

Page 1
HYBAR
User Manual
Page 2

Product information &
operating specifications
Function
Resistance
Max user weight
Capacity
Smart workout gear
16 lbs
330 lbs
300 mAh Li-ion 3.7V
Safeguards
Over discharge protection
Overheat protection
Over current protection
Overcharge protection
Short circuit protection
Auto power protection
Water Proof No
Input port
DC input
Charge Time (0-100%)
Battery Life
IPХ4
Micro USB
5V
2 hours
60 hours
Bluetooth version
Frequency
Bluetooth physical range
Connectivity
Dimensions
BLE 4.2
2.4 GHz
26 feet
Android, iOS
42,5 х 13 inches
Product weight
*Depending on the type of charger used
5,5 lbs
Page 3
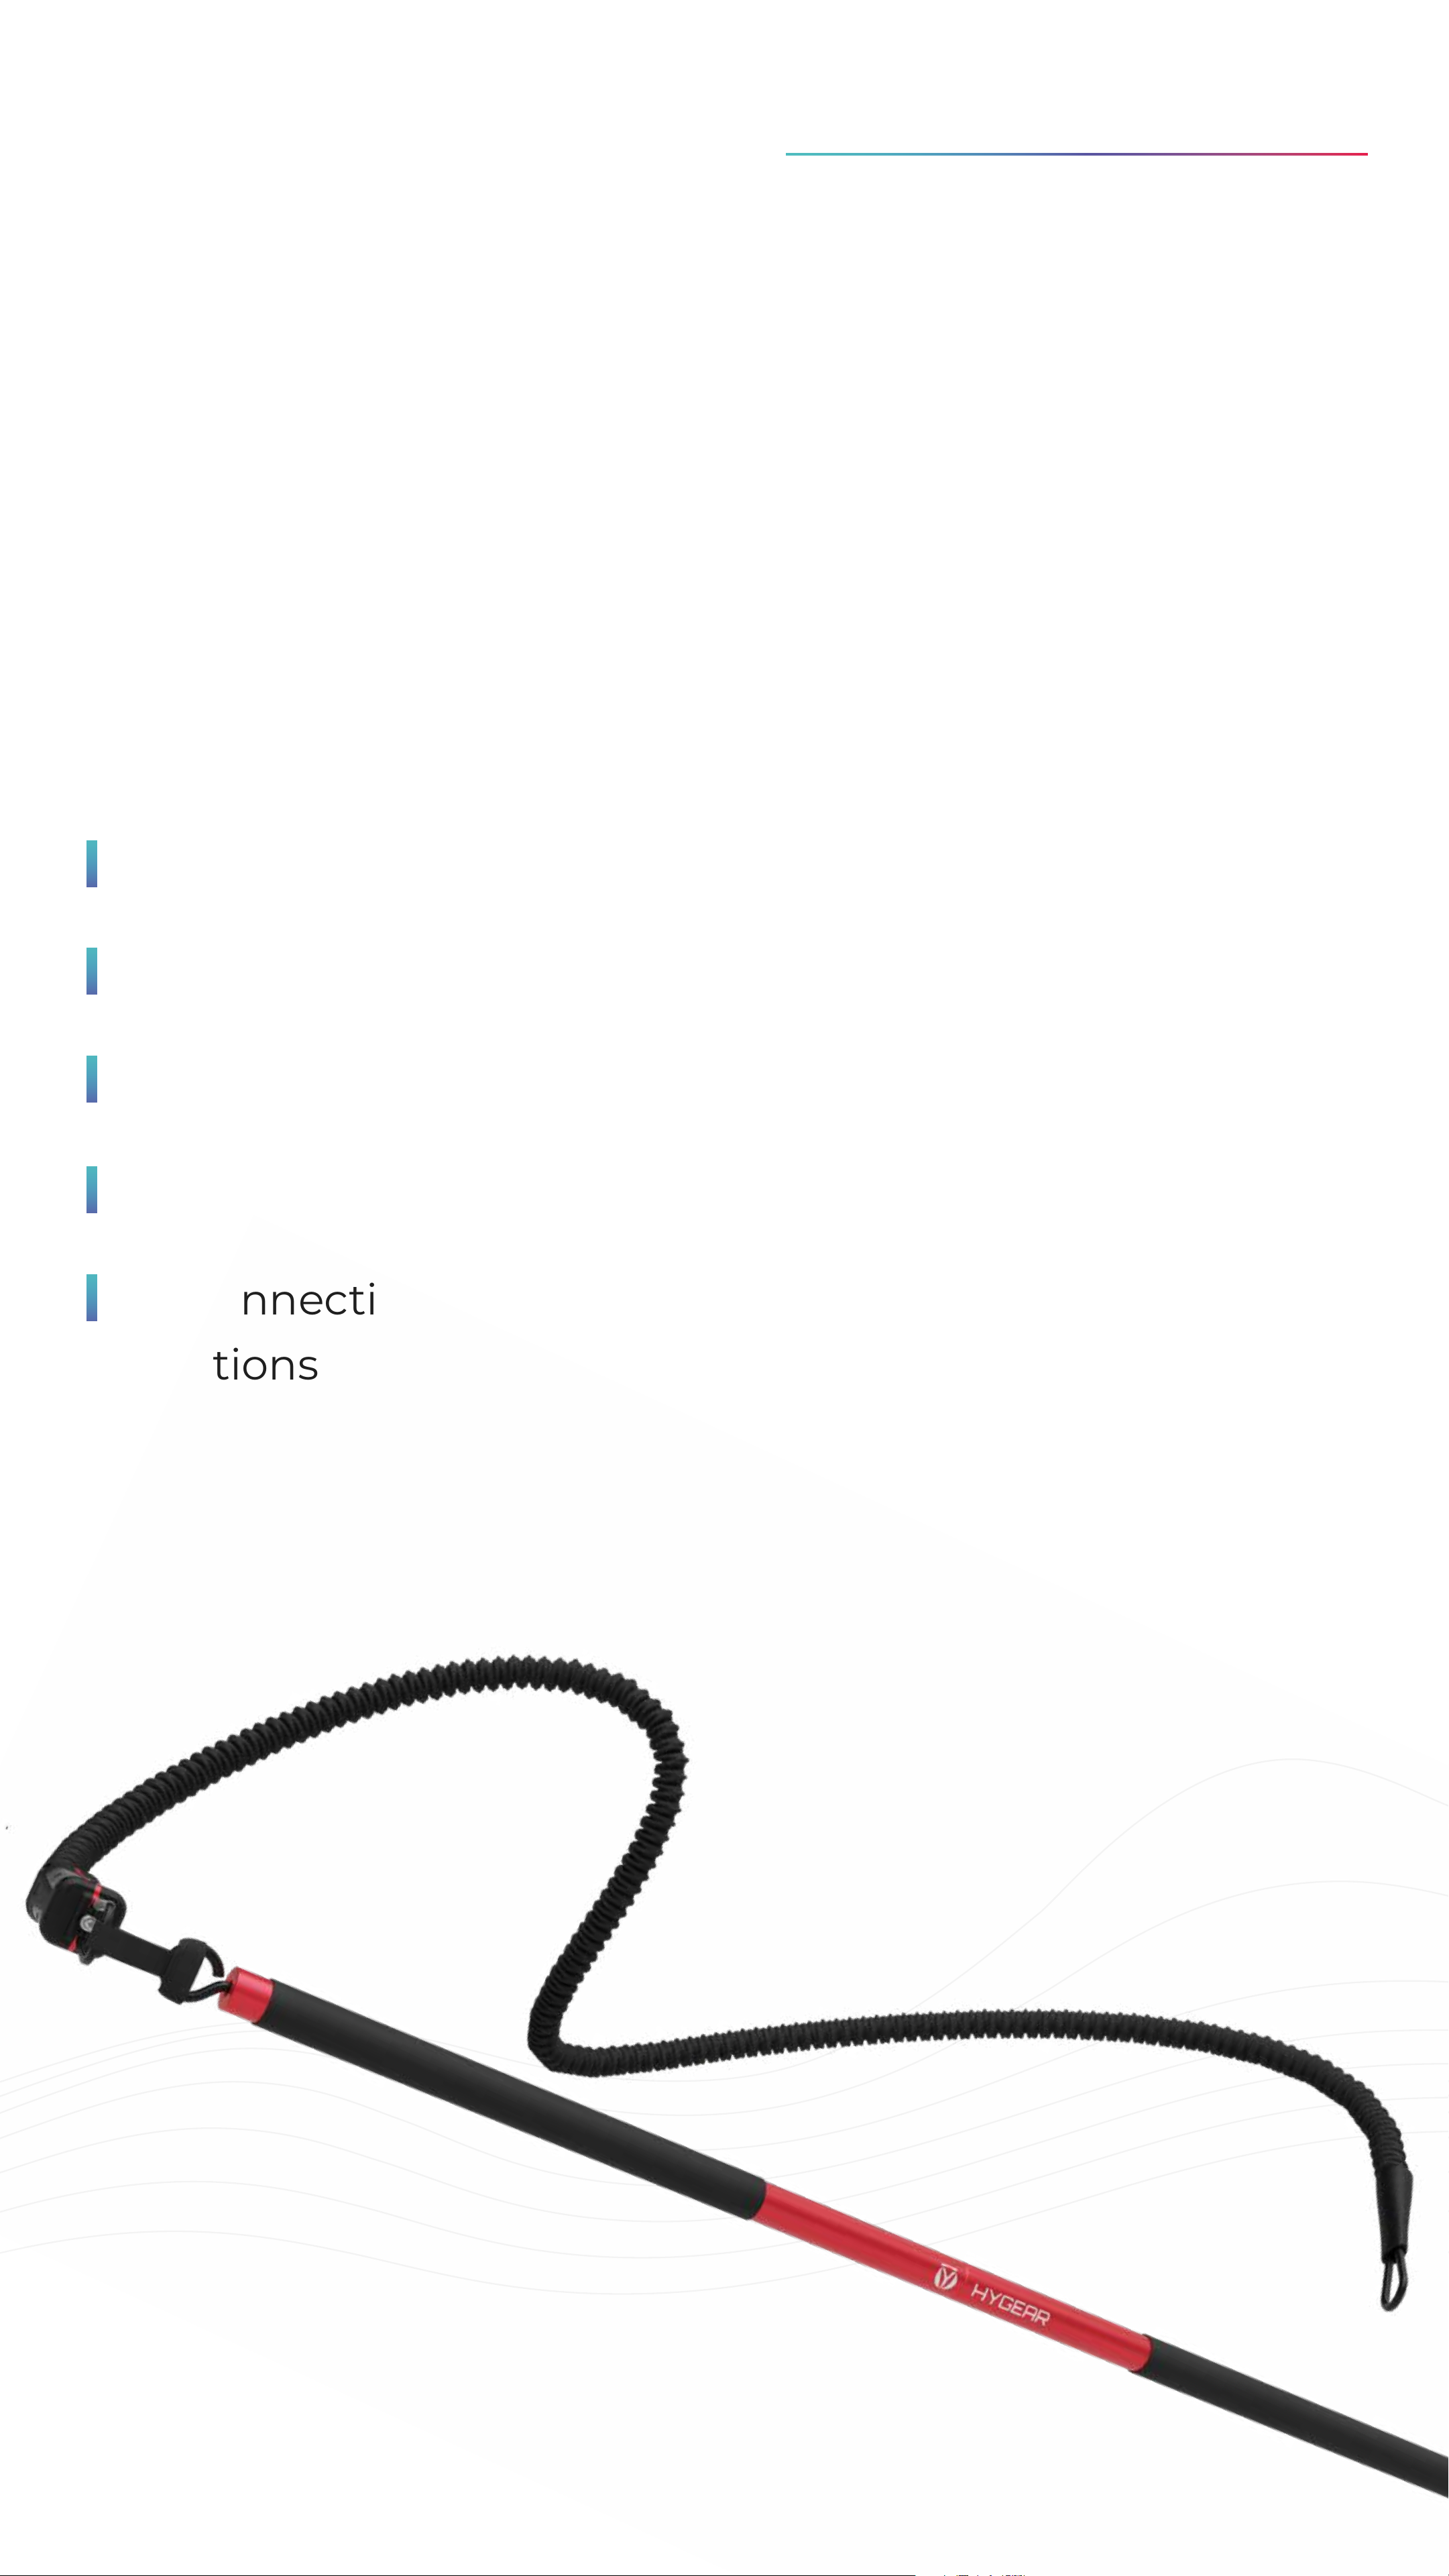
What is HYBAR?
Elevate your Strength.
Row, swing, press, and push your way to a stronger
body and core. This weighted bar resistance system is
super portable for effective strength workouts any time,
anywhere. Get real-time feedback and personalized
training to hit any fitness goal.
Hybar Mission:
Targets Core Muscles
Develops Full-Body Strength
Tracks Fitness Progress in Real Time
For Indoor or Outdoor Use
2 Connection Modes for Countless Exercise
Options
Page 4
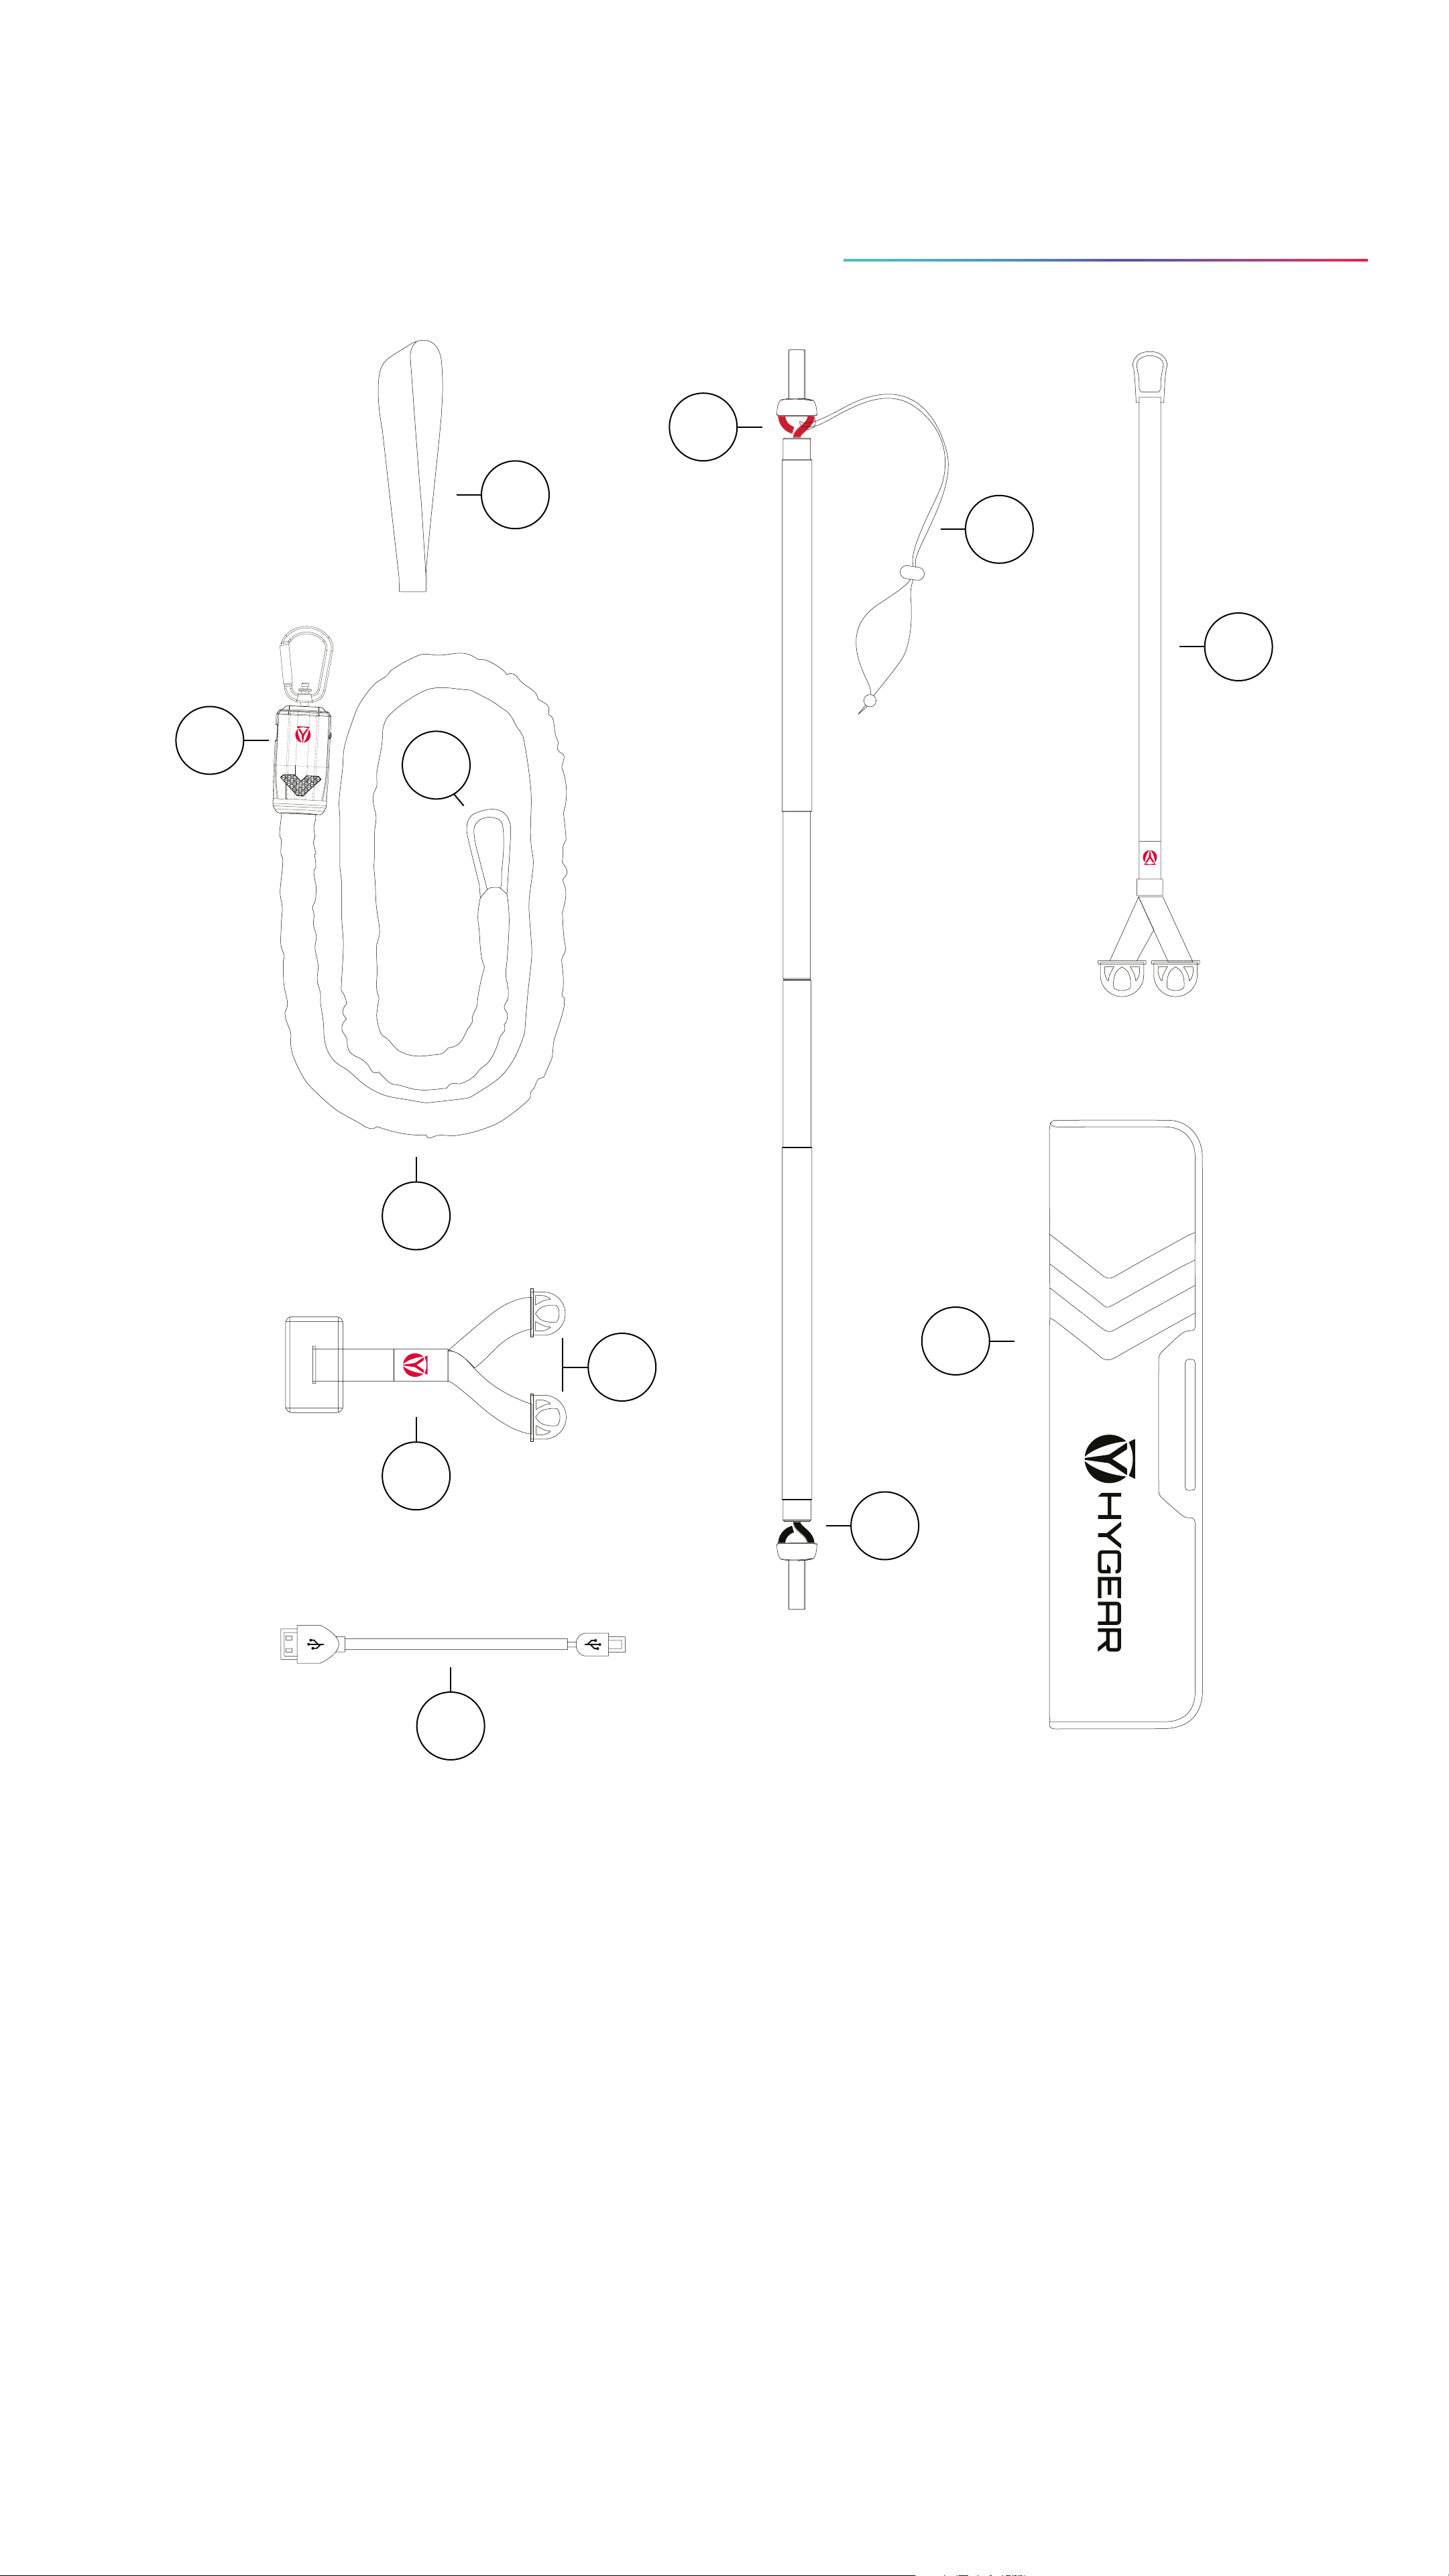
Product Map / What’s
In the Box HYBAR
2
7
3
4
9
5
12
10
11
6
1
1: Black End: Fixed
2: Red End: Rotating
3: Secure Band
4: Sensor unit
5: Carabiner
6: D-Ring
8
7: Wall Mount Fabric Loop
8: USB Cable
9: Foreign Connector
10: Door anchor
11: Carry Bag
12: Resistance Band with sensor
Page 5
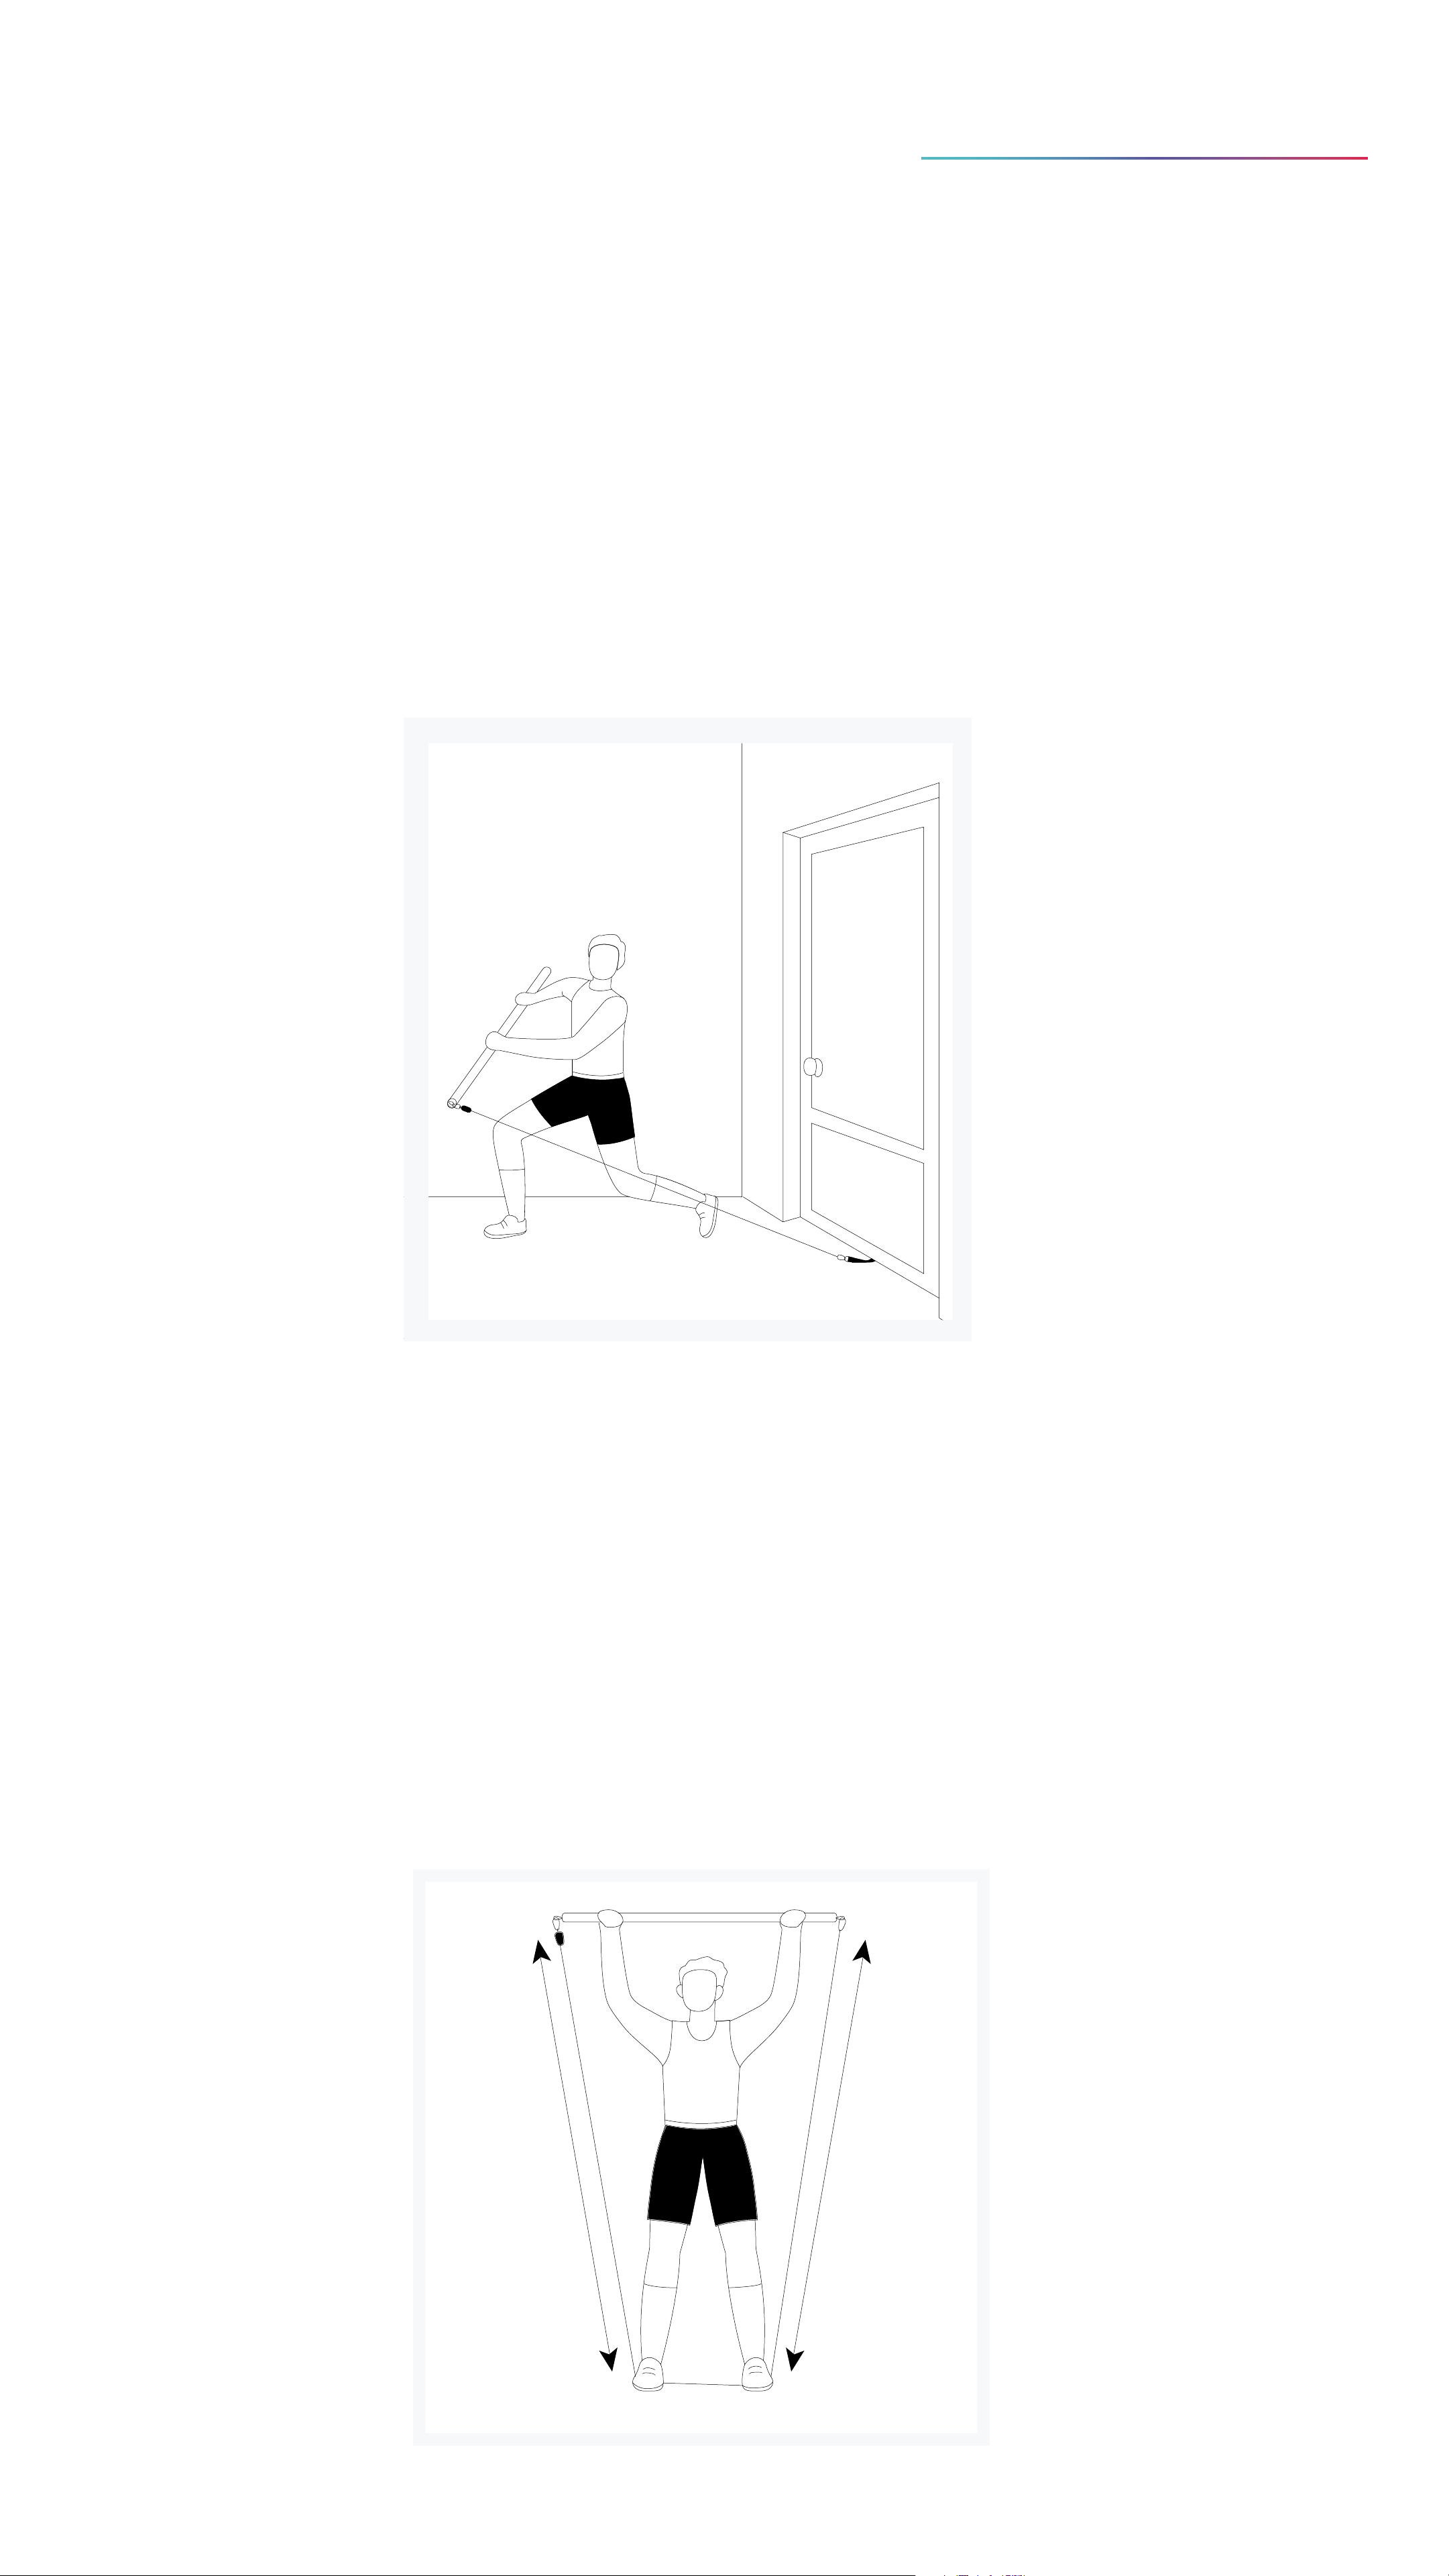
Two Workout Modes
Performance Mode
Connect the HYBAR at one end while the other end is
anchored to a sturdy door or object to develop rotational
power, improve flexibility, agility, coordination and
balance.
Strength mode
Turn your HYBAR into a completely freestanding barbell to
build strength and endurance. Simply connect the band
at both ends to push, pull and press your way to a stronger
body.
Page 6
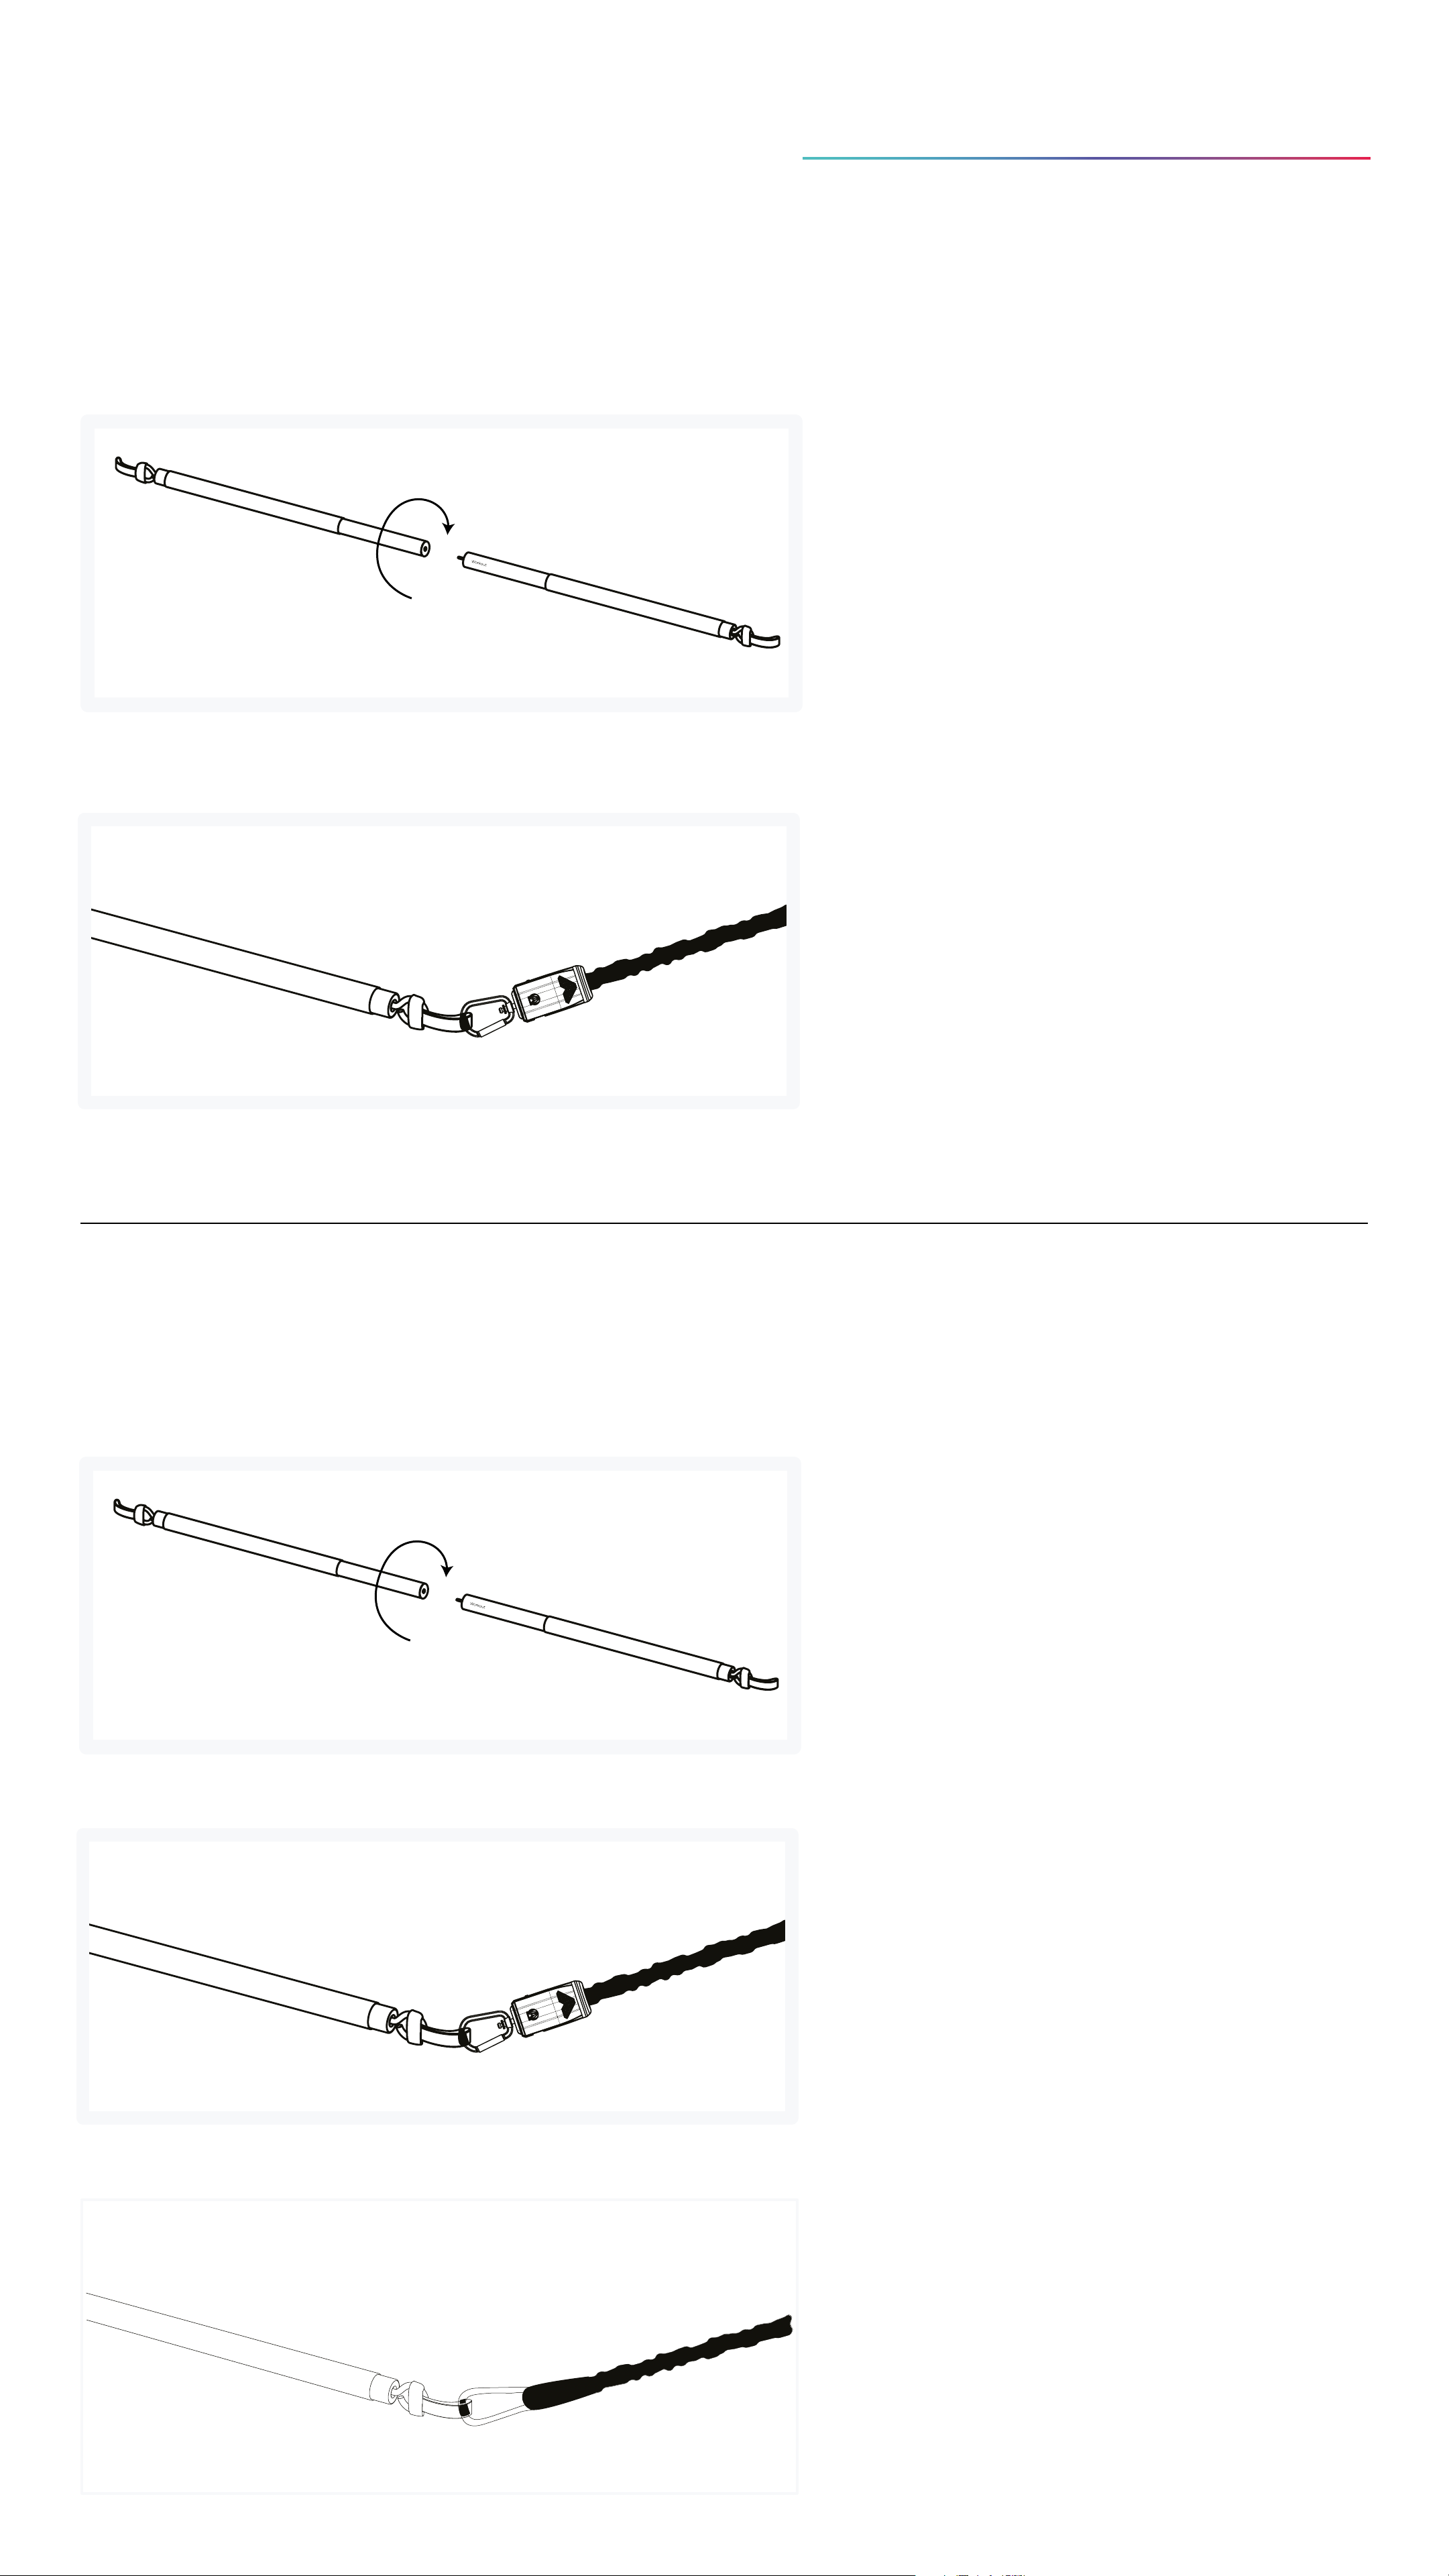
How to assemble
Performance Mode
1: Screw the two halves
together
2: Connect the sensor
unit to the red end
Strength Mode
1: Screw the two halves
together
2: Connect the sensor
unit to the red end
3: Connect the carabiner
to the black end
Page 7
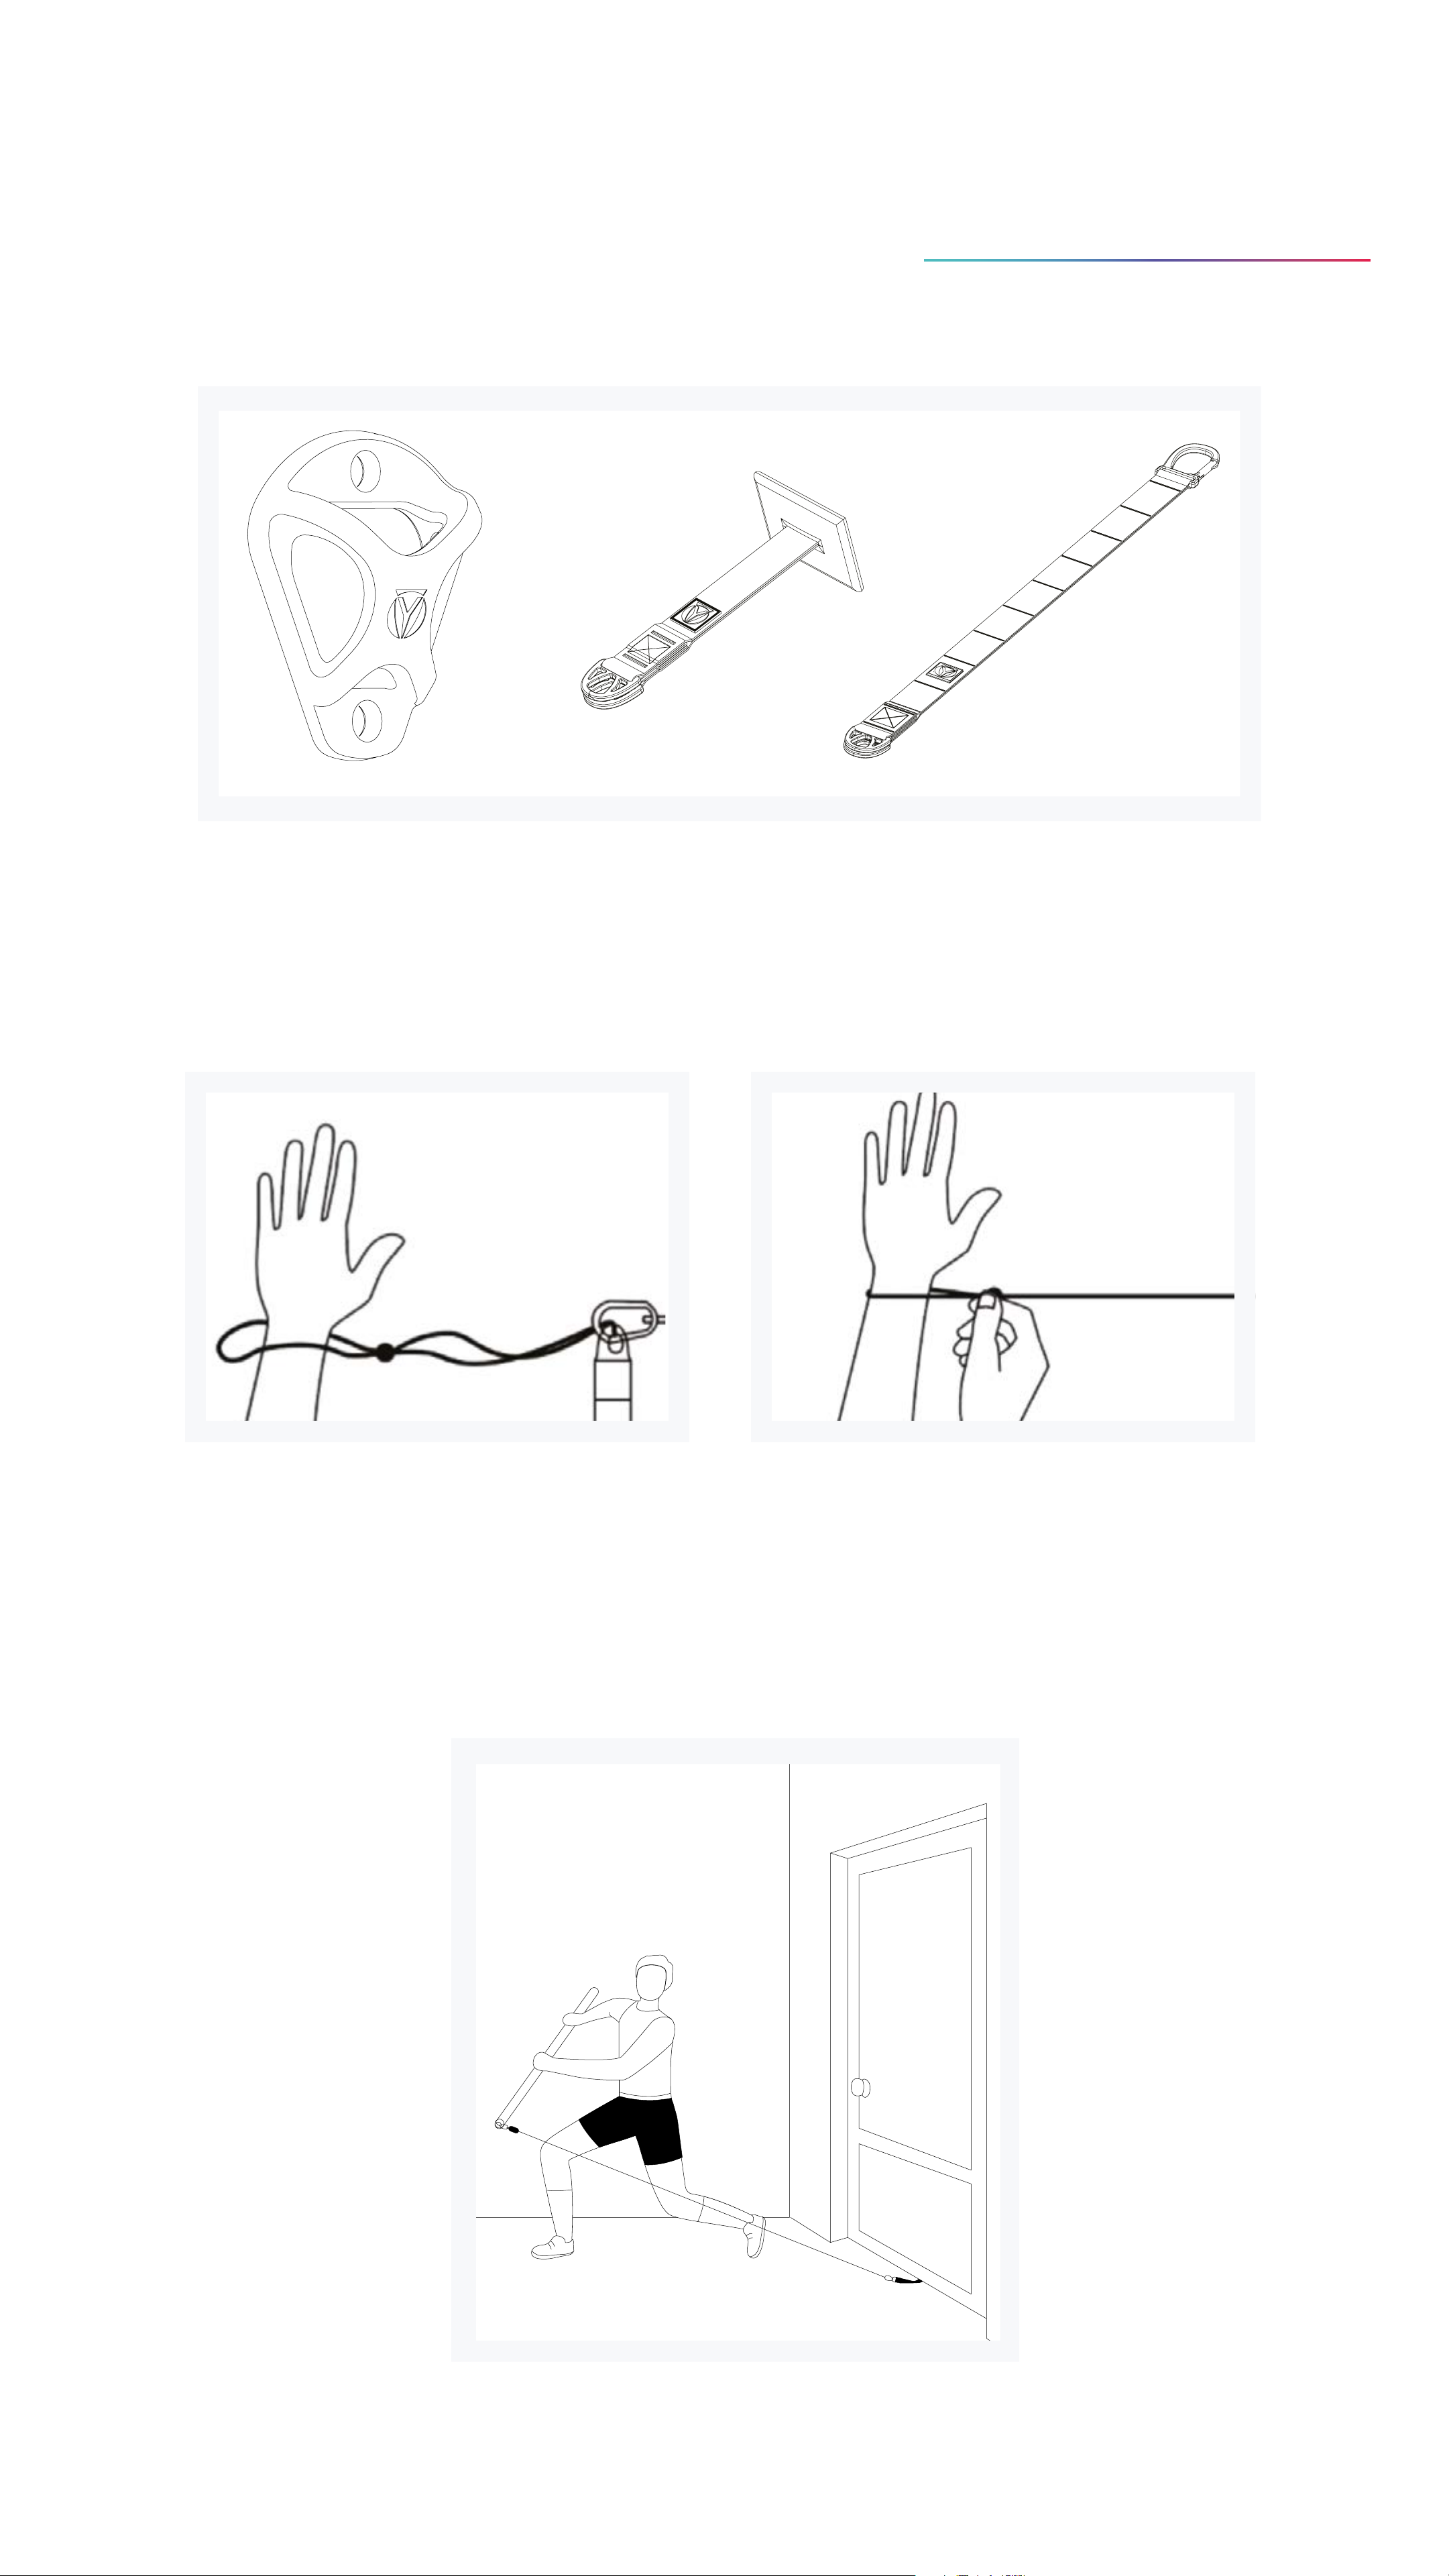
How to Use HYBAR Performance mode
1: Connect the carabiner to an anchor point
2: Place the safety cord on your hand and
tighten before starting your workout.
Page 8
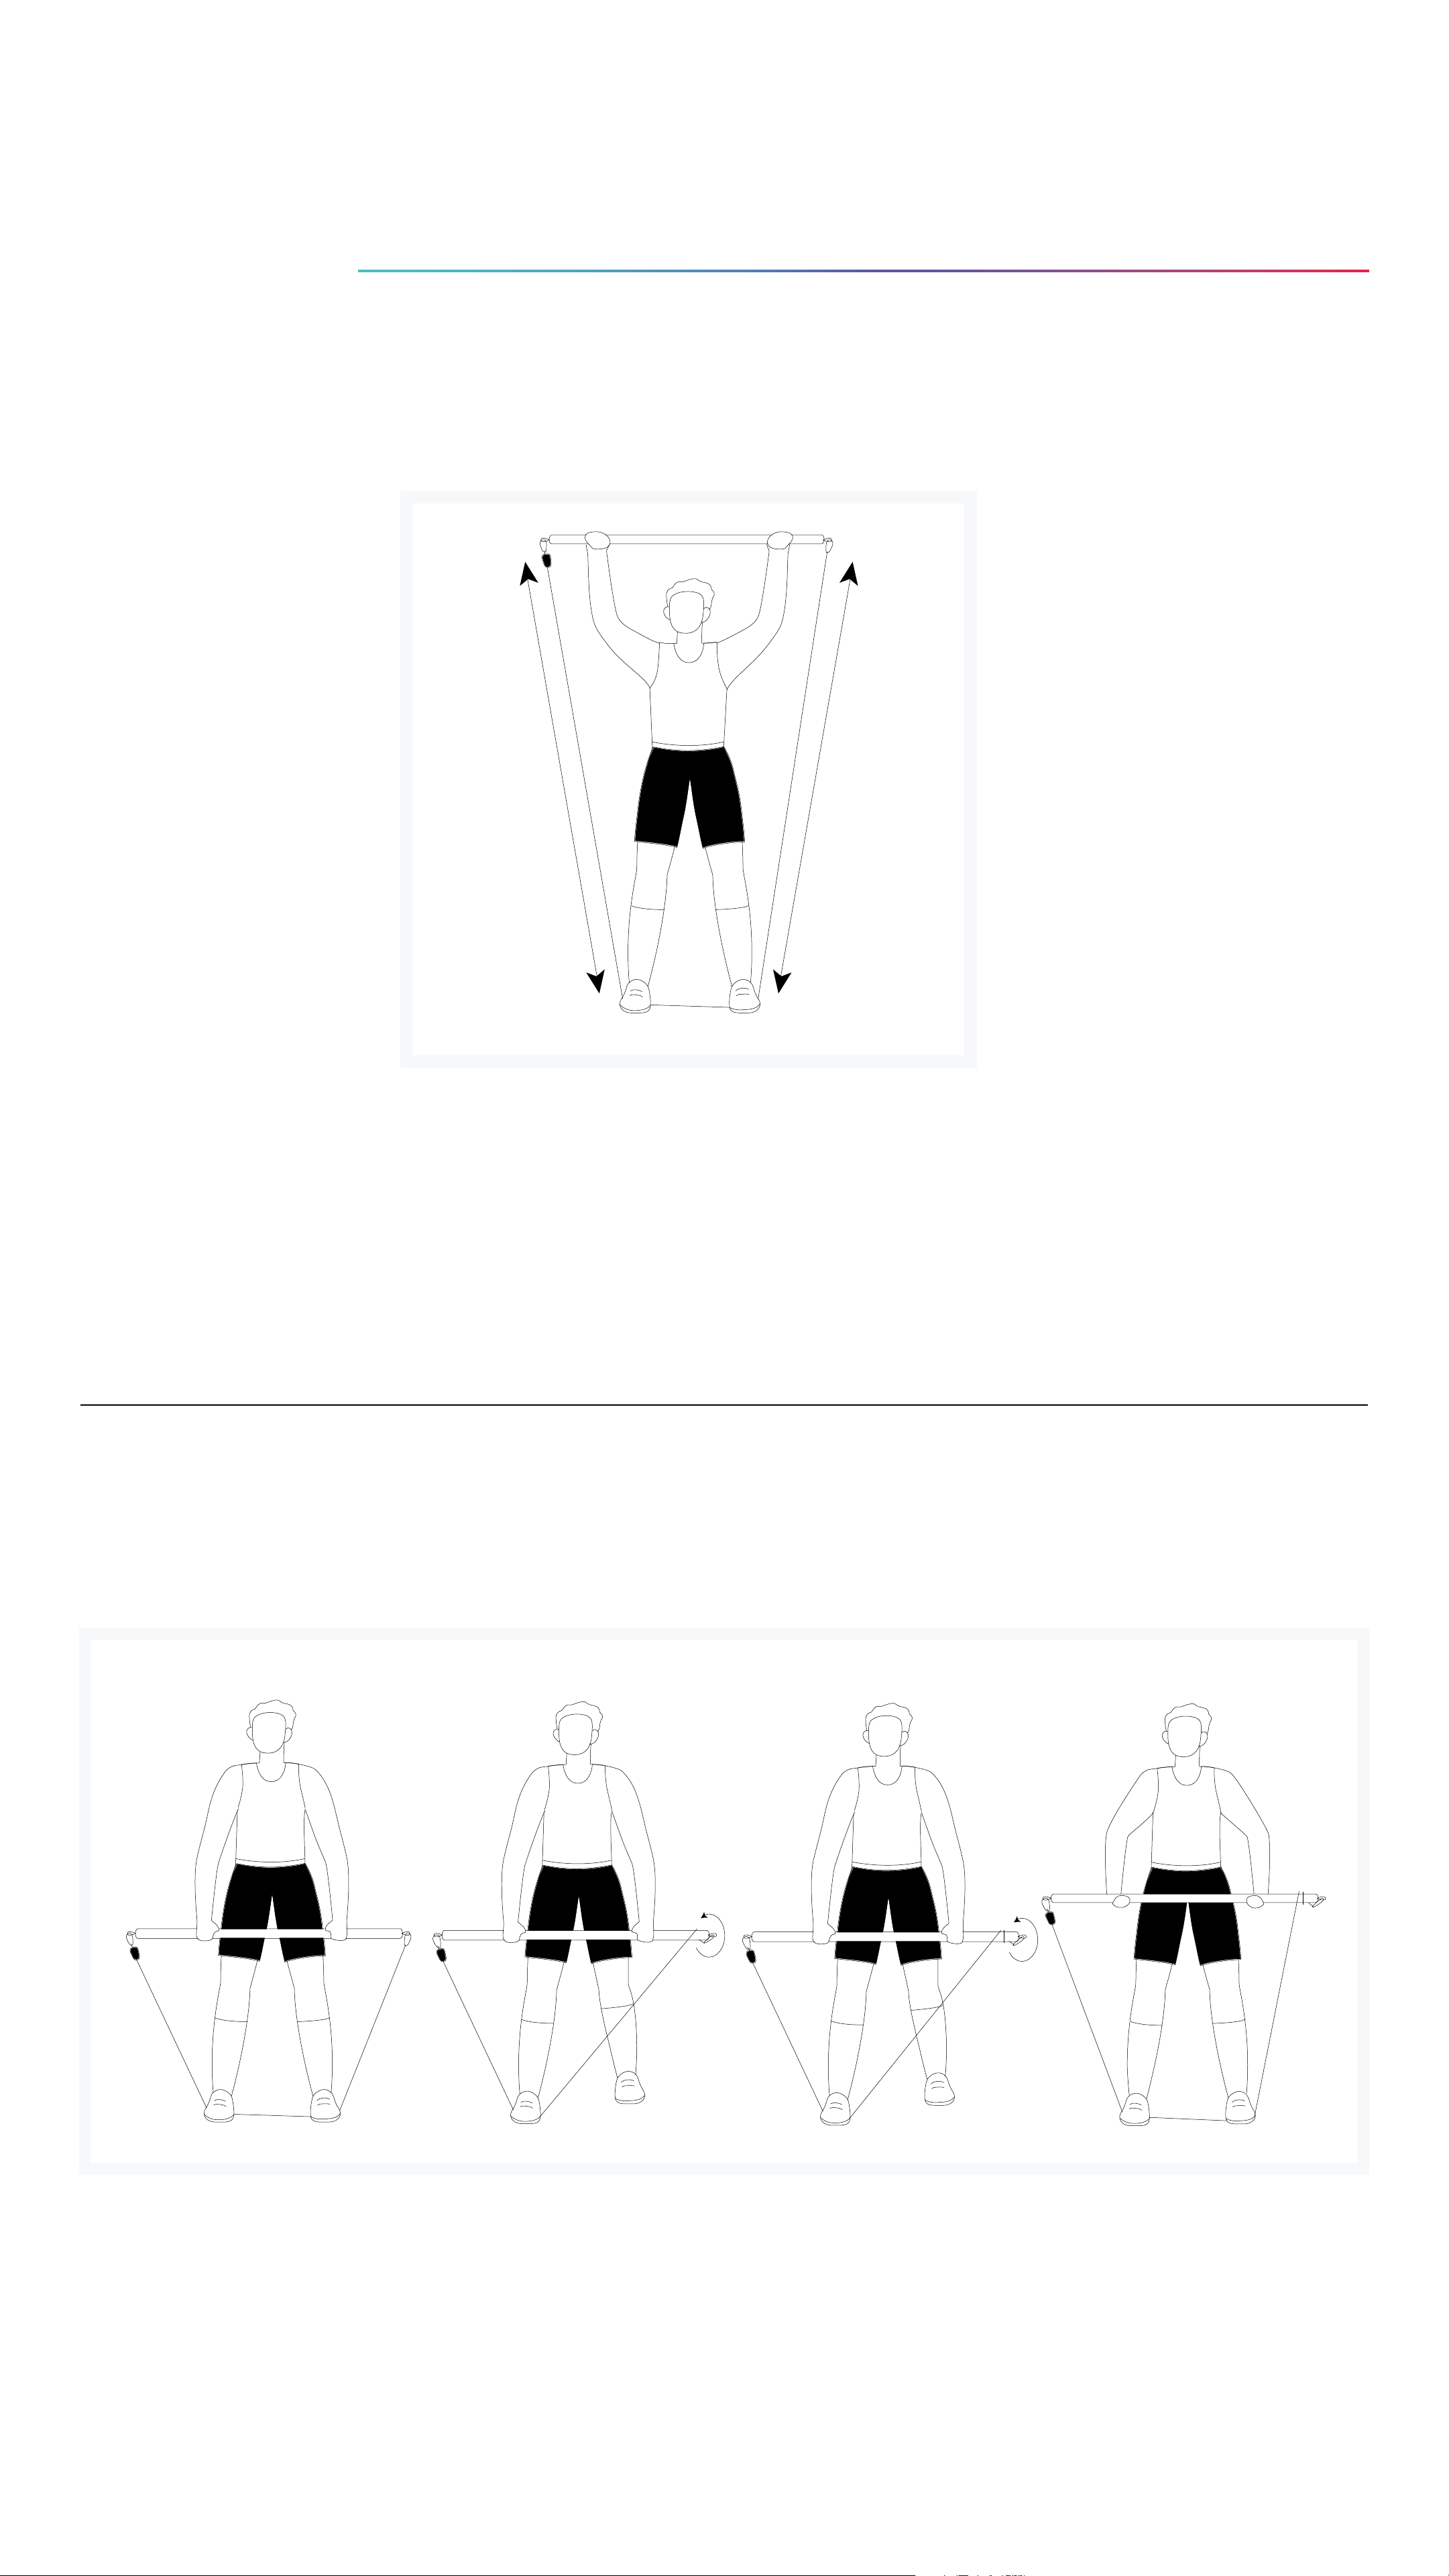
How to Use HYBAR - Strength
mode
Self-Anchored
These exercises focus on symmetrical workouts. Make sure
to step on the middle of the resistance band so that
the length is even on both sides.
Adjust the band length.
Rotate the HYBAR to wrap the band around the black end
until it reaches the desired length
Page 9
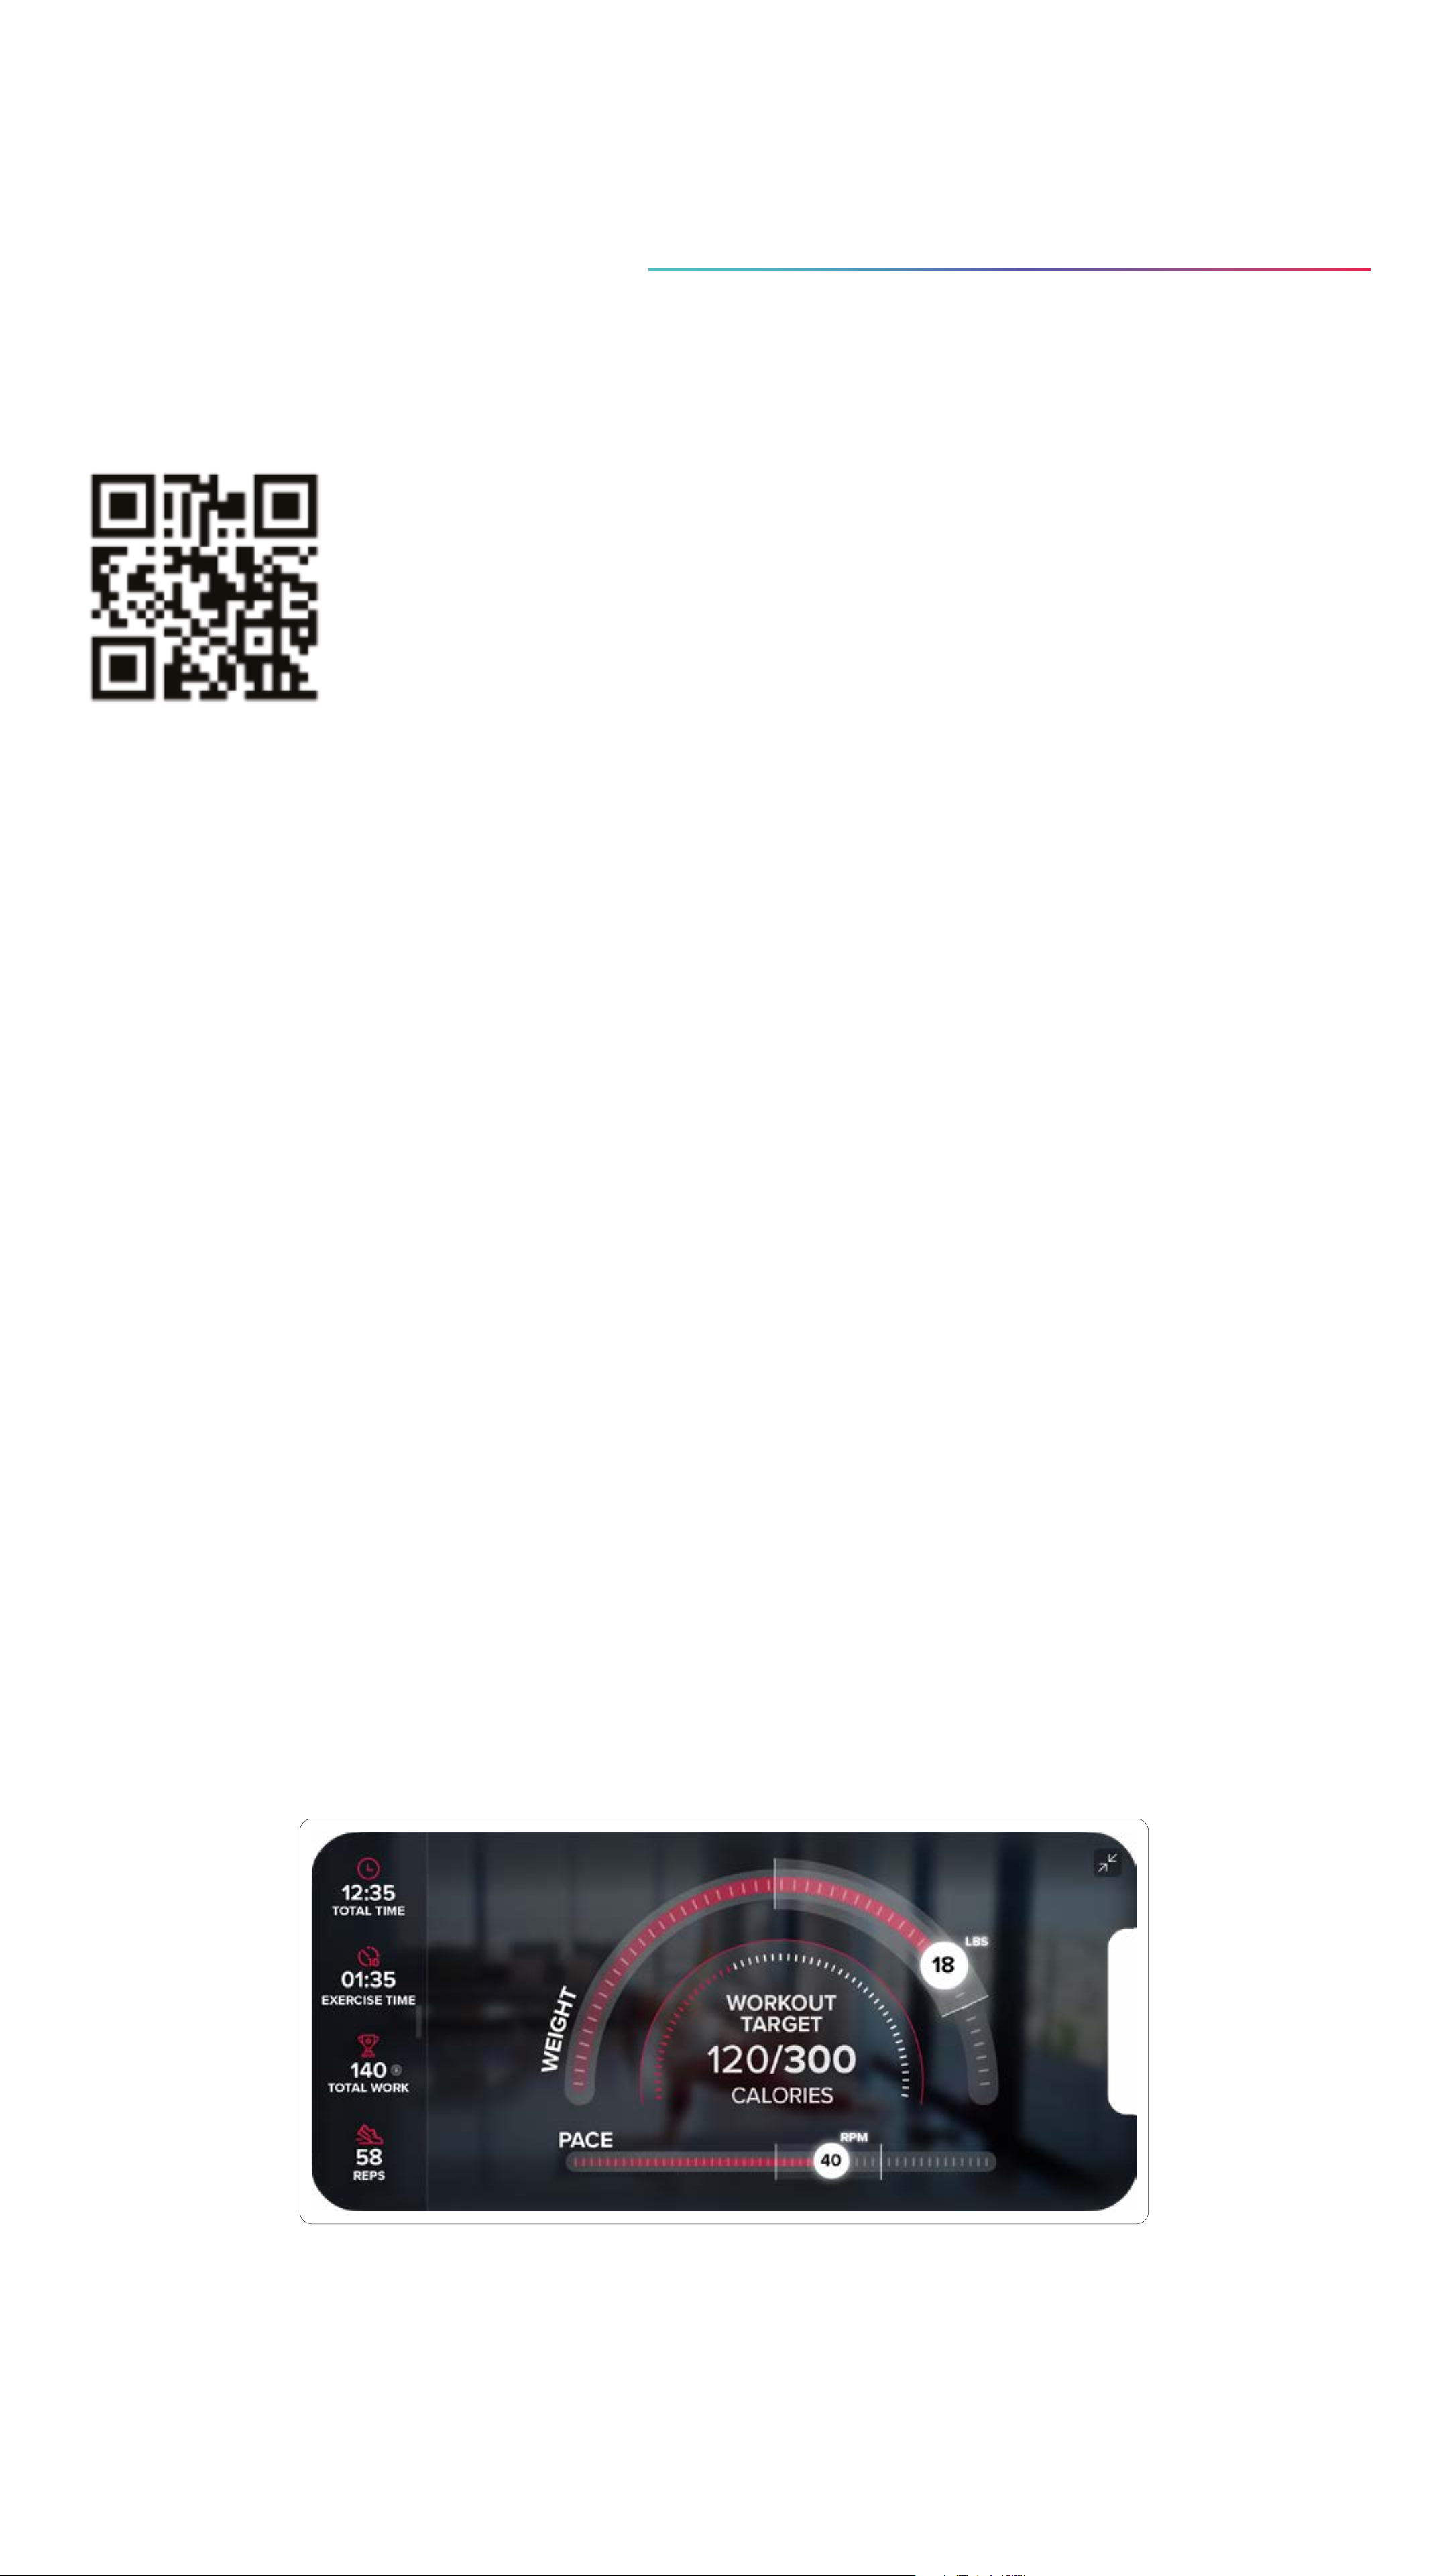
How to Connect to the
HYGEAR App
1. Scan the QR code to download the HYGEAR App
2. Make sure Bluetooth and location services are enabled
3. Open the HYGEAR app and follow the instructions to
connect
your HYBAR and create your HYGEAR account
4. To turn on the HYBAR and press the button on your
sensor unit
once to wake sensor. Red and blue lights will start flashing.
5. The app will connect automatically. If your band does not
connect successfully, shut down the app, re-open, and try
again.
Page 10
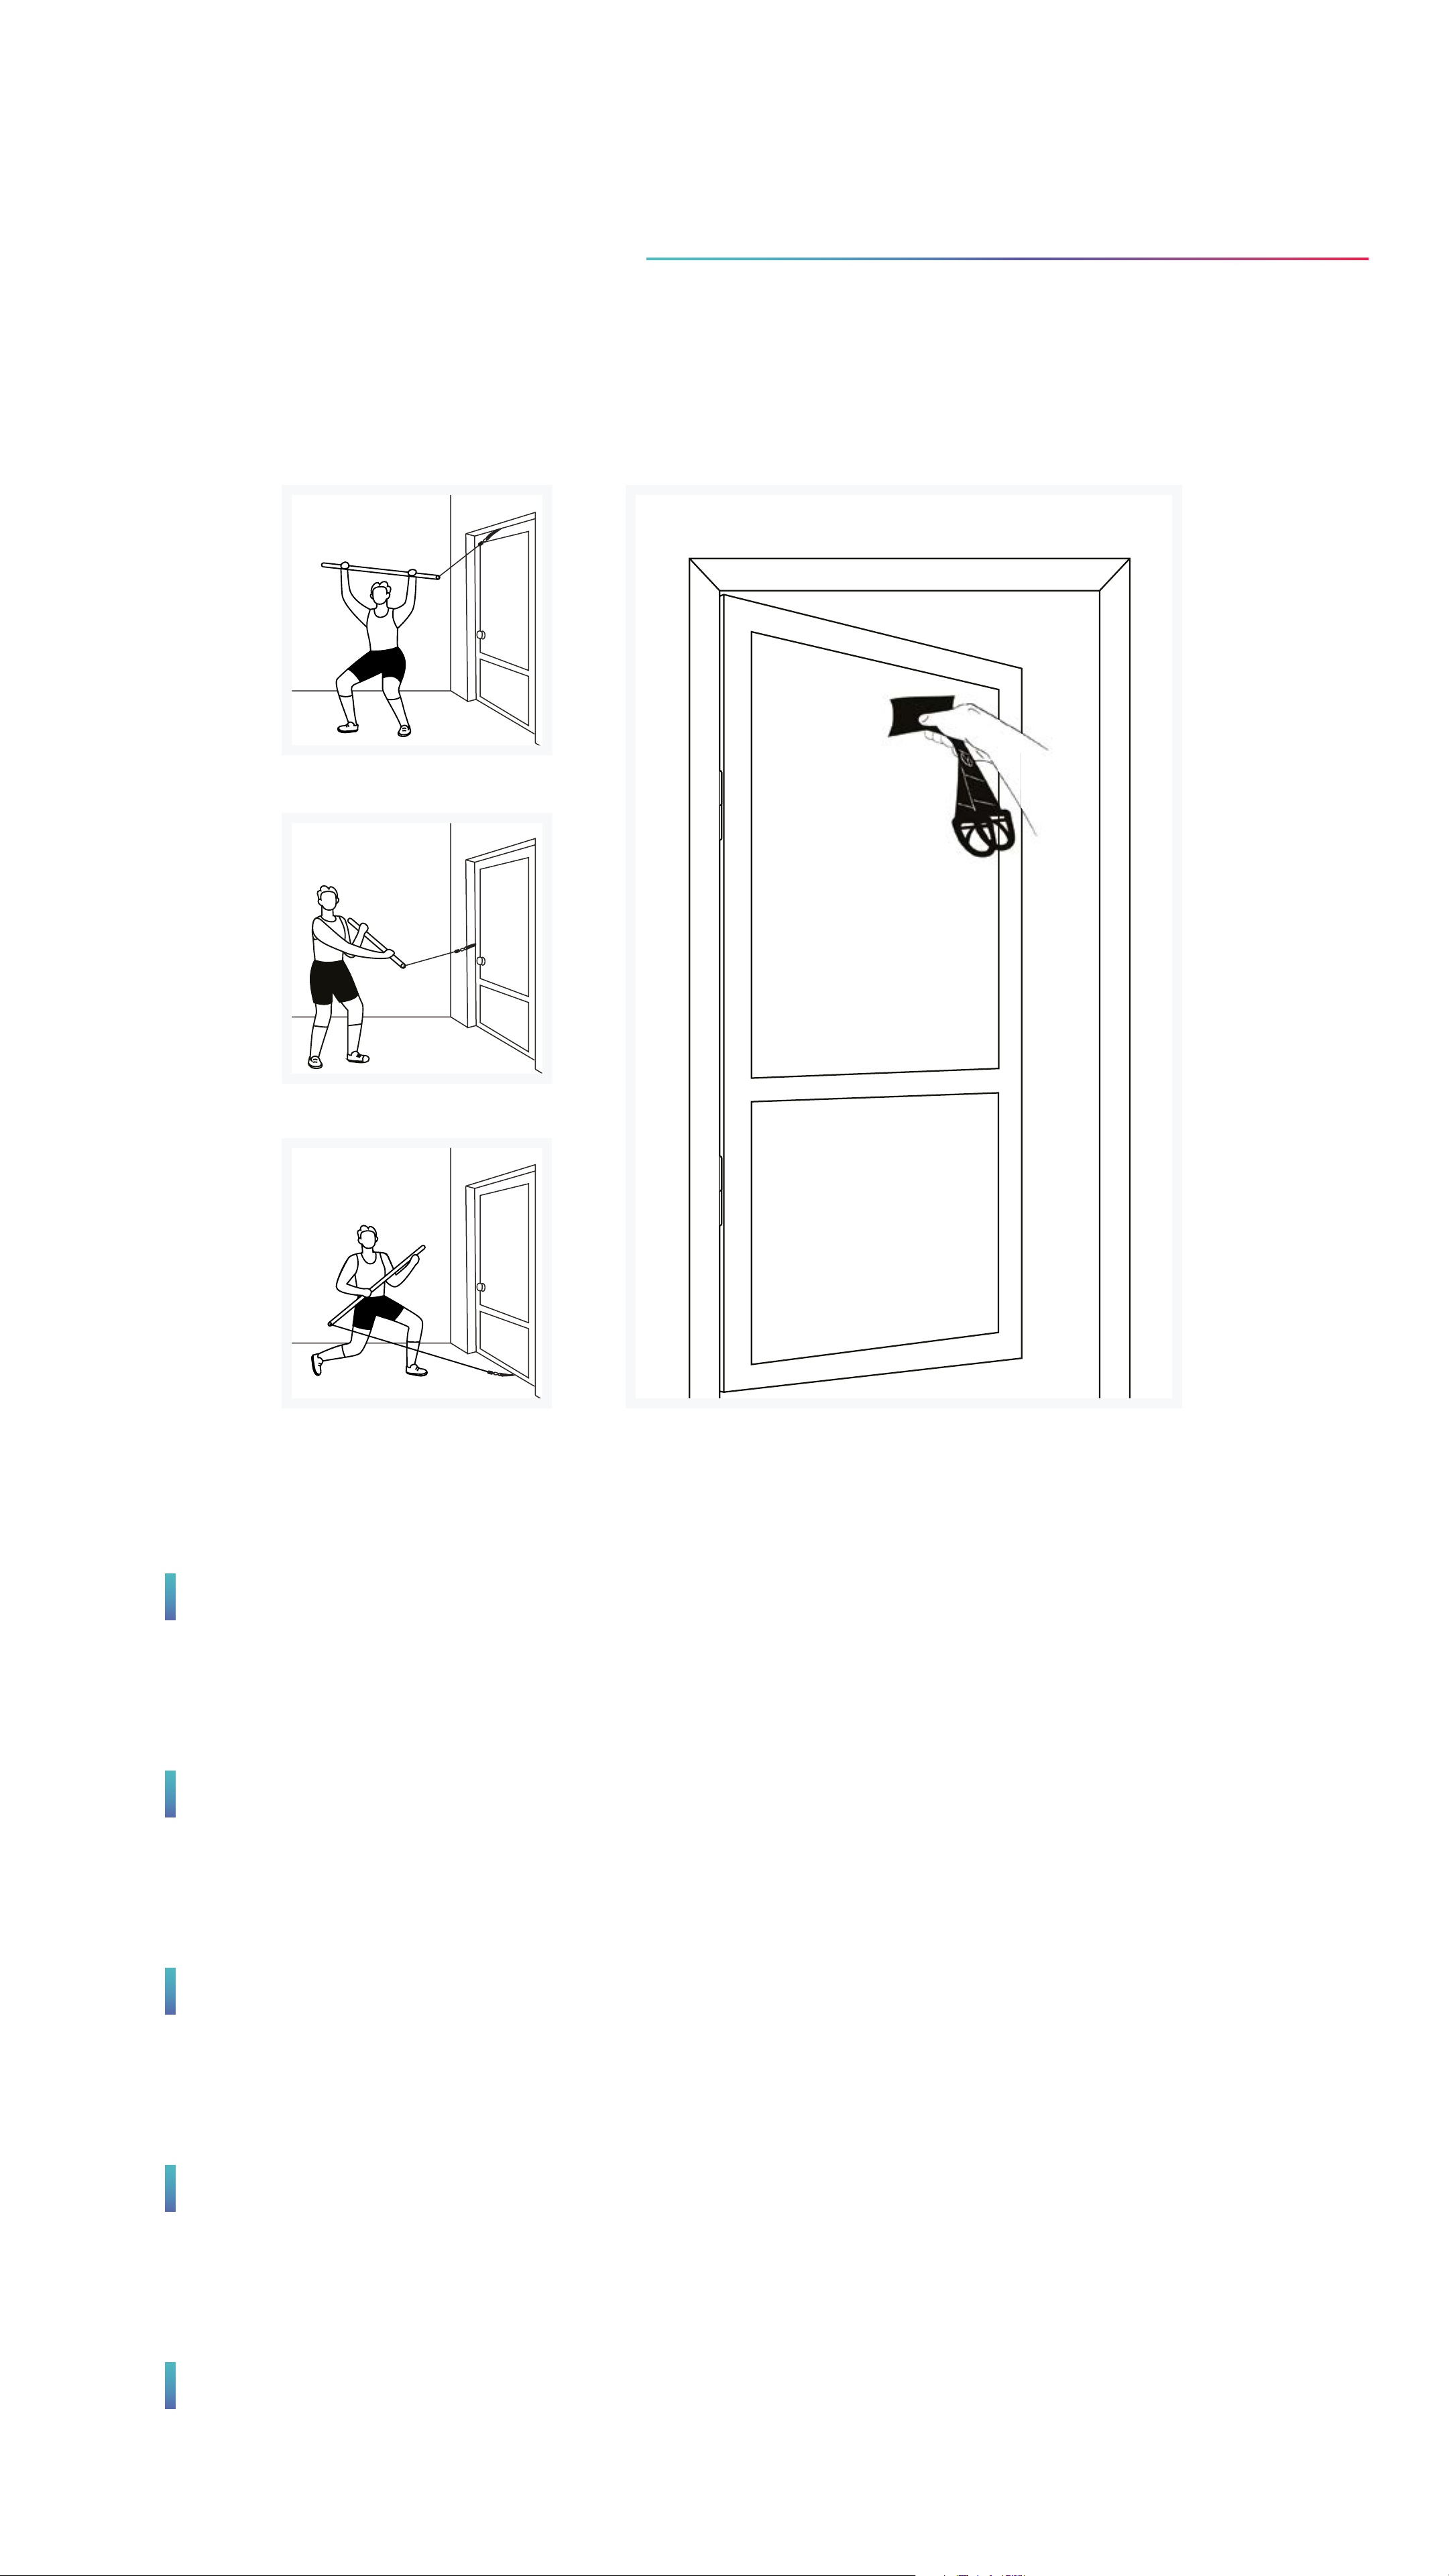
How to use HYBAR with the
Door Anchor
For a high anchor, place the Door Anchor inside
the top of the door
For a middle anchor, place the Door Anchor above
the door lock
For a low anchor, place the Door Anchor under the
door
Clip the carabiner on the resistance band to the
D-Ring on the Door Anchor
Always close the door securely.
Page 11
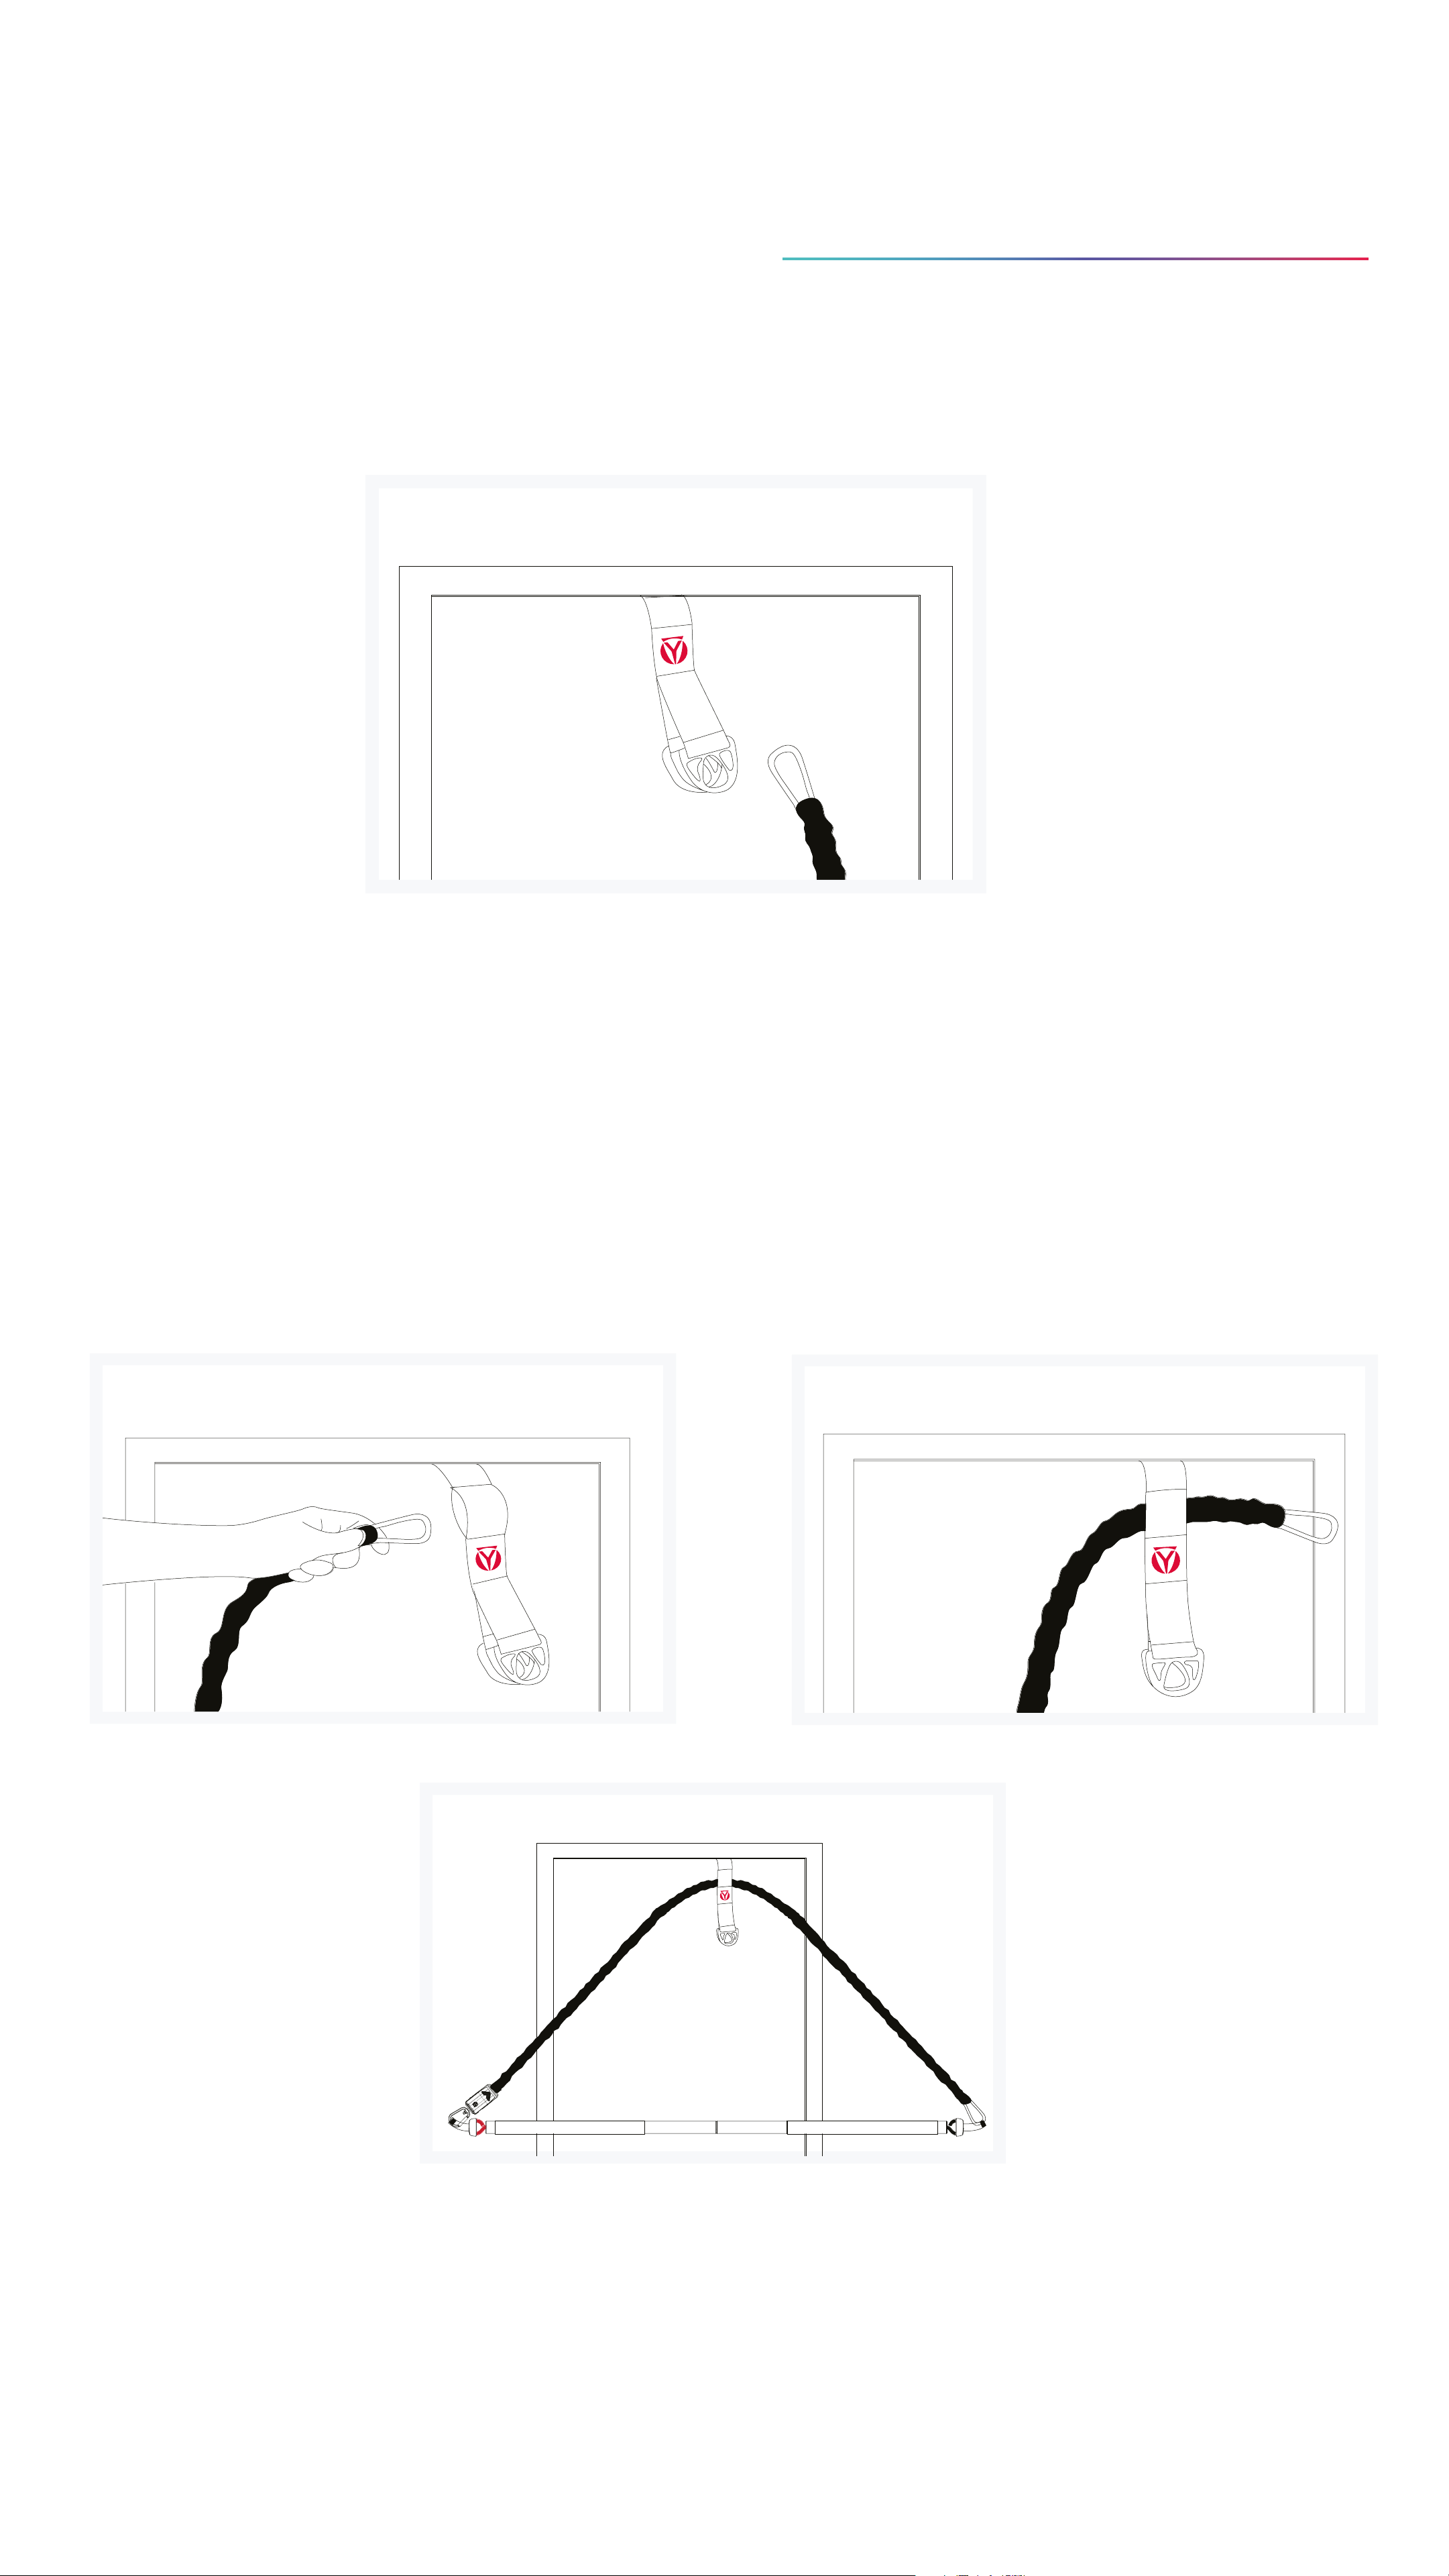
Anchoring the HYBAR with
the Door Anchor
Performance mode
1: Attach the carabiner to the D-rings
2: Make sure to place the safety cord on your hand and
tighten before you begin training.
Adjust the band length.
1: Insert the band through the door anchor textile.
2: Attach the sensor unit to the red end of the HYBAR and
the carabiner to the black end.
Page 12

Important Safety
Information for Door
Anchoring
Only use the HYBAR Door Mount with professionally
constructed doors that can fully support your body
weight.
A door that opens away from your body will be the safest
and most secure. Your body weight will pull the door
closed.
When using any hinge-style door, always ensure it is
completely closed before using.
Test that the door is fully closed secured by pushing or
pulling it before using.
For additional safety, use a door that locks, if one is
available.
For a high anchor, place the Door Anchor inside the top
of the door.
For a middle anchor, place the Door Anchor above the
door lock.
For a low anchor, place the Door Anchor under the door.
Clip the carabiner on the resistant band to the D-Ring on
the Door Anchor.
Always close the door securely.
Safety Tip:
To prevent getting injured by someone opening the door
unexpectedly during a workout, always place the sign
showing ‘Workout in Progress —
Do Not Open’ on the opposite side of the door before
starting your workout.
WARNING: DO NOT use HYBAR on glass doors, sliding
doors, or any lightweight doors such as closets or kitchen
cabinets
Page 13
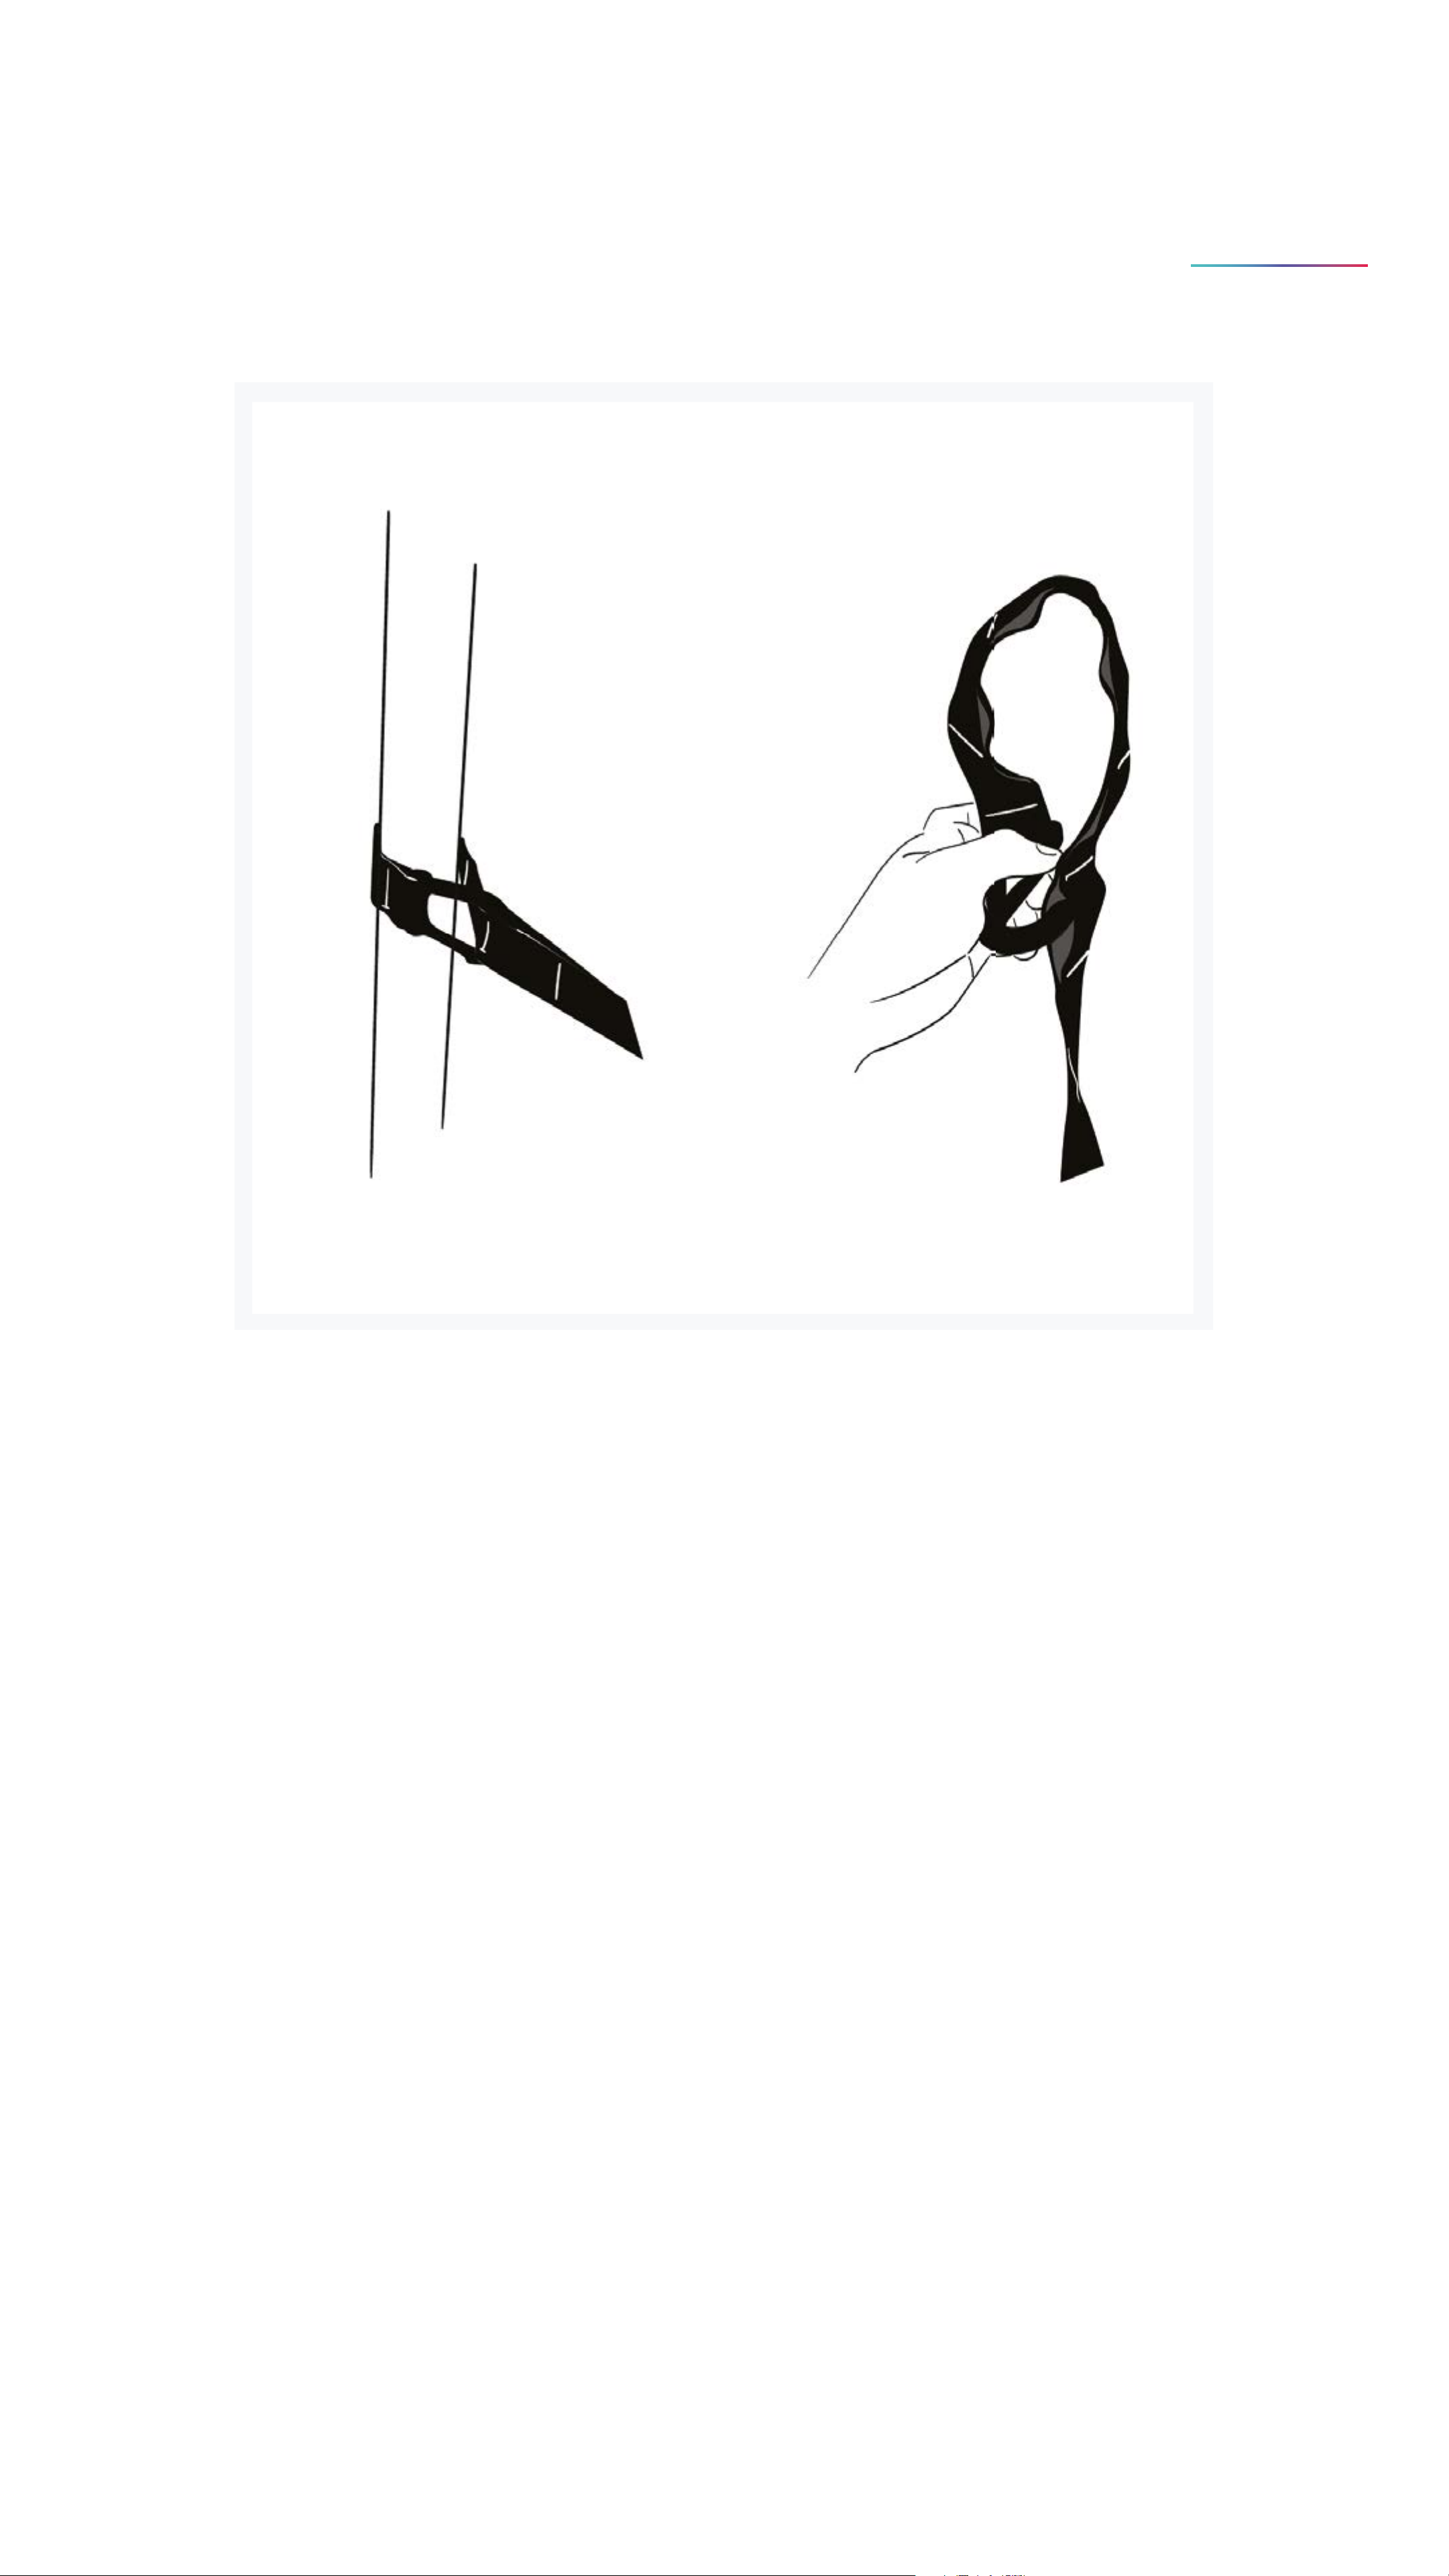
How to use HYBAR
with the Foreign Connector
1. Attach the foreign anchor to a sturdy object that
can support your weight.
2. Wrap the Object Anchor on the object and secure
the carabiner through the textile.
Page 14
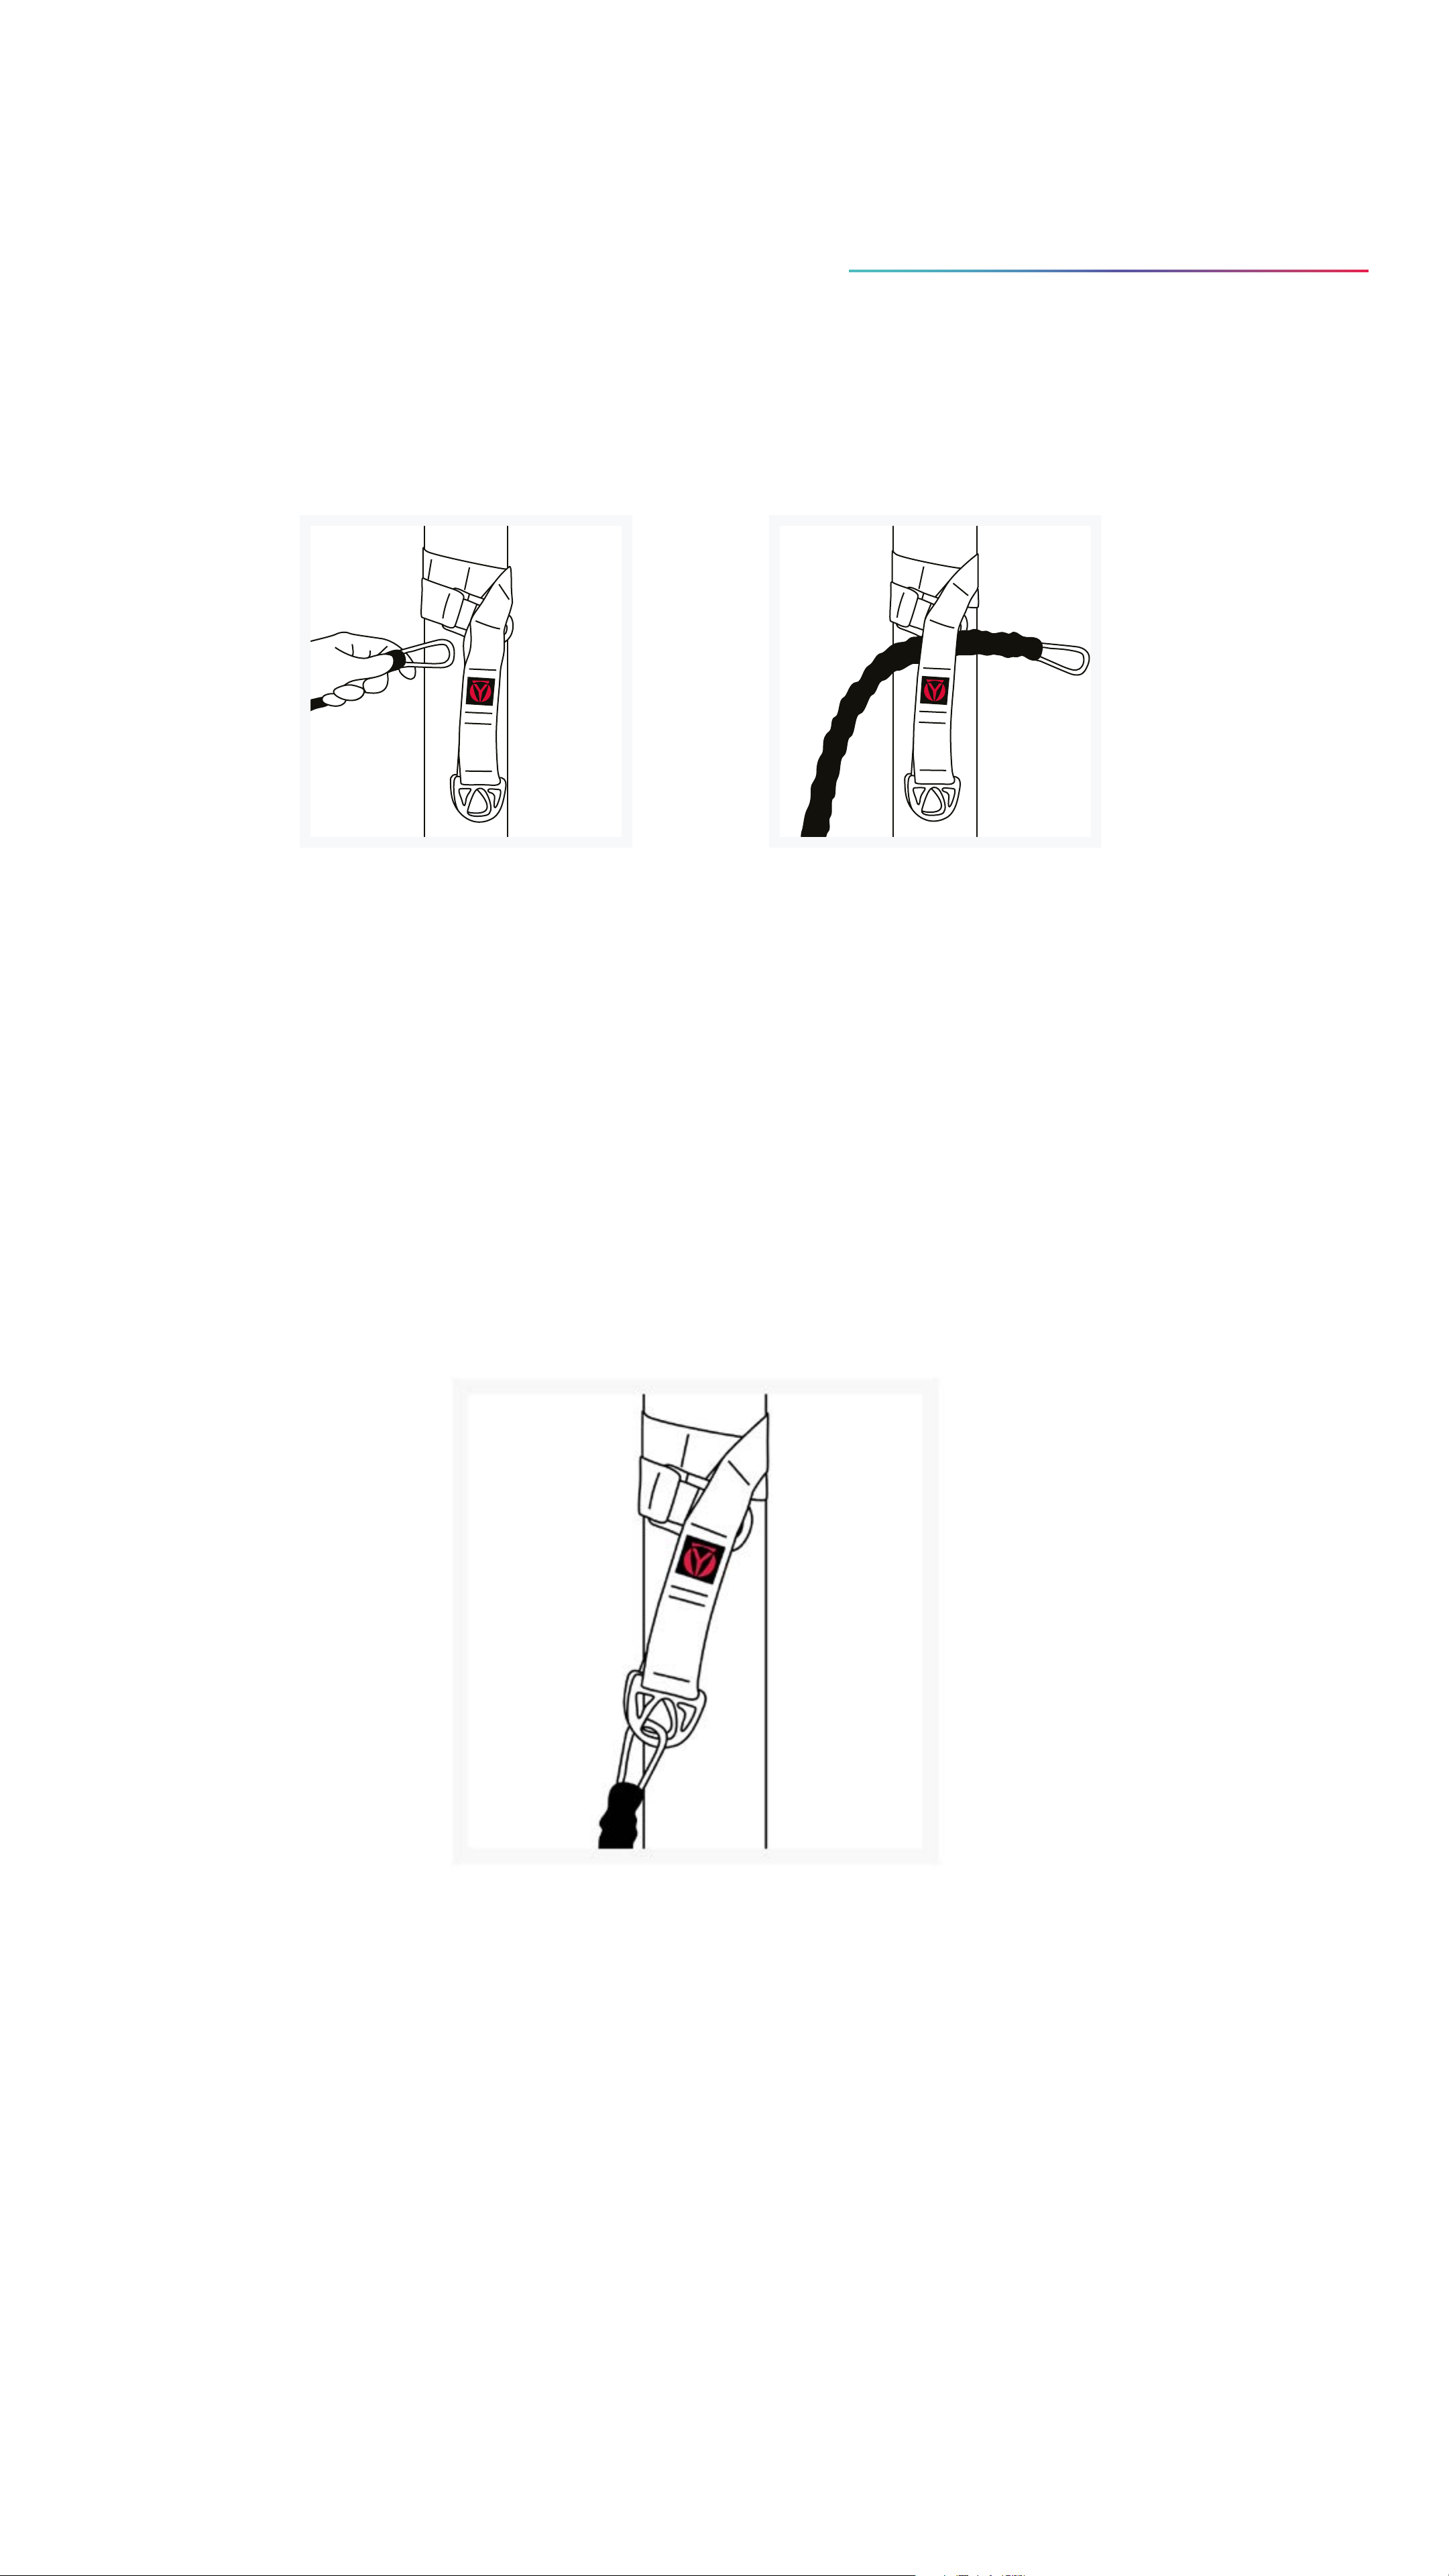
Anchoring the HYBAR with the
Foreign Connector
Strength mode
1: Insert the resistance band through the loops
between the stitches.
2: Attach the sensor unit to the red end and the
carabiner to the black end.
Performance mode
1: Attach the carabiner to the D-rings on the end.
2: Attach the sensor unit to the red end and the
carabiner to the black end.
Page 15

Important Safety Information for
Foreign Connector
Only use the Gear 1 Foreign Anchor attachment with
professionally constructed support structures that can
fully support your body weight.
The foreign anchor attachments are safest when
properly secured to sturdy, permanent structures. Use
outdoors on swing sets or playground bars. Use indoors
on professionally manufactured fitness facility cable
machines, ceiling mounts, smith machines or ceiling
beams and posts.
For higher anchor points, wrap around the anchor point
once and clip the carabiner into the chosen intermediate
loop.
For lower anchor points, wrap around the anchor point
as many times as needed to shorten it, and then clip the
carabiner into the selected intermediate loop to achieve
the correct height.
Ensure that the carabiner is securely attached to the
intermediate loop on the foreign anchor before attaching
the main straps.
Test that the foreign anchor is safely secured by firmly
pulling the bottom D-ring downward.
IMPORTANT: Never clip the carabiner of the main
straps into the intermediate loops of the foreign anchor
attachment. Always clip the main straps into the D-ring
on the foreign anchor attachments.
Page 16
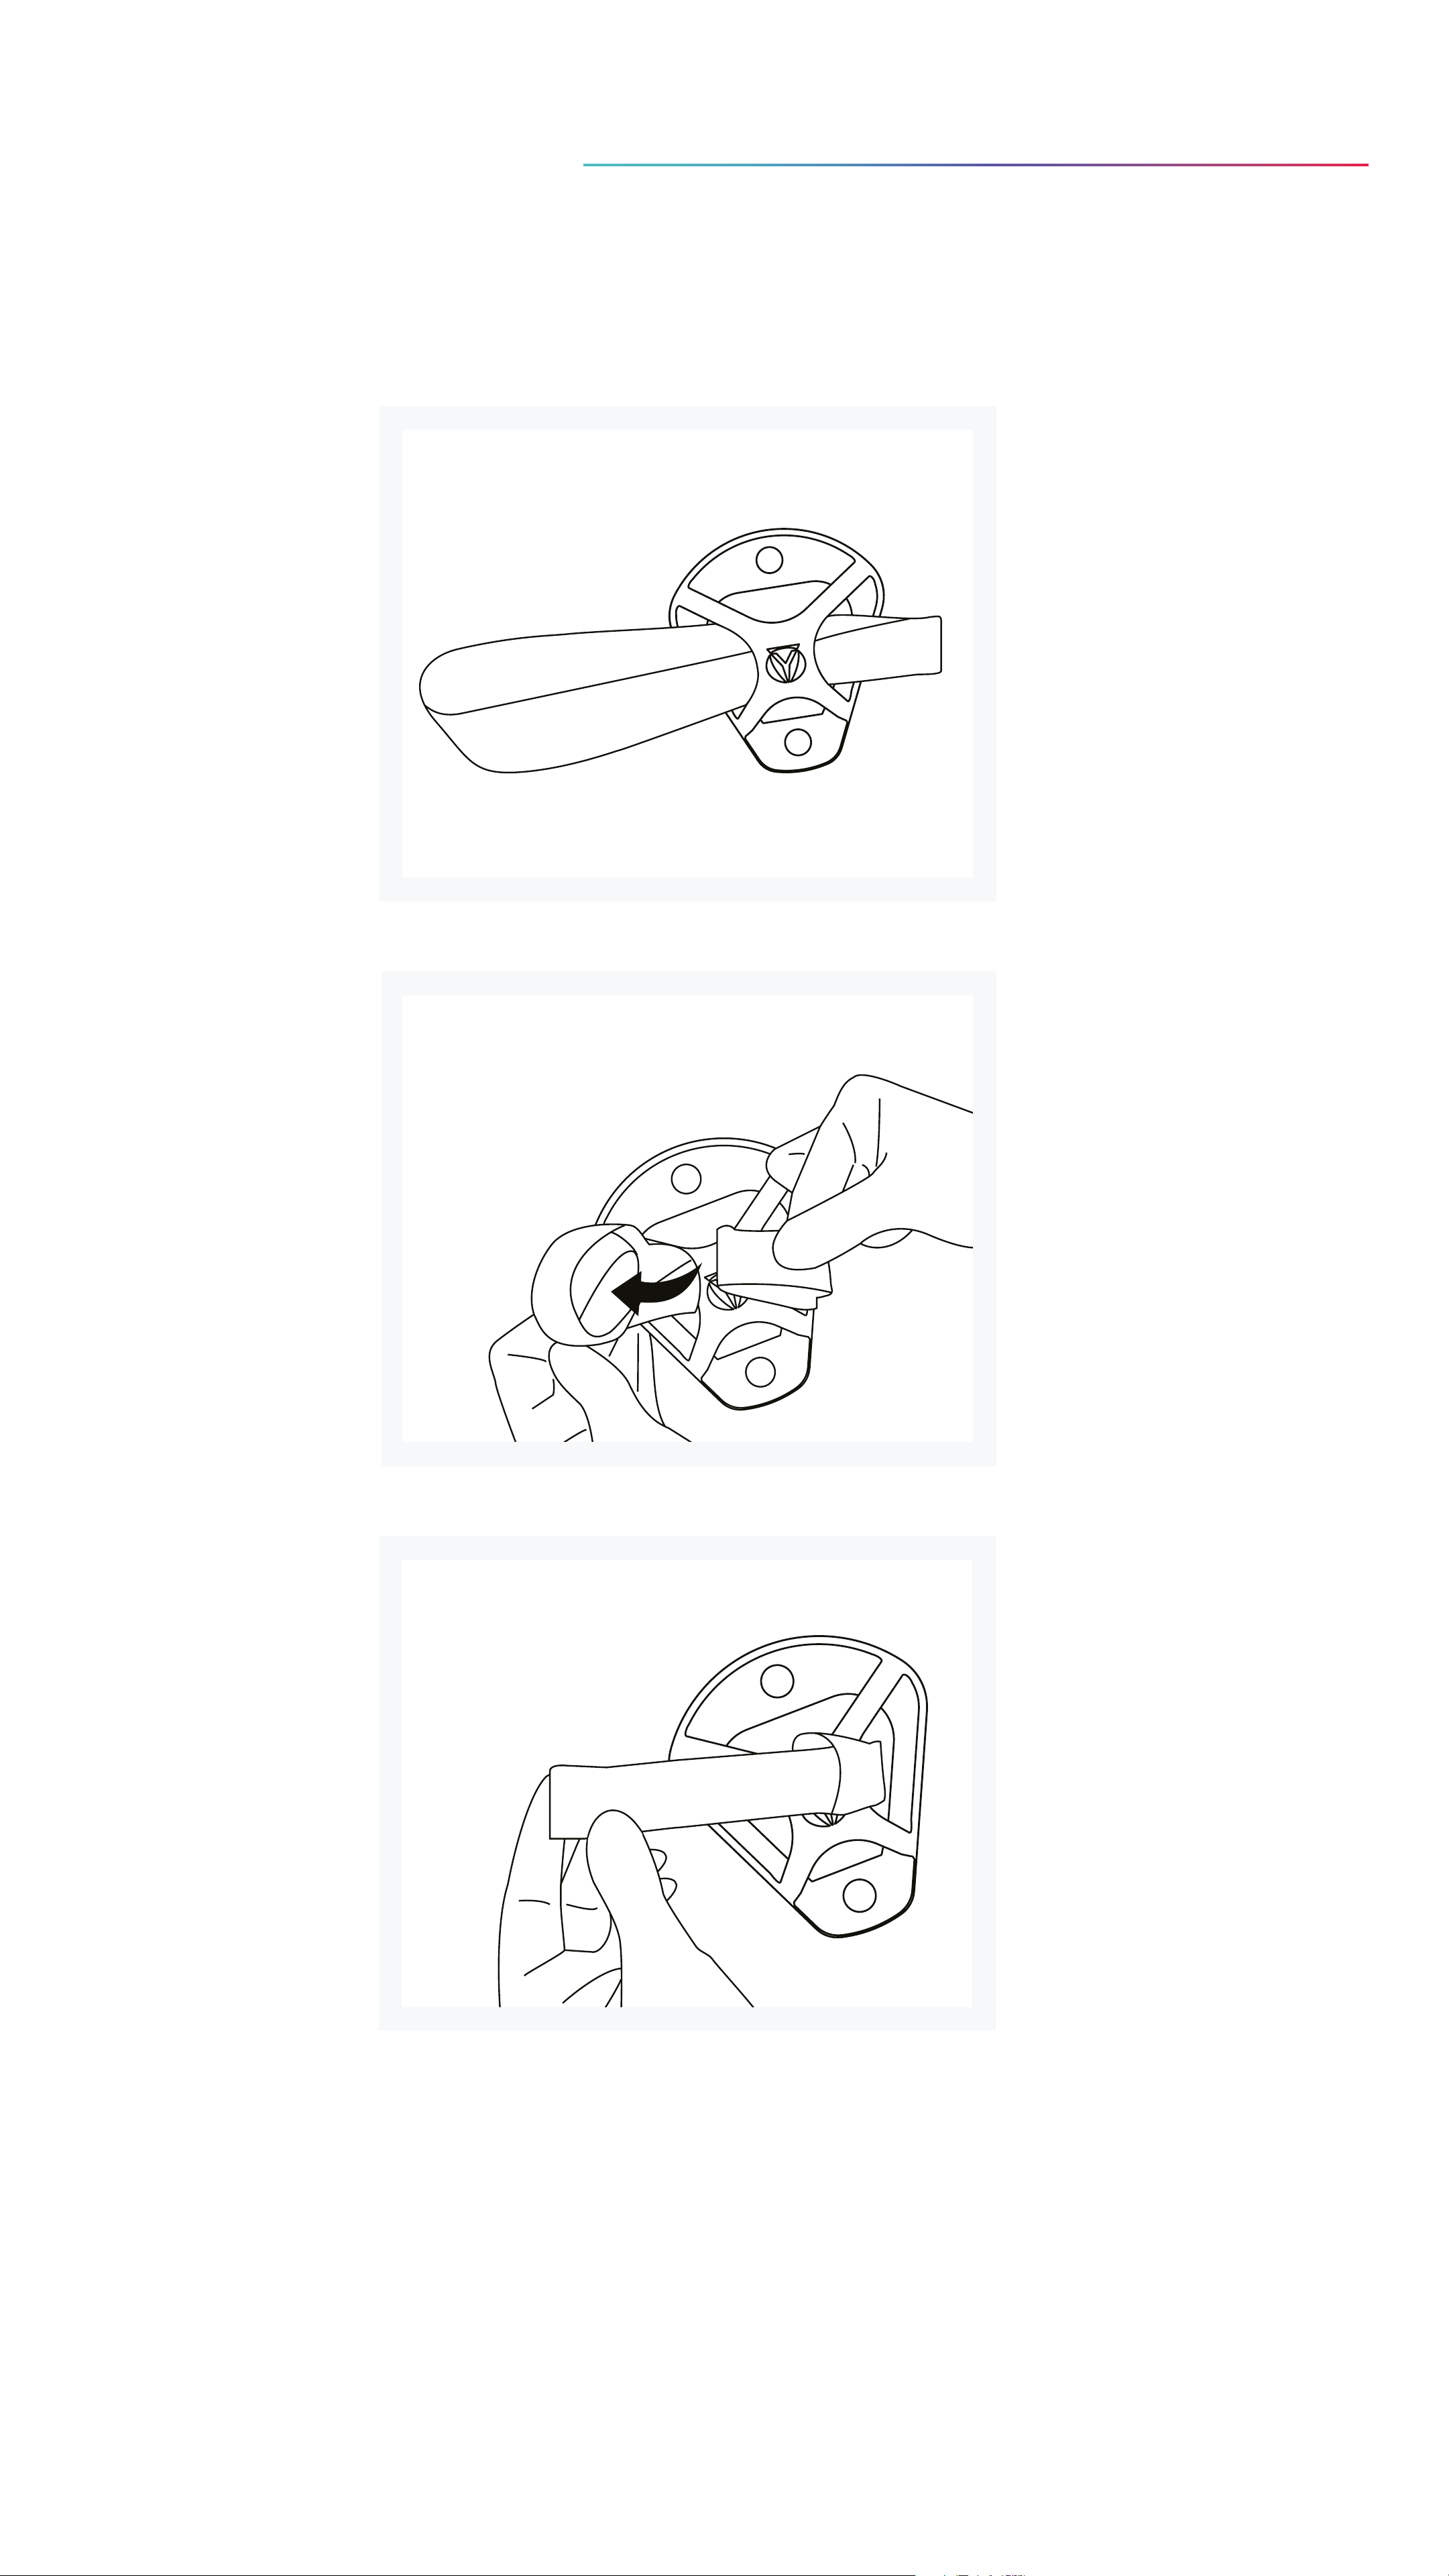
Wall Mount
Performance mode
1. Install the Wall Mount as described in the Wall Mount User
Manual.
2. Thread the fabric loop included in the box through the
center of the Wall Mount, as shown
*Wall mount is not included in the Box
Page 17
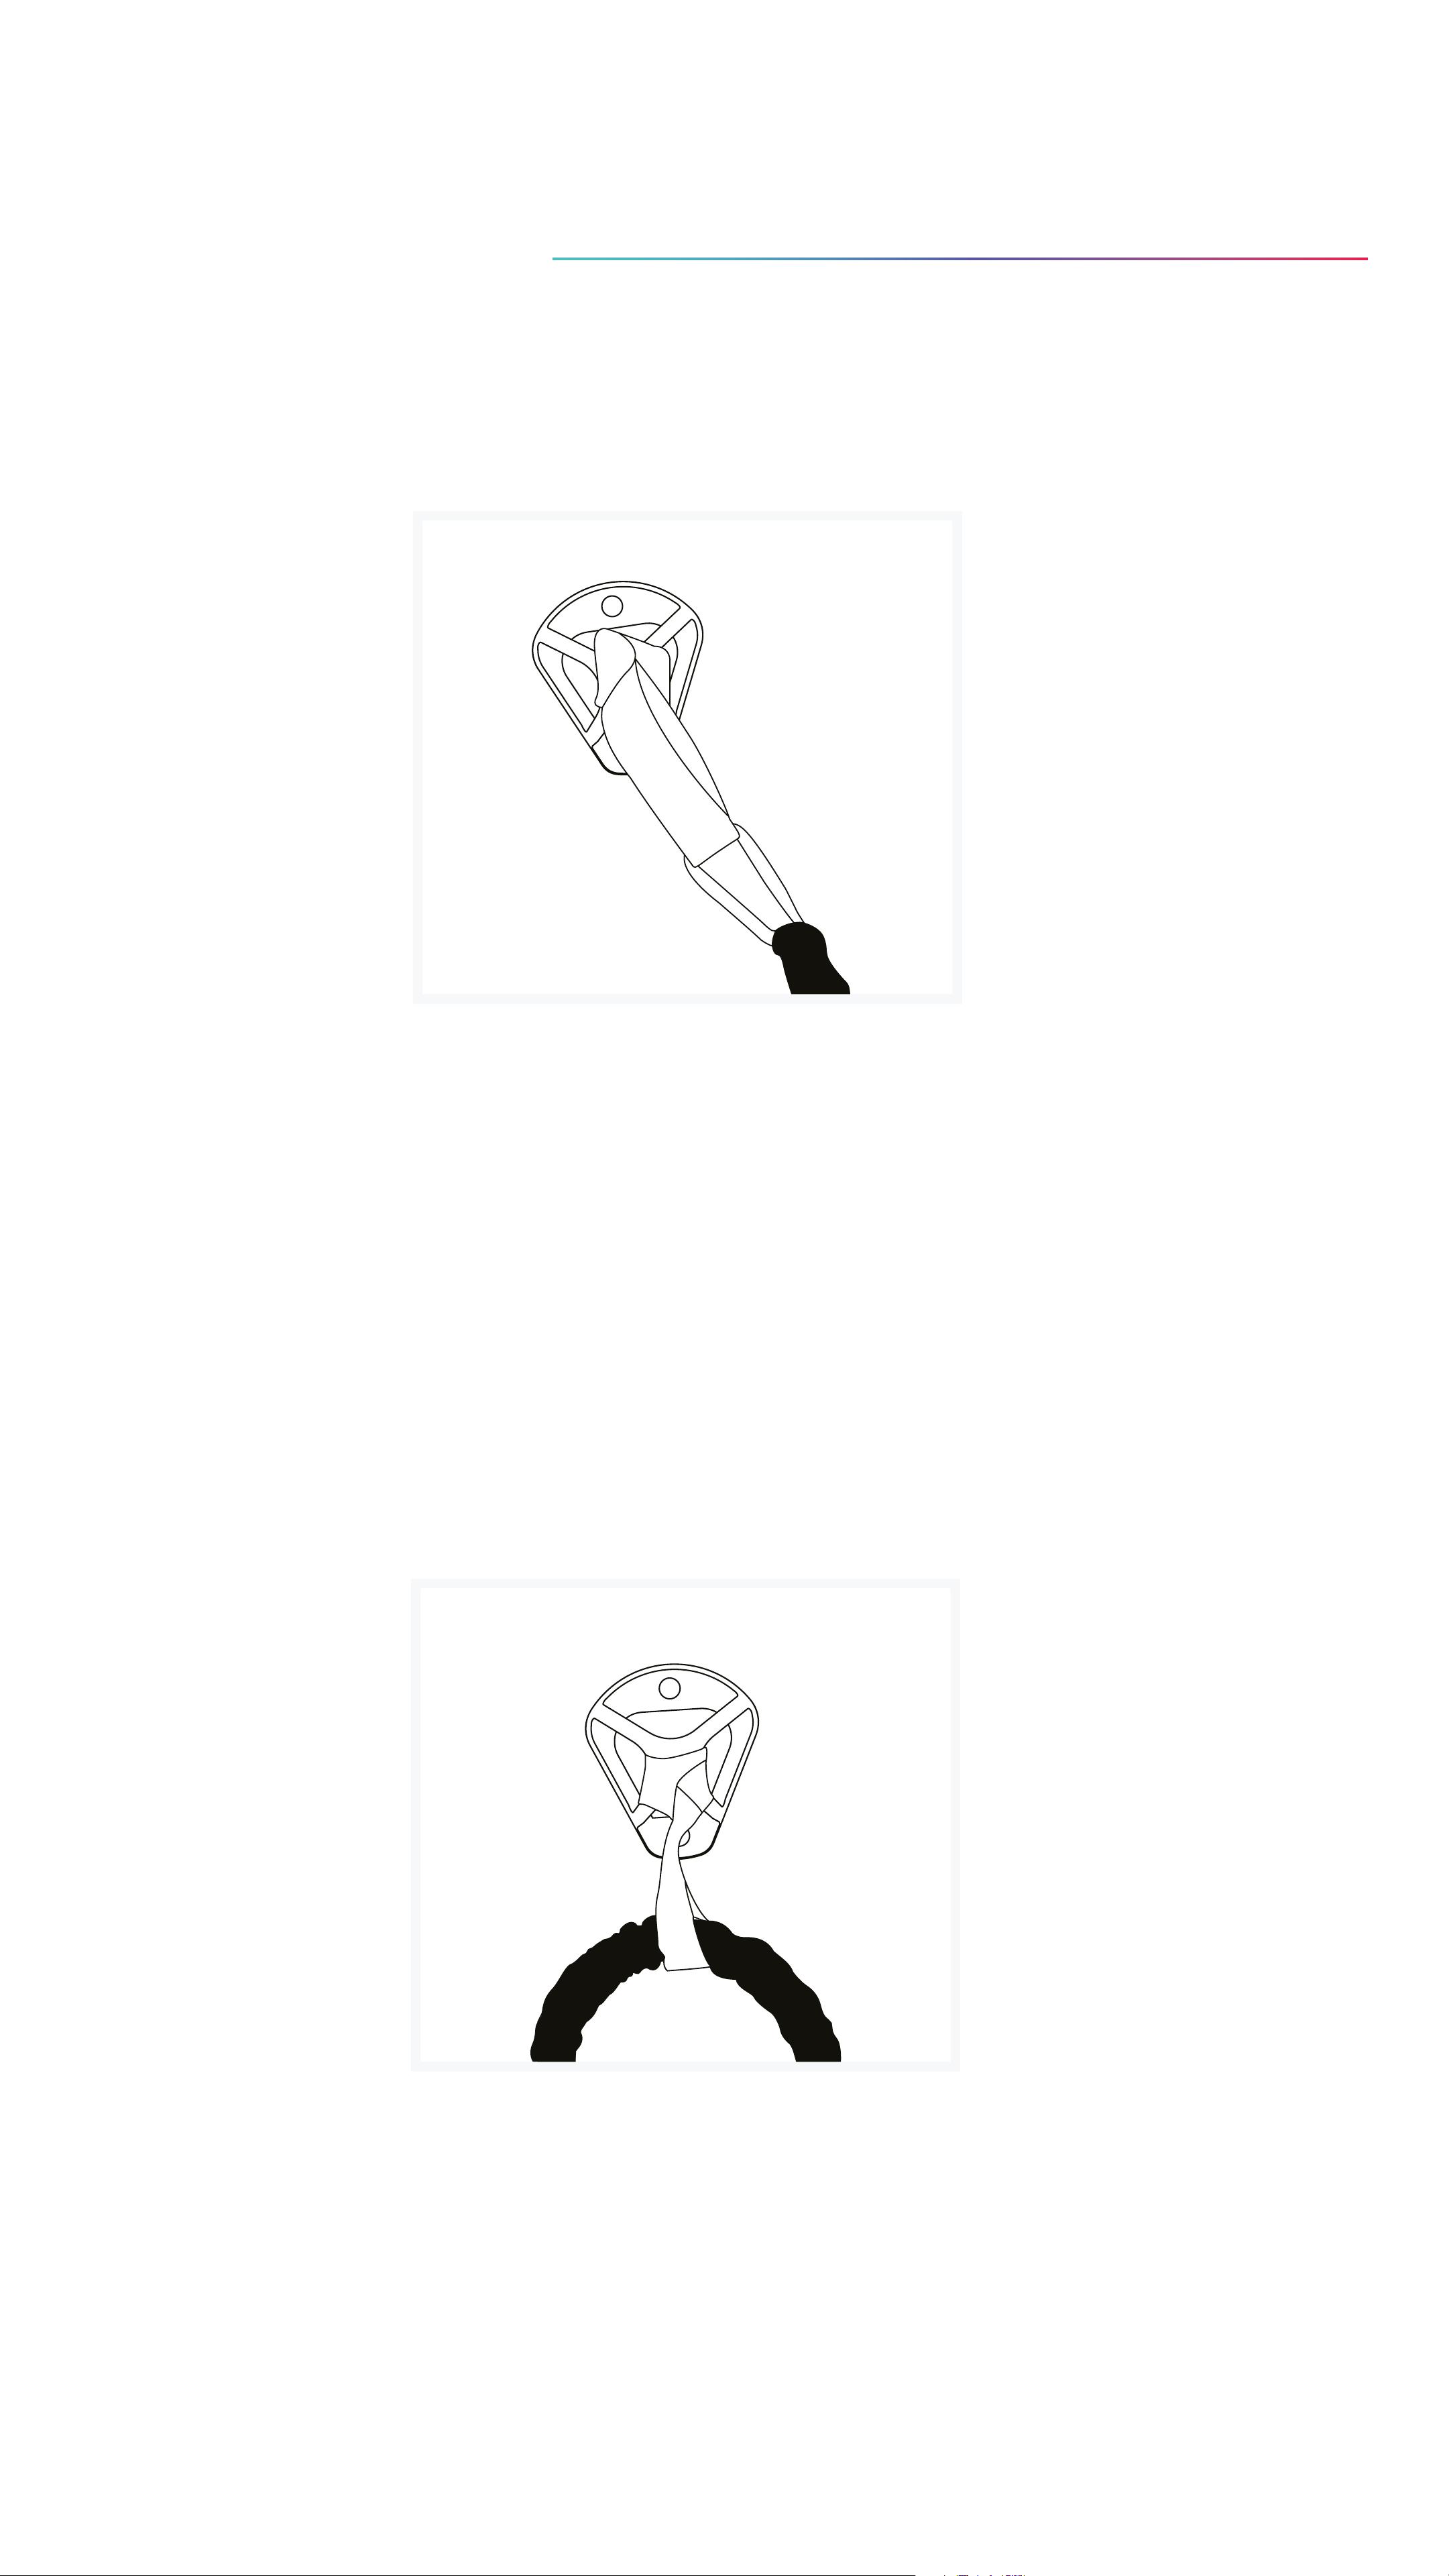
Anchoring the HYBAR with the
Wall Mount
Performance mode
1: Attach the carabiner to the fabric loop.
2: Attach the sensor unit to the red end of the
HYBAR.
Strength mode
1: Insert the resistance band through the fabric loop.
2: Attach the sensor unit to the red end, and the
carabiner to the black end.
Page 18
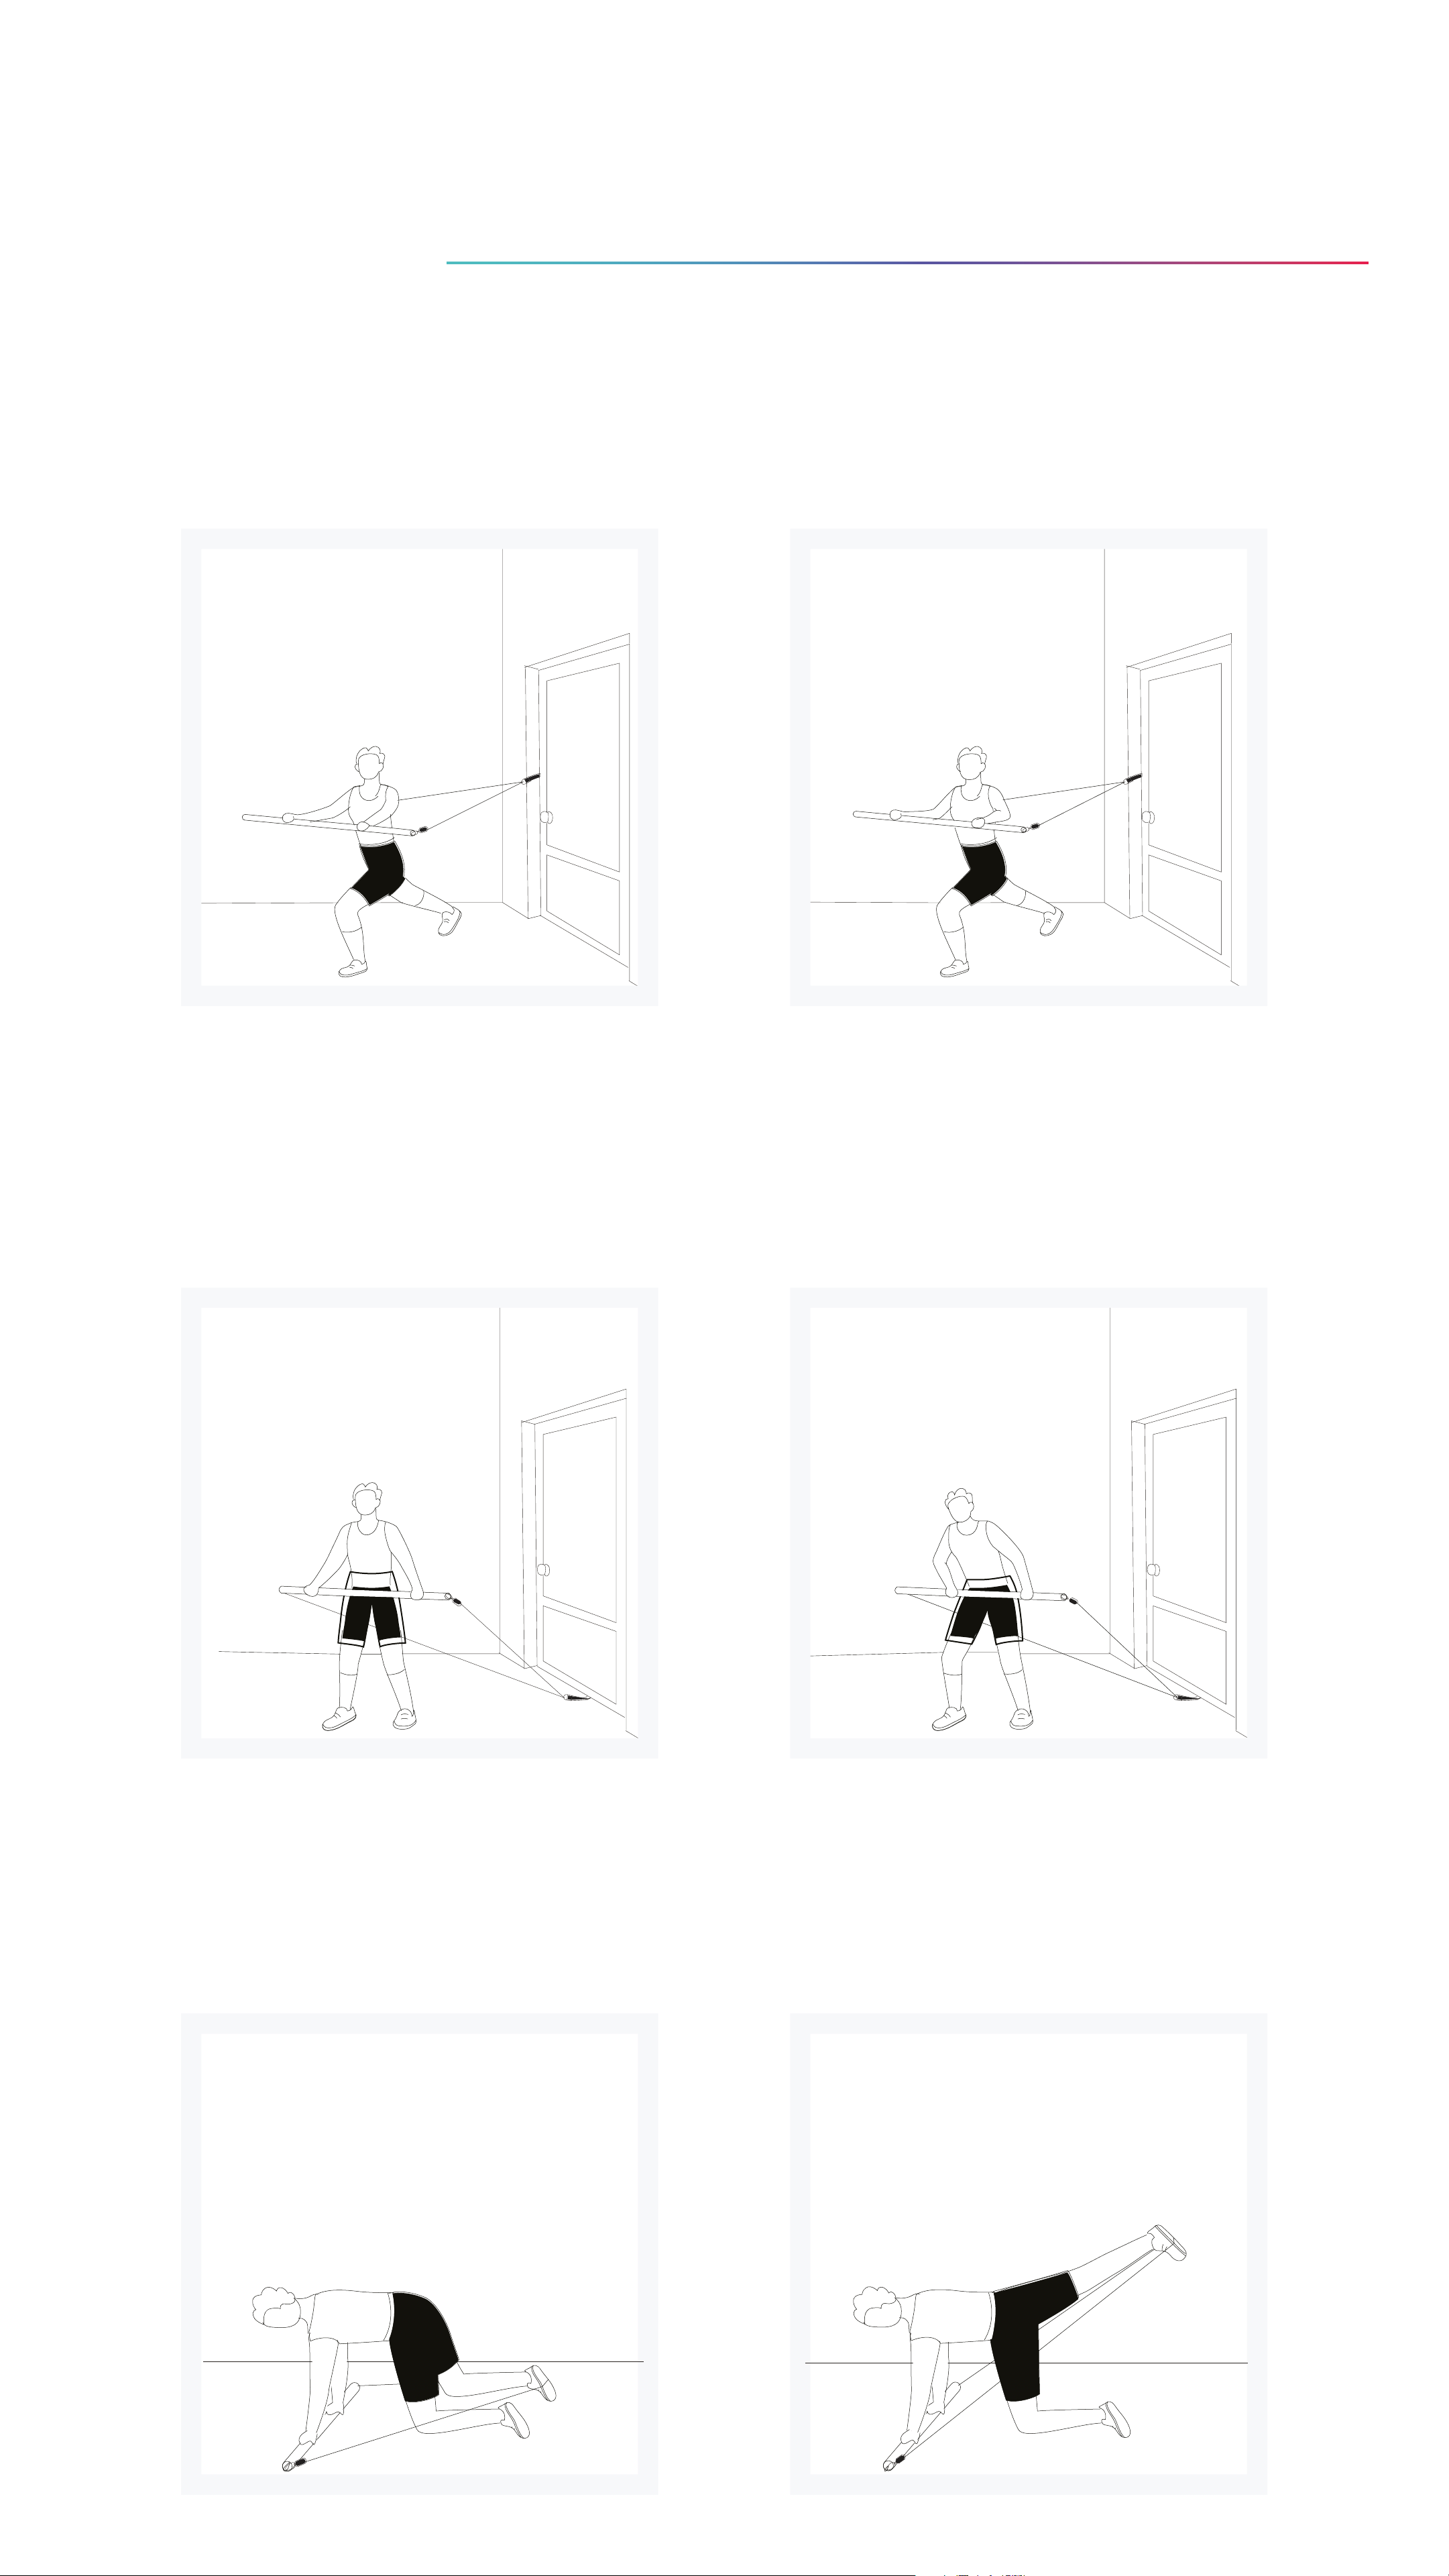
Workout Examples using
HYBAR
Chest press
Hip thrust
Glute kickbacks
Page 19

Safety: Do’s and Dont’s
DO start slowly and take it easy before progressing to a
more challenging or more intense workout.
DO set your own limits and be responsible for your own
safely.
DO choose the right workout program for your fitness
level and stay in control.
DO check that you have attached the product properly
and the bands are secure.
DO use a strong and secure anchoring point that can
fully support your body weight.
DO always perform a weight test by pulling hard on the
anchoring point and main straps when using any of the
anchoring attachments.
DO pull hard on the handles to ensure they are secure
before using.
DO ensure the carabiners are correctly attached to the
Hybar.
DO make sure the floor is not wet or slippery to avoid
minor or even severe injuries.
DO use Hybar only for its intended use, as described in
this manual.
DO inspect your Hybar and all its components before
each use.
DO replace any damaged or worn components
immediately.
Page 20

Safety: Do’s and Dont’s
DON’T continue exercising you feel pain or discomfort.
DON’T use Hybar if your hands are greasy, wet or overly
sweaty.
DON’T push yourself too far beyond your comfort zone.
DON’T use Hybar if a band or any other element is
damaged.
DON’T allow children under the age of 16 to use Hybar.
DON’T expose Hybar to direct sunlight, rain or snow.
DON’T leave Hybar exposed outdoors for an extended
period of time.
DON’T use strong chemical agents or cleaners, which
may discolor or damage your Hybar.
DON’T touch Hybar or the power plug with wet hands.
DON’T bend or yank the plug or power cord from the
electrical outlet.
DON’T download and install firmware from an
unauthorized provider.
This may cause Hybar to malfunction or become
incompatible, voiding the product warranty.
DON’T use Hybar if any of the components are worn or
damaged.
DON’T use an anchoring point that causes excessive
friction or wear to the Hybar
DON’T expose your Hybar to high temperature
Page 21

Safety: Do’s and Dont’s
Failure to adhere to severe injury. The user assumes the
full risk of injury and all liability Hybar safety guidelines
may result in minor or resulting from the use of Hybar
and all of its components.
Console your doctor before using the Hybar
Make sure to use the secure band at all times
Make sure that the bar is screwed all the way
Page 22

FCC Caution:
Any changes or modifications not expressly approved by
the part responsible for compliance could avoid the user’s
authority to operate this equipment.
This device complies with part 15 of the FCC Rules.
Operation is subject to the followingtwo conditions:
(1) this device may not cause harmful interference, and
(2) this device must accept any interference received,
including interference that may cause undesired operation.
This device and its antenna(s) must not be co-located
or operating in conjunction with any other antenna or
transmitter.
NOTE: This equipment has been tested and found to
comply with the limits for a Class B digital device, pursuant
to Part 15 of the FCC Rules. These
limits are designed to provide reasonable protection
against harmful interference in a residential installation.
This equipment generates, uses and
can radiate radio frequency energy and, if not installed
and used in accordance with the instructions, may cause
harmful interference to radio
communications. However, there is no guarantee that
interference will not occur in a particular installation.
If this equipment does cause harmful interference to radio
or television reception, which can be determined by turning
the equipment off and on, the user is encouraged to try
to correct the interference by one or more of the following
measures:
Page 23

FCC Caution:
Reorient or relocate the receiving antenna.
Increase the separation between the equipment and
receiver.
Connect the equipment into an outlet on a circuit
different from that to which the receiver is connected.
Consult the dealer or an experienced radio/TV
technician for help. Th device has been evaluated to
meet general RF exposure requirement. The
device can be used in portable exposure condition
without restriction.
Page 24

IC Caution:
EN
This device contains licence-exempt transmitter(s)/
receiver(s) that comply with Innovation, Science and
Economic Development Canada’s licence-exempt RSS(s).
Operation is subject to the following two conditions:
This device may not cause interference.
This device must accept any interference, including
interference that may cause undesired operation of the
device.
 Loading...