

Page 1
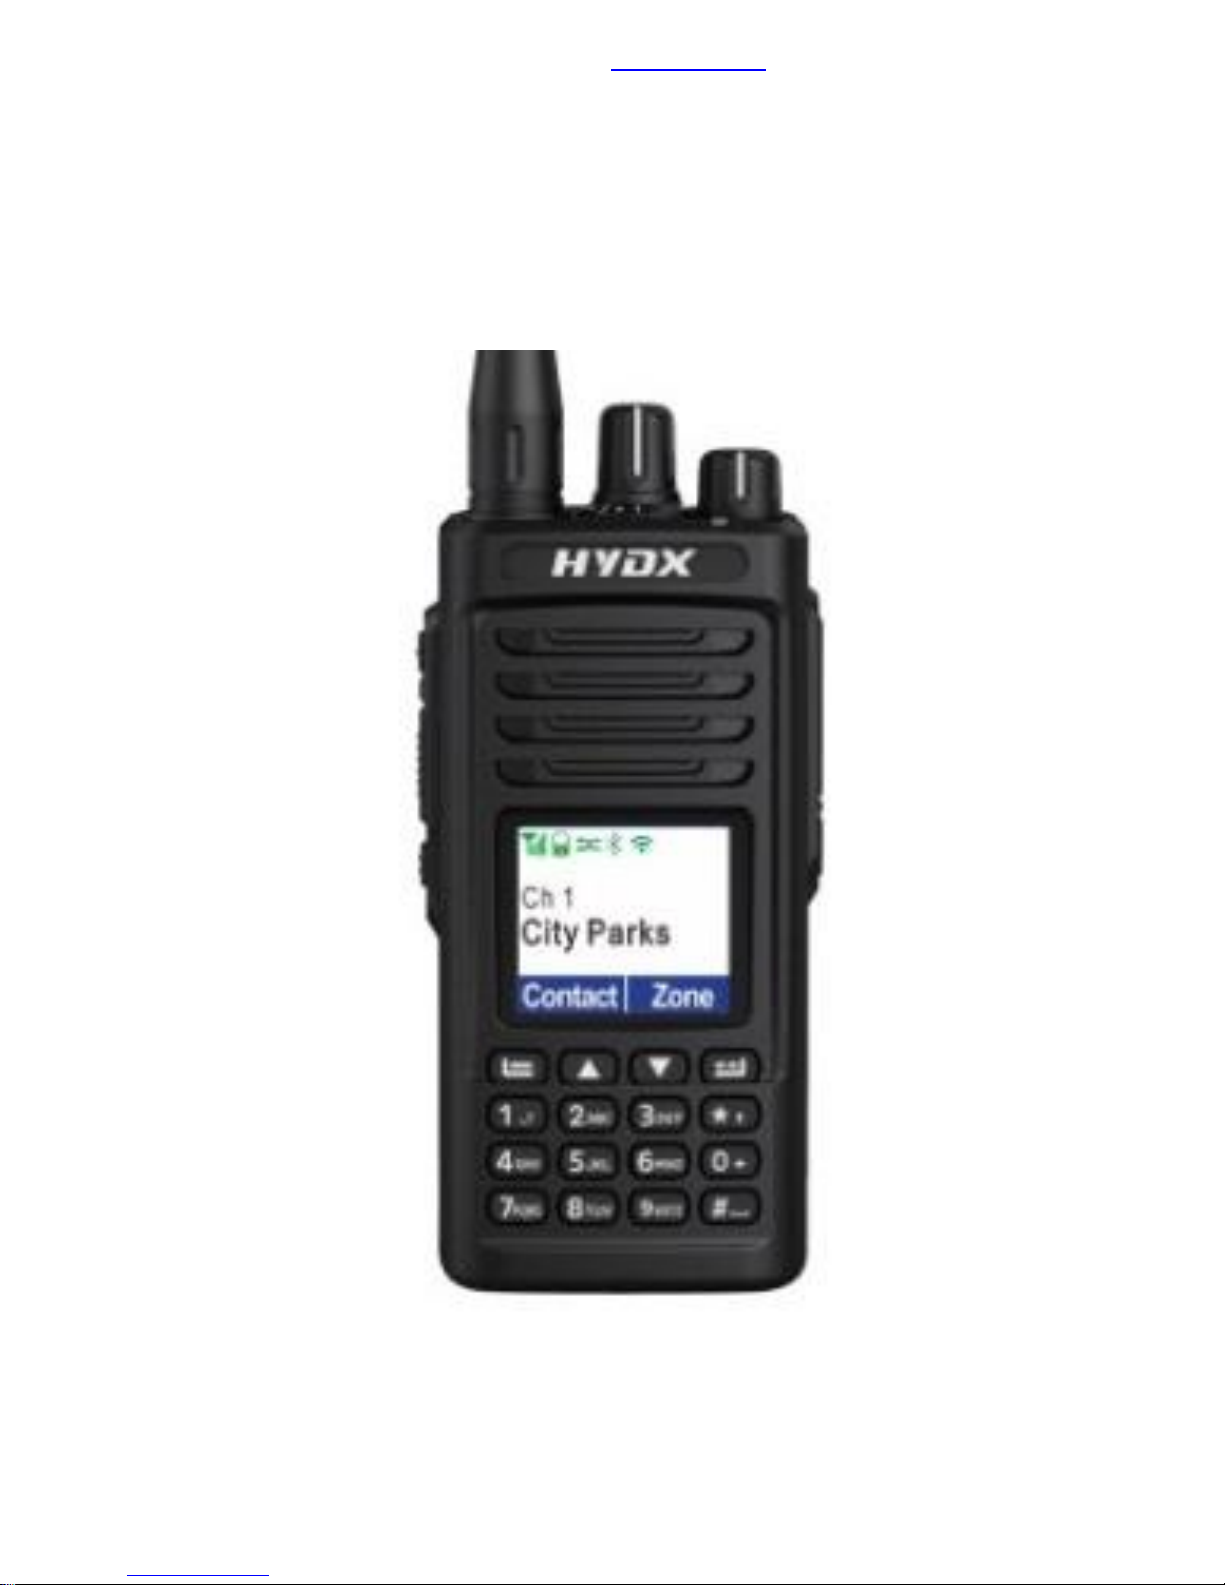
Importör HYDX – TyTera - WOUXUN
Svenska OH Gruppen – Anders Olsson – [email protected] – Tel. 070-598 80 50
HYDX D50 VHF DMR – WWW.TROLLEBORG.SE
1
HYDX D50
VHF DMR
Page 2

Importör HYDX – TyTera - WOUXUN
Svenska OH Gruppen – Anders Olsson – [email protected] – Tel. 070-598 80 50
HYDX D50 VHF DMR – WWW.TROLLEBORG.SE
2
Content
HYDX-D50 Specifications .............................................................................................................................. 6
Safety Criterion and Instructions ............................................................. Fel! Bokmärket är inte definierat.
Safety and Overview ............................................................................... Fel! Bokmärket är inte definierat.
Unpacking and Checking Equipment
Charging The Battery
Getting Acquainted .................................................................................. Fel! Bokmärket är inte definierat.
Basic Operations .................................................................................... Fel! Bokmärket är inte definierat.
Power On/Off ..................................................................................... Fel! Bokmärket är inte definierat.
VOL Control ....................................................................................... Fel! Bokmärket är inte definierat.
Launch And Receive Call ....................................................................... Fel! Bokmärket är inte definierat.
Zone Selecting ................................................................................... Fel! Bokmärket är inte definierat.
Selecting Channel 、User ID、Group ID ......................................... Fel! Bokmärket är inte definierat.
Receive And Reply Group Call .......................................................... Fel! Bokmärket är inte definierat.
Receive And Reply Private Call ......................................................... Fel! Bokmärket är inte definierat.
Receive All Call .................................................................................. Fel! Bokmärket är inte definierat.
Rise A Radio Call ............................................................................. Fel! Bokmärket är inte definierat.
Calling By Channel Knob .................................................................. Fel! Bokmärket är inte definierat.
Group Call
Fel! Bokmärket är inte definierat.
Private Call
Fel! Bokmärket är inte definierat.
All Call
Fel! Bokmärket är inte definierat.
Private Call Or Group Call With One Key ......................................... Fel! Bokmärket är inte definierat.
Emergency Call Function ....................................................................... Fel! Bokmärket är inte definierat.
Receive Emergency Call ................................................................... Fel! Bokmärket är inte definierat.
Reply Emergency Call ....................................................................... Fel! Bokmärket är inte definierat.
Emergency Alarm .............................................................................. Fel! Bokmärket är inte definierat.
Emergency Alarm Call ....................................................................... Fel! Bokmärket är inte definierat.
Voice Emergency Alarm .................................................................... Fel! Bokmärket är inte definierat.
Re-start Emergency Mode................................................................. Fel! Bokmärket är inte definierat.
Logout Emergency Mode .................................................................. Fel! Bokmärket är inte definierat.
Menu Operation ........................................................................................... Fel! Bokmärket är inte definierat.
Character Input .................................................................................. Fel! Bokmärket är inte definierat.
English Typing:
Fel! Bokmärket är inte definierat.
Chinese Typing: Fel!
Bokmärket är inte definierat.
Numeral Typing: Fel!
Bokmärket är inte definierat.
Menu Operations ............................................................................... Fel! Bokmärket är inte definierat.
Self-testing ......................................................................................... Fel! Bokmärket är inte definierat.
Send Self-testing Report Fel!
Bokmärket är inte definierat.
Monitor ............................................................................................... Fel! Bokmärket är inte definierat.
Page 3

Importör HYDX – TyTera - WOUXUN
Svenska OH Gruppen – Anders Olsson – [email protected] – Tel. 070-598 80 50
HYDX D50 VHF DMR – WWW.TROLLEBORG.SE
3
Start Monitoring Fel!
Bokmärket är inte definierat.
Contacts Setting ................................................................................ Fel! Bokmärket är inte definierat.
Group Call With Contacts Fel! Bokmärket är inte definierat.
Private Call With Contacts Fel! Bokmärket är inte definierat.
Call Log .............................................................................................. Fel! Bokmärket är inte definierat.
Message Function................................................................................... Fel! Bokmärket är inte definierat.
Edit And Send SMS Fel! Bokmärket är inte definierat.
Sent Prefabricate SMS Fel! Bokmärket är inte definierat.
Sent Prefabricate SMS With A Key Fel! Bokmärket är inte definierat.
Manage The Failed SMS Fel! Bokmärket är inte definierat.
Manage The Send SMS Fel! Bokmärket är inte definierat.
Receive SMS .............................................................................. Fel! Bokmärket är inte definierat.
Check the SMS Fel! Bokmärket är inte definierat.
Manage Received SMS Fel! Bokmärket är inte definierat.
Check The Inbox SMS Fel! Bokmärket är inte definierat.
Reply The Inbox SMS Fel! Bokmärket är inte definierat.
Delect The Inbox SMS Fel! Bokmärket är inte definierat.
Delect All Inbox SMS Fel! Bokmärket är inte definierat.
Encryption ............................................................................................... Fel! Bokmärket är inte definierat.
Basic Encryption Fel! Bokmärket är inte definierat.
DTMF ............................................................................................................................................................. 26
Secrecy ....................................................................................... Fel! Bokmärket är inte definierat.
Kill Fel! Bokmärket är inte definierat.
Stun Fel! Bokmärket är inte definierat.
Scaning List ............................................................................................. Fel! Bokmärket är inte definierat.
Check List of Members Fel! Bokmärket är inte definierat.
Scanning Instruction Fel! Bokmärket är inte definierat.
Start/Stop Scan Fel! Bokmärket är inte definierat.
Press Pre-programmed Power On/Off or enter the scan meun function……………………...41
Scanning Reply Fel! Bokmärket är inte definierat.
General Setting ....................................................................................... Fel! Bokmärket är inte definierat.
Setting ....................................................................................................... Fel! Bokmärket är inte definierat.
Fuori Rete Fel! Bokmärket är inte definierat.
Tones/Presentation Fel! Bokmärket är inte definierat.
Silence ....................................................................................................... Fel! Bokmärket är inte definierat.
Switch On/Off Keyboard Sound ................................................................. Fel! Bokmärket är inte definierat.
Function Levels Setting------------------------------------------------------------------------------------------------------------Fel!
Bokmärket är inte definierat.
Control Screen Backlight----------------------------------------------------------------------------------------------------------Fel!
Bokmärket är inte definierat.
SQL Setting---------------------------------------------------------------------------------------------------------------------------Fel!
Bokmärket är inte definierat.
Switch On/Off Home Page--------------------------------------------------------------------------------------------------------Fel!
Bokmärket är inte definierat.
Lock/Un-lock
Key--------------------------------------------------------------------------------------------------------------------Fel! Bokmärket
Page 4

Importör HYDX – TyTera - WOUXUN
Svenska OH Gruppen – Anders Olsson – [email protected] – Tel. 070-598 80 50
HYDX D50 VHF DMR – WWW.TROLLEBORG.SE
4
är inte definierat.
Language Selecting
-----------------------------------------------------------------------------------------------------------------Fel! Bokmärket
är inte definierat.
Switch On/Off LED Indicator---------------------------------------------------------------------------------------------------- Fel! Bokmärket är inte definierat.
Switch On/Off (VOX) Function-------------------------------------------------------------------------------------------------- Fel! Bokmärket är inte definierat.
Power-on Password------------------------------------------------------------------------------------------------------- Fel! Bokmärket är inte definierat.
Clock------------------------------------------------------------------------------------------------------------------------------
Fe
l! Bokmärket är inte definierat.
Time ........................................................................................................... Fel! Bokmärket är inte definierat.
Date ........................................................................................................... Fel! Bokmärket är inte definierat.
Model-----------------------------------------------------------------------------------------------------------------------------------Fel!
Bokmärket är inte definierat.
Access to General Information ............................................................. Fel! Bokmärket är inte definierat.
Walkie Talkie ID
Fel! Bokmärket är inte definierat.
Walkie Talkie Versions
Fel! Bokmärket är inte definierat.
Walkie Talkie Configuration
............................................................... Fel! Bokmärket är inte definierat.
RF------------------------------------------------------------------------------------------------------------------------------------- Fel! Bokmärket är inte definierat.
TF------------------------------------------------------------------------------------------------------------------------------------- Fel! Bokmärket är inte definierat.
Channel Name-------------------------------------------------------------------------------------------------------------------- Fel! Bokmärket är inte definierat.
TOT------------------------------------------------------------------------------------------------------------------------------------Fe
l! Bokmärket är inte definierat.
CTCSS Fel! Bokmärket är inte definierat.
Encode ...................................................................................................... Fel! Bokmärket är inte definierat.
Decode ...................................................................................................... Fel! Bokmärket är inte definierat.
Color Code
------------------------------------------------------------------------------------------------------------------------Fel!
Bokmärket är inte definierat.
RepeaterTS
------------------------------------------------------------------------------------------------------------------------Fel!
Bokmärket är inte definierat.
Page 5

Importör HYDX – TyTera - WOUXUN
Svenska OH Gruppen – Anders Olsson – [email protected] – Tel. 070-598 80 50
HYDX D50 VHF DMR – WWW.TROLLEBORG.SE
5
Page 6
Importör HYDX – TyTera - WOUXUN
Svenska OH Gruppen – Anders Olsson – [email protected] – Tel. 070-598 80 50
HYDX D50 VHF DMR – WWW.TROLLEBORG.SE
6
Safety and Overview
Product safety and RF Exposure for handheld two way radio .
Before using this two way radio ,please read the manual which contains important
operating instructions for safe usage, RF Energy Awareness, control information
and operational instructions for compliance with RF Energy Exposure limits in
applicable national and international standards Also read the operational
instructions for safe use.
HYDX-D50 Specifications
General Specifications
Frequency Range
400-470MHz/136-174MHz
Working Frequency
450-520 /136-174MHz
245.025-245.97875 MHz
Channel Capactiy
1000 个
Working Voltage
7.4V
Working Temperature
-30℃~+60℃
Storing Temperuature
-40℃~+85℃
Battery Lifespan
Standard Battery Capacity 2000mAh Li-ion
Analog:10h;Digital:14h
Receiver
Frequency Range
400~470MHz/136-174MHz
Channel Spacing
12.5KHz
Frequency Stability
+/-1.0ppm
Analog Sensitivity
0.35uV/-116dBm(20dB SINAD
0.22uV/-120dBm(Typical)
Digital Sensitivity
0.3uV/-117.4dBm(BER5%)
0.7uV/-110dBm(BER1%)
Inter-modulation
TIA603C:65dB
ETSI:65dB
Channel Selectivity
TIA603C:60dB@12.5KHz
ETSI:60dB@12.5KHz
Co-channel Rejection
12dB@12.5KHz
Spurious Response Rejection
TIA603C:70dB ETSI:70dB
Spurious Response Radiation
≤-57dBm@1GHz,≥-47dBm@
Block
84dB
Rated Audio Power
1W
Transmitter
Channel Spacing
12.5KHz
Frequency Stability
+/-1.5ppm
TX Power
Low:1W High:5W
Modulation Noise
-40dB@12.5KHz
TX Spurious Radiation
小于-36dB m@1GHz,大于-30dB m@1G
Hz
Page 7
Importör HYDX – TyTera - WOUXUN
Svenska OH Gruppen – Anders Olsson – [email protected] – Tel. 070-598 80 50
HYDX D50 VHF DMR – WWW.TROLLEBORG.SE
7
Adjacent Power
-60dB@12.5KHz
FM Modulation
12.5KHz:11F0F3E
4FSK Digital Modulation
12.5KHz(data only):7K60FXD
12.5KHz(data+voice):7K60FXE
Modulation Limit
Audio Response
+1dB~-3dB
Digital Voice Vocoder
AMBE+2TM
Unpacking and Checking Equipment
Welcome to use radios, before using we suggest you:
·Please check the packing box of this product and see if there are signs of damage.
·Please open the packing box carefully. We recommend that you identify the items listed in the following
packing list. if you find that our product and its accessories in handling are lost or damaged during the
shipment. Please immediately contact dealers.
Parts List
Item
Quantity
Radio
1
Rubber Antenna
1
Li-ion Battery Pack
1
Desktop Charger
1
Power Adapter
1
Belt Clip
1
User’s Manual
1
Hand-Strap
1
Warranty Card
1
Charging the Battery
1) Using the battery
The battery is not completely charged at the factory, please charge it before using.
To extend the battery life time, please power off the battery when you don't use two way radio, and
save battery in a cool (temperature less than 25℃ )and dry place.
2 Precautions of Charging Equipment
1. Do not expose the charger to rain or snow.
2. Do not operate the charger if it has received a sharp blow, or has been dropped or damaged in any
way.
3. Do not disassemble the charger if it has received a sharp blow, or has been dropped or damaged in
any way.
4. Never alter the AC cord or plug provided with the unit. If the plug will not fit the outlet, have the
Page 8

Importör HYDX – TyTera - WOUXUN
Svenska OH Gruppen – Anders Olsson – [email protected] – Tel. 070-598 80 50
HYDX D50 VHF DMR – WWW.TROLLEBORG.SE
8
proper outlet installed by a qualified electrician. An improper condition can result in a risk of electric
shock.
5. To reduce the risk of damage to the cord or plug, pull the plug rather than the cord when
disconnecting the charger from the AC receptacle.
6. To reduce the risk of electric shock, unplug the charger from the outlet before attempting any
maintenance or cleaning.
7. Use of an attachment not recommended or sold by may result in a risk of fire, electric
shock, or personal injury.
8. Make sure the cord is located so it will not be stepped on, tripped over, or subjected to damage or
stress.
9. An extension cord should not be used unless absolutely necessary. Use of an improper extension
cord could result in a risk of fire and/or electric shock. If an extension cord must be used, make sure
that:
•The pins on the plug of the extension cord are the same number, size, and shape as those on the
plug of the charger.
•The extension cord is properly wired and in good electrical condition.
•The cord size is 18 AWG for lengths up to 100 feet, and 16 AWG for lengths up to 150feet.
10. Do not replace charger's power cord. If the power cord damages, you must stop using charger
immediately.
3. Charging the Battery
Please use the battery charger designated by to charge battery. After purchase or
extended storage (more than two months), the first time to charge battery cannot make battery
reach its normal operating capacity. After repeating charge /discharge it two or three times, the
operating capacity will increase to its normal capacity.
4. Please Charge the Radio According to Operation Steps as Follows:
1. Insert power adapter into power supply socket.
2. Insert output terminal of power adapter into DC jack behind the charging kit, now the charging
orange indicator lights about 2 seconds then goes out.
3. Insert the battery or radio equipped with battery into the charging kit.
4. Confirm the battery and charging kit terminal contact reliably, when charging indicator light turns into
red and charging starts.
5. After completion of charge (charging time about 5 hours), light turns to be green.
5. Indicators Display As Following:
Status
Indicator
Power Connected
Orange light is on about 2 seconds then goes
out
No battery(temperature end judges)
All go out
Charge normally
Red light is on
The battery is fully charged
Green light is on
Page 9
Importör HYDX – TyTera - WOUXUN
Svenska OH Gruppen – Anders Olsson – [email protected] – Tel. 070-598 80 50
HYDX D50 VHF DMR – WWW.TROLLEBORG.SE
9
Fault (over temperature, battery
short circuit or over discharge state)
Red light flashes
Note: Before charging, please turn off radio power equipped with battery. When charging, using
radio will interfere with normal charge of battery and transceiver effect.
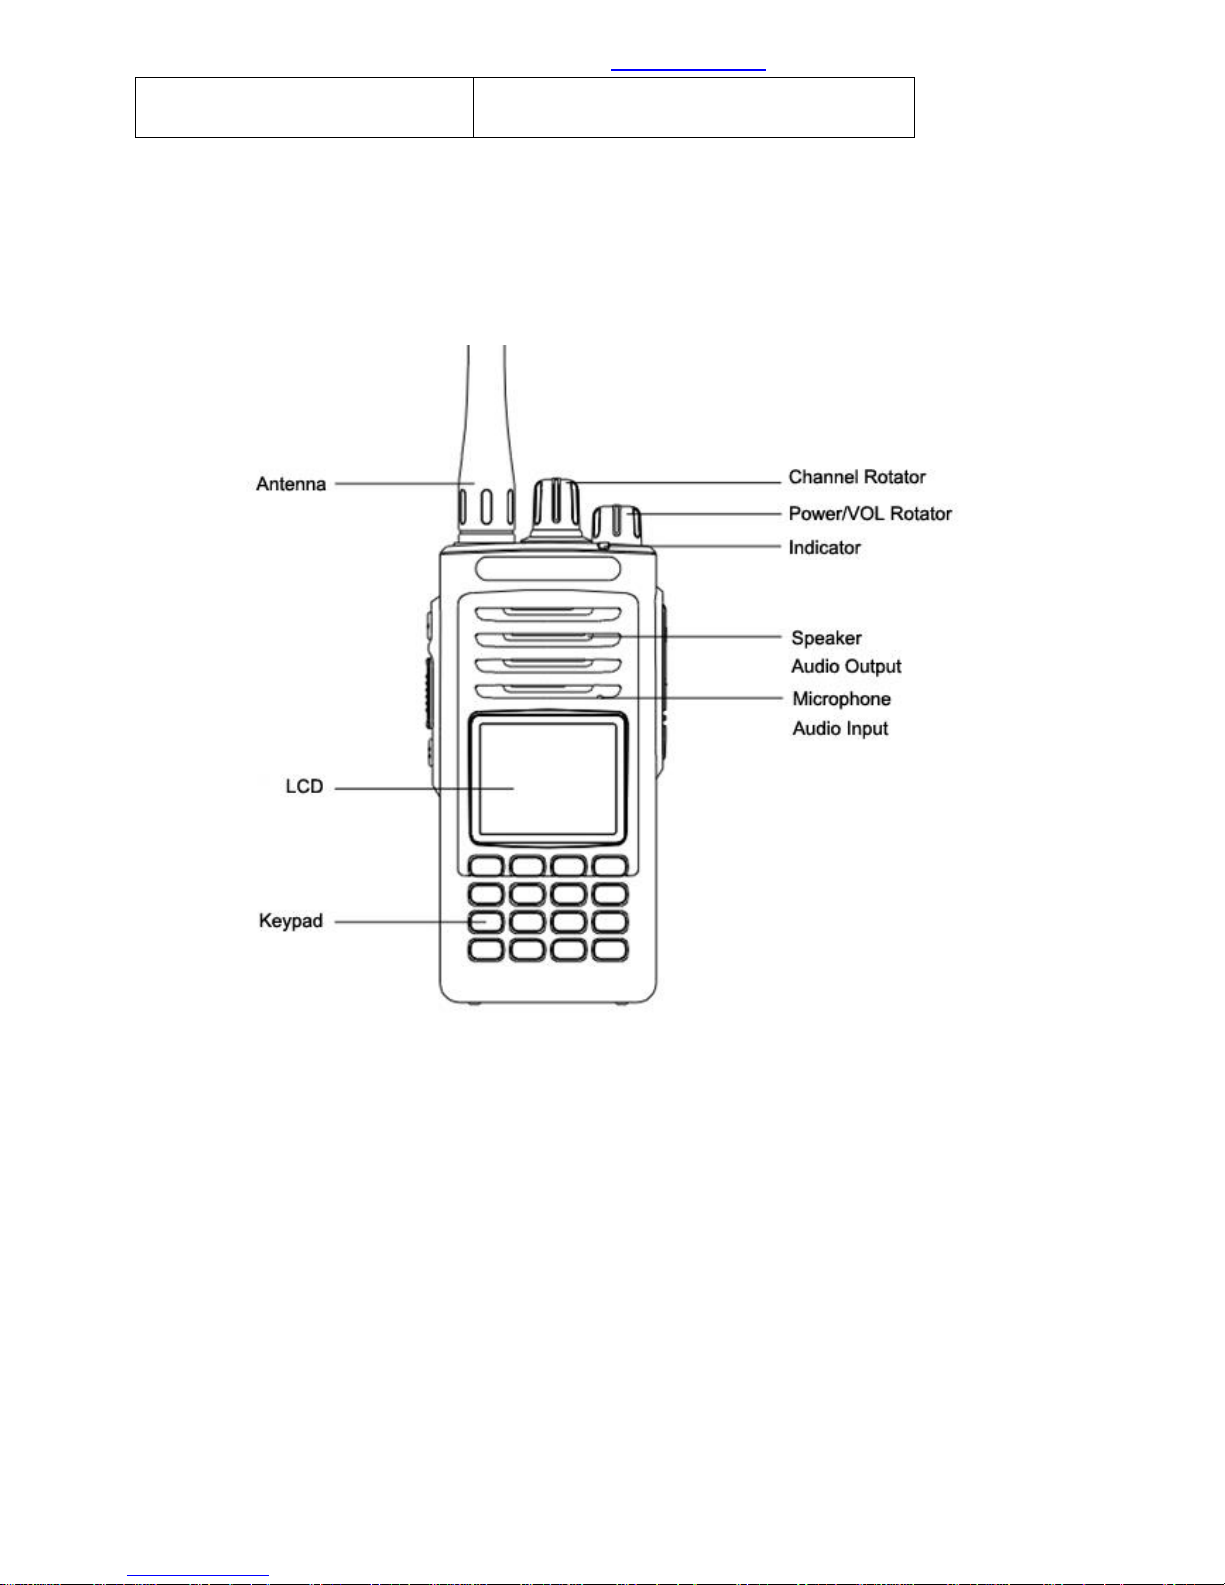
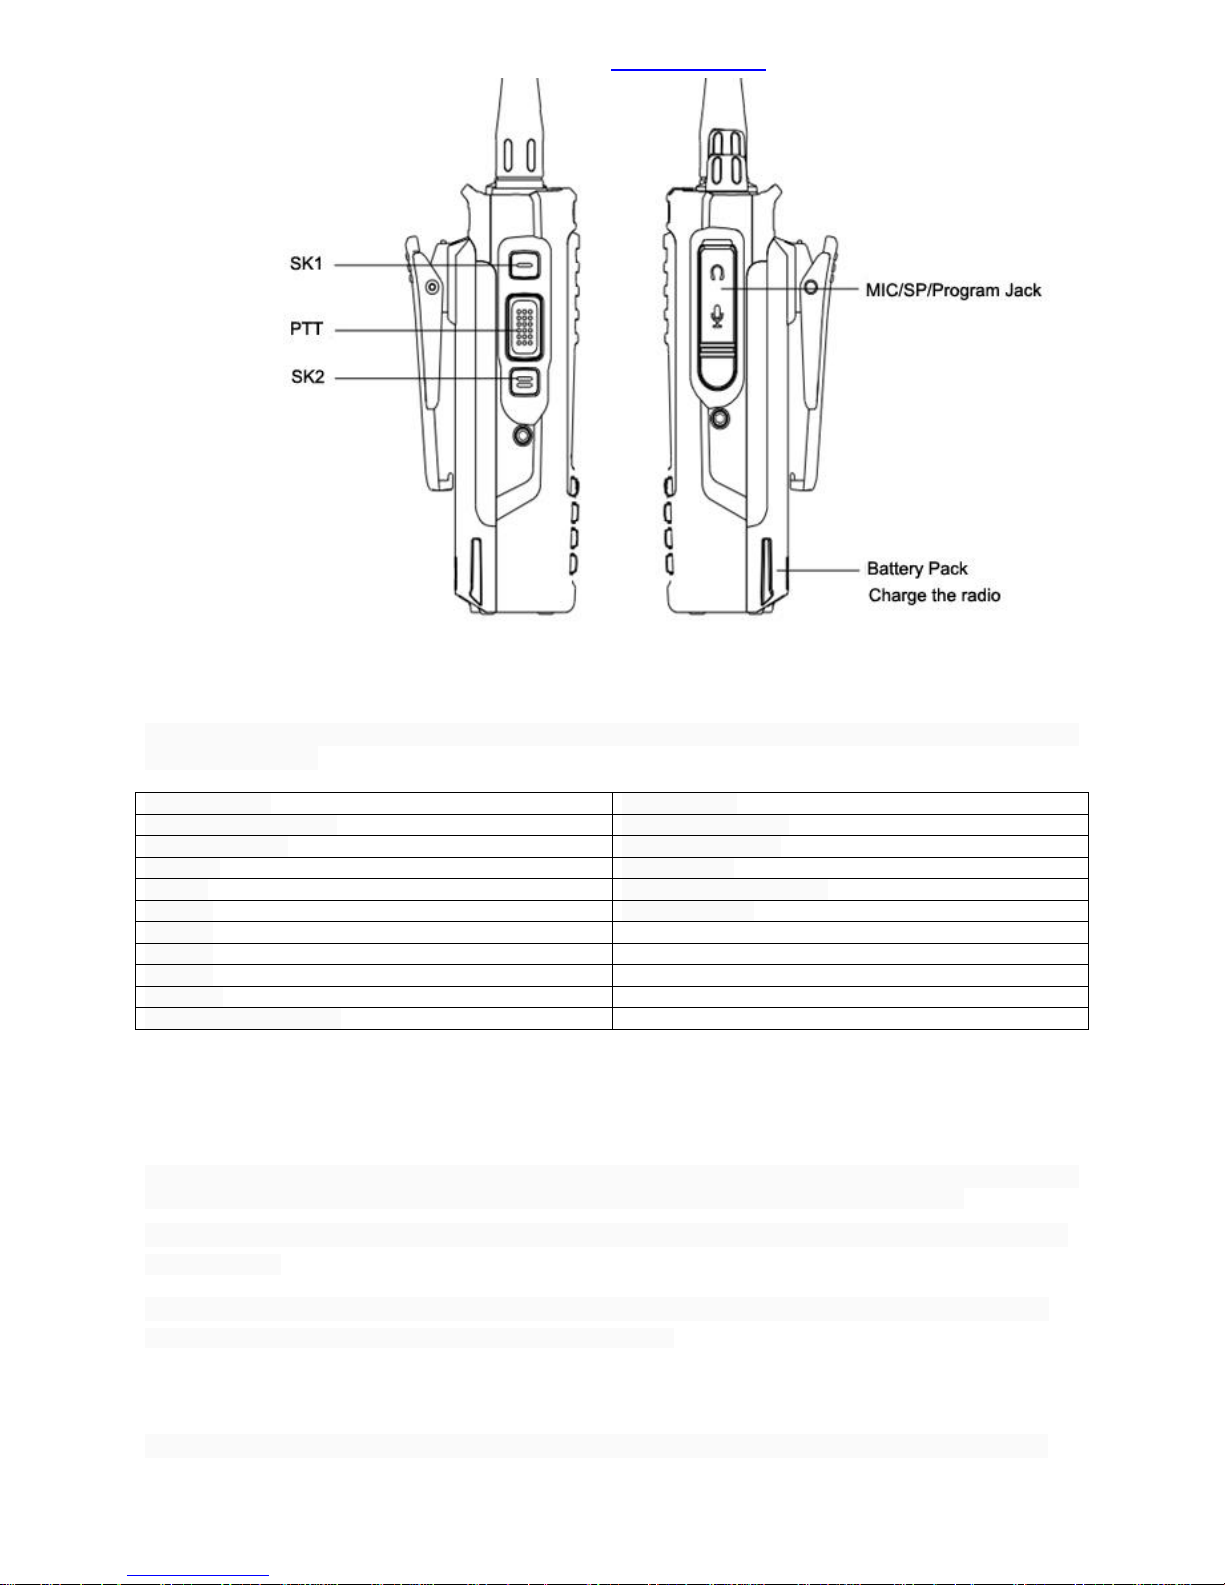
Getting Acquainted
Page 10
Importör HYDX – TyTera - WOUXUN
Svenska OH Gruppen – Anders Olsson – [email protected] – Tel. 070-598 80 50
HYDX D50 VHF DMR – WWW.TROLLEBORG.SE
10
Notice :Either Long-press or Short-press of Side-key 1/ Side-key 2/ Side-key 3 can be set by program software for the
following functions :
1.None-function
12.Scan on/off
2.All warning tone on/off
13.Tight/Normal SQL
3.High/Low power
14.Encryption on/off
4.Monitor
15.VOX on/off
5.PTT 1
16.Private Call By Manual
6. PTT 2
17. Lone Worker
7. PTT 3
8. PTT 4
9. PTT 5
10. PTT 6
11.Repeater/Talk Around
Basic Operation
Power On
Clockwise to turn on the radio volume knob ,there will be a “KADA” sound , message sound and the screen will show
up “Welcome”, while the LED indicator lights up and becomes Green color if the battery is full charged.
Notice: if all LED indicators are forbidden ,the screen will not light up when switch on the walkie talkie, but with a
message sound .
Notice: if the volume function is forbidden ,there will not any sound when power on . Here, need to power off the
walkie talkie and anticlockwise with the knob until a “KADA”sound .
Volume Control
Clockwise the volume knob to higher the volume or anticlockwise to lower;And there shows a volume line on the
Page 11

Importör HYDX – TyTera - WOUXUN
Svenska OH Gruppen – Anders Olsson – [email protected] – Tel. 070-598 80 50
HYDX D50 VHF DMR – WWW.TROLLEBORG.SE
11
screen
Launch And Receive Call
1) Zone Selection
Zones is a channel group .Each radio can set at most 250 zones and each zone with 16 channels (Maximum).
Operation as below:
1.Press [OK] to enter the menu.
2. Press[△/▽] to choose,and [OK] to confirm.
3. Screen shows the chosen zone and named .
4. Press[△/▽] to chose,and[OK] to confirm.
5. Screen shows the chosen zone .
2)Selection Of Channels , User ID Or Group ID
Select desired zone ,rotate channel knob to select the desired channel, user name or ID ,group name
or ID
3)Receive And Reply Group Call
To receive group calling ,radio should be allocated under the group.
When receiving :
1.LED indicator lights green.
2. Show RSSI mark on the top screen:First line show the group name , income call ID are in the
meddle ,group call ICON will be the last (only digital mode )
3.Hold the radio and place it between your lip within 2.5~3cm .Active the alert tone when channel free.
You will hear the tone when release the PTT and waiting for your answer.
4.Press [PTT] to answer the call, LED indicator light change to red .
5.Release [PTT] to receive next call
6.If there are not any transmitter within the time limited , the call failed .
4)Receive And Reply The Single Call
Single call is one to one calling. Only two types :1)Radio self detect before calling ;2) Ready to call.
When receiving :
1.LED indicator lights green.
2. Show RSSI mark on the top screen .First line show the single call ,user name or ID in the middle,
single call mark at the end (Only analog mode) .
3. Hold the radio and place it between your lip within 2.5~3cm .Active the alert tone when channel free.
You will hear the tone when release the PTT and waiting for your answer.
4. Press [PTT] to answer the call.LED indicator change to red .
5. Release [PTT] to receive .
5)Receive All Call
All call means communicate with all members on the same channel and to public important information
When receiving:
1. LED indicator lights green.
2. Show RSSI mark on the top screen .First line show the all call ,user name or ID in the middle,all call
mark at the end (Only analog mode)
3. Back to previous interface after finishing all call .If under the “free channel message
Page 12

Importör HYDX – TyTera - WOUXUN
Svenska OH Gruppen – Anders Olsson – [email protected] – Tel. 070-598 80 50
HYDX D50 VHF DMR – WWW.TROLLEBORG.SE
12
sound” function,when release the PTT key ,you will hear alert tone which means channel is free but
can not answer.
Notice:when receive the all call ,if you turn over to another channel,the radio stop to receive all call。
During the all call,You can use any re-programmed key until the call finished .
6)Launch a radio call
You can choose a channel , user ID or group call with following methods
• Channel Knob
• Pre-programmed key
• Contacts
• Manual dialing (only for single call)
7) Using Channel Knob To Make A Call
Group Call
The radio should be under the group then can have the group call
1. Turn over channel knob , use group name or ID to choose channel
2. Hold the radio and place it between your lip with 2.5~3cm。
3. Press[PTT]key to call,LED indicator changes to red 。Screen shows group name or ID with group mark 。
4. Release [PTT] key to receive ,when target radio is replying ,LED indicator becomes green .Screen shows group
mark or name or ID .
5. If on the “free channel message sound” function,release [PTT] key ,you can hear a message sound ,means it
channel is free for you to answer。
If there are not any transmitter within the time limited , the call failed .
6. when walkie talkie back to home screen ,you can make a group call with contacts。
Private Call
1. Turn over channel knob , use the name or user ID to choose channel。
2. Hold the radio and place it between your lip with 2.5~3cm。
3. On the top of the middle screen will show RSSI mark,follows shows single call ,User name or ID in the middle,
single call mark at the end (Only for analogue mode )。
4. Let go [PTT] key to receive ,when target radio is replying ,LED indicator becomes green
5. If on the “free channel message sound” function,let go [PTT] key ,you can hear a message sound ,means it
channel is free for you to answer。
If there are not any transmitter within the time limited , the call failed .
6. you will receive a message sound and screen shows call finished .
You can make a single call with contacts or use keyboard to search the target walkie talkie to make a call.
All Call
Walkie talkie must be programmed with this function , so that you can send information to every user who are under the
channel .
1. Turn over channel knob , use the name or user ID to choose channel。
2. Hold the radio and place it between your lip with 2.5~3cm.
3. Press [PTT] key to release a call , LED indicator becomes to red color .Screen shows Group name or ID with all call
mark .
User under the channel can not reply the call .
8) Use A Key To Make A Group Call Or Single Call
Single key call function is convenient for you to set a name or ID for group call or single call with long-press or
short-press the program key
Set a name or ID for a key
Page 13

Importör HYDX – TyTera - WOUXUN
Svenska OH Gruppen – Anders Olsson – [email protected] – Tel. 070-598 80 50
HYDX D50 VHF DMR – WWW.TROLLEBORG.SE
13
1. Press pre-programmed call key。
2. Hold the radio and place it between your lip with 2.5~3cm
3. Press [PTT] key to call , LED indicator becomes to red color .Screen shows name or ID with a mark .。
4. Let go[PTT] key to reveive, when target walkie talkie is replying ,LED indicator changes to green .
5. If on the“free channel message sound”function , let go [PTT] key ,you can hear a message sound ,means it
channel is free for you to answer .
If there are not any transmitter within the time limited , the call failed .
6. Walkie talkie back to before call screen.
Emergency Function
Emergency alarm only use to transfer emergency situations , you can release a emergency call at anytime
and anywhere . Even the walkie talkie is busy in transferring or receiving
Radio support 3 types of emergency call :
• Emergency Call
• Call the emergency alarm
• A voice follow emergency alert
Moreover ,alarm has the following types :
• Prohibit :radio can not send emergency call but can receive .
• Local + Remote:An emergency call with voice or notice .
• Remote :an emergency call without any voice or notice . Before press [PTT]key to call , local radios will not receive
any voice or notice .
• Remote + Voice : radio sending an emergency call while accept to receive calls. Before press the [PTT] key to
transmitter or reply , there are not any notice
Only part of above emergency situations can be set as pre-programmed key.
1) Receive Emergency Call
1. While receiving emergency calling ,number of emergency calls and alarms received ,exchange the sender name or
ID .
2. With a message sound and LED indicator becomes red
3. If the radio have activated ,then will confirm the emergency alarm automatically .When the radio receive the
emergency alarm ,screen shows the emergency alarm warning mark ,until send with a confirm message then can
logout . While , you will not receive any calls and notices from other radios during this situation .
Notice :short-press[back]key,then with the pre-programmed off key,delect all received emergency call and logout
the emergency mode .
2) Reply the emergency call
When received the emergency call:
1. Press any key to stop the emergency call alarm
2. Hold the radio and place it between your lip with 2.5~3cm . If on the“free channel message sound”function,let go
[PTT] key ,you can hear a message sound ,means it channel is free for you to answer。
If there are not any transmitter within the limited time , the call failed .
3. Press [PTT]key to have a call . LED indicator becomes red 。walkie talkie under the emergency call mode .
4.Let go [PTT] key to receive ,when reply the emergency call ,LED indicator becomes green 。The screen shows
group mark or ID and call ID
5.After the call ,short-press [back]key ,then press pre-programmed emergency key to off ,delect all the emergency
Page 14

Importör HYDX – TyTera - WOUXUN
Svenska OH Gruppen – Anders Olsson – [email protected] – Tel. 070-598 80 50
HYDX D50 VHF DMR – WWW.TROLLEBORG.SE
14
call and logout 。
6.Radio back to home screen。
3) Emergency Alarm
This function called speech signal and allows to send emergency alarm and will trigger on another radio .
1. Press pre-programmed power on key.
2. Screen shows sending emergency call ,exchange ID with other walkie talkie .LED indicator changes to red and
emergency call mark will down on the home screen .
3. When receive the emergency call ,the radio issues the emergency call and LED indicator changes to green ,
screen shows emergency call send out successfully .
Or , if the radio does not receive any confirm with the emergency call and out of the sending times ,the radio will with a
message sound and screen shows the emergency call failed .
4. Radio logout the emergency mode and back to home screen .If the radio under silence mode, there will not any
sounds or reminder during the emergency mode .
4) Emergency Alarm Call
This function allows you to send emergency call to other radio .After confirmed by the radio , the two radios can
contact by a pre-programmed channel .
1. Press pre-programmed key to switch on
2. Screen shows sending emergency alarm call ,exchange ID with other radio . LED indicator becomes red ,
emergency call mark will down on screen .
3. when the radio confirm with the sending emergency ,screen will show emergency call successful and LED indicator
change to green .
4. Hold the radio and place it between your lip with 2.5~3cm .
5. Press[PTT]key to call ,LED indicator light changes to red ,screen shows the group mark 。
6. Let go [PTT] key to receive .
7. If on the“free channel message sound”function,let go [PTT] key ,you can hear a message sound ,means it
channel is free for you to answer。
If there are not any transmitter within the limited time , the call failed .
Or press pre-programmed emergency call to off and logout the mode.
8. Radio back to home screen. If the radio is under the silence mode ,there are not any sounds or notices during the
emergency mode ,not receive calls from target walkie talkie ,until press the [PTT] key .If the radio under“with voice
mute”mode ,there are not any sounds or notices during the emergency mode ,not receive calls from target walkie
talkie .Until press the [PTT]key to call or receive ,then the screen will show up .
5) Voice emergency Alarm
This function allows you to send emergency call to others ,after confirm with you ,your radio microphone activate,
allows you to call other radios with press the [PTT] key 。This called “Emergency microphone”.If press [PTT] key
during pre-programmed emergency microphone,radio will ignore the [PTT] and stay on emergency mode .
Notice:If press[PTT]key during the emergency microphone ,hold the key before duration within limits ,let go
[PTT]key to transfer .
1. Press the pre-programmed emergency start key .
2. Screen shows sending emergency call ,LED indicator becomes red color and emergency call Mark will show on
Screen .
3. Screen will show emergency call successful ,then speak clearly .When under activated emergency microphone ,
radio transfer automatically without press [PTT] key before duration within limits
Page 15

Importör HYDX – TyTera - WOUXUN
Svenska OH Gruppen – Anders Olsson – [email protected] – Tel. 070-598 80 50
HYDX D50 VHF DMR – WWW.TROLLEBORG.SE
15
4. During transfer , LED indicator becomes red and emergency alarm mark will show on screen .
5. After the time of emergency microphone ,radio stop to transmit .Press [PTT] key to transmit again
If the radio under the “Silence”mode,there are not any sounds or notices during the emergency mode ,not receive
calls from target walkie talkie ,until pass the pre-programmed emergency microphone limited time and press
with [PTT] key .If the radio under“with voice mute”mode ,there are not any sounds or notices during the emergency
mode ,not receive calls from target walkie talkie .Until press the [PTT]key to call or receive ,then the screen will
show up .
Notice: If the emergency call failed , then the walkie talkie will back to home screen .
6) Restart Emergency Mode
Two situations will be happen:
• It will logout the emergency mode , if the walkie talkie change the channel under the emergency
mode .While , reset the emergency mode under the new channel , the walkie talkie restart the
emergency call .
• If press the Pre-programmed emergency key during the emergency call , the walkie talkie will be
stop the emergency call but restart later .
7) Logout Emergency Mode
The walkie talkie will logout emergency mode when any of the following situations happen :
• Confirm with the received emergency call,or
• Meet with the max emergency call,or
• press the pre-programmed emergency off key,or
• Press[PTT]key.
Notice: Emergency mode will be logout when power off the walkie talkie 。Radio will not under emergency mode when
the radio is power on next time .
Menu Operation
Inputting Character
Users can use the 3 x4 alphanumeric keypad to access the radio’s function. When you‘re Using the keypad
to input a user alias or text messages, walkie-talkie input contains three modes:1, English letters
mode,2,chinese input mode, 3,digital input mode. When using the keypad input ID, you can only select the
digital mode.
English Letter Mode:
Users have to press a button several times for getting some characters. The following table shows how many
times needed to press a button to get the required character.
Key
1 2 3 4 5 6 7 8 9 10 11 12 13
1
1 . , ? ! @ & ‘ % - : * #
2
a b c 2 A B C
3
d e f 3 D E F
Page 16
Importör HYDX – TyTera - WOUXUN
Svenska OH Gruppen – Anders Olsson – [email protected] – Tel. 070-598 80 50
HYDX D50 VHF DMR – WWW.TROLLEBORG.SE
16
4
g h i 4 G H I
5
j k l 5 J K L
6
m n o 6 M N O
7
p q r s 7 P Q R S
8
t u v 8 T U V
9
w x y z 9 W X Y Z
0
0 Space
*
* # Press # to switch mode 。
Chinese Pinyin Input Mode
Number 1 is a button of punctuation’s selection input ,Number 2-9 are correspond Pinyin input , when user
input something, the screen shows the pinyin input interface, the first line of interface shows the contents
inputted by user., second line of interface shows the Chinese characters what users input. When the content of
the pinyin input interface show in the first row, users can press [◁or▷]to select Pinyin, users can press
[back]button to delete the Pinyin what they inputted previously one by one, when all the Pinyin characters were
deleted, Pinyin input interface disappear. Press [OK] button to choose corresponding Chinese characters and
display them in the editing area, At this time the Chinese character input finished, Pinyin input interface
disappears. . Pressing* button shows *, pressing 0 button shows space, press # to switch input modes.
Numbers Input Mode
When in the Numbers input mode, press the number keys to display the corresponding number, press the *key to
display * on the screen, press # to switch input mode.
Note: When users Enter a user alias, ID, or text messages, if editing area without any content, then the [back] button is
used for returning to the higher level menu, or else if there is any content on the editor area, pressing [back] will delete
one character before the cursor at one time, until the editing area has no content ,then press the [back] button to return
to the higher level menu.
Menu Operation:
1.Press[OK]to enter Menu, then press left or right [◁or▷] to access the menu function
2. Press[OK],select a function or go into a sub menu
3. Press[back]to return the higher level menu
Note: After a period of time not activity radio will automatically exit and return to the main menu screen (hang time is set
by the programming software).
Two way radio Testing
If there are any activation, this feature allows you to determine whether there is other two way radio active inside the
system, and does not disturb the walkie-talkie users, none-voice or visual notice appears on the target two way radio
Page 17

Importör HYDX – TyTera - WOUXUN
Svenska OH Gruppen – Anders Olsson – [email protected] – Tel. 070-598 80 50
HYDX D50 VHF DMR – WWW.TROLLEBORG.SE
17
Sending a two way radio detection
Using menu function:
1,Press OK to enter menu mode
2,Press[◁or▷] to select contacts ,then press[OK] to select
3,Press[◁or▷] to to the required user alias or ID, and then press [OK] button to choose.
Sending the radio’s detection
Using Menu:
1.Press [OK] to enter Menu mode
2. Press[◁or▷]button to select Contacts, then press[OK] to select.
3. Press[◁or▷]to The required user alias or ID, then press [OK] to select
Or press[◁or▷]key to manual dialing, and then press [OK] key to select. If there are before calling ID, show ID and along
with the flashing cursor, using the keyboard editing ID, press [OK].
4. Press [◁or▷]to radio detection, and then press [OK] to select
5. When Screen displays radio detection: < user alias or ID >, it is indicating the ongoing of radio detection. The LED
indicator light is red.
6.Waiting for confirmation
7If the target radio is active in the system , then it makes a prompt sound, screen will show that target two way radio
has responded shortly.
Or if the target radio in the system is not active, then it makes a prompt sound, screen will show that target two way
radio has no answer shortly.
8.Two way radio returns to user alias or ID screen. If you press [back] when waiting for confirmation, made a prompt
sound, two way radio will end all retry and exit the two way radio detection mode.
Monitoring
Using monitoring function to open the target two way radio’s microphone (only the user alias or ID). You can use the
function to monitor any sound around target two way radio.
Your must allow your two way radio to use this function by programming it.
Starting monitor
Using the Menu:
1. Press [OK] to enter the Menu
2. Press[◁or▷]to Contacts,then press[OK]to select
3. Press[◁or▷] to The required user alias or ID, then press [OK] to select
Or press [◁or▷] key to manual dialing, and then press [OK] key to select
If there are any calling ID remains before, radio shows the ID and along with the flashing cursor, using the keyboard to
edit the ID, press [OK] key to choose.
Or press[◁or▷]key to manual dialing, and then press [OK] key to select. Inputting the user alias or ID, and then press
[OK] key to select.
4. Press[◁or▷] to select Monitor, then press [OK]to select
5. When two way radio makes a prompt sound, LED light turns green.
6. Waiting for confirmation.
7. Screen displays Monitor successed,
Or screen displays Monitor failed
If success: two way radio began to receive voice signals from the radios which are being monitored voice and screen
Page 18

Importör HYDX – TyTera - WOUXUN
Svenska OH Gruppen – Anders Olsson – [email protected] – Tel. 070-598 80 50
HYDX D50 VHF DMR – WWW.TROLLEBORG.SE
18
displays two way radio are moniting, until the end of the duration of the preprogrammed, two way radio made a prompt
sound, and the LED light puts out, screen display that monitoring ends.
If failed: two way radio Repeats until reach the preprogrammed attempts.
Contacts Setting
Contacts is "address book" for handheld two way radio. Each entry corresponds to an alias or ID used to start the call.
In addition, each item, according to the different content setting, relate to three types of call: group calling, single call,
all call. Your radio support digital address book.
The Contacts’ entries display in the following information
• call type
•Call the alias
• Call the ID
Note: you can add, delete, edit Contacts person in the digital address book(contacts)
Making Group Call Through the Address Book.
1. Press[OK]to enter Menu
2. Press [◁or▷] to contacts, then press [OK]to choose, entries arrange in alphabetical order.
3 . Press [◁or▷] to required calling group’s alias or ID.
4. Holding the radio and let it in a vertical position and keep mouth 1 to 2 inches (2.5 to 5.0 cm) with radio.
5 . Press [PTT]to start calling, the LED turns red. The screen displays the calling group’s alias or ID,as well as icon of
group call.
6Releasing (PTT) button to receive, when any user response within the group, the LED light turns green. You will see
on the screen group call icon of user’s ID
7if you enable the "channel Free prompt " function: when the target radio release the (PTT) button, you will hear a
short beep, said this channel is idle, waiting for your answer. Press the call key (PTT)to answer. If in a
preprogrammed group called hang time without voice activity, the call is ended.
Making Single Call by the Contacts
1. Press[OK]to enter Menu
2 Press[◁or▷] to Contact,then press [OK]to choose, entries arrange in alphabetical order.
3. Press [◁or▷]to required calling group’s alias or ID.
Or press[◁or▷] key to manual dialing, and then press [OK] key to choose. If there is a user alias or ID called before,
radio shows ID and along with the flashing cursor, using the keyboard editing this ID.
Or press[◁or▷] key to manual dialing, and then press [OK] key to choose, using the keyboard to enter a new ID
4Holding the radio and let it in a vertical position and keep mouth 1 to 2 inches (2.5 to 5.0 cm) with radio.
5. Press [PTT]to start calling, the LED turns red. The screen displays the calling group’s alias or ID,as well as icon of
group call.
6. Releasing (PTT) button to receive, when any user response within the group, the LED light turns green. You will
see on the screen group call icon of user’s ID
7. if you enable the "channel Free prompt " function: when the target radio release the (PTT) button, you will hear a
short beep, said this channel is idle, waiting for your answer. Press the call key (PTT)to answer. If in a
preprogrammed group called hang time without voice activity, the call is ended.
Page 19

Importör HYDX – TyTera - WOUXUN
Svenska OH Gruppen – Anders Olsson – [email protected] – Tel. 070-598 80 50
HYDX D50 VHF DMR – WWW.TROLLEBORG.SE
19
8. You will hear a sound short, screen shows the call ended
Note:
If you release(PTT) button when you are setting up the call, and when it will exit and return to the previous screen
without any remind. Radio can be preprogrammed executive two way radio are testing before establishing single call. If
the target radio did not reply, you will hear a short beep, and screen shows the other radios did not reply. Two way radio
return to menu before starting the radios around test. .
Calling Log
Your radio can record all the recent dialed, received, and not answered call. Use the calling record function view
and manage the recent calls.
To view the latest call number
Menu items can show the not answer call ,received calls and dialed call.
1. Press [OK] key to enter the menu mode.
2. Press the [◁or▷]key to the call history, and then press [OK] key to choose.
3. Press [◁or▷] to the required list, and then press [OK] key too choose.
4. The screen on the top of the list shows the recent entries.
5. Press [◁or▷] check list, press (PTT) at the current selected aliases or ID to start a call.
Missed call’s screen
Whenever you miss call, two way radio will display a not answered call, select view or view later.
Note:
If you press (PTT),when you’re viewing missing call number, radios will exit the missing call screen and
establishing a single call again..
1. The screen shows the missing call, and the missing call’s number and view.
2. Press [OK] view missing call’s ID, missing call’s record list displayed on the screen. Press [OK] to store or delete this
entry; Or press [◁or▷] key to view later, and then press [OK] key choice, return to the main screen.
Storing Missed Call List’s aliases or ID
1. Press [OK] key to enter the menu mode.
2. Press the [◁or▷]key to call history, and then press [OK] key to choose.
3. Press the [◁or▷] key to missed call, and then press [OK] key to choose.
4. Press [◁or▷] key to missed call’s alias or ID, and then press [OK] key to choose
5. Press the [◁or▷] key to store, and then press [OK] key to choose
6. Radio Shows flashing cursor, if needed, enter the ID alias, and then press [OK] key.
7. The screen contacts have been saved.
You can also enter ID without alias.
Page 20

Importör HYDX – TyTera - WOUXUN
Svenska OH Gruppen – Anders Olsson – [email protected] – Tel. 070-598 80 50
HYDX D50 VHF DMR – WWW.TROLLEBORG.SE
20
Deleting the Call of Calling List
1. Press [OK] key to enter the menu mode.
2. Press the[◁or▷] key to call history, and then press [OK] key to choose.
3. Press the[◁or▷] key to missed call, and then press [OK] key to choose.
4. Press [◁or▷] key to missed call’s alias or ID, and then press [OK] key to choose
5 Press [◁or▷] key to delete the entries, then press [OK] key to select if you need to delete this entry.
6 Select "yes" ,then press [OK] key to delete the entries, screen appears entry deleted; Or select "no" ,press [OK] key
to return to previous screen.
When you select a call list but there is no entry in, the screen will display the list is empty, if the keyboard is open at this
time, will be a low tone hint sound.
Call instruction’s Operation
Call instruction makes you can suggest a specific radio users in the possible time to call you back.
This feature applies only to the user alias or ID, and can be used through the menu by address book or manual dialing.
Receiving and Confirming the Call Reminder
When you receive a call reminder, screen shows call prompt, alternating transmit radio’s alias or ID
1. YOU will hear sound of repeat, LED light turn and shine red.
2. Then press and release [PTT] to confirm the prompt, or press [OK] to select “neglect” to exit the call reminder.
Starting a Call Reminder by Communication List
1. Press [OK] key to enter the menu mode.
2. Press the [◁or▷] key to call history, and then press [OK] key to choose.
3. Press [◁or▷] key to missed call’s alias or ID, and then press [OK] key to choose
Or press [◁or▷] key to manual dialing, and then press [OK] key to choose, a flashing cursor appears,then enter the
user ID you want to call, and then press [OK] key.
5 When the radio send call reminder, LED light turns red..
6 If received calls prompt confirmation, issued a prompt, and display the call indicate success.
Or prompt confirmation if not received a call, send a hint sound, and the screen call failure.
Message Function
Your radio can receive data, such as from another radio sent text messages, message of a maximum length of 144
characters, whole message is not longer than 50 lines.
Editing and sending message
Using the Menu
1. Press [OK] key to enter the menu mode.
2. Press the[◁or▷] key to call history, and then press [OK] key to choose.
3. Press [◁or▷] key to missed call’s alias or ID, and then press [OK] key to choose
4. A flashing cursor appears, using the keyboard to input messages, press [◁] key to move to the left one,
press[▷]button to the right one, when editing area have content ,press the [back] key to delete any useless character,
otherwise when editing area without content to return to the higher level menu.
Page 21

Importör HYDX – TyTera - WOUXUN
Svenska OH Gruppen – Anders Olsson – [email protected] – Tel. 070-598 80 50
HYDX D50 VHF DMR – WWW.TROLLEBORG.SE
21
5. After writing the text, press [OK] to choose to send or save.
6. When on the process of editing, user can choose by pressing the [OK] key to empty option to empty all the content of
the editor, quickly return to the higher level menu.
7. Choose the [◁or▷] key to the alias name or ID, and then press [OK] key to select .
Or press [◁or▷] or spending] key to manual dialing, and then press [OK] button, enter your user ID and press[OK]
key.
8. The screen shows message: < user/group name or ID > call, sending message are being confirmed
9. If the messages sent successfully, issued a prompt sound, and the screen displays text message has been sent.
Or if the message was not sent, issued a high tone hint sound, and screen displays text message sent failure. If
message sent failure, radio will return to chance to return to the retransmission selection screen
Sending Prefabricated Text
Two way radio support maximum 50 programming of prefabricated text messages by the agent:
When a predefined text message, you can edit every message before you can send each message
Using the Menu
1. Press [OK] key to enter the menu mode.
2. Press the [◁or▷] key to call history, and then press [OK] key to choose.
3. Press[◁or▷] key to missed call’s alias or ID, and then press [OK] key to choose
4. Press[◁or▷] to the prefabricated text messages, and then press [OK] key to choose .
5. A flashing cursor appears, using the keyboard to input messages, press [◁ ] key to move to the left one,
press[▷ ]button to the right one, when editing area have content ,press the [back] key to delete any useless character,
otherwise when editing area without content to return to the higher level menu.
6. After writing the text message, press [OK] to choose to send or save.
7. If the messages sent successfully, issued a prompt sound, and the screen displays text message has been sent.
Or if the message was not sent, issued a high tone hint sound, and screen displays text message sent failure. If
message sent failure, radio will return to chance to return to the retransmission selection screen
Using a single bond to send call button prefabricated messages
1,Press Preprogrammed ¸ single bond calls to a predefined alias or ID sends a prefabricated text messages.
2. The screen displays a text message: < user/group name or ID > call, to confirm text messages were being sent
3. If the messages sent successfully, issued a prompt sound, and the screen display text message has been sent.
Or if you cannot send text messages, screen display text message sent failure. If message sent failure, intercom
chance to return to the retransmission selection screen.
Managing sending failed message
In retransmission selection screen, you can choose the following options:
Resend,
Forward,
Edit
Page 22

Importör HYDX – TyTera - WOUXUN
Svenska OH Gruppen – Anders Olsson – [email protected] – Tel. 070-598 80 50
HYDX D50 VHF DMR – WWW.TROLLEBORG.SE
22
Resending message
1. Press[OK]to resend same message to same user/group name or ID.
2. If the messages sent successfully, issued a prompt sound, and display messages sent or if you cannot send text
messages, screen display text message sent failure.
Forwarding message
Choose to forward message to another User/group name or ID.
1Press the [◁or▷] key to forward, and then press [OK] key choose.
2. Press[◁or▷] to the alias name or ID, and then press [OK] key to choose.
Or press[◁or▷] key to manual dialing, and then press [OK] button to choose, enter your user ID and press [OK] key.
3. The screen display a text message: < user/group name or ID > call, to confirm text messages were being sent
4. If the messages sent successfully, issued a prompt sound, and the screen display text message has been sent.
Or if the message was not sent, issued a high tone hint sound, and screen displays text message sent failure.
Editing messages
Choosing edit to edit message before you edit.
Note: if you have a subject line (receive text messages from from email program ), you can't edit the subject line.
1,Press [◁or▷] key to edit, then press [OK] key to choose
2 A flashing cursor appears, using the keyboard to input messages, press [◁ ] key to move to the left one,
press[▷ ]button to the right one, when editing area have content ,press the [back] key to delete any useless character,
otherwise when editing area without content to return to the higher level menu.
3, After writing the text, press [OK] choose to send or save
4 When in the process of editing, can choose by pressing the [OK] key to empty option to empty all the content of the
editor, quickly return to the higher level menu
5, Choose after [◁or▷] button to send the required alias or ID, and then press [OK] key to choose
Or press [◁or▷] key to manual dialing, and then press [OK] button, enter your user ID and press [OK] key
6 Screen displays message: < user/group name or ID > call, to confirm text messages were being sent
7. If the messages sent successfully, issued a prompt sound, and the screen display text message has been sent.
Or if the message was not sent, issued a high tone hint sound, and screen displays text message sent failure.
Managing the sent messages
Once a message is sent to another radio, it will be saved in the "sent items". Send after sending a text message has
always been to "sent items" at the top of the list. The sent items folder can store up to 50 recently send text messages.
After the folder is full, the next send text messages will automatically replace the earlier messages in this folder.
Note: at any time pressing the [back] key can return to the previous screen.
Check the sent messages
Using the menu function:
1. Press [OK] button to enter the menu mode.
2. Press the [◁or▷] key to information, and then press [OK] key to choose
3. Press [◁or▷] to sent project, and then press [OK] key to choose
Page 23

Importör HYDX – TyTera - WOUXUN
Svenska OH Gruppen – Anders Olsson – [email protected] – Tel. 070-598 80 50
HYDX D50 VHF DMR – WWW.TROLLEBORG.SE
23
4. Press the [◁or▷] key to the SMS, and then press [OK] key choose. If the message from the email program, a
subject lines, will appear in the top right corner of the screen icon indicates state of SMS.
Sending the sent messages
When the view sent messages, you can choose the following options:
Resend
Forward,
Edit
Delete
1. Check the message, press [OK] key again
2. Press the[◁or▷] key to resend, then press [OK] key to choose.
3. The screen displays: < user/group name or ID > call, confirm that it is preparing to send the same message to the
same target radio
4. If the messages sent successfully, issued a prompt sound, and the screen display text message has been sent.
Or if the message was not sent, issued a high tone hint sound, and screen displays text message sent failure. If
message sent failure, intercom chance to return to the retransmission options screen. Press the [OK] key to send SMS
weight to the same user/group name or ID.
Note: Except for pressing the [OK], [◁or▷]key, if you change the volume and the press any other key, will return to this
message. When you press [PTT] for a single call or group call, or as a response to the group calling, radio will exit exit
the retransmission selection screen. If received text messages or remote sensing remote sensing information,
emergency call, or call the police, or call reminder, radio will exit the retransmission selection screen. If you press
[PTT]in response to a single call (in addition to the radio in the show did not answer the call screen), or at the end of all
call, the screen will return to resend selection screen. Press [◁or▷]key, enter the forwarding, edit, or delete selection
screen.
, choose forward, will choose the SMS sent to speak to other groups/user alias or ID.
, choose to edit, to edit the selected text messages before sending
• choose delete, delete the selected text.
Note: if you screen out SMS messages when send text messages, so radios will be in the "sent items" folder for SMS
status updates, not the tip or by voice prompt. If the messages in the sent items folder state before update, walkie-talkie
pattern changed or blackout, walkie-talkie will not be able to complete the ongoing message processing, and
automatically start tag to the icon of failure. This radio can handle 5 text messages at the same time. At this stage, the
radio can't send a new message, and automatically start tag icon to send failure.
Deleting all have send text messages In the "sent items"
Using the Menu Function
1Press the [OK] button to enter the menu mode.
2. Press the [◁or▷] key to information, and then press [OK] key choice.
3. Press [◁or▷] to sent project, and then press [OK] key choice.
4. Press the [◁or▷]key to delete all, and then press [OK] key choice.
5.When it appears to delete messages ,press [OK] button, select "yes" project has clear screen display has been sent.
Page 24

Importör HYDX – TyTera - WOUXUN
Svenska OH Gruppen – Anders Olsson – [email protected] – Tel. 070-598 80 50
HYDX D50 VHF DMR – WWW.TROLLEBORG.SE
24
Or delete the text, press [◁or▷] to no, and click [OK] key to return to the previous screen. When you select the "sent
items" but not one of them text messages, the screen will display the list is empty, if the keyboard is open at this time,
will be a low tone hint sound.
Receiving messages
When your radio are receiving SMS, the left of the screen shows the sender alias or ID ICONS and text messages.
When receive text messages, you can choose the following options:
• reading?
•Reading lager
• delete
Note: when the radio shows tip on the screen, please press (PTT), two way will exit and to establish a single call or text
message screen group call.
Check the SMS
1. Press the [◁or▷] key to Read, And then press [OK] key to choose
2. the selected text messages on the inbox opened, if the message is from the email program, it will appear a subject
line.
3. Click [OK] key to return to your inbox.
Or press [OK] to reply,forward or delete messages.
Press [◁or▷]key to enter later view or delete selection screen:
Later, select view screen before returning to receive messages.
Choose delete, delete receive text messages.
Manage received messages
Use your inbox to manage messages. inbox can store up to 50 text messages at Most.
Two way radio supports the following text options:
Reply,
Forward,
Delete
Delete all,
store the message in the inbox in the order of received time .
Note: at any time according to the [back] key can return to the previous screen.
Check and view the inbox messages
1. Press the [OK] button to enter the menu mode.
2. Press the [◁or▷]key to Message, and then press [OK] key to choose
3. Press [◁or▷] to the inbox, and then press [OK] key to choose.
4. Press the [◁or▷]key to check the message. If the messages are from the email program, it will appaer a subject
line.
Page 25
Importör HYDX – TyTera - WOUXUN
Svenska OH Gruppen – Anders Olsson – [email protected] – Tel. 070-598 80 50
HYDX D50 VHF DMR – WWW.TROLLEBORG.SE
25
5. Press the [OK] key to choose the current text, then press [OK] key again to reply, delete, or forward this message.
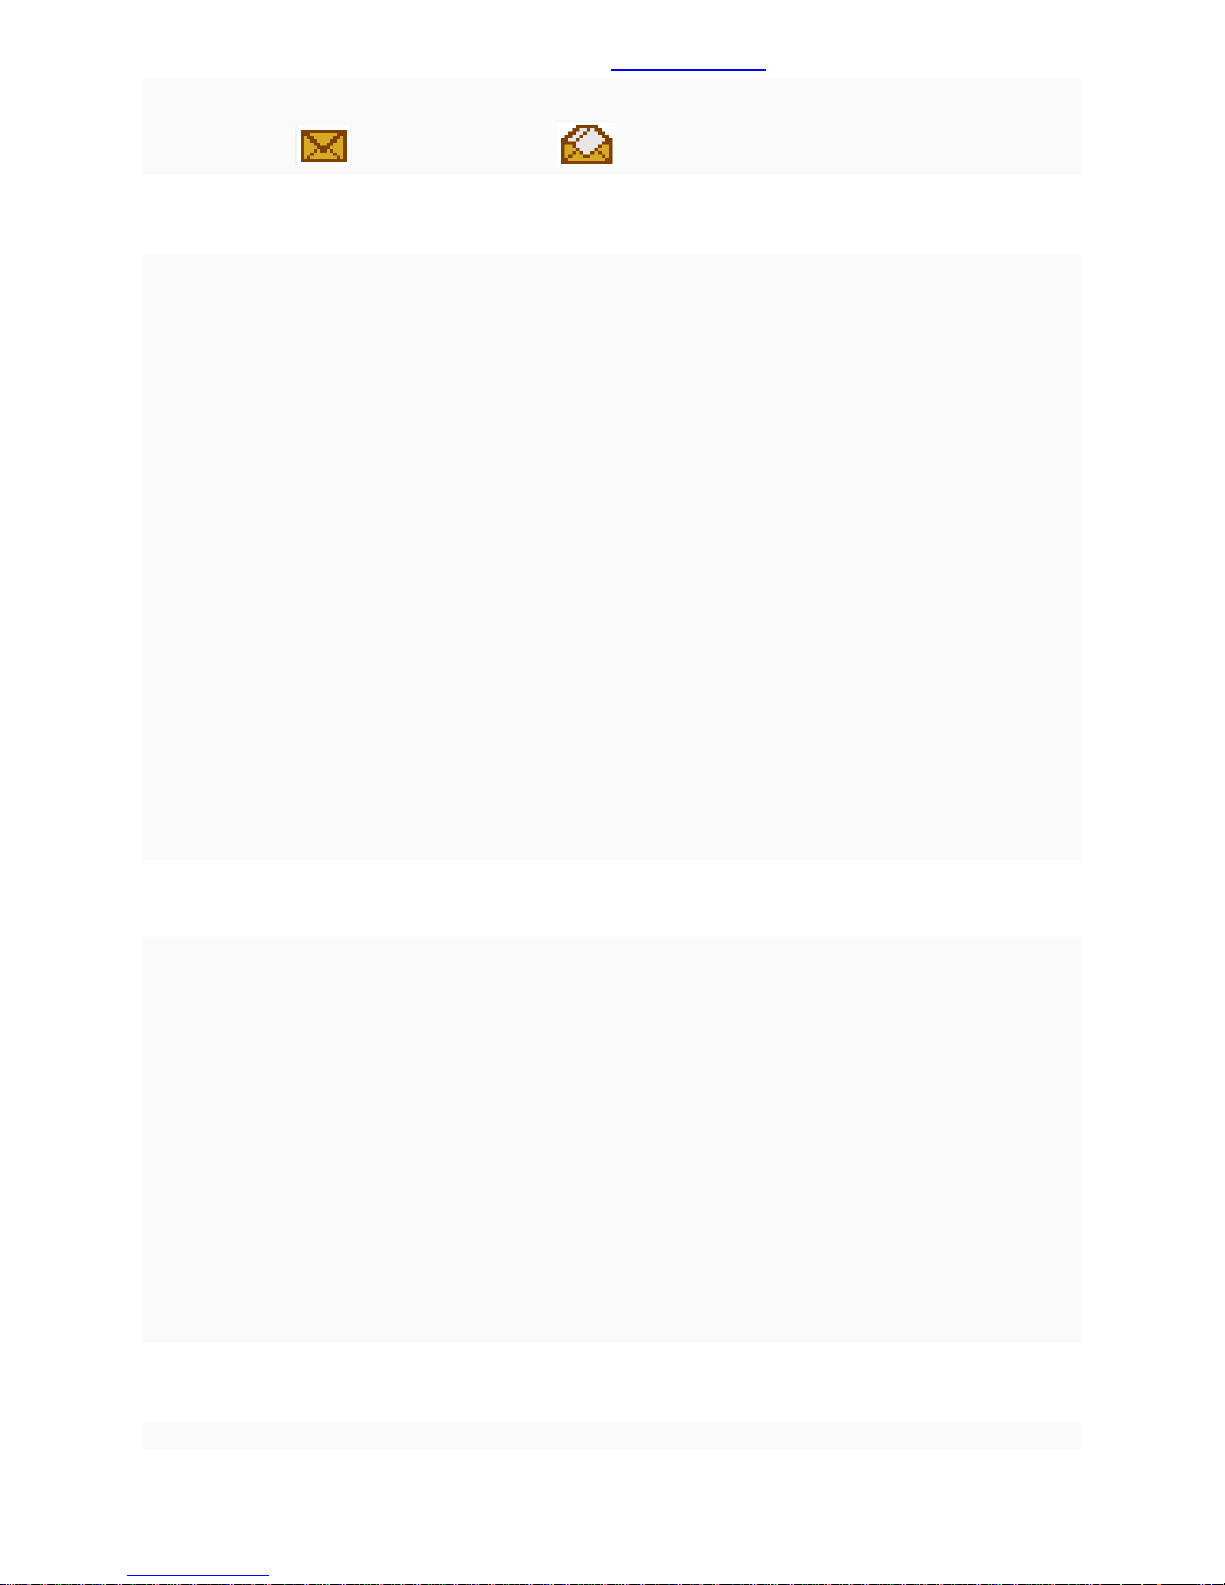
Unread messages: , .Already read message: .
Replying inbox’s messages
Use the menu function:
1. Press [OK] button to enter the menu mode.
2. Press the[◁or▷] key to message, and then press [OK] key to choose
3. Press [◁or▷]to the inbox, and then press [OK] key to choose
4. Press the [◁or▷] key to the SMS, and then press [OK] key to choose. If the messages are from the email program,
it will appear a subject line.
5. Press again [OK] button to enter submenu.
6. Press [◁or▷]to reply, and then press [OK] key to choose.
7. Press [◁or▷] to write messages, and then press [OK] key choice, a flashing cursor, using a keyboard editing text
messages.
Or press [◁or▷] key to prefabricated text messages, and then press [OK] key to choose. Choose the required
message after press [OK] a flashing cursor, if needed, with the keyboard editing your message.
8 After Writing the text, press [OK].
9. The screen displays message : < user/ call group name or ID >, to confirm. text messages were being sent
10. If the messages sent successfully, issued a prompt sound, and screen display text message has been sent.
Or if you cannot send text messages, screen display text message sent failure. If message sent failure, radio return to
the retransmission selection screen.
Deleting the inbox messages
Use the menu function:
1. Press the [OK] button to enter the menu mode.
2. Press the [◁or▷] key to message, and then press [OK] key to choose
3. Press [◁or▷] to the inbox, and then press [OK] key to choose
4. Press the[◁or▷] key to the SMS, and then press [OK] key choice. If the messages are from the email program, it
will appear a subject line.
5. Press again [OK] button to enter submenu.
6. Press the [◁or▷]key to delete, and then press [OK] key to choose.
7. Delete messages, press [◁or▷]key to "yes", then press [OK] key to choose.
8. Screen appears short message has been deleted.
9. The screen back to inbox.
Deleting all messages in the inbox
Use the menu function:
Page 26

Importör HYDX – TyTera - WOUXUN
Svenska OH Gruppen – Anders Olsson – [email protected] – Tel. 070-598 80 50
HYDX D50 VHF DMR – WWW.TROLLEBORG.SE
26
1. Press the [OK] button to enter the menu mode.
2. Press the [◁or▷] to the Message, and then press [OK] key to choose.
3. Press[◁or▷] to the inbox, and then press [OK] key to choose.
4. Press the [◁or▷] key to delete all, and then press [OK] key to choose.
5.When it appears Deleting the messages, press [◁or▷]select yes, and then press [OK] key to choose
6. Then The screen inbox was empty already.
When you select the "inbox" but not one of them text messages, the screen will display the list is empty, if the keyboard
is open at this time, will be a low tone hint sound.
Encryption
If you enable this feature, which is beneficial to prevent other users on the channel by using the method of software
encryption for unauthorized eavesdropping. The launch of signaling and user identification part unencrypted. Your
radio must be enabled on the channel encryption function, can send encrypted, even if the receiving transmission is not
must request to do so.
Basic encryption
Two way radio can only be assigned more than one type of encryption. If users Call for encryption or decryption of data
transmission, must make to be preprogrammed walkie-talkies and launch radio has the same "encryption keys"
(suitable for basic encryption).
If your radio to receive different encryption keys or key values and key encryption call ID, you will hear the sound of the
transport chaos encryption (basic).
Press the preliminary programming encryption keys on or off.
DTMF
Dual Tone Multi-Frequency (DTMF) function allows to operate radio when there is interference in the radio system.
To initiate a DTMF call
1. Press and hold [PTT] key.
2. Enter number you need.
You can disable DTMF tone by turning off all radio tone and prompts.
Secrecy
You can activate or kill any radio in the system. For example, you might want to disable a stolen radio, to prevent
thieves use it, and enable it when you get it back.
Note: radio kill or activation is limited to activate the radios with these functions.
Radio Kill
Use menu mode
Page 27

Importör HYDX – TyTera - WOUXUN
Svenska OH Gruppen – Anders Olsson – [email protected] – Tel. 070-598 80 50
HYDX D50 VHF DMR – WWW.TROLLEBORG.SE
27
1. Press [OK] key to enter the menu mode.
2. Press [◁or▷] key to Contacts, and then press [OK] key to select, entries are in alphabetical order.
3. Press [◁or▷] key to the required alias or ID, and press [OK] key to select.
Or press [◁or▷] key to dial manually, then press twice [OK] key to enter a user alias or ID, and press [OK] key to
select.
4. Press [◁or▷] key to radio kill, and then press [OK] key to select.
5. The display shows the radio kill: <user alias or ID> and the LED indicator light is red.
6. Wait for confirmation.
7. If successful, emit a beep and the screen displays radio kill successfully.
Or if it fails, emit a beep and the screen displays radio fail to kill.
During radio kill operation, do not press the [back] key, because you will not get a confirmation message.
Radio activate
Use menu function:
1. Press [OK] key to enter the menu mode.
2. Press [◁or▷] key to Contacts, and then press [OK] key to select, entries are in alphabetical order.
3. Press [◁or▷] key to the required alias or ID, and press [OK] key to select.
Or press [◁or▷] key to dial manually, then press twice [OK] key to enter a user alias or ID, and press [OK] key to
select.
4. Press [◁or▷] key to radio kill, and then press [OK] key to select.
5. The display shows the radio activate: <user alias or ID> and the LED indicator light is red.
6. Wait for confirmation.
7. If successful, emit a beep and the screen displays radio activate successfully.
Or if it fails, emit a beep and the screen displays radio fail to activate.
During radio activate operation, do not press the [back] key, because you will not get a confirmation message.
Scan List
Create a scan list and assign to a single channel / talkgroup, your radio can support up to 250 scan lists, each up to 16
members. Each scan list support mixed analog and digital channels. You can edit the scan list to add / delete channels
or set the priority channel.
View scan list members
1. Use the channel knob to select a channel with pre-programmed scan list;
2. Press the [OK] key to enter the menu mode;
3. Press [◁or▷] key to scan, and then press the [OK] key to select;
4. Press [◁or▷] key to view / edit the list, and then press the [OK] button to select;
5. Use [◁or▷] key to see members of list.
If you set the priority, the priority icon is displayed in the left of member alias, indicating that the member is the Priority
1 or Priority 2 channel; if the priority is set to None , no priority icon. In a scan list, you can not have
more than one Priority 1 or Priority 2 channel.
Scanning instructions and methods
When scanning, your radio can view if there is a voice activity in current channel through circulating pre-programmed
Page 28

Importör HYDX – TyTera - WOUXUN
Svenska OH Gruppen – Anders Olsson – [email protected] – Tel. 070-598 80 50
HYDX D50 VHF DMR – WWW.TROLLEBORG.SE
28
scan list. LED lights flashing for a red light, and the scan icon appears on the screen.
When scanning in dual mode, if you're in a digital channel and your radio locking an analog channel, radio will switch
automatically from digital mode to analog mode throughout the duration of the call. And vice versa.
There are two scanning methods
•Manual Scan: According to a pre-programmed scan on / off key or menu function to start the scan, when you
start scanning, radio will detect all channels / contact groups on pre-programmed scan list.
• Auto Scan: When you select an already activated auto scan channels / contact groups, radio scans from the
activated auto scan channel.
Start and stop scanning
Press Pre-programmed scan on / off key or enter the scan menu function
1.Using the channel knob to select a channel of pre-programmed scan list;
2.Press [OK] to enter menu mode;
3.Press [◁or▷] to scan, and then press [OK] to select;
4.If the scan is disabled, the screen displays on or if the scan is activated, the screen displays off.
5.Press [OK] to select
6.When the scan is activated, LED indicator flashes red and displays scan icon ; or when scanning is disabled,
LED light goes out and does not display the scan icon.
Scanning reply
Radio detect active channel/contact group when scanning, at this time radio will stay in the channel/ contact group,
which is called "Scan hang time" pre-programmed time.
Procedure:
1.Hold the radio in a vertical position and keep one to two inches (2.5 to 5.0 cm) distance from the mouth. If you enable
the "channel idle tone" function, when transmitting radio release [PTT] key, you will hear a short beep, indicating that
the channel is idle, waiting for your respond.
2.Within the hang time by pressing [PTT] button, LED indicator light is red.
3.Release [PTT] key to respond.
4.If you do not respond within the hang time, radio will continue down the scan.
Settings
Settings includes the following contents:
Radio settings
Radio information
Radio configuration
Radio settings
Radio settings includes:
Talk Around
Tone/Prompt
Transmit power
Page 29

Importör HYDX – TyTera - WOUXUN
Svenska OH Gruppen – Anders Olsson – [email protected] – Tel. 070-598 80 50
HYDX D50 VHF DMR – WWW.TROLLEBORG.SE
29
Backlight
Squelch boot interface
Keyboard lock
Language selection
LED indicator
VOX
Power-on password
Clock
Mode
Talk Around
When the transponder does not work, or when the radio located outside the range of the transponder but located within
the range of other radios call, you can continue to communicate. This is called "talk around."
Press Pre-programmed repeater / talk around button, you can switch between repeater / talk around mode.
Use the menu function
1. Press [OK] key to enter the menu mode.
2. Press [◁or▷] key to Settings, and then press [OK] key to select.
3. Press [◁or▷] key to radio settings, and then press the [OK] key to select.
4. Press [◁or▷] key to talk around, and then press [OK] key to select.
5. If radio is currently in repeater mode, you can see the open, or if radio is currently in talk around you can see the
close.
6. Press [OK] key to select.
7. Screen showing turn on talk around or turn off talk around.
8. The screen automatically returns to the previous menu.
Even after the shutdown, still remains talk around.
Radio Tone/prompt
including the following contents:
All quiet
keyboard tone
All quiet
If desired, you can enable or disable all radio tone and prompts (except emergency incoming tone).
Press pre-programmed all Beep ON / OFF to turn on or off all radio tones.
Use the menu function:
1. Press [OK] key to enter the menu mode.
2. Press [◁or▷] key to settings, and then press [OK] key to select.
3. Press [◁or▷] key to radio settings, and then press the [OK] key to select.
4. Press [◁or▷] key to tone / prompts, and then press [OK] key to select.
5.Press [◁or▷] key to all tone, and then press [OK] key to select.
6.Press [OK] key to select Open, then enable all tone and prompts, screen displays all tone is open.
Or press [OK] key to select Off, then turn off all tones and prompts, screen displays all tone is off.
Turn on or turn off keyboard tone
If desired, you can activate and deactivate call admission tone.
1. Press [OK] key to enter the menu mode.
Page 30

Importör HYDX – TyTera - WOUXUN
Svenska OH Gruppen – Anders Olsson – [email protected] – Tel. 070-598 80 50
HYDX D50 VHF DMR – WWW.TROLLEBORG.SE
30
2. Press [◁or▷] key to settings, and then press [OK] key to select.
3. Press [◁or▷] key to radio settings, and then press the [OK] key to select.
4. Press [◁or▷] key to tone / prompts, and then press [OK] key to select.
5. Press [◁or▷] key to keyboard tone, then press [OK] key to select.
6. Press [OK] key to select Open, then enable the keyboard tone, the screen shows keyboard tone is turned on.
Press [OK] key to select off, then turn off the keyboard sound, the screen shows keyboard tone is turned off.
Set the Power Level
You can set each channel power level to high or low.
Setting: High-power radio implement communications with relatively far distance radios. Low-power radio
implement communications with relatively close distance radios.
Press pre-programmed high / low power selection key, you can switch high / low transmit power.
Using the menu function:
1. Press the [OK] key to enter the menu mode.
2. Press [◁or▷] key to Settings, and then press [OK] key to select.
3. Press [◁or▷] key to radio settings, and then press the [OK] key to select.
4. Press [◁or▷] key to power, and then press [OK] key to select.
5. Follow the on-screen instructions to change the current settings.
6. Press [OK] key to select the new power level.
7. Return to the previous menu screen.
Press [back] to return to the main screen, the screen displays the power level icon.
Control Screen Backlight
You can turn on or off the screen backlight according to the need. This setting also affects the menu button and the
keyboard backlight.
Press a pre-programmed automatical backlight key to switch backlight settings
Using the menu function:
1. Press [OK] key to enter the menu mode.
2. Press [◁or▷] key to Setting, and then press [OK] key to select.
3. Press [◁or▷] key to radio settings, and then press the [OK] key to select.
4. Press [◁or▷] key to backlight, and then press [OK] key to select.
5. The screen displays always open, 5S, 10S, 15S options, press [OK] key to select always open, the screen will
remain lit and won’t turn off, or if you choose 5S, 10S, 15S, the screen backlight will be off in the corresponding time
under users without any operations.
Setting Squelch level
You can adjust radio squelch level, thus filtering low signal intensity useless call or channel higher than normal value.
Setting: Normal is the default, strict filtering (useless) call or background noise. However, a call from a remote location
may also be filtered out.
Press pre-programmed strict / normal squelch button to switch between normal and strict squelch level.
Using the menu function:
1. Press [OK] key to enter the menu mode.
2. Press [◁or▷] key to Settings, and then press [OK] key to select.
Page 31

Importör HYDX – TyTera - WOUXUN
Svenska OH Gruppen – Anders Olsson – [email protected] – Tel. 070-598 80 50
HYDX D50 VHF DMR – WWW.TROLLEBORG.SE
31
3. Press [◁or▷] key to radio settings, and then press [OK] key to select.
4. Press [◁or▷] key to squelch, and then press [OK] key to select.
5. Select strict or normal, and then press [OK] key to select.
6. The screen returns to the previous menu.
Turn On or Off the Boot Interface
If desired, you can enable and disable the boot interface display.
1. Press [OK] key to enter the menu mode.
2. Press [◁or▷] key to Settings, and then press [OK] key to select.
3. Press [◁or▷] key to radio settings, and then press the [OK] key to select.
4. Press [◁or▷] key to boot interface, then press [OK] key to select.
5. The screen is on, press [OK] key to enable the boot interface display, the screen displays the boot screen display
on.
Or the screen is off, press [OK] key to close the boot interface display, the screen displays the boot screen display off.
Lock the Keypad and Unlock the Keypad
You can lock the keypad to prevent accidental key input. Ways include manual and automatic keypad lock, which
includes 5S, 10S, 15S three options.
1. Press [OK] key to enter the menu mode.
2. Press [◁or▷] key to Settings, and then press [OK] key to select.
3. Press [◁or▷] key to radio settings, and then press [OK] key to select.
4. Press [◁or▷] key to keypad lock, then press [OK] key to select.
5. Press [◁or▷] key to manual, and then press [OK] key to select, screen show to select Manual, you need to long
press [*] key to lock keypad on the main interface.
6. Press [◁or▷] key 5S, 10S, 15S, the screen shows to select the corresponding time, then keypad will be locked and
return to the main screen if user have not any keypad operation after corresponding period of time.
7. To unlock the keypad, press [OK] key, then press [*] key.
8. Screen shows unlock keyboard, and then return to the main screen.
Language Selection
Radio supports the following languages:
•English
•Chinese
1. Press [OK] key to enter the menu mode.
2. Press [◁or▷] key to Settings, and then press [OK] key to select.
3. Press [◁or▷] key to radio settings, and then press [OK] key to select.
4. Press [◁or▷] key to the language selection, then press [OK] key.
5. Press [◁or▷] key to the corresponding language option, then press [OK] key.
6. Screen displays to select corresponding language, and then jump back to the main interface.
Turn on or off LED Indicator
If desired, you can activate and deactivate the LED.
1. Press [OK] key to enter the menu mode.
2. Press [◁or▷] key to Settings, and then press [OK] key to select.
3. Press [◁or▷] key to radio settngs, and then press [OK] key to select.
Page 32

Importör HYDX – TyTera - WOUXUN
Svenska OH Gruppen – Anders Olsson – [email protected] – Tel. 070-598 80 50
HYDX D50 VHF DMR – WWW.TROLLEBORG.SE
32
4. Press [◁or▷] key to LED indicator, and press [OK] key to select.
5. The screen displays open, press [OK] button to enable LDE light, screen shows to turn on the LED light.
Or The screen displays off, press [OK] button to turn off the LED light, screen shows to turn off the LED light.
If you disable the LED light, buttons and keyboard backlight automatically turns off.
Turn On or Off VOX Function
This function allows you to initiate voice-activated hands-free calls on pre-programmed channels. Whenever a
microphone with VOX function detect voice, radio will automatically transmit signals within pre-programmed period of
time.
During radio operation press [PTT] key will disable VOX function, to re-enable the VOX function, do one of the
following:
• Turn off and return on radio
• through the channel knob to change the channel, or
• Perform the following procedure:
Note: Enabling or disabling this function is limited to activate radios of these function.
Press pre-programmed VOX on / off key, to turn on or off this function.
Using the menu function:
1. Press [OK] key to enter the menu mode.
2. Press [◁or▷] key to Settings, and then press [OK] key to select.
3. Press [◁or▷] key to radio settings, and then press the [OK] key to select.
4. Press [◁or▷] key to VOX, and then press [OK] key to select.
5. Screen shows VOX off and VOX level 1-10S, if you choose to turn off, press [OK] key to disable the VOX function,
emitting a beep and the screen displays VOX off. If you choose 1-10S, VOX function is enabled, and the voice transmit
sensitivity is on the corresponding level. If you activate the call allowing sound, you can initiate a call using a trigger
word. Waiting sound end (if activated), and then speak clearly into the microphone.
Power-on Password
1. Press [OK] key to enter the menu mode.
2. Press [◁or▷] key to Settings, and then press [OK] key to select.
3. Press [◁or▷] key to radio settings, and then press [OK] key to select.
4. Press [◁or▷] key to power-on password, and then press [OK] key.
5. Use the keypad to enter the correct 8 digits password (You can pre-set by software), and then press the [OK] key.
6. If the password is incorrect, the screen displays an error code. If the password is correct, the screen displays
options.
7. If the first line shows open, press [OK] key to display the power-on password application. Next time you need to
enter the correct password to turn on radio. If the first line shows off, press [OK] key to display the power-on password
cancellation, next time you can directly turn on radio.
8. Press [◁or▷] key to change power-on password, and then press [OK] key to select.
9. Enter 8 digits new password, and then press [OK] key to select.
10. Once again, enter 8 digits new password, and then press [OK] key to select.
11. Screen displays that password was successfully changed.
Note: The power-on password must be set to eight digits.
Clock
Clock settings are divided into:
Page 33

Importör HYDX – TyTera - WOUXUN
Svenska OH Gruppen – Anders Olsson – [email protected] – Tel. 070-598 80 50
HYDX D50 VHF DMR – WWW.TROLLEBORG.SE
33
•Time
•Date
Time
1. Press [OK] key to enter the menu mode.
2. Press [◁or▷] key to Settings, and then press [OK] key to select.
3. Press [◁or▷] key to radio settings, and then press [OK] key to select.
4. Press [◁or▷] key to clock, and then press [OK] key.
5. Press [◁or▷] key to time, and then press [OK] key to display the current time.
6. Press [OK] key to enter time setting interface.
7. Press [◁or▷] key to move left and right to select the desired number, the selected number will reverse video
display,then enter the corresponding numbers to change the time via the numeric keypad.
8. Press [OK] key to save, the screen displays the time has been saved.
Date
1. Press [OK] key to enter the menu mode.
2. Press [◁or▷] key to Settings, and then press [OK] key to select.
3. Press [◁or▷] key to radio settings, and then press [OK] key to select.
4. Press [◁or▷] key to clock, and then press [OK] key.
5. Press [◁or▷] key to date, and then press [OK] key to display the current date.
6. Press [OK] key to enter the time setting interface.
7. Press [◁or▷] key to move left and right to select the desired numbers, the selected numbers will reverse video
display,then enter the corresponding number to change the date via the numeric keypad.
8. Press [OK] key to save, the screen displays the date has been saved.
Mode
Mode settings are divided into:
•CH Mode
•VFO Mode
1. Press [OK] key to enter the menu mode.
2. Press [◁or▷] key to Settings, and then press [OK] key to select.
3. Press [◁or▷] key to radio settings, and then press [OK] key to select.
4. Press [◁or▷] key to mode and then press [OK] key.
5. Press [◁or▷] key to select CH mode or VFO mode, then press [OK] key to select the corresponding mode, the
screen displays this mode is selected.
6. The main screen will show channel name or frequency (receiving frequency) according to the selected mode.
View General Two Way Radio Information
Radio contains the following information:
• Radio number
Radio version{software version, Codeplug version}
Note: At any time you can return to the previous screen by pressing the [back] key.
Page 34

Importör HYDX – TyTera - WOUXUN
Svenska OH Gruppen – Anders Olsson – [email protected] – Tel. 070-598 80 50
HYDX D50 VHF DMR – WWW.TROLLEBORG.SE
34
Check radio ID
1. Press [OK] key to enter the menu mode.
2. Press [◁or▷] key to Settings, and then press [OK] key to select.
3. Press [◁or▷] key to radio information, and press [OK] key to select.
4. Press [◁or▷] key to radio number, then press [OK] key.
5. The display shows radio ID and name.
Radio Version
Display radio firmware version.
1. Press [OK] key to enter the menu mode.
2. Press [◁or▷] key to Settings, and then press [OK] key to select.
3. Press [◁or▷] key to radio information, and press [OK] key to select.
4. Press [◁or▷] key to radio version, and then press [OK] key.
5. The screen will display the current firmware version, Codeplug version.
Radio Configuration
Radio configuration mainly includes editing the channel contents
Channel contents can be edited include:
• Receiving frequency
• Transmitting frequency
• Channel name
• Transmitting time
• CTCSS/DCS
• Color code
• Repeater slot
Receiving Frequency
1. Press [OK] key to enter the menu mode.
2. Press [◁or▷] key to Settings, and then press [OK] key to select.
3. Press [◁or▷] key to radio configuration, and then press [OK] key to select.
4. Use the keypad to enter the correct radio configuration password (programmed by software), and then press [OK]
key to select.
5. Press [◁or▷] key to receiving frequency, and then press [OK] key to select.
6. The screen displays receiving frequency of the current channel, and then press [OK] key to select.
7. Press the number keys to enter the corresponding number, press [◁ ] key to delete the last number, press [back] to
return to the previous menu.
8. After finish the change, press [OK] key, the screen displays receiving frequency has been saved.
Note: Editing frequency will be limited within the frequency range setted by programming software, if less than the write
frequency range setted by software, the final change result will be the minimum frequency of frequency range setted on
software, otherwise it is maximum.
Transmitting Frequency
1. Press [OK] key to enter the menu mode.
2. Press [◁or▷] key to Settings, and then press [OK] key to select.
Page 35

Importör HYDX – TyTera - WOUXUN
Svenska OH Gruppen – Anders Olsson – [email protected] – Tel. 070-598 80 50
HYDX D50 VHF DMR – WWW.TROLLEBORG.SE
35
3. Press [◁or▷] key to radio configuration, and then press [OK] key to select.
4. Use the keypad to enter the correct radio configuration password (programmed by software), and then press [OK]
key to select.
5. Press [◁or▷] key to transmitting frequency, and then press [OK] key to select.
6. The screen displays transmitting frequency of the current channel, and then press [OK] key to select.
7. Press the number keys to enter the corresponding number, press [◁ ] key to delete the last number, press [back] to
return to the previous menu.
8. After finish the change, press [OK] key, the screen displays transmitting frequency has been saved.
Note: Editing frequency will be limited within the frequency range setted by programming software, if less than the write
frequency range setted by software, the final change result will be the minimum frequency of frequency range setted on
software, otherwise it is maximum.
Channel Name
1
. Press [OK] key to enter the menu mode.
2. Press [◁or▷] key to Settings, and then press [OK] key to select.
3. Press [◁or▷] key to radio configuration, and then press [OK] key to select.
4. Use the keypad to enter the correct radio configuration password (programmed by software), and then press [OK]
key to select.
5. Press [◁or▷] key to the channel name and press [OK] key to select.
6. The screen displays the current channel name, press the [#] key to switch the input method to enter the relevant
letters, numbers or characters, the same as the input method and text editing.
7. After the change is complete, press [OK] key, the screen displays channel name has been saved.
Transmitting Time
1. Press [OK] key to enter the menu mode.
2. Press [◁or▷] key to Settings, and then press [OK] key to select.
3. Press [◁or▷] key to radio configuration, and then press [OK] key to select.
4. Use the keypad to enter the correct radio configuration password (programmed by software), and then press [OK]
key to select.
5. Press [◁or▷] key to transmitting time, and then press [OK] key to select.
6. The screen displays infinite, 15S, 30S ... 555S and other options (increasing 15S each time), press [◁or▷] key to
the corresponding option, then press [OK] key to select; if you choose infinite, the screen displays transmit time close, if
you select others, the screen display corresponding time selected.
CTCSS/DCS
CTCSS/DCS can only be set on analog mode, including:
•CTCSS/DCS encoding
•CTCSS/DCS decoding
CTCSS/DCS Encoding
1. Press [OK] key to enter the menu mode.
2. Press [◁or▷] key to Settings, and then press [OK] key to select.
3. Press [◁or▷] key to radio configuration, and then press [OK] key to select.
4. Use the keypad to enter the correct radio configuration password (programmed by software), and then press [OK]
Page 36

Importör HYDX – TyTera - WOUXUN
Svenska OH Gruppen – Anders Olsson – [email protected] – Tel. 070-598 80 50
HYDX D50 VHF DMR – WWW.TROLLEBORG.SE
36
key to select.
5. Press [◁or▷] key to CTCSS/DCS, and then press [OK] key to select.
6. Press [◁or▷] key to CTCSS/DCS encoding, and then press [OK] key to select.
7. Screen display off and a set of CTCSS/DCS encoding value, press [◁or▷] key to off, and then press [OK] key to
select, and there will be no CTCSS/DCS encoding value, screen displays CTCSS/DCS encoding value off; press [◁ or
▷ ] key to CTCSS/DCS encoding value, and then press [OK] key to select, then set the corresponding value, screen
displays the corresponding CTCSS/DCS encoding value.
CTCSS/DCS Decoding
1. Press [OK] key to enter the menu mode.
2. Press [◁or▷] key to Settings, and then press [OK] key to select.
3. Press [◁or▷] key to radio configuration, and then press [OK] key to select.
4. Use the keypad to enter the correct radio configuration password (programmed by software), and then press [OK]
key to select.
5. Press [◁or▷] key to CTCSS/DCS, and then press [OK] key to select.
6. Press [◁or▷] key to CTCSS/DCS decoding, and then press [OK] key to select.
7. Screen display off and a set of CTCSS/DCS decoding value, press [◁or▷] key to off, and then press [OK] key to
select, and there will be no CTCSS/DCS decoding value, screen displays CTCSS/DCS decoding value off; press [◁ or
▷ ] key to CTCSS/DCS decoding value, and then press [OK] key to select, then set the corresponding value, screen
displays the corresponding CTCSS/DCS decoding value.
Color Code
Color code only can be set on digital channels.
1. Press [OK] key to enter the menu mode.
2. Press [◁or▷] key to Settings, and then press [OK] key to select.
3. Press [◁or▷] key to radio configuration, and then press [OK] key to select.
4. Use the keypad to enter the correct radio configuration password (programmed by software), and then press [OK]
key to select.
5. Press [◁or▷] key to color code, then press [OK] key to select.
6. Press [◁or▷] key to select color code values, and then press [OK] key to select. Screen shows X(the selected
color code value) is selected.
Repeater Slot
Repeater slot only can be set on digital channels.
1. Press [OK] key to enter the menu mode.
2. Press [◁or▷] key to Settings, and then press [OK] key to select.
3. Press [◁or▷] key to radio configuration, and then press [OK] key to select.
4. Use the keypad to enter the correct radio configuration password (programmed by software), and then press [OK]
key to select.
5. Press [◁or▷] key to repeater slot, and then press [OK] key to select.
6. Press [◁or▷] key to select repeater slot values, and then press [OK] key to select. Screen shows X(the selected
repeater slot value) is selected.
 Loading...