

Page 1
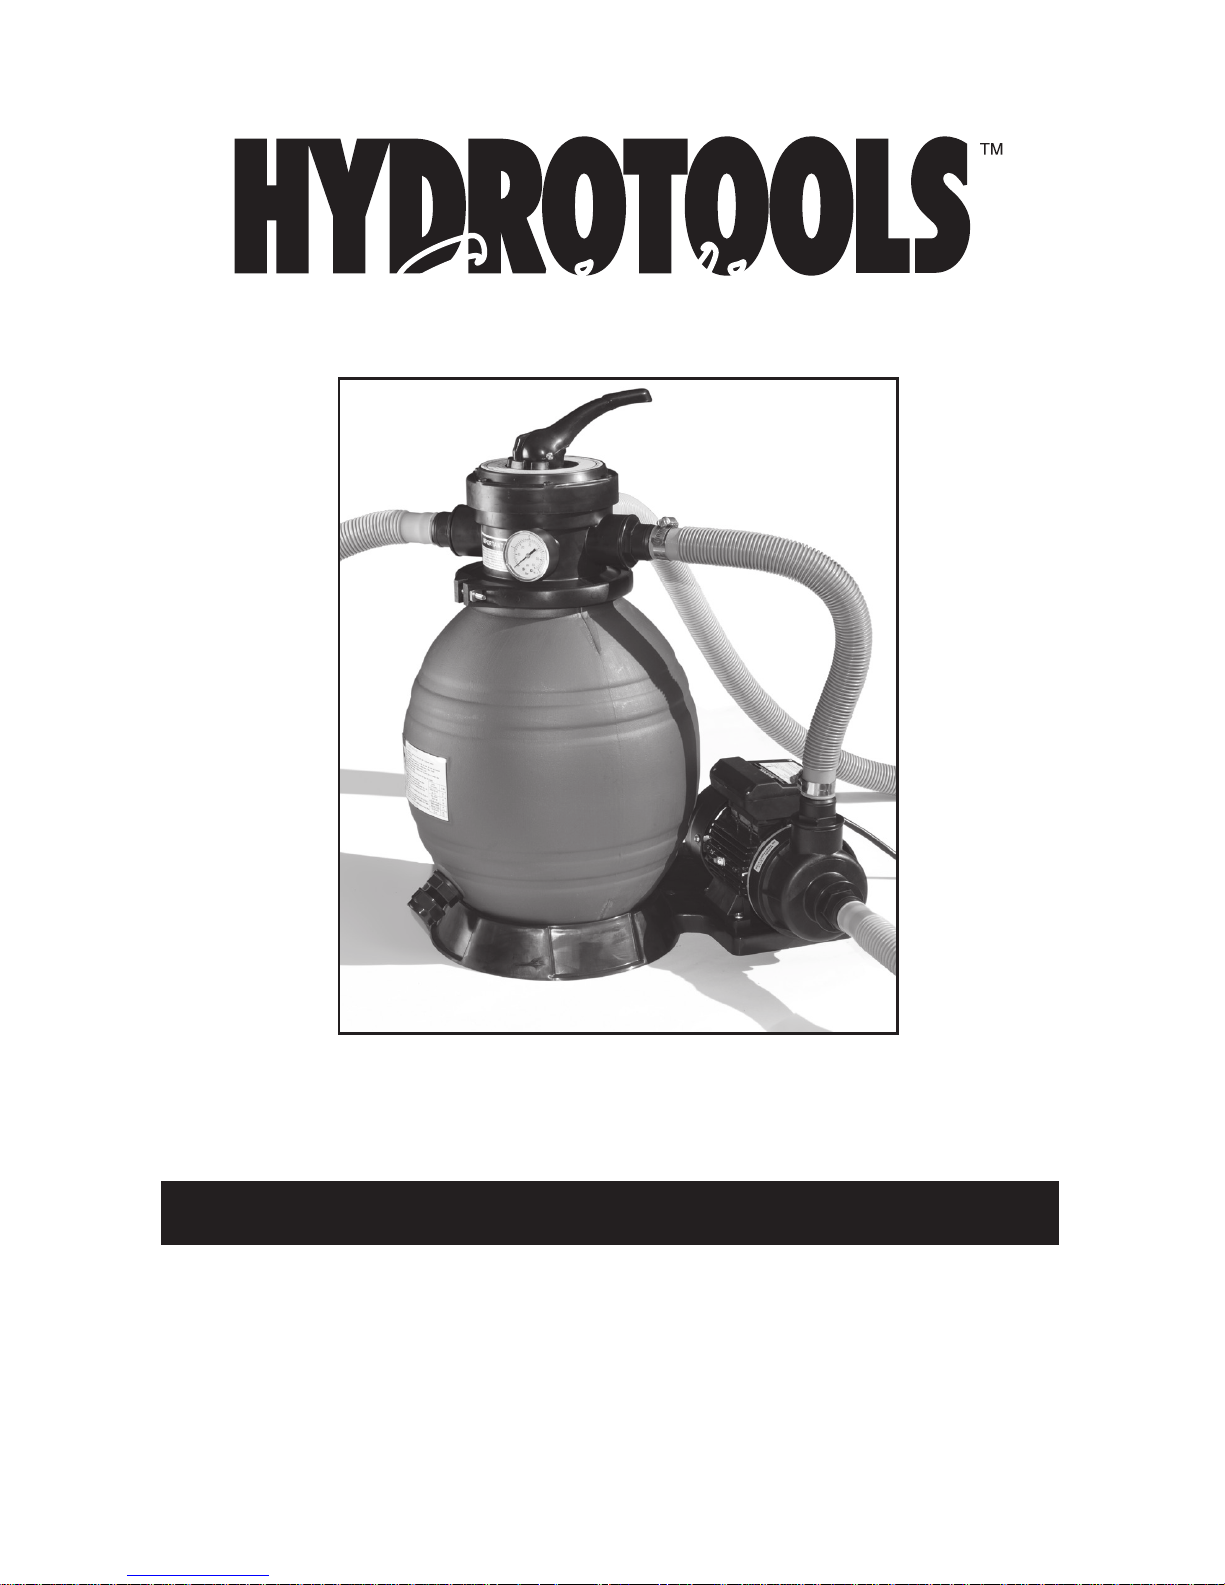
SwimlineSwimline
®
#71225
TOOLS REQUIRED
Phillips Screwdriver
Flat Head Screwdriver
O-Ring Lube
SAND FILTER & PUMP
Page 2
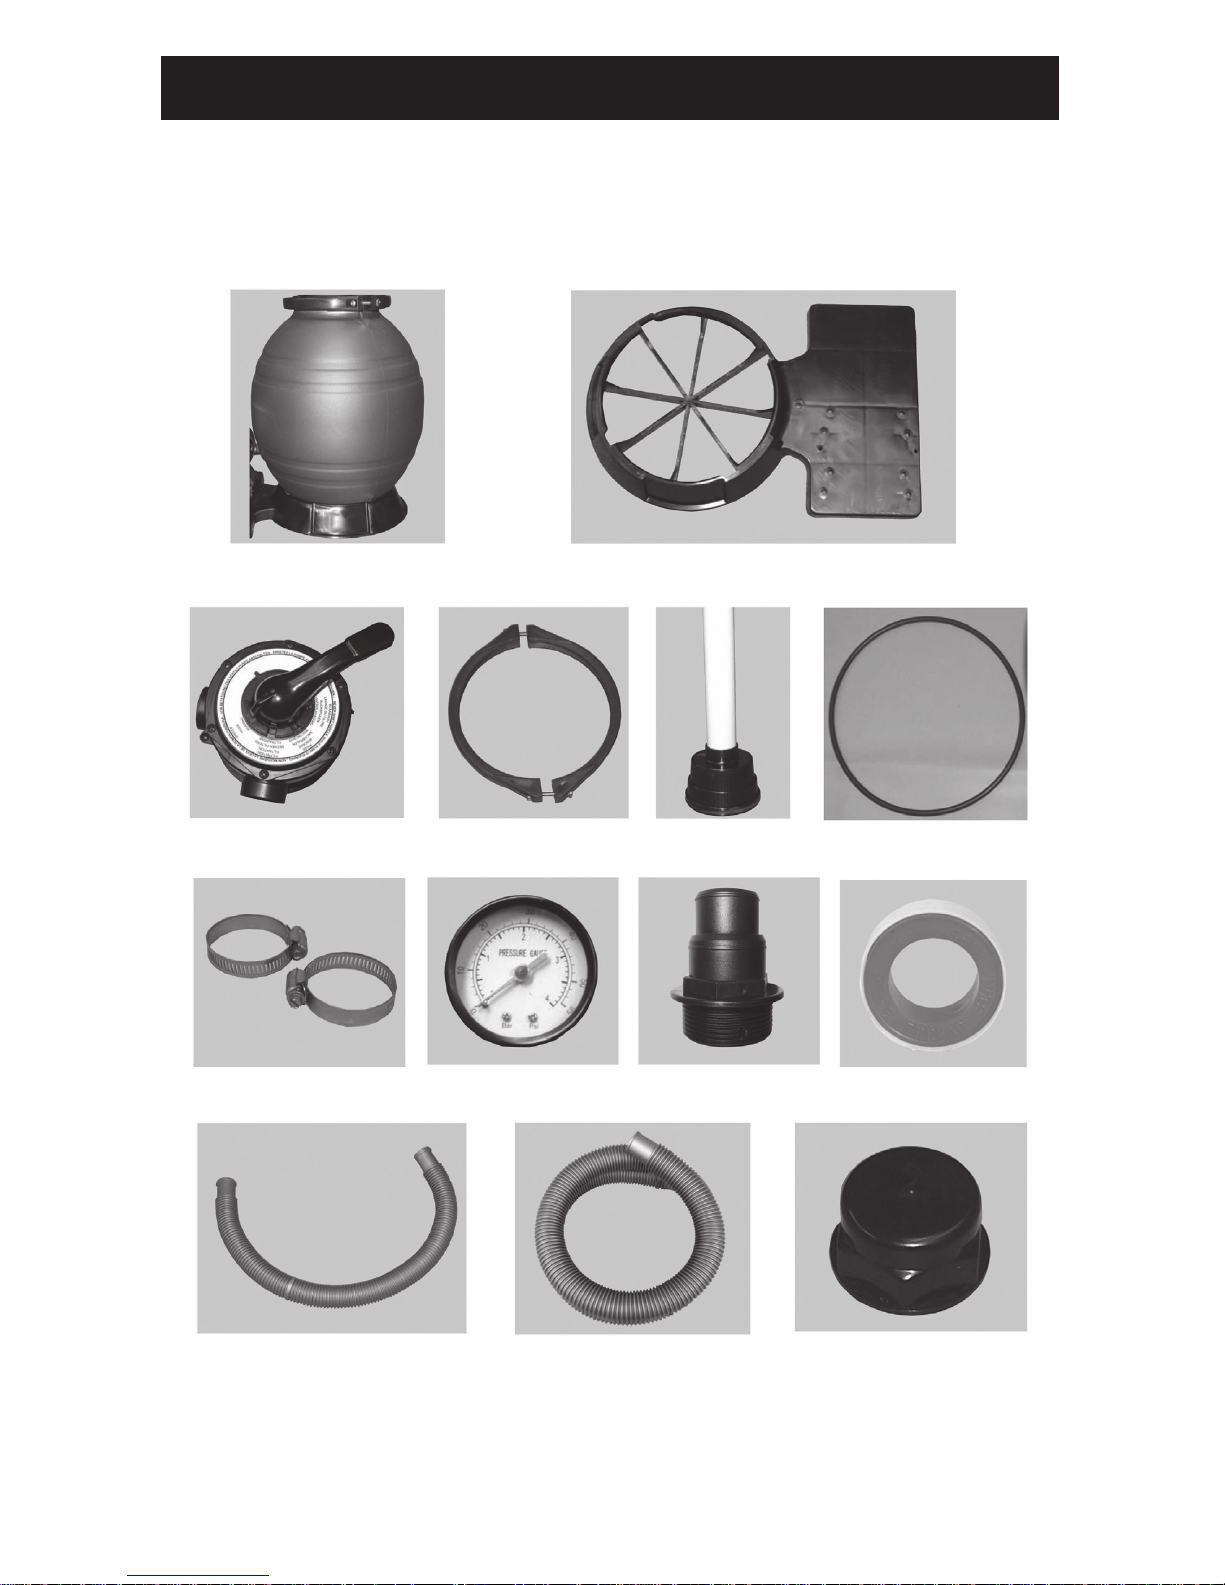
PARTS FOR #71225 SAND FILTER
See breakdown on following page for model specific parts list
Filter tank
4 way valve
Hose clamps (6)
2’ filter hose (1) 6’ filter hose (2) Drain plug
Pressure gauge Straight fitting Teflon tape
Flange clamp Standpipe Valve o-ring
Filter base
2
Page 3
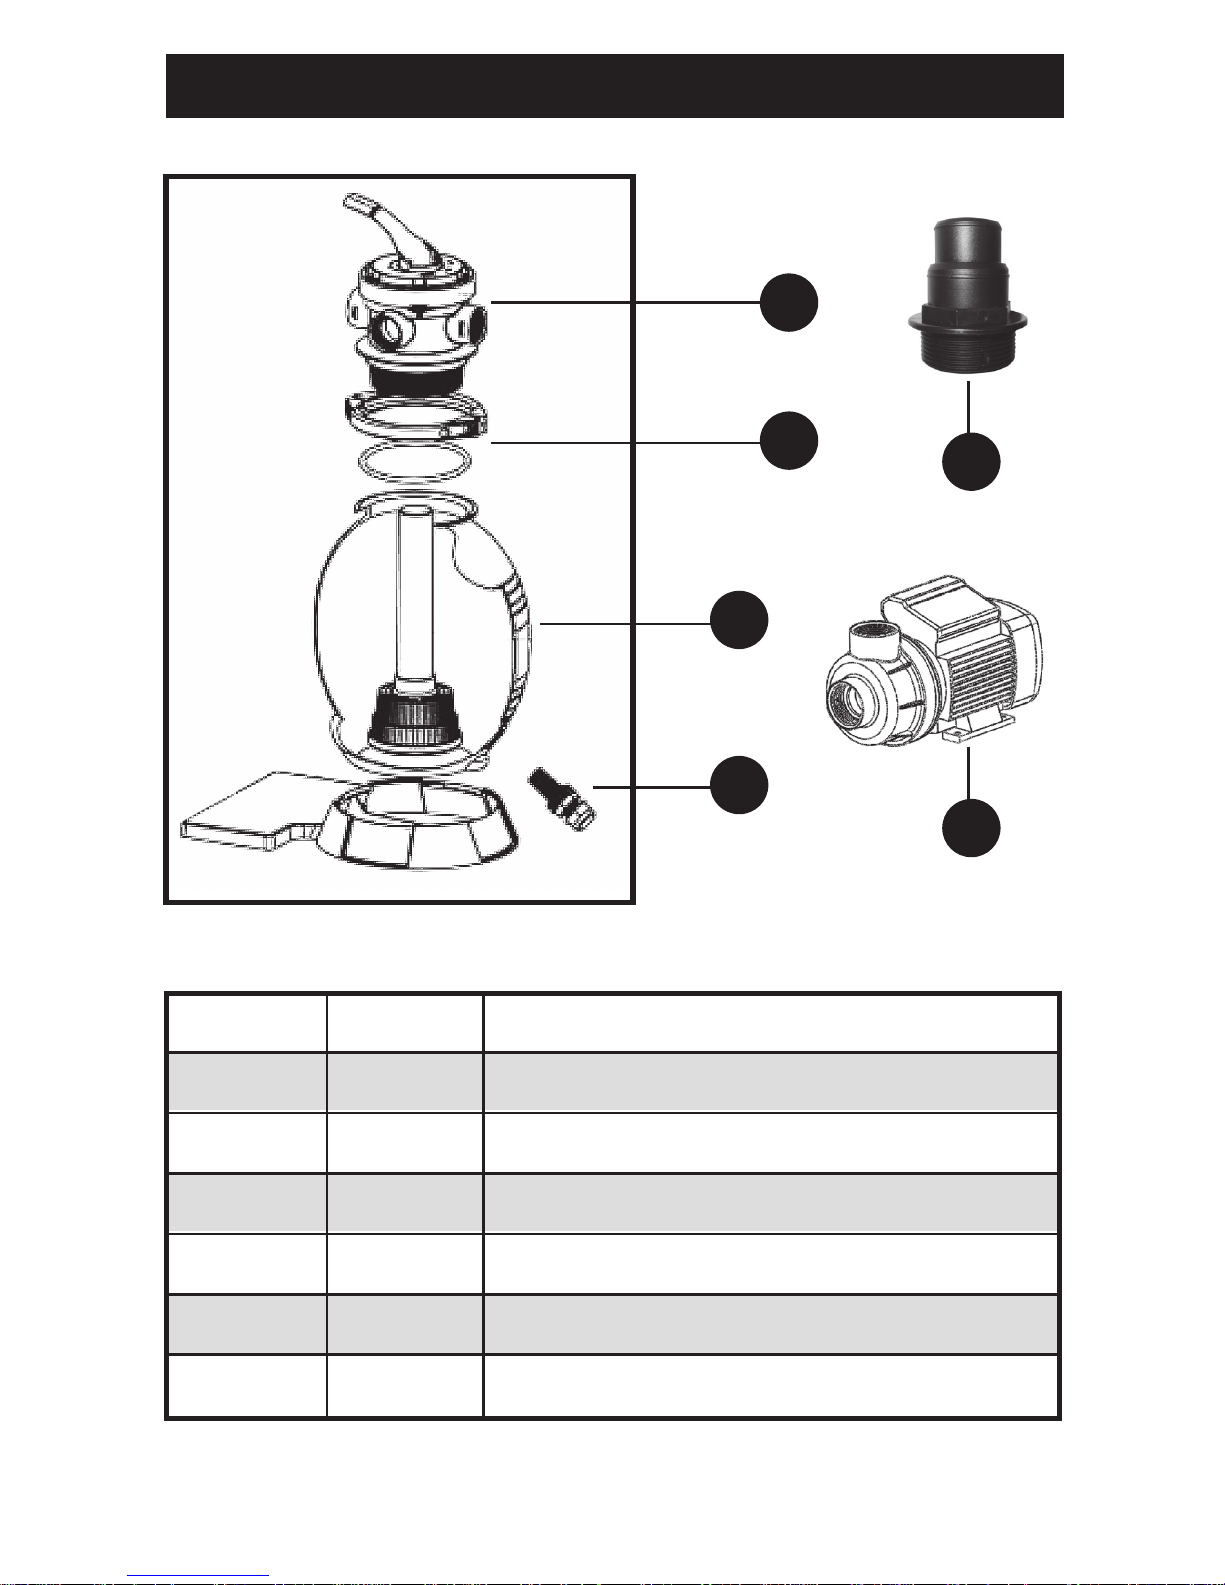
PARTS FOR #71225 SAND FILTER BY NUMBER
1
2
3
4
5
REF#
1
2
3
4
5
6
PART#
71201
71202
71203
71204
71205
71206
DESCRIPTION
4 WAY VALVE
FLANGE CLAMP & O-RING
STAND PIPE & FILTER ASSEMBLY
DRAIN PLUG & O-RING
STRAIGHT FITTING & O-RING
PUMP
6
3
Page 4
ASSEMBLY INSTRUCTIONS FOR SAND FILTER
STEP ONE - GETTING STARTED
NOTE:
Filter may be partially assembled; however, nothing has been
properly tightened. DO NOT operate filter system without
completing assembly instructions!
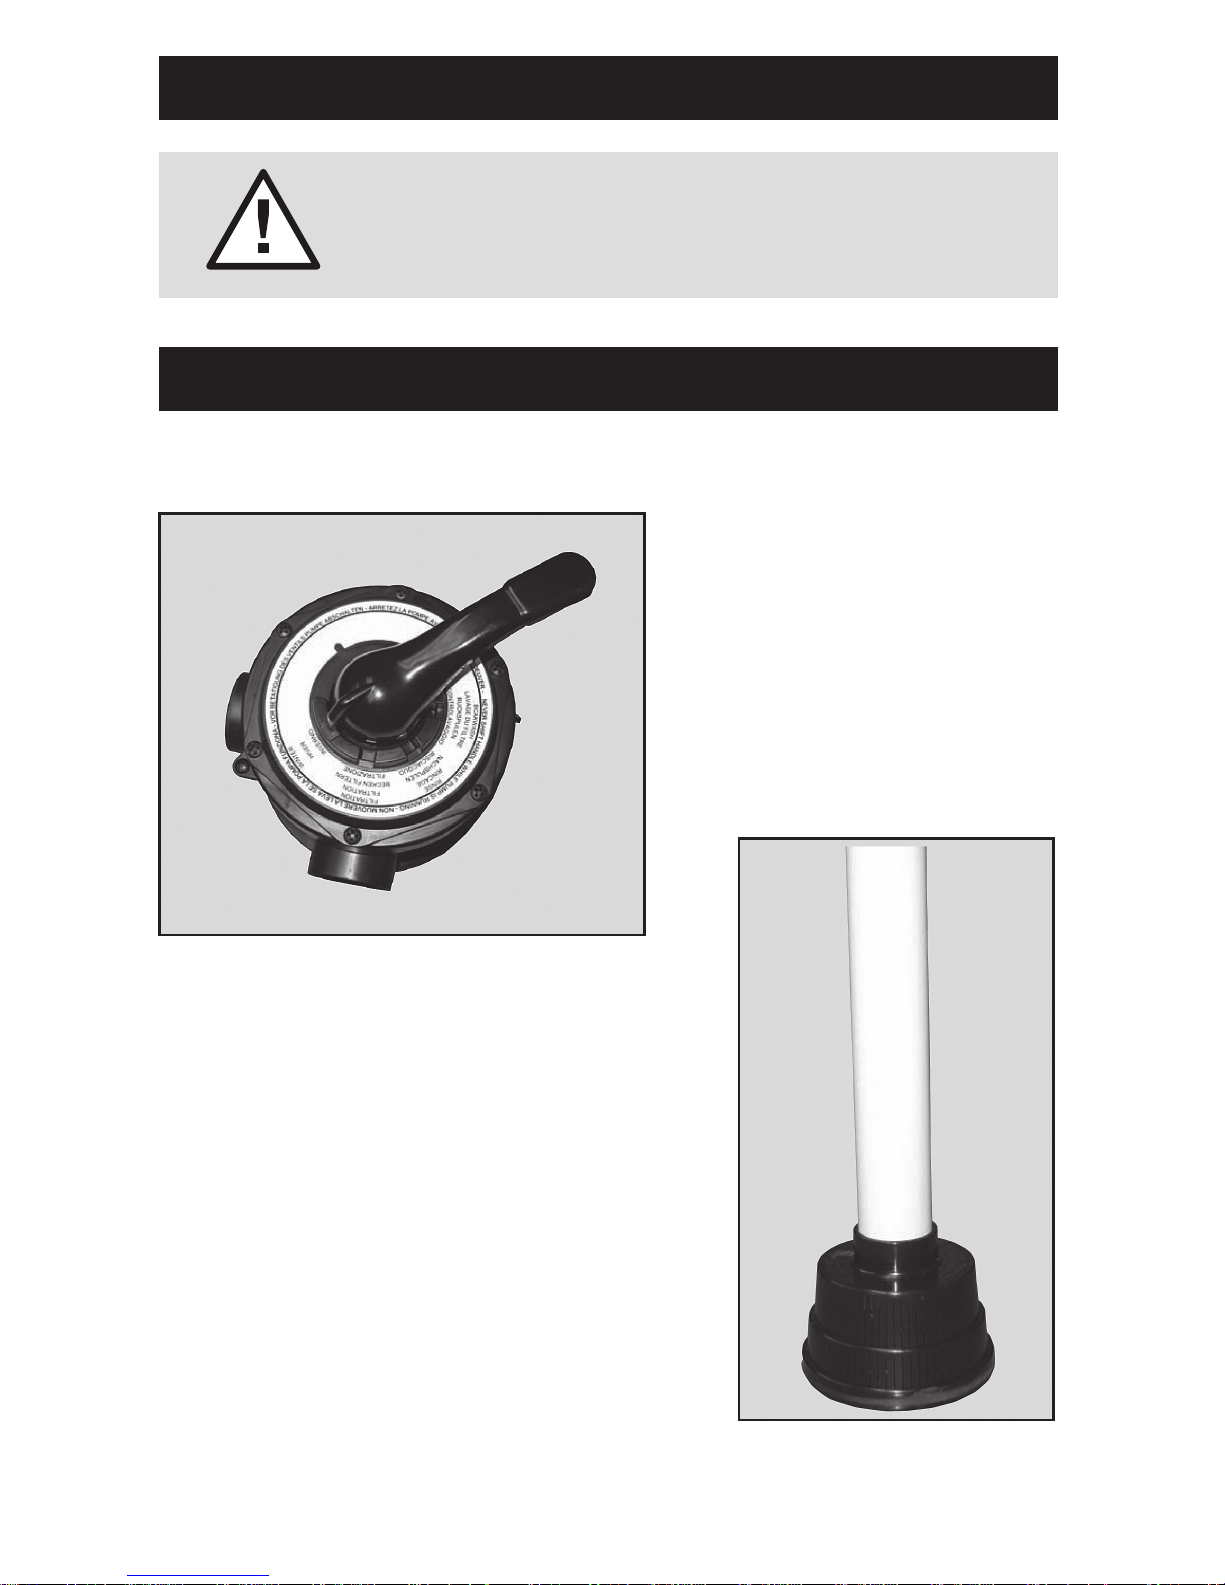
• Remove the valve (Fig.1) from the
box and place it to the side until
instructed to attach it.
• Inside the tank you will find the standpipe
(Fig. 2) and a plastic bag containing various
parts. Remove from tank and set aside.
Fig. 1
Fig. 2
4
Page 5
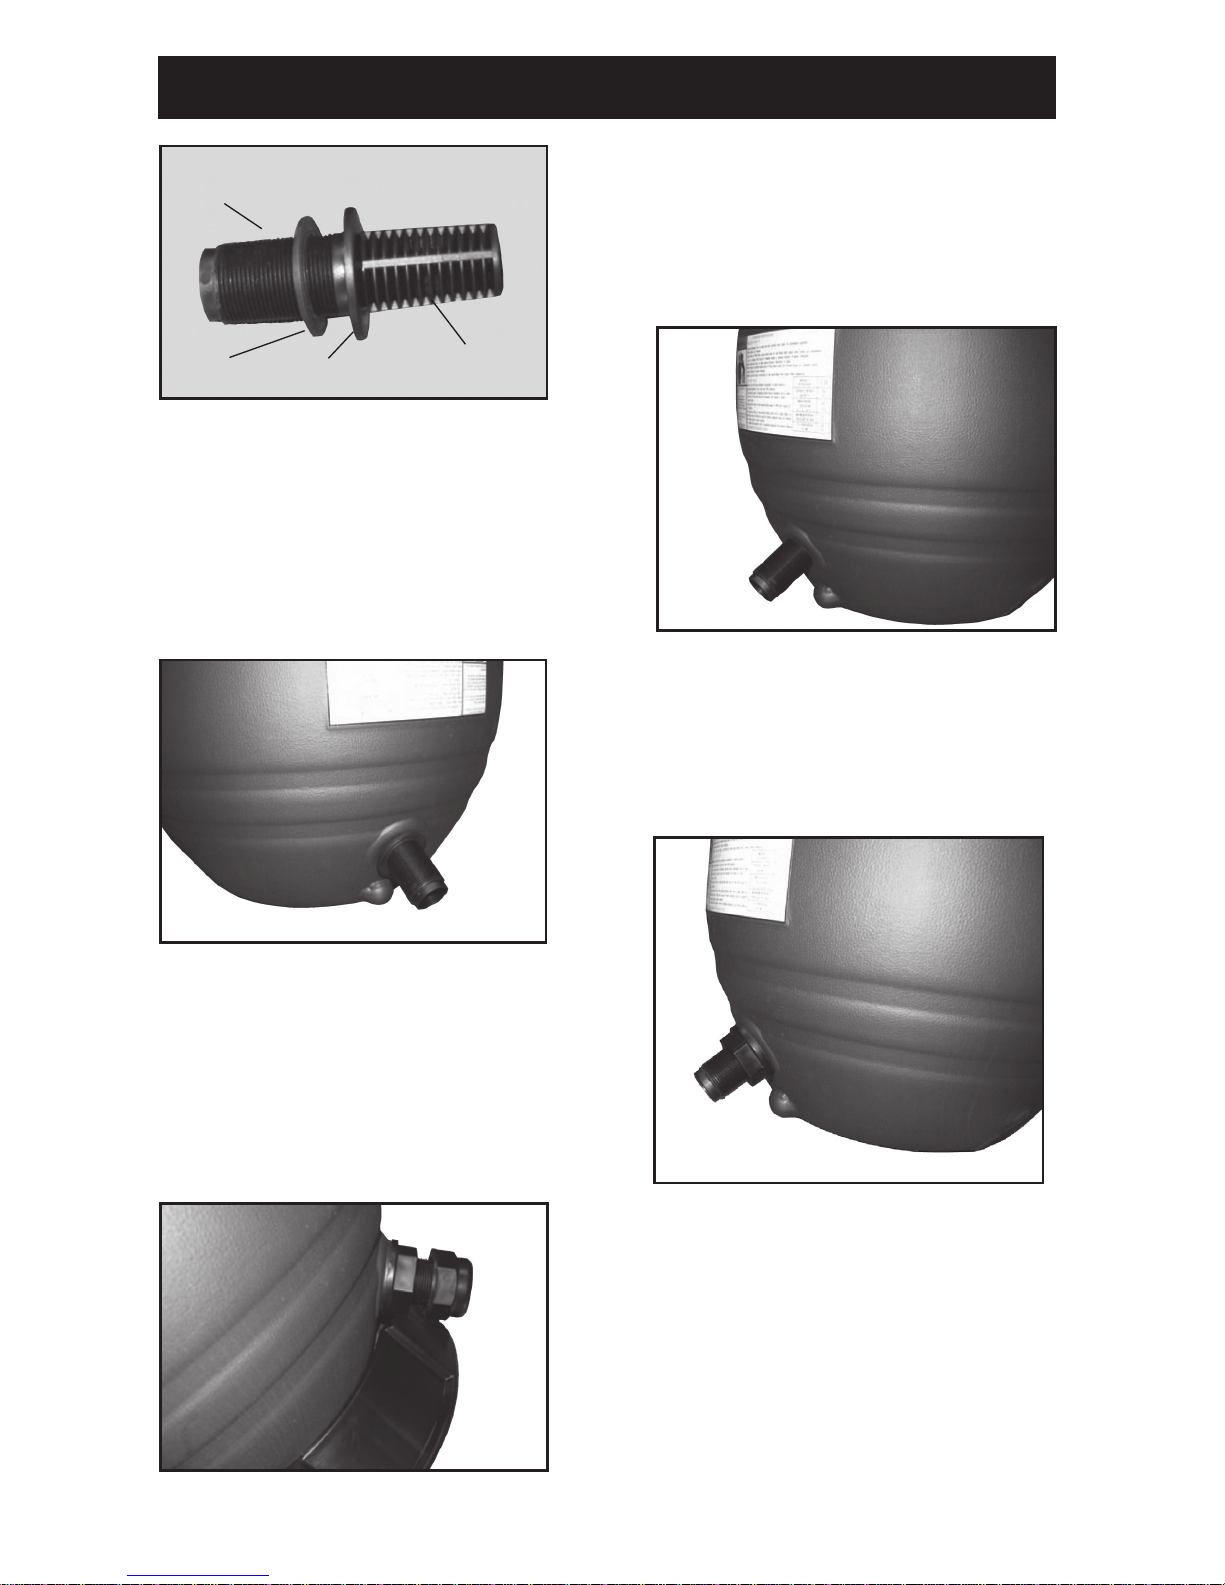
STEP TWO - ATTACH DRAIN ASSEMBLY
• If drain assembly (Fig. 3) is all together, take
it apart. Take one rubber gasket and put over
threaded part of the drain assembly. Flat part
of gasket must be flush against sealing plate.
• Place other gasket on threaded part of the drain
assembly that is outside of tank, flat side
to the tank. (Fig. 5)
• Place drain cap over threaded part on outside
of the tank. (Fig. 7)
Hand tighten only!
• From inside the tank, insert drain assembly
through hole in bottom of tank. (Fig. 4)
You will see the threaded part of the
drain assembly on the outside of the tank.
• Place locking nut on threaded part and
thread until snug. Hand tighten only!
Be sure to hold drain assembly from inside
the tank while hand tightening locking nut.
(Fig. 6)
Fig. 3
Threads
Gasket
Sealing Plate
This side inside tank
Fig. 4
Fig. 5
Fig. 7
Fig. 6
5
Page 6
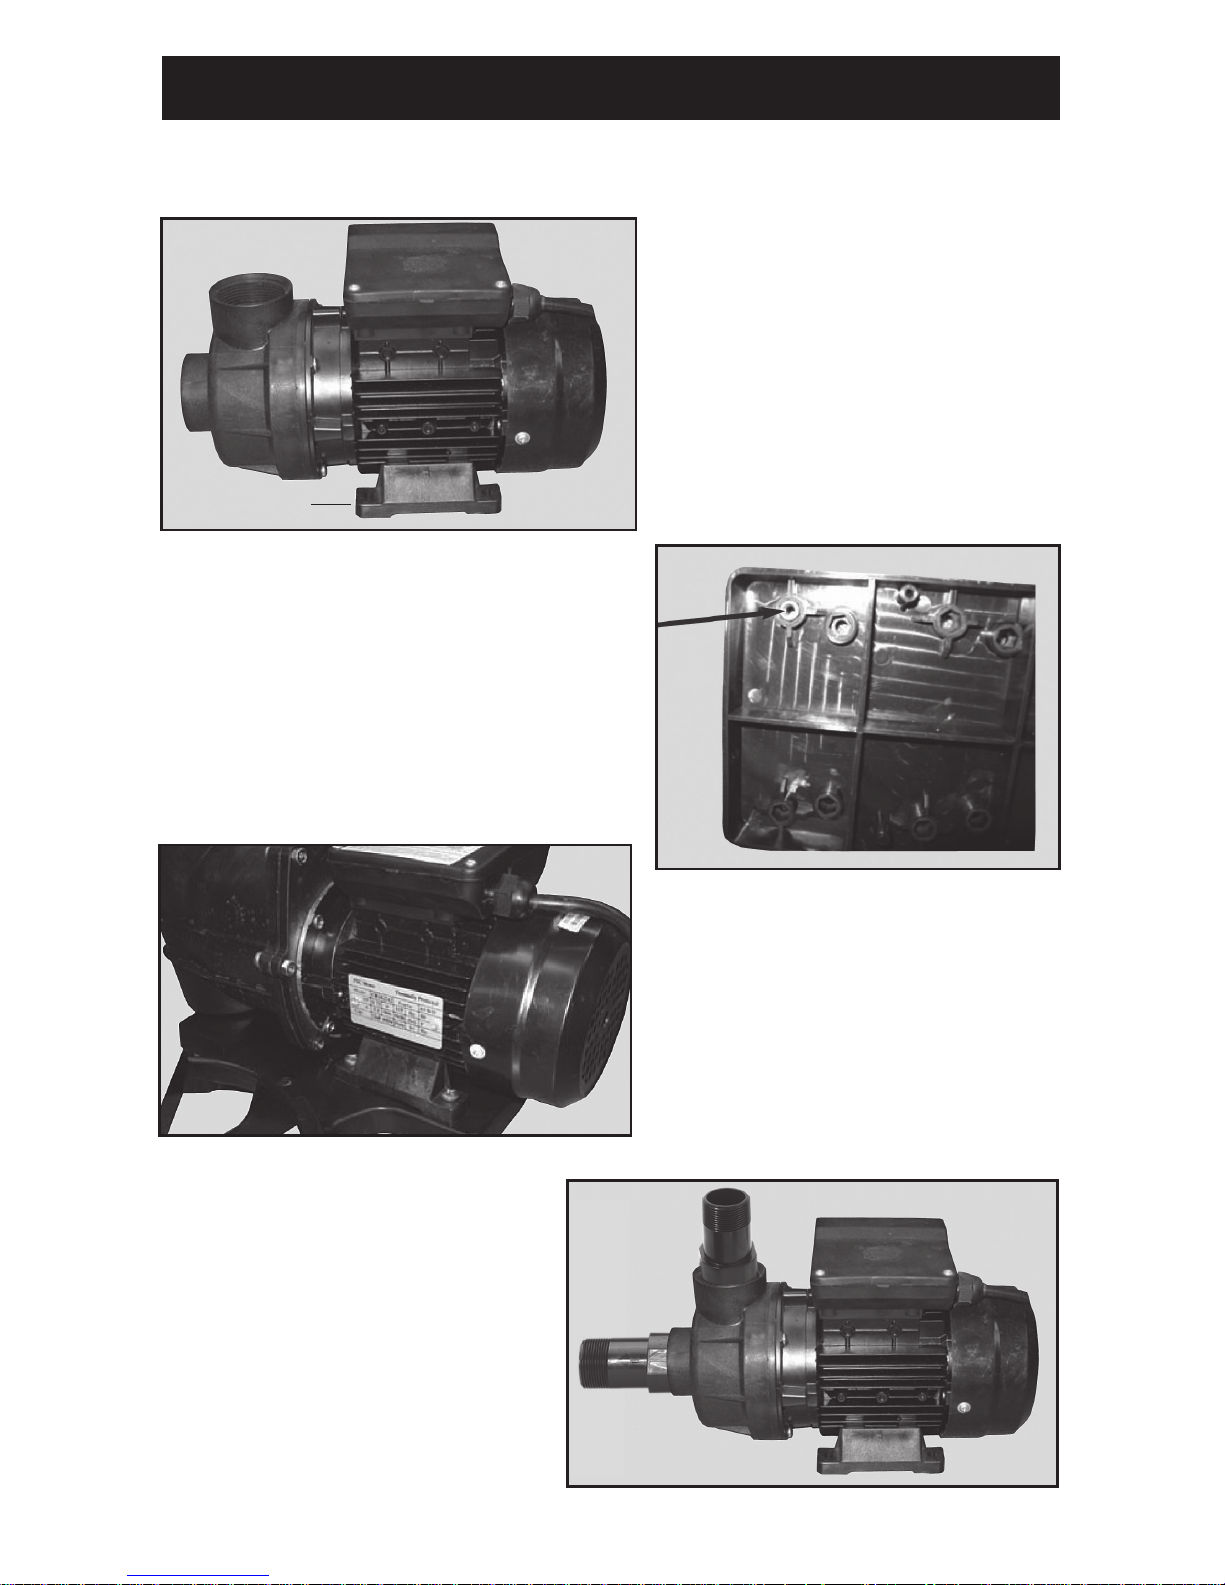
STEP THREE - ATTACH THE PUMP
• Allign the pump motor with the four
holes that match up to the filter base.
This will require the use of four
mounting bolts & nuts from the
hardware supplied with the base.
(Fig. 8)
• Bolt the housing of the pump
through the base & tighten securely.
(Fig.10)
The filter and pump should be attached to the base prior to filling the tank with sand as it will
be difficult to maneuver after the tank is full.
• Place bolts underneath the base
in the properly aligned mounting hole.
(Fig. 9)
• Cover the threads of each straight
fitting with teflon tape and thread one
fitting into the front of the pump and one
fitting into the top of the pump.
• Attach the hose with a clamp
on each fitting.
(Fig. 11)
Fig. 8
Mounting Holes
Fig. 9
Fig. 10
Fig. 11
6
Page 7
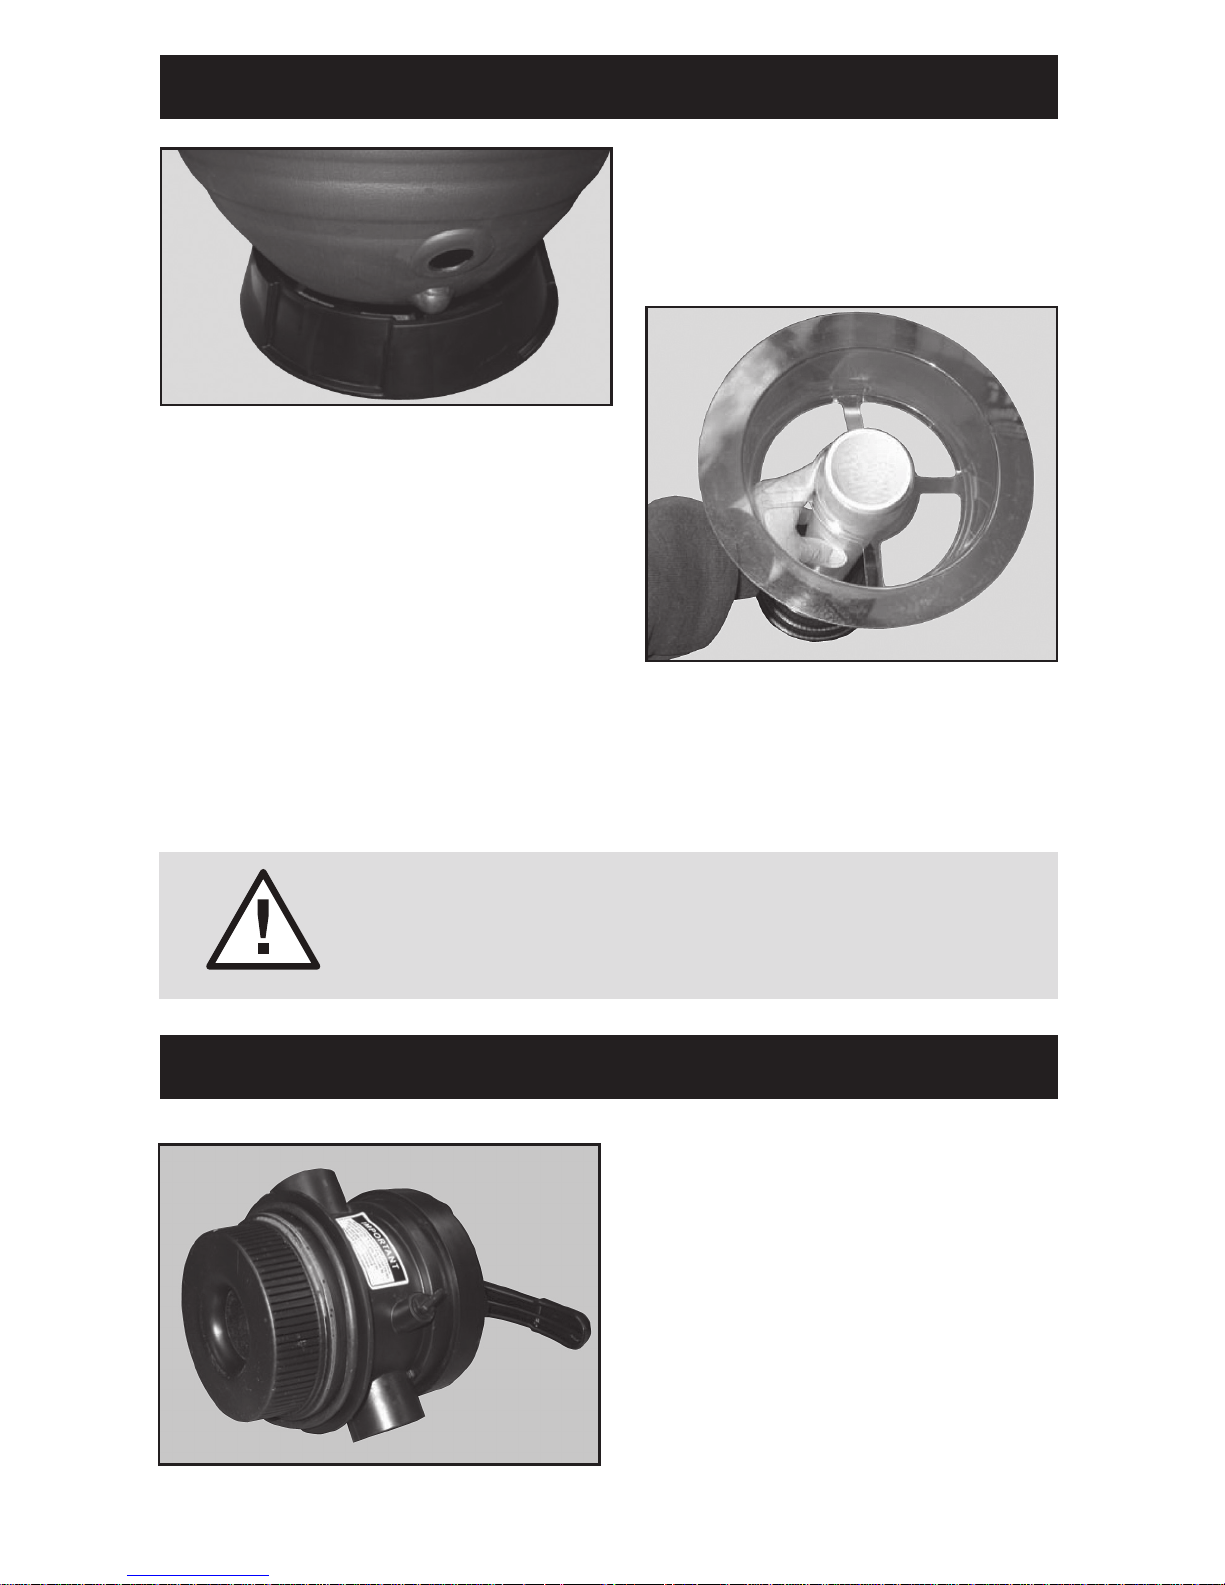
STEP FOUR - ADDING SAND
STEP FIVE - INSTALLING VALVE
NOTE:
Sand should be filled no LESS than 1/2 way up the tank and no
MORE than 3/4 up the tank. OVERFILLING WILL RESULT IN
PERMANENT DAMAGE TO YOUR FILTER SYSTEM!
• Before filling tank with sand, align nub
on bottom of tank into notched out piece
of the base, twist to the right til snug.
(Fig. 12)
• Place standpipe inside the filter,
cover standpipe with the round plastic
standpipe protector device to
prevent sand from entering
the standpipe.
(Fig. 13)
• Add filter grade sand (sold separately) to filter tank around standpipe. Your tank should use
42 Lbs. of sand. Remove plastic standpipe protector and fill tank with water until the tank is
filled right below opening of standpipe. (Save the standpipe protector for future use.)
• Lubricate O-Ring (3) in bag with various
parts.
• Lubricate with O-Ring lube to ensure proper
seal on tank. (O-Ring lube not included)
• Push O-Ring against the lip of the valve.
It MUST sit flat against the lip to protect
from leaking at the valve. (Fig. 14)
Fig. 12
Fig. 13
Fig. 14
7
Page 8
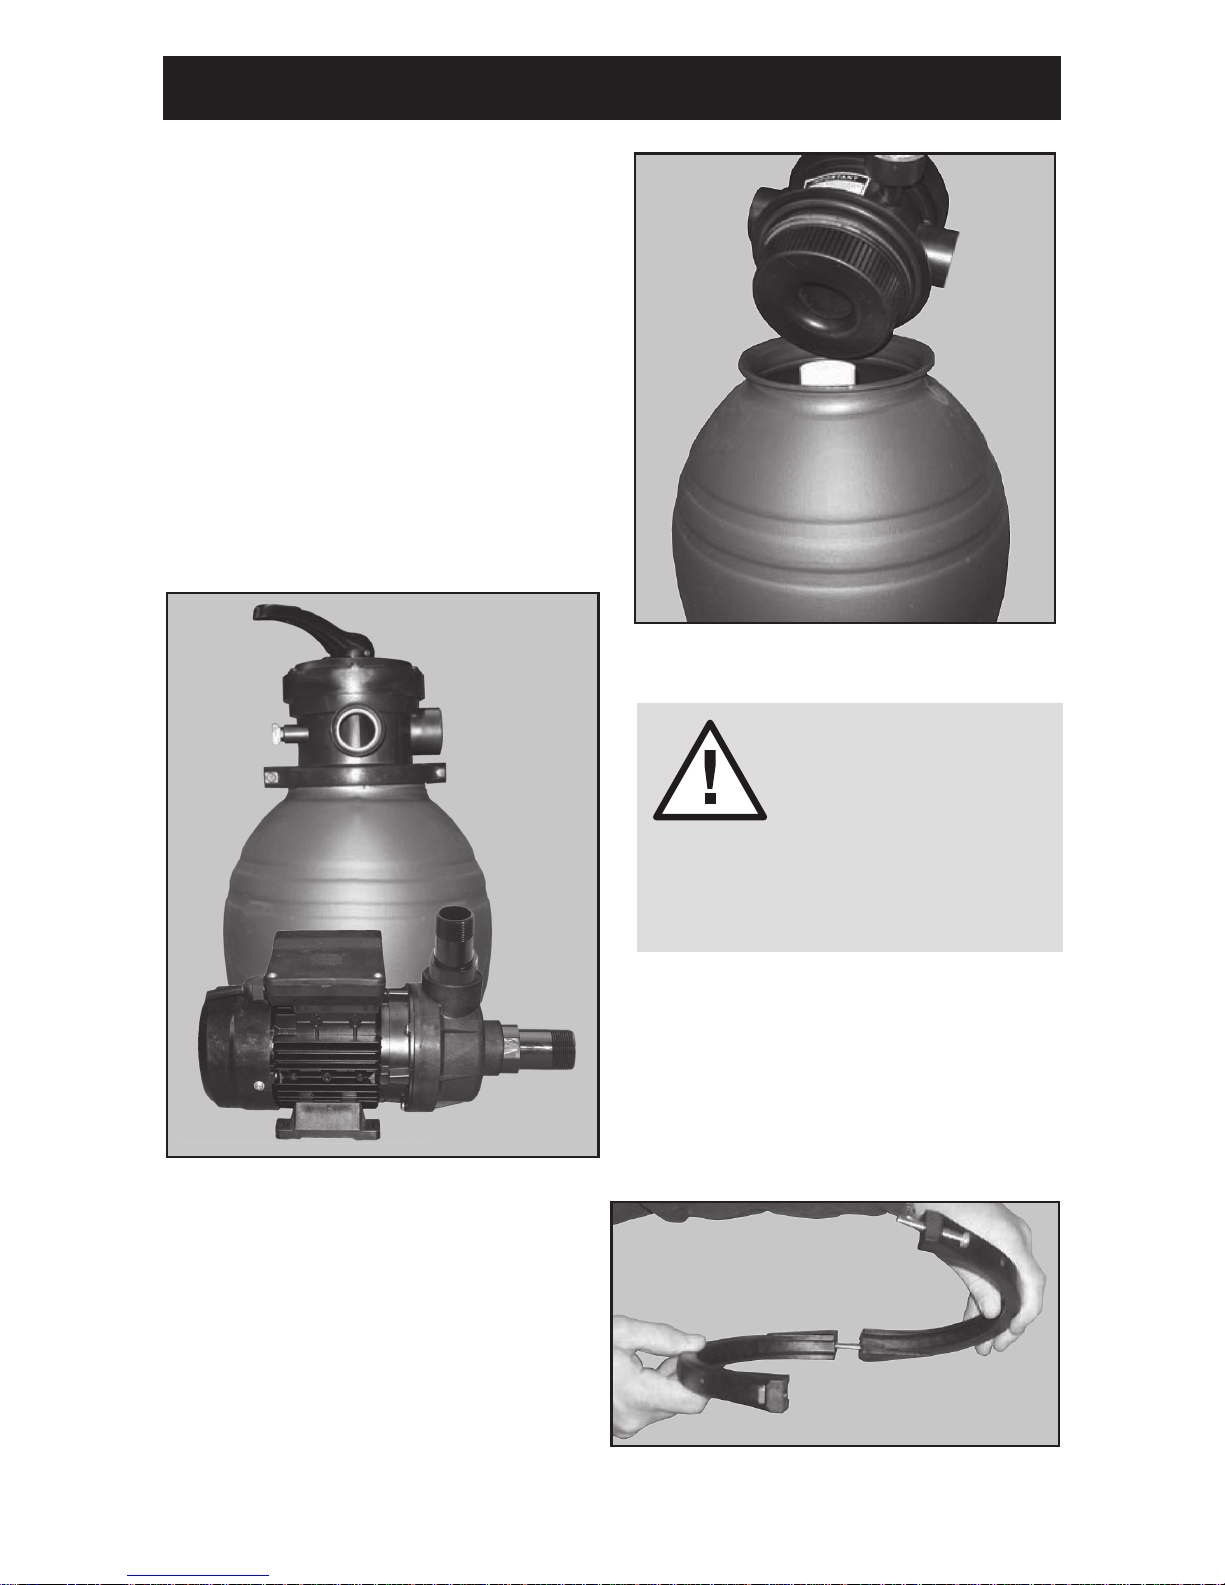
STEP FIVE - INSTALLING VALVE (continued)
• Once valve is in place, hold clamp as
shown and position clamp around lip of
tank and over edge of valve.
2 long screws and nuts are provided
to secure clamp. (Fig. 17)
• Clean off any sand or debris on top of filter
and position valve over the opening of the
standpipe. Valve will slide ONTO standpipe
when positioned properly in tank (Fig. 15).
Push down firmly to make sure valve slides
on all the way.
• Place valve so that pump port is directly
over the pump. (Fig. 16)
Fig. 17
NOTE:
You CANNOT pull
standpipe up to secure the
valve. Pulling up can damage the filter
and cause sand to get sent back with
water flow into the pool!
Fig. 15
Fig. 16
8
Page 9
STEP FIVE - INSTALLING VALVE (continued)
STEP SIX - CONNECT HOSES
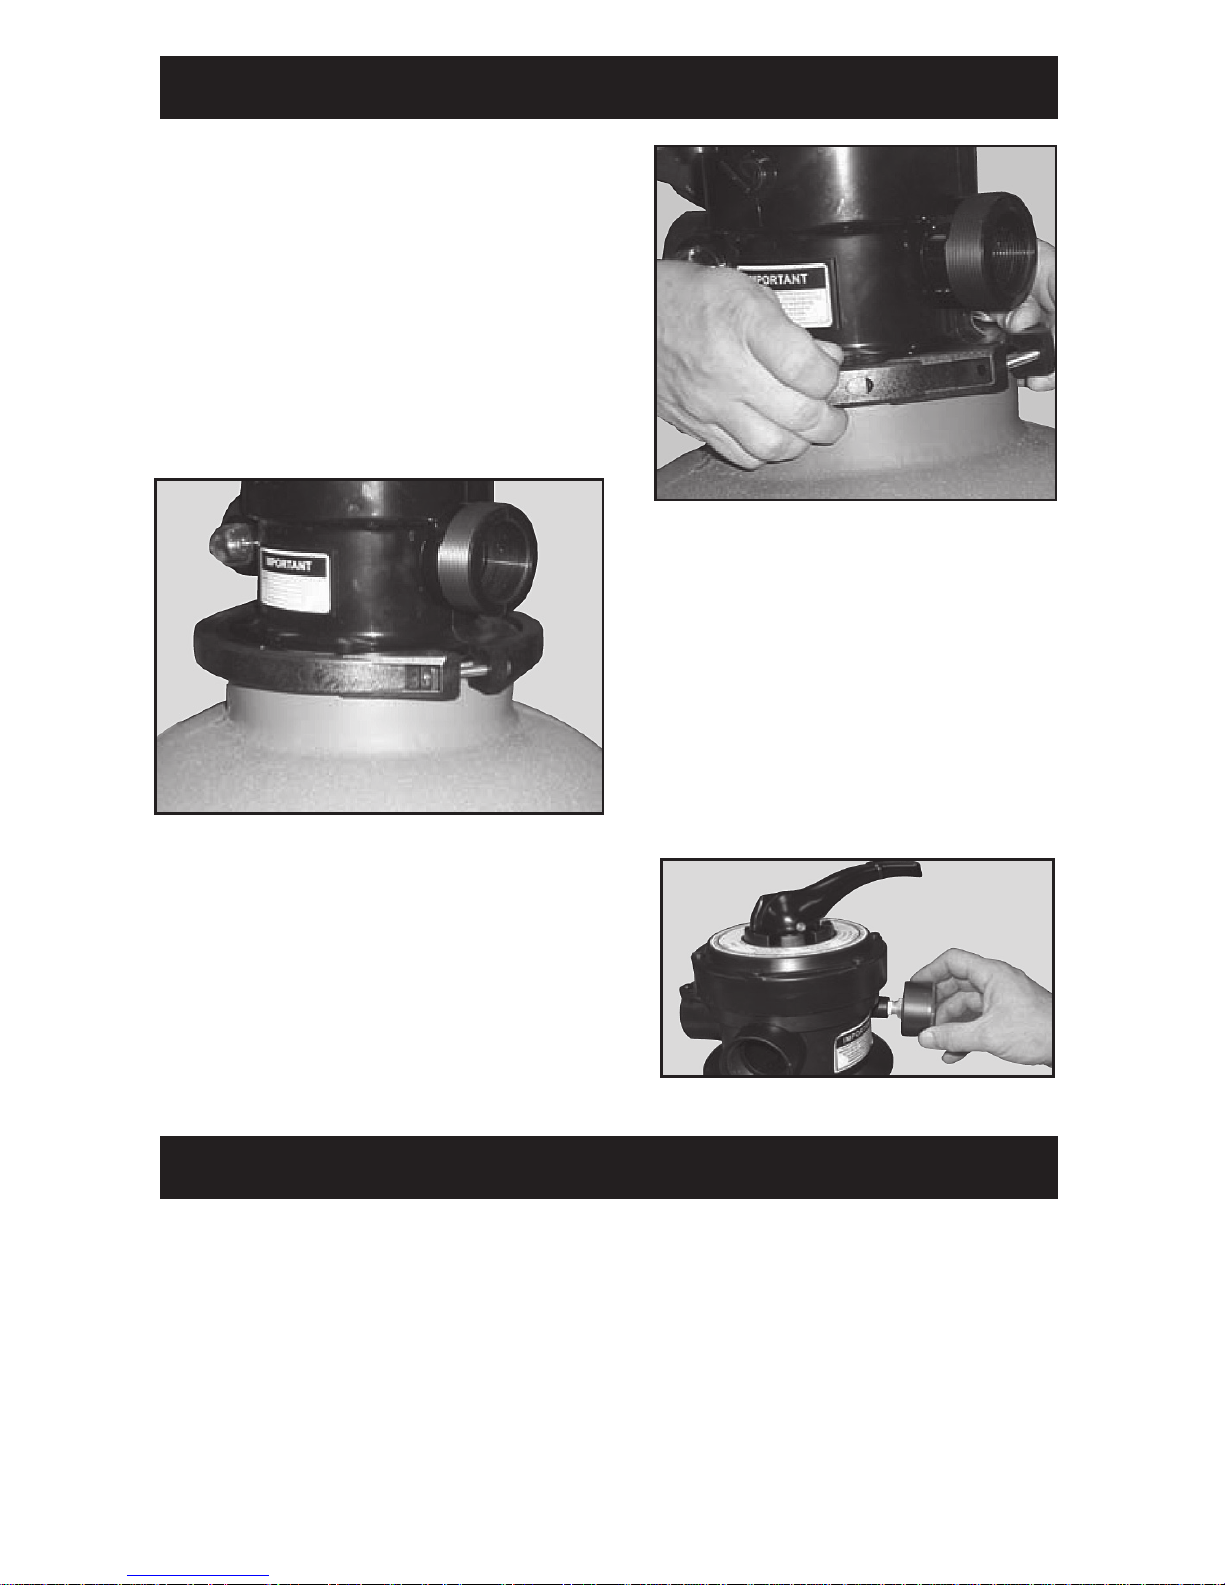
• Make sure that the screws of the
clamp are lined up with the seams of
the tank. Tighten two screws on clamp a
little at a time. Alternate from side to side
so that both sides are tightened equally.
Failure to tighten correctly will result in a
leak at the clamp. (Fig. 19)
• The clamp should sit flat around the lip of
the tank and edge of valve. If it is not sitting
flat the clamp will leak.
(Fig. 18)
• Cover threads of pressure gauge with Teflon
tape. Remove temporary plug from valve and
thread gauge into opening.
(Fig. 20)
•
The valve ports are labeled “RETURN”, “PUMP” and “WASTE” with raised letters next to
or on the openings. Attach one 6’ hose to the bottom of your through-wall skimmer and to the
front of the pump with hose clamps on each fitting. Attach second 6’ hose to the fitting on the
“RETURN” valve port and to the pools return fitting with hose clamps on each fitting.
“WASTE” port will accept a standard fitting and a backwash hose (Sold separately) which will
be used during maintenance.
•
Check drain plug at bottom of filter to ensure that it is screwed on tight.
Fig. 18
Fig. 19
Fig. 20
9
Page 10

STEP SEVEN - OPERATING THE FILTER
NOTE:
Your filter cannot be run if the water is not at the proper level
in the pool. Running the filter without water can cause serious
damage to your pump and filter system.
•
Prime filter prior to starting up filter system. DO NOT turn pump on until system has been
primed, you can damage your pump.
•
To use filter, with pump OFF, push down on selector handle on valve and turn to notch
labeled FILTER
.
•
When pressure through return fades and pressure gauge reads 5 psi above starting pressure,
you will need to backwash the filter system to remove debris.
•
The
WASTE position does not allow water to pass through filter. If there is a need for you to take
water directly out of pool,
WASTE is the position to do so. You may also vacuum on waste to
remove serious debris. Remember, this will reduce water level. If water level drops below
skimmer level you MUST turn pump OFF!
•
NEVER MOVE SELECTOR HANDLE WHEN PUMP IS ON! PUMP MUST BE OFF.
Failure to do so will cause damage to valve and will void WARRANTY!
•
Make sure water in pool is up to middle of skimmer(s) and that there is nothing blocking
water flow from return(s) and skimmer(s) (i.e. plug, plate, etc.).
•
Push down selector handle on valve and turn to notch labeled BACKWASH. Let go of handle
and the valve is now in backwash position. Make sure backwash hose (sold separately) is
attached to the WASTE port so water will not spray all over you once pump is started.
•
Be sure skimmer and return lines are filled with water. When water level is at proper height in
pool this should happen naturally.
•
Plug in and switch on pump. When pump starts up, water will come out through backwash hose.
•
When all air is purged from the system, turn pump off. If all air is not purged out of system,
double check all connections to make sure they are properly tightened and try again.
•
Connect pump to power to start filter operation.
•
Note pressure gauge reading at this time.
•
Turn pump off before moving selector to
BACKWASH position. Once in backwash, turn
pump back on.
•
Water will come out through Waste port, so position backwash hose where you would like
water to run out.
•
NEVER
backwash for longer than
ONE MINUTE
at a time! Backwashing longer than one
minute will cause sandblasting of internal components and can lead to damage of the
standpipe and/or hub and
VOIDS WARRANTY.
•
Turn pump off and move selector to
RINSE position. Rinse will allow water to flow through
to clear out the lines and prevent a puff of sand or debris back into pool after backwashing.
•
Rinse for approximately 15 seconds and turn off pump again. Move selector back to
FILTER
and turn pump back on. You are now filtering water.
10
Page 11
TROUBLESHOOTING
WINTERIZING
NOTE:
Failure to winterize your filter properly may result in damage
to the system which is NOT covered under any warranty.
•
At the end of the season once you disconnect filter system, remove the valve from the tank.
Valve selector handle should be positioned BETWEEN any of the notches to allow for air
ventillation through the valve to protect from cracking.
•
Remove drain plug from bottom of filter tank to drain water out of the filter. Keep this plug
off for the winter to allow any potential moisture build up to escape from tank.
•
Empty ALL sand from the filter system and dispose of. It is recommended to replace sand
EACH season.
•
Rinse out inside of tank and air dry. Remove standpipe from tank.
•
Store tank in an area where it will be protected from the elements and keep valve and tank
stored APART to protect from condensation forming and causing cracks in the tank or valve.
•
Run clean water (Not chlorinated water) through pump to rinse out and store in a warm, dry
place for the winter.
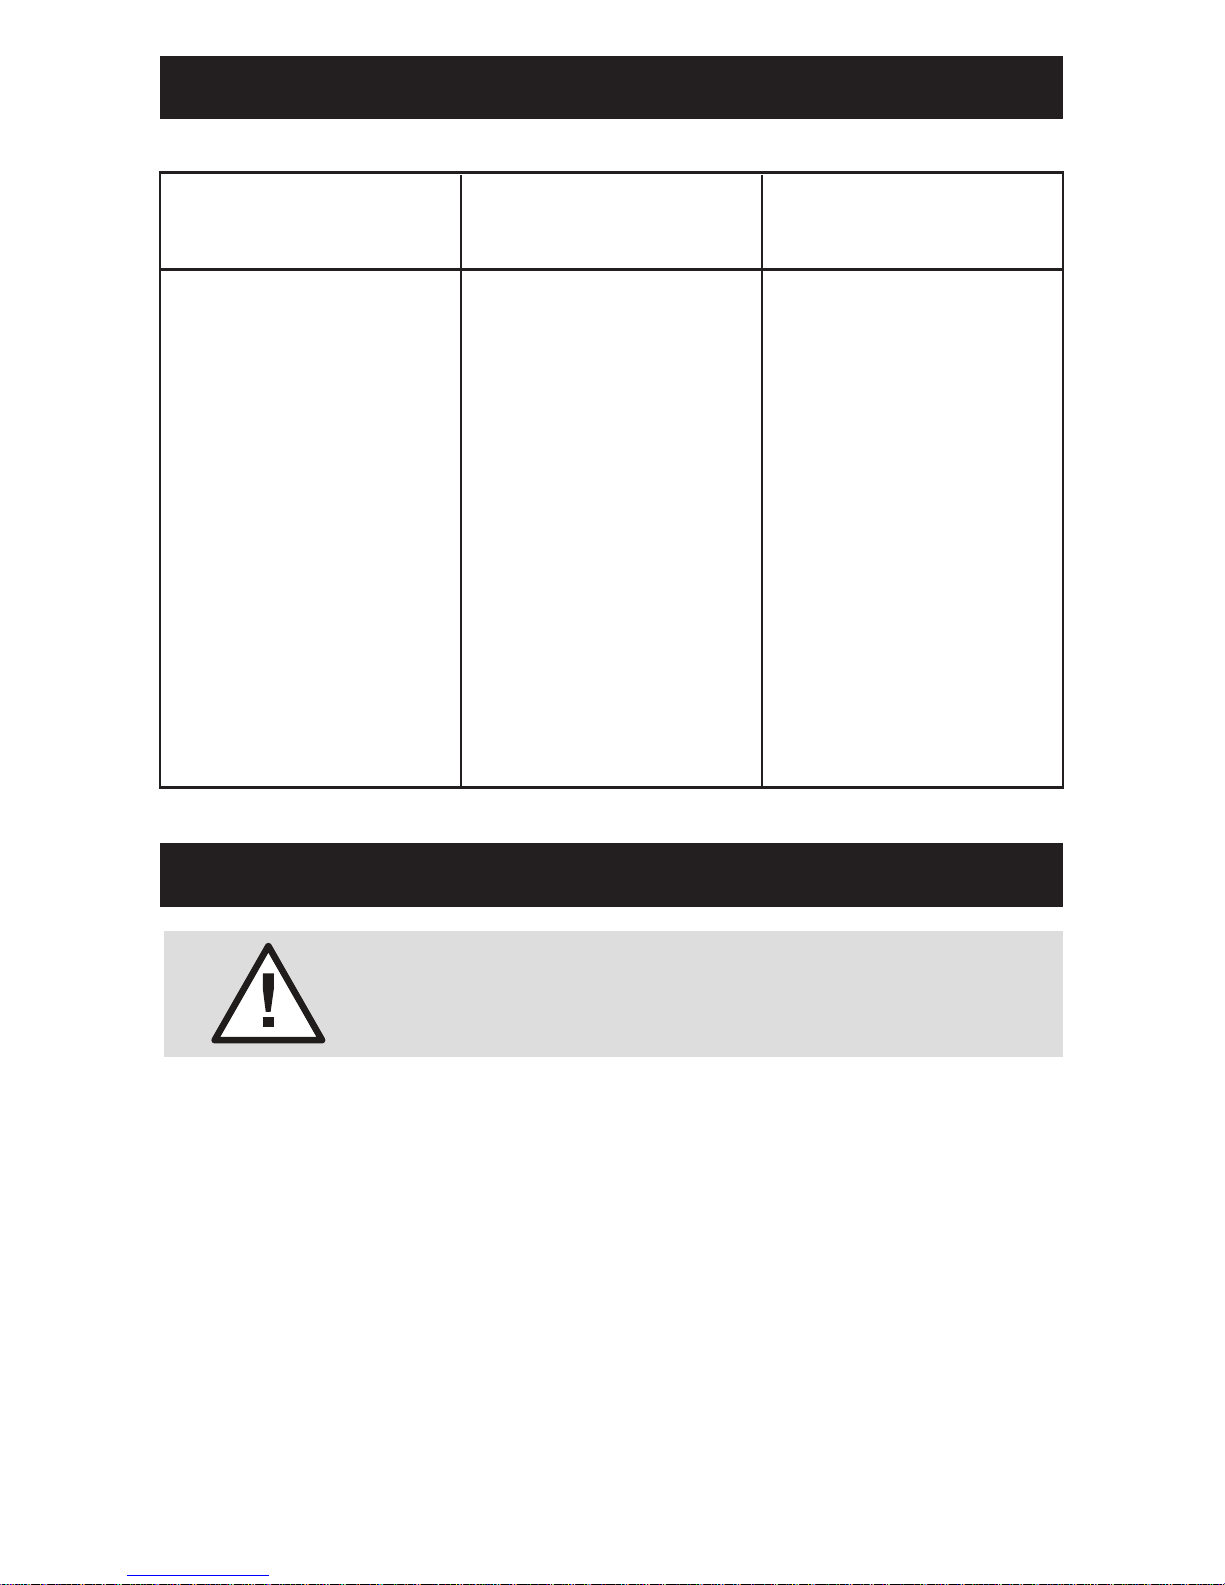
LOW
WATER FLOW
SHORT
FILTER CYCLES
CLOUDY
WATER
1. Check skimmer basket
for excess debris
2. Check for restrictions in
intake and discharge
lines
3. Check for air leak in
intake line (Indicated by
bubbles returning
to pool)
1. Check for algae in pool
and superchlorinate as
required.
2. Be sure chlorine and pH
levels are in proper
range. Adjust as required.
3. Check surface of filter
sand for crusting or
caking. Remove 1” of
sand if necessary.
1. Check chlorine, pH and
total alkalinity levels
and adjust as required.
2. Be sure flow rate through
filter is sufficient.
3. Operate filter for longer
periods.
4. Be sure valve is set to
“Filter” position.
5. Be sure sand is between
1/2 and 3/4 full in
tank.
11
Page 12

SwimlineSwimline
®
International Leisure Products, Inc.
191 Rodeo Drive, Edgewood, New York 11717
Tel: 1.631.254.254.2155 • Fax: 1.631.254.2363
E-Mail: [email protected]
www.swimlinecorp.com
 Loading...