

Page 1

Owner
Owner’’
s Manual
s Manual
Page 2

Congratulations on your purchase of a Mark lll Hydro S
Congratulations on your purchase of a Mark lll Hydro Sppa!a!
Owner
Owner’’
s Manual
s Manual
This Owner’s Manual will acquaint you with the operation and general maintenance of your
new Hydro Spa Mark lll Spa. Please keep this manual available for reference.
If you have any questions about any aspect of your spa’s set up procedures, operation or
maintenance, contact your authorized Hydro Spa dealer.
Date Purchased:
Date Installed:
Dealer Name:
Dealer Address:
Dealer Telephone:
Spa Model and Serial Number:
i
Page 3

CONTENTS
IMPORTANT SAFETY INSTRUCTIONS
CHOOSING A LOCA TION
POWER REQUIREMENTS
WIRING DIAGRAM HS200 SYSTEM
WIRING DIAGRAM HS200M7
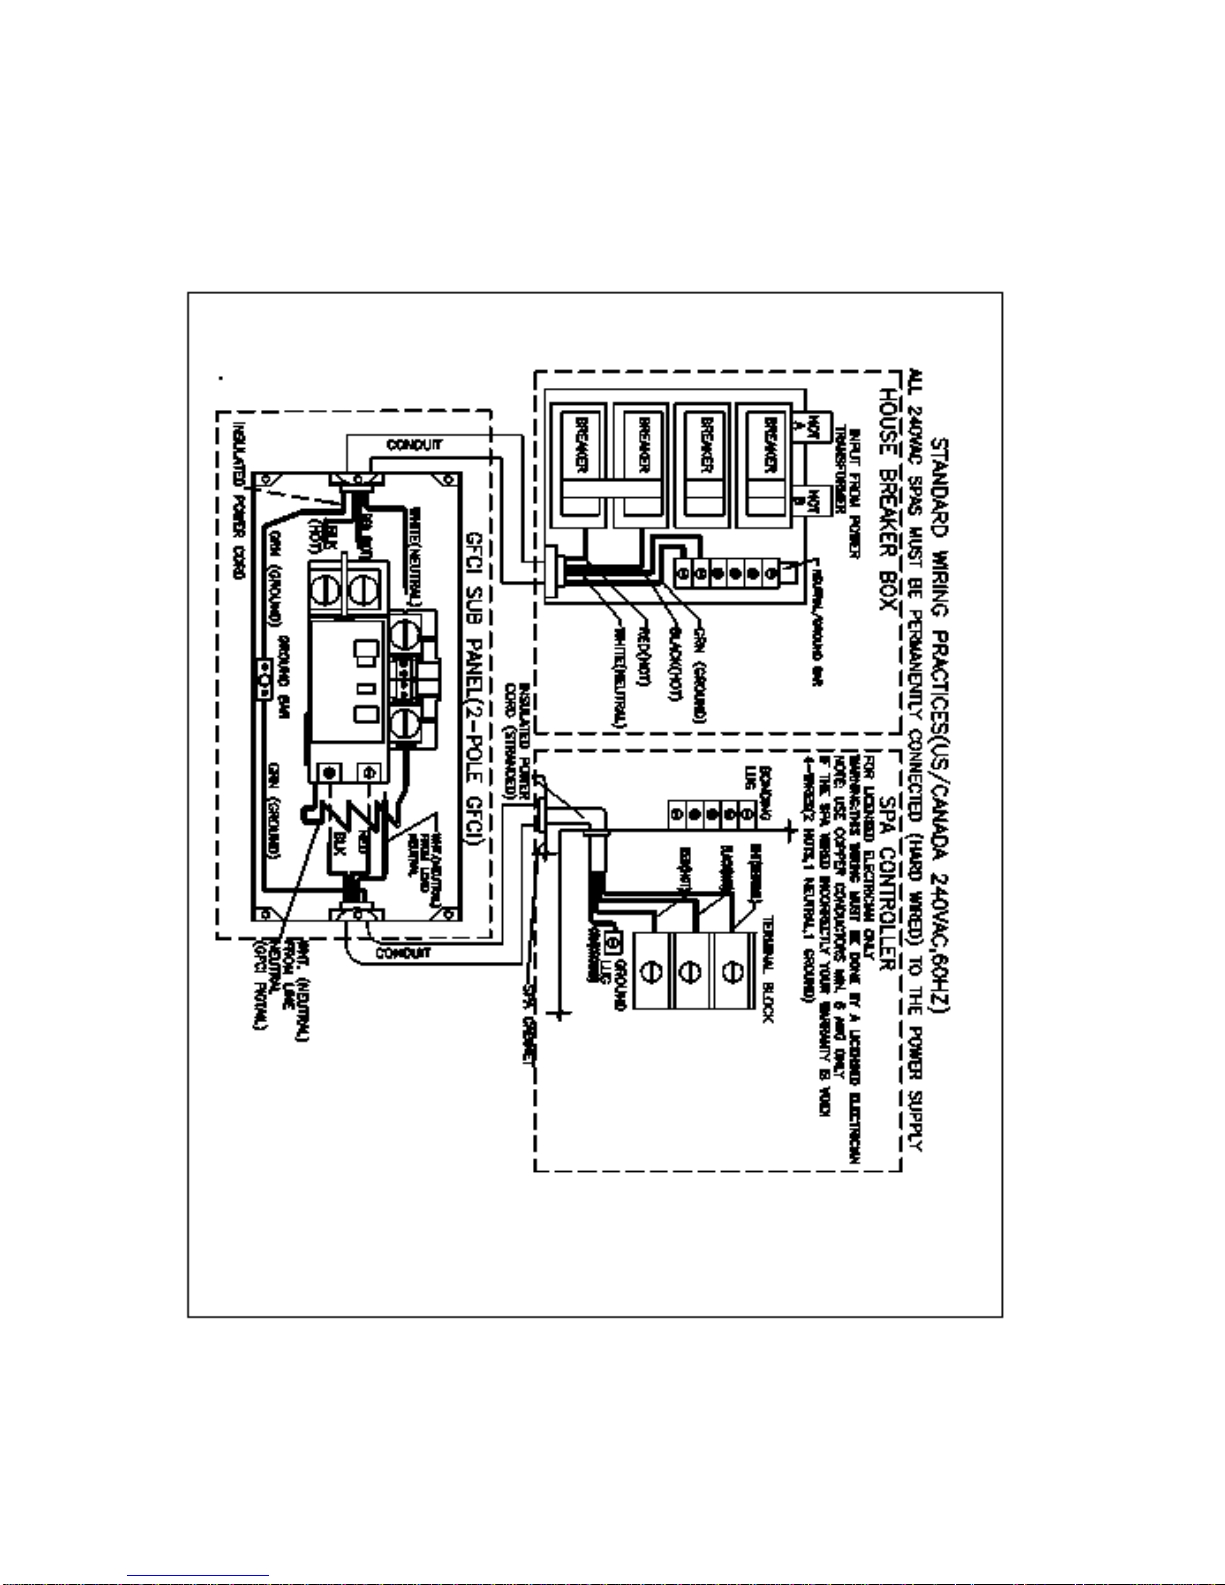
GFCI WIRING DIAGRAM
ELECTRICAL WIRING INSTRUCTIONS
EQUIPMENT AREA DIAGRAM
Contron Box - Inside View
START-UP INSTRUCTIONS HS200
OPERATING INSTRUCTIONS HS200
DISPLAY MESSAGES HS200
START-UP INSTRUCTIONS HS200M7
OPERATING INSTRUCTIONS HS200M7
DISPLAY MESSAGE HS200M7
SP ACARE AND MAINTENANCE
Draining Your Spa
Filter Cleaning and Cartridge Replacement
Care Of The Exterior
Care Of Spa Cover
Winterizing Your Spa
WATER QUALITYAND MAINTENANCE
Your Water In Your Spa
Methods For Testing Spa Water
Basic Chemical Safety
Water Terminology
SPA WATER MAINTENANCE & TROUBLESHOOTING
SPA CARE AND MAINTENANCE RECORD
WARRANTY
WARRANTY REGISTRATION
1-4
5
5
6
7
8
9
10
11
12-14
15
16 -17
18-20
21
22-25
25-28
24
29
30
31
32
PAGE
ii
IMPORTANT: Hydro Spa, Reserves the right to change specifications, or design, without notification and without incurring any obligation.
Page 4
1
Read and follow all instructions carefully
When installing and using this electrical equipment, basic safety precautions should always be followed, including:
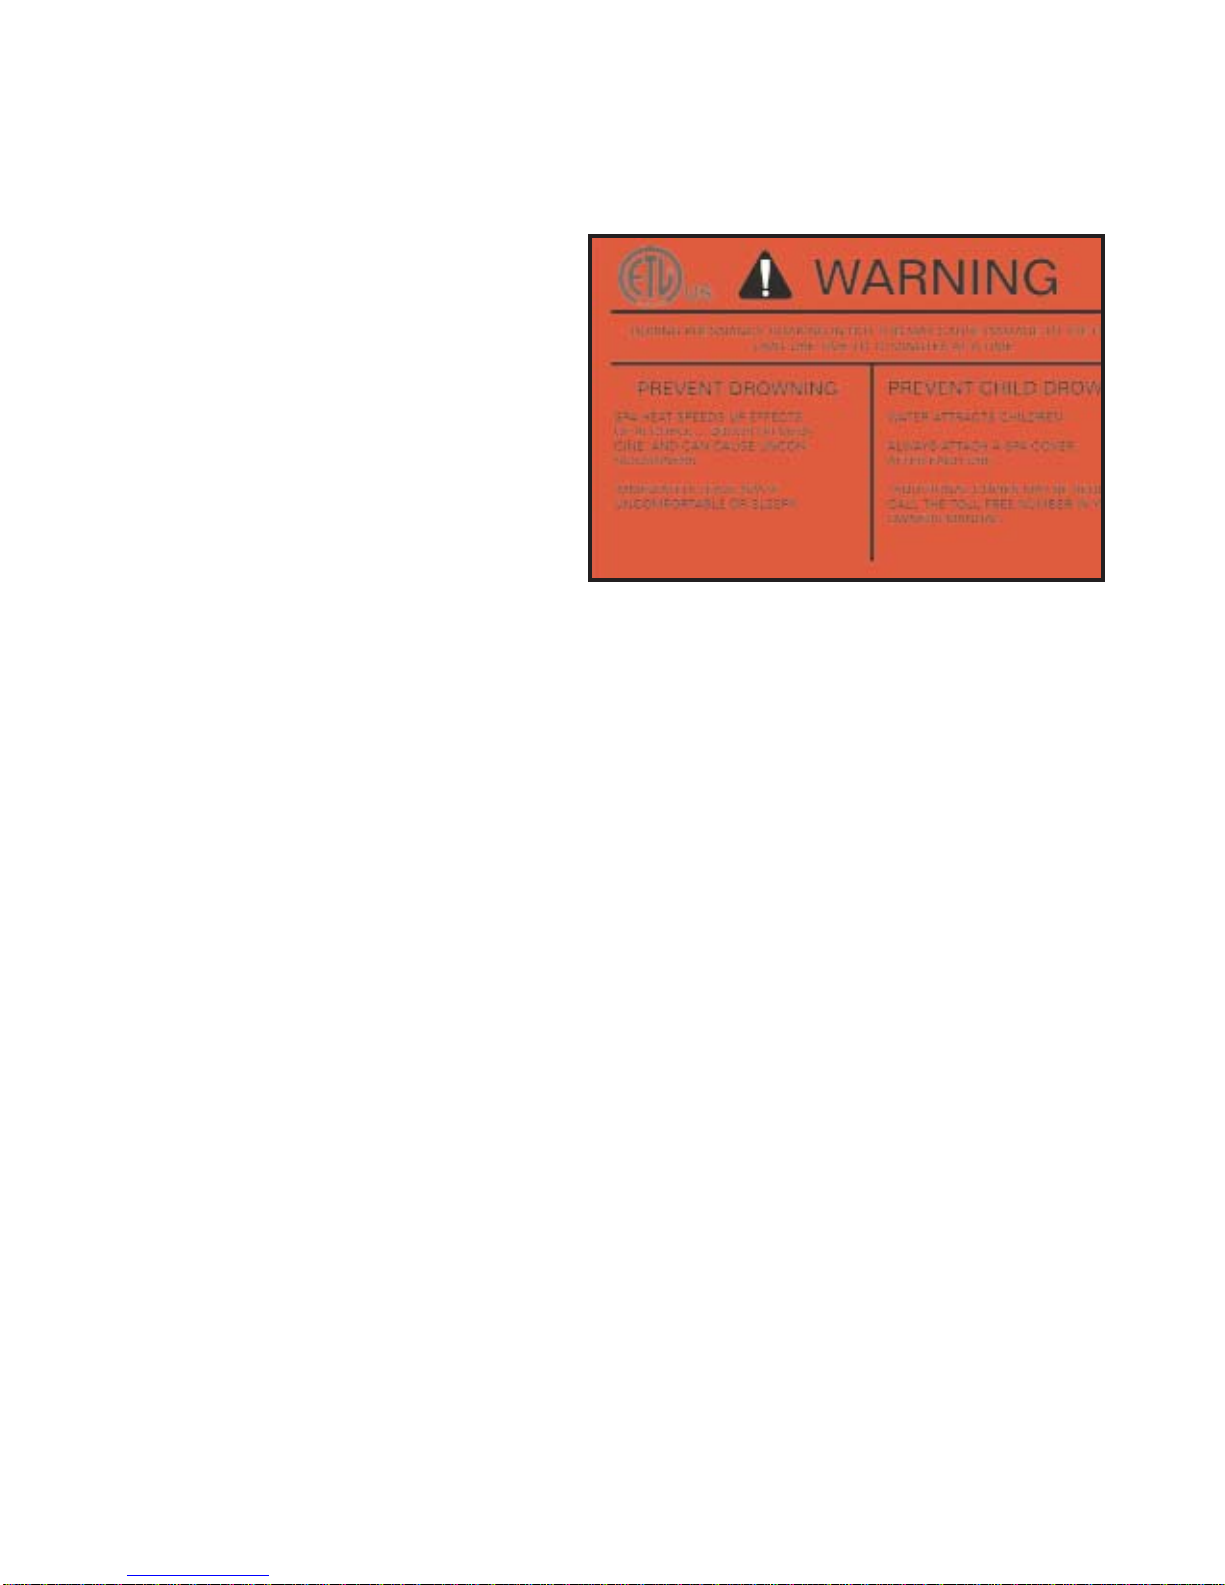
WARNING SIGN MUST BE POSTED
The Warning sign (RED) is packed with your
new Hydro Spa. This sign must be posted in a
prominent place in close proximity to the spa
installation site immediately upon completion of
spa installation.
WARNING: To reduce the risk of injury, do not permit children to use this product unless they
are closely supervised at all times.
WARNING: A grounding wire connector is provided on this unit to connect a minimum No. 8
AWG (8.4mm2) solid copper conductor between this unit and any metal equipment, metal
enclosures of electrical equipment, metal water pipe, or conduit within 5 feet (1.5m) of the
unit.
DANGER: Risk of Accidental Drowning. Extreme caution must be exercised to prevent unau
thorized access by children. To avoid accidents, ensure that children cannot use a spa or hot
tub unless they are supervised at all times. Cover spa and use safety locks to prevent acci
dents.
DANGER: Risk of Injury. The suction fittings in this hot tub are sized to match the specific
water flow created by pumps. Should the need arise to replace the suction fittings or the
pump, be sure that the flow rates are compatible. Never operate the hot tub if the suction fit
ting is broken or missing. Never replace a suction fitting with one rated less than the flow rate
marked on the original suction fitting.
DANGER: Risk of Electric Shock. Install at least 5 feet (1.5m) from all metal surfaces. As an
alternative, a hot tub may be installed within 5 feet of metal surfaces if each metal surface is
permanently connected (bonded) by a minimum No. 8 AWG (8.4mm2) solid copper conductor
attached to the wire connector on the grounding lug, inside the equipment compartment on
the equipment box.
DANGER: Risk of Electric Shock. Do not permit any electrical appliance, such as a light, tele
phone, radio, television, etc. within 5 feet (1.5m) of a hot tub unless such appliance are builtin by the manufacturer.
ELECTRICAL SUPPLY: The electrical supply for this product must include a suitable rated
switch or circuit breaker to open all ungrounded supply conductors to comply with section
422-20 of the National Electrical Code, ANSI/NFPA 70. The disconnect must be readily acces
sible and visible to the hot tub occupant but installed at least 5 feet (1.5m) from the hot tub
water.
IMPORTANT SAFETY INSTRUCTIONS
Page 5

WARNING: To reduce The Risk of Injury:
1. The water in a spa should never exceed 104°F (40°C). Water temperatures between
100°F (38°C). and 104°F(40°C) are considered safe for a healthy adult. Lower water temperatures are recommended for young children and when hot tub use exceeds 10 minutes.
2. Since excessive water temperatures have a high potential for causing fetal damage
during the early months of pregnancy, pregnant or possibly pregnant women should limit hot
tub water temperatures to 100°F (38°C). If pregnant, please consult your physician before
using a hot tub.
3. Before entering the hot tub, the user should measure the water temperature with an
accurate thermometer since the tolerance of the water temperature-regulating devices may
vary as mush as a +/- 5° F (+/-2°C).
4. The use of alcohol, drugs, or medication before or during hot tub use may lead to
unconsciousness with the possibility of drowning.
5. Persons suffering from obesity or a medical history of heart disease, low or high blood
pressure, circulatory system problems, or diabetes should consult a physician before using a
hot tub.
6. Persons using medication should consult a physician before using a hot tub since
some medication may induce drowsiness, while other medication may affect heart rate, blood
pressure, and circulation.
IMPORTANT CANADA SAFETY INSTRUCTIONS
When using this electrical equipment, basic safety precautions should always be followed, including
the following:
1. Read and follow all instructions.
2. Agreen colored terminal or a terminal marked G, Gr, Ground, Grounding or the ground
symbol is located inside the supply terminal box or compartment. To reduce the risk of electric
shock, this terminal must be connected to the grounding means provided in the electric supply
service panel with continuous copper wire equivalent in size to the circuit conductors that sup
ply this equipment.
3. At least two lugs marked "Bonding Lugs" are provided on the external surface or on the
inside of the supply terminal box/compartment. To reduce the risk of electric shock, connect
the local common bonding grid in the area of the hot tub to these terminals with an insulated
or bare copper conductor not smaller than No. 6 AWG.
4. All field-installed metal components such as rails, ladders, drains or other similar hard
ware within 10 feet(3m) of the hot tub shall be bonded to the equipment grounding buss with
copper conductors not smaller than No. 6 AWG.
SAVE THESE INSTRUCTIONS.
WARNING: Children should not use spa without adult supervision.
WARNING: Do not use hot tub unless all suction guards are installed to prevent body and hair
entrapment.
WARNING: People with infectious diseases should not use a hot tub.
WARNING: To avoid injury, exercise care when entering or exiting the hot tub.
IMPORTANT SAFETY INSTRUCTIONS
2
Page 6

3
WARNING: Do not use drugs or alcohol before or during the use of a hot tub to avoid unconsciousness and possible drowning.
WARNING: Pregnant or possibly pregnant women should consult a physician before using a hot tub.
WARNING: Water temperature in excess of 40°C (104°F) may be injurious to your health.
WARNING: Before entering the hot tub, measure the water temperature with an accurate thermome-
ter.
WARNING: Do not use a hot tub immediately following strenuous exercise.
WARNING: Prolonged immersion in a hot tub may be injurious to your health.
WARNING: Do not permit electric appliances (such as lights, telephone, radio, television, etc.) within
5 feet (1.5m) of this hot tub unless such appliances are built-in by the manufacturer.
CAUTION: Maintain water chemistry in accordance with manufacturer's instructions.
WARNING: The use of alcohol or drugs can greatly increase the risk of fatal hyperthermia in hot tub.
HYPERTHERMIA
Hyperthermia occurs when the internal temperature of the body reaches a level several degrees
above the normal body temperature of 98.6°F (37°C). The symptoms of hyperthermia include drowsiness, lethargy, and increase in the internal temperature of the body.
Prolonged immersion in hot water may induce hyperthermia. Adescription of the causes, symptoms,
and effects of hyperthermia are as follows:
CAUTIONS
1. Persons suffering from heart disease, diabetes, high or low blood pressure, and any condition
requiring medical treatment, pregnant women, the elderly, or infants should consult with physician
before using a spa.
2. The water temperature in a spa should not exceed 104°F (40°C). Immersion in water in excess of
104°F (40°C) can be hazardous to your health.
3. Observe a reasonable time limit when using the spa. Long exposure at higher temperatures can
cause high body temperature. Symptoms may include dizziness, nausea, fainting, drowsiness, and
reduced awareness. These effects could possibly result in drowning.
IMPORTANT SAFETY INSTRUCTIONS
Page 7

4. Do not use the spa under influence of alcohol, narcotics, or other drugs. Use of the spa under
these conditions may lead to serious consequences.
5. Always test the spa water temperature before entering the spa . Enter and exit the spa slowly.
Wet surfaces can be very slippery.
6. Never bring any electrical appliances into or near the spa. Never operate any electrical appliances from inside the spa or when you are wet unless such appliances are built-in by the manufacturer.
7. Proper chemical maintenance of spa water is necessary to maintain safe water and prevent possible damage to spa components.
8. Use the straps and clip tie downs to secure the cover when not in use. This will help to discourage unsupervised children from entering the spa. Keep the spa cover secure in high-wind conditions.
There is no representation that the cover, clip tie-downs, or actual locks will prevent access to the
spa.
9. Awarning sign is packed with your new spa. Please install it a location near your spa, where it is
visible to the user of the hot tub. For additional or replacement signs please contact our Service
Department.
For all spas equipped with audio components:
Caution - Risk of Electric Shock.
Do not leave audio compartment door open
Caution - Risk of Electric Shock
Replace audio components only with identical components.
Warning - Prevent Electrocution.
Do not connect any auxiliary components. For example, cable, additional speakers, head
phones, etc. to the system.
IMPORTANT: Because of the combined weight of the spa, water and users, it is extremely important
that the base upon which the spa rests be smooth, flat, level and capable of uniformly supporting this
weight, without shifting or settling, for the entire time the spa is in place. If the spa is placed on a
surface which does not meet these requirements, damage to the skirt and/or the spa shell may
result. Damage caused by improper support is not covered under warranty. It is the responsibility of
the spa owner to assure the integrity of the support at all times.
Manufacturer recommends a poured, reinforced concrete slab with a minimum thickness of 4 inches
(10cm). Wood decking is also acceptable provided it is constructed so that it meets the requirements outlined above. The spa must be installed in such a manner as to provide drainage away
from the spa. Placing the spa in a depression without provisions for proper drainage could allow
rain, overflow and other casual water to flood the equipment and create a wet deck. Install so as to
permit access to the equipment, either from above or below, for servicing. Make certain that there
are no obstruction which would prevent removal of the cabinet side panels and access to the jets
components, especially on the side with the equipment bay doors.
4
IMPORTANT SAFETY INSTRUCTIONS
Page 8
5
Outdoor Location
In selecting the ideal outdoor location for your spa, we suggest that you take into consideration:
1. The proximity to changing area and shelter (especially in colder weather conditions).
2. The pathway to and from the spa (free of debris, dirt, leaves as not to be tracked into
spa).
3. The closeness to trees and shrubbery (leaves and birds could create extra work).
4. Asheltered environment (less wind, weather exposure resulting in lowered operation
and maintenance costs).
Indoor Location
Be sure your spa will fit into the space you have chosen. Proper access into the home is needed to
move the spa into place. Ventilation may be needed because of the humidity from the spa. In most
cases, a spa cover is sufficient. Be sure to check the load carrying capabilities of the floor on which
you will be installing your spa. Most homes meet the requirement of 125lbs per square foot. Insure
you have proper drainage in the event of a leak. In case of maintenance problems; leave enough
room around the spa to work.
CHOOSING A LOCA TION
POWER REQUIREMENTS
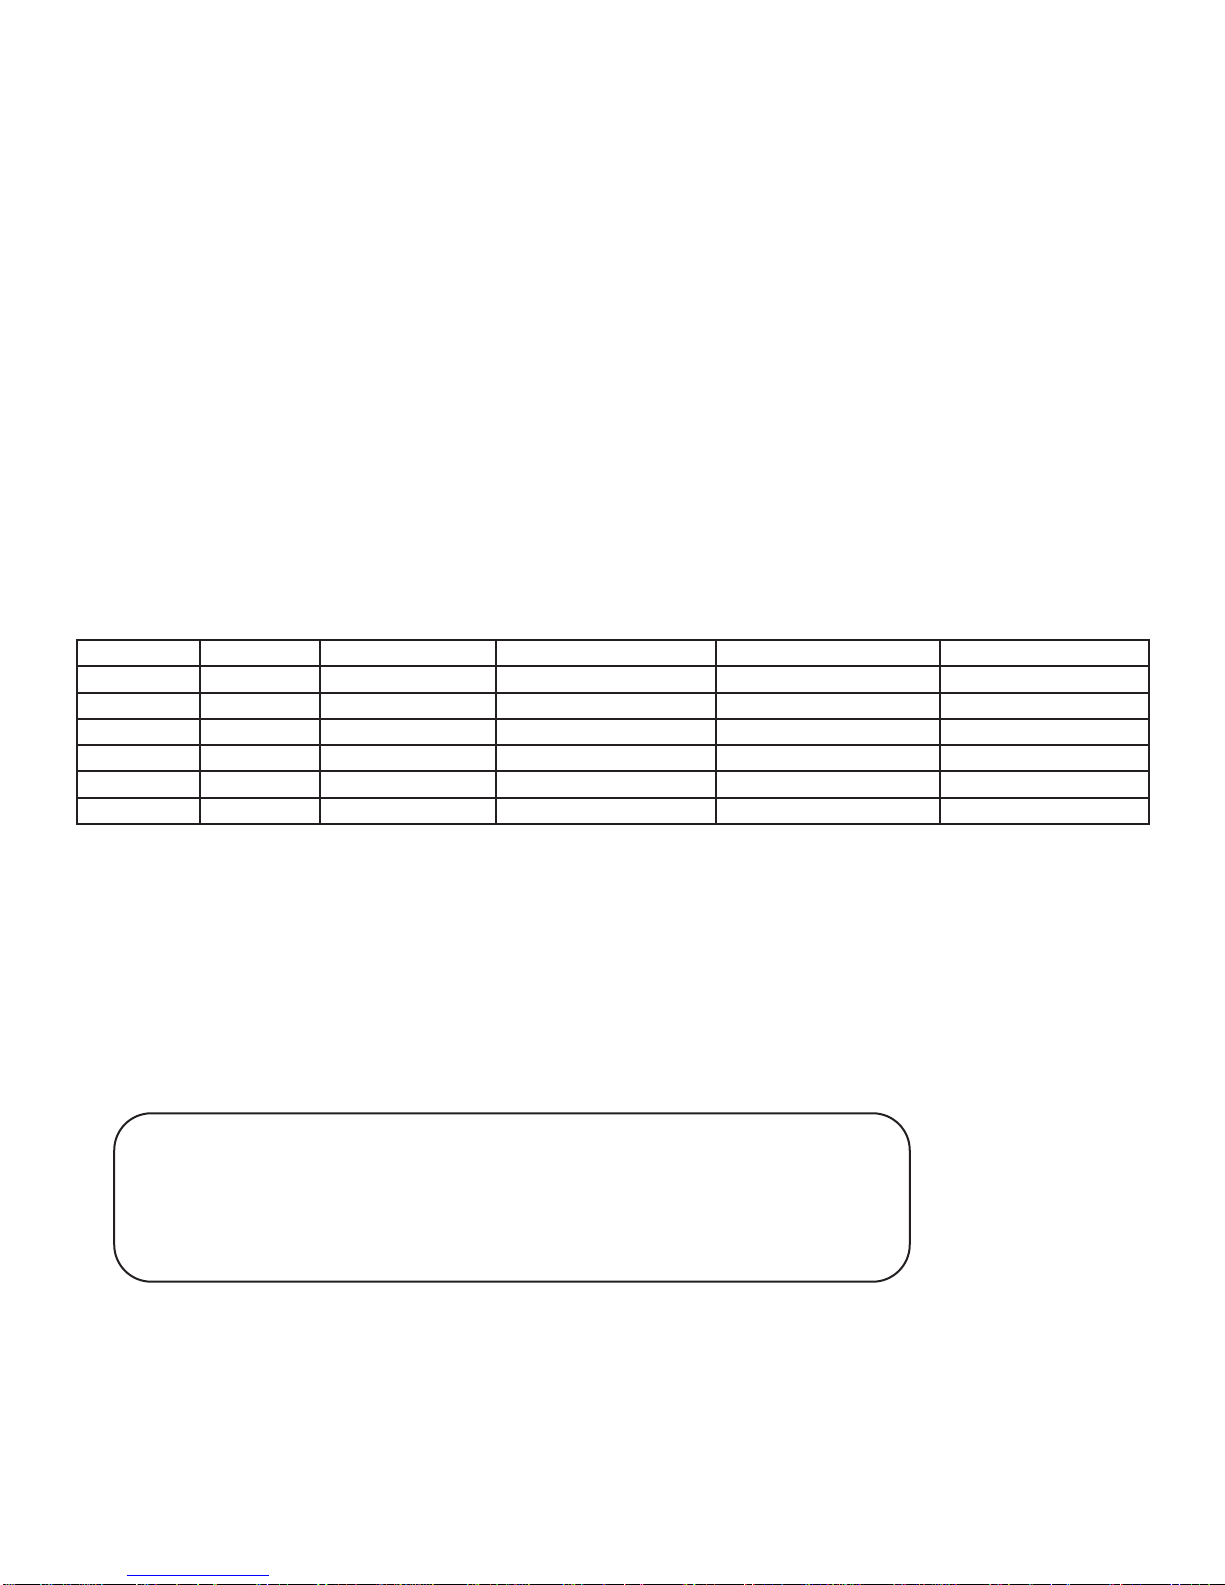
MODEL VOLTS GFCI AMPS EL RA TING AMPS MARKING APPLICATION
Millennium 240 50 40 3 Wire #6 + Grd 3 HS200/HS200M7
Omni 240 50 40 3 Wire #6 + Grd 3 HS200/HS200M7
Solaris 240 50 40 3 Wire #6 + Grd 3 HS200/HS200M7
Stratus 240 50 40 3 Wire #6 + Grd 3 HS200/HS200M7
Lexxus 240 50 40 3 Wire #6 + Grd 3 HS200/HS200M7
Tiara 240 50 40 3 Wire #6 + Grd 3 HS200/HS200M7
Our spas are designed to provide optimum performance and flexibility of use when connected to
their maximum electrical service listed in the table below.
·US/Canada 60Hz Model: 240vac/40A (50A GFCI breaker)
If you prefer, our Service Department can assist you with a minor circuit board modification
("S1"switch "mode operation" ON/OFF in Controller) that allows the spa to operate on a different
electrical service.
Electrical Service Options for all Mark III models:
Voltage 240vac 240vac
Number and size of wires 3wires #6+GR 3wires #6 +GR
Frequency 60Hz 60Hz
Circuit breaker (2-Pole) 40A** 50A*
S1 position ON OFF
* In this configuration, the heater will operate while both jets pumps and blower are running
** In this configuration, the heater will not operate while either jets pump is running or when the
blower is running
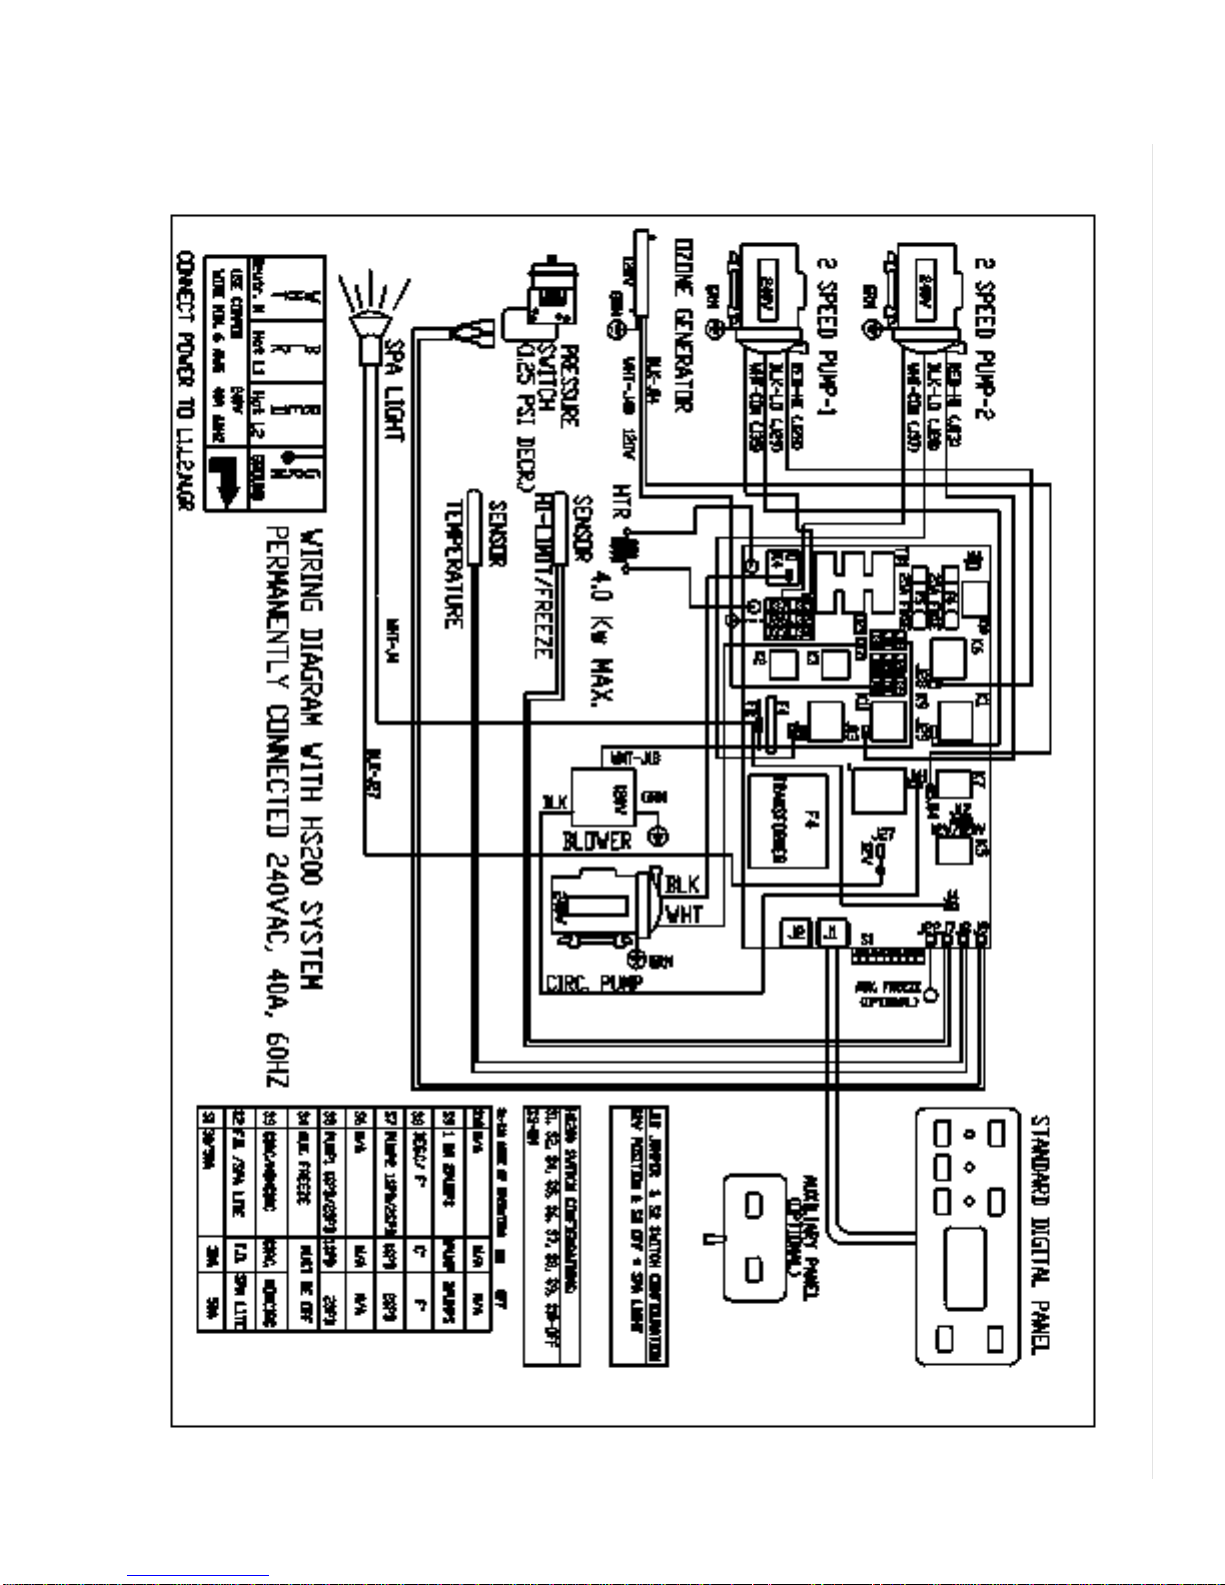
For details See Wiring Diagram Fig. 1 Page 6, Fig. 1b Page 7, and GFCI Wiring Diagram Fig. 2
Page 8.
Page 9
6
Figure 1
WIRING DIAGRAM HS200 SYSTEM
Page 10
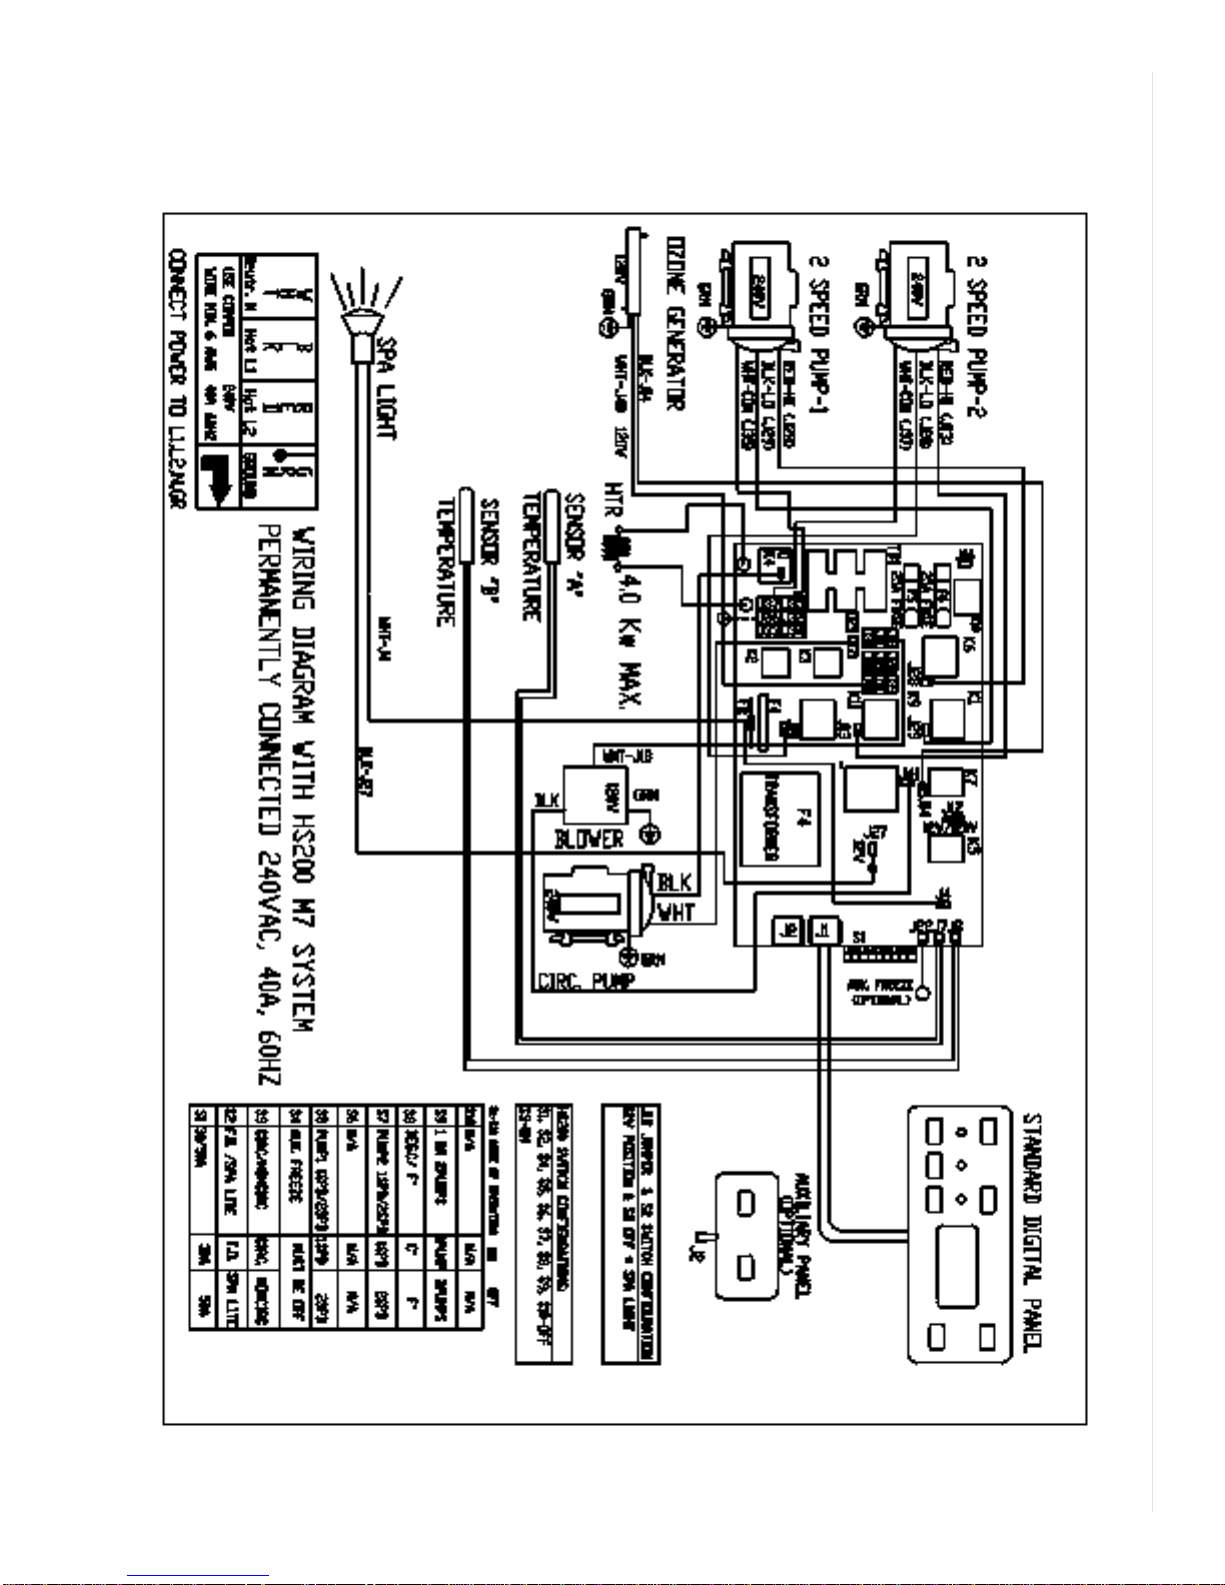
WIRING DIAGRAM HS200 M7 SYSTEM
Figure 1b
7
Page 11
8
GFCI WIRING DIAGRAM
Figure 2
Page 12

Important Notice:
When installed in the United States, the electrical wiring of this spa must meet the requirements of
the National Electric Code (NEC) and any applicable state or local codes. The electrical circuit must
be installed by an electrical contractor and approved by a local building/electrical inspector.
1. All Dedicated 240vac spas must be permanently connected (hard wired) to the power supply. No
plug-in connections or extension cords are to be used in conjunction with operation of this spa. See
specific power supply requirements by model. Supplying power to the spa which is not in accordance
with these instructions will void both the independent testing agency's listing and the manufacturer's
warranty.
2. The power supplied to the spa must be a dedicated circuit.
3. To determine the current, voltage and wire size required for the spa configuration to be connected, refer to Power Supply Requirements in the Owner's Manual.
Wire size must be appropriate per NEC and/local codes, and do not use rating size less than
shown on page 5 chart.
Wire size is determined by length of run from breaker box to spa and maximum current draw.
We recommend copper wire with THHN insulation
All wiring must be copper to ensure adequate connections. Do not use aluminum wire.
When using wire larger than #6 (10mm2), add a junction box near the spa and reduce to short
lengths of #6 (10mm2) wire between the junction box and the spa.
The Electrical supply for the spa must include a suitable rated switch or circuit breaker. The
disconnecting means must be readily accessible to the spa's occupant but installed at least 5
feet (1.5m) from the spa water. Check with local municipalities for additional code require
ments.
The electrical circuit for the spa must include a suitable ground fault circuit interrupter (GFCI)
as required by NEC Article 680-42.
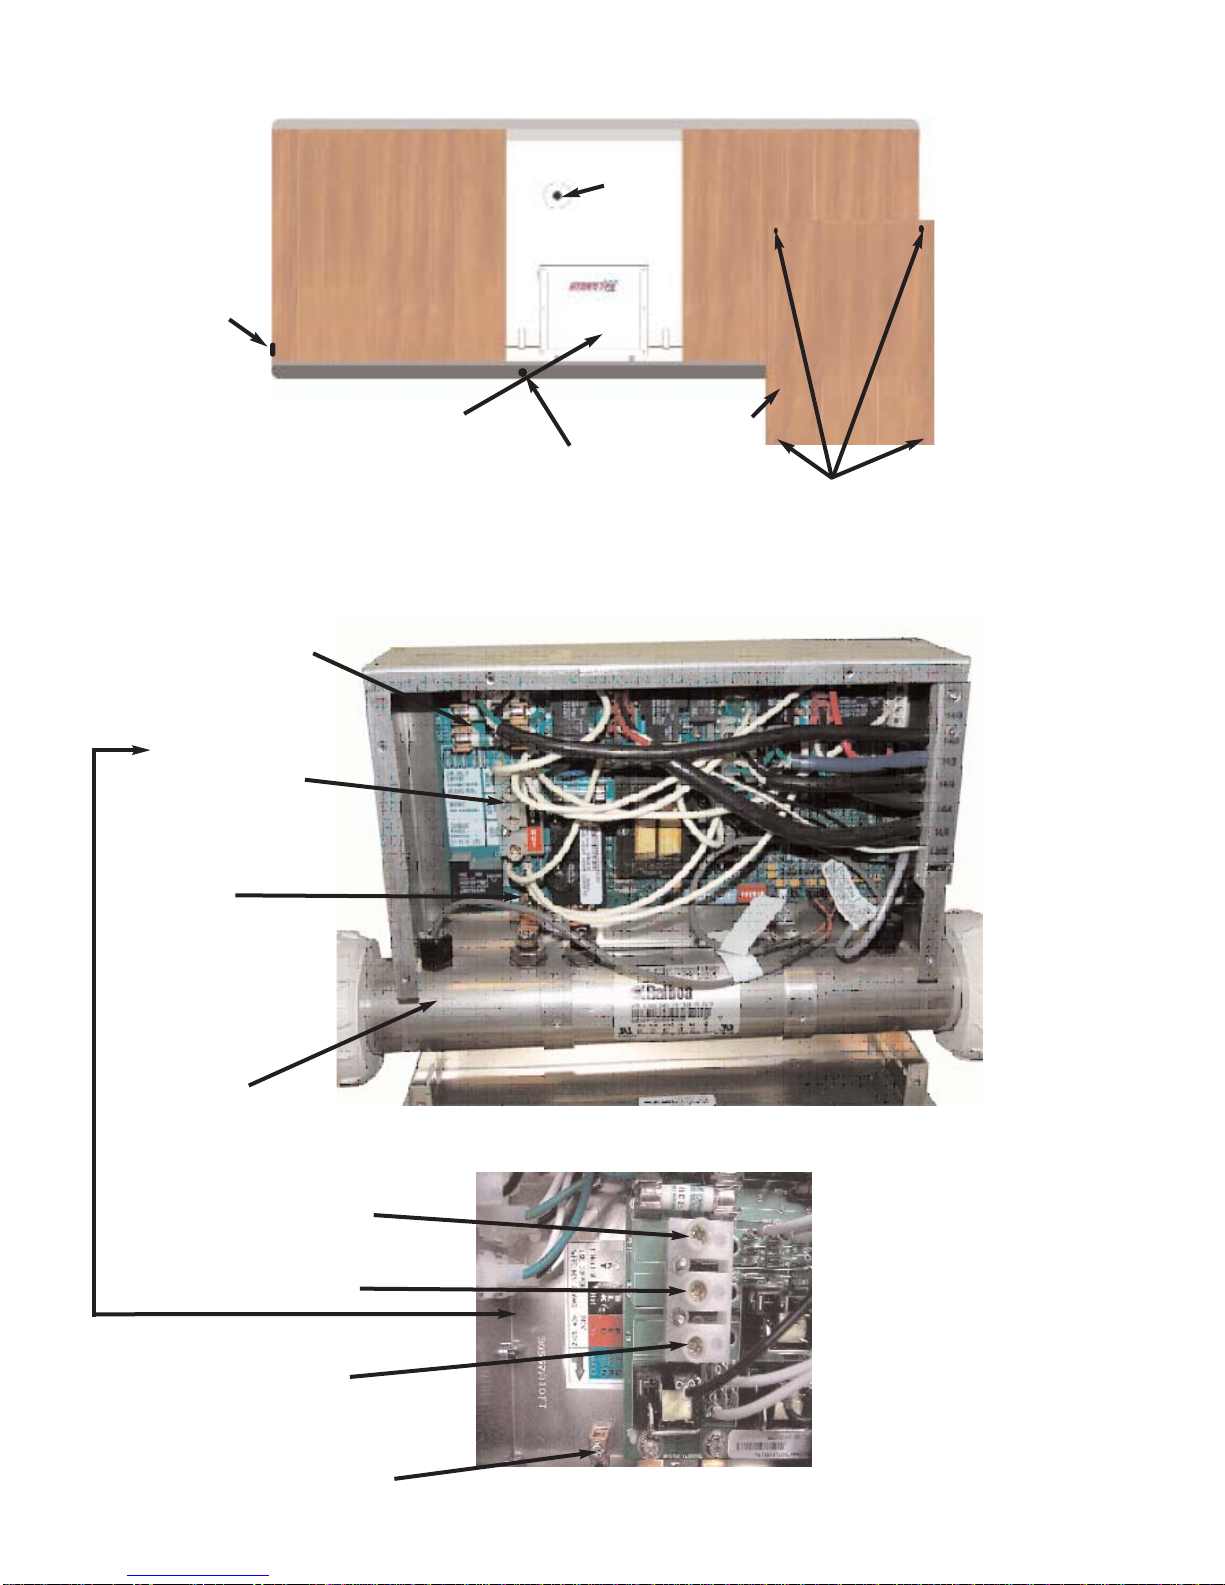
4. To gain access to the spa's power terminal strip, remove the wooden/plastic cabinet panel on the
side of the spa under the control panel. After removing the cabinet panel, remove the metal control
box cover screws and metal control box cover. See Fig. 3, 4.
5. An inlet is provided to allow the power supply to enter the equipment area from the left of the hot
tub near the base. Select the inlet, then feed the power cable through to the control box. If necessary you can drill a cable hole through either the bottom, back or right side of the spa cabinet to
meet cable connection to control box. See Fig. 3.
6. Install power cable through the large opening provided on the left side of the metal control box.
7. Connect wires, color to color, on the terminal block and tighten securely. See Spa controller box
drawing for details. See Fig. 4, 5.
8. Secure the metal control box door by installing its screws, then re-install the cabinet panel under
the control panel. Electrical installation is now complete. See Fig. 3, 4.
Important safety notice for all models!
Proper grounding is extremely important. A pressure securing wire connector (bonding lug) is provided on the outside of the spa controller to permit connection of a bonding wire between the spa and
any metal within 5 feet (1.5m) of the spa. Bonding wire must be at least #8 AWG (8.4mm2) solid
copper wire. For Canada use bonding wire # 6AWG.
ELECTRICAL WIRING INSTRUCTIONS
9
Page 13
10
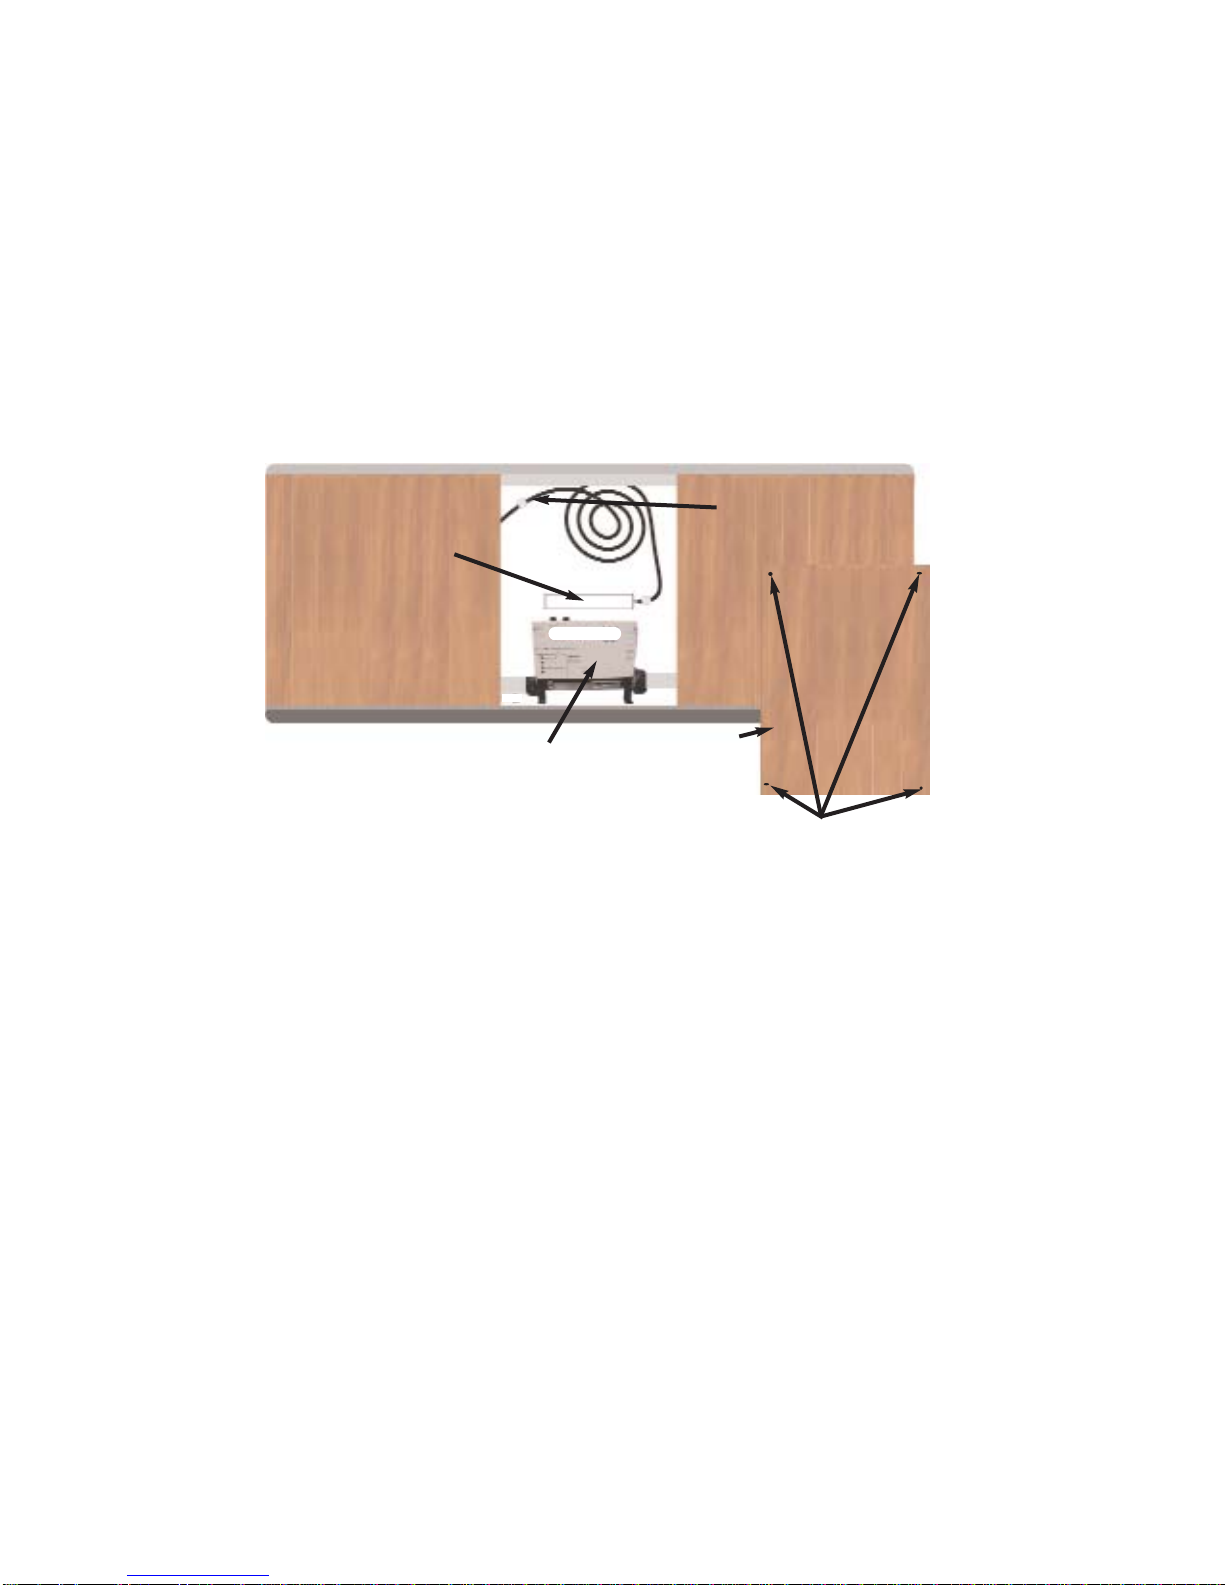
EQUIPMENT AREA DIAGRAM
Figure 3
Spa Cabinet
Control Electrical
Equipment Pack
Door Panel
Door Panel
Screws
Light
CONTROL BOX - INSIDE VIEW
Fuses
Wiring
Connections
Ground
Lug
Heater Tube
Heater Element Inside Tube
Figure 4
Spa Drain
Power Inlet
White
Neutral
Black
Red
Green
Ground
CONTROL BOX WIRING
(HS200 & HS200 M7)
Figure 5
Page 14
FOR BEST RESULTS, READ EACH STEP IN ITS ENTIRELY BEFORE PROCEEDING WITH STEP.
1. Prepare The Hot Tub For Filling
Clear all debris from the hot tub.
Remove filter lid. Place the end of your garden hose into the empty weir filter and begin
filling with clean water.
Note: Never fill with water from a water softener. If your water is extremely "hard", it is
preferable to fill half way with hard water and the rest of the way with softener water. Or, you
may fill entirely with hard water if you use special water additive available from your dealer.
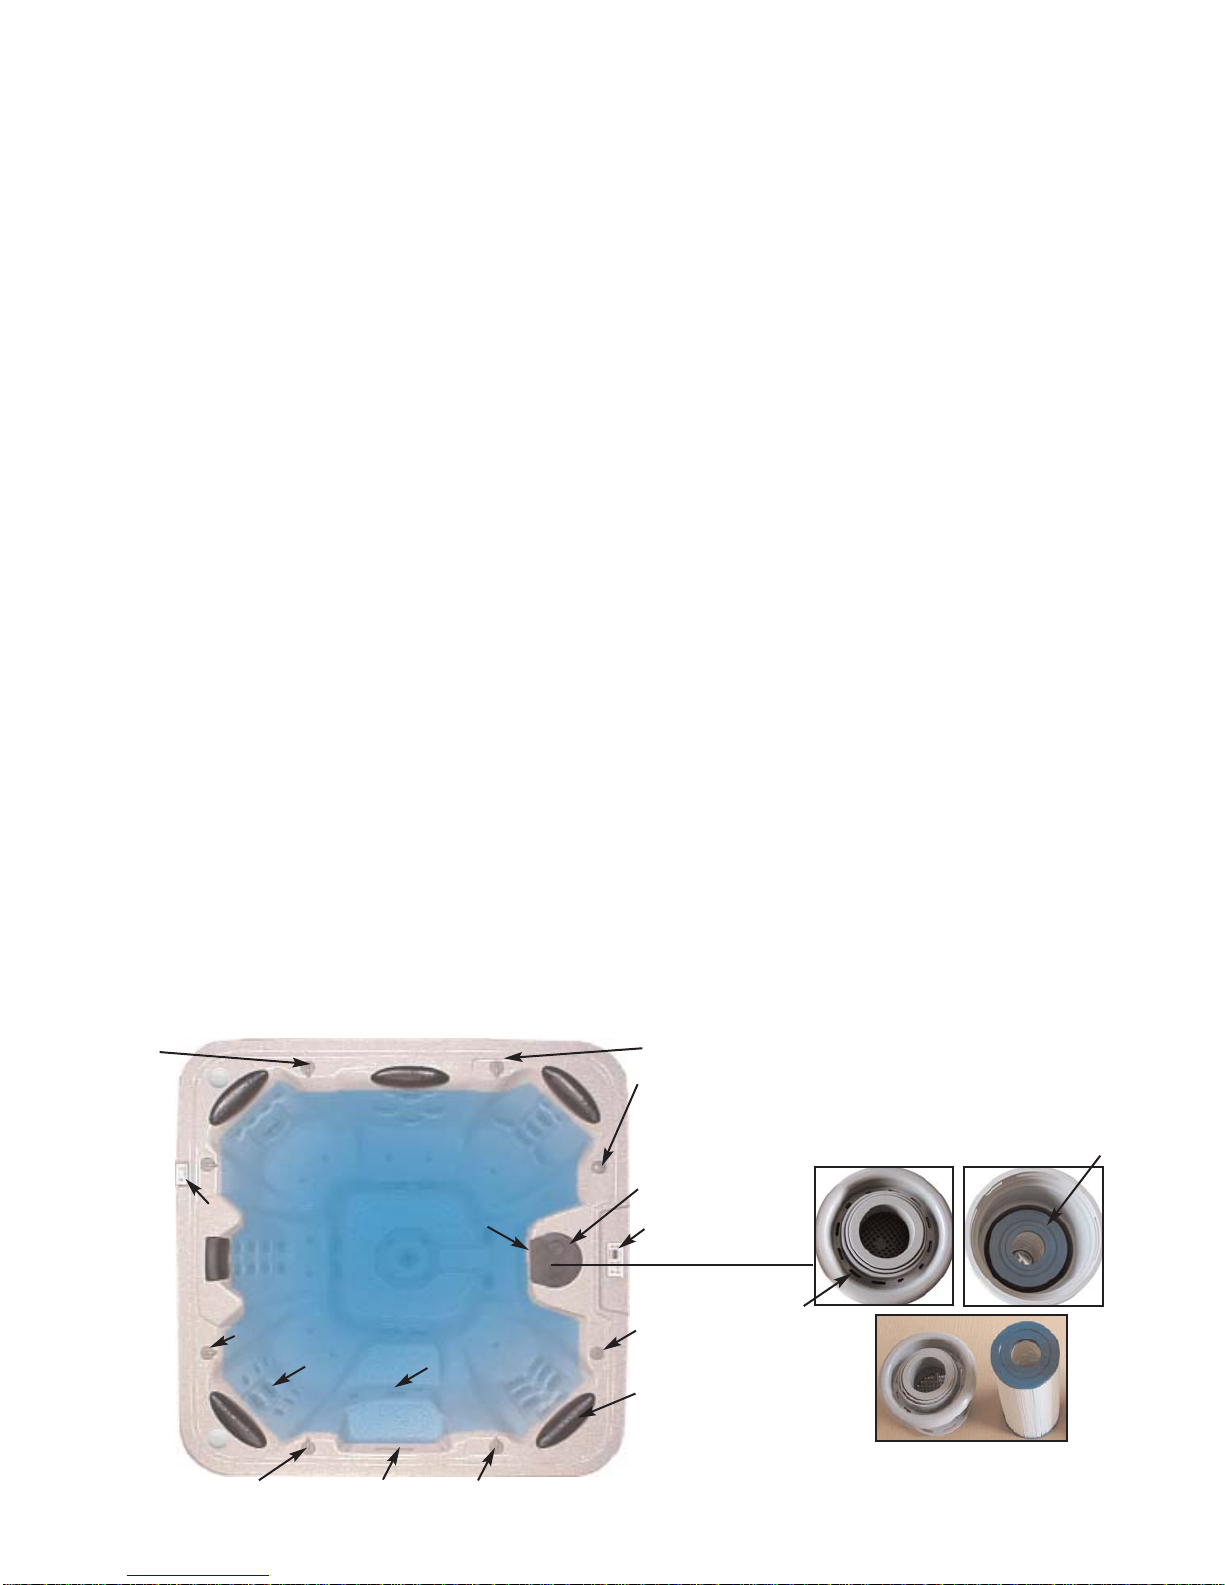
Fill hot tub until water level is 3" above of bottom of filter housing. See Fig. 6, 7.
Do not overfill.
Note: Always fill your spa through the filter bucket. See Fig 7. Failure to do so may cause air to be
trapped in circulation pump, preventing the pump from circulating water.
Remove the hose and re-install lid
2. Turn on power to hot tub at the home circuit breaker GFCI. The GFCI circuit breaker must
be tested before each use of your spa. Press the “TEST” button on the breaker, the circuit
breaker should go to the tripped positon. Reset the GFCI and ensure it stays set.
The heater and circulation pump will automatically activate. Ozone will be on. One minute after start
up blower purges for 30 seconds and pump 1 and pump 2 purge for one minute.
3. Add Start-Up Chemical as recommended by your dealer. Refer to Page 19 for general
guidance.
4. Place Cover On Hot Tub
Keeping the insulating cover in place anytime the hot tub is not in use will reduce the
time for heating, thereby minimizing operating costs.
The time required for initial heat-up will vary depending on the starting water tempera-
ture.
11
START-UP INSTRUCTIONS - HS200 CONTROL
Figure 6
Figure 7
Water Level 3”
Above Bottom Of
Filter Housing
Air Control
Air Control
Aromatherapy
Spa Side Control
Filter Lid & Cup Holder
Water On/Off
Valve
Pillow
Air ControlAir Control
water Fall
Aux Control
Air Control
Pillow
Jets
Filter Bucket
Skimmer Float
Assembly and
Basket
Filter Cartridge
Page 15
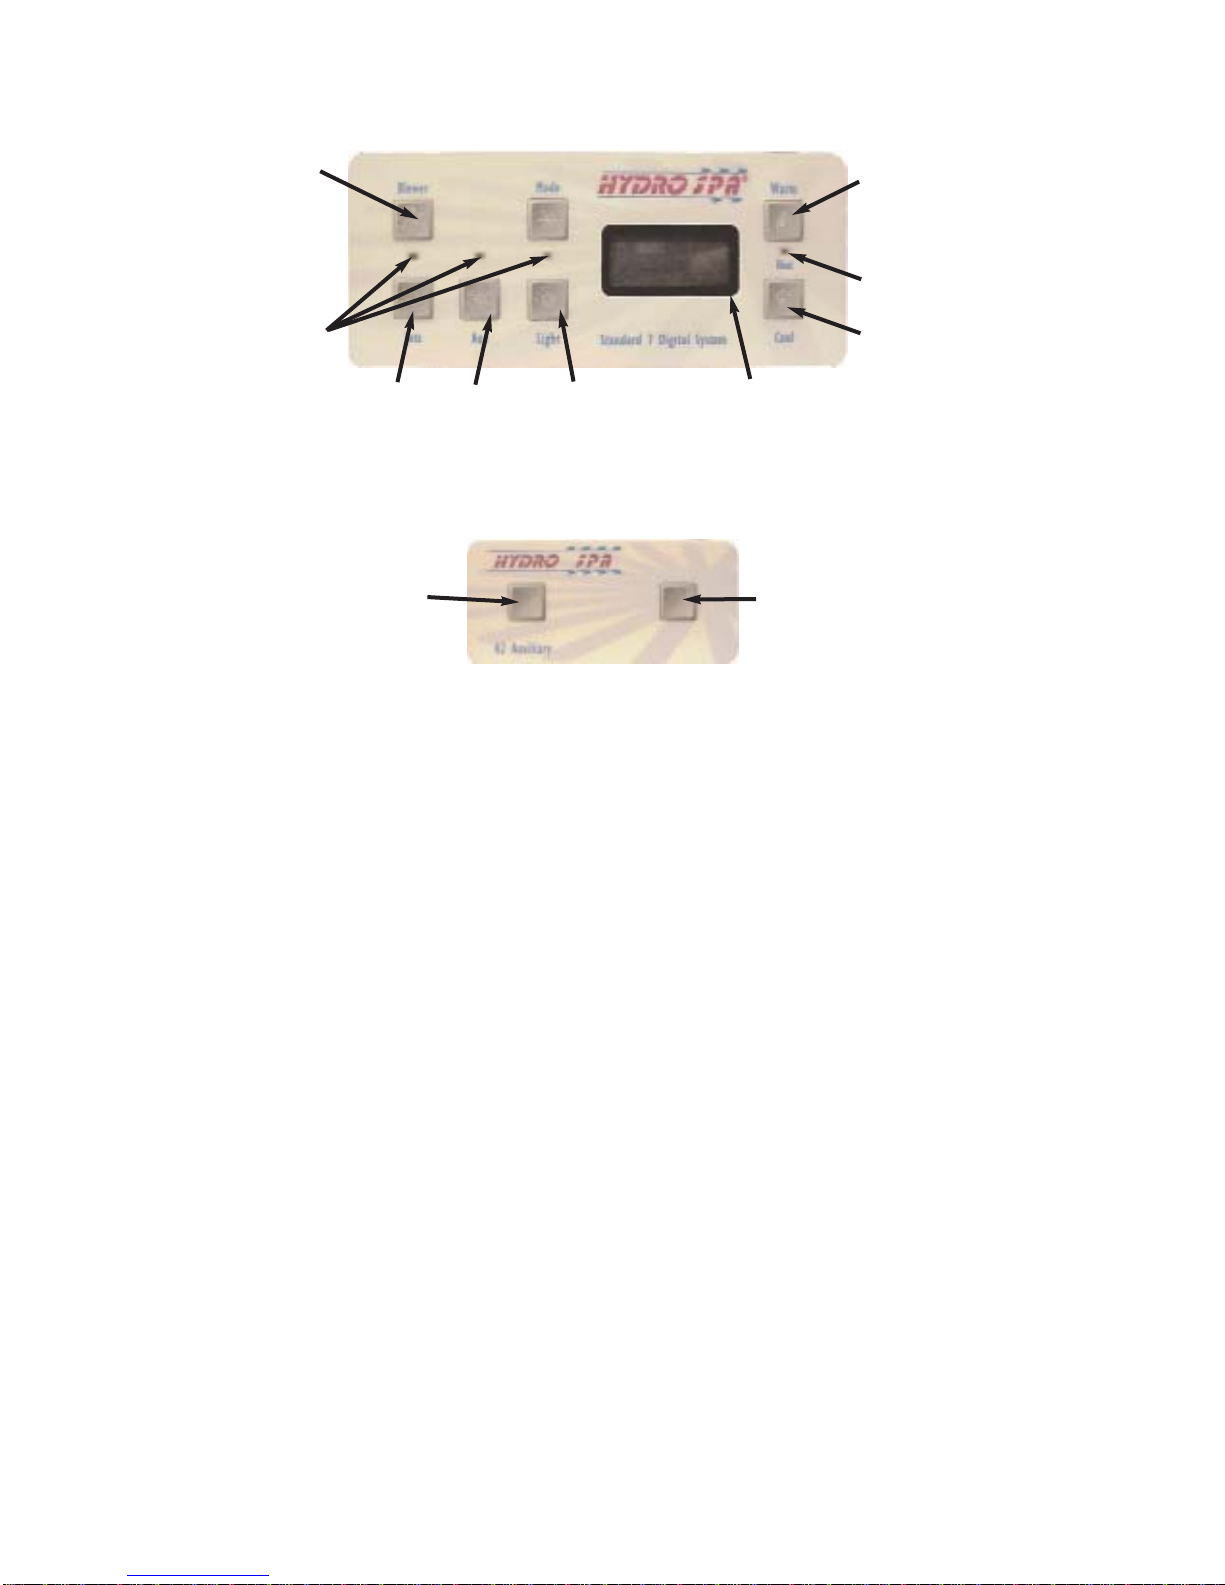
Blower
LED
Indicators
Jets 1
Aux
(Jets 2)
Light
Warm
Heat
Indicator
LED
Cool
Main Control Panel
Control Panel Display
Jets 1
Blower
Auxiliary Control Panel
Figure 8
OPERATING INSTRUCTIONS - HS200
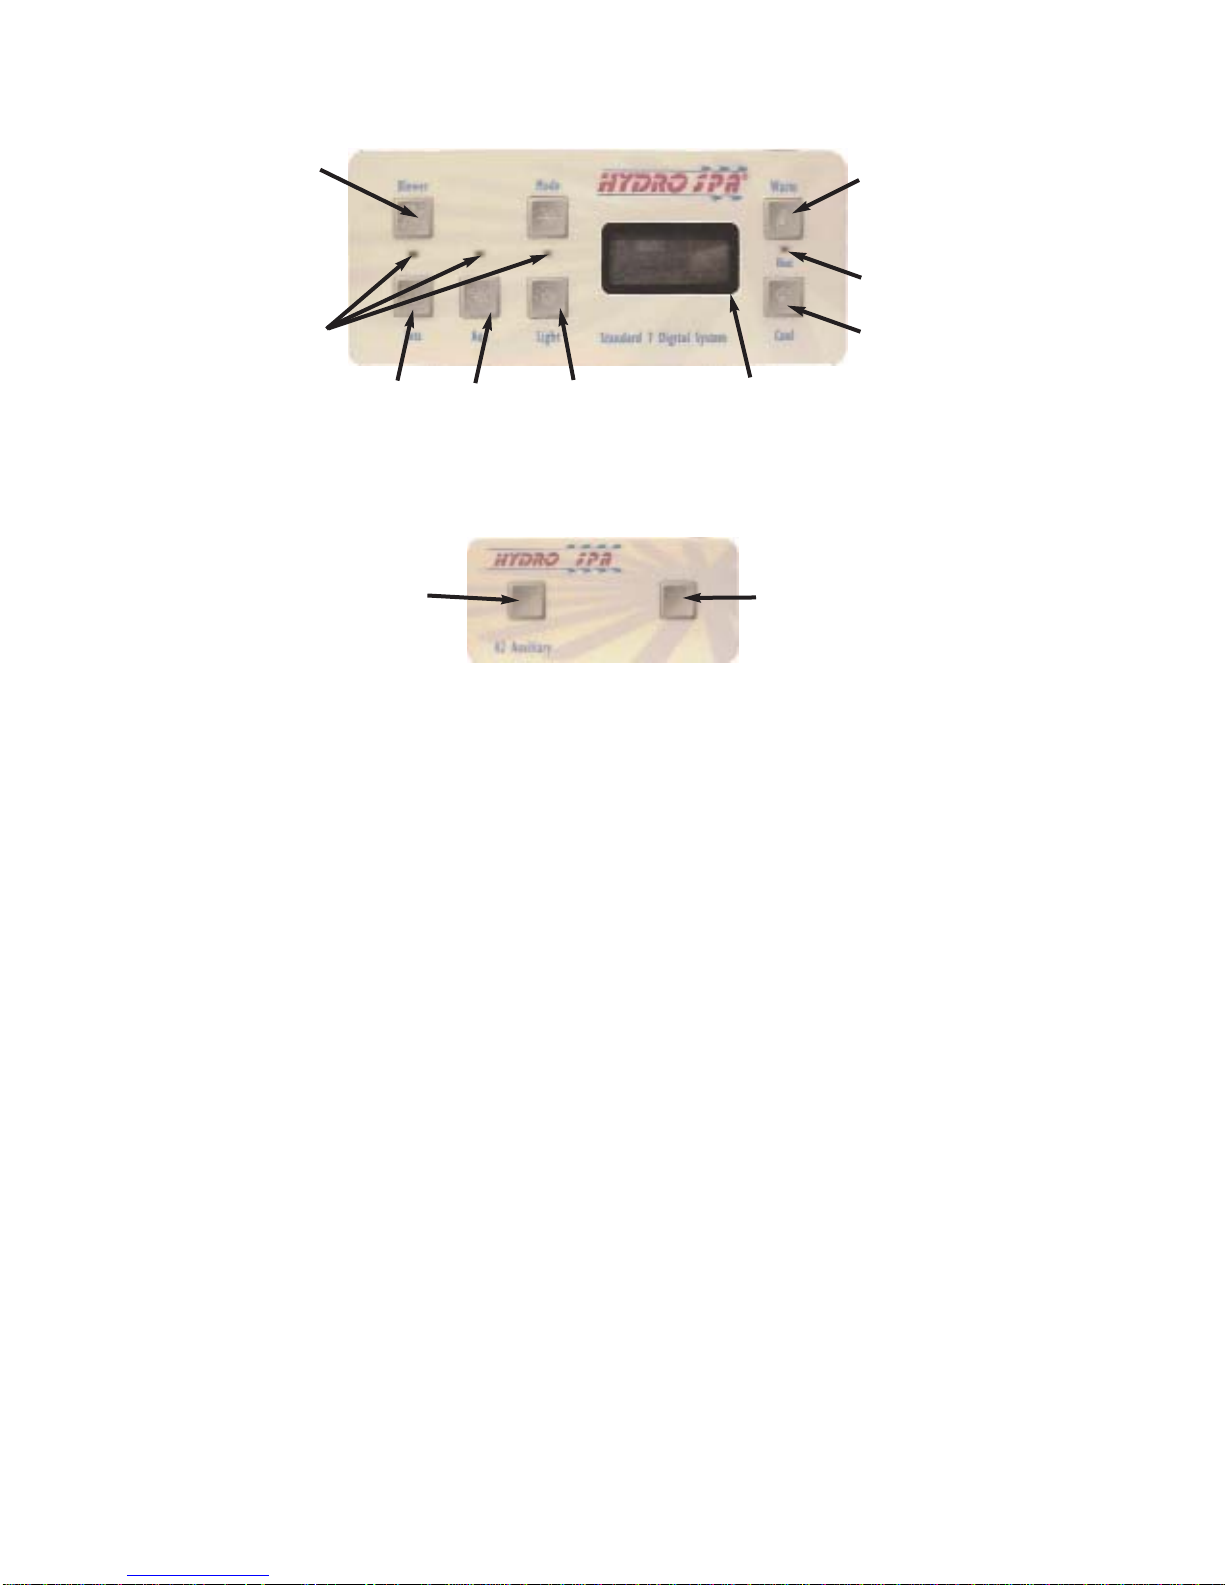
Your spa is equipped with a Topside control panel, air control knobs, on-off waterfall valve and aroma
-therapy canister. Some models are equipped with an auxiliary control panel. All controls located on
the top rail of the spa. These controls let you operate many of the special functions on your spa. The
main control panel controls all of the spa functions and uses indicator LED lights, LCD display to aid
the user to determining the status of the spa. Auxiliary control panel (if equipped) is conveniently
located on top rail so that a user inside of spa can operate the both pumps or pump and blower (See
Fig. 9, 9b). By familiarizing yourself with following information, you will be able to gain the full benefit
afforded by the various functions of your spa.
1. Main Control Panel (Fig. 8)
The main control panel provides quick visual check on the spa's status, and allows the user to adjust
the temperature set, activate the pumps, blower, light, control of the spa status.
The control panel activates functions at the touch of a button. The panel will also display diagnostic
messages which enable you to easily operate your spa and the spa’s condition. See "Display
Message for details" Page 15.
Temperature Adjustment
To adjust your spa temperature by pressing the WARM or COOL button pad. When the
pad is pressed, the display will show the set temperature. Pressing the WARM button
will cause the set temperature to increase or pressing the COOL button pad to
decrease. The temperature adjustment range is 80°F-104°F.
Default setting is 100°F. Any interruption of power will cause the unit to reset and revert
to the default programming of 100°F set point.
Figure 9
12
Page 16

13
Jets 1 control
Your spa is equipped with a two speed motor on pump 1. Depress the JETS1 pad to
turn on pump 1(low speed), depress the JETS1 pad second time to turn on pump
1(high), and depress the JETS1 pad again to turn pump1 off. Corresponding spa jets
will operate when pump 1 is on (low or high). Anytime Pump1 has been manually
turned on, it will automatically turn off after approximately 15 minutes on high speed
and 4 hours for low speed. LED light JETS1 is on when the pump 1 is on.
Aux. control (if spa equipped with 2 speed pump or a single speed pump)
If your spa is equipped with a two speed pump, depress the AUX pad to
turn pump to (low speed) - if a single speed pump, depress AUX pad once to turn
pump on, depress the AUX pad a second time to turn 2 speed pump to (high) depress
AUX pad once to turn single speed pump off. Depress the AUX pad again to turn 2
speed pump off. Corresponding spa jets will operate when pump 2 is on (low or high).
Anytime Pump 2 has been manually turned on, it will automatically turn off after
approximately 15 minutes. LED light AUX is on when the pump 2 is on.
Blower control (if equipped with Air blower)
If your spa is equipped with an Air Blower depress the BLOWER pad to turn on the
Blower. Depress the BLOWER pad a second time to turn the Blower off.
Corresponding air jets will operate when the Blower is on. Anytime the Blower has
been manually turned on, it will automatically turn off after approximately 15 minutes.
Mood Light control
If your spa equipped with a Mood Light, depress the LIGHT pad to turn on the Light.
Depress the LIGHT pad a second time to turn the Light off. The spa mood is light
preprogrammed with assortment of lighting effects. When you turn the Light off, and
turn on within 5 seconds it advances to the next effect. When you turn the Light off for
more than 5 seconds, it remembers that last effect you selected. The next time you
turn on the Light, it will display the sameeffect. The Light will automatically turn off after
approximately 4 hours.
For Standard Light application every time you depress the LIGHT pad the Light will turn
on and off.
Spa Mode selection
Depressing the MODE pad will allow you to select either "Standard" or "Economy"
mode. In Standard mode the water temperature is held to the set temperature at all
times. After the set temperature is reached, the heater turns off and the 24 hour circu
lation pump and ozone generator continue to operate to oxidize and sanitize the spa
water. In Economy mode the 24 hour circulation pump and ozone generator continues
to operate and the heater will turn on only during a programmed filter cycles. See the
circulation pump for details.
Circulation Pump
Your system is equipped with a 24-hour circulation pump which provides 24 hours
countinous water circulation and filtration. The spa’s entire contents is completely fil
tered 50-80 times each day. It works like this: a dedicated, energy efficient, quite
circulation pump constantly draws water from the spa, runs it through the filters and the
heater (heating only when necesssary), then back through return jets to
the spa. The ozone output is on whenever the circulation pump is running.
OPERATING INSTRUCTIONS - HS200
Page 17

Once a day the pumps and blower turn on to prevent the spa water from becoming
stagnant in the plumbing lines of the therapy jets and blower lines when the spa used
very little and improves the skimmer action to remove debris and suspensions from the
water surface, once per day at the start first “filtration” cycle the blower purges all air
lines for 30 seconds and pumps purge all plumbing lines and agitate water for 5
minutes.
In a 24 hour circulation system the “filtration cycle” program operates only on limited
base. In economy mode, when actual water temperature of the spa is below the
set temperature the heater will turn on only during the “filtration cycle”. The default
setting of the filtration cycle is 2 hours, twice per day.
Heater
Your spa is equipped with an electrical heater. By setting your thermostat to the
desired temperature, your heater will automatically turn on and off as needed. The
temperature set point (set temperature) can be adjusted from 80°F to 104°F/26°C40°C). To raise the set temperature press the “Warm” button. To lower the set temper
ature, press the “Cool” button. The start up temperature is set at 100°F/37.5°C.
"Simplified freeze protection"
If a freeze condition is detected (temperature of heater enclosure is less than 44° F, the
pump(s) are automatically activated until the temperature of the heater enclosure
reaches 45° F. If this occurs contact your dealer.
2. Air Volume Control
Your spa is equipped with Air Volume Controls. Each jet system has its own air control. These controls allow you to regulate the amount of air which is mixed with the water entering through the jets.
Counterclockwise rotation adds more air and clockwise rotation reduces air flow. To minimize heat
loss, these controls should be closed when the hot tub is not in use.
3. Waterfall control
Turn the waterfall valve clockwise to decrease or turn off waterfall output. It takes four full revolutions
to change the waterfall from full off to a full on flow rate.
4. Adjusting Jets
All jets in your new spa can be adjusted for high and low impact massage, providing an ultimate
massage. Each jet has its own water volume and directional or oscillating flow adjustment.
To adjust jets:
Turn outer dial counterclockwise to increase water volume. Turn outer dial clockwise to decrease
water volume or to shut jet off.
For adjustment of the directional jets move the nozzle of jet to any angle.
5. Aromatherapy
Simply remove the Aromatherapy injector cap, drop in the injector basket of your favorite scented
beads. When the Air blower is activated, the scent will be released into the spa vapor through the air
injectors. See your dealer for replacement of scented beads.
14
OPERATING INSTRUCTIONS - HS200
Page 18

15
Panel messages are very helpful to the user about the status of the spa and gives a quick clue
toward solving a variety of problems. Here are the most common messages you may see on the
Display and what they mean.
ECON- The spa is in economy mode. ECON flashed alternately with the current spa water temperature.
OH-Overheat (spa is deactivated)
The spa control is at a high-limit condition and the spa is deactivated.
DO NOT ENTER IN THE SPA WATER.
Either the water temperature sensor detected that the spa water temperature is above or equal to
112°F or high-limit sensor detected at least 118°F at the heater. Remove the spa cover and allow
water to cool. Adding cool water may be necessary. If the water is still hotter than the set temperature, press the blower button to cool the spa water. If the water temperature sensor detected temperature above 112° F and the spa water temperature drops to 110°F, the spa should automatically
reset. If the High limit sensor located on heater enclosure detected a temperature above 118° F, a
manual reset required. Push any button on the top side control or turn off the power to the spa and
then power on again. If the spa does not reset, then shut off power to the spa and call your dealer or
service representative.
The following is a list of most probable causes of this message.
Check the position of the slice-valves. Make sure that they are fully open.
Make sure that the cartridge filter has no blockage
Make sure that temperature sensor is fully inserted into the thermo well and that the sensor
mount is properly insulated with foam.
Check the water level. Water level should be 3" above the filter well.
Check the water temperature with an accurate thermometer
SN- Sensor failure detection
This indicates that the high-limit sensor or temperature sensor is open or faulty. The spa is deactivated.
Check the sensor wires for cracks or damage.
Inspect the connections of both sensors to the circuit board. The plugs must be clean.
If the problem continues after following the above steps, then replace the sensor set.
COOL-The Display shows COOL
The water is more than 20°F cooler than the set temperature. The heater will automatically activate
to provide freeze protection. COOL message will disappear once the temperature reaches the set
temperature.
ICE- The Display shows ICE.
When the high-limit sensor reads a temperature below 44°F, the system provides freeze protection. It
automatically activates all of pumps to circulate water and warm the plumbing. Freeze protection is
enabled regardless of the spa status. Consult with a service technician.
DISPLAY MESSAGES - HS200
Page 19

FOR BEST RESULTS, READ EACH STEP IN ITS ENTIRELY BEFORE PROCEEDING WITH STEP.
Prepare The Hot Tub For Filling
Clear any debris from the hot tub.
Remove filter lid. Place the end of your garden hose into the empty weir filter and begin
filling with clean water. Note: Never fill with water from a water softener. If your water is
extremely "hard", it is preferable to fill half way with hard water and the rest of the way
with softener water. Or, you may fill entirely with hard water if you use special water
additive available from your dealer.
Fill hot tub until water level is 3" above of bottom of filter housing. See Fig. 6, and 7 Page 11.
Do not overfill. Note: Always fill your spa through the filter bucket. Failure to do so may cause
air to be trapped in circulation pump, preventing the pump from circulating water.
Remove the hose and re-install filter lid.
Turn on power to hot tub at the home circuit breaker. The GFCI circuit breaker must be
tested before each use of the spa. Press the "Test" button on the breaker, the circuit breaker
should go to the tripped position. Reset the GFCI and ensure it stays on. The circulation
pump will automatically activate. Circ pump is turned on at power up and doesn't turn off
unless detected temperature gets 3 degrees above set temperature (outside filter cycle only;
never turns off inside filter cycle). The Display goes through specific sequences. At first the
Display will show a series of four numbers. The first three numbers in combination are called
the software ID. Following the software ID will either 12 or 24, indicating the heater wattage
the software is configured for. After any power-up, the spa first goes into Priming mode, indi
cated by "Pr". During this mode heating is disabled. All other pumps/blowers can be turned
on to any available speeds (as needed for priming) from the front panel. To exit Priming
mode and begin normal spa operation, press any set temperature button Up/Down).
As soon as "Pr" is indicated on the top side panel, push Jets 1 and Aux. buttons to start the
pumps. Push buttons until both pumps (if equipped) is on high speed. If the pumps have not
primed after two minutes, and water is not flowing from jets in the spa, do not allow the
pumps to continue to run. Turn the power off at main panel and vent air from the pumps. Do
this loosening the union nuts on the discharge side of pumps. Turn the power back on at
main panel. This will initiate a new pump priming mode. Sometimes momentarily turning
pump off and on will help to prime. Do not do this more than five times. Check and adjust if
necessary water and air flow of every jets. See Air Volume control and Adjusting Jets sections
for details. Priming mode will time out after 4 minutes. Ozone generator will turn on. After 6
minutes the actual water temperature will be displayed and heater will turn on if heats
required. The blower (if equipped) purges all air lines for 30 seconds and pump 1 (low) and
pump 2 (high) purge all water lines for 5 minutes.
Set Hot Tub To Heat - To warm hot water tub to a comfortable temperature, follow
these steps: To adjust your spa water temperature press the WARM or COOL button pad.
Default setting is 100F. The set temperature advances or decreases by one degree each time
one of these buttons is pressed. The heater will turn off when the temperature corresponding
to the thermostat setting is achieved. The heater will reactivate after the water cools to
approximately 1F below the set temperature. Setting the thermostat at maximum position will
not accelerate the heating process. This will only result in a higher ultimate temperature.
Heater indicator light is on when the heater is activated.
START-UP INSTRUCTIONS - HS200 M7
16
Page 20

Add Start-Up Chemical as recommended by your dealer. Refer to Page 26 for general guidance.
Place Cover On Hot Tub
Keeping the insulating cover in place anytime the hot tub is not in use will reduce the time for
heating, thereby minimizing operating costs.
The time required for initial heat-up will vary depending on the starting water temperature.
START-UP INSTRUCTIONS - HS200 M7 Cont.
17
Page 21
Blower
LED
Indicators
Jets 1
Aux
(Jets 2)
Light
Warm
Heat
Indicator
LED
Cool
Main Control Panel
Control Panel Display
Jets 1
Jets 2
Auxiliary Control Panel
Figure 8
OPERATING INSTRUCTIONS - HS200 M7
Your spa is equipped with a Topside control panel, air control knobs, on-off waterfall valve and an
aroma -therapy canister. Some models equipped with an auxiliary control panel. All controls located
on the top rail of the spa. These controls let you operate many of the special functions on your spa.
The main control panel controls all of the spa functions and uses indicator LED lights, LCD display to
aid the user to determining the status of the spa. Auxiliary control panel (if equipped) is conveniently
located on top rail so that a user inside of spa can operate the both pumps. By familiarizing yourself
with following information, you will be able to gain the full benefit afforded by the various functions of
your spa.
1. Main Control Panel
The main control panel provides quick visual check on the spa's status, and allows the user to adjust
the temperature set, activate the pumps, blower, light, control of the spa status.
The control panel activates functions at the touch of a button. The panel will also display diagnostic
messages which enable you to easily operate your spa and know about the spa's condition. See
"Display messages for details" Page 21.
Temperature Adjustment
To adjust your spa temperature by pressing the WARM or COOL button pad. When the
pad is pressed, the display will show the set temperature. Pressing the WARM button
will cause the set temperature to increase or pressing the COOL button pad to
decrease. The temperature adjustment range is 80°F-104°F.
Default setting is 100°F. Any interruption of power will cause the unit to reset and revert
to the default programming of 100°F set point.
Figure 9b
18
Page 22

19
Jets 1 control
Your spa is equipped with a two speed motor on pump 1. Depress the JETS1 pad to
turn on pump 1(low speed), depress the JETS1 pad a second time to turn on pump
1(high), depress the JETS1 pad again to turn pump 1 off. Corresponding spa jets will
operate when pump 1 is on (low or high). Anytime Pump 1 has been manually turned
on, it will automatically turn off after approximately 15 minutes on high speed and 4
hours for low speed. LED light JETS1 is on when the pump 1 is on.
Aux. control (if spa equipped with 2 speed pump or a single speed pump)
If your spa is equipped with a two speed pump, depress the AUX pad to
turn pump to (low speed) - if a single speed pump, depress AUX pad once to turn
pump on, depress the AUX pad a second time to turn 2 speed pump to (high) depress
AUX pad once to turn single speed pump off. Depress the AUX pad again to turn 2
speed pump off. Corresponding spa jets will operate when pump 2 is on (low or high).
Anytime Pump 2 has been manually turned on, it will automatically turn off after
approximately 15 minutes. LED light AUX is on when the pump 2 is on.
Blower control (if equipped with Air blower)
If your spa equipped with an Air Blower, depress the BLOWER pad to turn on the
Blower, depress the BLOWER pad a second time to turn the Blower off. Corresponding
air jets will operate when Blower is on. Anytime Blower has been manually turned on, it
will automatically turn off after approximately 15 minutes.
Mood Light control
If your spa equipped with a mood Light, depress the LIGHT pad to turn on the Light,
depress the LIGHT pad a second time to turn the Light off. The spa mood light prepro
grammed with assortment of lighting effects. When you turn Light off and turn on within
5 seconds it advances to the next effect. When you turn the Light off for more than 5
seconds, it remembers that last effect you selected. The next time you turn on the
Light, it displays same effect. The Light will automatically turn off after approximately 4
hours. For Standard Light application every time you depress the LIGHT pad the Light
will turn on and off.
Spa Mode selection
Depressing the MODE pad will allow you to select either "Standard", "Economy" or
"Sleep" mode. In Standard mode the water temperature is held to the set temperature
all time. After the set temperature is reached, the heater turns off and the 24 hour circu
lation pump and ozone generator continue to operate to oxidize and sanitize the spa
water. In Economy mode the 24 hour circulation pump and ozone generator continues
to operate and heater will turn on only during a programmed filter cycles. The heater in
Economy mode will operate when actual water temperature of the spa is below the set
point temperature and spa is in filtration cycle. Default setting of filtration cycle is 2
hours, twice per day. In Sleep mode the 24 hour circulation pump and ozone generator
continues to operate and heater will turn on only during a filtration cycle and the water
temperature in spa is 20F below the set temperature.
Circulation Pump
Your system is equipped with a 24-hour circulation pump which provides 24 hour con
tinuous water circulation and filtration. The spa's entire contents is completely filtered
50-80 times each day . It works like this: a dedicated, energy efficient, quit circulation
OPERATING INSTRUCTIONS - HS200 M7
Page 23

pump constantly draws water from the spa, runs it through the filters and the heater,
then back through return jets to the spa. The ozone output is on whenever the circulaion pump is running. Twice per day the pumps and blower (if equipped) turn on to pre
vent the spa water from becoming stagnant in plumbing lines of therapy jets and blower
lines when the spa used very little and improves the skimmer action to remove debris
and suspensions from the water surface, twice per day at the start of every filter cycle
the blower purges all air lines for 30 seconds and pumps purge all plumbing lines and
agitate water for 5 minutes. In a 24 hour circulation system the "filtration cycle" pro
gram operates only on limited base. In Economy mode, when actual water temperature
of the spa is below the set temperature the heater will turn on only during the filtration
cycle. In "Sleep" mode when actual water temperature of the spa is 20°F below the set
temperature the heater will turn on only during the filtration cycle.
Heater
Your spa is equipped with an electrical heater. By setting your thermostat to the desired
temperature, your heater will automatically turn on and off as needed. The temperature
set point ( set temperature) can be adjusted from 80°F to 104°F/26°C-40°C). To raise
the set temperature press the "Warm" button. To lower the set temperature, press the
"Cool" button. The start up temperature is set at 100°F/37.5°C.
"Simplified freeze protection"
If a freeze condition is detected (temperature of heater enclosure is less than 44° F, the
pump(s) are automatically activated until the temperature of heater enclosure reaches
45° F. The freeze protection is enabled regardless of the spa mode.
2. Air Volume Control
Your spa is equipped with Air Volume Controls. Each jet system has its own air control. These controls allow you to regulate the amount of air which is mixed with the water entering through the jets.
Counterclockwise rotation adds more air and clockwise rotation reduces air flow. To minimize heat
loss, these controls should be closed when the hot tub is not in use.
3. Waterfall control
Turn the waterfall valve clockwise to decrease or turn off waterfall output. It takes four full revolutions
to change the waterfall from full off to a full on flow rate.
4. Adjusting Jets
All jets in your new spa can be adjusted for high and low impact massage, providing an ultimate
massage. Each jet has its own water volume and directional or oscillating flow adjustment.
To adjust jets:
Turn outer dial counterclockwise to increase water volume. Turn outer dial clockwise to decrease
water volume or to shut jet off.
For adjustment of the directional jets move the nozzle of jet to any angle.
5. Aromatherapy
Simply remove the Aromatherapy injector cap, drop in injector basket your favorite scented beads.
When the Air blower is activated, the scent will be released into vapor through the air injectors of
your spa. See your dealer for replacement of scented beads.
OPERATING INSTRUCTIONS - HS200 M7
20
Page 24
21
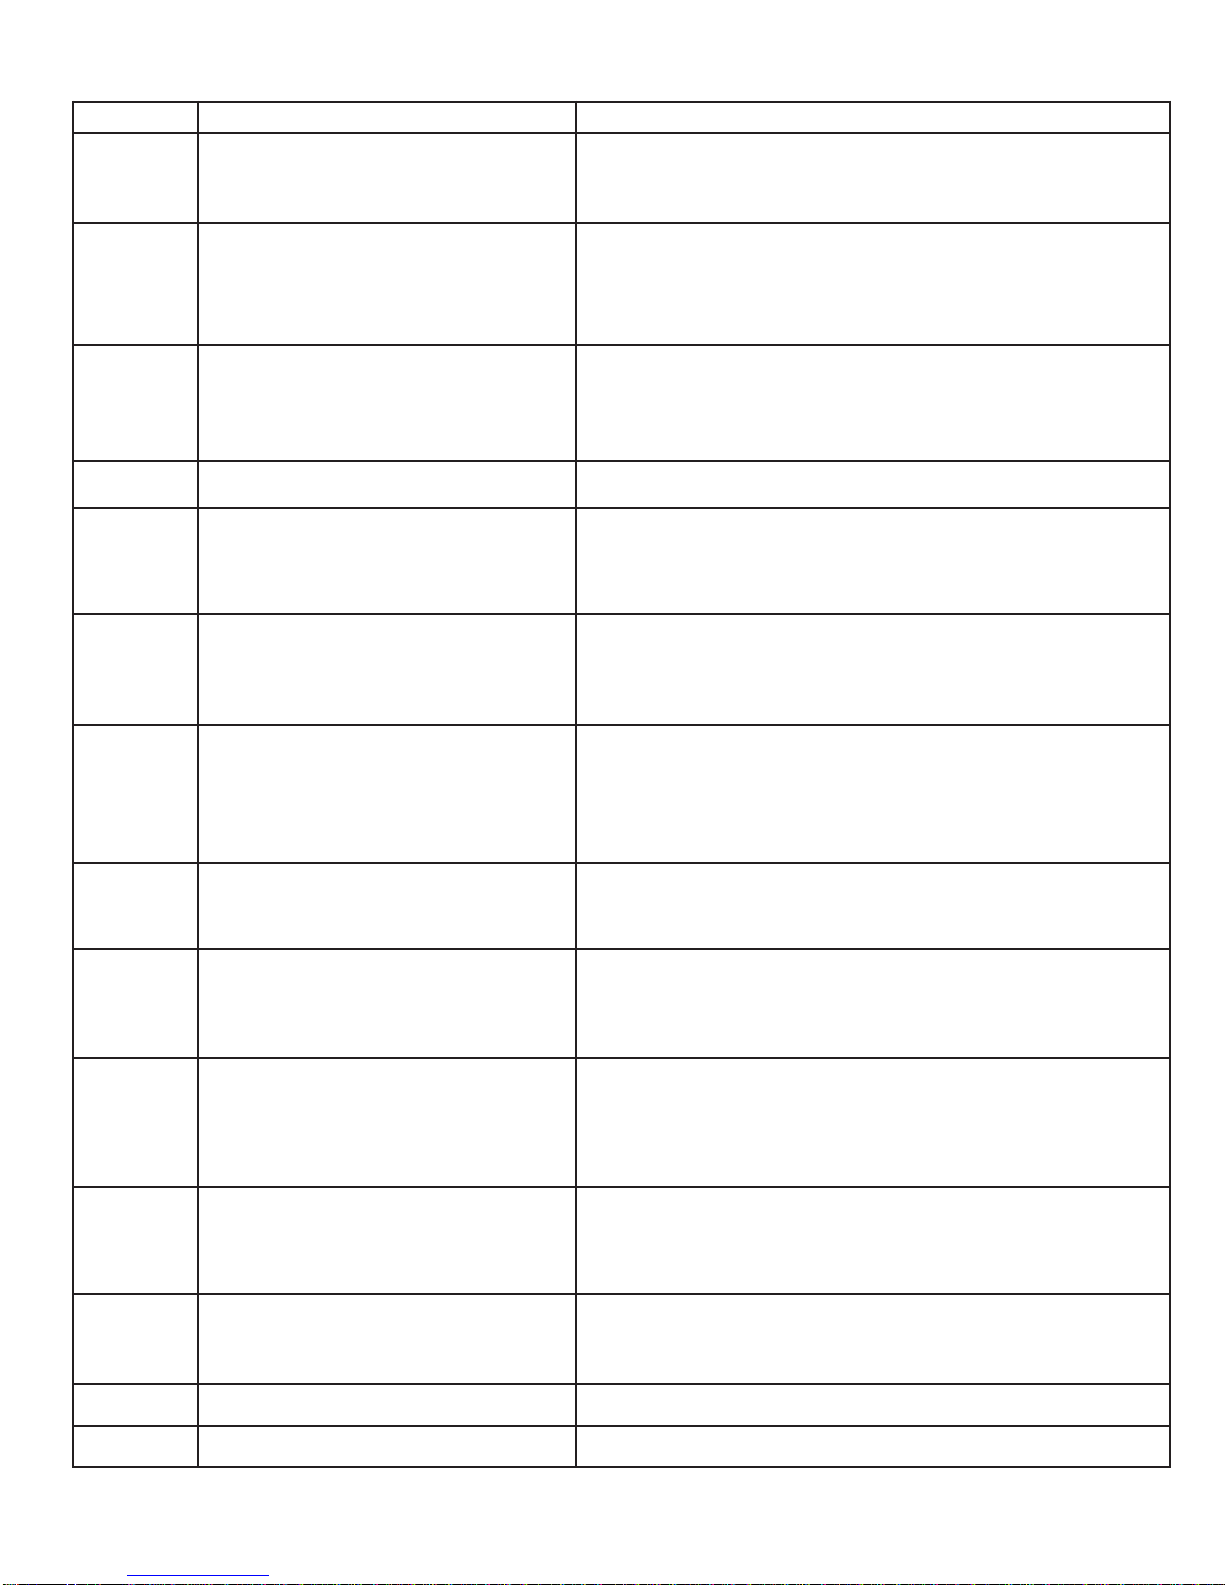
DISPLAY MESSAGES - HS200 M7
Message Meaning Action required
No message on display. Power has been
cut off to spa.
The control panel will be disabled until power returns. The system
reset the time of day on each power up. Spa settings are preserved.
OHH "Overheat"- The spa has shut down. One
of the sensors detected 118egree F
(approximately 47.8 degree C) at the
heater.
Do not enter the water. Remove the spa cover and allow the
water to cool. Once the heater has cooled, reset by pushing any
button. If the spa does not reset, shut off the power to the spa and
call your dealer or service.
OHS "Overheat"- The spa has shut down. One
of the sensors detected that the spa
water is 110egree F (approximately 43.3
degree C).
Do not enter the water. Remove the spa cover and allow the
water to cool. At 107 degree F (approximately 41.7 degree F), the
spa should automatically reset. If the spa does not reset, shut off
the power to the spa and call your dealer or sevice.
ICE "Ice" - Potential freeze condition detected.No action required. The pumps and the blower will automatically
activate regardless of the spa status.
SnA Spa is shut down. The sensor that is
plugged into the "Sensor A" jack is not
working correctly.
Check the sensor "A" plug connection to circuit board. If the problem persists, contact your dealer or service. (The problem may
appear temporarily in an overheat situation and disappear when
the heater cools).
SnB Spa is shut down. The sensor that is
plugged into the "Sensor B" jack is not
working correctly.
Check the sensor "B" plug connection to circuit board. If the problem persists, contact your dealer or service. (The problem may
appear temporarily in an overheat situation and disappear when
the heater cools).
SnS Sensors are out of balance. If this is alter-
nating with temperature, it may just be
temporary condition. If the display shows
only this message (periodically blinking),
the spa is shut down.
If the problem persists, contact your dealer or service.
HFL A substantial difference between sensors
was detected. This could indicate a flow
problem.
Check water level in spa. Add water if necessary. Be sure that
slide-valves are open. Make sure the circulation pump have been
primed and has power.
LF Persistent low flow problems. Displays on
the fifth occurrence of the "HFL" message
within 24 hours. Heater is shut down, but
other spa functions to run normally.
Follow actions required for "HFL" message. Heating capacity of
the spa will not reset automatically; you may press any button to
reset or cycle the power off and on.
dr Inadequate water detected in heater.
Displays on third occurrence of "dr" message. Spa is shut down for 15 minutes.
Check water level in spa. Add water if necessary. Be sure that
slide-valves are open. Make sure the circulation pump have been
primed and has power. On the third consective occurrence of the
dr message (without a successful heating cycle in between) the
panel will display dr4.
dr4 Inadequate water detected in heater.
Displays on third occurrence of "dr" message. Spa is shut down and will not reset
in 15 minutes.
Check water level in spa. Add water if necessary. Be sure that
slide-valves are open. Make sure the circulation pump have been
primed and has power. Press any button to reset.
Pr When your spa is first activated, it will go
into Priming mode.
See the 24 hour circulation pump operation. The Priming mode
will last for up to four minutes and then the spa will begin to heat
and maintain the water temperature in Standard mode.
- F Temperature unknown After 6minutes Pr mode, the temperature will be displayed.
- C Temperature unknown After 6minutes Pr mode, the temperature will be displayed.
Page 25
22
Draining Your Spa
To drain your spa, perform the following steps:
1. Turn the power off. (Turn breaker off).
2. Select a safe, suitable drainage area capable of safely assimilating 300 plus gallons of water,
which may contain both unsanitary contaminants and chemical residue that could cause harm to
plants or grass.
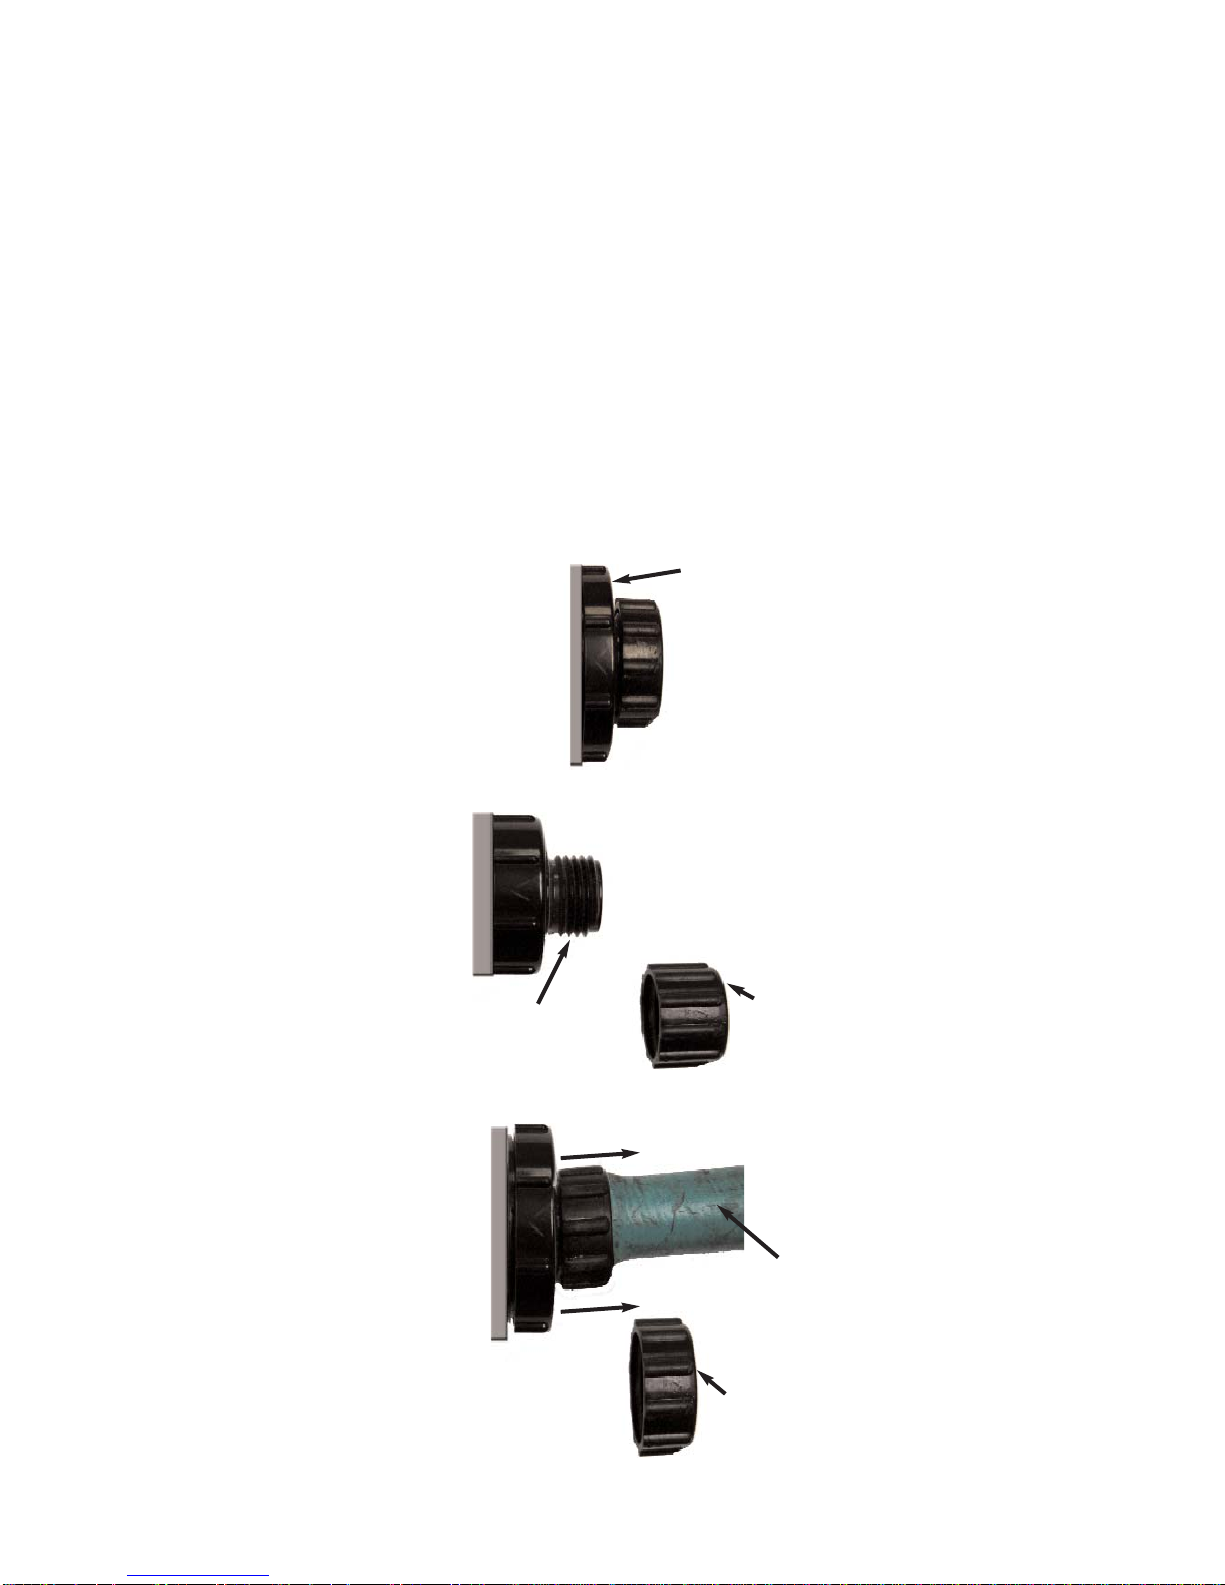
3. Locate drain valve at front of the spa of outside of pan bottom. See Fig. 3,10. Hold the rear
body to prevent it from turning, then loosen and remove the front cap to expose male hose threads.
4. Attach garden hose to the exposed threads.
5. Twist the drain fitting 1/3 turn counterclockwise to unlock the drain valve and pull it outward to
open completely. The spa water will drain by gravity flow.
6. After the spa drains, perform steps 3-5 in reverse order to close the drain prior to refilling spa.
7. After refilling, turn on the power to the spa and follow the steps listed under “Start-Up Instructions.
SPA CARE AND MAINTENANCE
Spa Drain Fitting
w/Cap Removed.
Attach Garden
Hose.
Figure 10
Spa Drain Fitting
w/Cap Installed
Cap
Drain Fitting
Hose Thread
Cap
Garden Hose
Pull Out
Pull Out
Spa Drain Fitting
Attached with
Garden Hose.
Rear Body
Page 26

23
Filter Cleaning and Cartridge Replacement
The filter(s) in your spa should be cleaned at least every month, depending on spa usage. This will
ensure that the water is being filtered properly, and there is no restriction in the filter due to dirt and
grease build-up. Turn off the spa, remove filter lid and set aside. Remove the filter skimmer basket
by turning it counterclockwise. Remove the filter element and replace or clean. Reinstall skimmer
basket turning it clockwise and turn the spa back on.
Cleaning the filter can be done easily using a Filter Degreaser solution and following the directions
on the bottle. Soak filter in a degreaser and power wash with a garden hose. It is recommended to
have a second filter, which can be cleaned between filter changes. This will enable you to quickly
exchange the dirty filter with a clean filter and immediately re-start your spa.
Care Of The Exterior
Spa Shell
Your spa shell is made of acrylic. Stains and dirt generally will not adhere to the surface. A soft rag
or a nylon scrubber should easily remove most dirt. Most household chemicals are harmful to your
spa’s shell. See your dealer for the best product to use. The only products which have passed the
manufacturer’s test are Soft Towel and Windex. Sodium bicarbonate (baking soda) can also be used
for minor surface cleaning. Always thoroughly rinse off any spa shell cleaning agent with fresh
water.
NOTES: Iron and copper in the water can stain the spa shell if allowed to go unchecked. Ask your
Hydro Spa dealer about a stain and scale inhibitor to use if your spa water has a high concentration
of dissolved minerals.
The use of alcohol or any household cleaners other than those listed to clean the spa shell surface
is NOT recommended. DO NOT use any cleaning products containing abrasives or solvents since
they may damage the shell surface. NEVER USE HARSH CHEMICALS! Damage to the shell by
the use of harsh chemicals in not covered under the warranty.
IMPORTANT: Some surface cleaners contain eye and skin irritants. Keep all cleaners out of the
reach of children and use care when applying.
Maintenance Free Cabinet
Spas consist of a rigid polymer that combines the durability of plastic with the beauty of a redwood or
gray cabinet. The spa cabinet will not crack, peel, blister or delaminate. Cleaning consists of simply
spraying the cabinet with a mild soap and water solution to remove any stains and residue.
SPA CARE AND MAINTENANCE
Figure 11
Cartridge Filter
Page 27

24
Care Of Spa Cover
To clean and condition the vinyl cover:
Remove the cover from the spa and gently lean it up against a wall or fence.
Using a garden hose, spray the cover to loosen and rinse away any dirt or debris.
Using a sponge and/or a soft bristle brush, and using a very mild soap solution (one teaspoon dishwashing liquid with two gallons of water), or baking soda (sodium bicarbonate), scrub the vinyl top in
a circular motion. Do not let the vinyl dry with a soap film on it.
Scrub the cover’s perimeter and side flaps. Rinse clean with water.
Rinse off the underside of the cover with water only (use no soap), and wipe it clean with a dry rag.
To condition the cover after cleaning, apply a thin film of vinyl cleaner to the surface and buff to a
high luster.
Important reminders:
DO NOT walk or stand on top of cover.
DO remove snow buildup to avoid breakage of the foam core from the additional weight of the snow.
DO lock cover locking straps to secure the cover when the spa is not in use.
DO NOT drag or lift the spa cover using either the flaps, or the cover lock straps.
Vacation Care Of Spa
Following these instructions to ensure that the water quality of your spa is maintained:
For Short Periods (3 to 5 days)
Adjust the pH
Sanitize the water
Lock cover for safety
For Long Periods (5 to 14 days)
Set temperature to its lowest level approximate water temperature of 80°F.
Adjust the pH
Sanitize the water
Lock cover for safety
Return Procedures
Sanitize the water following shock procedures
Return water temperature to original setting
Insure chlorine level had dropped below 5.0 ppm
NOTE: If you plan on not using your spa for periods exceeding 14 days, you may ask a family member or neighbor to assist with your spa maintenance, and if not available you will need to drain or
winterize spa.
Winterizing Your Spa
During the cold weather you may not wish to use your spa outside. In this case you may move it to
a heated area, or leave it until the weather warms up.
WARNING: Allowing your spa water to freeze will cause severe damage to the spa shell, equipment, and plumbing and WILL VOID THE WARRANTY.
SPA CARE AND MAINTENANCE
Page 28

25
The following steps should protect your spa from freezing:
Disconnect the spa from the power supply.
Remove the screws holding your spa access panel door.
Open the valve and the spa will drain by gravity flow.
Remove the filter cartridge, then clean and store in a dry place.
Attach a wet/dry shop vac (capable of blowing air as well as vacuuming) into the filter housing.
Turn blower on and allow it to blow out any water remaining in the plumbing lines. (Should take no
more than 5 minutes).
Reinstall the filter housing.
Use the shop vac to remove water inside spa blown through jets.
Use a shop vac and clean towel and remove any remaining water from bottom of spa until dry.
Vacuum water from blower injectors.
Leave the drain open.
Close the spa cover and fasten with tie down safety locks.
Your Water In Your Spa
The quality of your water in your spa is important. Your dealer can guide you through the process of
achieving and maintaining perfect water in your spa in your given local conditions. Your program will
vary depending on your water’s mineral content, and how often you use your spa, and the amount of
people using it.
Here are our suggested step-by-step procedures:
General Information - The three fundamental areas of water maintenance.
* Water Filtration * Chemical Balance/pH Control * Water Sanitation
A water sanitizer will chemically control the bacteria and viruses present in the water introduced dur-
ing the use of the spa. Bacteria and viruses can grow quickly in undersanitized spa water.
The water’s chemical balance and pH control are also your responsibility. You will have to add
chemicals to maintain proper levels of Total Alkalinity (TA), Calcium Hardness (CH) and pH. Proper
water balance and pH control will minimize scale buildup and corrosion of metals, extend the life of
the spa, and allow the sanitizer to work at maximum efficiency.
Methods For Testing Spa Water
Accurate water testing and analysis are an important part of effectively maintaining your spa water.
You must have the ability to test for:
Total Alkalinity (TA)
pH
Calcium Hardness (CH)
Sanitizer
SPA CARE AND MAINTENANCE
WATER QUALITY AND MAINTENANCE
Page 29

26
WATER QUALITY AND MAINTENANCE
Basic Chemical Safety
When using chemicals, always read the labels carefully and follow directions. Though chemicals
protect you and your spa when used correctly, they can be hazardous in concentrated form.
Observe the following guidelines:
Allow only a responsible person to handle spa chemicals. KEEP OUT OF THE REACH OF CHILDREN.
Accurately measure the exact quantities specified, never more. Do not overdose your spa.
Handle all containers with care. Store in a cool, dry well ventilated place.
Always keep chemical containers closed when not in use. Replace caps on their proper containers.
Don’t inhale fumes or allow chemicals to come in contact with your eyes, nose, or mouth. Wash
your hands immediately afer each use.
Follow the emergency advice on the product label in case of accidental contact or if the chemical is
swallowed. Call a doctor or the local Poison Control Center. If a doctor is needed, take the product
container along with you so that the substance can be identified.
Don’t let chemicals get on surrounding surfaces or landscaping.
Never smoke around chemicals. Some of the fumes can be highly flammable.
Don’t store chemicals in the spa equipment compartment.
Balancing Total Alkalinity (TA)
The recommended Total Alkalinity (TA) for your spa water is 125-150 ppm.
Total Alkalinity is measure of the total levels of carbonates, bicarbonates, hydroxides, and other alkaline substances in the water. TA is referred to as the water ’s “pH buffer”. It’s a measure of the ability
of the water to resist changes in pH level.
If the TA is too low, the pH level will fluctuate widely from high to low. Fluctuations in pH can cause
corrosion or scaling of spa components. Low TA can be corrected by adding pH/Alkalinity UP (sodium hydrogen carbonate).
If the TA is too high, the pH level will tend to be high and may be difficult to bring down. It can be
lowered by adding pH/Alkalinity down (sodium bisulfate).
Once the TA is balanced, it normally remains stable, although the addition of more water with a high
or low alkalinity will raise or lower the TA reading of the water.
When the Total Alkalinity is within the recommended range, proceed.
Balancing Calcium Hardness (CH)
The recommended Calcium Hardness (CH) level for your spa is 150-200ppm.
Calcium Hardness is a measure of the total amount of dissolved calcium in the water. Calcium helps
control the corrosive nature of the spa’s water. That’s why calcium-low water (commonly know as
“soft” water) is not recommended. It is very corrosive to the equipment, and can cause staining of
the spa shell. If the calcium level is too low, we recommend using Calcium Increaser to bring the
calcium hardness level to within the recommended range.
If the CH is too high (commonly know as “hard” water), formation of scale on the spa’s shell surface
and equipment can result. CH can be decreased by dilution - a mixture of 75% hard and 25% soft
water will be a good starting point. If soft water is not available, or practical for you, a stain and
scale control such as Scale Defense should be added to the spa water, according to instructions on
iIts label.
Page 30

27
WATER QUALITY AND MAINTENANCE
Once the CH is balanced, it normally remains stable, although the addition of more water with a high
or low calcium content will raise or lower the CH reading of the water.
When the Calcium Hardness is within the recommended range, proceed.
Balancing The pH
The recommended pH level for your spa water is 7.4-7.6.
The pH level is the measure of acidity and alkalinity. Values above 7 are alkaline; those below 7 are
acidic.
Maintaining the proper pH level is extremely important:
Optimizing the effectiveness of the sanitizer.
Maintaining water that is comfortable for the user.
Preventing equipment deterioration.
If the spa water’s pH level is too low, the following may result:
The sanitizer will dissipate rapidly.
The water may become irritating to spa users.
The spa’s equipment may corrode.
If the pH level is too low, it can be increased by adding pH/Alkalinity Up (sodium hydrogen carbonate) to the spa water.
If the pH level is too high, the following may result:
The sanitizer is less effective.
Scale will form on the spa shell surface and the equipment.
The water may become cloudy.
The filter cartridge pores may become obstructed.
If the pH is too high, it can be decreased by adding pH/Alkalinity Down (Sodium bisulfate) to the spa
water.
NOTE: After adding pH/Alkalinity Up (sodium hydrogen carbonate) or pH/Alkalinity Down (sodium
bisulfate), wait at least two hours before testing the water for pH. Measurements taken too soon
may not be accurate.
It is important to check the pH on a regular basis. The pH will be affected by the bather load, the
addition of new water, the addition of various chemicals, and the type of sanitizer used.
When the pH is within the recommended range, proceed.
Maintaining Sanitizer Level
Page 31
28
WATER QUALITY AND MAINTENANCE
Ozonator
Ozone Tubing & Check Valve
Control Electrical
Equipment Pack
Door Panel Screws
Door Panel
Figure 11
Water Terminology
Bromamines: Compounds formed when bromine combines with nitrogen from body oils, urine, per-
spiration, etc. Unlike chloramines, bromamines have no pungent odor, and are effective sanitizers.
Bromine: Ahalogen sanitizer (in the same chemical family as chlorine). Bromine is commonly used
in stick, tablet, or granular form.
Chloramines: Compounds formed when chlorine combines with nitrogen from body oils, urine, perspiration, etc. Chloramines can cause eye irritation as well as having a strong odor. Unlike bromamines, chloramines are weaker, slower sanitizers.
Chlorine: An efficient sanitizing chemical for spas.
Chlorine (or Bromine) Residual: The amount of chlorine or bromine remaining after chlorine or
bromine demand has been satisfied. The residual is, therefore, the amount of sanitizer which is
chemically available to kill bacteria, viruses and algae.
Corrosion: The gradual wearing away of metal spa parts, usually caused by chemical action.
Generally, corrosion is caused by low pH or by water with levels of TA, CH, pH or sanitizer which are
outside the recommended ranges is 7.4 to 7.6. Below 7.0 (considered neutral), the spa water is too
acidic and can damage the heating system. Above 7.8, the water is too alkaline and can result in
cloudy water, and scale formation on the shell and heater.
Scale: Rough calcium-bearing deposits that can coat spa surfaces, heaters, plumbing lines, and
clog filters. Generally, scaling is caused by mineral contect combined with high pH. Additionally
scale forms more readily at higher water temperatures.
Sanitizer is extremely important for killing algae, bacteria and viruses, and preventing unwanted
organisms from growing in the spa. At the same time, you don’t want too high a sanitizer level, or it
can irritate your skin, lungs, and eyes.
Always maintain the sanitizer level in your spa at the recommended level for each type of sanitizer.
Ozone
The Ozonation System in your spa drastically reduces the need for chemicals in the water.
Reagent: A chemical material in liquid, powder, or tablet form for use in chemical testing.
Sanitizer: Sanitizers are added and maintained at recommended residuals to protect bathers
against pathogenic organisms which can cause disease and infection in spa water.
Page 32
29
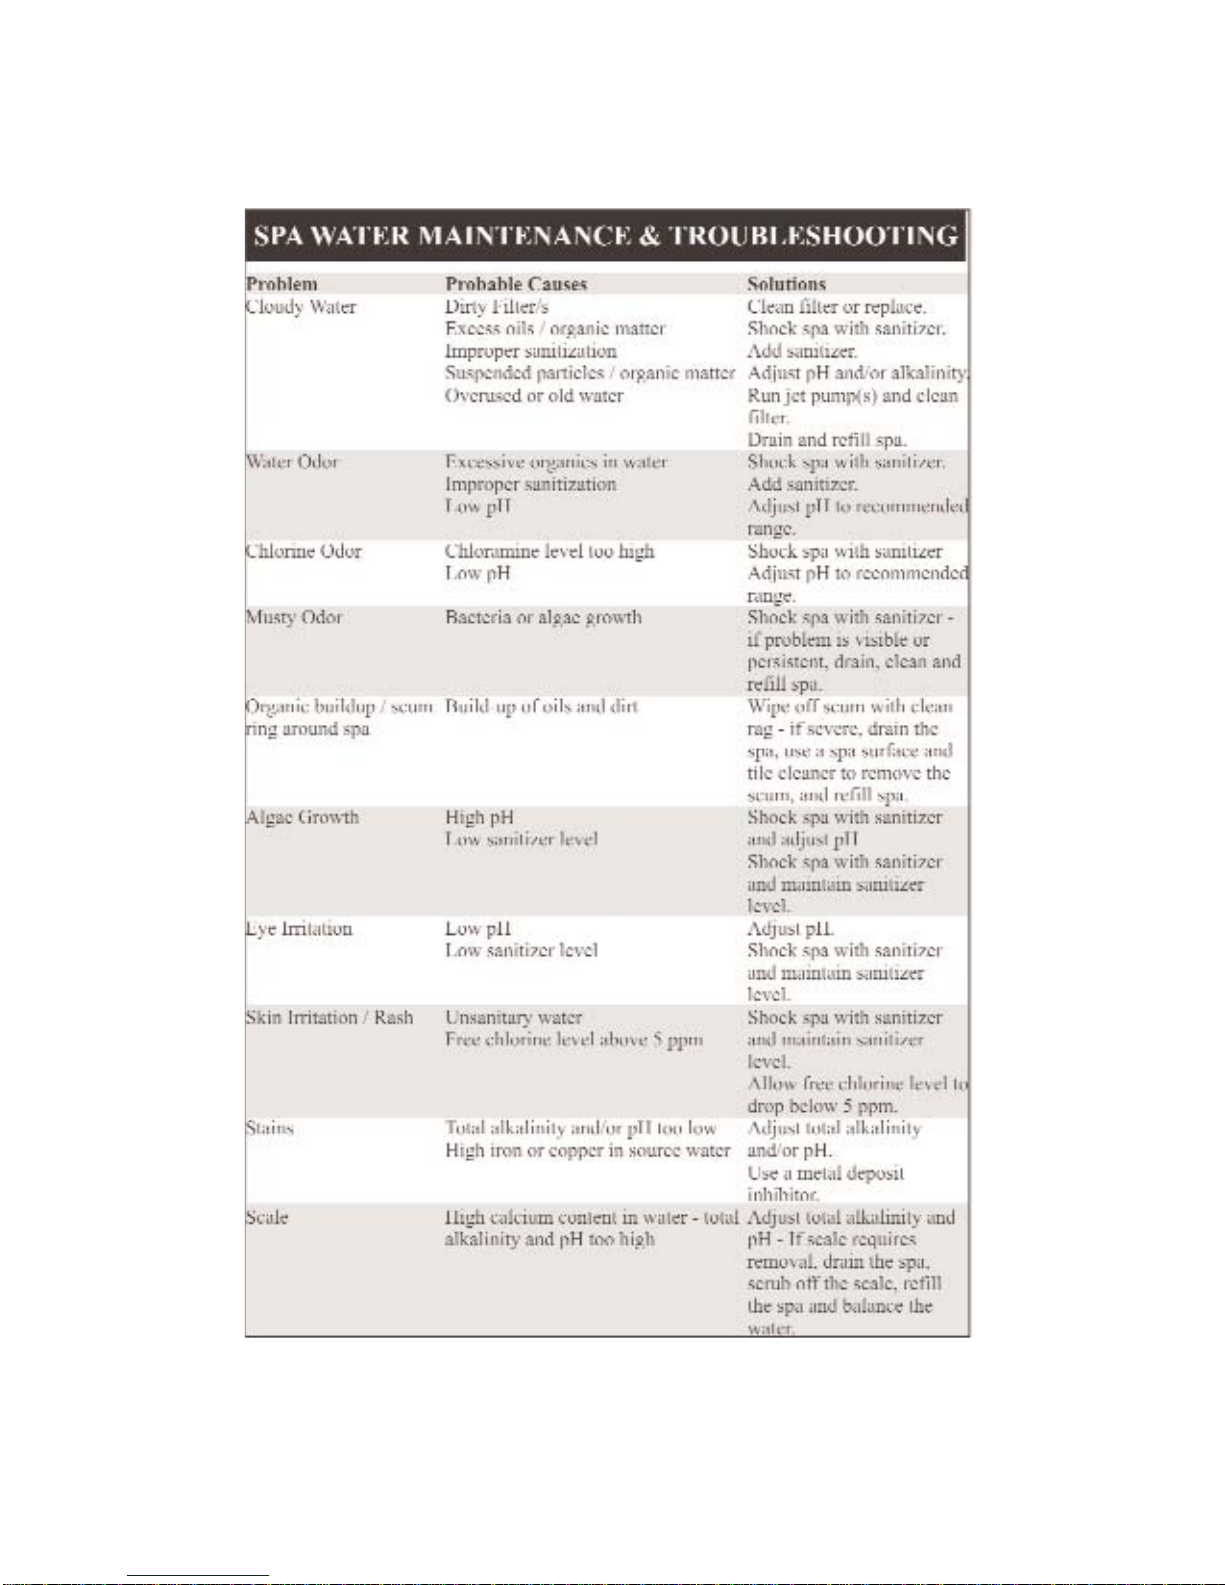
MAINTENANCE & TROUBLESHOOTING
Page 33
30
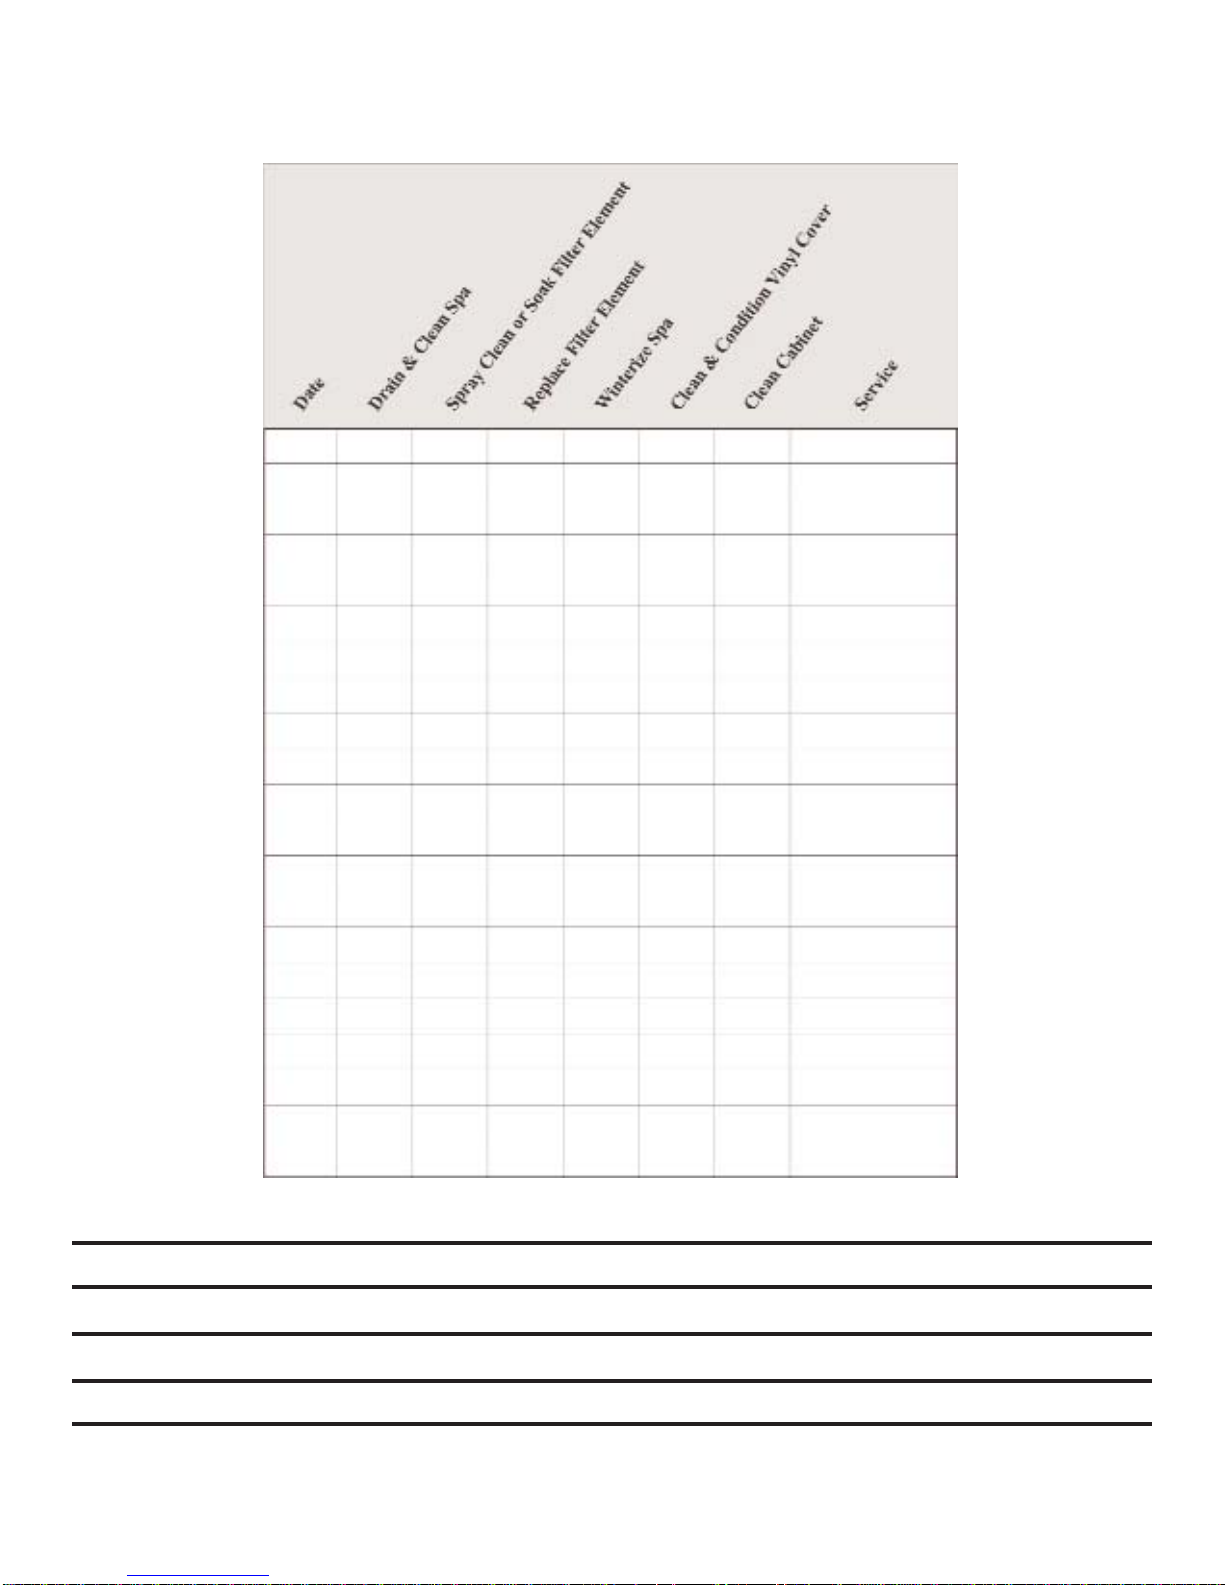
SPA CARE & MAINTENANCE RECORD
NOTES:
Page 34

31
This warranty applies to all Mark III series spas sold on or after July 1, 2005.
Poseidonite Shell Structural Warranty - Lifetime
Hydro Spa warrants the Poseidonite Mark III Series spa shell structure against the loss of water through the fiberglass laminate of the shell caused by defects in materials
and workmanship for as long as the original purchaser owns the spa.
Manifold Plumbing - Lifetime
Hydro Spa warrants the Mark III series plumbing manifolds to be free of defects in materials or workmanship for as long as the original purchaser owns the spa.
Surface Warranty - 10 year Limited
Hydro Spa warrants the Mark III series interior acrylic spa surface against blisters, cracks, or delaminating resulting from a defect in the acrylic surface material for a period
of 10 years from the date of purchase. This limited warranty is based on the following formula: Retail cost divided by months covered (10 years = 120 months), multiplied by
months owned, equals spa owners' replacement cost. Surface warranty issues should be notified to Hydro Spa by certified mail to warranty department within 30 days of
finding defect or warranty will become void. Shipping and installation costs of the substitute hot tub unit are the responsibility of the spa owner making the claim. Unit to be
replaced must have electrical detached and placed on ground in an area convenient for pick-up.
Electrical Equipment - 2 years
Hydro Spa warrants the Mark III series electrical equipment and components to be free of defects in materials and workmanship for a period of 2 years from date of purchase.
The Warranty Coverage's are covered by the terms of the Hydro Spa "Warranty Performance and Coverage."
Warranty Performance and Coverage
Please register your spa within 30 days of delivery by mailing in your warranty registration card found in this manual or by registering at www.hydrospa.com/owners.html. Hot
tubs not purchased from an Authorized Hydro Spa Dealer are specifically excluded from warranty coverage of any kind. Hydro Spa will, at its sole option, repair or replace
any hot tub or component found to be defective under the terms and conditions of this warranty. Hydro Spa reserves the right to substitute a hot tub or component of equivalent value, either new or factory reconditioned and any such repair or replacement shall assume as its warranty only the remaining portion of the warranty on the original
product. Labor service shall run concurrent with the "Electrical Equipment" warranty and no charge will be made for parts or labor. Hydro Spa or Hydro Spa Authorized
Technicians/Dealers who perform labor service to a spa owner beyond 30 miles of the registered service location may subject spa owner to reasonable travel costs.
The cost of shipping warranty parts to the spa owner is the responsibility of Hydro Spa. Spa owner must return defective part(s) to Hydro Spa within 30 days of the noted
defect and Hydro Spa may collect spa owner credit card information to secure defective part(s) return. Failure to return defective parts will result in a charge on spa owner's
credit card. Hot tub surface repairs will be made to function satisfactorily and an exact color match may not be possible. Non-defective replacement parts required to perform
or complete warranty repairs will be covered from the original spa purchase date. Contact your dealer if you have questions concerning warranty issues, prior to contacting
Hydro Spa. In the absence of a local Authorized Hydro Spa Dealer, to obtain warranty service, either the complete the web link at
http://www.hydrospa.com/service_request.html or notify in writing "Hydro Spa, Attention Warranty Service, 13055 49 Street N., Clearwater, FL 33762," or call
727-573-9611 within 30 days of the time the problem becomes apparent. Hydro Spa must preauthorize the return of all defective spas and parts. Hydro Spa always reserves
the right to inspect any spa.
Exceptions to Warranty
The following items are specifically excluded from any warranty coverage:
1. Damage caused by failure to follow procedures in the owner's manual.
2. Damage caused by improper installation or installing the hot tub on unstable surface, or by moving the hot tub.
3. Hydro Spa hot tubs when empty of water and left in direct sunlight without the hot tub cover in place are vulnerable to ultraviolet or solar damage. Temperatures generated by sunlight can become concentrated in the shell surface causing shell surface to delaminate. This occurrence is considered abuse and may result in surface blisters,
bubbles, or large layer delaminating. The hot tub cover must be kept on the hot tub while empty of water.
4. Any alterations, misuses, abuses, or if any repairs are attempted by anyone other that an authorized representative of Hydro Spa except with the express verbal or written
permission from Hydro Spa warranty or technical personnel.
5. Hot tub surface damage or discoloration or discoloration of spa jets or pillows resulting from improper maintenance including but not limited to; the use of sanitizers such
as Tri-Chlor, calcium hypochlorite, sodium hypochlorite, and/or any chemical that may dissolve or remain undissolved on the hot tub shell or cabinet surface. Damage or
stain caused by mineral or chemical content of the hot tub water.
6. The hot tub cover is not manufactured by Hydro Spa and any warranty claim must be made through the cover manufacturer.
7. The hot tub filter lid is not designed to support heavy weight loads and should not be used as a seat. In extreme cases the lid could crack and break.
This occurrence is not covered under warranty.
8. Damage caused by improper or incorrect electrical hook-up. In all cases the electrical hook-up directions in the owner's manual should be followed NOT those on the spa
electrical box.
9. Hot tub pillows, hot tub light bulb and lenses, hot tub filter element, outside cabinet panels, fuses, and hot tub jets, and stereo fuses. These items are only warranted at
the time of spa delivery.
10. Damage resulting from operating the hot tub at a water temperature outside the range of 33 degrees F to 118 degrees F (0.5 C to 48 C) for any reason.
11. Damage caused by normal use.
12. Use of hot tub in a non-residential application.
13. All hot tub accessories including but not limited to, spa steps, cover lifter, chemical kits, and add-on jet accessories.
14. Cracks are defined as a break in the shell that goes all the way through the shell. Scratches and cosmetic gouges are not considered cracks.
15. Acts of nature, accidents, or other causes beyond the control of Hydro Spa.
Disclaimers
The spa owner is required to provide adequate access to the spa for any repair or inspection. Hydro Spa shall not be liable for loss of use of the spa or other incidental or
consequential costs, expenses, or damages, which may include but are not limited to water damage, or the removal of a deck or custom fixture. Under no circumstances
shall we or any of our representatives be held liable for injury to any person or damage to any property, however arising. This warranty gives you specific legal rights and you
may have other rights. No Agent, Dealer, Service Company, or other party is authorized to change, modify, or extend the terms of this warranty in any manner whatsoever.
Warranty coverage is extended to the original consumer purchaser for personal, family or household use, from the date of original purchase within the boundaries of United
States and cannot be assigned or transferred by the original purchaser to any person or entity.
W A R R A N T Y
Page 35

WARRANTY REGISTRATION
You may process your warranty registration by logging on to Hydro Spa at www.hydrospa.com. Click
on the “Owners” button on top of the home page and complete and submit the online registration
form. You may also register your warranty by cutting out the registration form below and mailing it to
the Hydro Spa warranty department. The form is pre-addressed on the reverse side of this page.
IMPORTANT WARRANTY INFORMATION
The warranty card must be filled out completely and mailed within thirty (30) days of purchase to validate warranty.
SPA MODEL:________________________
SPA SERIAL NO.:_____________________
DEALER:_______________________ CUSTOMER NAME:________________________________
ADDRESS:______________________ CUSTOMER ADDRESS: ____________________________
CITY:___________________________ CITY:_______________________STATE:_____ZIP:______
STATE:_________ ZIP:____________ CUSTOMER PHONE NO.:__________________________
DEALER PHONE NO.:_____________ CUSTOMER SIGNATURE:__________________________
DATE OF PURCHASE:_______________________________
Since 1975, Hydro Spa has been designing and building the finest quality spas on the market.
Handmade by skilled technicians, using only the finest materials available, you can take
comfort knowing that our reputation is only as solid as your satisfaction with our products.
Rated 5-Stars, Best Of Class,” by Poolandspa.com, customers all over the country have spent
over the last two decades discovering how good it feels to enjoy the comfort and quality of a
Hydro Spa.
Our Mark lll Series offers the ultimate combination of luxury amenities, ease of use and
intuitive design. Each Mark lll Series model is backed by the Hydro Spa name, reputation and
warranty.
cut on line
cut on line
Page 36
6101 N. 45th Street
St. Petersburg, FL 33714
727-573-9611 Fax 727-573-7758
www.HYDROSPA.com
Part # 7622
1 - 8 7 7 - B E S T - S P A
6101 N. 45th Street
St. Petersburg, FL 33714
 Loading...