

HYDRO-RAIN HRC-390-06-NA, HRC-390-12-NA Instruction Manual

HRC–390 SERIES
Indoor/Outdoor Touch Screen Controller
INSTRUCTION MANUAL
Model 04040-24 rC
Models:
HRC-390-06-NA
HRC-390-12-NA
Printers are responsible
for meeting print
production requirements.
Any changes must be
approved by Orbit
®
.
Printed piece must meet
designated specifications
on this form.
© 2014 Orbit Inc.
This work is the property
of Orbit
®
, and cannot be
used, reproduced or
distributed in any way
without their express
permission.
Dieline
PMS
2955
Fold
PMS
0000
Product
Coverage
PMS
0000
Dims./
Callout
PMS
0000
∙
∙
∙
∙
Orbit
®
1.801.299.5555
orbitonline.com
Glue
Folded Flat Additional Information
PRINTERS AR E
REQUIRED TO MATCH
ALL SPECIFIE D
PMS COLORS.
K
DATE: 05/07/2014
DESIGNER: JC MARKETING: BT
SOFTWARE: Adobe Indesign CS6
ARTWORK №: 04040-24 rC
L:
W:
H:
0.0" W:
H:6.89"
5.7"
13.78 "
5.7"

Table of Contents
Section 1: INTRODUCTION...................................02
Section 2: GETTING STARTED .............................04
Section 3: PROGRAMING YOUR CONTROLLER ....05
Section 4: INSTALLATION................................... 08
Section 5: DIAGNOSTICS CIRCUIT BREAKER ......11
Section 6: GLOSSARY OF TERMS ........................12
Section 7: TROUBLE SHOOTING ..........................14
Section 1: INTRODUCTION
Thank you for selecting the Hydro-Rain® HRC-390 Series
sprinkler controller. Our designers have combined the
simplicity of touch-screen programming with the flexibility
and accuracy of digital electronics to give you a controller
that is easy to program and extremely versatile. This
convenient controller lets you run automatic or manual
watering programs with a wide spectrum of features,
including remote control and RF sensor operations.
Please read this manual completely before you begin
programming and using the controller.
Important Features and Capabilities
Three Independent Programs
HRC 390 sprinkler controller’s offer three independent
programming functions – Programs A, B, and C offer
watering flexibility across variable landscapes ie. Trees,
Turf, Xeriscape, etc. Any of the watering stations can be
assigned to individual or all programs. For example,
stations that water your garden and flower beds could
be assigned to Program A and watered daily starting
at 8 a.m., while stations that water your lawn could be
assigned to Program B and watered every third day
starting at 5 a.m. Program C could be selected for drip or
other low-flow stations.
Simultaneous C Program
The C program is specially designed for drip or other
low-flow stations that need to run for longer durations
or at more frequent intervals. The HRC 390 is able to run
concurrently the C program with A or B programs. See
“Stacking” Feature on the next page.
n
02
n

“Stacking” Feature
Occasionally you will inadvertently program one program
to water prior to another program finishing its watering
cycle. This could result in insufficient water flow necessary to operate the system. The HRC 390’s unique logic will
override human programming error and begin the next
water cycle after completion of the first cycle for the A and
B program. The C program will run concurrently with the
A and B programs. In order to ensure sufficient available
flow for the A and B programs, the C program should be
reserved for low-flow zones such as drip zones.
Docking Port
Mounting your HRC 390 to the wall is easy and convenient.
The HRC 390’s “docking port” is affixed to the wall and all
wires are connected to it. The controllers programming
unit is then convenie ntly slid in to the docking station. This
feature allows you to walk around the yard while programming each station to meet the needs of the landscape.
Remote Control Capabilities
The HRC 390 has an RF reciever built into its circuit board.
When used in coordination with the HRC 390-12-TR (RF
Transmitter) the HRC 390 programming can be overridden. This feature allows you to turn stations on and off on
the spot from anywhere within range. The 433 megahertz
remote frequency is approved for use in the United States,
Canada, Europe and Australia, and permits an effective
line-of-sight range of 200 feet.
Programming Information Stored Safely
in Non-Volatile Memory
All programming information for Programs A,B, and C are
stored indefinitely in the HRC 390’s non-volatile memory.
Non-volatile memory means your programming won’t be
lost or erased when or if both primary and battery power
are suspended.
Convenient, Easy-to-Read
Touch-Screen LCD Display
The HRC 390’s back-lighted, touch-screen LCD display
is convenient to program and easy to read under any lighting conditions. You may use either your finger or the builtin stylus to manipulate programming on the touch screen.
Choice of Five Languages
You can easily set the LCD display to read in any of five
languages: English, Spanish, French, German or Italian.
Water Budgeting
This convenient feature provides a quick, easy way to
increase or decrease the watering durations of all stations
in both programs to match seasonal watering needs.
You won’t have to adjust each station’s watering time
individually.
n
03
n
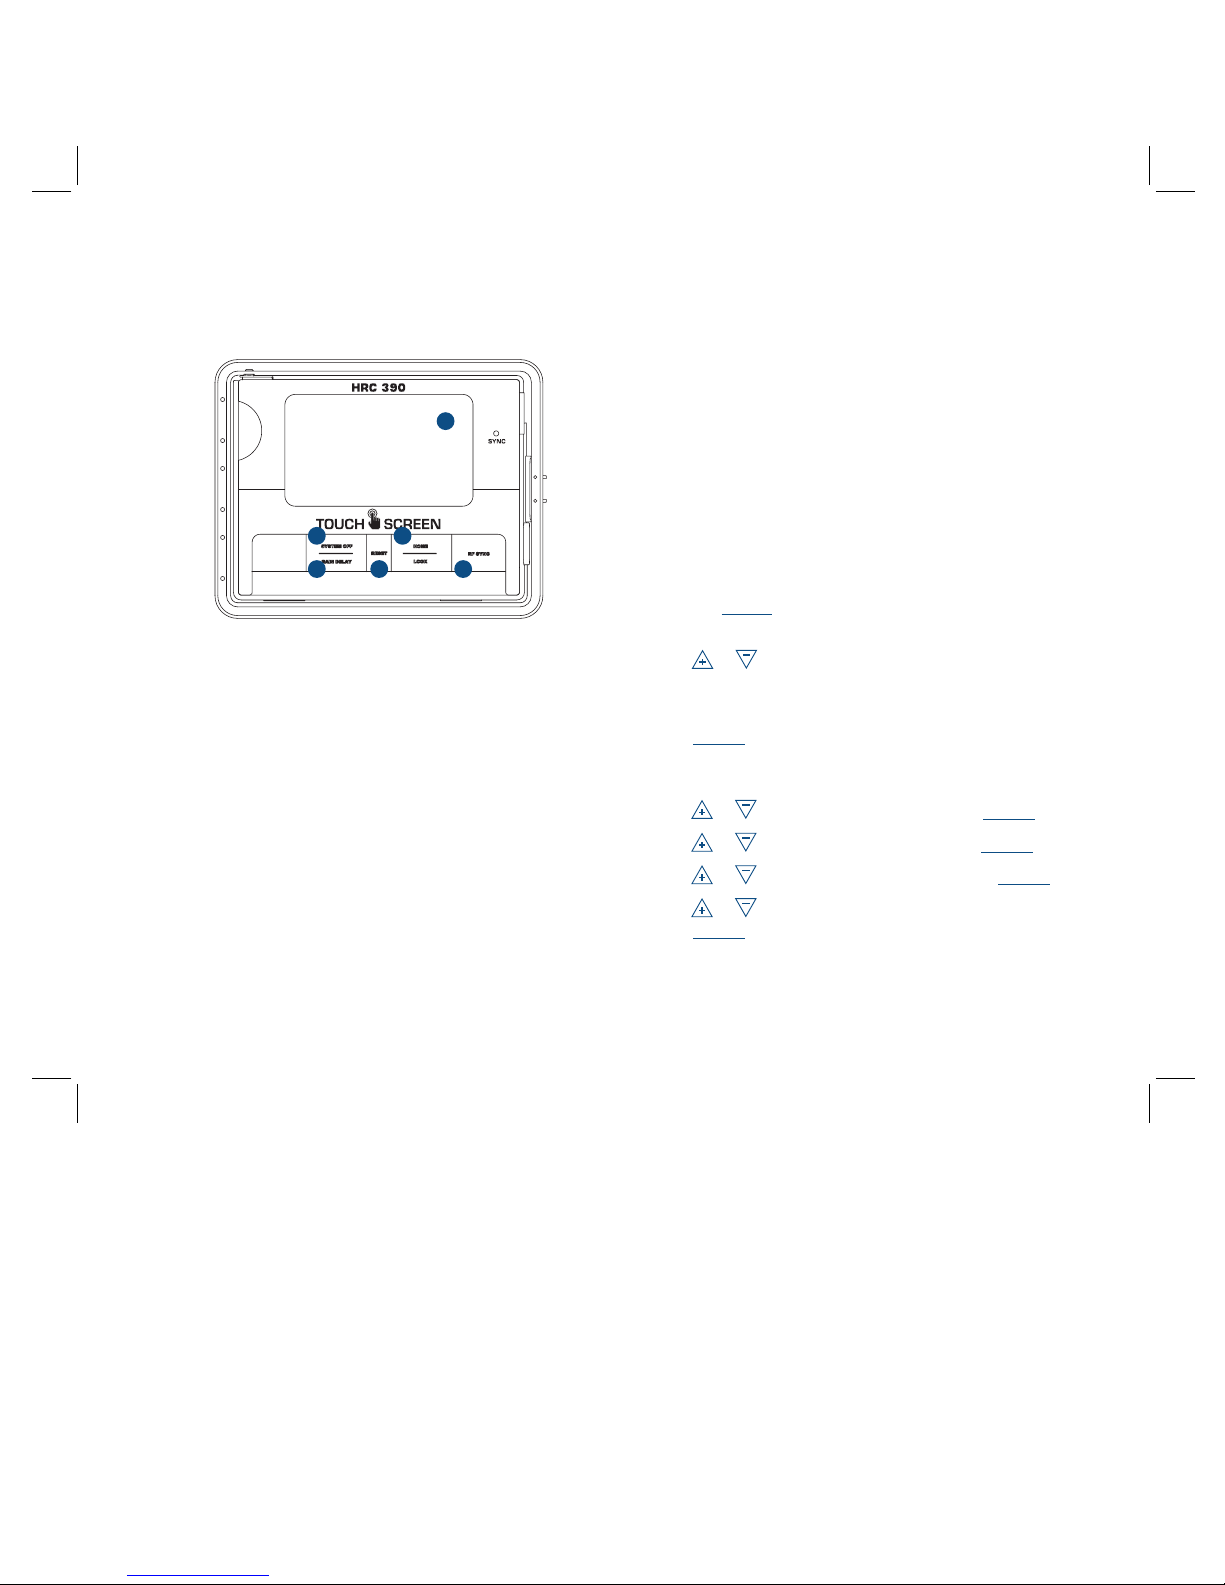
Push Buttons
These push buttons on the controller are used for
programming and other operations:
1 Home/Lock
Used to exit settings; to go into AUTO MODE, or to
lock the touch screen.
2 System Off
A single push will open the Rain Delay screen. A
second push of the button will place the entire
system in OFF mode.
3 Reset (pin hole)
Resets the HRC 390 to factory default settings.
4 RF Sync
Allows the HRC 390 to synchronize with a remote
transmitter or wireless rain sensor (HRC-300-12-RS)
sensor.
5 Rain Sensor
In “Active” position the controller will monitor the
rain sensor, in “Bypass” position the HRC 390
sprinkler controller will ignore the rain sensor. (This
switch is for hard wired sensors only and does not
effect wireless rain sensors. For wireless rain sensor
bypass refer to section 4.)
6 Touch Screen
Use stylus or finger to set programming.
Section 2: GETTING STARTED
Set Language
• Press the RESET button. The controller will now take
you through a step by step programming process.
• Press or on the touch screen to set the language
of your choice (English, Spanish, French, German,
Italian).
• Press ENTER.
Set Current Time and Date
• Press or to set the current time. Press ENTER.
• Press or to set the current year. Press ENTER.
• Press or to set the current month. Press ENTER.
• Press or to set the current day of the month.
Press ENTER.
Determine a Watering Plan
See page 13 for instructions.
Figure 1: Front view of touch-screen controller
12
3 45
n
04
n
6
Section 3: PROGRAMMING YOUR CONTROLLER
Walk through programming is available after pressing the
RESET button. (If you began the programming sequence
with Section 1 do not press “reset” again.)
Program Toggle Feature
The Program Toggle Feature allows you to switch back
and forth between Program A, Program B and Program
C. Press PROG. A B C on the touch screen to select
Program A (“A” is larger than “B”) or Press PROG. A B
C on the touch screen to select Program B (“B” is larger
than “A” etc.). You can change the watering start times,
watering days, and watering durations for each program.
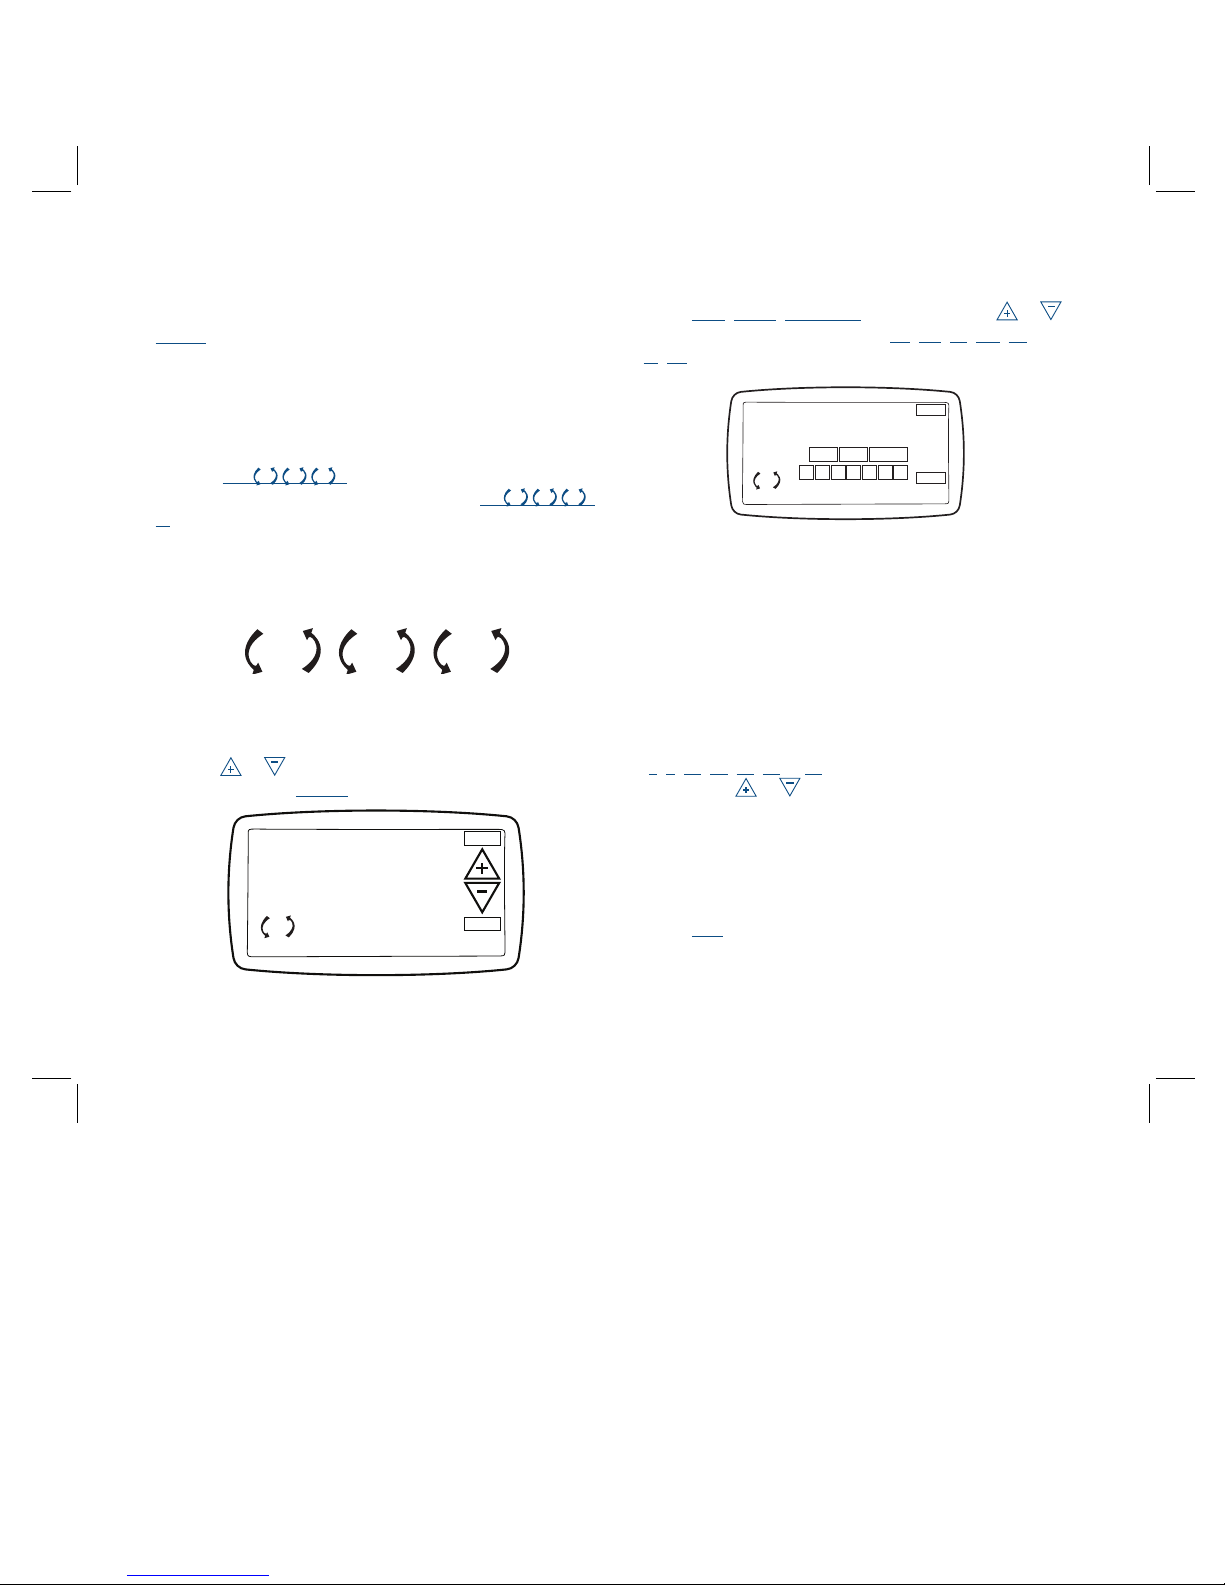
Set Start Times
• Press or to set the start time for the selected
program. Press ENTER.
Set Water Days
• Press ODD, EVEN, INTERVAL (1-32 days using or )
or the specific days of the week (Su, Mo, Tu , We, Th,
Fr, Sa) you want the selected program to water. Press
ENTER.
Set Station Watering Durations
• Select the first station to be watered by pressing the
station number (1 should be flashing) on the bottom
of the touch screen or press ENTER to advance to the
desired station. Note: The active station, being
programed, is flashing.
• Set the watering duration for each station by either:
1. Selecting one of the preset watering duration minutes
(0, 5, 10, 15, 20, 30 or 45) on the bottom of the LCD.
2. Using the or to enter the desired minutes.
Note: a watering duration must be entered for each watering station or the station will not water.
• Follow the same procedure to set the watering durations
for all other stations.
• Press EXIT.
At this point you will see the PROGRAMMING COMPLETE
screen. If you wish to go back and change any of the set-
SET START TIME
12:00AM
ENTER
BACK
PROG.
A
Figure 2: Set Start Times
PROG.
A
PROG.
B
PROG.
C
Figure 2: Program Toggle Feature
Figure 3: Set Watering Days
SET
ENTER
BACK
PROG.
A
ODD
Su Mo Tu We Th Fr Sa
EVEN
INTERVAL
WATERING DAYS
n
05
n
 Loading...