

Page 1
Engineering Data and
Installation Manual
WT MODELS WATER-TO-WATER HEAT PUMPS & HYDRONIC AIR HANDLERS
REVISION: B
20D082-08NN
20D082-08NN
Page 2

Page 3

Table of Contents:
Section 1: Model Nomenclature
Model Nomenclature................................................................................................................4 - 5
Section 2: Installation Introduction
Introduction, Pre-Installation, Components ............................................................................6 - 7
Section 3: Installation Considerations
Installation Considerations .............................................................................................................8
Heating Mode Operation Considerations...................................................................................9
Buffer Tank Sizing and Usage.......................................................................................................10
Section 4: Installation
Unit and Air Handler Placement ..................................................................................................11
Unit Dimensional Data ...........................................................................................................12 - 14
(Water-to-Water Units, Hydronic Air Handlers/”A” Coils)
Section 5: Unit Piping Installation
Interior Piping, Water Quality .................................................................................................15 - 19
Section 6: Antifreeze
Overview ..................................................................................................................................20 - 21
Anitfreeze Charging ......................................................................................................................22
Section 7: Desuperheater Installation
Installation ...............................................................................................................................23 - 25
Section 8: Controls
Controls....................................................................................................................................26 - 29
Hydronic Air Handler Airow Settings ...........................................................................................30
Wiring Diagrams ......................................................................................................................31 - 39
Section 9: Equipment Start-Up Procedures
Equipment Start-Up Checklist and Form..............................................................................40 - 41
Section 10: Troubleshooting
Troubleshooting Guide..........................................................................................................42 - 45
Superheat/Subcooling Conditions.......................................................................................46 - 47
Troubleshooting Form....................................................................................................................48
Section 11: Engineering Data
Unit and Air Handler Electrical Data ....................................................................................49 - 50
Glossary & Flow Rate Calculations ..............................................................................................51
AHRI Performance Data ...............................................................................................................52
Extended Unit Performance Data ........................................................................................53 - 64
Air Handler & “A” Coil Performance Data .................................................................................65
Section 17: Forms
Warranty Registration....................................................................................................................66
Warranty Claim Form.....................................................................................................................67
WT Models, Rev.: B Enertech Global
3
Page 4
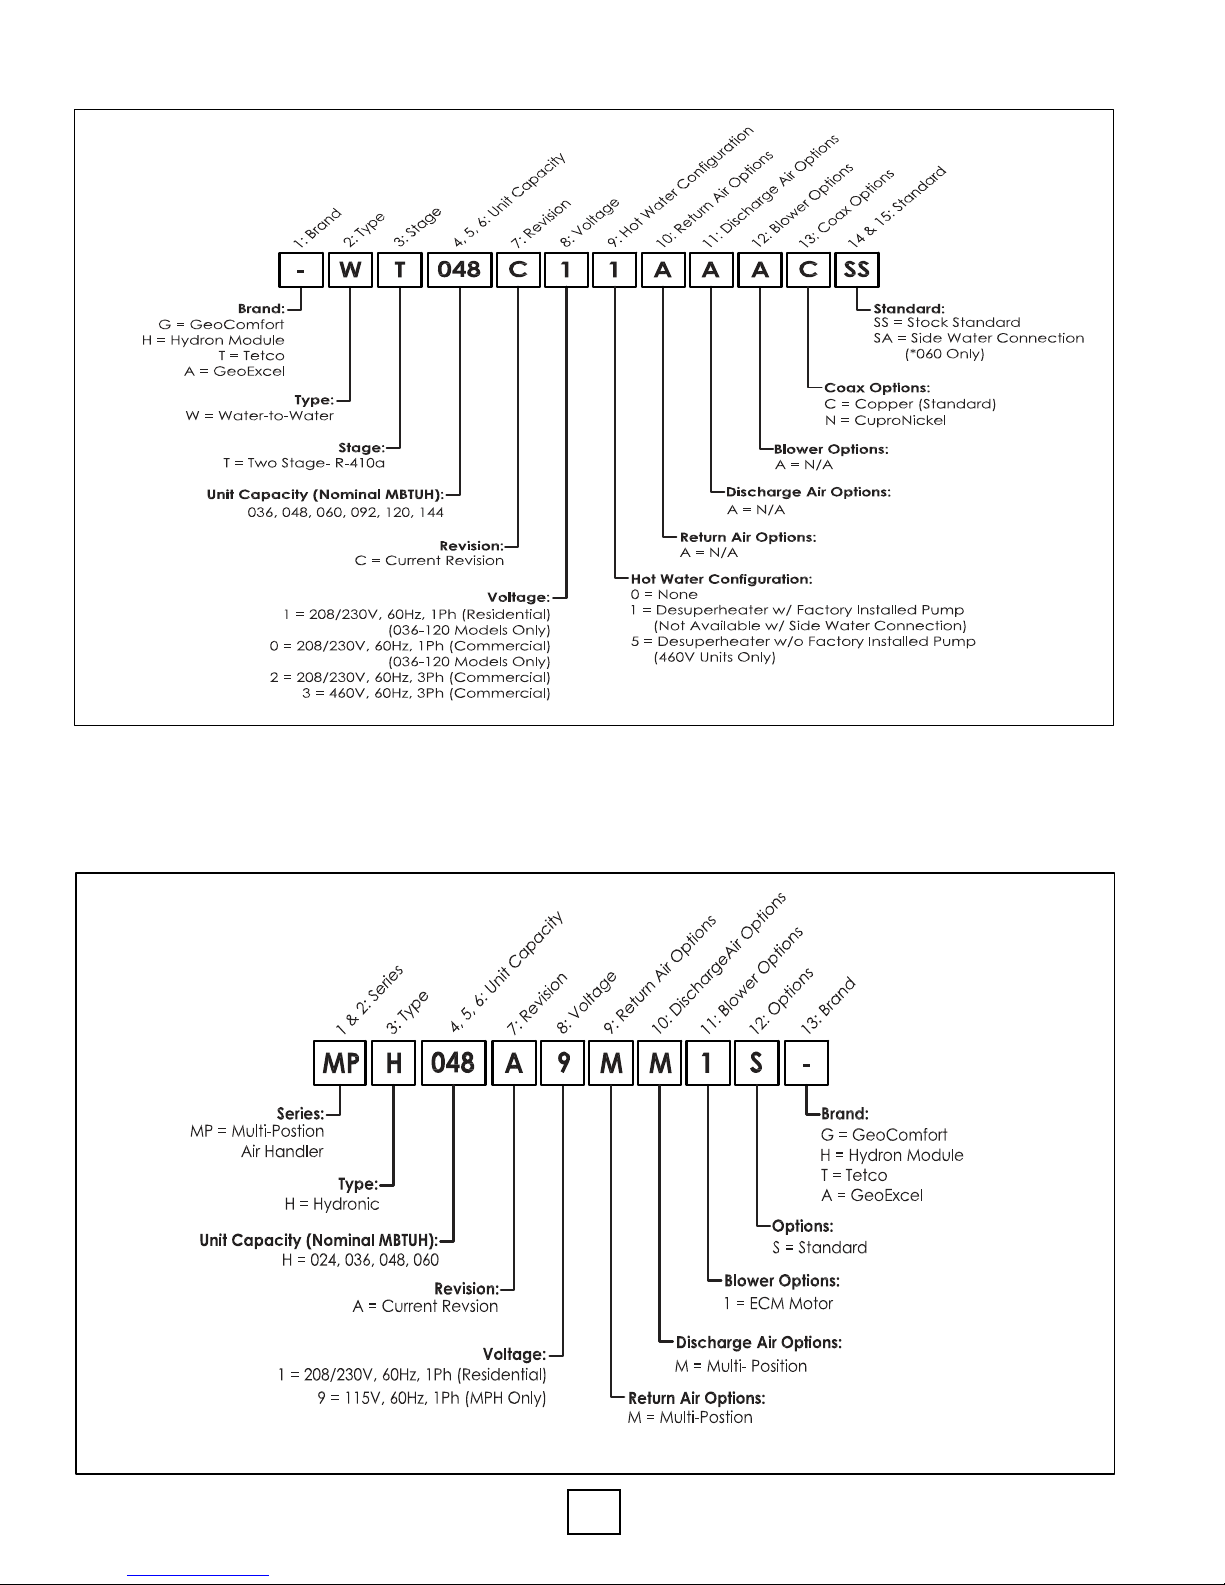
Section 1: WT Water-To-Water Unit Model Nomenclature
Section 1: Air Handler Model Nomenclature
Enertech Global WT Models, Rev.: B
4
Page 5
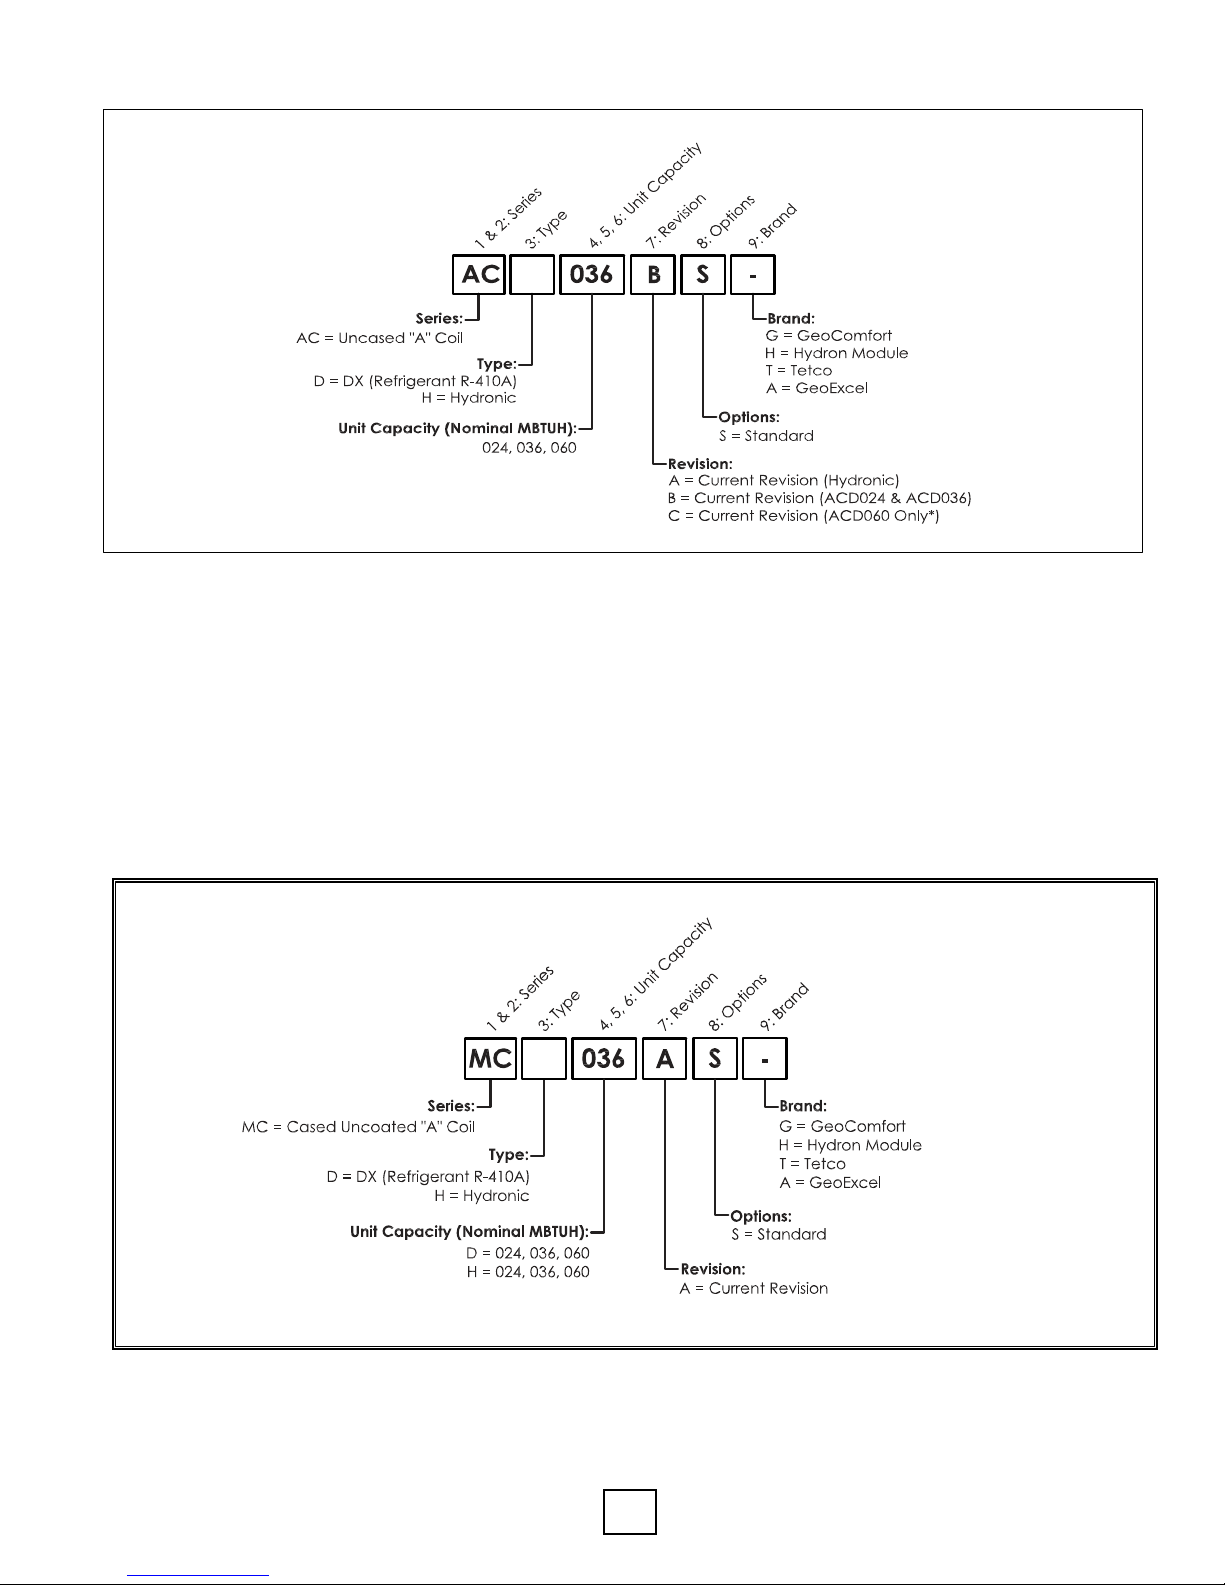
Section 1: Uncased ”A” Coil Model Nomenclature
H
Section 1: Cased”A” Coil Model Nomenclature
H
WT Models, Rev.: B Enertech Global
5
Page 6

Section 2: Installation Introduction
INTRODUCTION
This geothermal heat pump provides heated
water and chilled water as well as optional
domestic water heating capability. Engineering
and quality control is built into every
geothermal unit. Good performance depends
on proper application and correct installation.
Notices, Cautions, Warnings, & Dangers:
“NOTICE” Notication of installation, operation
or maintenance information which is important,
but which is NOT hazard-related.
“CAUTION” Indicates a potentially hazardous
situation or an unsafe practice which, if not
avoided, COULD result in minor or moderate
injury or product or property damage.
“WARNING” Indicates potentially hazardous
situation which, if not avoided, COULD result in
death or serious injury.
equivalent protective covering. Cap or recap
unit connections and all piping until unit is
installed. Precautions must be taken to avoid
physical damage and contamination which
may prevent proper start-up and may result in
costly equipment repair.
⚠ CAUTION ⚠
DO NOT OPERATE THE GEOTHERMAL
HEAT PUMP UNIT DURING BUILDING
CONSTRUCTION PHASE.
Storage
All geothermal units should be stored inside in
the original packaging in a clean, dry location.
Units should be stored in an upright position
at all times. Units should not be stacked unless
specially noted on the packaging.
“DANGER” Indicates an immediate hazardous
situation which, if not avoided, WILL result in
death or serious injury.
Inspection
Upon receipt of any geothermal equipment,
carefully check the shipment against the
packing slip and the freight company bill of
lading. Verify that all units and packages have
been received. Inspect the packaging of
each package and each unit for damages.
Insure that the carrier makes proper notation
of all damages or shortage on all bill of lading
papers. Concealed damage should be
reported to the freight company within 15 days.
If not led within 15 days the freight company
can deny all claims.
Note: Notify Enertech Global, LLC shipping
department of all damages within 15 days. It
is the responsibility of the purchaser to le all
necessary claims with the freight company.
Unit Protection
Protect units from damage and contamination
due to plastering (spraying), painting and
all other foreign materials that may be used
at the job site. Keep all units covered on the
job site with either the original packaging or
Pre-Installation
Special care should be taken in locating the
geothermal unit. Installation location chosen
should include adequate service clearance
around the unit. All units should be placed on
a formed plastic air pad, or a high density,
closed cell polystyrene pad slightly larger than
the base of the unit. If units are being placed
on racking, the unit must be placed on a solid
foundation. All units should be located in an
indoor area where the ambient temperature
will remain above 55°F and should be located
in a way that piping and ductwork or other
permanently installed xtures do not have to be
removed for servicing and lter replacement.
Pre-Installation Steps:
1. Compare the electrical data on the unit
nameplate with packing slip and ordering
information to verify that the correct unit
has been shipped.
2. Inspect all electrical connections
and wires. Connections must be clean and
tight at the terminals, and wires should not
touch any sharp edges or copper pipe.
3. Verify that all refrigerant tubing is free of
dents and kinks. Refrigerant tubing should
not be touching other unit components.
Enertech Global WT Models, Rev.: B
6
Page 7

Section 2: Installation Introduction
4. Before unit start-up, read all manuals and
become familiar with unit components
and operation. Thoroughly check the unit
before operating.
5. For A-Coil installations, it is recommended
that coil be sprayed with liquid detergent
thoroughly and rinsed thoroughly before
installation to assure proper drainage of
condensate from the coil ns to eliminate
water blowoff and to assure maximum coil
performance. If not sprayed approximately
50 hours of break in time is required to
achieve the same results.
⚠ CAUTION ⚠
ALL GEOTHERMAL EQUIPMENT IS
DESIGNED FOR INDOOR INSTALLATION
ONLY. DO NOT INSTALL OR STORE UNIT
IN A CORROSIVE ENVIRONMENT OR IN
A LOCATION WHERE TEMPERATURE AND
HUMIDITY ARE SUBJECT TO EXTREMES.
EQUIPMENT IS NOT CERTIFIED FOR
OUTDOOR APPLICATIONS. SUCH
INSTALLATION WILL VOID
ALL WARRANTIES.
Components
Master Contactor: Energizes Compressor
and optional Hydronic Pump and/or
Desuperheater pump package.
Logic Board: Logic Board operates the
compressor and protects unit by locking out
when safety switches are engaged. It also
provides fault indicator(s).
Terminal Strip: Provides connection to the
thermostat or other accessories to the low
voltage circuit.
Transformer: Converts incoming (source)
voltage to 24V AC.
Low Voltage Breaker: Attached directly to
transformer, protects the transformer and low
voltage circuit.
Reversing Valve: Controls the cycle of the
refrigerant system (heating or cooling).
Energized in cooling mode.
High Pressure Switch: Protects the refrigerant
system from high refrigerant pressure, by locking
unit out if pressure exceeds setting.
⚠ WARNING ⚠
FAILURE TO FOLLOW THIS CAUTION MAY
RESULT IN PERSONAL INJURY. USE CARE
AND WEAR APPROPRIATE PROTECTIVE
CLOTHING, SAFETY GLASSES AND
PROTECTIVE GLOVES WHEN SERVICING
UNIT AND HANDLING PARTS.
⚠ CAUTION ⚠
BEFORE DRILLING OR DRIVING ANY
SCREWS INTO CABINET, CHECK TO BE
SURE THE SCREW WILL NOT HIT ANY
INTERNAL PARTS OR REFRIGERANT LINES.
Low Pressure Switch: Protects the refrigerant
system from low suction pressure, if suction
pressure falls below setting.
Flow Switch (Freeze Protection Device):
Protects the water heat exchanger from
freezing, by shutting down compressor if water
ow decreases.
Compressor (Copeland Scroll): Pumps
refrigerant through the heat exchangers and
pressurizes the refrigerant, which increases the
temperature of the refrigerant.
Shipping Bolts: This unit is equipped with the
new COMPRESSOR ISOLATION feature. Do not
loosen or remove the bolts.
WT Models, Rev.: B Enertech Global
7
Page 8

Section 3: Installation Considerations
Consumer Instructions: Dealer should
instruct the consumer in proper operation,
maintenance, lter replacements, thermostat
and indicator lights. Also provide the consumer
with the manufacturer’s Owner's Manual for the
equipment being installed.
Enertech Global D-I-Y Policy: Enertech Global’s
geothermal heat pumps and system installations
may include electrical, refrigerant and/or water
connections. Federal, state and local codes
and regulations apply to various aspects of the
installation. Improperly installed equipment can
lead to equipment failure and health/safety
concerns. For these reasons, only qualied
technicians should install a Enertech Global built
geothermal system.
Because of the importance of proper
installation, Enertech Global does not sell
equipment direct to homeowners. Internet
websites and HVAC outlets may allow for
purchases directly by homeowners and doit-yourselfers, but Enertech Global offers no
warranty on equipment that is purchased via
the internet or installed by persons without
proper training.
Thermostat: Thermostats should be installed
approximately 54 inches off the oor on an
inside wall in the return air pattern and where
they are not in direct sunlight at anytime.
Loop Pumping Modules: Must be wired to the
heat pump’s electric control box. A special
entrance knockout is provided below the
thermostat entrance knockout. A pump
module connection block, connected to
the master contactor, and circuit breaker is
provided to connect the Pump Module wiring.
Desuperheater Package: Water heating is
standard on all residential units (units may be
ordered without). It uses excess heat during
both heating and cooling cycles, to provide
hot water for domestic needs. A double wall
desuperheater exchanger (coil) located
between the compressor and the reversing
valve, extracts superheated vapor to heat
domestic water; still satisfying its heating and
cooling needs. The water circulation pump
comes pre-mounted in all residential units, but
must be electrically connected to the master
contactor. Leaving it disconnected ensures that
the pump will not run without a water supply.
Enertech Global has set forth this policy
to ensure installations of Enertech Global
geothermal systems are done safely and
properly. The use of well-trained, qualied
technicians helps ensure that your system
provides many years of comfort and savings.
Equipment Installation: Special care should
be taken in locating the unit. All units should
be placed on a formed plastic air pad, or
a high density, closed cell polystyrene pad
slightly larger than the base of the unit. All units
should be located in an indoor area were
the ambient temperature will remain above
55°F and should be located in a way that
piping and ductwork or other permanently
installed xtures do not have to be removed for
servicing and lter replacement.
Electrical: All wiring, line and low voltage,
should comply with the manufacturer's
recommendations, The National Electrical
Code, and all local codes and ordinances.
The Desuperheater package can make up to
60% (depending on heat pump usage) of most
domestic water needs, but a water heater is still
recommended.
Desuperheater Piping: All copper tubes
& ttings should be 5/8” O.D (1/2” nom)
minimum with a maximum of 50ft separation.
Piping should be insulated with 3/8” wall
closed cell insulation.
Note: Copper is the only approved material
for piping the desuperheater.
Enertech Global WT Models, Rev.: B
8
Page 9
•
•
•
•
•
• • • • • • •
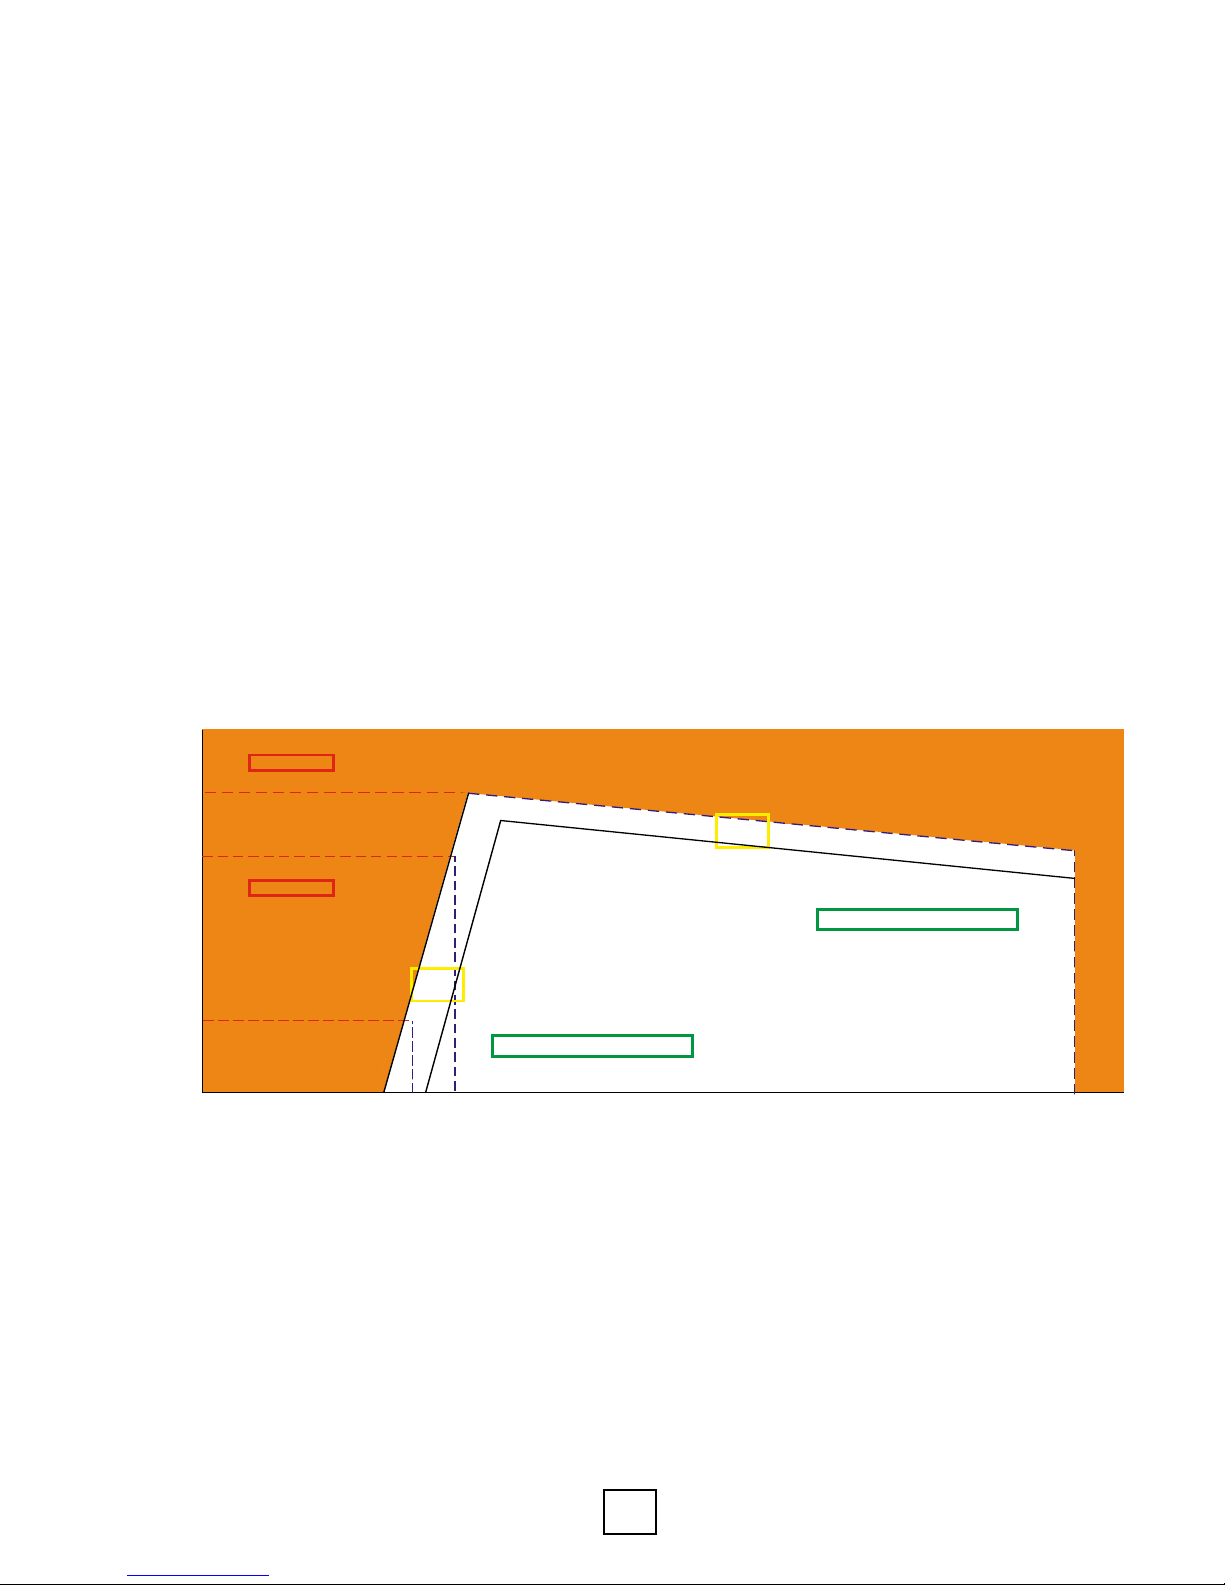
Acceptable Operating Conditions
45°F
40°F
35°F
30°F
25°F20°F
15°F10°F
100°F
110°F
115°F
120°F
125°F
130°F
SCROLL COMPRESSOR OPERATING CONDITIONS (WATER TO WATER)
HEATING MODE OPERATION
Source Entering Water Temperature
• • • • •
70°F
65°F
60°F
55°F
50°F
FAILURE ZONE
Acceptable Operating Conditions
Outside Safe Operating Range
Outside Safe Operating Range
•
•
•
•
75°F
•
80°F
FAILURE ZONE
Load Leaving Water Temperature
Safety
Factor
Safety
Factor
Section 3: Operation Considerations
Guidelines For Heating Mode Operation For Water-To-Water Units Using Scroll Compressors
Enertech recommends the aquastat setting not be set above 110°F for the storage tank
temperature. Excessive vibration and part failure can occur at higher than recommended
temperature settings. The higher operating temperatures cause substantial efciency and
capacity reductions.
The performance is negatively affected as the unit operates at the higher water temperatures
and it benets the unit and the homeowner to operate at or below the recommended water
temperature of 110°F.
With the lower efciency created by higher water temperatures, the output capacity of the
unit is decreased along with the efciency. When operating at the higher entering water
temperature the heat of extraction is signicantly reduced, as well. In order to maintain the
needed capacity, more of the heat is coming from the compressor working harder to compress
the refrigerant.
The illustration below shows the parameters which are safe for compressor operation. Based
on the leaving load water of 120°F, the loop would have to maintain 35°F to operate within
the acceptable operating conditions for the compressor. Once your loop temperatures drop
below 35°F, the acceptable leaving load temperature drops below 120°F. If you are designing
loops for 30°F, the recommended leaving load temperature is 110°F.
Because the water-to-water machines have become so popular for providing heated water for
a multitude of uses, we’ve provided the above chart for reference.
The obvious correlation is that the warmer the Source Entering Water Temperature, the hotter
the Load Leaving Water Temperature can be, to a point. R410A can only handle up to about
125°F Load Leaving Water Temperature before putting the compressor at risk.
Actual usage, and choices of heat distribution devices need to follow the acceptable
operating conditions presented in the chart. If a question arises, please consult the Technical
Services Department.
WT Models, Rev.: B Enertech Global
9
Page 10

Section 3: Buffer Tanks
BUFFER TANKS
Virtually all water-to-water heat pumps used
for hydronic applications require a buffer tank
to prevent equipment short cycling, and to
allow lower ow rates through the water-to-
water unit than through the hydronic delivery
system. The following are considerations for
buffer tank sizing.
• The size of the buffer tank should be
determined based upon the predominant
use of the water-to-water equipment
(heating or cooling).
• The size of the buffer tank is based upon the
lowest operating stage of the equipment.
For example, a water-to-water heat
pump with a two-stage compressor or two
compressors may be sized for rst stage
capacity, reducing the size of the tank (twostage aquastat required).
• Pressurized buffer tanks are sized differently
than non-pressurized tanks (see guidelines
listed below).
stage. Requirements for storage are less
according to the manufacturer of the HSS series
non-pressurized buffer tank. Using the same
conditions for maximum heating and cooling
capacity mentioned above, non-pressurized
buffer tanks require 6 U.S. gallons per ton.
Pressurized buffer tanks for predominately
heating applications should be sized at one (1)
U.S. gallon per 1,000 Btuh of heating capacity
(10 gallons per ton may also be used) at the
maximum entering source water temperature
(EST) and the minimum entering load water
temperature (ELT), the point at which the waterto-water unit has the highest heating capacity,
usually 50-70°F EST and 80-90°F ELT.
For predominately cooling applications,
pressurized buffer tanks should be sized at
one (1) U.S. gallon per 1,000 Btuh of cooling
capacity (10 U.S. gallons per ton may also be
used) at the minimum EST and the maximum
ELT, the point at which the water-to-water unit
has the highest cooling capacity, usually 5070°F EST and 50-60°F ELT.
Select the size of the tank based upon the
larger of the calculations (heating or cooling).
Non-pressurized buffer tanks must also be sized
based upon predominate use (heating or
cooling) and based upon the lowest capacity
Enertech Global WT Models, Rev.: B
10
Page 11

Section 4: Unit Placement
UNIT PLACEMENT
When installing a geothermal heating and
cooling unit, there are several items the installer
should consider before placing the equipment.
1. Service Access. Is there enough space for
service access? A general rule of thumb is
at least 2 feet in the front and 2 feet on at
least one side.
2. Unit Air Pad. All geothermal heating and
cooling equipment should be placed on
either a formed plastic air pad, or a high
density, closed cell polystyrene pad. This
helps eliminate vibration noise that could
be transmitted through the oor.
3.
If units are being placed on racking, the
unit must be placed on a solid foundation
covering the full base of the unit. Also,
utilize a foam pad between the unit and
the rack.
4. The installer must verify that all applicable
wiring, piping, and accessories are correct
and on the job site.
PRE-INSTALLATION
Before you fully install the geothermal
equipment, it is recommended you go
through this quick checklist before placing the
equipment.
⧠ Fully inspect the unit after unpacking.
⧠
Locate the Unit Start-Up form from this
manual and have it available as the unit
installation proceeds.
HYDRONIC AIR HANDLER INSTALLATION
These units have a 0” minimum clearance to
combustible materials rating from all cabinet
surfaces. The unit should be i9nstalled with
serviceability clearance of 30” from the front
of the unit. The unit can be serviced entirely
from the front, including replacing the lter.
Be sure and route primary and secondary
drain connections so as not to obstruct
replacement of lter.
UPFLOW APPLICATION
In an upow installation the discharge outlet
is at the top. Care should be taken to insure
unit is level to permit proper condensate
drainage.
Normal upow installation will be in a
basement or closet. If installed in a closet,
the closet should have a platform framed in,
with an opening on top of the platform
centered in the closet.
Connect the supply air outlet to a warm air
plenum. Install return air grilles from outside
the closet to space below the platform.
Platform must be at least 10” above the
oor. If installed in a basement, run supply
and return ductwork in accordance with
local codes.
Caution! A “P” trap must be installed in the
coil drain line! Cap unused drain ttings.
HORIZONTAL APPLICATION
Horizontal application will normally be used
in an attic or crawl space. This type of
installation requires a return air duct be
attached to the unit inlet. The opposite end
of the return air duct is attached to a return
air lter grill through the ceiling or wall.
Remove lter from unit if lter grill is used. The
unit is shipped in right to left conguration.
For left to right applications (Begin with
the unit in the verticl upright poisition and
before connecting drains and refrigerant
lines) remove coil and doors and move
horizontal pan to right side. Reinstall coil and
doors.
CAUTION: IT IS MANDATORY TO USE AN
EMERGENCY AUXILLARY DRAIN PAN WITH
ANY COIL OR AIR HANDLER INSTALLED IN AN
ATTIC OR ABOVE A FINISHED CEILING!
DOWNFLOW APPLICATION
Contact Enertech for proper downow kit
including instructions.
Unit is shipped from the factory arranged to
be installed in a vertical upow or horizontal
right to left airow position (standard) or eld
convertible to a horizontal left to right airow
position.
WT Models, Rev.: B Enertech Global
11
Page 12
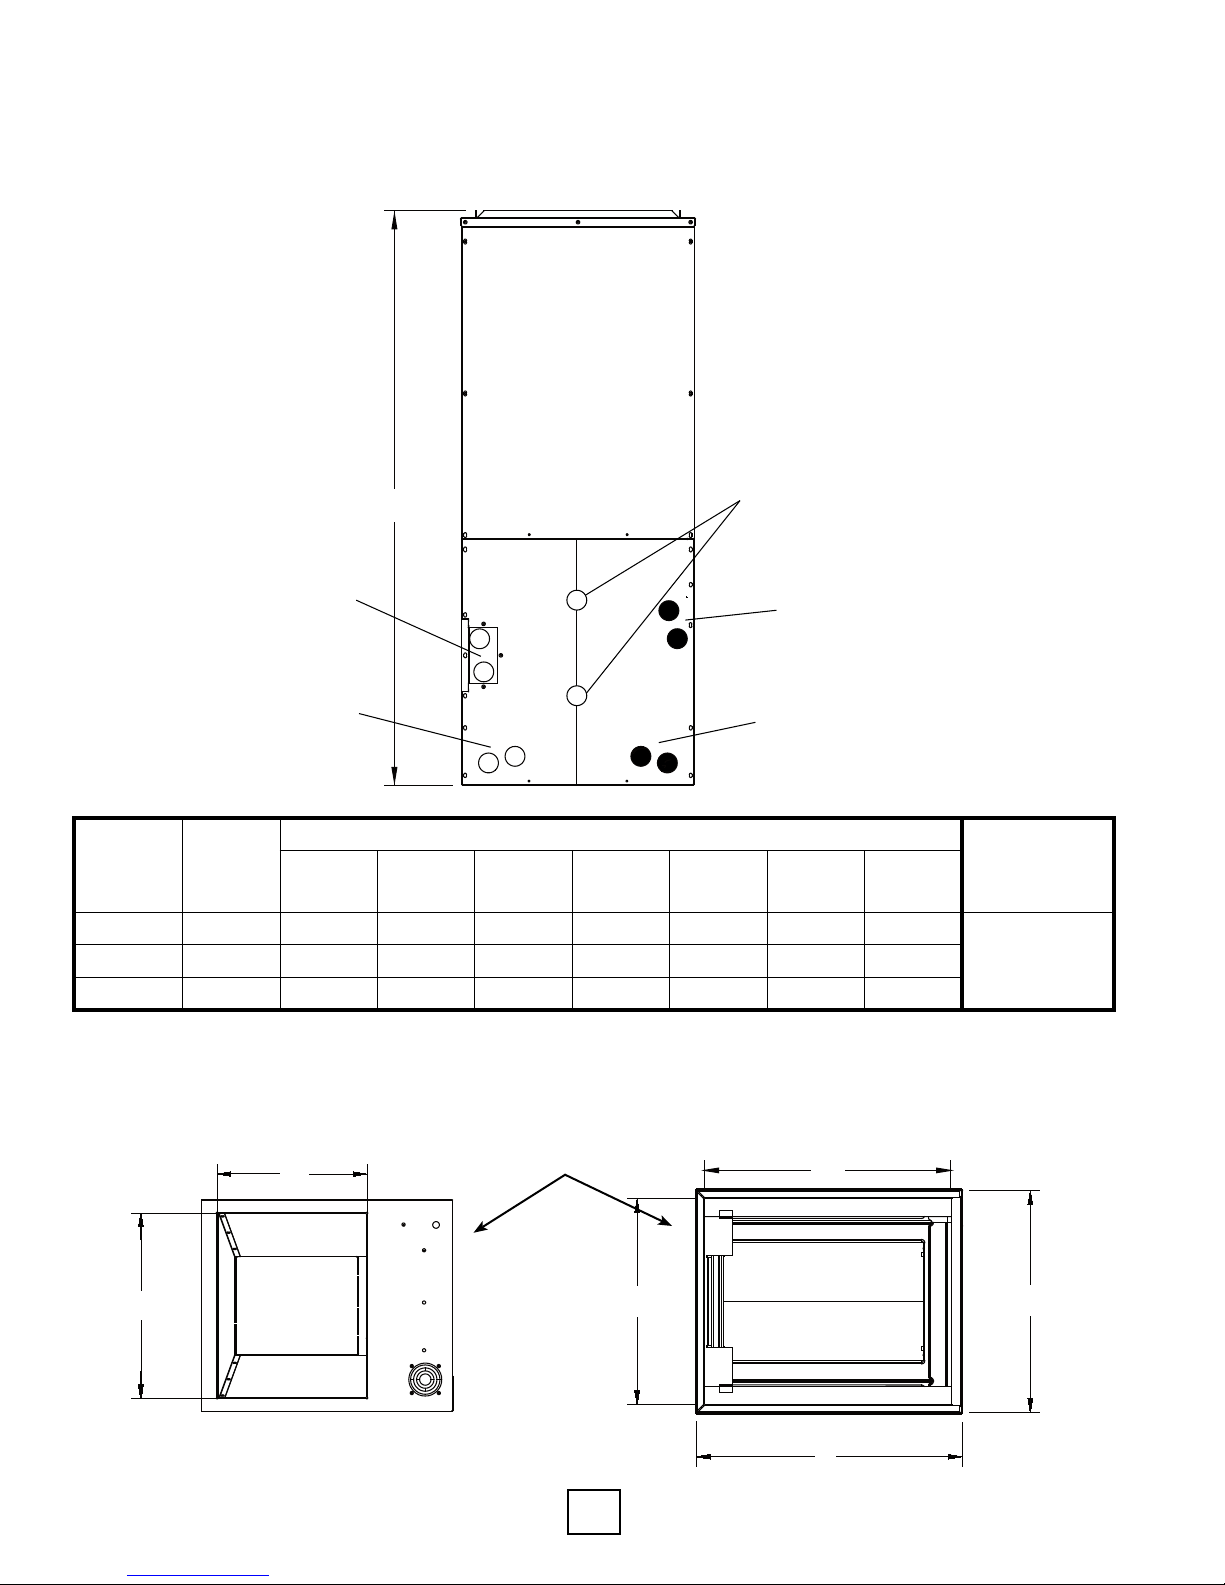
Section 4: Air Handler Dimensional and Physical Data
G
FRONT VIEW
Model Size
(tons) A B C D E F G
48-60 4 - 5 25 22 23 3/8 20 1/2 19 5/8 16 1/8 58 3/4
24 2 17 5/8 21 16 1/3 20 1/4 15 1/2 12 1/2 43
36 3 21 1/8 21 19 3/4 20 1/4 19 12 1/2 48 1/4
DIMENSIONAL DATA
All Dimensions in Inches
Alternate Drain
Connection
(Horizontal)
Alternate Drain
Connection
(Vertical)
Water Connections, Hydronic (Sweat)
Primary Drain
Connection
(Vertical)
Primary Drain
Connection
(Horizontal)
Supply
Return
FRONT VIEW
G
Water Connections, Hydronic (Sweat)
Return
Supply
All Dimensions in Inches
Alternate Drain
Connection
(Horizontal)
Alternate Drain
Connection
(Vertical)
Model
Primary Drain
Connection
(Horizontal)
Primary Drain
Connection
(Vertical)
Size
(tons)
A B C D E F G
024 2 17 5/8 21 16 1/3 20 1/4 15 1/2 12 1/2 43
036 3 21 1/8 21 19 3/4 20 1/4 19 12 1/2 48 1/4
048-060 4 - 5 25 22 23 3/8 20 1/2 22 1/4 14 1/4 58 3/4
TOP VIEW
BOTTOM VIEW
Water
Connection
Size (Sweat,
“L” Copper)
0.875” O.D.
0.045” Wall
F
E
Enertech Global WT Models, Rev.: B
Front
C
12
D
A
B
Page 13
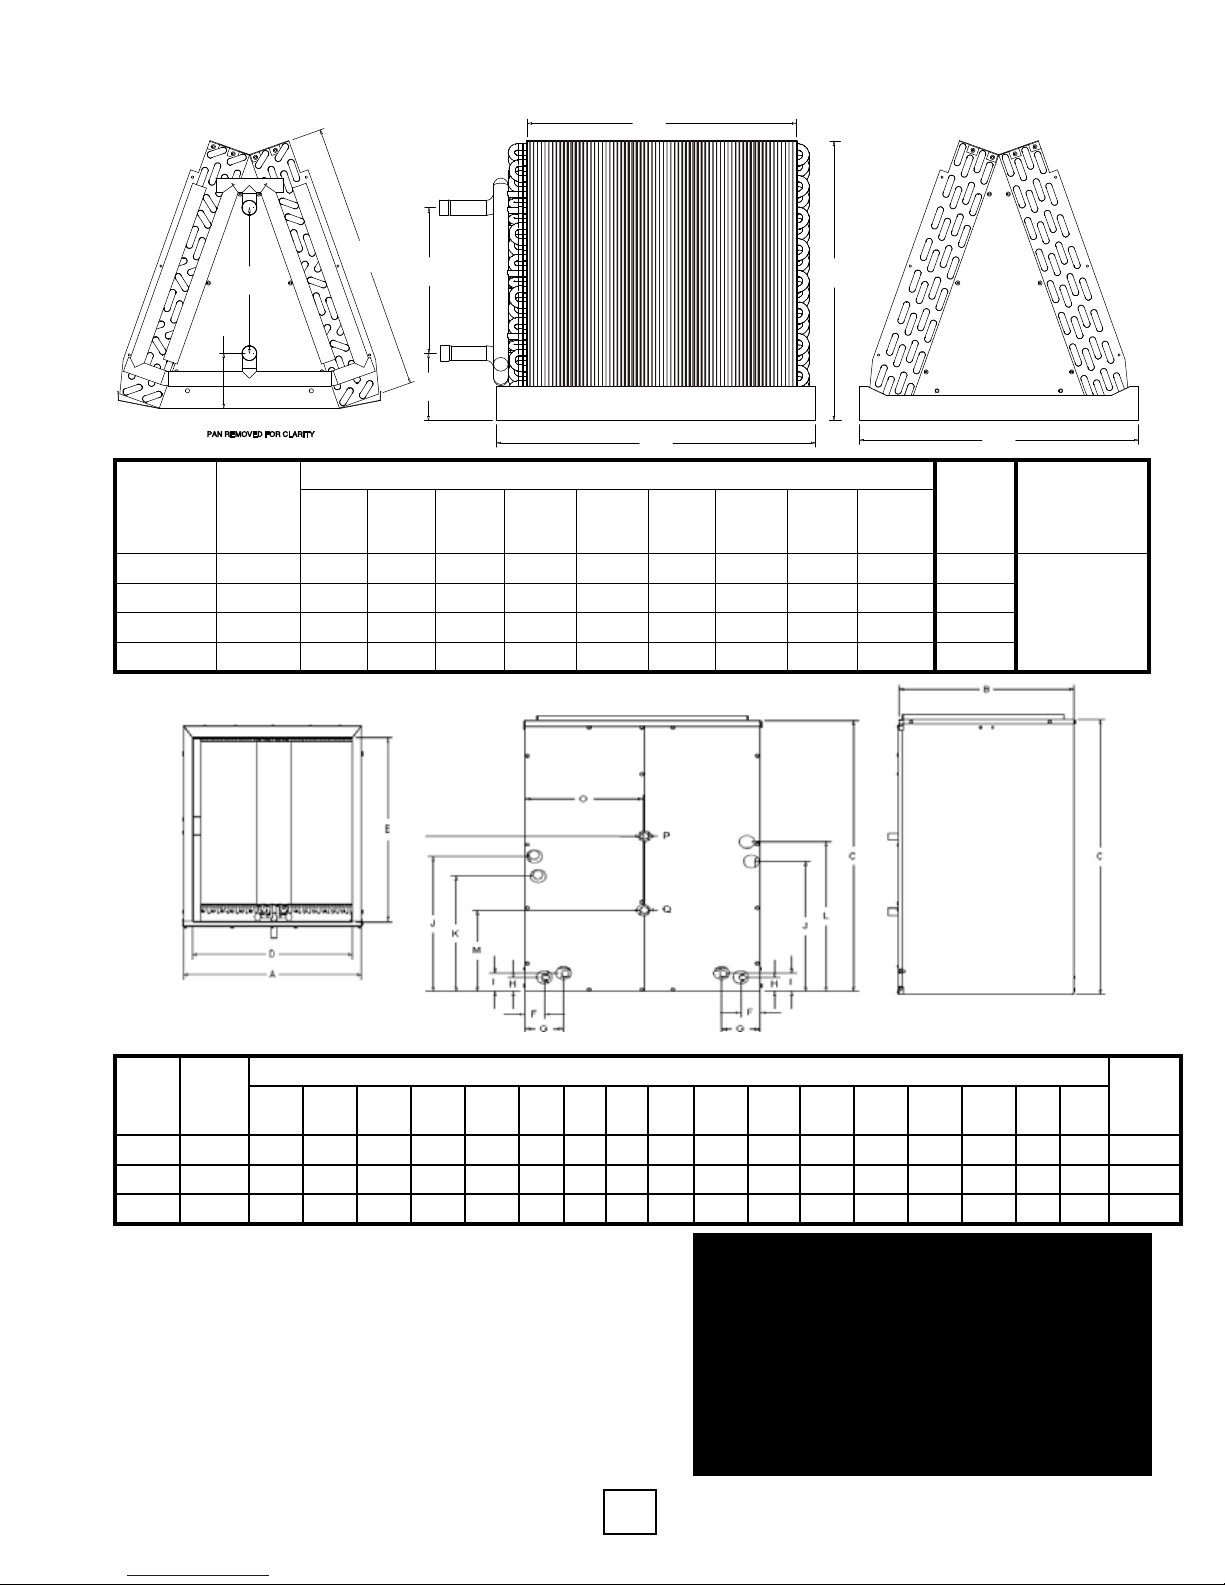
Section 4: Cased and Uncased “A” Coil Dimensional and Physical Data
I
D
G
H
PAN REMOVED FOR CLARITY
Model
024 2 16.63 19.00 18.5 16.00 4.00 8.67 8.67 3.27 16.00 38
036 3 19.63 19.00 21.0 20.00 6.76 6.77 6.77 6.04 16.00 46
048 4 23.92 20.50 28.0 28.58 9.38 9.38 9.38 8.66 17.50 48
060 5 23.92 20.50 28.0 28.58 9.38 9.38 9.38 8.66 17.50 67
Size
(Tons)
A B C D E F G H I
F
E
All Dimensions In Inches
Drain Pan
B
Return
C
Weight
Drain Pan
A
BackSideFront
(lbs)
Water
Connection
Size (Sweat,
“L” Copper)
0.875” O.D.
0.045” Wall
Supply
Model
024 2 17.5 21.0 20.0 15.2 19.2 2.1 4.1 1.6 2.3 11.1 8.5 13.8 9.2 13.5 8.8 .88 8.8 45
036 3 21.0 21.0 24.0 18.7 19.2 4.0 6.0 1.8 2.3 13.0 10.5 15.6 7.8 14.6 10.5 .88 .38 50
060 5 24.5 22.0 34.0 22.0 19.9 2.2 4.2 1.9 2.3 17.3 14.8 19.8 10.3 19.6 12.5 .88 .38 72
NOTES:
1. TheACseriescoilsaredesignedashighefciency“A”coilsto
be installed on new and existing indoor furnaces. These coils
maybeusedinupowanddownowapplications.
2. Coils are ETL and CSA approved.
3. Primaryandsecondarydrainconnectionsareavailableonthe
LH or RH side of the drain pan, and are 3/4” FPT. Center line
ofdrainslocatedfrompancorner,11/2”forprimaryand31/2”
forsecondary.
4. Drain pan is injection molded high temperature UL approved
plastic.
Size
(Tons)
A B C D E F G H I J K L M N O P Q
All Dimensions In Inches (nominal)
⚠ WARNING ⚠
IF USING A DUAL FUEL APPLICATION,
“A” COIL MUST BE INSTALLED ON
THE OUTLET OF THE FURNACE.
INSTALLATION ON THE RETURN
COULD CAUSE FURNACE HEAT
EXCHANGER FAILURE, AND MAY
VOID FURNACE WARRANTY.
Weight
(lbs)
WT Models, Rev.: B Enertech Global
13
Page 14
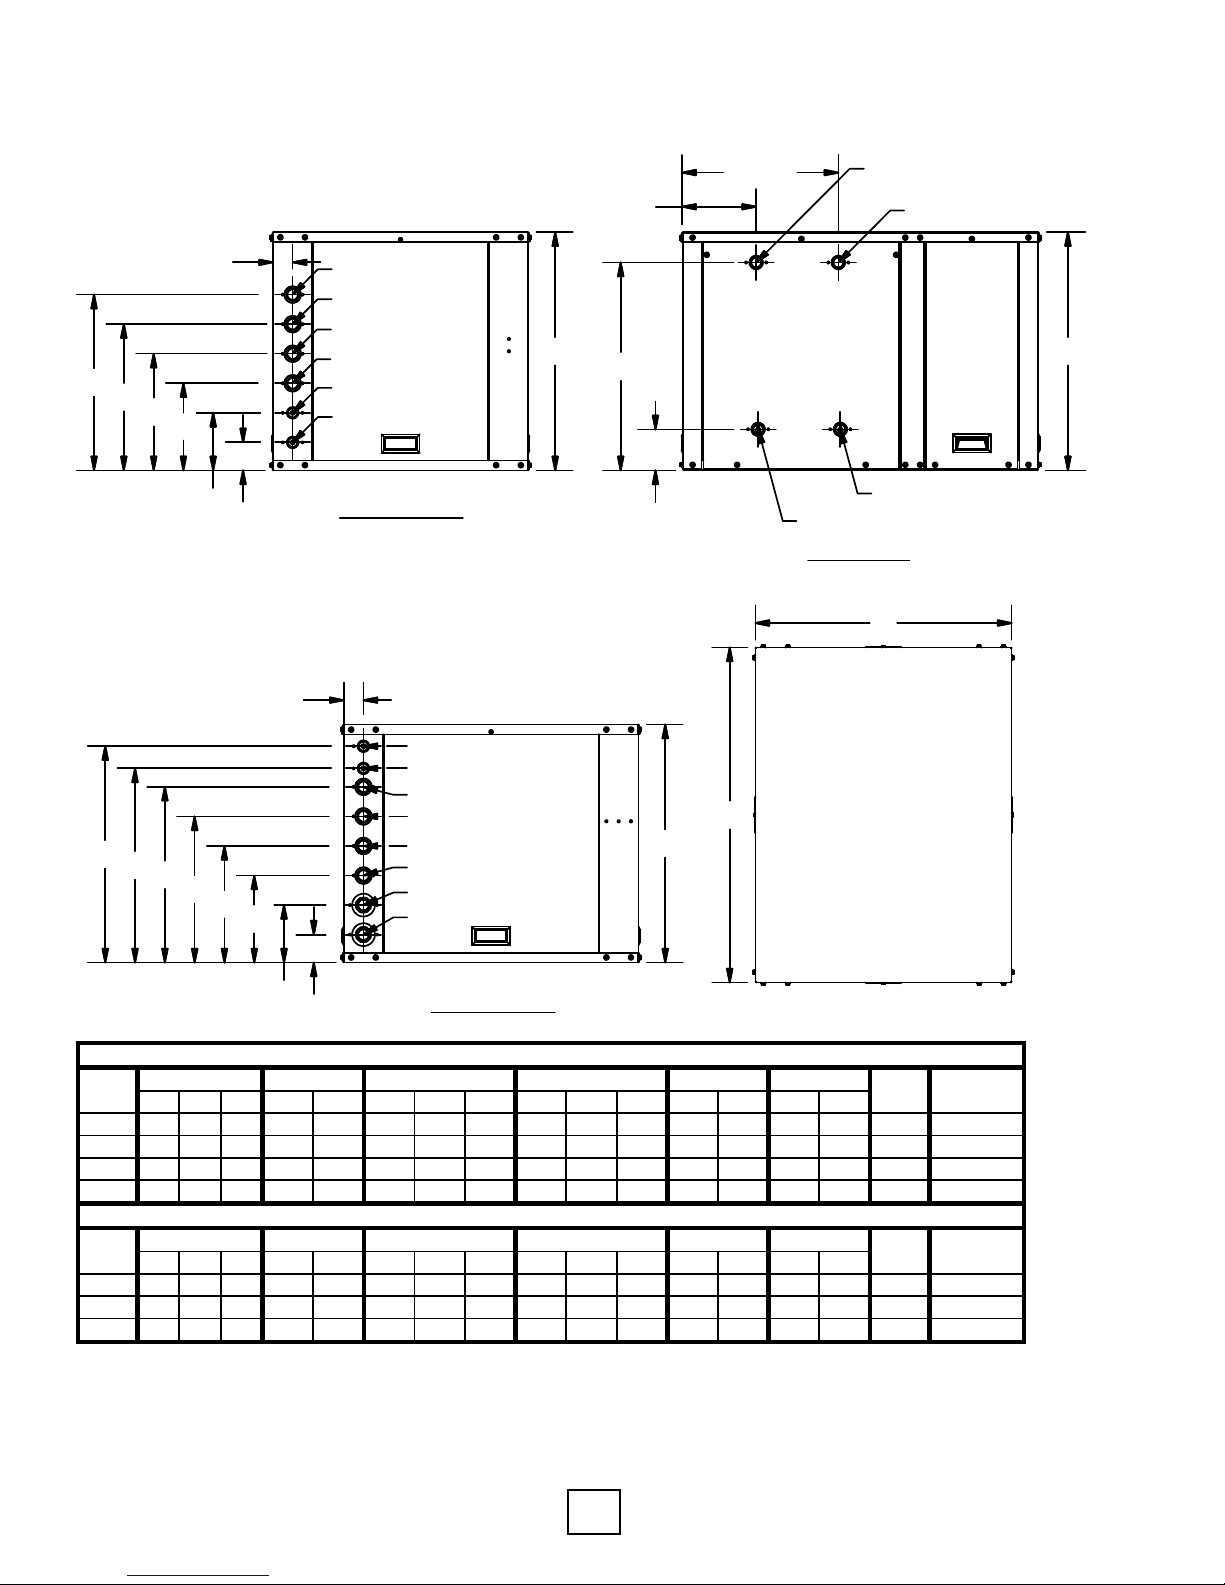
Section 4: Unit Dimensional Data
Factory
ABC
DE
F F2 I G G2 H IN OUT IN OUT
Charge (oz)
036
24 26 34 2.83 5.83 8.83 N/A 17.83 11.83 N/A 14.83 1" 1" 1" 1" 315 65
048 24 26 34 2.83 5.83 8.83 N/A 17.83 11.83 N/A 14.83 1" 1" 1" 1" 345 73
060 24 26 36 2.83 5.83 8.83 N/A 17.83 11.83 N/A 14.83 1" 1" 1" 1" 390 101
060* 24 32 36 N/A N/A 4.16 N/A 21.10 4.16 N/A 21.10 1" 1" 1" 1" 410 101
Factory
ABC
DE
F F2 I G G2 H IN OUT IN OUT Charge (oz)
092
24 30 48 19.71 21.96 17.83 14.83 2.83 11.83 8.83 5.83 1" 1.25" 1" 1.25" 550 68 EA
120 24 30 48 19.71 21.96 17.83 14.83 2.83 11.83 8.83 5.83 1" 1.5" 1" 1.5" 670 76 EA
144 24 30 48 19.71 21.96 17.83 14.83 2.83 11.83 8.83 5.83 1" 1.5" 1" 1.5" 670 81 EA
Overall Cabinet HWG Water
HWG Water
Single Compressor Units
Weight
Weight
Load Water
Load Water
Source Water
Source Water
Dual Compressor Units
Load Loop Source Loop
Load Loop Source Loop
Model
Overall Cabinet
Model
16.000
7.500
2.000
I
H
G
F
E
D
Out (Load Loop)
Out (Source Loop)
In (Source Loop)
In (Load Loop)
HWG Water Out
HWG Water In
FRONT VIEW
Single Compressor
A
H & I
F & G
In (Source Loop)
Out (Source Loop)
Out (Load Loop)
A
In (Load Loop)
SIDE VIEW
*WT060 Side Water Connection
B
2.000
HWG Water Out
HWG Water In
In (Load Loop #1)
In (Load Loop #2)
E
D
F
F2
G
G2
In (Source Loop #1)
In (Source Loop #2)
Out (Source Loop)
Out (Load Loop)
A
C
H
I
Notes:
- All models & brands (see exception below) use FPT fittings for all source & load loop connections.
- Geocomfort, residential only, models 036-060 use 1" Double O-Ring fittings for source loop connections.
- Dual Compressor: There are two "IN" connections, but only one "Out" Connection (Source & Load)
- All Desuperheater connections are 3/4" FPT.
- Electrical connections are 1" for high voltage, 1/2" for low voltage
*All measurements are in inches.
Enertech Global WT Models, Rev.: B
FRONT VIEW
Dual Compressor
14
TOP VIEW
Page 15
Section 5: Unit Piping Installation
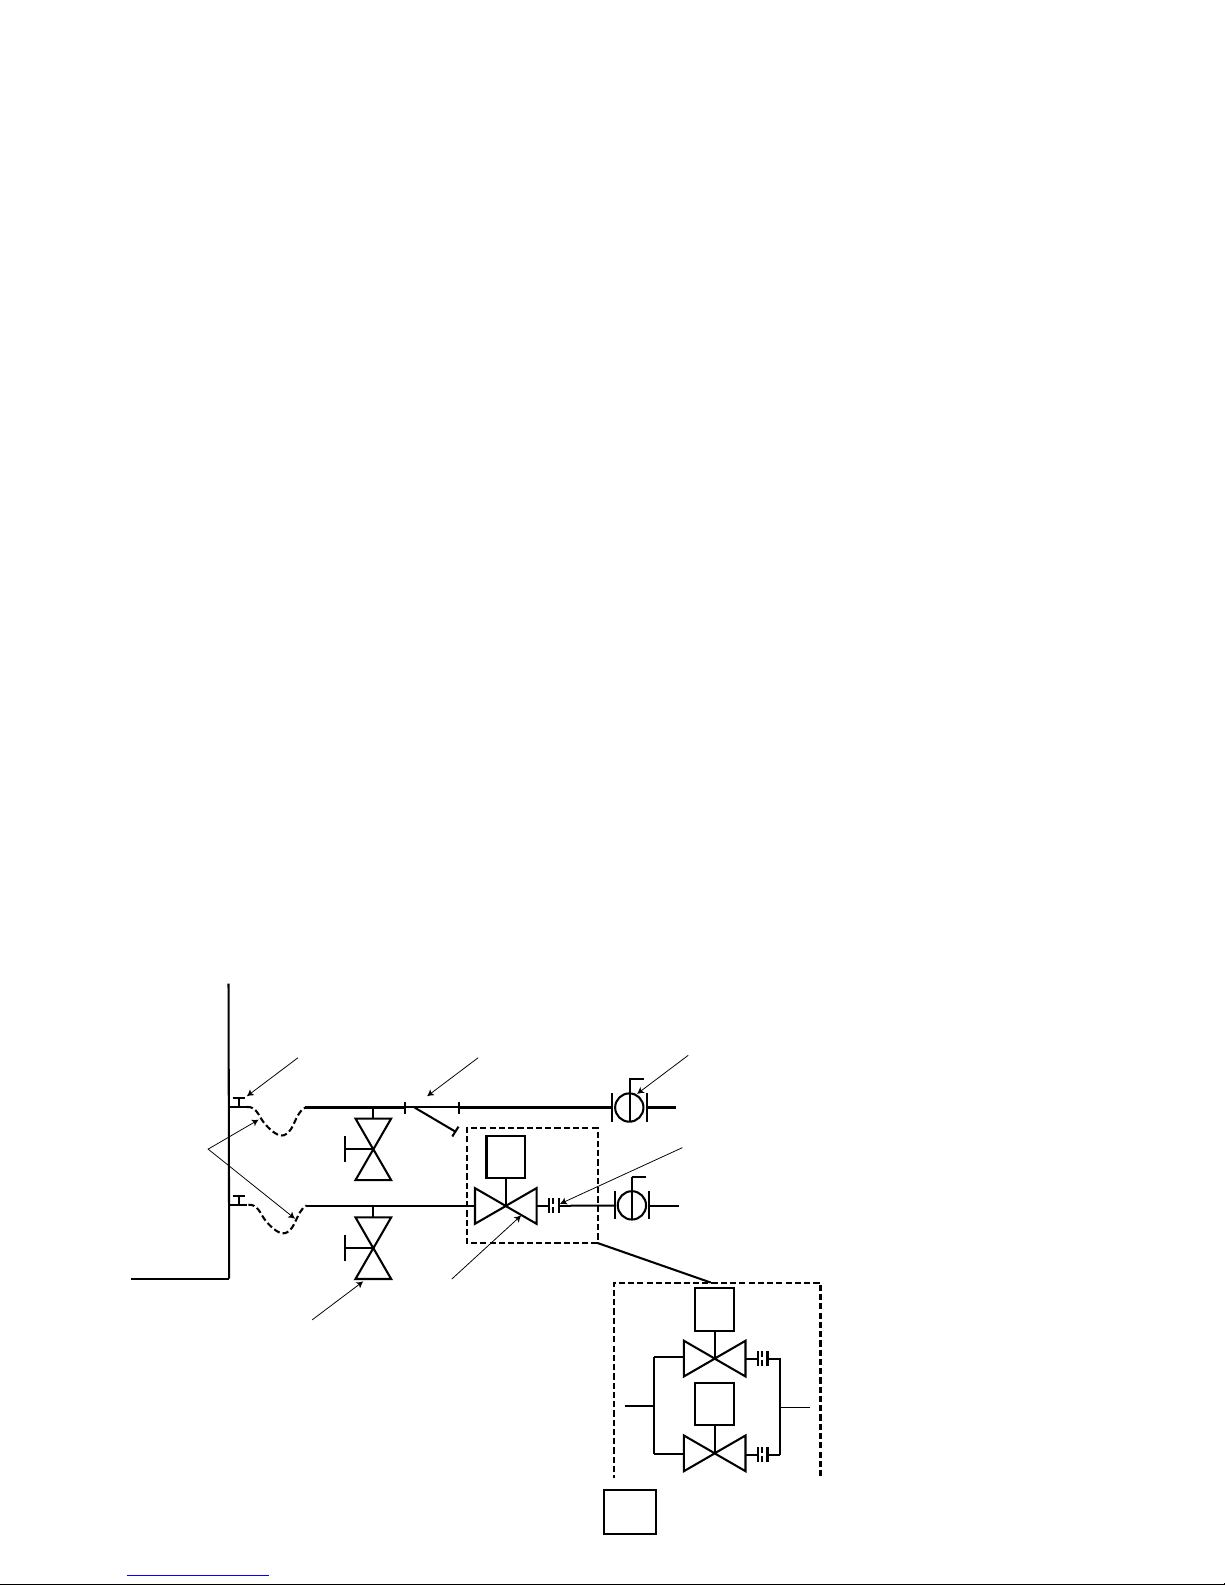
Open Loop Piping
Placement of the components for an open
loop system are important when considering
water quality and long term maintenance. The
water solenoid valve should always be placed
on the outlet of the heat pump, which will keep
the heat exchanger under pressure when the
unit is not operating. If the heat exchanger is
under pressure, minerals will stay in suspension.
Water solenoid valves are also designed to
close against the pressure, not with the pressure.
Otherwise, they tend to be noisy when closing.
A ow regulator should be placed after the
water solenoid valve. Always check the product
specication catalog for proper ow rate. A
calculation must be made to determine the
ow rate, so that the leaving water temperature
does not have the possibility of freezing.
Other necessary components include a strainer,
boiler drains for heat exchanger ushing, P/T
ports and ball valves. Ball valves allow the
water to be shut off for service, and also help
when velocity noise is noticeable through the
ow regulator. Spreading some of the pressure
drop across the ball valves will lessen the
velocity noise. Always double check ow rate
at the P/T ports to make sure the ball valve
adjustments have not lowered water ow too
much, and essentially taken the ow regulator
out of the equation. It’s a good idea to remove
the ball valve handles once the system is
completed to avoid nuisance service calls.
Hose kits are optional, but make for an easier
installation, since the P/T ports and connections
are included. The hose also helps to isolate the
heat pump from the piping system.
Since the heat pump can operate at lower
waterow on rst stage, two stage units
typically include two water solenoid valves
to save water. The ow regulators should be
sized so that when one valve is open the unit
operates at rst stage ow rate, and when
both valves are open, the unit operates at
full load ow rate. For example, a 4 ton unit
needs approximately 4 GPM on rst stage, and
approximately 7 GPM at full load. The ow
regulator after the rst valve should be 4 GPM,
and the ow regulator after the second valve
should be 3 GPM. When both valves are open,
the unit will operate at 7 GPM.
Figure 1: Open Loop Piping Example
TYPICAL OPEN LOOP PLUMBING
AND VALVE INSTALLATION EXAMPLE
HEAT
PUMP
Optional
Hose Kit*
OUT
*Hose kit used for unit isolation, includes fittings for P/T ports.
**See product specifications for flow rates.
P/T Port
(2 required)
IN
Boiler Drain
for Heat
Exchanger
Maintenance
(2 required)
WYE Strainer
Water
Solenoid
Valve
S
Single
Speed
Units
Ball Valve
(2 required)
From Well
Flow Regulator**
Discharge Line
S
S
Two-
Stage
Units
Note: All GWT, HWT, & TWT
units are two-stage units.
Not recommended for
3 ton and smaller. Use
single solenoid and
ow regulator.
WT Models, Rev.: B Enertech Global
15
Page 16
Section 5: Unit Piping Installation
Water Quality
The quality of the water used in geothermal
systems is very important. In closed loop systems
the dilution water (water mixed with antifreeze)
must be of high quality to ensure adequate
corrosion protection. Water of poor quality
contains ions that make the uid “hard” and
corrosive. Calcium and magnesium hardness
ions build up as scale on the walls of the system
and reduce heat transfer. These ions may also
react with the corrosion inhibitors in glycol based
heat transfer uids, causing them to precipitate
out of solution and rendering the inhibitors
ineffective in protecting against corrosion. In
addition, high concentrations of corrosive ions,
such as chloride and sulfate, will eat through any
protective layer that the corrosion inhibitors form
on the walls of the system.
Ideally, de-ionized water should be used for
dilution with antifreeze solutions since de-
ionizing removes both corrosive and hardness
ions. Distilled water and zeolite softened water
are also acceptable. Softened water, although
free of hardness ions, may actually have
increased concentrations of corrosive ions and,
therefore, its quality must be monitored. It is
recommended that dilution water contain less
than 100 PPM calcium carbonate or less than
25 PPM calcium plus magnesium ions; and less
than 25 PPM chloride or sulfate ions.
In an open loop system the water quality is
of no less importance. Due to the inherent
variation of the supply water, it should be tested
prior to making the decision to use an open
loop system. Scaling of the heat exchanger
and corrosion of the internal parts are two of
the potential problems. The Department of
Natural Resources or your local municipality
can direct you to the proper testing agency.
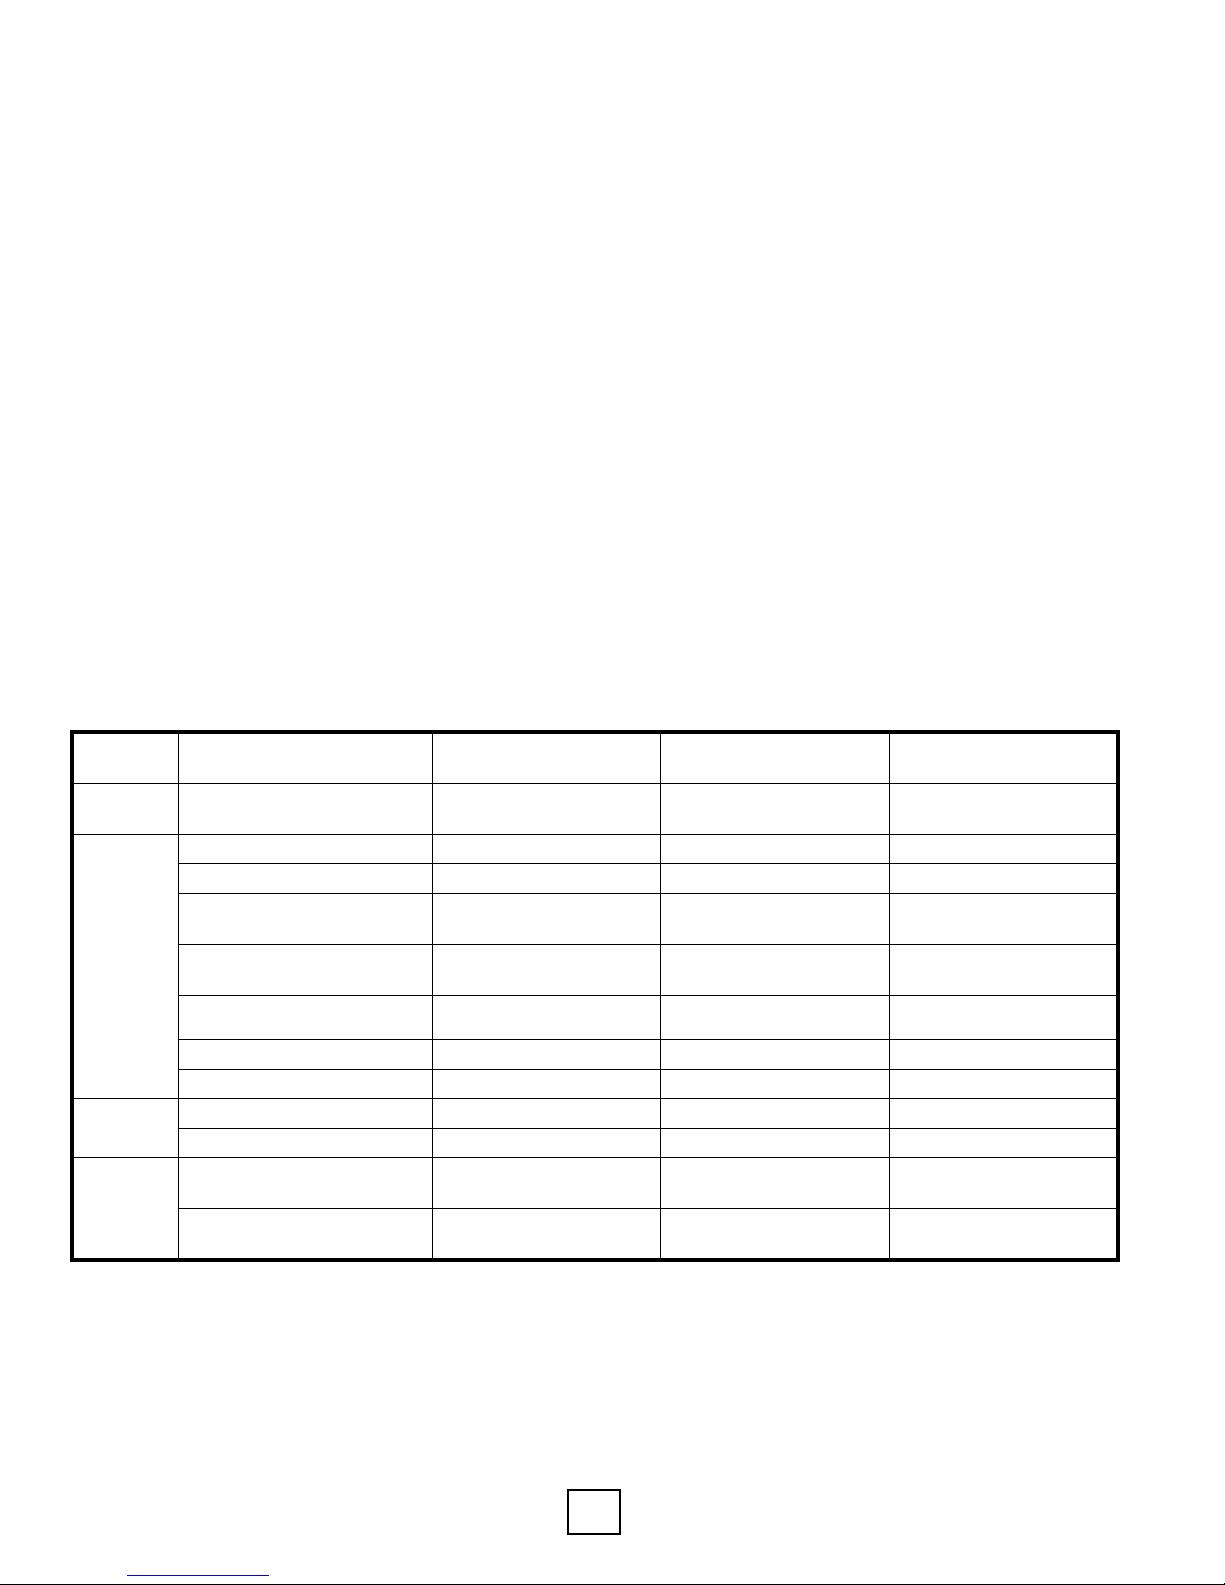
Please see Table 1 for guidelines.
Table 1: Water Quality
Potential
Problem
Scaling
Corrosion
Biological
Growth
Erosion
* Chlorine can not be used with 304 Stainless Steel.
Notes
1. Hardness in ppm is equivalent to hardness in mg/l.
2.Grains/gallon=ppmdividedby17.1.
3. Unit internal heat exchangers are not recommended for pool applications or water outside the range of the table.
Secondaryheatexchangersarerequiredforpoolorotherapplicationsnotmeetingtherequirementsshownabove.
4.Saltwaterapplications(approx.25,000ppm)requiresecondaryheatexchangersduetocopperpipingbetweentheheatexchanger
andtheunitttings.
5. Filter for maximum of 600 micron size.
Chemical(s) or Condition
Calcium & Magnesium Car-
bonate
pH Range 7 - 9 5 - 9 7 - 9
Total Dissolved Solids Less than 1000 ppm Less than 1500 ppm No rigid setpoint
Ammonia,AmmoniumHy-
droxide
Ammonium Chloride,
Ammonium Nitrate
Calcium/Sodium Chloride
Suspended Solids - Note 5 Less than 10 ppm Less than 10 ppm
See Note 4
Chlorine Less than 0.5 ppm Less than 0.5 ppm Less than 1 ppm*
HydrogenSulde None Allowed None Allowed Less than 0.05 ppm
Iron Bacteria None Allowed None Allowed None Allowed
Iron Oxide Less than 1 ppm Less than 1 ppm Less than 0.2 ppm
WaterVelocity Less than 8 ft/s Less than 12 ft/s
Range for Copper
Heat Exchangers
Less than 350 ppm Less than 350 ppm Less than 0.1 ppm
Less than 0.5 ppm Less than 0.5 ppm No Limit
Less than 0.5 ppm Less than 0.5 ppm Less than 2-20 ppm
Less than 125 ppm Less than 125 ppm None Allowed
Cupro-Nickel Heat
Exchanger Ranges
Stainless Steel Heat
Exchanger Ranges
16-20 mesh strainer
recommended
Less than 5.5 m/s in the
port
Enertech Global WT Models, Rev.: B
16
Page 17
Section 5: Unit Piping Installation
To/From
Interior Piping
All interior piping must be sized for proper ow
rates and pressure loss. Insulation should be
used on all inside piping when minimum loop
temperatures are expected to be less than
50°F. Use the table below for insulation sizes with
different pipe sizes. All pipe insulation should
be a closed cell and have a minimum wall
thickness of 3/8”. All piping insulation should
be glued and sealed to prevent condensation
and dripping. Interior piping may consist of the
following materials: HDPE, copper, brass, or
rubber hose (hose kit only). PVC is not allowed
on pressurized systems.
Table 2: Pipe Insulation
Piping Material Insulation Description
1” IPS Hose 1-3/8” ID - 3/8” Wall
1” IPS PE 1-1/4” ID - 3/8” Wall
1-1/4” IPS PE 1-5/8” ID - 3/8” Wall
2” IPS PD 2-1/8” ID - 3/8” Wall
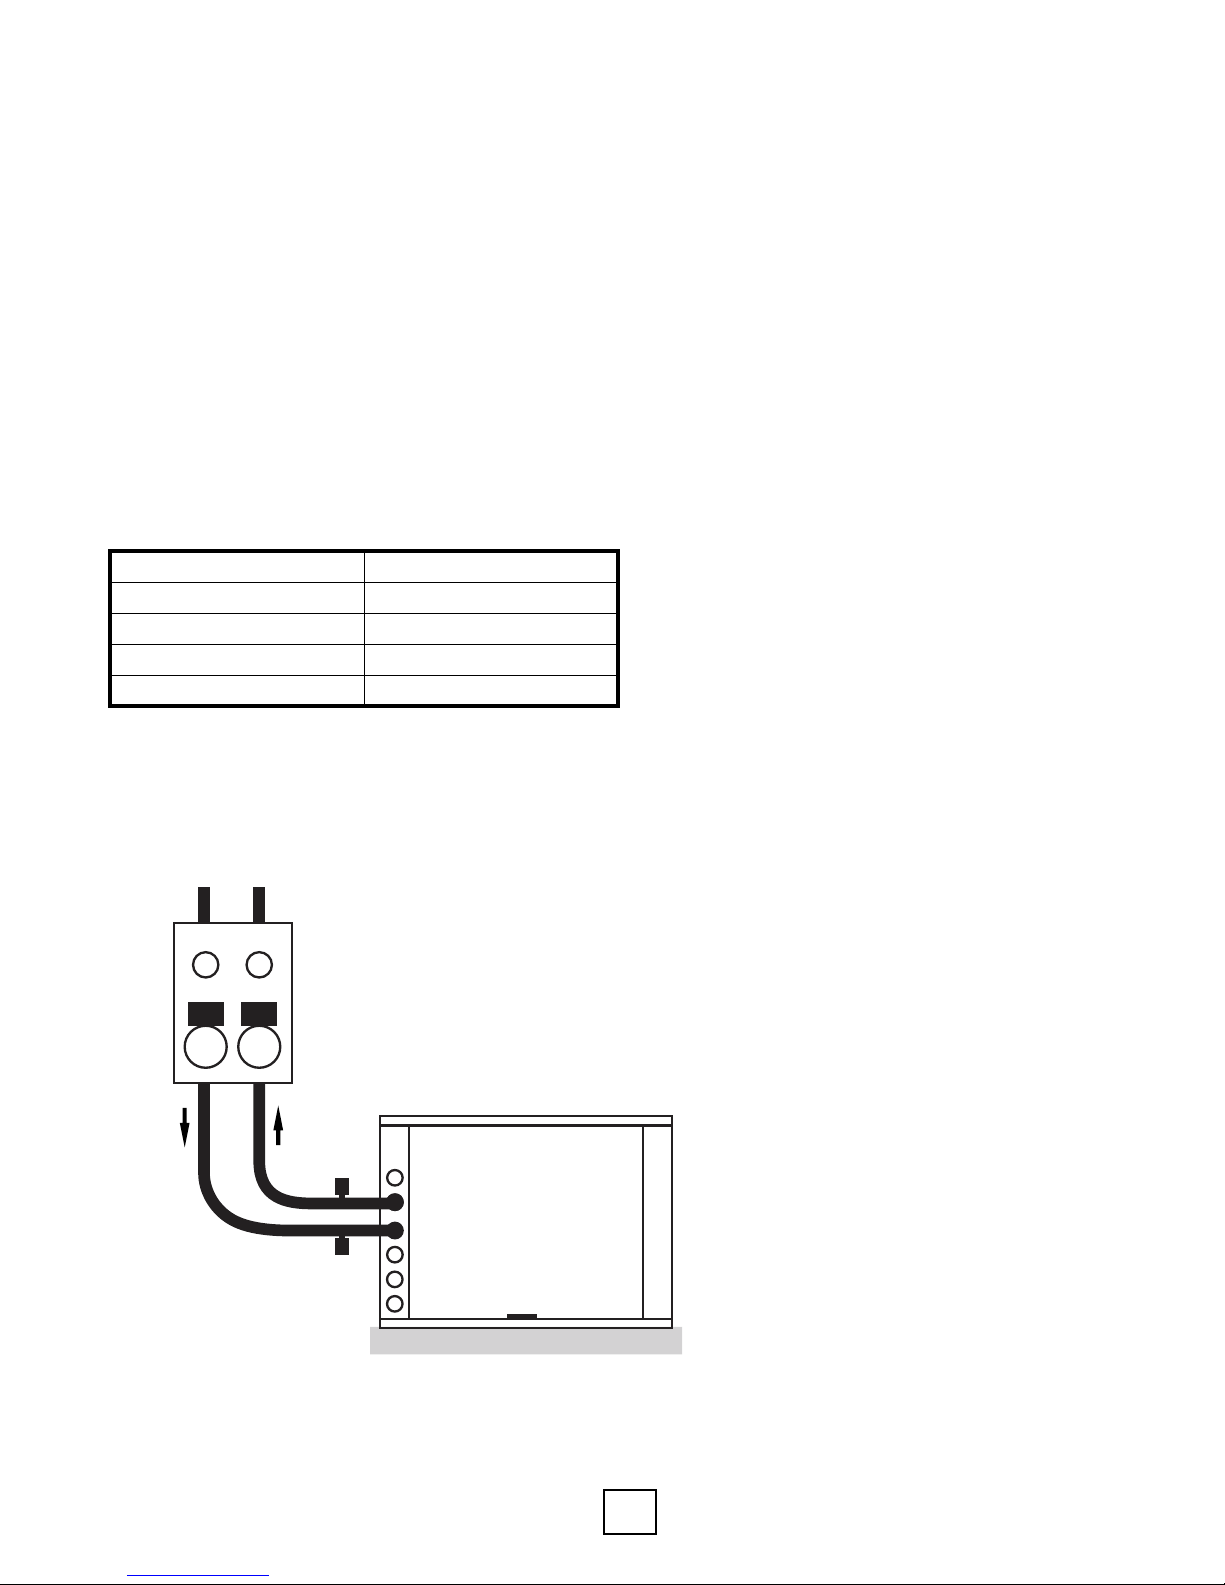
Typical Pressurized Flow Center Installation
The ow centers are insulated and contain
all ushing and circulation connections for
residential and light commercial earth loops
that require a ow rate of no more than 20
gpm. 1-1/4” fusion x 1” double o-ring ttings
(AGA6PES) are furnished with the double
o-ring ow centers for HDPE loop constructions.
Various ttings are available for the double
o-ring ow centers for different connections.
See gure 2 for connection options. A typical
installation will require the use of a hose kit.
Matching hose kits come with double o-ring
adapters to transition to 1” hose connection.
Note: Threaded ow centers all have 1” FPT
connections. Matching hose kits come with the
AGBA55 adapter needed to transition from 1”
FPT to 1” hose.
Figure 2: Typical Single Unit Piping Connection (Pressurized Flow Center)
Loop Field
~~
Hose
Kit
Flow
Center
P/T
Ports
GSHP
Source Water Out
Source Water In
2” Polyethylene Foam
WT Models, Rev.: B Enertech Global
Equipment Pad
17
Page 18
Section 5: Unit Piping Installation
Typical Non-Pressurized Flow Center Installation
Standing column ow centers are designed to
operate with no static pressure on the earth
loop. The design is such that the column of
water in the ow center is enough pressure to
prime the pumps for proper system operation
and pump reliability. The ow center does have
a cap/seal, so it is still a closed system, where the
uid will not evaporate. If the earth loop header
is external, the loop system will still need to be
ushed with a purge cart. The non-pressurized
ow center needs to be isolated from the ush
cart during ushing because the ow center
is not designed to handle pressure. Since this
is a non-pressurized system, the interior piping
can incorporate all the above-mentioned pipe
material options (see interior piping), including
PVC. The ow center can be mounted to the
wall with the included bracket or mounted on
the oor as long as it is properly supported.
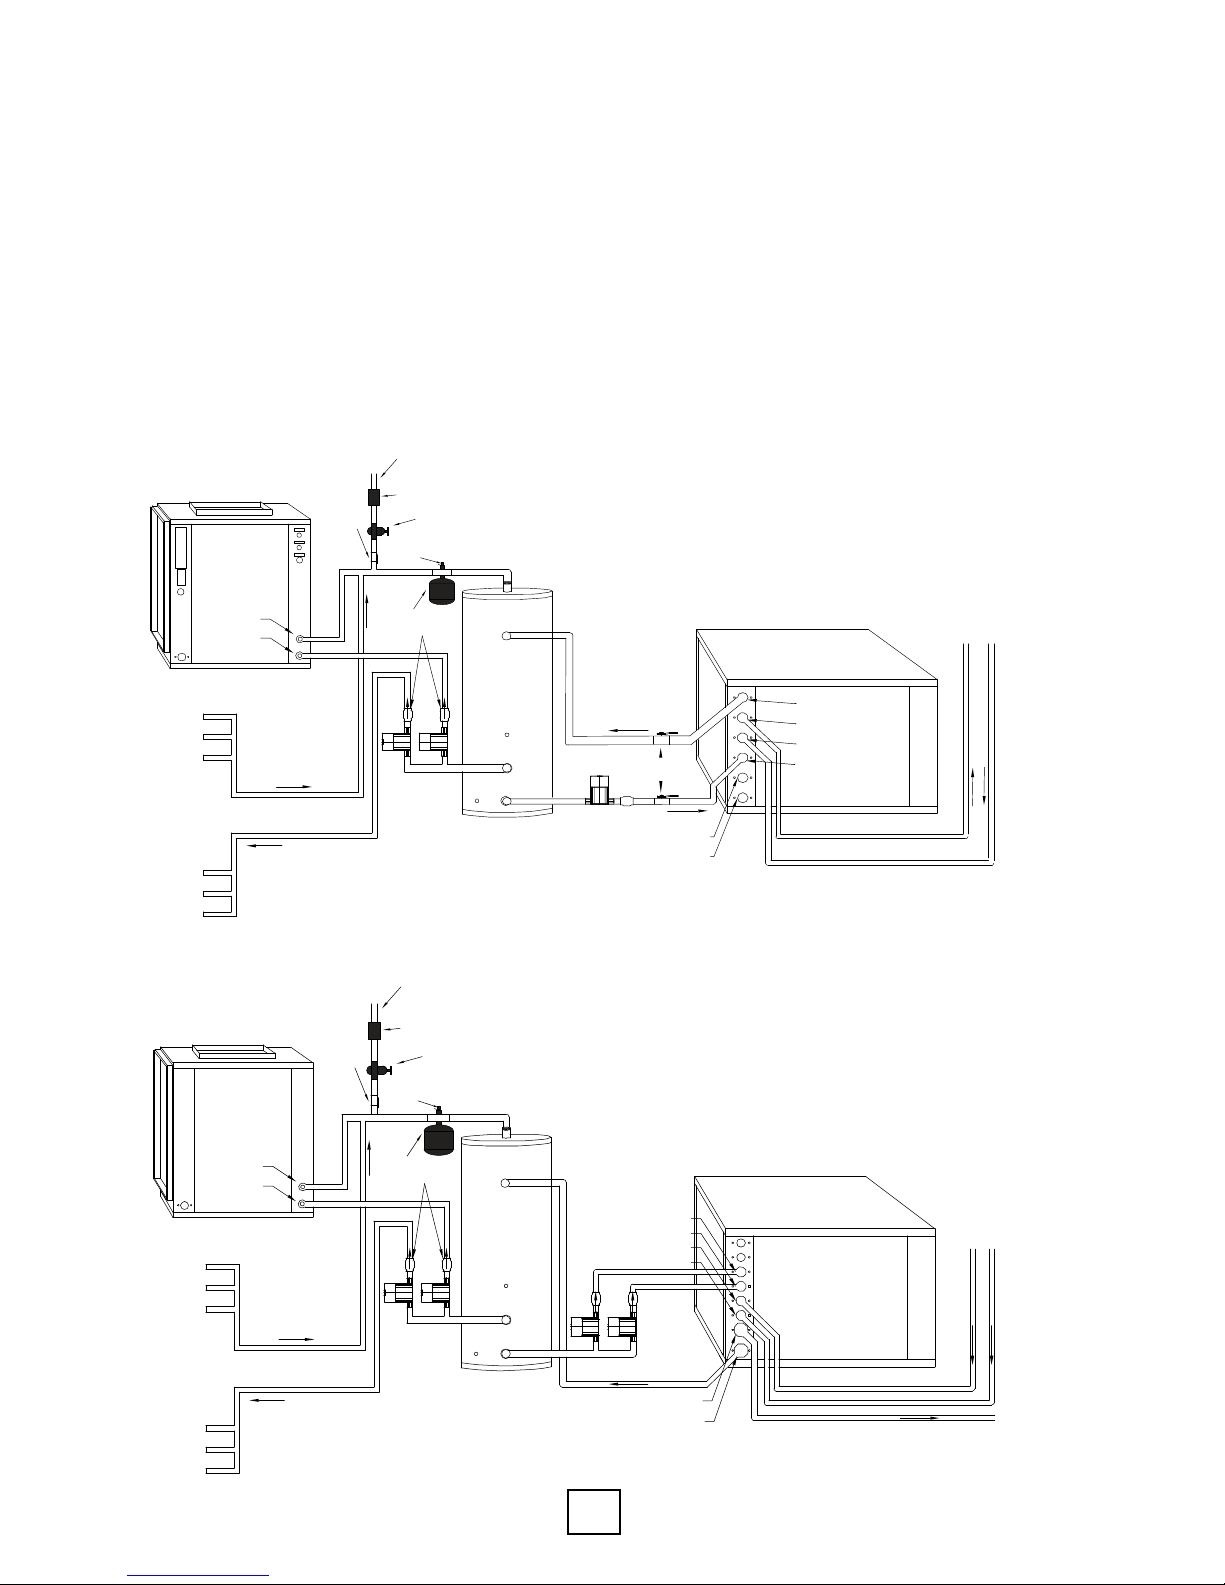
Figure 3: Typical Single Compressor Unit Piping Connection
Make-up
Water Line
Hydronic Fan Coil
Water Out
Water In
Shutoff
Valve
Backflow
Preventer
Pressure Reducing
Valve
Air Vent
Expansion Tank
Check Valve
Pressurized
Storage
Tank
Shutoff
Valves
Water to Water
Heat Pump
Out (Loa d Loop)
Out (Ground Loop)
In (Ground Loop)
In (Load Loop)
To / From
Earth Loop
Heating
Radiant Infloor
Out (Desuper heater)
In (D esuperheater)
Figure 4: Typical Dual Compressor Unit Piping Connection
Make-up
Water Line
Hydronic Fan Coil
Water Out
Water In
Heating
Radiant Infloor
Shutoff
Valve
Backflow
Preventer
Pressure Reducing
Valve
Air Vent
Expansion Tank
Check Valve
Pressurized
Storage
Tank
In (Load Loop #1)
In (Load Loop #2)
In (Ground Loop #1)
In (Ground Loop #2)
Out (Ground Loop)
Out (Load Loop)
From
Earth Loop
Heat Pump
To Earth Loop
Enertech Global WT Models, Rev.: B
18
Page 19
Section 5: Unit Piping Installation
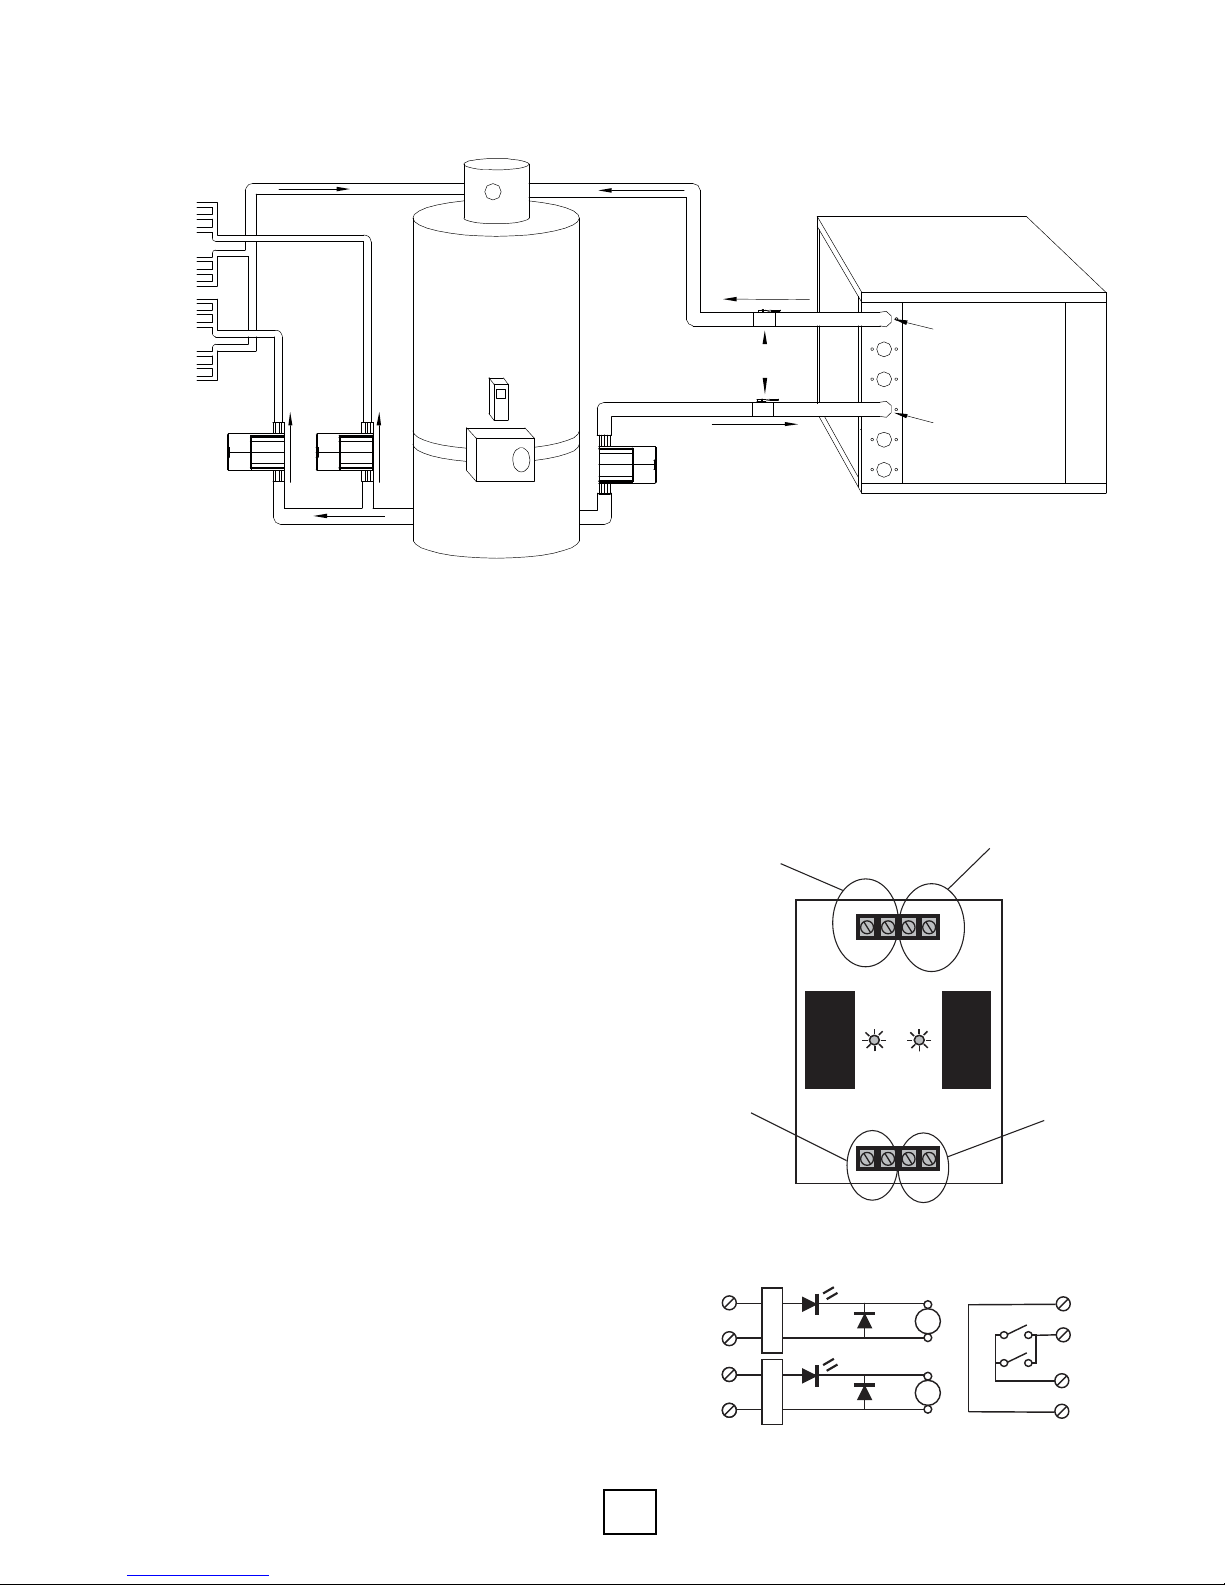
Figure 5: Typical Storage Tank Piping For Radiant Floor Heating
Storage
Zone 1 & 2
Radiant Infloor
Check Valves Installed
Tank
Shutoff
Valves
Water to Water
Heat Pump
Out (Load Loop)
In (Load Loop)
APSMA PUMP SHARING MODULE
The pump sharing module, part number
APSMA, is designed to allow two units to share
one ow center. With the APSMA module,
either unit can energize the pump(s). Connect
the units and ow center as shown in Figure
11, below. Figure 12 includes a schematic of
the board. The module must be mounted in a
NEMA enclosure or inside the unit control box.
Local code supersedes any recommendations
in this document.
Figure 11: APSMA Module Layout
240VAC
Power Source
24VAC
connection
to unit #1
(Y1 & C From Thermostat)
240V IN
240V OUT
Relay Relay
24VAC 24VAC
240VAC
to Pump(s)
connection
to unit #2
(Y1 & C From Thermostat)
24VAC
Figure 12: APSMA Module Wiring Schematic
DC
Bridge
LED
24VAC input
from unit #1
24VAC input
from unit #2
+
Diode
-
RY1
RY1
RY2
240VAC input
+
Diode
-
RY2
240VAC to pump(s)
WT Models, Rev.: B Enertech Global
19
Page 20

Section 6: Antifreeze
Antifreeze Overview
In areas where minimum entering loop
temperatures drop below 40°F, or where piping
will be routed through areas subject to freezing,
antifreeze is required. Alcohols and glycols
are commonly used as antifreeze. However,
local and state/provincial codes supersede
any instructions in this document. The system
needs antifreeze to protect the coaxial heat
exchanger from freezing and rupturing.
Freeze protection should be maintained to
15°F below the lowest expected entering
loop temperature. For example, if 30°F is the
minimum expected entering loop temperature,
the leaving loop temperature could be 22
to 25°F. Freeze protection should be set at
15°F (30-15 = 15°F). To determine antifreeze
requirements, calculate how much volume
the system holds. Then, calculate how much
antifreeze will be needed by determining
the percentage of antifreeze required for
proper freeze protection. See Tables 3a
and 3b for volumes and percentages. The
freeze protection should be checked during
installation using the proper hydrometer
to measure the specic gravity and freeze
protection level of the solution.
Antifreeze Characteristics
Selection of the antifreeze solution for closed
loop systems require the consideration of
many important factors, which have long-term
implications on the performance and life of
the equipment. Each area of concern leads to
a different “best choice” of antifreeze. There
is no “perfect” antifreeze. Some of the factors
to consider are as follows (Brine = antifreeze
solution including water):
Safety: The toxicity and ammability of the brine
(especially in a pure form).
Cost: Prices vary widely.
Convenience: Is the antifreeze available and
easy to transport and install?
Codes: Will the brine meet local and state/
provincial codes?
The following are some general observations
about the types of brines presently being used:
Methanol: Wood grain alcohol that is
considered toxic in pure form. It has good heat
transfer, low viscosity, is non-corrosive, and is mid
to low price. The biggest down side is that it is
ammable in concentrations greater than 25%.
Ethanol: Grain alcohol, which by the ATF
(Alcohol, Tobacco, Firearms) department
of the U.S. government, is required to be
denatured and rendered unt to drink. It has
good heat transfer, mid to high price, is noncorrosive, non-toxic even in its pure form, and
has medium viscosity. It also is ammable with
concentrations greater than 25%. Note that
the brand of ethanol is very important. Make
sure it has been formulated for the geothermal
industry. Some of the denaturants are not
compatible with HDPE pipe (for example,
solutions denatured with gasoline).
Propylene Glycol: Non-toxic, non-corrosive,
mid to high price, poor heat transfer, high
viscosity when cold, and can introduce micro
air bubbles when adding to the system. It
has also been known to form a “slime-type”
coating inside the pipe. Food grade glycol is
recommended because some of the other
types have certain inhibitors that react poorly
with geothermal systems. A 25% brine solution is
a minimum required by glycol manufacturers,
so that bacteria does not start to form.
Ethylene Glycol: Considered toxic and is not
recommended for use in earth loop applications.
Thermal Performance: The heat transfer and
viscosity effect of the brine.
Corrosiveness: The brine must be compatible
with the system materials.
Stability: Will the brine require periodic change
out or maintenance?
Enertech Global WT Models, Rev.: B
GS4 (POTASSIUM ACETATE): Considered highly
corrosive (especially if air is present in the
system) and has a very low surface tension,
which causes leaks through most mechanical
ttings. This brine is not recommended for use in
earth loop applications.
20
Page 21
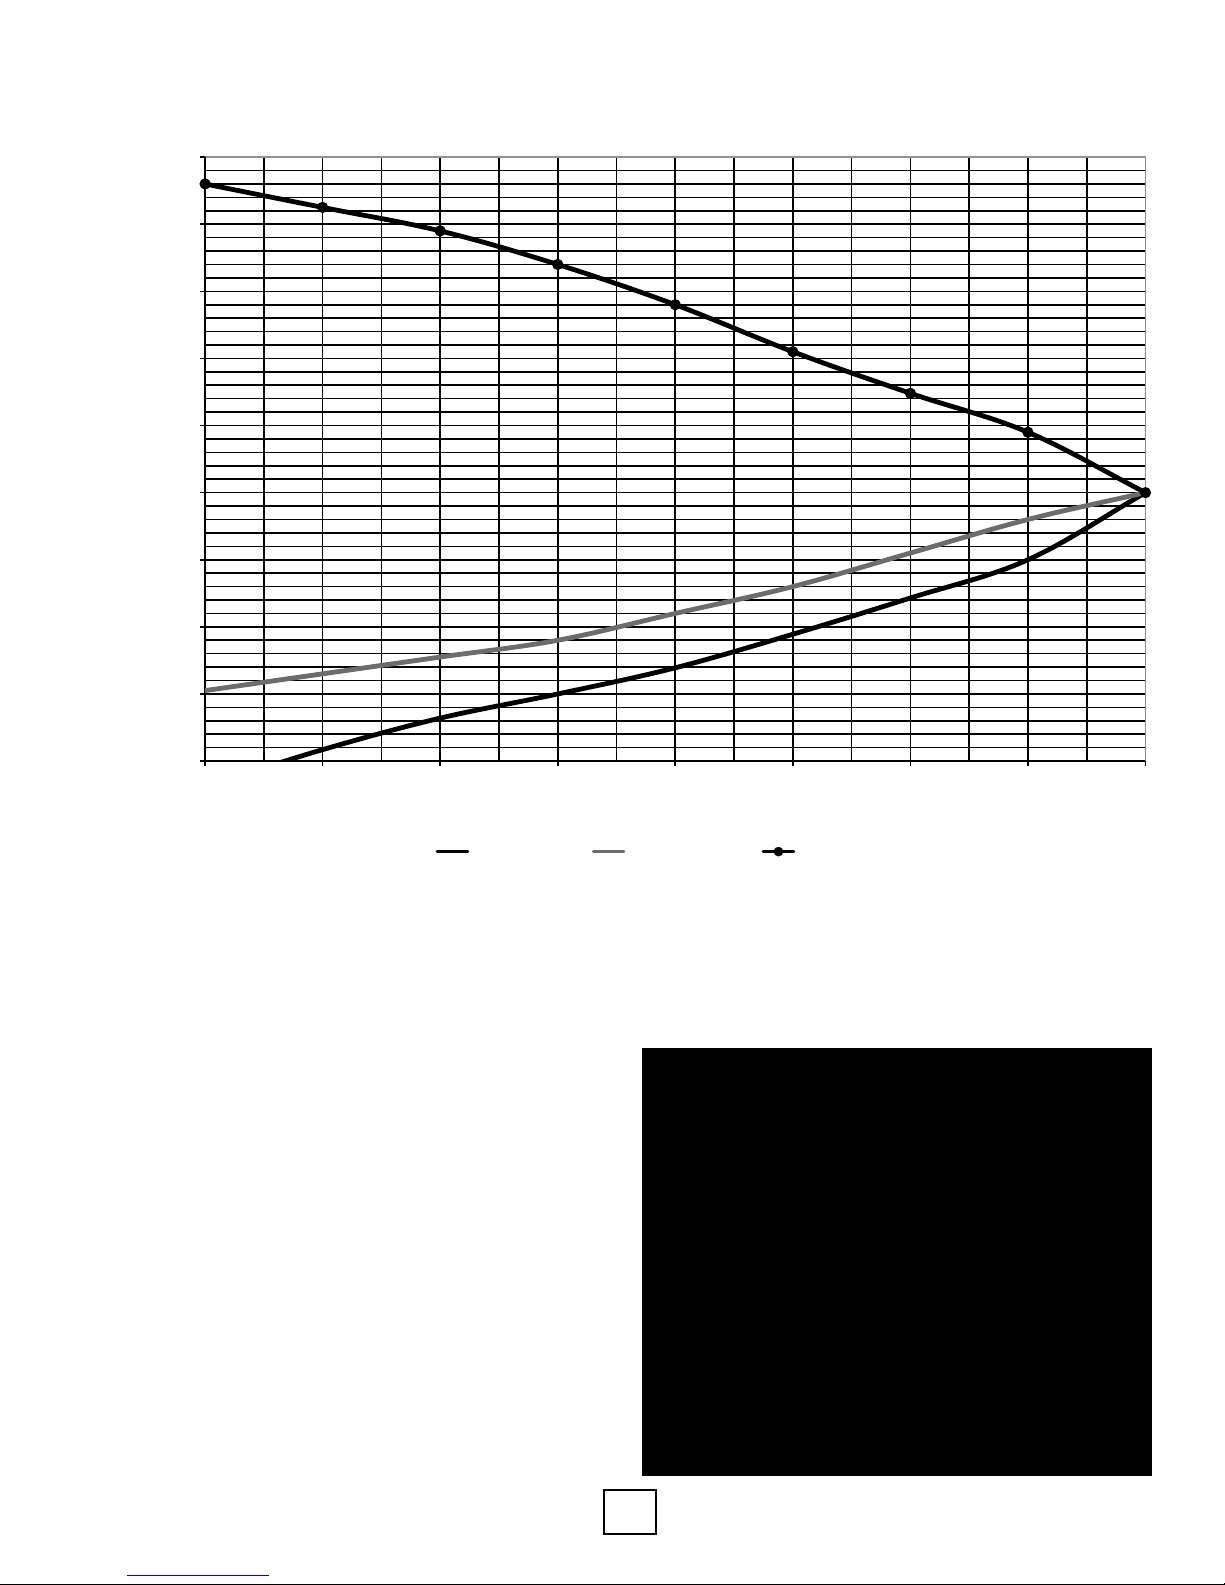
Section 6: Antifreeze
Figure 6: Antifreeze Specic Gravity
1.0500
1.0400
1.0300
1.0200
1.0100
1.0000
Specific Gravity
0.9900
0.9800
0.9700
0.9600
-5 0 5 10 15 20 25 30 32
Freeze Protection (deg F)
Procool Methanol Propylene Glycol
Notes:
1. Consult with your representative or distributor if you have any questions regarding antifreeze
selection or use.
2. All antifreeze suppliers and manufacturers recommend the use of either de-ionized or distilled
water with their products.
⚠ CAUTION ⚠
USE EXTREME CARE WHEN OPENING,
POURING, AND MIXING FLAMMABLE
ANTIFREEZE SOLUTIONS. REMOTE FLAMES
OR ELECTRICAL SPARKS CAN IGNITE
UNDILUTED ANTIFREEZES AND VAPORS.
USE ONLY IN A WELL VENTILATED AREA.
DO NOT SMOKE WHEN HANDLING
FLAMMABLE SOLUTIONS. FAILURE TO
OBSERVE SAFETY PRECAUTIONS MAY
RESULT IN FIRE, INJURY, OR DEATH. NEVER
WORK WITH 100% ALCOHOL SOLUTIONS.
WT Models, Rev.: B Enertech Global
21
Page 22
Section 6: Antifreeze
Antifreeze Charging
Calculate the total amount of pipe in the
system and use Table 3a to calculate the
amount of volume for each specic section of
the system. Add the entire volume together,
and multiply that volume by the proper
antifreeze percentage needed (Table 3b)
for the freeze protection required in your
area. Then, double check calculations during
installation with the proper hydrometer and
specic gravity chart (Figure 6) to determine if
the correct amount of antifreeze was added.
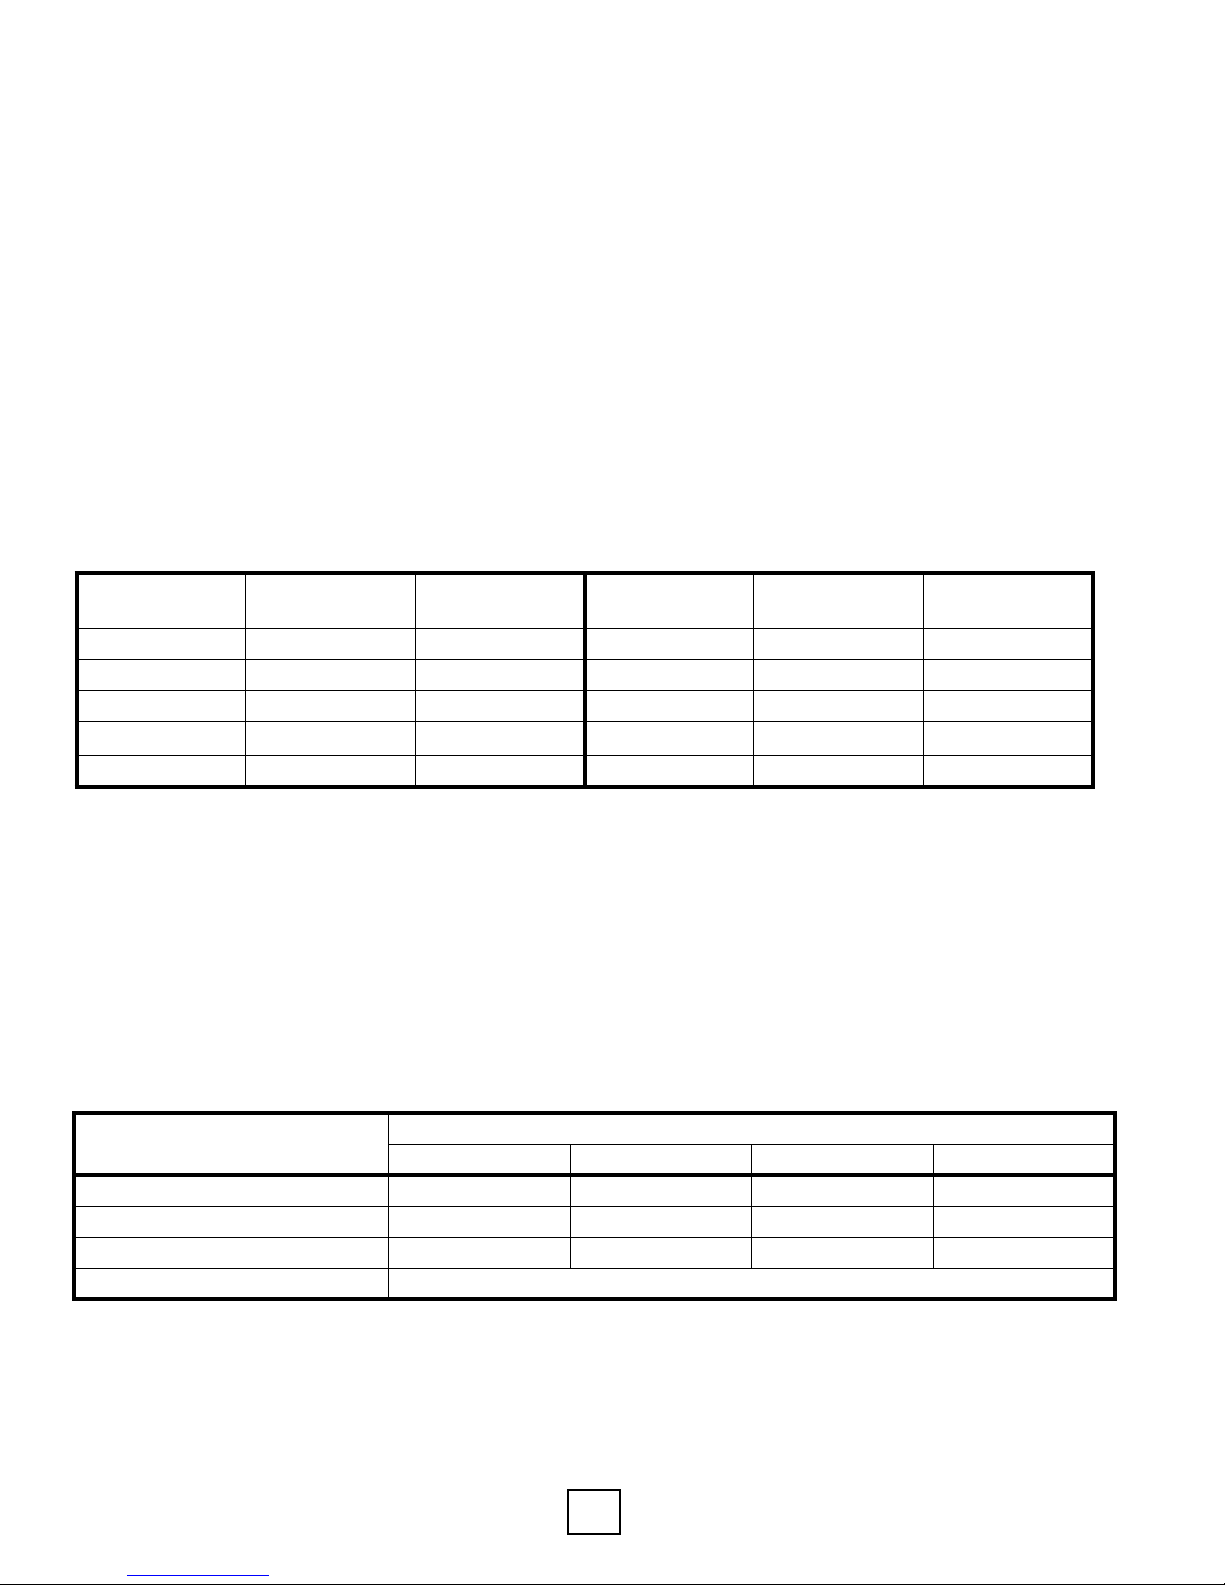
Table 3a: Pipe Fluid Volume
Type Size
Copper 1” CTS 4.1 HDPE .75” SDR11 3.0
Copper 1.25” CTS 6.4 HDPE 1” SDR11 4.7
Copper 1.5” CTS 9.2 HDPE 1.25” SDR11 7.5
Volume Per 100ft
US Gallons
Type Size
HDPE 1.5” SDR11 9.8
HDPE 2” SDR11 15.4
Volume Per 100ft
US Gallons
Additional component volumes:
Unit coaxial heat exchanger = 1 Gallon
Flush Cart = 8-10 Gallons
10’of1”RubberHose=0.4Gallons
Table 3b: Antifreeze Percentages by Volume
TypeofAntifreeze
ProCool (Ethanol) 25% 22% 17% 12%
Methanol 25% 21% 16% 10%
PropyleneGlycol 38% 30% 22% 15%
Heat Transfer Fluid (HTF) Mixaccordingtomanufacturer’sdirectionsoncontainerlabel
Antifreeze solutions are shown in pure form - not premixed
HTF is a premixed Methanol solution
10°F (-12.2°C) 15°F (-9.4°C) 20°F (-6.7°C) 25°F (-3.9°C)
Minimum Temperature for Freeze Protection
Enertech Global WT Models, Rev.: B
22
Page 23

Section 7: Desuperheater Installation
Desuperheater Installation
Units that ship with the desuperheater function
must be connected to the water heater/
storage tank with the optionally offered
Desuperheater Connection Kit or (as supplied
by others) shown on the following sections of this
manual.
Note: Desuperheater capacity is based on 0.4
GPM Flow per nominal ton at 90°F entering hot
water temperature.
Note: Units that are shipped with a
desuperheater do not have the desuperheater
pump wires connected to the electrical circuit,
to prevent accidentally running the pump while
dry. Pump has to be connected to the electric
circuit (master contactor) when the lines from
the water heater are installed & air is removed.
CONTENTS OF THE DESUPERHEATER FITTING
KIT:
• (1) p/n 20D052-01NN, Installation Instruc-
tions
• (1) p/n 33P211-01BN, 3/4”x 3/4”x 3/4” FPT
Brass Tee
• (1) p/n 33P210-01NN, ¾” Boiler
Drain Valve
• (1) p/n 11080005001, ¾” MPT x 3-1/2”
Brass Nipple
• (3) p/n 11080006001, ½” SWT x ¾” MPT
Copper Adaptor
• (1) p/n 11080007001, ¾” x ¾” x ½” SWT
Copper Tee
PLUMBING INSTALLATION
NOTE: All plumbing and piping connections
must comply with local plumbing codes.
TIP: Measure the distance above the oor or
shelf that the water heater is setting on, to
where the drain valve is located. This distance
must be greater than one-half the width of the
tee you’re about to install, or you won’t be able
to thread the tee on to the water heater.
1. Disconnect electricity to water heater.
2. Turn off water supply to water heater.
3. Drain water heater. Open pressure
relief valve.
4. Remove drain valve and tting from water
heater.
5. Thread the ¾” MPT x 3-1/2” nipple into the
water heater drain port. Use Teon tape, or
pipe dope on threads.
6. Thread the center port of the ¾” brass tee
to the other end of the nipple.
7. Thread one of the copper adaptors
into the end of the tee closest to the heat
pump.
8. Thread the drain valve into the other end of
the nipple. See Figure 1.
9. Above the water heater, cut the incoming
cold water line. Remove a section of that
line to enable the placement of the copper
tee.
⚠ WARNING ⚠
TO AVOID SERIOUS INJURY, IT IS
RECOMMENDED THAT AN ANTI-SCALD
MIXING VALVE IS INSTALLED ON THE HOT
WATER SUPPLY LINE INTO THE HOME. EVEN
THOUGH HOT WATER TANK TEMPERATURES
COULD APPEAR TO BE SET AT LOWER
LEVELS, HIGH TEMPERATURE WATER FROM
THE DESUPERHEATER COULD RAISE TANK
TEMPERATURES TO UNSAFE LEVELS.
WT Models, Rev.: B Enertech Global
10. Insert the copper tee in the cold water line.
See Figure 2.
11. Thread the remaining two ½”SWT x ¾”MPT
copper adaptors into the ¾” FPT ttings on
the heat pump, marked HWG IN and HWG
OUT.
12. Run interconnecting ½” copper pipe from
the HOT WATER OUT on the heat pump, to
the copper adaptor located on the tee at
the bottom of the water heater.
13. Run interconnecting ½” copper pipe from
the HOT WATER IN on the heat pump, to the
copper tee in the cold water line.
23
Page 24
Section 7: Desuperheater Installation
14. Install an air vent tting at the highest point
of the line from step 13 (assuming it’s the
higher of the two lines from the heat pump
to the water heater).
15. Shut off the valve installed in the
desuperheater line close to the tee in the
cold water line. Open the air vent and all
shut off valves installed in the “hot water
hot”.
16. Turn the water supply to the water heater
on. Fill water heater. Open highest hot
water faucet to purge air from tank and
piping.
17. Flush the interconnecting lines, and check
for leaks. Make sure air vent is shoutoff
when water begins to drip steadily from the
vent.
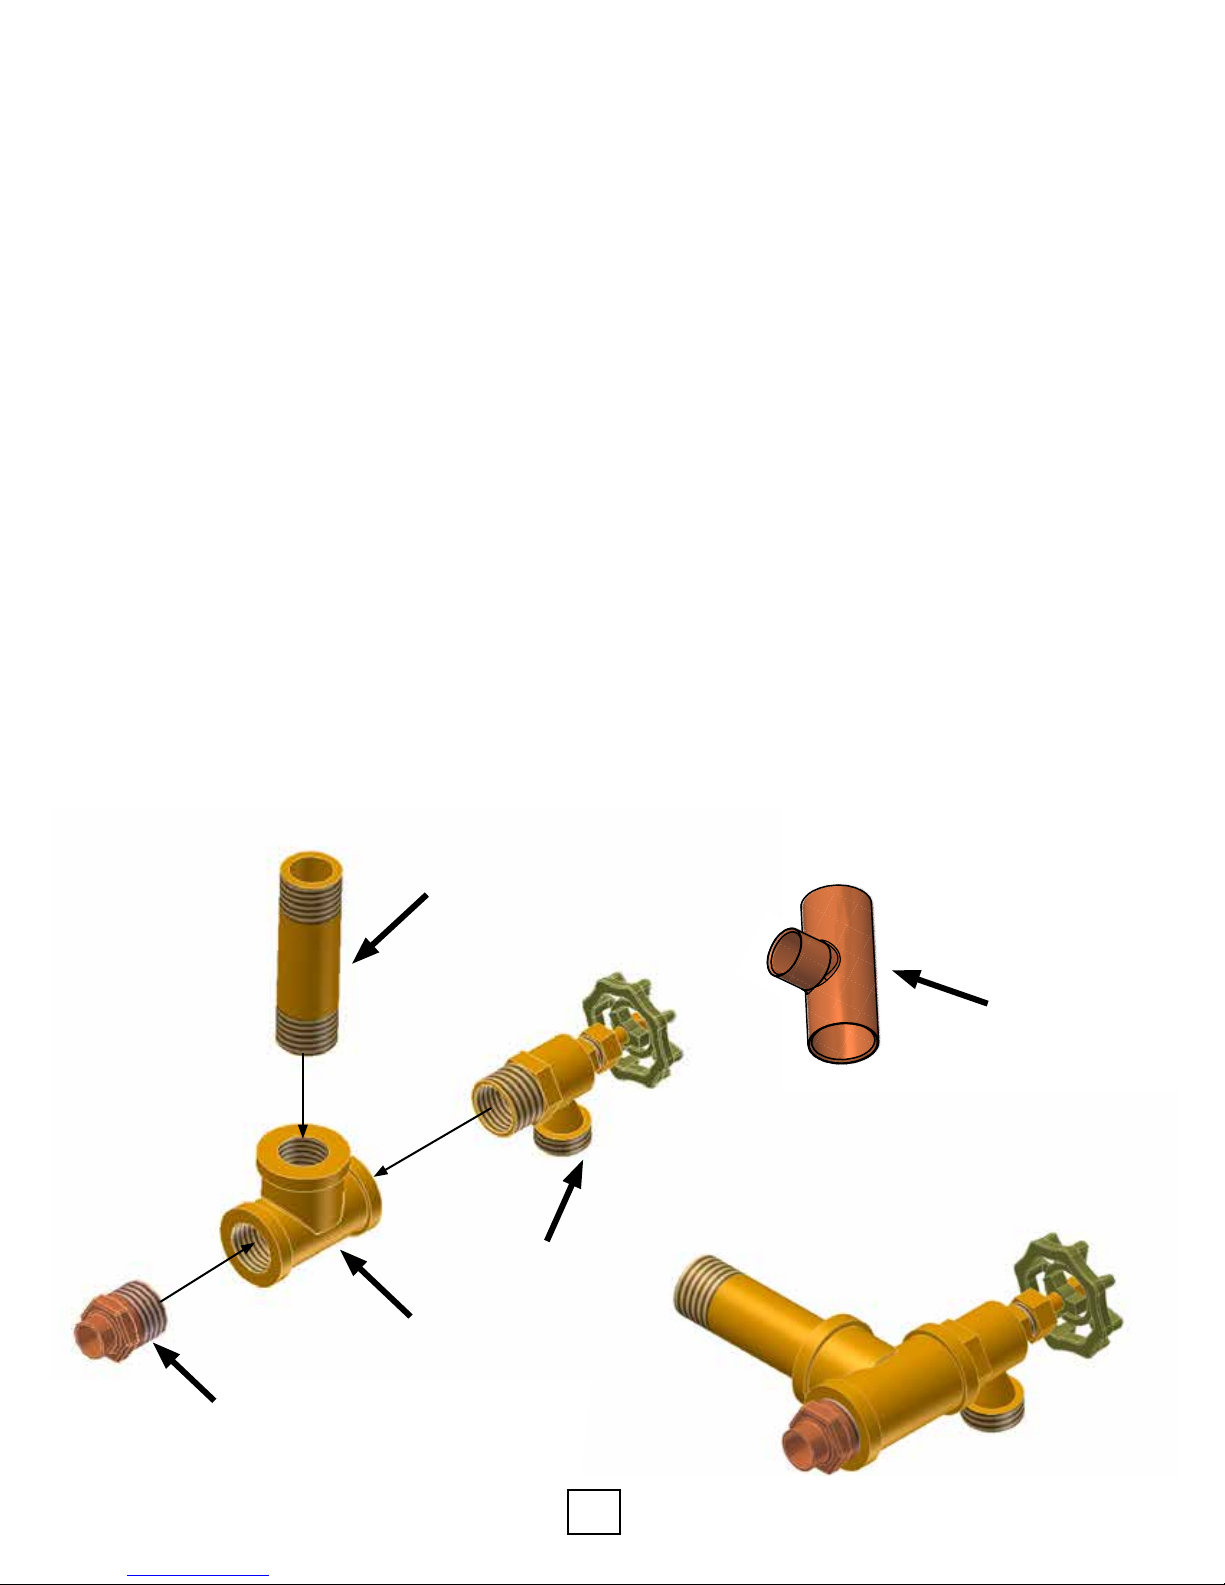
Figure 10: Water Heater Connection Kit
Assembly for Bottom of Water Heater
18. Loosen the screw on the end of the
despuerheater pump to purge the air from
the pump’s rotor housing. A steady drip
of water will indicate the air is removed.
Tighten the screw and the pump can be
connected to the contactor or teminal
block.
19. Install 3/8” closed cell insulation on the lines
connecting the heat pump to the water
heater.
20. Reconnect electricity to water heater.
NOTE: Drawing shown vertically for detail.
Fitting installs horizontally into hot water tank.
Connection to Hot
Water Tank
Drain
Copper Tee
For Domestic
Cold Water
In Line
Brass Tee
Adapter to Unit
Water Line
Enertech Global WT Models, Rev.: B
24
Page 25
Section 7: Desuperheater Installation
Cold Water
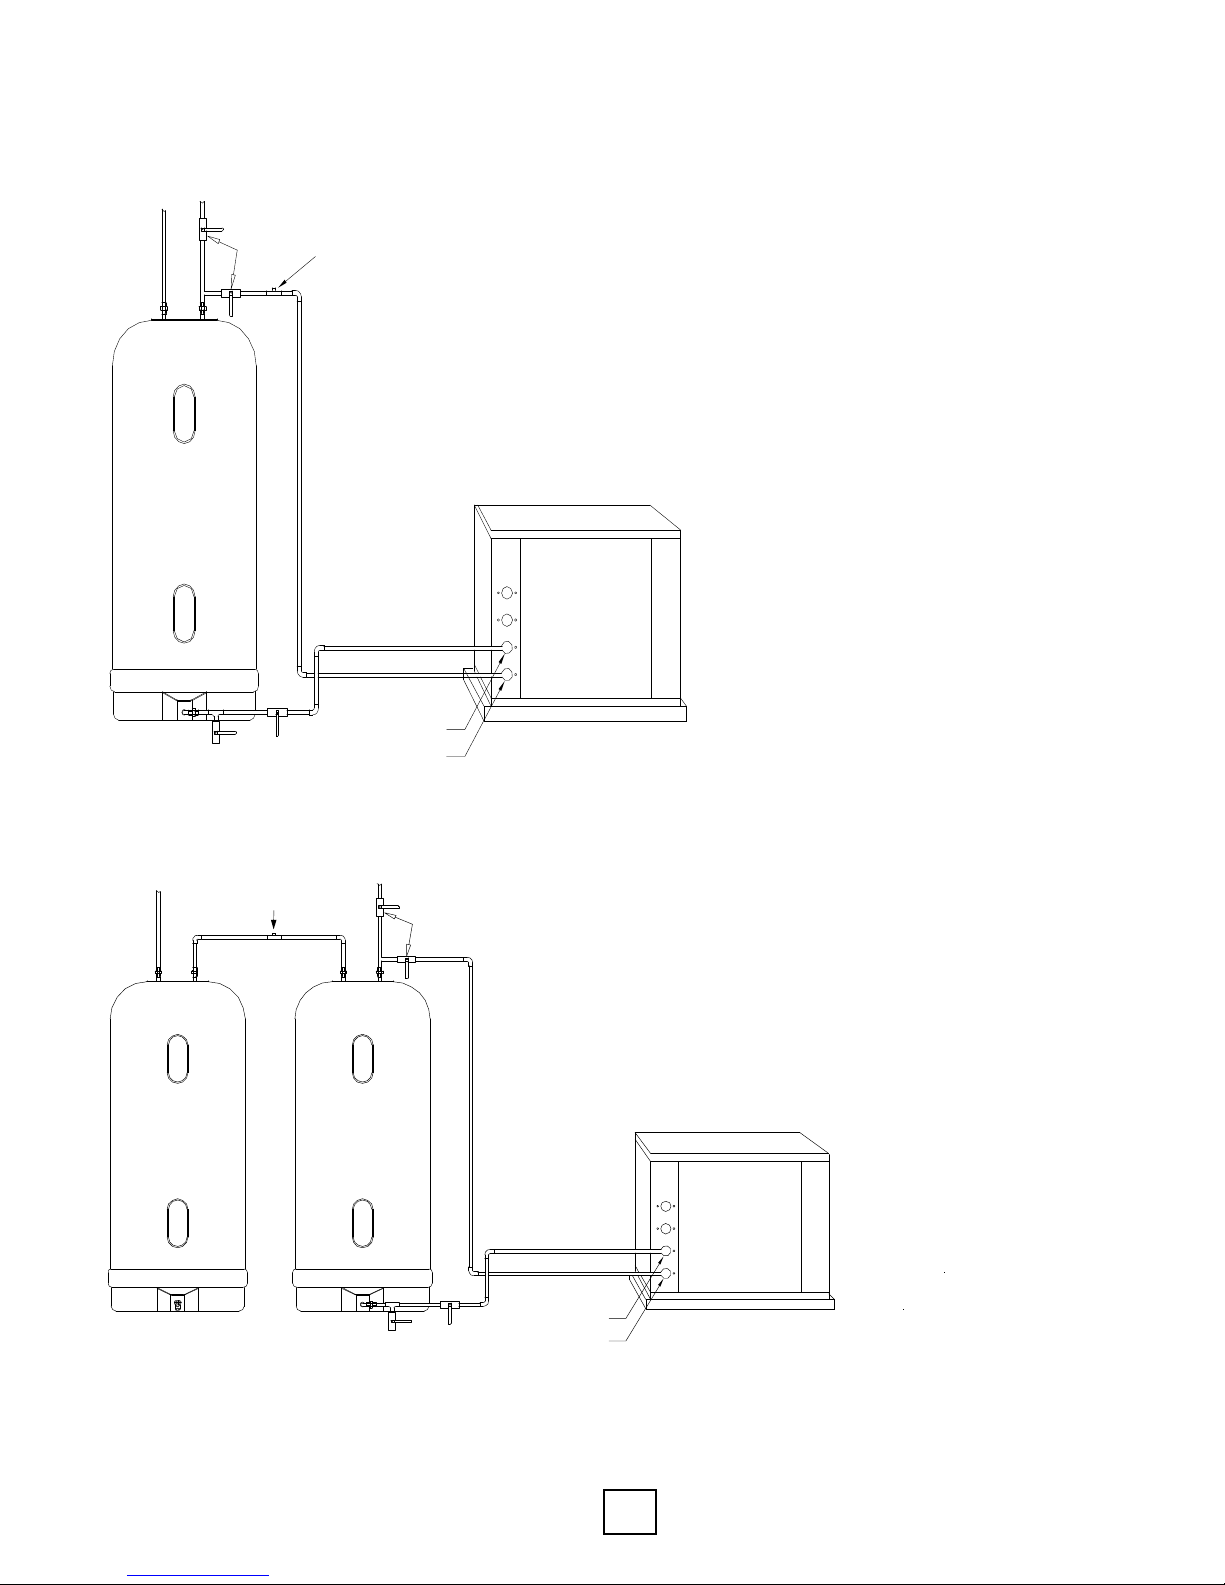
Figure 8: Typical Desuperheater Installation
Cold Water
Hot Water
Supply
Water Heater
(or Storage Tank)
Shutoff
Valves
Air Vent
Located at
System
High Point
Heat Pump
Drain
Valve
Shutoff
Valves
Desuperheater Out
Desuperheater In
2” Polyethylene Equipment Pad
Figure 9: Desuperheater Installation in Preheat Tank
Hot Water
Cold Water
Supply
Air Vent
Located at
System
High Point
Hot Water
Supply
Shutoff
Valves
Water Heater No. 2
(or Storage Tank)
Water Heater No. 1
(or Storage Tank)
Heat Pump
Drain
Valve
Drain
Valve
WT Models, Rev.: B Enertech Global
Shutoff
Valves
Desuperheater Out
Desuperheater In
2” Polyethylene Equipment Pad
25
Page 26

Section 8: Controls
MICROPROCESSOR FEATURES AND OPERATION
Enertech Global geothermal heat pump
controls provide a unique modular approach
for controlling heat pump operation. The
control system uses one, two, or three printed
circuit boards, depending upon the features
of a particular unit. This approach simplies
installation and troubleshooting, and eliminates
features that are not applicable for some units.
A microprocessor-based printed circuit board
controls the inputs to the unit as well as outputs
for status mode, faults, and diagnostics. A
status LED and an LED for each fault is provided
for diagnostics.
Removable low voltage terminal strips provide
all necessary terminals for eld connections.
Not only are the thermostat inputs included,
but there are also removable terminal strips
for all of the accessory wiring for ease of
installation and troubleshooting.
Startup/Random Start
The unit will not operate until all the inputs
and safety controls are checked for normal
conditions. At rst power-up, the compressor is
energized after a ve minute delay. In addition,
a zero to sixty second random start delay is
added at rst power-up to avoid multiple units
from being energized at the same time.
Short Cycle Protection
A built-in ve minute anti-short cycle
timer provides short cycle protection of
the compressor.
Component Sequencing Delays
Components are sequenced and delayed for
optimum space conditioning performance and
to make any startup noise less noticeable.
Test Mode
The microprocessor control allows the
technician to shorten most timing delays for
faster diagnostics by changing the position of a
jumper located on the lockout board.
Water Solenoid Valve Connections
Two accessory relay outputs at the terminal
strip provide a eld connection for two types
of water solenoid valves, a standard 24VAC
solenoid valve, or a 24VAC solenoid valve
with an end switch. Additional eld wiring is no
longer required for operation of the end switch.
Loop Pump Circuit Breakers
The loop pump(s) and desuperheater pump
on single compressor units are protected
by control box mounted circuit breakers
for easy wiring of pumps during installation.
Dual compressor units
desuperheater pump but
loop or load side pumps. All loop and load side
pumps must be wired externally using relays
and circuit breakers supplied by others. Circuit
breakers eliminate the need to replace fuses.
Safety Controls
The control receives separate signals for high
pressure, low pressure, and low water ow. Upon
a continuous 30-second measurement of the
fault (immediate for high pressure), compressor
operation is suspended (see Fault Retry below),
and the appropriate LED ashes. Once the unit
is locked out (see Fault Retry below), an output
(terminal “L”) is made available to a fault LED
at the thermostat (water-to-water unit has fault
LED on the corner post).
Low Pressure: If the low pressure switch is open
for 30 continuous seconds, the compressor
operation will be interrupted, and the control
will go into fault retry mode. At startup, the low
pressure switch is not monitored for 90 seconds
to avoid nuisance faults.
High Pressure: If the high pressure switch
opens, the compressor operation will be
interrupted, and the control will go into fault
retry mode. There is no delay from the time the
switch opens and the board goes into fault
retry mode. There is also no delay of switch
monitoring at startup.
Flow Switch: If the ow switch is open for 30
continuous seconds, the compressor operation
will be interrupted, and the control will go into
fault retry mode. At startup, the ow switch
is not monitored for 30 seconds to avoid
nuisance faults.
FAULT RETRY
only protect the
do not protect the
Enertech Global WT Models, Rev.: B
26
Page 27
Section 8: Controls
All faults are retried twice before nally locking
the unit out. The fault retry feature is designed to
prevent nuisance service calls. There is an antishort cycle period between fault retries. On the
third fault, the board will go into lockout mode.
Over/Under Voltage Shutdown
The lockout board protects the compressor
from operating when an over/under voltage condition exists. The control monitors
secondary voltage (24VAC) to determine if
an over/under voltage condition is occurring on the primary side of the transformer.
For example, if the secondary voltage is
18VAC, the primary voltage for a 240V unit
would be approximately 180V, which is
below the minimum voltage (197V) recommended by the compressor manufacturer.
Under voltage (<18VAC) causes the compressor to disengage and restart when the
voltage returns to >20VAC. Over voltage
(>31VAC) causes the compressor to disengage and restart when the voltage returns
to <29VAC.
When an O/U Voltage condition occurs,
the board will initiate a fault, shut down the
compressor, and start the ve minute ASC
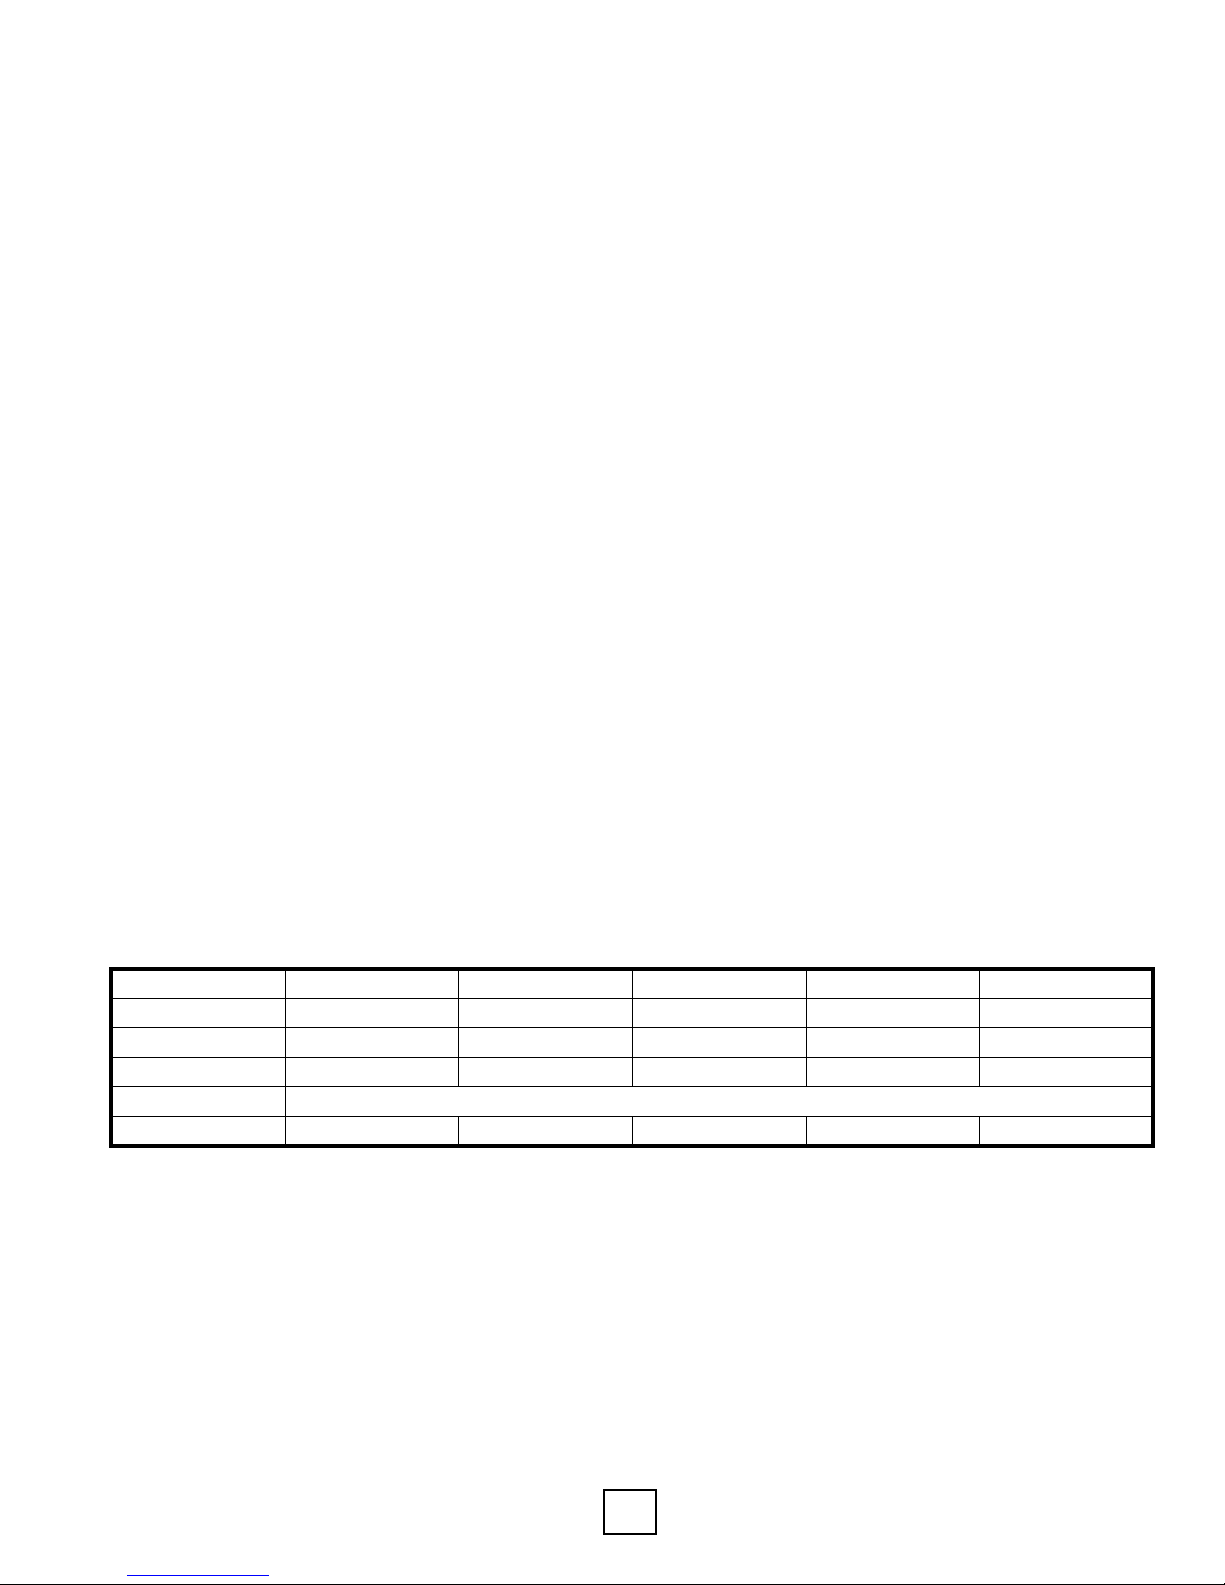
Table 4a: LED Identication
period. All four fault LEDs will ash (HP + LP
+ FS + CO) and the thermostat “Call For
Service” indicator will be illuminated. This
feature is self-resetting. If voltage returns to
normal range normal operation will resume
if/when the ASC period is over (except if in
lockout mode). If voltage is still out of range
at the end of the ASC period the control
will execute a Fault Retry. On the third fault
within 30 minutes, the board will go into
lockout mode and illuminate the “Call For
Service” indicator. When normal operation
is restored the four fault LED’s will stop ashing and the “Call For Service” indicator will
turn off.
Intelligent Reset
If the thermostat is powered off and back
on (soft reset), the board will reset, but the
last fault will be stored in memory for ease of
troubleshooting. If power is interrupted to the
board, the fault memory will be cleared.
Diagnostics
The lockout board includes ve LEDs (status,
high pressure, low pressure, low water ow,
condensate overow) for fast and simple
control board diagnosis. Below is a table
showing LED function.
LED Color Location
Green To p High Pressure OFF Flashing
Orange 2nd Low Pressure OFF Flashing
Red 3rd Water Flow OFF Flashing
Yellow Not applicable on water-to-water units
Green Bottom Status Flashing
Notes:
1. Looking at the board when the LEDs are on the right hand side
2.Ifallvelightsareashing,thefaultisover/undervoltage
3.Onlythelightassociatedwiththeparticularfault/lockoutwillbeonorashing.
For example, if a high pressure lockout has occurred, the top green light will be on.
Theorange,red,andyellowlightswillbeoff
4. Status lights will be off when in test mode
5.FlashesalternatelywiththefaultLED
WT Models, Rev.: B Enertech Global
1
Function Normal Operation FaultRetry
4
Flashing
27
2
3
3
3
5
Lockout
Flashing
ON
ON
ON
2
3
3
3
4
Page 28
Section 8: Controls
Hot Water Pump Control
Controls for high water temperature and low
compressor discharge line temperature prevent
the hot water (desuperheater) pump from
operating when the leaving water temperature
is above 130°F, or when the compressor
discharge line is too cool to provide adequate
water heating.
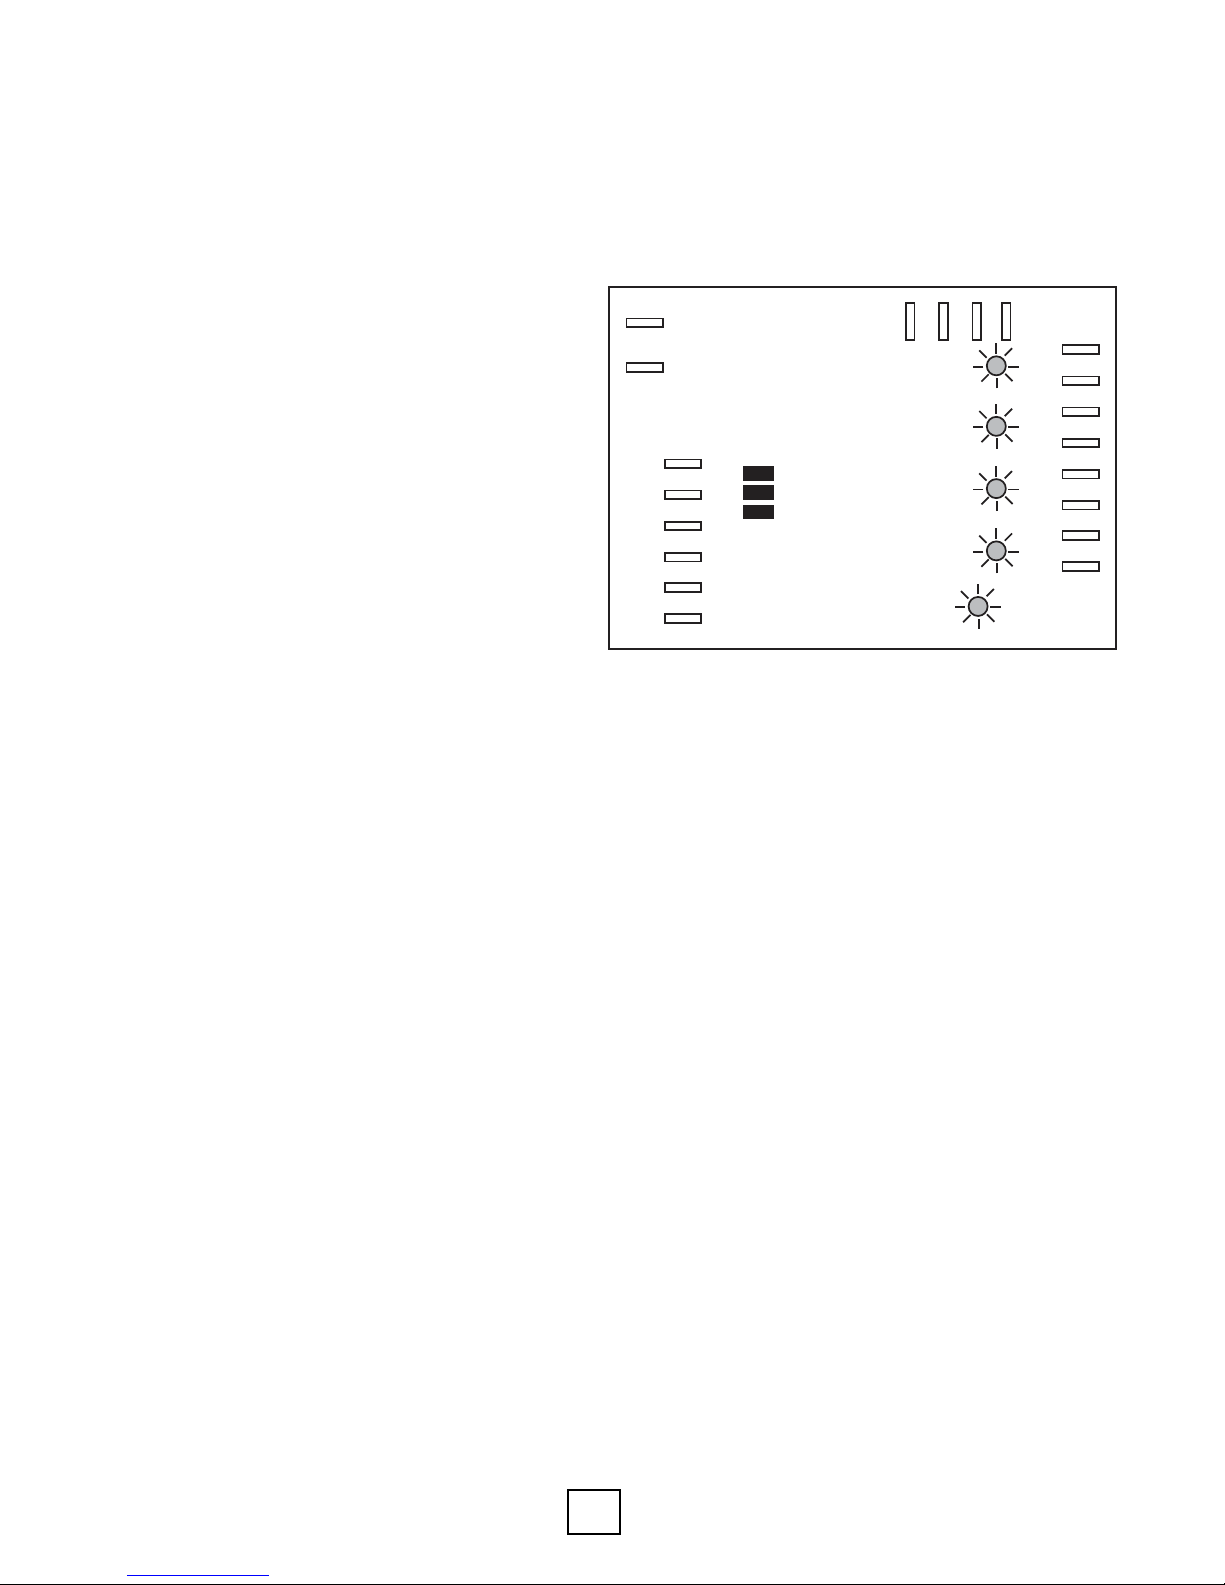
Lockout Board Jumper Selection
The lockout board includes three jumpers for
eld selection of various board features.
Water Solenoid Valve Delay (WSD): When
the WSD jumper is installed, the “A” terminal is
energized when the compressor is energized.
When the jumper is removed, the “A” terminal
is energized 10 seconds after the compressor.
If using the Taco water solenoid valve (or a
valve with an end switch), the unit terminal strip
includes a means for connecting a valve of
this type. The WSD jumper should be installed.
If using a fast opening valve without an end
switch, the jumper should be removed.
include power company transformer selection,
insufcient entrance wire sizing, defective
breaker panel, incorrect transformer tap (unit
control box), or other power-related issues.
Figure 10a: Lockout Board Layout
CCG
R2 R1 C2 C1
CC
Lockout
Board
HP
HP
LP
LP
A
C
R
Y
WSD
TEST
O/V
FS
FS
CO
CO
L
O
SEQUENCE OF OPERATION:
Water-to-Water Units, Single Compressor
Status
Test Mode (TEST): When the TEST jumper is
installed, the board operates in the normal mode.
When the jumper is removed, the board operates
in test mode, which speeds up all delays for easier
troubleshooting. When service is complete, the
jumper must be re-installed in order to make sure
that the unit operates with normal sequencing
delays. While test jumper is removed, the status
(bottom green light) will remain off.
Over/Under Voltage Disable (O/V): When the
O/V jumper is installed, the over/under voltage
feature is active. When the jumper is removed,
the over/under voltage feature is disabled. On
rare occasions, variations in voltage will be
outside the range of the over/under voltage
feature, which may require removal of the
jumper. However, removal of the jumper could
cause the unit to run under adverse conditions,
and therefore should not be removed without
contacting technical services. An over/under
voltage condition could cause premature
component failure or damage to the unit
controls. Any condition that would cause this
fault must be thoroughly investigated before
taking any action regarding the jumper removal.
Likely causes of an over/under voltage condition
Heating (Y1)
Water-to-Water Units, Single Compressor
Heating rst stage (Y1)
The compressor (rst stage) and loop/
desuperheater pump(s) are energized 10
seconds after the “Y1” input is received.
Heating second stage (Y1, Y2)
The compressor solenoid is energized
immediately upon receiving a “Y2” input,
switching the compressor to full load.
Cooling Operation
The reversing valve is energized for cooling
operation. Terminal “O” is connected to the
reversing valve solenoid.
Cooling rst stage (Y1, O)
The compressor (rst stage) and loop/
desuperheater pump(s) are energized 10
seconds after the “Y1” input is received.
Cooling second stage (Y1, Y2, O)
The compressor solenoid is energized
immediately upon receiving a “Y2” input,
switching the compressor to full load.
Enertech Global WT Models, Rev.: B
28
Page 29

Section 8: Controls
SEQUENCE OF OPERATION:
Water-to-Water Units, Dual Two-Stage
Compressors (WT092 Only)
Heating rst stage (Y1)
Compressor A is energized in rst stage 10
seconds after the “Y1” input is received.
Compressor B is energized in rst stage 10
seconds after Compressor A.
Heating second stage (Y1, Y2)
Both compressor solenoids are energized
immediately upon receiving a “Y2” input,
switching the compressors to full load.
Cooling Operation
The reversing valve is energized for cooling
operation. Terminal “O” is connected to the
reversing valve solenoid.
Cooling rst stage (Y1, O)
Compressor A is energized in rst stage 10
seconds after the “Y1” input is received.
Compressor B is energized in rst stage 10
seconds after Compressor A.
Cooling second stage (Y1, Y2, O)
Both compressor solenoids are energized
immediately upon receiving a “Y2” input,
switching the compressors to full load.
SEQUENCE OF OPERATION:
Water-to-Water Units, Dual Single Stage
Compressors (WT120 & WT144 Only)
Heating rst stage (Y1)
Compressor A is energized 10 seconds after
the “Y1” input is received.
Heating second stage (Y1, Y2)
Compressor B is energized 10 seconds after
the “Y2” input is received. Compressor A
remains energized.
Cooling Operation
The reversing valve is energized for cooling
operation. Terminal “O” is connected to the
reversing valve solenoid.
Cooling rst stage (Y1, O)
Compressor A is energized 10 seconds after
the “Y1” input is received.
Cooling second stage (Y1, Y2, O)
Compressor B is energized 10 seconds after
the “Y2” input is received. Compressor A
remains energized.
WT Models, Rev.: B Enertech Global
29
Page 30
MPH Series
Section 8: Controls/Hydronic Air Handler
HYDRONIC AIR HANDLER:
ECM fan/hydronic chilled water/hot water coil
Thermostat Wiring / Fan Speed Notes
For two-stage thermostats, use both Y1 and Y2.
For single stage thermostats, jumper Y1 and Y2,
and use the “CFM Y2” column in table 6b for
determining jumper location. The ECM control
board in the air handler is the thermostat
connection point. Wire nut the thermostat
wiring to the leads connected to the 1/4”
spades on the ECM board.
For dehumidication in cooling, cut the resistor
at the “DEHUMIDIFY” LED. Use either the HUM
terminal (reverse logic -- designed to be used
with a humidistat) to lower the fan speed when
Table 4b: MPH Air Handler Fan Speeds
Model Number
WT036 with MPH024A
Change to:
COOL Jumper B
HEAT Jumper B
ADJUST Jumper Norm
WT036 with MPH036A
Ships Set On:
COOL Jumper C
HEAT Jumper C
ADJUST Jumper Norm
WT048 with MPH060B
Change to:
COOL Jumper C
HEAT Jumper C
ADJUST Jumper Norm
WT060 with MPH060B
Ships Set On:
COOL Jumper B
HEAT Jumper B
ADJUST Jumper Norm
COOL
Jumper
A A Norm 930 930 920 830 820 810 420 410 410
B B Norm 930 920 890 770 750 730 380 370 360
C C Norm 870 860 820 710 700 670 360 350 330
D D Norm 870 840 810 700 680 650 350 340 330
A A + 930 930 920 930 930 920 470 460 460
B B + 930 930 900 880 860 830 440 430 420
C C + 930 930 890 810 800 760 410 400 380
D D + 930 930 890 800 780 750 400 390 370
A A Norm 1556 1556 1508 1448 1448 1428 567 539 502
B B Norm 1547 1547 1518 1239 1239 1227 476 433 407
C C Norm 1312 1308 1308 1012 1006 1006 396 349 302
D D Norm 1150 1145 1139 880 873 865 322 288 N/A
A A + 1556 1556 1508 1566 1566 1518 674 633 619
B B + 1547 1547 1518 1428 1428 1428 558 529 493
C C + 1528 1520 1486 1156 1156 1156 450 404 377
D D + 1317 1317 1317 1024 1020 1006 395 345 302
A A Norm 2180 2170 2116 1810 1810 1784 1157 1137 1137
B B Norm 2015 2015 2004 1678 1678 1664 1087 1087 1045
C C Norm 1710 1701 1693 1407 1407 1396 953 934 905
D D Norm 1567 1567 1546 1318 1304 1274 9 11 989 962
A A + 2243 2170 2116 1885 1860 1823 1289 1271 1253
B B + 2232 2170 2105 1897 1873 1848 1215 1203 1191
C C + 1937 1921 1914 1612 1612 1603 1032 1017 981
D D + 1809 1795 1752 1493 1488 1467 1003 978 945
HEAT
Jumper
ADJUST
Jumper
High SPD CFM Y2 Low SPD CFM Y1 FAN G
.40” .60” .80” .40” .60” .80” .40” .60” .80”
dehumidication is needed, or if the HUM
terminal is not connected (and the resistor is cut),
the air handler will operate at a lower fan speed
in cooling and normal fan speed in heating.
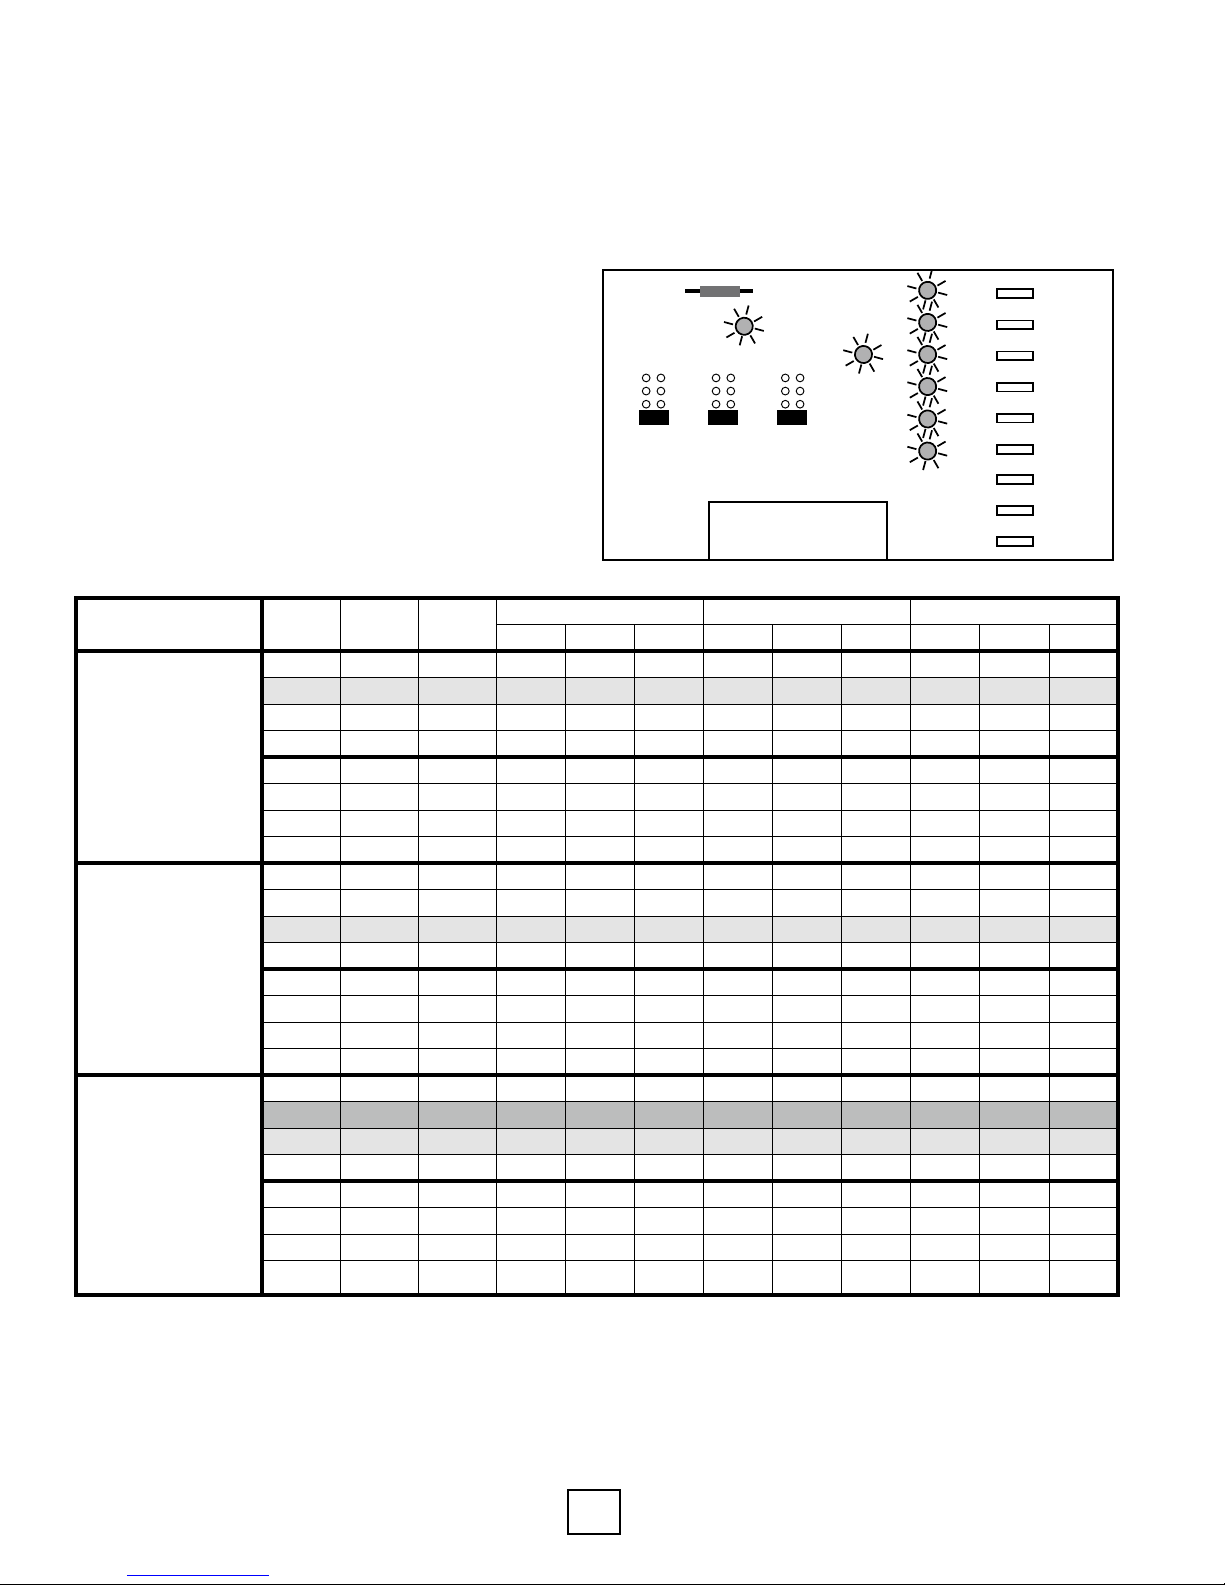
Figure 10b: ECM Board (Air Handler Board)
CUT TO ENABLE
G
DEHUMIDIFY
COOL
D
C
B
A
D
C
B
A
HEAT ADJUST
ECM Control Board
(MPD series)
Low Voltage
Connection
to ECM Motor
TEST
(-)
(+)
NORM
CFM
Y1
Y2
O
W1
EM
C1
R
HUM
NOTES:
1.DehumidicationmodecanbeenabledbycuttingthejumperontheECMboard.Whencut,coolingCFMisreducedby15%,andheating/auxiliaryheatCFMremains
unchanged. Example: Model 036 with HEAT and COOL jumpers on C setting and ADJUST jumper on Norm setting would run at 1115 CFM with jumper cut, instead
of 1308 CFM with jumper intact.
1.Grayshadedareasarerecommendedsettings.Othersettingsmaybeused,dependinguponapplication.DONOTcutdehumidicationjumperifCFMsettingwill
causeairowtobebelow250CFMpertononrststage,andbelow325CFMpertononsecondstage.Example:Model036shouldnotrunbelow750CFMinrst
stage, or below 975 CFM in second stage.
2.TheCOOLandHEATjumpersshouldbothbesetatthesameposition.COOLcontrolsheatingandcoolingairow;HEATcontrolselectricheatairow.
3. Above CFM will be maintained up to 0.50” ESP for models MPH024 and 036, and up to 0.75” ESP for models MPH048 and 60.
Enertech Global WT Models, Rev.: B
30
Page 31
Section 8: Controls
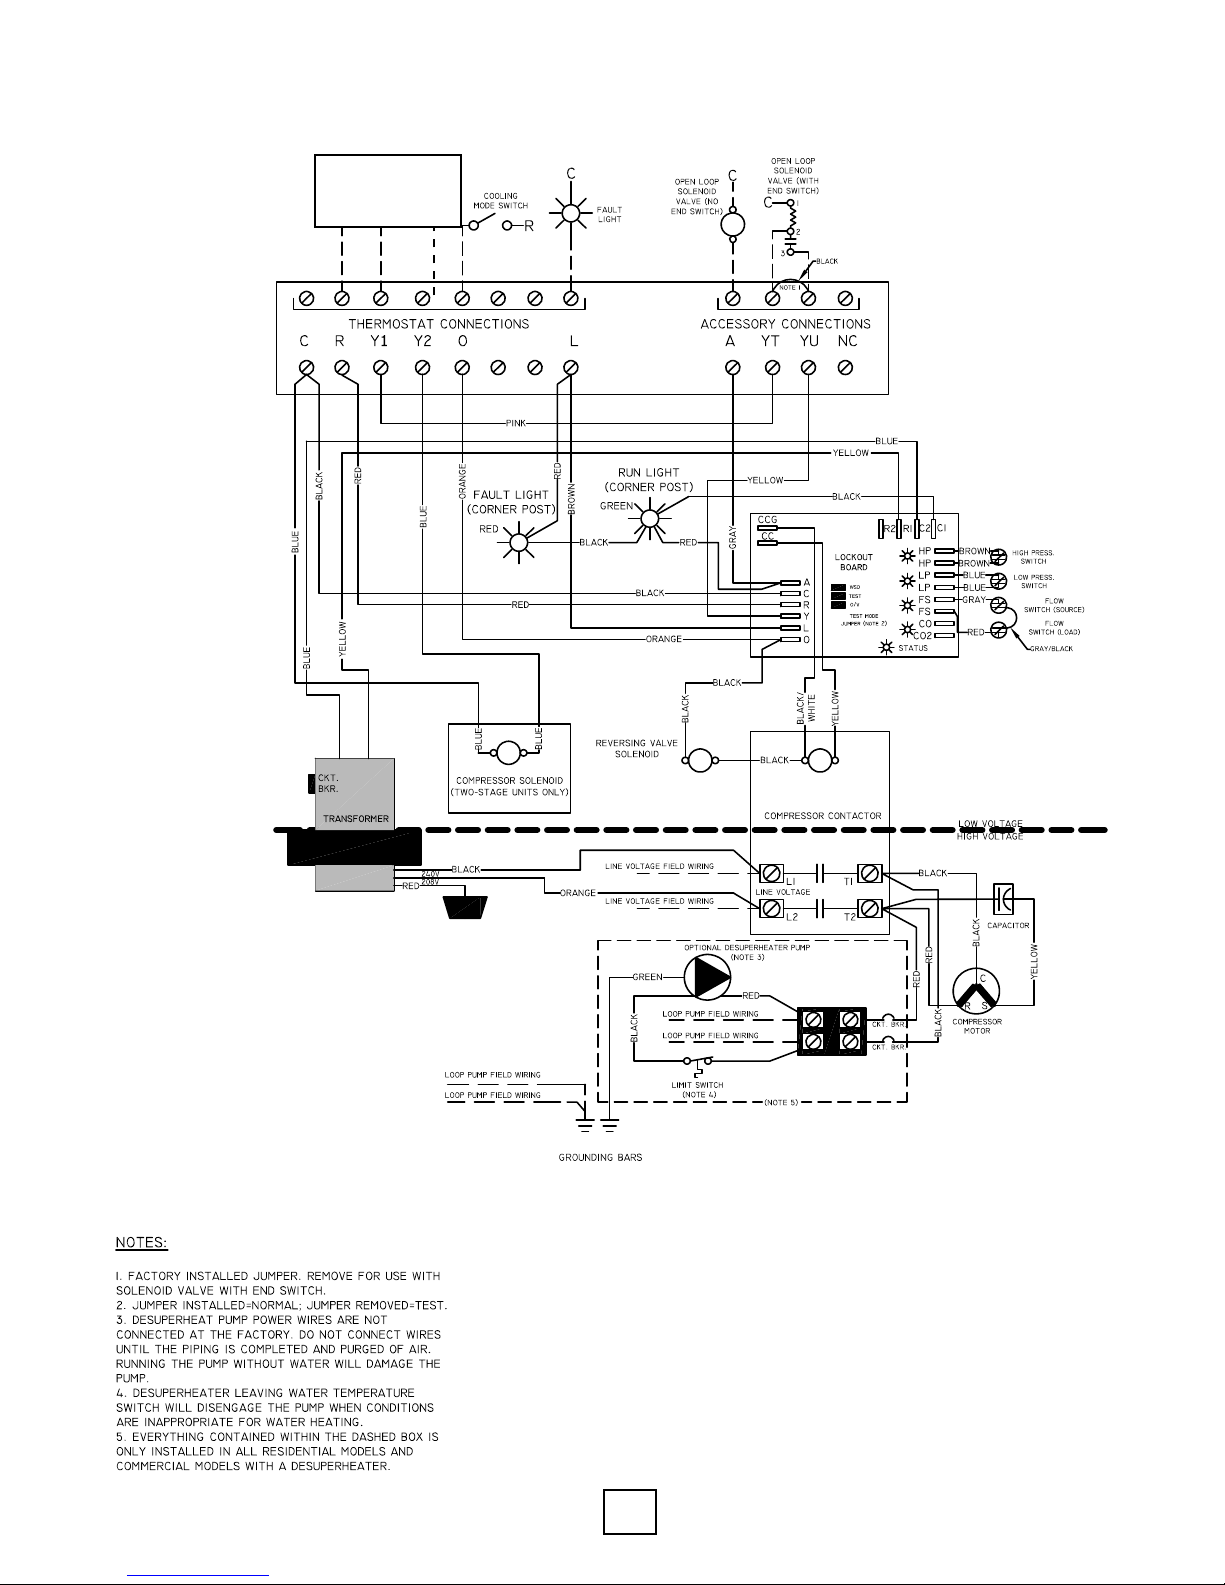
Water-to-Water Unit, Two-Stage, Single Compressor Wiring Diagram
2 STAGE AQUASTAT
R1 Y1 Y2
Note: On units lower
than 8 tons, load side
pumping is handled via
connection to the loop
pump terminals (i.e. the
loop and load pumps can
be powered from the unit
as long as no more than
three UP26-116 pumps
are connected total (loop
and load side).
WT Models, Rev.: B Enertech Global
31
Page 32
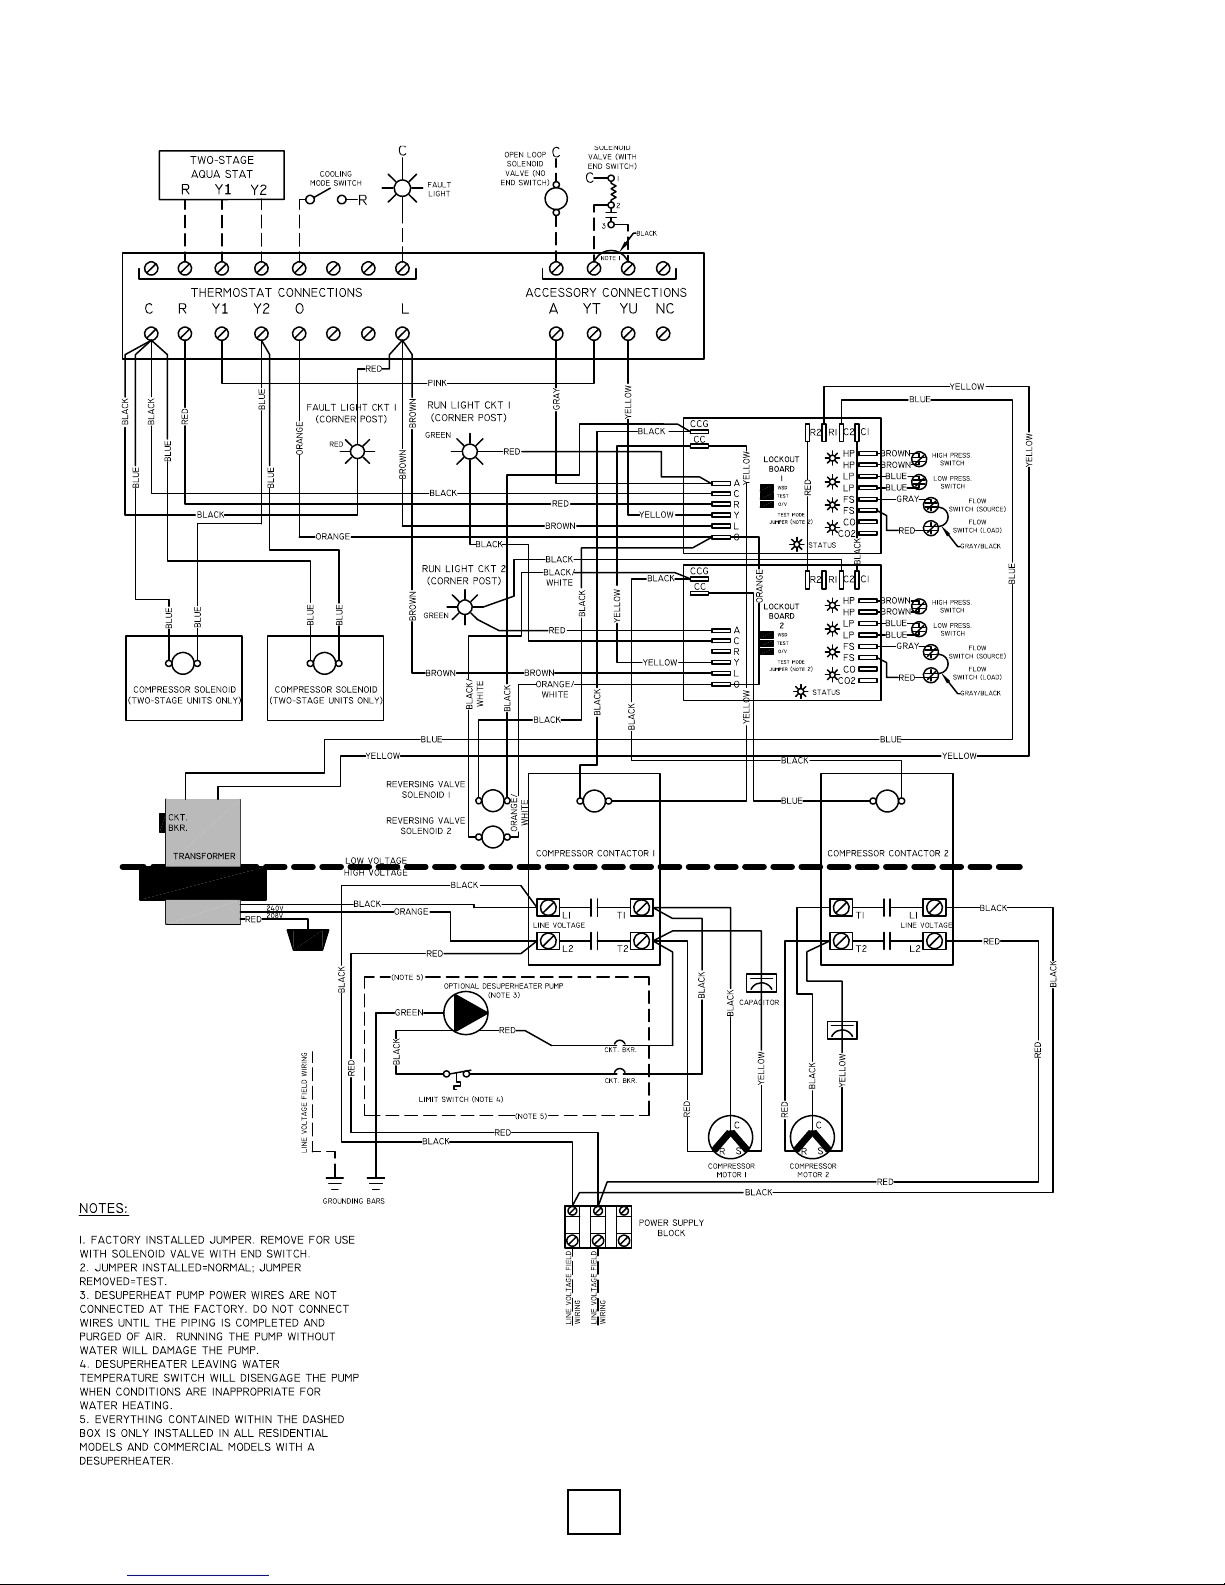
Section 8: Controls
Water-to-Water Unit, Two-Stage, Dual Two-Stage Compressor Wiring Diagram
Note: Units 8 tons and
larger are considered
“commercial” size units
and all pumping is
handled from a separate
electrical circuit outside
of the unit
Enertech Global WT Models, Rev.: B
32
Page 33
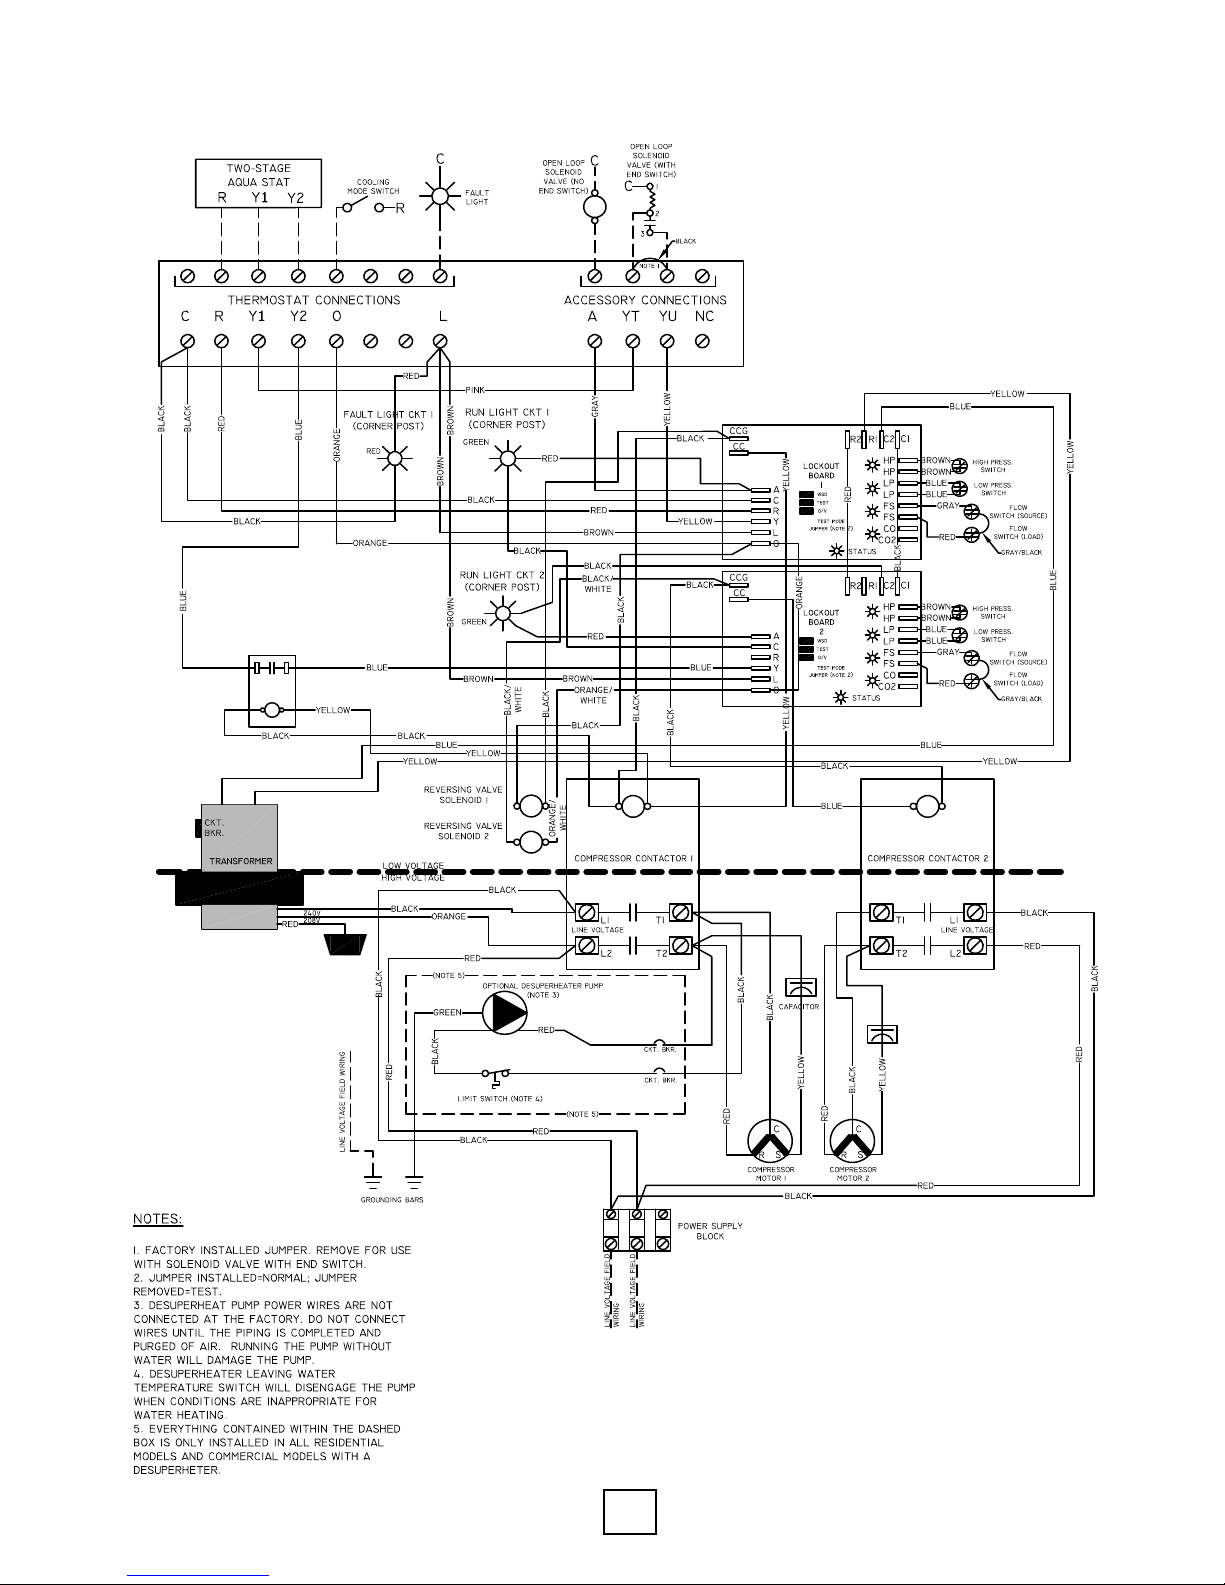
Section 8: Controls
Water-to-Water Unit, Two-Stage, Dual Single Stage Compressor Wiring Diagram
Note: Units 8 tons and
larger are considered
“commercial” size units
and all pumping is
handled from a separate
electrical circuit outside
of the unit
WT Models, Rev.: B Enertech Global
33
Page 34
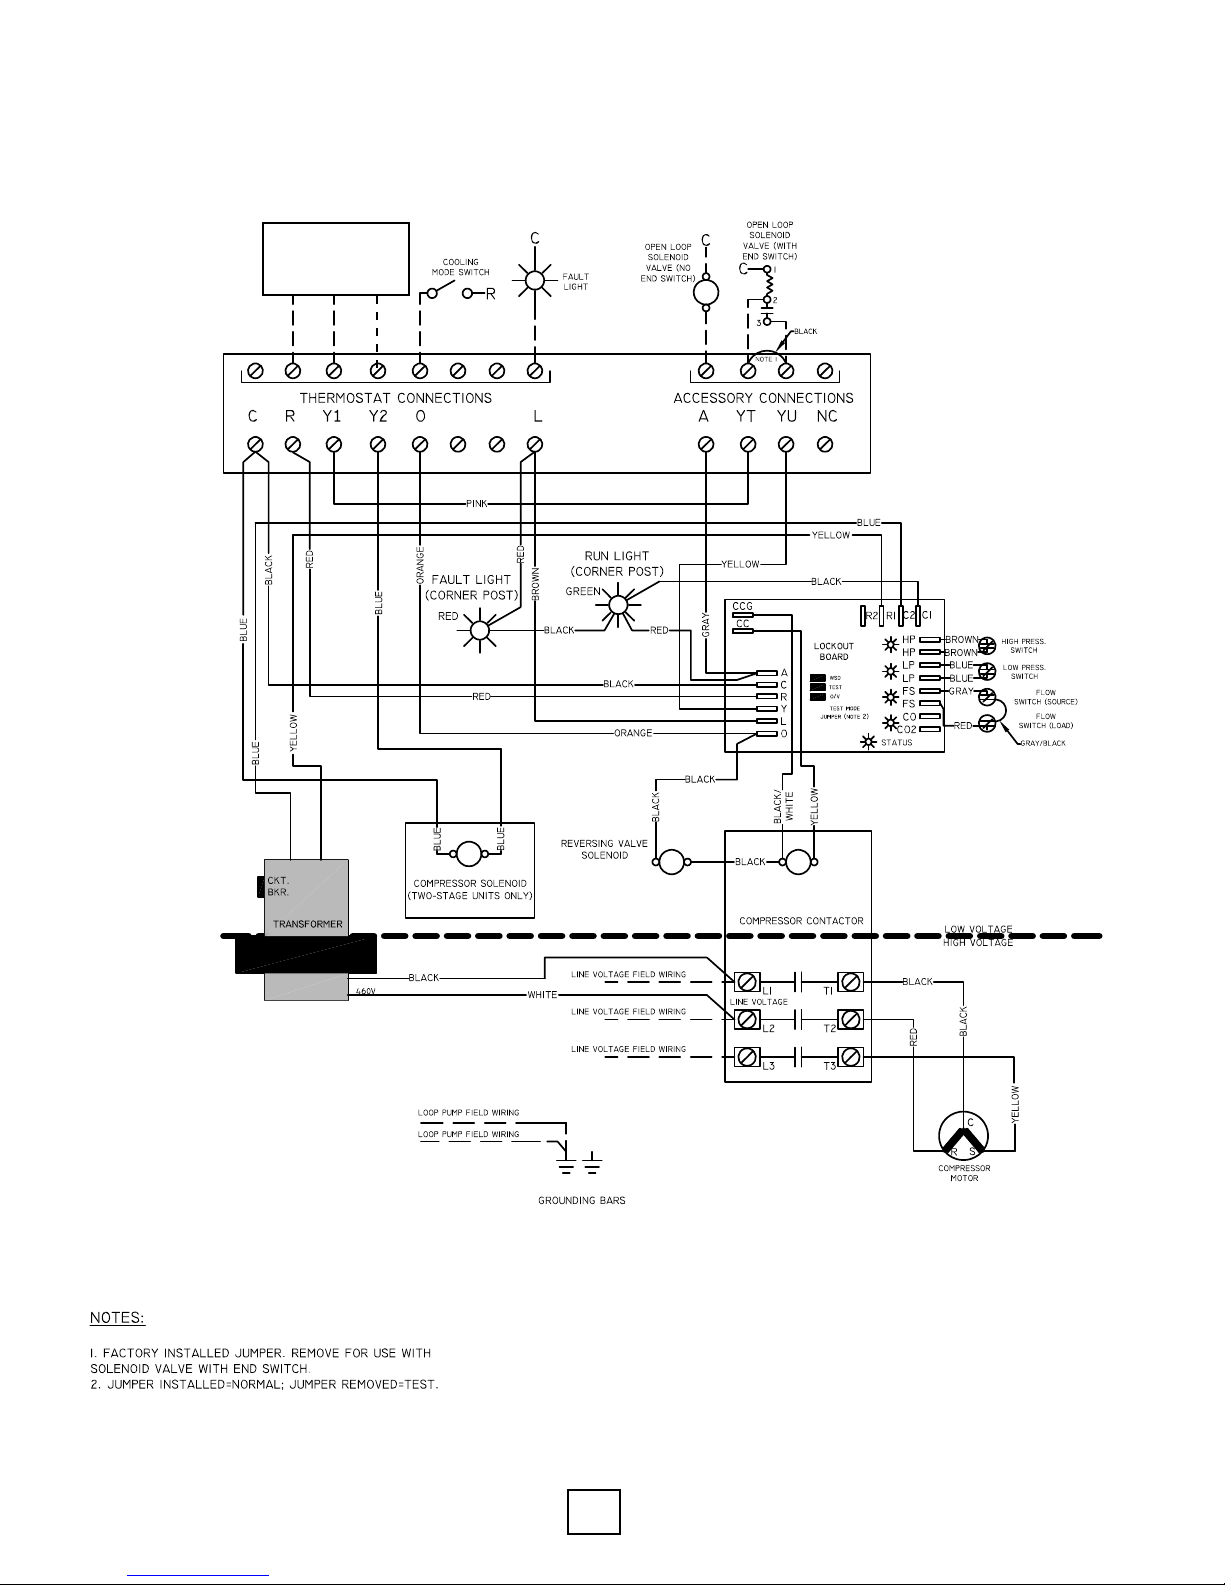
Section 8: Controls
Water-to-Water Unit, Single, Two Stage Compressor, Three Phase, 460V,
60 HZ Wiring Diagram
2 STAGE AQUASTAT
R1 Y1 Y2
Enertech Global WT Models, Rev.: B
34
Page 35
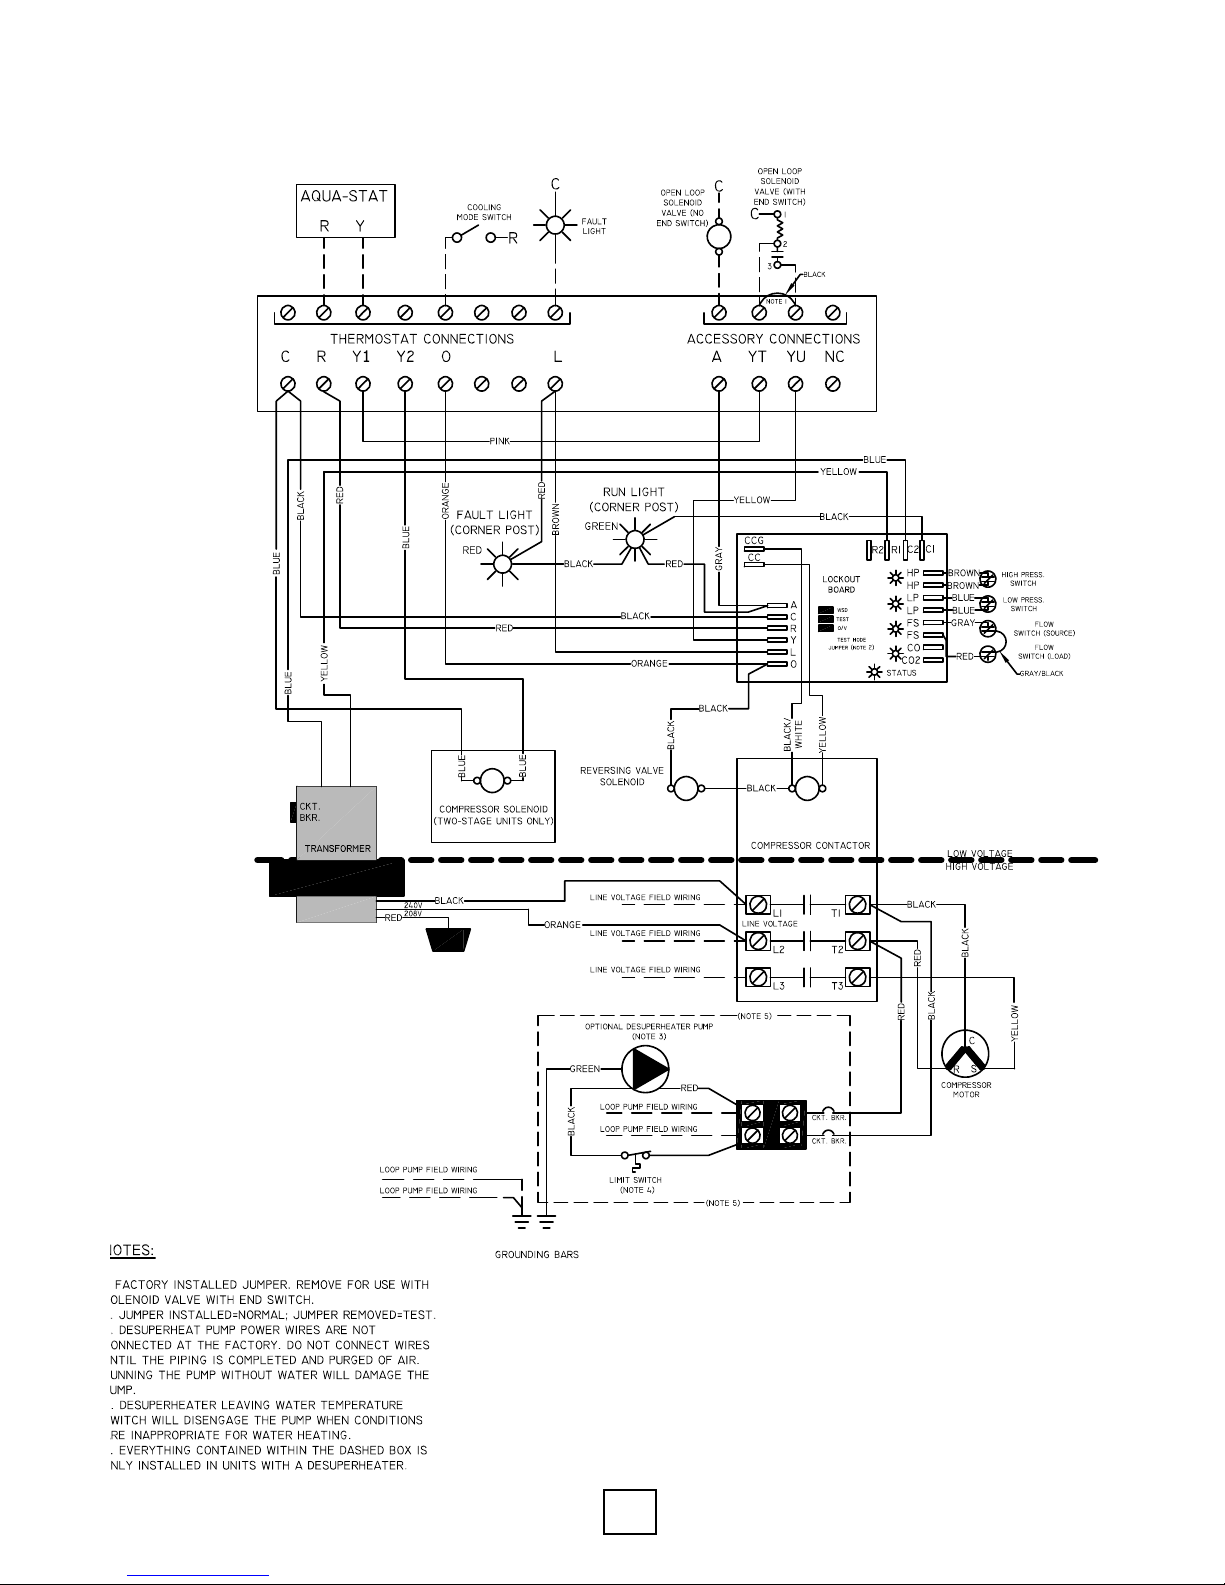
Section 8: Controls
Water-to-Water Unit, Two-Stage or Single Stage Compressor, Three Phase , 60HZ Wiring Diagram
WT Models, Rev.: B Enertech Global
35
Page 36
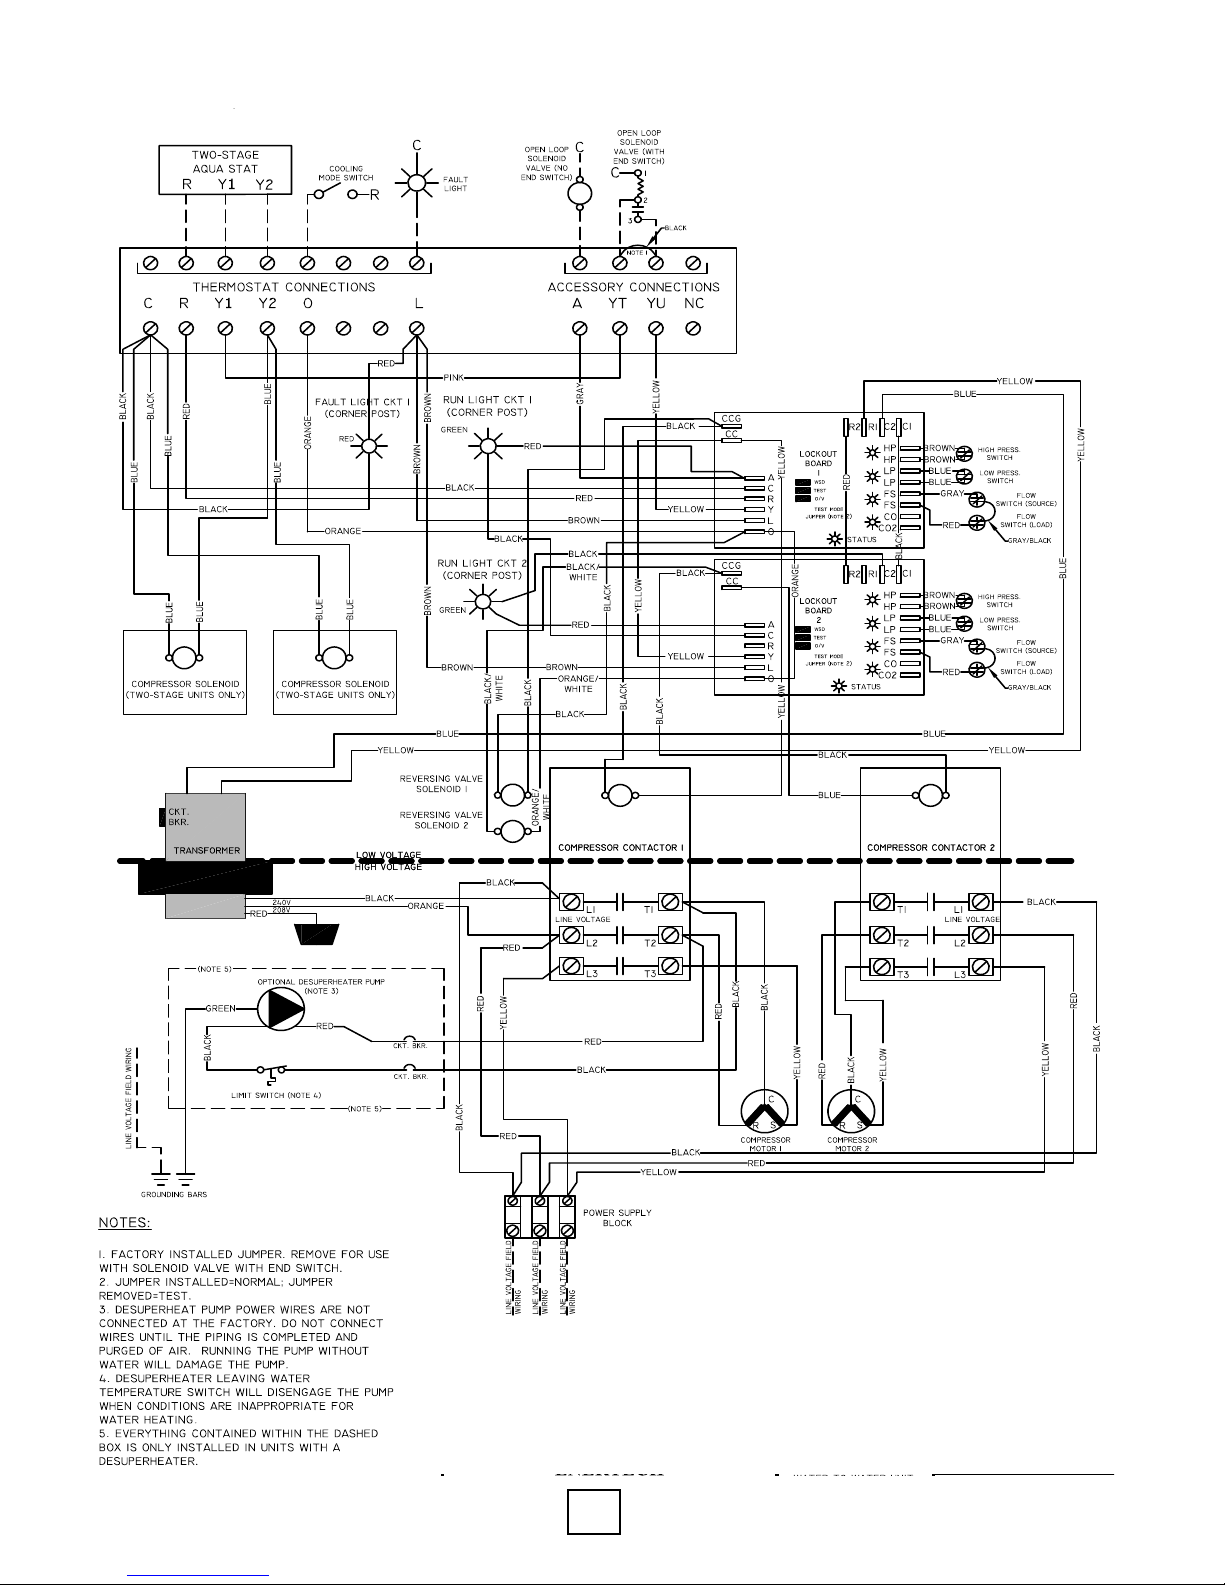
Section 8: Controls
Water-to-Water Unit, Dual Two Stage Compressors, Three Phase, 60 HZ Wiring Diagram
Note: Units 8 tons and
larger are considered
“commercial” size units
and all pumping is
handled from a separate
electrical circuit outside
of the unit
Enertech Global WT Models, Rev.: B
36
Page 37
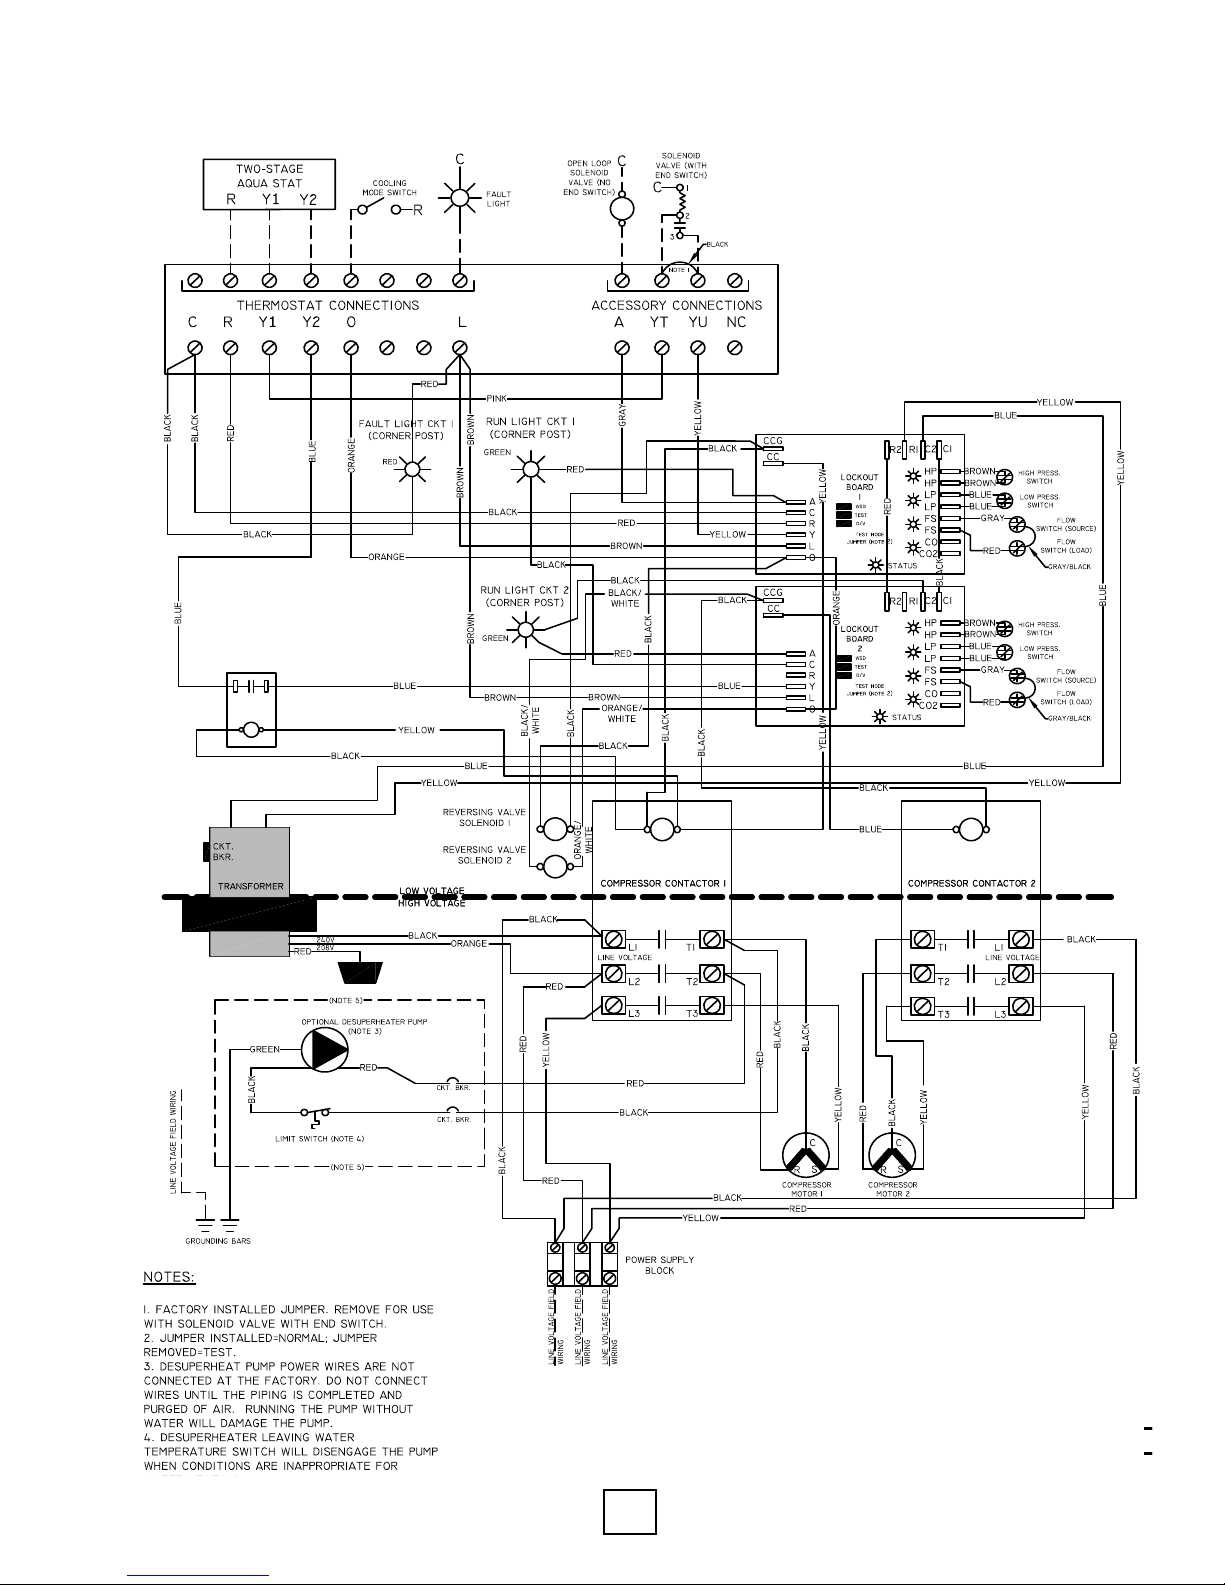
Section 8: Controls
Water-to-Water Unit, Dual Single Stage Compressors, Three Phase , 60HZ Wiring Diagram
Note: Units 8 tons and
larger are considered
“commercial” size units
and all pumping is
handled from a separate
electrical circuit outside
of the unit
WT Models, Rev.: B Enertech Global
37
Page 38
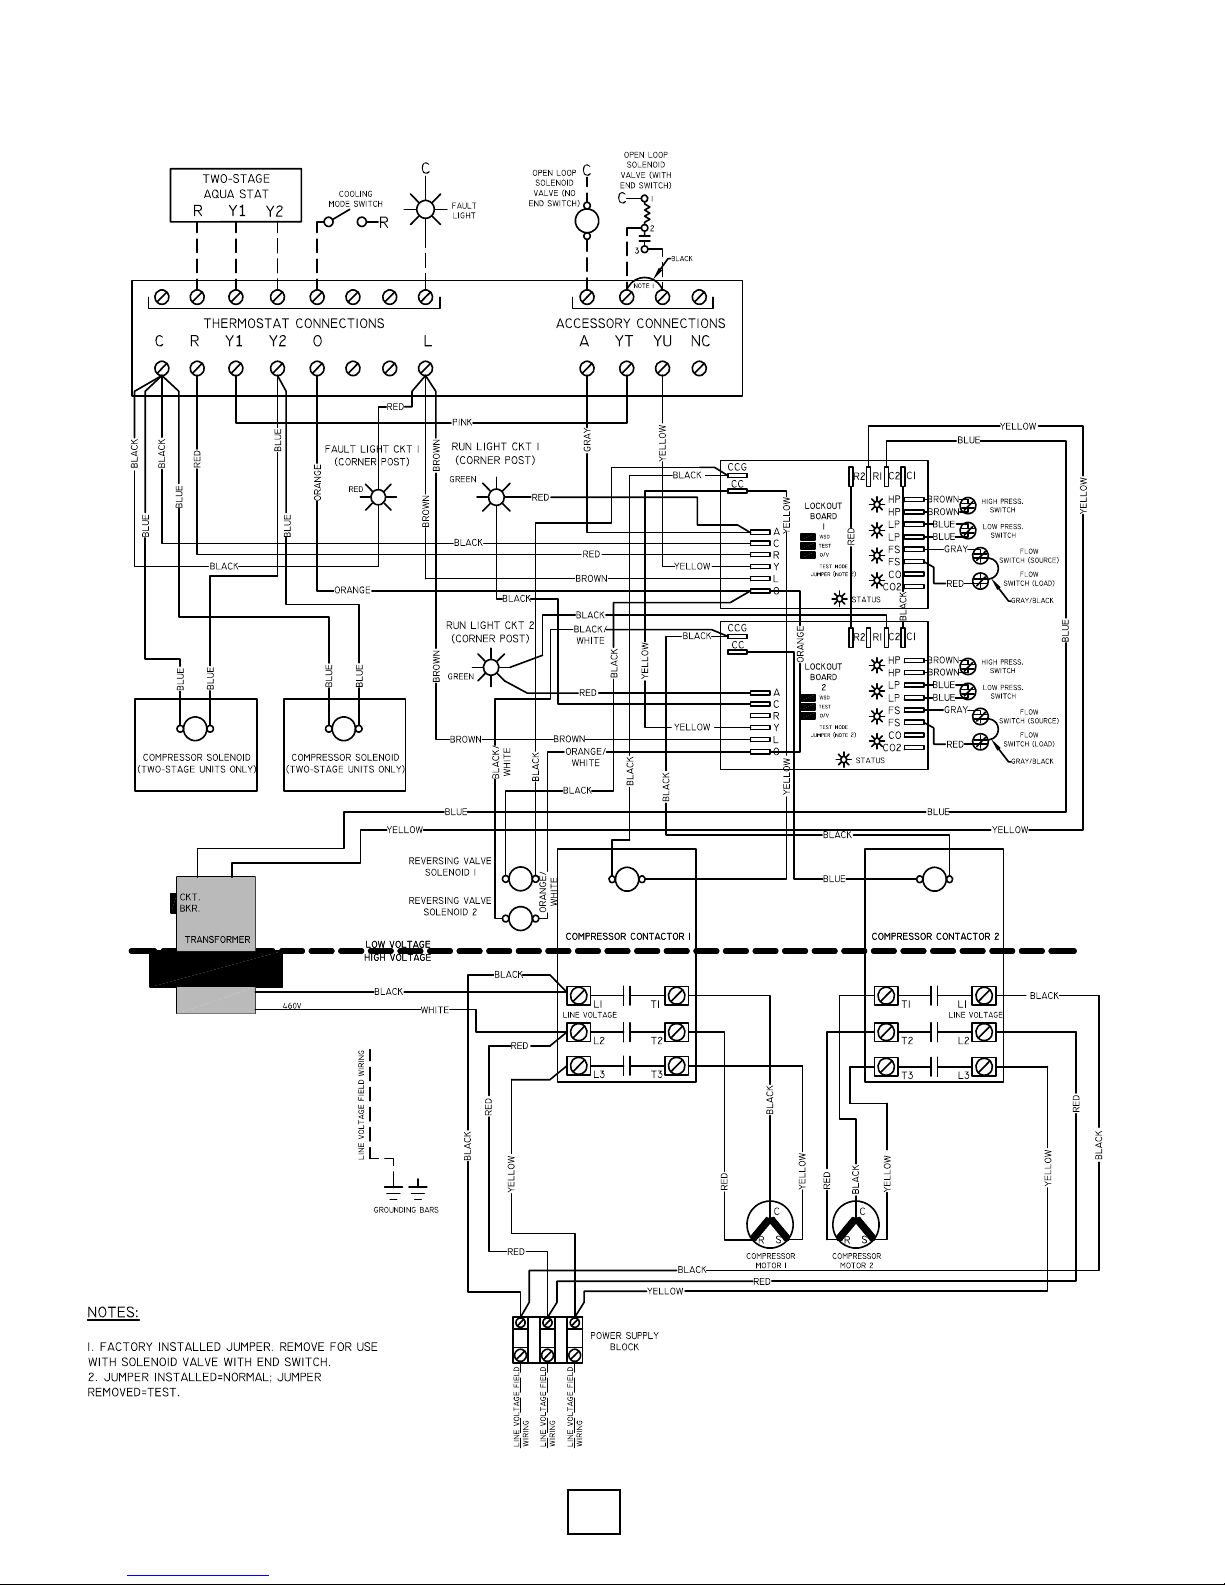
Section 8: Controls
Water-to-Water Unit, Dual Two-Stage Compressors, Three Phase , 460V, 60HZ Wiring Diagram
Note: Units 8 tons and
larger are considered
“commercial” size units
and all pumping is
handled from a separate
electrical circuit outside
of the unit
Enertech Global WT Models, Rev.: B
38
Page 39
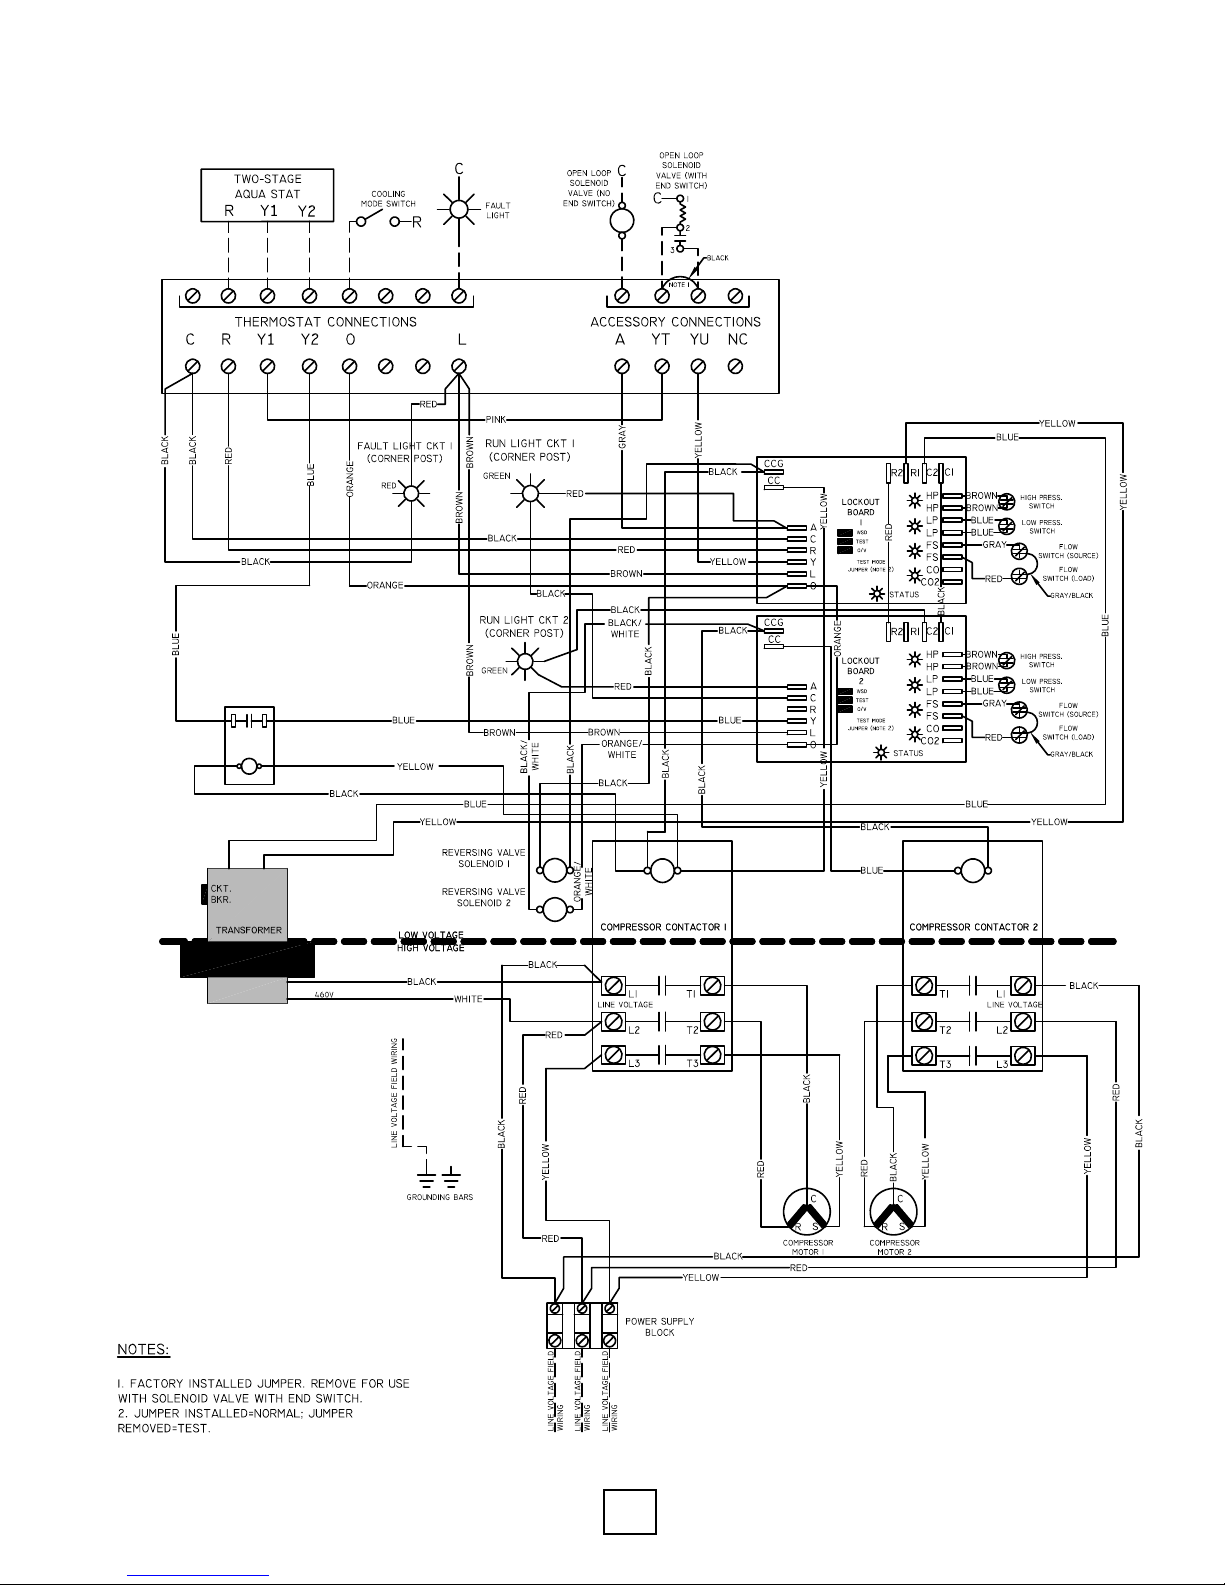
Section 8: Controls
Water-to-Water Unit, Dual Single Stage Compressors, Three Phase, 460V, 60 HZ Wiring Diagram
Note: Units 8 tons and
larger are considered
“commercial” size units
and all pumping is
handled from a separate
electrical circuit outside
of the unit
WT Models, Rev.: B Enertech Global
39
Page 40
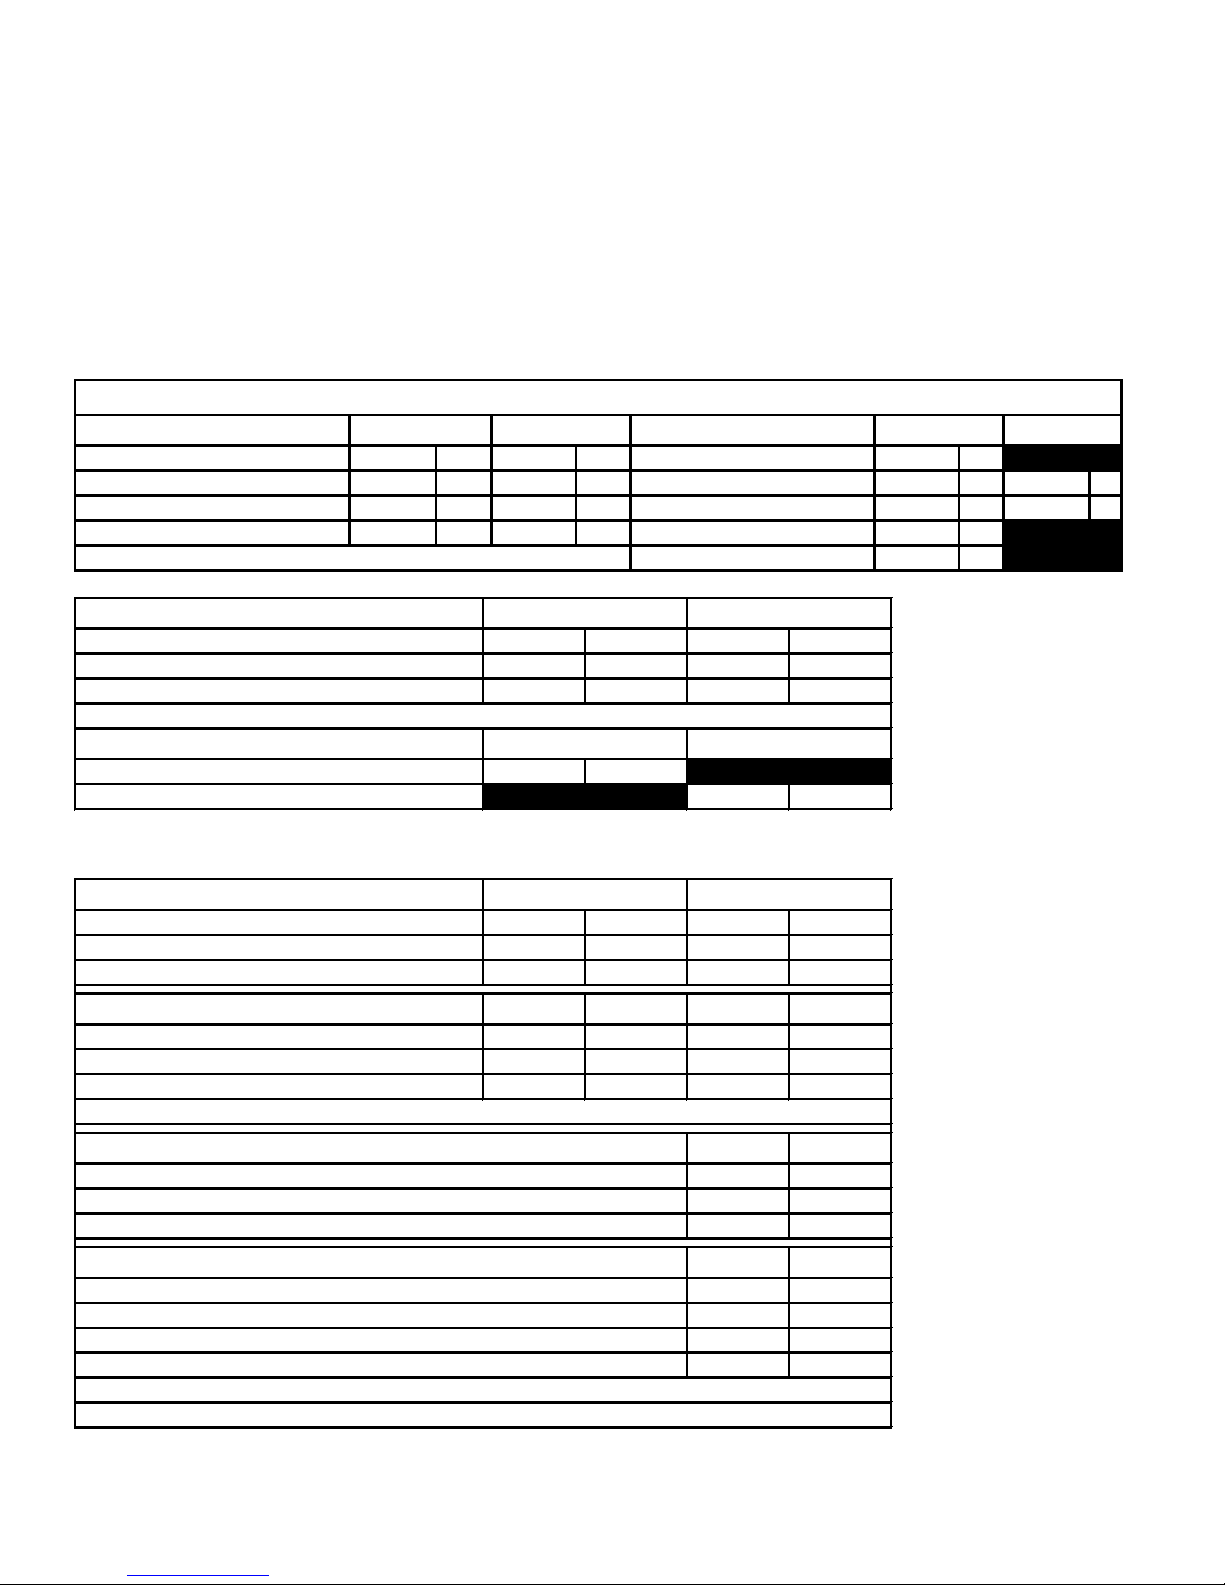
EQUIPMENT START-UP FORM
Unit Electrical Data
A
Loop Type: Open Closed
(Circle One)
Line Voltage
Wire Size
Circuit Breaker Size
Cooling
Heating
Cooling
Heating
Flow Rate
*Check pressure drop chart for GPM
Total Unit Amps
Compressor Amps
Flow Rate
Source Water Pressure In
Source Water Pressure Out
Source Water Pressure Drop
BTU/HR
Source Water Temp. Difference
Cooling
Heating
Source Water Temperature In
Source Water Temperature Out
Source Water Temperature Difference
Cooling
Heating
Load Water Temp. Difference
Cooling
Heating
Heat of Extraction/Rejection = GPM X Water Temp. Difference X 485 (Water & Antifreeze - Closed Loop)
Heat of Rejection
Heat Of Extraction
Load Water Temperature In
Load Water Temperature Out
Load Water Temperature Difference
Heat of Extraction/Rejection = GPM X Water Temp. Difference X 500 (Water - Open Loop)
Air Temperature Difference
Supply Air Temperature
Return Air Temperature
Air Temp. Difference
Auxiliary Heat Operation Only
Supply Air Temperature
*Confirm auxiliary heaters are de-energized for the above readings.
Return Air Temperature
Air Temp. Difference
Auxiliary Heat Electrical Data
CFM = (Watts X 3.413) ÷ (Air Temp. Difference X 1.08)
Watts = Volts X Auxiliary Heater Amps
Line Voltage
Total Amperage (Full kW - All Stages)
Wire Size
Breaker Size
Customer Name:_________________________________________________________________
Customer Address:_____________________________________________________________________________________
Model #:__________________________________________ Serial #:____________________________________________
Dealer Name:__________________________________________________________________________________________
Distributor Name:_____________________________________________ Start-up Date:____________________________
PSI PSI V
PSI PSI A A
PSI PSI A A
GPM GPM GA
ºF ºF
ºF ºF
ºF ºF
Heat of Rejection/Extraction
BTU/HR
ºF ºF
ºF ºF
ºF ºF
Cooling Heating
ºF ºF
ºF ºF
ºF ºF
Heating
ºF
ºF
ºF
Heating
V
A
GA
A
Installer/Technician:____________________________________________ Date:________________________
Page 41

Equipment Start-Up Process
Check the following before power is applied to the equipment
Caution: Do not start-up the unit until the new structure is ready to be occupied
Electrical:
Geothermal unit high voltage
wiring is installed correctly
Geothermal unit high voltage
wiring and breaker are the correct
size
Auxiliary electric heaters are
wired and installed correctly
Circulating pumps are wired and
fused (if necessary) correctly
Desuperheater pump is NOT
wired, unless piping is complete
and all air is purged
Low voltage wiring is correct and
completely installed
Equipment Start-Up
1. Energize geothermal unit with
high voltage.
2. Set the thermostat to “Heat” or
“Cool.” Adjust set point to
energize the unit. System will
energize after delays expire
(typically a five minute delay).
3. Check water flow with a flow
meter (non-pressurized) or
pressure drop conversion
(pressurized). Pressure drop
tables must be used to convert
the pressure drop to GPM. The
pressure drop can be obtained by
checking water pressure in and
water pressure out at the P/T
ports.
4. Check the geothermal unit’s
electrical readings listed in the
Unit Electrical Data table.
5. Check the source water
temperature in and out at the P/T
ports (use insertion probe). Allow
10 minutes of operation before
recording temperature drop.
6. Calculate the heat of extraction or
heat of rejection.
Plumbing:
Pipe and pump sizes are correct
Air is purged from all lines
Antifreeze is installed
All valves are open, including
those on the flow center
Condensate is trapped and piped
to the drain
Ductwork:
Filter is installed and clean
Packaging is removed from the
blower assembly
Blower turns freely
Canvas connections installed on
supply plenum & return drop
7. Check the temperature difference
of the load coax (water-to-water)
or air coil (water-to-air). P/T ports
are recommended for use on the
load side, but the line
temperatures can be used to
check the temperature difference.
8. Change the mode of the
thermostat and adjust the set
point to energize the unit. Check
the data in opposite mode as the
previous tests. Amp draws as
well as temperature differences
and flow rate should be recorded.
9. Check auxiliary heat operation by
adjusting the thermostat set point
5°F above the room temperature
in “Heat” mode or set thermostat
to “Emergency." Record voltage,
amperage, and air temperature
difference.
Page 42

Section 10: Troubleshooting
PERFORMANCE CHECK:
Heat of Extraction(HE)/Rejection(HR)
Record information on the Unit Start-up Form
Equipment should be in operation for a
minimum of 10 minutes in either mode – WITH
THE HOT WATER GENERATOR TURNED OFF.
1. Determine ow rate in gallons per minute
a. Check entering water temperature
b. Check entering water pressure
c. Check leaving water pressure
Once this information is recorded, nd
corresponding entering water temperature
column in Specication Manual for unit.
Find pressure differential in PSI column in Spec
Manual. Then read the GPM column in Spec
Manual to determine ow in GPM.
2. Check leaving water temperature of unit.
FORMULA: GPM x water temp diff, x 485
(antifreeze) or 500 (fresh water) = HE or HR in
BTU/HR
A 10% variance from Spec Manual is allowed.
Always use the same pressure gauge &
temperature measuring device.
Water ow must be in range of Specication
Manual. If system has too much water ow,
performance problems should be expected
Enertech Global WT Models, Rev.: B
42
Page 43
Section 10: Troubleshooting
A: UNIT WILL NOT START IN EITHER CYCLE
Set thermostat on heating and highest temperature setting. Unit should run. Set thermostat on cooling and
Thermostat
Loose or broken wires Tighten or replace wires.
Blown Fuse/
Tripped Circuit Breakers
Low Voltage Circuit
Water Flow (runs for 30 sec)
lowest temperature setting. Unit should run. Set fan to On position. Fan should run. If unit does not run in
anyposition,disconnectwiresatheatpumpterminalblockandjumpR,G,Y.Unitshouldruninheating.If
unitruns,replacethermostatwithcorrectthermostatonly.
Check fuse size, replace fuse or reset circuit breaker.
Check low voltage circuit breaker.
Check24volttransformer.Ifburnedoutorlessthan24volt,replace.Beforereplacing,verifytapsetting
andcorrectifnecessary.
Ifwaterowislow(lessthan3.5GPM),unitwillnotstart.MakesurePumpModuleorsolenoidvalveis
connected(seewiringdiagram).Waterhastoowthroughtheheatexchangerintherightdirection(see
labelsatwaterttingconnections)beforethecompressorcanstart.Ifwaterowisatnormalow,usean
ohmmetertocheckifyougetcontinuityattheowswitch.Ifnoswitchisopenandowisanormalow,
remove switch and check for stuck particles or bad switch.
B: UNIT RUNNING NORMAL, BUT SPACE TEMPERATURE IS UNSTABLE
Thermostat
Thermostat is getting a draft of cold or warm air. Make sure that the wall or hole used to run thermostat
wire from the ceiling or basement is sealed, so no draft can come to the thermostat.
FaultyThermostat(Replace).
C: NO WATER FLOW
MakesurePumpModuleisconnectedtothecontrolboxrelay(checkallelectricalconnections).Fornon-
Pump Module
Solenoid valve Make sure solenoid valve is connected. Check solenoid. If defective, replace.
pressurizedsystems,checkwaterlevelinPumpModule.Iffullofwater,checkpump.Closevalveonthe
pumpangesandloosenpump.Takeoffpumpandseeifthereisanobstructioninthepump.Ifpumpis
defective,replace.Forpressurizedsystems,checklooppressure.Repressurizeifnecessary.Mayrequire
re-ushingifthereisairintheloop.
D: IN HEATING OR COOLING MODE, UNIT OUTPUT IS LOW
Water Waterow&temperatureinsufcient.
Load Side Flow
Refrigerant charge
Reversing valve
Check speed setting, check nameplate or data manual for proper speed, and correct speed setting.
Checkfordirtyairlter—Cleanorreplace.
Restrictedorleakyductwork.Repair.
Refrigerantchargelow,causinginefcientoperation.Makeadjustmentsonlyafterairowandwaterow
are checked.
Defectivereversingvalvecancreatebypassofrefrigeranttosuctionsideofcompressor.Switchreversing
valvetoheatingandcoolingmoderapidly.Ifproblemisnotresolved,replacevalve.Wrapthevalvewitha
wetclothanddirecttheheatawayfromthevalve.Excessiveheatcandamagethevalve.Alwaysusedry
nitrogenwhenbrazing.Replacelter/drieranytimethecircuitisopened.
E: IN HEATING OR COOLING MODE, UNIT OUTPUT IS LOW
Heat pump will not cool but will
heat. Heat pump will not heat
but will cool.
Water heat exchanger
Systemundersized Recalculate conditioning load.
Reversing valve does not shift. Check reversing valve wiring. If wired wrong, correct wiring. If reversing
valveisstuck,replacevalve.Wrapthevalvewithawetclothanddirecttheheatawayfromthevalve.
Excessiveheatcandamagethevalve.Alwaysusedrynitrogenwhenbrazing.Replacelter/drieranytime
the circuit is opened.
Check for high-pressure drop, or low temperature drop across the coil. It could be scaled. If scaled, clean
with condenser coil cleaner.
F: WATER HEAT EXCHANGER FREEZES IN HEATING MODE
Waterow Lowwaterow.Increaseow.SeeF.Nowaterow.
Flow Switch Check switch. If defective, replace.
G: EXCESSIVE HEAD PRESSURE IN COOLING MODE
Inadequatewaterow Lowwaterow,increaseow.
WT Models, Rev.: B Enertech Global
43
Page 44
Section 10: Troubleshooting
H: EXCESSIVE HEAD PRESSURE IN HEATING MODE
Load Side Flow SeeE:Noisyblowerandlowairow.
I: WATER DRIPPING FROM UNIT
Unit not level Level unit.
Condensation drain line plugged
Water sucking off the air coil in
cooling mode
Water sucking out of the
drain pan
Unplug condensation line.
Toomuchairow.Ductworknotcompletelyinstalled.Ifductworkisnotcompletelyinstalled,nishduct
work.Checkstaticpressureandcomparewithairowchartinspecmanualunderspecicmodelssection.
IfductworkiscompletelyinstalleditmaybenecessarytoreduceCFM.
Install an EZ-Trap or P-Trap on the drain outlet so blower cannot suck air back through the drain outlet.
Enertech Global WT Models, Rev.: B
44
Page 45
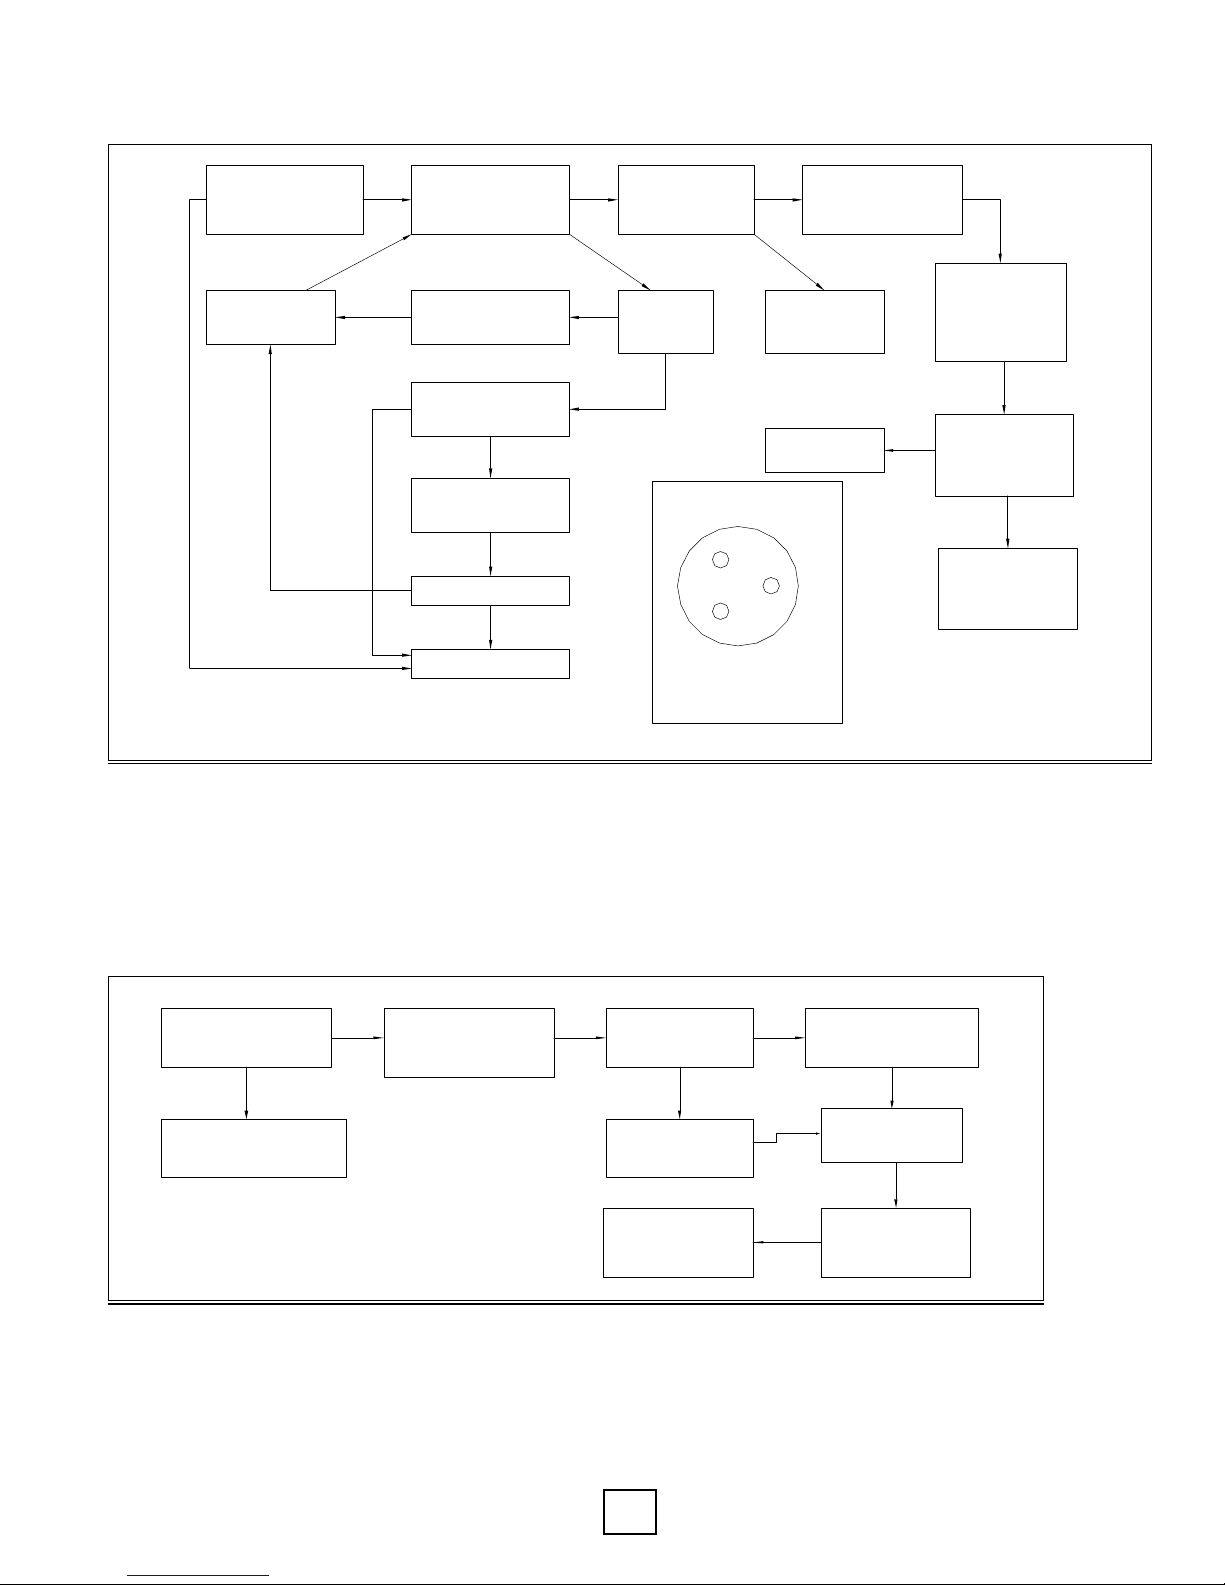
Section 10: Troubleshooting
J: COMPRESSOR WON’T START
Check for proper
compressor nameplate
voltage.
Attempt to restart
the compressor
OK
No
Does Compressor draw
OK
current when voltage is
applied.
Check voltage supply
OK
& contactor operation.
Is the compressor
hot?
Allow time for the
protector to reset.
Recheck Resistance
Replace Compressor
Yes
Yes
Not
OK
Are the suction &
Yes
discharge pressures
balanced.
No
Check motor
OK
resistance.
(See Note B)
Not
OK
Yes
Allow time for
compressor to
balance.
Voltage supply
is too low.
Compressor
Connection Block
C
S
R
Single Phase 208-230
C = Line Winding
R = Run Winding
S = Start Winding
Check the wiring,
capacitor & contactor
operation. (See Note A)
No
No
OK
Allow to start the
compressor while
measuring voltage
on the load side of
the contactor.
OK
Is the voltage 197
or higher when the
compressor is trying
to start.
Yes
If the compressor
fails to start after
3 attempts, replace
the compressor.
A: Check all terminals, wires & connections for loose or burned wires and connections. Check contactor and 24 Volt
coil. Check capacitor connections & check capacitor with capacitor tester.
B: Ifohmmeterreads0(short)resistancefromCtoS,StoR,RtoCorfromanyoneofoneoftheseterminalsto
ground (shorted to ground), compressor is bad.
K: COMPRESSOR WON’T PUMP CHART
Is the c om p re ssor
ru n n ing?
N o
R ef er t o t h e co m pr esso r
w on 't s ta rt f low ch art.
M ea su re & r eco rd
Y es Y es
th e a m p s, volts,
suc ti on & d is ch a rg e
p re ss ur e .
D oe s th e u n it
O K
h av e a r e frig er a nt
c h a rg e?
A dd r e frig er an t
to t h e s ys te m .
If th e co m p ressor
s till w o n't pum p
re p lace co m pr esso r.
N o
S hut t h e unit d ow n &
re v er se th e p h as in g
(3 -P has e On ly )
C heck & v er ify
th e r un c ap acitor
C heck th e ope ra tio n
o f t h e r ev e rs ing
O K
v a lv e.
O K
O K
WT Models, Rev.: B Enertech Global
45
Page 46
Superheat Subcooling Condition
Normal Normal Normal operation
Normal High Overcharged
High Low Undercharged
High High Restriction or TXV is stuck almost closed
Low Low TXV is stuck open
Section 10: Troubleshooting
Table 6: Refrigeration Troubleshooting
SystemFaults Mode
Under Charge
Over Charge
Low Air Flow
Low Source
Water Flow
Low Load
Water Flow
Restricted TXV
TXV Stuck Open
Inadequate
Compression
Discharge
Pressure
Heat Low Low High Low Low Low Low
Cool Low Low High Low Low Low Low
Heat High High/Normal Normal High High Normal High
Cool High High/Normal Normal High Normal High High
Heat High High/Normal Normal High/Normal High Low High
Cool Low Low/Normal Low Normal High Low High/Normal
Heat Low Low/Normal Low Normal High Low High/Normal
Cool High High/Normal Normal High/Normal High Low High
Heat High High/Normal Normal High/Normal High Low High
Cool Low Low/Normal Low Normal High Low High/Normal
Heat High Low High High Low Low Low
Cool High Low High High Low Low Low
Heat Low High/Normal Low Low Low Low High
Cool Low High/Normal Low Low Low Low High
Heat Low High High/Normal Low/Normal Low Low Low
Cool Low High High/Normal Low/Normal Low Low Low
Suction
Pressure
Superheat Subcooling Air TD Water TD
Compressor
Amps
Superheat/Subcooling Conditions
Enertech Global WT Models, Rev.: B
46
Page 47
Discharge Suction Subcooling Superheat
Source Water
Temp Drop
Load Water
Temp Rise
°F GPM/Ton GPM/Ton °F PSIG PSIG °F °F °F °F
85
318-363 49-84 11-26 6-14 7-11 4-9
95
365-411 51-86 10-25 5-13 7-11 4-9
110
438-488 53-89 8-24 4-13 5-10 4-8
85
291-332 56-89 6-20 7-13 3-8 5-10
95
334-377 58-92 5-20 5-12 3-8 5-10
110
402-447 60-95 3-18 4-12 2-7 4-10
85
330-376 77-110 12-28 6-13 11-15 6-10
95
378-426 79-114 11-27 4-12 10-15 6-10
110
455-506 82-117 9-26 4-12 9-13 6-10
85
302-344 86-118 7-22 9-14 5-10 7-12
95
346-390 89-122 6-21 7-13 5-10 7-12
110
417-463 92-125 4-20 7-13 4-9 6-12
85
344-390 106-141 13-29 6-15 15-20 8-13
95
394-442 109-145 12-27 5-14 14-19 8-12
110
474-525 113-150 11-27 4-15 13-17 8-12
85
315-357 118-151 8-23 11-18 8-13 9-15
95
361-405 122-156 7-22 10-17 7-13 9-15
110
434-480 125-161 5-21 10-18
6-12 9-14
85
356-403 134-172 15-29 9-18 19-24 11-15
95
408-457 138-178 13-27 7-17 19-23 10-15
110
490-543 142-183 12-27 7-18 17-21 10-14
85
326-369 149-185 9-24 16-23 10-16 11-17
95
374-418 154-191 8-22 15-22 9-15 11-17
110
450-496 158-197 6-21 14-23 8-12 11-15
Discharge Suction Subcooling Superheat
Source Water
Temp Rise
Load Water
Temp Drop
°F GPM/Ton GPM/Ton °F PSIG PSIG °F °F °F °F
40
193-252 58-94 12-28 5-16 13-19 4-9
45
193-252 65-100 12-28 5-15 14-20 4-9
50
193-252 71-107 12-28 5-15 15-22 5-10
40
176-231 66-100 8-23 6-15 6-11 5-10
45
176-231 73-107 7-23 7-16 6-12 5-10
50
176-231 80-114 7-23 7-16 7-13 6-11
40
266-312 62-96 14-26 4-14 13-19 4-9
45
266-312 68-102 13-26 4-14 14-20 4-9
50
266-312 75-109 13-26 4-14 15-21 5-10
40
243-286 69-103 8-21 6-14 6-11 4-9
45
243-286 77-109 8-20 7-14 6-12 5-10
50
243-286 84-117 8-20 7-14 7-12 5-10
40
346-393 64-98 12-27 4-13 13-19 3-8
45
349-396 71-104 12-28 5-13 14-20 4-8
50
352-399 78-111 12-28 5-13 15-21 4-9
40
316-359 72-104 7-22 6-13 6-11 4-9
45
319-362 80-111 7-22 7-13 6-11 4-9
50
322-366 87-119 7-23 7-14
7-12 5-10
40
444-495 67-102 9-25 3-12 13-19 3-7
45
448-500 74-109 10-26 3-12 13-20 3-8
50
452-504 82-116 10-26 3-12 14-21 3-8
40
407-453 75-109 4-20 5-12 6-11 3-8
45
411-457 83-116 4-20 5-13 6-11 3-8
50
415-461 91-124 4-21 6-13 6-12 4-9
Load
EWT
Full Load Heating-No Hot Water Generation
50
1.5
3.0
3.0
30
1.5
3.0
3.0
Source
EWT
Source
Flow
Load
Flow
70
1.5
3.0
3.0
90
1.5
3.0
3.0
Source
EWT
Source
Flow
Load
Flow
Load
EWT
Full Load Cooling-No Hot Water Generation
50
1.5
3.0
3.0
110
1.5
3.0
3.0
70
1.5
3.0
3.0
90
1.5
3.0
3.0
Section 10: Troubleshooting
Table 4: Typical R-410A Unit Superheat/Subcooling Values
WT Models, Rev.: B Enertech Global
47
Page 48
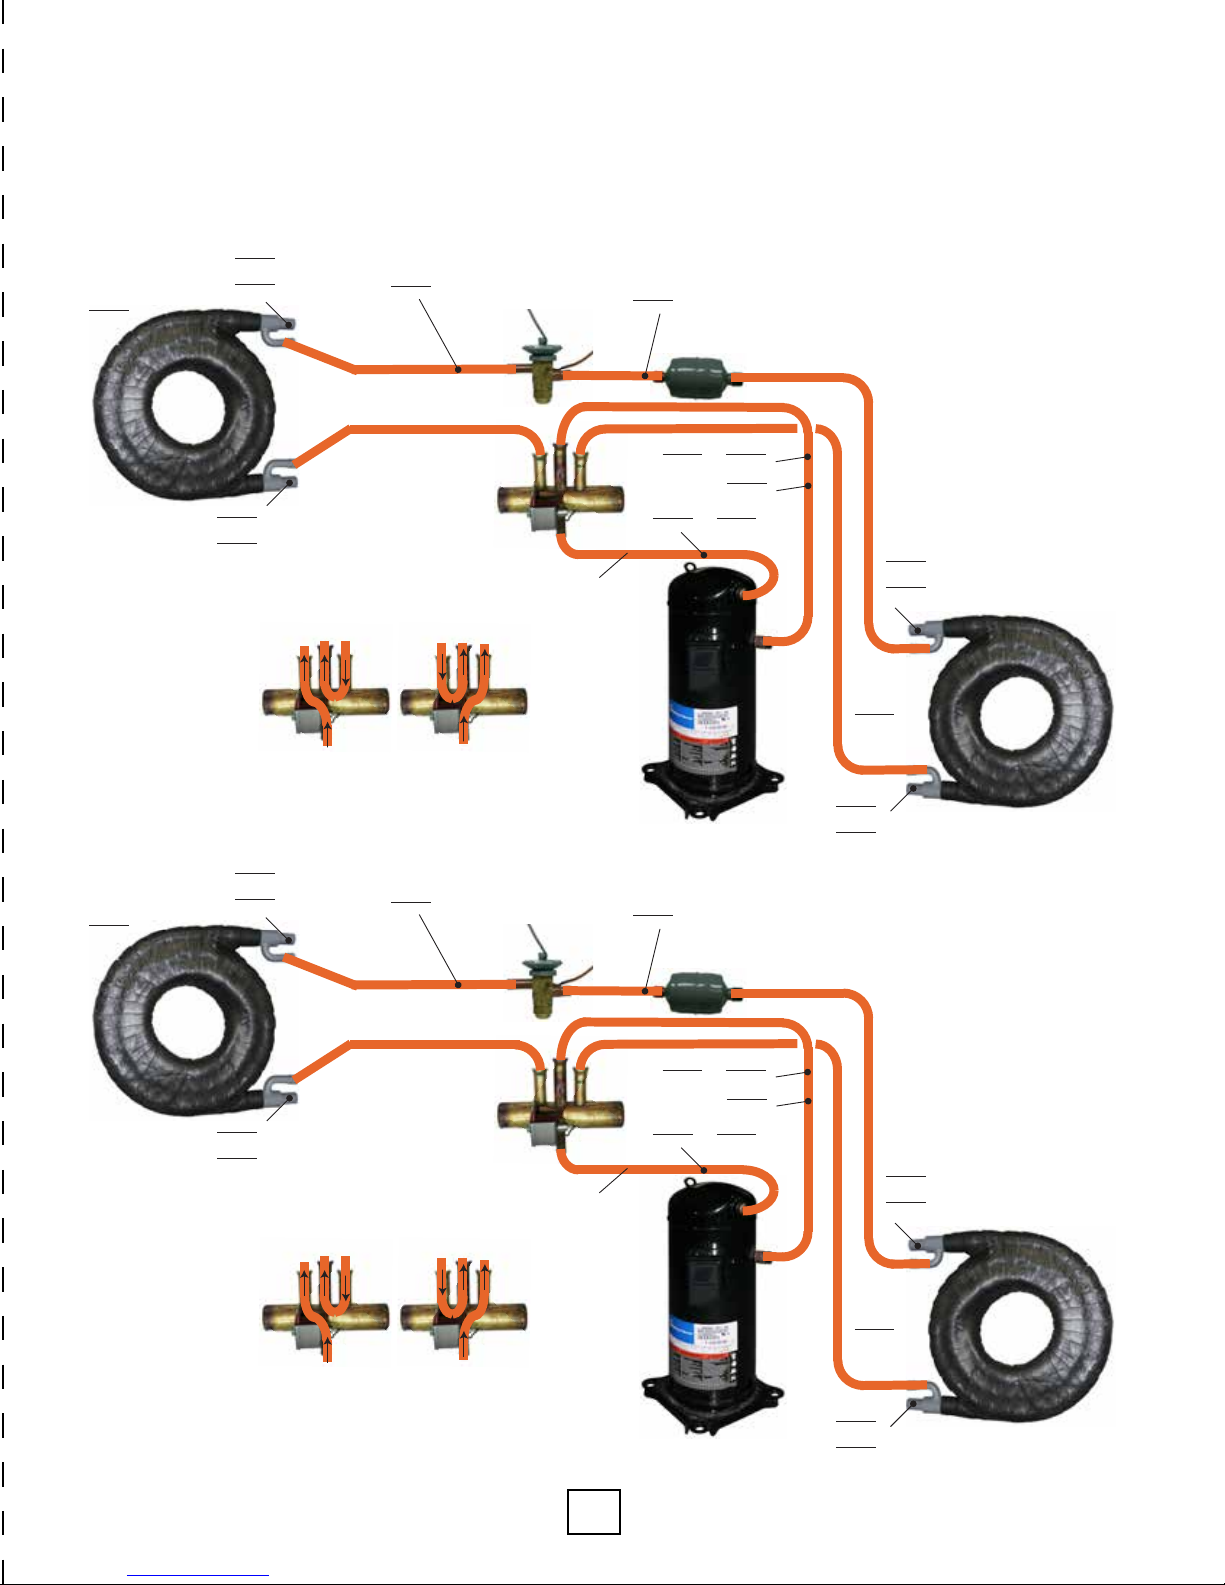
°F
Section 10: Forms - Troubleshooting
Customer/Job Name:____________________________________________ Date:________________________________
Model #:__________________________________________ Serial #:____________________________________________
Antifreeze Type:____________________________________
GPM
Load
Coax
For water-to-water units
substitute a second coaxial
heat exchanger for the air coil.
Load IN
Load OUT
Heating
Mode
psi
°F
psi
Condenser
Suction
Discharge
Air Coil
Evaporator
°F
Liquid line (heating)
Reversing
Valve
Evaporator
Discharge
Suction
Condenser
To suction line bulb
TXV
Optional desuperheater
installed in discharge line
(always disconnect during
troubleshooting)
Cooling
Mode
To suction line
HE or HR = GPM x TD x Fluid Factor
(Use 500 for water; 485 for antifreeze)
SH = Suction Temp. - Suction Sat.
°F
Liquid line (cooling)
SC = Disch. Sat. - Liq. Line Temp.
Filter Drier
Suction Line
Discharge Line
psi
psi
(saturation)
Suction temp
°F
(saturation)
°F
°F
°F
psi
Source (loop) IN
GPM
Source
Coax
Cut along this line
Diagram A: Water-to-Water Unit (Cooling Mode)
°F
GPM
Load
Coax
For water-to-water units
substitute a second coaxial
heat exchanger for the air coil.
Load OUT
Load IN
°F
psi
Heating
Mode
psi
Air Coil
Condenser
Suction
Evaporator
Discharge
°F
Liquid line (heating)
Reversing
Valve
Evaporator
Discharge
Suction
Condenser
To suction line bulb
TXV
Cooling
Mode
Liquid line (cooling)
To suction line
Optional desuperheater
installed in discharge line
(always disconnect during
troubleshooting)
°F
Suction Line
Discharge Line
psi
Suction temp
psi
(saturation)
Filter Drier
(saturation)
°F
°F
°F
°F
psi
Source (loop) OUT
Source (loop) IN
GPM
°F
psi
Source
Coax
Diagram B: Water-to-Water Unit (Heating Mode)
Enertech Global WT Models, Rev.: B
°F
psi
Source (loop) OUT
48
Page 49
Section 11: Unit Electrical Data
20D237‐02NN:WTElectricalData
Voltage
Model Max Ft
WT036
WT048
WT060
WT092
WT120
WT144
Notes:
1. All line and low voltage wiring must adhere to the National Electrical Code and Local Codes, whichever is the most stringent.
2.Wirelengthbasedonaonewaymeasurementwitha2%voltagedrop.
3.Wiresizebasedon60°Ccopperconductorandminimumcircuitampacity.
4. All fuses class RK-5
* The external loop pump FLA is based on a maximum of three UP26-116F-230V pumps (1/2hp) for 048 - 060 and two pumps for 034
Code/ HWG
Option
00 208/230 1 104.0 21.2 0.0 0.0 21.2 26.5 45 10 78
01 208/230 1 104.0 21.2 0.5 0.0 21.7 27.0 45 10 76
10 208/230 1 104.0 21.2 0.0 4.0 25.2 30.5 50 8 101
11 208/230 1 104.0 21.2 0.5 4.0 25.7 31.0 50 8 99
20 208/230 3 83.1 14.0 0.0 0.0 14.0 17.5 30 14 46
21 208/230 3 83.1 14.0 0.5 0.0 14.5 18.0 30 14 44
30/35 460 3 41.0 6.4 0.0 0.0 6.4 8.0 10 14 100
00 208/230 1 152.9 27.1 0.0 0.0 27.1 33.9 60 8 94
01 208/230 1 152.9 27.1 0.5 0.0 27.6 34.4 60 8 92
10 208/230 1 152.9 27.1 0.0 5.5 32.6 39.4 60 8 78
11 208/230 1 152.9 27.1 0.5 5.5 33.1 39.9 60 8 77
20 208/230 3 110.0 16.5 0.0 0.0 16.5 20.6 35 12 60
21 208/230 3 110.0 16.5 0.5 0.0 17.0 21.1 35 12 58
30/35 460 3 52.0 7.2 0.0 0.0 7.2 9.0 15 14 89
00 208/230 1 179.2 29.7 0.0 0.0 29.7 37.1 60 8 86
01 208/230 1 179.2 29.7 0.5 0.0 30.2 37.6 60 8 84
10 208/230 1 179.2 29.7 0.0 5.5 35.2 42.6 70 6 115
11 208/230 1 179.2 29.7 0.5 5.5 35.7 43.1 70 6 114
20 208/230 3 136.0 17.6 0.0 0.0 17.6 22.0 40 12 56
21 208/230 3 136.0 17.6 0.5 0.0 18.1 22.5 40 12 55
30/35 460 3 66.1 8.5 0.0 0.0 8.5 10.6 14 14 75
00 208/230 1 152.9 ea. 27.1 ea. 0.0 0.0 54.2 61.0 80 4 119
01 208/230 1 152.9 ea. 27.1 ea. 0.5 0.0 54.7 61.5 80 4 117
10 208/230 1 152.9 ea. 27.1 ea. 0.0 0.0 54.2 61.0 80 4 119
11 208/230 1 152.9 ea. 27.1 ea. 0.5 0.0 54.7 61.5 80 4 117
20 208/230 3 110.0 ea. 16.5 ea. 0.0 0.0 33.0 37.1 50 8 77
21 208/230 3 110.0 ea. 16.5 ea. 0.5 0.0 33.5 37.6 50 8 76
30/35 460 3 52.0 ea. 7.2 ea. 0.0 0.0 14.4 16.2 20 14 44
00 208/230 1 178.0 ea. 28.3 ea. 0.0 0.0 56.6 63.7 90 4 113
01 208/230 1 178.0 ea. 28.3 ea. 0.5 0.0 57.1 64.2 90 4 112
10 208/230 1 178.0 ea. 28.3 ea. 0.0 0.0 56.6 63.7 90 4 113
11 208/230 1 178.0 ea. 28.3 ea. 0.5 0.0 57.1 64.2 90 4 112
20 208/230 3 136.0 ea. 19.2 ea. 0.0 0.0 38.4 43.2 60 6 106
21 208/230 3 136.0 ea. 19.2 ea. 0.5 0.0 38.9 43.7 60 6 104
30/35 460 3 66.1 ea. 8.7 ea. 0.0 0.0 17.4 19.6 25 14 37
20 208/230 3 149.0 ea. 22.4 ea. 0.0 0.0 44.8 50.4 70 6 91
21 208/230 3 149.0 ea. 22.4 ea. 0.5 0.0 45.3 50.9 70 6 90
30/35 460 3 75.0 ea. 10.6 ea. 0.0 0.0 21.2 23.9 30 12 47
Proper Power Supply Evaluation: Whenanycompressorbearingunitisconnectedtoaweakpowersupply,startingcurrentwillgenerate
asignicant“sag”inthevoltagereducingthestartingtorqueofthecompressormotorincreasingthestarttime.Thiswillinuencetherestofthe
electricalsysteminthebuildingbyloweringthevoltagetothelights.Thismomentarylowvoltagecauses“lightdimming”.Thetotalelectricalsystem
shouldbeevaluatedbyanelectricianandHVACtechnician.Theevaluationshouldincludeconnections,sizesofwires,andsizeofthedistribution
panelbetweentheunitandtheutility’sconnection.Thetransformerconnectionandsizingshouldbeevaluatedbytheelectricutilityprovider.
60 Hz Power Compressor
Volts Phase LRA RLA
HWG
Pump
FLA
Ext.
Loop
Pump
FLA
Total
Unit FLA
Min
Circuit
AMPS
Max
Fuse
HACR
Min
AWG
CHECK COMPRESSOR AMP DRAW TO VERIFY COMPRESSOR ROTATION ON THREE PHASE UNITS. COMPARE AGAINST
UNIT ELECTRICAL TABLES. REVERSE ROTATION RESULTS IN HIGHER SOUND LEVELS, LOWER AMP DRAW, AND INCREASED
COMPRESSOR WEAR. THE COMPRESSOR INTERNAL OVERLOAD WILL TRIP AFTER A SHORT PERIOD OF OPERATION.
WT Models, Rev.: B Enertech Global
⚠ CAUTION ⚠
49
Page 50
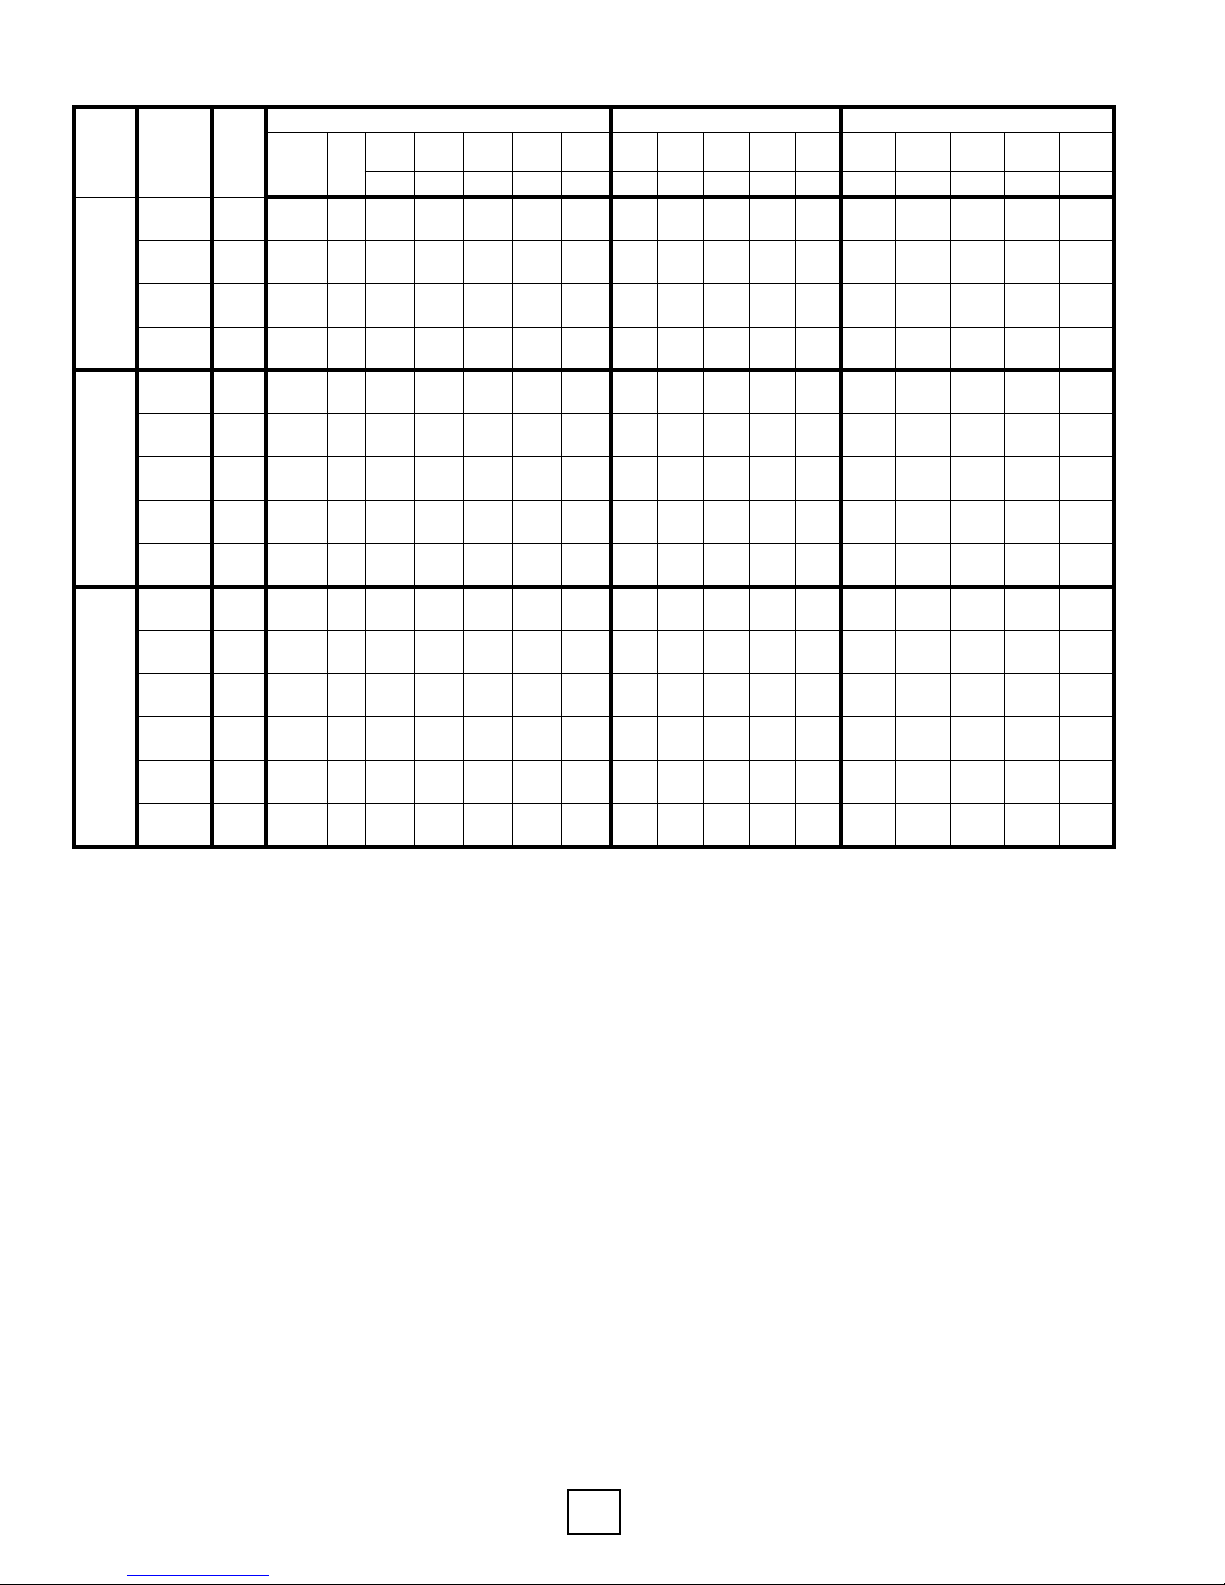
Section 11: Hydronic Air Handler Unit Electrical Data
Model
024
036
048-060
60 HZ
Power
Single
Phase
Volts
208/240
208/240
208/240
115
208/240
208/240
208/240
208/240
115
208/240
208/240
208/240
208/240
208/240
115
Motor
Amps /
HP
2.8 /
0.33
2.8 /
0.33
2.8 /
0.33
5.0 /
0.33
4.3 /
0.50
4.3 /
0.50
4.3 /
0.50
4.3 /
0.50
7.7 /
0.50
6.8 /
0.75
6.8 /
0.75
6.8 /
0.75
6.8 /
0.75
6.8 /
0.75
12.8 /
1.0
Electric Heater Data MinimumCircuitAmpacity Maximum Overcurrent Protection
Amps
Amps
Amps
Amps
Amps
MCA
MCA
MCA
MCA
MCA
MOCP
MOCP
MOCP
# of
Circuits
115V
208V
208V
240V
240V
115V
208V
208V
240V
240V
115V
kW
Cr 1 Cr 1 Cr 2 Cr 1 Cr 2 Cr 1 Cr 1 Cr 2 Cr 1 Cr 2 Cr 1 Cr 1 Cr 2 Cr 1 Cr 2
208V
208V
MOCP
240V
0 0 - - - - - - 3.5 - 3.5 - - 10.0 - 10.0 -
1 5 - 18.0 - 20.8 - - 25.3 - 28.8 - - 35.0 - 35.0 -
1 10 - 36.1 - 41.7 - - 47.9 - 54.9 - - 60.0 - 60.0 -
0 0 5.0 - - - - 6.3 - - - - 10.0 - - - -
0 0 - - - - - - 5.4 - 5.4 - - 10.0 - 10.0 -
1 5 - 18.0 - 20.8 - - 26.8 - 30.3 - - 35.0 - 40.0 -
1 10 - 36.1 - 41.7 - - 49.4 - 56.4 - - 60.0 - 60.0 -
2 15 18.0 36.1 20.8 41.7 26.8 49.4 30.3 56.4 35.0 60.0 40.0 60.0
0 0 7.7 - - - - 9.6 - - - - 15.0 - - - -
0 0 - - - - - - 8.5 - 8.5 - - 15.0 - 15.0 -
1 5 - 18.0 - 20.8 - - 29.3 - 32.8 - - 35.0 - 40.0 -
1 10 - 36.1 - 41.7 - - 51.9 - 58.9 - - 60.0 - 70.0 -
2 15 - 18.0 36.1 20.8 41.7 - 29.3 51.9 32.8 58.9 - 35.0 60.0 40.0 70.0
2 20 - 36.1 36.1 41.7 41.7 - 51.9 51.9 58.9 58.9 - 60.0 60.0 70.0 70.0
0 0 12.8 - - - - 16.0 - - - - 20.0 - - - -
MOCP
240V
Notes:
1.Alwaysrefertounitnameplatedatapriortoinstallation
2. Maximum overcurrent device, overcurrent protection installed on breaker are sized per MCA
Enertech Global WT Models, Rev.: B
50
Page 51
Section 11: Specication Glossary, Calculations
Glossary
COP=CoefcientofPerformance=BTUOutput/BTUInput HR = Total Heat Of Rejection, Btu/hr
DH=DesuperheaterCapacity,Btu/hr KW = Total Power Unit Input, Kilowatts
EER=EnergyEfciencyRatio=BTUoutput/Wattsinput LWT = Leaving Source Water Temperature, Fahrenheit
EST = Entering Source Water Temperature, Fahrenheit LLT = Leaving Load Water Temperature, Fahrenheit
ELT = Entering Load Water Temperature, Fahrenheit TC=TotalCoolingCapacity,Btu/hr
GPM = Water Flow, Gallons Per Minute HC=HeatingCapacity,Btu/hr
HE = Total Heat Of Extraction, Btu/hr WPD = Water Pressure Drop, PSI & Feet of Water
Heating & Cooling Calculations
Heating Cooling
LWT = EST - HE
GPM x 500*
HE = 500* x GPM x (EWT - LWT) HR = 500* x GPM x (LWT - EWT)
*500 = Constant factor for pure water. Brine should be 485.
LWT = EST + HR
GPM x 500*
Source Water Flow Selection
Properowrateiscrucialforreliableoperationofgeothermalheat
pumps.Theperformancedatashowsthreeowratesforeachentering
water temperature (EST column). The general “rule of thumb” when
selectingowratesisthefollowing:
Topowrate:Openloopsystems(1.5to2.0gpmperton)
Middleowrate:Minimumclosedloopsystemowrate
(2.25 to 2.50 gpm/ton)
Bottomowrate:Nominal(optimum)closedloopsystemowrate
(3.0 gpm/ton)
Although the “rule of thumb” is adequate in most areas of North
America,itisimportanttoconsidertheapplicationtypebeforeapplying
this“ruleofthumb.”Antifreezeisgenerallyrequiredforallclosedloop
(geothermal) applications. Extreme Southern U.S. locations are the
onlyexception.Openloop(wellwater)systemscannotuseantifreeze,
andmusthaveenoughowrateinordertoavoidfreezingconditionsat
the Leaving Source Water Temperature (LWT) connection.
CalculationsmustbemadeforallsystemswithoutantifreezetodetermineifthetopowrateisadequatetopreventLWTatornearfreezing
conditions. The following steps should taken in making this calculation:
DetermineminimumESTbaseduponyourgeographicalarea.
Go to the performance data table for the heat pump model selected and
lookupthetheHeatofExtraction(HE)atthe“ruleofthumb”waterow
rate (GPM) and at the design Entering Load Temperature (ELT).
Calculate the temperature difference (TD) based upon the HE and GPM
of the model.
TD = HE / (GPM x 500).
Calculate the LWT.
LWT = EST - TD.
If the LWT is below 35-38°F, there is potential for freezing conditions if
theowrateorwatertemperatureislessthanidealconditions,andthe
owratemustbeincreased.
Example 1:
EST = 50°F, ELT = 95°F.
Model 036 Full Load, heating. Flow rate = 5 GPM. HE = 33,600 Btuh.
TD = 33,600 / (5 x 500) = 13.4°F
LWT = 50 - 13.4 = 36.6°F
Waterowrateshouldbeadequateundertheseconditions.
Example 2:
EST = 40°F, ELT = 95°F.
Model 036 Full Load, heating. Flow rate = 5 GPM. HE = 28,700 Btuh.
TD = 28,700 / (5 x 500) = 11.5°F
LWT = 40 - 11.5 = 28.5°F
Waterowratemustbeincreased.
Application Notes for Performance Data
Notes:
1.DesuperheaterCapacityisbasedupon0.4GPMFlowpernominaltonat90°Fenteringhotwatertemperature.
2. Extrapolation data down to 25°F for heating and interpolation between EST & GPM data is permissible.
3. EWT (Entering Water Temperature) is also called EST (Entering Source Temperature).
4.Loadowrateisthesameasthenominalsourceowrate,approximately3GPMperton.
WT Models, Rev.: B Enertech Global
51
Page 52
Section 11: AHRI Performance Data
MODEL TYPE
F/L COOL F/L EER F/L HEAT F/L COP P/L COOL P/L EER P/L HEAT P/L COP
GW 44,300 20.6 44,900 3.6 34,600 24.5 33,300 3.5
GL 42,000 16.0 36,400 3.0 33,300 20.6 29,200 3.1
GW 54,300 19.8 55,100 3.6 40,800 23.0 40,500 3.4
GL 49,400 15.1 44,100 3.0 38,800 19.2 35,700 3.1
GW 62,700 19.0 66,200 3.6 47,800 21.4 49,500 3.5
GL 57,800 14.6 53,200 3.0 46,100 18.1 44,400 3.1
GW 107,100 19.8 117,000 3.8 78,500 22.2 82,300 3.5
GL 100,200 15.2 92,400 3.1 75,700 18.6 75,700 3.1
GW 124,400 20.1 124,900 3.5 NA NA NA NA
GL 114,800 15.4 97,400 2.8 NA NA NA NA
GW 134,000 17.2 140,800 3.3 NA NA NA NA
GL 124,500 13.5 109,400 2.7 NA NA NA NA
WT060
WT092
WT120
WT144
WT036
WT048
Ground Loop and Ground Water Heat Pump
Ground Loop (GL) Notes:
Rated in accordance with ISO Standard 13256-2 which includes Pump Penalties.
Heating capacities based on 32°F EST & 104°F ELT.
Cooling capacities based on 77°F EST & 53.6°F ELT.
Entering load temperature over 120°F heating and under 45°F Cooling is not permissible.
Floorheatingismostgenerallydesignedfor85°Fenteringloadtemperature.
Ground Water (GW) Notes:
Rated in accordance with ISO Standard 13256-2 which includes Pump Penalties.
Heating capacities based on 50°F EST & 104°F ELT.
Cooling capacities based on 59°F EST & 53.6°F ELT.
Entering load temperature over 120°F heating and under 45°F Cooling is not permissible.
Floorheatingismostgenerallydesignedfor85°Fenteringloadtemperature.
Notice:
*Model144isavailablein3-PhaseOnly
Model 144 is outside the scope of the ENERGY STAR program and AHRI listing.
Enertech Global WT Models, Rev.: B
52
Page 53
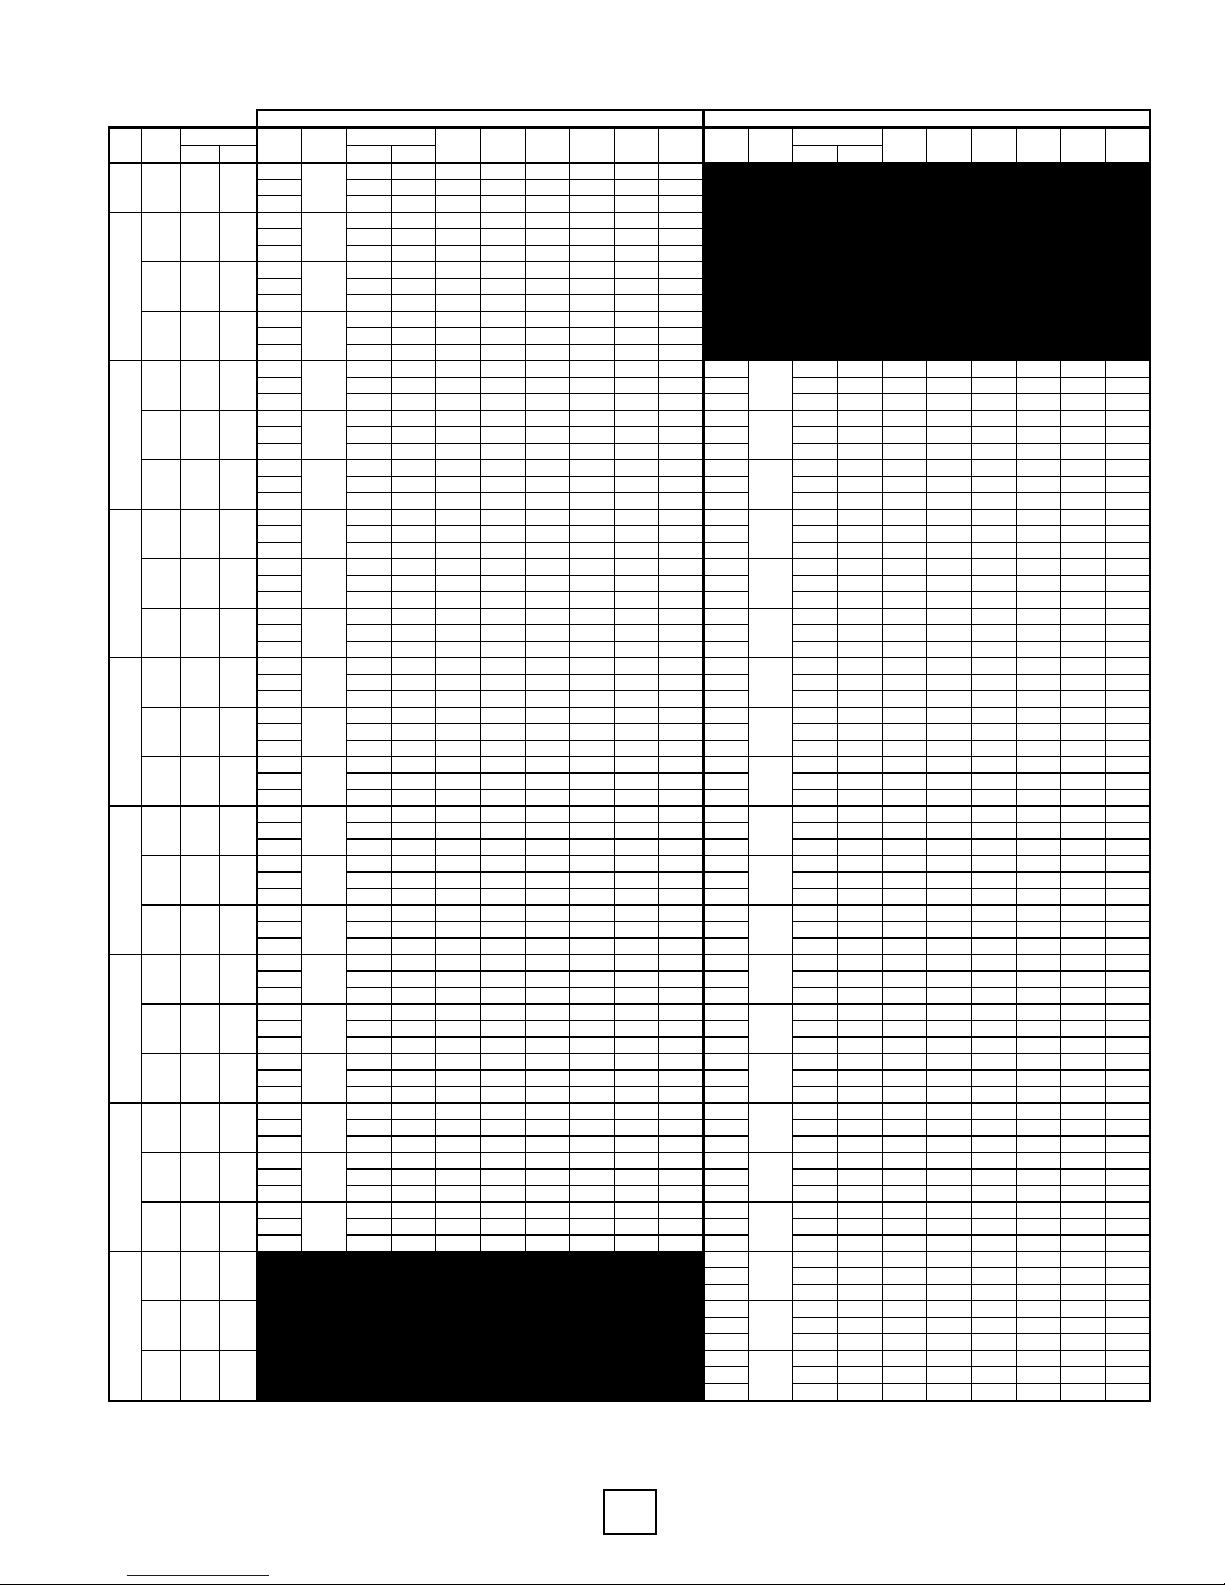
Section 11: Model 036 Performance Data: 3.0 Ton, Part Load Capacity
GWT036B LOW STAGE
Load GPM set to max
PSI FT PSI FT PSI FT
85
1.8 4.1
24.1 16.7 93.0 2.18 3.24 3.2
95
1.7 4.0
23.9 15.2 103.0 2.55 2.75 3.2
110
1.6 3.6
23.5 12.7 117.8 3.16 2.18 3.1
85
1.8 4.1
25.5 18.0 93.5 2.21 3.38 3.4
95
1.7 4.0
25.3 16.5 103.4 2.59 2.86 3.4
110
1.6 3.6
24.9 13.9 118.3 3.21 2.27 3.3
85
1.8 4.1
26.1 18.7 93.7 2.17 3.52 3.5
95
1.7 4.0
25.9 17.2 103.6 2.54 2.99 3.4
110
1.6 3.6
25.4 14.7 118.5 3.15 2.36 3.4
85
1.8 4.1
26.7 19.4 93.9 2.13 3.67 3.5
95
1.7 4.0
26.4 17.9 103.8 2.49 3.11 3.4
110
1.6 3.6
26.0 15.5 118.7 3.09 2.47 3.4
85
1.8 4.1
29.9 22.5 95.0
1.57
4.06 3.9 40
1.6 3.6
32.5 35.6 29.2 0.92 35.33 4.1
95
1.7 4.0
29.6 21.0 104.9
1.57
3.43 4.0 45
1.6 3.6
35.8 38.9 33.1 0.91 39.34 4.6
110
1.6 3.6
29.1 18.4 119.7
1.57
2.72 4.0 50
1.6 3.6
38.1 41.2 37.3 0.91 41.87 4.8
85
1.8 4.1
30.6 23.4 95.2 2.12 4.23 4.0 40
1.6 3.6
34.5 37.6 28.5 0.90 38.33 4.4
95
1.7 4.0
30.3 21.8 105.1 2.48 3.58 4.0 45
1.6 3.6
37.9 40.9 32.4 0.89 42.58 4.8
110
1.6 3.6
29.8 19.3 119.9 3.07 2.84 4.0 50
1.6 3.6
40.3 43.3 36.6 0.89 45.28 5.1
85
1.8 4.1
31.2 24.1 95.4 2.08 4.40 4.0 40
1.6 3.6
33.4 36.4 28.9 0.88 37.95 4.2
95
1.7 4.0
30.9 22.6 105.3 2.43 3.73 4.3 45
1.6 3.6
36.8 39.8 32.7 0.87 42.30 4.6
110
1.6 3.6
30.4 20.1 120.1 3.01 2.96 4.2 50
1.6 3.6
39.1 42.1 37.0 0.87 44.94 4.5
85
1.8 4.1
34.2 27.0 96.4 2.12 4.73 4.5 40
1.6 3.6
31.0 35.1 29.7 1.21 25.62 4.1
95
1.7 4.0
33.9 25.5 106.3 2.47 4.02 4.5 45
1.6 3.6
34.1 38.2 33.6 1.19 28.66 4.6
110
1.6 3.6
33.3 22.9 121.1 3.06 3.19 4.4 50
1.6 3.6
36.3 40.4 37.9 1.19 30.50 4.8
85
1.8 4.1
35.0 27.9 96.7 2.08 4.93 4.6 40
1.6 3.6
32.9 36.9 29.0 1.18 27.88 4.4
95
1.7 4.0
34.7 26.4 106.6 2.43 4.19 4.5 45
1.6 3.6
36.2 40.2 32.9 1.17 30.94 4.8
110
1.6 3.6
34.1 23.8 121.4 3.01 3.32 4.5 50
1.6 3.6
38.5 42.5 37.2 1.17 32.91 5.1
85
1.8 4.1
35.7 28.7 96.9 2.04 5.13 4.6 40
1.6 3.6
31.9 35.9 29.4 1.16 27.50 4.2
95
1.7 4.0
35.4 27.3 106.8 2.38 4.36 4.7 45
1.6 3.6
35.1 39.0 33.3 1.15 30.52 5.1
110
1.6 3.6
34.8 24.7 121.6 2.95 3.46 4.5 50
1.6 3.6
37.4 41.3 37.5 1.15 32.52 4.9
85
1.8 4.1
38.8 31.8 97.9 2.05 5.55 5.1 40
1.6 3.6
30.5 35.5 29.8 1.46 20.89 4.4
95
1.7 4.0
38.4 30.2 107.8 2.40 4.69 5.1 45
1.6 3.6
33.6 38.5 33.8 1.44 23.33 4.4
110
1.6 3.6
37.7 27.6 122.6 2.97 3.72 5.1 50
1.6 3.6
35.7 40.6 38.1 1.44 24.79 4.5
85
1.8 4.1
39.7 32.8 98.2 2.01 5.79 5.1 40
1.6 3.6
32.3 37.2 29.2 1.43 22.59 4.6
95
1.7 4.0
39.3 31.3 108.1 2.35 4.90 5.2 45
1.6 3.6
35.6 40.4 33.1 1.41 25.25 4.4
110
1.6 3.6
38.6 28.6 122.9 2.92 3.87 5.1 50
1.6 3.6
37.9 42.7 37.4 1.41 26.88 4.5
85
1.8 4.1
40.5 33.7 98.5 1.98 5.99 5.3 40
1.6 3.6
31.4 36.2 29.5 1.40 22.43 4.5
95
1.7 4.0
40.1 32.2 108.4 2.31 5.09 5.5 45
1.6 3.6
34.5 39.2 33.5 1.39 24.82 4.7
110
1.6 3.6
39.4 29.6 123.1 2.86 4.04 5.5 50
1.6 3.6
36.7 41.4 37.8 1.39 26.40 4.6
85
1.8 4.1
43.3 36.5 99.4 2.00 6.35 5.7 40
1.6 3.6
30.0 35.8 30.0 1.71 17.54 3.9
95
1.7 4.0
42.9 34.9 109.3 2.33 5.40 5.5 45
1.6 3.6
33.0 38.8 34.0 1.69 19.53 4.3
110
1.6 3.6
42.2 32.3 124.1 2.89 4.28 5.6 50
1.6 3.6
35.1 40.9 38.3 1.69 20.77 4.6
85
1.8 4.1
44.3 37.6 99.8 1.96 6.62 5.7 40
1.6 3.6
31.8 37.5 29.4 1.67 19.04 4.1
95
1.7 4.0
43.9 36.1 109.6 2.29 5.62 5.8 45
1.6 3.6
35.0 40.6 33.3 1.65 21.21 4.5
110
1.6 3.6
43.2 33.5 124.4 2.84 4.46 5.6 50
1.6 3.6
37.2 42.8 37.6 1.65 22.55 4.8
85
1.8 4.1
45.3 38.7 100.1 1.92 6.91 6.0 40
1.6 3.6
30.8 36.4 29.7 1.64 18.78 4.0
95
1.7 4.0
44.8 37.1 109.9 2.25 5.84 5.9 45
1.6 3.6
33.9 39.4 33.7 1.62 20.93 4.9
110
1.6 3.6
44.1 34.6 124.7 2.78 4.65 5.8 50
1.6 3.6
36.1 41.6 38.0 1.62 22.28 4.7
85
1.8 4.1
47.6 40.9 100.9 1.96 7.12 6.3 40
1.6 3.6
29.3 36.1 30.2 1.98 14.80 4.2
95
1.7 4.0
47.2 39.4 110.7 2.30 6.01 6.3 45
1.6 3.6
32.2 38.9 34.3 1.96 16.43 4.2
110
1.6 3.6
46.4 36.7 125.5 2.85 4.77 6.3 50
1.6 3.6
34.3 41.0 38.6 1.96 17.50 4.3
85
1.8 4.1
48.8 42.2 101.3 1.93 7.41 6.4 40
1.6 3.6
31.1 37.7 29.6 1.94 16.03 4.5
95
1.7 4.0
48.3 40.6 111.1 2.25 6.29 6.6 45
1.6 3.6
34.2 40.8 33.6 1.92 17.81 4.2
110
1.6 3.6
47.5 38.0 125.8 2.79 4.99 6.5 50
1.6 3.6
36.4 43.0 37.9 1.92 18.96 4.4
85
1.8 4.1
49.8 43.4 101.6 1.89 7.72 6.6 40
1.6 3.6
30.1 36.6 30.0 1.91 15.76 4.3
95
1.7 4.0
49.3 41.8 111.4 2.21 6.54 6.8 45
1.6 3.6
33.1 39.5 34.0 1.88 17.61 4.3
110
1.6 3.6
48.5 39.2 126.2 2.74 5.19 6.7 50
1.6 3.6
35.3 41.7 38.2 1.88 18.78 4.4
85
1.8 4.1
52.0 45.4 102.3 1.94 7.86 7.0 40
1.6 3.6
28.6 36.5 30.5 2.31 12.38 3.8
95
1.7 4.0
51.5 43.8 112.2 2.26 6.68 6.9 45
1.6 3.6
31.4 39.2 34.5 2.28 13.77 4.2
110
1.6 3.6
50.6 41.0 126.9 2.80 5.30 6.8 50
1.6 3.6
33.5 41.3 38.8 2.28 14.69 4.5
85
1.8 4.1
53.2 46.7 102.7 1.90 8.21 7.1 40
1.6 3.6
30.3 38.0 29.9 2.27 13.35 4.1
95
1.7 4.0
52.7 45.1 112.6 2.22 6.96 7.1 45
1.6 3.6
33.3 40.9 33.9 2.24 14.87 4.4
110
1.6 3.6
51.8 42.4 127.3 2.75 5.52 6.9 50
1.6 3.6
35.5 43.1 38.2 2.24 15.85 4.8
85
1.8 4.1
54.3 48.0 103.1 1.86 8.56 7.3 40
1.6 3.6
29.4 37.0 30.2 2.23 13.18 3.9
95
1.7 4.0
53.8 46.4 112.9 2.18 7.23 7.2 45
1.6 3.6
32.3 39.8 34.2 2.20 14.68 4.3
110
1.6 3.6
52.9 43.7 127.6 2.70 5.74 7.1 50
1.6 3.6
34.4 41.9 38.5 2.20 15.64 4.6
40
1.6 3.6
26.4 37.0 31.2 3.10 8.52 3.5
45
1.6 3.6
29.1 39.5 35.3 3.06 9.51 3.9
50
1.6 3.6
30.9 41.3 39.7 3.06 10.10 4.1
40
1.6 3.6
28.0 38.4 30.7 3.04 9.21 3.8
45
1.6 3.6
30.8 41.0 34.7 3.00 10.27 4.1
50
1.6 3.6
32.8 43.0 39.1 3.00 10.93 4.4
40
1.6 3.6
27.2 37.4 30.9 2.98 9.13 3.6
45
1.6 3.6
29.9 39.9 35.0 2.94 10.17 3.9
50
1.6 3.6
31.8 41.8 39.4 2.94 10.82 4.2
DH
Mbtuh
COP
W
/
WDHMbtuh
ELT °F
Load
GPM
WPD
TC
MbtuhHRMbtuh
LLT
°F
EER
EST
°F
Source
GPM
WPD
ELT °F
Load
GPM
WPD
HC
MbtuhHEMbtuh
LLT
°F
6.0 6.0
6.0 6.0
6.0 6.0
Operation Not Recommended
6.0
6.0
6.0
6.0 6.0
6.0 6.0
6.0 6.0
6.0 6.0
6.0 6.0
6.0 6.0
6.0 6.0
6.0 6.0
6.0 6.0
6.0 6.0
6.0
6.0 6.0
6.0 6.0
6.0 6.0
6.0 6.0
25 6.0 2.2 5.0
Heatin
g
Coolin
g
kW kW
6.0
Operation Not Recommended
6.0
6.0
2.0
5.0 1.3 3.0
6.0 1.8 4.1
30
4.0 0.9
6.0
40
4.0 0.8 1.8
5.0 1.2 2.7
6.0 1.6 3.7
6.0
50
4.0 0.8 1.8
5.0 1.2 2.8
6.0 1.6 3.8
60
4.0 0.8 1.8
5.0 1.2 2.7
6.0 1.6 3.7
70
4.0 0.7 1.6
5.0 1.1 2.5
6.0 1.4 3.3
80
4.0 0.6 1.5
5.0 1.0 2.2
6.0 1.3 3.0
90
4.0 0.6 1.5
5.0 1.0 2.2
6.0 1.3 3.0
2.5
110
4.0 0.5 1.2
5.0 0.8 1.8
6.0 1.1
* See Page 13 for Application Notes
WT Models, Rev.: B Enertech Global
53
Page 54
Section 11: Model 036 Performance Data: 3.0 Ton, Full Load Capacity
GWT036B HIGH STAGE
Load GPM set to max
PSI FT PSI FT PSI FT
85
2.6 5.9
30.9 21.6 91.9 2.74 3.31 4.1
95
2.5 5.8
30.4 19.7 101.8 3.15 2.83 4.1
110
2.2 5.1
29.1 16.2 116.5 3.79 2.25 3.8
85
2.6 5.9
35.0 25.4 92.8 2.80 3.66 4.6
95
2.5 5.8
34.5 23.5 102.7 3.22 3.14 4.6
110
2.2 5.1
33.0 19.8 117.3 3.87 2.50 4.3
85
2.6 5.9
35.8 26.4 93.0 2.76 3.80 4.8
95
2.5 5.8
35.4 24.6 102.9 3.17 3.27 4.6
110
2.2 5.1
33.8 20.8 117.5 3.82 2.59 4.5
85
2.6 5.9
35.9 26.6 93.0 2.73 3.85 4.7
95
2.5 5.8
35.4 24.7 102.9 3.14 3.30 4.6
110
2.2 5.1
33.8 20.9 117.5 3.78 2.62 4.4
85
2.6 5.9
40.1 30.6 93.9
2.60
4.23 5.2 40
2.6 6.0
40.6 45.5 31.0 1.43 28.39 5.1
95
2.5 5.8
39.6 28.7 103.8
2.60
3.63 5.4 45
2.6 6.0
44.7 49.6 35.1 1.43 31.26 5.7
110
2.2 5.1
37.8 24.7 118.4
2.60
2.88 5.3 50
2.6 6.0
47.6 52.5 39.4 1.43 33.29 6.0
85
2.6 5.9
41.1 31.8 94.1 2.74 4.40 5.3 40
2.6 6.0
41.8 46.6 30.7 1.41 29.65 5.3
95
2.5 5.8
40.6 29.9 104.0 3.15 3.78 5.3 45
2.6 6.0
45.9 50.7 34.8 1.41 32.55 5.7
110
2.2 5.1
38.8 25.9 118.6 3.79 3.00 5.3 50
2.6 6.0
48.9 53.7 39.1 1.41 34.68 6.2
85
2.6 5.9
41.2 32.0 94.2 2.71 4.46 5.2 40
2.6 6.0
41.9 46.6 30.7 1.39 30.14 5.2
95
2.5 5.8
40.7 30.1 104.0 3.12 3.82 5.6 45
2.6 6.0
46.1 50.8 34.8 1.39 33.17 5.8
110
2.2 5.1
38.8 26.0 118.6 3.75 3.03 5.5 50
2.6 6.0
49.1 53.8 39.1 1.39 35.32 5.6
85
2.6 5.9
45.1 35.6 95.0 2.77 4.77 6.0 40
2.6 6.0
38.8 45.1 31.4 1.84 21.09 5.1
95
2.5 5.8
44.5 33.6 104.9 3.19 4.09 5.9 45
2.6 6.0
42.6 48.9 35.5 1.84 23.15 5.7
110
2.2 5.1
42.5 29.4 119.4 3.83 3.25 5.7 50
2.6 6.0
45.4 51.7 39.9 1.84 24.67 6.0
85
2.6 5.9
46.2 36.9 95.3 2.73 4.96 6.1 40
2.6 6.0
39.9 46.1 31.1 1.81 22.04 5.3
95
2.5 5.8
45.6 34.9 105.1 3.14 4.26 5.9 45
2.6 6.0
43.8 50.0 35.3 1.81 24.20 5.7
110
2.2 5.1
43.6 30.7 119.7 3.78 3.38 5.8 50
2.6 6.0
46.7 52.9 39.6 1.81 25.80 6.2
85
2.6 5.9
46.3 37.1 95.3 2.70 5.03 6.0 40
2.6 6.0
40.0 46.1 31.1 1.79 22.35 5.2
95
2.5 5.8
45.7 35.1 105.2 3.11 4.31 5.9 45
2.6 6.0
44.0 50.1 35.2 1.79 24.58 6.4
110
2.2 5.1
43.7 30.9 119.7 3.74 3.42 5.7 50
2.6 6.0
46.8 52.9 39.6 1.79 26.15 6.1
85
2.6 5.9
51.5 42.0 96.4 2.78 5.43 6.7 40
2.6 6.0
38.1 45.2 31.5 2.07 18.41 5.5
95
2.5 5.8
50.8 39.9 106.3 3.20 4.65 6.7 45
2.6 6.0
41.9 49.0 35.7 2.07 20.24 5.4
110
2.2 5.1
48.6 35.5 120.8 3.85 3.70 6.7 50
2.6 6.0
44.6 51.7 40.1 2.07 21.55 5.6
85
2.6 5.9
52.8 43.5 96.7 2.74 5.65 6.7 40
2.6 6.0
39.2 46.2 31.3 2.04 19.22 5.6
95
2.5 5.8
52.1 41.4 106.6 3.15 4.85 6.8 45
2.6 6.0
43.1 50.1 35.4 2.04 21.13 5.4
110
2.2 5.1
49.8 36.9 121.1 3.79 3.85 6.6 50
2.6 6.0
45.9 52.9 39.8 2.04 22.50 5.6
85
2.6 5.9
52.9 43.7 96.8 2.71 5.72 6.7 40
2.6 6.0
39.3 46.2 31.3 2.01 19.55 5.6
95
2.5 5.8
52.2 41.6 106.6 3.12 4.90 7.2 45
2.6 6.0
43.2 50.1 35.4 2.01 21.49 5.9
110
2.2 5.1
49.9 37.1 121.1 3.75 3.90 7.0 50
2.6 6.0
46.0 52.9 39.8 2.02 22.77 5.7
85
2.6 5.9
57.5 47.9 97.8 2.81 6.00 7.6 40
2.6 6.0
37.5 45.3 31.7 2.29 16.38 5.0
95
2.5 5.8
56.8 45.8 107.6 3.23 5.15 7.3 45
2.6 6.0
41.2 49.0 35.8 2.29 17.99 5.4
110
2.2 5.1
54.2 40.9 122.0 3.89 4.08 7.2 50
2.6 6.0
43.9 51.7 40.2 2.29 19.17 5.8
85
2.6 5.9
58.9 49.4 98.1 2.77 6.23 7.6 40
2.6 6.0
38.5 46.2 31.4 2.26 17.04 5.0
95
2.5 5.8
58.1 47.2 107.9 3.18 5.35 7.6 45
2.6 6.0
42.4 50.1 35.6 2.25 18.84 5.5
110
2.2 5.1
55.5 42.4 122.3 3.83 4.25 7.2 50
2.6 6.0
45.1 52.8 40.0 2.26 19.96 5.9
85
2.6 5.9
59.1 49.8 98.1 2.74 6.32 7.7 40
2.6 6.0
38.7 46.3 31.4 2.23 17.35 5.0
95
2.5 5.8
58.3 47.6 108.0 3.15 5.42 7.6 45
2.6 6.0
42.5 50.1 35.6 2.23 19.06 6.2
110
2.2 5.1
55.7 42.8 122.4 3.79 4.31 7.3 50
2.6 6.0
45.3 52.9 39.9 2.23 20.31 5.9
85
2.6 5.9
61.4 51.7 98.6 2.85 6.31 8.0 40
2.6 6.0
36.6 45.4 31.9 2.59 14.13 5.3
95
2.5 5.8
60.6 49.4 108.5 3.28 5.41 8.1 45
2.6 6.0
40.3 49.1 36.0 2.59 15.56 5.2
110
2.2 5.1
57.9 44.4 122.9 3.95 4.30 7.9 50
2.6 6.0
42.9 51.7 40.5 2.59 16.56 5.3
85
2.6 5.9
62.9 53.3 99.0 2.81 6.56 8.1 40
2.6 6.0
37.7 46.4 31.6 2.55 14.78 5.5
95
2.5 5.8
62.1 51.0 108.8 3.24 5.62 8.3 45
2.6 6.0
41.4 50.1 35.8 2.55 16.24 5.2
110
2.2 5.1
59.3 46.0 123.2 3.89 4.47 8.1 50
2.6 6.0
44.1 52.8 40.2 2.55 17.29 5.4
85
2.6 5.9
63.0 53.5 99.0 2.78 6.64 8.1 40
2.6 6.0
37.8 46.4 31.6 2.52 15.00 5.4
95
2.5 5.8
62.2 51.3 108.8 3.20 5.70 8.4 45
2.6 6.0
41.5 50.1 35.8 2.52 16.47 5.4
110
2.2 5.1
59.4 46.3 123.2 3.85 4.52 8.2 50
2.6 6.0
44.2 52.8 40.2 2.53 17.47 5.5
85
2.6 5.9
65.1 55.2 99.5 2.91 6.56 8.7 40
2.6 6.0
35.7 45.8 32.1 2.97 12.02 4.8
95
2.5 5.8
64.3 52.9 109.3 3.35 5.63 8.6 45
2.6 6.0
39.3 49.4 36.3 2.97 13.23 5.4
110
2.2 5.1
61.4 47.7 123.6 4.02 4.48 8.2 50
2.6 6.0
41.8 52.0 40.7 2.98 14.03 5.6
85
2.6 5.9
66.7 56.9 99.8 2.87 6.81 8.9 40
2.6 6.0
36.7 46.7 31.8 2.93 12.53 5.0
95
2.5 5.8
65.8 54.5 109.6 3.30 5.84 8.8 45
2.6 6.0
40.4 50.4 36.0 2.93 13.79 5.4
110
2.2 5.1
62.9 49.4 124.0 3.97 4.64 8.4 50
2.6 6.0
43.0 53.0 40.4 2.93 14.68 5.8
85
2.6 5.9
66.9 57.2 99.9 2.83 6.93 8.9 40
2.6 6.0
36.8 46.7 31.8 2.90 12.69 4.9
95
2.5 5.8
66.0 54.9 109.7 3.26 5.93 8.8 45
2.6 6.0
40.5 50.4 36.0 2.90 13.97 5.4
110
2.2 5.1
63.0 49.6 124.0 3.92 4.71 8.4 50
2.6 6.0
43.1 53.0 40.4 2.90 14.86 5.7
40
2.6 6.0
33.0 46.1 32.7 3.83 8.62 4.4
45
2.6 6.0
36.3 49.4 36.9 3.83 9.48 4.8
50
2.6 6.0
38.7 51.8 41.4 3.84 10.08 5.2
40
2.6 6.0
33.9 46.8 32.5 3.78 8.97 4.5
45
2.6 6.0
37.3 50.2 36.7 3.78 9.87 4.9
50
2.6 6.0
39.8 52.7 41.2 3.78 10.53 5.3
40
2.6 6.0
34.0 46.8 32.4 3.74 9.09 4.5
45
2.6 6.0
37.4 50.1 36.7 3.73 10.03 5.0
50
2.6 6.0
39.9 52.7 41.1 3.74 10.67 5.3
DH
Mbtuh
COP
W
/
WDHMbtuh
ELT °F
Load
GPM
WPD
TC
MbtuhHRMbtuh
LLT
°F
EER
EST
°F
Source
GPM
WPD
ELT °F
Load
GPM
WPD
HC
MbtuhHEMbtuh
LLT
°F
9.0 9.0
9.0 9.0
9.0 9.0
Operation Not Recommended
9.0
9.0
9.0
9.0 9.0
9.0 9.0
9.0 9.0
9.0 9.0
9.0 9.0
9.0 9.0
9.0 9.0
9.0 9.0
9.0 9.0
9.0 9.0
9.0
9.0 9.0
9.0 9.0
9.0 9.0
9.0 9.0
25 9.0 4.0 9.2
Heatin
g
Coolin
g
kW kW
9.0
Operation Not Recommended
9.0
9.0
3.5
7.0 2.6 5.9
9.0 3.8 8.8
30
5.0 1.5
9.0
40
5.0 1.4 3.1
7.0 2.3 5.4
9.0 3.4 8.0
9.0
50
5.0 1.2 2.8
7.0 2.1 4.8
9.0 3.1 7.2
60
5.0 1.1 2.6
7.0 1.9 4.4
9.0 2.8 6.5
70
5.0 1.0 2.4
7.0 1.8 4.1
9.0 2.6 6.1
80
5.0 1.0 2.3
7.0 1.7 3.9
9.0 2.5 5.8
90
5.0 0.9 2.2
7.0 1.6 3.8
9.0 2.4 5.6
5.1
110
5.0 0.9 2.0
7.0 1.5 3.4
9.0 2.2
* See Page 13 for Application Notes
Enertech Global WT Models, Rev.: B
54
Page 55
Section 11: Model 048 Performance Data: 4.0 Ton, Part Load Capacity
GWT048B LOW STAGE
Load GPM set to max
PSI FT PSI FT PSI FT
85
2.2 5.0
30.3 21.2 91.7 2.67 3.33 3.9
95
2.1 4.9
29.4 19.0 101.5 3.06 2.82 3.9
110
1.9 4.4
28.5 15.7 116.3 3.74 2.23 3.7
85
2.2 5.0
29.4 19.7 91.5 2.84 3.03 3.8
95
2.1 4.9
28.6 17.5 101.4 3.24 2.59 3.8
110
1.9 4.4
27.7 14.2 116.2 3.97 2.04 3.6
85
2.2 5.0
31.4 22.2 92.0 2.71 3.40 4.2
95
2.1 4.9
30.5 19.9 101.8 3.10 2.88 4.1
110
1.9 4.4
29.5 16.6 116.6 3.79 2.28 3.9
85
2.2 5.0
32.3 23.4 92.2 2.61 3.63 4.3
95
2.1 4.9
31.4 21.2 102.0 2.99 3.08 4.1
110
1.9 4.4
30.4 17.9 116.8 3.65 2.44 4.0
85
2.2 5.0
34.5 24.9 92.7
2.22
3.61 4.5 40
2.2 5.1
33.6 37.4 32.5 1.11 30.27 4.0
95
2.1 4.9
33.6 22.6 102.5
2.22
3.07 4.7 45
2.2 5.1
36.9 40.7 36.8 1.11 33.24 4.4
110
1.9 4.4
32.5 19.1 117.2
2.22
2.43 4.6 50
2.2 5.1
39.2 43.0 41.3 1.10 35.64 4.6
85
2.2 5.0
36.8 27.7 93.2 2.68 4.02 4.8 40
2.2 5.1
36.3 39.9 31.9 1.06 34.25 4.3
95
2.1 4.9
35.8 25.4 103.0 3.06 3.43 4.9 45
2.2 5.1
39.8 43.4 36.2 1.06 37.55 4.6
110
1.9 4.4
34.7 21.9 117.7 3.75 2.71 4.8 50
2.2 5.1
42.3 45.9 40.6 1.05 40.29 5.0
85
2.2 5.0
37.9 29.1 93.4 2.58 4.31 4.9 40
2.2 5.1
37.1 40.6 31.8 1.03 36.02 4.3
95
2.1 4.9
36.9 26.8 103.2 2.95 3.67 5.0 45
2.2 5.1
40.6 44.1 36.0 1.02 39.80 4.6
110
1.9 4.4
35.7 23.4 117.9 3.61 2.90 5.0 50
2.2 5.1
43.2 46.6 40.4 1.01 42.77 4.5
85
2.2 5.0
39.6 30.1 93.8 2.77 4.19 5.3 40
2.2 5.1
30.0 35.6 33.3 1.64 18.29 4.0
95
2.1 4.9
38.5 27.7 103.6 3.17 3.56 5.1 45
2.2 5.1
32.9 38.5 37.7 1.63 20.18 4.4
110
1.9 4.4
37.3 24.1 118.3 3.87 2.82 5.0 50
2.2 5.1
34.9 40.4 42.2 1.62 21.54 4.6
85
2.2 5.0
42.2 33.2 94.4 2.65 4.67 5.6 40
2.2 5.1
32.4 37.8 32.8 1.57 20.64 4.3
95
2.1 4.9
41.1 30.8 104.1 3.03 3.98 5.4 45
2.2 5.1
35.5 40.8 37.1 1.56 22.76 4.6
110
1.9 4.4
39.8 27.2 118.8 3.70 3.15 5.3 50
2.2 5.1
37.7 43.0 41.6 1.54 24.48 5.0
85
2.2 5.0
43.5 34.8 94.7 2.55 5.00 5.7 40
2.2 5.1
33.0 38.2 32.7 1.51 21.85 4.3
95
2.1 4.9
42.3 32.3 104.4 2.92 4.25 5.5 45
2.2 5.1
36.2 41.3 37.0 1.50 24.13 5.2
110
1.9 4.4
41.0 28.8 119.1 3.57 3.37 5.4 50
2.2 5.1
38.5 43.6 41.4 1.49 25.84 5.0
85
2.2 5.0
44.0 34.8 94.8 2.70 4.78 5.7 40
2.2 5.1
29.3 36.0 33.5 1.95 15.03 4.2
95
2.1 4.9
42.8 32.3 104.5 3.08 4.07 5.9 45
2.2 5.1
32.1 38.7 37.9 1.94 16.55 4.2
110
1.9 4.4
41.4 28.5 119.2 3.77 3.22 5.8 50
2.2 5.1
34.1 40.7 42.4 1.92 17.76 4.4
85
2.2 5.0
46.9 38.1 95.4 2.58 5.33 6.0 40
2.2 5.1
31.7 38.0 33.0 1.86 17.04 4.5
95
2.1 4.9
45.6 35.5 105.1 2.95 4.53 6.1 45
2.2 5.1
34.7 41.0 37.3 1.85 18.76 4.4
110
1.9 4.4
44.2 31.9 119.8 3.60 3.60 6.0 50
2.2 5.1
36.9 43.1 41.8 1.83 20.16 4.5
85
2.2 5.0
48.3 39.8 95.7 2.48 5.71 6.2 40
2.2 5.1
32.3 38.4 32.8 1.79 18.04 4.6
95
2.1 4.9
47.0 37.3 105.4 2.84 4.85 6.2 45
2.2 5.1
35.4 41.5 37.1 1.78 19.89 4.6
110
1.9 4.4
45.5 33.7 120.1 3.47 3.84 6.1 50
2.2 5.1
37.6 43.6 41.6 1.77 21.24 4.5
85
2.2 5.0
48.2 39.3 95.7 2.62 5.39 6.4 40
2.2 5.1
28.6 36.3 33.6 2.25 12.71 3.8
95
2.1 4.9
46.8 36.6 105.4 2.99 4.59 6.1 45
2.2 5.1
31.4 39.0 38.0 2.24 14.02 4.1
110
1.9 4.4
45.4 32.9 120.1 3.66 3.64 6.0 50
2.2 5.1
33.3 40.9 42.6 2.22 15.00 4.4
85
2.2 5.0
51.4 42.9 96.4 2.50 6.03 6.7 40
2.2 5.1
30.9 38.2 33.1 2.15 14.37 4.0
95
2.1 4.9
49.9 40.1 106.1 2.86 5.11 6.5 45
2.2 5.1
33.9 41.2 37.5 2.14 15.84 4.4
110
1.9 4.4
48.4 36.5 120.8 3.50 4.05 6.3 50
2.2 5.1
36.0 43.2 42.0 2.12 16.98 4.7
85
2.2 5.0
52.9 44.7 96.8 2.41 6.43 6.9 40
2.2 5.1
31.5 38.6 33.0 2.08 15.14 4.1
95
2.1 4.9
51.5 42.1 106.4 2.76 5.47 6.6 45
2.2 5.1
34.6 41.6 37.3 2.06 16.80 5.0
110
1.9 4.4
49.8 38.3 121.1 3.37 4.33 6.5 50
2.2 5.1
36.7 43.7 41.8 2.04 17.99 4.8
85
2.2 5.0
52.7 43.9 96.7 2.58 5.99 6.8 40
2.2 5.1
27.2 36.1 34.0 2.61 10.42 3.9
95
2.1 4.9
51.3 41.2 106.4 2.95 5.10 7.1 45
2.2 5.1
29.8 38.7 38.4 2.60 11.46 3.9
110
1.9 4.4
49.7 37.4 121.0 3.60 4.05 7.0 50
2.2 5.1
31.6 40.4 43.0 2.58 12.25 4.0
85
2.2 5.0
56.2 47.8 97.5 2.46 6.70 7.3 40
2.2 5.1
29.3 37.8 33.5 2.50 11.72 4.2
95
2.1 4.9
54.7 45.1 107.2 2.82 5.68 7.4 45
2.2 5.1
32.2 40.7 37.8 2.49 12.93 4.1
110
1.9 4.4
52.9 41.2 121.8 3.44 4.51 7.3 50
2.2 5.1
34.2 42.6 42.4 2.46 13.90 4.2
85
2.2 5.0
57.9 49.8 97.9 2.37 7.16 7.5 40
2.2 5.1
30.0 38.2 33.3 2.41 12.45 4.3
95
2.1 4.9
56.3 47.1 107.5 2.71 6.09 7.5 45
2.2 5.1
32.8 41.0 37.7 2.39 13.72 4.0
110
1.9 4.4
54.5 43.2 122.1 3.32 4.81 7.4 50
2.2 5.1
34.9 43.0 42.2 2.37 14.73 4.2
85
2.2 5.0
57.2 48.6 97.7 2.53 6.63 7.6 40
2.2 5.1
25.5 35.8 34.3 3.01 8.47 3.4
95
2.1 4.9
55.6 45.7 107.4 2.90 5.62 7.5 45
2.2 5.1
27.9 38.1 38.8 2.99 9.33 3.8
110
1.9 4.4
53.9 41.8 122.0 3.54 4.46 7.2 50
2.2 5.1
29.6 39.7 43.4 2.96 10.00 4.0
85
2.2 5.0
61.0 52.7 98.6 2.42 7.39 8.2 40
2.2 5.1
27.5 37.3 33.9 2.88 9.55 3.7
95
2.1 4.9
59.3 49.8 108.2 2.77 6.27 7.9 45
2.2 5.1
30.1 39.9 38.3 2.86 10.52 4.1
110
1.9 4.4
57.4 45.9 122.8 3.38 4.98 7.7 50
2.2 5.1
32.0 41.7 42.9 2.83 11.31 4.3
85
2.2 5.0
62.8 54.8 99.0 2.33 7.90 8.4 40
2.2 5.1
28.1 37.6 33.8 2.77 10.14 3.8
95
2.1 4.9
61.1 52.0 108.6 2.67 6.71 8.2 45
2.2 5.1
30.8 40.2 38.2 2.76 11.16 4.1
110
1.9 4.4
59.2 48.1 123.2 3.26 5.32 7.9 50
2.2 5.1
32.7 42.0 42.7 2.73 11.98 4.4
40
2.2 5.1
21.9 35.3 35.1 3.93 5.57 2.9
45
2.2 5.1
24.0 37.3 39.7 3.91 6.14 3.3
50
2.2 5.1
25.5 38.7 44.3 3.87 6.59 3.4
40
2.2 5.1
23.6 36.4 34.8 3.75 6.29 3.2
45
2.2 5.1
25.9 38.6 39.2 3.73 6.94 3.4
50
2.2 5.1
27.5 40.1 43.9 3.70 7.43 3.7
40
2.2 5.1
24.1 36.5 34.6 3.62 6.66 3.2
45
2.2 5.1
26.4 38.7 39.1 3.60 7.33 3.5
50
2.2 5.1
28.1 40.2 43.8 3.56 7.89 3.7
DH
Mbtuh
COP
W
/
WDHMbtuh
ELT °F
Load
GPM
WPD
TC
MbtuhHRMbtuh
LLT
°F
EER
EST
°F
Source
GPM
WPD
ELT °F
Load
GPM
WPD
HC
MbtuhHEMbtuh
LLT
°F
9.0 9.0
9.0 9.0
9.0 9.0
Operation Not Recommended
9.0
9.0
9.0
9.0 9.0
9.0 9.0
9.0 9.0
9.0 9.0
9.0 9.0
9.0 9.0
9.0 9.0
9.0 9.0
9.0 9.0
9.0 9.0
9.0
9.0 9.0
9.0 9.0
9.0 9.0
9.0 9.0
25 9.0 2.3 5.2
Heatin
g
Coolin
g
kW kW
9.0
Operation Not Recommended
9.0
9.0
1.2
7.0 1.0 2.3
9.0 2.2 5.0
30
5.0 0.5
9.0
40
5.0 0.5 1.1
7.0 0.9 2.1
9.0 1.9 4.5
9.0
50
5.0 0.4 1.0
7.0 0.8 2.0
9.0 1.8 4.2
60
5.0 0.4 1.0
7.0 0.8 2.0
9.0 1.8 4.2
70
5.0 0.4 1.0
7.0 0.9 2.0
9.0 1.8 4.2
80
5.0 0.4 1.0
7.0 0.8 2.0
9.0 1.8 4.2
90
5.0 0.4 0.9
7.0 0.8 1.8
9.0 1.7 3.8
3.6
110
5.0 0.4 0.9
7.0 0.7 1.7
9.0 1.6
* See Page 13 for Application Notes
WT Models, Rev.: B Enertech Global
55
Page 56
Section 11: Model 048 Performance Data: 4.0 Ton, Full Load Capacity
GWT048B HIGH STAGE
Load GPM set to max
PSI FT PSI FT PSI FT
85
3.6 8.4
41.1 29.8 91.9 3.32 3.63 5.4
95
3.4 7.9
40.2 27.4 101.7 3.74 3.15 5.3
110
3.4 7.9
38.9 23.7 116.5 4.45 2.56 5.1
85
3.6 8.4
40.8 28.4 91.8 3.62 3.30 5.4
95
3.4 7.9
39.9 26.0 101.7 4.08 2.87 5.3
110
3.4 7.9
38.7 22.2 116.5 4.85 2.34 5.1
85
3.6 8.4
43.5 31.7 92.3 3.45 3.70 5.8
95
3.4 7.9
42.5 29.2 102.1 3.89 3.20 5.6
110
3.4 7.9
41.2 25.4 116.9 4.63 2.61 5.5
85
3.6 8.4
44.2 32.8 92.4 3.34 3.88 5.8
95
3.4 7.9
43.2 30.3 102.2 3.77 3.36 5.6
110
3.4 7.9
41.9 26.6 117.0 4.48 2.74 5.5
85
3.6 8.4
46.9 34.4 92.8
3.99
3.77 6.1 40
4.0 9.2
47.1 53.9 32.2 1.98 23.79 5.7
95
3.4 7.9
45.8 31.7 102.6
3.99
3.26 6.4 45
4.0 9.2
50.9 57.7 36.5 2.00 25.45 6.2
110
3.4 7.9
44.4 27.7 117.4
3.99
2.66 6.3 50
4.0 9.2
54.6 61.5 40.9 2.02 27.03 6.6
85
3.6 8.4
49.9 38.0 93.3 3.48 4.20 6.5 40
4.0 9.2
50.2 56.6 31.6 1.89 26.56 6.1
95
3.4 7.9
48.8 35.4 103.1 3.93 3.64 6.5 45
4.0 9.2
54.2 60.7 36.0 1.91 28.38 6.5
110
3.4 7.9
47.3 31.4 117.9 4.67 2.97 6.5 50
4.0 9.2
58.1 64.7 40.3 1.93 30.10 7.1
85
3.6 8.4
50.7 39.2 93.5 3.38 4.40 6.5 40
4.0 9.2
54.1 60.3 31.0 1.83 29.56 6.5
95
3.4 7.9
49.6 36.6 103.3 3.80 3.83 6.8 45
4.0 9.2
58.4 64.7 35.3 1.85 31.57 6.7
110
3.4 7.9
48.0 32.6 118.0 4.52 3.11 6.6 50
4.0 9.2
62.7 69.1 39.6 1.87 33.53 6.6
85
3.6 8.4
53.1 40.5 93.9 3.69 4.22 7.1 40
4.0 9.2
43.1 51.7 32.8 2.51 17.17 5.7
95
3.4 7.9
51.9 37.7 103.7 4.16 3.66 6.9 45
4.0 9.2
46.5 55.2 37.3 2.54 18.31 6.2
110
3.4 7.9
50.3 33.4 118.4 4.95 2.98 6.7 50
4.0 9.2
49.9 58.7 41.7 2.57 19.42 6.6
85
3.6 8.4
56.6 44.6 94.4 3.52 4.71 7.5 40
4.0 9.2
45.8 54.0 32.4 2.40 19.08 6.1
95
3.4 7.9
55.3 41.8 104.2 3.97 4.08 7.2 45
4.0 9.2
49.5 57.8 36.8 2.42 20.45 6.5
110
3.4 7.9
53.6 37.5 118.9 4.72 3.33 7.1 50
4.0 9.2
53.1 61.5 41.2 2.45 21.67 7.1
85
3.6 8.4
57.4 45.8 94.6 3.41 4.93 7.5 40
4.0 9.2
49.4 57.3 31.8 2.32 21.29 6.5
95
3.4 7.9
56.1 43.0 104.4 3.85 4.27 7.4 45
4.0 9.2
53.4 61.4 36.1 2.35 22.72 7.6
110
3.4 7.9
54.4 38.8 119.1 4.57 3.49 7.1 50
4.0 9.2
57.3 65.4 40.5 2.37 24.18 7.5
85
3.6 8.4
59.5 46.7 94.9 3.75 4.65 7.8 40
4.0 9.2
41.3 50.8 33.1 2.78 14.86 5.9
95
3.4 7.9
58.1 43.7 104.7 4.22 4.03 8.0 45
4.0 9.2
44.6 54.2 37.6 2.82 15.82 5.8
110
3.4 7.9
56.3 39.2 119.4 5.02 3.29 7.9 50
4.0 9.2
47.8 57.5 42.0 2.84 16.83 6.1
85
3.6 8.4
63.4 51.2 95.6 3.58 5.19 8.2 40
4.0 9.2
44.0 53.1 32.7 2.66 16.54 6.3
95
3.4 7.9
61.9 48.1 105.3 4.03 4.50 8.3 45
4.0 9.2
47.4 56.6 37.1 2.69 17.62 6.3
110
3.4 7.9
60.0 43.7 120.0 4.79 3.67 8.1 50
4.0 9.2
50.9 60.1 41.5 2.71 18.78 6.4
85
3.6 8.4
64.4 52.6 95.7 3.46 5.45 8.3 40
4.0 9.2
47.4 56.2 32.1 2.57 18.44 6.8
95
3.4 7.9
62.9 49.6 105.5 3.90 4.73 8.5 45
4.0 9.2
51.2 60.1 36.5 2.60 19.69 6.5
110
3.4 7.9
61.0 45.2 120.2 4.64 3.85 8.4 50
4.0 9.2
54.9 63.9 40.9 2.63 20.87 6.4
85
3.6 8.4
66.3 53.3 96.1 3.82 5.09 8.8 40
4.0 9.2
39.4 49.8 33.4 3.05 12.92 5.2
95
3.4 7.9
64.8 50.1 105.8 4.30 4.42 8.4 45
4.0 9.2
42.6 53.1 37.9 3.09 13.79 5.5
110
3.4 7.9
62.8 45.3 120.5 5.12 3.59 8.3 50
4.0 9.2
45.7 56.3 42.4 3.12 14.65 6.0
85
3.6 8.4
70.7 58.3 96.8 3.64 5.69 9.2 40
4.0 9.2
42.0 51.9 33.0 2.91 14.43 5.4
95
3.4 7.9
69.1 55.1 106.5 4.11 4.93 9.0 45
4.0 9.2
45.3 55.3 37.5 2.94 15.41 6.0
110
3.4 7.9
66.9 50.2 121.2 4.88 4.02 8.7 50
4.0 9.2
48.6 58.7 41.9 2.97 16.36 6.3
85
3.6 8.4
71.8 59.8 97.0 3.53 5.96 9.4 40
4.0 9.2
45.3 54.9 32.5 2.82 16.06 6.0
95
3.4 7.9
70.1 56.5 106.7 3.98 5.16 9.1 45
4.0 9.2
48.9 58.6 36.9 2.85 17.16 7.1
110
3.4 7.9
68.0 51.9 121.3 4.73 4.21 8.9 50
4.0 9.2
52.5 62.3 41.3 2.88 18.23 6.9
85
3.6 8.4
73.6 60.3 97.3 3.89 5.55 9.6 40
4.0 9.2
37.1 48.7 33.8 3.41 10.88 5.4
95
3.4 7.9
72.0 57.0 107.0 4.39 4.81 9.9 45
4.0 9.2
40.1 51.8 38.3 3.44 11.66 5.3
110
3.4 7.9
69.7 51.9 121.6 5.22 3.91 9.8 50
4.0 9.2
43.0 54.9 42.8 3.48 12.36 5.4
85
3.6 8.4
78.5 65.8 98.1 3.72 6.18 10.2 40
4.0 9.2
39.5 50.6 33.4 3.25 12.15 5.7
95
3.4 7.9
76.7 62.4 107.8 4.19 5.36 10.4 45
4.0 9.2
42.7 53.9 37.9 3.29 12.98 5.7
110
3.4 7.9
74.3 57.3 122.4 4.98 4.37 10.2 50
4.0 9.2
45.8 57.1 42.4 3.32 13.80 5.9
85
3.6 8.4
79.7 67.4 98.3 3.60 6.49 10.3 40
4.0 9.2
42.6 53.3 32.9 3.15 13.52 6.2
95
3.4 7.9
77.9 64.0 108.0 4.06 5.62 10.6 45
4.0 9.2
46.0 56.9 37.3 3.18 14.47 5.6
110
3.4 7.9
75.5 59.1 122.6 4.82 4.59 10.4 50
4.0 9.2
49.4 60.4 41.8 3.21 15.39 5.8
85
3.6 8.4
81.1 67.5 98.5 3.98 5.97 10.9 40
4.0 9.2
34.9 48.0 34.2 3.84 9.09 4.7
95
3.4 7.9
79.3 64.0 108.2 4.48 5.19 10.6 45
4.0 9.2
37.7 50.9 38.7 3.88 9.72 5.1
110
3.4 7.9
76.8 58.6 122.8 5.33 4.22 10.3 50
4.0 9.2
40.4 53.8 43.3 3.92 10.31 5.4
85
3.6 8.4
86.5 73.6 99.4 3.79 6.69 11.6 40
4.0 9.2
37.2 49.7 33.8 3.66 10.16 5.0
95
3.4 7.9
84.5 69.9 109.1 4.28 5.79 11.3 45
4.0 9.2
40.1 52.7 38.3 3.70 10.84 5.4
110
3.4 7.9
81.9 64.5 123.7 5.09 4.72 11.0 50
4.0 9.2
43.1 55.9 42.8 3.74 11.52 5.8
85
3.6 8.4
87.8 75.3 99.6 3.67 7.01 11.7 40
4.0 9.2
40.1 52.2 33.3 3.55 11.30 5.4
95
3.4 7.9
85.8 71.7 109.3 4.14 6.07 11.5 45
4.0 9.2
43.3 55.5 37.8 3.59 12.06 5.8
110
3.4 7.9
83.1 66.3 123.9 4.93 4.94 11.1 50
4.0 9.2
46.4 58.8 42.3 3.62 12.82 6.2
40
4.0 9.2
31.4 47.9 34.8 4.85 6.47 4.2
45
4.0 9.2
33.9 50.6 39.4 4.90 6.92 4.6
50
4.0 9.2
36.4 53.3 43.9 4.95 7.35 4.9
40
4.0 9.2
33.4 49.2 34.4 4.62 7.23 4.5
45
4.0 9.2
36.1 52.0 39.0 4.67 7.73 4.8
50
4.0 9.2
38.7 54.8 43.6 4.72 8.20 5.2
40
4.0 9.2
36.0 51.3 34.0 4.48 8.04 4.8
45
4.0 9.2
38.9 54.4 38.5 4.53 8.59 5.2
50
4.0 9.2
41.8 57.4 43.0 4.57 9.15 5.6
DH
Mbtuh
COP
W
/
WDHMbtuh
ELT °F
Load
GPM
WPD
TC
MbtuhHRMbtuh
LLT
°F
EER
EST
°F
Source
GPM
WPD
ELT °F
Load
GPM
WPD
HC
MbtuhHEMbtuh
LLT
°F
12.0 12.0
12.0 12.0
12.0 12.0
Operation Not Recommended
12.0
12.0
12.0
12.0 12.0
12.0 12.0
12.0 12.0
12.0 12.0
12.0 12.0
12.0 12.0
12.0 12.0
12.0 12.0
12.0 12.0
12.0 12.0
12.0
12.0 12.0
12.0 12.0
12.0 12.0
12.0 12.0
25 12.0 4.2 9.7
Heatin
g
Coolin
g
kW kW
12.0
Operation Not Recommended
12.0
12.0
1.6
9.0 2.2 5.2
12.0 4.0 9.2
30
6.0 0.7
12.0
40
6.0 0.6 1.4
9.0 2.0 4.6
12.0 3.6 8.3
12.0
50
6.0 0.6 1.3
9.0 1.8 4.2
12.0 3.2 7.5
60
6.0 0.5 1.2
9.0 1.7 3.9
12.0 3.0 6.9
70
6.0 0.5 1.2
9.0 1.6 3.8
12.0 2.9 6.8
80
6.0 0.5 1.2
9.0 1.7 3.9
12.0 3.0 7.0
90
6.0 0.6 1.3
9.0 1.8 4.1
12.0 3.2 7.4
7.9
110
6.0 0.6 1.4
9.0 1.9 4.4
12.0 3.4
* See Page 13 for Application Notes
Enertech Global WT Models, Rev.: B
56
Page 57
Section 11: Model 060 Performance Data: 5.0 Ton, Part Load Capacity
GWT060B LOW STAGE
Load GPM set to max
PSI FT PSI FT PSI FT
85
3.2 7.5
36.4 25.4 91.1 3.22 3.31 4.8
95
3.0 7.0
35.3 22.7 100.9 3.68 2.81 4.7
110
2.2 5.1
34.2 18.8 115.7 4.50 2.23 4.5
85
3.2 7.5
35.7 23.9 91.0 3.46 3.02 4.7
95
3.0 7.0
34.6 21.1 100.8 3.96 2.56 4.6
110
2.2 5.1
33.5 17.0 115.6 4.84 2.03 4.4
85
3.2 7.5
37.5 26.4 91.3 3.25 3.38 5.0
95
3.0 7.0
36.4 23.7 101.1 3.72 2.87 4.8
110
2.2 5.1
35.3 19.8 115.9 4.55 2.27 4.7
85
3.2 7.5
38.8 28.1 91.5 3.14 3.62 5.1
95
3.0 7.0
37.7 25.4 101.3 3.60 3.07 4.9
110
2.2 5.1
36.5 21.5 116.1 4.40 2.43 4.8
85
3.2 7.5
41.9 30.2 92.0
3.45 3.59
5.4 40
3.5 8.0
45.2 49.8 32.5 1.36 33.24 5.8
95
3.0 7.0
40.6 27.3 101.8
3.45 3.04
5.6 45
3.5 8.0
46.9 51.5 37.2 1.35 34.74 6.1
110
2.2 5.1
39.4 23.1 116.6
3.45 2.42
5.5 50
3.5 8.0
50.6 55.2 41.6 1.34 37.76 6.5
85
3.2 7.5
44.0 33.0 92.3 3.21 4.02 5.7 40
3.5 8.0
47.9 52.3 32.0 1.28 37.42 6.2
95
3.0 7.0
42.7 30.1 102.1 3.68 3.40 5.8 45
3.5 8.0
49.7 54.0 36.7 1.27 39.13 6.4
110
2.2 5.1
41.4 26.1 116.9 4.49 2.70 5.7 50
3.5 8.0
53.6 57.9 41.1 1.26 42.54 6.9
85
3.2 7.5
45.6 35.0 92.6 3.11 4.30 5.8 40
3.5 8.0
49.9 54.1 31.7 1.24 40.24 6.4
95
3.0 7.0
44.2 32.1 102.4 3.55 3.65 6.0 45
3.5 8.0
51.7 55.9 36.4 1.23 42.03 6.5
110
2.2 5.1
42.9 28.1 117.2 4.35 2.89 5.9 50
3.5 8.0
55.8 60.0 40.7 1.22 45.74 6.5
85
3.2 7.5
48.0 36.5 93.0 3.38 4.16 6.4 40
3.5 8.0
44.0 50.8 32.7 2.00 22.00 5.8
95
3.0 7.0
46.5 33.3 102.8 3.87 3.52 6.2 45
3.5 8.0
45.6 52.4 37.4 1.99 22.91 6.1
110
2.2 5.1
45.1 29.0 117.5 4.73 2.79 6.0 50
3.5 8.0
49.2 55.9 41.8 1.97 24.97 6.5
85
3.2 7.5
50.5 39.6 93.4 3.18 4.65 6.7 40
3.5 8.0
46.6 53.0 32.2 1.88 24.79 6.2
95
3.0 7.0
48.9 36.5 103.2 3.63 3.95 6.4 45
3.5 8.0
48.3 54.7 37.0 1.87 25.83 6.4
110
2.2 5.1
47.5 32.4 117.9 4.44 3.14 6.3 50
3.5 8.0
52.1 58.4 41.3 1.85 28.16 6.9
85
3.2 7.5
52.3 41.8 93.7 3.07 4.99 6.8 40
3.5 8.0
48.5 54.7 31.9 1.82 26.65 6.4
95
3.0 7.0
50.7 38.7 103.5 3.51 4.23 6.6 45
3.5 8.0
50.3 56.5 36.6 1.81 27.79 7.2
110
2.2 5.1
49.2 34.6 118.2 4.29 3.36 6.4 50
3.5 8.0
54.2 60.3 41.0 1.79 30.28 7.1
85
3.2 7.5
53.3 42.1 93.9 3.29 4.75 6.9 40
3.5 8.0
42.9 51.0 32.9 2.38 18.03 6.1
95
3.0 7.0
51.7 38.9 103.6 3.76 4.03 7.1 45
3.5 8.0
44.5 52.6 37.6 2.36 18.86 6.0
110
2.2 5.1
50.1 34.4 118.4 4.60 3.19 7.0 50
3.5 8.0
48.0 56.0 42.0 2.34 20.51 6.2
85
3.2 7.5
56.0 45.5 94.3 3.09 5.31 7.2 40
3.5 8.0
45.5 53.1 32.4 2.23 20.40 6.4
95
3.0 7.0
54.3 42.3 104.1 3.53 4.51 7.3 45
3.5 8.0
47.1 54.7 37.2 2.22 21.22 6.3
110
2.2 5.1
52.7 38.0 118.8 4.32 3.58 7.2 50
3.5 8.0
50.8 58.3 41.5 2.20 23.09 6.5
85
3.2 7.5
58.0 47.8 94.7 2.99 5.69 7.4 40
3.5 8.0
47.3 54.7 32.1 2.16 21.90 6.6
95
3.0 7.0
56.3 44.6 104.4 3.42 4.82 7.5 45
3.5 8.0
49.1 56.4 36.8 2.15 22.84 6.5
110
2.2 5.1
54.6 40.3 119.1 4.18 3.83 7.4 50
3.5 8.0
52.9 60.2 41.2 2.13 24.84 6.5
85
3.2 7.5
58.4 47.5 94.7 3.19 5.37 7.8 40
3.5 8.0
41.9 51.3 33.0 2.75 15.24 5.6
95
3.0 7.0
56.6 44.1 104.4 3.65 4.54 7.4 45
3.5 8.0
43.4 52.7 37.8 2.74 15.84 5.7
110
2.2 5.1
54.9 39.6 119.2 4.47 3.60 7.3 50
3.5 8.0
46.8 56.0 42.2 2.71 17.27 6.2
85
3.2 7.5
61.4 51.2 95.2 3.00 6.00 8.0 40
3.5 8.0
44.4 53.2 32.6 2.58 17.21 5.8
95
3.0 7.0
59.5 47.8 104.9 3.43 5.08 7.8 45
3.5 8.0
46.0 54.8 37.3 2.57 17.90 6.1
110
2.2 5.1
57.7 43.4 119.6 4.20 4.03 7.5 50
3.5 8.0
49.6 58.3 41.7 2.55 19.45 6.5
85
3.2 7.5
63.6 53.7 95.6 2.90 6.43 8.3 40
3.5 8.0
46.2 54.7 32.3 2.50 18.48 6.1
95
3.0 7.0
61.7 50.4 105.3 3.32 5.45 8.0 45
3.5 8.0
47.9 56.4 37.0 2.49 19.24 6.8
110
2.2 5.1
59.8 45.9 120.0 4.06 4.32 7.8 50
3.5 8.0
51.6 60.0 41.4 2.46 20.98 6.8
85
3.2 7.5
63.9 53.2 95.7 3.14 5.96 8.3 40
3.5 8.0
40.7 51.6 33.2 3.19 12.76 5.8
95
3.0 7.0
62.0 49.8 105.3 3.59 5.06 8.5 45
3.5 8.0
42.2 53.0 38.0 3.17 13.31 5.6
110
2.2 5.1
60.1 45.1 120.0 4.39 4.01 8.4 50
3.5 8.0
45.5 56.2 42.4 3.14 14.49 5.9
85
3.2 7.5
67.2 57.1 96.2 2.95 6.68 8.7 40
3.5 8.0
43.1 53.3 32.8 3.00 14.37 6.0
95
3.0 7.0
65.2 53.7 105.9 3.38 5.65 8.9 45
3.5 8.0
44.7 54.9 37.6 2.98 15.00 6.0
110
2.2 5.1
63.2 49.1 120.5 4.13 4.48 8.8 50
3.5 8.0
48.2 58.3 42.0 2.95 16.34 6.2
85
3.2 7.5
69.6 59.9 96.6 2.85 7.16 9.0 40
3.5 8.0
44.9 54.8 32.5 2.90 15.48 6.3
95
3.0 7.0
67.5 56.4 106.3 3.26 6.07 9.1 45
3.5 8.0
46.5 56.3 37.3 2.88 16.15 5.9
110
2.2 5.1
65.5 51.9 120.9 3.99 4.81 8.9 50
3.5 8.0
50.2 59.9 41.6 2.85 17.61 6.2
85
3.2 7.5
69.4 58.9 96.6 3.09 6.58 9.3 40
3.5 8.0
39.3 51.8 33.5 3.67 10.71 5.3
95
3.0 7.0
67.2 55.2 106.2 3.53 5.58 9.0 45
3.5 8.0
40.8 53.3 38.2 3.65 11.18 5.4
110
2.2 5.1
65.2 50.5 120.9 4.32 4.42 8.7 50
3.5 8.0
44.0 56.4 42.7 3.62 12.15 5.9
85
3.2 7.5
72.9 63.0 97.2 2.90 7.37 9.8 40
3.5 8.0
41.7 53.5 33.1 3.45 12.09 5.5
95
3.0 7.0
70.7 59.4 106.8 3.32 6.24 9.5 45
3.5 8.0
43.2 54.9 37.8 3.43 12.59 5.8
110
2.2 5.1
68.6 54.7 121.4 4.06 4.95 9.2 50
3.5 8.0
46.6 58.2 42.2 3.40 13.71 6.2
85
3.2 7.5
75.5 65.9 97.6 2.81 7.87 10.1 40
3.5 8.0
43.4 54.8 32.8 3.33 13.03 5.8
95
3.0 7.0
73.2 62.2 107.2 3.21 6.68 9.8 45
3.5 8.0
45.0 56.3 37.5 3.32 13.55 6.0
110
2.2 5.1
71.0 57.6 121.8 3.92 5.31 9.5 50
3.5 8.0
48.5 59.7 41.9 3.29 14.74 6.5
40
3.5 8.0
36.7 53.0 33.9 4.79 7.66 4.9
45
3.5 8.0
38.0 54.3 38.7 4.77 7.97 5.1
50
3.5 8.0
41.0 57.1 43.2 4.72 8.69 5.5
40
3.5 8.0
38.8 54.2 33.5 4.50 8.62 5.2
45
3.5 8.0
40.3 55.6 38.3 4.48 9.00 5.4
50
3.5 8.0
43.4 58.5 42.8 4.44 9.77 5.8
40
3.5 8.0
40.4 55.2 33.3 4.35 9.29 5.4
45
3.5 8.0
41.9 56.7 38.0 4.33 9.68 5.6
50
3.5 8.0
45.2 59.8 42.5 4.29 10.54 6.0
DH
Mbtuh
COP
W
/
WDHMbtuh
ELT °F
Load
GPM
WPD
TC
MbtuhHRMbtuh
LLT
°F
EER
EST
°F
Source
GPM
WPD
ELT °F
Load
GPM
WPD
HC
MbtuhHEMbtuh
LLT
°F
12.0 12.0
12.0 12.0
12.0 12.0
Operation Not Recommended
12.0
12.0
12.0
12.0 12.0
12.0 12.0
12.0 12.0
12.0 12.0
12.0 12.0
12.0 12.0
12.0 12.0
12.0 12.0
12.0 12.0
12.0 12.0
12.0
12.0 12.0
12.0 12.0
12.0 12.0
12.0 12.0
25 12.0 5.4 12.5
Heatin
g
Coolin
g
kW kW
12.0
Operation Not Recommended
12.0
12.0
3.6
9.0 2.8 6.5
12.0 5.1 11.8
30
6.0 1.6
12.0
40
6.0 1.4 3.3
9.0 2.7 6.2
12.0 4.6 10.6
12.0
50
6.0 1.3 2.9
9.0 2.5 5.8
12.0 4.1 9.5
60
6.0 1.2 2.7
9.0 2.5 5.8
12.0 3.8 8.7
70
6.0 1.1 2.5
9.0 2.4 5.5
12.0 3.5 8.1
80
6.0 1.0 2.4
9.0 2.3 5.3
12.0 3.3 7.7
90
6.0 1.0 2.3
9.0 2.3 5.3
12.0 3.2 7.3
5.2
110
6.0 0.7 1.6
9.0 2.2 5.1
12.0 2.3
* See Page 13 for Application Notes
WT Models, Rev.: B Enertech Global
57
Page 58
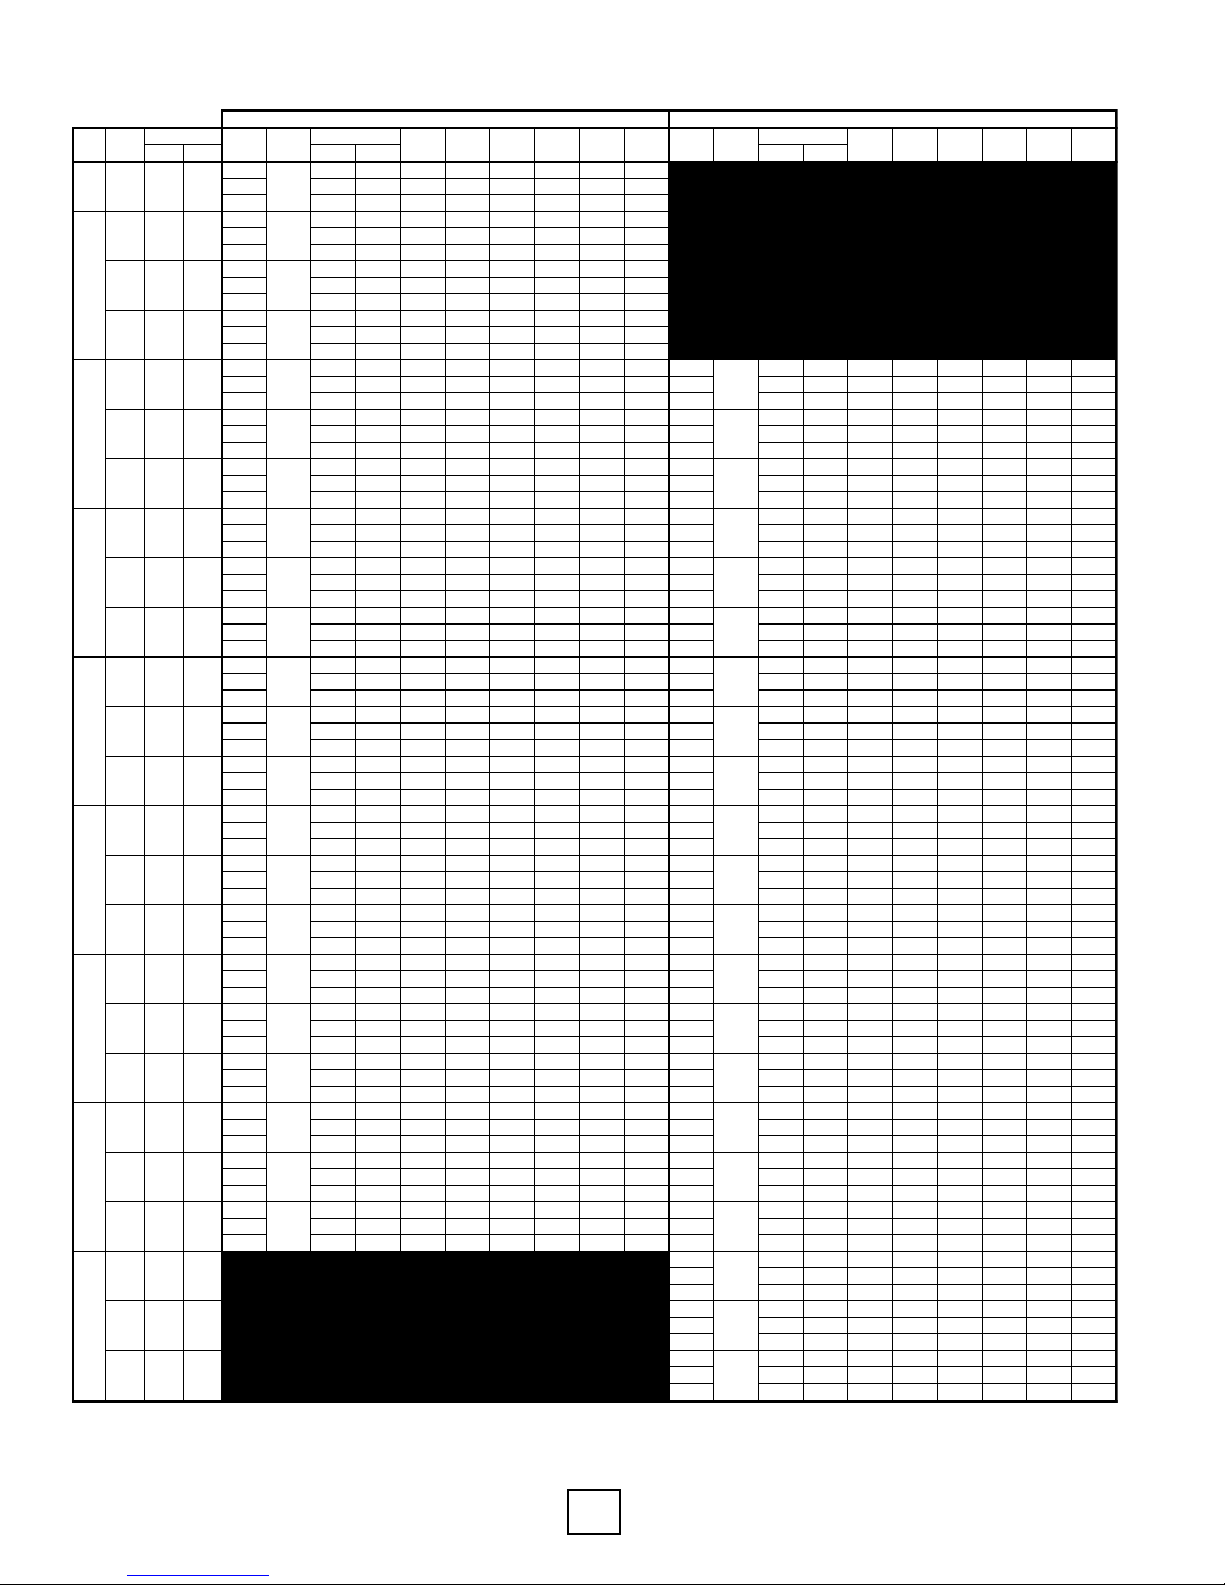
Section 11: Model 060 Performance Data: 5.0 Ton, Full Load Capacity
GWT060B HIGH STAGE
Load GPM set to max
PSI FT PSI FT PSI FT
85 5.2 12.1 49.2 35.8 91.6 3.94 3.66 6.5
95 5.1 11.7 48.0 32.6 101.4 4.50 3.13 6.4
110 4.6 10.7 46.4 27.9 116.2 5.41 2.51 6.1
85 5.2 12.1 50.2 35.8 91.7 4.22 3.49 6.6
95 5.1 11.7 48.9 32.5 101.5 4.82 2.97 6.5
110 4.6 10.7 47.3 27.5 116.3 5.79 2.39 6.2
85 5.2 12.1 51.8 37.8 91.9 4.11 3.69 6.9
95 5.1 11.7 50.5 34.5 101.7 4.69 3.16 6.6
110 4.6 10.7 48.8 29.6 116.5 5.64 2.54 6.5
85 5.2 12.1 52.6 38.7 92.0 4.06 3.80 6.9
95 5.1 11.7 51.3 35.5 101.8 4.64 3.24 6.7
110 4.6 10.7 49.6 30.6 116.6 5.57 2.61 6.5
85 5.2 12.1 57.8 43.5 92.7 4.19 4.04 7.5 40 4.6 10.7 62.3 71.6 31.7 2.72 22.90 8.1
95 5.1 11.7 56.3 40.0 102.5 4.79 3.44 7.7 45 4.6 10.7 64.7 74.1 36.4 2.75 23.53 8.3
110 4.6 10.7 54.4 34.7 117.3 5.76 2.77 7.6 50 4.6 10.7 69.5 79.0 40.7 2.78 25.00 9.0
85 5.2 12.1 59.6 45.7 92.9 4.08 4.28 7.8 40 4.6 10.7 64.5 73.5 31.4 2.65 24.34 8.3
95 5.1 11.7 58.1 42.2 102.7 4.66 3.65 7.8 45 4.6 10.7 67.0 76.1 36.1 2.68 25.00 8.5
110 4.6 10.7 56.2 37.1 117.5 5.61 2.94 7.7 50 4.6 10.7 72.0 81.2 40.4 2.70 26.67 9.3
85 5.2 12.1 60.6 46.8 93.1 4.03 4.41 7.8 40 4.6 10.7 65.7 74.6 31.2 2.62 25.08 8.3
95 5.1 11.7 59.1 43.4 102.9 4.61 3.76 8.1 45 4.6 10.7 68.2 77.2 35.9 2.64 25.83 8.7
110 4.6 10.7 57.1 38.2 117.6 5.54 3.02 8.0 50 4.6 10.7 73.3 82.4 40.2 2.67 27.45 8.7
85 5.2 12.1 65.5 51.2 93.7 4.18 4.59 8.7 40 4.6 10.7 60.6 70.6 31.9 2.92 20.75 8.1
95 5.1 11.7 63.9 47.6 103.5 4.78 3.92 8.5 45 4.6 10.7 62.9 73.0 36.6 2.95 21.32 8.3
110 4.6 10.7 61.8 42.2 118.2 5.75 3.15 8.2 50 4.6 10.7 67.6 77.8 41.0 2.98 22.68 9.0
85 5.2 12.1 67.6 53.7 94.0 4.07 4.87 9.0 40 4.6 10.7 62.8 72.5 31.6 2.84 22.11 8.3
95 5.1 11.7 65.9 50.0 103.8 4.65 4.15 8.6 45 4.6 10.7 65.1 74.9 36.3 2.87 22.68 8.5
110 4.6 10.7 63.7 44.6 118.5 5.60 3.33 8.5 50 4.6 10.7 70.0 79.9 40.7 2.90 24.14 9.3
85 5.2 12.1 68.7 55.0 94.2 4.02 5.01 9.0 40 4.6 10.7 63.9 73.5 31.5 2.81 22.74 8.3
95 5.1 11.7 67.0 51.3 103.9 4.60 4.27 8.7 45 4.6 10.7 66.3 76.0 36.2 2.84 23.35 9.3
110 4.6 10.7 64.8 45.9 118.6 5.53 3.43 8.5 50 4.6 10.7 71.2 81.0 40.5 2.86 24.90 9.3
85 5.2 12.1 73.3 58.6 94.8 4.30 5.00 9.5 40 4.6 10.7 59.1 70.2 32.1 3.24 18.24 8.3
95 5.1 11.7 71.4 54.6 104.5 4.91 4.26 9.7 45 4.6 10.7 61.3 72.5 36.8 3.27 18.75 8.1
110 4.6 10.7 69.0 48.8 119.2 5.91 3.42 9.6 50 4.6 10.7 65.9 77.2 41.2 3.31 19.91 8.4
85 5.2 12.1 75.6 61.3 95.1 4.19 5.29 9.7 40 4.6 10.7 61.2 71.9 31.8 3.15 19.43 8.6
95 5.1 11.7 73.7 57.4 104.8 4.78 4.52 9.9 45 4.6 10.7 63.5 74.4 36.5 3.18 19.97 8.3
110 4.6 10.7 71.2 51.6 119.5 5.75 3.63 9.7 50 4.6 10.7 68.3 79.3 40.9 3.22 21.21 8.5
85 5.2 12.1 76.8 62.7 95.2 4.14 5.44 9.9 40 4.6 10.7 62.4 73.0 31.7 3.11 20.06 8.7
95 5.1 11.7 74.9 58.8 105.0 4.73 4.64 10.2 45 4.6 10.7 64.7 75.4 36.4 3.15 20.54 8.6
110 4.6 10.7 72.4 53.0 119.7 5.68 3.74 10.1 50 4.6 10.7 69.5 80.4 40.7 3.18 21.86 8.6
85 5.2 12.1 81.4 66.2 95.9 4.45 5.36 10.7 40 4.6 10.7 57.7 69.8 32.3 3.54 16.30 7.6
95 5.1 11.7 79.4 62.0 105.6 5.09 4.57 10.3 45 4.6 10.7 59.8 72.0 37.0 3.57 16.75 7.8
110 4.6 10.7 76.7 55.8 120.2 6.12 3.67 10.1 50 4.6 10.7 64.3 76.6 41.4 3.61 17.81 8.5
85 5.2 12.1 84.0 69.2 96.2 4.33 5.69 10.9 40 4.6 10.7 59.7 71.4 32.0 3.44 17.35 7.8
95 5.1 11.7 81.9 65.0 105.9 4.95 4.85 10.7 45 4.6 10.7 62.0 73.9 36.7 3.48 17.82 8.2
110 4.6 10.7 79.2 58.9 120.6 5.95 3.90 10.3 50 4.6 10.7 66.6 78.6 41.1 3.51 18.97 8.7
85 5.2 12.1 85.4 70.8 96.4 4.28 5.85 11.2 40 4.6 10.7 60.8 72.4 31.9 3.40 17.88 8.0
95 5.1 11.7 83.3 66.6 106.1 4.89 4.99 10.9 45 4.6 10.7 63.1 74.8 36.6 3.44 18.34 8.9
110 4.6 10.7 80.5 60.4 120.7 5.88 4.01 10.6 50 4.6 10.7 67.8 79.6 41.0 3.47 19.54 8.9
85 5.2 12.1 90.4 74.9 97.1 4.54 5.84 11.8 40 4.6 10.7 56.0 69.2 32.5 3.87 14.47 7.9
95 5.1 11.7 88.2 70.5 106.8 5.18 4.99 12.0 45 4.6 10.7 58.1 71.5 37.3 3.92 14.82 7.7
110 4.6 10.7 85.2 63.9 121.4 6.23 4.01 11.8 50 4.6 10.7 62.5 76.0 41.7 3.96 15.78 8.0
85 5.2 12.1 93.3 78.2 97.4 4.42 6.19 12.1 40 4.6 10.7 58.0 70.9 32.3 3.77 15.38 8.1
95 5.1 11.7 91.0 73.8 107.1 5.05 5.28 12.3 45 4.6 10.7 60.2 73.2 37.0 3.81 15.80 7.9
110 4.6 10.7 88.0 67.3 121.7 6.07 4.25 12.1 50 4.6 10.7 64.7 77.8 41.4 3.85 16.81 8.2
85 5.2 12.1 94.9 80.0 97.7 4.36 6.38 12.3 40 4.6 10.7 59.1 71.8 32.1 3.73 15.84 8.3
95 5.1 11.7 92.5 75.5 107.3 4.99 5.43 12.7 45 4.6 10.7 61.3 74.2 36.8 3.77 16.26 7.9
110 4.6 10.7 89.4 69.0 121.9 5.99 4.37 12.5 50 4.6 10.7 65.9 78.9 41.2 3.80 17.34 8.2
85 5.2 12.1 99.6 83.8 98.3 4.63 6.30 13.4 40 4.6 10.7 54.2 69.1 32.8 4.36 12.43 7.3
95 5.1 11.7 97.1 79.0 107.9 5.30 5.37 13.0 45 4.6 10.7 56.2 71.2 37.5 4.41 12.74 7.5
110 4.6 10.7 93.9 72.2 122.5 6.37 4.32 12.6 50 4.6 10.7 60.4 75.6 41.9 4.46 13.54 8.1
85 5.2 12.1 102.8 87.4 98.7 4.51 6.68 13.8 40 4.6 10.7 56.1 70.6 32.5 4.25 13.20 7.5
95 5.1 11.7 100.3 82.7 108.4 5.15 5.71 13.3 45 4.6 10.7 58.2 72.8 37.2 4.29 13.57 7.7
110 4.6 10.7 96.9 75.7 122.9 6.20 4.58 13.0 50 4.6 10.7 62.6 77.4 41.7 4.34 14.42 8.4
85 5.2 12.1 104.5 89.3 98.9 4.46 6.87 13.9 40 4.6 10.7 57.1 71.4 32.4 4.20 13.60 7.6
95 5.1 11.7 101.9 84.5 108.6 5.09 5.87 13.6 45 4.6 10.7 59.3 73.8 37.1 4.24 13.99 7.9
110 4.642 10.7 98.5 77.6 123.1 6.12 4.72 13.1 50 4.6 10.7 63.7 78.3 41.5 4.29 14.85 8.5
40 4.6 10.7 50.5 69.7 33.3 5.62 8.99 6.7
45 4.6 10.7 52.4 71.8 38.0 5.69 9.21 7.0
50 4.6 10.7 56.3 75.9 42.5 5.74 9.81 7.5
40 4.6 10.7 52.3 71.0 33.0 5.48 9.54 7.0
45 4.6 10.7 54.3 73.2 37.8 5.53 9.82 7.2
50 4.6 10.7 58.3 77.4 42.2 5.59 10.43 7.8
40 4.6 10.7 53.2 71.7 32.9 5.41 9.83 7.1
45 4.6 10.7 55.3 74.0 37.6 5.47 10.11 7.4
50 4.6 10.7 59.4 78.2 42.1 5.52 10.76 7.9
TC
Mbtuh
HR
LLT
°
EER
DH
WPD
ELT °F
Load
GPM
HC
Mbtuh
HE
LLT
°F
COP
DH
Mbtuh
WPD
ELT °F
Load
15.0 5.0 11.6 15
110
10.0 2.6 6.0
Operation Not Recommended
15
13.0 4.0 9.2 15
15
15.0 5.2 12.0 15 15
90
10.0 2.7 6.3 15 15
13.0 4.2 9.6 15
15
15.0 5.4 12.4 15 15
80
10.0 2.8 6.5 15 15
13.0 4.3 9.9 15
15
15.0 5.5 12.8 15 15
70
10.0 2.9 6.7 15 15
13.0 4.4 10.2 15
15
15.0 5.7 13.1 15 15
60
10.0 3.0 6.8 15 15
13.0 4.5 10.5 15
6.1 14.1 15 15
50
10.0 3.1 7.1 15 15
40
15.0
13.0 4.7 10.8 15 15
15.0 5.9 13.6 15 15
15
13.0 4.9 11.3 15 15
15.0 6.4 14.8 15
10.0 3.2 7.4 15
30
10.0
25 15.0 6.5 15.0
WPD
kW kW
3.3 7.7 15
13.0 5.1 11.8 15
15
Operation Not Recommended
EST
°
Source
GPM
* See Page 13 for Application Notes
Enertech Global WT Models, Rev.: B
58
Page 59
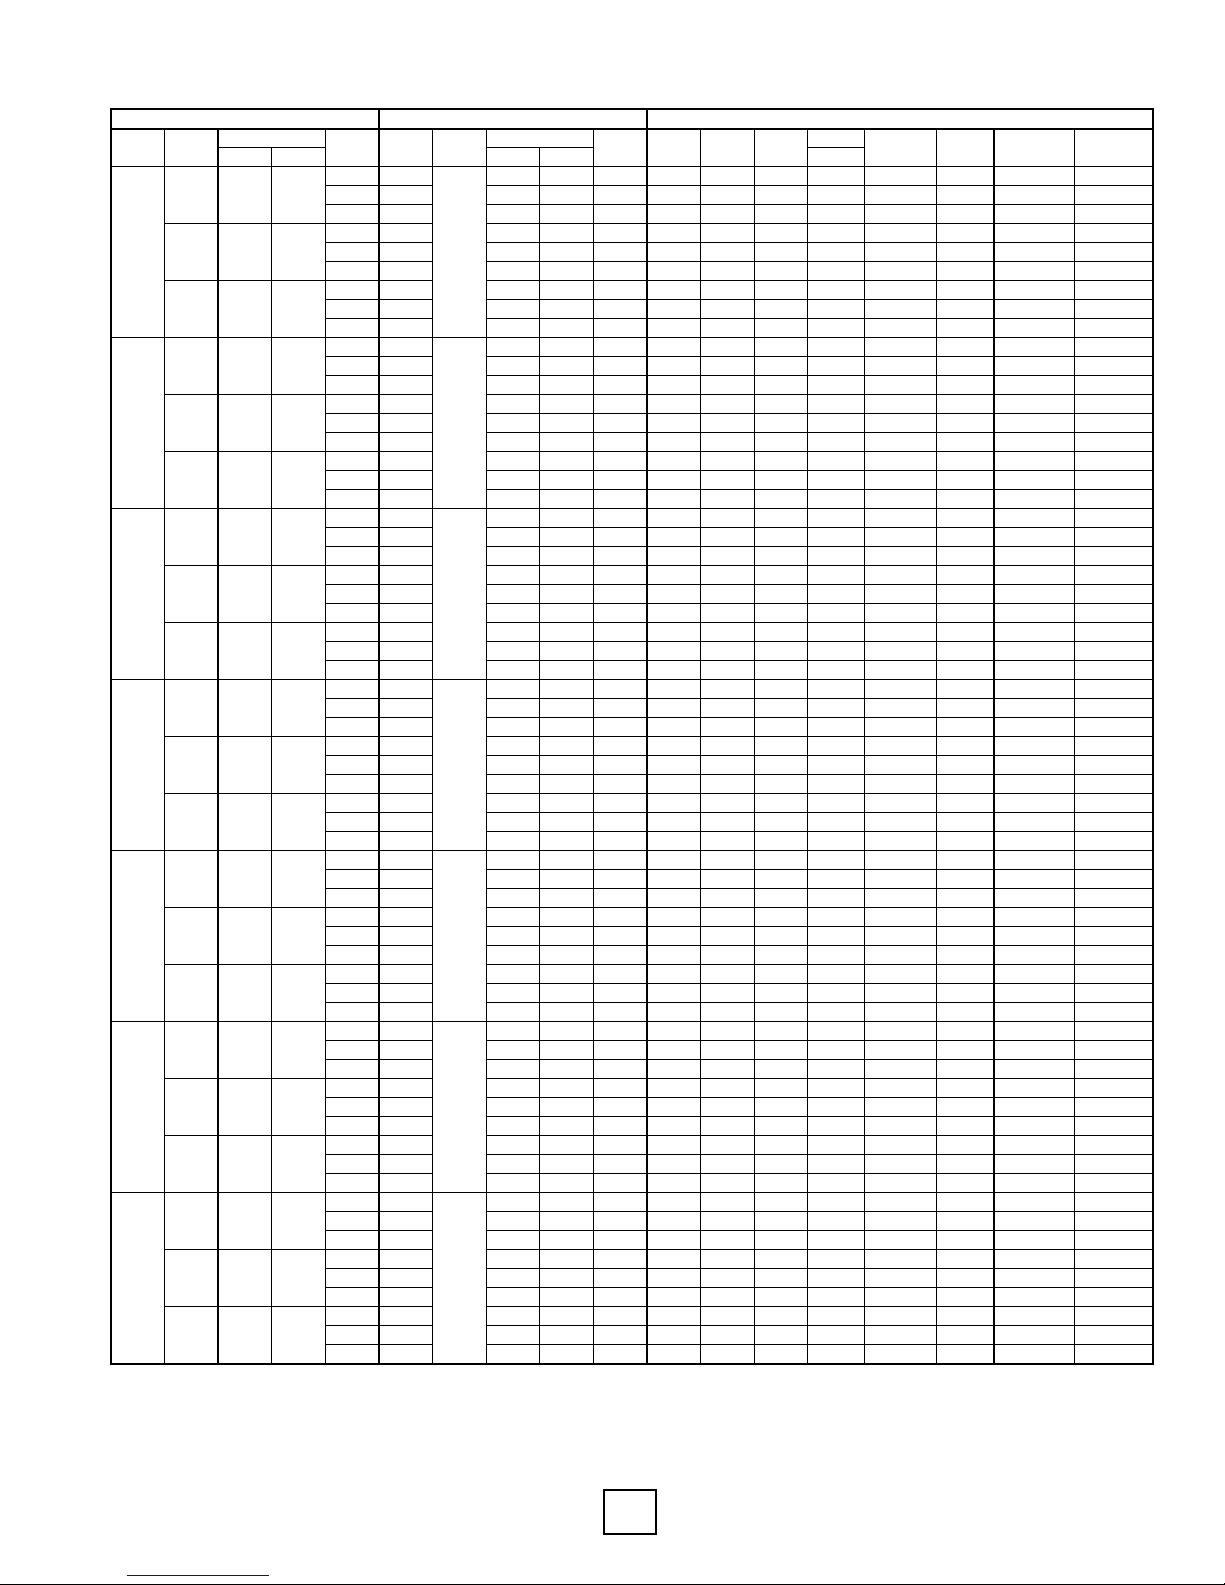
Section 11: Model 092 Cooling Performance Data: 8.0 Ton, Full Load Capacity
EST Flow LST ELT Flow LLT
TC HR EER Discharge Suction Subcooling Superheat
°F GPM PSID FT °F °F GPM PSID FT °F MBtuh MBtuh kW Btuh/W PSIG PSIG °F °F
57.7 40 4.0 9.3 32.5 89.6 103.3 4.02 22.3 182.3 81.4 13.2 3.5
59.0 45 3.9 9.1 36.9 96.6 110.5 4.05 23.8 182.3 87.8 13.1 3.3
60.3 50 3.9 8.9 41.3 104.0 117.9 4.09 25.4 182.3 94.6 13.0 3.0
52.8 40 4.0 9.3 31.8 98.5 111.6 3.86 25.5 171.6 87.5 10.1 3.0
53.7 45 3.9 9.1 36.2 106.2 119.5 3.89 27.3 171.6 94.4 10.0 3.1
54.6 50 3.9 8.9 40.5 114.2 127.6 3.92 29.1 171.6 101.7 9.9 3.2
49.7 40 4.0 9.3 31.6 100.2 112.9 3.72 27.0 166.1 88.0 8.6 4.7
50.4 45 3.9 9.1 36.0 108.1 120.9 3.75 28.8 166.1 95.0 8.5 5.0
51.1 50 3.9 8.9 40.3 116.2 129.2 3.78 30.7 166.1 102.3 8.4 5.3
67.2 40 4.0 9.3 33.1 83.1 100.2 5.01 16.6 231.6 78.9 23.5 5.8
68.4 45 3.9 9.1 37.5 89.6 106.8 5.05 17.7 231.6 85.2 23.4 5.7
69.6 50 3.8 8.9 42.0 96.4 113.8 5.09 18.9 231.6 91.8 23.2 5.6
62.3 40 4.0 9.3 32.4 91.3 107.7 4.81 19.0 218.1 84.8 19.8 5.4
63.2 45 3.9 9.1 36.8 98.5 115.0 4.85 20.3 218.1 91.5 19.8 5.6
64.0 50 3.9 8.9 41.2 105.9 122.6 4.89 21.7 218.1 98.6 19.6 5.8
59.3 40 4.0 9.3 32.3 92.9 108.8 4.63 20.1 211.0 85.4 18.1 7.2
60.0 45 3.9 9.1 36.6 100.2 116.2 4.68 21.4 211.0 92.1 18.0 7.6
60.6 50 3.9 8.9 41.0 107.8 123.9 4.71 22.9 211.0 99.2 17.9 8.1
77.2 40 4.0 9.3 33.2 81.0 99.9 5.52 14.7 261.0 80.2 22.2 5.5
78.3 45 3.9 9.1 37.7 87.4 106.4 5.57 15.7 261.0 86.5 22.0 5.4
79.4 50 3.8 8.9 42.2 94.0 113.1 5.61 16.7 261.0 93.2 21.9 5.3
72.3 40 4.0 9.3 32.6 89.0 107.1 5.30 16.8 245.7 86.1 18.3 5.1
73.1 45 3.9 9.1 37.0 96.0 114.2 5.34 18.0 245.7 92.9 18.2 5.4
73.9 50 3.9 8.9 41.4 103.3 121.6 5.39 19.2 245.7 100.2 18.1 5.6
69.3 40 4.0 9.3 32.5 90.6 108.0 5.11 17.7 237.8 86.7 16.5 6.9
69.9 45 3.9 9.1 36.9 97.7 115.3 5.15 19.0 237.8 93.5 16.4 7.4
70.5 50 3.9 8.9 41.2 105.1 122.8 5.20 20.2 237.8 100.8 16.2 7.9
87.0 40 4.0 9.3 33.5 78.4 99.2 6.08 12.9 292.3 81.0 21.3 5.5
88.1 45 3.9 9.1 38.0 84.6 105.5 6.13 13.8 292.3 87.4 21.2 5.4
89.2 50 3.8 8.9 42.4 91.0 112.0 6.18 14.7 292.3 94.1 21.0 5.4
82.2 40 4.0 9.3 32.8 86.2 106.1 5.83 14.8 275.2 87.0 17.4 5.1
82.9 45 3.9 9.1 37.3 92.9 113.0 5.89 15.8 275.2 93.9 17.3 5.5
83.8 50 3.9 8.9 41.7 99.9 120.2 5.93 16.9 275.2 101.1 17.1 5.8
79.2 40 4.0 9.3 32.7 87.7 106.9 5.63 15.6 266.4 87.6 15.5 6.9
79.8 45 3.9 9.1 37.1 94.6 113.9 5.68 16.7 266.4 94.5 15.4 7.5
80.4 50 3.9 8.9 41.5 101.7 121.2 5.72 17.8 266.4 101.8 15.2 8.1
96.8 40 4.0 9.2 33.8 74.6 98.0 6.86 10.9 332.6 81.3 22.7 5.8
97.9 45 3.9 9.1 38.3 80.5 104.1 6.92 11.6 332.6 87.7 22.6 5.8
99.0 50 3.8 8.9 42.8 86.6 110.4 6.98 12.4 332.6 94.5 22.4 5.9
92.0 40 4.0 9.3 33.2 82.0 104.5 6.59 12.5 313.1 87.3 18.8 5.5
92.7 45 3.9 9.1 37.6 88.4 111.1 6.65 13.3 313.1 94.2 18.7 5.9
93.5 50 3.9 8.9 42.1 95.1 118.0 6.70 14.2 313.1 101.5 18.5 6.3
89.0 40 4.0 9.3 33.0 83.5 105.1 6.35 13.1 303.0 87.9 17.0 7.4
89.6 45 3.9 9.1 37.5 90.0 111.8 6.41 14.0 303.0 94.8 16.9 8.0
90.2 50 3.9 8.9 41.9 96.8 118.8 6.46 15.0 303.0 102.2 16.6 8.7
106.8 40 4.0 9.2 34.1 70.8 97.6 7.85 9.0 372.5 82.6 22.2 5.5
107.8 45 3.9 9.1 38.6 76.4 103.4 7.92 9.7 375.8 89.1 22.6 5.5
108.8 50 3.8 8.9 43.2 82.1 109.4 7.98 10.3 379.3 96.0 23.0 5.6
101.9 40 4.0 9.3 33.5 77.8 103.5 7.53 10.3 350.7 88.7 18.5 5.2
102.6 45 3.9 9.1 38.0 83.9 109.8 7.60 11.0 353.8 95.7 19.0 5.7
103.3 50 3.9 8.9 42.5 90.3 116.4 7.66 11.8 357.1 103.1 19.4 6.1
98.9 40 4.0 9.3 33.4 79.2 104.0 7.26 10.9 339.4 89.3 16.8 7.1
99.5 45 3.9 9.1 37.9 85.4 110.4 7.33 11.7 342.4 96.3 17.2 7.8
100.1 50 3.9 8.9 42.3 91.9 117.1 7.39 12.4 345.6 103.8 17.7 8.5
126.8 40 4.0 9.2 34.7 63.4 97.6 10.04 6.3 475.4 87.0 20.4 3.8
127.7 45 3.9 9.1 39.3 68.3 102.9 10.13 6.7 479.6 93.8 20.9 3.9
128.6 50 3.8 8.9 43.9 73.5 108.3 10.21 7.2 484.1 101.1 21.3 4.1
121.7 40 4.0 9.3 34.2 69.6 102.5 9.64 7.2 447.6 93.4 16.4 3.6
122.4 45 3.9 9.1 38.7 75.1 108.3 9.72 7.7 451.5 100.8 16.9 4.1
123.1 50 3.8 8.9 43.3 80.8 114.2 9.80 8.2 455.7 108.6 17.2 4.6
118.8 40 4.0 9.3 34.1 70.9 102.6 9.30 7.6 433.2 94.0 14.8 5.5
119.3 45 3.9 9.1 38.6 76.4 108.4 9.38 8.2 437.0 101.5 15.2 6.3
119.8 50 3.8 8.9 43.2 82.2 114.4 9.45 8.7 441.1 109.3 15.6 7.1
LST is based on 15% (by volume) methanol antifreeze solution only or 485 multiplier
LLT is based on water only or 500 multiplier
Performance data accurate within ± 10%
Discharge pressure is ± 20 PSI; Suction pressure is ± 10 PSI
SubCooling is ± 5 °F; Superheat is ± 6 °F
Source Water
Load Water
Cooling
WPD
WPD
24.018.0 2.6 6.0
24.0 4.4 10.1
24.018.0 2.5 5.8
24.0
50
12.0 1.2 2.8
40
12.0 1.3 2.9
4.2 9.6
60
12.0 1.2 2.7
24.018.0 2.4 5.6
24.0 4.0 9.3
24.018.0 2.4 5.4
24.0 3.9 9.0
24.018.0 2.3 5.3
24.0
80
12.0 1.1 2.6
70
12.0 1.2 2.7
3.8 8.9
90
12.0 1.1 2.6
24.018.0 2.3 5.3
24.0 3.8 8.8
110
12.0 1.2 2.7
24.0
18.0 2.4 5.4
24.0 3.9 9.0
WT Models, Rev.: B Enertech Global
59
Page 60
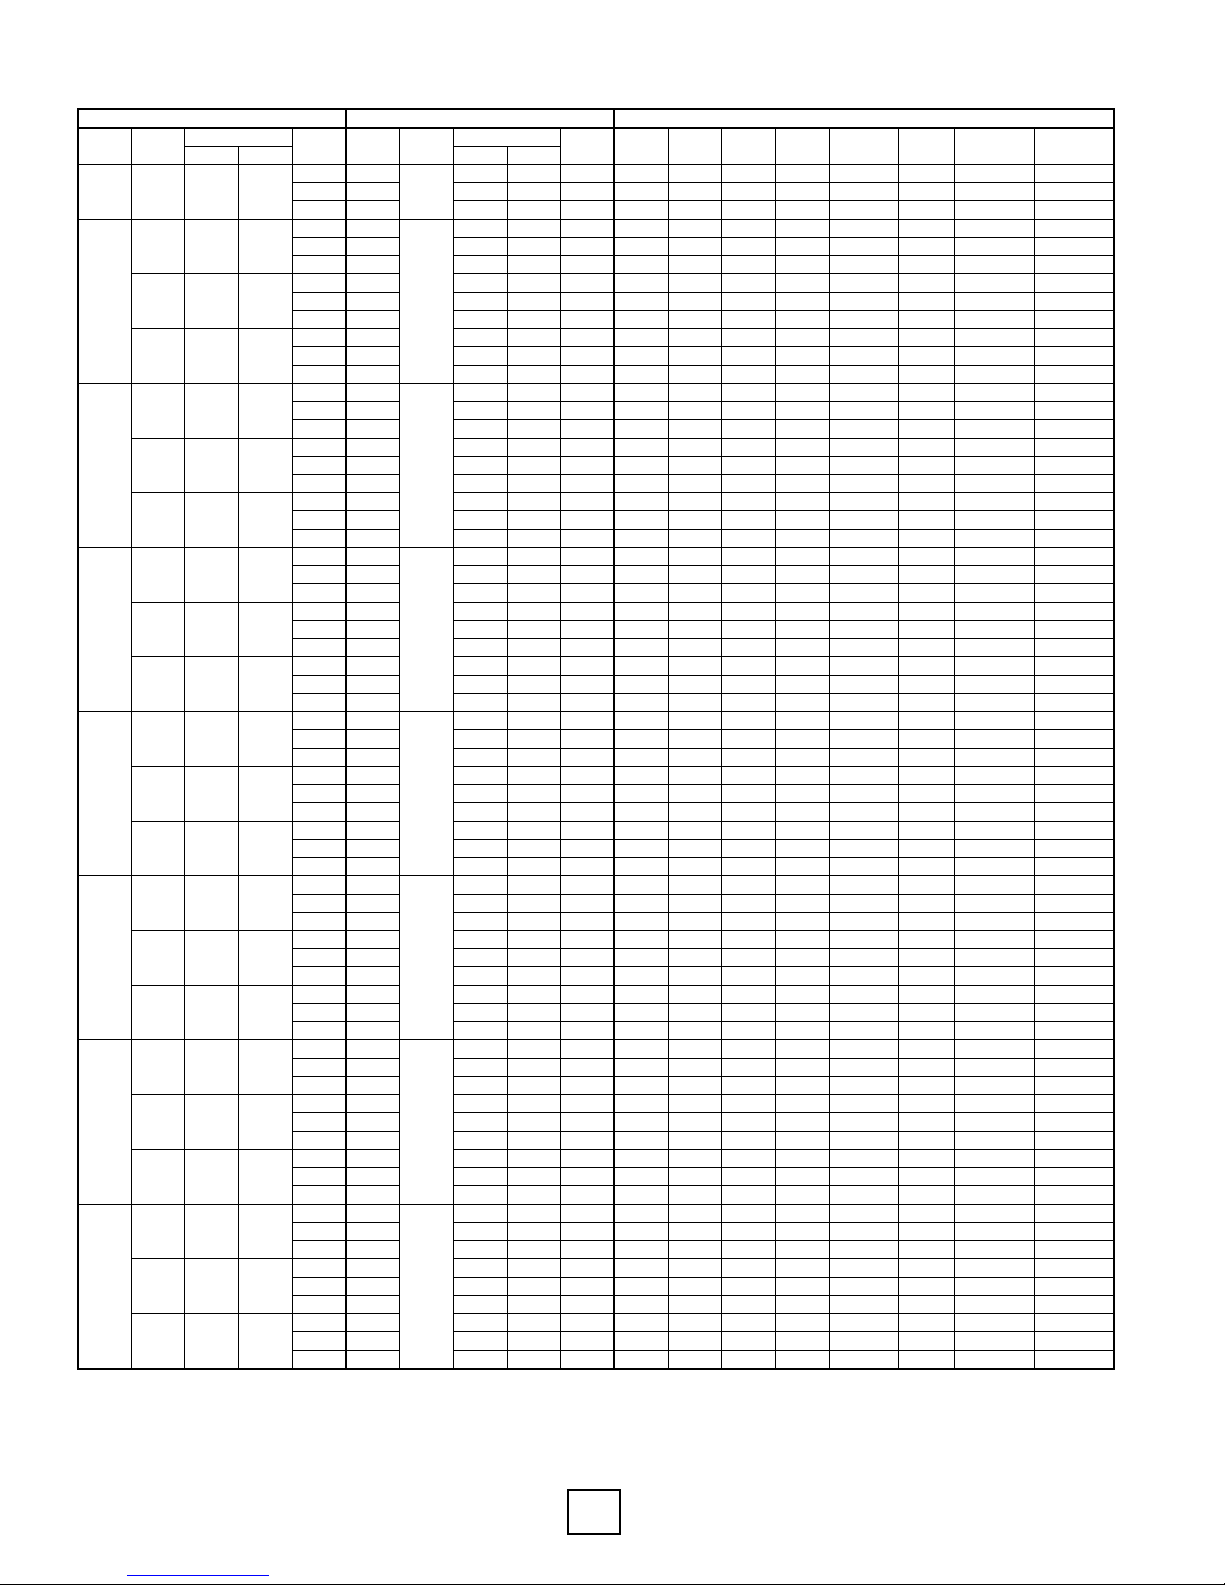
Section 11: Model 092 Heating Performance Data: 8.0 Ton, Full Load Capacity
EST Flow LST ELT Flow LLT
HC HE COP Discharge Suction Subcooling Superheat
°F GPM PSID FT °F °F GPM PSID FT °F MBtuh MBtuh kW W/W PSIG PSIG °F °F
19.5 85 3.2 7.5 92.2 86.3 63.5 6.68 3.79 308.7 65.9 14.6
8.1
19.9 95 3.1 7.2 102.1 85.7 59.6 7.65 3.28 352.4 68.4 14.2
6.6
20.5 110 3.0 7.0 117.0 83.7 52.4 9.17 2.68 421.6 70.7 12.7
5.6
20.8 85 3.2 7.5 91.5 78.5 53.8 7.24 3.18 342.9 68.9 20.8 6.4
21.5 95 3.1 7.2 101.5 78 49.7 8.30 2.75 391.4 71.4 19.9 4.9
22.7 110 3.0 7.0 116.4 76.2 42.3 9.93 2.25 468.3 73.8 18.6 3.8
21.9 85 3.2 7.5 92.8 94 70.3 6.94 3.97 322.8 74.0 17.0 5.4
22.4 95 3.1 7.2 102.8 93.4 66.2 7.96 3.44 368.5 76.7 16.3
3.9
23.3 110 3.0 7.0 117.6 91.2 58.7 9.53 2.80 440.9 79.3 14.7 2.9
23.8 85 3.2 7.5 92.9 94.5 71.6 6.70 4.13 312.4 74.5 15.2 6.8
24.2 95 3.1 7.2 102.8 93.9 67.7 7.68 3.58 356.6 77.2 14.7 5.3
24.8 110 3.0 7.0 117.6 91.7 60.3 9.19 2.92 426.7 79.8 13.1 4.3
29.0 85 3.2 7.5 92.5 89.4 64.3 7.35 3.56 349.3 81.9 21.8
5.7
29.7 95 3.1 7.2 102.4 88.8 60.0 8.43 3.09 398.6 84.9 20.8
4.2
31.0 110 3.0 7.0 117.2 86.8 52.4 10.09 2.52 477.0 87.7 19.6
3.3
30.5 85 3.2 7.5 93.9 107 82.9 7.06 4.44 328.8 87.9 18.0 5.4
31.0 95 3.1 7.2 103.9 106.4 78.8 8.09 3.85 375.3 91.2 17.3 4.0
31.9 110 3.0 7.0 118.7 103.9 70.8 9.69 3.14 449.1 94.3 15.7 3.1
32.7 85 3.2
7.5 94.0 107.6 84.4 6.81 4.63 318.2 88.5 16.2
7.3
33.1 95 3.1 7.2 103.9 106.9 80.3 7.80 4.02 363.2 91.8 15.6
5.8
33.8 110 3.0 7.0 118.7 104.4 72.5 9.34 3.28 434.6 94.9 14.0
5.0
37.1 85 3.2 7.5 93.4 100.5 75.0 7.48 3.94 355.7 95.2 22.7 5.8
37.9 95 3.1 7.2 103.3 99.9 70.7 8.57 3.42 405.9 98.7 21.6 4.3
39.3 110 3.0 7.0 118.1 97.5 62.5 10.26 2.79 485.7 102.0 20.6 3.6
39.0 85 3.2 7.5 95.0 120.3 95.8 7.18 4.91 334.9 102.2 18.9 6.3
39.5 95 3.1 7.2 105.0 119.6 91.5 8.23 4.26 382.2 106.0 18.1 4.8
40.5 110 3.0 7.0 119.7 116.8 83.2 9.85 3.48 457.3 109.6 16.5 4.1
41.6 85 3.2 7.5 95.1 120.9 97.3 6.92 5.12 324.1 102.9 17.2 8.6
42.0 95 3.1 7.2 105.0
120.2 93.1 7.93 4.44 369.9 106.7 16.4 7.2
42.7 110 3.0 7.0 119.8 117.3 84.9 9.50 3.62 442.6 110.3 14.8 6.6
45.0 85 3.2 7.5 94.4 113.2 87.3 7.59 4.37 362.7 110.1 23.4
5.8
45.8 95 3.1 7.2 104.4 112.4 82.7 8.70 3.79 414.0 114.2 22.2
4.4
47.3 110 3.0 7.0 119.2 109.8 74.2 10.42 3.09 495.4 118.0 21.4
3.7
47.3 85 3.2 7.5 96.3 135.5 110.7 7.28 5.45 341.5 118.3 19.7 7.0
47.8 95 3.1 7.2 106.2 134.6 106.1 8.35 4.72 389.8 122.7 18.6 5.6
48.9 110 3.0 7.0 121.0 131.4 97.3 10.00 3.85 466.4 126.8 17.1 5.0
50.4 85 3.2 7.5 96.3 136.1 112.1 7.02 5.68 330.5 119.1 17.9
9.9
50.7 95 3.1 7.2 106.3 135.2 107.7 8.05 4.92 377.2 123.4 17.0
8.5
51.5 110 3.0 7.0 121.0 132.1 99.2 9.64 4.02 451.4 127.6
15.4
8.0
52.8 85 3.2 7.5 95.5 126.4 100.1 7.71 4.80 369.8 125.8 23.8 6.2
53.6 95 3.1 7.2 105.5 125.6 95.4 8.84 4.16 422.1 130.5 22.5 4.8
55.1 110 3.0 7.0 120.2 122.6 86.5 10.59 3.39 505.1 134.9 21.9 4.2
55.6 85 3.2 7.5 97.6 151.3 126.1 7.40 5.99 348.2 135.2 20.1 8.0
56.1 95 3.1 7.2 107.5 150.3 121.3 8.49 5.19 397.4 140.2 18.9 6.6
57.2 110 3.0 7.0 122.2 146.8 112.1 10.16 4.23 475.5 144.9 17.4 6.2
59.0 85 3.2 7.5 97.7 152 127.6 7.14 6.24 337.0 136.1 18.3 11.4
59.4 95 3.1 7.2 107.6 151.1 123.2 8.19 5.41 384.6 141.1 17.3 10.0
60.2 110 3.0 7.0 122.3 147.5 114.1 9.80 4.41 460.2 145.9 15.6 9.7
60.7 85 3.2 7.5 96.6 139.1 112.2 7.88 5.17 376.3 141.3 23.9
7.3
61.5 95
3.1 7.2 106.5 138.2 107.4 9.04 4.48 429.5 146.5 22.5
5.9
63.1 110 3.0 7.0 121.3 135 98.1 10.82 3.66 513.9 151.4 22.1
5.4
63.9 85 3.2 7.5 98.9 166.5 140.7 7.57 6.45 354.3 151.8 20.3 9.7
64.4 95 3.1 7.2 108.8 165.5 135.9 8.67 5.59 404.3 157.4 18.9 8.3
65.6 110 3.0 7.0 123.5 161.6 126.1 10.39 4.56 483.8 162.7 17.5 7.9
67.8 85 3.2 7.5 98.9 167.3 142.4 7.30 6.72 342.9 152.8 18.5
13.6
68.2 95 3.1 7.2 108.9 166.3 137.8 8.36 5.83 391.3 158.4 17.3
12.2
69.0 110 3.0 7.0 123.5 162.4 128.2 10.02 4.75 468.2 163.8 15.6
12.0
68.6 85 3.2 7.5 97.7 152.1 124.6 8.06 5.53 382.8 157.0 24.0 8.7
69.5 95 3.1 7.2 107.6 151.1 119.6 9.24 4.79 436.9 162.8 22.4 7.2
71.1 110
3.0 7.0 122.3 147.6
109.9 11.06 3.91 522.8 168.3 22.2 6.8
72.2 85 3.2 7.5 100.2 182.1 155.7 7.73 6.90 360.4 168.7 20.3 11.7
72.7 95 3.1 7.2 110.1 180.9 150.6 8.87 5.98 411.3 174.9 18.8 10.2
73.9 110 3.0 7.0 124.7 176.7 140.5 10.62 4.88 492.2 180.8 17.5 9.9
76.5 85 3.2 7.5 100.3 183 157.5 7.46 7.19 348.8 169.8 18.6 16.1
76.9 95 3.1 7.2 110.2 181.8 152.6 8.55 6.23 398.1 176.0 17.2 14.6
77.7 110 3.0 7.0 124.8 177.5 142.6 10.24 5.08 476.3 182.0 15.5
14.5
LST is based on 15% (by volume) methanol antifreeze solution only or 485 multiplier
LLT is based on water only or 500 multiplier
Performance data accurate within ± 10%
Discharge pressure is ± 20 PSI; Suction pressure is ± 10 PS I
SubCooling is ± 5 °F; Superheat is ± 6 °F
90
12.0 1.1 2.7
24.0
18.0 2.3 5.4
24.0 3.8 8.9
80
12.0 1.2 2.7
70
12.0 1.2 2.8
3.9 9.0
24.018.0 2.4 5.5
24.0
24.018.0 2.4 5.6
24.0 4.0 9.3
60
12.0 1.3 2.9
24.018.0 2.5 5.8
24.0 4.2 9.6
50
12.0 1.3 3.0
40
12.0 1.4 3.1
4.3 10.0
24.018.0 2.6 6.1
24.0
24.018.0 2.8 6.4
24.0 4.5 10.5
25 24.0 4.9 11.2 24.0
30
12.0 1.4 3.3
24.018.0 2.9 6.7
24.0 4.8 11.0
Source Water
Load Water
Heating
WPD
WPD
Enertech Global WT Models, Rev.: B
60
Page 61
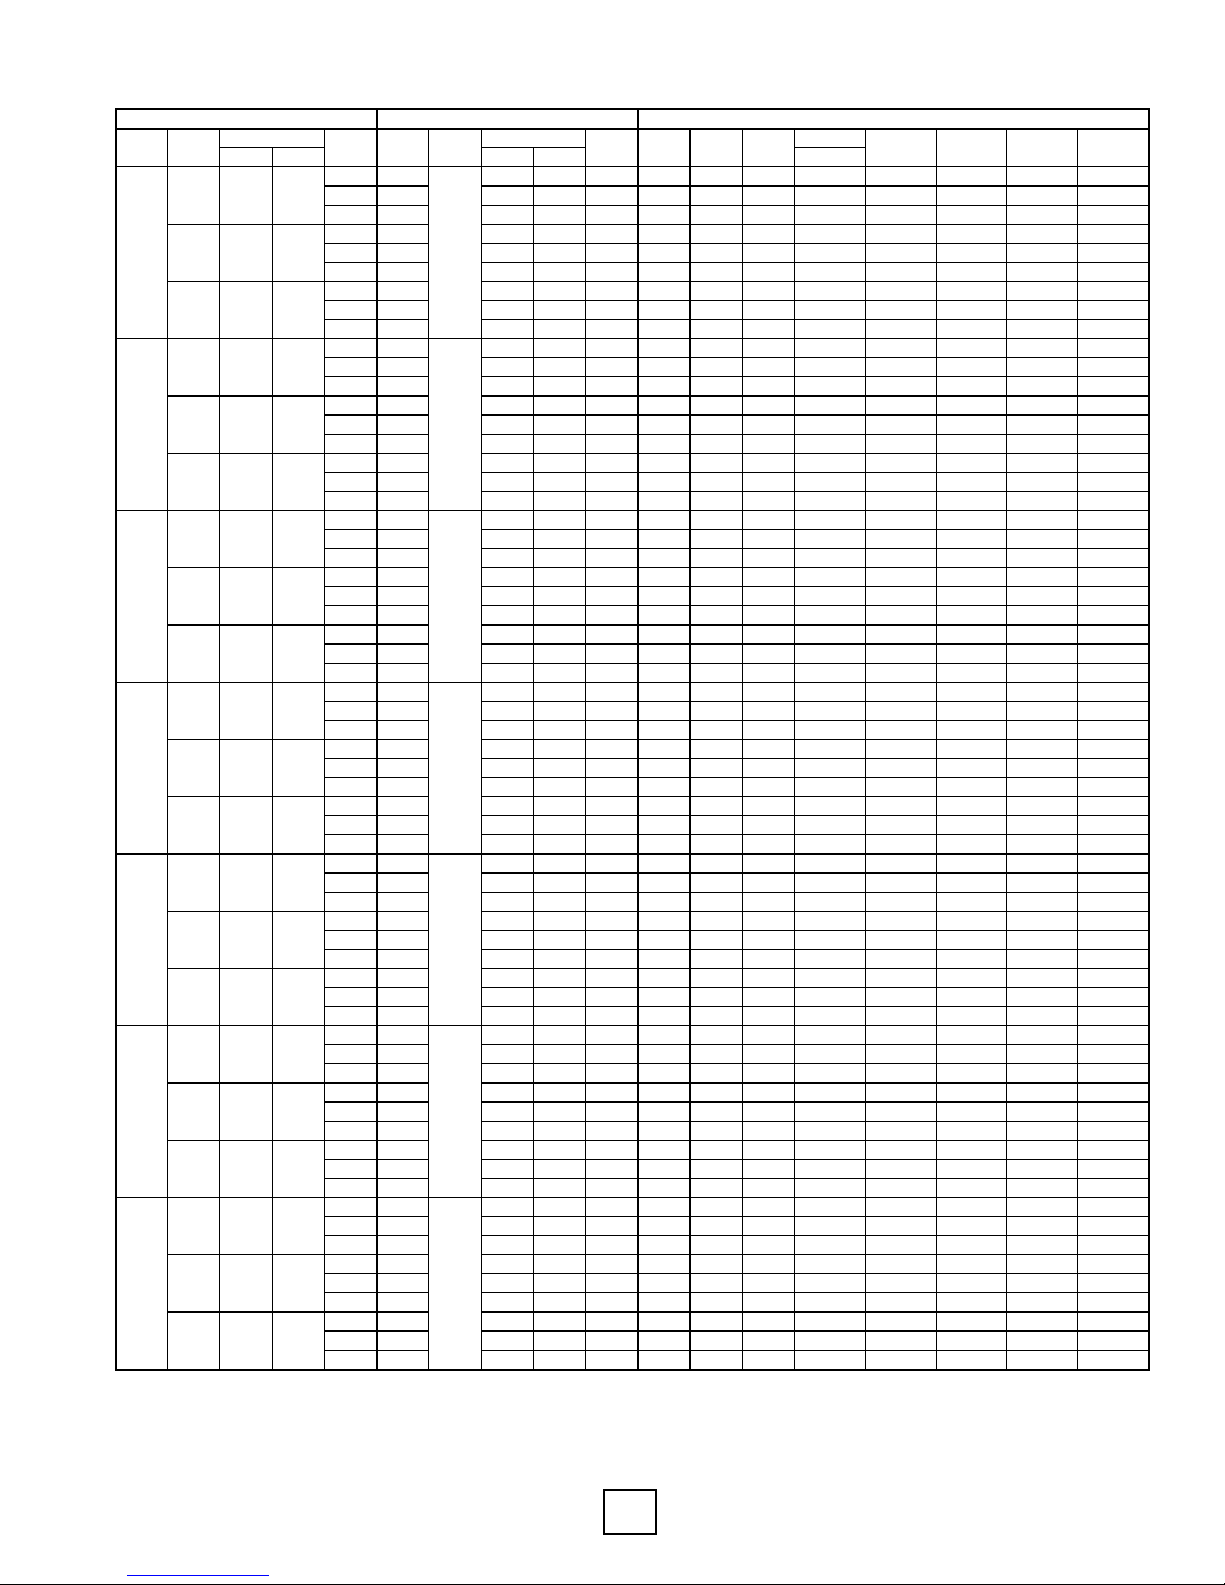
Section 11: Model 120 Cooling Performance Data: 10.0 Ton, Full Load Capacity
EST Flow LST ELT Flow LLT
TC HR EER Discharge Suction Subcooling Superheat
°F GPM PSID FT °F °F GPM PSID FT °F MBtuh MBtuh kW Btuh/W PSIG PSIG °F °F
54.7 40 6.1 14.1 33.9 91.5 106.7 4.44 20.6 181.9 66.5 19.1 15.5
55.7 45 6.0 13.8 38.4 99.0 114.3 4.47 22.2 181.9 72.3 19.0 15.4
56.8 50 5.9 13.5 42.9 106.8 122.1 4.50 23.7 181.9 78.2 18.8 15.5
50.2 40 6.1 14.1 33.5 96.9 111.2 4.20 23.1 172.4 71.0 16.3 15.1
50.9 45 6.0 13.8 38.0 104.9 119.3 4.23 24.8 172.4 77.2 16.1 15.3
51.7 50 5.9 13.6 42.5 113.0 127.6 4.26 26.5 172.4 83.5 15.9 15.7
47.9 40 6.1 14.1 33.3 100.6 114.6 4.11 24.5 167.4 73.3 14.7 15.4
48.4 45 6.0 13.8 37.7 108.8 122.9 4.13 26.3 167.4 79.6 14.6 15.8
49.0 50 5.9 13.6 42.2 117.3 131.5 4.17 28.2 167.4 86.2 14.4 16.4
64.7 40 6.1 14.1 34.0 90.1 107.3 5.05 17.8 213.1 73.3 19.4 10.6
65.8 45 6.0 13.8 38.5 97.4 114.8 5.08 19.2 213.1 79.7 19.1 10.4
66.8 50 5.9 13.5 43.0 105.0 122.5 5.12 20.5 213.1 86.2 18.9 10.5
60.2 40 6.1 14.1 33.6 95.3 111.6 4.78 20.0 201.9 78.2 16.2 10.2
61.0 45 6.0 13.8 38.1 103.1 119.5 4.80 21.5 201.9 85.1 16.0 10.3
61.7 50 5.9 13.5 42.6 111.2 127.7 4.84 23.0 201.9 92.0 15.8 10.6
57.9 40 6.1 14.1 33.4 98.9 114.9 4.67 21.2 196.0 80.8 14.6 10.5
58.5 45 6.0 13.8 37.9 107.0 123.1 4.70 22.8 196.0 87.8 14.4 10.7
59.0 50 5.9 13.5 42.3 115.4 131.5 4.73 24.4 196.0 95.0 14.1 11.3
74.8 40 6.1 14.1 34.1 88.0 107.7 5.76 15.3 247.7 75.8 19.9 9.1
75.8 45 6.0 13.8 38.7 95.2 115.0 5.80 16.4 247.7 82.4 19.7 8.9
76.8 50 5.9 13.5 43.2 102.6 122.5 5.84 17.6 247.7 89.2 19.4 8.9
70.2 40 6.1 14.1 33.8 93.1 111.7 5.45 17.1 234.8 80.9 16.5 8.7
71.0 45 6.0 13.8 38.3 100.8 119.5 5.48 18.4 234.8 88.0 16.3 8.7
71.7 50 5.9 13.5 42.8 108.6 127.5 5.53 19.7 234.8 95.2 16.0 9.0
67.9 40 6.1 14.1 33.6 96.6 114.8 5.33 18.1 227.9 83.6 14.7 8.9
68.4 45 6.0 13.8 38.0 104.6 122.9 5.36 19.5 227.9 90.8 14.5 9.2
69.0 50 5.9 13.5 42.5 112.7 131.2 5.41 20.9 227.9 98.3 14.2 9.7
84.8 40 6.1 14.1 34.3 85.3 107.8 6.59 13.0 285.9 76.7 20.6 8.8
85.8 45 6.0 13.8 38.8
92.3 115.0 6.63 13.9 285.9 83.3 20.3 8.6
86.8 50 5.9 13.5 43.4 99.5 122.3 6.68 14.9 285.9 90.2 20.0 8.6
80.2 40 6.1 14.1 34.0 90.3 111.6 6.23 14.5 271.0 81.8 17.0 8.3
80.9 45 6.0 13.8 38.5 97.7 119.1 6.27 15.6 271.0 88.9 16.7 8.4
81.6 50 5.9 13.5 43.0 105.4 126.9 6.32 16.7 271.0 96.2 16.4 8.7
77.9 40 6.1 14.1 33.8 93.7 114.5 6.10 15.4 263.0 84.5 15.1 8.6
78.4 45 6.0 13.8 38.2 101.4 122.4 6.13 16.5 263.0 91.8 14.8 8.9
79.0 50 5.9 13.5 42.7 109.3 130.4 6.18 17.7 263.0 99.4 14.5 9.5
94.8 40 6.1 14.1 34.5 82.1 107.8 7.52 10.9 327.6 77.5 20.8 8.5
95.8 45 6.0 13.8 39.1 88.8 114.7 7.57 11.7 327.6 84.2 20.5 8.3
96.7 50 5.9 13.5 43.6 95.8 121.8 7.63 12.6 327.6 91.1 20.2 8.4
90.2 40 6.1 14.1 34.2 86.9 111.2 7.12 12.2 310.4 82.7 17.3 8.1
90.9 45 6.0 13.8 38.7 94.1 118.5 7.16 13.1 310.4 89.9 17.0 8.2
91.5 50 5.9 13.5 43.2 101.4 126.0 7.21 14.1 310.4 97.2 16.6 8.5
87.8 40 6.1 14.1 34.0 90.2 114.0 6.96 13.0 301.3 85.3 15.4 8.4
88.4 45 6.0 13.8 38.5 97.6 121.5 7.00 13.9 301.3 92.8 15.1 8.7
88.9 50 5.9 13.5 43.0 105.2 129.3 7.06 14.9 301.3 100.4 14.8 9.2
104.8 40 6.1 14.1 34.8 78.3 107.6 8.57 9.1 365.5 78.9 19.0 7.8
105.7 45 6.0 13.8 39.4 84.7 114.1 8.62 9.8 368.5 85.8 19.2 7.7
106.6 50 5.9 13.5 43.9 91.3 121.0 8.68 10.5 371.8 92.8 19.4 7.7
100.1 40 6.1 14.1 34.5 82.9 110.6 8.10 10.2 346.4 84.2 15.6 7.4
100.8 45 6.0 13.8 39.0 89.7 117.5 8.15 11.0 349.2 91.6 15.8 7.5
101.4 50 5.9 13.5 43.6 96.7 124.7 8.21 11.8 352.4 99.1 16.1 7.9
97.8 40 6.1 14.1 34.3 86.0 113.1 7.93 10.9 336.2 86.9 13.8 7.7
98.3 45 6.0 13.8 38.8 93.1 120.3 7.97 11.7 339.0 94.5 14.0 8.0
98.8 50 5.9 13.5 43.3 100.3 127.7 8.03 12.5 342.1 102.3 14.3 8.6
124.6 40 6.1 14.1 35.4 69.0 106.5 10.99 6.3 464.4 82.1 16.4 7.1
125.4 45 6.0 13.8 40.0 74.6 112.3 11.05 6.8 468.2 89.3 16.6 7.1
126.3 50 5.9 13.5 44.6 80.4 118.4 11.13 7.2 472.5 96.6 16.8 7.2
119.9 40 6.1 14.1 35.1 73.0 108.5 10.39 7.0 440.1 87.7 12.9 6.8
120.5 45 6.0 13.8 39.7 79.0 114.7 10.45 7.6 443.7 95.3 13.0 7.0
121.1 50
5.9 13.5 44.3 85.2 121.1 10.53 8.1 447.7 103.1 13.2 7.5
117.6 40 6.1 14.1 34.9 75.8 110.5 10.16 7.5 427.2 90.5 11.1 7.1
118.0 45 6.0 13.8 39.5 82.0 116.9 10.22 8.0 430.7 98.4 11.3 7.6
118.5 50 5.9 13.5 44.1 88.4 123.5 10.30 8.6 434.6 106.5 11.4 8.3
LST is based on 15% (by volume) methanol antifreeze solution only or 485 multiplier
LLT is based on water only or 500 multiplier
Performance data accurate within ± 10%
Discharge pressure is ± 20 PSI; Suction pressure is ± 10 PSI
SubCooling is ± 5 °F; Superheat is ± 6 °F
110
15.0 1.8 4.1
30.0
22.5 3.6 8.4
30.0 6.0 13.8
90
15.0 1.7 4.0
80
15.0 1.8 4.0
5.9 13.6
30.022.5 3.6 8.2
30.0
30.022.5 3.6 8.2
30.0 5.9 13.6
70
15.0 1.8 4.1
30.022.5 3.6 8.4
30.0 6.0 13.9
60
15.0 1.8 4.2
50
15.0 1.9 4.4
6.2 14.3
30.022.5 3.7 8.6
30.0
30.022.5 3.9 8.9
30.0 6.4 14.8
Source Water
Load Water
Cooling
WPD
WPD
40
15.0 2.0 4.5
30.022.5 4.0 9.3
30.0 6.7 15.5
WT Models, Rev.: B Enertech Global
61
Page 62
Section 11: Model 120 Heating Performance Data: 10.0 Ton, Full Load Capacity
EST Flow LST ELT Flow LLT
HC HE COP Discharge Suction Subcooling Superheat
°F GPM PSID FT °F °F GPM PSID FT °F MBtuh MBtuh kW W/W PSIG PSIG °F °F
20.3 85 5.0 11.6 91.2 93.4 68.7 7.24 3.78 306.7 62.6 13.1
8.8
20.6 95 4.9 11.3 101.1 92 63.8 8.26 3.26 349.1 64.2 12.9
7.9
21.2 110 4.7 10.8 115.9 89.2 55.4 9.92 2.64 416.2 66.0 10.8
7.3
20.5 85 5.0 11.6 91.4 96.2 69.1 7.94 3.55 337.9 64.5 19.0 9.4
21.2 95 4.9 11.3 101.3 94.7 63.8 9.06 3.06 384.6 66.1 18.4 8.5
22.5 110 4.7 10.8 116.1 91.8 54.7 10.88 2.47 458.5 68.0 16.3 8.0
23.2 85 5.0 11.6 91.7 99.8 74.2 7.51 3.89 320.2 68.8 15.4 8.4
23.7 95 4.9 11.2 101.6 98.3 69.1 8.57 3.36 364.5 70.6 15.1 7.5
24.5 110 4.7 10.8 116.4 95.3 60.2 10.29 2.71 434.5 72.5 12.9 7.0
24.7 85 5.0 11.6 91.8 101.8 76.7 7.35 4.06 310.8 71.0 13.6 8.3
25.1 95 4.9 11.2 101.7 100.3 71.7 8.38 3.51 353.8 72.9 13.3 7.4
25.7 110 4.7 10.8 116.5 97.2 62.8 10.07 2.83 421.7 74.9 11.1 7.0
28.5 85 5.0 11.6 92.4 111 83.5 8.05 4.04 343.8 78.2 19.5
8.3
29.3 95 4.9 11.3 102.3 109.3 78.0 9.18 3.49 391.3 80.2 18.8
7.3
30.6 110 4.7 10.8 117.1 106 68.4 11.03 2.82 466.5 82.4 16.7
7.0
31.8 85 5.0 11.6 92.7 115.2 89.2 7.61 4.44 325.8 83.5 16.0 7.8
32.3 95 4.9 11.2 102.6 113.4 83.7 8.69 3.82 370.9 85.6 15.5 6.9
33.2 110 4.7 10.8 117.3 110 74.4 10.43 3.09 442.1 88.0 13.2 6.7
33.7 85 5.0 11.6 92.8 117.5 92.1 7.45 4.62 316.2 86.2 14.1
8.1
34.0 95 4.9 11.2 102.7 115.7 86.7 8.50 3.99 360.0 88.4 13.7
7.2
34.7 110 4.7 10.8 117.5 112.2 77.4 10.20 3.22 429.1 90.8 11.4
7.1
36.5 85 5.0 11.6 93.4 125.9 98.1 8.16 4.52 349.7 92.0 20.0 8.2
37.3 95 4.9 11.2 103.3 124 92.2 9.31 3.90 398.1 94.4 19.2 7.3
38.7 110 4.7 10.8 118.0 120.2 82.1 11.18 3.15 474.6 97.0 17.2 7.2
40.4 85 5.0 11.5 93.7 130.6 104.3 7.72 4.96 331.4 98.2 16.5 8.3
41.0 95 4.9 11.2 103.6 128.7 98.7 8.80 4.29 377.3 100.7 15.9 7.5
41.9 110 4.7 10.8 118.3 124.8 88.7 10.57 3.46 449.7 103.5 13.5 7.5
42.6 85 5.0 11.5 93.9 133.3 107.5 7.55 5.17 321.7 101.3 14.7 9.0
43.0 95 4.9 11.2 103.8
131.3 101.9 8.61 4.47 366.2 104.0 14.1 8.2
43.7 110 4.7 10.8 118.5 127.3 92.0 10.34 3.61 436.5 106.8 11.8 8.3
44.5 85 5.0 11.6 94.4 141.4 113.0 8.32 4.98 356.8 106.4 20.6
9.0
45.3 95 4.9 11.2 104.3 139.3 106.9 9.49 4.30 406.2 109.2 19.7
8.1
46.8 110 4.7 10.8 119.0 135 96.1 11.40 3.47 484.2 112.2 17.8
8.3
49.0 85 5.0 11.5 94.8 146.7 119.8 7.87 5.46 338.2 113.6 17.2 9.7
49.6 95 4.9 11.2 104.6 144.5 113.9 8.98 4.72 384.9 116.5 16.4 8.9
50.5 110 4.7 10.8 119.3 140.1 103.3 10.78 3.81 458.9 119.7 14.1 9.2
51.5 85 5.0 11.5 95.0 149.6 123.3 7.70 5.69 328.2 117.2 15.4
10.9
51.9 95 4.9 11.2 104.8 147.4 117.4 8.78 4.92 373.6 120.3 14.7
10.1
52.7 110 4.7 10.8 119.5 142.9 106.9 10.55 3.97 445.4 123.6 12.2
10.5
52.4 85 5.0 11.5 95.5 157 128.1 8.48 5.43 364.0 120.9 21.3 10.2
53.3 95 4.9 11.2 105.3 154.7 121.7 9.68 4.68 414.3 124.1 20.3 9.4
54.8 110 4.7 10.8 120.0 150 110.4 11.62 3.78 493.9 127.5 18.6 9.8
57.6 85 5.0 11.5 95.9 162.9 135.5 8.02 5.95 344.9 129.1 17.9 11.6
58.2 95 4.8 11.2 105.7 160.5 129.3 9.15 5.14 392.6 132.4 17.0 10.8
59.2 110 4.7 10.7 120.4 155.6 118.1 10.99 4.15 468.1 136.1 14.7 11.3
60.4 85 5.0 11.5 96.1 166.2 139.4 7.85 6.20 334.8 133.2 16.1 13.2
60.8 95 4.8 11.2 105.9 163.7 133.2 8.95 5.36 381.1 136.7 15.3 12.4
61.6 110 4.7 10.7 120.6 158.7 122.0 10.75 4.33 454.3 140.5 12.8 13.0
60.3 85 5.0 11.5 96.5 172.5 143.2 8.60 5.88 370.0 135.0 21.9
11.5
61.3 95 4.9 11.2 106.3 169.9 136.4 9.81 5.08 421.2 138.5 20.8
10.7
62.9 110 4.7 10.7 121.0 164.8 124.6 11.78 4.10 502.1 142.4 19.4
11.3
66.1 85 5.0 11.5 96.9 179 151.3 8.13 6.45 350.7 144.1 18.5 13.4
66.7 95 4.8 11.2 106.8 176.3 144.6 9.28 5.57 399.2 147.8 17.5 12.6
67.8 110 4.6 10.7 121.4 170.9 132.9 11.15 4.49 475.9 151.9 15.3 13.3
69.3 85 5.0 11.5 97.2 182.6 155.4 7.96 6.72 340.4 148.8 16.7
15.3
69.8 95 4.8 11.2 107.0 179.9 148.9 9.08 5.81 387.5 152.6 15.8
14.6
70.6 110 4.6 10.7 121.6 174.4 137.2 10.90 4.69 461.9 156.8 13.4
15.4
68.2 85 5.0 11.5 97.5 188.1 158.3 8.72 6.32 376.1 149.1 22.6 13.0
69.2 95 4.8 11.2 107.4 185.3 151.3 9.95 5.46 428.2 153.0 21.4 12.3
70.9 110
4.7 10.7 122.0 179.6 138.8 11.95 4.40 510.4 157.2 20.2 13.0
74.7 85 5.0 11.5 98.0 195.1 166.9 8.25 6.93 356.5 159.2 19.2 15.4
75.3 95 4.8 11.1 107.8 192.2 160.1 9.41 5.99 405.8 163.3 18.1 14.7
76.5 110 4.6 10.7 122.4 186.4 147.8 11.30 4.83 483.7 167.8 16.0 15.6
78.2 85 5.0 11.5 98.3 199.1 171.6 8.07 7.23 346.0 164.3 17.4 17.7
78.7 95 4.8 11.1 108.1 196.1 164.7 9.20 6.25 393.9 168.6 16.4 17.0
79.5 110 4.6 10.7 122.7 190.1 152.4 11.05 5.04 469.5 173.2 14.0 18.0
LST is based on 15% (by volume) methanol antifreeze solution only or 485 multiplier
LLT is based on water only or 500 multiplier
Performance data accurate within ± 10%
Discharge pressure is ± 20 PSI; Suction pressure is ± 10 PSI
SubCooling is ± 5 °F; Superheat is ± 6 °F
90
15.0 1.8 4.1
30.0
22.5 3.6 8.3
30.0 5.9 13.6
80
15.0 1.8 4.2
30.022.5 3.6 8.4
30.0 6.0 13.9
70
15.0 1.9 4.3
60
15.0 1.9 4.4
6.2 14.2
30.022.5 3.7 8.6
30.0
30.022.5 3.9 9.0
30.0 6.4 14.7
50
15.0 2.0 4.6
30.022.5 4.0 9.3
30.0 6.7 15.4
40
15.0 2.1 4.8
30
15.0 2.2 5.1
7.0 16.1
30.022.5 4.2 9.8
30.0
30.022.5 4.4 10.2
30.0 7.3 16.9
Source Water
Load Water
Heating
WPD
WPD
25 30.0 7.5 17.3 30.0
Enertech Global WT Models, Rev.: B
62
Page 63
Section 11: Model 144 Performance Data: 12.0 Ton, Part Load Capacity
EST GPM PSI FT
10.0 2.2 5.0
14.0 4.0 9.3
30
18.0 6.5 15.0
10.0 2.0 4.7
50
14.0 3.7 8.6
18.0 6.0 14.0
10.0 2.0 4.7
70
14.0 3.6 8.3
18.0 5.8 13.3
10.0 1.9 4.3
90
14.0 3.3 7.7
18.0 5.3 12.3
10.0 1.8 4.2
110
14.0 3.3 7.7
18.0 5.3 12.1
Heating Cooling
ELT HC HE KW L LT COP DH ELT TC HR KW LLT EER DH
85 58.8 42.2 5.13 96.7 3.36 7.3
95 57.1 39.7 5.40 106.4 3.10 7.5
110 55.3 37.4 5.66 121.0 2.86 7.8
85 60.5 44.0 5.18 93.7 3.42 7.5
95 58.9 41.3 5.46 103.4 3.16 7.8
110 57.3 38.9 5.73 118.2 2.93 8.0
85 61.3 44.8 5.18 91.8 3.47 7.6
95 59.7 42.3 5.45 101.6 3.21 7.9
110 58.1 39.7 5.73 116.5 2.97 8.2
85 76.0 58.9 5.37 100.2 4.15 9.5 40 61.9 72.8 3.57 27.6 17.3 5.2
95 73.7 55.4 5.66 109.7 3.82 9.7 45 67.2 77.5 3.65 31.6 18.4 5.3
110 71.2 52.2 5.93 124.2 3.52 10.0 50 72.6 82.1 3.73 35.5 19.5 5.5
85 79.2 61.7 5.48 96.3 4.24 9.9 40 62.5 73.1 3.41 31.1 18.3 5.0
95 76.6 58.2 5.77 106.0 3.89 10.1 45 67.9 77.7 3.48 35.3 19.5 5.1
110 74.2 54.6 6.06 120.6 3.58 10.4 50 73.3 82.4 3.55 39.5 20.6 5.2
85 80.8 63.3 5.50 94.0 4.31 10.1 40 63.1 73.5 3.31 33.0 19.1 4.7
95 78.2 59.7 5.79 103.7 3.96 10.3 45 68.6 78.2 3.38 37.4 20.3 4.8
110 75.6 56.1 6.09 118.4 3.64 10.6 50 74.1 82.8 3.45 41.8 21.5 5.0
85 92.5 74.3 5.71 103.5 4.75 11.5 40 58.0 70.9 4.29 28.4 13.5 7.5
95 89.2 70.1 6.01 112.8 4.35 11.8 45 63.0 75.4 4.39 32.4 14.3 7.7
110 85.9 65.8 6.30 127.2 4.00 12.1 50 68.1 80.0 4.47 36.4 15.3 8.0
85 97.1 78.3 5.88 98.9 4.84 12.1 40 58.9 71.2 4.09 31.6 14.4 7.2
95 93.7 73.8 6.19 108.4 4.44 12.4 45 64.0 75.8 4.17 35.8 15.3 7.5
110 90.2 69.4 6.51 122.9 4.06 12.7 50 69.1 80.4 4.25 40.1 16.2 7.6
85 99.7 80.7 5.95 96.1 4.92 12.4 40 59.4 71.6 3.96 33.4 15.0 6.9
95 96.1 76.1 6.26 105.7 4.50 12.7 45 64.7 76.2 4.04 37.8 16.0 7.1
110 92.5 71.5 6.57 120.3 4.13 13.0 50 69.8 80.6 4.13 42.2 16.9 7.4
85 106.6 87.6 5.67 106.3 5.52 13.3 40 52.8 68.2 5.31 29.4 9.9 9.9
95 102.7 82.5 6.41 115.5 4.70 13.6 45 57.4 72.6 5.41 33.5 10.6 10.2
110 98.8
85 112.7 92.9 6.22 101.1 5.31 14.0 40 53.8 68.6 4.99 32.3 10.8 9.5
95 108.6 87.6 6.55 110.5 4.86 14.4 45 58.5 73.0 5.12 36.6 11.4 9.8
110 104.3 82.4 6.88 124.9 4.45 14.6 50 63.3 77.3 5.19 41.0 12.2 10.0
85 116.5 96.1 6.32 97.9 5.40 14.5 40 54.5 68.7 4.87 33.9 11.2 9.1
95 112.0 90.7 6.64 107.4 4.94 14.8 45 59.2 73.1 4.96 38.4 11.9 9.4
110 107.6 85.3 6.98 122.0 4.52 15.1 50 63.9 77.5 5.07 42.9 12.6 9.7
77.6 6.59 129.7 4.39 13.9 50 62.0 77.0 5.50 37.6 11.3 10.4
40 46.0 64.9 6.61 30.8 7.0 12.2
45 50.0 69.1 6.70 35.0 7.5 12.6
50 54.1 73.2 6.87 39.2 7.9 13.0
40 47.2 65.2 6.19 33.3 7.6 11.8
Operation Not Recommended
45 51.4 69.3 6.33 37.6 8.1 12.2
50 55.5 73.5 6.50 42.1 8.5 12.4
40 47.7 65.2 6.06 34.7 7.9 11.3
45 51.9 69.3 6.14 39.2 8.5 11.7
50 56.0 73.5 6.25 43.8 9.0 12.1
Operation Not Recommended
* See Page 13 for Application Notes
WT Models, Rev.: B Enertech Global
63
Page 64
Section 11: Model 144 Performance Data: 12.0 Ton, Full Load Capacity
EST GPM PSI FT
17.8 2.3 5.4
24.9 4.4 10.1
30
32.0 7.0 16.2
17.8 2.2 5.0
50
24.9 4.1 9.4
32.0 6.6 15.1
17.8 2.2 5.0
70
24.9 3.9 9.0
32.0 6.2 14.4
17.8 2.0 4.7
90
24.9 3.6 8.3
32.0 5.8 13.3
17.8 2.0 4.5
110
24.9 3.6 8.3
32.0 5.7 13.2
Heating Cooling
ELT HC HE KW L LT COP DH ELT TC HR KW LLT EER DH
85 117.5 84.3 10.26 98.2 3.36 14.6
95 114.2 79.4 10.81 107.8 3.10 15.1
110 110.6 74.8 11.33 122.4 2.86 15.5
85 121.1 87.9 10.37 94.7 3.42 15.1
95 117.7 82.7 10.92 104.5 3.16 15.6
110 114.5 77.8 11.47 119.2 2.93 16.1
85 122.6 89.6 10.36 92.7 3.47 15.3
95 119.4 84.7 10.91 102.5 3.21 15.8
110 116.2 79.4 11.45 117.3 2.97 16.3
85 152.0 117.8 10.75 102.1 4.15 18.9 40 123.7 145.7 7.14 26.1 17.3 10.4
95 147.5 110.9 11.32 111. 6 3.82 19.5 45 134.4 155.1 7.30 29.9 18.4 10.7
110 142.5 104.3 11.87 126.0 3.52 20.0 50 145.1 164.3 7.45 33.7 19.5 10.9
85 158.5 123.4 10.95 97.7 4.24 19.7 40 125.0 146.2 6.82 29.9 18.3 9.9
95 153.2 116.5 11.54 107.3 3.89 20.3 45 135.7 155.4 6.97 34.1 19.5 10.2
110 148.3 109.3 12.13 121.9 3.58 20.8 50 146.7 164.8 7.11 38.2 20.6 10.4
85 161.7 126.6 11.01 95.1 4.31 20.1 40 126.3 146.9 6.62 32.1 19.1 9.4
95 156.5 119.4 11.59 104.8 3.96 20.7 45 137.2 156.4 6.76 36.4 20.3 9.7
110 151.2 112.2 12.17 119.4 3.64 21.2 50 148.2 165.6 6.90 40.7 21.5 9.9
85 185.0 148.6 11.42 105.8 4.75 23.0 40 116.1 141.8 8.59 27.0 13.5 15.0
95 178.4 140.1 12.01 115.1 4.35 23.6 45 126.0 150.8 8.79 30.8 14.3 15.5
110 171.8 131.6 12.60 129.3 4.00 24.1 50 136.2 159.9 8.93 34.7 15.3 16.0
85 194.2 156.5 11.76 100.6 4.84 24.2 40 117.9 142.3 8.17 30.5 14.4 14.5
95 187.3 147.6 12.37 110.1 4.44 24.8 45 128.1 151.5 8.35 34.7 15.3 15.0
110 180.5 138.7 13.02 124.5 4.06 25.3 50 138.3 160.7 8.51 38.9 16.2 15.2
85 199.5 161.4 11.89 97.5 4.92 24.8 40 118.9 143.1 7.92 32.6 15.0 13.7
95 192.3 152.2 12.51 107.0 4.50 25.4 45 129.3 152.3 8.08 36.9 16.0 14.2
110 185.1 143.1 13.14 121.6 4.13 26.0 50 139.5 161.2 8.25 41.3 16.9 14.7
85 213.3 175.2 11.33 109.0 5.52 26.6 40 105.6 136.5 10.62 28.1 9.9 19.8
95 205.4 165.0 12.82 118.1 4.70 27.2 45 114.8 145.1 10.82 32.1 10.6 20.3
110 197.5
85 225.4 185.7 12.44 103.1 5.31 28.1 40 107.6 137.2 9.99 31.3 10.8 19.1
95 217.2 175.2 13.10 112.5 4.86 28.7 45 117.1 145.9 10.23 35.6 11.4 19.6
110 208.7 164.7 13.75 126.8 4.45 29.3 50 126.5 154.6 10.38 39.8 12.2 20.1
85 233.0 192.3 12.64 99.6 5.40 29.0 40 108.9 137.5 9.73 33.2 11.2 18.3
95 224.1 181.4 13.29 109.0 4.94 29.6 45 118.4 146.2 9.91 37.6 11.9 18.8
110 215.2 170.6 13.95 123.5 4.52 30.2 50 127.8 155.1 10.14 42.0 12.6 19.3
155.2 13.19 132.2 4.39 27.7 50 124.0 154.1 11.00 36.1 11.3 20.8
40 92.1 129.8 13.22 29.6 7.0 24.4
45 100.0 138.3 13.40 33.8 7.5 25.2
50 108.2 146.4 13.73 37.8 7.9 25.9
40 94.4 130.4 12.38 32.4 7.6 23.6
Operation Not Recommended
45 102.8 138.5 12.65 36.7 8.1 24.4
50 111.0 146.9 13.00 41.1 8.5 24.9
40 95.4 130.4 12.11 34.0 7.9 22.6
45 103.8 138.5 12.28 38.5 8.5 23.4
50 112.0 146.9 12.51 43.0 9.0 24.1
Operation Not Recommended
* See Page 13 for Application Notes
Enertech Global WT Models, Rev.: B
64
Page 65
Section 11: Air Handler and “A” Coil Performance Data
Air Handler / “A” Coil Capacities
Hot Water Heating Capacity -- 68°F EAT (DB)
Model CFM
MPH/
ACH024
MPH/
ACH036
MPH/
ACH048
MPH/
ACH060
1058
1564
1952
EWT
GPM
°F
100
105 1.9 17,677 88.7
789
110 1.9 21,829 93.6
115 1.8 25,980 98.5
120
100
105 1.9 23,527 88.6
110 1.9 29,246 93.6
115
120 1.8 40,684 103.6
100
105 2.4 33,373 87.8
110
115 2.4 49,441 97.3
120 2.3 57,474 102.0
100
105
110 3.9 54,791 94.0
115 3.8 64,785 98.7
120 3.7 74,779 103.5
3.0
4.5
6.0
7.5
WPD
Htg Cap
Ft Hd
1.9 13,526 83.9
1.8
30,131 103.4
1.9 17,808 83.6
1.8
34,965 98.6
2.5 25,339 83.0
2.4
41,407 92.5
4.0 34,801 84.5
3.9
44,796 89.2
Btuh
LAT
°F
Air Handler / “A” Coil Corrections
Airow Correction Factors
Model CFM
MPH/
ACH024
1058 1.000 1.000 1.000
MPH/
ACH036
MPH/
ACH048
MPH/
ACH060
1023 0.987 0.987 0.979
1952 1.101 1.098 1.159
1761 1.051 1.050 1.081
1564 1.000 1.000 1.000
1385 0.954 0.955 0.927
1952 1.000 1.000 1.000
1761 0.960 0.961 0.937
1564 0.919 0.921 0.873
1385 0.882 0.885 0.814
Heating
Capacity
880 1.047 1.046 1.074
789 1.000 1.000 1.000
690 0.949 0.950 0.920
584 0.895 0.897 0.833
831 0.913 0.915 0.862
657 0.846 0.850 0.757
Tot Cooling
Capacity
Sensible
Capacity
Chilled Water Cooling Capacity -- 80/67°F EAT (DB/WB)
Model CFM
MPH/
ACH024
MPH/
ACH036
MPH/
ACH048
MPH/
ACH060
1200 45 4.0 3.3 41,540 30,430
1600 45 5.5 5.5 51,940 38,600
2000 45 7.0 8.4 63,750 47,340
EWT
GPM
°F
800 45 3.5 2.1 32,350 22,190
WPD
Ft Hd
TC
Btuh
SC
Btuh
Air Handler / “A” Coil Corrections
Entering Air Correction Factors
Heating Cooling
EAT
°F (DB)
**At this condition, Total Capacity = Sensible Capacity.
Gray shaded area includes conditions not typical for cooling operation.
Heating
Capacity
50 1.038 50 0.743 0.911 ** ** ** ** **
55 1.028 55 0.820 0.771 0.882 1.019 ** ** **
60 1.018 60 0.896 0.670 0.854 1.047 ** **
65 1.007 65 0.971 0.649 0.866 1.081 **
68 1.000 67 1.000 0.556 0.780 1.000 1.216
70 0.995 70 1.044 0.638 0.865 1.085
75 0.984 75 1.116 0.601 0.832
EAT
°F (WB)
Total
Capacity
60 65 70 75 80 85
Sensible Capacity
EAT °F (DB)
WT Models, Rev.: B Enertech Global
65
Page 66
WARRANTY ORDER & CLAIM
PHONE : 618.664.9010 FAX : 618.66 4.4597 EMAIL : WARRANTY@ENERTECHGEO.COM
ALL WARRANTY REGISTRATIONS SHOULD BE SUBMITTED WITHIN 10 DAYS OF INSTALLATION
COMPANY NAME ____________________________________________________ DAT E ___________________
(Form submitter)
PHONE _________________ FAX _________________ EMAIL ________________________________________
ORDERED BY _____________________________________ JOB NAME/PO # ____________________________
UNIT Model # _____________________________________ Serial # ____________________________________
FAILURE DATE ____________________
SHIP TO
(If different
ADDRESS
than
company)
Required if claim is for defective ow center
HOMEOWNER
FLOW CENTER MODEL # ________________________ FLOW CENTER SERIAL # __________________________
FAILURE CODES, DESCRIPTION AND LABOR REIMBURSEMENT
MUST BE FOUND IN WARRANTY MANUAL
FAILURE CODE DESCRIPTION PART NUMBER
____________ _________________________________________________
____________ _________________________________________________
__________
__________
____________ _________________________________________________
LABOR REIMBURSEMENT REQUESTED
DO YOU NEED PARTS ORDERED?
(If no, and replacement was purchased from another vendor, attach copy of bill
if reimbursement is needed
3
.)
NO YES
NO YES
____________
__________
____________
OTHER NOTES _______________________________________________________________________________
____________________________________________________________________________________________
FOR ENERTECH COMPANIES USE ONLY
SRO# _________________________________________ CREDIT MEMO# ________________________________
1) See warranty coverage summary sheet for labor allowances, conditions and exclusions, etc. 2) Warranty start date is ship date from Enertech
facility unless proof of startup is presented. 3) Outsourced warranty replacement parts will be reimbursed in the form of credit for the part only.
Credit will be no more than the standard equivalent part cost through Enertech. 4) Factory pre-approval is required for anything outside the scope
of this document. 5) Fuses, hose kits and items not mentioned on Warranty Coverage Summary are not covered under this program.
Page 67
WARRANTY REGISTRATION
1 (Very Dissatis ed) 2 3 4 5 6 7 8 9 10 (Very Satis ed)
1 (Very Dissatis ed) 2 3 4 5 6 7 8 9 10 (Very Satis ed)
NOW REGISTER ONLINE AT WARRANTY-REGISTRATION.ENERTECHGEO.COM
WARRANTY REGISTRATIONS SHOULD BE SUBMITTED WITHIN 60 DAYS OF INSTALLATION
Model Number _________________________Serial Number __________________________ Install Date _______________
This unit is performing Satisfactorily Not Satisfactorily (please explain) _______________________________________
______________________________________________________________________________________________________
Purchaser/User Name _____________________________________________________ Phone ________________________
Address ____________________________________________ City __________________________ State/Prov _________
Postal Code ___________________ Email __________________________________________________________________
Installer Company Name ________________________________________________________________________________
City _____________________________State/Prov __________ Email ___________________________________________
Application
Residential New Construction Residential Geo Replacement Residential Replacement of Electric, Gas or Other
Multi-Family (Condo/Townhome/Multiplex) Commercial Other ___________________________________
Use (check all that apply)
Space Conditioning Domestic Water Heating Radiant Heat Swimming Pool Snow/Ice Melt
Other ______________________________________________________________________________________________
Loop Type
Horizontal Loop Vertical Loop Pond Loop Open Loop
Demographics
Household Income Under $30,000 $30,000–$45,000 $45,000–$60,000 $60,000–$75,000 $75,000–$100,000 Over $100,000
Home Size Up to 1500 sq. ft. 1501 to 2500 sq. ft. 2501 to 4000 sq. ft. Over 4000 sq. ft.
Home Location Rural Urban Suburban
Value of Home Less than $100,000 $100,000–$250,000 $250,000–$500,000 $500,000–$1 mil Over $1 mil
Customer Satisfaction
How would you rate your overall satisfaction with your new geothermal system?
How would you rate your overall satisfaction with your installing geothermal contractor?
MAIL THIS FORM TO: EMAIL THIS FORM TO: FAX THIS FORM TO:
ENERTECH GLOBAL LLC [email protected] ENERTECH GLOBAL LLC
2506 SOUTH ELM STREET 618.664.4597
GREENVILLE, IL 62246
REGISTER ONLINE AT: warranty-registration.enertechgeo.com
Rev 30 DEC 2013B
Page 68
Greenville, IL - Mitchell, SD
MEMBER
Rev Tab
Enertech Global is continually working to improve its products. As a result, the pricing, design and specications of each
product may change without notice and may not be as described herein. For the most up-to-date information, please visit our
website, or contact our Customer Service department at [email protected]. Statements and other information contained
herein are not express warranties and do not form the basis of any bargain between the parties, but are merely Enertech
Global’s opinion or commendation of its products.
20D082-08NN
ENERTECH GLOBAL, LLC
160113G
 Loading...