

Page 1
1
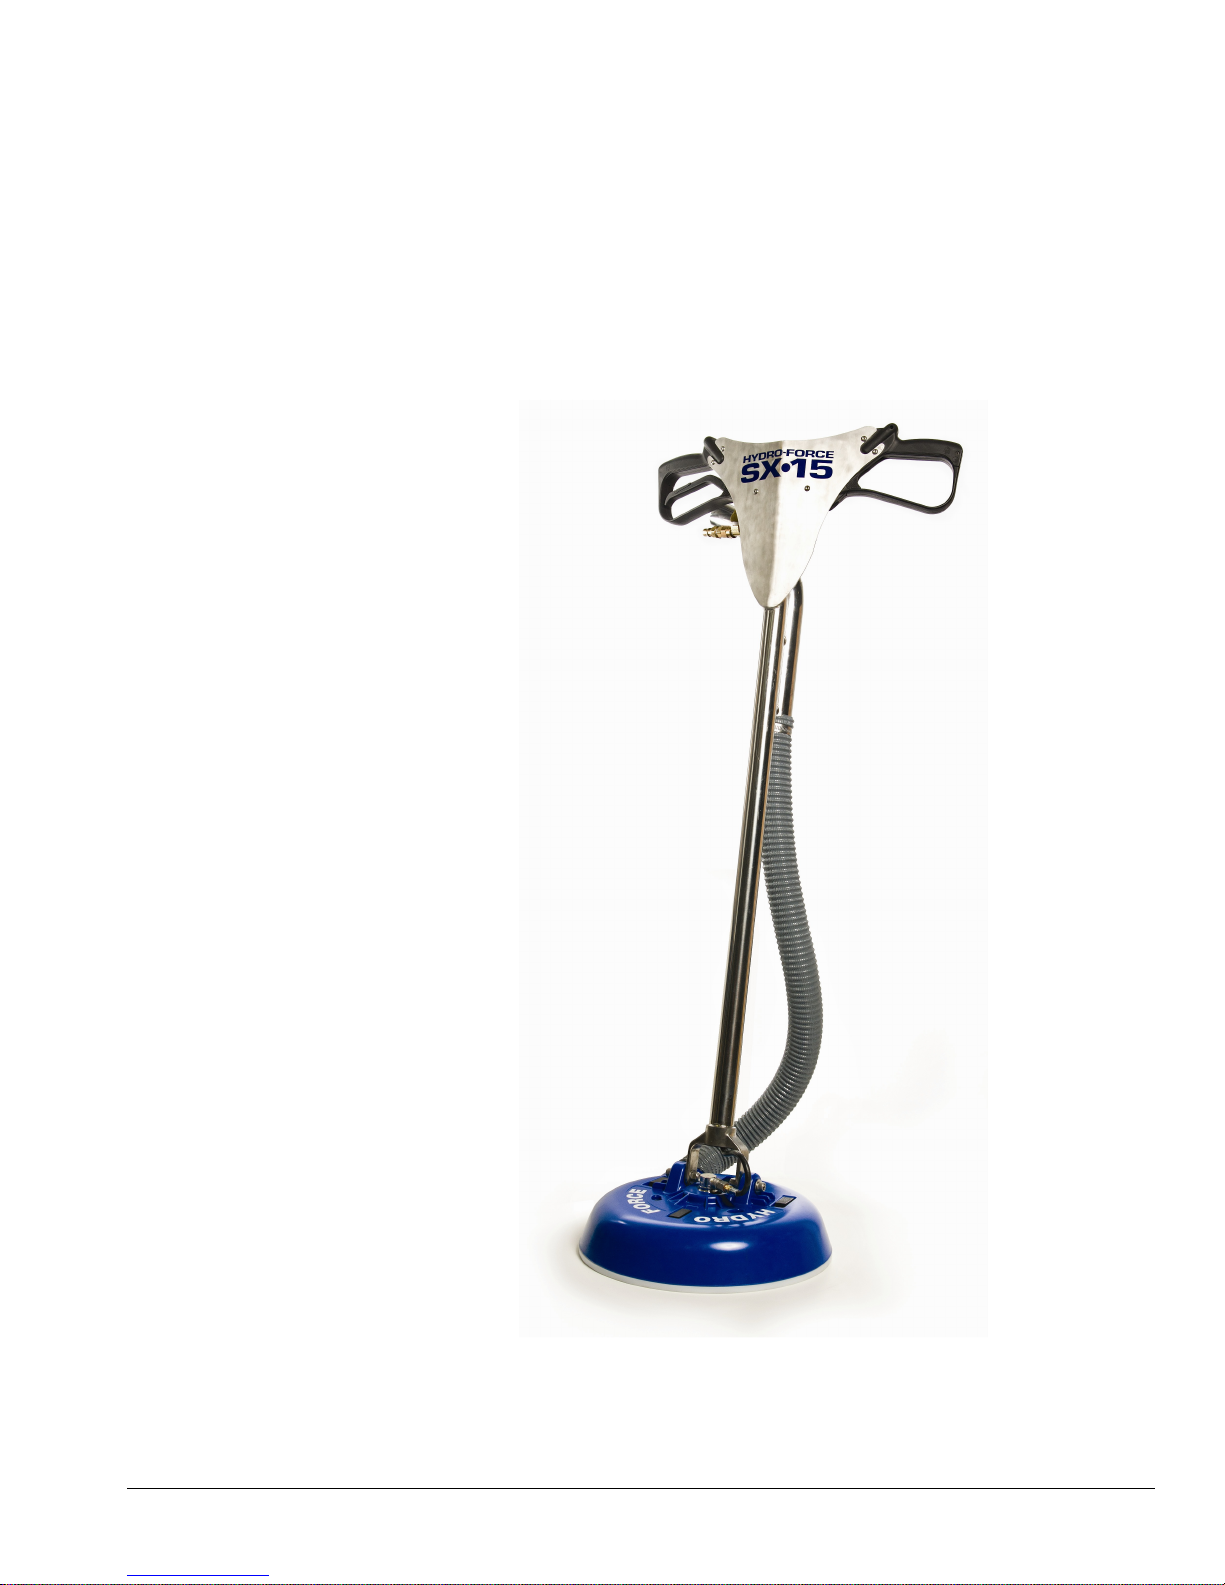
SX-15
R
evised: 0
7/02/14
HARD SURFACE CLEANING TOOL
AW105
LMANAW105
Hydro-Force Manufacturing
4282 South 590 West
Salt Lake City, UT 84123
801-268-2673
801-268-3856 FAX
Page 2

2
INTRODUCTION
Congratulations on your purchase of the SX-15 hard surface cleaning tool.
Years of experience, engineering, and planning have gone into the design and manufacturing
of the SX-15. We take a great deal of pride in the SX-15; our goal is no less than your
complete satisfaction.
The SX-15 can be used with portable or truck mounted extractors to clean tile, concrete and
stone floors. The larger cleaning area and superior water recovery of the SX-15 will make your
tile cleaning faster and more efficient.
This manual will provide users with the knowledge to operate and maintain the SX-15.
Any questions pertaining to the operating or servicing of this unit should be directed to your
nearest Hydro-Force distributor.
This manual is written specifically for the SX-15 tile cleaning tool manufactured by:
Hydro-Force Manufacturing
4282 South 590 West
Salt Lake City, UT 84123
801-268-2673
801-268-3856 FAX
Information in this manual is subject to change without notice and does not represent a
commitment on the part of Hydro-Force, its parent or affiliated companies.
Page 3

3
SPECIFICATIONS
Model AW105 SX-15 Tile Cleaning Tool:
Cleaning Head: Width: 15 inches
Cleaning Head: Height: 3.13” w/ Hard Boot & 3.50” w/ Brush Ring
Total Height with Handle: 51 inches
Weight: 15.5 lbs.
Shell Construction: Polycarbonate
Hard Boot: HDPE
Brush Bristles: Nylon
Handle Construction: Stainless Steel
Maximum Solution Pressure: 2500psi
Minimum Solution Pressure: 700psi
SX-15 MAINTENANCE
Your SX-15 requires very little maintenance. To keep your SX-15 looking and
working its best for the longest period of use:
After each use rinse the Inner Shell of the SX-15 to remove accumulated dirt &
debris. The Inner Shell can be separated from the Outer Shell to clean the air flow
channel between the two shells. (See instructions for changing the Hard Boot &
Brush Ring for procedure to separate Outer and Inner Shells on Pages 5-7.)
Rinse & wipe down top of head assembly & handle.
Rinse & wipe clean the Hard Boot or the Brush Ring if used.
Examine Hard Boot - Replace the Hard Boot if worn down or deep gouges and
embedded debris are found.
Examine the Brush Ring – Replace Brush ring if bristles are excessively bent, worn or
if too many bristles are missing.
Check and clean the stainless steel mesh filter between the quick connect and valve to
prevent a reduction in water flow and tool efficiency. See item NA0803 in the parts
diagram on Page 16.
Check the spray pattern of the jets and clean or replace the jets as needed to assure
even spray pattern.
Check vacuum hose for holes or cracks. Replace Vacuum hose as needed.
Page 4
4
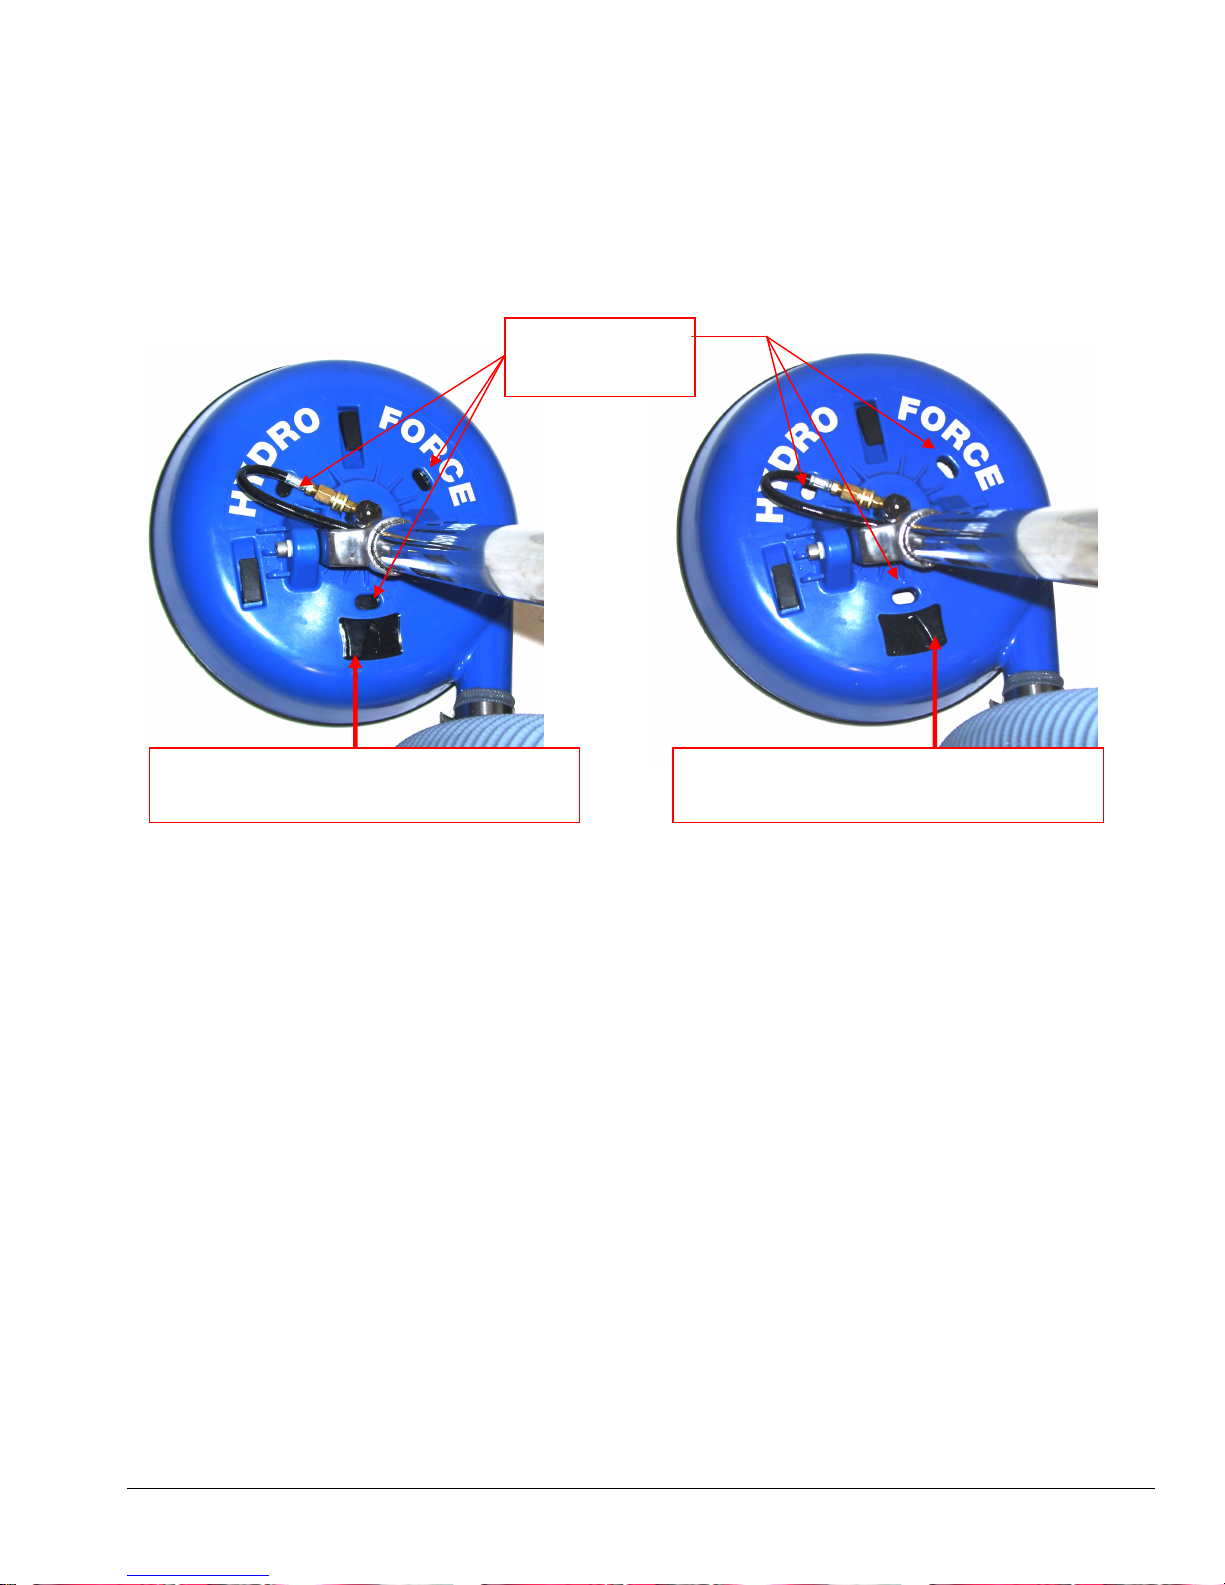
Vacuum Relief Vent Adjustment
Vacuum Relief Slide
–
Moved Left
Vacuum Relief
Vents
- CLOSED
Vacuum Relief Slide
–
Moved Right
Vacuum Relief
Vents
- OPEN
Vacuum
The SX-15 has vacuum relief vents on top of the head assembly. To increase the
water recovery, move the vacuum relief slide to the left to close the three vents. To
prevent the SX-15 from sticking to the floor and to make the SX-15 easier to move,
push the vacuum relief slide to the right to open the vents. Try different slide position
settings to get the best movement and recovery for your equipment and the type of
floor being cleaned.
Relief Vents
Using the SX-15 with extractors with higher air flow will generally require the vacuum
relief vents to be opened more.
Using the SX-15 with smaller portable extractors may require the vacuum relief vents
to be closed for the best water recovery.
When using the Hard Boot the vacuum relief vents will usually be opened more than
it is when using the Brush Ring with the same extractor.
Page 5
5
Hard Boot & Brush Ring Use
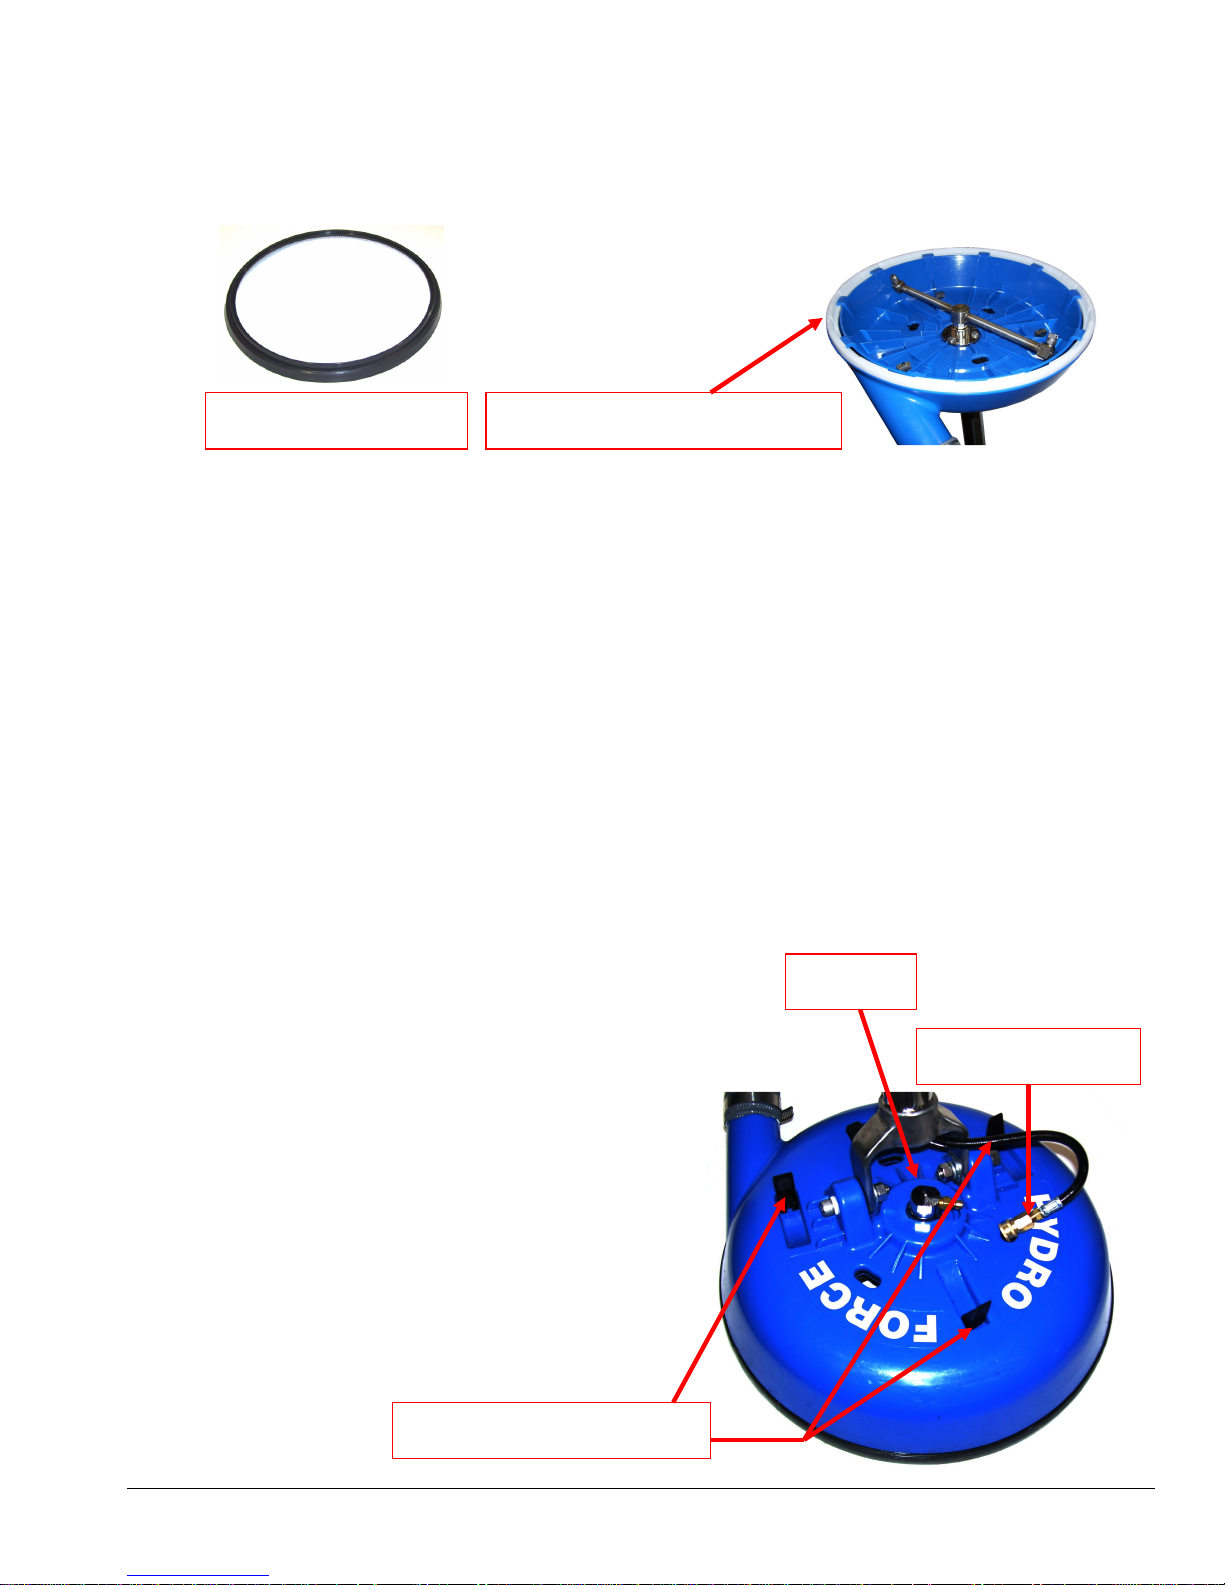
The SX-15 comes with a Hard Boot and Brush Ring. You have the option to choose
to install either for the type of floor being cleaned and the equipment used.
Brush Ring – AB53 Hard Boot – NM5772
Use of the Hard Boot should be limited to durable surfaces such as ceramic tile.
Do not use the Hard Boot on Soft Surfaces such as marble. The Hard Boot may
scratch soft surfaces.
Use of the Brush Ring will help prevent scratching of soft surfaces.
When using portable extractors with lower air flow the Hard Boot will provide
improved recovery compared to the Brush Ring.
Truck mounts with higher air flow will get excellent recovery with Brush Ring or
Hard Boot.
With a high air flow truck mount extractor, the tight seal of the Hard Boot on
smooth surfaces such as concrete may prevent the SX-15 from being moved
properly across the floor.
Swivel
Changing the Hard Boot & Brush Ring
Changing between the Hard Boot and Brush
Ring can be done quickly and easily without
tools.
1. Disconnect the solution hose from the
swivel.
2. Lift the three retainer levers on top of
the SX-15 head to release the retainers.
Solution Hose
Three Retainer Levers
Page 6
6
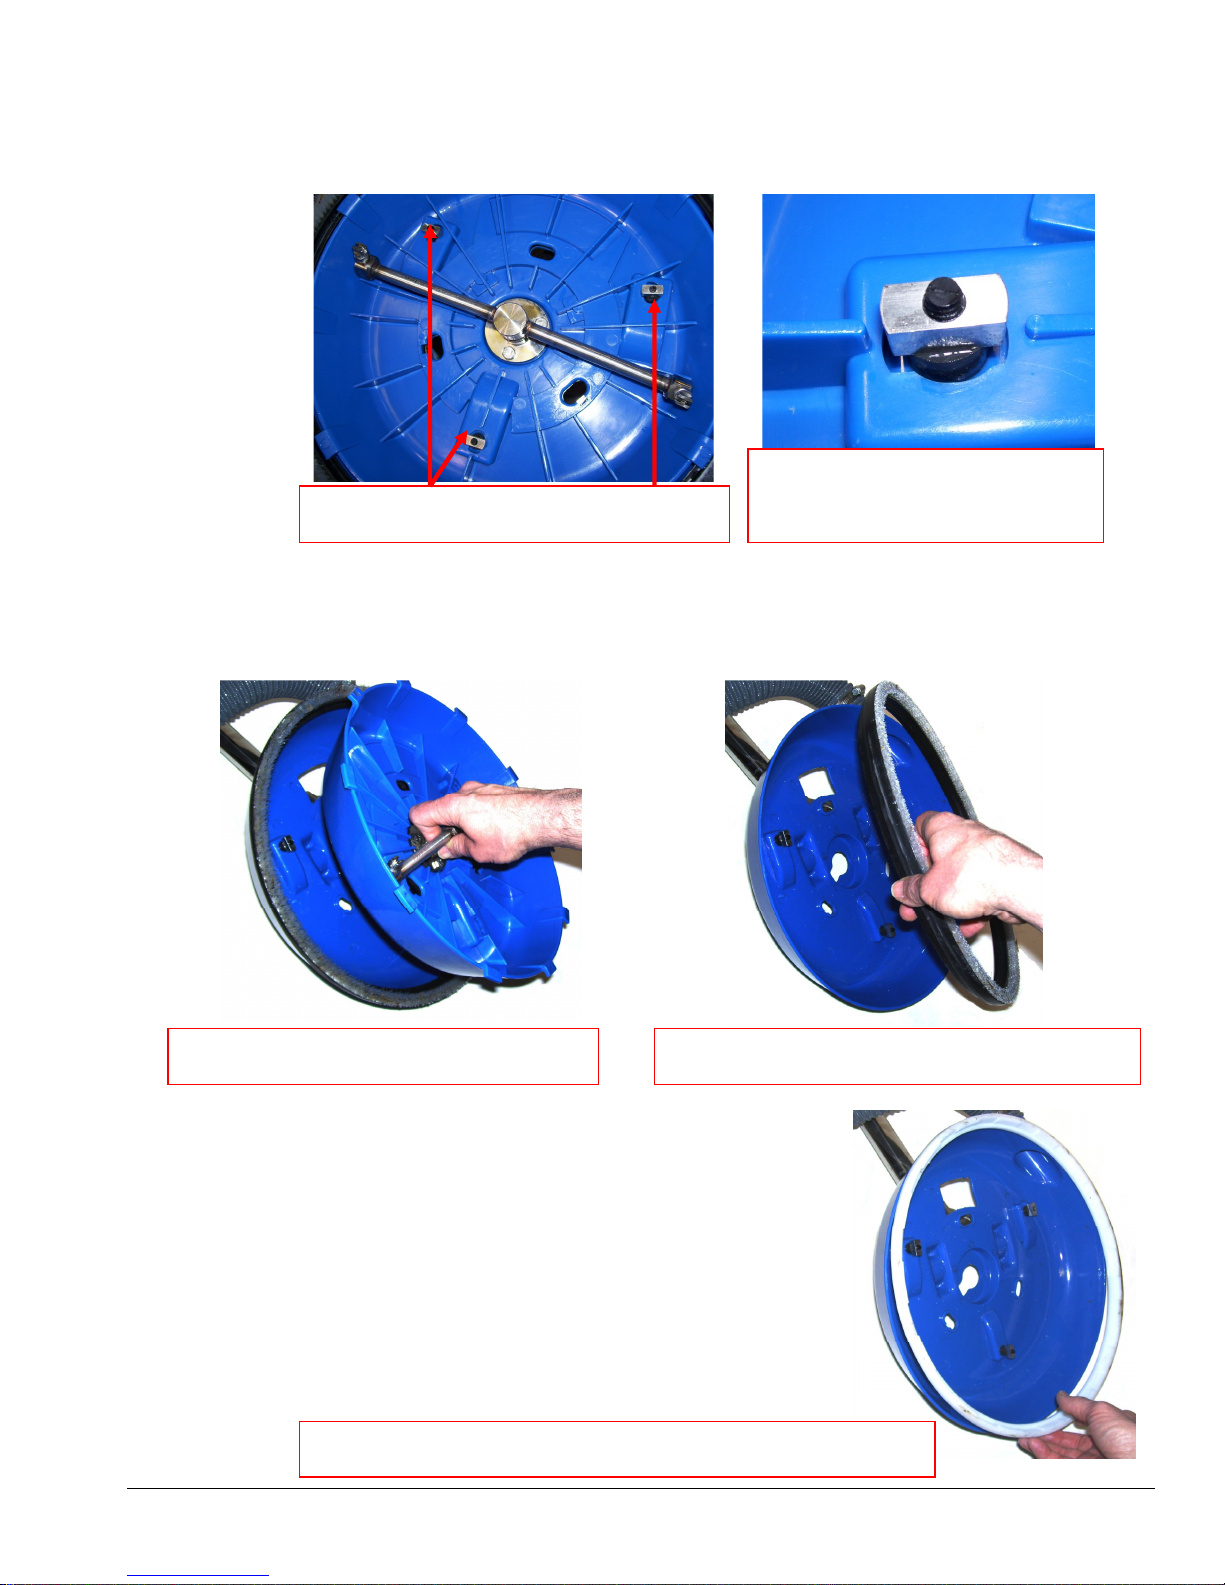
3. Turn the deck over and turn the three rectangular retaining nuts on the
Retaining
Nut
Aligned for
retainers to align with the holes in the bottom of the Inner Shell, so they can
pass through the holes.
Three Rectangular Retaining Nuts
Inner Shell Removal
4. Pull and separate the Inner Shell from the Outer Shell.
5. Lift up and remove the current Hard Boot or Brush Ring from the bottom lip
of the Outer Shell.
Remove the Brush Ring or Hard Boot Separate the Outer & Inner Shells
6. Place the desired Brush Ring or Hard Boot back
onto the bottom lip of the Outer Shell.
7. Place the Inner Shell back onto the Outer Shell
with the rectangular retaining nuts going through
the openings in the Inner Shell. The flanges on the
Inner Shell set on the edge of the Hard Boot or
Brush Ring to hold it in place.
Place the Brush Ring or Hard Boot on the Outer Shell
Page 7
7
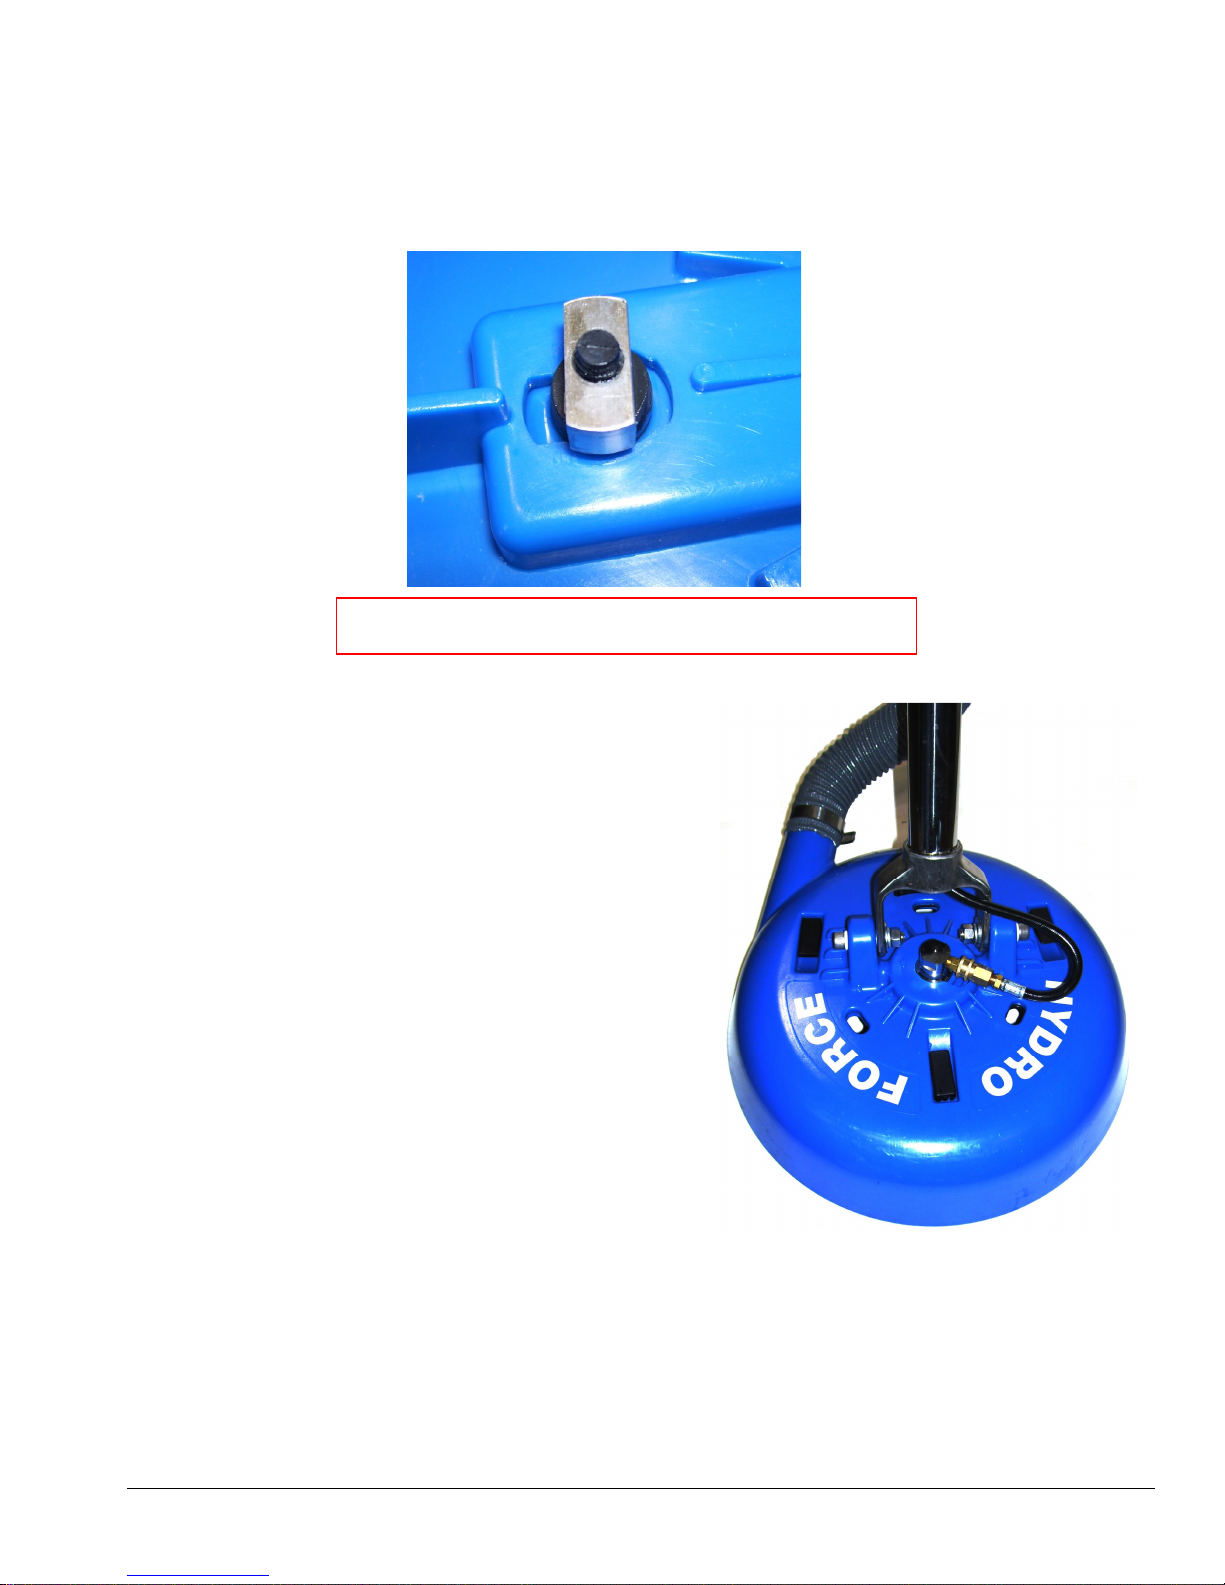
8. Turn the rectangular retaining nuts perpendicular to the slots in the bottom of
Retaining
Nut Aligned to Secure
Inner Shell
the Inner Shell. Retaining nuts may need to be tightened so that they each
contact the plastic surface of the inner shell when the retaining levers are
pushed back down to assure that the SX-15 assembly is secured properly.
9. Turn the head assembly back over &
snap the three retaining levers back
down to secure the Outer & Inner
Shells. Check the retaining nuts to be
sure all three are in contact with the
plastic inner shell. Open retaining levers
and tighten retaining nuts as needed to
assure that the inner shell is properly
secured when the latches are pushed
down.
10. Reconnect the solution hose to the
swivel, and the change is complete.
Page 8

8
USING THE SX-15
Extraction Equipment
The SX-15 will work with portable or truck mounted extractors, but the water
recovery may be better with higher powered extractors with more air flow. The
extractor solution pump must provide a minimum of 700psi of water pressure with a
flow rate of 1.5gpm (Gallon Per Minute). At 1000psi the flow rate must exceed 2.0
gpm & at 1500psi the flow rate must exceed 3.0gpm.
The recommended pressure for SX-15 operation is 700 to 1500psi.
Set-up Procedure
1. Install the Hard Boot or Brush Ring on the SX-15 as needed. (See instructions for
changing Hard Boot & Brush Ring on Page 5.)
2. Connect the vacuum hose from your extractor to the vacuum pipe on the SX-15
handle. A 2” cuff will fit over the pipe, a 1-1/2” cuff will fit inside the pipe.
3. Connect the solution hose from the extractor to the quick connect on the SX-15
valve assembly.
4. Turn the extractor ON. Adjust the water pressure to the desired pressure.
Minimum Pressure : 700psi Maximum Pressure: 2500psi
5. Adjust the Vacuum Relief Slide for best recovery & ease of movement.
Basic Cleaning Procedure
Remove all furniture from the area you are going to clean. Use tools and aids that will
make your job easier and safer. Gliders walk off mats, furniture protector tabs and
foam blocks can help with moving and placing furniture away from areas to be
cleaned. Depending upon the customer’s wishes, it may be alright to leave some
furniture or appliances, such as refrigerators, in place and clean around them. Begin
by sweeping or vacuuming the floor to remove dust and grit, pieces of glass, sand, etc.
You can use the Gekko accessory brush head to vacuum to your truck mount
(Remember to use your Dust-Downer to prevent dry abrasives from getting into your
blower.).
It is important for you to show utmost care for your client’s home and furnishings.
Place Corner Guards when moving your hoses about and use furniture skidders or
floor guards for moving heavy appliances. Note any places where other surfaces
Page 9
9
border the floor. Carpet, cabinets, delicate wall covering, or painted surfaces need to
be protected from all types of over spray. Caution and care in spraying is generally
sufficient, but masking or use of a spray shield (like those used by painters) works
well and may be necessary in high-risk areas. Use removable painter’s tape to avoid
damage to wood finishes when masking is removed. If the pre-sprays are over
sprayed on the carpet they can simply be rinsed using your carpet wand.
Select the appropriate pre-spray and apply to the floor. Usually, a 5 minute or less
dwell time is ideal. Excessive dwell time may actually retard the cleaning process by
soaking in deeper and requiring more drying time before sealing. You could
inadvertently begin a process of efflorescence by over-wetting. Avoid letting the presprays dry on the floor by extracting within the five minute time frame. A helper can
assist you by spraying three to five minutes ahead as you extract for highest efficiency.
Begin by going over large areas with the SX-15. Recommended pressure is 700 to
1500 psi, and temperature up to 200°F. It is usually easiest to move at a moderate rate
forward and backward. You need only overlap enough to assure complete coverage.
You will be surprised at how quickly you can clean with the SX-15. Moving too fast
will create a spiral pattern in the grout or tile. Slow down so this pattern does not
occur. Get air movers going where you have just extracted to get the grout dry as
quickly as possible, especially if you plan to seal the grout the same day.
Do the detail work last. The Gekko is the tool of choice for edging, corners and
cleaning in tight places. The Gekko tool with the Edge & Corner attachment works
great for cleaning the tile coving and edges. For heavier soiling not removed by the
SX-15, use the Gekko tool with a five inch head straight on, blasting the soil off of
the grout.
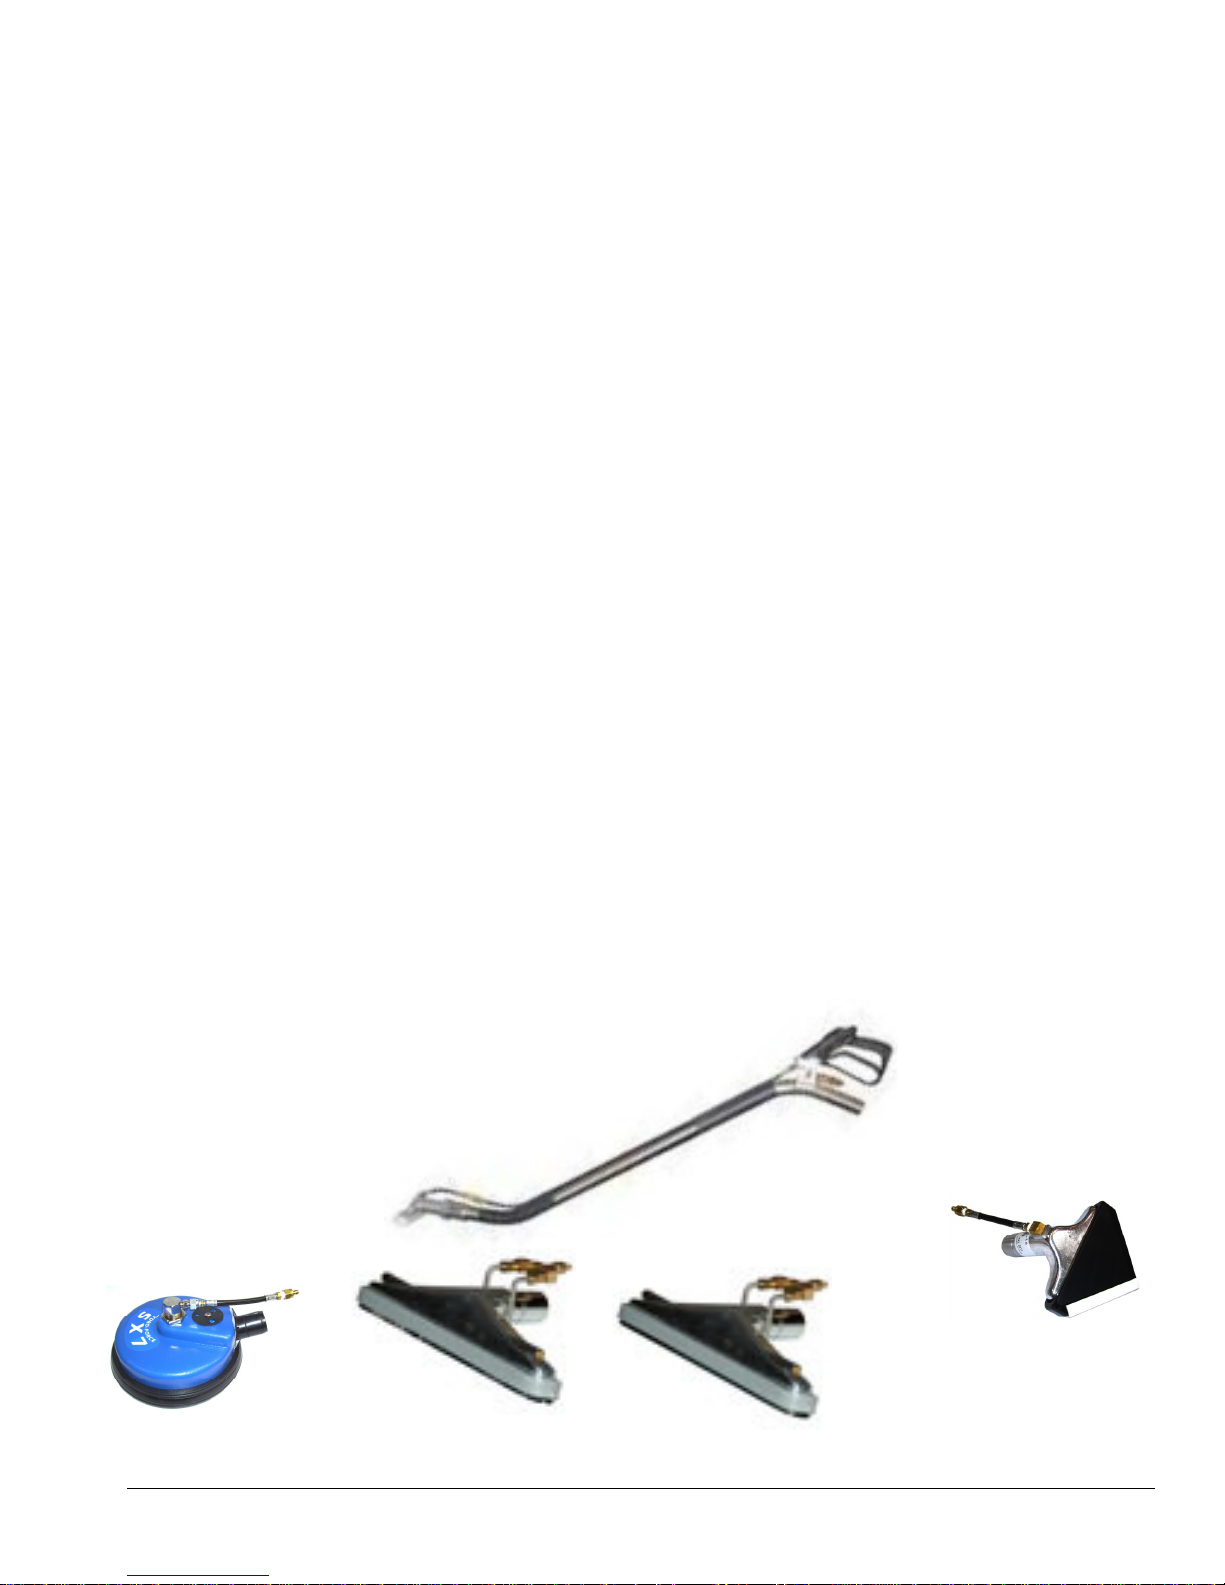
Recommended Tools for Tile Detail Work
Gekko Wand w/ 5” Head
AR54
Gekko SX-7 Head
AR54G
14” Gekko Brush Head
AR54H
Gekko Edge Corner
Coving Head
AR54C
14” Gekko Squeegee Head
AR54E
Page 10
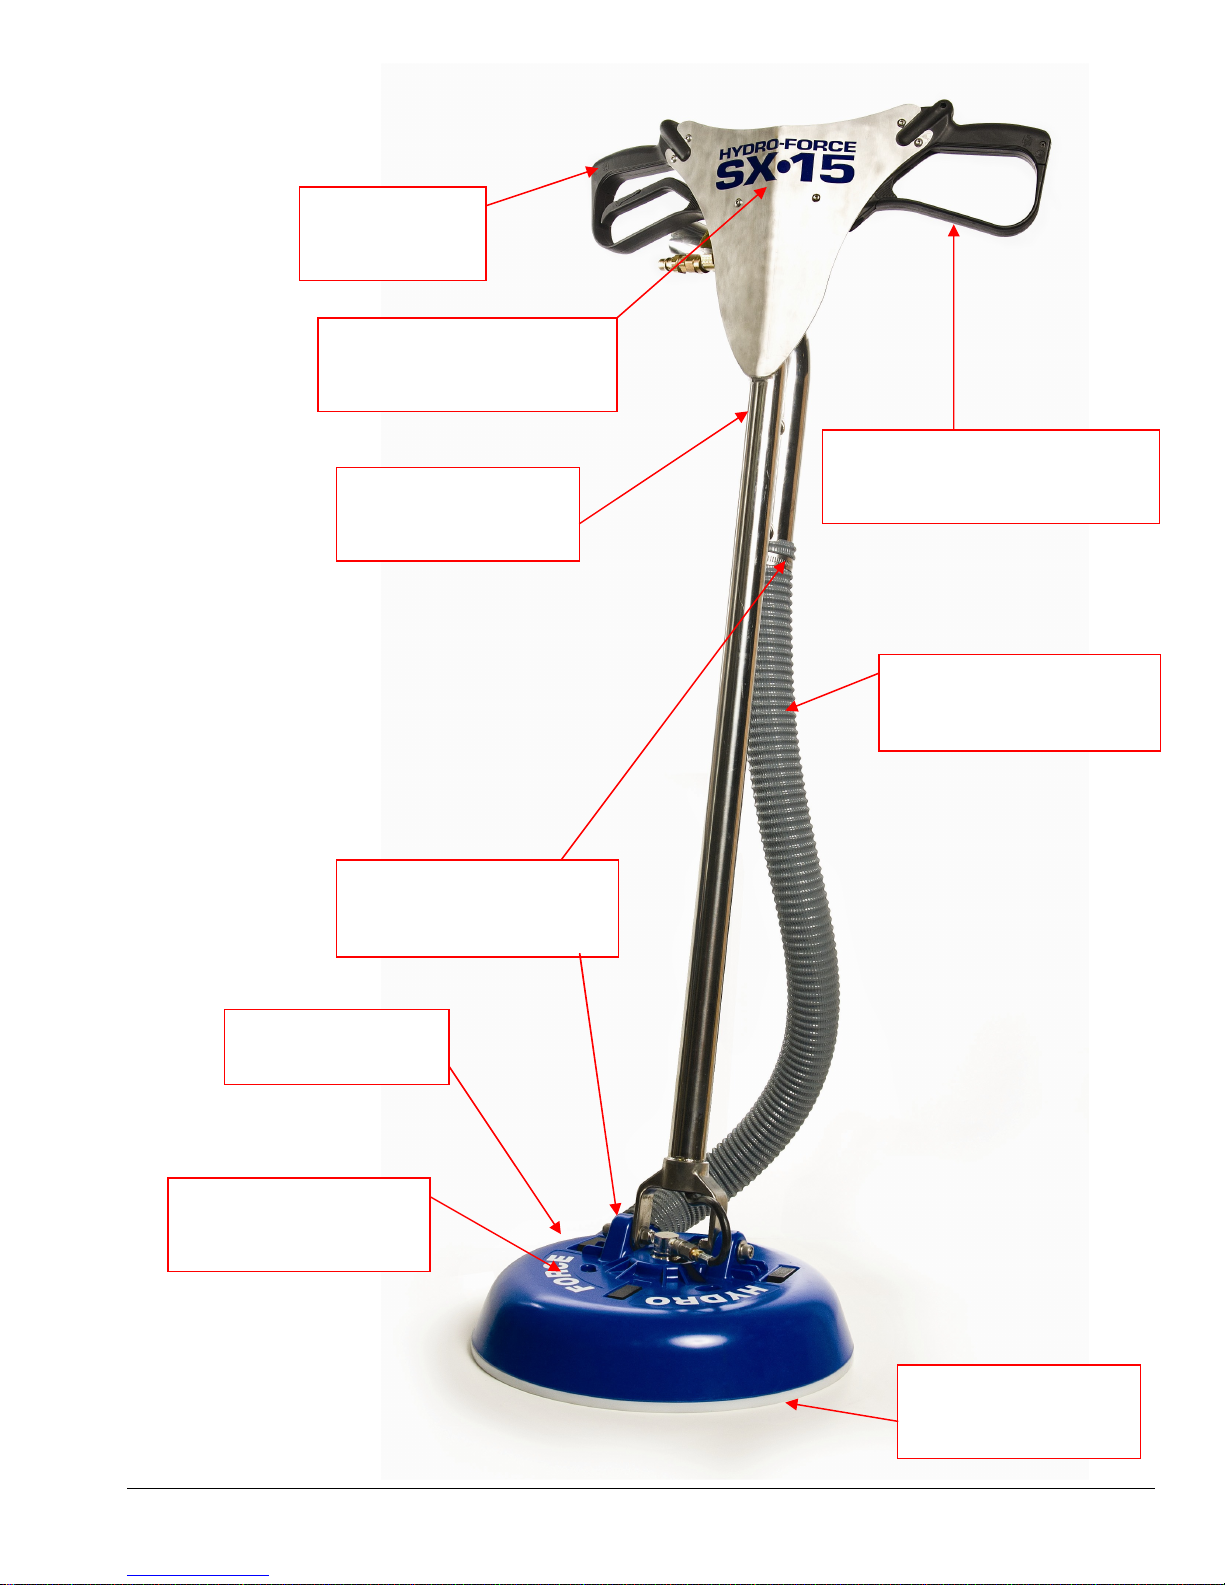
SX-15 Parts
SPRAY GUN
100010
DECAL SX-15 HANDLE
NM5602
SPRAY GUN – BODY ONLY
HANDLE SX-15 SS
NM5774
NA031B
VACUUM HOSE 2” ID
NM5726 (QTY 3’)
OUTER SHELL
NM5763
DECAL SX-15 HEAD
NM5600
HOSE CLAMP
PA051 (QTY 2)
HARD BOOT
NM5772
10
Page 11
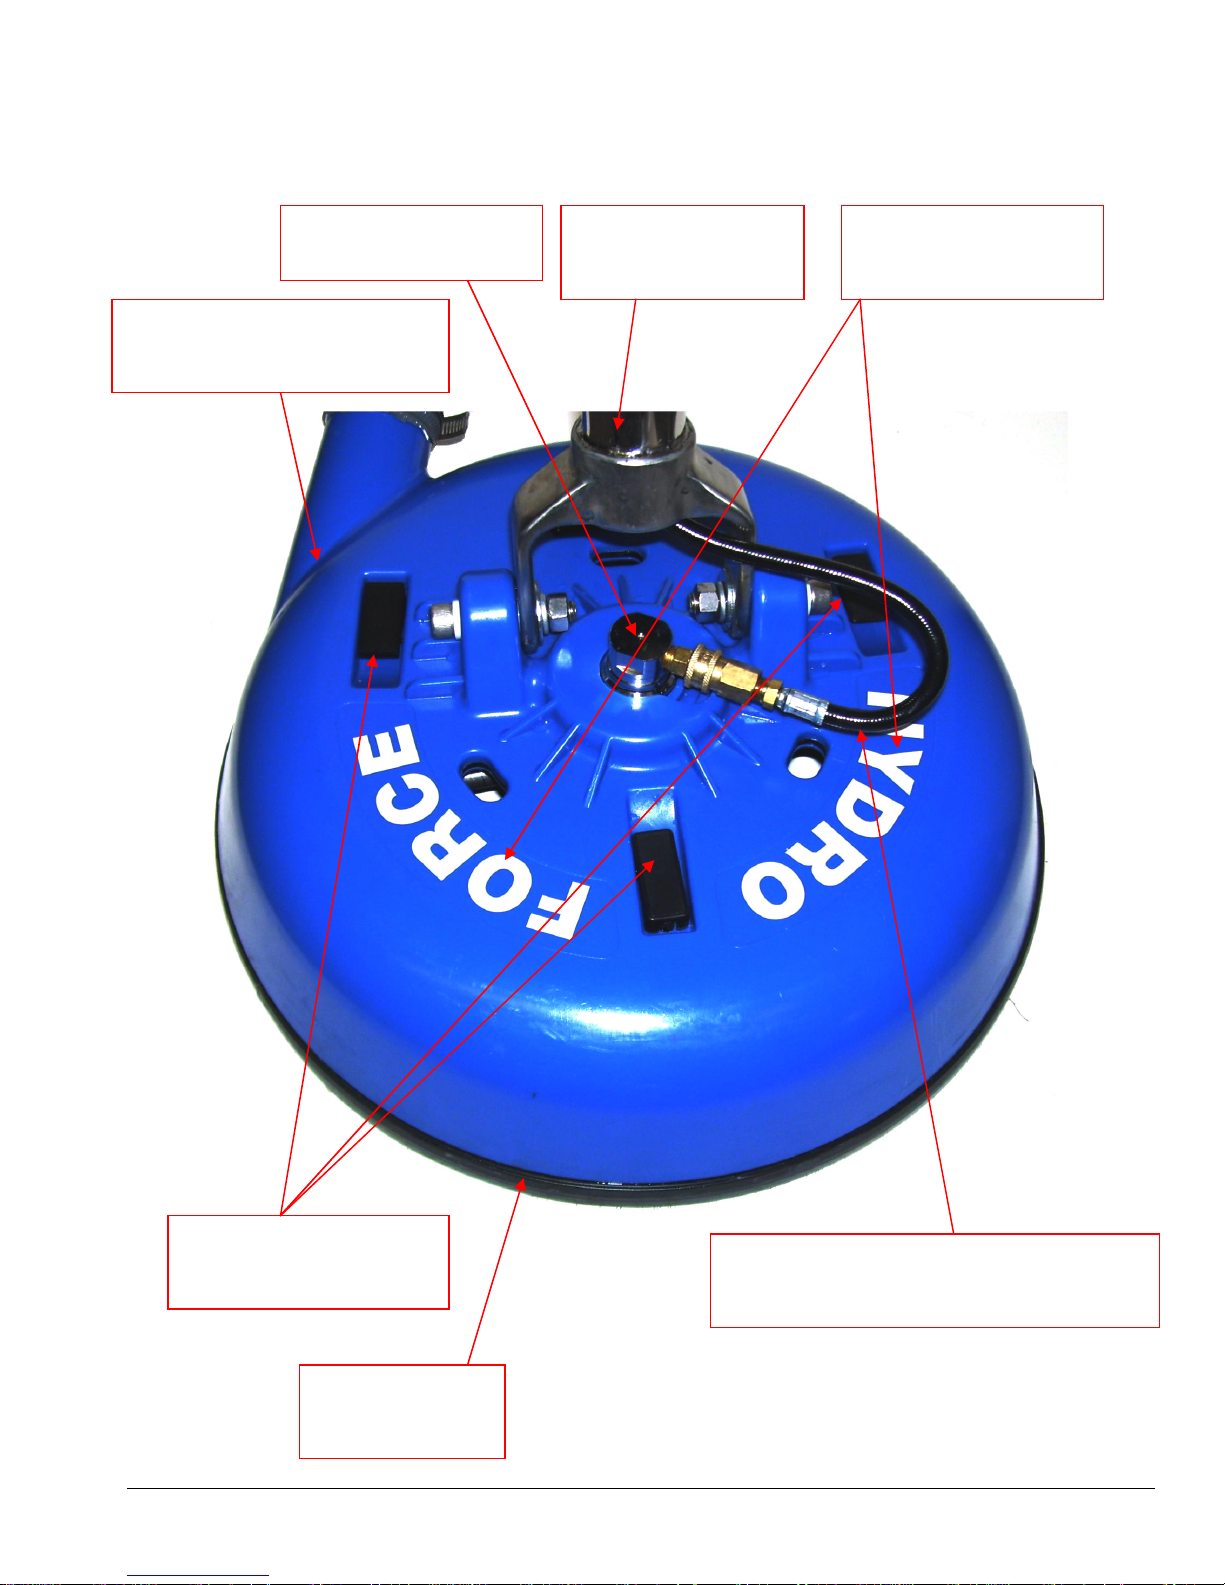
NM4088
SX-15 Parts
SWIVEL W/ FLANGE
NX105
OUTER SHELL- TOP VIEW
NM5763
HANDLE SX-15 SS
NM5774
DECAL SX-15 HEAD
NM5600
SWELL LATCH (QTY 3)
NM5768
SOLUTION HOSE HP 3/16” ID X 50”
1/8” MPT & 1/4” MPT ENDS
BRUSH RING
AB53
11
Page 12
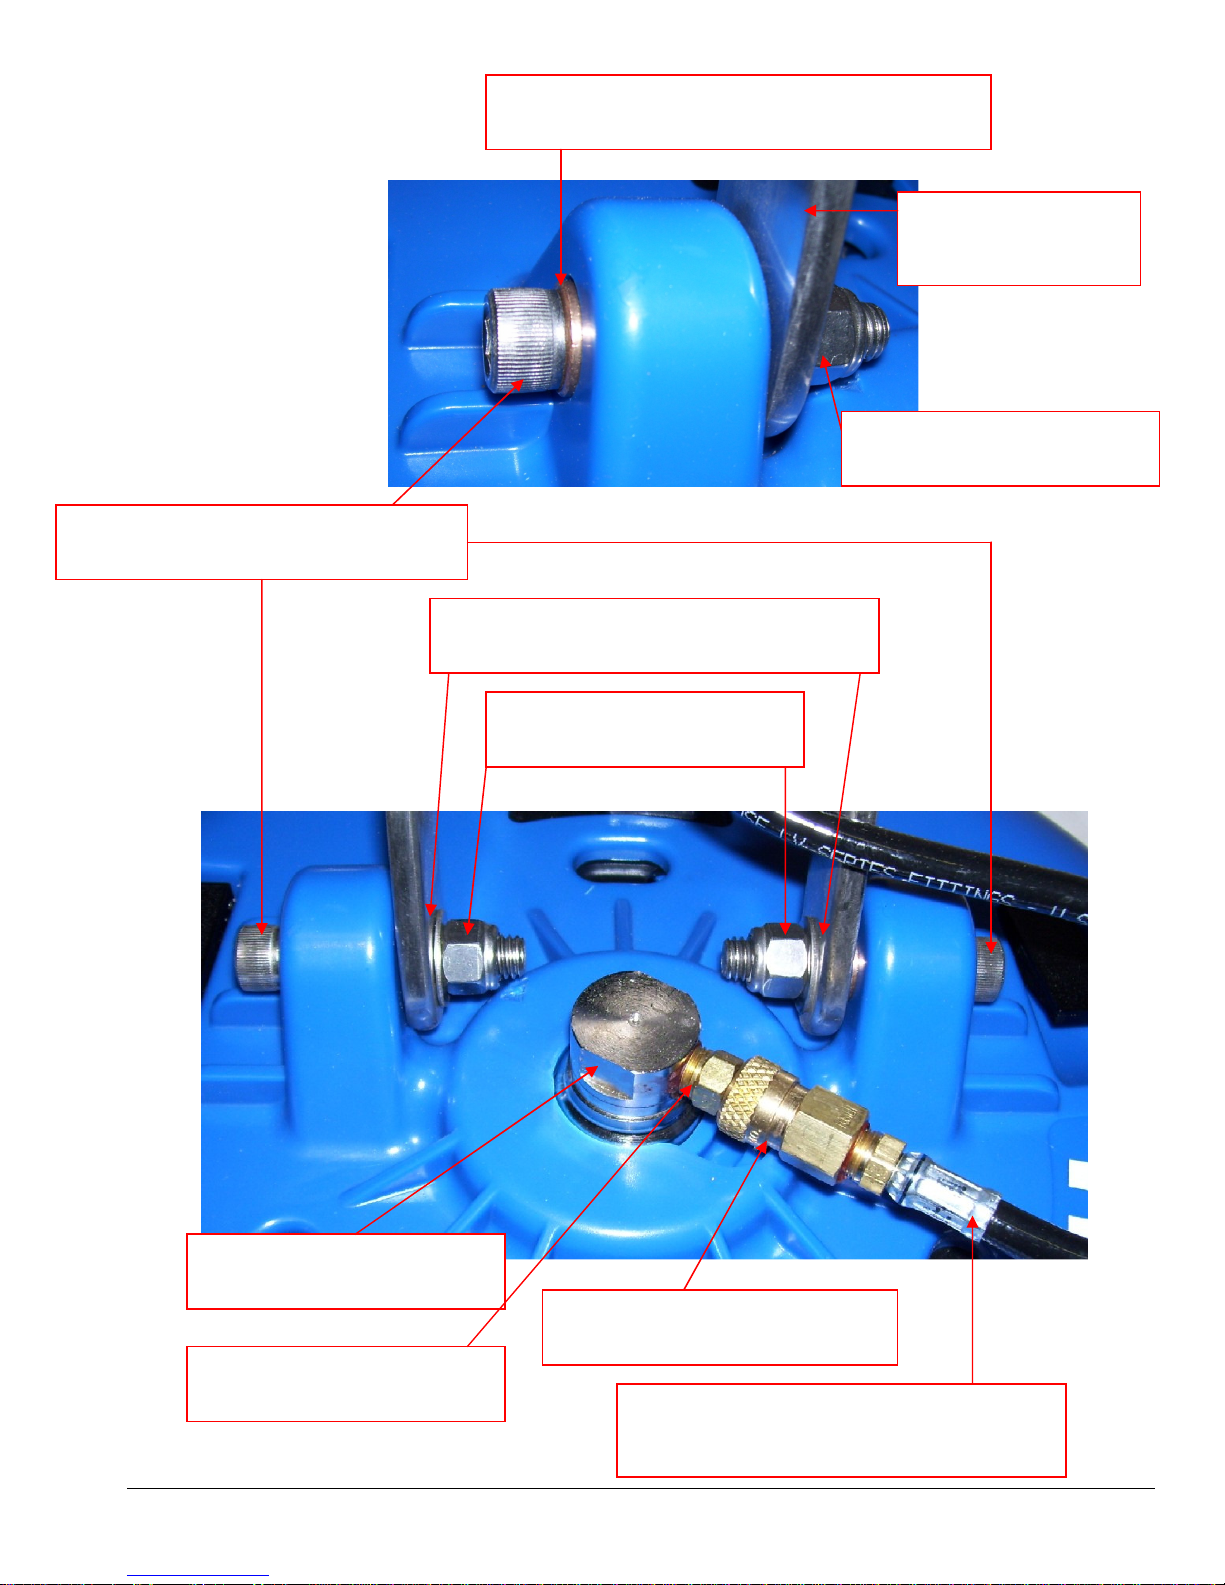
NM4088
SX-15 Parts
BUSHING BRONZE 3/8” ID X 5/8” OD X 2”
NM5770 (QTY 2)
SCREW 3/8-16 X2” SS SOC HEAD
NM5780 (QTY 2)
HANDLE SX-15 SS
NM5774
NUT 3/8-16 SS NYLOCK
NM4085 (QTY 2)
WASHER FLAT 3/8” SS
PA189 (QTY 2)
NUT 3/8-16 SS NYLOCK
NM4085 (QTY 2)
SWIVEL W/ FLANGE
NX105
QC 1/8” FEMALE X 1/8” FPT
NA034
QC 1/8” MALE X 1/8” MPT
PKLF01
SOLUTION HOSE HP 3/16” ID X 50”
1/8” MPT & 1/4” MPT ENDS
12
Page 13
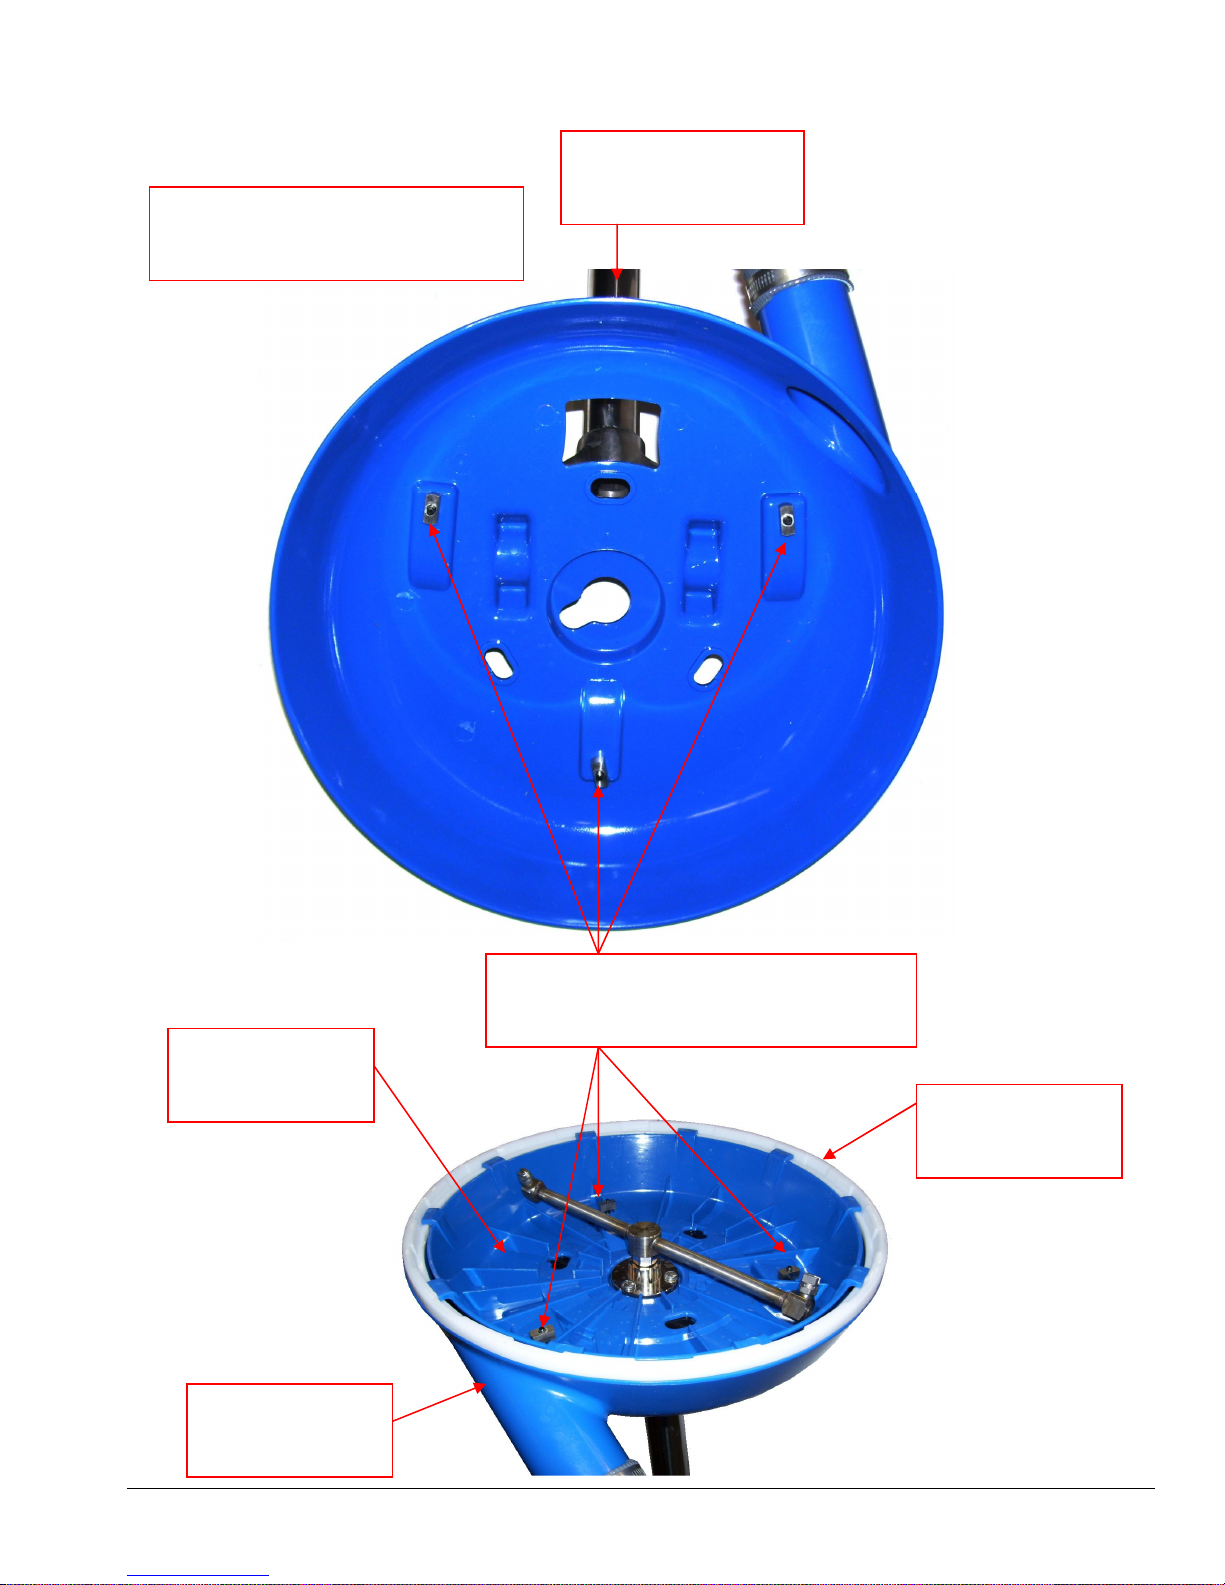
SX-15 Parts
OUTER SHELL- BOTTOM VIEW
NM5763
HANDLE SX-15 SS
NM5774
INNER SHELL
NM5761
RETAINING NUT - RECTANGULAR
NM5784 (QTY 3)
HARD BOOT
NM5772
OUTER SHELL
NM5763
13
Page 14
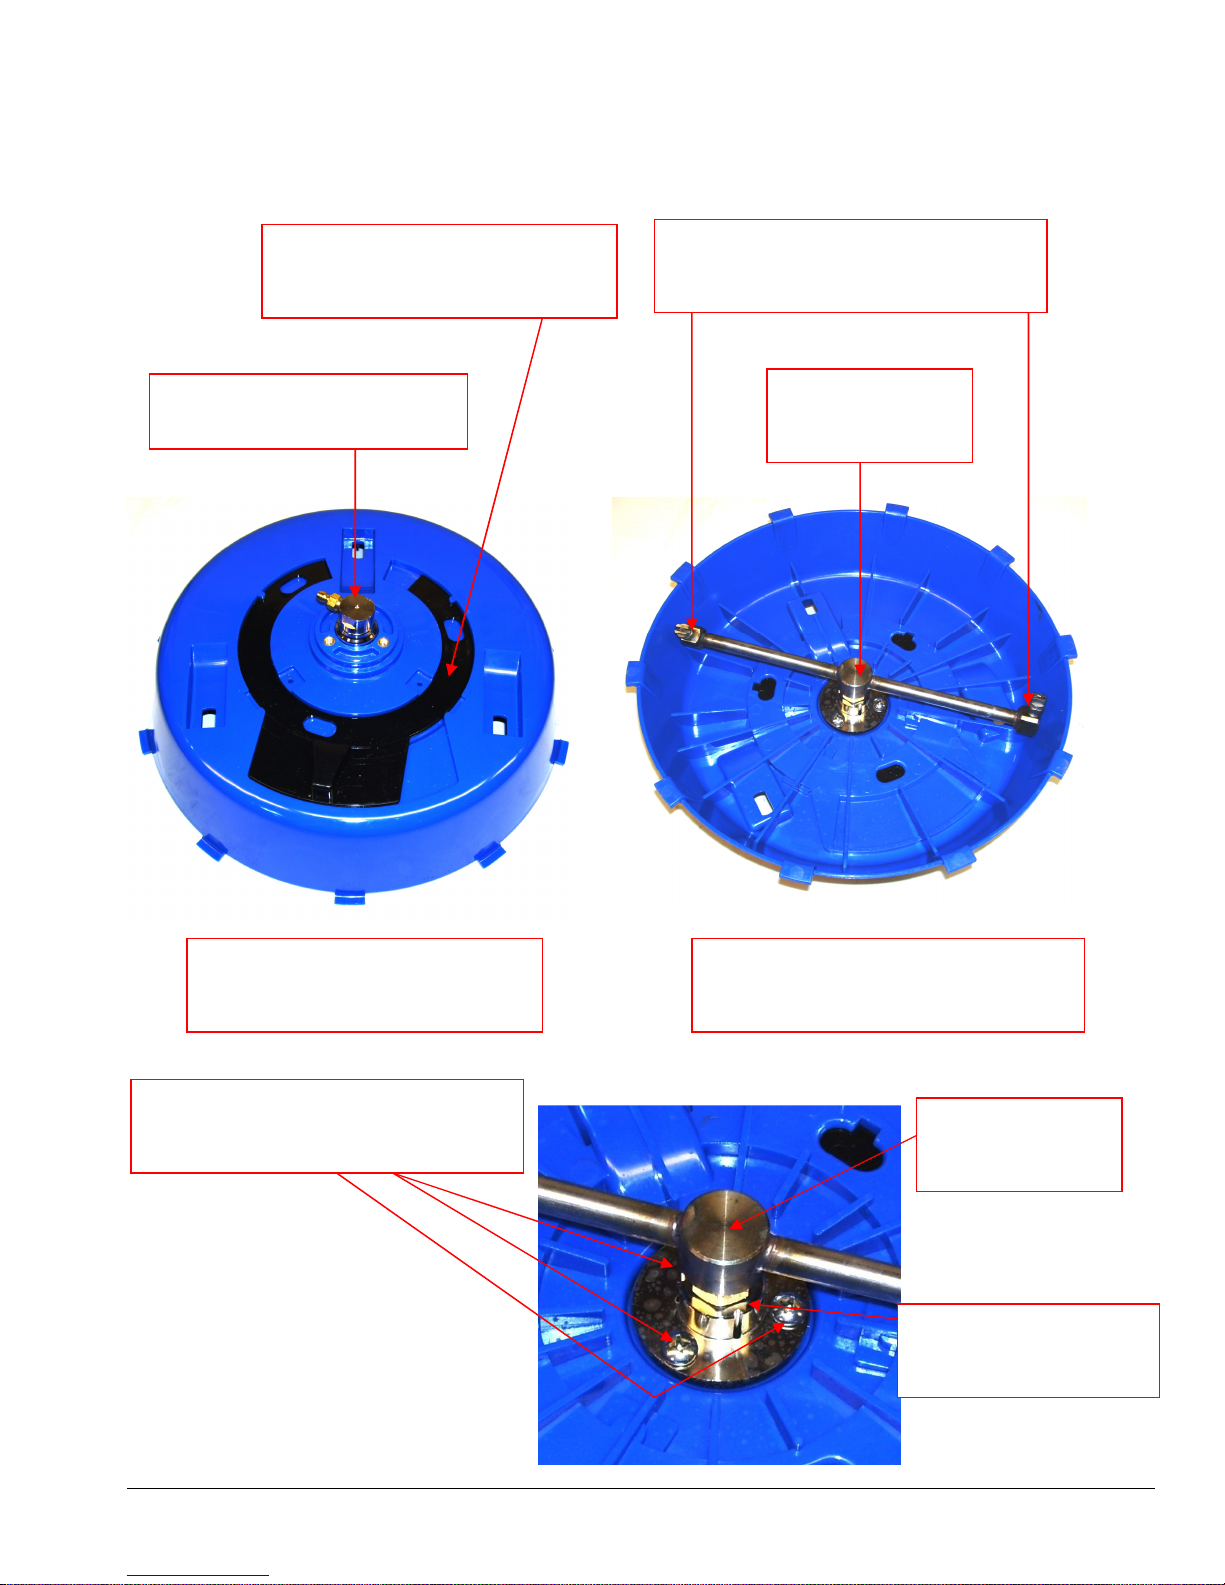
NM5766
SX-15 Parts
VACUUM RELIEF RING
NM5765
VEEJET 1/8” SS MEG0502 (QTY 2)
B632
SWIVEL W/ FLANGE
NX105
SPRAY BAR SS
NX115
INNER SHELL – TOP VIEW
NM5761
SCREW 1/4-28 X 1/2” SS PHP
(QTY 3)
INNER SHELL – BOTTOM VIEW
NM5761
SPRAY BAR SS
NX115
SWIVEL W/ FLANGE
NX105
14
Page 15
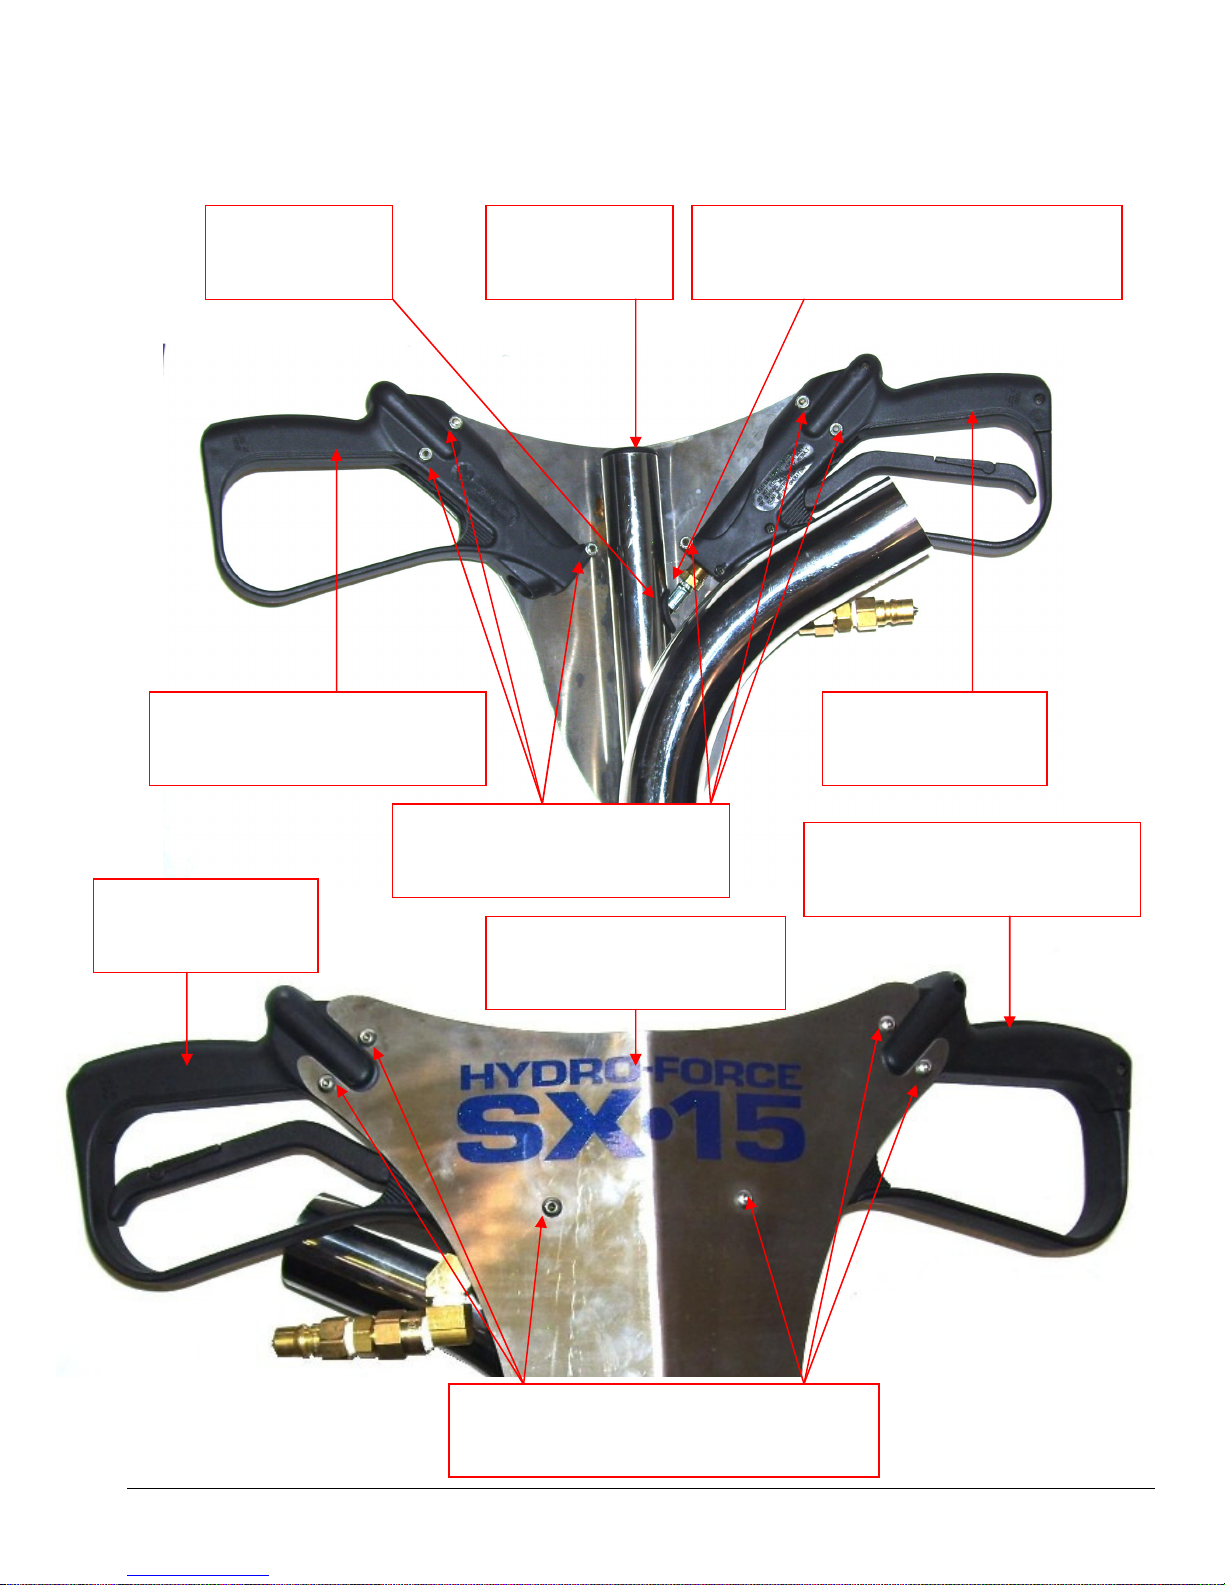
NM4088
SX-15 Parts
GROMMET
NM5778
SPRAY GUN – BODY ONLY
NA031B
END CAP
NM5776
SOLUTION HOSE HP 3/16” ID X 50”
1/8” MPT & 1/4” MPT ENDS
SPRAY GUN
100010
SPRAY GUN
100010
NUT 10-32 NYLOCK
NM4028 (QTY 6)
DECAL SX-15 HANDLE
NM5602
SCREW 10-32 X 1-5/8” BHSOC SS
NM4080 (QTY 6)
SPRAY GUN – BODY ONLY
NA031B
15
Page 16
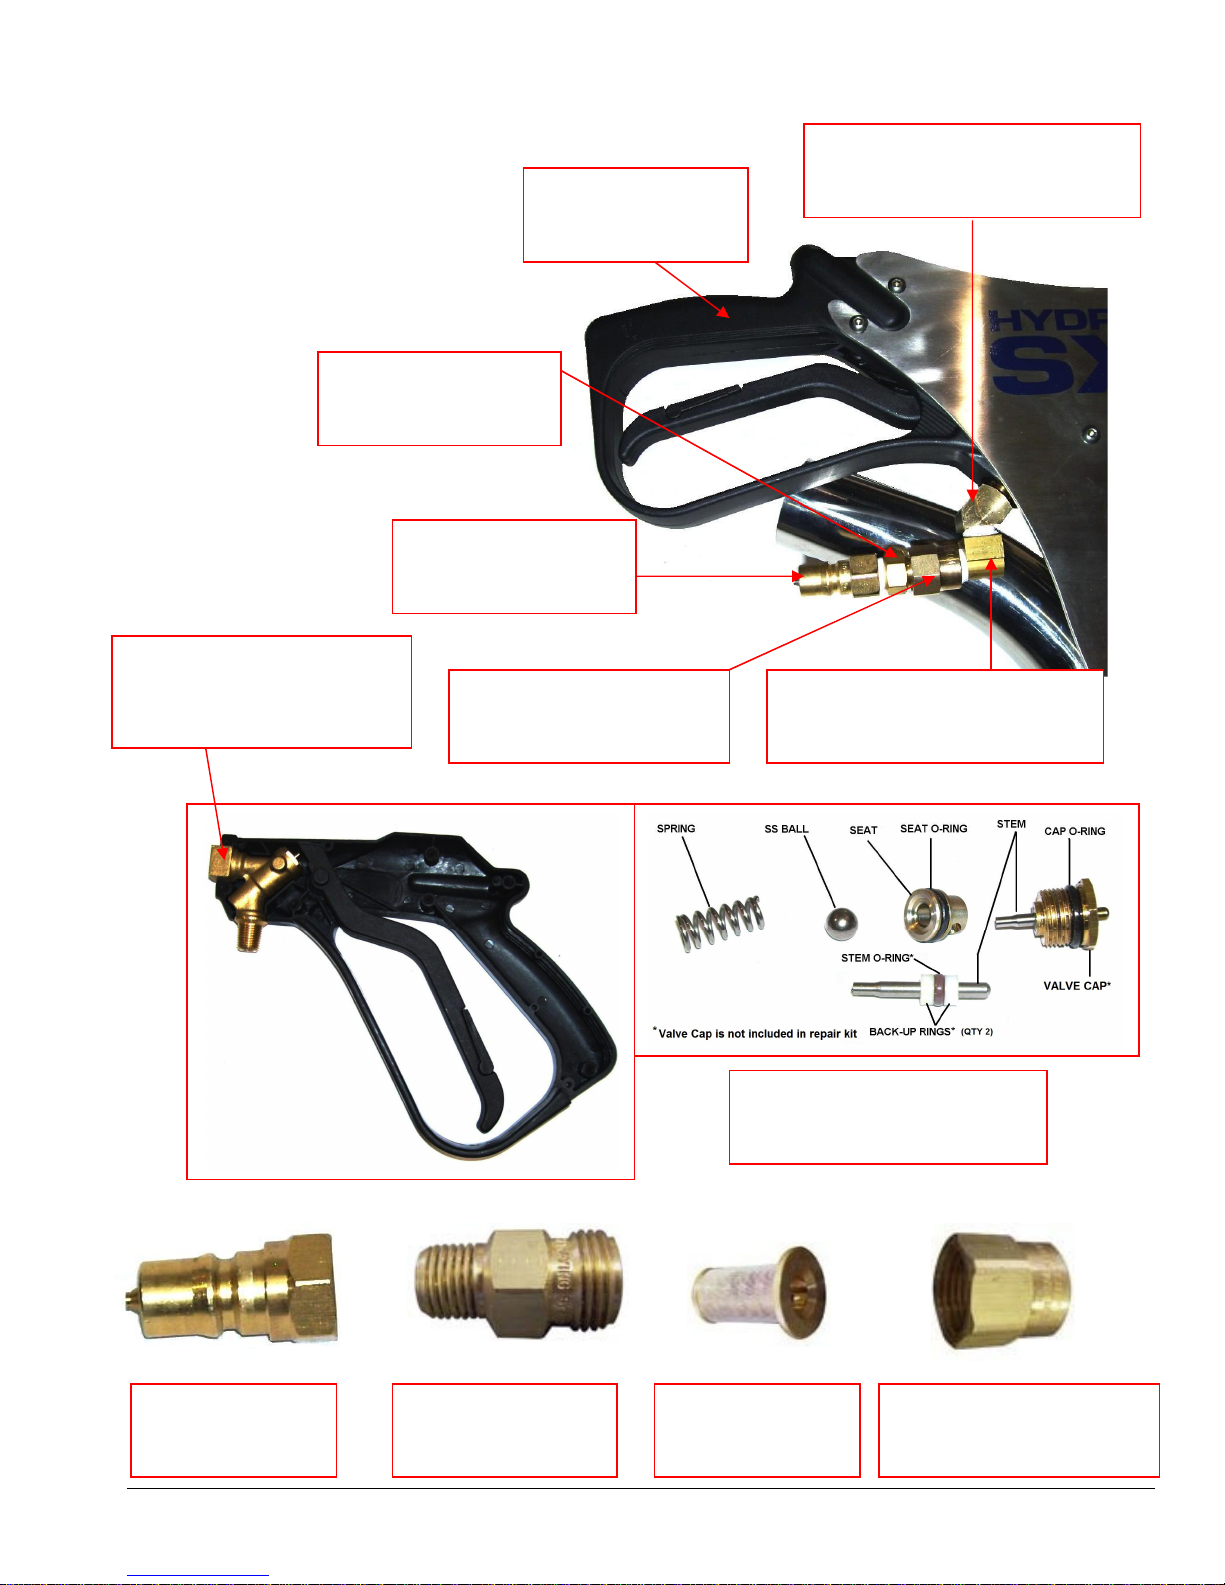
NA03
3A
SX-15 Parts
ELBOW 45° 1/4” STREET
BR272
SPRAY GUN
100010
STRAINER BODY
NA0802
REPLACEMENT VALVE
FOR 100010 SPRAY GUN
NA033
QC 1/4” Male
AH102B
STRAINER ADAPTER
NA0804
ELBOW 90° 1/4” STREET
BR282
QC 1/4” Male
AH102B
STRAINER BODY
NA0802
VALVE REPAIR KIT
FOR 100010 SPRAY GUN
STRAINER 50SS
NA0803
16
STRAINER ADAPTER
NA0804
Page 17

LIMITED WARRANTY
Your SX-15 tile cleaning tool is designed to give you years of reliable service. If a problem
should arise contact your distributor or Hydro Force for assistance.
Hydro-Force warrants the SX-15 tile cleaning tool to be free from defects in material or
workmanship for one year for the deck and handle and 90 days for all other items excluding
normal wear and tear items such as, but not limited to, the hard Boot, brush Ring, quick
connects, strainer screens, spray jets, swivel seals and valve seals.
During the warranty period, Hydro Force will, at its option repair or replace components
which prove to be defective. This warranty does not provide for replacement of complete
units due to defective components. Any costs for transportation or related service labor are
not covered in this warranty. Replacement parts are warranted only for the remainder of the
original warranty period.
This warranty shall not apply to defects resulting from improper operation, lack of
maintenance, unauthorized modification, chemical incompatibility, misuse, abuse or exposure
to freezing temperature conditions.
To obtain warranty service for the SX-15, contact your distributor or Hydro Force. If the tool
must be returned to Hydro Force or an authorized service center, the purchaser shall prepay
shipping charges for products returned for warranty service. No returned items will be
accepted by Hydro Force without prior authorization. All returns must have a return
authorization number, issued by Hydro Force, clearly marked on the exterior of the package.
Hydro Force makes no other warranty either expressed or implied with respect to this
product.
The remedies provided herein are the purchaser’s sole and exclusive remedies. In no event
shall Hydro Force be liable for any direct, indirect, special, incidental or consequential
damages.
This warranty gives you specific legal rights. You may also have other rights which vary from
jurisdiction to jurisdiction.
17
 Loading...