

Page 1
1
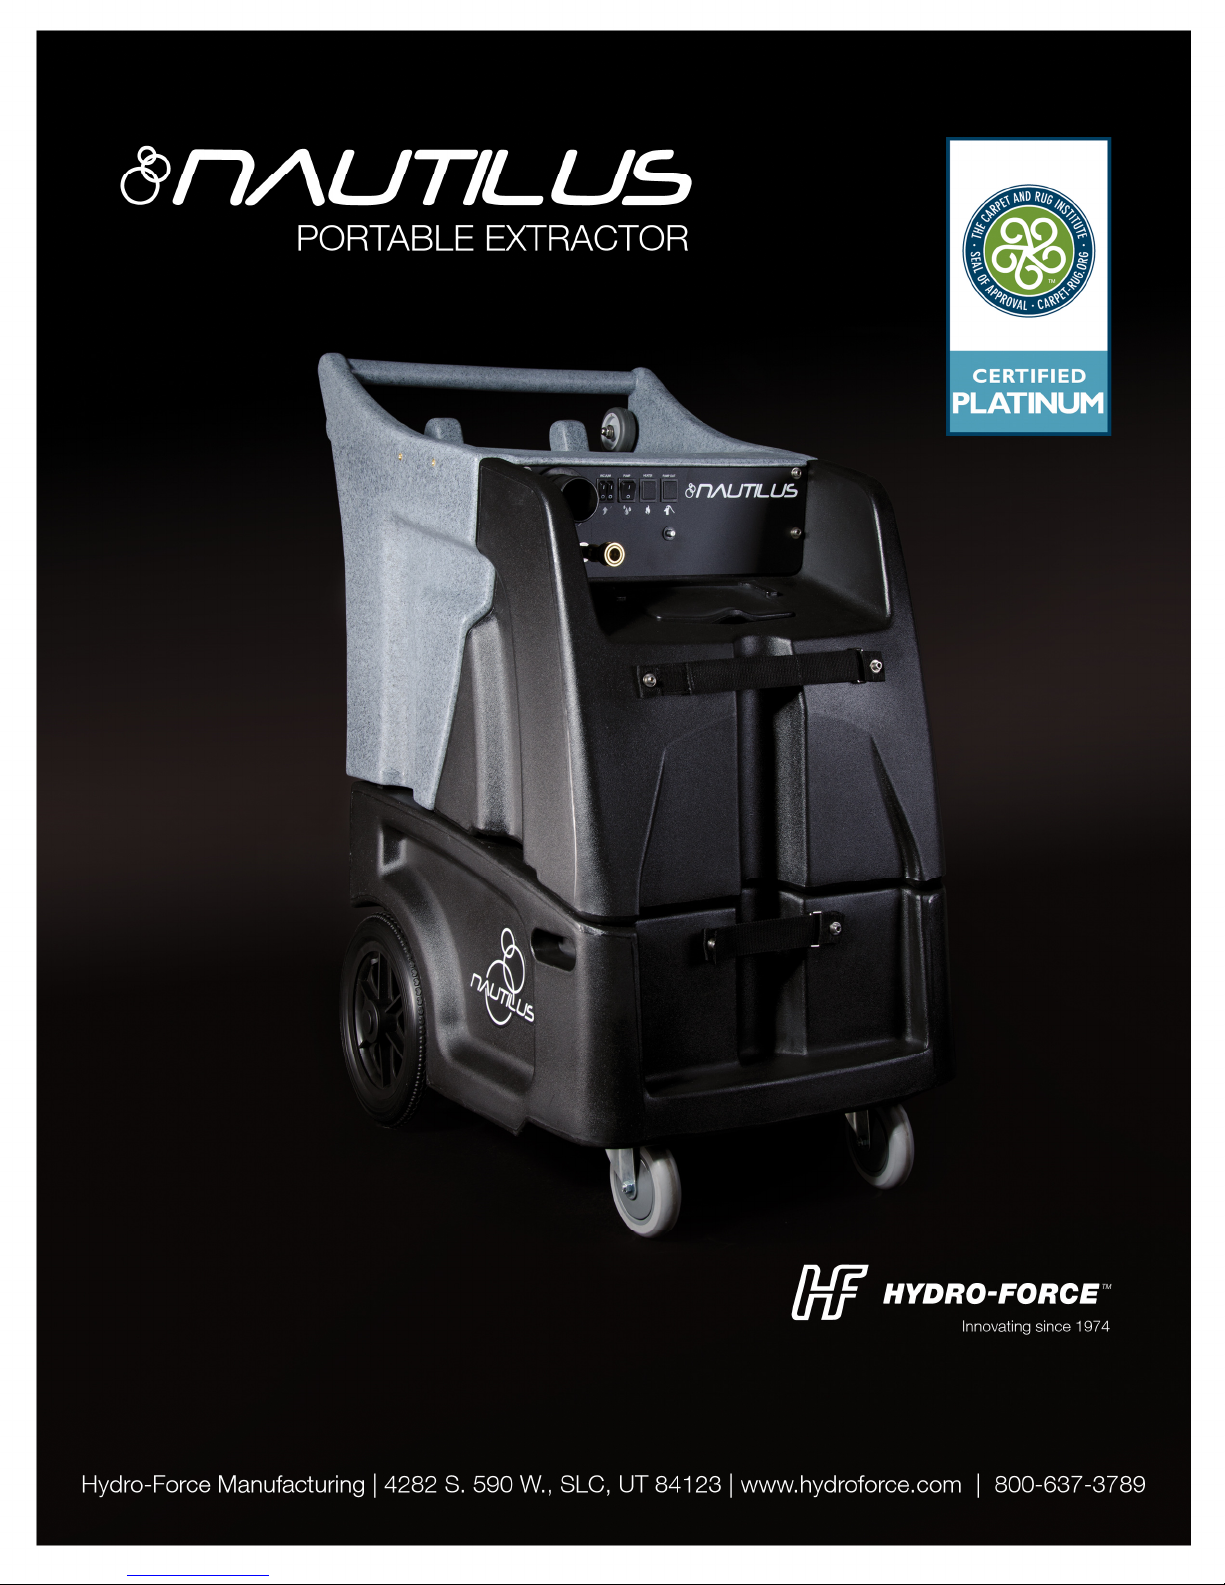
Nautilus MX3-1200
Operating Manual
#LMANN02 Revised: 06-04-2014
Page 2
2
Nautilus MX3-1200 Operating Manual
TABLE OF CONTENTS
TOPIC PAGE #
• Introduction 3
• Technical Specifications 4
• Optional Equipment 5
SECTION 1: Operational Safety
• Electrical Safety 6
• Mechanical Safety 7
SECTION 2: Operation Procedures
• Vacuum Connections 8
• Electrical Supply 9
• Water Supply & Chemicals 10
• Solution Hose & Pump Priming 13
• Vacuum Hoses 14
• Foam Downer 15
• Pump-Out System 16
• Pressure Adjustments 17
• Shutdown Procedures 18
• Accessory Storage 19
• Troubleshooting 20
• Solution Flow Path 23
• Wiring Diagrams 24
SECTION 3: Maintenance/ Technical
• Maintenance 27
• Drawings & Parts Lists
o Pump 36
o Auto-Fill 38
o Pressure Unloader 40
o Pump-Out Pump 41
o Parts Pictures 42
o Parts List 53
o Hose List 56
• Warranty 57
Page 3

3
Introduction
Congratulations on your purchase of the Hydro-Force Nautilus MX3-1200. The
MX3-1200 is designed to give truckmount-level performance in a portable
machine that combines versatility with ease of transport. Years of experience,
engineering, and planning have gone into the design and manufacturing of the
MX3-1200. We take a great deal of pride in the MX3-1200; our goal is no less
than your complete satisfaction.
The Hydro-Force Nautilus MX3-1200 is intended for commercial use only.
This manual will provide users with the knowledge required to operate the
Nautilus MX3-1200 safely, to understand how to properly operate and maintain
the machine, and to ensure that the equipment operates at its maximum
performance level.
All users must read and understand this manual completely before
operating the machine.
Always maintain this manual in legible condition adjacent to the Nautilus MX31200, or place in a secure location for future reference.
Any questions pertaining to the operating or servicing of this unit should be
directed to your nearest Hydro-Force distributor.
This manual is written specifically for the Nautilus MX3-1200 portable extractor
units manufactured by:
Hydro-Force
4282 South 590 West
Salt Lake City, UT 84123
801-268-2673
801-268-3856 FAX
Information in this manual is subject to change without notice and does not
represent a commitment on the part of Hydro-Force or its parent or affiliated
companies.
Page 4

4
Technical Specifications
MX3-1200 High Pressure Extractor
Height: 42-1/4”
Length: 34-3/8”
Width: 23-3/8”
Weight: 160 lbs.
Solution Tank Capacity: 12 gallon
Recovery Tank Capacity: 12 gallon
Solution Pump: Pump-Tec #356 pump with 1-1/2 HP Motor
0-1200 psi – 2.2 gpm
Vacuum Motors: Two AMETEK Lamb 5.7” diameter 3-Stage – tangential discharge
Can be operated in series or parallel configuration
Pump-out Pump: FloJet 120VAC 4.5 gpm
Power Draw: Cord #1 – 20.80Amp wide open / 13.43amp full load (Both Vacuums)
Cord #2 – 15.80Amp max total (14.30 Solution Pump /1.50 Pump-Out)
Standard Equipment
MX3-1200 High Pressure Extractor
Vacuum Connection: 2” Barb or 2”Male Flash Cuff with 2” Male NPT
Vacuum Hose: 25’ X 1-1/2” with 1-1/2” cuff & 2” cuff
4’ x 1-1/2” with 2” cuffs
2” Female Flash Cuff x 1-1/2” hose adapter
Hydro-Filter II Inline Filter - AC10
HP Solution Hose: 25’ x 1/4” with 1/4” male & female quick connects
Accessory Mount Hardware: Four 1/4-20 x 5/8” SS Screws & Washers
Auto Fill System with chemical draw:
Metering Tip Kit: 14 different tips for changing chemical dilution rate
Water Supply Hose: 50’ x 3/8” with 1/4” female quick connect &
Female garden hose fitting
Auto Pump-out System:
Pump-out Hose: 50’ x 3/4” with male & female garden hose fittings
Power Cords: 2 – 50’ x 12gauge with male & female plug ends
Electrical: Dual Circuit Indicator
20amp Pump Circuit Breaker
Internal Component Cooling Fan
Page 5
5
Additional / Optional Equipment
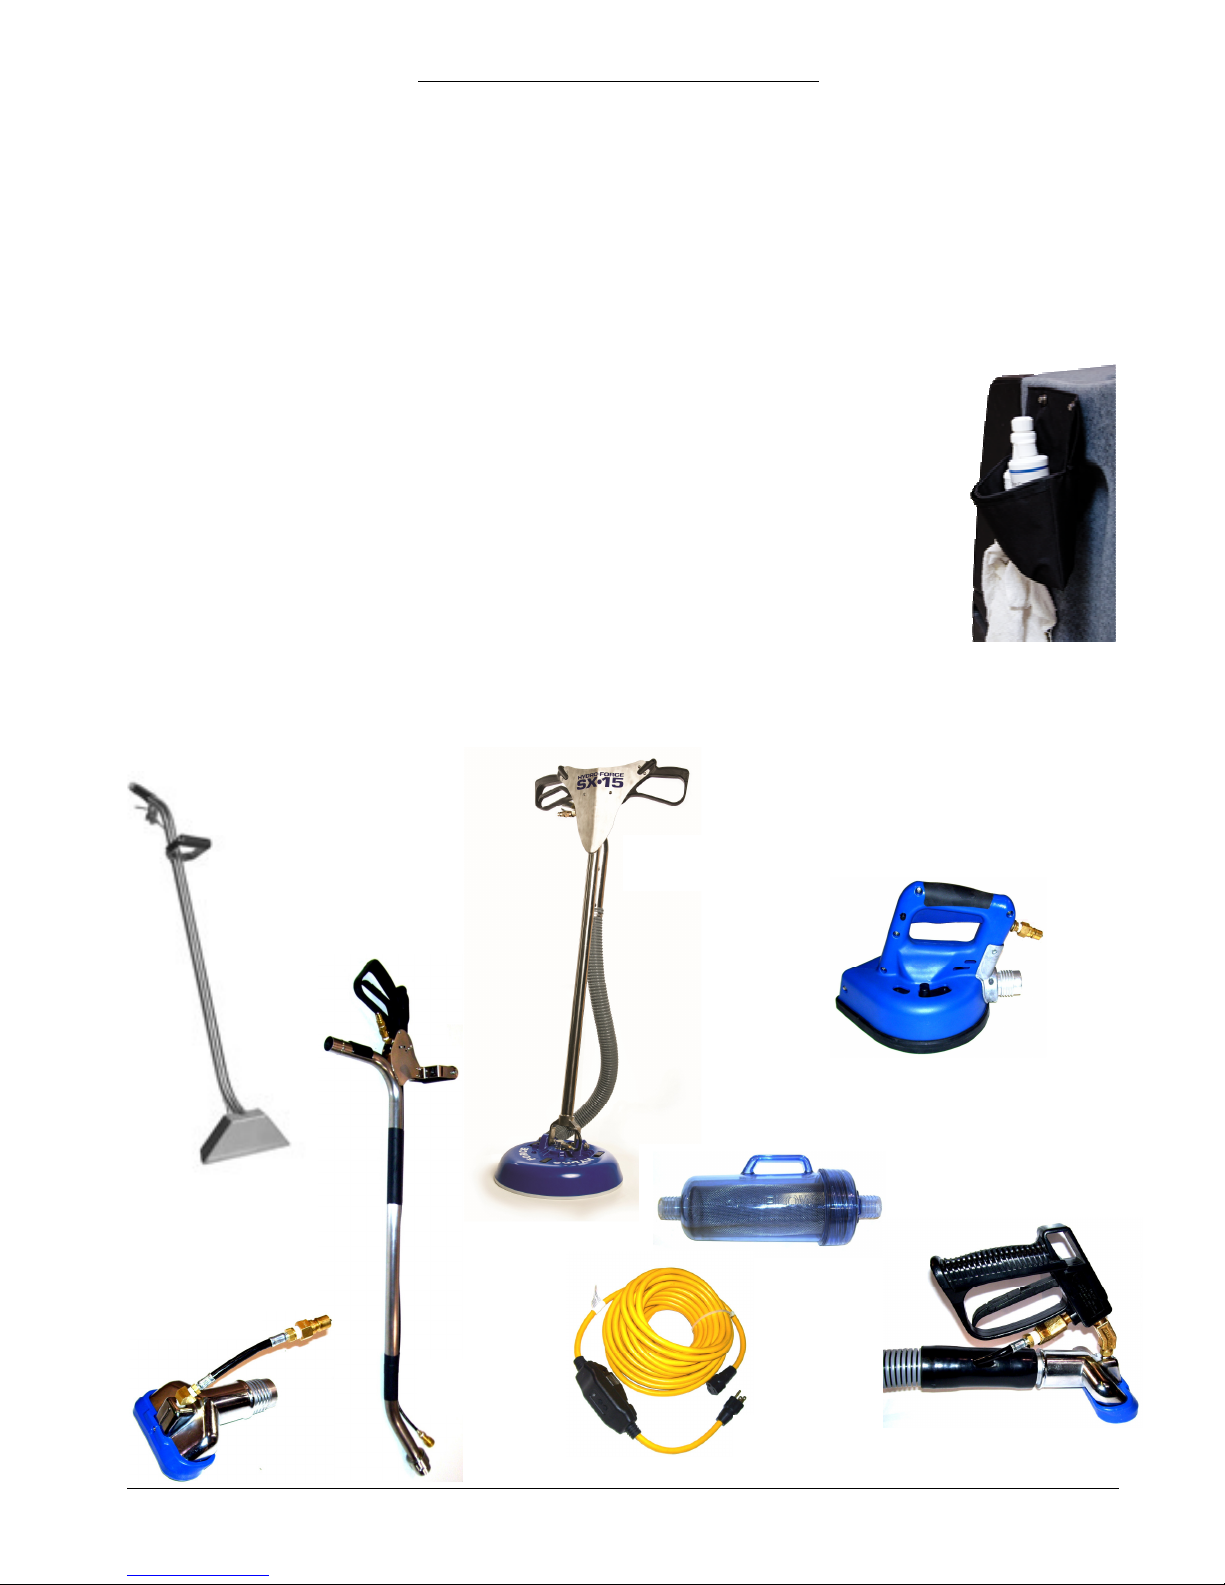
AW29
AC10
Carpet Wand: AW29
Wand Glide – Delrin for AW29 Wand AW529D
Wand Glide – Teflon for AW29 Wand AW529T
18” Bottom Velcro Strap for Wand Holder NM5841
Foam Downer: AH17
Hose Hook: AH95
SX-15 Hard Surface Tool: AW105
Gekko Handle Assembly: AR51A
Gekko 4” Grout Tool Head: AR51D
SX-7 Tool Head: AR51G
Gekko Hand Tool: AR53
1-1/2” Vacuum Hose: (Sold per foot – No cuffs) AH36
2” cuff for 1-1/2” Vac Hose: AH46
1-1/2” cuff for 1-1/2” Vac Hose: AH42
1-1/2” Hose Connector PVC: AH74
HP Solution Hose 1/4” X 25’ w/M-F Quick Connects AH79D
1/4” Male Quick Connect: AH102B
1/4” Female Quick Connect: AH101B
Pump-out Hose: AH65
Hydro-Filter II: AC10
Replacement Screen for Hydro-Filter II: AC10C
Metering Tip Kit: PDE001
12/3 X 50’ Power Cord: AX33
12/3 x 50’ GFCI Power Cord: NM4407A
Belt Pack AX108
AR51D
AW105
AR51A
NM4407A
AX108
AR51G
AR53
Page 6
6
Safety
Section
1
CAUTION! This machine is an electrical appliance. Care must be
taken to reduce the risk of electrical shock.
• READ AND UNDERSTAND ALL INSTRUCTIONS BEFORE OPERATING THE MX3-1200.
• To reduce the risk of property damage or injury, repairs to electrical systems should only be performed by
experienced technicians. Contact your distributor for assistance. Unplug machine power cord from outlet
before performing any repairs on the extractor.
• This machine shall be grounded while in use to protect the operator from electric shock. The machine is
provided with a three-conductor cord and a three-contact grounding type attachment plug to fit the
proper grounding type receptacle. The green (or green and yellow) conductor in the cord is the grounding
wire. Never connect this wire to other than the grounding pin of the attachment plug.
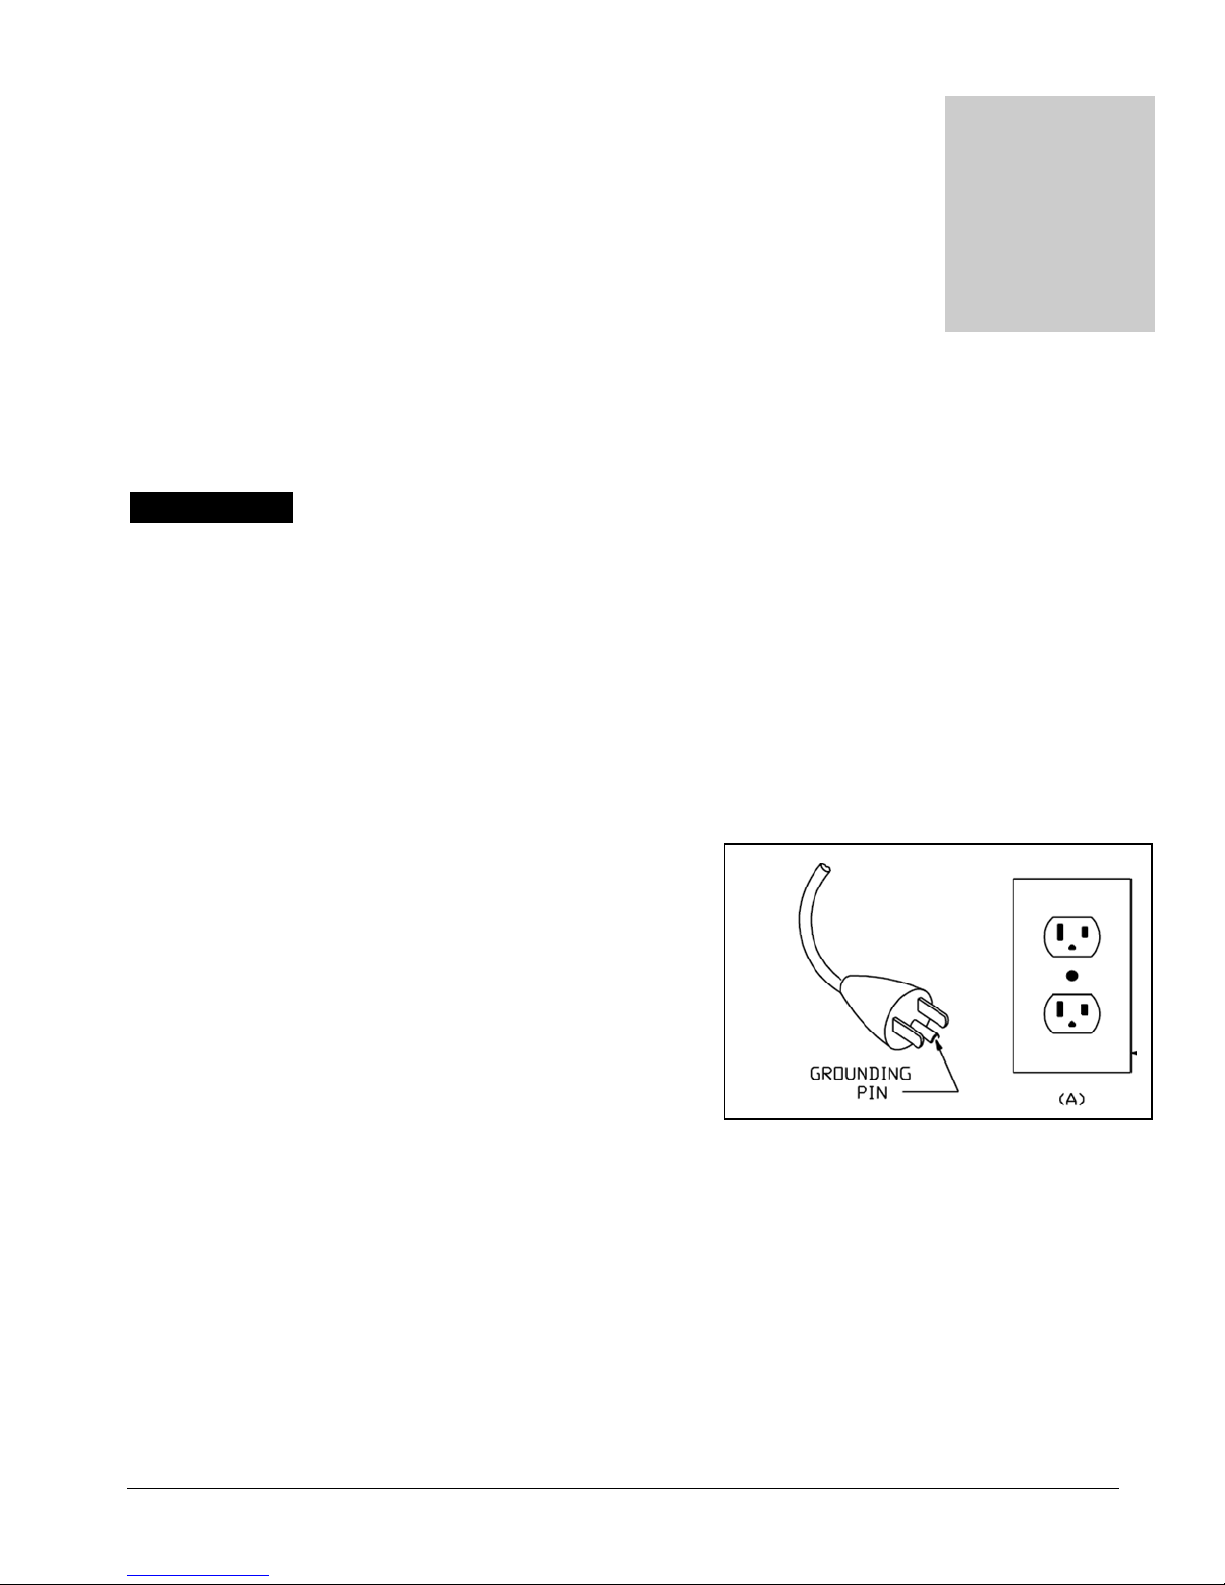
• This machine is for use on a nominal 120-volt circuit and
has a grounding plug that resembles the plug illustrated in
the sketch to the right. Make sure that the machine is
connected to an outlet having the same configuration as
the plug. No plug adapter should be used with this
machine.
• The power cords supplied with this machine are properly
sized to handle the electrical load of this machine and
properly grounded as described above. Any extension
cords used with this machine must be similarly sized and
grounded to assure safe operation. A properly sized
GFCI protected cord can be used for additional protection.
• The two power cords must be plugged into separate circuits during operation. The Dual Circuit Indicator will
ensure that the two cords are operating on different circuits (see Page 9 for details.)
• Do not use the MX3-1200 outdoors, in standing water or on wet surfaces. Do not store the MX3-1200 in wet
conditions. If extractor is leaking, unplug machine power cords from outlets before approaching or touching
machine.
• Do not unplug power cord by pulling on the cord. Grasp the plug end when unplugging the cord. Do not pull
the extractor by the cord. If cord or plug is damaged, do not use cord. Replace with new cord or repair as
needed before use.
• Overloaded circuit may not always trip circuit breaker. Reduced voltage to machine on overloaded circuit will
prevent components from operating properly.
Page 7

7
WARNING! This machine must be protected from conditions which may
damage the pump, tank, hoses and other components.
• Freezing of water in this machine will cause serious damage. The MX3-1200, solution hoses, and tools
must be protected from freezing temperature. Store, transport, and use this equipment only in temperatures
well above freezing. (32ºF or 0ºC). If you suspect the MX3-1200 has been frozen, do not plug in or turn on
machine until you are sure it has thawed completely.
• If the equipment cannot be stored or transported in a warm environment, it can be guarded from freezing by
running an anti-freeze solution through the incoming water lines, chemical feed system, solution pump, solution
lines, tools and pump-out pump. The machine is filled at the factory with anti-freeze to eliminate damage during
shipment in cold weather.
o The anti-freeze solution must be completely flushed from the machine before it is returned to service.
• The MX3-1200 must not be used to pick up flammable or combustible materials or used in areas where these
materials may be present.
• Solvent-based or water-based solutions containing solvents may damage the pump, hoses, and other
components. Do not assume chemical compatibility. Contact your distributor or Hydro-Force if you have
questions regarding the compatibility of your chemicals with the machine.
• Do not clean with solutions that are at temperatures above 140ºF.
• Rinse the solution tank, chemical system, and pump with fresh water after each day’s use.
• Do not allow pump to run dry. Always maintain adequate solution level to supply solution pump.
• HP hoses may rupture if worn or damaged. Do not use HP solution hoses if hose covering is cut, bulging, or
otherwise damaged. Examine HP solution hoses daily and replace or repair hoses as needed.
• Use Hydro-Filter II and clean the recovery tank daily to keep pump-out filter and pump from becoming
clogged. Store the MX3-1200 with the recovery tank lid open.
• Keep Vacuum Inlet Filter clean and check float for proper operation. Do not operate the MX3-1200 without
the Vacuum Inlet Filter in place. Use defoamer to eliminate foam build-up during cleaning and prevent
foam/moisture from entering vacuums.
***Use common sense to protect yourself and others while using this equipment.***
• Keep pets and children away from the machine when in use.
• Keep all body parts, hair, and loose clothing away from openings and moving parts. Always wear appropriate
clothing and safety equipment when operating unit.
• Use extra care when cleaning on stairs. Wet carpet on stairs can be slippery.
• Do not move the MX3-1200 up or down stairs when tanks are full of water. Drain solution and recovery tanks,
and secure base latches before moving unit up or down stairs. Lift using only the appropriate handles.
• Water may be spilled, drip, or be exhausted from vacuums during operation. Place unit in area where water will
not cause damage or use drop cloth to protect surfaces.
Page 8
8
Vacuum Connections
Section
2
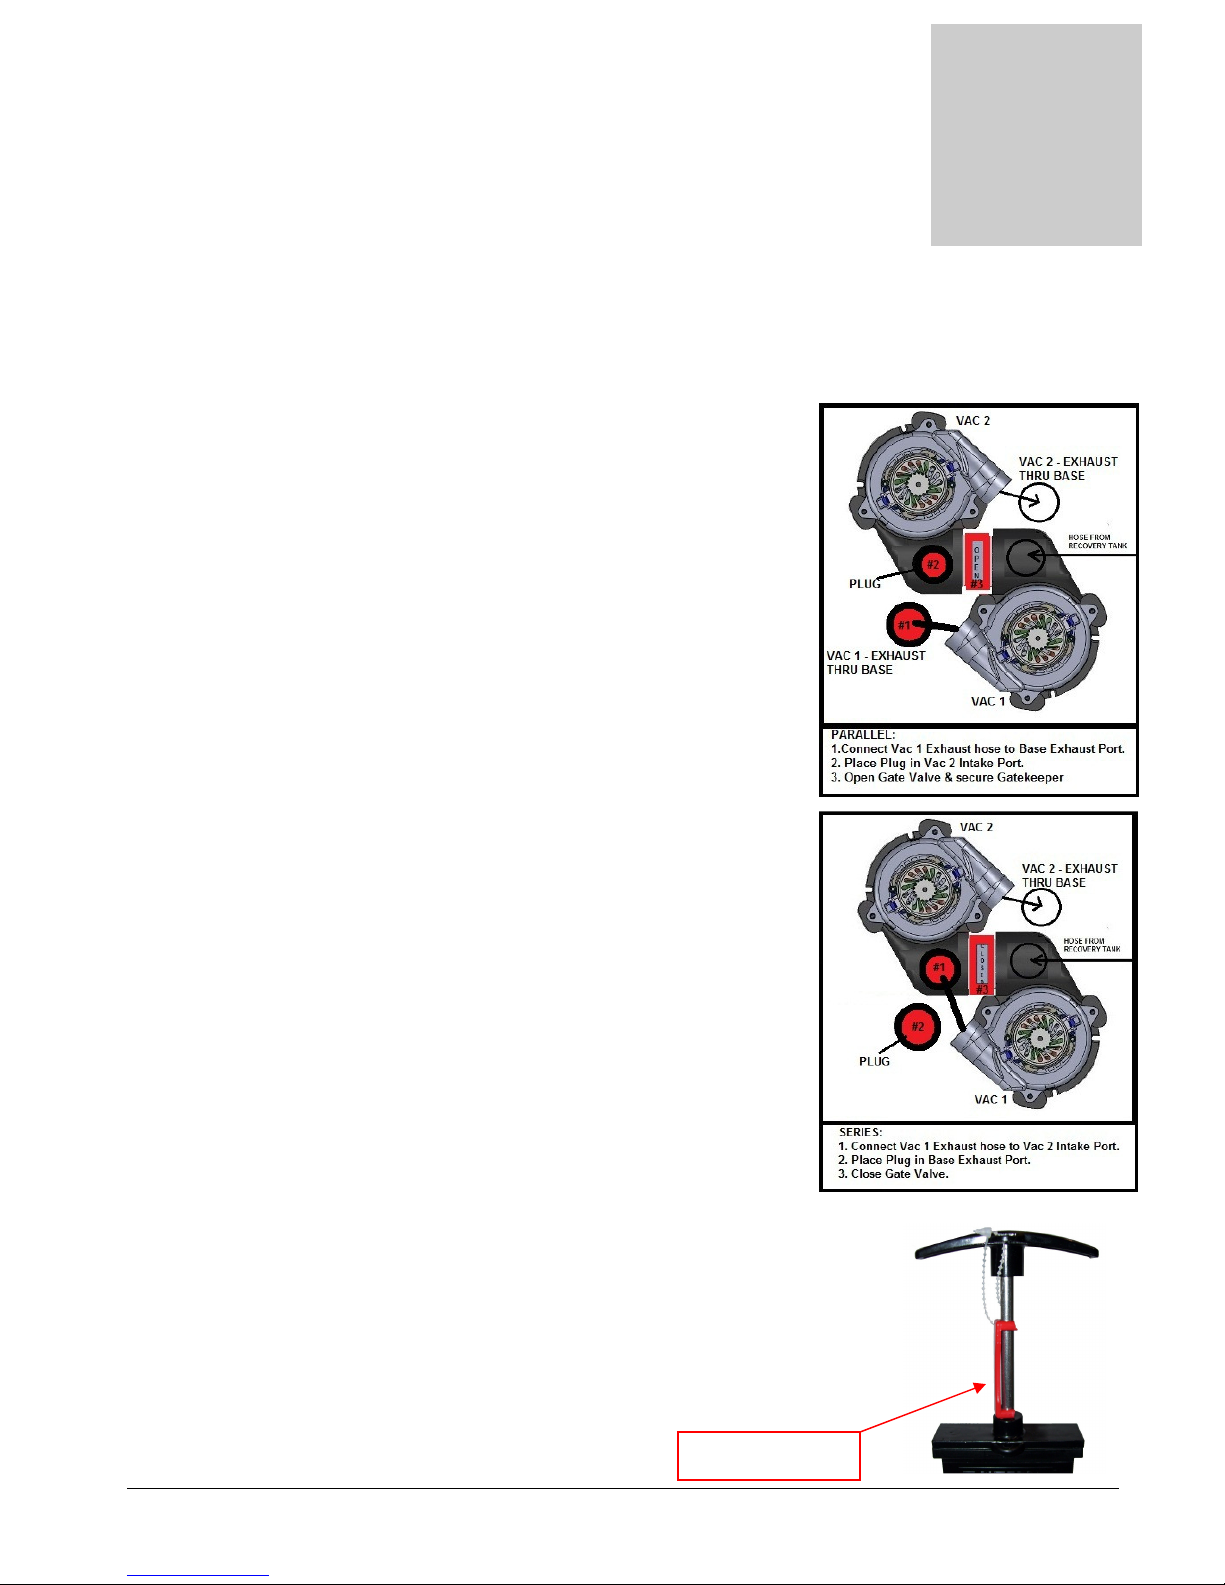
The MX3-1200 has a unique vacuum system which allows you to
connect your vacuums in either parallel or in series. Vacuum
connections can be changed quickly, with only a screw driver.
While there is debate on which vacuum alignment provides the best
extraction, this much is true:
• Two vacuums in series: The vacuum lift is increased by 1.6
times the rating of a single vacuum, while the air flow stays the
same as a single vacuum.
• Two vacuums in parallel: The vacuum air flow is increased by
2.0 times the rating of a single vacuum, while the lift says the
same.
Air flow is usually measured in cubic feet per minute, indicated as
CFM.
Lift is usually measured in inches of water column, indicated as
“H2O or “WC.
To connect vacuums in parallel:
1. Connect the discharge / exhaust hose from vacuum #1 to the
exhaust pipe on machine base.
2. Place the rubber stopper into the vacuum inlet port of vacuum
manifold number two.
3. Open vacuum gate valve and attach the Gatekeeper to prevent
accidental valve closure.
When connected in parallel, both vacuums must be running during
cleaning. Vacuums cannot be operated individually.
To connect vacuums in series:
1. Connect the discharge / exhaust hose from vacuum #1 to the
vacuum inlet port of vacuum manifold number two.
2. Place rubber stopper into the exhaust pipe on machine base.
3. Remove Gatekeeper and close vacuum gate valve.
When connected in series vacuums can be operated individually if desired during
cleaning.
Warning: Always secure the Gate Valve Open with the
Gatekeeper when connecting the vacuums in Parallel.
Closing the Vacuum Gate Valve with the hoses connected
in the Parallel configuration may cause damage to
Vacuum
#2.
GATEKEEPER
Page 9
9
Operation Procedures
Knowledge of the proper operation of the MX3-1200 is required to ensure
user safety and efficient performance of the extractor.
SET UP AND OPERATION
1. Electrical Cords:
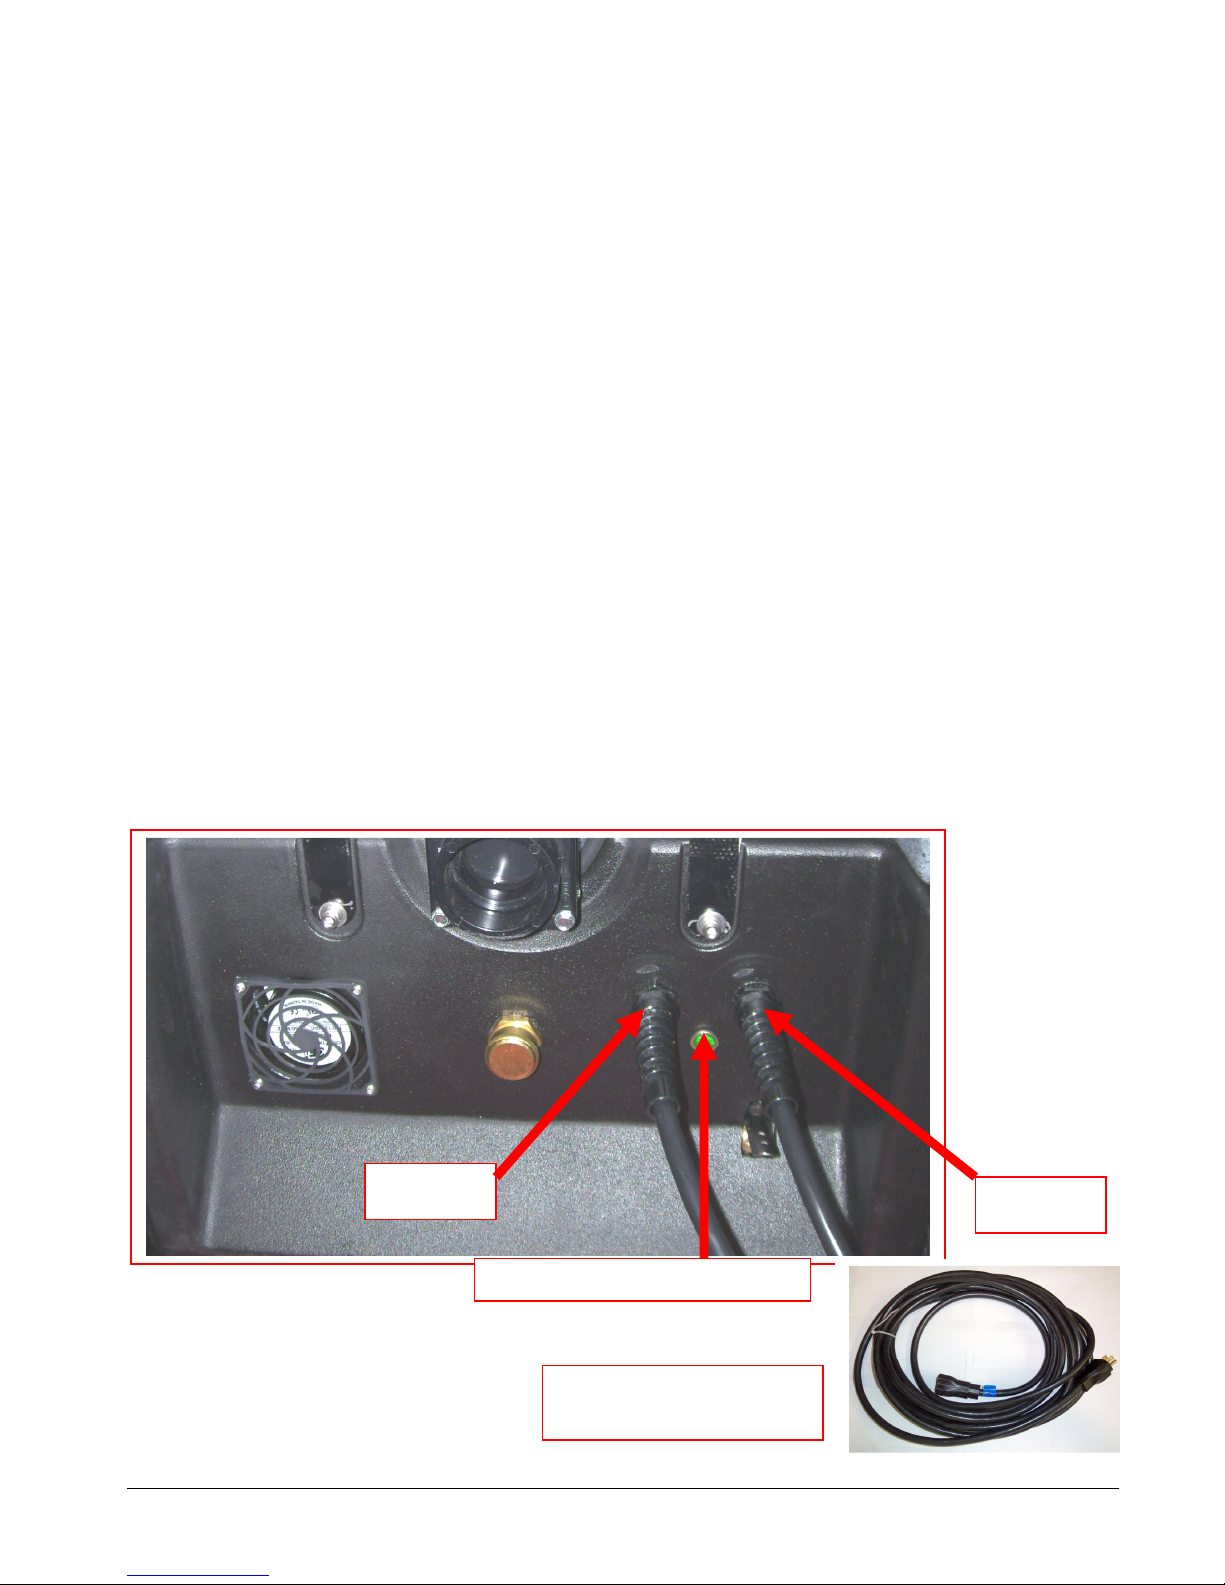
Two 50’ power cords are supplied with the Nautilus MX3-1200. Cord #1 powers both vacuum motors and
the cooling fan; Cord #2 powers the high pressure solution pump and the waste pump. The amperage
required by each cord requires that the two cords be plugged into two separate 20amp circuits:
• Cord #1 (Left side) will supply power to both vacuums.
• Cord #2 (Right side) will supply power to the Solution Pump and Pump-out Pump.
While the machine may be able to run for a short time when both cords are connected to separate 15amp
circuits, component power draw will require two separate 20amp circuits for continuous operation.
20amp circuits are usually found in kitchens and bathrooms.
Make sure no other items are plugged into these circuits. An overloaded circuit will not trip the circuit breaker
immediately, but may not provide sufficient voltage for proper operation and the breaker will trip eventually.
Plug the two power cords into two outlets from different circuits. If the Dual Circuit Indicator green light
fails to light, you may be on the same circuit and may need to select a different plug for one of the cords. If
the Dual Circuit Indicator green light comes on, you are plugged into two different circuits. Proceed with
your set-up procedure.
(Dual Circuit Indicator light may take up to 30 seconds to recognize the two circuits and turn ON.)
If a circuit breaker trips or the pump circuit breaker trips during operation, reset the breakers and move the
cord to another outlet as needed.
Cord #1
Cord #2
Dual Circuit Indicator Light
Power Cord – AX33
50’ – 12 gauge M-F Plugs
Page 10
2A. Water Supply & Chemical Mixing– Manual Fill:
Proportioning V
alve
Chemical Feed Hose
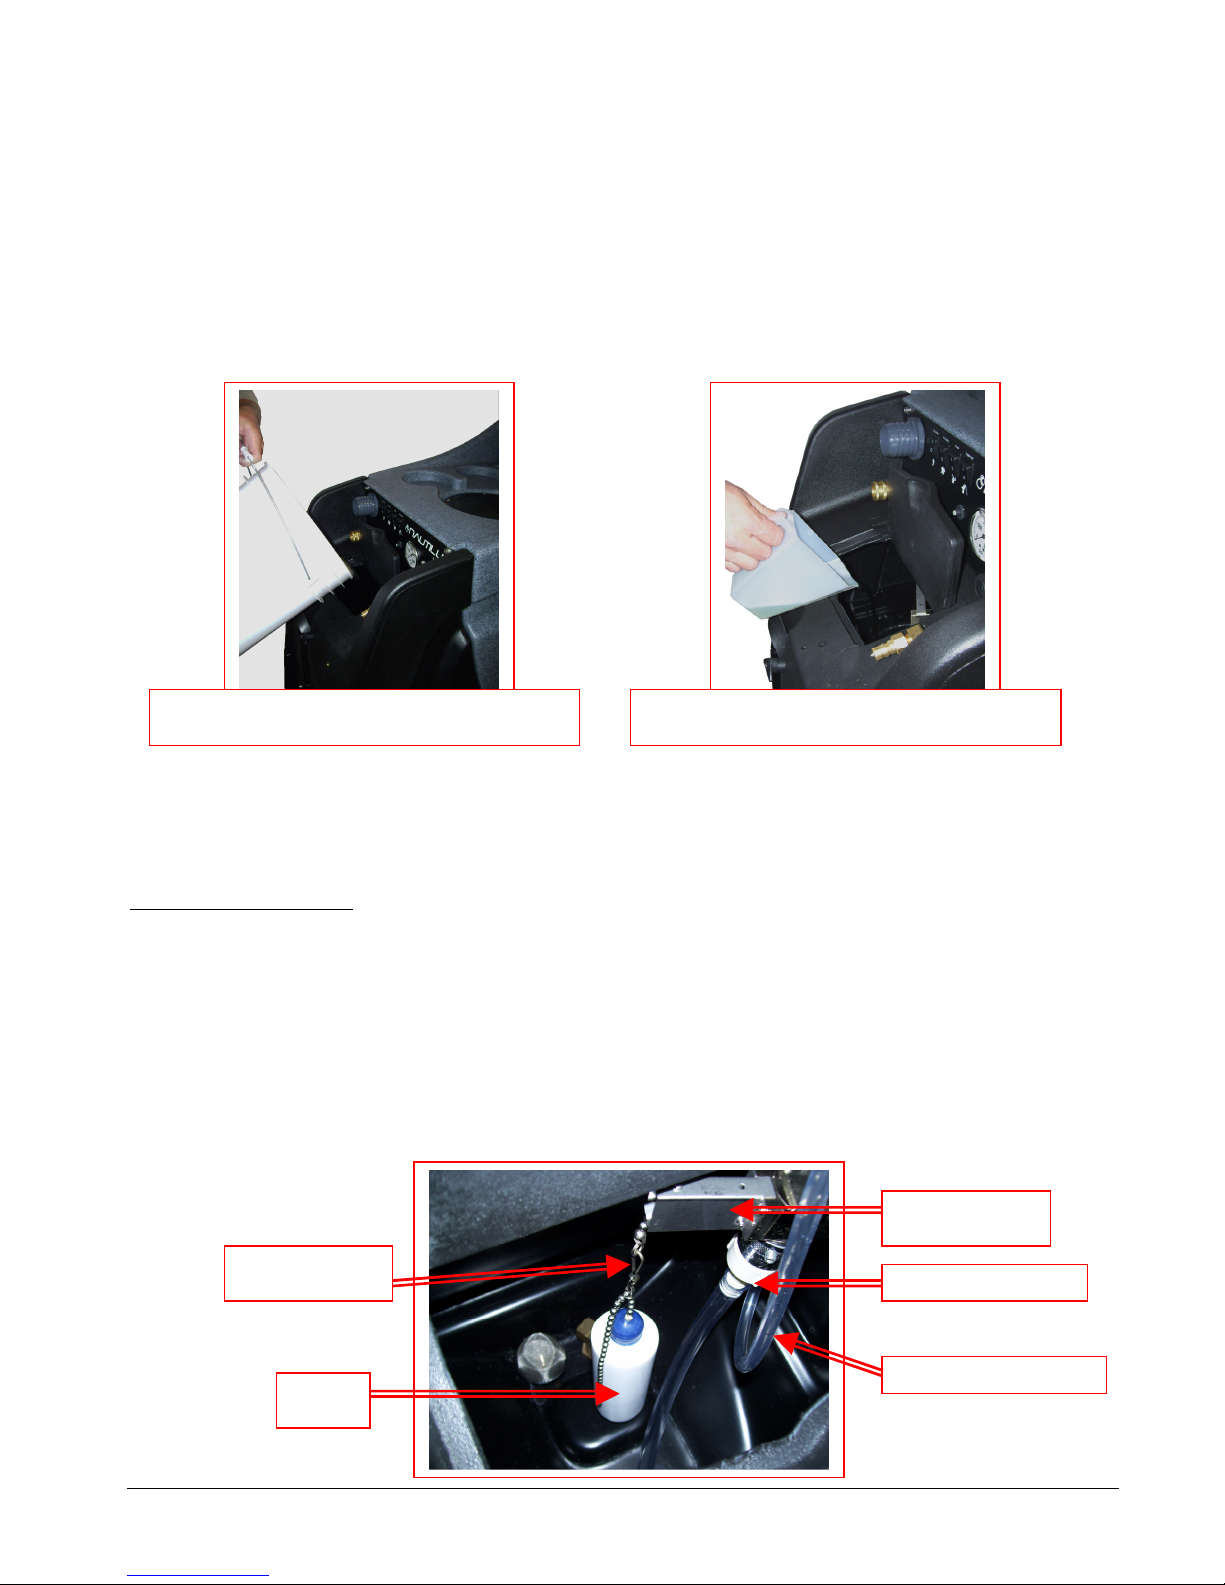
• Pour up to 12 gallons of hot water into the solution tank at the front of the machine. The water
temperature cannot exceed 140°°°°F.
• Measure and add the appropriate amount of the desired liquid chemical to the water in the solution tank.
The amount of chemical will vary depending on the type of chemical used, the amount of water in the
tank, and the material being cleaned; consult the chemical packaging for specific mixture ratios.
• Powdered chemicals should be dissolved in water before adding to the water in the solution tank.
DO NOT RUN OUT OF WATER WHILE USING THE MACHINE! Ensure that the tank
contains enough water to complete each job. If the water level is low: stop cleaning, turn off the
pump, and refill the tank. Running the pump dry will damage the pump and void the warranty.
Pour appropriate amount of hot water into
Add appropriate amount of chemical to water
2B. Water Supply & Chemical Dilution – Auto-Fill:
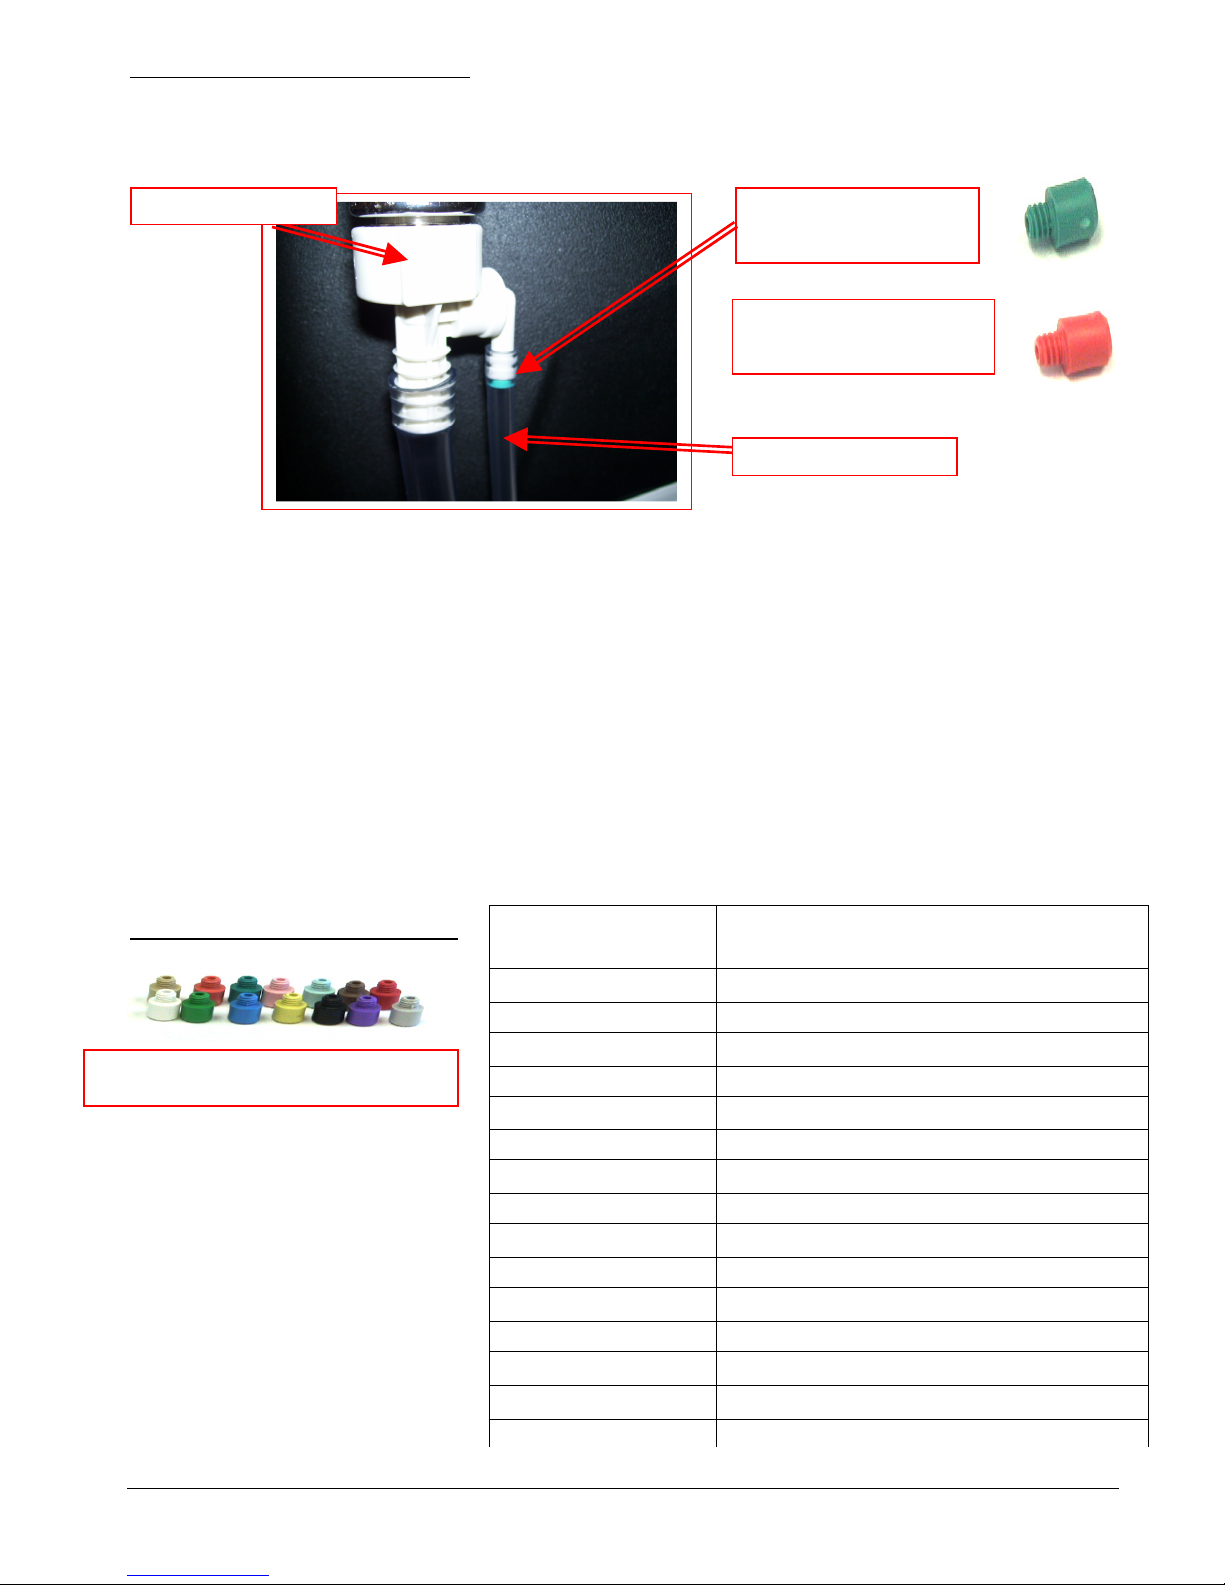
• The chemical dilution rate is controlled by the metering tip, and the dilution rate can only be changed by
changing the metering tip (See “How to Change the Metering Tip” on Page 11 for instructions.)
Chemical Feed Setup:
• Remove the chemical feed hose from the solution tank. Make sure float is attached to valve and hanging
freely, above the bottom of the solution tank. Adjust float height to maintain adequate water level.
• Place the end of the chemical feed hose into a container of liquid chemical.
• If the tip is removed, and the proportioning system operated with no tip, the dilution rate will be 8:1 (the
equivalent to adding 16-1/4oz of chemical to each gallon of water.)
• The standard tip for use with the MX3-1200 is the turquoise tip with a dilution rate of 256:1. This means
that for each gallon of water flowing into the machine, 1/2 ounce of chemical will be added.
• If a fresh water rinse with no chemical is desired, simply leave the chemical feed hose inside the
solution tank.
•
Float Valve
Float Hanger
Float
10
Page 11
How to Change the Metering Tip:
TIP
CHEMICAL DILUTION RATES
Proportioning Valve
Chemical Feed Hose
• Remove the chemical feed hose from the barb on the side of the proportioning valve.
• Unscrew and remove the old tip.
• Screw in the proper tip for your chemical tip and place the hose back on the barb
Turquoise Tip
Dilution 256 - 1
Red Tip
Dilution 85 - 1
Metering Tip Kit (Hydro-Force Item# PDE001) contains 14 different colored metering tips, allowing
dilution rates from 11:1 up to 427:1. Refer to the chart below to select the tip that meets the dilution rate for
your chemical application.
• For example: if you require 1-1/2 ounces of chemical per gallon of water, change to the red metering tip
with the dilution rate of 85:1.
• The dilution rates are based on chemicals with water-like viscosity. Thicker (more viscous) chemicals will
dilute at a different rate.
• For powdered chemicals, a liquid concentrate must be made. Mix the concentrate according to the
manufacturer’s directions, and then select the appropriate metering tip.
• Contact your distributor or Hydro-Force if you have questions about your chemical.
Metering Tip Application Chart:
COLOR
OZ / GAL (RATIO)
Metering Tip Kit – PDE001
TAN 0.30 (427:1)
ORANGE 0.40 (320:1)
TURQUOISE 0.50 (256:1)
PINK 0.75 (170:1)
LIGHT BLUE 1.00 (128:1)
BROWN 1.12 (114:1)
RED 1.50 (85:1)
WHITE 1.75 (73:1)
GREEN 2.00 (64:1)
BLUE 2.50 (51:1)
YELLOW 3.75 (34:1)
BLACK 5.00 (26:1)
PURPLE 8.50 (15:1)
GRAY 11.50 (11:1)
NO TIP 16.25 (8:1)
11
Page 12
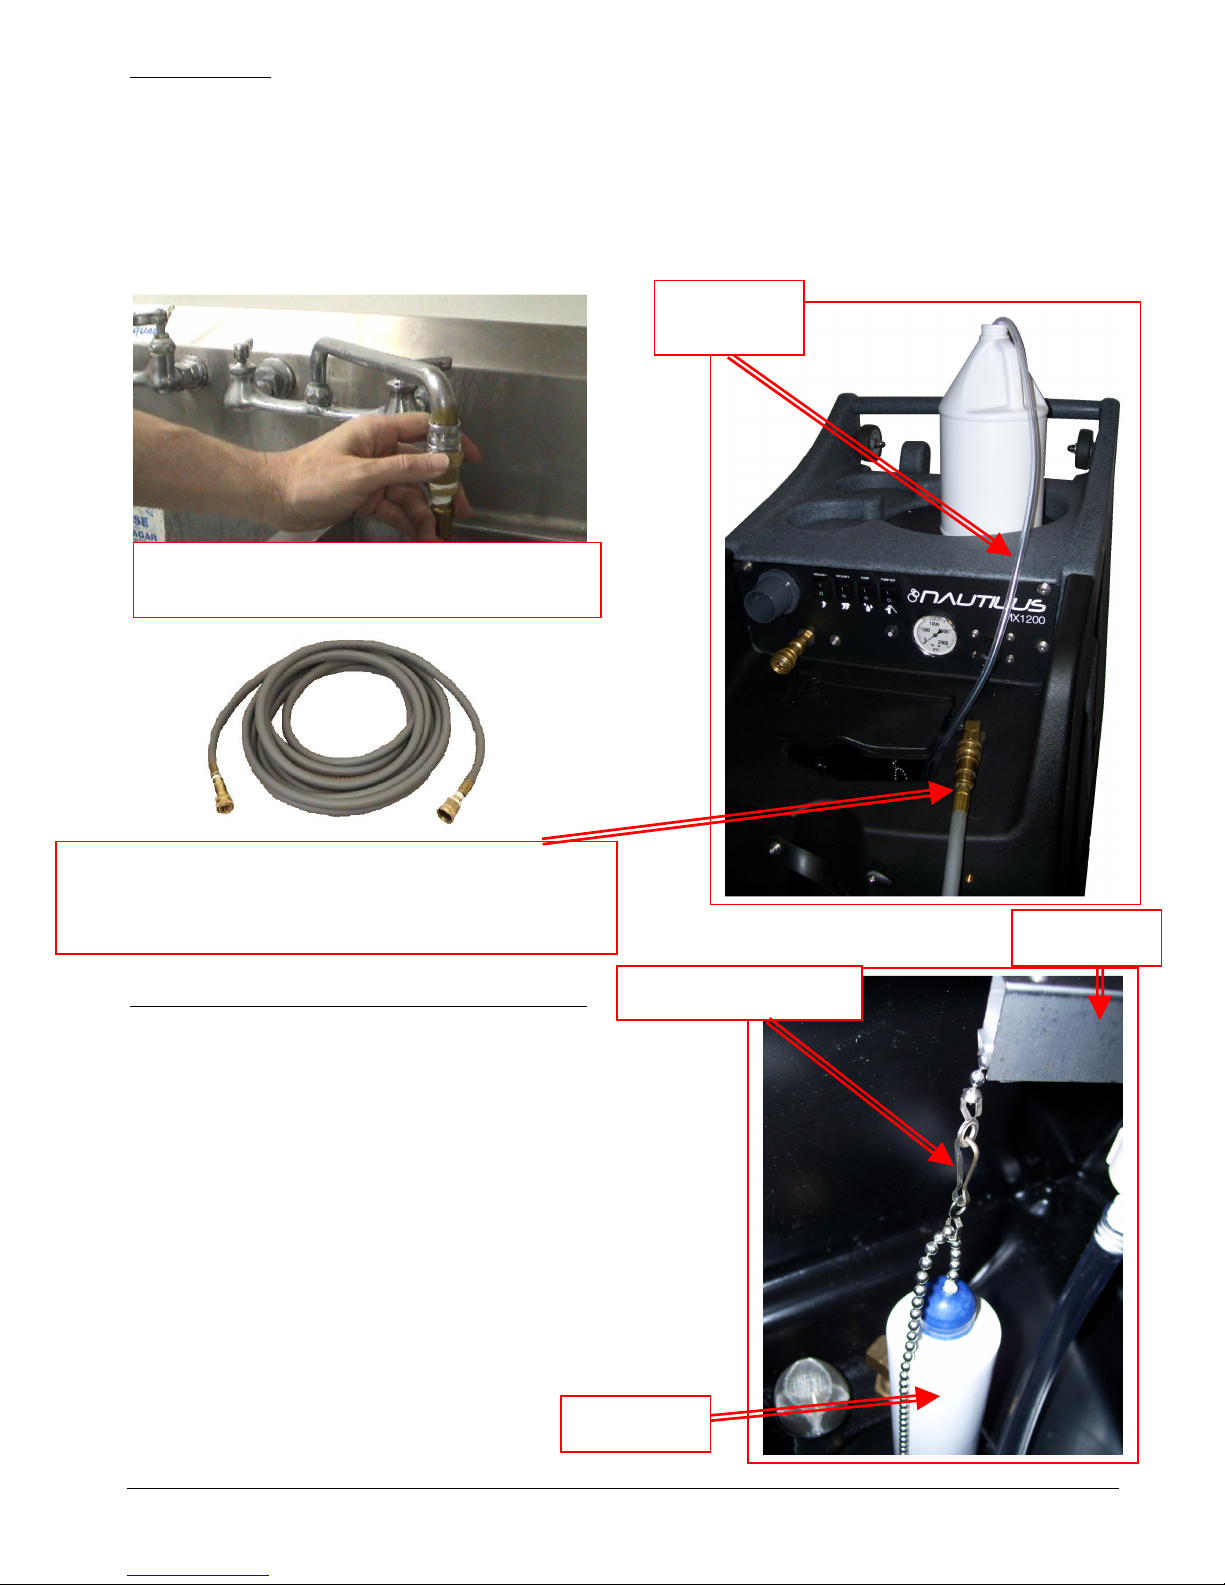
Water Supply:
• Once the correct metering tip is in place:
o Connect the Auto-Fill Water Supply Hose to the water inlet (the male quick-connect on the front
of the machine.)
o Connect the other end of the hose to a water faucet, and then turn on the water.
• Hot water can be used as long as the temperature does not exceed 140°F.
• Faucet adapter kits (Hydro-Force item #AX21 & AX22) are available that allow connection to different
types of faucets if needed.
Chemical
Feed Hose
Connect the Auto-Fill Water Supply Hose to a
faucet and turn on the water
Connect the Auto-Fill Water Supply Hose to Solution Inlet
(Male quick connect on the front of the machine.)
3/8” id X 25’ with F Quick Connect & F Garden Hose Fitting
To adjust the water level in the solution tank:
Float Hanger Hook
• Turn off the water supply.
• Adjust the length of the chain connecting the float bottle to
the float valve. Unhook the float from the beaded chain on
the valve. Unsnap the hook from the beaded chain on the
float.
Move the bottle down to decrease the water level.
Move the bottle up to increase the water level.
• Snap the back onto the float chain & hook the float back
onto the valve chain.
• Turn the water supply back on.
If the chemical is not drawing, or if the tank is not filling
or is overflowing, refer to the trouble shooting guide, or
contact your distributor for assistance.
Float Bottle
Float Valve
12
Page 13
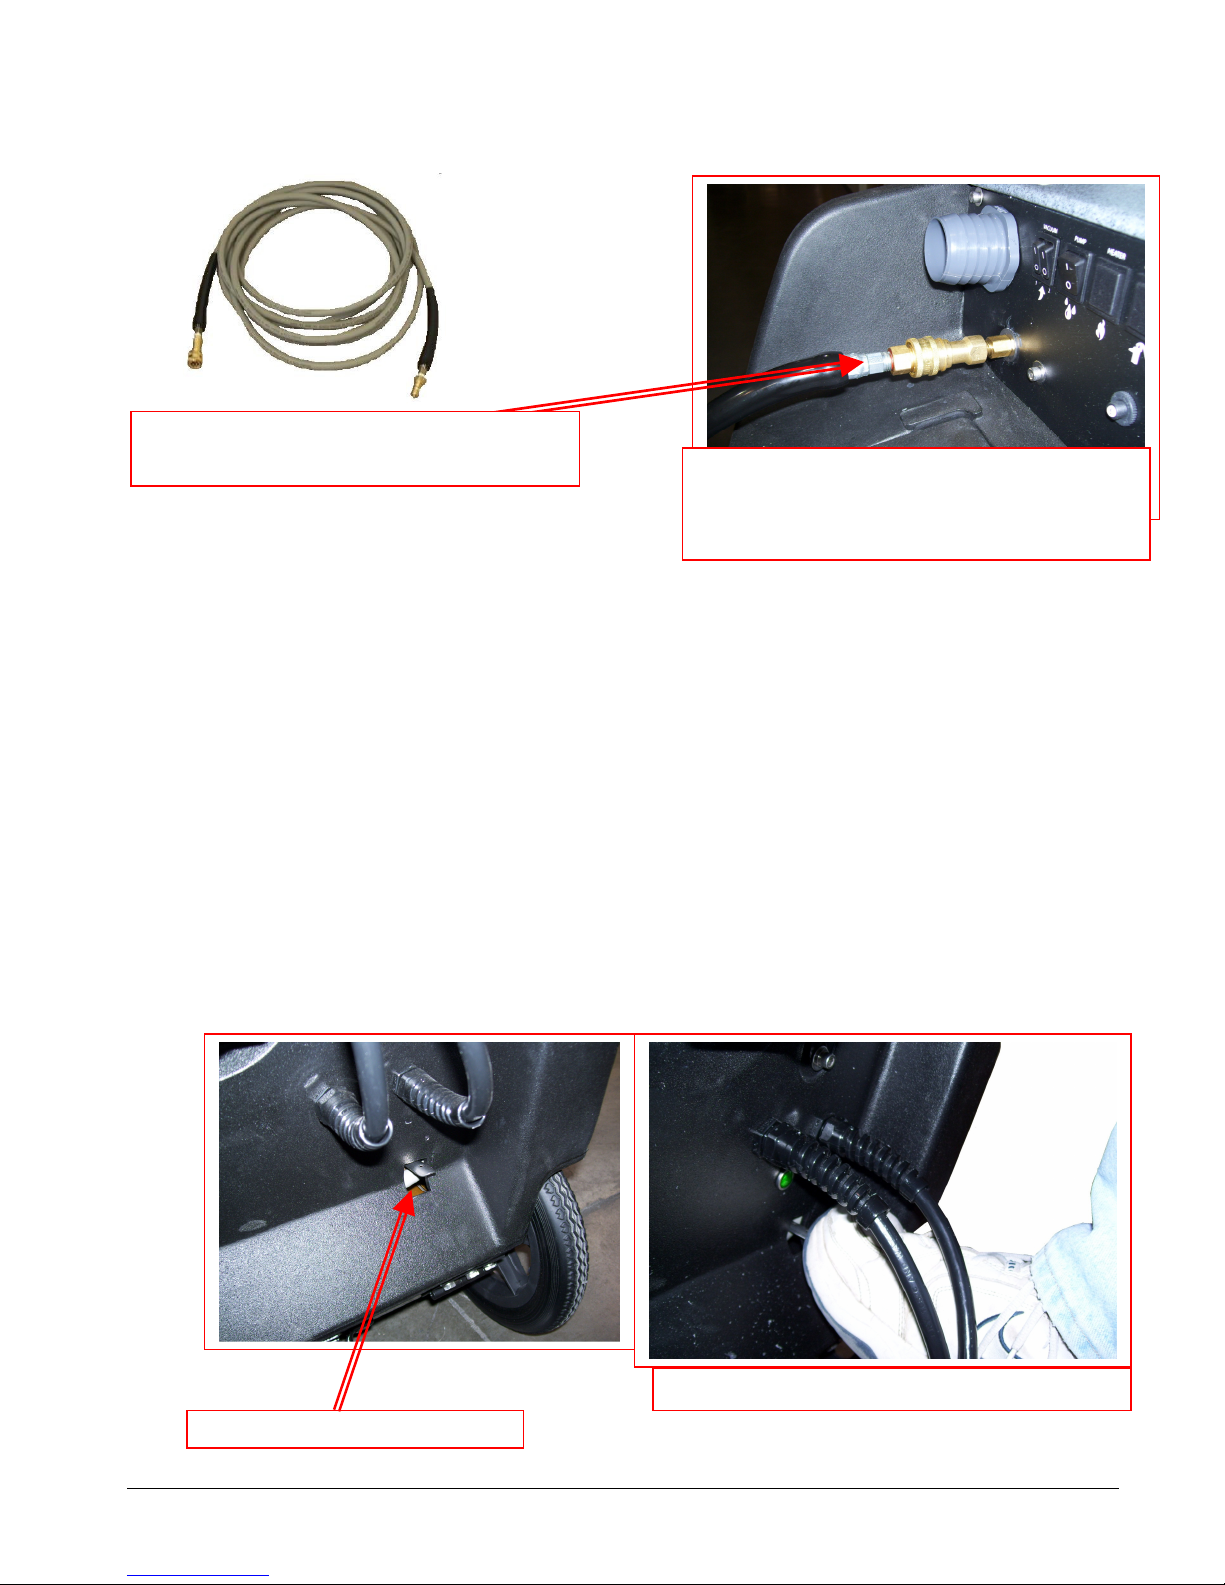
3. Connection of Solution Hose:
PUMP PRIMING VALVE
PRESSING THE PUMP PRIMING VALVE
Connect the high pressure solution hose to the solution outlet (female quick connect on the front of the
machine). Connect the other end of the hose to the male quick connect on the cleaning tool. When you are
ready to start cleaning, turn the solution pump switch to the ON position
HP Solution Hose Assembly – AH79D
1/4” id X 25’ with M-F Quick Connects
Connect the male end of the HP Solution Hose
Assembly to the female solution outlet fitting on
the machine. Connect the female end to the
cleaning tool.
4. Priming the High-Pressure Pump:
Before priming the pump, make sure your solution hose and tool are connected to the machine.
Once water is in the solution tank, the high pressure pump must be primed:
• There is a prime valve located on the lower back portion of the machine.
• Turn on both vacuums and the solution pump. Press the priming lever for a few seconds while you
block off the vacuum inlet with your hand. The vacuum will pull solution through the pump and
prime valve into the vacuum tank.
• Let off the prime valve and your pump is primed. As long as there is solution in the tank the pump
should remain primed. You can now proceed with cleaning or turn the pump off and continue your
set-up.
If the pump still does not prime, or if flow is low or unsteady, check the hose from the solution tank to the
pump (as well as the filter) for clogging, kinks, or restrictions. Clean or replace hose and/or filter and repeat
the priming procedure.
If you are having trouble with the pump, refer to the trouble shooting guide or contact your distributor for
advice or assistance.
13
Page 14
TO PRIME THE SOLUTION PUMP:
1. TURN ON BOTH VACUUMS
2. TURN ON THE SOLUTION
PUMP
3. BLOCK OFF THE VACUUM
PORT
4. PRESS THE PUMP PRIMING
VALVE
BLOCKING THE VACUUM PORT TO PRIME THE PUMP
5. Connection of Vacuum Hoses:
The vacuum connection on the machine can be either a 2” hose barb or 2” male Flash Cuff. Both are
included with your MX3-1200. The desired connector can be threaded into the vacuum port on the front of
the machine.
A 2” female Flash Cuff 1-1/2” hose adapter is also included to connect the 1-1/2” vacuum hose to the 2”
male Flash Cuff on the machine.
A 2” hose cuff for 1-1/2” vacuum hose is included to connect the 1-1/2” vacuum hose to the 2” hose barb
on the machine.
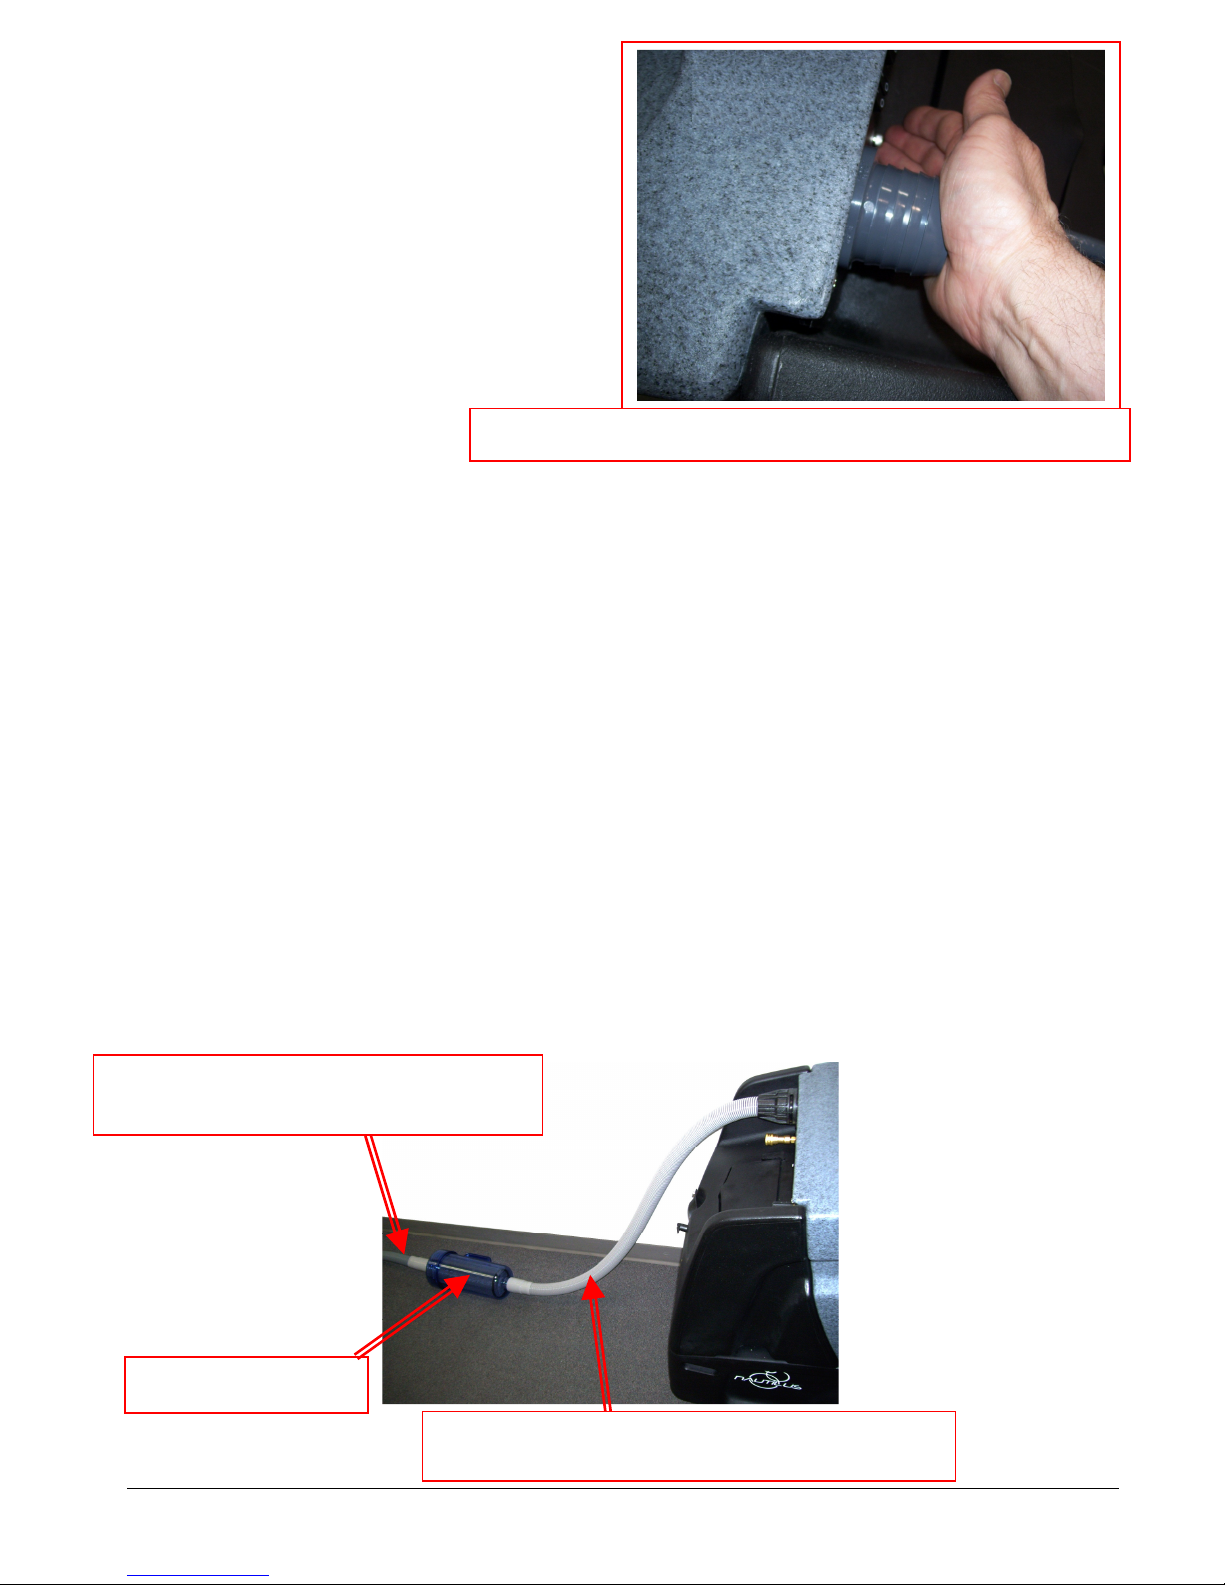
There are three components used to connect the cleaning tool to the vacuums and recovery tank:
1. A short 4’ vacuum hose: Connect one end to the 2” vacuum barb or 2” male Flash Cuff to the front
of the machine using the appropriate cuff and the other to the outlet side of the Hydro Filter.
2. A Hydro Filter II inline filter.
3. A 25’ Vacuum Hose: The 2” cuff on the 25’ vacuum hose is connected to the inlet side of the hydro
filter. The other end with the 1-1/2” cuff is connected to the cleaning tool.
When ready to begin cleaning, turn both vacuum switches to the ON position. If connected in series, the
MX3-1200 can be operated with only one vacuum for cleaning delicate fabrics. (See Vacuum Connection
instructions on Page 8) In most situations you will turn both vacuum switches ON.
Vacuum Hose
1-1/2” x 25’ with 2” & 1-1/2” cuffs
Hydro-Filter II – AC10
Short Vacuum Hose
1-1/2” x 4’ with 2” Cuff & 2” female Flash Cuff adapter
14
Page 15
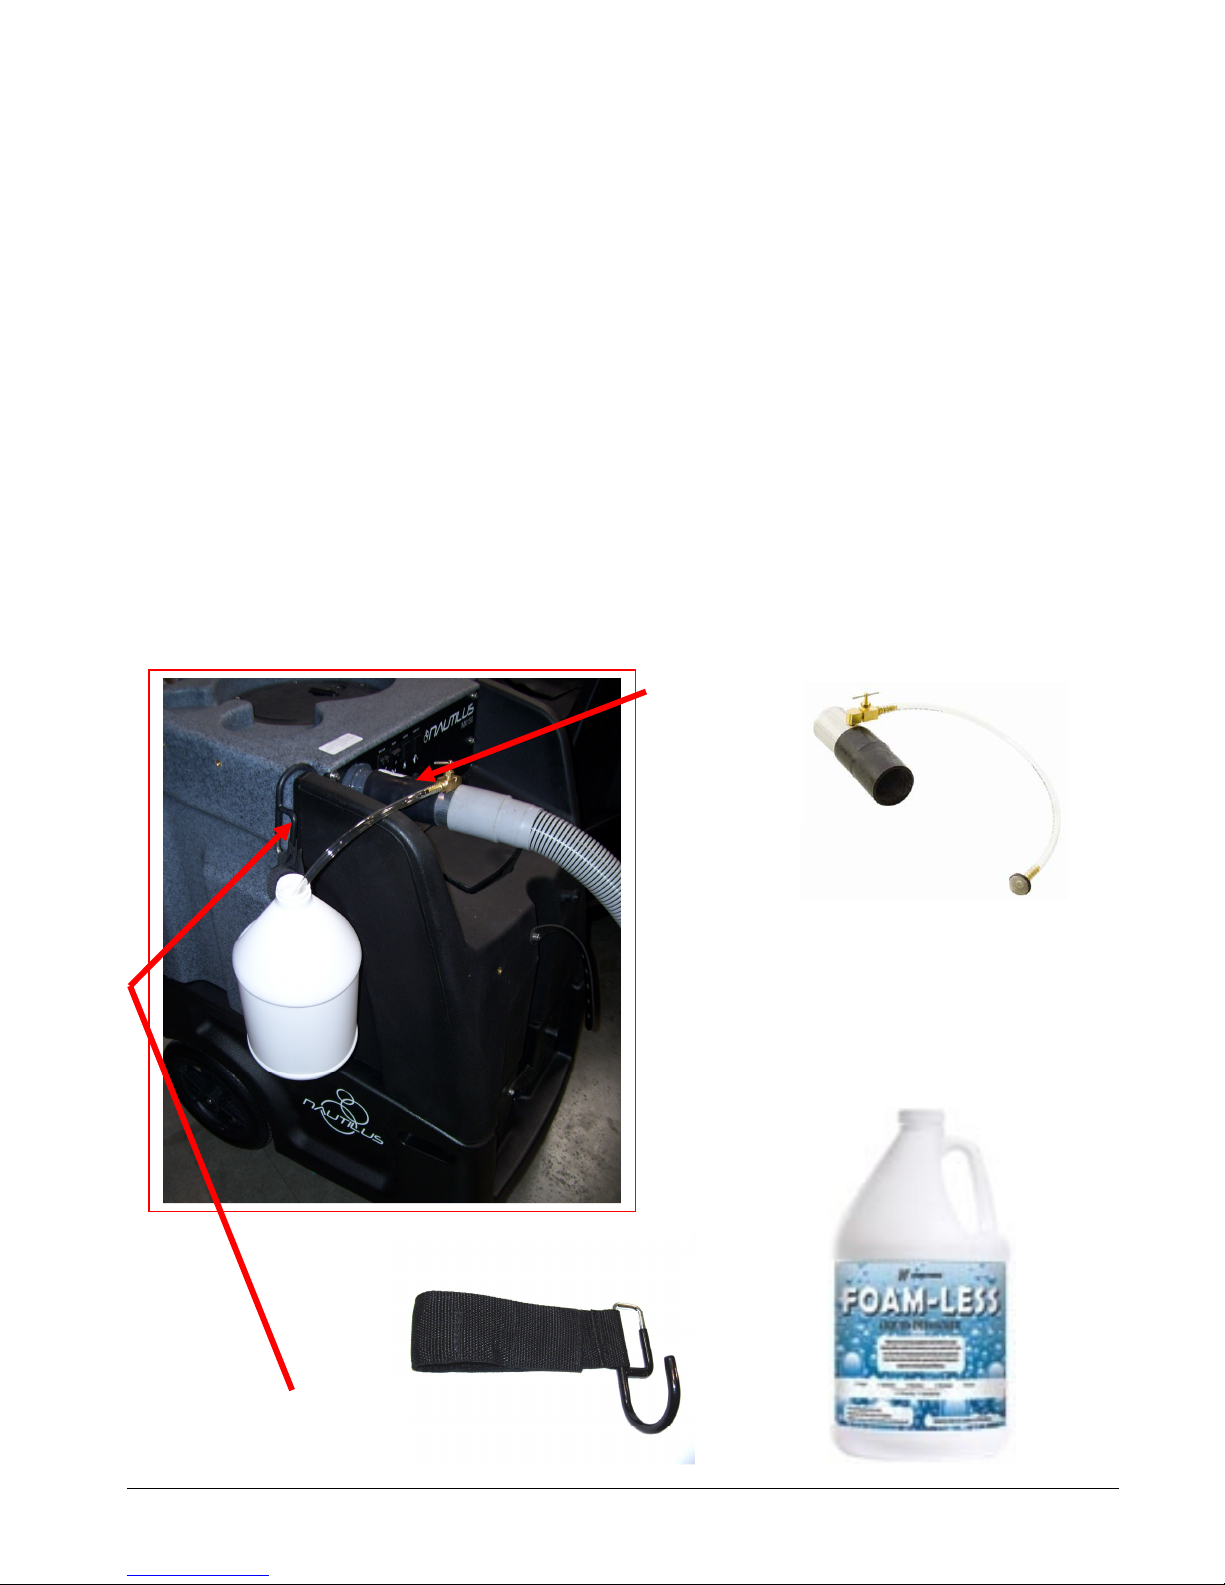
Foam Downer – Optional Accessory:
FOAM
FOAM DOWNER cannot be used
HOSE HOOK
AH95
A key problem with portable extractors is that they have small tanks where foam dissipates slowly. If you
have had issues with foam or are anticipating foaming problems, you will want to setup your Foam Downer.
Foam can be drawn into the vacuums before the vacuum shutoff closes. Foam and water blowing out the
vacuum makes a big mess, can decrease vacuum lift and damage the vacuum motors.
The Foam Downer kills foam as waste water enters the machine. Place a container of liquid defoamer on the
top of your MX3-1200. The vacuum air flow siphons the liquid defoamer through Foam Downer into the
vacuum tank, breaking down the foam before it can cause any damage or make a mess.
• Mounts and is ready to use in seconds
• Uses defoamer very economically
• NO LABOR is involved to spray or spread defoamer – it’s all automatic
• Keeps silicone defoamers off the floor where they can cause resoiling problems
The Foam Downer is an attachment that allows the vacuum to draw a small amount of defoamer in a
constant slow flow into the waste tank of the Nautilus. We recommend using a diluted defoaming solution of
four ounces of defoamer to one gallon of water (1-32). Place the draw tube into the gallon of diluted
defoamer and open the needle valve one half turn as your starting point. If this is not sufficient to break
down the foam you can open the valve more or add more defoamer to the water to make a stronger solution.
With the valve open one half turn it will take approximately one half hour to drain the gallon of diluted
defoaming solution.
DOWNER
AH17
with 2” Male Flash Cuff connector
on machine. Remove 2” Male Flash
Cuff and install 2” hose barb as
needed.
15
Page 16
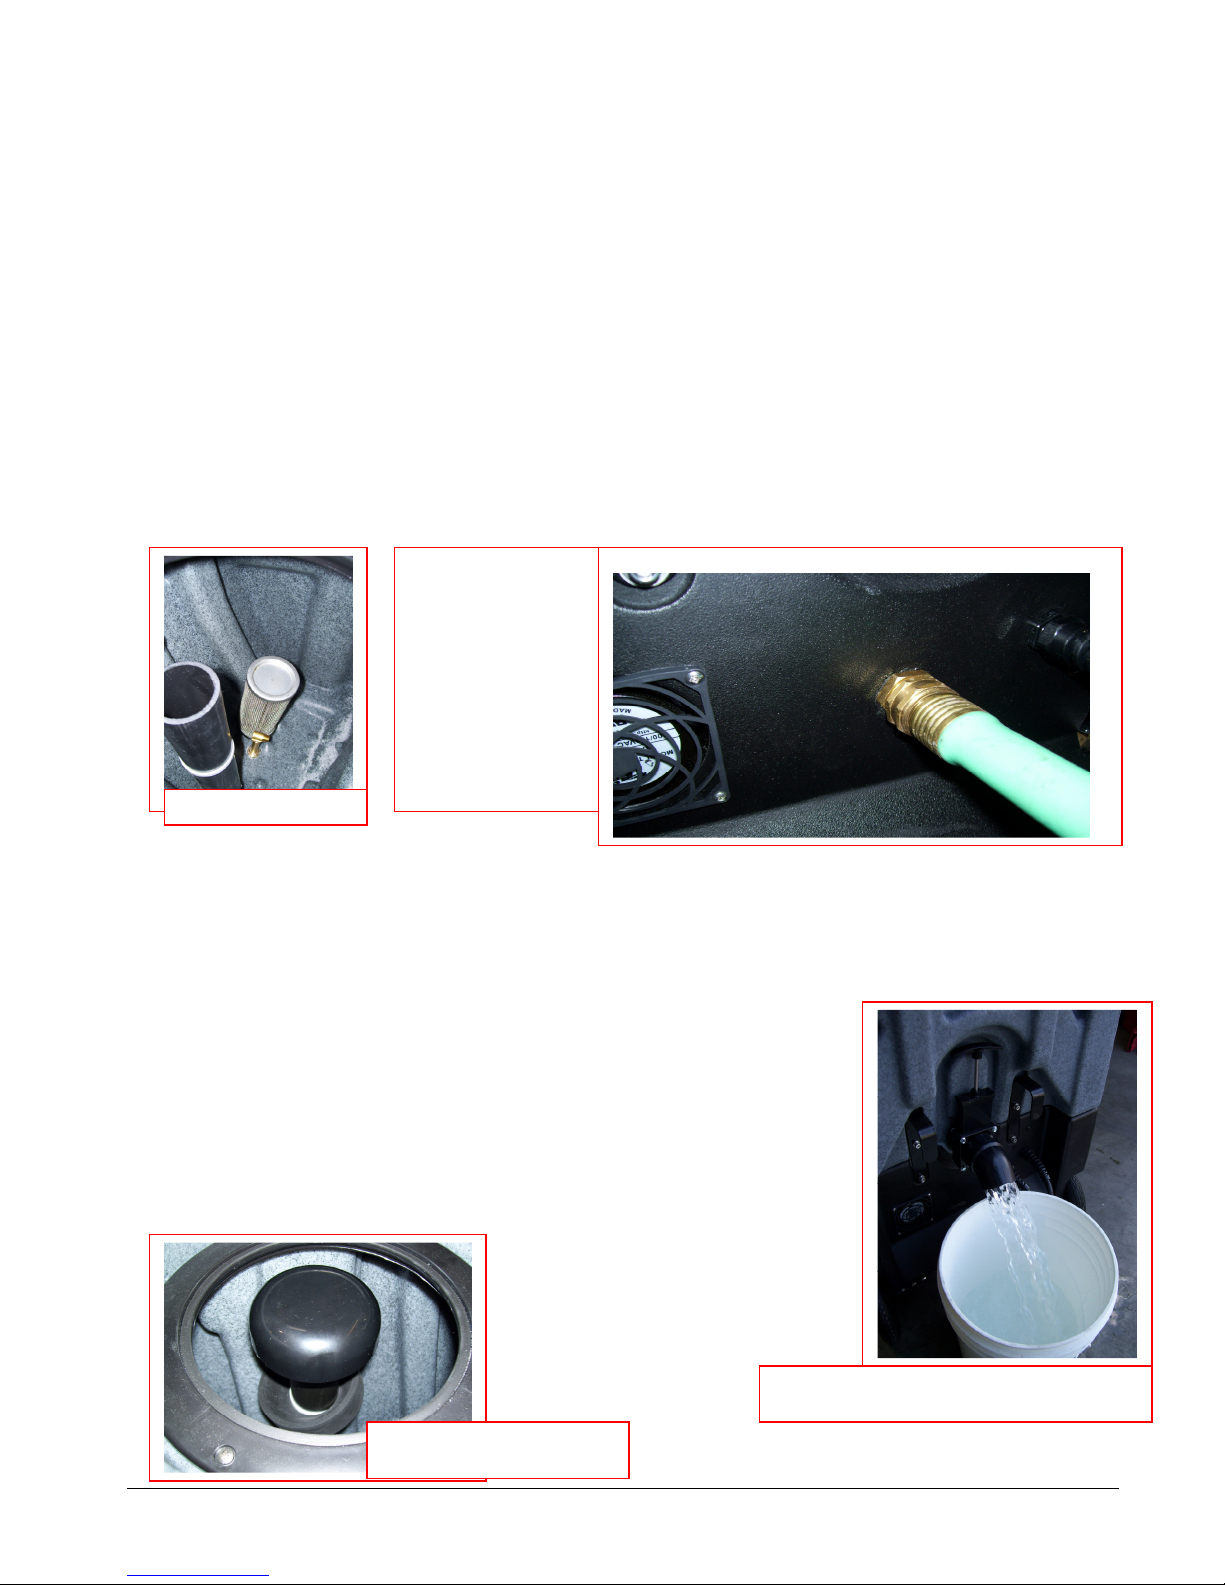
6. Connection of Pump-out Hose:
Pump
-
out Filter
The pump-out hose is a 50’ section of 3/4” garden hose. (Use of smaller diameter hose may reduce flow.)
• Remove the cap from the pump-out outlet fitting on the back of the machine.
• Connect the pump-out hose to the outlet fitting.
• Place the other end of the hose in a commode or drain connected to the sanitary sewer system.
• Secure hose end to prevent movement during pumping.
Use defoamer to prevent foam build-up in recovery tank during cleaning and to keep
foam/moisture from entering vacuums.
Use Hydro Filter II inline filter to trap and remove debris from the waste water before it
enters the recovery tank. Excess debris in recovery tank may clog Pump-Out filter. Clean
Filter as needed during use.
Do not turn the Waste Pump switch ON unless pump-out hose is connected and has been
routed to a proper drain.
The Waste Pump does not use a float switch and will run as soon as the Waste Pump switch
is turned ON. It is made to run continuously while cleaning, as this type diaphragm pump
can run dry without damage.
When ready to begin cleaning, turn the Waste Pump switch to the ON position.
Connect the
Female Garden
Hose Fitting end of
the Pump-out Hose
to the outlet fitting
on the back of the
recovery tank.
Place the other end
of the pump-out
hose in a sanitary
If not using the waste pump-out, the pump-out hose does not need to be connected. When the recovery tank
fills during cleaning, the float assembly in the vacuum inlet filter will rise and will automatically shut off the
vacuum air flow to prevent the recovery tank from overfilling and waste water from getting into the vacuums.
When this occurs:
• Immediately shut off the vacuum switches.
• Drain the recovery tank.
o Turn off the pump switch while draining the tank.
o Turn pump switch back upon resumption of cleaning.
• Close the drain valve and turn the vacuum switches back on when
ready to resume cleaning.
If the pump-out or vacuum shutoff is not working properly, refer to the
trouble shooting guide or contact your distributor for advice or assistance.
Float Shutoff Assembly
Draining the Recovery Tank
16
Page 17
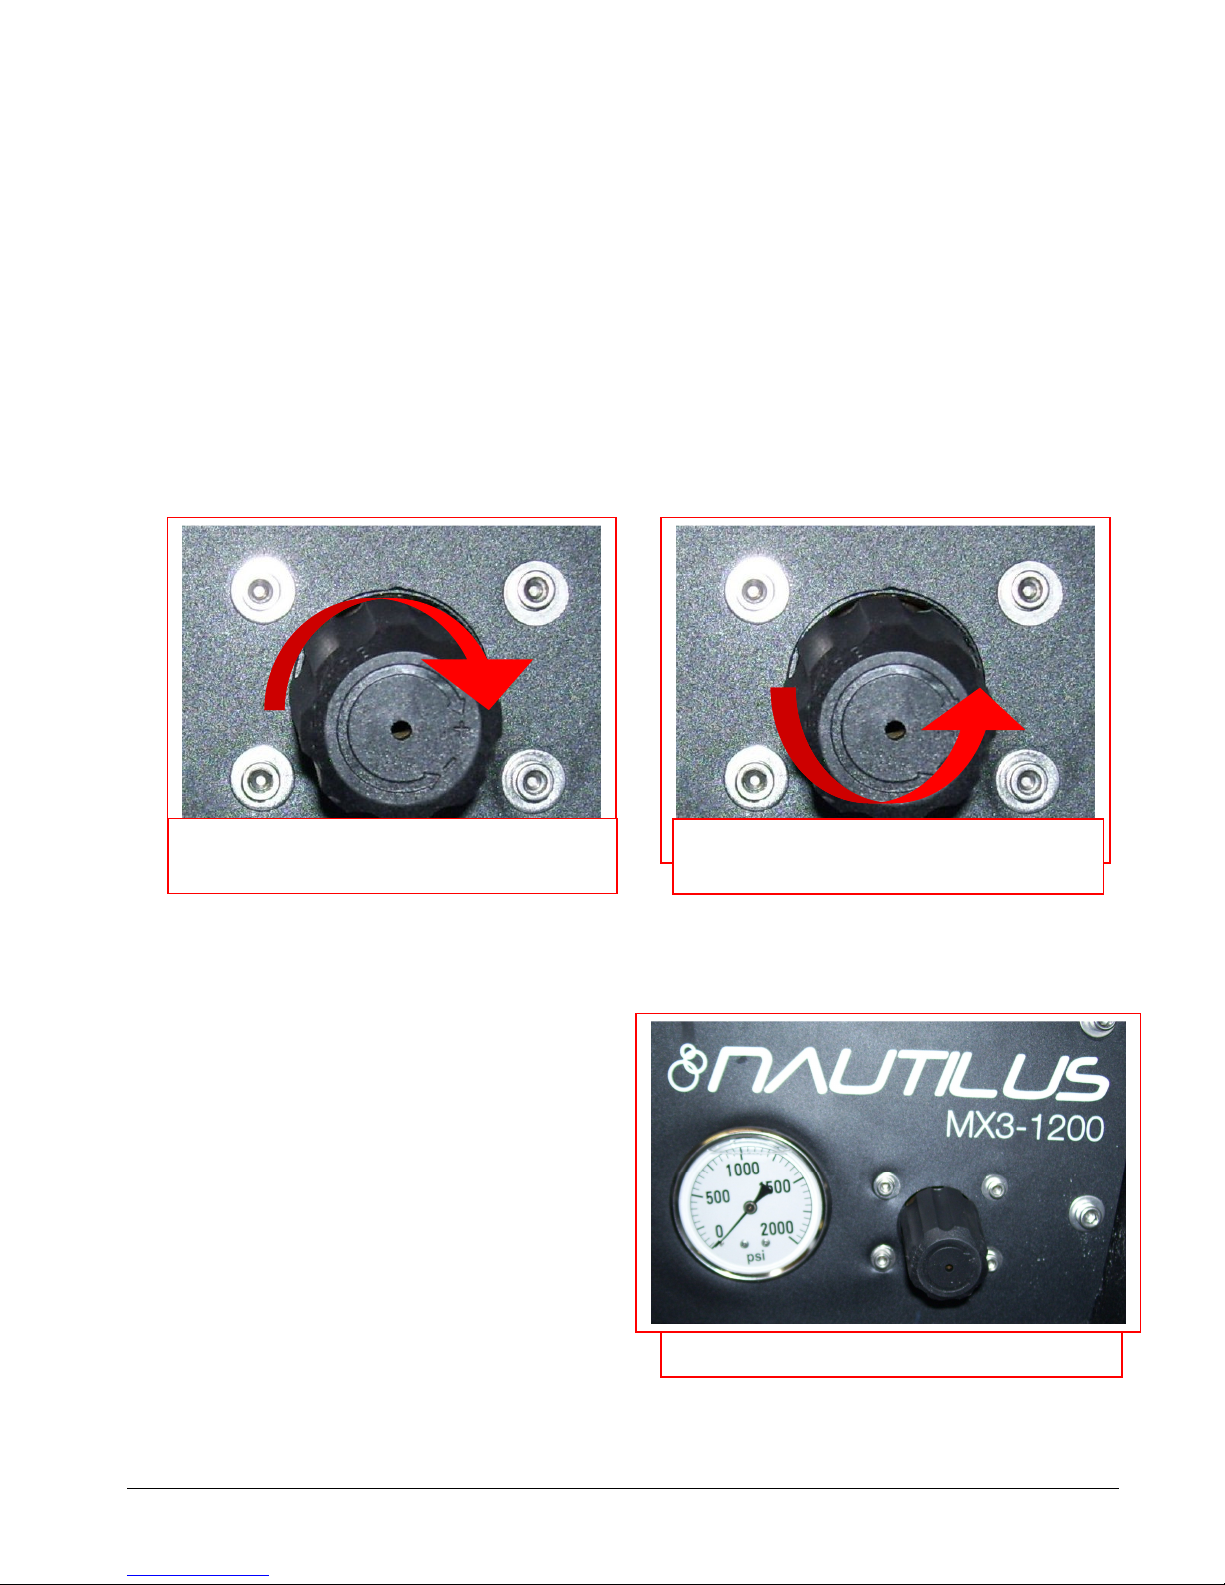
7. Pressure Adjustment:
To make it easier to check and adjust the pressure, the pressure gauge and the pressure regulator/unloader are
mounted on the control panel on the front of the machine. When the high-pressure solution pump is on and
primed, pressure will show on the gauge only while the tool is being sprayed. When the tool is sprayed the
gauge will display the pressure being delivered to the tool. When the tool is not being sprayed the gauge will
return to zero.
• To decrease the pressure, turn the black knob on the pressure regulator/unloader to the left (counter-
clockwise.)
• To increase the pressure, turn the black knob on the pressure regulator/unloader to the right
(clockwise.)
• To adjust pressure to your tool and surface requirements:
o Spray the tool.
o Check the pressure on the gauge.
o Re-adjust as needed to set the machine at the desired pressure.
o Choose the pressure setting that best meets your type of cleaning.
To increase the solution pressure, turn the
regulator/unloader knob clockwise.
The maximum pressure setting is 1200psi;
however, the highest pressure attained is
dependent on the amount of water flow at the
tool:
• Smaller jets and lower flow will allow for
higher pressure at the tool.
• Larger jets and higher flow will lower the
maximum pressure attained at the tool.
The desired setting will depend on the type of
cleaning and tool used. For example:
• Carpet Cleaning with 2-jet AW29 wand: 400psi
• Tile Cleaning with SX-15: 1000psi
If adjusting or maintaining pressure becomes a
problem, refer to the trouble shooting guide or
contact your distributor for advice or assistance.
To decrease the solution pressure, turn the
regulator/unloader knob counter-clockwise.
Pressure gauge & Regulator/Unloader
17
Page 18
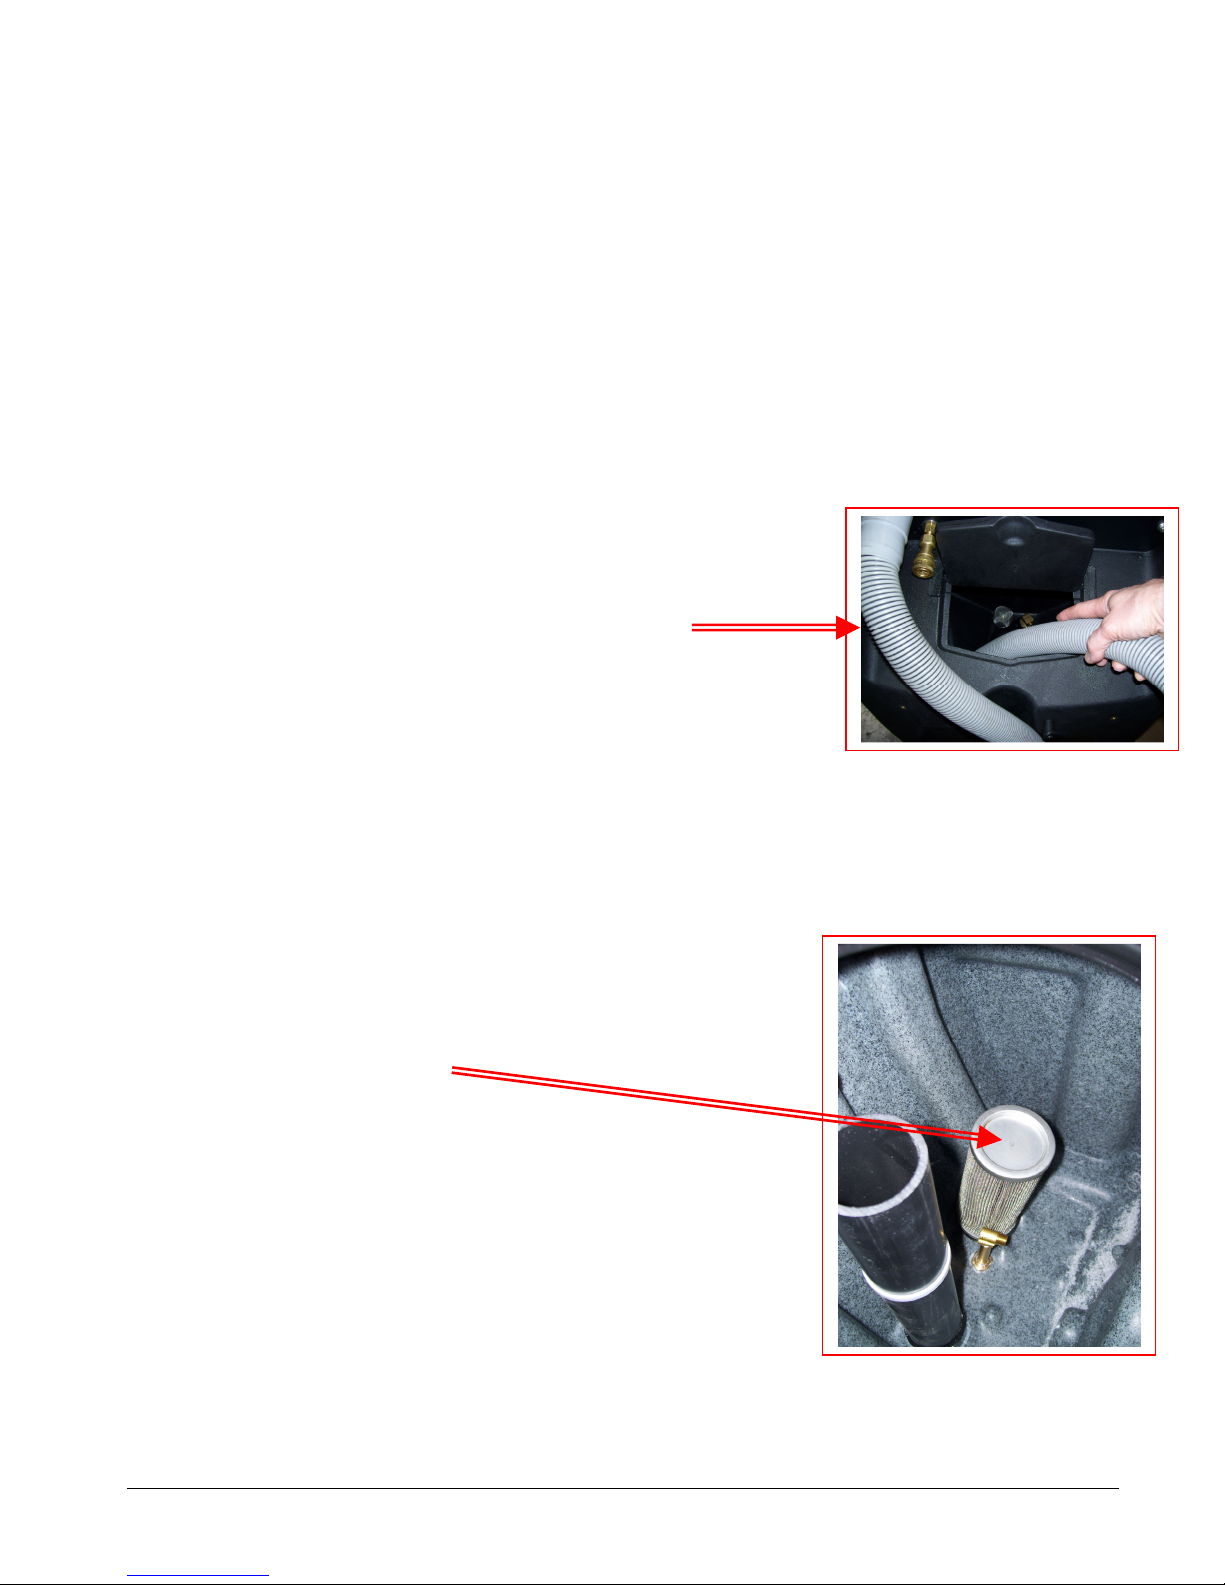
Shutdown Procedures:
• If using the auto-fill system, turn the water supply off before finishing each job. This will allow use of the
water and chemical already in the tank, and will reduce the amount of excess water to be disposed of later.
• When finished cleaning, turn off all switches.
• If the auto-fill system was used and there is still water in the solution tank, push the float down to release
the water inlet hose pressure before disconnecting the hose from the faucet. Disconnect the water inlet
hose from the quick-connect on the front of the machine.
• Disconnect the solution hose and vacuum hose from the cleaning tool. Pull valve trigger to release
pressure from the hose before disconnecting solution hose from cleaning tool.
• Disconnect the Hydro-Filter II from the vacuum hoses and clean the
filter as needed. Replacement filter screens are available (AC10C.)
• Disconnect the vacuum hose and solution hose from the machine.
• If water remains in the solution tank, use the short
vacuum hose and vacuum the excess water from the tank.
• If the auto-fill system was utilized, place the chemical feed
hose back into the solution tank.
• If the waste pump-out system was used:
o Turn the waste pump switch “on” to pump out any remaining water from the recovery tank.
o Turn switch off, remove the pump-out hose from the outlet fitting and replace the cap.
o Roll up hose toward drain to remove remaining water from hose.
o Connect ends of hose together to prevent dirty water from dripping from hose during transport.
• Disconnect the power cords from the outlets and from the machine.
• Remove the float shutoff assembly from
the recovery tank and clean vacuum shutoff filter as needed.
Clean Pump-Out filter screen.
Replace shutoff assembly and tank lid.
• Drain any remaining water from the recovery tank
and dispose in sanitary drain. Do not use the same
bucket to drain the tank that you use to fill the tank.
• Roll up all hoses and cords.
Collect and store extractor, all tools, and accessories.
18
Page 19
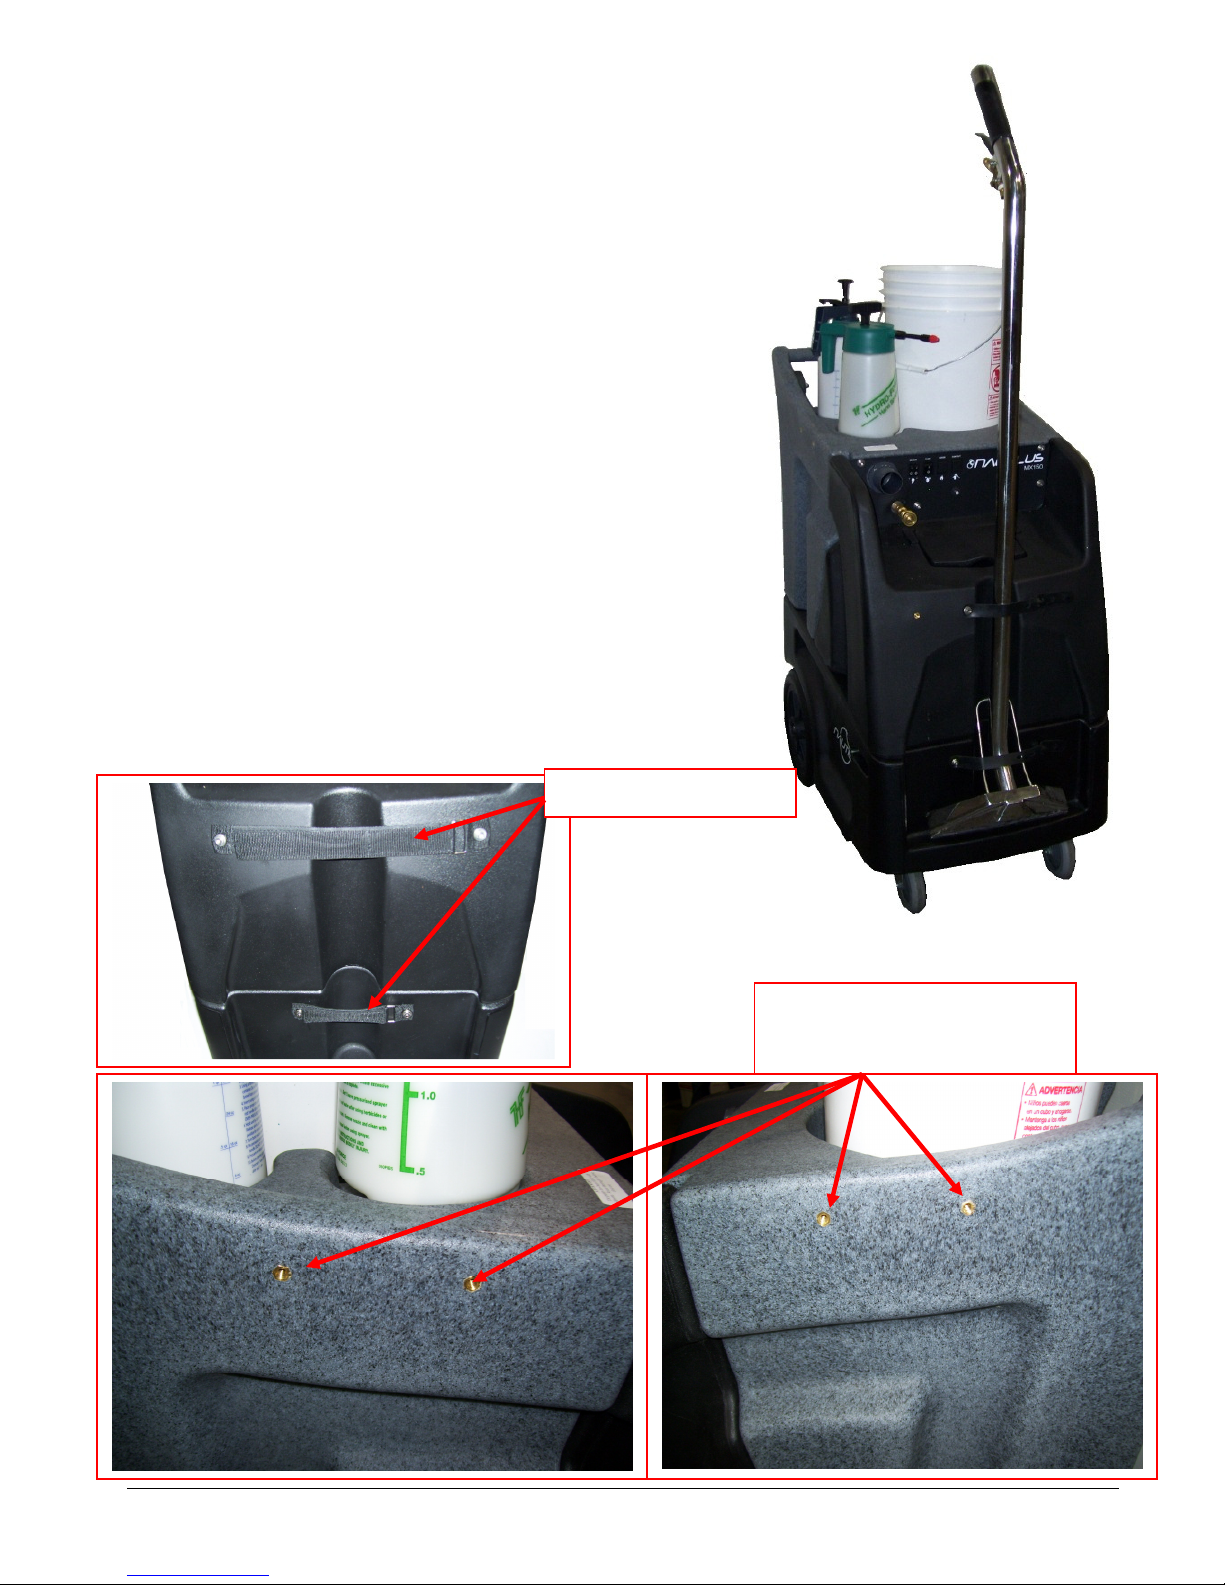
Accessory Storage Options:
The MX3-1200 is designed to make it easier for the operator to
transport the machine and the most common cleaning
accessories.
Bucket & Sprayer Storage
The top of the MX3-1200 is sized and recessed to hold a five
gallon bucket or two one-gallon chemical bottles as well as two
2QT sprayers.
Power Cord Storage
The back of the MX3-1200 has two sets of cord wraps to hold
two 12/3 x 50’ power cords.
Carpet Wand Storage
The front of the MX3-1200 is designed to hold a S-Bend
Carpet wand and has two straps to hold it securely.
Optional strap for larger wands available
Other Storage
Each side of the MX3-1200 has a set of molded in threaded
inserts to which holders can be attached to hold other
accessories or supplies making it much easier to move around.
Four 1/4-20 x 5/8” mounting screws & washers included.
Wand Holder Straps
Molded in Threaded Inserts
for Side Mount Holders
19
Page 20
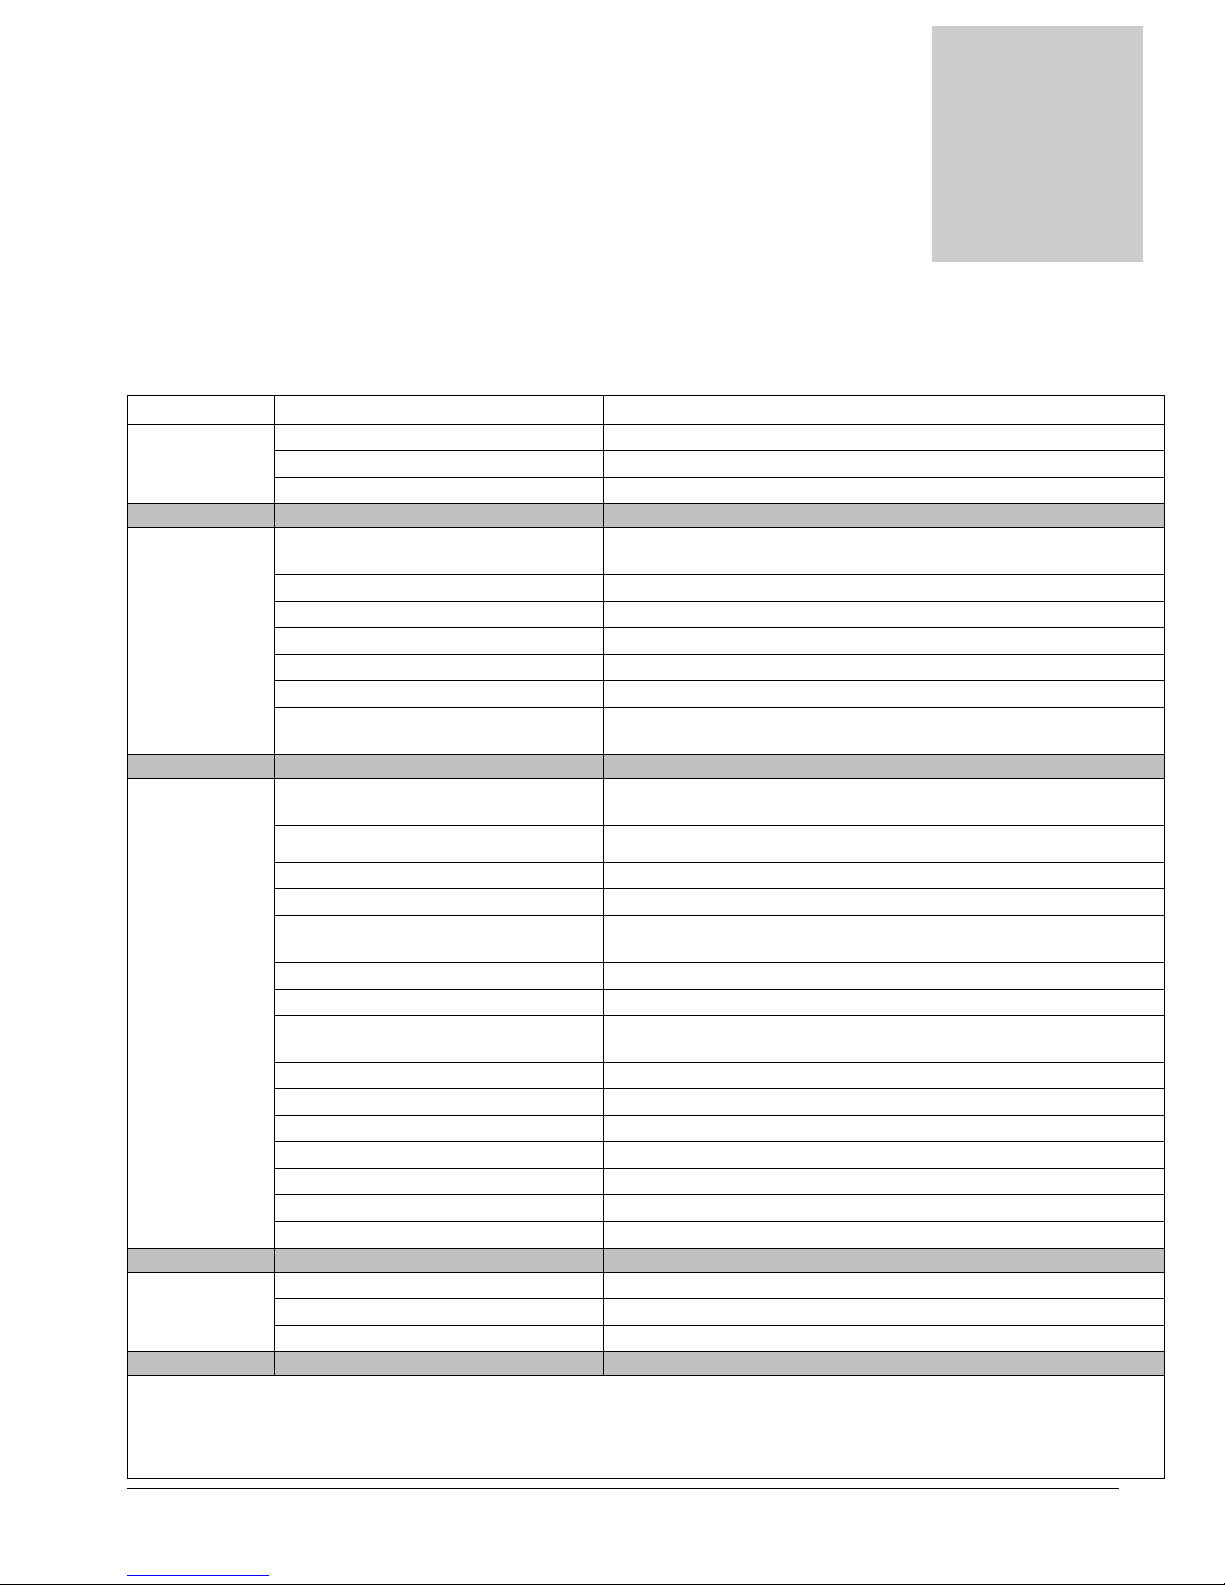
Problem
Cause
Solution
Section
2
Troubleshooting
Troubleshooting –
Nautilus MX3-1200
Machine not Building circuit breaker tripped. Reset breakers or move cords to other outlets
turning on - Faulty power cord Replace cord (AX33)
No power Faulty switches or internal wiring Check wiring & test switches - Repair as needed *
Solution
Pump Building circuit breaker tripped. Reset breakers or move cords to other outlets
not running Pump circuit breaker tripped Reset breaker – Check available circuit power & pump
Faulty power cord Replace cord (AX33)
Faulty switches or internal wiring Check wiring & test switches - Repair as needed *
Pump motor breaker tripped Push in reset button on pump motor &/or external breaker
Pump motor faulty Replace pump motor (PT059)
Repair or replace pump head & bearing (PT058) - Check
Pump seized - trips breaker
Low Solution Jets too large for pressure desired
motor and/or replace complete pump & motor assy. (AP48)
Check jets size & flow rates use smaller jets or lower
pressure
Pressure Jets worn allowing too much flow Replace Jets
Low and/or Solution inlet filter plugged Clean or replace filter
Pulsating Hose from solution tank restricted Repair or replace hose
Pump intake hose or fittings
Pressure regulator sticking Lube o-rings on regulator shaft – PAGE 33
Pressure regulator faulty Repair or replace pressure regulator / unloader (PT017)
Solution tank empty Add water to tank - Check & repair auto fill assembly
Pump not primed Perform pump priming procedure
Priming Valve stuck open Repair or replace the Priming Valve
Pump faulty Repair or replace pump (PT059 or AP48)
Pressure Gauge faulty Replace gauge (PT063)
Tool valve faulty Repair or replace valve
Quick connects or hoses restricted Clean out or replace quick connects and/or hoses
Can't connect Pressure in lines Release pressure
solution hose Quick connects faulty Replace quick connects (AH101B, AH102B)
to machine Wrong style/size quick connects Replace quick connects to match connects on machine
experienced service technicians.
If you are not experienced in checking electrical wiring contact your nearest authorized service
center to perform tests and repairs to wiring and switches.
leaking Repair or replace hose. Tighten clamps or replace fittings
Filter screen or jets plugged on
tool Clean out filter or jets
* To reduce the risk of fire electrical shock or injury repairs to wiring should only be performed by
20
Page 21
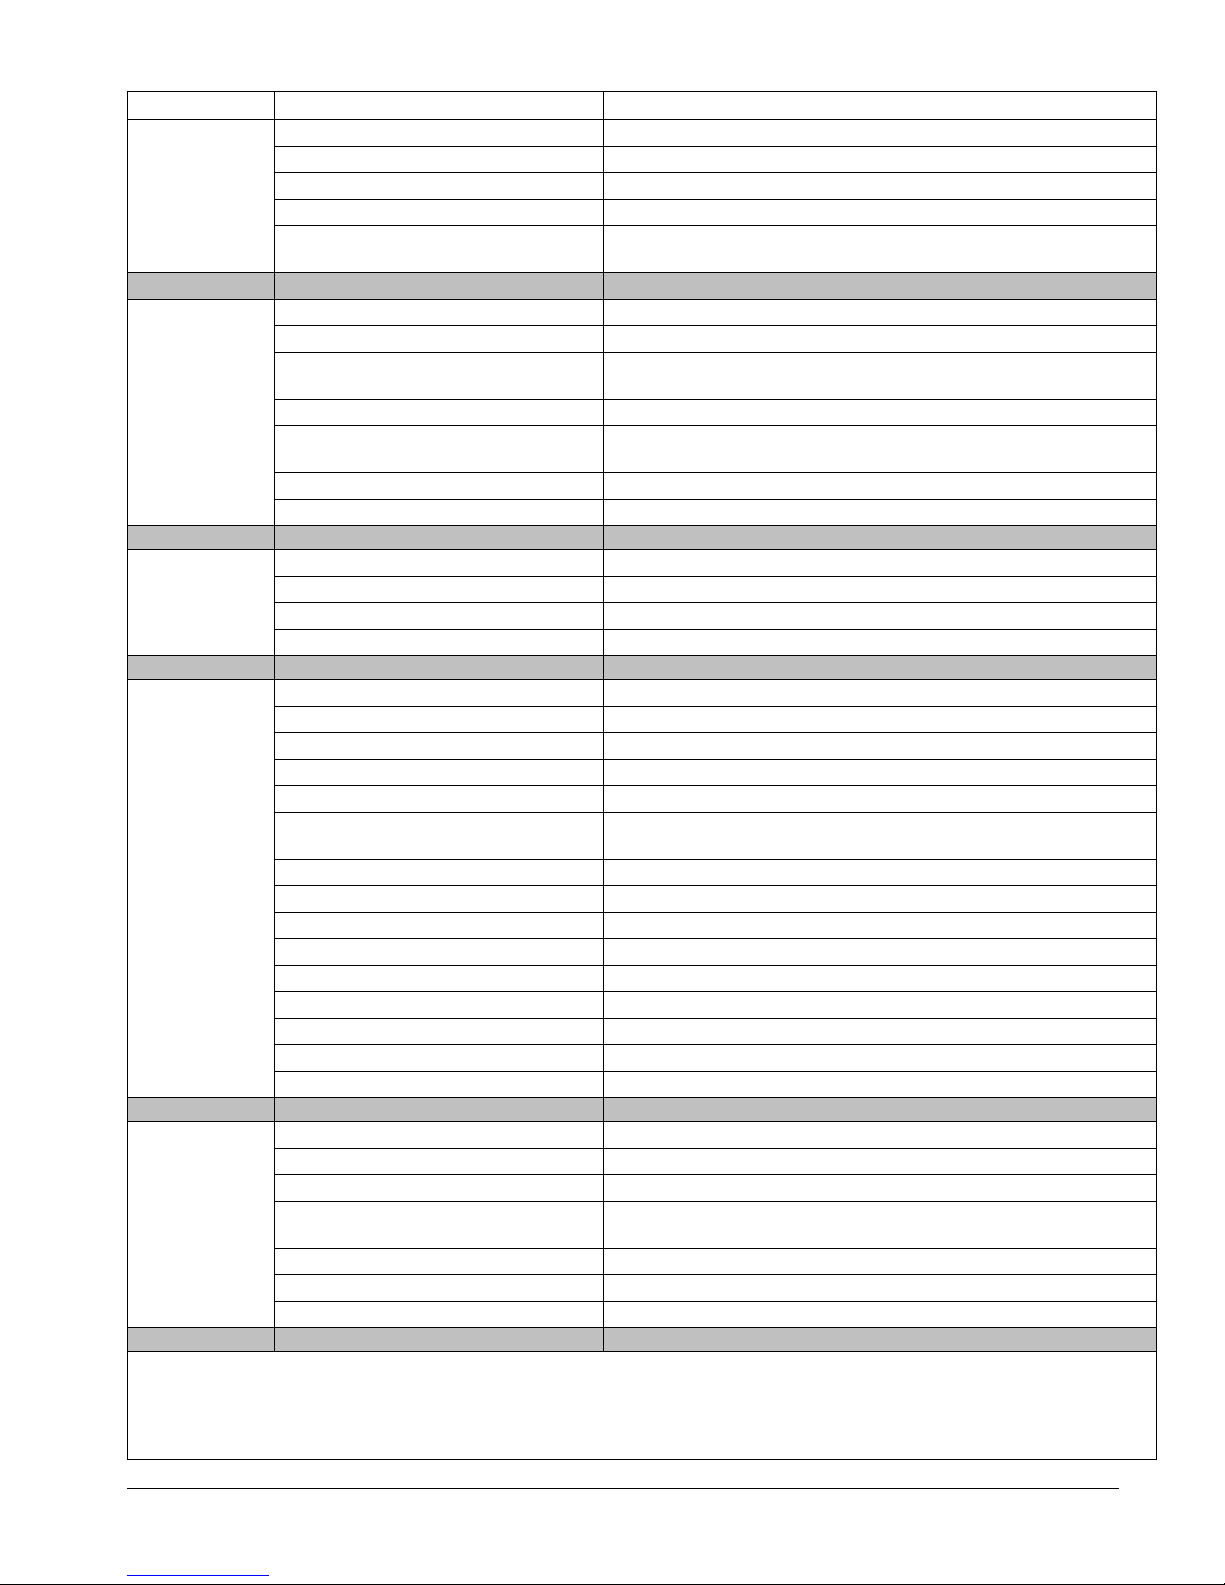
Problem
Cause
Solution
Dual Circuit Cords on the same circuit Move one cord to outlet on different circuit
Indicator No voltage from one/ both outlets Check circuit breakers – Reset breakers or move cords
Not Lighted Light Bad Replace Light
Dual Circuit Indicator Bad Replace indicator
If hot & neutral sides switched on outlet, machine will work,
One/Both Outlets Wired wrong
Pump-out Building circuit breaker tripped. Reset breakers or move cords to other outlets
not working Faulty power cord Replace cord (AX33)
Faulty switches or internal wiring
Pump-out pump faulty Replace pump-out pump (AP37)
Pump-out filter clogged
Discharge hose restricted Un-kink, clean out or replace hose
Pump-out pump clogged Remove and clean out pump
Vacuum Building circuit breaker tripped. Reset breakers or move cords to other outlets
Motor Faulty power cord Replace cord (AX33)
not running Faulty switches or internal wiring Check wiring & test switches - Repair as needed *
Vacuum motor faulty Replace vacuum motor (AV010)
Loss of Vacuum motor faulty Replace vacuum motor (AV010)
Vacuum Vacuum motor gasket damaged Replace gasket (PA010)
Recovery tank lid gasket damaged Replace gasket (NM5718)
Drain valve open Close valve
Drain valve leaking Repair or replace drain valve (PEA11)
Vacuum motor hoses loose /
Vacuum Valve in wrong Position Check Vacuum Gate Valve Position. – PAGE 8
Vacuums not connected properly See vacuum connection instructions – PAGE 8
Vacuum hose or tool clogged Clean out vacuum hoses and tool
Vacuum hoses or cuffs leaking Replace vacuum hoses, cuffs & connectors as needed
Recovery tank full Drain tank
Float shutoff filter clogged Clean float shutoff filter
Float stuck in float shutoff Repair or replace float shutoff
Pump-out Pump faulty Repair or replace pump out pump (AP37)
Recovery tank damaged Replace recovery tank
Chemical not Solution tank not filling Check & repair auto fill assembly
feeding Chemical hose restricted Un-kink, shorten, clean out or replace hose
Filter screen plugged Clean or replace filter (PDE100-11P)
Low Incoming Water Pressure
Wrong size metering tip Change metering tip
Chemical proportioner faulty Replace chemical proportioner (PDE61-22-3)
Check valve in filter faulty Replace filter (PDE100-11P)
experienced service technicians.
If you are not experienced in checking electrical wiring contact your nearest authorized service
center to perform tests and repairs to wiring and switches.
leaking Reconnect or replace vacuum motor hoses
* To reduce the risk of fire electrical shock or injury repairs to wiring should only be performed by
but light will not turn ON.
Check wiring & test switches - Repair as needed *
(NM5714)
Clean pump-out filter - Keep recovery tank clean –
Use Hydro-Filter AC10
Move bottle & shorten chemical hose to improve draw –
Find other water source.
21
Page 22
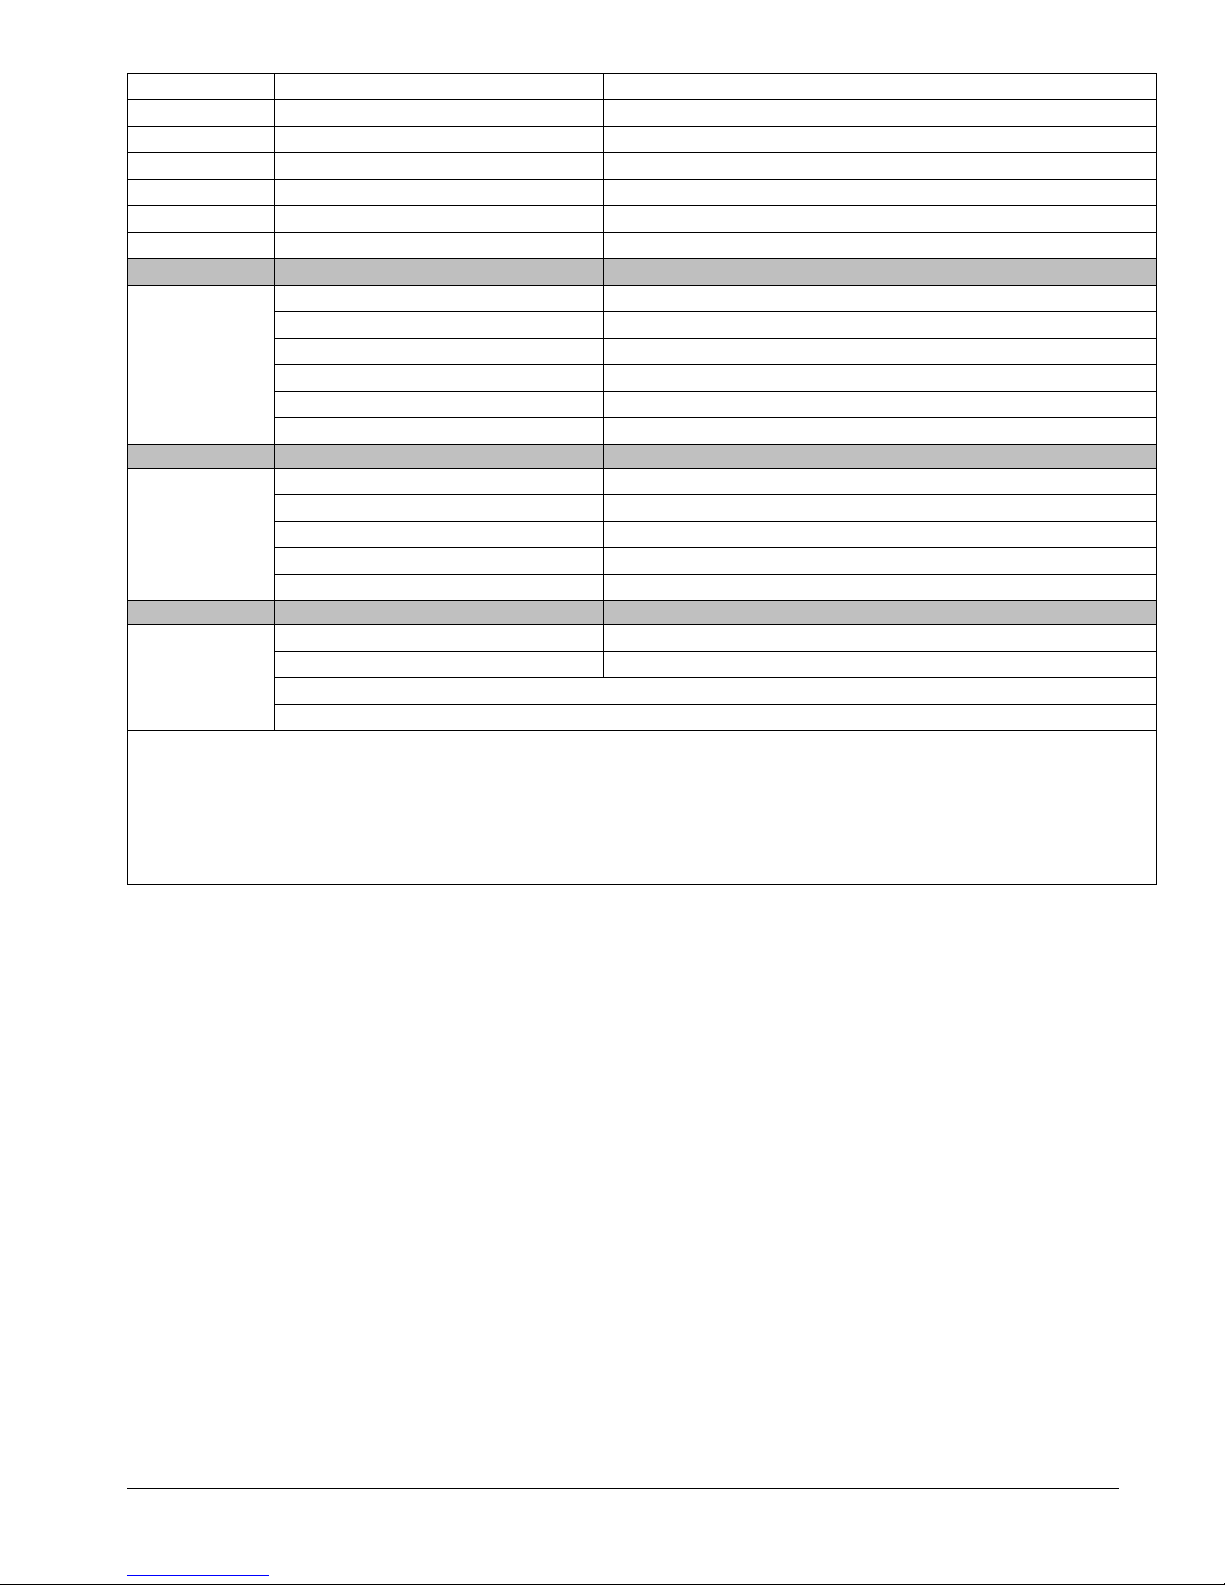
Problem Cause Solution
Tool won't Jets clogged Clean out or replace jets
spray - low or Inline filter clogged Clean out or replace filter
uneven spray Jets worn Replace jets
Jets not aligned properly Re-align jets
Tool valve faulty Repair or replace valve
Quick connects or hoses restricted Clean out or replace quick connects and/or hoses
Solution Tank Water source turned off Turn on faucet or find other water source
not filling Float not on valve arm Reconnect float to valve arm - Adjust to proper height/level
Float valve faulty Repair or replace float valve
Water hose restricted Un-kink, clean out or replace hose
Water Pressure too high Use pressure regulator on auto-fill hose
Quick connects faulty Clean out or replace quick connects (AH101B, AH102B)
Solution tank Float too heavy/ Filled with water Replace float
overflowing Float & chain tangled Make sure float chain free & hanging properly
Float too high Adjust chain to set float at proper level
Water Pressure too high Use pressure regulator on auto-fill hose
Float valve faulty Repair or replace float valve
Chemical Jug Foot valve in Filter stuck Clean out foot valve and filter
Filling with Foot valve in Filter faulty Replace foot valve and filter (PDE100-11P)
water -
Overflowing
* To reduce the risk of fire electrical shock or injury repairs to wiring should only be performed by
experienced service technicians.
If you are not experienced in checking electrical wiring contact your nearest authorized service
center to perform tests and repairs to wiring and switches.
• Contact your distributor for additional troubleshooting
assistance, to order parts, or for advice and assistance in
performing necessary repairs.
22
Page 23
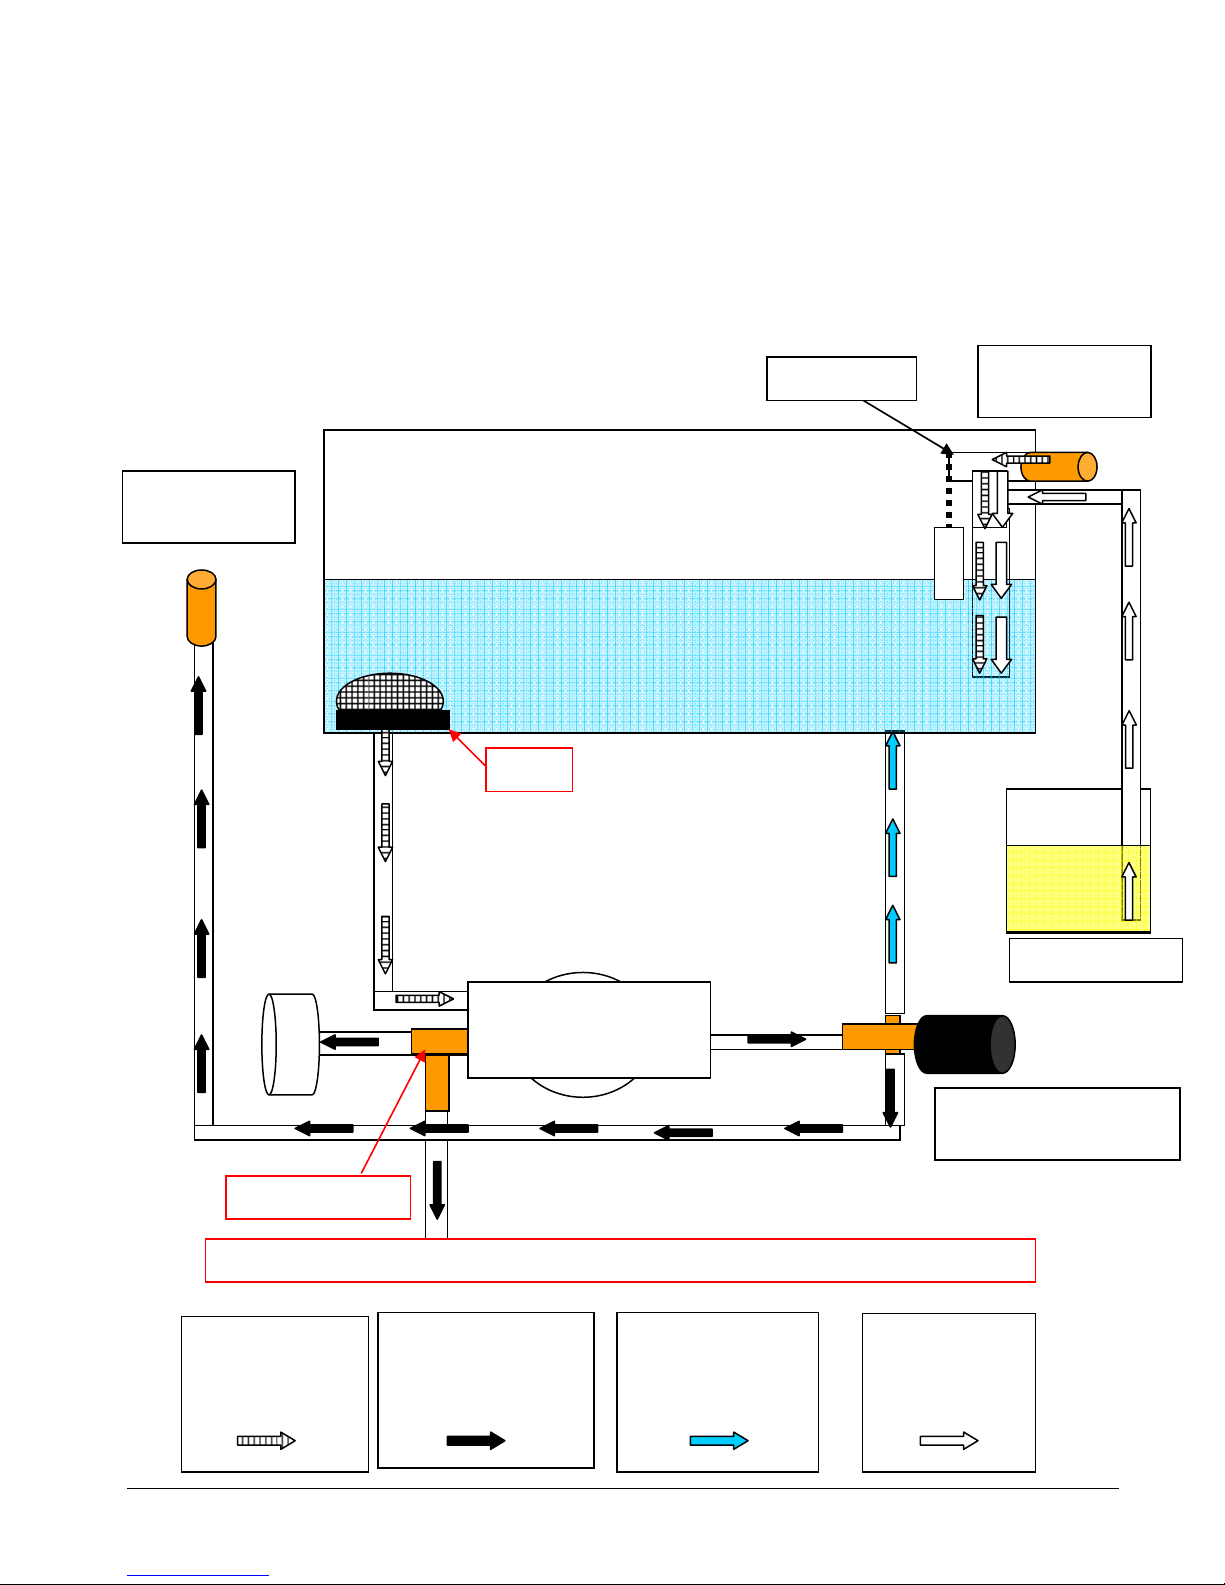
Gauge
Chemical Jug
Float Valve
Priming Valve
MX3-1200
Solution Flow Path
Outlet Quick
Connect
When Priming Valve held open water flows through hose to Recovery Tank
Denotes
incoming water
flow
Solution Tank
Filter
Pump – AP48
Denotes Water
flow in high
pressure hose
Denotes by-pass
water flow from
pressure regulator
23
Inlet Quick
Connect
Pressure Regulator /
Unloader – PT017
Denotes
Chemical flow
Page 24
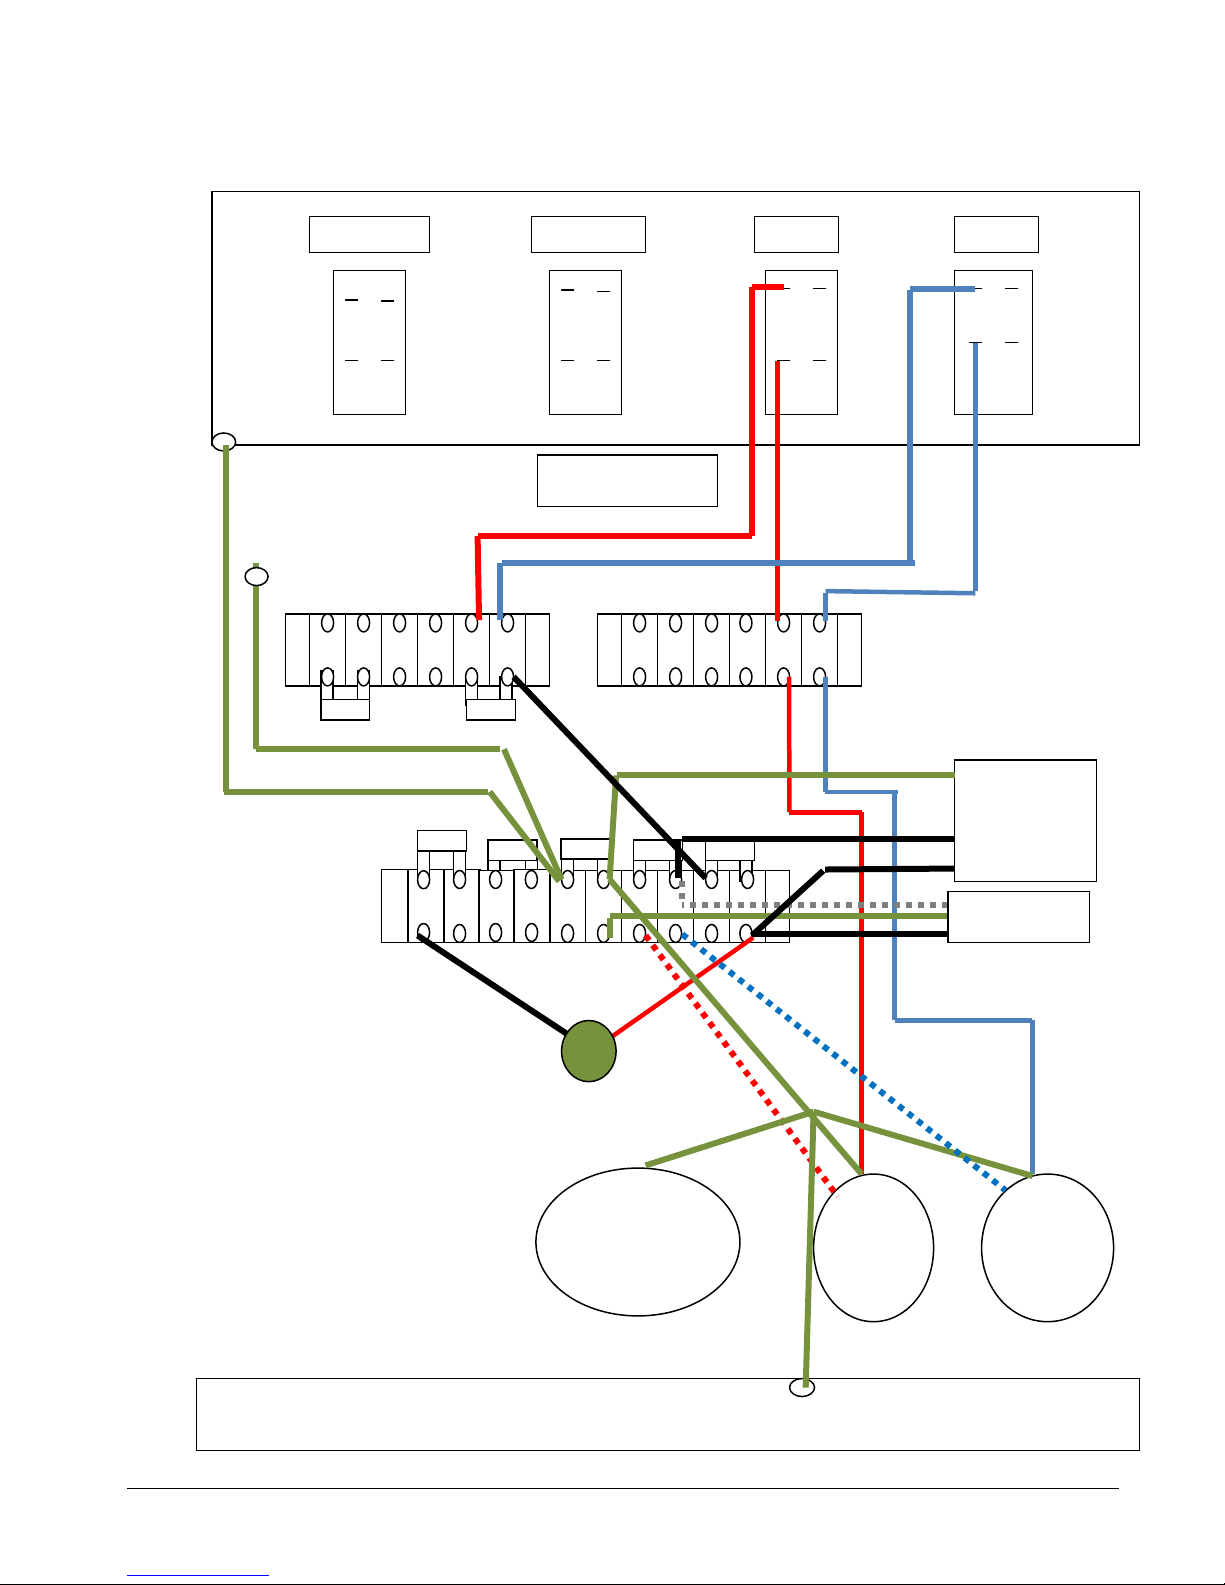
VAC 1
PUMP OUT
SOL PUMP
Dual Circuit
VAC1 VAC2
VAC 2
CORD #1
CIRCUIT BREAKER
20AMP
SOLUTION
M1200
MX3-1200
Wiring Diagram
Wiring Diagram – Cord #1
12GA
Indicator
PUMP
Machine Base
24
COOLING FAN
12/3
Page 25
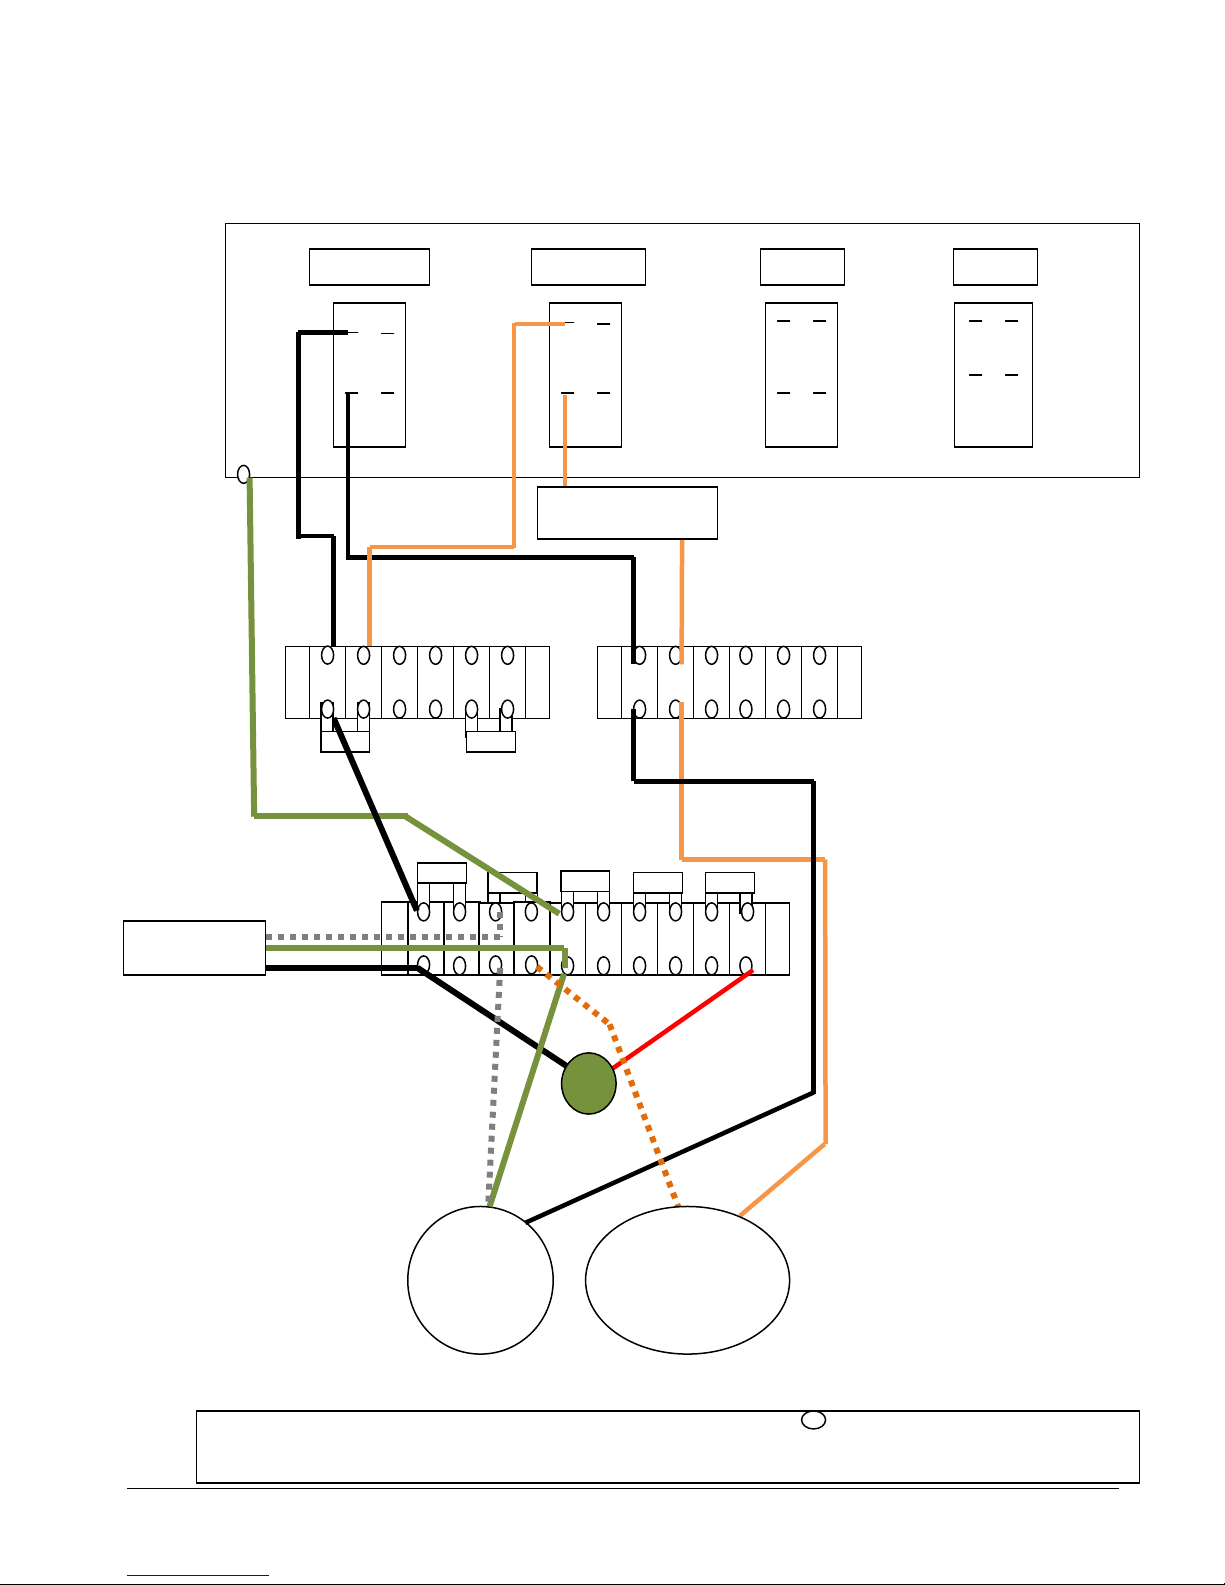
VAC 1
PUMP OUT
SOL PUMP
Dual Circuit
VAC 2
PUMP OUT
CORD #2
SOLUTION
GREEN
CIRCUIT BREAKER
20AMP
MX3-1200
Wiring Diagram – Cord #2
12GA
12/3
Indicator
PUMP
Machine Base
25
Page 26
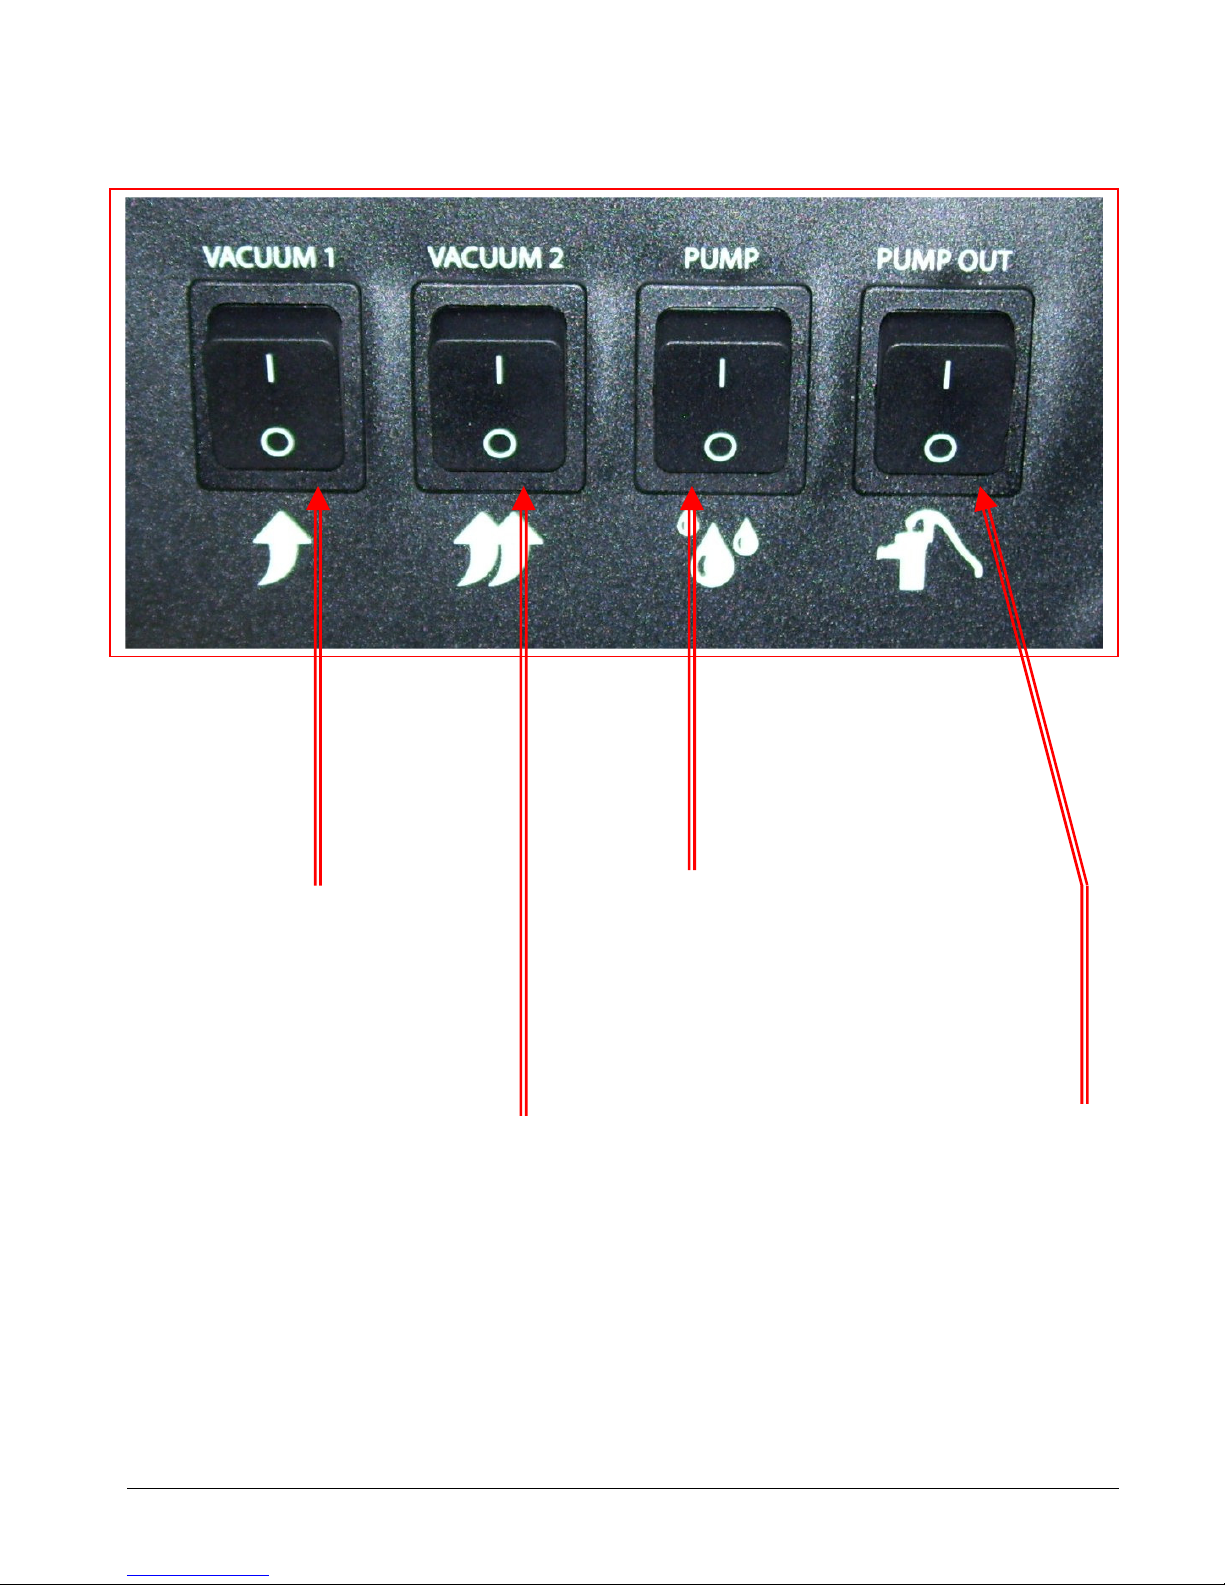
NAUTILUS MX3-1200 SWITCH PANEL:
Vacuum #1 – Power from Cord #1.
When the switch is turned to the ON
position power is supplied to the vacuum
motor. (3-Stage Vacuum)
Vacuum #2 – Power from Cord #1.
When the switch is turned to the ON
position power is supplied to the vacuum
motor. (3-Stage Vacuum)
Cooling Fan – Power from Cord #1.
The cooling fan is not controlled by any
switch.
As soon as Cord #1 is plugged in the
cooling fan will turn on to exhaust air from
the base.
Solution Pump Switch – Power from Cord #2.
When the switch is turned to the ON position
power is supplied to the solution pump motor.
When not using solution (Extracting only) do not
turn this switch ON.
Waste Pump Switch – Power from Cord #2.
Do not turn Waste Pump Switch ON unless a
hose is connected to the Pump-out Outlet port.
For pump protection there is a pressure switch
which will turn the waste pump off if the
pressure in the discharge line gets too high, as it
would if the pump was turned on while the
outlet cap was still in place.
26
Page 27
CLEAN
CHEMICAL FEED FILTER & FOOT VALVE
Daily
– After Each Job
28
CLEAN VACUUM SHUTOFF ASSEMBLY SCREEN
Daily
– After Each Job
28
CLEAN HYDRO
-
FILTER
II
Daily
– After Each Job
29
RINSE OUT RECOVERY TANK
Daily
29
CLEAN WASTE PUMP
-
OUT PUMP
Daily
30
FLUSH SOLUTI
ON TANK AND PUMP
Daily
30
CLEAN PUMP
-
INLET FILTER
Weekly
– As needed
31
FLUSH CHEMICAL SYSTEM
Monthly
32
LUBRICATE PRESSURE REGULATOR O
-
RINGS
Monthly
33
CLEAN DRAIN VALVE
As needed
34
STORAGE PREP
– FREEZE PROTECTION
As needed
35
Section
3
Maintenance
Proper maintenance is required to keep the MX3-1200 operating properly, prevent
downtime and to extend the life of your equipment.
WARNING: Disconnect electrical power before performing any service or
maintenance inside machine base or before testing or repairing switches or power
cords. Failure to do so may result in severe personal injury or death.
OPERATION INTERVAL Page #
27
Page 28
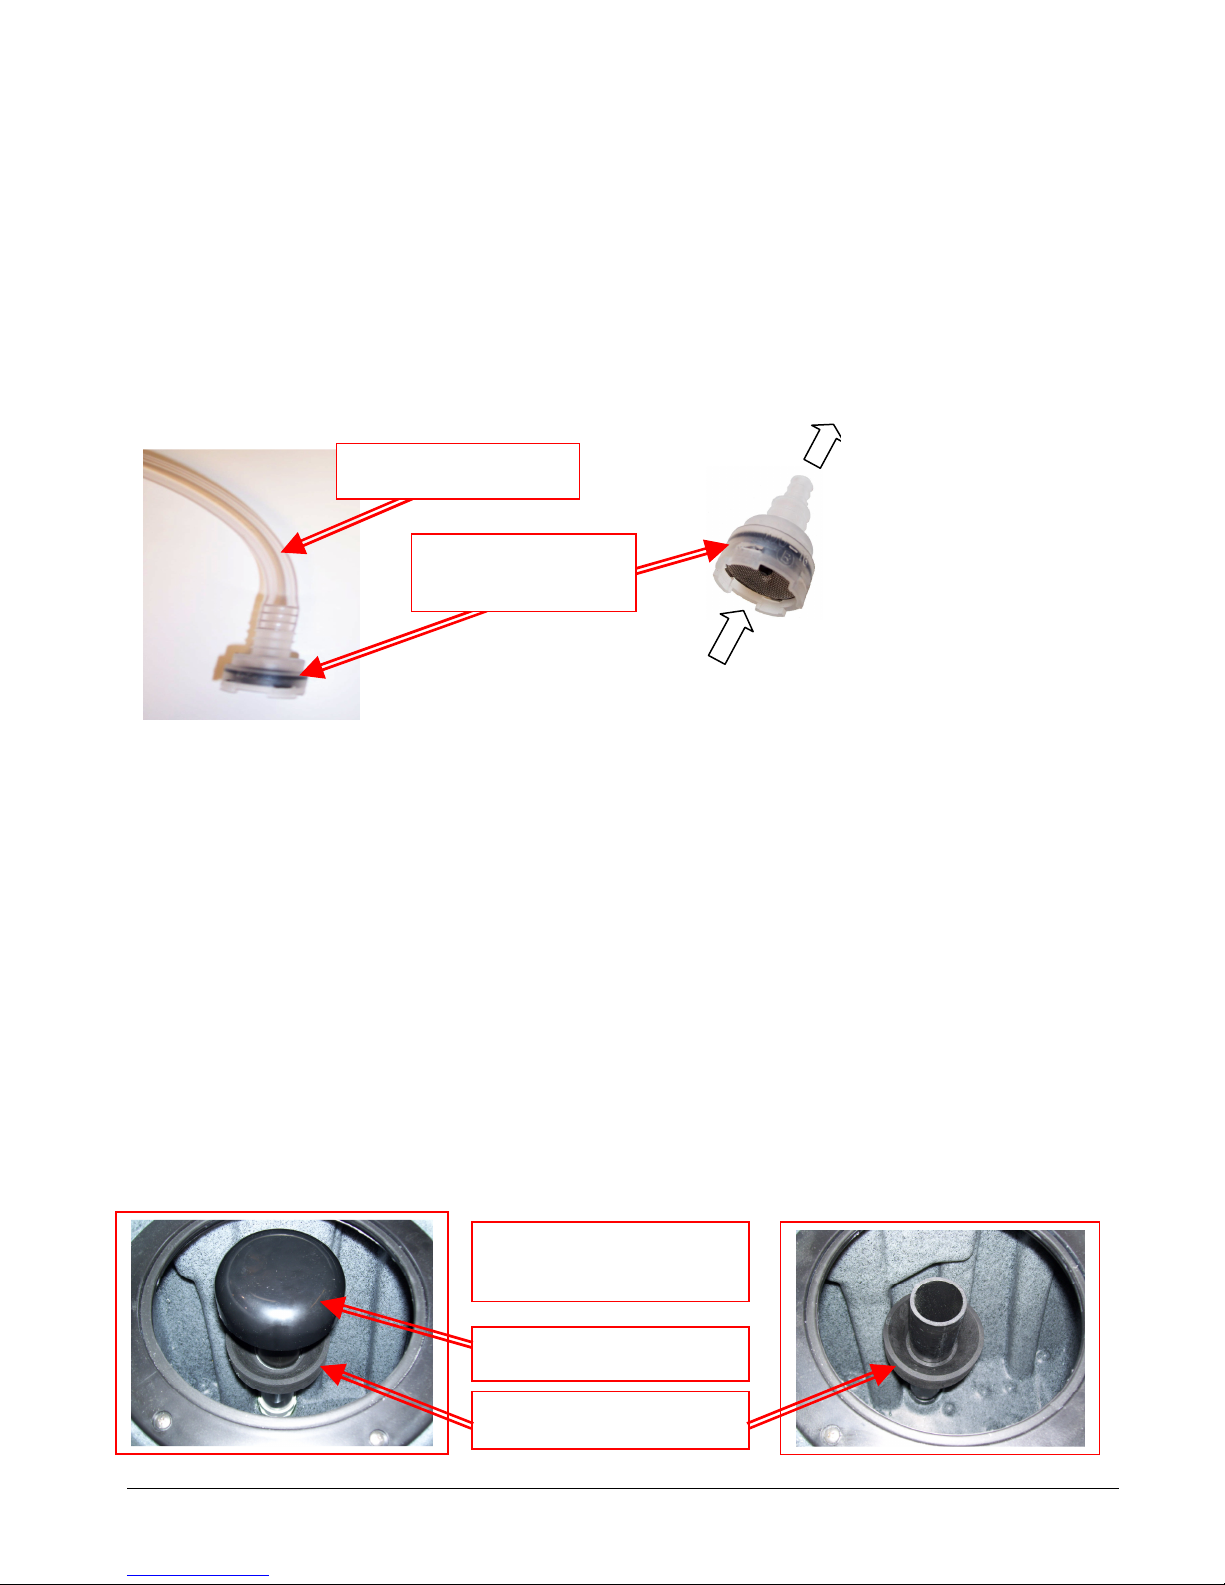
CLEAN CHEMICAL FEED FILTER & FOOT VALVE:
Vacuum Shutoff Float
The Filter & Foot Valve is on the end of the chemical feed hose that is placed in the chemical jug as part of
the chemical feed system. Regularly examine the filter and clean as needed.
To test the Foot Valve:
• Remove the Filter & Foot Valve from the end of the chemical feed hose and rinse in fresh water.
• Blow through the valve from the filter side of the barb.
o If the Foot Valve is functioning, air should move freely from the filter side, but will not flow from
the barb side of the filter.
o If valve is not functional, clean or replace as needed.
Heavy chemical build-up can be removed with a mild acid rinse and/or the use of a brush and compressed
air.
Chemical Feed Hose
Filter & Foot Valve
PDE100-11P
Flow Direction
Flow Direction
CLEAN VACUUM SHUTOFF ASSEMBLY SCREEN:
Inside the recovery tank, on top of the stand pipe, is the Vacuum Shutoff Assembly. It functions to prevent
debris and water from being sucked into the vacuum motors. Operating the MX3-1200 without the Vacuum
Shutoff Assembly or with a poorly maintained assembly will greatly decrease the life of the vacuum motors
and will void the warranty.
If debris builds up on this filter, it will reduce the vacuum air flow and may cause a significant decrease in the
rate of water recovery. If debris prevents the float from moving or seating against the Filter Cap Assembly, it
may not stop the airflow when the tank fill with water, and the water will be sucked into the vacuums and
blown out the exhaust.
Use defoamer to prevent foam or moisture from entering vacuums (See Page 15).
To clean:
• Do not pull up on top of cap. Carefully pull up from the bottom of filter cap assembly to pull the
assembly off of the stand pipe. Then pull float off of riser pipe.
• Pull fibers and lint off and rinse filter cap assembly and float with clean water.
• Place the float back on the riser pipe then push the filter cap assembly back onto the stand pipe and
replace the recovery tank lid.
Vacuum Shutoff
Assembly
Filter Cap Assembly
28
Page 29
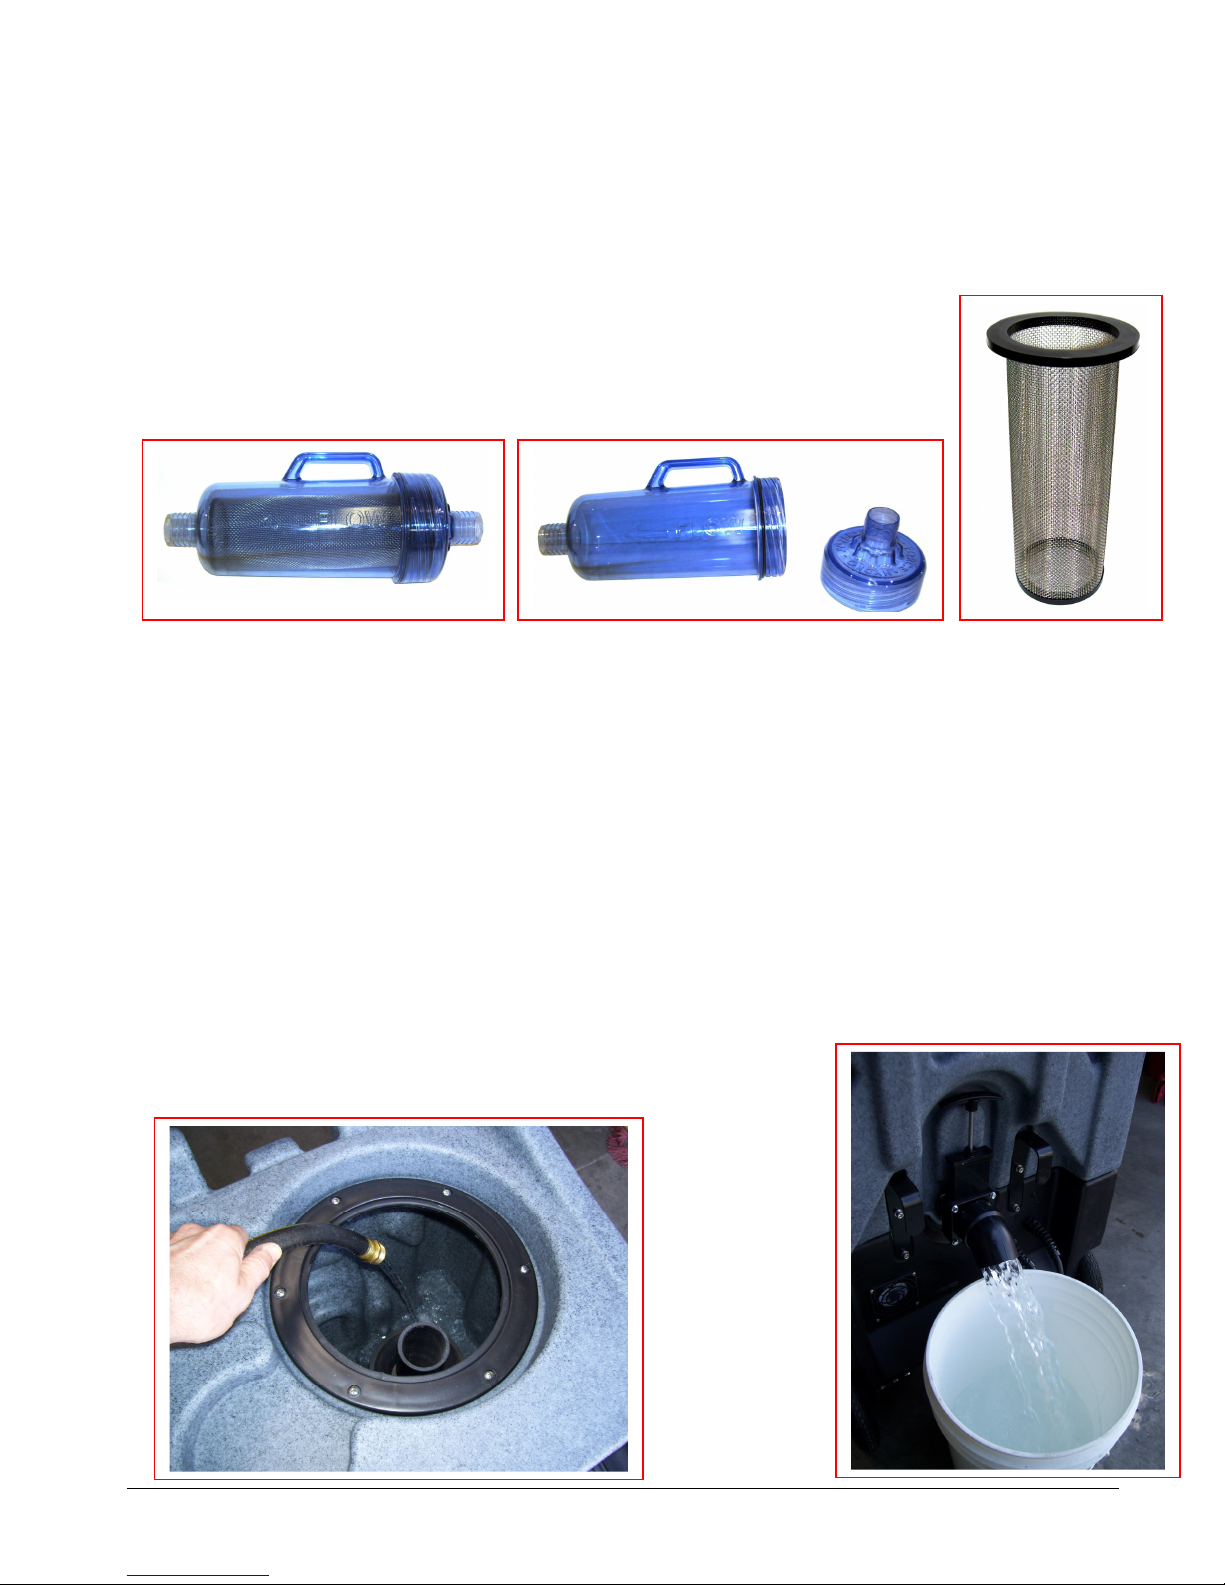
CLEAN THE HYDRO-FILTER II:
Build-up of debris in the filter screen of the Hydro-Filter II will reduce the vacuum air flow and may cause a
significant decrease in water recovery. A torn filter screen will allow debris past the filter and into the recovery
tank. This debris can clog the Waste Pump and the Vacuum Shutoff Assembly. The Hydro-Filter II must
be examined and cleaned regularly to keep the MX3-1200 functioning properly:
• Grasp and turn the lid counterclockwise to open the Hydro-Filter II lid.
• Remove the filter screen. Examine the screen and clean or replace as needed.
• Rinse the body of the Hydro-Filter II with clean water.
• Examine the o-ring lid seal and replace as needed.
• Re-install the new or cleaned screen.
• Screw the lid back onto the body and turn clockwise to tighten.
RINSE OUT RECOVERY TANK:
Build-up of fine silt, sand and other debris in the recovery tank can damage the Drain Valve (and Waste
Pump if so equipped). Hair and fibers in the recovery tank can clog the vacuum filter (and Pump-out filter if
so equipped).Clean out the tank on a regular basis to extend the life of these components and to keep the
tank and machine smelling better.
• Remove the recovery tank lid and open the drain valve.
• Place a bucket under the drain valve.
• Use a hose to rinse the dirt and debris out of the recovery tank.
• Close the drain valve and spray the tank with a deodorizer or disinfectant.
• Proceed to Waste Pump Cleaning and replace the recovery tank lid.
• Dispose of the dirty water and debris.
29
Page 30
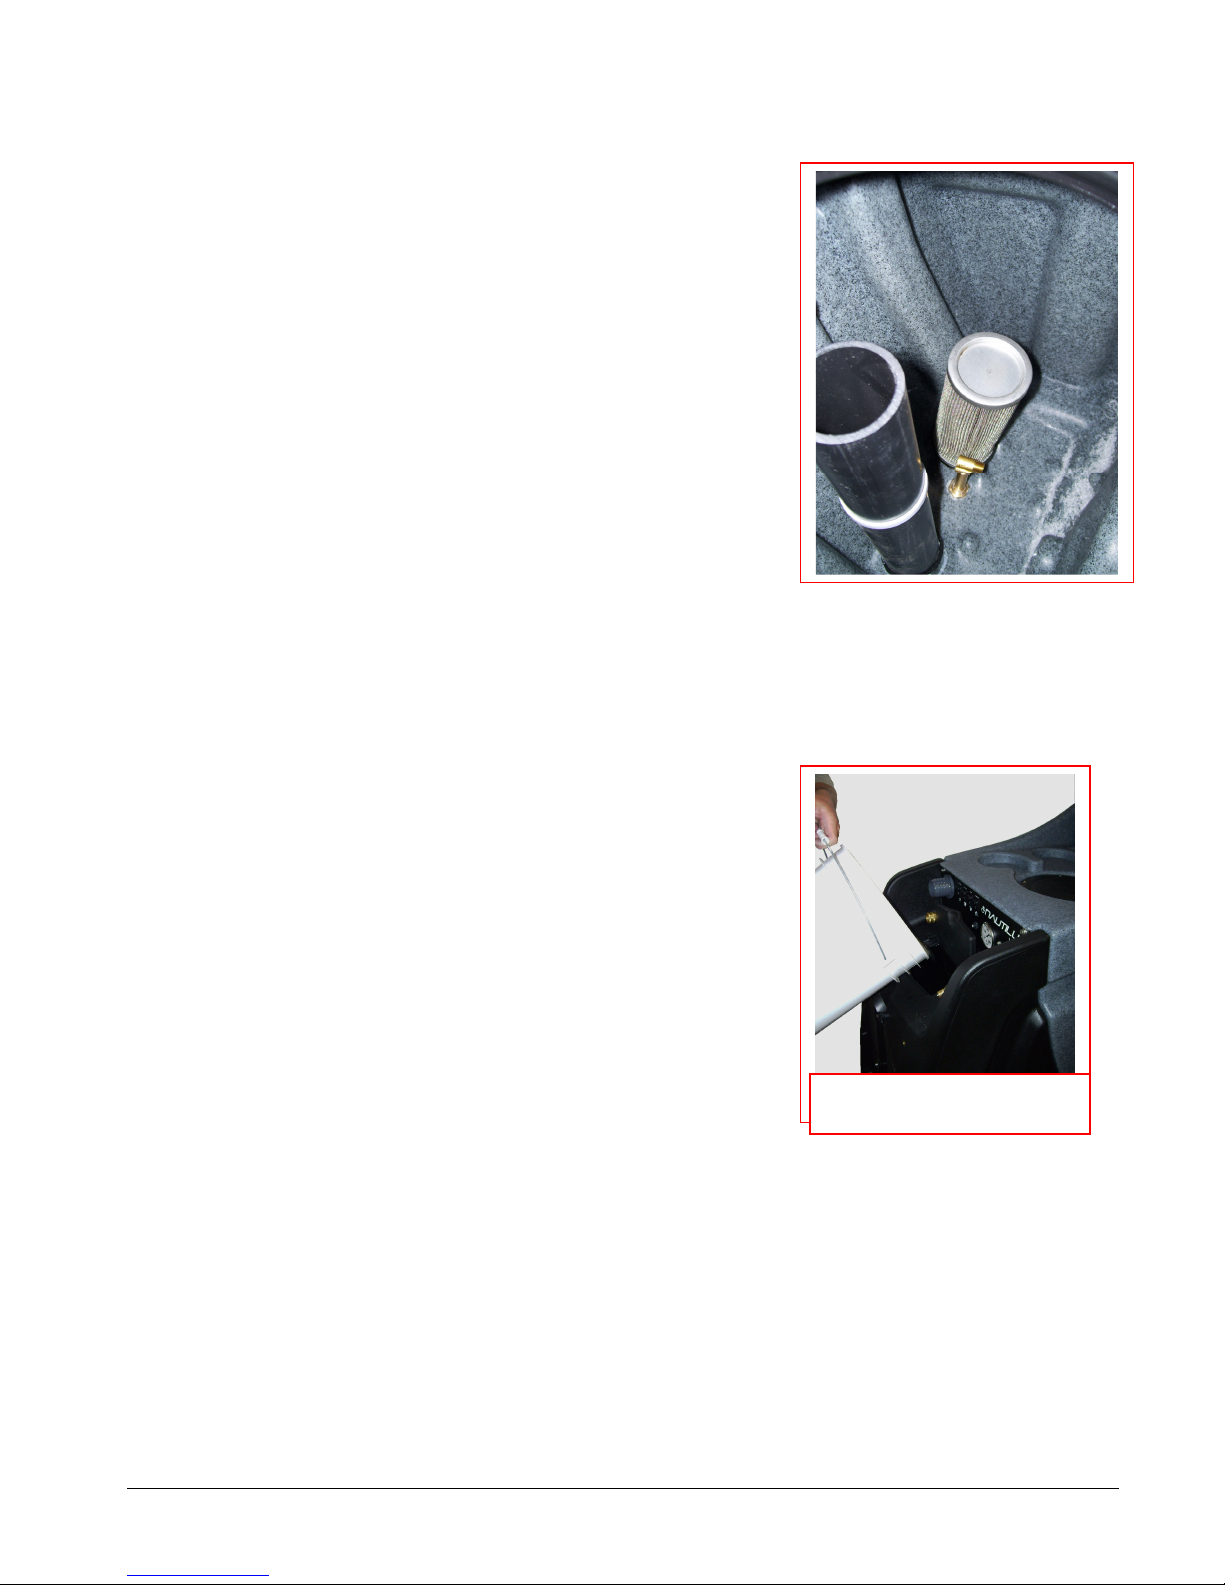
CLEAN WASTE PUMP-OUT PUMP:
water into Solution Tank
Build-up of fine silt inside the Waste Pump can clog the pump even if the pump is not used, so this
maintenance procedure should be performed regardless of whether the Waste Pump has been used.
• After cleaning out the recovery tank, remove the cap and
connect the Pump-Out hose to the Waste Pump outlet fitting
on the back of the machine; run the hose to a drain.
• Remove the waste pump filter screen by turning it
counterclockwise. Remove the filter screen. Examine the
screen and clean or replace as needed.
• Re-install the filter screen. Thread the filter loosely on to the
nipple – Leave slightly loose to keep it easy to remove for
future cleaning.
• Use a hose to fill the recovery tank approximately 1/2 full
with clean water.
• With Cord #2 plugged in, turn the Waste Pump switch to the
ON position.
• Let the pump run until it pumps the level down to the point
below the pump intake filter.
• Unplug the cord and turn the Waste Pump switch OFF.
• Open the drain valve and drain out the remaining water.
• Close the drain valve, replace the recovery tank lid, and dispose of the dirty water and debris.
FLUSH SOLUTION TANK AND PUMP:
• Pour two or three gallons of clean water into the solution
tank.
• With Cords #1 & #2 plugged in, connect a solution hose to
the solution outlet female quick connect. The other end of the
hose should have an open quick connect or no quick connect
to allow full flow out of the hose.
• Direct the open end of the solution hose into the recovery
tank vacuum barb.
• Turn one or both of the vacuums ON and turn the solution
pump ON.
• Let the pump run until most of the water has been pumped
out of the solution tank. Do not let the pump run dry. Turn
the pump OFF before the water gets to the bottom of the
tank.
• Turn the vacuums OFF and disconnect the open flow solution hose.
• Place a bucket under the drain valve; open the drain valve to drain the water out of the recovery tank.
• Close the drain valve and dispose of the water.
If there is a heavy chemical build-up in the machine, hoses, or tools, a mild acid can be added to the rinse
water in the previous procedure (REFER TO PHOTOS ON FOLLOWING PAGE.)
• After the pump has been primed, turn the solution pump switch OFF and turn the vacuums OFF.
• Connect the HP solution hose and tools.
• Turn the solution pump ON and direct the tool spray into a bucket. Let the pump run until most of
the water has been pumped out of the solution tank. Do not let the pump run dry. Turn the pump
OFF before the water gets to the bottom of the tank.
• Disconnect the solution hose and tool.
30
Pour 2 or 3 gallons of clean
Page 31
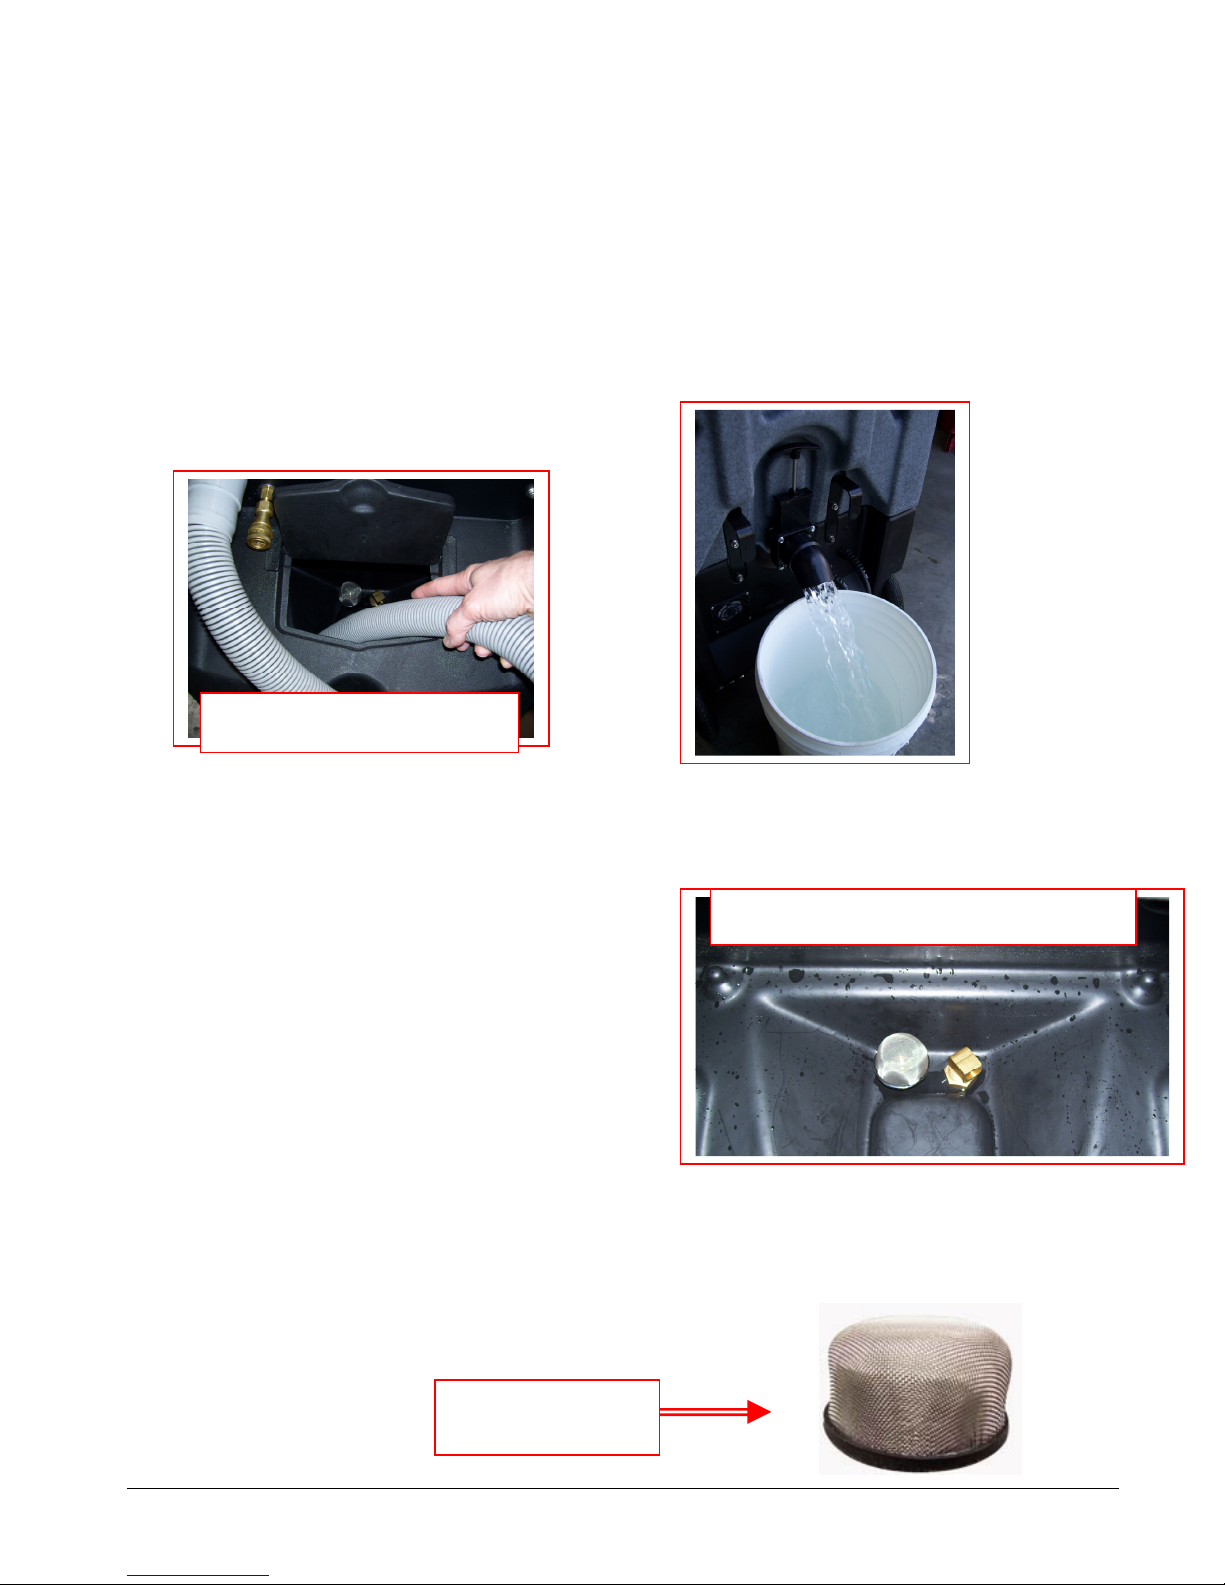
FLUSH SOLUTION TANK AND PUMP: (continued from previous page)
Solution Tank
• Use the 4’ short section of vacuum hose to vacuum the remaining acid solution out of the solution
tank.
• Pour two or three gallons of clean water into the solution tank.
• Connect a solution hose to the solution outlet female quick connect. The other end of the hose
should have an open quick connect or no quick connect to allow full flow out of the hose.
• Direct the open end of the solution hose into the recovery tank vacuum barb.
• Turn one or both of the vacuums ON and turn the solution pump ON. Let the pump run until most
of the water has been pumped out of the solution tank. Do not let the pump run dry. Turn the
pump OFF before the water gets to the bottom of the tank.
• Turn the vacuums OFF and disconnect the open flow solution hose.
• Place a bucket under the drain valve and open the drain valve to drain the water out of the recovery
tank.
• Close the drain valve and dispose of the water.
Vacuum acid solution out of
CLEAN PUMP INLET FILTER
A restricted Pump Inlet Filter can prevent the solution pump from providing adequate pressure for cleaning.
A restriction or air leak on the pump inlet hose can also
damage the solution pump check valves and plunger
seals.
CAUTION: Before proceeding with this procedure,
make sure both power cords are disconnected.
• To examine the filter, open the solution tank lid
on the front of the machine. The filter is in the
bottom of the solution tank.
• Grasp the filter cap and unscrew the filter from
the brass nipple by turning counter-clockwise.
Clean or replace the filter as needed (PP14-
806504).
• To examine the pump inlet hose, release the latches on the front/bottom of the machine and tilt the
tanks off of the base assembly.
• Examine the hose for kinks, clogs or holes and repair or replace the hose as needed.
(Replacement Hose: NM5086 – sold per foot)
• Tilt the tanks back onto the base and secure the latches.
Inside View: MX3-1200 Solution Tank
SOLUTION FILTER
PP14-806504
31
Page 32
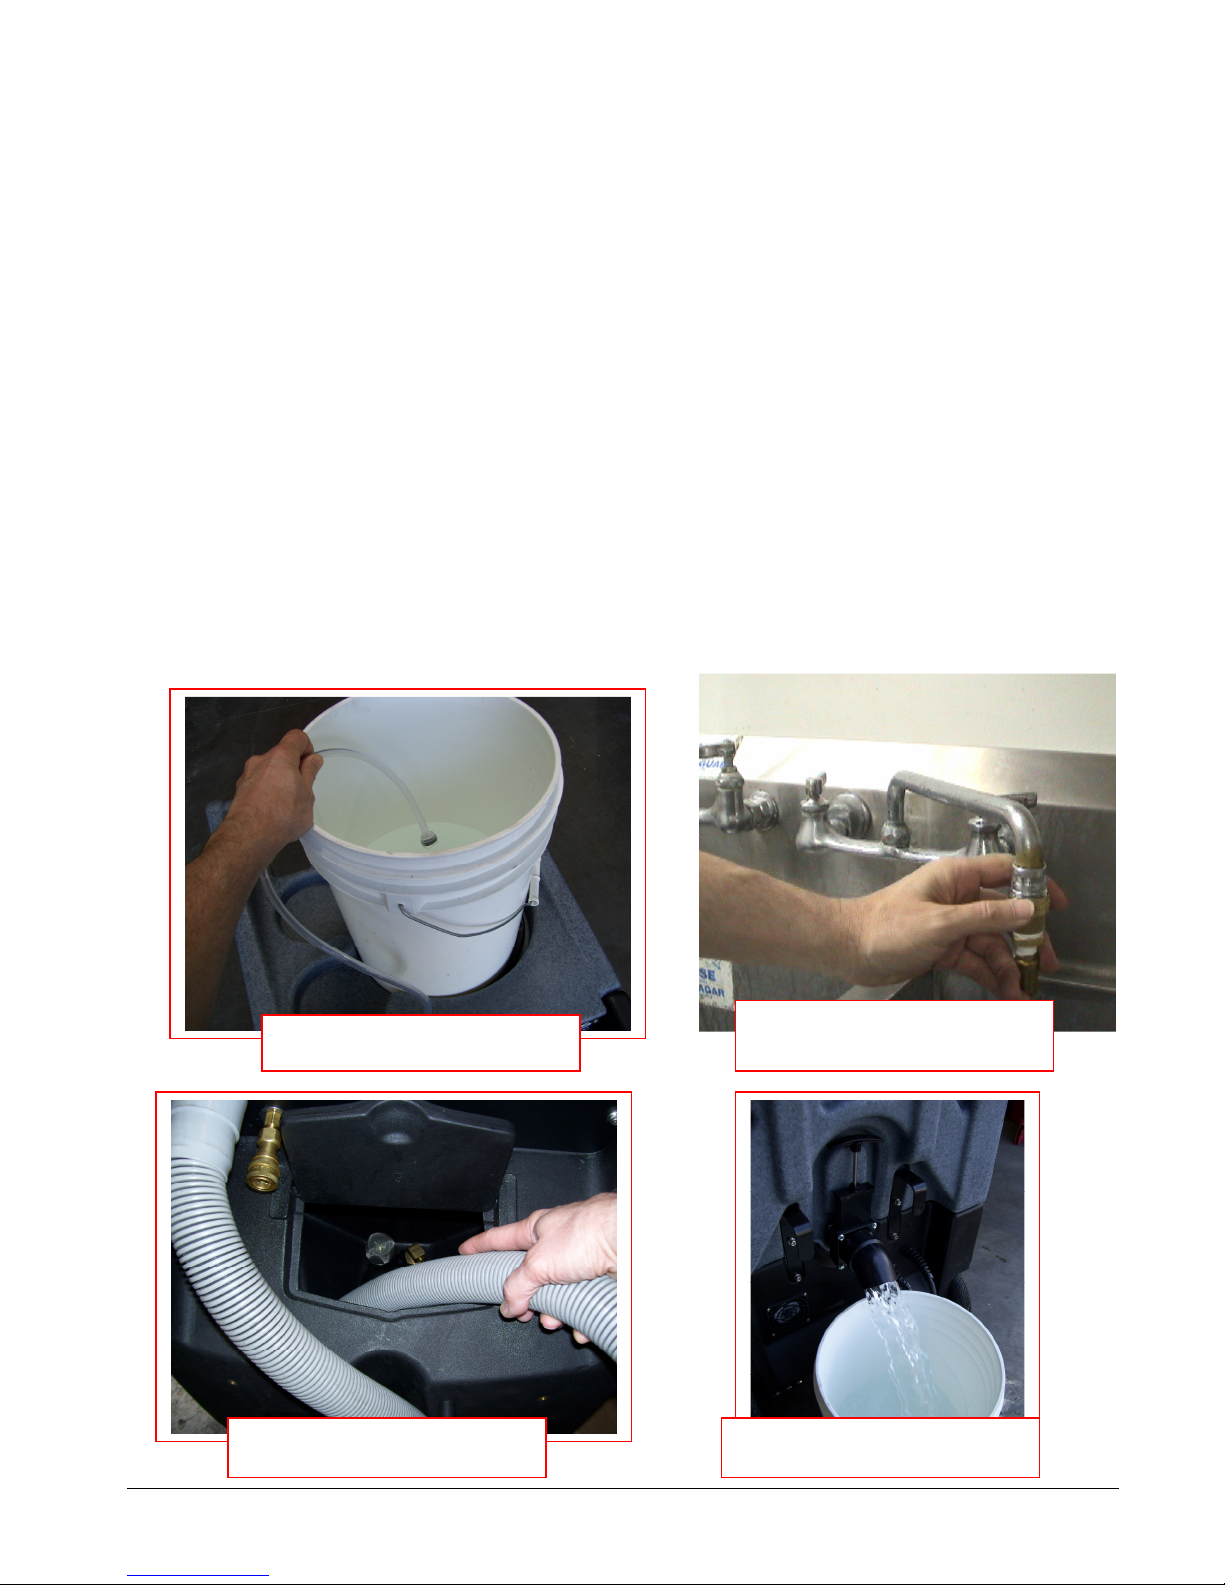
Tank
Tank
FLUSH CHEMICAL SYSTEM:
Chemical build-up in the chemical system can prevent the system from drawing chemical.
• Rinse the chemical system with fresh water (For heavy chemical build-up, a mild acid can be added to the
rinse water.)
• Remove the chemical feed hose from the solution tank and place the end of the hose in a bucket of fresh
water or mild acid solution.
• Connect the Auto-Fill Water Supply Hose to the water inlet (male quick connect) on the front of the
machine.
• Connect the other end of the hose to a water faucet and turn on the water. Let the water flow into the
tank until you are sure the rinse solution has been drawn through the proportioner and mixed with the
incoming water. The metering tip can be removed from the proportioner to speed up the process.
• Once the rinse solution has been drawn through the proportioner, turn off the water faucet and
disconnect the Auto-Fill Water Supply Hose.
• Plug in Cord #1, connect the short 4’ vacuum hose to the vacuum barb, turn on one or both vacuums,
and use the short vacuum hose to remove the water from the solution tank.
• When the solution tank has been emptied, turn off the vacuums and unplug the power cord.
• Place a bucket under the drain valve and open the drain valve to drain the water from the recovery tank.
• Close the drain valve and dispose of the water.
Place Chemical Feed Hose into
Connect Auto-Fill Water Supply
Hose to machine and faucet
Vacuum water out of Solution
Drain water from Recovery
32
Page 33
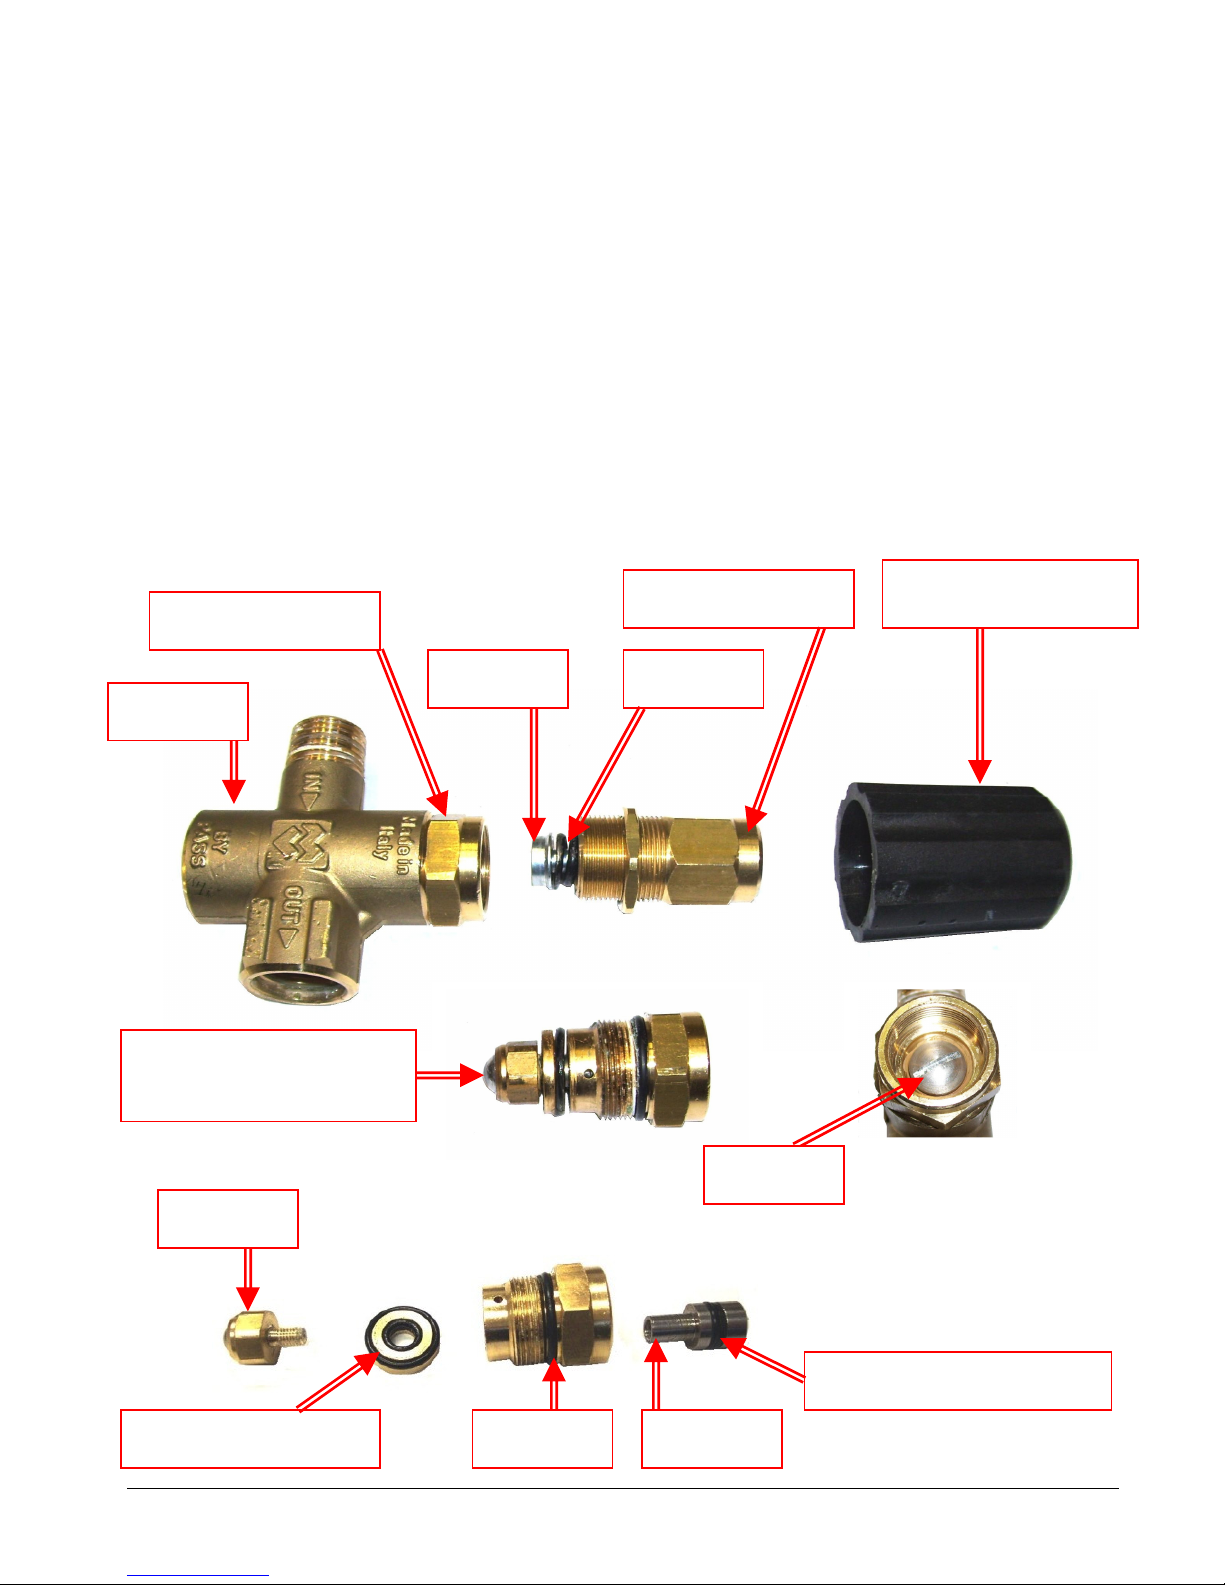
LUBRICATE PRESSURE REGULATOR O-RINGS:
ASSEMBLY
PLATE
RETAI
NER
& WASHER
O-RING & WASHER
To maintain consistent adequate pressure delivery to the cleaning tool, the o-rings on the stem of the MX31200 pressure regulator must be lubricated regularly.
1. Remove the black knob from the regulator.
2. Unscrew the brass knob assembly from the piston retainer.
3. Remove the spring plate and spring from the piston retainer.
4. Unscrew the piston retainer from the regulator body.
5. Hold the hex head of the spindle with a wrench while using a screw driver to turn the piston screw and
separate the spindle head & piston screw so they can be removed from the stem retainer.
6. Use a synthetic grease with Teflon such as Ultra-Slick or Super-Lube to lubricate the o-rings on the piston
and spindle assembly.
7. Re-install the piston and spindle assembly into the retainer and tighten.
8. Apply thread sealant to the threads of the stem retainer and screw the retainer back into the regulator
body and tighten.
9. Replace spring and spring plate back into brass knob assembly and re-install the brass knob.
10. Push black knob back onto the brass knob.
PISTON RETAINER
BODY
BRASS KNOB
SPRING SPRING
BLACK PLASTIC KNOB
PT017KNOB
RETAINER, PISTON &
SPINDLE ASSEMBLY
SPINDLE
LUBRICATE SPINDLE
PISTON
LUBRICATE PISTON O-RING
PISTON PISTON
33
Page 34
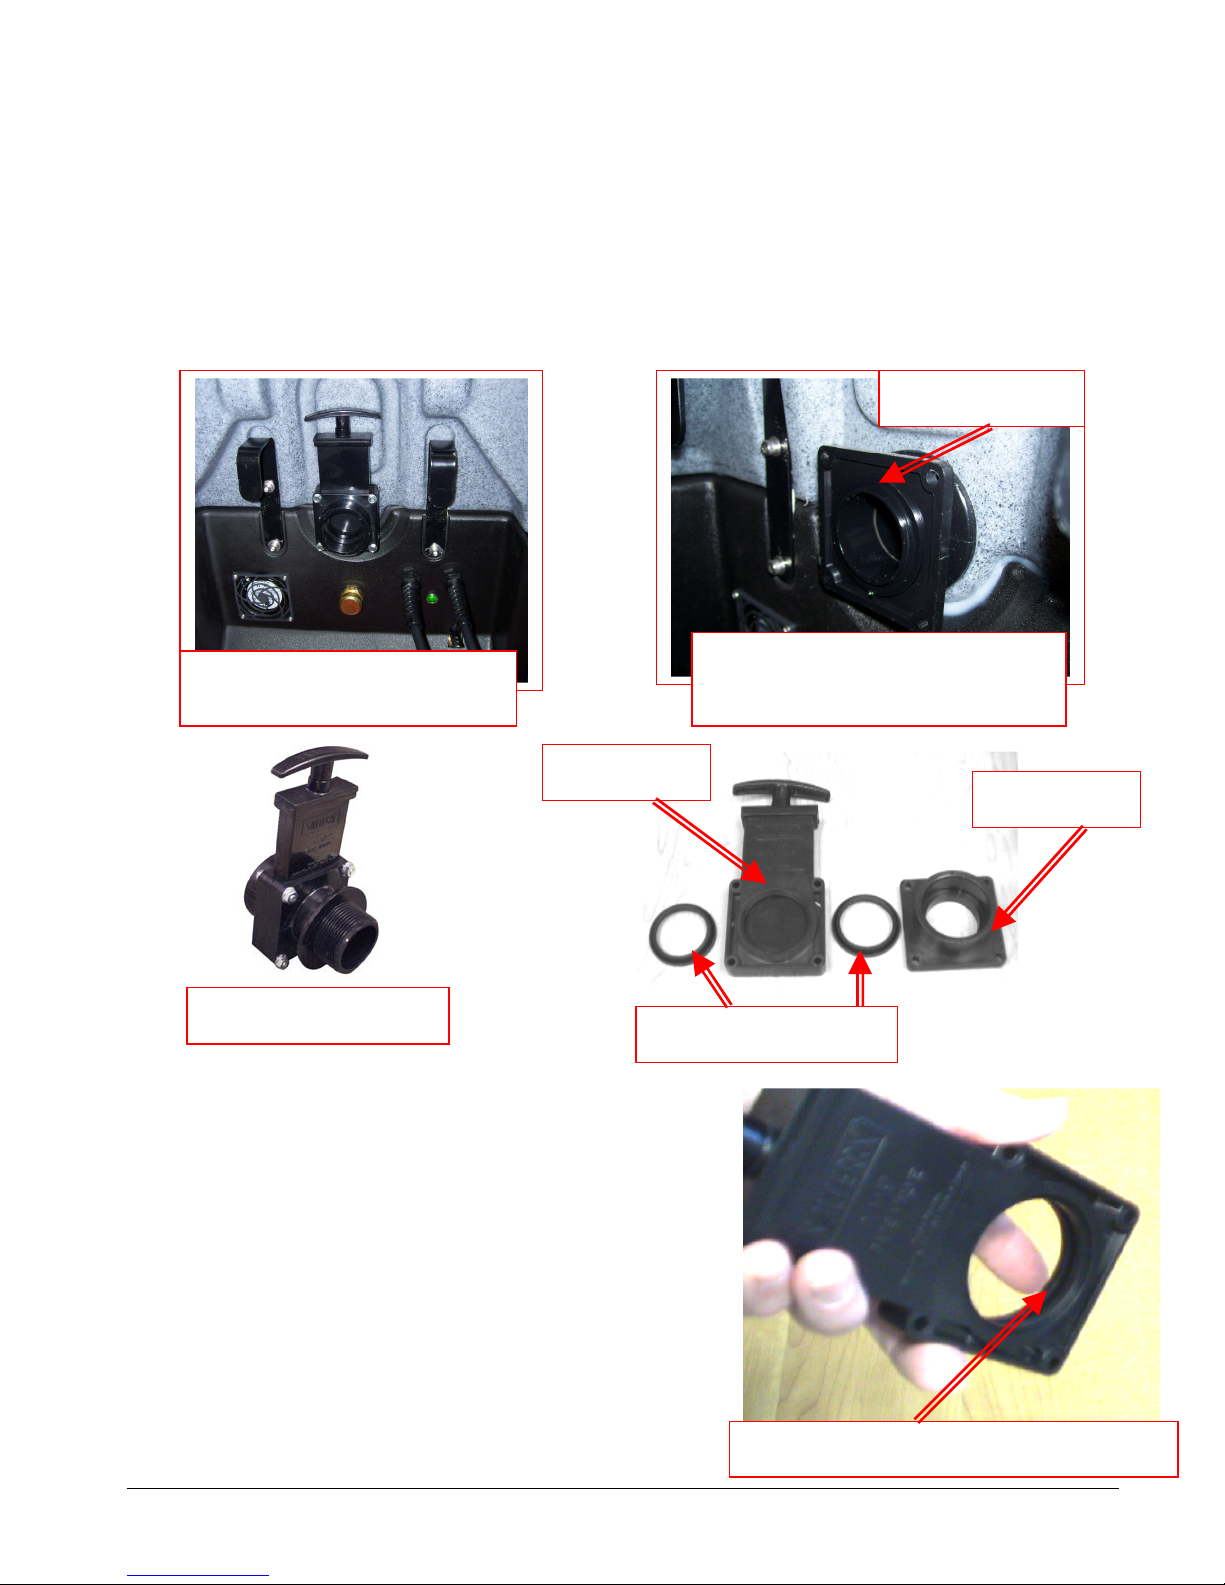
CLEAN RECOVERY TANK DRAIN
Debris and sand accumulation in the drain valve can damage the valve or prevent it from closing completely.
This will result in dirty water leaking from the valve. Use of the Hydro-Filter and regular cleaning of the
recovery tank will help prevent this, but occasionally the drain valve will require cleaning or replacement.
Drain the recovery tank before attempting to service the drain valve.
• Unscrew the nuts and remove the four bolts holding the valve assembly to the flange attached to the
recovery tank. Unless the flange is damaged, it does not have to be removed from the tank, even when
replacing the drain valve.
• Separate the valve body, outlet adapter and gaskets from the flange.
Remove four bolts holding valve
assembly to flange fitting
VALVE BODY
DRAIN VALVE – PEA11
GASKET – NM3019
• Examine the valve body for wear. Check the valve slide
for deep scratches. Deep scratches will allow water to flow
past gaskets and leak from valve. Replace valve if needed.
• Examine the gaskets and replace if cut, torn or deformed.
• Raised, rounded side of gasket goes toward valve slide.
Larger flat sides seat on ring on flange and outlet adapter.
Sand and debris will collect in the bottom of the valve
body and prevent the slide from going down and seating
properly.
• Clean debris out as needed so slide can move to bottom.
• Rinse valve body and reassemble valve body, gaskets and
outlet adapter, and place assembly back onto flange fitting.
• Replace four bolts and tighten evenly to secure assembly
to flange. Do not over-tighten bolts.
Unless damaged or leaking between
tank and flange, the flange fitting does
not have to be removed
Clean debris from slot in bottom of valve body.
FLANGE FITTING
OUTLET
34
Page 35

Storage Prep and Freeze Protection Procedures:
Your Nautilus MX3-1200 must be protected from freezing. Freezing can cause serious damage to the pump,
pump-out, auto-fill float valve, and any other component containing water. If the MX3-1200 is transported or
stored in freezing temperatures, the following procedures should be performed.
ALSO, if the MX3-1200 is stored for an extended period of time, the following procedure should be
performed to prevent the pump seals from drying out.
1. In a separate container mix 1/2 gallon of water with 1/2 gallon of automotive radiator Ethylene Glycol
anti-freeze. (Propylene glycol can be used as a non-toxic alternative anti-freeze.). Mix well and pour into
the solution tank.
2. Connect the solution hose to the solution outlet (female quick connect. Connect the HP solution hose to
the solution outlet (female quick connect.) Connect the opposite end of the HP solution hose to the
Auto-Fill inlet (male quick connect.) Leave the chemical feed hose in the solution tank and ensure the
check valve filter is submerged in the anti-freeze solution. To speed the process the metering tip can be
removed. Turn the pressure regulator knob counter-clockwise to lower the pressure to 100psi or lower
CAUTION: Applying high pressure (over 100psi) to the Auto-Fill system will cause damage to
the Float valve and chemical proportioning mechanism.
3. Turn the solution pump switch to the ON position and perform the pump priming procedure. Hold the
priming valve open for a few extra seconds to be sure the anti-freeze has passed through the priming
valve. When the pump is primed, allow the anti-freeze to circulate for 5-10 minutes. Mix and add more
anti-freeze solution as needed. Make sure end of chemical feed hose stays submerged in the anti-freeze
solution. This will assure that the anti-freeze will be drawn into the proportioning valve.
4. Connect any cleaning tools that will be stored with the MX3-1200. Direct tool spray back into the
solution tank or into a bucket. Repeat for all tools to be protected.
5. Turn the solution pump switch to the OFF position.
6. Use the 4’ short section of vacuum hose to vacuum the remaining anti-freeze solution out of the solution
tank and bucket.
7. Remove the cap from the waste-pump out outlet fitting on the back of the machine. Connect a hose to a
drain or hold a bucket up to the fitting to catch the pump-out flow.
8. Remove the lid from the recovery tank. Turn the Waste Pump switch to the ON position to engage the
pump-out. Turn off the Waste Pump Switch as soon as you see anti-freeze flowing from the outlet fitting
or hose.
9. Drain the remaining anti-freeze solution from the recovery tank and the machine is ready for storage.
RETURNING THE MX3-1200 TO SERVICE AFTER STORAGE OR
FREEZE PROTECTION:
To return the MX3-1200 to service, the anti-freeze must be flushed from the machine. Flush the anti-freeze
out of the machine by repeating the procedures above using fresh water in place of anti-freeze.
35
Page 36
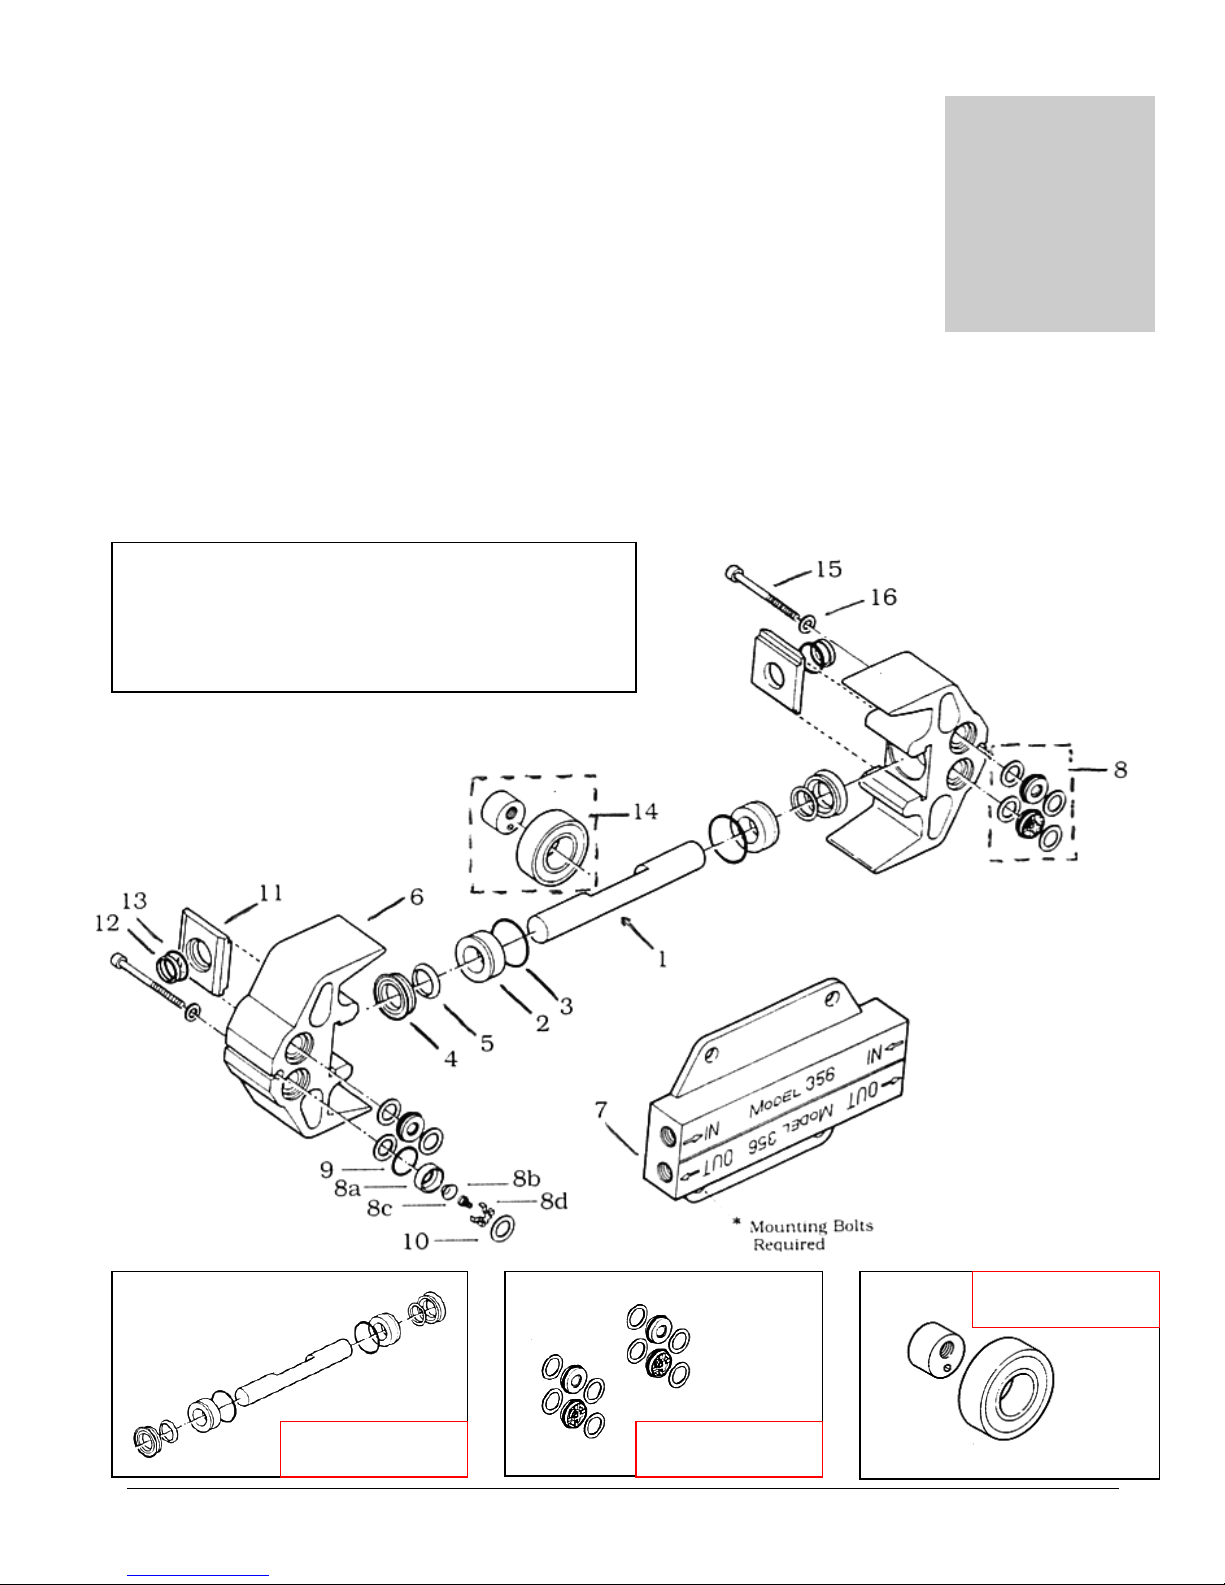
Parts
Section
3
Replacement parts available for repair of your MX3-1200.
MX3-1200 PUMP – AP48
PARTS ASSEMBLY
KIT A – PT042 KIT B – PT044
KIT C – PT046
36
Page 37
ITEM
DESCRIPTION
QTY PART NUMBER
1 PLUNGER
1 0311-0006-0002
2 PLUNGER GUIDE
2
0311-0009
3 O-RING FOR PLUNGER GUIDE
2
C0100
-
1124
4 U-CUP 2 C0220
-
1075
5 U-CUP BACKING RING
2
0311-0011
6 PUMP HEAD
2
0356-0002-0001
7 PUMP MANIFOLD
1
0356-0004-0001
8 VALVE ASSEMBLY
4
0205-0012
8A VALVE SEAT (Part o
f #8 -
Valve Assembly)
4
0205-0017
8B VALVE POPPET
(Part of #8
- Valve Assembly)
4
0205-0013
8C VALVE SPRING (Part of #8
- Valve Assembly)
4
C1220
-
0001
8D SPRING RETAINER (Part of #8 Valve Assembly)
4
0205-0014
9 O-RING FOR VALVE
4
C0100
-
1116
10 PLA
STIC SPACER RING
8
0205-0016
11 GUIDE & VACUUM SEAL RETAINER
2
0311-0012
12 VACUUM SEAL
2
0311-0010
13 O-RING FOR VACUUM SEAL
2
C0100
-
1117
14 BEARING ASSEMBLY
1
0300-1000-0001
ECCENTRIC INSERT (Part of #14
– Bearing Assembly)
1
0300-0001-0XXX
BEAR
ING 6205 (Part of #14
– Bearing Assembly)
1
C3000
-
0003
15 SOCKET HEAD CAP SCREW
2
C100-0504
16 WASHER AN TYPE
2
C1500
-
0004
KIT A
PLUNGER & SEALS
– Includes 1, 2, 3, 4, 5, 12 & 13
1
PT042
KIT B
VALVES & O
-
RINGS
– Includes 8, 9 & 10
1
PT044
KIT C
BEAR
ING ASSEMBLY (#14)
1
PT046
PUMP COMPLETE
- WITHOUT MOTOR
1
PT058
MOTOR
1
PT059
MOUNTING BOLTS 3/8
-
16 X 2
-
3/4” 4
PUMPTEC #356 PUMP
– AP48
37
Page 38
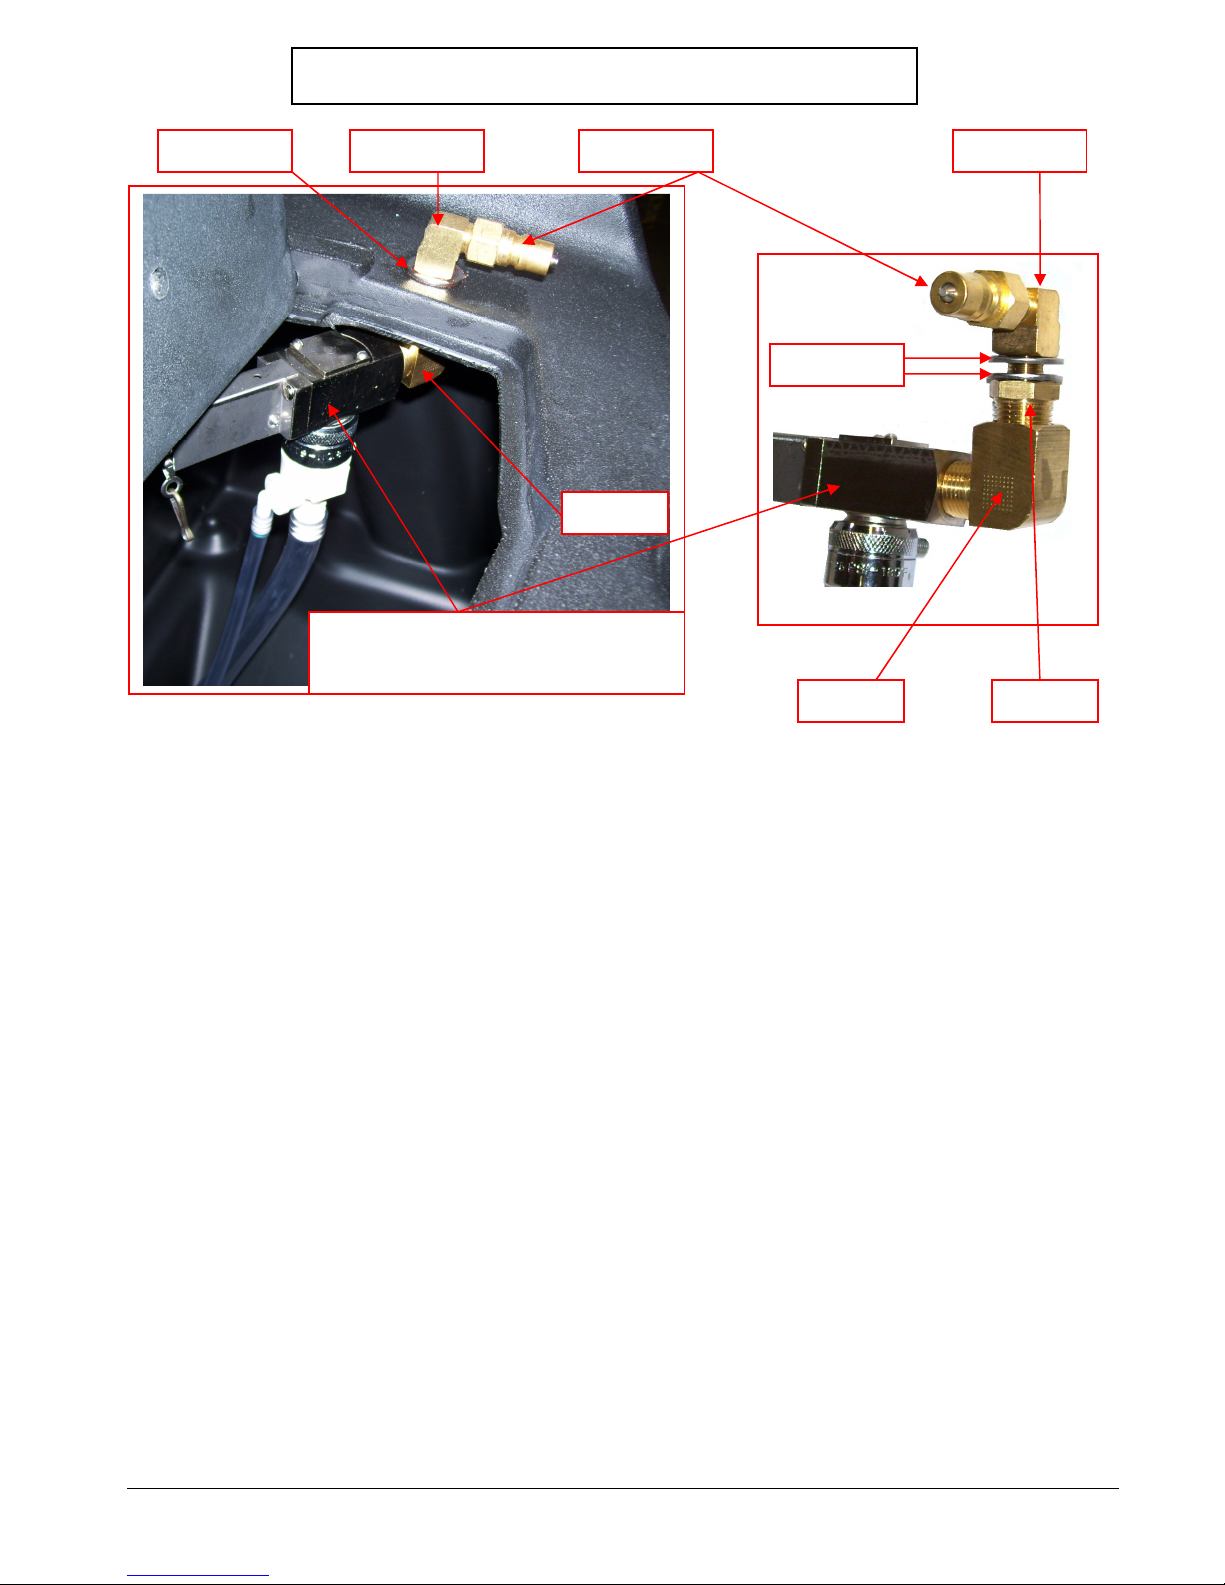
BR286
BR286
BR138
NM5751
NM5751
BR282A
AH102B
BR282A
AUTO-FILL ASSEMBLY
– M013
NM5740 Float Valve Assembly
See Parts Breakdown on Next Page
38
Page 39
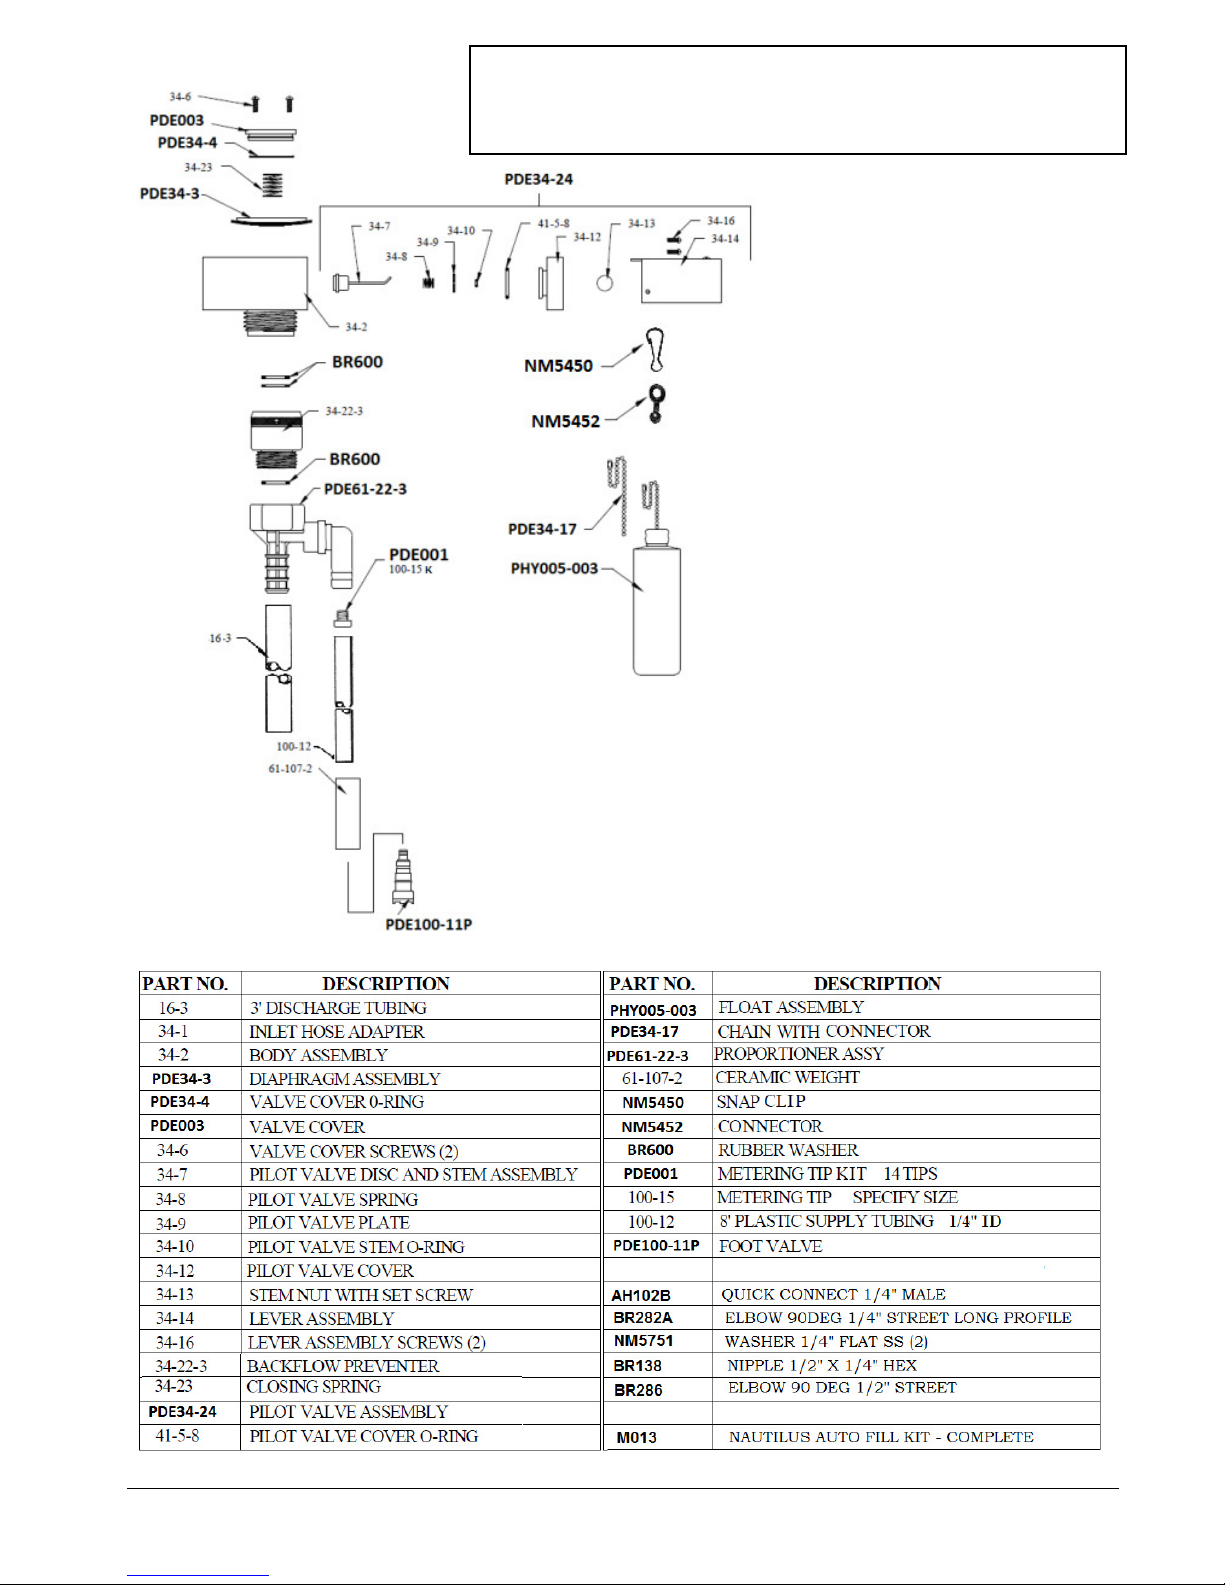
NM5740
AUTO-FILL FLOAT VALVE ASSEMBLY
39
Page 40
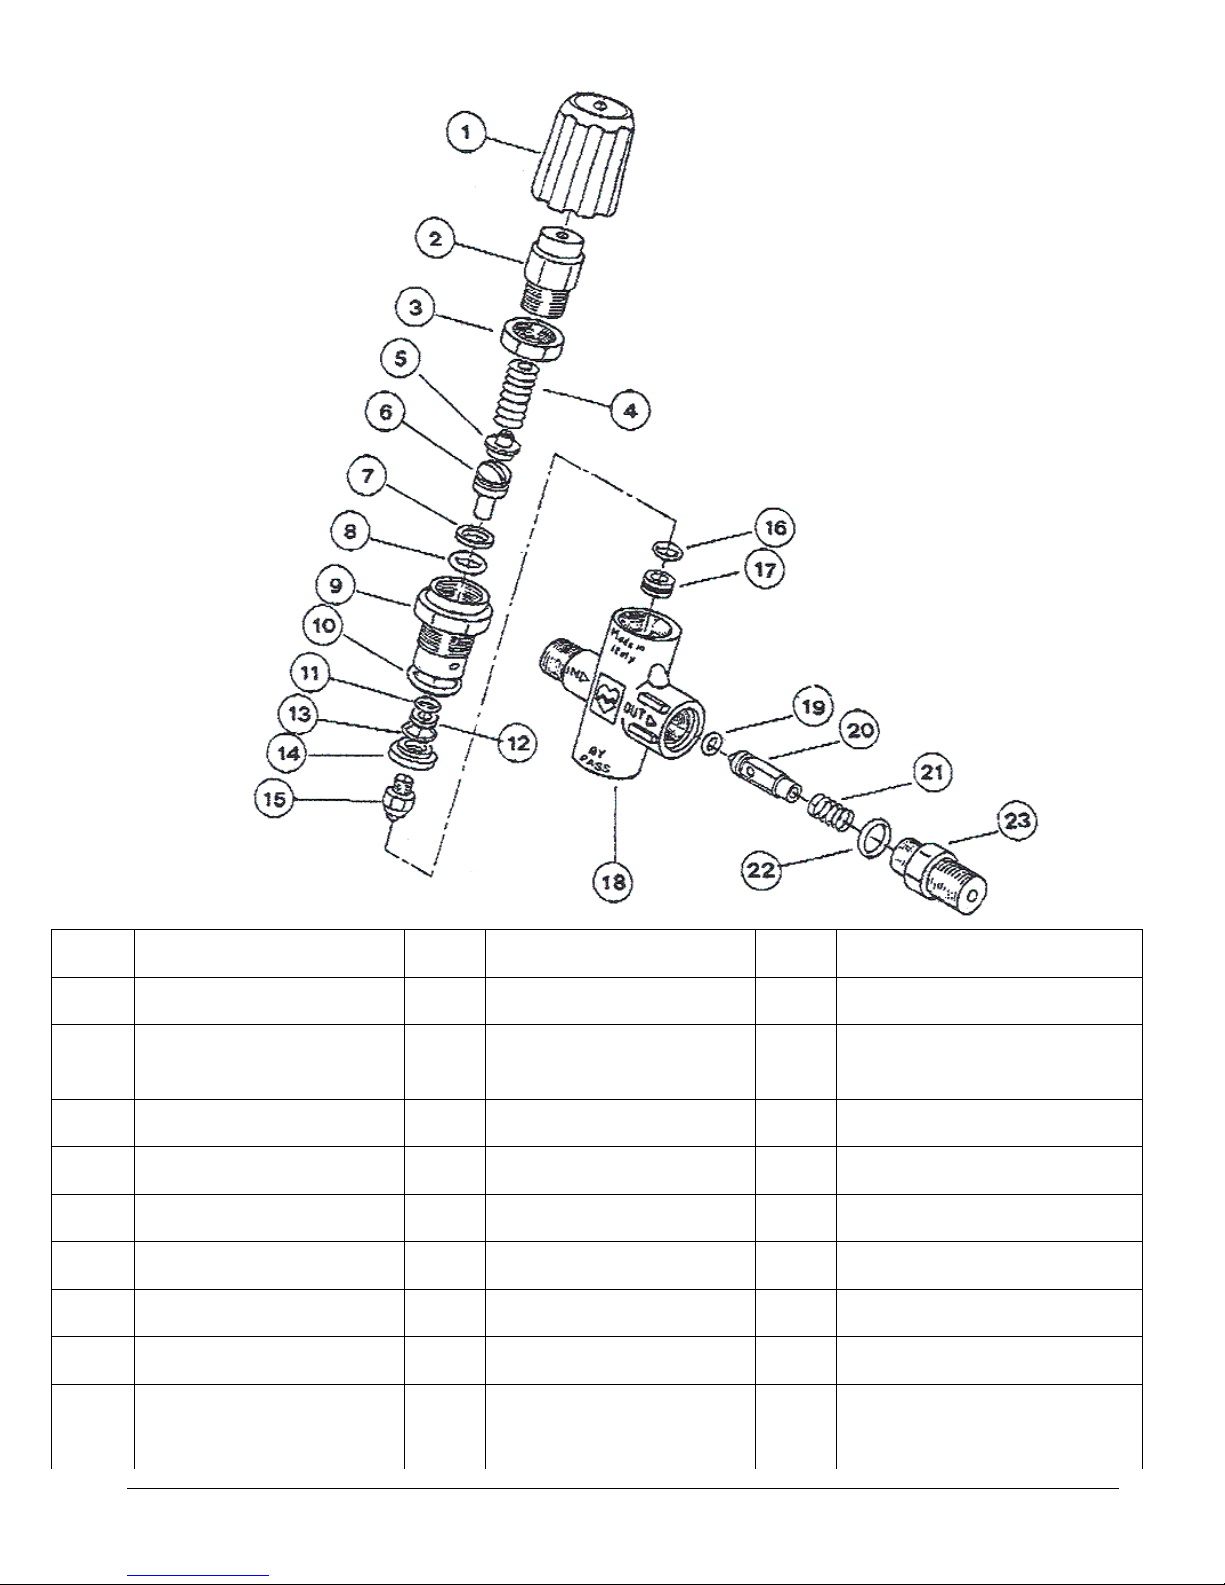
ITEM
DESCRIPTION
ITEM
DESCRIPTION
ITEM
DESCRIPTION
HP UNLOADER PT017
8
PISTON O
-
RING
- LARGE
16
SEAT O
-
RING
1 BLACK PLASTIC KNOB
9 PISTON
RETAINER
17
SEAT
2 BRASS KNOB
10
PISTON
RETAINER O
-
RING
18
BRASS BODY
3 LOCKING NUT
11
PISTON O
-
RING
- SMALL
19
POPPET O
-
RING
4 SPRING
12
PISTON WASHER
- SMALL
20
POPPET
5 SPRING PLATE
13
SPINDLE O
-
RING
21
POPPET SPRING
6 PISTON
14
SPINDLE SPACER
22
OUTLET RETAINER O
-
RING
7 PISTON WASHER
- LARGE
15
SPINDLE
23
OUTLET RETAINER
PT017
HP UNLOADER
PT017KNOB
REPAIR KIT –
INCLUDES: PARTS 6-15
40
PT017KIT
Page 41
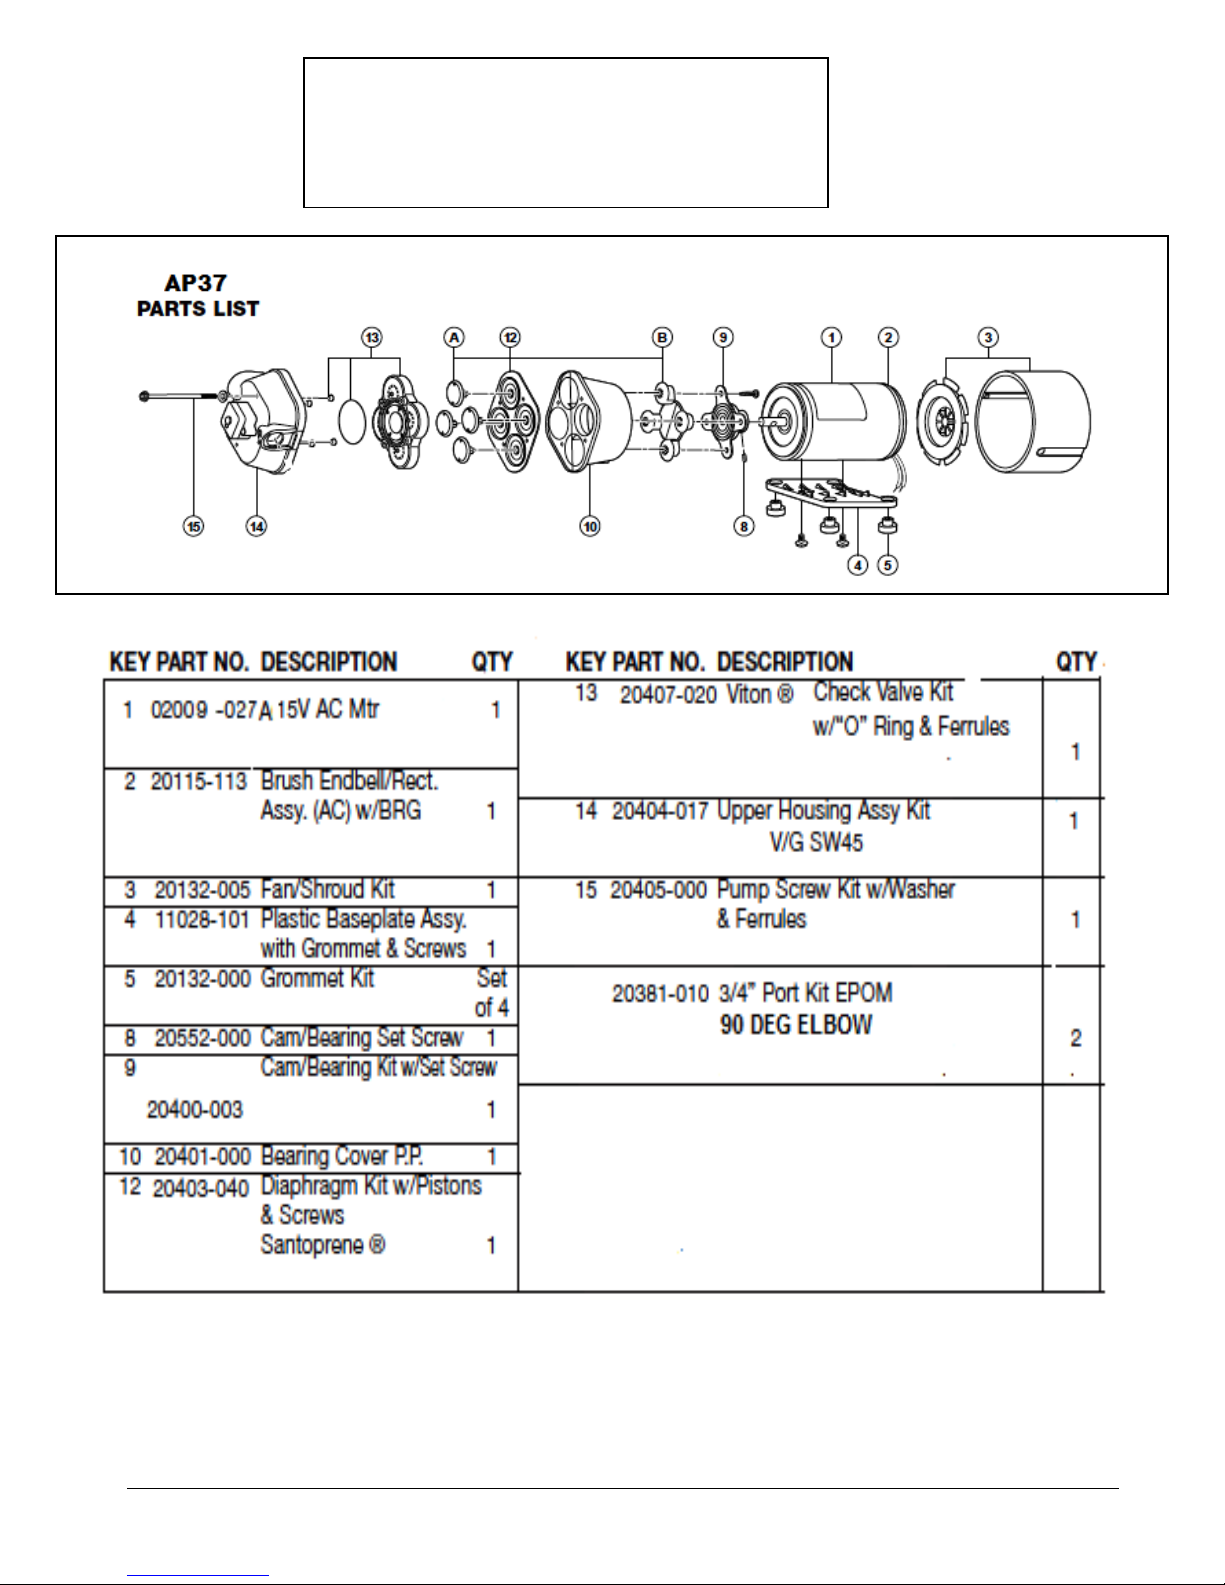
PARTS ASSEMBLY
Pump-Out Pump
AP37
41
Page 42
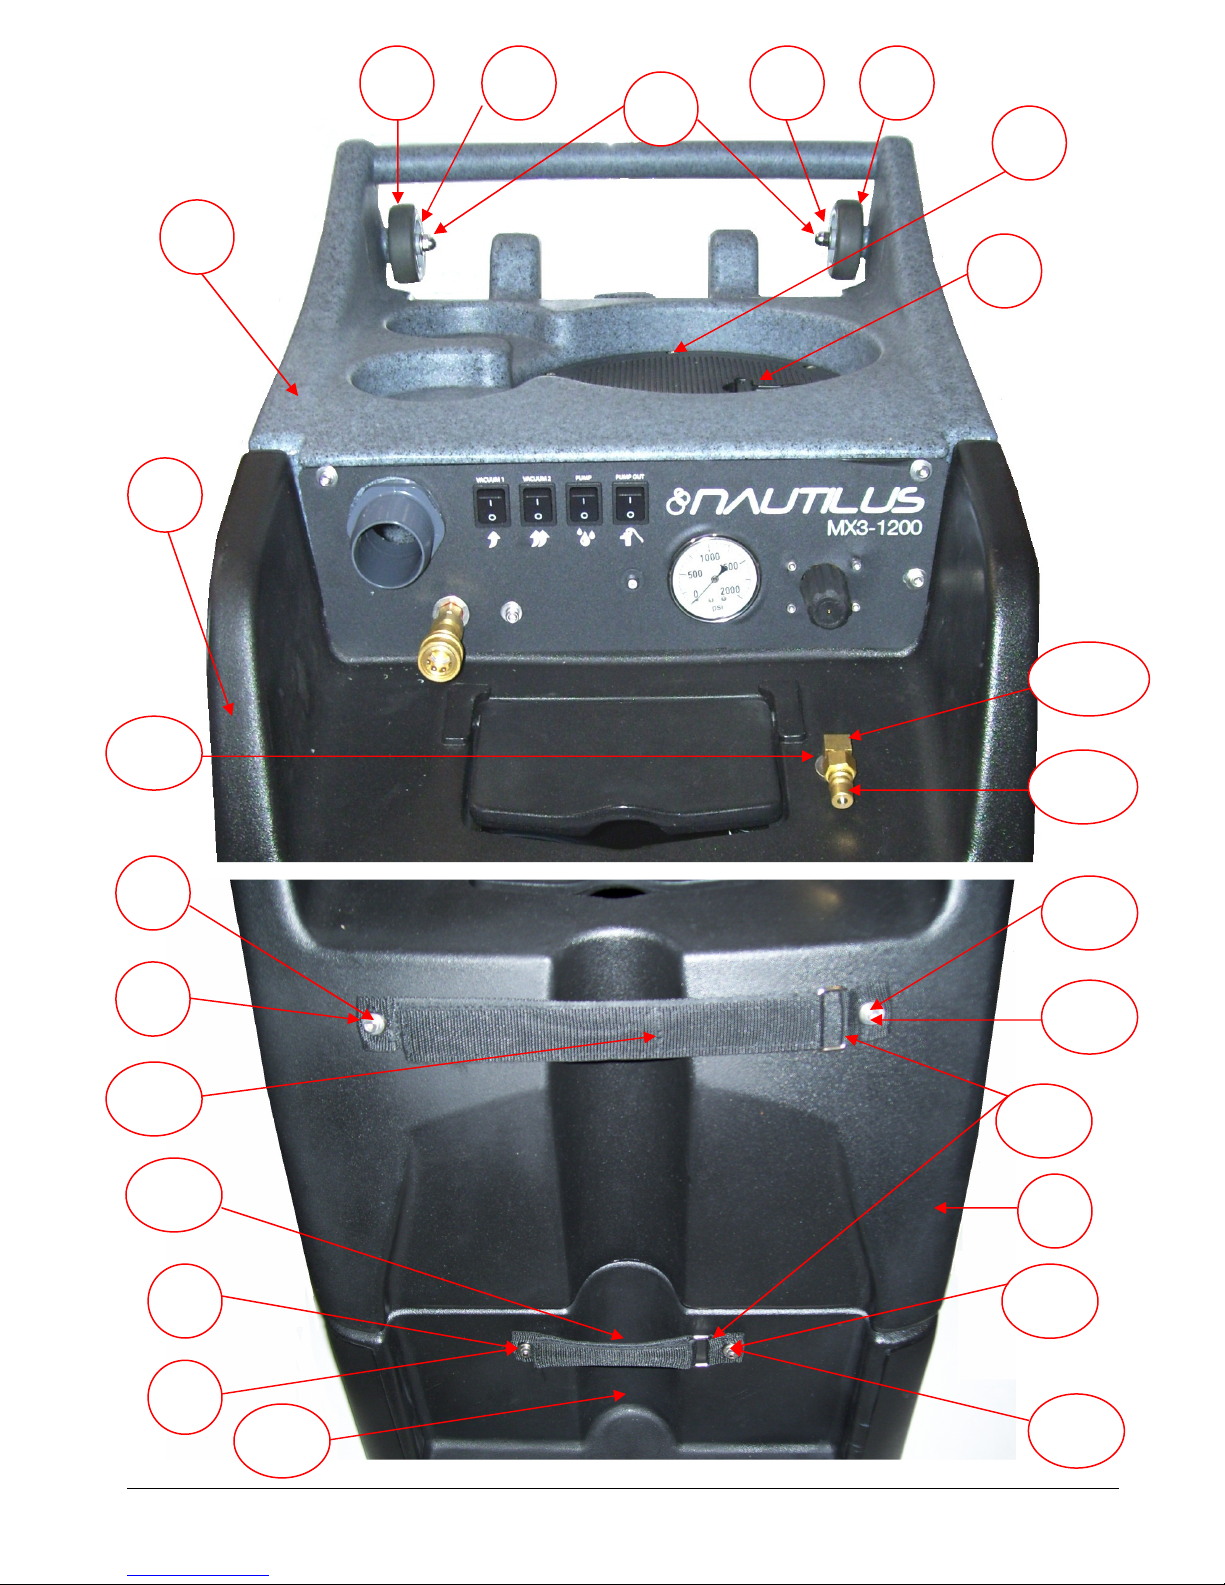
1
2
3
5
4 4
6
7
8
9
10
8
9
3
8
9
8 9
100
104
12
11
2
39
23
42
Page 43
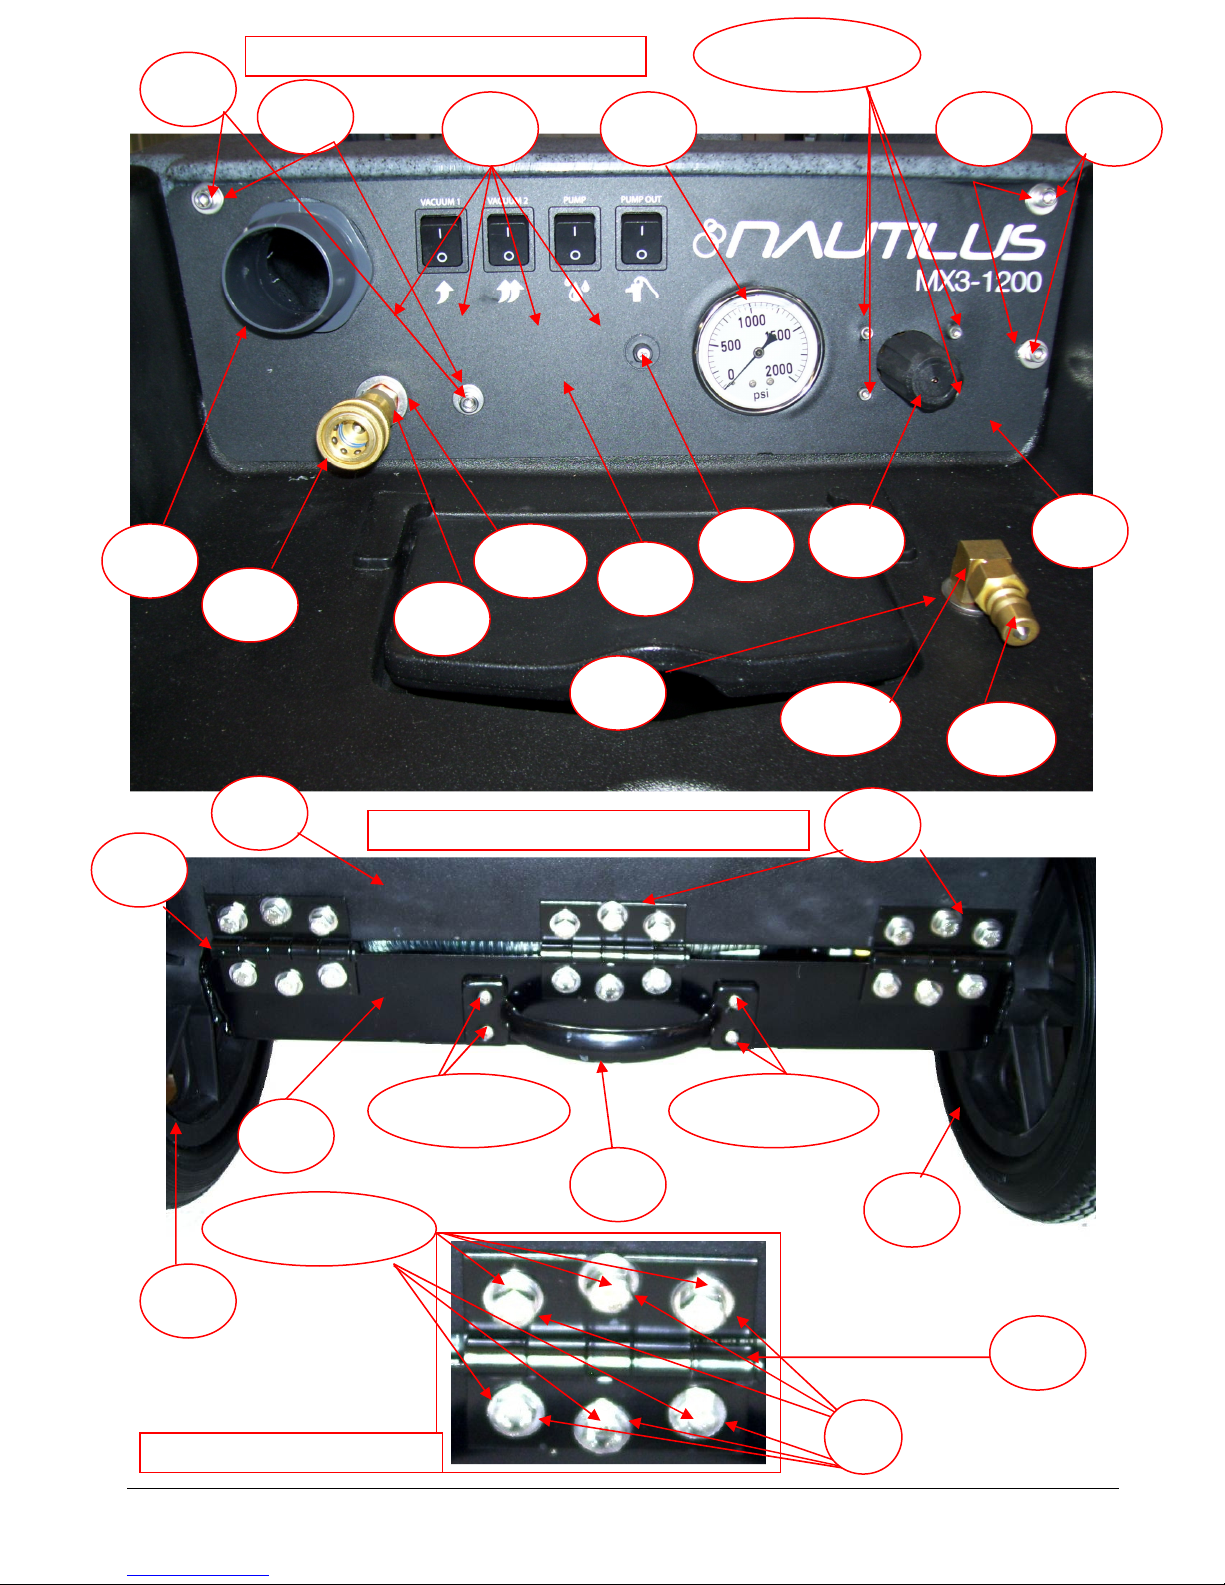
8
9
15
16 17
18
8 9
21
22
23
24
32
32
37
38
40
40
41 & 41A
9
CONTROL PANEL
REAR VIEW
- BASE & BASE SKIRT
HINGE SCREWS
19 & 19A
25
104
100
20
23A
40
39
55 & 56
55 & 56
43
Page 44
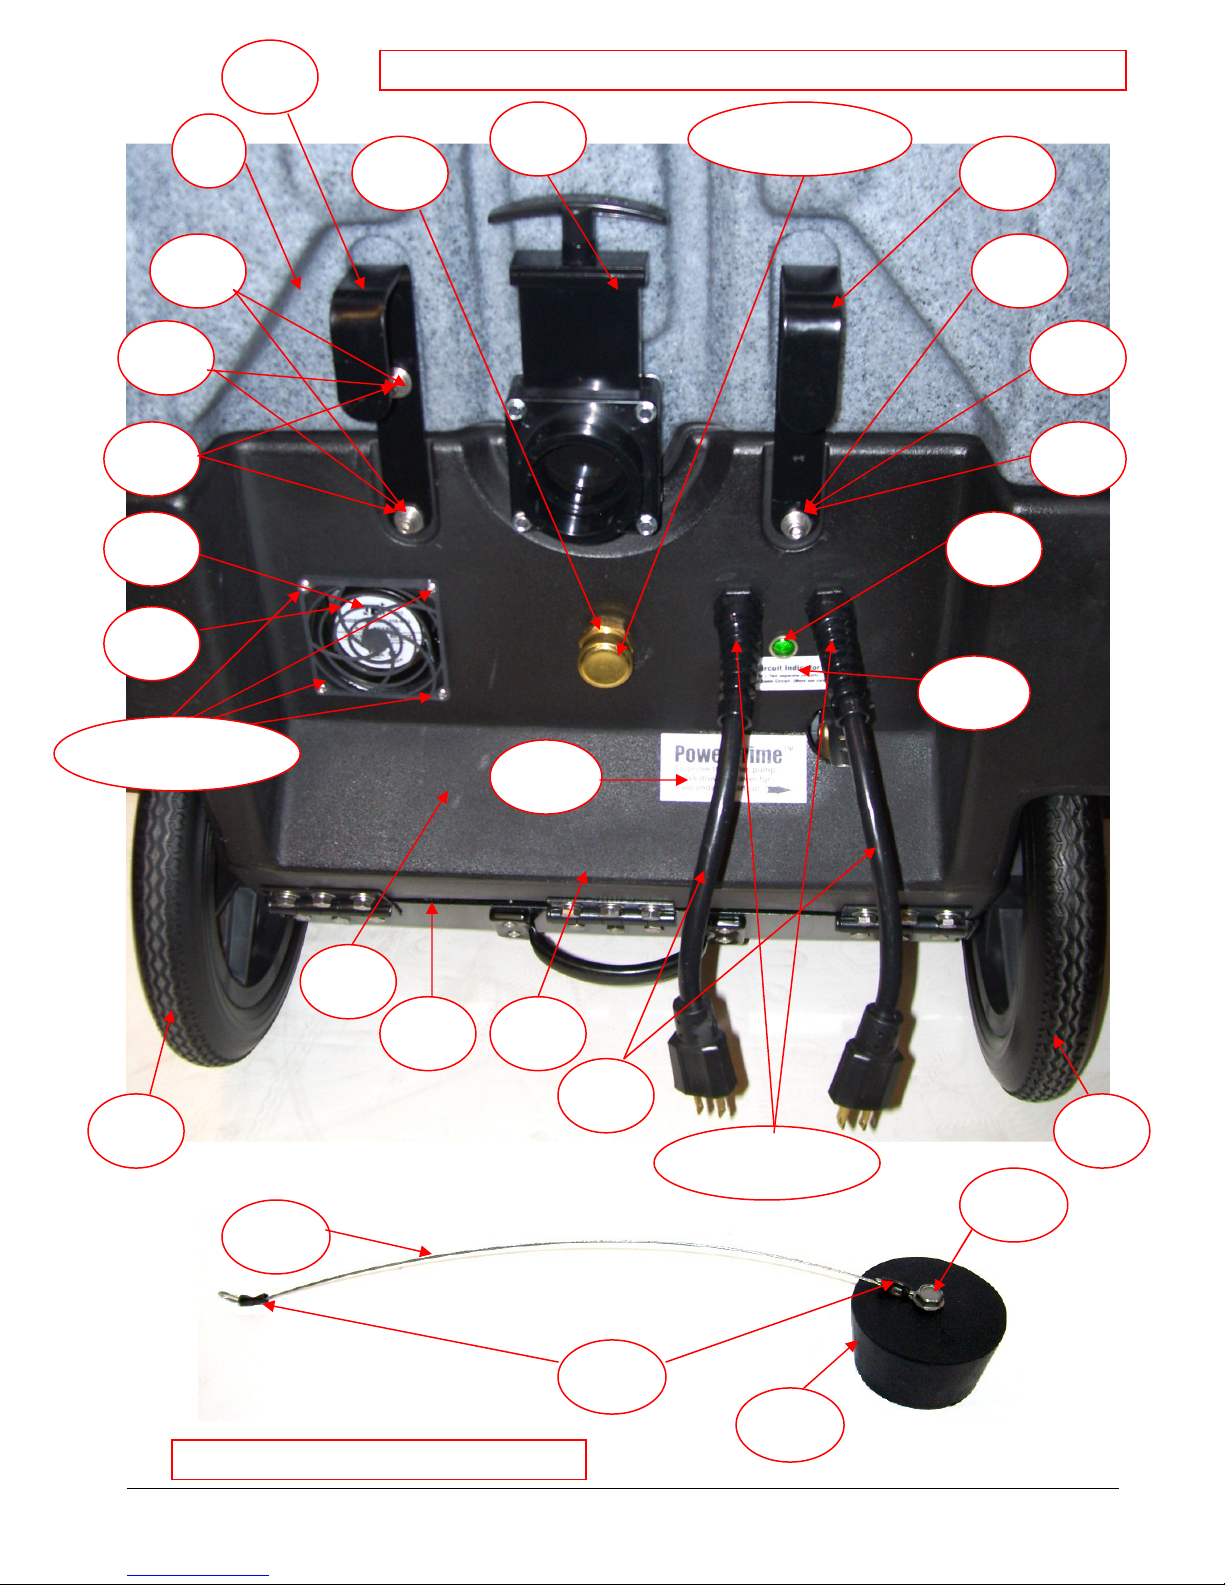
27 & 27A
28
29
29
31 31
9 9
32 32
33 34
35
38 37
1
39
13
14 & 14a
30 30
26
REAR VIEW
– B
ASE, BASE SKIRT & RECOVERY TANK
VACUUM PLUG ASSEMBLY
109
106
107
108
36 & 79
103
114
44
Page 45
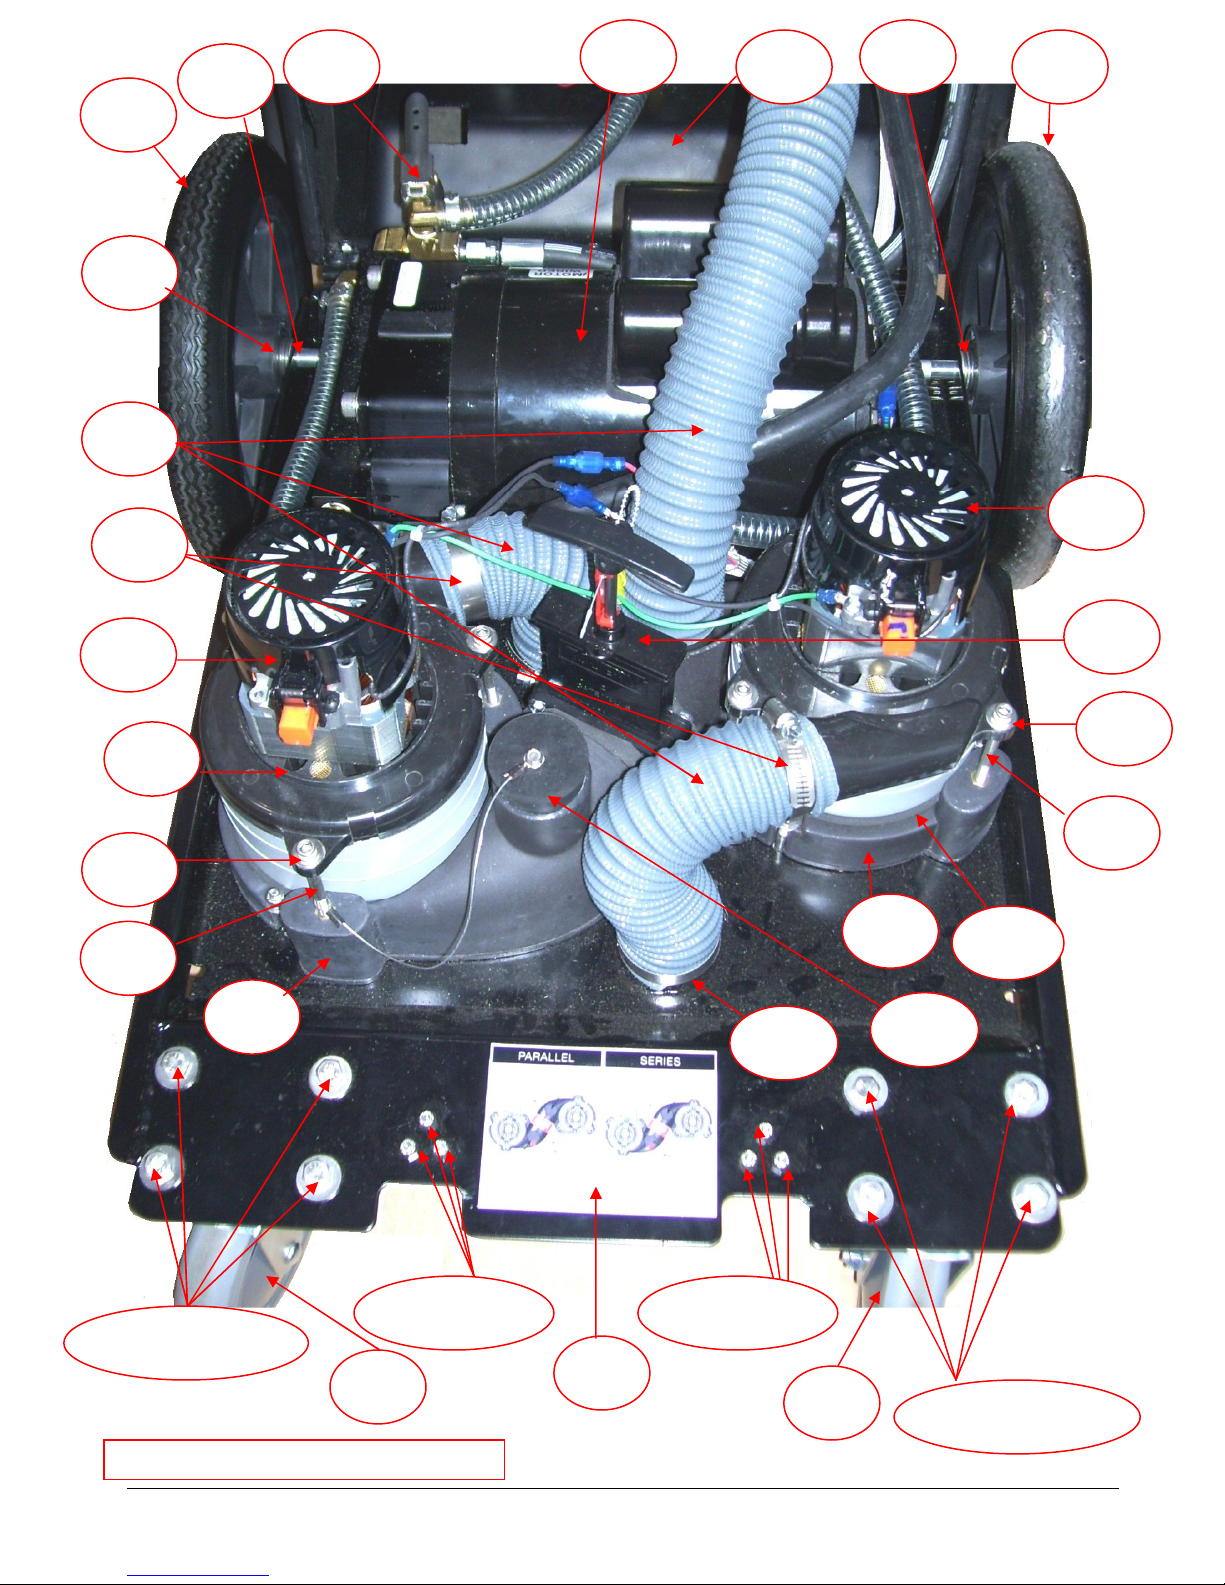
32
32
43
44
45
37
46
46
47
48
50
9
50
9
51
53
3, 58
& 59
TOP VIEW OF BASE
3, 58
& 59
52
39
55 & 56
55 & 56
106
47A
47
60
60
115
115
118
45
Page 46
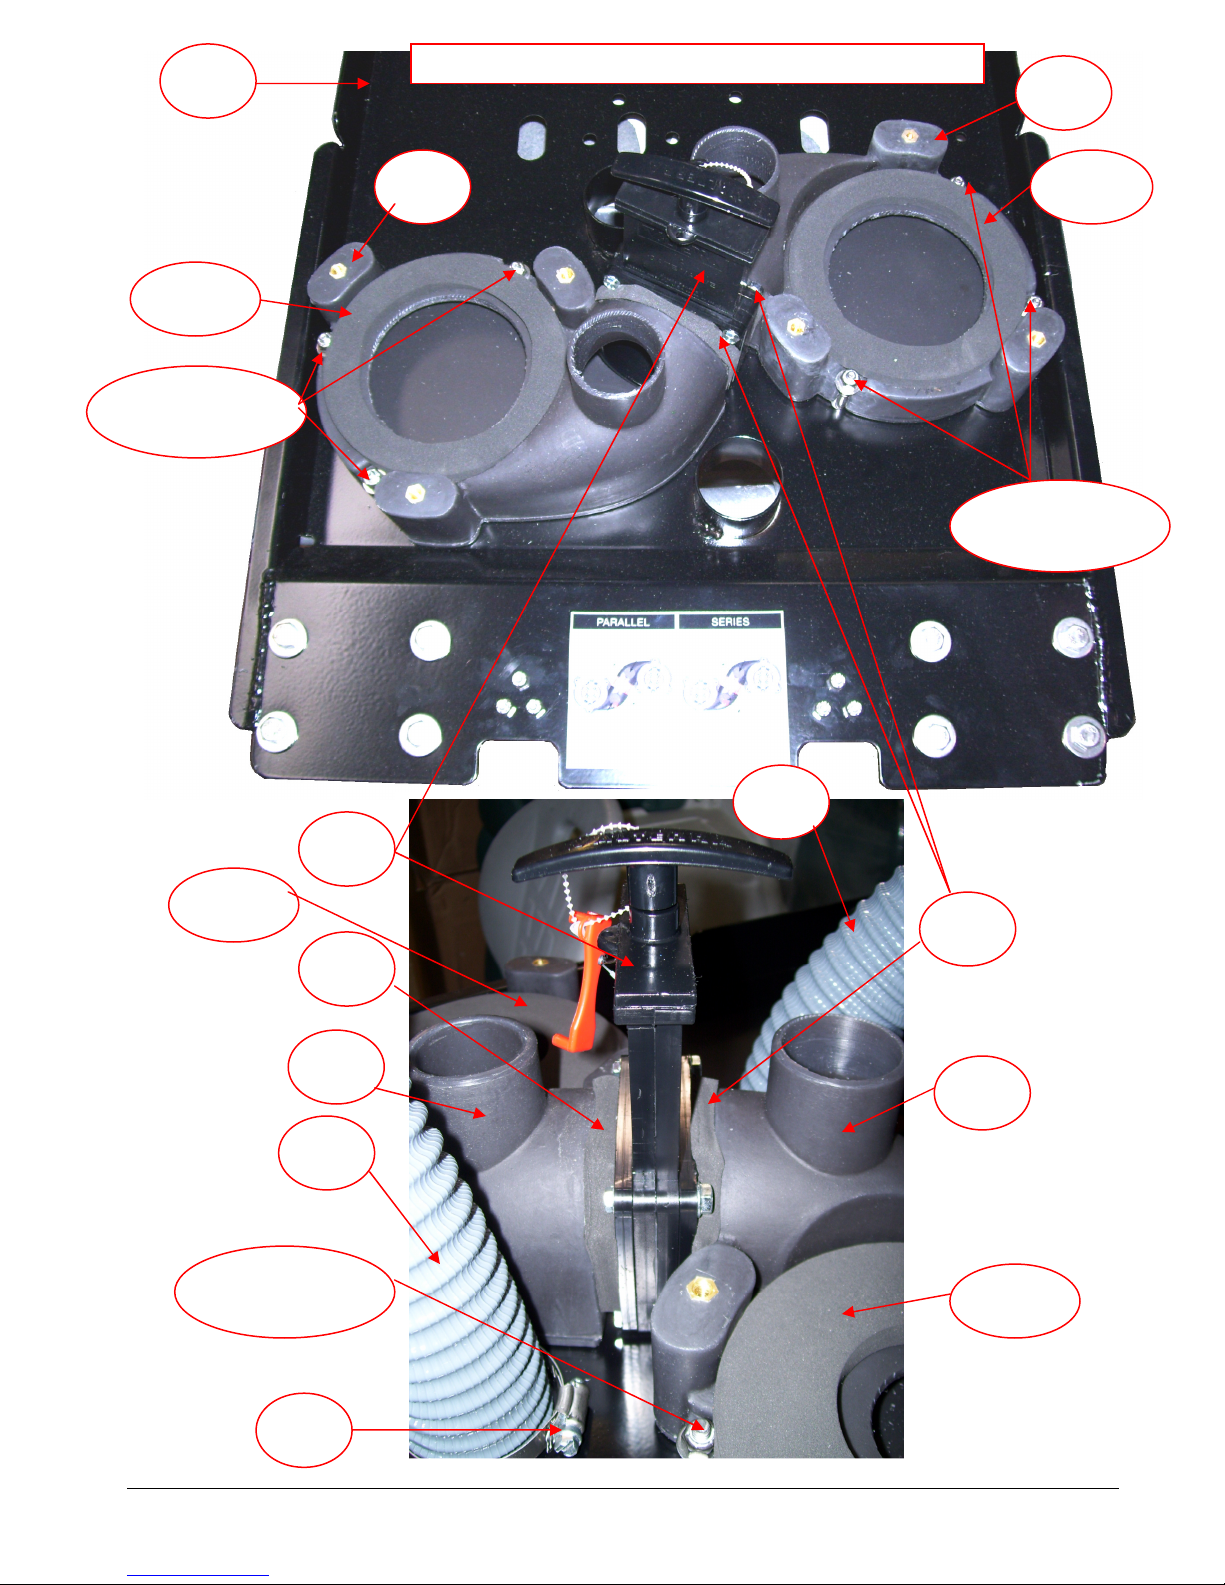
48
49
49
47
47
47A
47
47A
47
47A
47A
51
51
37
9, 54 & 64
9, 54 & 64
52
VACUUM MOUNTS & CONNECTIONS
9, 54 & 64
46
Page 47
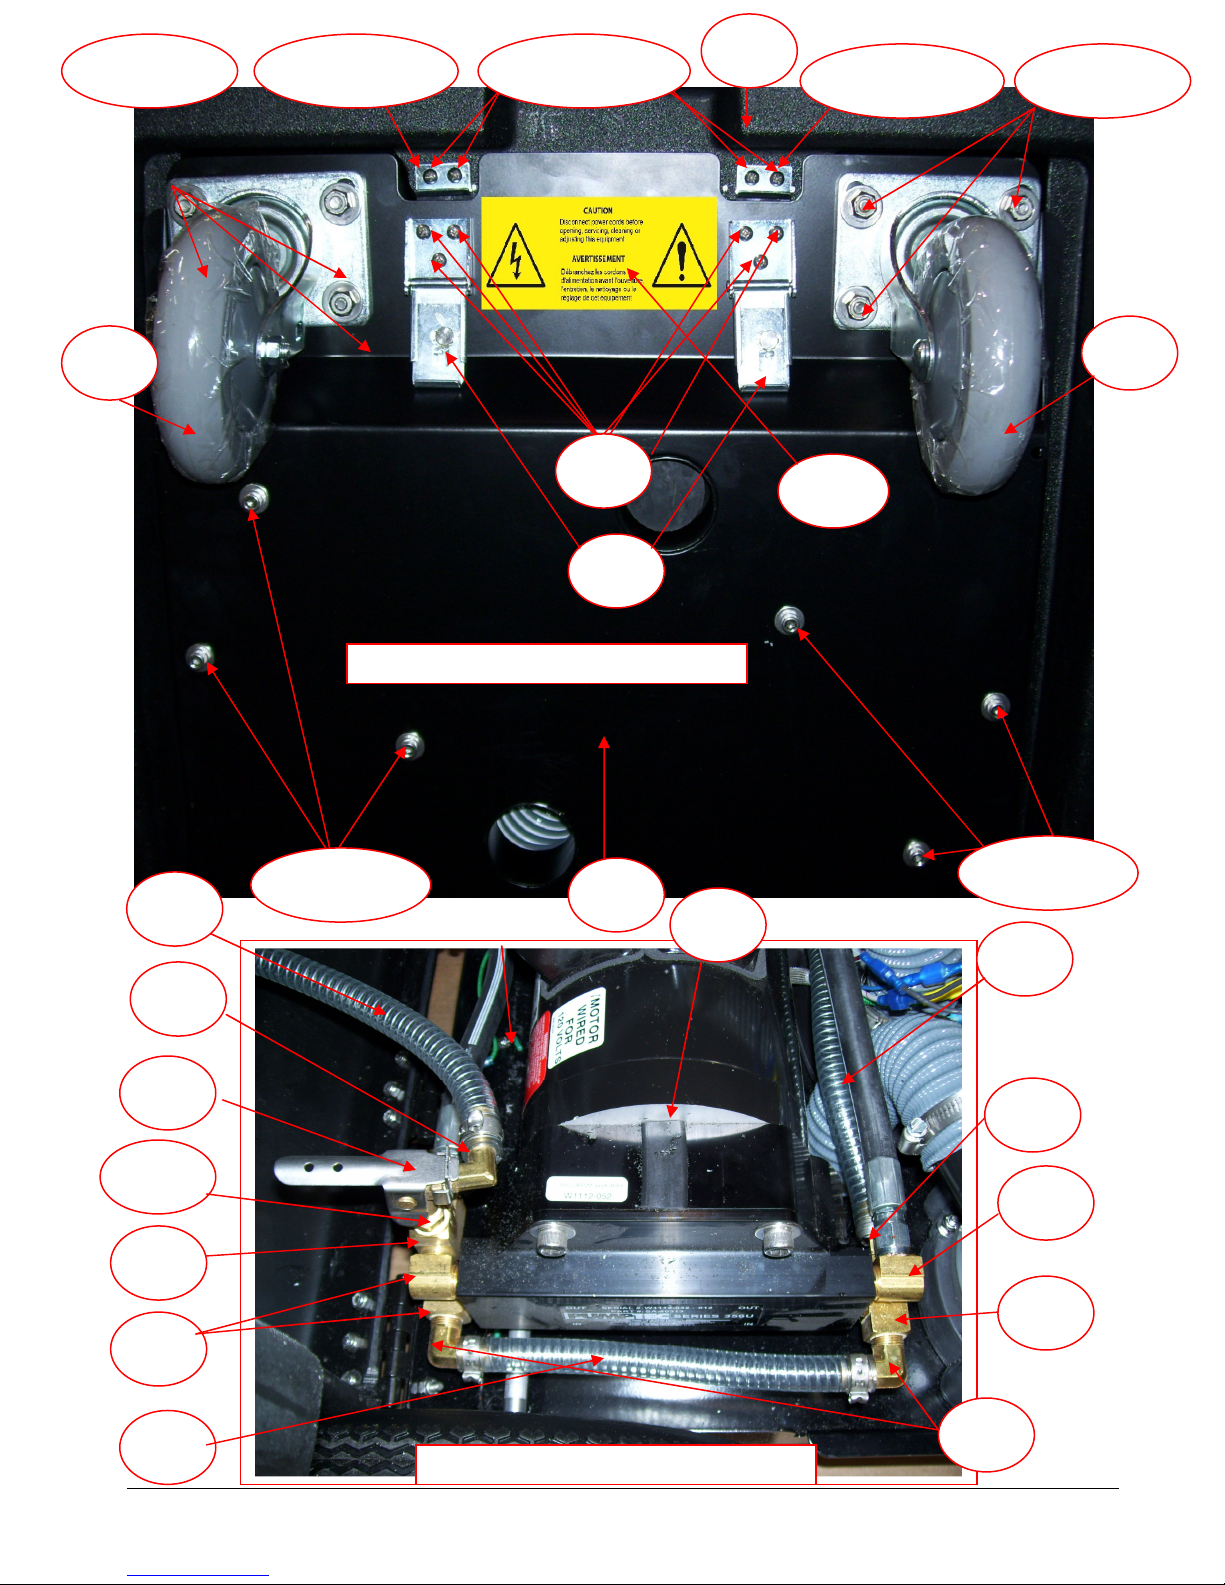
60
60
3 &
59
37
39
61 & 62
57
56
9 & 54
9 & 54
44
66
69
68
70
71
PUMP & PRIMING VALVE
BOTTOM VIEW OF BASE
45
117
71
110
67
68
65
63 & 55
3 & 59
61 & 62
122
47
Page 48
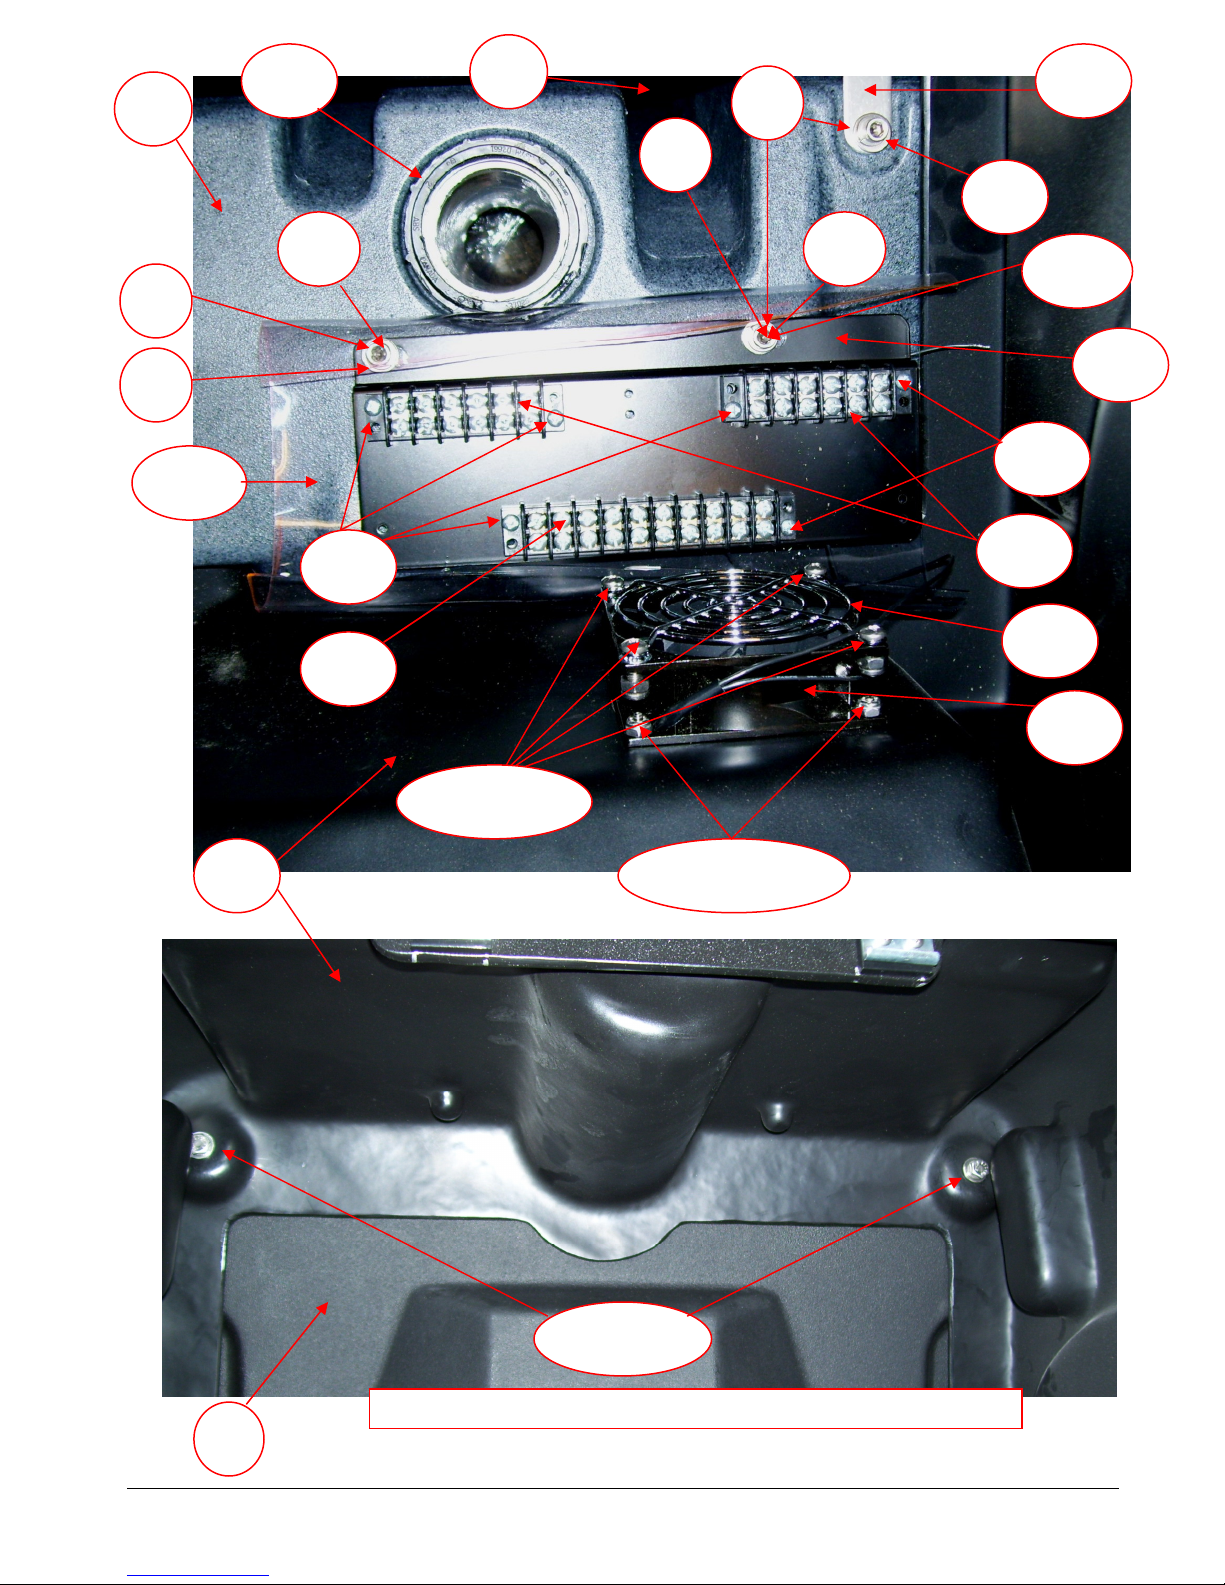
9 & 41
2
BOTTOM VIEW SOLUTION TANK & BASE SKIRT
72
1
73
9
9
8
8
39
74
75
76
77
77
78
34
36 & 36A
30 30
2
120
121
31
80 & 5
5
48
Page 49
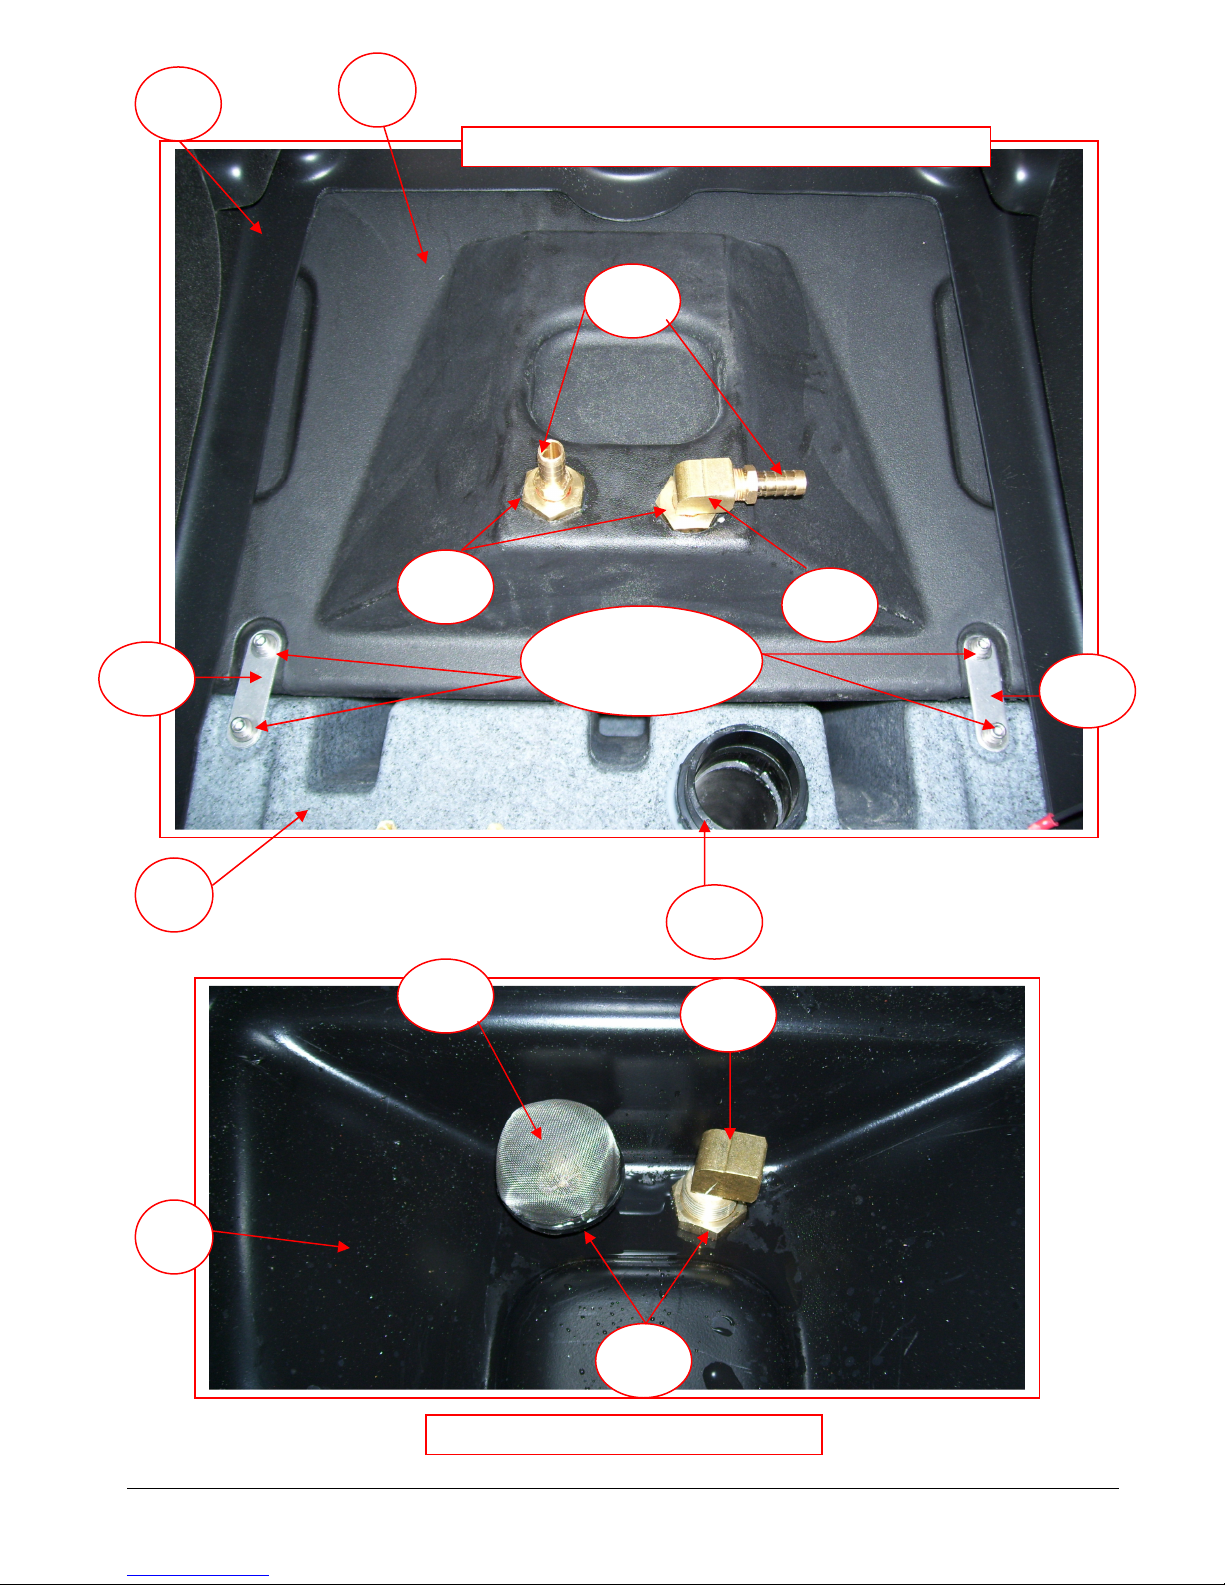
39
1
72
73
73
67
9, 30 & 31
82
83
2
83
82
INSIDE SOLUTION TANK
BOTTOM VIEW SOLUTION TANK
2
84
49
Page 50
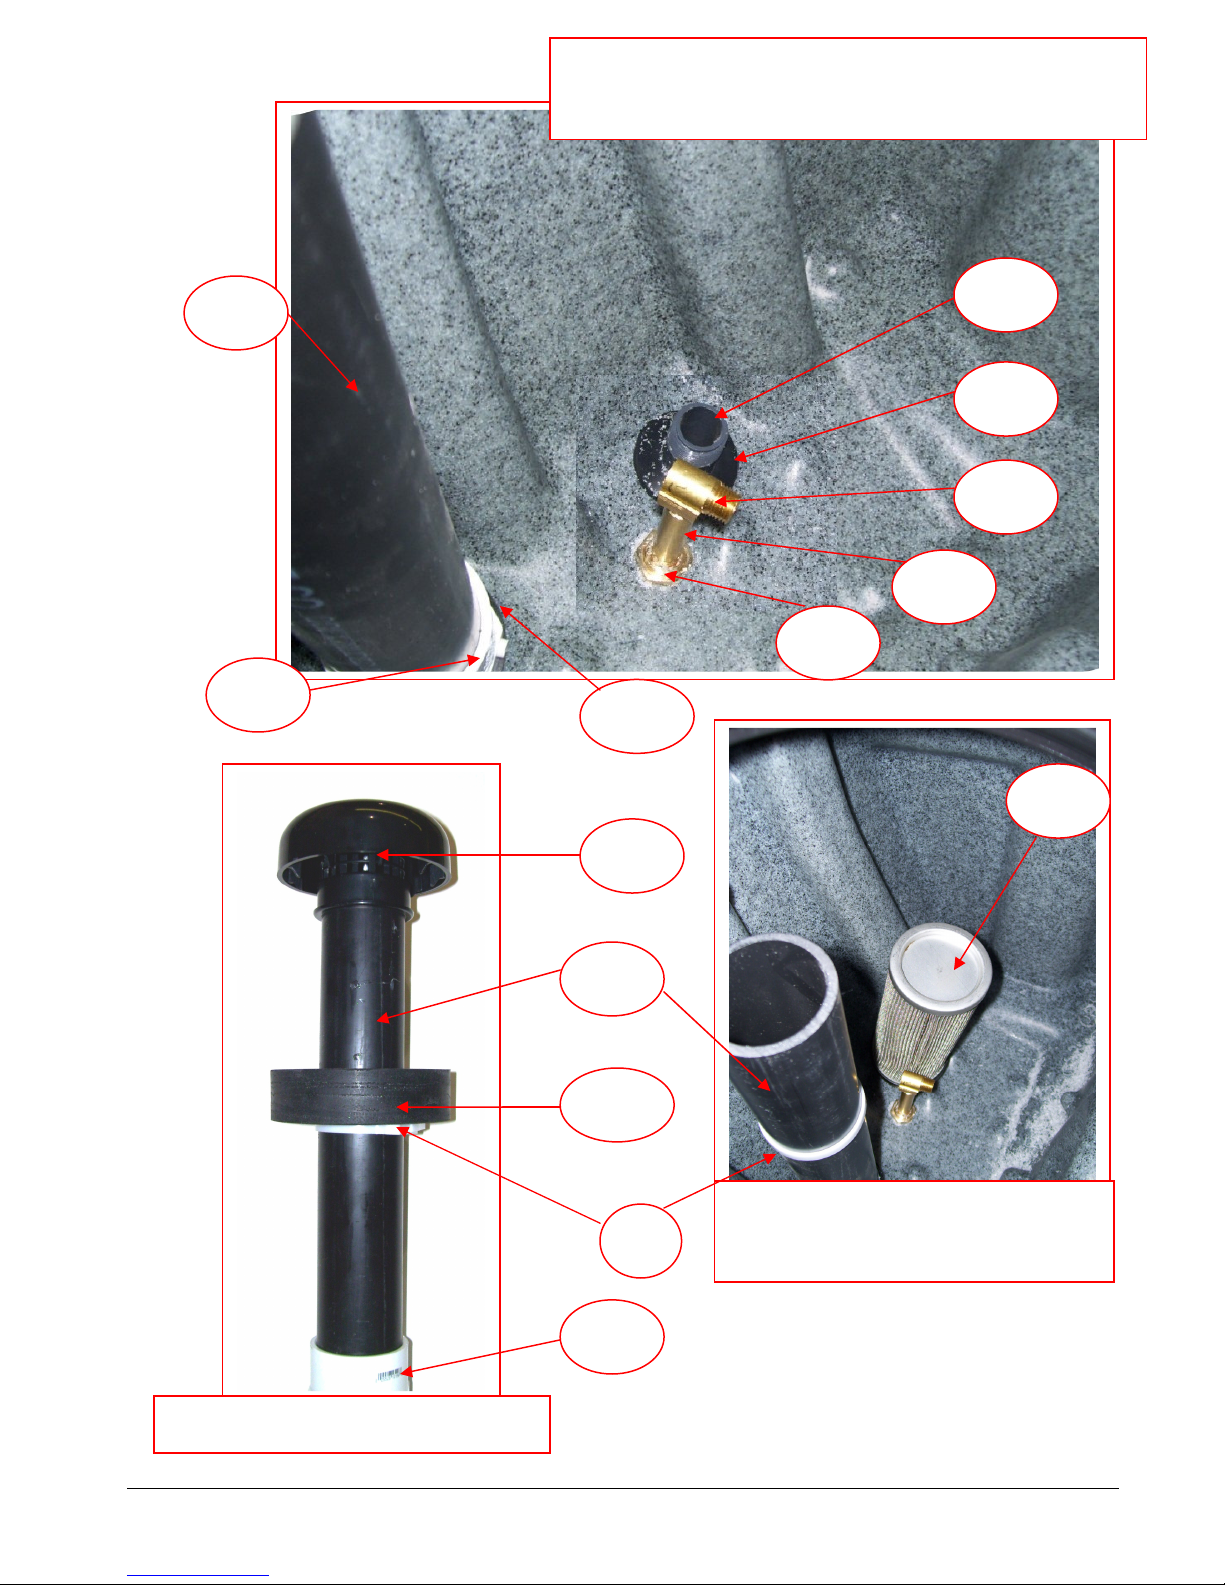
101
102
91
86
92
86
88
89
90
85
81
87
85
VACUUM SHUTOFF ASSEMBLY
INSIDE RECOVERY TANK
VACUUM SHUTOFF AND PUMP-OUT FILTER
REMOVED
116
INSIDE RECOVERY TANK
WITH PUMP-OUT FILTER IN
PLACE
50
Page 51
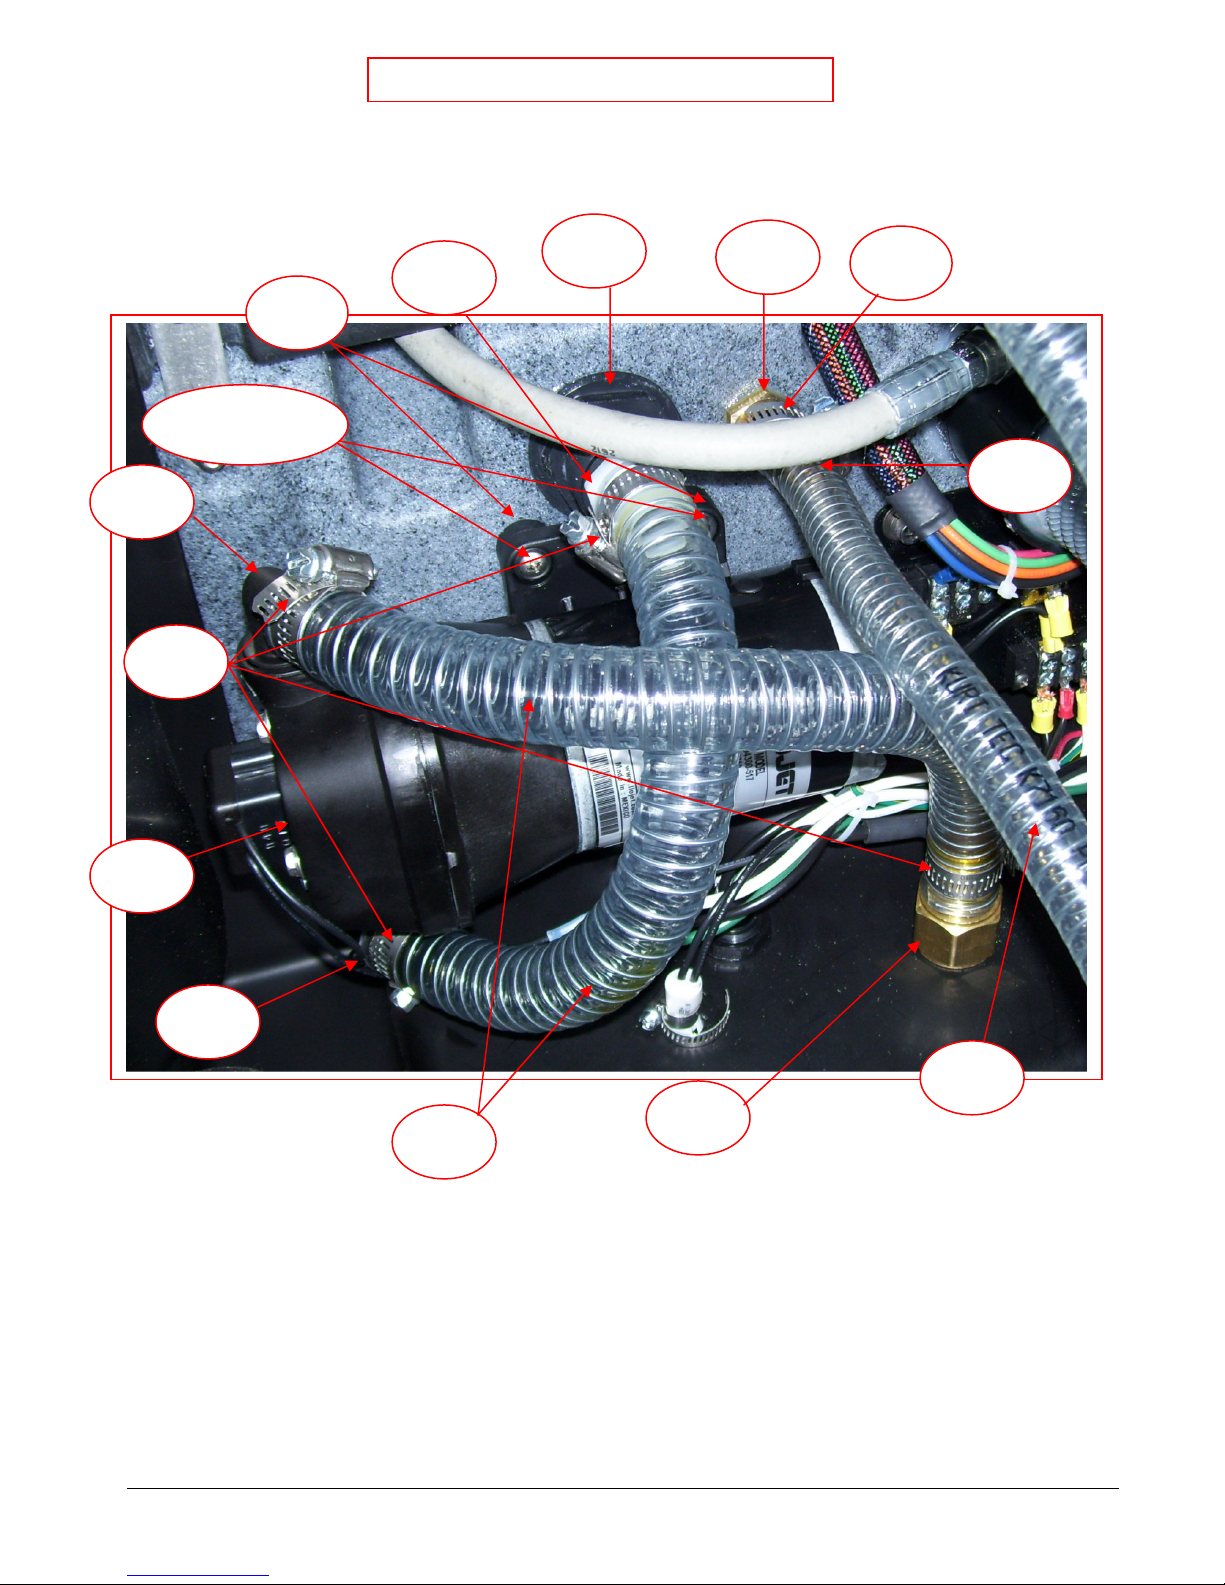
96
88
112
105
93
99
96
91
111
113
117
119
95
97 & 9
PUMP-OUT CONNECTIONS
51
Page 52
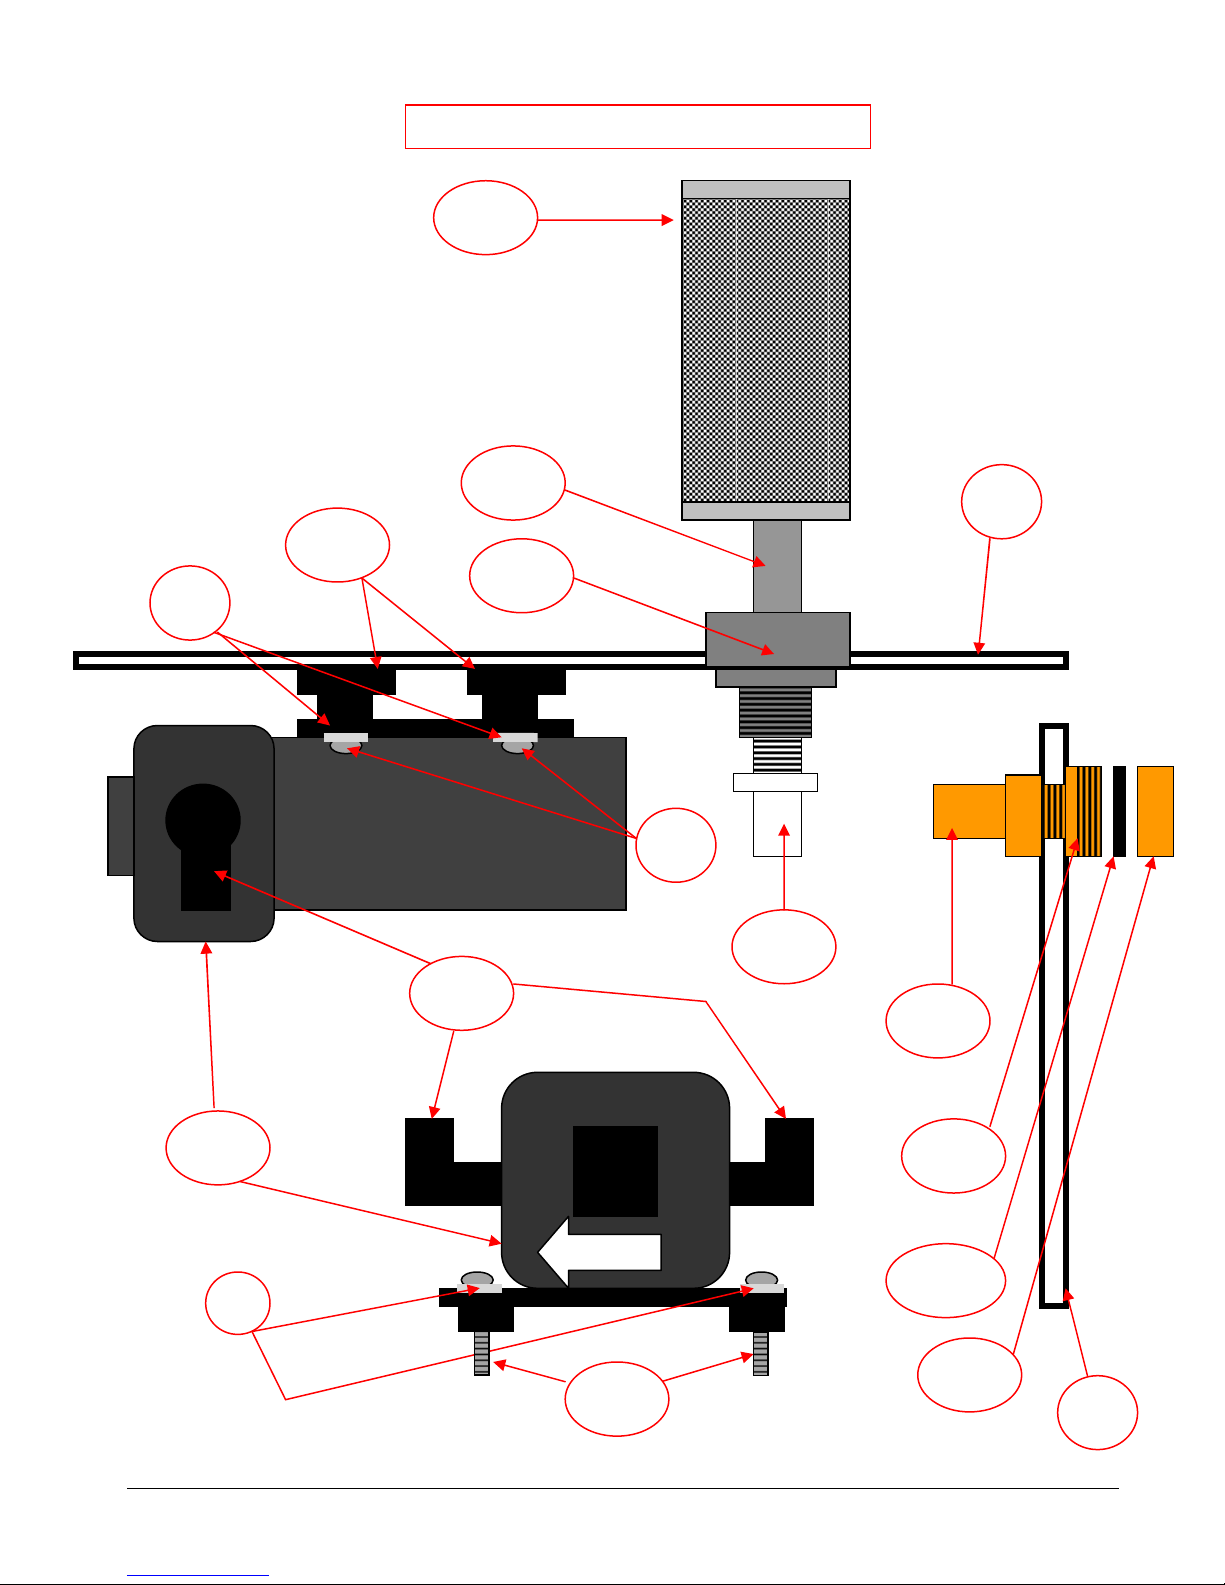
FLOW
81
92
91
96
9
97
105
13
14A
14
95
1
39
9
97
119
PUMP-OUT PARTS
52
99
Page 53
KEY PART # DESCRIPTION
RECOVERY TANK
QUICK CONNECT FEMA
LE ¼”
SOLUTION TANK
ADAPTER ¼” M
-F
WASHER 5/16” FLAT SS
WASHER ½” FLAT SS
WHEEL 2
-
1/2” GRAY
WASHER ½” FLAT SS
WITH
ACORN NUT CAP 5/16
-18
CONTROL PANEL PLAT
E
SCREW 5/16
-
18 X 2.75” HX SS
MX3-12
00 PANEL DECAL
LID ASSY WASTE TANK
CORD 12GA W/ PLUG (QTY 2)
SCREW
#10 X 5/8” PH SS
(QTY 6)
CORD STRAIN RELIEF (QTY 2)
GASKET WASTE TANK DECK
NUT CORD STRAIN RELIEF
SCREW ¼
-
20 X1/2” SOCHD SS
GATE VALVE 1
-
1/2” MPT
WASHER ¼” FLAT SS
CORD WRAP BRACKET (QTY 2)
WAND HOLDER STRAP
LONG
WASHER ¼” LOCK SS
WAND HO
LDER
BUCKLE
SCREW ¼
-
20 X ¾” SOCHD SS
WAND HOLDER STRAP SHORT
WHEEL 12”
with HUB CAP
ADAPTER ¾” MPT X ¾” MGH
AXLE CAP
– PUSH NUT
GARDEN HOSE CAP
GREEN
NEON LIGHT 120
V
GARDEN HOSE WASHER
COOLING FAN
BARB 2” X 2” MPT PVC
PLASTIC FAN COVER
FLASH CUFF 2” MALE
- MPT
SCREW
6-32 X ¾” PPH SS
(QTY 4)
FLASH CUFF 2” FEMALE 1.5”
BASE PLATE
ASSEMBLY
ROCKER SWITCH DPST (QTY 4)
HANDLE
PRESSURE GAUGE 2
000PSI
BASE SKIRT
UNLOADER 20
00PSI
HINGE (QTY 3)
SCREW
8-32 X1” SOHD SS
(QTY 4)
SCREW ¼
-
20 X ¾” HXHD SS
NUT
8-32 NYLOCK SS
(QTY 4)
NUT ¼
-
20 NYLOCK
PHY018
-005 CIRCUIT BREAKER 20
AMP
SCREW
10-24 x ½”PPH SS
(QTY 4)
KEY PART # DESCRIPTION
1 NM5704
2 NM5702
3 PFA11
4 NM5724
5 NM5143
NS NM5137
6 NM5718
7 PA187
NS NM5718A
8 NM5028
9 NM5066
21 AH101B
22 BR174
23 NM5751
23A NM5751A
NEOPRENE BACKING
24 NM5743
25 NM5743B
26 NM5009
27 NM5038
27A NM5039
28 PEA11
29 NM5759
10 NM5840
11 NM5844
12 NM5842
13 BR319
14 BR325
14A BR600
15 AH68
NS AH224
NS AH201
16 NM5714
17 PT063
18 PT017
TOP STRAP
30 NM5014
31 NM4063
32 NM5722
BOTTOM STRAP
NS NM5010
33 NM4447
34 NM5754
35 NM5757
36 NM5753
37 NM5710A
Comes with Lift Handle & Hinges
38 NA041
39 NM5700
40 NM5750
19 NM5747
19A NM5793
20
41 NM5017
41A NM4261
42 NM5947
53
Page 54
KEY PART # DESCRIPTION
PHY094
-
034 NUT
10-24 NYLOCK SS
(QTY 4)
BARB ½” X 3/8” MPT
AXLE REAR WHEELS
–
22.5”
HOSE ½” ID CLEAR COIL
12
00PSI PUMP WITH MOTOR
ELBOW 90 BARB ½” X 3/8” MPT
PRIMING VALVE
ELBOW 90 BARB
3/8” X 1/4” MPT
VACUUM MOTOR 3
-
STAGE
ELBOW 90DEG 3/8” STREET
VACUUM MANIFOLD
ADAPTER 2” FPT X SPG
VACUUM GASKET
BRACKET SOL/REC TANK
GATE VALVE 2” W/ KEEPER
BRACKET TERMINAL BLOCKS
GASKET VACUUM VALVE
T
ERMINAL BLOCK 6 SPACE
SCREW
¼-20X3.25” SOCHD SS
TERMINAL BLOCK 10 SPACE
VACUUM HOSE 2”
– PER INCH
SCREW #6 X ½” PPH SS (QTY 6)
HOSE CLAMP 2
-
2.75”
FAN GUARD
– WIRE FORMED
D
ECAL VAC CONNECTION
NUT 6
-
32 NYLOCK SS
SCREW
¼-20 X 2 SOCHD SS
SCREW 8
-
32 X ½” PPH SS
NUT
8-32 NYLOCK SS
FILTER SS
- ¾” FPT
SCREW
8-32 X ½” PPH SS
(QTY 6)
BULKHEAD FITTING 3/8”
LATCH
- SLIDE
(QTY 2)
ELBOW 90DEG 3/8” STREET
SCREW
5/16-18 X 3/4
” HH SS
PP14-806504
ACORN STRAINER ¾” FPT
NUT
5/16-18 NYLOCK SS
ADAPTER 2”MPT X H
PVC
CASTER 5” (QTY 2)
PIPE 2” AB
S (13.5”)
LATCH HOOK
- KEEPER
CLAMP NYLON 2
-
2.5”
SPACER
– LATCH HOOK
BULKHEAD FITTING ¼”
SCREW 8
-
32 X ¾” PPH SS(QTY 4)
NIPPLE ¼” X 3” BRASS
NUT ¼
-
20 NYLOCK SS
ELBOW 90
DEG ¼” STREET
NIPPLE 3/8” X ¼”
BULKHEAD FITTING ¾” PVC
STREET TEE 3/8”
NIPPLE ¾” X 2” PVC
KEY PART # DESCRIPTION
42A
43 NM5748
44 AP48
45 NM5096
46 AV14
47 NM5706
47A PA010A
48 NM5728
49 NM5728A
50 NM5141
51 NM5726
52 PA051
67 BR030
68 NM5086
69
70
71 BR284
72 NM5712
73 NM5027
74 NM5738
75 NM5730
76 NM5732
(QTY 6)
77 NM5142
78 NM5756
53 NM5705
54 NM5133
55 NM5793
56 NM5124
57 NM5752C
58 NM5120
59 PFA10
60 NM5720
61 NM5752B
62 NM5752A
63 NM5128
64 NM4261
79 NM4031
80 NM5124
81 NM5746
82 NM5098
83 BR284
84
85 NM5727
86 PA029
87 NM5741E
88 NM5087
89 BR083
90 BR282
65 BR132
66 BR254
91 NM5742
92 NM5744
54
Page 55
KEY PART # DESCRIPTION
HOSE ¾” ID CLEAR COIL
GROMMET 3/8”
HOSE CLAM
P FOR 1/2” HOSE
MOISTURE BARRIER
PUMP
-
OUT PUMP
1/4” INTERNAL STAR WASHER SS
PF20381
-
010 ELBOW 90 ¾” BARB QUAD FTTG
DECAL CSA WARNING
SCREW 10
-
24 X 1.25” PPH SS
RIVET
– VAC HOSE END
WASHER #10 FLAT SS
ADAPTER 2”FPT X HSLIP ABS
BARB ¾” X ¾” MPT NYLON
SPACER UNLOADER MOUNT
QUICK CONNECT MALE ¼”
ISOLATOR
– PUMP MOUNT
FILTER CAP ASSEMBLY
SCREW 5/16
-18
X 1” HXHD SS
FLOAT VACUUM SHUTOFF
WASHER 5/16” FLAT FENDER
DECAL DUAL CIRCUIT LIGHT
WIRING HARNESS
- UPPER
ELBOW 90DEG ¼” LONG STREET
WIRING HARNESS
- LOWER
BARB ¾” X ¾” FPT
KIT DUAL CIRCUIT WIRING
PHY106
-
028 RUBBER VACUUM PLUG
DECAL NAUTILUS SIDE
SCREW TEK #10 X 5/8” SS
SCREW 1/4
-
20 X .63” SOC BH SS
CABLE
#6 INTERNAL STAR WASHER SS
SLEEVE #7 CABLE CLAMP
SERIAL NUMBER PLATE
TEE 3/8” BRANCH F
-M-F
3/16” INT STAR WASHER SS
BARB ½” X ¼” MPT
HOSE CLAMP FOR 3/4” HOSE
HOSE CLAMP FOE 3/8” HOSE
DECAL POWER PRIME VALVE
WASHER ½” FLAT ZINC PL
GASKET VACUUM RISER PIPE
HOSE 3/8” CLEAR COIL
HOSE CLAMP W/ THUMB SCREW
KEY PART # DESCRIPTION
93 NM5093
94 PH07
95 AP37
96
97 NM5850
98 NM4255
99 BR048P
100 AH102B
101 NM5735
102 NM5741F
103 NM5705B
104 BR282A
119 NM4116
120 NM5737
121 NM5433
122 NM5705C
NS NM5025
NS NM5713
NS NM5709
NS NM5736
NS NM5794
NS NM5792
NS NM5703
NS NM5701
105 BR049
106
107 NM4263
108 NM4460
109 NM4462
110
111 BR028
112 PH09
113 NA2250
114 NM5705A
115 NM5125
116 NM5725
NS NM5758
NS NM5711
(QTY 2)
NS NM4087
NS NM5434
CONTROL PANEL GROUND LUG
NS
WITH FOUR RIVETS
NS NM5933
FAN GROUND WIRE CONNECT
117 NM5082
118 NM4472
55
Page 56
DESCRIPTION HOSE TYPE LENGTH NOTES
VAC HOSE
REC TANK TO MANIFOLD
VAC HOSE
VAC 1 TO MANIFOLD
VAC HOSE
VAC 2 TO BASE
SOLUTION HOSE
SOL TANK TO PUMP TEE FITTING
SOLUTION HOSE
PUMP TO PUMP TEE FITTING
SOLUTION HOSE
UNLOADER TO SOL TANK
SOLUTION HOSE
PRIME VALVE TO REC TANK
HP HOSE #1
PUMP TO UNLOADER
HP HOSE #2
PUMP TO GAUGE
HP HOSE #3
UNLOADER TO HP HOSE #4
HP HOSE #4
OUTLET QC TO HP HOSE #3
DRAIN HOSE
REC TANK TO PUMP-OUT PUMP
DRAIN HOSE
PUMP-OUT PUMP TO PUMP-OUT
OUTLET FITTING
∗ FITTINGS ADDED BETWEEN HOSE #4 AND CONTROL PANEL:
(1) NM5751, (2) BR174 & (1) BR282
2” VAC – NM5726
SOLD PER FT
2” VAC – NM5726
SOLD PER FT
2” VAC – NM5726
SOLD PER FT
½” ID CLEAR COIL
NM5086
SOLD PER INCH
½” ID CLEAR COIL
NM5086
SOLD PER INCH
½” ID CLEAR COIL
NM5086
SOLD PER INCH
3/8” ID CLEAR COIL
NM5082
SOLD PER INCH
HP PULSE
SOLD ASSEMBLED
HP PULSE
SOLD ASSEMBLED
HP PULSE
SOLD ASSEMBLED
¼” HP HYDROCOIL
AH79CF
SOLD PER FT
¾” CLEAR COIL
NM5093
SOLD PER INCH
¾” CLEAR COIL
NM5093
SOLD PER INCH
56
29” TANK END:
1 - NM5713
2 – NM5025
VAC END:
HOSE CLAMP
PA051
9.5” VAC END:
HOSE CLAMP
PA051
MANIFOLD
END HOSE
CLAMP NM4472
9.5” BOTH ENDS:
HOSE CLAMP
PA051
18” BOTH ENDS:
HOSE CLAMP
PH07
12” (QTY 2) BOTH ENDS:
HOSE CLAMP
PH07
32” BOTH ENDS:
HOSE CLAMP
PH07
27” BOTH ENDS:
HOSE CLAMP
NA2250
50”
ITEM# 30805
45”
ITEM# PH509
BOTH ENDS:
3/8” MS
GAUGE END:
¼” MS
PUMP END:
3/8” MS
17”
ITEM# PH505
UNLOADER
END: 3/8” MS
JOINT END: ¼”
MS
19.5” QC END:
XAF1 (M) *
JOINT END:
XAF2 (FM)
14” BOTH ENDS:
HOSE CLAMP
PH09
13” BOTH ENDS:
HOSE CLAMP
PH09
Page 57

Section
4
Limited Warranty
Your Nautilus MX3-1200 is designed to give you years of reliable service. If a problem should arise use the
troubleshooting section in the operation manual to diagnose and correct the problem if possible.
If you are unable to determine the cause or solution to the problem contact your distributor or Hydro-Force
for assistance.
Hydro-Force warrants the roto-molded tanks and base of the Nautilus MX3-1200 to be free from defects in
material or workmanship for five years from the date of purchase.
All other components of the Nautilus MX3-1200 are warranted to be free of defects in material and
workmanship for one year from the date of purchase.
During the warranty period, Hydro-Force will, at its option, repair or replace components which prove to be
defective. This warranty does not provide for replacement of complete units due to defective components.
Any costs for transportation or related service labor are not covered in this warranty. Replacement parts are
warranted only for the remainder of the original warranty period.
This warranty shall not apply to defects resulting from improper operation, lack of maintenance,
unauthorized modification, chemical incompatibility, misuse, abuse or exposure to freezing temperature
conditions. It does not cover normal wear items such as o-rings, valve seals, pump seals, hoses, jets, cords,
batteries, or other items which require replacement as a result of ordinary usage.
To obtain warranty service for the Nautilus MX3-1200, contact your distributor or Hydro-Force. If the
extractor must be returned to Hydro-Force or an authorized service center, the purchaser shall prepay
shipping charges for products returned for warranty service. No returned items will be accepted by HydroForce without prior authorization. All returns must have a return authorization number, issued by HydroForce, clearly marked on the exterior of the package.
Hydro-Force makes no other warranty either expressed or implied with respect to this product.
The remedies provided herein are the purchaser’s sole and exclusive remedies. In no event shall Hydro-Force
be liable for any direct, indirect, special, incidental or consequential damages.
This warranty gives you specific legal rights. You may also have other rights which vary from jurisdiction to
jurisdiction.
57
 Loading...