

Page 1
HC6000v2 Electronic Sump Pump Switch
Overview:
The HydroCheck HC6000v2 Electronic Sump Pump Float Switch with Hi-Lo Dual Sensors and Built-in Alarms is a universal
float switch that works with all types of sump pumps. The pump cycle will start when water reaches the Hi-Sensor (Red) and stop
when water drops below the Lo-Sensor (Black). Easily achieve your desired cycle length by adjusting the distance between the
sensors. See the Troubleshooting section for Smart Button, LED and Alarm specifications. Not rated for outdoor use.
READ PRIOR TO INSTALLATION:
1. The “piggyback plug” attached to the mechanical float switch cannot be used with the HC6000v2. It must be dis-
connected and remain disconnected.
2. If your sump pump has internal float switch wiring, i.e. does not have a “piggyback plug”, then you must secure
the float in an upward position as if the pit were full. This assures that the internal switch is always closed and that
the pump is enabled.
3. Pits that receive water from a water softener or that have high mineral/iron content require an alternative installa-
tion method. Use the HydroCheck Sensor Installation Kit to ensure maximum reliability in all installation applications. Visit our website www.hydrocheckproducts.com for more information.
Step-by-Step Installation
Step 1
Unplug the sump pump from the back of the “piggyback plug”.
Step 2
Unplug the “piggyback plug” from the 120 VAC and
set aside. The HC6000v2 completely replaces this
component.
Step 3
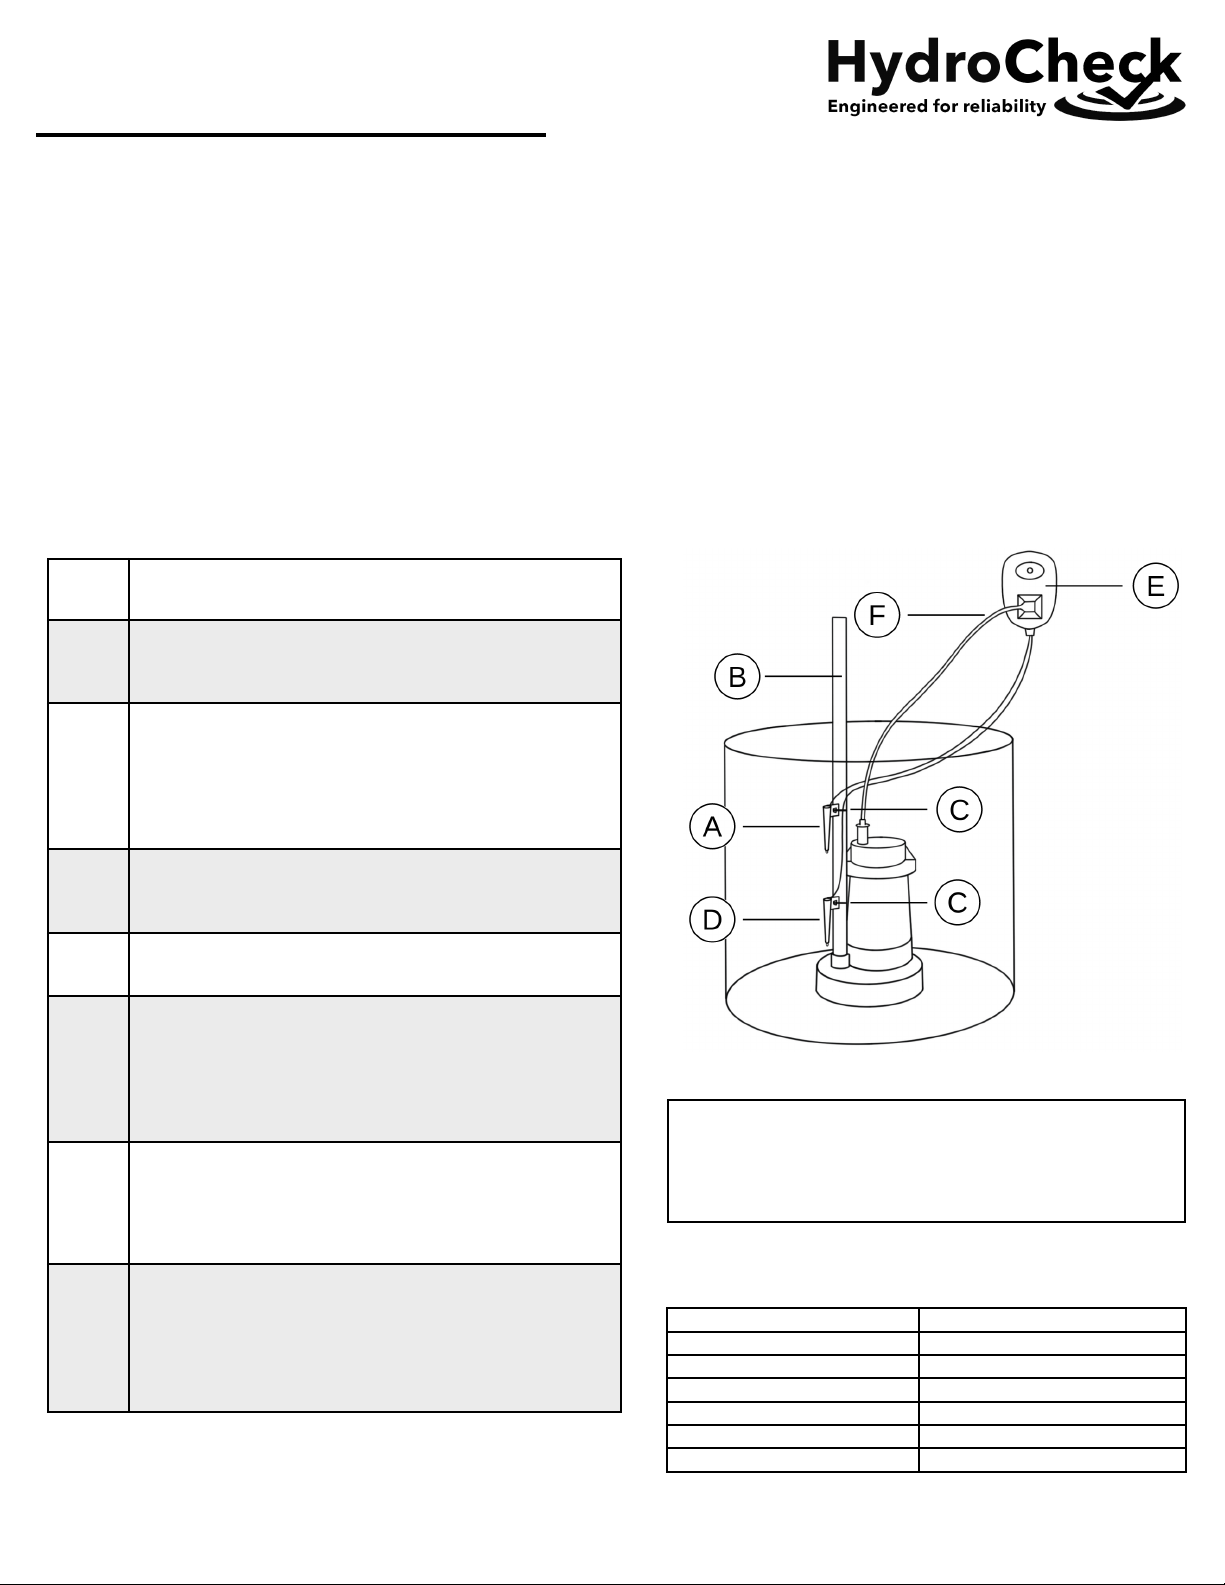
Secure the red sensor (A) to the discharge pipe (B)
with tie wrap (C) where the pump is intended to turn
on.
NOTE: Recommended height for the Red Sensor is
slightly below the Drain Tile (Water Inlet Pipe).
Step 4
Secure the black sensor (D) to the discharge pipe
(B) with tie wrap (C) where the pump is intended to
turn off.
Step 5
Check that the red sensor (A) is positioned above
the black sensor (D).
Step 6
Plug the control module (E) into a 3-prong 120 VAC
outlet.
NOTE: The output will turn on briefly and the LED will
illuminate red. If the Red Sensor detects water, a
pump cycle will begin.
Step 7
Plug the sump pump power cord (F) into the control module (E).
NOTE: The HC6000v2’s output is rated for a maxi-
mum of 1 HP and/or 15 amps at 120 VAC.
Step 8
TEST YOUR INSTALLATION BEFORE LEAVING IT
FOR UNATTENDED USE.
NOTE: This product will not work if tested in a cup
of water. See How the Sensor Works: Do I need a
ground wire? On Page 2 for more information.
!!
www.hydrocheckproducts.com | [email protected] | 1(877)-225-2124
1
Rev-A
with Hi-Lo Dual Sensors and Built-in Alarms
A. Red Sensor (Hi-Sensor)
D. Black Sensor (Lo-Sensor)
B. Discharge Pipe
E. Control Module
C. Tie Wrap
F. Pump Power Cord
*“Piggyback plug” and 120 VAC outlet are not pictured
Installation Key
Product Dimensions
2.8 x 2.5 x 3.5 in
Weight
14.4 oz
Output Rating
120 VAC, 15 Amp, 1 HP
Alarm Rating
80 dB
Power
120 VAC, 60 Hz
Sensor Cable Length
12 ft
Anti-Airlock Cycle
2 Attempts
Product Specifications
Page 2

How the Sensors Work: Do I need a ground wire?
The sensors detect the presence of water by using a continuity circuit. The continuity circuit works by allowing a very small current
to flow from each the sensor, through the water, to ground when the tip of the sensor is in water. When no water is present, the
circuit is broken and no current flows. Normally, the pump provides the ground reference needed for the continuity circuit to work,
but occasionally it won’t. A Flashing LED and audible alarm indicates a weak ground reference. When this happens, it is necessary to provide a ground reference for the sensor to work.
Adding a Ground Wire:
TROUBLESHOOTING:
Alarm & LED Guide
Smart Button Features
WARRANTY:
STAK Enterprises Inc. warrants the model HC6000v2 to be free from defects in materials and workmanship for its normal, useful life, for a period of 5
years from the date of purchase. STAK Enterprises Inc. makes no other express warranty for this device. No agent, representative, dealer, or employee
of STAK Enterprises Inc. has the authority to increase or alter the obligations or limitations of the warranty. The company's obligation of this warranty
shall be limited to the repair or replacement of any part of the HC6000v2 which is found to be defective in materials or workmanship under normal use
and service during the 5 year period of product use by original product owner commencing with the date of purchase. Owner must pay all shipping
charges necessary to replace product covered by this warranty. This warranty shall not apply to acts of God, nor shall it apply to products which, in the
sole judgment of STAK Enterprises, Inc. have been subject to negligence, abuse, accident, tampering, alteration, misapplication, or improper installation.
THE DURATION OF ANY EXPRESS OR IMPLIED WARRANTY, INCLUDING THAT OF MERCHANTABILITY OR FITNESS FOR ANY PARTICULAR
PURPOSES, SHALL BE LIMITED TO THE NORMAL, USEFUL LIFE OF THE PRODUCT, COMMENCING WITH THE DATE OF PURCHASE. IN NO
CASE SHALL THE COMPANY BE LIABLE FOR ANY CONSEQUENTIAL OR INCIDENTAL DAMAGES FOR BREACH OF THIS OR ANY OTHER
WARRANTY, EXPRESS OR IMPLIED, WHATSOEVER.
Step 1
Strip 1 inch of insulation off each end of a 14 AWG length of wire.
Step 2
Secure one end of the wire to a copper water pipe or metal electrical conduit.
Step 3
Place the other end of the wire into the pit so that it is below the Lo-Sensor.
NOTE: No danger of electrocution. Visit our website www.hydrocheckproducts.com for more information.
Meaning
Possible Cause
Red LED
The switch's output is off (the pump is off).
None—Normal operation
Green LED
The pump is on and water is above the lo-sensor.
None—Normal operation
Flashing LED and Fixed
Rate Alarm
(Green or Red)
Weak or missing ground reference detected during a
cycle.
See How the Sensors Work: Do I need a
ground wire? above.
2-Beep Alarm
(No Pump Current
Detected)
The switch did not detect a motor current during the
previous pumping cycle.
• Pump is not plugged in
• Pump failure
• Mechanical float switch is not disabled
3-Beep Alarm
(High Water Alarm)
High Water Alarm will sound if water does not drop
below the Hi-Sensor within 25 seconds following two
anti-airlock cycles.
NOTE: See the Product FAQ page on our website for
more information about airlock cycles
www.hydrocheckproducts.com
• Pump failure
• Pump can’t keep up
• Blocked or frozen discharge pipe
• Trapped air is preventing normal pump
operation (airlock)
Goal
Method
Silence Alarm
Pressing and releasing the Smart Button while an alarm is active will silence the alarm for 24hrs.
Disable Alarm
Pressing and holding the Smart Button while an alarm is active will disable the alarm until the switch is
reset. The Smart Button should be pressed and held until the device sounds a short beep followed by a
long beep, indicating that the alarm was successfully disabled.
Switch Reset
Press and hold Smart Button while plugging switch into a 120 VAC outlet. A short beep will sound to
indicate that the switch has been reset. Resetting the switch returns all settings back to the original factory defaults.
Manually Run Pump
Press and hold the Smart Button while the LED is solid red. The pump will run until the button is released.
Cancel Cycle
Press and release the Smart Button while the pump is on to cancel the cycle.
!!
www.hydrocheckproducts.com | [email protected] | 1(877)-225-2124
2
Rev-A
 Loading...