

Page 1
Manual
Hydrion10
Ion Concentration Meter
Page 2

Manual
Hydrion10
Ion Concentration Meter
Hydrion bv
Hesselink van Suchtelenweg 4
NL 6703 CT Wageningen
P.O.Box 522
NL 6700 AM Wageningen
The Netherlands
T + 31 317 421711 (general information)
T + 31 317 415551 (technical support)
F + 31 317 415384
E [email protected]
I www.hydrion.nl
Chamber of Commerce nr.: 09088047
VAT Nr: 8056.33.546.B.01
Page 3

Important Information
For proper use of the Hydrion10 Ion Concentration Meter, it is important to read the information in the
manual first, or at least the following chapters:
2.4.6 Recommendations for Accurate Measurements
3.3 Sensor-Unit Maintenance
Page 4

Table of Contents
1
Measuring Equipment
4
1.1 The Sensor-unit 4
1.2 The Hydrion10 Program 5
2
The Hydrion10 Program
6
2.1 General 6
2.1.1 Starting the Hydrion10 Program 6
2.1.2 Menu of the Hydrion10 Program 6
2.1.3 Toolbar 7
2.1.4 Project Window 8
2.2 Project 9
2.2.1 The Importance of Using Different Projects 9
2.2.2 Creating a Project 10
2.2.3 Opening an Existing Project 11
2.3 Calibrate 12
2.3.1 Creating a Calibration Set 12
2.3.2 Selecting a Calibration Set 13
2.3.3 One-Point Calibration 13
2.3.4 Multi-Point Calibration 15
2.3.5 Standard Calibration Fluid 16
2.4 Measuring 17
2.4.1 Measuring a New Sample 17
2.4.2 Measuring Panel 17
2.4.3 Box colors 18
2.4.4 Symbols in the Result Bar 19
2.4.5 Selecting Units 19
2.4.6 Recommendations for Accurate Measurements 20
2.5 Results 21
2.5.2 Viewing Stored Data/Results 21
2.5.3 Processing Data/Results 22
2.5.4 Printing Stored Data/Results 23
3
Specifications
24
3.1 Measuring range 24
3.2 Sensor-unit Maintenance 25
Appendix
New Data-Logger Application 26
Application for the Replacement of Sensor Caps 26
Page 5
5
1. Measuring Equipment
1.1 The Sensor-unit
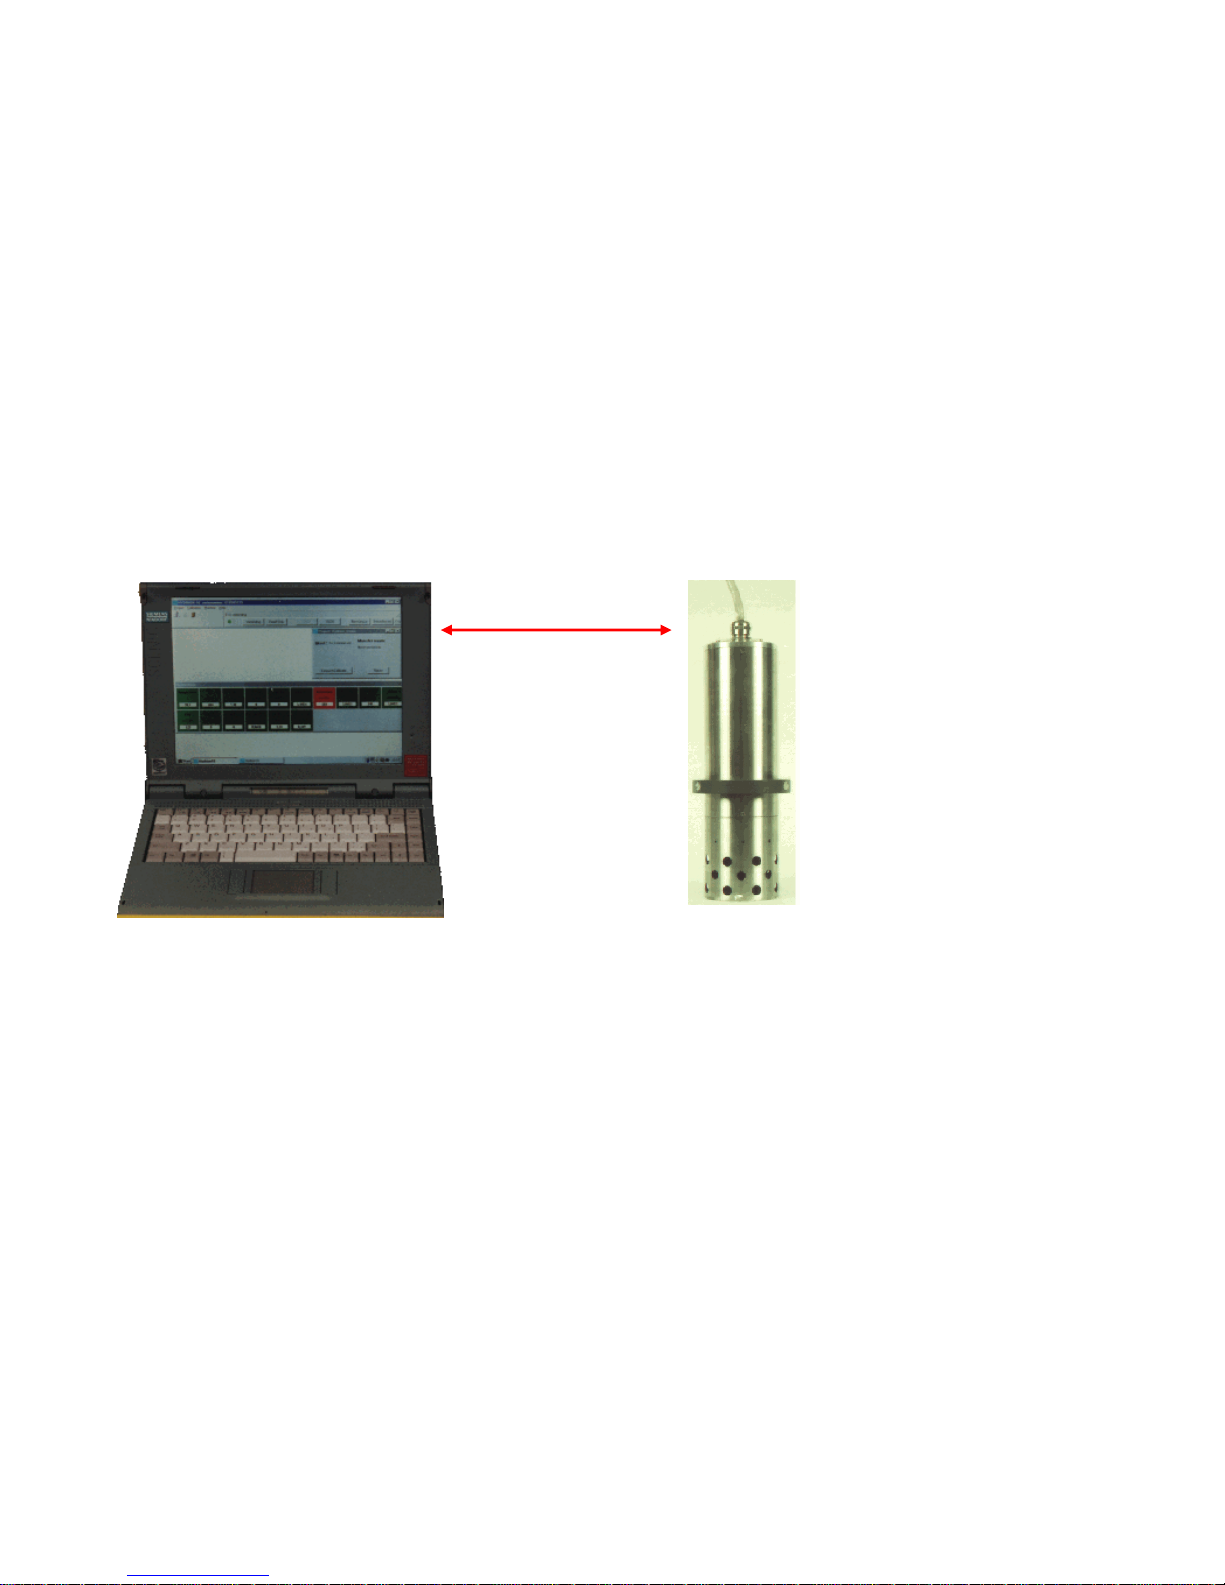
The Sensor-unit is the heart of the Hydrion10 and consists of a watertight, stainless steel tube containing ion-selective
sensors, a small motor and pre-amplifiers plus data conversion. A serial cable handles all communication between the
Sensor-Unit and the PC. There is a plug-in connector for the USB port of the PC that converts the serial signals from the
Sensor-Unit to USB signals for the PC.
The standard Sensor-unit is capable of measuring: temperature, EC, pH, potassium, sodium, calcium, ammonium,
chloride, nitrate and carbon dioxide.
Optionally, one extra sensor could be added to measure for instance: redox potential, dissolved oxygen, fluoride, bromide
or lithium, etc. If one or more of the standard ions are not being measured because they are either in very low
concentration or altogether absent from the solution, then these sensors are not necessary.
Communication cable
from Sensor-Unit to PC
Page 6
6
1.2 The Hydrion10 Program
The Hydrion10 program is compatible with all PC’s running Windows 95, 98 or (recommended) 2000 / XP. It is not
recommended to run the software on Vista.
It is also not recommended to run the software on dual cores, and if the processor supports hyperthreading;
Hyperthreading should be disabled in the BIOS (refer to your mainboard/pc’s manual for instructions on how to disable
hyperthreading.
The program converts the raw measurement data into accurate results, by simultaneously correcting for: temperature, pH,
total ionic strength and other interactions that influence the measurements. The user is also kept informed about the
actual condition of the sensors and possible exceeding of measuring ranges. Additionally, the Hydrion10 program
performs calibrations and processes data before printing. This leads to highly accurate and reliable results.
Certain variables can be changed via the control panel. However, these settings are only accessible by authorized
personnel with the proper password (i.e. service engineer).
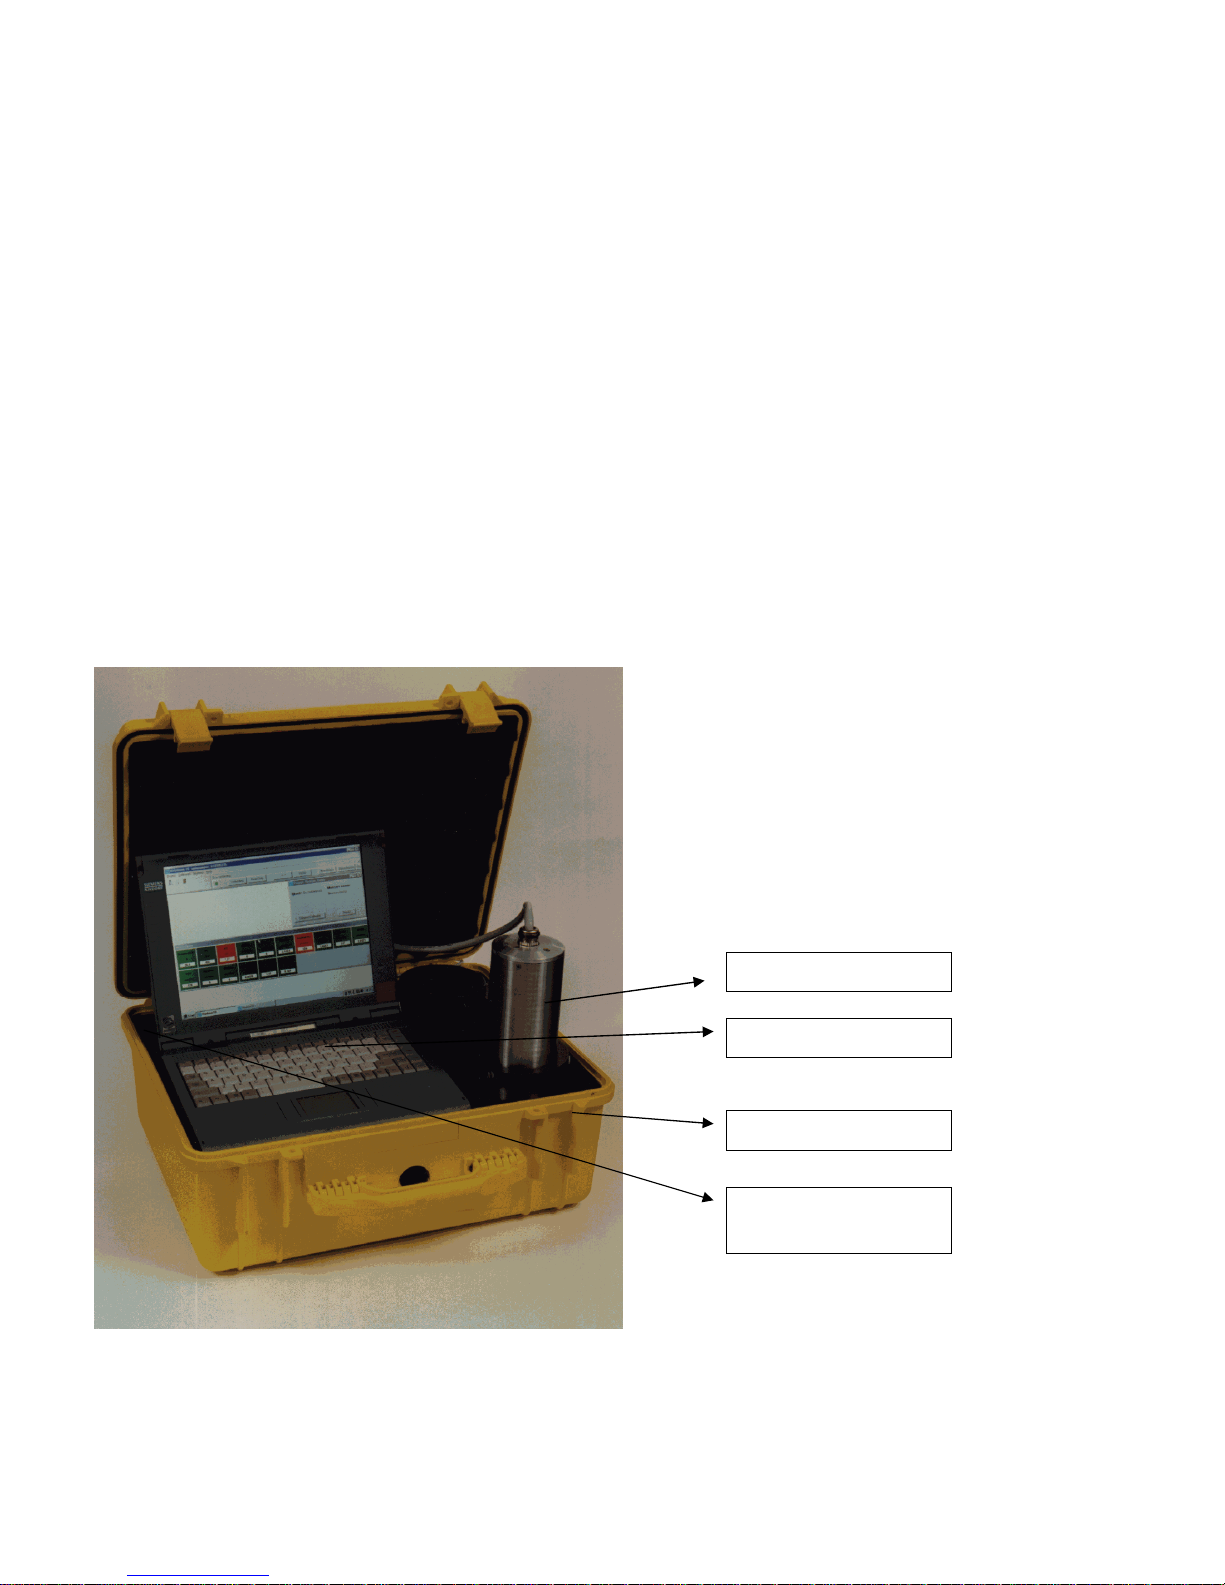
Sensor-unit
Computer
Suitcase
AC-
DC adaptor for PC
( hidden behind PC )
Page 7
7
2 The Hydrion10 Program
2.1 General
2.1.1 Starting the Hydrion10 Program
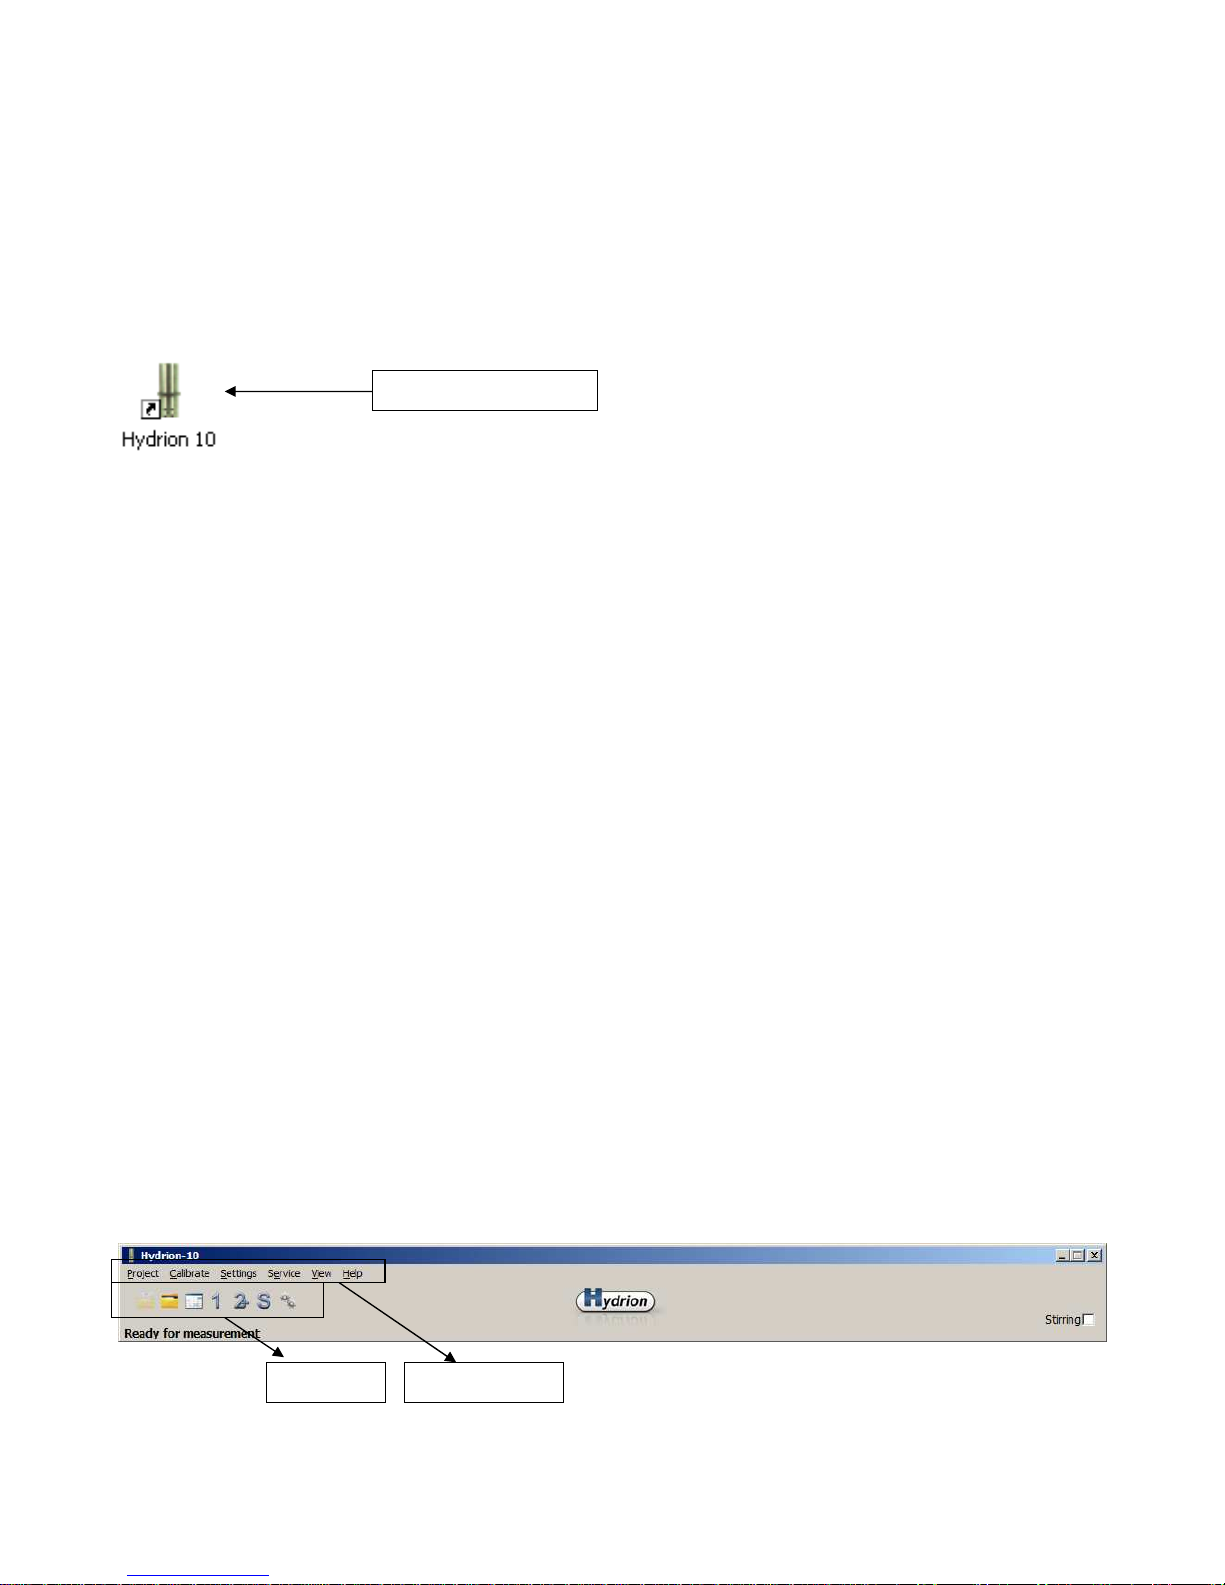
Double-click the icon with the left mouse button (shown below) to start the Hydrion10 program.
Once a connection is established between the program and the Sensor-unit, all data from the Sensor-unit will be
transferred to the program. When this exchange is complete, the program will be ready for use.
2.1.2 The Menu Bar of the Hydrion10 Program
The menu bar consists of two parts as shown in the figure below:
The left-hand side is meant for operating the program; this is handling the actual menu.
The right-hand side shows the battery status (not important in this version).
Clicking on [Project] will open the following drop-down menu:
Project:
Create a new project [New]
Open an existing project [Open]
View the results [View]
Close the active project [Close]
Close the Hydrion10 program [Exit]
Opening recent project
All of these options can be activated with a single-click on the left mouse button.
Clicking on [Calibrate] will open the following drop-down menu:
Calibrate:
Create a new calibration set [New]
Select a calibration set [Calibration set]
Start a one-point calibration [One-point calibration]
Start a multi-point calibration [Multi-point calibration]
[Service] is only accessible by a certified Hydrion service engineer
[Help] is used to solve problems.
Toolbar Main menu bar
Double-click to start
Page 8
8
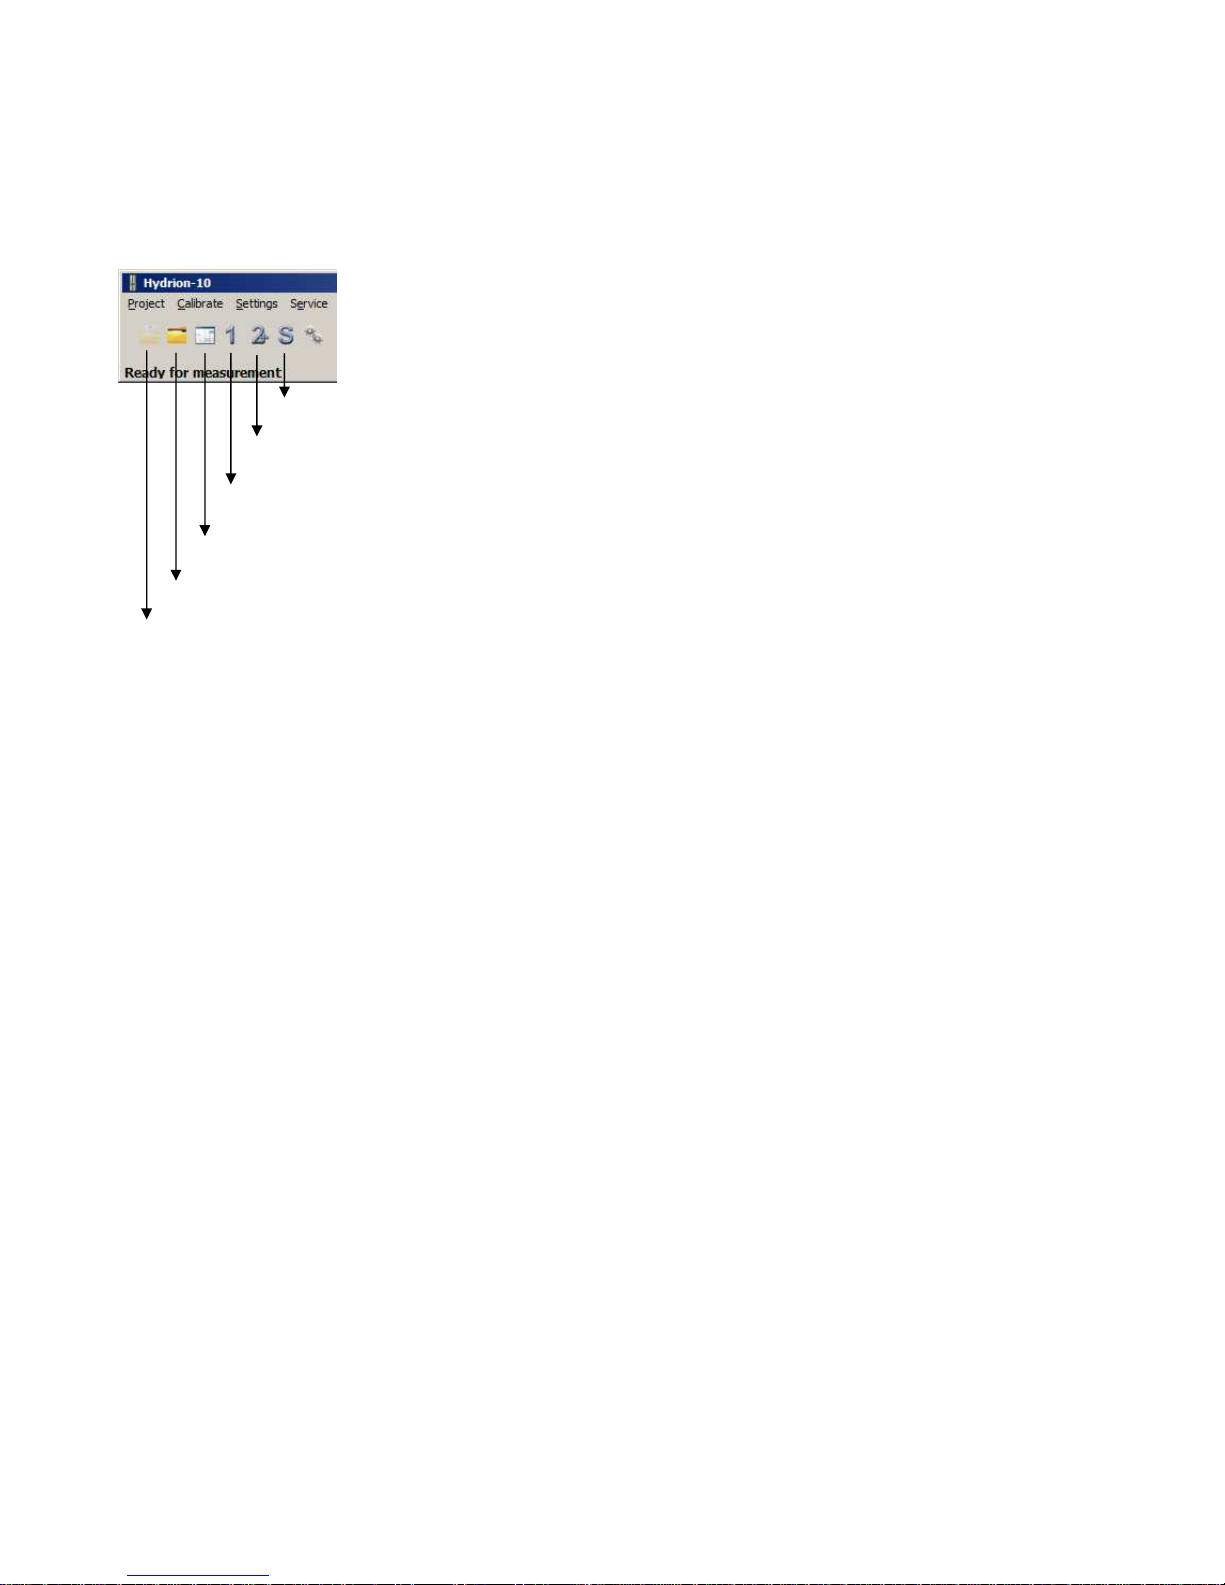
2.1.3 Toolbar
The toolbar makes it possible to easily carry out various procedures. These procedures are also available in the main
menu bar.
Start multi-point
calibration
Close project
Start one-point
calibration
Open project
View saved data
Start new sample
Page 9
9
2.1.4 Project Window
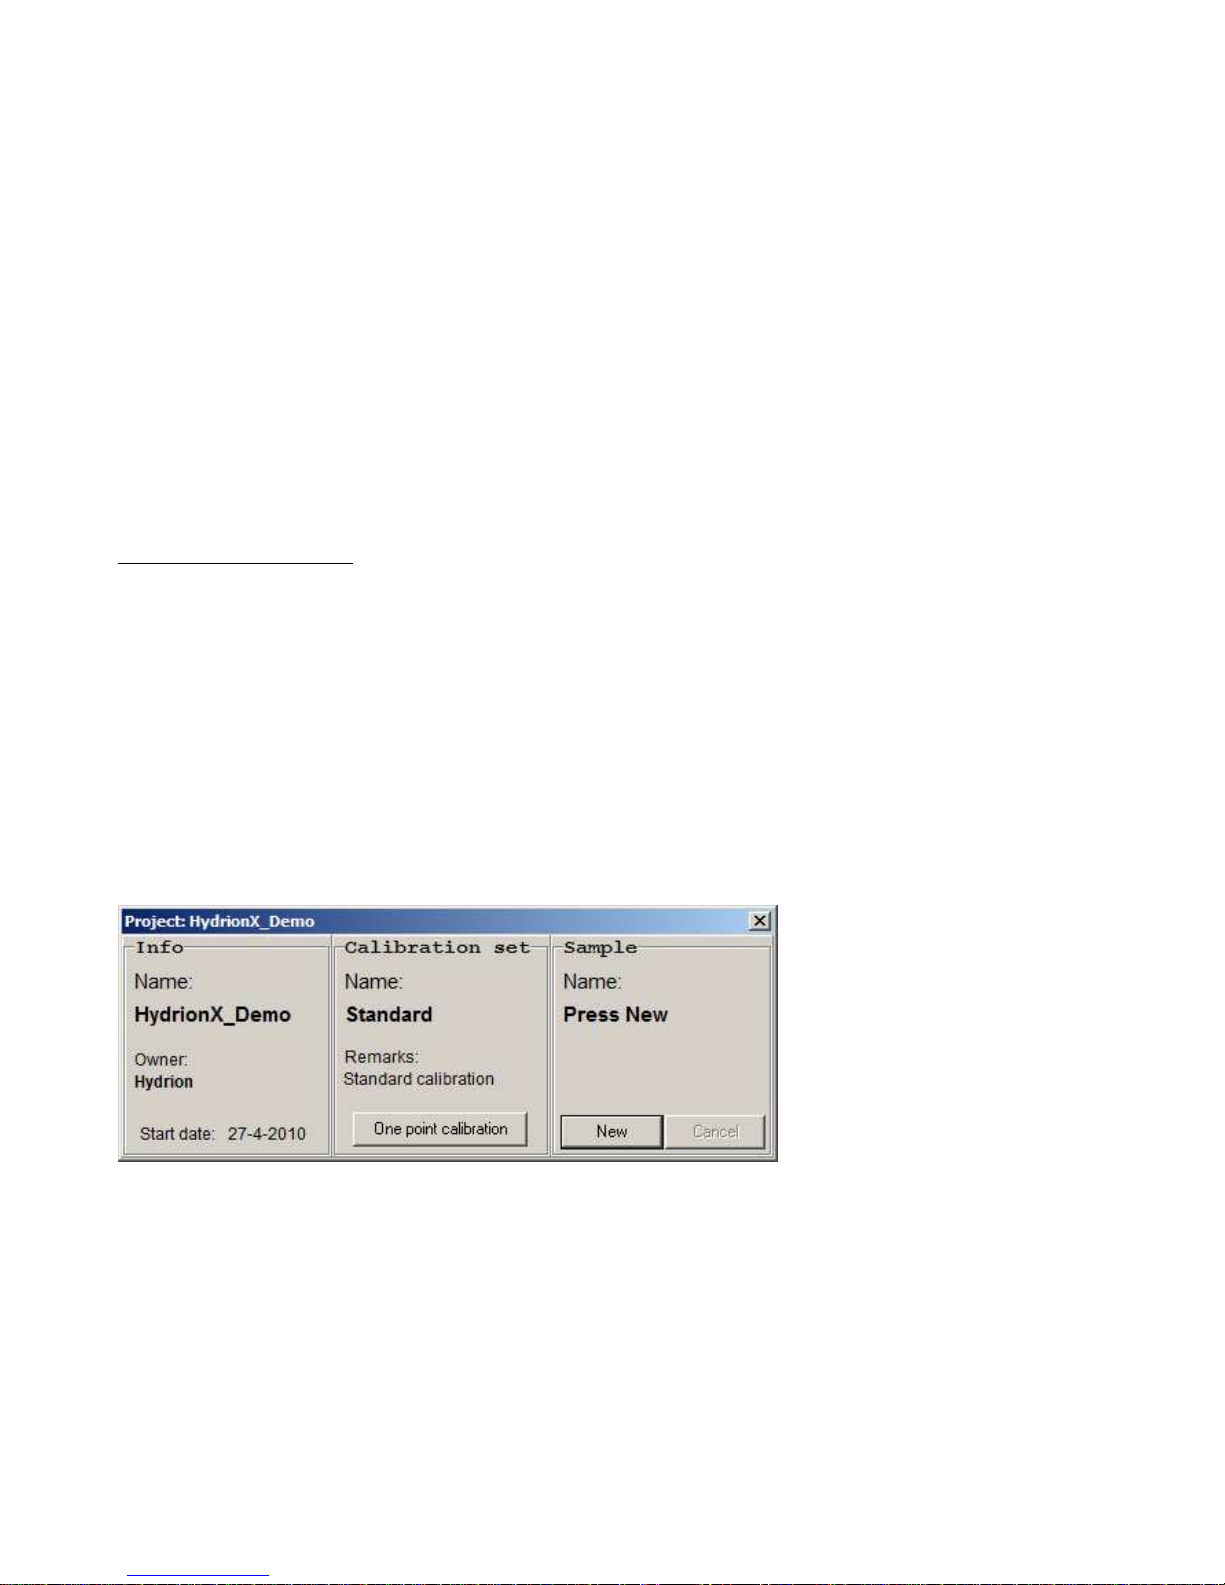
When [Open project] is selected from the drop-down menu or toolbar button, a project window will open. The name of
the active project will then be displayed in the title bar of the project window.
The project window consists of three sections:
1. The left section gives information about the owner, the identification number of the Sensor-unit and the starting date of
the active project.
2. The middle section is for starting a one-point calibration procedure (usually repeated every two hours). At the top, the
name of the calibration set is shown. By clicking the [One Point Calibration] button, the program starts the
calibration procedure.
3. The right section of the window is for measuring samples. At the top, the name of the sample being analyzed is
shown. In order to keep your measurements well organized, it is advisable to fill in a new name for every new sample.
Starting a new measurement
Click on [New] to start the measurement procedure. The program will ask for a sample name. You can either type a new
name or accept the old name by pressing the [ENTER] key and the measurement will start. Make sure that the Sensorunit is in the sample solution before pressing the [ENTER] key. At this point, you can click on [Save now] to save the
results immediately or [Cancel] to abort the measurement procedure.
• If all measurements are sufficiently stable (all boxes are green), the results are automatically saved in memory
and the measurement procedure is complete.
• If the measurement procedure takes longer than seven minutes to complete, it will automatically terminate and
the incomplete results will be saved, regardless of measurement stability. These incomplete results will be
marked with an asterix (*). When this occurs, a warning will appear on the screen with a red dot reporting:
‘Measurement not stable’.
See also chapter 2.4.1: Measuring a new sample.
Page 10

10
2.2 Project
2.2.1 The Importance of Using Different Projects
The Hydrion10 program makes it possible for you to organize your measurement data in different ways which are stored
in different, unique projects.
For example, if you are measuring in different areas, you can make a separate project for each area with its own
calibration set and sequence of measurement results. All the information belonging to one project will be saved under this
project. You can also organize the different projects by using personal names for project titles.
Page 11
11
2.2.2 Creating a New Project
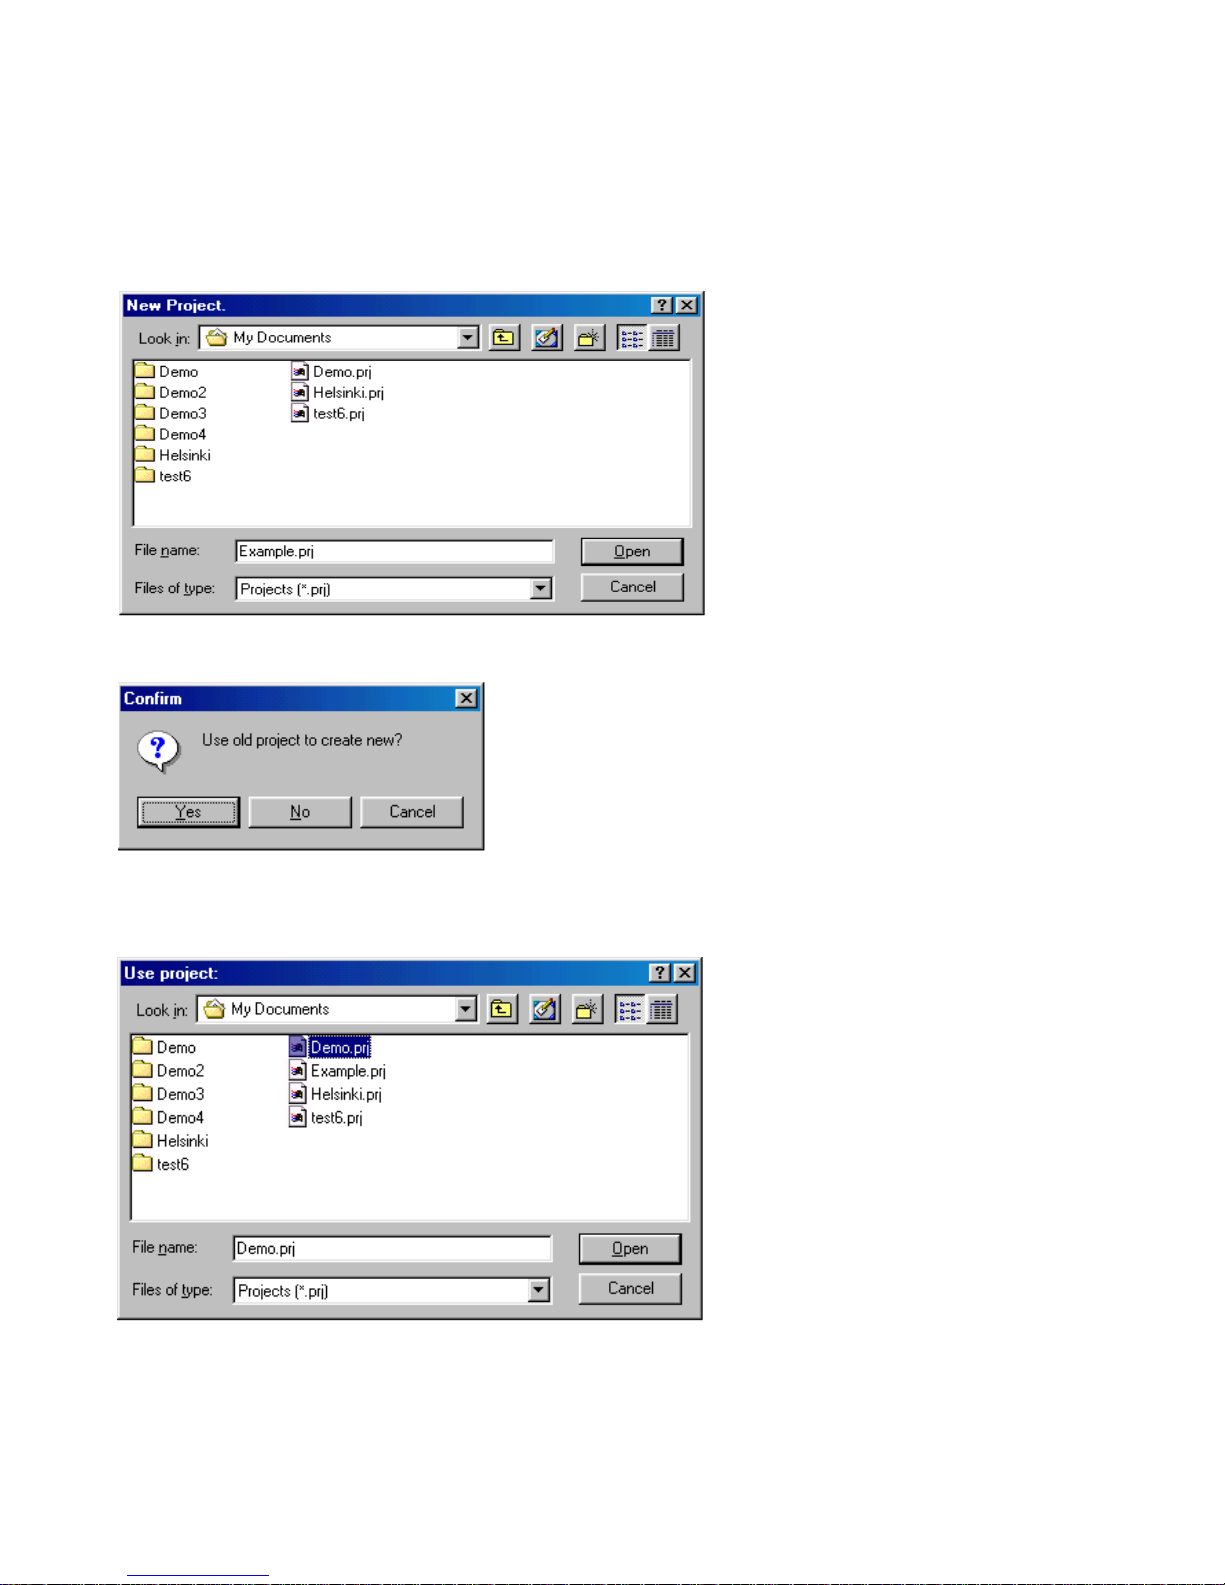
Open the drop-down menu under [Project] and click on [New] and the ‘New Project’ window will appear.
In the white bar next to ‘filename’, type the new project name (i.e. Example.prj) and click on [Open].
A validation window will then appear, asking if you want to use an existing project for the layout of the new project or not.
You can create a new project based on an existing project, by selecting it from the list below. Otherwise, click on [No] in
the validation window and the default settings will appear. When you close this new project, all new settings will be stored
under the new project name.
Page 12
12
2.2.3 Opening a Project
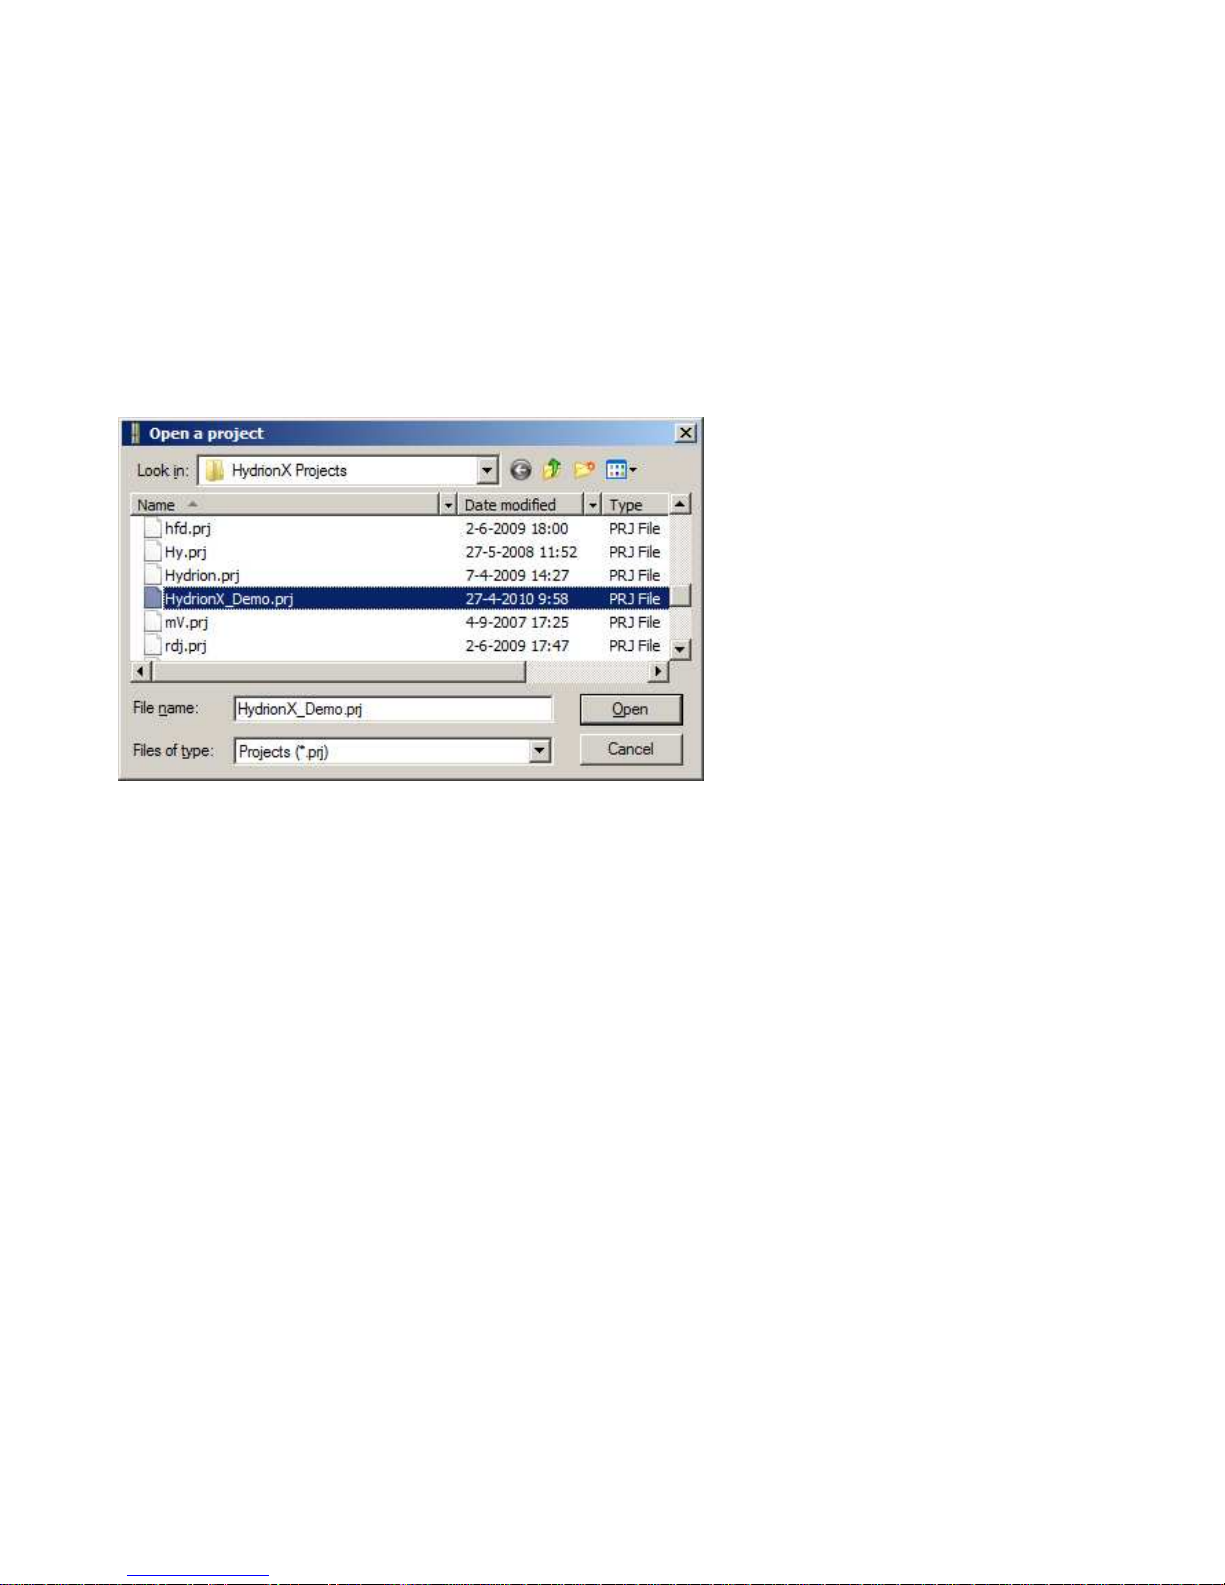
Open the drop-down menu under [Project] and click on [Open]. Next to ’filename’, type the name of the project and click
on [Open].
You can also open a project by double-clicking directly on its name in the list.
If you want to create a project or open a project, you must first close the active project. To do this, click on the [X] button
in the right hand corner of the measurement window.
Page 13
13
2.3 Calibrating
2.3.1 Creating a Calibration Set
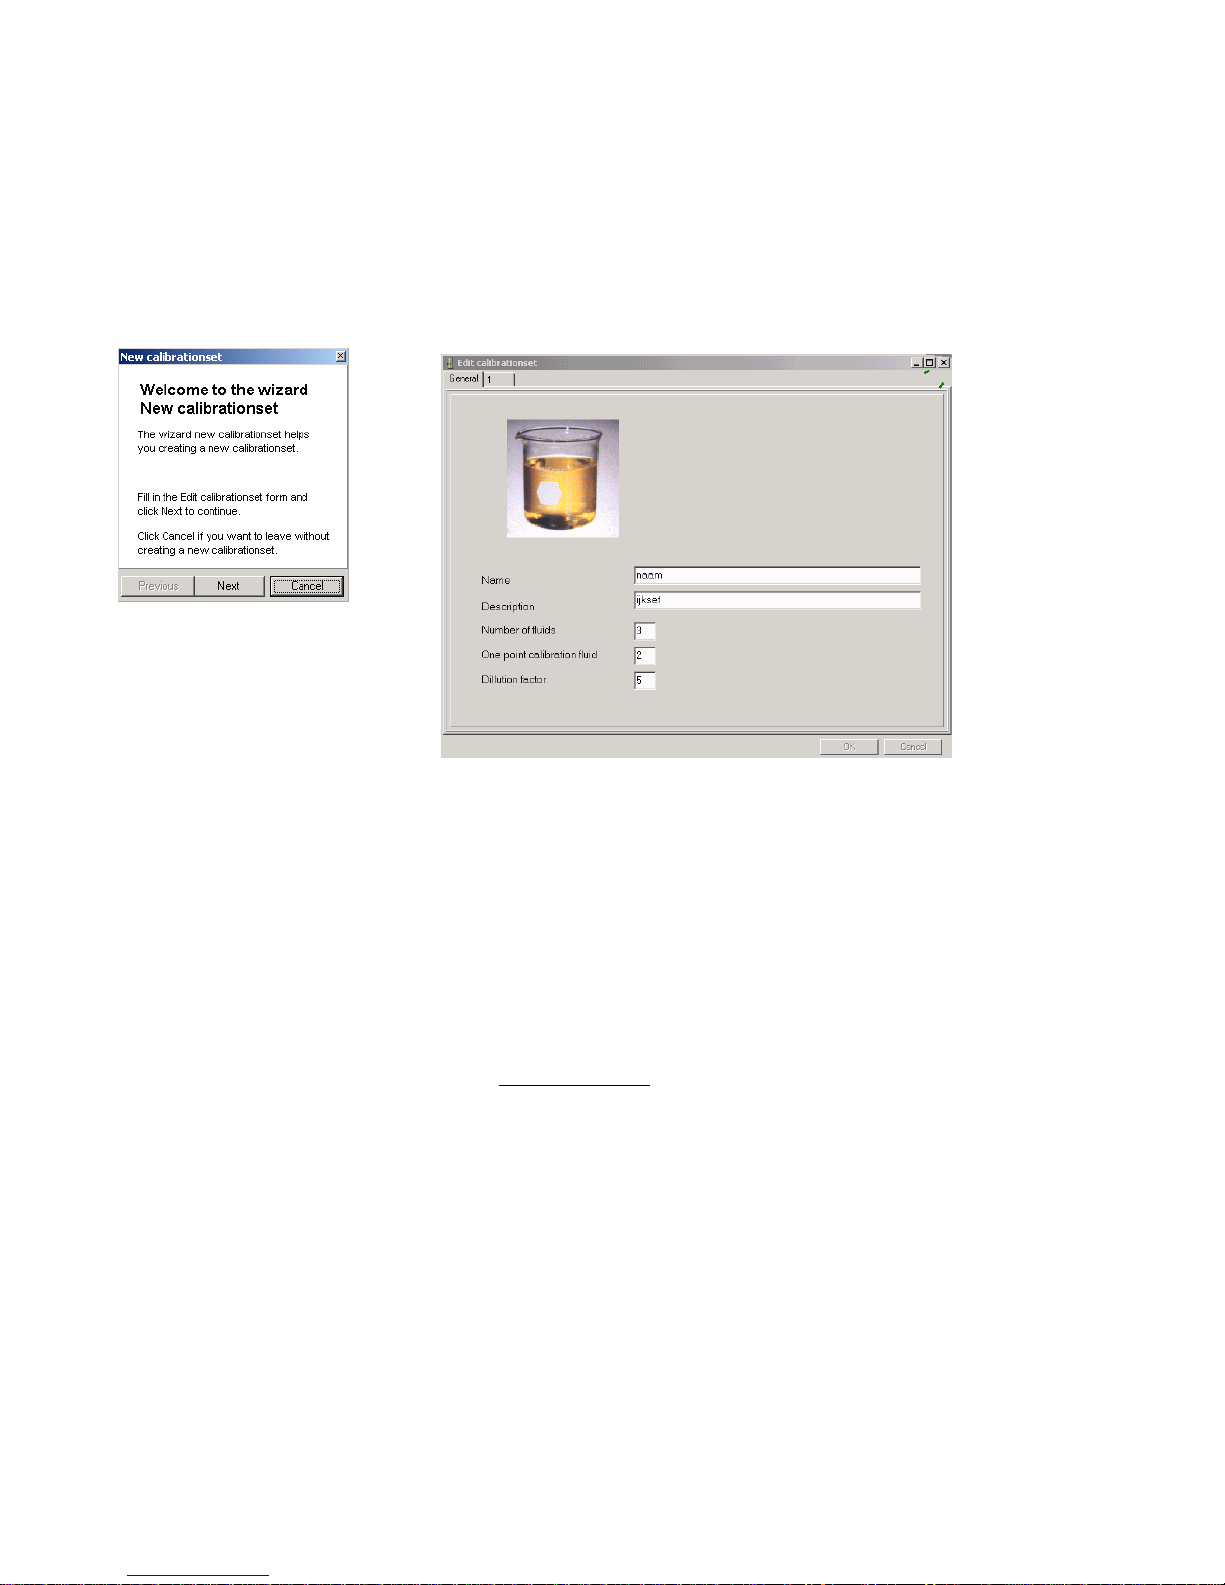
First, click on [Calibrate] in the main menu bar and select [creating a calibration set] from the drop-down menu, then
click on [New]. A menu will appear with the parameters for the new calibration set.
First, fill in the name of the calibration set, the number of calibration fluids, the dilution factor and which fluid has to be
used for the one-point calibration procedure. After that, click on [Next] and the following window will appear.
As a standard, we use a three-point calibration for a multi-point calibration set with the middle solution as the one-point
calibration fluid. The ‘Edit Calibration Set’ window assumes that you will follow this convention and has already filled in
these default values for you. However, you can change the values in this window to a (2) for a two-point calibration set or
a (4) for a four-point calibration set, etc.
The dilution factor can also be changed. By default, the dilution factor is a five-fold dilution starting from the highest
concentration. All calibration fluids of the same set have the same composition, and only the concentrations between
fluids are different. The dilution factor between consecutive fluids of the same set is the same for the whole set.
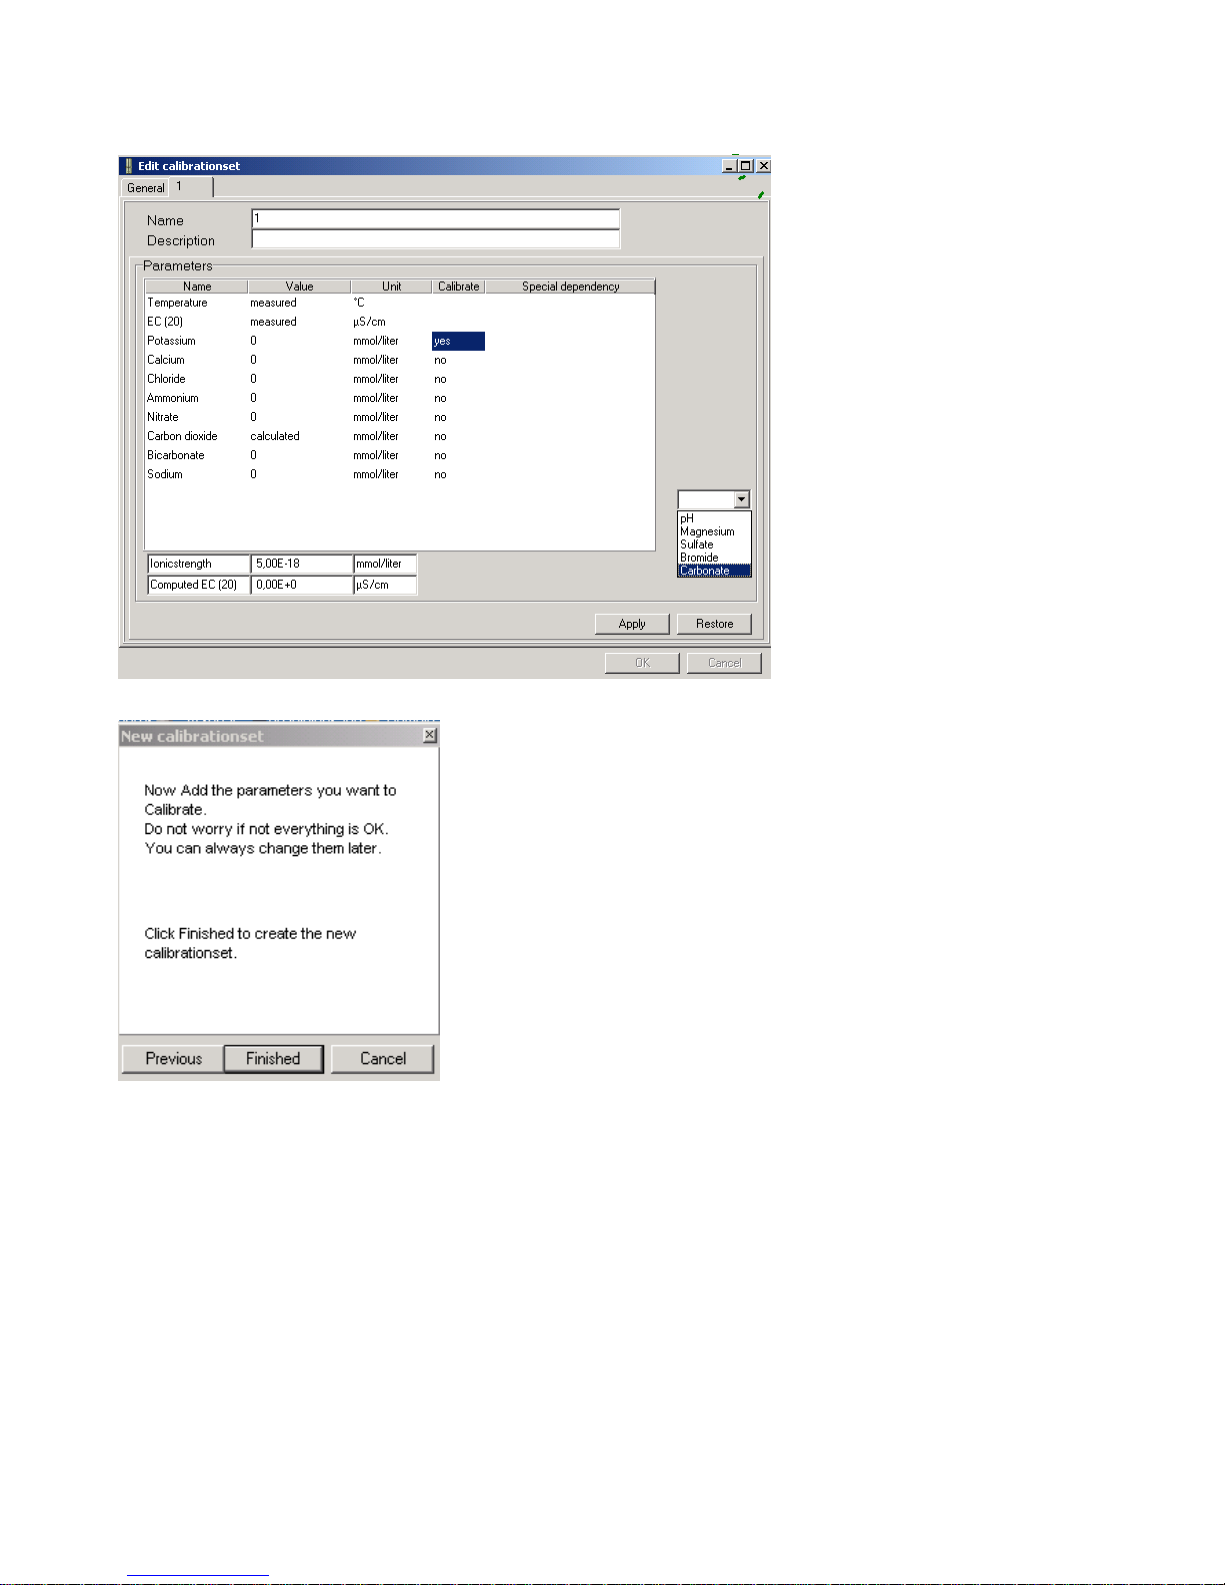
In the following window, you can give the concentrations of the different ions that are in your new calibration fluid. In the
column ‘Value’, fill in the concentrations of the most concentrated calibration solution.
In the column ‘Calibrate’, fill in ‘yes’ to include it in the calibration set or ‘no’ to exclude it.
pH, Na, K, Ca, NH4, NO3, Cl and CO2 can be measured, the other concentrations will be calculated.
You can also add new ions to the list, by clicking on [Add] in the bottom right-hand corner of the window. This will open a
drop-down menu (see next window).
When you feel that your list is complete, click on [Apply] in the ‘Edit Calibration Set’ window before continuing with the
Wizard window.
Page 14
14
To finish this procedure, click on [Finished] in the Wizard window.
Page 15
15
2.3.2 Selecting a Calibration Set
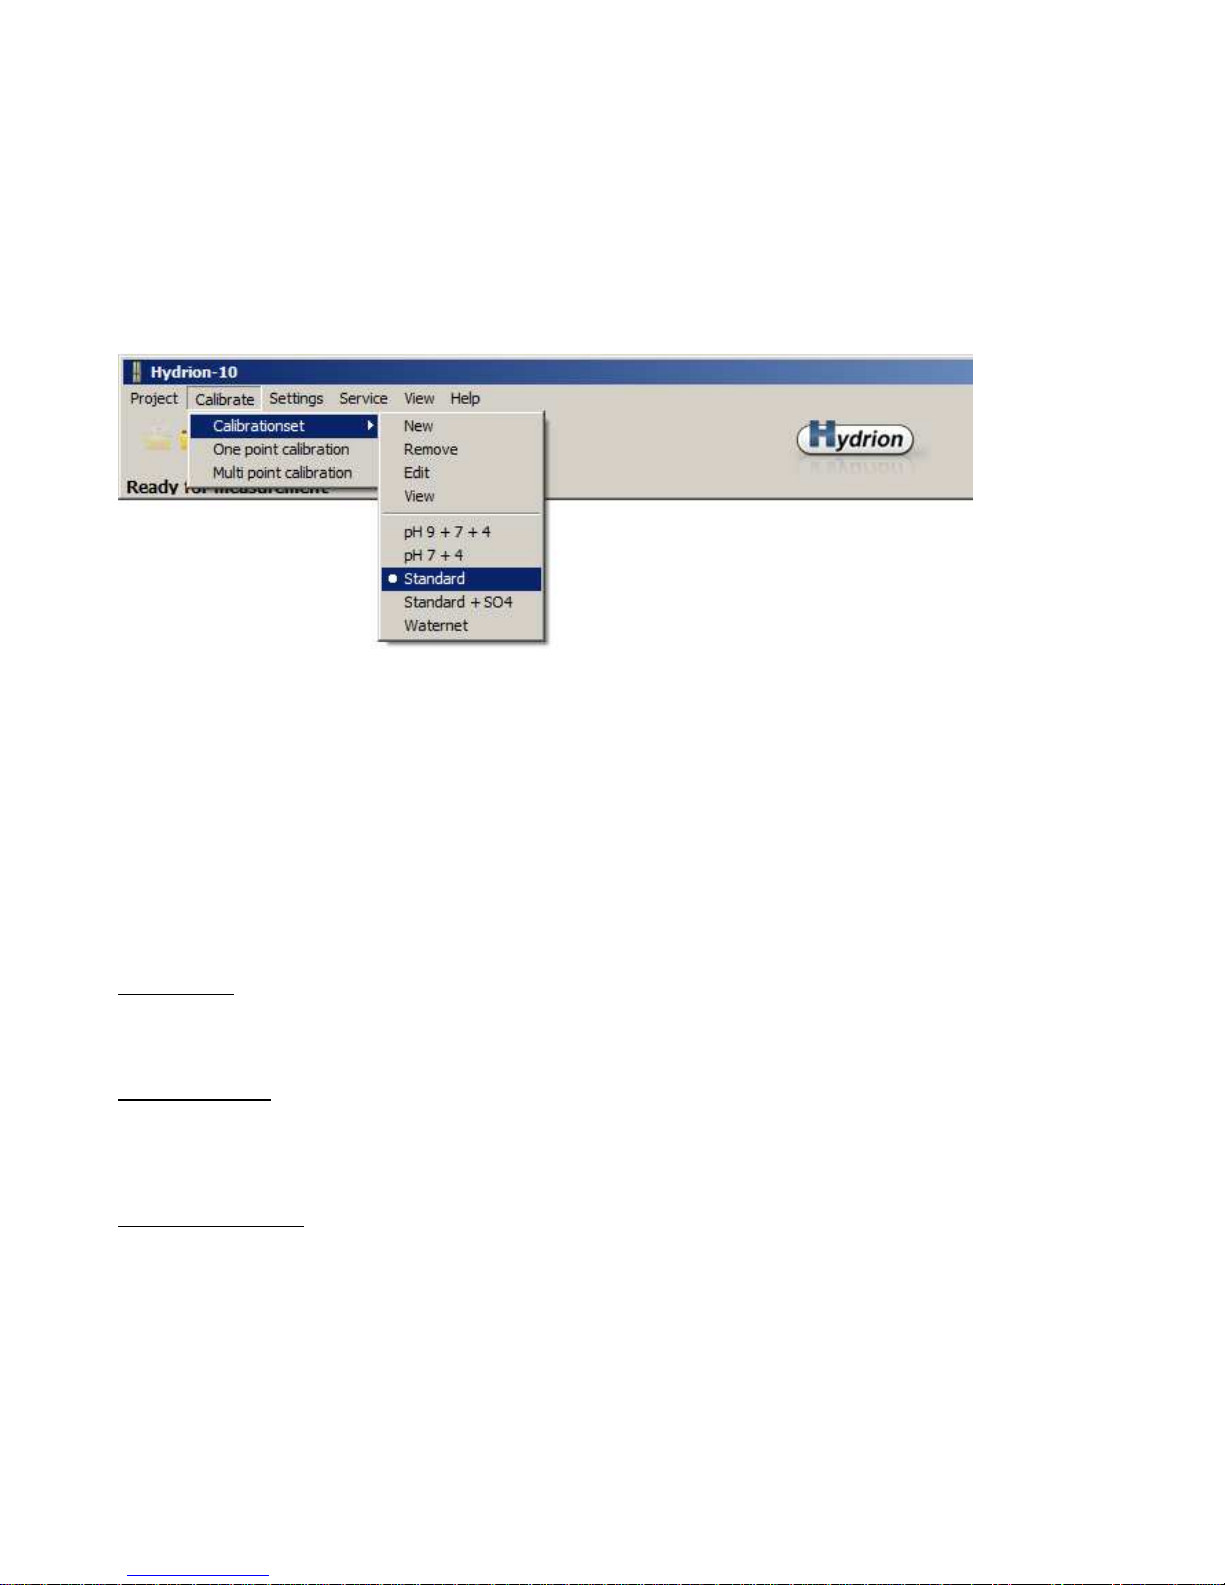
Open the drop-down menu under [Calibrate], and click on [Selecting a calibration set]. Another drop-down menu will
appear, with three predefined calibration sets: pH 9_7_4, pH 7_4 and Standard. Beneath these will be listed any
additional, user-defined calibration sets. These user-defined sets can be deleted.
Select the desired calibration set and activate it by clicking inside the table. This will cause all the drop-down menus to
disappear. The selected calibration set is now activated, and its name will appear in the Project window.
2.3.3 One-Point Calibration
Once the desired calibration set is selected, click again on [Calibrate] in the menu bar, choose [one-point calibration]
from the drop-down menu and click on [Start]. The one point calibration can also be started by clicking on [one point
calibration] in the project window.
Place the Sensor-unit in the correct calibration fluid and click on [OK] to start the calibration.
If, by any chance, the wrong calibration fluid is used, the program will automatically notice after one minute and will
interrupt the procedure with the comment: “Wrong Calibration fluid”.
The one-point calibration has to be repeated every two hours. Therefore, if you start a new measurement session on a
new day, you must always begin with a one-point calibration.
pH Calibration
A pH one-point calibration has to be carried out once every week. Whenever there is a need for a one-point calibration,
the Hydrion10 Program will warn you by graying-out the little windows for pH and HCO3 measurement results. After a
one-point pH calibration, the Sensor-Unit should be rinsed and placed in (old) standard fluid 2 for at least 15 minutes.
Calibration Interval
The two hour interval for the one-point calibration for all sensors, except the pH, and the one week interval for the onepoint calibration for the pH have been set as defaults in the program. If necessary, these settings can be changed by a
service engineer, but not by the user. Since we now use a much better reference electrode, recalibration every two hours
may not be required anymore.
Control Measurements
It is advisable to perform a control measurement on a standard solution with a known composition. For the standard
calibration set, we recommend using Evian bottled water or a comparable mineral water with a stable composition. This
control measurement should be performed after every one-point calibration and once every hour during measurement
sessions.
When results differ more than 10% from the actual values, you must repeat the one-point calibration.
Page 16

16
2.3.4 Multi-Point Calibration
After selecting the desired calibration set, click on [Calibrate] in the menu bar and choose [multi-point calibration] from
the drop-down menu.
Click on [Start] to start the calibration procedure.
The program will them prompt you to ‘’insert measuring tube in fluid 1’’. This is the fluid with the lowest concentration of
the calibration set. Follow the instructions and click on [OK] to start the measurement. Repeat these steps when
prompted for fluid 2 and fluid 3. Fluid 3 is the fluid with the highest ion concentration of the standard calibration set.
At the end of the procedure, the measurement results will change and should then be close to the known concentrations
of the last calibration fluid used.
After the calibration, one or more boxes may turn blue or black. This indicates that one or more of the sensors are working
poorly (blue) or are altogether defective (black). Additionally, blue or black boxes will appear when the multi-point
calibration procedure failed in one way or another. One possible reason for such a failure is that the temperature was not
kept stable during the whole procedure. If ever in doubt, simply repeat the procedure. If the black or blue boxes continue
to appear, please contact us.
It is advisable to perform a control measurement on a standard solution with known composition, like Evian bottled water,
after each multi-point calibration. Before the measurement, rinse the Sensor-Unit thoroughly with Evian. (Refer to Control
Measurements in Section 2.3.3)
For all calibration procedures and measurements, ionic concentrations should be measured from low to high. If a second
multi-point calibration has to be carried out immediately after the first one (that failed), first rinse the Sensor-Unit
thoroughly with (old) Fluid 1 and leave it in (old) Fluid 1 for at least 15 minutes. Restart the calibration procedure with
fresh Fluid 1.
A multi-point calibration should be carried out once every two weeks and preferably also at the end of a measuring
session. The need for a multi-point calibration is indicated in the (green) result boxes. Some of the result bars may
become grayed-out. If you place the mouse pointer over the result bar, the program will explain why it is grayed-out.
pH Multi-Point Calibration
Carry out the pH multi-point calibration from a high pH value to a low pH value.
A pH multi-point calibration should be carried out once every four weeks. Immediately following this calibration, the
Sensor-Unit must be kept for at least an hour in the Standard calibration fluid 2 used for the normal one point
calibration.
If both a pH calibration and a normal calibration are required at the same time, begin with the pH calibration. The
concentration of the HCO3-ion is calculated, based on the pH of the fluid and the measured concentration of dissolved
CO2 in the water. Thus, if the pH measurement is incorrect, the calculation of the HCO3- concentration will also be
incorrect!
The recommended buffer solutions for pH calibration are manufactured by Merck (http://www.merck.de)
pH 4 – ordering number: 109435
pH 7 - ordering number: 109439
pH 9 – ordering number: 109461
for most purposes using only pH 4 and pH 7 is sufficient.
Type of Calibration
Period
When
pH one
-
point Every week
Begin of measuring session
pH multi
-
point Every four weeks
End of measuring session
One-point calibration Every two hours Begin of measuring session
Multi-point calibration
Every two weeks
End of
measuring session
Page 17
17
2.3.5 Standard Calibration Fluid
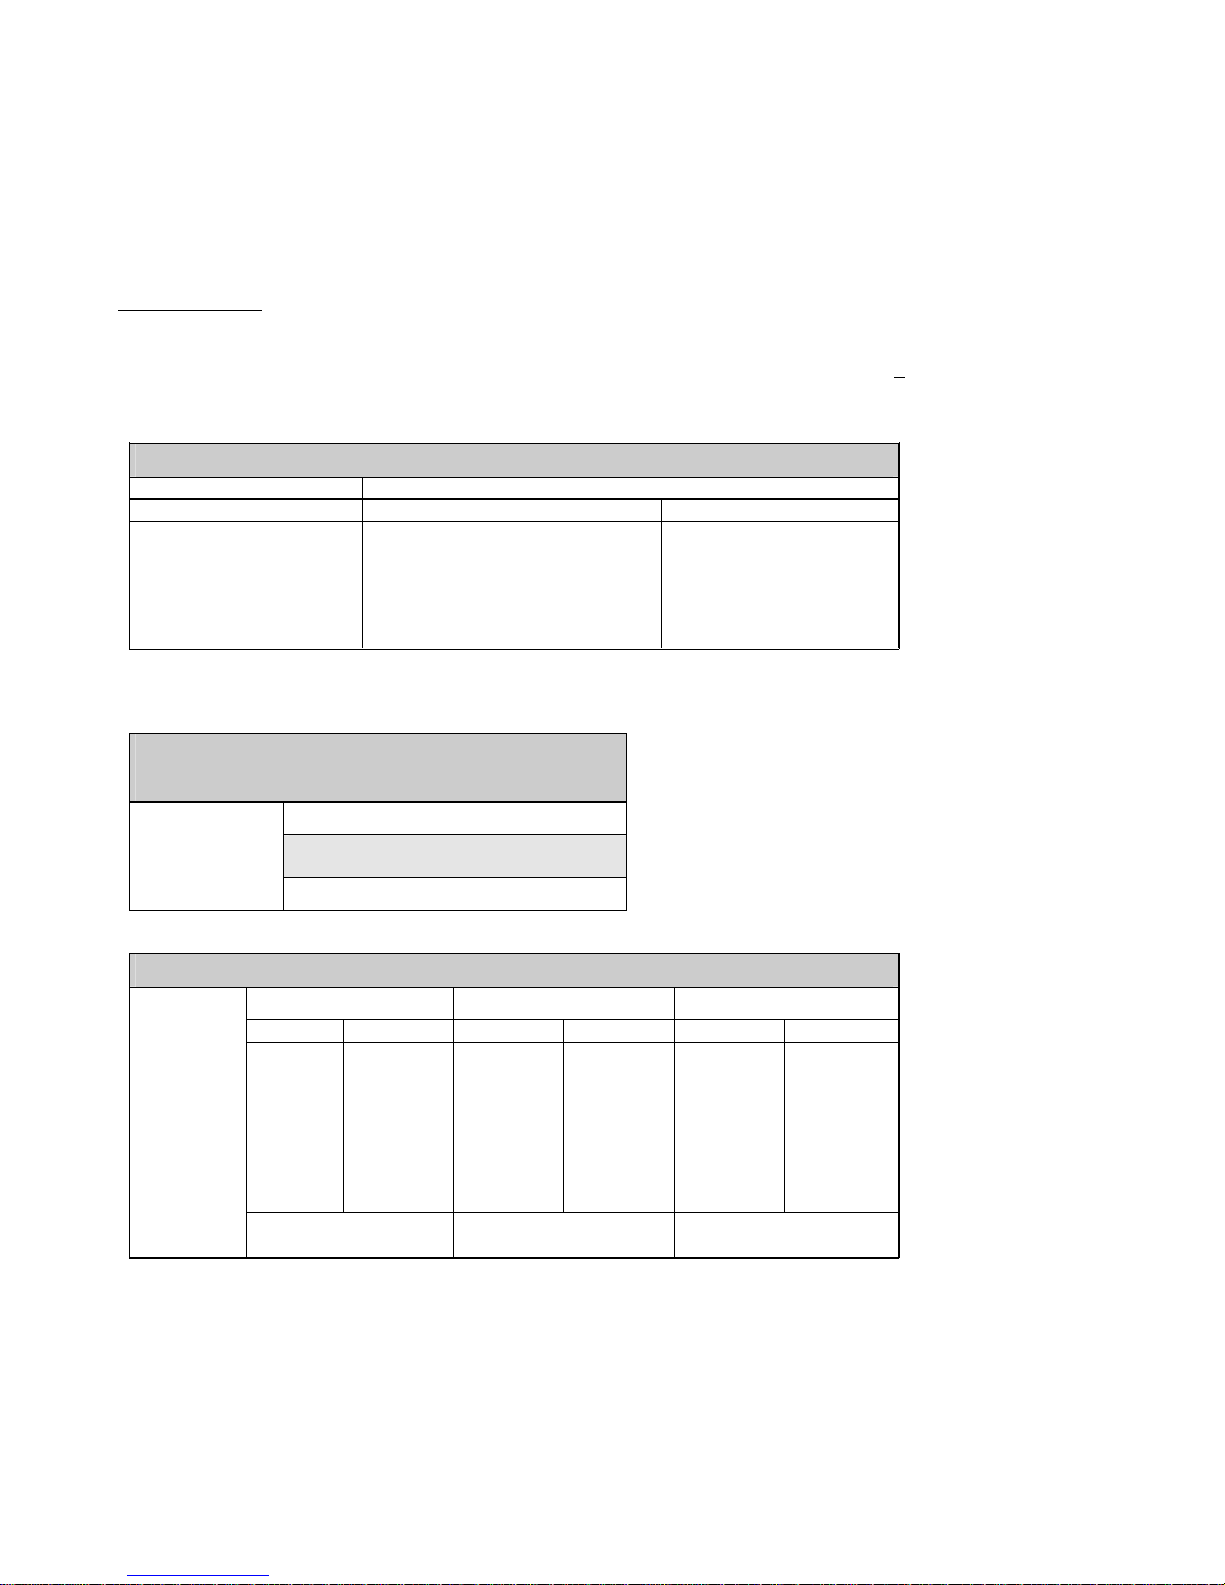
Shown below is the recipe for making a standard calibration fluid for surface water and the like. This calibration fluid is
especially useful for the measurement of drinking water in most areas.
General Remarks
• The EC is adjusted to 20 °C.
• NH
4+
and NO
3
-
are expressed as total weight, not as pure -N.
• HCl must be added last to the volumetric flask, which is first filled with demineralized water (+ 4000 ml for the big
flask). CO2 starts to develop as soon as HCl is added. This is why the bottles with calibration fluid must be tightly
sealed with as little air inside as possible.
Recipe for Standard Calibration fluid 2 (B) and 3 (C)
Stock solution Pipette
fluid 2
(B) fluid 3 (C)
NH4Cl
Ca(NO3)
2
KHCO
3
CaCl
2
NaHCO
3
HCl
0,01 M
0,05 M
0,025 M
0,15 M
0,3125 M
0,1 M
20 ml per 5000 ml
20 ml “
20 ml "
20 ml "
20 ml "
20 ml "
100 ml per 5000 ml
100 ml “
100 ml "
100 ml "
100 ml "
100 ml "
Calibration fluid 2 and Calibration fluid 1 are respectively 5x and 25x diluted solutions of Calibration fluid 3.
It is best to make Calibration fluid 2 directly and not as a dilution of Calibration fluid 3.
Recipe for Standard calibration fluid
1
Fluid 1 (A)
5000 ml graduated flask
¾ filled with demi-water
Fluid 3
(C)
200 ml (pipette)
Composition Calibration fluids
fluid 1 (A)
Fluid 2 (B)
fluid 3 (C)
PPM µ mol
/
li
ter
PPM µ mol
/
liter
PPM µ mol
/
liter
[K+]
[Na+]
[Ca2+]
[NH
4
+
]
[Cl-]
[NO
3
-
]
[HCO3]
0.782
5.75
6.42
0.144
11.644
4.96
11.59
20
250
160
8
328
80
190
3.9
28.75
32.1
0.7
58.22
24.8
57.95
100
1250
800
40
1640
400
950
19.55
143.75
160.4
3.6
291.1
124.0
289.75
500
6250
4000
200
8200
2000
4750
EC20 ±64 microS/cm EC20 ±309 microS/cm EC20 ± 1450 microS/cm
pH ± 6.7 pH ± 6.7 pH ± 6.7
Page 18
18
2.4 Measuring
2.4.1 Measuring a New Sample
Click [New] in the measurement window to start the measurement.
Handling Procedure:
Rinse the tube (Sensor-unit) with sample fluid.
Shake off the remaining fluid.
Place the tube in fresh sample fluid and click on [New].
Fill in the sample name and click on [OK] to start the measurement. The measurement box will begin blinking and the
buttons [Save now] and [Cancel] will appear.
After completion of the measurement, the buttons [Save now] and [Cancel] disappear and the measurement box will
stop blinking.
When all measurements are stable, the values will be saved along with the date and time of the measurement. If the
measurement procedure takes longer than seven minutes to complete, it will automatically terminate and the incomplete
results will be saved, regardless of measurement stability. These incomplete results will be marked in the data file with an
asterix (*). When this occurs, a warning will appear on the screen with a red dot reporting: ‘Measurement not stable’.
This could mean that just one measurement was not stable!
After the results are saved, the measurement will continue, but new data will not be stored in the data file unless you click
the [Save now] button or start a new measurement procedure by clicking on [Start].
By clicking on [Save now], the measurement data is instantly saved. By clicking on [Cancel], the measurement
procedure is interrupted and no data is saved.
2.4.2 Measuring Panel
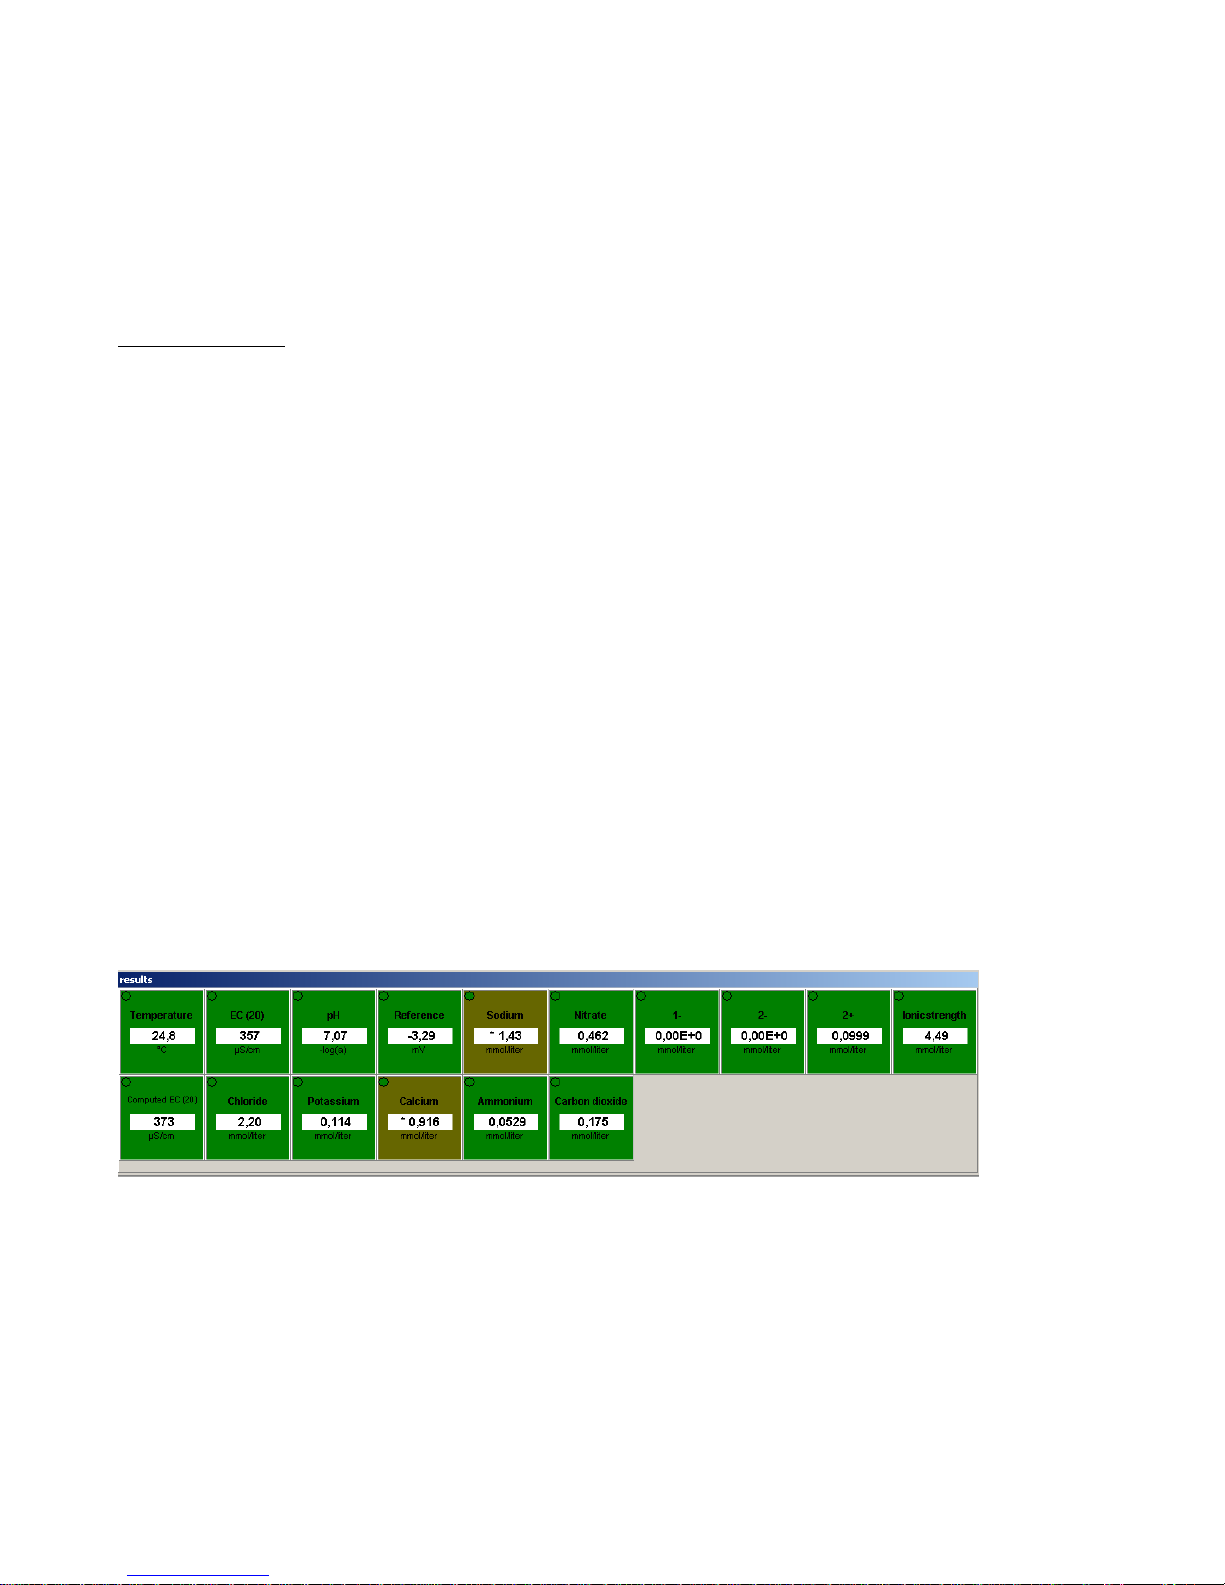
When the Hydrion10 program is active, the measuring panel will be visible. One parameter is shown per box. The results
can be displayed in different units. The result bar, in which results are displayed, will be white or gray. If the result bar is
gray, a one-point or multi-point calibration is required. For more information, put the mouse pointer over the bar and you
will be shown what sort of calibration is required.
Read the following chapters for an explanation of the boxes, result bars and the text displayed.
Page 19
19
2.4.3 Box Colors
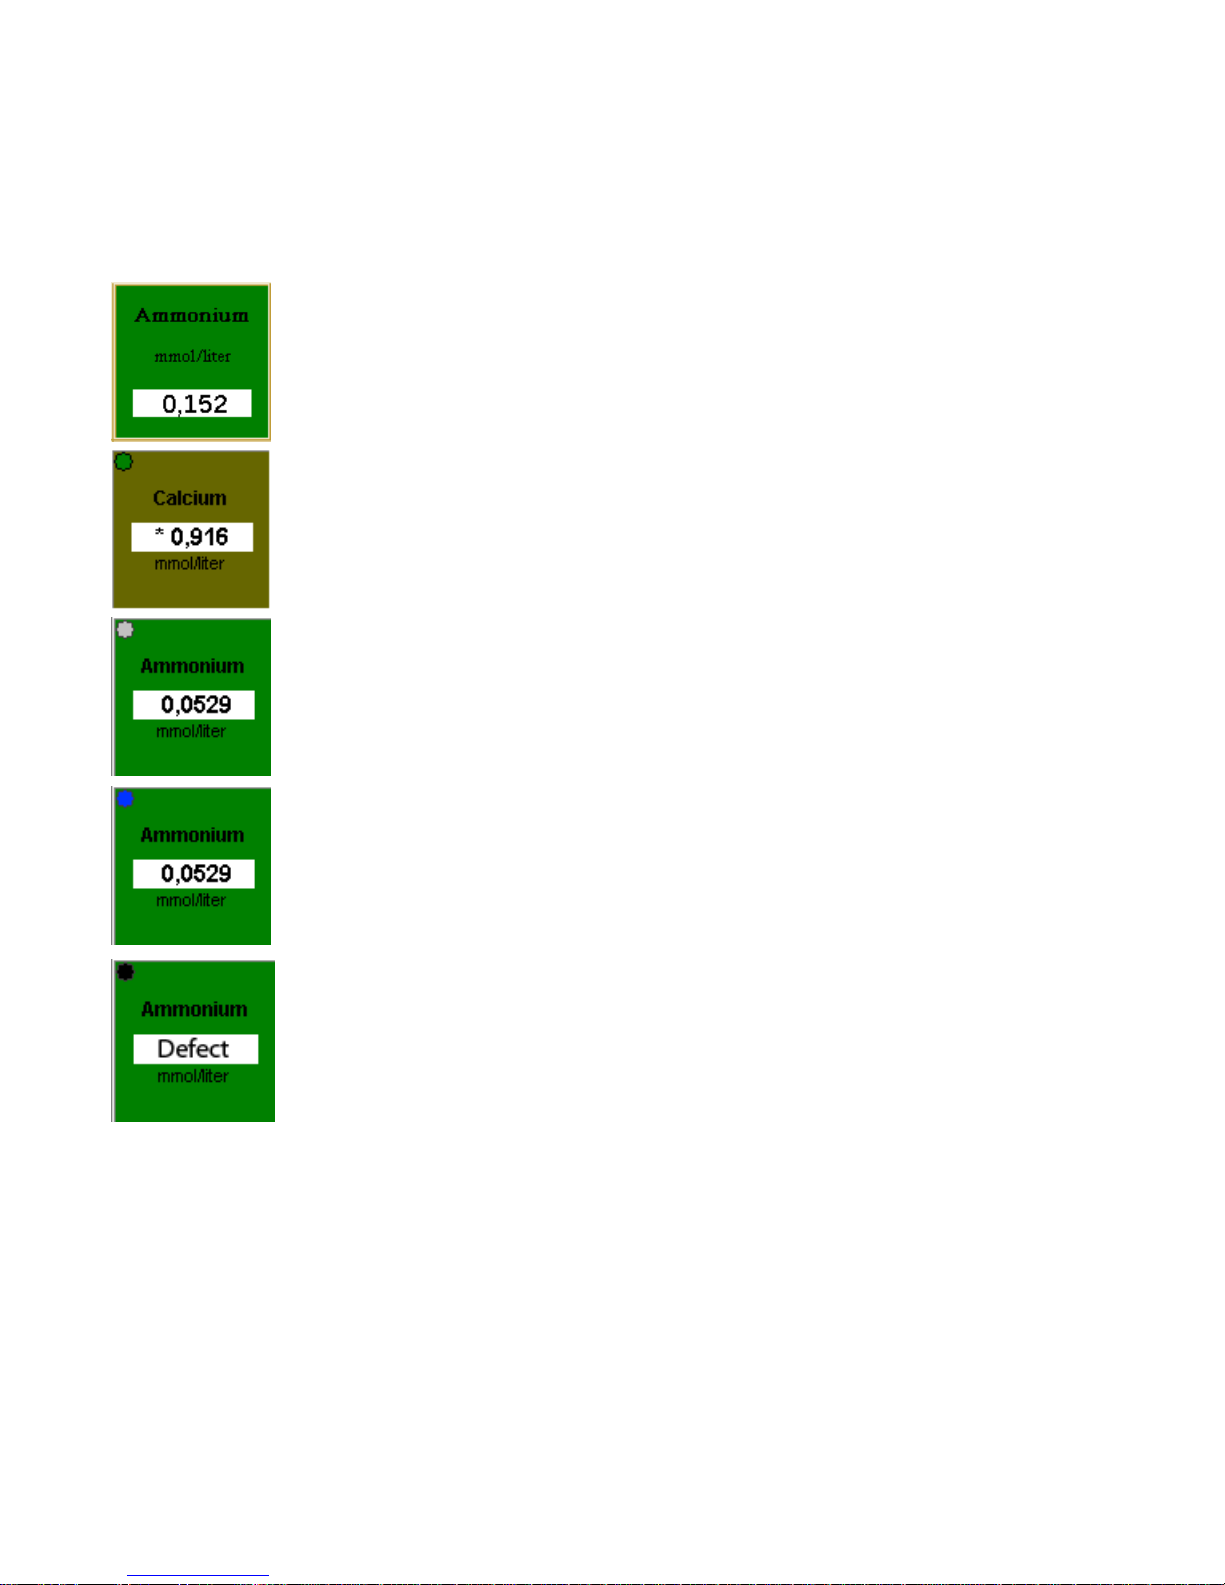
The measurement boxes can have different colors: green, brown, gray, blue or black.
When the color of the box is green, then the measurement is stable and reliable, provided that the
result bar is white and no prefixes appear.
If the box is brown, then the measurement is not yet stable. Usually, it takes at least a minute before
a measurement is adequately stabilized. In which case, the box will turn green. Some sensors simply
need more time before the measurement is stabilized, but it could also be caused by the age of the
sensor or a notably large change in the concentration between samples (from high to low).
If the dot in the upper left corner is gray, then the concentration of the sample solution is above or
below the measuring range of the sensor. In the case the concentration of the sample solution is too
high, you could dilute it to bring it within the measuring range.
If the dot is blue, then the relevant sensor is old or is otherwise working poorly. It is also possible that
something went wrong with the multi-point calibration. In which case, you should repeat the
calibration procedure. Sensor sensitivity decreases with age. This will be noticed during the multipoint calibration. The sensor is working but should be replaced as soon as possible.
If the dot is black, then the relevant sensor is defective. It is possible, that something has gone
wrong during the multi-point calibration. In which case, you can simply repeat the calibration
procedure to correct the problem. However, if the sensor is truly defective, it will no longer give
measurement results. Please contact your dealer for a replacement.
Page 20
20
2.4.4 Symbols in the Result Bar
* The measurement is not yet stable (the color of the box is brown).
< The measurement is below the lower limit of the calibration range.
> The measurement is above than the upper limit of the calibration range.
<< The measurement is below the measuring range of the sensor.
>> The measurement is above the measuring range of the sensor.
# A one-point calibration is required.
! A multi-point calibration is required.
P P stands for poisoning. This indicates too much interference from other ions. This happens especially when
the sensor is sensitive to other ions.
For example, the ammonium sensor is quite sensitive to potassium ions. When you have a solution with a
high potassium concentration and a low ammonium concentration, the ammonium sensor only detects
potassium ions. In this case, the measurement for ammonium is unreliable.
R The sensor shows response, but not enough for an accurate measurement. It needs replacement (the dot
has turned blue).
Defective The sensor shows no response and should be replaced immediately.
Except for the indication ‘Defective’, all prefixes are also stored in the data file!
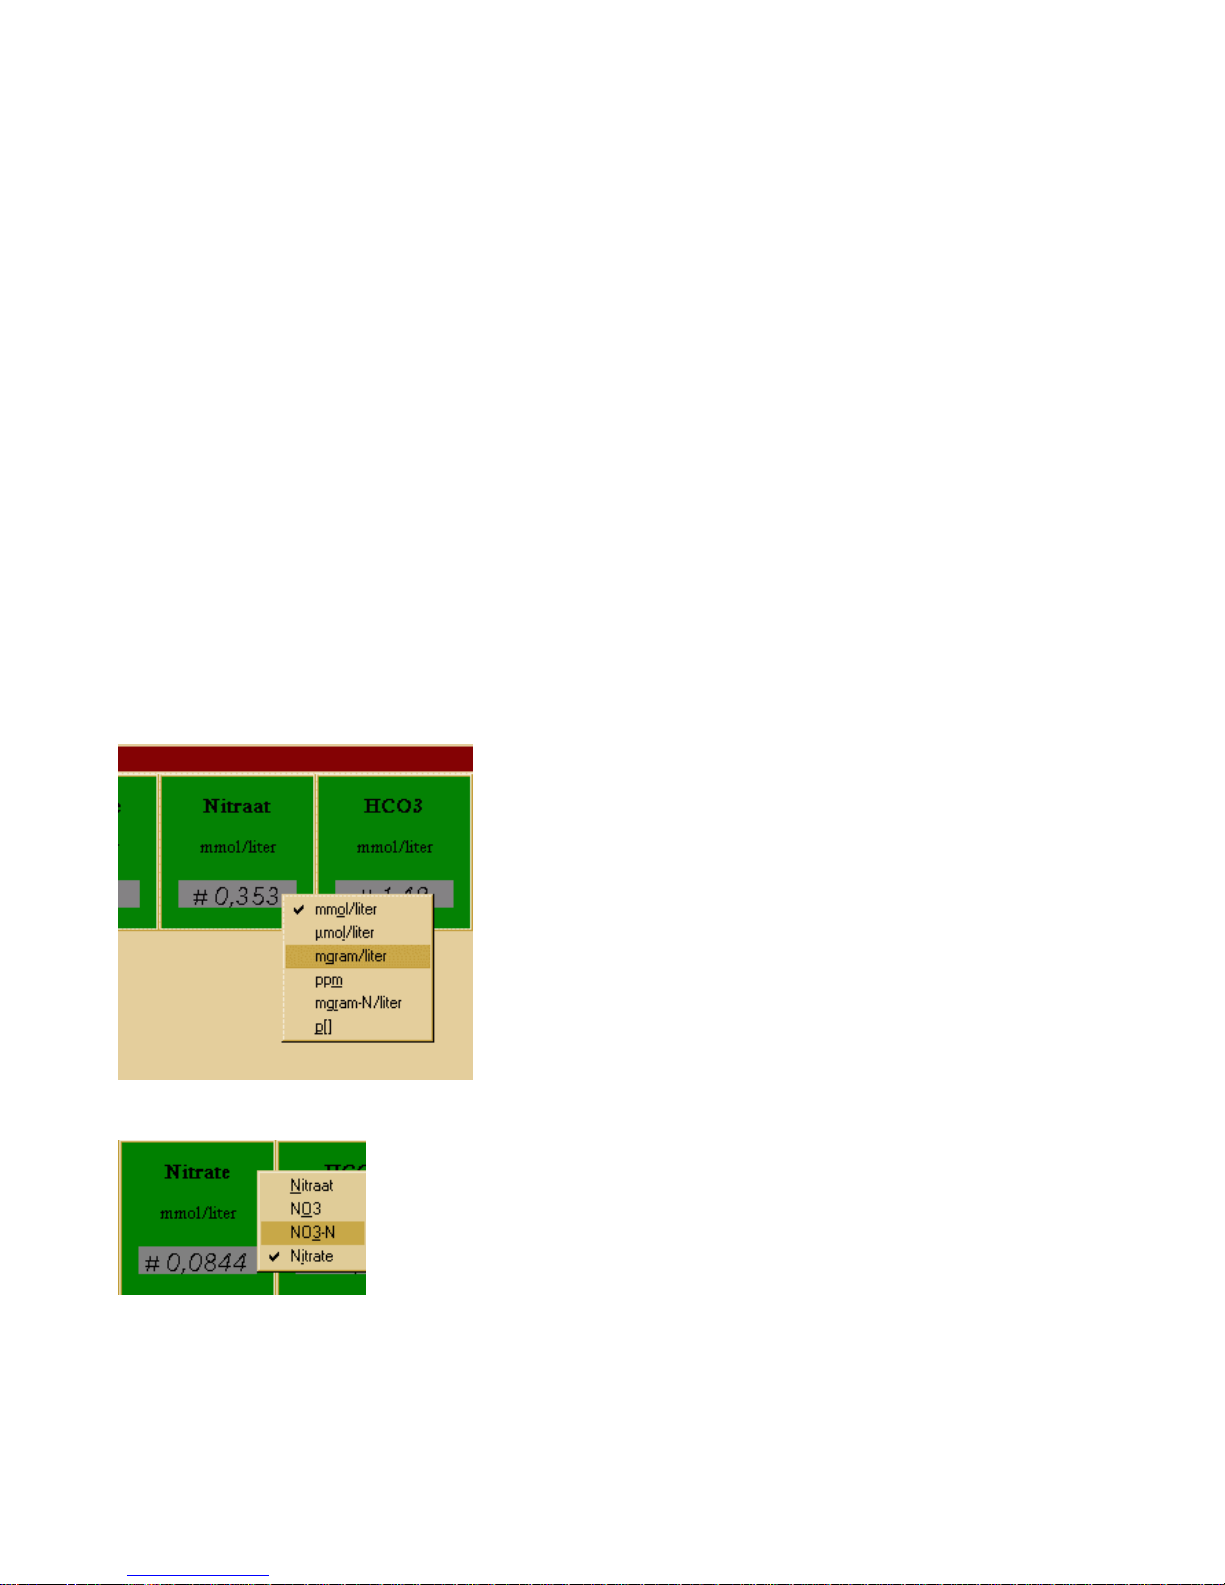
2.4.5 Selecting Names and Units
Clicking on ‘unit’ with the right mouse button will display a list of possible units.
Click on the desired unit in this list and the results of this box will be shown in this unit.
You can choose a different unit for each parameter.
Clicking on the name in the box with the right mouse button will display a list of possible names.
Page 21

21
2.4.6 Recommendations for Accurate Measurements
If the Sensor-unit has been stored in the storage vessel for more than 12 hours, rinse the Sensor-unit with calibration fluid
2 and put it in calibration fluid 2 for conditioning for at least 15 minutes. For rinsing and conditioning, it is sufficient to use
old calibration fluid.
For obtaining best results, all samples, solutions and the Hydrion10 must have the same temperature. During calibration
and measurement, temperature must not change more than 0.05 ºC/min; otherwise, the measurement procedure will take
longer.
When measuring a new sample, the Sensor-Unit should be rinsed with sample fluid. If no sample fluid is available, then
rinse the Sensor-Unit with old calibration fluid 1. Shake off the remaining fluid and place the Sensor-Unit in fresh sample
fluid.
Try to keep the sample concentrations within the calibration range for the most accurate results.
When a set of samples has to be measured, try to measure from low to high concentrations.
After a pH multi-point calibration, put the Sensor-unit in calibration fluid 2 for at least one hour. When measuring from high
to low concentrations, put the Sensor-unit in the sample for at least 5 minutes before starting the measuring procedure.
The Sensor-unit fits into a standard 500-ml laboratory beaker. During measurement, the Sensor-unit should be placed
preferably 6 to 7 cm into the sample fluid. Keep the small holes in the Sensor-unit cap just above the surface of the
sample fluid.
A sample of 250-300 ml is sufficient for measurement. However, it is recommended to have about 500 ml sample fluid
available. The additional 200 ml can be used for rinsing prior to measuring.
Page 22
22
2.5 Results
2.5.1 Viewing Stored Data/Results
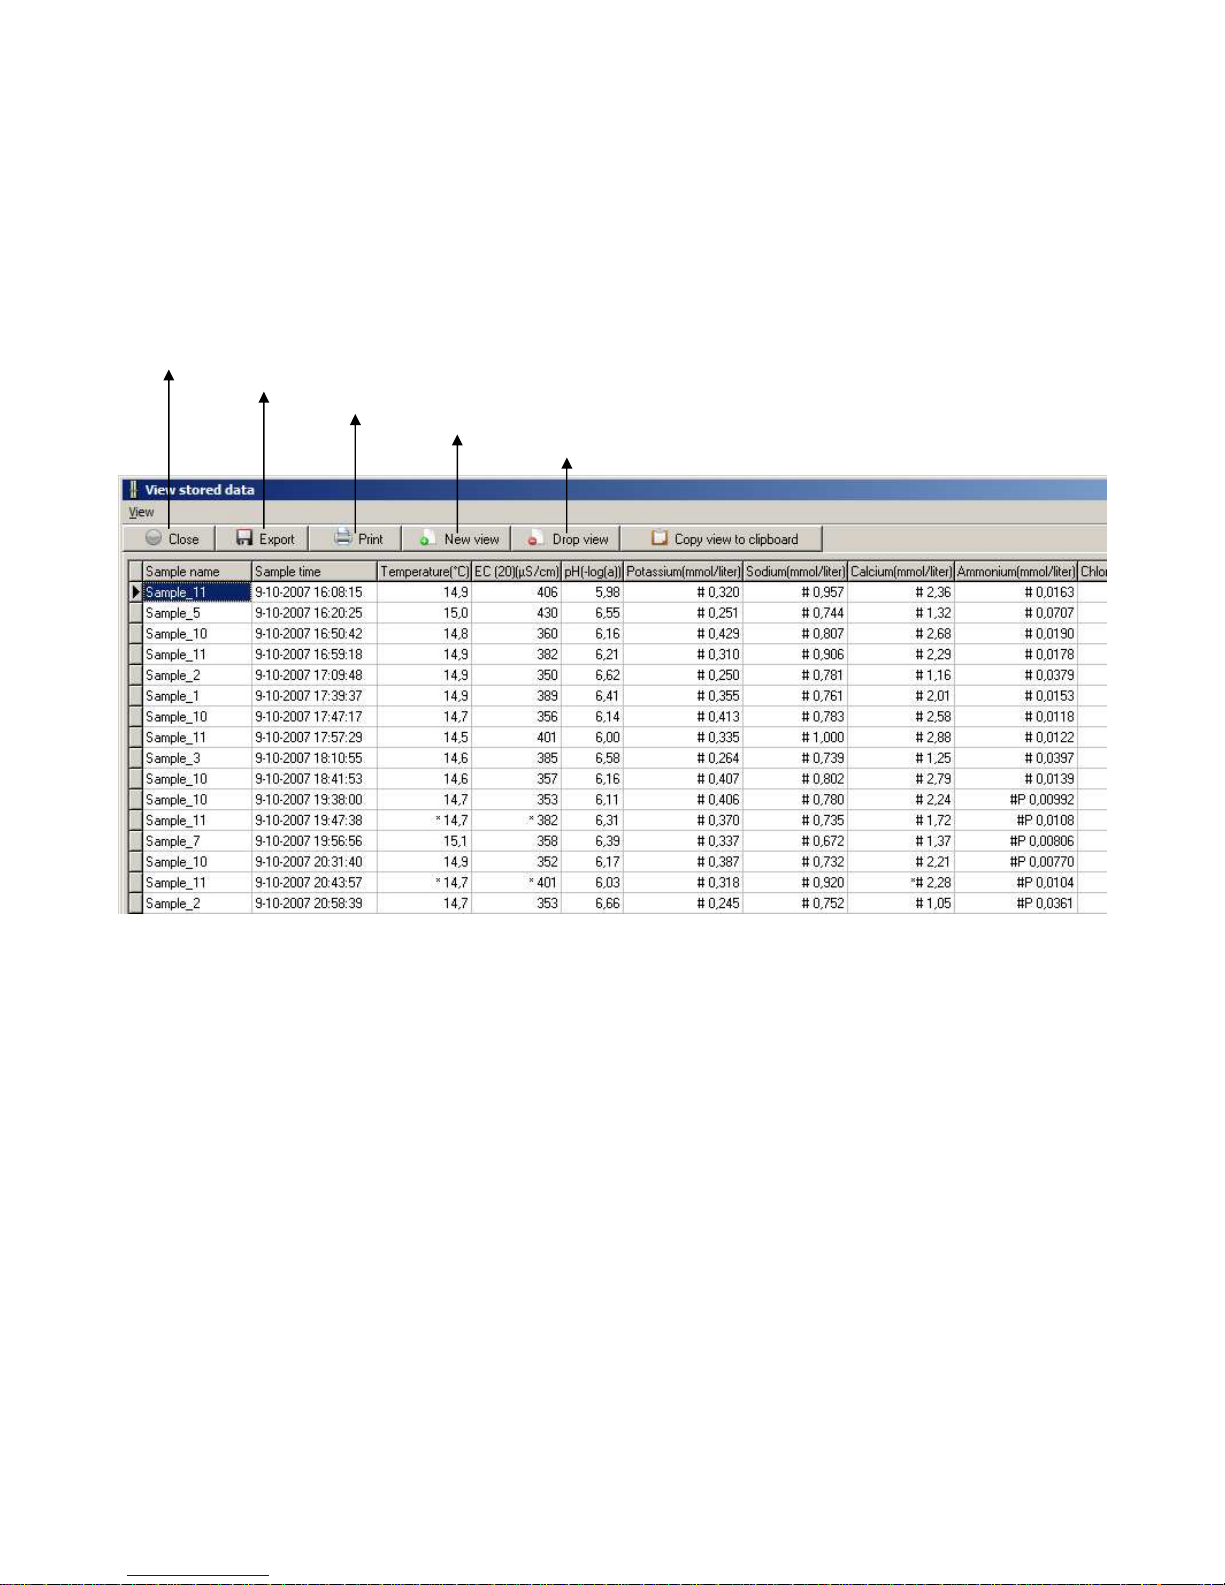
The project data can be viewed by clicking on [View] under [Project]. You can choose to view just today’s results or the
total results. Only results that belong to the current project will be shown.
Close View Project
Save data file as…
Print table
Add a new selection
Delete an existing selection
Page 23
23
2.5.2 Processing Stored Data/Results
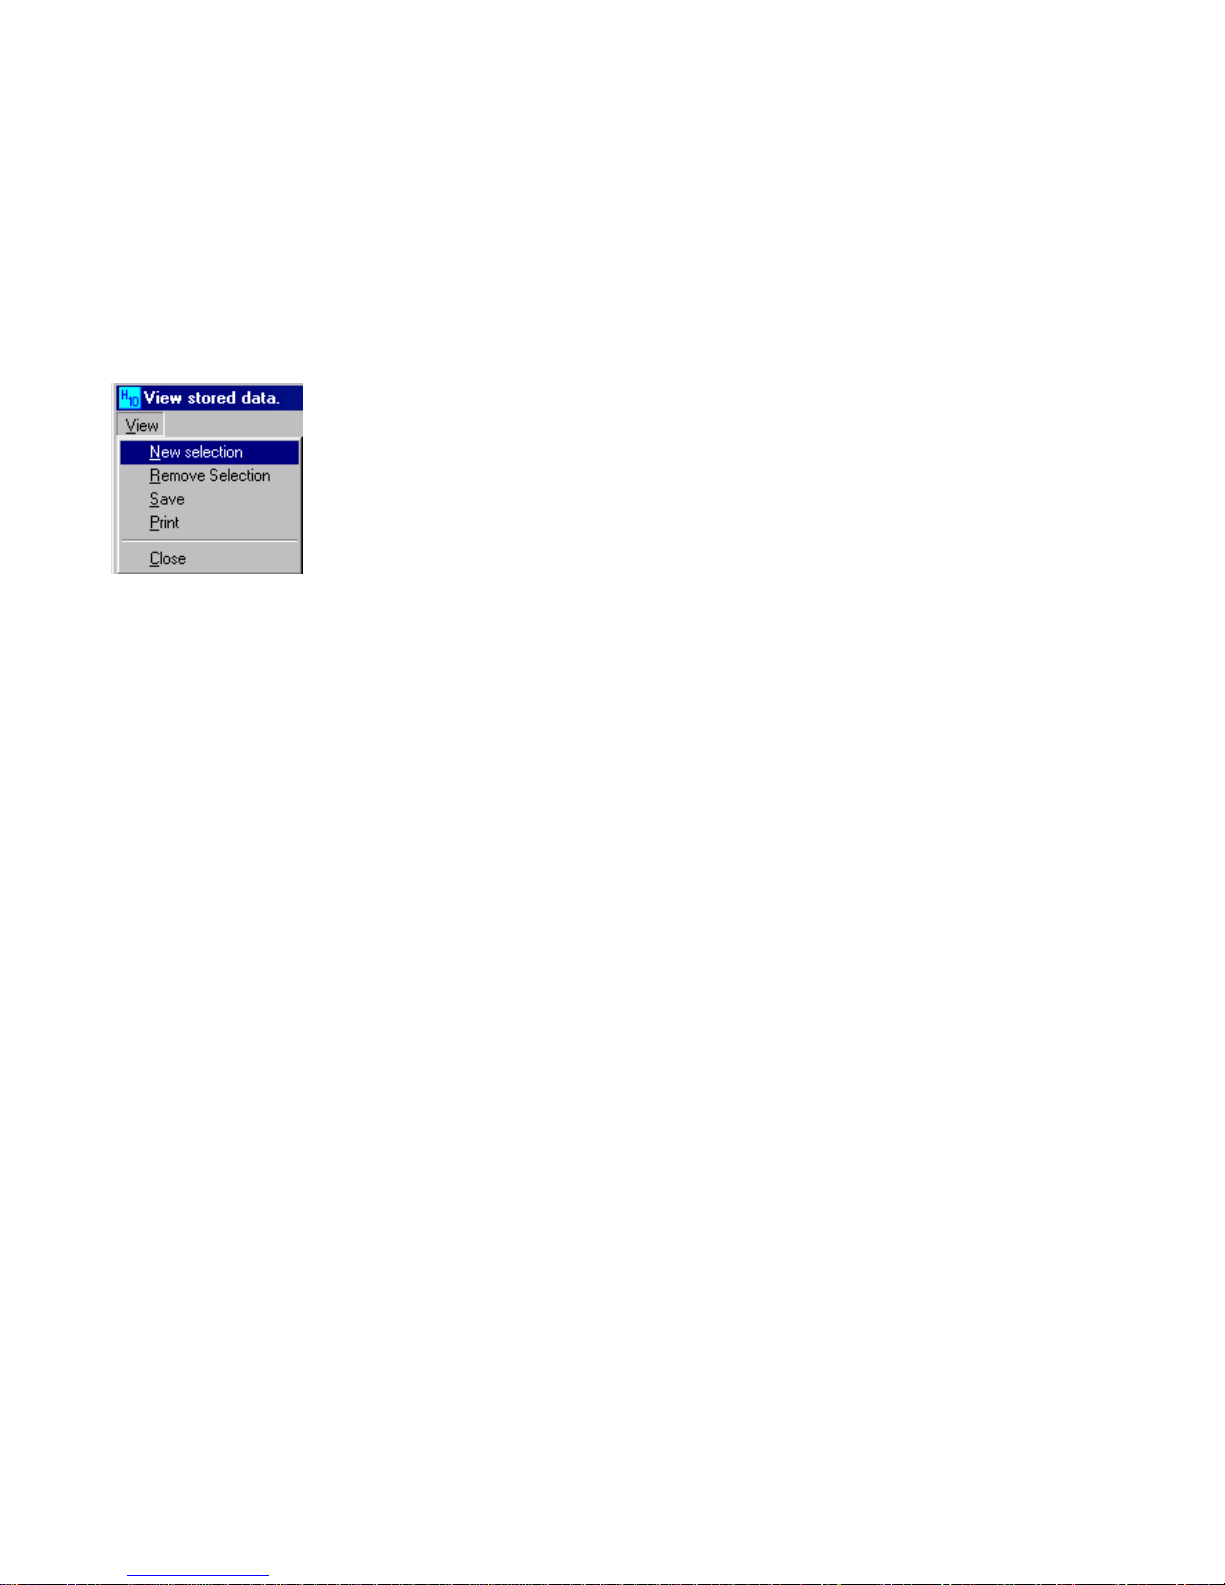
Click on [View] in the menu bar to make a new selection, remove an existing selection, save the results, or print the
results.
New Selection: if only a part of the results must be removed, printed or saved; select the desired lines.
Remove Selection: click this option in order to remove the selection.
Save: the results will be saved in the chosen format.
Print: the selected results will be printed.
Page 24
24
2.5.3 Printing Stored Data/Results
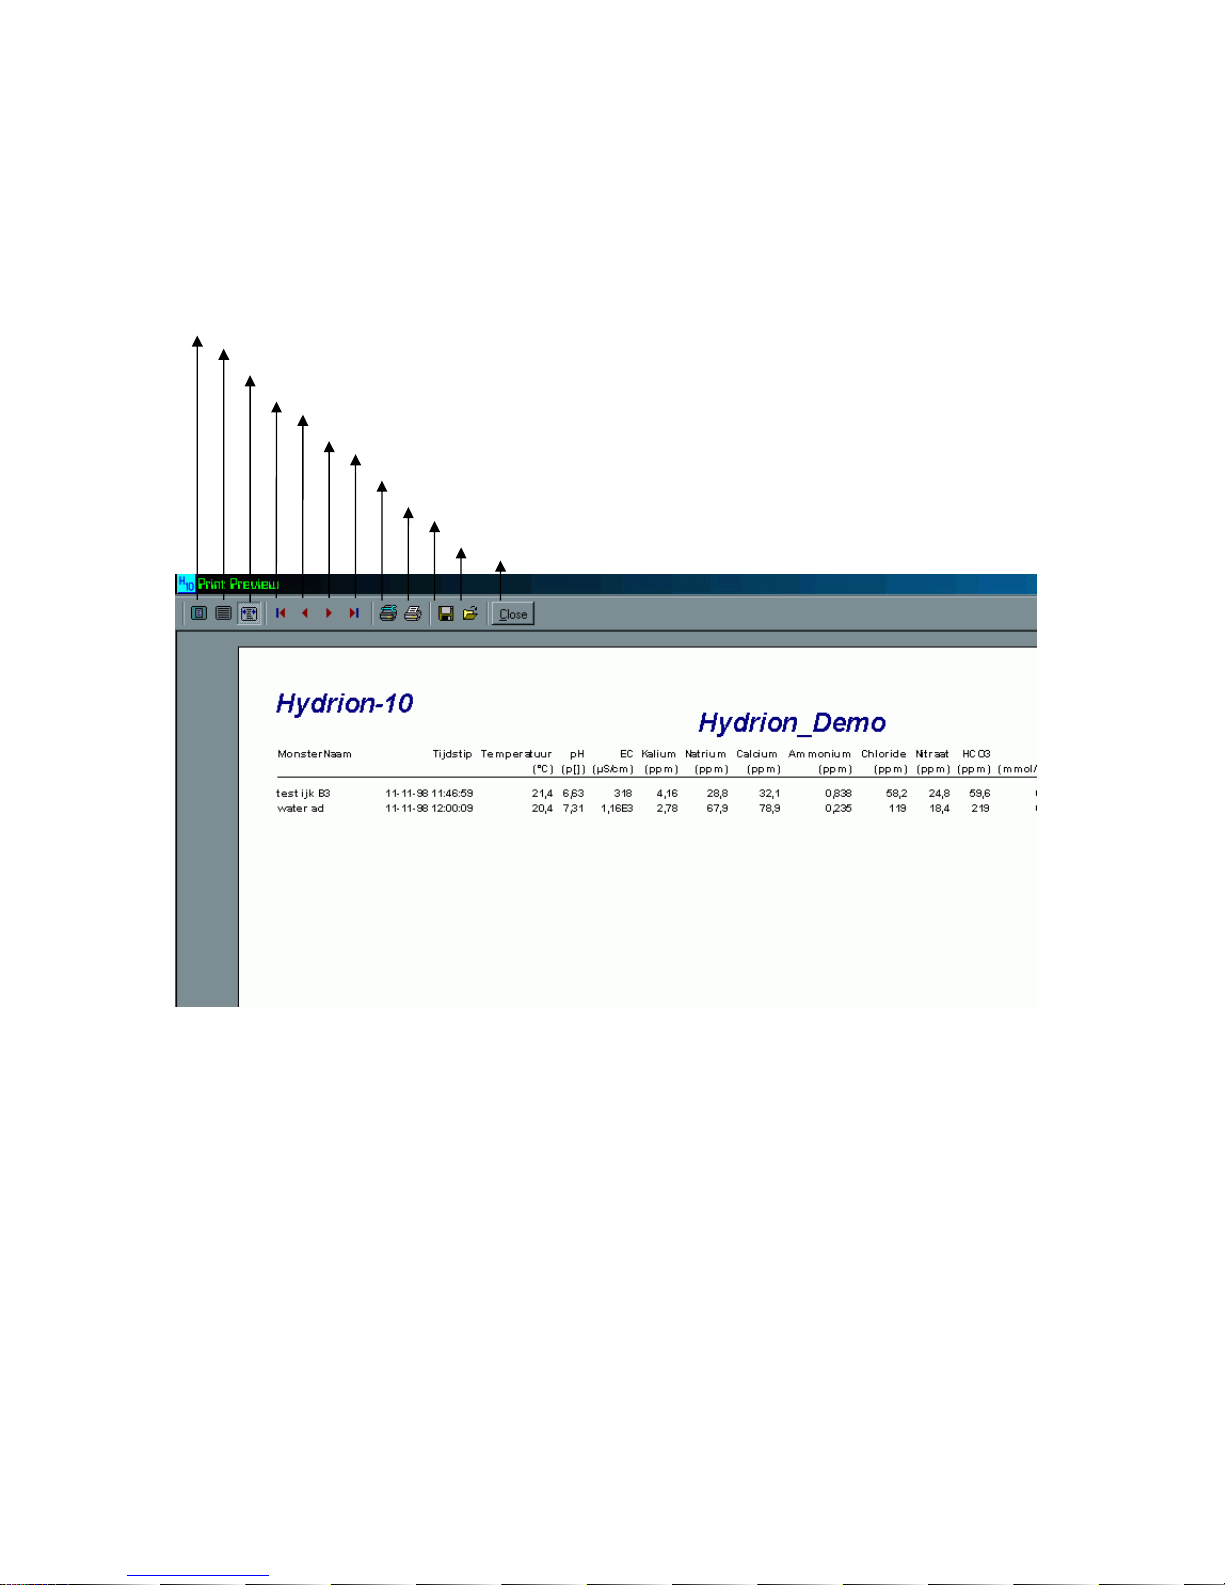
If [Print table] is selected, a print preview will appear.
Use the icons in the menu bar to adjust the columns so that they fit on either A4 or Letter format paper.
To actually print out the results, click on the printer icon in the menu bar.
Zoom to fit
100% zoom
Zoom to width
First page
Previous page
Next page
Last page
Printer setup
Print
Save report
Load report
Exit print preview
Page 25
25
3 Specifications
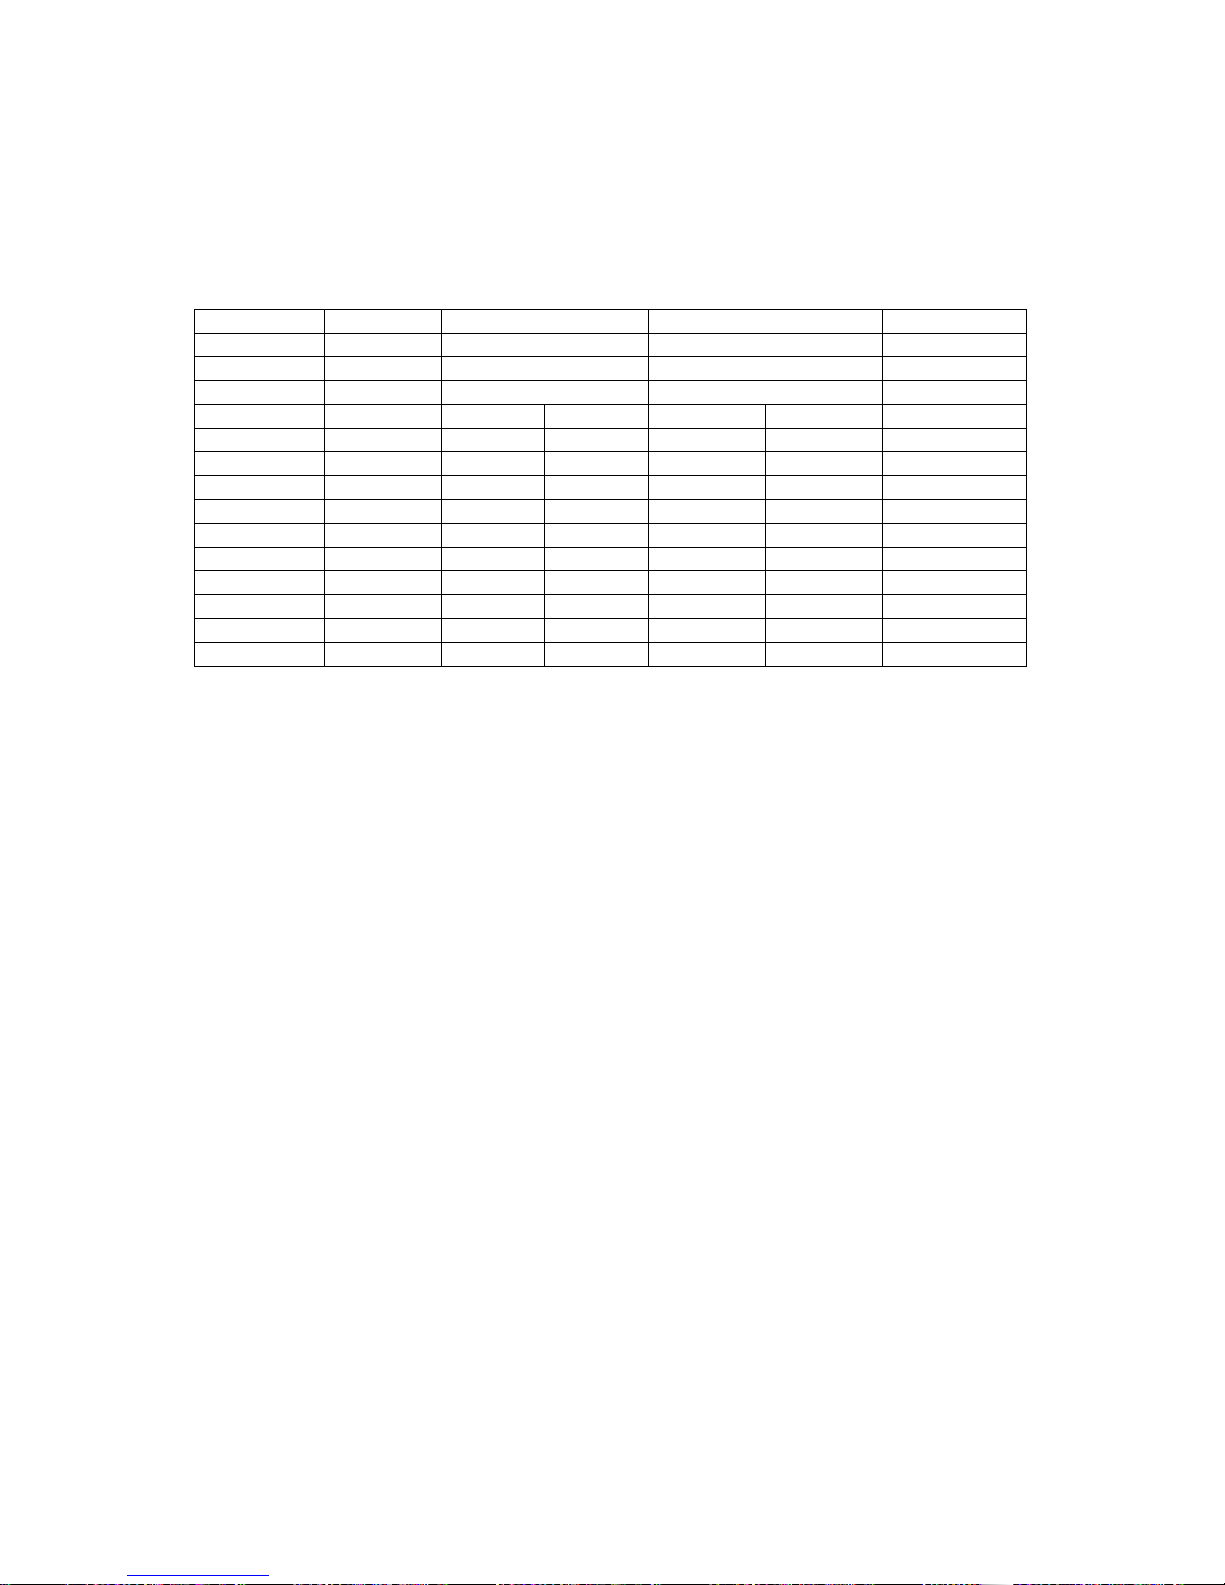
3.1 Measuring Range
Sensor type
minimum
maximum
lifespan
Temperature(*)
Pt100
5 °C 30 °C
∞
EC
20
4 microS/cm 10000 microS/cm
∞
pH ISE
4 10 >2 year
K
+
ISE 5*10
-
6
M
0,2 PPM 3.900 PPM
0,1 M 6 months
Na+ ISE
10
-
5
M 0,2 PPM 2.300 PPM
0,1 M
>2 year
Ca
2+
ISE 5*10
-
5
M 2,0 PPM 1.000 PPM
0,04 M
2 year
NH
4
+
ISE 4*10
-
6
M 0,08 PPM 1.800 PPM
0,1 M 6 months
Cl
-
ISE 3*10
-
5
M 2,4 PPM 3.500 PPM
0,1 M
>2 year
NO
3
-
ISE
10
-
5
M 0,6 PPM 6.200 PPM
0,1 M
2 year
HCO
3
-
Gas
2 year
at pH 4 4,4*10
-
8
M 0,003 PPM
2,7 PPM 4,4 *10
-
5
M
at pH 7 4,4*10
-
5
M 2,7 PPM 2.700 PPM 4,4*10
-
2
M
> pH 8,2
unreliable
Reference (**) Ag/AgCl
>3 months
(*) Temperature of sample fluid should not exceed given values. Low temperatures make ISE sensors
slow, high temperatures speeds up aging of ISE sensors as does high ionic strength.
(**) Reference electrode needs refill after 3 months
Total ionic strength must not exceed 0.5 M.
Maximum inaccuracy is +/-10% of the measuring value over the entire calibration range.
Page 26

26
3.3 Sensor-Unit Maintenance
Always store the Sensor-unit in the provided storage vessel. To prevent the sensors from drying out, move
the Sensor-Unit directly from the fluid to the storage vessel.
A thorough cleaning of the Sensor-unit should be performed once a month. This cleaning should also be
performed if the Sensor-unit has come in contact with polluted water (i.e. containing bacteria, fungi,
floating organic material, etc.). This cleaning will prevent the growth of bacteria and/or fungi on the sensor
membranes, which can considerably shorten the lifespan of the Sensor-unit.
To perform this thorough cleaning of the Sensor-unit, immerse it in a 70% alcohol solution for exactly 30
seconds. Then rinse the Sensor-unit with old one-point calibration fluid for an hour. After this, the
Hydrion10 is ready for use or long-term storage.
Page 27
27
Appendix:
This version of the Hydrion10 contains Smart-Sensors inside the Sensor-unit. The body of a Smart-Sensor
functions as a mini data logger that contains calibration data that is used by the PC to convert the raw
data into accurate measurement data. To check the Smart-Sensor data inside the Sensor-unit, a special
monitoring program scans them at the start of each measurement session.
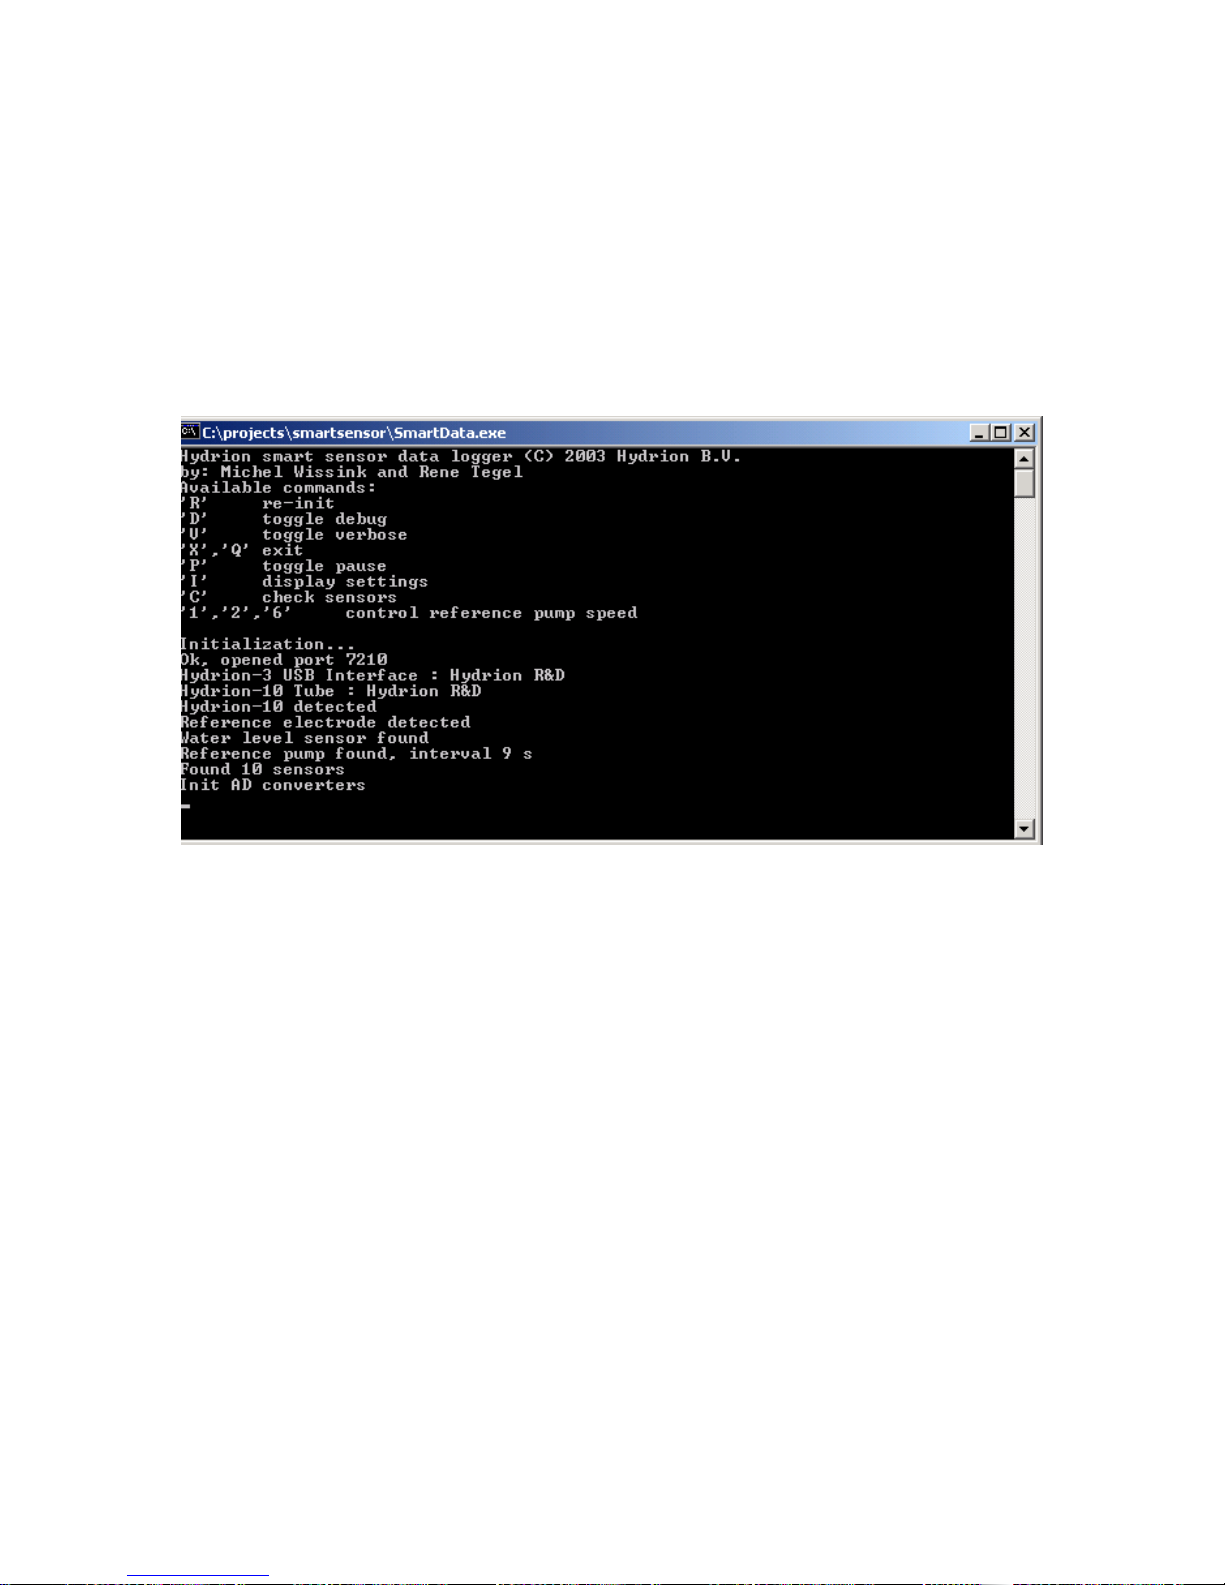
Smart-Sensor data check Application
Most important functions:
• ‘R’: If a sensor is unplugged while the meter is still working, press ‘r’.
• ’C’: If everything is working well, this gives a status report of the most important sensors.
• ‘Q’: Exit
Guidelines for the Replacement of Sensors and Sensor caps
Aside from the temperature and EC sensor, all other sensors have a limited lifespan. The life expectancy
of ISE (Ion Selective Electrode) sensors varies from 4 months to over 24 months. Although the pH sensor
is a Smart-Sensor and also an ISE, its has no replaceable cap and must be replaced completely. The
CO2 gas sensor is a Smart-Sensor with a replaceable cap, but it is not an ISE. Replacement of the
electrolyte and its cap is more complicated. This sensor can not be pulled out of the Sensor-unit as
described below.
A Smart ISE Sensor consists of a body containing electronics, some electrolyte fluid and a sensor cap
with an ion-selective membrane. All the ISE sensors have replaceable sensor caps. All Smart-Sensors
(except the CO2 gas sensor) can easily be replaced from the Sensor-unit with a sensor puller. After
extracting the sensor from the unit one can remove the cap. This allows you to replace the inner
electrolyte fluid and place a new cap onto it.
The complete Smart-Sensor can also be replaced, if that is more convenient. Smart-Sensors contain the
most recent calibration data, so a factory delivered Smart-Sensor is immediately ready for use.
Replacement of a Smart-Sensor should only be done by certified personnel or a Hydrion distributor.
 Loading...