

Page 1
INSTALLATION INSTRUCTIONS
9300 SERIES
FLUSH WELL LIGHTS
Installation should be performed by a qualified
electrician in accordance with the National Electrical Code
and relevant local codes.
1. Install well flush with finish grade in EARTH OR CON-
CRETE ONLY.
2. Provide 6" of pea gravel at bottom of well for drainage.
3. Position j-box or combo box so that it is flush with finish
grade and interconnecting conduit enters under well.
4. Leave enough cord in well to pull lamp housing out for
re-lamping.
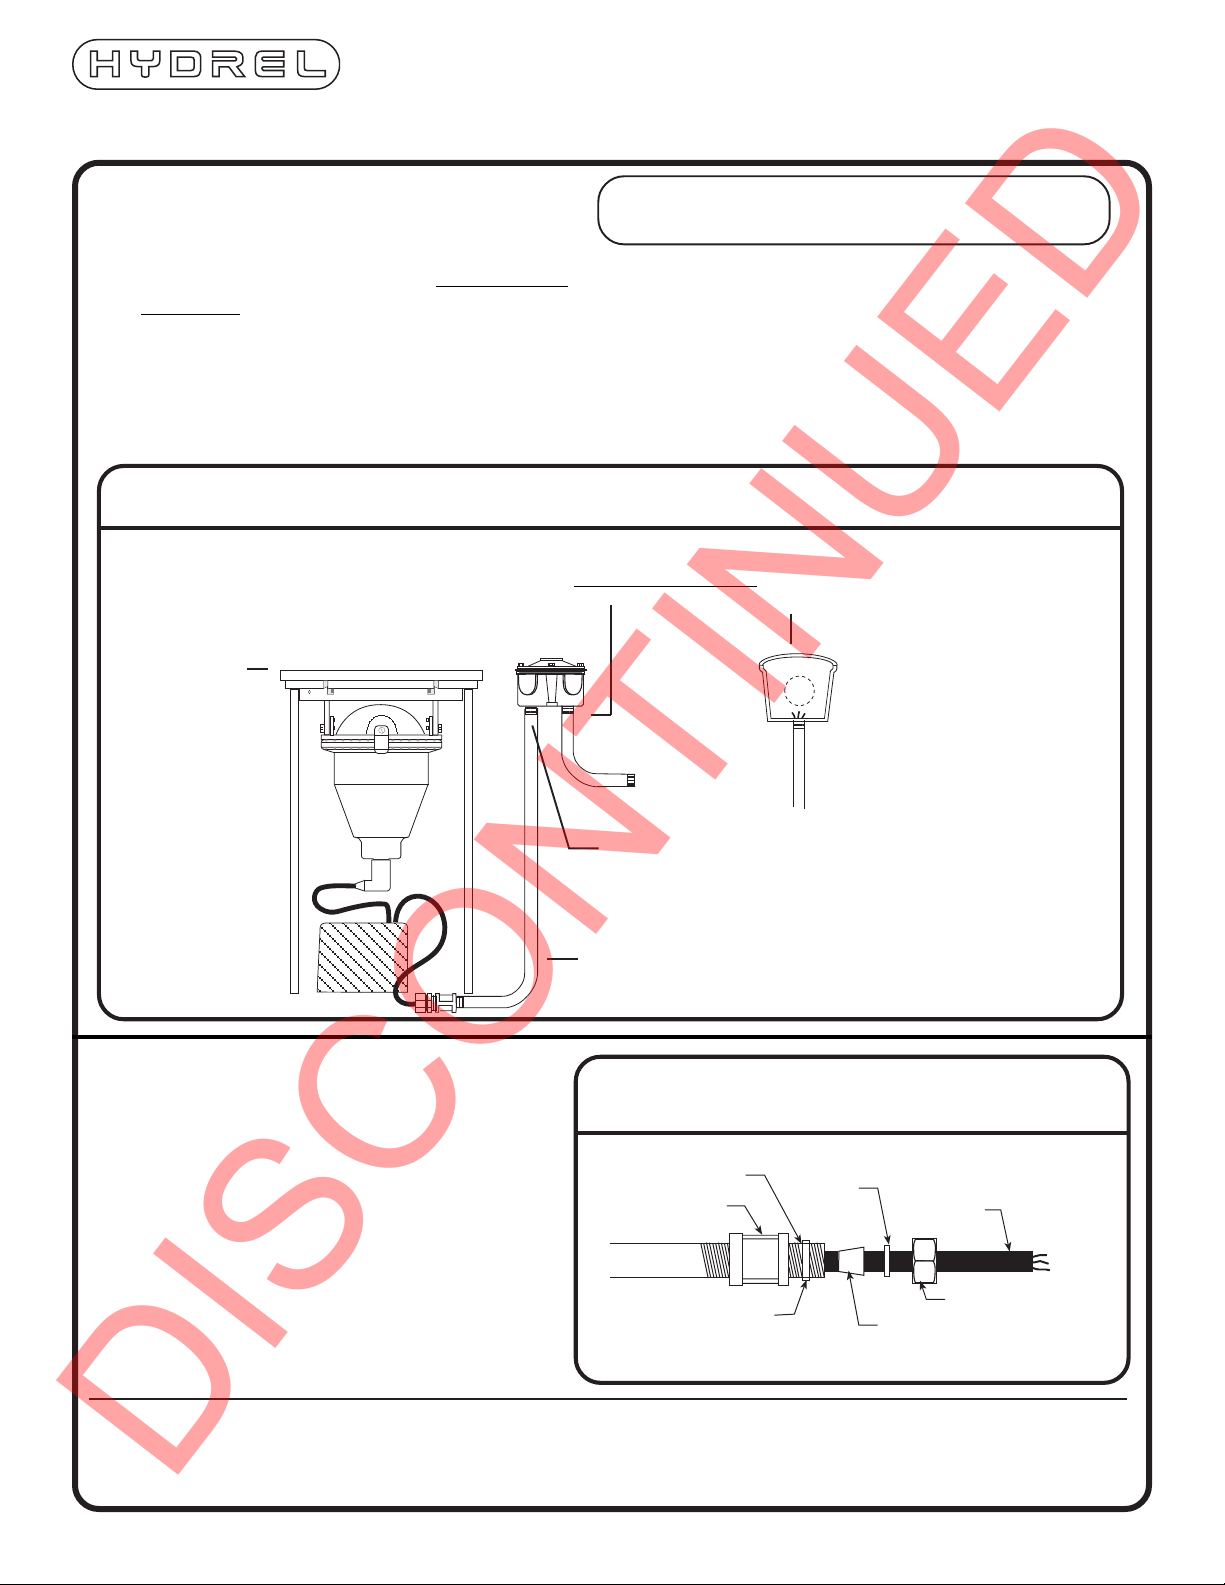
INSTALLATION DIAGRAM
USE CORRECT LAMP TYPE AT RATED WATTAGE.
FLUSH WITH
FINISH GRADE IN
EARTH OR CONCRETE ONLY.
T
T
5. Install correct lamp type at rated voltage.
6. Tighten j-box screws using a crisscross pattern to 50
inch pounds (minimum).
7. Remove debris from screw holes and under gasket, or
lamp housing will not seal properly.
8. Place lamp housing into the fixture well and position it.
9. Install grill and tighten set screws securing it to the well.
SEAL CONDUIT ENTRY WITH SUITABLE COMPOUND TO PREVENT
MOISTURE PENETRATION FROM THE SUPPLY CONDUIT SYSTEM.
T
T
TO SUPPLY
USE SUITABLE THREAD SEALING COMPOUND WHEN CONNECTING CONDUIT.
CORD SEAL INSTALLATION DETAIL:
1. Slip brass cord seal onto fixture cord and push
cord through the fixture well and conduit until
sufficient cord is in j-box for proper connections
to be made.
2. Thread brass cord seal into coupling at end of
supplied conduit. Tighten completely.
3. Use minimum of 3 wraps of teflon tape around
threads for water tightness.
4. Cord seal will act as a watertight connection and
strain relief.
©2006 Hydrel
Rev. 07/26/06
INS-93 REV_0
DISCONTINUED
NOTE: HYDREL RESERVES THE RIGHT TO MODIFY SPECIFICATION WITHOUT
NOTICE. Any dimension on this sheet is to be assumed as a reference
dimension: "Used for information purposes only. It does not govern
manufacturing or inspection requirements." (ANSI Y14.5-1973)
T
THE FACTORY CONDUIT IS FOR INTERCONNECTING
THE LAMP HOUSING TO THE J-BOX.
EXPLODED VIEW CORD SEAL
TEFLON TAPE
COUPLING
FACTORY
CONDUIT
CORD SEAL BODY
NYLON
WASHER
GROMMET
FIXTURE
CORD
TO
LAMP
CORD SEAL NUT
12881 Bradley Ave
Sylmar, CA 91342
Phone: 818-362-9465
Fax: 818-362-6548
www.hydrel.com
Page 2
9300 SERIES
RE-LAMPING, MAINTENANCE AND AIMSET™ RECOMMENDATIONS
Installation should be performed by a qualified
INSTALLATION INSTRUCTIONS
RELAMPING:
1. Make sure power to fixture is off.
2. Remove the grill and dismount the sealed lamp module from
the grate.
3. Unplug the lamp module and place the attached plug cover
into the connector.
4. When replacing the lamp use correct lamp type and rated
wattage.
5. Take the module to a clean dry place (to prevent condensation within the lamp module, it’s best to relamp in a dry
atmosphere, such as an air conditioned space.)
6. The lamp module is sealed by a clamp ring with a single
fastener. Loosen the ring for easy access to the lamp.
7. Replace the lamp, clean the lens, and replace the gasket.
8. Remove the protective plug from connector and reconnect
the module.
9. Remount the lamp module onto the grate and secure the
grate to the well.
10. Tighten set screws to secure.
MAINTENANCE TIPS:
1. Clean lens: Debris must be keep clear from top of fixture.
Excessive heat could occur that may harm fixture gasket or create a fire hazard.
2. Lenses may be soaked in white vinegar to remove lime build-up.
3. Remove any debris that might accumulate inside the well during operation or during the relamping process.
4. Replace gasket if it is cracked, torn, or badly depressed or worn.
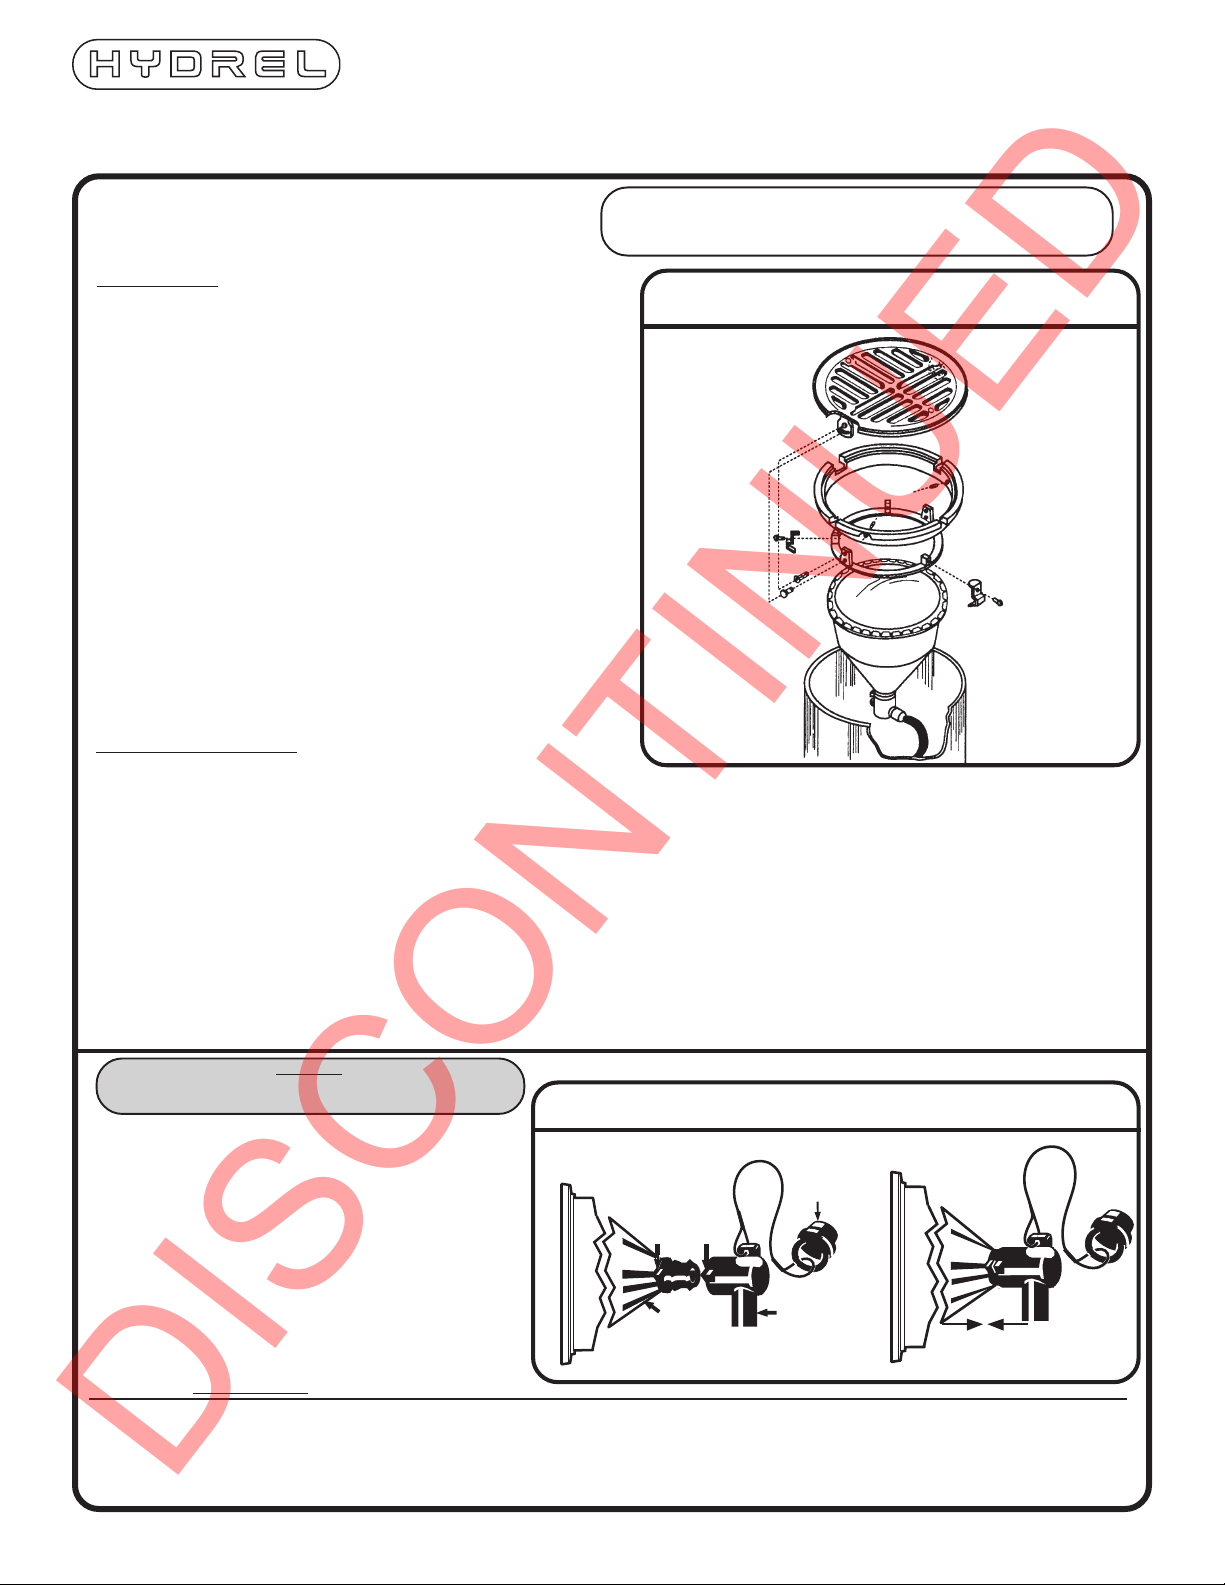
AIMSET™
The AIMSET™ accessory allows relamping of the fixture without reaming. A machined ring is secured to the well via set
screws which allow a 360o rotation. The grate is indexed such that it will fit into a single position on the ring and is secured
with two fasteners. Aiming is accomplished by adjusting the lamp module to the desired angle and tightening a bolt and a
screw.
The AIMSET™ allows the installer to preset the beam angle and direction. Once set the fixture can be relamped while
retaining the original setting—a significant time saving and aiming accuracy convenience. Available in Aluminum and Bronze.
DO NOT CONNECT LAMP MODULE WHILE SYSTEM IS
ENERGIZED. TURN OFF POWER PRIOR TO LAMPING.
1. Check marking on lamp module with power cord
markings to ensure proper power connection.
2. Remove red temporary plug cover from lamp module.
(Lamp module connector is charged with electrical
compound. Be careful not to get dirt into compound.)
3. Unplug attached plug cover from power cord. Leave
cover attached for connector protector protection
during future relamps.
4. Align triangle tab on bottom of the lamp module
connector with the tab on the molded power cord.
Lightly push the connector & cord together until the
connection is seated. Then push firmly to seat the
connector. DO NOT TWIST.
©2006 Hydrel
Rev. 07/26/06
INS-93 REV_0
DISCONTINUED
CAUTION:
NOTE: HYDREL RESERVES THE RIGHT TO MODIFY SPECIFICATION WITHOUT
NOTICE. Any dimension on this sheet is to be assumed as a reference
dimension: "Used for information purposes only. It does not govern
manufacturing or inspection requirements." (ANSI Y14.5-1973)
electrician in accordance with the National Electrical Code
and relevant local codes.
RE-LAMPING DIAGRAM
MODULE CONNECTOR DETAIL
ATTACHED
PLUG
COVER
ALIGN TABS
LAMP
MODULE
POWER
PLUG
PUSH TO SEAT
12881 Bradley Ave
Sylmar, CA 91342
Phone: 818-362-9465
Fax: 818-362-6548
www.hydrel.com
 Loading...