

Hydra Research Nautilus User Manual&handbook
N A U T I L U S
User Manual & Handbook
Version 1.0
2016-2019 Hydra Research, LLC | Hydra Research™ is a trademark of Hydra Research, LLC
Portland, OR, USA | www.hydraresearch3d.com | support@hydraresearch3d.com

Table of Contents
Safety Information 4
1 Product Details 5
1.1 Hardware Overview 5
1.1.1 Exterior 5
1.1.2 Interior 7
1.2 Touch Screen UI Overview 8
1.2.1 Control Tab 9
1.2.2 Print Tab 13
1.2.3 Console Tab 15
1.2.4 Setup Tab 16
1.3 Duet Web Control 17
1.3.1 Interface Overview 17
1.4 Accessories 18
1.4.1 Tool Cartridges 18
1.4.2 Print Surfaces 20
1.4.3 Tool Kit 21
1.4.4 Filter 22
1.5 Product Support 23
1.5.1 Documentation & Resources 23
1.5.2 Community Forum 23
1.5.3 Hydra Research Support 23
1.5.4 Duet Open Source Electronics 23
2 Getting Started 24
2.1 Getting Ready to Print 24
2.1.1 Powering ON 24
2.1.2 Bed Leveling and Z-Offset 24
2.1.3 Connecting to a network 25
2.1.4 Password Protecting your Nautilus 26
2.1.5 Print Surface and Purge Bucket 26
2.1.6 Loading/Unloading Material 27
2.2 Cura Setup 28
2.2.1 Installing the Hydra Research Nautilus Plugin 28
2.2.2 Connecting to your Nautilus 30
3 Printing 31
3.1 Slicing 3D Files in Ultimaker Cura 31
3.1.1 Importing a Model and Slicing 31
3.1.2 Uploading Sliced Files to your Nautilus 31
3.2 Starting a Print 32
3.3 Removing a Print 33
3.3.1 Removing the part from the Print Surface 33
1

3.4 Canceling a Print 34
3.5 Filament Handling 34
3.6 Post-Processing 35
4 Advanced Usage & Techniques 36
4.1 Printer Calibration 36
4.1.1 Temperature tuning (PID) 36
4.1.2 Z-Offset Calibration 36
4.1.3 Automatic Bed Leveling 37
4.2 Filament Runout 37
4.3 Power Loss Recovery 38
5 Materials 39
5.1 PLA - Easy to Print 39
5.2 Co-polyester - Tough and Chemically resistant 40
5.3 ABS/ASA - Durable and Tough 41
5.4 Nylon - Abrasion Resistant and Durable 42
5.5 Vinyl/PVC - Flame retardant, tough, and chemically resistant 43
5.6 Flexible - Wear and abrasion resistant 44
5.7 Composites - Combination materials that exhibit unique properties 45
6 Maintenance and Troubleshooting 46
6.1 Software 46
6.1.1 Updating Firmware and Macros 46
6.1.3 Updating and Troubleshooting Cura 48
6.2 General Maintenance 49
6.2.1 Purge Bucket 49
6.2.2 Clean the Outside 50
6.2.3 Clean the Inside 50
6.2.4 Print Surface Maintenance 51
6.2.5 Removing Frame Panels 51
6.3 Tool Head and Extruder 54
6.3.1 Clearing Material Jams 54
6.3.2 Cleaning the Extruder 56
6.3.3 Extruder Tension 57
6.4 Tool Cartridges 58
6.4.1 Clean the Tool Cartridges 58
6.4.2 Clearing Nozzle Jams 58
6.4.3 Replacing Tool Cartridge PTFE Tubing 59
6.5 Movement System 59
6.5.1 Belt Tension 59
6.6 Electronics 60
6.6.1 Duet Wiring Diagram 60
2

Nautilus User Manual
by Hydra Research, LLC.
Permission is granted to copy, distribute and/or modify this document under the terms of the Creative Commons
Attribution-ShareAlike 4.0 International License. To view a copy of this license, visit
http://creativecommons.org/licenses/by-sa/4.0/ or send a letter to Creative Commons, PO Box 1866, Mountain
View, CA 94042, USA.
The Nautilus designs and software are licensed under LGPL-3.0 (https://www.gnu.org/licenses/lgpl-3.0.en.html)
by Hydra Research, LLC.
At Hydra Research we believe progress is a collaborative effort! We have released source files for the Nautilus 3D
printer on our GitHub https://github.com/hydraResearchLLC/. This means you can use, share, reproduce, or sell
any of our designs as you like, as long as you publish everything you do under the same or a compatible license.
For more information, call (503) 849-4879 or visit HydraResearch3D.com.
3

Safety Information
WARNINGS
The Nautilus 3D printer contains electronic, motorized, and heated parts. Always be aware of possible hazards
during operation. Keep your printer indoors in a dry, ventilated area and do not expose to rain or snow.
Burn Hazard
Never touch the nozzle, heater block, Print Surface, or build plate while hot, especially during printing. Make sure
heating to the tool and bed are turned off and internal parts have cooled completely before touching. Do not touch
recently extruded plastic, it is very hot and can stick to the skin causing burns. Avoid touching motors during or
after printing as they can also get hot.
Pinch Hazard
The Nautilus uses motorized, moving parts that can get caught on body parts, hair, jewelry or clothing. Do not
reach or put anything inside the printer during operation to avoid possible injury.
Fire Hazard
Never place flammable materials or any liquids on or near the printer while it is powered on. Electronics and
heated parts can pose a fire hazard when used improperly. Never cover the fan vents on your printer; doing so
can damage your printer and is a fire hazard.
Electric Shock Hazard
Always power down and unplug your Nautilus before connecting or disconnecting wires or accessing the
electronics enclosure. Never open the power supply; it contains parts that can cause harm when handled
improperly. Even when powered off, some power supply components pose a risk of electric shock. Place the
power cable so that it does not pose a tripping hazard and do not use a damaged power cable.
Print Surface
Do not print directly onto the Aluminum Build Plate, it can damage your printer and violate your warranty.
Keep Attended
Never leave your Nautilus unattended during operation or while powered on.
Appropriate Surface
Always keep your printer on a clear, stable, and level surface.
Age Warning
For users under the age of 18, adult supervision is strongly recommended. Small components or printed parts
may present a choking hazard.
Warranty Warning
The warranty included with the Nautilus covers manufacturer’s defects. Failure to observe the above warnings will
void your warranty. Operation instructions can be found in this user manual; failure to follow the instructions or
improper operation can damage your printer and void your warranty. Keep the packaging from your Nautilus; it
must be shipped in packaging approved by Hydra Research for all warranty claims.
User Modifications
The Nautilus is open source and easily modified; the team at Hydra Research respects your right to modify or
repair your printer. However, any damage caused by user modifications or attempted repairs is not covered by
your warranty. If you have any questions or concerns feel free to reach out to us by email:
support@hydraresearch3d.com or phone: +1(503) 849-4879.
4

1 Product Details
1.1 Hardware Overview
1.1.1 Exterior
Front
1. Spool Holder: This is where you will place your spool
of filament. Ensure the free end of the filament is at the
front of the spool and pointing downwards.
2. Filament Insertion Point (FIP): There is a hole at the
top of the FIP lined with a PTFE tube. This is where
you will insert filament for printing. This part also
contains the switch for filament runout detection.
3. Touch Panel: This is the touchscreen interface for
your Nautilus. There is an overview of the interface
structure in Section 1.2
4. IO Panel: This plate on the side of your printer
contains the power switch, USB-B port for wired
printing, and Micro USB port for updating the touch
panel.
5. Enclosure Door: This is the door to access the
interior of your Nautilus. The door is reversible if you
are left-handed or just prefer that the door open the
other way. To flip the door, remove the screws holding
the hinges to the printer and swap them with the
placeholder screws on the other side.
ⓘ Do not overtighten the screws; you can strip
out the threads in the front panel
IO Panel
1. Panel USB Port: This Micro USB port is used for
updating the touch panel firmware.
2. Main USB Port: This USB-B port is used for tethered
printing. If you are unable to send files to the Nautilus
over a wireless network, you can connect the Nautilus
to a computer via this port and stream the print job
from Cura to your printer. The printer must not lose
connection to the computer for the duration of the job.
3. Power Switch: Used for powering the Nautilus ON
and OFF.
5
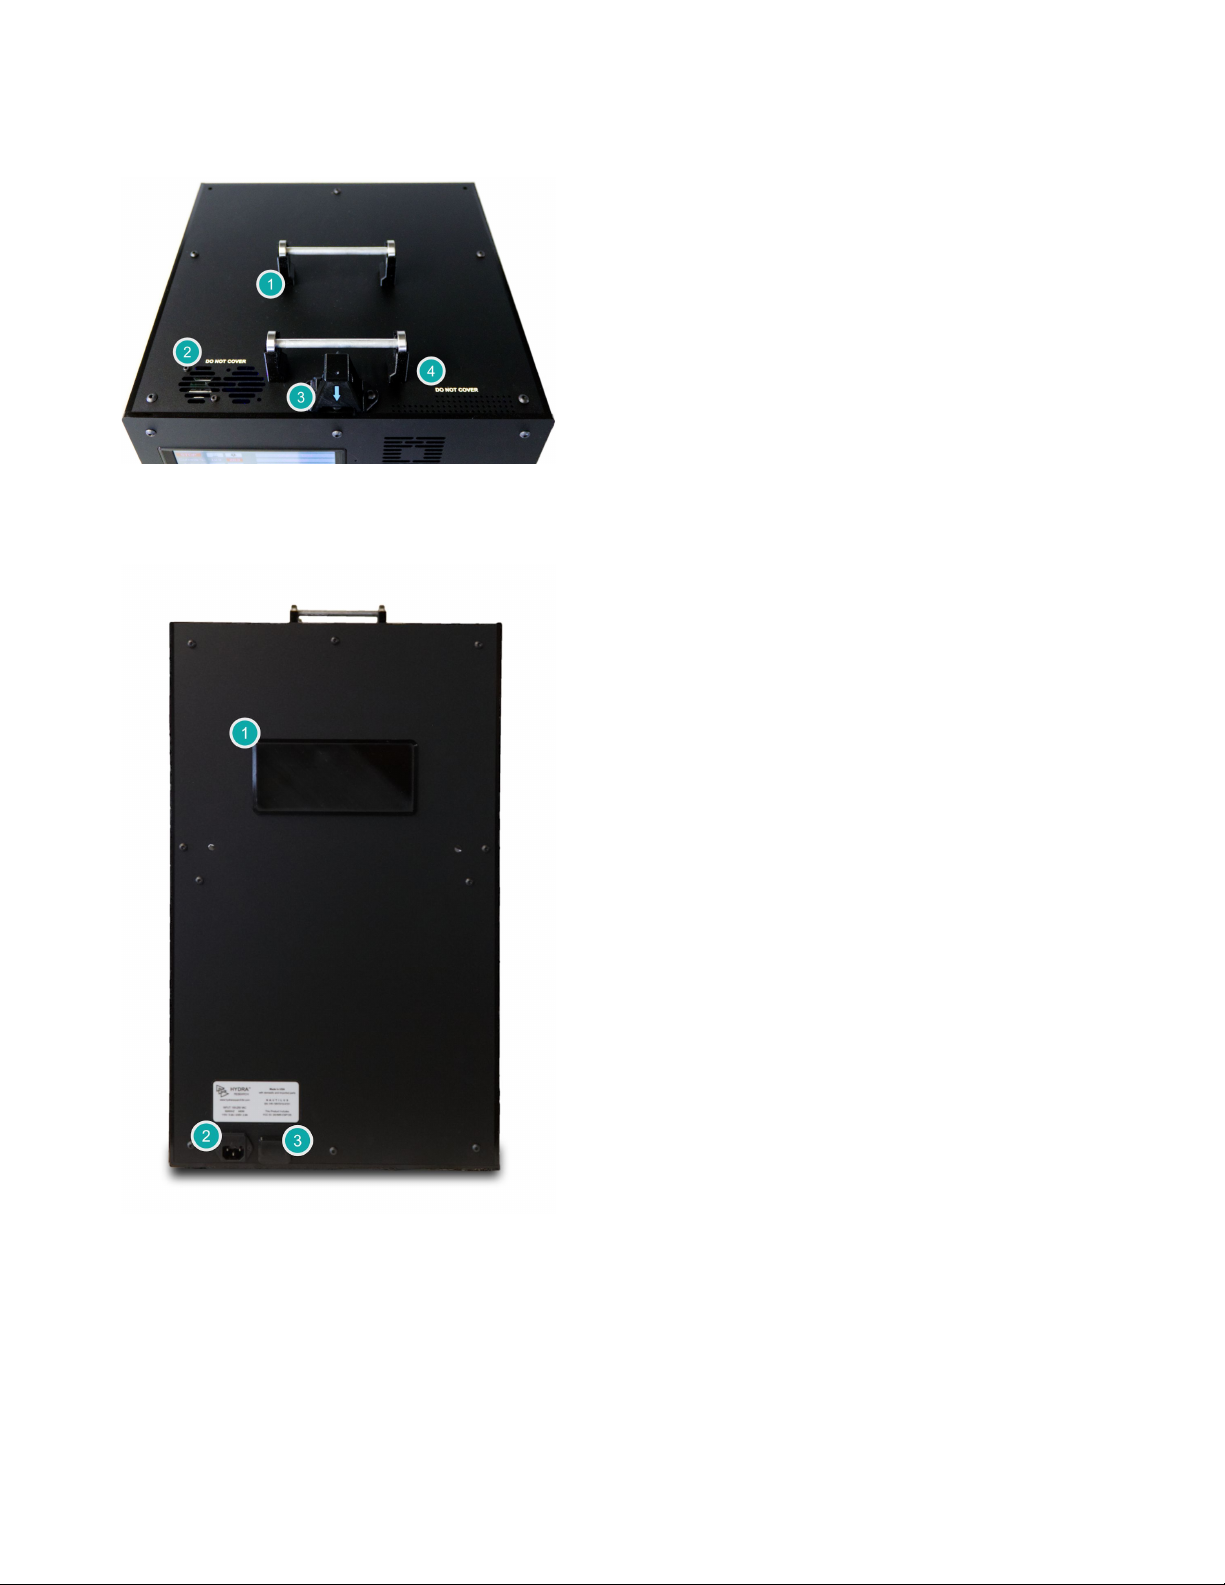
Top
1. Spool Holder: This is where you will place your spool
of 1.75 mm diameter filament. Ensure the free end of
the filament is at the front of the spool and pointing
downwards. The spool holder can accommodate a
spool up to 11 cm wide and 30 cm in diameter.
2. Active Ventilation: Ventilation port with a fan that will
turn ON when needed. Do not cover this vent.
3. Filament Insertion Point (FIP): There is a hole at the
top of the FIP lined with a PTFE tube. This is where
you will insert filament for printing. This part also
contains the switch for filament runout detection.
4. Passive Ventilation: Ventilation port, do not cover.
Back
1. Fume Vent: Two 80mm fan vent holes are located
behind the black plastic cover. The cover can be
unscrewed from the inside of the printer.
2. Power Inlet: This is where the power cord is plugged
into the Nautilus. Make sure to use a cord rated for
10A at 110W or better. The Nautilus can be configured
for 220W input rather easily, if you are interested
contact support.
3. Ethernet Port: This is where you connect an ethernet
cable for wired network connection if you opted for the
Ethernet version of the Nautilus. This port will be
covered if you purchased the WiFi version.
6
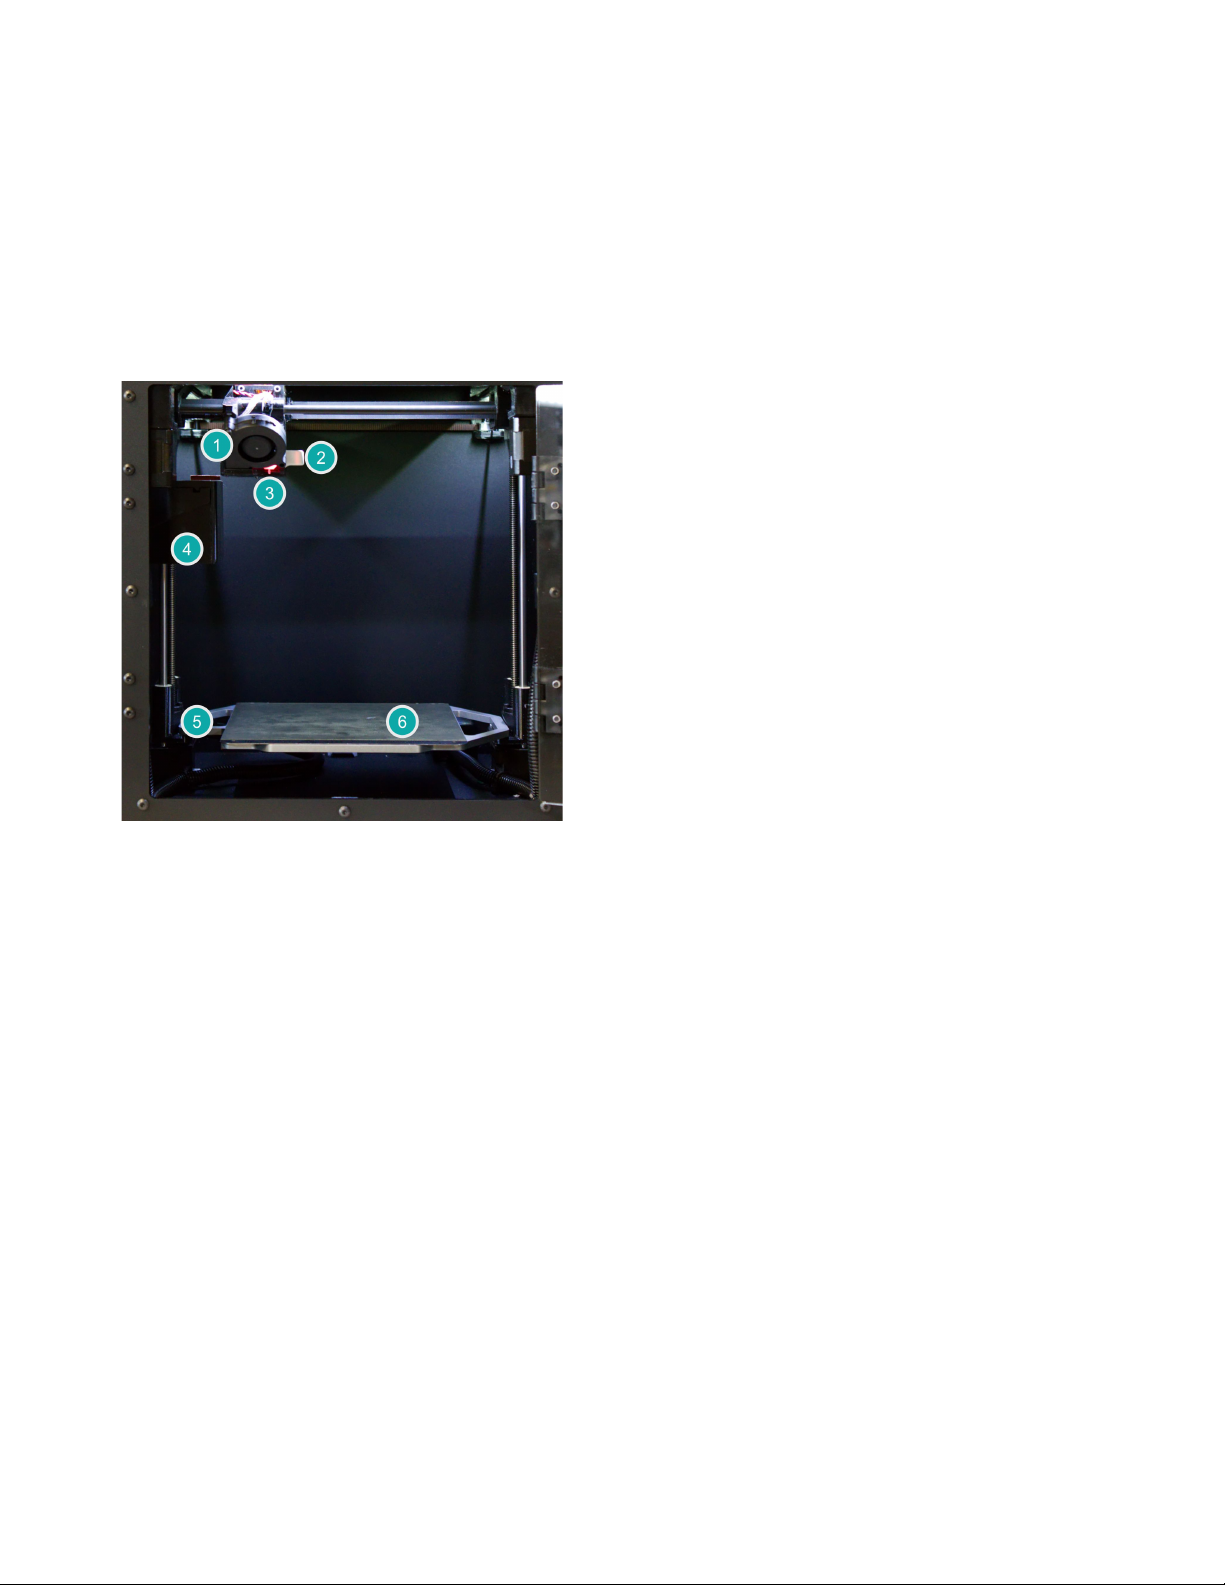
1.1.2 Interior
1. Tool Head: This is the part of the printer responsible
for heating and extruding the plastic filament. It
includes the extruder, Tool Cartridge, part cooling, and
bed probing systems.
2. Tool Cartridge: This part is removable by the white
tab sticking out on the right side of the tool head. (See
Section 1.4.1 for instructions on changing the Tool
Cartridge.)The Tool Cartridge is where the plastic
filament is melted and pushed out of the nozzle to
create 3D printed parts.
3. BLTouch (Bed Leveling) Probe: The BLTouch is the
white cylinder located behind the blower fan on the
front of the toolhead. A small plastic pin will drop down
from the BLTouch during the bed leveling procedure
and for a moment when the printer is powered ON.
4. Purge Bucket: The purge bucket captures excess
material purged from the nozzle during material
load/unload, at the beginning of each print, and when a
print is resumed after a pause. It also has a square,
orange, silicone pad used for wiping excess material
from the nozzle after a purge.
5. Build Plate: This is the heated aluminum plate that
moves up and down. The Print Surface is magnetically
attached to the build plate. Do not print directly on
the build plate, a Print Surface is always required.
6. Print Surface: The magnetically attached, flexible
Print Surface is what the print adheres to during
printing. This part can easily be switched for a
replacement or to use an alternative surface for
improved material adhesion.
7
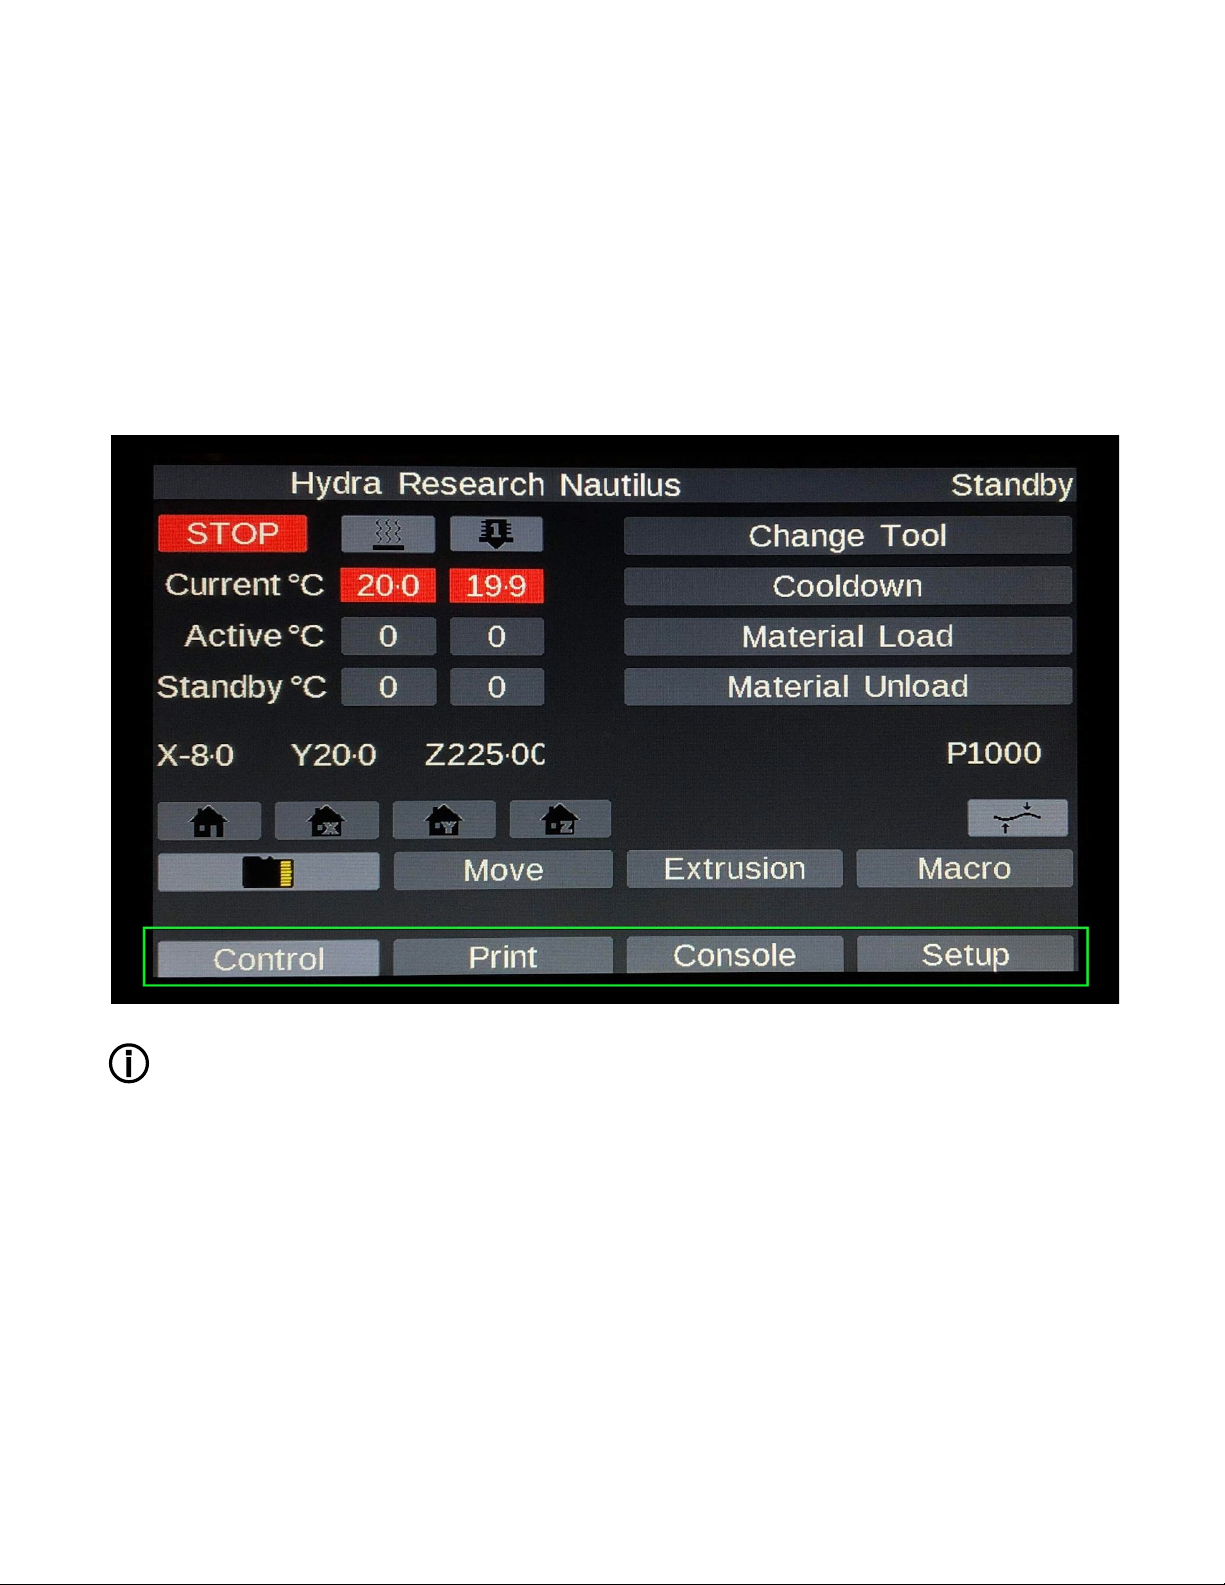
1.2 Touch Screen UI Overview
The Nautilus uses a 7’’ touch screen for user control of the printer. Here you can start print jobs, monitor the
printer’s activity, load/unload material, and much more.
Tabs
The main interface is organized into four tabs that are always displayed at the bottom of the screen (highlighted in
green). The Nautilus defaults to the Control Tab on startup.
Each tab is explored in depth in the following section.
ⓘ The Nautilus uses the Duet open source CNC Control Platform. This platform was designed to work with as
many different configurations as possible so the Nautilus does not use everything that is available. Hydra
Research has streamlined the display configuration as much as possible, but you may run into the occasional
button that does not do anything on your Nautilus.
8
1.2.1 Control Tab
This Tab is opened upon startup of the Nautilus. This and the Print Tab will be where you spend most of your
time.
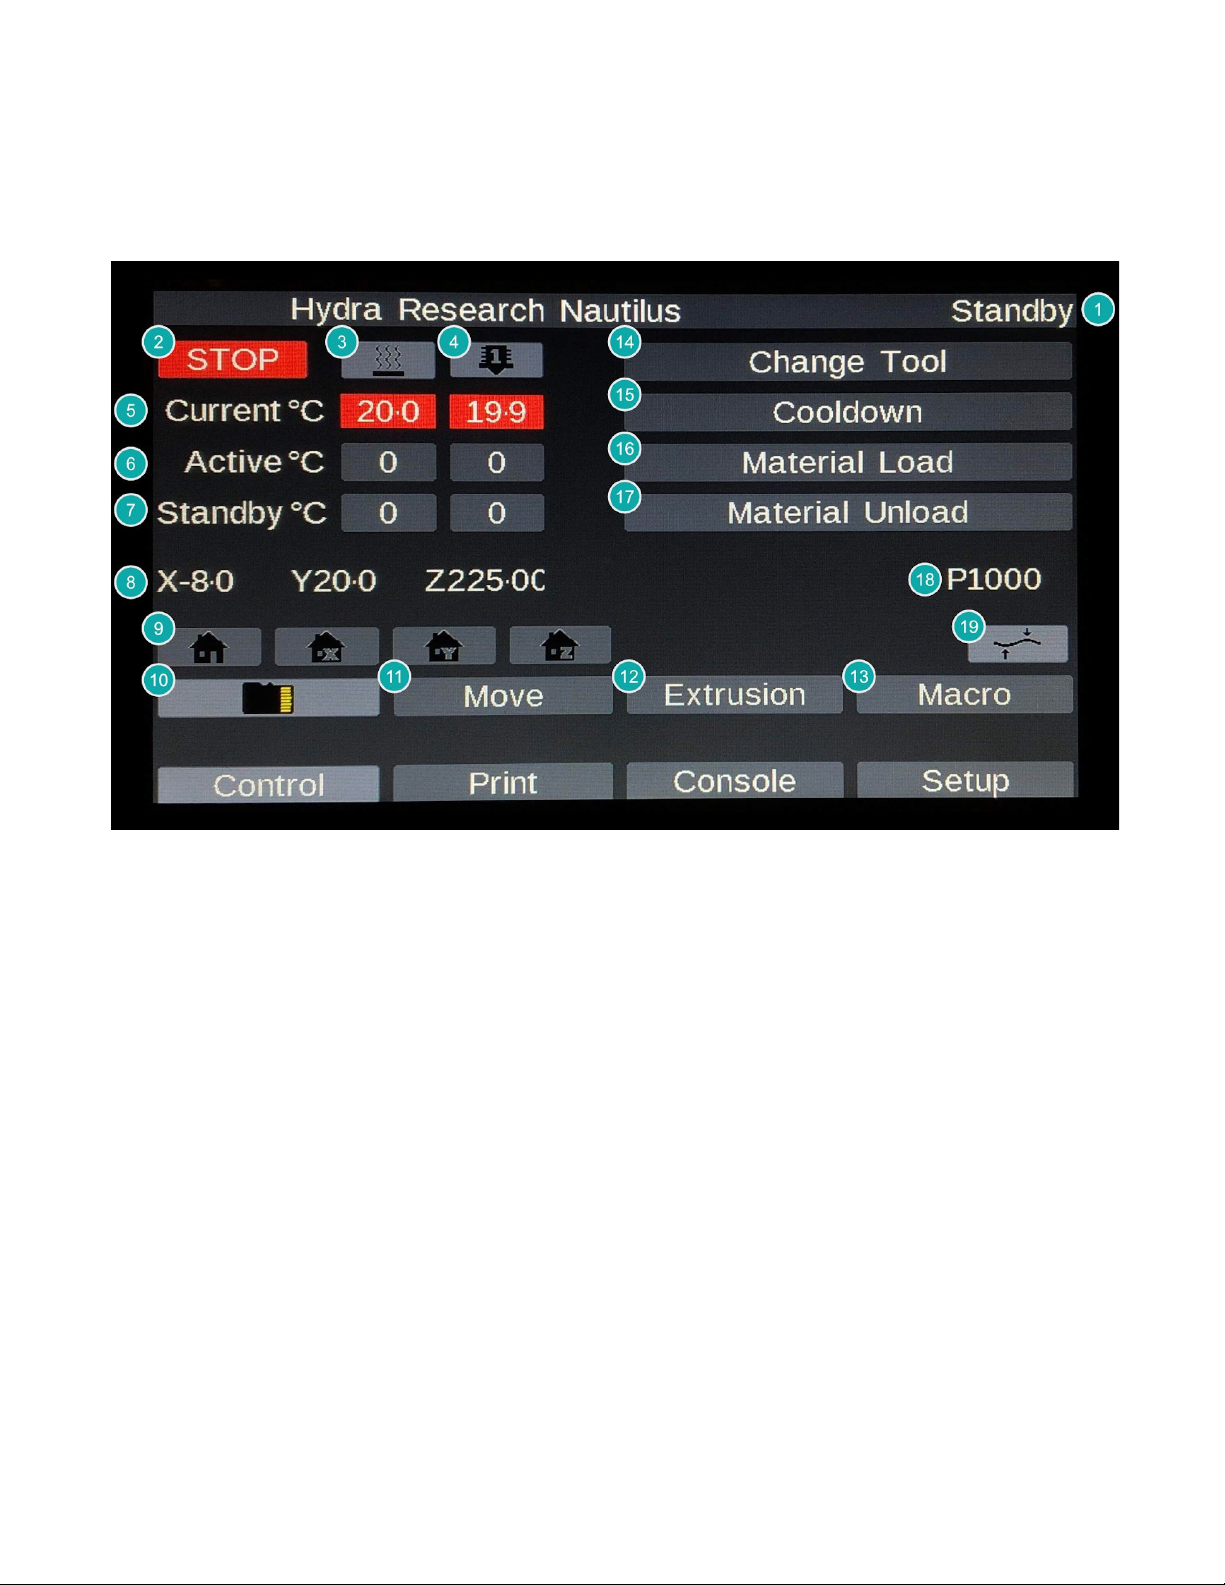
1. Printer Status: Displays the current printer status: Standby, Idle, or Printing.
2. Stop: The button acts as a software emergency stop. For all intents and purposes, it is like turning the
printer OFF and then back ON again. Uses this if you need to stop what the printer is doing urgently.
3. Heatbed ON/OFF: Turns the bed heater ON and OFF.
4. Hotend ON/OFF: Turns the hotend heater ON and OFF.
5. Current Heater Temperatures: The current temperature of the heaters on the Nautilus display in
Celcius.
● Red - the heater is ON and heating to the set active temperature.
● Green - the heater is OFF.
● Purple - heater fault. Check to ensure that the tool cartridge is properly inserted.
6. Active Heater Temperatures: The temperature the heaters will heat to when powered ON. Click the box
below the desired heater to manually adjust the active temperature.
7. Standby Heater Temperatures: The Nautilus does not use standby temperatures. The standby
temperature will usually be set the same as the active temperature unless the active temperature is set
manually by the user via the display or Duet Web Control. Click the box corresponding to the desired
heater to manually adjust the standby temperature.
8. Tool Head Position XYZ: The current XYZ position of the tool head within the printer.
9. Manual Homing: The far left of the homing buttons will home the X, Y, and Z axes all at once; the other
three homing buttons will home each of the axes individually. The Nautilus conducts homing routines
automatically, so you should rarely need to use these functions.
10. Print Jobs: This button opens the file menu for all the Print Jobs that have been uploaded to your printer.
This is where you select a job for printing.
9

11. Manual Movement: Opens manual axis jog control, allowing you to manually move the tool head and
build plate around. This is primarily used for maintenance and troubleshooting, but may be useful after
pausing a print job for inspecting or repairing prints.
● X moves the tool to the left (-) or the right (+).
● Y moves the tool to the front (-) or the back (+).
● Z moves the print surface up (-) or down (+).
12. Manual Extrude: Opens the manual extrusion control, allowing you to manually extrude or retract
material/filament. This is primarily used for maintenance and troubleshooting.
13. Macro Menu: Opens the Macro menu, which is home to the majority of the printer functions you will need
for setup and calibration. Four key macros are displayed in the top right corner for easy access.
14. Change Tool: Activate when you want to switch Tool Cartridges, or if you need to remove a Tool
Cartridge for maintenance.
15. Cooldown: Disables all heaters.
16. Material Load: Activates the material loading sequence.
17. Material Unload: Activates the material unloading sequence.
18. Bed Probe Reading: This is the reading from the bed probe, which is used during automatic bed level
compensation. You do not need to pay attention to this. It will display P0 when the probe is not triggered.
19. Automatic Bed Level Compensation: Manually initiate the automatic bed level compensation. This is
only needed for diagnostic/debugging purposes; the Nautilus initiates auto bed level compensation at the
beginning of every print job by default.
10
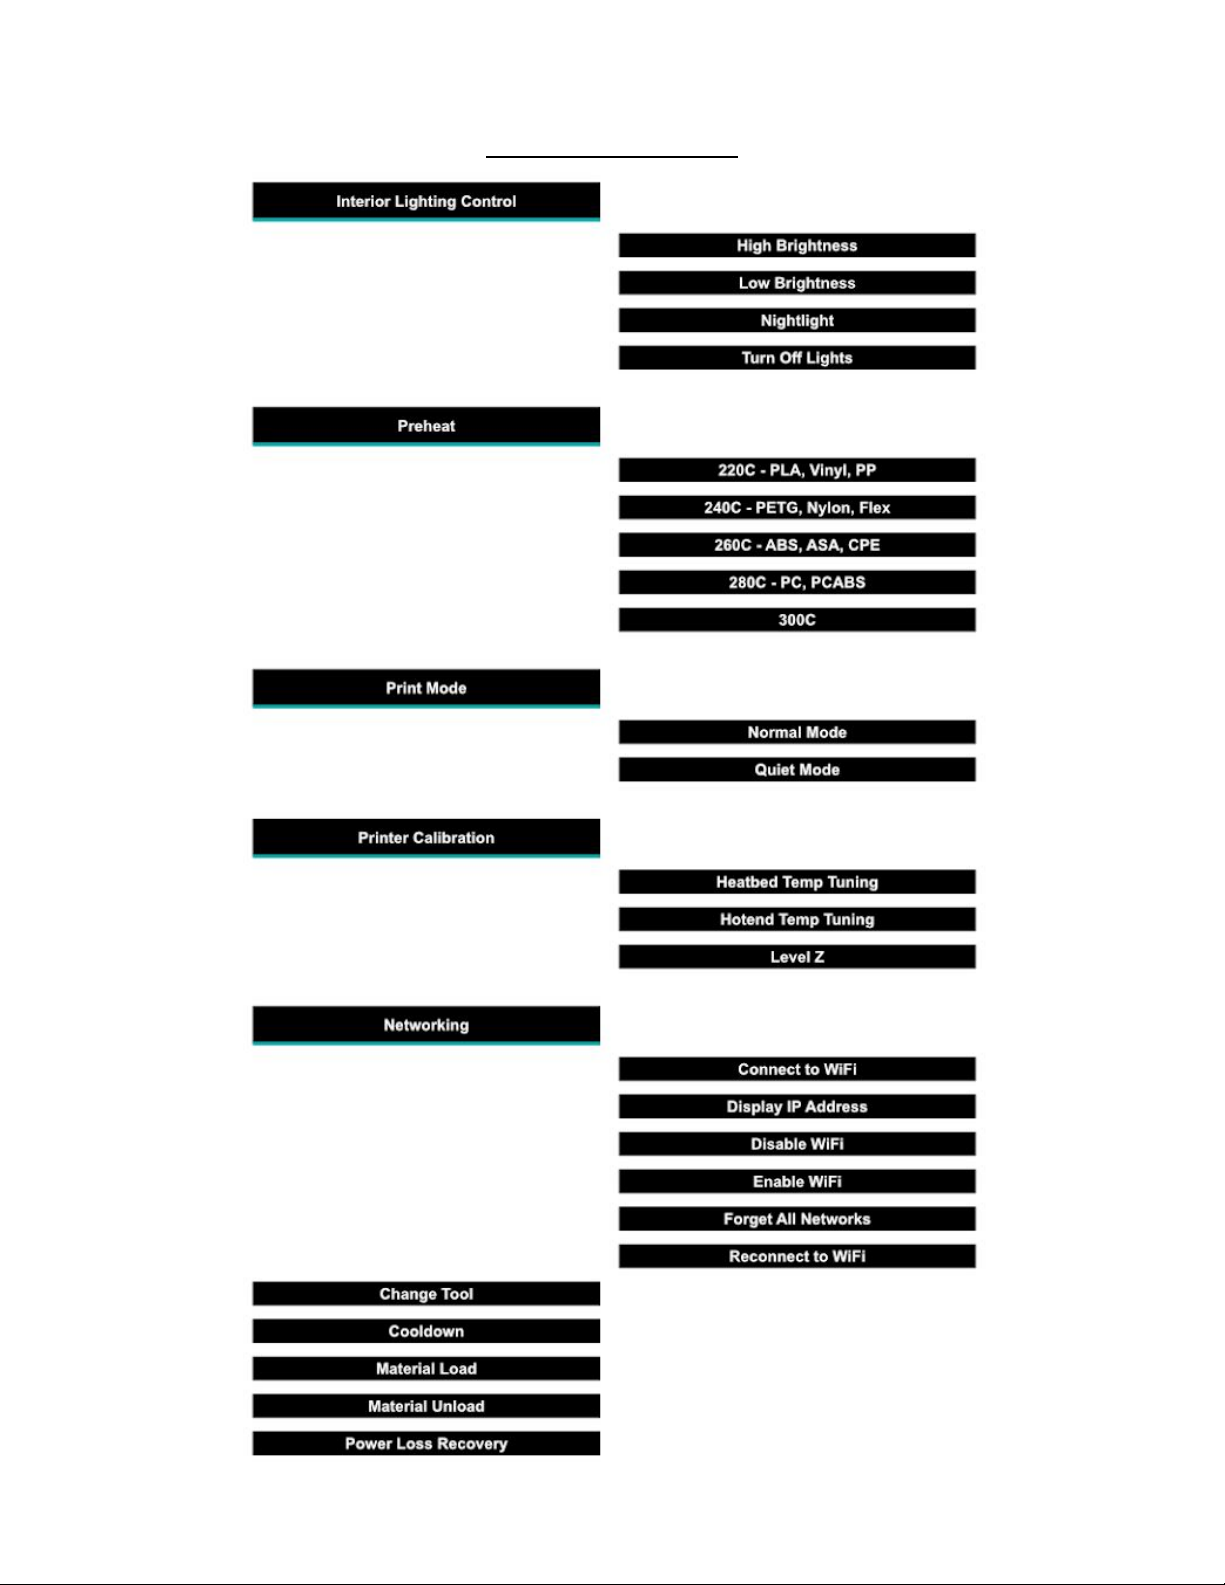
Macro Menu Structure
11

● Interior Lighting Control: Control the brightness level of interior lighting.
○ High Brightness: Full brightness.
○ Low Brightness: Low brightness.
○ Nightlight: Just enough to see that the job is still going.
○ Turn Off Lights: Lights fully disabled.
● Preheat: Preheat the nozzle before loading or unloading material. If you are changing materials, always
preheat for the higher of the two materials. The heater will not actually turn on until it is time to extrude
material (loading, unloading, printing, etc.) or if the heater is manually activated.
○ 220°C: Preheat the nozzle to 220°C.
○ 240°C: Preheat the nozzle to 240°C.
○ 260°C: Preheat the nozzle to 260°C.
○ 280°C: Preheat the nozzle to 280°C.
○ 300°C: Preheat the nozzle to 300°C.
● Print Mode: Switch between normal and quiet mode for printing.
○ Normal Mode: This is the default mode.
○ Quiet Mode: Reduces speed and motor current for quieter operation.
● Printer Calibration: Calibration routines. These should rarely be needed.
○ Heatbed Temp Tuning: Runs automatic temperature calibration for the heat bed.
○ Hotend Temp Tuning: Runs automatic temperature calibration for the hotend.
○ Level Z: Levels the Z-carriages by raising the Z-axis until it hits the top of the axis. You will hear a
grinding sound when this happens, which is normal and intentional.
● Networking
○ Connect to WiFi: Displays the G-code required to connect to WiFi. This G-code must then be
entered in the Console Tab. (See Section 2.1.3 for more information on connecting to WiFi)
○ Display IP Address: If connected to a wireless network, this will display the Nautilus’ IP address
used for uploading files from Cura and accessing Duet Web Control.
○ Disable WiFi: Disables WiFi on the Nautilus until manually enabled or the Nautilus is restarted.
○ Enable WiFi: Enables WiFi on the Nautilus. Only necessary if you have disabled the WiFi.
○ Forget All Networks: Removes all remembered networks from the Nautilus.
○ Reconnect to WiFi: Re-establishes a wireless connection by resetting the WiFi module and
sending a new DHCP request.
● Change Tool: Use this when you want to change or unload a Tool Cartridge. Remember to unload
material before initiating this process. The process will reset the heater fault that is triggered when you
remove a Tool Cartridge.
● Cooldown: Turns OFF all heaters on the Nautilus.
● Material Load: Runs the material loading procedure. Make sure to preheat first; if you are changing
materials, always preheat for the higher of the two materials.
● Material Unload: Runs the material unloading procedure. Make sure to preheat first; if you are changing
materials, always preheat for the higher of the two materials.
● Power Loss Recovery: In the event of a power loss during a print job, this feature gives you the chance
to resume/save the job. This recovery relies on the power stored in capacitors to run some emergency
procedures before all power is lost. Additionally, jobs using materials that shrink significantly as they cool
may not be resumable if the printer has cooled before power loss recovery is initiated. Power loss
recovery is not guaranteed to work every time, and you should always visually inspect the Nautilus
and the part to make sure the part is still stuck to the Print Surface and everything looks in order
with the printer.
12
1.2.2 Print Tab
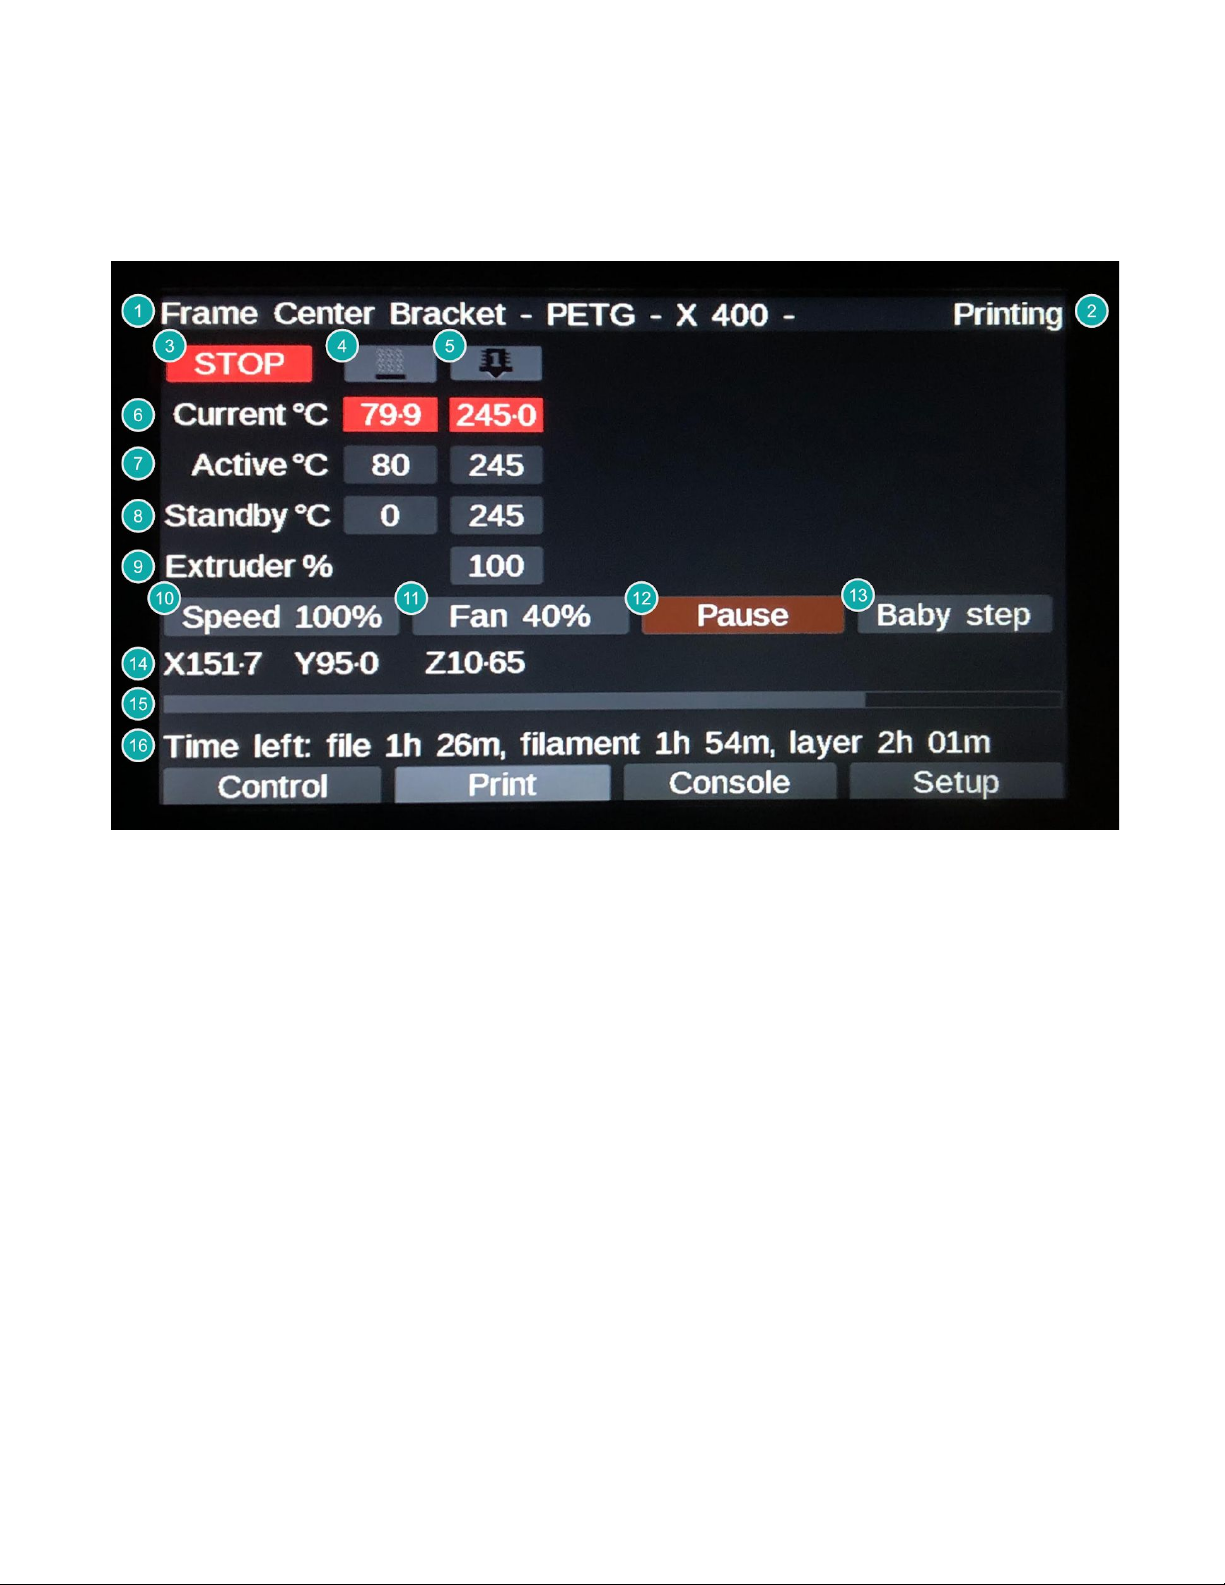
The Print Tab gives you control over the active print job. Here you can adjust print speed, printing temperature,
Z-offset, and view remaining time estimates.
1. Print Job Name: Displays the name of the active print job. If not displaying, toggle to another tab and
then back to the Print Tab.
2. Printer Status: Displays the current printer status.
3. Stop: The button acts as a software emergency stop. For all intents and purposes, it is like turning the
printer OFF and then back ON again. Use this if you need to stop what the printer is doing urgently.
4. Heatbed ON/OFF: Turns the bed heater ON and OFF.
5. Hotend ON/OFF: Turns the hotend heater ON and OFF.
6. Current Heater Temperatures: The current temperature of the heaters on the Nautilus display in
Celcius.
● Red - the heater is ON and heating to the set active temperature.
● Green - the heater is OFF.
● Purple - Heater Fault. Check to ensure that the tool is properly inserted.
7. Active Heater Temperatures: The temperature the heaters will heat to when powered ON. Click the box
below the desired heater to manually adjust the active temperature.
8. Standby Heater Temperatures: The Nautilus does not use standby temperatures. The standby
temperature will usually be set the same as the active temperature unless the active temperature is set
manually by the user via the display or Duet Web Control. Click the box corresponding to the desired
heater to manually adjust the standby temperature.
9. Extruder Flow: Controls the amount of material flowing from the extruder as a percentage. Increase or
decrease to adjust for under or over extrusion.
10. Print Speed: This controls the printing speed as a percentage.
11. Part Cooling Fan: This controls the part cooling fan speed as a percentage.
13

12. Pause/Resume/Cancel: This button will pause the current Job. When a job is paused it will be replaced
with a resume button and the babystepping button will be replaced with a cancel button.
13. Babystepping: This allows for micro adjustments to the Z-offset. Used for dialing in the first layer offset.
DO NOT use after the first layer has been completed. The babystepping value is reset every time the
printer restarts. (Refer to Section 4.1.2 for instructions on permanently saving the Babystepping value.)
14. Tool Head Position XYZ: The current XYZ position of the tool head within the printer.
15. Print Job Progress Bar: Displays the print job progress with a bar visual.
16. Time Remaining Estimates: Three different time remaining estimates based on the file size, amount of
filament used for the job, and the layer height.
14
1.2.3 Console Tab
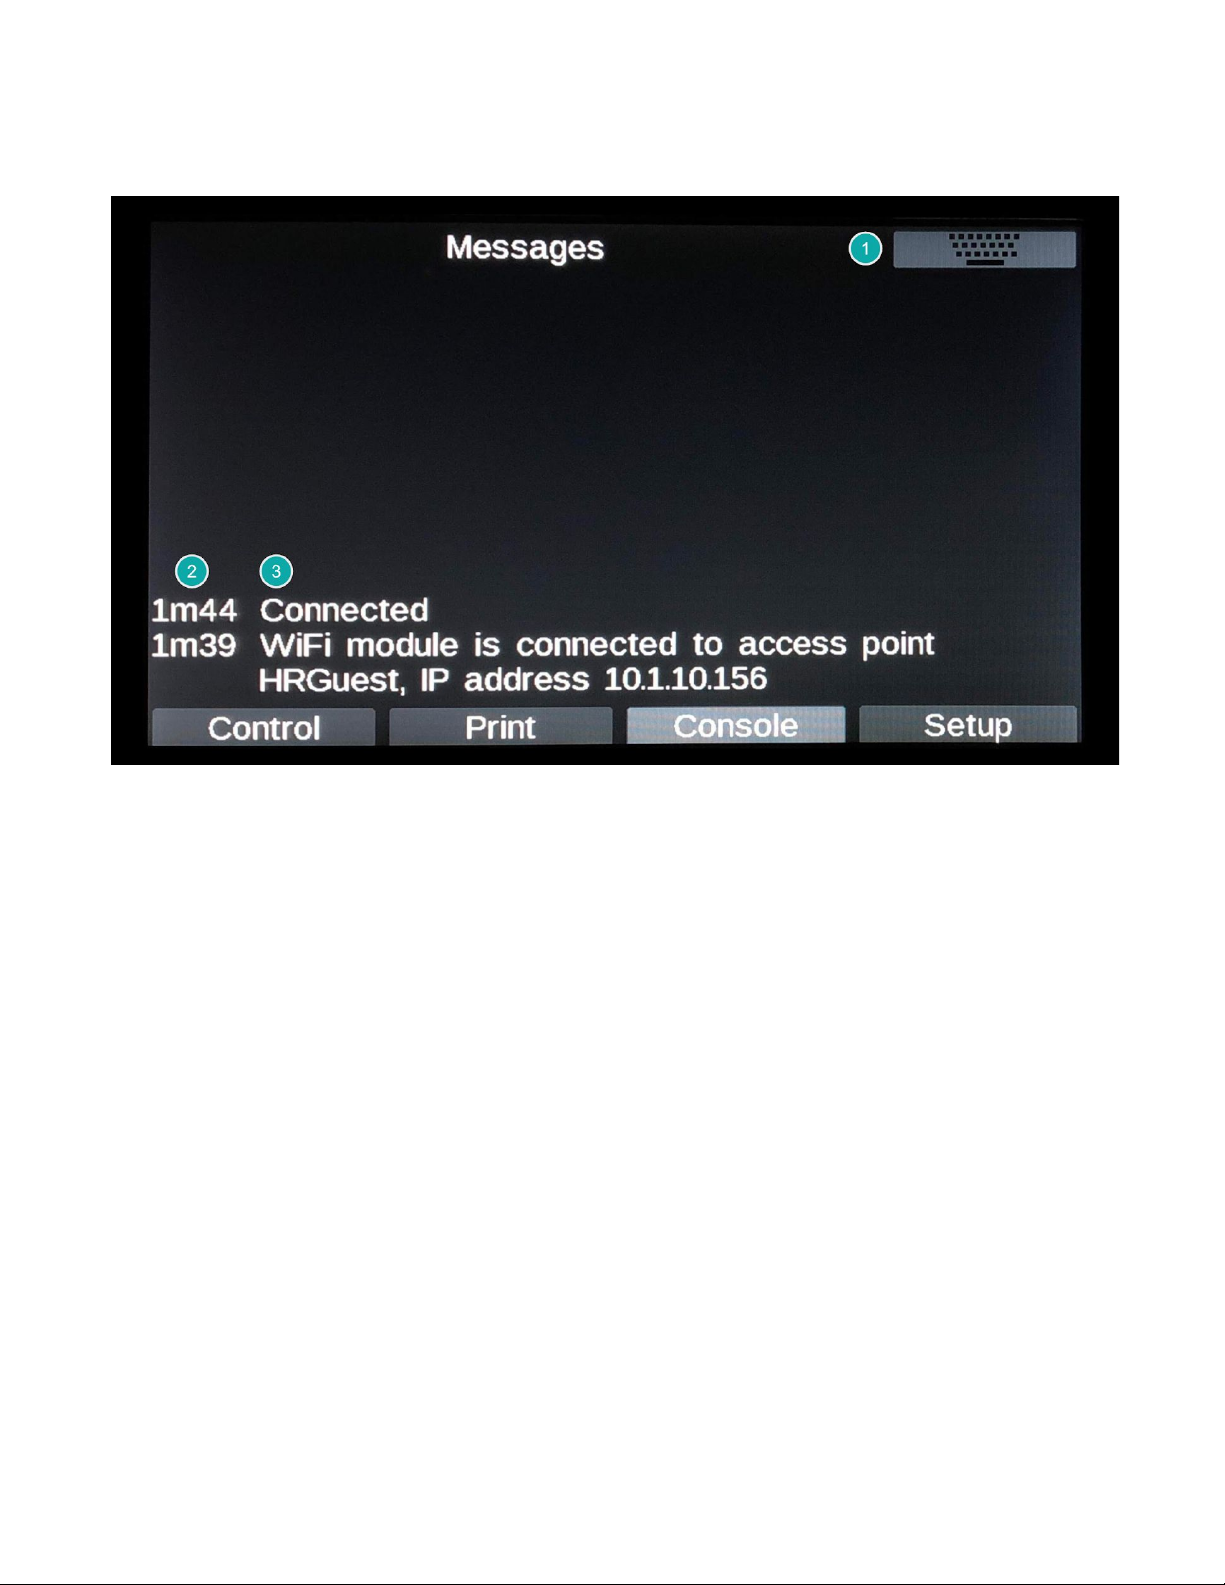
1. Keyboard: This opens a keyboard for manual entry of G-code commands.
2. Message Time: The time elapsed since the message was initially triggered.
3. Message: Useful information about the status of the printer, calibration results, and error messages.
15
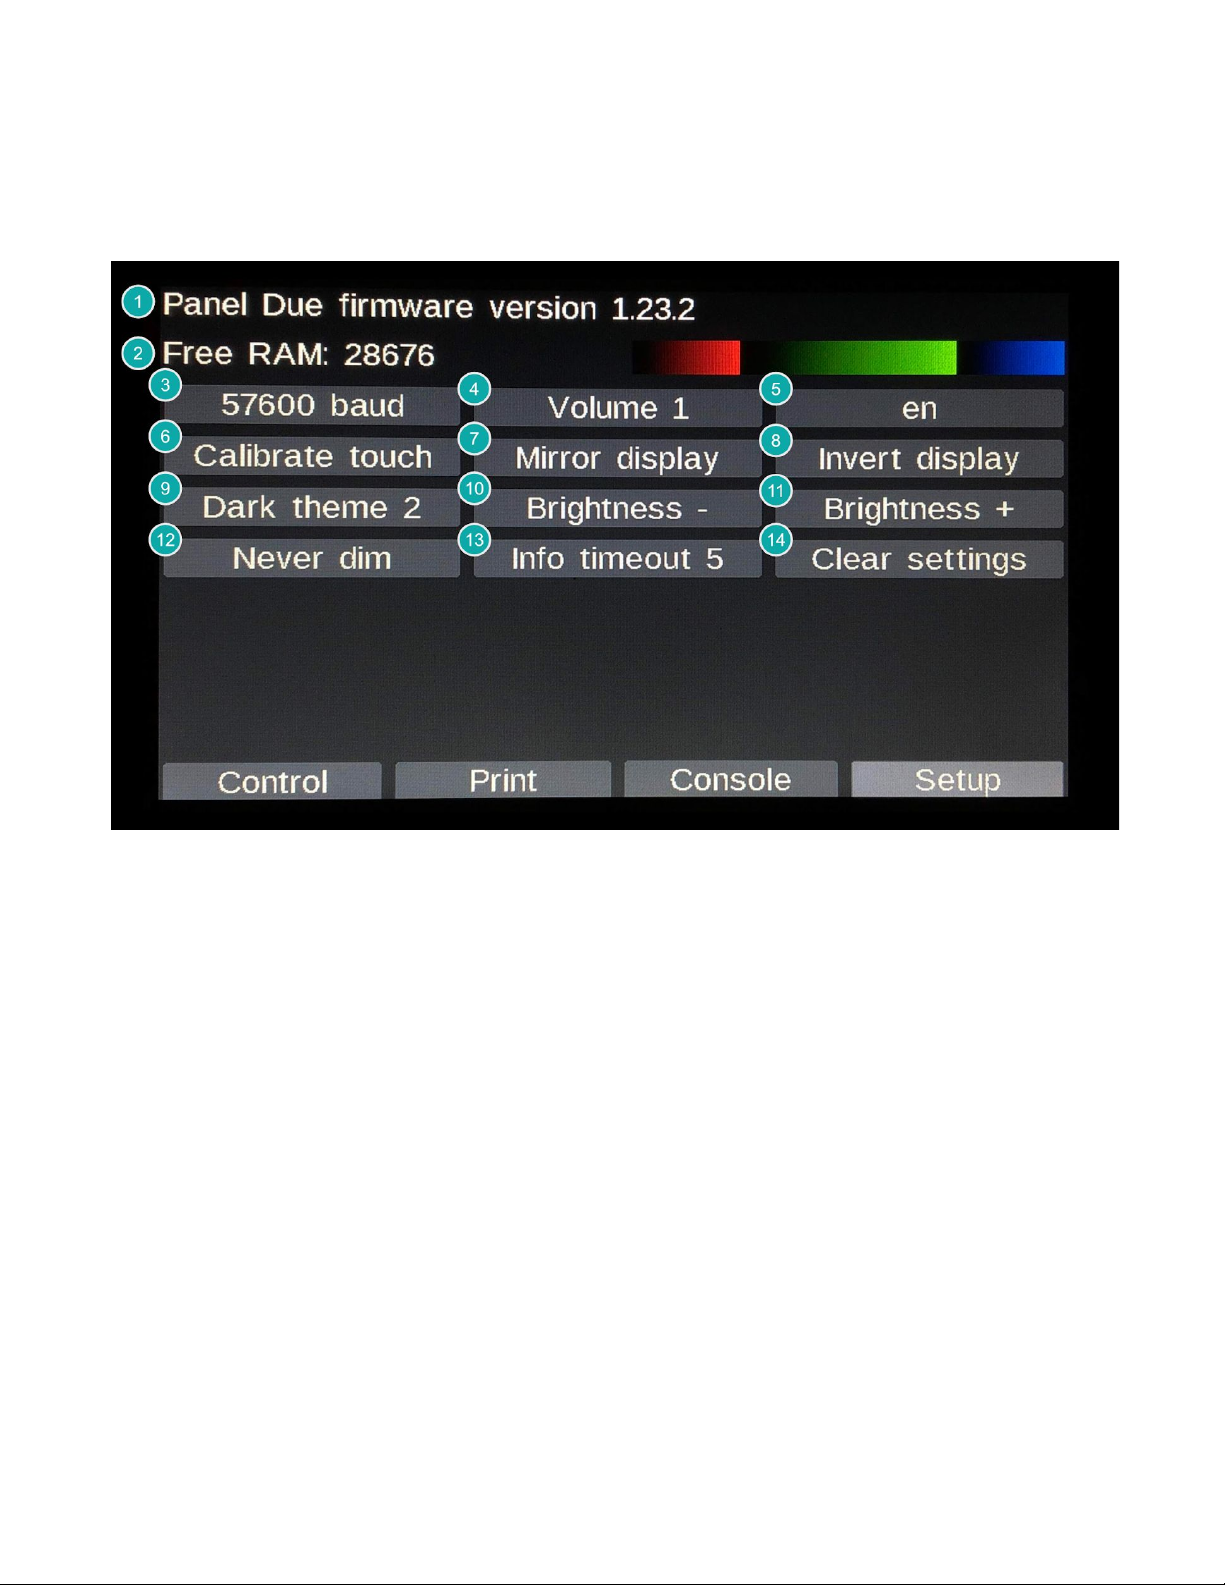
1.2.4 Setup Tab
The Setup Tab is home to the settings and calibration for the touch display on the Nautilus. Here you will be able
to adjust your brightness, volume, language, theme, and more.
1. Touch Screen Firmware Version: Displays the version of the PanelDue open source firmware, which
the Nautilus touch display is based on.
2. Free Ram: This is primarily for debugging purposes. You should not need to worry about it.
3. Baud Rate: Changing this is not recommended. The default is 57600.
4. Press Feedback Volume: Controls the click that is played to provide auditory feedback when pressing
buttons on the display. A value of 0 will turn the press feedback off.
5. Language: Choose the language of the text on the display. This will not affect custom messages on the
Nautilus, which are only available in English at this time.
6. Calibrate Touch: If your display is registering presses inaccurately, running this calibration may remedy
that.
7. Mirror Display: This will mirror the display left to right and is not recommended for the Nautilus.
8. Invert Display: This will rotate the display 180°. This should not be needed for the Nautilus.
9. Display Theme: Here you can choose a display theme. The default for the Nautilus is Dark theme 2.
10. Brightness Decrease: Decrease the display brightness.
11. Brightness Increase: Increase the display brightness.
12. Automatic Dimming Control: Choose how/if the display will dim if not used for a certain amount of time.
13. Info Timeout: Controls the information pop-up timeout for system messages. The Default value is 5. This
does not affect custom messages for the Nautilus, which have message-specific timeouts that are not
user controllable.
14. Clear Settings: This will restore all settings to the Duet factory defaults NOT the Nautilus defaults.
16
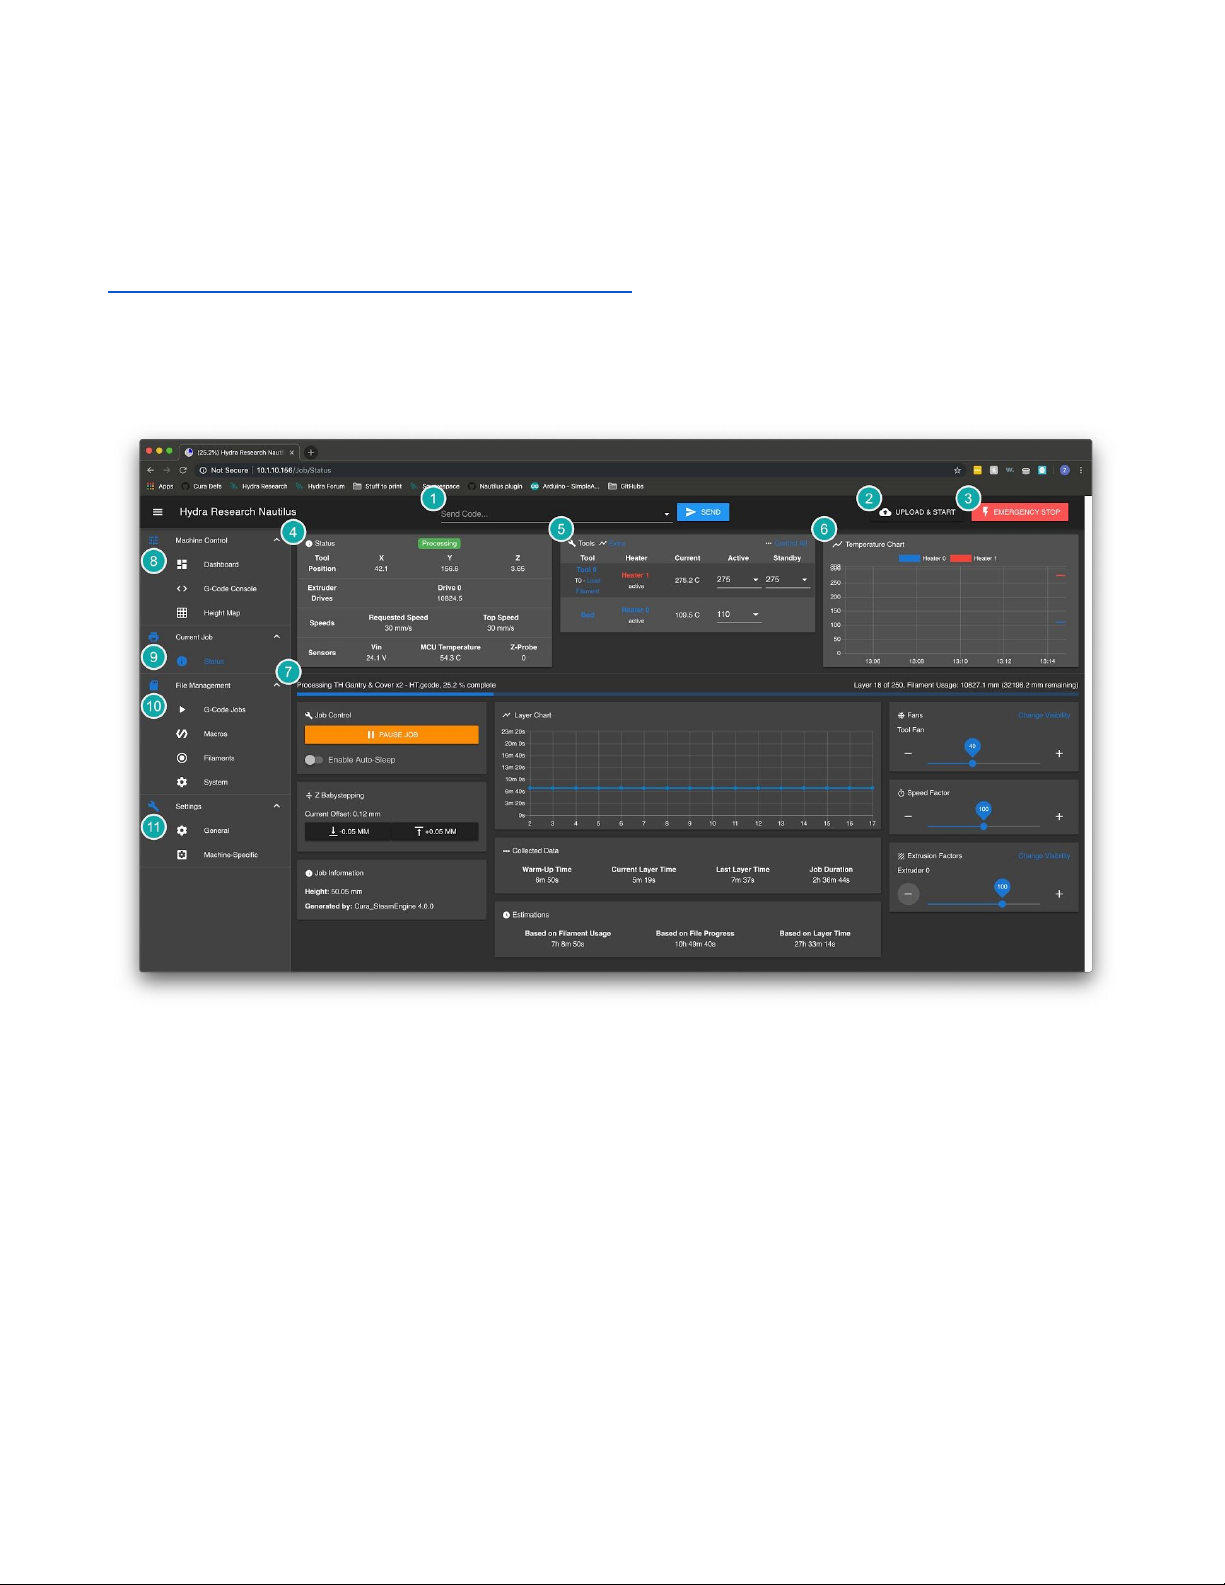
1.3 Duet Web Control
Duet Web Control is a browser-based UI for your Nautilus that allows full control from any computer on the same
wireless network. Duet Web Control can be accessed by typing your Nautilus’ IP address in the URL bar of your
browser. This is a limited overview of the Duet Web Control interface; for a more detailed description, visit:
https://duet3d.dozuki.com/Wiki/Duet_Web_Control_Manual
1.3.1 Interface Overview
1. G-code entry box: Allows you to quickly send G-code commands to your Nautilus.
2. Upload & Start: Upload sliced prints to your Nautilus. It is recommended to start prints directly from the
printer to make sure everything is properly set up for printing.
3. Emergency Stop: This button acts as a software emergency stop. For all intents and purposes, it is like
turning the printer OFF and then back ON again. Use this if you need to stop what the printer is doing
urgently.
4. Status: Displays the status of important values including Tool Head position/speed and sensor values.
5. Tools: Displays nozzle and bed temperatures, they can also be adjusted from this box.
6. Temperature: Plots nozzle and bed temperatures over the course of a print.
7. Current Tab: Displays the selected tab from the sidebar (Items 8-10). The default is Status. The sidebar
and everything in the top section of Duet Web Control will stay the same regardless of the selected tab.
8. Machine Control: This category contains tabs that allow you to control your Nautilus.
a. Dashboard: Allows you to control the motors and fans as well as run macros.
b. G-Code Console: This is the same as the Console tab on the Touch Interface.
c. Height Map: Displays the data from the last bed probing sequence.
17
9. Current Job: This category contains some simple controls including babystepping as well as the Status
tab, which gives current information about your Nautilus.
10. File Management: This category contains tabs that give access to various important files on your
Nautilus.
a. G-Code Jobs: Same as the Print Jobs menu on the Control Tab. Run, add, delete, or organize
print jobs.
b. Macros: Same as the Macros menu on the touch interface. Run, add, delete, or organize macros.
c. Filaments: This tab is not used by default on the Nautilus. You can upload filament specific
macros in this tab.
d. System: Access to the configuration and system files for your Nautilus. It is not recommended to
edit these files unless you understand what you are changing
11. Settings: This category contains a settings interface for Duet Web Control as well as your Nautilus.
a. General: Duet Web Control settings. You should not have to change most of these settings
except for theme control and adding a wireless webcam. These settings carry over between
different printers running on Duets.
b. Machine-specific: Duet Web Control settings for your Nautilus, including some basic machine
settings such as temperatures and babystepping.
1.4 Accessories
1.4.1 Tool Cartridges
Tool cartridges are quick and easy to change and offer a wide variety of printing capabilities from high detail to
rapid drafting.
Changing a Tool Cartridge
1. Before starting, make sure to unload filament.
2. On the Control tab select the Change Tool option from the menu in the top right.
3. Once the printer stops moving, a message will pop up prompting you to remove the installed Tool
Cartridge. Remove the Tool Cartridge by grabbing the white tab located on the right side of the print
head. Pull the tab to the right and up slightly. The Tool Cartridge is held in by both friction and a magnet
so it will take a little force to get it out.
⚠ CAUTION The Tool Cartridge may be HOT when you remove it, especially if it was just
heated to remove filament.
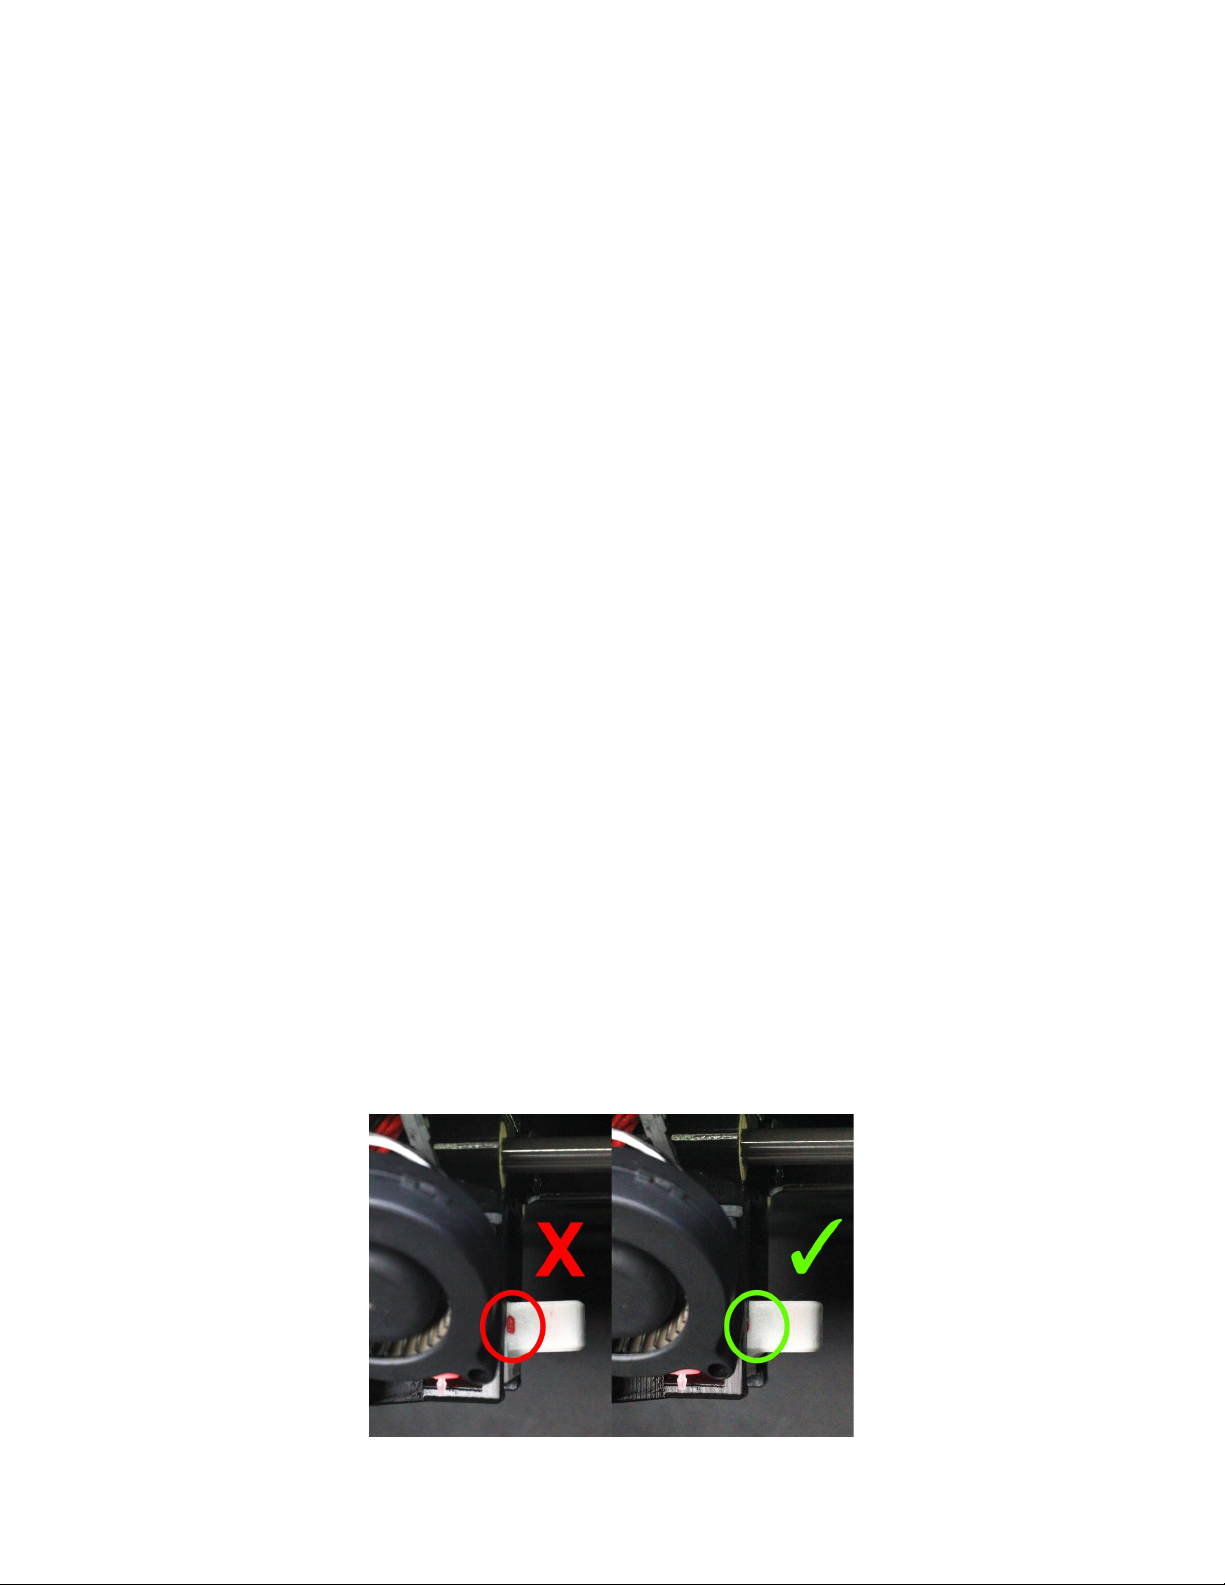
4. When you are ready, insert the new Tool Cartridge you want to use. Make sure the red line on the tool
cartridge is covered by the Tool Head. Press OK on the pop-up message to clear the heater fault that was
triggered by removing the previous tool. You are now ready to use your Nautilus.
The Tool Cartridge is properly installed when the red mark is covered
18
 Loading...