

Page 1
CARPET SCOUT
and
SEAHA WK
12 Gallon Extractors
.
ISSAE::
on Cleaning and Maintenance
Page 2
6321 204th Street SW, Lynnwood, WA 98036
SCOUT
and
SEAHAWK
Table of Contents
Machine Specifications . . . . . . . . . . . . . . . . . . . 1
Precautions . . . . . . . . . . . . . . . . . . . . . . . . ...2
Operation . . . . . . . . . . . . . . . . . . . . . . . . . . ...4
Machine Parts . . . . . . . . . . . . . . . . . . . . . . . ..5
Cleaning Wand Parts . . . . . . . . . . . . . . . . . . ...15
Maintenance . . . . . . . . . . . . . . . . . . . . . . . . ..17
Troubleshooting Guide . . . . . . . . . . . . . . . . . ...18
Repair Guide . . . . . . . . . . . . . . . . . . . . . . . . ..21
Warranty Repair Policy . . . . . . . . . . . . . . . . . ...22
Warranty . . . . . . . . . . . . . . . . . . . . . . . . . . ...23
Machine Serial Number
Page
Copyright @1996
CLEANMASTER@ Corporation
Lynnwood, Washington
182-401
No part of this manual may be reproduced or used in any form or by any means (i.e. graphic, electronic, photocopying or
electronic retrieval systems) without the express written permission of the CLEAN MASTER@ Corporation. All rights reserved.
Revised July 2, 1996
Page 3
SCOUT and SEAHAWK
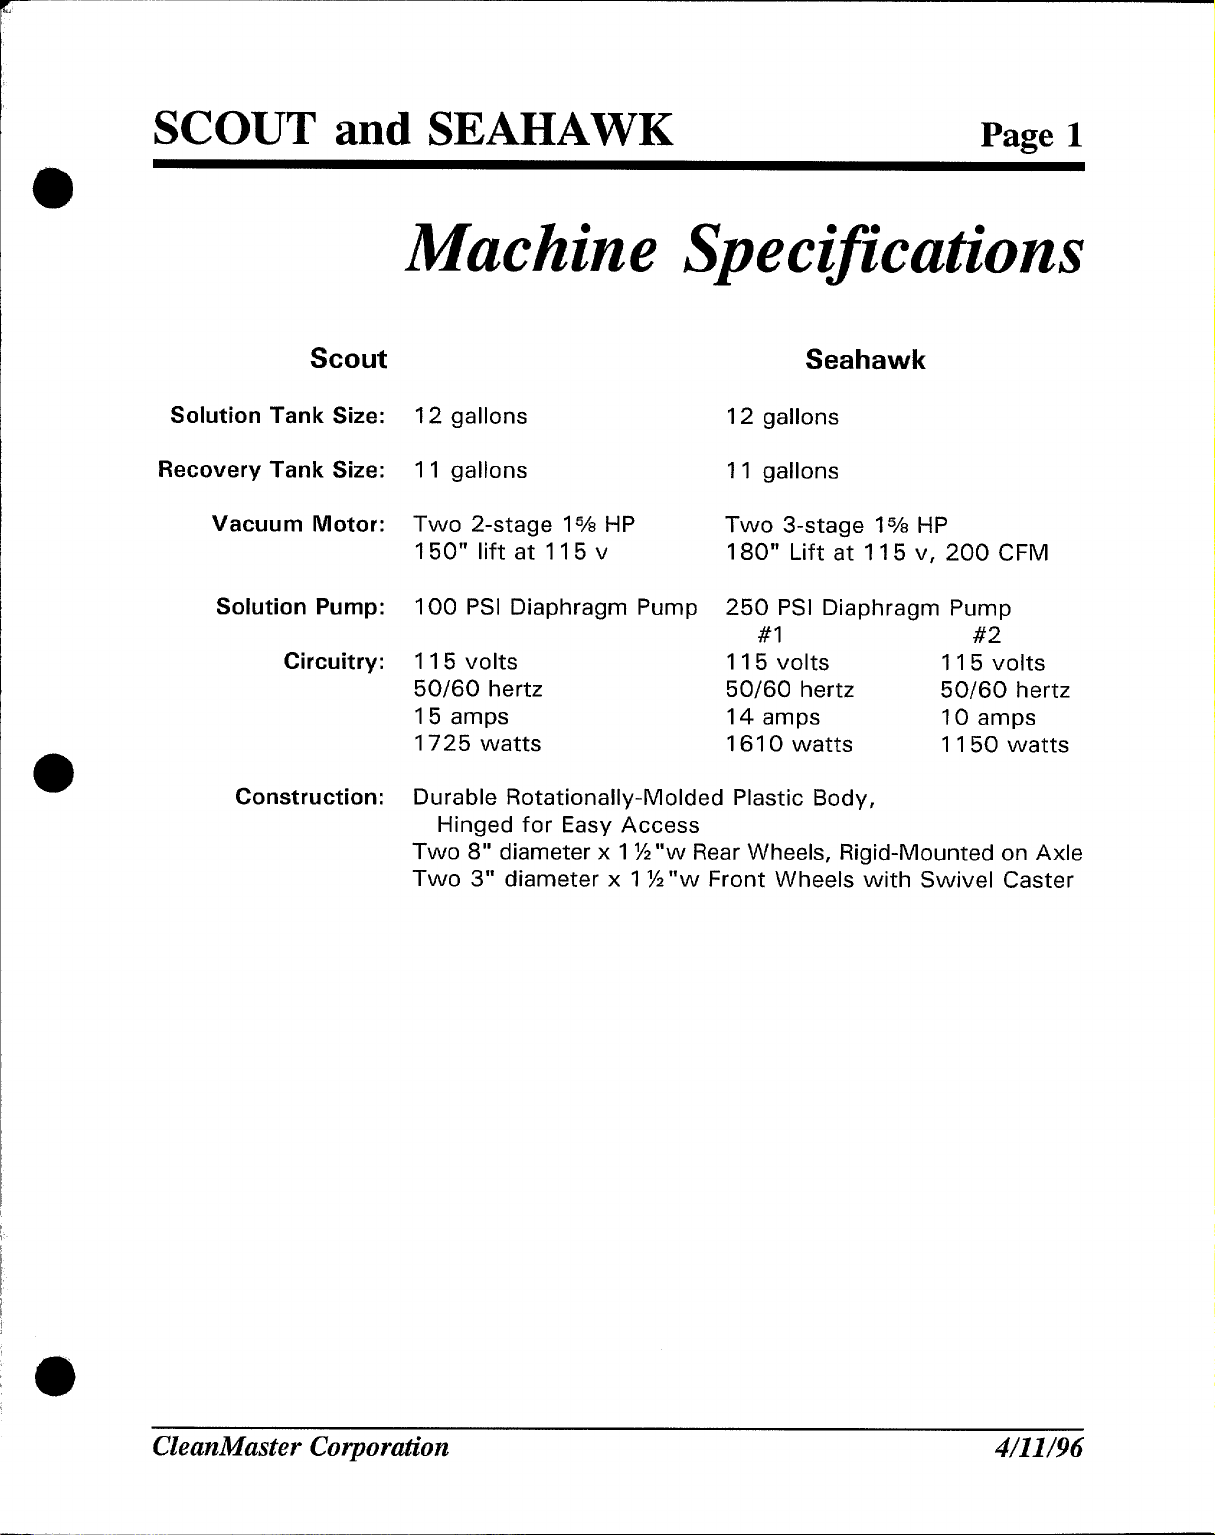
Machine Specifications
Page 1
scout
Solution Tank Size:
Recovery Tank Size:
Vacuum Motor:
Solution Pump:
Circuitry:
Construction: Durable Rotationally-Molded Plastic Body,
Seahawk
12 gallons
11 gallons
Two 2-stage 1
150” lift at 115 v
100 PSI Diaphragm Pump
115 volts
50/60 hertz
15 amps
1725 watts
Hinged for Easy Access
Two 8“ diameter x 1 !4“w Rear Wheels, Rigid-Mounted on Axle
Two 3“ diameter x 1 ?4“w Front Wheels with Swivel Caster
5/8 HP
12
gallons
11 gallons
Two 3-stage 1
180” Lift at 115 v, 200 CFM
250 PSI Diaphragm Pump
#1
115 volts
50/60 hertz
14 amps
1610 watts
5/8 HP
#2
115 volts
50/60 hertz
10 amps
1150 watts
@
CleanMaster Corporation
4/11/96
Page 4
SCOUT and SEAHAWK Page 2
9
Precautions
To avoid hazardous conditions, do not use your machine in areas where
1.
flammable and/or explosive vapors or dust are present.
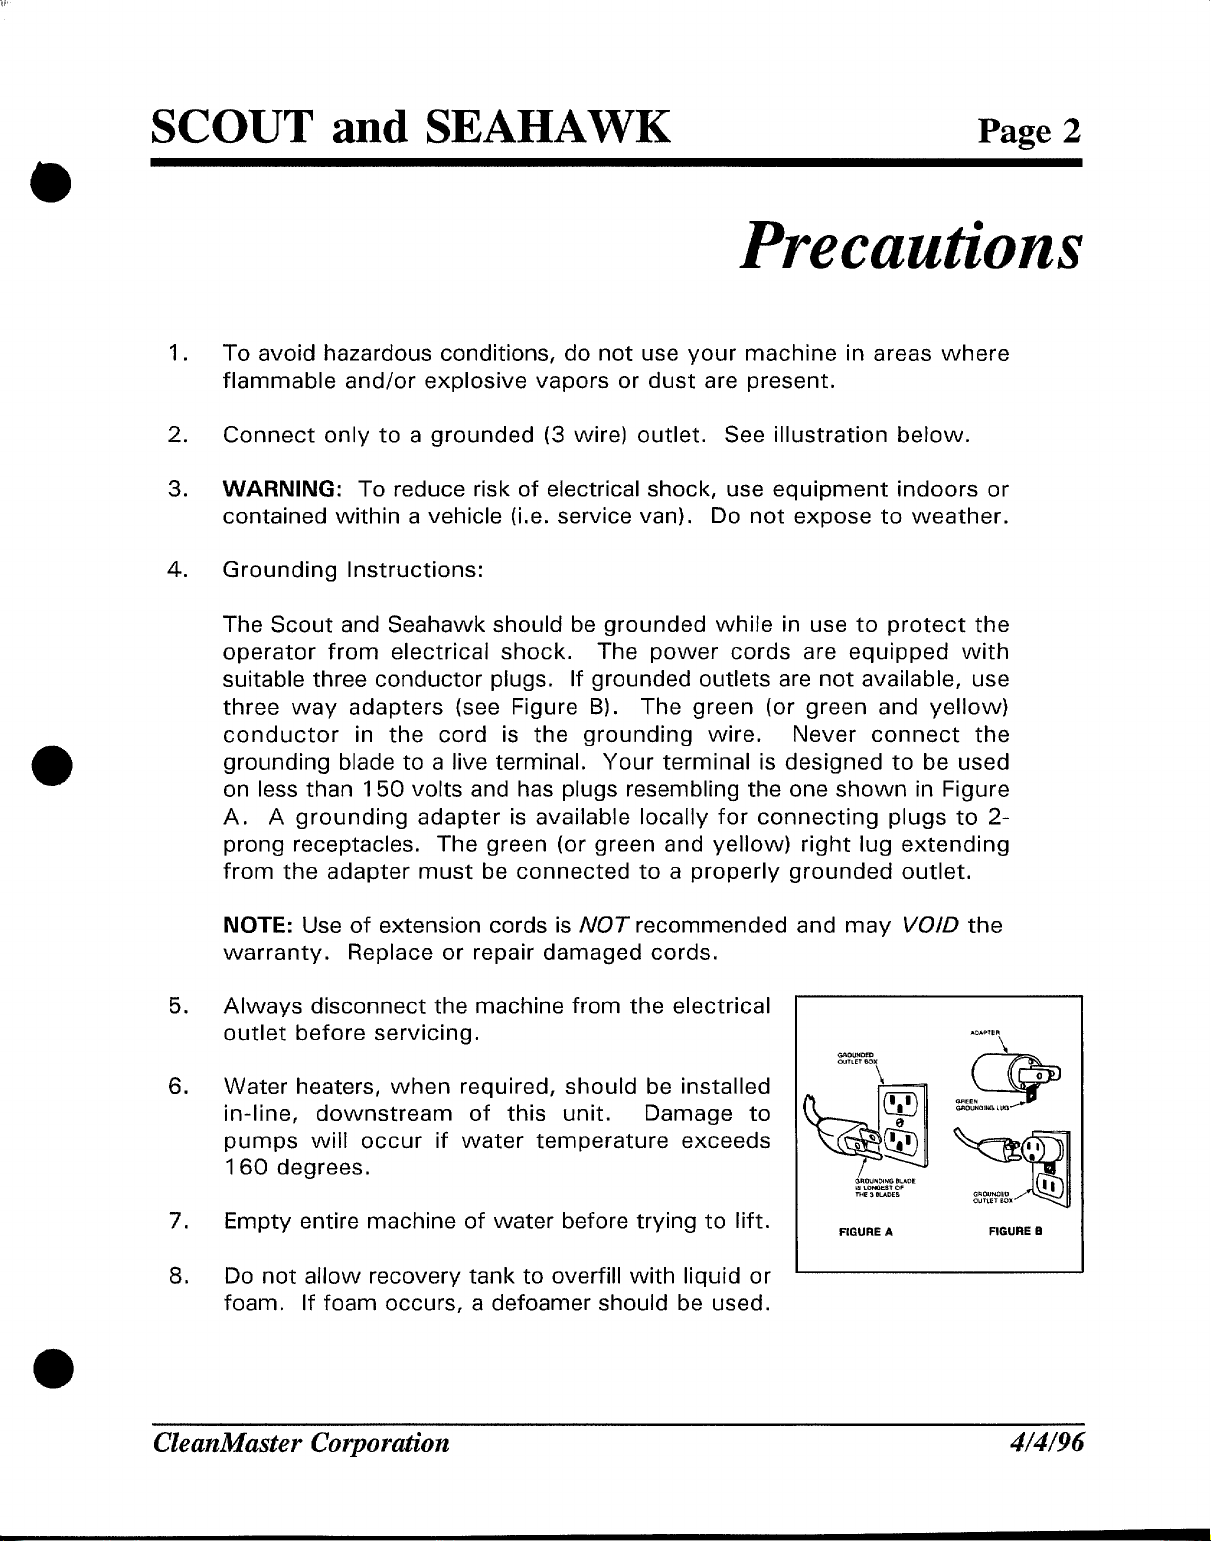
Connect only to a grounded (3 wire) outlet. See illustration below.
2.
WARNING: To reduce risk of electrical shock, use equipment indoors or
3.
contained within a vehicle (i.e. service van).
4.
Grounding Instructions:
The Scout and Seahawk should be grounded while in use to protect the
operator from electrical shock.
suitable three conductor plugs. If grounded outlets are not available, use
three way adapters (see Figure B).
conductor in the cord is the grounding wire.
grounding blade to a live terminal. Your terminal is designed to be used
on less than 150 volts and has plugs resembling the one shown in Figure
A. A grounding adapter is available locally for connecting plugs to 2-
prong receptacles. The green (or green and yellow) right lug extending
from the adapter must be connected to a properly grounded outlet,
The power cords are equipped with
The green (or green and yellow)
Do not expose to weather.
Never connect the
NOTE: Use of extension cords is NOT recommended and may VO/D the
warranty. Replace or repair damaged cords,
5.
Always disconnect the machine from the electrical
outlet before servicing.
6.
Water heaters, when required, should be installed
in-line, downstream of this unit.
pumps will occur if water temperature exceeds
160 degrees.
7.
Empty entire machine of water before trying to lift.
Do not allow recovery tank to overfill with liquid or
8.
foam, If foam occurs, a defoamer should be used,
CleanMaster Cm-por&”on
Damage to
Gnouwom
OUTLET w.
\
m
~QII
G)
w
c.mumw BLAm
. LOWEST .$
mums
ml, 3
FIGURE A
1
FIGURE B
4/4/96
Page 5
SCOUT and
After each use of the machine, rinse out and empty the recovery tank.
9.
Then, with the recovery lid open and the vacuum hose off, run the
vacuum motor to allow to dry.
SEAHAWK
Page 3
10. When adding a heater to the Scout, the solution hose must be upgraded
higher temperature hose.
to a
CleanMaster Corporation
7/2/’96
Page 6
SCOUT and SEAHAWK
1.
Remove the power cord and solution hose from the solution tank.
2.
Check to be sure the Empty slide valve is closed.
3.
Fill the solution side of the tank with warm water (not to exceed 160° F).
4.
Put in the proper amount of cleaning solution for ten gallons of water.
CAUTION: Only non-foaming cleaning solutions can be used and absolutely
harsh solvents or petroleum products,
gaskets, diaphragms and seals.
5.
Close the recovery tank lid,
6,
Hook up both the solution hose and the vacuum flex hose to their appropriate
connections, Connect the other end to cleaning wand or tool,
Page 4
Operation
no
They will decrease the life of rubber
7.
Turn on the solution pump and depress the water valve on the wand until all air
is pumped out of the system, and the pump is primed. Turn on the vacuum.
8,
For carpet:
Place the wand on the carpet.
back toward the operator at a moderate rate for about an arm’s length at a
time. Move the wand to the right or left, slightly overlapping until you cover
a five foot square floor area,
may be vacuumed a second time without using spray solution,
Note: At the first sign of foam in the recovery tank, a defoamer should be
used.
For upholstery:
Place tool on upholstery.
toward the operator at a moderate rate for about an arm’s length at a time.
Move the tool to the right or left, slightly overlapping until you cover the soiled
area.
second time without using spray solution,
Note: At the first sign of foam in the recovery tank, a defoamer should be
used.
9.
Repeat Step 8 until the solution tank is empty or until the job is completed.
For further moisture recovery, the cleaned area may be vacuumed a
Depress the water valve and draw the wand
For further moisture recovery, the cleaned area
Depress the water valve and draw the tool back
CleanMaster Corporation
4/4/96
(
Page 7
SCOUT and SEAHAWK
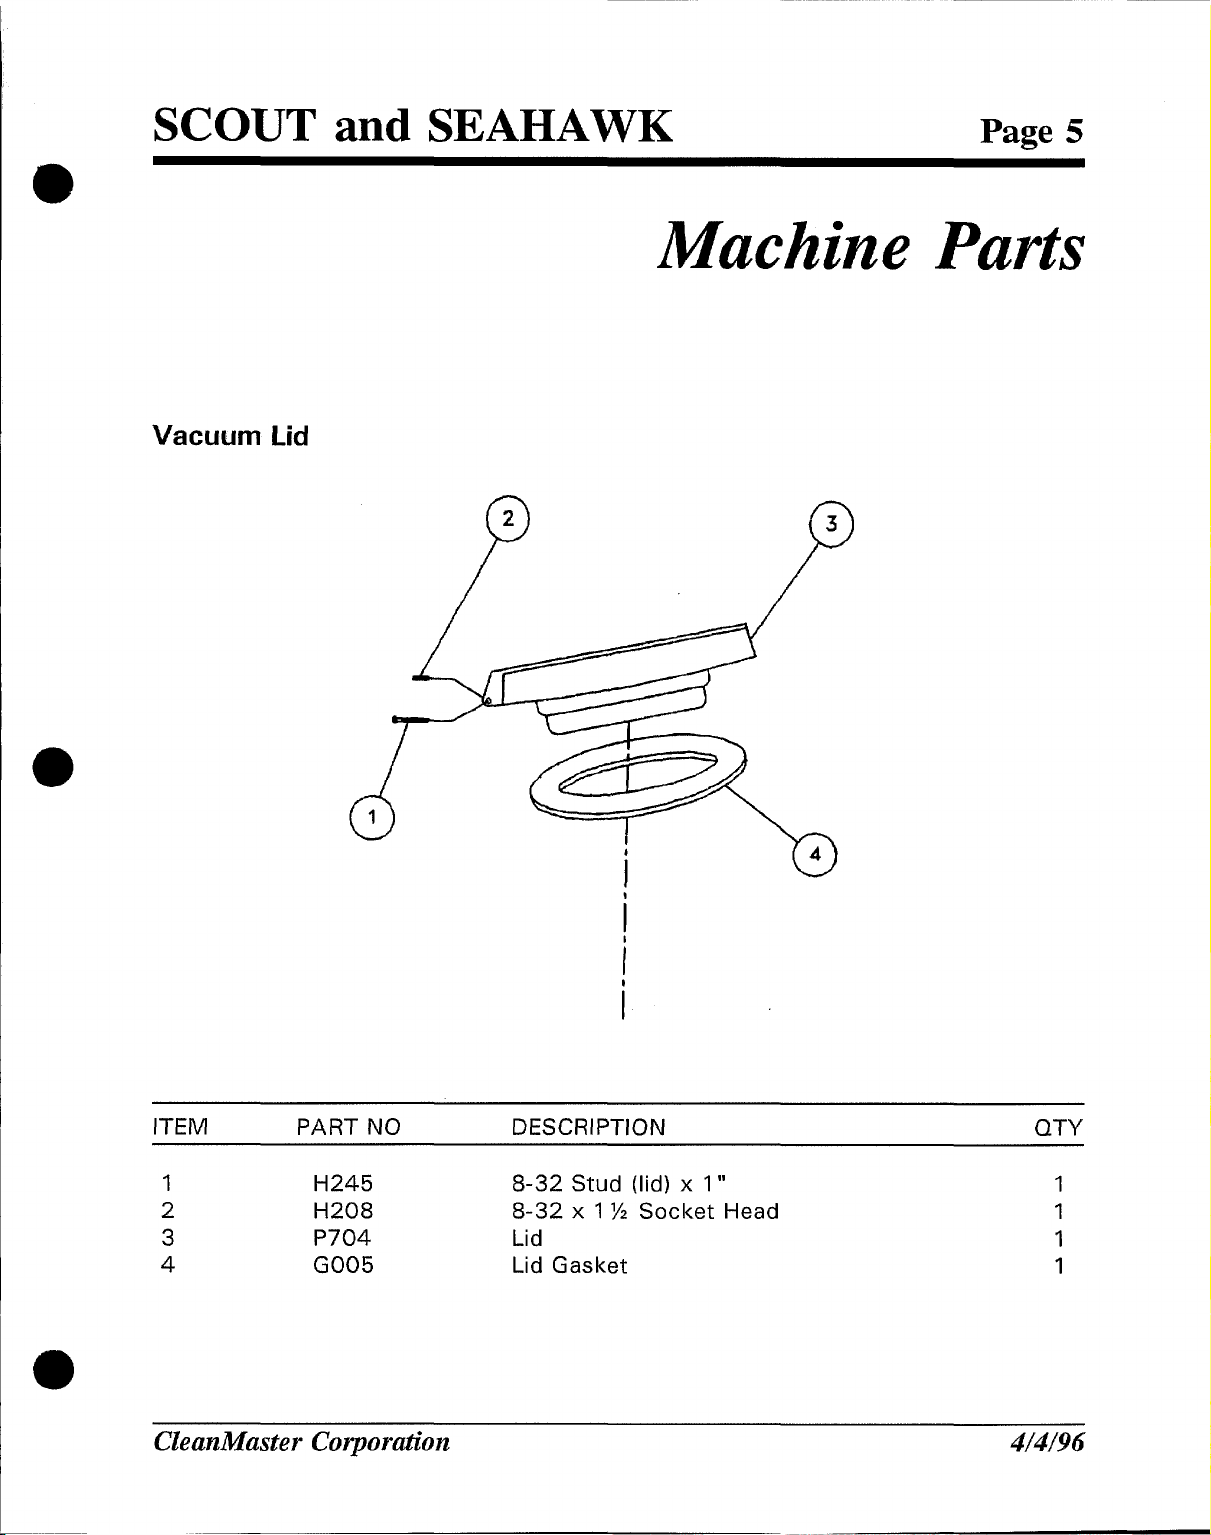
Vacuum Lid
Page 5
Machine Parts
ITEM
1
2
3 P704 Lid
4
PART NO DESCRIPTION
H245
H208
GO05
CleanMaster Corpor@”on
i
QTY
8-32 Stud (lid) x 1” 1
8-32 x 1 ?4 Socket
Lid Gasket
Head
4/4/96
1
1
1
Page 8
SCOUT and SEAHAWK
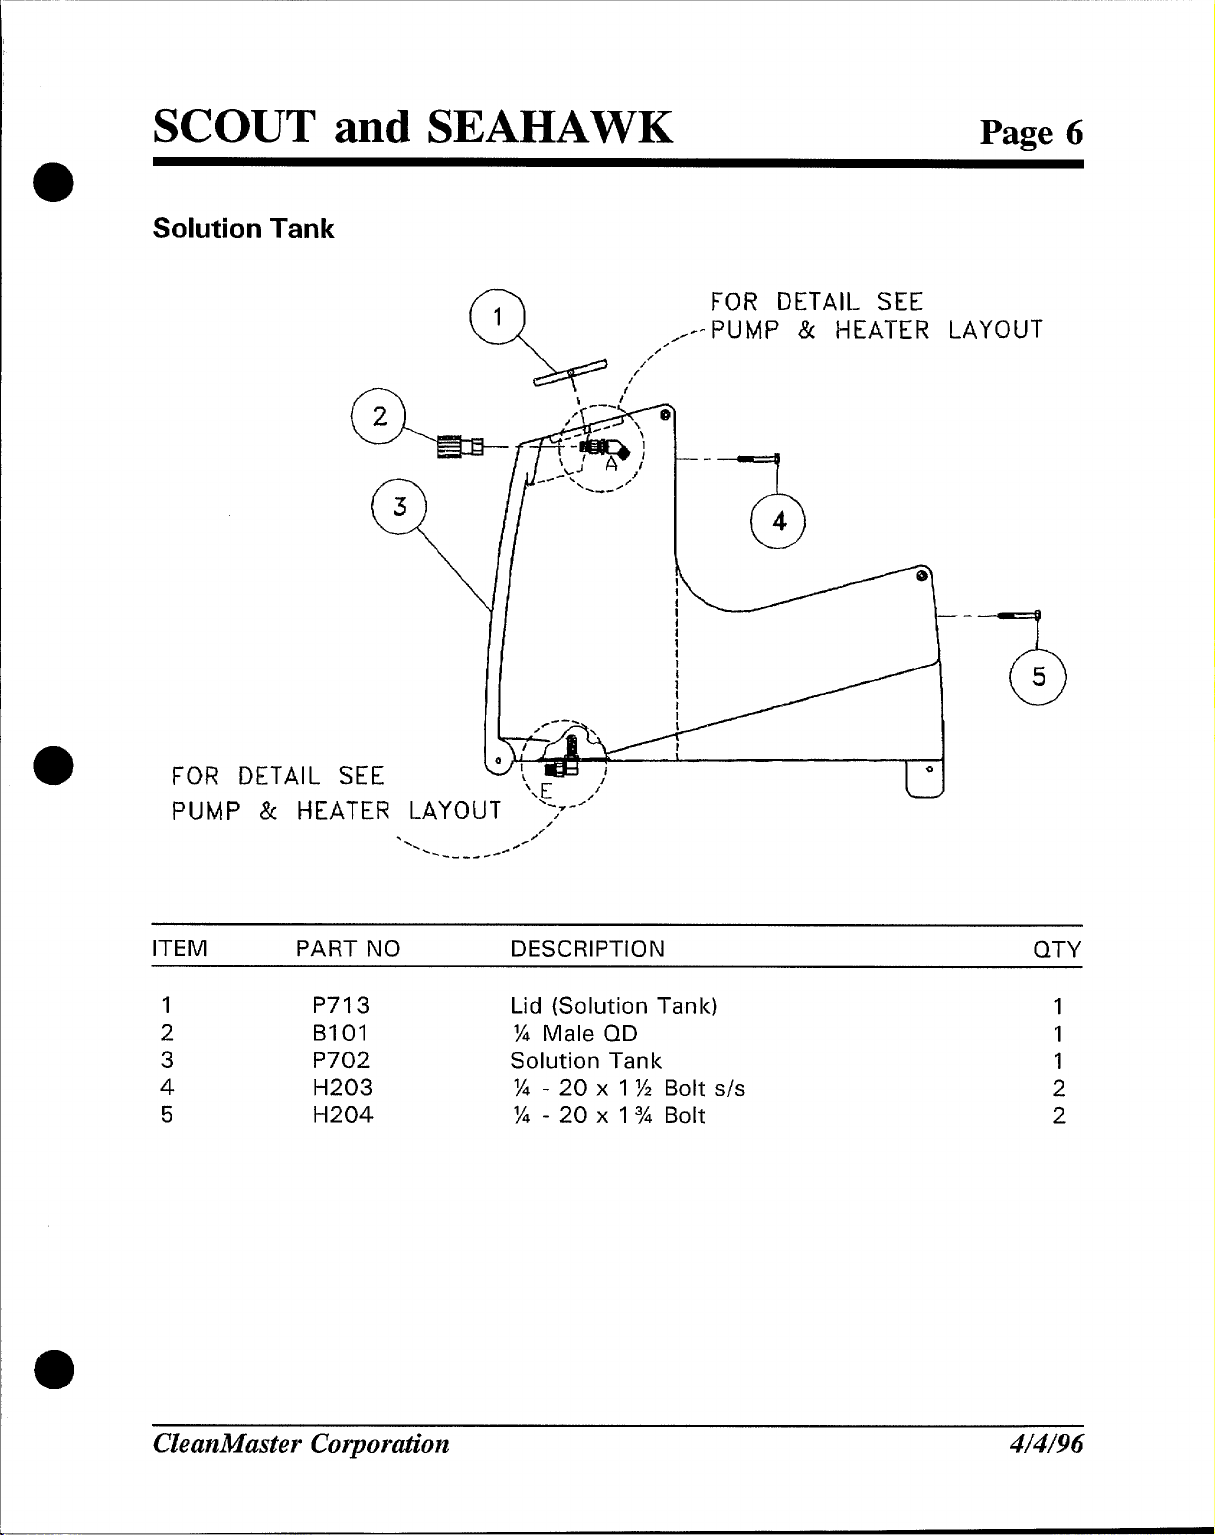
Solution Tank
Page 6
(“n
,
FOR DETAIL SE
PUMP & HEATER LAYOUT ,/
/’
‘ ,.
-.
. ----
,.
---
FOR DETAIL SEE
,--- PUMP & HEATER LAYOUT
.
I
i
I
)
i
I
I
‘7!)
5
ITEM
1 P713
2 BIOI
3 P702
4
!5 H204
PART NO DESCRIPTION
H203
CleanMaster Corporafk”on
QTY
Lid (Solution Tank)
% Male QD 1
Solution Tank
14-20 xl% Bolts/s 2
y4 - 20 X 1 3A Bolt
4/4/96
1
1
2
Page 9

SCOUT and SEAHAWK
Base
Page 7
.—. — ._. —
r-
1
I
i-
25’ POWER CABLE
PRONG CONNECTOR
w/ 3
CleanMaster Corporation
4/4/96
Page 10

SCOUT and SEAHAWK Page 8
a
Base Parts
ITEM PART NO DESCRIPTION
1
2
3
4
5
6
7
8
9
10
11
12
13
14
15
16
e
H202
H205
H210
H216
H219
H222
H223
H224
H238
H239
P701
E534
H220
H221
E512
H212
74 - 20 x 3A” Bolt
5/16 18 3“ Blk Bolt
‘!4 Flat Washer
!4 - 20 Locknut
Axle Caps
Rubber Sleeve Hinge Pins
Hinge Pin Set
Axle
3“ Castors
8“ Wheels
Base
30’ 16/3 Gray
Strain Relief
Locknut
Indicator Light
9/16” ID X 1 %“ OD F.W.
QTY
12
2
24
12
2
2
1
1
2
2
1
1
1
1
1
4
CleanMaster Corporation 4/4/96
Page 11

a
SCOUT and SEAHAWK
Vacuum Tank
/1 —
Page 9
—
13
20
a
20
7
R
CleanMaster Corpor&”on
4/4/96
Page 12

SCOUT and SEAHAWK
Page 10
e
Vacuum Tank Parts
ITEM
1
2
3
4
!5
6
7
8
9
10
11
12
13
14
15
16
a
17
18
19
20
21
22
PART NO DESCRIPTION
GO02
GO03
H230
H231
H244
H227
H234
H235
H236
H237
PH622
H243
P714
H229
GOOI
H228
P703
H225
H226
E525
E501
H246
Float Flapper
1.88 Filter Foam
10-32 %“ Screw
10-32 1 Screw
PVC FM.S
lYz” PVC Pipe 12X”
1 % ABS Sleeve
Float
Lever Float
Clamping Ring
Metal Screen
PVC Elbow
Blue Elbow
1 YZ M,T, x M.S. Inlet
Thin Rubber Gasket
1 k Steel Locknut
Vacuum Tank
1 % Drain Valve
45° Drain Spout
Four Hole Switch Plate
Waterproof Switches
8-32 x
3/8” Socket Head
X FM.T
QTY
1
1
1
1
1
1
1
1
1
1
1
1
0
2
2
1
1
2
1
1
3
4
CleanMaster Corpor&”on
4/4/96
Page 13

● ●
e
Page 14

SCOUT and SEAHAWK Page 12
e
Pump and Heater Parts
ITEM PART NO DESCRIPTION
1
2
3
4
5
6
7
8
9
10
11
12
13
14
15
16
17
18
Bill
BI06
B130
A910
A912
BI18
BI13
BI03
BI07
BI19
BI04
C305
C306
E526
E527
H273
A909
H272
A91 1
Ya Extender Adapter
M Close Nipple
45” Mx%M
18” H.P. Hose
23” H,P. Hose
Relief Valve
% Tee
90”?4’’x?4M
Ya Hex Nipple
Filter Strainer
l/Bx % Bushing
100 PSI Pump, 115 Volts
100 PSI Pump, 230 Volts
192° Thermostat (Automatic)
275° Thermostat (Manual)
Heater Casting
7“ H,P. Hose
Heater Clamp, 6%”
14” H,P. Hose
QTY
3
1
1
1
2
1
1
4
3
1
1
1
0
0
0
0
0
0
~
CleanMaster Corporation 4/4/96
Page 15

I
SCOUT and SEAHAWK
Vacuum Motors
n
@---
Page 13
(2)
(2Ka
5
0-’
(6)
CleanMaster Corporah”on
4/4/96
Page 16

,
SCOUT and SEAHAWK
*
Page 14
Vacuum Motor Parts
ITEM PART NO
1
2
3
4
5 H247 1 %” Vacuum Hose, 20”
6
7
8
9
10
11
12
13
14
C301 Two Stage Vacuum Motor, 115 Volts
C303 Two Stage Vacuum Motor, 230 Volts
H248 2“ Vacuum Hose, 4“
GO04
H249
PH629
H217
H216
H218
H201
H210
P705
H202
H253
DESCRIPTION
Vacuum Gasket
2“ Vacuum Hose, 9“
Blk Hose Cuff
Hose Clamps
U -20 Locknut
Springs
% -20
U Flat Washer
Manifold
X - 20x %“ Bolt
Vacuum Mounting
X M Bolts
QTY
2
1
4
1
1
1
3
2
6
6
4
2
2
Plate 1
CleanMaster Corpordion
4/4/96
Page 17

SCOUT and SEAHAWK
Page 15
CleanMaster Corporation
5/16/96
Page 18

SCOUT and SEAHAWK Page 16
Wand Parts List
ITEM PART NO. DESCRIPTION
1
2
3
4
5
6
7
8
9
10
11
12
Handle Assembly (Item #1 O):
061-007
015-203
167-018
052-082
052-072
052-050
169-074
052-152
168-001
061-024
052-450
076-004
094-035
143-012 Bolt, 5/1 6-18
061-006
Handle Grip 1
Bracket, Low Pressure Wand Valve Holder 1
Trigger, Wand Low PSI 1
Elbow, %” Brass 45 Street 1
Nipple, % Brass Close 1
Quick Connect, 440 Male with Viton
Valve, High PSI Brass 1
Compression, H”
Tube, HydraHoe Solution %“ OD s/s 1
Handle Kit, Wand - Pressure Guide (see below) 1
Elbow, For Jet Assembly Wands 1
Jet, #1 1004 %“ VV s/s
Nut, 5/1 6-18 s/s Nylock Half
Handle, Pressure Guide
Male HydraHoe Fitting 2
X %“ HHC S/S
QTY
1
1
2
2
1
CleanMaster Corporah”on
5/16/96
Page 19

SCOUT and SEAHAWK
Page 17
Maintenance
Depending upon the frequency of use, the Pump/Spray/Heater system of your Scout
or Seahawk should be cleaned with a solution of two gallons of water and one quart
of white vinegar, or an anti-browning solution mixed according to the manufacturer’s
directions. This will prevent a buildup of alkaline deposits in the pump and spray jet
of your floor wand,
Make sure that all excess cleaning solution has been drained from the solution
1.
tank.
2,
Add water and vinegar or anti-browning solution.
3,
Attach the solution hose and wand. Turn on the pump and the heater,
4.
Allow the water and vinegar or anti-browning solution to circulate through the
pump, heater, solution hose and floor wand.
appropriate area for this operation. )
5.
As soon as it is apparent that the solution (not residual water or cleaning
chemicals) is being sprayed out of the jets, turn off the pump and allow the unit
to sit for approximately five minutes to allow any alkaline residues to dissolve.
Empty the solution through the wand,
6.
7.
Rinse the system with one gallon of clear water by pumping through the wand.
NOTE: If your machine is used on a daily basis or several t[mes each week you
should follow the above procedure every two to four weeks. If the unit is used
once per month or less frequently.
(Make sure that you are in an
CAUTION: When a portable in-line water heater is in use, always use approved high
temperature hose. This hose connects the machine’s pump to the cold water inlet of
the heater and the hot water outlet of the heater to the wand. This hose, so
connected, increases the life of the pumps.
At least once each month inspect all of the vacuum hoses, filters and electrical cords
for cracking or fraying.
At least every week apply silicone lubricate to all pressure fittings.
CleanMaster Corpora.h”on
Defective parts should be repaired or replaced,
5/’16/96
Page 20

SCOUT and SEAHAWK Page 18
Troubleshooting Guide
No Problem / Possible Cause
%ibtihrn **&ei:iEi:&O&~~: :!’~.:’::~“’~j
:“!.i; ;;’;::
~
,: ~~... ........ ..... ..... .... ..,,..,,.,..,,..,,.
1,1 Lint on top of the automatic shut- Remove any lint.
off screen in the recovery tank,
1!2 The vacuum hoses are not securely Push the vacuum hose cuff further
attached.
1.3 The slide dump valve is open, Close the valve securely.
1,4 The flex hose is clogged or broken,
onto the extractor hose connector.
Check and/or replace the hose,
No Problem / Possible Cause
,..,..
;;}}s:}:}::
2.1 The circuit breakers are tripped,
:’*&tig&ti::mhitii. i#:;*tii;;:::’;:::”i,::,.;.:;“::
,.
:.j ::~g@@~@~=:’:”:!’:::’”:;//“:”’;:‘;‘;::’:.;::’::’;:}’:}::;;:::;’;”:;
Locate a heavier circuit or reduce
the load.
Solution
Solution
2.2 The electrical connections are not
secure. connections.
2.3 A switch is burned out. Remove and replace the switch.
2.4 Field armature is shorted out.
2,5 The motor is burned out.
Recheck all of the electrical
Remove and replace the motor.
Remove and replace the motor.
CleanMaster Corporatz”on 5/16/96
Page 21

SCOUT and SEAHAWK
Page 19
3.1
3.2 The water level is high.
3,3 I The foam level is high.
No
4.1 The suction hose is loose.
4s2 The suction hose filter is clogged,
4,3 The front screws on the pump are
4.4 I There is debris in the pump. I Clean the pump.
4.5 I The valve assembly is worn out.
The recovery tank automatic shutoff is not operating properly.
I
Problem / Possible Cause
unevenly tightened.
Check for proper water level in the
float. Clean the filter,
Reduce the water level in the
vacuum tank.
I Add defoamer to the solution tank,
I
Tighten the hose clamp,
Clean the filter,
Retighten the screws uniformly.
I Remove and replace the valve.
Solution
No
‘Q:: ,“:
,.
5!1
5,2 There is an obstruction in the
Problem / Possible Cause
“:$ke’’:;i’~$ iii:~iisiifii:g; ::”::’!.”.; :! ‘*/:’;
This is normal when using the
hand upholstery tool.
pump, hoses, quick coupler or
CleanMaster Corpor@”on
Solution
Use a larger v-jet.
Check and clean the hoses, quick
coupler and/or v-jet.
5/’16/96
I
Page 22

SCOUT and SEAHAWK
Page 20
No
‘g;’
:::,
:;:::::
601 The quick coupler is loose.
6.2 The pressure switch is open.
6.3 The rectifier is open,
6,4 The motor is burned out,
6,5 The panel switch is burned out,
6.6 This is normal when the hand
6.7 There is an obstruction in the
Problem / Possible Cause
;,,,,.::..: :,.:.::.::,::,.::,,,, ,,:!:::
:ThHiapEia#& ~urnp:.rn’ottx ! ::‘
~j~:,. '.:.::::::::,*::,::::.:.,,.:,,:,.,:.,.,..:::.,:,:
::naf:f~~~l~gr:::”,: : ;:;::;“;::.:: ; ~:.:;:; :.:
trigger valve is closed.
pump discharge hoses quick
coupler and/or v-jet.
Solution
Reconnect the quick coupler.
Remove and replace the switch.
Remove and replace the rectifier.
Remove and replace the motor.
Remove and replace the panel
switch,
Activate the trigger valve.
Check and clean the hoses, quick
coupler and/or v-jet.
o
CleanMaster Corpor&”on 5/16/96
Page 23

SCOUT and SEAHAWK
Removal of Vacuum Motor:
1.
2.
3,
4.
Reinstallation of Vacuum Motor:
1,
2, Install gasket around vacuum horn.
3.
4.
5.
Disconnect unit from power source.
Disconnect wiring,
Loosen vacuum hoses.
Remove vacuum motor.
Carefully seat motor against mounting plate.
Reconnect wiring.
CAUTION: Ground wire must be reconnected to insure operator safety.
Reconnect vacuum hoses.
Tighten motor bolts.
Page 21
Repair Guide
Removal of Diaphragm Pump and Motor:
1.
2.
3.
4,
5.
Reinstallation of Diaphragm Pump and Motor:
1.
2.
3.
Removal of Diaphragm Pump From Motor:
1, Remove two (2) screws.
2.
3.
4.
Replacement of Diaphragm Pump Parts:
1. Remove pump and motor per instructions above.
2. See pump breakdown.
Disconnect unit from power source.
Disconnect wiring.
Remove two (2) screws.
Remove pump by moving forward and up.
Remove hose fitting.
new pump,
Install hoses and fittings.
Install pump using two (2) screws.
Reconnect wiring.
CAUTION: Ground wire must be reconnected to insure operator safety.
Hoses and fittings to be used on reinstallation of
Pry off top bearing.
Remove pump.
Reverse procedure for installation.
CleanMaster Ckwporatk”on
5/16/96
Page 24

SCOUT and SEAHAWK
Page 22
Warranty Repair Policy
When requesting warranty information, call or write and provide the following
information:
1,
2,
3.
4,
Upon receipt of the above information, a Material Return Authorization will be issued.
All packages should be prepaid and clearly marked with the Material Return
Authorization number. If these conditions are not met, shipment will be refused.
After evaluation, the item(s) will be repaired or replaced at our discretion.
If failure or defect is the result of physical
repairs will be charged to the customer.
For service, contact the distributor
When and where the equipment in question was purchased.
Model and serial number of machine.
Part number and description of part.
Description of failure or defect.
abuse, or if the warranty period has expired,
where the machine was purchased or
call our Customer
Monday through Friday
Parts:
Service:
Parts and Service FAX:
Service Department.
● 8:00 am To 5:00 pm PST
(206) 775-7276
(206) 775-7275
(800) 426-4225
PST ROCK MT.
CleanMaster Corpor&”on
CENTRAL EASTERN
5/16/96
Page 25

SCOUT and SEAHAWK
5 -3-1 WARRANTY
Page 23
CleanMaster products are warranted
either 5 years, 3 years, or 1 year as noted below:
* 5 Years on Roto Cast Molded Tanks
* 3 Years Prorated on Drive Motor Gearbox Assembly (RX-Express Only)
* 1 Year on Vacuum Motors, Pumps, Switches, Fittings, Etc.
* 1 Year on HushhVac Vacuums
During this warranty period, we will repair or replace, at our sole option, free of charge,
any parts shown to be defective in either material or workmanship, Said parts must be
returned with postage or freight pre-paid. Specific parts, such as switches, vacuum
motors, pumps, fittings, etc., are also warranted for a period of 1 year from date of
original purchase.
This warranty is for replacement of defective parts or workmanship only. IT DOES NOT
PROVIDE FOR REPLACEMENT OF COMPLETE UNITS DUE TO DEFECTIVE PARTS. It
does NOT cover normal wear items such as hoses, power cords, bumpers, carbon
brushes, gaskets, etc., which require replacement as a result of ordinary usage. Also,
failures caused by abuse, neglect, alterations or operation contrary to manufacturer’s
recommendations are not warranted.
Replacements parts are warranted only for the remainder of the original warranty
period.
This warranty does not cover labor or other charges in connection with replacement
parts. NO LOCAL SERVICE OR REPAIR CHARGES ARE ALLOWED UNLESS PRIOR
AUTHORIZATION IS OBTAINED.
to be free of defects in material for a period of
There are no other warranties, expressed or implied, made with respect to this
equipment. The manufacturer assumes no responsibility for damages resulting from the
use or misuse of this equipment.
6321 204th SW . Lynnwood, WA 98036
CleanMaster Corporation
c .
5/16/96
 Loading...