

Page 1

o
Page 2
INDEX
PAGE
General Information
Warranty ............................................................................................................................... 2
Warranty Information .
Warranty Procedure .............................................................................................................. 3
Purchaser’s Responsibility ................................................................................................ 4
Truck Preparation Information ............................................................................................... 4
Truck Preparation Illustration ................................................................................................. 4
Propane Tank Location/illustration ........................................................................................ 5
Hard Water Area Map ..................................................................................................... ... .
Machine Specifications ....................................................................................................... 5
Spare Parts Flecommendation/Parts Orders .................................................................... 5-6
Water& Chemical Flow Operation ..................................................................................... 6
Water Flow Diagram ................................................... ... .................................................... .
Chemical Flow Diagram
High Pressure Pump Information ......................................................................................... 7
Bypass Valve Assembly Illustration ....................................................................................... 7
High Pressure Pump/Chemical System Troubleshooting ............................................. 7 & 16
Model 290 Cat Pump Operating Instructions .................................................................. 8-15
Chemical Proportioning and Level Control Illustration ......................................................... 16
Chemical Tank Troubleshooting ..........................................................................................
.........................................................................................................,, ,,.
...................................................................... ... .... ...........................
......................................................................................................,,.
16
2
3
5
6
6
Heating System Information ............................................................................................... 16
Heater Operating Instruction ................................................................................................
Heater Troubleshooting ....................................................................................................... 17
Vacuum System Information .............................................................................................. 18
Vacuum Flow Diagram ........................................................................................................
Vacuum Tank Filter Bag ...................................................................................................... 18
Vacuum Blower Lubrication (Diagram) ................................................................................ 18
Vacuum System Warranty
Vacuum System Troubleshooting ........................................................................................
Engine Manual/Warranty ............................................................................................. 21-28
Engine Troubleshooting .......................................................................................................
Electrical Diagram
Electrical Troubleshooting ................................................................................................... 30
Machine installation Information ....................................................................................... 31
Machine Tie Down Cleat Information ................................................................................... 31
Propane Hook-Up Illustration ............................................................................................... 31
Gas Hook-Up Illustration ...................................................................................................... 31
Water Softener Information .................................................................................................. 32
Jet Assembly
Wand Assembly ................................................................................................................... 32
Valve Assembly
Machine Operation Instructions ......................................................................................... 33
Controi Panel
Operation Precautions
Freeze Protection ....
.............................................................................................................. 30
....................................................................................................................... 32
................................................................................................................... 32
...................................................................................................................... 33
.................................... .... ... .... .... .................. .... ...................
PO
29
........................................................................................................ 33
........................................................................................... 34
17
18
19
Cleaning and Chemical Precautions and information ......................................................... 34
Cleaning Stroke Procedure/Over-Wetting ........................................................................... 34
Maintenance Procedures .
Overaii Careof Machine ...................................................................................................... 35
Maintenance Logs .......................
....................................... .. . ...................................................
.................................................................................... 36-38
35
Page 3

GENERAL
INFORMATION
This manual contains installation and operation instructions as well
information required for proper maintenance, adjustment and re-
as
pair of this unit. Since the first and most important part of repair work
is the correct diagnosis of the trouble, a general troubleshooting section and component manual troubleshooting charts have been included for your convenience.
Unlike the garden tractor, Iawnmower and cement mixer, all having
one or two functions to perform, the truck-mounted carpet cleaning
plant has many functions to perform simultaneously.
Engine has to run consistent RPM.
Vacuum has to pull air and dirty water back from cleaning site.
Water pump provides stable pressure at proper water flow for
cleaning.
Chemical has to be injected into the water stream at the right
consistency.
Heater must maintain proper heat.
Vacuum tank must store dirty water until drained.
As you can see, it is not just a turn key operation with only one thing
to worry about, Does
THE SYSTEMS WORK AS
FOLLOWS:
The water system takes incoming water at tap (low) pressure, com-
bines it with chemical from the chemical system automatically,
pumps it under high pressure through the heating system and out to
the cleaning tool. After being sprayed into the carpet being cleaned,
the water/chemical/soil solution is extracted by the vacuum system
and returned
As there is no guess work in the manufacture of these highly advanced cleaning plants, there must be none in preparing it to get the
job done in the field. It is the purpose of this manual to help you prop-
erly understand, maintain and service your cleaning plant. Follow
the directions carefully and you will be rewarded with years of profita-
ble trouble-free operation.
It is imperative that no
eratirm of this equipment.
to the waste recovery tank.
Imm@!l
it start?!
section be overlooked when preparing for op-
The manufacturer uses this symbol
throughout the manual to warn of
possible injury or death.
This symbol is used to warn of
possible equipment damage.
HYDRA-MASTER WARRANTY POLICY
Effective January 1, 1989
HYDRA-MASTER warranty covers only defective materials and/or
workmanship for the periods listed, Labor, and/or diagnostic reimbursement is specifically excluded,
YEAR GOLDEN GUARANTEE@
2
LIMITED WARRANTY PLAN
HydraMaster warrants products of Its manufacture to be free from
defects In material and workmanship If properly Installed, malr-
ta!ned, and o~erated under normal cond{llons with competent
superwslon No person,
authorized 10 give any warranties on behalf of Hydra Master [nor to
assume for Hydra Masler any other Iabdrty m connection with any
of HydraMaster’s products ‘his ‘warranty shall extend for the
pertods Ilsted by component below from date of nstallatton If
repatrs or replacements are made by the Purchaser wtthout
HydraMaster’s written consent
cease 10 be [n effect No allowance WIII be granted for anv repairs
or alterations made Dy {he PJrchaser wltnout HydraMaster s prtor
written consent
Machinery, equipment and accessories furnished bv
HydraMaster, but manufactured by others are warranled only 10
the extent of the orlglnal manufacturer s warran!v to HvdraMaster
Hydra Master agrees at Its option to repair at the potnt of st?lpment,
or to replace without charge any parts or parts of products O{
Hydra Master s manufacture. which wlthn the specified warranty
period shall be DrOved to HvctraMaster’s satsfactron to have been
defective when shpped. provided the Purchaser promptly nohfles
HvdraMaster {n wrttng of such alleged defect HydraMaster will
Day all freight and transportation charges via ‘?ormal ground
shipping means for replacement ~f Darts covered undel Ihls
,warrantv
Hydra Master s Iablllty :C Purchaser wnelher ,7co171racl or m ‘ort
arlsl fig Jut of warranties, ,eDresertatlon wstructlons, or detects
from ,]nv (cause SILIII be lr~ted :C repar\17g CI replac:~lg Ihe defec
[Ive part or parts
No habilrty whatsoever shall attach to HydraMaster untl said
prOObCtS have Oeell pdld tOr
Exceot as stated r this secton and 10the Drecedng secfton tiled
Warrantv and except as !O ttle there are nc guarantees or
warranties ot merchant ablhtv tltness performance or otherwise
lcxpress
Ihabtlrty for consequential mcldental or other damages, howsoever
caused
FRAME/COVER ASSEMBLIES: . . . . . . . . . . . . . . . . . . . . . ..3 years
VACUUM RECOVERY TANK/CHEMICAL MIX TANKS: .,3 years
CHEMICAL PROPORTIONING SYSTEM: . . . . . . . . . ., .,: years
CLEANING WAND:.........,....,.. . . . . . . . . . . . . . . . ..z years
ENGINE: \T)7ru orlg]nal blan~taclurer Or> Elrecl Dllve umrs
seeorlclnal blar7ufac! Lrersiv Jrrra,7!\ J ., ., . . . . . . . . . . ..L
Y
INTERNAL MACHINE I+OSES ..,., .,. , . . . . . . . . . . . . . . ..yea.s
VACUUM BLOWER: (Thru orgnal Manufacturer See
1!
Cooper Industries warranty I
(
HIGH PRESSURE BY PASS VALVE . . . . . . . . . . . . . . . . . ..2vears
BELTS, FITTINGS, FILTER SCREENS, GAUGES: . . . . ...1 year
WATER HEATER OR HEAT EXCHANGER, ., ., . . . ...1 year
HIGH PRESSURE PUMP (Thru or[glnal Manufacturer 1 ..1 year
~- VACUUM HOSE, SOLUTION HOSE,
QUICK CONNECTORS, O-RINGS, SEALS:. ., ., . . . ...90 days
Freez)ng of any water or chemical related component WIII VOID all
warranties on water or chemical related components internal or
external, of ths equpment
Deposits and build-up m the water chemcal or heater systems,
$ due [o hardness m the water used or poor quallty chemicals wh!ch
1 __
5 resulf In deposi!s will vod all warranl!es on affected compo~en!s
k
J,@n
-. w .-.
~43=17x .
Implled or statu[or~
agent, representative or dealer IS
HydraMaster’s warranty shall
ar)u f+vdra Mas[er snail t7ave no
- ~ea,s
. . . . . . . . . . . . . . . . . . . . . . . . . ,c !/ears
—.. .
I
2
Page 4
parts shipment will be sent to the customer for the amount of the
WARRANTY INFORMATION
To avoid misunderstandings which might occur between machine
owners and manufacturer, we are listing causes of component failure that specifically voids warranty coverage. Such causes as listed
below shall constitute
ENGINE: operation at speed in excess of 2800 R.P.M. Failure to
maintain proper oil level (oil should be checked every 5 running
hours). Failure to use the proper oil viscosity and type (see engine
manual). Use of other than manufacturer’s recommended spark
plug in engines. Failure to perform recommended maintenance as
described on pages 3 and 4 of engine manual.
BLOWER: Failure to lubricate impellers daily with LPS-1 or 1. Call Hydra-Master Warranty/Service Dept. at (206) 775-7275
WD-40 lubricant. Failure to lubricate bearings as recommended in
blower manual. Failure to maintain proper oil levels in the blower. 2. Give the Warranty/Service Representative the following informaFailure to use the correct oil grade and viscosity as recommended in tion:
blower manual. Failure to properly maintain blower safeguard systems such as waste tank filter screen, vacuum safety relief valve in A. Name of your company and your address.
vacuum tank lid and waste tank automatic shut-off svstem. B. Eauipment Model (i.e. Hvdra-Cat, Bobcat 2, etc.)
HIGH PRESSURE WATER PUMP: operation of pump at
pressures over 1200 PSI. Failure to maintain proper oil level as recommended in pump manual. Failure to change oil in pump at recommended intervals. Failure to protect pump against freezing. Failure
to maintain pump protection shut-off system. Failure to use water
softener in hard water areas. Use of improper chemicals.
abuse or neglect.
parts sent. The customer’s faulty parts must be
tion prior to the expiration of the thirty (30) day period. Upon warranty
approval, a credit will be issued the customer for the replacement
parts invoice.
parts ‘within the thirty (30) day period allowed will result in the
customer being charged for the replacement parts sent.
Wsrranty disapproval or failure to return the faulty
HOW TO ORDER
To obtain a proper diagnosis of your malfunction, and to order warranty replacement parts, it is important you follow the below procedure:
C. D&e of purchase. ” “
D. Hours on the unit.
E. Serial number of unit.
F. Name of person authorized to order parts.
G. Salesman unit purchased from.
H. Description of malfunction.
1. Pressure readings on high pressure gauge with wand turned on
and off.
returned for evalua-
HEATER: Operation of heater without adequate water supply.
Changing factory set propane regulator. Operating heater without
proper ventilating. Failure to protect heater against freezing. Operating machine at water pressures over 1000 PSI. Overfilling of propane tank. Use of improper chemicals. Failure to use water softener
in hard water areas.
VAC TANK: Failure to properly maintain filtering devices in tank.
Failure to clean tank as recommended by manufacturer. Failure to
maintain vacuum safety release in tank lid. Use of improper chemicals.
CHEM. PRO PORTIONER: use of improper chemical. Failure
to use water softener in hard water area. Operating machine without
proper chemical filter screen. Failure to protect against freezing.
3. If warranty replacement parts are needed, please specify method
of shipment desired.
freight collect, via:
A. U.P.S.
B. Airfreight
C. Air mail
D. Air express
E. Auto Freight
4, Do not give malfunctioning parts to a Hydra-Master Sales or Service Representative. All parts must be returned directly to Hydra-
Master, freight prepaid.
NOTE: All replacement parts are sent
CONTROL PANEL: Failure to motect flow meter and water ONE FINAL NOTE:
pressure gauge against freezing. ‘
Any questions you have regarding the warranty program should be
directed to the Warranty/Service Dept. Personnel at Hydra-Master
VACUUM AND SOLUTION HOSES: Failure to protect Corporation.
hoses against freezing. Failure to protect hoses against burns from
engine/blower exhaust. Damage to hoses from being run over by ve- We shall always endeavor to be fair in our evaluation of your war-
hicles. Kinking or cracking from failure to store or unroll hoses cor- rarity claim, and shall provide you with a complete analysis of our
rectly. Normal wear and tear from everyday use.
findings.
CLEANING WAND: Failure to protect against freezing. Obvi-
ous physical abuse of wand.
WARRANTY PROCEDURE
Warranty coverage is available to you ONLY through Hydra-Master
Corporation, 20309 64th Ave. West, Lynnwood, Washington 98036;
When warranty parts are needed, write Hydra-Master Warrsnty
Dept. at the above address, or call the Warranty/Service Dept. at
(206) 775-7275. No collect calls will be accepted. Hours of the
Warranty/Service Dept. are 8:00-11:30 am and 12:30-5:00 pm,
Pacific Time.
IMPORTANT
Hydra-Master’s warranty policy provides replacement parts without
charge for thirty (30) days to customers maintaining current account
status. An invoice dated thirty (30) days from date of replacement
3
Page 5
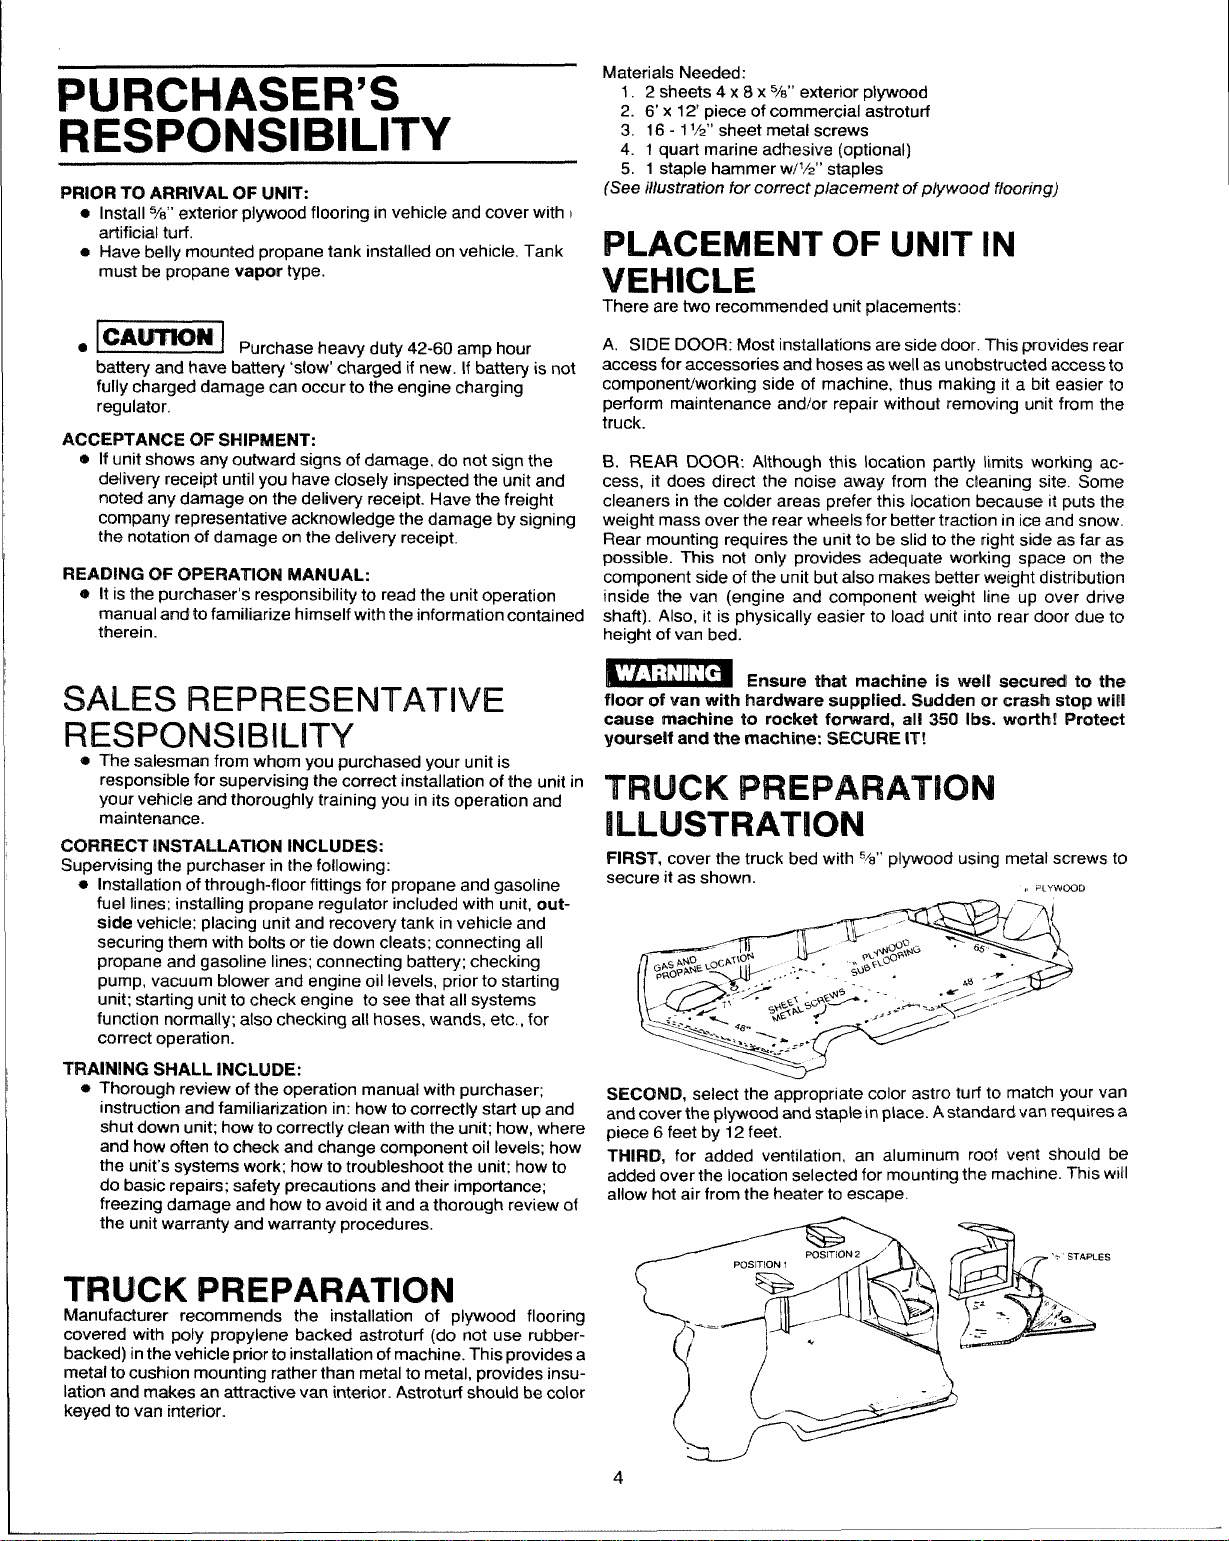
PURCHASER’S
.—
RESPONSIBILITY
PRIOR TO ARRIVAL OF UNIT:
● Install %“ exterior plywood flooring in vehicle and cover with I
artificial turf.
a Have belly mounted propane tank installed on vehicle. Tank
must be propane
vapor type
Materials Needed:
1. 2 sheets 4 x 8 x 5A” exterior plywood
2. 6’ x 12’ piece of commercial astroturf
3. 16-1 lA” sheet metal screws
4. 1 quart marine adhesive (optional)
5. 1 staple hammer w/’/z” staples
(See
illustration for correct placement of plywood flooring)
IPLACEMENT OF UNIT IN
VEHICLE
There are two recommended unit placements:
~ P.rchaseheavyd.ty 42-60 amp hour
battery and have battery ‘slow’ charged if new. If battery is not
fully charged darnage can occur to the engine charging
regulator.
ACCEPTANCE OF SHIPMENT:
e If unit shows any outward signs of damage, do not sign the
delivery receipt until you have closely inspected the unit and
noted any damage on the delivery receipt. Have the freight
company representative acknowledge the damage by signing
the notation of damage on the delivery receipt.
READING OF C9PERAT10N MANUAL:
e It is the purchaser’s responsibility to read the unit operation
manual and to familiarize himself with the information contained
therein.
SALES REPRESENTATNE
RESPONSIBILITY
e The salesman from whom you purchased your unit is
responsible for supervising the correct installation of the unit in
your vehicle and thoroughly training you in its operation and
maintenance.
CCNIRECT INSTALLATION INCLUDES:
Supervising the purchaser in the following:
● Installation of through-floor fittings for propane and gasoline
fuel lines: installing propane regulator included with unit, outside vehicle; placing unit and recovery tank in vehicle and
securing them with bolts or tie down cleats: connecting all
propane and gasoline lines; connecting battery; checking
pump, vacuum blower and engine oil levels, prior to starting
unit; starting unit to check engine to see that all systems
funti[on normally; also checking all hoses, wands, etc., for
correct operation.
TRAINING SHALL INCLUDE:
Thorough review of the operation manual with purchaser;
*
instruction and familiarization in: how to correctly start up and
shut down unit; how to correctly clean with the unit; how, where
and how often to check and change component oil levels; how
the unit’s systems work; how to troubleshoot the unit; how to
do basic repairs; safety precautions and their importance;
freezing damage and how to avoid it and a thorough review of
the unit warranty and warranty procedures.
A, SIDE DOOR: Most installations are side door. This provides rear
access for accessories and hoses as well as unobstructed access to
component/working side of machine, thus making it a bit easier to
perform maintenance and/or repair without removing unit from the
truck.
B. REAR DOOR: Although this location partly limits working access, it does direct the noise away from the cleaning site. Some
cleaners in the colder areas prefer this Iocatlon because it puts the
weight mass over the rear wheels for better traction in ice and snow.
Rear mounting requires the unit to be slid to the right side as far as
possible. IWs not only provides adequate working space on the
component side of the unit but also makes better weight distribution
inside the van (engine
shaft). Also, it is physically easier to load unit into rear door due to
height of van bed.
floor of van with hardware supplied. Sudden or crash stop will
and component weight line up over drive
Ensure that machine is well secured
to the
cause machine to rocket fonward, al! 350 Ibs. worth! Protect
yourself and the machine: SECURE IT!
TRUCK PREPARATION
!ILLUSTRATION
FIRST, cover the truck bed with 54” plywood using metal screws to
secure it as shown.
SECOND, select the appropriate color astro turf to match your van
and cover the plywood and staple in place. A standard van requ~res
piece 6 feet by 12 feet.
THIRD, for added ventilation, an aluminum roof vent should be
added over the location selected for mounting the rnachme. This WIII
allow hot air from the heater to escape.
,, +Lw,mm
s
a
TRUCK PREPARATION
Manufacturer recommends the installation of plywood flooring
covered with poly propylene backed astroturf (do not use rubberbacked) in the vehicle prior to installation of machine. This provides a
metal to cushion mounting rather than metal to metal, provides insulation and makes
keyed to van interior.
an attractive van interior. Astroturf should be color
4
Page 6

PROPANE TANK LOCATION
1
Either the 10 gallon or 16.5 gallon propane tank will fit this location.
Have your local propane dealer install the tank you select and purch-
ase. The machine will come with the proper propane regulator.
(Tank must have vapor outlet).
truck or van. Besides being dangerous it is unlawful
Do not use a portable propane tank inside the
Ww
L
in most states.
TANKFILLVALVE
HARD WATER AREA MAP
The quality of water varies greatly throughout the United States and
influences the reliability arid efficiency of equipment in direct propor-
tion to its level of hardness. The map below defines areas which
compromise fluid related components such as hoses, fittings, heaters, pumps, valves and water cooled engines.
Cleaning efficiency and equipment life is increased, chemical use
decreased and the appearance of cleaned carpets enhanced when
water softeners are incorporated in hard water areas. Manufacturer
strongly urges the use of water softener units in areas exceeding 3%
grains per gallon. Using the legend as a reference, determine the
quality of water in your area and take action immediately should it be
necessary.
(For installation ; ~ ~~’;’ ‘,’
diagram see
machine
installation section)
GRAINS
PER GALLON
~]
- 31/. -7 _ 10%ANDABOVE
0- 3~/2
.
F*
w
‘q
MACHINE
SPECIFICATIONS
FRAME: 18“ W, 53”L, 34”H, Steel With Baked-On Epoxy
WEIGHT:
COWLING: Steel With Baked-On Epoxy Finish.
ENGINE:
IGNITION: Magneto Key Start. Solid State Ignition.
HI-PRESSURE Tri-Plex Piston - Cat 290 -3.5 GPM -1200 PSI
PUMP:
VACUUM Model 3.03 MB Sutorbilt W/l 4 HG Safety Relief.
BLOWER:
CHEM, SYSTEM: Electro-Mechanical, Flow Meter Controlled.
HEATER:
INSTRUMENTS:
RECOVERY
TANK:
CLEANING
WAND:
HI-PRESSURE
HOSE:
l-l
VACUUM HOSE: 2“ Reinforced Safety Orange, 1M“’ Reinforced
STANDARD
FEATURES: S/S Cleaning Wand, 100’ M“ High Pressure
OPTIONAL
FEATURES: Vacuum Hose in 50’ Lengths, Additional %“
Finish.
Model 3.0:485 pounds.
Model 3.5:500 pounds.
16 HP Briggs & Stratton Opposed Twin Piston.
Steel Sleeved Cylinders, Ducted.
(@ 1200 RPM.
Model 3,5: 3LFS Sutorbilt W/12 HG Safety Relief.
Propane Fired, ThermostaticallyControlled.
20,000 BTU).
(1
1-1000 High Pressure Gauge, Hour Meter,
Chemical Flow Meter, ignition Key Start,
Temperature Gauge,
Model 3.0:52 Gallon Aluminum Epoxy Finish.
Model 3.5:65 Gallon Aluminum Epoxy Finish,
S/S 11” W/Heat Cover Handle - and Forward
Guide Handle,
M“ High Temp Lined/Vinyl Covered Safety
Orange W/Brass Quick Connects.
Safety Orange.
Power Console, Vacuum Recovery Tank, 11”
Hose, 100’- 2“ Vacuum Hose, 10’-1 M“
Vacuum Hose, Through Floor Connections For
Gasoline and Propane Hook-up, Tie-Down
Cleats, Vacuum Hose Connections, 5 Gallon
Chemical Jug, Operation Manual.
Stair Tool, Steel Legs W/Casters, Additional 2“
Pressure Hose In 50’ Lengths, Pressure
Washing Gun, Spare Patis Package.
SPARE PARTS
RECOMMENDATION
Because your truck-mounted unit is capable of generating several
hundred dollars per day, down-time on the unit can be very expensive.
In order to minimize such down-time, it is strongly recommended by
the manufacturer that you purchase and keep in vour truck the folIowing spare parts:
QUANTITY
PART NUMBER
2
1
1
1
1
2 000-049-028
6
000-078-015
000-078-024
000-078-034
000-076-007
000-049-023
DESCRIPTION
Engine Spark Plug
Flow Meter Kit
Wand Valve Plunger Kit
Press. Bypass Valve Kit
Spray Jet 8008E
Recovery Tank Filter Bag
Screen Garden Hose
PARTS ORDERS
To expedite your parts needs, please call your sales representative.
In most instances, he either stocks or has access to parts through a
regional service center.
In the event parts are unavailable locally, contact the factory and co-
ordinate your needs. If this becomes necessary, always indicate the
method of shipment you desire, i.e. U. P.S., U.P. S. Blue Label, Air
Freight, Air Express, etc..
Hydra-Master Parts Dept. phone (206) 775-7276.
QUANTITY
5
1
1
1
1
1
1
1
000-078-001
000-078-004
000-052-050
000-052-051
000-052-052
000-052-053
000-010-019
PART NUMBER
DESCRIPTION
Cat 290
Standard
Cat 290 Hot Cup Kit (Optional)
440 Male Quick Connect
440 Female Quick Connect
660 Male Quick Connect
660 Female Quick Connect
Belt, Pump Drive. AX-26
Shori Cup Kit
Page 7
OPERATION
This electro-mechanical system has been designed to be simple
and trouble free. Incoming water flows first through the Solenoid
Control Valve (1) and the low pressure Chemical Injector (2) which
are both mounted on the exterior of the mlx tank. As the water
passes through the Chemical Injector, it IS automatically proportioned with a predetermined quantity of detergent. The MIX (3)
Tank is equipped with two different float switches, the Water Level
Float (4) responds to the level in the tank and will maintain the
proper volume of solution to be reserved for the water pump. The
secondary, Low Water Float switch (5) is a safety switch that is
designed to protect your system from sudden or unexpected loss
of water supply. If, for example, the water source at the house were
turned off, the water level of the mix tank would drop, activating the
secondary switch, which automatically dmengages the system and
prevents the water pump from running dry.
The desired chemical InjectIon ratio may be obtained by an adjust-
ment of the Chemical Flow Meter (6) during the fill cycle of the mlx
tank. Water must be flow!ng into the mix tank In order to adjust the
chemical mix. The chemical WIII flow from the Chem!cal Jug (7) to
the Chemical Flow Meter, then to the Chemical Injector where It IS
proportioned into the MIX Tank at the desired chemtcal setting.
NOTE: With th[s unique chemical system, the chemical flow is
proportioned only during the filling cycles of the Mix Tank, not dur-
ing the direct spraying of the wand, Therefore, !t is possible that as
your wand IS spraying, you may have no chemical flow. Also, the
converse is true [n that you may not be spray!ng your wand, but if
the mix tank is In a filllng cycle. your Chemical Flow Meter may be
actwe at the desired flow rate.
The chemical proportlomng system will mix chemical with water at
a t to 30 ratio when the Flow Meter is set at 5 GPH, or a 1 to 15
ratio when the Flow Meter is set at 10 GPH.
At this point in the flow, solution (water with chemical) will now be
siphoned from the bottom of the Mix Tank to the inlet of the Water
Pump (8), When the wand IS not us!ng solution by spraying, the
solution will be bypassed from the bottom of the brass Pressure
Relief Valve (9), back to the MIX Tank.
When the wand is spraying, the solution continues its flow to the
Water Heater (1O). The coils of this heater have a capacity of up to
2 gallons, therefore it IS extremely important that all air pockets are
bled out of the heater prior to initial start-up. This may be achieved
by running the water system, without the heater on, for approximately 60 seconds,
WATER FLOW
Chemical
‘~
Injector -
Sole;oid -~
Control
1 “’
d
6- Chemical Flow Meter 12 - Incoming Water
7- Chemical Jug 13- Tank Dratn
8- High Pressure Pump
+ High Pressure
3
}
Y-
10- Heater COII
1? - Pressure Guage
14- To Wand
-+ Low Pressure
CHEMICAL PROPORTIONHUG AND
LEVEL CONTROL
6FA 6uFS
.1
I
II
Relay
MIX Tank
{
CHEMICAL SYSTEM MAINTENANCE
The chemical lines may need to be flushed with vinegar periodical-
ly to prevent abnormal chemical build-up. This flushing may be
done by removing the clear plastic hose from the Chemical Jug
and inserting it into a one quart container of vinegar, This should
be done with the Chemical Flow Meter setting on 10 GPH and the
Water Heater “off”. Simply spray water from the wand until the
quart of vinegar is exhausted, the repeat the process with one
quart of clear water to void all lines of vinegar.
CHEMICAL SYSTEM WIRING DIAGRAM
Solenoid Valve
“!!+!!%::=*
GFD
“L.._J
~.
‘“ @!
Check Va ve
Spring
~ ‘ ~ ~ ‘“’’”0’ 60”’
O S S Ball
o check Valve
l!)
Cap
Nut
~ Che.[cal L — F/r .
Mounmg
*~=L—lJ ,~wate,
12 vDC
Coil Plate
T-
6
Mounting
Inlet
Page 8

GENERAL
INFORMATION FOR
CAT PUMP REPAIR
As you remove your discharge manifold, there is a set of 3 check val-
ves (which usually fall out during dis-assembly). If the surfaces of
these check valves are dirty, or show signs of chemical build-up, it is
probable that they would remain open causing pressure loss or pulsation. Upon inspecting the valves, make sure that the teflon buttons
in the valve spring retainers are still itact. Also examine the discharge manifold. Look for problems such as cracks, chemical buildup or warpage due to freezing. If this discharge manifold is warped, it
will cause the check valves to stick and will result in loss of pressure.
The Cat pump cups are often the source of pressure loss. Upon inspection they may appear melted or torn, but often they will look
good. Replace them anyway. There is no sure method of visually inspecting the cups. Hydra-Master recommends changing cups
whether they look good or not.
Anytime your pump is being dismantled, Hydra-Master recommends
replacement of all ‘o’ rings and seals. This is merely a convenience
to the customer to make sure that the Cat pump is in top operating
condition.
The prrrm-a-lube seals located within the intake manifold will allow
air to enter the pump if they are worn. Again, it is difficult to visually
pinpoint a defective prrrm-a-lube seal. Replace them all.
Within the piston sleeve cylinders there are 6 ‘o’ rings that are about
1/4the size of a penny. Ifthese ‘o’ rings are bad, water will be pumped
back into the oil. If this has occured the oil will raise in level and will
appear milky. If you are unable to repair seals right away, change oil
frequently. Repair the pump as soon as possible so as to not damage bearing or connecting rods.
Repairing of Cat pumps is not a difficult task. However, before disas-
sembling make sure you have the proper parts required.
1- short (or hot) cup kit
6- piston sleeve ‘o’ rings
3- Prrrm-a-lube seals
1- bottle Cat oil
Read instructions thoroughly, supplied in the Cat pump manual,
prior to disassembly and follow directions as stated. 011 all seals
thoroughly prior to installation. (Remember, a newly scarred seal is
no better than one you just took out.)
BYPASS VALVE
ILLUSTRATION
Bypass Valve Parts List
REF. NO. PART NO.
3. 000-105-101 Thrust Plate, Bypass
4.
000-105-102 Piston
5. 000-078-101 Kit, Seal for Bypass
7.
000-148-004 Seat & O-Ring, Bypass
8. 000-097-005 O-Ring, Bypass Valve
DESCRIPTION
Valve 1
QTY.
Plate, Bypass
Valve 1
Valve
Valve
Fittina
1
1
1
BYPASS VALVE
169=101
HIGH PRESSURE PUMP
TROUBLESHOOTING
A pump instruction brochure on pages Et-15 may assist you in resolving a pump related problem.
PROBLEM:
● LOSS OF PRESSURE
CAUSE AND/OR SOLUTION:
1. Clogged Filter Screen in garden hose quick connect
coupler.
A. Remove and clean or replace filter.
2. Low water pressure at source.
A. Determine rate of flow and select an alternate source of
supply if water pressure is inadequate.
3. Defective or blocked check valves in high pressure pump
cylinder head.
A. Disassemble cylinder head and replace or clean applicable
check valve.
4. Delaminated, kinked or clogged hose between the mix tank
and the high pressure pump.
A. Remove and replace defective hose.
5. Defective pressure relief valve or debris in pressure relief
valve. NOTE: the high pressure bypass valve is designed to
fully close when the cleaning tool is turned on. Any foreign
matter collecting on the piston will prevent full closure of the
valve and allow a portion of the water to continue to circulate
instead of being routed to the cleaning tool. To correct this
situation, the bypass valve must be disassembled and cleaned
(refer to drawing provided in this manual for bypass disassembly).
A. Disassemble and clean pressure relief valve as illustrated in
drawing.
B. Replace defective or worn out bypass cup.
C. Replace bypass valve.
6. Defective or worn cups.
A. Remove and replace piston cups as defined by pump manual.
7. Loose drive belt for high pressure pump.
A. Readjust belt as required or replace if defective.
WATER FLOW
1. Worn out spray jet. NOTE: Cleaning tools designed to spray a
constant flow of 1lA GPM will average 1 gallon of flow per minute in
actual working situations since flow is not continuous. An average
flow of 1 GPM results in 6000 gallons of flow for every 100 hours of
unit operation. Spray tips are capable of consistent flow rates for
approximately 20,000 gallons. They should be replaced therefore,
approximately every 350 hours. Worn spray jets allow a greater
average rate of flow thus reducing desired temperature levels.
A. Remove and replace spray jet.
7
(Continued on Page 16).
?@’
Page 9

. ,$%, ,,
I
—
@
r~~ ‘
-. .-
&
SPECIFICATIONS
volume ...........................................................................................................................3.5 GpM
13ischarge Pressure ...................................................................................................... 1200 psi
Maximum Inlet Pressure ...................................................................................8.5 to +
RPM ............................................................................................................................. 1200 RPM
Bore ....................................................................................................................................O.78O''
................................................................................................................................O.472''
Stroke
Crankcasa Capacity ..........................................................................................................
Maximum Fluid Temperature .......................................................................................... 160” F
Inlet Port (I) ...................................................................................................................l/2'' NpT
Dlschar e Fort (2)
Pulley ounting ........................................................................................................ Either side
J
Shaft Diameter
Weight
............................................................................................................................l2.1 Ibs.
Dimensions .......................................................................................................l O.6
This Cat Pump Vpraduct”) is warranted by tha manufacturer to be
from defects in workmanship and material for one year from
free
date of manufacturer’s shipment. This warranty Is limited to repair-
ing or replacing products which manufacturer’s investigation
shows were defective at the time of shipment by the manufacturer.
Ail products
ilon, repair or replacement.
The express warranty sat forth herein is in
ties, express or Implied, including without limitation any warranties
of merchantability or fitness for a particular purpose and all such
warranties are hereby discteimed and excluded by the manufac
turer. Repair or replacement of defective products as provided
above is the sole and exclusive remedy provided hereunder and the
manufacturer shall not be liable for any further Ioas, dama es or
expermea, including incidental or consequential damages, d rectly
or indirectly ariahrg from the sale or use of this product.
This warranty is subject to the following warranty conditions:
sub.ect to Ma warranty shall be returned F.O.B. Cat
/Pumps Corp., M nneapolis, Minnesota 55430, U.S.A. for examhta-
.........................................................................................................3/8'' NPT
..................................................................................................................O.65O''
CAT PUMP
lieu of all other warran-
?
Model 290
OPERATING INSTRUCTIONS
CAUTION: CAT PUMPS are positive displacement pumps. Therefore,
a properly designed pressure relief mechanism MUST be installed in
the discharge piping. Failure to install such relief mechanism could
result in personal injury or damage to the pump or system. Cat
Pumps Corporation does not assume any liability or responsibility
for the operation of a customer’s high pressure system.
U.S. Measure
40 psl
10oz.
X 9.1 X 5.7”
WARRANTY
IMPORTANT CONDITIONS
LLlaRICATION — ftll crankcase 10 dot on oil gauge window per Srxmtlcatmns wllh Cat
Pump 011 or equllvalenl SAE 60 weight hydraulic 011wtlh afltlW@aland rust lnhlbitor ad-
ditives. Change
500 hour Intervals thereafter Prrrrrm-a-lube seals need no lubrication Blue dot seals and
wicks must recewe three drops 0! Cat Pump 0!1 Per w!ck every 50 hours of operallon.
GOOO
PREVENTATIVE MAINTENANCE.
RPMand PRESSURE—
Pressure reltef valve must be ,nstalled
DO NOT
tlonal information on questionable
FREEZING CONDITIONS — Pump must ba protected from !reez!ng condtllons
inltnal fill after 50 hour run.in period. Chnage 011every three months or at
LUBRICATION IS THE EASIEST, MOST EFFICIENT IW40 LEAST ExPENSIVE OF
Pump operatton musl be woth(n RPM ano pressure specd!cattons
PUMP ACIDS OR ABRASIVE FLUIOS with this und Consult Cat Pumpe tor add!.
USEOF OTHER THAN CAT PUMP PARTSOR
THEIR EQUIVALENT VOIOS THE WARRANTY
flu!ds
M@tr[c Measure
(-0.6 to+!% g~!~
(268 x 230x 146mm)
(13 MM)
(1200 RPM)
(20mm)
(12mm)
(0.3
(71 “c)
(1/2” NPT)
(3/8” NPT)
(Either Side)
(16.5 mm)
(5.5 kg)
L)
,
I
Products descr,bed
hereon are covered by one or more of the following U S patenls 3558244 3652188 3809508 3920356 and 3930~56
—-.
?%..
-)
- ,;
>*/A#p’
,.,
,’., C,,,,,.,
. . .
P O Box 685 MINNEAPOLIS MN 55440
Phone (612) 780.5440 0 Telex 29.0276
N V CAT PUMPS INTERNATIONAL S A
Harmmmeslraat 29
!3.2000 Anlwerp. Belq!um
,?, ...
*
LoretohOhe 5
CH 6300. ZUG Switzerland
CAT PUMPS DEuTSCHLAND GmbH
Roslocker StraSSe 9
6200 Wlesbaden. Bterstadt
Wesl Germany
CAT PUMPS (U K ) LTD
17A K,ngs Road Fleet
HamDshlre Gu13 9AA
‘!
●
●
D/str/buted BY
8
Page 10
3
~,o.55,2~3”g4’100)
/8’
3
\
.5
1
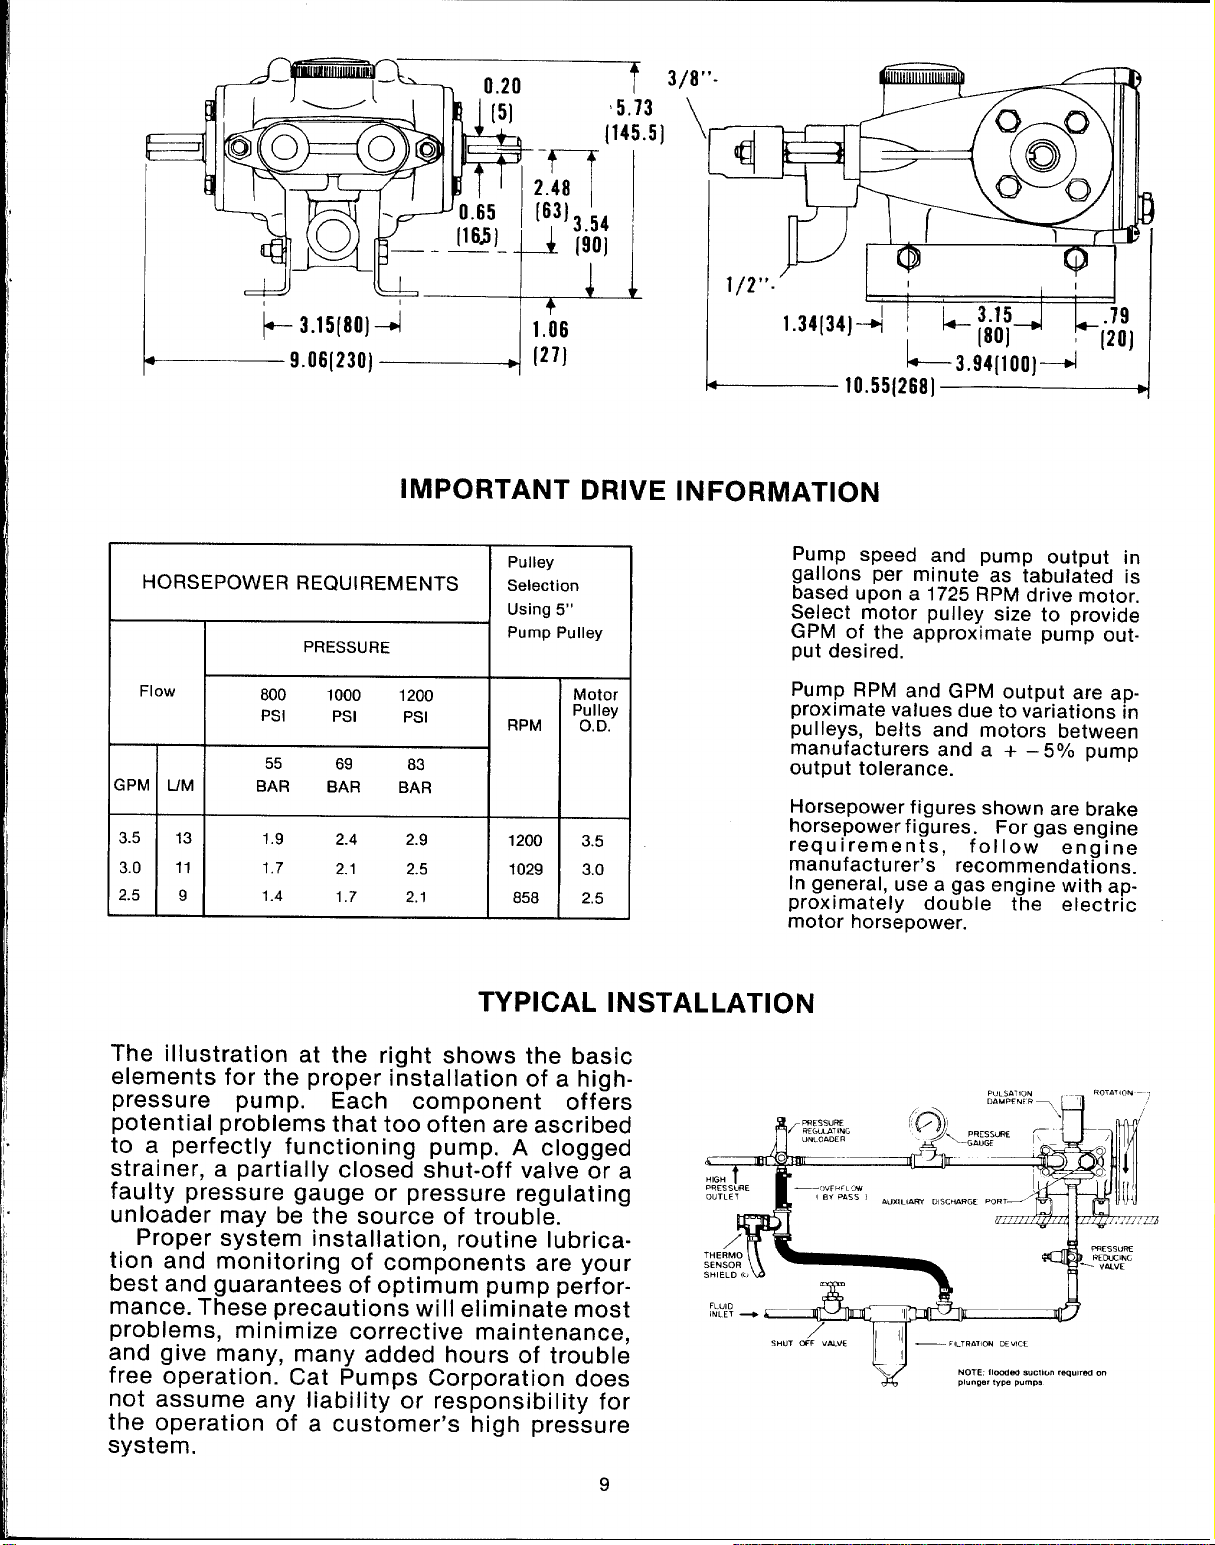
IMPORTANT DRIVE INFORMATION
I
Pulley
HORSEPOWER REQUIREMENTS
PRESSURE
Flow
;PM
3.5
3.0
2.5
UM
13 1.9
11
9 1.4
800 1000 1200
Psl
55
BAR
1.7
Psl Psl
69 83
BAR BAR
2.4
2.1
1.7 2.1
2.9
2.5
Selection
Using 5“
Pump Pulley
Motor
RPM
1200
1029
P:J:y
3.5
3.0
858 2.5
TYPICAL INSTALLATION
The illustration at the right shows the basic
elements for the proper installation of a high-
-pressure pump. Each component offers
potential problems that too often are ascribed
to a perfectly functioning pump. A clogged
strainer, a partially closed shut-off valve or a
faulty pressure gauge or pressure regulating
unloader may be the source of trouble.
Proper system installation, routine lubrica-
tion and monitoring of components are your
best and guarantees of optimum pump performance. These precautions will eliminate most
problems, minimize corrective maintenance,
and give many, many added hours of trouble
free operation. Cat PumDs Cor~oration does
not assume any
the operation of
system.
Iiability”or responsibility for
a customer’s high pressure
Pump speed and pump output in
gallons per minute as tabulated is
based upon a 1725 RPM drive motor.
Select motor pulley size to provide
GPM of the
put desired.
Pump RPM and GPM output are approximate values due to variations in
pulleys, belts and motors between
manufacturers and a + – 5°!0
output tolerance.
Horsepower figures shown are brake
horsepower figures. For gas engine
requirements,
manufacturer’s recommendations.
In general, use a gas engine with ap-
proximately double the electric
motor horsepower.
/
S HUT c$F “bJ.VE
approximate pump out-
follow engine
II
F,LTROT,CM Ixv,cc
—
L
u
NOTEIl&ed s“.!,.” ,eq”,ml.“
plungertype pump,
pump
9
Page 11

GENERAL INFORMATION
INTERPRETING PRESSURE READINGS: Pressure
readings that differ
normal for
a particular set-up indicate a problem,
from the rated PSI or those
but not necessarily a pump problem!
Before any servicing of the pump, carefully check
the following; inlet plumbing for size, restriction
and/or air leaks, restricted or worn orifice and condition of the by-pass valve and pressure gauge.
Check any shut-off valves in the inlet or discharge
plumbing to be sure they are fully open. Seven out
of ten problems are other than pump problems!
FOR SERVICE contact your local representative
or look in the Yellow Pages under PUMPS.
ORDERING OF PARTS: When ordering parts, be
sure to give the “model number” and “serial
number”,
“description”, and “quantity” of the
items desired.
INSTALLATION
Optimum performance of the pump is dependent upon the entire fluid system and will
be obtained only with the proper selection and installation of plumbing and accessories,
MATERIAL RETURNS: If necessary to return a Cat
Pump, please secure an approved “RETURN
GOODS AUTHORIZATION” form from Cat Pumps
Corporation and complete a “PRODUCT
REPORT” form detailing the application and the
conditions of operation. Any material AUTl-fORIZ-
ED for return must be shipped FREIGHT
PREPAID.
FILTER lNSPECTICIN: A frequent source of low
pressure is
due to foreign matter in the fluid being
pumped. It takes but one small particle to partially
hold open a valve—several to plug an inlet screen
or filter, or if the particles are abrasive, to damage
packings, valves, valve
seats, or plunger%
Inspect filters and screens on a schedule commensurate with the material being pumped and
whenever a low pressure problem develops.
NOZZLES: A worn nozzle will result in loss of
pressure.
Lubrication: Fill crankcase with oil as covered under
warranty conditions.
Pulley Selection: Select size of motor pulley required to
deliver the desired volume from Horse Power Require-
ment and Pulley Selection Chart.
Motor $electicm: The motor or engine driving the pump
must be of adequate horsepower to maintain full RPM
when the pump is under load. Select a motor from the
Horse Power Requirement Chart according to required
pump discharge volume and maximum pressure at the
pump!
Mount the
ner to permit drainage of crankcase oil. An uneven
pump on a rigid, horizontal suface in a man-
mounting surface will cause extensive damage to the
pump base. Use the correct belt; make sure pulleys are
aligned. Excessive belt tension may be harmful to the
bearings.
Inlet Plumbing must be at least the same diameter as
the inlet port, preferably one size larger. Restriction in
the inlet plumbing will cause cavitation in the pump,
drastically reducing packing life. All joints must be air
tight.
Inlel Pressure: Optimum performance is obtained with
+ 20 PSI inlet pressure. With adequate size inlet plum-
bing, the pump will perform very satisfactorily with
flooded suction. The pump can operate with inlet
pressure up to 40 PSI. Use of excessive pressure will
void the warranty.
inlet
Accessories: Install an inlet strainer of twice the
rated capacity of the pump.
A stand pipe to help maintain a positive pressure
head in the inlet line is desirable.
A shut-off valve is recommended to facilitate
maintenance.
Discharge Plumbing: Install a pulsation dampening
device mounted directly to the discharge line and
precharged to a pressure calibrated for operating conditions.
A reliable pressure gauge should be installed near
the discharge outlet of the high pressure manifold.
This is extremely important for adjusting pressure
regulating devices and also for proper sizing of the noz-
zle or restricting orifice. The pump is rated for a max-
imum pressure; this is the pressure which would be
read at the discharge manifold of the pump, not at the
gun or nozzle end of a long hose.
A pressure regulating relief valve or unloader must
be insta//ed to prevent over-pressure in the event the
discharge or downstream plumbing becomes plugged
or is turned off. Severe damage to the pump will result
if this condition occurs without a relief valve in the line.
CAUTION: Failure to install such a valve will void the
warranty on the pump.
10
Page 12

S’8
EXPLODED VIEW
MODEL 290
63
‘ 57
11
Page 13

ITEM
PARTS LIST
CAT PUMP MODEL
2
3
4
5
a
9
10
11
12
15
16
17
18
19
20
21
23
24
25
26
27
28
2$3
30
:;
33
34
35
PART No
28766
85680
14177
43211
26087
26105
22289
23170
25625
92520
43804
14487
24159
26536
27950
92519
101799
101800
16948
20017
25301
25327
25392
28771
29003
29614
26854
28597
25128
25635
30315
30325
DESCRIPTION
QTY.
Crankcase
Stud (M8
X 82)
O-Ring, Oil Filler Cap
Oil Filler Cap
O-Ring, Crankcase Cover
Crankcase Cover
Oil Gauge
O-Ring, Drain Plug
Drain Plug
Sems Comb Head
Screw (M6 x 20)
Crankshaft
Rearing
Oil Seal
O-Ring, Oil Seal Case
Oil Seal Case
Sems Comb. Head
Screw (M6x 16)
Connecting Rod
Piston Rod
Piston Pin
Seal Washer
Seal
Oil
Barrier Slinger
O-Ring, Sleeve
O-Ring, Sleeve (Viton)
Back-UD Rirm, Sleeve
Sleeve (2974 ~’Unchromed) 3
Seal Washer 3
Seal Retainer 3
Inlet Manifold 1
Inlet Manifold-Stainless
Steel 1
Prrrrrm-A-Lube Seal
Prrrrrm-A-Lube Seal(Viton) 3
ITEM PART NO.
1
2
1
38
39
40
27004
30543
30544
1
1
1
1
1
1
6
1
41
42
43
44
45
46
47
48
2
2
2
49
50
2
43172
27983
27002
27006
18956
14158
101802
23172
11377
21985
24459
25634
DESCRIPTION
Inlet Valve 3
Bat-Cup Piston 3
Bat-Cup Ring
(Teflon)
Cup (Viton) 3
Piston Spacer
Piston Retainer
Conical Washer-SS (M6) 3
Nut-SS (M6)
Cotterpin 3
Cylinder (43834 Unch) 3
O-Ring, Cylinder
O-Ring, Cylinder (Viton)
BacJJp Ring, Cylinder 3
Discharge Manifold 1
Discharge Manifold-
QTY.
3
3
3
3
:
Stainless Steel
8
3
3
3
3
3
3
3
3
51
52
53
54
56
57
58
59
60
3
61
62
63
64
43442
43360
43723
43434
81109
101804
25130
26246
30901
30920
30910
30032
30047
Valve Spring Retainer
Valve Spring
Valve
Discharge Valve Seat 3
Hex Nut (M8)
Hex Flange Nut (M8) 2
Shaft Protector
Angle Rail
Hex Cap Screw
(5/16 x23A)
30612
Split Lockwasher i%%%ng
(5/16 US)
Hex Nut (5/16 US) 2
Puiiey 5“ w/2
Set screws
Key (M5)
1
30246
Pulley
J
Asbly
;
3
3
2
1
2
2
2
?
1
3
30023 Cup Kit
cup
3
O-Ring, Cylinder
6
Cotterpin
3
1 Instruction Sheet
1
Cup Inserter
30305 Seal Kit
Prrrrrm-A-Lube Seal
3
Cotterpin
3
Abrasive Paper
2
Instruction Sheet
1
30431 Sleeve and
Prrrrrm-A-Lube Seal
3
Barrier Slinger
3
Cotterpin
3
Sleeve
3
O-Ring, Sleeve
6
Instruction Sheet
1
Seal Kit
SERVICE KITS
12
30686
30860
Valve Kit
Valve Spring Retainer
3
Valve Spring
3
Vaive
3
Valve Seat
3
O-Ring, Cyiinder
3
Instruction Sheet
1
Piston Kit
O-Ring, Cylinder
6
Back-Up Ring, Cylinder
3
Bat-Cup Piston
3
Bat-Cup Ring
3
cup
3
Piston Spacer
3
Piston Retainer
3
Conical Washer (M6)
3
Nut (M6)
3
Cotterpin
3
Inlet Valves
3
1
Instruction Sheet
Page 14

L
SERVICING DISCHARGE VALVES
& VALVE SEATS
DISASSEMBLY
Loosen the 2 (M8) locking nuts approximately one
1.
turn.
2.
Then remove the 2 (M8) flange nuts.
3.
Grasp the discharge manifold with 3 fingers on
the underside and tap with a soft mallet to remove
4.
Valve assemblies will remain with the manifold. in-
vert manifold and discharge valve assemblies
should fall out.
Inspect discharge valves for wear or ridges.
5.
(Sperical valves due to their shape must be replaced when worn.)
REASSEMBLY:
Place retainer in manifold chamber
1.
2.
Next insert spring into center of retainer
Place valve over spring with spherical (mooned)
3.
side down.
Next insert the valve seat.
4.
Position manifold back onto pump. NOTE: Exer-
5.
cise caution when inserting cylinders into manifold
to avoid damaging cylinder o-rings.
Replace flange nuts on studs and hand tighten
6.
both sides. Then torque each side to 125 inch
pounds.
Hand tighten locking nut.
7.
CAUTION: When restarting the pump, check to see
that there is no cylinder motion as this will
cause premature
Center cylinder motion canbe eliminated by swit.
thing with one of the endcylinders.
failure of the cylinder o-rings.
SERVICING THE PUMPING SECTION
DISASSEMBLY:
1.
Remove discharge manifold as described above.
2.
Slip cylinders out of inlet manifold.
NOTE: Identify cylinders so they will be relapced in
their origional position. (Front to back)
3.
Remove cotterpin, nut, and washer.
4.
Next remove piston retainer, spacer, and piston
assembly.
5.
1,
——
13
Remove inlet valve.
Page 15

REASSEMBLY:
SERVICING THE SEALS
AND SLEEVES
DISASSEMBLY
1 Examine inlet valve surface and reverse if dam-
aged. (both sides are lap surf aces.)
‘2 Examine piston assembly for clean inlet surface.
If damaged, replace and lubricate.
NOTE CUP INSTALLATION:
Wipe cup inserter lightly with oil. Slip bat-cup ring onto
piston. Force cup over inserter and square with all sur-
faces. Faulty cup insta//ation causes premature
faiture.
Next replace piston spacer and retainer.
3.
4.
SliP washer onto rod, screw on nut and torque to
60 inch pounds. NOTE: ALWAYS REPLACE WITH
NEW CO JTERPIN.
Examine cylinder walls for scoring or etching.
5.
These conditions will cause premature wear of
your piston assemblies. replace if worn or damaged.
Lubricate cylinder and replace o-rings and back-
6.
up rings (if defective).
Position cylinders in their origional order into
7.
manifold chambers and carefully slip over rod
ends onto the pump.
Replace flange nuts on studs and hand tighten
8.
both sides. Then torque each side to 125 inch
pounds.
Hand tighten locking nuts.
9.
1.
Remove discharge manifold and piston assem blies as described .
Remove both (M8) locking nuts from studs
2
3
With soft mallet, tap inlet manifold loose from
crankcase.
4.
Place inlet manifold on pair of clearance blocks
with crankcase side down. and drive out seals.
Invert inlet manifold with CRANKCASE SIDE UP.
5
6.
Lubricate circumfrance of new Prrrrrm-A-Lube
seals, position in manifold with GARTER SPRING
DOWN and drive into place.
7.
Examine sleeves for scoring or other damage
before removing
If worn. grasp sleeve with pliers and pull off.
8.
NOTE: This procedure wit! mar the sleeve so use
only if sleeve is to be repiaced.
Remove o-ring and back-up rings from piston rod.
9.
REASSEMBLY:
Place barrier slinger on rod.
1.
2.
Lubricate new o-rings and back-up rings. Install
first o-ring in the o-ring groove on the piston rod.
Position back-up ring against the shoulder in front
of the first o-ring, then the second o-ring. Be
careful to avoid damaging the o-rings when slip-
ping them over the piston rod threaded ends.
PISTON SPACER BACCUP
PISTON R
CUPWA
COTTERP
‘uT~”
PUMPING SECTION CUTAWAY
BAC.CUP RING
T
d
PISTON RODSLEEVE
Immerse sleeve in
3.
onto rod. (machined counter bore end first}.
Replace seal retainers.
4.
ON
J
Exercise caution when replacing inlet manifold, so
5.
the inlet seals are not damaged by the threaded
ends.
rod
Replace locking nuts on studs.
6.
Reassemble ~iston assemblies and discharae
7.
manifold as described.
Consult factory for your local distributor for
crankcase servicing.
oil carefully twist and push
Page 16

DIAGNOSIS AND MAINTENANCE
PROBLEM
Pulsation
Low Pressure
,
lumps runs extremely rough,
messure very low
:ylinder O.rings blown next 10
Iischarge manifold
eakage at the cylinder O.rings
st the discharge manifold and
>Iack, powdery substanca in the d
~raa of the O.rings
Nater leakage from under the
nlet manifold
)il leak between crankcase
md pumping section
)il leaking in the area of
: rankshaft
PROBABLECAUSE
Faulty Pulsation Oampener
Worn nozzle Replace nozzle, of proper size
Belt Slippage
Air leak in inlet plumblng
Pressure gauge inoperative
regtstermg accurately
Relief valve stuck, partially plugged or
Improperly adjusted; valve seat worn
I!Ilet suction strainer clogged or
improper mze
Worn piston assembly Abrasives m
pumped flwd or severe cavitation.
Inadequate water supply,
Fouled or dirty Inlet or discharge
valves
Worn Inlet or discharge valves
Leaky discharge hose
Restricted inlet or arr entering the relet Proper size inlet plumbing; check for air tight
plumbing
Inlet restrictions andlor air leaks,
Oamaged cup or stuck inlet or
dwcharge valve
Worn Inlet manifold seals Replace worn seals, Short cup life Over pressure of pumps
Worn inlet seals allow pump to draw Install new Inlet manitold seals, Running Pump dry
a Ir
Pressures In excess of rated PSI
Warped man(fold Replace manifold
LOose Cyllnders Cyllnder motion
caused by Improper shlmmlng of the
,scharge mamfold
worn Inlet mancfold seals Leak, ng
51eeve O.ring rePlace sleeves and sleeve O.rmgs
w orn cra~kcase piston rod seals
Excess 011from wicks
worn crankshaft seal or Improperly
n stalled o(I seal retatner packing
ad bearing
B
or not
Check precharge; if low recharge it or Install a
new one
Tighten or replacq use correct belt
Disassemble, reseal, and reassemble
Check with new gauge; replace worn or
damaged gauge, P.N. 06090
Clean, and adjust relief valv~ check for worn
and dirty valve seats. Kit Available.
Clean. Use adquate size. Check more frequently.
Install proper fitter. Suction at inlet manifold
must be limited to lifting less than 20 feet of
water or -8.5 PSI vacuum.
Clean relet and discharge valve assemblies.
Replace worn valves, valve seats andlor
dmcharge hose.
seal Abrasive material in the fluid being
Replace worn cup or cups, clean out foreign
material, replace worn valves
check for plugged nozzle, closed valves or
Impropedy adjusted bypass valve
Remove spacer shims on manifold sluds, Do not
remove too many shims or the ears of the
manlfold WIII be bowed when the man!f old IS
r
et!ghtened, causing looseness in the center
cylinder
Install seals If Piston rod sleeves are scored,
Replace crankcase pwton rod seals
Reduce quant!ty of 011per otlsng
Remove 011seal retatner and replace damaged
gaaket andlor seals
Replace bearing
--
—
SOLUTION
PROSLEM
Excessive play in the endof the Wornmainball bearingfromexcesswe
crankshaft pulley tenston on drive belt
Water in crankcase crankcase
Ieekingfrom undereide of Worn crankcase proton rod seals
Oil
crenkcase
Oil leaking at the rear portfon of
the crankcase
Oil leakage from drain plug
Loud knocking noise in pump Pulley loose on crankshaft
Frequent or premature failure of
the inlet manifold seals
strongsurging al the infet and
Iow pressure on the discharge
side dIsCharge valves and relet valve seats may be lapped cm a
-.
——
PROBABLECAUSE
—
May be caused by humid air
condensing into water inside the
Leakage of manifold !nlet seals andlor Replace seals, sleeve and O.rings.
piston rod sleeve O.rmg
Oamaged or improperly installed oil Replace 011gauge or cover O-ring, and drain plu{
gauge or crankcase rear cover O.ring,
and drain plug O.ring
Loose drain plug or worn dram plug
O.ring
Broken or worn bearing
Scored rods or sleeves
over pressure to inlet manifold
Oamaged or worn chrome plating of
the cylinders
pumped
Excessive pressure andlor Check pressures and fluid relet temperature; be
temperature of fluid being pumped
Frent edge of piston sharp Replace with new piston
chrome plating of cylinders damaged
causing excesswe wear of cups. May be c
caused by pumping ac]d soluflon
Fore!gn particles In the relet or
discharge valve or wom relet arldlor
—
SOLUTION
Replace ball bearing, Properly temaon belt
Change 011at 3 month or 500 hour ,nterval~
using Cat Pump Crankcase 011 (other approved
011every month or 200 hews) P.N. 06100,
O.ring
Tighten drain plug or replace O.ring
—
Check key and tighten set screw.
Replace bearings
Replace rods and sleeves.
Reduce inlet pressure per instructmns
Replace cylinders
Install proper fdtration cm pump Inlet
sure they are within specifi~d range
Reduce pressure
Do not run pump w!thout water
Install new cups and cylinders Pump only fluid
ompatible with chrome
check for smooth lap surfaces on inlet and
discharge valve seats Dmcharge valve seats
flne 011 stone; damaged cups and discharge
valves cannot be lapped but must be replaced.
pl”rnbl”~
very
—
Page 17

2. Fkfucticm of Flow. MIX TANK OVERFLOWS
A. Due to increased length of solution hose.
Nt3TE: for every 50 feet of hose, beyond 100
feet in total length, a measurable loss of flow
is experienced. This condition is a result of the
increased friti~on experienced by the water
as it passes through the hose. Therefore, it is
necessary to increase the pressure at the
machine 40 PSI for every additional 50 feet of
cleaning solution hose over 100 feet.
—-—-
WATER FLOW
‘
1. Float ball in mix tank hanging up (not moving freely).
2. Extension bracket pinching the float lever, restricting full action of
the lever.
3. Plunger not seating properly on the valve. (Remove the 2 screws
which hold the extension assembly to the valve. Do not lose or
drop the screws. Remove the extension assembly. Turn it upside
down. Inspect the plunger for proper seating. If there is no debris
obstructing the valve or plunger, the plunger may be out of adjust-
ment. To adjust, loosen the set screw on tf?e ball nut and move
the ball toward the end of the rod 1H 6“, Retighten set screw.
Place extension assembly back into position. Tighten the two
screws.
2
Chemmal
lnpctor
Sale\old
Control
Valve
....
.4
.! ~ ;,
%
bq
::: ~ > F=” ;
“ .
~: ..%> ‘“
~
9 - Bypass Valve
10- Heater COII
11 - Pressure Guage
12- Incoming Water
Tank Drann
*3 -
I
I
I
li&a; < # ‘
‘8L
.,
,29
‘Q%
‘,3 J$& ~Ap ‘
;-
Chem!cal Flow Meter
6.
Chemical Jug
? S - High Pressure Pump 14- To Wand
High Pressure 4 Low Pressure
. .. . ....... ... .
4
2’
CHEMICAL TANK”” “--
TROUBLESHOOTING
NO OR LOW CHEMICAL FLOW
1.
Check that hoses in the tank are secured. Check that the hose
from the top of the flow meter to the side of the mix tank is secured
with no kinks. Check the hose from the bottom of the flow meter to
the them. Jug for kinks or cracks.
2.
Check the foot valve and screen on the end of the hose which
goes into the mix tank. To check this screen for proper function,
remove! it from the plastic hose. You should be able to suck
through the hose barb end, but you should not be able to blow
through the hose barb end. (If you cart not suck through It then
rinse it out with vinegar). When screen is removed the chem!cal
fuel hose should be lifted into a vertical position so the ball in the
foot valve will seat by gravity. (This is only a tempora~ fix for low
water pressure areas.)
3.
Check flow meter for float obstruction.
4.
Check to insure that the adjusting screw on proportioning venturi
is backed out.
is proportioning venturi closed? Soak in warm water or vinegar
5.
solution.
IS incoming water pressure less than 20 PSI.?
6
7
Cracked or defective chemical flow meter?
NOTE: If you are in a low water pressure area and find that the volume of water entering the mix tank is not enough to allow your venturi
to siphon chemical, unscrew the spring from the foot valve screen
and remove the spring.
INABILITY TO ADJUST’ CHEMICAL WITH THE FLOW METER
1.Debris lodged behind teflon seat in flow meter knob.
2. Teflon seat dismounting from flow meter knob.
MIX TANK DOESN’T KEEP UP WITH WATER OUTPUT
1, Check garden hose quick connect assembly screen.
2. Check garden hose and/or feed hose to the mix tank for clog,
kinks or blockage.
3. Float ball in mix tank hanging up. (Not moving freely),
4. Extension bracket pinching float lever, restricting $uII action of
lever.
5. Valve plunger not opening fully. To adjust, remove the 2
screws
which hold the extension assembly to the valve. (Do not lose or
drop the screws). Remove the extension assembly, turn it upside
down. To adjust, loosen the setscrew on the ball nut. Pface your
thumb on the plunger and press it in 1,’16” and slide the ball nut w)
set screw toward the plunger end 11 6“. Tighten the set screw.
Place the extension assembly back into position. If the tank starts
to overfill, the ball nut is too close to the valve plunger and should
be moved back away from the valve plunger slightly,
PUMP PULSATES WHEN THE TANK KIN A FILL MODE
1. Check that the hose which goes from the gray plastic venturi to
the bottom of the tank is not directed toward the Cat pump pickup
port. If it is, aim it in another direction.
HEATING SYSTEM
INFORMATION
The propane heater incoporatad in thm equipment is of special de-
sign for use in the carpet cleaning industry. It’s high pressure coIls
and thermostatic temperature control make It slmpte to operate and
reliable. Once the desired temperature
‘on’ and ‘off according to the water temperature within the heater. As
water is used through the cleamng tool, cold water entering the heater will activate the thermostatically controlled propane valve thereby
firing the heater to mamtain a consistent flow of hot
cleaning wand is shut off and the fiow of water through the heater
stops, the heater will continue to burn until the set temperature is attained.
It is possible then with this design that the flame maybe on when the
wand is off, Iikewlse, t is possible the flame may be off when the
wand is on.
~~-N This heater IS designed to burn vapor proPane
gas only, Any liquid propane entering the heater may cause damage
to the control valve on the heater. It will also cause improper burning
and a soot build-upon the coils. Therefore, it is necessary to shut off
the heater and close the valve at the tank between cleaning locations. Failure to do this allows sloshing liquid to enter the vapor feed
line to the heater.
IS set, the heater WIII then go
water. Once the
SOLUTION REVERSING FROM MIX TANK TO CHEMICAL JUG
1. Anti-siphon screen removed from chemical jug hose.
2. Debris in anti-siphon screen.
Overfilling of the propane tank will cause many problems. To avoid
this, advise the attendant filling the tank
nottofill the tank aver
80”/o. When filling the tank, watch the 10%, valve and immediately
16
Page 18

stop filling when white liquid starts spurting from the 10°% valve.
prevent damage to the propane regulator, always close the valve on
the tank before filling.
When venting the heater through the roof of the van, it is necessary
to install a draft diverter on top of the heater. This will prevent down
drafts from blowing out the pilot light.
The propane regulator is pre-set at the factory at 6 oz. of propane.
This reading is taken at the control valve on the heater (see figure A
#6). To prevent road dust and moisture from entering the propane
regulator, keep the white Tupperware cover (supplied) on the regulator at all times.
I
To avoid restriction of air flow at base of heater, keep articles such as
chemical containers, hose, boxes, etc. from within 18 inches of base
of heater. NOTE: This restricted situation also creates an over rich
condition which results in soot build-up.
IMPORTANT: If a new propane tank has been installed or hoses
have been disconnected, air may enter propane hoses and must be
purged prior to attempting to light the pilot burner. Should this condition exist, operator must depress the pilot button for 1-5 minutes and
attempt to ignite the pilot light at 15 second intervals. A very slight
hissing noise should be evident while performing this operation.
To
C. TO ACHIEVE PROPER CARPET CLEANING
TEMPERATURE:
1. Complete procedures A & B
2. Wtth 100’ of hose, turn cleaning wand on for 5 minutes and
the temperature should stabilize.
3. Once a constant temperature is established, turn cleaning
wand ‘off. The flame on the heater burner should remain on
for 10-15 seconds.
A. If the flame expires prior to 10 seconds, turn the
thermostat dial to a higher reading, then repeat C 1-3.
B. If the flame remains lit after 15 seconds, turn the
thermostat dial to a lower reading, then repeat C 1-3.
D.TO SHUTDOWN HEATER:
1. Turn upper dial to ‘off position. @ Fig. A.
-2. Turncleaningwandonfor3to 5minutesto
cool heater core. If heater core is not cooled, it is impossible
that the heat retained in the core will cause boiling back into
the chemical mix tank.
3. Close propane tank valve while
wand is on and heater is cooling.
PILOTBURNER
FIG
ADJUSTMENT
1. Remove pilot adjustment cap@
HEATER - OPERATING
INSTRUCTIONS
Heater must be fWecf with water
KZ@@l!l
. -- --- -- -.. --
A.
lU=l Atf I PILUI:
1.
Adjust thermostat control knob on unitrol to desired setting.
2.
Adjust upper dial to
Depress pilot button.
3.
4.
Depress sparking button to light pilot.
IF PILOT FAILS TO LIGHT:
Is propane tank full?
Is propane tank valve open?
Has air been properly bled from propane line?
WHEN PILOT LIGHTS:
Wait ten seconds, depressing button manually, then
release button.
B. TO LIGHTMAINBURNER:
1.Turn upper knob to “on” position. Flame will come on,
If you do not get the burner to flame, the pilot has expired. You
must turn upper dial to “off’ position. Do not attempt to re-light
the pilot for 60
instructions as above (TO START PILOT), 1 through 4.
OR,
Water may already beat controlled temperature.
Flame will turn off when thermostat senses maximum
temperature.
prkwtokmjthg.
pilot position.
seconds. To light the maih burner, repeat
2. Adjust pilot key to provide -properly sized flame
3. Replace pilot adjustment cap
ALLENHEADPIPEPLUG G
CANBEREMOVED
FORMONOMETERINSERTION
TOREADPROPANEOUNCES.
o
HEATER
TROUBLESHOOTING
● EXCESSIVE HEAT
● FLAMES PROTRUDING OUTSIDE
THE LOWER OPENINGS
CAUSE AND/OR SOLUTION:
1.
Thermostatic control dial set too high
A. Turn dial to lower setting
2. Maladjustment of propane regulator. NOTE: Propane regulators
are factory preset and may be readjusted by authorized
personnel.
A. Contact manufacturer to determine correct procedure.
B. Have your local propane dealer use a monometer at the
unitrol to re-set the propane regulator to 7 oz. maximum.
3. Overfilled propane tank. NOTE: Propane heater is designed to
operate on vapor propane only. Over-filling a propane tank
allows liquid propane to enter ail heater related components
and permits an over-rich burning condition to occur. This
condition usually requires the heater core to be cleaned of soot
and carbon deposits. Cleaning is a messy, dirty job and very
inconvenient, so don’t let it happen to you!
PROBLEM:
● PILOT LIGHT
CAUSE AND/OR SOLUTION:
1.
Pilot light will not ignite. NOTE: Do not use a needle or pinto clean
pilot orifice - use compressed air or solvent only.
A. Verify propane reaching igniter. NOTE: A kinked or crushed
hose may impede propane flow.
B. Remove and clean orifice.
C. Verify igniter spark is operating correctly.
17
Page 19

VACUUM SYSTEM
INFORMATION
The vacuum blower incorporated in this machine is a positive displacement lobe type, manufactured by Fuller Company. The performance and life of this unit is greatly dependent on the care and proper mainten ante it receives,
VACUUM TANK FILTER BAGS
Hydra-Master filter bags are designed to trap all of the~nt, ~a~d~nd
dirt that would normally collect at the bottom of vour vacuum tank.
The use of these bags, jf emptied at the end of eac’h job, will eliminate
the build-up of much of the debris in the tank and avoid a mess on the
customer’s driveway or street. The drawstring top of these bags is
designed to be tied to the incommg dirt~ water inlet in the vacuum
tank.
To re-order bags use part number
649-028
Because of the close tolerances between the lobes and housing of
the vacuum blower, solid objects entering the inlet will damage the
internal lobes, gears
To prevent this, a stainless steel filter screen has been placed at the
vacuum inlet inside the vacuum recovery tank. This stainless steel
screen is finger tight and should be removed for cleaning weekly.
~ Should be used when machine is beirm run for
test purpose and the vacuum inlet on top of machine is op&
To protect the vacuum blower from overloading and damaging itself.
there is a vacuum relief system installed on the vac tank lid. When
the vacuum tank inlet is completely sealed off, a maximum of 14 HG
will be attained. A hole on the top blower pipe elbow acts as the lubrication point; at the end of each day, LPS 1 or WD-40 is sprayed in before shutting down the machine. See blower lubrication illustration. If
you fail to lubricate the vacuum blower daily, rust deposits and moisture will decrease the life of the vacuum blower.
Read the vacuum blower manual carefully for proper oil change and
grease application. The maintenance log may differ slightly from the
manual, but the truck-mounted carpet cleaning machine application
is very demanding of the vacuum blower and therefore it should be
maintained more regularly.
and bearing or direct drive coupler.
VACUUM FLOW DIAGRAM
VACUUM RECOVERY TANK
~
BAG
~ <’WATER TO VACUUM TANK
BLOWER
ELBOW ON TOP OF
VAC””MBLOVVE13
INCOMING DIRTY
M
BAG
LUBRICANT
HOSE TO VAC TANK
S/S FILTER
VACUUM
BLOWER
w
w
A
ti
SPRAY LUBRICANT INTO VACULfM RELIEF HOLE FOR 3
TO 5 SECONDS, THEN IMMEDIATELY SHUT OFF
MACHINE.
USE ONLY LPS 1 OR WD-40 MOISTURE DISPLACING
LUBRICANTS.
18
Page 20

WARRANTY
FULLER warrants products of its manufacture to be fre~ from defects in material and workmanship if properly
installed, maintained, and operated under normal conditions with competent supervision.
No person, agent, representative or dealer isauthorized togiveany warranties on behalf of FULLER nortoassulme for
FULLER any other liability in connection with any of FULLER’S products.
This warranty shall extend for two (2) years from date of installation provided this equipment has been put into service
within six months after shipment from the FULLER factory. If repairs or replacements are made by the Purchaser
without FULLER’S prior written consent,
granted for any repairs or alterations made by the Purchaser without FULLER’S prior written consent.
Machinery, equipment and accessories furnished by FULLER, but manufactured by others, are warranted only to the
extent of the original manufacturer’s warranty to FULLER.
FULLER agrees at its option to repair at the point of shipment or to replace without charge f.o.b. point of shipment,
any part or parts of products of FULLE R’S manufacture, which within the specified warranty period shall be proved to
FULLER’S satisfaction to have been defective when shipped, provided the Purchaser promptly notifies FULLER, in
writing, of such alleged defect.
FULLER’S liability to Purchaser, whether in contract or in tort arising out of warranties, representations, instructions,
or defects from any cause shall be Iim;ted to repairing or replacing of the defective part or parts as aforesaid, f.o. b.
point of shipment.
No liability whatsoever shall attach to FULLER until said products have been paid for.
EXCEPT AS STATED IN THIS SECTION AND IN THE PRECEDING SECTION TITLED “WARRANTY” AND
EXCEPT AS TO TITLE, THERE ARE NO GUARANTEES OR WARRANTIES OF MERCHANTABILITY, FITNESS,
PERFORMANCE OR OTHERWISE, EXPRESS, IMPLIED OR STATUTORY, AND FULLER SHALL HAVE NO
LIABILITY FOR CONSEQUENTIAL, INCIDENTAL OR OTHER DAMAGES, HOWSOEVER CAUSED.
DATE INSTALLED
MODE L
SERIAL #
FULLER’S warranty shall cease to be in effect. No allowance will be
FULLER COMPANY
2966 East Victoria Street
Compton,
California 90224
FACTORY AUTHORIZED SERVICE CENTERS
FOR SUTORBILT PRODUCTS
FULLER COMPANY / COMPTON DIVISION
2966 E. VICTORIA ST., COMPTON, CAL. 90224
BAYLISS MACHINE& WELDING CO.
ASSOCIATED TECHNICAL SERVICES, INC.
SCHWARZ FOUNDRY COMPANY
213/636-9821 or 636-7600
2901 8TH AVENUE NORTH
BIRMINGHAM, ALABAMA 35203
205/323-6121
BARNEY’S PUMPS INC.
3907 HIGHWAY 98 SOUTH
LAKELAND, FLORIDA 33802
81 3/686-8195
1229 WAIMANU STREET #21
HONOLULU, HAWAII 96814
808/637-1 206
WM. W. MEYER & SONS
8261 ELMWOOD AVENUE
SKOKIE, ILLINOIS 60076
31 2/673-0312
GREGORY-SALISBURY & CO.
805 SOUTH FRONT STREET
NEW ORLEANS, LOUSIANA 70130
504/524-5207
2001 WEST FORT STREET
OETROIT, MICHIGAN 48216
3131486-1880
FULLER CO MPANV
A GATX COMPANY
.2966 EAST VICTORIA STREET
POST OFFICE, E30X 4308, COMPTON, CALIFORNIA 90224
TEL: [2131 639-7600 [2131 636-9821 TELEX: 67-4607
m
lY-
0
19
FULLER COMPANY / MANHEl M DIVISION
236 SOUTH CHERRY STREET
MANHEl M, PENNSYLVANIA 17545
7771665-2224
CAROTEK INCORPORATED
640 SAM NEWELL ROAD
MATHEWS, N. CAROLINA 28105
704/847-4406
DYNMAC CORPORATION
7925 E. 40TH STREET
TULSA, OKLAHOMA 74145
918/627-0110
OLIVER & LAUGHTER EQUIPMENT CO.
10450 WESTOFFICE
HOUSTON, TEXAS 77042
7131977-2577
ELECTRIC CRAFTS LTD.
3936 EDMONTON TRAIL N.E.
CALGARY, ALBERTA T2E 3P6
4031276-8676
PUMPS & POWER LTD.
1380 NAPIER STREET
VANCOUVER, B.C., CANADA
6041255-4341
GATX-FULLER LTD.
721 PROGRESS AVENUE
SCARBOROUGH, ONTARIO, CANAOA
4161438-6540
Page 21

LUBRICATION
At ttse gear end the timing gear teeth are lubricated by being partially
submerged. The gear teeth serve as oil slingers for gear end bearings. At the drive end the bearings are grease lubricated.
FILLING PROCEDURE
Remove square head vented oil fill plug (A) on gear end. Remove oil
level plug (B) located in the head plate. Fill
out of the oil level hole (B).
Use lubricants as listed.
Add fresh oil as required to maintain proper level. The oil should be
drained, flushed and replaced every 1500 hours or
inspection so indicates. The oil drain plug is at (C).
NOTE: Older units may have the oil fill level and drain holes located
in the cast iron gear case instead of in the head plate.
Bearings on drive end of blower require grease lubrication every 100
hours of operation. Bearings which require grease lubrication will
have a grease fitting (D) at each bearing. When regressing, the old
grease will be forced out of the vents during operation. To prevent
damage to seals, these vents must be kept open at all times.
LUBRICATION lNSTRlf CTIONS FOR
OIL LUftRICATEO GEARS ANtr BEARINGS
Add fresh oil as required to mamtain proper
level. Drain and refill every 1500 hours of
operation under normal kervice, more fre-
quently when required. Use a good quality oil.
BLOWER
OISCHARGE
, TEMPERATURE U.S. A.*
-40°to 320 F
(-40°to r
32°to 1000 F
OOto 38° C)
(
100
“to 275ok
38°to 135°c)
over275°
(
●ln applications with extreme variations in
135”C) ‘*E 50
ambient temperature a 20W 50W multlple
viscosity oil is recommended.
FOR GREASE LUBRICATE BEARINGS
Service every 500 hours of operatton
OIL
GRAOE CEN;~;~KES
c) ‘AE‘ow
SAE 20
SAE 40
F
gear case until oil drips
more frequently if
OIL VISCOSITY,
45
100
200
250
VACUUM BLOWER
TROUBLESHOOTING
PROBLEM:
e~o$s OF
CAUSE ANIXIR SOLUTION:
1. Collapsed vacuum hose between blower and vacuum tank.
A. Remove and replace hose.
is required for replacement.
VACUUM
NOTE: A special reinforced hose
2. Clogged stainless steel filter.
A. Remove and clean or replace stainless stea?lfilter.
3. Defective vacuum tank seal.
A. Remove and replace vacuum tank seal.
4. Defective or ‘open’ vacuum tank dump valve.
A. Close
B. Replace valve.
5. Fractured weld on vacuum tank.
A. Re-weld as required or replace tank.
6. Collapsed
A. Reshape hose if possible and/or eliminate kinks.
7. Plugged vacuum hose.
A. Remove obstrutilon by reversing the vacuum hose.
8. Restriction in cleaning tool.
A. Remove obstruction.
9. Worn end plates or lobes in vacuum blower.
A. Replace worn components. NOTE: Must be accomplished by
10. Loose coupling system between engine and blower.
A. The set screws may come loose causing blower to stand still
valve.
or kinked vacuum hose.
a qualified technician.
while engine may be turning properly.
blower is seized or making a knocking noise, your vacuum loss
is not caused by a bad blower.
NOTE: Unless the
iPFKIHUEM:
@
iBLIOWE!3[SSEIZED
CAUSE AND/OR SOLUTION:
1.
Rust.
A. Spray rust dissolving lubricant onto lobes to emulsify rust and
attempt to rotate vacuum lobes.
2. Foreign matter.
A. Disassemble and remove foreign matter and repair as
required. NOTE: Disassembly must be accomplished by
qualified technician.
3. Seized.
A. If you suspect that your blower has seized, remove coupling
element, then run engine for a few seconds. This
won’t confuse similiar problems.
NOTE: The above mentioned, rust, foreign matter and seizing are
often caused from foam traveling through the blower.
way you
PROBLEM:
e NOISE
CAUSE AND/OR SOLUTION:
1. Loose Direct Drive Coupler.
A. Examine coupler for defects and retighten lock bolts.
B. Replace coupler boot if it is either torn or punctured.
2. Worn Gears.
A. Remove and replace gears. NOTE: Replacement of gears
B. Timing of vacuum blower has been changed due to worn
3. Lack of Lubrication. NOTE: Permanent damage may have
resulted from lack of lubrication.
A. Lubricate as specified by applicable vacuum blower manual.
4. Worn bearings
A. Remove and replace bearings as required. Must be
5. Debris and/or foreign material build-up. NOTE: A stainless steel
filter is provided in vacuum inlet located in vacuum tank to proteact
vacuum blower components.
A. Disassemble vacuum blower and remove foreign material.
6. Loose or missing mounting bolts.
A. Tighten or reinstall mounting bolts.
20
INVACUUM BLOWER
must be accomplished by a qualified technician.
components. Replacement of components must be accom-
plished by a qualified technician.
See index.
accomplished by qualified technician.
NOTE: Disassembly should be accomplished by qualified
technician only. Replacement of worn parts is recommended
if this procedure is necessary.
Page 22

~.r.u-
,.,..
Briggs & Stratton
OPERATING
)
AND MAINTENANCE
INSTRUCTIONS ,,.
MODELS
401400 to 401499
421400 to 421499
IN THE INTEREST OF SAFETY
DO NOT RUN ENGINE AT EXCESSIVE SPEEDS. Operating an engine at excessive speeds increases the hazard of personal injury.
DO NOT TAMPER WITH PARTS WHICH MAY INCREASE THE GOVERNED SPEED.
For rotary Iawnmower safety,
19,000 feet per minute (96.5 meters per second), primarily to reduce the hazard from thrown objects.
Rotary Iawnmower manufacturers select the governed top speed of the engine based on the length and design of the cutter blade and
design of other mower parts.
All rotary Iawnmowers should be checked for conformance to the A. N.S. I. Standard Safety Specifications for Power Lawn Mowers on
blade tip speed, if the engine is repaired or replaced, or if mower parts are changed.
DANGER: GASOLINE VAPOR IS HIGHLY FLAMMABLE. Refuel outdoors preferably, or only in well ventilated areas.
DO NOT STORE, SPILL OR USE GASOLINE NEAR AN OPEN FLAME or devices such as a stove, furnace, water heater which utilize a
pilot light, or devices that can create a spark.
If gasoline is accidentally spilled, move machine away from area of spill and avoid creating any source of ignition until gasoline vapors
have dissipated,
DO NOT REFUEL GASOLINE TANK WHILE ENGINE IS RUNNING.
DO NOT RUN THE ENGINE IN AN ENCLOSED AREA. Exilaust gases contain carbon monoxide, an odorless and deadly poison.
TO PREVENT ACCIDENTAL STARTING always remove the spark plugs from the engine, before working on the engine or equipment
driven by the engine.
Except for adjustment; DO NOT operate engine if air cleaner orcoverdirectly over carburetor air intake is removed. Removal of such part
could create a fire hazard.
DO NOT OPERATE WITHOUT A MUFFLER OR TAMpER WITH THE EXHAUST SYSTEM. Damaged
create a fire hazard. Inspect periodically and replace if necessary.
DO NOT STRIKE FLYWHEEL with a hard objector metal tool as this may cause flywheel to shatter in operation, causing personal Injury
or property damage. Use Briggs & Stratton approved tools only, and if in doubt, contact your Authorized Briggs & Stratton
Center.
ALWAYS KEEP HANDS AND FEET CLEAR OF ROTATING PARTS.
A muffler which leaks because of rust or damage can permit an increased exhaust noise level. Therefore, examine the muffler periodically
to be sure it is functioning effectively. To purchase a new muffler, see SERVICE AND REPAIR INFORMATION.
WARNING: If this engine is not equipped with a spark arrester and is to be used on any forest covered, brush covered, or grass covered
unimproved land, before using on such land a spark arrester must be added to the muffler. The arrester must be maintained in effective
working order by the operator. In the State of California the above is required by law (Section 4442 of the California Public Resources
Code). Other states may have similar laws. Federal laws apply on federal lands. See your Authorized Briggs & Stratton Serwce Center
for spark arrester muffler options.
A. N.S. I. Standard Safety Specifications for Power Lawn Mowers specify a maximum blade tip speed of
mufflers or spark arresters could
Service
IN THE INTEREST OF ENVIRONMENT
SERVICE & REPAIR INFORMATION
If service or repair is needed, contact an Authorized Efriggs &
Stratton Service Center. To serve you promptly and efficiently, the
Service Center will need the model, type and code number on
your engine.
Each Authorized Service Center carries a stock of original
Briggs & Stratton repair parts and is equipped with special service
tools. Trained mechanics assure expert repair service on all
Briggs & Stratton engines.
Major engine repairs should not be attempted unless you have
the proper tools and a thorough knowledge of internal combustion engine repair procedure.
Your nearest service center is listed in the “Yellow
Pages” under “Engines, Gasoline” or “Gasoline
Engines.” He is one of over 25,000 authorized
n
@owmEfss
dealers available to serve you.
BRIGGS & STRATTON
v’
e
This illustrated book includes common
specifications, and detailed information covering the adjustment, tune-up
and
repair procedures for Twtn
Cylinder models. It is available from
any Authorized Bnggs & Stratton
Service Center, Order as Part Number
271172.
.
BRIGGS & STRATTON CORP.
Milwaukee, Wisconsin 53201
21
.WL
G!G:
.-,4
):+>.
Page 23

BEFORE STARTING
All? CLEANER
8LOWER
HOUSING
e~:
‘“”~
—-------
CARBURETOR
MANIFOLD
EXTENDED
OIL FILL
“? MOOEL, TYPE AND
COOE NUMBER ON
1
IDE COVER
READ THE OPERATING lNSTRLJCTIONSOF
THE EQUIPMENT THIS ENGINE POWERS
Use a high quallty detergent 011classified
SD, SE or MS “ Detergent oils keep theengtne cleaner and
retard the formation of qum and varnish deoosits. Nothlna
should be added to the-recommended 011
RECOMMENDED SAE ‘vISCOSiTY GRADES
I
1
980s
I
I I
20
–lo
EXTENOE
OIL FILL
8
I
20
4,
‘>
F 20 0
“c 30
TEMPERATURE RANGE ANTICIPATED BEFORE NEXT OIL CHANGE
“If not avatlable, a synthetic oil may be used hawn~ 5W-20, 5W-30
or 5W40 wsco.wty.
FILL CRANKCASE WITH OIL
Place engine level. Clean area around
remowng d[pstick.
EXTENDED OIL FILL. Remove cap and dipstick. FILL TO
FULL MARK on dipstick, POUR SLOWLY. Capac!ty 3 pints
(142 liters). When checking ml level, push dipstick
assembly firmly but slowly until cap bottom on tube. DO
NOT OVERFILL. Dipstick assembly must be securely
assembled into tube at all times when engine is operating.
I
1~~
*
’10
10
b
“For Service SC<
1
WI 80
2a 30
oil fill before
~
103
4’0
.
/w@’
OIL D“RAIN
PLuG
EL~CTRIC
STARTER
MOTOR
5
L__-4”1 I
I
CHARGE BATTERY
Charge battery before use on engines equtpped with
(OPTIONAL) 12 volt electric starter motor. See equipment
manufacturers’ recommendations,
FILL FUEL TANK
Use clean, fresh,
gasoline. DO NOT MIX OIL WITH GASOLINE.
NOTE: The use of “lead-free” gasoline produces fewer
combustion deposits, but may shorten valve life if
carburetor adjustment is too lean.
22
“regular grade leaded or low-lead”
Page 24

STARTING
OPEN FUEL VALVE on engines so equipped.
CHOKE ENGINE: Move equipment control lever to
“CHOKE’ position.
1
NOTE: This should fully close choke on carburetor. If it
does not, remote control must be re-adjusted. See
ADJUSTMENT section.
NOTE: A warm engine requires less choking than a cold
engine.
GCVERNOR SPEED CONTROL LEVER: Move governor
speed control lever to “RUN,” “FAST” or “START’
p’osition if so equipped.
CHOKE
PULL OUT TO CHOKE
Electric Starter, Turn key to “Start” position and/or press
starter button on powered equipment. When engine starts
open choke gradually.
l.=
#
DEPRESS
BUTTON +
1
% %
1
When equipment is not in operation, provide protection
from direct exposure to weather,
COLD WEATHER STARTING HINTS
1. Be sure to use the proper oil for the temperature
expected.
2. Declutch all possible external loads.
3. Set throttle at part-throttle position.
4. A slightly richer fuel mixture, obtained by turning
carburetor needle valve 1/8 turn counterclockwise, will
usually improve cold starting.
5. A warm battery has much more starting capacity than a
cold battery.
6. Use fresh winter grade fuel.
NOTE: Winter grade gasoline has higher volatility to
improve starting, Do not use gasoline left over from
summer.
STARTER
SWITCH
I
Of F
t
[\
J
TO START ENGINE
DANGER: ALWAYS KEEP HANDS AND FEET CLEAR OF
MOWER BLADE OR OTHER ROTATING MACHINERY.
Rope Starter. Wind the starter rope around the pulley in
direction shown by arrow. Pull the rope with a quick full arm
stroke to overcome compression and prevent kickback.,
Repeat if necessary with choke opened slightly. When
engine starts open choke gradually.
CAUTION: When using rope starter to crank engine, use
caution so knotted end of rope does not strike persons
standing nearby.
TO STOP ENGINE
Turn key to “OFF” ~osition.
CAUTION: Always remove key from switch when leaving
equipment unattended or when equipment is not in use.
MAINTENANCE
CHECK OIL LEVEL regularly — after each five hours of
operation. BE SIJ RE OIL LEVEL IS MAINTAINED.
CHANGE OIL after first five hours of operation. Thereafter
change oil every 25 hours of operation. Remove oil drain
plug and drain oil while engine is warm. Replace drain plug.
Remove dipstick and refill with new oil of proper grade.
Replace dipstick.
23
Page 25

\
‘-s:-:”---”
GENERAL INFORMATION
These engines are two-cylinder L-head, air-cooled type.
MODEL SERIES 401400 to 401499
Bore . . . . . . . . . . . . . . . . . . . . . . . . . . 3-7/16” (87.31 mm)
Stroke . . . . . . . . . . . . . . . . . . . . . . . . . . . ..2-5/32’’ (54.77 mm)
Displacement . . . . . . . . . . . . . . . . ...40.00 cu. in. (656.0 cc)
Horsepower . . . . . . . . . . . . . . . . ..l6 l-fPMax. Q3600 RPM
Torque (Ft. -Lbs.) . . . . . . . . . . . 25.8 Max, Q 2700 RPM
MODEL SERIES 421400
Bore . . . . . . . . . . . . . . . . . . . . . . . . . . . . . . . 3-7/16” (87.31 mm)
Stroke . . . . . . . . . . . . . . . . . . . . . . . . . . . ..2-9/32’’ (57.94 mm)
Displacement . . . . . . . . . . . . . . . . ...42.33 cu. in, (694.0 cc)
Horsepower . . . . . . . . . . . . . . . . . . . . . . 18 HP Q3600 RPM
Torque (Ft,-Lbs,) . . . . . . . . . . . . . . . . . . ..28,6 Q2600 RPM
The horsepower ratings listed above are established in
accordance with the Society of Automotive Engineers Test
Code -J607, For practical operation, the horsepower
loading should not exceed 85 °/oof this rating. Engine power
will decrease
sea level and 1°/0
In some areas, local law requires the use of a resistor spark
plug so as to suppress Ignition signals. If an engine was
originally equipped with resistor spark plugs, besureto use
the same type of spark plugs for replacement.
Spark Plug Type
Long Plug
Resistor Long Plug
Spark Plug Gap...........,,,,,,. . . . . . ..030’’ (.76 mm)
Ignition Point Gap...........,,,, , . . . . . .. 020’’(.51 mm)
Intake Valve Clearance*” 004’’ -.006”( 10 -
Exhaust Valve Clearance”-. 007”- 009”( 18- 23mm)
“’w}th valve spring installed.
WARNING For electrical safety always remove cable from
negative (-) side of the battery before attempting any
repairs or maintenance
BRIGGS & STRATTON ENGINES ARE MADE UNDER ONE OR MORE OF THE FOLLOWING PATENTS
28960
2999491 3 194224
2.99’2562 32369.37
3114851
3 118,433
3i,40/0 for each 1,000 feet (304,8 m) above
for each 10” above 60” F (16° C).
TUNE-UP SPECIFICATIONS
Champion Autoiite
J-8
RJ-8
3 149618 327’6439
3242741
3,252449
3305 ,!23
3457 80J 3572307
3465 :40
to 421499
3526146
357.? 218
3625492
295
306
1.5mm)
3625071 3831 268
J 650354 3882336
3745393
3738345 3961 724
Engines to be stored over 30 days should be completely
drained of fuel to prevent gum deposits forming on
essential carburetor parts, fuel filter and tank.
NOTE: The use of a fuel additive, such as STA-BIL, or an
equivalent, WIII mini mlzetheformation of fuel gum depos!ts
during storage. Such an additive may be added to the
gasollne in the fuel tank of the engine, ortothegasoline$n a
storage container.
a, ‘All fuel should be removed from the tank. Run the engine
b.
c.
d
6 e.
J 901 199
LW. L*7 Smlmn -
1 I , =-----J
Tri-Circuit
STORAGE lNSTRIJCTiONS
until It stops from lack of fuel. The small amount of fuel
that remains In the sump of the tank should be removed
by absorbing it with a clean, dry cloth,
While engine IS still warm, drain 011 from crankcase,
Refill with fresh oil.
Remove spark plugs, pour oneounce (29 6cc)of engine
011 Into each cylinder and crank slowly to dlstnbute 011
Replace spark plugs.
Clean dirt and chaff from cyllnders, cyllncier head fins.
blower housing, rotating screen and muffler areas
Store In a clean and dry area
3968854
.1971 353
.) 991 152
4 168288
,_-..
I ,, G,*
-----1
I
24
Page 26

CAUTION: Petroleum solvents, such as kerosene, are not
—
I
I
I
TO SERVICE DUAL ELEMENT AIR CLEANER
Clean and re-oil foam pre-cleaner at three month intervals
or every 25 hours, whichever occurs first.
NOTE: Service air cleaner more often under dusty condi-
tions.
Remove knob and cover,
1.
2.
Remove foam pre-cleaner by sliding it off the paper
cartridge.
3.
a. Wash foam pre-cleaner in kerosene or liquid deter-
gent and water.
b. Wrap foam pre-cleaner in cloth and squeeze dry.
c. Saturate foam pre-cleaner in engine oil. Squeeze to
remove excess
4.
Install foam pre-cleaner over paper cartridge. Re-
assemble cover and screw down tight.
011.
to be used to clean cartridge, They maycausedeterioration
of the cartridge, DO NOT OIL CARTRIDGE, DO NOT USE
PRESSURIZED AIR TO CLEAN OR DRY CARTRIDGE.
CLEAN COOLING SYSTEM — Grass, chaff or dirt may
clog the rotating screen and the air cooling system,
especially after prolonged service In cutting tall dry
grasses, Yearly or every 100 hours, whichever occurs first,
remove the blower housing and clean the areas shown to
avoid overspeeding, overheating and engine damage.
Clean more often if necessary.
-“’”
~
@zz2Ez::HER
Yearlv or everv 100 hours. whichever occurs first. remove
pape; cartridgb. Clean by’ tapping gently on flat “surface.
If very dirty, replace cartridge, or wash in a low or nonsudsing detergent and warm water solution. Rinse
thoroughly with flowing water from inside out, until water
is clear. Cartridge must be allowed to stand and air dry
thoroughly before using. Service more often if necessary.
~u~
CARTRIDGE
FOAM
PRE-CLEANER
DANGER: Periodically clean muffler area to remove all
grass, dirt and combustible debris.
SPARK PLUGS — C“lean and reset gap at .030” every 100
hours of operation.
.
CAUTION: Do not blast clean spark plugs. Spark plug
should be cleaned by scraping or wire brushing and
washing with a commercial solvent.
Sparking can occur if wire terminals do not fit firmly on
spark plugs. Reform terminals if necessary.
REMOVE COMBUSTION DEPOSITS every 100-300 hours
of operation. Remove cylinder heads and cylinder head
shields. Scrape and wire brush the combustion deposits
from cylinder, cylinder heads, top of pistons and around
valves. Use a soft brush to remove deposits. Re-assemble
gaskets, cylinder heads and cylinder head shields. Turn
screws down finger tight, with the three longer screws
around the exhaust valve, if so equipped. Torque cylinder
head screws in a staggered sequence to 165 inch pounds
(18.65 Nm).
SPARK ARRESTER EQUIPPED MUFFLER — If engine
muffler is equipped with spark arrester screen assembly,
remove every 50 hours for cleaning and inspection.
Replace if damaged.
25
Page 27

ADJUSTMENTS
CARBURETOR ADJUSTMENTS
Minor carburetor adjustment may be required to compensate for differences in fuel, temperature, altitude
or load.
INITIAL ADJUSTMENT — Turn idle and needle valves
clockw!se until they just close.
CAU’Tl ON: Valves may be damaged by turning them in too
far.
Now open needle and idle valves 1’/2 turns counter-
clockwise. This tnitlal adjustment will permit the engine
to be started and warmed up prior to final adjustment.
NOTE: All carburetor adjustments must be made with the
air cleaner on engine. ‘
NOTE: Governed idle must be adjusted on all engines for
proper operation, The smaller spring keeps the engine on
governor, even at idle speed. If moderate loads are applied
at idle, the engine will not stall. Governed idle speed should
be no lower than 1100 RPM.
Needle Valve (High Speed)
Place governor speed control lever in fast position, Then
turn needle valve in slowly clockwise (lean) until engine
misses or RPM slows, Then turn needle vaive ‘4 turn
counterclockwise.
If engine does not accelerate properly, readjust needle
valve approximately ‘4 turn counterclockwise (richer).
CONTROL ADJUSTMENTS
Proper choke and speed control operation is dependent
upon proper adjustment of remote controls on the powered
equipment.
TO CHECK OPERATioN OF CHOKE CONTROLS:
Move remote control lever to “choke” position, The
carburetor choke should be closed.
TO ADJUST CHOKE:
Place remote control lever on equipment In “CHOKE”
position, Loosen control casing clamp screw. Move control
casing and wire until choke is completely closed, Tighten
casing clamp screw,
!--
1>
“ IDLE SPEED
ADJUSTING THROTTLE
SCREW
/ “M,:;:RE N:::: -
1 FvFR
VALVE (HIGH SPEEO]
FINAL ADJUSTMENT PROCEDURE
Idle Valve Mixture
governor speed control lever in governed “IDLE”
Place
position, f-told throttle lever
against idle stop and set idle
speed adjusting screw to obtain 1400 RPM. Turn idle valve
slowly clockwise (lean mixture) until engine misses or
RPM slows. Then turn idle valve % turn counterclockwise.
Governed Idle
Hold throttle lever against idle speed adjusting screw.
Adjust idle speed screw to obtain 900 RPM. Release the
throttle. With governor speed control lever In governed
“IDLE” position, align %“ diameter holes in control plate
and lever as shown. Re-adjust governor speed control
casing and wire if required. See Governor Speed Control
Adjustment section. Adjust tang “A” to obtain 1400 RPM
governed idle.
OECREASE
I
CHOKE
CLQSEO
CASIN
CLAMP
SCFiEW
.\-
GOVERNOR SPEED CONTROL ADJUSTMENT
Theacceptable operating speed range IS 1800to 3600 RPM,
Idle speed IS 1400 RPM The manufacturer of the equipment on which the engine IS used, specifies the top
governed no load speed at which the engine may be
operated DO NOT EXCEED this speed.
Engine speed IS controlled by movement of the control
lever U,ove control
lever on equ{pment, “D”, 10 slowest
engine speed possible Throttle lever on carburetor should
touch Idle speed ad)ustlng screw To adjust. loosen control
Casing clamp screw “C “ Move control casing and wtre In
dlrectlon shown by arrow until throttle lever touches Idle
speed ad]ustlng screw on carburetor Retlghten casing
clamp screw “C “ Move
control lever “D” to “FAST’(
posltlon If engine exceeds equipment manufacturer’s
maximum governed no load RPM, move lever” D” to obtain
recommended speed Bend tang “6” to touch
CAUTION Throttle lever on carburetor MUST touch Idle
I
speed adlustlng screw when equipment control lever IS In
slowest posltlon
lever “A “
26
Page 28

BRIGGs a STRATTON ENGINEWARRANTY pOLICY
FOR INDUSTRIAL/COMMERICAL (l/C) SERIES AND SNO/GARD ENGINES ONLY
EffectiveJanuary’1,1983
When warranty repair is justified, Briggs & Stratton Corporation welcomes such repair by any of its Authorized Service
Centers.
In most instances, the requests for warranty brought to the attention of our Service Accounts are handled in a prompt routine
manner with no question regarding their validity. However, some requests for warranty are received which appear not justified.
In these cases, though engine owners may not be aware that the premature failure of their engine was the result of abuse or
neglect, or that the difficulty which they experience is caused by the equipment rather than the engine, investigation is made to
determine the applicability of warranty.
BRIGGS & STRATTON WARRANTY covers only DEFECTIVE MATERIAL and/or WORKMANSHIP.
LIMITED WARRANTY FOR l/C SERIES AND SNO/GARD ENGINES ONLY
“For two years from date of purchase, Briggs & Stratton Corporation will replace for the original purchasers, free
of charge, any part, or parts of the engine, found upon examination by any Factory Authorized Service Center, or
by the Factory at Milwaukee, Wisconsin, to be defective in material or workmanship or both. This is the exclusive
remedy.
“For five years from date of puchase, Briggs & Stratton Corporation will replace for the orginal purchasers, free of
charge, any part, or parts of the MAGNETRON@ Ignition System (excluding the spark plug), found upon examination by any Factory Authorized Service Center, or by the Factory at Milwaukee, Wisconsin, to be defective in
material or workmanship, or both, so as to result in the loss of ignition. This is the exclusive remedy.
“All transportation charges on parts submitted for replacement under this Warranty must be borne by purchaser.
For warranty service contact your nearest Authorized Service Center as listed in the ‘Yellow Pages’ under
‘Engines, Gasoline’ or ‘Gasoline Engines.’ THERE IS NO OTHER EXPRESS WARRANTY. IMPLIED WARRANTIES, INCLUDING THOSE OF MERCHANTABILITY AND FITNESS FOR A PARTICULAR PURPOSE ARE
LIMITED TO ONE YEAR FROM PURCHASE AND TO THE EXTENT PERMITTED BY LAW ANY AND ALL
IMPLIED WARRANTIES ARE EXCLUDED. LIABILITY FOR CONSEQUENTIAL DAMAGES UNDER ANY AND
ALL WARRANTIES ARE EXCLUDED TO THE EXTENT EXCLUSION IS PERMITTED BY LAW. Some jurisdictions do not allow limitations on how long an implied warranty lasts, and some jurisdictions do not allow the exclusion or limitation of incidental or consequential damages, so the above limitation and exclusion may not apply to
you. This warranty gives you specific legal rights and you may also have other rights which vary from jurisdiction
to jurisdiction.”
Briggs & Stratton Corporation
A%!!zf#%j#!
F.P. Stratton, Jr.
President and Chief Executive Officer
v
NO REGISTRATION (WARRANTY) CARD IS NECESSARY TO OBTAIN WARRANTY ON BRIGGS & STRATTON
ENGINES. FILL IN THE REQUIRED INFORMATION AND RETAIN FOR YOUR RECORD:
(Engine
Engine Model No.
Dealer Purchased From
Type of Equipment
Name or Trademark of Equipment Manufacturer
If warranty service is needed contact your nearest Authorized Service Center. For prompt attention your center will need to
know the engine model, type and code number, the trouble experienced and the total number of hours the engine has run. If
you differ with the decision of the Service Center on a warranty claim, ask the Service Center to submit all suppotiing facts to
the Factory for review. If the Factory decides that your claim is justified, you will be fully reimbursed for those items accepted
as defective.
Model, Type and Code Numbere ere Located on the Blower Housing, Cylinder Head Shield or Backplane.)
Type No.
Code No.
27
Page 29

To avoid misunderstandirms which miciht occur between enqine owners and authorized Brims & Stratton service accounts,
we are listing some of the ~auses of en~ine failure,
where rep=ir or replacement is NOT cover~~ by Briggs & Stratton warranty.
NORMAL WEAR:
Warranty wilt not cover repair where normal use has exhausted the life of a part or engine. Engines, like all mechanical
diwices, need periodic parts replacement and service to perform well. It should be remembered that the service life of any
engine is dependent on the care it receives and the conditions under which it has to operate. Some applications, such as
tillers, trash pumps, rotary
mowers, are very often used in dusty or dirty conditions, which can cause what appears to be
premature wear. Such wear, when caused by dirt, dust, spark plug cleaning grit or other abrasive material, which has entered
the engine because of improper maintenance, is not covered by Warranty.
ABUSEOR NEGLECT
Bent or broken crankshafts: Such damage is normally the result of abuse, such as striking a solid object with the cutter
1.
blade on a rotary lawn mower, and is not covered by Warranty.
Engine repairs requied from the use of contaminated or stale fuel are not covered by Warranty, Such failures would in-
2.
elude sticking valves, and carburetors and fuel pipes which are clogged by gum deposits which form through the use of
stale fuel. Always use clean fresh regular gasoline.
Parts which are scored or broken because an engine was operated without sufficient lubricating oil, the proper grade of
3.
lubricating oil or contaminated lubricating oil are not covered by Warranty. Check oil level at least every five hours and
refill when necessary. Change oil at recommended intervals.
Damage caused by overheating or overspeeding is not covered by Warranty. Overspeeding or overheating occurs if the
4.
cooling fins become p~ugged with dirt, grass or debris, or if an engine is operated in a confined area without su~lcient
ventilation. Clean fins on the cylinder, cylinder head and flywheel regularly.
Damage or wear caused by dirt which enters the engine because of improper air cleaner maintenance is not covered by
5.
Warranty. Clean and re-oil the air cleaner regularly.
Damage or wear caused by grit from blast cleaning sprak plugs is not covered by Warranty. We do not approve of cleaning
6.
spark plugs on an abrasive blast cleaning machine, since grit can remain in the plug, and later enter the engine.
Warranty does not cover the tune-up or adjustment of an engine unless the need for such repair is the result of defects in
7,
material or workmanship or both. If equipment is assembled and adjusted by the owner, the engine Operating and
Maintenance Instructions are sufficiently clear to permit the average owner to make minor adjustments. Such minor
adjustments are NOT covered by Warranty.
Broken parts, which result from excessive vibration caused by loose engine mounting, loose cutter
8.
unbalance, improperly attaching equipment to engine crankshaft, overspeeding or abuse in operation, are not covered by
Warranty.
Repair or adjustment of associated parts or assemblies such as clutches, transmissions, remote controls, etc., which are
9
not of Briggs & Stratton manufacture will not be covered by Briggs & Stratton Warranty.
10,
Only ORIGINAL 13riggs & Stratton parts, or parts approved by Briggs & Stratton may be covered by Warranty,
blades, blade
WARRANTY IS AVAILABLE ONLY THROUGH SERVICE CENTERS WHICH HAVE BEEN AUTHORIZED BY THE BRIGGS
& STRATTON CORPORATION. YOUR NEAREST SERVICE CENTER IS LISTED IN THE YELLOW PAGES OF YOUR
TELEPHONE INRECTORY, UNDER “ENGINES, GASOLINE” OR “GASOLINE ENGINES.”
28
Page 30

ENGINE
An engine instruction brochure is included with this manual (see,
index) which may assist you in resolving engine related problems.
PROBLEMS:
● ENGINEFAILS TO START
o ENGINERUNS ROUGH
o ENGINEBACKFIRES
● ENGINEFAILS TO ACCELERATE
● ENGINEREDUCES SPEED TO LOW RPM
UNDER LOAD
CAUSES AND1ORSOLUTION:
1. Loss of fuel
A. Empty gas tank.
B. Plugged fuel line or filter.
C. Defective fuel pump. (Replace with mfg. suggested
replacement parts only).
D. Gas line kinked, crushed or
not connected.
Blown master fuse.
2.
A. Electrical short.
B. Defective fuse.
3. Worn or maladjusted points (Onan eng. Only) (Briggs has
electronic ignition).
A. Remove and replace points and condenser.
B. Clean and adjust points,
4. Defective spark plugs
A. Remove and replace.
B. Clean and regap.
5. Defective spark plug wires
A. Sparkplug wires along with many others may, at certain points
come in contact with heated parts (exhaust manifold) or
abrasive parts (sharp metal, teflon hose). This may be taken
into consideration for electrical shorts.
B. Remove and replace.
6. Low compression
A. Defective valve.
B. Stuck valve.
C. Worn compression rings.
D. Defective piston.
7. Float switch in recovery tank inoperative. NOTE: Temporary
repair permits disconnection of float switch wire between tank
and machine. Continued operation with this condition will
compromise vac blower.
A. Switch stuck on upright position by foreign material.
B. Defective float switch.
8. Engine will not turn over
A. Dead battery
B. Loose terminal connection on battery or ignition switch.
C. Defective starter.
D. Seized engine or blower.
9. Defective Carburetor or gas leakage.
A. Clean carb.
B. Replace carb.
C. Choke locked in closed position.
quick disconnect inside the truck
A
Carbon build-up may be excessive if carb. or valves are
improperly adjusted, engine Rl%l too low, improper sparkplug
gap.
B,
Remove cylinder heads and eliminate carbon build-up with
wire brush:
12. Incorrect timing
A. ~iming may become offset if point box is not secure or if
points are out of adjustment. (Onan only).
13. Dirty air cleaner
A. If exhaust gaskets do not seat properly or heat exchanger
gasket is bad, exhaust may heat and melt the the air cleaner
requiring much clean-up repair.
14. Clogged fuel filter
A. Remove and replace
15. Low oil level or malfunctioning oil pump
A. Oil pressure sensors can be installed on the engine. This will
eliminate many problems which may occur.
16. Vacuum tank full
A. Empty vacuum tank
D. When replacing fuel pump insure that it is the same pressure
rating recommended by mfg.
10. Improperly adjusted carb. NOTE: A comprehensive manual is
available and defines necessary adjustments.
A. Incorrect air mixture ratio adjustment.
B. Incorrect float level adjustment.
11. Carbon build-up in cylinders. NOTE: Carbon build-up can be
minimized by using unleaded regular gas. Should carbon
removal be necessary, reinstall heads with new gaskets.
29
Page 31

a. tlectncal snort m wlrmg system
ELECTRICAL SYSTEM , ,Oorgroundmnnection
The entire electrical system operates on 12 volts DC which is provialed by a battery. Battery levels are sustained by a 3 amp alternator
designed within the engine.
NOTE: When new battery is installed insure it is properly charged
before installation or damage to the charging regulator may occur.
A. Examme electrical systems for bare wires.
A. Examine terminal and remove corrosion if necessary,
6. Follow ground wire from (-) of battery to where it grounds at the
frame. If it is grounded to painted steel then scratch some of
the paint off to allow for circuit to be completed through the
steel.
PROBLEM:
*
LOW BA’TTERYVOLTAGE
CAUSE AND/OR SOLUTION:
1. Defective battery
A. Remove and replace.
2. Corroded battery terminals
A. Clean terminals and battery posts.
3. Low battery fluid
A. Add water to appropriate level.
4. Loose wiring within electrical system.
A. Examine all terminal connections and verify that they are
secure. NOTE: Give special attention to ignition switch
terminals.
INOPERATIVE HOUR METER
CAUSE AND/OR SOLUTION:
1. Time is not advancing correctly
A. Verify 12 volts DC is available at the hour meter with the
ignition switch turned on. This can be accomplished with a volt
meter or a test lamp.
B. Remove and replace hour meter if 12 volts is available.
C. A nylon gear within the clock may have been jammed due to
a sudden jolt of the machine or truck. You may try simply
tapping on the meter to try to free the nylon gear,
TEMP GA
‘!, ~“o
~.. .
,—
I
BLACK
BOB CAT 2/290
ELECTRICAL DIAGRAM
!~ wOUR METER
BLUE
—
START SOLENOID
I I I
WHITE WIRE GOING TO TERMINAL
85 AND BLACK WIRE TO 87A
SHOULD BE REVERSED
1
30
Page 32

MACHINE
INSTALLATION
PROPANE TANK PLUMBING
INFORMATION
There are two ways of positioning the machine in the truck as shown
on the following page. There are also two locations for the vacuum
recovery tank to be positioned. First, the standard way with the tank
directly alongside the machine. Second, with the tank across the
back of the machine as shown below; this location is most space efficient.
Whichever way you select, make sure the tank and machine are sec-
ured to the floor of the van to insure driver safety.
It is important that the machine be placed as close to the door as pos-
sible so that outside air can be pulled into the engine for proper cool-
ing.
exhaust from the front of the machine be vented down under the
truck to prevent carbon monoxide from entering the job site. Always
park the truck so the exhaust is blowing
The manufacturer also recommends that installation of aluminum
vents in the truck roof to allow heat from the heater to escape.
propane tank or a portable gas can
an open flame type and could cause a fire or explosion.
Mount a fire extinguisher just inside the rear or side door for
emergencies.
It is recommended by the manufacturer that the
away from the job site.
Never operate this machine with a
inside the truck. The heater is
portable
IL. ---- 68
/
PROPANETANK
165 GAL
/=
%f_h%%%IJMTOR
~ PROPANEVAPOR VALVE
TANKFILLVALVE
CARRIAGE
‘7q~
FLAT.WAS-HER H -R
LOCKWASHER ~m
~ \J’=~
THRU-FLOOR GAS HOOK-UP
AND INSTALLATION
FITHNG
(’4 BRS STR ELBOW}
Q
&
SCREW
&
Q
uOsE CLAMP
~ \&_’’_ SCREW
/
bilf
BP% ~ ‘CUT‘0 ‘ENGm)
o
/
autcK CONNECT
SOCKET
PLATE
MACHINE TIE DOWN CLEAT
ILLUSTRATION
10 MAXIMUM
SETBACKOF
MACHINEFROMDOORWAY
CLOSE TO
PLACEAS
‘!3 \ II Il.
NOTE USETIESTOSECURET.FI~ING
TOTHE FRAMEANDTO STABILIZE
HOSEATA MINIMUM6 FROM
THEEXHAUSTPIPE
31
Page 33

WATER SOFTENER
Many areas of the country have an excess of minerals in the water
which results in what is commonly called “hard water”. These minerals tend to adhere to the insides of heater coils and other parts of the
machines causing damage and a loss of cleaning effectiveness.
Reports from several of our machine users commending the results
of the use of water softeners in conjunction with their machines
prompts us to recommend the procedure to everyone in a “hard
water” area.
The relatively low cost of a water softener service is more than made
up for in the increased life of machine parts and continued cleaning
efficiency. The water softener will also increase the effectiveness of
the cleaning chemical being used, therefore, less chemical will be
needed.
Contact a water softener distributor in your area for information on the
rental of a simple water treatment unit to carry in your truck. Be sure
to change the water softener in accordance with the capability of the
softener. Example: If the softener will treat 900 gallons of water and
the machines uses an average of 30 gallons per hour of use, and an
average of 5 hours a day, would be 150 gallons a day. 5 days would
equal 750 gallons of water, therefore, the softener would be changed
every 6 working days for maximum softening.
q
\<
FRAME TU8E
/
WAND ASSEMBLY
y
v
u,
ill,”
/
SEE JET ASSY
WAND LIP
SEE VALVE ASSY
S S SOLUTION HOSE
HANDLE
SLE~VE
I
--—%
WATER
SOflENEe
WATER
FAUCET
GARDEN HOSE
L
W? J
,L&!?J?’
\_ ,
JET ASSEMBLY
BRASS CAP
!!’ ‘ ‘008’
b
J-
@
VALVE ASSEMBLY
00
c
O-RING
I
BODY
,P
+
-,
STABILIZER
.s+--- cLip
f!=
\
KEEPER RING
I
32
Page 34

OPERATING
INSTRUCTIONS
START UP
1:
Perform daily aperiodic maintenance as specified by the owner’s
manual.
2.
Connect ail required hoses.
3.
Connect cleaning tool to length of hose required to perform
cleaning.
4.
Caution: Mix tank must be full prior to ignition.
5.
Start engine (choke as required). Engine is at operating speed
(recommended -2600 RPM). Allow warm-up period of 2-5
minutes.
6.
Spray wand to void all air from system. As the mix tank is in a fill
cycle, the chemical flow meter may be adjusted to your desired
300 Psi.
7.
the heater. Thaw the heater and check for leaks.
Turn on burner, adjust dial to normal or slightly below for 200
8.
9.
SHUT DOWN
1.
2.
3.
4.
Turn on cleaning tool to flush chemical from unit hoses and
5.
6.
7.
8.
NOTE: Recommended carpet cleaning pressure is 250-
setting.
all air is voided from system, heater maybe ignited. NOTE:
Once
If not familiar with operation of this heater, refer to heater section
of the manual.
A. Open propane valve on the tank.
B. Ignite pilot on the heater.
C. To ignite burner, turn dial to on position.
NOTE: If you suspect that the unit has been frozen -DO NOT light
Deg. F.
Commence cleaning operation
NOTE: Chemical flow meter set at 5 GPM is a 1 to 30 mix ratio
and 10 GPH is 1 to 15 ratio. When flow meter is set at 10 GPH,
you will be using what most chemical manufacturers recommend
at 5 GPH.
Turn heater to off position. Spray wand for a least 3 minutes to
allow the heater coils to cool.
Close valve on propane tank.
Remove vacuum hose.
Flush clear water through chemical system for 10 seconds.
(vinegar should be rinsed through system weekly). Turn off
chemcial flow meter.
cleaning tool.
NOTE: If freeze guard is necessary, perform steps 1 & 2 of freeze
guard procedure at this time.
At this time, the blower should be lubricated with LPS 1 or WD 40.
Shut engine down.
Drain vacuum tank. Vacuum filter should be cleaned prior to
mobilization of van.
NOTE: If freeze guard is necessary, perform steps 3-9 of freeze
guard procedure at this time.
MACHINE CONTROL PANEL
HOUR M!3ER
INCOMING
wATER CONNECTION
‘“ Q ~~-” ~
BLOwEfl,ENGINE EXHALW HIGHPRESSURE
1
CLEANING SOLUTION
CONNECTION
I
ADJUSTABLEHIGH PRESSURE
BYPASS VALVE
‘(CLOCKWISE TO INCF4EASE)
OPTIONAL
~ LEG HOLES ~,x TANKDRA,N
I
!
PETcOCK VALVE
&HOSE
OPERATION PRECAUTIONS
MACHINE ADJUSTMENTS:
Although this unit has been factory adjusted, it may require addi-
tional adjustments to achieve optimum performance; i.e. altitude
may require carb adjustment and ambient temperatures may require
heat control adjustment. When required, consult an authorized representative.
ENGINE COOLING:
~ Units employing air cooled engines must not
be incapacitated within a van with doors and windows closed. Ex-
cessive” temperatures within the engine will result in premature engine failure and a compromise of applicable warranty.
LEVEL OPERATION:
_ Duringoperation, vanortrailermustbeparkedon
level ground not to exceed + or – 10 deg.. Failure to insure proper
leveling may prevent proper internal lubrication of engine, vacuum
andlor high pressure components,
FREEZE PROTECTION:
_ Mother nature gives little warning astohercold
spells. Therefore, protecting this equipment from freezing will save
costly down-time. Placing an electric heater in the truck or parking
the truck indoors, will help to insure against freezing.
LIGHTING HEATER:
the heater when lighting.
Never put your face down close to the opening of
STRONG PROPANE ODOR:
propane around the heater.
33
Never light the heater if you smell a strong odor of
Page 35

HEATER:
IznmiEl
boxes, chemical jugs, etc., as this will block the flow of air required for
a clean burning heater.
Never pile things around the heater, i.e. hoses,
OPEN FLAME:
kw!!2il Fl
therefore, do not remove engine gas line while troubleshooting or
store any flammable material in the truck with heater operating.
emember that this heater is an open flame,
FREEZE PROTECTION
Any freezing of this machine is not covered by warranty and during
the colder months of operation, careful protection should be of ut-
concern.
most
THE FOLLOWING PRECAUTIONS ARE RECOMMENDED:
Run machine before leaving for the first job to insure nothing has
1.
frozen the night before, including hoses and wand.
Insulate the garden hose from the cold ground by runmng It
2.
through an extra 1 % inch vacuum hose.
Leave truck doors closed until time cleaning begins, then open
3.
slightly for ventilation of air cooled engine.
4.
On extremely coid days propane does not vaporize as quickly,
therefore, venting the warm exhaust over to blow on the propane
tank will stabilize the propane flow. (This is necessary if you
notice a drop in heat or a low burning flame in the heater.)
In colder climates, insulating the truck walls and floor boards will
5.
help protect the unit.
Don’t procrastinate during the cleaning operation or the hot water
6.
solution line will also freeze on the ground.
should be insulated in extremely cold climates.
Whenever ~ossible. the truck and machine should be stored in a
7
heated garage at night or over the weekend. if not possible, place
a 1500 watt electric heater inside the truck, aimed directly at the
machine, Never use a propane heater-it causes excessive moisture on the truck ceiling and the possibility of it going out is higher.
If the machine and truck are left outside with a heater, you should
first drain all possible water from the machine cleaning tools and
hoses. (They freeze also.)
TO DRAIN THE MACHINE. FOLLOW THESE STEPS:
A.
Before shutting off the machine, remove the chemical line from
the chemical jug and place in a mixture of 50/50 anti-freeze and
water. Wtth the cleaning tool on, allow mixture to fill chemical systwn back to the chemical mix tank.
Loosen the petcock valve on your bypass drain hose and allow
5.
the water to drain thoroughly from the mix tank.
To remove the water from the heater and pump use the freeze
c.
guard kit which is a small air compresor that can be plugged into
the dash board lighter in the truck, or air at the gas station. Using
the correct connectors, first blow air into the high pressure solution male quick connect. This will force the water through the
heater back through the pump and into the chemical mix tank to
be drained out through the petcock valve to the ground.
Next, blow the air into the incoming water quick connect and
force that water into the chemical mix tank to be drained out.
The solution line
CLEANING AND
CHEMICAL
PRECAUTIONS
INFORMATION
Your mobile carpet cleaning plant has been engineered using the
latest and most sophisticated technology available, to produce the
finest carpet cleaning results possible. Despite this however, it remains only a tool of the carpet cleaning trade, and it can produce only
as good a job as the person operating it.
There are no short cuts to good carpet cleaning, it requires time,
cleaning knowledge and the use of good chemicals.
Manufacturer recommends the use of spotting agents. and traffic
lane cleaners prior to the actual cleaning of carpeting, as required.
Manufacturer recommends setting heater thermostat at ‘normal’ setting when cleaning synthetic fiber carpets, and at ‘warm’ setting
when cleaning natural fiber carpets.
~ When cleanma cut-txleacrilan dush camets, set
heater at
fiber damage on this type of carpet.
The use of some chemicals through your mobile carpet cleaning
plant can seriously damage the internal plumbing, high pressure
pump and heater. (Chemicals such as concentrated acids and some
paint oil and grease removers w/high concentration of solvents.)
Manufacturer recommends only the use of chemicals containing rust
and corrosion inhibitors and water softening agents to prevent
chemical build-up.
NOTE:
At no time should a chemical solution with a PH of less than 7 or
higher than 10 be used in the unit.
CLEANING STROKE
PROCEDURE/OVER-WETTING
PURPOSE:
To eliminate excess moisture remaining in the carpet fiber and the
sawtooth appearance which results from diagonal movement of the
cleaning tool on all types of carpet.
‘warm’ setting. Using fiighe’r treater se~ing may ’result in
CHART
Pbf
1234567891011 12131~
+ ACID
—NEUTRAL
‘ALKALNF~
To be sure all water is out of the system, alternate between quick
connectors several times.
BE SL.WIE [T’S PROTECTED!
8.
Freezing will cause GRIEF, MONEY and DOWN-TIME. Don’t
mess with mother nature! Remember to close the petcock
valve prior to next operation of your BobCat 2/290.
‘PROCEDURE:
Always move the cleaning tool in smooth forward and backward
strokes. Apply
tion is injected into the carpet. When extracting (drying), apply firm
pressure on the forward stroke to ensure a positive “lock”’ for the
vacuum and minimize the “hopping’” effect resulting on unsmooth
carpet. During the fofward and reverse strokes, movement to the
34
slight pressure to the fonvard stroke while the solu-
Page 36

right or left should only be accomplished at the extreme rear of the
-
stroke. Overlapping is also important to ensure even application of
solution to prevent saturation
at the same point at the rear of the cleaning stroke.
Failure to adopt this procedure can result in increased chance of
“clean streaks”, fiber shrinkage, brown out, and longer drying
periods.
when cleaning wand is stopped twice
. Clean vacuum tank thoroughly with high pressure washer.
. Flush water and chemical system with 50/50 white vinegar
‘ solution.
. Check engine RPM’s - adjust to 2600 RPM’s as
needed.
IMPORTANT: Record date and machine hours on maintenance
chart.
INCORRECT METHOD
‘w: ~
CORRECT METHOD
OVERIAP
BETWEEN STROKES
OVER-WEITING
Over-wetting is annoying to all concerned and sometimes Ieaves a
bad impression of the cleaning process used.
There are several areas that will cause over-wetting:
1. Too few vacuum strokes or improper saw tooth vacuum
strokes as shown above.
2. Obstructed, kinked or cut hoses.
3. Vacuum tank drain valve left partially open.
4. Clogged vacuum blower filter or vacuum tank lid not sealing
properly.
5. Cleaning a heavily foam-saturated carpet without defoamer.
(We recommend crystal type.)
MAINTENANCE
PROCEDURES
To avoid costly repairs and down-time, it is imperative to develop
and practice good maintenance procedures from the beginning.
These procedures fall into daily, weekly, monthly and quarterly increments, and are outlined below. We have provided a maintenance
log for your convenience on the following pages; it is recommended
that you affix a copy of the logon the vehicle door near your unit for
convenience and to serve as a maintenance reminder.
DAILY
● Check engine oil level.
● Inspect garden hose screen - clean as needed.
e Visually
etc..
. Inspect recovery tank s/s filter and filter bag for tears, holes, etc. -
clean, repair or replace as needed.
. Lubricate blower with LPS-I or WD-40 through blower inlet.
WEEKLY
● Change engine oil. (25-30 hours of operation)
. Check engine air cleaner filter - clean as necessary.
o Check high pressure pump oil - add as necessary.
. Check drive coupler setscrews - tighten as needed.
● Check pump drive belt for wear - tighten as needed.
o Check
● Check fuel lines for wearlchafing.
● Check all nuts and bolts - tighten as needed.
. Check heater burner assy. union for tightness/leaks.
irrspectmachine for loose wires, oil leaks, water leaks,
pimppulleys - tighten as needed.
MONTHLY
e Grease blower bearing fittings.
● Remove, clean and reinstall engine air cleaner filter.
o Remove pressure by pass valve stem, grease cup and stem,
reinstall.
● Check water level in battery. Clean connections as needed.
IMPORTANT:
Record date and machine hours on maintenance
chart.
QUARTERLY
● Change oil in blower (see blower manual).
. Check engine compression.
@ Check for combustion chamber carbon deposit
e Change spark plugs (see engine manual).
—t131J&,er
OVERALL CARE OF UNIT
MAINTAINING THE ORIGINAL APPEARANCE OF YOUR UNIT IS
IMPORTANT FOR TWO REASONS:
1. It represents a big dollar investment for your cleaning business
and its appearance should reflect that fact. A dirty machine is not
professional!
2. Maintenance, troubleshooting, and repair is much easier to
accomplish on a clean well maintained unit. Regular cleaning of
the machine offers you an opportunity to visually inspect all facets
of the machine and spot potential problems before they occur.
FOLLOWING MAINTENANCE IS RECOMMENDED BY THE MANUFACTURER AT THE FREQUENCY INDICATED.
AFTER EACH JOB: Check
required.
DAILY: Wipe machine down thoroughly with a damp cloth; flush recovery tank out thoroughly. Empty filter bag and inspect for rips,
tears, etc. - replace as needed; remove, thoroughly clean and
reinstall stainless steel filter screen in recovery tank; inspect and
clean vacuum slot on cleaning wand;
edges that could tear carpet - file down as needed; clean wand with
stainless steel cleaning compound to maintain original appearance
(available through grocery stores); wipe down vacuum and high
pressure hoses as needed - visually inspect for cuts, etc..
WEEKLY: Wipe down entire unit as needed - apply good coat of
auto wax to all painted surfaces inside and out, and to control panel:
thoroughly clean recovery tank using high pressure hot water (unit
with optional high pressure cleaning gun may be used for this); re-
move stainless steel filter in recovery tank, thoroughly clean remov-
ing all lint build-up, inspect for damage and reinstall. Remove filter
bag, thoroughly clean and reinstall - if torn, replace; empty chemical
from chemical container, wash out thoroughly to remove any chemical build-up; inspect chemical feed line strainer and use 50% white
vinegar/water solution to remove any chemical build-up; thoroughly
clean wand and inspect for clogged jet, debris in vacuum slot and
leaking fittings at valve. Apply light coat of auto wax to wand;
thoroughly clean vacuum and high pressure hoses including hose
cuffs - inspect for wear or damage to hoses and quick connect fittings. Inspect garden hose connect/adapter screen for debris, remove and clean thoroughly. Inspect all propane and gas lines for
wear or abrasions that may cause possible fuel leaks.
recovery tank, Sk filter and filter bag as
check wand head for sharp
35
Page 37

DAILY CLEANING & INSPECTION
Engine oil - check
Garden hose screen - clean
Machine - general inspection
Clean vac tank filter bag after every job
Blower inlet - spray with LPS 1 after last job
WEEKLY SERVICE
MAX HRS
25
25
25
25
25
25
25
25
25
25
25
I
25
ENGINE OIL change
BLOWER check oil level
PUMP OIL check
DRIVE COUPLER tighten set screws
BELTS & PULLEYS check tightness
FUEL LINES check for chafing
WIRING check for chafing
CHEMICAL SYSTEM flush w/vineaar
SERVICE
DATE/HRS
I
I I
I
DATEIHRS
I
I
I
MAINTENANCE LOG
DATE/t-iRs
I
I I
1 DATE/HRS I DATE/HRS I DATE/HRS ~ DATE/HR{
I
I
I
I
MONTHLY SERVICE
100
100
100
BLOWER grease bearing
ENGINE AIR CLEANER clean
BY PASS VALVE grease cup& stem
QUARTERLY SERVICE (3 MONTHS)
300
300
300
SPARK PLUGS
change
Page 38

DAILY CLEANING & INSPECTION
Engineoil-check
Garden hose screen - clean
Machine - general inspection
Clean vac tank filterbag after every job
Blowerinlet-spraywithLPS1afterlastjob
WEEKLY SERVICE
MAX HRS
25
25
25
25
25
25
25
25
25
25
25
25
ENGINE OIL change
BLOWER
PUMP OIL check
DRIVE COUPLER tighten set screws
BELTS & PULLEYS
FUEL LINES check for chafing
NUTS & BOLTS check tightness
BATTERY LEVELS check
HEATER BURNER ASSM tightnesslleaks
VACUUM TANK clean
WIRING check for chafing
CHEMICAL6YSTEM flush w/vinegar
SERVICE
check oil level
check tightness
DATE/HRS DATE/HRS DATE/HRS
MAINTENANCE LOG
DATE/HRS
DATE/HRS
DATE/HRS
DATE/HRS
MONTHLY SERVICE
100
100
100
BLOWER grease bearing
ENGINE AIR CLEANER clean
BY PASS VALVE grease cup& stem
QUARTERLY SERVICE (3 MONTHS)
300
300
300
BLOWER OIL change
ENGINE compression
SPARK PLUGS change
 Loading...