

Page 1
Installation
Manual
Table of Contents
• Thanks For Buying A Hydraid® BioSand Water Filter
• Important Safety Instructions
• Features And Benefits
• Product View
• Hydraid® BioSand Water Filter Parts List
• Before Installing The Hydraid® BioSand Water Filter
• Assembly
• Installation
• Using The Hydraid® BioSand Water Filter
• Filter Maintenance
• Troubleshooting
• Monitoring
• Frequently Asked Questions
• Warranty
Page 2

Page 3

anks For Buying A
Hydraid® Biosand Water Filter
We are glad you purchased the Hydraid® BioSand
Water Filter. Your filter is very well made. The design is
based on the integration of the time-tested process of
slow sand filtration and the state-of-the-art, patented
technology of Dr. David Manz, a civil engineer from
the University of Calgary (Canada). He conceived the
idea for the Hydraid® BioSand Water Filter from his
international work in water systems. The Hydraid®
BioSand Water Filter is backed by scientific research and
has a limited one-year warranty.
We, at Triple Quest, are committed to developing
product and business solutions that empower health
and development for everyone while being culturally
responsible and environmentally sustainable. We are
confident you will be overjoyed with the health and
economic benefits of clean, safe water.
Thanks again from all of us at Triple Quest.
Marta Johnson
Business Unit Leader
1
Page 4

Important Safety Instructions
The Hydraid® BioSand Water Filter is designed for daily use with water
that is contaminated with bacteria, parasites, and viruses. The filter
does not remove heavy metals. The Hydraid® BioSand Water Filter is
not approved by the U.S. Environmental Protection Agency for drinking
water in the United States. The filter is intended for intermittent usage
with periods of pause (1 to 4 hours) and if used continuously, should be
followed with chlorination. Post filtration chlorination is always recommended since cross contamination of stored water is a reality. Chlorine
should always be added to post-filtered water and never be added to
the water entering the Hydraid® as this would negatively impact the
biolayer. The biolayer is a living system and should not be left for longer
than two days without having water run through it.
It can take up to 14 days for the biolayer to form after the filter is installed, and during this period, post filtration chlorination is absolutely
necessary to address bacteria and viruses. The filter media (sand)
accounts for essentially all parasite removal immediately. Within 14 days
of installation, the filter will achieve optimal efficiency and effectiveness.
Features and benefits
• Convenient in-home, point-of-use filtration
• Dramatically reduces diarrhea, as well as skin and urinary
tract infections
• Improves health, thus impacts ability to work and attend school
• Consistently produces sufficient quantities of safe water to meet
many household needs
• Provides affordable, safe water for less than 3¢ a day
• Works for all microbiologically-contaminated water
• Simple to operate
• Parts do not need replacing
• Saves wood/fuel needed for boiling water
• Significantly reduces household labor burdens associated with
securing clean water
• Significantly reduces household expenses needed to purchase
clean water
• Significantly reduces carbon footprint caused by using stoves to
boil water
• Restores dignity and hope in disaster relief situations
2
Page 5
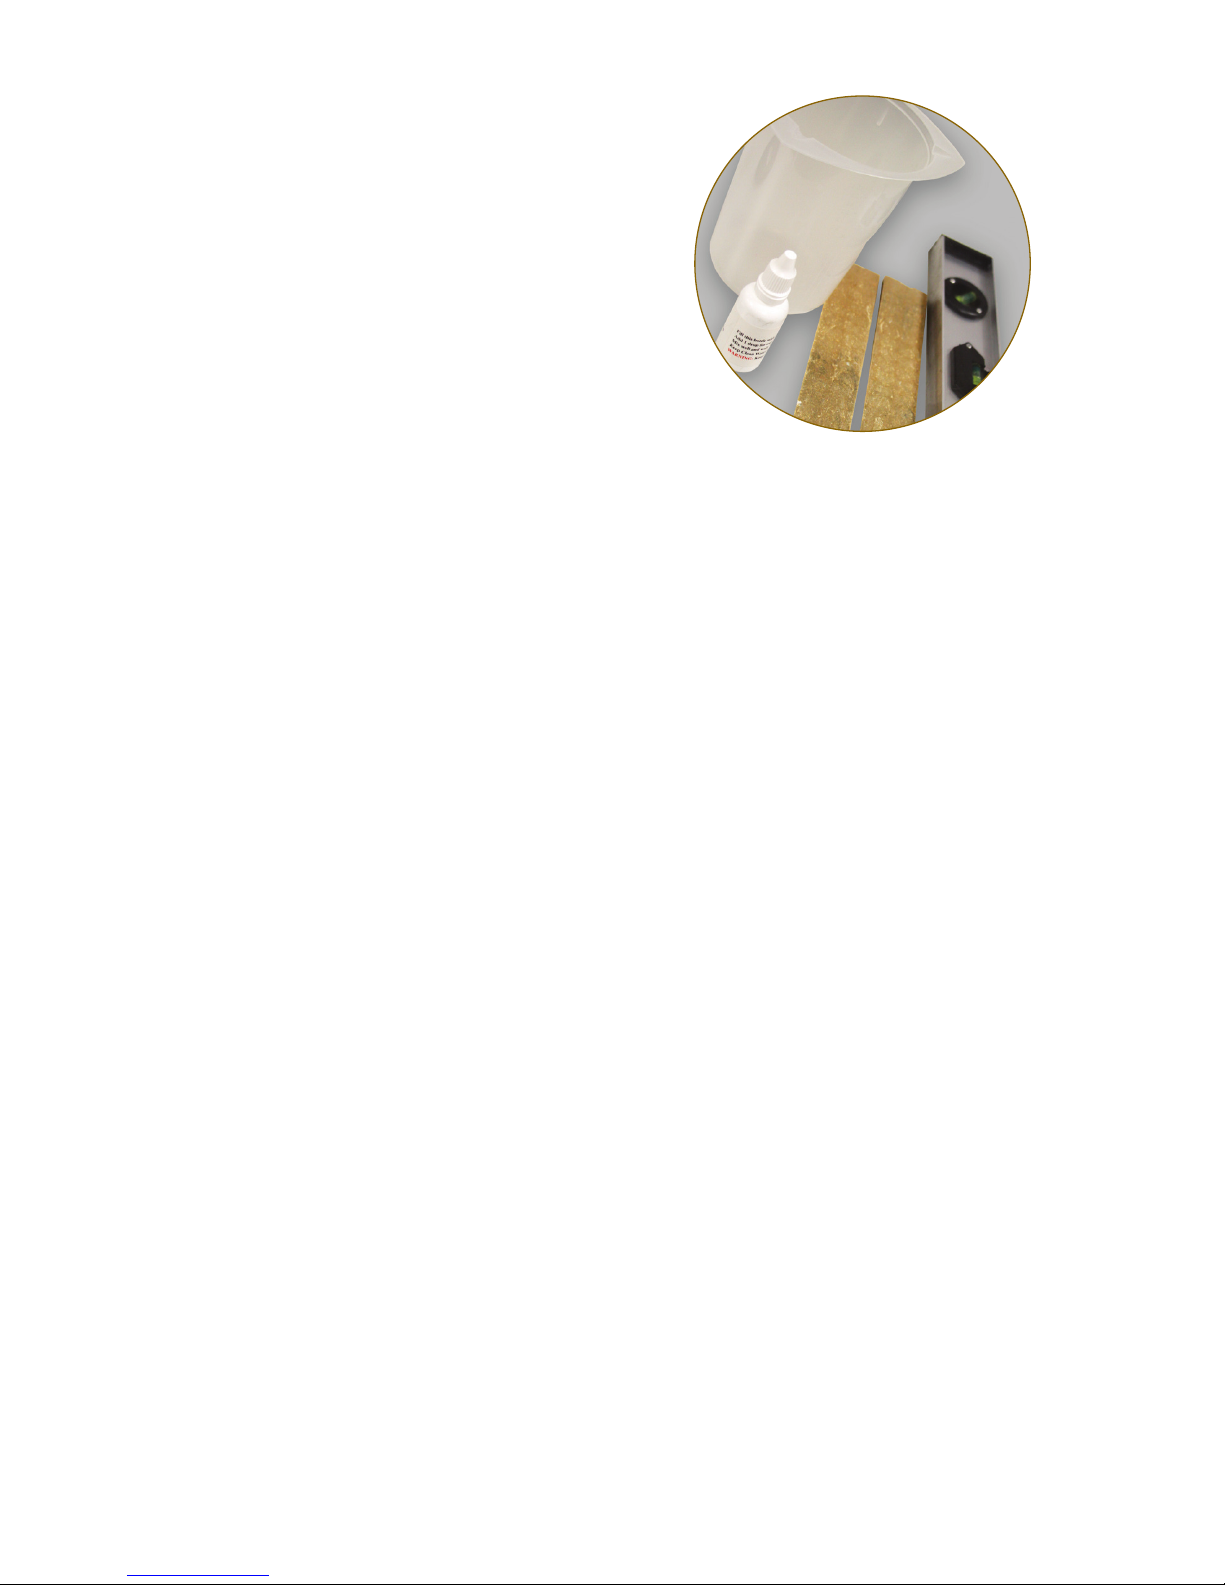
Product View
Hydraid® Biosand Water Filter
Parts List
1 – Filter Body
1 – Diffuser Plate
1 – Filter Lid
1 – Filter Standpipe, Transparent
Hose & threaded connector
1 – Bag of Underdrain Gravel (marked with a green label)*
1 – Bag of Separation Gravel (marked with a yellow label)*
2 – Bags of Filtration Sand (marked with a red label)*
1 – 1 Liter Measuring Cup
1 – Ruler and Level
1 – Set of Wooden Shims
1 – Chlorine Dropper Bottle
* For complete filter systems. Bags from a local certified sand
source may not look the same.
Before Installing The Hydraid® BioSand Water Filter
Before installing the Hydraid® BioSand Water Filter, please consider
gathering the following tools:
1. 5-gallon buckets (3 or 4) for water and sand during installation
2. Watch with a second hand or a timer to test filter flow rate
3. Chlorine (liquid or tablet) without soap or phosphate additives.
Household bleach offers premixed convenience
4. Hammer for breaking up and leveling the ground under filter (for
earthen floors)
5. Flashlight for low light conditions
6. Spatula for leveling filter media
7. Strainer to remove floating debris from the Diffuser Plate
3
Page 6
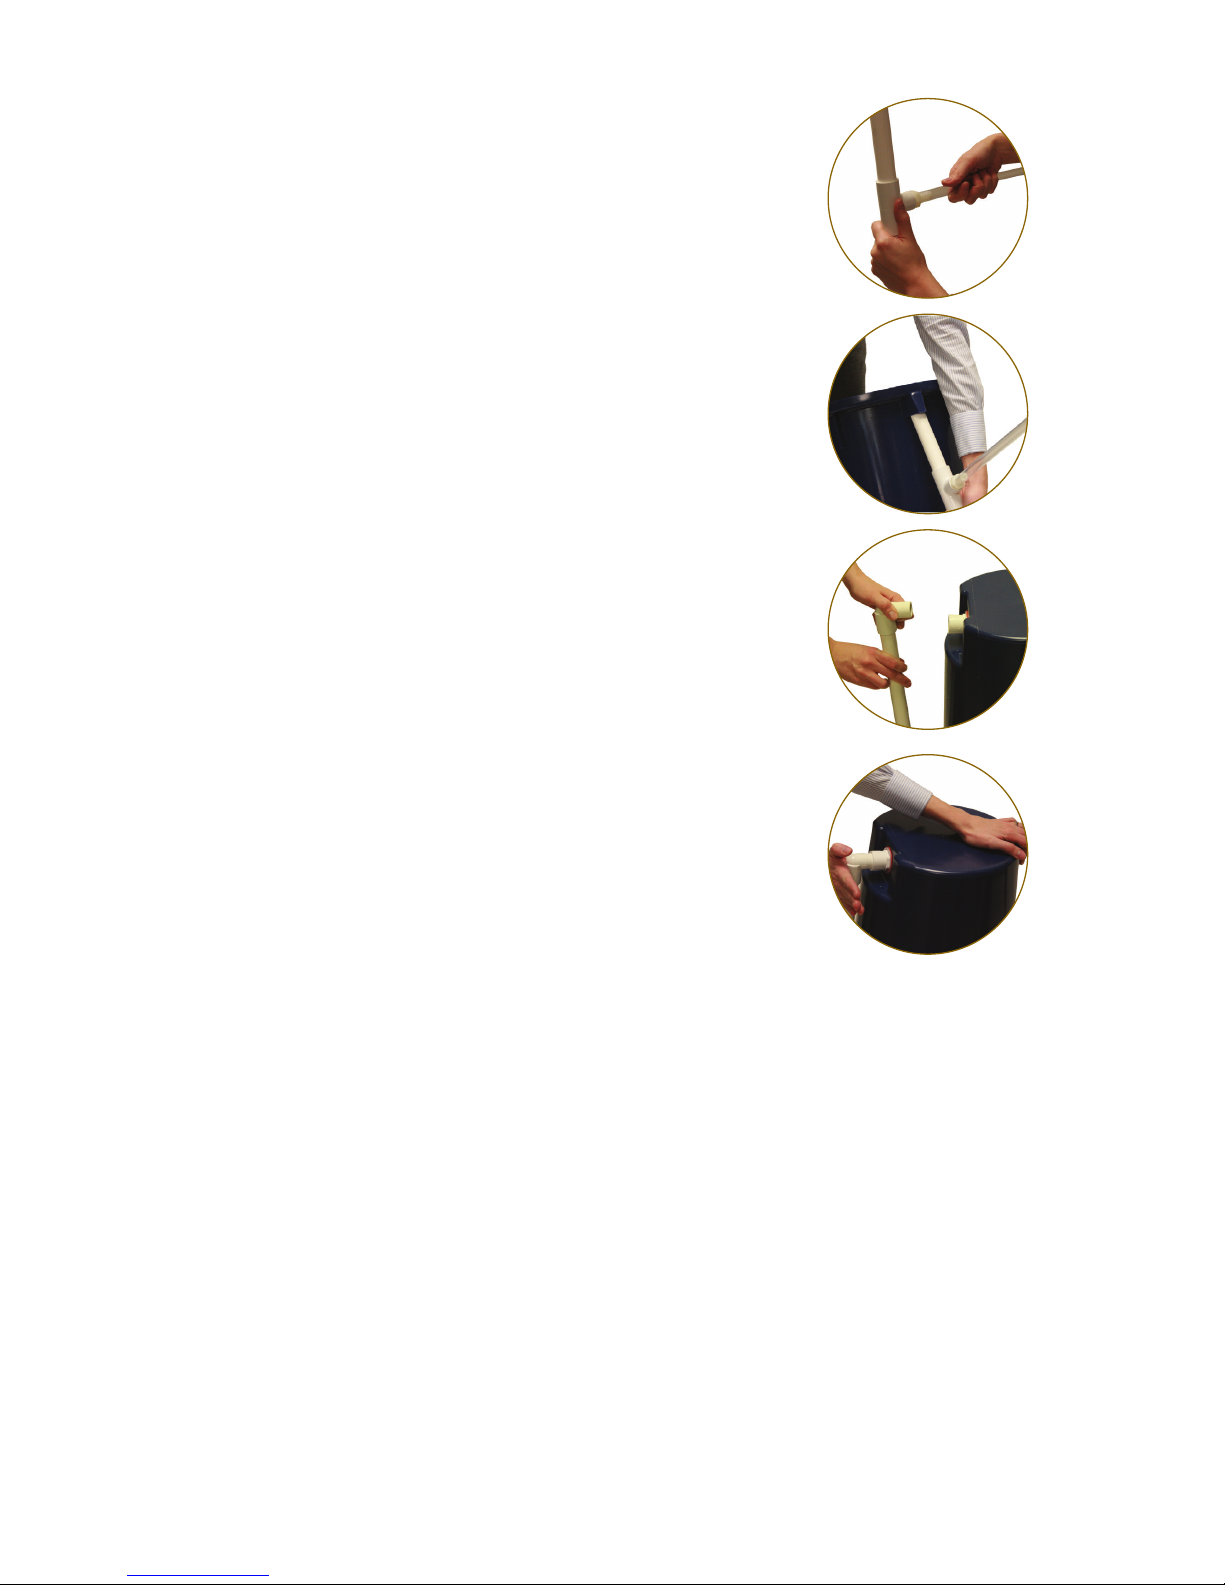
Assembly (see visuals)
1. Remove the transparent hose from the flat
end of the plumbing tube.
2. Screw the fitting of the transparent hose into
the side of the PVC standpipe Tee.
3. Insert the flat end of the standpipe into the
opening at the top of the filter below the rim.
4. Turn the filter upside down. Firmly push the
standpipe down until it is in line with the PVC
union at the bottom of the filter.
5. Firmly push the elbow end of the standpipe
into the PVC union at the bottom of the filter.
No PVC glue is needed.
6. Turn the filter upright and continue with the
installation.
Installation
Filter Location Selection
1. Involve household members in selecting
the filter location for acceptance,
convenience, and permanence.
2. Choose a safe, clean, permanent area
indoors to place the filter. Once installed,
the filter should not be moved.
3. Make sure the location is a protected
area, preferably in a corner or against a stable wall in the kitchen
where the filter is convenient, yet not likely to be bumped or damaged.
4. Place the filter upright, and level with shims if necessary. Keep
away from direct sunlight, wind, rain, freezing temperatures, heat
sources, clutter, and animals.
Filter Placement
1. Position the filter carefully on a level and stable surface.
• On a hard dirt floor, you may need a hammer to break up the
surface to make it level.
• On a concrete floor, you may need to use wooden shims to
make it level.
4
Page 7
• Consider constructing a concrete or wooden platform.
• Avoid placing on elevated surfaces to prevent tipping and to
make filling easy.
2. Level the filter with a contractor’s level. Check both front to back
and side to side.
3. Where possible, position standpipe assembly facing a wall with
the flexible Outlet Tube turned in a convenient direction.
Filter Installation
Note: You must ALWAYS add Gravel or Sand into standing water.
If necessary, replace the Diffuser Plate and add additional water to
the filter so that you are always pouring Gravel or Sand into standing
water.
1. Fill with about 4 gallons of water. Confirm there are no leaks.
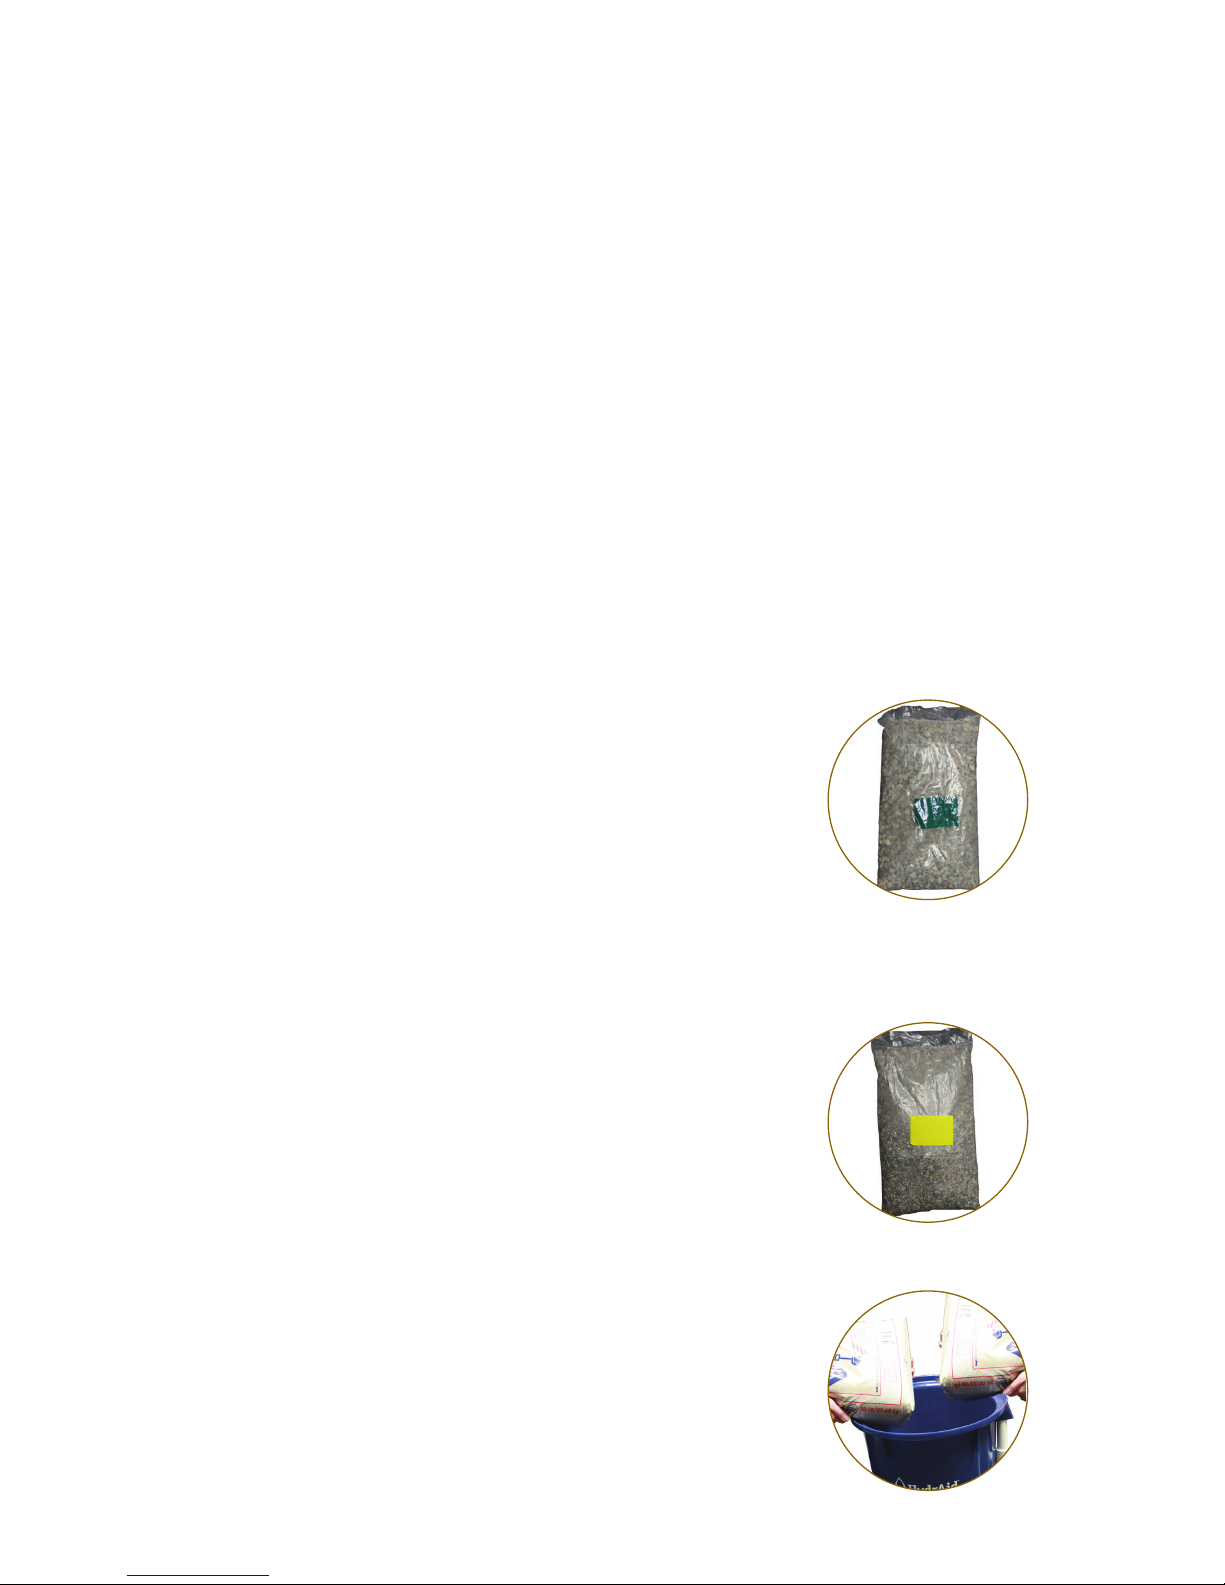
2. Add Underdrain Gravel to a depth of about
7 cm (3125 ml or about 9.6 lbs). This is the
bag with a green label if purchased through
Triple Quest. Make sure this layer is level.
3. Add 5.7 cm of the smaller Filtration Gravel
(3350 ml or 9.9 to 10.6 lbs). This is the bag
with a yellow label if purchased through Triple
Quest. Make sure this layer is level. Both layers of gravel should
add up to a depth of about 12.7 cm together.
4. Rapidly in a sweeping motion, fill the Filter Body with 34 liters (49.9
kilos or 110 lbs) of Sand (sand from Triple
Quest is marked with a red label). Make sure
the sand comes all the way up to the raised
textured line that is on the inside of the filter
body. It is important to do this as fast as possible to prevent sand stratification and the filter
plugging. It is helpful if two people are available to pour the sand simultaneously. Make sure this layer is level.
Save any extra sand for maintenance later.
5. Place the Diffuser Plate and the Filter Lid
on the Filter Body. Identify the filter with
location, date, serial number, and name of
installer on an Installation Survey form.
5
Page 8
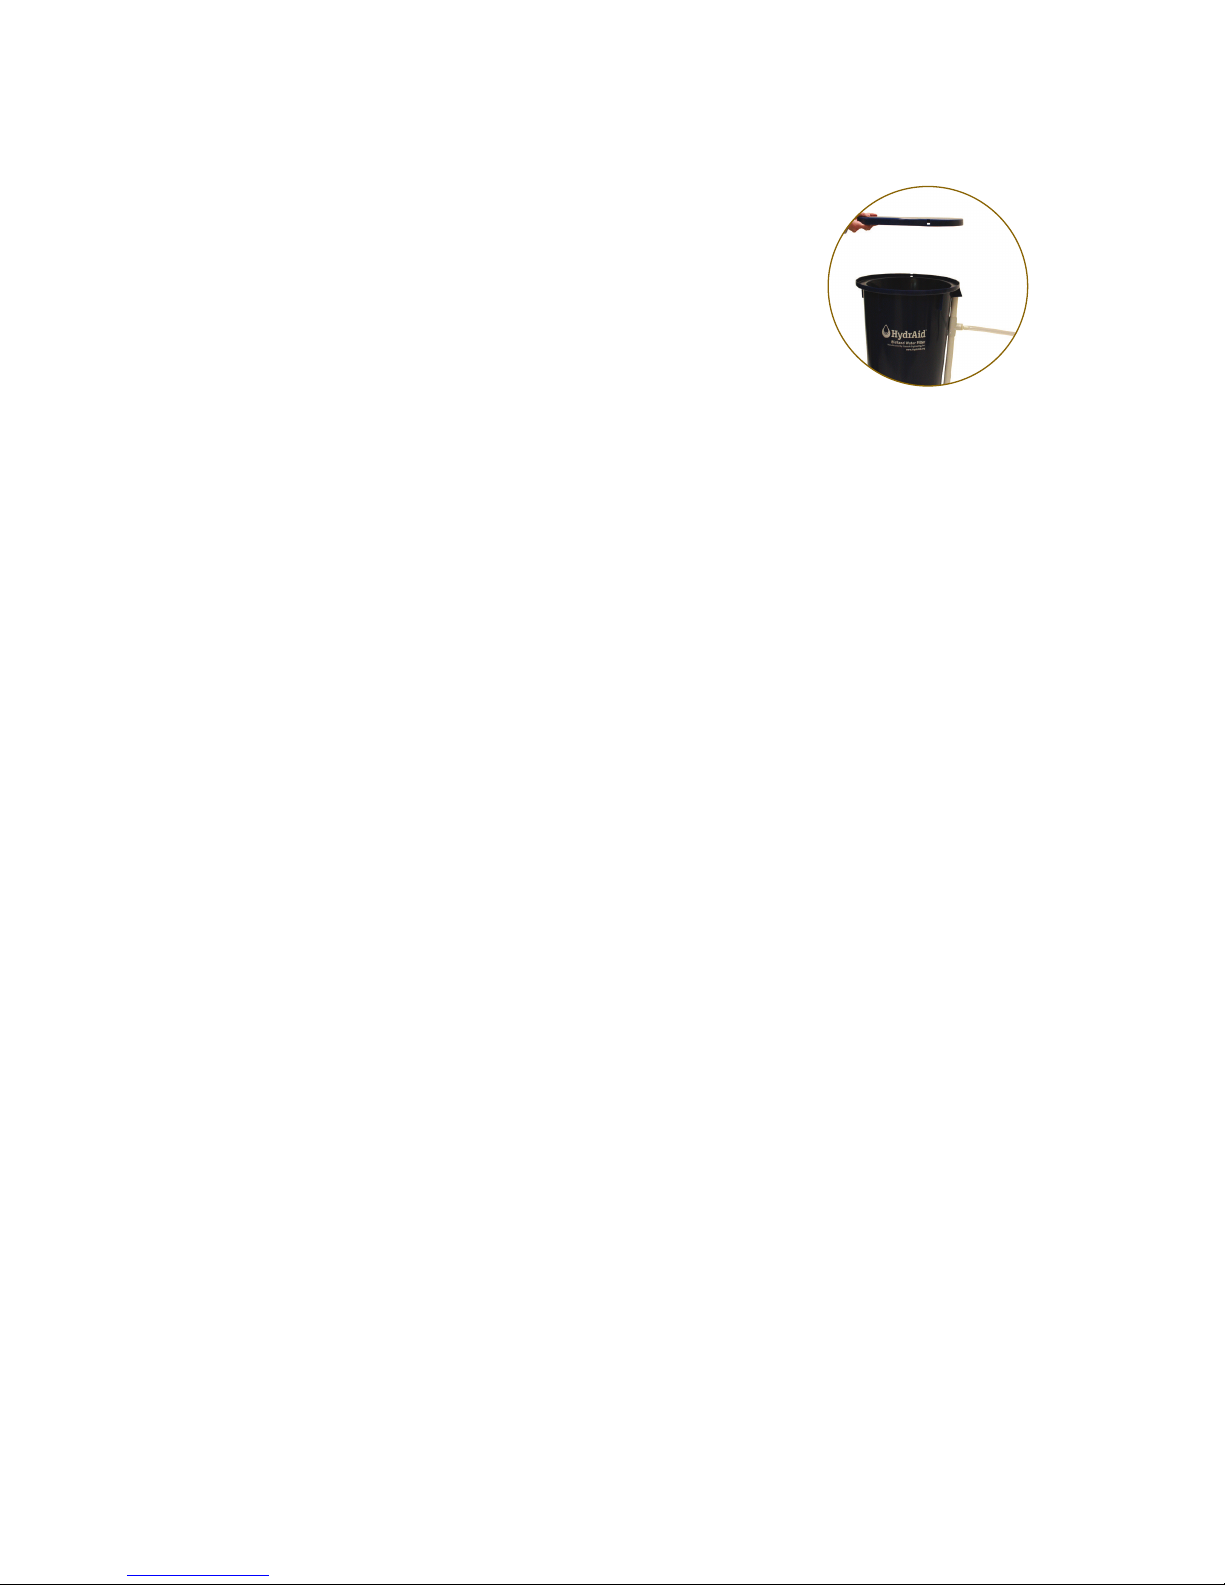
6. Pour one or more buckets of water through
the Diffuser Plate until the water flowing from
the transparent hose runs clear
(usually less than 20 liters or 5 gallons).
Checking Flow Rate
1. Flow Rate: To ensure the flow rate does not
exceed .8 liters per minute, replace the Diffuser Plate and fill the
filter to the rim with water. Put a 1-liter container at the end of the
transparent hose to collect the water. Use a watch with a second
hand to count out 60 seconds and collect the water for that
entire time. At the end of 60 seconds, you should have collected
between .4 and .8 liters (400-800 ml). If you collect between .4
and .8 liters, your filter is working properly. If you collect more
than .9 liters, contact Triple Quest at 616.254.4114.
2. Depth Measure: When the filter is at rest (i.e. no water is being
filtered), remove the Diffuser Plate and measure the depth of the
standing water. There should be almost 5 cm (2 inches) of water
above the Filtration Sand.
Clean Water Storage Container
A container of approximately 20 liters (5 gal.) size is ideal. Avoid larger
containers that cause weight-related handling issues and safe storage
considerations. Note: Water weighs about 1 kg per liter (8 pounds per
gallon). A suitable storage container should meet the following criteria:
1. Be easy to clean
2. Be used exclusively for filtered water
3. Have a secure cover with a small opening to fill with post-filtered,
clean water (optional)
4. Have a handle for carrying convenience (optional)
5. Have a spigot or faucet for sanitation and convenience (optional)
Refrigerate or chlorinate post-filtered water if possible. Both help
protect post-filtered water from recontamination.
Note: A clean storage container is part of an overall sanitation
and hygiene program. For more information, see www.hydraid.org.
Using The Hydraid® Biosand Water Filter
Your filter is a living system. The biological layer must be fed with at
least 15 liters (3 gal.) of water every other day to insure it remains alive
6
Page 9

and able to consume and reduce bacteria. However, the biological
layer cannot effectively consume and reduce the maximum amount of
bacteria if operated continuously. If the filter is to be used continuously
without pause periods, the filtered water must be properly chlorinated to
address bacteria and viruses. Never add chlorine/bleach to water that
is inside the filter. Nor should you put chlorinated water into the filter.
Only add chlorine to water after it has gone through the filter.
Usage Of The Filter
1. Pour at least 15 liters (3 gal.) of water through the filter at least
every other day. After pouring water into the filter, wait a minimum
of 1-4 hours (but no more than 48 hours) before adding more.
This pause period is necessary to allow the filter to work properly. The filter will reduce parasites and helminths immediately,
however, to dramatically improve water quality and positively
impact health you must wait 14 days for the biological layer to
fully develop.
* The biological layer accounts for most of the filter’s bacteria
reduction capabilities and takes up to 14 days to fully develop.
This thin, invisible film of living organisms naturally grows on
and within the top surface of the sand within the paused water
reservoir, where it consumes bacteria and viruses. During the
14-day period, the filter’s ability to remove bacteria in the water
steadily increases proportional to the biological layer development.
The Filter Media (sand) accounts for essentially all parasite reduction. Within 14 days of installation, the filter will achieve optimal
efficiency and effectiveness. Scientific health impact studies
have shown that the Hydraid® BioSand Water Filter dramatically
improves water quality and reduces the incidence of diarrhea by
47% without additional interventions such as chlorination, hand
washing, or other hygiene and sanitation measures.
2. Chlorination of post-filtered water to reduce bacteria and viruses
is strongly recommended during the first 14 days. A dropper
bottle can be used, and a reasonable effort should be made
to continue routine chlorination after the startup period. This
protects stored water from naturally occurring recontamination
associated with water storage. To chlorinate post-filtered water:
• Fill dropper bottle with 5.25% chlorine (household bleach).
Note: Bleach is not available in all countries, and solution
strengths vary.
WARNING: Keep chlorine away from children.
7
Page 10

• Add 2 drops chlorine for each liter of filtered water. Add 2 ml
(40 drops) of bleach for each 20 liters (5 gallons) of water.
• Mix water well and wait 30 minutes before drinking.
• Keep clean water container covered to avoid
recontamination.
• Chlorinated water should have a slight chlorine odor. If it does
not, repeat the process and wait 15 minutes. Chlorine tablets
also work well and should be used according to manufacturer’s instructions. Chlorine solutions (household bleach) can
lose up to half of their strength when stored for just one year.
Chlorine evaporates out of treated water, so chlorine treatment is always a temporary measure.
3. After initial 14 days: Water flow rate should be between .4-.8
liters (400-800 ml) per minute.
Note: Water flow rate generally slows a little after a few days of
operation and may need readjusting on follow-up (see Filter Maintenance). The sand may also compact after a few days, requiring
additional sand to be added to the filter to maintain the paused
water depth of about at 5 cm (2 inches).
4. Store pre-filtered source water over night before adding it to the
filter. Sedimentation naturally occurs when pre-filtered source
water is stored overnight or for some hours. The more turbidity in
the water, the more hours necessary for sedimentation to occur.
The water begins to visibly clear as the suspended microbes and
contaminants settle and concentrate at the bottom of the
container. The water can then be slowly poured out of the container into another container leaving many contaminants behind.
This process can dramatically improve the quality of the water
even before it is put into the filter. In cases of extreme water
sedimentation, repeat this process. This sedimentation process
can be significantly accelerated by adding a small amount of an
inexpensive flocculent such as alum to the water (3–6 ml [½–1
teaspoon] per 5 gallons of water).
5. Draw post-filtered water from the filter in “as-needed” quantities.
This practice reduces the amount of stored water, which in turn
reduces the opportunity for recontamination. Smaller quantities of
stored water are easier to protect than larger quantities.
Note: Water that is retained in the filter overnight will generally be
the best water. This first water of the day is best for drinking.
8
Page 11

6. Cover all stored water, pre-filtered and post-filtered, to keep out insects and debris. Containers used for handling and storing source
water (pre-filtered) and containers used for post-filtered water
should be clearly differentiated by shape, size or color to prevent
recontamination of filtered water. Containers must not be used
interchangeably.
7. Protect the biological layer. The paused water protects the
biological layer and the Diffuser Plate protects the paused water.
The biological layer should not be allowed to dry out, as that would
destroy it. If destroyed, the biological layer takes up to 14 days to
redevelop. If the biological layer does dry out for any
reason, a special process needs to be followed. Add clean water
to the filter by pouring it through a funnel inserted into the upturned
Plastic Outlet Tube. The water needs to be absorbed into the filter
from the bottom up so that air in the sand layer can be forced up
and out. The process can be slow, so patience is required. Do not
add water through the Diffuser Plate, as this may cause air pockets
or airlocks to form in the filter, reducing its performance. Once the
water level in the filter is restored above the top of the sand, water
can be poured into the top of the filter through the Diffuser Plate.
Note: The biological layer, which accounts for most of the filter’s
bacteria reduction, takes up to 14 days to fully develop.
8. The filter is not intended to be moved after installation. If it must be
moved short distances, it may be lifted by its upper rim.
Keep the filter upright and level and avoid jarring or dropping.
Alternatively, secure lifting straps may be placed under the filter to
facilitate lifting and handling. The filter is heavy when loaded with
filter media and water, weighing about 61 kg (135 pounds).
Appropriate care should be taken to avoid personal injury and
filter damage. If jarring or vibration is anticipated while moving, the
filter media should be removed. Removed filter media may not be
able to be reinstalled properly due to the mixing of
materials and loss.
9. Flow rates should continue at .4-.8 liters (400-800ml) per minute at
full head pressure.
Filter Maintenance
There are 4 maintenance considerations: Biological Layer, Filter
Outlet Tube, Diffuser Plate and Clean Water Container. With routine
maintenance, the filter should last up to 10 years or more.
9
Page 12

Biological Layer – A significant decrease in flow rate means
maintenance is needed. This should not be performed more often than
four times per year.
1. Remove Filter Lid leaving the Diffuser Plate in place.
2. Pour approximately 15 liters of water through the Diffuser Plate until
the water reaches the top rim of the filter.
3. Remove the Diffuser Plate.
4. Using the palm of your hand, lightly touch the very top of the sand
and move your hand in a circular motion 2-3 times. This will cause
captured sediment to become suspended in the water. Do not dig
into the sand. Digging into the sand will cause the biological layer to
become buried, potentially resulting in decreased filter performance,
water discoloration, and odor.
5. Allow sand particles to settle for a few seconds, and then scoop
out most of the water and suspended sediment. Do not disturb the
sand layer. Make sure the top of the sand is flat and level.
6. Replace Diffuser Plate.
7. Repeat steps 2–6 as needed until an acceptable flow rate is
re-established.
8. Wash the Lid and Difuser Plate with soap and water (do not use
chlorine). Rinse with filtered water.
9. Replace Diffuser Plate and Filter Lid.
10. Pour a bucket of water into the filter.
11. Wash your hands with soap and water. This is important since the
biolayer layer on the top of the sand contains pathogenss.
12. If this procedure does not restore normal flow rate after repeated
attempts, remove the top 5–10 cm (2–4 inches) of sand from the
filter and place it in a bucket. Add water, agitate, and wash the
sand. Allow the sand to settle for a few seconds, and then scoop
or pour out most of the water and suspended sediment. Avoid
pouring out or removing any sand. Repeat if necessary. Replace
and level sand in filter. Adjust flow rate as necessary. You will need
to wait 14 days for the biolayer to regrow if you perform this step.
Note 1: This maintenance process should not be confused with
“harrowing.”
Harrowing involves digging the hands/fingers into the sand layer.
Harrowing introduces captured biological material into the
anaerobic sand environment and may cause poor taste, discoloration,
10
Page 13

or odor. The harrowing technique is not approved by Triple Quest or
by Dr. David Manz, the inventor of the BioSand technology. Harrowing causes three problems. The first is temporary destruction of the
biological layer after every cleaning. Restoration can take 5–14 days,
during which time filter effectiveness is compromised. The second
problem is poor taste, discoloration, and odor. The third is eventual
clogging of the filter, which will require removal/cleaning of filter media
or its replacement.
Note 2: The biological layer requires protecting, nurturing, and
maintaining. It is the life of the Hydraid® BioSand Water Filter. It is
important that the biological layer be treated gently. It is a delicate
living system and can be easily damaged or destroyed if not
protected. Damage to the biological layer may reduce the
effectiveness of the filter. A constant 5 cm (2 inch) layer of water
above the sand and the Diffuser Plate prevents incoming water from
disrupting the biological layer.
Actions that harm the biological layer include:
• Pouring water into the filter without the Diffuser Plate
• Allowing the paused water depth to become too shallow
• Putting chlorine into the top of the filter
• Allowing the paused water to evaporate will kill it
• Not using the filter for several days can deplete its nutritional
supply. Continuous use can also overtax the natural system.
• Deep cleaning will cause a portion of the biological layer to be
driven deep below the sand surface where there is little or no
oxygen when the filter is at rest. This causes that portion of the
biological layer to die and decompose, resulting in poor taste,
discoloration, or odor.
Note 3: Filter Media (Underdrain Gravel, Drainage Gravel and Filtration
Sand) does not require replacement under normal use. Additional
Filtration Sand may need to be added over time due to normal settling
and slow loss associated with biological layer maintenance and maintenance of a 5 cm (2 inch) paused water depth. If sand is added, it is
recommended that the top 1–2 cm (1/2–1 inch) of sand and biological
layer be temporarily removed before adding additional sand. The
removed sand and biological layer should be redistributed on top
of the freshly added sand. This will speed recovery and minimize
potential for anaerobic decay of the biological layer.
11
Page 14

Outlet Tube – Growth of mold or algae in the outlet tube means
maintenance is needed. This condition is most prevalent in hot, humid
climates. Periodic cleaning is recommended.
1. Remove Plastic Outlet Tubing by gently pulling tube off of adaptor
or by unscrewing adaptor fitting
2. Soak tube in 1–2 liters of water containing 15 ml (1 Tbsp) chlorine
solution (household bleach) for 30 minutes. Allow the chlorine solution to flow through the tube by tipping it back and forth.
3. Wipe the adapter outlet fitting clean with chlorine solution.
4. Rinse tube with filtered water and reinstall.
Diffuser Plate – Accumulation of dirt, scum, or debris in the
Diffuser Plate means maintenance is needed. Periodic cleaning is recommended.
1. Remove Filter Lid and Diffuser Plate.
2. Using a clean, wet cloth, wipe Diffuser Plate to remove debris.
Note: Do not use chlorine solution. If further cleaning is
necessary, use soapy water and rinse thoroughly before
reinstalling the Diffuser Plate.
3. Replace Filter Lid.
Clean Water Container – The need for periodic maintenance is
variable depending upon household conditions and use patterns.
Weekly sanitation with a chlorine solution is recommended.
1. Fill clean water container with a solution of 2 liters post-filtered,
clean water and 30 ml (2 Tbsp) chlorine solution (bleach). If
chlorine solution is not available, hot, soapy, post-filtered, clean
water can be used.
2. Using a clean cloth, thoroughly wash the inside and then the outside of clean water container with the chlorine solution.
3. Rinse thoroughly with clean post-filtered water and air dry.
Note 1: Never use chlorine solution on the Diffuser Plate or in the
paused water reservoir. It will damage the biological layer.
Note 2: Never plug, cap, or tap the outlet tube. It needs to breathe.
Note 3: Instructions for proper maintenance are illustrated on the inside
of the Filter Lid.
12
Page 15

Troubleshooting
Filter stability – Cause: Filter is not level or is unstable
1. Reposition filter and use wooden shims as necessary.
2. Floor strategies: On a hard earth floor, use a hammer to break up
and level the compacted surface, and then use sand or concrete
pre-mix to create a level base.
• Use dry sand to create a level, even surface.
• Use dry concrete pre-mix and allow it to harden on its own
over time by absorbing moisture from the ground and air.
• Make a simple 30 cm square (12x12 inch) frame of 5x5 cm
(2x2 inches) boards and pour concrete inside to form a pad.
• Place a precast concrete pad on a level sand base.
Filter leaking – Cause: Loose standpipe fitting.
Prevent problems by carefully testing for leaks after installation and
before adding sand to the filter. Gently tap standpipe elbow into the
filter’s PVC outlet fitting. If necessary, PVC glue may be used at this
fitting. The standpipe assembly operates under extremely low water
pressure, so stubborn leaks are unlikely.
Water flow rate too slow (less than .3 liters per minute) – Cause:
Filter blockage in the biological layer or too much Filtration Sand.
1. Confirm that there is about 5 cm (2 inches) of water above the
sand when the filter is at rest.
2. If the filter has been in use, perform routine biological layer
maintenance as illustrated on inside of Filter Lid and as
described in the Filter Maintenance section on page 10.
3. If the filter is being installed, perform the following procedure:
• Pour water into the Diffuser Plate to the top rim of the filter.
• Remove the Diffuser Plate.
• Stir the top 25 cm (10 inches) of sand, to suspend fine
particles.
• Remove the water with suspended sand particles using a
small container or bowl, then retest flow rate.
• Repeat this process one or two times if necessary.
• If unsuccessful, remove most of the Filtration Sand from the
filter and set aside. Put enough clean water back into the filter
to cover 30% of the sand. Add back 30% of the sand and
wash it by vigorously stirring the water. Remove all dirty water
13
Page 16

and save it. Add more clean water to cover 30% more sand.
• Add back another 30% of the sand and wash it to remove
all dust. Remove all dirty water and save it. Add more clean
water to cover the remaining sand.
• Add back the remaining sand and wash it to remove all dust.
Make sure the sand level reaches the line on the inside of the
filter.
• Fill the filter to the rim with clean water and retest the flow
rate. Add the dirty water if the flow rate is fast. Repeat some
or all of the process if the flow rate is too slow. If still too
slow, contact Triple Quest at 616.254.4114.
• This process destroys the biolayer, so you must wait two
weeks for layer to regrow.
Water flow rate too fast (more than .9 liters per minute) – Cause:
Insufficient Filtration Sand or sand not settled.
1. Assure a paused water depth of about 5 cm (2 inches).
2. Rock the filter slightly to gently compact and settle the
Filtration Sand.
3. Add additional Filtration Sand into the top 10–15 cm (4–6 inches)
of the sand layer and pack it down with your hand.
Monitoring
Research shows that when a Hydraid® filter is used properly, it
reduces diarrhea by 47-59%. Proper usage depends on proper installation and monitoring. As part of our shared commitment to high
quality water treatment, the project implementor shall follow-up with
end-users during the first year at one month, three months, and six
months to ensure the filter is being used properly. Critical elements of
successful project implementation and monitoring include the following elements:
1. A facilitator(s) selected from the community who attends a training course and manages a water committee.
2. Project personnel or a trained local water committee that coordinates the filter delivery, installs the filters, educates the families on
use, provides followup up visits, and reports on usage and any
issues.
3. Each family receiving a filter should pay something for the filter
to demonstrate commitment and ownership investment. This
14
Page 17

money can fund a portion of the filter and/or be returned to the
water committee and used for community needs or to compensate the facilitator or committee.
4. See Appendix 1 for sample forms for installation and monitoring
via a household survey.
Frequently Asked Questions
1. Can the Hydraid® BioSand filter kill all viruses and bacteria?
No, it is never correct to say the Hydraid® BioSand filter kills all
viruses and bacteria. The Hydraid® BioSand Water Filter removes
98-9% of viruses and bacteria with a fully developed biolayer and
has been shown to reduce diarrhea by 47-59%.
2. Can the Hydraid® BioSand filter remove parasites?
Yes, typically 98.9% of parasites are removed if the filter is
installed and used correctly. It is important to note that the
majority of parasites are highly resistant to disinfection with
chlorine; therefore, the best way to remove parasites from water
is to filter it.
3. Can the Hydraid® BioSand filter remove earth or dirt
in water?
Yes, the filter removes most solids or turbidity in water. It is de-
signed to handle turbidity in the normal course of operation. If the
water is very dirty (more than 70–100 Units of Turbidity [UOT]),
follow the de-sedimentation processes described in the Usage of
the Filter, Week Three and After section on page 8. If the water
is very, very dirty, an additional, final de-sedimentation process
of pouring pre-filter water through a finely woven fabric, doubled
several times, is recommended to remove the majority of the dirt
before pouring the water into the filter. Additionally, the filter may
need to be cleaned more frequently.
4. Why should I add chlorine to the post-filtered, clean water?
Isn’t filtering alone or chlorination alone enough?
The filter removes most of the harmful parasites, bacteria and
viruses in the water with a fully formed biolayer, but not all. People with deficient immune systems and especially children under
5 years of age, could still become ill. Filtration and chlorination
are complementary. The addition of chlorine to the filtered water
15
Page 18

will kill the remaining bacteria that survive the filter, but, more
importantly, chlorine prevents the recontamination of stored water
that naturally occurs, particularly in higher temperatures.
5. How do I add chlorine to the water?
Add chlorine to the container in which the clean water will be
stored. It is recommended that sufficient chlorine be added to kill
all the bacteria plus a little more to protect the water. It is difficult
to precisely calculate how much chlorine to add to the water
because of variables in the water and the concentration of the
chlorine solution. Typically, it is recommended to add between
2 and 4 drops of chlorine to each liter of water and to allow it to
rest about 30 minutes before consuming. When a slight
detectable flavor and scent are present, then sufficient chlorine
has been added.
IMPORTANT: Do not add chlorine to source water before pouring
it into the filter. Putting chlorine into the top of the filter can kill the
biological layer.
6. How do I find out if the turbidity of the water is less than
70–100 UOT?
Fill a clear plastic 2-liter bottle with water. Place the bottle on
its side on a newspaper or similar printed material. Look down
from above through the water. If you can read the words on the
paper, the water is less than 70–100 UOT and can be poured
directly into the filter. If the words are not readable, see
Question #3.
7. Can the Hydraid® BioSand Water Filter remove industrial
pesticides, polluting agents, salt from seawater or other
chemicals?
The Hydraid® BioSand Water Filter does not remove salt from
seawater. Salt water should never be put into the filter. The filter
does not eliminate contaminants such as industrial pesticides,
polluting agents, fluoride, or heavy metals dissolved in the water.
It is possible to make some modifications to the filter to help
remove such contaminants. Appropriate solutions can only be
determined through testing. The Hydraid® BioSand Water Filter
is not approved by the U.S. Environmental Protection Agency for
drinking water in the United States.
16
Page 19

8. What does a well-installed and well-maintained Hydraid®
BioSand filter look like?
• Location – Inside a structure or home, on a flat level
surface, protected from the elements (dust and wind), birds,
animals, mosquitoes, and insects.
• Filtration Sand – Surface of the sand is flat and level at a
depth of about 5 cm (2 inches) below water level.
• Cover – Clean on the outside and inside. The lid fits well but
is not sealed.
• Diffuser Plate – Clean.
• Free from leaks – No drops of water or wet areas beneath
the filter.
9. What is the best way to use the filter?
• Use the filter daily but not continuously. Daily usage provides
nutrients to the biolayer and keeps the biological layer alive.
• Make sure that the water comes from the best source. If pos-
sible, always use the same source. If the source water is very
turbid, let it rest and allow the sediment to settle for 24 hours,
and then filter it by using a finely woven fabric that has been
doubled several times.
• Slowly pour water from a container through the Diffuser Plate
into the filter, but do not allow the sediment to follow. Reposition the Filter Lid immediately after adding water.
• Make sure that the post-filtered water storage container is
clean. Do not use the same container to collect clean water
as the one being used to collect dirty water
• Add 2 drops of chlorine solution (5.25%) to each liter of
filtered water. For example, if the container holds 20 liters of
water, add 40 drops of chlorine.
• Keep the storage container covered.
• Perform Filter Maintenance periodically.
• Keep animals and children away from the Outlet Tube and
the filtered water.
10. Which water should I use?
The Hydraid® BioSand filter is suitable for filtering microbiologically
contaminated water from any source. It can treat water from
17
Page 20

ponds, lakes, cisterns, reservoirs, rivers, streams, shallow and
deep wells. It can treat rain water, spring water, water from piped
systems, delivered water and grey water. Always use the cleanest water source possible and, if possible, try to always use the
same water source.
11. What are the most common errors made by new users of
the Hydraid® BioSand Water Filter?
• Some new users do not use clean storage containers to collect
the water from the filter or use the same container they used to
collect the source water, causing recontamination of the water.
• Some new users perform the biological layer maintenance
procedure too frequently. Too frequent biological layer
maintenance reduces the effectiveness of the water
filtration system.
• Some new users want to add a tap to the Outlet Tube, which
keeps the water level too high and prevents oxygen from
reaching the biological layer.
• Some new users add chlorine to the water before filtering
instead of adding it to the post-filtered, clean water. The
addition of chlorine directly into the filter can kill the biological
layer and will reduce the effectiveness of the filter.
• Some new users do not allow the dirt in the source water to
settle before pouring the water into the filter.
• Some new users place the filter outside the home instead
of inside the home. This increases the possibility of
recontamination of the filtered water.
• Some new users do not use the filtered water to bathe, to
wash their clothes, to cook, and to clean their food preparation
surfaces and utensils. They only use it for drinking.
• Some new users use a large spoon or jar to remove filtered water
from the storage container. This can cause recontamination.
Filtered, clean water must be poured from the storage
container into a receptacle for use.
12. How can the biological layer be seen?
The biological layer is not visible. At most, a little discoloration
may be noted on the surface of the sand.
18
Page 21

13. Can anything dissolve from the filter and contaminate the
water, such as the plastic, sand or the biological layer?
No, the plastic, sand and biological layer cannot contaminate
the water. Sand originating from a river, stream, lake or upland
source that is not prepared properly before being installed could
contain contaminants that could contaminate the water. For
information on a local sand source, please contact
Triple Quest at 616.254.4114.
14. How is the filtered water stored?
The filtered, clean water should be stored in a clean, covered
container from which the water can be poured out or released
through a spigot. Water should never be dipped from the
container. The post-filtered water should be disinfected with
chlorine to prevent recontamination while stored. Minimize water
storage time to prevent recontamination.
15. What should be done if the water is flowing very slowly?
Refer to Filter Maintenance on page 10.
16. How often do I need to replace the sand?
The sand does not need to be replaced. It is cleaned using the
biological layer maintenance process detailed in Filter
Maintenance on page 10.
17. How much water should remain over the sand?
When the water is paused (no water flowing out of the filter),
there should be about 5 cm (2 in) of water above the sand. This
allows oxygen in the air and in the water to permeate the biological layer. If there is much less than 5 cm, add a little water to
compensate for evaporation. After adding the water, measure
it again. If there is less than 5 cm, remove a little sand. If there
is more than 5 cm, a small amount of approved sand should
be added using the adding sand process detailed in Note 3 on
page 11. Use only approved sand – i.e., sand supplied directly
from Triple Quest or an approved local sand source.
NOTE: Removing sand can disturb the biological layer and thus it
would need to be re-established.
18. How many times per day may I put water through
19
Page 22

the filter?
Ideally, there should be a 1–4 hour pause period between filter-
ing. Generally, the longer the pause, the better the quality up to 48
hours after which point pausing may actually deplete the nutritional
supply of the biolayer. In continuous use situations, chlorination of
post-filtered water is strongly recommended.
19. What do I do if my filter is dry?
This can happen if the filter is not used during a long period or
if it has a leak. The water level must be re-established by
pouring water through a funnel inserted into the upturned
transparent hose. Refer to Protect the biological layer on
page 9. If this does not work and there is a leak, contact Triple
Quest at 616.254.4114 for a replacement filter.
20. What do I do if my filter begins to smell or if the water becomes discolored or poor tasting?
The filtered water may have a bad taste and smell for different
reasons. First, does the source water smell and taste bad? If
the source water smells and tastes bad, it may be that the filter
is not able to remove certain contaminants that are in the water.
The filtered water may also smell and taste bad if the standing
water level is too high. The standing water level should be 5 cm (2
inches) above the sand. If the water level is too high, then oxygen
from the air cannot pass through the water to the biolayer. Bacteria grow in the biolayer that do not require oxygen. These bacteria
make the water smell and taste bad. A bad taste and smell might
also be from improper filter maintenance or if the filter has not
been used in some time. Refer to Filter Maintenance on page 10
to correct the problem and run water through it regularly to restart
the biolayer.
WARRANTY
For more information, please refer to www.Hydraid.org/resources.
1. Filter Installation Worksheet
2. Follow-up Worksheet
20
Page 23
Filter Installation Worksheet
Date: _______/_______/________ Money paid : ___________________
1. Community: _________________________________________________________
2. Household number (if available):_______________ Zip Tie Number:___________
3. Name of facilitator present during installation:
____________________________________________________________________
4. Name of the household member present during installation:
____________________________________________________________________
5. Who is the person responsible for caring for the filter?
____________________________________________________________________
Observation:
6. Did the user receive the following?
a. Brochure Yes No
b. Explanation of how to use Yes No
c. Lid Yes No
b. Diffuser Plate Yes No
7. Where was the filter installed in the home?
8. Flow rate measure: ______________________ml per minute
9. Please note the age and sex of people who live in the household:
Sex: >=5 years old <5 years old Tot al
Male
Female
Other observations:
21
Page 24
Follow-Up Worksheet
1. Date: _______/_______/________ Time at start of interview: ______________
2. Household number (if available):_______________ Zip Tie Number:___________
3. Name of interviewer: __________________________________________________
4. Name of the person interviewed: _______________________________________
Nickname: __________________________________________________________
5. Please note the age and sex of people who live in the household:
Sex: >=5 years old <5 years old Tot al
Male
Female
6. Were you present the day the filter was installed? Yes No
7. Were you the person who received training on how to use the filter?
Yes, I am No, I am not
8. Have you received a follow-up visit from your community facilitator who helped
install the filter? Yes _____________ #of visits No, I have not
9. Are you still using the filter? Yes, I am No, I am not
If not, why? (Don’t read the options, circle all that they say)
a) The filter broke and was unable to be fixed
b) Did not like using it
c) Felt it was not necessary
d) Felt it was not improving the quality of your water
e) Found it to be too time consuming
f) It is no longer here in this household
g) Found a better or more trusted source of water
If the BSF is no longer in this household, please describe where it went or is?
If not using the BSF, what is your main source of drinking water?
Note: For households not using the BSF, this concludes the survey.
For households using the BSF, continue with question #10 until the end
of the survey.
22
Page 25

10. Have you sought training or information for the BSF outside of that which was
provided to you? Yes No (if no, please go to question 12)
11. If you received additional training, from whom did you receive the training?
(please read the options and circle all that apply)
a) A family member
b) A community member
c) The community facilitator trained in BSF
d) An organization
e) Other, please specify: _____________________________________
12. Have you had to maintain the filter to restore the flow-rate in the BSF since you
had it? Yes (if yes, go to 13) No (if no, go to 16)
13. How many times have you maintained the filter in the BSF? (Put N/A if never
cleaned) _________________
14. When was the last time you performed the maintenance procedure to restore the
flow rate? (N/A if never) Day:__________/Month:_____________/Year:__________
15. Who usually does the process of maintaining the filter?
(1) Interviewee
(2) Other, please specify: _____________________________________
(3) N/A
16. Do you clean the filter spout? Yes No (if no, go to 18)
17. How often do you clean the filter spout?
18. How many times do you use BSF each week?_______________________
19. What is the main drinking water source you use in the BSF?
20. Do you use the BSF-treated water to drink (please read and select only one)?
(1) Yes, always
(2) Yes, sometimes
(3) Yes, not very often
(4) No
21. When was the last time you filtered water (list number of days ago)?__________
22. Do you use the same container to collect untreated water and to store BSF
treated water? Yes No
23
Page 26

23. What container do you use to store BSF treated water (ask to see the
container)?
a) A narrow neck container with a lid
b) A narrow neck container with no lid
c) A wide neck container with a lid
d) A wide neck container with no lid
e) Other specify: _____________________________________
24. What do you use treated water for (please read options and circle all that apply)?
a) Drinking
b) Washing vegetables, washing food, and cooking
c) Hand washing
d) Washing dishes and kitchen ware
e) Bathing
f ) Other, please specify: ______________________________
25. Since you have had the filter, have you stopped treating, boiling, or buying water?
a) Yes (if yes, go to 26)
b) No (if no, go to 27)
c) Didn’t treat or buy before
26. If yes, what did you do before?
a) Boil water
b) Add bleach
c) Buy bottled water
d) Filter through cloth
e) Other_________________________
f ) Don’t know
g) N/A
27. If the filter broke, do you know where to go to find BSF spare parts or do you
know someone who can help you find BSF spare parts in this area?
a) Yes, I know who to ask or where I can buy
Where or who __________________________________________________
b) No, I don’t know who to ask or where I can buy
28. Have you had any problems with the BSF?
Yes (go to 29) No (go to 30)
29. If yes, what was the problem?
a) Slow or no flow
b) The diffuser plate broke
c) The top of the filter broke
d) The filter was leaking
e) Other _________________________________________________________
f ) N/A
24
Page 27

30. Who do you ask for assistance to fix the BSF (Please do not read answers but
select all that apply)?
a) Community facilitator
b) Community water committee
c) Neighbor
d) Repair myself
e) Do not repair
f ) Other: ______________________________
Note: The following steps are observations.
31. Does the filter have a top? Yes No
32. Is the outlet hose free of restrictions? (nothing attached)
Yes No. Specify: ___________________________________________
33. Is there a diffuser plate? Yes No
34. Are there any visible cracks or leaks in the filter body, diffuser plate or outlet
tubing? Yes No
35. Measure the flow rate: ________________ ml per minute
36. Time at end of interview: ________________
Other observations:
Thank the participant for his or her time.
25
Page 28
3400 Innovation Court SE
Grand Rapids, MI 49512
1.616.254.4114
www.hydraid.org
©2011 Triple Quest. All Rights Reserved.
 Loading...