

Hydraflow Industries Limited EZIDRI ULTRA FD1000, EZIDRI SNACKMAKER FD500, EZIDRI CLASSIC FD300 User Manual

TM
ULTRA FD1000 - SNACKMAKER FD500 - CLASSIC FD300
HOME FOOD DRIER
C 0 N T E N T S PAGE
Introduction 2
Features 2
Specifications 4
Important Safeguards 6
Care of your Ezidri 7
Using your Ezidri 7
Helpful Basic Guidelines 8
Drying Fruits 10
Drying Table for Fruits 12
Drying Roll-ups 16
Drying Table for Roll-ups 18
Drying Vegetables 20
Drying Table for Vegetables 22
Drying Meats & Fish 26
Drying Herbs & Spices 29
Drying Flowers 31
Recipes 34
Warranty 49
YDRAFLOW INDUSTRIES LIMITED

2
INTRODUCTION
With over 25 years of Dehydrator manufacturing experience Hydraflow Industries
Limited, New Zealand have incorporated 21st century technology to lead the world
in the production of the EZIDRI Food Dryers. With the Hydraflow Seal of Quality,
the EZIDRI range of Food Driers provide outstanding reliability with an accurate
heated airflow system to ensure the highest standard of naturally delicious and
nutritious dried food without the use of preservatives or additives.
Certified to International electrical and food grade standards, EZIDRI is a
world leading brand of Food Dehydrators.
The unique heated airflow pattern, combined with microprocessors and integrated
PLD circuitry, provide accurate and an even heated airflow temperature,
ensuring fast, even drying with minimal electricity consumption and exceptional
expandability, EZIDRI Food Driers provide years of reliable and cost effective
operation backed by Internationally acclaimed after sales service.
FEATURES
EZIDRI ULTRA FD1000 – The Ultimate Food Drier
Complete with base and 5 trays, with 1 Mesh Sheet and 1 Solid Sheet, Inst/Recipe
Book. Designed to take 15 Kgs approx of wet produce, the Ultra is Expandable up
to 30 trays for Herbs & Flower Drying, 24 trays for Fruit, Vegetables and Beef Jerky,
15 trays for Fruit Puree roll-ups, Meals and Soups.
Temperature control is by manual variable setting, ranging from 35�C – 63�C�C – 63�C – 63�C�C
EZIDRI SNACKMAKER FD500 – Family Food Drier
Complete with base and 5 trays, with 1 Mesh Sheet and 1 Solid Sheet,
Inst/Recipe Book. Expandable up to 15 trays for Herbs and Flowers, 12 trays for
Fruits & Vegetables and Beef Jerky, 10 Trays for Fruit Puree Roll-ups, Meals and
Soups.
Temperature control is soft touch, 3 settings, Low - Medium – High
EZIDRI CLASSIC FD300 – Everyday Food Drier
Complete with base and 4 trays, with 1 Mesh Sheet and 1 Solid Sheet
Inst/Recipe Book. Designed as a general food drier for smaller amounts of
produce, snacks etc. Expandable up to 10 trays.
No temperature control.
Factory pre-set to have an average drying temperature of 50 – 55�C�C
TRAYS: One layer of sliced fruit or vegetables can be placed directly onto each
tray. The trays are then placed on the base with the lid on top.
MESH SHEET. The mesh sheet is a detachable plastic mat insert which flexes
for easy removal of the toughest dried-on food and also used when drying small
produce which may slip through the spokes of the tray.
SOLID SHEET. The solid sheet (lightly oiled first) is used when making roll-ups
and for drying soups and meals. It is also used on the bottom tray when drying
marinated meats for beef jerky or when drying flowers and herbs.
SPACER RINGS: These rings provide extra height when drying larger items, such
as bunches of herbs, flower heads or stemmed flowers. They can be purchased
from your local stockist or national distributor.
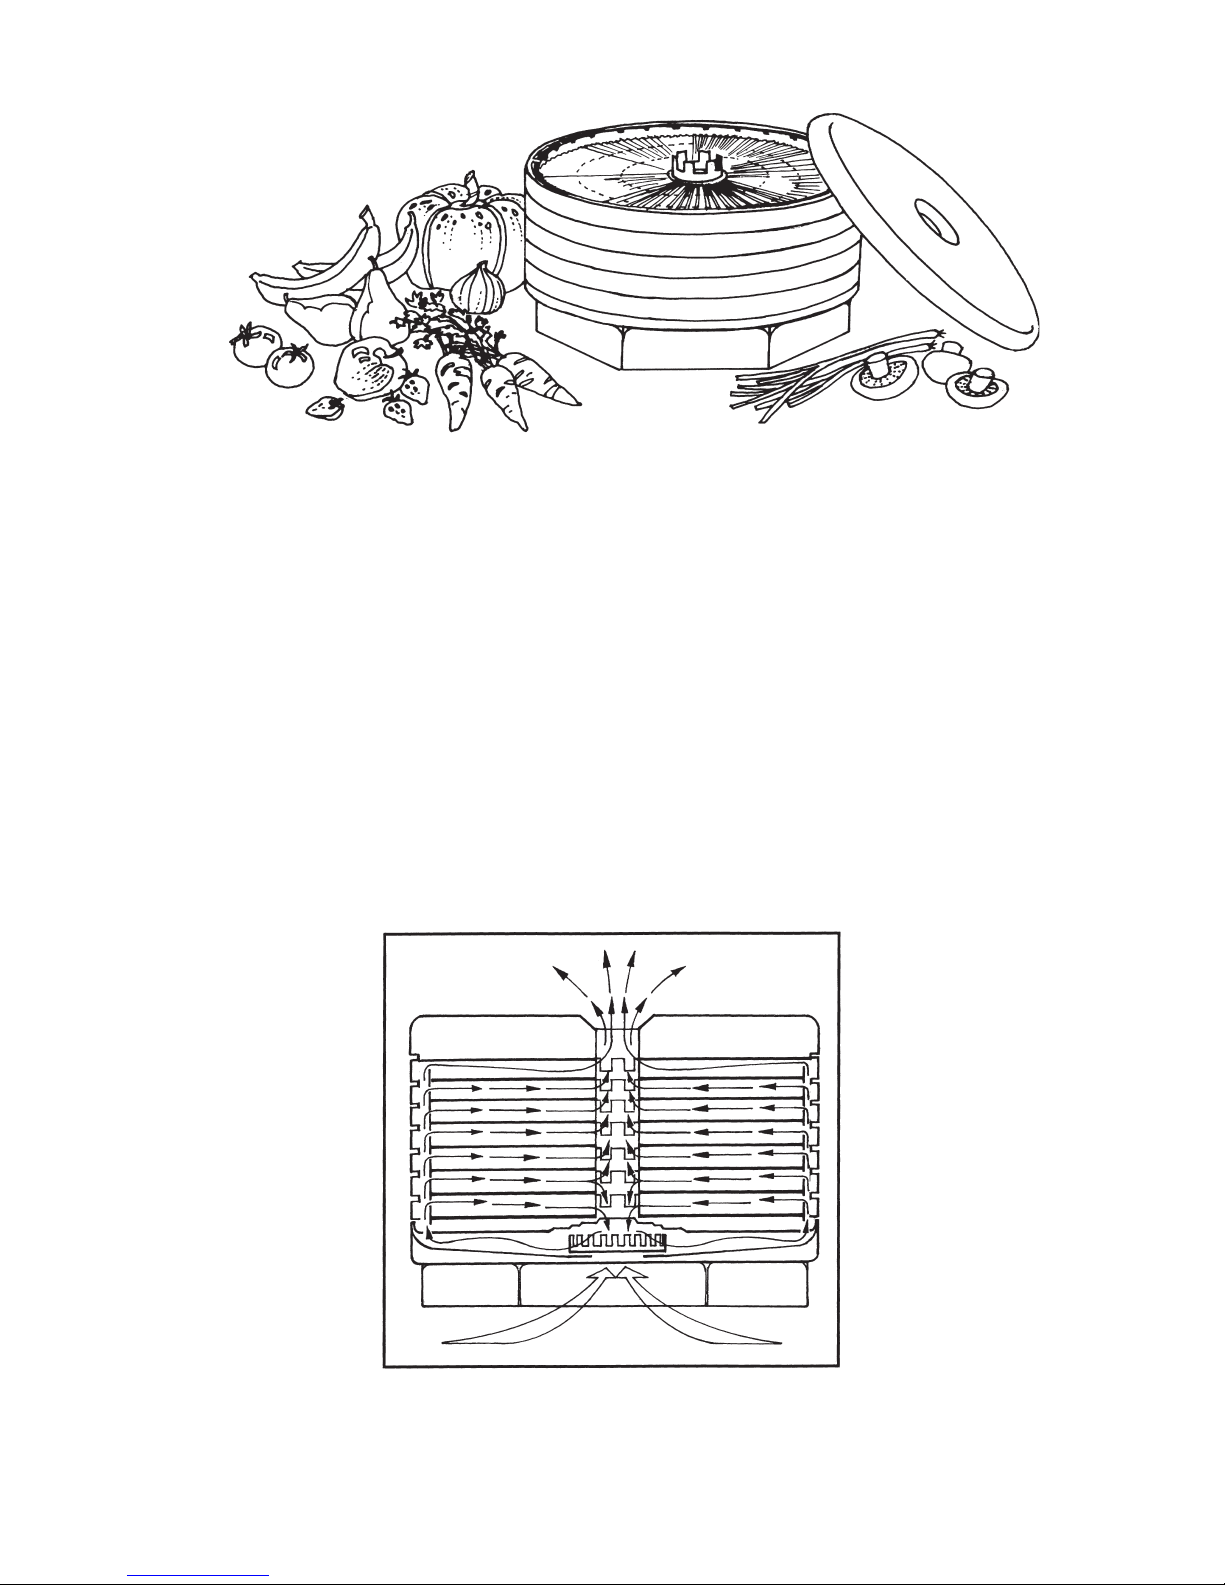
THE EZIDRI HEATED AIRFLOW PATTERN

4
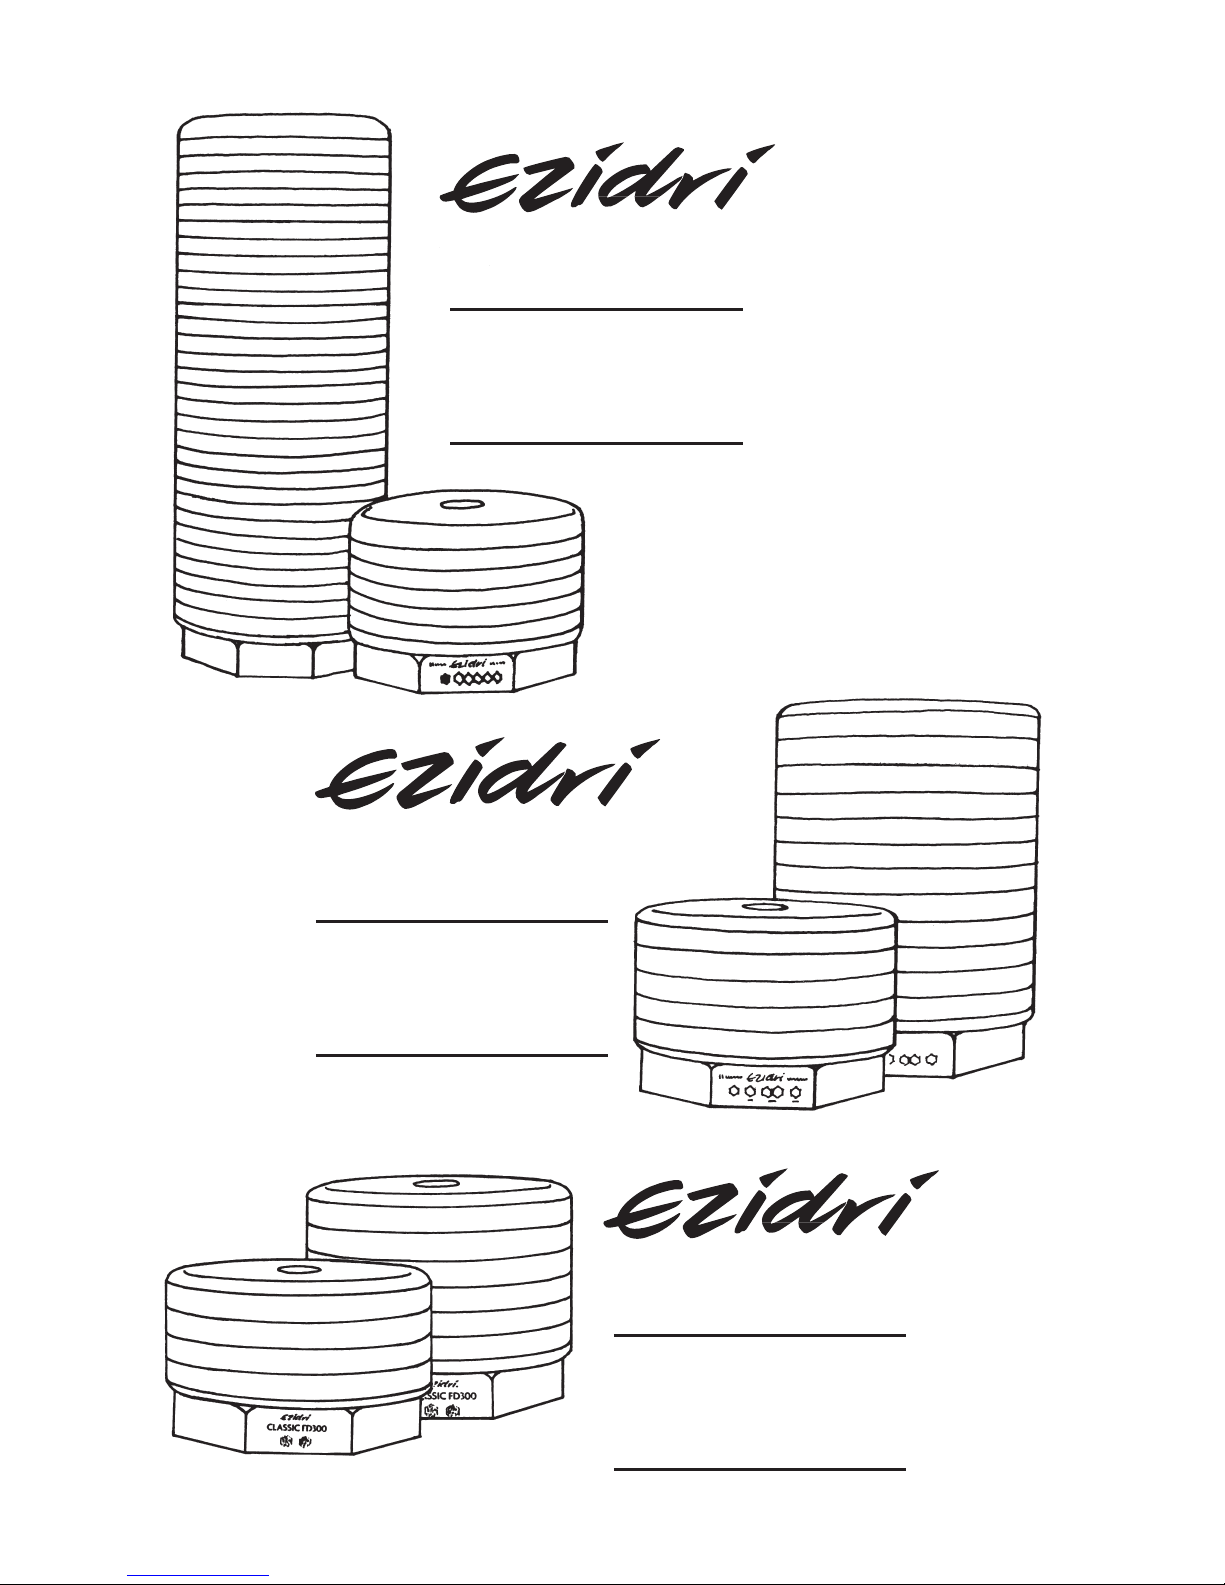
S N A C K M A K E R
F D 5 0 0
5 TRAYS
ExpANDAbLE
TO 15
TM
U L T R A F D 1 0 0 0
5 TRAYS
ExpANDAbLE
TO 30
TM
C L A S S I C F D 3 0 0
4 TRAYS
ExpANDAbLE
TO 10
TM

6
IMpORTANT SAFEGUARDS
The EZIDRI range of Food Driers have been manufactured to the highest standards. As with
all household appliances care should be taken to ensure units remain electrically safe and the
following instructions should be noted.
PLEASE READ ALL INSTRUCTIONS
1. When the unit is first switched on, ensure that the fan in the centre of the base is
rotating. This will be apparent by both sight and sound. If not, unplug the EZIDRI
immediately and return it to your local retailer.
2. The outer surface of the appliance may get hot when it is operating
3. To protect against electrical hazards:
(a) Do not immerse the Ezidri base, cord or plug in water or other liquid.
(b) Do not pour or spill water or liquid down the opening at the top or any other
opening.
(c) When preparing roll-ups or purees, always fill the solid sheet on an individual
tray off the EZIDRI base and then carefully transfer the tray to the unit.
(d) When preparing roll-ups, ensure that the puree is of such a heavy
consistency, that it will not spill over the solid sheet. The consistency should
be such that a spatula is required to spread the puree evenly.
(e) Do not move the unit whilst the produce is being dried.
(f) Switch off the power and remove the plug before cleaning. (see ‘Care of your
EZIDRI’)
(g) The appliance is not intended to be operated by means of an external timer or
separate remote- control.
4. Unplug the unit from the electrical outlet when not in use.
5. Do not operate the appliance if it malfunctions or has been damaged in
any manner. Return the appliance or send to an authorised service agent for
examination, repair or adjustment.
6. If the cord or plug is damaged, it must be replaced by an authorised service
agent.
7. Do not use the EZIDRI or accessories for any other purpose than that for which
the appliance has been designed for – i.e.: food drying.
8. Do not use accessory attachments not recommended by the manufacturer.
9. Avoid using sharp instruments that could damage the EZIDRI.
10. Do not use out doors.
11. Do not let cord hang over edge of table or counter, or touch hot surfaces.
12. Do not place on or near a hot gas or electric burner, or in a heated oven.
13. Always refer to the instruction Book supplied and if in doubt contact your
supplier or national distributor for advice.
14. This appliance is not intended for use by persons (including children)
with reduced physical, sensory or mental capabilities or lack of experience and
knowledge, unless they have been given supervision or instruction concerning
use of the appliance by a person responsible for their safety.

CARE OF YOUR EZIDRI
TOP: Wipe with a soft, damp cloth after removing from the unit. Do not use
abrasive pads or sharp utensils.
TRAYS & MESH SHEETS: Soak in warm water with a mild detergent. A soft
bristled brush will loosen dried-on food particles. A weak solution of bleach and
water will whiten badly stained mesh sheets.
SOLID SHEETS: Wash with warm water or wipe over with paper towel. Do not use
detergent.
BASE: DO NOT PUT BASE, CORD OR PLUG IN WATER: Wipe with a soft, damp
cloth and do not use abrasive pads or sharp utensils.
DO NOT USE: any solvents on any part of the EZIDRI as these may damage the
unit.
USING YOUR EZIDRI
1 Remove trays which are located between the top and base of your EZIDRI.
2 Plug cord into electrical outlet and switch on the power. Check that the fan is
rotating and allow the unit to warm up for a few minutes while preparing the
first tray of food.
3 Select the temperature recommended for the product you are drying.
4 Place the food on the trays with pieces not quite touching. Do not spray trays
with vegetable oils or fat as this may cause the trays to crack.
5 Use a mesh sheet on a tray when drying herbs and flowers or items which
can slip through the spokes in the tray. The flexibility of the mesh sheet
makes it easy to remove dried-on fruit and vegetables, like bananas and
tomatoes.
6 Use a solid sheet, lightly oiled with vegetable oil, on a tray when drying
purées for roll-ups or soups and meals. Use a paper towel to wipe the solid
sheet if excess fat accumulates on the solid sheet. Place a solid sheet on the
bottom tray nearest the base when drying herbs and flowers.
7 Always fill the trays away from the drier and then carefully transfer the tray to
the base of the unit, particularly when making roll-ups, as the purée could
spill into the base.
8 Place the unit in a WELL VENTILATED AREA.
15. Correct Disposal of this product :
This marking indicates that this product should not be disposed of with
other Household wastes throughout the EU. To prevent possible harm to
the environment or human health from uncontrolled waste disposal, recycle
it responsibly to promote the sustainable reuse of material resources.
To return your used device, please use the return and collection systems or
contact the retailer where the product was purchased. They can take this
product for environmental safe recycling.

8
HELpFUL bASIC GUIDELINES
POWER FAILURE: In the event of power failure, the Ultra FD1000 will remain on
the set temperature, but the Snackmaker must be reset to the desired temperature
setting.
The more you dry the more proficient you will become. You will notice that there
are many factors, which affect the drying process, such as humidity, altitude,
preparation and the quality of the fresh produce.
PREPARATION: Choose mature, ripe produce and prepare it quickly. Do not leave
sliced produce for long periods before placing in the drier as this affects the quality
of the finished product. Where possible, cut fruit and vegetables into the same
number of pieces so you will know how many slices to put into a particular recipe.
To ensure that the produce will dry at the same rate, cut produce into uniform
slices or circles 5mm thick or use a food processor or slicer.
OPTIONAL PRE-TREATMENT: Pre-treatment does prevent oxidization (the
darkening of light-coloured foods like apples) and prevents loss of essential
vitamins. Natural dips like citrus fruit juices can be used as an alternative to citric
and ascorbic acid.
DRYING: Always operate your drier in a well-ventilated position. Pre-heating the
unit before commencing drying is recommended. Dry the same type of produce
together and do not add fresh product to partially dried as this will increase the
drying time for both products. Spread one layer of food only on each tray.
DRYNESS TEST: If possible, check your produce near the end of the drying
cycle as over-dried food loses nutritional value and taste and is more difficult to
reconstitute. A cooled piece of produce should be torn in half and squeezed. If no
moisture is apparent, it is dry enough to be stored.
Generally, fruit and roll-ups are pliable and leathery, although if honey has been
added they may still be slightly sticky. “Vegetables will be either tough or crisp and
beef jerky and fish will be quite tough and will bend.
9 HYGIENE
■ Wash hands thoroughly before handling food.
■ Detergent, bleach and water will ensure utensils, containers and cutting
surfaces are thoroughly cleaned.
■ Prepare food quickly for drying and store excess supplies in refrigerator
until ready to be used.
■ If leaving dried food to cool in the drier before storing, cover the centre
outlet to stop flies and insects entering.
■ Always store dried foods in air-tight containers in a cool, dark place.

PACKAGING: Always cool your dried product completely before packaging it in airtight,
moisture-proof containers, away from insects and possible reconstitution caused by
humidity.
■ Vacuum packaging bags or glass jars are ideal for long term storage.
■ Glass containers previously used for food storage are most commonly used.
■ Bag sealers can also be used but always squeeze the bag to remove as
much air as possible before sealing.
■ Ordinary plastic bags are not airtight so they are not moisture proof.
STORAGE: Dried food should always be stored in a COOL, DARK, DRY LOCATION.
For every 10�C drop in storage temperature, the shelf life of dried food increases up
to four times. The ideal storage place is your refrigerator or deep freeze for such low
acid foods as vegetables, meats and fish. Any possibility of insect infestation can be
overcome by placing your packages of dried produce in the deep freeze for up to 48
hours.
RECONSTITUTION: Do not add too much water when reconstituting dried food as
nutritional loss will result. The amount of water dried food will absorb and the time it
takes to complete reconstitution varies according to the size of the food and its degree
of dryness. If the liquid is absorbed quickly and the food still looks shrivelled, add a little
more water until the food will hold no more. Boiling water hastens reconstitution.
Although a lot of fruit is eaten dry as a snack, fruit for stewing and pie recipes is
reconstituted by adding one cup of fruit to one cup of water. Allow to stand until reconstituted and then proceed with the recipe.
A general rule for reconstituting vegetables is to add 11/2 cups of water to each cup of
vegetables. For stews and casseroles the vegetables can be placed directly into stock
to reconstitute during the cooking process but remember to add extra stock to allow
the dried vegetables to reconstitute fully.
EZIDRI ULTRA FD1000 SNACKMAKER CLASSIC
Herbs & Spices 35-40�C Low Not rec.
Vegetables & Flowers 50�C Medium On
Fruit & Fruit Roll-ups 55�C Medium On
Meat & Meals 60�C High Not rec.
DRYING TEMpERATURE CHART
10
DRYING FRUITS
DRYING TEMPERATURES: ULTRA FD1000 55°C
SNACKMAKER FD500 Medium
CLASSIC FD300
Pre-set Temp
AVERAGE DRYING TIMES: 10 to 14 hours
Different fruits take varying times to dry. Drying times can be affected by the
thickness of the slices, humidity, altitude and moisture content of the fruits.
Always place the drier in a good air flow so that the moist air being extracted from
the produce is not being re-used and causing extra humidity.
For high quality dried fruits, choose firm, ripe fruits, when the sugar and nutritional
content is high. Over-ripe fruit is used for roll-ups.
Process fruit quickly; prepare sufficient produce for one tray at a time. Then place it
on the pre-heated drier and prepare the next.
PREPARATION:
Wash fruit well, remove blemishes, pips and stems. Pat dry with paper towels.
Generally fruit is sliced 5mm thick with a sharp knife, food processor, or apple peeler/slicer/corer. Uniform sized slices result in even drying. Apples, pears, citrus fruit
and stone fruit can be dried without peeling, if desired.
SHOULD FRUITS BE PRE-TREATED?
THIS IS NOT NECESSARY FOR MOST FRUITS WHICH ARE SIMPLY SLICED
AND DRIED. However, pre-treatment does help to keep fruit a bright colour and
prevents loss of vitamins A and C.
Natural pre-dips like citrus or pineapple juice reduce browning, which mainly
occurs in apples. Slice fruit directly into juice and remove after five minutes, drain
thoroughly and place on trays. Stone fruit (Apricots, Plums etc), Kiwifruit and
Tamarillo can be treated by preparing a solution of one part of honey dissolved in
two parts of water, heat the solution to ensure honey is totally dissolved, then allow
it to completely cool and add the sliced fruit and soak overnight before drying.
This will help to retain the colour and give a lightly glaced fruit which is delicious.

Ascorbic Acid/Citrus Acid: Dissolve 15 mls (1 tbs) in two litres of water. Soak fruit
for two minutes to prevent browning, drain thoroughly and place on trays.
POPPING BACKS:
Popping the backs (inside-out) of apricot and plum halves and placing the fruit skin
down on the tray speeds drying time. Larger fruit should be cut in quarters or 5mm
slices for faster drying.
CHECKING:
If drying whole fruits with a natural wax coating like grapes and blueberries it is
advisable to dip them into boiling water for three minutes. This crazes the skin and
makes them more porous as small lines allow moisture to escape thus speeding
up drying time. Be sure to dip fruit in ice cold water after dipping in boiling water.
Large grapes can be halved and placed skin down on trays without checking.
FILLING TRAYS:
Place food slices evenly in single layers on each tray and do not overlap as these
areas will take longer to dry. Each tray will hold approx. 1/2 kilo of “wet” fruit.
DRYNESS TEST.
Most fruit will be pliable or leathery without damp spots when properly dried. Tear
a cooled piece of fruit in half and check by squeezing to see if there is any moisture
left inside.
RECONSTITUTION:
Allow one cup of water to one cup of fruit. Boiling water hastens reconstitution.
Let stand until reconstituted and then proceed with the recipe. Reconstitute in fruit
juice for fruit salad or directly into yoghurt.
HUMIDITY:
In very Humid conditions it is recommended to set the Snackmaker to high and the
Ultra FD1000 to max�C to compensate for the high moisture content.

12
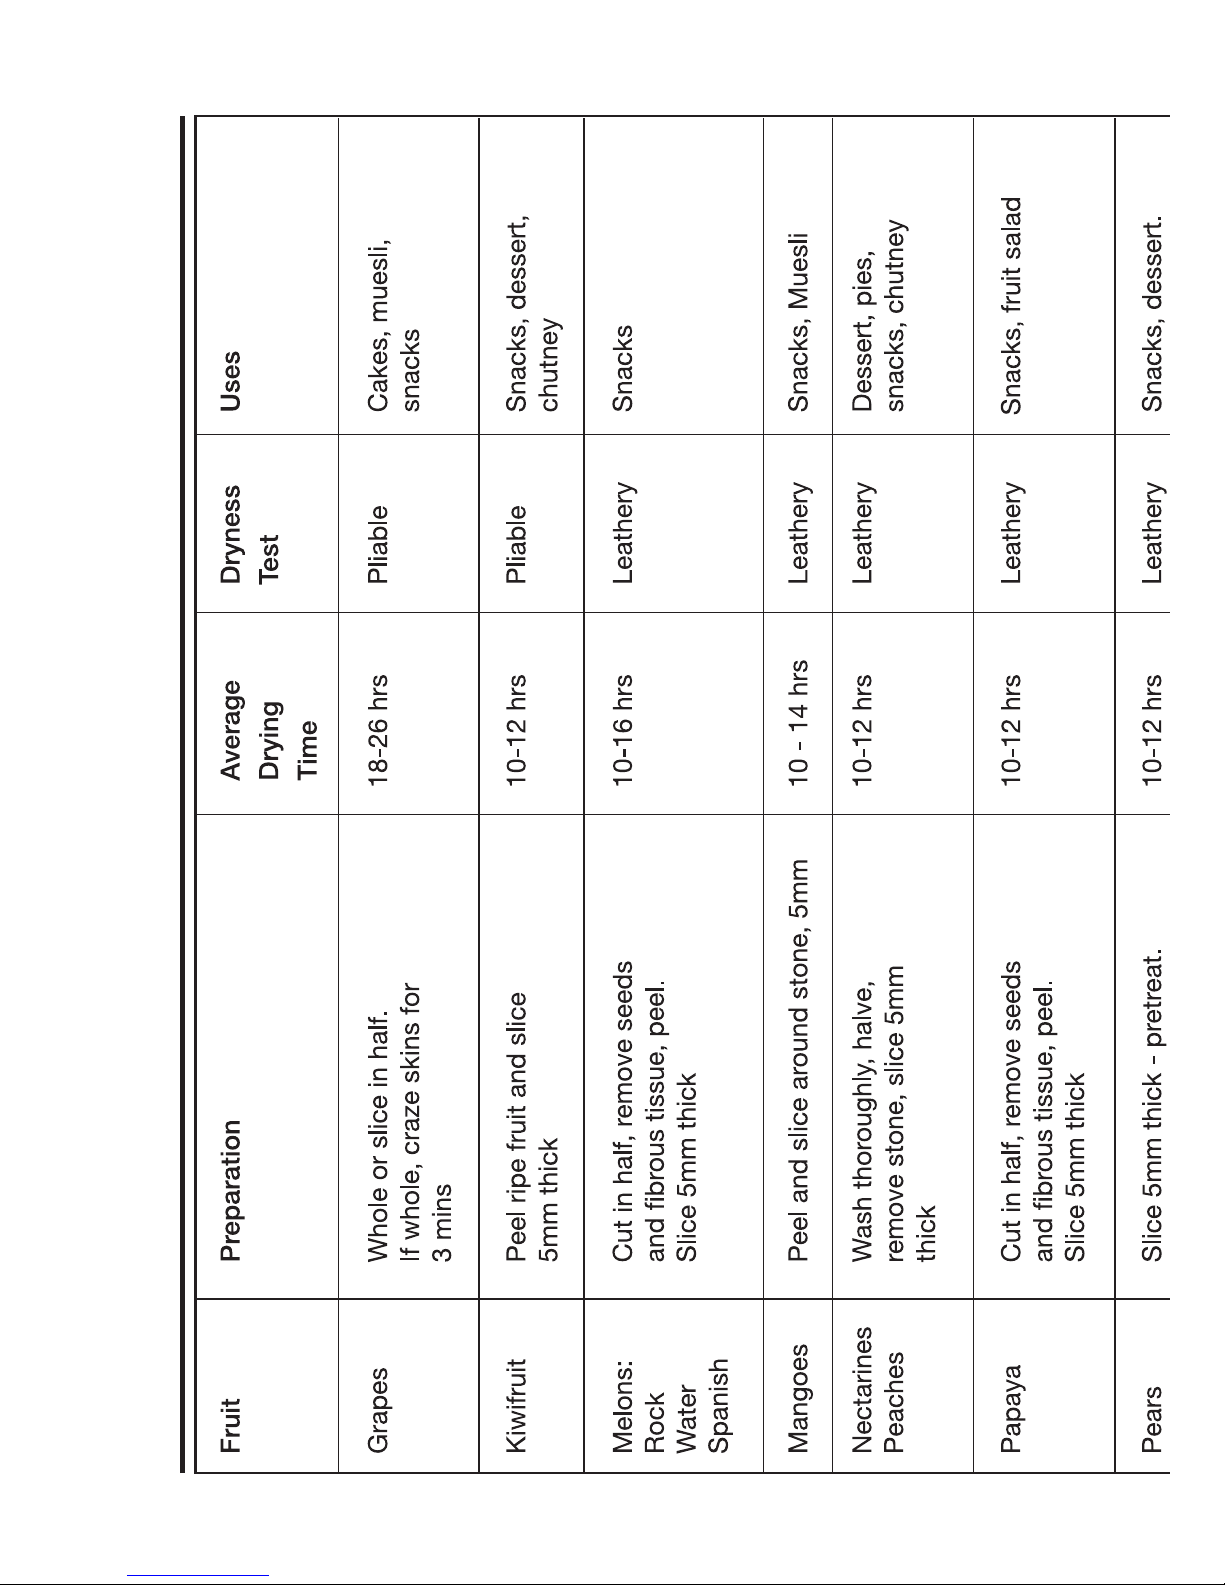
Fruit Preparation Average Dryness Uses
Drying Test
Time
Apples Peel (if desired), 8-12 hrs Pliable Snacks, pies, fritters
slice, core. Pretreat - optional
Apricots Slice firm, ripe fruit or cut in 12-24 hrs Leathery Snacks, muesli,
half, stone, pop back. or meat dishes,
Pretreat or soak overnight pliable desserts
in honey and water - optional
Bananas Slice ripe bananas 5mm 12-16 hrs Leathery Snacks, muesli,
thick or divide lengthwise. banana cake
Pretreat in citrus juice -
optional
Blue- Wash and remove stems. 12-16 hrs Leathery Ice-cream,
berries Blanch for 3 mins; place in yoghurt, muesli,
cold water pies, muffins
Other small
berries Suitable for roll-ups only
Cherries Wash, remove stems, pit, 14-24 hrs Leathery Pies, ice-cream,
or cut in half cakes,snacks
Citrus: Slice 3mm thick. Peel can 14-18 hrs Crisp or Snacks, powder,
Oranges be dried separately if leathery cakes, desserts,
Tangelos desired chocolates
Mandarins
Drying Temperatures
ULTRA FD1000 55°C
SNACKMAKER FD500 MEDIUM
CLASSIC FD300 Pre-set Temp
DRYING TAbLE FOR FRUITS
NOTE: Very humid conditions will require higher
temperature settings: ULTRA FD1000 - Max�C
Snackmaker FD500 - High
Note: Drying times shown are guidelines only.

Other small
berries Suitable for roll-ups only
Cherries Wash, remove stems, pit, 14-24 hrs Leathery Pies, ice-cream,
or cut in half cakes,snacks
Citrus: Slice 3mm thick. Peel can 14-18 hrs Crisp or Snacks, powder,
Oranges be dried separately if leathery cakes, desserts,
Tangelos desired chocolates
Mandarins
Lemons
Coconut Drain off liquid and gouge 10-14 hrs Crisp or Cakes, icings,
out flesh. Remove dark leathery muesli, curries
outer skin and grate flesh desserts
or slice 5mm thick
Feijoas Cut fruit in half, scoop out 10-14 hrs Leathery Snacks, desserts,
flesh avoiding grittiness. chocolates
Slice 5mm thick
Figs Slice, halve or quarter ripe 10-24 hrs Leathery Stewed, puddings,
figs. Simmer in honey or or cakes,snacks
sugar to make more pliable
pliable - optional
14
DRYING TAbLE FOR FRUITS (continued)

 Loading...