

Page 1
REPLACEMENT BRUSH HEADS
Hydrabrush has 5 brush head styles for your custom needs.
Visit www.hydrabrush.com/heads or call 1-888-813-6631
CUSTOMER SERVICE
If you have any questions or comments about HydraBrush, please
contact customer service at 1-888-813-6631 or visit the FAQ on our
website at www.hydrabrush.com
CONTACT
HydraBrush, Inc.
701 S Andreasen Dr, Suite C
Escondido, CA 92029
www.hydrabrush.com
[email protected]
1.888.813.6631
Please register your HydraBrush at:
www.hydrabrush.com/register
Benefits of Registration:
1. Automatic notification of future promotions
2. Assurance of warranty registration
WARRANTY
The 1 year warranty covers failures due to defects in materials and workmanship, and DOES
NOT cover brush heads, normal wear and tear, batteries, water damage, costmetic damage,
damages incurre d in shipment, or failures which are caused by products not supplied by
HydraBrush, or failures which result from accidents, misuse, abuse, neglect, mishandling,
misapplicati on, alteration, imp roper maintenanc e, power line surge, lightening damage,
modification, or service by anyone other than an Authorized Service Center, or damage due
to acts of nature. Warranty is void if HydraBrush has corro sion du e to water entering the
battery compartment. If repair is needed during the warranty period, the purchaser will be
required to furnish a sales receipt/proof of purchase. Customer will be charged for the repair
of any unit received without such proof of purchase.
For warranty/repair, call: 1-888-813-6631 or email: [email protected].
www.hydrabrush.com
1.888.813.6631
Keep for future reference
User Manual
QUICK START
Model 108A-R
Printed on Recycled Paper.
Page 2
TROUBLESHOOTING FAQ
Problem: Brush head plastic hits my teeth.
Solution: You are not using the brush according to instructions.
Refer to “How It Works” DVD and Brushing Instructions.
Problem: Brush won’t operate.
Solution: Batteries are dead. Recharge batteries 12 hours, OR
Check battery polarity (- and +). See battery installation
instructions, OR Switch is not fully rotated on. Rotate switch
clockwise to obtain ON position, OR There may be corrosion inside
battery compartment. Contact customer service.
Problem: My gums are sore after using HydraBrush.
Solution: Continue using HydraBrush but significantly DECREASE
the brushing time. Brush for only 15 seconds or less on each side
until the gums toughen and become healthier. Be sure to use RED
bristled brush head for the first several weeks.
Problem: My gums are bleeding.
Solution: HydraBrush is locating and brushing areas that have
been missed with other toothbrushes. Some bleeding during the
first 3-5 days of use is normal. If excessive bleeding occurs for
more than a week, stop using and contact customer service.
Problem: Metal pins at end of handle are not even.
Solution: Metal pins are never the same length. Depending on where
the brush starts/stops, one pin will always be longer than the other.
Problem: Brush Head falls off.
Solution: Push brushes all the way onto the metal pins until you
feel and hear a “snap.”
Problem: I cannot remove brush head.
Solution: Depress the release button on brush head completely
and pull firmly on the brush. To avoid this problem in the
future, clean the notch in the metal pins with rubbing alcohol.
Problem: Batteries won’t charge.
Solution: Check polarity (-/+). See battery charging instructions,
OR Batteries have exceeded the number of times they can
be recharged. Replace with new AA NiMH rechargeable batteries.
Please visit www.hydrabrush.com for a complete list of
Frequently Asked Questions. Just click on FAQ.
Q
A
Q
A
Q
A
Q
A
Q
A
Q
A
Q
A
Q
A
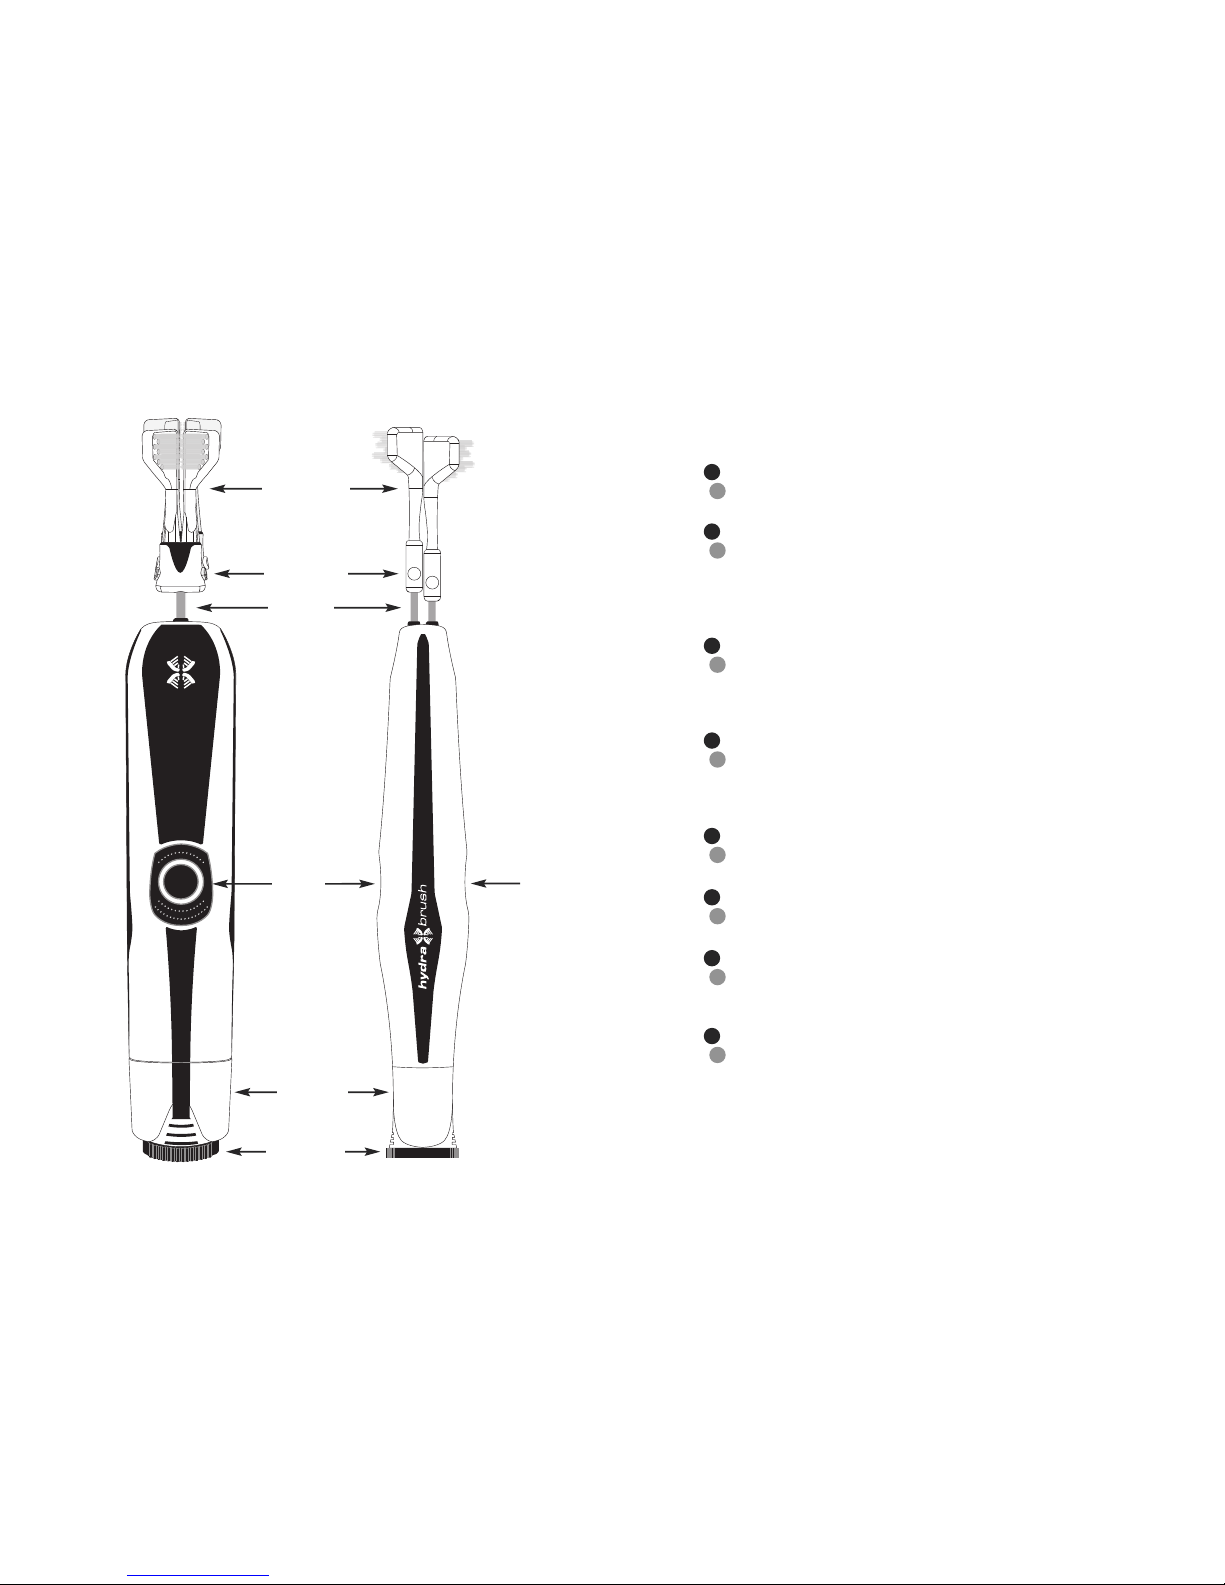
release button
metal pins
comfort
grips
battery cap
power switch
pair of brushes
Page 3
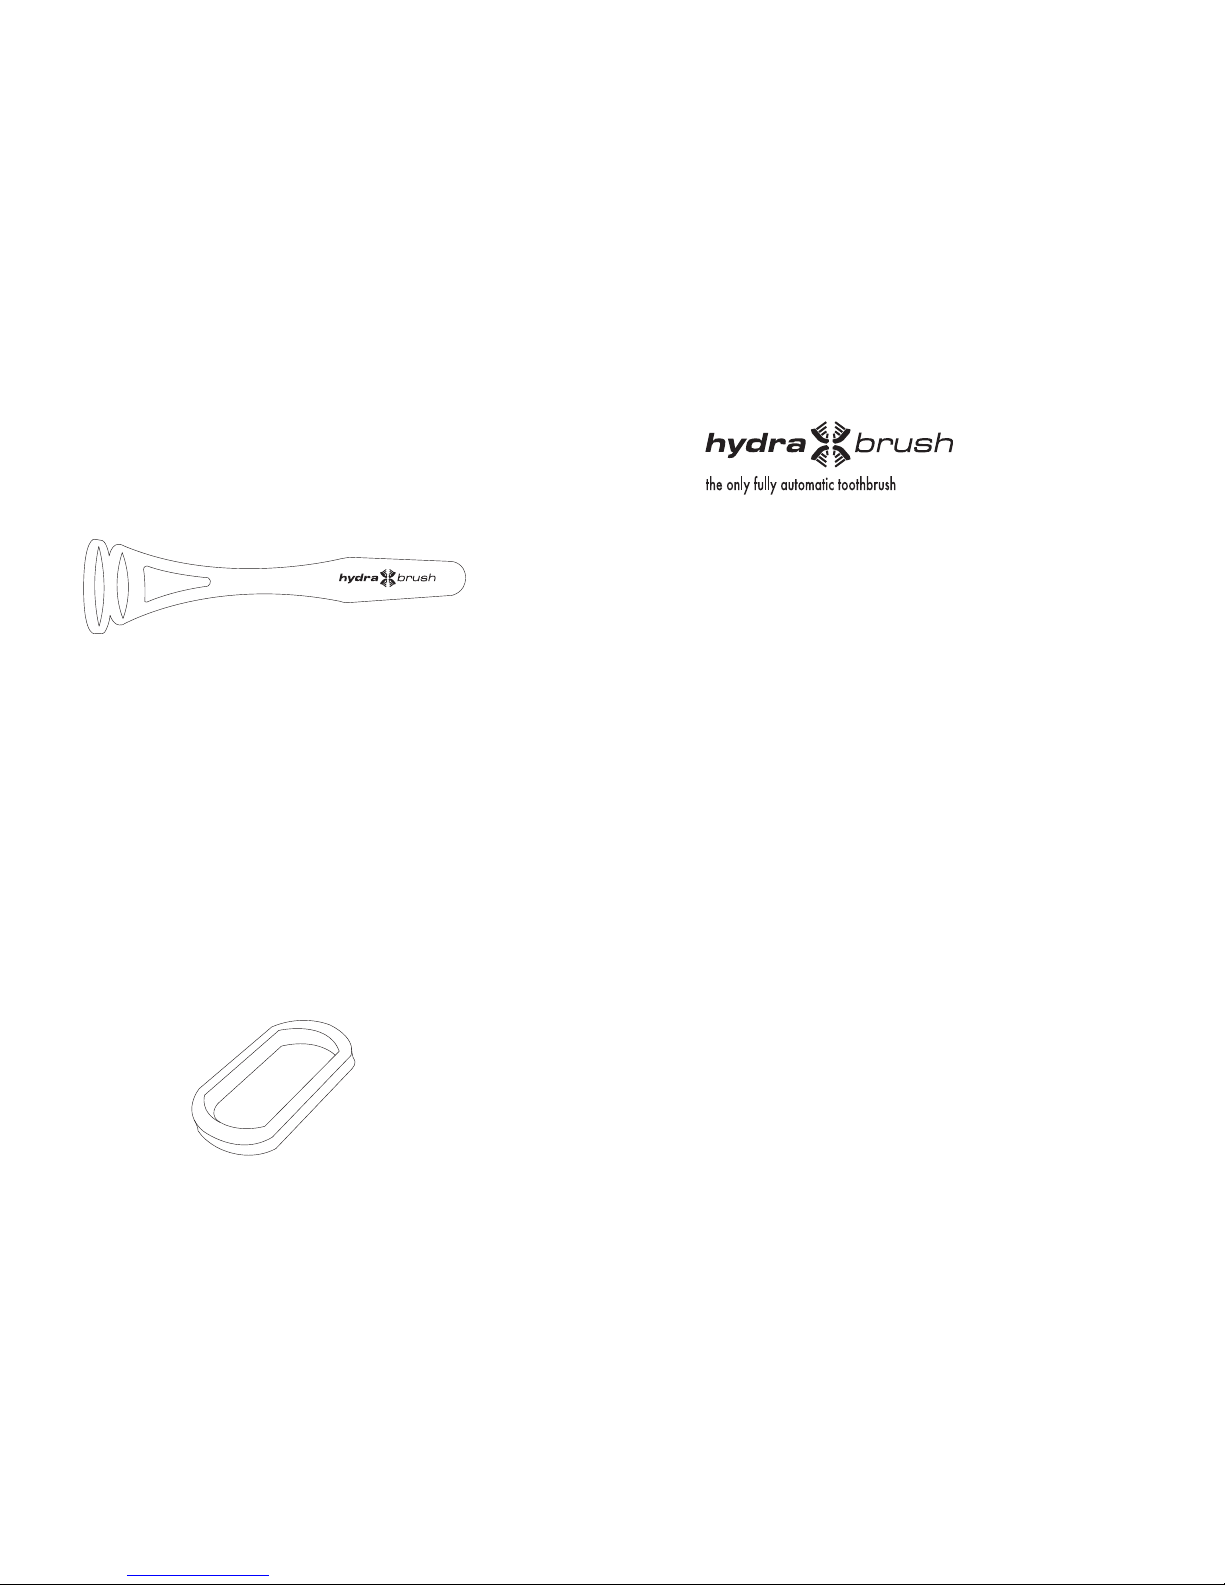
TONGUE SCRAPER
The tongue scraper removes plaque build-up on tongue and will give
you fresher breath. To Use: Depress scraper at back of tongue, apply
light pressure onto tongue and draw outward to remove plaque.
Rinse scraper frequently.
CLEANING
While brush is on, rinse brush head under hot running water after
each use. Periodically clean handle with a damp cloth. Take care
not to allow ANY water to enter the battery compartment. If the brush
fails to operate due to corrosion in the battery compartment, the
warranty is void.
TRAVEL
A travel pouch is included for your convenience. For travel abroad,
be sure to either fully charge the rechargeable batteries or you can
also use any regular AA Alkaline batteries. The charger has built in
switching power technology for worldwide use (100-240V AC).
DRIP SHIELD
This soft, white, rectangular rubber component can be slipped over
the metal pins before installing brush head. Slip onto handle until
snug. This helps to prevent water from running down the length of the
handle during use.
With your purchase of HydraBrush,
you are on your way to dramatically improving
the condition of your oral health. The revolutionary
brush head design gives you the power to
automatically brush according to the dentist
recommended Bass technique. No other
toothbrush can clean all surfaces of your teeth
and gums, simultaneously. Now go ahead,
experience HydraBrush and spread the word.
Before you begin using HydraBrush, read this user
manual and watch the “How It Works” video on
the enclosed mini DVD or on our website at
www.hydrabrush.com.
For the first several weeks, brush with the
Ultra-Soft Brush Head (Red Bristles). Brush for only
30 seconds for the first several days of use.
Please visit our website at www.hydrabrush.com or
call 1-888-813-6631 with any questions or feedback.
Sincerely,
The HydraBrush Team
CONGRATULATIONS
Page 4
IMPORTANT SAFEGUARDS
Basic safety precautions should always be followed when using any
electrical product.
DANGERS
1. Do not place or store the charger where it can fall or be pulled
into a tub, sink or toilet.
2. Do not place or drop the charger into water or other liquid.
If this happens, dispose of charger and order a new charger.
3. Do not plug charger into extention cords or surge protectors.
PLUG DIRECTLY INTO WALL OUTLET ONLY.
WARNINGS
1. Close supervision is recommended when this product is used
by or on children or disabled.
2. Use this product only for its intended purpose as described
in this booklet. Do not use the toothbrush handle or brush head
if damaged or if there are any loose or damaged components.
3. If the brush head is bumping your teeth, you are not using
the product correctly. Please refer to brushing instructions and
watch “How It Works” DVD.
4. Both halves of the brush head must be installed. Do not operate
with one metal pin exposed.
5. DO NOT charge batteries for more than 20 hours at one time.
MEDICAL CAUTIONS
1. If you recently had oral or gum surgery, it is imperative that
you use this product with the RED bristled brush head only for
a maximum of 10 seconds per side until your gums have
healed. Thereafter, you can resume normal brushing per the
instructions.
2. You may experience minor bleeding for the first several days of
use. This is normal since HydraBrush is reaching areas that
were previously missed. If excessive bleeding occurs for
more than a week, stop using the product and
contact customer service at 1-888-813-6631 or email:
[email protected]
3. Do not use if bristles are bent or crushed. If this occurs,
replace brush head.
3
21
4
5
6
A
B
C
A
B
C
STARTING POSITION
T
ooth Paste
(Both Sides)
Page 5
QUICK START
1. Charge batteries for a minimum of 12 hours before initial use
(maximum 20 hours). See charging instructions.
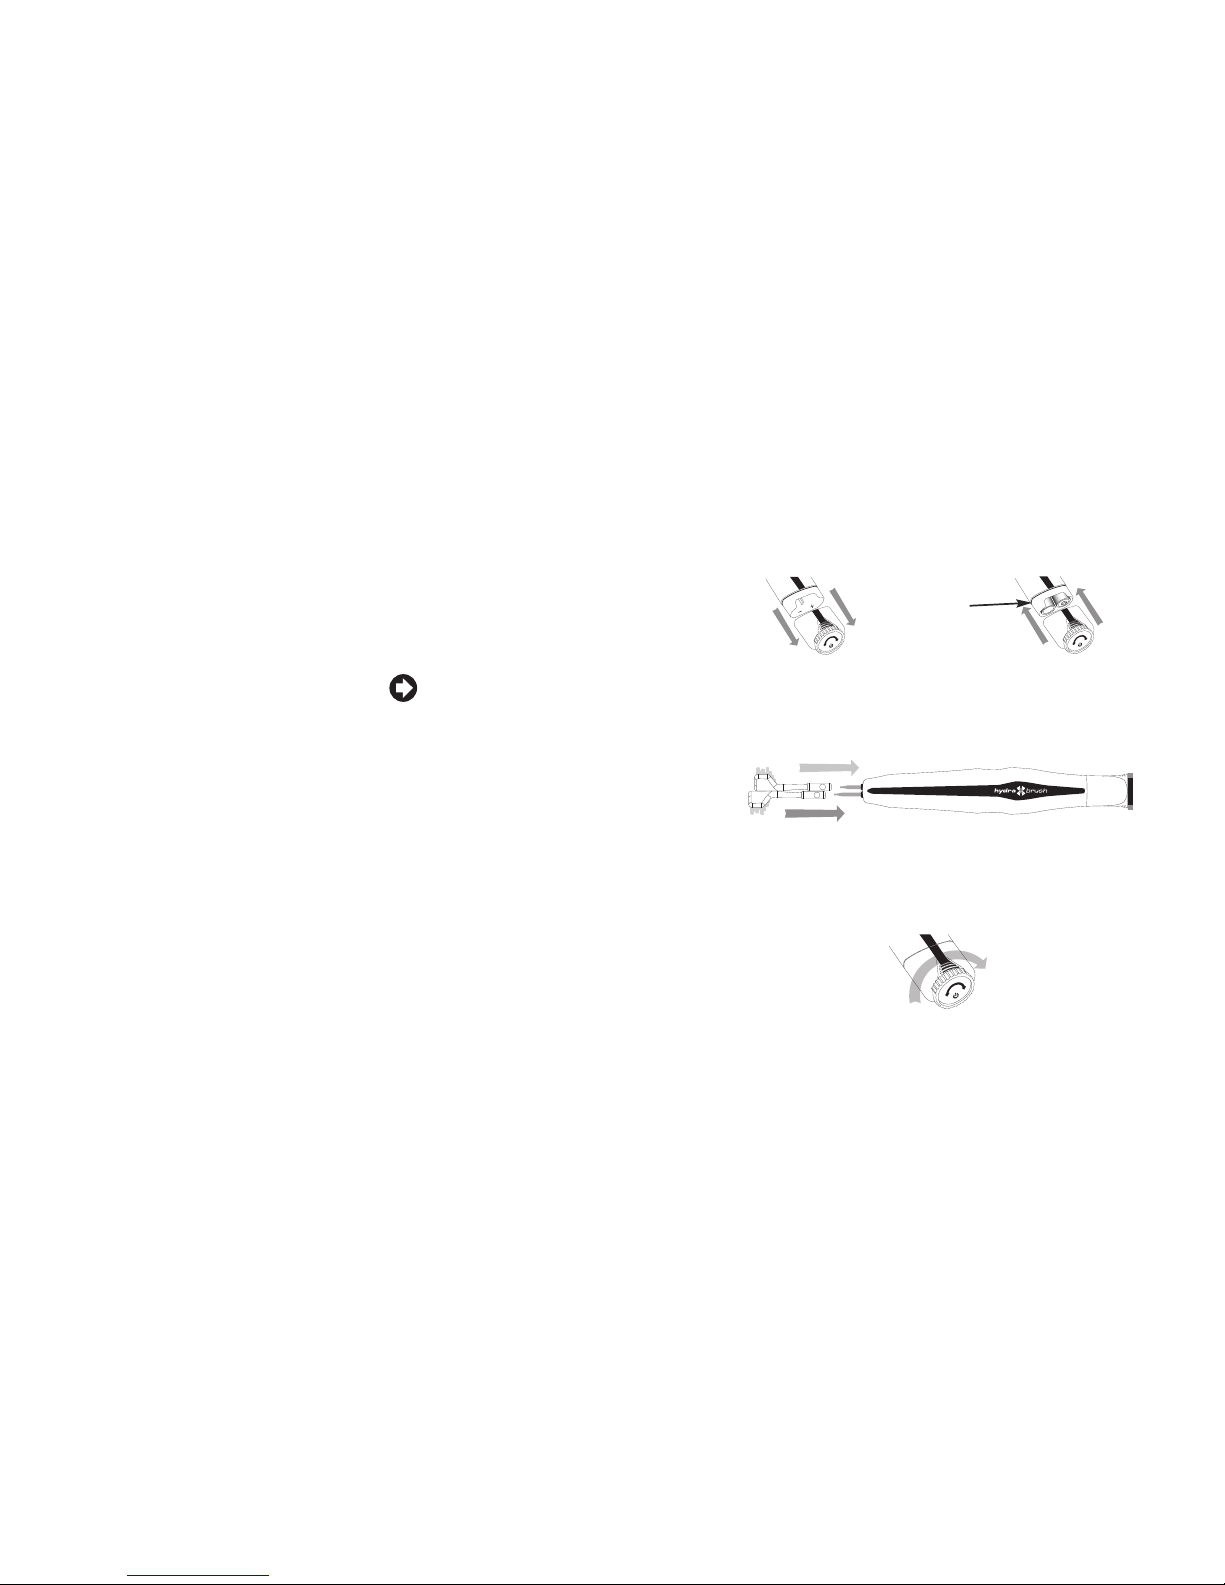
2. Open battery compartment at base of handle by pulling on the
battery cover. Insert batteries and replace cover by pushing firmly
until you hear a snap or see that the white rubber seal is covered.
3. Install RED Ultra-Soft brush head, one at a time, with bristles
facing outward, or back to back, away from each other. Align and
push onto metal pin until it snaps. Metal pins are never the same
length. Confirm brush head is installed by gently pulling on brush
head.
4. Wet brush head, then apply a pea sized amount of toothpaste if
desired.
5. Before putting the brush in your mouth, turn it on by rotating
switch, located at base of handle, clockwise.
6. Bite & Guide! Brush ONLY 15 seconds on each side of the mouth
(30 seconds total) for the first several days. See brushing
instructions for further directions.
7. Turn brush off by rotating switch counterclockwise.
8. Please read the entire user manual and don’t forget to register at
www.hydrabrush.com
rubber seal
BRUSHING INSTRUCTIONS
Brushing your entire mouth should only take 40 seconds (20
seconds/side) except THE FIRST FEW DAYS, USE ONLY 15
SECONDS/SIDE. You may experience minor bleeding. This is normal,
and is an indication that HydraBrush is now brushing areas of the
gums that were not reached with other brushes, and consequently,
you may experience minor gum discomfort and bleeding during the
initial several days of use. Each day thereafter, increase brushing time
as your gums toughen and become healthier.
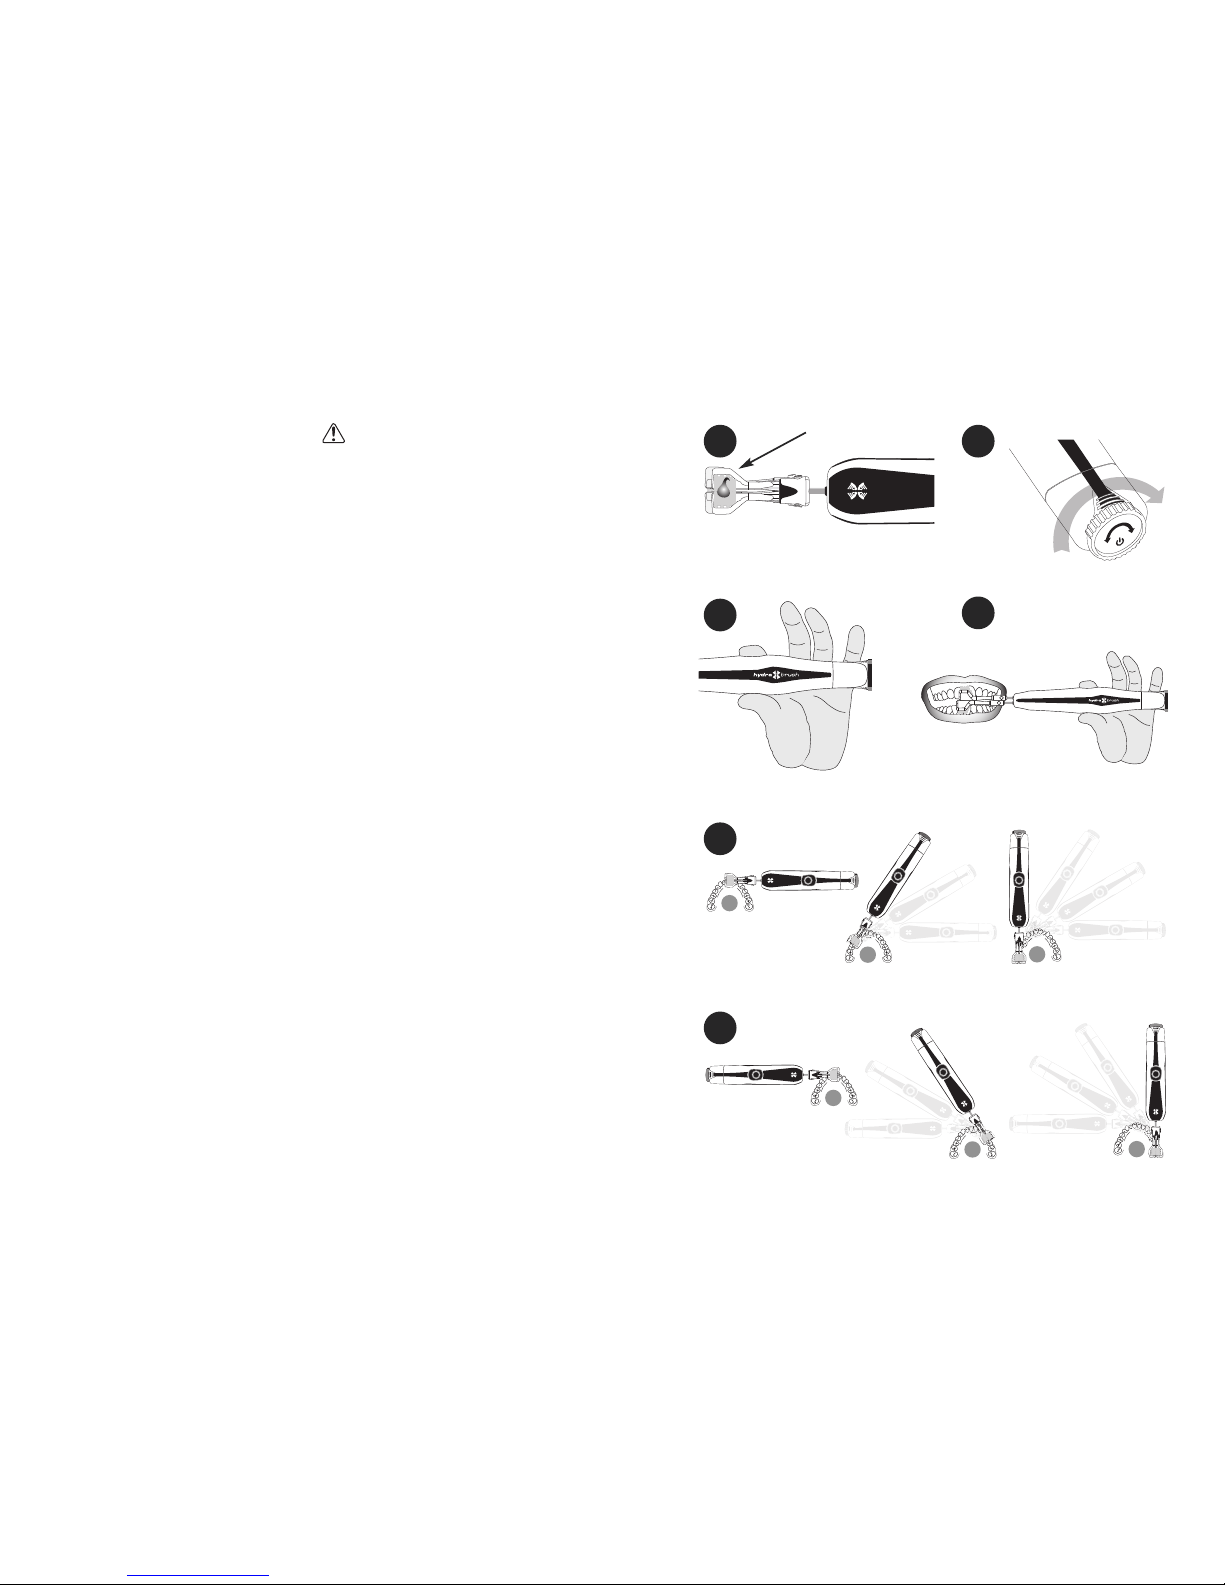
To be sure brush head does not bump teeth, follow these
instructions:
See corresponding pic t ures
1. Wet bristles and apply a pea sized amount of toothpaste,
if desired.
2. Before putting the brush in your mouth, turn it on by rotating
switch, located at base of handle, clockwise.
3. Hold handle with thumb and one finger ONLY, keeping the
handle horizontal. Do not grip the handle with your hand, as it
needs freedom to move along your teeth. The comfort grips in
the middle of the handle are not switches.
4. Bite into moving bristles with front teeth until you feel the brush
massaging the gums. DO NOT BITE TOO HARD. Allow your
teeth to position the brush, do not force it.
5. Gently move the brush from your front teeth to the
back teeth, guiding the brush along the natural curve of your
teeth. Then gently guide the brush toward the front. It is not
neccessary to move the handle vigorously back and forth.
Let the brush head do the work.
6. Switch hands and brush other side of the mouth using same
procedure.
7. Turn the brush off by rotating switch counterclockwise.
Page 6
USER INSTRUCTIONS
CHARGING AND INSTALLING BATTERIES
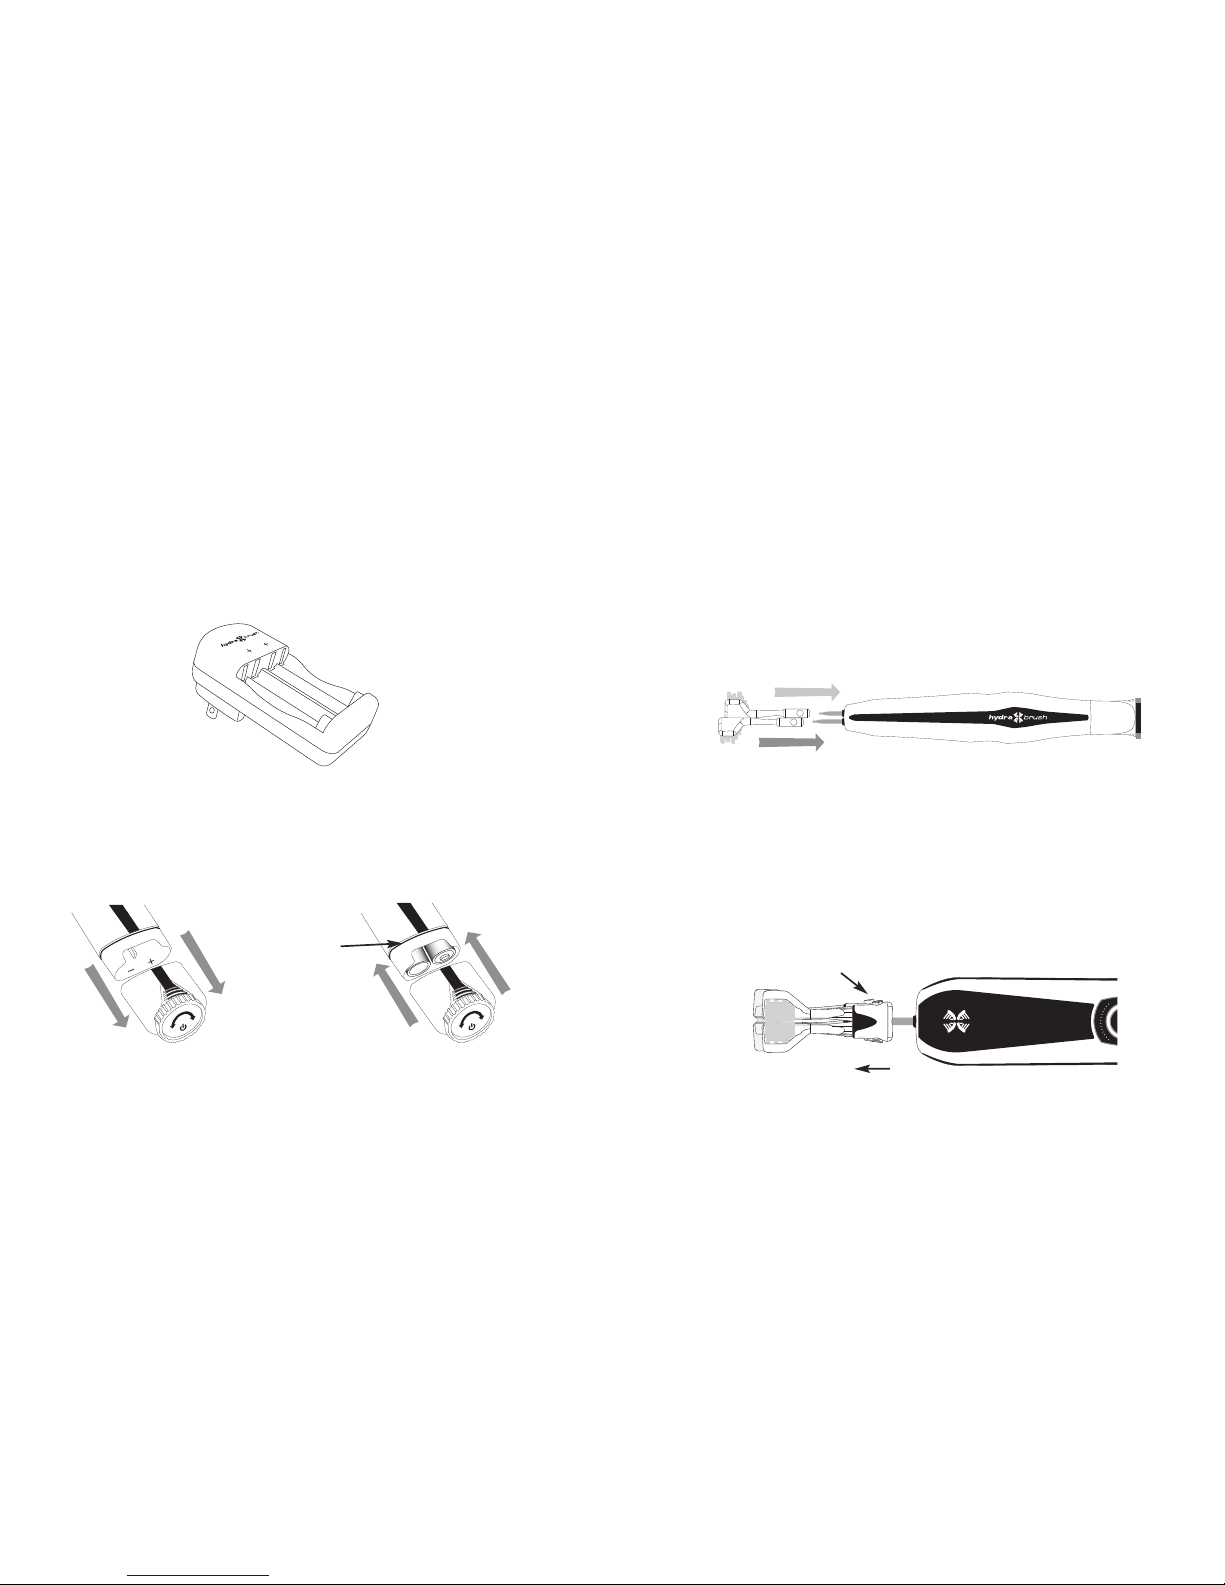
Insert 2 AA NiMH batteries (provided) into charger. Make correct
contact for polarity (- and +); according to marking on battery charger.
Plug charger in. Red LEDs will illuminate to indicate proper charging.
The LED lights will NOT turn off when batteries are fully charged.
Batteries should charge for a minimum of 12 hours (maximum 20
hours) before initial use to maintain performance. DO NOT charge
batteries for more than 20 hours at one time.
Open battery compartment at base of handle by pulling
on the battery cover. Insert batteries using correct polarity (- and +).
Replace cover by firmly pushing it back onto handle until you hear a
snap or see that the white rubber seal is covered.
This is very important so that water does not enter the battery
compartment. Warranty is VOID if water corrodes the battery
compartment.
Depending on your use of the toothbrush, your batteries should
last approximately 50-60 uses before needing to be recharged.
If you feel the batteries are weakening, charge them for a full
12 hours. The charger is safe to plug into a bathroom outlet.
Use the charger cover as a moisture barrier. Do not attempt to
charge batteries other than NiMH batteries.
BRUSH HEAD INSTALLATION
Note: A brush head consists of two halves of matching brushes.
For the first several weeks, use the RED Ultra-Soft brush head. After
your gums become accustomed to HydraBrush, you can switch to the
GREY-BLUE Extra-Reach Soft brush head, which is even more effective
in plaque removal and gum stimulation.
Install brush head, one half at a time, with bristles facing outward, or
back to back, away from each other. Align and push onto metal pin
until it snaps. Metal pins are never the same length. Confirm brush
head is installed by gently pulling on the brush head.
BRUSH HEAD REMOVAL
Remove brush head by pushing release button, located on the side
of the brush and pull away from handle body to remove. Repeat with
other half.
Brush heads should be replaced every 90 days.
Order at www.hydrabrush.com or 1-888-813-6631.
Other brush styles are available upon request.
STORAGE
The countertop pedestal stores the handle and is also hygienic
storage for extra brush heads. Store brush heads with bristle end up.
release button
push release button and pull
rubber seal
 Loading...