

Page 1
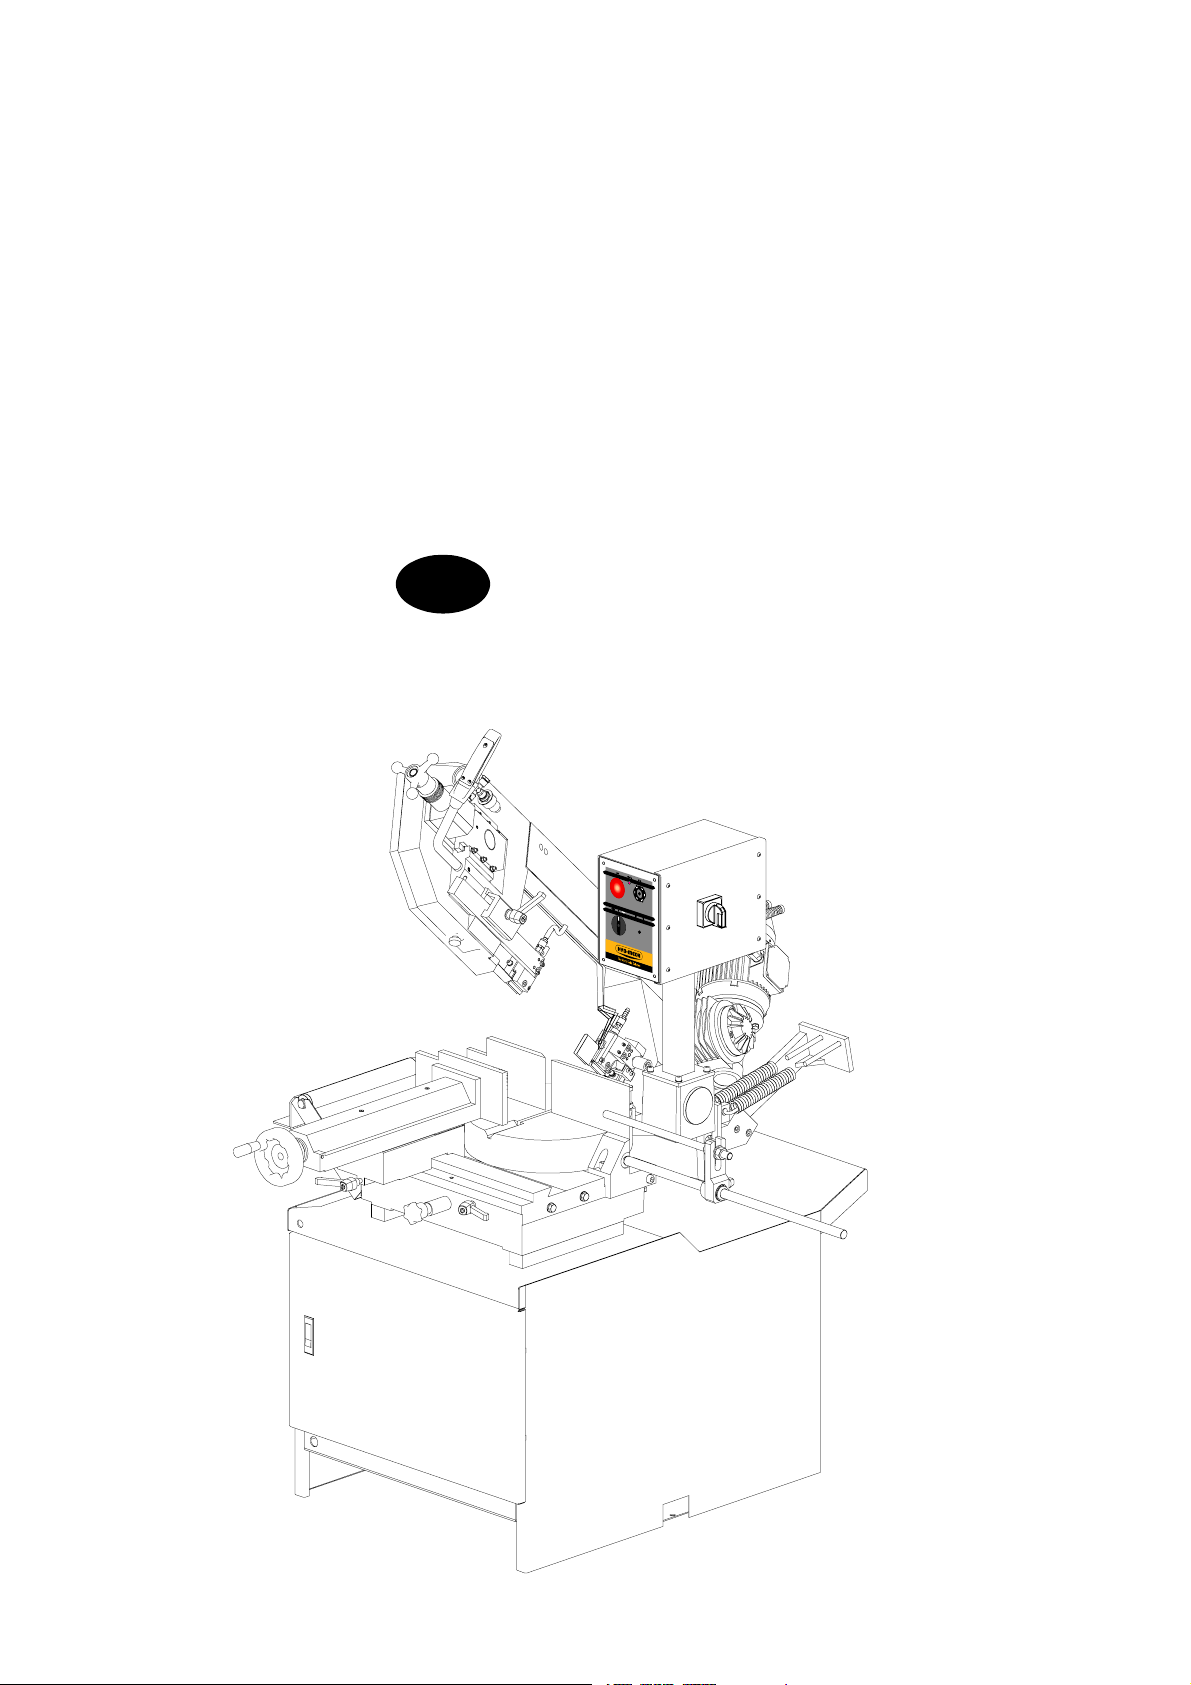
USE AND MAINTENANCE MANUAL
CA
YEAR OF MANUFACTURE: ______________
DM 8
Page 2

Page 3

Introduction and technical specifications 1---1.......................
Foreword 1---1..........................................................
Presentation of the machine 1---2..........................................
Machine specifications 1--- 2..............................................
N a m e p la t e 1 --- 2........................................................
General Technical Data Table 1---2........................................
Dimensions 1---6........................................................
F u n c t i o n a l p a r t s 2 --- 1............................................
D M 8 M o d e l 2 --- 1.......................................................
Cutting head 2---2.......................................................
Vice 2 --- 2..............................................................
C o n t r o l p a n e l 2 --- 3......................................................
Tu r n t a b le 2 --- 3..........................................................
Base 2 --- 4..............................................................
Safety and accident prevention 3---1................................
U s e o f t h e m a c h i n e 3 --- 1.................................................
General recommendations 3---2...........................................
Recommendations to the operator 3---3....................................
Machine safety devices 3---5..............................................
Reference standards 3---5................................................
Safety Protection against accidental contact with the blade 3---6................
Electrical equipment 3---6................................................
Emergency devices 3 --- 7..................................................
M a c h i n e n o i s e l e v e l 3 --- 8.................................................
Noise level measurement 3---8............................................
Machine noise levels 3--- 8................................................
Electromagnetic compatibility 3---9........................................
Emissions 3---9.........................................................
Immunity 3--- 10..........................................................
Machine installation 4---1........................................
Packaging and storage 4---1...............................................
Anchoring the machine 4--- 4..............................................
Minimum requirements 4--- 4..............................................
C h e c k l i s t 4 --- 5..........................................................
Optionals to be requested with original order: 4--- 5...........................
O p t i o na l s : 4 --- 5.........................................................
Balancing the cutting head 4--- 6...........................................
Connection to the compressed---air supply (MA version) 4---6..................
Connection to the power supply 4---7.......................................
Description of machine operation 5---1.............................
Description of the control panel 5---1......................................
Basic instructions for carrying out a cutting operation cycle. 5---3...............
Manoeuvring the cutting head 5--- 3........................................
Clamping the work piece in the vice 5---4...................................
Clamping the work piece in the Automatic Vice (MA version) 5---4.............
Rapid opening/closing of the vice 5---5......................................
Rapid translation of the vice 5 ---5..........................................
Wi d t h o f c u t 5 --- 6.......................................................
Preliminary check list for cutting operation 5---7.............................
Manual operating cycle 5---7..............................................
Page 4

CCS (Cut Control System) functioning cycle 5---10............................
A n g l e d c u t s 5 --- 1 1........................................................
Angled cuts 45˚ to the left 5---11...........................................
Angled cuts 60˚ to the left 5---13...........................................
Angled cuts 45˚to the right 5--- 14...........................................
Diagrams, exploded views and replace---ment parts 6---1..............
D i a g r a m s 6 --- 1..........................................................
Pneumatic diagram (MA version) 6---1.....................................
How to read the wiring diagrams 6---2......................................
Standard version electrical diagram 208V (CSA standard) 6--- 7.................
L i s t o f c a b l e s 6 --- 1 1.......................................................
List of components 6--- 13..................................................
L i s t o f t e r m i n a l s 6 --- 1 4....................................................
Standard version electrical diagram 240V (CSA standard) 6---15.................
L i s t o f c a b l e s 6 --- 1 9.......................................................
List of components 6--- 21..................................................
L i s t o f t e r m i n a l s 6 --- 2 2....................................................
Standard version electrical diagram 575V (CSA standard) 6---23.................
L i s t o f c a b l e s 6 --- 2 7.......................................................
List of components 6--- 29..................................................
L i s t o f t e r m i n a l s 6 --- 3 0....................................................
Standard version electrical diagram 220V Single--- Phase (CSA standard) 6---31....
L i s t o f c a b l e s 6 --- 3 5.......................................................
List of components 6--- 38..................................................
L i s t o f t e r m i n a l s 6 --- 3 9....................................................
Exploded views 6 ---40.....................................................
Motor assembly 6---40....................................................
Front flywheel assembly 6---42..............................................
Motor flywheel assembly 6--- 44.............................................
Cutting head cover 6---46..................................................
Vice assembly 6---48......................................................
Base assembly 6---50......................................................
C o n t r o l p a n e l 6 --- 5 2......................................................
H a n d gr i p 6 --- 5 4..........................................................
Re d u c t i o n g e a r 6 --- 5 6.....................................................
Fixed work table and turntable 6--- 58........................................
Optional Cut Control System 6 ---60.........................................
Supplementary pneumatic vice 6---62........................................
A d j u s t m e n t s 7 --- 1...............................................
Air treatment unit (MA version) 7--- 1......................................
Topping up and bleeding the cylinder (Cut Control System) 7---2...............
Topping up the head cylinder 7---2.........................................
Bleeding the head cylinder 7--- 3...........................................
Vice 7 --- 4..............................................................
Vice play adjustment 7---4................................................
Cutting head 7---5.......................................................
Blade tensioner slide play adjustment 7---5..................................
B l a d e t e n s i o n i n g u n i t 7 --- 6................................................
Cutting head stroke 7---8.................................................
Blade guide parts 7---9...................................................
Blade guide heads 7---9..................................................
Blade steady buttons 7---9................................................
Page 5

Blade guide plates 7---9..................................................
Blade 7 --- 1 1.............................................................
Tool change 7---11........................................................
Blade perpendicularity 7---13..............................................
Orthogonality of the blade 7---14...........................................
Front flywheel 7 ---17......................................................
Motor flywheel 7---18.....................................................
Maintenance and choice of consumables 8---1.......................
The role of the operator 8---1.............................................
Maintenance requirements 8---1...........................................
General maintenance 8--- 2...............................................
Daily 8 --- 2.............................................................
Weekly 8 --- 2............................................................
Monthly 8 --- 2...........................................................
Maintenance of operating parts 8---3.......................................
C o n s u m a b l e s 8 --- 3.......................................................
Oil for blade t ensioner cylinder 8 ---3.......................................
Oils for Cut Control System hydraulic circuit 8---3............................
Oil for transmission box 8---3.............................................
Oil for lubricant/coolant fluid 8 ---4.........................................
Cutting speed and choice of tools 9---1..............................
Cutting speed 9--- 1......................................................
Standard machine 9---1..................................................
Machine with 4/8 pole motor (optional) 9---1................................
Machine with Inverter (optional) 9---1......................................
Choice of blade 9---2....................................................
Saw tooth pitch 9--- 3.....................................................
Cutting speed and downstroke speed 9---3..................................
Lubricant/coolant fluid 9---4..............................................
Blade structure 9---5.....................................................
B l a d e t y p e s 9 --- 5........................................................
Blade selection table relating to cutting speed and downstroke speed 9---8.......
Classification of steels 9---9...............................................
Steel nomenclature ta ble 9---10.............................................
Troubleshooting 10---1............................................
Blade and cutting problems 10--- 1..........................................
Troubleshooting 10 ---7....................................................
Warranty 10---9..........................................................
Page 6

Page 7

Introduction and
technical
specifications
Foreword
This work tool has been designed to satisfy the wide range of cutting needs of a
modern workshop with simplicity and reliability, while at the same time complying with all EEC safety standards.
The DM 8 is structurally rigid, silent and safe: it produces a minimum of waste
(1.2 mm = 0.05 in.) while its great versatility makes it suitable for cutting various
materials such as stainless steel light alloys, aluminium, copper and bronze at
high speed and with high precision.
1
Warning
Its high cutting capacity, which enables it to handle both single workpieces and
bundles, combined with the possibility of making inclined cuts from 60˚ left to
45˚ right, make this model the ideal solution for satisfying the wide strange of
cutting needs of machine shops, turneries, structural steel shops and engineering
workshops.
We congratulate our clients on having chosen this product, which will give
effective and faithful service for many years, especially if the instructions
contained in this use and maintenance manual are carefully followed.
This cutting machine has been designed and made specifically for cutting metallic materials.
1--1
Page 8
MEP S.p.A.
Presentation of the machine
Functioning is completely manual: the operator, after having checked the
workpiece in the vice, grips the control lever and presses the bandsaw start
microswitch; with a downwards movement, the material is cut to the preset
length; the cutting head returns up at the end of the cutting operation, ready to
start a new work cycle.
In the MA version (Automatic Vice), a pneumatic cylinder applied on the vice
blocks the material between the jaws: the open/close control is located on the
base of the machine.
With the CCS (Cut Control System), the machine can also perform a semi---automatic work cycle. The operator, after using the selector located on the control
panel to choose the semi---automatic work cycle, clamps the material in the vice
and presses the button on the cutting head handgrip to start up the bandsaw; the
saw begins turning and the head commences its downstroke, the speed of which
can be adjusted using the control valve (head downstroke speed regulator)
located on the control panel. The head performs the cutting operation; once the
cut has been made, a limiter stops the cutting cycle, after which the head is
manually returned to its upper position so that, when a new workpiece is in place,
a new cycle can be started using once more the handgrip button.
Warning
The Automatic Vice is optional for the DM 8 model; it can be factory installed
on request made during the ordering procedure, or may be installed by the
user after the machine has been bought.
Machine specifications
Name plate
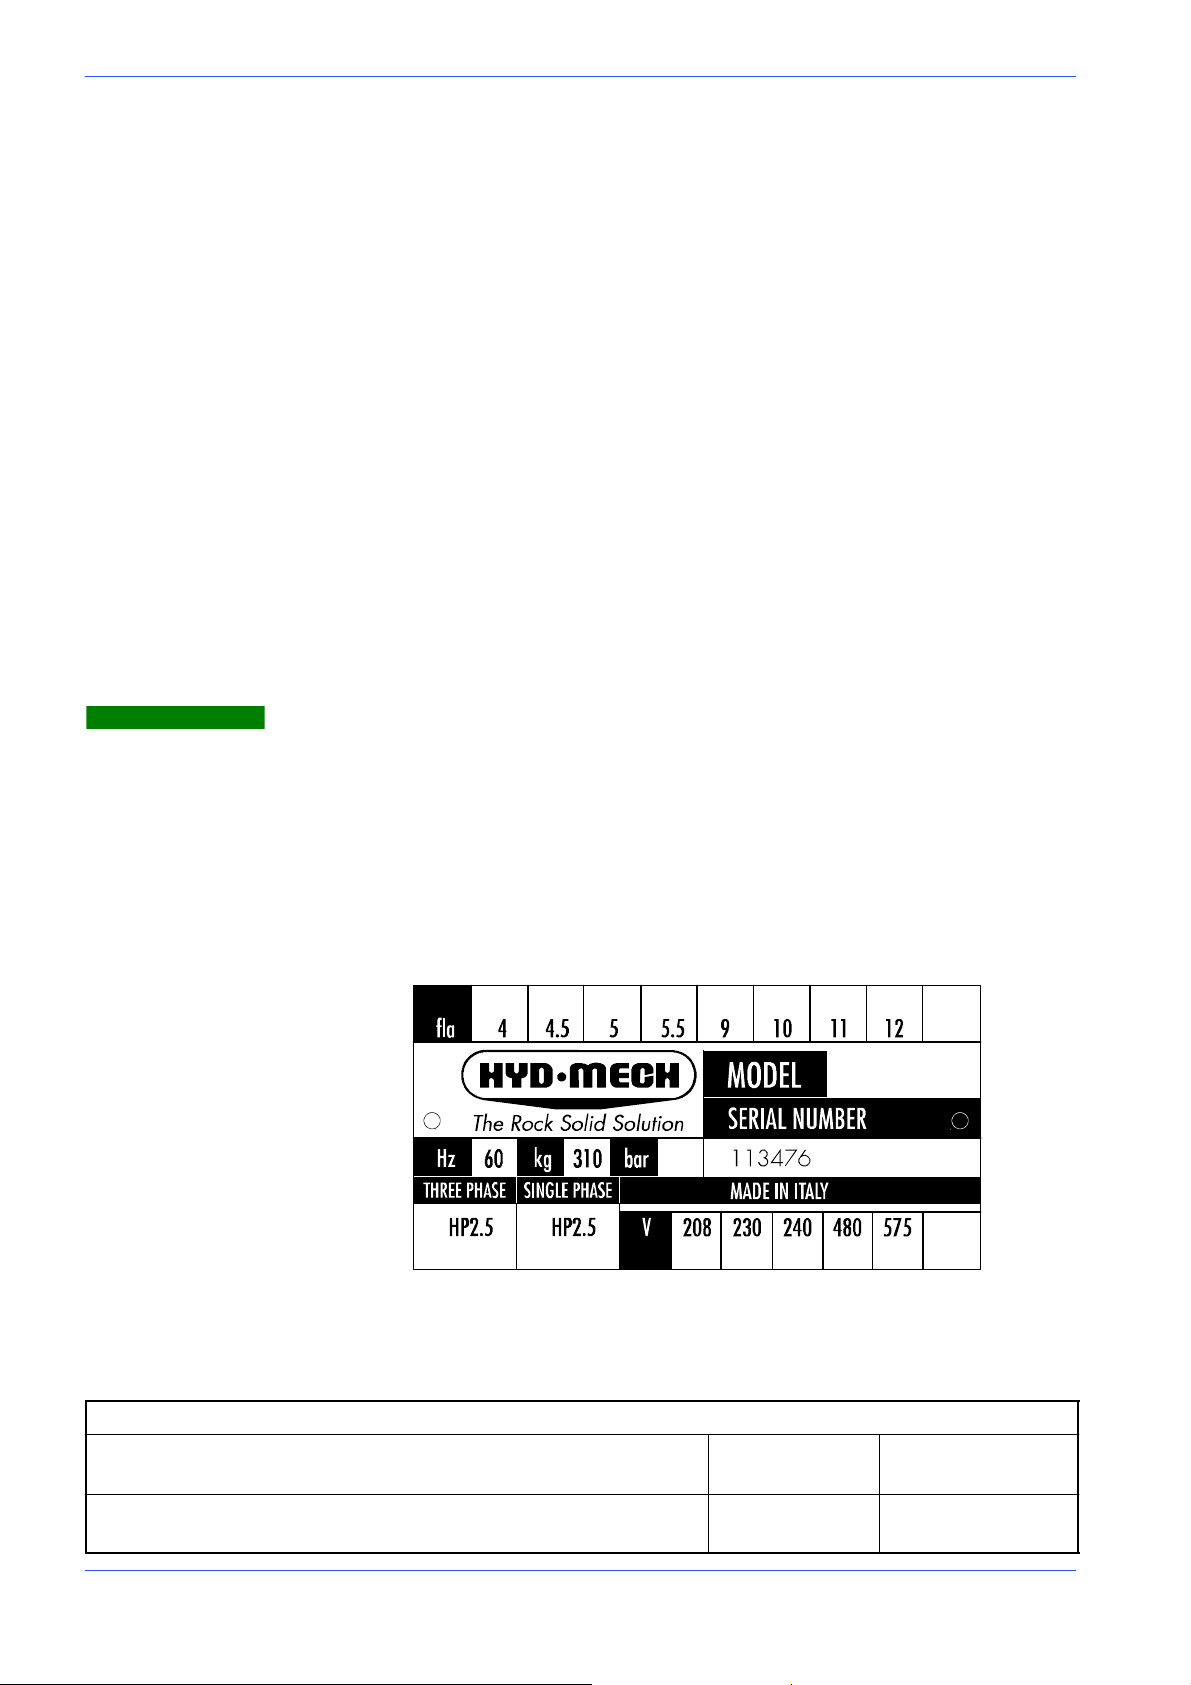
Theanodisedaluminiumnameplateisrivetedonthesideofthemachine;the
same data are reproduced on the declaration of conformity included with this use
and maintenance manual.
DM 8
N.B.
When communicating with the Technical Service department, the model, serial
number and year of manufacture of the machine must be quoted.
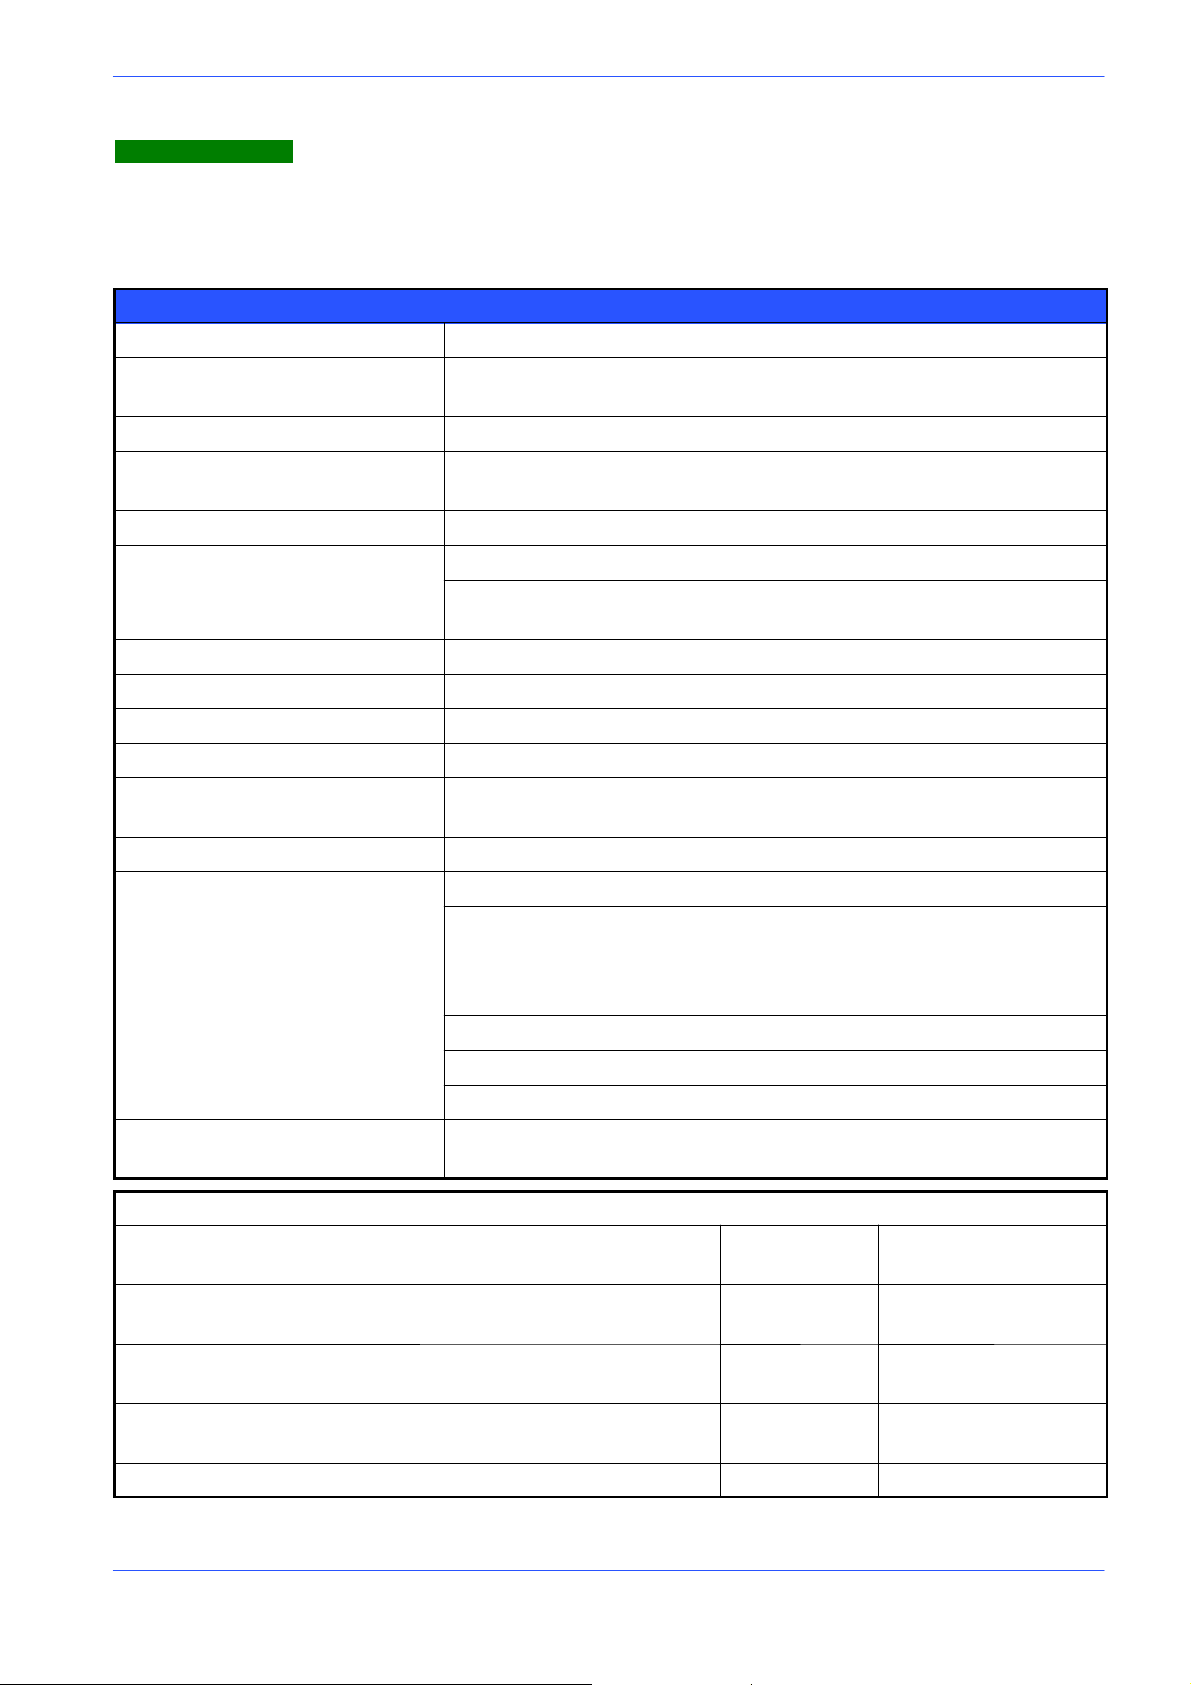
General Technical Data Table
CUTTING SPEEDS
1st Slow Speed mt/min
ft./min
2nd Fast Speed mt/min
ft./min
1--2 Use and maintenance manual DM 8
36
11.21
72
22.43
Page 9
Version 24DM
ydev
tionandsafetydevice
s
Warning
All models can be equipped with the Inverter,anoptional device, which offers
a range of speeds comprised between 20 and 90 mt/min. (from 6.23 to 28.04
ft./min). As the machine is predisposed for the Inverter, it can be installed by
the client or factory pre--installed on request made during the ordering procedure.
Technical Characteristics of the Inverter
Protection rating IP 31
Vibration and Shock resistance
(EN50178)
0.6gnfrom10to50Hz
2gnfrom50to150Hz
Max. relative humidity 93% without condensation or drop--forming
Acceptable Temperature Range
(EN 50178)
For warehouse storing: from --25˚Cto+65˚C For functioning purposes:
from --10˚Cto+40˚C
Max. altitude 1000 mt. with no derating
-- single phase: 200V -- 15% to 240V + 10%
Supply
-- three--phase: 200V -- 15% to 230V + 10%
380V -- 15% to 460V + 10%
Frequency 50/60 Hz ¦ 5%
Output voltage Maximum voltage equal to the supply voltage
Output frequency range 0.5 to 320 Hz
Max transients 150% of electronic speed control rated current for 60 secs.
Frequency resolution
--- D i s p l a y : 0 . 1 H z
--- Analog inputs: 0.1 Hz per 100 Hz max.
Switching frequency Adjustable from 2.2 to 12 Hz max
galvanic insulation between power and control panel
Short circuit protection:
-- of available internal supplies
Electronic speed control protection and safet
ices
-- between U--V--W phases
-- between phase and earth for calibres from 5.5 to 15 Kw
Heat overload protection for overheating and overcurrents
Mains under and overcurrent safety protections
Braking overload protection
Motor protections
Protection integrated in the electronic speed controller with 12t calculation
BAND SAW
Rated size mm
in.
Max/min blade length mm
in.
2750 x 27 x 0.9
108.27x1.06x0.03
27602740
from 108.66 to 107.87
Blade height mm
in.
Blade width mm
in.
27
1.06
0.9
0.03
Band saw tension bar / Kg / psi 70 / 900 / 1015
Introduction and technical specifications 1--3
Page 10
MEP S.p.A.
Attention
When choosing the cutting tool, if its dimensions do not correspond to those
included in the ”Rated size” section, check that the dimensions at least fall
within the admissible max/min specifications.
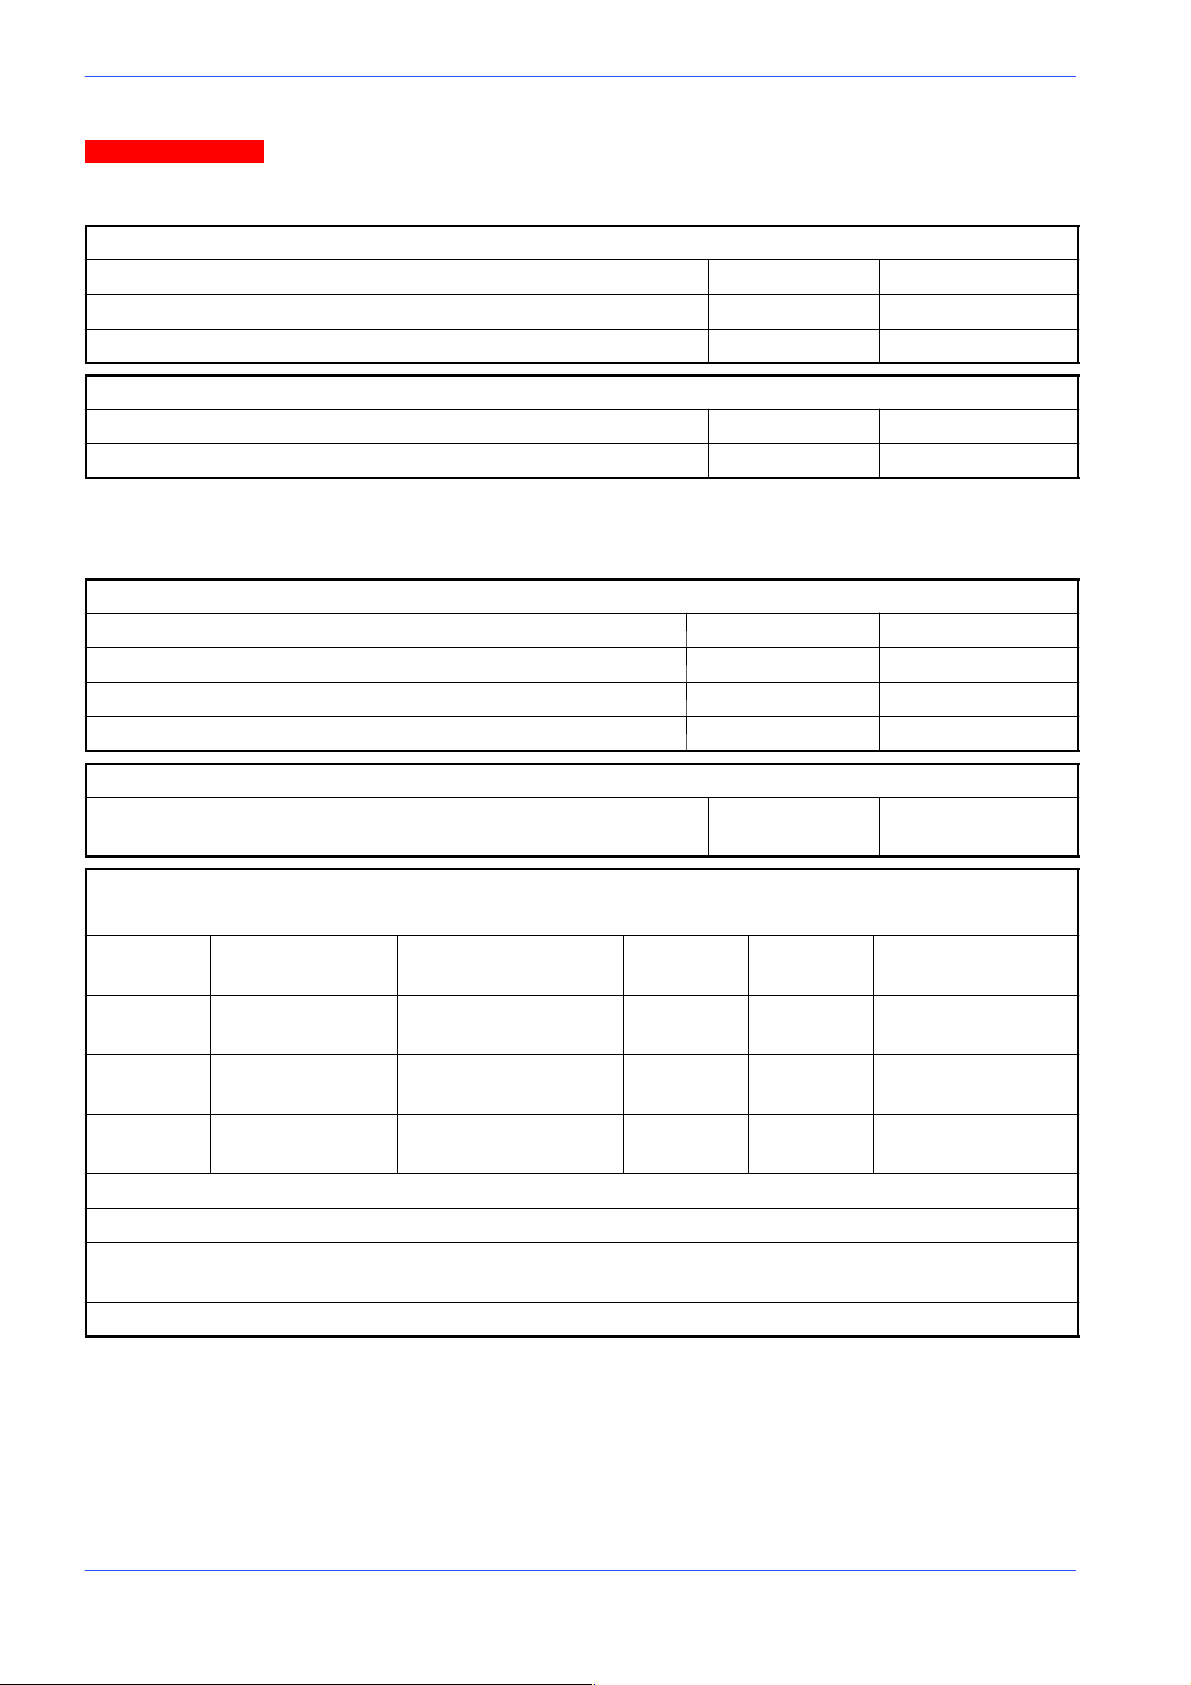
RATED ELECTRICAL POWER
Spindle motor HP 2.5/2
Lubricant/coolant fluid electropump motor HP 0.1
Max electrical power rating HP 2.6
WORKING PRESSURE MODEL MA (Automatic Vice)
Max. working pressure for opening/closing vice Bar / psi 6/87
Air consumption for a complete cycle Nl/min 1.34
N.B.
The ”air consumption for vice” value refers to standard conditions (temperature
0˚ and pressure 1.013 bar, i.e. density 1.3 x 10
-- 3
Kg/l) where 1 Kg/min. = 772
Nl/min.
LUBRICANT/COOLANT FLUID AND OIL
Oil for blade tensioner unit Vol . L t. 0.5
Oil for transmission box capacity in KG 0.32
Oil for Cut Control System cylinder capacity in Litres 0.7
Lubricant/coolant fluid (oil concentration 5--- 6%) capacity in Litres 11
VICE
Vice max. opening mm
in.
275
10.83
SPINDLE MOTOR
T hr e e --- p h a s e 2 --- 4 p o l e a s y n c h r o n o us ; Fr e q u e n c y 6 0 H z
No.of poles Current (Volts) Absorption (Amps) Power
rpm Band saw speed
(HP)
2/4 208 11/8.2 1.8/1.5 3150/1580 72/36 mt/min
22.43/11.21 ft./min
2/4 240 8.9/6.5 1.8/1.5 3480/1730 72/36 mt/min
22.43/11.21 ft./min
2/4 575 3.4/2.6 1.8/1.5 3360/1690 72/36 mt/min
22.43/11.21 ft./min
Stator wound with enamelled copper wire, class H 200˚C.
Class F insulation (limit temperature TL155˚C).
IP 55 protection rating (total against contact with live parts, water sprayed from all directions, with
shaft oil seal).
Conforming to CEI norms, publication: IEC 34 of 01/07/1985.
N.B.
Example of class F insulation: in air--cooled machines at an ambient temperature of 40˚C (according to CEI 2--3 and IEC 85), the allowable overtemperature is 100˚C (where 100˚C represents the allowable ∆T).
1--4 Use and maintenance manual DM 8
Page 11

Version 24DM
Warning
The machine is supplied with a 2/4 pole three phase motor giving 2 band saw
speeds:
-- 1ª speed (4 poles) = 36 mt/min (11.21 ft./min)
-- 2ª speed (2 poles)= 72 mt/min (22.43 ft./min);
The OPTIONAL 4/8 pole motor gives speeds of 36/18 mt./min. (11.21 / 5.61
ft./min).
Introduction and technical specifications 1--5
Page 12
MEP S.p.A.
ELECTROPUMP MOTOR
Single phase; Frequency 60 Hz.
Voltage ( Vo l t s) Absorption (Amps) Power (HP) rpm Delivery rate
lt/min
208 0.22 0.1 3380 11 1.5
240 0.2 0.1 3380 11 1.5
575 0.16 0.1 3380 11 1.5
Protection rating IP 55.
Conforming to CEI norms, publication: IEC 34 of 01/07/1985.
CUTTING CAPACITY
Section
0˚ 210 mm = 8.27 in. 200 mm = 7.87 in. 270x200 mm = 10.63x7.87 in.
45˚ left 180 mm = 7.09 in. 180 mm = 7.09 in. 180x190 mm = 7.09x7.48 in.
60˚ left 100 mm = 3.94 in. 90 mm = 3.54 in. 120x90 m m = 4.72x3.54 in.
45˚ right 130 mm = 5.12 in. 130 mm = 5.12 in. 120x150 mm = 4.72x5.90 in.
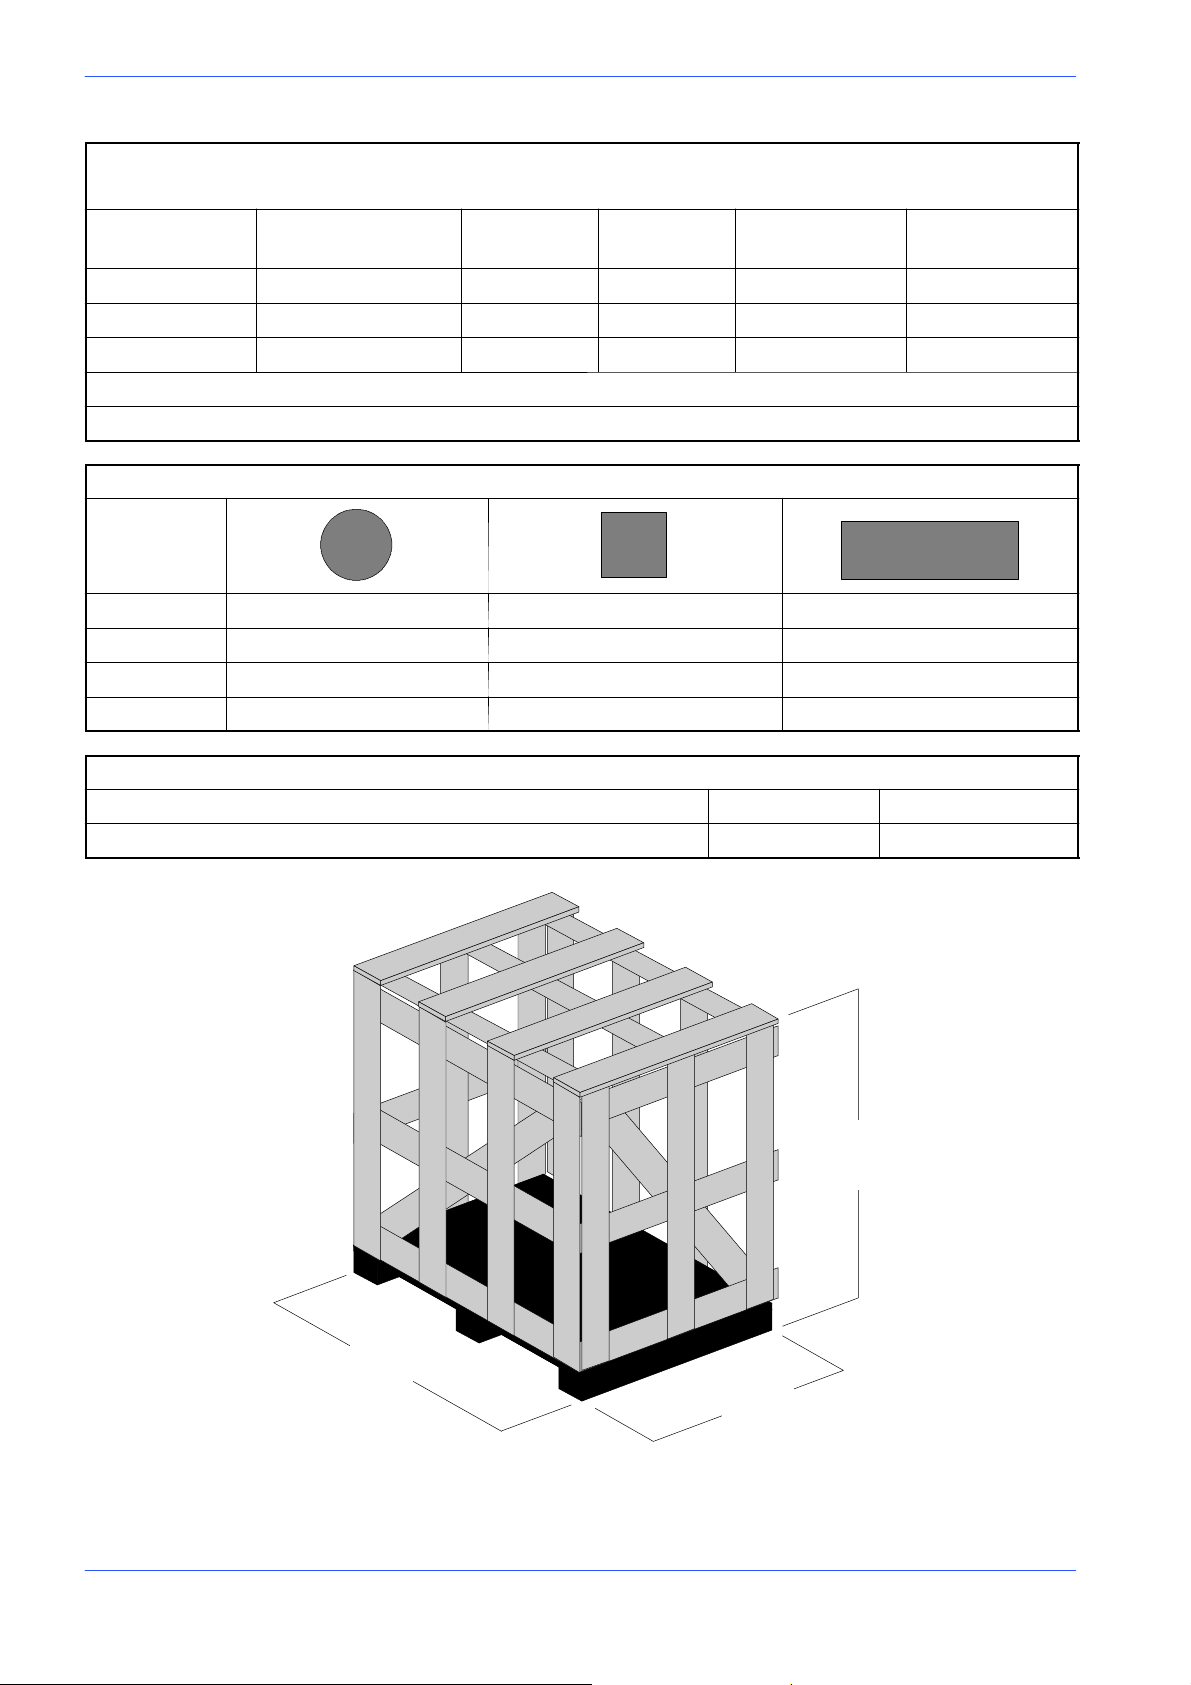
PAC KED WEIG HT
Ø
lxl
Head (mt.)
bxh
Wooden cage and pallet Kg 70
Wooden pallet Kg 20
1900 mm
74.80 in.
1700 mm
66.93 in.
1000 mm
39.37 in.
1--6 Use and maintenance manual DM 8
Page 13
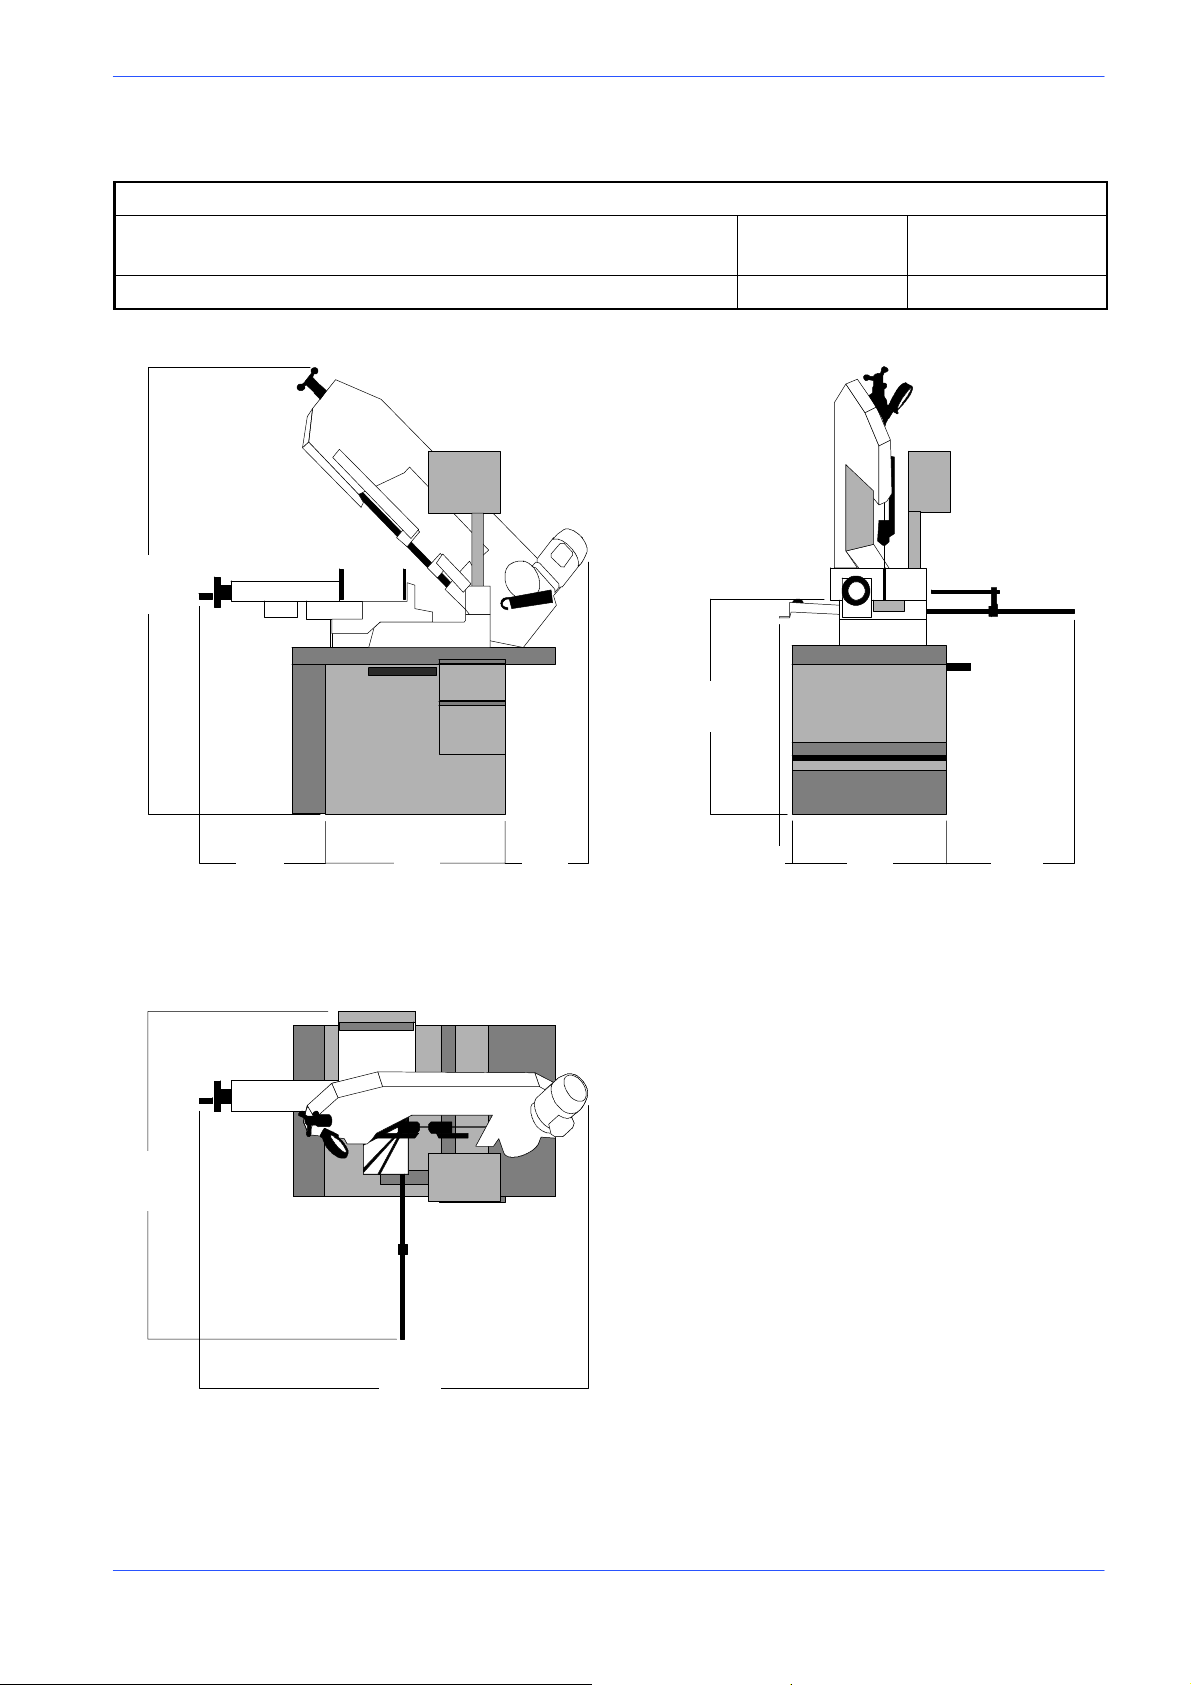
Dimensions
MACHINE INSTALLED
Version 24DM
Work table height mm
in.
870
34.25
Weight Kg 430
1830
72.05
870
34.25
1315
51.77
18.50
900
35.43
1800
70.87
16.14
170
6.70
700470 410
27.56
550
21.65
Introduction and technical specifications 1--7
Page 14
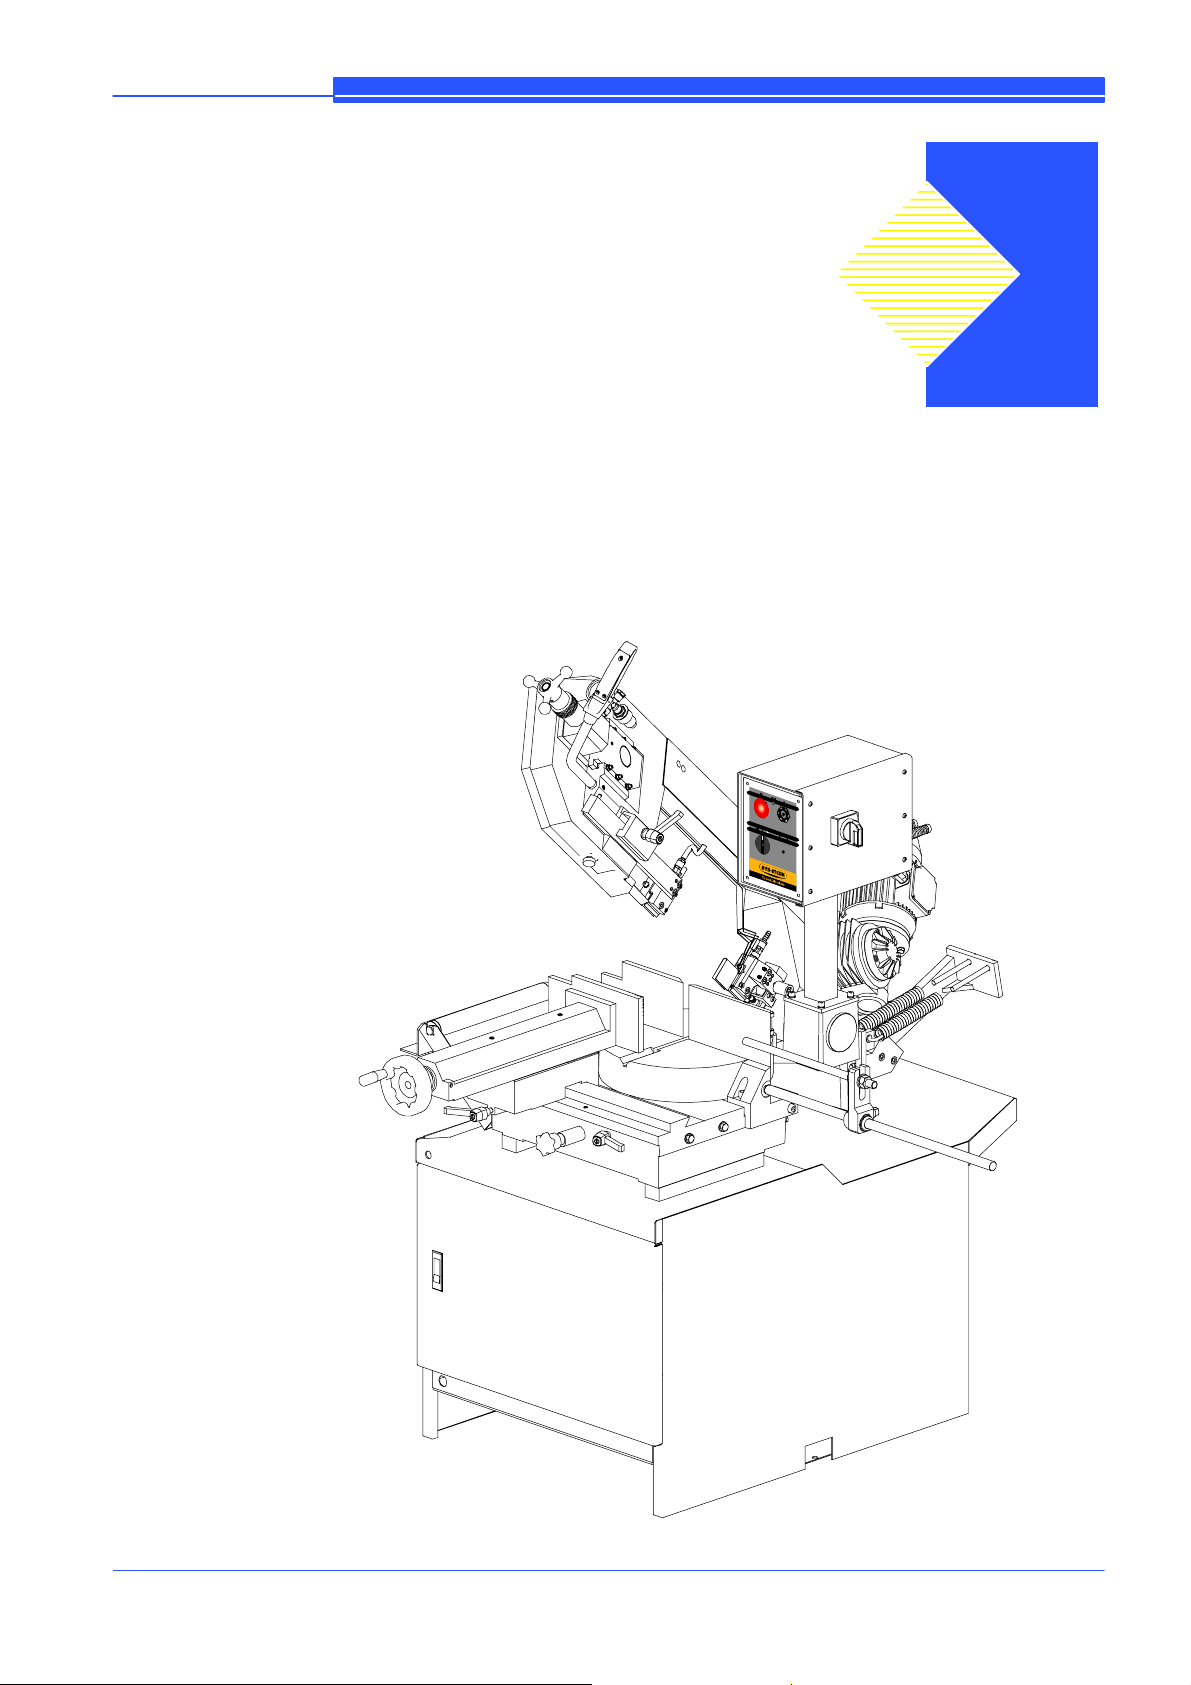
Functional parts
DM 8 Model
In order for the user to move towards a full understanding of how the machine
works, which is described in detail in the chapter DESCRIPTION OF MACHINE OPERATION, this chapter deals with the main units and their locations.
CUTTING
HEAD
2
CONTROL
PANEL
VICE
TURNTABLE
BASE
2--1
Page 15
MEP S.p.A.
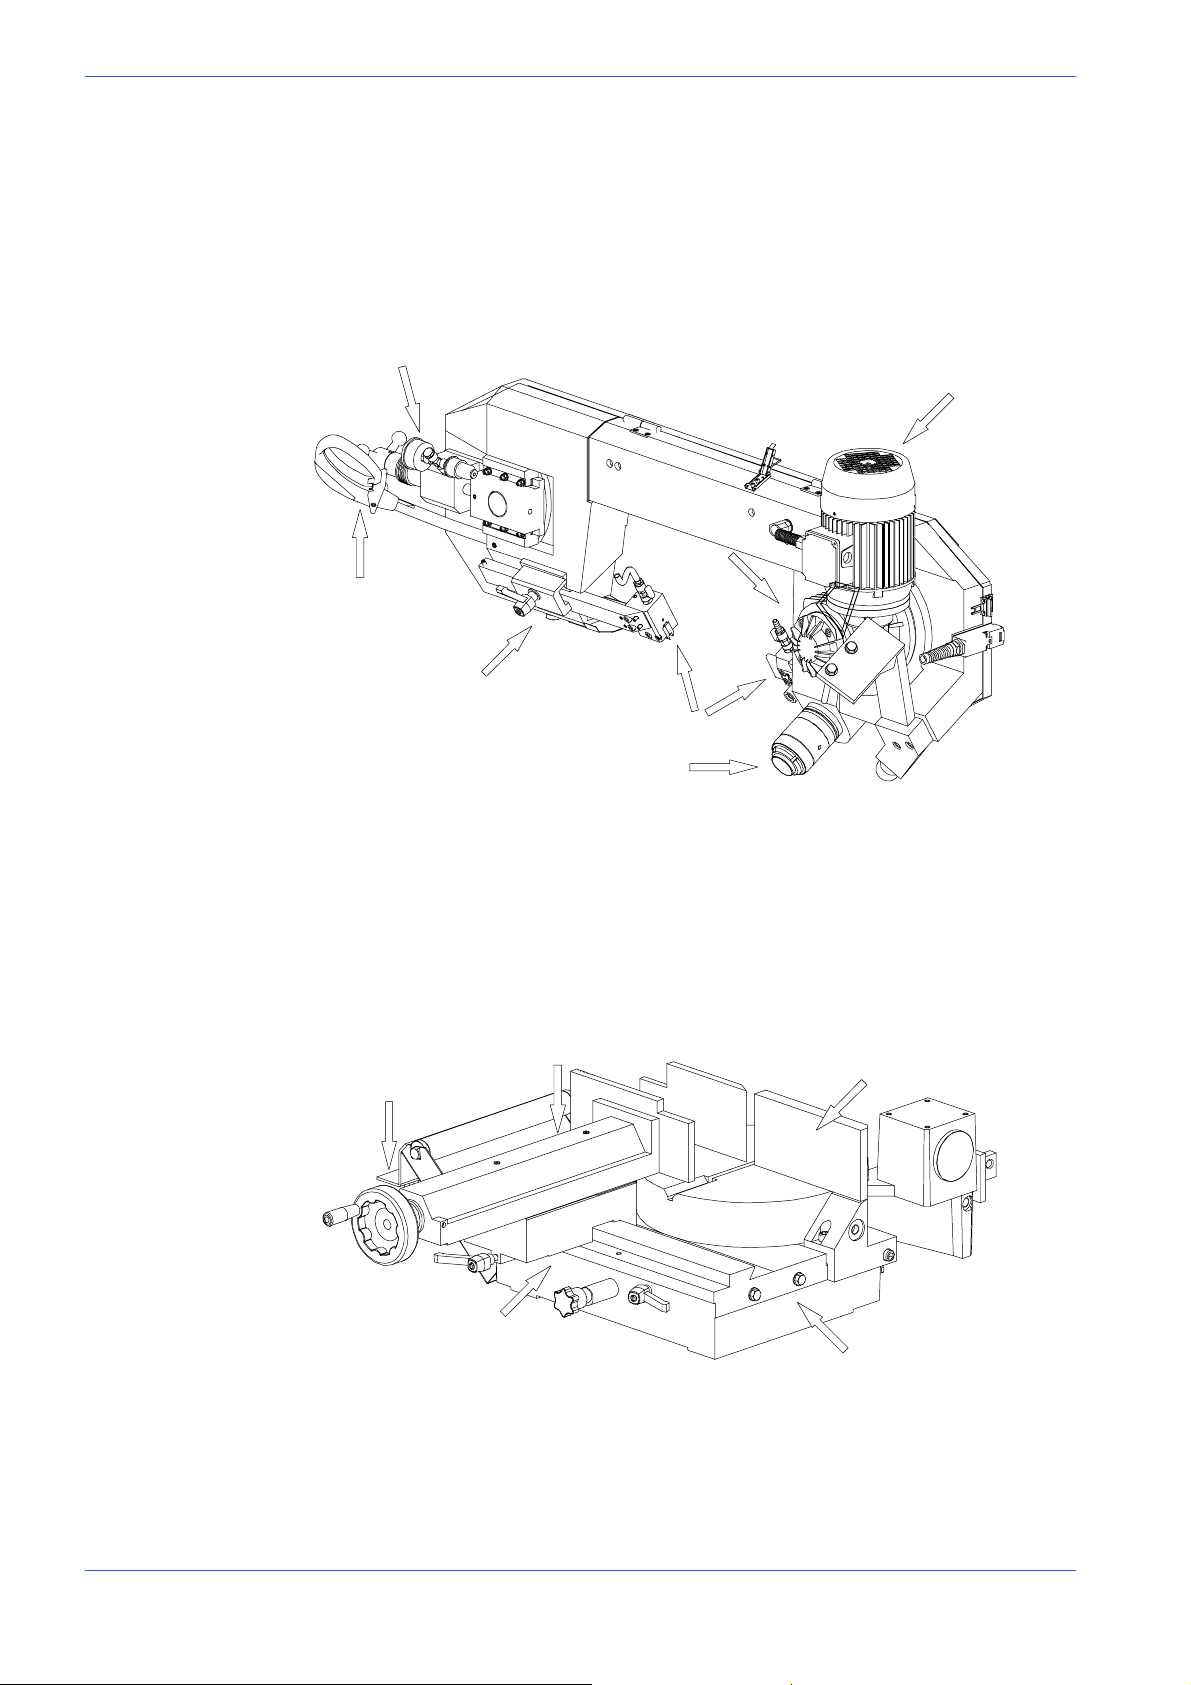
Cutting head
The cutting head is the unit that cuts the material. It consists of a cast iron head
on which the following are mounted: the band saw, the blade guide components,
the blade tensioner components, the transmission box and the spindle motor. The
cutting head is limited in its movements by the joint on the work table, and its
cutting stroke is manually guided by the operator.
Handwheel
Motor
Transmission box
Handgrip
Vice
Blade guide head plate
Blade guide heads
Head joint pivot
The vice is the unit that clamps the workpiece in place during cutting; it consists
ofavicesupport,commonlyknownasaleadnut,fixedtotheworktable,anda
lead screw with a slideway on which the mobile jaw is mounted. The vice is
operated manually by a handwheel, or by a pneumatic cylinder in the MA version
(optional).
Slideway
Turntable
Handwheel
Vice support
(lead nut)
2--2 Use and maintenance manual DM 8
Fixed platform
Page 16
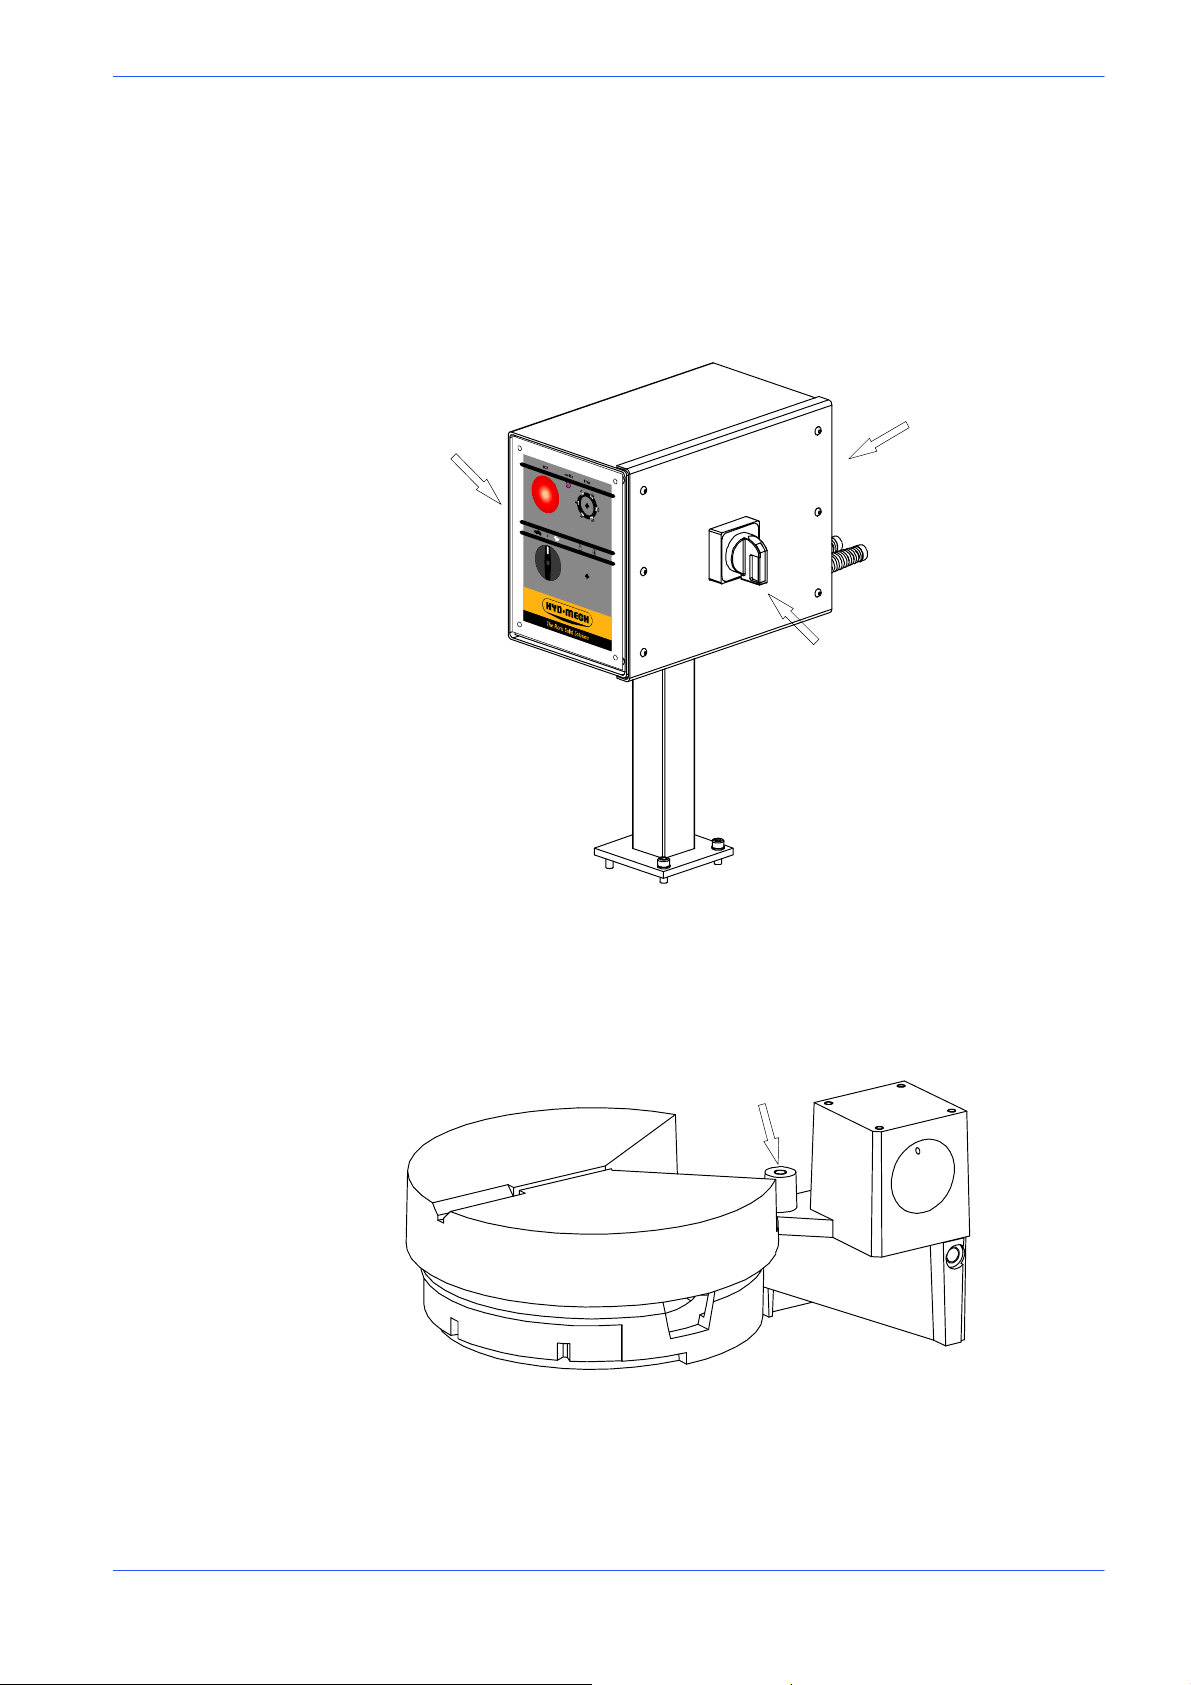
Control panel
Version 24DM
The control panel has a protection rating of IP 54 and contains the electrical
equipment. Access is gained by removing the screws fastening a safety panel,
while the operator’s safety is guaranteed by a key ---operated safety switch,
designed to prevent any intentional interference with the unit. In order to remove
the panel from its mounting, the main switch has to be shifted to 0 (OFF), which
automatically cuts off the electrical supply.
Panel fastened by
Control
panel
Main switch
screws
Turntable
A cast iron casting forms the fulcrum for the cutting head, and the support for the
work table and the control panel. Releasing the locking lever on the slideway
allows the cutting head to be rotated to the right and to the left.
Cutting head mechanical limiting switch
Functional parts 2--3
Page 17
MEP S.p.A.
Base
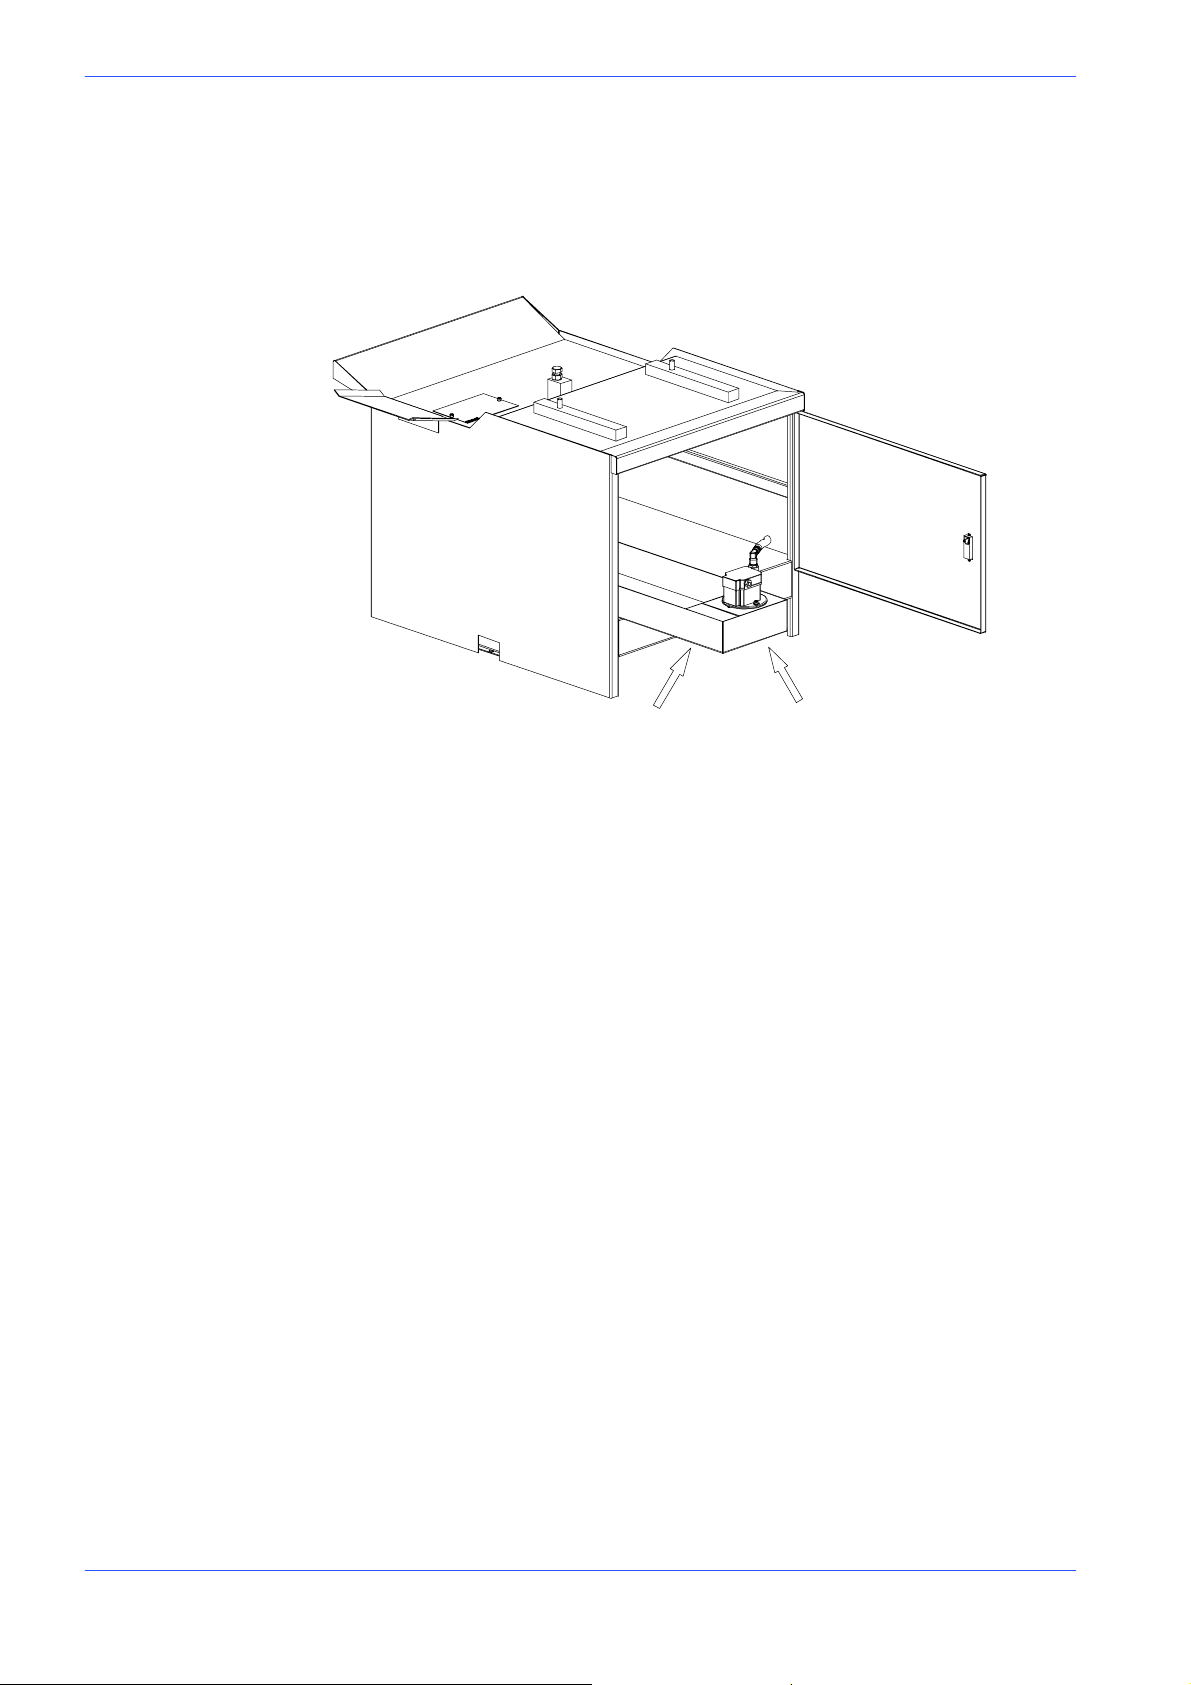
On opening the door in the base, you will find the air treatment unit (optional
extra only on versions with MA automatic vice) and the drawer with the coolant,
complete with electric pump.
Lubricant/coolant tank
Electric pump
2--4 Use and maintenance manual DM 8
Page 18

Safety and
accident
prevention
The DM 8 has been designed and produced in accordance with European
standards. For the correct use of the machine we recommend that the instructions contained in this chapter are carefully followed.
Use of the machine
The DM 8 band saw cutting machine is intended exclusively for cutting metallic
materials, ferrous or non--- ferrous, in section or solid. Other types of material
and machining are not compatible with the specific technical characteristics of
the saw.
The employer is responsible for instructing the personnel who, in turn, are
obliged to inform the operator of any accident risks, safety devices, noise
emission and accident prevention regulations provided for by international
standards and national laws regarding the use of the machine. The operator must
be perfectly aware of the position and operation of all the machine controls.
3
Attention
The instructions, warnings and accident prevention standards in this manual must
be respected without question by all those concerned with the operation of the
machine.
The following definitions are those provided for by EC DIRECTIVE ON MA-
CHINERY No. 98/37/CE:
= ”Danger zones”: any zone in and/or around a machine in which the presence
of a person constitutes a risk for the safety and health of that person.
= ”Person exposed”: any person finding himself either completely or partly in a
danger zone.
= ”Operator”: the person or persons given the responsibility of installing, oper-
ating, adjusting, maintaining, cleaning, repairing or transporting the machine.
The manufacturer declines any responsibility whatsoever, either civil or
criminal, should there be unauthorized interference or replacement of one or
more parts or assemblies on the machine, or if accessories, tools and
consumable materials are used that are different from those recommended by
the manufacturer itself or if the machine is employed in a plant system and its
proper function is thereby altered.
3--1
Page 19
MEP S.p.A.
General recommendations
LIGHTING
Insufficient lighting for the types of operation envisaged could constitute a safety
hazard for the persons concerned. For this reason, the machine user must provide
lighting in the working area sufficient to eliminate all shadowy areas while also
avoiding any blinding light concentrations. (Reference standard ISO 8995 ---89
”Lighting in work environments”).
CONNECTIONS
Check that the power supply cables and pneumatic feed systems comply with the
maximum machine absorption values listed in the ”Machine Specification” tables;
replace i f necessary.
GROUNDING
The installation of the grounding system must comply with the requirements set
out in IEC STANDARD 204.
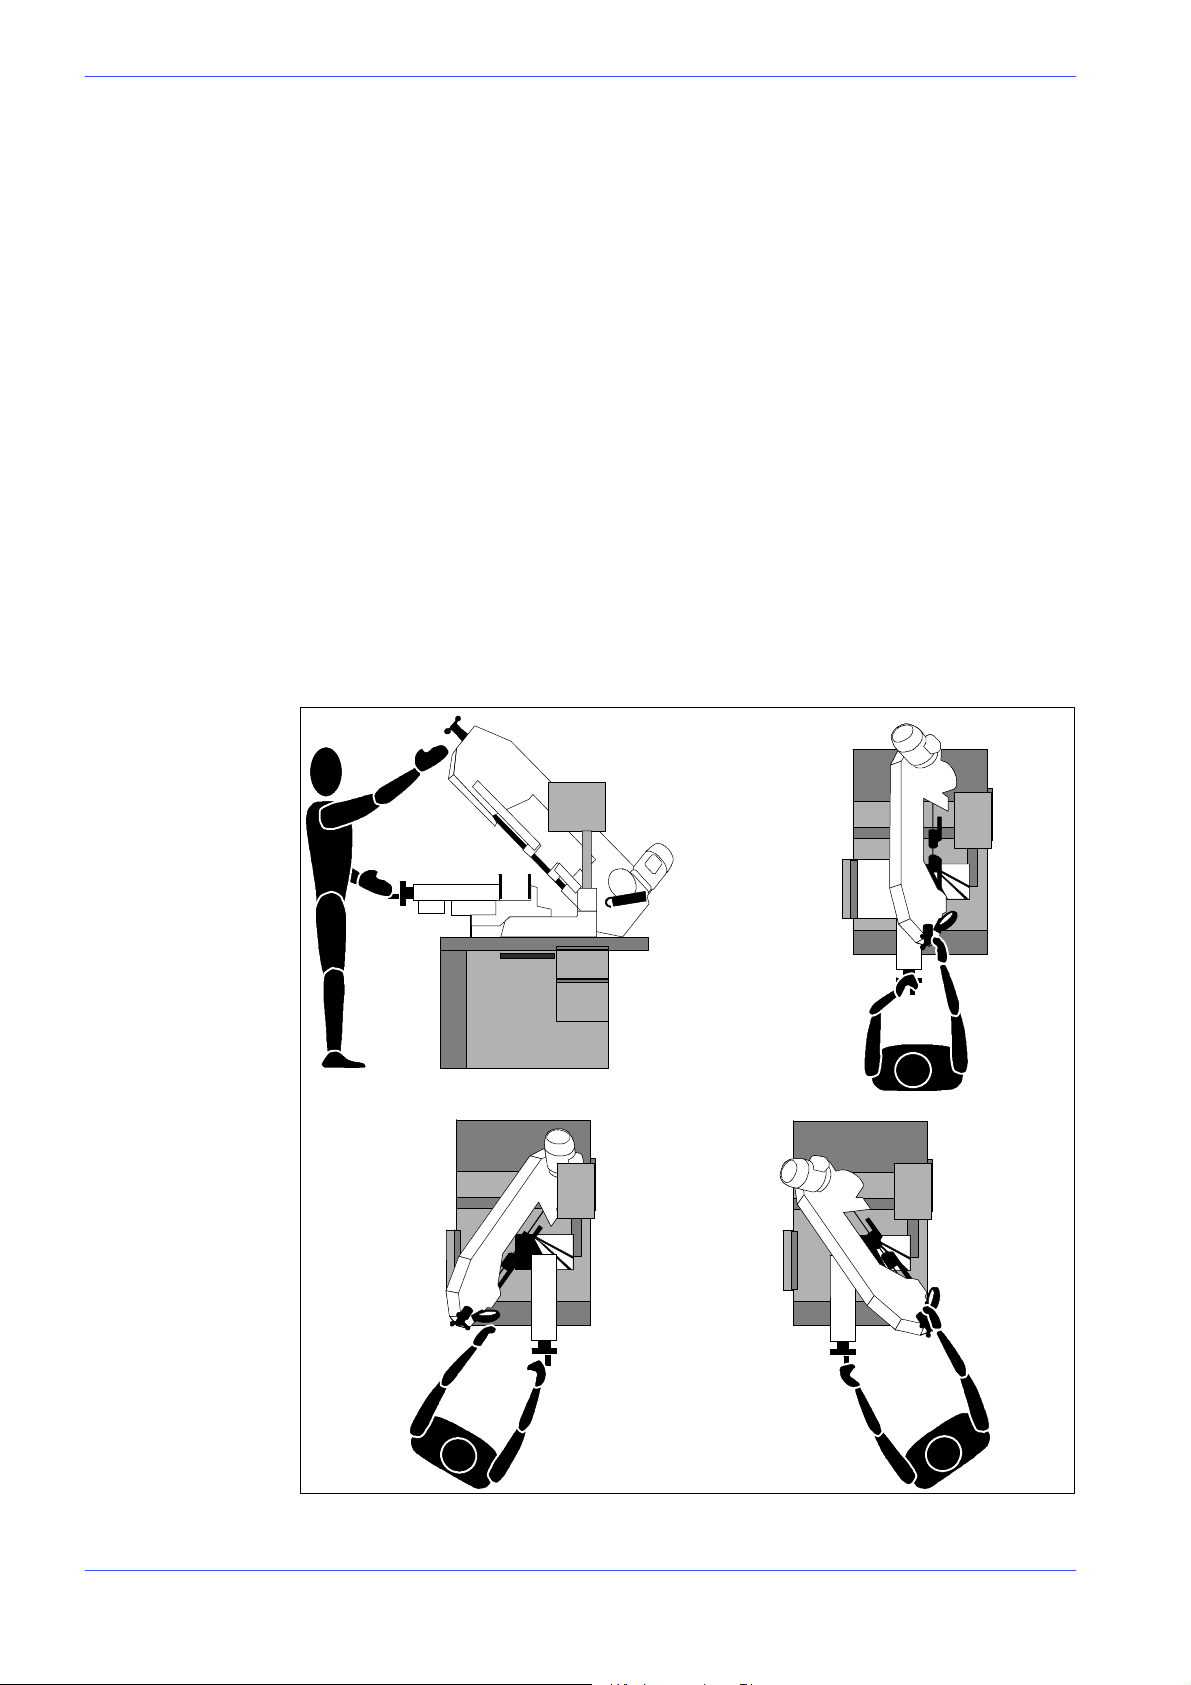
OPERATOR POSITION
The position of the operator controlling machine operations must be as shown in
the diagram below.
3--2 Use and maintenance manual DM 8
Page 20
Recommendations to the operator
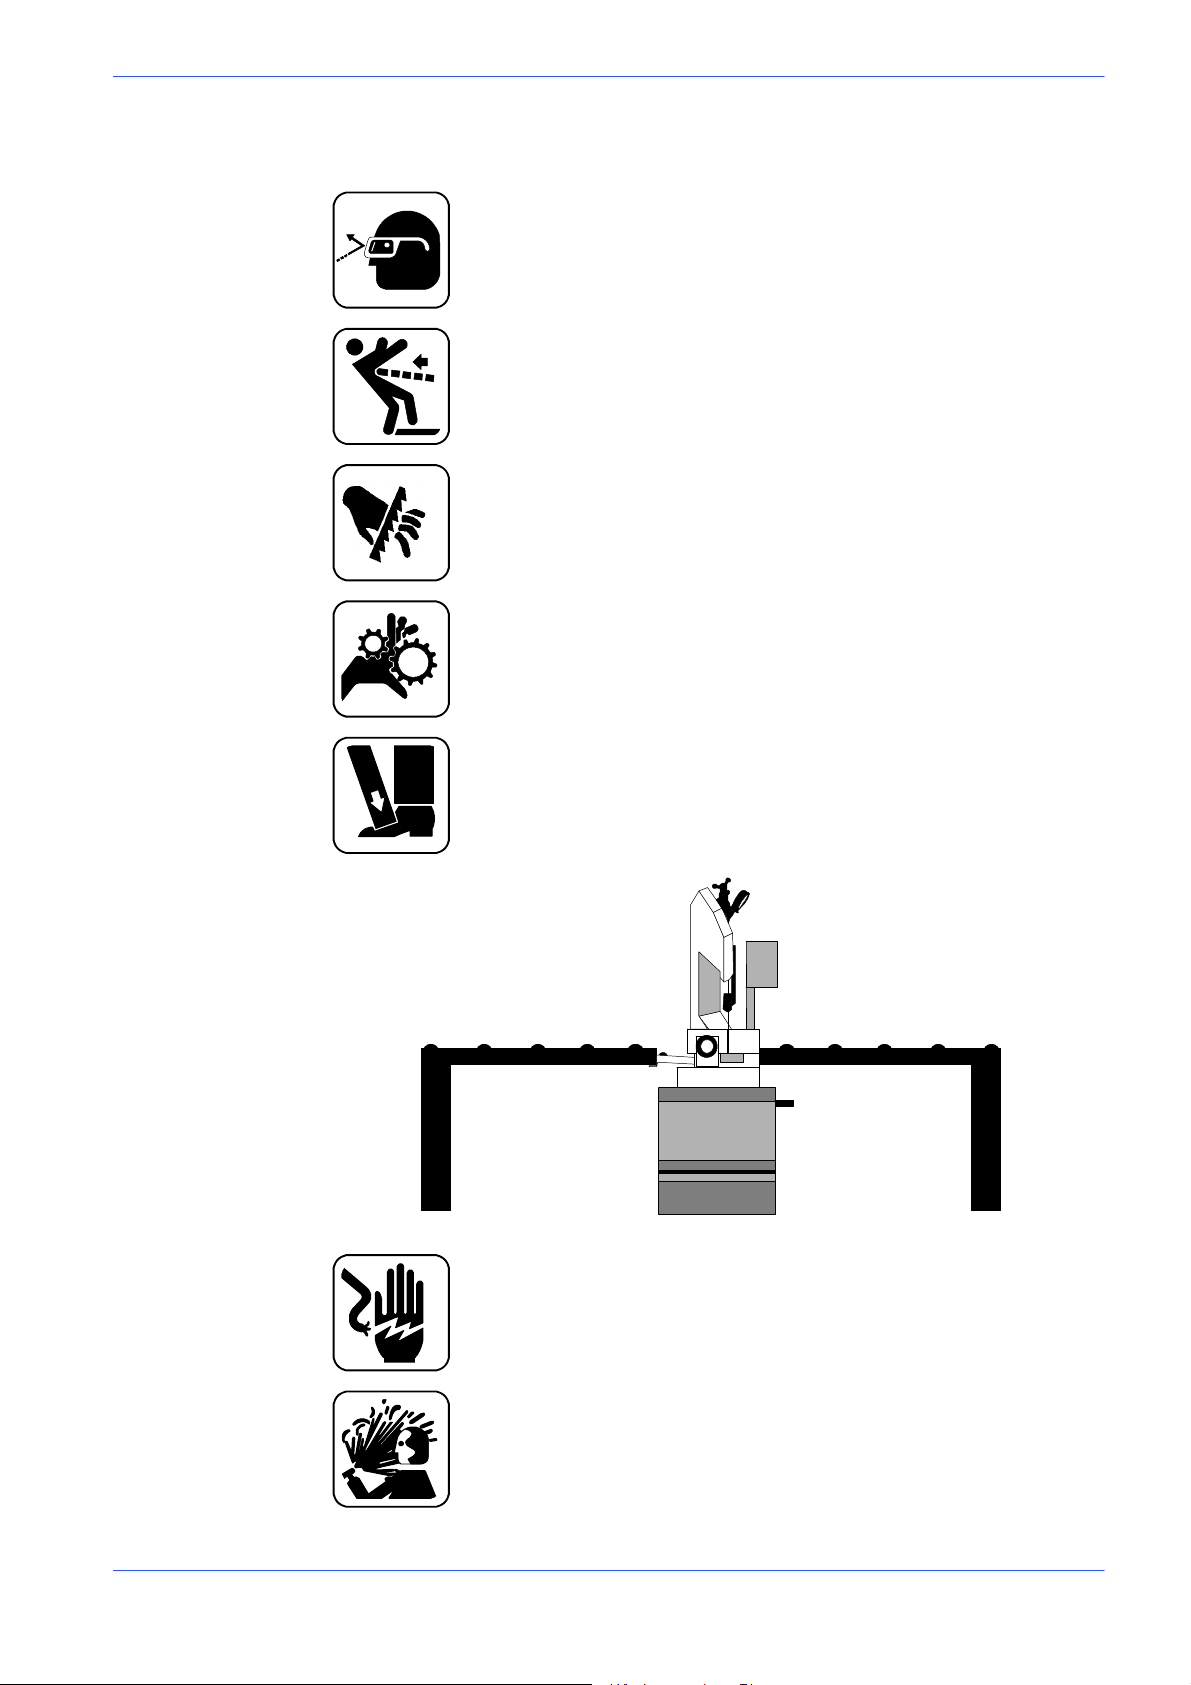
Always wear proper goggles or protective glasses.
Do not use the machine without the guards in place.
Do not allow hands to encroach on the cutting zone while the machine is
operating or still in motion.
Do not wear oversize clothing with long sleeves, oversize gloves, bracelets, necklaces or any other object that may become entangled in the machine during working; long hair must be tied back and bunched.
Version 24DM
Before starting cutting operations, support the material at both ends of
the machine using the support arm (standard) or OPTIONAL accessories
such as the feed and discharge roller tables shown in the diagram below.
FEED SIDE ROLLER
TABLE 1500 mm
(59.05 in.)
DISCHARGE SIDE
ROLLER TABLE 1500 mm
(59.05 in.)
Alwaysdisconnectthepowersupplytothemachinebeforecarryingout
any maintenance work whatsoever, including when the machine is operating abnormally.
Any maintenance work on the hydraulic or pneumatic systems must be
carried out only after the pressure in the system has been released.
Safety and accident prevention 3--3
Page 21
MEP S.p.A.
The operator must not perform any risky operations or operations not
required for the machining operation under way (e.g. remove swarf or
metal shavings from the machine while cutting).
Remove equipment, tools or any other objects from the cutting zone; always keep the working area as clean as possible.
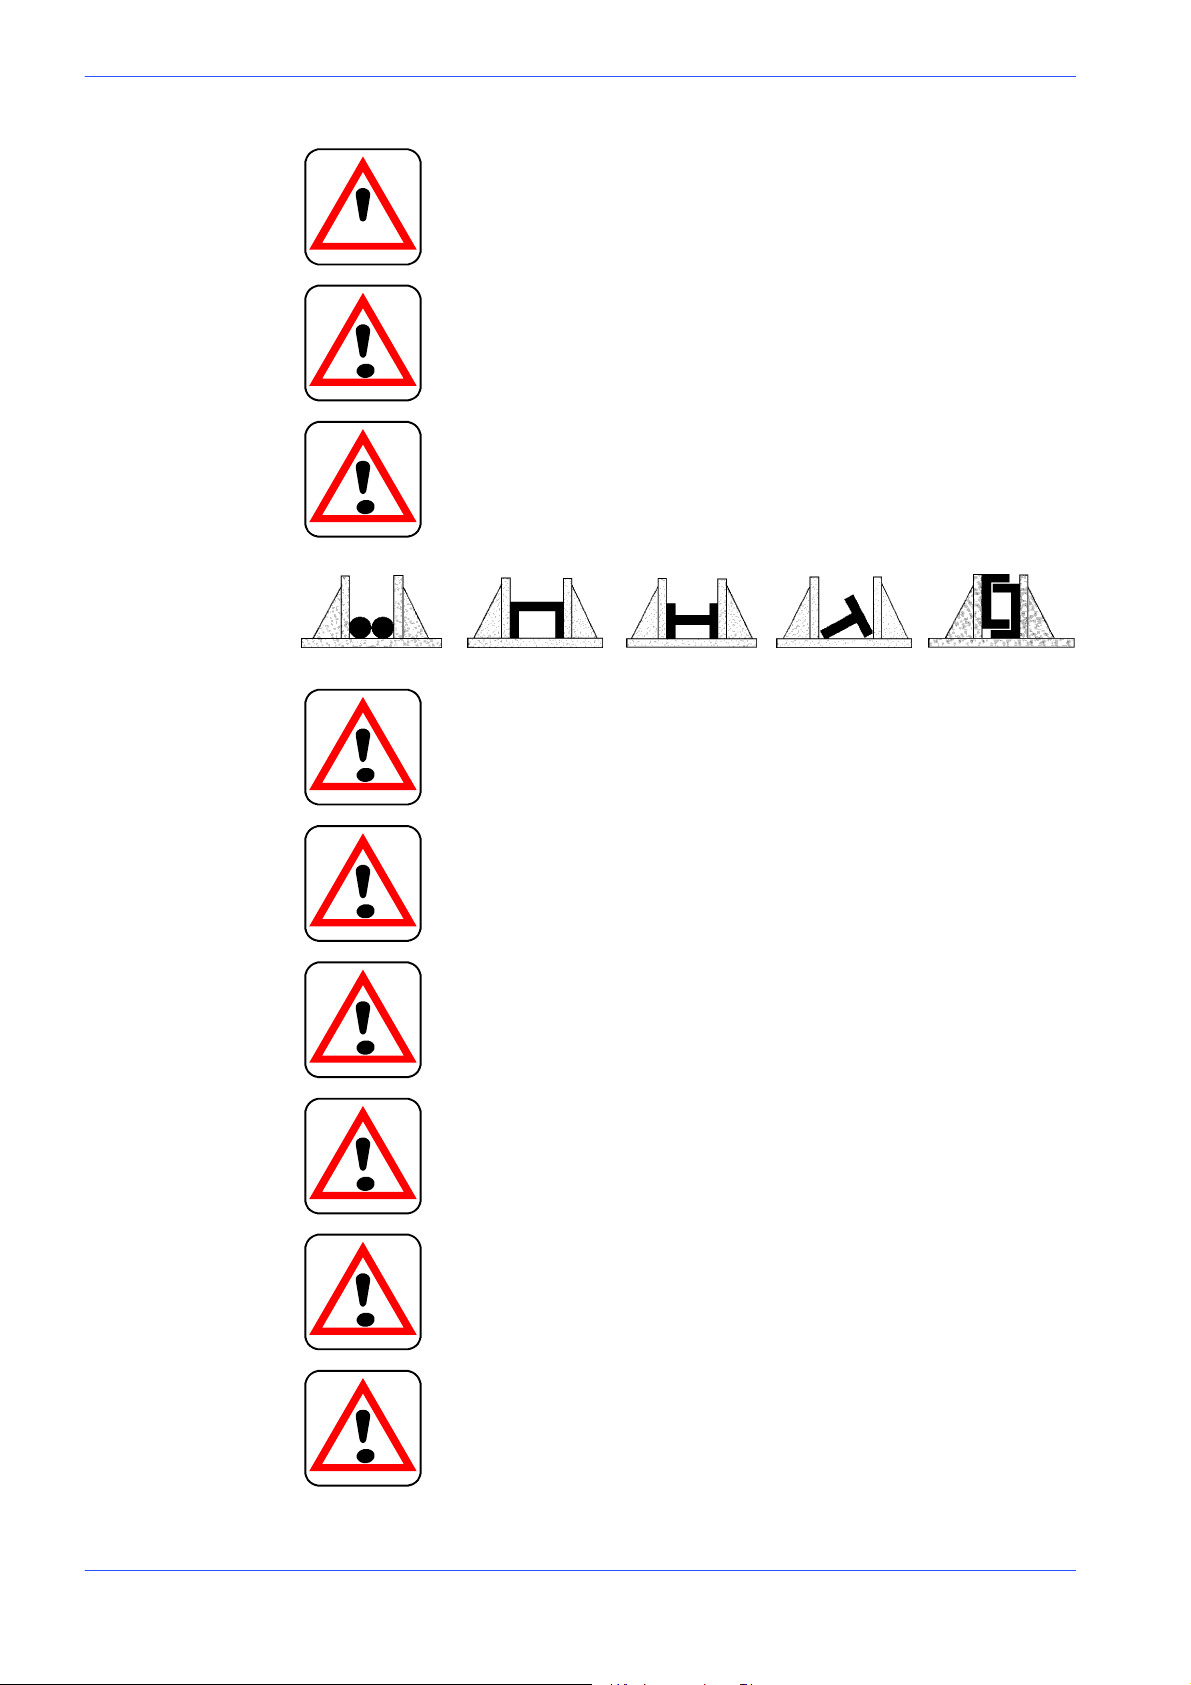
Before starting any cutting operations, ensure that the workpiece is securely held in the vice and the machine has been set correctly. A number
of examples of how to clamp different profiles correctly in our machines
are shown below.
Do not use the machine to cut pieces that exceed the capacity of the machine as listed in the machine specifications.
Never move the machine while it is cutting.
Do not use blades of different sizes to those recommended in the machine specifications.
When cutting very short pieces, make sure that they are not dragged behind the support shoulder, where they could jam in the blade.
When using the pneumatic vice (MA version) check that the jaws move
right up to and effectively clamp the workpiece, as the maximum travel is
only 8 mm, and check that the clamping procedure is correct.
When working on the band saw, wear gloves only when handling materials and for tool changing or adjustment operations. Only perform one
operation at a time and do not hold more than one item or operate more
than one device simultaneously. Keep hands as clean as possible.
3--4 Use and maintenance manual DM 8
Page 22
Machine safety devices
This use and maintenance manual is not intended purely as a guide for the use of
the machine in a strictly productive environment. It is also an instrument for
providing information on how to use the machine correctly and safely. The
following standards are those specified by the EEC Committee in directives
regarding safety of machinery, health and safety at the workplace, personal
protection, and safeguarding the environment. These standards have been
incorporated in the DM 8 band saw.
Version 24DM
Warni n g: if the blade jams in the cut, press the emergency stop push--button immediately. If this does not free the blade, slowly loosen the
vice, remove the piece and check the blade or blade teeth for breakage.
Replace the blade if necessary.
Before carrying out any repair work on the machine, consult the MEP
Technical Assistance Service: this can be done through a representative
in the country of use of the machine.
Reference standards
MACHINE SAFETY
= EEC Directive no. 98/37/CE of 14.06.1989, known as ”Machines Directive”
= EEC directive no. 89/336 ”EMC --- Electromagnetic Compatibility”
= EEC Directive no. 73/23 known a s ”Low voltage directive”
HEALTH AND SAFETY AT THE WORKPLACE
= EEC Directive no. 80/1107; 83/447; 86/188; 88/188; 88/642 for the protection of
workers against risks caused by exposure to physical, chemical and biological
agents while working.
= EEC Directive no. 89/391 and Special EEC Directives nos. 89/654 and 89/655
for improvements in health and safety at the workplace.
= EEC Directive no. 90/394 for the protection of workers against risks deriving
from exposure at work to substances likely to cause cancer.
= EEC Directive nos. 77/576 and 79/640 on safety signs at work.
PERSONAL PROTECTION
= EEC Directive nos. 89/656 and 89/686 on the use of personal protection de-
vices.
ENVIRONMENTAL PROTECTION
= EEC Directive no. 75/442 on waste disposal.
= EEC Directive no. 75/439 on the disposal of used oil.
Safety and accident prevention 3--5
Page 23
MEP S.p.A.
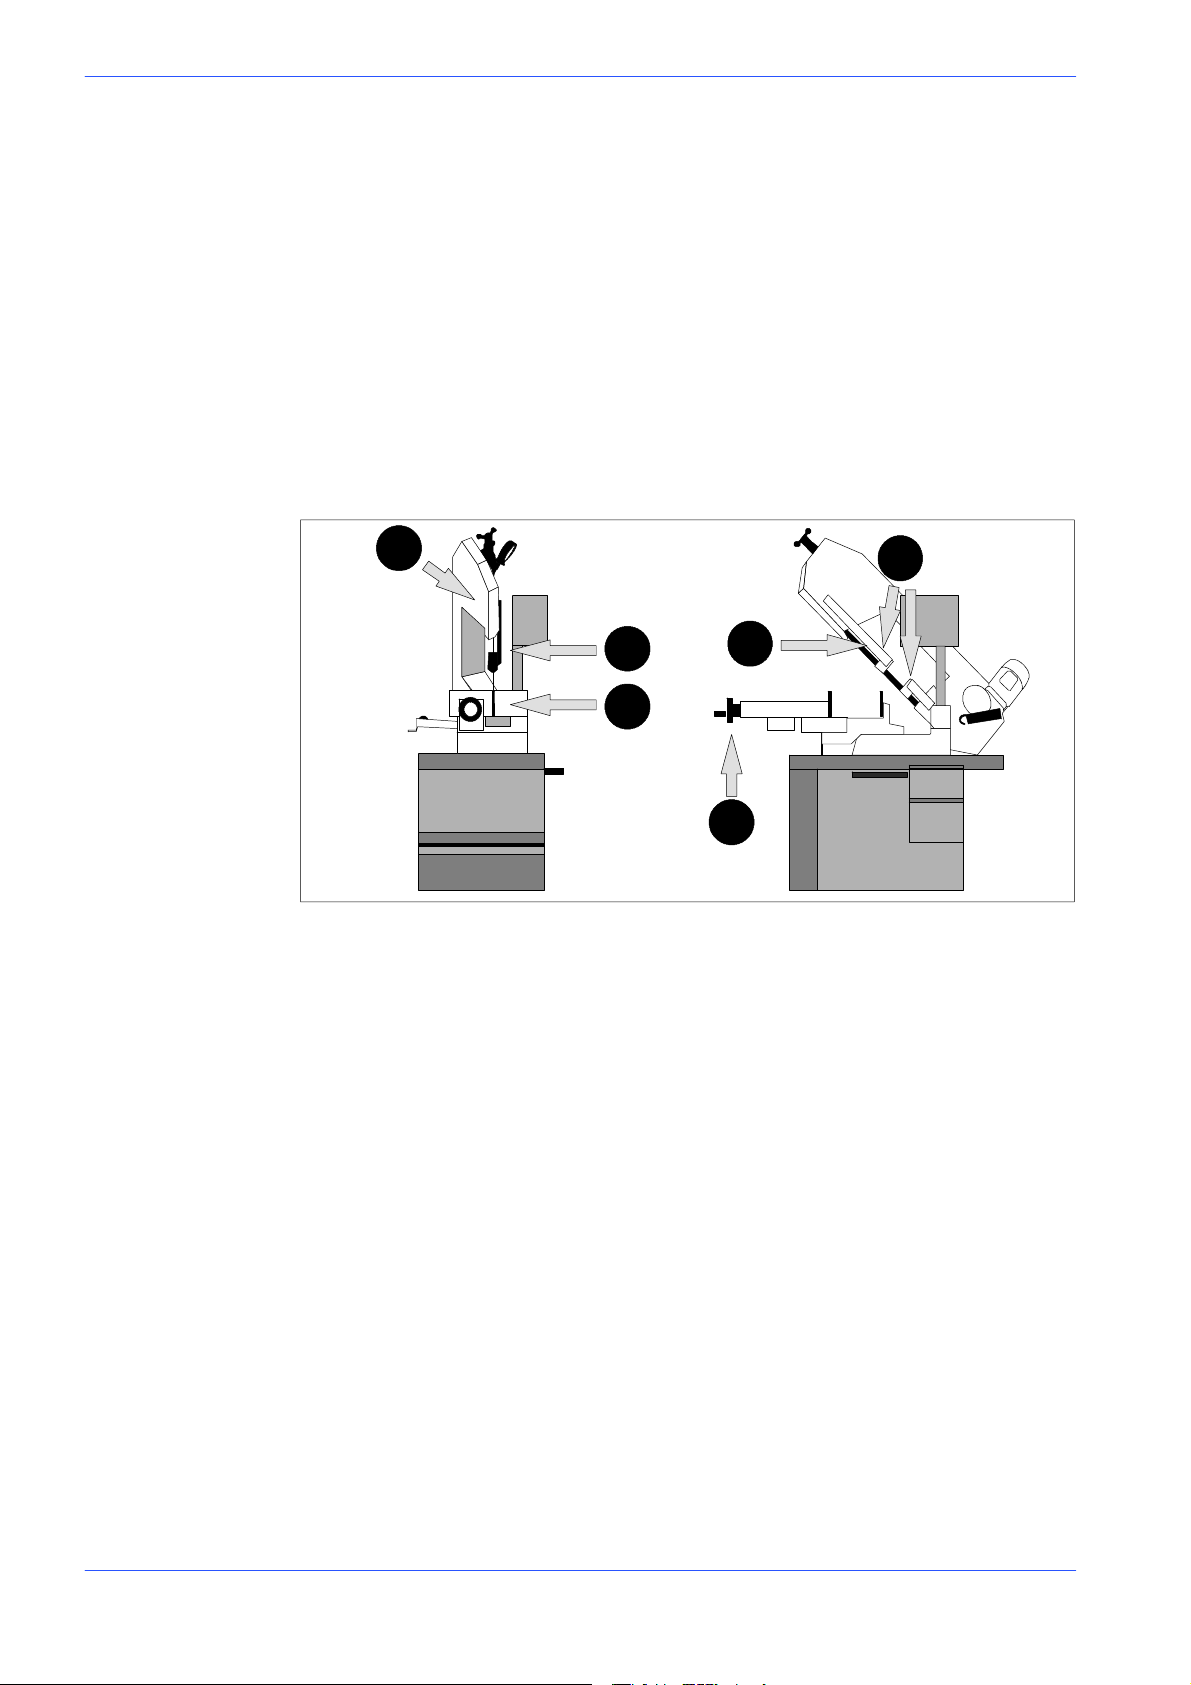
Safety Protection against accidental contact with the blade
1. Metal guard screwed to the rear blade guide head (machine side);
2. Metal guard screwed to the front blade guide head (operator side);
3. front head sliding support: when the head is at maximum aperture, the
support ensures that the blade is covered, leaving free only the part of the
blade engaged in the actual cutting, in accordance with Presidential Decree
no. 547/55, art. 108;
4. Hinged protective cover over blade, fitted with ”removable” closing devices;
5. Blade guide plates completely covering the blade teeth;
6. On the MA version, the vice is pneumatically operated by a manual control or
foot pedal and has a maximum travel of 8 mm. (0.31 in.) The jaw must be
moved from 2 to 3 mm. from the workpiece.
4
2
3
5
1
6
Electrical equipment
In accordance with Italian standard CEI 60204---1, April 1998, derived from
European Standard EN 60204 ---1, December 1997, publication IEC 204---1,
October 1997:
= access to electrical control panel limited by screws and panel ---lock device,
allowing panel to be opened only after the electricity supply has been turned
off;
= 24 Vac Control voltage for actuators, in accordance with chapter 6 or Euro-
pean Standard ”Control and indication circuits”, paragraph 2 ”Control Circuits” sub--- section 1 ”Preferential voltage values for control circuits”;
= plant short---circuit protection by means of rapid fuses, earthing of all plant
parts connected with work as well as all foreseeable accidental contact; a thermal---magnetic overload cutout switch shuts down the motor.
= protection from accidental start---up by a minimum voltage relay in case of
power failure.
3--6 Use and maintenance manual DM 8
Page 24
Version 24DM
Emergency devices
In accordance with IEC 204---1Standard:
= Chapter 5 Section 6 Sub --- section 1 ”Emergency stop device”:
«the emergency stop device immediately stops all dangerous and other functions
of the machine.»
= Chapter 6 Section 2 Sub---section 4 Point 7 ”Protective guards”:
«the removal of protective guards designed to prevent access to dangerous parts or
zones causes the machine to stop immediately; replacing the guards does not re-
start the functions, which must be reset»
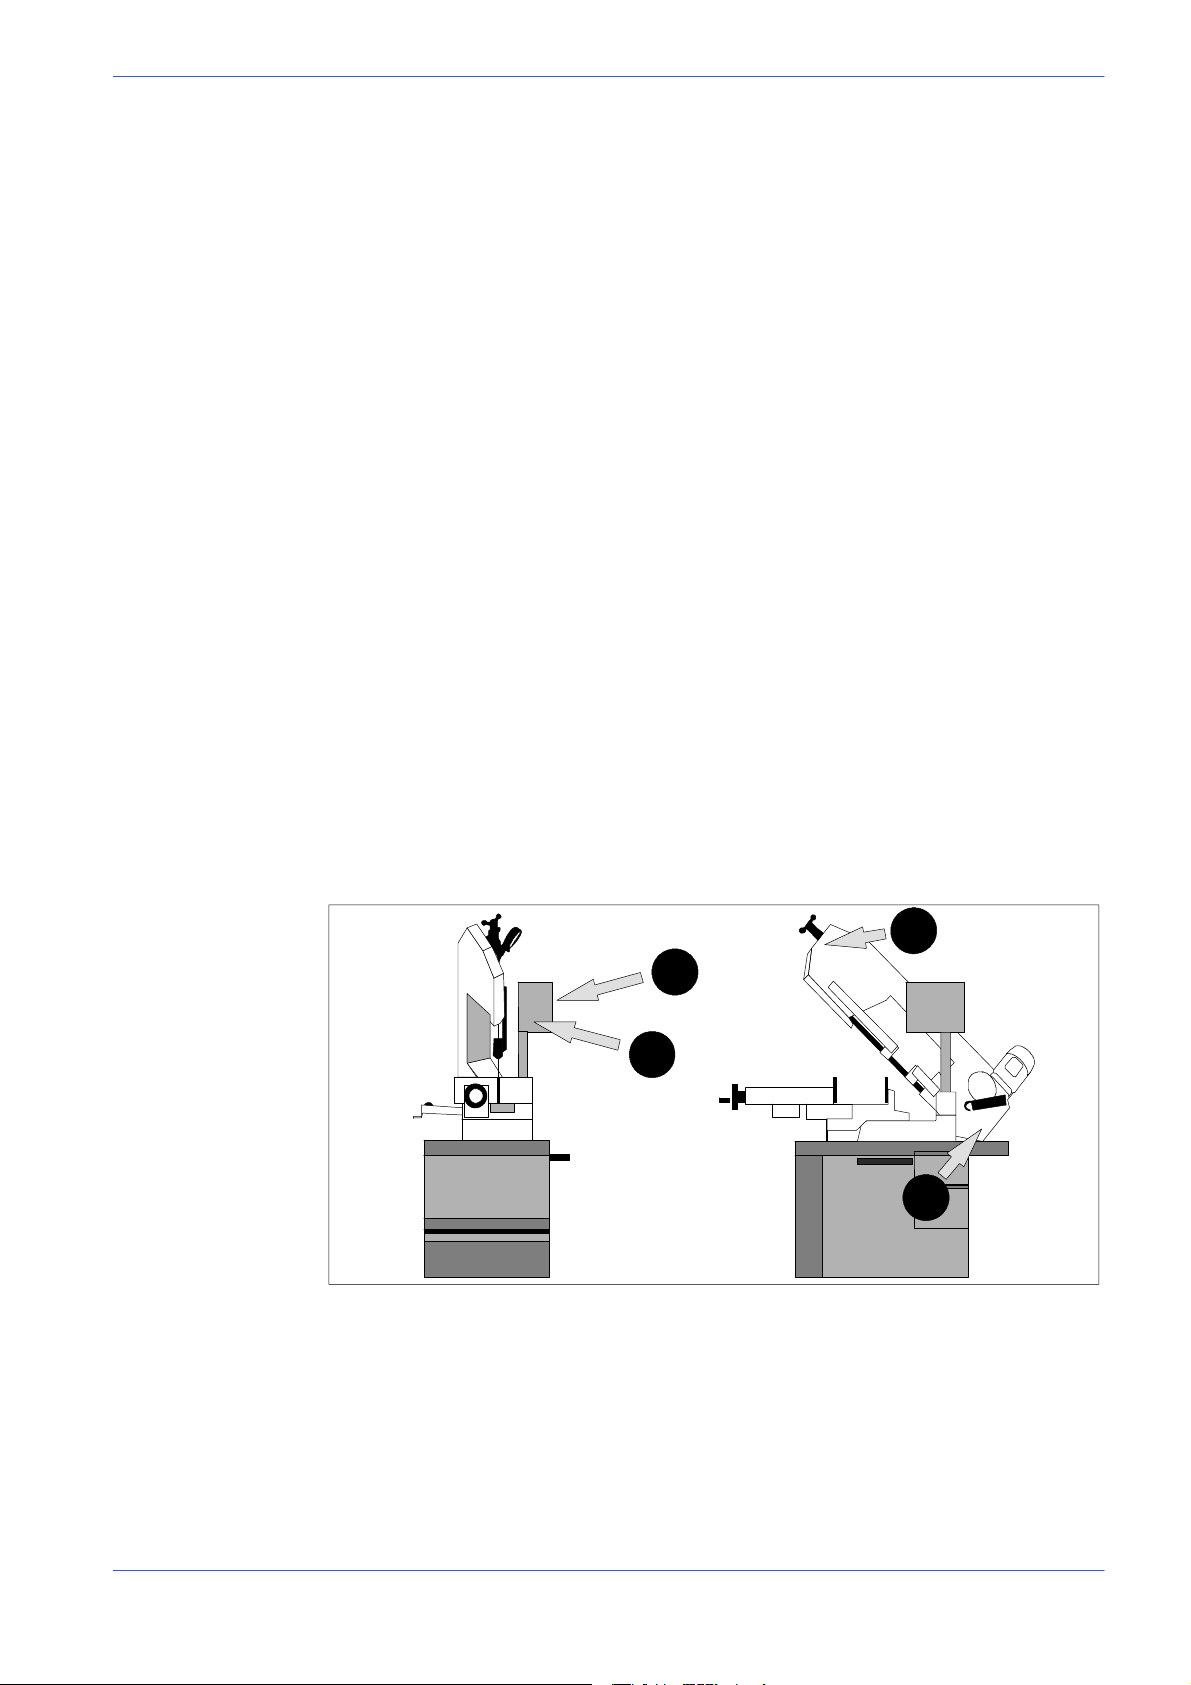
...emergency devices on DM 8:
1. Emergency stop: a no-- return mushroom push--button, colour red on yellow
background, is located on the control panel of the machine. To release the
push-- button, the actuator must be rotated by 45˚. After the emergency situation
has been resolved, the machine must be reset.
2. Automatic thermal--magnetic cutout switch with thermal--magnetic relay: the
machine auto switch, located on the control panel, has two protection systems
against voltage drops. In the case of a voltage drop, all electrical components are
disengaged, the machine stops immediately, and automatic restart when the power
supply returns is inhibited. Another function is t hat of resetting the thermal relay
provided to protect against overcurrents.
3. Pressure contact for monitoring blade tension: the machine stops immediately
if the blade breaks or if the tensioner cylinder pressure drops.
4. Protective guard for blade: a coded key microswitch is operated if the blade
cover is accidentally or intentionally opened during the machine operating cycle,
immediately shutting down all functions.
3
2
1
4
Safety and accident prevention 3--7
Page 25
MEP S.p.A.
Testn
o.3
Machine noise level
Noisecancausehearingdamage and represents one of the problems dealt with
by many countries by adopting their own regulations. In accordance with the EEC
Machine Directive no. 98/37/CE we list the standards that specify noise levels for
machine tools. This chapter publishes the noise levels produced by the DM 8
during its various operating phases and the methods used for measuring these
levels. The Italian standard relating to this aspect is D.M. no. 277/91, drawn
from EEC Directives no. 80/1107EEC, 82/605/EEC, 83/477/EEC, 86/188/EEC
and 88/642 /EEC.
Noise level measurement
Noise levels are measured using an instrument known as an Integrator noise--meter, which registers the equivalent continuous acoustic pressure level at the
work station.
The damage caused by noise depends on three parameters: level, frequency and
duration. The Leq equivalent level concept combines the three parameters and
supplies one overall indication. The L
and represents the continuous stationary level containing the same amount of
energy, expressed in dBA, as the real fluctuating level over the same time period.
is based on the principle of equal energy,
eq
Machine noise levels
Identification
Machine Type Band saw for metal
Model DM 8
Reference standard ISO 3746
Results
C 40 steel cut -- pipe 50x82 mm. (1.97x3.23 in.)
Description
Test n o . 1
Results
Description
Test n o . 2
Results
Bimetal band 2750x27x09 S.GLB Z 5/7
Bimetal band 108.27x1.06x0.03 S.GLB Z 5/7
MEAN NOISE LEVEL (Leq) 79.65 dB (A))
Environmental correction (K): 3.71 dB (A)
Peak noise level (Lw) 91.27 dB(A)
C 40 steel cut -- solid rod 150 mm. (5.90 in.) dia. Ø
Bimetal band 2750x27x09 M42 Z 3/4
Bimetal band 108.27x1.06x0.03 S.GLB Z 5/7
MEAN NOISE LEVEL (Leq) 78.43 dB(A)
Environmental correction (K) 3.71 dB(A)
Peak noise level (Lw) 88.64 dB(A)
34CND6 material cut --pipe 140x130 mm.
Description
Test n o . 3
Results
3--8 Use and maintenance manual DM 8
(5.51x5.11in.)
Bimetal band 2750x27x09 S.GLB Z 10/14
Bimetal band 108.27x1.06x0.03 S.GLB Z 5/7
MEAN NOISE LEVEL (Leq) 78.57 dB(A)
Environmental correction (K) 3.71 dB(A)
Peak noise level (Lw) 89.32 dB(A)
Page 26
Electromagnetic compatibility
As from 1 January 1996 all electrical and electronic appliances bearing the CE
marking that are sold on the European market must conform to Directive
89/336/EEC and decree law no. 476/92 concerning electromagnetic compatibility,
i.e. the compatibility of electrical/electronic devices and systems with the
electromagnetic environment in which they are located. The prescriptions regard
two specific aspects in particular:
1. “EMISSIONS: during its operation, the appliance or system must not emit spurious
electromagnetic signals of such magnitude as to contaminate the surrounding
electromagnetic environment beyond clearly prescribed limits”;
2. “IMMUNITY: the appliance or system must be able to operate correctly even when
it is placed in an electromagnetic environment that is contaminated by disturbances
of defined magnitude”.
The following text contains a list of the applied standards and the results of the
electromagnetic compatibility testing of machine model DM 8;
Test report no. 061200.
Version 24DM
Emissions
= EN 50081--2 (1994) Electromagnetic Compatibility -- Generic standard regarding
emissions. Part 2: Industrial Environment.
= EN 55011 (1999) Industrial, scientific, and medical radio frequency appliances
(ISM). Characteristics of radio frequency disturbance -- Limits and methods of
measurement.
= EN 55014--1 + A2 (1998--1999) Electromagnetic Compatibility -- Prescriptions for
domestic appliances, electric power tools, and similar equipment. Part 1: Standard
Emission in relation to product family.
CONDUCTED EMISSIONS
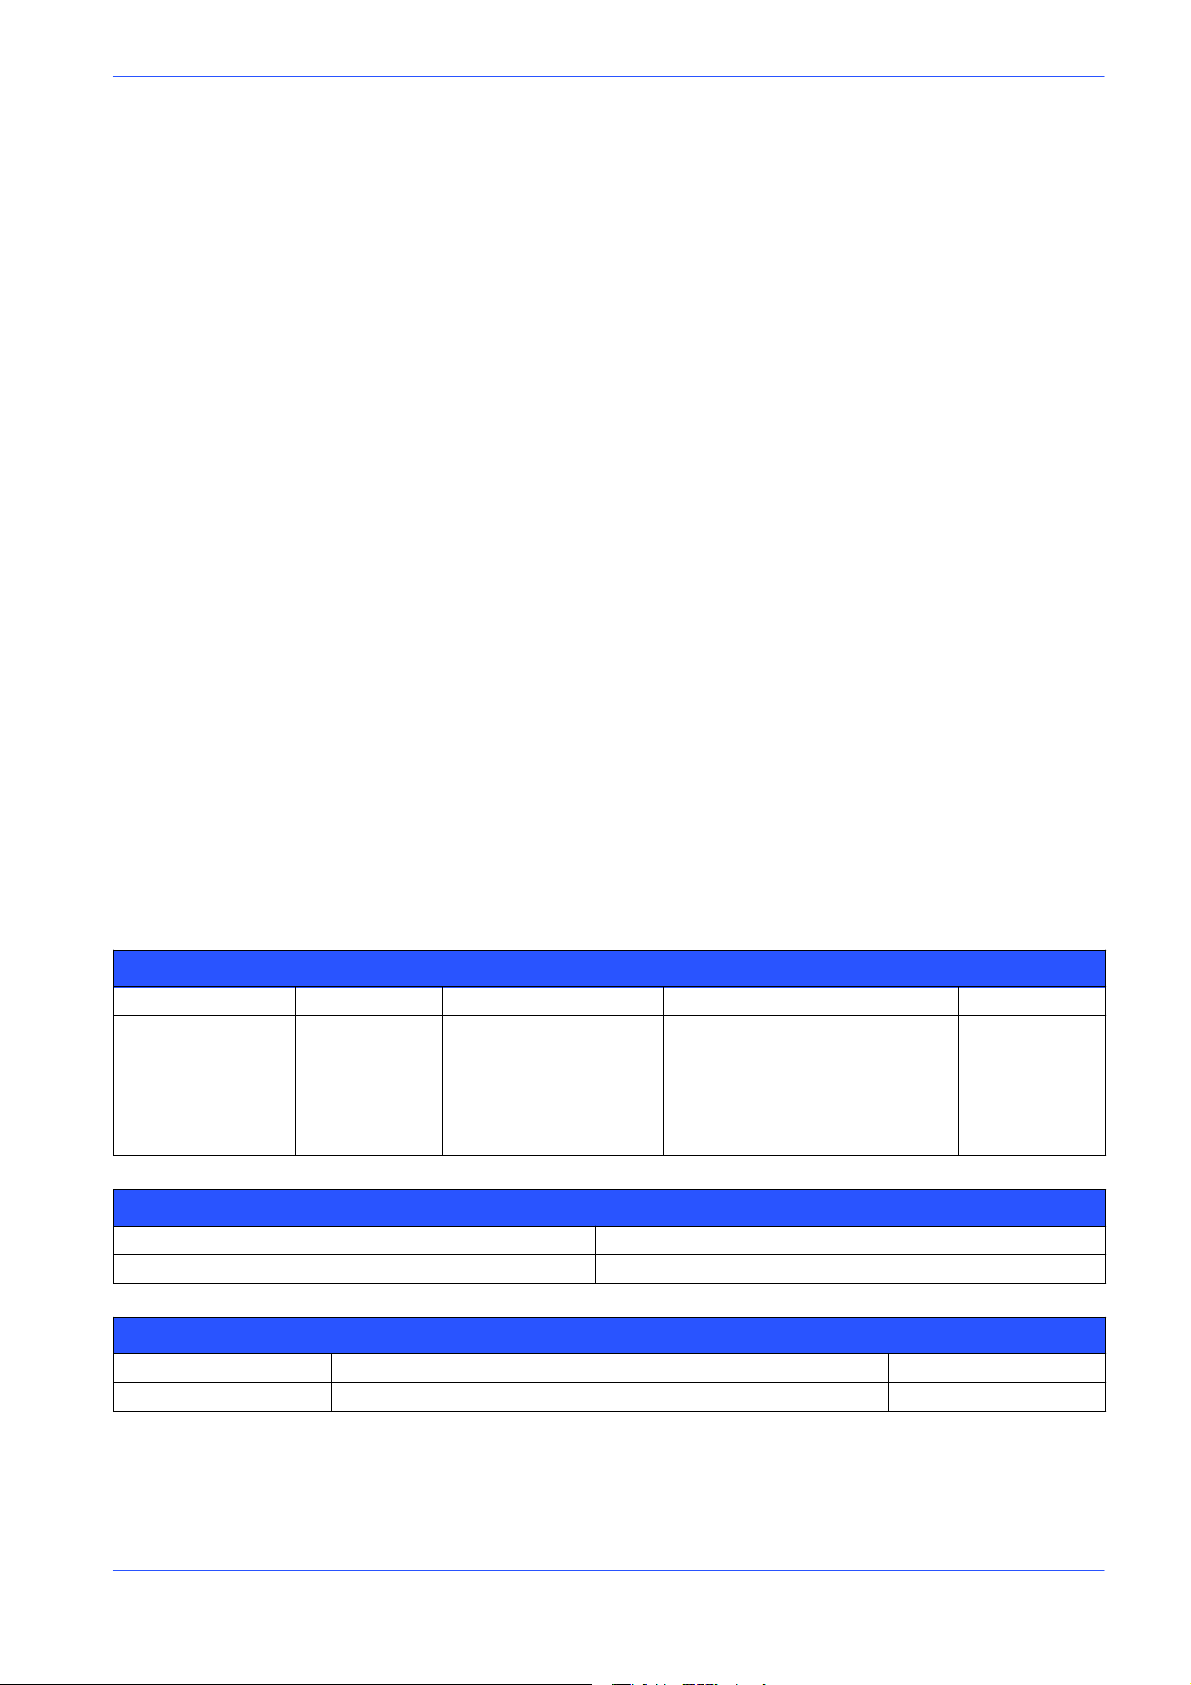
Gate A Freq. (MH z) Q --- p e a k l i m i t ( d B u V ) Mean value limit (dBuV) Result
A.C. mains 0.15 --- 0.5
(linear reduction with
0 . 5 --- 5
5 --- 3 0
66---56
log of frequency)
56
60
56---46
(linear reduction with log of fre-
quency)
46
50
COMPLIES
CONDUCTED EMISSIONS --- ANALYSIS OF INTERMITTENT DISTURBANCES
Gate Result
A.C. mains Not applicable
IRRADIATED EMIS SIONS
Gate Limit (class) Result
A.C. mains A Complies
Safety and accident prevention 3--9
Page 27

MEP S.p.A.
Immunity
= EN 50082--2 (1995) Electromagnetic Compatibility -- Generic standard on immuni-
ty. Part 2: Industrial Environment.
The EUT is deemed to fulfil the immunity requirements without testing, because
it contains no electonic control circuitry.
3--10 Use and maintenance manual DM 8
Page 28
Machine
installation
Packaging and storage
MEP S.p.A. use packing materials that guarantee the integrity and protection of
the machine during its transport to the customer.
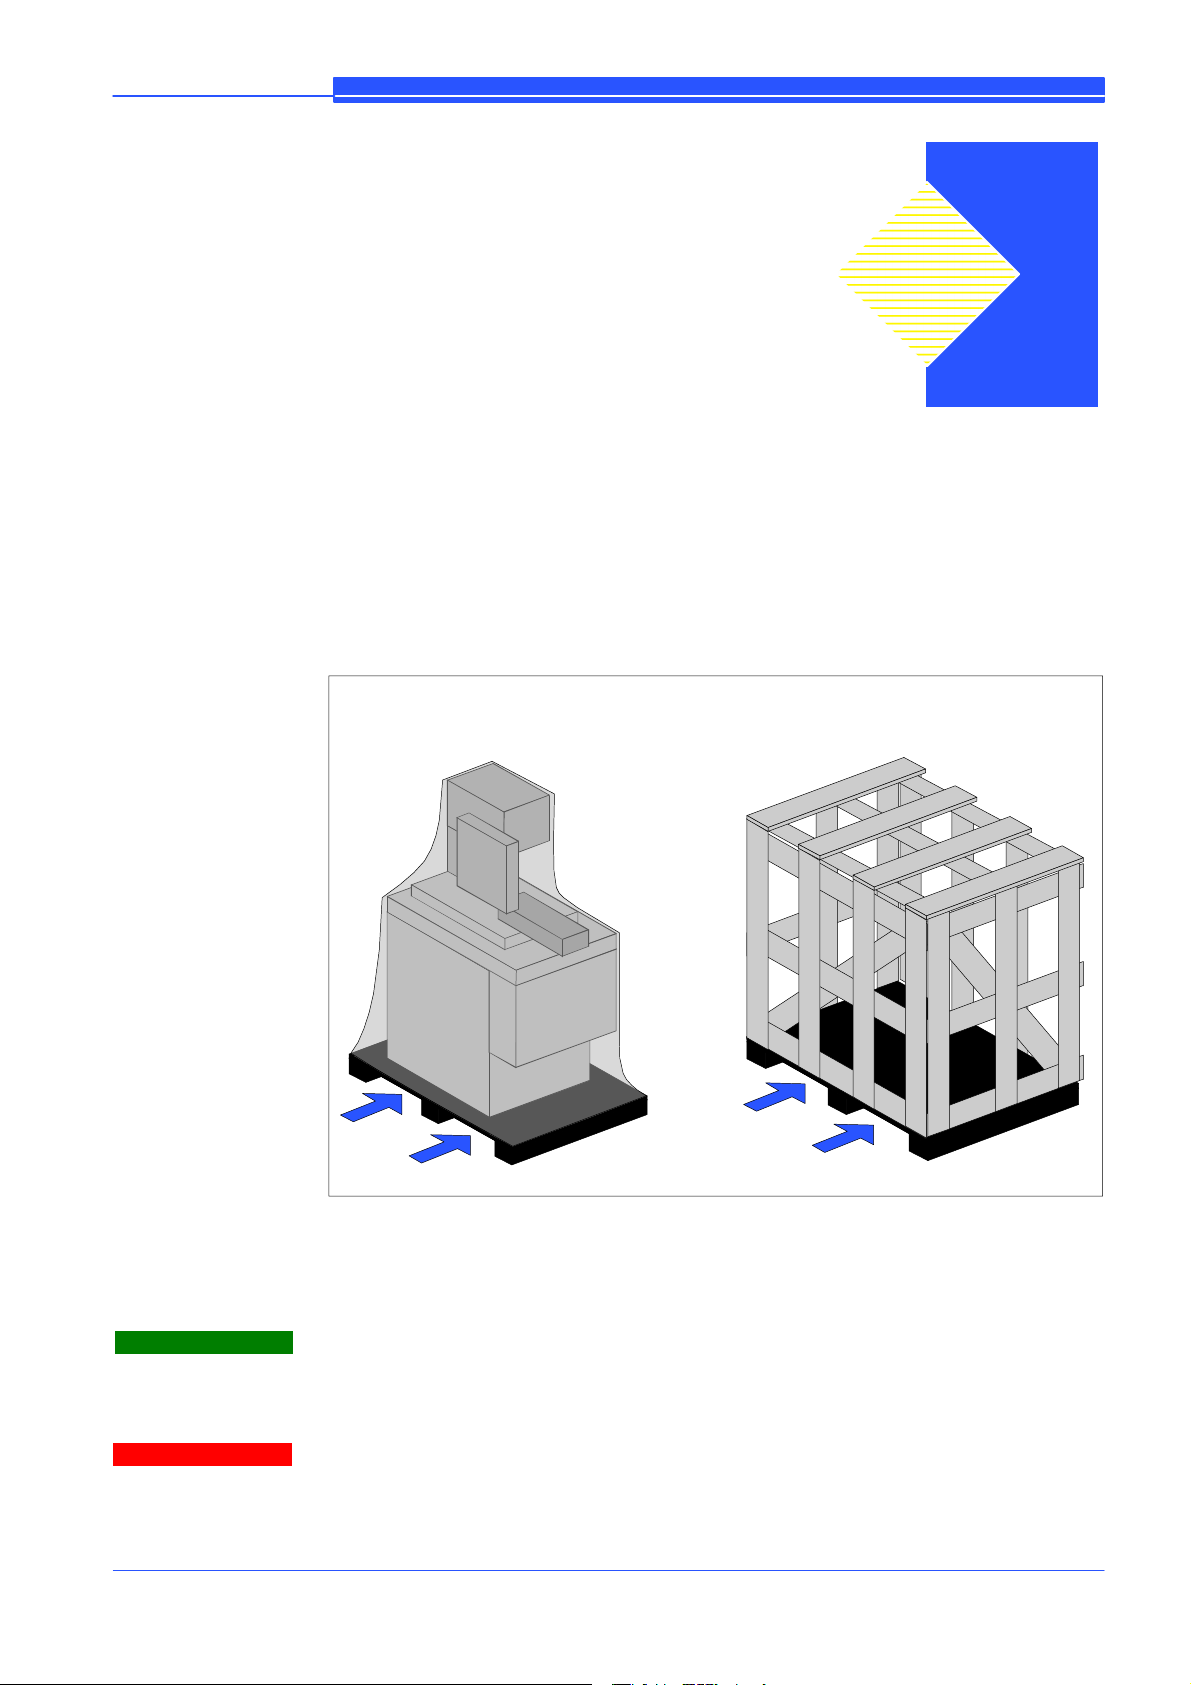
The type of packing differs according to the size, weight and destination.
Therefore the customer will receive the machine in one of two following ways:
4
¡©
Warning
Attention
¡ on a pallet with s traps and heat---shrink plastic;
© on a pallet with straps, heat---shrink plastic and a wooden crate.
In both cases, for correct balancing the machine must be handled using a
fork--lift truck, inserting the tines at the points indicated by the arrows, using
the reference marks on the crate itself.
Before carrying out lifting operations, make sure that the weight of the machine, as indicated on the crating or other packaging, is within the forklift truck
load limit.
4--1
Page 29
MEP S.p.A.
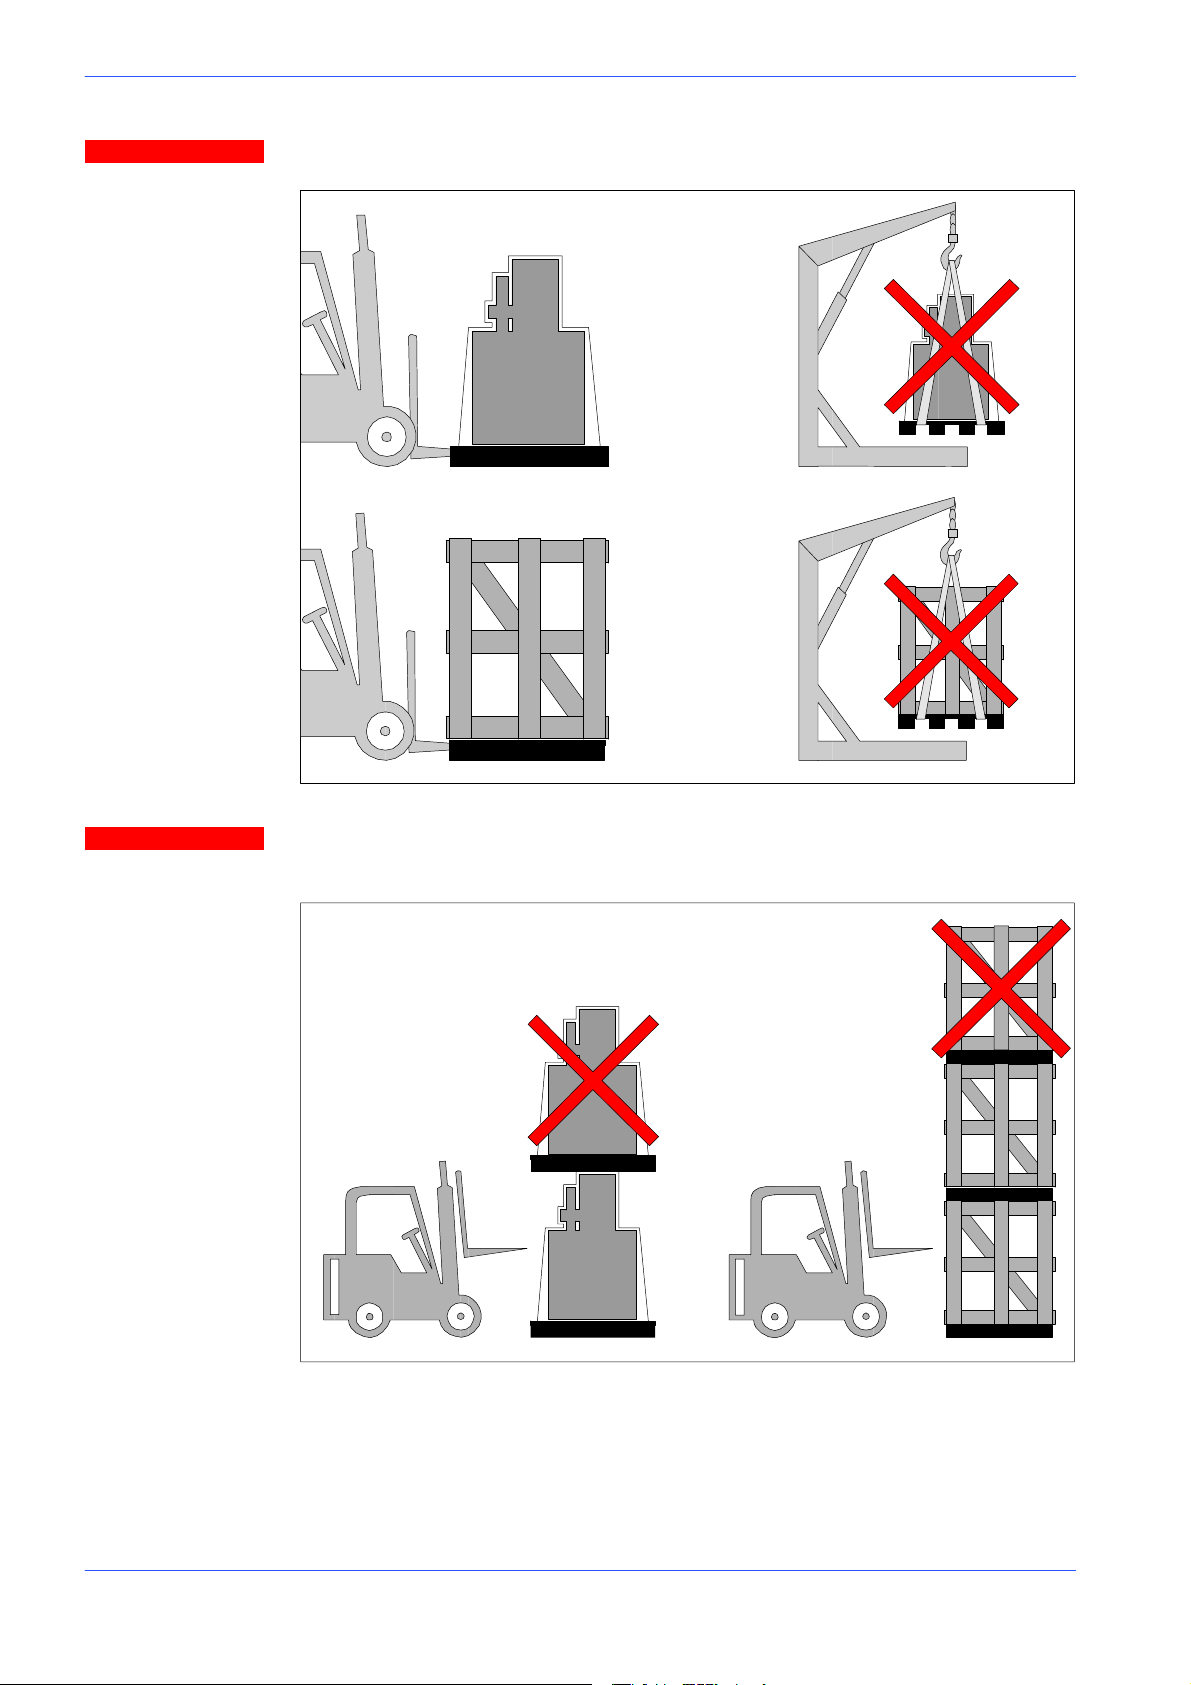
Attention
Do not handle the packed machine using slings.
Attention
When storing, machines palletized and shrink--wrapped must not be stacked
two high, and machines pallettized and crated must not be stacked three high.
To install the machine, first remove the packing, paying particular attention not to
cut any electric wires or hydraulic hoses; if necessary use pliers, a hammer and a
cutter.
Open crate in the illustrated order:
1. remove nails and lift the top of the cage;
4--2 Use and maintenance manual DM 8
Page 30
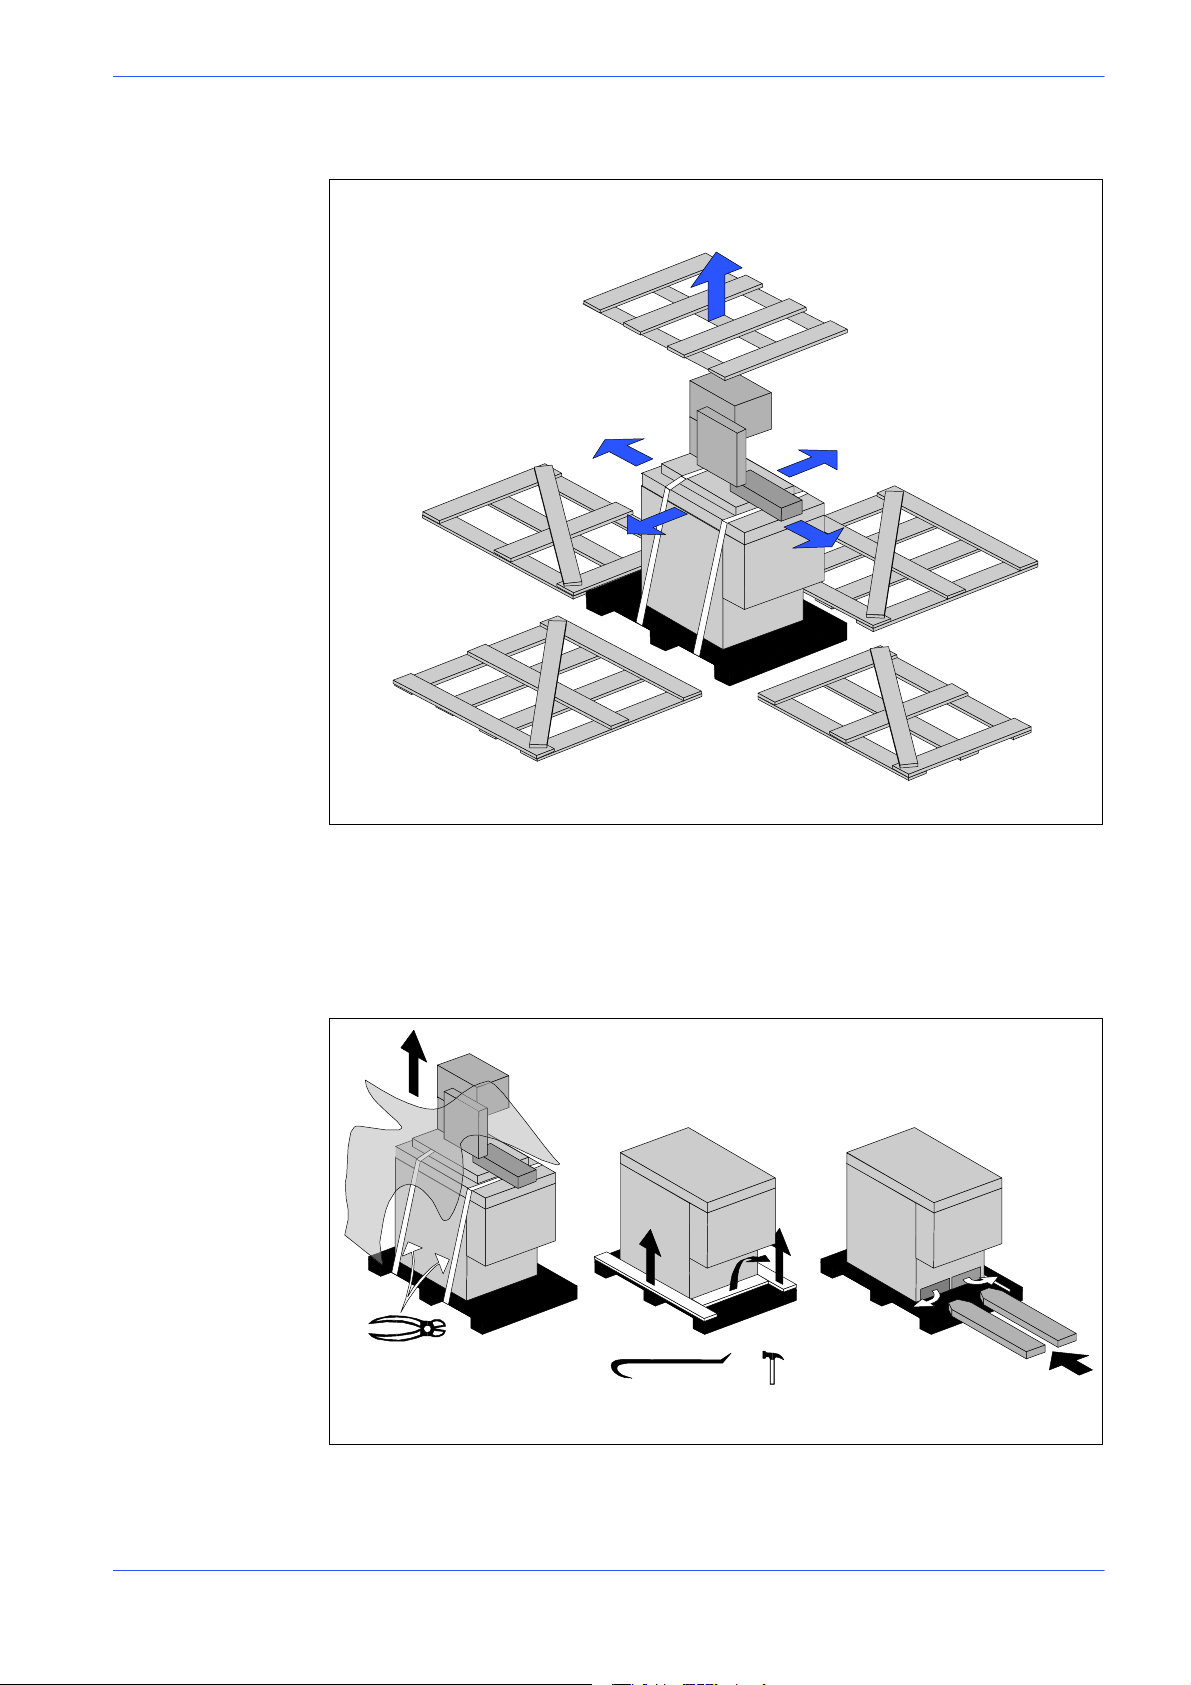
2. remove nails and lower walls;
©
Version 24DM
¡
©
©
3. remove heat---shrink covering;
4. remove the straps;
5. remove nails from pallet securing planks and remove planks;
6. remove the front panel and insert fork tines.
¢
©
£
¥
¤
Machine installation 4--3
Page 31
MEP S.p.A.
To locate the machine in the workplace, the machine dimensions and necessary
operator working space, including the spaces laid down in safety standards, must
be taken into account.
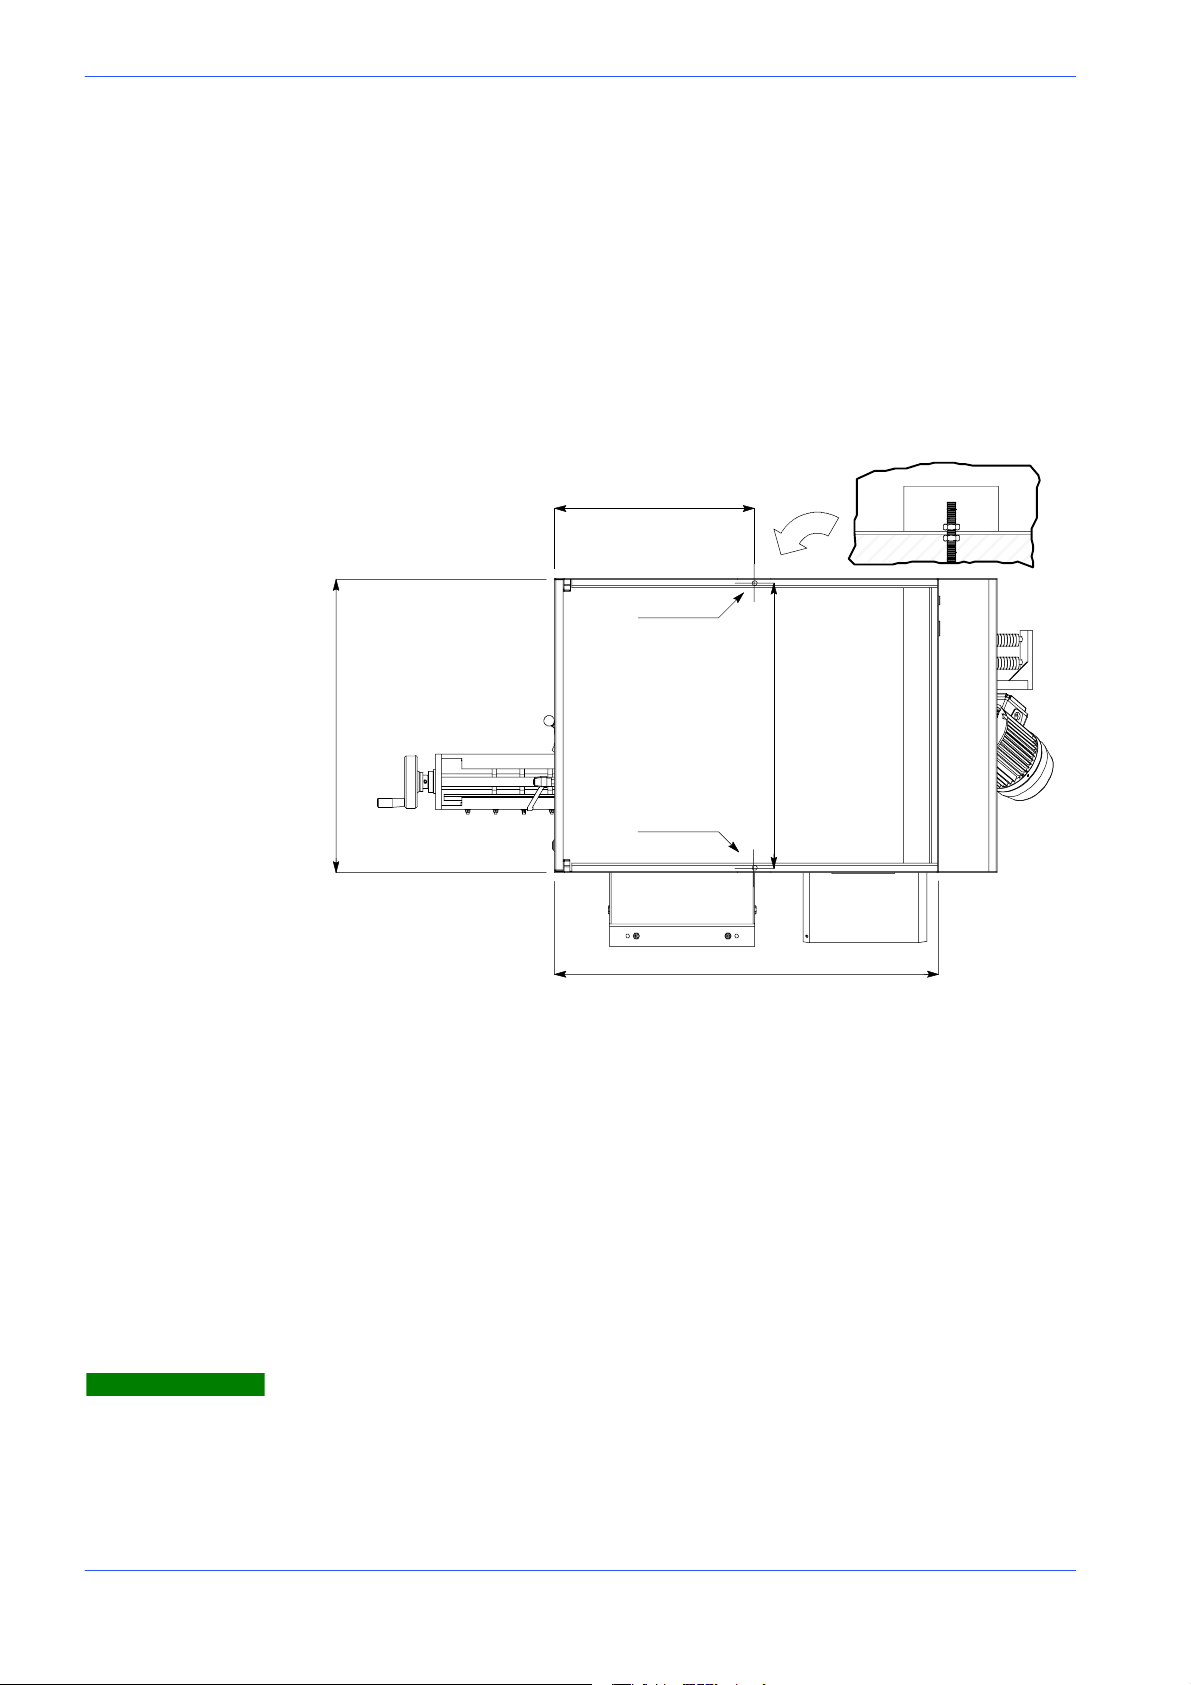
Anchoring the machine
The base of the machine is anchored to the floor by two permanent studs located
on the sides of the base. The studs are screwed into nuts previously sunk into the
concrete, and tightened from above with lock nuts. The schematic specifications
set out in Chapter 1 should be taken into account when positioning the machine.
(seen from below)
704,5 mm 27.74 in.
Minimum requirements
BASE
480 mm 18.90 in.
Ø12mm0.47in.
704,5 mm 27.74 in.
Ø12mm0.47in.
920 mm 36.22 in.
For the machine to function correctly, the room in which it is to be installed must
satisfy the following requirements:
- power supply voltage/frequency: refer to the values on the rating plate.
- Working pressure (MA version) not less than 6 Bar (87 psi) and not greater
than 8 Bar (116 psi);
- temperature of machine location: from --- 10 to + 50˚C;
- relative humidity: not more than 90%
- lighting: not less than 500 Lux;
Warning
The machine is already protected against voltage variations, but will only run
trouble--free if the variations do not exceed ± 10%.
4--4 Use and maintenance manual DM 8
Page 32

Check list
Version 24DM
Before starting installation, check that all the accessories, whether standard or
optional, supplied with the machine are present. The basic version of the DM 8
2---SPEED machine is supplied complete with:
- base with large swarf collection drawer, removable coolant tank and electropump for band saw lubrication/cooling;
- double return spring for head upstroke;
- hydraulic transducer for blade tension display;
- 2750x27x0.9 (108.27x1.06x0.03 in.) bimetal blade for solid and section materi-
als;
- Right/left slide locking unit, with quick locking/release;
- vice with rapid jaw positioning;
- blade cleaning brush;
- designed for transpallet handling systems;
- electric control panel (totally identifiable cabling, stand--- by, main switch with
lockable panel---closing device, speed switch, emergency device, thermal --magnetic overload cutout, minimum voltage relay, voltage drop protection, 24
V low ---voltage plant);
- blade protection behind and below blade guide heads;
- precision stops for cuts at 0˚,45˚,60˚ left and 45˚ right;
- Cut Control System (CCS);
- accessory kit.
The accessory kit bag is enclosed in the machine before packing; the following is a
list of the accessories:
- hexagonal keys: 4/10 mm;
- pipe wrench 10 mm;
- m e a s u r i ng r o d f o r c u t s --- t o --- m e a s u r e ;
- arm with roller, predisposed for roller table fitting on feed side;
- Use and Maintenance manual, including order form for parts in relevant user
language.
Optionals to be requested with original order:
- vice control pedal (only with MA version);
- 4/8 pole motor for 36/18 mt./min (11.21/5.61 ft./min) speed.
Optionals:
- Automatic Vice kit (MA);
- 2750x27x0.9 (108.27x1.06x0.03 in.) M2/M42 bimetal band saw;
- Electronic speed control (inverter) 20 to 90 mt/min (from 6.23 to 28.04 ft./
min);
- Ø 20 mm measuring rod for cuts to measure with ratchet wrench and lever;
- bar support;
- K60/K100 roller table on supply side --- kit 1500 mm. (59.05 in.);
- feed side roller table support;
- discharge side roller table adaptor;
- K60/K100 roller table for discharge side, 1500 mm (59.05 in.);
Machine installation 4--5
Page 33
MEP S.p.A.
- K60/K100 roller table for discharge side, 3000 mm (118.11 in.);
- K60/K100 roller table for discharge side, 4500 mm (177.16 in.);
- K60/K100 roller table for discharge side, 6000 mm (236.22 in.);
- 5 litres of emulsible oil.
Balancing the cutting head
Before making the electrical and pneumatic connections (MA version), the head
return springs must be tensioned to balance the cutting head weight. Using a 10
mm. wrench, tighten the screws until the distance between the first coil of the
spring and the bracket is 8 mm. (0.31 in.)
Connection to the compressed--air supply (MA version)
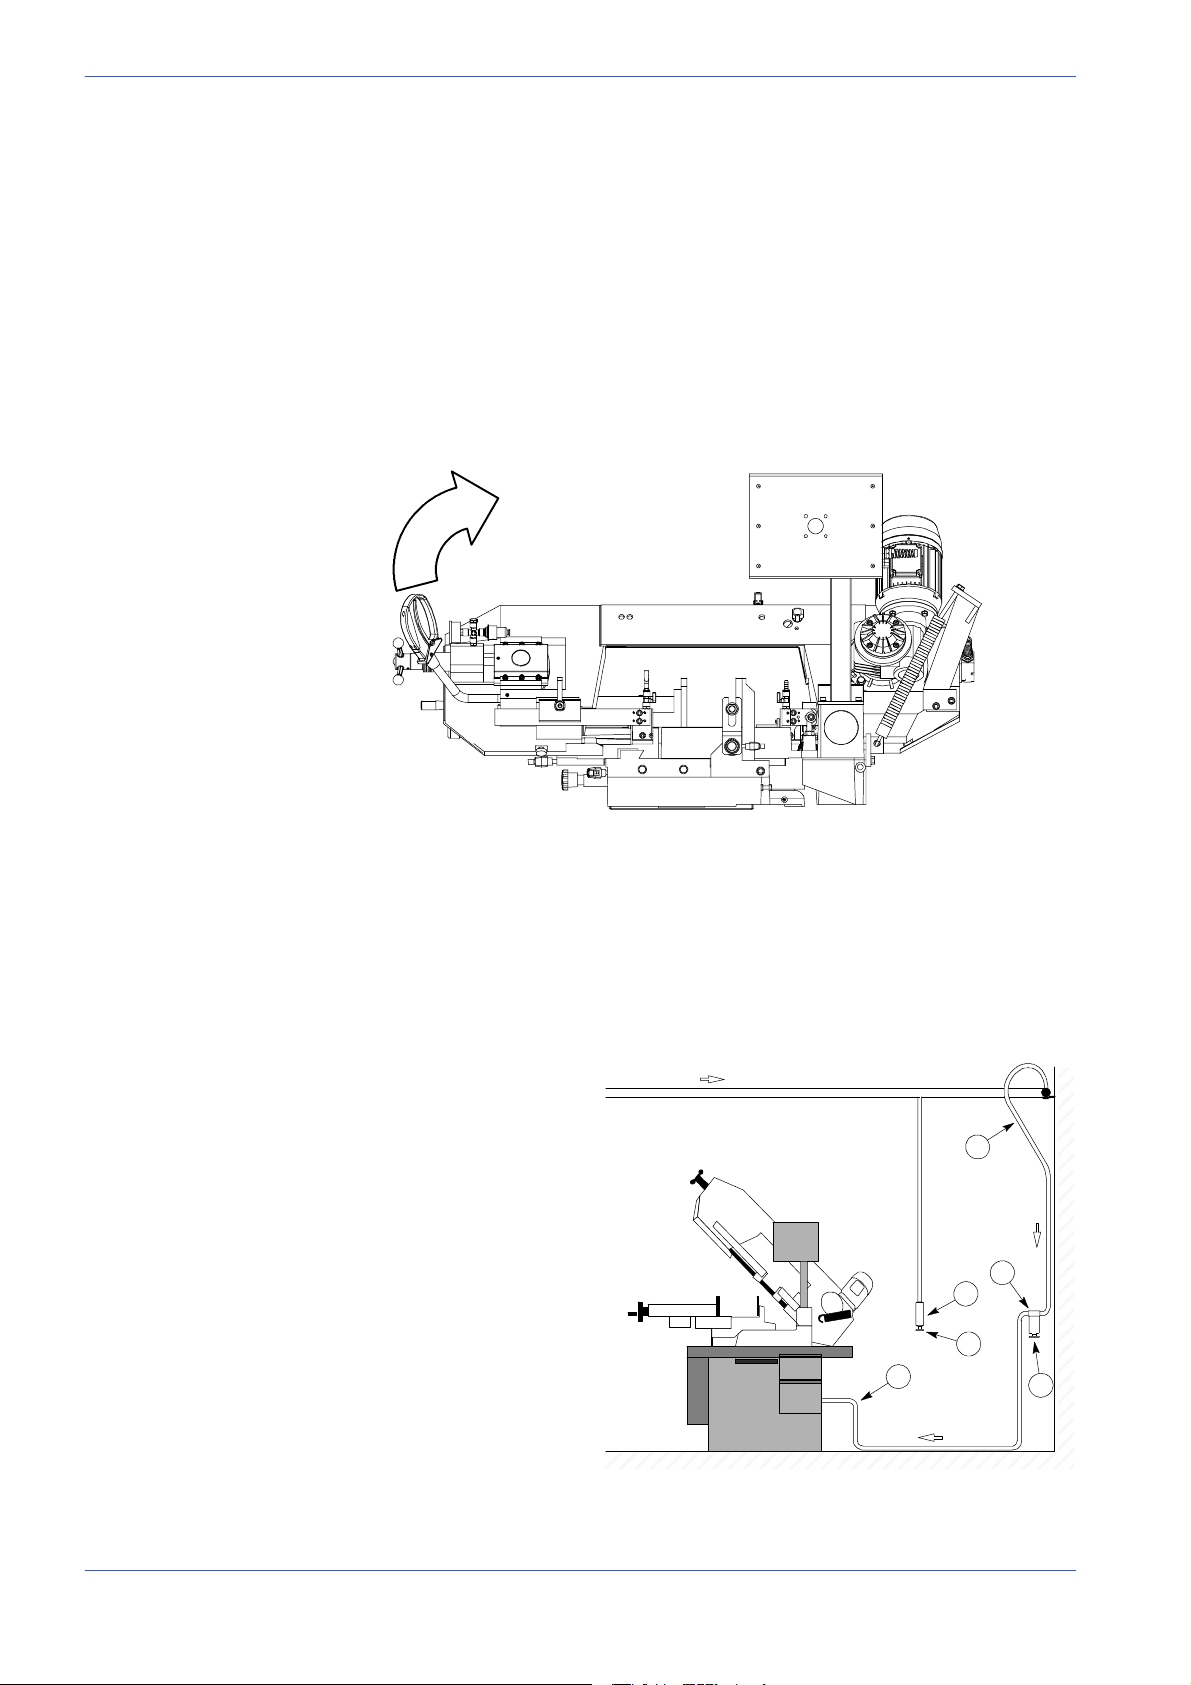
The MA version (automatic vice) is supplied with an air treatment unit for the
vice closing system, controlled by a pneumatic cylinder. To ensure perfect
performanceandlongservicelifeweadvisethatthemachinebeconnectedtoa
compressed air system having the characteristics illustrated in the following
diagram.
Key
1-- down pipe
2-- condensate collector
3-- drain cock
4-- air filter
5-- drain cock
6-- connecting hose
1
4
2
3
6
5
4--6 Use and maintenance manual DM 8
Page 34
Connection to the power supply
Before connecting the machine to the power supply, check that the socket is not
series ---connected with other machines. This requirement is fundamental for
efficient operation of the machine.
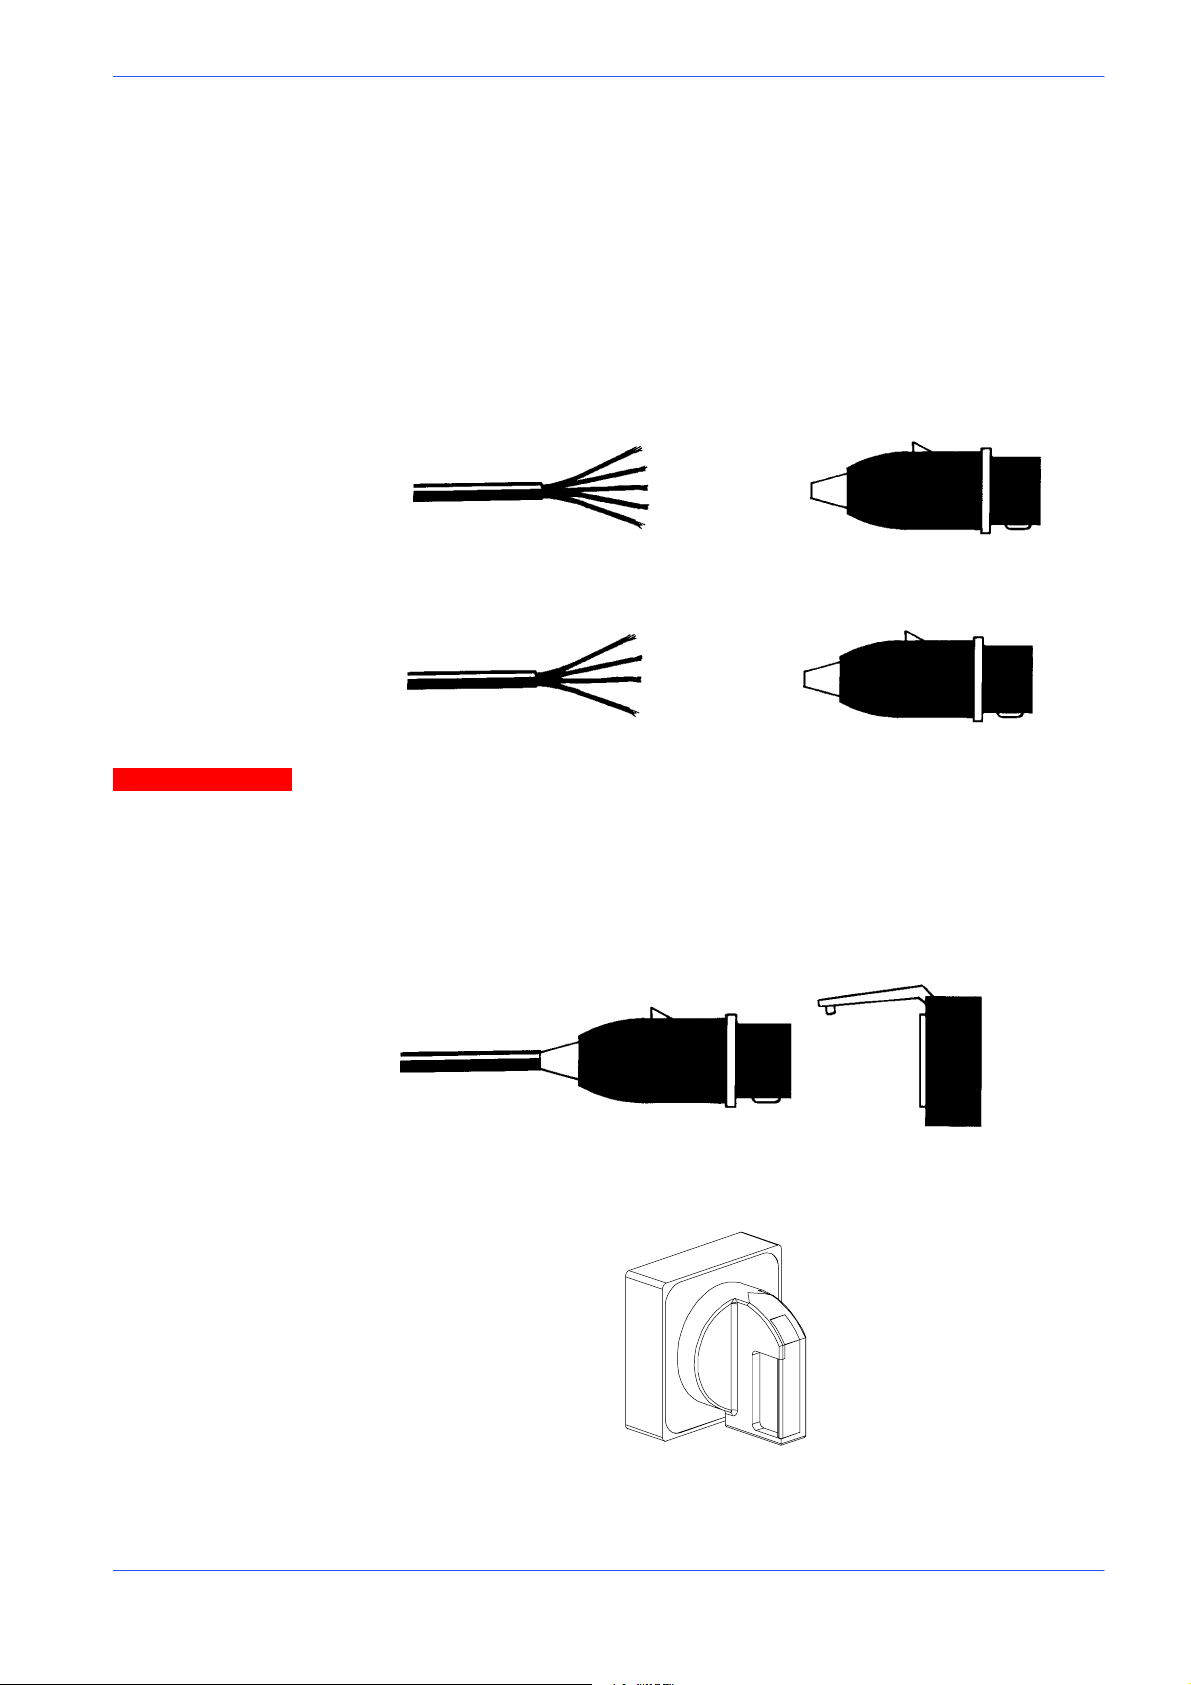
To connect the machine to the power supply, proceed as follows:
" connect up the machine power supply cable to the correct plug for the socket
to be used (EN 60204---1, section 5.3.2)
Version 24DM
CONNECTION FOR 5--CORE WIRE SYSTEMS WITH NEUTRAL
R=L1
S=L2
T=L3
PE = GND
N = NEUTRAL
CONNECTION FOR 4--CORE WIRE SYSTEMS WITH NEUTRAL
R=L1
S=L2
T=L3
PE = GND
Attention
When using systems with a neutral wire, special care must be taken when connecting the blue neutral wire, as if it is connected to a phase wire it will discharge the phase voltage to the equipment connected for voltage: phase--
neutral.
" Insert the plug in the socket, ensuring that the mains voltage is the same as
that for which the machine has been set up.
VOLT ? VO LT ?
" Power up machine by rotating the main switch located on the right side of the
control panel (The STAND BY LED lights up);
Check that the motor is rotating in the correct direction. For this check the
following operations must be carried out:
" set the blade tension to 70 BAR (1015 psi);
Machine installation 4--7
Page 35
MEP S.p.A.
" make sure the cover is properly closed: at the back of the cutting head there is
a bayonet limiter for correct cover closure;
" make sure that the machine is not in emergency state (red mushroom button
released);
" select a cutting speed using the polarity change switch;
Attention
" operate the jog button on the manual head control lever;
" if all the above operations have been carried out correctly, the blade motor
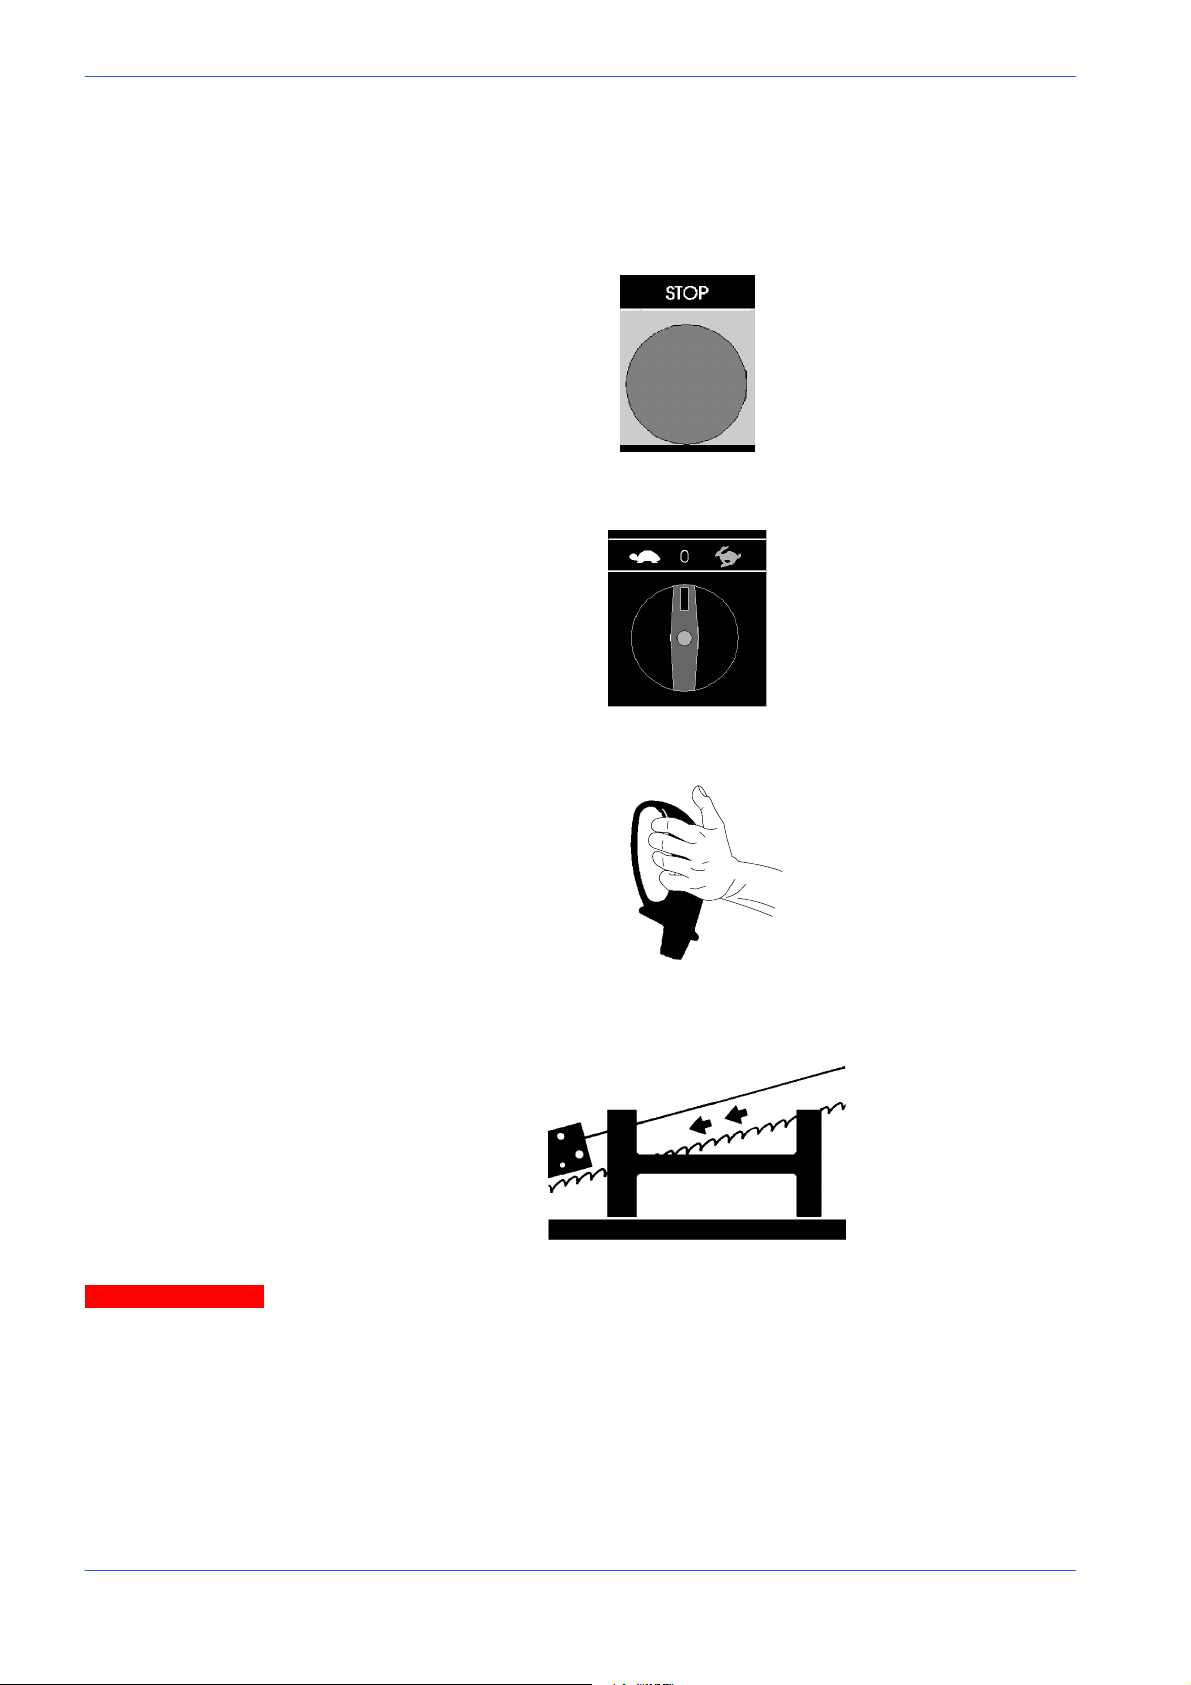
will start up and the blade will start rotating.
Ensure that the blade moves in the correct direction as shown in the
above figure. If it does not, simply reverse two of the phase wires on the ma-
chine power supply input.
The cutting machine is now ready to start the work for which it was designed.
Chapter 5 provides a detailed description of the various functions of the machine
and its operating cycles.
4--8 Use and maintenance manual DM 8
Page 36
Description of
machine
operation
This chapter analyses all the machine functions. We begin with a description of
the pushbuttons and other components on the control panel.
Description of the control panel
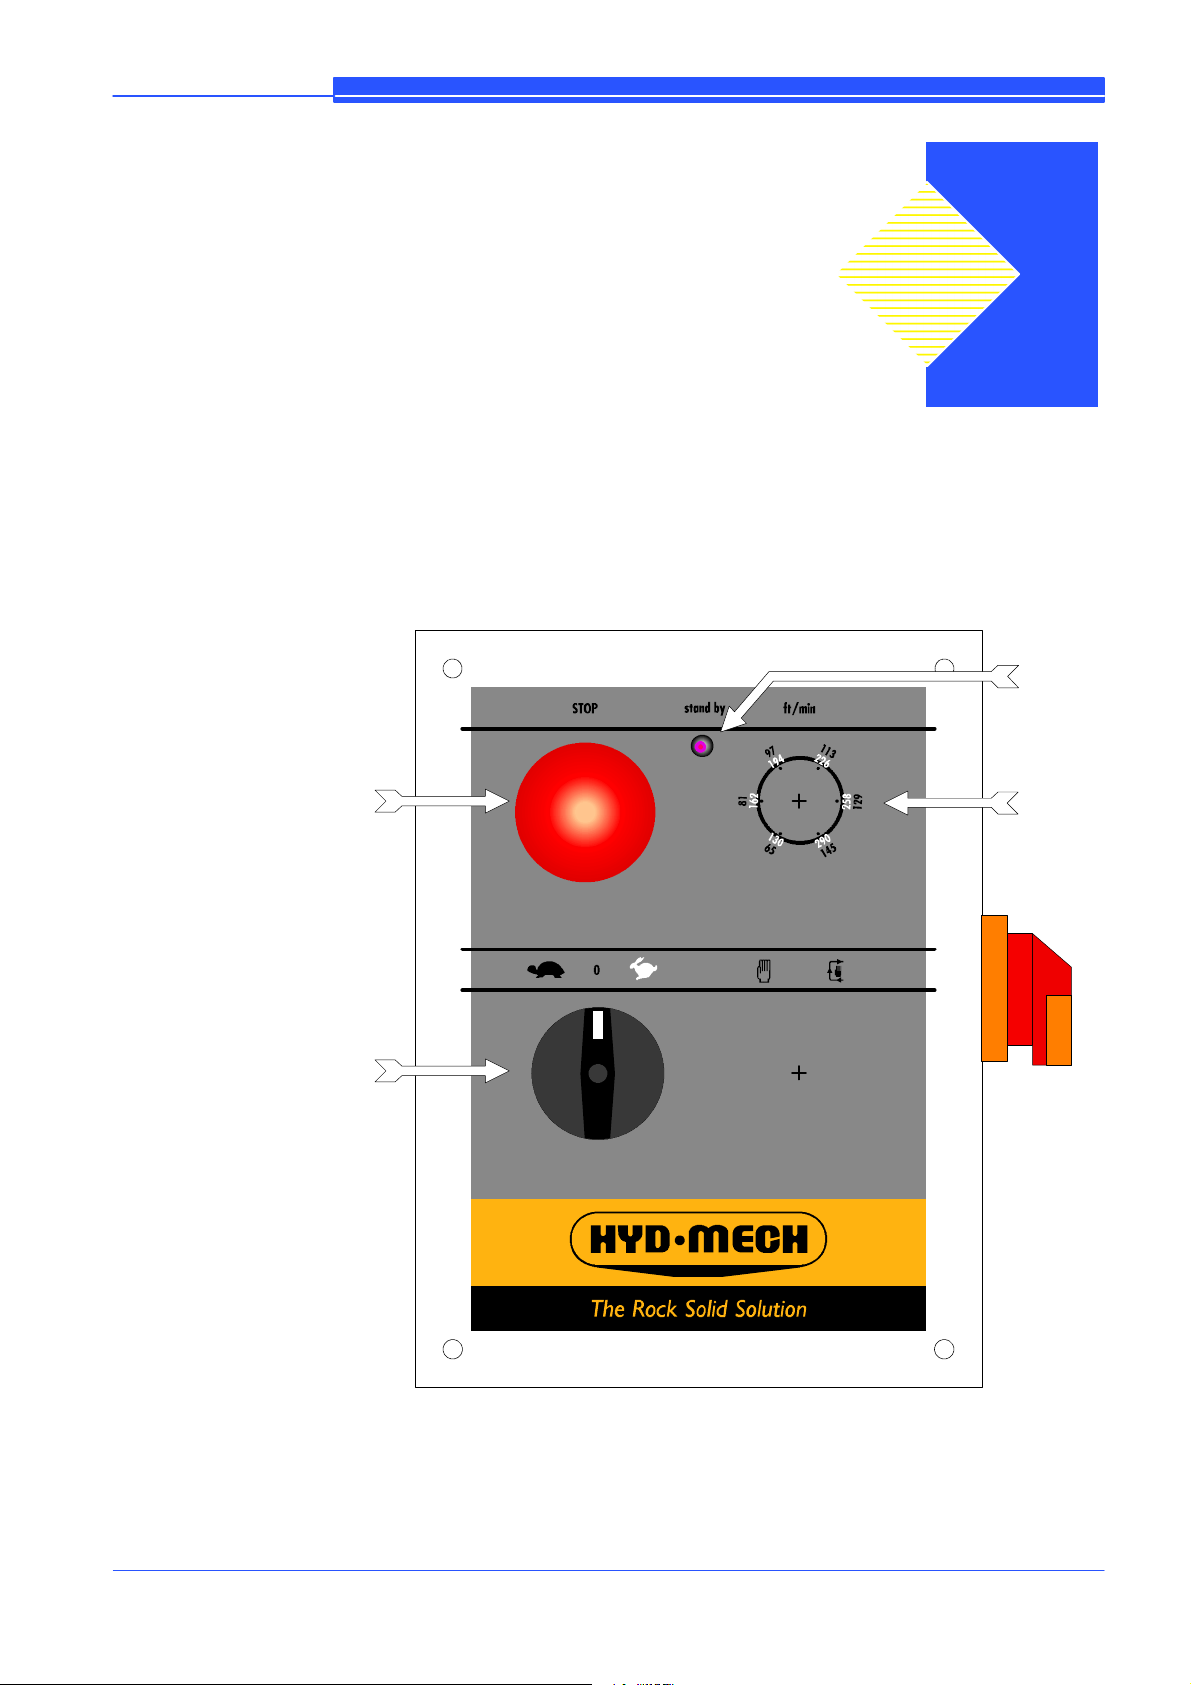
The components of the DM 8 control panel are shown in the diagram below.
Each arrow has a number which corresponds to the descriptions that follow.
5
1
5
4
2
3
1 -- LED STAND BY
This either confirms machine start up or indicates an emergency state to the
operator.
5--1
Page 37

MEP S.p.A.
2 -- PREDISPOSITION FOR INVERTER (OPTIONAL)
Selects the blade cutting speed range: from 20 to 45 mt/min. (from 6.23 to 14.02
in.) for the 1st speed and from 35 to 90 mt/min. (from 10.90 to 28.04 ft./min) for
the second speed.
This model has been designed for the installation of a frequency converter
(inverter) and is set up for both the electrical wiring and converter control
potentiometer, which must be housed in the machine control panel.
3 -- AUTOMATIC THERMAL--MAGNET CUTOUT WITH MINIMUM VOLTAGE RE-
LAY AND HATCH LOCKING DEVICE
The machine is provided on the right of the control panel with a main switch with
a locking device which, when set in the ON position (1), powers up the machine
by resetting the minimum---voltage relay and the blade motor thermal magnet
cutout.
This device has three protection systems against power failure. When there is a
power failure the electrical devices are all shut down, instantly shutting down the
machine and preventing automatic restoring of power on power return. A further
function is to reset the thermal relay, which protects against overcurrents.
4 -- POLARITY CHANGE SWITCH
This selects the blade cutting speed, 36/72 mt/min. (from 11.21 to 22.43 ft./min)
on the standard 2---speed machine.
5 -- EMERGENCY STOP MUSHROOM BUTTON
Pressing this button immediately stops machine operation. The emergency
button, designed to conform to all safety standards, is positioned so that it is
easily accessible at any time and is clearly visible --- being a red button on a yellow
background.
To reset the emergency button, rotate actuator by 45˚.
OPTIONAL PEDAL FOR VERSION WITH AUTOMATIC VICE (MA)
The foot pedal opens and closes the vice during normal machine operation.
5--2 Use and maintenance manual DM 8
Page 38
Version 24DM
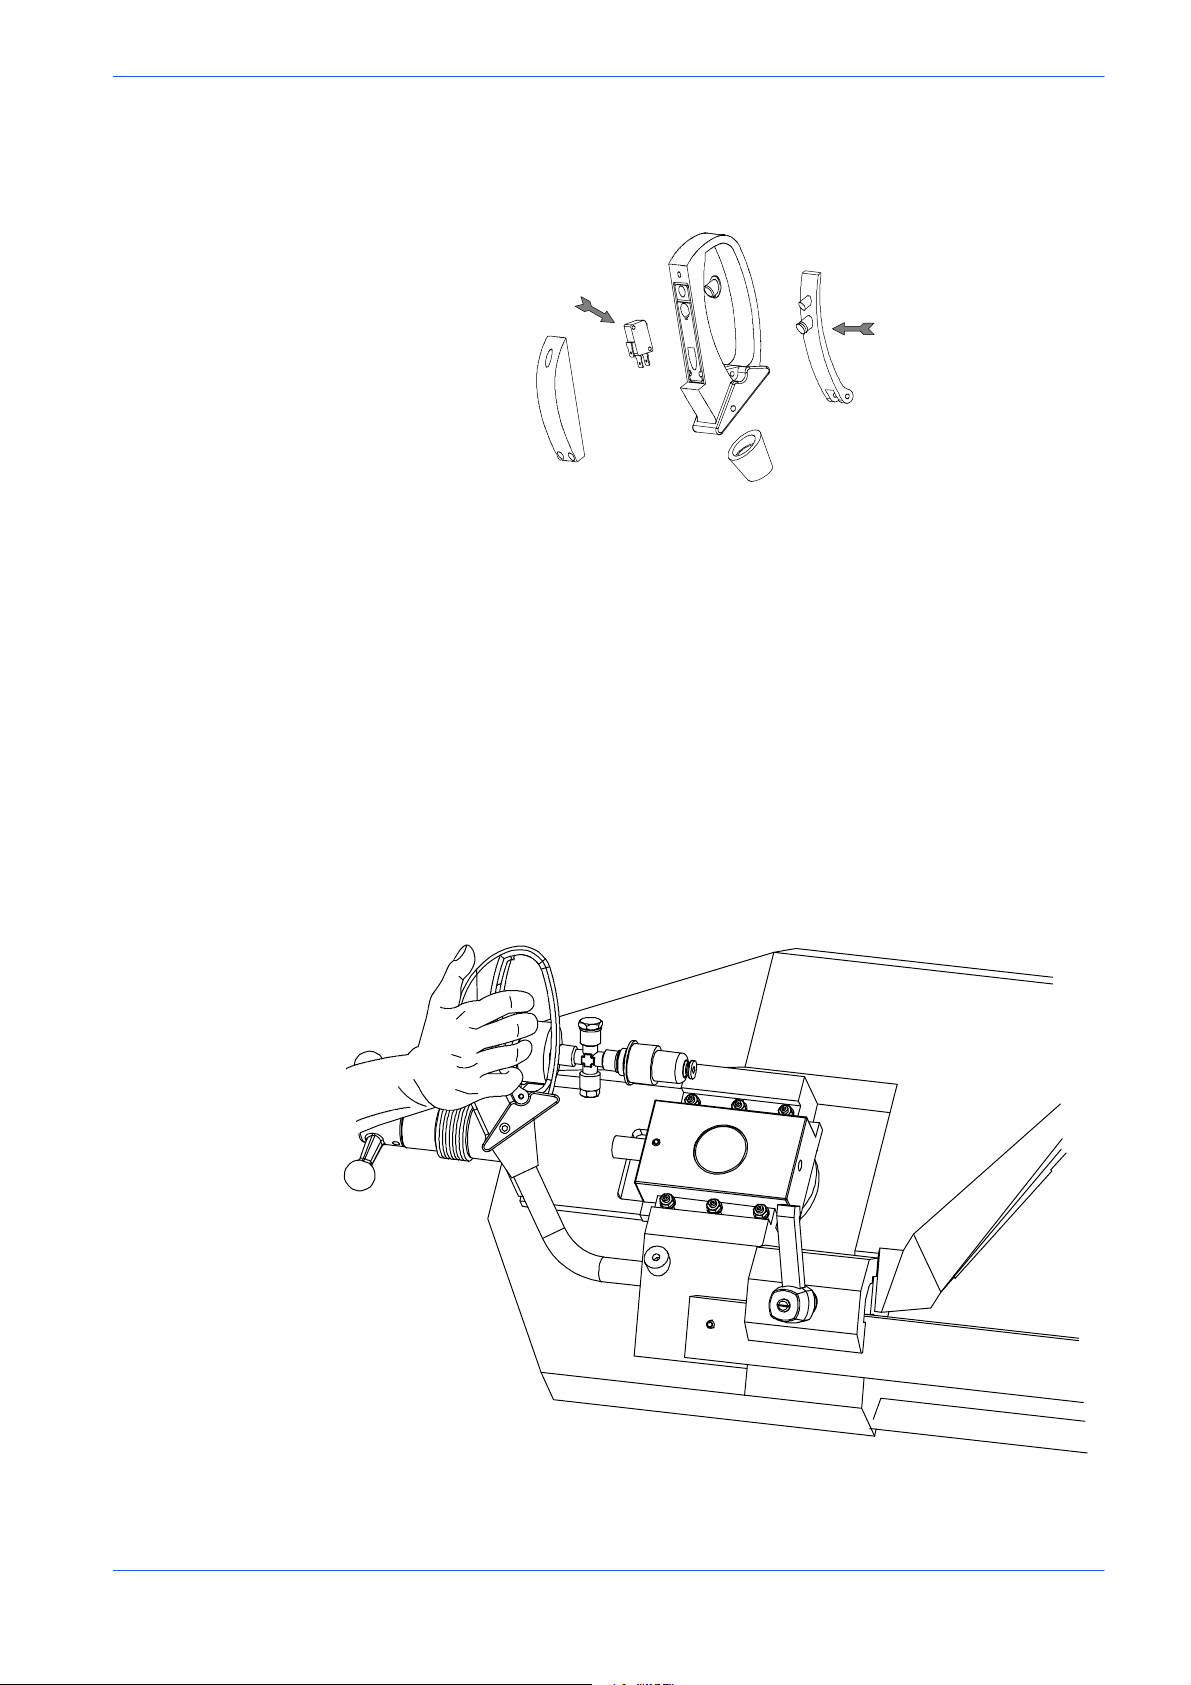
HEAD CONTROL LEVER MICROSWITCH
The grip of the manual head control lever incorporates a microswitch for manual
control of the blade motor.
Microswitch
Operating
lever
The microswitch is enabled when the machine is not in emergency state. In
compliance with the relevant existing standards, voltage is 24V and the microswitch is installed in a housing (blue knob) sealed against external agents such as
dust or moisture, with a protection rating of IP 55.
Basic instructions for carrying out a cutting operation cycle.
Manoeuvring the cutting head
Cutting head movement is facilitated by perfect balancing of the head weight,
thanks to the traction force exerted by the two return springs located at the back
of the machine.
Also, the grip on the head control lever enables the operator to achieve a firm
grip in order to start up band saw rotation by pressing the microswitch start lever,
located in the handle itself.
Description of machine operation 5--3
Page 39
MEP S.p.A.
Clamping the work piece in the vice
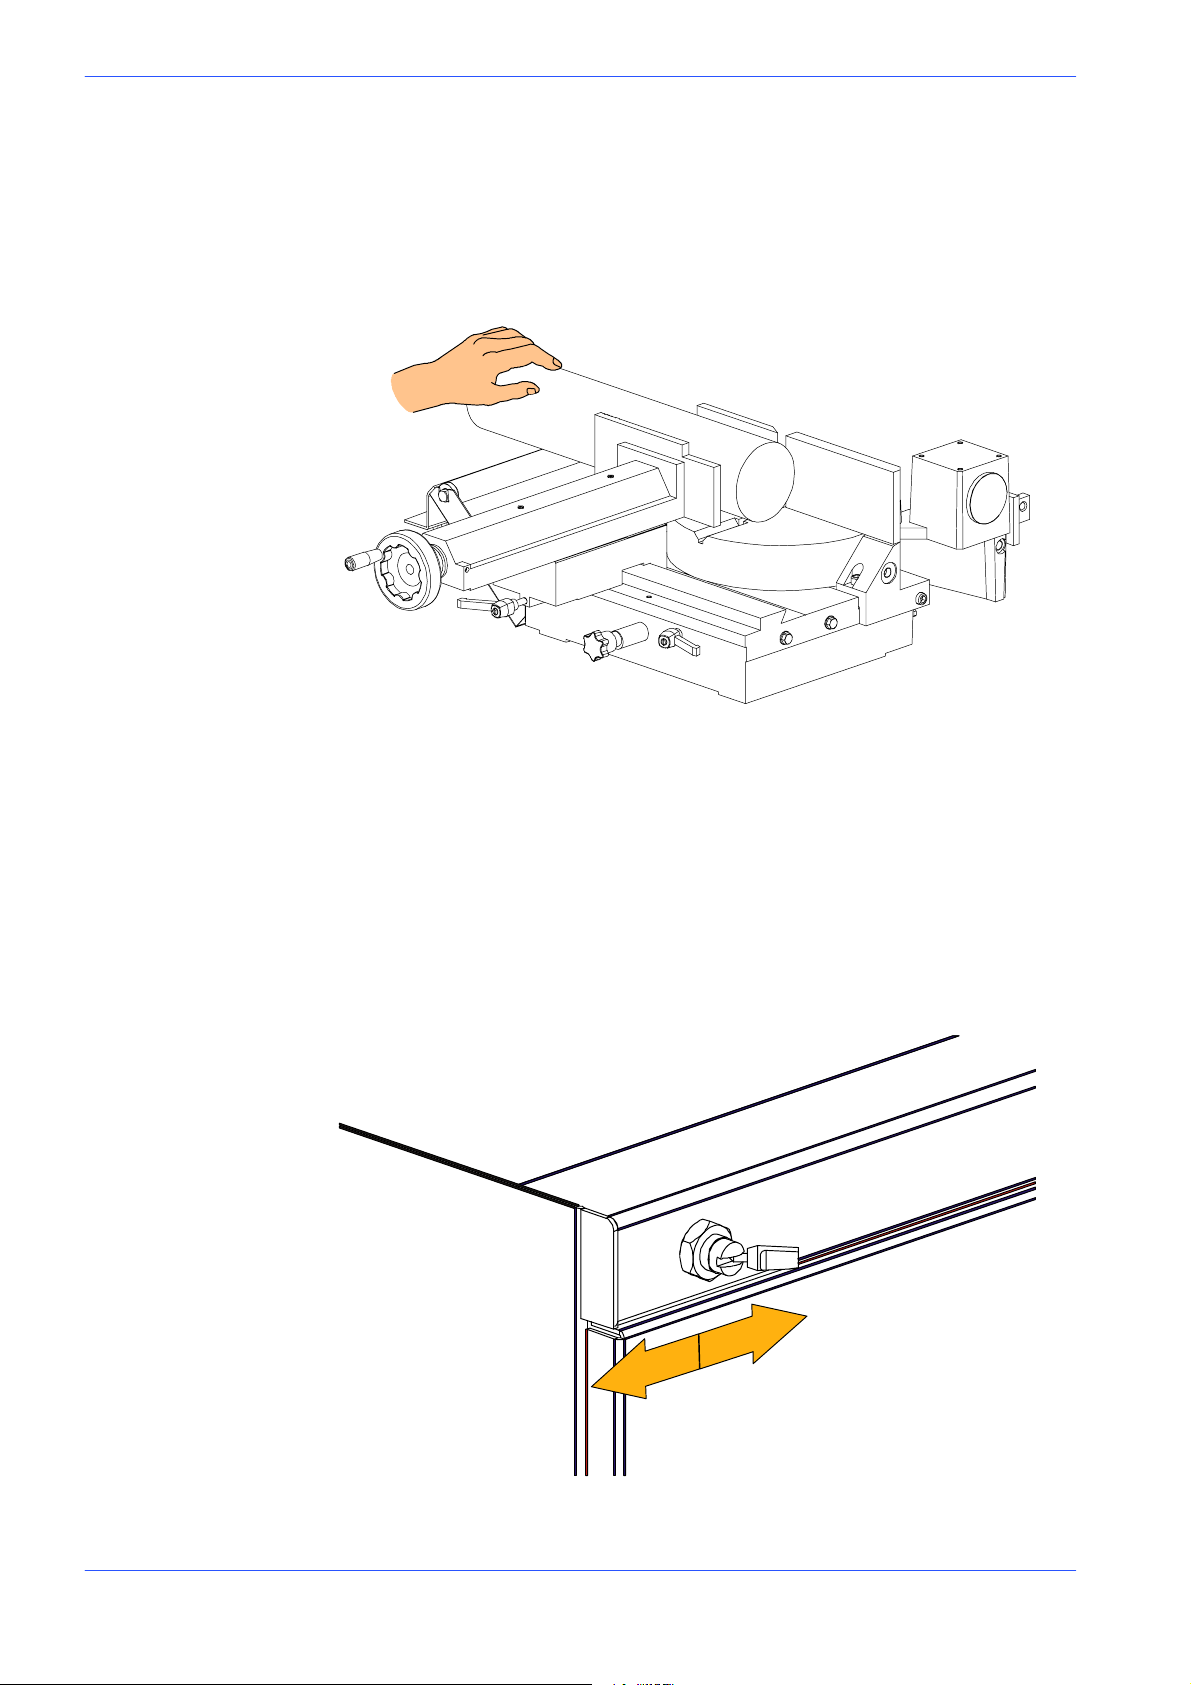
In the basic version, the work piece is clamped in the vice by rotating the
opening/closing handwheel (in a clockwise/anticlockwise direction), as shown:
" each time the vice is closed make certain that the work piece is solidly
clamped. This can be done manually.
Clamping the work piece in the Automatic Vice (MA version)
If the machine is equipped with the Automatic Vice optional device (MA), the
opening and closing of the vice is performed by means of the manual valve switch
located on the base, which activates the vice pneumatic cylinder device. An
optional pedal unit is available as an alternative to the manual valve.
" Nearthevicefrom2to3mmfromtheworkpiece;
" close the vice using the manual valve situated on the base and make certain
that the piece is tightly blocked. This can be done manually.
5--4 Use and maintenance manual DM 8
Page 40
Version 24DM
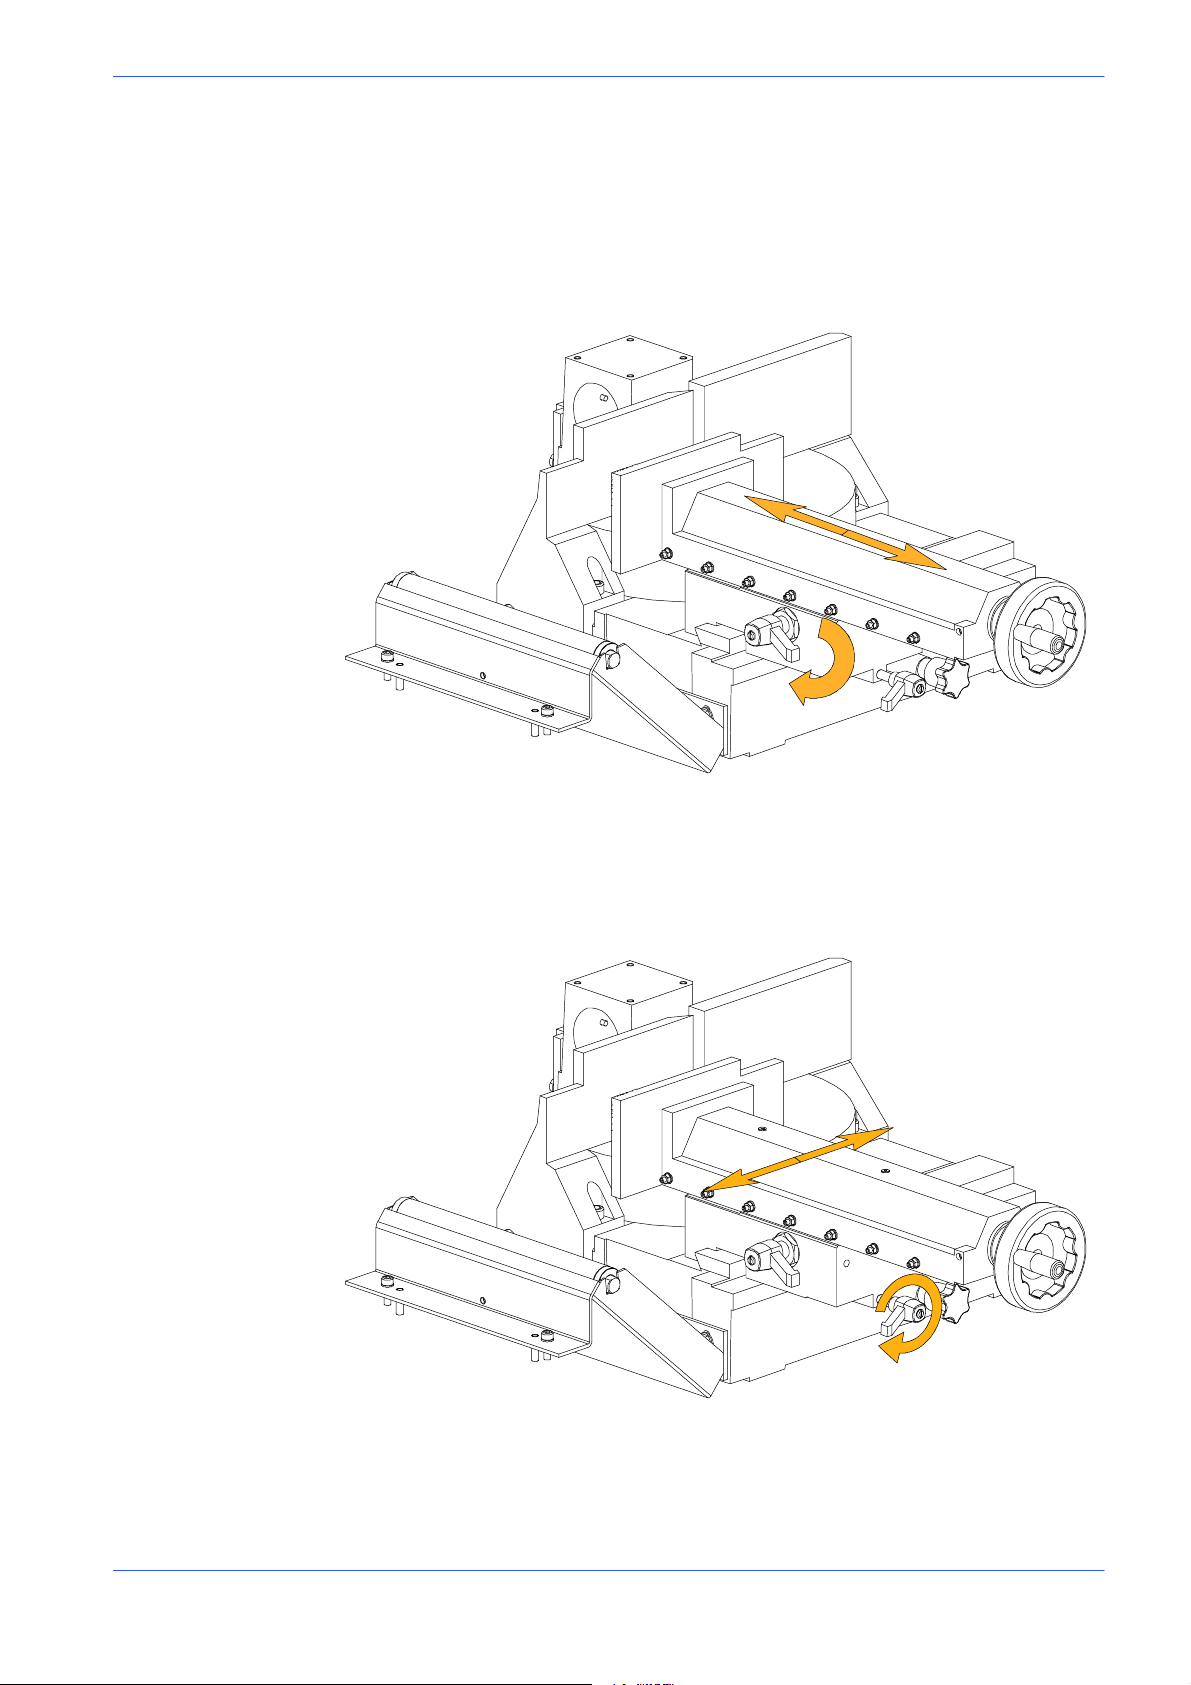
Rapid opening/closing of the vice
Using a simple device the vice can be slid forwards and backwards to accelerate
vice opening and closing operations.
" Grip the lever as indicated in the photograph and rotate in a clockwise direc-
tion: the vice is free to slide forwards and backwards into the desired position.
when the lever is released, the vice blocks in that position.
Rapid translation of the vice
For inclined cuts move the vice to the left or right, sliding it on the sliding guide.
" Loosen the locking lever as indicated in the figure;
" position the vice to the right or left and tighten the locking lever;
Description of machine operation 5--5
Page 41
MEP S.p.A.
Width of cut
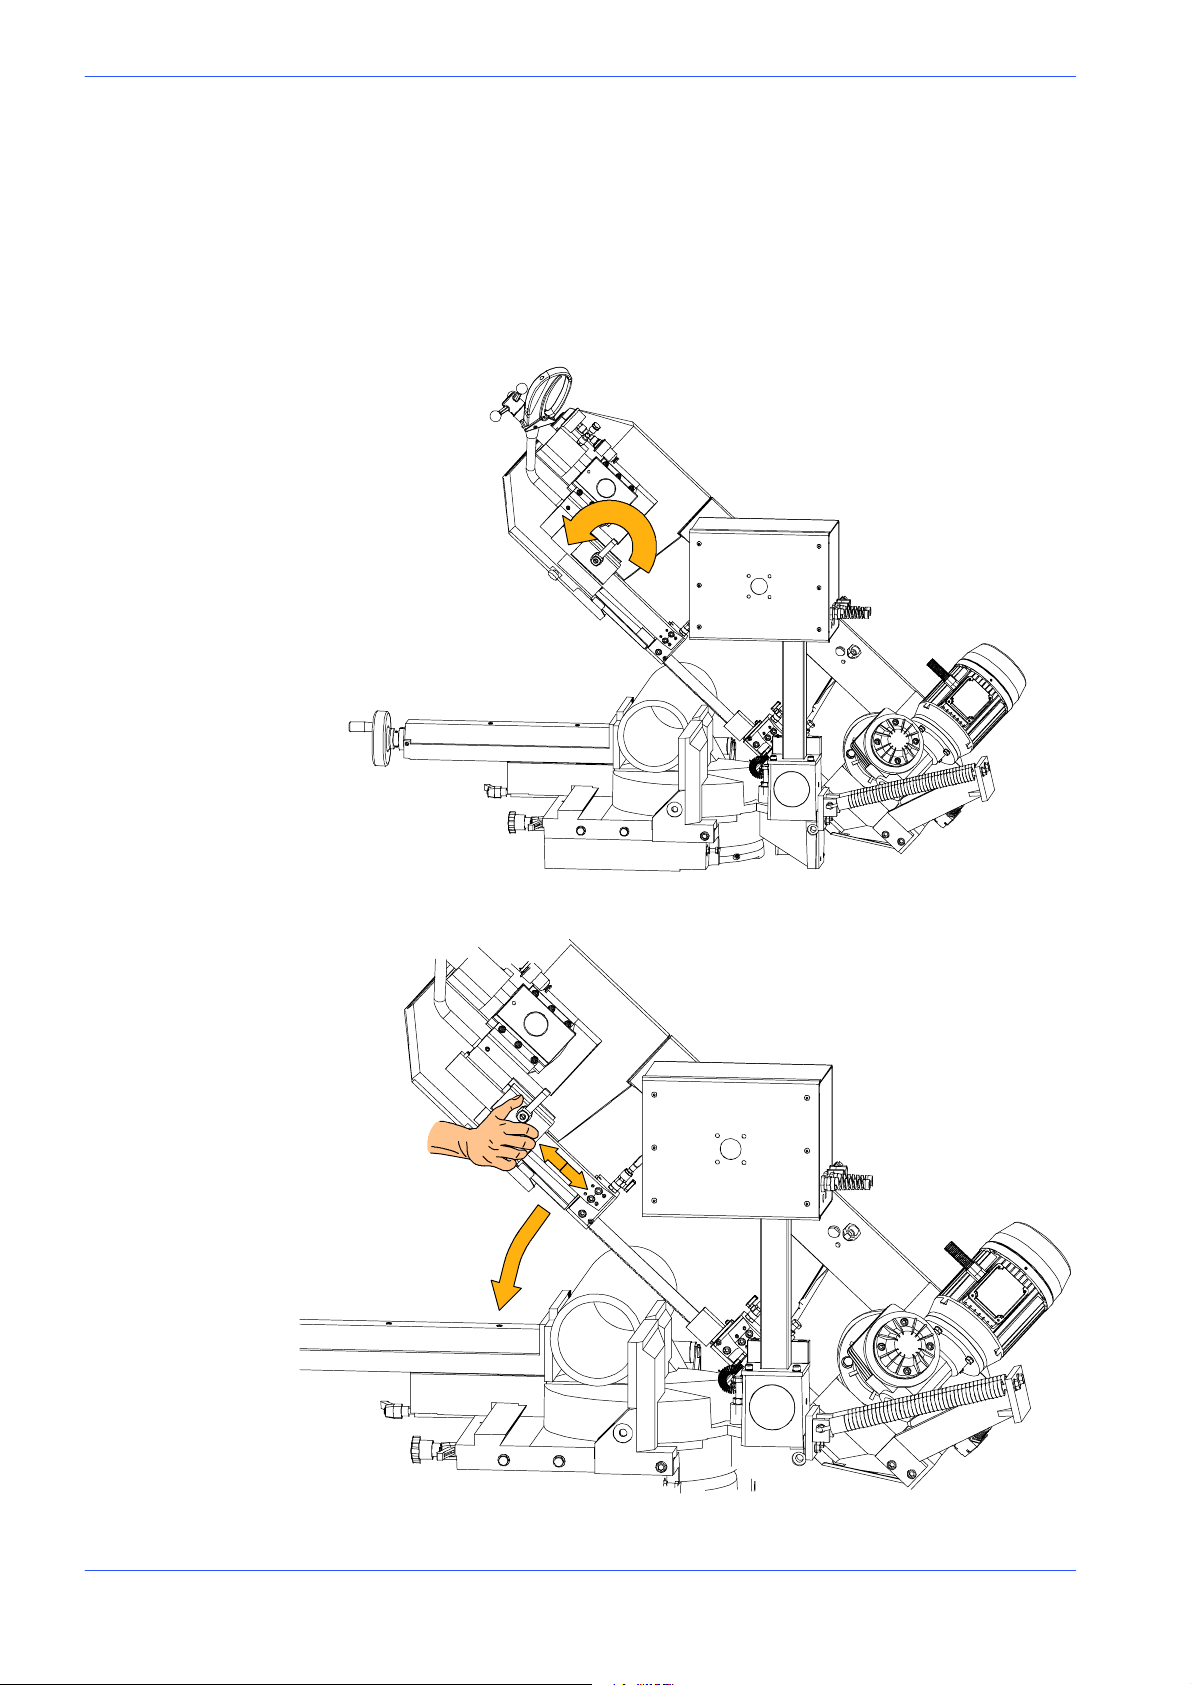
In compliance with the existing standards, the machine is provided with guards
covering the blade throughout its length except for the tract which is to be used to
make a cut. The width of the cut should be determined on the basis of the
longitudinal section of the workpiece, in order to leave free only the part of the
saw which will perform the cut.
" position the workpiece on the work table close to the blade vertical;
" loosen the ratchet lever on the sliding shaft of the front blade guide head;
" themobilefrontguideheadmustbepositionedneartothematerial,leaving
thedownstroketrajectoryfreetoreachbeyond theslidingvicejaw;
" tighten the ratchet lever to lock the head slide;
5--6 Use and maintenance manual DM 8
Page 42
Preliminary check list for cutting operation
To guarantee complete safety during cutting cycles, the operator should work
through a check l ist of the entire apparatus, checking:
" blade tension;
" that the blade guide head bracket is locked in the correct position;
" that the cutting angle is correct and the cutting head is locked;
" that the work piece is properly clamped in place;
" that the blade teeth are correct for the job to be begun;
" that the speed selected is right for the kind of piece to be cut;
" that all protections are in place and correctly locked;
" the level of lubricant/coolant and that the electropump is activated;
" that the blade downstroke speed and the cutting pressure are correct (version
with CCS);
Manual operating cycle
Sequence of operations for performing a cut:
" power up the machine by pressing the reset button.
" Positiontheworkpieceintheviceandcalculatethelengthofcut(usingthe
measuring rod for cuts to measure).
Version 24DM
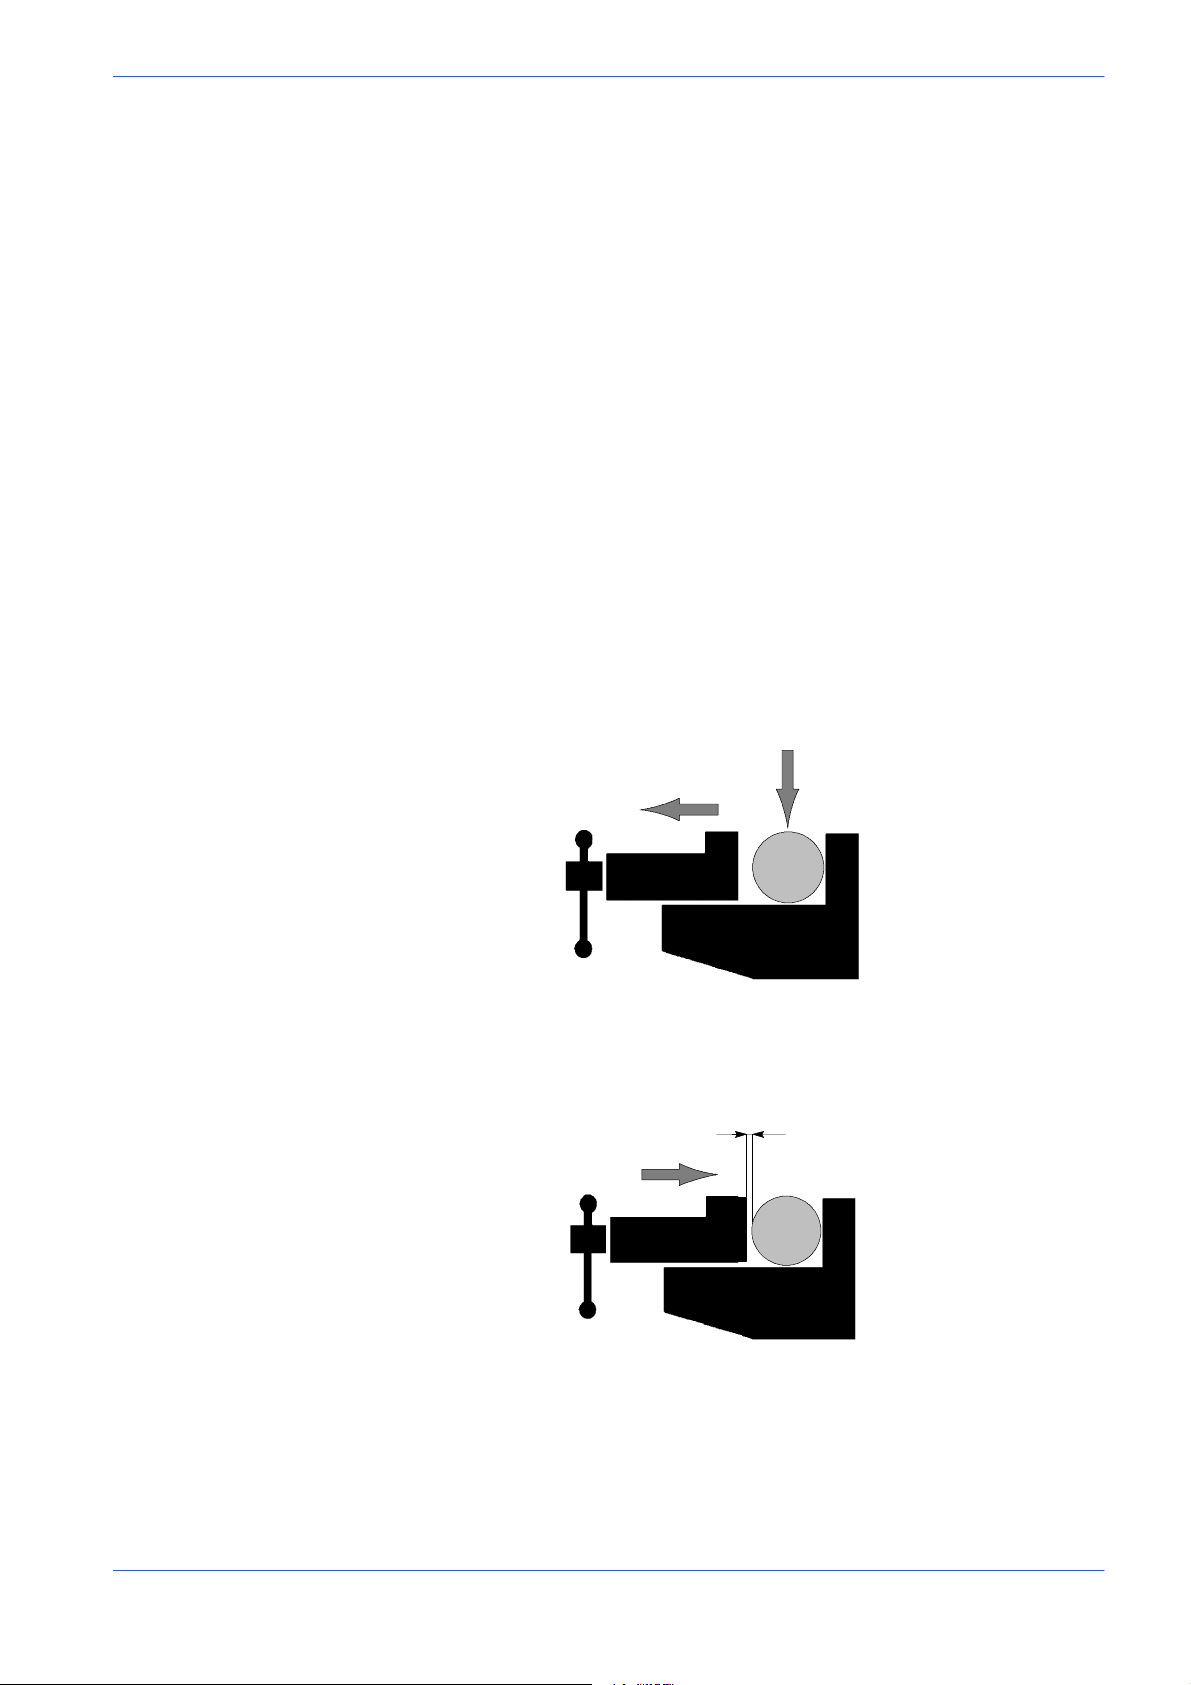
" Clamp the workpiece in the vice; If the machine is the MA version, bring the
vice manually from,2 to 3 mm. of the workpiece ; tighten the vice using the
special open/close button on the base or using the foot---pedal if equipped.
from2to3mm
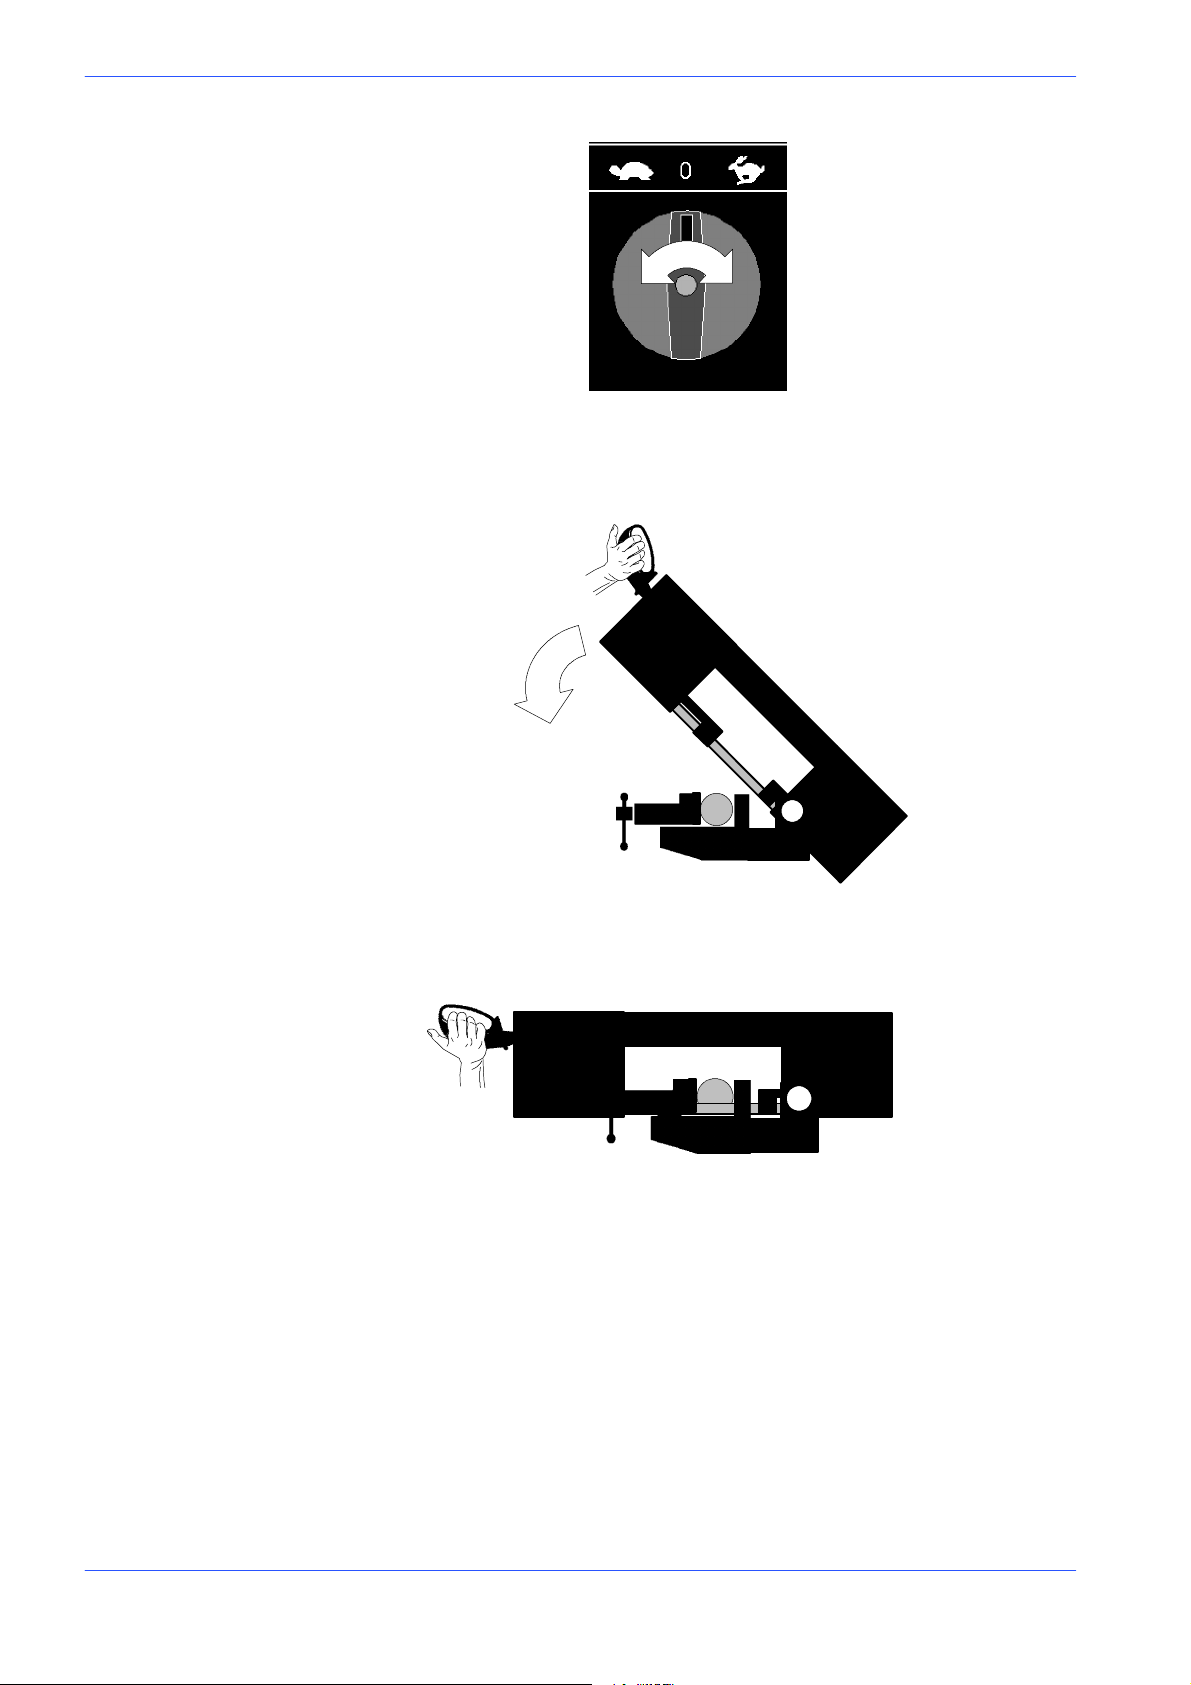
" Select the cut using the polarity change switch according to the type of the
material to be cut (shape, thickness, hardness, etc.).
Description of machine operation 5--7
Page 43
MEP S.p.A.
" Grip the head control lever and start the blade rotating by pressing the micro-
switch on the handgrip; the downstroke speed of the head is manually con-
trolled by the operator.
" The motor starts up and sets the blade in rotary motion; the lubricant/coolant
pump starts up at the same time.
5--8 Use and maintenance manual DM 8
Page 44
Version 24DM
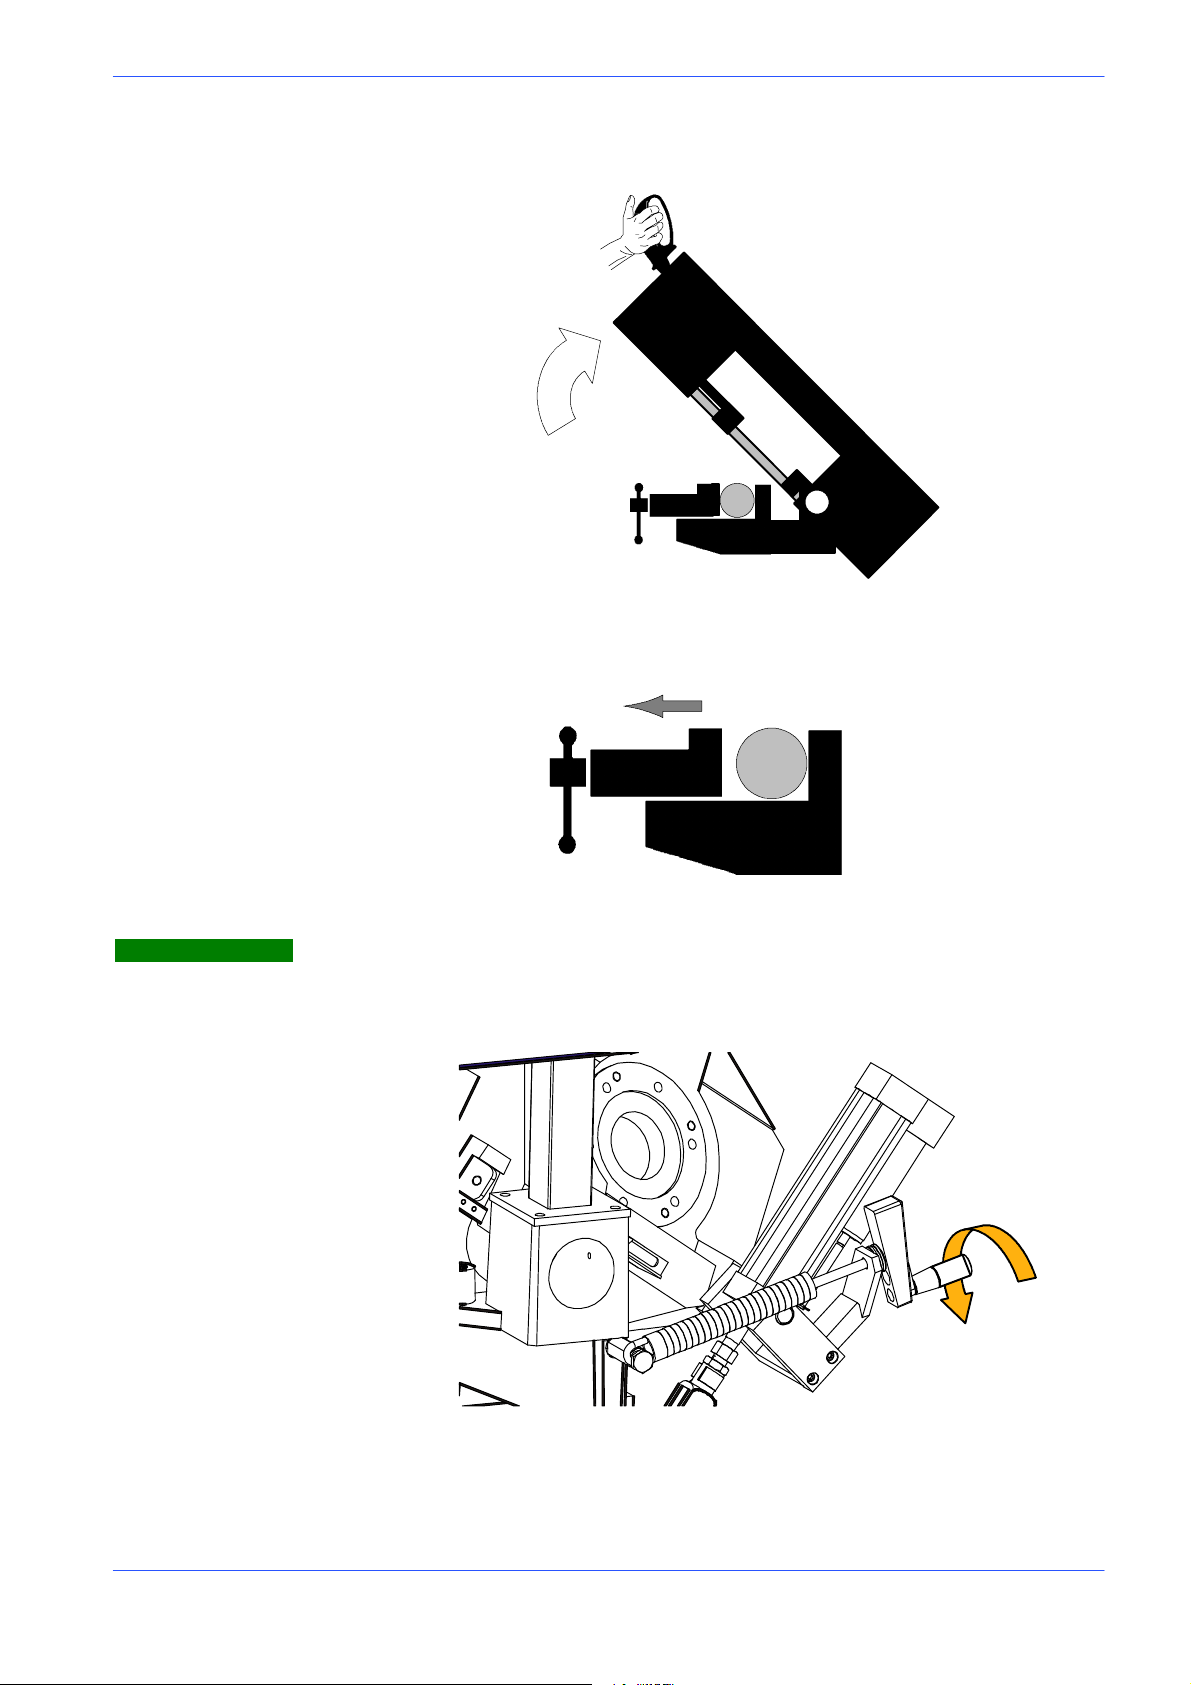
" At the end of the cutting operation, the head can be raised.
" Removethepiecefromthevice;intheMAversiontheviceisopenedusing
the open/close button, or by manually turning the vice handwheel.
Warning
If the machine is equipped with the Cut Control System, make sure that the
function selector switch is positioned on Manual and that the head return
spring is tensioned in the Manual position.
Description of machine operation 5--9
Page 45
MEP S.p.A.
CCS (Cut Control System) functioning cycle
The Cut Control System enables both a Manual and a Semiautomatic/Dynamic
work cycle to be performed.
Sequence of operations for carrying out a cut in Semiautomatic/Dynamic mode:
" power up the machine by pressing the reset switch.
" Position the material in the vice and calculate the cut lengths (using the mea-
suring rod).
" Clamp the piece in the vice; if the machine is the MA version, bring the vice
manually from2to3mm.oftheworkpiece;closetheviceusingthespecial
open/close button on the base of the machine or using the footpedal if
equipped on the machine.
" Select the cut speed using the Polarity change switch.
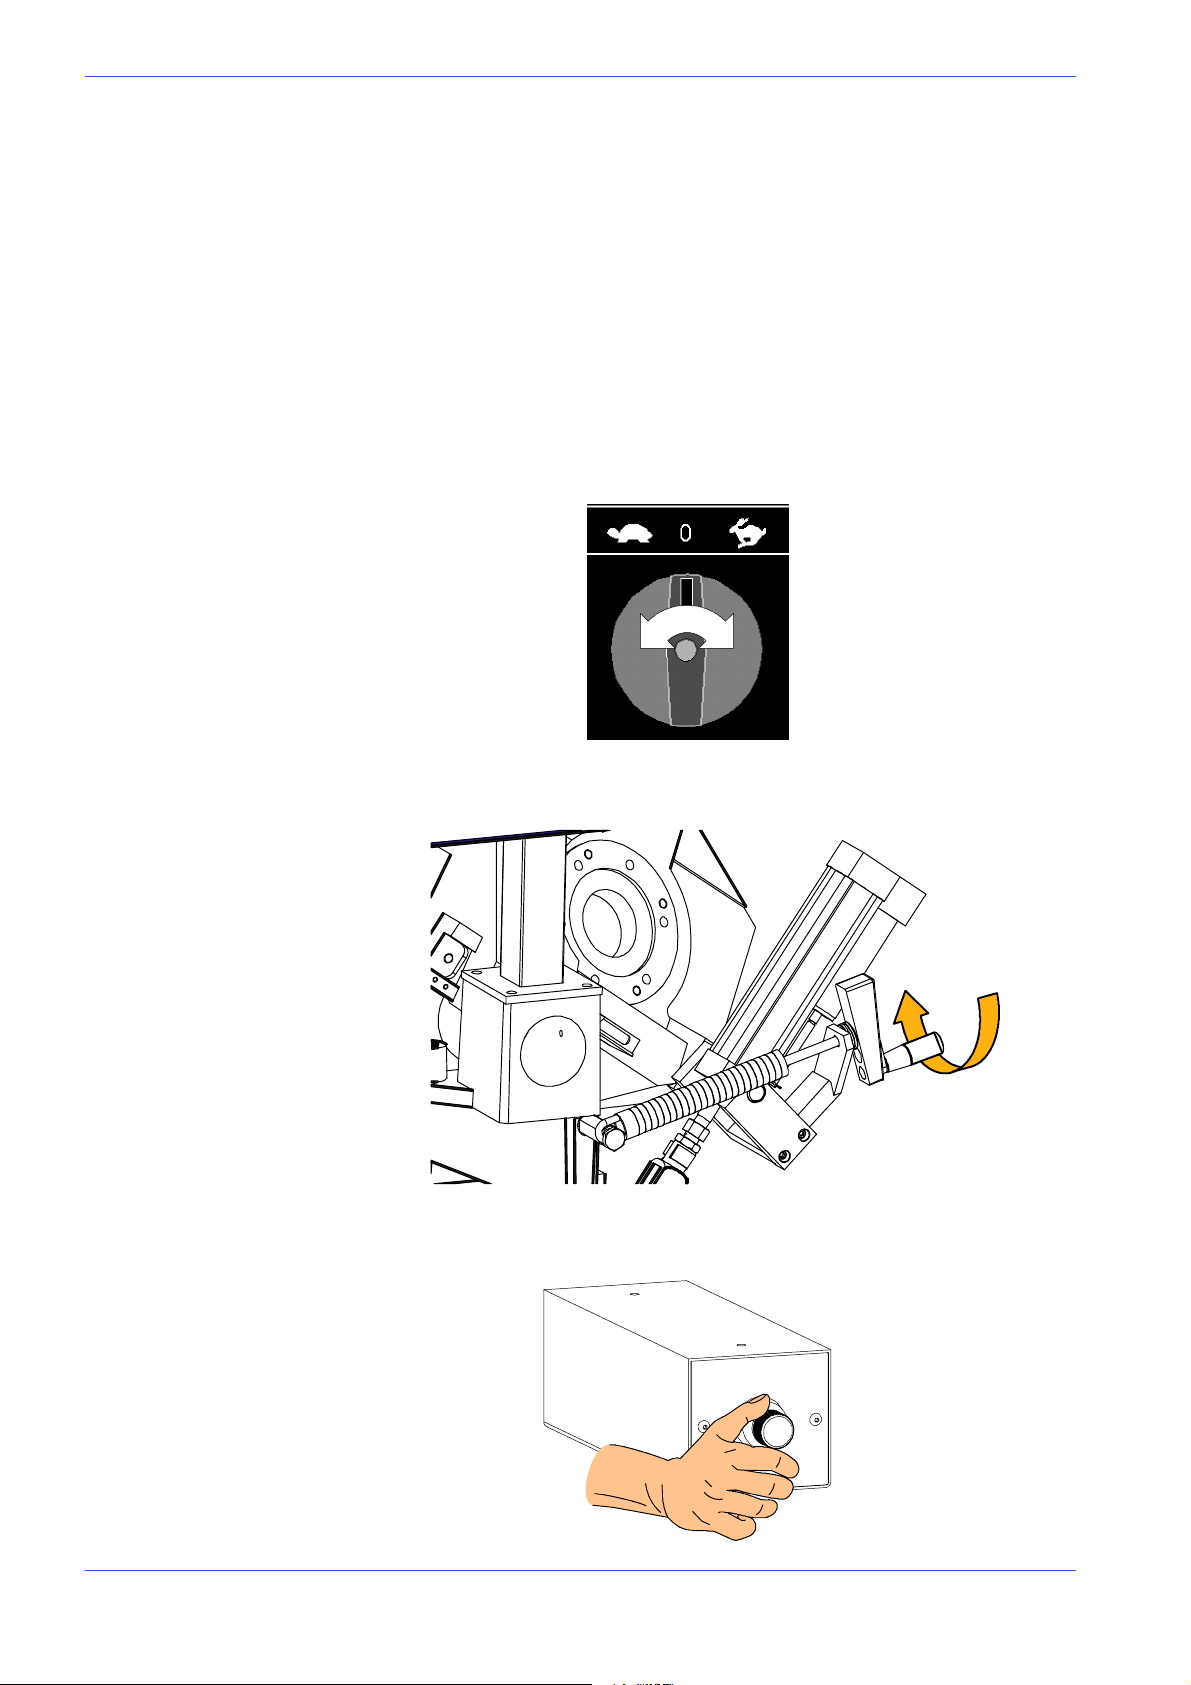
" Set the tension on the head return spring using the appropriate crank so that
the first turn is aligned with the Semi.automatic/Dynamic cycle notch.
" Set the head downstroke speed on the hydraulic panel. located below the ma-
chine control panel, according to the characteristics of the material to be cut.
5--10 Use and maintenance manual DM 8
Page 46
Angled cuts
Version 24DM
" Grip the head control lever and move the blade in the proximity of the mate-
rial to be cut: when you reach a distance of approx. 10 mm select function
type: Semi ---automatic or Dynamic and then press microswitch on the handgrip to start up blade rotation
" The operating head will now perform cutting until it reaches HDL (Head
Downstroke Limit) at which point the motor will stop.
The machine can make angled cuts from 60˚ left to 45˚ right. Reference stops are
mounted on the sides of the turntable to facilitate rapid 0˚,45˚ and 60˚ cuts to
the left and 45˚ cuts to the right.
Angled cu ts 45˚ to the left
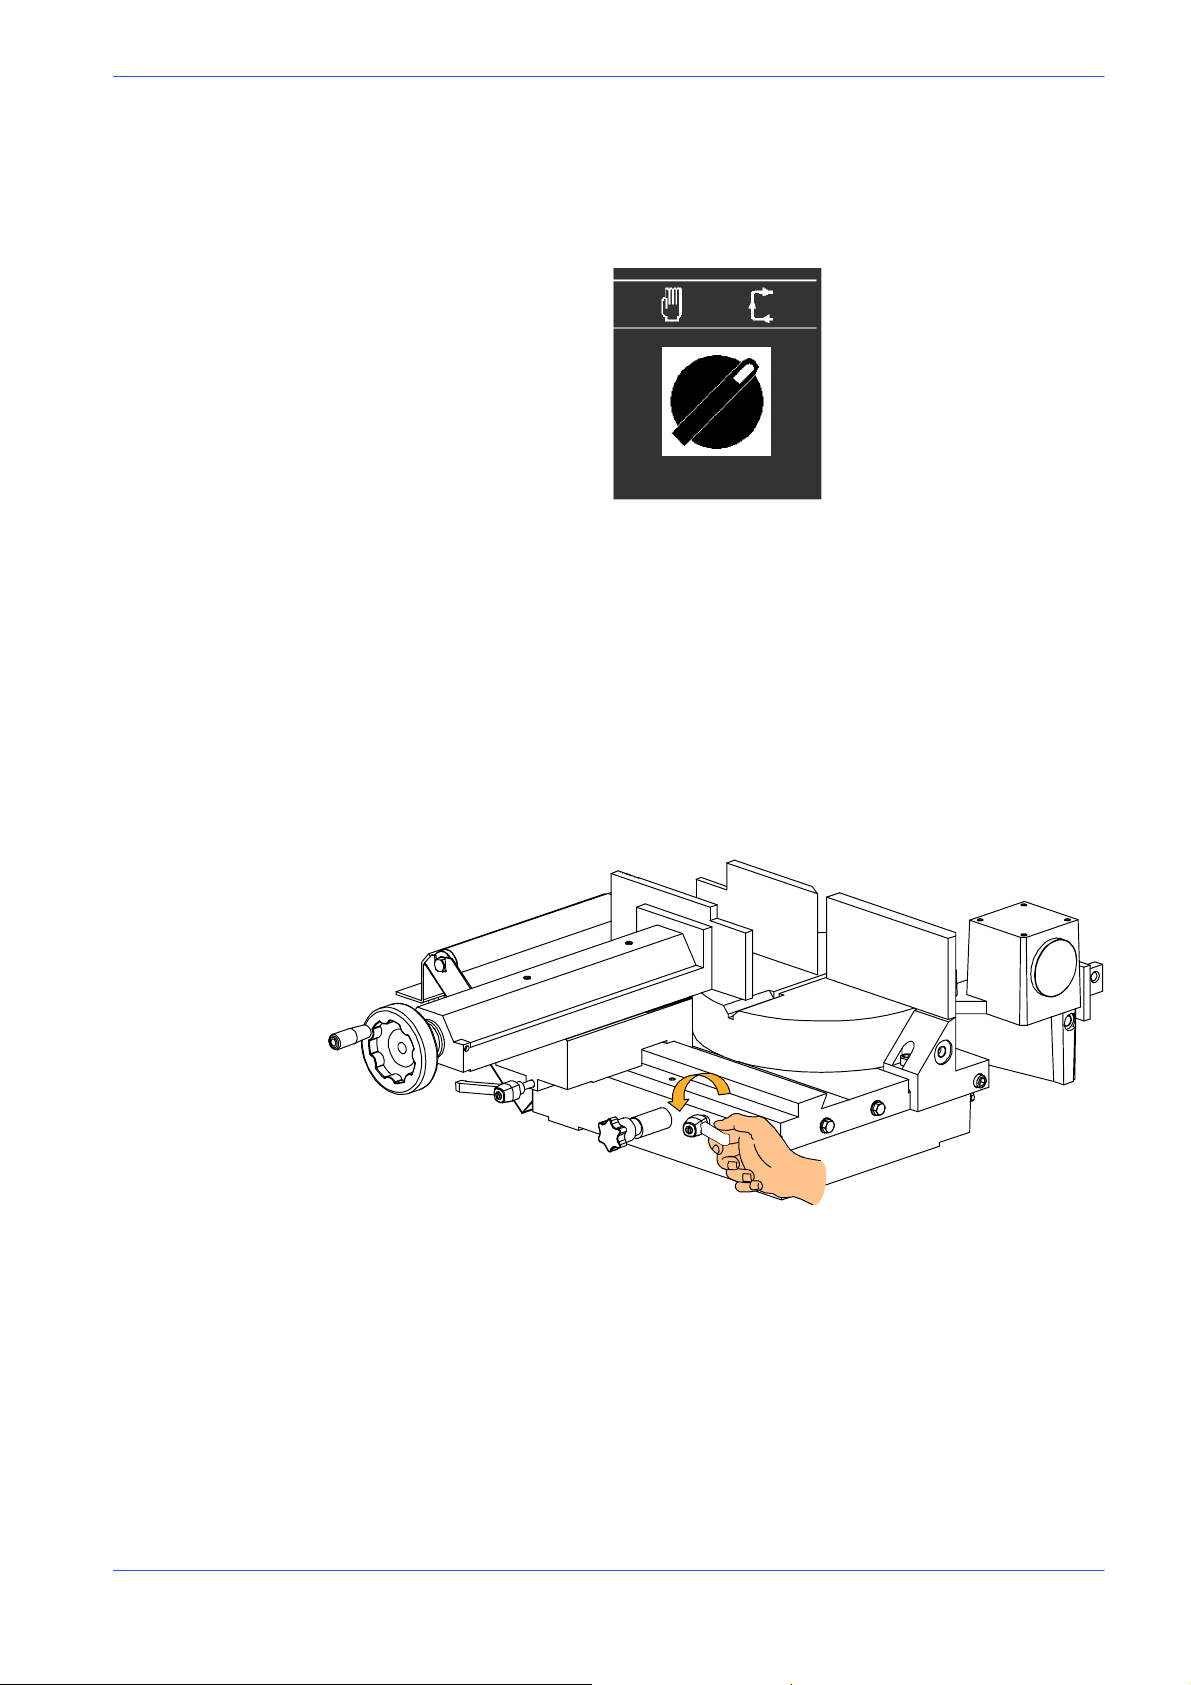
" Make sure the vice is positioned to the left of the 0˚ cutting slot.
" Slacken the turntable lock/release lever.
Description of machine operation 5--11
Page 47
MEP S.p.A.
" Pull the eccentric pin knob towards you (0˚ reference stop) and rotate slightly
to raise it.
Warning
The 0, 45 and 60˚ reference stops for cuts to the left and the 45˚ reference
stop for cuts to the right facilitate rapid head positioning during turntable rotation. However, the eccentric pin is only correctly positioned if the initial rotation
of the turntable when released is corrected.
" Swing the head from left to right until it is positioned at the required angle, as
indicated by the graduated scale on the turntable.
Attention
Always rotate with the head raised, so that there is no risk of collision between
the blade and the fixed vice jaws.
" Relock the turntable lock/release lever.
" Make the cut in the required operating mode, following the preliminary
safety instructions set out in this chapter.
5--12 Use and maintenance manual DM 8
Page 48
Version 24DM
Angled cu ts 60˚ to the left
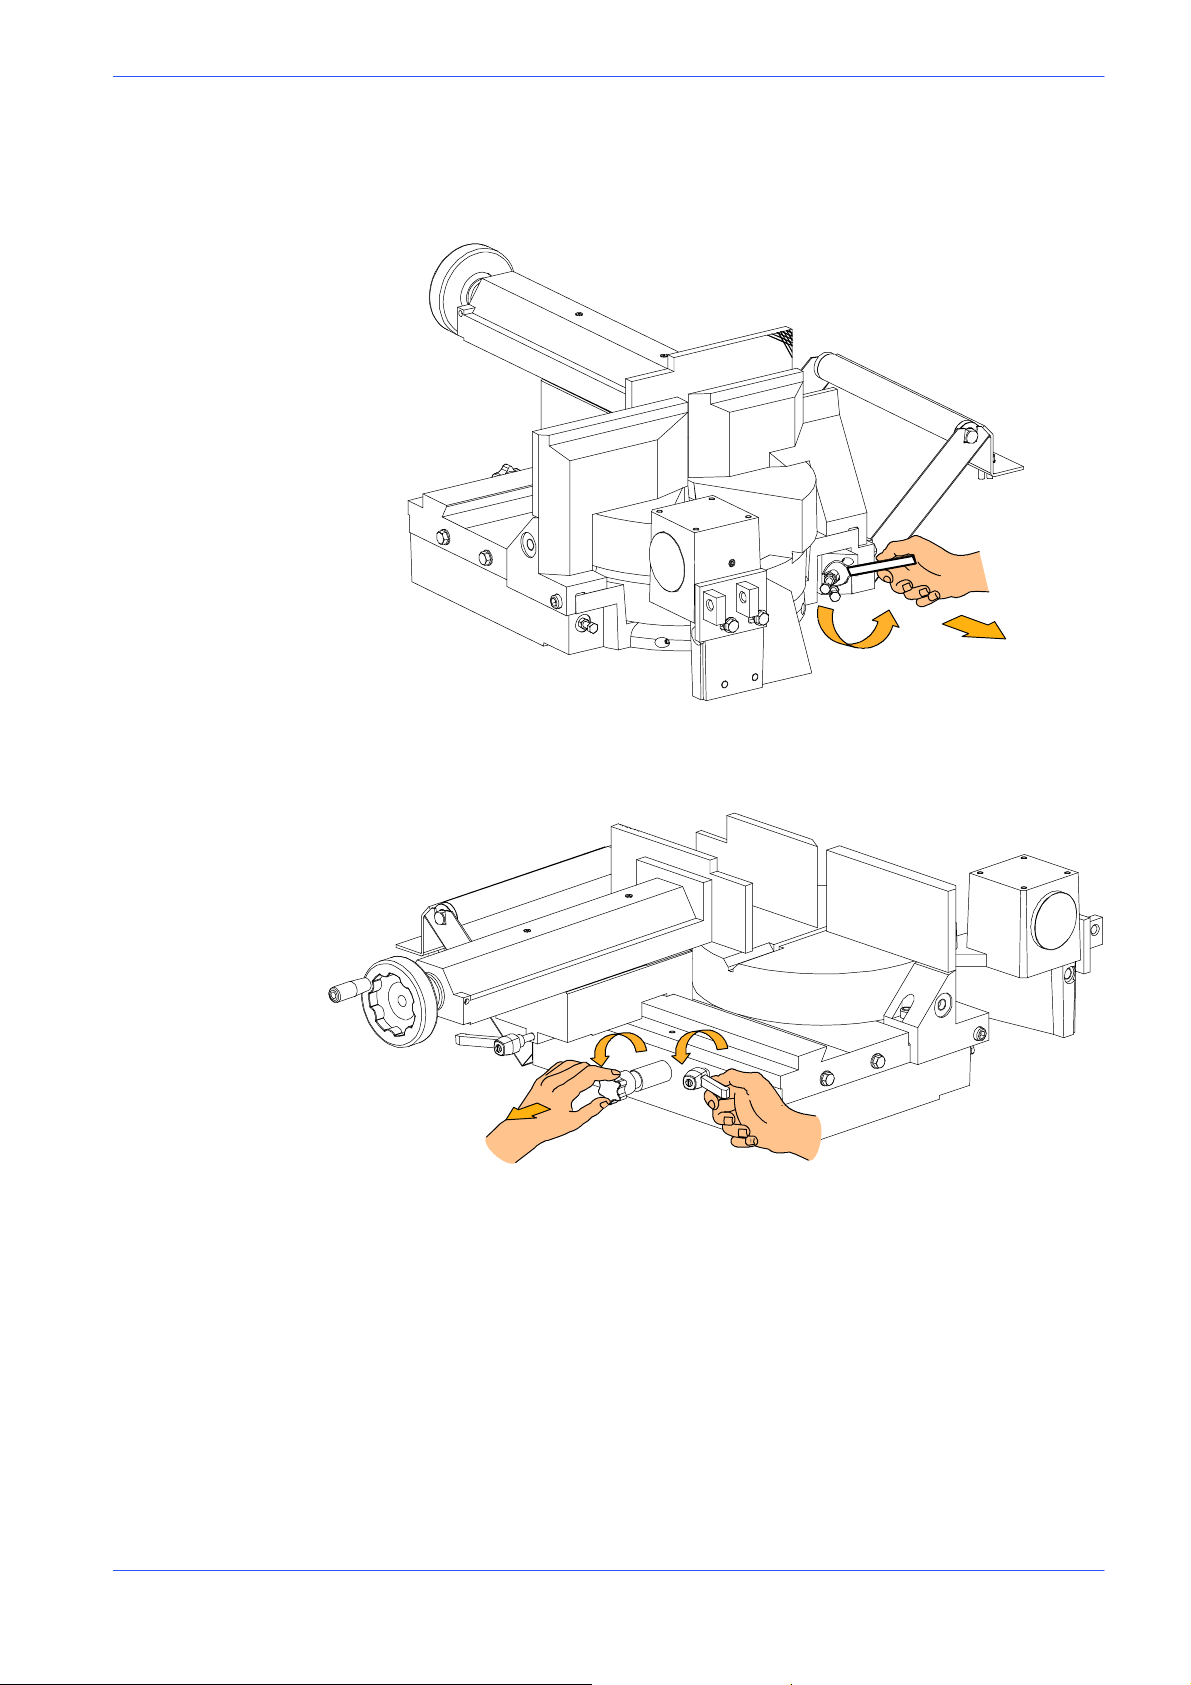
" Undothebushonthe45˚ left reference stop, as illustrated in the figure be-
low, using a 36 mm wrench.
" Slacken the turntable lock/release lever.
" Pull the eccentric pin knob towards you (0˚reference stop) and rotate slightly
to raise it.
" Swing the head from left to right until it is positioned at the required angle, as
indicated by the graduated scale on the turntable.
" Relock the turntable lock/release lever.
" Make the cut in the required operating mode, following the preliminary safe-
ty instructions set out in this chapter.
Description of machine operation 5--13
Page 49
MEP S.p.A.
Angled cu ts 45˚to the right
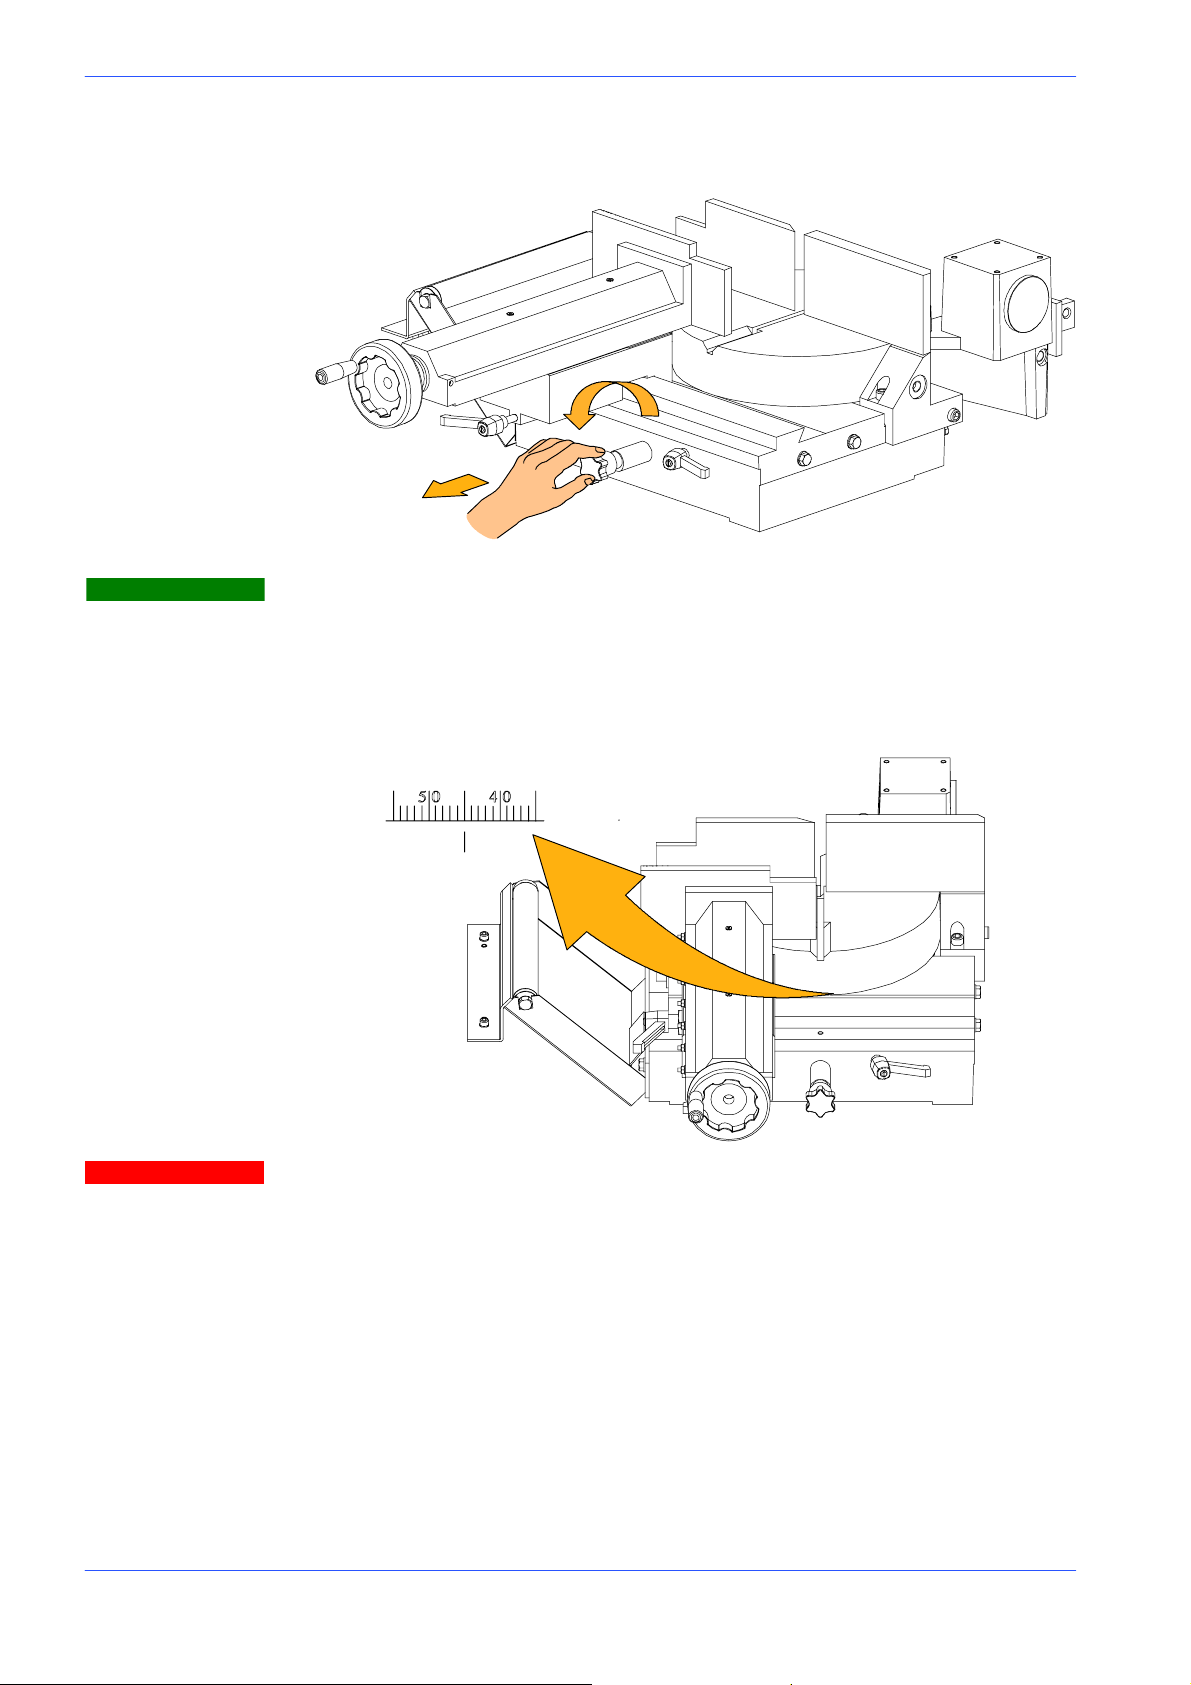
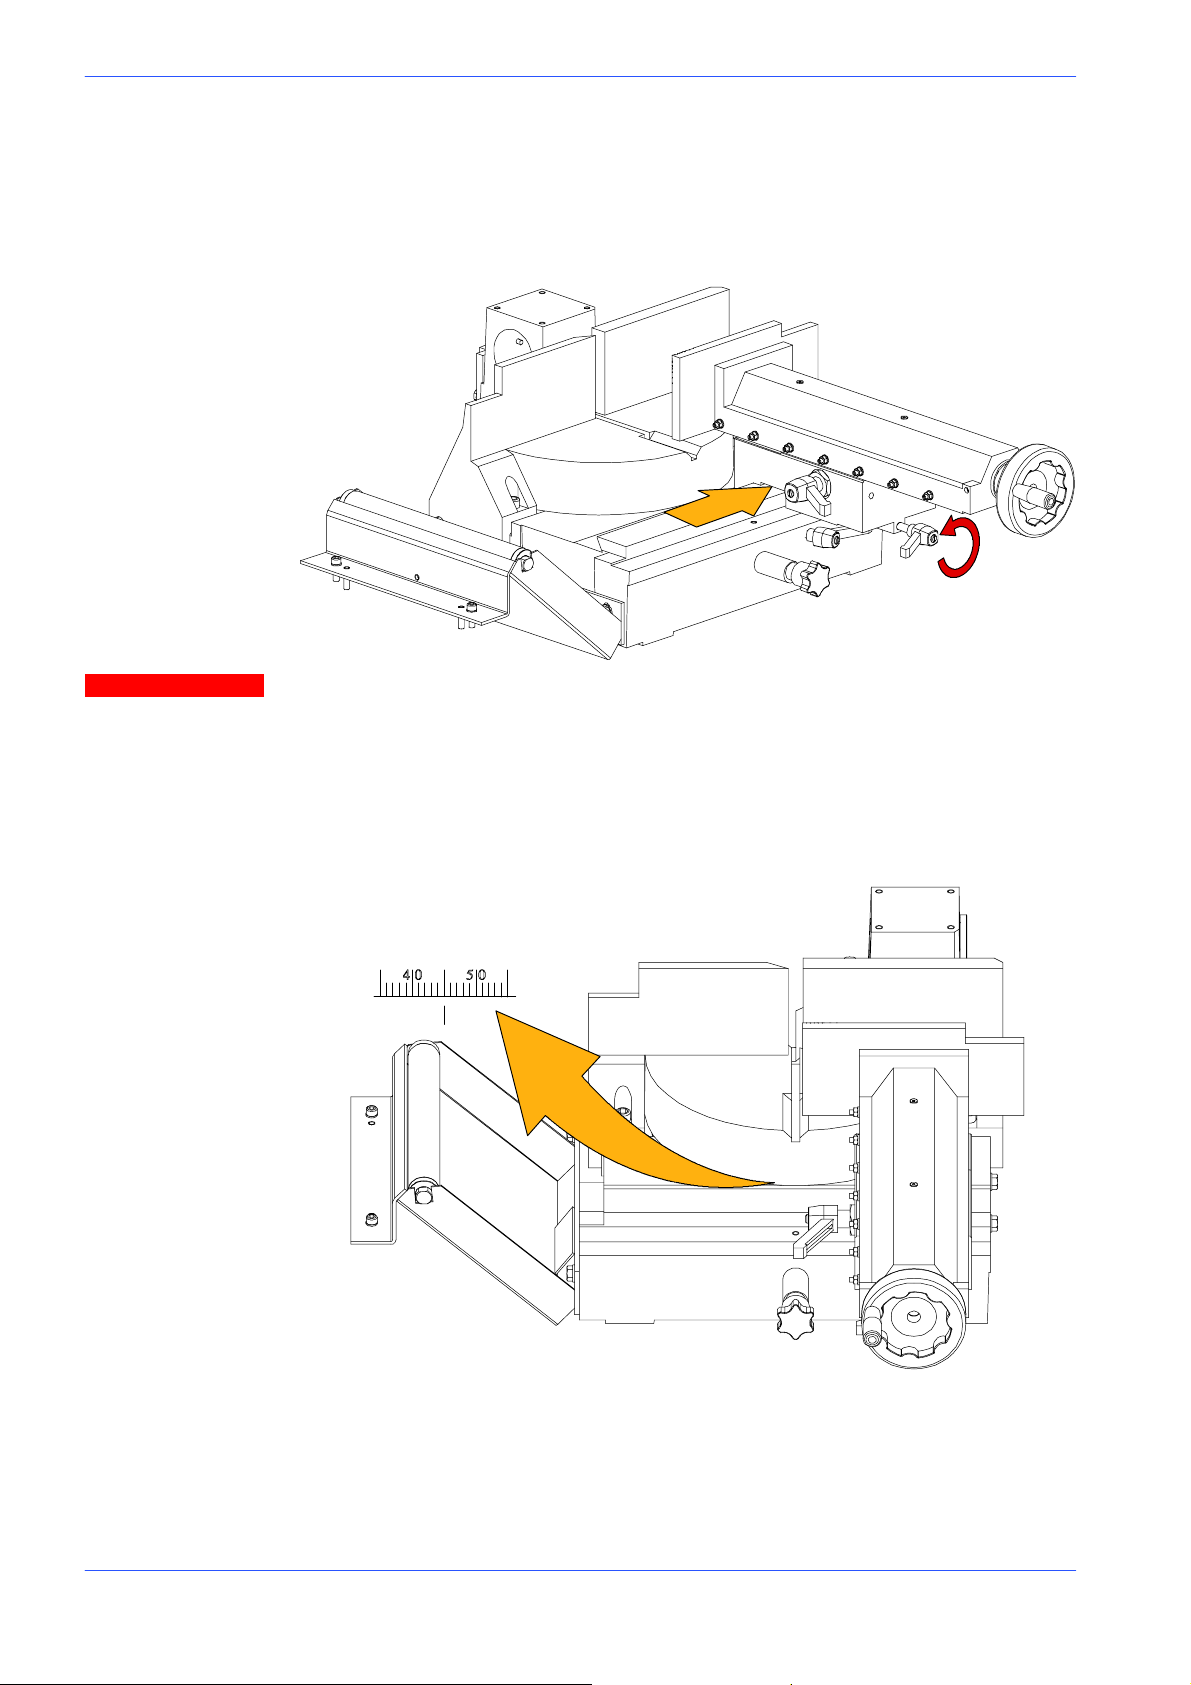
" Make sure the vice is positioned to the right of the 0˚ cutting slot.
" Slackenthelockingleverasshowninthefigurebelow.
" Position the vice to the right and lock the lever.
Attention
When positioning the vice to the left or right, make sure the moving jaw is beyond the 0˚cutting slot to avoid any risk of collision with the blade downstroke.
Following the same procedure described above for 45˚ cuts to the left, now
position the head for 45˚ cuts to the right.
" Slacken the turntable lock/release lever.
" Pull the eccentric pin knob towards you (0˚reference stop) and rotate slightly
to raise it.
" Swing the head from left to right until it is positioned at the required angle, as
indicated by the graduated scale on the turntable.
" Relock the turntable lock/release lever.
" Make the cut in the required operating mode, following the preliminary safe-
ty instructions set out in this chapter.
5--14 Use and maintenance manual DM 8
Page 50
Diagrams,
exploded views
and replace-ment parts
This chapter contains functional diagrams and exploded views of the DM 8,
including the MA version. This document is intended to help in identifying the
location of the various components making up the machine, giving information
useful in carrying out repair and maintenance operations; This chapter will also
enable the user to order replacement parts with no risk of misunderstanding, as
all parts are given codes.
Diagrams
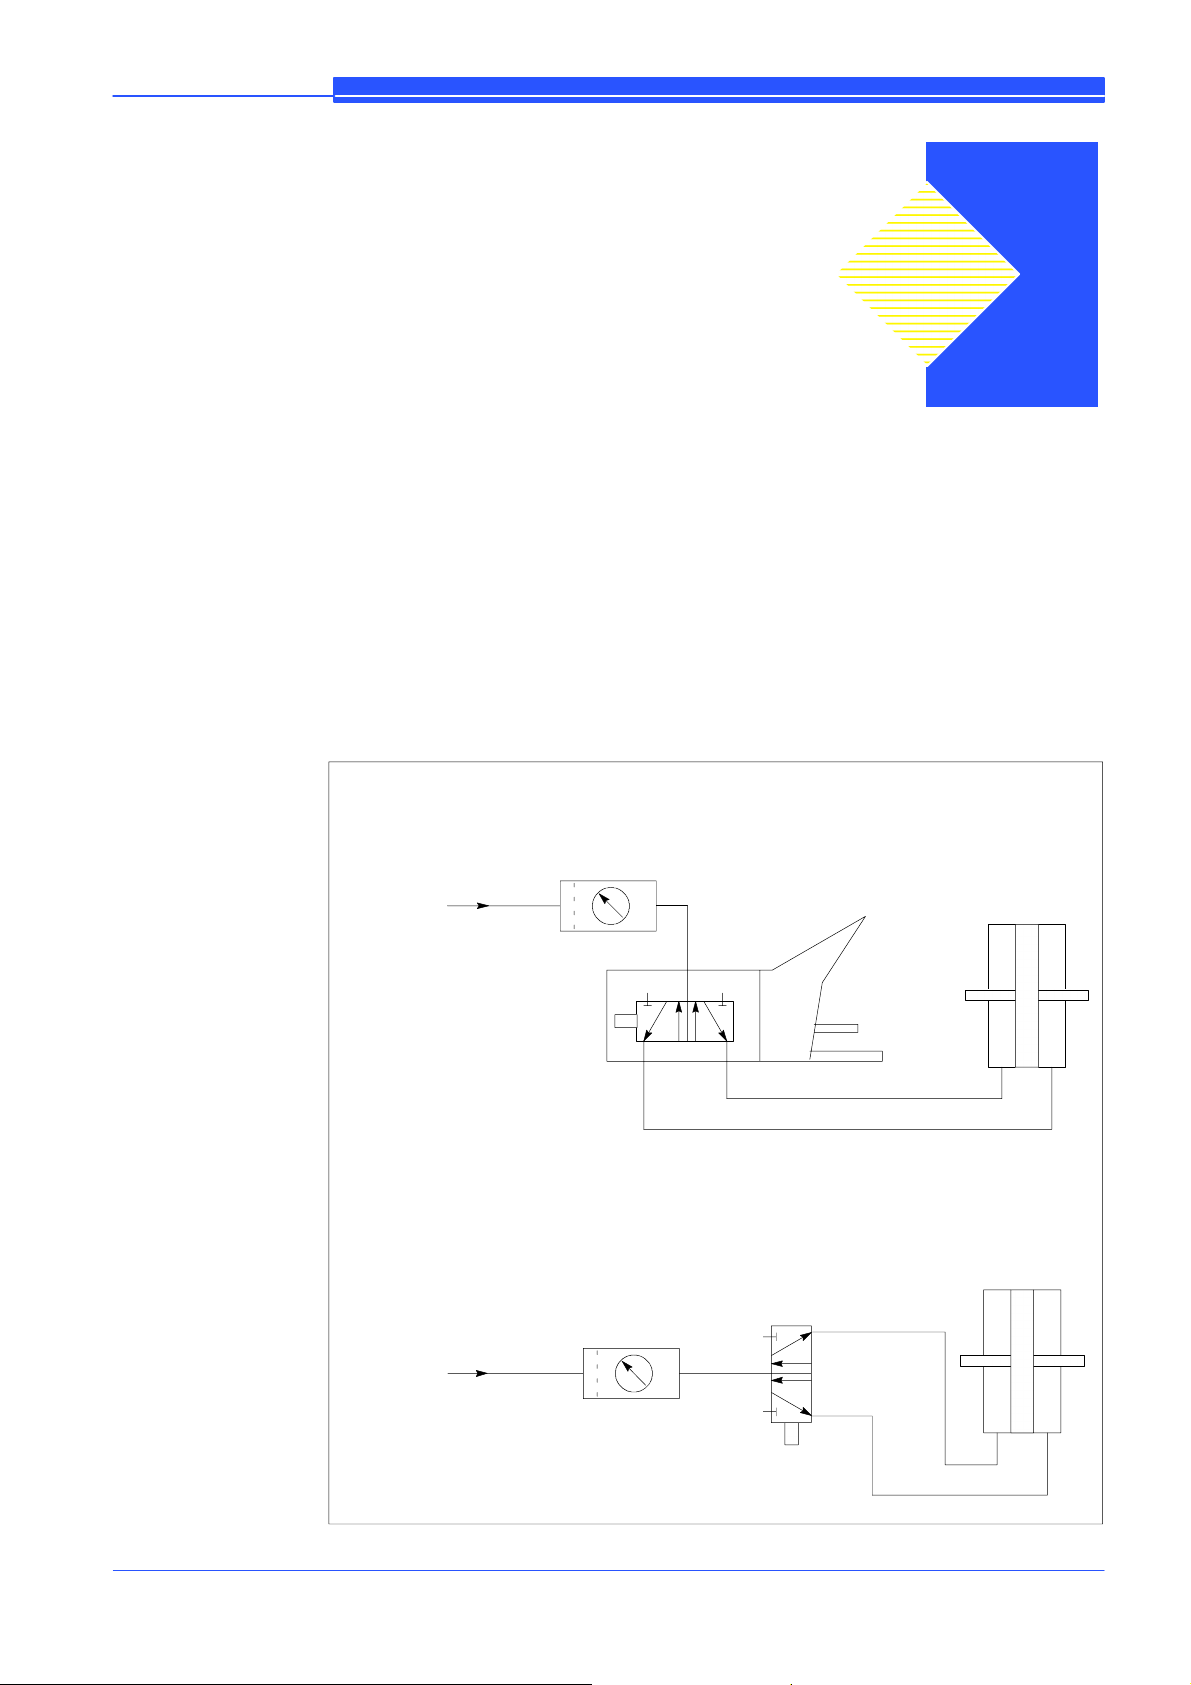
Pneumatic diagram (MA version)
6
MA diagram with OPTIONAL footpedal
Air treatment unit
Compressed
air supply
Pedal valve
MA diagram with manual valve
Air treatment
unit
Compressed
air supply
Manual
valve
Vice
pneumatic
cylinder
Vice
pneumatic
cylinder
6--1
Page 51
MEP S.p.A.
How t o read the wiring d iagrams
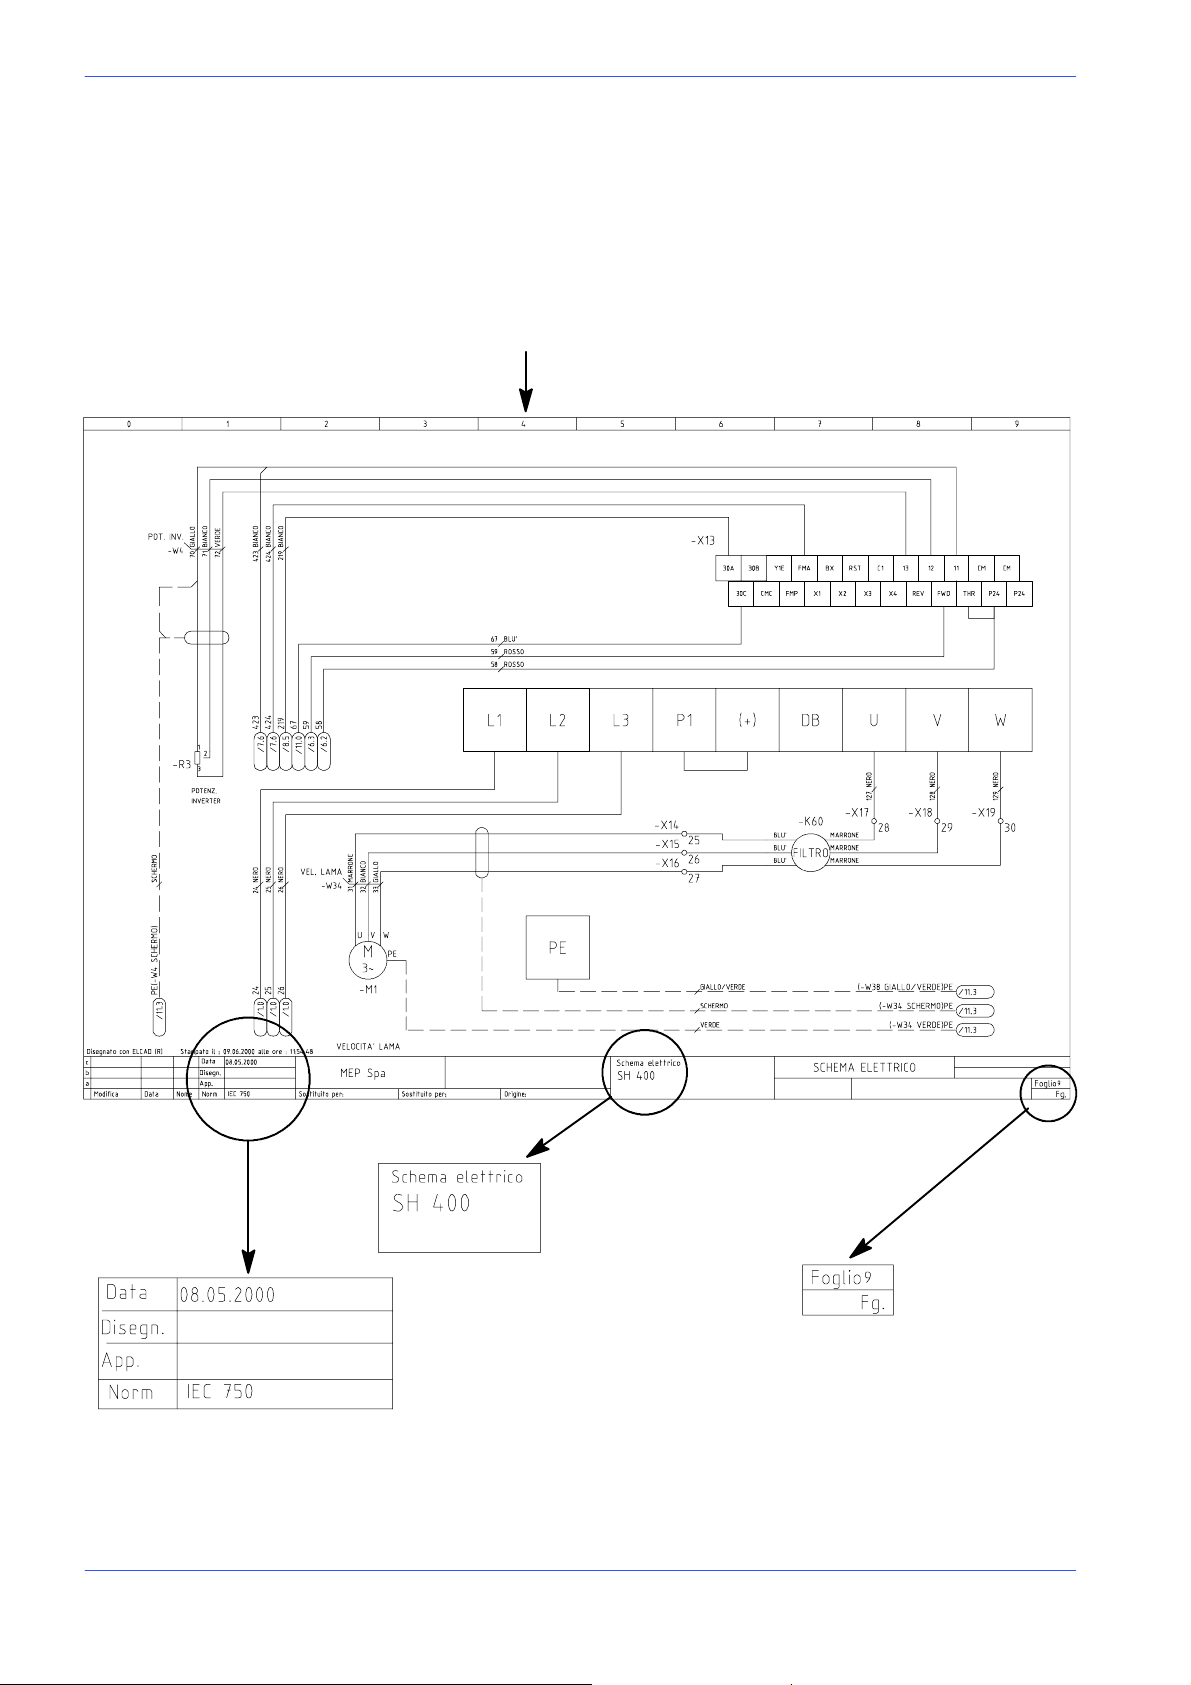
With the introduction of the new standardised wiring diagrams, the following gives an illustration of the way
in which they have been drawn up.
Each sheet of the project contains a box which gives the following information:
The numbers indicate the co-
lumns into which the entire dra-
wing is divided
MARIO ROSSI
Indicates of the date production started
MARIO ROSSI
Identification of the designer
Identification of the Reference Standard
6--2 Use and maintenance manual DM 8
Indications of the
model of machine
Indication of the page number
Page 52
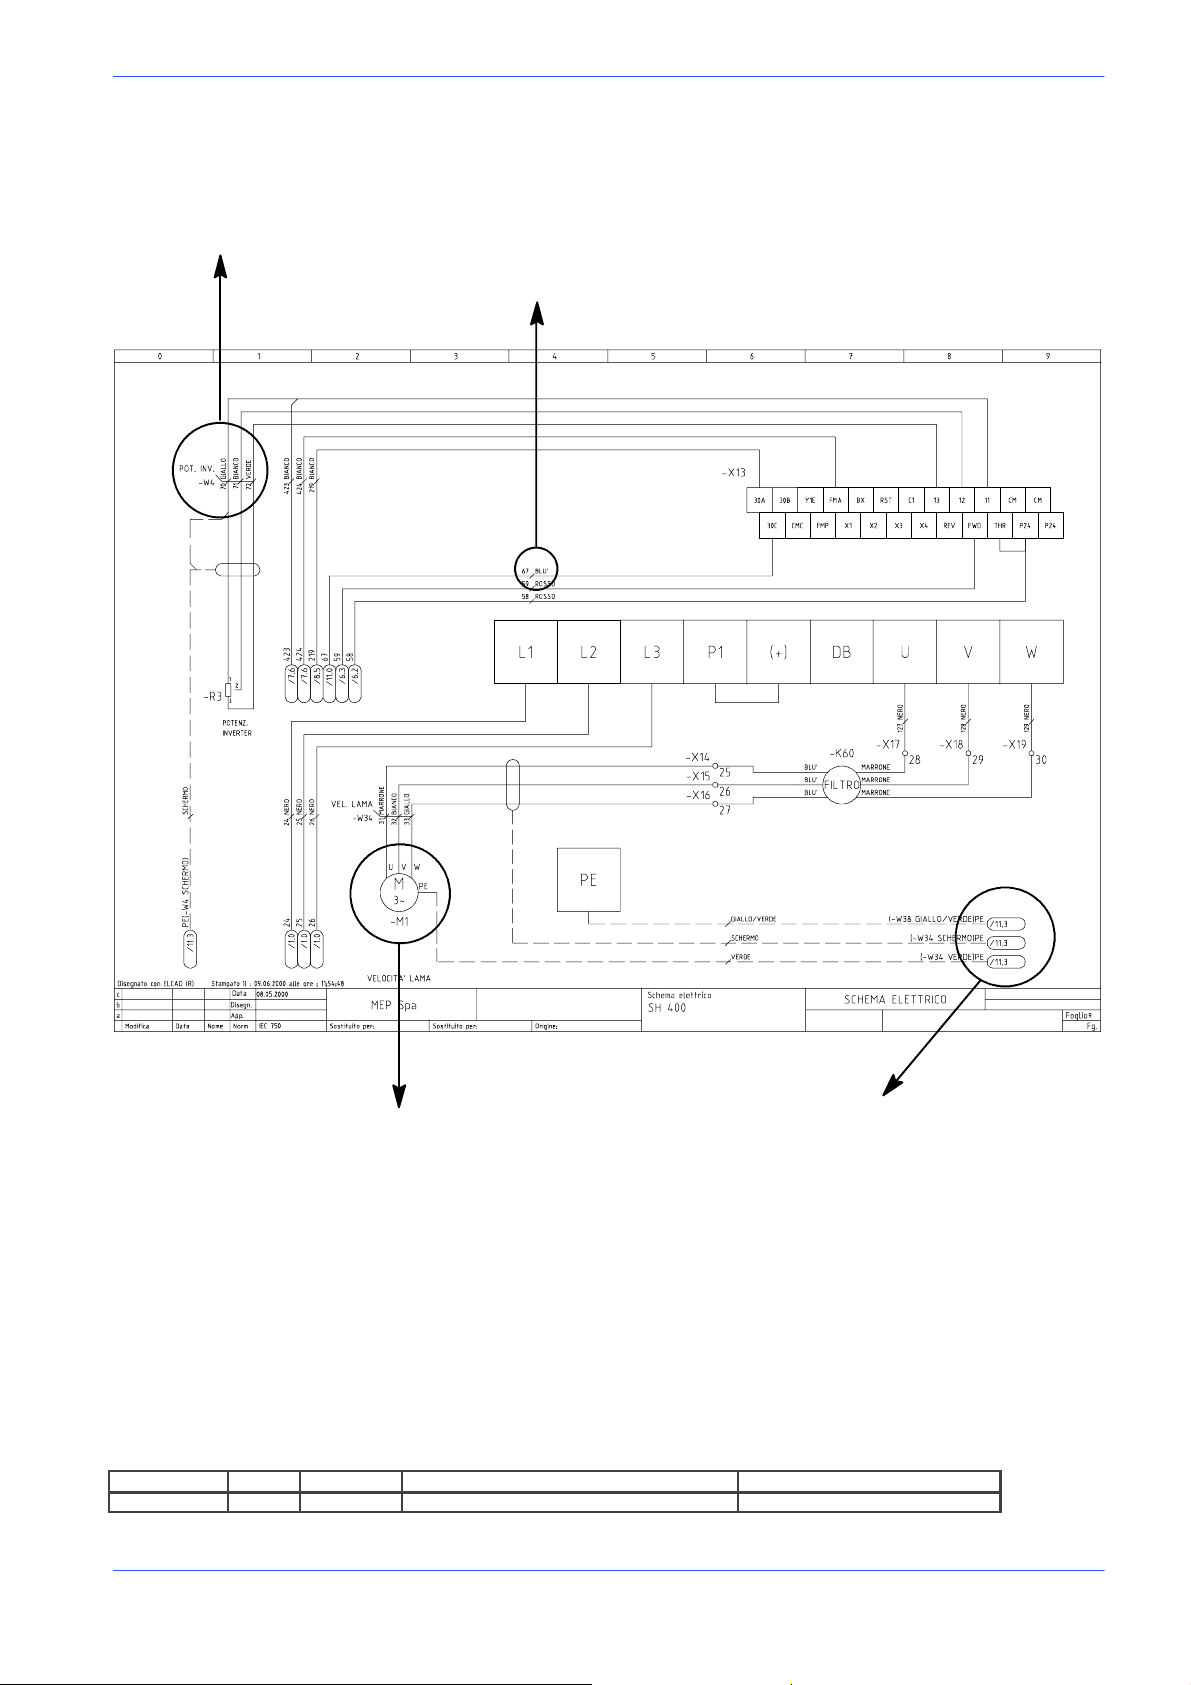
Version 24DM
Each component in the wiring diagram is identified by a unique alphanumeric identification code, in compliance with regulations:
The wire is identified by the
code -- W4
This symbol identifies the wire
with its relative number and co-
lour
MARIO ROSSI
The motor is identified by the code --M1
These symbols, known as potentials, are used to provide page references: the first number indicates the page
to be referred to, the second number, after the dot, iden-
tifies the column on that page; example /11.8 indicates
that the wire continues on page no. 11 in column 8
The pages following the wiring diagrams contain the following lists:
1. components list (list of all components) and terminals list (list of all the terminals) with the following information:
- in--house article code;
- identification code;
- reference, no. of the page and column on which it can be found;
- description;
- manufacturer
ART. COD. ID PRES.REF DESCRIPTION MANUFACTURER
022.2151 -- B 1 /5.2 Strain gauge Deltatec
Diagrams, exploded views and replacement parts 6--3
Page 53

MEP S.p.A.
2. wires list (list of all wires) with the following information:
- in--house article code;
- identification code;
- description
2
- section of wire (mm
);
- colour of wire;
- start: indicates the component (identification code and contact number) at which the wire starts;
- end: indicates the component (identification code and contact number) at which the wire ends;
e.g.
CODE CABLE DESCRIPTION SECTION NO. COLOUR START END
022.0141 -- W 7 RESET+EMERGENCY 0.50 317 WHITE -- S 3 4 -- K 1 0 14
In this example, wire no. 317 white, identified as --- W7, starts from contact no. 4 on component ---S3, and
ends at contact no. 14 on component ---K10.
Enclosed below is Appendix D2 to European Standard EN 60204 ---1
D2--- Letter codes used to designate the type of component
LETTER TYPE OF COMPONENT EXAMPLES
Laser
A Complex units
Transducers converting a non
B
C Capacitors C
D
E Various materials
electrical signal to an electrical
signal and vice versa
Binary operators, timing devices, storage devices
Maser
Regulator
Transistor amplifier
IC amplifier
Magnetic amplifier
Valve amplifier
Printed circuit board
Drawer
Rack
Digital integrated circuits
and devices:
Delay line
Bistable element
Monostable element
Recorder
Magnetic memory
Tape or disk recorder
Devices not specified in
this table
Lightning protectors
Arrestors
IDENTIFICATION OF THE COMPONENT
A
AD
AJ
AM
AV
AP
AT
AR
D
E
F
FA
F
6--4 Use and maintenance manual DM 8
Protective Devices
Instant action current threshold protector
Delayed action current
threshold protector
Instant and delayed action
current threshold protector
Fuse
Voltage threshold protector
FR
FS
FU
FV
Page 54

Version 24DM
LETTER
EXAMPLESTYPE OF COMPONENT
IDENTIFICATION OF THE COMPONENT
Rotating generators
Crystal oscillators
G
Generators, feeders
Accumulator battery
Rotating or static frequency converter
Power feeder
H
Signaling Devices
Buzzer
Optical signal, indicator
light device
J
Instant all or nothing relays
or instant contactors
Bistable relays or interdependent contactors
(All or nothing contactors
K Relays, Contactors
with mechanical contact or
permanent magnet etc.)
Contactors
Polarised relays
Reed relays
All or nothing timed relays
(timers)
Inductor
L Inductors, reactors
Stop coil
Reactor
M Motors M
Operational amplifiers
N Analogue intgrated circuits
Hybrid analog/digital appliances
Indicator, recorder and in-
P
Measurement equipment, test
devices
tegrator measurement devices
Signal generators
Q
Power circuit switching appliances
R Resistors
Automatic switch
Engine saver switch
Knife switch
Fixed or variable resistor
(rheostat)
Selector or switch
Button (including electronic
proximity switch)
Numerical all or nothing
sensors (single step) of
mechanical and electronic
S Command or control devices
type:
-- Liquid level sensor
--Pressure sensor
Position sensor (including
proximity)
--Rotation sensor
--Temperature probe
G
GB
GF
GS
HA
HL
KA
KL
KM
KP
KR
KT
L
N
P
QF
QM
QS
R
SA
SB
SL
SP
SQ
SR
ST
Diagrams, exploded views and replacement parts 6--5
Page 55

MEP S.p.A.
LETTER
T Transformers
U Modulators, converters
V
W
Electronic pipes, semiconductors
Transmission lines, wave guides, antennas
X Terminals, sockets, plugs
EXAMPLESTYPE OF COMPONENT
Current transformer
Control circuit supply transformer
Power transformer
Magnetic stabiliser
Voltage transformer
Discriminator
Demodulator
Frequency converter
Coder
Converter
Inverter
Telegraphic repeater
Electronic pipe
Gas discharge pipe
Diode
Transistor
Thyristor
Conductor
Cable
Bar
Wave guide
Wave guide directional
coupler
Dipole
Parabolic antenna
Connector bar
Test plug
Plug
Socket
Terminal connector band
IDENTIFICATION OF THE COMPONENT
TA
TC
TM
TS
TV
U
V
W
XB
XJ
XP
XS
XT
Electromagnet
Y
Electrically operated mechanical appliances
Electromagnetic brake
Electromagnetic clutch
Magnetic table spindle
Electromagnetic valve
Transformers, impedence
Z
adapters, equalizers, band limiters
Line equalizer
Compresser
Crystal filter
YA
YB
YC
YH
YV
Z
6--6 Use and maintenance manual DM 8
Page 56
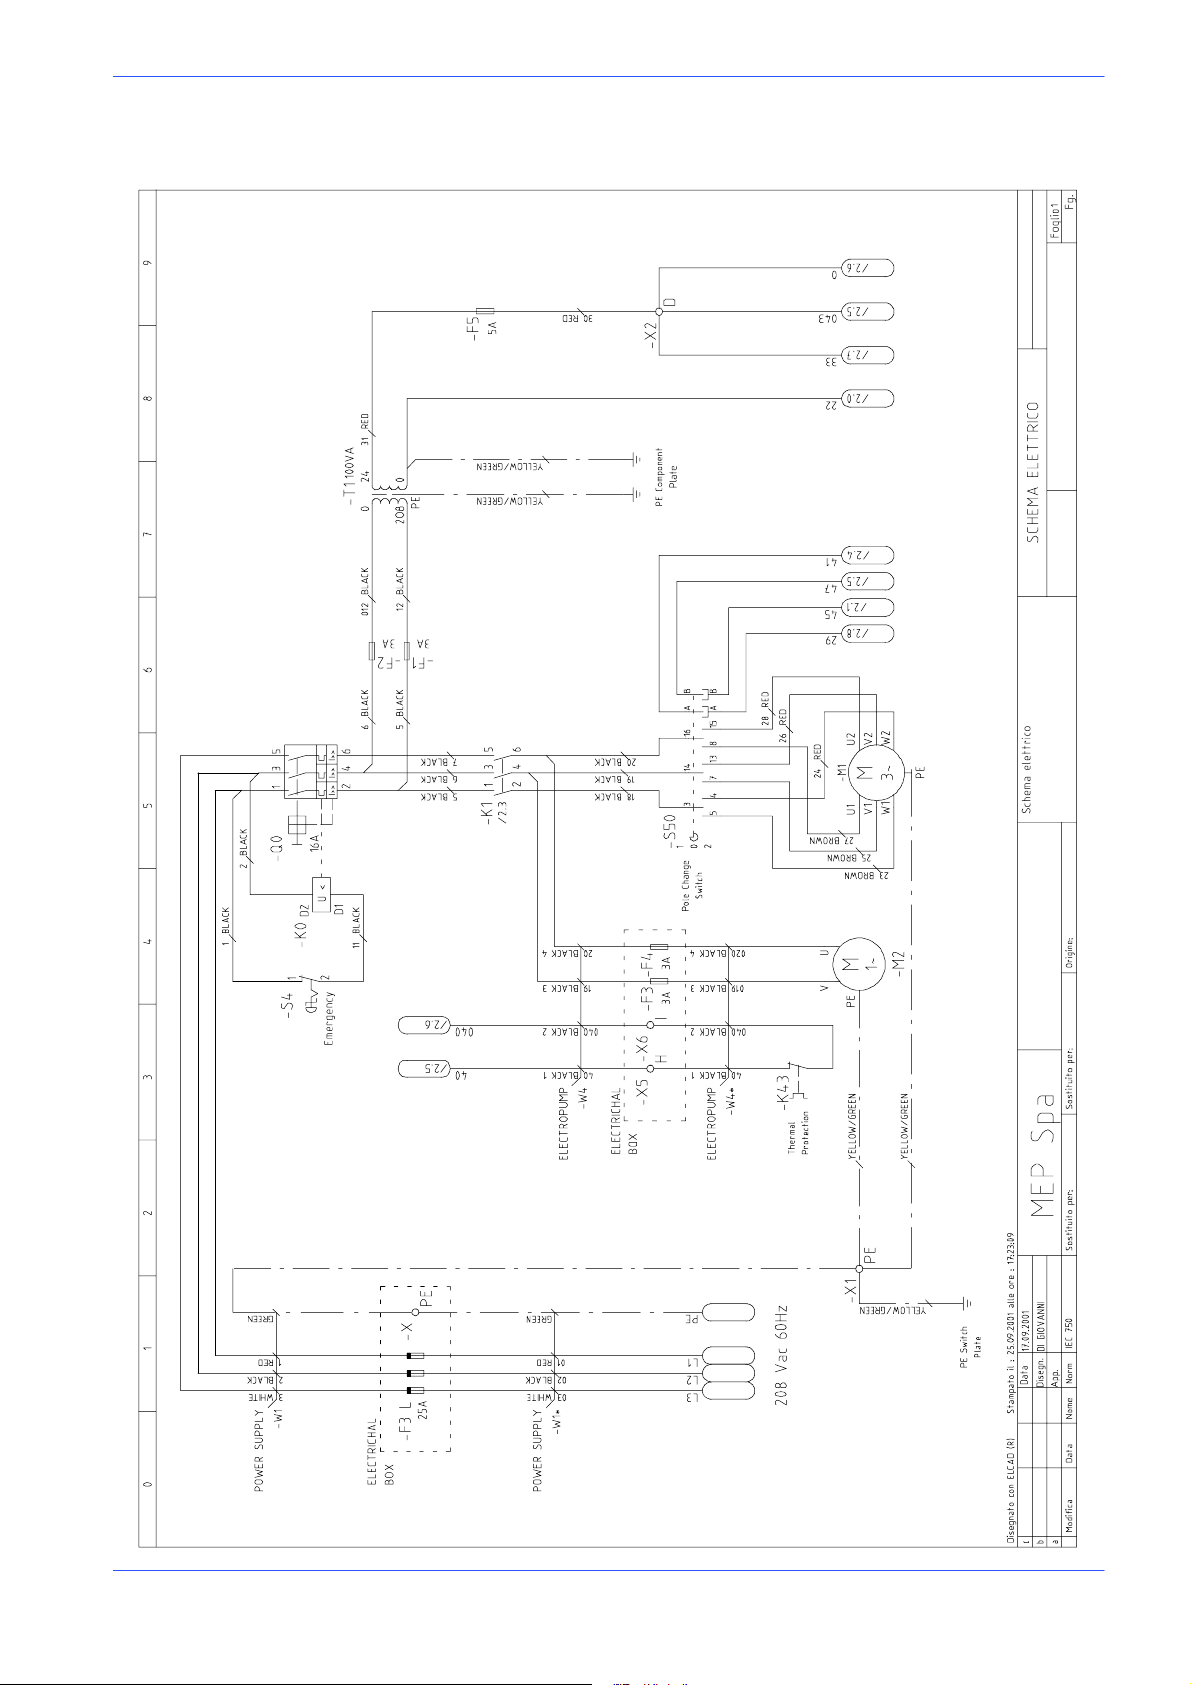
Standard version electrical diag ram 208V (CSA standard)
Version 24DM
DM 8 G -- 208/60
Diagrams, exploded views and replacement parts 6--7
Page 57
MEP S.p.A.
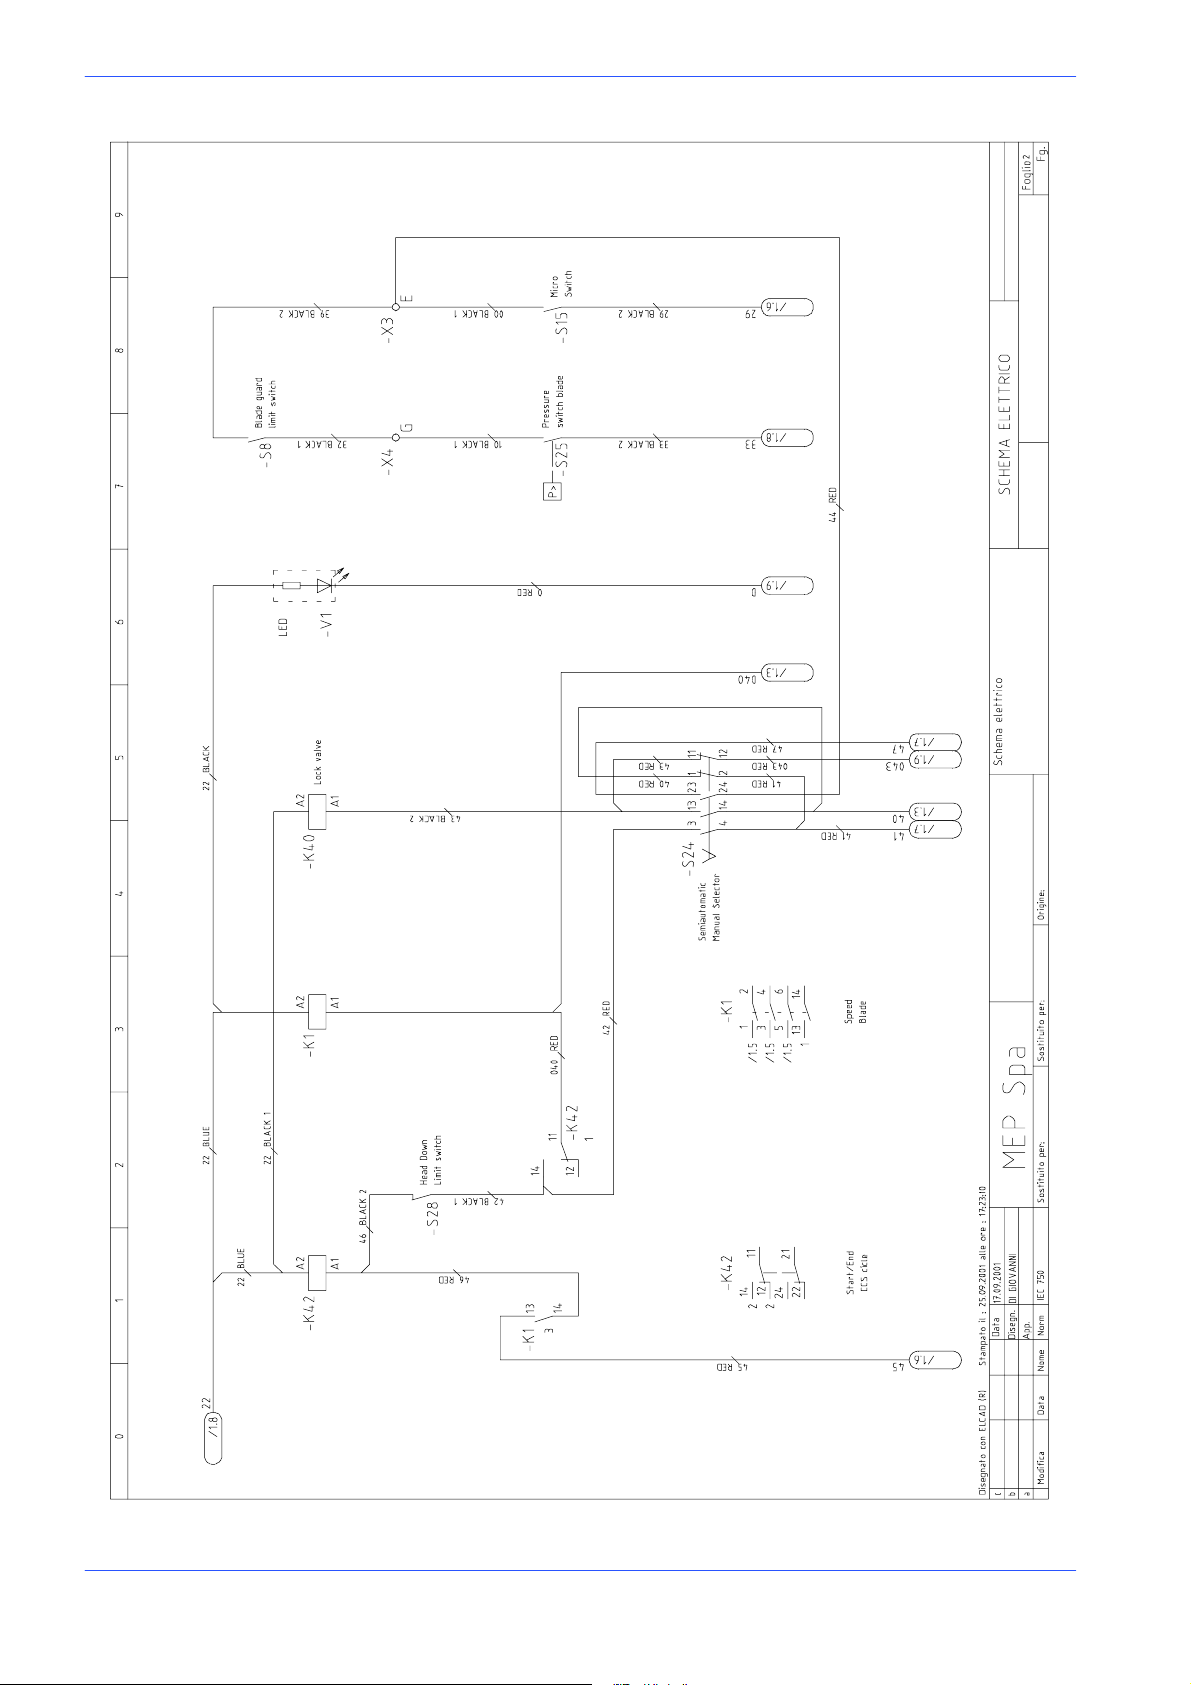
DM 8 G -- 208/60
6--8 Use and maintenance manual DM 8
Page 58
Version 24DM
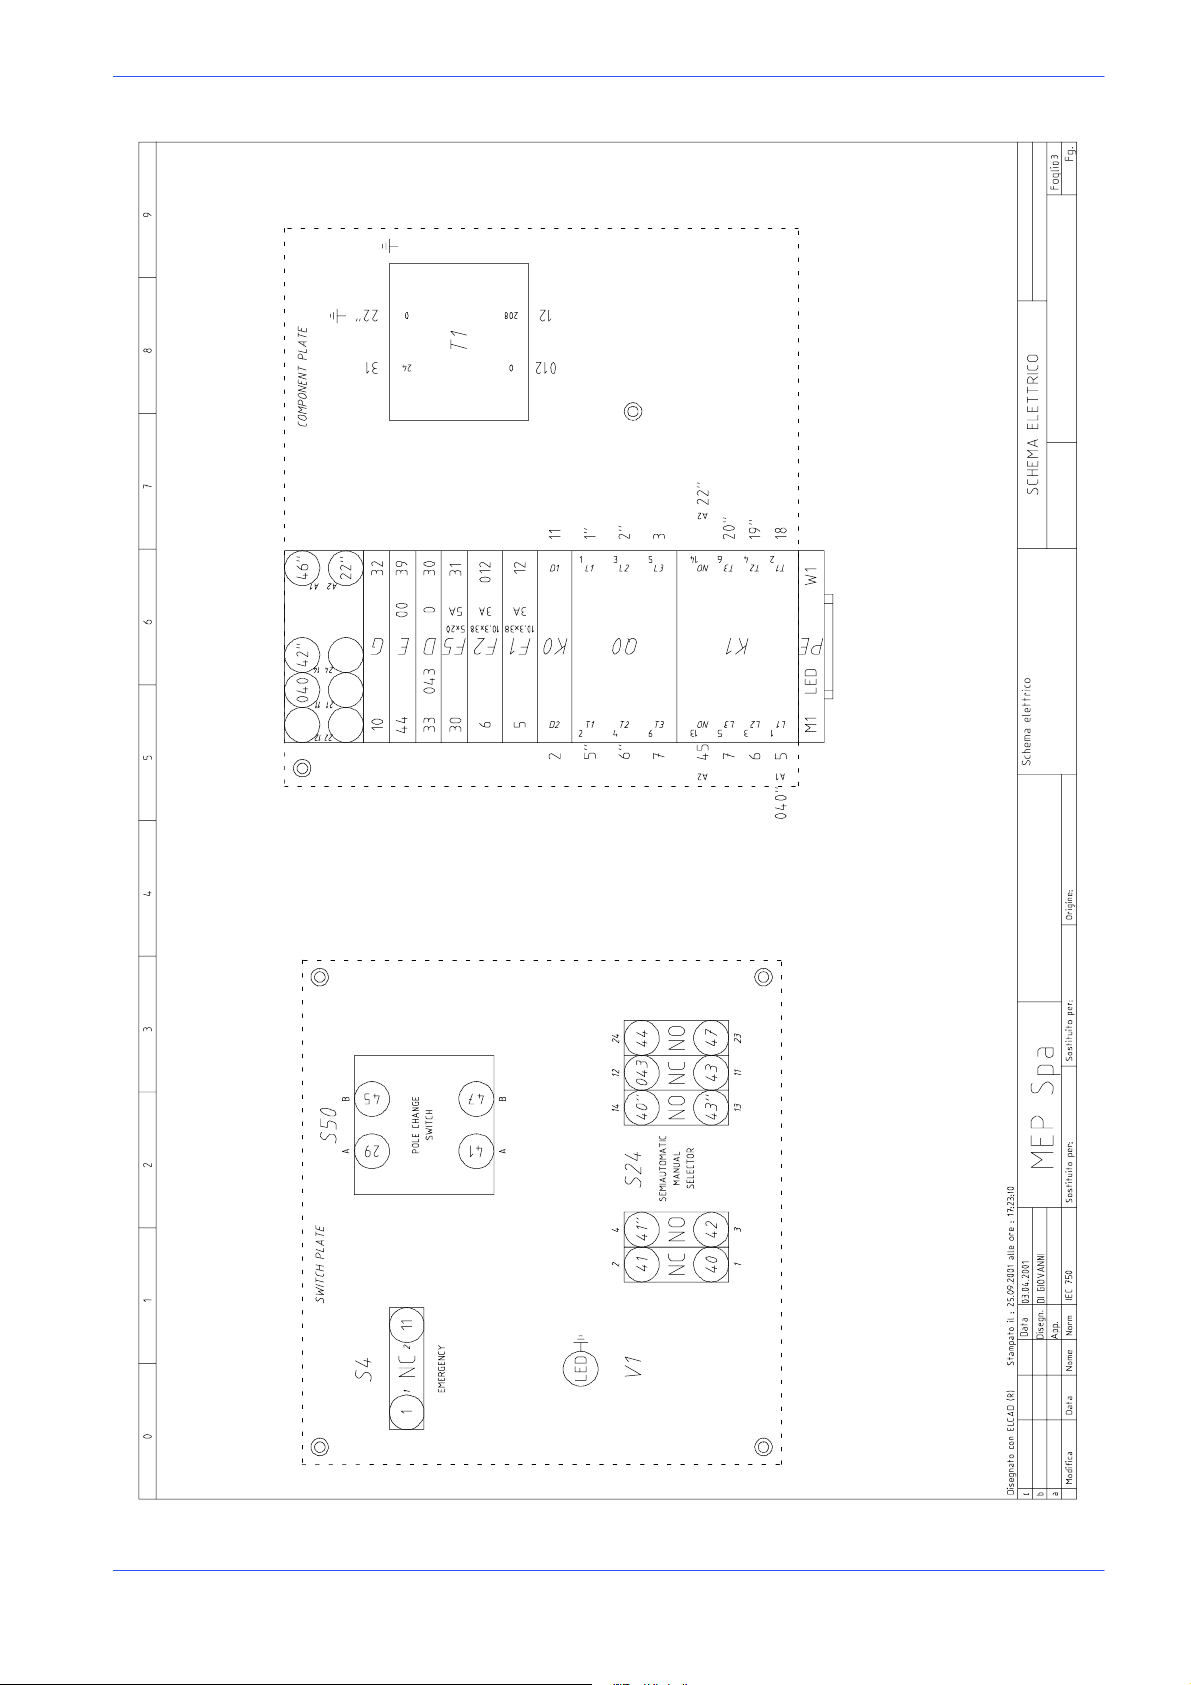
K42
DM 8 G -- 208/60
Diagrams, exploded views and replacement parts 6--9
Page 59
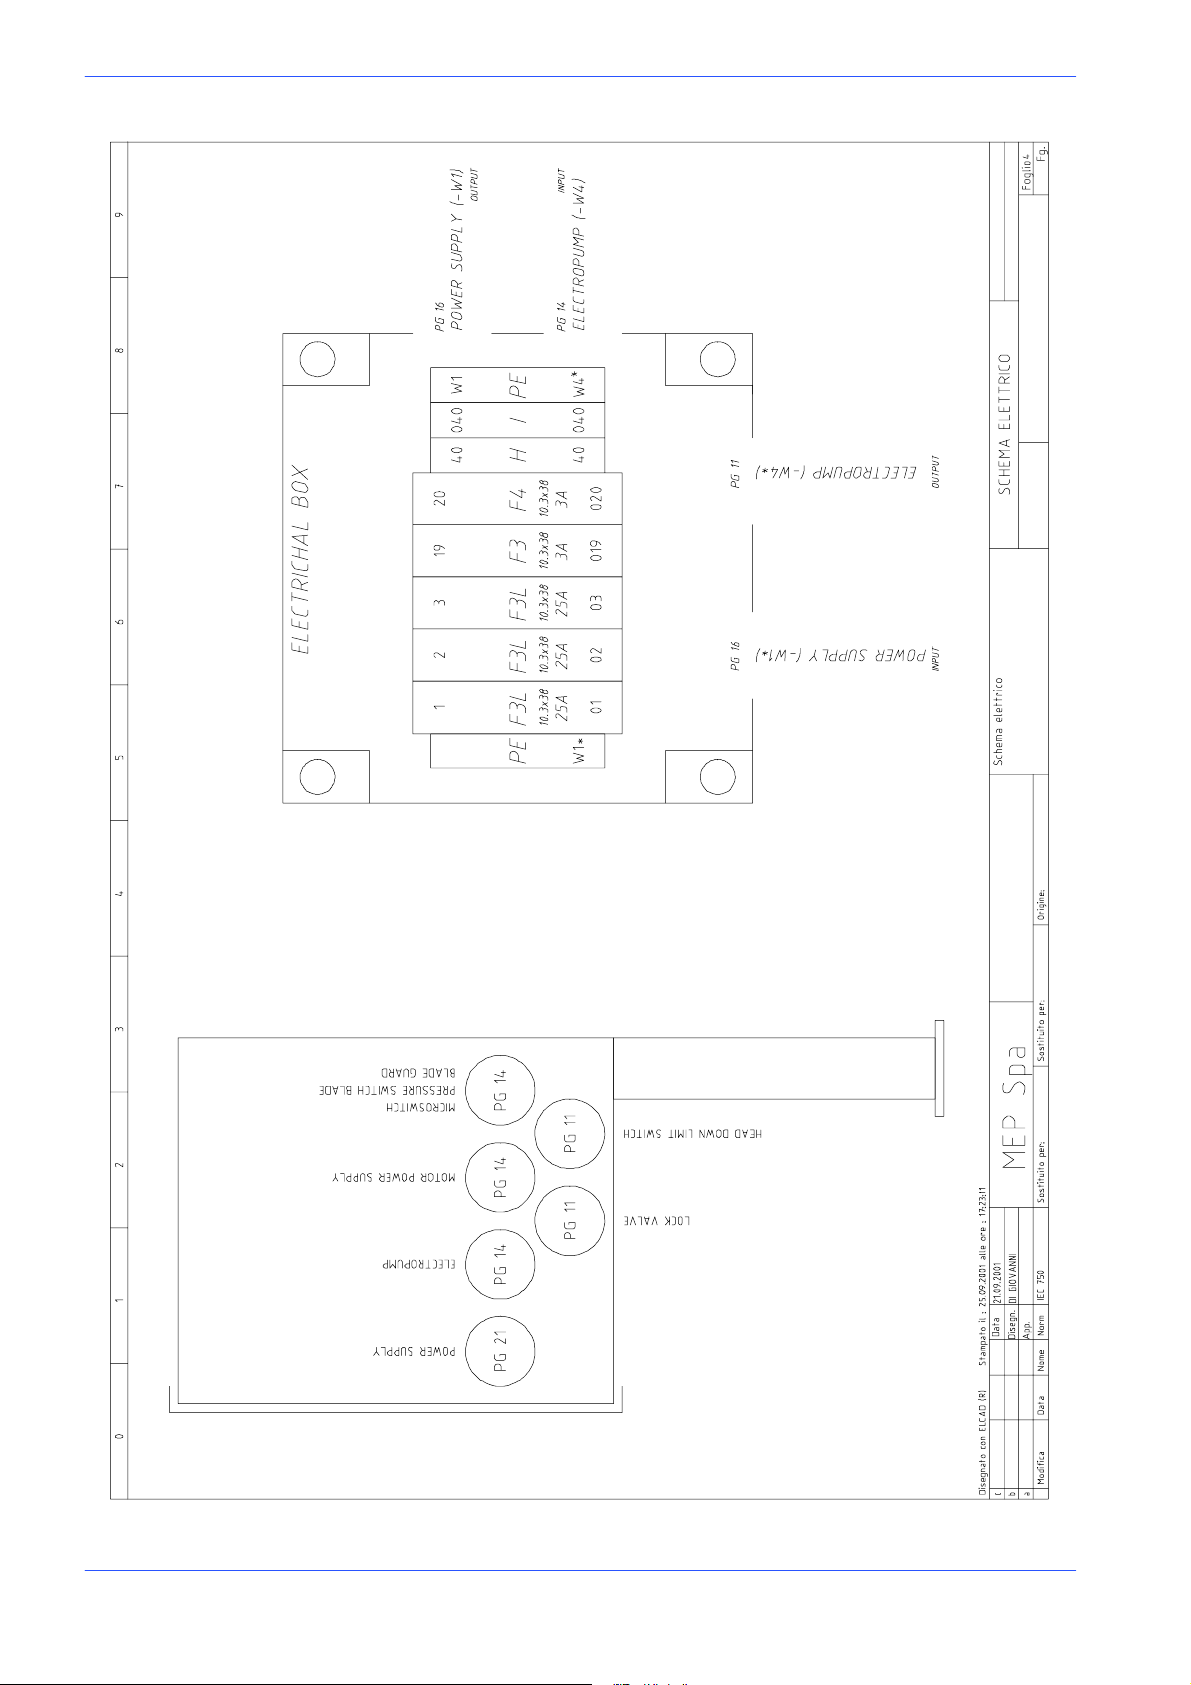
MEP S.p.A.
DM 8 G -- 208/60
6--10 Use and maintenance manual DM 8
Page 60
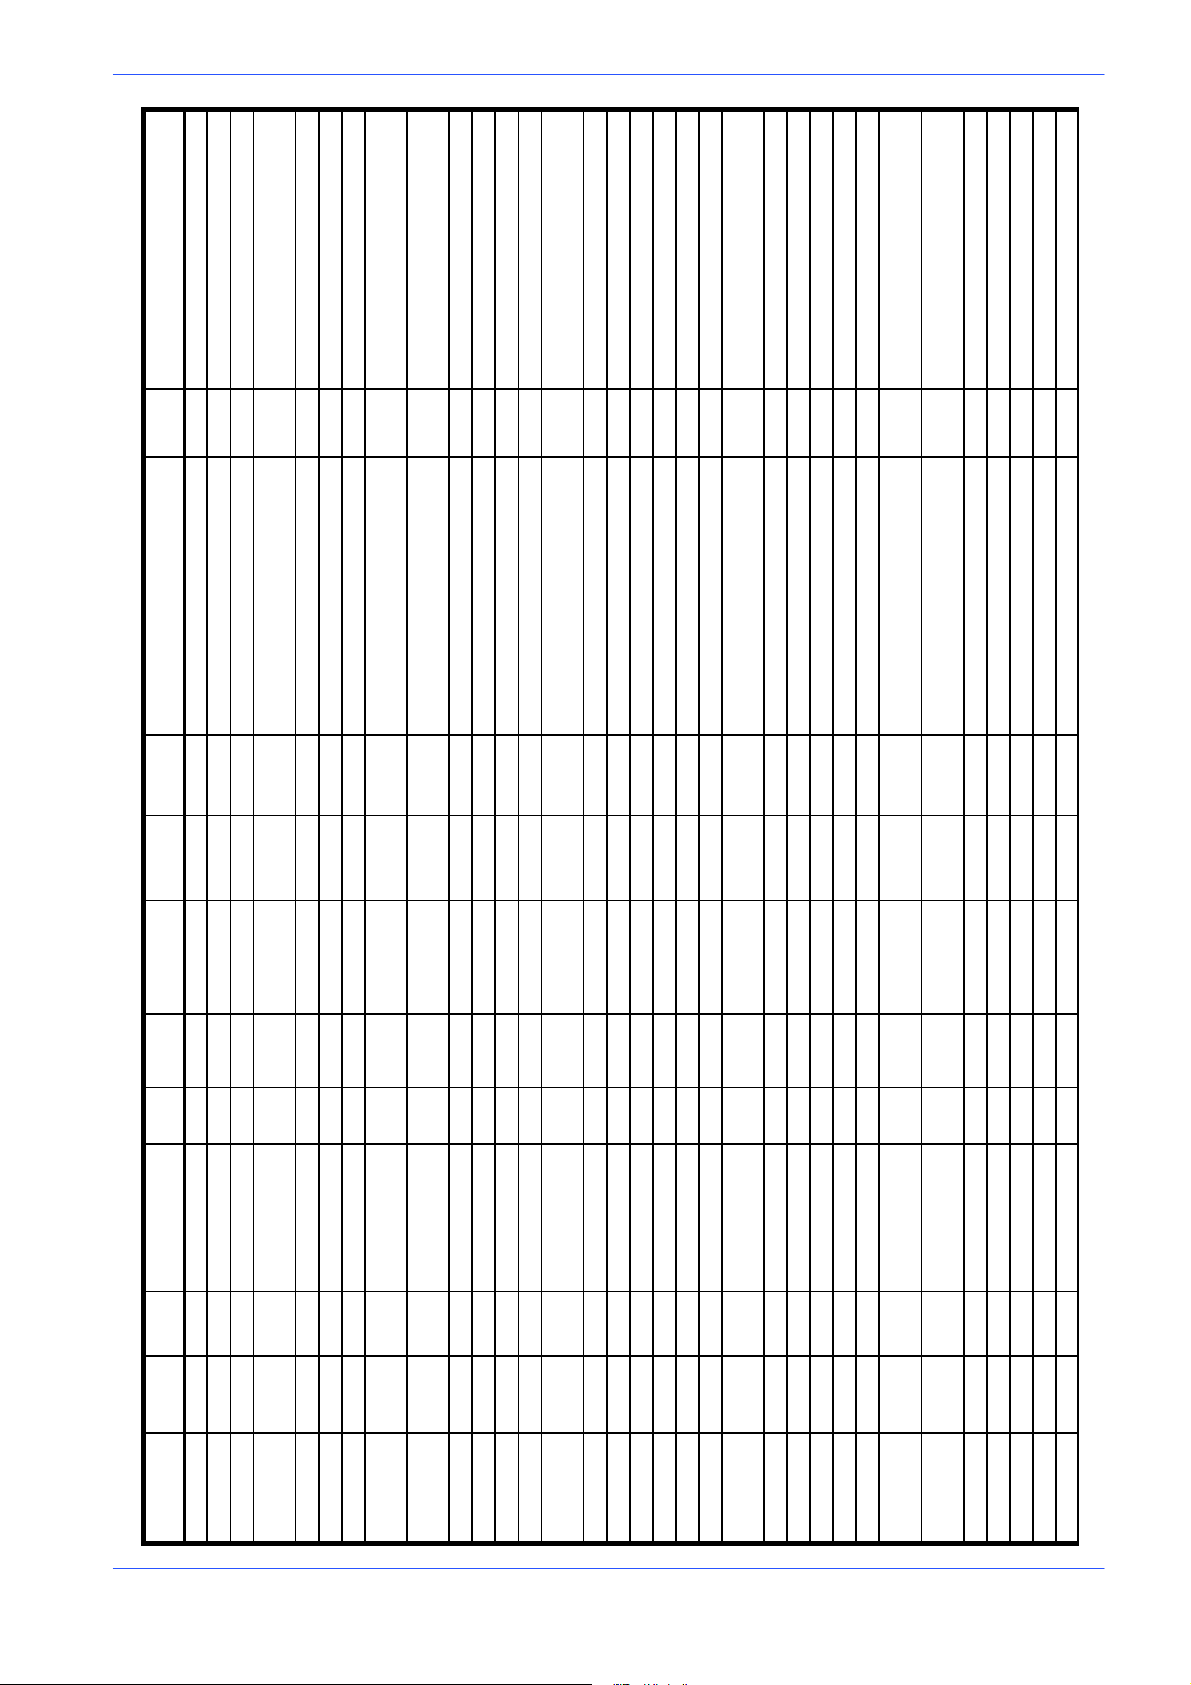
022.0311 Tube terminal wire 0,50mm
022.0300 Red Faston 1,5mm
022.0311 Tube terminal wire 0,50mm
Version 24DM
022.0311 Tube terminal wire 0,50mm
2500mm -- X 1 : P E 022.0312* Tube terminal wire 2,5mm --X:PE 022.0312* Tube terminal wire 2,5mm
GREEN
2500mm -- X 1 : P E 022.0312* Tube terminal wire 2,5mm
GREEN
4
2500mm
GREEN
E
3000mm -- X 1 : P E 022.031 1 Tube terminal wire 0,50mm -- M 2 : P
GREEN
3
2
List of cables
SEC. COLOR LENGTH START CABLE TERMINAL START END CABLE TERMINAL END
RE
WI-
CODE CABLE TYPE DESCRIPTION
022.1901 -- W 1 S00W POWER SUPPLY AWG14 RED 2500mm -- F 3 L 022.0312* Tube terminal wire 2,5mm -- Q 0 : 1 022.0312* Tube terminal wire 2,5mm
022.1901 -- W 1 S00W POWER SUPPLY AWG14 BLACK 2500mm -- F 3 L 022.0312* Tube terminal wire 2,5mm -- Q 0 : 3 022.0312* Tube terminal wire 2,5mm
022.1901 -- W 1 S00W POWER SUPPLY AWG14 WHITE 2500mm -- F 3 L 022.0312* Tube terminal wire 2,5mm -- Q 0 : 5 022.0312* Tube terminal wire 2,5mm
022.1901 -- W 1 S00W POWER SUPPLY AWG14 YELLOW/
022.1901 -- W 1 * S00W POWER SUPPLY 01 AWG14 RED 2500mm -- F 3 L 022.0312* Tube terminal wire 2,5mm
022.1901 -- W 1 * S00W POWER SUPPLY 02 AWG14 BLACK 2500mm -- F 3 L 022.0312* Tube terminal wire 2,5mm
022.1901 -- W 1 * S00W POWER SUPPLY 03 AWG14 WHITE 2500mm -- F 3 L 022.0312* Tube terminal wire 2,5mm
022.1901 -- W 1 * S00W POWER SUPPLY AWG14 YELLOW/
022.0168 -- W 4 AWM ELECTROPUMP 40 AWG20 BLACK 1 2500mm -- X 5 : H --S24:1
022.0168 -- W 4 AWM ELECTROPUMP 040 AWG20 BLACK 2 2500mm -- X 6 : I -- K 1 : A 1 022.0311 Tube terminal wire 0,50mm
022.0168 -- W 4 AWM ELECTROPUMP 19 AWG20 BLACK 3 2500mm -- F 3 022.0311 Tube terminal wire 0,50mm -- K 1 : 4 022.0311 Tube terminal wire 0,50mm
022.0168 -- W 4 AWM ELECTROPUMP 20 AWG20 BLACK 4 2500mm -- F 4 022.0311 Tube terminal wire 0,50mm -- K 1 : 6 022.0311 Tube terminal wire 0,50mm
022.0168 -- W 4 AWM ELECTROPUMP AWG20 BLACK 5 2500mm
022.0168 -- W 4 AWM ELECTROPUMP AWG20 YELLOW/
022.0168 -- W 4 AWM ELECTROPUMP AWG20 SCREENING 2500mm
022.0168 -- W 4 * AWM ELECTROPUMP 40 AWG20 BLACK 1 3000mm -- X 5 : H -- K 4 3 022.0311 Tube terminal wire 0,50mm
022.0168 -- W 4 * AWM ELECTROPUMP 040 AWG20 BLACK 2 3000mm -- X 6 : I -- K 4 3 022.0311 Tube terminal wire 0,50mm
022.0168 -- W 4 * AWM ELECTROPUMP 019 AWG20 BLACK 3 3000mm -- F 3 022.0311 Tube terminal wire 0,50mm -- M 2 : V 022.0300 Red Faston 1,5mm
022.0168 -- W 4 * AWM ELECTROPUMP 020 AWG20 BLACK 4 3000mm -- F 4 022.0311 Tube terminal wire 0,50mm -- M 2 : U 022.0300 Red Faston 1,5mm
022.0168 -- W 4 * AWM ELECTROPUMP AWG20 BLACK 5 3000mm
022.0168 -- W 4 * AWM ELECTROPUMP AWG20 YELLOW/
022.0168 -- W 4 * AWM ELECTROPUMP AWG20 SCREENING 3000mm
022.0139 -- W 5 2 AWM MICROSWITCH 00 AWG20 BLACK 1 3000mm -- X 3 : E -- S 1 5 022.0300 Red Faston 1,5mm
022.0139 -- W 5 2 AWM MICROSWITCH AWG20 BLACK 2 3000mm -- S50:A 022.0301 Tube terminal wire 0,50mm -- S 1 5 022.0300 Red Faston 1,5mm
022.0139 -- W 5 5 AWM Blade Guard L/S AWG20 BLACK 1 2000mm -- S 8 022.0311 Tube terminal wire 0,50mm -- X 4 : G
022.0139 -- W 5 5 AWM Blade Guard L/S AWG20 BLACK 2 2000mm -- X 3 : E -- S 8 022.0311 Tube terminal wire 0,50mm
022.0139 -- W 6 5 AWM LOCK VALVE AWG20 BLACK 1 1200mm --K40:A2 022.0311 Tube terminal wire 0,50mm --K42:A
022.0139 -- W 6 5 AWM LOCK VALVE AWG20 BLACK 2 1200mm --K40:A1 022.0311 Tube terminal wire 0,50mm --S24:1
022.0139 -- W 6 7 AWM Press. Sw. Blade AWG20 BLACK 1 2800mm -- X 4 : G -- S 2 5 022.0300 Red Faston 1,5mm
022.0139 -- W 6 7 AWM Press. Sw. Blade AWG20 BLACK 2 2800mm -- X 2 : D -- S 2 5 022.0300 Red Faston 1,5mm
022.0862 -- W 7 4 AWM LED 0 AWG20 RED 750mm -- X 2 : D -- V 1
022.0862 -- W 7 4 AWM LED AWG20 BLACK 750mm -- K 1 : A 2 022.0311 Tube terminal wire 0,50mm -- V 1
022.0506 -- W 7 5 AWM Head Down L/S 42 AWG20 BLACK 1 1400mm -- K42:14 022.0311 Tube terminal wire 0,50mm -- S 2 8
Diagrams, exploded views and replacement parts 6--11
Page 61

MEP S.p.A.
2,50mm
2,50mm
2,50mm
2,50mm
2,50mm
2,50mm
022.0311 Tube terminal wire 0,50mm
1
80mm -- T 1 : P E 022.0304 Red Eyelet 5mm PE 022.0304 Red Eyelet 5mm
1400mm
150mm PE 022.0304 Red Eyelet 5mm -- T 1 : 0 022.0312 Tube terminal wire 1,50mm
022.0304 Red Eyelet 5mm
-- M 1 : P
1500mm -- X 1 : P E 022.0312* Tube terminal wire
E
2,50mm
470mm -- X 1 : P E 022.0312 Tube terminal wire 1,50mm PE 022.0303 Blue Eyelet 8mm
022.0312 Tube terminal wire 1,50mm
1
-- Q 0 : 2 022.0312* Tube terminal wire
-- Q 0 : 4 022.0312* Tube terminal wire
2,50mm
2,50mm
-- Q 0 : 6 022.0312* Tube terminal wire
2,50mm
-- K 1 : 2 022.0312* Tube terminal wire
-- K 1 : 4 022.0312* Tube terminal wire
2,50mm
-- K 1 : 6 022.0312* Tube terminal wire
2,50mm
022.0304 Red Eyeled 5mm
-- M 1 : W
2,50mm
1
M1:V1 022.0304 Red Eyeled 5mm
2,50mm
022.0304 Red Eyeled 5mm
-- M 1 : U
2,50mm
1
M1:W2 022.0304 Red Eyeled 5mm
2,50mm
2,50mm
GREEN
GREEN
GREEN
GREEN
GREEN
AWG16 YELLOW/
RE
WI-
DESCRIPTIONTYPECABLE
CODE CABLE TERMINAL ENDENDCABLE TERMINAL STARTSTARTLENGTHCOLORSEC.
022.0506 -- W 7 5 AWM Head Down L/S 46 AWG20 BLACK 2 1400mm -- S 2 8 --K42:A
022.0506 -- W 7 5 AWM Head Down L/S AWG20 BLEU 1400mm
022.0506 -- W 7 5 AWM Head Down L/S AWG20 BROWN 1400mm
022.0506 -- W 7 5 AWM Head Down L/S AWG20 YELLOW/
022.0134Y/G -- W100 AWM PE/Screening:T1 AWG16 YELLOW/
022.0134Y/G -- W101 AWM PE/T1:0Vac(0--24) AWG16 YELLOW/
022.0132Y/G -- W102 AWM X1:PE/M1:PE AWG14 YELLOW/
012 AWG16 BLACK 260mm -- T 1 : 0 022.0312 Tube terminal wire 1,50mm -- F 2 022.0312 Tube terminal wire 1,50mm
)
te
022.0134B --W104 AWM F2/T1:0Vac(0--208
022.0134B --W109 AWM Q0:1/S4:1 1 AWG16 BLACK 600mm -- S 4 : 1 022.0312 Tube terminal wire 1,50mm -- Q 0 : 1 022.0312 Tube terminal wire 1,50mm
022.0134B -- W 1 1 0 AWM Q0:3/K0:D2 2 AWG16 BLACK 370mm -- K 0 : D 2 022.0312 Tube terminal wire 1,50mm -- Q 0 : 3 022.0312 Tube terminal wire 1,50mm
022.0134B --W 111 AWM S4:2/K0:D1 AWG16 BLACK 550mm -- S 4 : 2 022.0312 Tube terminal wire 1,50mm -- K 0 : D
022.0134B -- W 1 1 2 AWM Q0:2/F1 AWG16 BLACK 170mm -- F 1 022.0312 Tube terminal wire 1,50mm -- Q 0 : 2 022.0312 Tube terminal wire 1,50mm
022.0132B -- W 1 1 3 AWM Q0:2/K1:1 AWG14 BLACK 200mm -- K 1 : 1 022.0312* Tube terminal wire
022.0132B -- W 1 1 6 AWM Q0:4/K1:3 AWG14 BLACK 180mm -- K 1 : 3 022.0312* Tube terminal wire
022.0134Y/G -- W103 AWM X1:PE/PE Sw.Pla-
022.0134B -- W 1 1 7 AWM Q0:4/F2 AWG16 BLACK 190mm -- F 2 022.0312 Tube terminal wire 1,50mm -- Q 0 : 4 022.0312 Tube terminal wire 1,50mm
AWG16 BLACK 260mm -- T1:208 022.0312 Tube terminal wire 1,50mm -- F 1 022.0312 Tube terminal wire 1,50mm
)
022.0132B -- W 1 1 8 AWM Q0:6/K1:5 AWG14 BLACK 160mm -- K 1 : 5 022.0312* Tube terminal wire
022.0134B -- W 1 1 9 AWM F1/T1:208V(0--208
022.0132B --W120 AWM K1:2/S50:3 AWG14 BLACK 430mm -- S50:3 022.0312* Tube terminal wire
022.0132B --W121 AWM K1:4/S50:14 AWG14 BLACK 520mm --S50:14 022.0312* Tube terminal wire
022.0132B --W122 AWM K1:6/S50:16 AWG14 BLACK 520mm --S50:16 022.0312* Tube terminal wire
022.0132BR --W124 AWM S50:5/M1:W1 AWG14 BROWN 1600mm --S50:5 022.0312* Tube terminal wire
022.0132BR --W125 AWM S50:7/M1:V1 AWG14 BROWN 1600mm --S50:7 022.0312* Tube terminal wire
022.0132R --W127 AWM S50:4/M1:W2 AWG14 RED 1600mm --S50:4 022.0312* Tube terminal wire
022.0132BR --W126 AWM S50:8/M1:U AWG14 BROWN 1600mm -- S50:8 022.0312* Tube terminal wire
6--12 Use and maintenance manual DM 8
Page 62
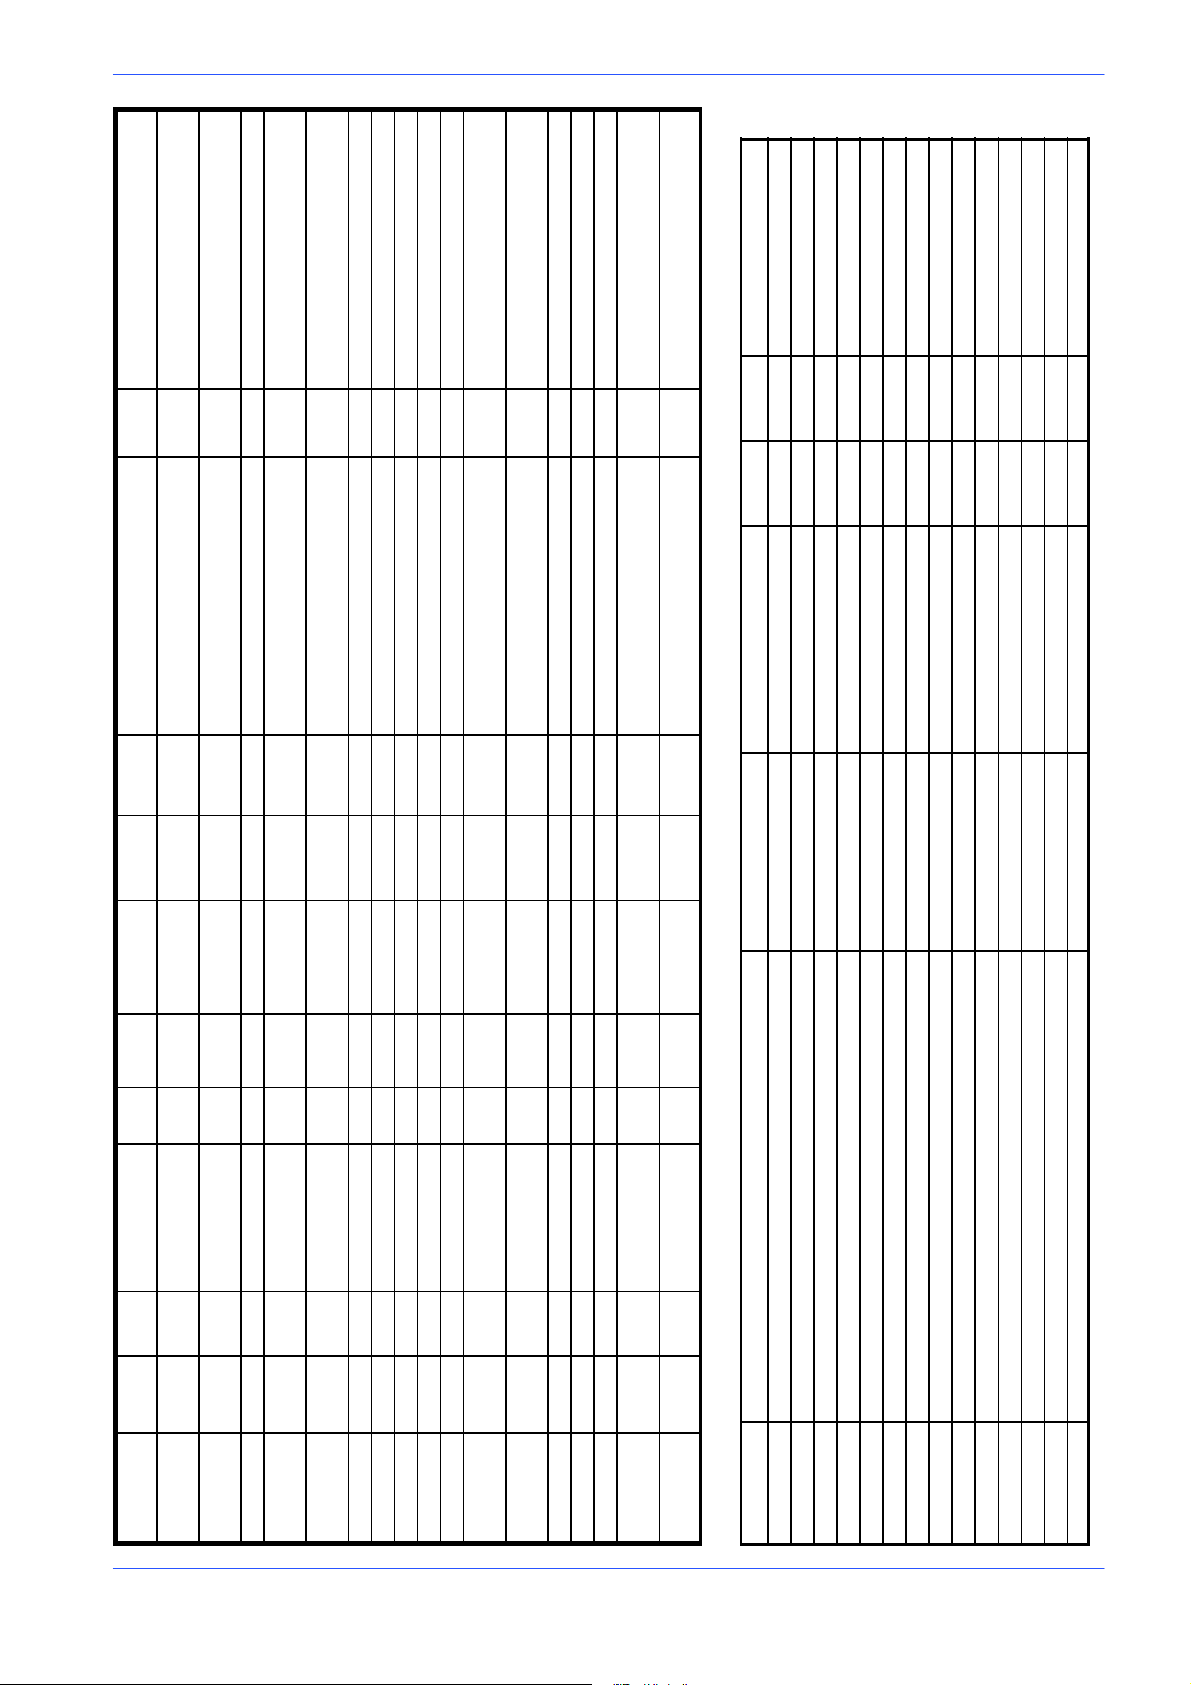
022.0304 Red Eyeled 5mm
-- M 1 : V
022.0304 Red Eyeled 5mm
2
-- M 1 : U
2,50mm
2
2,50mm
022.0311 Tube terminal wire 0,50mm
4
022.0311 Tube terminal wire 0,50mm
1
Version 24DM
022.0311 Tube terminal wire 0,50mm
3
AWG20 RED 280mm -- T 1 : 2 4 022.0311 Tube terminal wire 0,50mm -- F 5
22 AWG20 BLUE 210mm --K42:A2 022.0311 Tube terminal wire 0,50mm -- T 1 : 0 022.0311 Tube terminal wire 0,50mm
A2
22 AWG20 BLUE 350mm -- K 1 : A 2 022.0311 Tube terminal wire 0,50mm -- T 1 : 0
2
RE
WI-
5
DESCRIPTIONTYPECABLE
List of components
CODE CABLE TERMINAL ENDENDCABLE TERMINAL STARTSTARTLENGTHCOLORSEC.
022.0132R --W128 AWM S50:13/M1:V2 AWG14 RED 1600mm -- S 5 O : 1 3 022.0312* Tube terminal wire
022.0132R --W129 AWM S50:15/M1:U2 AWG14 RED 1600mm -- S50:15 022.0312* Tube terminal wire
022.0133R --W130 AWM F5/X2:D AWG20 RED 540mm -- X 2 : D -- F 5
022.0133R --W131 AWM T1:24Vac(0--24)/F
022.0133R --W133 AWM S24:14/S24:1 AWG20 RED 180mm --S24:1 022.0311 Tube terminal wire 0,50mm -- S24:1
022.0133R --W134 AWM S24:12/X2:D 043 AWG20 RED 530mm --S24:12 022.0311 Tube terminal wire 0,50mm -- X 2 : D
022.0133R --W135 AWM S24:24/X3:E AWG20 RED 530mm -- S24:24 022.0311 Tube terminal wire 0,50mm -- X 3 : E
022.0133R --W136 AWM S24:2/S24:4 41 AWG 20 RED 70mm -- S24:4 022.0312 Tube terminal wire 1,50mm --S24:2 022.0311 Tube terminal wire 1,50mm
022.0133R --W137 AWM S24:4/S50:A 41 AWG20 RED 160mm -- S50:A 022.0311 Tube terminal wire 0,50mm -- S24:4
022.0133R --W138 AWM K42:1 1/K1:A1 040 AWG20 RED 260mm --K42:11 022.031 1 Tube terminal wire 0,50mm -- K 1 : A 1 022.0311 Tube terminal wire 0,50mm
022.0133R --W139 AWM K42:A1/K1:14 46 AWG20 RED 270mm -- K 1 : 1 4 022.0311 Tube terminal wire 0,50mm --K42:A
022.0133R --W140 AWM S24:13/S24:11 43 AWG20 RED 70mm -- S24:11 022.0311 Tube terminal wire 0,50mm -- S24:1
022.0133R --W141 AWM S24:3/K42:14 42 AWG20 RED 570mm -- K42:14 022.0311 Tube terminal wire 0,50mm -- S24:3 022.0311 Tube terminal wire 0,50mm
022.0133R --W142 AWM S24:23/S50:B 47 AWG20 RED 200mm --S24:23 022.0311 Tube terminal wire 0,50mm --S50:B 022.0311 Tube terminal wire 0,50mm
022.0133R --W143 AWM K1:13/S50:B 45 AWG20 RED 460mm -- K 1 : 1 3 022.0311 Tube terminal wire 0,50mm -- S50:B 022.0311 Tube terminal wire 0,50mm
022.0133BL -- W149 AWM T1:0V(0-- 24)/K42:
022.0133BL -- W150 AWM T1:0V(0--24)/K1:A
Diagrams, exploded views and replacement parts 6--13
CODE DESCRIPTION TYPE CATALOG NUMBER ID. REF. MANUFACTURER
022.1140 FUSE ATM 3A 10,3X38 FUSE 3A -- F 1 /1,6 ELETTROITALIA
022.1140 FUSE ATM 3A 10,3X38 FUSE 3A -- F 2 /1,6 ELETTROITALIA
022.2255 FUSE--HOLDER USM 1 FOR FUSE 10,3X38 FUSE--HOLDER -- F 1 /1,6 ELETTROITALIA
022.1140 FUSE ATM 3A 10,3X38 FUSE 3A -- F 3 /1,4 ELETTROITALIA
022.2255 FUSE--HOLDER USM 1 FOR FUSE 10,3X38 FUSE--HOLDER -- F 2 /1,6 ELETTROITALIA
022.1139 FUSE ATM 25A 10,3X38 FUSE 25A -- F 3 L /1,1 ELETTROITALIA
022.2255 FUSE--HOLDER USM 1 FOR FUSE 10,3X38 FUSE--HOLDER -- F 3 /1,4 ELETTROITALIA
022.0139 FUSE ATM 25A 10,3X38 FUSE 25A -- F 3 L /1,1 ELETTROITALIA
022.0139 FUSE ATM 25A 10,3X38 FUSE 25A -- F 3 L /1,1 ELETTROITALIA
022.1140 FUSE ATM 3A 10,3X38 FUSE 3A -- F 4 /1,4 ELETTROITALIA
022.2254 FUSE--HOLDER USM 3 FOR FUSE 10,3X38 FUSE--HOLDER -- F 3 L /1,1 ELETTROITALIA
034.0723 ELECTRICHAL BOX BOX 34250 -- F 3 L /1,1 WEIDMULLER
022.2255 FUSE--HOLDER USM 1 FOR FUSE 10,3X38 FUSE--HOLDER -- F 4 /1,4 ELETTROITALIA
022.2246 FUSE--HOLDER ZFK ZFK 4--HESI 30 25 45 1 -- F 5 /1,9 PHOENIX
Page 63
MEP S.p.A.
CODE MANUFACTURERREF.ID.CATALOG NUMBERTYPEDESCRIPTION
022.1128 FUSE 5X20 5A FUSE 5A -- F 5 /1,9 COMAPEL
022.0571 LOW TENSION RELAY 208 Vac U--PKZO -- K 0 /1,4 KLOCKNER MOELLER
022.0087 CONTACTOR DILOOM --10 (01) 24Vac -- K 1 /2,3 KLOCKNER MOELLER
022.0592 LOC K VALVE R ELAY RELAY -- K 4 0 /2,5 TECNAIR
022.0412 CONNECTOR LOCK VALVE CONNECTOR -- K 4 0 /2,5 TECNAIR
044.1258 LOCK VALVE VALVE -- K 4 0 /2,5 TECNAIR
022.0992 RELAY 24 Vac RELAIS 171 G2 -- K 4 2 /2,1 SIEI PETERLONGO
019.1713 BLADE MOTOR HP 2/2,5 2/4P 200 Vac -- M 1 /1,5 CARPANELLI MOTORI
028.0281 ELCTROPUMP 208-- 275 Vac ELECTROPUMP EZC -- M 2 /1,4 SAP
022.1288 MAIN-- SWITCH OVER LOAD THERMAL PROTECTION PKZM0 -- 16A -- Q 0 /1,5 KLOCKNER MOELLER
022.0043 ROTATING KNOB RH -- PKZO -- MCC -- Q 0 /1,5 KLOCKNER MOELLER
022.1242 EMERGENCY PUSH BUTTON EMERGENCY -- S 4 /1,4 ROCKWELL AUTOMATION
022.0037 LIMIT -- SWITCH ATO--11--1--ZB B275 -- S 8 /2,7 KLOCKNER MOELLER
022.0515 MICRO -- SWITCH MICRO -- SWITCH -- S 1 5 /2,8 HONEYWELL
034.1221 KNOB KNOB -- S 1 5 /2,8 BARDEGGIA
6--14 Use and maintenance manual DM 8
List of terminals
010.0928 SPRING SPRING -- S 1 5 /2,8 ADRIATICA MOLLE
025.0691 KNOB SEAL KNOB SEAL -- S 1 5 /2,8 BARDEGGIA
022.0962 SELECTOR 2P QM 304 -- N -- S 2 4 /2,4 ROCKWELL AUTOMATION
022.0943 BLOCK V40 NC (RED) BLOCK V40 -- S 2 4 /2,4 ROCKWELL AUTOMATION
022.0943 BLOCK V40 NC (RED) BLOCK V40 -- S 2 4 /2,4 ROCKWELL AUTOMATION
022.0944 BLOCK V50 NO (GREEN) BLOCK V50 -- S 2 4 /2,4 ROCKWELL AUTOMATION
022.0944 BLOCK V50 NO (GREEN) BLOCK V50 -- S 2 4 /2,4 ROCKWELL AUTOMATION
022.0944 BLOCK V50 NO (GREEN) BLOCK V50 -- S 2 4 /2,4 ROCKWELL AUTOMATION
043.0142 PRESSURE SWITCH BLADE PRESSURE -- S 2 5 /2,7 HERBIRGER
022.0506 HEAD DOWN LIMIT SWITCH LIMIT SWITCH -- S 2 8 /2,2 HONEYWELL
022,0023 POLE CHANGE SWITCH SWITCH -- S 5 0 /1.5 ROCKWELL AUTOMATION
022.0436 TRANSFORMER 0-- 208-- 575 TRANSFORMER -- T 1 /1,7 E.R.C.
022.0862 SINGLE LED BOARD LED -- V 1 /2,6 METALAM
CODE DESCRIPTION TYPE CATALOG NUMBER ID. REF. MANUFACTURER
022.0377 SINGLE GROUND TERMINAL USLKG 5 04 41 50 4 -- X /1.1 PHOENIX
022.0377 SINGLE GROUND TERMINAL USLKG 5 04 41 50 4 -- X /1.1 PHOENIX
022.2247 QUADRUPLE GROUND TERMINAL UKK 5-- PE 27 74 21 1 -- X 1 /1.2 PHOENIX
022.2245 QUADRUPLE TERMINAL ZFDK 2,5 30 01 89 9 -- X 2 /1.9 PHOENIX
022.2283 QUADRUPLE TERMINAL PLATE D--ZFD 2,5 30 02 81 4 -- X 2 /1.9 PHOENIX
022.2244 TRIPLE TERMINAL ZFK 2,5 -- TWIN 30 01 81 5 -- X 3 /2.8 PHOENIX
022.2243 SINGLE TERMINAL ZFK 2,5 30 03 21 1 -- X 4 /2:7 PHOENIX
022.2243 SINGLE TERMINAL ZFK 2,5 30 03 21 1 -- X 5 /1.3 PHOENIX
022.2243 SINGLE TERMINAL ZFK 2,5 30 03 21 1 -- X 6 /1.3 PHOENIX
Page 64
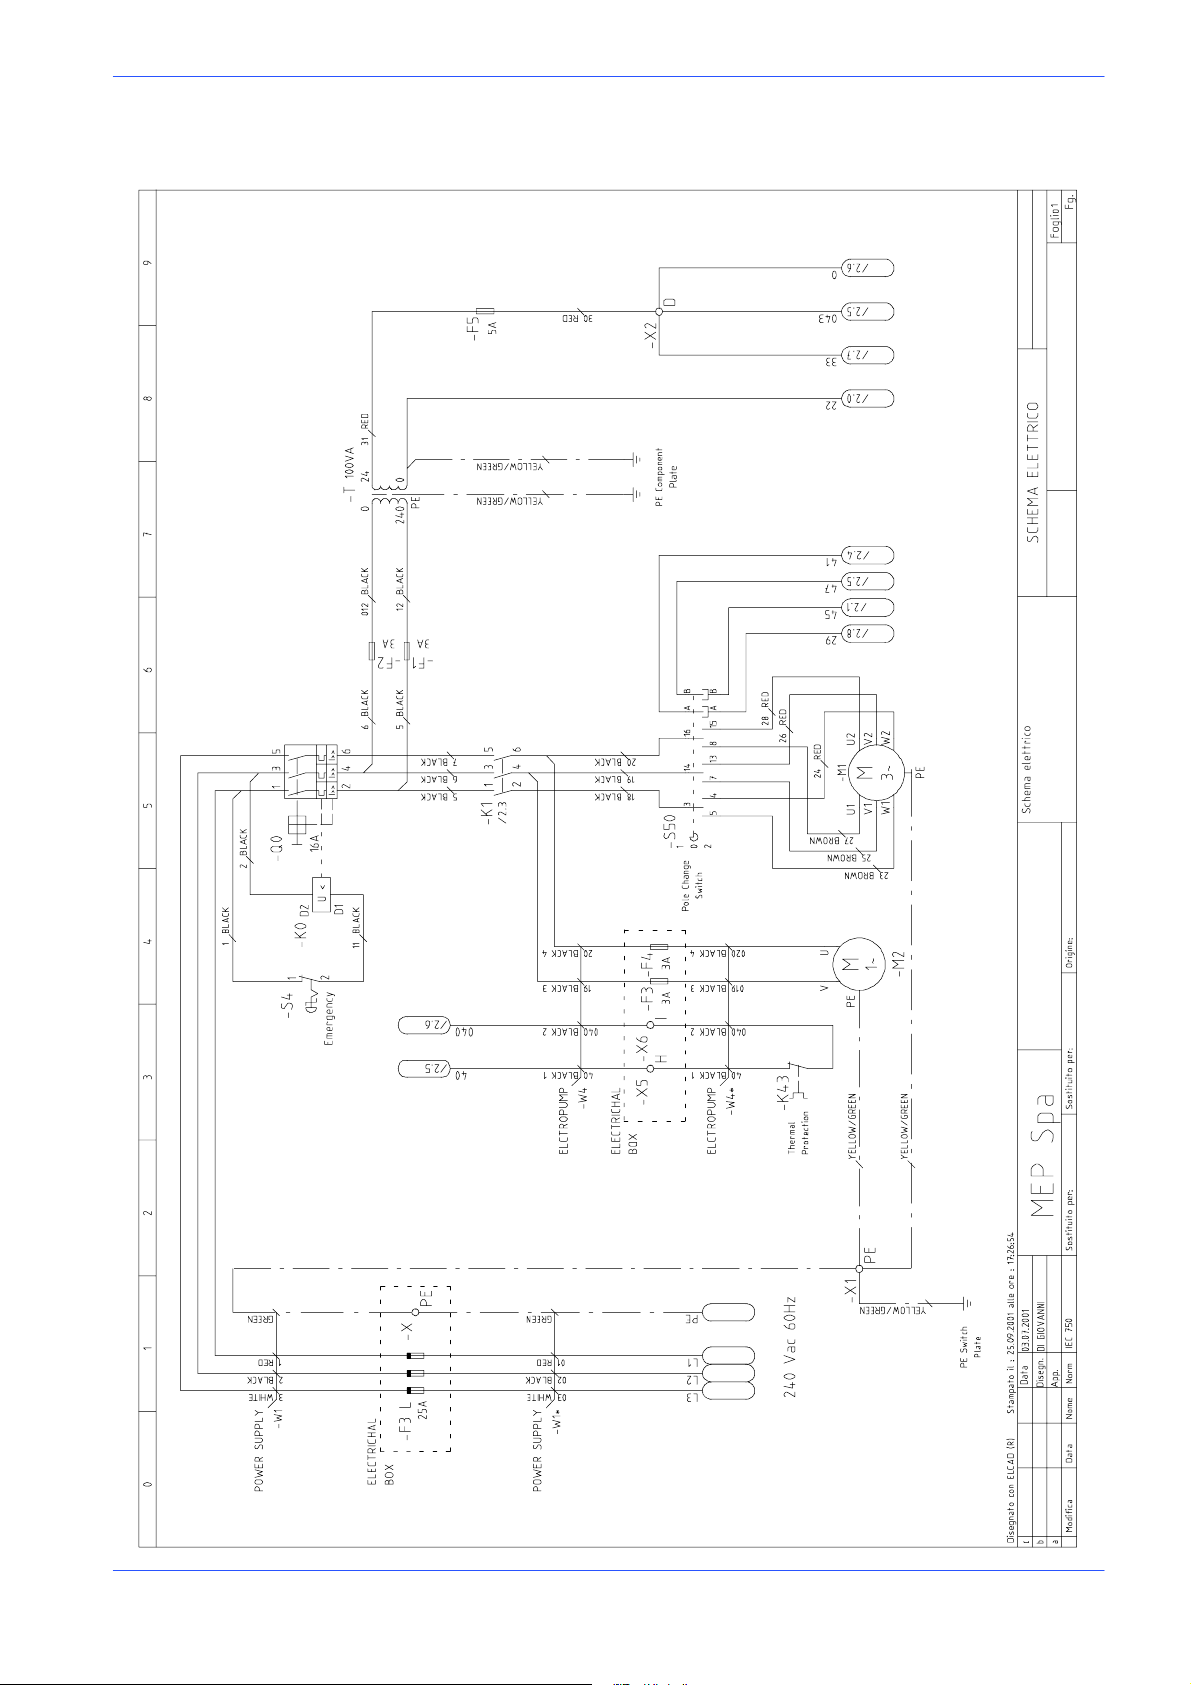
Standard version electrical diag ram 240V (CSA standard)
Version 24DM
DM 8 G -- 240/60
Diagrams, exploded views and replacement parts 6--15
Page 65
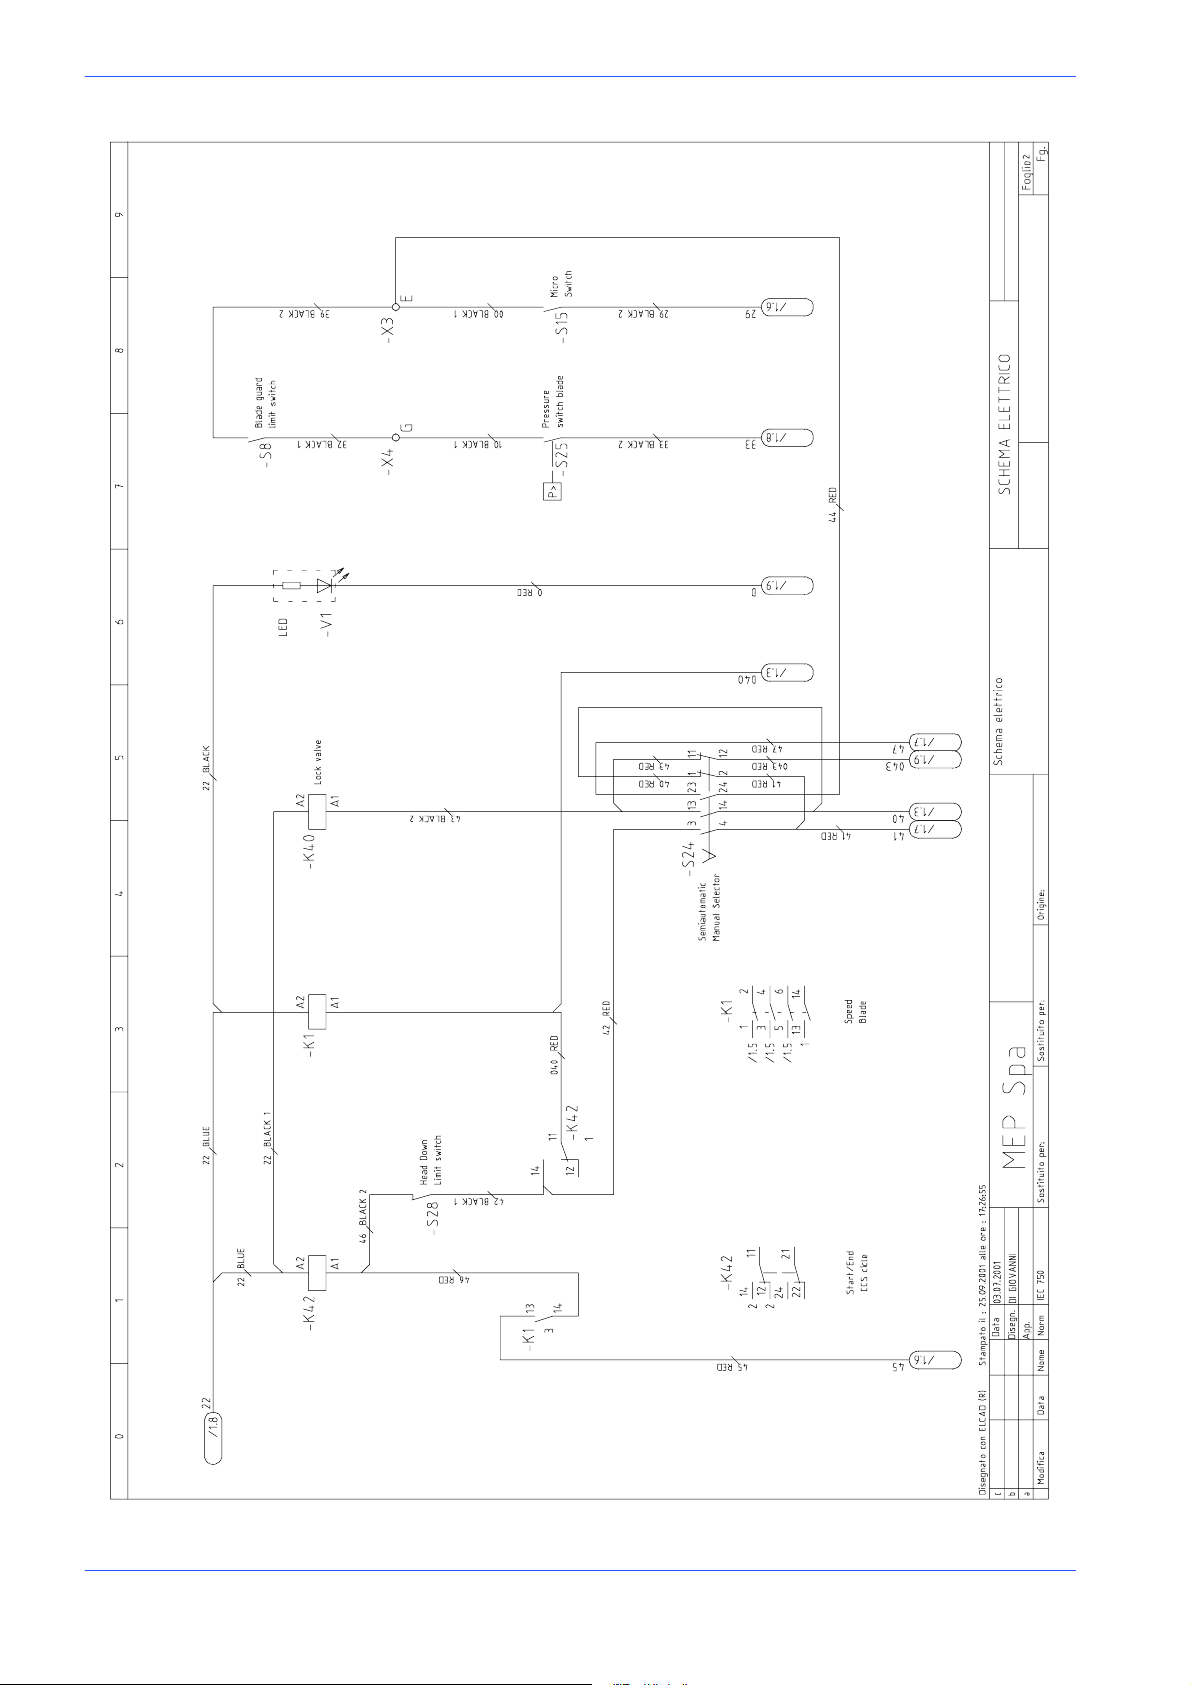
MEP S.p.A.
DM 8 G -- 240/60
6--16 Use and maintenance manual DM 8
Page 66
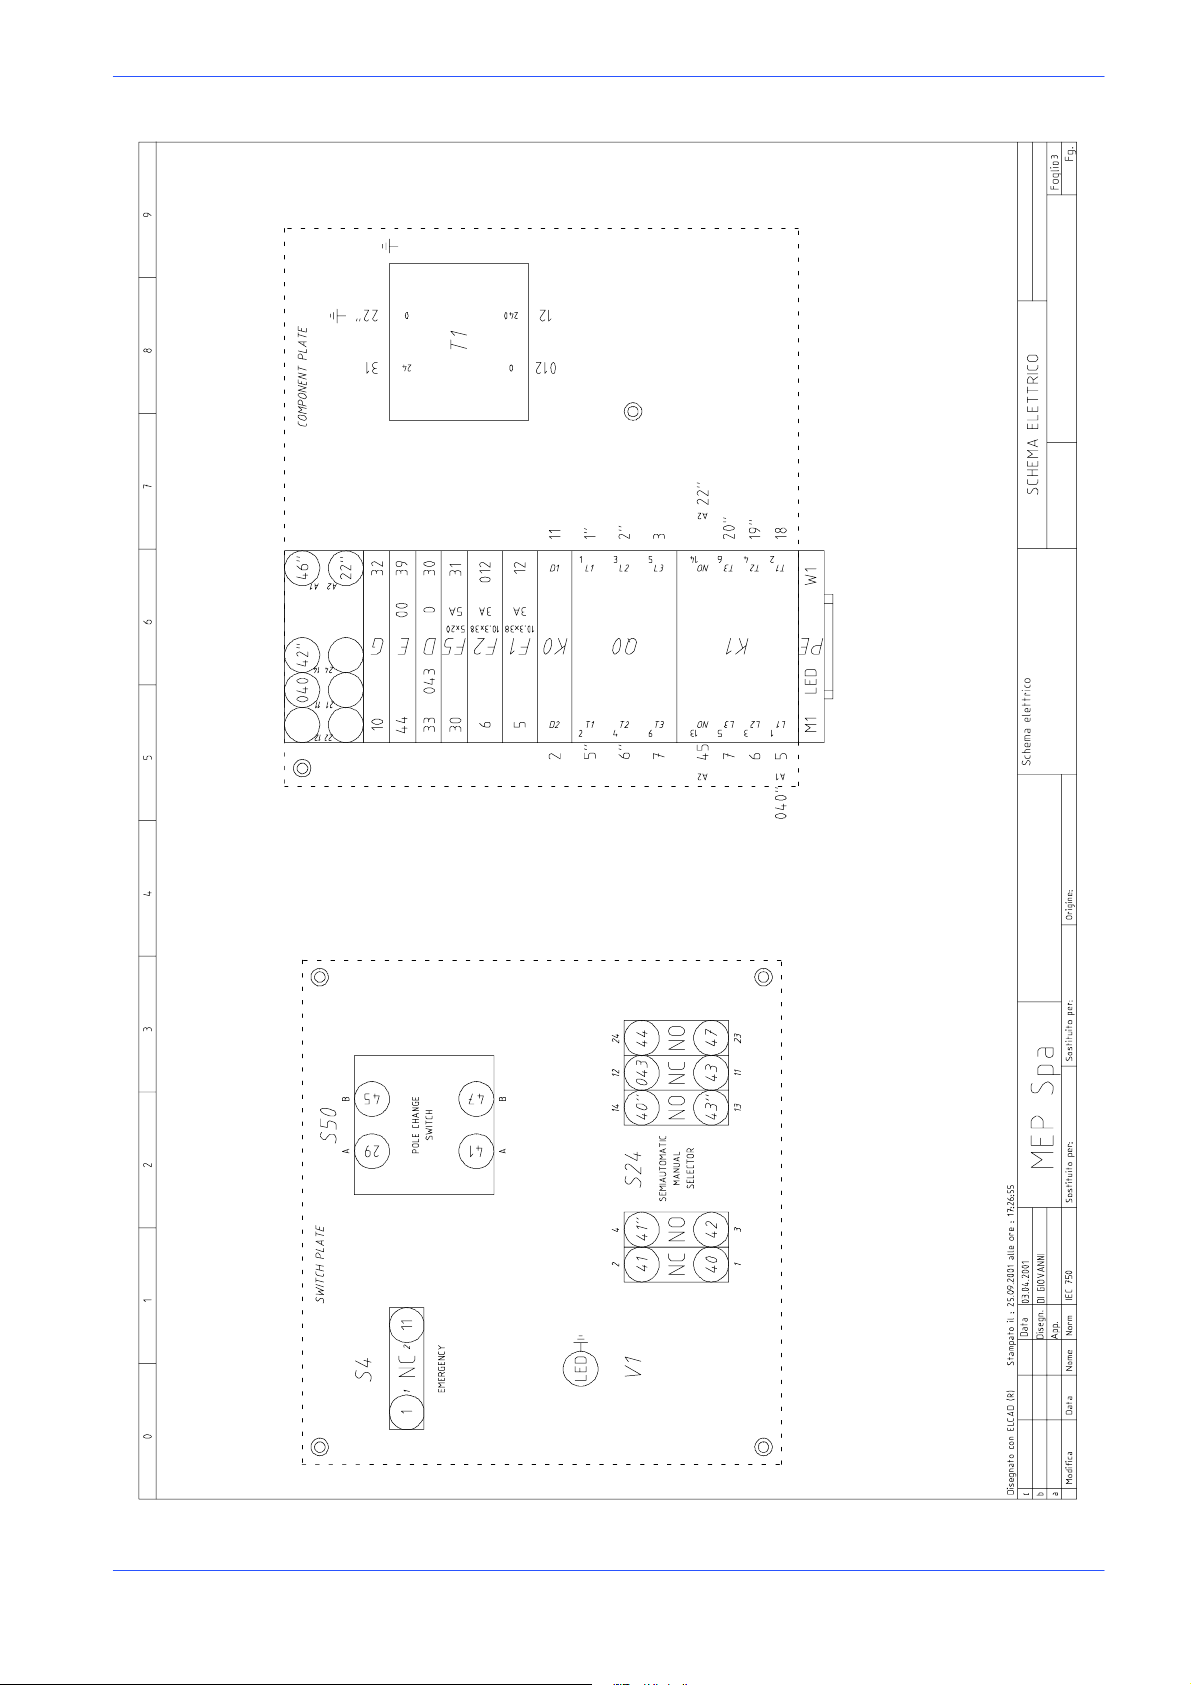
Version 24DM
K42
DM 8 G -- 240/60
Diagrams, exploded views and replacement parts 6--17
Page 67
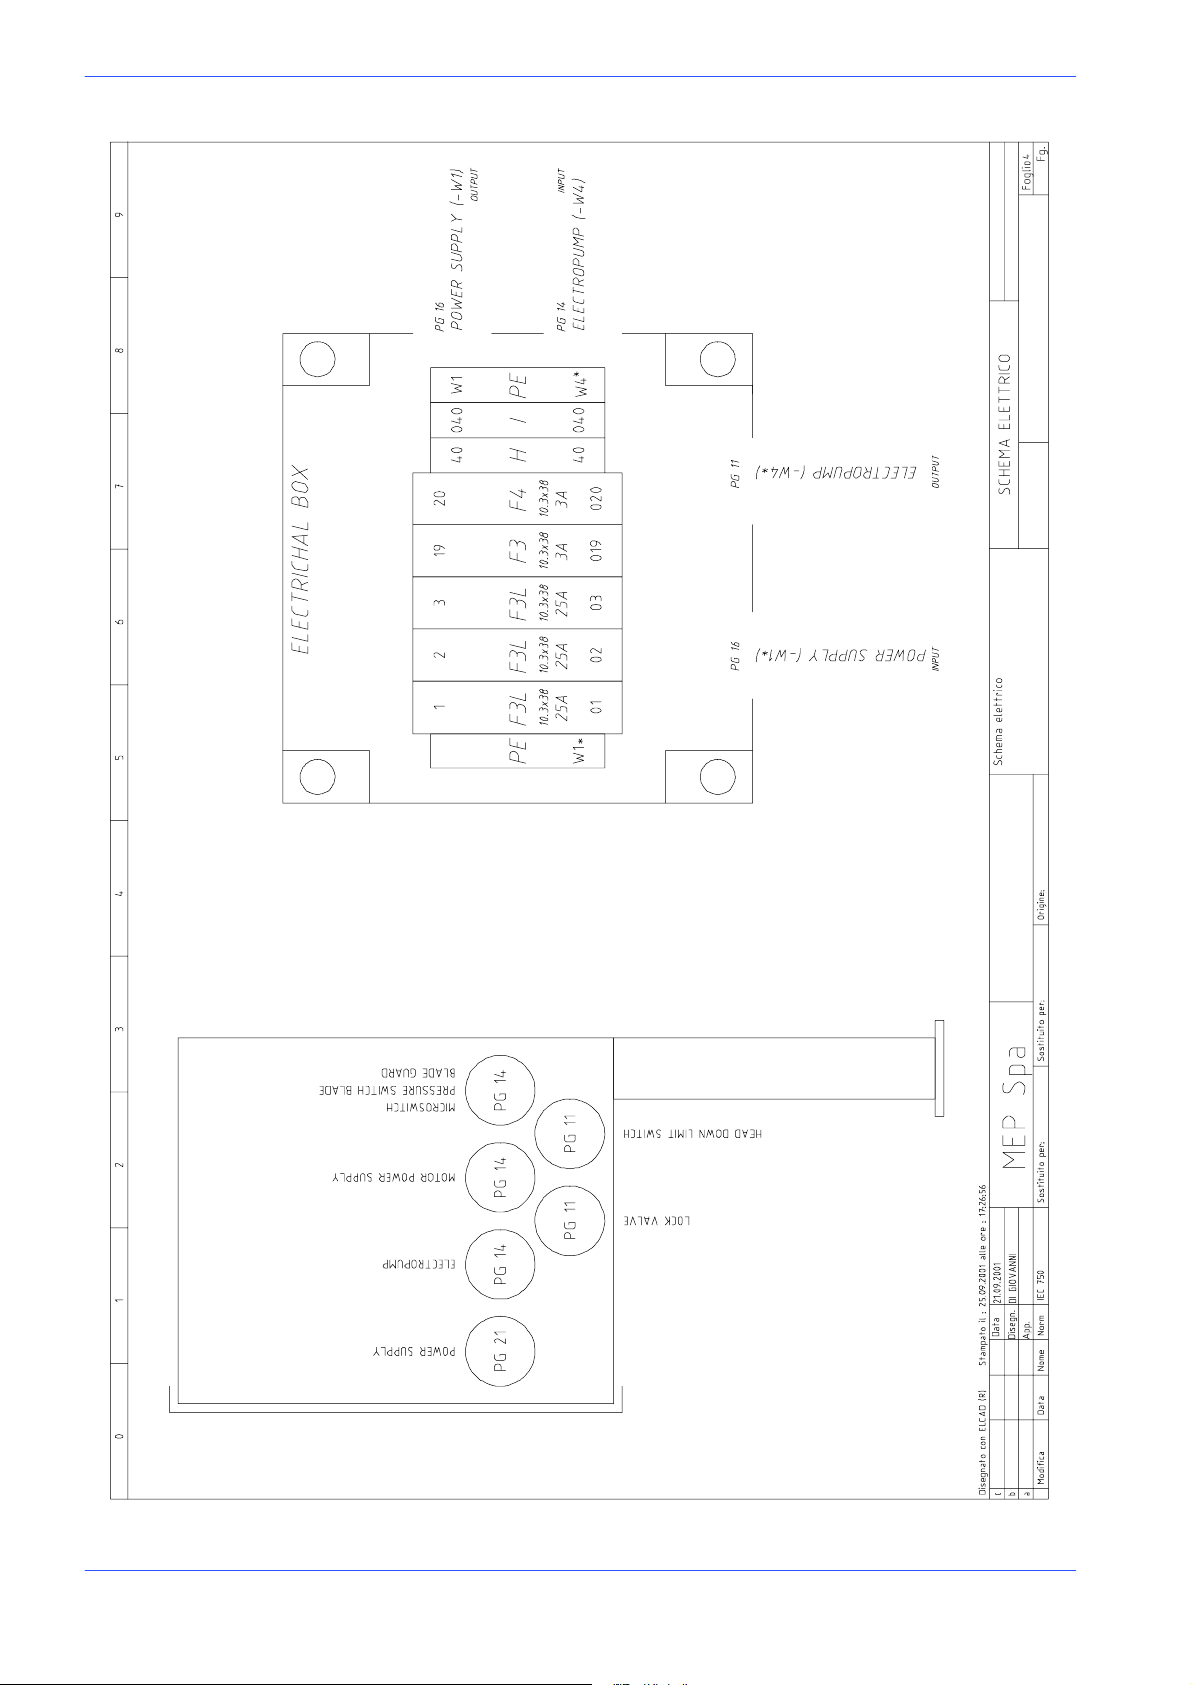
MEP S.p.A.
DM 8 G -- 240/60
6--18 Use and maintenance manual DM 8
Page 68
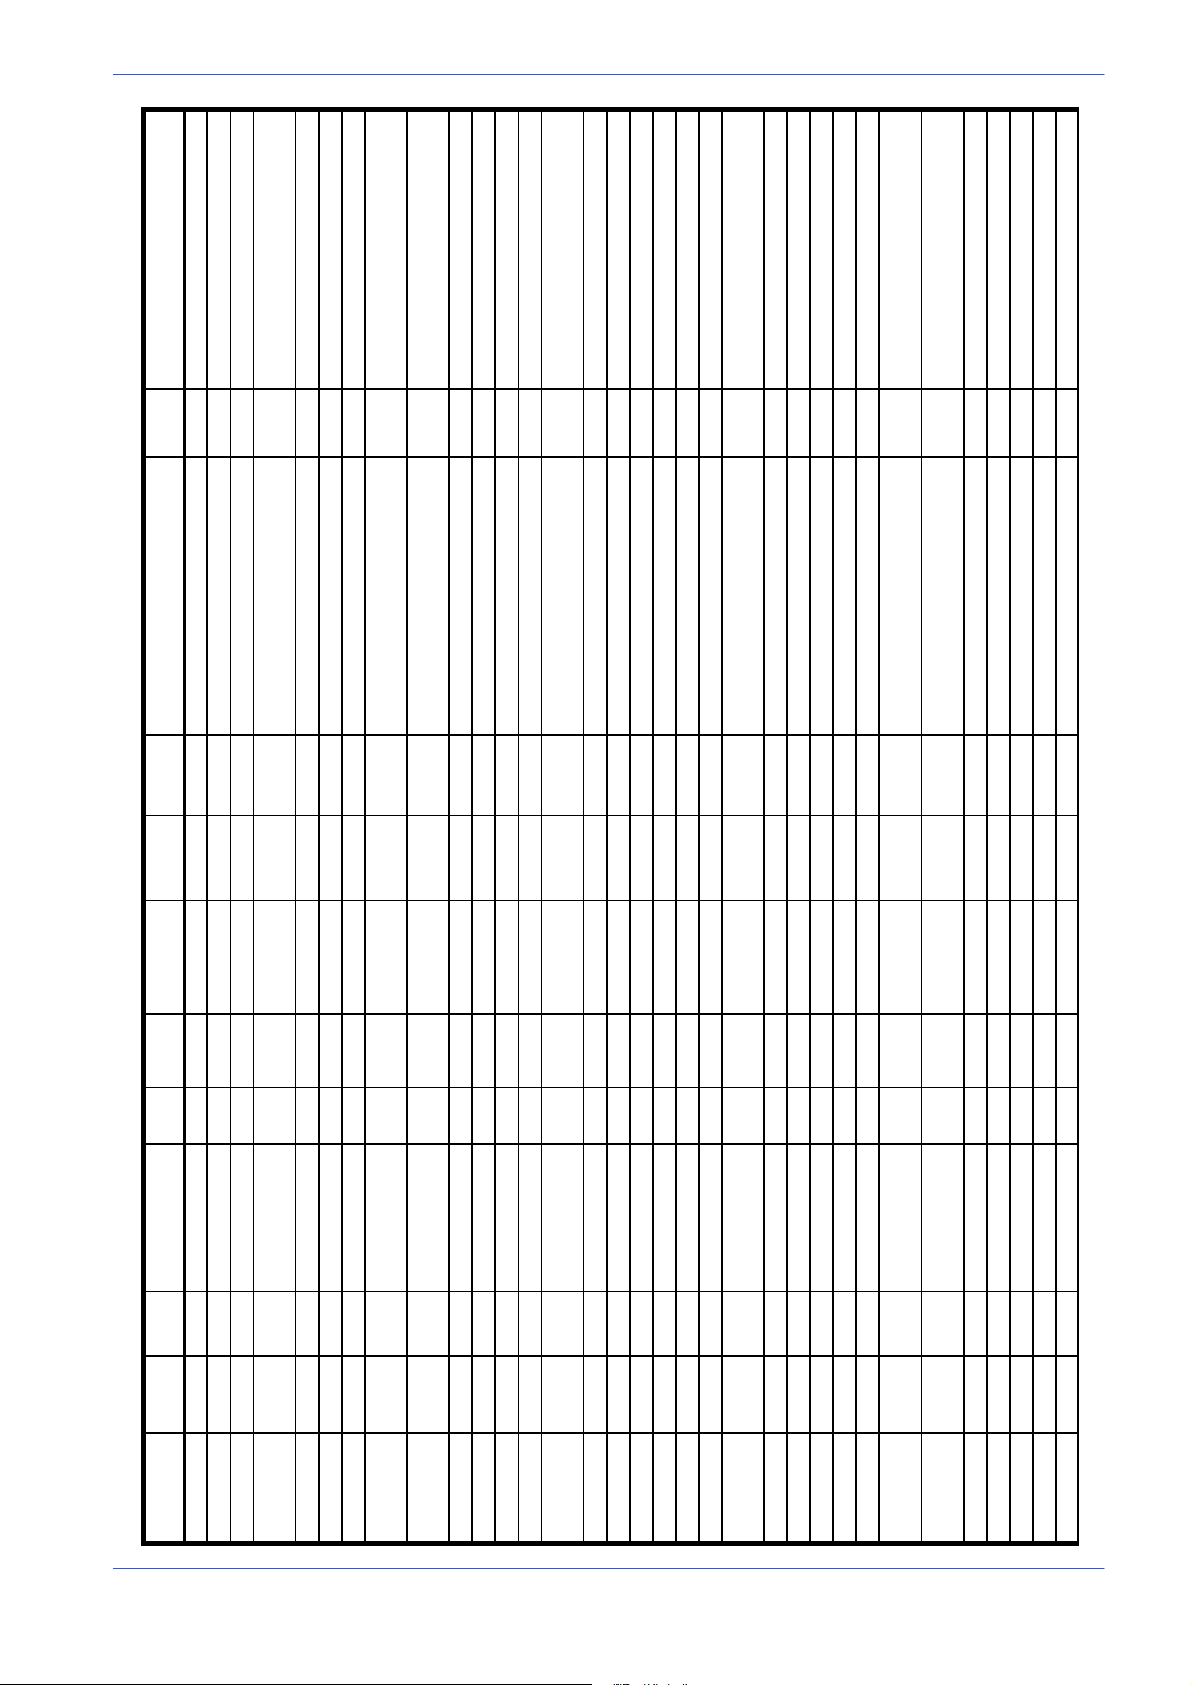
022.0311 Tube terminal wire 0,50mm
022.0300 Red Faston 1,5mm
022.0311 Tube terminal wire 0,50mm
Version 24DM
022.0311 Tube terminal wire 0,50mm
2500mm -- X 1 : P E 022.0312* Tube terminal wire 2,5mm --X:PE 022.0312* Tube terminal wire 2,5mm
GREEN
2500mm -- X 1 : P E 022.0312* Tube terminal wire 2,5mm
GREEN
4
2500mm
GREEN
E
3000mm -- X 1 : P E 022.031 1 Tube terminal wire 0,50mm -- M 2 : P
GREEN
3
2
List of cables
SEC. COLOR LENGTH START CABLE TERMINAL START END CABLE TERMINAL END
RE
WI-
CODE CABLE TYPE DESCRIPTION
022.1901 -- W 1 S00W POWER SUPPLY AWG14 RED 2500mm -- F 3 L 022.0312* Tube terminal wire 2,5mm -- Q 0 : 1 022.0312* Tube terminal wire 2,5mm
022.1901 -- W 1 S00W POWER SUPPLY AWG14 BLACK 2500mm -- F 3 L 022.0312* Tube terminal wire 2,5mm -- Q 0 : 3 022.0312* Tube terminal wire 2,5mm
022.1901 -- W 1 S00W POWER SUPPLY AWG14 WHITE 2500mm -- F 3 L 022.0312* Tube terminal wire 2,5mm -- Q 0 : 5 022.0312* Tube terminal wire 2,5mm
022.1901 -- W 1 S00W POWER SUPPLY AWG14 YELLOW/
022.1901 -- W 1 * S00W POWER SUPPLY 01 AWG14 RED 2500mm -- F 3 L 022.0312* Tube terminal wire 2,5mm
022.1901 -- W 1 * S00W POWER SUPPLY 02 AWG14 BLACK 2500mm -- F 3 L 022.0312* Tube terminal wire 2,5mm
022.1901 -- W 1 * S00W POWER SUPPLY 03 AWG14 WHITE 2500mm -- F 3 L 022.0312* Tube terminal wire 2,5mm
022.1901 -- W 1 * S00W POWER SUPPLY AWG14 YELLOW/
022.0168 -- W 4 AWM ELECTROPUMP 40 AWG20 BLACK 1 2500mm -- X 5 : H -- S24:1
022.0168 -- W 4 AWM ELECTROPUMP 040 AWG20 BLACK 2 2500mm -- X 6 : I -- K 1 : A 1 022.0311 Tube terminal wire 0,50mm
022.0168 -- W 4 AWM ELECTROPUMP 19 AWG20 BLACK 3 2500mm -- F 3 022.0311 Tube terminal wire 0,50mm -- K 1 : 4 022.0311 Tube terminal wire 0,50mm
022.0168 -- W 4 AWM ELECTROPUMP 20 AWG20 BLACK 4 2500mm -- F 4 022.0311 Tube terminal wire 0,50mm -- K 1 : 6 022.0311 Tube terminal wire 0,50mm
022.0168 -- W 4 AWM ELECTROPUMP AWG20 BLACK 5 2500mm
022.0168 -- W 4 AWM ELECTROPUMP AWG20 YELLOW/
022.0168 -- W 4 AWM ELECTROPUMP AWG20 SCREENING 2500mm
022.0168 -- W 4 * AWM ELECTROPUMP 40 AWG20 BLACK 1 3000mm -- X 5 : H -- K 4 3 022.0311 Tube terminal wire 0,50mm
022.0168 -- W 4 * AWM ELECTROPUMP 040 AWG20 BLACK 2 3000mm -- X 6 : I -- K 4 3 022.0311 Tube terminal wire 0,50mm
022.0168 -- W 4 * AWM ELECTROPUMP 019 AWG20 BLACK 3 3000mm -- F 3 022.0311 Tube terminal wire 0,50mm -- M 2 : V 022.0300 Red Faston 1,5mm
022.0168 -- W 4 * AWM ELECTROPUMP 020 AWG20 BLACK 4 3000mm -- F 4 022.0311 Tube terminal wire 0,50mm -- M 2 : U 022.0300 Red Faston 1,5mm
022.0168 -- W 4 * AWM ELECTROPUMP AWG20 BLACK 5 3000mm
022.0168 -- W 4 * AWM ELECTROPUMP AWG20 YELLOW/
022.0168 -- W 4 * AWM ELECTROPUMP AWG20 SCREENING 3000mm
022.0139 -- W 5 2 AWM MICROSWITCH 00 AWG20 BLACK 1 3000mm -- X 3 : E -- S 1 5 022.0300 Red Faston 1,5mm
022.0139 -- W 5 2 AWM MICROSWITCH AWG20 BLACK 2 3000mm -- S50:A 022.0301 Tube terminal wire 0,50mm -- S 1 5 022.0300 Red Faston 1,5mm
022.0139 -- W 5 5 AWM Blade Guard L/S AWG20 BLACK 1 2000mm -- S 8 022.0311 Tube terminal wire 0,50mm -- X 4 : G
022.0139 -- W 5 5 AWM Blade Guard L/S AWG20 BLACK 2 2000mm -- X 3 : E -- S 8 022.0311 Tube terminal wire 0,50mm
022.0139 -- W 6 5 AWM LOCK VALVE AWG20 BLACK 1 1200mm --K40:A2 022.0311 Tube terminal wire 0,50mm --K42:A
022.0139 -- W 6 5 AWM LOCK VALVE AWG20 BLACK 2 1200mm --K40:A1 022.0311 Tube terminal wire 0,50mm --S24:1
022.0139 -- W 6 7 AWM Press. Sw. Blade AWG20 BLACK 1 2800mm -- X 4 : G -- S 2 5 022.0300 Red Faston 1,5mm
022.0139 -- W 6 7 AWM Press. Sw. Blade AWG20 BLACK 2 2800mm -- X 2 : D -- S 2 5 022.0300 Red Faston 1,5mm
022.0862 -- W 7 4 AWM LED 0 AWG20 RED 750mm -- X 2 : D -- V 1
022.0862 -- W 7 4 AWM LED AWG20 BLACK 750mm -- K 1 : A 2 022.0311 Tube terminal wire 0,50mm -- V 1
022.0506 -- W 7 5 AWM Head Down L/S 42 AWG20 BLACK 1 1400mm -- K42:14 022.0311 Tube terminal wire 0,50mm -- S 2 8
Diagrams, exploded views and replacement parts 6--19
Page 69

MEP S.p.A.
2,50mm
2,50mm
2,50mm
2,50mm
2,50mm
2,50mm
022.0311 Tube terminal wire 0,50mm
1
80mm -- T 1 : P E 022.0304 Red Eyelet 5mm PE 022.0304 Red Eyelet 5mm
1400mm
150mm PE 022.0304 Red Eyelet 5mm -- T 1 : 0 022.0312 Tube terminal wire 1,50mm
022.0304 Red Eyelet 5mm
-- M 1 : P
1500mm -- X 1 : P E 022.0312* Tube terminal wire
E
2,50mm
470mm -- X 1 : P E 022.0312 Tube terminal wire 1,50mm PE 022.0303 Blue Eyelet 8mm
022.0312 Tube terminal wire 1,50mm
1
-- Q 0 : 2 022.0312* Tube terminal wire
-- Q 0 : 4 022.0312* Tube terminal wire
2,50mm
2,50mm
-- Q 0 : 6 022.0312* Tube terminal wire
2,50mm
-- K 1 : 2 022.0312* Tube terminal wire
-- K 1 : 4 022.0312* Tube terminal wire
2,50mm
-- K 1 : 6 022.0312* Tube terminal wire
2,50mm
022.0304 Red Eyeled 5mm
-- M 1 : W
2,50mm
1
M1:V1 022.0304 Red Eyeled 5mm
2,50mm
022.0304 Red Eyeled 5mm
-- M 1 : U
2,50mm
1
M1:W2 022.0304 Red Eyeled 5mm
2,50mm
2,50mm
GREEN
GREEN
GREEN
GREEN
GREEN
AWG16 YELLOW/
RE
WI-
DESCRIPTIONTYPECABLE
CODE CABLE TERMINAL ENDENDCABLE TERMINAL STARTSTARTLENGTHCOLORSEC.
022.0506 -- W 7 5 AWM Head Down L/S 46 AWG20 BLACK 2 1400mm -- S 2 8 --K42:A
022.0506 -- W 7 5 AWM Head Down L/S AWG20 BLEU 1400mm
022.0506 -- W 7 5 AWM Head Down L/S AWG20 BROWN 1400mm
022.0506 -- W 7 5 AWM Head Down L/S AWG20 YELLOW/
022.0134Y/G -- W100 AWM PE/Screening:T1 AWG16 YELLOW/
022.0134Y/G -- W101 AWM PE/T1:0Vac(0--24) AWG16 YELLOW/
022.0132Y/G -- W102 AWM X1:PE/M1:PE AWG14 YELLOW/
012 AWG16 BLACK 260mm -- T 1 : 0 022.0312 Tube terminal wire 1,50mm -- F 2 022.0312 Tube terminal wire 1,50mm
)
te
022.0134B --W104 AWM F2/T1:0Vac(0--240
022.0134B --W109 AWM Q0:1/S4:1 1 AWG16 BLACK 600mm -- S 4 : 1 022.0312 Tube terminal wire 1,50mm -- Q 0 : 1 022.0312 Tube terminal wire 1,50mm
022.0134B -- W 1 1 0 AWM Q0:3/K0:D2 2 AWG16 BLACK 370mm -- K 0 : D 2 022.0312 Tube terminal wire 1,50mm -- Q 0 : 3 022.0312 Tube terminal wire 1,50mm
022.0134B --W 111 AWM S4:2/K0:D1 AWG16 BLACK 550mm -- S 4 : 2 022.0312 Tube terminal wire 1,50mm -- K 0 : D
022.0134B -- W 1 1 2 AWM Q0:2/F1 AWG16 BLACK 170mm -- F 1 022.0312 Tube terminal wire 1,50mm -- Q 0 : 2 022.0312 Tube terminal wire 1,50mm
022.0132B -- W 1 1 3 AWM Q0:2/K1:1 AWG14 BLACK 200mm -- K 1 : 1 022.0312* Tube terminal wire
022.0132B -- W 1 1 6 AWM Q0:4/K1:3 AWG14 BLACK 180mm -- K 1 : 3 022.0312* Tube terminal wire
022.0134Y/G -- W103 AWM X1:PE/PE Sw.Pla-
022.0134B -- W 1 1 7 AWM Q0:4/F2 AWG16 BLACK 190mm -- F 2 022.0312 Tube terminal wire 1,50mm -- Q 0 : 4 022.0312 Tube terminal wire 1,50mm
AWG16 BLACK 260mm -- T1:240 022.0312 Tube terminal wire 1,50mm -- F 1 022.0312 Tube terminal wire 1,50mm
)
022.0132B -- W 1 1 8 AWM Q0:6/K1:5 AWG14 BLACK 160mm -- K 1 : 5 022.0312* Tube terminal wire
022.0134B -- W 1 1 9 AWM F1/T1:240V(0--240
022.0132B --W120 AWM K1:2/S50:3 AWG14 BLACK 430mm -- S50:3 022.0312* Tube terminal wire
022.0132B --W121 AWM K1:4/S50:14 AWG14 BLACK 520mm --S50:14 022.0312* Tube terminal wire
022.0132B --W122 AWM K1:6/S50:16 AWG14 BLACK 520mm --S50:16 022.0312* Tube terminal wire
022.0132BR --W124 AWM S50:5/M1:W1 AWG14 BROWN 1600mm --S50:5 022.0312* Tube terminal wire
022.0132BR --W125 AWM S50:7/M1:V1 AWG14 BROWN 1600mm --S50:7 022.0312* Tube terminal wire
022.0132R --W127 AWM S50:4/M1:W2 AWG14 RED 1600mm --S50:4 022.0312* Tube terminal wire
022.0132BR --W126 AWM S50:8/M1:U AWG14 BROWN 1600mm -- S50:8 022.0312* Tube terminal wire
6--20 Use and maintenance manual DM 8
Page 70
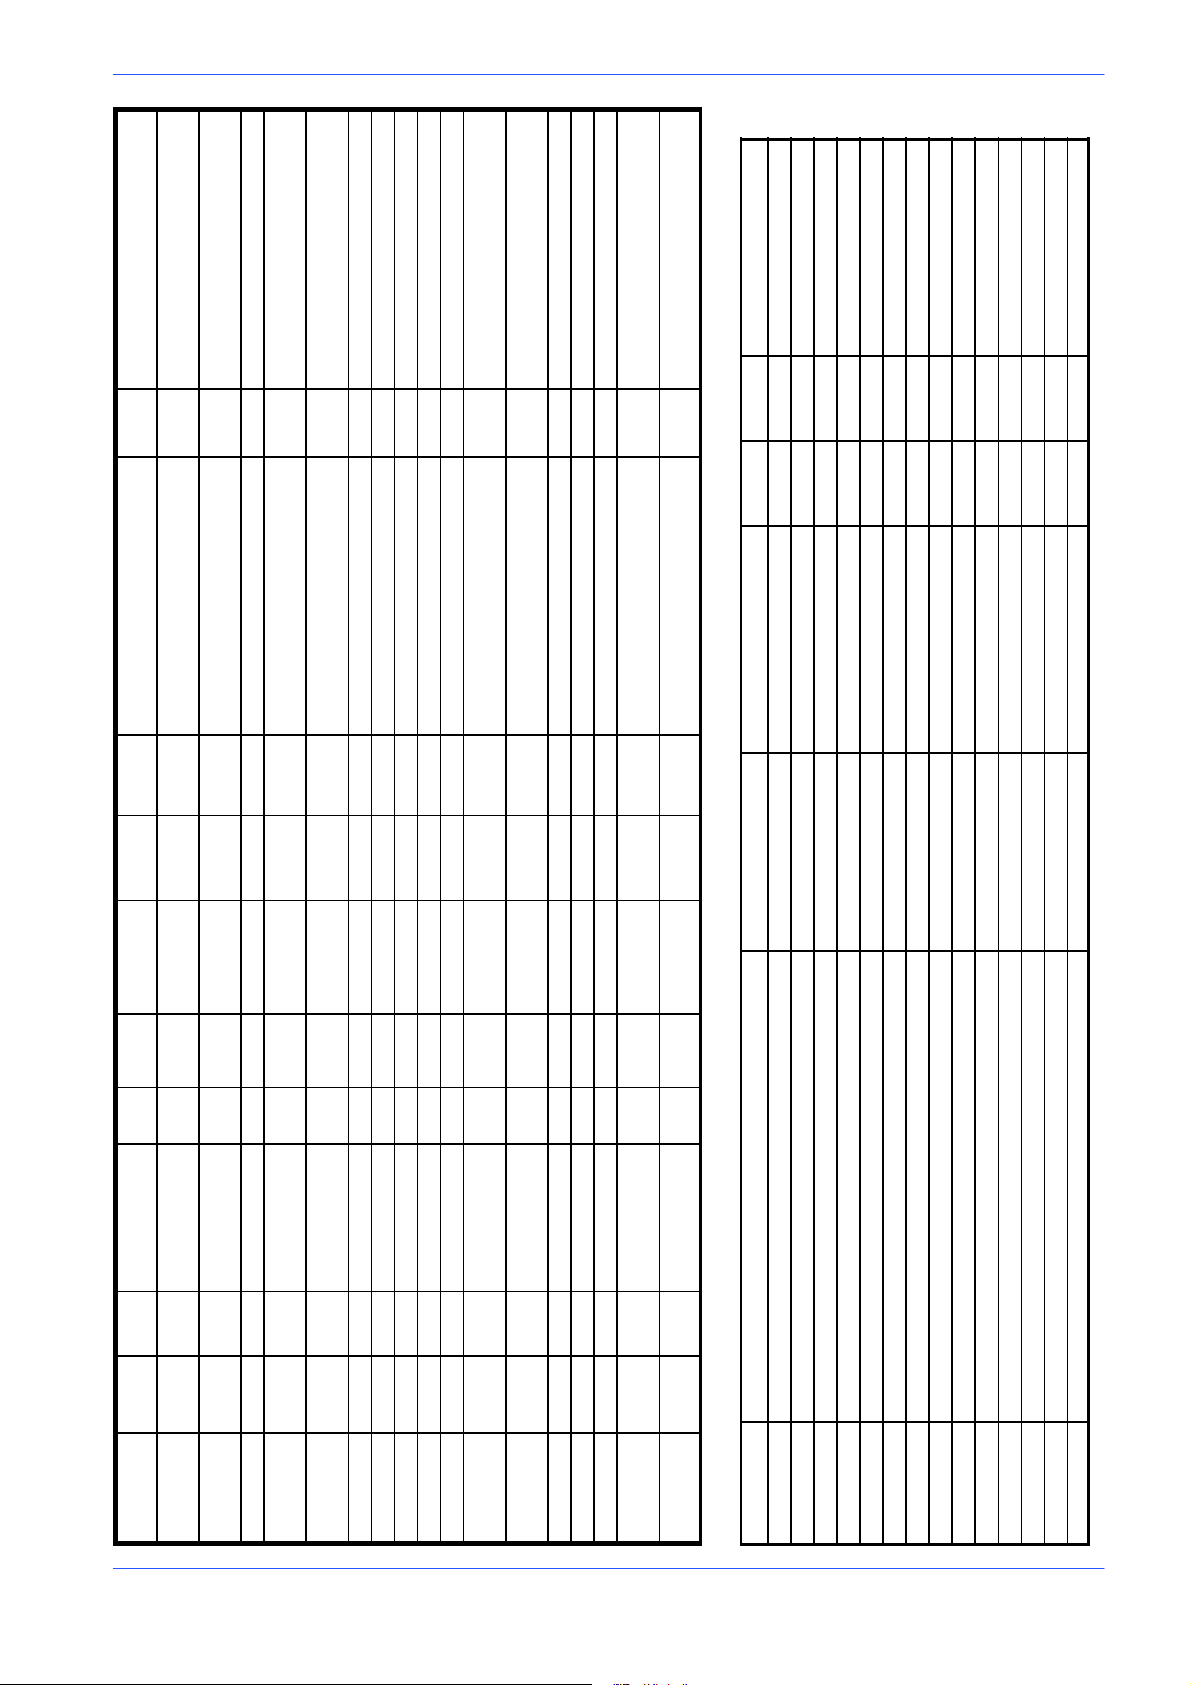
022.0304 Red Eyeled 5mm
-- M 1 : V
022.0304 Red Eyeled 5mm
2
-- M 1 : U
2,50mm
2
2,50mm
022.0311 Tube terminal wire 0,50mm
4
022.0311 Tube terminal wire 0,50mm
1
Version 24DM
022.0311 Tube terminal wire 0,50mm
3
AWG20 RED 280mm -- T 1 : 2 4 022.0311 Tube terminal wire 0,50mm -- F 5
22 AWG20 BLUE 210mm --K42:A2 022.0311 Tube terminal wire 0,50mm -- T 1 : 0 022.0311 Tube terminal wire 0,50mm
A2
22 AWG20 BLUE 350mm -- K 1 : A 2 022.0311 Tube terminal wire 0,50mm -- T 1 : 0
2
RE
WI-
5
DESCRIPTIONTYPECABLE
List of components
CODE CABLE TERMINAL ENDENDCABLE TERMINAL STARTSTARTLENGTHCOLORSEC.
022.0132R --W128 AWM S50:13/M1:V2 AWG14 RED 1600mm -- S 5 O : 1 3 022.0312* Tube terminal wire
022.0132R --W129 AWM S50:15/M1:U2 AWG14 RED 1600mm -- S50:15 022.0312* Tube terminal wire
022.0133R --W130 AWM F5/X2:D AWG20 RED 540mm -- X 2 : D -- F 5
022.0133R --W131 AWM T1:24Vac(0--24)/F
022.0133R --W133 AWM S24:14/S24:1 AWG20 RED 180mm --S24:1 022.0311 Tube terminal wire 0,50mm -- S24:1
022.0133R --W134 AWM S24:12/X2:D 043 AWG20 RED 530mm --S24:12 022.0311 Tube terminal wire 0,50mm -- X 2 : D
022.0133R --W135 AWM S24:24/X3:E AWG20 RED 530mm -- S24:24 022.0311 Tube terminal wire 0,50mm -- X 3 : E
022.0133R --W136 AWM S24:2/S24:4 41 AWG 20 RED 70mm -- S24:4 022.0312 Tube terminal wire 1,50mm --S24:2 022.0311 Tube terminal wire 1,50mm
022.0133R --W137 AWM S24:4/S50:A 41 AWG20 RED 160mm -- S50:A 022.0311 Tube terminal wire 0,50mm -- S24:4
022.0133R --W138 AWM K42:1 1/K1:A1 040 AWG20 RED 260mm --K42:11 022.031 1 Tube terminal wire 0,50mm -- K 1 : A 1 022.0311 Tube terminal wire 0,50mm
022.0133R --W139 AWM K42:A1/K1:14 46 AWG20 RED 270mm -- K 1 : 1 4 022.0311 Tube terminal wire 0,50mm --K42:A
022.0133R --W140 AWM S24:13/S24:11 43 AWG20 RED 70mm -- S24:11 022.0311 Tube terminal wire 0,50mm -- S24:1
022.0133R --W141 AWM S24:3/K42:14 42 AWG20 RED 570mm -- K42:14 022.0311 Tube terminal wire 0,50mm -- S24:3 022.0311 Tube terminal wire 0,50mm
022.0133R --W142 AWM S24:23/S50:B 47 AWG20 RED 200mm --S24:23 022.0311 Tube terminal wire 0,50mm --S50:B 022.0311 Tube terminal wire 0,50mm
022.0133R --W143 AWM K1:13/S50:B 45 AWG20 RED 460mm -- K 1 : 1 3 022.0311 Tube terminal wire 0,50mm -- S50:B 022.0311 Tube terminal wire 0,50mm
022.0133BL -- W149 AWM T1:0V(0-- 24)/K42:
022.0133BL -- W150 AWM T1:0V(0--24)/K1:A
Diagrams, exploded views and replacement parts 6--21
CODE DESCRIPTION TYPE CATALOG NUMBER ID. REF. MANUFACTURER
022.1140 FUSE ATM 3A 10,3X38 FUSE 3A -- F 1 /1,6 ELETTROITALIA
022.1140 FUSE ATM 3A 10,3X38 FUSE 3A -- F 2 /1,6 ELETTROITALIA
022.2255 FUSE--HOLDER USM 1 FOR FUSE 10,3X38 FUSE--HOLDER -- F 1 /1,6 ELETTROITALIA
022.1140 FUSE ATM 3A 10,3X38 FUSE 3A -- F 3 /1,4 ELETTROITALIA
022.2255 FUSE--HOLDER USM 1 FOR FUSE 10,3X38 FUSE--HOLDER -- F 2 /1,6 ELETTROITALIA
022.1139 FUSE ATM 25A 10,3X38 FUSE 25A -- F 3 L /1,1 ELETTROITALIA
022.2255 FUSE--HOLDER USM 1 FOR FUSE 10,3X38 FUSE--HOLDER -- F 3 /1,4 ELETTROITALIA
022.0139 FUSE ATM 25A 10,3X38 FUSE 25A -- F 3 L /1,1 ELETTROITALIA
022.0139 FUSE ATM 25A 10,3X38 FUSE 25A -- F 3 L /1,1 ELETTROITALIA
022.1140 FUSE ATM 3A 10,3X38 FUSE 3A -- F 4 /1,4 ELETTROITALIA
022.2254 FUSE--HOLDER USM 3 FOR FUSE 10,3X38 FUSE--HOLDER -- F 3 L /1,1 ELETTROITALIA
034.0723 ELECTRICHAL BOX BOX 34250 -- F 3 L /1,1 WEIDMULLER
022.2255 FUSE--HOLDER USM 1 FOR FUSE 10,3X38 FUSE--HOLDER -- F 4 /1,4 ELETTROITALIA
022.2246 FUSE--HOLDER ZFK ZFK 4--HESI 30 25 45 1 -- F 5 /1,9 PHOENIX
Page 71
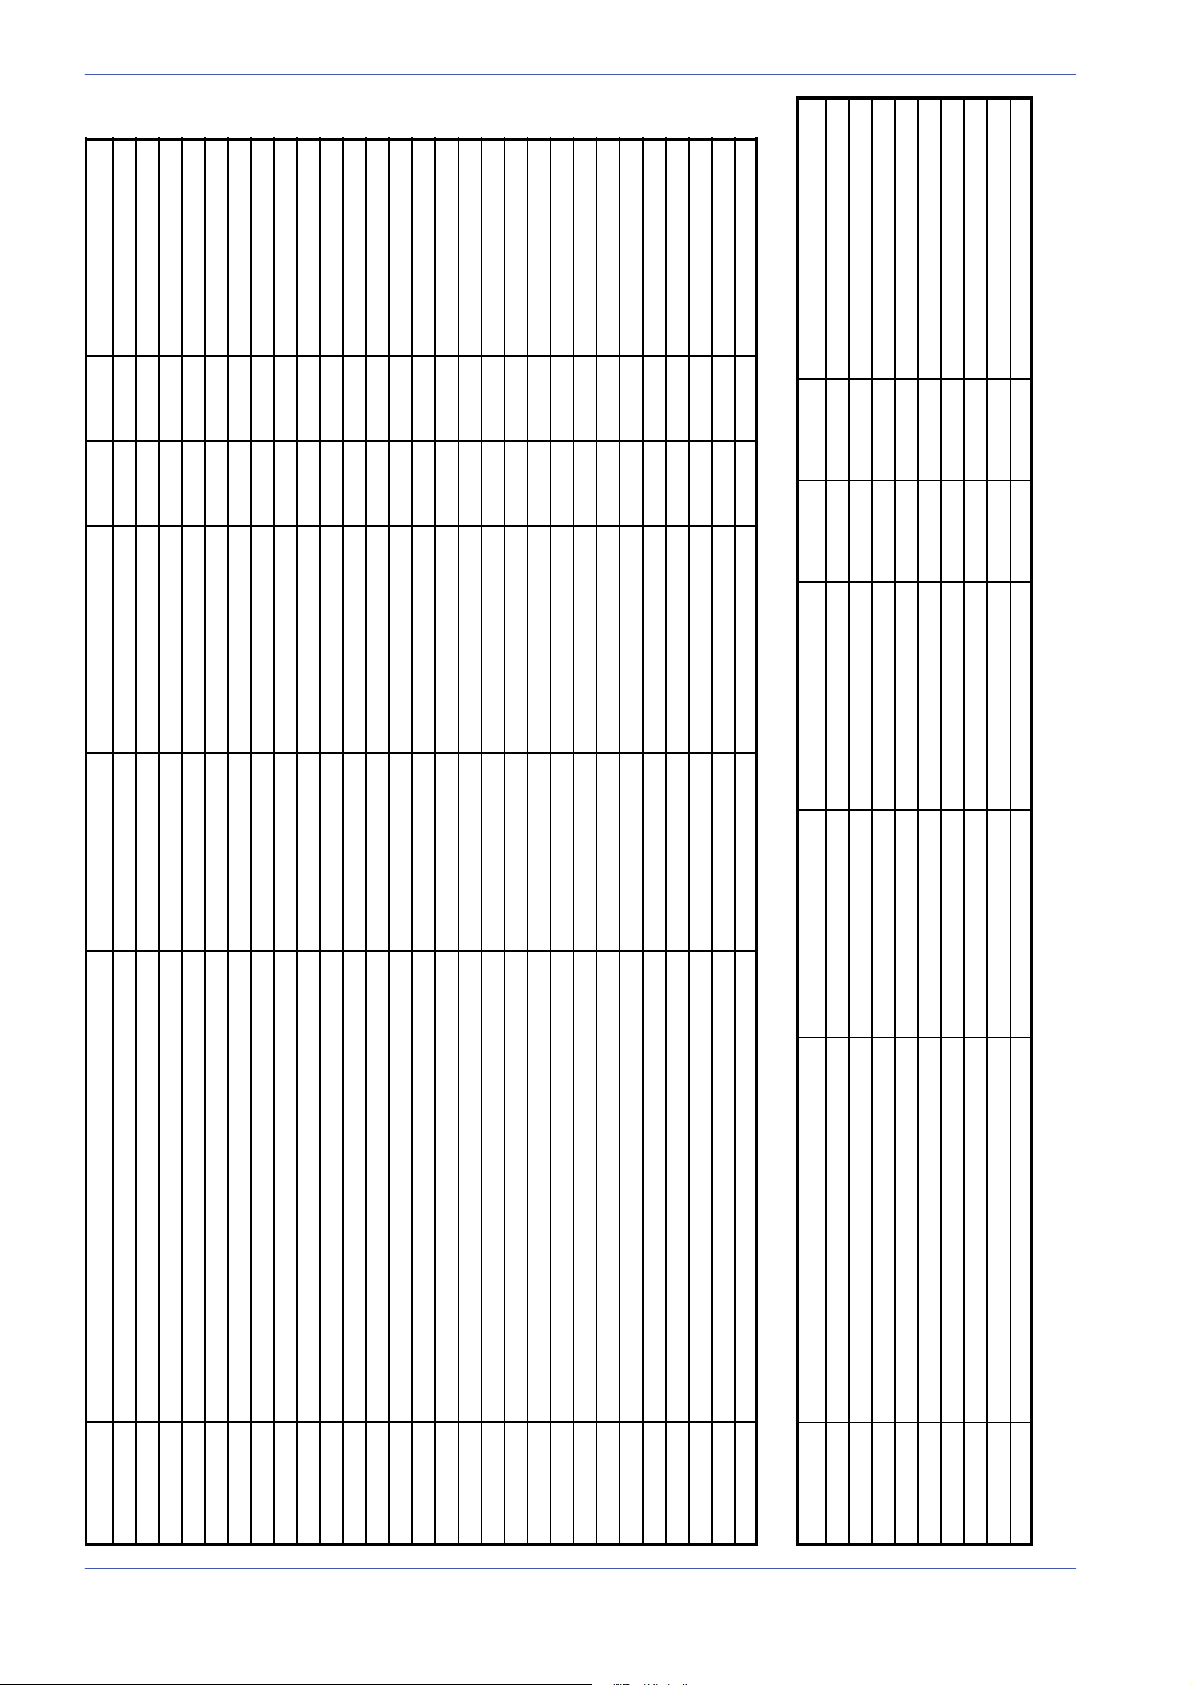
MEP S.p.A.
CODE MANUFACTURERREF.ID.CATALOG NUMBERTYPEDESCRIPTION
022.1128 FUSE 5X20 5A FUSE 5A -- F 5 /1,9 COMAPEL
022.0553 LOW TENSION RELAY 240 Vac U--PKZO -- K 0 /1,4 KLOCKNER MOELLER
022.0087 CONTACTOR DILOOM --10 (01) 24Vac -- K 1 /2,3 KLOCKNER MOELLER
022.0592 LOC K VALVE R ELAY RELAY -- K 4 0 /2,5 TECNAIR
022.0412 CONNECTOR LOCK VALVE CONNECTOR -- K 4 0 /2,5 TECNAIR
044.1258 LOCK VALVE VALVE -- K 4 0 /2,5 TECNAIR
022.0992 RELAY 24 Vac RELAIS 171 G2 -- K 4 2 /2,1 SIEI PETERLONGO
019.1722 BLADE MOTOR HP 2/2,5 2/4P 240 Vac -- M 1 /1,5 CARPANELLI MOTORI
028.0283 ELCTROPUMP 240Vac ELECTROPUMP EZC -- M 2 /1,4 SAP
022.1288 MAIN-- SWITCH OVER LOAD THERMAL PROTECTION PKZM0 -- 16A -- Q 0 /1,5 KLOCKNER MOELLER
022.0043 ROTATING KNOB RH -- PKZO -- MCC -- Q 0 /1,5 KLOCKNER MOELLER
022.1242 EMERGENCY PUSH BUTTON EMERGENCY -- S 4 /1,4 ROCKWELL AUTOMATION
022.0037 LIMIT -- SWITCH ATO--11--1--ZB B275 -- S 8 /2,7 KLOCKNER MOELLER
022.0515 MICRO -- SWITCH MICRO -- SWITCH -- S 1 5 /2,8 HONEYWELL
034.1221 KNOB KNOB -- S 1 5 /2,8 BARDEGGIA
6--22 Use and maintenance manual DM 8
List of terminals
010.0928 SPRING SPRING -- S 1 5 /2,8 ADRIATICA MOLLE
025.0691 KNOB SEAL KNOB SEAL -- S 1 5 /2,8 BARDEGGIA
022.0962 SELECTOR 2P QM 304 -- N -- S 2 4 /2,4 ROCKWELL AUTOMATION
022.0943 BLOCK V40 NC (RED) BLOCK V40 -- S 2 4 /2,4 ROCKWELL AUTOMATION
022.0943 BLOCK V40 NC (RED) BLOCK V40 -- S 2 4 /2,4 ROCKWELL AUTOMATION
022.0944 BLOCK V50 NO (GREEN) BLOCK V50 -- S 2 4 /2,4 ROCKWELL AUTOMATION
022.0944 BLOCK V50 NO (GREEN) BLOCK V50 -- S 2 4 /2,4 ROCKWELL AUTOMATION
022.0944 BLOCK V50 NO (GREEN) BLOCK V50 -- S 2 4 /2,4 ROCKWELL AUTOMATION
043.0142 PRESSURE SWITCH BLADE PRESSURE -- S 2 5 /2,7 HERBIRGER
022.0506 HEAD DOWN LIMIT SWITCH LIMIT SWITCH -- S 2 8 /2,2 HONEYWELL
022,0023 POLE CHANGE SWITCH SWITCH -- S 5 0 /1.5 ROCKWELL AUTOMATION
022.0434 TRANSFORMER 0--240 Vac TRANSFORMER -- T 1 /1,7 E.R.C.
022.0862 SINGLE LED BOARD LED -- V 1 /2,6 METALAM
CODE DESCRIPTION TYPE CATALOG NUMBER ID. REF. MANUFACTURER
022.0377 SINGLE GROUND TERMINAL USLKG 5 04 41 50 4 -- X /1.1 PHOENIX
022.0377 SINGLE GROUND TERMINAL USLKG 5 04 41 50 4 -- X /1.1 PHOENIX
022.2247 QUADRUPLE GROUND TERMINAL UKK 5-- PE 27 74 21 1 -- X 1 /1.2 PHOENIX
022.2245 QUADRUPLE TERMINAL ZFDK 2,5 30 01 89 9 -- X 2 /1.9 PHOENIX
022.2283 QUADRUPLE TERMINAL PLATE D--ZFD 2,5 30 02 81 4 -- X 2 /1.9 PHOENIX
022.2244 TRIPLE TERMINAL ZFK 2,5 -- TWIN 30 01 81 5 -- X 3 /2.8 PHOENIX
022.2243 SINGLE TERMINAL ZFK 2,5 30 03 21 1 -- X 4 /2:7 PHOENIX
022.2243 SINGLE TERMINAL ZFK 2,5 30 03 21 1 -- X 5 /1.3 PHOENIX
022.2243 SINGLE TERMINAL ZFK 2,5 30 03 21 1 -- X 6 /1.3 PHOENIX
Page 72
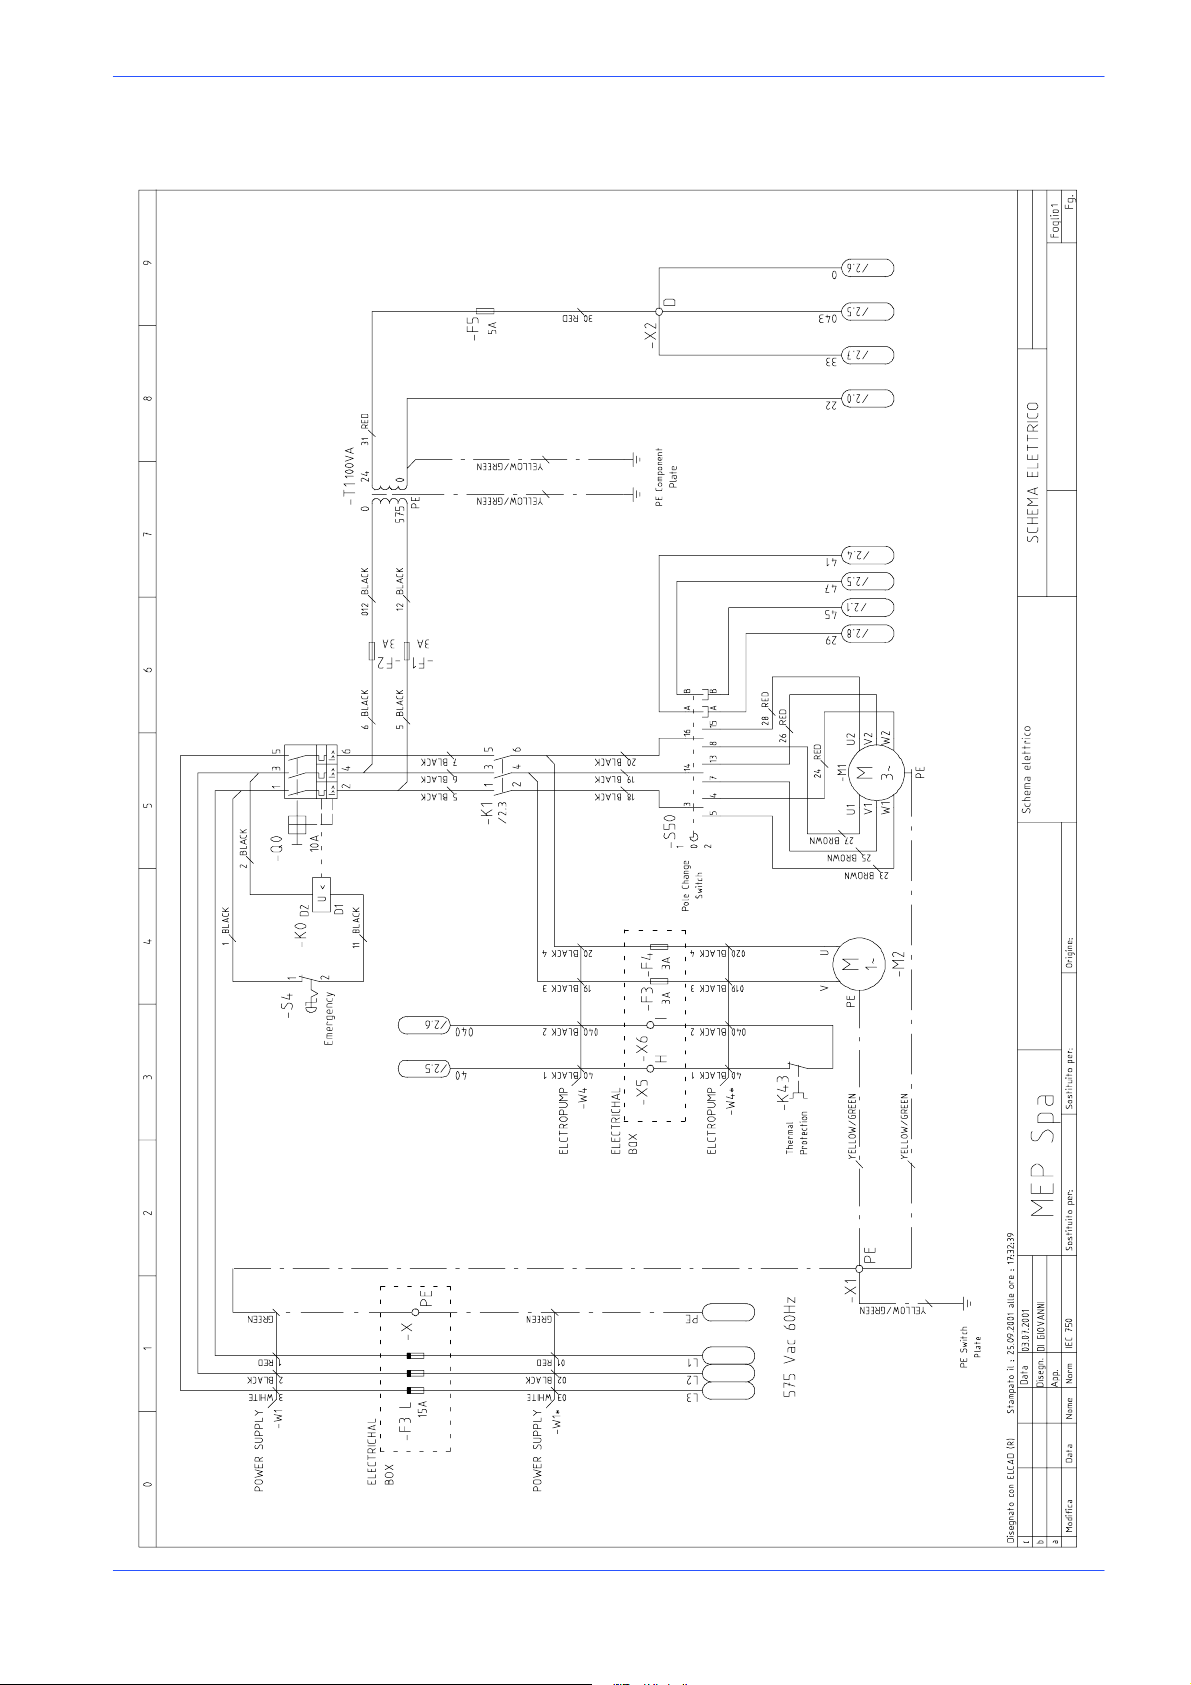
Standard version electrical diag ram 575V (CSA standard)
Version 24DM
DM 8 G -- 575/60
Diagrams, exploded views and replacement parts 6--23
Page 73
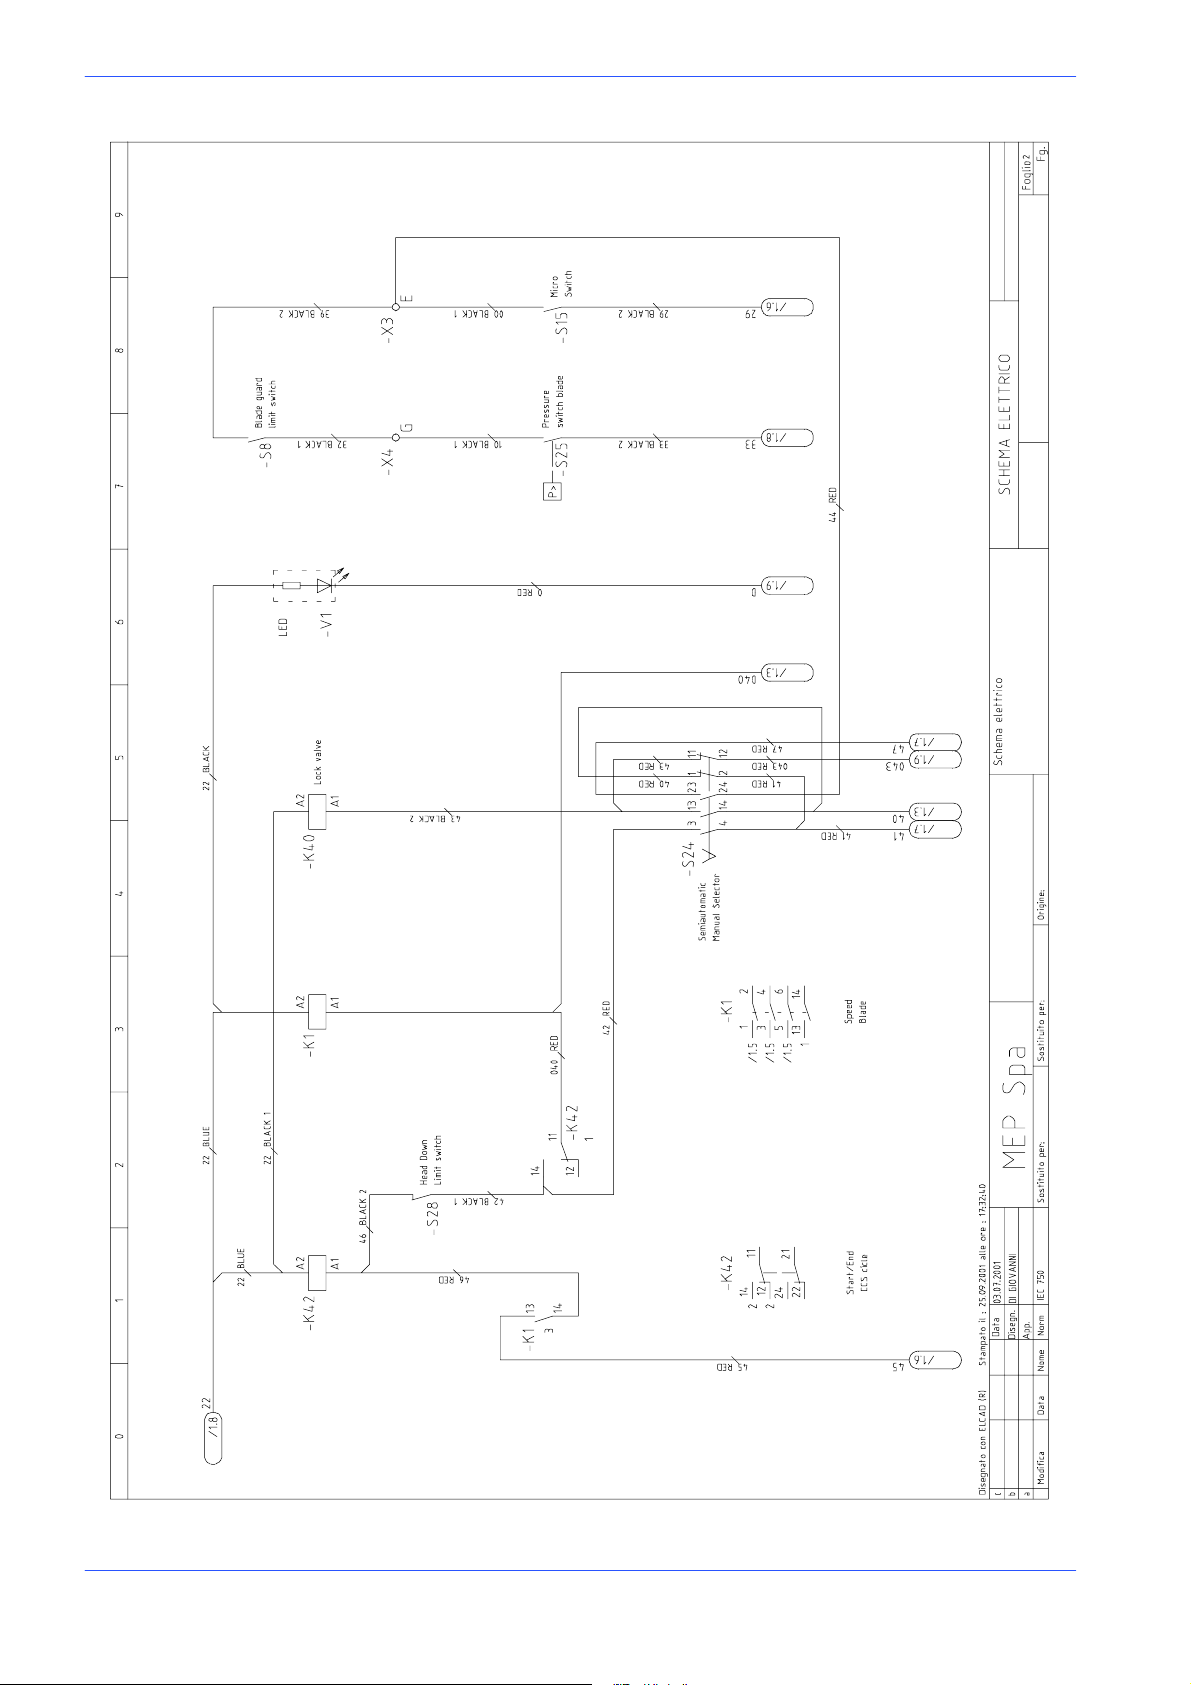
MEP S.p.A.
DM 8 G -- 575/60
6--24 Use and maintenance manual DM 8
Page 74
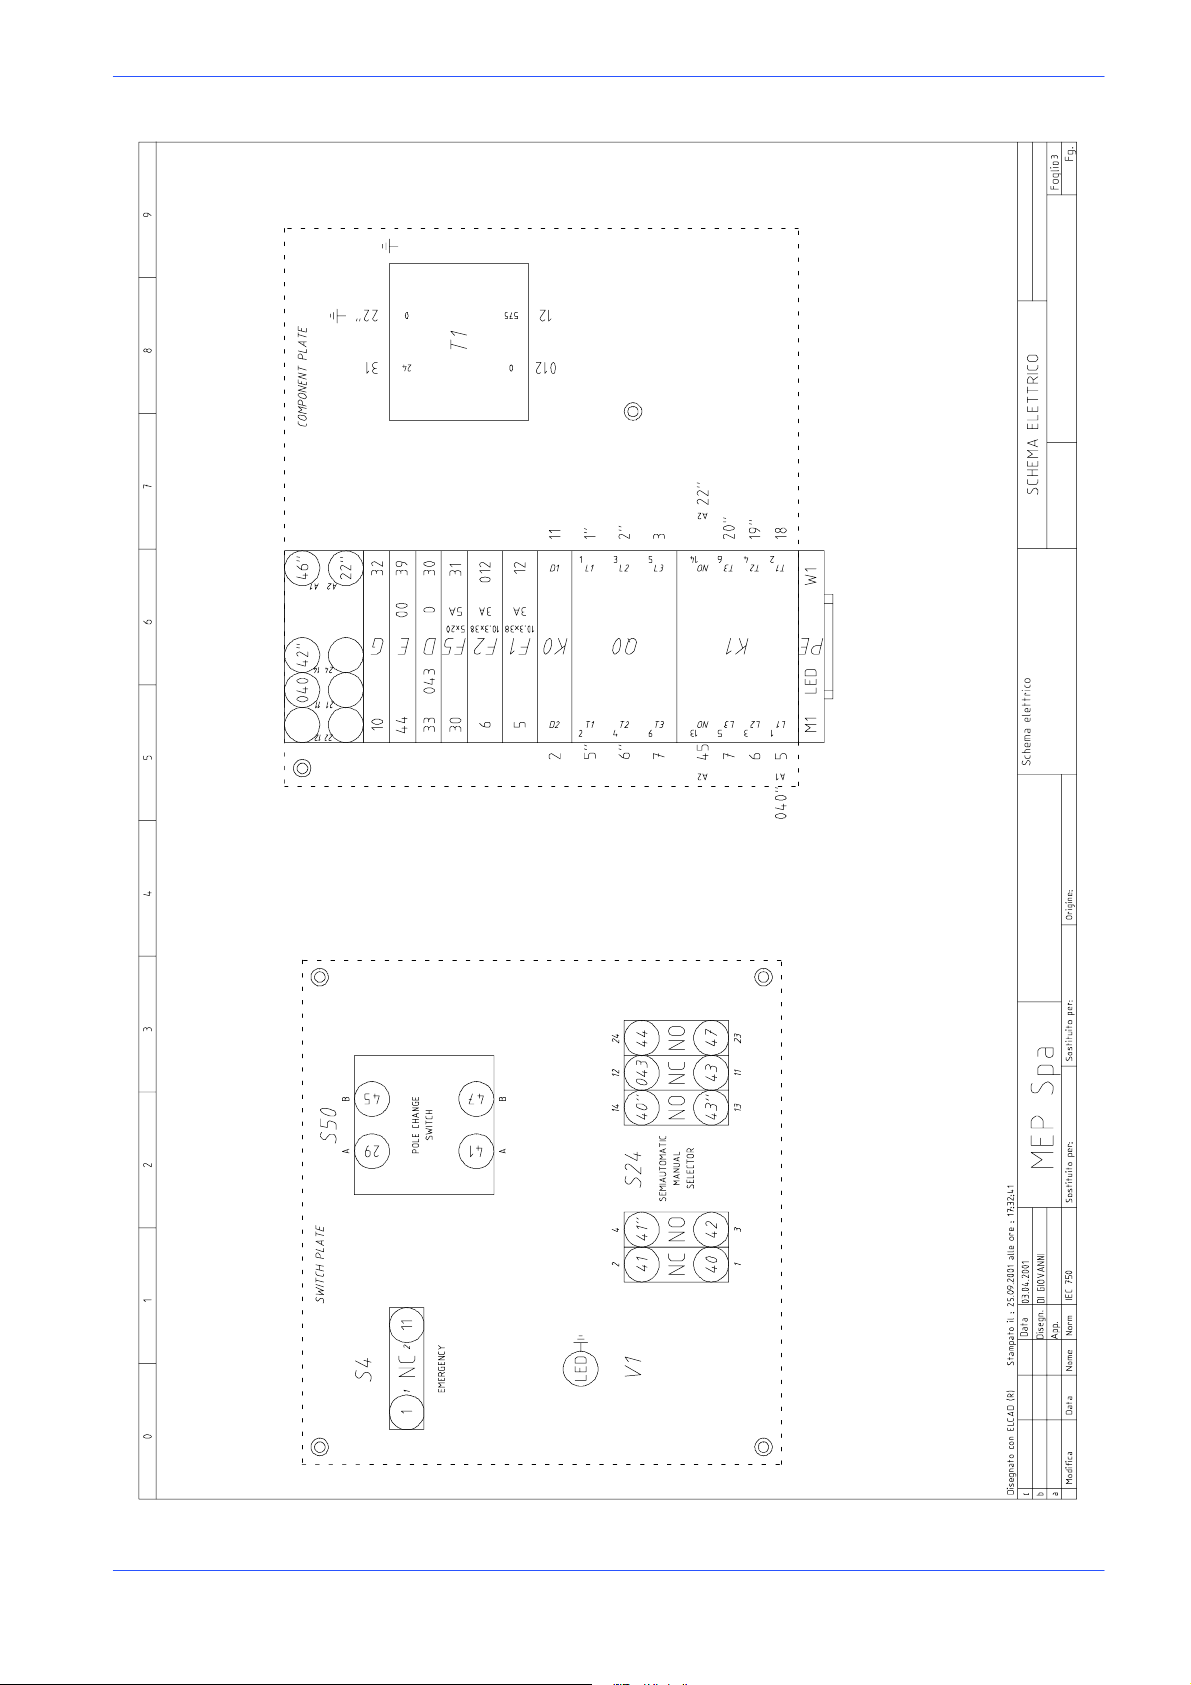
Version 24DM
K42
DM 8 G -- 575/60
Diagrams, exploded views and replacement parts 6--25
Page 75
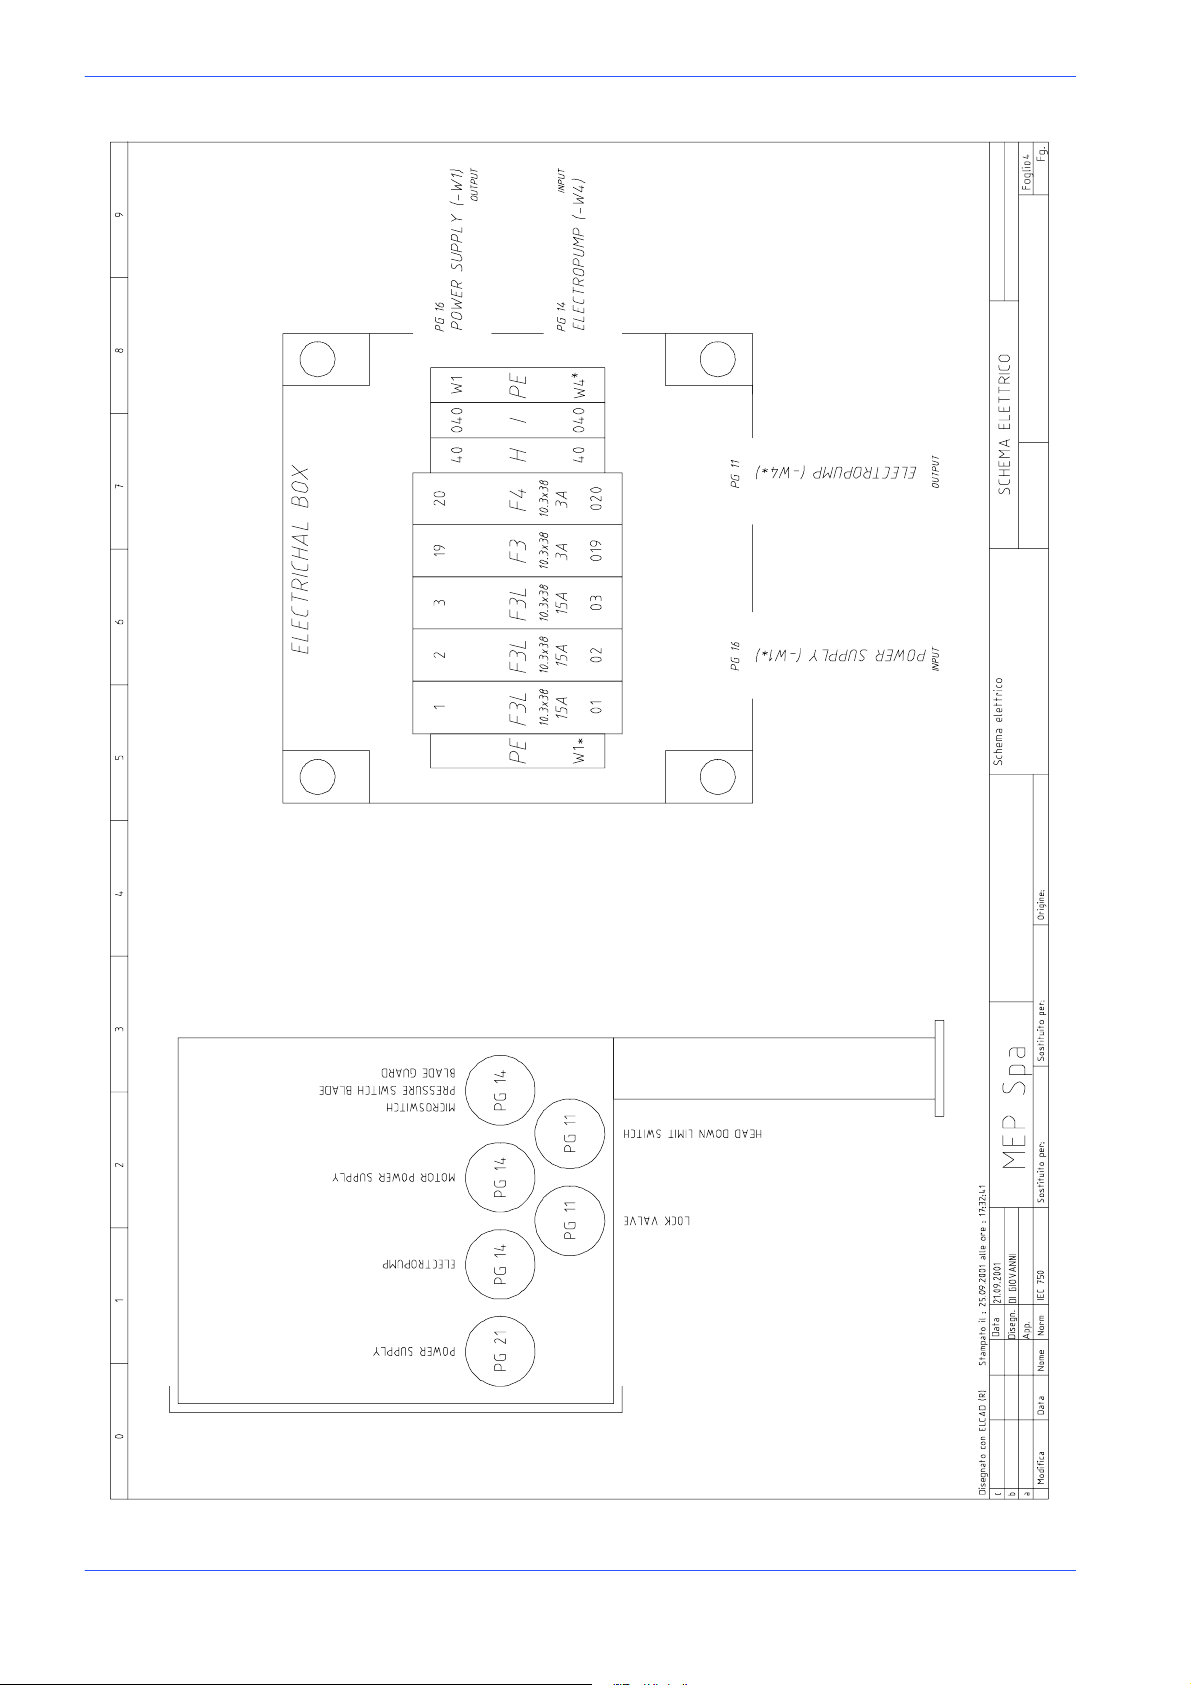
MEP S.p.A.
DM 8 G -- 575/60
6--26 Use and maintenance manual DM 8
Page 76
022.0311 Tube terminal wire 0,50mm
022.0300 Red Faston 1,5mm
022.0311 Tube terminal wire 0,50mm
Version 24DM
022.0311 Tube terminal wire 0,50mm
2500mm -- X 1 : P E 022.0312* Tube terminal wire 2,5mm --X:PE 022.0312* Tube terminal wire 2,5mm
GREEN
2500mm -- X 1 : P E 022.0312* Tube terminal wire 2,5mm
GREEN
4
2500mm
GREEN
E
3000mm -- X 1 : P E 022.031 1 Tube terminal wire 0,50mm -- M 2 : P
GREEN
3
2
List of cables
SEC. COLOR LENGTH START CABLE TERMINAL START END CABLE TERMINAL END
RE
WI-
CODE CABLE TYPE DESCRIPTION
022.1901 -- W 1 S00W POWER SUPPLY AWG14 RED 2500mm -- F 3 L 022.0312* Tube terminal wire 2,5mm -- Q 0 : 1 022.0312* Tube terminal wire 2,5mm
022.1901 -- W 1 S00W POWER SUPPLY AWG14 BLACK 2500mm -- F 3 L 022.0312* Tube terminal wire 2,5mm -- Q 0 : 3 022.0312* Tube terminal wire 2,5mm
022.1901 -- W 1 S00W POWER SUPPLY AWG14 WHITE 2500mm -- F 3 L 022.0312* Tube terminal wire 2,5mm -- Q 0 : 5 022.0312* Tube terminal wire 2,5mm
022.1901 -- W 1 S00W POWER SUPPLY AWG14 YELLOW/
022.1901 -- W 1 * S00W POWER SUPPLY 01 AWG14 RED 2500mm -- F 3 L 022.0312* Tube terminal wire 2,5mm
022.1901 -- W 1 * S00W POWER SUPPLY 02 AWG14 BLACK 2500mm -- F 3 L 022.0312* Tube terminal wire 2,5mm
022.1901 -- W 1 * S00W POWER SUPPLY 03 AWG14 WHITE 2500mm -- F 3 L 022.0312* Tube terminal wire 2,5mm
022.1901 -- W 1 * S00W POWER SUPPLY AWG14 YELLOW/
022.0168 -- W 4 AWM ELECTROPUMP 40 AWG20 BLACK 1 2500mm -- X 5 : H -- S24:1
022.0168 -- W 4 AWM ELECTROPUMP 040 AWG20 BLACK 2 2500mm -- X 6 : I -- K 1 : A 1 022.0311 Tube terminal wire 0,50mm
022.0168 -- W 4 AWM ELECTROPUMP 19 AWG20 BLACK 3 2500mm -- F 3 022.0311 Tube terminal wire 0,50mm -- K 1 : 4 022.0311 Tube terminal wire 0,50mm
022.0168 -- W 4 AWM ELECTROPUMP 20 AWG20 BLACK 4 2500mm -- F 4 022.0311 Tube terminal wire 0,50mm -- K 1 : 6 022.0311 Tube terminal wire 0,50mm
022.0168 -- W 4 AWM ELECTROPUMP AWG20 BLACK 5 2500mm
022.0168 -- W 4 AWM ELECTROPUMP AWG20 YELLOW/
022.0168 -- W 4 AWM ELECTROPUMP AWG20 SCREENING 2500mm
022.0168 -- W 4 * AWM ELECTROPUMP 40 AWG20 BLACK 1 3000mm -- X 5 : H -- K 4 3 022.0311 Tube terminal wire 0,50mm
022.0168 -- W 4 * AWM ELECTROPUMP 040 AWG20 BLACK 2 3000mm -- X 6 : I -- K 4 3 022.0311 Tube terminal wire 0,50mm
022.0168 -- W 4 * AWM ELECTROPUMP 019 AWG20 BLACK 3 3000mm -- F 3 022.0311 Tube terminal wire 0,50mm -- M 2 : V 022.0300 Red Faston 1,5mm
022.0168 -- W 4 * AWM ELECTROPUMP 020 AWG20 BLACK 4 3000mm -- F 4 022.0311 Tube terminal wire 0,50mm -- M 2 : U 022.0300 Red Faston 1,5mm
022.0168 -- W 4 * AWM ELECTROPUMP AWG20 BLACK 5 3000mm
022.0168 -- W 4 * AWM ELECTROPUMP AWG20 YELLOW/
022.0168 -- W 4 * AWM ELECTROPUMP AWG20 SCREENING 3000mm
022.0139 -- W 5 2 AWM MICROSWITCH 00 AWG20 BLACK 1 3000mm -- X 3 : E -- S 1 5 022.0300 Red Faston 1,5mm
022.0139 -- W 5 2 AWM MICROSWITCH AWG20 BLACK 2 3000mm -- S50:A 022.0301 Tube terminal wire 0,50mm -- S 1 5 022.0300 Red Faston 1,5mm
022.0139 -- W 5 5 AWM Blade Guard L/S AWG20 BLACK 1 2000mm -- S 8 022.0311 Tube terminal wire 0,50mm -- X 4 : G
022.0139 -- W 5 5 AWM Blade Guard L/S AWG20 BLACK 2 2000mm -- X 3 : E -- S 8 022.0311 Tube terminal wire 0,50mm
022.0139 -- W 6 5 AWM LOCK VALVE AWG20 BLACK 1 1200mm --K40:A2 022.0311 Tube terminal wire 0,50mm --K42:A
022.0139 -- W 6 5 AWM LOCK VALVE AWG20 BLACK 2 1200mm --K40:A1 022.0311 Tube terminal wire 0,50mm --S24:1
022.0139 -- W 6 7 AWM Press. Sw. Blade AWG20 BLACK 1 2800mm -- X 4 : G -- S 2 5 022.0300 Red Faston 1,5mm
022.0139 -- W 6 7 AWM Press. Sw. Blade AWG20 BLACK 2 2800mm -- X 2 : D -- S 2 5 022.0300 Red Faston 1,5mm
022.0862 -- W 7 4 AWM LED 0 AWG20 RED 750mm -- X 2 : D -- V 1
022.0862 -- W 7 4 AWM LED AWG20 BLACK 750mm -- K 1 : A 2 022.0311 Tube terminal wire 0,50mm -- V 1
022.0506 -- W 7 5 AWM Head Down L/S 42 AWG20 BLACK 1 1400mm -- K42:14 022.0311 Tube terminal wire 0,50mm -- S 2 8
Diagrams, exploded views and replacement parts 6--27
Page 77

MEP S.p.A.
2,50mm
2,50mm
2,50mm
2,50mm
2,50mm
2,50mm
022.0311 Tube terminal wire 0,50mm
1
80mm -- T 1 : P E 022.0304 Red Eyelet 5mm PE 022.0304 Red Eyelet 5mm
1400mm
150mm PE 022.0304 Red Eyelet 5mm -- T 1 : 0 022.0312 Tube terminal wire 1,50mm
022.0304 Red Eyelet 5mm
-- M 1 : P
1500mm -- X 1 : P E 022.0312* Tube terminal wire
E
2,50mm
470mm -- X 1 : P E 022.0312 Tube terminal wire 1,50mm PE 022.0303 Blue Eyelet 8mm
022.0312 Tube terminal wire 1,50mm
1
-- Q 0 : 2 022.0312* Tube terminal wire
-- Q 0 : 4 022.0312* Tube terminal wire
2,50mm
2,50mm
-- Q 0 : 6 022.0312* Tube terminal wire
2,50mm
-- K 1 : 2 022.0312* Tube terminal wire
-- K 1 : 4 022.0312* Tube terminal wire
2,50mm
-- K 1 : 6 022.0312* Tube terminal wire
2,50mm
022.0304 Red Eyeled 5mm
-- M 1 : W
2,50mm
1
M1:V1 022.0304 Red Eyeled 5mm
2,50mm
022.0304 Red Eyeled 5mm
-- M 1 : U
2,50mm
1
M1:W2 022.0304 Red Eyeled 5mm
2,50mm
2,50mm
GREEN
GREEN
GREEN
GREEN
GREEN
AWG16 YELLOW/
RE
WI-
DESCRIPTIONTYPECABLE
CODE CABLE TERMINAL ENDENDCABLE TERMINAL STARTSTARTLENGTHCOLORSEC.
022.0506 -- W 7 5 AWM Head Down L/S 46 AWG20 BLACK 2 1400mm -- S 2 8 --K42:A
022.0506 -- W 7 5 AWM Head Down L/S AWG20 BLEU 1400mm
022.0506 -- W 7 5 AWM Head Down L/S AWG20 BROWN 1400mm
022.0506 -- W 7 5 AWM Head Down L/S AWG20 YELLOW/
022.0134Y/G -- W100 AWM PE/Screening:T1 AWG16 YELLOW/
022.0134Y/G -- W101 AWM PE/T1:0Vac(0--24) AWG16 YELLOW/
022.0132Y/G -- W102 AWM X1:PE/M1:PE AWG14 YELLOW/
012 AWG16 BLACK 260mm -- T 1 : 0 022.0312 Tube terminal wire 1,50mm -- F 2 022.0312 Tube terminal wire 1,50mm
)
te
022.0134B --W104 AWM F2/T1:0Vac(0--575
022.0134B --W109 AWM Q0:1/S4:1 1 AWG16 BLACK 600mm -- S 4 : 1 022.0312 Tube terminal wire 1,50mm -- Q 0 : 1 022.0312 Tube terminal wire 1,50mm
022.0134B -- W 1 1 0 AWM Q0:3/K0:D2 2 AWG16 BLACK 370mm -- K 0 : D 2 022.0312 Tube terminal wire 1,50mm -- Q 0 : 3 022.0312 Tube terminal wire 1,50mm
022.0134B --W 111 AWM S4:2/K0:D1 AWG16 BLACK 550mm -- S 4 : 2 022.0312 Tube terminal wire 1,50mm -- K 0 : D
022.0134B -- W 1 1 2 AWM Q0:2/F1 AWG16 BLACK 170mm -- F 1 022.0312 Tube terminal wire 1,50mm -- Q 0 : 2 022.0312 Tube terminal wire 1,50mm
022.0132B -- W 1 1 3 AWM Q0:2/K1:1 AWG14 BLACK 200mm -- K 1 : 1 022.0312* Tube terminal wire
022.0132B -- W 1 1 6 AWM Q0:4/K1:3 AWG14 BLACK 180mm -- K 1 : 3 022.0312* Tube terminal wire
022.0134Y/G -- W103 AWM X1:PE/PE Sw.Pla-
022.0134B -- W 1 1 7 AWM Q0:4/F2 AWG16 BLACK 190mm -- F 2 022.0312 Tube terminal wire 1,50mm -- Q 0 : 4 022.0312 Tube terminal wire 1,50mm
AWG16 BLACK 260mm -- T1:575 022.0312 Tube terminal wire 1,50mm -- F 1 022.0312 Tube terminal wire 1,50mm
)
022.0132B -- W 1 1 8 AWM Q0:6/K1:5 AWG14 BLACK 160mm -- K 1 : 5 022.0312* Tube terminal wire
022.0134B -- W 1 1 9 AWM F1/T1:575V(0--575
022.0132B --W120 AWM K1:2/S50:3 AWG14 BLACK 430mm -- S50:3 022.0312* Tube terminal wire
022.0132B --W121 AWM K1:4/S50:14 AWG14 BLACK 520mm --S50:14 022.0312* Tube terminal wire
022.0132B --W122 AWM K1:6/S50:16 AWG14 BLACK 520mm --S50:16 022.0312* Tube terminal wire
022.0132BR --W124 AWM S50:5/M1:W1 AWG14 BROWN 1600mm --S50:5 022.0312* Tube terminal wire
022.0132BR --W125 AWM S50:7/M1:V1 AWG14 BROWN 1600mm --S50:7 022.0312* Tube terminal wire
022.0132R --W127 AWM S50:4/M1:W2 AWG14 RED 1600mm --S50:4 022.0312* Tube terminal wire
022.0132BR --W126 AWM S50:8/M1:U AWG14 BROWN 1600mm -- S50:8 022.0312* Tube terminal wire
6--28 Use and maintenance manual DM 8
Page 78
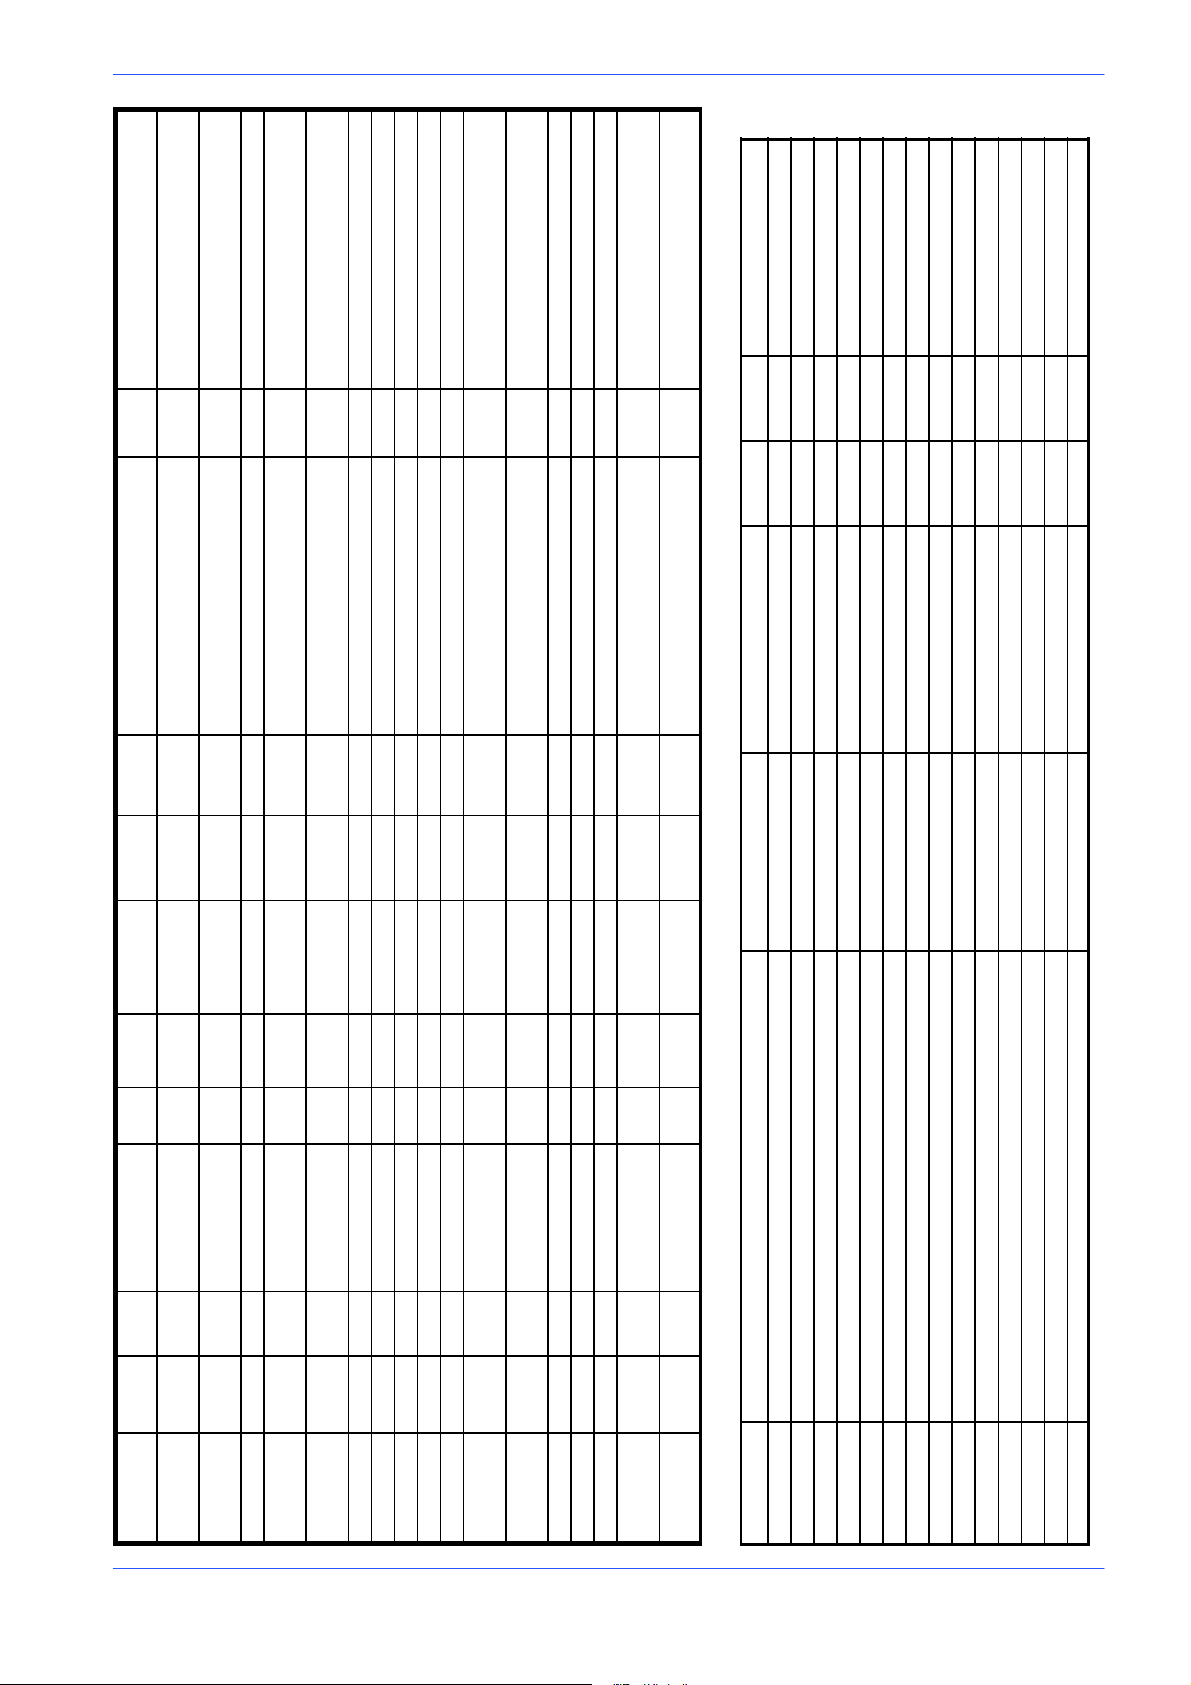
022.0304 Red Eyeled 5mm
-- M 1 : V
022.0304 Red Eyeled 5mm
2
-- M 1 : U
2,50mm
2
2,50mm
022.0311 Tube terminal wire 0,50mm
4
022.0311 Tube terminal wire 0,50mm
1
Version 24DM
022.0311 Tube terminal wire 0,50mm
3
AWG20 RED 280mm -- T 1 : 2 4 022.0311 Tube terminal wire 0,50mm -- F 5
22 AWG20 BLUE 210mm --K42:A2 022.0311 Tube terminal wire 0,50mm -- T 1 : 0 022.0311 Tube terminal wire 0,50mm
A2
22 AWG20 BLUE 350mm -- K 1 : A 2 022.0311 Tube terminal wire 0,50mm -- T 1 : 0
2
RE
WI-
5
DESCRIPTIONTYPECABLE
List of components
CODE CABLE TERMINAL ENDENDCABLE TERMINAL STARTSTARTLENGTHCOLORSEC.
022.0132R --W128 AWM S50:13/M1:V2 AWG14 RED 1600mm -- S 5 O : 1 3 022.0312* Tube terminal wire
022.0132R --W129 AWM S50:15/M1:U2 AWG14 RED 1600mm -- S50:15 022.0312* Tube terminal wire
022.0133R --W130 AWM F5/X2:D AWG20 RED 540mm -- X 2 : D -- F 5
022.0133R --W131 AWM T1:24Vac(0--24)/F
022.0133R --W133 AWM S24:14/S24:1 AWG20 RED 180mm --S24:1 022.0311 Tube terminal wire 0,50mm -- S24:1
022.0133R --W134 AWM S24:12/X2:D 043 AWG20 RED 530mm --S24:12 022.0311 Tube terminal wire 0,50mm -- X 2 : D
022.0133R --W135 AWM S24:24/X3:E AWG20 RED 530mm -- S24:24 022.0311 Tube terminal wire 0,50mm -- X 3 : E
022.0133R --W136 AWM S24:2/S24:4 41 AWG 20 RED 70mm -- S24:4 022.0312 Tube terminal wire 1,50mm --S24:2 022.0311 Tube terminal wire 1,50mm
022.0133R --W137 AWM S24:4/S50:A 41 AWG20 RED 160mm -- S50:A 022.0311 Tube terminal wire 0,50mm -- S24:4
022.0133R --W138 AWM K42:1 1/K1:A1 040 AWG20 RED 260mm --K42:11 022.031 1 Tube terminal wire 0,50mm -- K 1 : A 1 022.0311 Tube terminal wire 0,50mm
022.0133R --W139 AWM K42:A1/K1:14 46 AWG20 RED 270mm -- K 1 : 1 4 022.0311 Tube terminal wire 0,50mm --K42:A
022.0133R --W140 AWM S24:13/S24:11 43 AWG20 RED 70mm -- S24:11 022.0311 Tube terminal wire 0,50mm -- S24:1
022.0133R --W141 AWM S24:3/K42:14 42 AWG20 RED 570mm -- K42:14 022.0311 Tube terminal wire 0,50mm -- S24:3 022.0311 Tube terminal wire 0,50mm
022.0133R --W142 AWM S24:23/S50:B 47 AWG20 RED 200mm --S24:23 022.0311 Tube terminal wire 0,50mm --S50:B 022.0311 Tube terminal wire 0,50mm
022.0133R --W143 AWM K1:13/S50:B 45 AWG20 RED 460mm -- K 1 : 1 3 022.0311 Tube terminal wire 0,50mm -- S50:B 022.0311 Tube terminal wire 0,50mm
022.0133BL -- W149 AWM T1:0V(0-- 24)/K42:
022.0133BL -- W150 AWM T1:0V(0--24)/K1:A
Diagrams, exploded views and replacement parts 6--29
CODE DESCRIPTION TYPE CATALOG NUMBER ID. REF. MANUFACTURER
022.1140 FUSE ATM 3A 10,3X38 FUSE 3A -- F 1 /1,6 ELETTROITALIA
022.1140 FUSE ATM 3A 10,3X38 FUSE 3A -- F 2 /1,6 ELETTROITALIA
022.2255 FUSE--HOLDER USM 1 FOR FUSE 10,3X38 FUSE--HOLDER -- F 1 /1,6 ELETTROITALIA
022.1140 FUSE ATM 3A 10,3X38 FUSE 3A -- F 3 /1,4 ELETTROITALIA
022.2255 FUSE--HOLDER USM 1 FOR FUSE 10,3X38 FUSE--HOLDER -- F 2 /1,6 ELETTROITALIA
022.1138 FUSE ATM 15A 10,3X38 FUSE 15A -- F 3 L /1,1 ELETTROITALIA
022.2255 FUSE--HOLDER USM 1 FOR FUSE 10,3X38 FUSE--HOLDER -- F 3 /1,4 ELETTROITALIA
022.0138 FUSE ATM 15A 10,3X38 FUSE 15A -- F 3 L /1,1 ELETTROITALIA
022.0138 FUSE ATM 15A 10,3X38 FUSE 15A -- F 3 L /1,1 ELETTROITALIA
022.1140 FUSE ATM 3A 10,3X38 FUSE 3A -- F 4 /1,4 ELETTROITALIA
022.2254 FUSE--HOLDER USM 3 FOR FUSE 10,3X38 FUSE--HOLDER -- F 3 L /1,1 ELETTROITALIA
034.0723 ELECTRICHAL BOX BOX 34250 -- F 3 L /1,1 WEIDMULLER
022.2255 FUSE--HOLDER USM 1 FOR FUSE 10,3X38 FUSE--HOLDER -- F 4 /1,4 ELETTROITALIA
022.2246 FUSE--HOLDER ZFK ZFK 4--HESI 30 25 45 1 -- F 5 /1,9 PHOENIX
Page 79
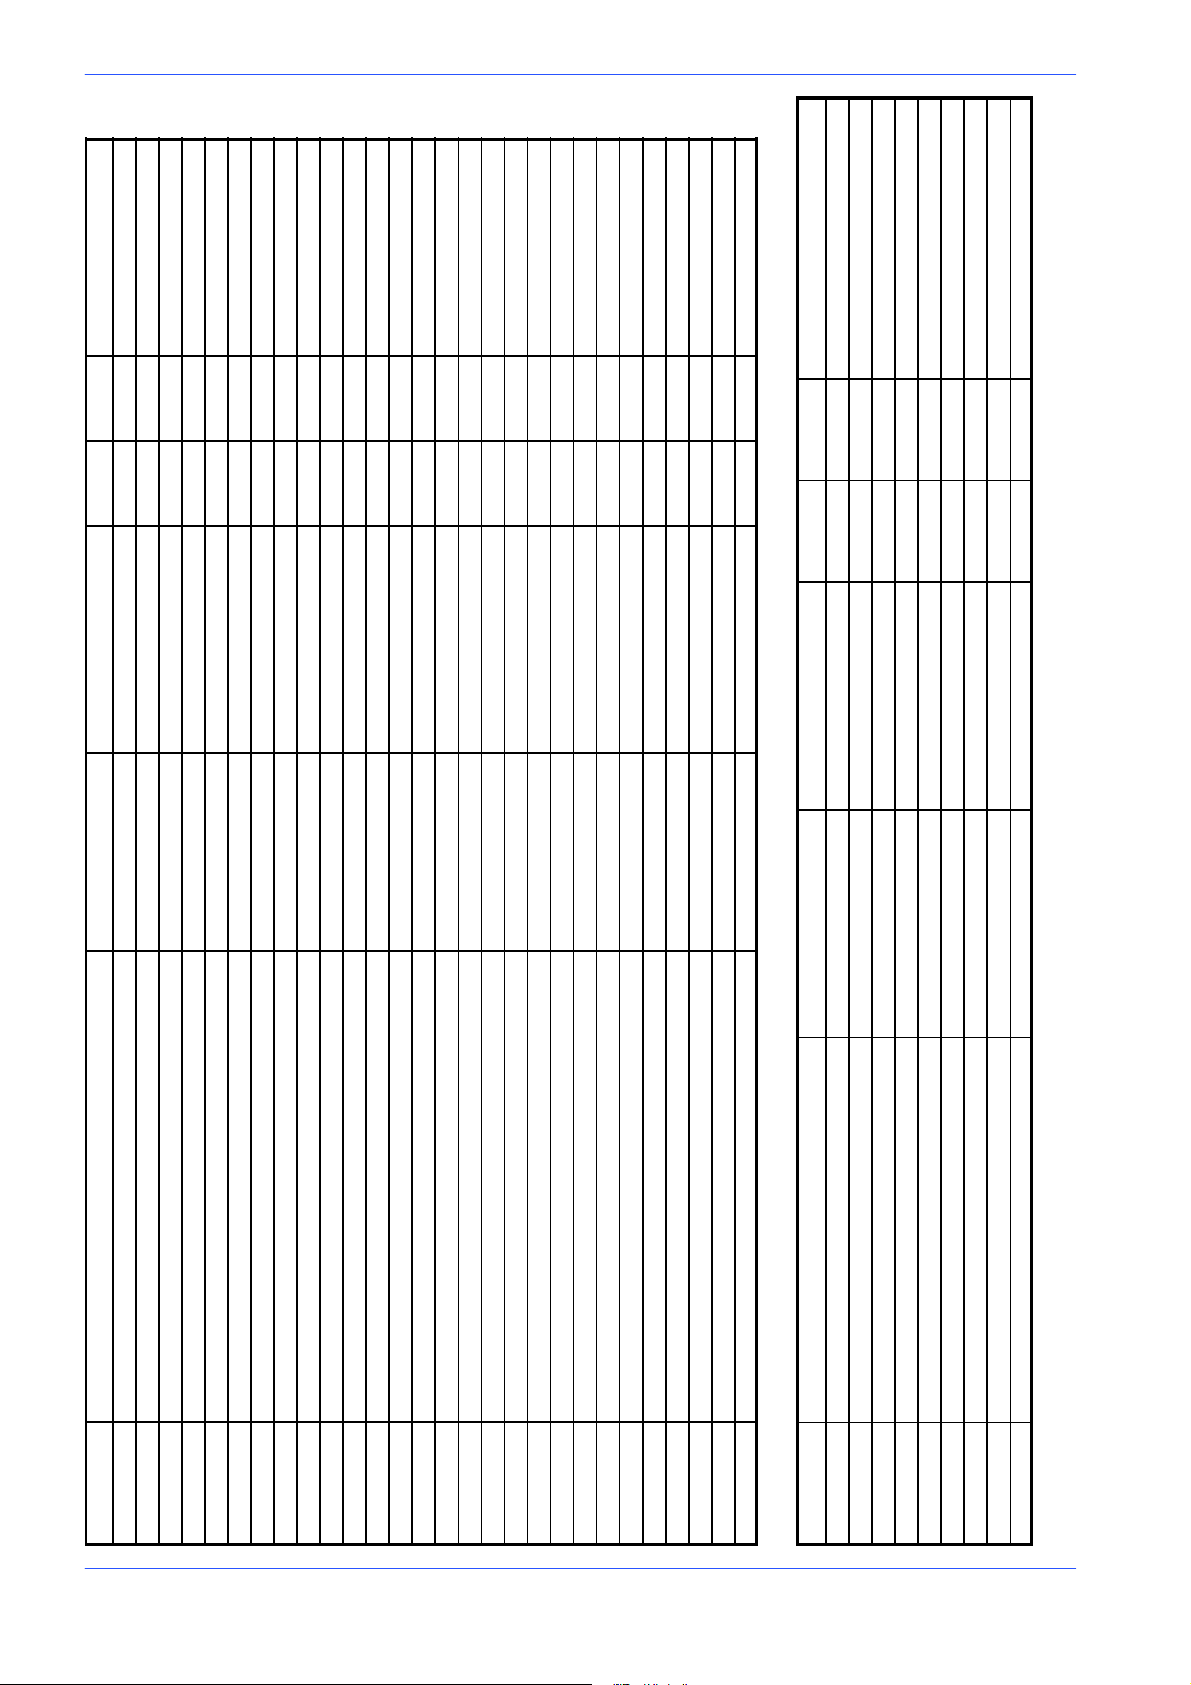
MEP S.p.A.
CODE MANUFACTURERREF.ID.CATALOG NUMBERTYPEDESCRIPTION
022.1128 FUSE 5X20 5A FUSE 5A -- F 5 /1,9 COMAPEL
022.0558 LOW TENSION RELAY 575 Vac U--PKZO -- K 0 /1,4 KLOCKNER MOELLER
022.0087 CONTACTOR DILOOM --10 (01) 24Vac -- K 1 /2,3 KLOCKNER MOELLER
022.0592 LOC K VALVE R ELAY RELAY -- K 4 0 /2,5 TECNAIR
022.0412 CONNECTOR LOCK VALVE CONNECTOR -- K 4 0 /2,5 TECNAIR
019.1711 BLADE MOTOR HP 2/2,5 2/4P 575 Vac -- M 1 /1,5 CARPANELLI MOTORI
044.1258 LOCK VALVE VALVE -- K 4 0 /2,5 TECNAIR
022.0992 RELAY 24 Vac RELAIS 171 G2 -- K 4 2 /2,1 SIEI PETERLONGO
028.0281 ELCTROPUMP 575 Vac ELECTROPUMP EZC -- M 2 /1,4 SAP
022.1287 MAIN-- SWITCH OVER LOAD THERMAL PROTECTION PKZM0 -- 10A -- Q 0 /1,5 KLOCKNER MOELLER
022.0043 ROTATING KNOB RH -- PKZO -- MCC -- Q 0 /1,5 KLOCKNER MOELLER
022.1242 EMERGENCY PUSH BUTTON EMERGENCY -- S 4 /1,4 ROCKWELL AUTOMATION
022.0037 LIMIT -- SWITCH ATO--11--1--ZB B275 -- S 8 /2,7 KLOCKNER MOELLER
022.0515 MICRO -- SWITCH MICRO -- SWITCH -- S 1 5 /2,8 HONEYWELL
034.1221 KNOB KNOB -- S 1 5 /2,8 BARDEGGIA
6--30 Use and maintenance manual DM 8
List of terminals
010.0928 SPRING SPRING -- S 1 5 /2,8 ADRIATICA MOLLE
025.0691 KNOB SEAL KNOB SEAL -- S 1 5 /2,8 BARDEGGIA
022.0962 SELECTOR 2P QM 304 -- N -- S 2 4 /2,4 ROCKWELL AUTOMATION
022.0943 BLOCK V40 NC (RED) BLOCK V40 -- S 2 4 /2,4 ROCKWELL AUTOMATION
022.0943 BLOCK V40 NC (RED) BLOCK V40 -- S 2 4 /2,4 ROCKWELL AUTOMATION
022.0944 BLOCK V50 NO (GREEN) BLOCK V50 -- S 2 4 /2,4 ROCKWELL AUTOMATION
022.0944 BLOCK V50 NO (GREEN) BLOCK V50 -- S 2 4 /2,4 ROCKWELL AUTOMATION
022.0944 BLOCK V50 NO (GREEN) BLOCK V50 -- S 2 4 /2,4 ROCKWELL AUTOMATION
043.0142 PRESSURE SWITCH BLADE PRESSURE -- S 2 5 /2,7 HERBIRGER
022.0506 HEAD DOWN LIMIT SWITCH LIMIT SWITCH -- S 2 8 /2,2 HONEYWELL
022,0023 POLE CHANGE SWITCH SWITCH -- S 5 0 /1.5 ROCKWELL AUTOMATION
022.0436 TRANSFORMER 0-- 208-- 575 TRANSFORMER -- T 1 /1,7 E.R.C.
022.0862 SINGLE LED BOARD LED -- V 1 /2,6 METALAM
CODE DESCRIPTION TYPE CATALOG NUMBER ID. REF. MANUFACTURER
022.0377 SINGLE GROUND TERMINAL USLKG 5 04 41 50 4 -- X /1.1 PHOENIX
022.0377 SINGLE GROUND TERMINAL USLKG 5 04 41 50 4 -- X /1.1 PHOENIX
022.2247 QUADRUPLE GROUND TERMINAL UKK 5-- PE 27 74 21 1 -- X 1 /1.2 PHOENIX
022.2245 QUADRUPLE TERMINAL ZFDK 2,5 30 01 89 9 -- X 2 /1.9 PHOENIX
022.2283 QUADRUPLE TERMINAL PLATE D--ZFD 2,5 30 02 81 4 -- X 2 /1.9 PHOENIX
022.2244 TRIPLE TERMINAL ZFK 2,5 -- TWIN 30 01 81 5 -- X 3 /2.8 PHOENIX
022.2243 SINGLE TERMINAL ZFK 2,5 30 03 21 1 -- X 4 /2:7 PHOENIX
022.2243 SINGLE TERMINAL ZFK 2,5 30 03 21 1 -- X 5 /1.3 PHOENIX
022.2243 SINGLE TERMINAL ZFK 2,5 30 03 21 1 -- X 6 /1.3 PHOENIX
Page 80
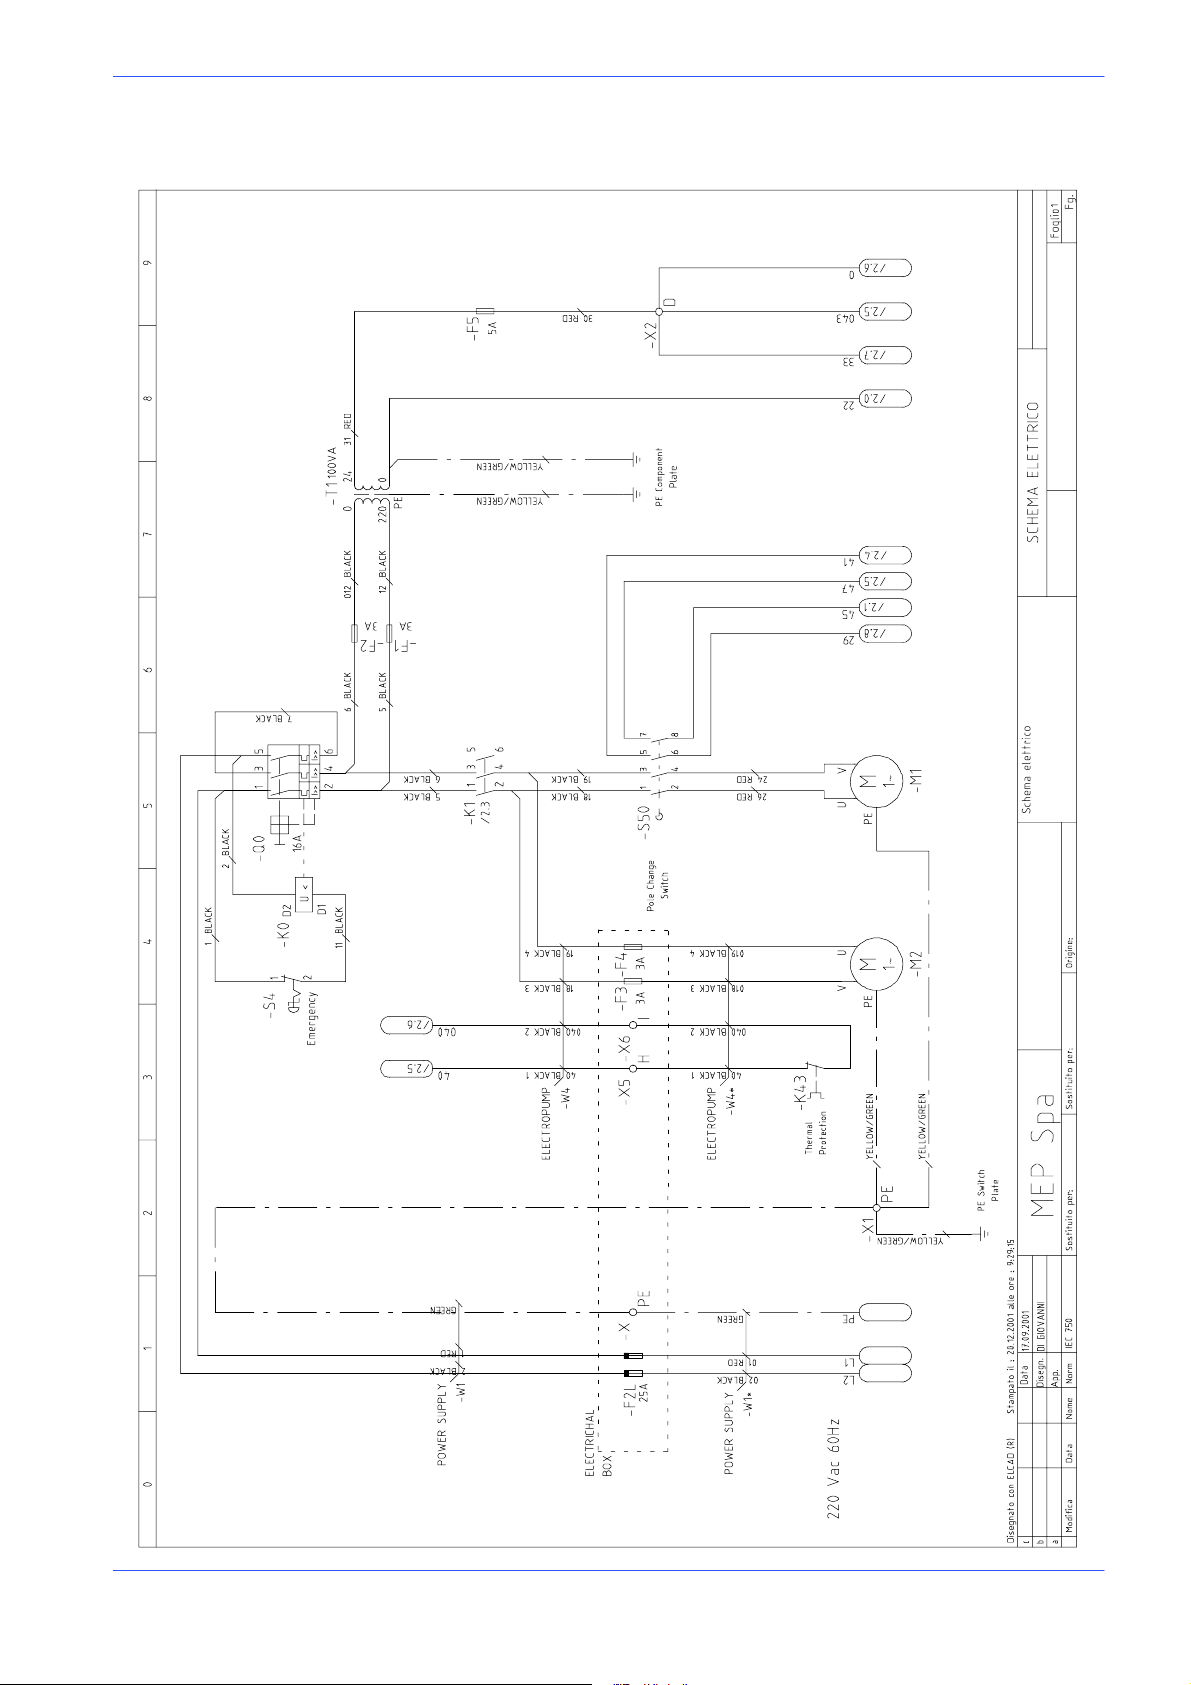
Version 24DM
Standard version electrical diag ram 220V Single-- Phase (CSA stan d ard)
DM 8 G -- 220 Vac
Diagrams, exploded views and replacement parts 6--31
Page 81
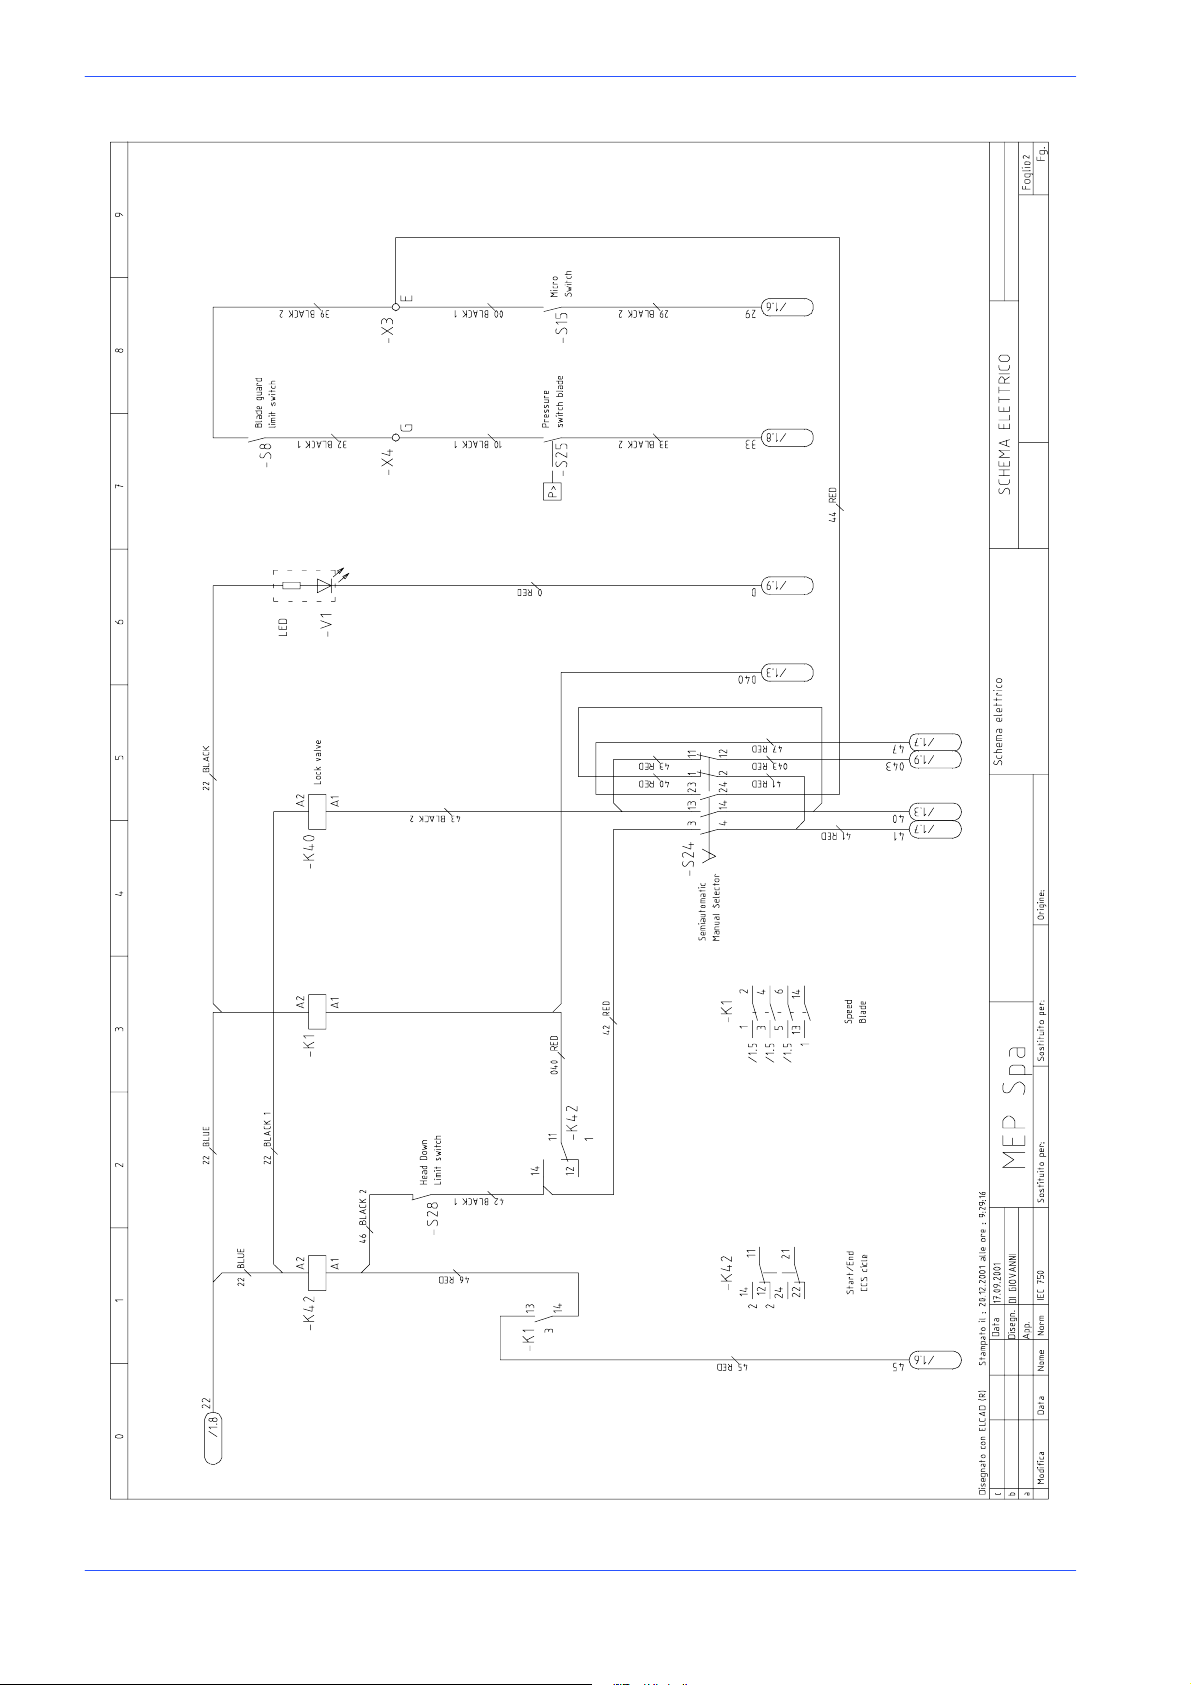
MEP S.p.A.
DM 8 G -- 220 Vac
6--32 Use and maintenance manual DM 8
Page 82
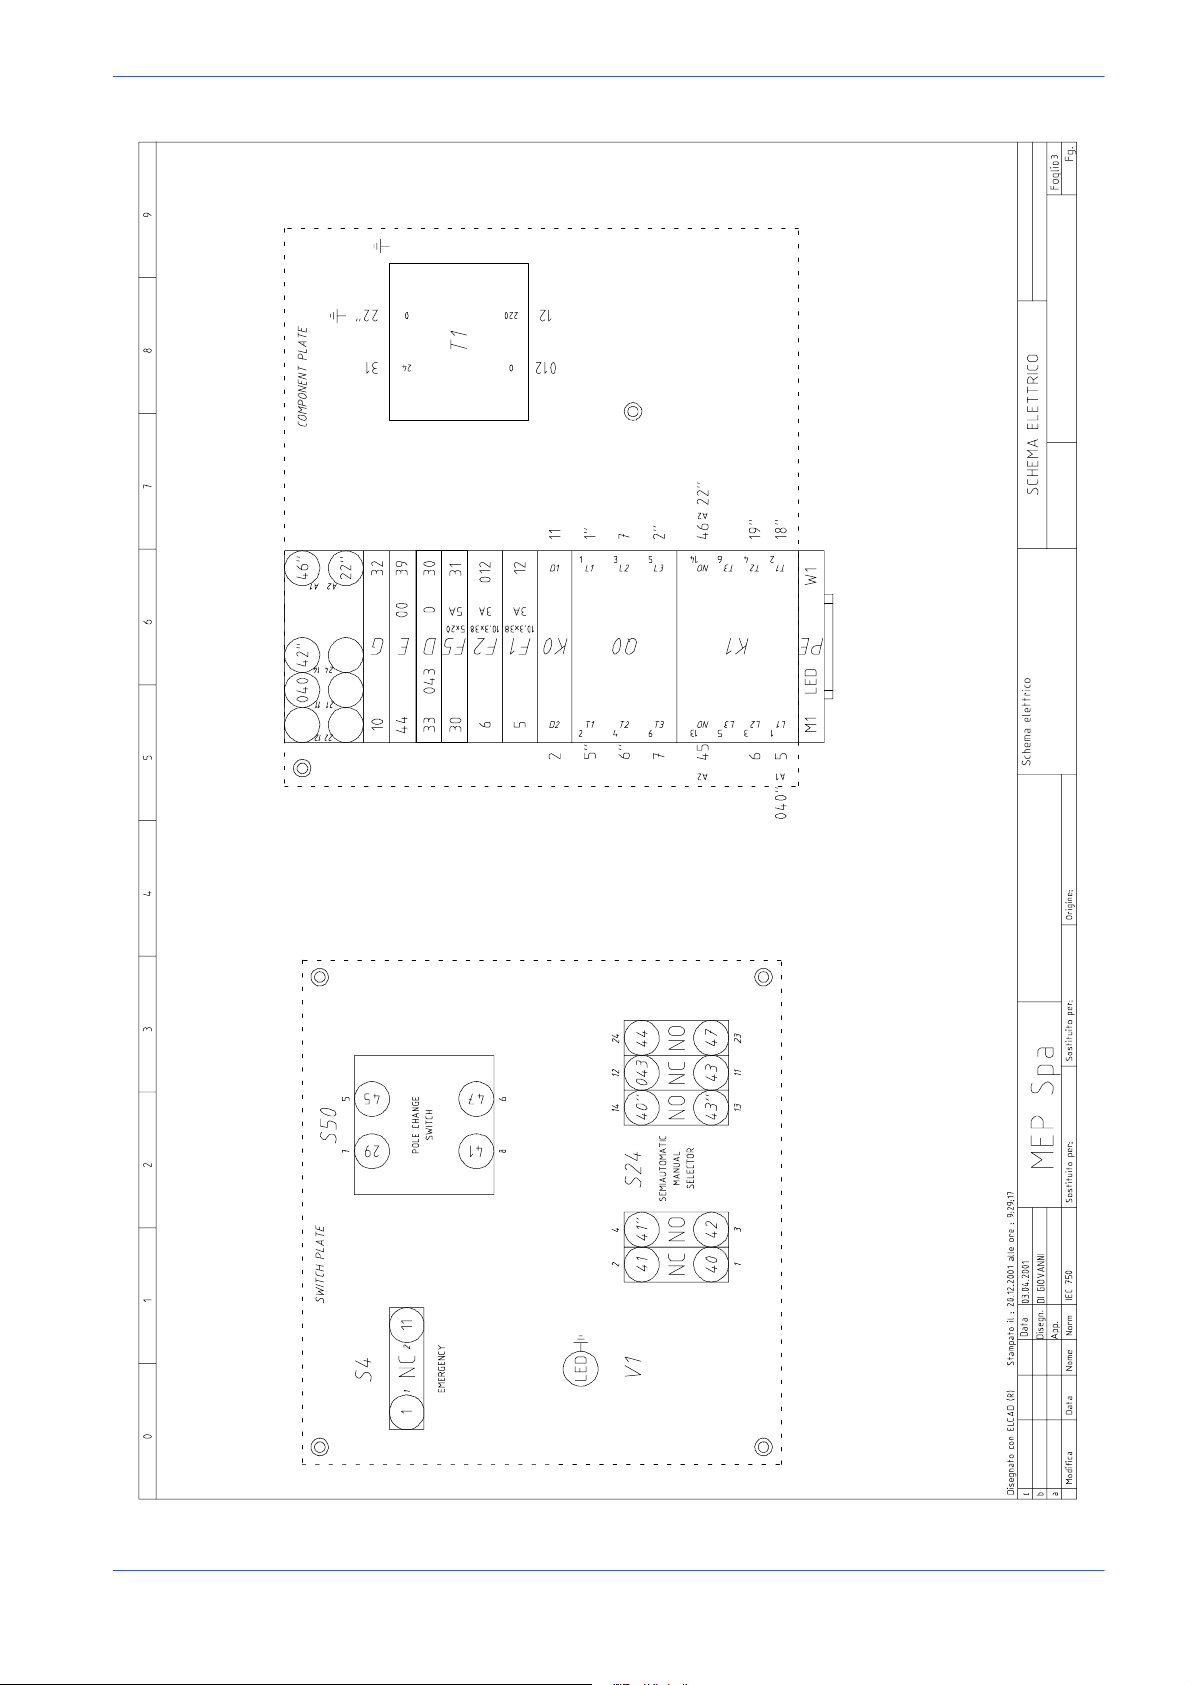
Version 24DM
K42
DM 8 G -- 220 Vac
Diagrams, exploded views and replacement parts 6--33
Page 83
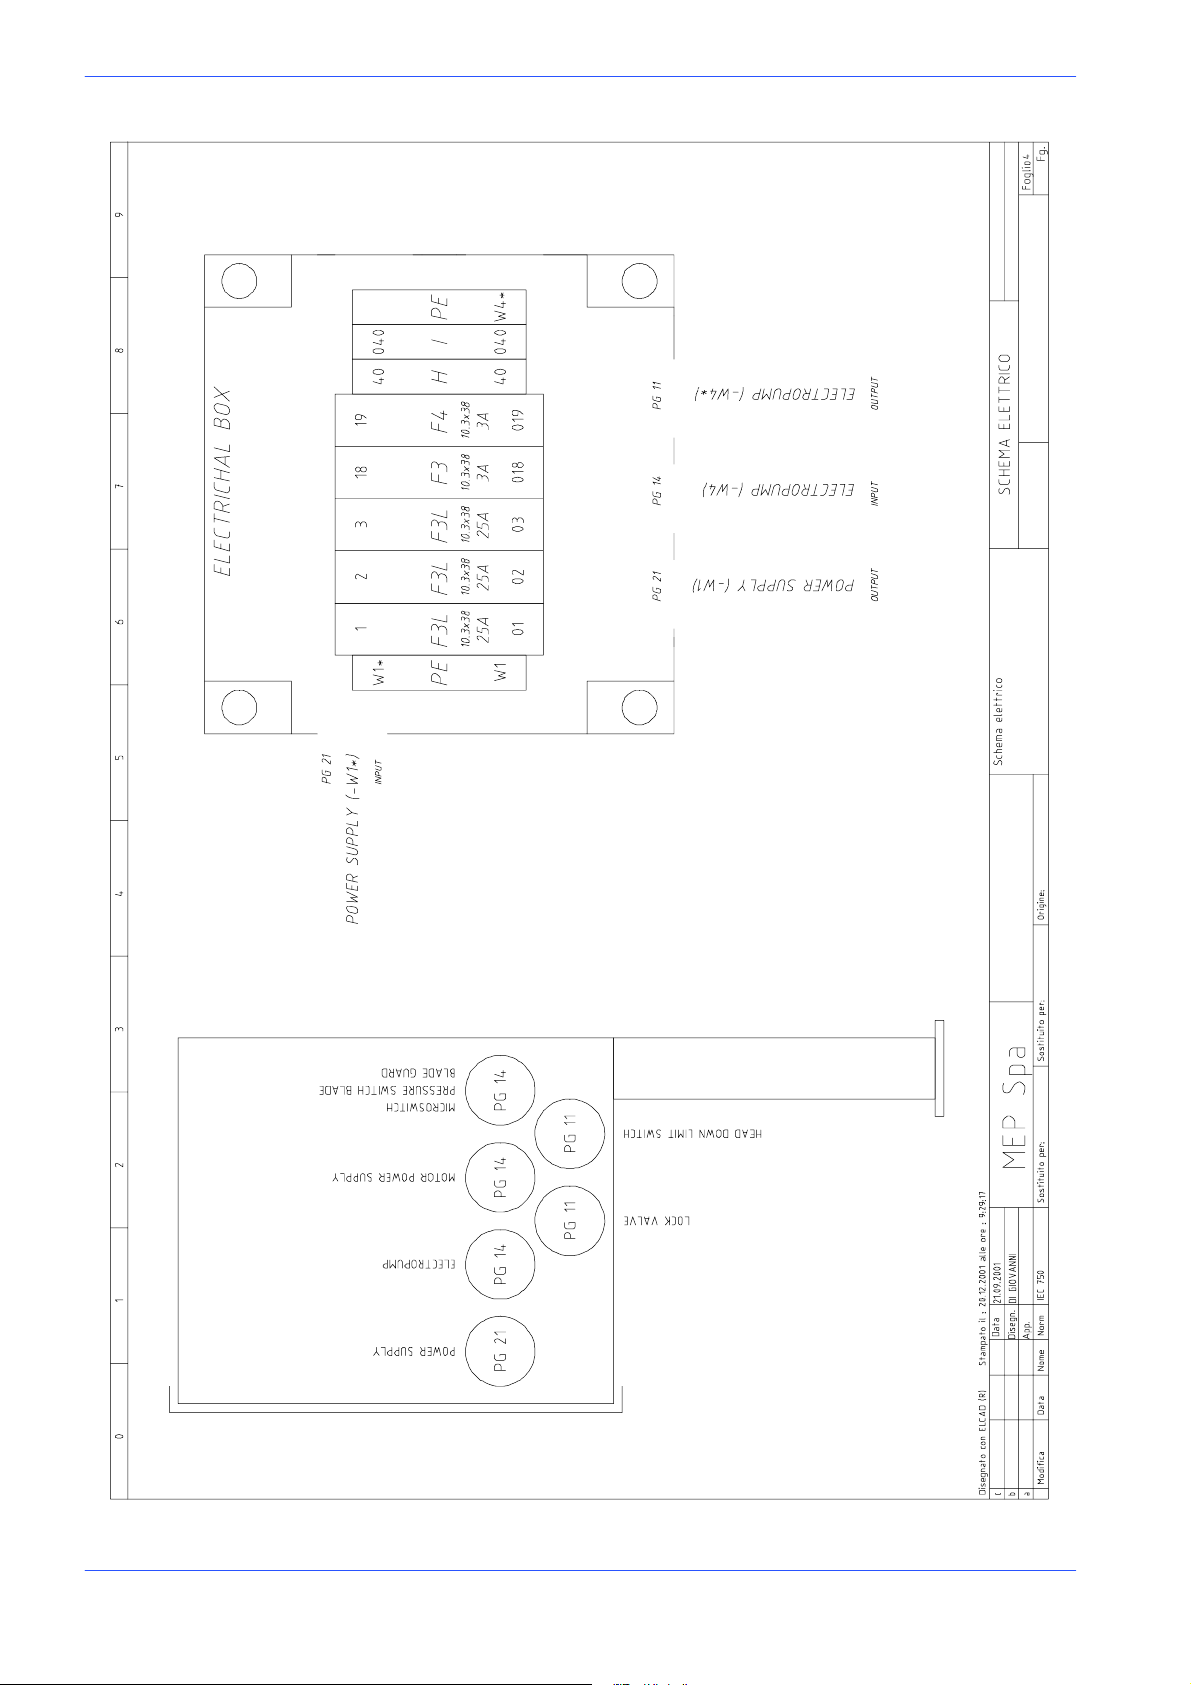
MEP S.p.A.
DM 8 G -- 220 Vac
6--34 Use and maintenance manual DM 8
Page 84
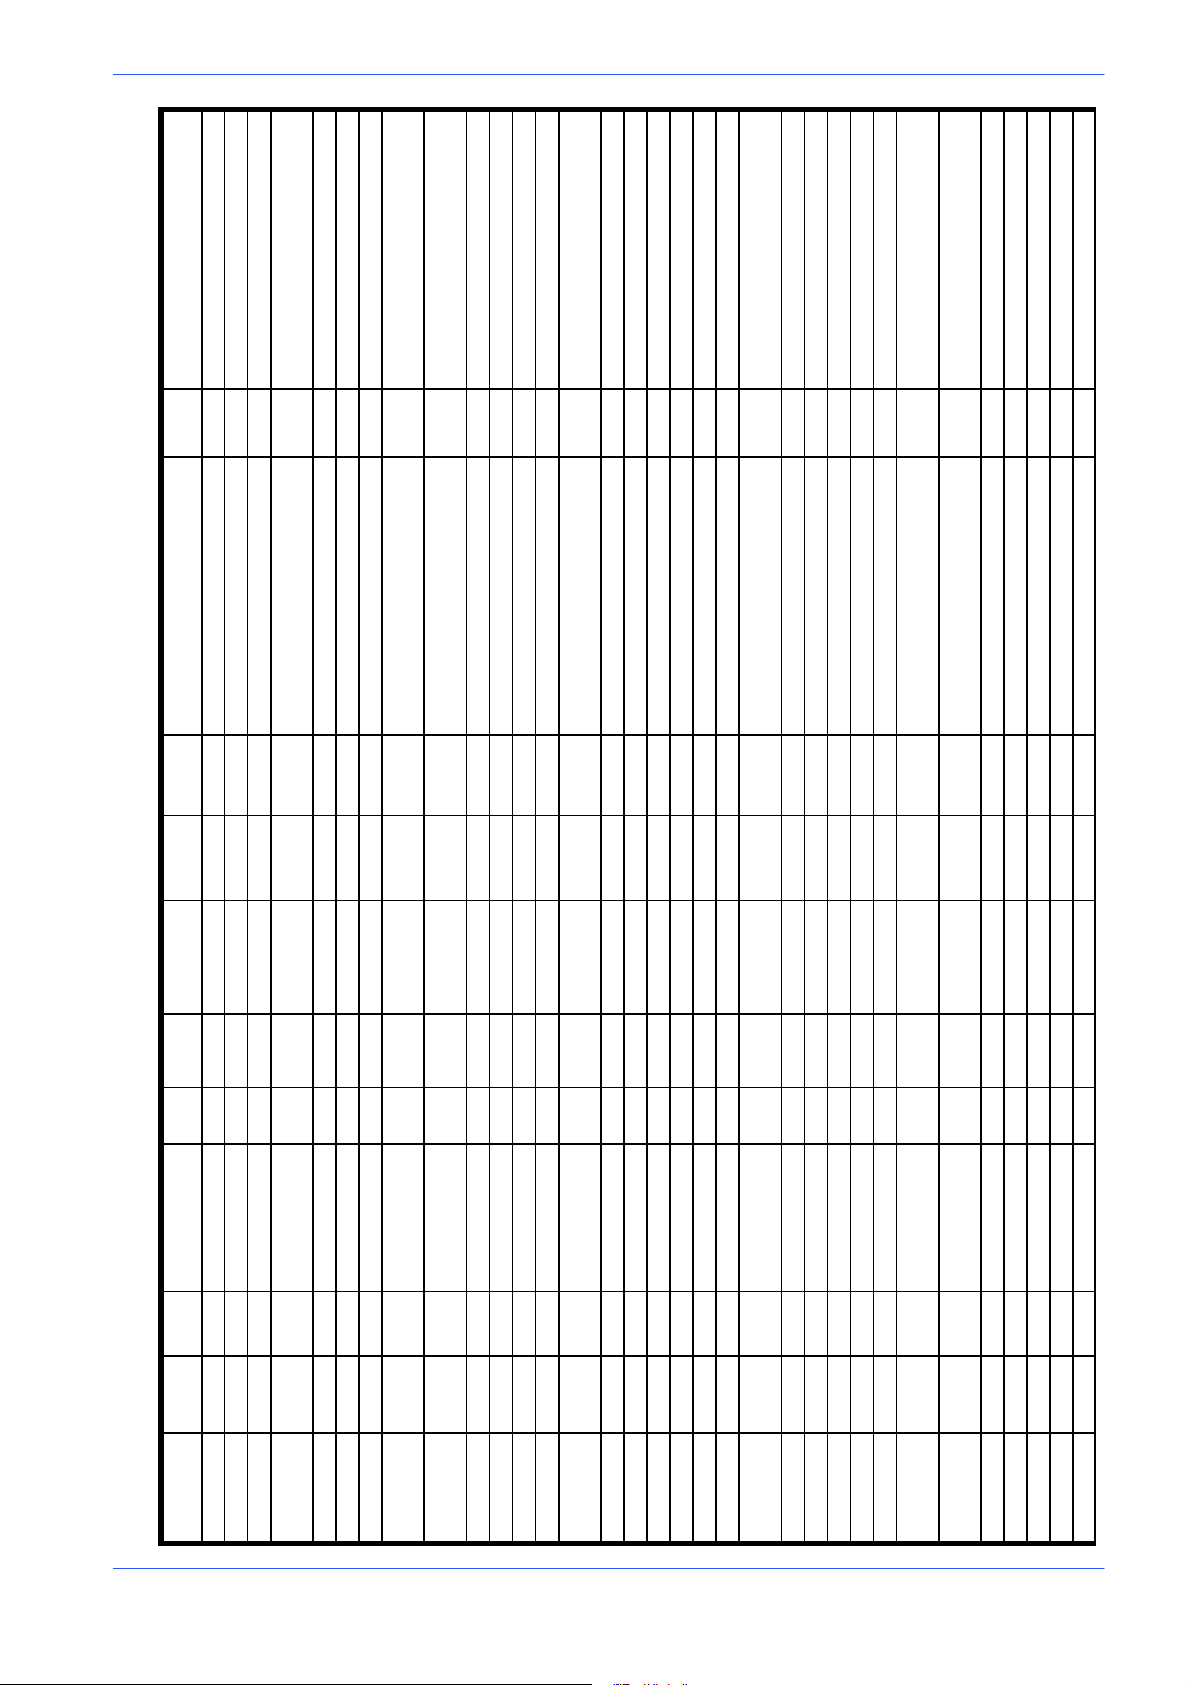
022.0311 Tube terminal wire 0,50mm
022.0300 Red Faston 1,5mm
022.0311 Tube terminal wire 0,50mm
022.0311 Tube terminal wire 0,50mm
Version 24DM
2500mm -- X 1 : P E 022.0312* Tube terminal wire 2,5mm --X:PE 022.0312* Tube terminal wire 2,5mm
GREEN
2500mm -- X 1 : P E 022.0312* Tube terminal wire 2,5mm
GREEN
4
2500mm
GREEN
E
3000mm -- X 1 : P E 022.031 1 Tube terminal wire 0,50mm -- M 2 : P
GREEN
3
2
List of cables
SEC. COLOR LENGTH START CABLE TERMINAL START END CABLE TERMINAL END
RE
WI-
CODE CABLE TYPE DESCRIPTION
022.1901 -- W 1 S00W POWER SUPPLY AWG14 RED 2500mm -- F 3 L 022.0312* Tube terminal wire 2,5mm -- Q 0 : 1 022.0312* Tube terminal wire 2,5mm
022.1901 -- W 1 S00W POWER SUPPLY AWG14 BLACK 2500mm -- F 3 L 022.0312* Tube terminal wire 2,5mm -- Q 0 : 3 022.0312* Tube terminal wire 2,5mm
022.1901 -- W 1 S00W POWER SUPPLY AWG14 WHITE 2500mm -- F 3 L 022.0312* Tube terminal wire 2,5mm -- Q 0 : 5 022.0312* Tube terminal wire 2,5mm
022.1901 -- W 1 S00W POWER SUPPLY AWG14 YELLOW/
022.1901 -- W 1 * S00W POWER SUPPLY 01 AWG14 RED 2500mm -- F 3 L 022.0312* Tube terminal wire 2,5mm
022.1901 -- W 1 * S00W POWER SUPPLY 02 AWG14 BLACK 2500mm -- F 3 L 022.0312* Tube terminal wire 2,5mm
022.1901 -- W 1 * S00W POWER SUPPLY 03 AWG14 WHITE 2500mm -- F 3 L 022.0312* Tube terminal wire 2,5mm
022.1901 -- W 1 * S00W POWER SUPPLY AWG14 YELLOW/
022.0168 -- W 4 AWM ELECTROPUMP 40 AWG20 BLACK 1 2500mm -- X 5 : H -- S24:1
022.0168 -- W 4 AWM ELECTROPUMP 040 AWG20 BLACK 2 2500mm -- X 6 : I -- K 1 : A 1 022.0311 Tube terminal wire 0,50mm
022.0168 -- W 4 AWM ELECTROPUMP 19 AWG20 BLACK 3 2500mm -- F 3 022.0311 Tube terminal wire 0,50mm -- K 1 : 4 022.0311 Tube terminal wire 0,50mm
022.0168 -- W 4 AWM ELECTROPUMP 20 AWG20 BLACK 4 2500mm -- F 4 022.0311 Tube terminal wire 0,50mm -- K 1 : 6 022.0311 Tube terminal wire 0,50mm
022.0168 -- W 4 AWM ELECTROPUMP AWG20 BLACK 5 2500mm
022.0168 -- W 4 AWM ELECTROPUMP AWG20 YELLOW/
022.0168 -- W 4 AWM ELECTROPUMP AWG20 SCREENING 2500mm
022.0168 -- W 4 * AWM ELECTROPUMP 40 AWG20 BLACK 1 3000mm -- X 5 : H -- K 4 3 022.0311 Tube terminal wire 0,50mm
022.0168 -- W 4 * AWM ELECTROPUMP 040 AWG20 BLACK 2 3000mm -- X 6 : I -- K 4 3 022.0311 Tube terminal wire 0,50mm
022.0168 -- W 4 * AWM ELECTROPUMP 019 AWG20 BLACK 3 3000mm -- F 3 022.0311 Tube terminal wire 0,50mm -- M 2 : V 022.0300 Red Faston 1,5mm
022.0168 -- W 4 * AWM ELECTROPUMP 020 AWG20 BLACK 4 3000mm -- F 4 022.0311 Tube terminal wire 0,50mm -- M 2 : U 022.0300 Red Faston 1,5mm
022.0168 -- W 4 * AWM ELECTROPUMP AWG20 BLACK 5 3000mm
022.0168 -- W 4 * AWM ELECTROPUMP AWG20 YELLOW/
022.0168 -- W 4 * AWM ELECTROPUMP AWG20 SCREENING 3000mm
022.0139 -- W 5 2 AWM MICROSWITCH 00 AWG20 BLACK 1 3000mm -- X 3 : E -- S 1 5 022.0300 Red Faston 1,5mm
022.0139 -- W 5 2 AWM MICROSWITCH AWG20 BLACK 2 3000mm -- S50:A 022.0301 Tube terminal wire 0,50mm -- S 1 5 022.0300 Red Faston 1,5mm
022.0139 -- W 5 5 AWM Blade Guard L/S AWG20 BLACK 1 2000mm -- S 8 022.0311 Tube terminal wire 0,50mm -- X 4 : G
022.0139 -- W 5 5 AWM Blade Guard L/S AWG20 BLACK 2 2000mm -- X 3 : E -- S 8 022.0311 Tube terminal wire 0,50mm
022.0139 -- W 6 5 AWM LOCK VALVE AWG20 BLACK 1 1200mm --K40:A2 022.0311 Tube terminal wire 0,50mm --K42:A
022.0139 -- W 6 5 AWM LOCK VALVE AWG20 BLACK 2 1200mm --K40:A1 022.0311 Tube terminal wire 0,50mm --S24:1
022.0139 -- W 6 7 AWM Press. Sw. Blade AWG20 BLACK 1 2800mm -- X 4 : G -- S 2 5 022.0300 Red Faston 1,5mm
022.0139 -- W 6 7 AWM Press. Sw. Blade AWG20 BLACK 2 2800mm -- X 2 : D -- S 2 5 022.0300 Red Faston 1,5mm
022.0862 -- W 7 4 AWM LED 0 AWG20 RED 750mm -- X 2 : D -- V 1
022.0862 -- W 7 4 AWM LED AWG20 BLACK 750mm -- K 1 : A 2 022.0311 Tube terminal wire 0,50mm -- V 1
022.0506 -- W 7 5 AWM Head Down L/S 42 AWG20 BLACK 1 1400mm -- K42:14 022.0311 Tube terminal wire 0,50mm -- S 2 8
Diagrams, exploded views and replacement parts 6--35
Page 85

MEP S.p.A.
2,50mm
2,50mm
2,50mm
2,50mm
2,50mm
2,50mm
022.0311 Tube terminal wire 0,50mm
1
80mm -- T 1 : P E 022.0304 Red Eyelet 5mm PE 022.0304 Red Eyelet 5mm
1400mm
150mm PE 022.0304 Red Eyelet 5mm -- T 1 : 0 022.0312 Tube terminal wire 1,50mm
022.0304 Red Eyelet 5mm
-- M 1 : P
1500mm -- X 1 : P E 022.0312* Tube terminal wire
E
2,50mm
470mm -- X 1 : P E 022.0312 Tube terminal wire 1,50mm PE 022.0303 Blue Eyelet 8mm
022.0312 Tube terminal wire 1,50mm
1
-- Q 0 : 2 022.0312* Tube terminal wire
-- Q 0 : 4 022.0312* Tube terminal wire
2,50mm
2,50mm
-- Q 0 : 6 022.0312* Tube terminal wire
2,50mm
-- K 1 : 2 022.0312* Tube terminal wire
-- K 1 : 4 022.0312* Tube terminal wire
2,50mm
-- K 1 : 6 022.0312* Tube terminal wire
2,50mm
022.0304 Red Eyeled 5mm
-- M 1 : W
2,50mm
1
M1:V1 022.0304 Red Eyeled 5mm
2,50mm
022.0304 Red Eyeled 5mm
-- M 1 : U
2,50mm
1
M1:W2 022.0304 Red Eyeled 5mm
2,50mm
2,50mm
GREEN
GREEN
GREEN
GREEN
GREEN
AWG16 YELLOW/
RE
WI-
DESCRIPTIONTYPECABLE
CODE CABLE TERMINAL ENDENDCABLE TERMINAL STARTSTARTLENGTHCOLORSEC.
022.0506 -- W 7 5 AWM Head Down L/S 46 AWG20 BLACK 2 1400mm -- S 2 8 --K42:A
022.0506 -- W 7 5 AWM Head Down L/S AWG20 BLEU 1400mm
022.0506 -- W 7 5 AWM Head Down L/S AWG20 BROWN 1400mm
022.0506 -- W 7 5 AWM Head Down L/S AWG20 YELLOW/
022.0134Y/G -- W100 AWM PE/Screening:T1 AWG16 YELLOW/
022.0134Y/G -- W101 AWM PE/T1:0Vac(0--24) AWG16 YELLOW/
022.0132Y/G -- W102 AWM X1:PE/M1:PE AWG14 YELLOW/
012 AWG16 BLACK 260mm -- T 1 : 0 022.0312 Tube terminal wire 1,50mm -- F 2 022.0312 Tube terminal wire 1,50mm
)
te
022.0134B --W104 AWM F2/T1:0Vac(0--575
022.0134B --W109 AWM Q0:1/S4:1 1 AWG16 BLACK 600mm -- S 4 : 1 022.0312 Tube terminal wire 1,50mm -- Q 0 : 1 022.0312 Tube terminal wire 1,50mm
022.0134B -- W 1 1 0 AWM Q0:3/K0:D2 2 AWG16 BLACK 370mm -- K 0 : D 2 022.0312 Tube terminal wire 1,50mm -- Q 0 : 3 022.0312 Tube terminal wire 1,50mm
022.0134B --W 111 AWM S4:2/K0:D1 AWG16 BLACK 550mm -- S 4 : 2 022.0312 Tube terminal wire 1,50mm -- K 0 : D
022.0134B -- W 1 1 2 AWM Q0:2/F1 AWG16 BLACK 170mm -- F 1 022.0312 Tube terminal wire 1,50mm -- Q 0 : 2 022.0312 Tube terminal wire 1,50mm
022.0132B -- W 1 1 3 AWM Q0:2/K1:1 AWG14 BLACK 200mm -- K 1 : 1 022.0312* Tube terminal wire
022.0132B -- W 1 1 6 AWM Q0:4/K1:3 AWG14 BLACK 180mm -- K 1 : 3 022.0312* Tube terminal wire
022.0134Y/G -- W103 AWM X1:PE/PE Sw.Pla-
022.0134B -- W 1 1 7 AWM Q0:4/F2 AWG16 BLACK 190mm -- F 2 022.0312 Tube terminal wire 1,50mm -- Q 0 : 4 022.0312 Tube terminal wire 1,50mm
AWG16 BLACK 260mm -- T1:575 022.0312 Tube terminal wire 1,50mm -- F 1 022.0312 Tube terminal wire 1,50mm
)
022.0132B -- W 1 1 8 AWM Q0:6/K1:5 AWG14 BLACK 160mm -- K 1 : 5 022.0312* Tube terminal wire
022.0134B -- W 1 1 9 AWM F1/T1:575V(0--575
022.0132B --W120 AWM K1:2/S50:3 AWG14 BLACK 430mm -- S50:3 022.0312* Tube terminal wire
022.0132B --W121 AWM K1:4/S50:14 AWG14 BLACK 520mm --S50:14 022.0312* Tube terminal wire
022.0132B --W122 AWM K1:6/S50:16 AWG14 BLACK 520mm --S50:16 022.0312* Tube terminal wire
022.0132BR --W124 AWM S50:5/M1:W1 AWG14 BROWN 1600mm --S50:5 022.0312* Tube terminal wire
022.0132BR --W125 AWM S50:7/M1:V1 AWG14 BROWN 1600mm --S50:7 022.0312* Tube terminal wire
022.0132R --W127 AWM S50:4/M1:W2 AWG14 RED 1600mm --S50:4 022.0312* Tube terminal wire
022.0132BR --W126 AWM S50:8/M1:U AWG14 BROWN 1600mm -- S50:8 022.0312* Tube terminal wire
6--36 Use and maintenance manual DM 8
Page 86
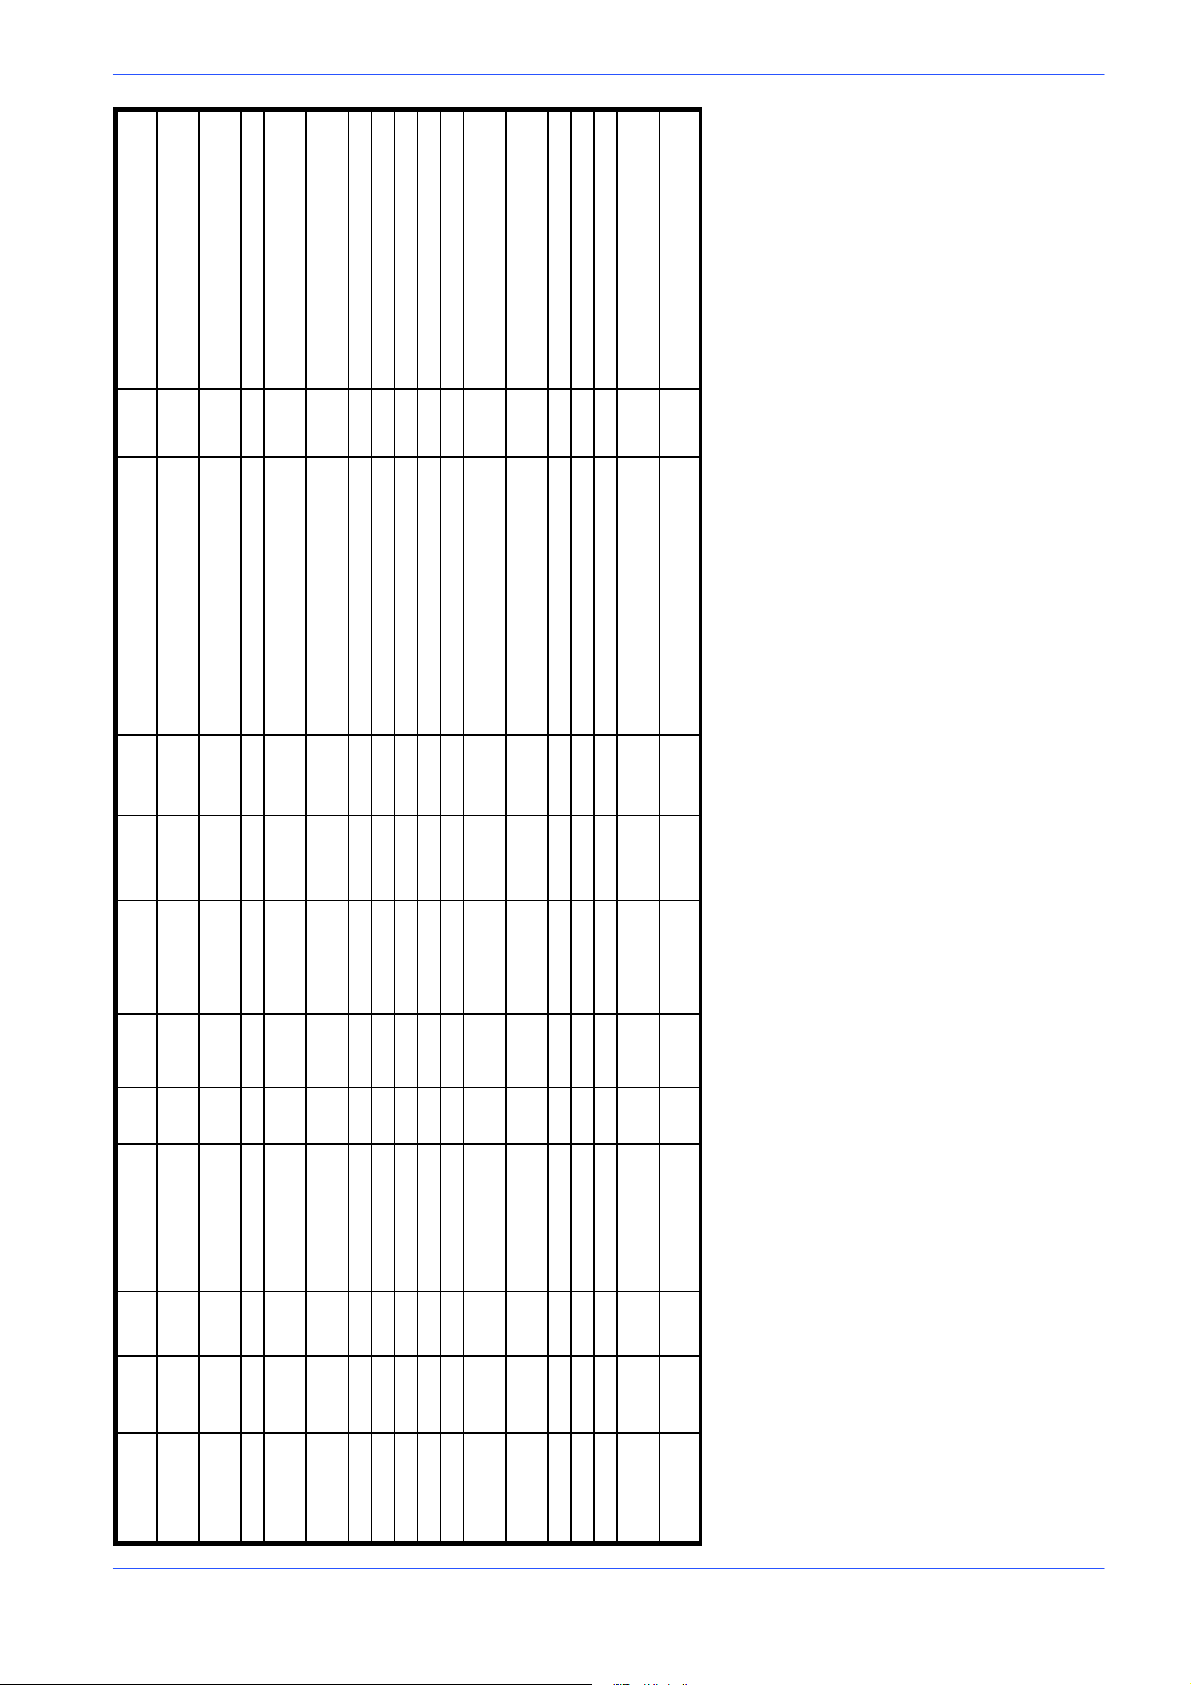
022.0304 Red Eyeled 5mm
-- M 1 : V
022.0304 Red Eyeled 5mm
2
-- M 1 : U
2,50mm
2
2,50mm
022.0311 Tube terminal wire 0,50mm
4
022.0311 Tube terminal wire 0,50mm
1
Version 24DM
022.0311 Tube terminal wire 0,50mm
3
AWG20 RED 280mm -- T 1 : 2 4 022.0311 Tube terminal wire 0,50mm -- F 5
22 AWG20 BLUE 210mm --K42:A2 022.0311 Tube terminal wire 0,50mm -- T 1 : 0 022.0311 Tube terminal wire 0,50mm
022.0133BL -- W149 AWM T1:0V(0-- 24)/K42:
A2
22 AWG20 BLUE 350mm -- K 1 : A 2 022.0311 Tube terminal wire 0,50mm -- T 1 : 0
2
022.0133BL -- W150 AWM T1:0V(0--24)/K1:A
RE
WI-
5
DESCRIPTIONTYPECABLE
CODE CABLE TERMINAL ENDENDCABLE TERMINAL STARTSTARTLENGTHCOLORSEC.
022.0132R --W128 AWM S50:13/M1:V2 AWG14 RED 1600mm -- S 5 O : 1 3 022.0312* Tube terminal wire
022.0132R --W129 AWM S50:15/M1:U2 AWG14 RED 1600mm -- S50:15 022.0312* Tube terminal wire
022.0133R --W130 AWM F5/X2:D AWG20 RED 540mm -- X 2 : D -- F 5
022.0133R --W131 AWM T1:24Vac(0--24)/F
022.0133R --W133 AWM S24:14/S24:1 AWG20 RED 180mm --S24:1 022.0311 Tube terminal wire 0,50mm -- S24:1
022.0133R --W134 AWM S24:12/X2:D 043 AWG20 RED 530mm --S24:12 022.0311 Tube terminal wire 0,50mm -- X 2 : D
022.0133R --W135 AWM S24:24/X3:E AWG20 RED 530mm -- S24:24 022.0311 Tube terminal wire 0,50mm -- X 3 : E
022.0133R --W136 AWM S24:2/S24:4 41 AWG 20 RED 70mm -- S24:4 022.0312 Tube terminal wire 1,50mm --S24:2 022.0311 Tube terminal wire 1,50mm
022.0133R --W137 AWM S24:4/S50:A 41 AWG20 RED 160mm -- S50:A 022.0311 Tube terminal wire 0,50mm -- S24:4
022.0133R --W138 AWM K42:1 1/K1:A1 040 AWG20 RED 260mm --K42:11 022.031 1 Tube terminal wire 0,50mm -- K 1 : A 1 022.0311 Tube terminal wire 0,50mm
022.0133R --W139 AWM K42:A1/K1:14 46 AWG20 RED 270mm -- K 1 : 1 4 022.0311 Tube terminal wire 0,50mm --K42:A
022.0133R --W140 AWM S24:13/S24:11 43 AWG20 RED 70mm -- S24:11 022.0311 Tube terminal wire 0,50mm -- S24:1
022.0133R --W141 AWM S24:3/K42:14 42 AWG20 RED 570mm -- K42:14 022.0311 Tube terminal wire 0,50mm -- S24:3 022.0311 Tube terminal wire 0,50mm
022.0133R --W142 AWM S24:23/S50:B 47 AWG20 RED 200mm --S24:23 022.0311 Tube terminal wire 0,50mm --S50:B 022.0311 Tube terminal wire 0,50mm
022.0133R --W143 AWM K1:13/S50:B 45 AWG20 RED 460mm -- K 1 : 1 3 022.0311 Tube terminal wire 0,50mm -- S50:B 022.0311 Tube terminal wire 0,50mm
Diagrams, exploded views and replacement parts 6--37
Page 87
MEP S.p.A.
List of components
CODE DESCRIPTION TYPE CATALOG NUMBER ID. REF. MANUFACTURER
022.1140 FUSE ATM 3A 10,3X38 FUSE 3A -- F 1 /1,6 ELETTROITALIA
022.1140 FUSE ATM 3A 10,3X38 FUSE 3A -- F 2 /1,6 ELETTROITALIA
022.1140 FUSE ATM 3A 10,3X38 FUSE 3A -- F 3 /1,4 ELETTROITALIA
022.2255 FUSE--HOLDER USM 1 FOR FUSE 10,3X38 FUSE--HOLDER -- F 1 /1,6 ELETTROITALIA
022.2255 FUSE--HOLDER USM 1 FOR FUSE 10,3X38 FUSE--HOLDER -- F 2 /1,6 ELETTROITALIA
022.1138 FUSE ATM 15A 10,3X38 FUSE 15A -- F 3 L /1,1 ELETTROITALIA
022.2255 FUSE--HOLDER USM 1 FOR FUSE 10,3X38 FUSE--HOLDER -- F 3 /1,4 ELETTROITALIA
022.0138 FUSE ATM 15A 10,3X38 FUSE 15A -- F 3 L /1,1 ELETTROITALIA
022.0138 FUSE ATM 15A 10,3X38 FUSE 15A -- F 3 L /1,1 ELETTROITALIA
6--38 Use and maintenance manual DM 8
022.1140 FUSE ATM 3A 10,3X38 FUSE 3A -- F 4 /1,4 ELETTROITALIA
022.2254 FUSE--HOLDER USM 3 FOR FUSE 10,3X38 FUSE--HOLDER -- F 3 L /1,1 ELETTROITALIA
034.0723 ELECTRICHAL BOX BOX 34250 -- F 3 L /1,1 WEIDMULLER
022.2255 FUSE--HOLDER USM 1 FOR FUSE 10,3X38 FUSE--HOLDER -- F 4 /1,4 ELETTROITALIA
022.2246 FUSE--HOLDER ZFK ZFK 4--HESI 30 25 45 1 -- F 5 /1,9 PHOENIX
022.1128 FUSE 5X20 5A FUSE 5A -- F 5 /1,9 COMAPEL
022.0558 LOW TENSION RELAY 575 Vac U--PKZO -- K 0 /1,4 KLOCKNER MOELLER
022.0087 CONTACTOR DILOOM --10 (01) 24Vac -- K 1 /2,3 KLOCKNER MOELLER
022.0592 LOC K VALVE R ELAY RELAY -- K 4 0 /2,5 TECNAIR
022.0412 CONNECTOR LOCK VALVE CONNECTOR -- K 4 0 /2,5 TECNAIR
019.1711 BLADE MOTOR HP 2/2,5 2/4P 575 Vac -- M 1 /1,5 CARPANELLI MOTORI
044.1258 LOCK VALVE VALVE -- K 4 0 /2,5 TECNAIR
022.0992 RELAY 24 Vac RELAIS 171 G2 -- K 4 2 /2,1 SIEI PETERLONGO
028.0281 ELCTROPUMP 575 Vac ELECTROPUMP EZC -- M 2 /1,4 SAP
022.1287 MAIN-- SWITCH OVER LOAD THERMAL PROTECTION PKZM0 -- 10A -- Q 0 /1,5 KLOCKNER MOELLER
022.0043 ROTATING KNOB RH -- PKZO -- MCC -- Q 0 /1,5 KLOCKNER MOELLER
022.1242 EMERGENCY PUSH BUTTON EMERGENCY -- S 4 /1,4 ROCKWELL AUTOMATION
022.0037 LIMIT -- SWITCH ATO--11--1--ZB B275 -- S 8 /2,7 KLOCKNER MOELLER
022.0515 MICRO -- SWITCH MICRO -- SWITCH -- S 1 5 /2,8 HONEYWELL
034.1221 KNOB KNOB -- S 1 5 /2,8 BARDEGGIA
010.0928 SPRING SPRING -- S 1 5 /2,8 ADRIATICA MOLLE
025.0691 KNOB SEAL KNOB SEAL -- S 1 5 /2,8 BARDEGGIA
022.0962 SELECTOR 2P QM 304 -- N -- S 2 4 /2,4 ROCKWELL AUTOMATION
022.0943 BLOCK V40 NC (RED) BLOCK V40 -- S 2 4 /2,4 ROCKWELL AUTOMATION
022.0943 BLOCK V40 NC (RED) BLOCK V40 -- S 2 4 /2,4 ROCKWELL AUTOMATION
022.0944 BLOCK V50 NO (GREEN) BLOCK V50 -- S 2 4 /2,4 ROCKWELL AUTOMATION
022.0944 BLOCK V50 NO (GREEN) BLOCK V50 -- S 2 4 /2,4 ROCKWELL AUTOMATION
022.0944 BLOCK V50 NO (GREEN) BLOCK V50 -- S 2 4 /2,4 ROCKWELL AUTOMATION
043.0142 PRESSURE SWITCH BLADE PRESSURE -- S 2 5 /2,7 HERBIRGER
022.0506 HEAD DOWN LIMIT SWITCH LIMIT SWITCH -- S 2 8 /2,2 HONEYWELL
Page 88
Version 24DM
List of terminals
CODE MANUFACTURERREF.ID.CATALOG NUMBERTYPEDESCRIPTION
022,0023 POLE CHANGE SWITCH SWITCH -- S 5 0 /1.5 ROCKWELL AUTOMATION
022.0436 TRANSFORMER 0-- 208-- 575 TRANSFORMER -- T 1 /1,7 E.R.C.
022.0862 SINGLE LED BOARD LED -- V 1 /2,6 METALAM
CODE DESCRIPTION TYPE CATALOG NUMBER ID. REF. MANUFACTURER
022.0377 SINGLE GROUND TERMINAL USLKG 5 04 41 50 4 -- X /1.1 PHOENIX
022.0377 SINGLE GROUND TERMINAL USLKG 5 04 41 50 4 -- X /1.1 PHOENIX
022.2247 QUADRUPLE GROUND TERMINAL UKK 5-- PE 27 74 21 1 -- X 1 /1.2 PHOENIX
022.2245 QUADRUPLE TERMINAL ZFDK 2,5 30 01 89 9 -- X 2 /1.9 PHOENIX
022.2283 QUADRUPLE TERMINAL PLATE D--ZFD 2,5 30 02 81 4 -- X 2 /1.9 PHOENIX
022.2244 TRIPLE TERMINAL ZFK 2,5 -- TWIN 30 01 81 5 -- X 3 /2.8 PHOENIX
022.2243 SINGLE TERMINAL ZFK 2,5 30 03 21 1 -- X 4 /2:7 PHOENIX
022.2243 SINGLE TERMINAL ZFK 2,5 30 03 21 1 -- X 5 /1.3 PHOENIX
022.2243 SINGLE TERMINAL ZFK 2,5 30 03 21 1 -- X 6 /1.3 PHOENIX
Diagrams, exploded views and replacement parts 6--39
Page 89
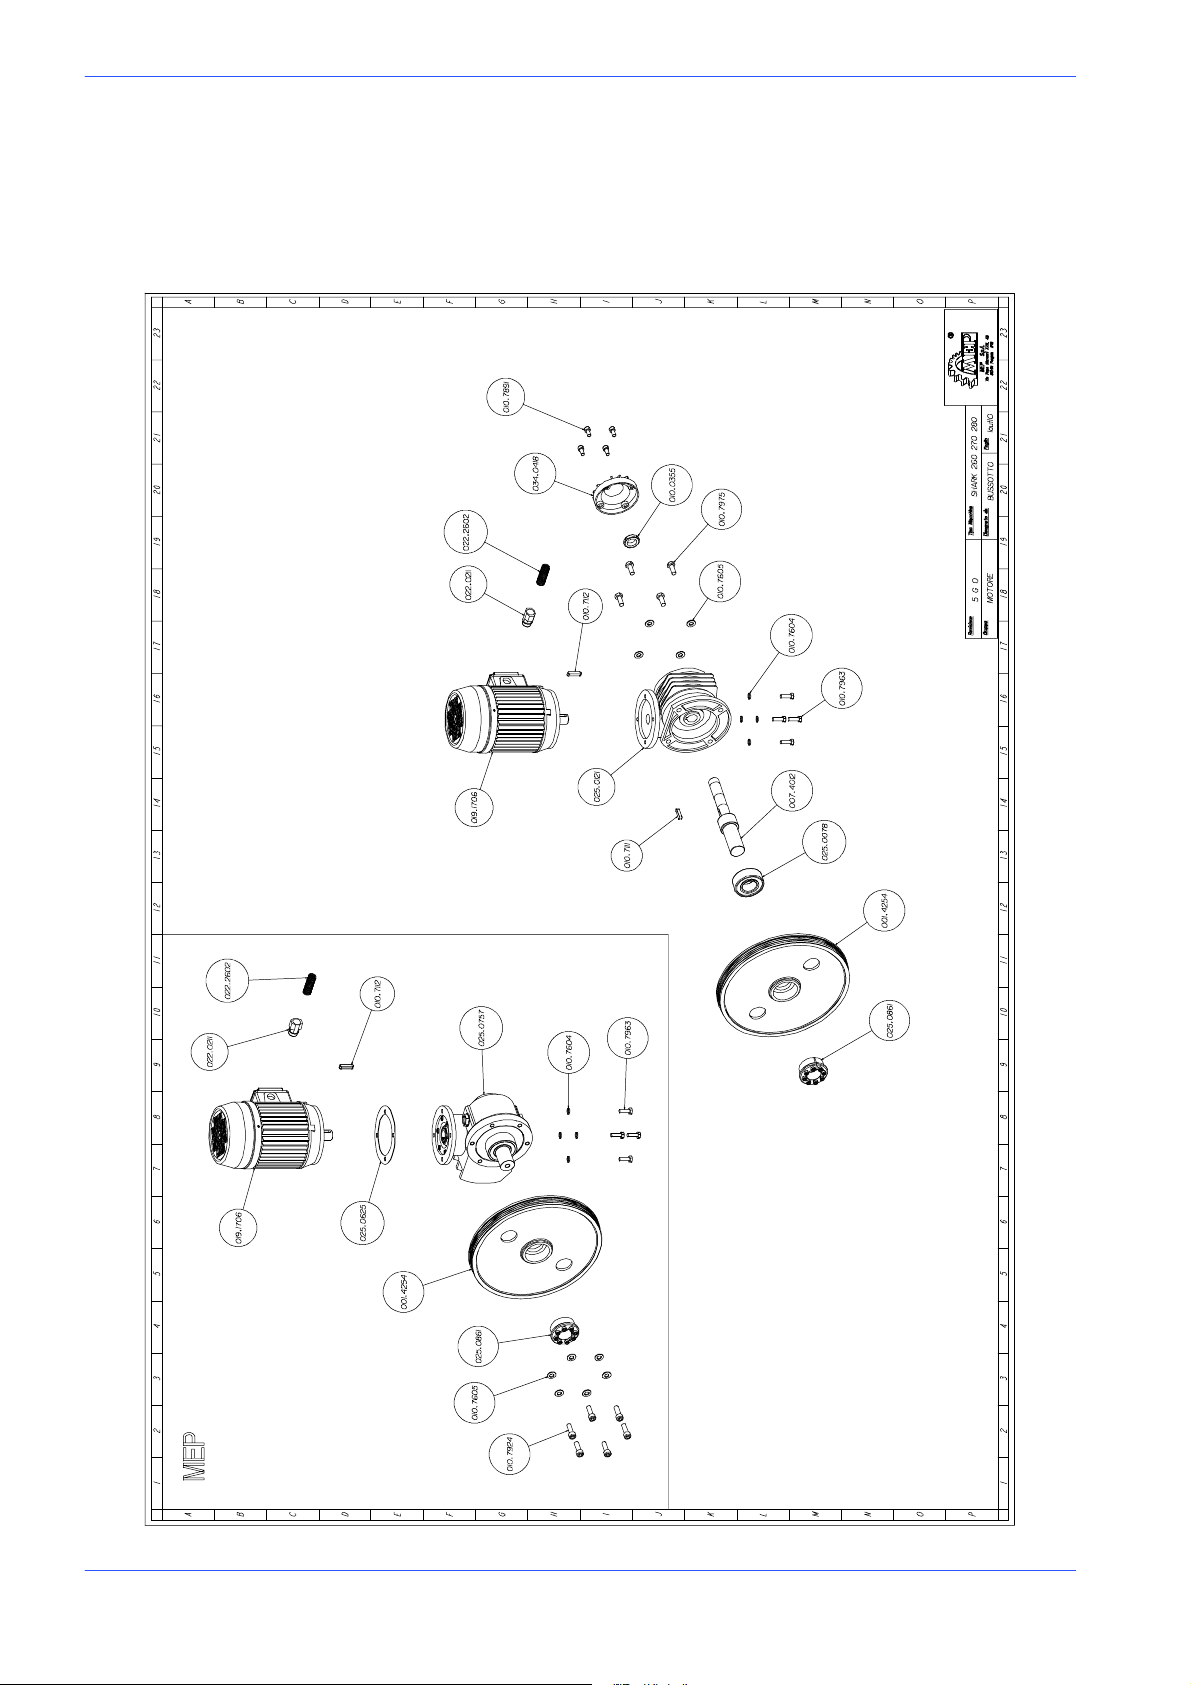
MEP S.p.A.
Exploded views
This part of the manual contains detailed exploded views of the machine which
can help to gain a deeper knowledge of how it is made.
Motor assembly
6--40 Use and maintenance manual DM 8
Page 90
SPARE PARTS
Code Description U.of M. Quantity
001.4254 DRIVING PULLEY NR 1,000
007.4012 REDUCTOR SHAFT NR 1,000
010.0355 SELF-- LOCKING RING NUT 25X1,5 NR 1,000
010.7111 8X7X32KEY NR 1,000
010.7112 8X7X35KEY NR 1,000
010.7604 0 8 WASHER NR 4,000
010.7605 0 10 WASHER NR 4,000
010.7891 TCEI 8 X 16 SCREW NR 4,000
010.7963 TE 8 X 25 SCREW NR 4,000
010.7975 TE 10 X 25 SCREW NR 4,000
019.1706 HP 2/2,5 2/4P V.380 B14 FC90L NR 1,000
022.0211 QUICK FITTING SEM PG 13,5 NR 1,000
022.2602 POLIFLEX SHEATH NW 14--1200143 MT 1,000
025.0078 BEARING 3207A--2RS1TN9 NR 1,000
025.0121 REDUCER MVF 63 FCO 1A38 90 B14 NR 1,000
025.0757 ”REDUCER MVF 62 ””IR””” NR 1,000
025.0861 KEYER 0 35X60 NR 1,000
034.0418 REDUCER COVER NR 1,000
Version 24DM
Code Description U.of M. Quantity
001.4254 DRIVING PULLEY NR 1,000
010.7112 8X7X35KEY NR 1,000
010.7604 0 8 WASHER NR 4,000
010.7605 0 10 WASHER NR 6,000
010.7924 TCEI 10 X 30 SCREW NR 6,000
010.7963 TE 8 X 25 SCREW NR 4,000
019.1706 HP 2/2,5 2/4P V.380 B14 FC90L NR 1,000
022.0211 QUICK FITTING SEM PG 13,5 NR 1,000
022.2602 POLIFLEX SHEATH NW 14--1200143 MT 1,000
025.0625 MOTOR GASKET NR 1,000
025.0757 ”REDUCER MVF 62 ””IR””” NR 1,000
025.0861 KEYER 0 35X60 NR 1,000
Diagrams, exploded views and replacement parts 6--41
Page 91
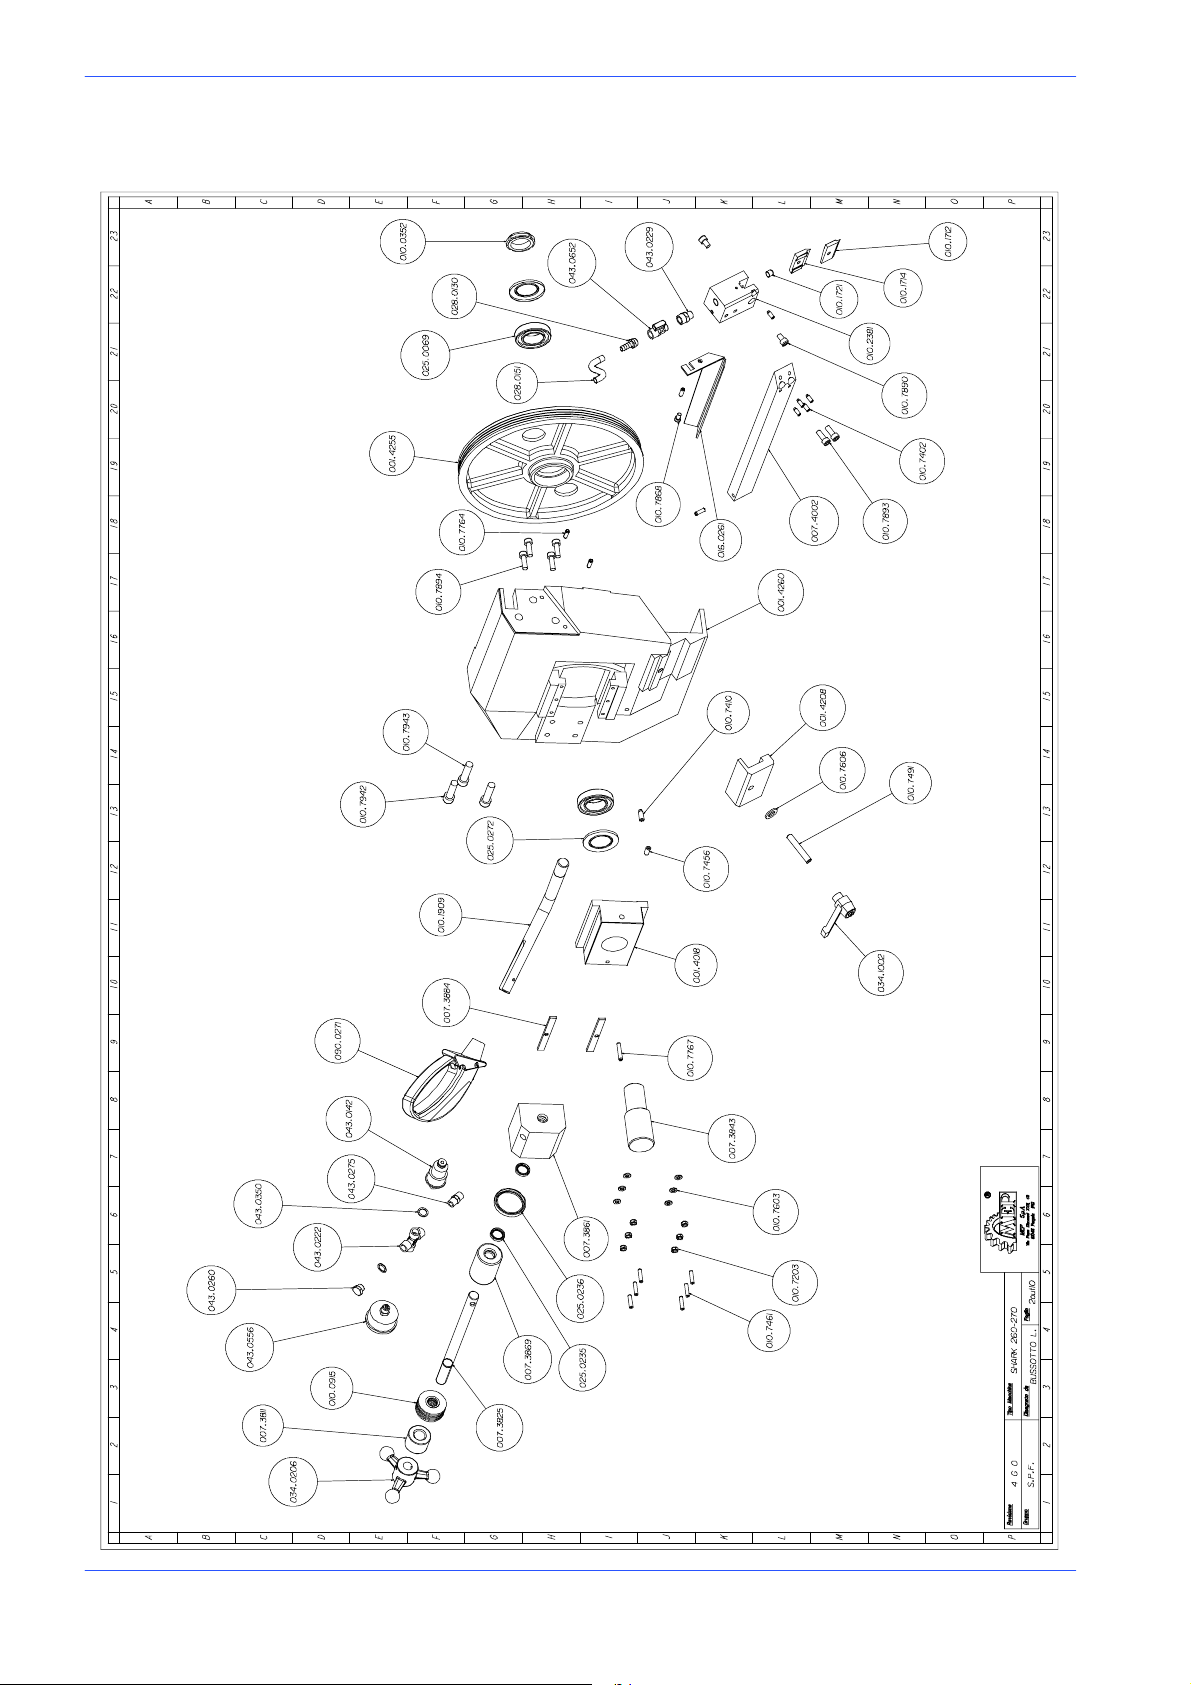
MEP S.p.A.
090.1299
Front flywh eel assembly
6--42 Use and maintenance manual DM 8
Page 92
SPARE PARTS
Code Description U.of M. Quantity
001.4018 BLADE TENSIONER SLIDE NR 1,000
001.4208 HEAD GUIDE LOCKING BRACKET NR 1,000
001.4255 IDLER PULLEY NR 1,000
001.4260 IDLER PULLEY SECTION BOW NR 1,000
007.3811 HANDWHEEL SPACER NR 1,000
007.3825 BLADE TENSIONING REGULATING PIN NR 1,000
007.3843 FREE FLYWHEEL SHAFT NR 1,000
007.3861 TENSIONING CYCLINDER NR 1,000
007.3869 BLADE TENSIONING PISTON NR 1,000
007.3884 GIB SLIDE BLADE TIGHTENER NR 2,000
007.4002 FRONT BLADE GUIDE HEAD BRACKET NR 1,000
010.0352 SELF-- LOCKING RING NUT 35X1,5 NR 1,000
010.0915 BELLEVILLE WASHER 50X18,4X3 NR 6,000
010.1712 FRONT INSERT BLADE GUIDE NR 1,000
010.1714 FRONT INSERTS BLADE GUIDE NR 1,000
010.1721 BLADE PUSHER NR 1,000
010.1909 BT/NOT--AUS HEAD COMMAND LEVER NR 1,000
010.2381 FRONT BLADE GUIDE HEAD NR 1,000
010.7203 M6 SCREW NUT NR 6,000
010.7402 6 X 12 CYLINDRICAL POINT VCE GRUB SCREW NR 5,000
010.7410 8 X 16 CYLINDRICAL POINT VCE GRUB SCREW NR 1,000
010.7456 8 X 16 CONICAL POINT VCE GRUB SCREW NR 1,000
010.7461 6 X 25 LEVEL POINT VCE GRUB SCREW NR 6,000
010.7491 10 X 60 LEVEL POINT VCE GRUB SCREW NR 1,000
010.7603 0 6 WASHER NR 7,000
010.7606 0 12 WASHER NR 1,000
010.7764 ELASTIC PIN DIA M. 6 X 20 NR 4,000
010.7767 ELASTIC PIN DIA M. 6 X 35 NR 1,000
010.7868 TCEI 6 X 12 SCREW NR 1,000
010.7890 TCEI 8 X 12 SCREW NR 2,000
010.7893 TCEI 8 X 20 SCREW NR 2,000
010.7894 TCEI 8 X 25 SCREW NR 4,000
010.7942 TCEI 12 X 40 SCREW NR 1,000
010.7943 TCEI 12 X 45 SCREW NR 2,000
016.0261 FRONT BLADE PROTECTION NR 1,000
025.0069 BEARING 32007X NR 2,000
025.0235 GAS RING NI 150 18--25--4,5 NR 2,000
025.0236 GAS RING NI 150 45--55--7 NR 1,000
025.0272 GUARD RING NILOS 32007 NR 2,000
028.0130 FITTING 1/4--9 CL 2601 NR 1,000
028.0151 PLASTICIZED TUBE 07--11 KG 1,000
034.0206 BLADE TENSIONING HANDWHEEL NR 1,000
034.1002 10 MA RATCHET LEVER NR 1,000
043.0142 OIL PRESSURE SWITCH NR 1,000
043.0222 CL 2033 1/4 CROSS OVER CONNECTOR NR 1,000
043.0229 MF 1/4 -- CL 2520 REDUCTOR NR 1,000
043.0260 TTE41/4--CL2611CAP NR 1,000
043.0275 A2--1/4 -- CL 2500 CONICAL NIPPLE NR 1,000
043.0350 GFV 1/4 G ASKET NR 2,000
043.0556 MANOMETER X BLADE TENSIONING NR 1,000
043.0652 1/4F.M.TAP * NR 1,000
090.0271 MEP TYPE COMPLETE HANDGRIP NR 1,000
Version 24DM
Diagrams, exploded views and replacement parts 6--43
Page 93
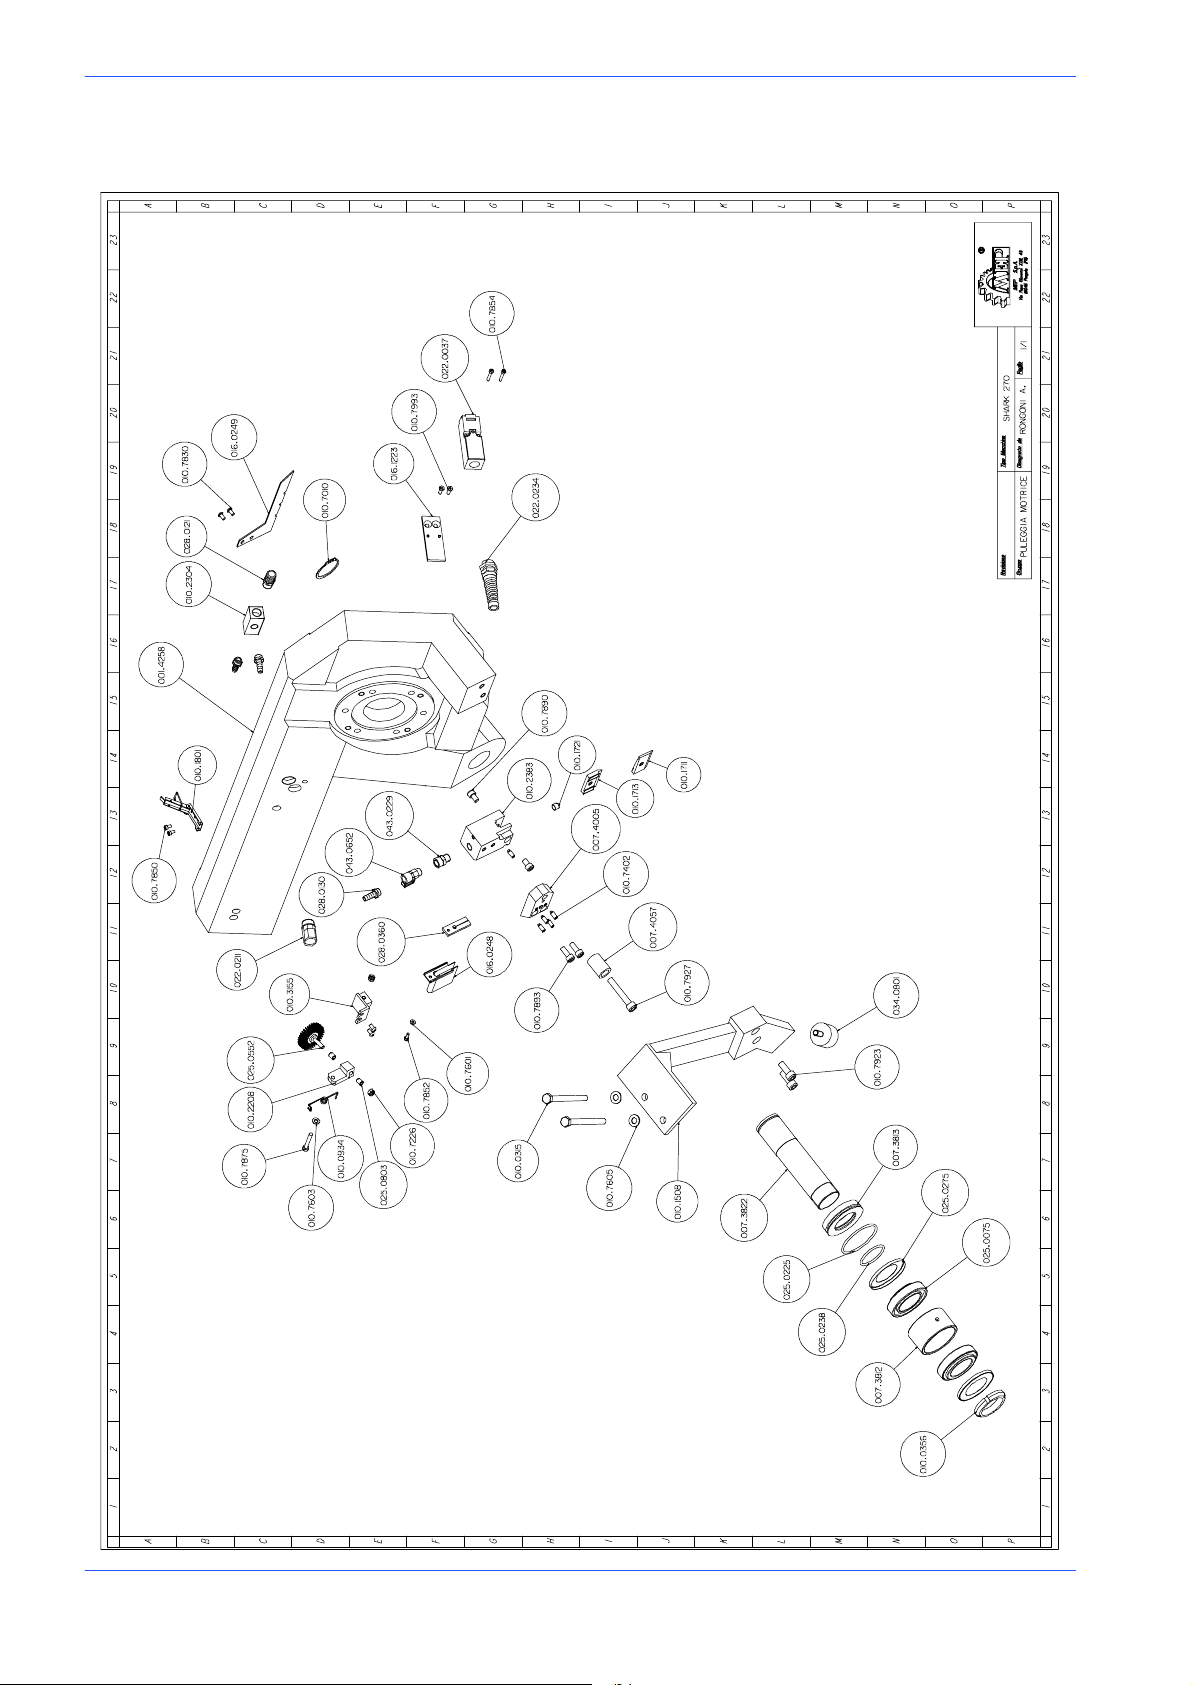
MEP S.p.A.
Motor flywheel assembly
6--44 Use and maintenance manual DM 8
Page 94
SPARE PARTS
Code Description U.of M. Quantity
001.4258 DRIVING PULLEY SECTION BOW NR 1,000
007.3812 HEAD PIVOT BEARING SPACER NR 1,000
007.3813 BOW SPACER NR 1,000
007.3822 HEAD PIVOT SUPPORT PIN NR 1,000
007.4005 60› REAR BLADE GUIDE HEAD BRACKET NR 1,000
007.4057 LIMIT STOP BUSHING NR 1,000
010.0356 SELF-- LOCKING RING NUT 45X1,5 NR 1,000
010.0934 SPRING FOR BLADE CLEANER NR 1,000
010.1711 REAR INSERT BLADE GUIDE NR 1,000
010.1713 REAR INSERTS BLADE GUIDE NR 1,000
010.1721 BLADE PUSHER NR 1,000
010.1801 ”SH GALVANISED ””D”” CLOSURE LEVER” NR 1,000
010.2208 BLADE CLEANER BRUSH HOLDER NR 1,000
010.2304 REFRIGERATING LIQUID DISTRIBUTOR NR 1,000
010.2383 REAR BLADE GUIDE HEAD NR 1,000
010.3155 BLADE CLEANER BRUSH FIX BRACKET NR 1,000
010.7010 0 45 US.010.1201 SNAP RING NR 1,000
010.7205 M10 SCREW NUT NR 1,000
010.7226 M6 SELF--THREADING SCREW NUT NR 2,000
010.7402 6 X 12 CYLINDRICAL POINT VCE GRUB SCREW NR 5,000
010.7601 0 4 WASHER NR 1,000
010.7603 0 6 WASHER NR 1,000
010.7850 TCEI4X8SCREW NR 2,000
010.7852 TCEI 4 X 12 SCREW NR 1,000
010.7854 TCEI 4 X 25 SCREW NR 2,000
010.7875 TCEI 6 X 40 SCREW NR 1,000
010.7890 TCEI 8 X 12 SCREW NR 2,000
010.7893 TCEI 8 X 20 SCREW NR 2,000
010.7927 TCEI 10 X 60 SCREW NR 1,000
010.7993 TSPEI 5 X 12 SCREW NR 2,000
016.0248 STRIP PROTECTION NR 1,000
016.0249 REAR BLADE PROTECTION NR 1,000
016.1223 BOW SAFETY SWITCH FIX PLATE NR 1,000
022.0037 FR 690 SH SAFETY SWITCH NR 1,000
022.0211 QUICK FITTING SEM PG 13,5 NR 1,000
022.0234 FLEXIBLE CABLE PRESSER 3246 BLACK PG 13, NR 1,000
025.0075 BEARING 32009X NR 2,000
025.0225 GAS RING OR 171-- 68,26 NR 1,000
025.0238 GAS RING OR 149-- 44,45X3,53 NR 1,000
025.0275 GUARD RING NILOS 32009X NR 2,000
025.0552 BLADE CLEANER BRUSH 6X25 030 NR 1,000
025.0803 GRAPHITIZED BUSH L. 10 DIA M . 6 NR 2,000
028.0121 FITTING 3/8--17 CL 2601 NR 1,000
028.0130 FITTING 1/4--9 CL 2601 NR 3,000
028.0360 BLADE CLEANER RUBBER NR 1,000
034.0801 P 40/30 ELASTIC STOP NR 1,000
043.0229 MF 1/4 -- CL 2520 REDUCTOR NR 1,000
043.0652 1/4F.M.TAP * NR 1,000
Version 24DM
Diagrams, exploded views and replacement parts 6--45
Page 95
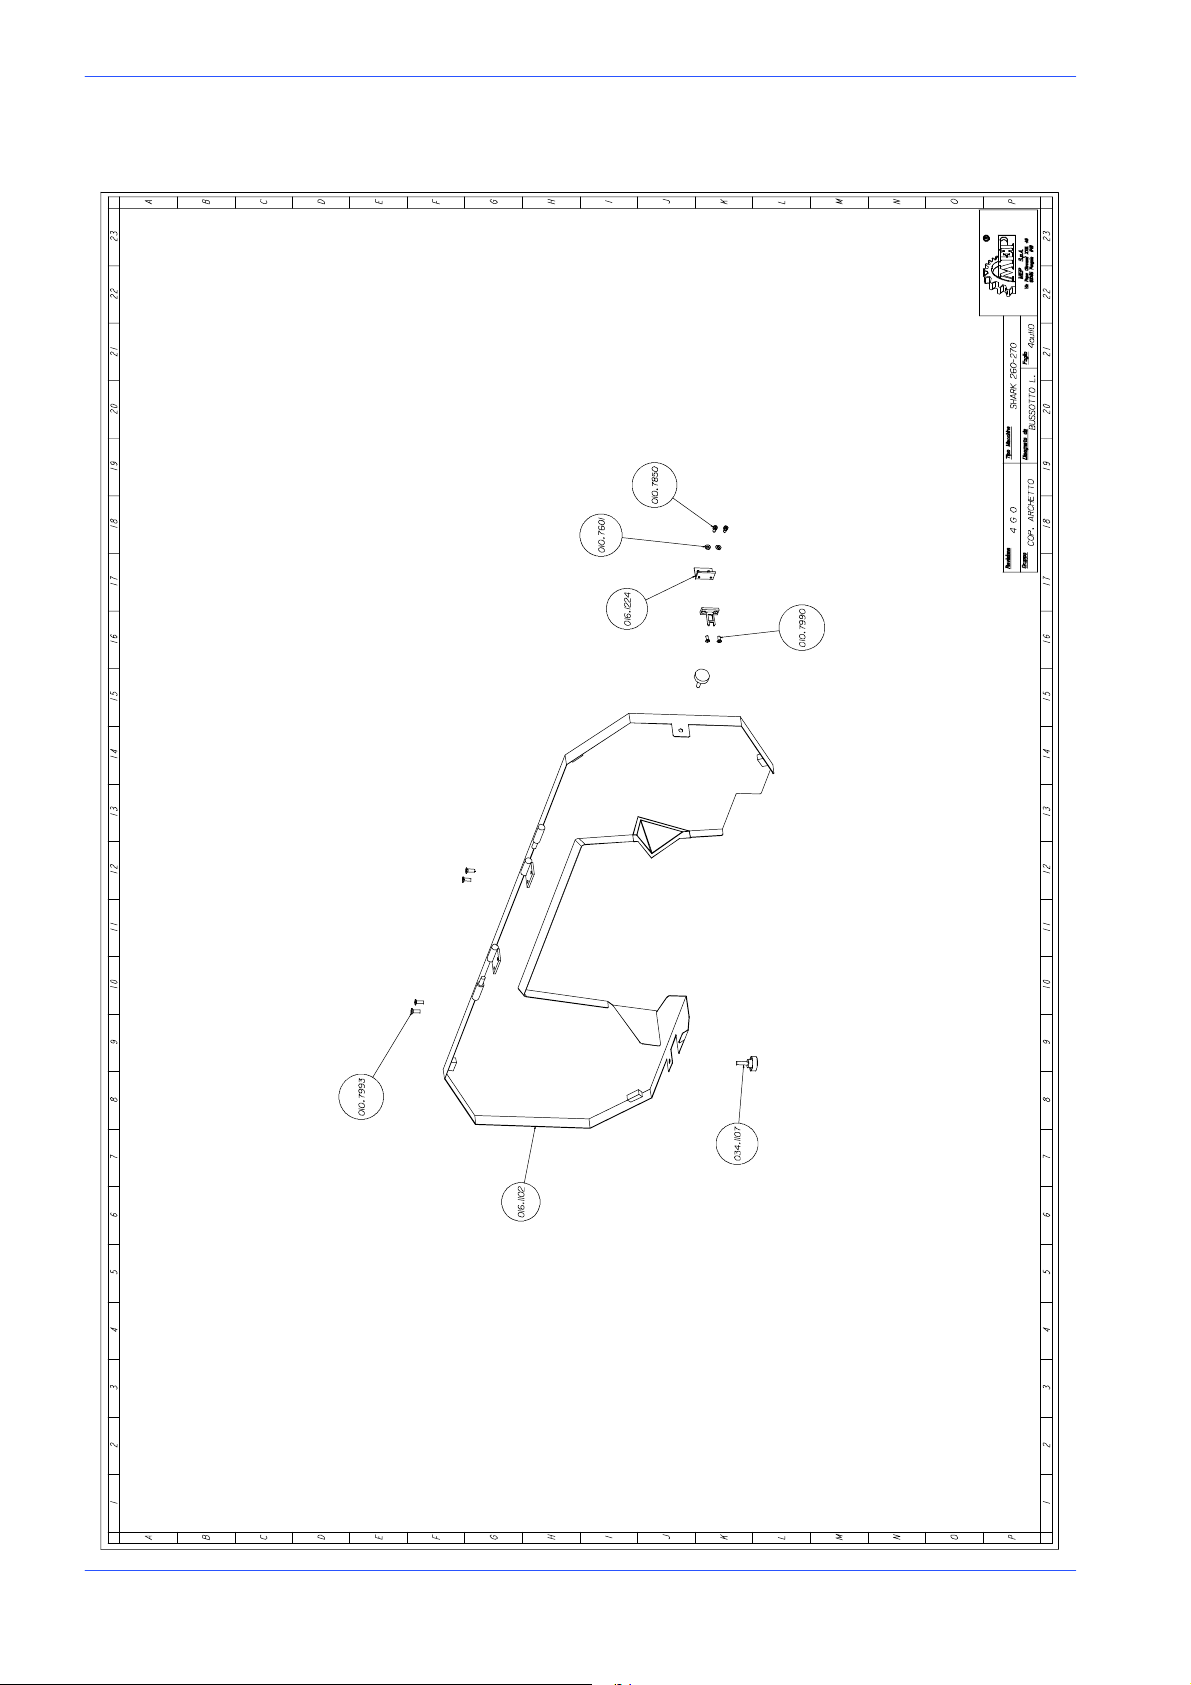
MEP S.p.A.
Cutting head cover
6--46 Use and maintenance manual DM 8
Page 96
SPARE PARTS
Code Description U.of M. Quantity
010.7601 0 4 WASHER NR 2,000
010.7850 TCEI4X8SCREW NR 2,000
010.7990 TSPEI 4 X 8 SCREW NR 2,000
010.7993 TSPEI 5 X 12 SCREW NR 4,000
016.1102 BOW COVER NR 1,000
016.1224 SAFETY COVER SWITCH FIX PLATE NR 1,000
034.1107 O 30 M6 X 20 HANDWHEEL NR 2,000
Version 24DM
Diagrams, exploded views and replacement parts 6--47
Page 97
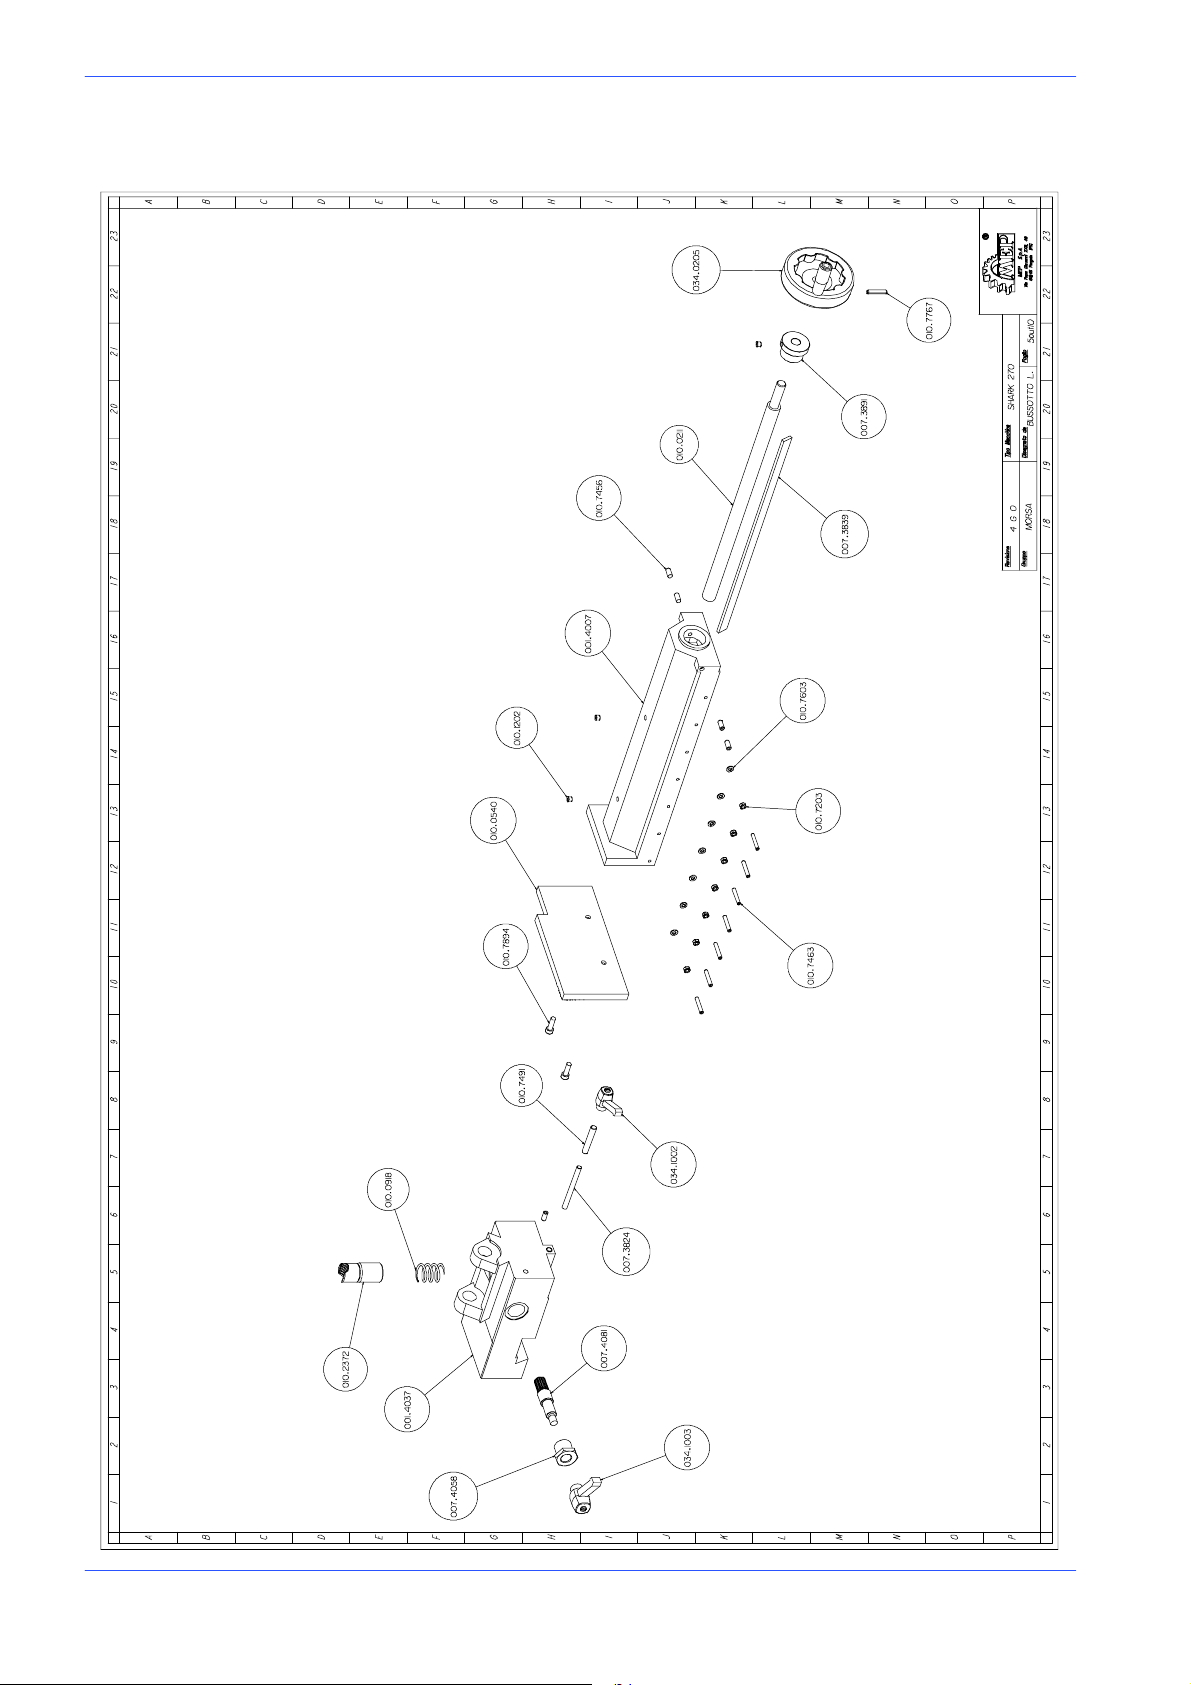
MEP S.p.A.
Vice assembly
6--48 Use and maintenance manual DM 8
Page 98
SPARE PARTS
Code Description U.of M. Quantity
001.4007 SLIDING VICE NR 1,000
001.4037 VICE SUPPORT NR 1,000
007.3824 QUICK CLAMPING VICE LOCKING PIN NR 1,000
007.3839 VICE GIB NR 1,000
007.3891 VICE SCREW BUSHING NR 1,000
007.4058 CAM BUSHING NR 1,000
007.4081 UNLOCKING LOWER VICE PINION NR 1,000
010.0211 525X24TPN VICE SCREW NR 1,000
010.0540 MOBILE VICE JAW NR 1,000
010.0918 LEAD SCREW VICE RETURNING ACTION SPRING NR 1,000
010.1202 SPHERICAL DIA M. 8 OILER NR 3,000
010.2372 45› BRONZE LEAD SCREW NR 1,000
010.7203 M6 SCREW NUT NR 7,000
010.7456 8 X 16 CONICAL POINT VCE GRUB SCREW NR 5,000
010.7463 6 X 35 CONICAL POINT VCE GRUB SCREW NR 7,000
010.7491 10 X 60 LEVEL POINT VCE GRUB SCREW NR 1,000
010.7603 0 6 WASHER NR 7,000
010.7767 ELASTIC PIN DIA M. 6 X 35 NR 1,000
010.7894 TCEI 8 X 25 SCREW NR 2,000
034.0205 VPRA/125 MR HANDWHEEL NR 1,000
034.1002 10 MA RATCHET LEVER NR 1,000
034.1003 12 MA RATCHET LEVER NR 1,000
Version 24DM
Diagrams, exploded views and replacement parts 6--49
Page 99
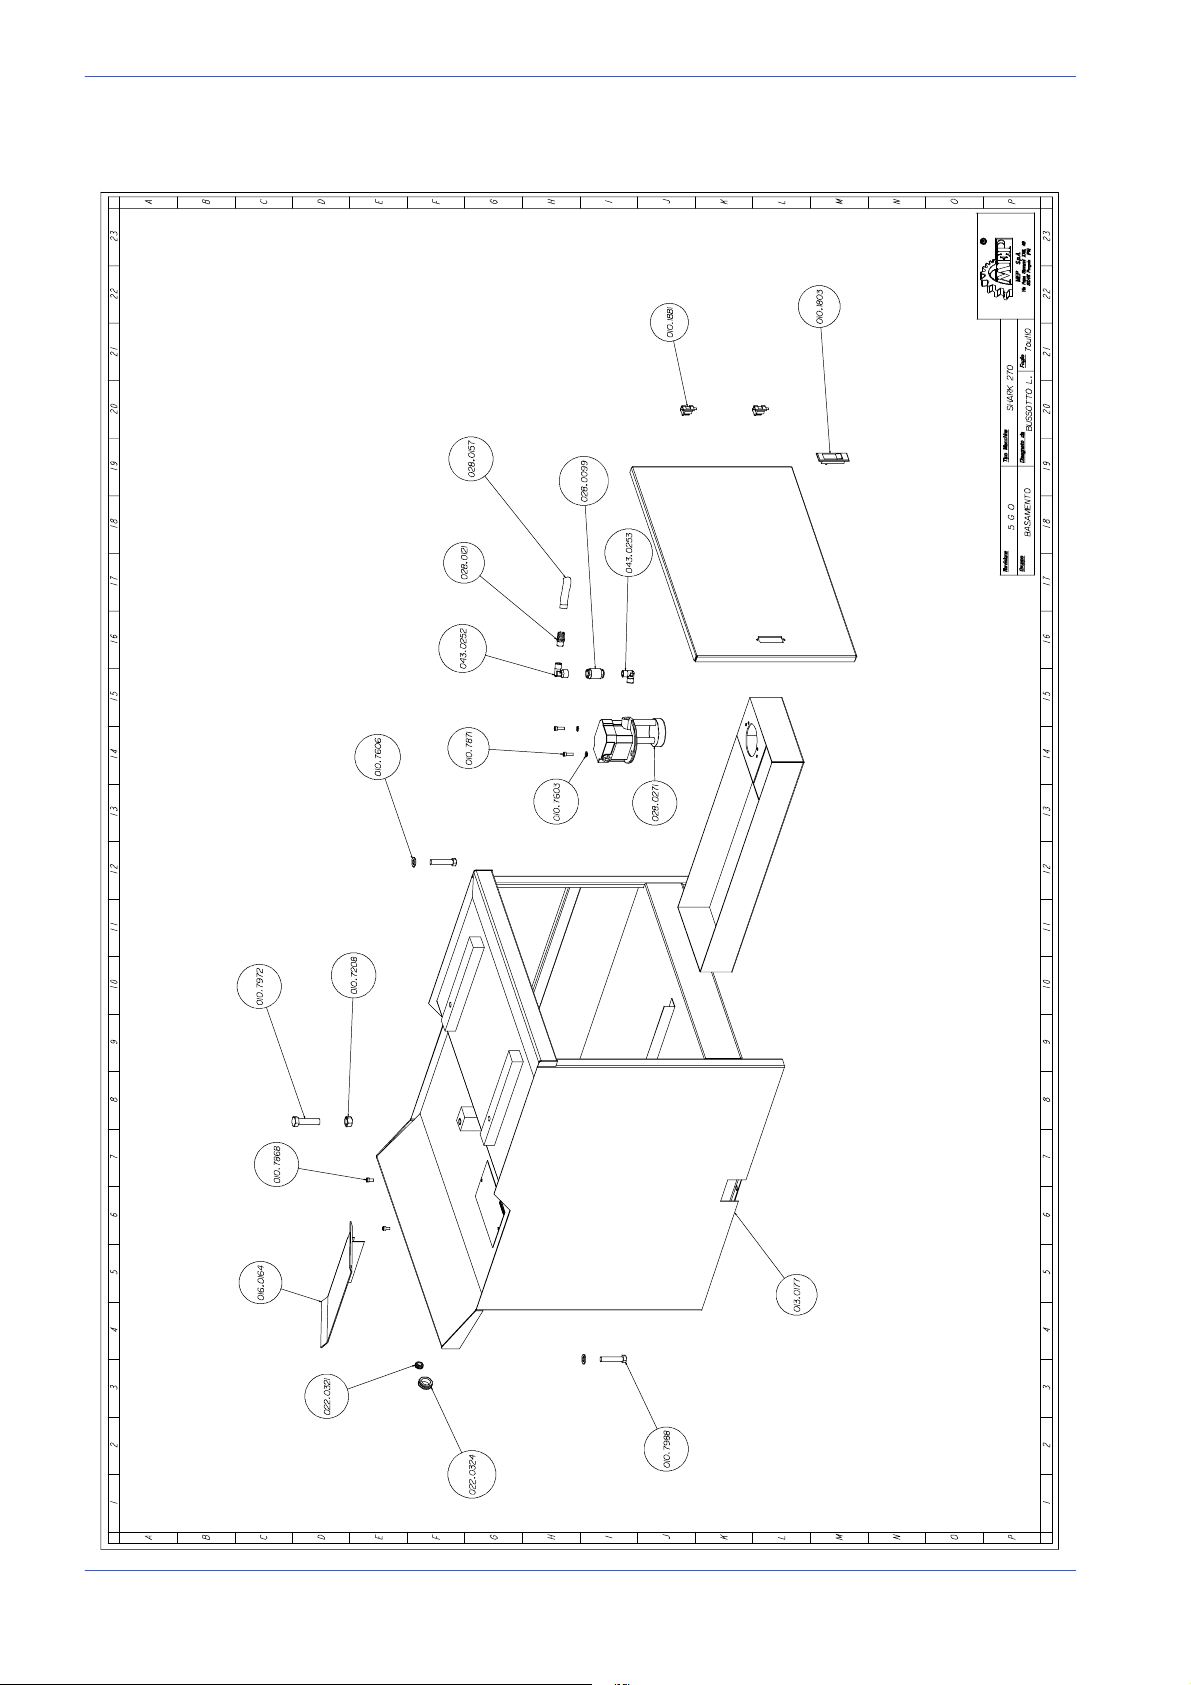
MEP S.p.A.
016.1548
Base assembly
6--50 Use and maintenance manual DM 8
Page 100
SPARE PARTS
Code Description U.of M. Quantity
010.1803 BASE DOOR CLOSURE * NR 1,000
010.1881 BASE DOOR HINGE NR 2,000
010.7208 M16 SCREW NUT NR 1,000
010.7603 0 6 WASHER NR 2,000
010.7606 0 12 WASHER NR 2,000
010.7868 TCEI 6 X 12 SCREW NR 2,000
010.7871 TCEI 6 X 20 SCREW NR 2,000
010.7972 TE 16 X 60 SCREW NR 1,000
010.7988 TE 12 X 60 SCREW NR 2,000
013.0177 STEEL BASE NR 1,000
016.0164 BOW WATER COLLECTOR NR 1,000
022.0321 FAIRLEADS 12 INC.M M.2 NR 1,000
022.0324 FAIRLEADS 24 INC.M M.2.5 NR 1,000
028.0099 ”NONRETURN V ALVE 3/8””” NR 1,000
028.0121 FITTING 3/8--17 CL 2601 NR 1,000
028.0157 SCREENED TUBE DIA M.13--19 KG 1,000
028.0271 ELECTRIC PUMP EZ/C V. 220--380 NR 1,000
043.0252 MF 3/8 CL 2020 ELBOW NR 1,000
043.0253 M. M.3/8 CL 2010 ELBOW NR 1,000
Version 24DM
Diagrams, exploded views and replacement parts 6--51
 Loading...