

Page 1

Nature Well-Being Light®
Art.No.: 8325
Instructions
Please read carefully before using the Nature
Well-Being Light
2
M1E102/ENG
Page 2
Nature Well-Being Light
You are now able to have the full benefits of Nature Well-Being Light that helps
you to improve mood, energy, productivity and the quality of sleep and
awakening.
MMooddeell:: 8833225
5
IMPORTANT SAFETY INSTRUCTIONS
When using electrical products, especially when children are present, basic
safety precautions should always be followed, including the following:
READ ALL INSTRUCTIONS BEFORE USING
Important
y Always unplug the product from the electric outlet immediately after using
and before cleaning.
y Do not reach for a product that has fallen into water. Unplug immediately.
y Do not let water run into appliance or spill water onto the appliance.
y Close supervision is necessary when this appliance is used by, on, or near
children, invalids or disabled person.
3
M1E102/ENG
y Use this appliance only for its intended use as described in this manual. Do
not use any attachment not been recommended by the manufacturer.
y Never operate the appliance if it has a damaged cord or plug, if it is not
working properly, if it has been dropped or damaged, or dropped into water.
y Return this appliance to a service center for examination and repair.
y Keep the cord away from heated surfaces.
y The appliance has been fitted with an automatic protection against
overheating. If the vents are covered, the appliance switches off
automatically. Remove the cause of overheating, unplug the appliance and
let it cool down for approx 30 minutes. Then switch the appliance back on by
plugging it in again.
4
M1E102/ENG
Page 3

y Let the appliance cool down for approx 15 minutes before you clean or store
it.
y Never use the appliance when the lamp housing is damaged, broken or
missing.
y Always replace the lamp with a 60W clear incandescing lamp or 70W
energy saving halogen lamp.
Preparing for use
3. When you have set the correct time of hour, press SET button to confirm the
hour and set the correct time of min, press SET button again to confirm the
min.
4. After finishing clock time, press SET button and move to alarm time of hour
and set the correct alarm time of hour, press SET button to confirm the time
of min.
Using the appliance
Setting the alarm
Installation
When you set alarm, you can choose the light intensity level, the type of sound
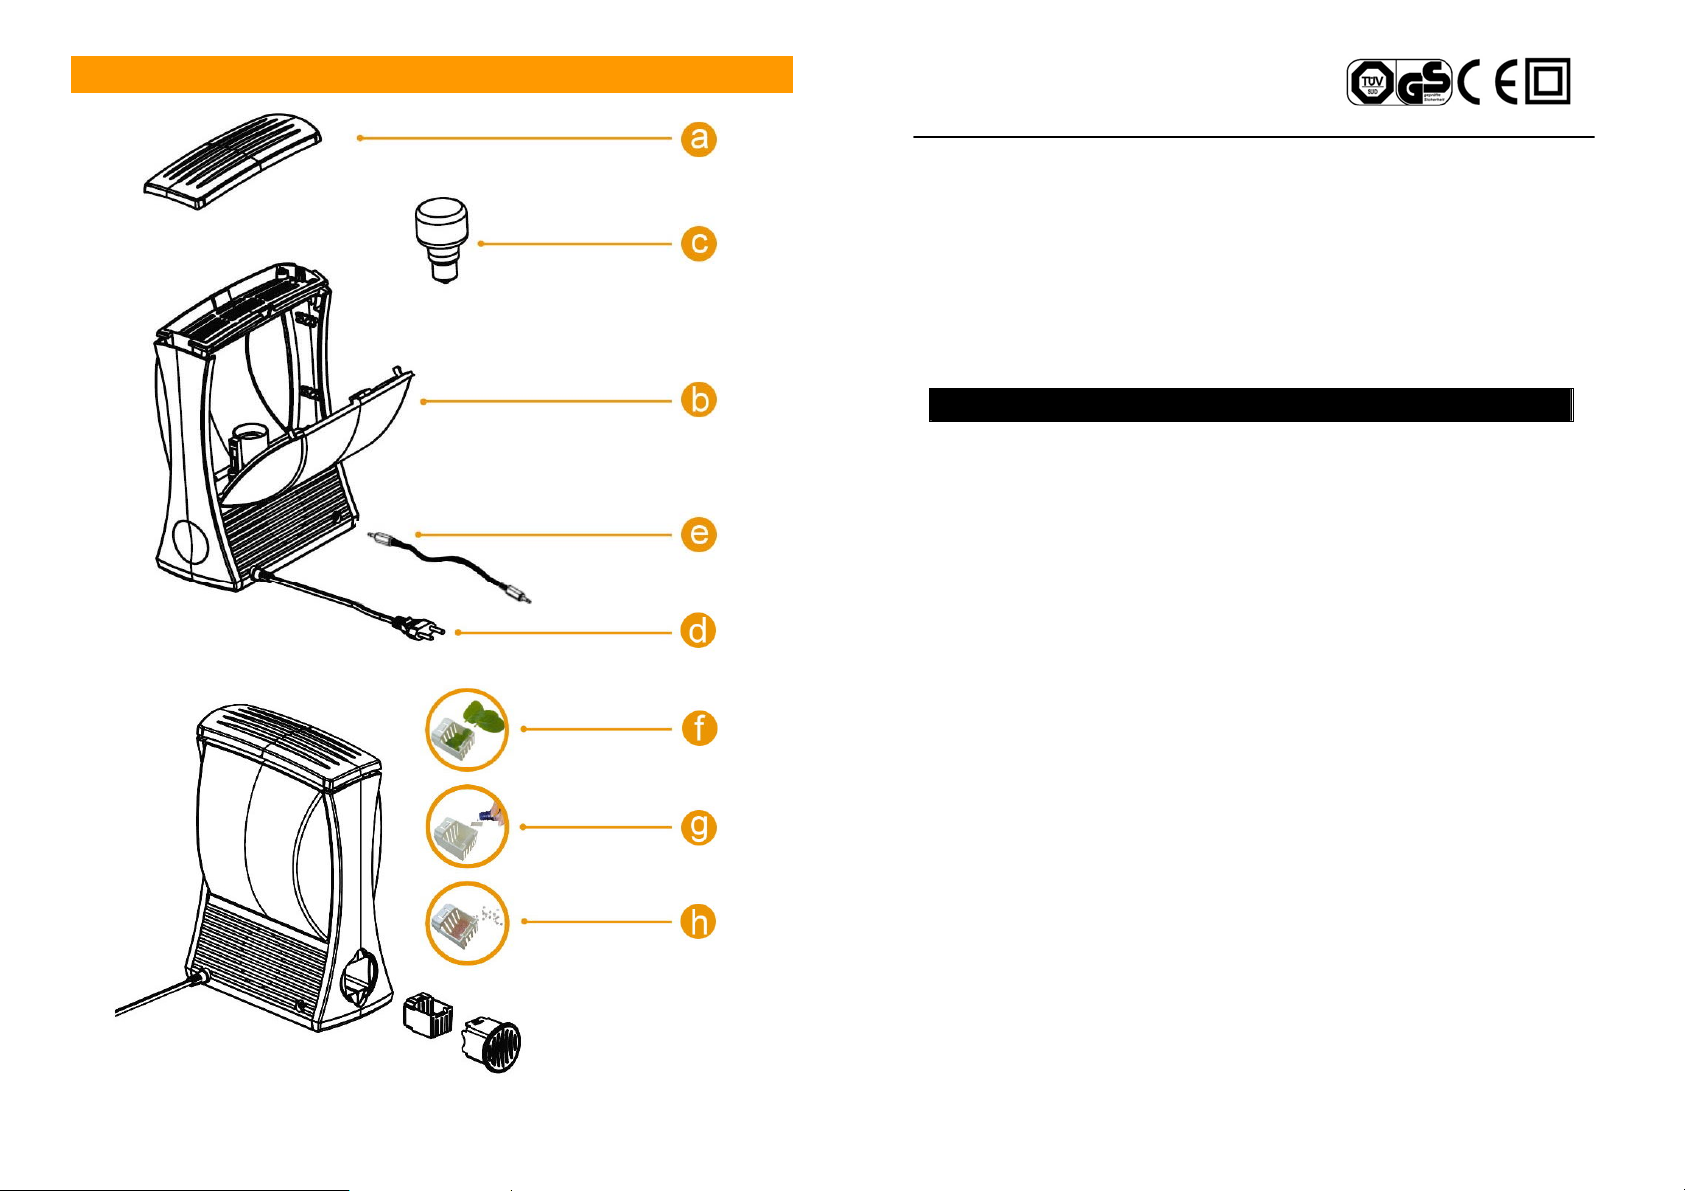
1. Before first use, open the light cover on top (Fig. a) and back (Fig. b) of the
appliance and screw the lamp into the lamp holder (Fig. c).
2. Place the appliance at 40-50cm from your head, for example on a bedside
table.
3. Put the plug in the wall socket (Fig. d).
4. The light blue color as screen default back light.
5. The clock time on the display starts flashing and below the alarm time has to
be set. (Fig. 1) Please see Setting the clock and alarm.
6. After finishing clock and alarm time, please press button for sun raise
time and aroma setting or by pressing
installation. (For sun raise and aroma setting, please see Setting the
Alarm)
7. After finishing first setting the appliance into stand by mode, you can change
the screen back light by pressing SNOOZE button. (Fig. 2)
button again to finish first
Setting the clock and alarm
or FM radio, sound level and aroma. The alarm is set when the screen showing
alarm symbol and alarm time. The light intensity slowly increases to the chosen
level during the set sun raise time before the set alarm time. The sounds slowly
increase to the chosen level after the set alarm time. The aroma functions will
actives 10 min before the set alarm time.
Setting the clock alarm time
1. Press once to set the clock and alarm. (Fig. 1)
2. Use ▲ and ▼ buttons to select correct clock and alarm time. (Fig. 3)
3. Hold ▲ and ▼ buttons longer to put the time forward or backward more
4. Press SET button to shift and confirm the clock time and alarm time.
5. When you have set the correct time of hour, press SET button to confirm the
Setting Alarm with Sun Raise or Aroma Function
quickly.
hour and set the correct time of min, press SET button again to confirm the
min. (Fig. 4)
1. To use ▲ and ▼ buttons to set the time.
2. Hold ▲ and ▼ buttons longer to put the time forward or backward more
quickly.
5
M1E102/ENG
1. Press button again to set the sun raise time and aroma.
2. Use ▲ and ▼ buttons to choose sun raise time 00, 15, 30, 45, 60 min. (Fig.
5) Note: If set “00” means no sun raise for wake up and the sun raise symbol
6
M1E102/ENG
Page 4

will disappear on the screen (Fig. 6)
3. Press SET button to set Aroma on the aroma symbol shown on screen (Fig.
6), press SET button again to turn it off.
Note: If no aroma symbol on screen means no aroma function for wake up.
2. Press button to adjust the brightness and press ▲ and ▼ to adjust light
intensity.
3. After selecting your favorite intensity, to press MEM button to memorize light
intensity. (Fig. 12)
4. To press
button again the appliance will into stand by mode.
Setting the Sound/FM radio and sound level
1. Press button, the default nature sounds ‘01’ will start playing at sound
level 10 , to press ▲ and ▼ buttons to select favorite nature sounds (01~10
for nature sounds, 11 for beep sound) (Fig. 7)
2. Press FM button into radio mode and press SET button the appliance will
auto seek FM station; press ▲ and ▼ buttons to manually select program.
(Fig.8)
3. The default sound level is 10, to adjust volume to press
to set the sounds level (00~20).
4. Press MEM button to memorize wake up sound/radio station and sound
level; when press MEM button, the screen will show on and release the
button the MEM will disappear. (Fig. 9)
5. If you like no sound for wake up, please set MEM button and volume level at
‘00’ as mute.
6. If
or FM button works with or buttons, the active function
symbol will show on screen, the one with flashing function can use ▲ and ▼
or
and buttons, press desired function key again to change setting.
(e.g. When button is working, you can use ▲ and ▼ or and
buttons; if you like to change light intensity, press
change the intensity) (Fig. 10)
and buttons
button again to
4. If you don’t want to wake up with light, select light intensity level ‘00’ and
press MEM.
Quick alarm time check
1. When the alarm setting at stand by mode, press button, to start an
accelerated wake up.
2. During the 60 sec, you can see the light and sound rapid increase of the
light intensity to the selected level. Also the aroma goes on (if select aroma
function). (Fig. 13)
3. Press
To Turn the alarm on or off
When the alarm is on, the screen will display wake up sound, sound level, aroma,
light and light intensity.
1. At the set time, the wake up sound is played and aroma will active before 10
min and light will be gradual from ‘01’ to sun raise setting. (Fig. 14)
2. The alarm is active when press
music, light and aroma will stop working and all relative symbols will
disappear. (Fig. 15)
3. Press
will disappear. It’s means there is no alarm on tomorrow. (Fig. 16)
button again or any key to stop.
button, to turn off all alarm settings, the
button again to set the alarm off, the alarm time and symbol
Light intensity level setting
1. When pressing button, the light will slowly increase to the chosen level.
(default value is 25) (Fig. 11)
7
M1E102/ENG
Snoozing/Screen Color Selection
1. Press SNOOZE button to switch off the sound and light and aroma for 6
minutes when the alarm has gone off.
(Fig. 17)
8
M1E102/ENG
Page 5
2. After 6 minutes the wake up sound is automatically played again. (Fig. 18)
Note: You can only use the snooze function with 6 times. After 35 minutes,
the button no longer functions as snooze and only functions as SCREEN
color selection.
once button is pressed, the FM function will be deactivate.
2. Adjust ▲ and ▼ buttons to change the favorite nature sound (01-10), beep
sound(11)
3. Screen Color Selection only available at stand by mode, to press SNOOZE
button to change color; there are 8 colors for choosing. The default color is
light blue when first plug in.
4. At
Light – reading lamp
1. Press button to switch the lamp on or off. If RGB function is active once
2. Turn on the light and adjust ▲ and ▼ buttons to increase or decrease the
3. The light level indication on the display shows the light intensity level (00 to
4. The
RGB – color changing mood light
1. Press button to switch the mood light on or off. (Fig. 19) If RGB function
2. Adjust ▲ and ▼ buttons to change the favorite color (01-09) or press SET
mode, the Screen color will follow the RGB light, after quit the RGB
mode, the screen color will recover the original color setting.
button is pressed, the RBG function will be deactivate.
light intensity level.
25).
button can work with button or FM radio
is active once button is pressed, the light function will be deactivate.
button to auto change mode (00) (Fig. 20)
3. The
MP3
1. To turn on your own MP3 and plug audio cable into your own MP3 and
2. When first time plug-in the audio cable the
3. When the MP3 is working, to adjust ▲ and ▼ to change the favorite nature
4. Once the audio jack is disconnected, the AUX will disappear from the screen.
5. The MP3 volume control by MP3 itself, the appliance does not provide
FM Radio
1. Press FM button to switch the radio on or off. If the music function is active
2. Press SET button to scan radio frequencies automatically.
button can work with button or button.
connect to the appliance at backside of unit (Fig. e), the screen will show
AUX (Fig. 21). The active nature sounds or FM radio will be interrupted by
MP3.
symbol will show on screen
and playing MP3 directly (as 12th sound). (Fig. 22)
sounds (01-10), beep sound (11) or MP3 music (12)
Note: The MP3 music cannot set as a wake up sound.
volume for MP3.
once FM button is pressed, the music function will be deactive.
3. The
Note: The RGB color cannot set as wake up light.
Nature Sounds
1. Press button to switch the sound on or off. If the FM function is active
button can work with button or FM radio.
9
M1E102/ENG
3. Or to press ▲ and ▼ to select frequency of your favorite station.
4. The FM button can work with
Aroma Function
1. Aroma installation:
button or button.
10
M1E102/ENG
Page 6

a. Put dry plants into small aroma container (Fig. f). 3pcs aroma pouches
are included.
b. Drip one or two drops essential oils into pad and insert into front side of
container (Fig. g). 4pcs aroma pads are included.
c. Put solid aroma beads into aroma container (Fig. h). The aroma beads
are not included.
2. Press AROMA button, the screen will show four leaves aroma symbol, the
aroma function will auto shut off after 30 min. (Fig. 23)
Reset Function (MEM)
1. At stand by mode to press and hold MEM button for 3sec, all information and
setting will be clear after release the button, all setting will back to default
value. Please refer to Installation for setting.
Cleaning and maintenance
Always unplug the appliance and let it cool down for approx 20 minutes before
you start to clean.
Never use scouring pads, cleaning agents or aggressive liquids to clean the
appliance.
Regularly remove dust from the inside (open the top and back cover) of the
appliance with a dry cloth.
Clean the outside of the appliance with a soft cloth.
Replacing the lamp
3. Unplug the appliance
2. For memory function (MEM) please refer to Light, Nature Sounds and FM
Radio setting.
Sleep Function
Press SLEEP button, the screen will show zzZ (Fig. 24) and all functions will auto
shut off after one hour.
The appliance fall down protection
When the light is working, the appliance falls down (Fig. 25) the light will auto shut
off all functions. Put it on table again to check the lamp in good condition then start
to operate.
Power Failure
The unit provides a memory to memorize your alarm setting (includes alarm time,
sun raise, aroma setting, sound or FM station and volume level) except of clock,
so if any power failure the user should set clock again.
4. Let the appliance cool down for approx 20 minutes.
5. To open the top and back cover of the appliance.
6. Unscrew the old lamp and remove it from the lamp holder.
7. Screw a new lamp in the lamp holder.
Specification
Modell/Typ : WE-677
Rated Voltage : 220~240V, 50Hz
Rated Input : 80W
Light : 315 Lux in 50 cm distance
LED Class : 1
Power bulb : 60W (f.e. ECO Classic 30; Halogen Energy Saver Classic “A”
(70W)
Frequency : FM 87,5 . 108 MHz
Protection class : II
IIPP220
0
11
M1E102/ENG
12
M1E102/ENG
Page 7

13
M1E102/ENG
GGuuaarraanntteeee
The guarantee lasts for 24 months from the date of purchase for manufacturers' error
in material and quality. This guarantee is only valid if the instructions in the
"instructions for use" have been followed. The guarantee is no longer valid if the
device is damaged due to violent usage, misuse or improper use or service by
unqualified persons.
Address for the guarantee and service:
Hydas GmbH & Co. KG, Am Hohlen Weg 37, 34369 Hofgeismar
HHaavvee yyoouu aannyy qquueessttiioonnss??
HHoottlliinnee:: 006699 –– 9955440066112244
14
M1E102/ENG
Page 8

For the sake of the environment, we request that you take packaging
material to be recycled (collection points).
Disposal of appliances
Electrical and electronic devices may not be disposed of with domestic
waste. Consumers are obliged by law to return electrical and
electronic devices at the end of their service lives to the public collecting points
set up for this purpose or point of sale. Details to this are defined by the
national
llaaww ooff tthhee rreessppeeccttiivvee ccoouunnttrryy.. TThhiiss ssyymmbbooll oonn tthhee pprroodduucctt,, tthhee iinnssttrruuccttiioonn mmaannuuaall
oorr tthhee ppaacckkaaggee iinnddiiccaatteess tthhaatt aa pprroodduucctt iiss ssuubbjjeecctt ttoo tthheessee rreegguullaattiioonnss.. BByy
rreeccyycclliinngg,, rreeuussiinngg tthhee mmaatteerriiaallss oorr ootthheerr ffoorrmmss ooff uuttiilliissiinngg oolldd ddeevviicceess,, yyoouu aarree
mmaakkiinngg aann iimmppoorrttaanntt ccoonnttrriibbuuttiioonn ttoo pprrootteeccttiinngg oouurr eennvviirroonnmmeenntt..
bbyy HHyyddaass GGmmbbHH && CCoo.. KKGG,, AAmm HHoohhlleenn WWeegg 3377,, DD--3344336699 HHooffggeeiissmmaarr,, GGeerrmmaanny
y
15
M1E102/ENG
 Loading...