

Page 1
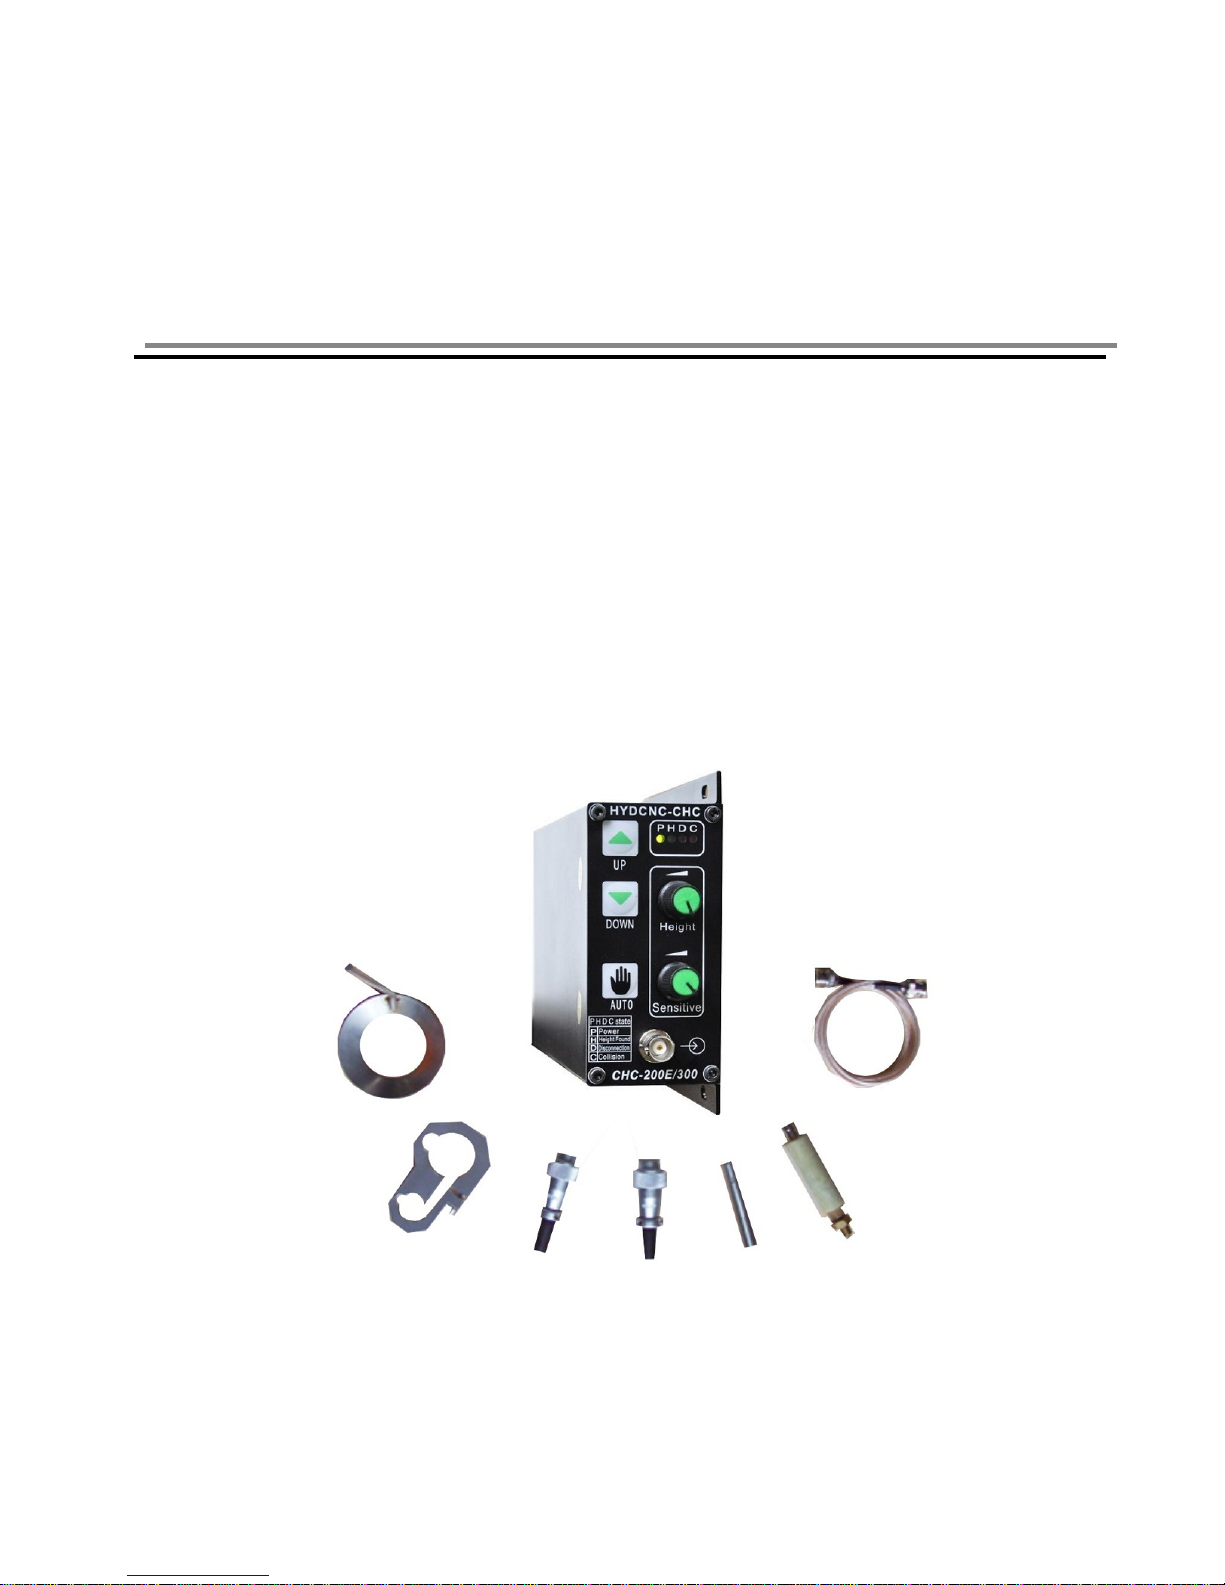
Capacitive Torch Height Controller
CHC-200E Instruction
(Revision 2011)
Page 2

HYD 深圳市宏宇达数控技术有限公司
All
SAFETY:
Please read this manual fully before use CHC-200E
DO NOT open cabinet of THC unless trained technician.
DO NOT adjust the sealed resister.
Turn off Powersupply if when THC is unused.
DO NOT put liquid on THC.
Attention Anti-dust work, DO NOT let metal dust into THC.
DO NOT use on plasma over 100A or HF plasma
Installation Note:
CHC-200E uses AC24
GND Port must be well grounded, GND resister≤1Ω.
UP/DOWN on THC must be same to Z-axis Lifter
To Customer:
We only supply to re-seller as CNC cutting machine manufacturer,
engineering company… end-user please contact our local distributor for
product supplying.
We offer technical support to all distributors and users of our product.
The product is under ONE year warrant y since delivery, and enjoys life-long
service and support.
IMPORTANT NOTE
:
our THCs have been tested in our workshop before delivery, all
commissioning work has been done. Please NOT change the setting
without informing your supplier.
ShenZhen HYD CNC Technology CO.,LTD
Page 3
HYD 深圳市宏宇达数控技术有限公司
1 Intro
1.1 Basic specs
z Power supply:
CHC-200E:AC24V±10%,50Hz/60Hz;
z DC motor used on lifter:
CHC-200E:DC24V;
z Output current:
CHC-200E:1A-4A,max:100W;
z Work temperature:THC-10∽60℃;
HF cable:-10∽200℃;
Sensor parts:-10∽350℃。
z Accuracy:±0.1mm (matters with lifter design);
Auto height range:from cutting material surface 1mm — 20mm.
z HF-cable:200mm∽1300mm。
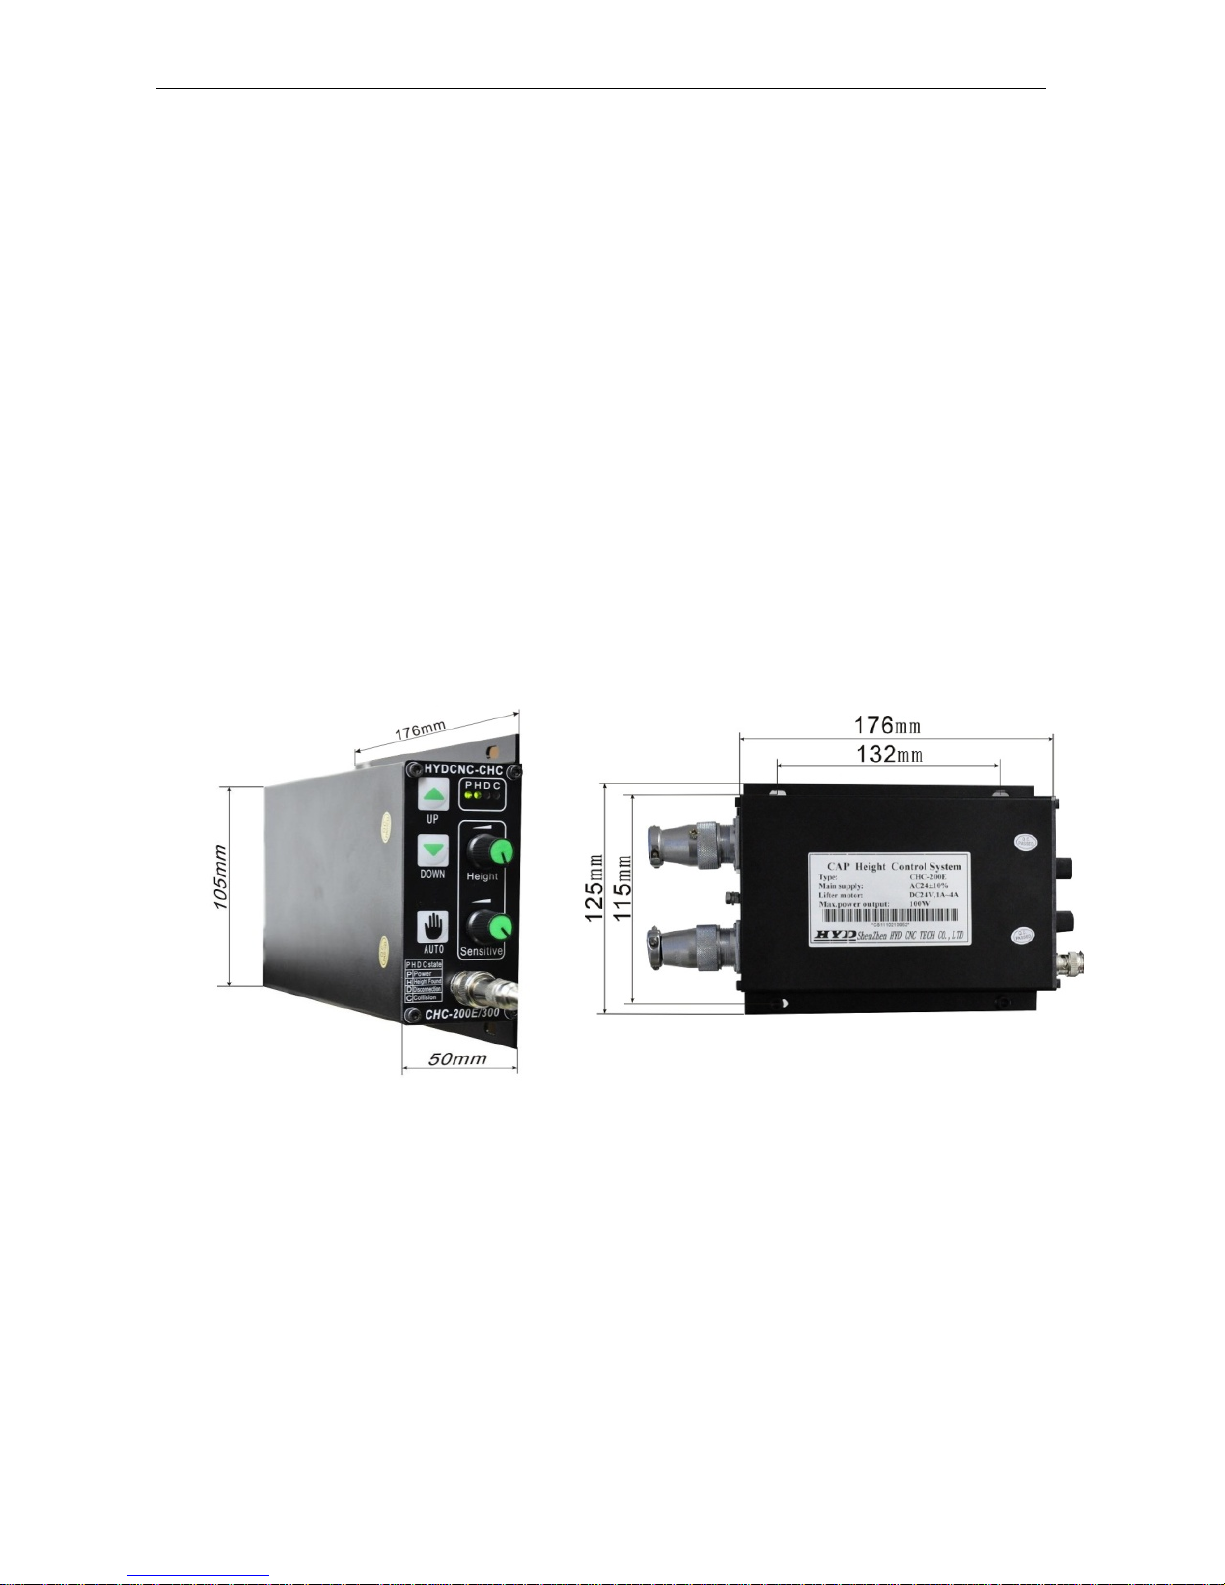
z Product size shows as figure 1-1
L*W*H:176mm * 105mm * 50mm。
Figure 1-1
Page 4

HYD 深圳市宏宇达数控技术有限公司
1.1.2 New features
Comparing to CHC-200D, CHC-200E has new features as follow,
1、 Increased more indicators to shows different states of THC.
2、 Output of collision-alarm, which is optical isolation output from THC, can be sent to CNC’s
Alarm input to freeze machine’s move. This signal is effective on both manual/auto mode.
The max output is 200mA, capable to drive most relays.
3、 Anti-collision function. On manual/auto mode, when metal or low-conductive item like hand
touches sensor ring, THC would send out collision signal and lift torch up until no collision
exist.
4、 When HF cable is disconnected or weakly connected, it would be indicated on the
disconnection indicator. So after installation of HF cable, just shake the HF cable, the
connection will be showed by the indicator.
5、 Sensitive and Accuracy is increased 100%.
6、 CHC200E uses digital logic control circuit for logic control, greatly improved anti-interference
performance.
3 Work elements
CHC-200E work elements: It detects the distance between Sensor ring and the cutting
material (steel, metal material) via detecting the capacitance between the two parts, and keep
the two parts at a set distance by control the DC motor move. CHC-200E is a closed-loop control
system, with 4 parts: Position Signal Sensing, Signal Process, Logic Control and Motor Drive.
Page 5
HYD 深圳市宏宇达数控技术有限公司
2 Components
2.1 For flame cutting
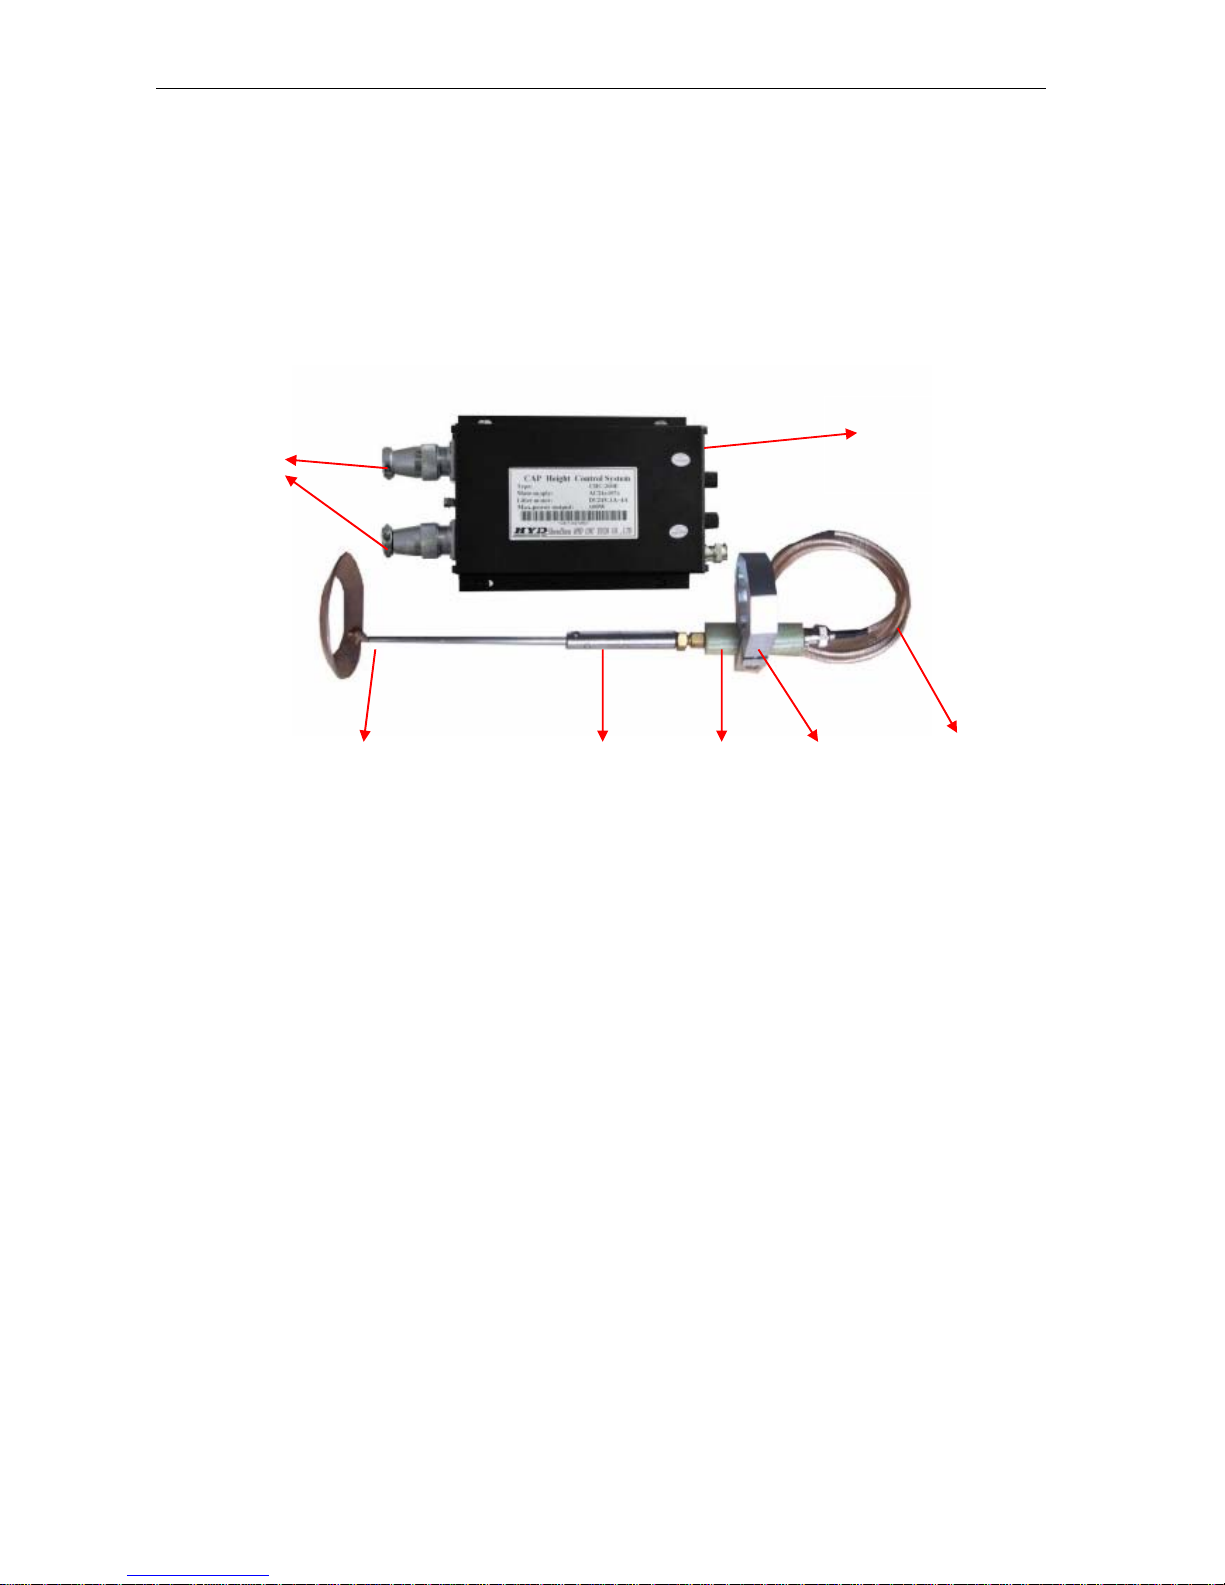
CHC-200E/300 full package includes follow parts: THC control module, socket connector, sensor
ring, elastic connector, insulation part, fixture, HF cable. As figure 2-1shows,
THC control
module
Socket
connector
Sensor ring elastic connector insulation part fixture HF cable
Figure 2-1
Page 6
HYD 深圳市宏宇达数控技术有限公司
3 THC control and connection
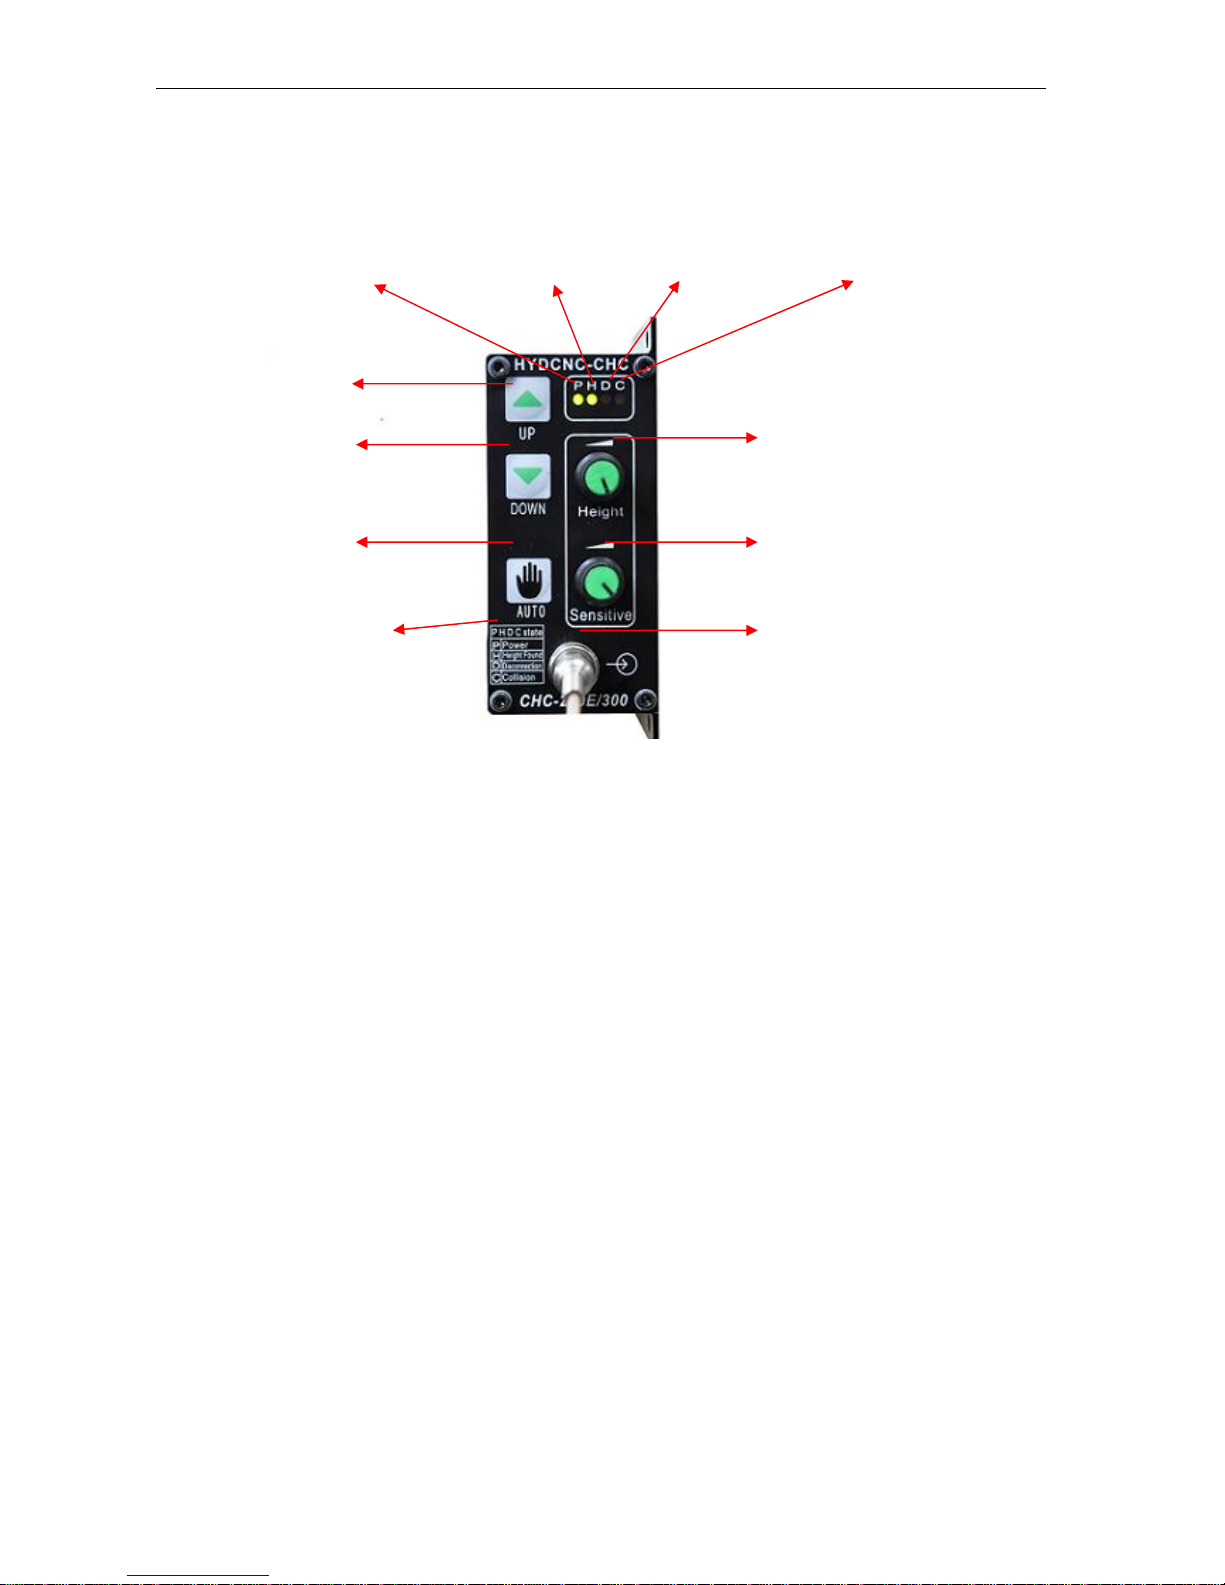
3.1 operation panel intro.
(Power) (Height found) (Disconnection) (collision)
Figure 3-1
Indicator
intro
DOW
Auto/manual
UP
AUTO HEIGHT adjustor
SENSITIVE adjustor
Connect to sensing part
Indicators:
P Power:Power indicator, red, Off means no power supply.
H Height Found: Turn on when torch reaches auto height, green.
D Disconnection: Disconnection indicator, red. When HF cable is unconnected or disconnected,
it turns on. On auto mode, if disconnection happens, torch would keep lifting up until it’s solved.
C Collision: Turn red when sensor ring collision happens, both on manual/auto mode. Torch
would keep lifting up until collision disappears. At this moment, press Down doesn’t work. If HF
cable short-connected with shield net, it is same as collision to THC.
Buttons on operation panel
Up/Down Button
It is active on any mode. Priority is always given to Manual mode. For UP and Down, priority’s given
to UP. In case HF gets problem, it’s always on UP mode, so the Down doesn’t work.
Auto Button
Press the AUTO button, THC is always on Auto Mode, no matter there is a auto signal from outside
Page 7
HYD 深圳市宏宇达数控技术有限公司
or not. During cutting, THC needs to work on Auto Mode and it should be controlled by CNC, having
nothing to do with this Auto button
Height
It is used to adjust cutting torch height during Auto Mode. Height increases when it is turned
clockwise. At the first commissioning, turn clockwise maximum to reach the highest height.
Sensitive
On Auto Mode, the Sensitive increases when it is turned clockwise.
Sensor ring Port
One end of HF Cable link with the socket, the other end link with the sensor ring groupware
3.2 THC Connectors
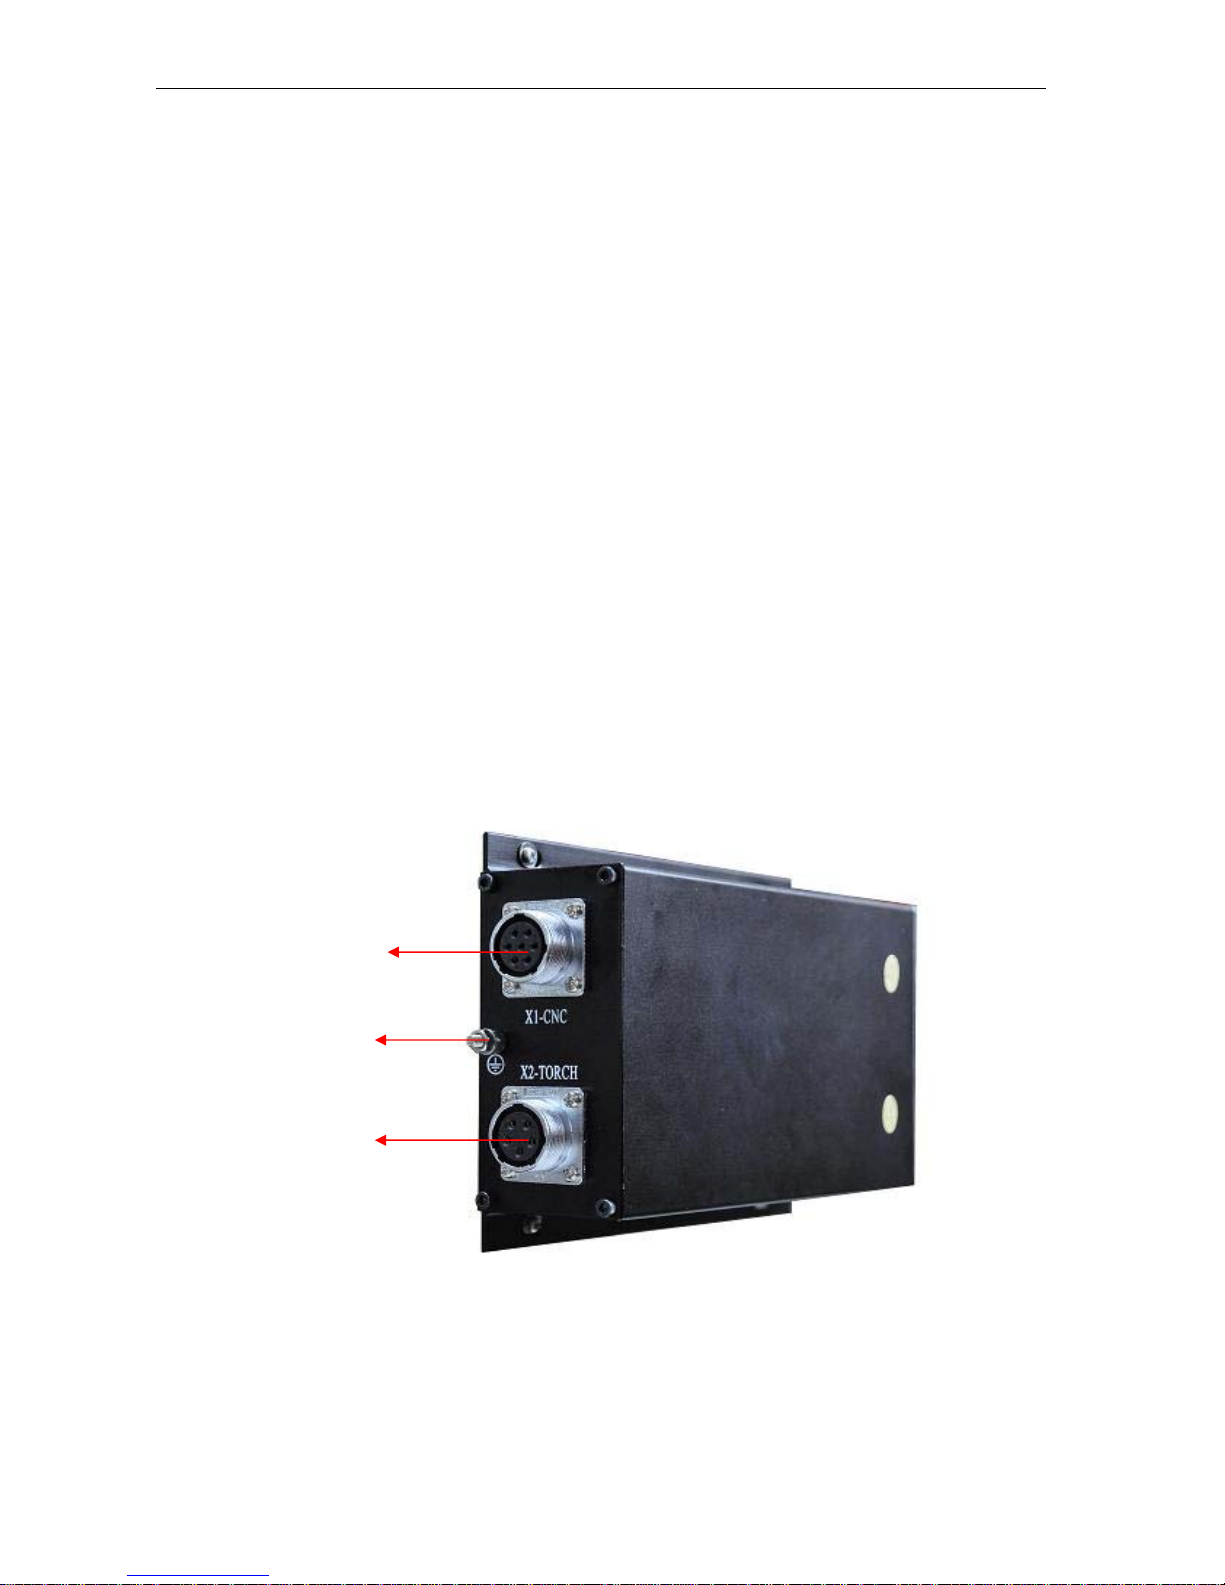
As figure 3-2 shows,CHC-200E has only two connectors for installation, one is to CNC(X1-CNC),
the other one is to lifter motor (X2-TORCH).
To CNC controller
To lifter motor
and limit switch
GND
Figure 3-2
Page 8

HYD 深圳市宏宇达数控技术有限公司
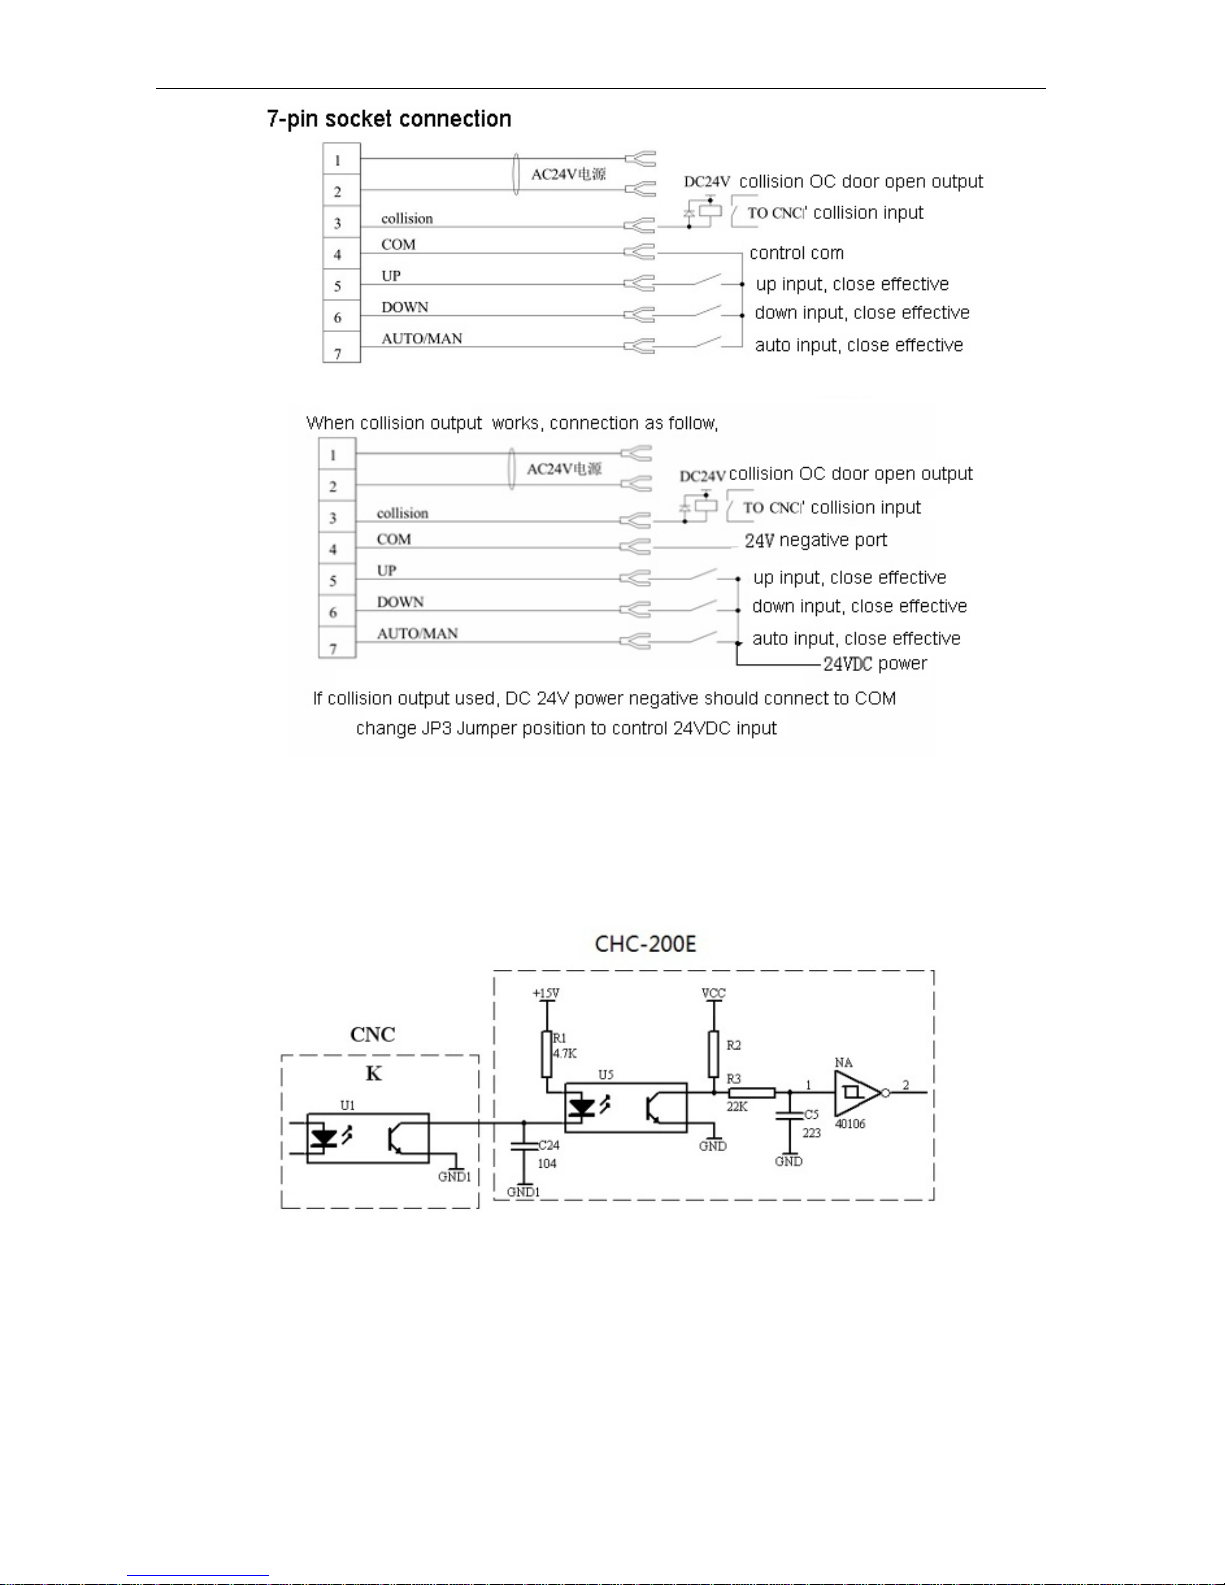
3.2.1、X1- CNC ( TO CNC)
It is a 7-pin socket, pin definition as follow,
Pin signal Specs
1 , 2 POWER
CHC200E:AC24V
CHC-300:AC/DC 24V
3 Collision
Collision output to CNC,OC door open
output
Max drive current :200mA
4 COM I/O COM
5 UP Up control, low-level effective
6 DOWN Down control, low-level effective
7 AUTO/MAN Auto control, low-level effective
Page 9
HYD 深圳市宏宇达数控技术有限公司
Figure 3-3
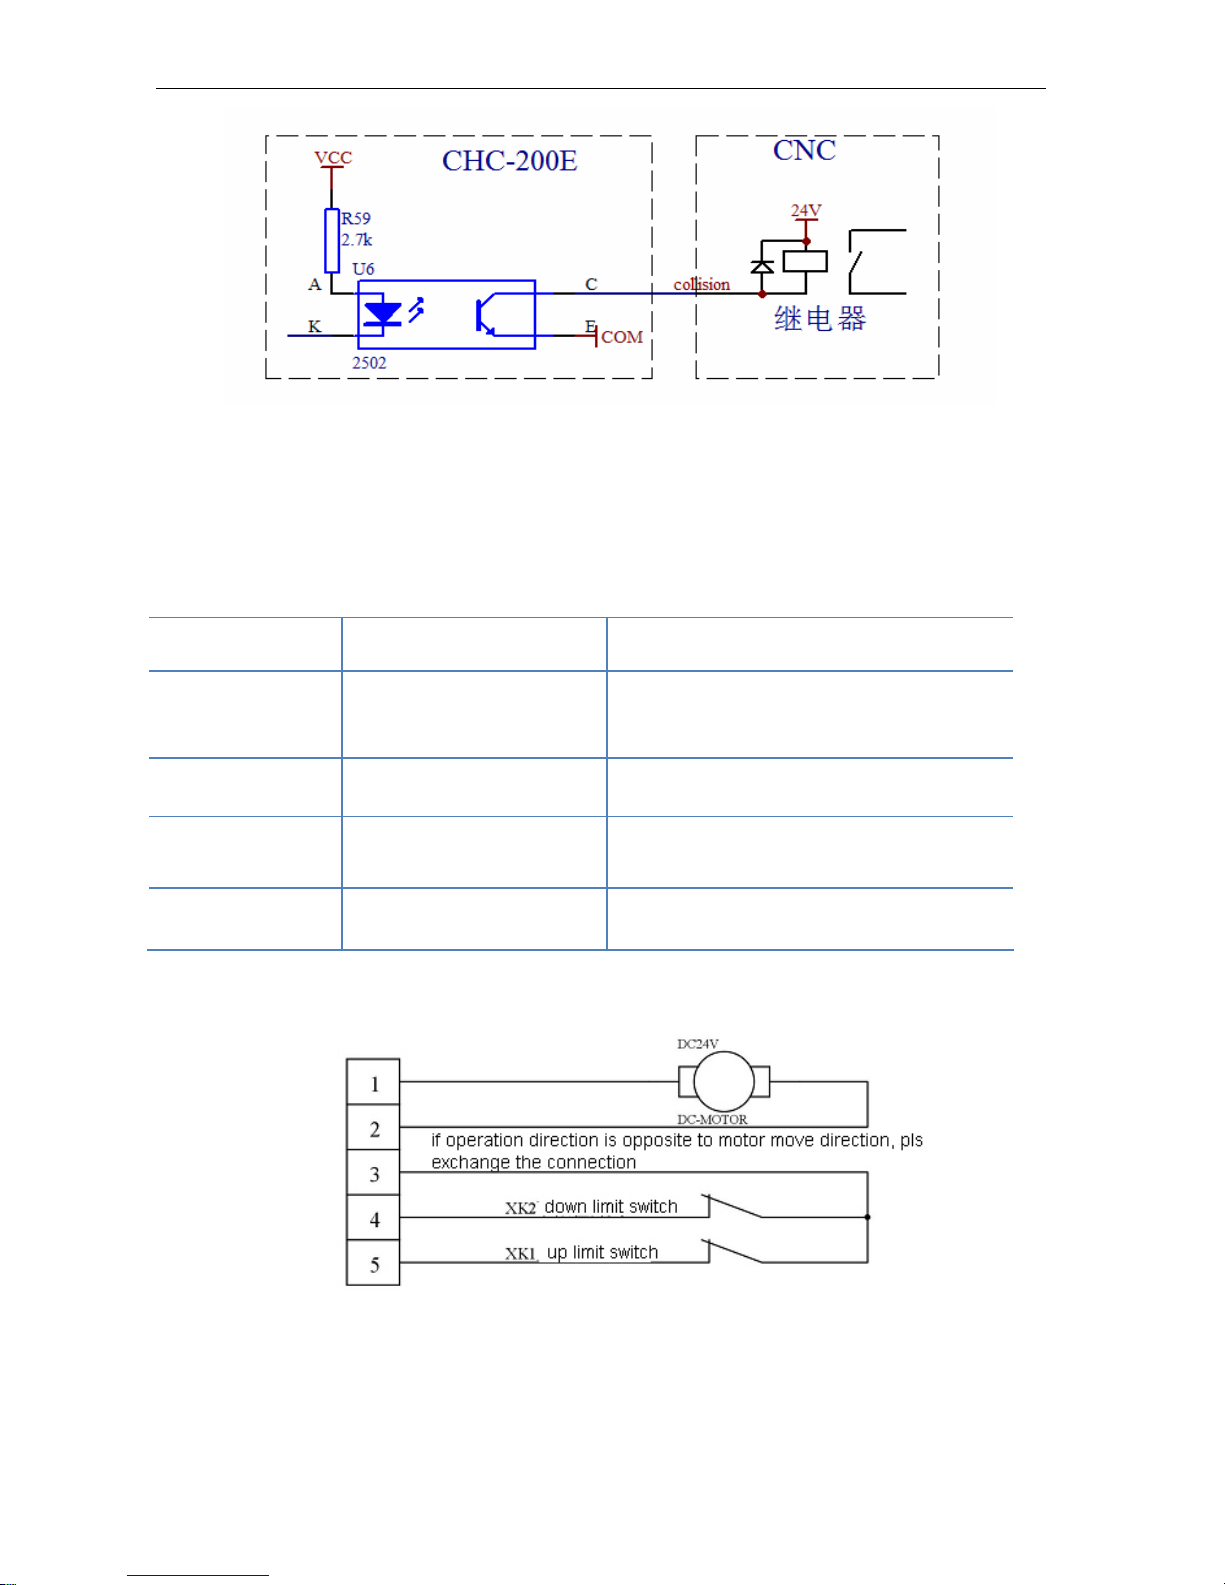
CHC-200E to CNC (X1-CNC),input/output both use optical isolation, UP/DOWN/AUTO is external
signal input to THC, Collision output from THC. All those signals share same COM. The
input/output shows as Figure 3-4,
Input circuit
Page 10
HYD 深圳市宏宇达数控技术有限公司
Output circuit
Figure 3-4
3.2.2 X2-TORCH (to torch lifter motor)
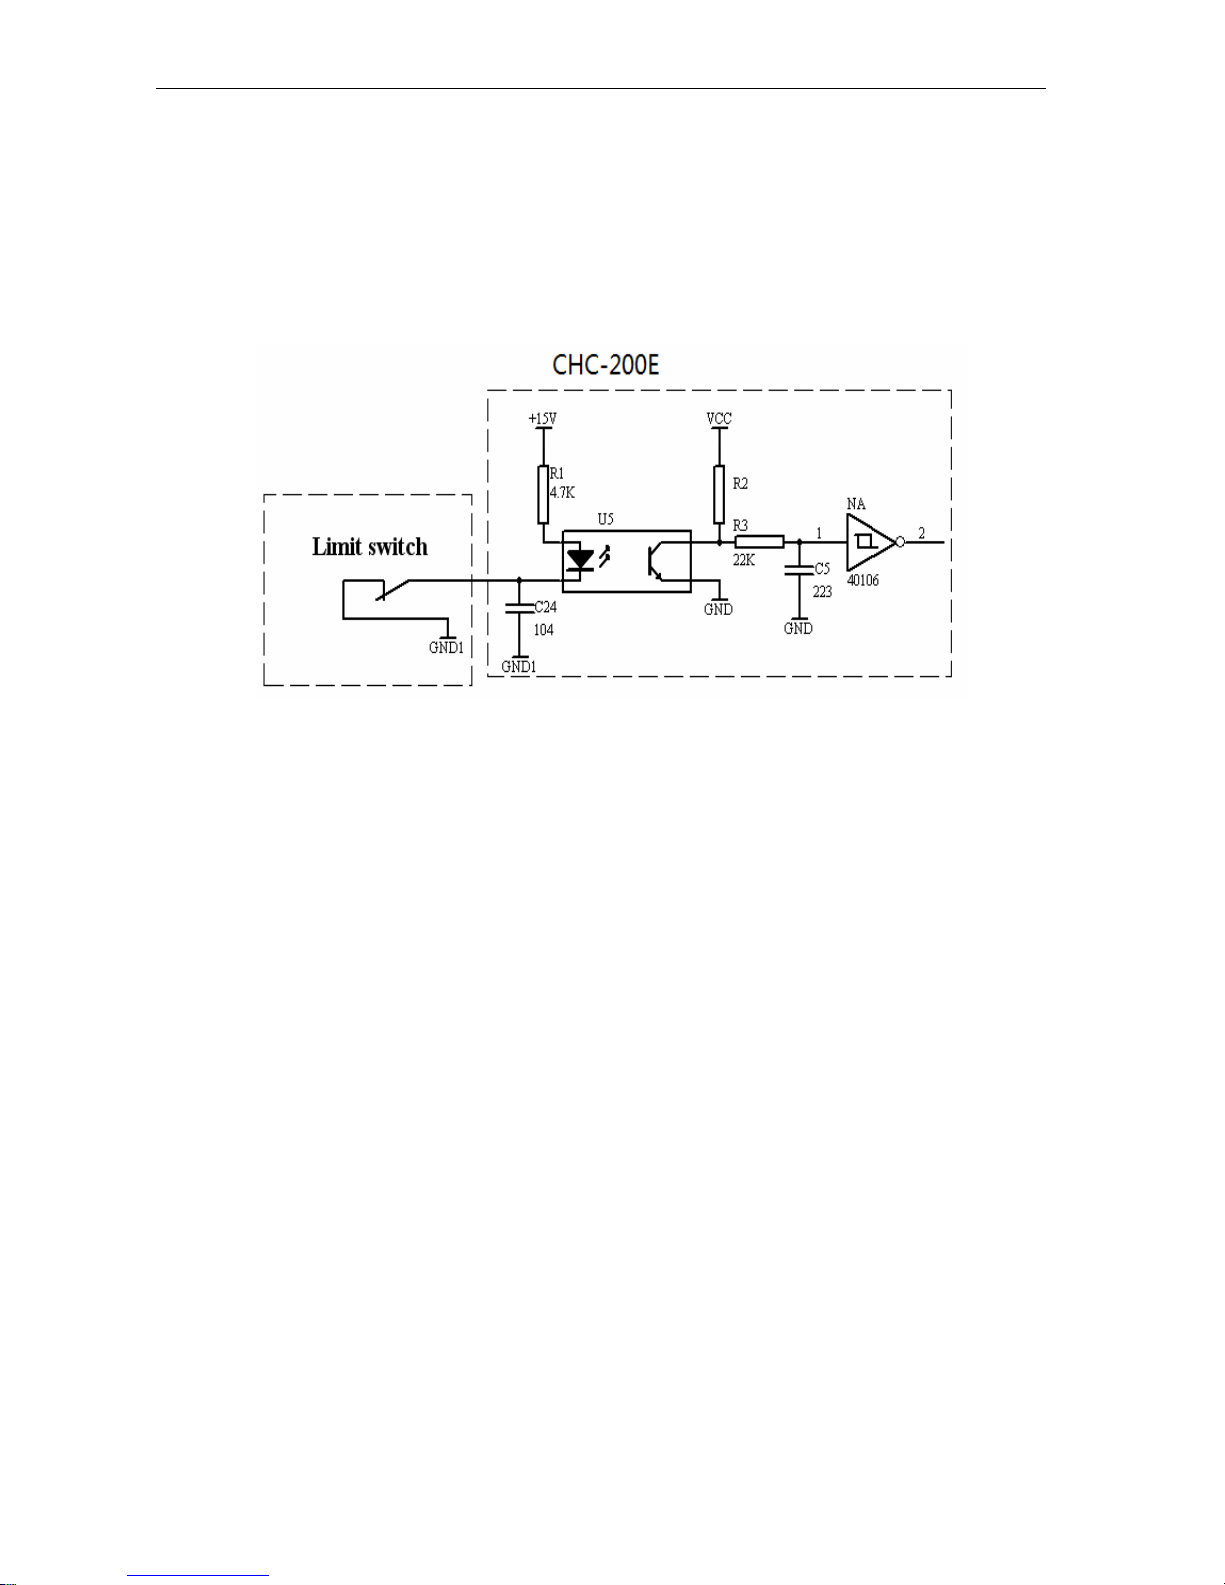
It is a 5-pin socket, pin definition as follow,
Pin signal specs
1 , 2
DC Motor Drive
(Output)
DC motor connection
Max 100W
PWM
3 LIMIT COM
Limit
COM
4
Down LIMIT
(Input)
Down limit input
Limit switch normally closed
5
Up LIMIT
(Input)
Up limit input
Limit switch normally closed
Figure 3-5
Page 11
HYD 深圳市宏宇达数控技术有限公司
Note:
1、Pin 1、2 are DC motor connector,H bridge drive,PWM speed control.
2. CHC-200E limit switch must be normally closed contact, when one side limit is open,
the move at this direction must be stopped,but the other direction move is still effective.
Limit switch connection as figure 3-6.
Figure 3-6 Limit input
Page 12
HYD 深圳市宏宇达数控技术有限公司
3.3 THC inside circuit instruction
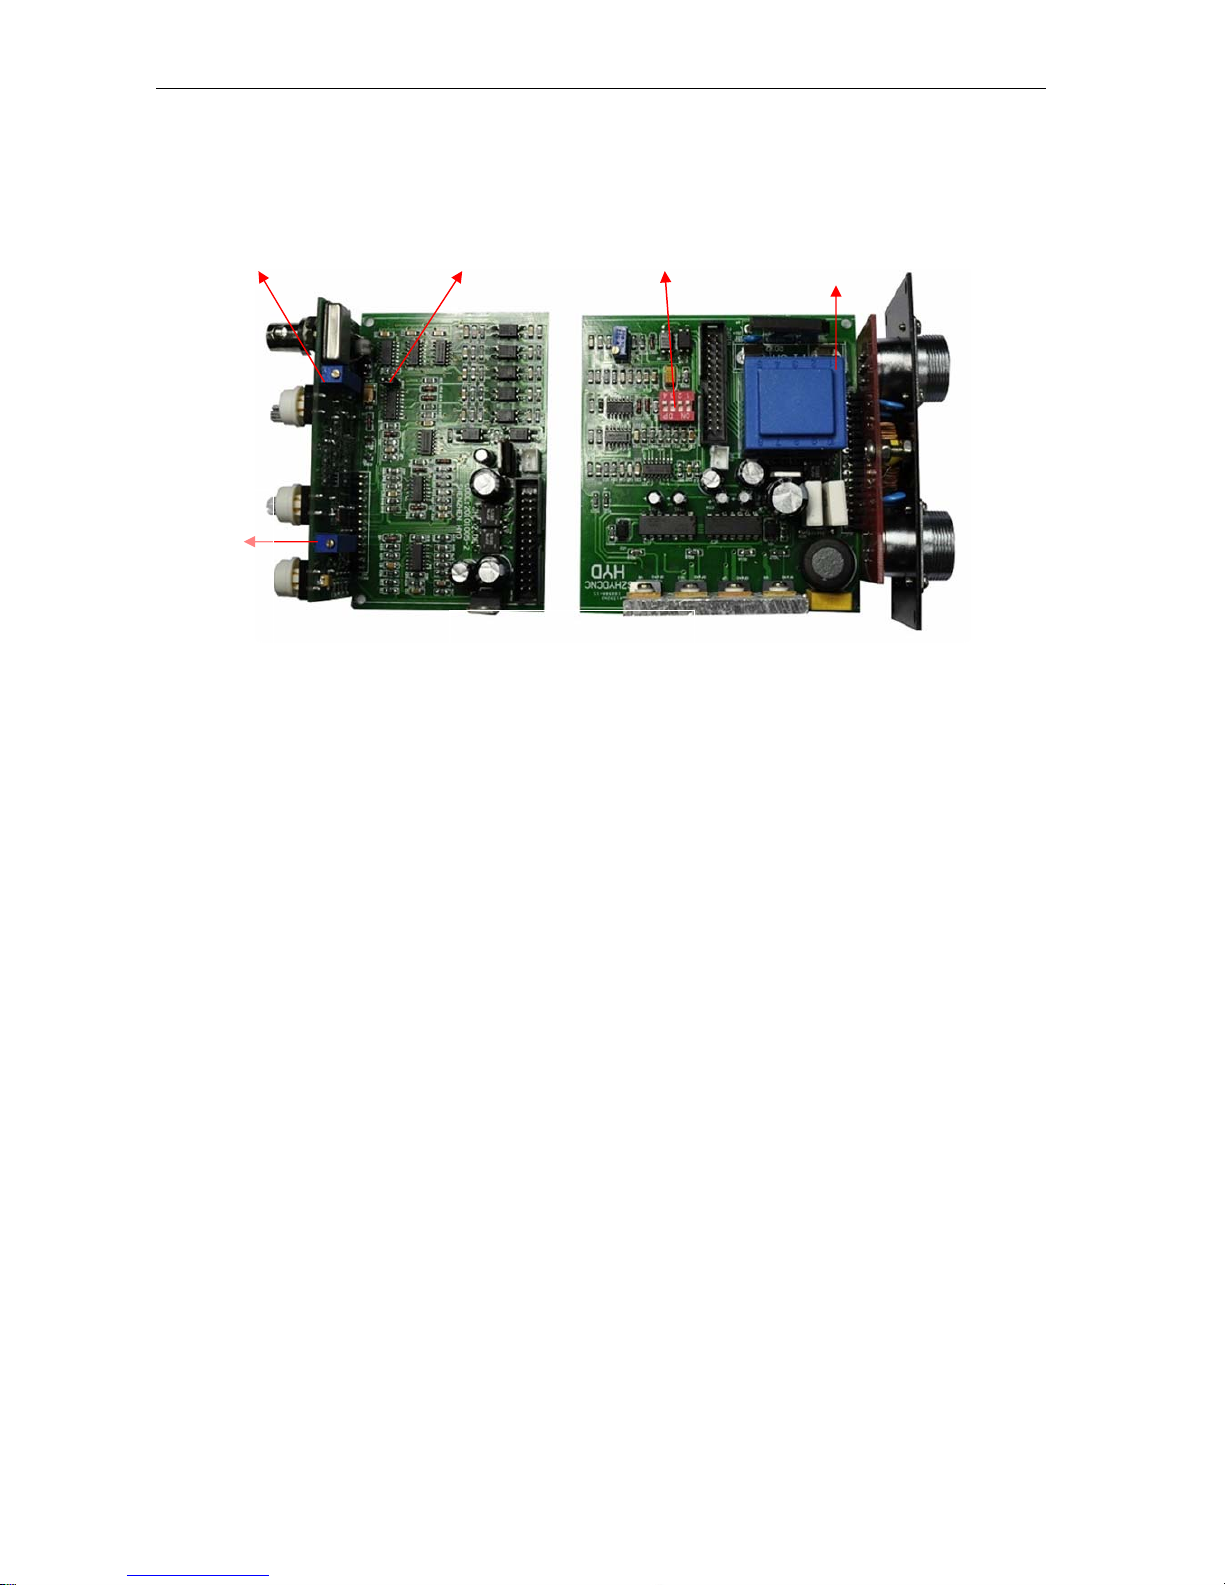
THC inside circuit configuration as follow,
Balance point adjustor JP2 discon Jumper Frequency/current set Fuse
Disconnection
adjustor
CHC-200E
Figure 3-7
1、 Balance point adjustor (R39)
It is to control THC find the balance point on Auto mode ( balance point—torch stops at this
position when it reaches the set auto height). This adjustor has passed commissioning before
delivery, so no need user’s adjusting. Unless the sensor ring installation changes or HF cable
changes.
2、 Disconnection protection adjustor
On auto mode, lift torch up when HF cable disconnected to protect torch. It has been set well
before delivery, no need user’s adjusting, unless HF cable length changed.
3、 JP2 disconnection protection jumper
Disconnection protection is non-effective when it is un-plugged. Testing as follow, disconnect
HF cable, press Auto button, if JP2 plugged torch lift up, if un-plugged, torch lift down. The
original setting is JP2 PLUGGED, when the indicator (Disconnection) turns on, and THC is on
Auto mode, torch would lift up.
4、Drive Frequency and Current set:
Motor drive circuit is H Bridge Circuit,and adjust speed via PWM.
PWM frequency changed between 9KHz and 18KHz, controlled by SP2, showed as figure 3-7.
Usually when motor is below 30W, we use 18KHz, when motor is above 30W, we use 9KHz,
the original set is 9KHz.
Page 13
HYD 深圳市宏宇达数控技术有限公司
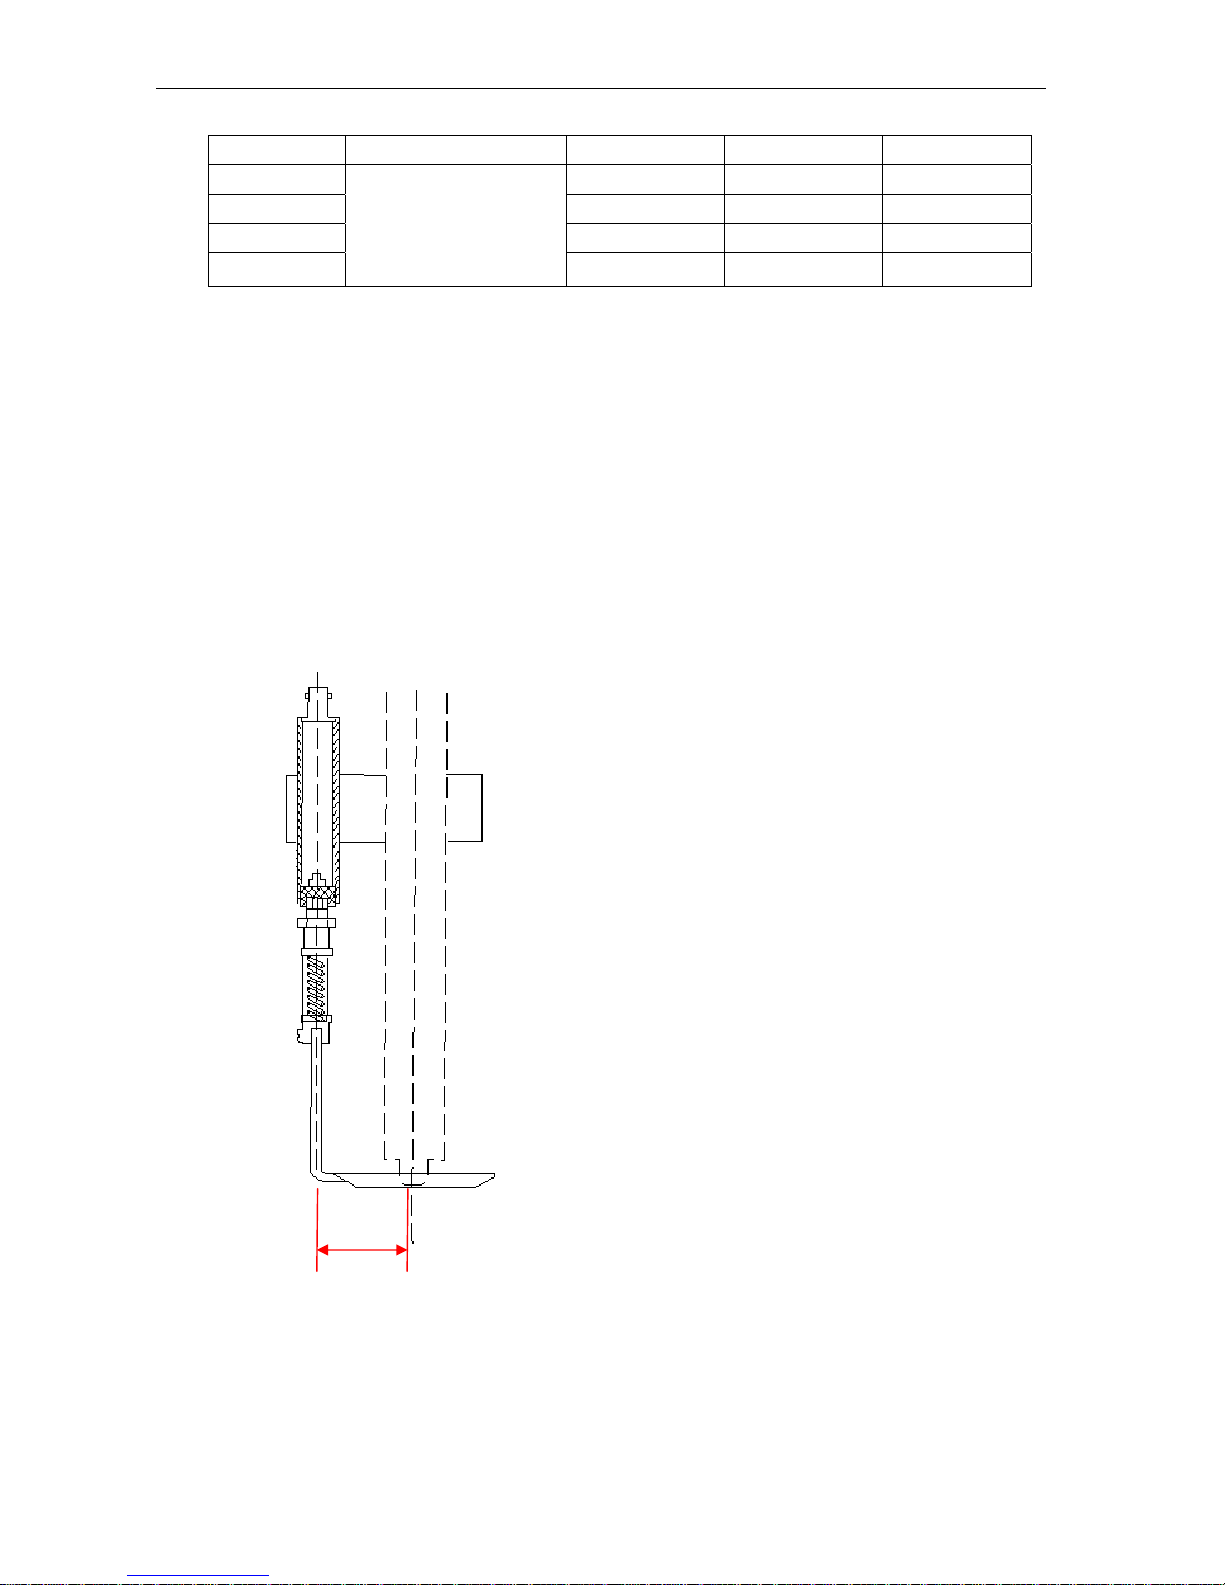
Current feedback circuit as follow,
Current 1-8 2-7 3-6 4-5
4A OFF OFF OFF
3A OFF OFF ON
2A OFF ON ON
1A
OFF :
PWM=9KHZ
ON :
PWM=18KHZ
ON ON ON
Figure 3-8
4. Installation and Commissioning.
4.1
4.1.1Sensorringinstallation
Figure 4-1 flame cutting installation
Page 14

HYD 深圳市宏宇达数控技术有限公司
4.
Installation of sensor ring: According to our years practice, sensor ring should be installed lower
about 1∽2mm than torch head to avoid the edge effect during cutting edge of workpiece, and it
anti-collision more effectively, as showed in Figure 4-1.
While on plasma cutting, the sensor ring shall be installed little higher than the torch head, to
avoid the effect of plasma arc voltage, and it needs a special insulation part supplied from HYD.
2 Commissioning.
4.2.1 Test after installation
Up/Down connects with GND, motor moves up and down, firstly make sure on Manual mode, torch
up/down is same direction as Up/Down control button.
Auto/Manual connects with GND, THC is on Auto Mode. When it is open, the manual mode is
active.
On Auto mode, if the sensor ring is not connected with THC and THC is under disconnection
protection, the indicator Disconnection would turn on, cutting torch would keep lifting up. If sensor
ring is connected with THC, the cutting torch should stop at a position via adjusting the Height
button (THC finds the Auto Height),
On Auto Mode, the height of cutting torch is under control of Height button. At first commission,
always turn clockwise maximum to get the highest height, then turn anti-clockwise, the height
decreases. In case over adjusted, cutting torch touches the workpiece; motor will be on a
shocking-state.
THC always drives motor to make sensor ring close to the Balance Position ( the set Auto Height),
and it stops when ring is around the Balance Position, 0.1m lower or higher). The closer, the more
slowly the motor runs.
Auto sensitivity meets the request of THC when sensor ring is 5—20mm away from workpiece.
4.2.2 Commissioning when THC meets problem
A、Disconnection and Collission
Disconnection
Page 15
HYD 深圳市宏宇达数控技术有限公司
When installation is well done, but Disconnection indicator is on, it means THC is under
disconnection protection, can not work under auto mode. In this situation, user should have
changed a longer HF cable, or a different cable not meet THC’s request, the commission work as
follow,
Disconnect HF cable with THC, the indicator keeps ON, connect it back.
And if disconnect HF cable at the other side, indicator still is ON. If not ON, then turn R47
Anti-clockwise till the indicator turns on.
Connect the HF cable back, if the indicator is not turn off, then turn R47 clock-wise till it turns off.
Collision
CHC-200E has Anti-collision function, it is effective on both manual/auto mode. When steel or other
conductive item touches sensor ring, torch lift up, and the collision signal is sent out from the Pin3
of 7-pin socket(OC door), when CNC receives this signal, machine pauses and waits for treatment
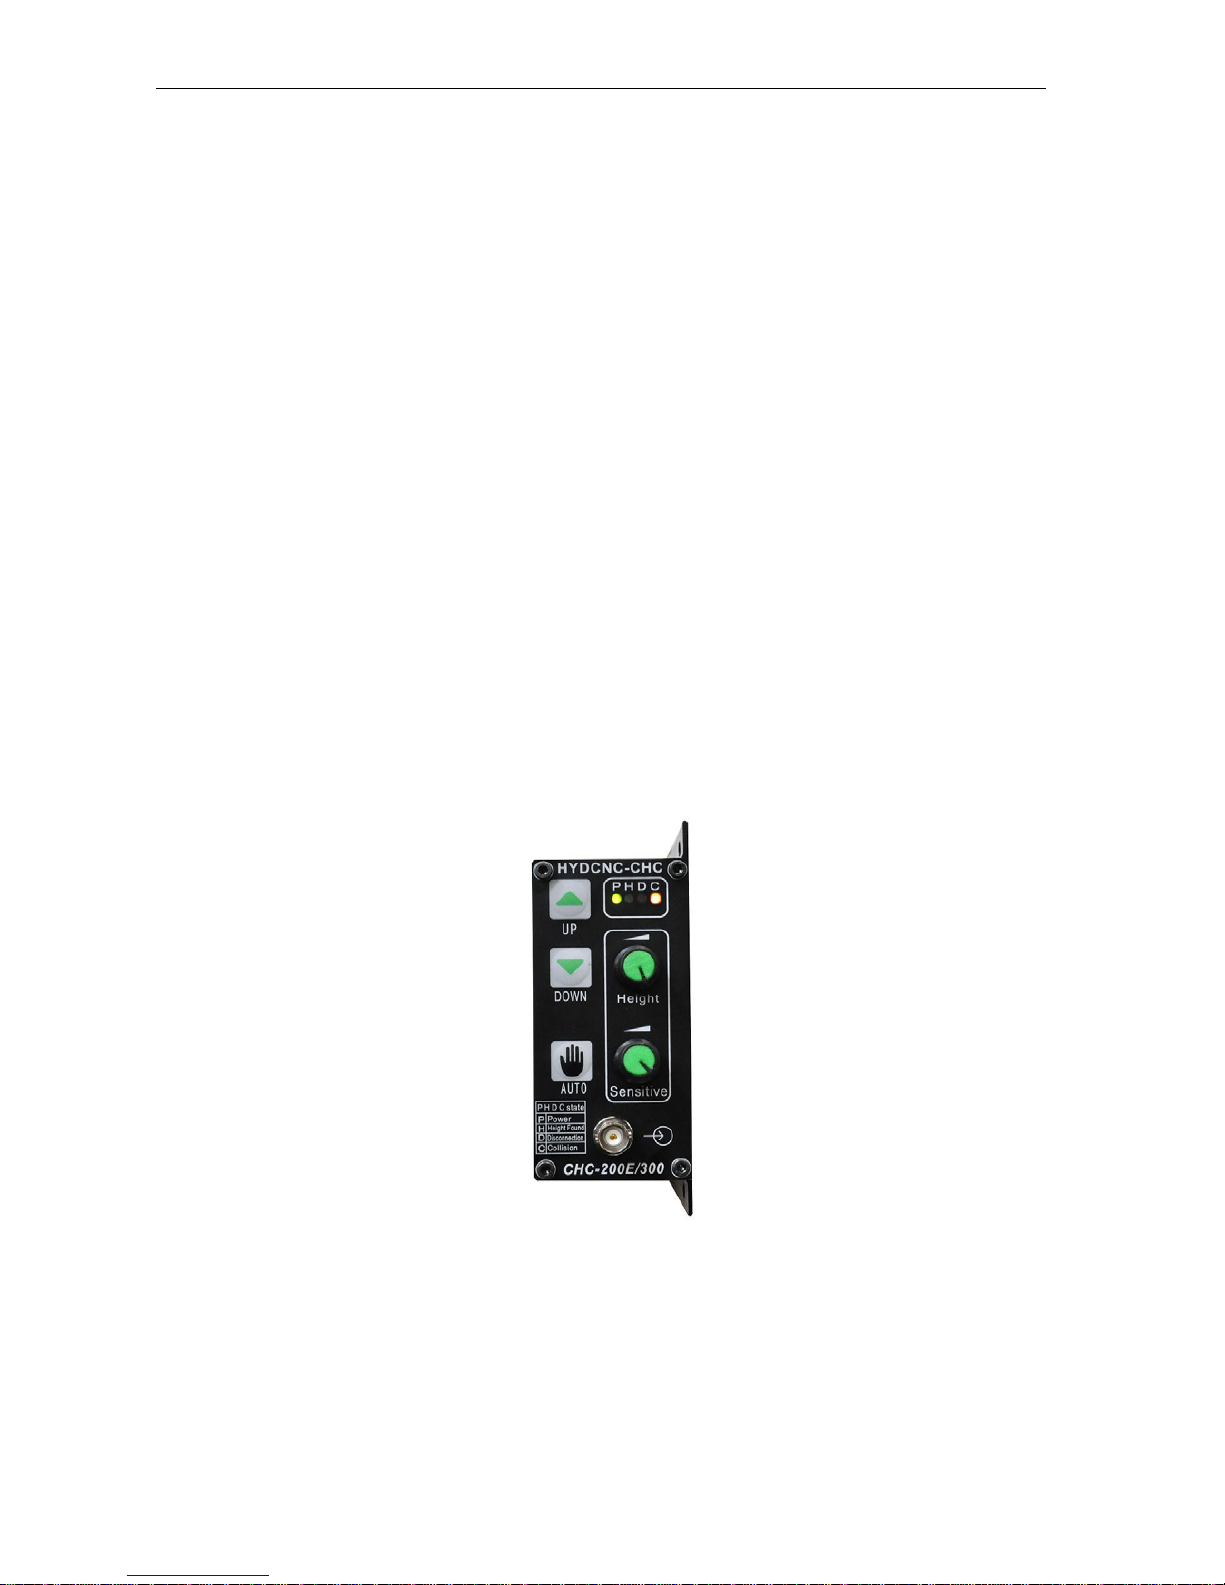
of collision. When collision happens, the C indicator(collision) on operation panel turns on, shows
as figure 4-2,
When manually press Down button, sensor ring touches steel, the C indicator flashes, torch will
move up/down on steel.
Normally human’s hand touches sensor ring, C indicator would turn on and send out collision
signal.
If user changes HF cable, or HF cable spec changes, C indicator might turn on, like follow situation,
HF cable short-circuit, once it happens, C indicator turns on, torch lift up. It could be confirmed by
checking the HF cable shield net and Signal connect or not.
HF cable gets longer, it needs to adjust R39 to find the Balance point, then THC can work right on
Auto mode, and C indicator will turn off.
Figure 4-2 collision happens“C” indicator is on
Page 16
HYD 深圳市宏宇达数控技术有限公司
B、None collision or disconnection
As the difference of cutting torch, THC can not find the Balance Position in all range of Height
adjustor, torch keeps lifting up or down. In this situation, DO NOT open the THC cabinet, just do it
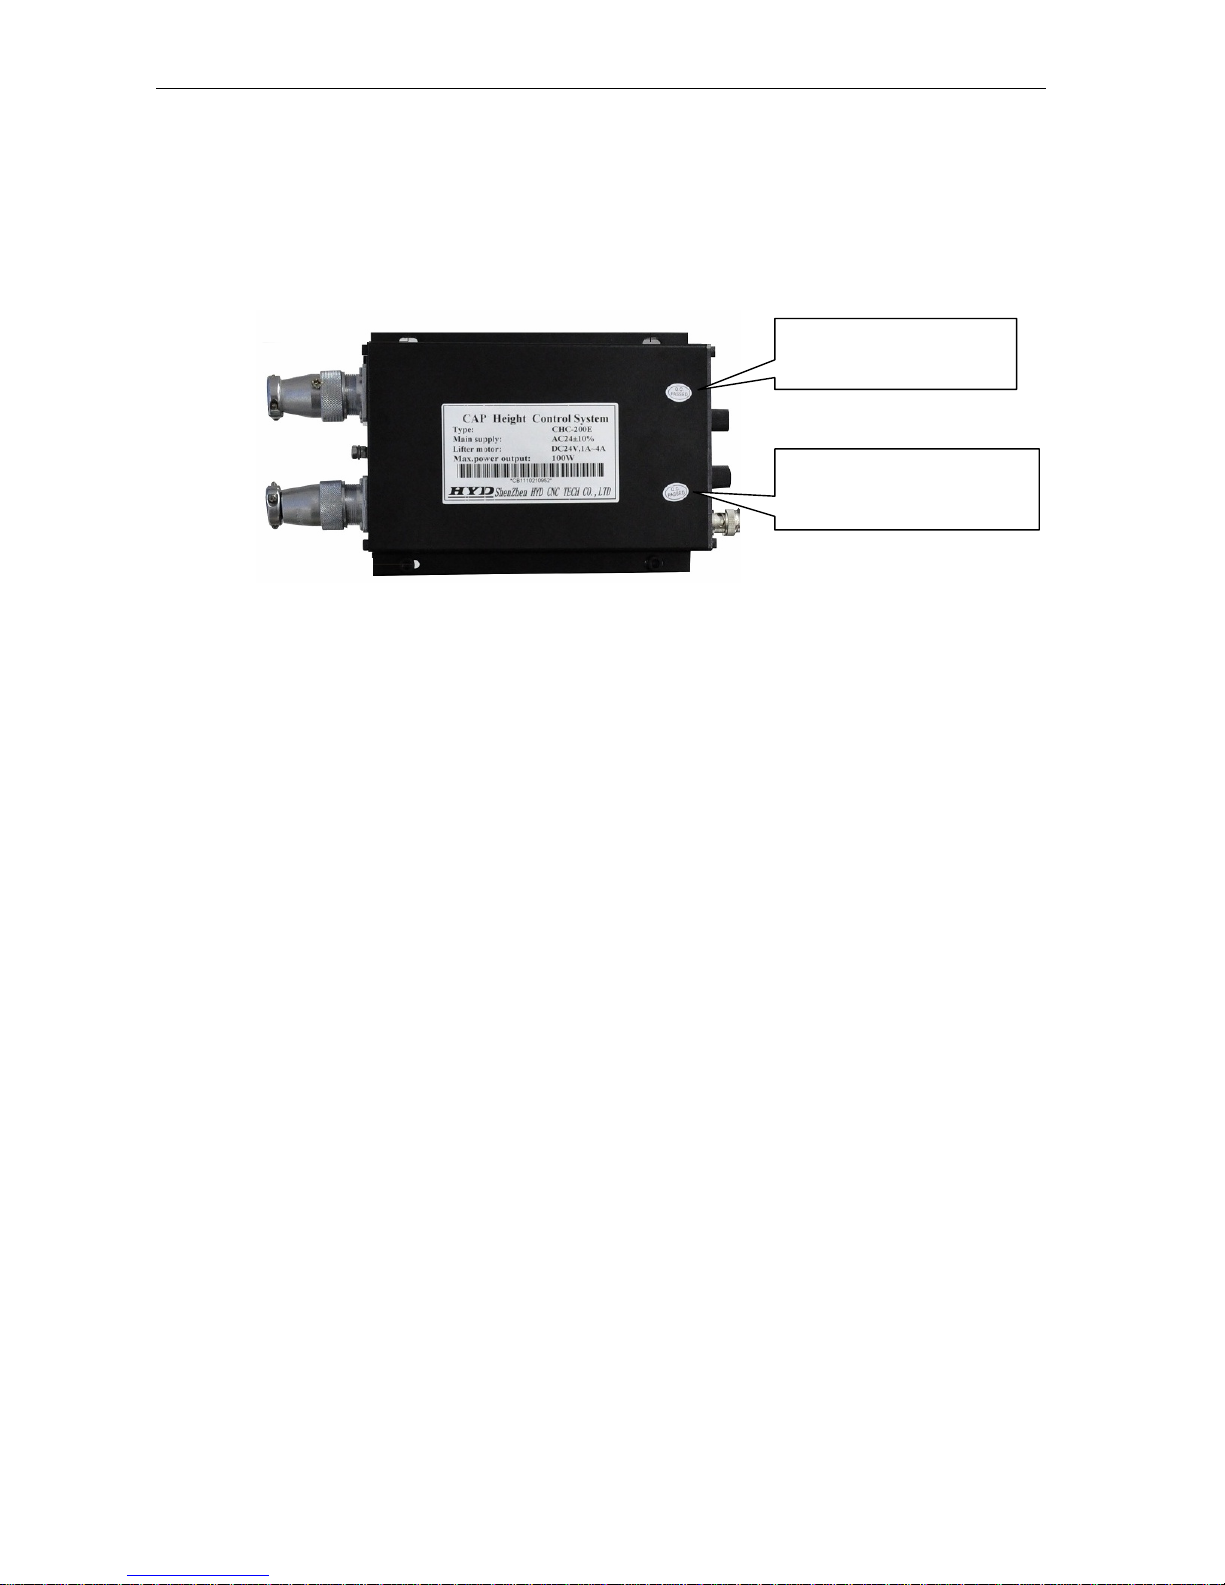
as follow introduction, shows as Figure 4-3.
Disconnection
ad
j
ustor(R47)
Balance position
adjustor (R39)
Figure 4-2
Note:Firstly to confirm the two situations when torch keeps lifting up before adjusting
1、On auto mode, THC controls torch up/down to find the Balance point, if the Auto height is set
too high, torch would keep lifting up. Manual control torch down is effective, because Manual
control has priority against Auto Control. In this situation it needs to adjust the Height Button,
further adjust R39.
2、On auto mode, when HF cable is disconnected or short-connected, or collision happens,
THC lifts torch up for protection, Manual control down is non-effective. This Up has priority
against Down.
In situation 1, Press AUTO button and hold, turn Height button clockwise maximum. Then, motor
would control sensor moves, please turn Height button left/right, torch should stop at some position
(Balance Point—Auto Height). If not, please use a small screwdriver to adjust R39 as follow step, (no
need to open THC cabinet, just the screwdriver passes the small hole).
First, set on Manual mode, lift torch up over 50mm against steel plate.
Press Auto button to turn Auto on, if torch lift down, means Auto Height is too low, then adjust R39
clockwise to raise the auto height. If torch lift up, means Auto height is too high, turn anti-clockwise
Please protect the adjust Resistor to avoid damage, Do Not exceed 1/4 round on every turn,
and make record of turn direction.
Every time after turned R39, turn Auto mode on, to check the torches move for Balance Point.
Page 17
HYD 深圳市宏宇达数控技术有限公司
When torch can stops at a set height by adjusting R39, then turn Height button to set the Auto height
at right high on Auto mode.
Note: The THC has passed all commissioning work before delivery, please NOT adjust the
inside resistor without informing your supplier.
The adjustable resistor spec
Mark no spec function
R39 1K Auto height adjusting
R47 20K Disconnection protection
 Loading...