

MINIFLEX LR PROGRAMMABLE LEVEL CONTROLLER
INSTALLATION AND OPERATION MANUAL
Rev 0
Hycontrol Limited, Larchwood House, Orchard Street,
Redditch, Worcestershire, B98 7DP, UK.
Tel: +00 44 (0)1527 406800 Fax: +00 44 (0)1527 406810
Email:
sales@hycontrol.com Web: www.hycontrol.com

MINIFLEX LR USER MANUAL - INDEX
Page Drawings
Introduction
1
SECTION 1 Installation
Transceiver Mounting 2 Fig. 1
Transceiver Wiring 3 - 4 Fig. 2 & 3
Transducer Mounting 5 Fig. 4
Transducer Alternative Mounting 6 Fig. 5
Transducer Mounting Faults 7 Fig. 6
Transducer Stand Pipe 7
Transducer Cable Extensions 8 Fig. 7 & 8
Temperature Sensor 9 Fig. 9
SECTION 2 Easy start for Miniflex LR
Quick Start Guide 10
Principle of Program ming 10
Keypad Definitions 10 - 11
To Enter Programme 11
To Enter the Password 11
To Change an Option 12
To Reset 13
Simulation Mode 13
SECTION 3 Programming the instrument
Parameter List 14 - 34
SECTION 4 Miniflex LR Default programs
1. Distance Measurement Mode 35
2. Level Measurement Mode 36
3. Contents, Volume Conversion 37
4. Pump Control 38
5. Open Channel Flow 39 - 40
6. Differential 41 - 42
SECTION 5 Commissioning fault finding
APPENDIX 1 LINEARISATION OF SPECIAL
43 - 47
48 - 52
VESSELS OR FLUMES
APPENDIX 2 SPECIFICATION
APPENDIX 3 INSTALLATION INSTRUCTIONS
53
54 - 55
FOR ATEX TRANSDUCER IN
HAZARDOUS AREA
APPENDIX 4 PARAMETER SETTINGS
APPENDIX 5 PARSHALL FLUMES
APPENDIX 6 WIRING DIAGRAM FOR
56 - 62
63
64
SYNCHRONISATION OF
INSTRUMENTS
APPENDIX 7 MINIFLEX LR PROGRAMMING
65 - 74
CHARTS

SECTION 1
MINIFLEX LR PROGRAMMABLE LEVEL CONTROLLER
USER MANUAL
INTRODUCTION
Miniflex LR is a programmable multi-purpose level measurement and flow control
instrument. It consists of two elements, a wall mounted transceiver, which has a display and
an integral keypad for programming, and a transducer, which must be mounted directly above
the surface to be monitored.
Ultrasonic pulses are transmitted by the transducer to the surface of the material to be
monitored and are reflected back to the transducer. The time period between transmission and
reception of the sound pulses is directly proportional to the distance between the transducer
and the material.
Since speed of sound through air is affected by changes in temperature, a separate or
integrated temperature sensor may be fitted to improve accuracy.
Miniflex LR is capable of the following functions:-
a) Distance Measurement (distance from a datum)
b) Level Measurement (height above datum)
c) Volume Measurement
d) Pump Control
e) Open Channel Flow Measurement (O.C.M.)
f) Differential Level Measurement
WARNING
DO NOT OPEN THE TRANSCEIVER
TERMINAL COVER WHEN THE POWER IS ON TO
THE SUPPLY OR RELAY TERMINALS.
IMPORTANT INSTALLATION REQUIREMENTS
1: A SWITCH OR CIRCUIT BREAKER SHALL BE INCLUDED IN
THE INSTALLATION
2: IT SHALL BE IN CLOSE PROXIMITY TO THE EQUIPMENT AND
WITHIN EASY REACH OF THE OPERATOR
3: IT SHALL BE MARKED AS THE DISCONNECTING DEVICE FOR
THE EQUIPMENT
Ref: MINIFLEX LR MANUAL Rev. 0 1
SECTION 1
INSTALLATION
Transceiver For ATEX hazardous areas refer to Appendix 3.
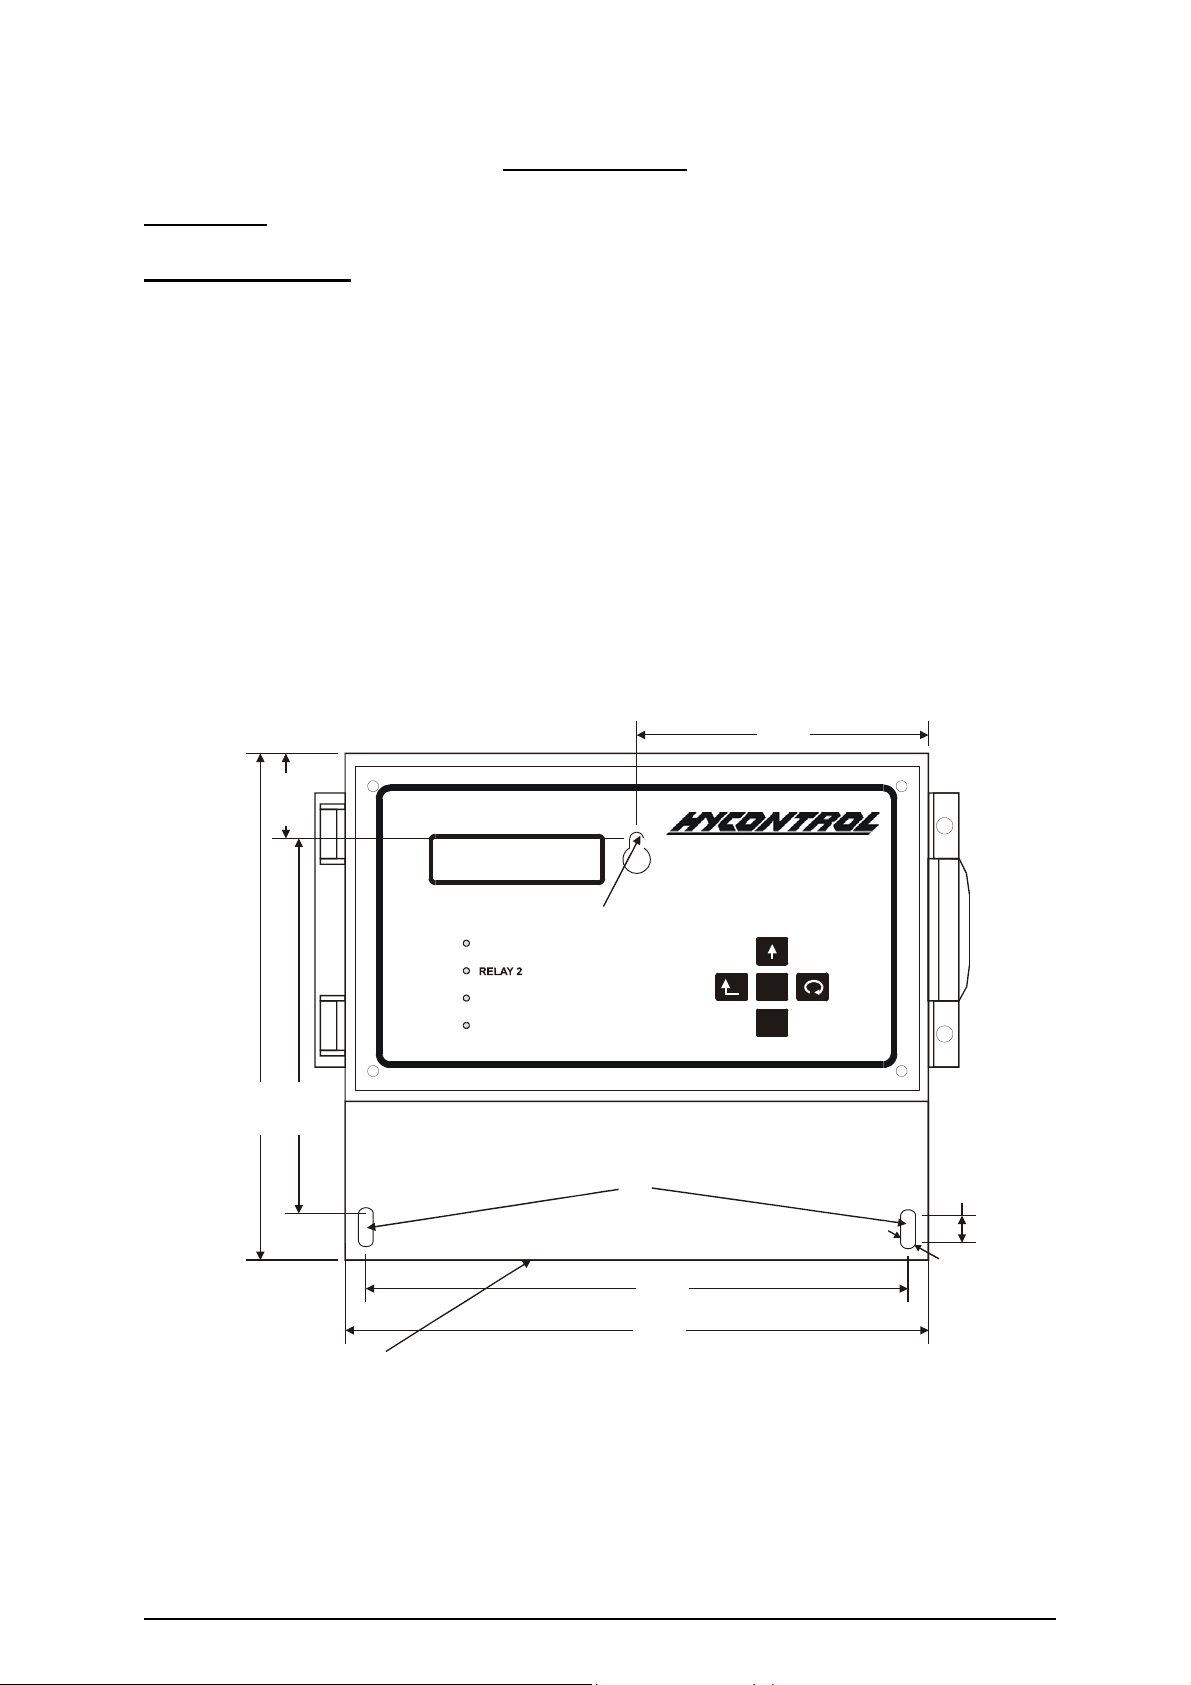
Enclosure mounting
Secure one of the three fixing screws provided with the instrument 30mm below the centre of
where the top of the instrument is to be located. This fixing screw will need to be left 4mm
proud of the surface allowing the instrument to be hung from this point. The instrument is
then secured in place by 2 more screws using the two mounting slots exposed when the
terminal cover is removed. DO NOT use excessive force when tightening the fixings and
avoid any distortion of the enclosure.
Ensure that the mounting surface is not subject to vibration and is not in close proximity to
high voltage cables, contactors or drive controls. The unit should not be mounted in a
confined space where temperatures may exceed the normal working temperature. If the unit
is mounted outside, it must be protected from direct sunlight or severe weather conditions.
Select appropriate knockouts in the base of the enclosure and fit appropriate cable glands to
maintain the IP65 rating.
106.5
31.00
MINIFLEX LR
LEVEL CONTROLLER
INCREASE
MOUNTING POINT 1
RELAY 1
FOUND ON REAR
RELAY 3
ECHO
HYCONTROL LTD, ENGLAND
TEL :+44(0) 1527 406800 Websi t e: www.hycontrol.com
BACK
DIGIT
M
ENT
(MODIFY)
OPTION
/ DIGIT
185.0
137.0
MOUNTING POINT 2 & 3
(REMOVE TERMINAL COVER)
10
∅
198.0
213.0
5.4
KNOCKOUTS FOR 1 HOLE 16mm AND 5 HOLES 20mm
∅∅
NOTE: - All dimensions are shown in mm
Figure 1: Enclosure dimensional & mounting drawing
Ref: MINIFLEX LR MANUAL Rev. 0 2
SECTION 1
Electrical and Transducer Connections
The Miniflex LR has two-part screw terminals; the top part can be removed for ease of connection. It can be
powered from either an AC or DC supply.
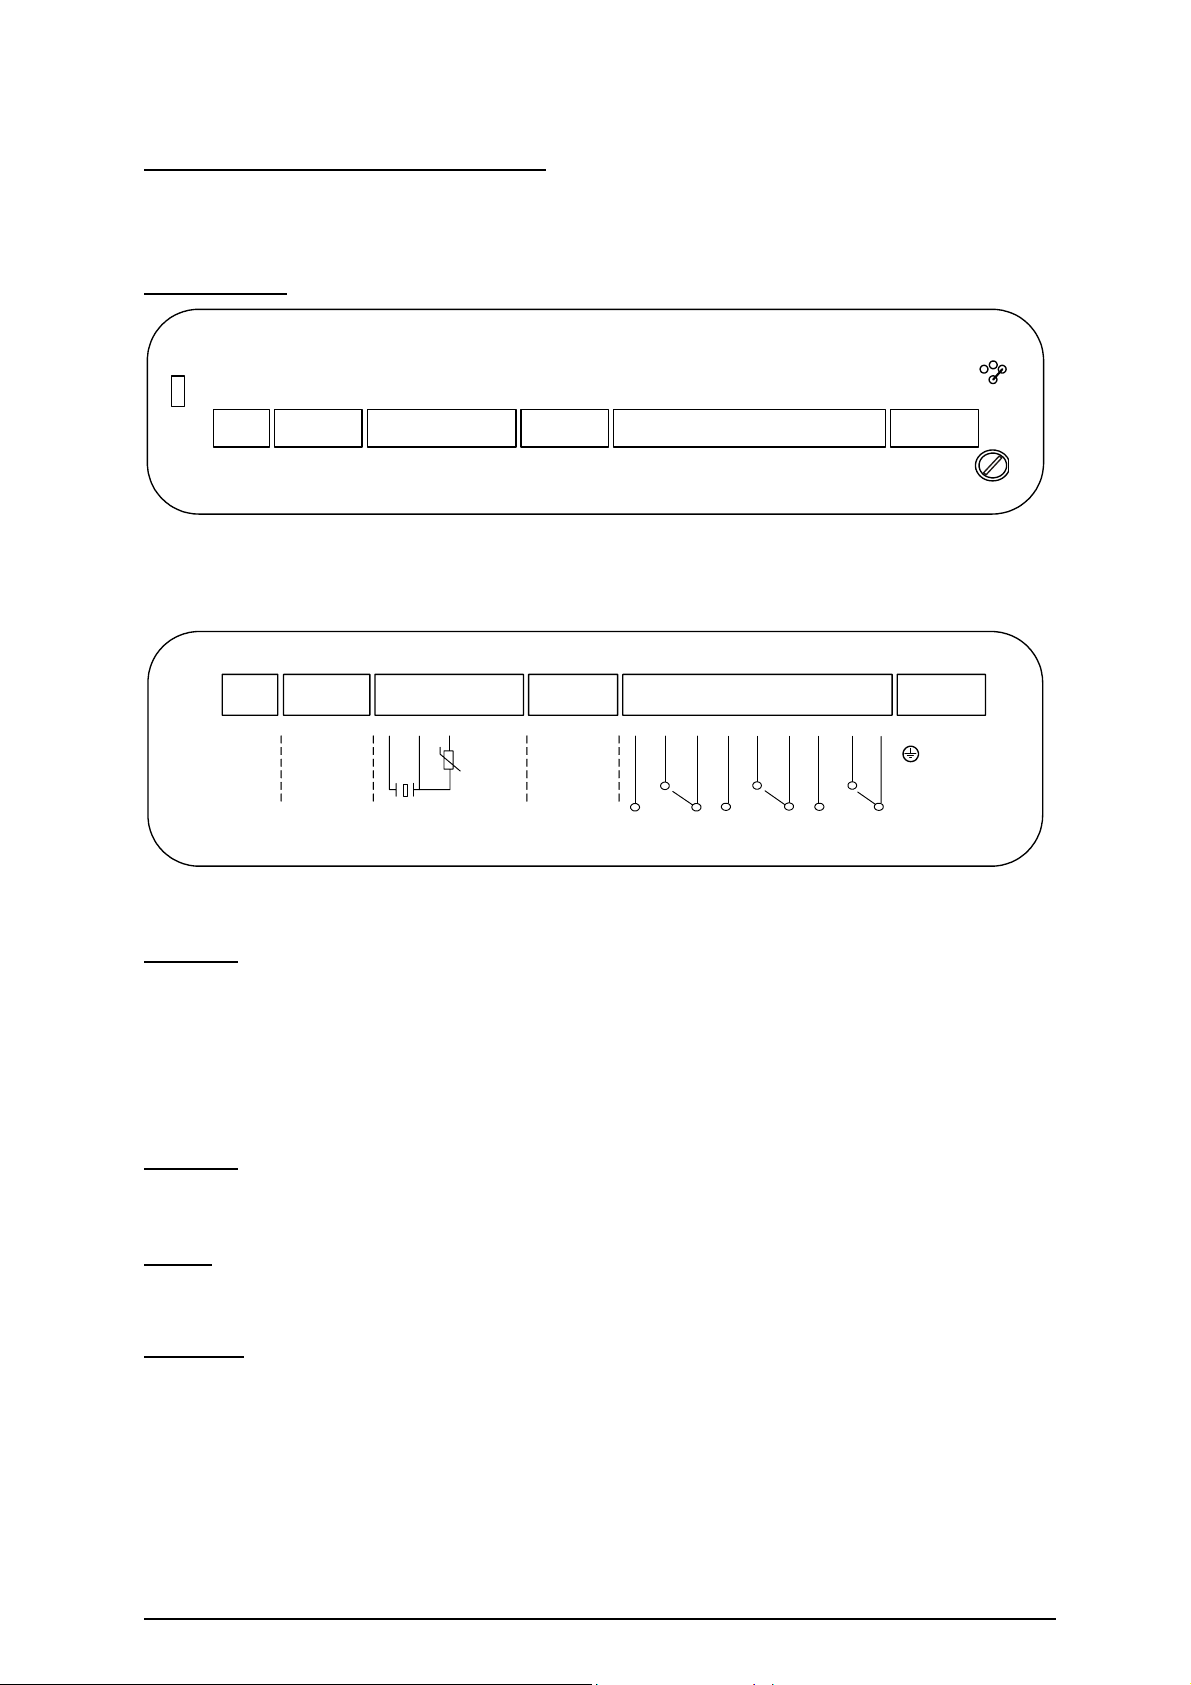
Power Supply Remove the terminal cover to expose the terminals shown below.
F4
T250mA
TB1
1 2 3 4 5 6 7 8 9 101112131415161718192021222324
TB2 TB3 TB4 TB5 TB6
95V
25
F3
T160mA
110V
230V
Figure 2: Terminals as seen in Miniflex LR.
The wiring instructions are on the inside of the terminal cover as shown below.
1
2 3 4 5 6 7 8 9 101112131415161718192021222324
+
DC POWER
21.6-30VDC
9W
SHIELD
-
RS485
+
TRANSDUCER
-
SHIELD
HOT
SYNC
SHIELD
+
-
ISOLATED
ANALOG
OUTPUT
RELAY 1
RELAY 3RELAY 2
E
L2
AC POWER
95/110/230V AC
+10%/-10%
50/60 HZ 12VA
25
LN
L1
Figure 3: Wiring diagram label inside MIniflex LR terminal cover
AC Supply The instrument will accept either 95V, 110V or 230VAC ±10%, 50Hz or 60Hz, 12VA.
A time lag fuse T160mA is fitted.
Select the voltage required using the jumper link situated just above terminal TB6.
Pass mains cable through cable gland and - Connect:- Earth to terminal 23
Neutral to terminal 24
Live to terminal 25
DC Supply The instrument will accept 21.6 - 30VDC, 5W. A time lag fuse T250mA is fitted.
- Connect :- Positive +ve to terminal 1
Negative -ve to terminal 2
Relays
3 SPDT Relays - rated at 8A/250VAC 8A/30V DC resistive, are connected at terminals 14 to 22, for activating
external alarms, contactors, pumps etc..
Transducer
Transducer RYV15 & RWV15 - is connected:- Black to terminal 6
Blue to terminal 7
Shield to terminal 9
Ref: MINIFLEX LR MANUAL Rev. 0 3

Temperature compensated transducer RYT15 & RWT15 - is connected: Shield to terminal 6
Blue to terminal 7
Black to terminal 8
Analogue Output
Analogue - is connected : - Shield to terminal 11
Positive +ve to terminal 12
Negative -ve to terminal 13
RS485 Output
RS485 - is connected : - Shield to terminal 3
Negative –ve to terminal 4
Positive +ve to terminal 5
Note: - See Page 8 for transducer extension cables.
SECTION 1
Ref: MINIFLEX LR MANUAL Rev. 0 4
SECTION 1
Transducer Mounting
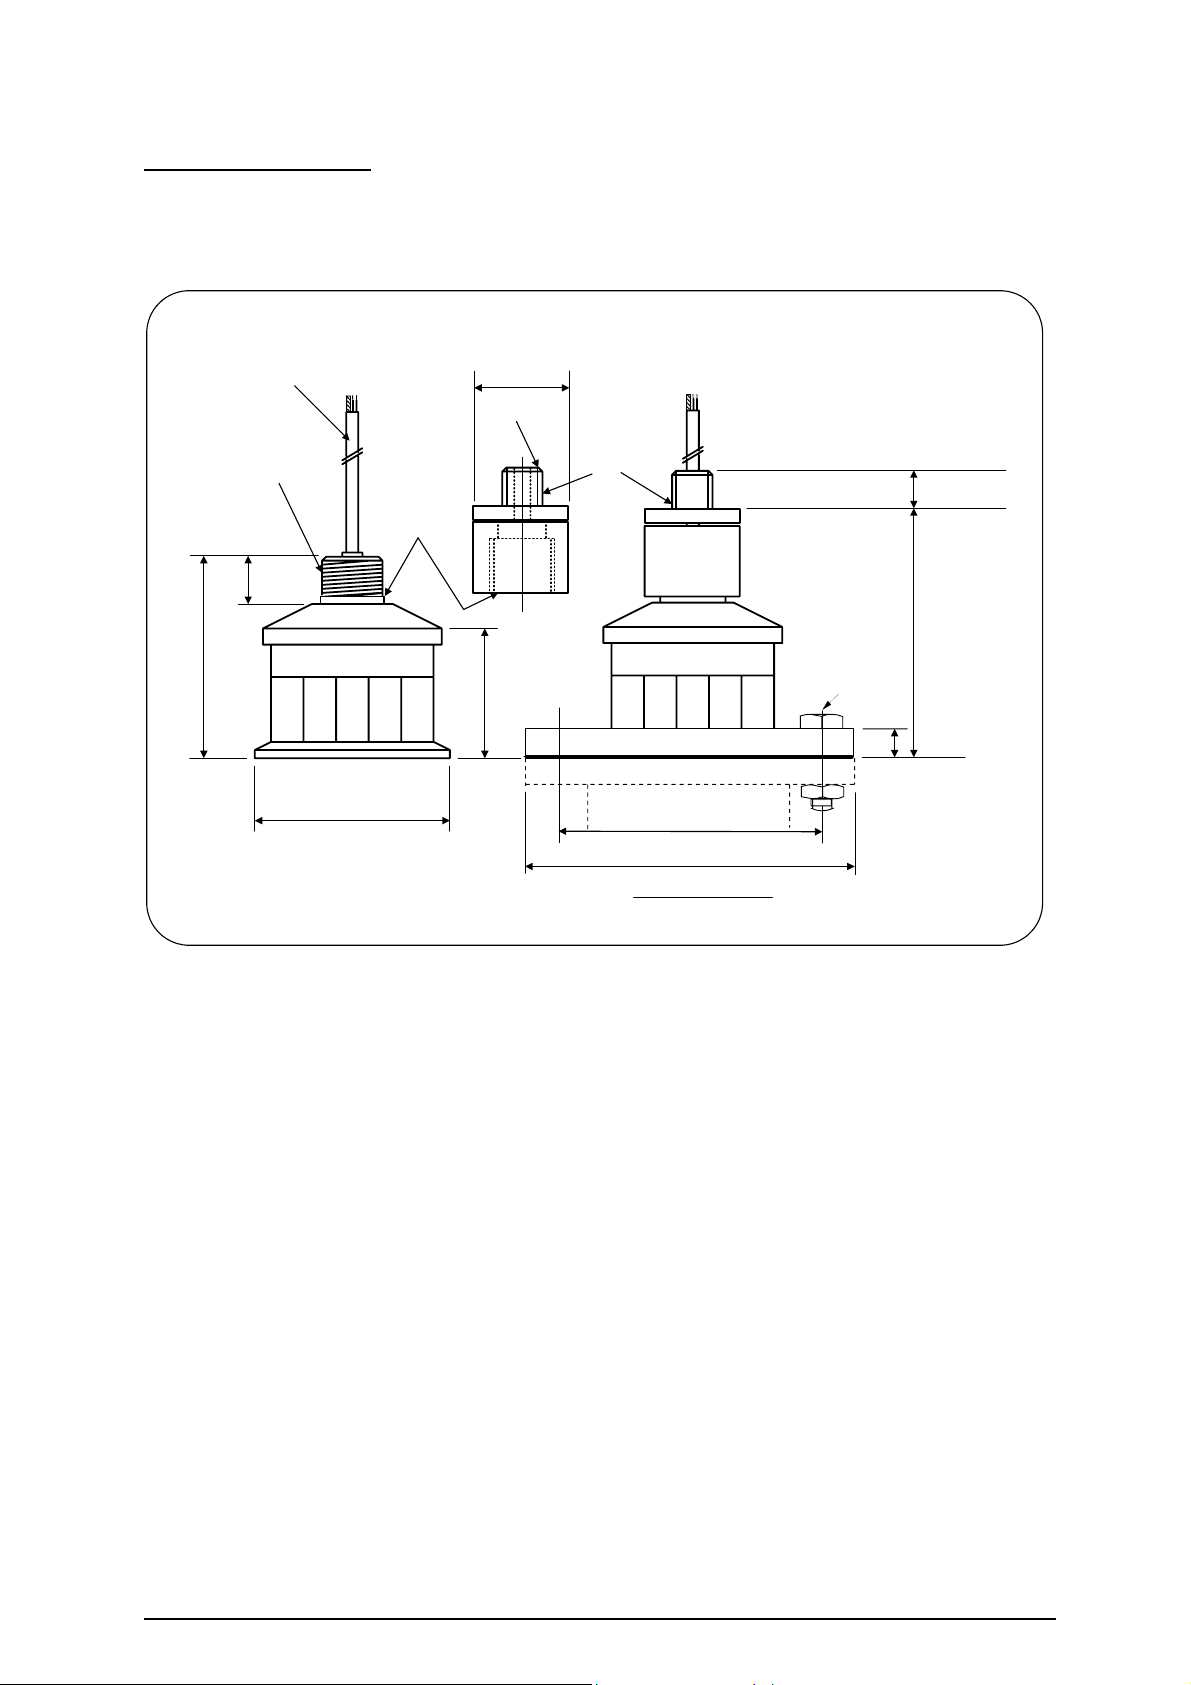
The transducer can be supplied as 'standard' or mounted in a flange. For applications
requiring chemical compatibility the transducer is available fully enclosed in PVDF in a
standard mounting or with flange. Figure 4 shows the dimensions:
10m cable 6.0 dia
50 dia
M20 x 1.5
M32 x 1.5
Isolation Kit
Fit as shown
20
102
26
62
No. & size of bolts
to suit flange selected
20
130
assembled
height
92 dia
Bolt hole PCD to suit
flange selected
Dia to suit flange selected
INTEGRAL FLANGE
Figure 4: Transducer mounting diagram
An isolation kit is provided with each transducer to minimise any ringing transmitted through
the mounting structure.
The transducer must be mounted perpendicular to the monitored surface and, ideally, at least
0.5 metres above it.
The transducer has a 12° inclusive conical beam angle at -3dB and must be mounted with a
clear unobstructed sight of the liquid to be measured over the complete measurement range.
The transducer is provided with integral cable which can be extended up to 300 metres using
a suitable junction box and RG62AU cable. The temperature compensated transducer
requires an additional single core screen extension, or twin-ax cable.
Refer to Page 8 for full details.
Transducer cables and temperature compensation cables can be run together but
should be separated from power cables by at least 150mm and preferably installed in
their own earthed steel conduit.
Ref: MINIFLEX LR MANUAL Rev. 0 5
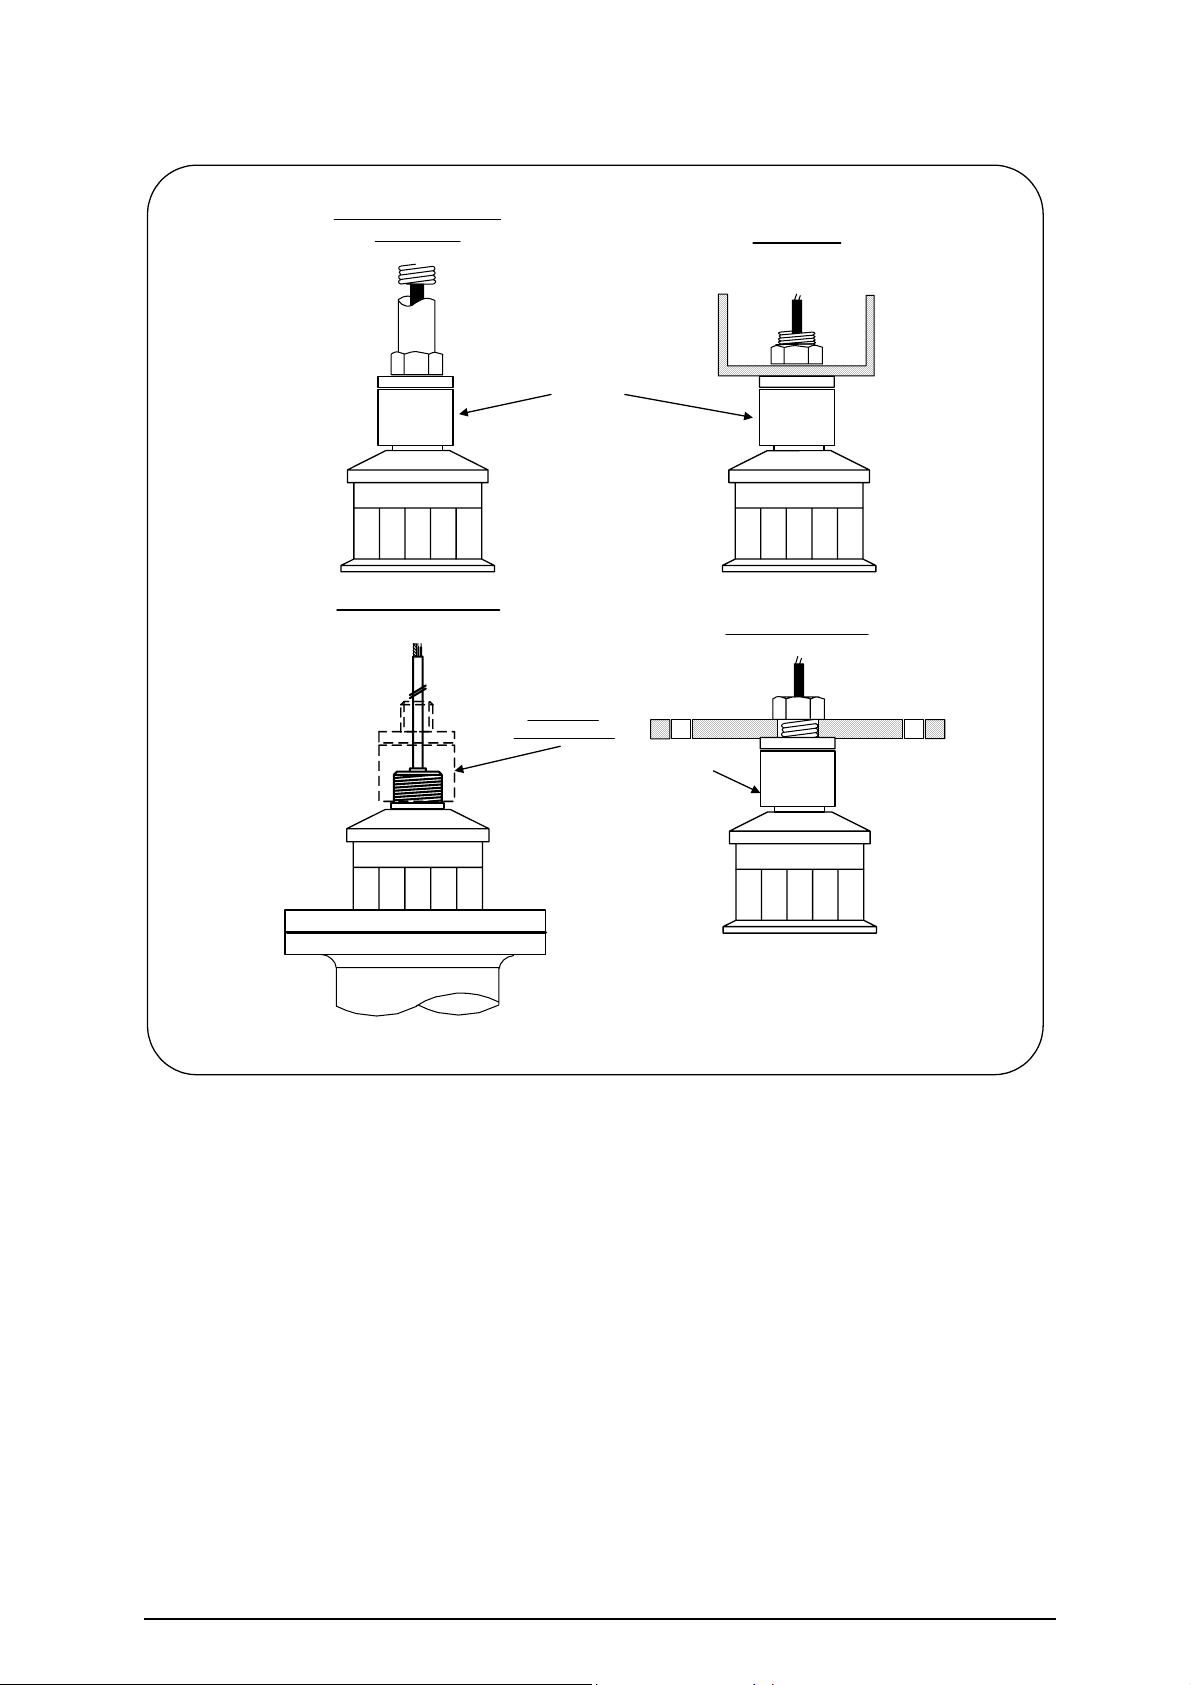
SECTION 1
FLEXIBLE OR RIGID
CONDUIT.
BRACKET.
ISOLATION KIT.
INTEGRAL FLANGE
UNDER FLANGE.
OPTIONAL
ISOLATION KIT
ISOLATION KIT.
Figure 5: Alternative mounting arrangements for transducers
Do not mount transducers incorporating temperature compensation in direct sunlight.
Do not over-tighten the bolts on flange construction transducers.
Flange transducers are not pressure rated and are suitable only for atmospheric pressure.
ATEX approved transducers must be mounted and wired in accordance with the appropriate
National Standards concerning installation in hazardous environments.
For differential applications mount both transducers at the same height above the zero
datum point.
For open channel flow applications the transducer must be mounted upstream of the flume
or weir as detailed in BS3680 (usually 3 or 4 times maximum head).
Ref: MINIFLEX LR MANUAL Rev. 0 6
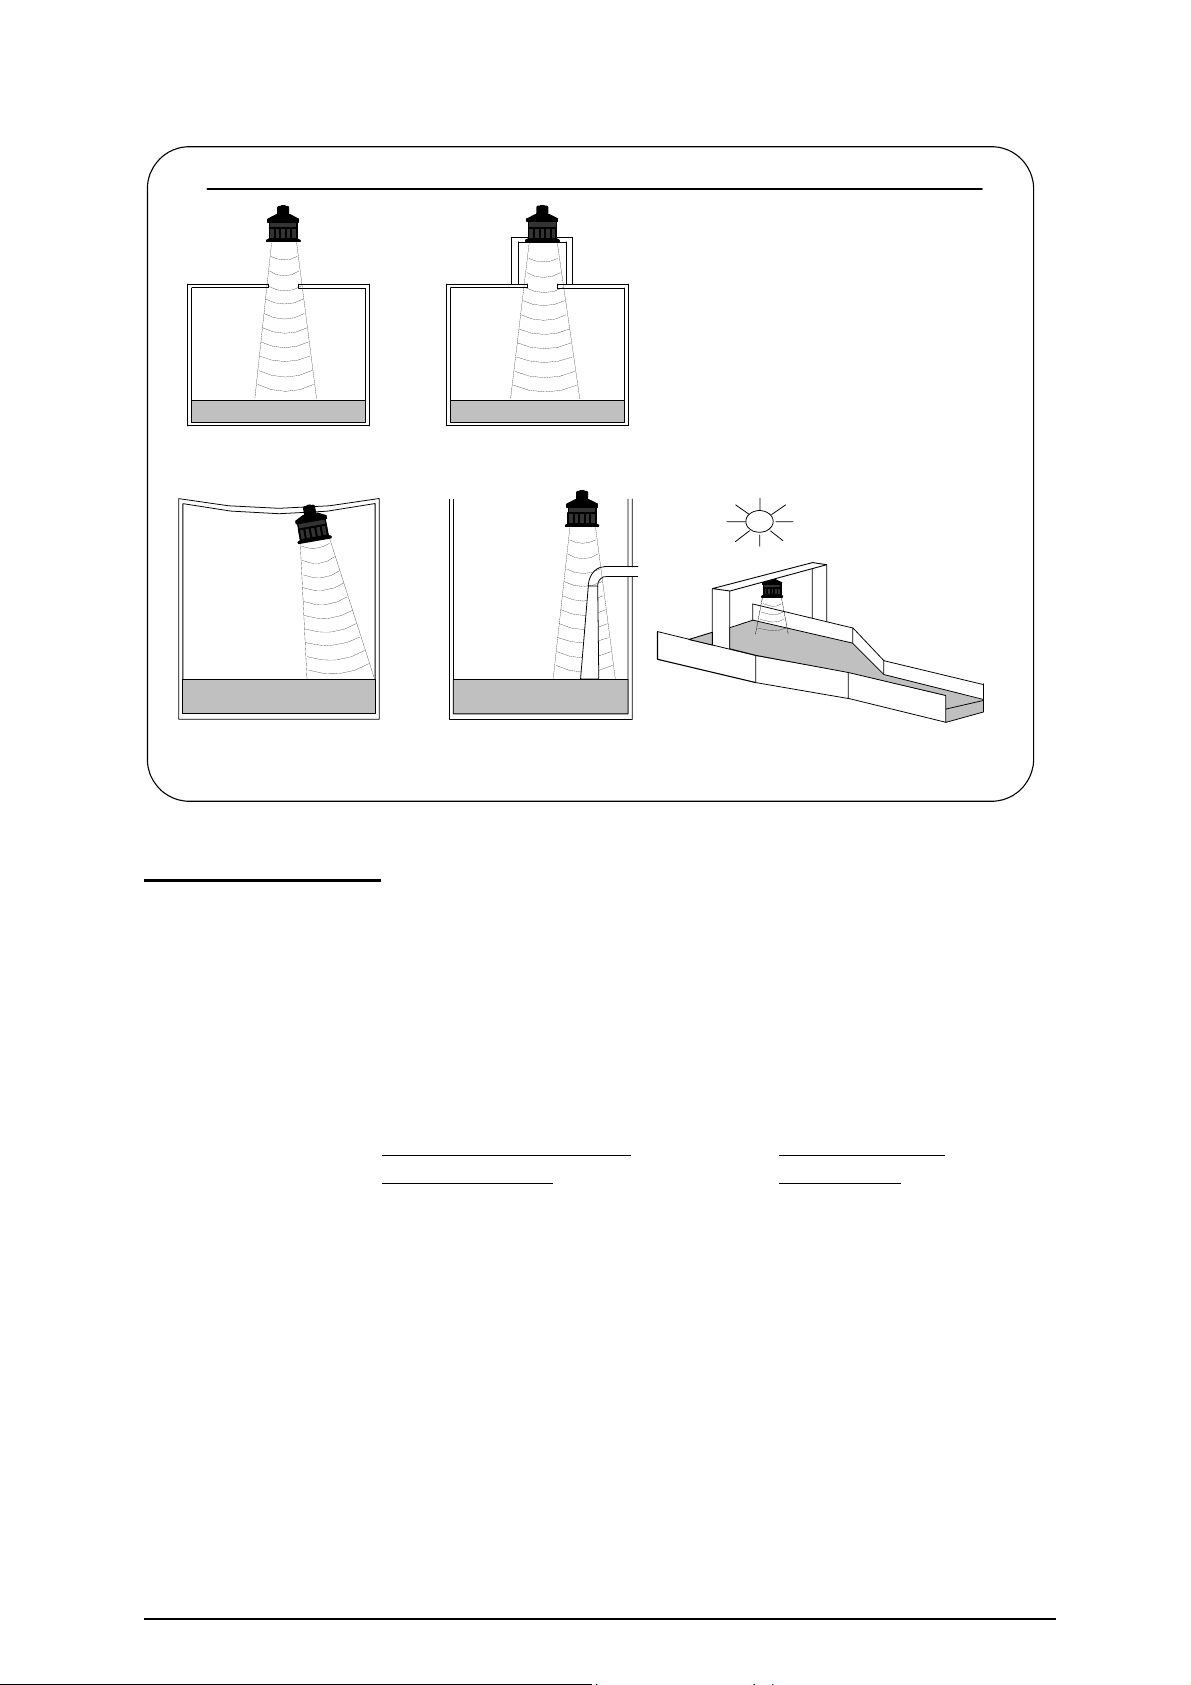
SECTION 1
CAUTION: AVOID THE FOLLOWING TRANSDUCER INSTALLATION FAULTS
DO NOT AIM THROUGH
HOLES IN THE TANK
AVOID ROUGH EDGES
IN STANDPIPES
KEEP TRANSDUCERS AND
TEMPERATURE COMPENSATION
PROBES OUT OF DIRECT
SUNLIGHT
KEEP TRANSDUCER
PERPENDICULAR
TO LIQUID.
AVOID INFLOWS OR
OTHER OBSTRUCTIONS
Figure 6: Transducer installation faults
Standpipe Installations
In many applications access to a vessel must be made via a standpipe. However, it is
necessary to observe some basic rules when fitting transducers into standpipes.
BLANKING: Parameter 4.0 should always be set at least 150mm longer than the
length of the standpipe.
STANDPIPE should be in accordance with the following table
DIMENSIONS:
Flange size and minimum
bore of Standpipe
of Standpipe
Maximum length
3" ( 80mm) 300mm
4" (100mm) 300mm
e.g. Using a 4" flanged transducer would require the standpipe length to be no more than
300mm and Pr.4.0 set at 450mm minimum.
The inside of the pipe and joint with vessel top must be clean and free of any
obstructions, seams or welds.
Ref: MINIFLEX LR MANUAL Rev. 0 7
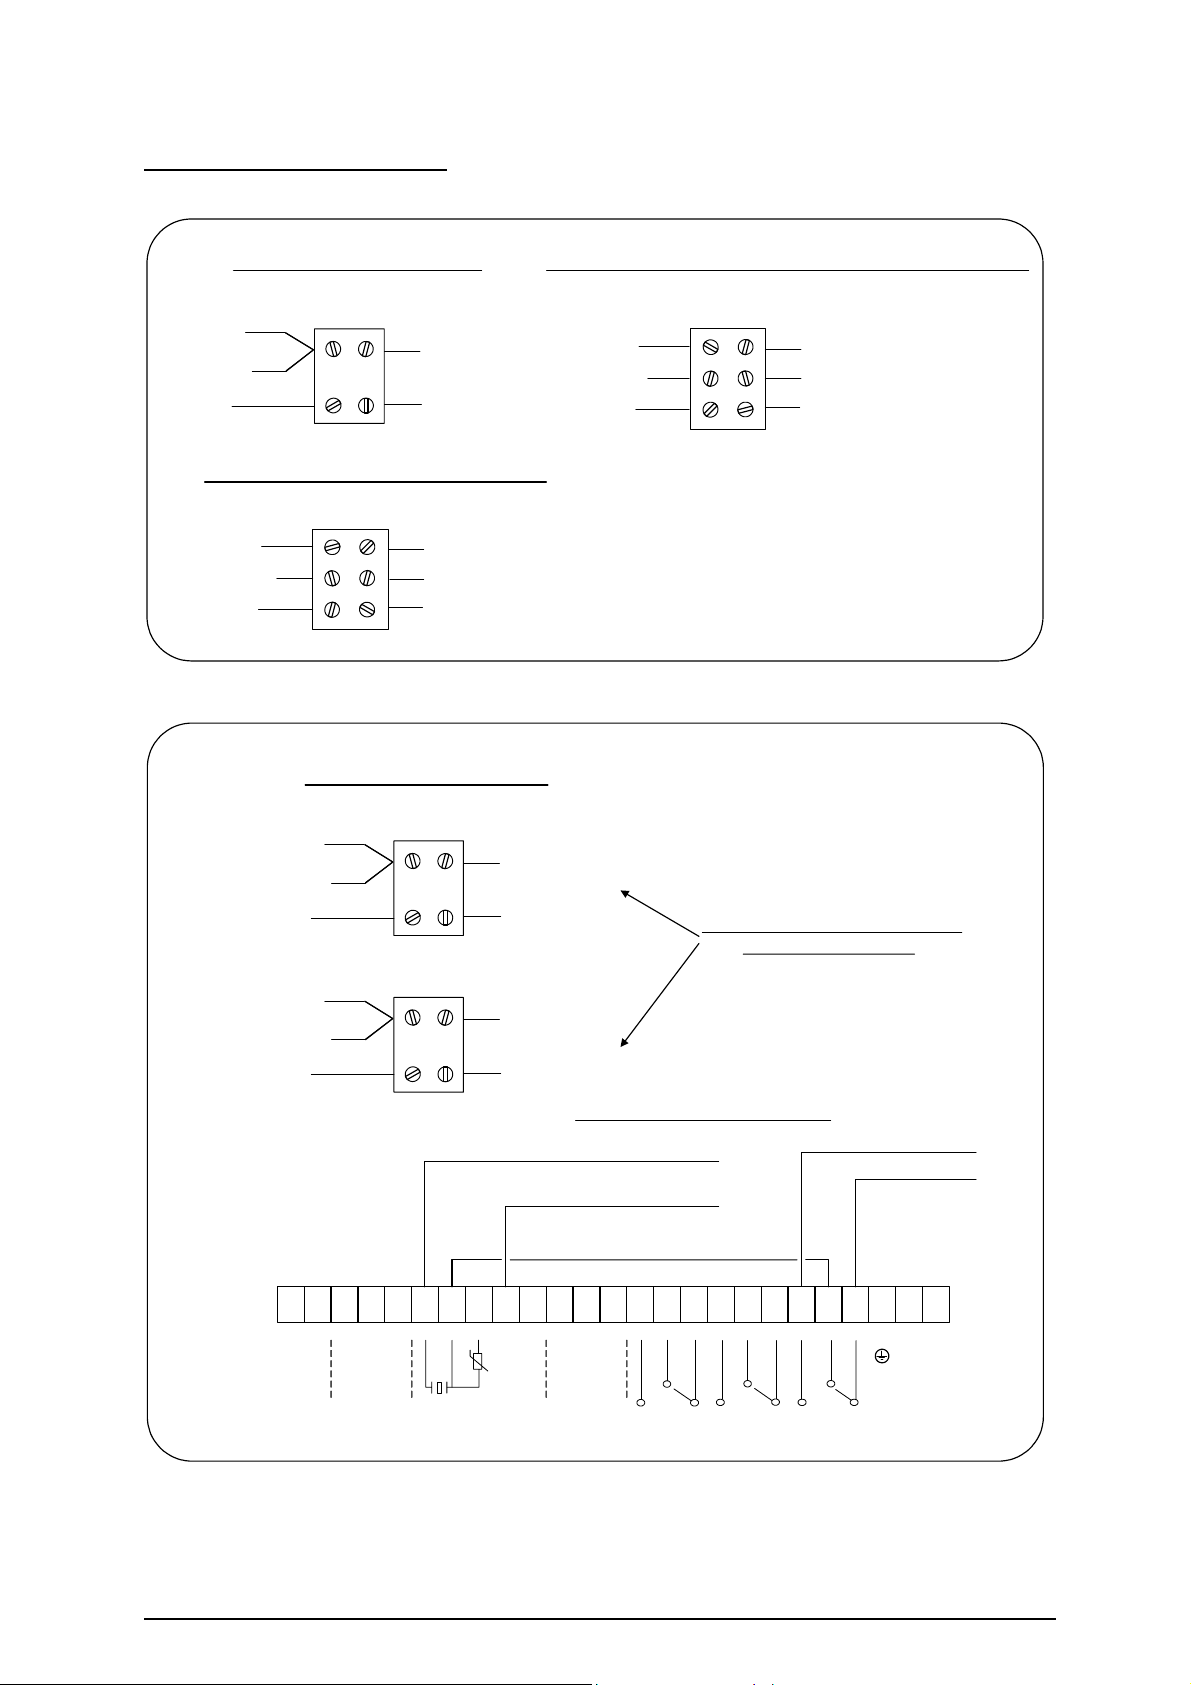
Transducer Cable Extensions
Transducer cables may be extended using junction boxes as shown in Figure 7:
RWV15 / RYV15 Transducer
Transducer
Black
Shield
Blue
Junction
To Miniflex LR
Shield - Term 6
RG62AU
Core - Term 7
Temperature Compensation RWT15 / RYT15 Transducer
Junction
Black
Shield
Blue
To Miniflex LRTransducer
Copper core Term 8
Shield Term 6
Silver core Term 7
RWV15 / RYV15 Transducer- alternative
Black
Shield
Blue
Junction
To Miniflex LRTransducer
Copper core Term 6
Shield Term 9
Silver core Term 7
Beldon 9207
or equal
Figure 7: Transducer lead extension diagram
RWV15 / RYV15 Transducer
Upstream Transducer
Black
Shield
Blue
Downstream Transducer
Black
Shield
Blue
Junction
Junction
To Miniflex LR
Shield - Term 6
RG62AU
Core - Term 22
To Miniflex LR
Shield - Term 9
RG62AU
Core - Term 20
Extend transducer cable if necessary
with RG62AU as shown.
Wire unextended transducers as below
UP & DOWNSTREAM BLACKS
UP & DOWNSTREAM SHIELDS
Note Link
DOWNSTREAM - BLUE
UPSTREAM - BLUE
1
2 3 4 5 6 7 8 9 10 11 12 13 14 15 16 17 18 19 20 21 22 23 24
DC POWER
21.6-30VDC
9W
SHIELD
+
+
RS485
-
TRANSDUCER
-
SHIELD
HOT
SYNC
SHIELD
ISOLATED
ANALOG
OUTPUT
+
-
RELAY 1
RELAY 3RELAY 2
E
AC POWER
95/110/230V AC
+10%/-10%
50/60 HZ 12VA
Figure 8: Transducer Wiring for Differential Mode
SECTION 1
Beldon 9207
or equal
25
LN
L2
L1
Ref: MINIFLEX LR MANUAL Rev. 0 8
SECTION 1
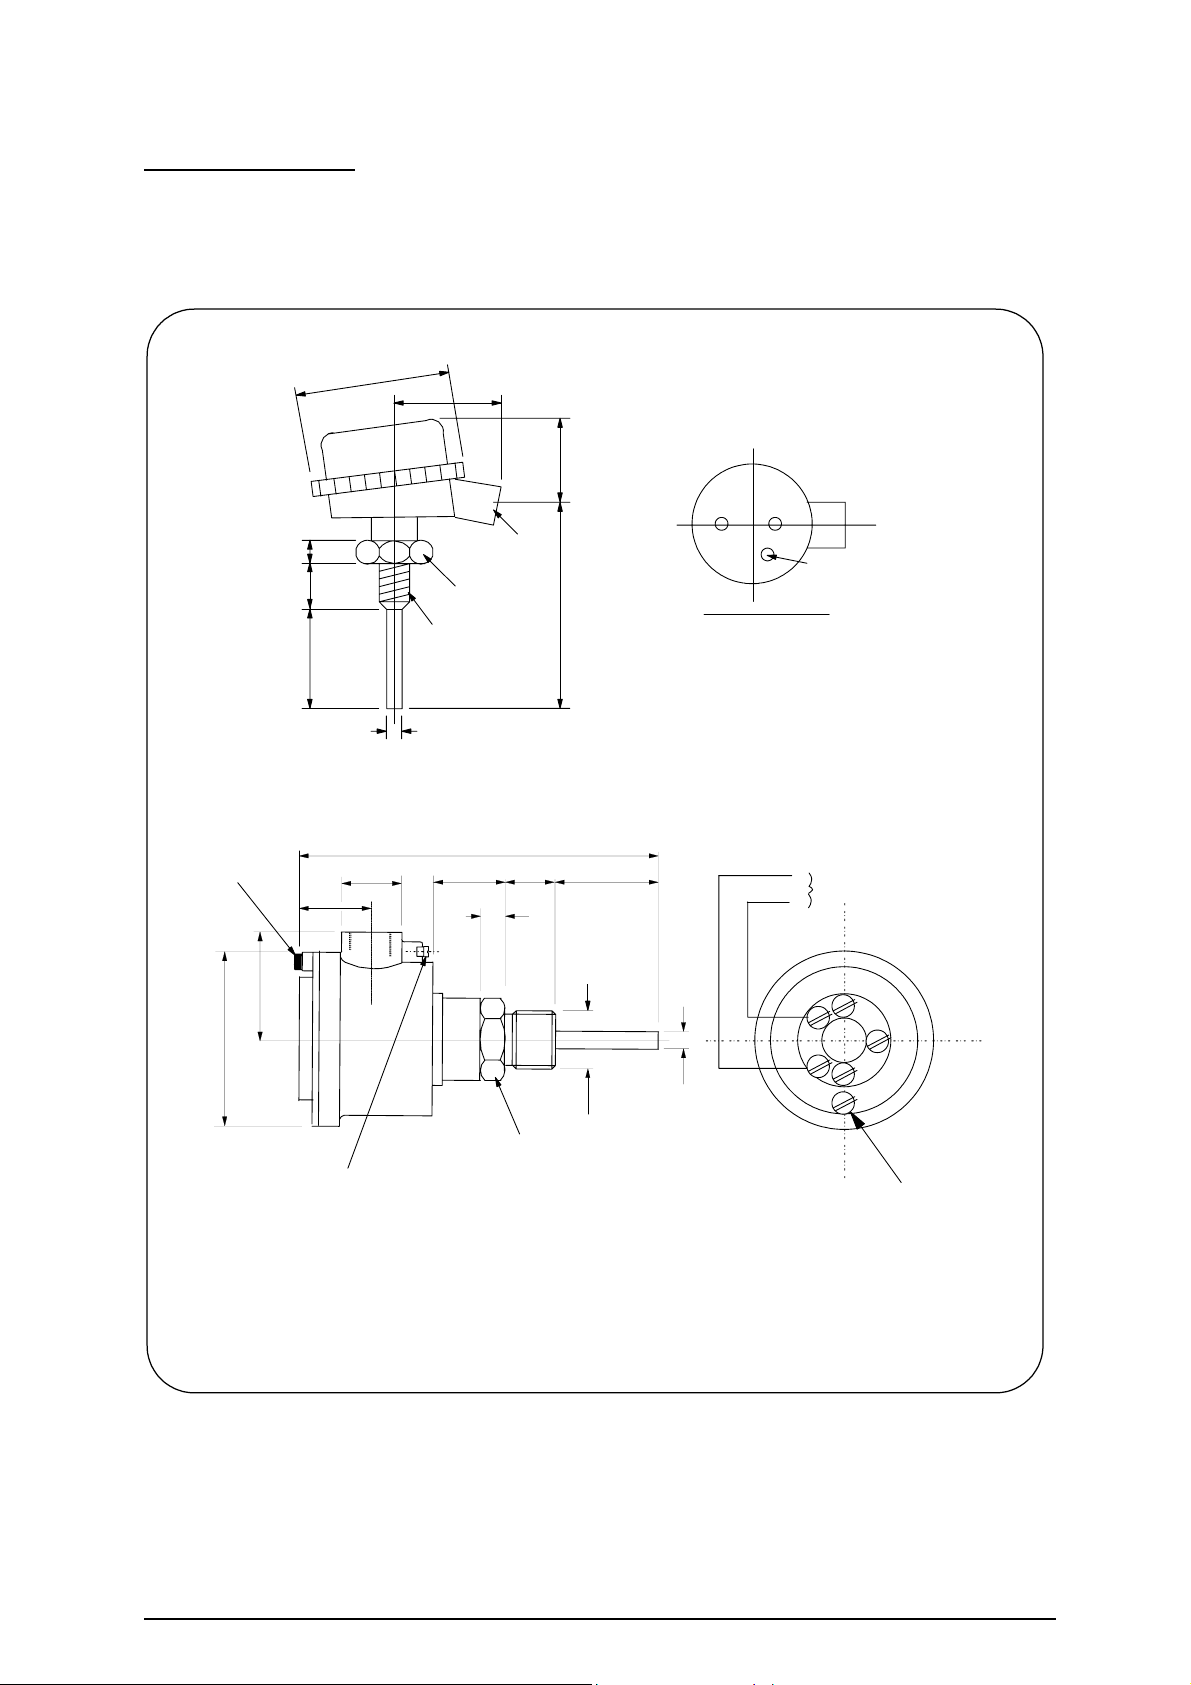
Temperature Sensor
If a separate temperature sensor is to be used it must be mounted where it will monitor
temperature changes of the air between the transducer and the liquid. This is usually adjacent
to the transducer, but should not be in direct sunlight and should be protected from wind chill.
75 dia.
60
50
33 a/f hex
M20 x 1.5
Cable entry
M20 x 1.5
110
HOUSING: POLYCARBONATE IP65
PROBE: 316SS
16
25
50
Process connection
10 dia.
blue red
no connection
Electrical connections
Note that the connections are not polarised
TEMPERATURE SENSOR RTS-2
35
175
25
12
50
POLARITY
+
UNIMPORTANT
-
LOCK
SCREW
30 dia
34 ref
52
85 dia
9 dia
HOUSING: CAST IRON BLACK EPOXY PAINT
CLASSIFICATION EEx e II T6/IP 65
PROBE: 316SS
EXTERNAL
EARTH
33 HEX
3/4" BSPP
INTERNAL
EARTH
TEMPERATURE SENSOR RTS 2B
Figure 9 Temperature sensor dimensional drawing
Ref: MINIFLEX LR MANUAL Rev. 0 9

SECTION 2
EASY START FOR MINIFLEX LR
The Miniflex LR system requires programming by the operator to obtain the required
measurements and control. To create a basic working system, only the application type and
parameters 2.0 to 5.0 need be programmed. To become familiar with the use of the system, it
is suggested that the following QUICK START guide is used before the instrument is
installed.
Quick Start Guide
1. Connect power and transducer cables as defined on the instrument.
Temperature
compensated
dc Power Supply
Transducer ac Power Supply
Terminal Nos: [1 ] [2] [ 6 ] [ 7 ] [8 ] [ 23 ] [ 24 ] [ 25]
+ve -ve Shield Blue Black E N L
2. Close the front cover and secure in position before switching on the power.
The instrument is supplied factory set to work in distance measurement
up to 10 metres from the transducer.
3. Hold the transducer approximately 1.5 metres from a flat surface and switch on.
After a short period, the display will show the distance (e.g. 1.50) between the
transducer and the surface.
If the transducer is now moved slowly towards the surface, the reading should
decrease. This shows that the unit is correctly wired and is operating as expected in
response to the reduction in distance.
If the reading increases as the transducer is moved towards the surface, it indicates
that the unit has been previously programmed to read level not distance.
Principle of Programming
The Miniflex LR has two modes:-
a) RUN (Normal operating)
In the 'RUN' mode, the instrument is monitoring the target, displaying values, and setting
outputs as programmed by the operator.
b) Program Mode (Programming)
In the 'Program Mode' the operator uses the keypad in conjunction with the display to adjust
the settings and to test that the unit is programmed correctly.
Keypad Definitions
The keypad consists of 5 keys, which are used to programme the operation of the transceiver. These
keys also have secondary functions enabling the operator to view the results being obtained by the
instrument during its normal 'RUN' cycle.
Ref: MINIFLEX LR MANUAL Rev. 0 10
SECTION 2
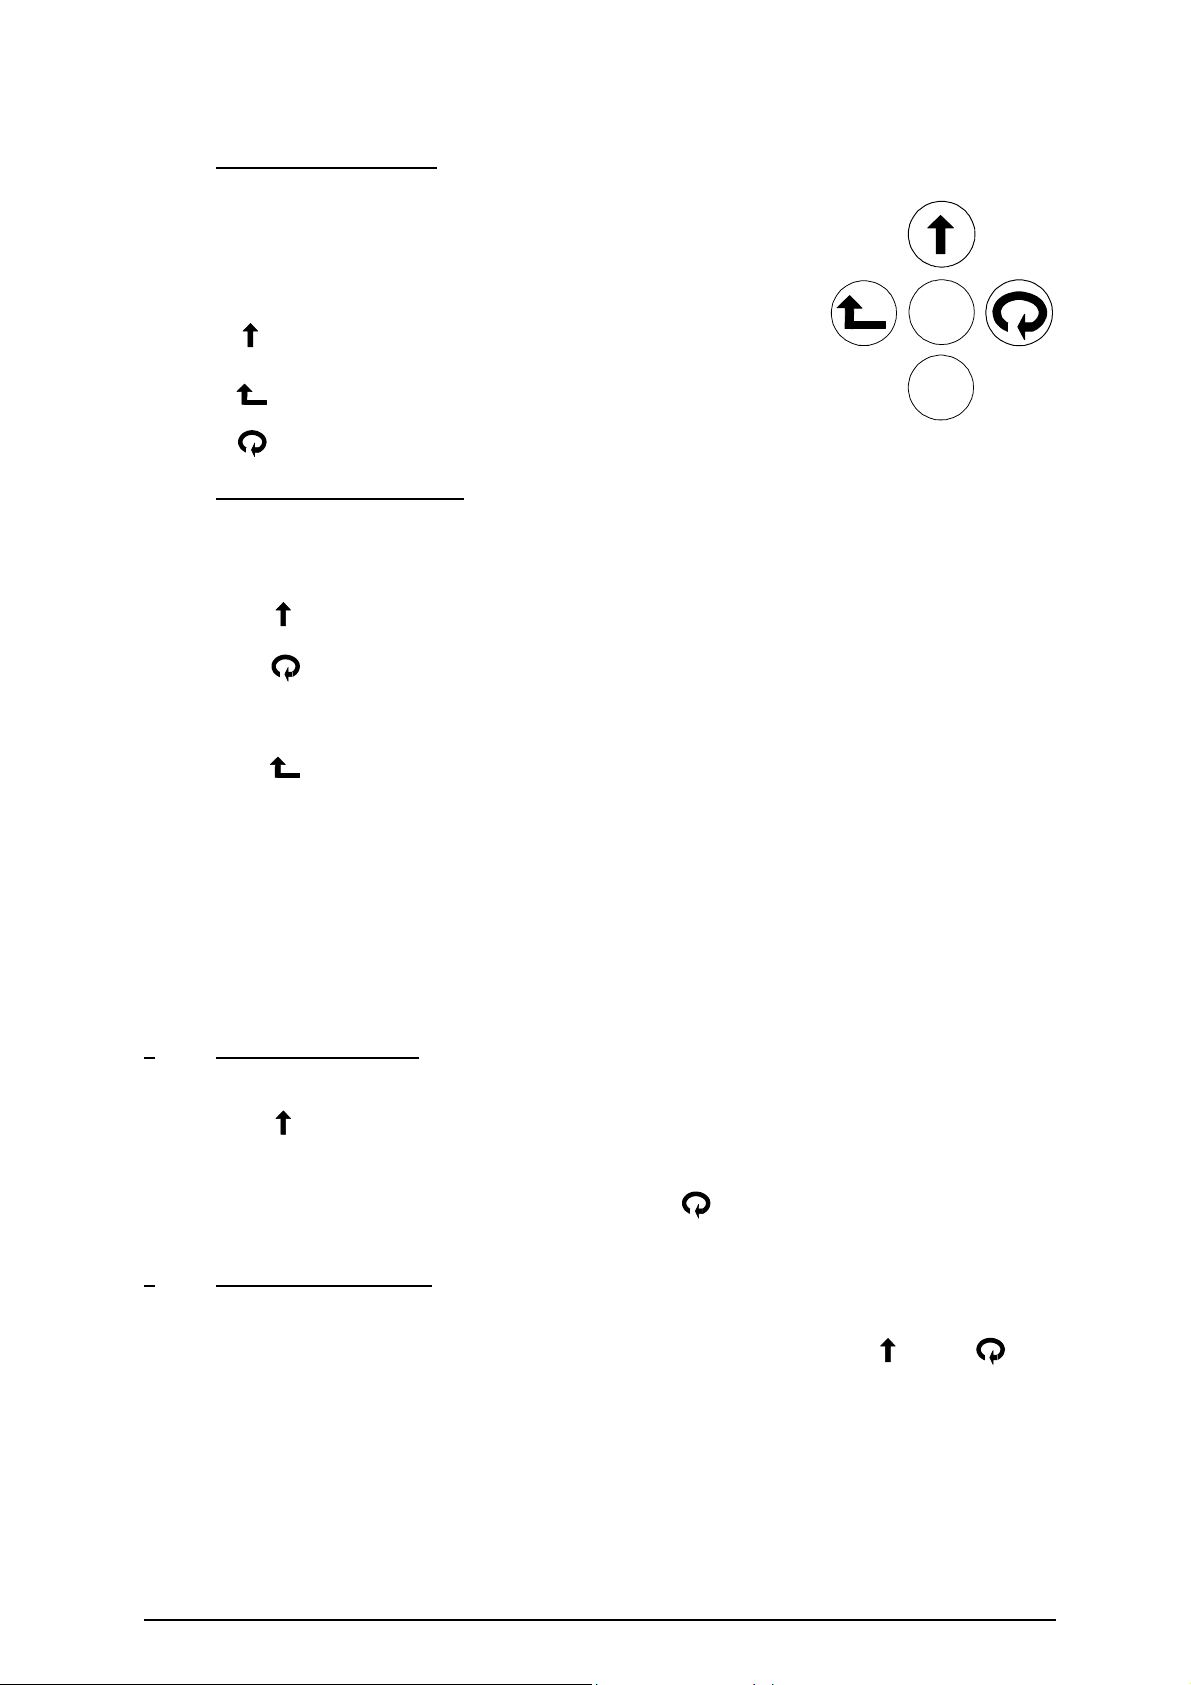
Primary Key Functions
M = Mode Key - to go from "RUN" to "Program Mode”
- or to go from "Program Mode" to "RUN" Mode
ENT = ENTER - to enter a value or option change or
start a simulation if parameter 12.5.2 is entered.
M
= In program mode to increase the selected digits
value.
= To move back to the main sections of parameters.
ENT
= Scroll through options or move cursor to the right if there is a value.
Alternative Key Functions
The 4 peripheral keys have secondary functions which can be viewed without interrupting the
instrument's operation. In the normal "RUN" mode:-
Press = Display will show head and flow values when in OCM mode.
Press = Display will show the echo distance in metres and "GAIN" with a value
from 0.2 to 100, which represents strength of echo. Low numbers mean
strong echo.
Press = Display will show the operating temperature if using a temperature
compensated transducer or 20ºC with standard transducer, and the
analogue output value in mA.
Press ENT = Display will show the number of Alarms and Starts for relay 1, if the
button is pressed again whilst displaying the value for relay 1 it will
change to relay 2 and if pressed again relay 3.
NOTE:- The Miniflex LR comes with pre-programmed applications, which can be simply modified
to meet your applications requirements. See
SECTION 4 for more details.
1
) To Enter Programme
Press M - Display will show "Program Mode"
Press immediately - Display will show either Distance Measurement, Level
Measurement, Volume Measurement, Pump Control, Open
Channel Flow Monitoring or Differential Measurement.
If you wish to change the selected application press to move through the applications,
you will be asked to enter the password.
) To Enter the Password
2
The first time that you try to change the application, a value or a parameter option, you will
be required to enter the password. The default for this is 1000. You use the and the to
change the digits then ENT when you have finished, if you enter the wrong code the display
value will be cleared and you will need to try again.
Ref: MINIFLEX LR MANUAL Rev. 0 11
SECTION 2
3) To Accept the Current Selection press ENT
Continue to press
ENT - To accept the value or option and move to the
next applicable parameter.
4)
To Change the Value of a Number
Press - To increase value of flashing digit between 0 and 9.
It will then roll over to its minimum and start again.
Press - To move the cursor right and select the next digit to be
changed, then Press
to change its value as above.
Press ENT - To enter the new value. The display will then show the next
parameter in the list.
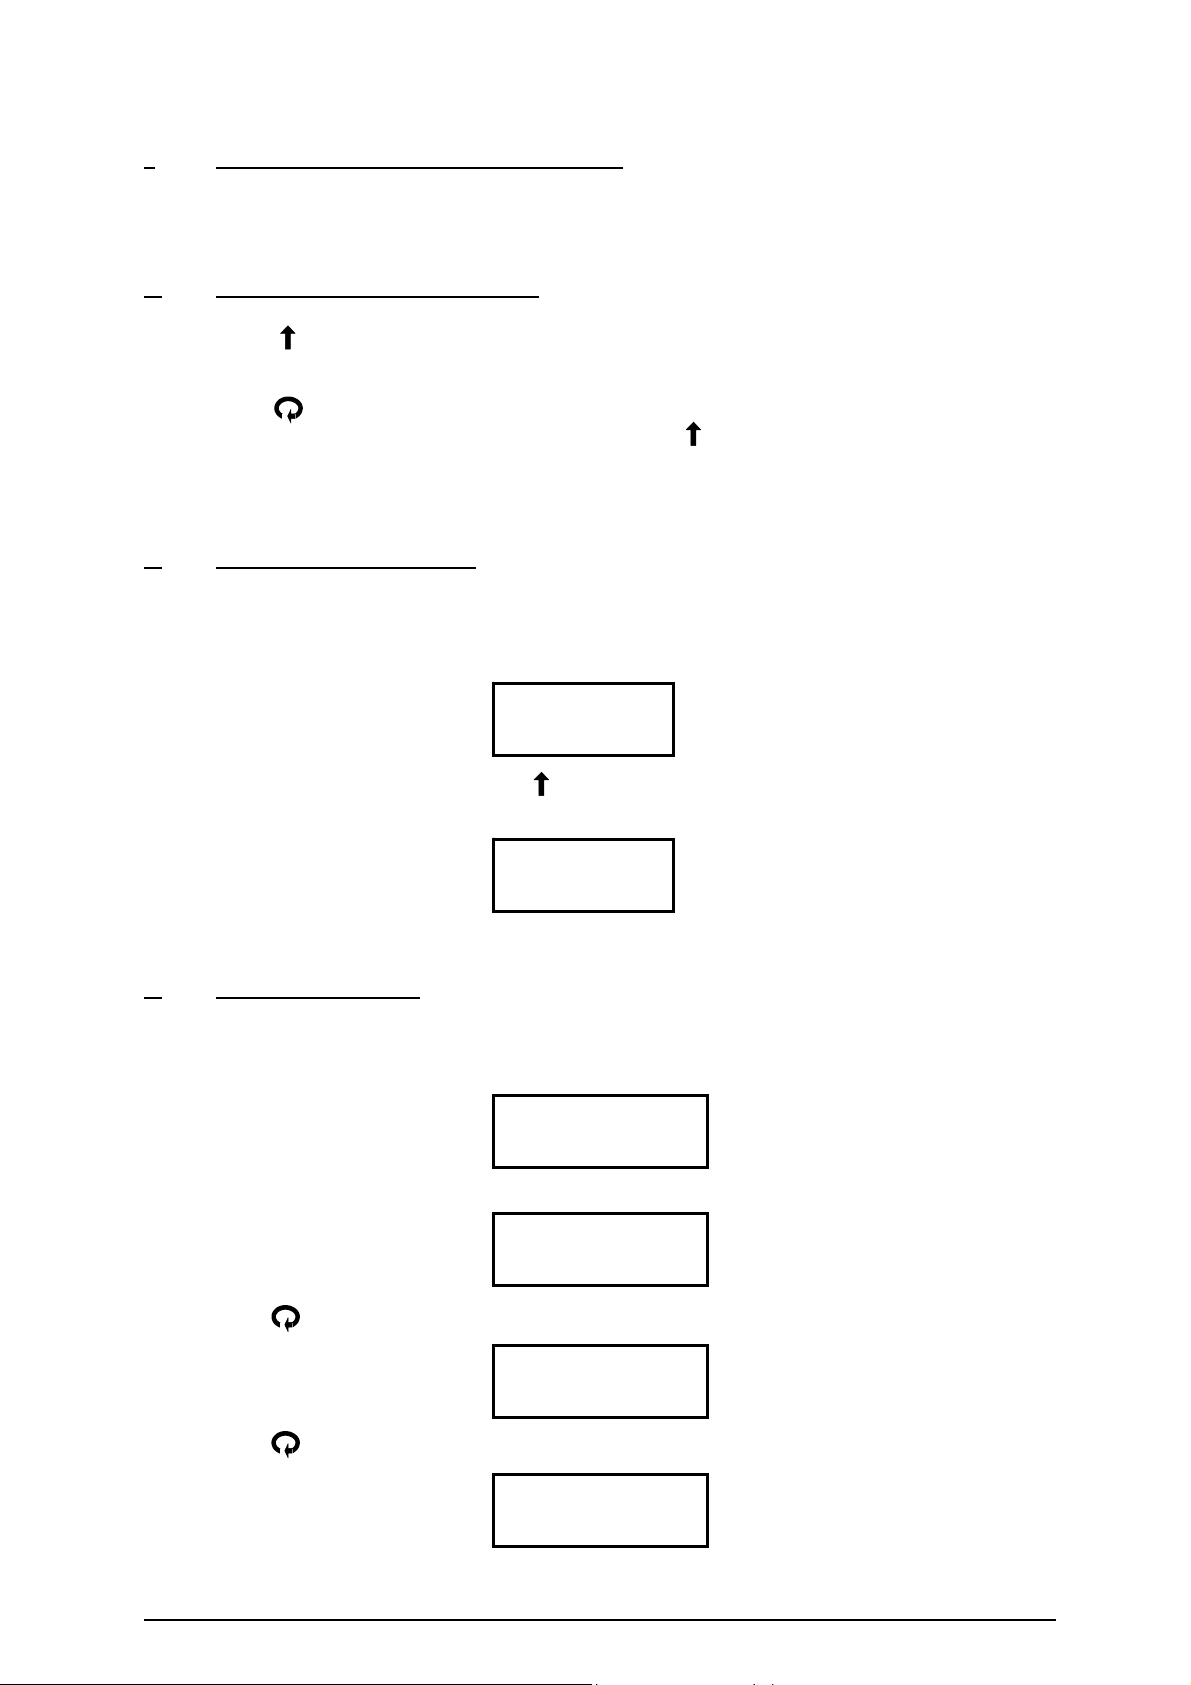
To Change a Y or N Option
5)
Certain parameters have been put into sections to avoid stepping through numerous
parameters that you may not need to change initially. Each of the sections will have a Yes or
No option.
8.0 Edit relays
No
To change the relay settings use the to change a ‘No’ to a ‘Yes’ or to skip that section just
press ENT.
8.0 Edit relays
Yes
When you have made your selection press ENT to move to the next parameter.
6)
To Change an Option
A display which shows a label enclosed in brackets means that this is the currently selected
value for this parameter, but it can be changed.
e.g. 8.1 Rly1 Options
(Norm–Energised)
Press ENT
8.1.1 Relay 1
Norm - Energised
Press to change the option
8.1.2 Relay 1
Norm-DeEnergised
Press to change the option again
8.1.3 Relay 1
Temp Alarm
Ref: MINIFLEX LR MANUAL Rev. 0 12
SECTION 2
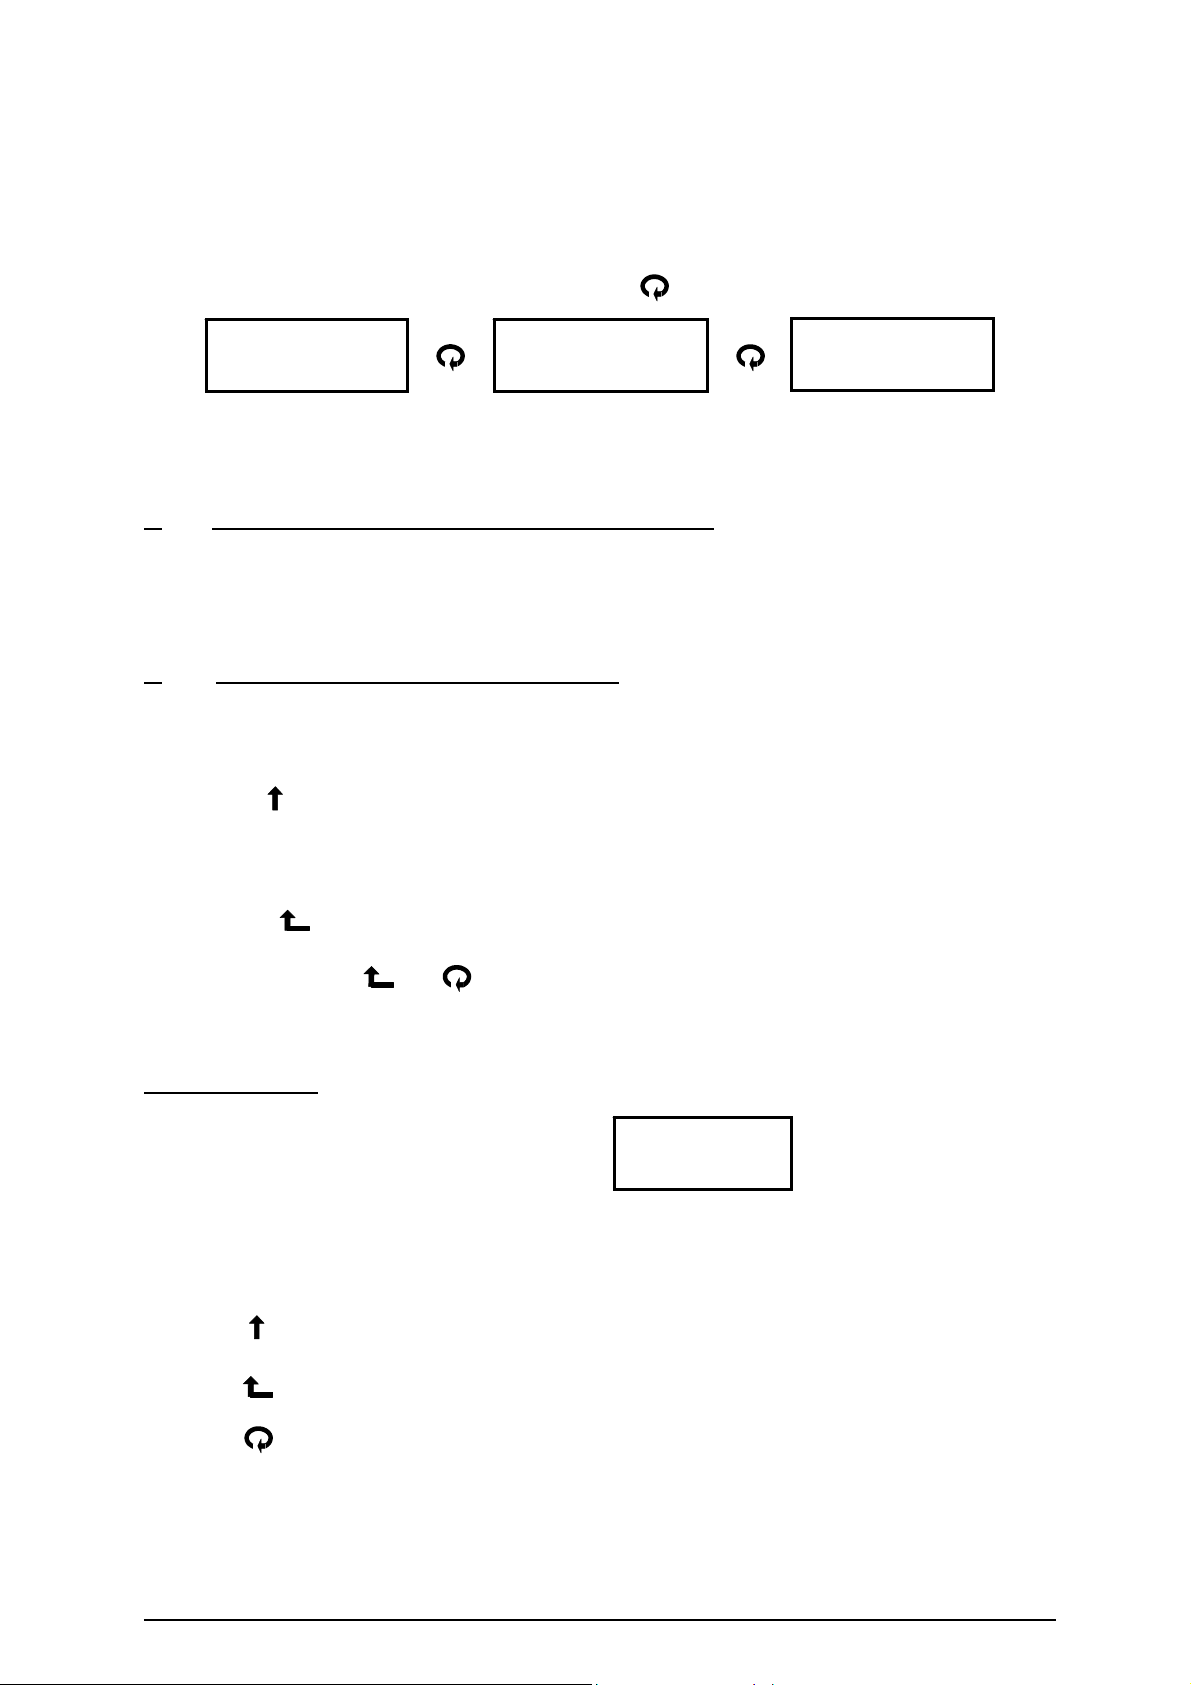
When you come to the option you want press ENT to accept the new selection and move on the next
parameter in the list.
(Shortcut for more familiar users)
Alternatively if you don’t need to make a change to this parameter and its associated settings you can
move to the next parameter in the top level by using the
key.
e.g. 8.1 Rly1 Options 8.2 Rly2 Options 8.3 Rly3 Options
(Norm-Energised) (Norm–Energised) (L.O.E. Alarm)
When you come to a parameter you want to adjust press ENT and follow step 4), 5) or 6) depending
on whether there is a value to enter, a yes or no option or select an option.
To complete Programming and Return to RUN Mode
7)
Press M - The display will show “Storing Values” and “Data stored to
memory”, if a value has been changed. Then "Searching for
target" and then the measured value in the selected units.
8) To Reset all Parameters to Factory Default
Press M if not already
in program mode - Displays "Program mode".
Press To display a parameter (it can be any one)
To reset the instrument you need to be in the first parameter of any application displaying
Distance Measurement, Level Measurement, Volume Measurement, Pump Control, Open
Channel Flow Monitoring or Differential Measurement. If you haven’t appeared here you can
use the key to move back through the program to the first parameter.
Then press both
instrument will reset the parameters, custom tables and totaliser, and reverts back to
displaying Distance Measurement.
and simultaneously and when prompted Enter the password. The
Simulation mode
To simulate a program go to parameter
12.5.2 Simulate then press ENT.
Yes
Keys
M = Exits simulation mode
ENT = Direction to decrease displayed value
= Direction to increases displayed value
= Reduce speed by 2 from a maximum of 64x to 1x. The initial speed
of 1x is set by the rate of change defined in parameter 6.0.
= Increase speed by 2. From 1x to a maximum of 64x.
Ref: MINIFLEX LR MANUAL Rev. 0 13

PARAMETER INDEX
Application
Pr. 1.0 Basic Application
Basic Set-up
Pr. 2.0 Empty Distance
Pr. 3.0 Operatio nal Span
Pr. 4.0 Blanking
Pr. 5.0 Rate Of Ch ange
Volume Measurement
Pr. 6.1 Vessel shape
Pr. 6.2 Displ a y Units
Pr. 6.3 Maximum Display x 100
Pr. 6.4 Displa y F orm at
Open Channel Flow Monitoring (O.C.M.)
Pr. 7.1 Flow device
Pr. 7.2 Maximum Flow Value Type
Pr. 7.3 Maximum Flow
Pr. 7.4 Totaliser Units
Pr. 7.5 External Totaliser Drive
Pr. 7.6 Totaliser Reset
Relays
Pr. 8.1 Relay1 Options
Pr. 8.2 Relay2 Options
Pr. 8.3 Relay3 Op tio n s
Pump Control
Pr. 9.1 Pump Sequence
Pr. 9.2 Duty Standby
Pr. 9.3 Exerciser
Pr. 9.4 Tolerance
Pr. 9.5 Maintenance
Pr. 9.6 Pump Run-on Interval
Pr. 9.7 Pump Run-on Time
MINIFLEX LR
Failsafe
Pr. 10.1 Relay 1 Failsafe
Pr. 10.2 Relay 2 Failsafe
Pr. 10.3 Relay 3 Failsafe
Pr. 10.4 Fail Time
Pr. 10.5 mA Fail
Analogue
Pr. 11.1 Analogue Output
Pr. 11.2 Analogue Value
Pr. 11.3 Test mA
Pr. 11.4 Analogue Scale
Miscellaneous
Pr. 12.1 Offset
Pr. 12.2 Passcode
Pr. 12.3 Number Of Decimals
Pr. 12.4 Relay totaliser
Pr. 12.5 Simulation
Pr. 12.6 Station ID
Pr. 12.7 Synchronisation
Pr. 12.8 Check Search
Pr. 12.9 Maximum gain
SECTION 3
Ref: MINIFLEX LR MANUAL Rev. 0 14

SECTION 3
PROGRAMMING THE INSTRUMENT
NOTE:- (D = ) factory default entry for that parameter.
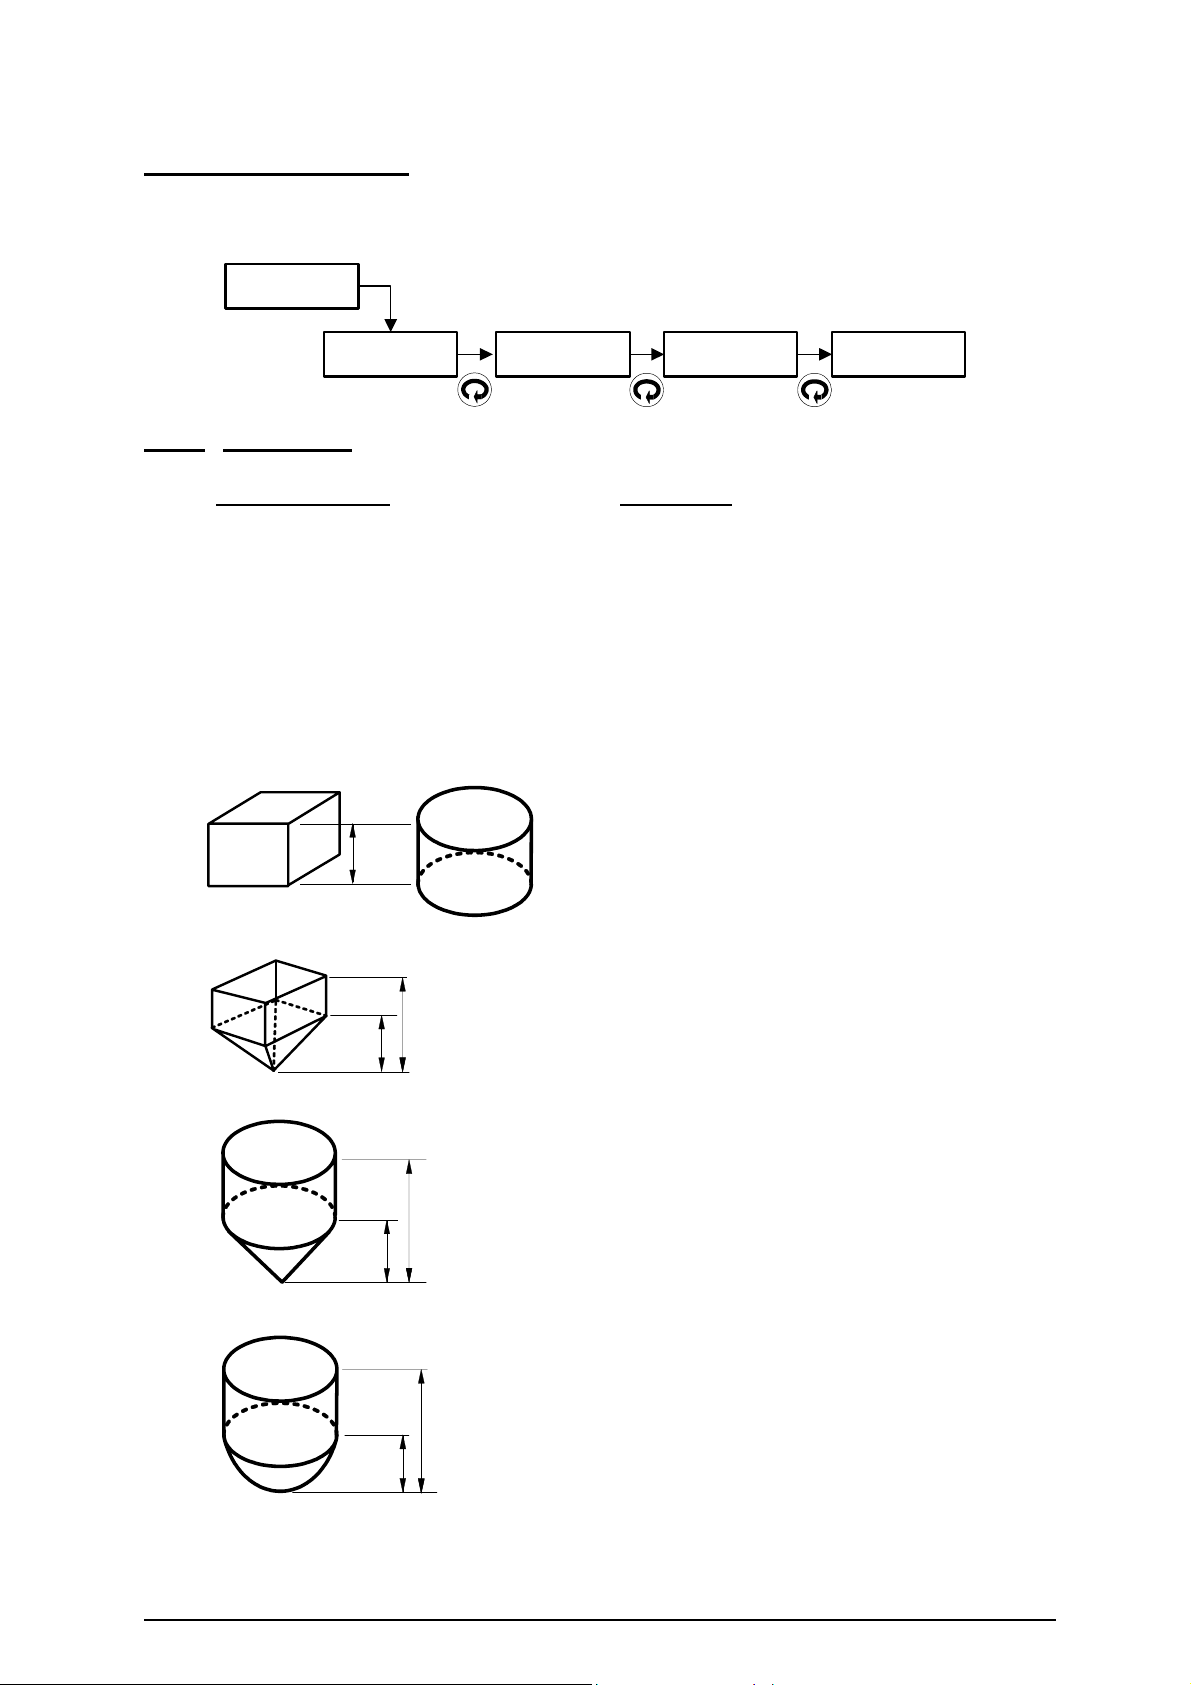
Step 1: - Select application (Pr.1.0)
Application (D = Distance Measurement)
This will automatically load the applicable default program which can then be
modified to suit your application.
At initial start up display will show one of below listed options: -
Distance Measurement (Page 35)
Level Measurement (Page 36)
Volume Measurement (Page 37)
Pump Control (Page 38)
Open Channel Flow Monitoring (Pages 39 – 40)
Differential Measurement (Pages 41 – 42)
For more details see Pr.1.0 Application Selection Guide (Page 16)
Step 2: - Enter Basic Set-up parameters
Complete Basic Set-up section - Page 17
Step 3: - Dependent on application, go to appropriate section in manual.
For Distance Measurement go to Page 35.
For Level Measurement go to Page 36.
For Volume Measurement go to Page 37.
For Pump Control go to Page 38.
For Open Channel Flow Monitoring go to Pages 39 - 40.
For Differential Measurement go to Pages 41 - 42.
Step 4: - Set any relay conditions
Relay section go to Pages 24 - 26
Step 5: - Set any failsafe conditions
Failsafe section go to Page 30
Step 6: - Set any analogue conditions
Analogue section go to Pages 31 - 32
Step 7: - Set any miscellaneous conditions
Miscellaneous section go to Pages 33 - 34
Step 8: - Exit program mode and return to run mode
Go to Section 7 Page 13
Ref: MINIFLEX LR MANUAL Rev. 0 15

SECTION 3
Pr.1.0 APPLICATION SELECTION GUIDE
Miniflex LR can be programmed for Distance measurement, Level measurement, Volume
measurement, Pump control, OCM and Differential measurement. Each application selected
will allow access to only parameters associated with that application.
Distance Measurement
Displays a distance measurement; relay set and reset points can be programmed and a relay
can be programmed for Loss Of Echo indication. A 4-20mA output proportional to the
displayed distance is provided.
Level Measurement
Displays a level; relay set and reset points can be programmed and a relay can be
programmed for Loss Of Echo indication. A 4-20mA output proportional to level is provided.
Volume Measurement
Displays contents, ullage or both contents and ullage. Choose from a variety of vessel shapes
including vertical and horizontal cylinders or a 24-point custom table. Display in Litres,
Gallons, Tons, Tonnes, Kg, m3 or %. Provide a 4-20mA output proportional to contents or
ullage.
Pump Control
For pump control applications; can include pump sequencing, duty standby, pump
maintenance and pump run on.
Open Channel Flow Monitoring (O.C.M.)
For flow measurement, using BS3680 flumes and weirs, Parshall flumes, or custom table for
non-standard devices. Displays flow rate in litres/sec or gallons/sec and totalises in a variety
of units. Provides a pulse output to drive an external totaliser and a 4-20mA output
proportional to level or flow.
Differential Measurement
Uses two transducers switched automatically. The display indicates the difference between
two levels and gives a 4-20mA output proportional to the reading. Relay set and reset points
can be programmed and a relay can be programmed for Loss Of Echo indication.
Ref: MINIFLEX LR MANUAL Rev. 0 16

Basic Set-up
Pr.2.0
Pr.3.0
Pr.4.0
Pr.5.0
Empty Dist Empty Distance in Metres
Distance Level Volume Pump OCM Differential
Default 10.00 6.000 6.000 6.000 1.200 2.000
The approximate distance from the face of transducer to the furthest point away,
usually the bottom of the container or channel. Enter the distance in metres.
Resolution is a function of this parameter.
Span Operational Span in Metres
Distance Level Volume Pump OCM Differential
Default 10.00 5.500 5.500 5.500 0.280 0.500
The distance between the furthest and nearest points over which measurement is
required. Enter the distance in metres.
For OCM, span = maximum head.
For differential applications, the value required is the maximum difference in the
levels to be measured.
Blanking (D = 0.500 Metres)
Blocking or Blanking Zone.
Minimum distance from transducer face to target, within which no return echoes will
be processed. It is important to ensure that the target material does not enter this
zone.
Enter in metres.
DO NOT REDUCE THE FACTORY SET VALUE WITHOUT REFERENCE
TO HYCONTROL.
RateOfChange Rate Of Change in Metres/Min
Distance Level Volume Pump OCM Differential
Default 10.00 1.000 1.000 1.000 1.000 1.000
This value should be as small as possible but greater than the maximum rate of
change of level. Do not
greater than 1.0m/min or that the system continually 'tracks' a level lower than the
actual level.
If it is necessary to change the value, enter the new value in m/min; the suggested
range is 0.1 to 10.
SECTION 3
change this value unless you know that the rate of change is
Ref: MINIFLEX LR MANUAL Rev. 0 17
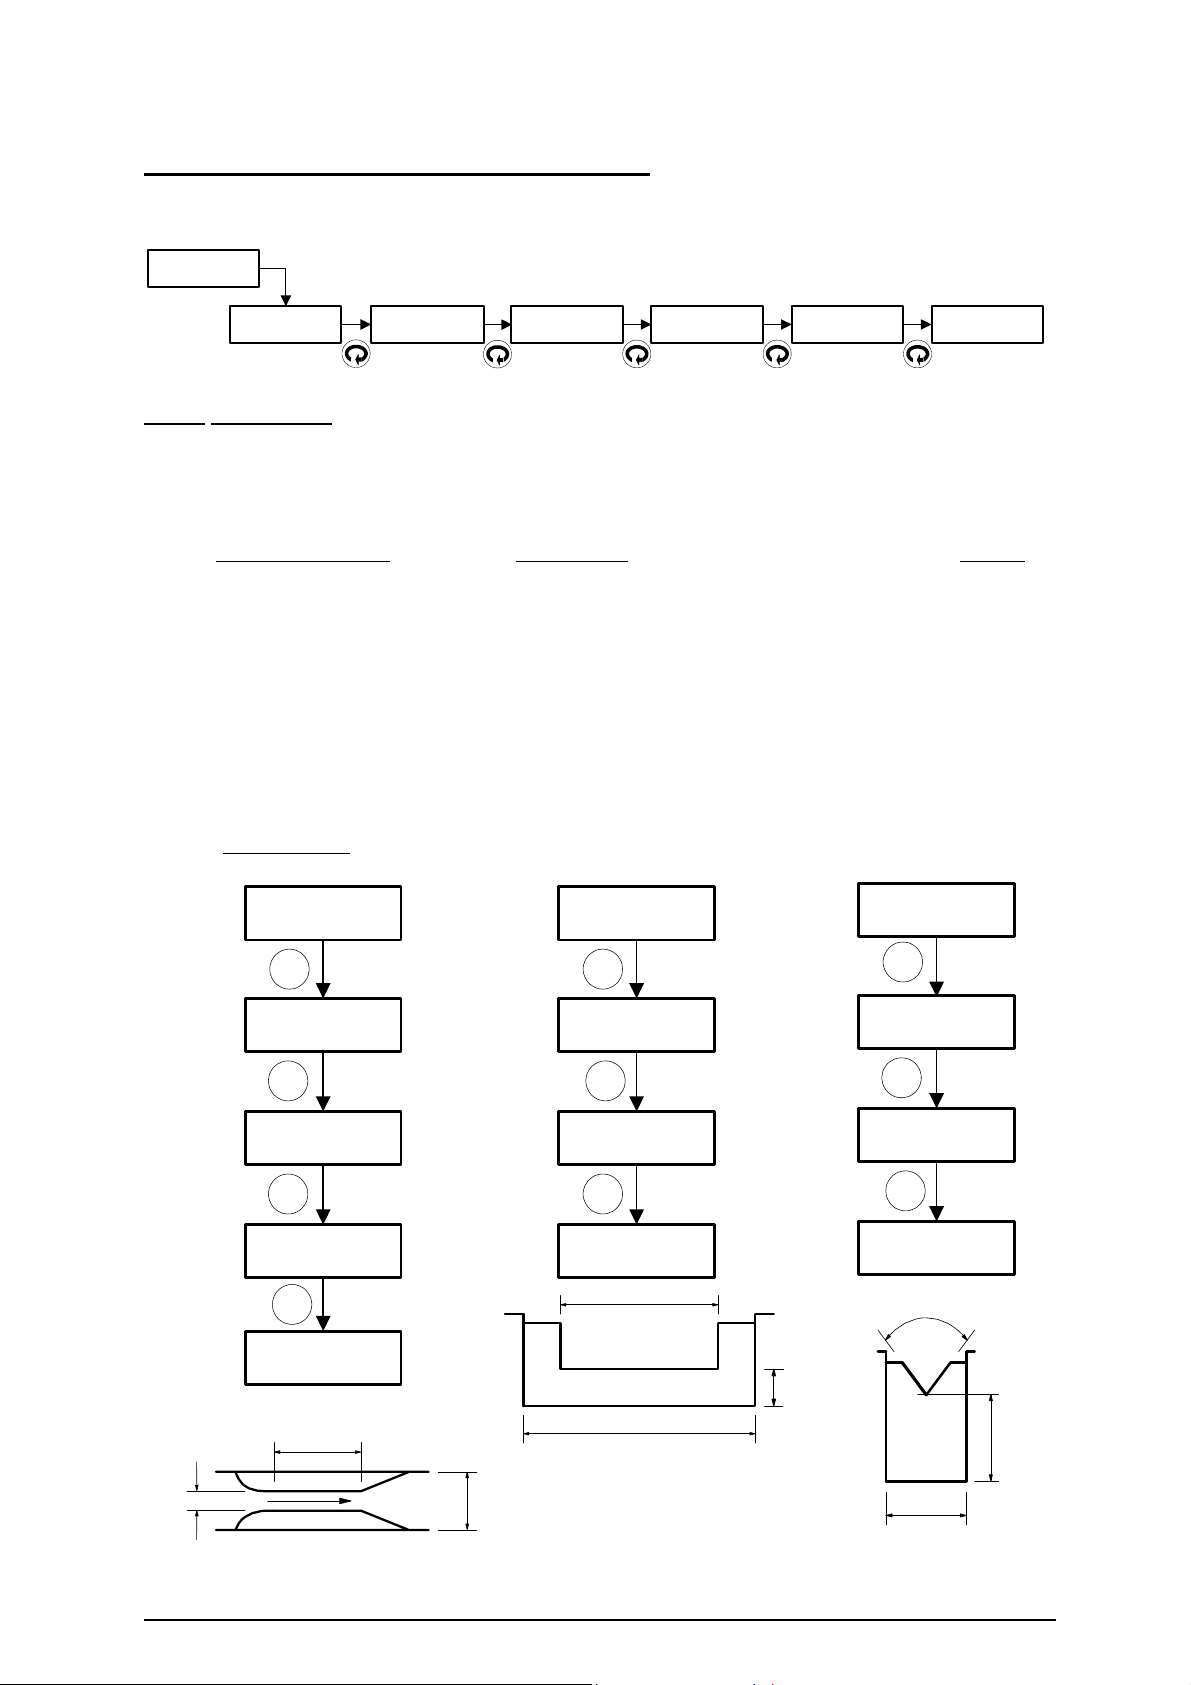
Volume Measurement
The following main parameters set up a volume measurement application.
6.0 Edit
Volume No
No
Pr.6.1
Vessel shape (D = Linear)
Options displayed
6.1.1 Linear Vessel Linear vessel
6.1.2 Vertical Pyramid Bottom Vertical cylindrical tank with pyramid bottom
6.1.3 Vertical Conical Bottom Vertical cylindrical tank with conical bottom
6.1.4 Vertical Spherical Bottom Vertical cylindrical tank with half spherical bottom
6.1.5 Vertical Dished Bottom Vertical with dished bottom
6.1.6 Horizontal Cylind Flat Ends Horizontal cylinder with flat ends
6.1.7 Horizontal Cylind Dish Ends Horizontal cylinder with dished ends
6.1.8 Custom table – 24point 2 4 point linearisation table – See appendix 1
Additional parameters may be required dependent on vessel shape selection.
6.1.1 LINEAR VESSEL
6.1.2 VERTICAL PYRAMI D BO TT OM
6.1.3 VERTICAL CONICAL BOTTOM
6.1.4 VERTICAL SPHERICAL BOTTOM.
Yes
6.1 Vessel shape
(Linear)
Pr.3.0
Pr. 6.1.2.1
Pyramid h
Pr.6.1.3.1
Cone h
Pr. 6.1.4.1
Sphere h
6.2 Display Units
(Litres)
6.3 MaxDisp x100
(001.0)
Description
No additional parameters
Pr 6.1.2.1 Pyramd h (D = 0.00)
Pr.3.0
Pr.3.0
Pr.3.0
Enter pyramid h in metres.
Pr 6.1.3.1 Cone h (D = 0.00)
Enter cone h in metres.
Pr 6.1.4.1 Sphere h (D = 0.00)
Enter sphere h in metres.
6.4 Display Format
(Contents)
SECTION 3
Ref: MINIFLEX LR MANUAL Rev. 0 18

SECTION 3
Pr.6.1.5.2
Radius R
Pr.3.0
Pr.6.1.5.1
Dish h
6.1.5 VERTICAL DISHED BOTTOM.
Pr 6.1.5.1 Dish h (D = 0.00)
Enter dish h in metres.
Pr 6.1.5.2 Radius R (D = 0.00)
Enter radius R in metres.
Pr.3.0
6.1.6 HORIZONTAL CYLINDER FLAT ENDS.
6.1.7 HORIZONTAL CYLINDER DISHED ENDS.
Pr.6.1.7.2
Cylndr L
Pr.6.1.7.1
Dish L
Pr.3.0
No additional parameters
Pr 6.1.7.1 Dish L (D = 0.00)
Enter dish L in metres.
Pr 6.1.7.2 Cylndr R (D = 0.00)
Enter cylinder R in metres.
Pr. 6.2
DisplayUnits Display Units (D = %)
Options displayed
6.2.1 Units Litres Un its label displayed in Litres
6.2.2 Units Gallons Units label displayed in Gallons
6.2.3 Units Tons Units label displayed in Tons
6.2.4 Units Tonnes Units label displayed in Tonnes
6.2.5 Units Kg Units label displayed in Kg
6.2.6 Units m3 Units label displayed in m3
6.2.7 Units % Units label displayed in %
Description
Pr. 6.3 MaxDsp x 100 Maximum display x 100 (D = 1.0)
Enter - full scale display ÷ 100
e.g. if 100% = 2000 litres and display required in litres then set Pr. 6.3 to 2000 ÷ 100
= 20.
This parameter should not be adjusted in conjunction with 6.2.7 Units % as it will
invalidate the % reading.
Pr. 6.4
Disp. Format Display Format (D = Contents)
Options displayed Description
6.4.1 Display Contents Display contents only
6.4.2 Display Ullage Display ullage only
6.4.3 Display Ullage &Conte nts Display both ullage and contents
Ref: MINIFLEX LR MANUAL Rev. 0 19
SECTION 3
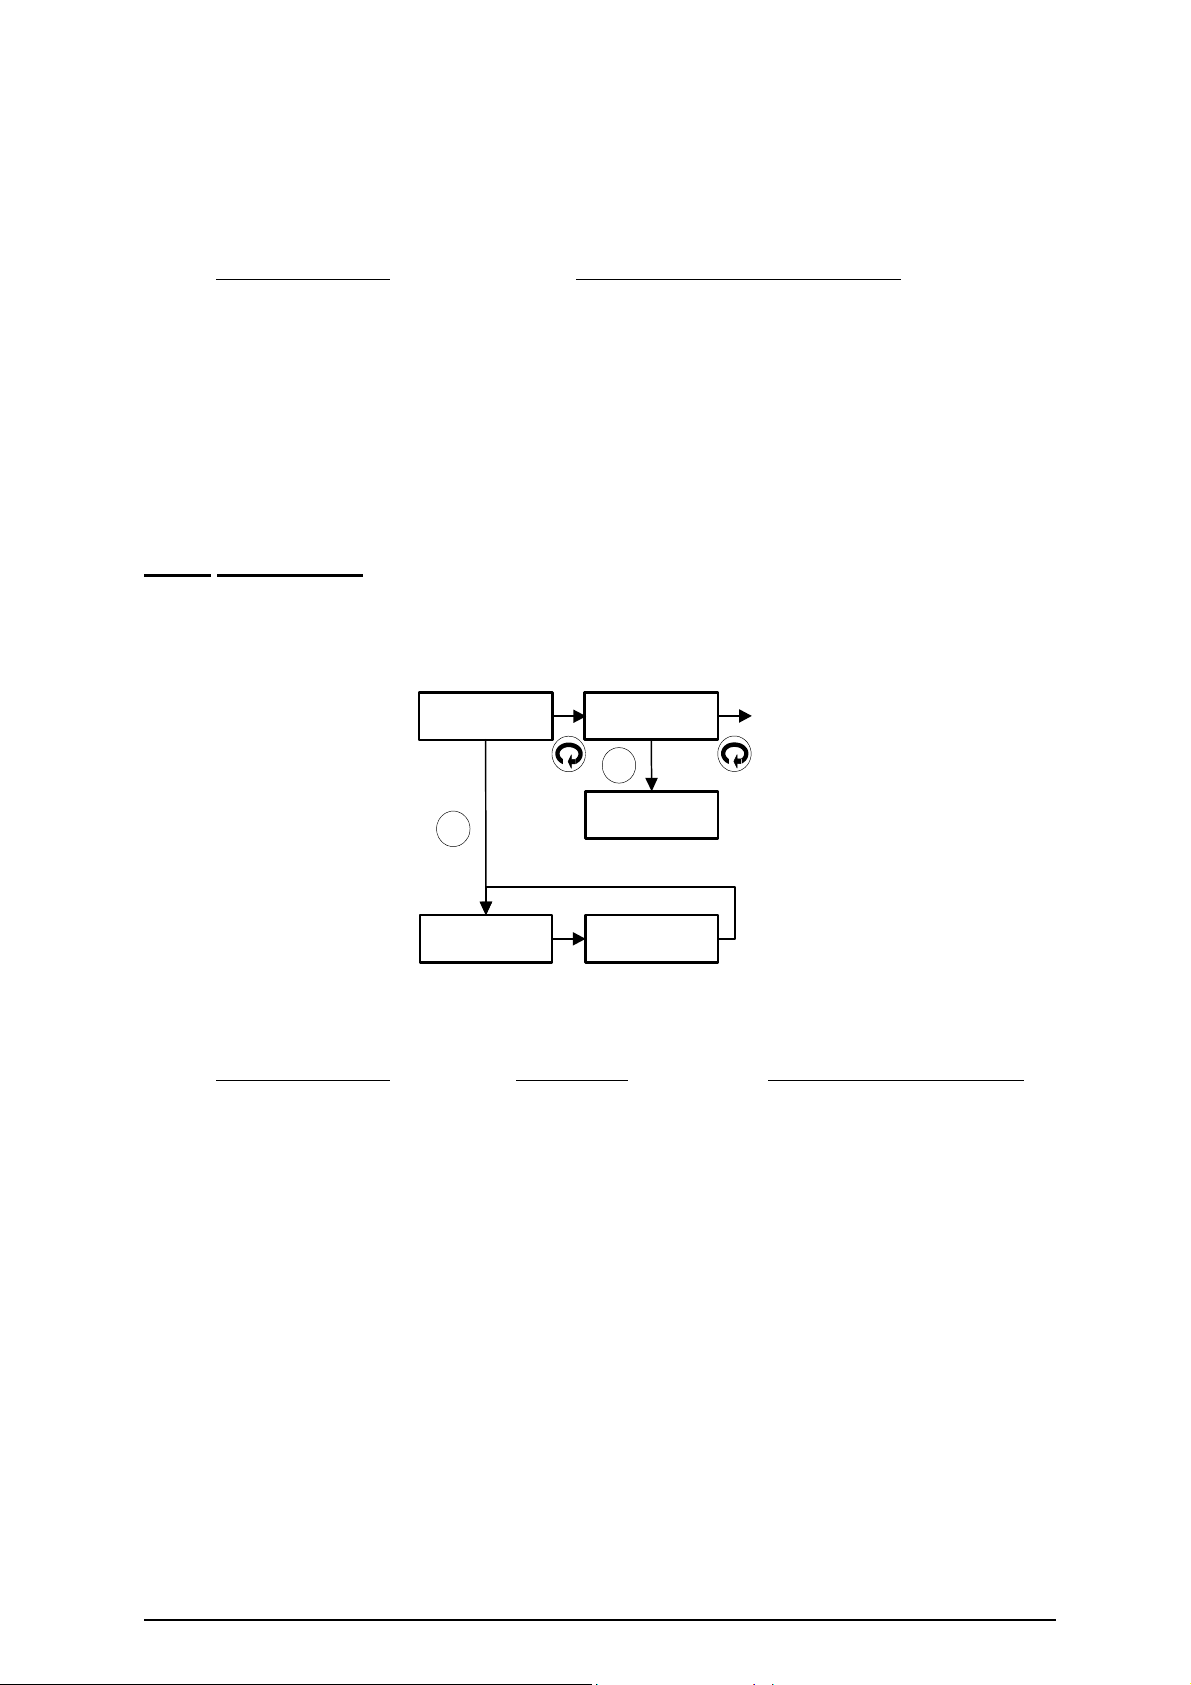
Open Channel Flow Monitoring (O.C.M.)
The following main parameters set up an Open Channel Flow Monitoring application.
7.0 Edit
OCM No
No
Yes
7.1 Flow Device
(Rect.Flume 3/2)
7.2 Max Flow Val
(Auto calculate)
7.3 Maximum Flow
(50.00)
7.4 Total. Units
(in m3)
7.5 Ext. Tot. Drv.
(0.000)
7.6 Total Reset
(No)
Pr.7.1
Flow device (D = Rect. Flume 3/2)
The instrument provides options for three standard ratio-metric flow devices, three
BS3680 flow devices, a variety of Parshall flumes or a custom 24-point table.
Select the flow device from the following list.
Options displayed
7.1.1 Std. Ratio Rect. Flume 3/2 Standard Ratio Rectangular flume 3/2
7.1.2 Std. Ratio Rect. Weir 3/2 Standard Ratio Rectangular weir 3/2
7.1.3 Std. Ratio V-Notch Weir 5/2 Standard Ratio V-notch weir 5/2
7.1.4 BS3680 Rect. flume BS3680 Rectangular flume * Follow BS3680 set-up at step A
7.1.5 BS3680 Rect. weir BS3680 Rectangular weir * Follow BS3680 set-up at step B
7.1.6 BS3680 V-notch weir BS3680 V-notch weir * Follow BS3680 set-up at step C
7.1.7 Parshall Flumes Parshall Flumes * Follow PARSHALL set-up step D
7.1.8 Custom table 24-point linearization table. Refer to appendix 1
Description Action
BS3680 set-ups
Rectangular flume Rectangular weir V-notch weir
Step A Step B Step C
7.1.4 BS3680
Rect. Flume
ENT
7.1.5 BS3680
Rect. Weir
ENT
Throat Width
0.000 Metres
Crest Width
0.000 Metres
ENT
ENT
Channel Width
0.000 Metres
ENT
Throat Length
0.000 Metres
ENT
Channel Width
0.000 Metres
ENT
Crest Height
0.000 Metres
Crest width (Metres)
Throat width (Metres)
Hump Height
0.000 Metres
Throat length (Metres)
Channel
width
(Metres)
Channel width (Metres)
Crest
height
(Metres)
7.1.6 BS3680
V-Notch Weir
ENT
Angle
000.0 Degrees
ENT
Channel Width
0.000 Metres
ENT
Vertex Height
0.000 Metres
Angle (Degrees)
Channel width (Metres)
Vertex
height
(Metres)
Ref: MINIFLEX LR MANUAL Rev. 0 20
Pr. 7.2
SECTION 3
Step D: -
Select from one of the following options if a Parshall flume is required
(See also Appendix 5)
Options displayed
7.1.7.1 Parshall 1,2,3,24 inches 1, 2, 3 or 24 inches
7.1.7.2 Parshall 6 inches 6 inches
7.1.7.3 Parshall 9 inches 9 inches
7.1.7.4 Parshall 12 inches 12 inches
7.1.7.5 Parshall 18 inches 18 inches
7.1.7.6 Parshall 36 inches 36 inches
7.1.7.7 Parshall 48 inches 48 inches
7.1.7.8 Parshall 72 inches 72 inches
7.1.7.9 Parshall 96 inches 96 inches
7.1.7.10 Parshall 10 – 50 feet 10 to 50 feet
Max Flow Val
Description - Parshall flume type
* Only applies if 7.1 set to BS3680
Maximum Flow Value (D = Auto calculation)
There are two types of calculation either Auto calculate, if you want the instrument to
calculate the flow automatically or Input by User if you want to enter the flow value
manually.
7.2 Max Flow Val
(Auto calculate)
ENT
7.3 Maximum Flow
(50.00)
ENT
7.3.1 Max. Flow
50.00
Calculates flow and Manually enter flow
stores in Pr.7.3 in Pr.7.3.1
7.2.1 Automatic
calcul a tion
7.2.2 User sets
maximum flow
Options displayed
7.2.1 Automatic Calculation
7.2.2 User sets maximum flow
Description Action following selection
This option calculates
maximum flow based on the
entered flume or weir values
and the maximum head in
metres @ Pr.3.0 Span. The
calculated flow is stored in
litres/sec @ Pr.7.3.1.
Selecting this option requires
you to enter manually the
maximum flow in litres/sec
@ Pr.7.3.1 and the
maximum head in me tres @
Pr.3.0.
Calculates a new flow value
based on entered parameters
and rewrites this flow in
litres/sec then displays this
value in Pr.7.3
Displays Pr.7.3.1. does not
modify the existing entered
value.
Ref: MINIFLEX LR MANUAL Rev. 0 21

Pr. 7.3 Maximum Flow (D = 50.00)
Enter the maximum flow rate in litres per second corresponding to maximum head,
set at Pr. 3.0
Text displayed
7.3.1 Max. Flow 50.00 Maximum Flow
Note
1. If you are using a BS3680 flume or weir in auto calculate mode the
maximum flow will be calculated and stored by the instrument, overwriting any previous value.
2. If using a Parshall flume enter the value in gallons per second and set the 7.4 Totaliser
to totalise in 7.4.4 Gallons or 7.4.5 Million Gallons.
Description
Pr.7.4
Total. Units Totaliser Units (D = m3)
Option displayed
Metric measurement
7.4.1 Totalise In Litres Totalise flow in Litres
7.4.2 Totalise In m3 Totalise flow in m3
7.4.3 Totalise In 1000 m3 Totalise flow in 1000 m3
Imperial measurement (required for Parshall flume)
7.4.4 Totalise In Gallons Totalise flow in Gallons
7.4.5 Totalise In Million Gallons Totalise flow in Million Gallons
Description
Select from one of the above options: -
Pr.7.5
Ext. Tot. Drv. External Totaliser Drive (D = 0.000)
If 8.3.6 Rly 3 option (Page 26) is set to "Totaliser Out." (Totaliser Output), then
enter the amount, which each relay trip is to represent.
Text displayed
7.5.1 Tot. Dri. On every multiple of this parameter output a pulse to
drive an external totaliser.
Description
e.g.
7.5.1 Tot. Dri. = 0.000
External Totaliser Drive is disabled.
7.5.1 Tot. Dri. = 1.000
If "Totalise in Litres" selected at 7.4 then relay output is tripped every litre
If "Totalise in m3" selected at 7.4 then relay output is tripped every cubic metre (m3)
If "Totalise in 1000m3" selected at 7.4 then relay output is tripped every 1000 cubic metres (1000m3)
7.5.1 Tot. Dri. = 1000
If "Totalise in Litres" entered at 7.4 then relay output is tripped every cubic metre (m3)
After making entries in Pr.7.5.1, go to Pr.7.6 to clear and initiate totaliser.
SECTION 3
Ref: MINIFLEX LR MANUAL Rev. 0 22

Pr.7.6 Total. Reset Relay Hours/Starts Totaliser Reset (D = No)
Option displayed Description
7.6.1 Totaliser Reset No No effect on totaliser
7.6.2 Totaliser Reset Yes Resets the totaliser to 0
To clear the totalisers select the following:
7.6.2 Totaliser Reset Yes
The following messages “Totaliser reset” then “Totaliser stored” appear on the screen.
Note
1. Pr. 7.6 will never display (Yes) even after the totaliser is reset.
SECTION 3
Ref: MINIFLEX LR MANUAL Rev. 0 23

SECTION 3
Relays
The 3 relays can be assigned to various functions depending on the application, as shown
below:
Hysteresis is fully adjustable, so for most functions it is necessary to enter both "set" and
"reset" values.
The relay state under normal operating conditions is defined as:-
Normally energised. De-energise when "set" value is reached.
Normally de-energised. Energise when "set" value is reached.
"Failsafe" functions are detailed in Pr.10.1 – 10.5.
The relays can be programmed to give both high and low alarm or control levels.
e.g. High alarm
Set: 2.0m Low Alarm Reset: 0.5m
Reset 1.8m Set 0.2m
The system will automatically configure itself as high or low alarm depending on which of
the set and reset entries has the higher value.
Note that in distance measurement mode set by Pr 1.0, the highest value is furthest from the
transducer.
The relays are controlled using parameter section 8.0 as follows: -
8.0 Edit
Relays No
No
Yes
ENT
8.1 Rly 1 Options
1
(*
)
8.2 Rly 2 Options
2
(*
)
8.3 Rly 3 Options
3
(*
)
*1
See Pr.8.1 Relay 1 Options default table below
*2
See Pr.8.2 Relay 2 Options default table on Page 25
*3
See Pr.8.3 Relay 3 Options default table on Page 25
Pr.8.1
Rly1 Options Relay 1 Options
The default setting for Rly1 Options is dependent on the application as shown in the
following table: -
Distance Level Volume Pump OCM Differential
Default
Off Norm-
Energised
Norm-
Energised
Norm-
DeEnerg
Flow
Alarm
Diff
Control
Ref: MINIFLEX LR MANUAL Rev. 0 24

SECTION 3
Relay 1 options in Distance, Level, Volume, Pump and OCM mode: -
Options displayed
8.1.1 Relay 1 Norm-Energised Relay 1 Normally Energised
8.1.2 Relay 1 Norm-DeEnergised Relay 1 Normally De-Energised
8.1.3 Relay 1 Temp Alarm
8.1.4 Relay 1 L.O.E. Alarm Relay 1 L.O.E. Alarm (Normally Energised)
8.1.5 Relay 1 Off Relay 1 Off
8.1.6 Relay 1 Flow Alarm
Description
5
*
Relay 1 Temperature alarm (Normally Energised)
4
*
Relay 1 Flow Alarm (Normally Energised)
Options 8.1.1, 8.1.2, 8.1.3 and 8.1.6 require relay set and reset points to be entered in
the units indicated on the display.
Relay 1 options in Differential mode: -
Options displayed Description
8.1.1 Relay 1 Differ. Alarm Relay 1 Differential Alarm (Normally Energised)
8.1.2 Relay 1 Differ. Control Relay 1 Differential Control (Normally De-
8.1.3 Relay 1 Temp Alarm
8.1.4 Relay 1 L.O.E. Alarm Relay 1 L.O.E. Alarm (Normally Energised)
8.1.5 Relay 1 Off Relay 1 Off
8.1.6 Relay 1 Downstream Alarm Relay 1 Downstream Alarm (Normally Energised)
8.1.7 Relay 1 Upstream Alarm Relay 1 Upstream Alarm (Normally Energised)
8.1.8 Relay 1 Alarm on Up/Down Relay 1 Alarm on both Upstream and Downstream
5
*
Relay 1 Temperature alarm (Normally Energised)
Energised)
(Normally Energised)
Options 8.1.1, 8.1.2, 8.1.3, 8.1.6, 8.1.7 & 8.1.8 require relay set and reset points to be
entered in the units indicated on the display.
Pr.8.2 Rly2 Options Relay 2 Options
The default setting for Rly2 Options is dependent on the application as shown in the
following table: -
Distance Level Volume Pump OCM Differential
Default
Off Norm-
Energised
Norm-
Energised
Norm-
DeEnerg
L.O.E. Upstream
Alarm
Relay 2 options in Distance, Level, Volume, Pump and OCM mode: -
Options displayed
8.2.1 Relay 2 Norm-Energised Relay 2 Normally Energised
8.2.2 Relay 2 Norm-DeEnergised Relay 2 Normally De-Energised
8.2.3 Relay 2 Temp Alarm
8.2.4 Relay 2 L.O.E. Alarm Relay 2 L.O.E. Alarm (Normally Energised)
8.2.5 Relay 2 Off Relay 2 Off
8.2.6 Relay 2 Flow Alarm
Description
5
*
Relay 2 Temperature alarm (Normally Energised)
4
*
Relay 2 Flow Alarm (Normally Energised)
Options 8.2.1, 8.2.2, 8.2.3 and 8.2.6 require relay set and reset points to be entered in
the units indicated on the display.
4
*
Option only available in OCM mode
5
*
Requires t/comp transducer or separate temperature sensor.
Ref: MINIFLEX LR MANUAL Rev. 0 25

SECTION 3
Relay 2 options in Differential mode: -
Options displayed Description
8.2.1 Relay 2 Differ. Alarm Relay 2 Differential Alarm (Normally Energised)
8.2.2 Relay 2 Differ. Control Relay 2 Differential Control (Normally
8.2.3 Relay 2 Temp Alarm
8.2.4 Relay 2 L.O.E. Alarm Relay 2 L.O.E. Alarm (Normally Energised)
8.2.5 Relay 2 Off Relay 2 Off
8.2.6 Relay 2 Downstream Alarm Relay 2 Downstream Alarm (Normally Energised)
8.2.7 Relay 2 Upstream Alarm Relay 2 Upstream Alarm (Normally Energised)
8.2.8 Relay 2 Alarm on Up/Down Relay 2 Alarm on both Upstream and Downstream
5
*
Relay 2 Temperature alarm (Normally Energised)
De-Energised)
(Normally Energised)
Options 8.2.1, 8.2.2, 8.2.3, 8.2.6, 8.2.7 & 8.2.8 require relay set and reset points to be
entered in the units indicated on the display.
Pr.8.3
Rly3 Options Relay 3 Options
The default setting for Rly3 Options is dependent on the application as shown in the
following table: -
Distance Level Volume Pump OCM Differential
Default
L.O.E. L.O.E. L.O.E. L.O.E. Totaliser
Output
N/A
Relay 3 options: -
Options displayed
8.3.1 Relay 3 Norm-Energised Relay 3 Normally Energised
8.3.2 Relay 3 Norm-DeEnergised Relay 3 Normally De-Energised
8.3.3 Relay 3 Temp Alarm
8.3.4 Relay 3 L.O.E. Alarm Relay 3 Loss Of Echo Alarm (Normally Energised)
8.3.5 Relay 3 Off Relay 3 Off
8.3.6 Relay 3 Totaliser Output
De-Energised)
Description
5
*
Relay 3 Temperature alarm (Normally Energised)
4
*
Relay 3 Output pulse to external totaliser (Normally
*4 Option only available in OCM mode
5
Requires t/comp transducer or separate temperature sensor.
*
Options 8.3.1, 8.3.2 and 8.3.3 require relay set and reset points to be entered in the
units indicated on the display.
Ref: MINIFLEX LR MANUAL Rev. 0 26

Pump Control
The following main parameters set up a Pump Control application.
9.0 Edit
Pump No
No
9.1 PumpSequence
Pr.9.1
In order to even out the wear of pumps it is possible to alternate the sequence in
which pumps are used.
NOTE: When using Pr.9.1 with Pr.9.2 set to 9.2.2 or 9.2.3: -
Pr. 9.2 Duty Standby (D = Duty Assist)
Yes
ENT
&2 )(Alternate 1
9.2 Duty Standby
(Duty Assist)
9.3 Exerciser
(0000)
9.4 Tolerance
(No Tolerance)
9.5 Maintenance
(All pumps in)
9.6 RunOnIntervl
(0.00)
PumpSequence Pump Sequence (D = Alternate pumps1&2)
Select the sequence from the following list.
Options displayed
9.1.1 Off Sequence by set points (i.e. no alternation).
9.1.2 Alternate pumps 1 & 2 Alternate Relay 1 and Relay 2 (1-2 / 2-1 etc.)
9.1.3 Alternate pumps 1,2 & 3 Alternate Relay 1, Relay 2 and Relay 3
(1,2,3 / 2,3,1 / 3,1,2 etc.)
Description
1. All switch-off points should be set at the same level
2. Do not include alarm
function relays in duty/standby routines.
Duty assist
pumps. Duty standby
is where pumps are switched on by set point, and kept on to assist earlier
is where only one of the pumps specified for duty can be on at a
time, i.e. when the set point for the second pump is reached and it switches on, the
first pump will switch off.
Select the duty sequence from the following list.
Options displayed
9.2.1 Duty Assist Duty/assist operation
9.2.2 Duty Standby 1 & 2 Duty/standby on pumps 1 and 2
9.2.3 Duty Standby 1,2 & 3 Duty/standby on pumps 1, 2 and 3
Description
The turn-off points for the pumps can all be the same, or they can be different
depending on the chosen "Set" and "Reset" values for each relay – unless using
alternating sequence at Pr.9.1.
SECTION 3
9.7 Run On Time
(0000)
Ref: MINIFLEX LR MANUAL Rev. 0 27

Pr.9.3 Exerciser (D = 0000)
To use this facility, first select alternating duty options 9.1.2 or 9.1.3 in Pr.9.1,
depending on the number of pumps installed.
Enter the number of starts assigned to Pump 1 before the sequence switches to allow
the other pumps to be exercised in turn.
Pr.9.4
Tolerance (D = No Tolerance)
In applications where a greasy topped liquid is being pumped, problems may occur
due to build-up of grease at the levels where pumping starts. It is usually necessary
for this to be cleared manually. To avoid this, varying the "turn on" point for the
pumps by ± 10% of the set point value causes the build-up to occur over a larger area,
significantly reducing the maintenance problem.
Select the tolerance setting from the following list.
Options displayed
9.4.1 No Tolerance No tolerance applied to pumps
9.4.2 Tolerance On Toleran ce applied to all pumps
Description
NOTE: The programmed pump “reset” points must be outside the 10% tolerance
zone and outside the blanking distance Pr.4.0.
Pr.9.5
Maintenance (D = All pumps in)
SECTION 3
The removal of one pump for maintenance can necessitate a great deal of
readjustment to ensure correct control. Pr.9.5 simplifys this by allowing one pump to
be removed without affecting the control levels. Pumps are re-assigned downwards
so that the highest level is not used, therefore, normal control levels are maintained
for lower level settings.
Select the pump maintenance sequence from the following list.
Options displayed
9.5.1 All pumps in All pumps in
9.5.2 Drop out pump 1 Drop out pump 1
9.5.3 Drop out pump 2 Drop out pump 2
9.5.4 Drop out pump 3 Drop out pump 3
Description
NOTE: a. The system assumes that the lower numbered pumps turn on first.
b. CAUTION - A PUMP NOT INCLUDED IN AN ALTERNATING
SEQUENCE BUT PROGRAMMED INTO THE FIXED PART OF
THE SEQUENCE WILL BE SUBSTITUTED INTO THE
ALTERNATING SEQUENCE TO REPLACE A PUMP DROPPED
OUT.
c. This feature should not be used if the relays are being used for a
mixture of pump control and alarm functions.
Ref: MINIFLEX LR MANUAL Rev. 0 28

SECTION 3
Pr.9.6 RunOnIntervl Pump Run-on Interval (D = 0.00)
When submersible pumps are used, it may be necessary to pump down occasionally to
clear the sludge from the bottom of the well. This feature is controlled by Pr.9.6 and
Pr.9.7. Once in every interval defined by Pr.9.6, the pump will run-on for the time
period defined by Pr.9.7.
Enter the time interval in hours between each run-on cycle.
Pr.9.7
Pump Run-on Time (D = 0)
Enter the pump running time in seconds. Maximum 120 seconds.
Only one run-on cycle occurs per interval as set by Pr.9.6.
NOTE: a. Caution is required when choosing a value for pump run-on time,
as extended pump run-on can lead to cavitation, causing air locks or
pump damage.
b. As overflow can occur, do not use pump run-on for pump up
operation, set Pr.9.6 and Pr.9.7 to zero.
c. Care should be taken if pump sequence and pump run-on are defined
together, as pump run-on will be assigned to the last pump to turn
off, which could be any of those in the sequence.
Ref: MINIFLEX LR MANUAL Rev. 0 29

SECTION 3
Failsafe
On loss of power all relays will de-energise.
For other fault conditions e.g. damaged transducer, the failsafe relay state (after time delay
selected at Pr.10.4), is selectable:-
Pr.10.1
Default
Pr.10.2 Relay 2 Relay 2 Failsafe
Relay 1 Relay 1 Failsafe
Distance Level Volume Pump OCM Differential
Hold State Hold State Hold State De-
Energise
Options displayed
10.1.1 Relay 1 Energise Relay 1 energises when in fail conditio n
10.1.2 Relay 1 De-Energise Relay 1 de-energises wh en in fail condition
10.1.3 Relay 1 Hold State Relay 1 holds state when in fail condition
Description
Hold State Hold State
Distance Level Volume Pump OCM Differential
Default
Hold State Hold State Hold State De-
Energise
Hold State Hold State
Options displayed
10.2.1 Relay 2 Energise Relay 2 energises when in fail conditio n
10.2.2 Relay 2 De-Energise Relay 2 de-energises wh en in fail condition
10.2.3 Relay 2 Hold State Relay 2 holds state when in fail condition
Description
Pr.10.3 Relay 3 Relay 3 Failsafe (D = Hold State)
Options displayed
10.3.1 Relay 3 Energise Relay 3 energises when in fail conditio n
10.3.2 Relay 3 De-Energise Relay 3 de-energises wh en in fail condition
10.3.3 Relay 3 Hold State Relay 3 holds state when in fail condition
NOTE: Relay designated LOSS-OF-ECHO will always de-energise on failsafe.
Relay 3 Failsafe is not applicable in differential or OCM mode.
Pr.10.4
Fail Time Failsafe time delay
Distance Level Volume Pump OCM Differential
Default 600 600 600 30 30 600
Enter time delay value (in seconds) before unit goes to selected failsafe
positions. Minimum value is 30 seconds. Maximum Value is 9999 seconds.
Pr.10.5
mA Fail Analogue and Display Failsafe (Pump D = High)
(Other applications D = Hold)
Options displayed
10.5.1 Analogue Low Set analogue output low
10.5.2 Analogue High Set analogue output high
10.5.3 Analogue Hold Analogue output holds its value
Description
Ref: MINIFLEX LR MANUAL Rev. 0 30

Analogue
Pr.11.1
Pr.11.2
measurement and OCM).
Analog. O/P Analogue Output (D = 4-20mA)
Options displayed
11.1.1 Output 4-20mA
11.1.2 Output 20-4mA related to span (Pr.3.0) or Pr.11.4.2
11.1.3 Output 0-20mA
11.1.4 Output 20-0mA
11.1.5 4-20mA Overrange will over-range 0-24mA if normal span
11.1.6 0-20mA Overrange (Pr.3.0) is exceeded
The output represents different variables depending on the application mode selected
at Pr.1.0.
Limits are defined by Pr.3.0
Pr. 1 Application Output Proportional To
Distance Measurement
Level Measurement
Volume Measurement
Pump Control
Open Channel Meter (OCM)
Differential Level Measurement (DLD)
NOTE: Refer to Pr.11.3 for the mA output test.
Analog. Val Analogue value options (Only available in differential level
In differential mode (D = Upstream Level)
Options displayed
11.2.1 Output differential of levels - Pr.3.0 represents maximum differential in levels
11.2.2 Output upstream level - Pr.3.0 represents the difference between upstream
11.2.3 Output downstream level - Pr.3.0 represents the difference between downstream
In OCM mode (D = Relative to flow)
Options displayed
11.2.1 Output relative to Flow Output proportional to calculated flow
11.2.2 Output relative to Head Output proportional to measured head (depth of
SECTION 3
Description
Target distance
Level
Volume
Level
a) If 11.2.1 Output relative to Flow
b) If 11.2.2 Output relative to Head
Differential level. (The unit can differentiate
between positive and negative differentials.
(See Pr.11.2)
Description
empty distance Pr.2.0 and maximum upstream level
empty distance Pr.2.0 and maximum downstream
level
Description
liquid)
Ref: MINIFLEX LR MANUAL Rev. 0 31

Pr.11.3 Test mA (D = 4mA)
This parameter outputs a mA value selected by the user. A value of 4, 8, 12 , 16 or
20mA can be outputted and measured at terminals 12 & 13, to test the external
circuitry.
Options displayed
11.3.1 Analogue set output 4mA Sets the analogue output to 4mA
11.3.2 Analogue set output 8mA Sets the analogue output to 8mA
11.3.3 Analogue set output 12mA Sets the analogue output to 12mA
11.3.4 Analogue set output 16mA Sets the analogue output to 16mA
11.3.5 Analogue set output 20mA Sets the analogue output to 20mA
11.3.6 End analogue test Exits analogue test
Description
Pr.11.4
Analogue Scale
11.4.1 Analogue Datum (D = 0.00)
If an analogue output is required with a zero different from the measurement zero
(Pr.2.0) then an offset defined as a percentage of the measurement span/flow/volume
etc., can be entered here.
11.4.2 Analogue Span (D = 100.0)
If an analogue output is required with a span different to that defined for the
measurement (Pr.3.0) then an alternative value defined as a percentage of the
measurement span/flow/volume etc., can be entered here. A value of zero is ignored.
Miscellaneous
Pr.12.1
Offset (D = 0.00)
Both negative and positive values can be input. This value must be entered in metres.
This parameter has two uses:
1. It can be used to correct minor reading errors on the display
SECTION 3
2. It can be used to prevent loss-of-echo when the target can go further
away from the transducer than the desired span.
e.g. a) When a channel floor is lower than the zero point of a "V" notch weir.
b) To set an elevated zero level in a vessel, which is not normally completely
emptied.
Add the extra depth to Pr.2.0 and enter minus
the extra depth at Pr.12.1 in metres.
Pr.12.2
Passcode Security Code Store
A new security code can be entered at this parameter, but after entry it is scrambled.
Refer to Hycontrol if you forget your security code and quote the number displayed
here.
Ref: MINIFLEX LR MANUAL Rev. 0 32

Pr.12.3 NoOfDecimal Number of decimal places (D = 2 dec points)
The number of decimal places required for displaying when in normal operation.
Options displayed
12.3.1 Display No decimal point Display value with no decimal point
12.3.2 Display 1 Decimal Point Display value with 1 decimal point
12.3.3 Display 2 Decimal Points Display value with 2 decimal points
12.3.4 Display 3 Decimal Points Display value with 3 decimal points
Description
Pr.12.4 Relay tot. Relay totaliser (D = Off)
Options displayed Description
12.4.1 Relay totaliser off Disables relay totaliser function
12.4.2 Relay totaliser on Enable relay totaliser function
Pr.12.5
Simulation (D = No)
Options displayed
12.5.1 Simulation No Don’t simulate program
12.5.2 Simulation Yes Start simulation
Description
The value displayed will depend on the application set in Pr.1.0.
Select
12.5.2 Simulation Yes to simulate the operation of the instrument as set up
between Blanking (Pr.4.0) and Empty distance (Pr.2.0).
Application type
Display value relative to
Level Measurement - LEVEL
Distance measurement - DISTANCE
Differential level measurement - NO SIMULATION AVAILABLE
Open Channel Measurement - LEVEL
Pump Control - LEVEL
Volume - LEVEL
It will set all LEDs/relays and the current output as programmed. Therefore, care
must be taken if the instrument is wired into other instruments or controls. The
displayed value, on which all relays are operated, is that which is set by the operator.
The initial speed of the simulation is that set into Rate of Change (Pr.5.0) this can be
increased by a factor of 2 by pressing the ' ' key and the key can be pressed 6 times
(x64). To reduce the speed press the ' ' key, the speed cannot be reduced below
that defined by Rate of Change.
The direction of the simulation can be changed by using the ' ' and 'ENT' keys,
which one has to be pressed depends on the set up. Press ' M' to end.
SECTION 3
Ref: MINIFLEX LR MANUAL Rev. 0 33

SECTION 3
Pr.12.6 Station ID (D = 1)
For polled data transfer, the unit must have a station number assigned to it in the
range of 1 – 31, which must be unique to the unit.
Text displayed
12.6.1 StationID 01 Unique identification number for instrum e nt
Description
Pr.12.7
Sync Instrs Synchronise instruments (D = Master)
Options displayed
12.7.1 Sync Master
12.7.2 Sync Slave
This parameter is used in conjunction with Pr12.6 Station ID for synchronising two or
more instruments when they are in close proximity. See Appendix 6 for details, Page
64.
Pr.12.8
Check Search (D = Off)
Options displayed
12.8.1 Check Search Off Check search not used
12.8.2 Check Search On Check search included
Description
Check search should be used where fill rates can sometimes be greater than that
entered at Pr.5.0, or if the transducer is liable to be submerged.
Pr.12.9
Maximum gain (D = 100.0)
The maximum gain will be displayed in % and will be linear. It defines the level of
gain (power) available to the instrument when searching for a valid echo.
Pr.12.10
Serial Number (Viewable only)
This parameter displays the serial number of the Miniflex LR unit.
Pr.12.11
Revision Number (Viewable only)
Displays the Revision number of the software, e.g. LR 1.0.
Ref: MINIFLEX LR MANUAL Rev. 0 34

SECTION 4
MINIFLEX LR DEFAULT PROGRAMS
For each application type in the Miniflex LR there is a default program, which is
automatically loaded on first selecting a new application at Pr.1.0. Resetting the instrument
(Page 13) will load the factory default program for a typical distance measurement
application. The default settings for all 6 application types are detailed on the following
pages.
DISTANCE – Distance Measurement Mode Default Program
Changing the application to Distance Measurement or resetting the instrument, loads this
distance measurement default program into memory.
Pr.4.0 Blanking 0.500m
Pr.2.0 Empty Distance
10.00m
Pr.3.0 Operational
Span
10.00m
TARGET
This default program is created to do the following:-
To measure and display the distance between the face of the transducer and the target
in metres.
Maximum distance of 10.00m.
Rate of change of 10.0 metre/min.
No alarms.
4-20mA output proportional to distance.
This program can be easily modified to suit the required application. You should delete from
this program any unwanted entries (e.g. 8.3.4 Relay 3 L.O.E.).
Parameter Default Description
number Setting
2.0 Empty Distance = 10.00 Maximum measurable distance from transducer.
3.0 Operational Span = 10.00 The span, based on zero level.
4.0 Blanking = 0.500 Blanking zone i nt o which target should not rise.
5.0 RateOfChange = 10.00 The maximum rate of change of target distance in
metres/minute.
8.1 Rly1 Options = 8.1.5 Relay 1 Off Relay 1 Off
8.2 Rly2 Options = 8.2.5 Relay 2 Off Relay 2 Off
8.3 Rly3 Options = 8.3.4 Relay 3 L.O.E. Relay 3 (L.O.E. Alarm – de-energises relay)
10.4 Fail Time = 600 Failsafe time in seconds
10.5 mA Fail = 10.5.3 Analogue Hold Analogue output holds on failsafe.
11.1 Analog O/P = 11.1.1 Output 4–20mA 4-20mA output fixed to span (Pr.3.0).
To simulate the program go to 12.5.2 yes then press ENT again.
Ref: MINIFLEX LR MANUAL Rev. 0 35

SECTION 4
LEVEL – Level Measurement Mode Default Program
Changing the application to Level measurement loads this default program into memory.
Pr.4.0 Blanking 0.500m
Pr.2.0 Empty Distance
6.000m
Pr.3.0 Operational
5.500m
Span
Pr.8.1.1.2
R1 Reset
4.800m
Pr.8.1.1.1
R1 Set
5.000m
Pr.8.2.1.1
R2 Set
1.000m
Pr.8.2.1.2
R2 Reset
1.200m
This default program is created to do the following:-
To measure and display the level of liquid in metres.
Maximum level 5.5m.
Fill rate 1.0 metre/min.
Alarm if level exceeds 5.0 metres or goes below 1m.
4-20mA output proportional to level.
This program can be easily modified to suit the required application. You should delete from
the program any unwanted entries (e.g. Relay 2 settings).
Parameter Default Description
number Setting
2.0 Empty Distance = 6.000 Distance from transducer to zero level.
3.0 Operational Span = 5.500 The span, based on zero level.
4.0 Blanking = 0.500 Blanking zo ne i nto whi ch level should not rise.
5.0 RateOfChange = 1.000 The maximum rate of change of liquid level in
metres/minute.
8.1 Rly1 Options = 8.1.1 Relay 1 Norm-Energised Relay 1 to alarm on level (normally energised)
8.1.1.1 Relay 1 Set = 5.0 Relay 1 to de-energise at 5.0 metres to indicate
high alarm.
8.1.1.2 Relay 1 Reset = 4.8 Relay 1 to re-energise at 4.8 metres to clear the
high alarm.
8.2 Rly2 Options = 8.2.1 Relay 2 Norm-Energised Relay 2 to alarm on level (normally energised)
8.2.1.1 Relay 2 Set = 1.0 Relay 2 to de-energise at 1.0 metre to indicate
low alarm.
8.2.1.2 Relay 2 Reset = 1.2 Relay 2 to re-energise at 1.2 metres to clear the
low alarm.
8.3 Rly3 Options = 8.3.4 Relay 3 L.O.E. Alarm Relay 3 (L.O.E. Alarm – de-energises
relay)
10.1 Relay 1 = 10.1.3 Relay 1 Hold State Hold alarm indication (relay 1) on failsafe.
10.2 Relay 2 = 10.2.3 Relay 2 Hold State Hold alarm indication (relay 2) on failsafe.
10.4 Fail Time = 600 Failsafe time in seconds
10.5 mA Fail = 10.5.3 Analogue Hold Analogue output holds on failsafe.
11.1 Analog O/P = 11.1.1 Output 4–20mA 4-20mA output fixed to span (Pr.3.0).
To simulate the program go to 12.5.2 yes then press ENT again.
Ref: MINIFLEX LR MANUAL Rev. 0 36

SECTION 4
VOLUME - Contents Measurement with Volumetric Conversion Default Program
Changing the application to volume measurement loads this default program into memory.
Pr.4.0 Blanking 0.500m
Pr.8.1.1.1
R1 Set
90
High alarm
Pr.8.2.1.2
R2 Set
10
Pr.8.2.1.1
R2 Reset
15
Low alarm
Pr.2.0 Empty Dis t anc e
6.000m
Pr.3.0 Operational
5.500m
Pr.8.1.1.2
R1 Reset
85
Span
This default program is created to do the following:-
To measure the level in a flat bottomed tank. Dimensions as shown.
Output/display in m³.
Analogue output to be 4-20mA proportional to volume in tank.
High alarm at 90% volume.
Low alarm at 10% volume.
This program can be easily modified to suit the required application. You should delete from
this program any unwanted entries (e.g. Relay 3 L.O.E.).
Parameter Default Description
number Setting
2.0 Empty Distance = 6.000 Distance from transducer to zero level.
3.0 Operational Span = 5.500 The span, based on zero level.
4.0 Blanking = 0.500 Blanking zo ne i nto whi ch level should not rise.
5.0 RateOfChange = 1.000 The maximum rate of change of liquid level in
metres/minute.
6.1 Vessel Shape = 6.1.1 Linear Vessel Define vessel as linear vessel
6.2 Display Units = 6.2.7 Units % Display in %
8.1 Rly1 Options = 8.1.1 Relay 1 Norm-Energised Relay 1 to alarm on volume (normally
energised)
8.1.1.1 Relay 1 Set = 90 Relay 1 to de-energise at 90% to indicate high
alarm.
8.1.1.2 Relay 1 Reset = 85 Relay 1 to re-energise at 85% to clear the high
alarm.
8.2 Rly2 Options = 8.2.1 Relay 2 Norm-Energised Relay 2 to alarm on volume (normally
energised)
8.2.1.1 Relay 2 Set = 10 Relay 2 to de-energise at 10% to indicate low
alarm.
8.2.1.2 Relay 2 Reset = 15 Relay 2 to re-energise at 15% to clear the low
alarm.
8.3 Rly3 Options = 8.3.4 Relay 3 L.O.E. Alarm Relay 3 (L.O.E. Alarm)
To simulate the program go to 12.5.2 yes then press ENT again.
Ref: MINIFLEX LR MANUAL Rev. 0 37

SECTION 4
Pump Control Default Program
Changing the application to Pump Control loads this default program into memory.
Pr.4.0 Blanking 0.500m
Pr.2.0 Empty Distance
6.000m
Pr.3.0 Operational
5.500m
Span
Start 1
Pr.8.1.1.1
1.000m
Stop 1
Pr.8.1.1.2
0.500m
Start 2
Pr.8.2.1.1
2.000m
Stop 2
Pr.8.2.1.2
0.500m
This default program is created to do the following:
2 pump control, pump down in a wet-well, duty-assist operation.
Alternate pump duty to reduce wear.
4-20mA to remote indicator.
Loss-of-Echo indication to telemetry.
Display actual level in metres.
This program can be easily modified to suit the required application. You should delete from
this program any unwanted entries (e.g. 9.2.1 Duty assist).
Parameter Default Description
number Setting
2.0 Empty Distance = 6.000 Distance from transducer to zero level.
3.0 Operational Span = 5.500 The span, over which measurement is required.
4.0 Blanking = 0.500 Blanking zo ne i nto whi ch level should not rise.
5.0 RateOfChange = 1.000 The maximum rate of change of liquid level in
metres/minute.
8.1 Rly1 Options = 8.1.2 Relay 1 Norm-DeEnergised Relay 1 control on level (normally de energised)
8.1.1.1 Relay 1 Set = 1.0 Relay 1 energises at 1.0m to turn pump 1 on.
8.1.1.2 Relay 1 Reset = 0.5 Relay 1 de-energises at 0.5m to turn pump off.
8.2 Rly2 Options = 8.2.2 Relay 2 Norm-DeEnergised Relay 2 to control on level (normally de energised)
8.2.1.1 Relay 2 Set = 2.0 Relay 2 energises at 2m to turn pump 2 on.
8.2.1.2 Relay 2 Reset = 0.5 Relay 2 de-energises at 0.5m to turn pump 2
off.
8.3 Rly3 Options = 8.3.4 Relay 3 L.O.E. Alarm Relay 3 (L.O.E. Alarm – de-energises relay)
9.1 Pump Sequence = 9.1.2 Alternate pumps 1 & 2 Alternate pumps 1 & 2
9.2 Duty Standby = 9.2.1 Duty Assist Duty assist ope rat i on .
10.1 Relay 1 = 10.1.2 Relay 1 De-Energise Pump 1 de-energise on failsafe.
10.2 Relay 2 = 10.2.2 Relay 2 De-Energise Pump 2 de-energise on failsafe.
10.4 Fail Time = 30 Failsafe time in seconds
10.5 mA Fail = 10.5.2 Analogue High Analogue output goes high on failsafe.
11.1 Analog O/P = 11.1.1 Output 4–20mA 4-20mA output fixed to span (Pr.4).
To simulate the program go to 12.5.2 yes then press ENT again.
Ref: MINIFLEX LR MANUAL Rev. 0 38

SECTION 4
OpenChannel Flowmeter Default Program
Changing the application to Open Channel Flow Monitoring loads this default program into
memory.
Pr.4.0 Blanking 0.500m
Pr.2.0 Empty Distance
1.200m
Transducer position
3 - 4 times max. head
0.90 – 1.20m
Pr.3.0 Operational Span
0.280m
Flow
This default program is created to do the following:-
Standard Ratio Rectangular flume, with a maximum flow of 50 litres per second at
head 28cm.
Loss-of-Echo indication to telemetry system.
4-20mA output proportional to flow.
Totalise flow and provide pulsed output to external totaliser every 1000 litres.
Display flow reading.
This program can be easily modified to suit the required application. You should delete from
this program any unwanted entries (e.g. Relay 1 settings).
Parameter Default Description
number Setting
2.0 Empty Distance = 1.200 Distance from transducer to bottom of channel.
3.0 Operational Span = 0.280 Level at which maximum flow rate value is
defined.
4.0 Blanking = 0.500 Blanking zone into which level will not rise. It
is suggested that this is above the top of the
channel to allow the system to continue reading
up to that level.
5.0 RateOfChange = 1.000 Rate of change of level 1m/min.
7.1 Flow device = 7.1.1 Std. Ratio Rect. Flume 3/2 To define that a rectangular flume is being
used (Not BS3680).
7.3 Maximum Flow = 50 Defines the maximum flow is 50 litres per
second.
7.4 Totaliser Units = 7.4.2 Totalise In m3 To avoid totaliser overflow, totalise in cubic
metres
8.1 Rly1 Options = 8.1.6 Flow alarm Relay 1 to alarm on flow (normally
energised)
8.1.1.1 Relay 1 Set = 45 Relay 1 to de-energise at 45 litres per second to
indicate flow alarm.
8.1.1.2 Relay 1 Reset = 40 Relay 1 to re-energise at 40 litres per second to
clear the flow alarm.
Ref: MINIFLEX LR MANUAL Rev. 0 39

SECTION 4
8.2 Rly2 Options = 8.2.4 Relay 2 L.O.E. Alarm Relay 2 (L.O.E. Alarm)
8.3 Rly3 Options = 8.3.4 Relay 3 Totaliser Output Relay 3 used to trigger external totaliser
10.1 Relay 1 = 10.1.2 Relay 1 De-Energise De-energise (relay 1) on failsafe.
10.2 Relay 2 = 10.2.2 Relay 2 De-Energise De-energise (relay 2) on failsafe.
10.4 Fail Time = 30 Failsafe time in seconds
10.5 mA Fail = 10.5.3 Analogue Hold Analogue output holds on failsafe.
11.1 Analog. O/P = 11.1.1 Output 4–20mA Output over 4-20mA
11.2 Analog. Val = 11.2.1 Output relative to flow 4-20mA output is proportional to flow
To simulate the program go to 12.5.2 yes then press ENT again.
(NOTE:- Only simulates the level not flow).
To clear and initiate the totaliser before returning to run mode set 7.6 Total. Reset = 7.6.2 Totaliser Reset Yes
Ref: MINIFLEX LR MANUAL Rev. 0 40

SECTION 4
Differential Level Measurement Program
Changing the application to Differential Level Measurement Control loads this default
program into memory. In this mode, the transceiver drives two transducers to measure the
difference in levels by subtracting the downstream level from the upstream level. Please see
connection diagram Figure 7 for transducer wiring (Page 8).
The upstream transducer should be chosen to give a positive differential value.
RAKE CONTROL
Pr.4.0 Blanking 0.500m
Pr.2.0 Empty Distance
2.000m
UPSTREAM ALARM
Pr.8.2.1.1 R2 Set
0.600m
Pr.8.2.1.2 R2 Reset
Pr.3.0 Operational Span
0.500m
0.550m
Pr.8.1.1.2 R1 Reset 0.050m
Stop rake
Pr.8.1.1.1 R1 Set 0.150m
Start rake
Flow
This default program is created to do the following:-
Start rake when differential reaches 0.15m.
Stop rake when differential falls to 0.05m.
Maximum differential 0.50m.
Alarm if level on upstream side exceeds 0.60m.
4-20mA output proportional to differential.
On Loss-of-Echo energise alarm and switch rake on.
This program can be easily modified to suit the required application. You should delete from
this program any unwanted entries (e.g. Relay 2 settings).
Parameter Default Description
number Setting
2.0 Empty Distance = 2.000 The distance from bottom of channel to
transducers in metres.
3.0 Operational Span = 0.500 The maximum differential span.
4.0 Blanking = 0.500 Blanking zone.
5.0 RateOfChange = 1.000 The maximum rate of change of level in
metres/minute.
8.1 Rly1 Options = 8.1.2 Relay 1 Differ. Control Relay 1 designated for differential control.
8.1.2.1 Relay 1 Set = 0.15 Relay 1 energises at differential 0.15m to start
rake.
8.1.2.2 Relay 1 Reset = 0.05 Relay 1 de-energises at differential 0.05m to
stop rake.
8.2 Rly2 Options = 8.2.7 Relay 2 Upstream Alarm Relay 2 to alarm on an upstream level.
8.2.1.1 Relay 2 Set = 0.60 Relay 2 de-energises at 0.60m high alarm.
8.2.1.2 Relay 2 Reset = 0.55 Relay 2 energises at 0.55m to clear high alarm.
Ref: MINIFLEX LR MANUAL Rev. 0 41

SECTION 4
10.1 Relay 1 = 10.1.1 Relay 1 De-Energise Switch rake off in failsafe.
10.2 Relay 2 = 10.2.2 Relay 2 De-Energise Alarm level indication on failsafe.
10.4 Fail Time = 600 Failsafe time in seconds
10.5 mA Fail = 10.5.3 Analogue Hold Analogue output holds on failsafe.
11.1 Analog O/P = 11.1.1 Output 4–20mA 4-20mA output fixed to span (Pr.3.0).
12.4 Relay tot. = 12.4.2 Relay totaliser On This counts the number of times the rake is
turned on, and how many hours it has been
energised.
NOTE:- It is not possible to simulate any differential mode applications.
Ref: MINIFLEX LR MANUAL Rev. 0 42

SECTION 5
COMMISSIONING FAULT FINDING
WARNING! FAULT FINDING SHOULD BE UNDERTAKEN
ONLY BY SUITABLY TRAINED PERSONNEL.
Basic Hardware
A) The display is blank or frozen, the leds are unlit and the neon does not fire:-
1. Ensure that power is being supplied to the board, and that it is correctly wired.
Refer to figure 3, on Page 3.
2. Check fuses F3 (ac) and F4 (dc)
3. Check that the supply voltage is within specified levels (See Section 1 Page 3).
A large voltage drop can cause the unit to lock and show last distance or level
reading.
B) The fuse blows continuously:-
1. Power down and fit a new fuse – refer to Page 3
Remove all connection blocks except AC power TB6 or DC power TB1.
If fuse does not blow on power up insert each terminal block until fault
reappears.
Check wiring of this terminal block.
2. Check that the power supply is within specified limits -refer to Page 3.
3. Check the enclosure for metal debris which may be under the lower PCB.
C) The system powers up, but displays garbage:-
1. Power down then check that an EPROM is fitted at U2 and that it is firmly in
place.
D) The display is blank:-
1. Power down then check that a jumper link is fitted on 3 pin link LK1 at the
side of the display on the top PCB going between the centre pin and pin W.
E) The display appears faded or too dark:-
1. Adjust contrast pot P1.
Ref: MINIFLEX LR MANUAL Rev. 0 43

SECTION 5
F) The display shows 'LOSS OF ECHO':-
1. Check the transducer wiring and connections to the instrument. Note that
different connections are used if a temperature compensated transducer is
connected. See Figure 3, Page 3.
If the transducer cable has been extended as per Page 8, disconnect and
remove the transducer and connect it direct to the Miniflex LR. If the unit now
operates, recheck the extension cable connections and routing, avoiding power
cables. Re-install the transducer checking that its aim is perpendicular to the
target surface.
2. Check whether the neon light on the bottom PCB nearest terminal 1 is
flashing. If it is proceed to number 3, if it is not then:-
a: Disconnect the transducer: If the neon now lights then there is a short
circuit in the cabling.
b: If the neon does not light the transmission fuse may have blown.
Check F1 T80mA fuse on the bottom PCB.
c: If the unit still shows 'LOSS OF ECHO' check that you can hear the
transducer "clicking" when close to the ear.
d: If the transducer does not click proceed to 5.
3. Is there a target within the empty distance specified in Pr.2.0? This is
particularly important if temperature variations are experienced and no
compensation is applied.
4. Is the vessel empty with a conical, parabolic, sloping or spherical bottom?
This commonly causes loss of echo if the transducer cannot be mounted
over the centre of the vessel. When the vessel becomes empty the pulse from
the transducer hits the sloping sides of the bottom section and the signal is not
reflected back to the transducer. Under this condition the display will indicate
'LOSS OF ECHO' but the failsafe designation will operate until product
returns and the system will automatically recover and track level. If the
transducer cannot be mounted centrally, the problem may be overcome by the
installation of a target plate.
5. Connect a known good transducer to the instrument and check the operation.
If the known transducer gives a good signal check the instrument’s gain by
pressing the ' ' key. The number displayed ranges from 0.1 – 100, the lower
the number the greater the signal strength.
If the gain figure is 50 - 100 check the surface level for foam or other
materials which may float in and out of the beam and cause poor echoes.
Ref: MINIFLEX LR MANUAL Rev. 0 44

G) The keypad fails to respond:-
1. Check for correct alignment of connection from keypad to main board.
2. Check that key press sequence is valid; refer to Page 11.
3. Power down unit and wait 5 seconds. Power up and immediately press 'M'.
This should result in 'Program Mode' being displayed. It is now advisable to
reset to your original default program, Page 15.
H) Analogue output is unstable:-
1. Connect a test meter in series with your external wiring.
Can the fault be seen on the test meter? If YES, then use Pr.11.3 to set a stable
value into the current loop.
If the output is still unstable disconnect external wiring and connect a meter
across terminals 12 and 13 and repeat Pr.11.3 test.
If the output is now stable check wiring and meters
I) Analogue has no output:-
1. Check programme value at Pr.11.1
2. Insert a test meter in series with the output. Under Pr.11.3 select a fixed
output. If still no output, connect a test meter directly across terminals 12 and
13, repeat test under Pr.11.3. If no value is read at terminals 12 to 13 contact
Hycontrol.
J) Analogue output is less than 20 at maximum display reading:-
1. The load attached to the output may be too high. To check this disconnect all
the external wiring and see if it now reads 20. The output is capable of driving
20mA into 750 Ohms.
K) Analogue output does not correspond to application:-
1. Check that the correct options (Pr.11.1, 11.2 and 11.4 ) have been selected.
2. Check that the correct span (Pr.3.0) has been input, this is the value over which
the analogue will be spanned unless a separate entry has been made at Pr.11.4.1
and 11.4.2.
SECTION 5
Ref: MINIFLEX LR MANUAL Rev. 0 45

L) Reading on display and outputs stay high:-
* This is usually caused by return echoes from close-in obstructions.
1. Check for obstructions. If the transducer is mounted on a standpipe, check for
rough edges at the connection with the vessel, refer to figure 6 Page 7.
2. If there are no close-in obstructions ensure that the iso lation kit is fitted on the
transducer and that the transducer is mounted correctly. The isolation kit
should enable the transducer to move slightly, it should not be solid. (Not
applicable to flanged transducers.)
3. Check the entry at Pr.4.0, Blanking distance, and return it to 0.5m if reduced
from factory setting
4. May be caused by rate of change, Pr.5.0 being too small.
M) Reading is lower than expected:-
1. Check that Pr.2.0 and Pr.3.0 are correct for the application
2. It can be caused when the level rises into the blanking zone. The system can
then lock on to a multiple echo, and may continue tracking the multiple when
the level decreases. Using check search Pr.12.8 should rectify this situation, but
preventing the level entering the blanking zone is the preferred solution.
3. It can also be caused by the level moving at a much faster rate than is allowed
for by the defined rate of change (Pr.5.0). To solve the problem the rate of
change value should be increased to more closely match the real rate.
N) Reading changes in steps:-
* This is usually caused by the rate of change value (Pr.5.0) being too
small to keep up with the process.
1. To rectify, increase the value of Pr.5.0 to match the rate of change of level.
O) The display is inaccurate:-
1. The empty distance (Pr.3.0) of the vessel may be incorrectly set.
2. The dimensions of the vessel or flume may be incorrect, as may the values of
maximum flow, volume or mass conversion.
3. The system m ay require temperature compensation.
4. The application may include vapours that significantly change the speed of
sound.
SECTION 5
Ref: MINIFLEX LR MANUAL Rev. 0 46

P) Temperature compensation error:-
1. The position of the transducer/temperature sensor is important to prevent
heating by sunlight and convection currents. Also the sensor should be in a
free-air vented position if possible to prevent hot-spots.
NOTE: The sensor compensates only for temperature variance, it is not expected to
accurately measure the actual temperature.
Q) Temperature reads 20ºC all the time:-
1. Check the transducer wiring and connections to the instrument. Note that
different connections are used if a temperature compensated transducer is
connected. See Figure 3, Page 3.
2. Check fuse F2 T80mA.
R) The boards hums loudly:-
* Usually vibration from the transformer.
1. Check the mounting screws for tightness.
S) Relays not switching:-
1. Check the programmed relay designations and settings at Pr.8.1 - Pr.8.3
Functions can be tested under simulation using Pr.12.5 (Not differential).
2. Check contact continuity at the terminals 14 - 22.
WARNING: It is recommended that all external controls, alarms etc. are
disconnected before performing the above tests.
SECTION 5
Ref: MINIFLEX LR MANUAL Rev. 0 47

APPENDIX 1
LINEARISATION
VESSELS OR FLUMES
This feature allows volume conversion to be applied to irregular shaped vessels and flow
measurements to be made on open channels, providing that level/volume/flow relationships
are known.
The system allows the entry of a volume or flow profile with up to 24 points of level or head
to be entered into memory, that is then used to produce the required flow or volume values
when in 'RUN' mode.
Before proceeding it is useful to write down a table of the point numbers and 'Level / Head in
Metres' with the corresponding ‘%Volume / % Flow’ values, to facilitate programming.
VOLUME
The custom volume table is selected in Pr.6.1.8. The profile is level in metres, against
percentage of the total volume. See example on page 50.
FLOW
The custom flow table is selected in Pr.7.1.8. The profile is stored as head in metres, against
percentage of the total flow. See example on page 52.
PROCEDURE
The procedure uses a 24 point curve to map the profile, but all 24 points do not have to be
used.
Head or Level (m)
% Flow or Volume
The profile data is input into Pr.6.1.8 for volume and Pr.7.1.8 for flow. The values can be
displayed and changed as required.
Ref: MINIFLEX LR MANUAL Rev. 0 48

APPENDIX 1
Custom table - Keyboard controls
- Used to increase digit and change value.
- Moves to previous entered value if available.
- Move to next digit.
ENT - Enters a new value and moves to next entry if available.
M - Exit custom table key, asks for confirmation of storing table before returning
the operator to normal program.
Custom table - Inputting Values
When inputting a value for the first time or after a reset the initial value will be displayed as
_ . _ _ _ or _ _ _ . _.
Selecting either the ‘ ’or ‘ ’ will display 0.000 allowing you then to enter the head or
level in metres. The decimal position is fixed and cannot be changed.
For volume, both Level (Metres) and Volume (%) figures should be entered up to the
required number of points you wish to map.
For flow, both Head (Metres) and Flow (%) figures should be entered up to the required
number of points you wish to map.
After entering each value, press the ENT key to accept the value and display the next point to
be entered.
To finish entering the data points press the M key.
PARAMETER RESET: CLEARS ALL METRES VALUES TO _._ _ _
Head / Level (Metres)
The decimal position is fixed at 3 decimal places
The allowable range of level / head values is 0.000 – 9.999m
PARAMETER RESET: CLEARS ALL % VALUES TO _ _ _._
Flow / Volume (%)
The decimal position is fixed at 1 decimal place.
The allowable range of % values is 0-250%.
Any unused data values must be cleared to _ _ _ _
NOTE: 1. The standard keypad time-outs are suspended, to allow sufficient time to
enter the data.
2. We recommend that the required values are written in tabular form,
as shown, before programming commences.
Ref: MINIFLEX LR MANUAL Rev. 0 49

APPENDIX 1
Example: Flow – Special Flume Mapping
Use default flow example on Page 39, but substitute a special 'U' throat flume with maximum
flow 50 litres/second at 30 cm/head.
First, create the following table from the relationship of head and flow, which must be given
for the special flume.
Point Head (m) Flow
% Flow
litres/sec
1 0.000 0.0 000.0
2 0.025 0.6 001.1
3 0.050 2.2 004.4
4 0.075 4.8 009.5
5 0.100 8.1 016.2
6 0.150 16.3 032.5
7 0.200 26.0 052.0
8 0.250 37.5 075.0
9 0.300 50.0 100.0
10 _ . _ _ _ Not used _ _ _ . _
11 _ . _ _ _ Not used _ _ _ . _
12 _ . _ _ _ Not used _ _ _ . _
21 _ . _ _ _ Not used _ _ _ . _
22 _ . _ _ _ Not used _ _ _ . _
23 _ . _ _ _ Not used _ _ _ . _
24 _ . _ _ _ Not used _ _ _ . _
NOTE: Points 10 to 24 not used - leave at factory default value.
Now continue programming the instrument as follows:
Ref: MINIFLEX LR MANUAL Rev. 0 50

Flowchart to program the example custom flow table into the instrument.
APPENDIX 1
Pr 6.1.8 Custom
table – 24 points
ENT
Head (Metres) 01
_ . _ _ _
Head (Metres) 01
0.000
ENT
Flow (Metres) 01
_ _ _ . _
Flow (Metres) 01
000.0
ENT
Head (Metres) 02
_ . _ _ _
Head (Metres) 02
0.025
ENT
Flow (Metres) 02
_ _ _ . _
Flow (Metres) 02
001.1
ENT
Head (Metres) 03
_ . _ _ _
Head (Metres) 03
0.050
ENT
Flow (Metres) 04
_ _ _ . _
Flow (Metres) 04
004.4
ENT
Head (Metres) 04
_ . _ _ _
Head (Metres) 04
0.075
ENT
Flow (Metres) 04
_ _ _ . _
Flow (Metres) 04
009.5
ENT
Head (Metres) 05
_ . _ _ _
Head (Metres) 05
0.100
ENT
Flow (Metres) 05
_ _ _ . _
Flow (Metres) 05
016.2
ENT
Head (Metres) 06
_ . _ _ _
Head (Metres) 06
0.015
ENT
Flow (Metres) 06
_ _ _ . _
Flow (Metres) 06
032.5
ENT
Head (Metres) 07
_ . _ _ _
Head (Metres) 07
0.020
ENT
Flow (Metres) 07
_ _ _ . _
Flow (Metres) 07
052.0
ENT
Head (Metres) 08
_ . _ _ _
Head (Metres) 08
0.024
ENT
Flow (Metres) 08
_ _ _ . _
Flow (Metres) 08
075.0
ENT
Head (Metres) 09
_ . _ _ _
Head (Metres) 09
0.030
ENT
Flow (Metres) 09
_ _ _ . _
Flow (Metres) 09
100.0
M
Store Custom
Table Yes
ENT
Custom Table
Stored
ENT
Ref: MINIFLEX LR MANUAL Rev. 0 51
Returns to 7.3

APPENDIX 1
Example: Vessel Mapping
Level in Metres
5.500
5.000
4.500
4.000
3.500
3.000
2.500
2.000
1.500
1.000
0.500
0.000
Transducer
Vessel (or channel)
symmetrical
about c/1
Required values
Use the custom table to create a volume profile for a non standard tank with a capacity of
8500 litres. Each of the points is entered as a Level in metres against % Volume.
Point Level (m) Volume in Units % Volume
1 0.000 0 000.0
2 0.500 0 000.0
3 1.000 612 007.2
4 1.500 1368.5 016.1
5 2.000 2320.5 027.3
6 2.500 3187.5 037.5
7 3.000 4122.5 048.5
8 3.500 5057.5 059.5
9 4.000 5992.5 070.5
10 4.500 6800.0 080.0
11 5.000 7607.5 089.5
12 5.500 8500.0 100.0
13 _ . _ _ _ Not used _ _ _ . _
14 _ . _ _ _ Not used _ _ _ . _
23 _ . _ _ _ Not used _ _ _ . _
24 _ . _ _ _ Not used _ _ _ . _
NOTE: Points 13 to 24 not used - leave at factory default value.
Leave Pr.6.2 DisplayUnits at the default setting of Litres to display the readings in litres and
change Pr.6.3 MaxDsp x 100 = 85.0 to scale the 0 – 100% volume value 0 to 8500 litres.
Ref: MINIFLEX LR MANUAL Rev. 0 52

APPENDIX 2
SPECIFICATION
Transceiver
Enclosure : IP65, NEMA 4X, IK08 / IK07 polycarbonate, hinged lid.
Dimensions : 185H X 213W X 119.5D (mm).
Weight : 1.55Kg
Power Supply : 95/110/230VAC +
10%. 50/60Hz, 12VA,
24V DC + 25% - 10%, 9W. Separate terminals.
Fuse Rating : F3 T160mA for AC supply
F4 T250mA for 24V DC supply
F1 & F2 T80mA.
Range : Up to 10 metres.
Accuracy of Change in
Level
: +
0.25% of measured distance from the transducer at constant
temperature of 20ºC,
Ambient Temperature : -20ºC to + 70ºC.
Resolution : 2mm or 0.1% of range, whichever is the greater.
Analogue Output : 4-20mA into 750 Ohms. 16 bit. Short circuit protected and opto-
isolated on AC powered units. Not opto-isolated on 24V DC units.
Relay Outputs : 3 multi-function SPDT relays rated 8A/250VAC/30V DC resistive,
with gold contacts.
Indication : Integral display, 2lines x 16digit Backlit LCD.
3 red LED's to indicate relay status.
Interface : 5 key integral keypad with security code.
Failsafe : High, Low, Hold
Damping : Fully adjustable
Blanking : Fully adjustable
Transducer
Type : RYV15 RYT15 RWV15 RWT15
Temperature
: No Yes No Yes
Compensation
Frequency (in KHz) : 41.5 kHz 41.5 kHz 41.5 kHz 41.5 kHz
Beam Angle at 3dB : 12 degrees @
-3dB
Body Material : Solvay Solef
6008 (PVDF)
Face Material : Glass reinforced
epoxy
12 degrees @
-3dB
Solvay Solef
6008 (PVDF)
Glass reinforced
epoxy
12 degrees @
-3dB
Solvay Solef
6008 (PVDF)
Solef 6008
(PVDF)
12 degrees @
-3dB
Solvay Solef
6008 (PVDF)
Solef 6008
(PVDF)
Process Temperature * : -40ºC to + 90ºC -40ºC to + 90ºC -40ºC to + 90ºC -40ºC to + 90ºC
Protection : IP68
IP68 IP68 IP68
Weight (Kg) : 1.5 1.5 1.5 1.5
Hazardous area approval* EEx m II T6 KEMA 04ATEX1124X
Temperature range –40 to +60ºC
NOTE: CE approved - EMC tested in accordance with BS EN61000-6-2: 2001 &
BSEN61000-6-3 including A1 & C1
Low voltage directive, EN61010
* Refer to pages 54 & 55 for ATEX installations.
Ref: MINIFLEX LR MANUAL Rev. 0 53

Installation Instructions for ATEX Transducer in Hazardous Area
For transceiver installation refer to Page 2.
SAFE AREA
HAZARDOUS AREA
APPENDIX 3
Miniflex LR
Transceiver
Maximum
separation of
300m
Transducer
Installation must be in accordance with the applicable codes of practice and harmonised
standards for EEx m (encapsulated) equipment.
The transducer must be driven only by the Miniflex LR transceiver.
The transceiver must always be installed in a safe area.
User repairs are not permitted; in case of faults return the unit to Hycontrol.
Periodically clean the radiating face only with clean water, and inspect the body and wiring
for damage.
Ref: MINIFLEX LR MANUAL Rev. 0 54

Installation Instructions for ATEX Transducer in Hazardous Area
Refer to the appropriate section for:-
Transducer mounting guidelines - Page 5.
Cable connections - Pages 3 & 4.
Cable extensions - Page 8.
Specification
Type: RYV/RYT/RWV/RWT15
Frequency: 41.5 kHz
Beam angle: 12 degrees @ -3dB
Body material: Solvay Solef 6008 (PVDF)
Face material: RYV/RYT Glass reinforced epoxy
RWV/RWT Solef 6008
Temperature range: -40ºC to + 60ºC
Maximum Range: 10m (depending on application)
Typical marking
Manufacturer: Hycontrol Ltd.
Group / category:
EC certification: KEMA 04ATEX1124X
Type: RYV/RYT/RWV/RWT15
Type of protection: EEx m II T6
Tamb: -40ºC to + 60ºC
Degree of protection: IP68
Maximum input: 6W
S/No; xxxxxxxx
Mfg. year: xxxx
10m cable 6.0 dia
M32 x 1.5
26
102
50 dia
M20 x 1.5
62
92 dia
Outline drawing RYV/RYT/RWV/RWT15
0038
All dimensions are in mm unless stated.
Fit the isolation kit to minimise any ringing
through metal mounting surfaces
II 2 G D
Mounting
face
Optional
isolation kit
AK3730
20
130 assembled
height
APPENDIX 3
Ref: MINIFLEX LR MANUAL Rev. 0 55

APPENDIX 4
DISTANCE APPLICATION PARAMETERS
Pr Description Factory Default User Service
Application
1.0 Basic Application Distance
Basic Set-up
2.0 Empty Distance 10.00
3.0 Operational Span 10.00
4.0 Blanking 0.500
5.0 RateOfChange 10.00
Relays
8.1 Rly1 Options Off
8.1.1.1 R1 Set NOT APPLICABLE
8.1.1.2 R1 Reset NOT APPLICABLE
8.2 Rly2 Options Off
8.2.1.1 R2 Set NOT APPLICABLE
8.2.1.2 R2 Reset NOT APPLICABLE
8.3 Rly3 Options L.O.E. Alarm
8.3.1.1 R3 Set NOT APPLICABLE
8.3.1.2 R3 Reset NOT APPLICABLE
Failsafe
10.1 Relay 1 NOT APPLICABLE
10.2 Relay 2 NOT APPLICABLE
10.3 Relay 3 De-Energise
10.4 Fail Time 600
10.5 mA Fail Hold
Analogue
11.1 Analogue O/P Output 4-20mA
11.2 Analogue Value NOT APPLICABLE
11.3 Test mA 4mA
11.4 Analogue Scale NO VALUE REQUIRED
11.4.1 Datum (%) 0.0
11.4.2 Span (%) 100.0
Miscellaneous
12.1 Offset 0.000
12.2 Passcode 36.67
12.3 NoOfDecimal 2 Dec Points
12.4 Relay tot. Off
12.5 Simulation No
12.6 Station ID 1
12.7 Sync Instrs Master
12.8 Check Search Off
12.9 Maximum gain 100.0
NOT APPLICABLE – Parameter is not required for the selected option but may need to be set if the option is
changed.
NO VALUE REQUIRED – This parameter is just a heading and leads to another parameter.
Ref: MINIFLEX LR MANUAL Rev. 0 56

APPENDIX 4
LEVEL APPLICATION PARAMETERS
Pr Description Factory Default User Service
Application
1.0 Basic Application Level
Basic Set-up
2.0 Empty Distance 6.000
3.0 Operational Span 5.500
4.0 Blanking 0.500
5.0 RateOfChange 1.000
Relays
8.1 Rly1 Options Norm-Energised
8.1.1.1 R1 Set 5.000
8.1.1.2 R1 Reset 4.800
8.2 Rly2 Options Norm-Energised
8.2.1.1 R2 Set 1.000
8.2.1.2 R2 Reset 1.200
8.3 Rly3 Options L.O.E. Alarm
8.3.1.1 R3 Set NOT APPLICABLE
8.3.1.2 R3 Reset NOT APPLICABLE
Failsafe
10.1 Relay 1 Hold State
10.2 Relay 2 Hold State
10.3 Relay 3 De-Energise
10.4 Fail Time 600
10.5 mA Fail Hold
Analogue
11.1 Analogue O/P Output 4-20mA
11.2 Analogue Value NOT APPLICABLE
11.3 Test mA 4mA
11.4 Analogue Scale NO VALUE REQUIRED
11.4.1 Datum (%) 0.0
11.4.2 Span (%) 100.0
Miscellaneous
12.1 Offset 0.000
12.2 Passcode 36.67
12.3 NoOfDecimal 2 Dec Points
12.4 Relay tot. Off
12.5 Simulation No
12.6 Station ID 1
12.7 Sync Instrs Master
12.8 Check Search Off
12.9 Maximum gain 100.0
NOT APPLICABLE – Parameter is not required for the selected option but may need to be set if the option is
changed.
NO VALUE REQUIRED – This parameter is just a heading and leads to another parameter.
Ref: MINIFLEX LR MANUAL Rev. 0 57

APPENDIX 4
VOLUME APPLICATION PARAMETERS
Pr Description Factory Default User Service
Application
1.0 Basic Application Level
Basic Set-up
2.0 Empty Distance 6.000
3.0 Operational Span 5.500
4.0 Blanking 0.500
5.0 RateOfChange 1.000
Volume Conversion
6.1 Vessel Shape Linear
h Metres NOT APPLICABLE
R Metres NOT APPLICABLE
Dish L Metres NOT APPLICABLE
Cylindr L Metres NOT APPLICABLE
6.2 Display Units %
6.3 MaxDisp *100 001.0
6.4 Disp. Format Contents
Relays
8.1 Rly1 Options Norm-Energised
8.1.1.1 R1 Set 90.00%
8.1.1.2 R1 Reset 85.00%
8.2 Rly2 Options Norm-Energised
8.2.1.1 R2 Set 10.00%
8.2.1.2 R2 Reset 15.00%
8.3 Rly3 Options L.O.E. Alarm
8.3.1.1 R3 Set NOT APPLICABLE
8.3.1.2 R3 Reset NOT APPLICABLE
Failsafe
10.1 Relay 1 Hold State
10.2 Relay 2 Hold State
10.3 Relay 3 Hold State
10.4 Fail Time 600
10.5 mA Fail Hold
Analogue
11.1 Analogue O/P Output 4-20mA
11.2 Analogue Value NOT APPLICABLE
11.3 Test mA 4mA
11.4 Analogue Scale NO VALUE REQUIRED
11.4.1 Datum (%) 0.0
11.4.2 Span (%) 100.0
Miscellaneous
12.1 Offset 0.000
12.2 Passcode 36.67
12.3 NoOfDecimal 2 Dec Points
12.4 Relay tot. Off
12.5 Simulation No
12.6 Station ID 1
12.7 Sync Instrs Master
12.8 Check Search Off
12.9 Maximum gain 100.0
NOT APPLICABLE – Parameter is not required for the selected option but may need to be set if the option is
changed.
NO VALUE REQUIRED – This parameter is just a heading and leads to another parameter.
Ref: MINIFLEX LR MANUAL Rev. 0 58

APPENDIX 4
PUMP CONTROL APPLICATION PARAMETERS
Pr Description Factory Default User Service
Application
1.0 Basic Application Pump Control
Basic Set-up
2.0 Empty Distance 6.000
3.0 Operational Span 5.500
4.0 Blanking 0.500
5.0 RateOfChange 1.000
Relays
8.1 Rly1 Options Norm-DeEnergised
8.1.1.1 R1 Set 1.000
8.1.1.2 R1 Reset 0.500
8.2 Rly2 Options Norm-DeEnergised
8.2.1.1 R2 Set 2.000
8.2.1.2 R2 Reset 0.500
8.3 Rly3 Options L.O.E. Alarm
8.3.1.1 R3 Set NOT APPLICABLE
8.3.1.2 R3 Reset NOT APPLICABLE
Pump Controls
9.1 PumpSequence Alternate 1&2
9.2 Duty Standby Duty Assist
9.3 Exerciser 0000
9.4 Tolerance No Tolerance
9.5 Maintenance All pumps in
9.6 RunOnIntervl 0.000
9.7 Run On Time 0000
Failsafe
10.1 Relay 1 De-Energise
10.2 Relay 2 De-Energise
10.3 Relay 3 De-Energise
10.4 Fail Time 30
10.5 mA Fail High
Analogue
11.1 Analogue O/P Output 4-20mA
11.2 Analogue Value NOT APPLICABLE
11.3 Test mA 4mA
11.4 Analogue Scale NO VALUE REQUIRED
11.4.1 Datum (%) 0.0
11.4.2 Span (%) 100.0
Miscellaneous
12.1 Offset 0.000
12.2 Passcode 36.67
12.3 NoOfDecimal 2 Dec Points
12.4 Relay tot. Off
12.5 Simulation No
12.6 Station ID 1
12.7 Sync Instrs Master
12.8 Check Search Off
12.9 Maximum gain 100.0
NOT APPLICABLE – Parameter is not required for the selected option but may need to be set if the option is
changed.
NO VALUE REQUIRED – This parameter is just a heading and leads to another parameter.
Ref: MINIFLEX LR MANUAL Rev. 0 59

r
r
OCM APPLICATION PARAMETERS
Pr Description Factory Default User Service
Application
1.0 Basic Application Open Channel Flow
Monitoring
Basic Set-up
2.0 Empty Distance 1.200
3.0 Operational Span 0.280
4.0 Blanking 0.500
5.0 RateOfChange 1.000
Open Channel Flow
7.1 Flow Device Rect.Flume 3/2
If Flow device is a BS3680 rectangular flume / weir or V-Notch weir enter details in boxes below
FD User Serv FD User Serv FD User Serv
Throat
Width (m)
N/A
Crest
Width (m)
Channel
Width (m)
Throat
Length (m)
Hump
Height (m)
BS3680 Rect. Flume
N/A
N/A
N/A
Channel
Width (m)
Crest
Height (m)
BS3680 Rect. Wei
N/A
N/A
N/A
Angle
(Degrees)
Channel
Width (m)
Vertex
Height (m)
N/A
N/A
N/A
BS3680 V-Notch Wei
APPENDIX 4
7.2 Max Flow Val *Only used in BS3680
7.3 Maximum Flow 50.00
7.4 Total. Units in m3
7.5 Ext. Tot. Drv. 0.000
7.6 Total. Reset No
Relays
8.1 Rly1 Options Flow Alarm
8.1.1.1 R1 Set 45.00
8.1.1.2 R1 Reset 40.00
8.2 Rly2 Options L.O.E. Alarm
8.2.1.1 R2 Set NOT APPLICABLE
8.2.1.2 R2 Reset NOT APPLICABLE
8.3 Rly3 Options Totaliser Output
8.3.1.1 R3 Set NOT APPLICABLE
8.3.1.2 R3 Reset NOT APPLICABLE
Failsafe
10.1 Relay 1 De-Energise
10.2 Relay 2 De-Energise
10.3 Relay 3 NOT APPLICABLE
10.4 Fail Time 30
10.5 mA Fail Hold
Analogue
11.1 Analogue O/P Output 4-20mA
11.2 Analogue Value Relative to flow
11.3 Test mA 4mA
11.4 Analogue Scale NO VALUE REQUIRED
11.4.1 Datum (%) 0.0
11.4.2 Span (%) 100.0
Cont’d…
Ref: MINIFLEX LR MANUAL Rev. 0 60

APPENDIX 4
Miscellaneous
12.1 Offset 0.000
12.2 Passcode 36.67
12.3 NoOfDecimal 2 Dec Points
12.4 Relay tot. Off
12.5 Simulation No
12.6 Station ID 1
12.7 Sync Instrs Master
12.8 Check Search Off
12.9 Maximum gain 100.0
NOT APPLICABLE – Parameter is not required for the selected option but may need to be set if the option is
changed.
NO VALUE REQUIRED – This parameter is just a heading and leads to another parameter.
Ref: MINIFLEX LR MANUAL Rev. 0 61

APPENDIX 4
DIFFERENTIAL LEVEL APPLICATION PARAMETERS
Pr Description Factory Default User Service
Application
1.0 Basic Application Differential
Measurement
Basic Set-up
2.0 Empty Distance 2.000
3.0 Operational Span 0.500
4.0 Blanking 0.500
5.0 RateOfChange 1.000
Relays
8.1 Rly1 Options Diff. Control
8.1.1.1 R1 Set 0.150
8.1.1.2 R1 Reset 0.050
8.2 Rly2 Options Upstream Alarm
8.2.1.1 R2 Set 0.600
8.2.1.2 R2 Reset 0.550
8.3 Rly3 Options NOT AVAILABLE Used to switch between transducers
Failsafe
10.1 Relay 1 Energise
10.2 Relay 2 De-Energise
10.3 Relay 3 NOT AVAILABLE
10.4 Fail Time 600
10.5 mA Fail Hold
Analogue
11.1 Analogue O/P Output 4-20mA
11.2 Analog. Value Differential
11.3 Test mA 4mA
11.4 Analogue Scale NO VALUE REQUIRED
11.4.1 Datum (%) 0.0
11.4.2 Span (%) 100.0
Miscellaneous
12.1 Offset 0.000
12.2 Passcode 36.67
12.3 NoOfDecimal 2 Dec Points
12.4 Relay tot. On
12.5 Simulation No
12.6 Station ID 1
12.7 Sync Instrs Master
12.8 Check Search Off
12.9 Maximum gain 100.0
NOT APPLICABLE – Parameter is not required for the selected option but may need to be set if the option is
changed.
NOT AVAILABLE – Parameter does not apply to this application type.
NO VALUE REQUIRED – This parameter is just a heading and leads to another parameter.
Ref: MINIFLEX LR MANUAL Rev. 0 62

APPENDIX 5
PARSHALL FLUMES
The OCM flow exponent (Pr.7.1) has been expanded to include 10 Parshall flume profiles.
The data for the selected flume is loaded into the flume mapping system (Appendix 1) from
tables held in memory.
Maximum head is entered in Pr.3.0 and the associated maximum flow in Pr.7.3. If one of the
values is known, the other can be found in the flume tables or by calculation from :
Flume Size -
Inches
1 3.22 10 331.60
Q = KH
where H = Inches, Q = US GPM and K = Constant for flume size
(for imperial gallon multiply K factor by 0.8).
K Factor for US GPM
n
GPM,
Flume
Size - Feet
K Factor for US GPM
2 6.45 12 393.70
3 9.46 15 486.90
6 18.20 20 642.10
9 30.80 30 797.40
12 40.90 40 1263.00
18 58.90 50 1574.00
24 76.30
36 110.00
48 142.00
72 204.70
96 256.60
Ref: MINIFLEX LR MANUAL Rev. 0 63

APPENDIX 6
WIRING DIAGRAM FOR SYNCHRONISATION OF INSTRUMENTS
If two or more instruments are situated close together or the transducers beam profile
overlaps there is a possibility they can interfere with each other.
Instruments located
in close proximity
MASTER
SLAVE
Potential problem application with two instruments located close together.
To solve this problem, connect the sync and shield terminals of each of the units in close
proximity to each other as shown below.
To program one instrument as master give it the ID number 1 (Pr 12.6 = 1) then set each of
the attached instruments as slaves (Pr. 12.7 = Slave) with consecutive ID numbers, up to a
maximum of 5.
Instrument 1
Pr. 12.6 = 1
Pr. 12.7 = Master
876
SHIELD
SYNC
10
9
Connection diagram for up to 5 instruments
Instrument 2
Pr. 12.6 = 2
Pr. 12.7 = Slave
SHIELD
SYNC
10
9
876 9
Instrument 3
Pr. 12.6 = 3
Pr. 12.7 = Slave
SHIELD
876
SYNC
10
Instrument 4
Pr. 12.6 = 4
Pr. 12.7 = Slave
SHIELD
876
SYNC
10
Instrument 5
Pr. 12.6 = 5
Pr. 12.7 = Slave
SHIELD
9
8769
SYNC
10
Ref: MINIFLEX LR MANUAL Rev. 0 64

To enter a program
press
M
then press
when Program mode is
displayed. This will bring
you to either Distance
Measurement, Level
Measurement, Volume
Measurement, Pump
Control or Open Channel
Flow Monitoring.
.
Distance
Measurement
ENT
2.0 Empty Dist
10.00 Metres
ENT
3.0 Span
10.00 Metres
ENT
4.0 Blanking
0.500 Metres
ENT
5.0 RateOfChange
10.00 Metres/Min
ENT
8.0 Edit
Relays No
ENT
10.0 Edit
Failsafe No
ENT
11.0 Edit
Analogue No
ENT
12.0 Edit
Misc. No
Level
Measurement
ENT
2.0 Empty Dist
6.000 Metres
ENT
3.0 Span
5.500 Metres
ENT
4.0 Blanking
0.500 Metres
ENT
5.0 RateOfChange
1.000 Metres/Min
ENT
8.0 Edit
Relays No
ENT
10.0 Edit
Failsafe No
ENT
11.0 Edit
Analogue No
ENT
12.0 Edit
Misc. No
MINIFLEX LR PROGRAMMING CHARTS APPENDIX 7
Measurement
ENT
2.0 Empty Dist
6.000 Metres
ENT
3.0 Span
5.500 Metres
ENT
4.0 Blanking
0.500 Metres
ENT
5.0 RateOfChange
1.000 Metres/Min
ENT
6.0 Edit
Volume
ENT
8.0 Edit
Relays No
ENT
10.0 Edit
Failsafe No
ENT
11.0 Edit
Analogue No
ENT
12.0 Edit
Misc. No
Pump ControlVolume
ENT
2.0 Empty Dist
6.000 Metres
ENT
3.0 Span
5.500 Metres
ENT
4.0 Blanking
0.500 Metres
ENT
5.0 RateOfChange
1.000 Metres/Min
ENT
8.0 Edit
Relays No
ENT
9.0 Edit
Pump
ENT
10.0 Edit
Failsafe No
ENT
11.0 Edit
Analogue No
ENT
12.0 Edit
Misc. No
Open Channel
Flow Monitoring
ENT
2.0 Empty Dist
1.200 Metres
ENT
3.0 Span
0.280 Metres
ENT
4.0 Blanking
0.500 Metres
ENT
5.0 RateOfChange
1.000 Metres/Min
ENT
7.0 Edit
OCM No
ENT
8.0 Edit
Relays No
ENT
10.0 Edit
Failsafe No
ENT
11.0 Edit
Analogue No
ENT
12.0 Edit
Misc. No
Differential
Measurement
ENT
2.0 Empty Dist
2.000 Metres
ENT
3.0 Span
0.500 Metres
ENT
4.0 Blanking
0.500 Metres
ENT
5.0 RateOfChange
1.000 Metres/Min
ENT
8.0 Edit
Relays No
ENT
10.0 Edit
Failsafe No
ENT
11.0 Edit
Analogue No
ENT
12.0 Edit
Misc. No
Ref: MINIFLEX LR MANUAL Rev. 0 65

6.0 Edit
Volume No
Yes
No
6.1 Vessel shape
(Linear)
ENT
6.1.1 Linear
Vessel
Pr.3.0
6.1.1 LINEAR VESSEL
Pr. 6.1.4.1
Sphere h
6.1.4 VERTICAL SPHERICAL BOTTOM.
6.2 Display Units
(%)
ENT
6.2.1 Units
Litres
6.1.2 Vertical
Pyramid Bottom
6.1.2.1 Pyramd h
0.000 Metres
Pr.3.0
MINIFLEX LR PROGRAMMING CHARTS APPENDIX 7
6.3 MaxDisp x100
(001.0)
ENT
6.3.1MaxDsp x100
001.0
6.2.2 Units
Gallons
6.1.3 Vertical
Conical Bottom
ENTENT
6.1.3.1 Cone h
0.000 Metres
Pr.6.1.5.2
Radius R
6.1.5 VERTICAL DISHED BOTTOM.
6.4 Disp. Format
(Contents)
ENT
6.4.1 Display
Contents
6.2.3 Units
Tons
6.1.4 Vertical
Spherical Bottom
ENT
6.1.4.1 Sphere h
0.000 Metres
6.1.2 VERTICAL PYRAMID BOTTOM
Pr.6.1.5.1
Dish h
Pr.3.0
6.4.2 Display
Ullage
6.2.4 Units
Tonnes
6.1.5 Vertical
Dished Bottom
6.1.5.1 Dish h
0.000 Metres
6.1.5.2 Radius R
0.000 Metres
Pr. 6.1.2.1
Pyramid h
6.4.3 Display
Ullage &Contents
6.2.5 Units
Kg
6.1.6 Horizontal
Cylind Flat Ends
ENT
ENT ENT
Pr.3.0
6.1.3 VERTICAL CONICAL BOTTOM
6.1.6 HORIZONTAL CYLINDER FLAT ENDS.
6.2.6 Units
m3
6.1.7 Horizontal
Cylind Dish Ends
6.1.7.1 Dish L
0.000 Metres
6.1.7.2 Cylndr L
0.000 Metres
Pr.6.1.3.1
Cone h
Pr.3.0
6.2.7 Units
%
6.1.8 Custom
table – 24points
See Figure
Pr.3.0
Pr.6.1.7.1
Dish L
6.1.7 HORIZONTAL CYLINDER DISH ENDS.
Pr.6.1.7.2
Cylndr L
Pr.3.0
Ref: MINIFLEX LR MANUAL Rev. 0 66

MINIFLEX LR PROGRAMMING CHARTS APPENDIX 7
Custom
Clear Custom
Table?
No
ENT
Only appears if inst rument already
has a table programmed
Yes
ENT
Reset Data Points
Level (metres) 01
ENT
M
Volume (%) 01
M
ENT
Custom Table
Stored
Yes
ENT
Store Custom
Table?
No
ENT
Increase point number by 1
upto a maximum of 24 points
No
ENT
Modify Custom
Table
Yes
ENT
Back to point 1
See figure
Ref: MINIFLEX LR MANUAL Rev. 0 67

7.0 Edit
OCM No
No
7.1.7 Pars l
flumes
hal
ENT
7.1.7.1 Par hall
1,2,3,24 inches
s
Yes
7.1 Flow Device
(Rect.Flume 3/2)
ENT
7.1.1 Std. Ratio
Rect. Flume 3/2
7.1.7.2 Parshall
6 inches
7.2 Max Flow Val
(Auto calculate)
ENT
7.2.1 Automatic
calculation
7.1.2 Std. Ratio
Rect. Weir 3/2
7.1.7.3 Parshall
9 inches
7.3 Maximum Flow
(50.00)
ENT
7.3.1 Max. Flow
50.00
7.2.2 User sets
maximum flow
7.1.3 Std. Ratio
V-Notch Weir 5/2
7.1.7.4 Parshall
12 inches
MINIFLEX LR PROGRAMMING CHARTS APPENDIX 7
7.4 Total. U nits
(in m3)
ENT
7.4.1 Tota lise
in Litres
7.1.4 BS3680
Rect. Flume
ENT
Throat Width
00.00 Metres
ENT
Channel Width
00.00 Metres
ENT
Throat Length
00.00 Metres
ENT
Hump Height
00.00 Metres
7.1.7.5 Parshall
18 inches
7.5 Ext. Tot. Drv.
(0.000)
ENT
7.5.1 Tot. Drv.
0.000
7.4.2 Totalise
in m3
7.1.5 BS3680
Rect. Weir
ENT
Crest Width
00.00 Metres
ENT
Channel Width
00.00 Metres
ENT
Crest Height
00.00 Metres
7.1.7.6 Parshall
36 inches
7.6 Total. Reset
(No)
ENT
7.6.1 Totaliser
Reset No
7.4.3 Totalise
in 1000m3
7.1.6 BS3680
V-Notch Weir
ENT
Angle
000.0 Degrees
ENT
Channel Width
00.00 Metres
ENT
Vertex Height
00.00 Metres
7.1.7.7 Parshall
48 inches
7.6.2 Totaliser
Reset Yes
7.4.4 Totalise
in Gallons
7.1.7 Parshall
flumes
7.1.7.8 Parshall
72 inches
7.4.5 Totalise
in Million Gals
7.1.8 Custom
table–24points
See Appendix A
7.1.7.9 Parshall
96 inches
7.1.7.10 Parshall
10 – 50 feet
Ref: MINIFLEX LR MANUAL Rev. 0 68

MINIFLEX LR PROGRAMMING CHARTS APPENDIX 7
Custom
ENT
Clear Custom
Table?
No
ENT
Reset Data Points
Yes
Only appears if instrument already
has a table programmed
Head (metres) 01
ENT
M
Flow (%) 01
M
ENT
Custom Table
Stored
Yes
ENT
Store Custom
Table?
ENT
No
Increase point number by 1
upto a maximum of 24 points
See figure
No
ENT
Modify Custom
Table
Yes
ENT
Back to point 1
Ref: MINIFLEX LR MANUAL Rev. 0 69

MINIFLEX LR PROGRAMMING CHARTS APPENDIX 7
8.0 Edit
Relays No
No
Yes
ENT
8.1 Rly 1 Options
1
(*
)
ENT
4
*
8.1.1 Relay 1
Norm Energised
ENT
8.1.1.1 R1 Set
1
*
Metres
ENT
8.1.1.2 R1 Reset
1
*
Metres
*3 Relay 3 Default Options
RELAY
APPLICATION
8.2 Rly 2 Options
2
(*
)
ENT
4
*
8.2.1 Relay 2
NormEnergised
ENT
8.2.1.1 R1 Set
2
*
Metres
ENT
8.2.1.2 R1 Reset
2
*
Metres
8.1.2 Relay 1
Norm-DeEnergised
*4 Selections for Relay 1 and Relay 2 in DIFFERENTIAL mode. X = Relay number (1 or 2)
8.X.1 Relay X
Differ. Alarm
8.3 Rly 3 Options
3
(*
)
ENT
8.3.1 Relay3
NormEnergised
ENT
8.3.1.1 R1 Set
3
*
Metres
ENT
8.3.1.2 R1 Reset
3
*
Metres
8.2.2 Relay 2
Norm-DeEnergised
1
Relay 1 Default Options
*
APPLICATION
DISTANCE
DIFFERENTIAL
8.1.3 Relay 1
Temp Alarm
8.X.2 Relay X
Differ. Control
8.3.2 Relay3
Norm-DeEnergised
*
APPLICATION
8.2.3 Relay 2
Temp Alarm
RELAY
LEVEL
VOLUME
PUMP
OCM Flow Alarm
8.1.4 Relay 1
L.O.E. Alarm
8.X.3 Relay 1
Temp Alarm
2
Relay 2 Default Options
DIFFERENTIAL
Rly1 Options
Norm-Energised
Norm-Energised
Norm-DeEnergised
Off
Diff. Control
LEVEL
VOLUME
PUMP
DISTANCE
DIFFERENTIAL
DISTANCE
RELAY
LEVEL
VOLUME
PUMP
OCM
OCM
Rly3 Options
L.O.E.
L.O.E.
L.O.E.
L.O.E.
Totaliser Output
8.3.3 Relay3
Temp Alarm
Rly2 Options
Norm-Energised
Norm-Energised
Norm-DeEnergised
Off
Upstream Alarm
L.O.E.
8.2.4 Relay 2
L.O.E. Alarm
R1 Set
5.00
90.00
1.00
0.00
0.15
45.00 40.00
8.1.5 Relay 1
Off
8.X.4 Relay 1
L.O.E. Alarm
N/A
R1 Reset
4.80
85.00
0.50
0.00
0.05
8.3.4 Relay3
L.O.E. Alarm
R2 Set
1.00
10.00
2.00
0.00
0.60
8.2.5 Relay 2
Off
8.1.6 Relay 1
Flow Alarm
8.X.5 Relay X
Off
R2 Reset
1.20
15.00
0.50
0.00
0.55
8.3.5 Relay3
Off
8.2.6 Relay 2
Flow Alarm
8.X.6 Relay X
Downstream Alarm
8.3.6 Relay3
Totaliser Output
8.X.7 Relay X
Upstream Alarm
8.X.8 Relay X
Alarm on Up/Down
Ref: MINIFLEX LR MANUAL Rev. 0 70

MINIFLEX LR PROGRAMMING CHARTS APPENDIX 7
9.0 Edit
Pump No
No
9.1 PumpSequence
(Alternate 1&2 )
9.1.1 Off 9.1.2 Alternate
ENT
ENT
Yes
9.2 Duty Standby
(Duty Assist)
ENT
9.2.1 Duty
Assist
pumps 1 & 2
9.3 Exerciser
(0000)
ENT
9.3.1 NoOfStarts
0000
9.2.2 Duty
Standby 1 & 2
9.1.3 Alternate
pumps 1,2 & 3
9.4 Tolerance
(No Tolerance)
ENT
9.4.1
No Tolerance
9.2.3 Duty
Standby 1,2 & 3
9.5 Maintenance
(All pumps in)
ENT
9.5.1 All Pumps
In
9.4.2
Tolerance On
9.6 RunOnIntervl
(0.00)
ENT
9.6.1 In hours
0.00
9.5.2 Pump 1
Drop out
9.7 Run On Time
(0000)
ENT
9.7.1 In seconds
0000
9.5.3 Pump 2
Drop out
9.5.4 Pump 3
Drop out
Ref: MINIFLEX LR MANUAL Rev. 0 71

MINIFLEX LR PROGRAMMING CHARTS APPENDIX 7
Relay failsafe – default status for differ ent applications
10.1 Relay 1 10.2 Relay 2 10.3 Relay 3
**
LEVEL / VOLUME /
DISTANCE
PUMP
OCM De-Energise De-energise De-energise
Hold State Hold State Hold State
De-Energise De-energise
*
De-energise
10.4 Fail Time
*
600
30
30
10.5 mA Fail
*
Hold
High
Hold
10.0 Edit
Failsafe No
No
Yes
ENT
10.1 Relay 1
(*)
DIFFERENTIAL De-Energise N/AEnergise 600 Hold
10.2 Relay 2
(*)
10.3 Relay 3
(*)
10.4 Fail Time
(*)
10.5 mA Fail
(*)
ENT
ENT
ENT
10.4.1 In secs
0600
10.5.1 Analogue
Low
10.5.2 Analogue
High
10.5.3 Analogue
Hold
ENT
ENT
10.3.1 Relay 3
Energise
10.3.2 Relay 3
De-Energise
10.3.3 Relay 3
Hold State
10.2.1 Relay 2
Energise
10.2.2 Relay 2
De-Energise
10.2.3 Relay 2
Hold State
10.1.1 Relay 1
Energise
10.1.2 Relay 1
De-Energise
10.1.3 Relay 1
Hold State
Ref: MINIFLEX LR MANUAL Rev. 0 72

MINIFLEX LR PROGRAMMING CHARTS APPENDIX 7
11.0 Edit
Analogue No
No
11.1 Analog O/P
(Output 4-20mA)
11.1.1
Output 4-20mA
ENT
ENT
Yes
APPLICATION
OCM
DIFFERENTIAL
*Only applies in OCM
11.2 Analog Val
ENT
1
*
11.2.1
11.1.2
Output 20-4mA
1
11.2.1 11.2.2 11.2.3
*
11.2.1 Output
relative to Flow
11.2.1 Output
Diff. of Levels
2
*
11.2.2 Output
relative to Head
11.2.2 Output
Upstream Level
2
*
11.2.2
11.1.3
Output 0-20mA
3
*
11.2.3 Output
Downstream Level
3
*
11.2.3
11.3.1 Analog
Set output 4mA
ENT
Analog
Testing 4mA
11.1.4
Output 20-0mA
11.3 Test mA
ENT
11.3.2 Analog
Set output 8mA
ENT
Analog
Testing 8mA
11.1.5
4-20mA Overrange
11.4 Analogue
Scale
ENT
11.4.1 Datu m (%)
(0.000)
ENT
11.4.2 Sp an (%)
(100.0)
11.3.3 Analog
Set output 12mA
ENT
Analog
Testing 12mA
11.1.6
0-20mA Overrange
11.3.4 Analog
Set output 16mA
ENT
Analog
Testing 16mA
11.3.5 Analog
Set output 20mA
ENT
Analog
Testing 20mA
11.3.6 End
Analog Test
Ref: MINIFLEX LR MANUAL Rev. 0 73

12.0 Edit
Miscellaneous
No
EN
12.1 ffset
O 12.2 Passcode
(0.00)
12.1.1 Offset
0.00
MINIFLEX LR PROGRAMMING CHARTS APPENDIX 7
Yes
No
T
T
(36.67)
ENTEN
12.2.1 New code
0000
12.3 NoOfDecimal
(2 Dec Points)
ENT
12.4 Relay tot.
(Off)
ENT ENT ENT
12.5 Simulation
(No)
12.6 Station ID
(1)
12.7 Sync Instrs
(Master)
ENT
12.8 Check Search
(Off)
ENT
12.8.1 Check
Search Off
12.9 Max gain
(100.0)
ENT
12.9.1 Max Gain
100.0
12.8.2 Check
Search On
12.10 Serial No.
(XXXX)
*Non adjustable
12.11
Rev. No. XXXX
*Non adjustable
12.6 Station ID
1
12.7.1 Sync
Master
12.7.2 Sync
Slave
12.5.1 Simulate
No
12.5.2 Simulate
Yes
12.4.2 Relay
totaliser On
12.3.3 Display
2 decimal points
12.3.4 Display
3 decimal points
12.3.1 Display
No decimal point
12.4.1 Relay
totaliser Off
12.3.2 Display
1 decimal point
Ref: MINIFLEX LR MANUAL Rev. 0 74
 Loading...