

Page 1

User Manual
Cradle: FCC ID:2ARHS-W2X
Ring: FCC ID:2ARHS-W26
Page 2

User Manual
Disclaimer
Disclaimer @ 2018 Hyco Genyong Technology Co., Ltd. All rights reserved.
Please read through the manual carefully before using the product and operate it
according to the manual. It is advised that you should keep this manual for future
reference.
Do not disassemble the device or remove the seal label from the device. Otherwise,
Hyco Genyong Technology Co., Ltd. does not assume responsibility for the warranty
or replacement.
The products depicted in this manual may include software copyrighted by Hyco
Genyong Technology Co., Ltd. or a third party. The user, corporation or individual,
shall not duplicate, in whole or in part, distribute, modify, decompile, disassemble,
decode, reverse engineer, rent, transfer or sublicense such software without prior
written consent from the copyright holders.
This manual is copyrighted. No part of this publication may be reproduced or used in
any form without written permission from Hyco.
Hyco Genyong Technology Co., Ltd. reserves the right to make final interpretation of
the statement above.
Hyco Genyong Technology Co., Ltd.
1
Page 3
User Manual
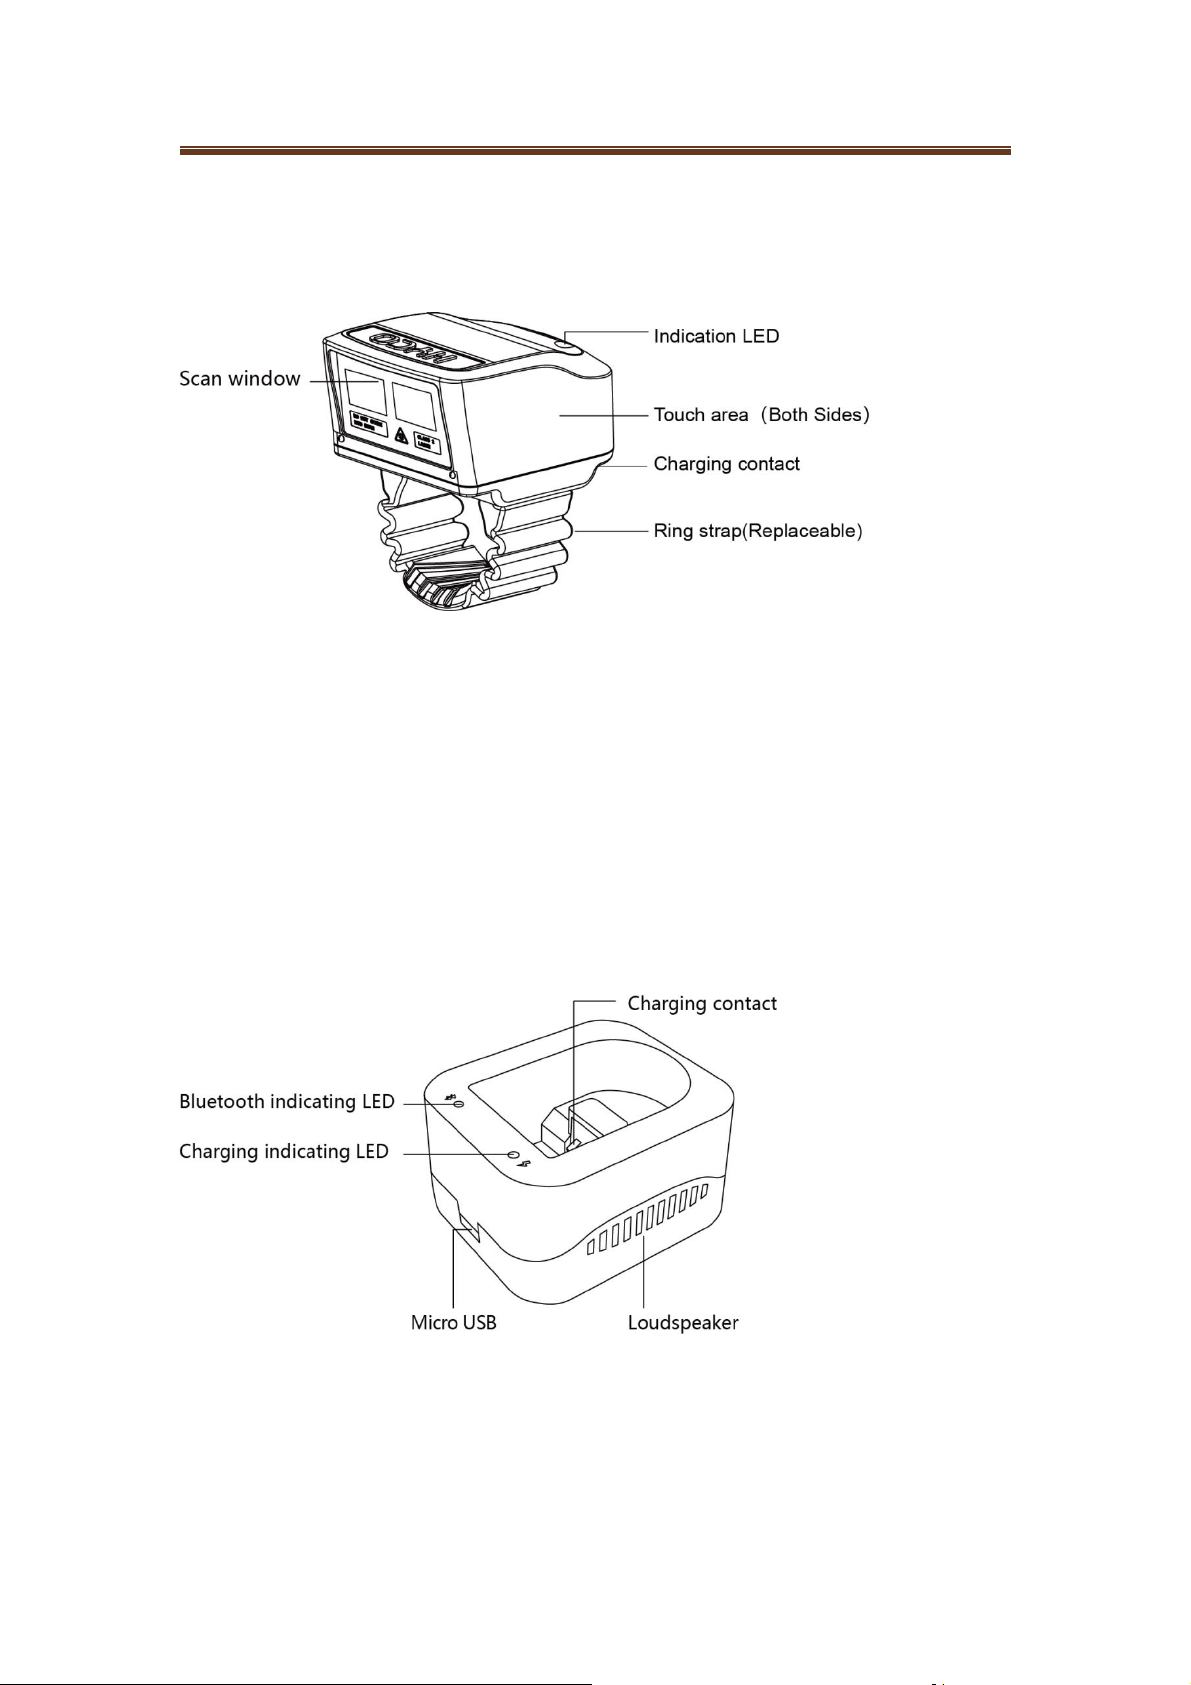
Design
Ring Scanner
Wearing: wear on index finger on left or right hand
Scanning: touch either side of ring body with thumb finger
to trigger the scanning
Ring scanner charging cradle(Bluetooth Receiver)
2
Page 4
Charging
1. Charging Ring Scanner
User Manual
Charging Illustration 1
Charging Illustration 2
3
Page 5

User Manual
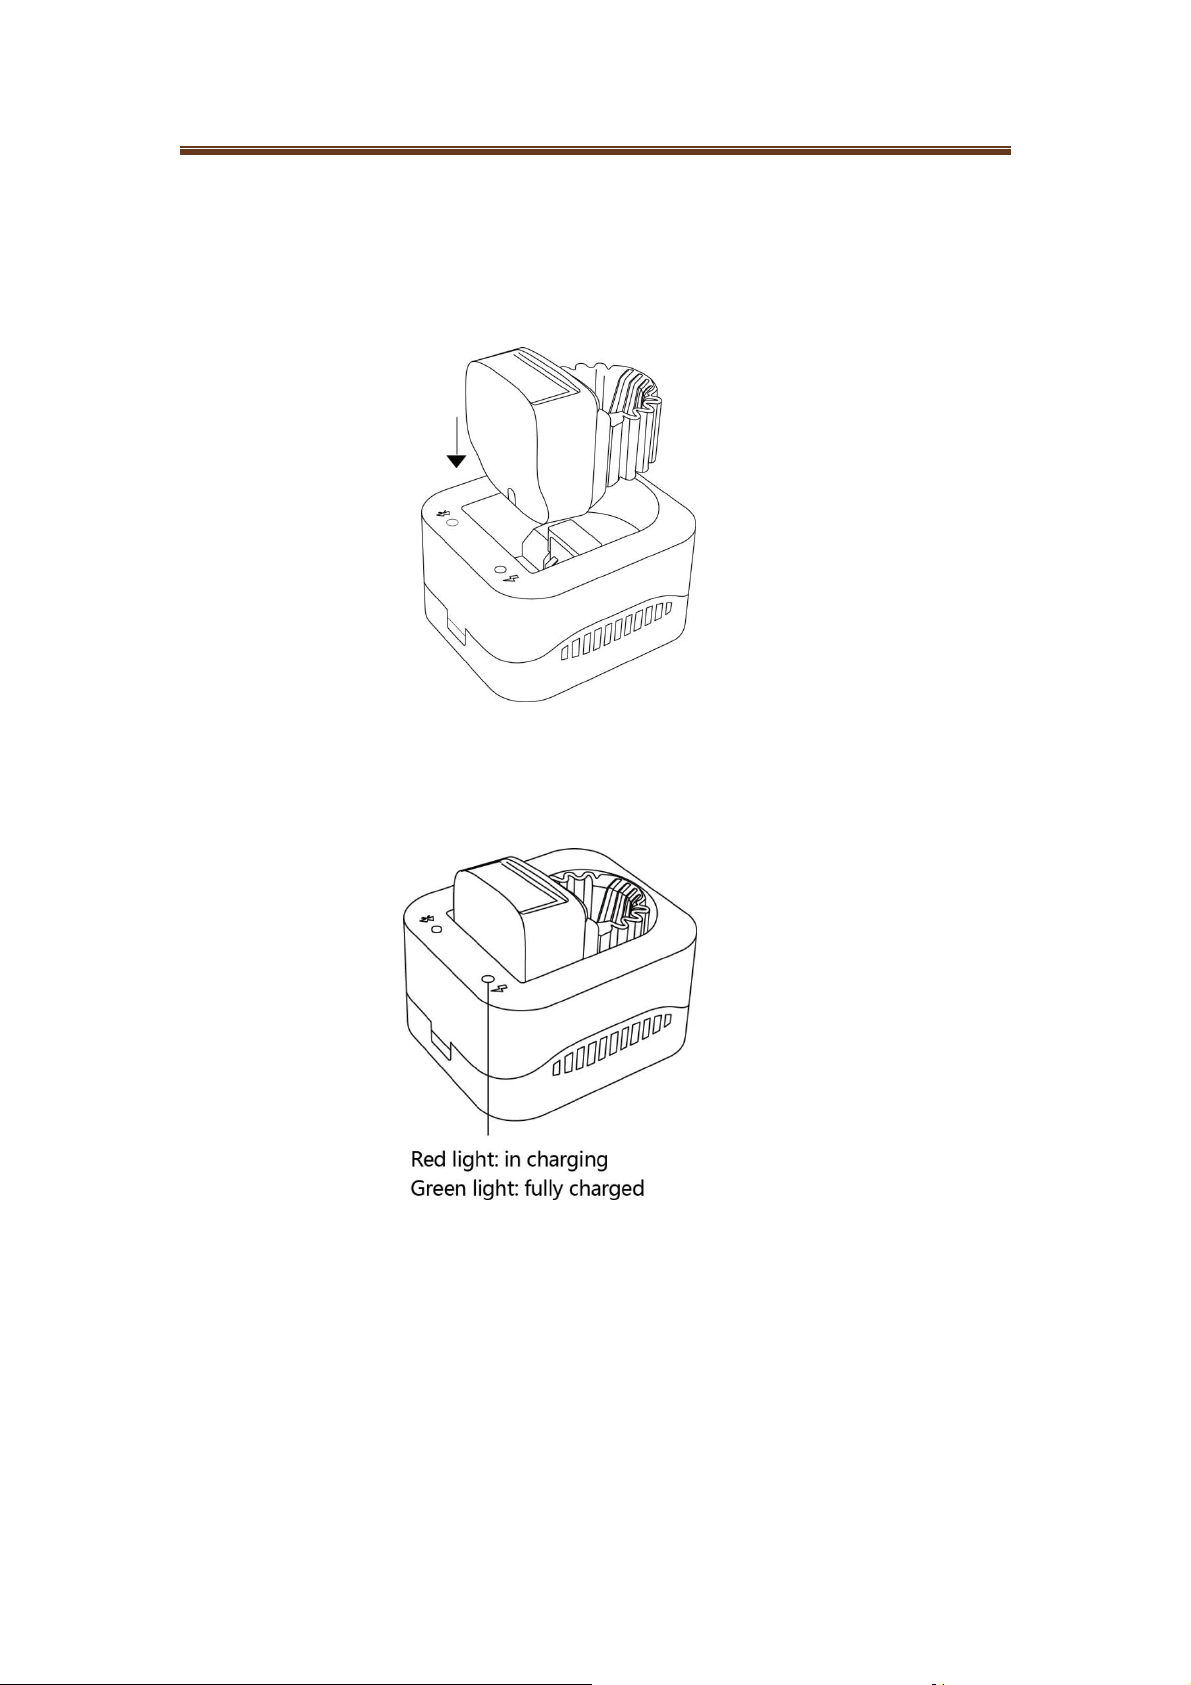
Connect the Ring scanner charging cradle to power, click the
ring scanner into the bottom of cradle with the scan window
upward. Please note the power contacts of the ring and
cradle must be touched.
The red light indicates it is in charging, when the green light
turns on, it’s finished charging.
Warning: don't look straightly into the scan window when
scanning in case of harm to eyes.
2. Take the Ring Scanner out of the Ring scanner charging
cradle
Hold the middle of the ring scanner gently and pull out upward
from the cradle.
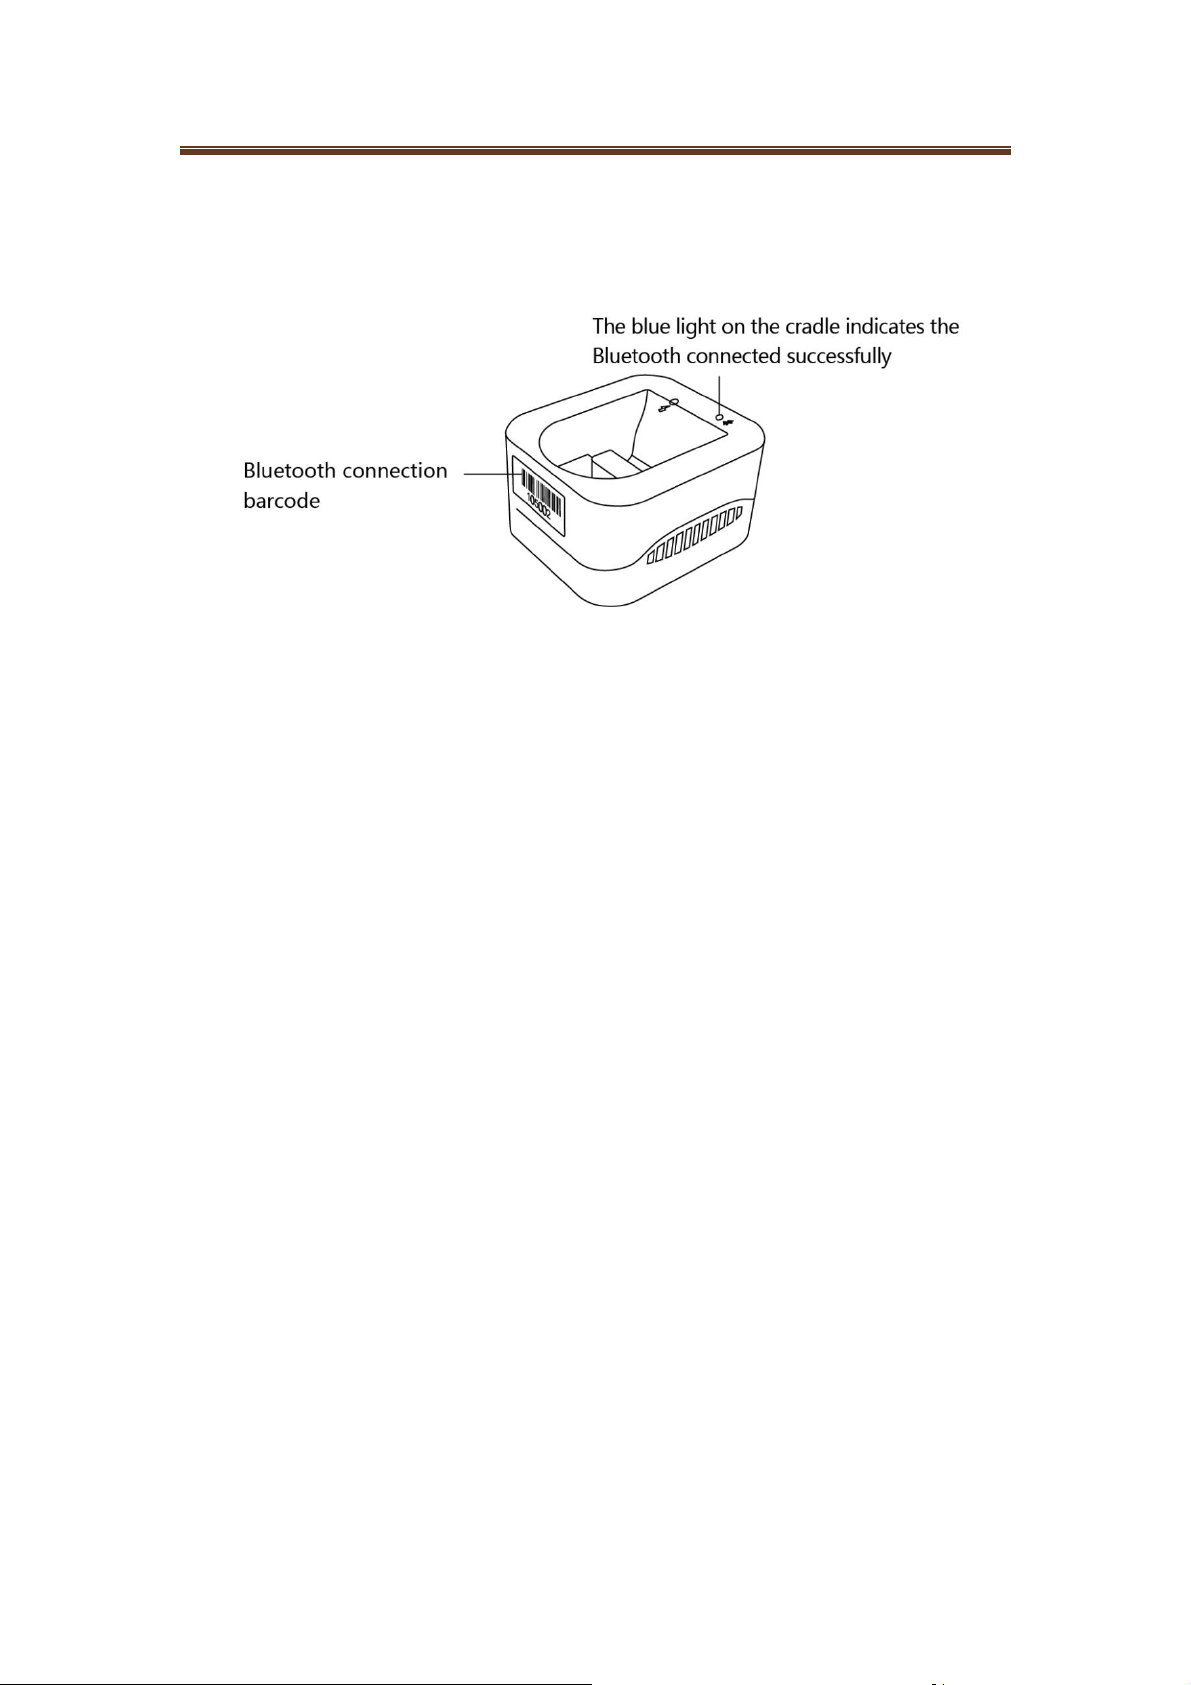
Bluetooth connection
Connect with PC:
Firstly, connect the Ring scanner charging cradle with
computer via USB cable, the green light on the cradle turns
on. Secondly, after 15 seconds, Ring Scanner scans the
"Bluetooth connection" barcode on the front of cradle, the
blue light on the cradle indicates the Bluetooth
4
Page 6
User Manual
communication between ring scanner and cradle is
successfully set up.
Connect with Tablet PC or phone:
Enter the “ Setting ” in the Tablet PC or phone, click
"Bluetooth search", find the Bluetooth serial number of the
ring scanner, choose the corresponding Bluetooth serial
number in the searching list. When the ring light turns on
green, it indicates successful Bluetooth connection between
ring and Tablet PC or phone.
Remark: Ring Scanner is the slave, and terminal device is the
master
Use of applications (APP):
Prerequisites before connecting ring with different devices:
5
Page 7
User Manual
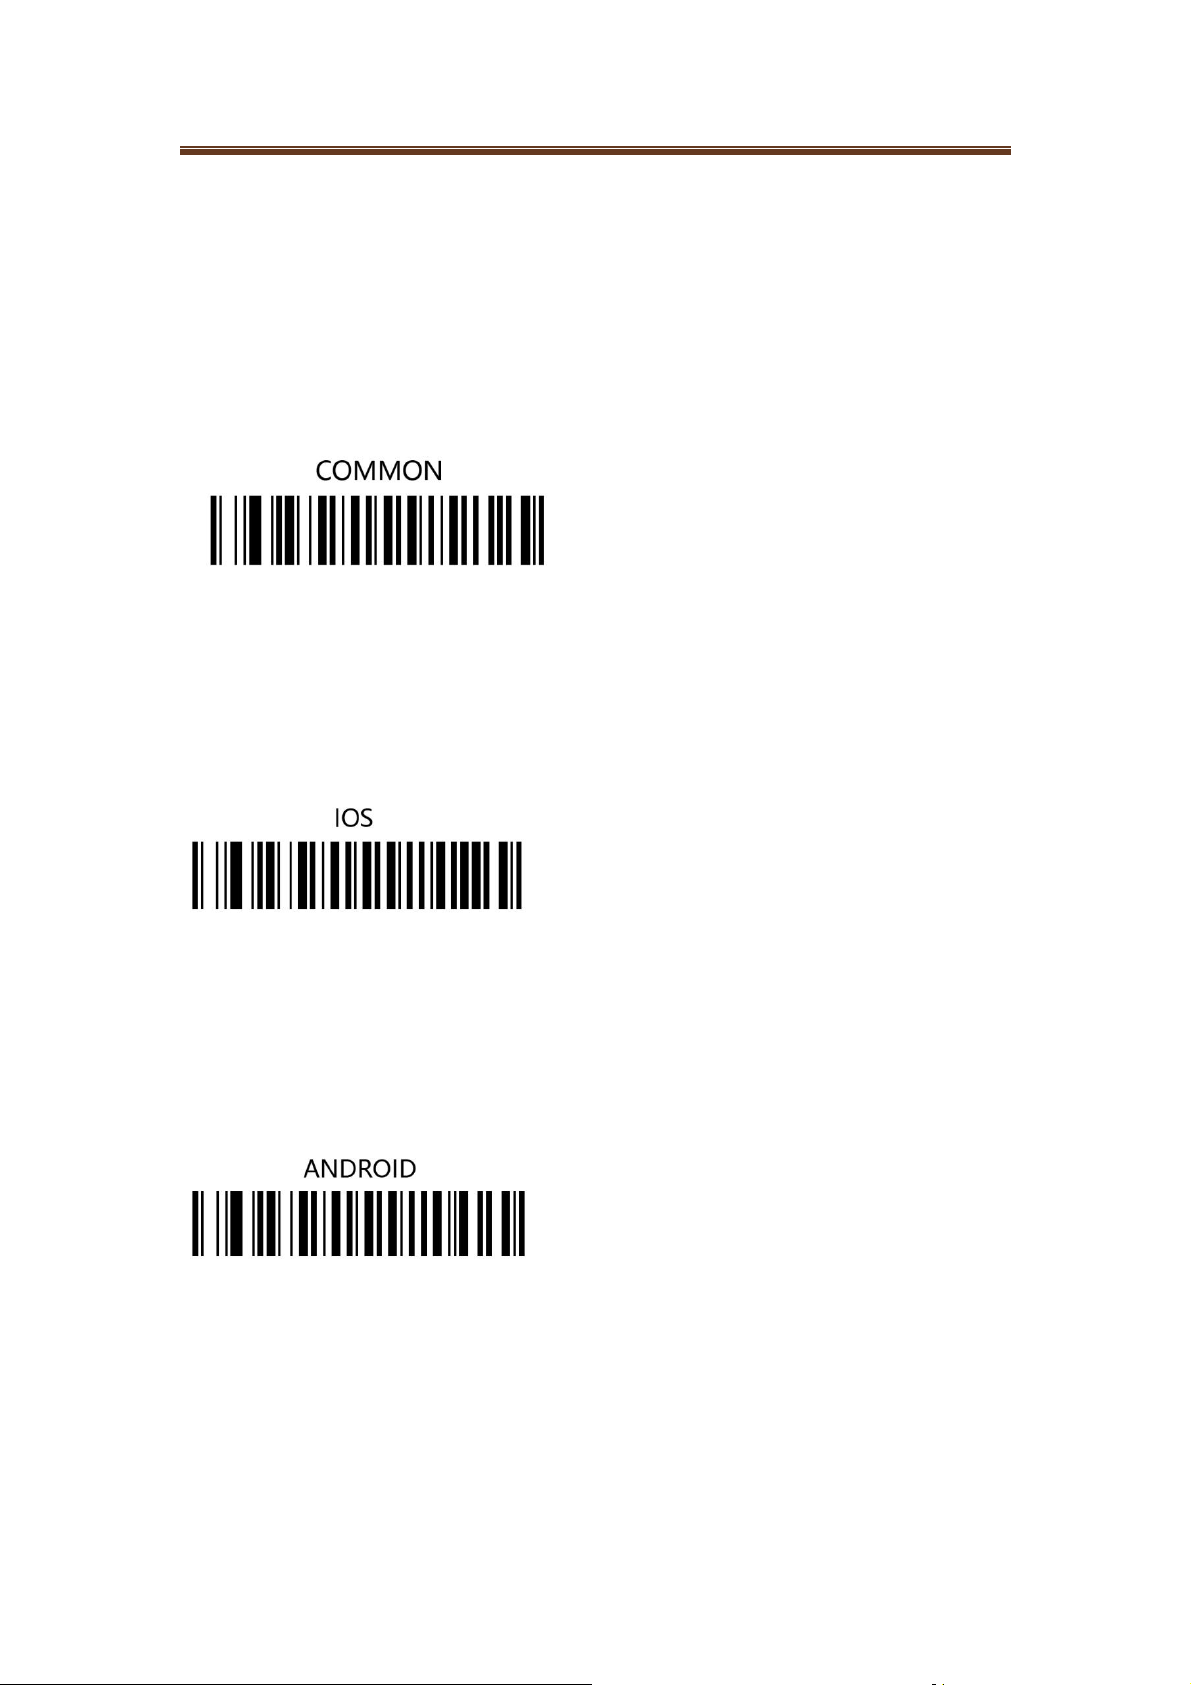
Change connection with different masters among computer,
Tablet PC and phone.
When ring pairs with different terminal devices, user needs to
scan different barcode before Bluetooth connection.
To connect ring scanner with computer, please scan the
barcode “COMMON”, but it is set by default.
To connect ring scanner with Smart Phone or Tablet PC based
on IOS system, please scan the barcode "IOS".
To connect ring scanner with Smart Phone or Tablet PC based
on Android system, please scan the barcode "ANDROID".
6
Page 8

User Manual
To connect ring scanner with Smart Phone or Tablet PC based
on Windows system, please scan the barcode "WINDOWS".
Components
7
Page 9

Specifications
User Manual
8
Page 10

User Manual
Functions
1. Scanning
Wear on left or right index finger, touch left or right side of ring
and aim at the barcode, the ring light turns green, it starts to
scan.
2. Ring Straps
Firstly, straightly pull out ring strap from the slot, then choose
another ring strap and push it to the top of slot.
3. Ring Indicator
9
Page 11

User Manual
The green light indicates successful scanning.
The red light flashing indicates low battery.
The green light keeping on for 1 second indicates successful
Bluetooth connection.
The blue light keeping on for 1 second indicates Bluetooth
disconnection.
The red, green and blue light flashing indicates restarting.
4.Bluetooth can’t connect
Normally, if the Bluetooth light doesn ’ t turn on, user can
scan the barcode "Reset Bluetooth Name", wait for 10 seconds,
and reconnect.
Scan the barcode “ Restore factory settings ” , the ring will
10
Page 12

User Manual
disconnect Bluetooth connection with terminal devices, and all
the settings will change to factory default.
5. Charging cradle light indicator
6.Wake up ring in charging
The ring doesn ’ t work when in charging, while it could be
waked up by touching either side of ring three times.
7. Laser calibration
If laser length changes longer or shorter, please stop scanning,
touch ring for 4 seconds once and repeat several times to get it
right. If it’s still abnormal, please scan the barcode“Automatic
calibration”.
After scan the barcode “Automatic laser calibration”, the ring
11
Page 13

User Manual
turns on purple, put it on the table, wait for 15 seconds until
the purple light turns off. The ring laser is calibrated right and
functions normally.
SERVICE
1.Warranty: one year for ring scanner, half year for battery and
accessories.
2.Contact: junqi.zheng@hyco.cc
Notice
» The ring window must be kept clean. Improper usage will
breach the limited warranty clause.
» Avoid rough objects scratching the window.
» Remove stains from window by soft cloth.
» Do not spray any liquid onto the window.
» Use cleaning water to clean.
12
Page 14

User Manual
Function barcodes setup
Change function of scanning after scanning the following
barcodes:
"Device information" barcode includes device information (e.g.
serial number, version number, Bluetooth version information).
Scan function code “ Vibration Open ” to activate vibration
function, Scan function code “ Vibration close ” to close
13
Page 15

vibration function.
User Manual
In HID mode, scan the barcode "Speed up data transmission
through ring cradle", it can accelerate the data transmission
speed between the cradle and computer; scan the barcode
"Slow down data transmission through ring cradle", it can slow
down the data transmission between the cradle and computer.
Scan the barcode “Triggered continuous scanning”, ring could
keep scanning when user keeps touching the ring.
14
Page 16

User Manual
If user wants to change to common scanning, scan the
“Manual Trigger Mode” bar code.
"Manual Trigger Mode" is set by default, user needs to touch
ring once to scan once.
After scan "Automatic interval scanning" bar code, ring could
automatically scan every 0.5 ~ 3 seconds without touching (2
seconds by default)
After scan "Automatic interval scanning‐reduce" barcode, it can
expedite the scanning speed once by 0.5 second, the fastest
15
Page 17

User Manual
scanning speed is scanning once every 0.5 second.
After scan "Automatic interval scanning‐increase" barcode, it
can slow down the scanning speed once by 0.5 second, the
slowest scanning speed is scanning once every 3 seconds.
Scan angle adjustment
According to different barcode length, user needs to change
laser length to achieve better scanning effect.
1、Scan “Laser calibration” barcode to activate the function,
the ring light turns white and begins to automatically and
intermittently scan.
16
Page 18

User Manual
2、After scan “ Widen” barcode, the laser length becomes
long; after scan “short ” barcode, the scan angle becomes
short .
Note: do not extend or shorten more than 10 times one time.
3、Scan “Confirm” barcode, the ring light turns yellow and
white, the laser length is confirmed.
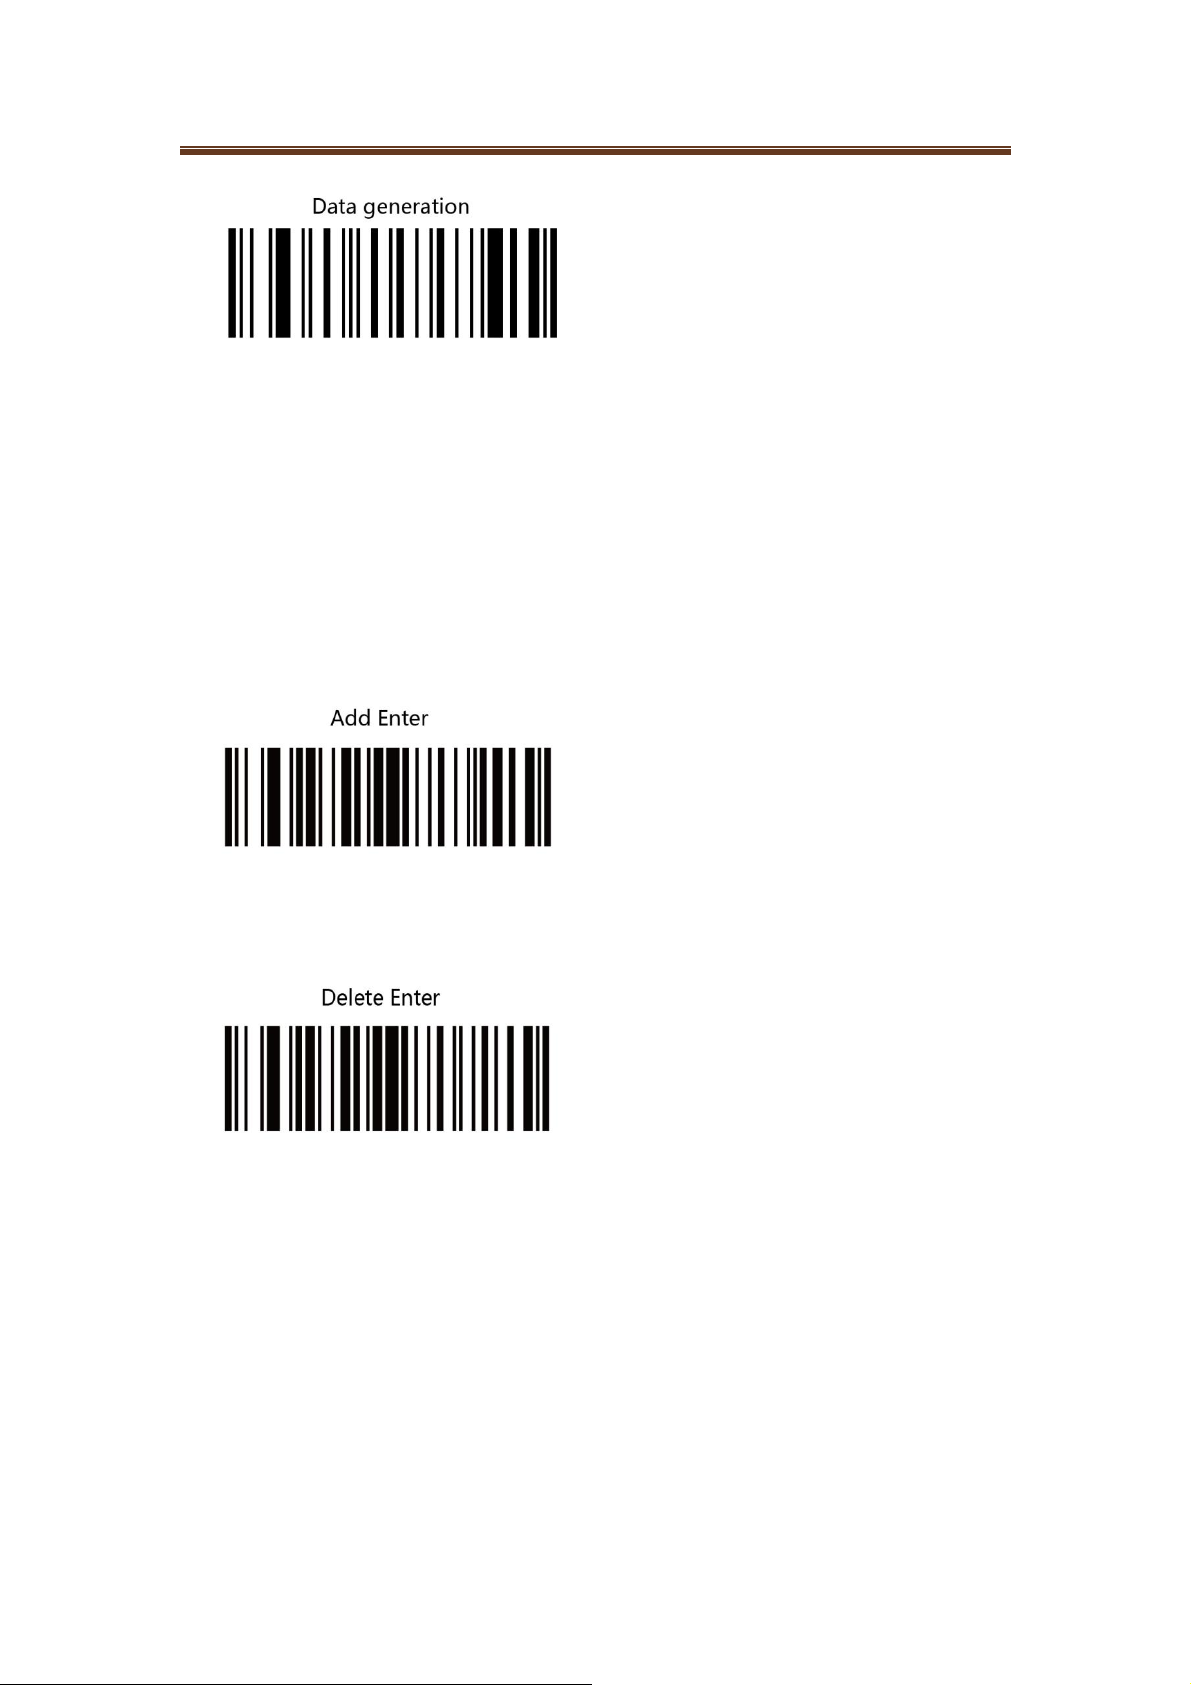
4、Scan “ Data generation ” barcode, the ring light turns
yellow and red, and then turns purple for a while. The laser
length is set successfully after the purple light turns off.
17
Page 19
User Manual
Common functional barcodes
To meet different needs for customers, there are some
functional barcodes used to meet the requirements for
different customers.
After scan “Add Enter” barcode, it can automatically move to
next line in the text field after each scanning. If user wants to
close the function, scan “Delete Enter” barcode.
18
Page 20

User Manual
After scan "Add the tab" barcode, it can automatically move to
next line in excel after each scanning. If user wants to close the
function, scan "Delete the tab" barcode.
19
Page 21

User Manual
Note:
USB connection port information:
Due to the used enclosure material, the product shall only be connected to a
USB Interface of version 2.0 or higher. The connection to so called power USB
is prohibited.
Temperature information:
When charging, please place the device in an environment that has a good
ventilation. It is recommended to charge the device in an environment with a
temperature that ranges from 0℃~40℃.
Please ensure to use only the charger offered by the manufacturer.
Using unauthorized charger may cause danger and violate the authorization of
the device and the guarantee article.
Battery information:
CAUTION RISK OF EXPLOSION IF BATTERY IS REPLACED BY AN
INCORRECT TYPE. DISPOSE OF USED BATTERIES ACCORDING TO THE
INSTRUCTIONS
Adapter information:
AC Adapter 1
AC Adapter 2
AC Adapter 3
AC Adapter 4
Note1: The plug considered as disconnect device of adapter.
Note2: The adapter shall be installed near the equipment and shall be easily
accessible.
Operating Frequency Range and Max Output Power
Ring Scanner
Ring scanner charging
cradle
Model: UT-133E-5100,Output: 5.0V 1.0A
Model: UT-200B-5100C,Output: 5.0V 1.0A
Model: NBS05B050100VKU,Output: 5.0V 1.0A
Model: SK13G1-0500100V,Output: 5.0V 1.0A
Frequency Range 2402MHz to 2480MHz
Equipment type Bluetooth LE 1M
Max EIRP -2.47 dBm
Frequency Range 2402MHz to 2480MHz
Equipment type Bluetooth LE 1M
Max EIRP -2.31 dBm
RF exposure information:
Max output power is less than 20mW,only need RF Exposure assessment
Meet the requirement EN 62479 :2010
20
,
Page 22
User Manual
EU Regulatory Conformance
Hereby, Hyco Genyong Technology Co., Ltd. declares that this device is in
compliance with the essential requirements and other relevant provisions of
Directive 2014/53/EU.
For the declaration of conformity, visit the Web site: www.hyco.cc/certification.
Scope of application
This product can be used across EU member states
Manufacturer Information
Manufacturer Hyco Genyong Technology Co., Ltd.
Address Room 105, 1/F, Building B, No.999 of Huaxu Road,
Qingpu District, Shanghai, CN
Federal Communication Commission (FCC) Radiation Exposure Statement
Cradle: When using the product, maintain a distance of 20cm from the body to ensure compliance
with RF exposure requirements.
Ring: The device has been evaluated to meet general RF exposure requirement, The
device can be used in portable exposure condition without restriction Federal
Communication Commission (FCC) Radiation Exposure Statement Power is so low that no
RF exposure calculation is needed.
This device complies with part 15 of the FCC rules. Operation is subject to
the following two conditions: (1) this device may not cause harmful interference, and
(2) this device must accept any interference received, including interference that
may cause undesired operation.
NOTE: The manufacturer is not responsible for any radio or TV interference caused
by unauthorized modifications or changes to this equipment. Such modifications or
changes could void the user’s authority to operate the equipment. NOTE: This
equipment has been tested and found to comply with the limits for a Class B
digital device, pursuant to part 15 of the FCC Rules. These limits are designed to
provide reasonable protection against harmful interference in a residential
installation. This equipment generates uses and can radiate radio frequency energy
and, if not installed and used in accordance with the instructions, may cause harmful
interference to radio communications. However, there is no guarantee
that interference will not occur in a particular installation. If this equipment does
cause harmful interference to radio or television reception, which can be
determined by turning the equipment off and on, the user is encouraged to
try to correct the interference by one or more of the following measures:
‐ Reorient or relocate the receiving antenna.
‐ Increase the separation between the equipment and receiver.
-Connect the equipment into an outlet on a circuit different from that to which the
receiver is connected.
-Consult the dealer or an experienced radio/TV technician for help.
21
 Loading...