

Product Instruction Manual
Speedflow
SF05K, SF10K & SF15K
SF05KSS, SF10KSS & SF15KSS
Undersink unvented water heater
Version 3.2 Jan 2015
V16.5/7

Thank you for purchasing a Hyco Speedflow unvented water heater. The
Speedflow is ideal for use in cloakrooms and kitchens in offices, shops,
student accommodation and domestic premises which have been extended
and there is no central hot water system nearby. One unit located under the
kitchen sink is often used to supply hot water for light dishwashing in the
kitchen sink and hand washing in the cloakroom basin. Please read and
understand these instructions before commencing installation and leave
them with the user when installation is complete.
1. Important safety points
•
The unit must be installed and maintained by a competent person in accordance
with current electrical and plumbing regulations.
•
Only connect the heater to a single phase supply with a mains voltage as specified
on the rating plate.
•
Do not connect to power unless unit is full of water – open tap and allow water
to flow freely to clear airlocks.
•
Do not switch power on if water in heater or pipes could be frozen.
•
Always fit the heater the correct way up (pipes should be at the top).
•
It is essential that the supplied pressure-relief device is fitted, make plumbing
connections with flexible stainless steel hoses to facilitate future maintenance.
•
Water may drip from the discharge pipe of the pressure-relief device and this
pipe must be left open to the atmosphere.
•
The pressure-relief device is to be operated regularly to remove lime deposits and
to verify that it is not blocked.
•
Use lowest acceptable temperature setting to save energy and reduce lime scale.
•
This appliance can be used by children aged from 8 years and above and persons
with reduced physical, sensory or mental capabilities or lack of experience and
knowledge if they have been given supervision or instruction concerning use of
the appliance in a safe way and understand the hazards involved. Children shall
not play with the appliance. Cleaning and user maintenance shall not be made
by children without supervision.
2

2. Installation
Wall Mounting
The Speedflow is normally fitted immediately below the outlet to be supplied, but it
can be mounted above or to the side of the outlet provided it is vertical with the
pipe outlets at the top.The unit can either be placed directly on the floor or fixed to
a wall using the mounting bracket supplied.
Ensure the mounting surface is strong enough to support the speedflow
including the weight of the water.
The 5 litre models (SF05K/SS) can typically serve 1 sink, the 10 litre models
(SF10K/SS) can typically serve 1 or 2 sinks and the 15 litre models (SF15K/SS)
can typically serve 2 or 3 depending on simultaneous usage.
3
Plumbing
A service valve should be fitted to allow / facilitate future maintenance.
The supplied 6 bar pressure relief valve must always be fitted. There must be
no obstructions in the pipwork between the heater and the relief valve. The
relief valve must discharge to a safe and visible place.
The hot and cold fittings are 1⁄2” BSP and are at the top of the unit. These
connections are colour coded (blue = cold, red = hot).They are not interchangeable.
The final connection of the Speedflow to pipework should be implemented with
flexible stainless steel hoses.
Open hot water tap and allow water to run through fpr at lease 5 seconds
to clear airlocks.
Depending on the installation circumstances, other accessories may be required.
If required, these must be ordered separately and are installed as shown on the
diagrams below and on the next page.Water pressure can increase considerably
at night when demand is low, so a pressure reducing valve may be required even
if there is no obvious problem at installation.
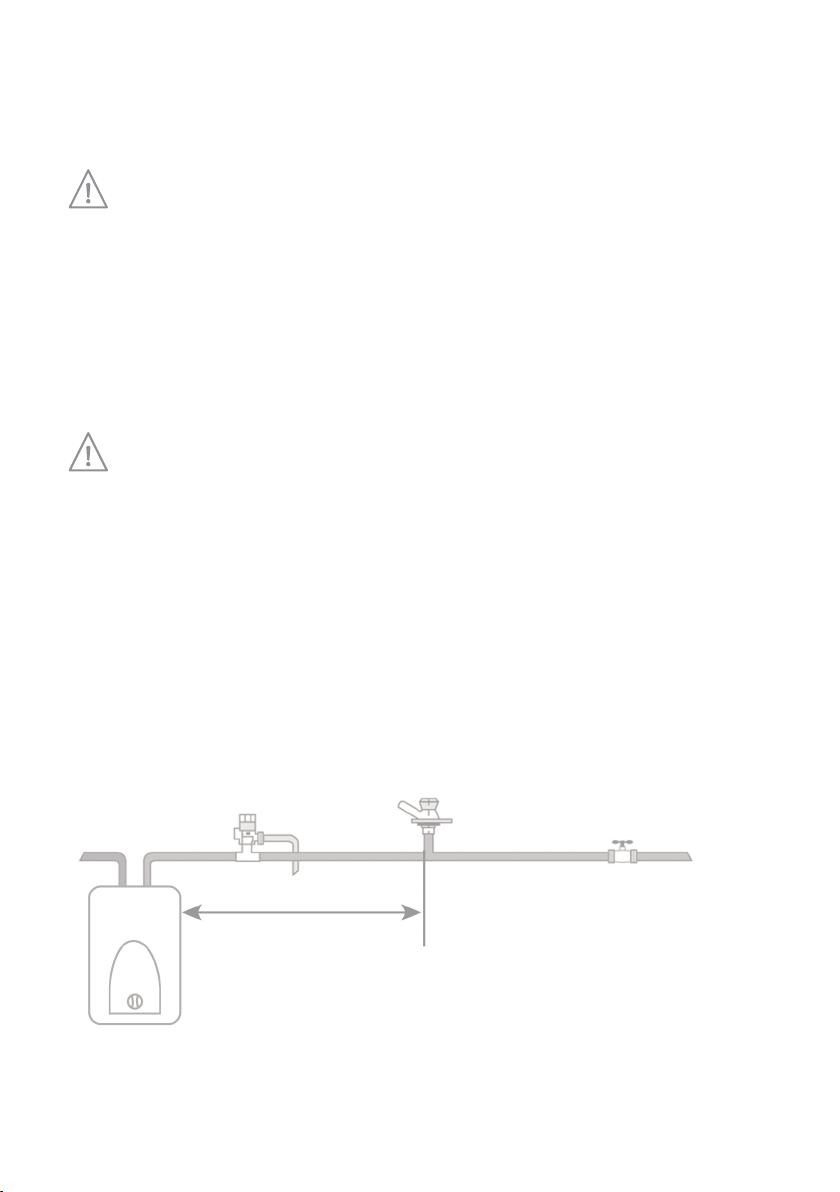
DIAGRAM A - Pressure below 4.2 bar
Pressure
relief valve
Hot
Cold
T piece
Speedflow
Length of pipework
required for expansion
5 litres - 1.4m
10 litres - 2.8m
15 litres - 4.2m
4
To drain
Nearest cold
draw off
Service valve
Cold water mains
No accessories needed.

DIAGRAM B - Pressure above 4.2 bar
Nearest cold
draw off
Pressure
reducing
valve
Service valve
Cold water mains
Hot
Cold
Speedflow
Pressure
relief valve
T piece
To drain
Accessory SF5 needed.
DIAGRAM C - Pressure below 4.2 bar and cold water draw off nearby
Hot
Cold
Pressure
relief valve
Expansion
vessel
Nearest cold
Check
valve
draw off
Service valve
Speedflow
T piece
To drain
Cold water mains
Accessory SF3 needed.
DIAGRAM D - Pressure above 4.2 bar and cold water draw off nearby
Cold
Hot
Speedflow
Expansion
Pressure
relief valve
T piece
Length of pipework
required for expansion
vessel
To drain
5 litres - 1.4m
10 litres - 2.8m
15 litres - 4.2m
Nearest cold
draw off
Check
valve
Pressure
reducing
valve
Service valve
Cold water mains
Accessory SF4 needed (ie SF3 + SF5).
5

Electrical
•
Installation must comply with the latest IEE regulations.
•
Connection should be to a fused switched 13A spur. If the cable length is insufficient,
it is recommended that the entire cable is replaced and no joins made to the original.
This product must be earthed.
Important: do not switch the heater on unless you are certain that it is
completely full of water. failure to do so will void the warranty.
3. Operation
Switch on the mains supply. The external neon lamp indicates when the element
is heating.
Use the lowest acceptable temperature setting to save energy.
Hot water may present a scalding hazard, especially to children or the infirm.
Athermostatic blending valve is recommended in high risk situations.
6

Thermal cutout reset, element replacement and anode replacement
Discount electricity supply before maintenance.
A re-settable safety thermal cut-out switches off the element in the event of the
unit over-heating.
The thermal cut-out may trip occasionally in normal use. If this happens the heater will
not heat water and the element light will not come on.
The thermal cut-out is located underneath the unit behind the grey access plate.
Depending on the mounting position of the unit, you may need to uninstall the unit for
ease of access to the cutout.
In these cases, disconnect electricity supply and unscrew flexible hose connectors. Drain
water from heater and locate grey access plate.
Remove the cover retaining screws and gently prise cover off. The thermal cut-out will
be visible, as shown below.
To reset the cutout, depress the button in the centre of the device. If the device has
tripped reduce the thermostat setting if possible.
If the device trips repeatedly with a low thermostat setting, contact Hyco Technical
Department on 01924 225200.
To access the element or anode, unscrew the bolts holding the flange in position.
The element and anode can then be removed. Reverse to re-fit.
Thermal cutout
- Press to reset.
Element securing bolt
Element flange - remove to access anode.
(x4) 6mm Allen key
required to remove.
7

4. Maintenance
A grey cylindrical magnesium sacrificial anode is fitted to the element to aid tank
corrosion resistance.The anode condition should be inspected annually and replaced
if the there are signs of significant corrosion.
The pressure relief valve should be checked annually by twisting the cap and verifying
water is discharged.
8

5. Specifications
W
H
D
Supply 230V ~ 50Hz
Power 2kW
Tank Capacity SF05K/SS - 5 Litres
SF10K/SS - 10 Litres
SF15K/SS - 15 Litres
Tank Material K Models - Vitreous enamel lined steel
SS Models - Stainless steel SUS 304 1.2mm
Dimensions (h x w x d) SF05K/SS 320 x 280 x 245mm
SF10K/SS 410 x 310 x 280mm
SF15K/SS 530 x 310 x 280mm
Pressure relief valve setting 6 bar
Thermal cutout Manual reset 85°C
9

6. Troubleshooting
Sympton Possible cause Solution
Water constantly flows Water pressure is too Fit Pressure Reducing
from pressure relief valve. high (above 4 bar). Valve Kit (Hyco Kit SF4).
Water flows from Heated water cannot Fit Expansion Vessel Kit
pressure relief valve expand back up inlet (Hyco kit SF3).
pipe
Water is not heated 1. Thermal cut-out has 1. See section 6. Check
tripped. heater is correct way
2. Element has failed. up (pipes at top).
3. Thermostat has failed. 2. Replace element.
See section 6 for access
to element.
3. Replace thermostat.
Small volume of 1. Unit upside down. 1. Re-install correct way up.
hot water 2. Thermostat set 2. Increase thermostat setting.
too low. 3. Replace thermostat.
3. Thermostat fault.
Water appears to leak 1. Poor connections 1. Check plumbing
from heater to pipework. connections, especially
2. Element gasket leak. those to inlet and outlet.
2. Refit gasket, tighten flange
bolts evenly. Do not over
tighten. See section 6 for
access to element.
If problems persist contact Hyco Technical Dept on 01924 225200.
10

7. Guarantee and service policy
This product is guaranteed against faulty materials and manufacture for a period of one
year from the date of purchase. Hyco will in its sole discretion replace, repair or refund
any faulty unit. Incorrect installation and failure to follow correct operating instructions
are excluded. Consequential costs such as labour charges or damage to surroundings
are expressly excluded.
11

INFORMATION FOR CORRECT DISPOSAL OF THE PRODUCT IN ACCORDANCE WITH THE
EUROPEAN DIRECTIVE 2002/96/E.
At the end of its working life this equipment must not be disposed of as household
waste. It must be taken to a local authority waste collection centre or to a dealer
providing this service. Disposing of electrical and electronic equipment separately
enables its components to be recovered and recycled to obtain significant savings in
energy and resources. In order to underline the duty to dispose of this equipment
separately, the product is marked with a crossed out dustbin.
Hyco Manufacturing Ltd
Normandy Court
Express Way
Castleford, WF10 5NR
T 01924 225 200
F 01924 225 210
E sales@hyco.co.uk
hyco.co.uk
 Loading...