


Product Instruction Manual
Rho
IN44T & IN60T
Instantaneous inline water heater
Version 3.2 Jan 2015
V15.6/3

2

Thank you for purchasing a Hyco instantaneous water heater. Instantaneous
water heaters are very energy efficient since they only consume energy
when they are used and so have no standing losses. The IN44T & IN60T
models are mains pressure instantaneous water heaters with external
electronic temperature control. Bare wire heating systems offer rapid heat
up times and a near instant supply of hot water. The heaters are intended
for handwashing applications and should be used in conjunction with spray
head taps. Please read and understand these instructions before commencing
installation, and leave them with the user when installation is complete.
1. Important safety points
•
The appliance must only be connected to a single phase supply.
•
Isolate electrical and water supply before installation.
•
Electrical installation must be carried out by a qualified electrician in accordance
with the latest edition of the IEE wiring regulations.
•
Only connect the appliance to a power supply that conforms to the specification
stated on rating plate.
•
The appliance must be earthed at all times.
•
The appliance must be permanently connected to the electrical supply through
an isolating switch with a contact separation of no less than 3mm in all poles.
•
Do not use the appliance if there is any possibility of the water supply being frozen.
•
Never remove the cover of the appliance without first isolating it from the electrical
power supply.
•
This appliance can be used by children aged from 8 years and above and persons
with reduced physical, sensory or mental capabilities or lack of experience and
knowledge if they have been given supervision or instruction concerning use of the
appliance in a safe way and understand the hazards involved. Children shall not play
with the appliance. Cleaning and user maintenance shall not be made by children
without supervision.
•
Do not use a supply with incoming water temperatures greater than 600C.
3

2. Installation
Wall Mounting
Do not install if there is a risk of water freezing in the heater.
Do not install the heater where the consequences of a leak could be
unusually severe. (e.g. above computer equipment).
•
When choosing a location for the heater, consider the visibility of any leak that
might arise. This is particularly important when locating in a concealed area such
as a cupboard.
•
The heater must be mounted horizontally with the inlet and outlet connections
at the top of the heater.
•
Before attaching the heater to the wall, consider the wiring route to the heater.
It is advised that the heater be located as close as practical to the hot water outlet in
order to avoid unnecessary heat losses through the pipework.
4

There are two options available for the mounting of the product, select either the
L
N
E
P
CB
RELAY
THERMAL
CUT OUT
TANK
TRIAC
TRIAC
TRIAC
key hole slots at the rear of the product or use the supplied bracket.
Using the bracket
1
Using the supplied bracket and ensuring a level, mark the two screw holes onto
the desired mounting surface.
Using the key hole slots
2
The back plate of the heater is detachable by the four screws located in each
corner. Once removed use the backplate as a template and, ensuring a level,
mark the two required screw holes.
Ensure there are no hidden cables or pipes before commencement of drilling.
Drill the holes, insert the wall plugs and screw the bracket/heater to the wall.
(see diagram below).
1
2
5

Plumbing connections
The heater is designed for use with spray head type taps.
Ensure the following criteria are met for the water supply:
•
Minimum flow = 2.0L/min
•
Pressure Min/Max = 0.1Mpa/0.75Mpa
•
Water resistivity = ≥1300 Ωcm
Suitable for use with pre-heated water e.g. solar heating systems to a maximum
0
of 60
C.
Flush supply pipes to remove any debris before connecting the heater
to the water supply.
Make the plumbing connections as indicated on the front cover of the heater:
•
Blue/Inlet (cold mains)
•
Red/Outlet (hot tap/outlet)
It is strongly recommended that a service valve be fitted close to the product on
the cold feed, this will aide future maintenance.
The inlet is the left hand pipe and the outlet the right, when viewed from the
front. The supplied gauze should be fitted into the inlet side of the heater.
The enclosed spray head/flow limiter attachment should be installed into the
outlet of the hot tap to ensure best performance of the heater.
Turn on the colds main feed and draw water through the heater for several
minutes by opening the hot outlet. Ensure a smooth flow of water from the outlet
to confirm all air is purged from the system and check for leaks on all connections.
This step is required every time the heater has been drained for any reason, such
as routine maintenance.
6
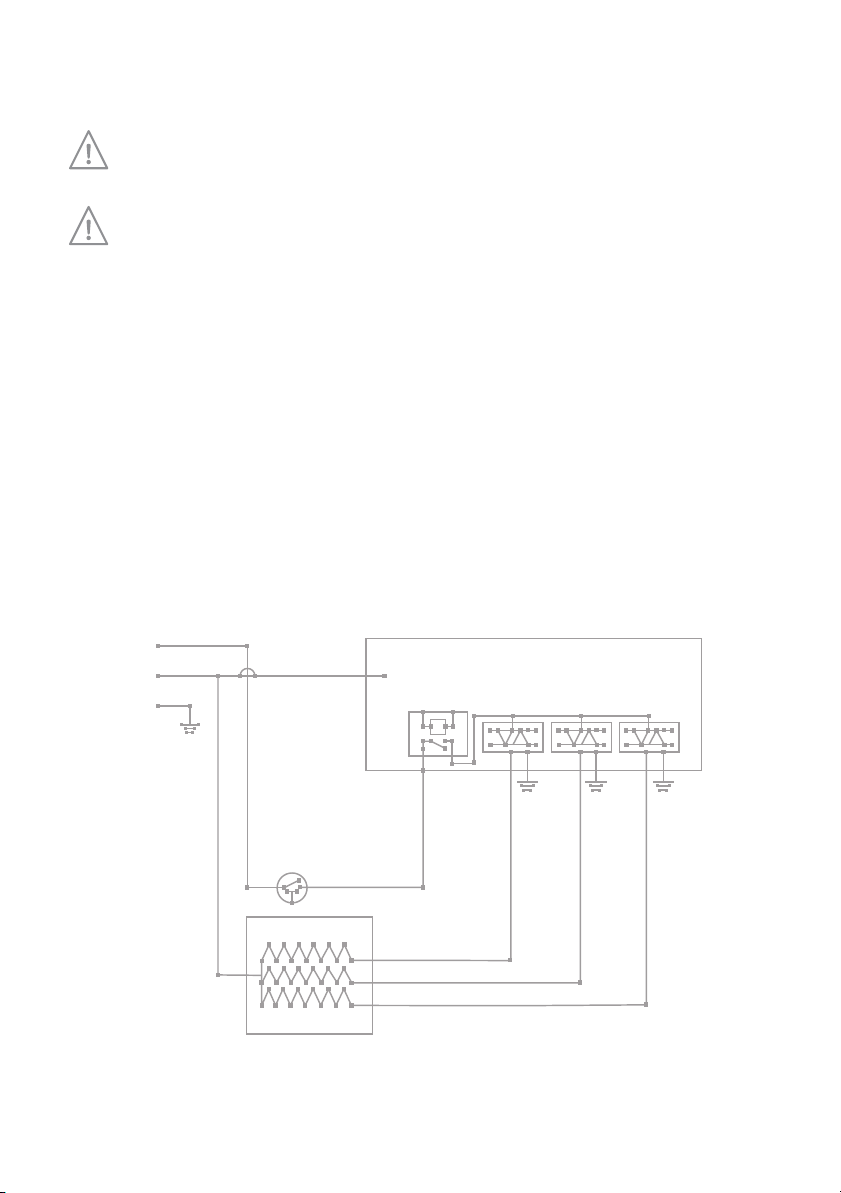
Electrical connection
L
N
E
PCB
RELAY
THERMAL
CUT OUT
TANK
TRIAC
TRIAC
TRIAC
Do not commence electrical installation before connecting the heater
to the water supply and verifying there are no leaks or air gaps.
Electrical installation must be carried out by a qualified electrician in
accordance with the latest edition of the IEE wiring regulations.
•
Electrical supply should be capable of isolation via a double poled switch.
•
The heater must be earthed.
•
Isolate electric and water supply before electrical installation.
•
Refer to the rating label on the heater to ensure correct specification of
installation.
The heaters are supplied pre-wired.
(see diagram below).
7

3. Operation
Once installed and connected to the electrical supply the heater is ready for use.
Turn on the heater using the power On/Off button. On first installation the
temperature setting will default to 38
the desired maximum target temperature is displayed. The heater will automatically
begin heating when it detects a flow of water through it (min 2.0L/m).
Open the outlet valve and check the display, the temperature display will flash if the
set temperature cannot be reached. It may be possible to reduce the flow rate in
order to achieve the set temperature, but it must have a minimum flow of 2.0L/min
in order to operate.
Due to the nature of instantaneous heaters, water is only heated as it passes
through the tank. Because the maximum power of the heater is fixed there is
a limit to the rate at which hot water can be delivered.
The heater incorporates intelligent control and will ensure the maximum
temperature setting is not exceeded regardless of drop in flow or increase in
incoming water temperature.
0
C. To adjust this press the +/- buttons until

4. Maintenance
•
Always disconnect the power before commencing any cleaning or maintenance.
•
Never open the cover of the heater without first isolating the mains power supply.
To clean the heater cover only use a clean damp cloth, do not use abrasive compounds.
Electrical and plumbing components should be inspected on a regular basis by a
suitably qualified/competent person.

5. Specifications
80mm
190mm
140mm
IN44T IN60T
Power supply 230V~ 50Hz 230V~ 50Hz
Dimensions H140 x W190 x D80mm H140 x W190 x D80mm
Power 4400W 6000W
Protection class IPX4 IPX4
Rated current 19A 27A
Over heat protection 80
temperature
Minimum operating 2.0L/Min 2.0L/Min
flow rate
Minimum operating 0.1MPa 0.1MPa
pressure
Maximum rated pressure 0.75MPa 0.75MPa
Required water resistivity ≥1300 Ωcm ≥1300 Ωcm
Maximum incoming water 60
supply temperature
0
C 800C
0
C 600C
Water fittings 1/2” BSP 1/2” BSP

6. Trouble Shooting
Defect Possible cause Action
Water is too hot Temperature set too Turn down the temperature
high on the heater on the heater (see section 6).
Water is too cold Water flow rate is Ensure flow restrictor and
too high spray attachment are fitted.
(see section 4).
Temperature setting Turn up temperature
is too low setting (see section 6).
No display on Unit in standby Turn On the heater
the heater (see section 6).
Power supply problem Check that power is supplied
to heater and is correct
specification as per the rating
label.
Minimum flow not met Ensure a flow of at least
2L/min.
For technical faults that cannot be resolved using the trouble shooting table contact
the technical department on 01924 225200 for further assistance and advice.
7. Guarantee and service policy
This product is guaranteed against faulty materials and manufacture for a period of one
year from the date of purchase. Hyco will in its sole discretion replace, repair or refund
any faulty unit. Incorrect installation and failure to follow correct operating instructions
are excluded. Consequential costs such as labour charges or damage to surroundings
are expressly excluded.

INFORMATION FOR CORRECT DISPOSAL OF THE PRODUCT IN ACCORDANCE WITH THE
EUROPEAN DIRECTIVE 2002/96/E.
At the end of its working life this equipment must not be disposed of as household
waste. It must be taken to a local authority waste collection centre or to a dealer
providing this service. Disposing of electrical and electronic equipment separately
enables its components to be recovered and recycled to obtain significant savings in
energy and resources. In order to underline the duty to dispose of this equipment
separately, the product is marked with a crossed out dustbin.
Hyco Manufacturing Ltd
Normandy Court
Express Way
Castleford, WF10 5NR
T 01924 225 200
F 01924 225 210
E sales@hyco.co.uk
hyco.co.uk
 Loading...