

8th Gen. Shifter Cables Install Guide for
2006-2011 Civic SI
This product may not be legal for highway use. Hybrid Racing is not responsible for any direct or indirect, actual
or incidental expense attributed to the use of any performance parts sold by Hybrid Racing LLC. Purchasers
agree to all of the terms of this agreement upon the purchase of parts.
Features:
6061-t6 end links
Spherical bearing pivot
6061-t6 bushings
Upgraded transmission springs
Increased cable core diameter
Integrated fiberglass heat shield
Package Contents:
(1) Shifter Cable set
(2) “c”-shaped linkage clips
(2) Cotter Pins
(2) Endlink Bushing Inserts
(1) Bushing Insert Retaining Ring
(2) Transmission Lever Selector Springs
Basic Hand Tools with
8mm allen key
Flathead screwdriver
Honda Bond
Hoist/Car Lift or jack
Key points before installing
You will need to lift the car in the air and a car lift/hoist
Depending on your exhaust you may have to remove
A small portion of the interior will also have to be dis-
Recommend Tools:
10mm and 12mm sockets and wrenches.
with jack stands
is recommended but it can be done with a jack and
jack stands
it to gain access for the installation.
assembled.
Important!! Please read the entire install guide twice before starting your instal-
lation. No really, it’s a good idea to read it twice before you begin so everything
goes smooth ;)
1

Shifter Cable Install guide
Installing these shifter cable should take 1-3 hours depending on your experience. If you consider yourself inexperienced at installs of this nature,
you may consider seeking help of an experienced professional. The guide
given below illustrates the necessary installation steps. Steps related to
removing some parts that prohibit access to the shifter cables on the
transmission is not included. Typically, several hose clamps and a few
nuts will need to be removed in order to take the intake piping and filter
box out of the engine. We will be working under the hood mainly in the area circled in the picture below and in the center console inside the car
2
Shifter Cable Install guide
Installing these shifter cable should take 1-3 hours depending on your experience. If you consider
yourself inexperienced at installs of this nature, you may consider seeking help of an experienced
professional. The guide given below illustrates the necessary installation steps. Steps related to
removing some parts that prohibit access to the shifter cables on the transmission is not included.
Typically, several hose clamps and a few nuts will need to be removed in order to take the intake
piping and filter box out of the engine.
OEM Cable Removal
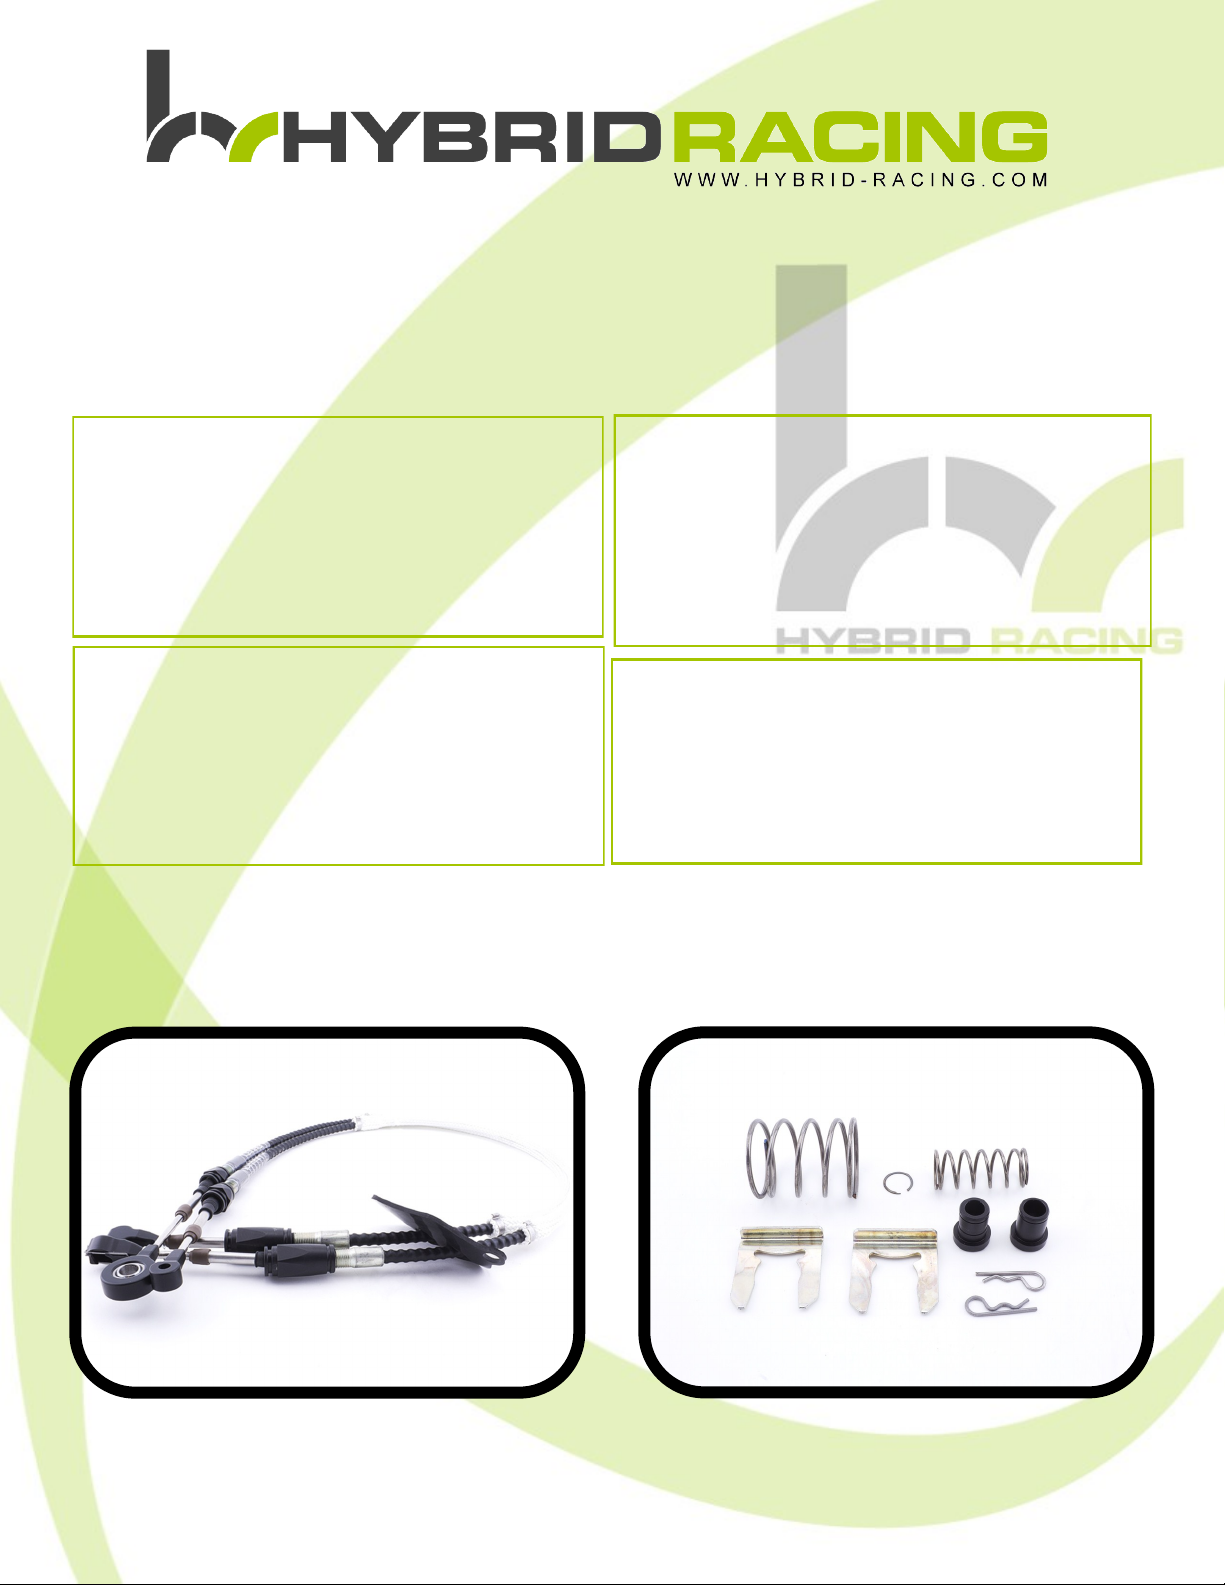
STEP 1:
The oem shifter cables are affixed to the
transmission by (2) cotter pins and (2) “c”shaped linkage clips. First, remove the
(2) cotter pins with your fingers (Fig 1A).
Next, with a flathead screwdriver pry up
the back side of the “c” shaped linkage
Fig 1A
Fig 1B
clip (Fig 1B) then pry from the front, twisting the screwdriver (Fig 1C). Once you
have removed both clips you can slide the
endlinks off of the transmission and completely remove the shifter cables from the
transmission side. Set them aside so they
can be pulled out from the bottom of the
car later. (NOTE: pictured in Fig 1A are
Hybrid Racing shifter cable bushings, the
OEM bushings are rubber and may use a
different style pin to hold them in)
STEP 2:
Using a jack or car hoist you will need to
lift the car high enough off the ground to
get under it. Be sure to use only manufac-
Fig 1C
turer approved jacking point and support
locations. NEVER get under a car that is
supported by a jack only!
3

OEM Cable Removal
STEP 3:
Next you will need to remove the heat shield for the exhaust Using a 10mm socket or nut driver, remove the (4) M6 bolts and (2) nuts pictured and rotate the heat shield out from behind the exhaust
(Fig 3A/3B). Depending on your exhaust set up, removal of a catalytic converter or midpipe may be
required to gain access to this heat shield.
Fig 3B
Fig 3A
STEP 4:
Once you have removed the heat shield, you
will need to remove the (2) mounting brackets and the mounting plate using a 10mm
socket. For the front bracket remove the (2)
M6 bolts( Fig 4A). For the middle bracket, remove the (2) nuts (Fig 4B), for now, the
brackets may be left attached to the cables.
Before removing the mounting plate, mark
the orientation of the plate with a sharpie.
Then remove it by removing the (2) nuts and
sliding the plate off the studs (Fig 4C).
Fig 4A
Fig 4B
Fig 4C
4
OEM Cable Removal
STEP 5:
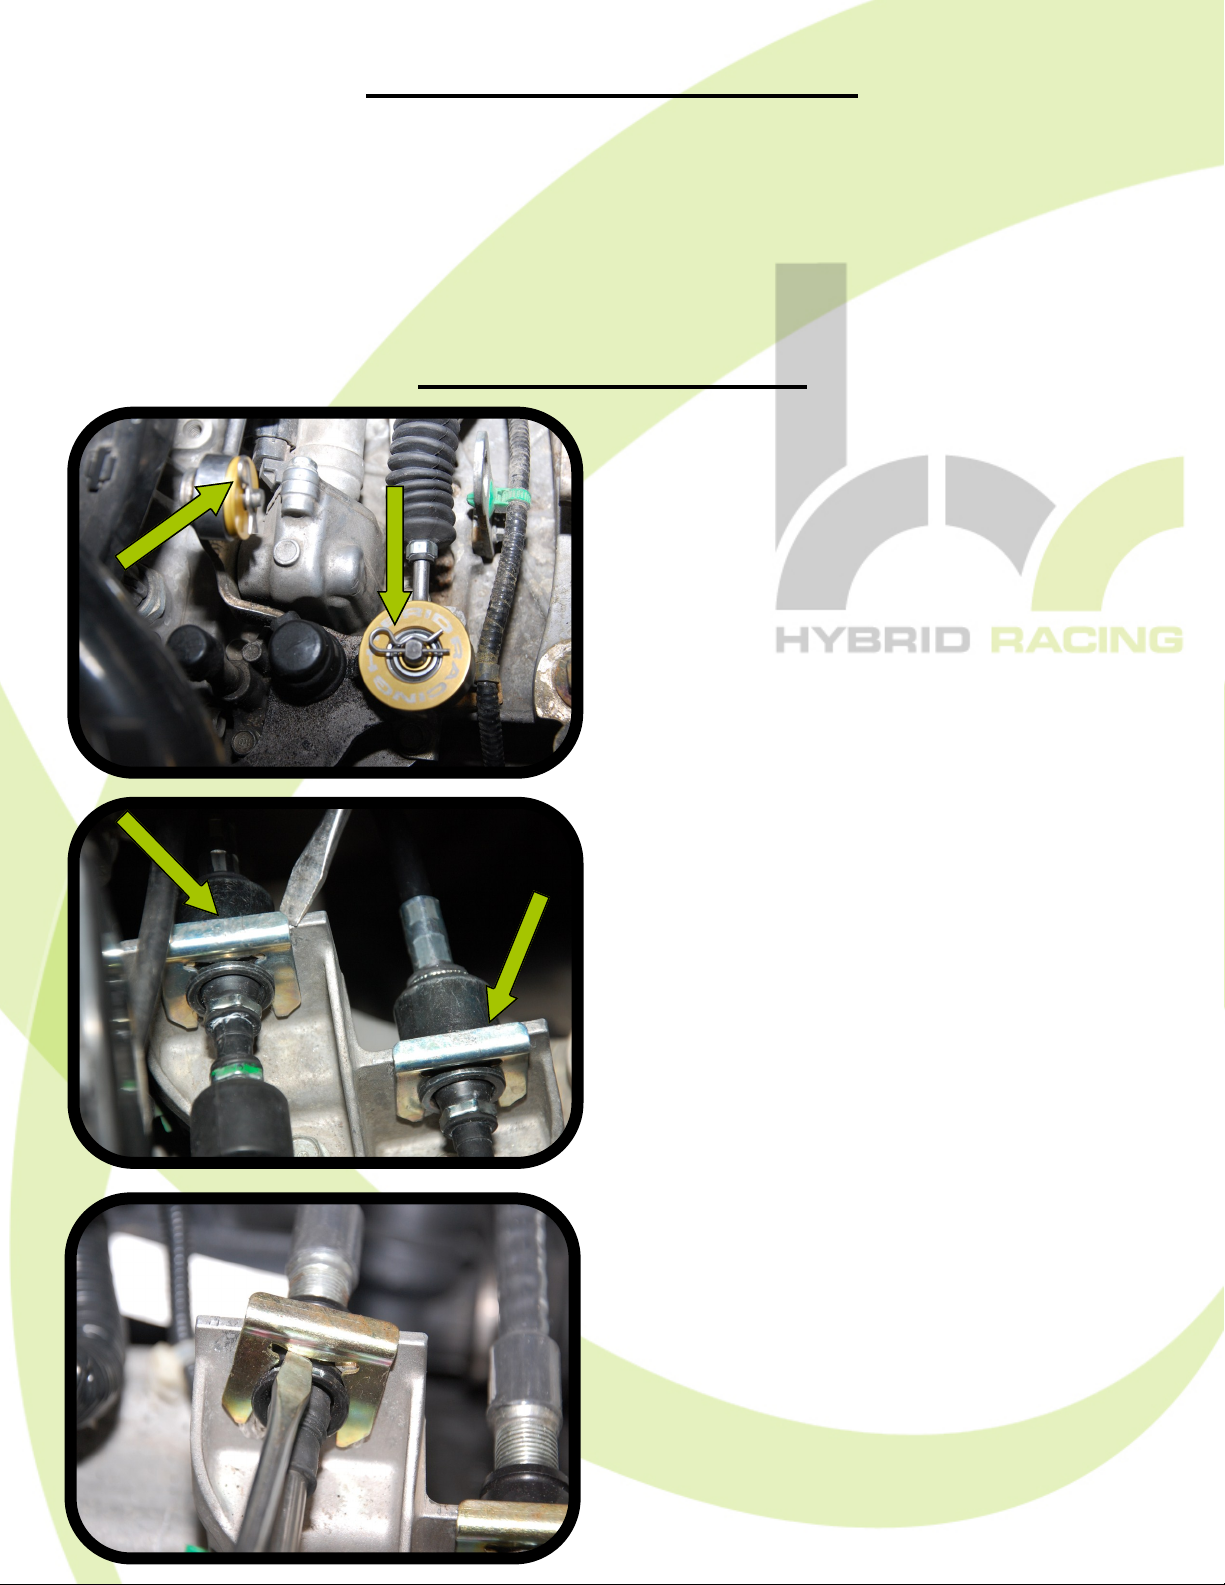
For the next set of steps , we will move
into the interior of the car. Start by pulling the emergency brake up and unscrewing the shift knob. Next, pull the
shift boot off by pulling straight up on all
four corners of the plastic base. Then
remove the upper center console piece
by grabbing right under the shifter and
pulling straight up(Fig 5).
STEP 6:
Next you will need to use your 8mm nut driver to remove the (4) bolts that hold the center
console down. The front (2) are right in front of the shifter as seen in Fig 6A, and to get to
the rear (2) you must open the center console compartment and remove the rubber mat to
get to them as seen in Fig 6B. Next you will need your flathead screwdriver again to remove the two plastic push-pin clips in the very front. The one on the left side is right next to
the gas pedal(Fig 6C). To get to the right one you will need to pull the plastic piece under
the glove box off by pulling straight down. This will reveal the right side clip as seen in Fig
6D.
Fig 5
Fig 6A
Fig 6C
Fig 6B
5
Fig 6D

OEM Cable Removal
STEP 7:
Now that the center console is not attached, slide it into the back seat to give
yourself room to remove the cables from
the shifter. First, using your two thumbs
separate the wire clips holding the
endlinks on the shifter and slide them off
of the ball joints(Fig 7A). Second, you
need to the remove the two bushings located at the base of the shifter by rotating
them counter-clockwise and sliding out
the side(Fig 7B/7C)
Fig 7A
Fig7B
Fig 7C
6

OEM Cable Removal
STEP 8:
The shifter cables should now be unattached completely from the shifter and transmission, and now you should be able to pull the cables completely off the car from
the bottom. Be careful pulling them out as the bushings tend to get hung up. Once
they are out we can now begin the installation of the Hybrid Racing shifter cables.
Install Guide
STEP 9:
First we will start with installing the new
transmission selector lever springs. Before
doing so you MUST make sure the car is
in neutral before doing anything else.
Once you are completely sure the car is in
neutral, we will remove the shifter arm assembly from the transmission. Start by unplugging the reverse light switch plug (Fig
9A). With a 10mm socket, remove the (4)
M6 bolts as illustrated in Fig 9B(keep track
of which bolts came from where because
they are different lengths). Next, you will
need an 8mm allen key to remove the lower retaining interlock bolt as illustrated(Fig
9C). Now you must pull straight up on the
whole assembly to pull it out (you may
need a flathead screwdriver to pry on it
and get it started).
Fig 9A
Fig 9C
Fig 9B
7

Install Guide
STEP 10:
With the assembly out on, we can now
swap the springs. This step is much easier if you have an another person helping
you. The gear selector is under spring
pressure so start by holding it back with
your hand then using your 12mm boxed
end wrench to remove the M8 bolt as il-
Fig 10A
Fig 10B
lustrated in Fig 10A. Once the bolt is out,
carefully slide the gear selector off, making sure to keep all the parts in order.
With the selector off you can now swap
the large and small springs with the ones
provided in the kit (IMPORTANT: make
sure not to lose the washer shown with
red arrow touching the smaller spring in
Fig 10B as it must go back on where it
was after swapping the springs for proper
operation of the transmission gear selector). Now that the new springs are installed, slide the gear selector back on
making sure it is on the same way it was
when it came off. If you happen to get the
pieces out of order, the order they go in is
Fig 10C
displayed in Fig 10C.
8

Install Guide
STEP 11:
Now that we have the new springs installed, we can re-install the shifter
arm assembly back in the transmission. Before doing so, clean the old
Honda bond off of the base and reapply new Honda bond evenly with
your finger as illustrated in Fig 11.
Now slide the shifter arm assembly
back into the transmission, put the (4)
M6 bolts back in their original places
and tighten. Using your 8mm allen key
put the lower interlock bolt back in
Fig 11
and tighten, and plug the reverse light
switch plug back as well.
9

Install Guide
STEP 12:
With the transmission back together, we
are now ready to install your new Hybrid
Racing shifter cables. First we will need to
remove the two mounting brackets off of
the OEM cables(keep the larger bracket
Fig 12A
Fig 12B
STEP 13:
Now install the bushing insert into the
larger endlink for the transmission side
of the cables. Slide it through the
on the right handy as we will need it in the
install later-Fig 12A) so we can slide the
mounting plate off and slide it onto the
Hybrid Racing cables as illustrated(Fig
12B).
06
07+
Fig 13A
bushing and snap on the retaining ring
as illustrated(Fig 13B). NOTE: You
are given (2) different bushing inserts,
the insert with the groove in it is for
cars years 07+, the one without the
groove is 06 specific(Fig 13A). Be
sure you install the correct insert for
your application.
Fig 13B
10

Install Guide
STEP 14:
We will start from the underside of the
car by feeding them up to the transmission side first then into the car on
the shifter side. Once you have the cables staying there we can now move
back under the hood. First slide the
end links on the shifter arm assembly
and snap on the (2) cotter pins (Fig
14A). Next, pull back on the cable and
slide the cable bushing into place.
Once the bushings are in place, slide
the (2) “c”-shaped linkage clip back on
like the OEM ones as illustrated (Fig
Fig 14A
14B).
STEP 15:
Moving back into the interior, pull the
cables up to the shifter making sure
that you have them going to the correct side. NOTE: One of the endlinks
has a yellow dot on it, make sure it
goes on the rear of the shifter and
matches the one shown in Fig 15.
Once you have them on the correct
side, push the end links on to the shifter until the wire clips snap on. Make
sure that cables fit straight on as illus-
Fig 14B
trated in Fig 15, if they do no not you
may have to flip the end link on the
transmission side or they can be adjusted (Explained in following step)
Fig 15
11

Install Guide
STEP 16:
This is an optional step if the orientation of the endlink on the shifter side
is not adequate. To adjust it, loosen
the nut at the base of the endlink, rotate to desired orientation, and retighten the nut.
STEP 17:
Push the bushings into the correct place on the back side of the shifter and slide on
the “c”-shaped linkage clips provided just as you did with the transmission side. When
completed yours should look like the ones illustrated in Fig 17A/17B.
Fig 17A
Fig 17B
IMPORTANT
Make sure that you can go through all 6 gears and reverse. If you hear a click from
the transmission when moving the shift knob left to right and you cannot shift through
the gears you have the cables backwards on the shifter. Also, if you cannot feel the
distinct notch for the reverse gate you may have forgotten or incorrectly installed the
washer in the shifter arm assembly on the smaller spring. If you do not see either one
of these problems you may put the interior back together at this time if you wish.
12

Install Guide
STEP 18:
Next we need to move back under the
car to install the mounting plate back
to the bottom of the car. Slide the plate
back on the studs and using a 10mm
socket put the (2) nuts on to hold it in
place. Before tightening these nuts
make sure the rubber seal is aligned
with the plate correctly as illustrated
(you should NOT see any rubber being squeezed out of the sides).
STEP 19:
Next we need to install the bracket I
said to hold on to in step 4. First slide
the cables onto the bracket but do not
close the bracket or put the clamping
bolt in. First using a 10mm socket put
the (2) M6 bolts in the bracket and
tighten it to the car. Next, adjust the
cables as needed around the exhaust
and install the M6 clamping bolt with a
Fig 18
Fig 19
10mm boxed-end wrench and tighten
as illustrated.
STEP 20:
Finally, using your 10mm socket re-
install the heat shield with the (4) M6
bolts and (2) nuts and your installation
is complete!
Fig 20
13

Trouble Shooting & FAQ’s
Tips and tricks to help you get it done!
Make sure when installing the shifter arm selector springs NOT to forget the washer on the small-
When reinstalling the shifter arm assembly do not forget to install the interlock bolt and clean the
Make sure you have the correct bushing insert for your model year in the cable endlink on the
When installing the Hybrid Racing shifter cables onto the shifter make sure that you have them
When installing the Hybrid Racing shifter cables make sure that where the end links connect to
If cables do not actuate smoothly and consistently, they may be bent too tightly at some point.
er spring.
old Honda bond off with a razor blade and recoat with new Honda bond on the base of the assembly.
transmission side, if you do not it will either have a lot of play or will not go on.
on the correct side, if you hear a clicking sound when moving the shift knob left to right you have
them backwards.
the shifter they are not in a bind or rubbing on one side and look just like the ones pictures in
FIG15.
Loosen bracket bolts holding the cables in place, adjust cables as necessary and retighten.
14

If you have any questions or comments, please email support at
support@hybrid-racing.com
Legal Disclaimer
Users assume all cost and risk associated with these or any other items purchased
from Hybrid Racing LLC.
Parts sold or manufactured by Hybrid Racing LLC may not meet legal requirements for
use on public roads. People thinking about purchasing product(s) from Hybrid Racing
LLC should check with their local and state authorities for legality. It is the user’s responsibility to know and comply with all local and federal laws and regulations. Use or
installation of Hybrid Racing LLC products may affect user insurance and/or vehicle
warranty coverage. It is the user’s sole responsibility for consequences that may occur
due to having the product installed in his/her vehicle.
Hybrid Racing LLC assumes no legal responsibilities and/or liabilities, whether to user’s vehicle, engine, person(s), and/or property(s), that result from the use of, or servicing of a vehicle of which a Hybrid Racing LLC product has been installed/attempted to
be installed, or to any other vehicle(s) and/or person(s), regardless of whether or not
this product has any involvement
directly or indirectly and/or liability, and/or whether or not proper installation has been
carried forth.
All engines, engine parts and electrical components are for OFF ROAD USE ONLY/
RACING
VEHICLES ONLY. They are not for or to be used on public roads in the USA.
Acquisition of a Hybrid Racing LLC product will act as an acknowledgement of the legal disclaimer stated herein.
Hybrid Racing LLC reserves the right to change this disclaimer at any time without any
prior
consent or notification.
Should you need to contact us our details are as follows:
Hybrid Racing LLC, 12231 Industriplex Suite B, Baton Rouge, LA 70809
www.hybrid-racing.com
15
 Loading...