

Page 1

Dual Mode VoIP Keyphone IP37-31
Dual-mode VoIP Keyphone
Model: IP 37-31
User’s Manual
( V 1.3 )
Auto Telecom Company Limited Doc: IP37-31_Hybrex_Manual_1.3
http://www.hybrex.com 2011.1.3
Page 2

Dual Mode VoIP Keyphone IP37-31
Content
Product Overview ................................................................................................................................................. 1
IP37-31 Keyphone Layout .................................................................................................................................... 2
Description of the Keys and its Lights when Operating VoIP Calls ................................................................ 3
Functions of the Keys........................................................................................................................................ 3
The status of the lights and what they indicate ................................................................................................. 4
Description to the Keys and Lights when communicating via the FXO interface ......................................... 5
Functions of the Keys........................................................................................................................................ 5
The status of the lights and its indication .......................................................................................................... 5
A. VoIP Calls ......................................................................................................................................................... 6
A1. Making Calls ............................................................................................................................................... 6
A1.1 Dialing a Number .............................................................................................................................. 6
A1.2 DSS Direct Dial ................................................................................................................................. 6
A1.3 Last Number Redial .......................................................................................................................... 6
A1.4 Hotline ............................................................................................................................................... 6
A2. Receiving Calls ........................................................................................................................................... 7
A2.1 Answer .............................................................................................................................................. 7
A2.2 Call Pickup ........................................................................................................................................ 7
A2.3 Auto Answer ...................................................................................................................................... 7
A2.4 Answer the Second Call .................................................................................................................... 7
A3. Hold & Call Transfer ................................................................................................................................... 8
A3.1 Hold & Retrieve Held Call ................................................................................................................. 8
A3.2 Call Transfer (by Phone) ................................................................................................................... 8
A3.3 Call Transfer (by System) ................................................................................................................. 8
A3.4 Call Park & Retrieve Parked Call ...................................................................................................... 8
A4. During Conversation ................................................................................................................................... 9
A4.1 Mute .................................................................................................................................................. 9
A4.2 Handset & Handsfree Modes Switch ................................................................................................ 9
A4.3 Volume Adjustment ........................................................................................................................... 9
A4.4 Three-way Conference ..................................................................................................................... 9
A4.5 Call Split ............................................................................................................................................ 9
A5. Miscellaneous Functions .......................................................................................................................... 10
A5.1 Group Paging .................................................................................................................................. 10
A5.2 Listen Voice Message ..................................................................................................................... 10
A5.3 Conference Room ........................................................................................................................... 10
A5.4 Do Not Disturb (DND) ..................................................................................................................... 10
Page 3

Dual Mode VoIP Keyphone IP37-31
A5.5 Access the Auto Attendant .............................................................................................................. 11
A5.6 Group Listening ............................................................................................................................... 11
A5.7 Call Log ........................................................................................................................................... 11
B. Phone Settings ............................................................................................................................................... 12
B01. Basic Knowledge ............................................................................................................................. 12
B02. Main Menu ....................................................................................................................................... 12
B03. Steps to enter the Phone Settings as administrator........................................................................ 12
B1. Phone Book: Setup and Use the Phone Book .......................................................................................... 14
B2. Call History: View the Call History ............................................................................................................ 14
B3. Phone Settings: Configure the Phone Settings ........................................................................................ 14
B4. Network: Network Parameter Settings...................................................................................................... 15
B5. SIP Settings: Configure the SIP Settings. ................................................................................................ 16
B6. NAT Traversal: NAT Traversal Settings ................................................................................................... 17
B7. Administrator: System Setting .................................................................................................................. 18
B8. Test Menu: Initiating Self-Test .................................................................................................................. 18
C. WebPages Setup ............................................................................................................................................ 19
C1. Phone Book: ............................................................................................................................................. 21
C1.1 Phone Book: .................................................................................................................................... 21
C1.2 BLF ( Busy Lamp Field ): ................................................................................................................ 22
C2. Phone Settings ......................................................................................................................................... 24
C2.1 Call Forward .................................................................................................................................... 24
C2.2 SNTP ( Simple Network Time Protocol ) ........................................................................................ 25
C2.3 Volume Settings .............................................................................................................................. 26
C2.4 Ringer Settings................................................................................................................................ 27
C2.5 DND (Do Not Disturb) ..................................................................................................................... 27
C2.6 FXO Auto Answer ........................................................................................................................... 28
C2.7 Dial Plan .......................................................................................................................................... 29
C2.8 Flash Time ...................................................................................................................................... 30
C2.9 Call Waiting Settings ....................................................................................................................... 30
C2.10 Soft-Key Settings .......................................................................................................................... 31
C2.11 Hot Line ......................................................................................................................................... 31
C2.12 Alarm Settings ............................................................................................................................... 32
C3. Network ..................................................................................................................................................... 33
C3.1 Network Status ................................................................................................................................ 33
C3.2 WAN Settings .................................................................................................................................. 34
C3.3 LAN ................................................................................................................................................. 35
C3.4 DDNS .............................................................................................................................................. 36
Page 4

Dual Mode VoIP Keyphone IP37-31
C3.5 VLAN Settings................................................................................................................................. 36
C3.6 DMZ ................................................................................................................................................ 36
C3.7 Virtual Server .................................................................................................................................. 36
C3.8 L2TP Settings ................................................................................................................................. 37
C3.9 PPTP Settings................................................................................................................................. 37
C4. SIP Setting ................................................................................................................................................ 38
C4.1 Service Domain............................................................................................................................... 38
C4.2 Port Settings ................................................................................................................................... 39
C4.3 Codec Settings................................................................................................................................ 40
C4.4 Codec ID Settings ........................................................................................................................... 41
C4.5 DTMF Settings ................................................................................................................................ 41
C4.6 RPort Settings ................................................................................................................................. 42
C4.7 Other Settings ................................................................................................................................. 42
C5. NAT Traversal .......................................................................................................................................... 44
C5.1 STUN Settings ................................................................................................................................ 44
C6. Others ....................................................................................................................................................... 45
C6.1 Auto Configuration Settings ............................................................................................................ 45
C6.2 FXO Settings................................................................................................................................... 46
C6.3 MAC Clone ...................................................................................................................................... 46
C6.4 Tones Settings ................................................................................................................................ 47
C6.5 Advanced Settings .......................................................................................................................... 48
C6.6 Status Log ....................................................................................................................................... 48
C6.7 System Info ..................................................................................................................................... 48
C7. System Authority ...................................................................................................................................... 49
C8. Save Changes .......................................................................................................................................... 49
C9. Update ...................................................................................................................................................... 50
C9.1 Update ............................................................................................................................................ 50
C9.2 Auto Update Settings ...................................................................................................................... 51
C9.3 Default Settings............................................................................................................................... 52
C10. Reboot .................................................................................................................................................... 52
D. FXO Calls ........................................................................................................................................................ 53
D1. Making Calls ............................................................................................................................................. 53
D2. Answering Calls ........................................................................................................................................ 53
D3. Hold & Retrieve Held Call ......................................................................................................................... 53
D4. During Conversation ................................................................................................................................. 53
D4.1 Mute ................................................................................................................................................ 53
D4.2 Handset & Handsfree Modes Switch .............................................................................................. 53
Page 5

Dual Mode VoIP Keyphone IP37-31
D4.3 Volume Adjustment ......................................................................................................................... 53
D4.4 Flash ............................................................................................................................................... 53
E. Q & A................................................................................................................................................................ 54
E1. IP 37-31 VoIP Phone Quick Setup Guide ................................................................................................. 54
Page 6

Page 7

Dual Mode VoIP Keyphone IP37-31
1
Product Overview
The IP 37-31 Dual Mode VoIP Keyphone has adopted the advanced 32 bit RISC CPU and the
DSP technology to offer real time VoIP phone calls via the internet with a voice quality as good
as the traditional PSTN phones.
● PoE ( Power over Ethernet )
This feature enables the VoIP Keyphone to operate without the bulky AC power adapter.
The power is delivered by a PoE-enabled Hub or Switch over standard Ethernet cable.
● FXO ( Foreign Exchange Office )
The VoIP Keyphone can also make traditional phone calls through its built-in FXO interface,
thus integrating both PSTN and VoIP Internet communications.
Model No.
Description
IP37-31P
PoE-enabled VoIP Keyphone
IP37-31PF
PoE-enabled VoIP Keyphone with FXO interface
Note:
1. The Model IP37-31 is a standard VoIP Keyphone with the following features:
2-line * 16 characters backlit LCD screen
Earphone jack
Handsfree operation
2 Ethernet network ports ( RJ45 10/100 Base-T )
10 sets DSS/BLF (Direct Station Selection/ Busy Lamp Field) buttons
2. The character following the Model No. represents the feature of the product:
P: PoE enabled
F: Supports FXO interface
Page 8
Dual Mode VoIP Keyphone IP37-31
2
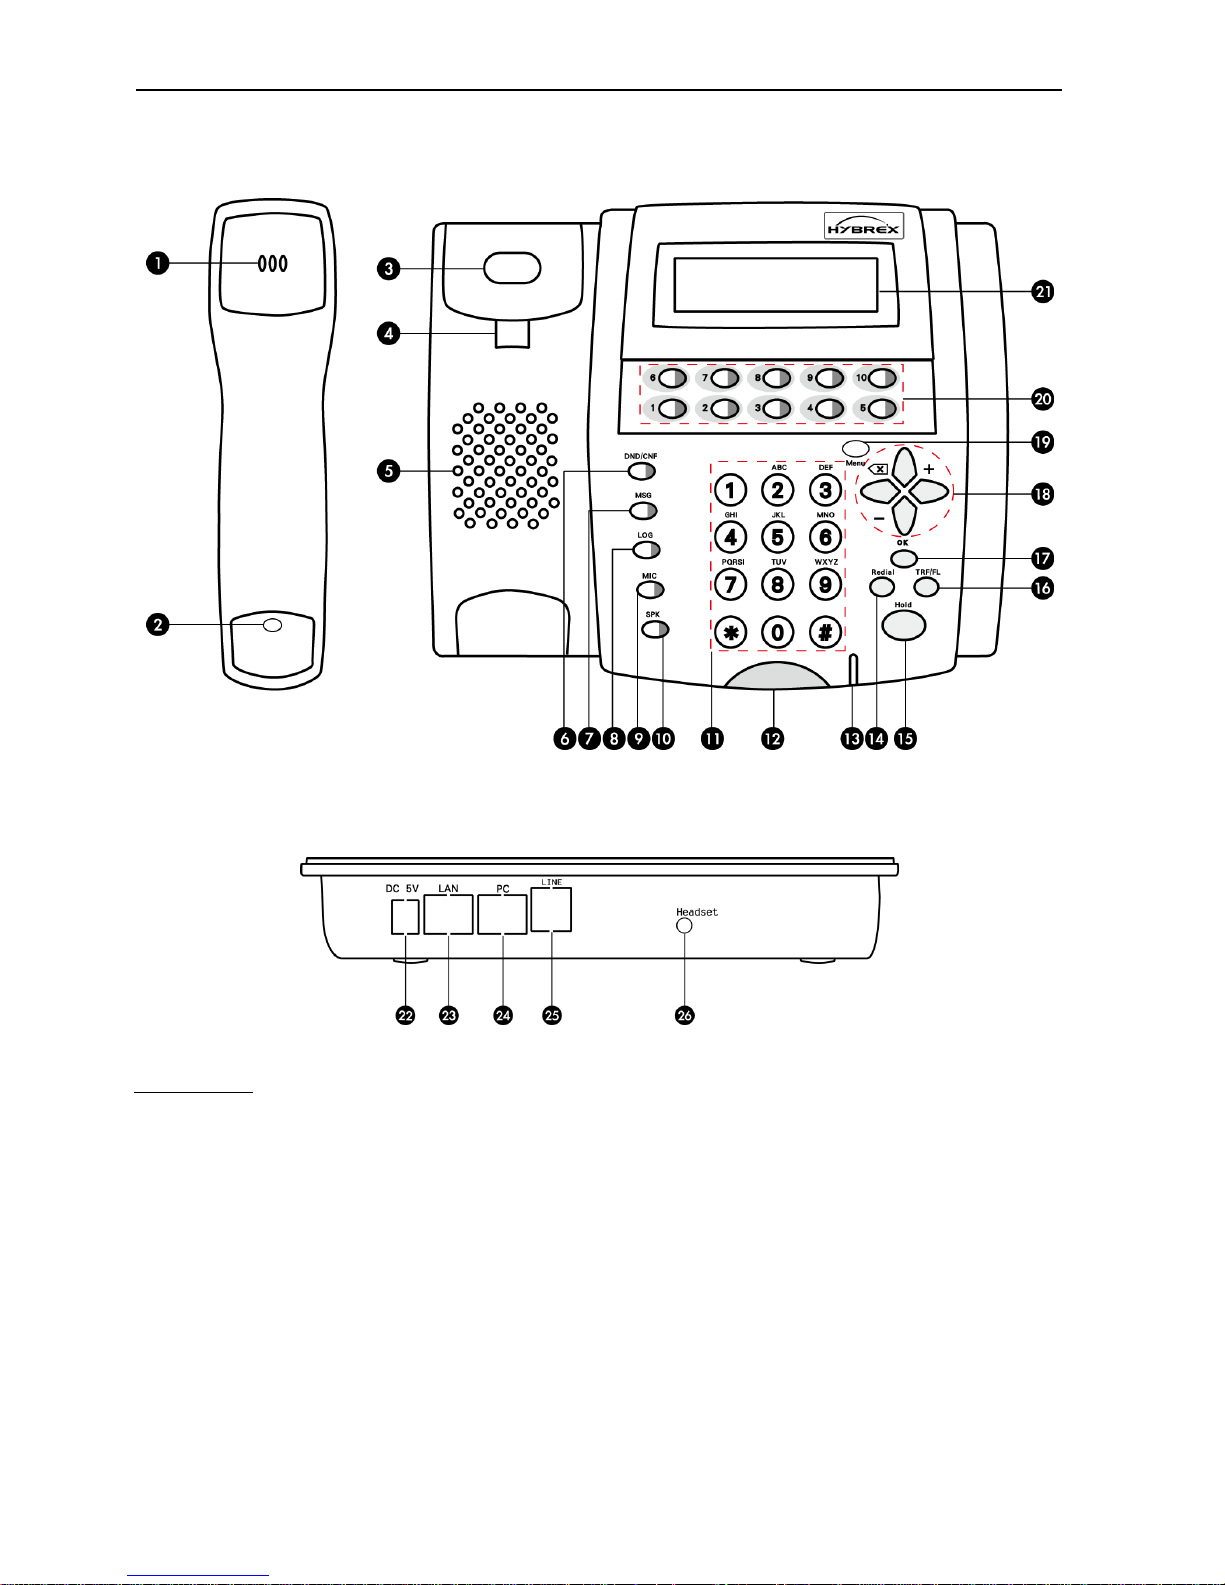
IP37-31 Keyphone Layout
Description:
1. Handset Speaker
2. Handset Microphone
3. Telephone Hook Switch
4. Wall Mount Hook
5. Speaker
6. [ DND/CNF ] Key
7. [ MSG ] Key
8. [ LOG ] Key
9. [ MIC ] Key
10. [ SPK ] Key
11. Dial Keypad
12. Front Indicator Light
13. Microphone
14. [ Redial ] Key
15. [ Hold ] Key
16. [ TRF/FL ] Key
17. [ OK ] Key
18. Direction Pad
19. [ Menu ] Key
20. [ DSS/BLF ] Buttons
21. LCD Screen
22. DC 5V Power Jack
23. LAN Port
24. PC Port
25. FXO Port
26. Headset Jack
Page 9

Dual Mode VoIP Keyphone IP37-31
3
Description of the Keys and its Lights when Operating VoIP Calls
Functions of the Keys
[ DND/CNF ] This key has two functions, they are:
(1) Activate or deactivate the “Do Not Disturb” function. ( Refer to A5.4 )
(2) Operate the “Conference” function. ( Refer to A4.4 )
[ TRF/FL ] During a VoIP call, this key offers the “Transfer” function. ( Refer to A3.2 )
[ MSG ] Access the voice mailbox in the IP-PBX. ( Refer to A5.2 )
[ LOG ] Access the records of incoming and outgoing calls (Dialed / Answered /
Missed). ( Refer to A5.7 )
[ MIC ] Turn On/Off the microphone of the handset and phone. ( Refer to A4.1 )
Enable/Disable Auto Answer. ( Refer to A2.3 )
[ SPK ] Activate or deactivate the dialing function. ( Refer to A1.1 )
Answer the call without lifting the handset. ( Refer to A2.1 )
[ Redial ] Redial the previously dialed numbers. ( Refer to A1.3 )
[ Hold ] Put the current call on hold. ( Refer to A3.1 )
[ Menu ] Configure the keyphone. ( Refer to section B “Phone Settings” )
[ UP ]: Display the previous menu item on the LCD
Turn up the volume
[ Down ]: Display the next menu item on the LCD
Turn down the volume
[ Left ]: Move the cursor on the LCD leftward
Delete the last entered digit
[ Right ]: Move the cursor on the LCD rightward
[ OK ] Confirmation key.
The Dial Keypad
[ DSS/BLF ] Direct Station Selection and Busy Lamp Field Buttons. ( Refer to A1.2 )
Page 10

Dual Mode VoIP Keyphone IP37-31
4
The status of the lights and what they indicate
[ DND/CNF ] Red light constantly on: The keyphone is at the “Do No Disturb” state;
The LCD shows “# DND #”.
Red light off: The keyphone is at the “Idle” state;
The LCD shows the extension number of this
keyphone and the current date & time.
[ MSG ] Red light flashes slowly: New voice mail(s) in the IP-PABX‟s mailbox.
The lower line of the LCD screen shows
“Unread Messages.”
[ LOG ] Red light flashes slowly: Missed call(s) stored in the list.
“Missed Call” are shown on the LCD screen.
Red light off: No missed call(s); or the missed call(s) had been
checked.
[ MIC ] Red light constantly on: The microphone of the handset or the phone
( Handsfree ) is on; or the “Auto Answer” feature is
activated.
Red light off: The microphones of the handset or the phone is
mute.
[ SPK ] Red light constantly on: The speaker is on during a Handsfree call.
Red light off: The speaker is off or the phone is at the idle status.
[ DSS/BLF ] Light off: (1) The assigned extension is online.
(2) No extension number was assigned for the key.
Red light flashes slowly: The assigned extension is ringing.
Red light on: (1) The assigned extension is busy.
(2) The assigned extension is offline.
Green light on: The assigned extension is on a call with this
phone.
( Front Indicator Light)
Red light flashes rapidly: An incoming call is waiting to be answered.
Page 11

Dual Mode VoIP Keyphone IP37-31
5
Description to the Keys and Lights when communicating via the FXO interface
Functions of the Keys
[ TRF/FL ] When communicating on a FXO call, this key provides only the “Flash”
feature. ( Refer to D4.4 )
[ Hold ] (1) Put the current call on hold. ( Refer to D3 )
(2) Press [ HOLD ] key again to get back to the held call. ( Refer to D3 )
The Dial Keypad
The status of the lights and its indication
[ MIC ] Red light constantly on:
The microphone of the handset or the phone (Handsfree) is on.
Red light off: The microphones of the handset or the phone is
mute.
[ SPK ] Red light constantly on: The speaker is on during a Handsfree
call.
Red light off: The speaker is off or the phone is at the idle status.
[ Front Indicator Light] Red light flashes rapidly:
An incoming call is waiting to be answered.
Page 12

Dual Mode VoIP Keyphone IP37-31
6
A. VoIP Calls
The IP 37-31 Dual-mode VoIP Keyphone can be used with a standard IP-PBX that runs
VoIP SIP protocol. However, the instructions below describe the features developed only for
the VP (VoIP Platform) series IP-PBX.
A1. Making Calls
The VP series IP-PBX is a feature-rich communication platform that provides flexible
numbering and various routing functions. The user only needs to know the called party‟s
number to make a call; the VP automatically decides whether this call is intercom, to a CO
Line number, to another station within the same IP-PABX, to other stations over another VP
or VoIP Gateway, or to a traditional PSTN terminal through the Gateway of the ITSP(Internet
Telephony Service Provider). All these complicated routings were handled by the VP, while
the user just needs to dial the number.
A1.1 Dialing a Number
To make call by dialing a number on the Dial Keypad:
(1) Lift the handset or press [ SPK ] key, the dial tone will be heard and the upper line
of the LCD screen will show “IP Dialing.. 1”.
(2) Dial the telephone number.
(3) Press the [ # ] key to send out the telephone number immediately, or wait for a few
seconds (refer to section C2.7 “Auto dial time”) and the keyphone will send out the
number automatically.
Note: Before pressing the [ # ] key, the user can delete any wrongly-entered digits by
pressing the [ Left ] key.
A1.2 DSS Direct Dial
The DSS feature of the keyphone must be set up (refer to section C1.2) before the
user can use it. The dual-color LED of the [ DSS/ BLF ] buttons indicate the status of
the assigned stations (online, offline, busy, or idle). The user can call that station by
simply pressing the respective [ DSS/BLF] button.
Note: The IP 37-31 Dual-mode VoIP Keyphone has 10 [ DSS/BLF ] buttons.
A1.3 Last Number Redial
The keyphone automatically stores the last dialed number.
To call that number again, follow the steps below:
(1) Lift the handset or press [ SPK ] key, wait for the dial tone.
(2) Press [ Redial ] key to call the last dialed number.
A1.4 Hotline
The user can call a preselected station by simply picking up the handset or pressing
the [ SPK ] key. This feature can be used to establish a direct-communication between
important personnel, or used at public locations for emergency call.
Steps of Operation: Lift the handset or press the [ SPK ] key to automatically call the
preselected station.
Page 13

Dual Mode VoIP Keyphone IP37-31
7
A2. Receiving Calls
A2.1 Answer
When the keyphone is ringing (the front indicator light flashes rapidly), the user can
answer the call.
Steps of Operation:
(1) Picking up the handset to answer the call directly.
(2) Or press the [ SPK ] key to answer the call in Handsfree mode.
A2.2 Call Pickup
This feature allows a user to answer a call ringing at another station. As telephone sets
are assigned into different groups, Call Pickup can be done by different ways:
Pick up a call in the same group:
(1) Lift the handset or press the [ SPK ] key.
(2) Dial [*0 ] to answer for another station.
Pick up a call in other groups
(1) Lift the handset or press the [ SPK ] key.
(2) Press the [*9 ], then
(3) Dial the [ group code ] (01 to 63, for a total of 63 groups) to pickup call.
A2.3 Auto Answer
Auto Answer allows the phone to automatically answer the call by Handsfree mode.
This feature is especially convenient for people in public areas as they can answer
calls without touching the phone.
Set the phone to Auto Answer:
Press [ MIC ] key to activate / deactivate this feature.
Note: The [ MIC ] key LED indication when the phone is idle.
Red light constantly on: Auto Answer mode
Red light off: Normal mode
A2.4 Answer the Second Call
The VP can flexibly assign a second line to the IP 37-31 keyphone.
Suppose that the IP 37-31 has two lines connected to the VP, if an extension calls this
station while it is on a call with the first line, the user of the IP 37-31 will hear a
call-waiting tone, however, the caller from the second line will not notice the IP 37-31 is
busy on the first line. If the VP activates the BLF (Busy Lamp Field) function on the IP
37-31, the Busy status will be shown when the phone is on a call. There are two ways
to handle such situation:
Hang up the phone to end the first call, wait for the ring tone, then pick up the
handset or press [ SPK ] key to answer the second call.
Place the first call on hold and answer the second call:
(1) Press [ HOLD ] key to place the first call on hold and switch to the second call.
(2) To switch back to the first call, simply hang up the handset and lift it again.
Note
: Please refer to section A4.4 and A4.5 for the steps to operate the Conference and the
Page 14

Dual Mode VoIP Keyphone IP37-31
8
Call Split features.
A3. Hold & Call Transfer
A3.1 Hold & Retrieve Held Call
(1) Press [ HOLD ] key while on a call to hold the call. The held caller will hear music
from the VP.
(2) Press [ HOLD ] key again to retrieve the held call.
(3) To hang up the handset when a call is on hold, the LCD screen will show “Line on
Hold” and the phone will keep ringing. The user can reconnect to the held caller by
simply picking up the handset.
A3.2 Call Transfer (by Phone)
(1) Press [ HOLD ] key while on a call to hold the call. The held caller will hear music
from the VP.
(2) Dial the extension number of the transfer destination.
(3) Press [ TRF/FL ] key to ring that extension and have the held call transferred to it.
A3.3 Call Transfer (by System)
Inform the transferred destination before transferring a call
(1) Press [*] twice while on a call. The VP will play a voice message prompting the
user to dial the extension number of the transfer destination.
(2) Dial the extension number of the transfer destination.
(3) When the transferred destination answers, announce the call, hang up, and the
held call will be transferred to that extension.
Note:
(1) If the transfer destination doesn‟t answer the call, the caller hang up the phone,
then the held call will ring the transfer destination.
(2) If the transfer destination refuses to answer the held call and hangs up its phone,
the caller will be automatically reconnected to the held call.
Transfer a call without informing the transferred destination.
(1) Press [ # ] while on a call, the VP will play a voice message prompting the caller to
dial the extension number of the transfer destination.
(2) Dial the number of the transferred destination.
(3) The caller will hear a busy tone when the transfer is done and the held call is
ringing the transferred destination. The caller can hang up now.
A3.4 Call Park & Retrieve Parked Call
Dialing [ # *7 ] while on a call, the VP will play a voice message informing which
zone was the call parked (there are 9 zones in total, the zone-code ranges from *
601 to *609).
To retrieve a parked call, simply lift the handset, or press [ SPK ] key and enter the
zone code.
Page 15

Dual Mode VoIP Keyphone IP37-31
9
A4. During Conversation
A4.1 Mute
When having conversation via the handset or in Handsfree mode, the user can press
[ MIC ] key to turn its LED light on or off. The status of the LED light is described below:
Red light steadily on: The microphone is activated.
Red light off: The microphone is mute.
A4.2 Handset & Handsfree Modes Switch
(1) When talking on the handset, press [ SPK ] key to have its LED light illuminate
steadily, and then hang up the handset to switch to Handsfree mode. Now the
[ MIC ] key and the [ SPK ] key both illuminate steadily.
(2) When talking in Handsfree mode, lift the handset to switch to talking on the
handset. The light of the [ SPK ] key went out; the red light of the [ MIC ] key is
steadily on, representing that the microphone is activated.
A4.3 Volume Adjustment
When talking on the handset or Handsfree mode, pressing the [Down] key will turn
down the volume of the speaker (on the handset or on the phone), while pressing the
[ Up] key will turn the volume up.
A4.4 Three-way Conference
Please refer to section A2.4 “Answer a Second Call”. The steps below describes how
to establish a three-way conference when the phone has two lines linked to the VP.
(1) Establish a call with party A. Press [ Hold ] key to place party A on hold.
(2) Establish a call with party B, and then press [ DND/CNF ] key. Party A, B and the
caller are now in a three-way conference.
(3) Hang up the phone to end the conference.
A4.5 Call Split
Please refer to section A2.4 ( “Answer a Second Call” ). With two lines connected to
the VP, the user can do Call Splitting, which means the user calls party A first, put party
A on hold, and make a call to party B, put party B on hold, and get back to party A…
The user can establish two calls simultaneously, but only talk to one of them at a time.
(1) Establish a call with party A on the first line, and then press [ Hold ] key.
(2) Make a call to party B, or answer the call from party B.
(3) While in conversation with party B, press [ Hold ] key to place party B on hold and
switch back to talk to party A.
(4) While in conversation with party A, press [ Hold ] key to place party A on hold and
switch back to talk to party B.
Page 16

Dual Mode VoIP Keyphone IP37-31
10
A5. Miscellaneous Functions
A5.1 Group Paging
This feature allows the user to announce to a pre-assigned group of VoIP extensions
through the speaker on their phones, thus making a paging announcement.
The steps are as follows:
(1) Lift the handset.
(2) Dial [*2 ].
(3) Dial the [ group code ]
(a two-digit number ranges from 01 to 63, for a total of 63 groups).
(4) Talk on the handset to make the announcement.
Hang up the handset when finished.
A5.2 Listen Voice Message
When a message is left in the voice mailbox assigned to this phone in the VP (IP-PBX),
the LED of the [ MSG ] key on this phone will flashes slowly in red color.
Follow the steps to listen to the messages.
(1) Lift the handset or press the [ SPK ] key.
(2) Press the flashing [ MSG ] key or dial [*8 6 ], the user will hear a voice prompt
from the VP. Follow the voice instructions to listen to the messages.
To use someone else‟s VoIP phone to listen to the messages, follow the steps below:
(1) Lift the handset or press [ SPK ] key.
(2) Dial [*8 6*], and follow the voice instruction to listen to the messages.
After finished listening to the messages, the phone will be back to idle. But the [ MSG ]
key will still flash slowly and the LCD still show “Unread Messages”. Wait a few
seconds for the phone to receive a signal of “all messages read” from the VP; after that,
the [ MSG ] key will stops flashing and the LCD screen will be back to normal state.
A5.3 Conference Room
The VP series IP-PBX offers the “Conference Rooms” feature to let multiple users enter
a designated conference room. The users can have a conference with each other.
The steps are as follows:
(1) Lift the handset or press [ SPK ] key.
(2) Dial the [ conference room number ] ( assigned by the VP ) and follow the voice
prompt.
A5.4 Do Not Disturb (DND)
The user can set the status of this phone to “Do Not Disturb” when not wanting to get
interrupted by phone calls. People calling this phone will hear a busy tone.
The steps are as follows:
(1) Pressing [ DND/CNF ] key to let its LED flashing slowly (Phone at DND state).
(2) Press the red-flashing [ DND/CNF ] key to turn the DND state off. The [ DND/CNF ]
key will stop flashing.
Page 17

Dual Mode VoIP Keyphone IP37-31
11
A5.5 Access the Auto Attendant
Some features are embedded in the Auto Attendant system to serve the outside callers.
However, when it is needed, the inside user can access the features as well.
The steps are as follows:
(1) Lift the handset or press [ SPK ] key.
(2) Dial [*8 9 ] and follow the voice prompt.
A5.6 Group Listening
When in conversation with party A, the user could let other people around hear the
voice of party A.
The steps are as follows:
(1) Have a call with party A with the handset.
(2) Press [ OK ] key, the voice of party A is now on the phone‟s speaker as well. The
upper right corner of the LCD shows a „G‟ for “Group Listening”.
Press [ OK ] key again, the letter „G‟ disappears and Group Listening mode is off.
A5.7 Call Log
The [ LOG ] key will flash slowly in red color if there is any missed call. Press
[ LOG ] key to have the following messages displayed on the LCD screen:
LCD upper line: 1.Incoming Calls
LCD lower line: 2.Dialed Number
Press the [Down] key to show the third line “ 3.Erase Record”.
Press [ 1 ] to show the incoming calls in the following example:
LCD upper line: <1>10-02 15:11M
The first record shows a missed call at 3:11 pm on October 2nd.
LCD lower line: 4507
The phone number of the incoming caller.
The letter at the upper right corner of the LCD screen:
V: Represents a Valid incoming call.
M: Represents a Missed incoming call.
While viewing a certain record, the user can call that caller directly by pressing the
[ SPK ] key.
Steps to view the history on outgoing calls:
(1) Make sure the phone is idle.
(2) Press the [ LOG ] key.
(3) Press [ 2 ]
(4) Press the [ Up ] or [ Down ] key to view more records.
(5) To call the number of a certain record, simply press [ SPK ] key.
Delete the call history:
(1) Make sure the phone is idle.
(2) Press the [ LOG ] key
(3) Press [ 3 ]
(4) Press [ 1 ] to delete all history; press [ 2 ] to delete the history on incoming
calls; press [ 3 ] to delete the history on outgoing calls.
(5) Press [ 3 ] to confirm deletion.
Page 18

Dual Mode VoIP Keyphone IP37-31
12
B. Phone Settings
The IP 37-31 is a feature-rich VoIP keyphone. Many of its features can be configured on the
phone with its keys and LCD screen. The configuration can also be done via an internet
browser. The following list is the instructions to complete the settings on the phone. However,
it is better to configure the settings in detail using an internet browser, and then
activate/deactivate the functions or check the settings on the phone. It is recommended to
read through section C “WebPages Setup” and gain the knowledge on the parameters
before reading this section. Listed below are only the names and codes of the items, their
contents were not included.
B01. Basic Knowledge
There are 7 main categories of setup options in the configuration menu of the phone.
Each category has many items; and each of these items has more sub-items. Pressing
the [ Menu ] key will display the setup screen on the LCD.
Press [ Up ] key to show the items in the sequence of 7. 6. 5. 4. 3. 2. 1. 0. 7. 6. 5.…
Press [ Down ] key to show the items in the sequence of 1. 2. 3. 4. 5. 6. 7. 0. 1. 2. 3.…
Press [ OK ] key to move one level down in the configuration menu.
Press [ Menu ] key to move one level up in the configuration menu.
Press [ SPK ] key or lift the handset to quit the configuration menu.
B02. Main Menu
There are 8 categories in the configuration main menu:
(1) Phone Book: Use or configure the phone book.
(2) Call History: View the call history.
(3) Phone Settings: Configure the phone settings.
(4) Network: Configure the network parameters.
(5) SIP Settings: Configure the SIP parameters.
(6) NAT Traversal: Configure the settings of NAT Traversal.
(7) Administrator: Configure the system settings.
(8) Test Menu: Self-test the phone.
The 8 categories above, as well as their sub-items, had been given codes. In addition
to using the [ Up ], [ Down ], [ OK ], and [ Menu ] keys to reach a certain setting, the
user can also press [ Menu ] key followed by the code number of an item to locate it.
B03. Steps to enter the Phone Settings as administrator
(1) Press [ Menu], [ 74 ] keys, the LCD will display the following screen:
The upper line prompts the user for password.
The lower line shows the letters the user entered.
Password:
Page 19

Dual Mode VoIP Keyphone IP37-31
13
(2) Press the keys of the dial keypad to enter the password*. Press [ OK] when
finished. The following screen will be displayed on the LCD.
The upper line shows the password is correct!
OR
The upper line shows the password is incorrect!
(3) Please lift the handset and then put it back. Wait for the phone to return to idle.
The user can now enter the phone settings mode.
Correspondence Table of Alphanumeric Input
Dial Keypad
Corresponding Character
1
1 - , ! ?
2
2 a b c A B C
3
3 d e f D E F
4
4 g h i G H I
5
5 j k l J K L
6
6 m n o M N O
7
7 p q r s P Q R S
8
8 t u v T U V
9
9 w x y z W X Y Z
0
0 „space‟
*
* ﹒ : @
#
(Non-Functional)
The characters are entered by dialing the keypad in a sequential manner.
For example, to enter “VoIP”:
V Press [8] seven times
o Press [6] four times
I Press [4] seven times
P Press [7] six times
B04. Phone Setting Structure
The structure-table below is described from the Administrator‟s point of view. Enter the
phone setting without the above B03 procedures; some items might not be displayed.
*
Note:
This password is identical to the Administrator Login password. If the Administrator Login password had
been changed, please enter the new password here.
Correct!
Incorrect!
Page 20

Dual Mode VoIP Keyphone IP37-31
14
B1. Phone Book: Setup and Use the Phone Book
(When used with a VP, it is not needed to configure this item.)
【1】 Phone Book
【11】Search Search for a certain entry in the phone book.
【12】Add Entry Add a new contact to the phone book.
【13】Erase All Delete all phone book entries
B2. Call History: View the Call History
【2】 Call History
【21】Incoming Calls Show the records of incoming calls
【22】Dialed Numbers Show the records of outgoing calls.
【23】Erase Record Delete all records.
B3. Phone Settings: Configure the Phone Settings
【3】 Phone Settings
【31】Call Forward Redirect calls to a preselected number.
【311】All Forward Forward all incoming calls.
【312】Busy Forward Only forward when the phone is busy.
【313】No Answer Forward Forward a call if it is not answered.
【314】Ring Time Out Set the timeout duration for the ringer.
【32】Do Not Disturb The Do-Not-Disturb mode.
【321】Always DND mode constantly active.
【322】By Period DND mode active periodically.
【323】Period Time Set the active times of DND mode.
【33】Alarm Settings Set the alarm.
【331】Activation Activates the alarm.
【332】Alarm Time Set the active times of the alarm.
【34】Date / Time Settings The date and time settings.
【341】Date / Time Set the date and time.
【342】SNTP Settings Set the SNTP.
【3421】SNTP Activate / Deactivate the SNTP.
【3422】Primary SNTP The primary SNTP server.
【3423】Secondary SNTP The secondary SNTP server.
【3424】Time Zone Set the time zone.
Page 21

Dual Mode VoIP Keyphone IP37-31
15
【35】SPK & MIC Adjust the volume of the speakers and the
microphones.
【351】Handset SPK Vol The handset speaker volume.
【352】Tel SPK Vol The phone speaker volume.
【353】PSTN Out Vol The PSTN output volume.
【354】Handset MIC Vol The handset microphone volume.
【355】Tel MIC Vol The phone microphone volume
【356】PSTN In Vol The PSTN input volume.
【36】Ringer Set the ringer.
【361】Ringer Volume The ringer volume.
【362】Ringer Type Select the ringer.
【37】Auto Dial The time waited for further dialing before sending
out the number.
【38】Headset Status Activate/Deactivate the headset.
【39】Backlight Status Activate/Deactivate the LCD backlight.
B4. Network: Network Parameter Settings.
【4】 Network
【41】WAN Setup Configure the WAN settings.
【411】IP Type Type of IP address.
【4111】Fixed IP Client Static IP address.
【4112】DHCP Client IP address acquired by DHCP
【4113】PPPoE Client IP address acquired by PPPoE.
【412】Fixed IP Settings Configure the fixed IP.
【4121】IP Address Assign the IP address.
【4122】Subnet Mask Set the Subnet Mask.
【4123】Default Gateway Set the Default Gateway.
【413】PPPoE Settings Configure the PPPoE.
【4131】User Name Assign the user name.
【4132】Password Assign the password.
Page 22

Dual Mode VoIP Keyphone IP37-31
16
【42】LAN Setup The LAN settings.
【421】Bridge Set the Bridge.
【422】Router Set the Router.
【43】DNS The DNS settings.
【431】Primary DNS The primary DNS server.
【432】Secondary DNS The secondary DNS server.
【44】VLAN The Virtual LAN settings.
【441】Activation Activate/Deactivate the VLAN.
【442】VID Set the VLAN ID.
【443】Priority Set the priority.
【444】CFI Set the Canonical Format Indicator.
【45】Status The status of the phone.
【46】Network Speed Network speed configurations
【461】Auto Automatic Adjustment.
【462】100M Full 100M Full-Duplex.
【463】100M Half 100M Half-Duplex.
【464】10M Full 10M Full-Duplex.
【465】10M Half 10M Half-Duplex.
B5. SIP Settings: Configure the SIP Settings.
【5】 SIP Settings
【51】Service Domain
【511】1st SIP Server Set the First SIP Server.
【5111】Activation Activate/Deactivate the SIP server.
【5112】User Name Set the User Name.
【5113】Display Name Set the name displayed on LCD.
【5114】Register Name Set the Register Name.
【5115】Register Password Set the Register Password.
【5116】Proxy Server Set the address of the Proxy server.
【5117】Domain Server Set the address of the SIP Server.
【5118】Outbound Proxy Set the address of Outbound Proxy.
【512】2nd SIP Server Set the Second SIP Server.
Page 23

Dual Mode VoIP Keyphone IP37-31
17
【5121】Activation Activate/Deactivate the SIP server.
【5122】User Name Set the User Name.
【5123】Display Name Set the name displayed on LCD.
【5124】Register Name Set the Register Name.
【5125】Register Password Set the Register Password.
【5126】Proxy Server Set the address of the Proxy server.
【5127】Domain Server Set the address of the SIP Server.
【5128】Outbound Proxy Set the address of Outbound Proxy.
【513】3rd SIP Server Set the Third SIP Server.
【5131】Activation Activate/Deactivate the SIP server.
【5132】User Name Set the User Name.
【5133】Display Name Set the name displayed on LCD.
【5134】Register Name Set the Register Name.
【5135】Register Password Set the Register Password.
【5136】Proxy Server Set the address of the Proxy server.
【5137】Domain Server Set the address of the SIP Server.
【5138】Outbound Proxy Set the address of Outbound Proxy.
【52】Status Display the registration status of the SIP servers.
B6. NAT Traversal: NAT Traversal Settings
【6】 NAT Traversal
【61】STUN Status
【611】STUN Enable/Disable the STUN protocol.
【612】STUN Server Set the STUN Server address.
Page 24

Dual Mode VoIP Keyphone IP37-31
18
B7. Administrator: System Setting
【7】 Administrator
【71】Auto Config Choose the method for auto-upgrading the
configurations.
【72】Upgrade System System upgrade settings.
【721】Upgrade Now Execute upgrade right away.
【722】Upgrade Via Choose the media to upgrade the system.
【723】Status Current software status.
【724】Reset Time Reset the time.
【73】Default Settings Restore the system to default settings.
【74】System Authent Administrator Authentication.
【75】Version Version code of the system components.
【76】Restart Restart the system.
【77】Auto Reboot Enable the system to automatically reboot.
B8. Test Menu: Initiating Self-Test
【8】 Test Menu
【81】Test Keypad Test the Keypad.
【82】Test LCD Test the LCD display.
【83】Test LED Test the LED lights.
Page 25
Dual Mode VoIP Keyphone IP37-31
19
C. WebPages Setup
Despite setting part of the phone features via the keys and the LCD screen of the phone, the
user can configure all the features in detail using a web browser on a PC.
Notes before setting
(1) IP address of the VoIP phone is required to configure the settings using browser.
(2) Press the [ Menu ] key and dial [ 45 ] to show the IP address of the VoIP phone on
the lower line of the LCD.
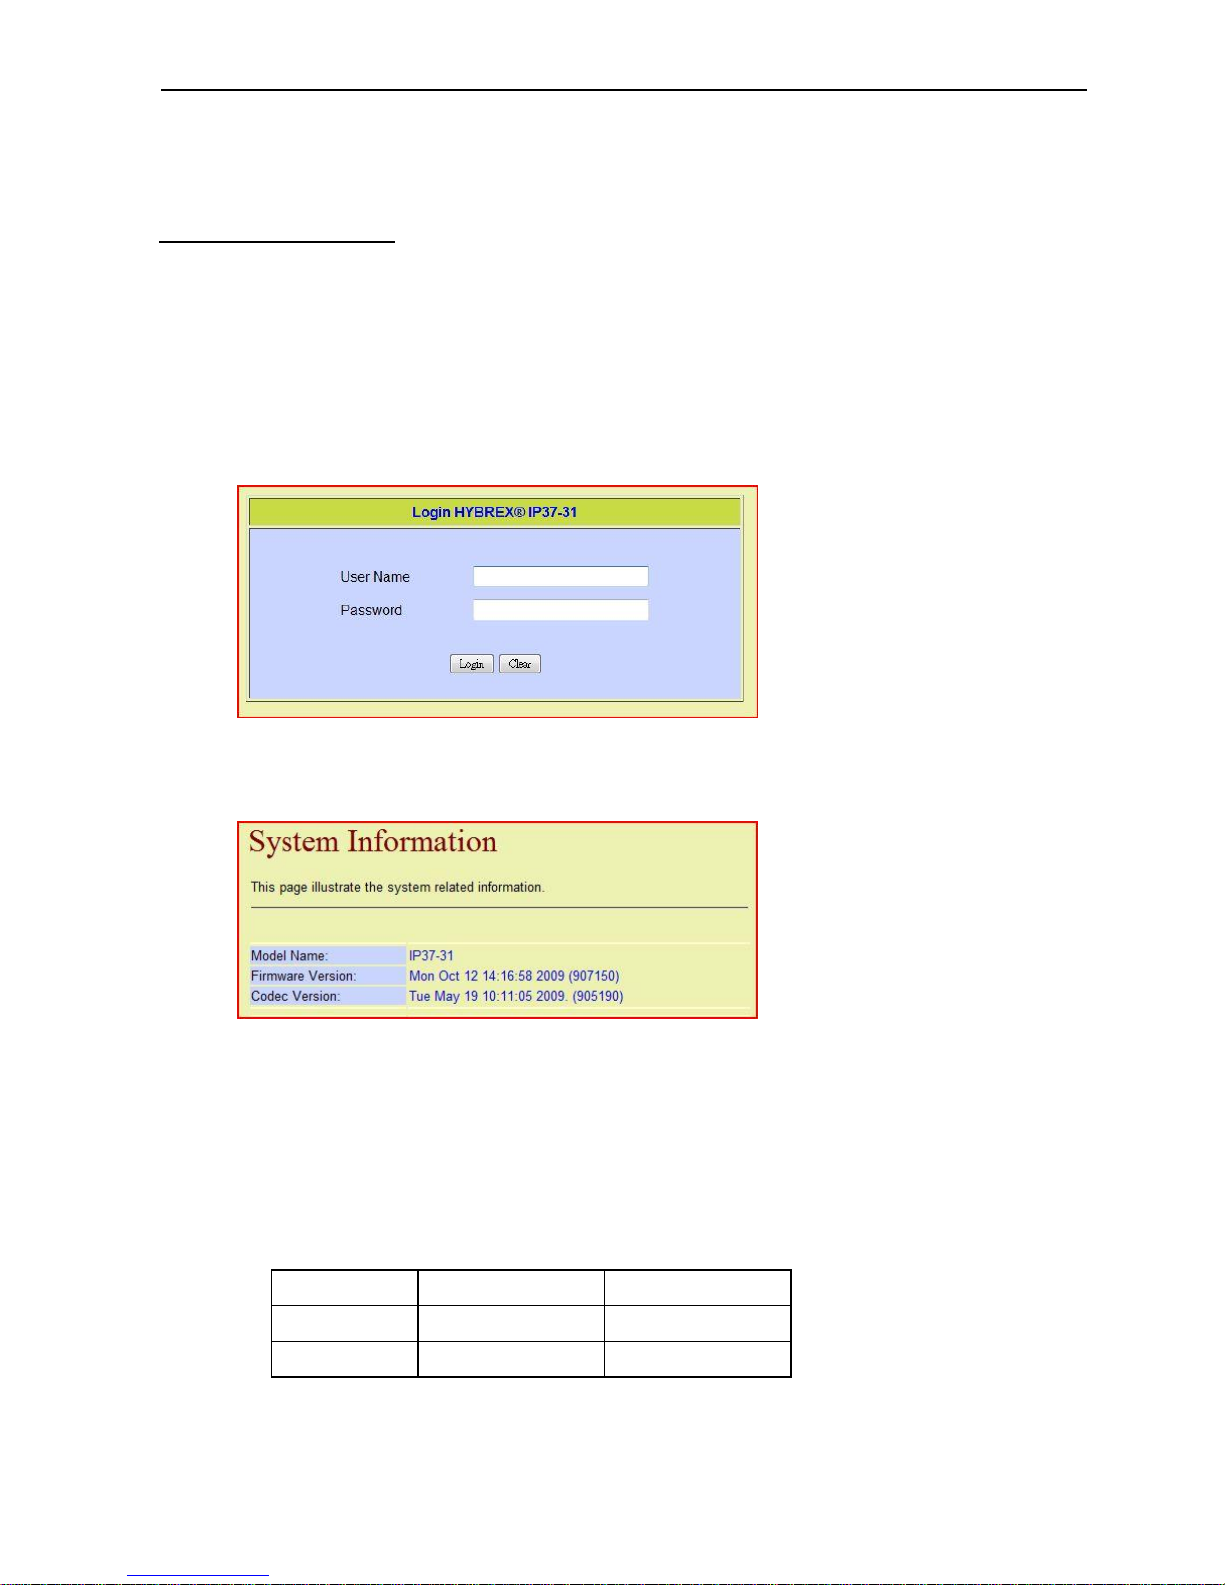
(3) Open the web browser on a PC, and enter the acquired IP address (e.g. 192.168.1.234)
as follows: http://192.168.1.234
(4) If the address is right, when the user press Enter at the computer shows the Login
screen of the IP 37-31 system as follows:
(5) Enter the correct User Name and Password, and then click Login to get into the
settings page as follows:
Model Name: The model number of this VoIP phone.
Firmware Version: The date and time of the current version of the firmware.
Codec Version: The date and time of the current version of the codec.
(6) Different sets of user name and password possess different authority. For
management reasons, the administrator only needs to notify the user-level user
names and passwords. The two authority levels are shown below:
User Name
Password
Administrator
admin
admin
User
user
1234
Page 26
Dual Mode VoIP Keyphone IP37-31
20
The webpage settings can be divided into 10 sectors (an User can only see 7 of them).
(1) Phone Book: Setup and use the phone book.
(2) Phone Settings: Configure the phone settings
(3) Network: Network parameter settings.
(4) SIP Settings: Configure the SIP settings. ( Hidden to User )
(5) NAT Traversal: NAT Traversal settings (Hidden to User )
(6) Others: Other settings
(7) System Auth.: System authority assignment. (Hidden to User )
(8) Save Changes: Save the changes to make them effective.
(9) Update: System-update settings.
(10) Reboot: Reboot the system.
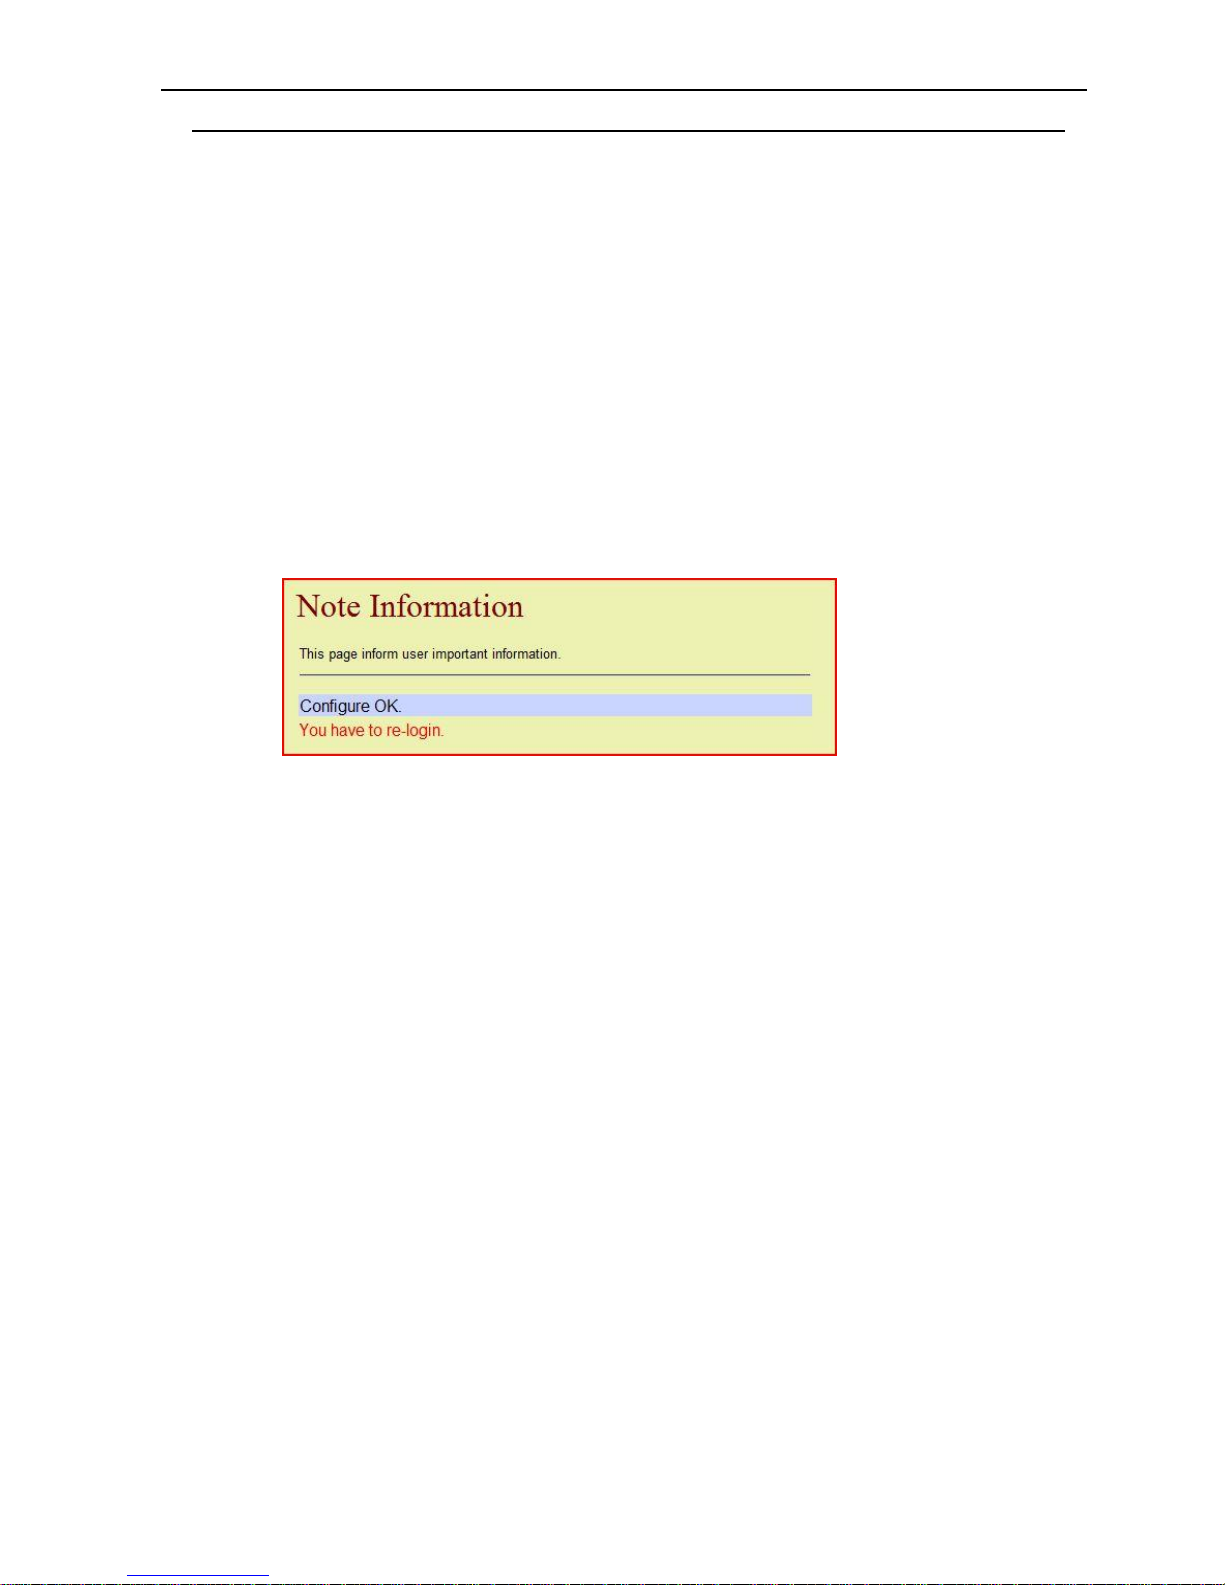
Note:
(1) In order to avoid any accidental changes done by the user that may cause the
system to be unstable, only 7 sectors were shown to the user. Some sub-items
of the 7 sectors were also hidden, or visible but when clicked the system shows
the following message, which means that item cannot be changed.
(2) This section describes the full content of the settings that are only accessible to
the administrator (admin).
Page 27
Dual Mode VoIP Keyphone IP37-31
21
C1. Phone Book:
C1.1 Phone Book:
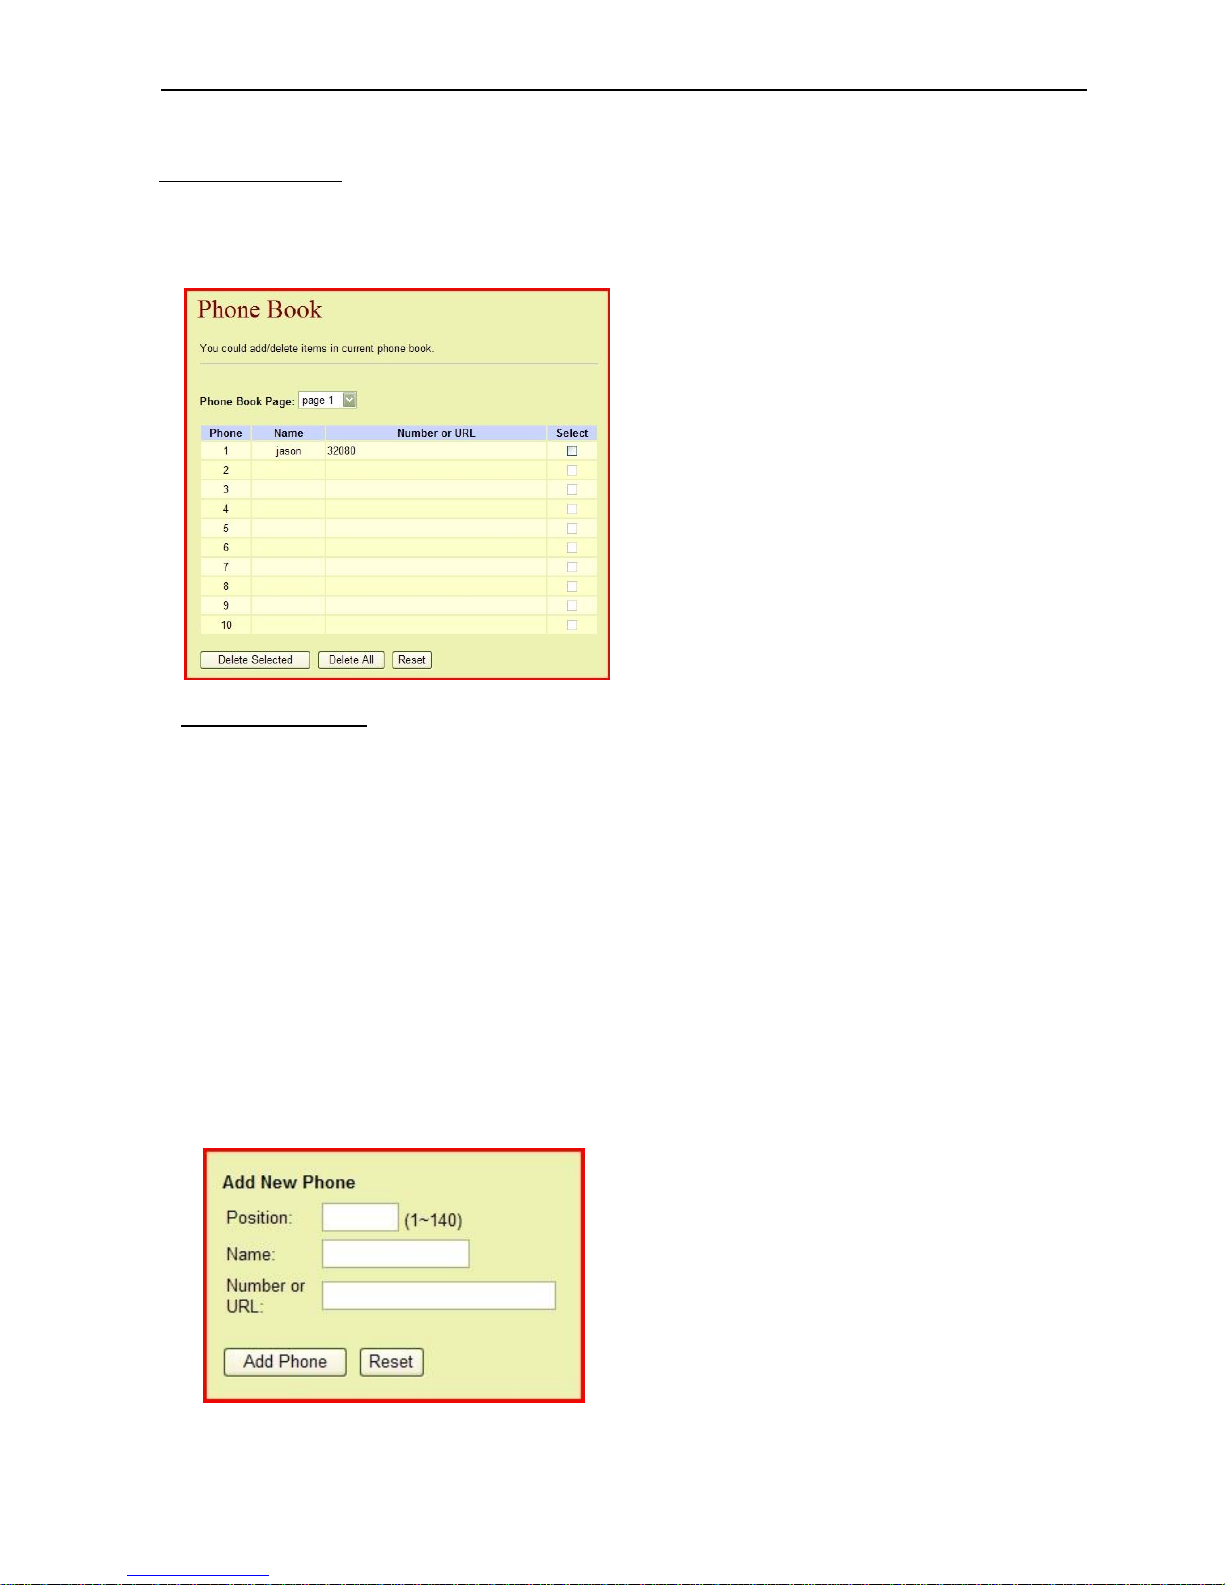
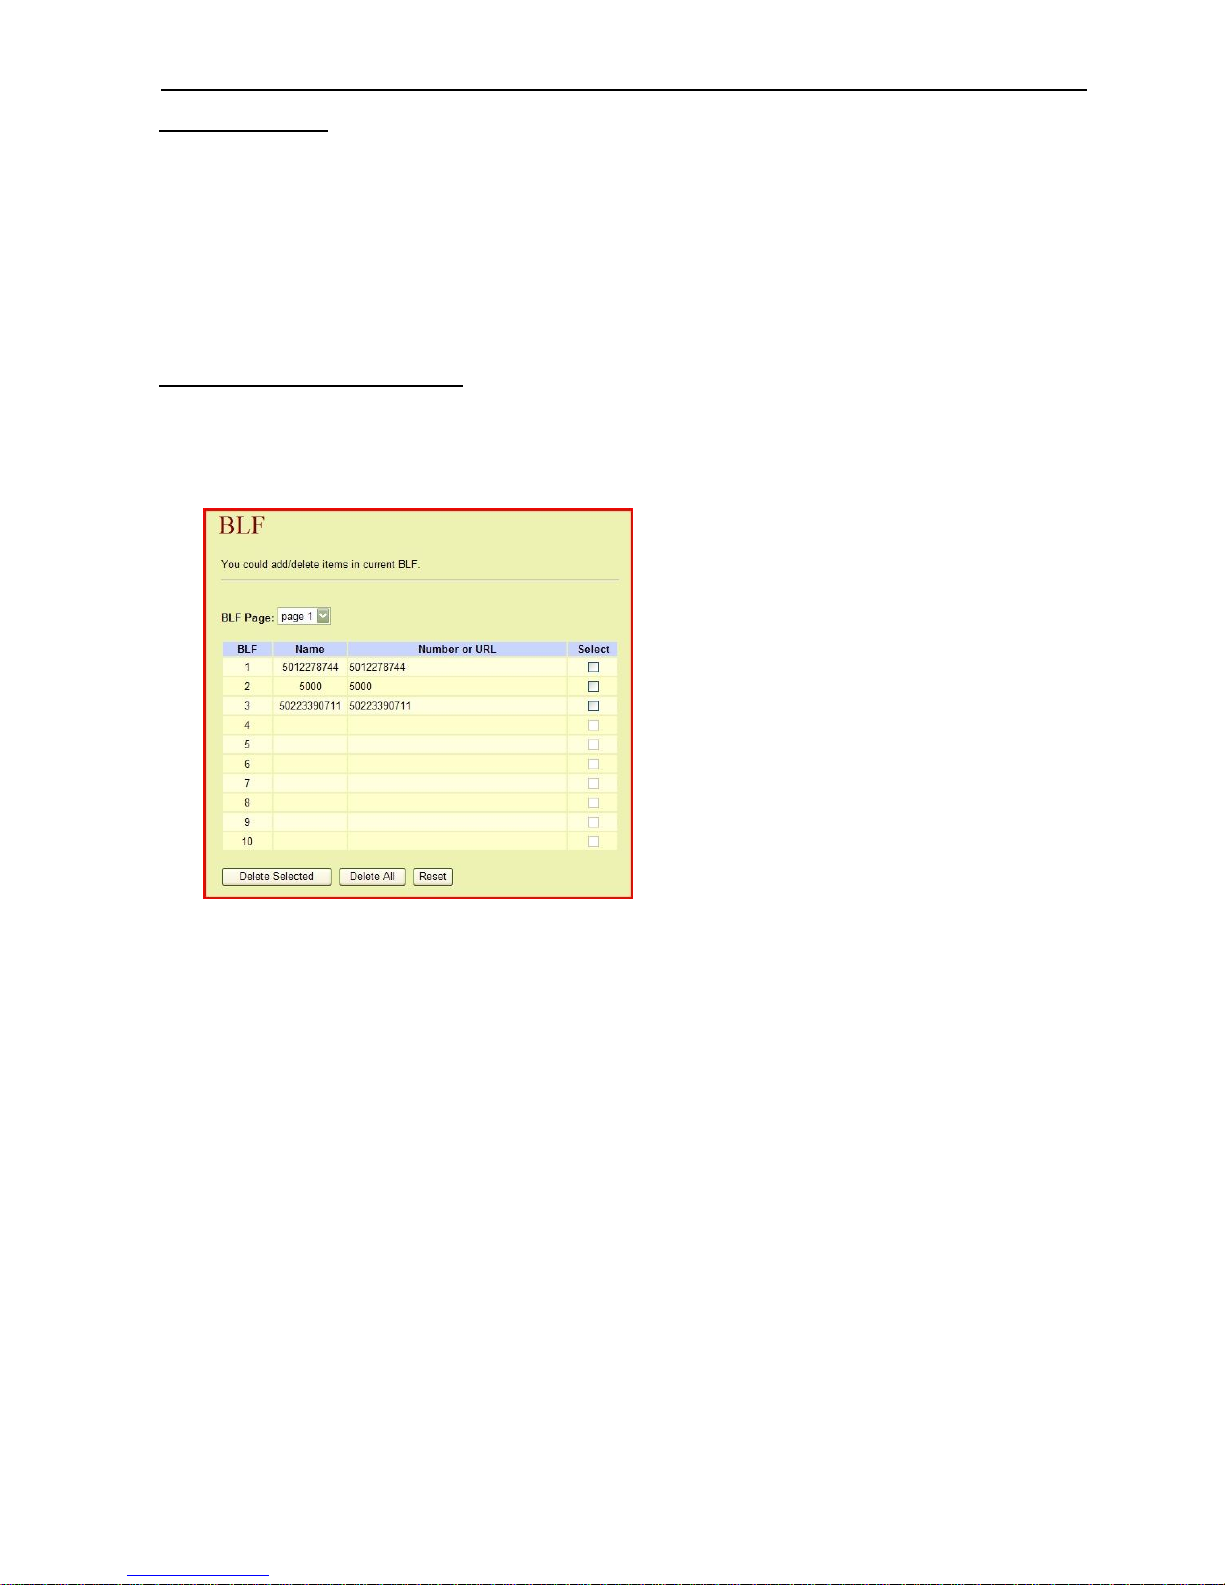
Since the VP provides more detail settings and bigger capacity on phone books, the phone
book configuration is not needed when the phone is used with the VP. But for a peer-to-peer
connection between phones, this setup is necessary. Please see the picture below:
Phone Book page:
The above picture shows a page of the phone book storing contact data. The VoIP phone
can store 14 pages with 10 contacts on each page.
The columns are as follows:
Phone: 1, 2…140 (A total of 140 entries sorted by the number ).
Name: The name of the contact.
Number or URL: The phone number or the URL address of the contact.
Select: The option is used with the “Delete Selected” key below.
The buttons are as follows:
[Delete Selected]: Delete the contacts with a ticked checkbox in the Select
column.
[Delete All]: Delete all contacts.
[Reset]: Clear the checkboxes in the Select column.
The below picture shows the screen of adding a new contact:
Page 28
Dual Mode VoIP Keyphone IP37-31
22
Add New Phone:
Position: Assign a sort number (1~140) to this entry.
Name: Enter the name of this entry.
Number or Enter the phone number or the URL address of this entry.
URL:
The buttons are as follows:
[Add Phone]: Add this entry into the phone book.
[Reset]: Clear all fields.
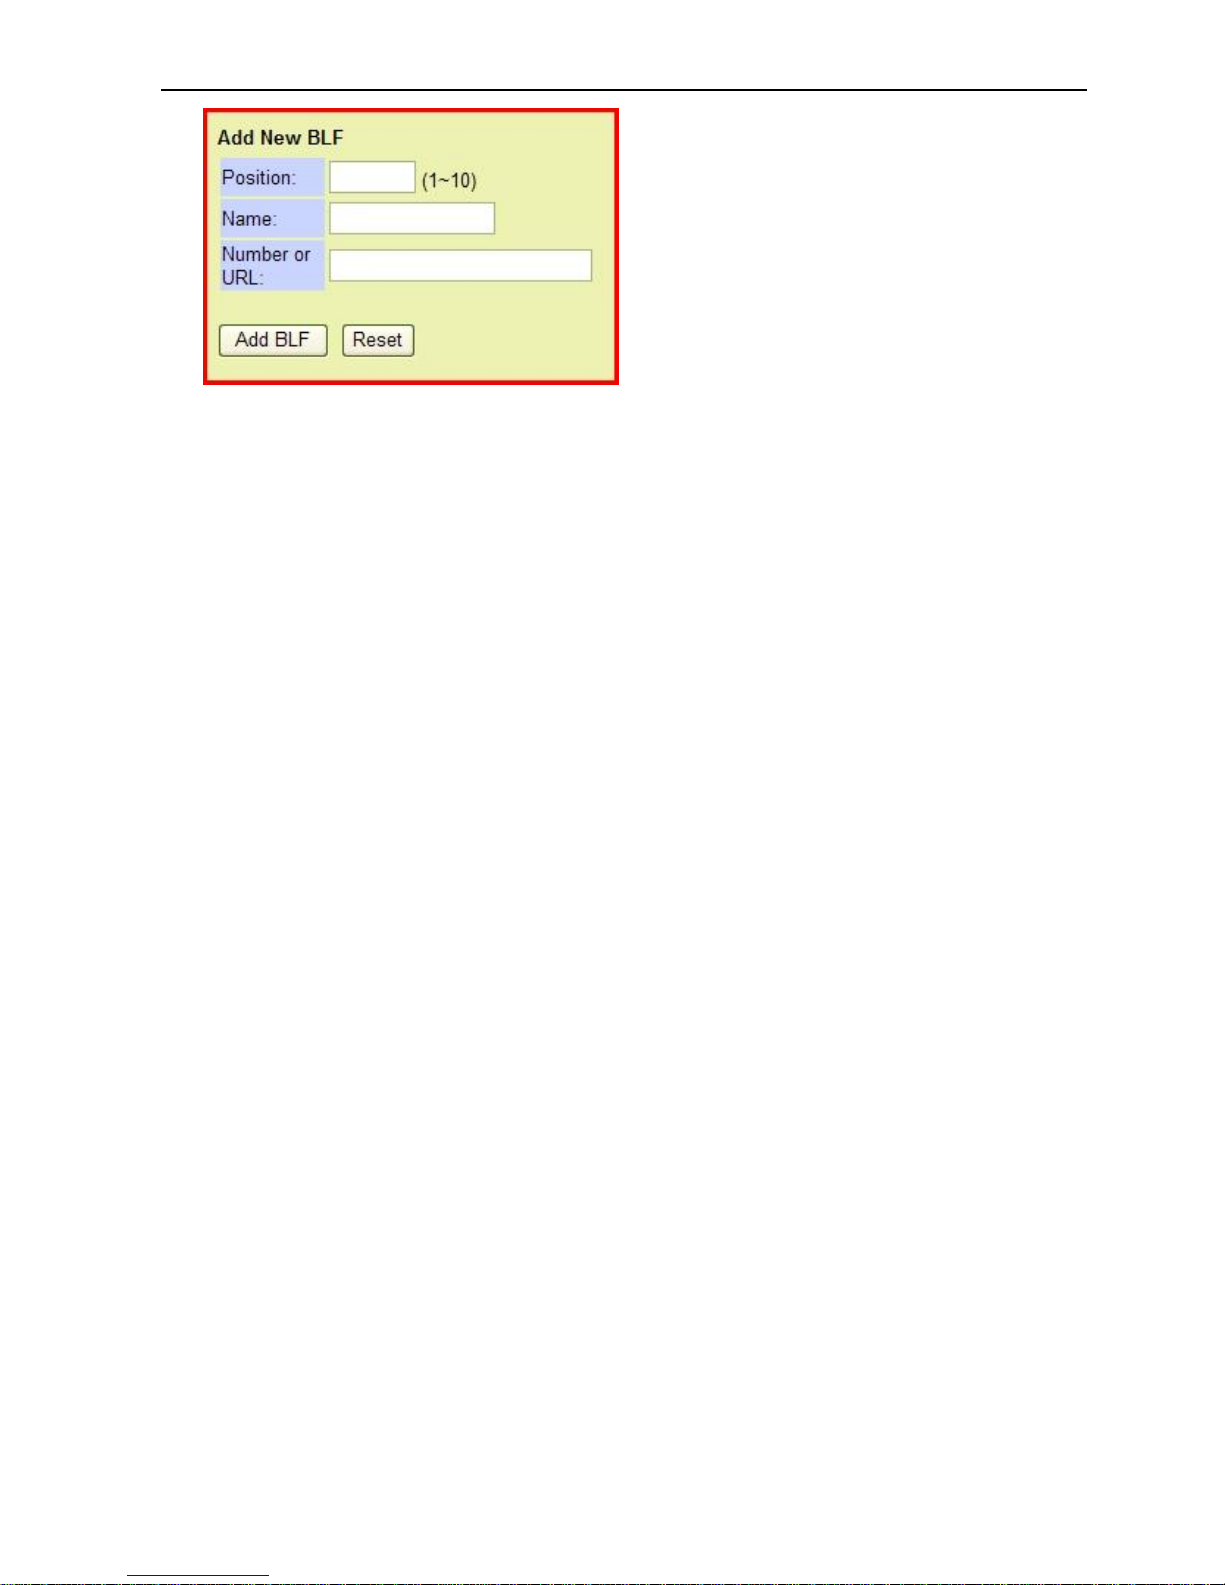
C1.2 BLF ( Busy Lamp Field ):
This VoIP phone has 10 [ DSS/BLF ] buttons with built-in BLF function. This feature is only
available when the phone is used with the VP series IP-PBX. The picture below shows the
BLF page.
The columns are explained below:
BLF: 1、2、3…10 (A total of 10 sort number for [ DSS/BLF ] buttons.)
Name: The extension name of a certain [ DSS/BLF ] buttons.
Number or URL: The extension number (Registered at VP) of [ DSS/BLF ] buttons.
Select: The option is used with the “Delete Selected” buttons below.
The buttons are as follows:
[Delete Selected]: Delete the contacts with a ticked checkbox in the Select column.
[Delete All]: Delete all contacts.
[Reset]: Clear the checkboxes in the Select column.
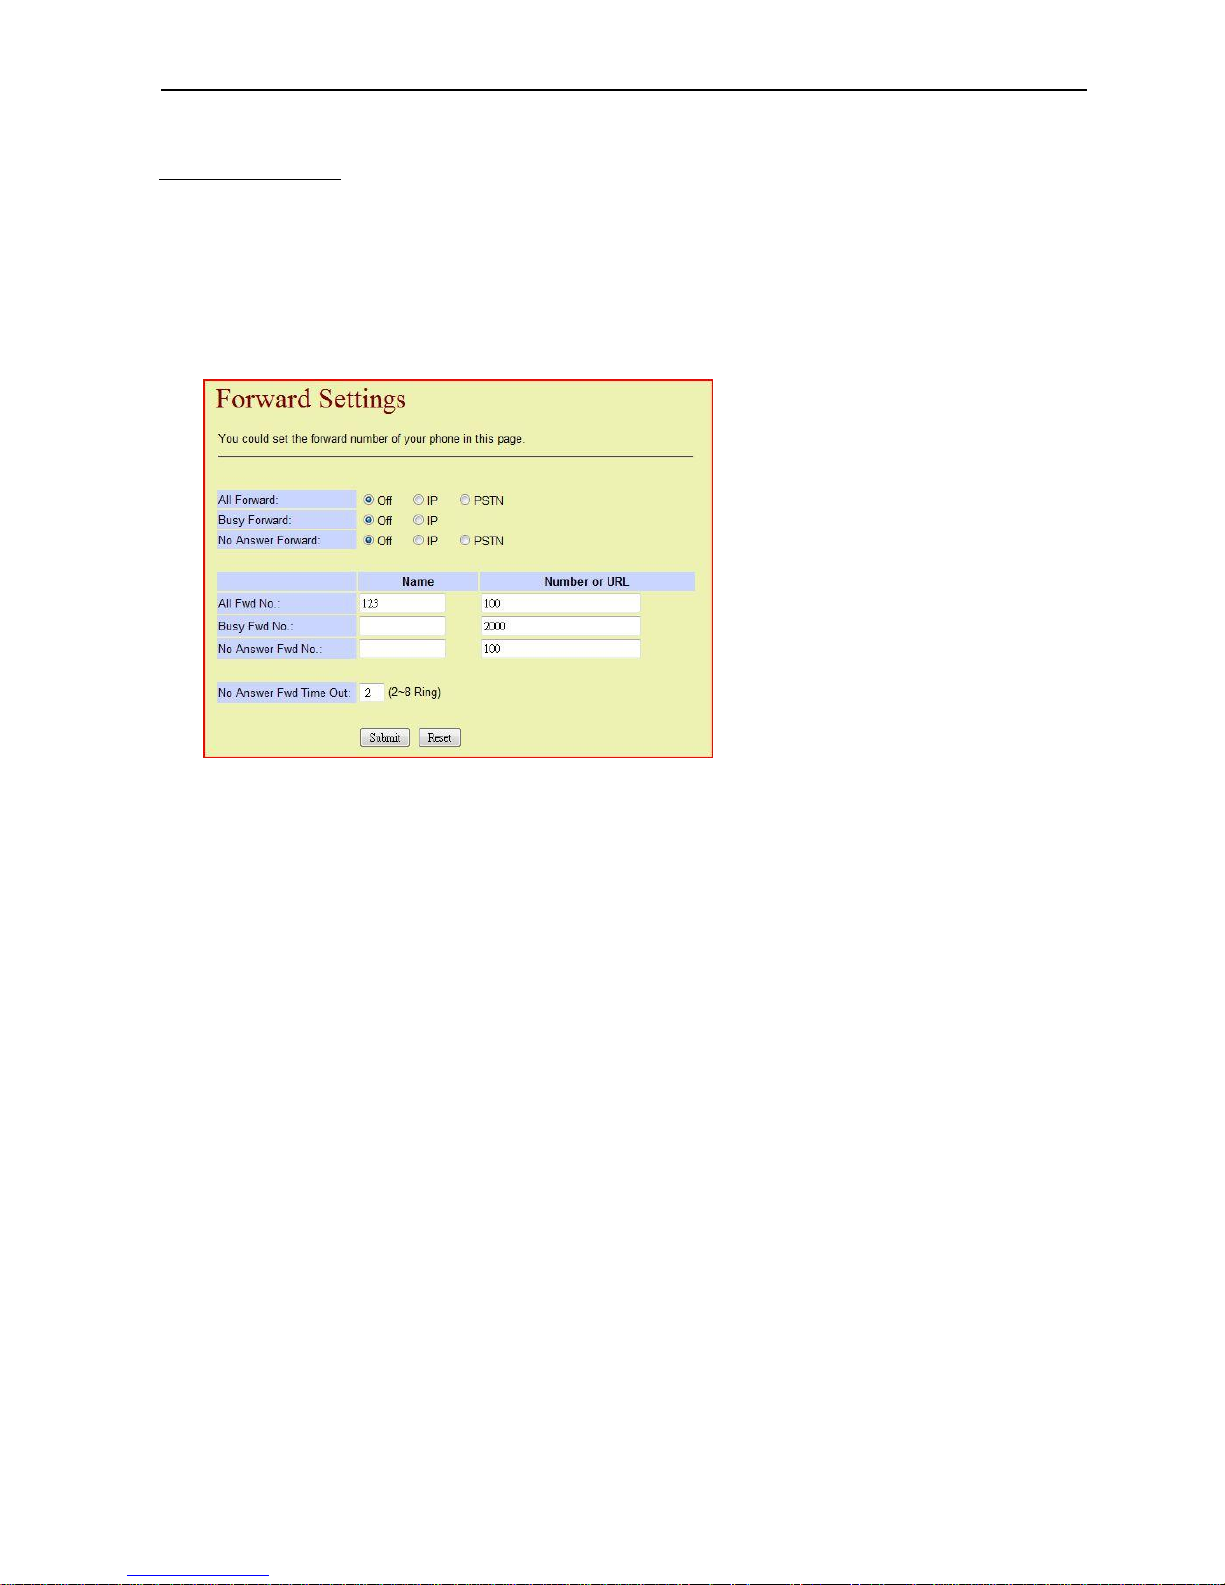
The below picture shows the screen of adding a new BLF entry:
Page 29
Dual Mode VoIP Keyphone IP37-31
23
Position: Assign a sort number (1~10) to this BLF entry.
Name: Enter the extension name of this BLF entry.
Number or URL: Enter the extension number of this BLF entry
(the one registered to the VP).
The buttons are as follows:
[Add BLF]: Add this entry into the BLF database.
[Reset]: Clear all fields.
Page 30
Dual Mode VoIP Keyphone IP37-31
24
C2. Phone Settings
C2.1 Call Forward
Depending on the settings, incoming calls can be redirected to a preselected extension in
three different ways:
All Forward: Forward all incoming calls to the preselected extension.
Busy Forward: Forward the calls only when the phone is busy.
No Answer Forward: Forward the calls only when they are not answered for a while.
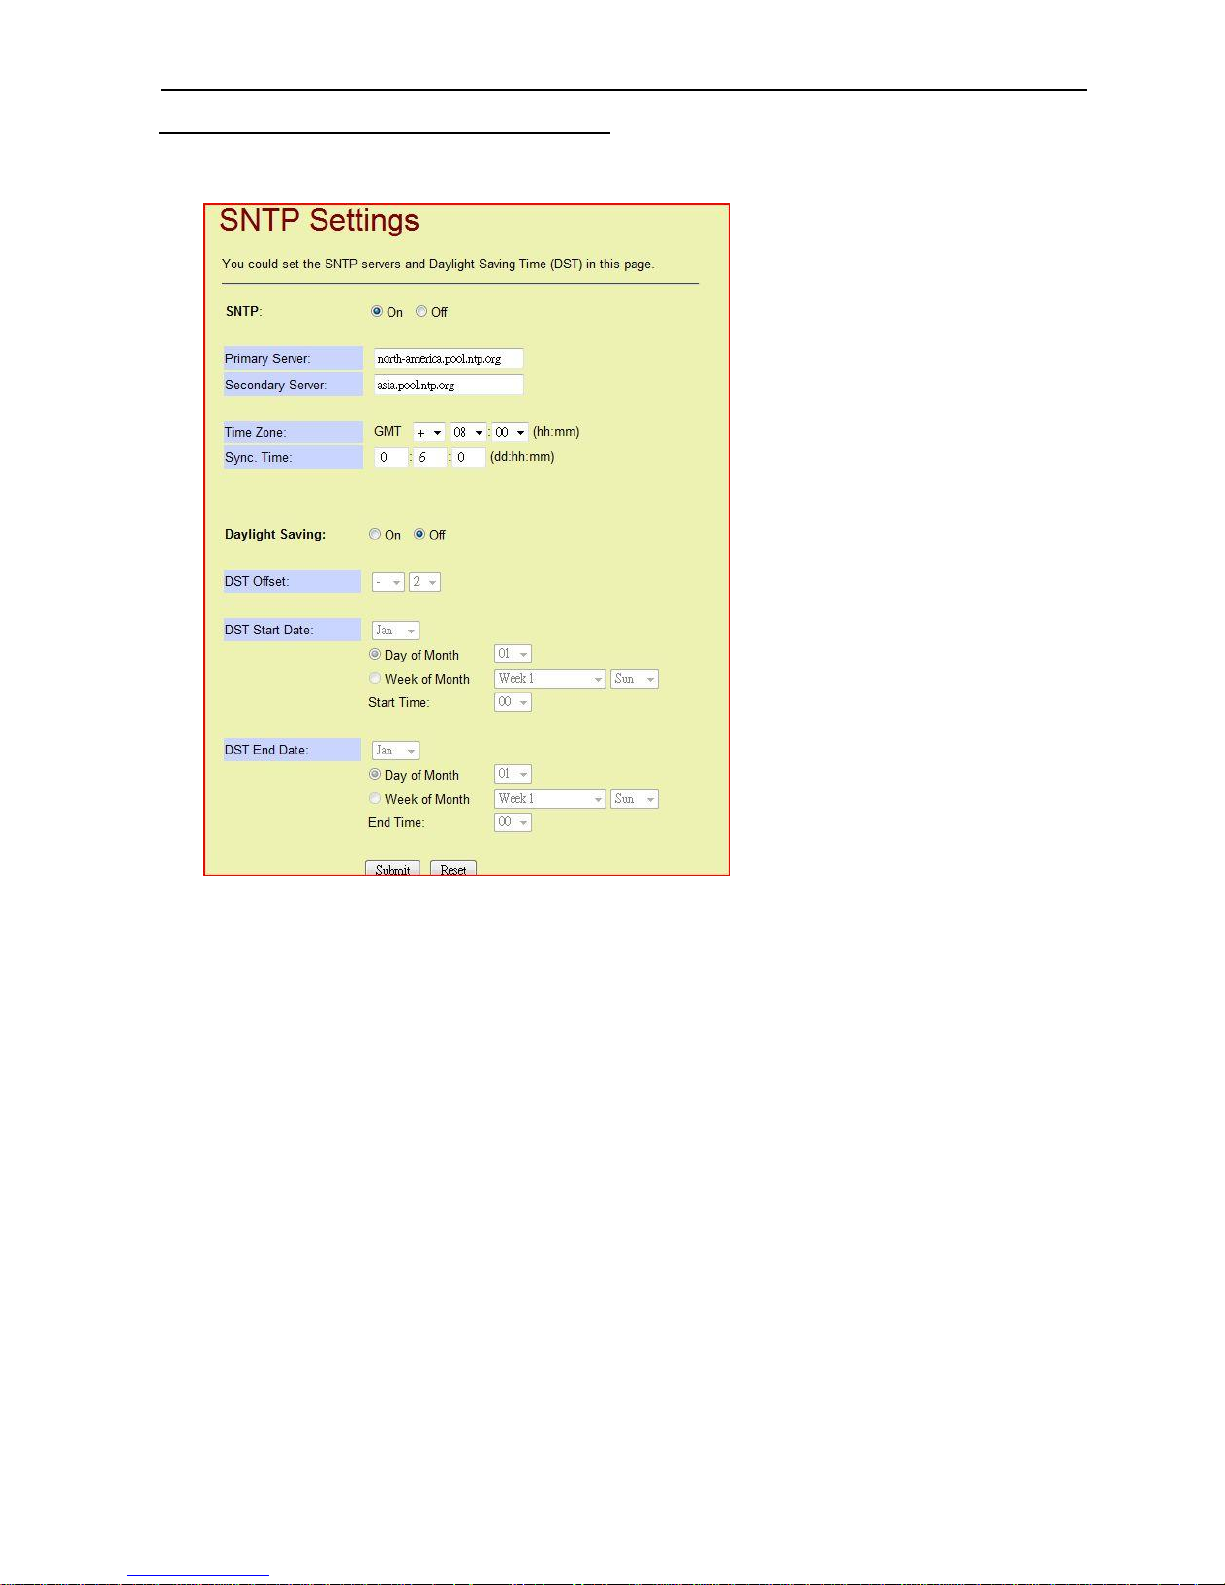
The picture below shows the Forward Settings page:
The settings for All Forward / Busy Forward / No Answer Forward are described as follows:
Off: Deactivate the Call Forward method.
IP: Forward the call to a VoIP extension.
PSTN: Forward the call to a FXO extension.
The All Fwd No. / Busy Fwd No. / No Answer Fwd No. settings are as follows:
Name: The name of the destination extension where the calls are to
be forwarded to.
Number or URL: The extension number or URL of the destination extension.
No Answer Fwd Time Out: ( 2~8 Ring )
The number in this field indicates how many times a call rings before being forwarded to
the preselected number, i.e. „2‟ represents that a call rings twice without being
answered will be forwarded immediately.
The buttons are as follow:
[Submit]: Apply the settings.
[Reset]: Clear all fields.
Page 31
Dual Mode VoIP Keyphone IP37-31
25
C2.2 SNTP ( Simple Network Time Protocol )
This feature enables the VoIP phone to automatically acquire the current time from a
SNTP-supported server on the internet. The SNTP settings page is as follows:
SNTP On: Activate the SNTP service.
Off: Deactivate the SNTP service.
Primary Server: The IP address of the primary SNTP Server.
Secondary Server: The IP address of the secondary SNTP Server.
Time Zone: The GMT time zone.
Sync. Time: How often the phone fetch the time from the SNTP Server.
Daylight Saving On: Daylight Saving Time adjustment effective.
Off: Daylight Saving Time adjustment ineffective.
DST Offset: The amount of DST adjustment.
DST Start Date: The month the DST turns effective.
Day of Month: The day of the month the DST turns effective.
Week of Month: The week of the month and the day of the week
when the DST turns effective.
Start Time: The hour of the day when the DST turns effective.
DST End Date: The month the DST turns ineffective.
Day of Month: The day of the month the DST turns ineffective.
Week of Month: The week of the month and the day of the week when the
DST turns ineffective.
DST End Time: The hour of the day the DST turns ineffective.
Page 32
Dual Mode VoIP Keyphone IP37-31
26
The buttons are as follow:
[Submit]: Apply the settings.
[Reset]: Clear all fields.
C2.3 Volume Settings
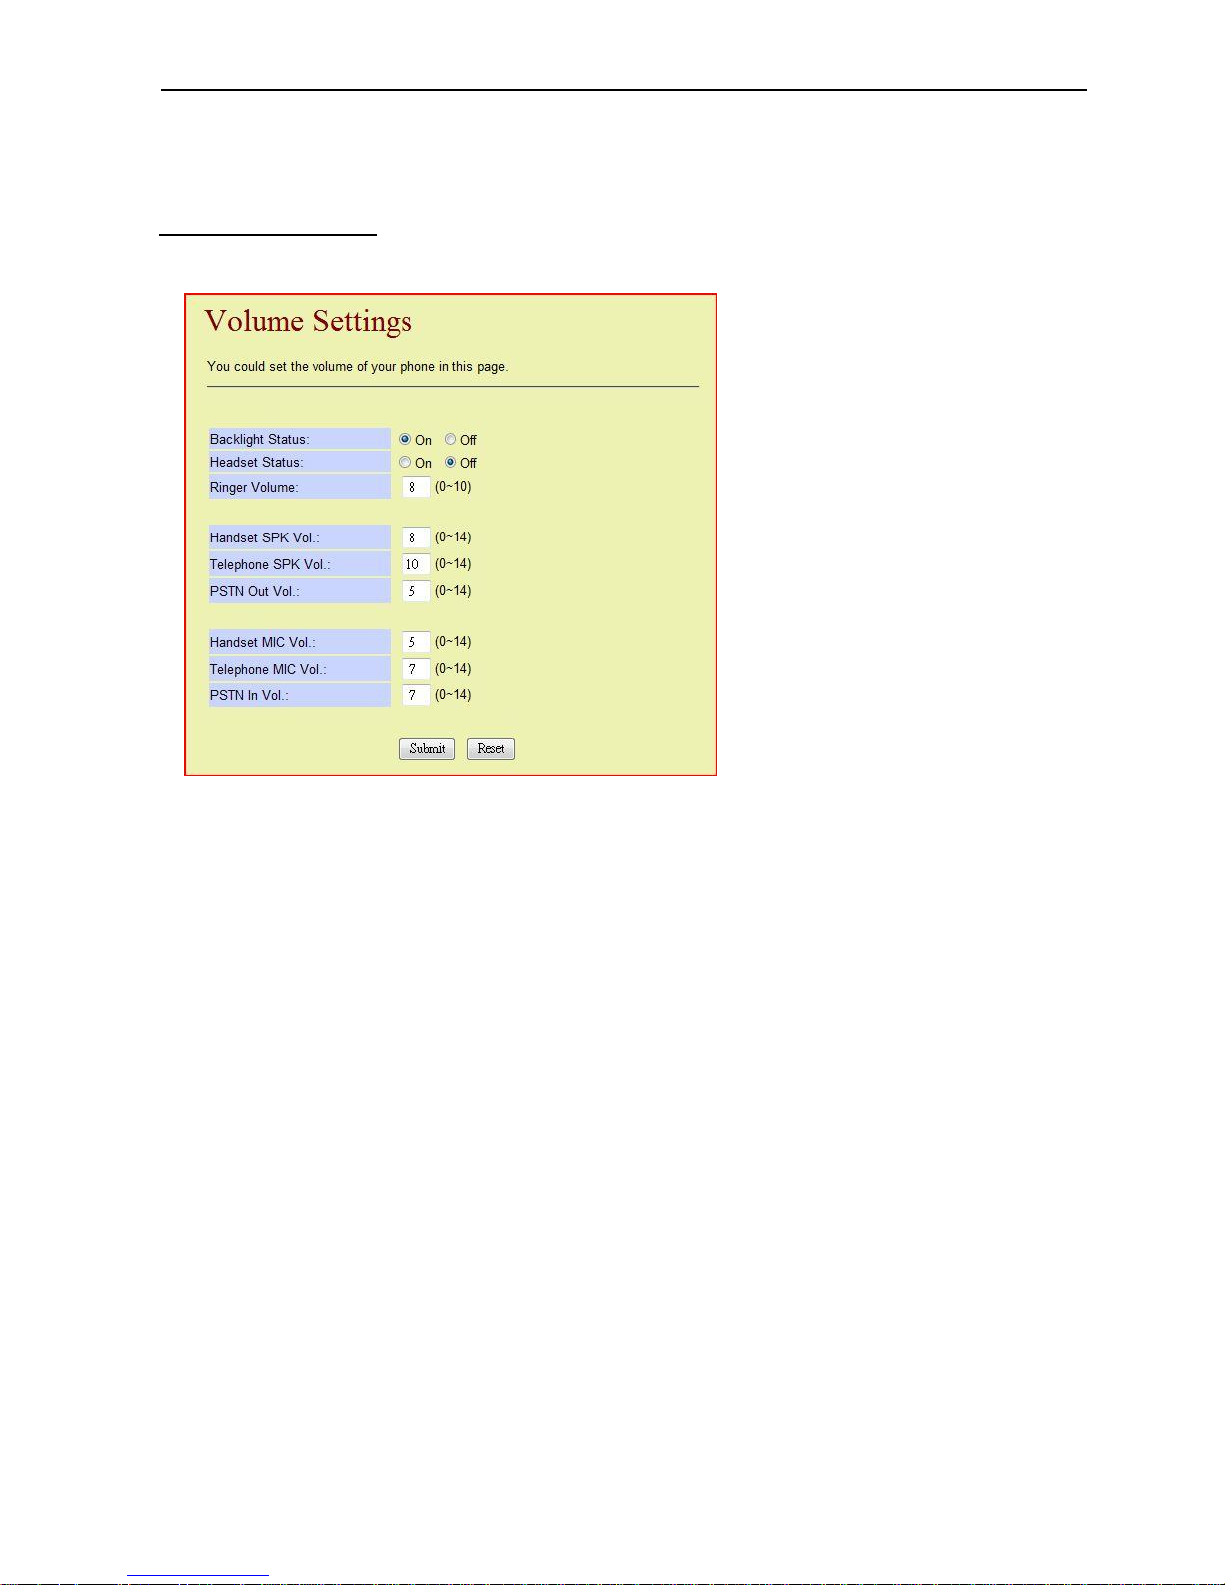
Various volume settings can be configured here. Please see the picture below:
Backlight Status On: Turn on the LCD backlight.
Off: Turn off the LCD backlight.
Handset Status On: Activate the headset.
Off: Deactivate the headset.
Ringer Volume: Adjust the volume of the ringer (0~10).
Handset SPK Vol: Adjust the volume of the handset speaker (0~14).
Telephone SPK Vol: Adjust the volume of the speaker on the phone(0~14).
PSTN Out Vol: Adjust the outgoing voice volume in a PSTN call(0~14).
Handset MIC Vol: Adjust the volume of the handset microphone (0~14).
Telephone MIC Vol: Adjust the volume of the microphone on the phone (0~14).
PSTN In Vol: Adjust the incoming voice volume in a PSTN call(0~14).
Note
: For the volume settings, a smaller number represents a lower volume, while a larger
number represents a higher volume.
The buttons are as follow:
[Submit]: Apply the settings.
[Reset]: Clear all fields.
Page 33
Dual Mode VoIP Keyphone IP37-31
27
C2.4 Ringer Settings
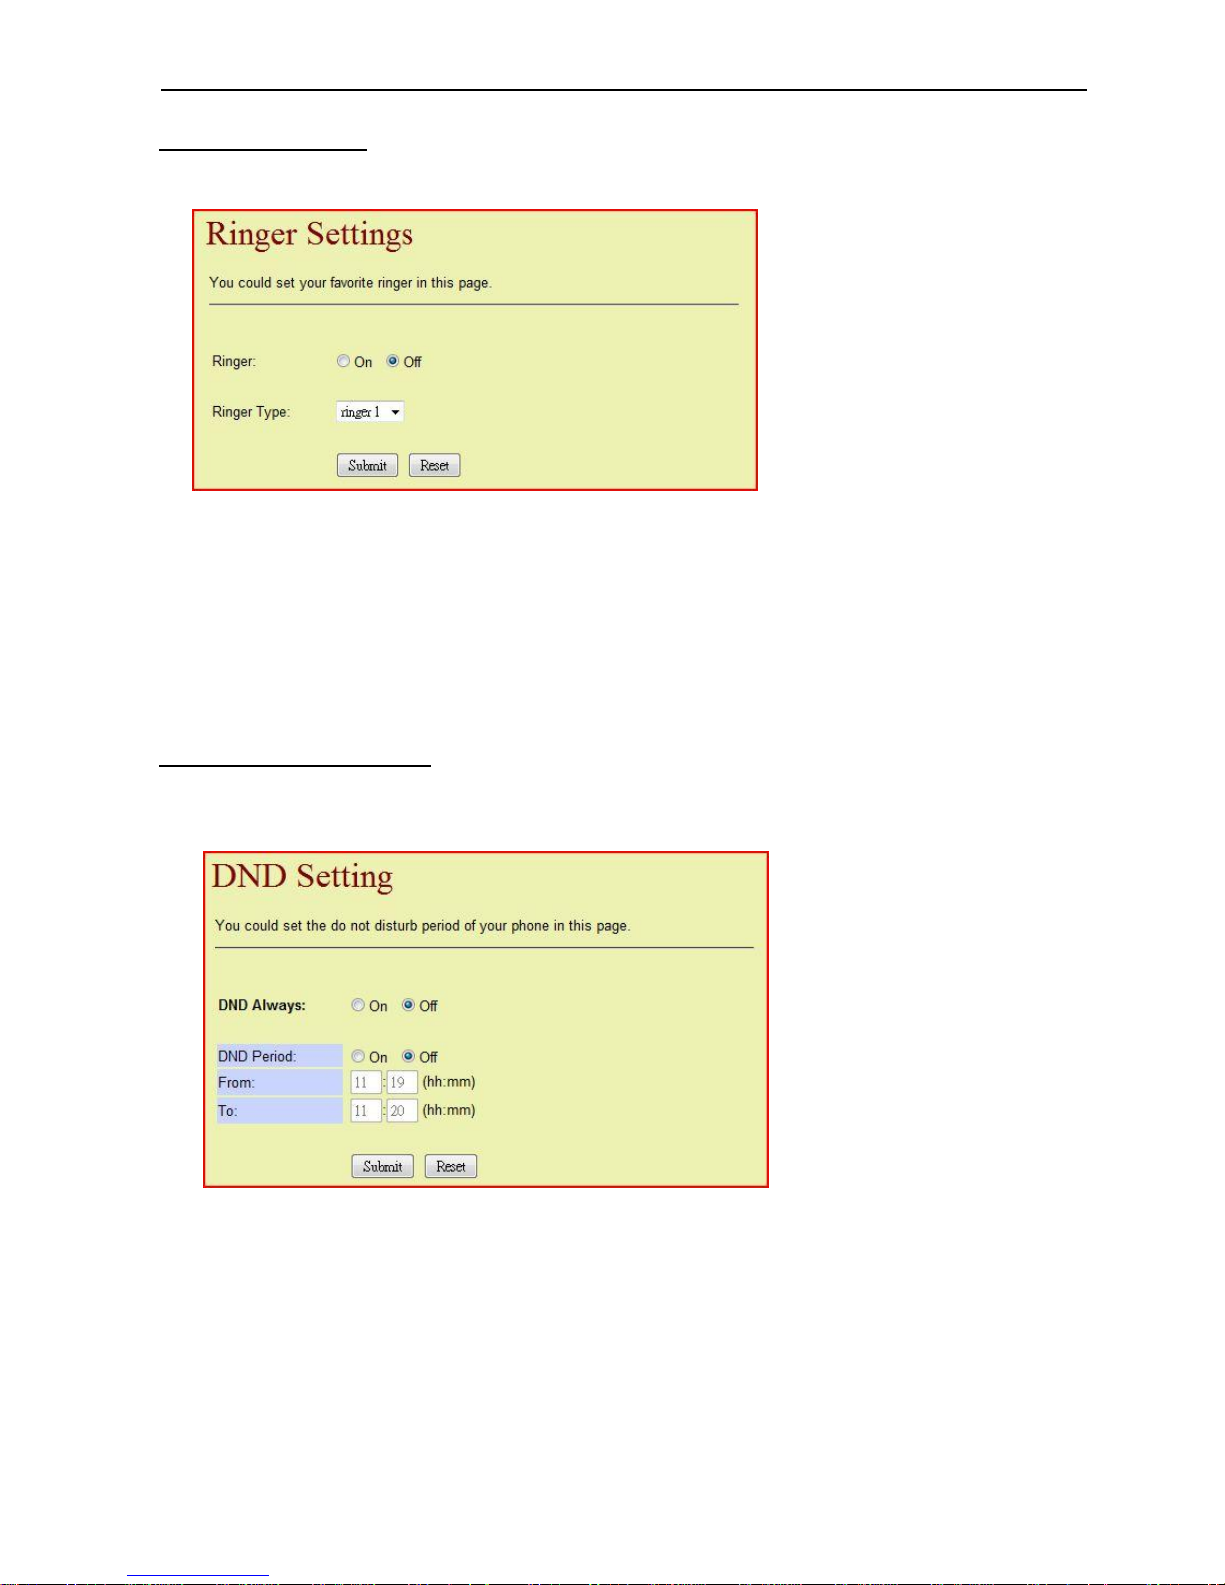
The phone has 4 ringer types available. The settings page is as follows:
Ringer On: Turn on the ringer.
Off: Turn off the ringer.
Ringer Type: 4 Ringer Types to be chosen from.
The buttons are as follow:
[Submit]: Apply the settings.
[Reset]: Clear all fields.
C2.5 DND (Do Not Disturb)
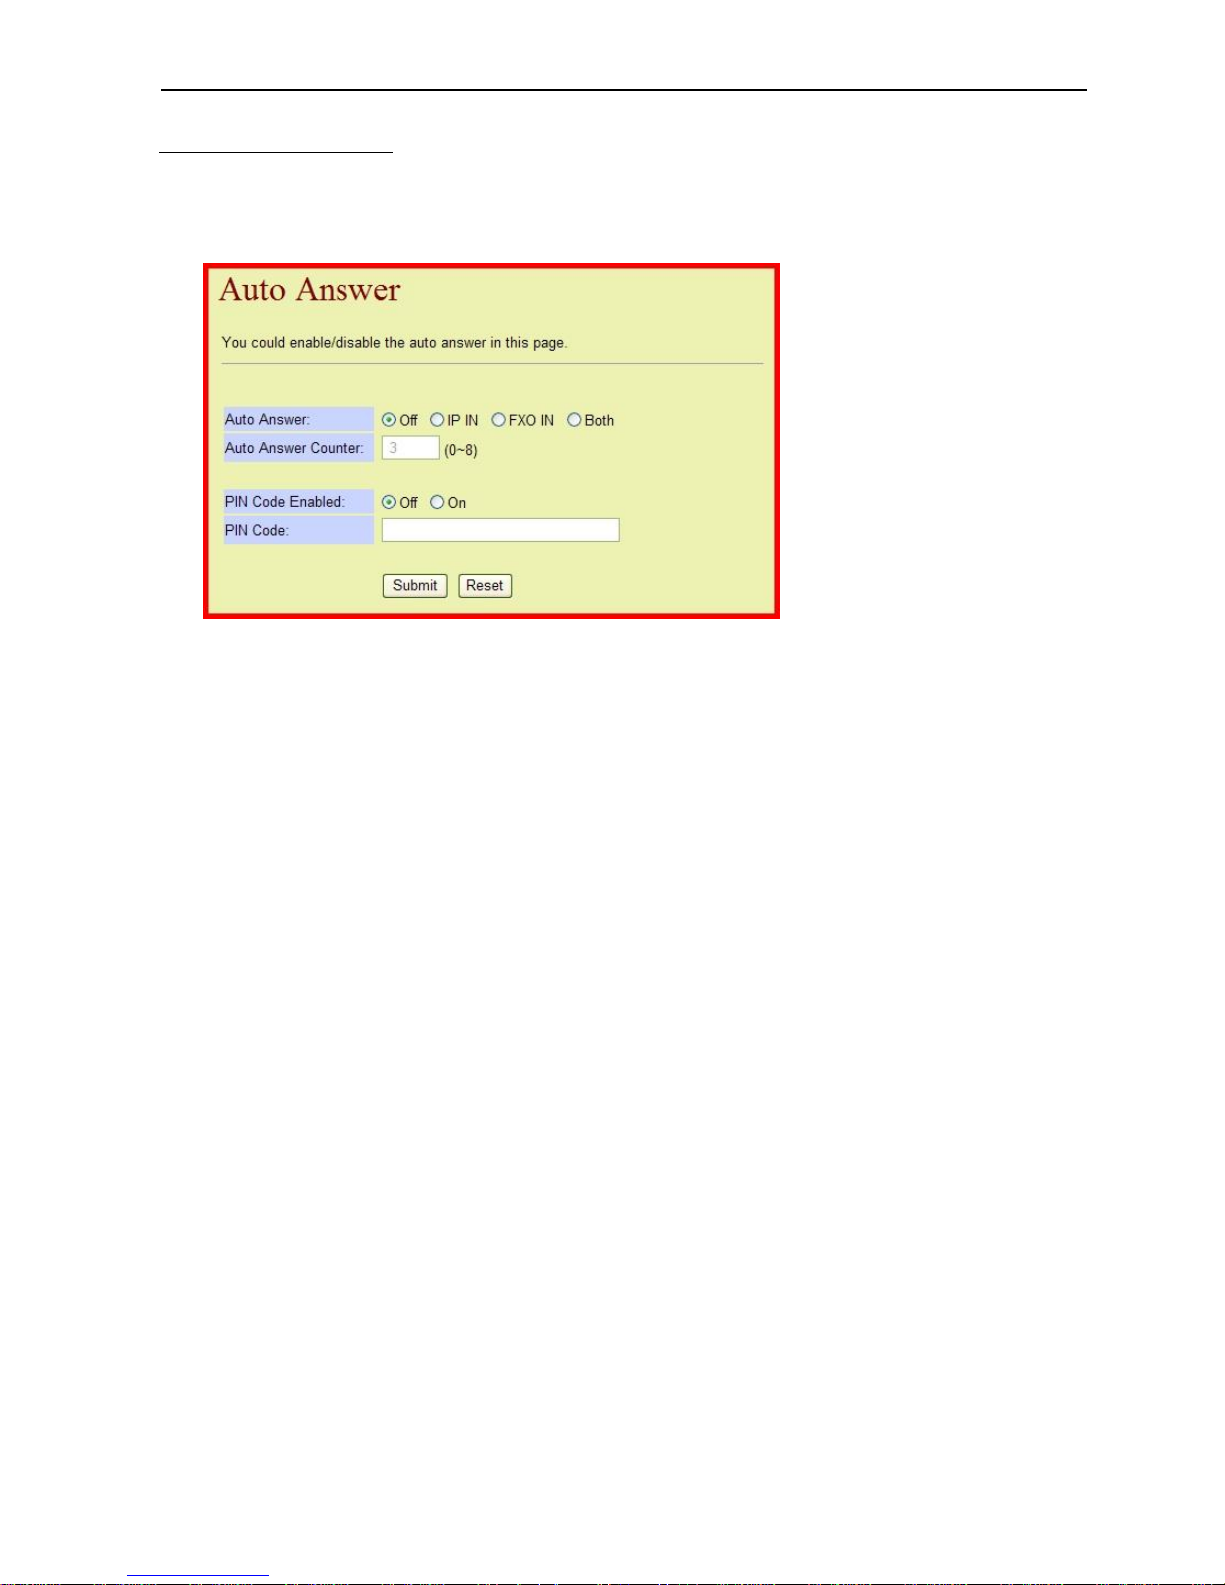
When the phone is set in DND mode, it is unavailable to be called. The callers will hear a
busy tone. The settings screen is as follows:
DND Always On: Turn on the DND mode.
Off: Turn off the DND mode.
DND Period On: Activate the periodical DND mode.
Off: Deactivate the periodical DND mode.
From: The start time of the periodical DND mode.
To: The end time of the periodical DND mode.
The buttons are as follow:
[Submit]: Apply the settings.
[Reset]: Clear all fields.
Page 34
Dual Mode VoIP Keyphone IP37-31
28
C2.6 FXO Auto Answer
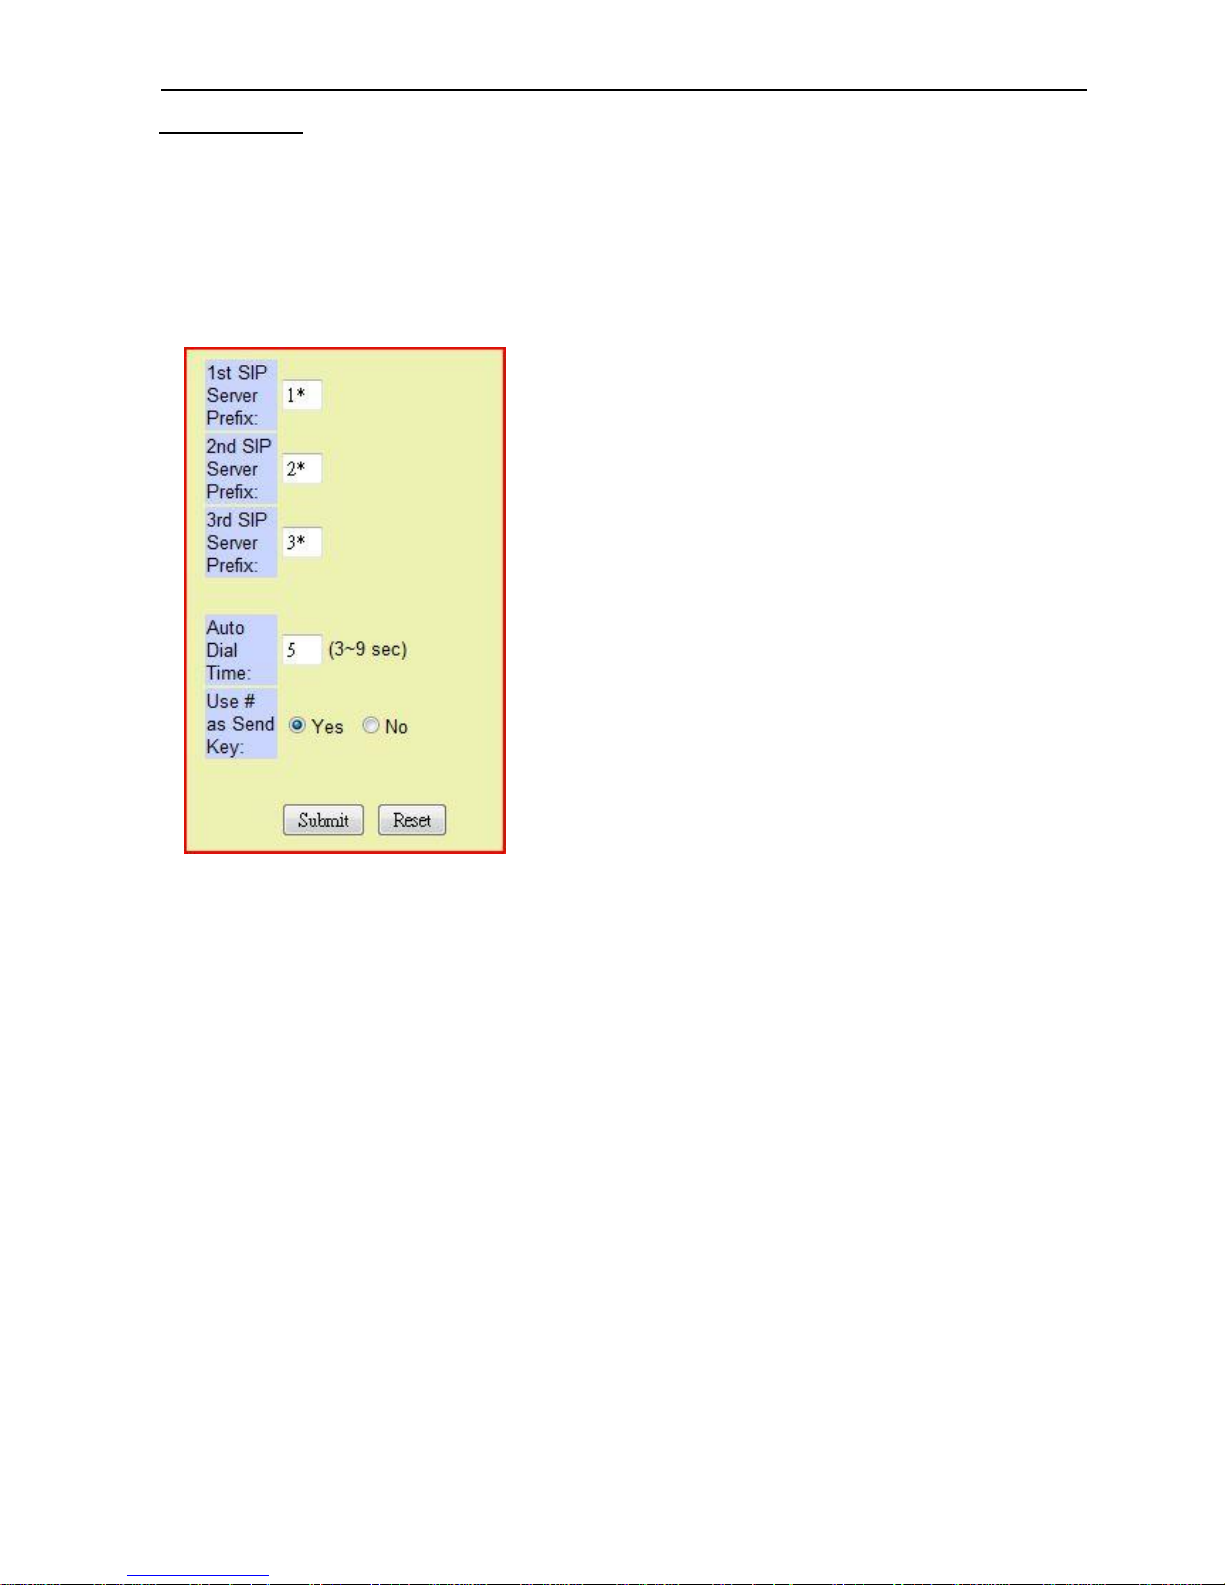
The phone can answer a call coming through the FXO port without the user touching any
keys. If the phone is used with the VP, this setting won‟t need to be changed. The settings
page is as follows:
Auto Answer
Off: Deactivate the Auto Answer feature.
IP IN: Auto-answer only the VoIP calls.
FXO IN: Auto-answer only the FXO calls.
Both: Auto-answer both VoIP and FXO calls.
Auto Answer Counter: The number of repeat ring before the call is
auto-answered.
PIN Code Enabled Off: No PIN code is needed for a two-way conversation.
On: The caller must enter the PIN code to enable a two-way
conversation; otherwise, the caller can only talk but not
hear anything from this phone.
PIN Code: Enter the PIN code here.
The buttons are as follow:
[Submit]: Apply the settings.
[Reset]: Clear all fields.
Page 35
Dual Mode VoIP Keyphone IP37-31
29
C2.7 Dial Plan
According to the Dial Plan, the phone will add or discard some digits when sending out a
phone number. The VP has a similar but more flexible setting option, in which the system
administrator can do an one-time setting at the VP without having to go through every
extension phone individually, so the upper half of the settings page is not shown here. It is
used for special case.
The possible settings screen is as follows:
1st SIP Server Prefix: The prefix for the 1st SIP server
2nd SIP Server Prefix: The prefix for the 2nd SIP server
3rd SIP Server Prefix: The prefix for the 3rd SIP server
Note:
When used with the VP, please do not change the above settings in order to avoid dialing errors.
Auto Dial Time: After the user stops dialing, this setting decides how
many seconds the phone would wait before sending out
the number.
Use # as Send Key Yes: Dialing the [ # ] key will send out the number immediately.
No: Dialing the [ # ] key will only enter the „#‟ letter but not
send out the number; though after the duration of the
“Auto Dial Time”, the phone will send out the number with
„#‟ digit.
The buttons are as follow:
[Submit]: Apply the settings.
[Reset]: Clear all fields.
Page 36
Dual Mode VoIP Keyphone IP37-31
30
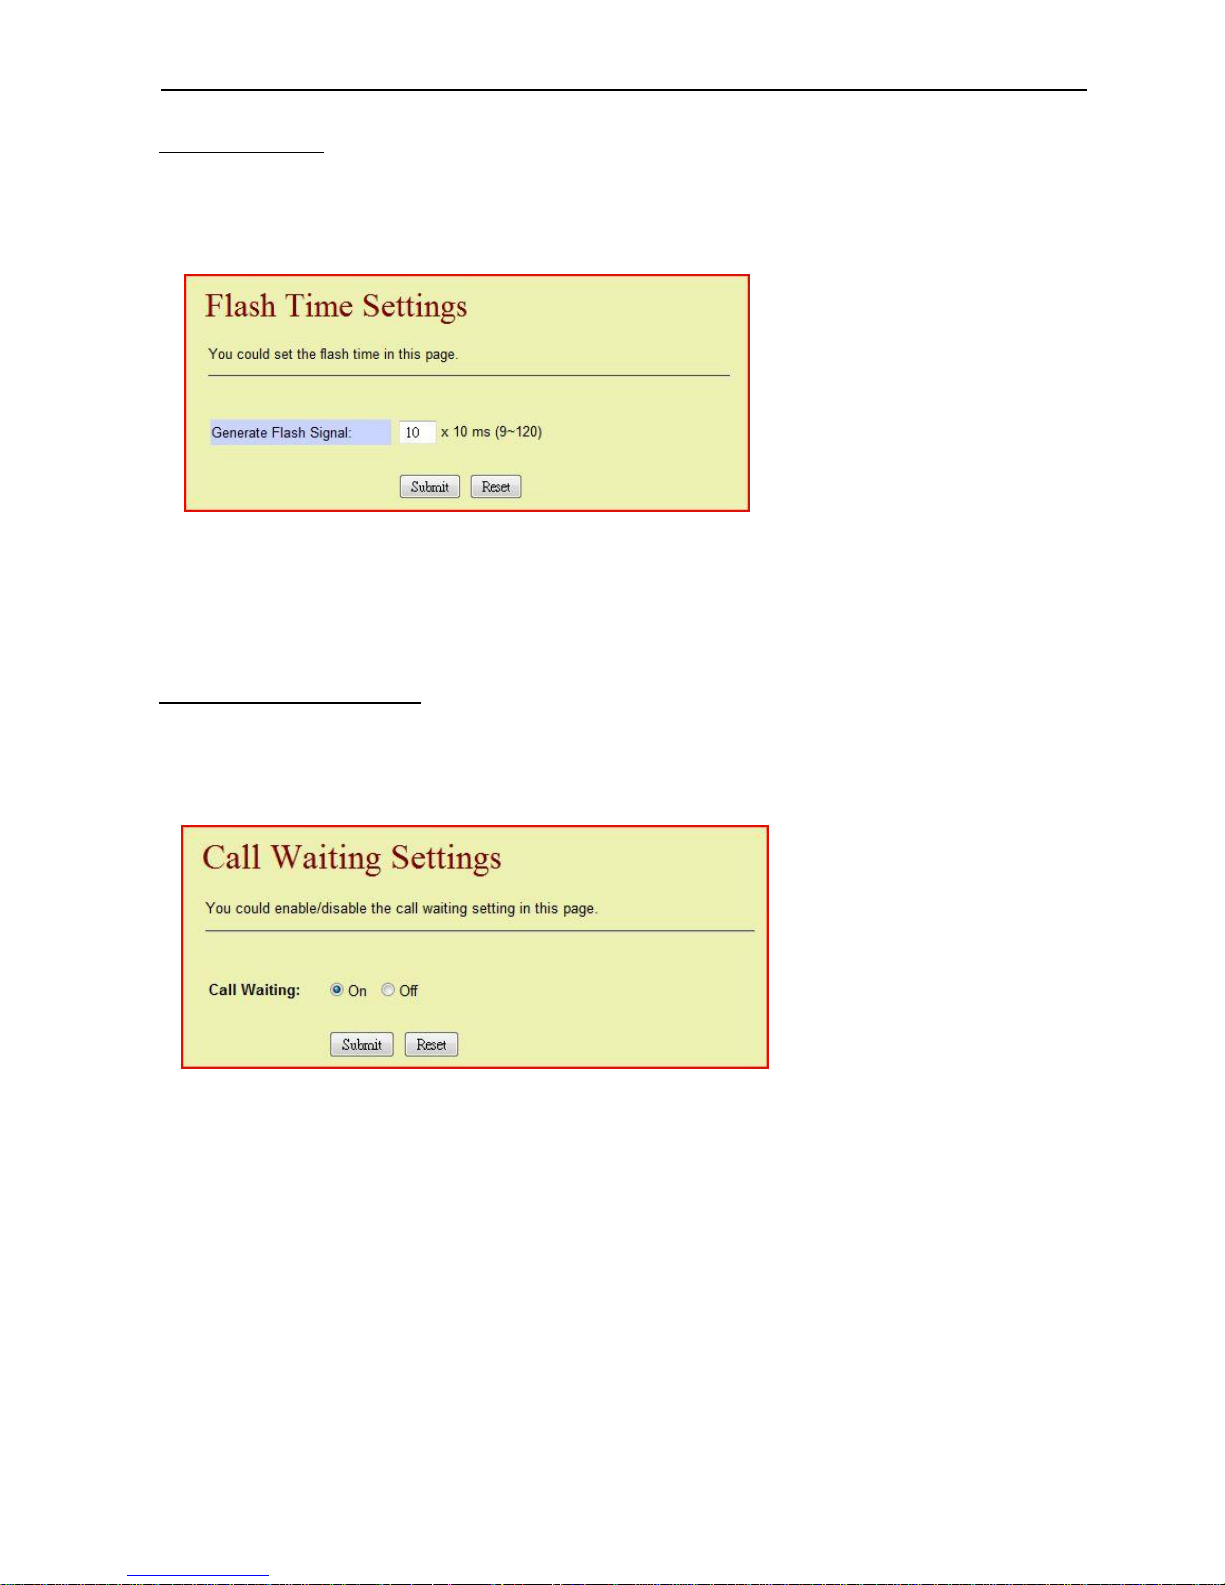
C2.8 Flash Time
This feature will only affect the FXO (PSTN) calls. A Flash Signal temporarily cuts off a FXO
connection for a few milliseconds (1 sec. = 1000 ms), and then quickly resumes the call.
The settings page is as follows:
Generate Flash Signal: If this is set to 10, then the Flash Time will be {10*10 ms = 100 ms}.
The buttons are as follow:
[Submit]: Apply the settings.
[Reset]: Clear all fields.
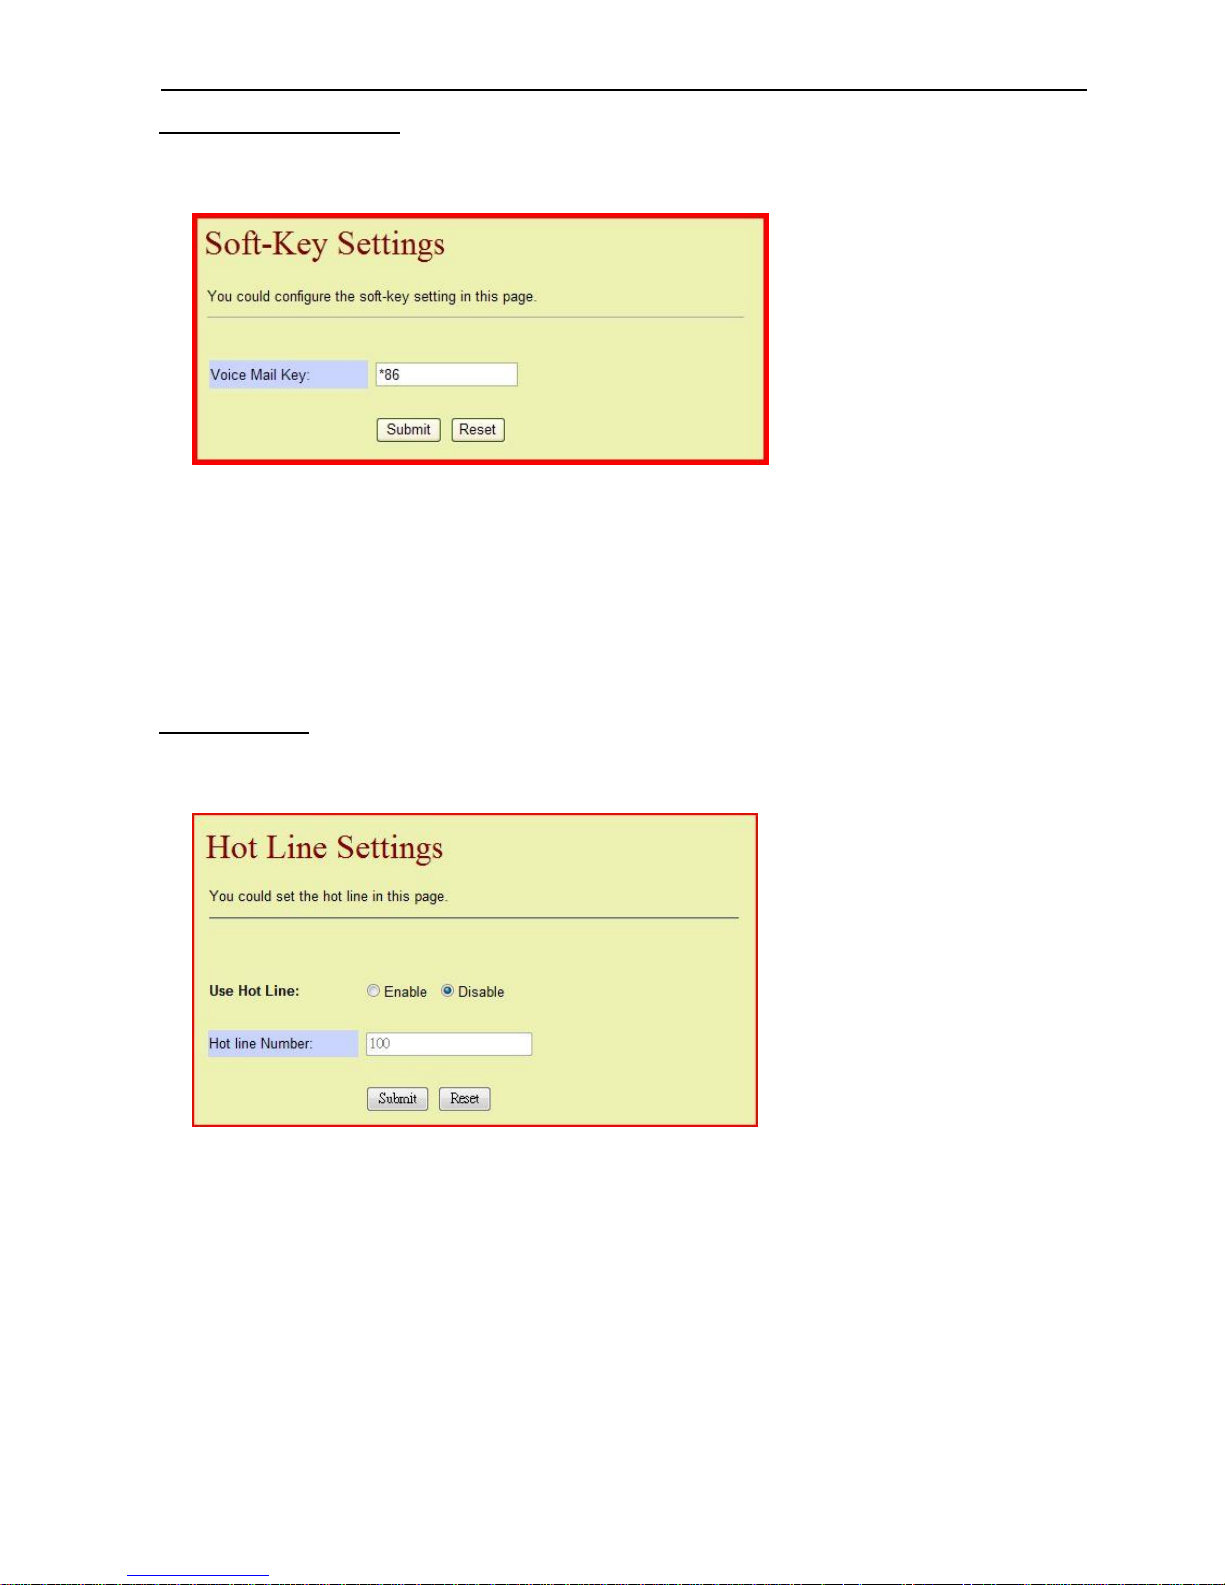
C2.9 Call Waiting Settings
The Call Waiting feature remind user with a “Remind tone” that another incoming call is
waiting for answer while he/she is on a call already.
The settings page is as follows:
Call Waiting On: Activate the Call Waiting feature.
Off: Deactivate the Call Waiting feature.
The buttons are as follow:
[Submit]: Apply the settings.
[Reset]: Clear all fields.
Page 37
Dual Mode VoIP Keyphone IP37-31
31
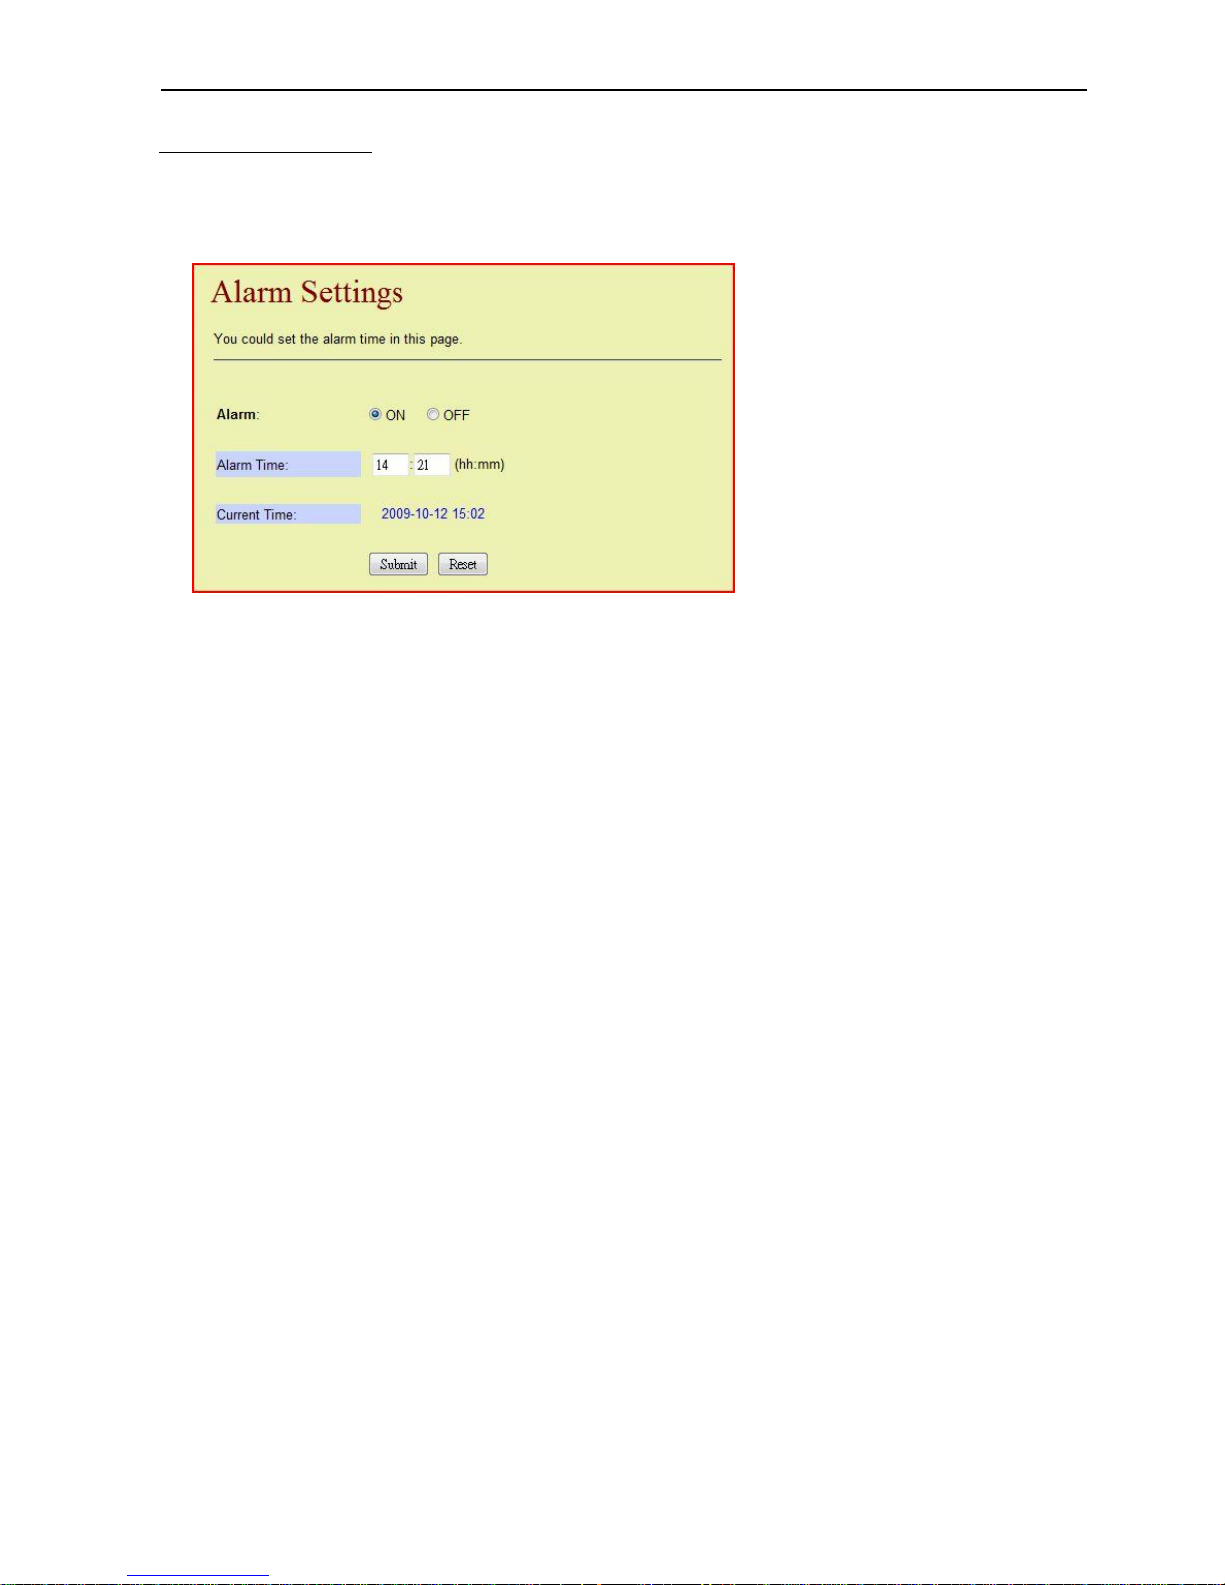
C2.10 Soft-Key Settings
The code below can be changed when needed; however it is recommended not to change it
unless necessary. The settings page is as follows:
Voice Mail Key: This feature allows the user to listen to voice mails.
Pressing the [ MSG ] key will have this code sent out.
The buttons are as follow:
[Submit]: Apply the settings.
[Reset]: Clear all fields.
C2.11 Hot Line
When Hot Line is enabled, pressing [ SPK ] key or lifting the handset will call a certain
extension automatically. Please refer to section A1.4. The settings page is as follows:
Use Hot Line Enable: Activate the Hot Line feature.
Disable: Deactivate the Hot Line feature.
Hot Line Number: The number of the extension the Hot Line calls.
The buttons are as follow:
[Submit]: Apply the settings.
[Reset]: Clear all fields.
Page 38
Dual Mode VoIP Keyphone IP37-31
32
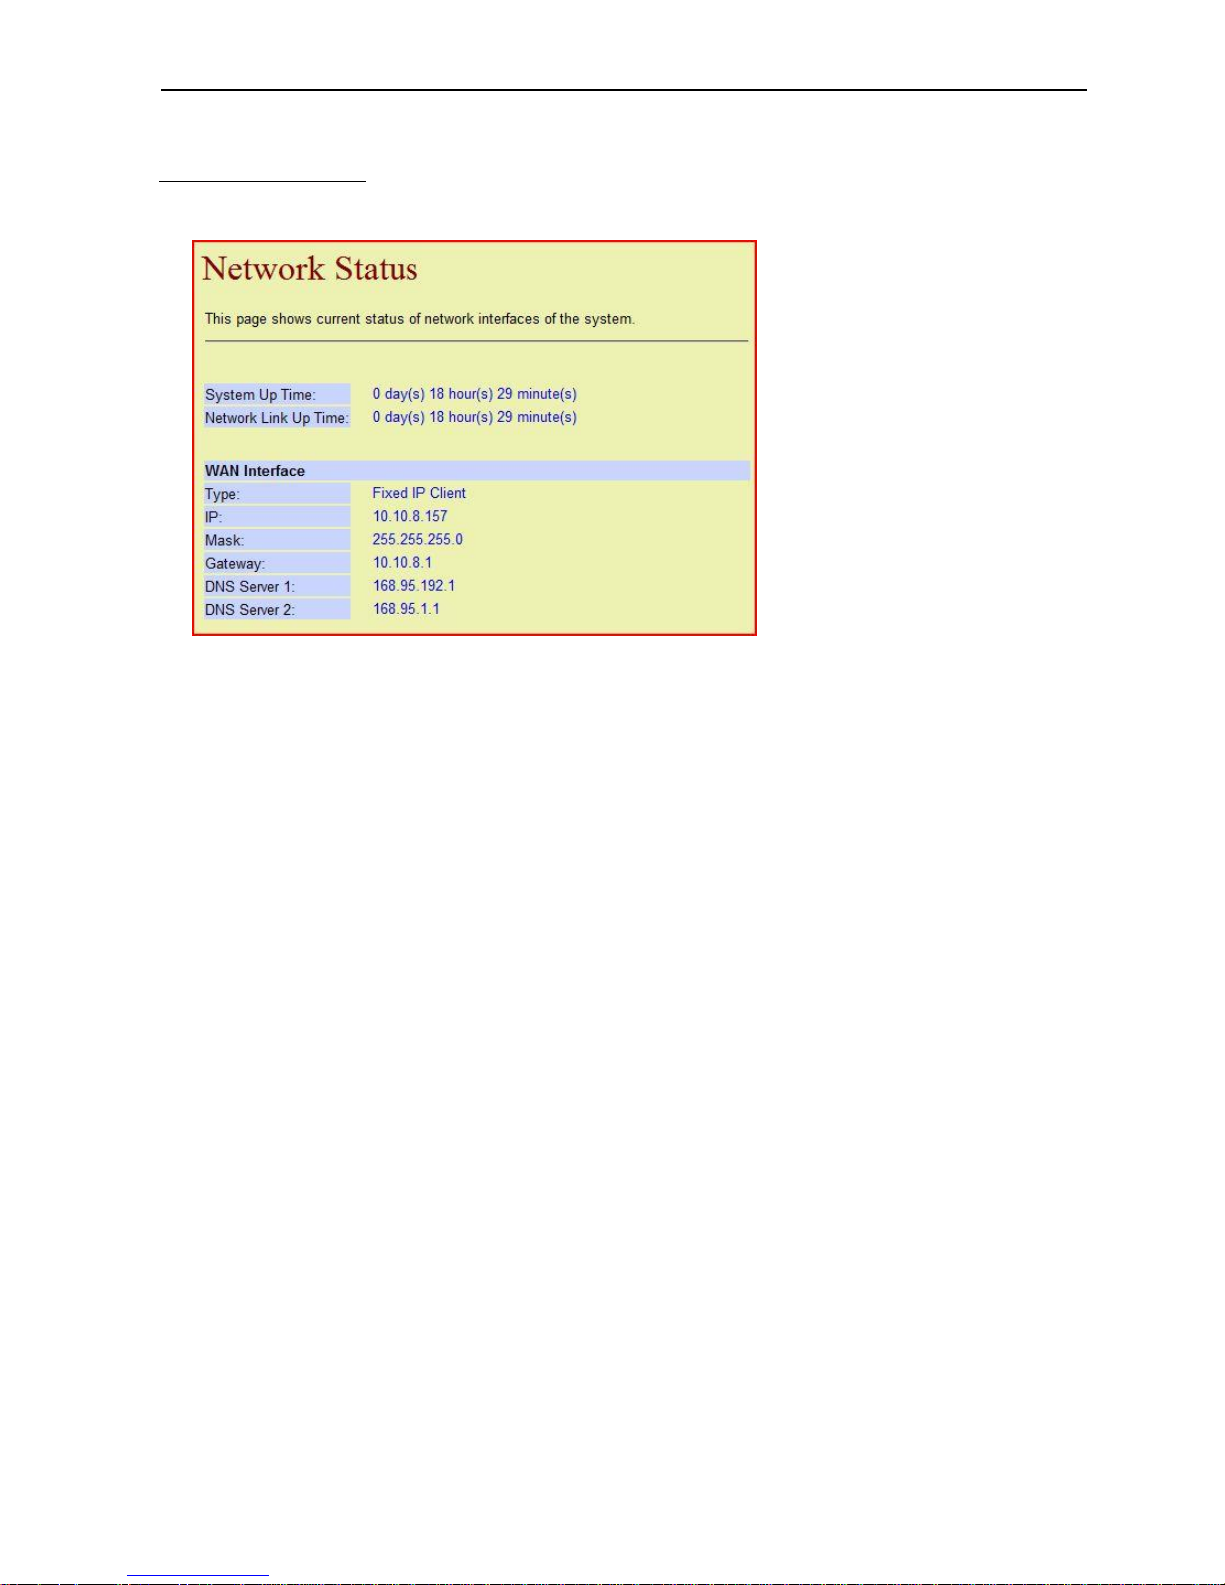
C2.12 Alarm Settings
The phone can be used as an alarm clock. At a preset time, the phone will play the alarm
ringtone for 1 minute and the LCD will display “Alarm”. Lift the handset and hook it back to
stop the alarm ringtone. The settings page is as follows:
Alarm On: Activate the Alarm (Ring for 1 minute at a preset time everyday.)
Off: Deactivate the Alarm.
Alarm Time: The time the alarm is activated (hour : minute).
Current Time: The time now.
The buttons are as follow:
[Submit]: Apply the settings.
[Reset]: Clear all fields.
Page 39
Dual Mode VoIP Keyphone IP37-31
33
C3. Network
C3.1 Network Status
This page shows the status of the network as follows:
System Up Time: For how long the phone has been up.
Network Link Up Time: For how long the phone has been linked to the network.
WAN Interface
Type: The way the IP address was acquired.
IP: The IP address of the phone.
Mask: The Mask address.
Gateway: The IP address of the Gateway.
DNS Server 1: The IP address of the primary DNS Server.
DNS Server 2: The IP address of the secondary DNS Server.
Note:
When the “LAN” port of this phone connects to the WAN, the “PC” port shall be connected to the LAN.
Page 40
Dual Mode VoIP Keyphone IP37-31
34
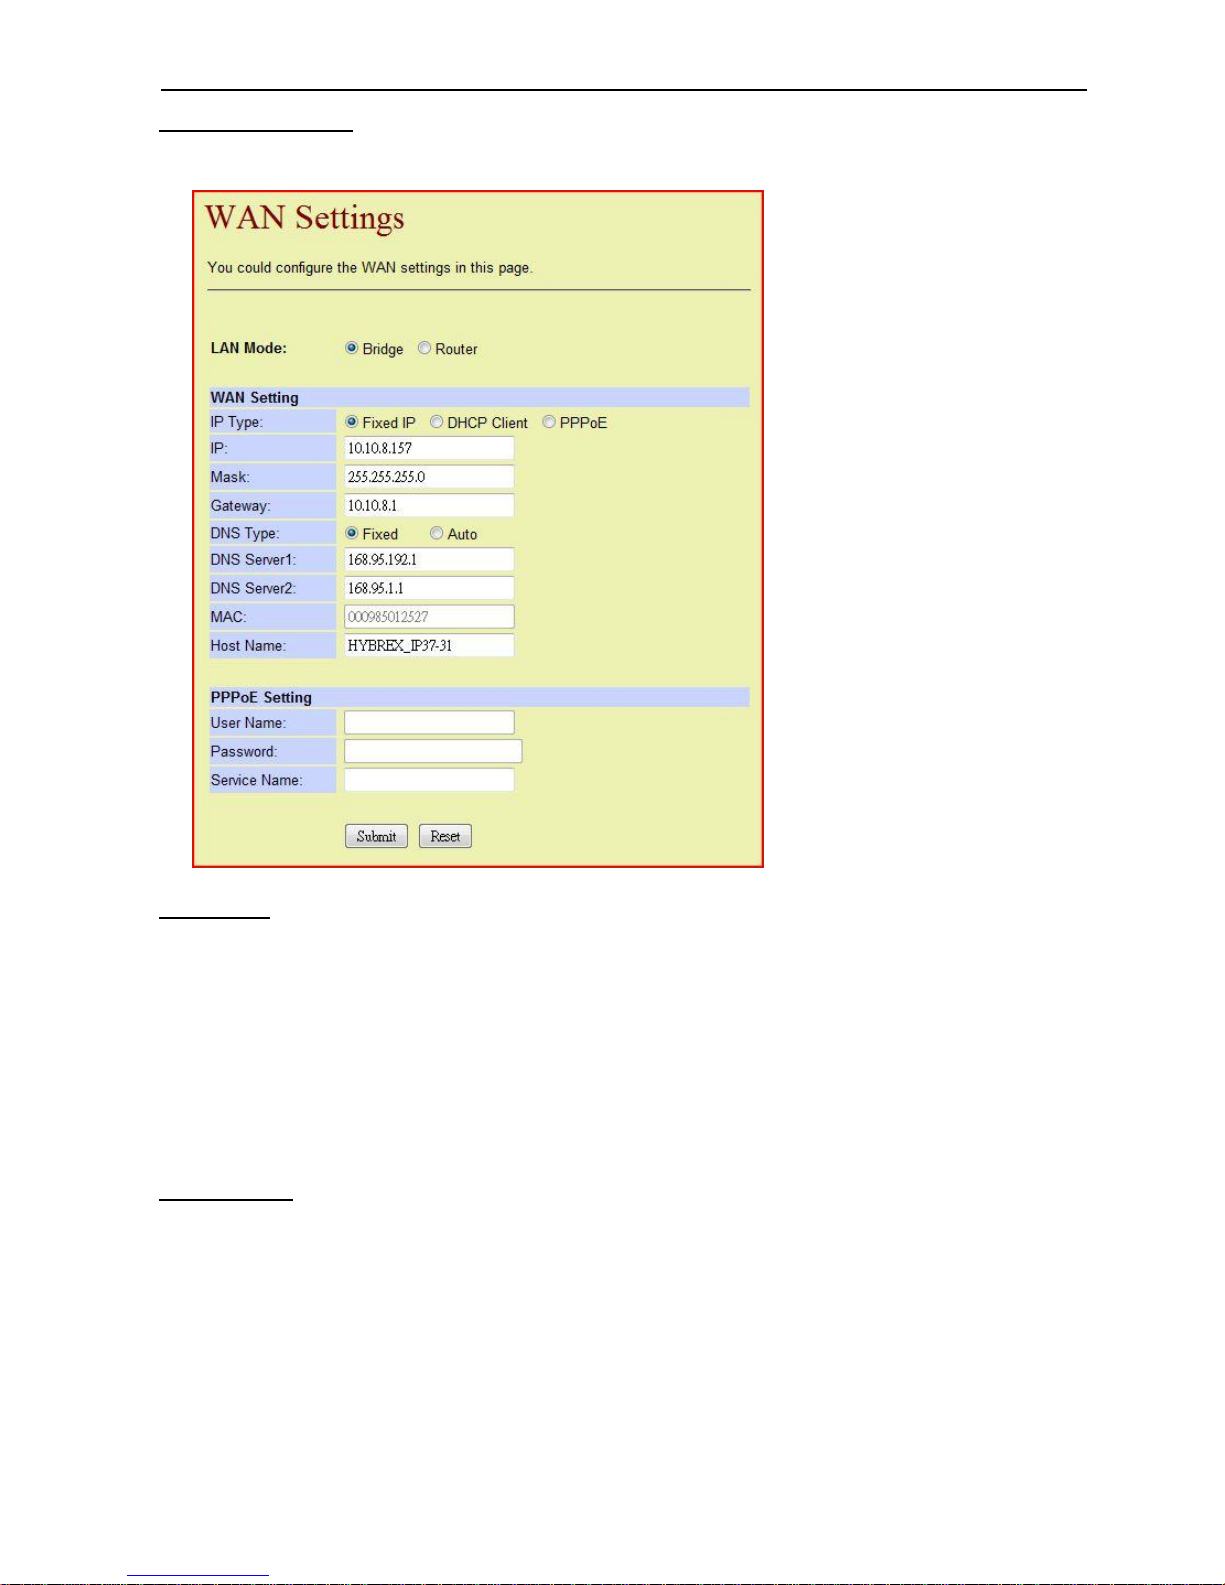
C3.2 WAN Settings
The settings page is as follows:
LAN Mode
Bridge: The phone can be used as a simple LAN Hub to link two network ports together.
Connect the “LAN” port to a LAN and acquire an IP address. This port can also be
connected to the WAN for internet connection. Connect the “PC” port to a local PC
or other network equipments. The equipments connected to this port acquire their
IP addresses from the LAN.
Router: The phone itself can be a DHCP Server and provide new IP addresses to the
equipments connected to the “PC” port. Please refer to the LAN settings in section
C3.3.
WAN setting
IP Type: The way the IP address was acquired.
Fixed IP: The user assigns a valid static IP address.
DHCP Client: Acquire the IP address from the DHCP Server.
PPPoE: Dial-up and connect to the ITSP to acquire a dynamic IP address.
IP: The IP address.
Mask: The sub-net mask.
Gateway: The default IP address of the Gateway.
DNS Type:
Fixed: The user assigns the DNS server.
Auto: DNS server assigned by the DHCP Server.
Page 41
Dual Mode VoIP Keyphone IP37-31
35
DNS Server 1: The primary DNS Server.
DNS Server 2: The secondary DNS Server.
MAC: The unique hardware ID code of this phone in the network.
Host Name: The reference name of this phone.
PPPoE Settings
User Name: The user name provided by the ITSP.
Password: The password provided by the ITSP.
Service Name: The name of the ITSP.
The buttons are as follow:
[Submit]: Apply the settings.
[Reset]: Clear all fields.
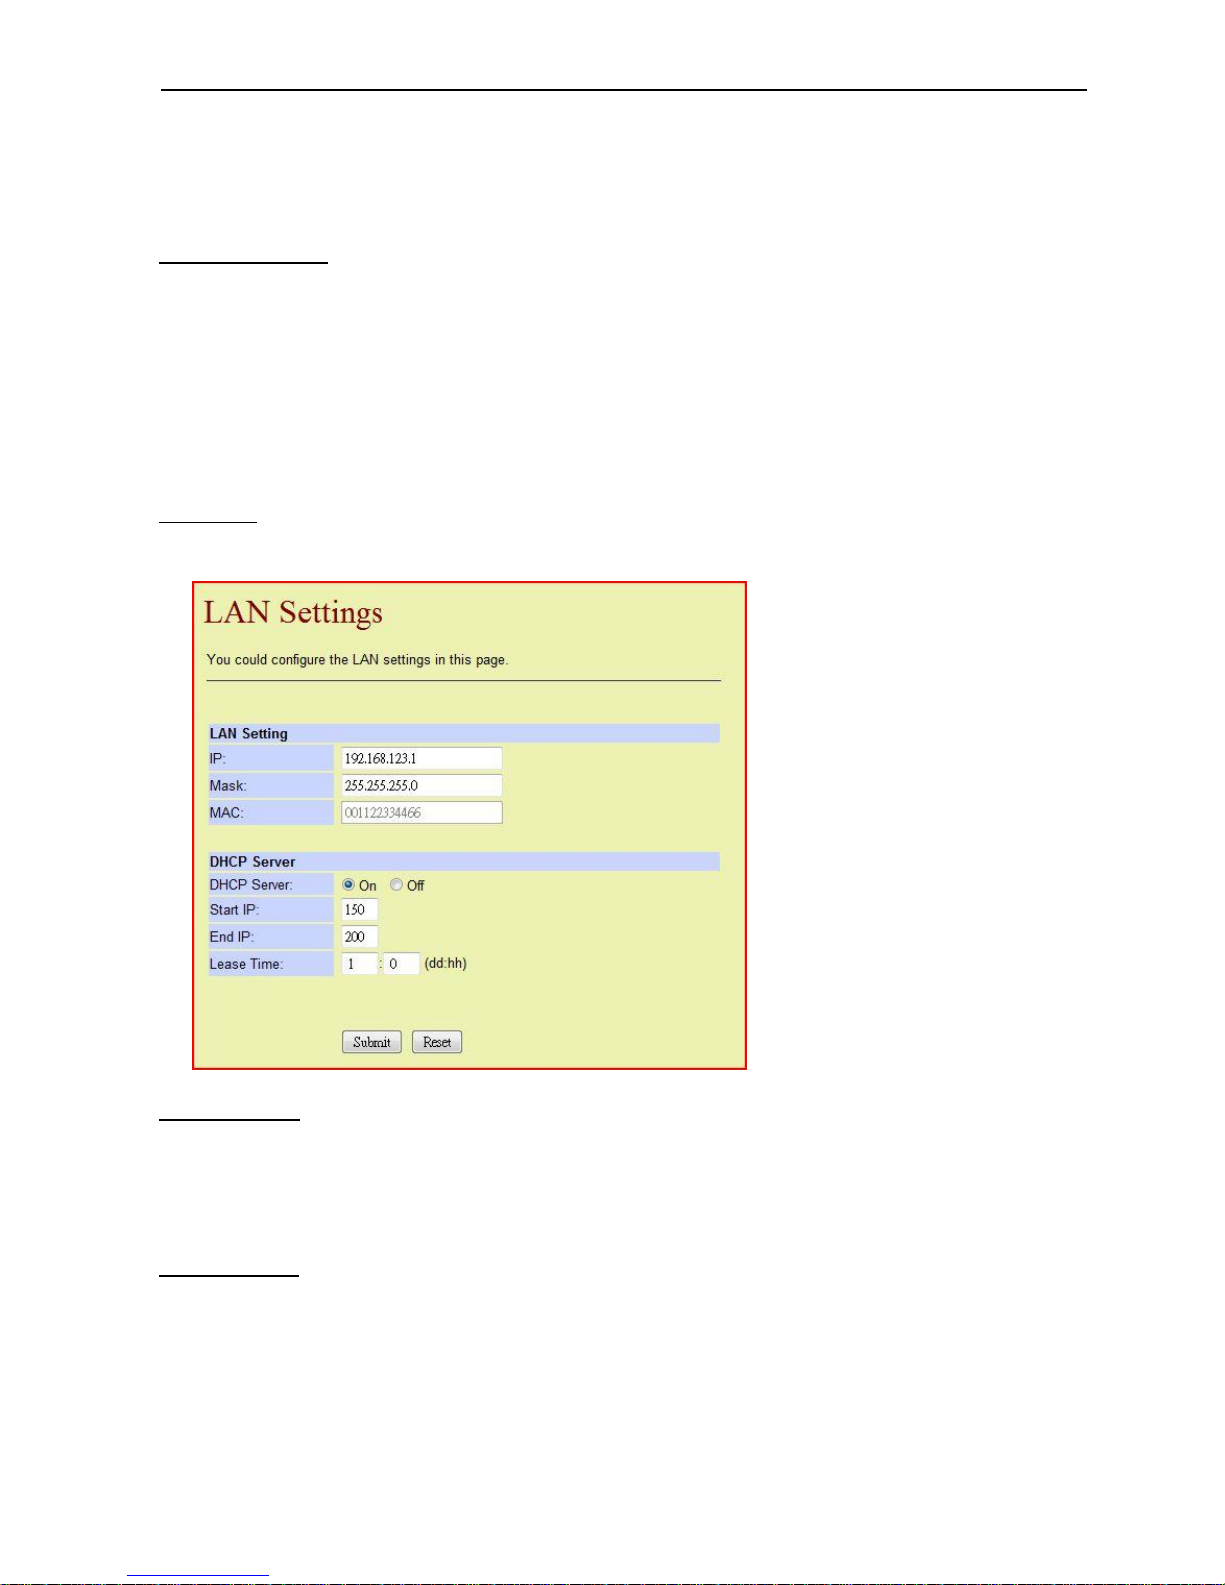
C3.3 LAN
The settings below will only take effect when the LAN Mode is set to “Router”
LAN Settings
IP: The IP address provided by the phone as a DHCP Server to the equipments
connected to the “PC” port.
Mask: The sub-net mask.
MAC: The unique ID code of this phone in the network (non-changeable).
DHCP Server
DHCP Server On: Activate the DHCP server feature.
Off: Deactivate the DHCP server feature.
Start IP: The starting point of the range of IP address given by the phone
as a DHCP server. If the value is 150, then the starting IP
address would be 192.168.123.150
End IP: The ending point of the range of IP address given by the phone
Page 42
Dual Mode VoIP Keyphone IP37-31
36
as a DHCP server.
If the value is 200, then the ending IP address would be
192.168.123.200
Lease Time: The period of time a particular given IP is valid for. If an
equipment is not connected to the phone for more than the
Lease Time, then its given IP will become invalid.
The buttons are as follow:
[Submit]: Apply the settings.
[Reset]: Clear all fields.
C3.4 DDNS
This is a special feature. Normally the DDNS is set to Off.
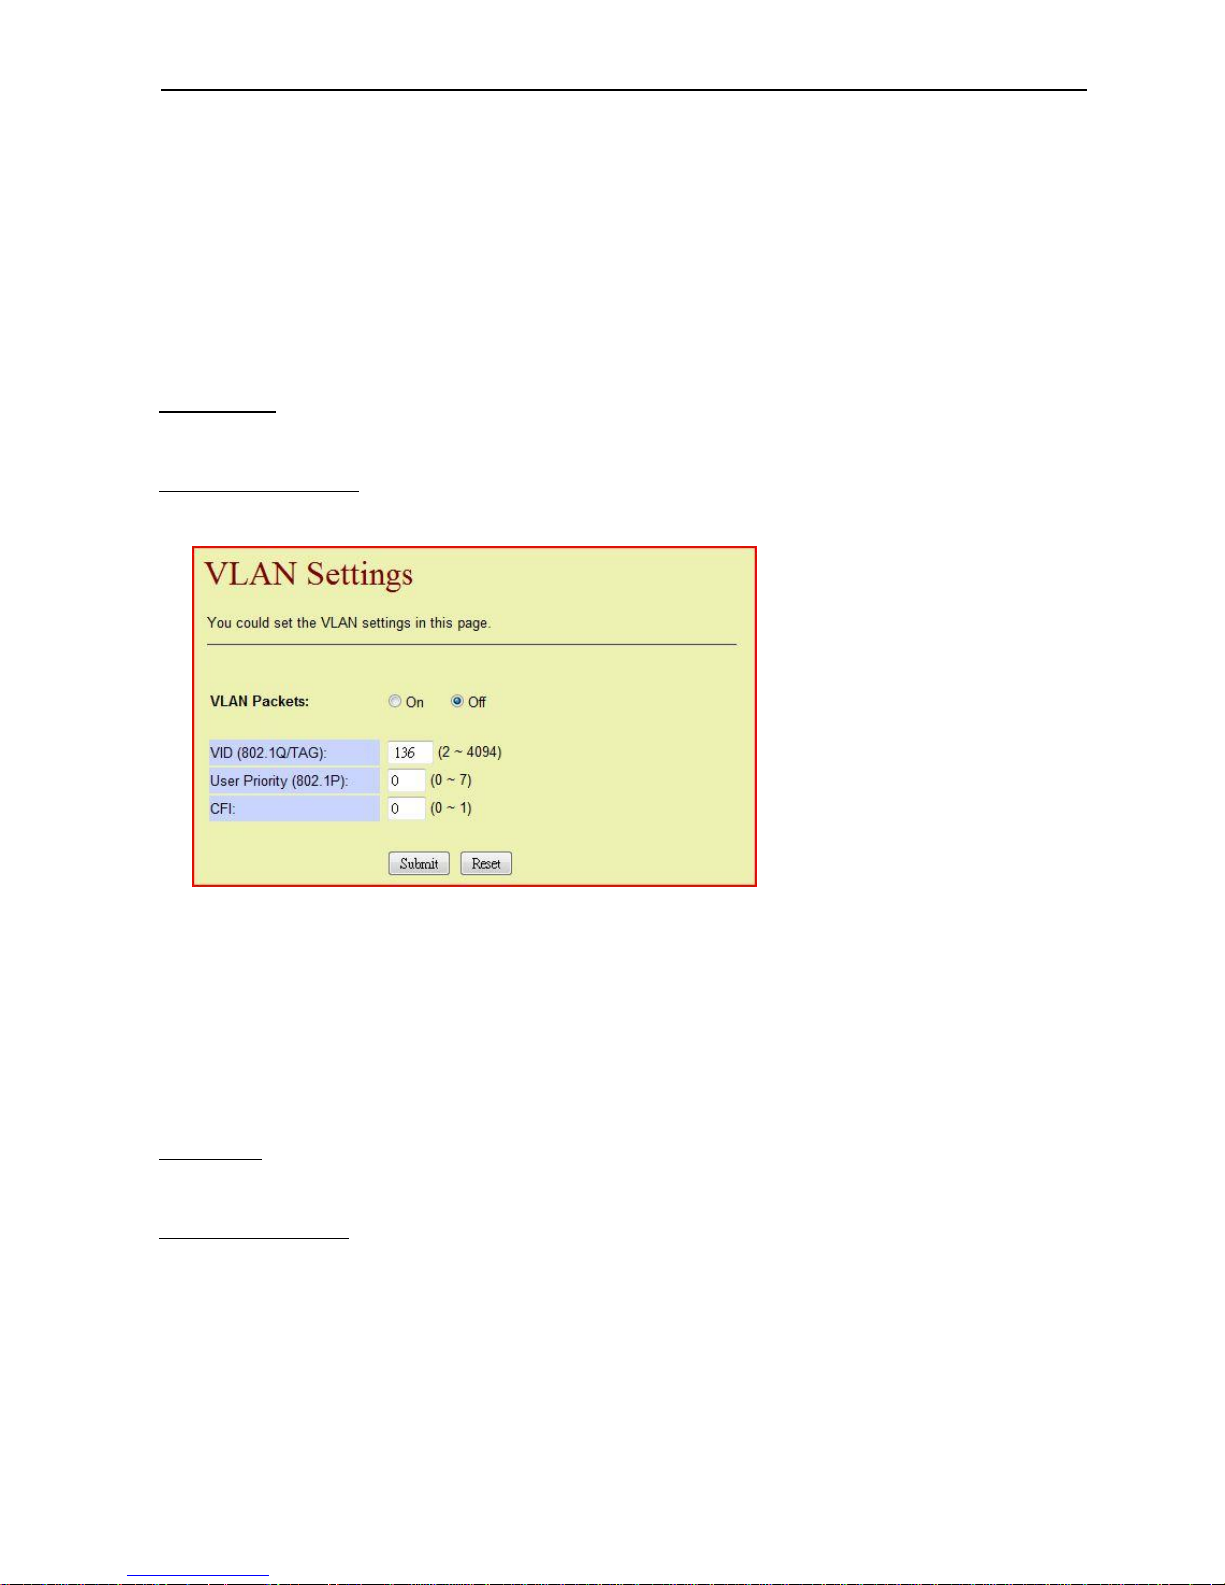
C3.5 VLAN Settings
The phone can be set to operate in a Virtual LAN. The settings page is as follows:
VLAN Package On: Activate the VLAN feature.
Off: Deactivate the VLAN feature.
VID ( 802.1Q / TQG ): The ID number of the VLAN.
User Priority ( 802.1Q ): The priority level of the user.
CFI: Canonical Format Indicator, a field in the VLAN Tag.
Note: The VLAN Tag field contains four components: TPID, Priority, CFI, and VID.
C3.6 DMZ
This is a special feature. Normally the DMZ is set to Off.
C3.7 Virtual Server
This is a special feature. Under normal conditions, please do not change any settings on this
page.
Page 43
Dual Mode VoIP Keyphone IP37-31
37
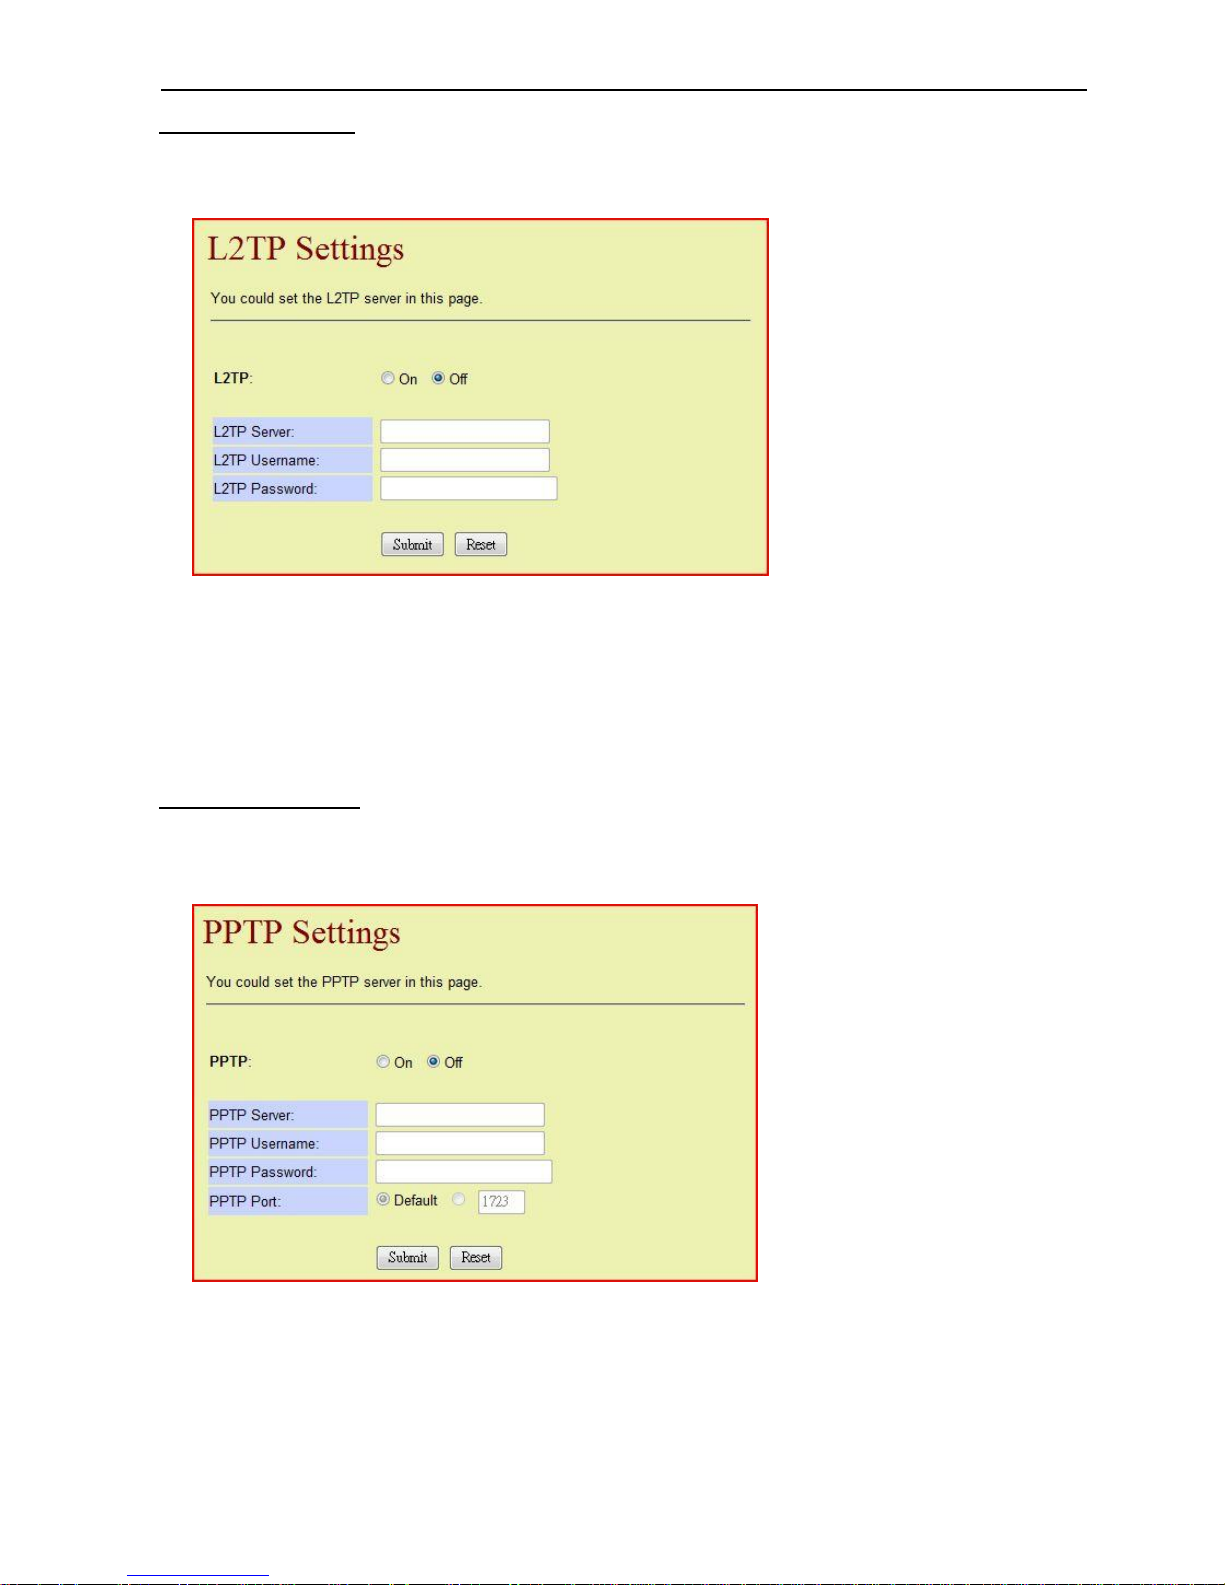
C3.8 L2TP Settings
The L2TP (Layer 2 tunneling protocol) can be used with the VPN to provide remote access
to a private network over the Internet. The settings page is as follows:
L2TP On: Activate the L2TP feature.
Off: Deactivate the L2TP feature.
L2TP Server: The IP address of the L2TP server.
L2TP Username: The Login Username to the L2TP server.
L2TP Password: The Login Password to the L2TP server.
C3.9 PPTP Settings
Similar to the L2TP, the PPTP (Point-to-point tunneling protocol) can be used with the VPN
to provide remote access to a private network over the Internet.
The settings page is as follows:
PPTP On: Activate the PPTP feature.
Off: Deactivate the PPTP feature.
PPTP Server: The IP address of the PPTP server.
PPTP Username: The Login Username to the PPTP server.
PPTP Password: The Login Password to the PPTP server.
PPTP Port Default: The default port value for the PPTP.
PPTP Port [ ] : The user assigned port value.
Page 44
Dual Mode VoIP Keyphone IP37-31
38
C4. SIP Setting
C4.1 Service Domain
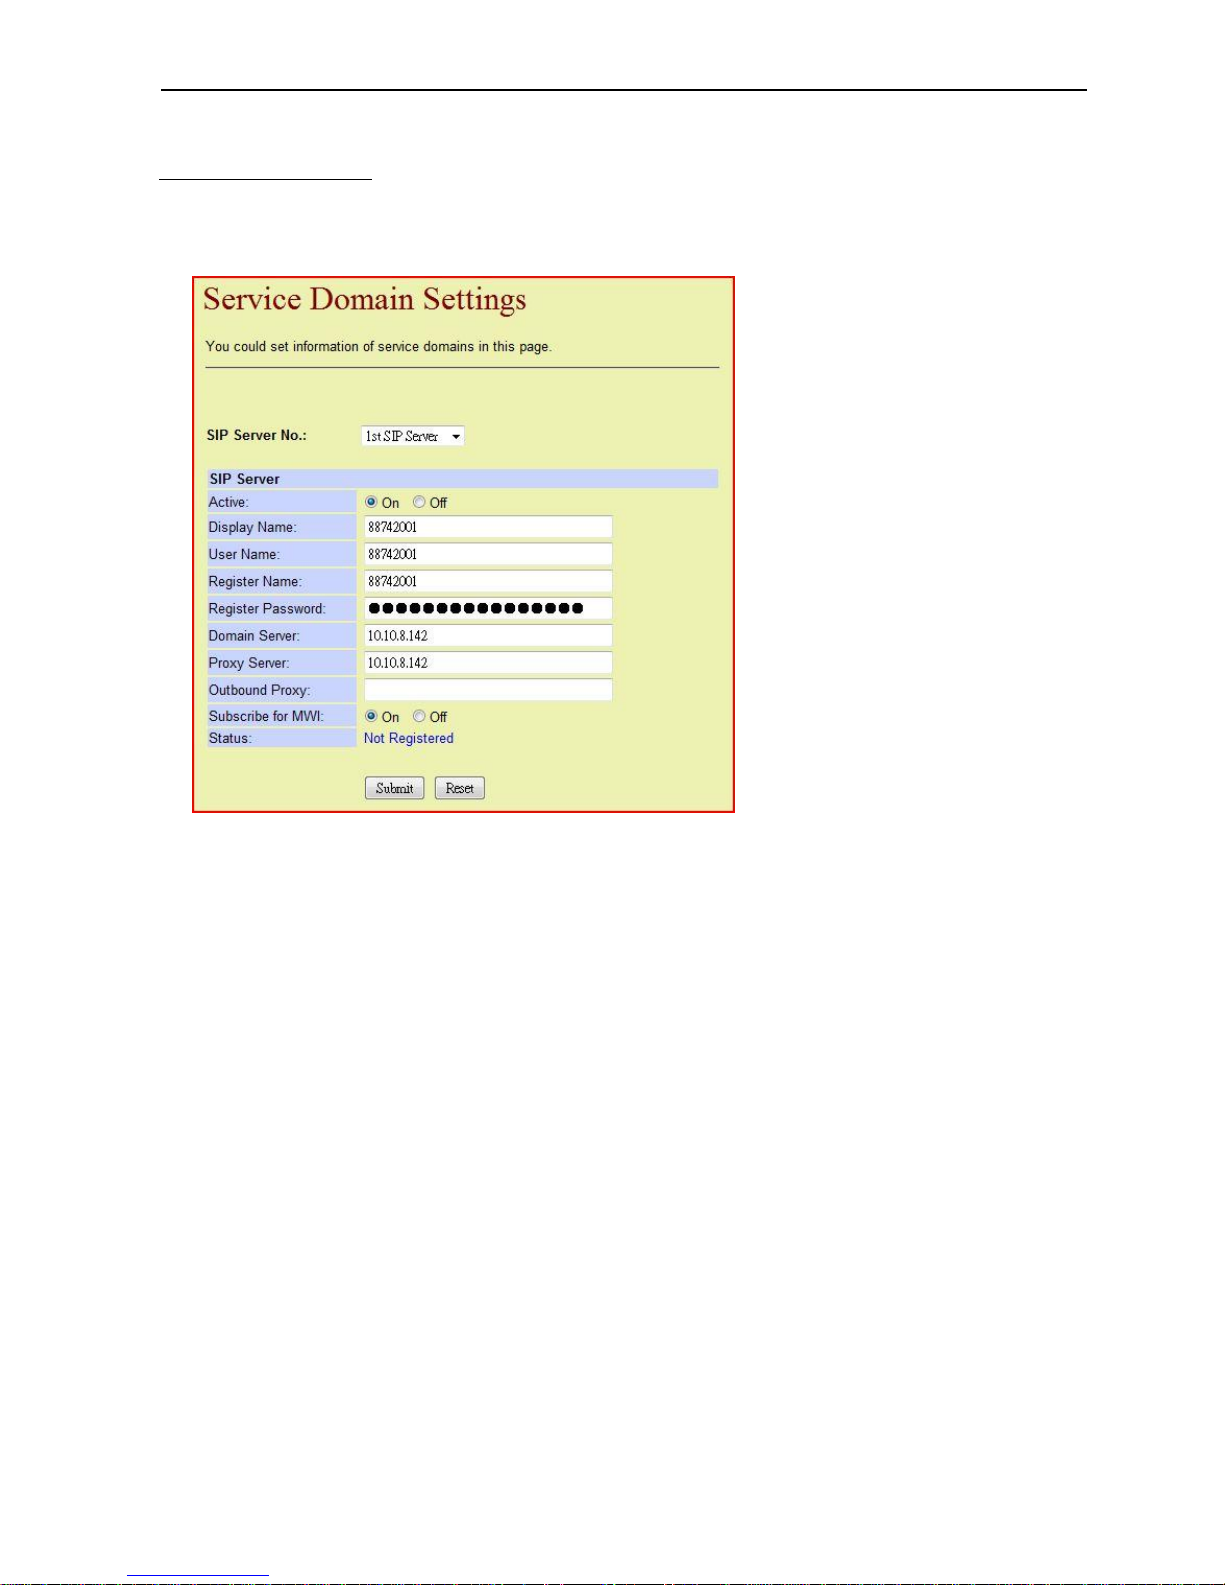
Each VoIP phone can be registered to three different SIP servers. The settings page below
demonstrates how to register to the first SIP server; the procedures are the same for
registering to the other two SIP servers.
SIP Server No. The number of the SIP server. There are 3 SIP servers to
choose from. The VoIP phone will search for and register
to an available SIP server in the order of their number here,
i.e. the phone tries the first SIP server, then the second,
and then the third.
Active On: Activate this SIP server option so the phone will try to
connect to it.
Off: Deactivate this SIP server option so the phone will NOT try
to connect to it.
Display Name: The name of this phone shown on the LCD when the
phone is idle.
User Name: The assigned telephone number of the phone in this SIP
server.
Register Name: The username needed to register to this SIP server (can
be identical to the User Name above).
Register Password: The password needed to register to this SIP server.
Domain Server: The IP address of this SIP server.
Proxy Server: The IP address of the Proxy server.
Outbound Proxy: The IP address of the Outbound Proxy.
Subscribe for MWI On: Obtain the MWI from the SIP server.
Off: Not to obtain the MWI from the SIP server.
Note: For the [ MSG ] key on the phone to properly indicate any message left for this extension in
the mailbox at the VP, the MWI (Message Waiting Information) needs to be set to On.
Status Registered: Indicates the phone is registered to this SIP server.
Page 45
Dual Mode VoIP Keyphone IP37-31
39
Status Not registered: Indicates the phone is NOT registered to this SIP server.
C4.2 Port Settings
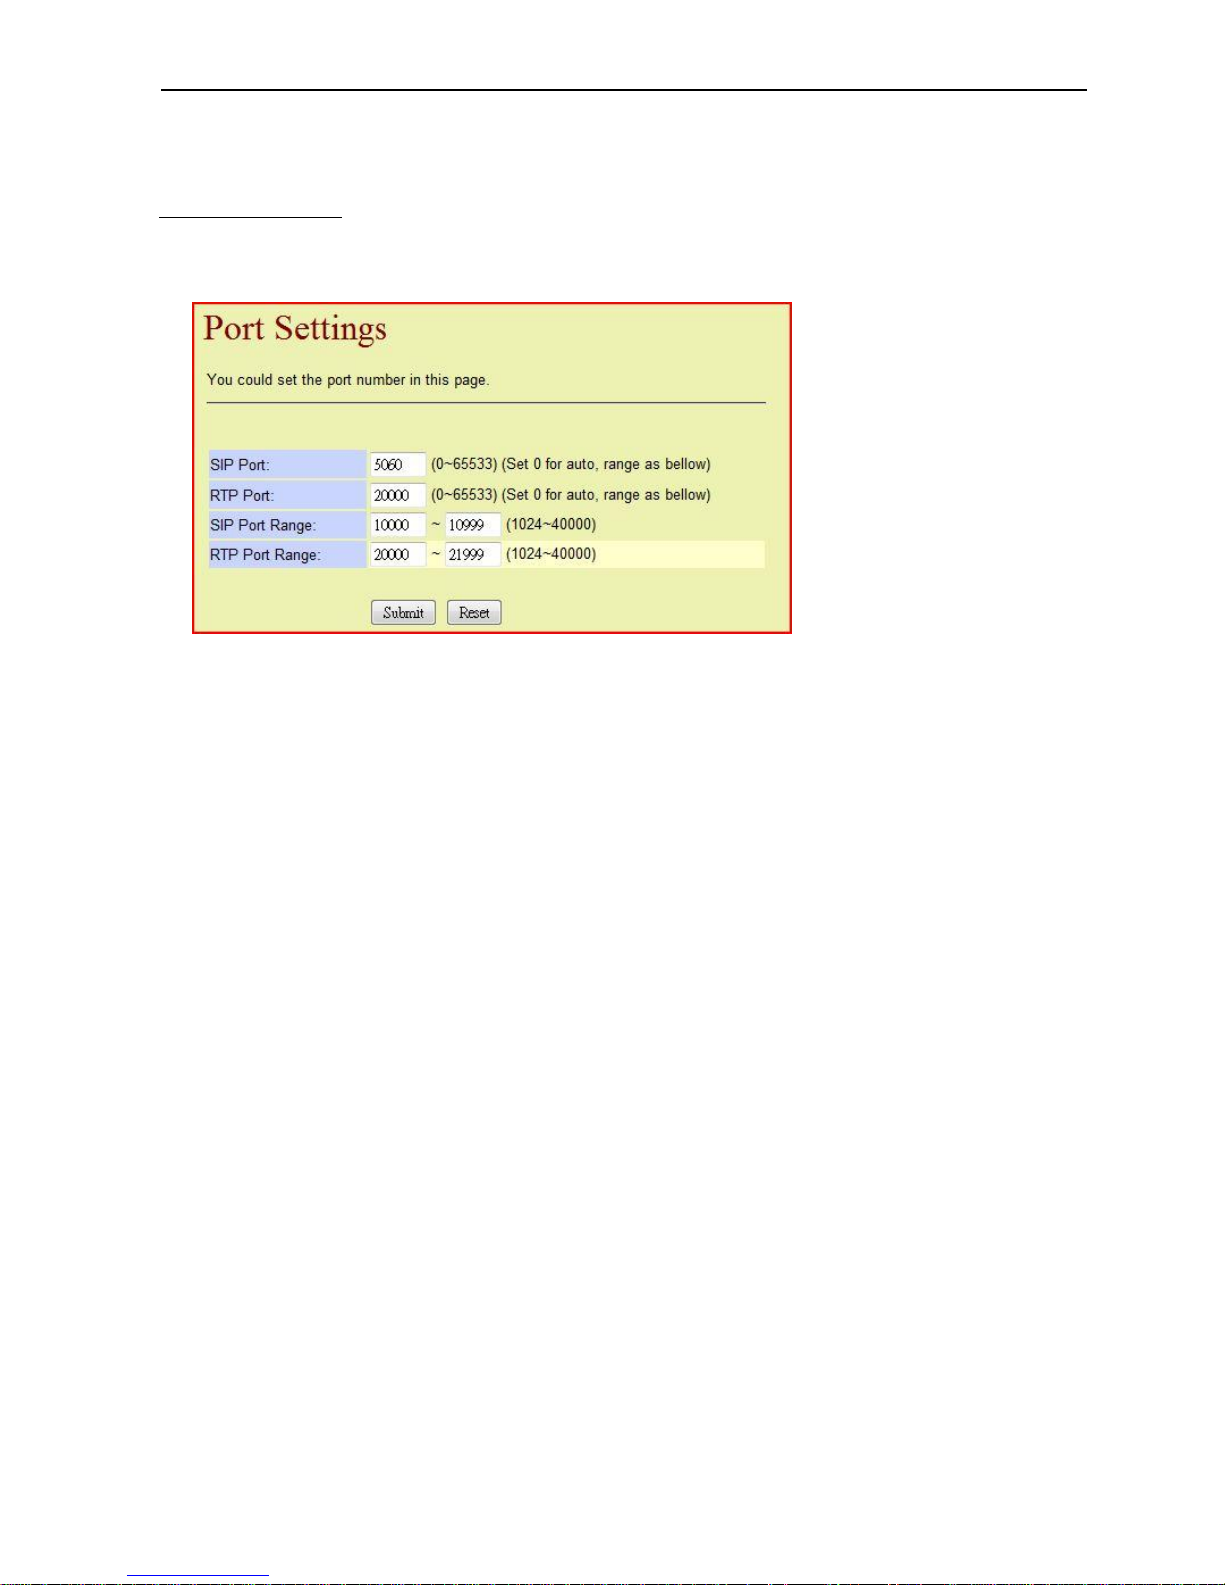
Different signals can be transmitted on the same medium without interfering each other by
going through different ports. The settings page is as follows:
SIP Port: The default value is 5060 (available values: 0 ~ 65533 )
RTP Port: The default value is 2000 (available values: 0 ~ 65533 )
SIP Port Range: The default range is 10000 ~ 10999 (available range: 1024 ~ 40000)
RTP Port Range: The default range is 20000 ~ 21999 (available range: 1024 ~ 40000)
The buttons are as follow:
[Submit]: Apply the settings.
[Reset]: Clear all fields.
Page 46
Dual Mode VoIP Keyphone IP37-31
40
C4.3 Codec Settings
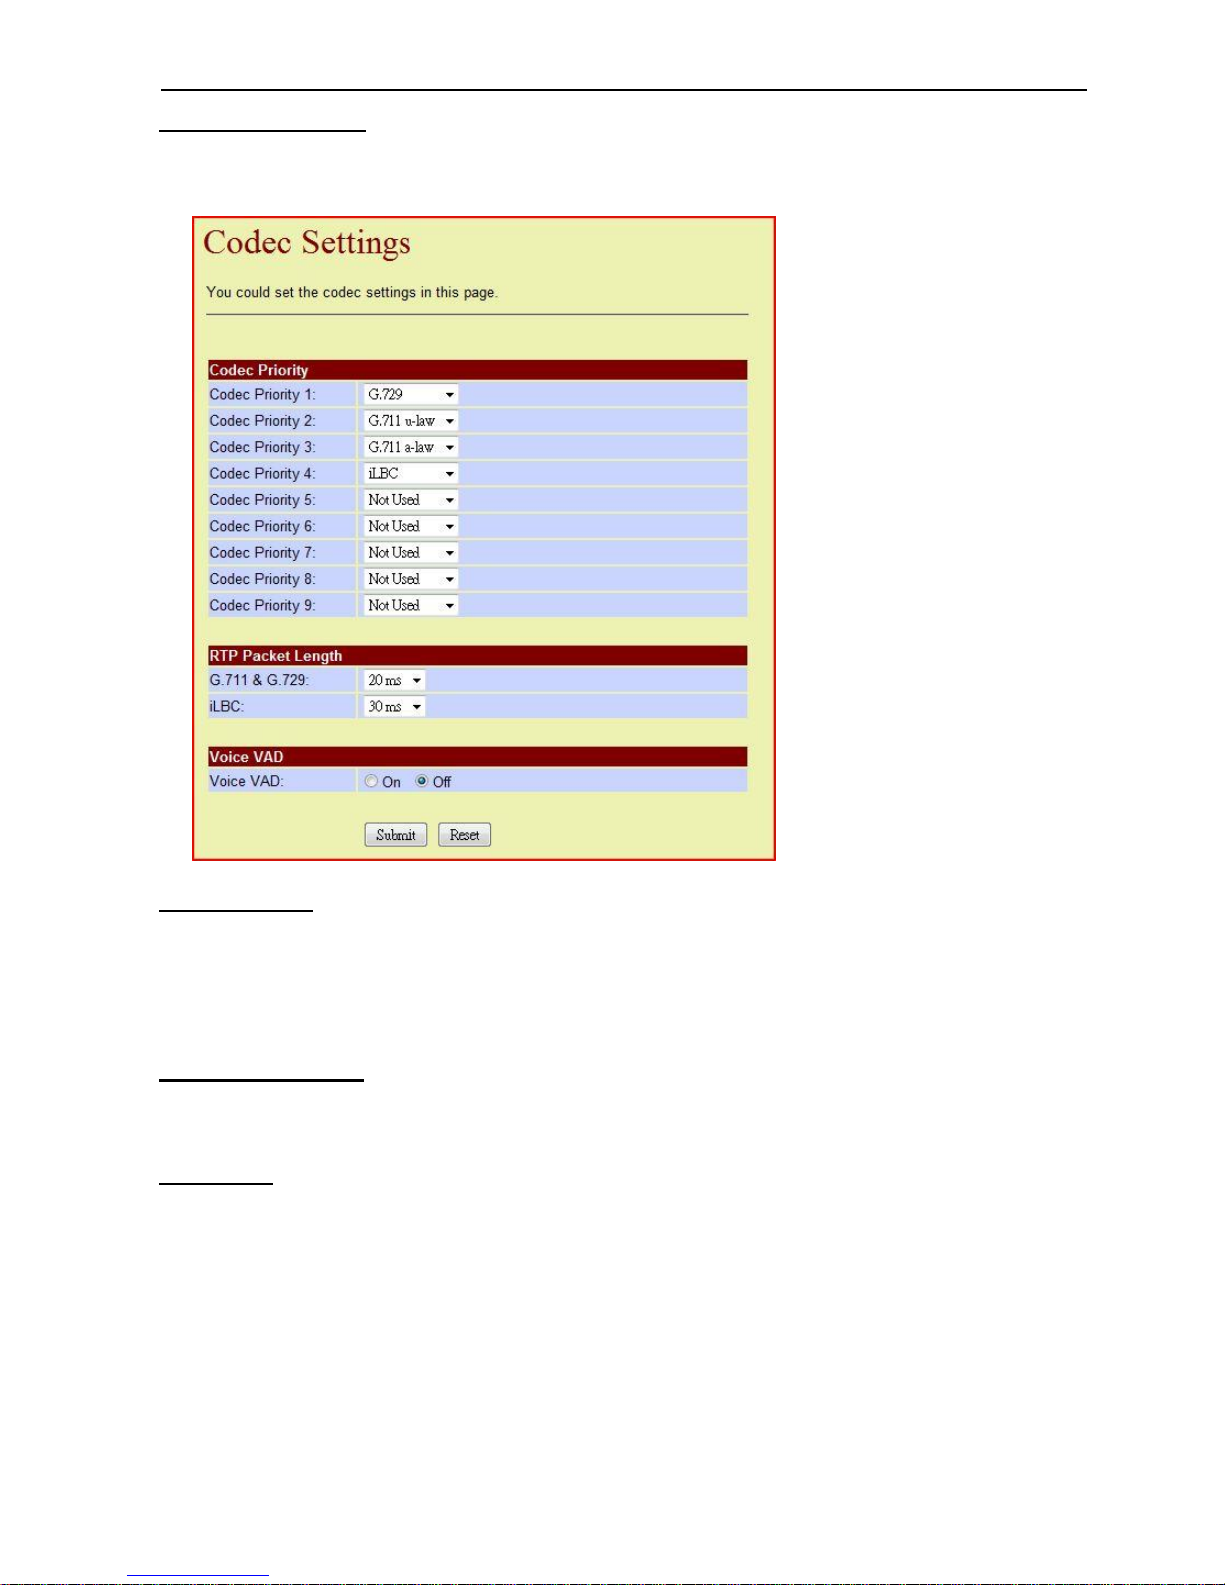
The phone chooses a Codec to compress the voice signals in the order of the priority
settings below:
Codec Priority
Codec Priority 1: The Codec at the 1st priority.
Codec Priority 2: The Codec at the 2nd priority.
…
Codec Priority 9: The Codec at the 9th priority.
RTP Packet Length
G.711 & G.729: 20ms (default value)
iLBC: 30ms (default value)
Voice VAD
On: Activate the Voice VAD feature.
Off: Deactivate the Voice VAD feature.
Note: Voice VAD ( Voice Active Detector )
The buttons are as follow:
[Submit]: Apply the settings.
[Reset]: Clear all fields.
Page 47
Dual Mode VoIP Keyphone IP37-31
41
C4.4 Codec ID Settings
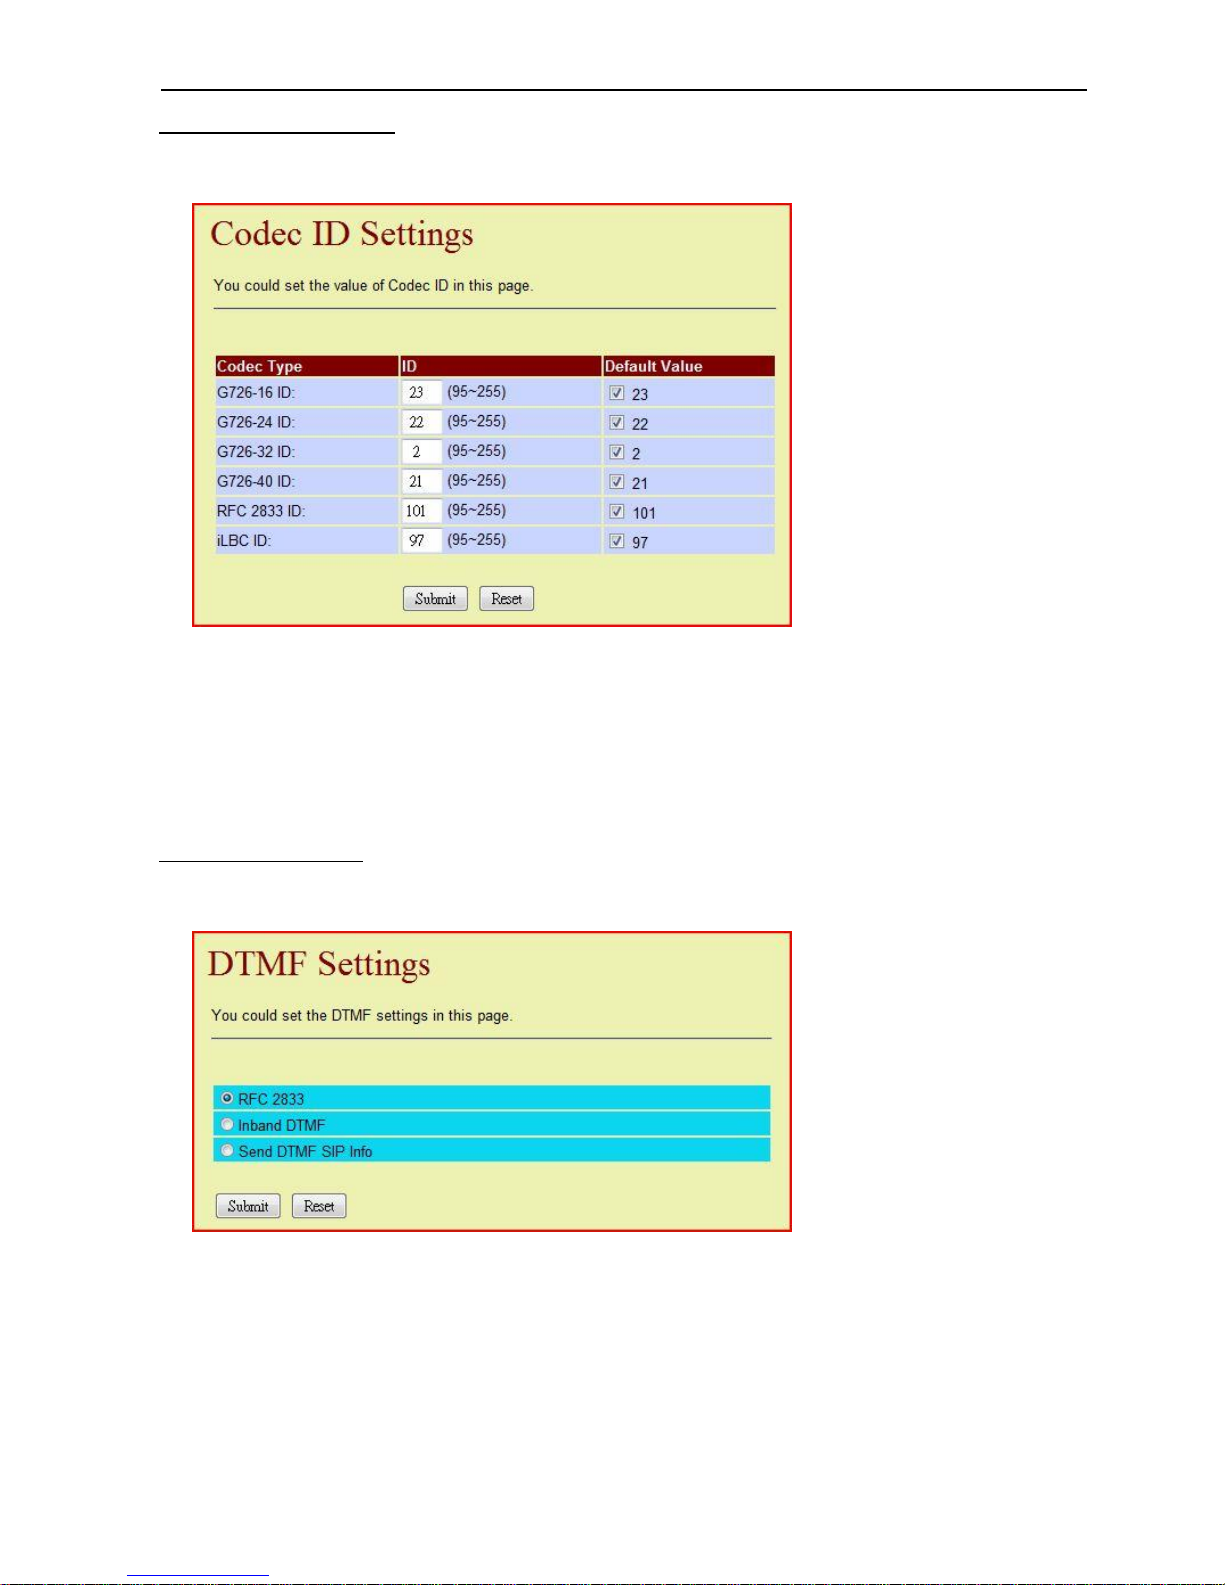
The ID number of the Codec G.726, iLBC, and RFC 2833 can be set flexibly. The settings
page is as follows:
Codec Type: The type of the Codec.
ID: The allowed range for the ID
Default Value: The default ID value.
The buttons are as follow:
[Submit]: Apply the settings.
[Reset]: Clear all fields.
C4.5 DTMF Settings
This setting decides which protocol is to be used to send the DTMF signals. The settings
page is as follows:
RFC 2833 (The packets of the RTP protocol)
Inband DTMF (The analog DTMF tone in the voice channel)
Send DTMF SIP Info (The DTMF packets of the SIP protocol)
The buttons are as follow:
[Submit]: Apply the settings.
[Reset]: Clear all fields.
Page 48
Dual Mode VoIP Keyphone IP37-31
42
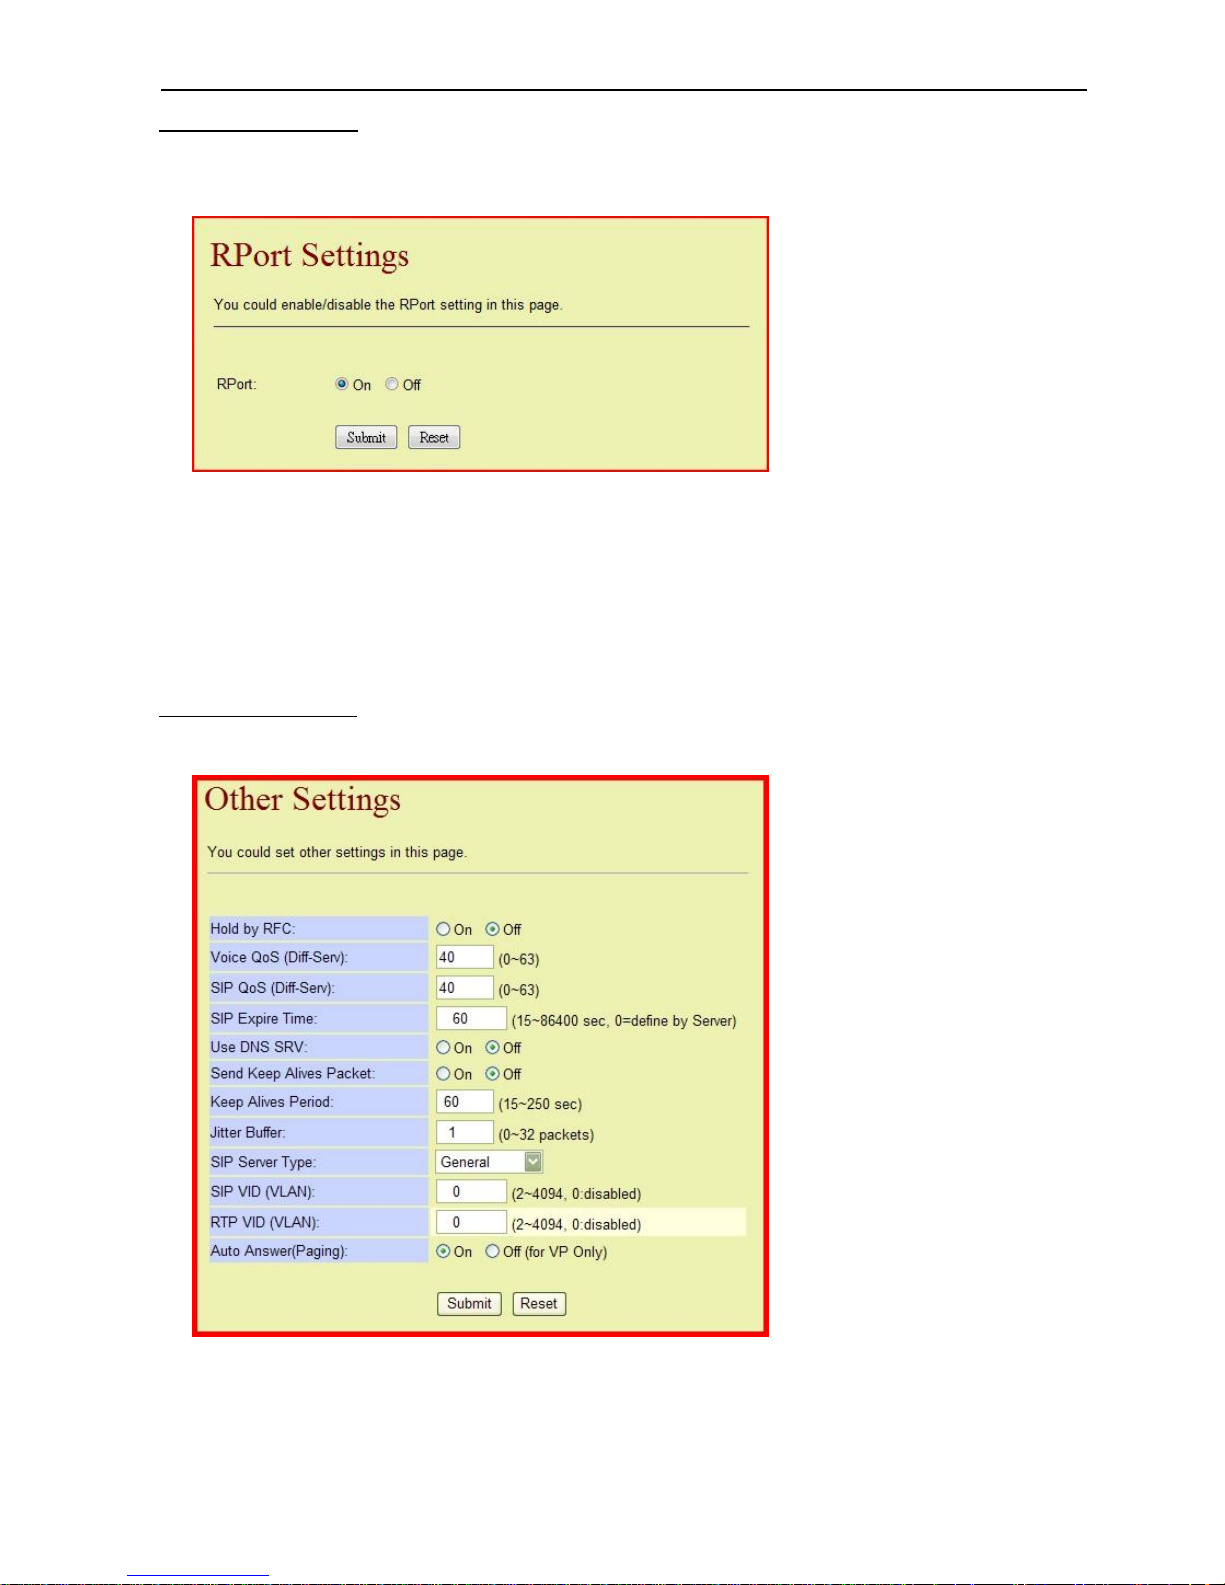
C4.6 RPort Settings
If the phone is behind a NAT in the network, the following setting must be set to On (activate
the RPort).
RPort On: Activate the RPort feature.
Off: Deactivate the RPort feature.
The buttons are as follow:
[Submit]: Apply the settings.
[Reset]: Clear all fields.
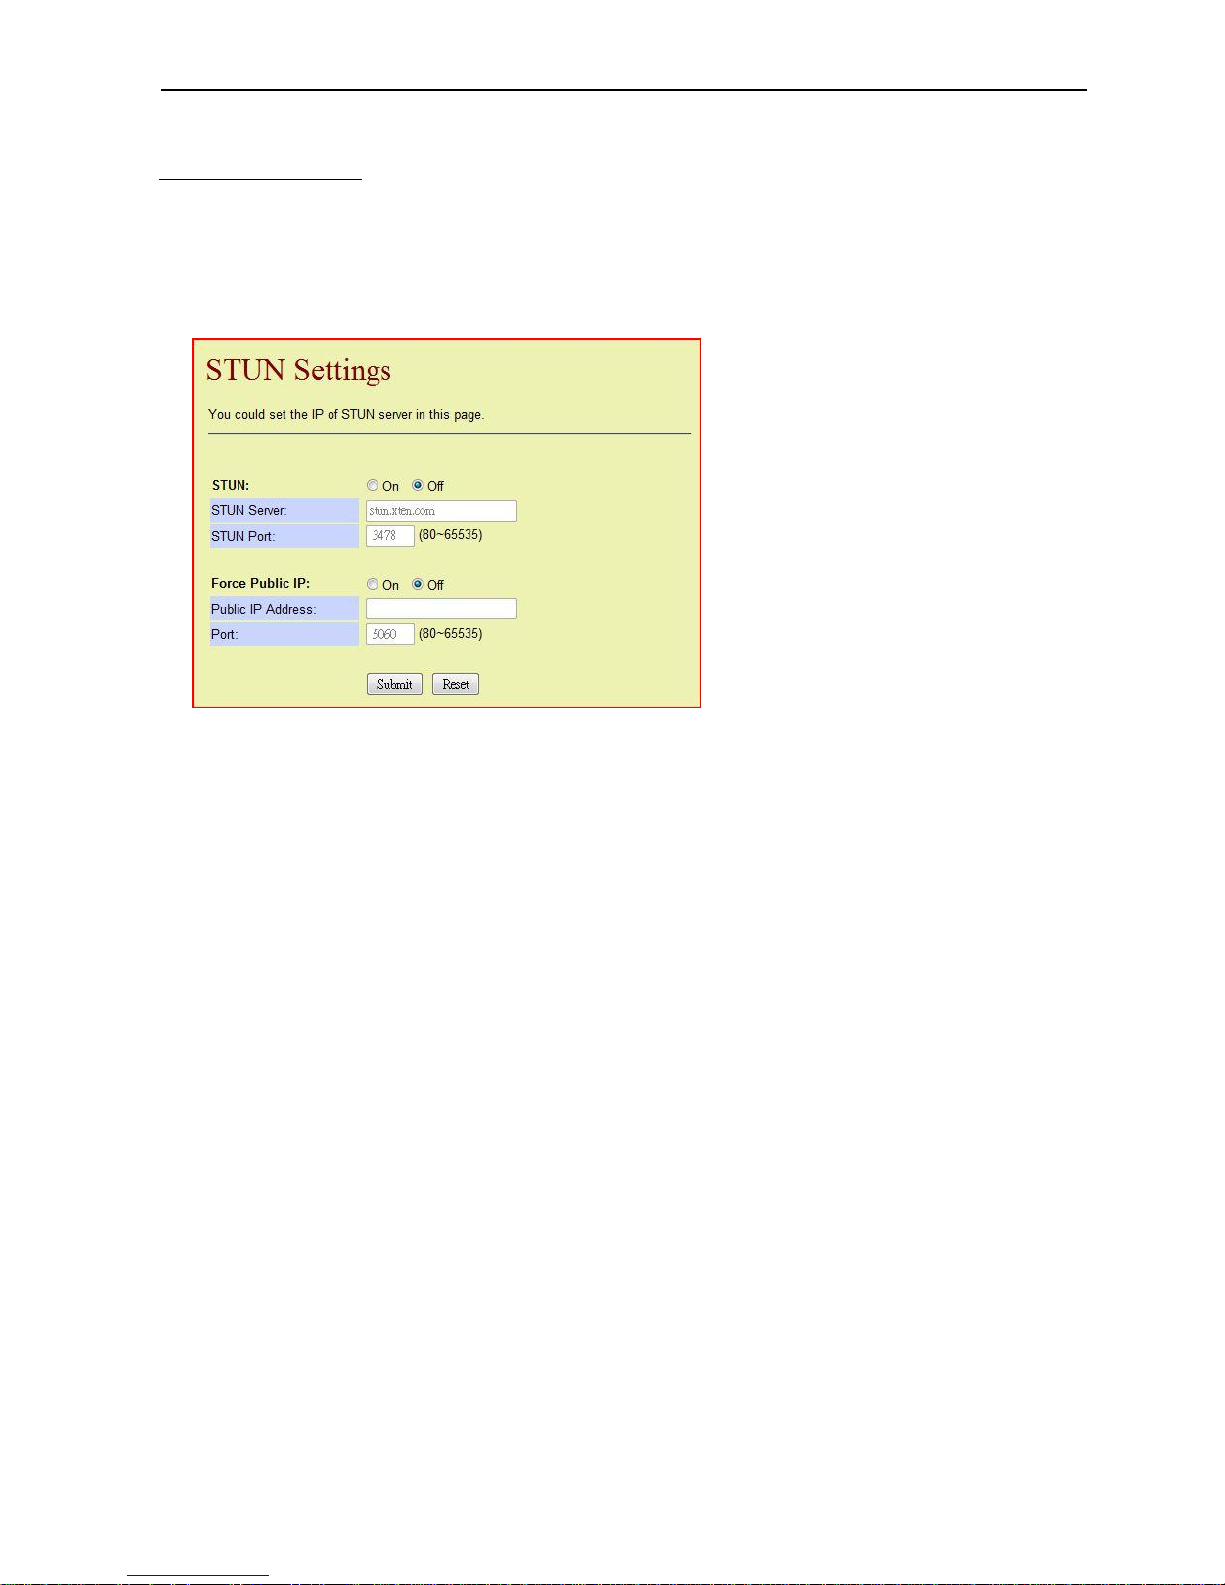
C4.7 Other Settings
This section includes all the uncategorized settings. The settings page is as follows:
Page 49

Dual Mode VoIP Keyphone IP37-31
43
Hold by RFC On: Activate the Hold function of the RFC.
Off: Deactivate the Hold function of the RFC (when used
with a VP, this setting shall be set to Off)
Voice QoS ( Diff-Serv ): This item (Differentiated Services) offers a better
voice quality when the packets are transmitted along
with other data over the IP network. This value shall
only be modified by a technician.
SIP QoS ( Diff-Serv ): This item (Differentiated Services) offers a better SIP
transmission quality when the packets are
transmitted along with other data over the IP network.
This value shall only be modified by a technician.
SIP Expire Time: The registration to a SIP server expires when it
receives no packet from the phone for the period of
time set here.
Use DNS SRV On: Use the DNS server
Off: Do not use DNS server
Send Keep Alives Packet On: Send the Keep-Alive packets periodically.
Off: Do not send the Keep-Alive packets.
Keep Alives Period: The time interval of each Keep-Alive packet sending.
Jitter Buffer: The number of Jitter packets tolerated.
SIP Server Type: Choose a SIP server type to register with.
Choose General when the phone is used with a VP.
SIP VID ( VLAN ): The SIP VID value used in a VLAN.
RTP VID ( VLAN ): The RTP VID value used in a VLAN
Auto Answer ( Paging ) On: Activate the Auto Answer feature (only available
when used with a VP).
Off: Deactivate the Auto Answer feature (only available
when used with a VP).
The buttons are as follow:
[Submit]: Apply the settings.
[Reset]: Clear all fields.
Page 50
Dual Mode VoIP Keyphone IP37-31
44
C5. NAT Traversal
C5.1 STUN Settings
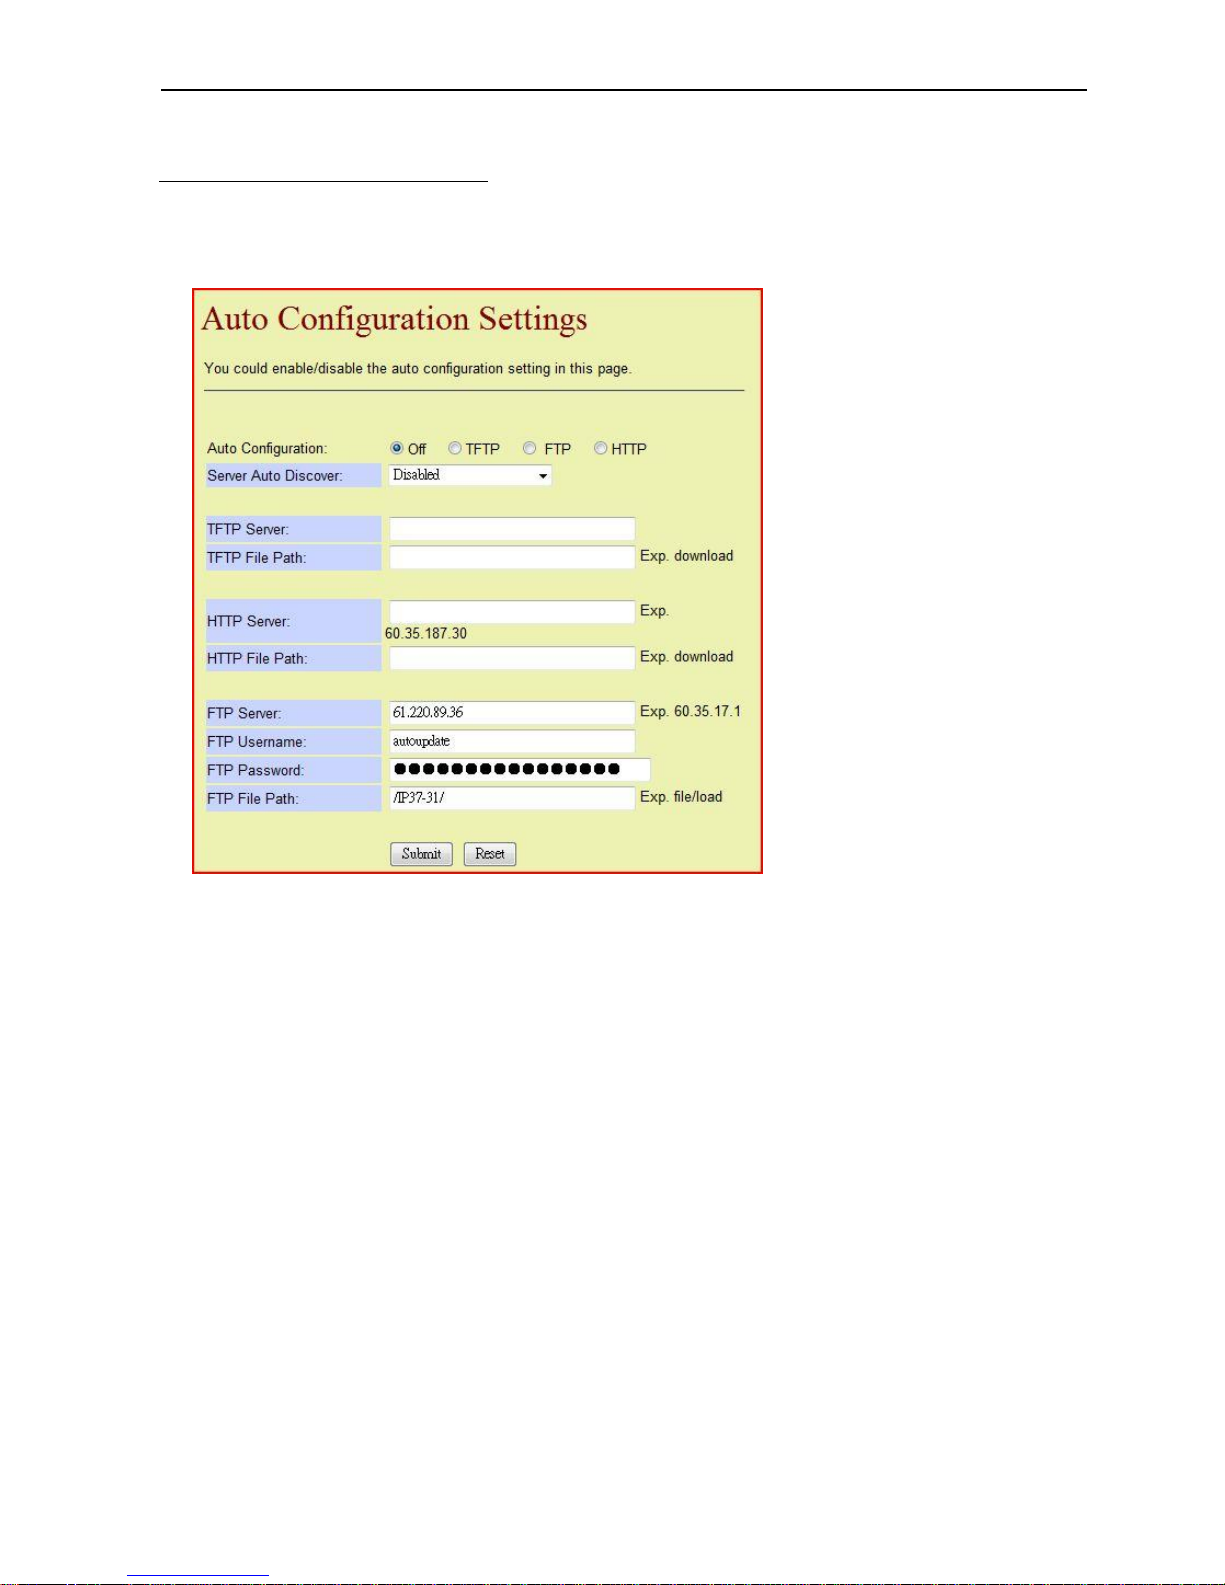
Using the STUN (Simple Traversal of User Datagram protocol through Network Address
Translators) protocol, an extension behind a NAT can communicate with another extension
in a different network. The STUN server is not needed when the VoIP phone uses the VP to
go through the NAT in a different network where another VoIP phone locates. The settings
page is as follows:
STUN On: Use the STUN server.
Off: Do not use the STUN server.
STUN Server: The IP address of the STUN server.
STUN Port: The port number used by the STUN server.
Force Public IP On: Activate the Force Public IP server.
Off: Deactivate the Force public IP server.
Public IP Address: The IP address of the Public IP server.
Port: The port used by the Public IP server.
The buttons are as follow:
[Submit]: Apply the settings.
[Reset]: Clear all fields.
Page 51
Dual Mode VoIP Keyphone IP37-31
45
C6. Others
C6.1 Auto Configuration Settings
Automatically update the parameters of the VoIP phone by using the TFTP, the HTTP, or the
FTP protocols.
The settings page is as follows:
Auto Configuration Off: Do not auto-update the settings.
TFTP: Using TFTP to update the settings.
FTP: Using FTP to update the settings.
HTTP: Using HTTP to update the settings.
Server Auto Discover: Auto-detect which protocol to be used to transfer the data.
TFTP Server: The IP address of the TFTP server.
TFTP File Path: The location in the TFTP server that the new settings file is
stored.
HTTP Server: The IP address of the HTTP server.
HTTP File Path: The location in the HTTP server that the new settings file is
stored.
FTP Server: The IP address of the HTTP server.
FTP Username: The username needed to login the FTP server.
FTP Password: The password needed to login the FTP server.
FTP File Path: The location in the FTP server where the new settings file
is stored.
The buttons are as follow:
[Submit]: Apply the settings.
[Reset]: Clear all fields.
Page 52
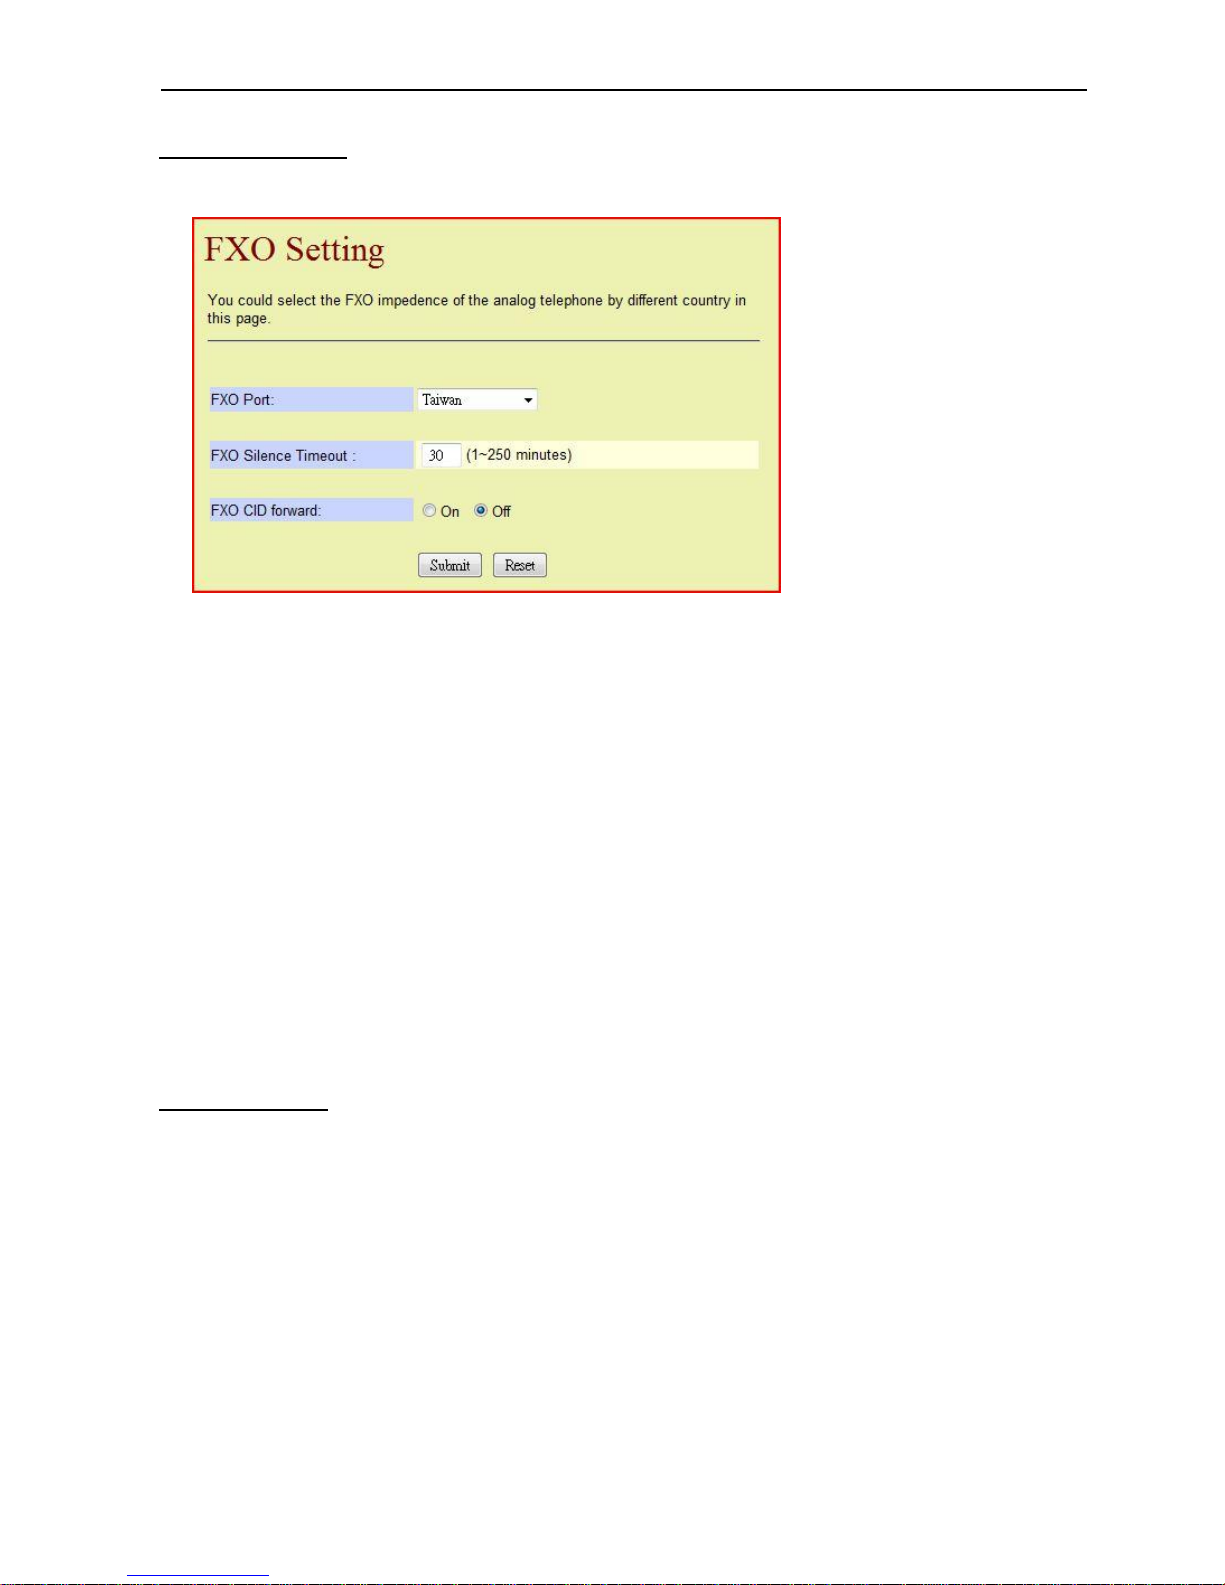
Dual Mode VoIP Keyphone IP37-31
46
C6.2 FXO Settings
The settings below are relevant to the FXO interface:
FXO Port: The phone has all of its FXO-related interface parameters
pre-configured for different countries. The settings were
packaged and labeled with the name of the countries. The
user only needs to choose which country the phone is
located.
FXO Silence Timeout: When a FXO turned silence for a period of time, the phone
will automatically hang up the call.
FXO CID Forward On: Activate the FXO CID Forward feature.
Off: Deactivate the FXO CID Forward feature.
The buttons are as follow:
[Submit]: Apply the settings.
[Reset]: Clear all fields.
C6.3 MAC Clone
This is a special feature. Please do not change any setting on this page unless necessary.
Page 53
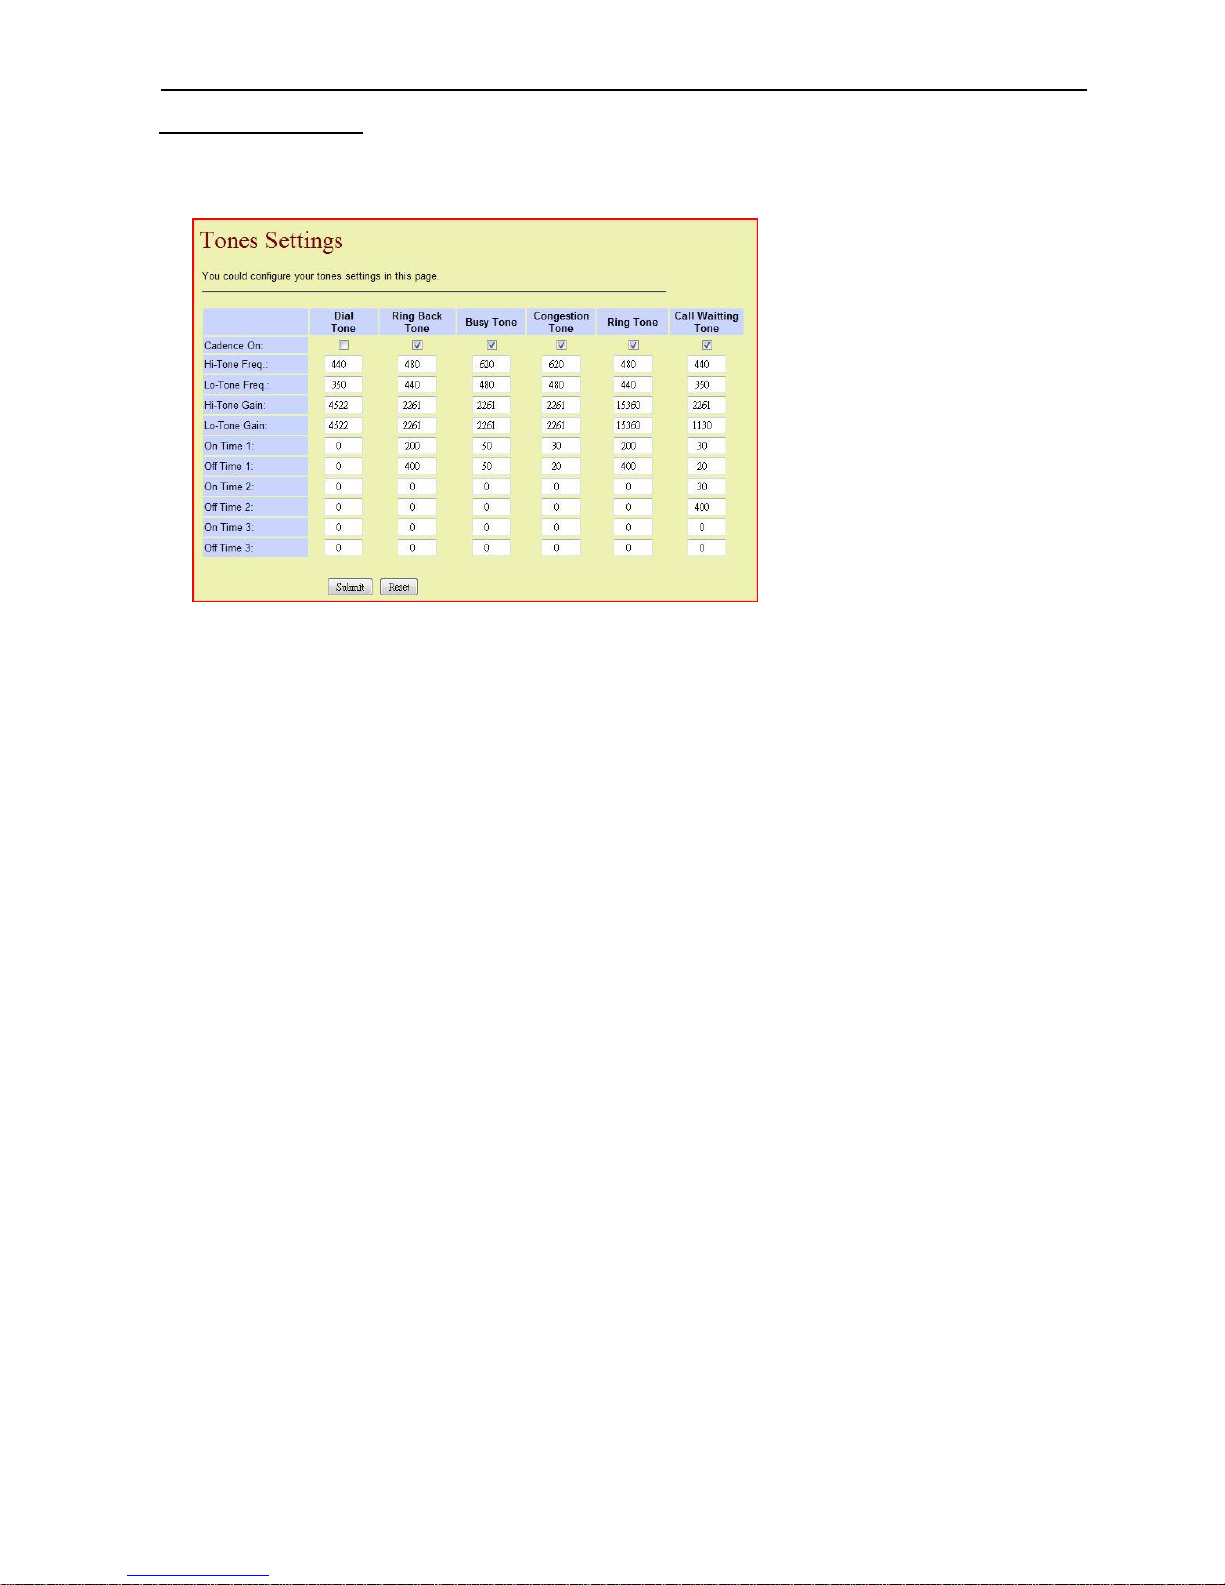
Dual Mode VoIP Keyphone IP37-31
47
C6.4 Tones Settings
The settings below allow the user to adjust the frequency of different signals and their on/off
time. These settings shall only be changed by a technician.
Dial Tone: This tone indicates that the line is ready and the user can start
dialing.
Ring Back Tone: The tone is heard when the phone is ringing at the called party.
Busy Tone: The caller will hear this tone when the called party is busy.
Congestion Tone: The caller will hear this tone when the line is busy (system busy).
Ring Tone: The tone made by the telephone to indicate an incoming call.
Call Waiting Tone: The user on a call would hear this tone when another user calls.
Cadence On: Tick this option to enable the ON/Off interval of the tone.
Hi-Tone Freq.: The frequency of the high-pitched tone.
Lo-Tone Freq.: The frequency of the low-pitched tone.
Hi-Tone Gain: The volume of the high-pitched tone.
Lo-Tone Gain: The volume of the low-pitched tone.
On Time 1: The time length of the tone part in the 1st section of the total tone
cycle.
Off Time 1: The time length of the silence part in the 1st section of the total
tone cycle.
On Time 2: The time length of the tone part in the 2nd section of the total
tone cycle.
Off Time 2; The time length of the silence part in the 2nd section of the total
tone cycle.
On Time 3; The time length of the tone part in the 3rd section of the total tone
cycle.
Off Time 3: The time length of the silence part in the 3rd section of the total
tone cycle.
The buttons are as follow:
[Submit]: Apply the settings.
[Reset]: Clear all fields.
Page 54
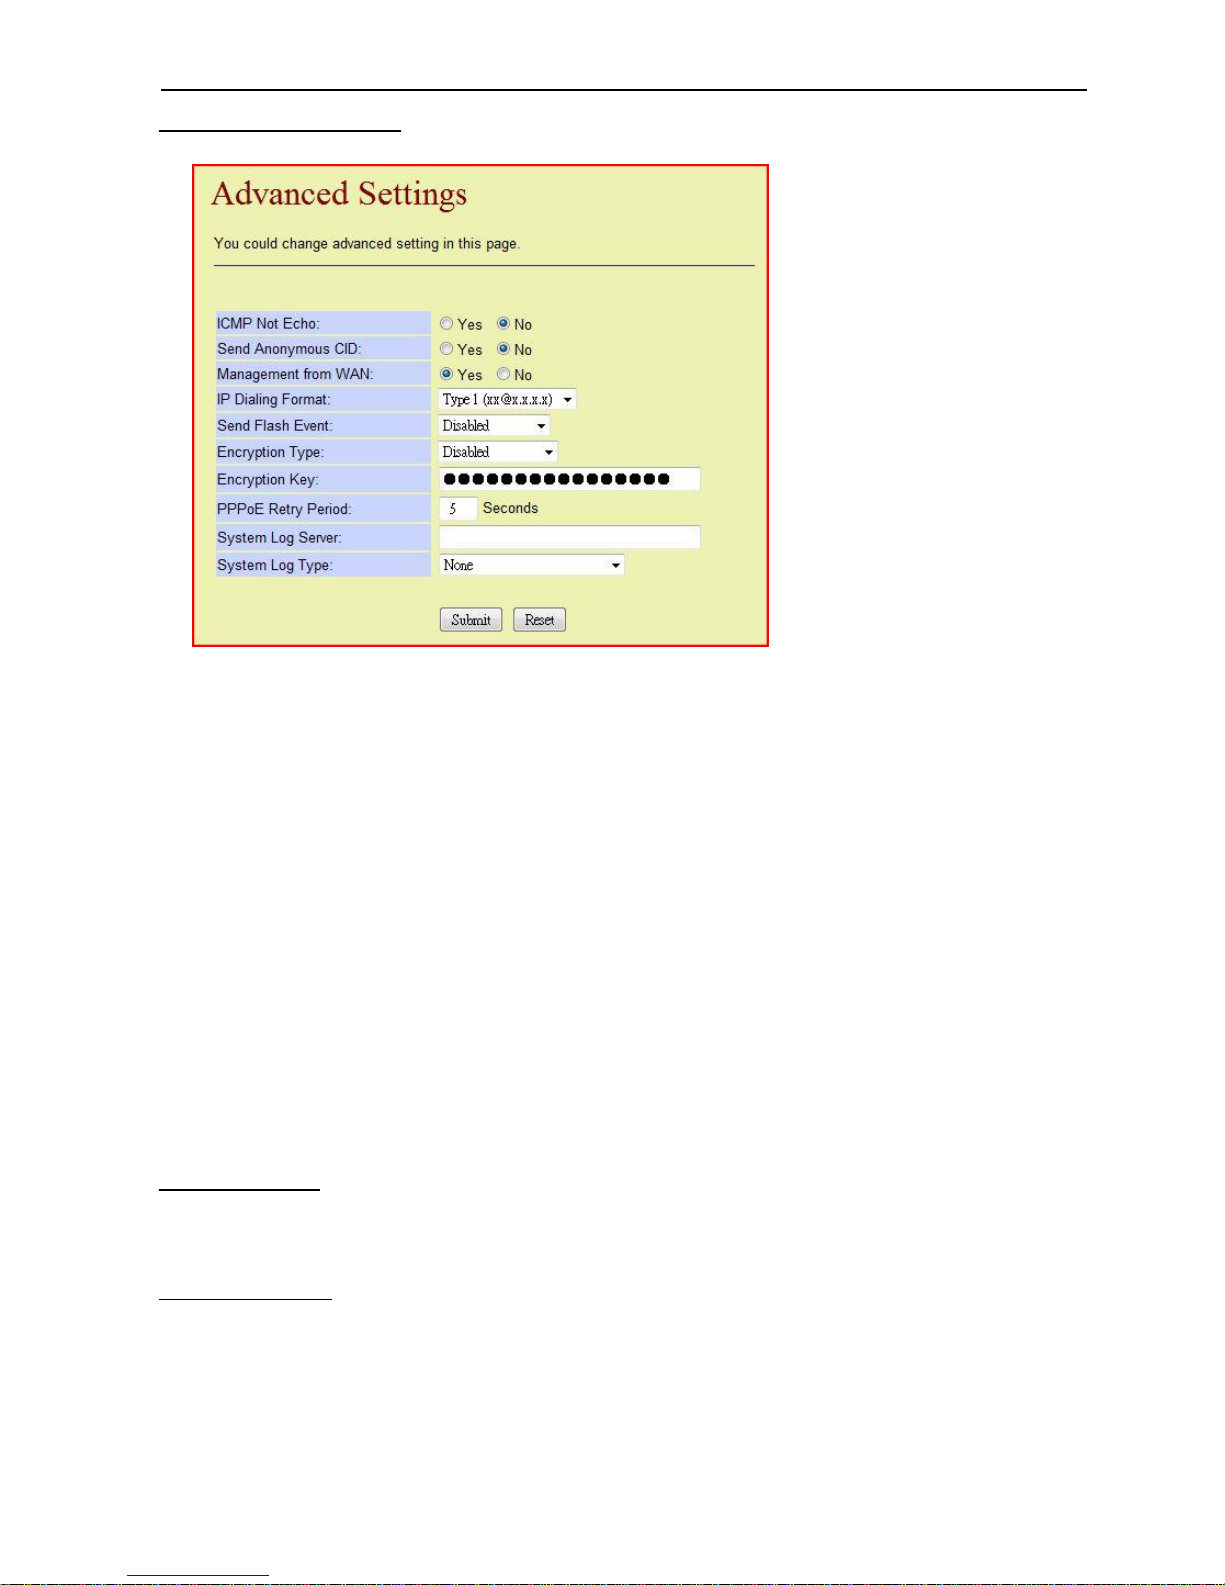
Dual Mode VoIP Keyphone IP37-31
48
C6.5 Advanced Settings
ICMP Not Echo Yes: Do not respond to the ICMP messages.
No: Respond to the ICMP messages.
Send Anonymous CID Yes: Do not send the CID.
No: Send the CID.
Management from WAN Yes: Allows a remote user to configure the settings of the
phone via the WAN port.
No: Do not allow the settings to be configured via the
WAN port.
IP Dialing Format: The format of IP dialing.
Send Flash Event: The method to send a Flash signal.
Encryption Type: The algorithm used for encryption.
Encryption Key: The password for encryption.
PPPoE Retry Period: This value determines the time interval between
each retry cycle when a PPPoE connection is failed.
System Log Server: The server where the System Log is saved.
System Log Type: To choose which systems information that is
recorded.
C6.6 Status Log
Enter this page to view the System Log stored on the phone.
C6.7 System Info
Click this item to show the system information page that the user sees upon logging in.
Page 55
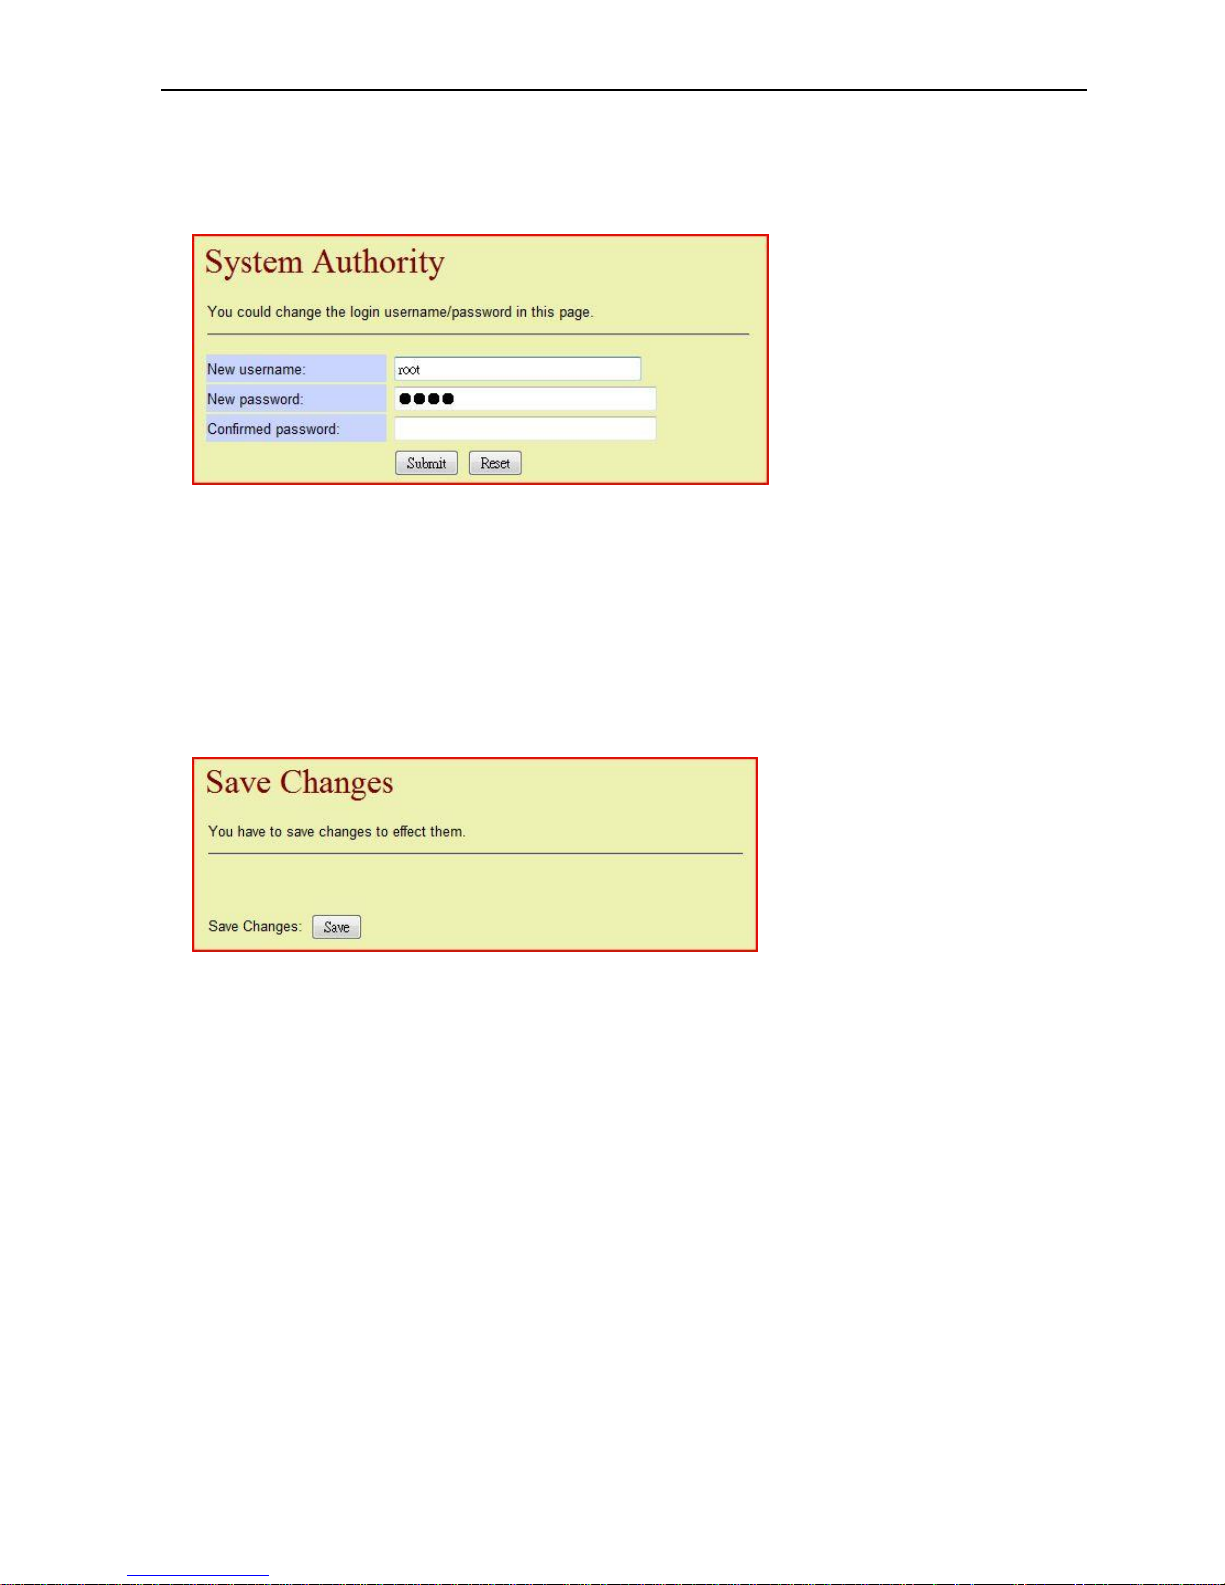
Dual Mode VoIP Keyphone IP37-31
49
C7. System Authority
The settings page below allows the user to modify the Username and the Password of the
current user.
New Username: Assign the new username.
New Password: Assign the new password.
Confirmed Password: Re-enter the new password.
C8. Save Changes
The changes to the phone settings done in the above sections must be saved through this
page. Press the [Save] key to apply the changes and reboot the phone.
Page 56
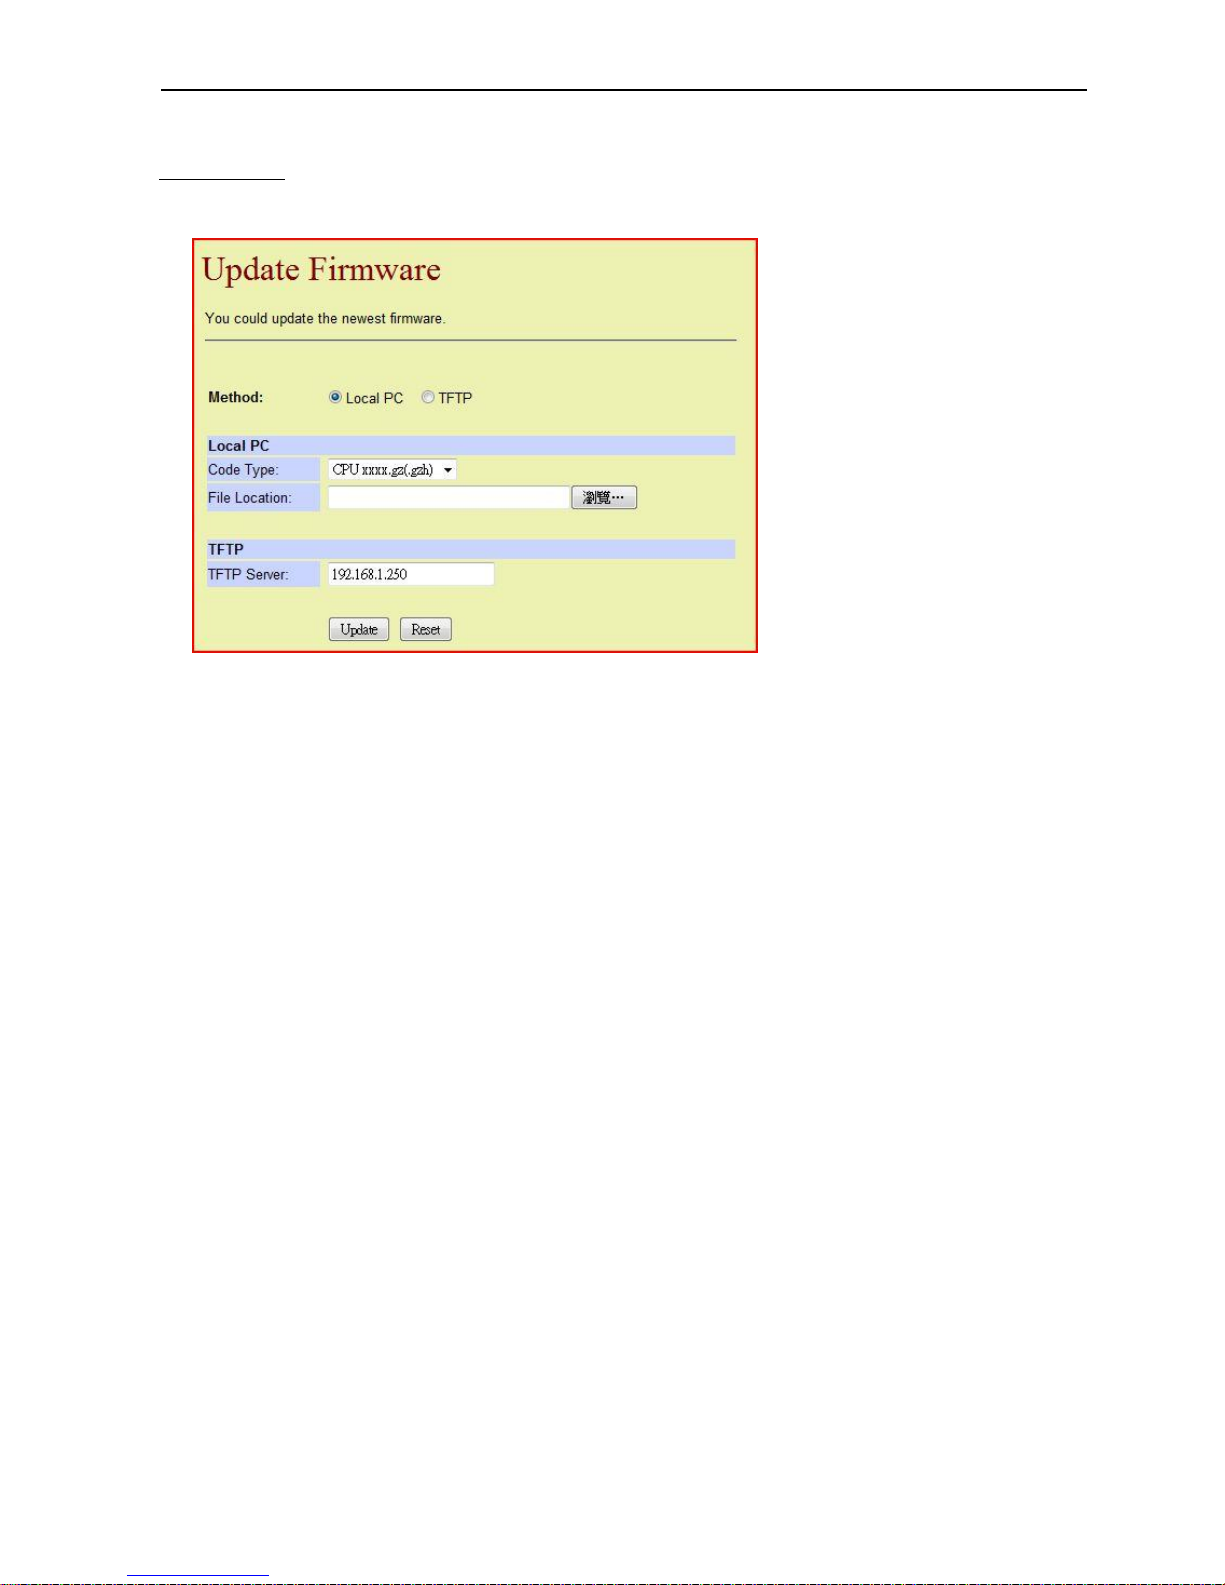
Dual Mode VoIP Keyphone IP37-31
50
C9. Update
C9.1 Update
The user can update the firmware of the phone manually. The settings page is as follows:
Method
Local PC: Update the firmware via the local PC.
TFTP: Update the firmware via a TFTP server.
Local PC
Code Type: To choose which firmware (Control Unit or the DSP) to be updated.
File Location; The location where the update-file is stored. This information is
shared by the local PC and the TFTP server. The user can only
choose one method to update the firmware.
TFTP
TFTP Server: The IP address of the TFTP server.
The buttons are as follow:
[Update]: Update the firmware.
[Reset ]: Clear all fields.
Page 57
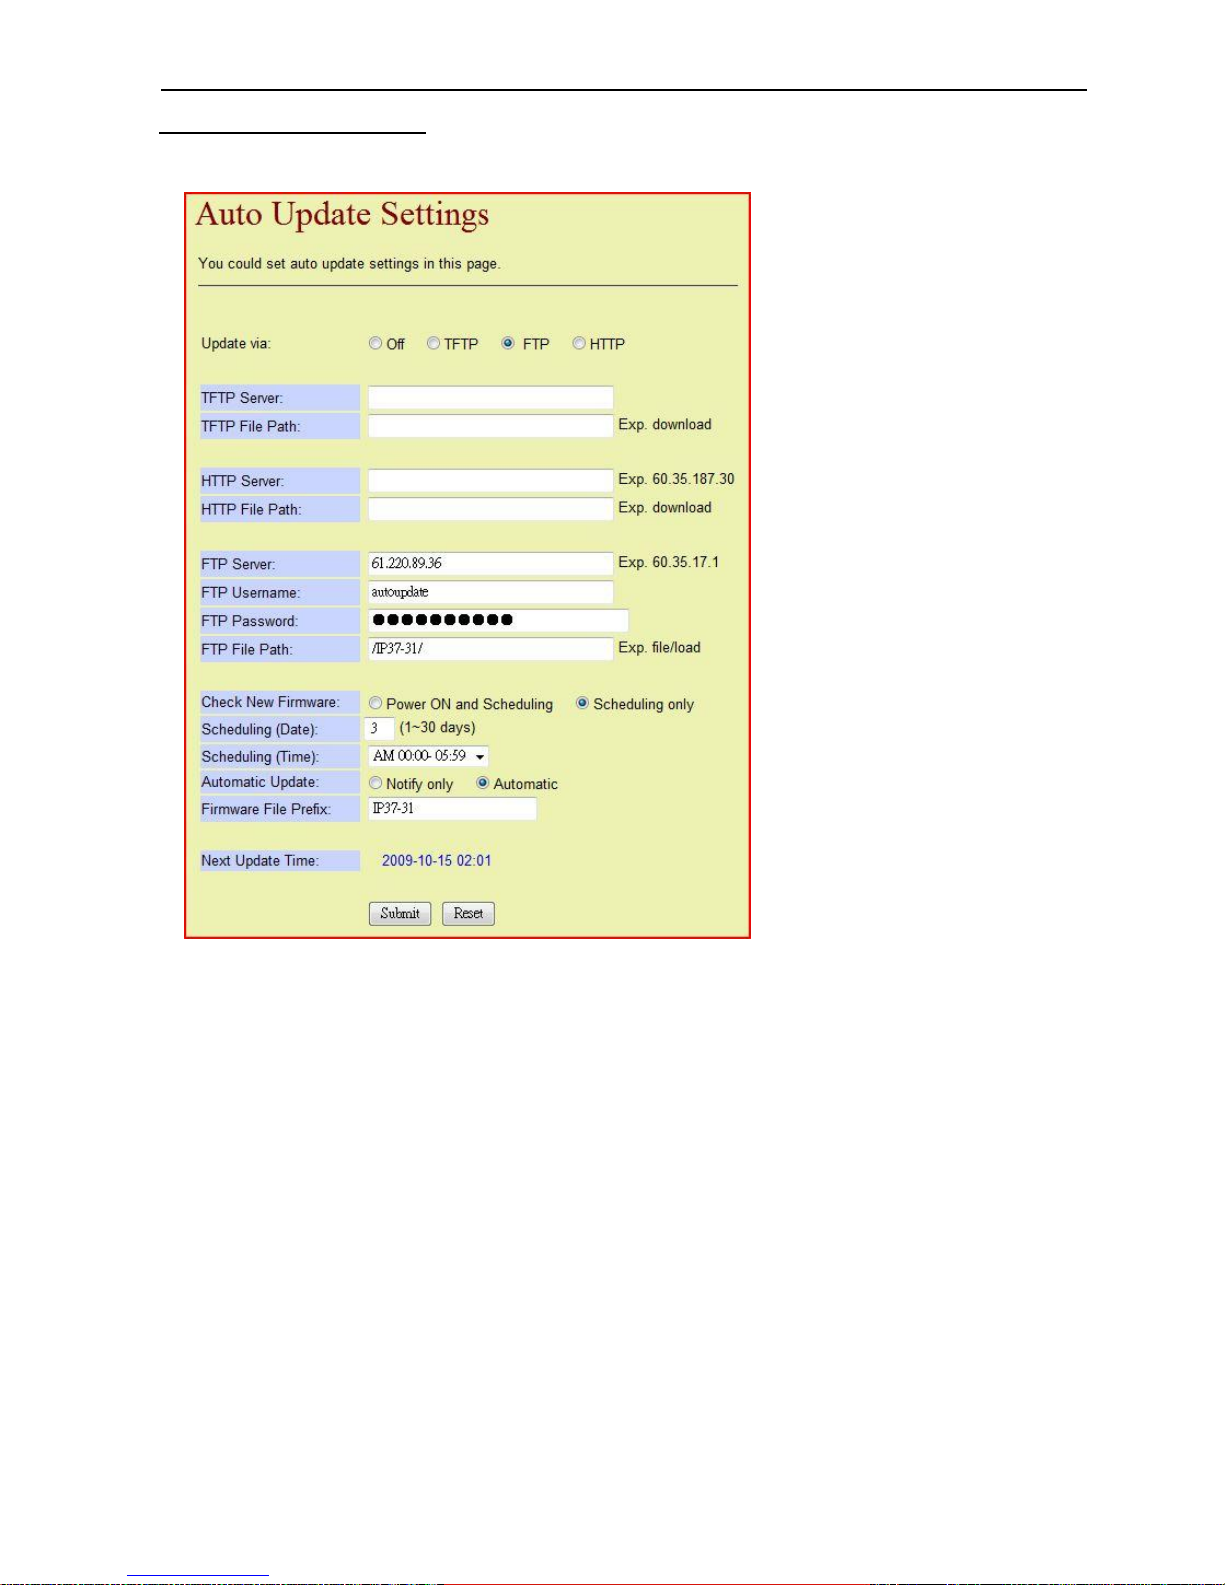
Dual Mode VoIP Keyphone IP37-31
51
C9.2 Auto Update Settings
The settings page below allow the user to set the phone to Auto-Update.
Update via
Off: Do not auto-update.
TFTP: Auto-update via a TFTP server.
FTP: Auto-update via a FTP server.
HTTP: Auto-update via a HTTP server.
TFTP Server: The IP address of the TFTP server.
TFTP File Path: The location in the TFTP server where the new settings file is
stored.
HTTP Server: The IP address of the HTTP server.
HTTP File Path: The location in the HTTP server where the new settings file is
stored.
FTP Server: The IP address of the FTP server.
FTP Username: The username needed to login the FTP server.
FTP Password: The password needed to login the FTP server.
FTP File Path: The location in the FTP server where the new settings file is stored.
Page 58
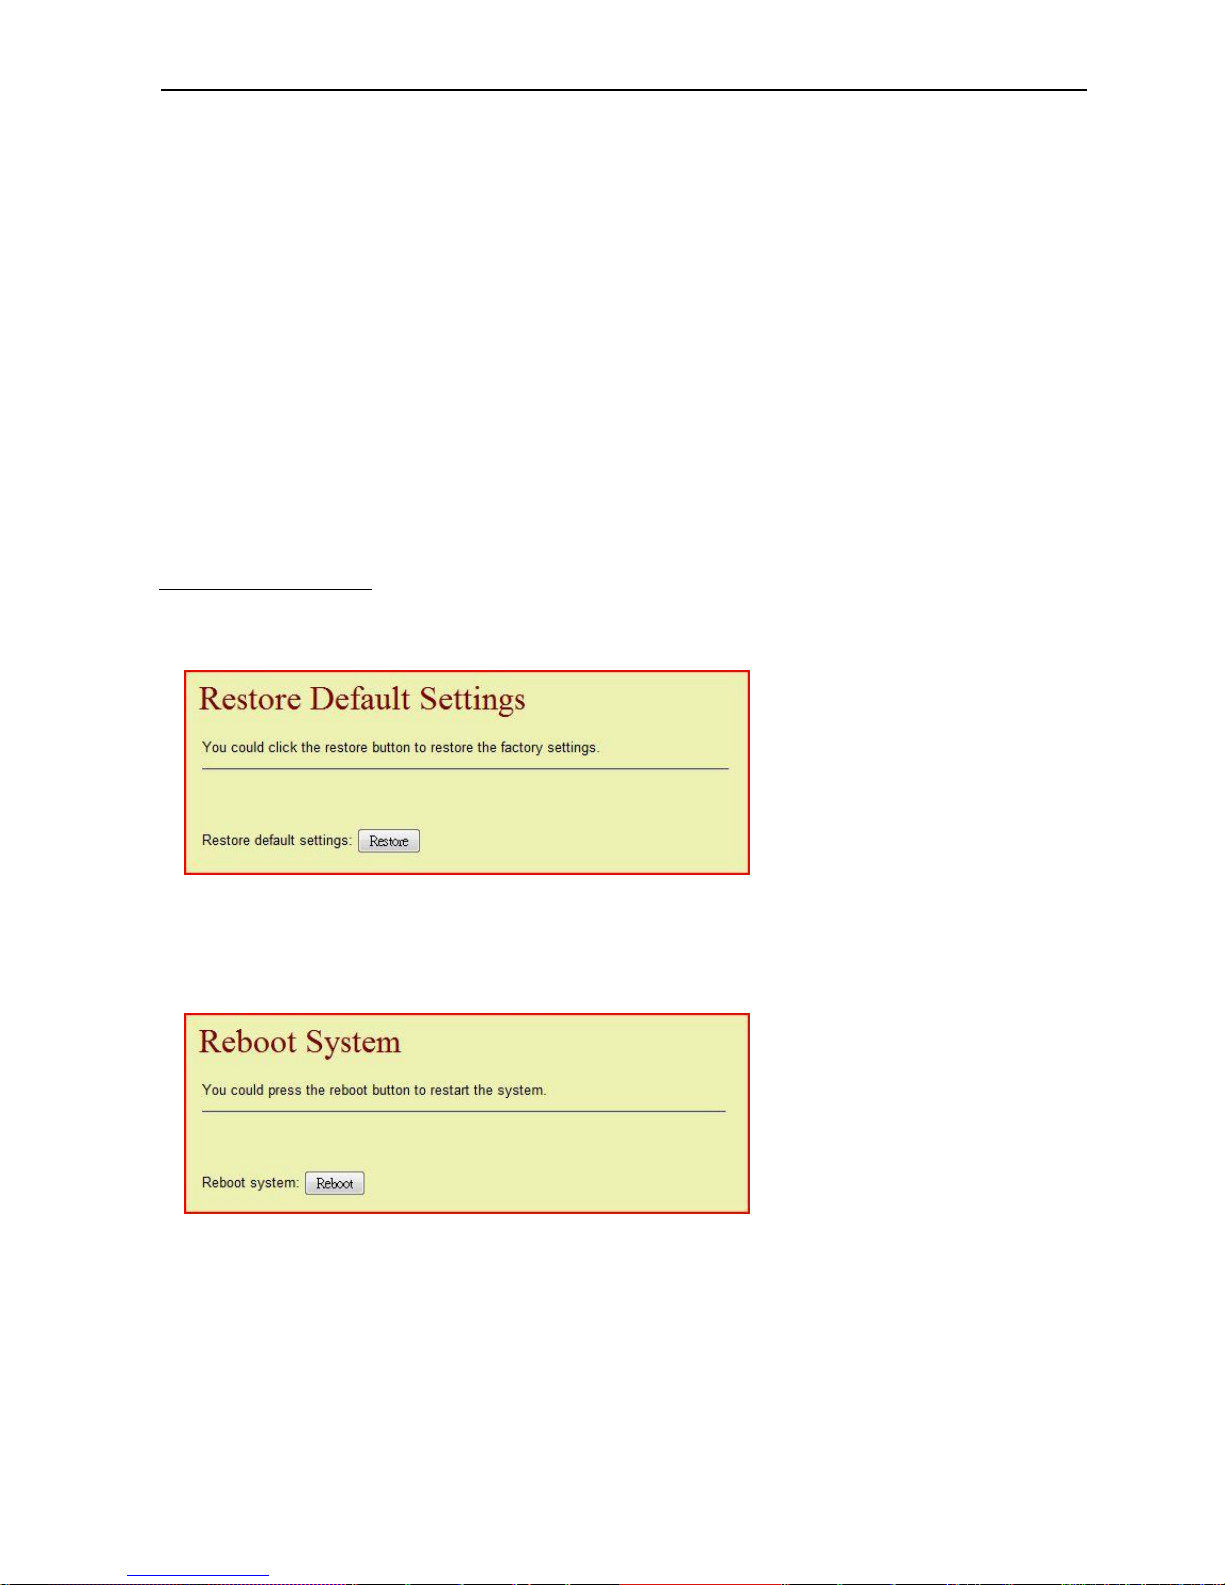
Dual Mode VoIP Keyphone IP37-31
52
Check new firmware
Power On and Schedule: Checking version when phone is powered on and by
schedule.
Scheduling only: Check for new firmware only by schedule.
Scheduling ( Date ): The day-interval between each update check.
Scheduling ( Time ): The time of the day to perform the update check.
Automatic Update
Notify Only: Only notify the user of the new firmware but not update it.
Automatic: Automatically update the firmware.
Firmware File Prefix: The prefix name of the firmware file.
Next Update Time: The date and time of the next update-check.
C9.3 Default Settings
Press the [Restore] button on the settings page below to erase all settings and restore them
back to factory default value.
C10. Reboot
Press the [Reboot] button on the settings page below to reboot the phone.
Page 59

Dual Mode VoIP Keyphone IP37-31
53
D. FXO Calls
D1. Making Calls
Follow the steps below to make a call using the Dial Keypad.
(1) Lift the handset or press [ SPK ] key, and then dial [ 0*].
(2) The user would hear the Dial Tone from a PBX or the PSTN via the FXO interface.
(3) Dial the telephone number.
D2. Answering Calls
When the phone receives a call via the FXO interface, it will be ringing.
Follow the steps below to answer a call.
Lift the handset or press [ SPK ] key.
D3. Hold & Retrieve Held Call
(1) While on a call, pressing the [ HOLD ] key will hold the call on this phone, the held
caller will hear a music sent by this phone.
(2) Press [ HOLD ] key again to retrieve the held call and resume conversation.
(3) Or the user can hang up the handset and pick it up again to resume conversation.
D4. During Conversation
D4.1 Mute
When having conversation via the handset or in Handsfree mode, the user can press
[ MIC ] key to turn its LED light on or off.
The status of the LED light is described below:
Red light steadily on: The microphone is activated.
Red light off: The microphone is mute.
D4.2 Handset & Handsfree Modes Switch
(1) When talking on the handset, press [ SPK ] key to have its LED light illuminate
steadily, and then hang up the handset to switch to Handsfree mode. Now the [ MIC ]
key and the [ SPK ] key both illuminate steadily.
(2) When talking in Handsfree mode, lift the handset to switch to talking on the handset.
The light of the [ SPK ] key went out; the red light of the [ MIC ] key is steadily on,
representing that the microphone is activated.
D4.3 Volume Adjustment
When talking on the handset or in Handsfree mode, pressing the [Down] key will turn
down the volume of the speaker (on the handset or on the phone), while pressing the
[ Up] key will turn the volume up.
D4.4 Flash
While on a call via the FXO interface with a CO Line from the PBX or the PSTN, the
user can initiate some special features by sending a Flash signal (a 90 ms to 400 ms
quick disconnect then reconnect action); the user can then execute the special
features by pressing certain keys.
Press the [TRF / FL] key while on a call to send a Flash signal.
Page 60
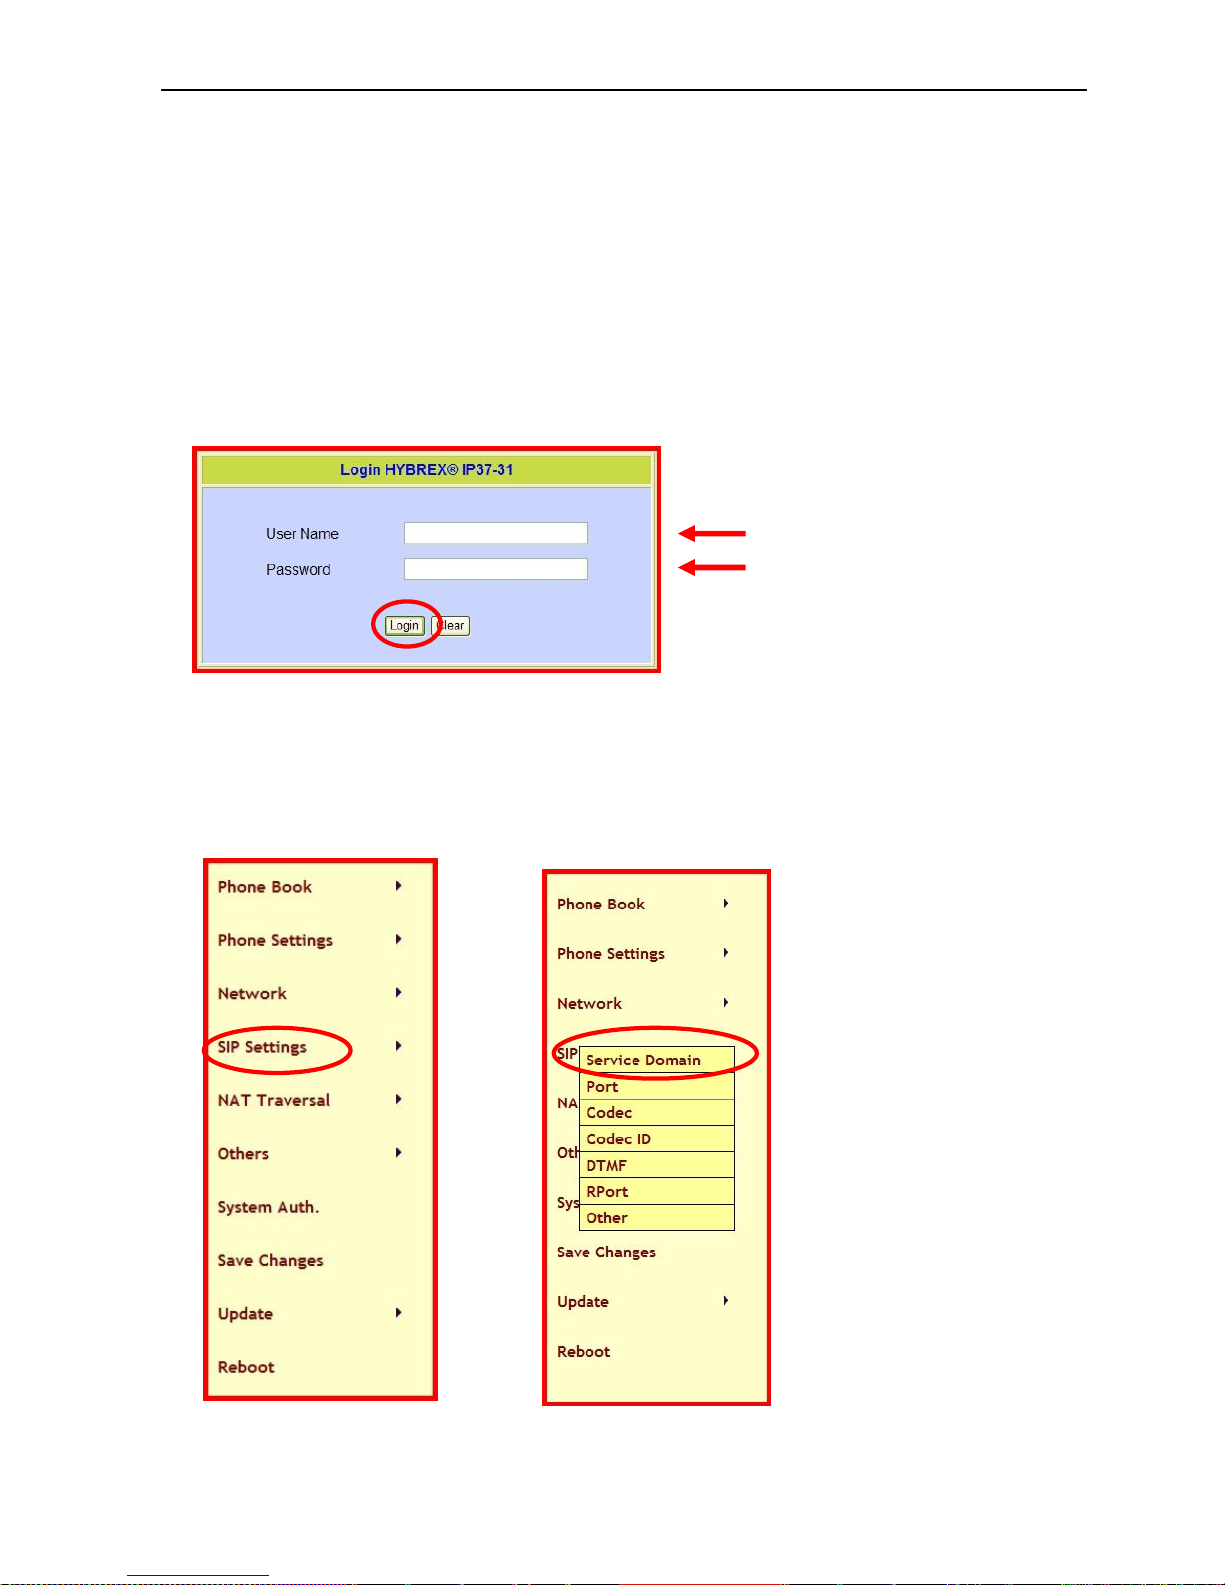
Dual Mode VoIP Keyphone IP37-31
54
E. Q & A
E1. IP 37-31 VoIP Phone Quick Setup Guide
Follow the steps below to set the configurations via the settings webpage.
1. The IP address of the IP 37-31 must be acquired first to do the setting using a web
browser. Pressing [ Menu ] key and dial [ 45 ] to show the IP address of the VoIP phone
on the upper line of the LCD. The lower line shows the MAC code.
2. Open the IE browser and type the obtained IP address in the URL field then press
[Enter]. The following screen will show up.
3. Please enter the username of the administrator into the “User Name” field.
Please enter the password of the administrator into the “Password” field then click
[ Login ] button. Refer to C. (6). If successfully verified, the user will login to the web
settings page of the phone.
4. Please click “SIP Settings” on the left of the IE screen, and then click “Service Domain”.
Page 61
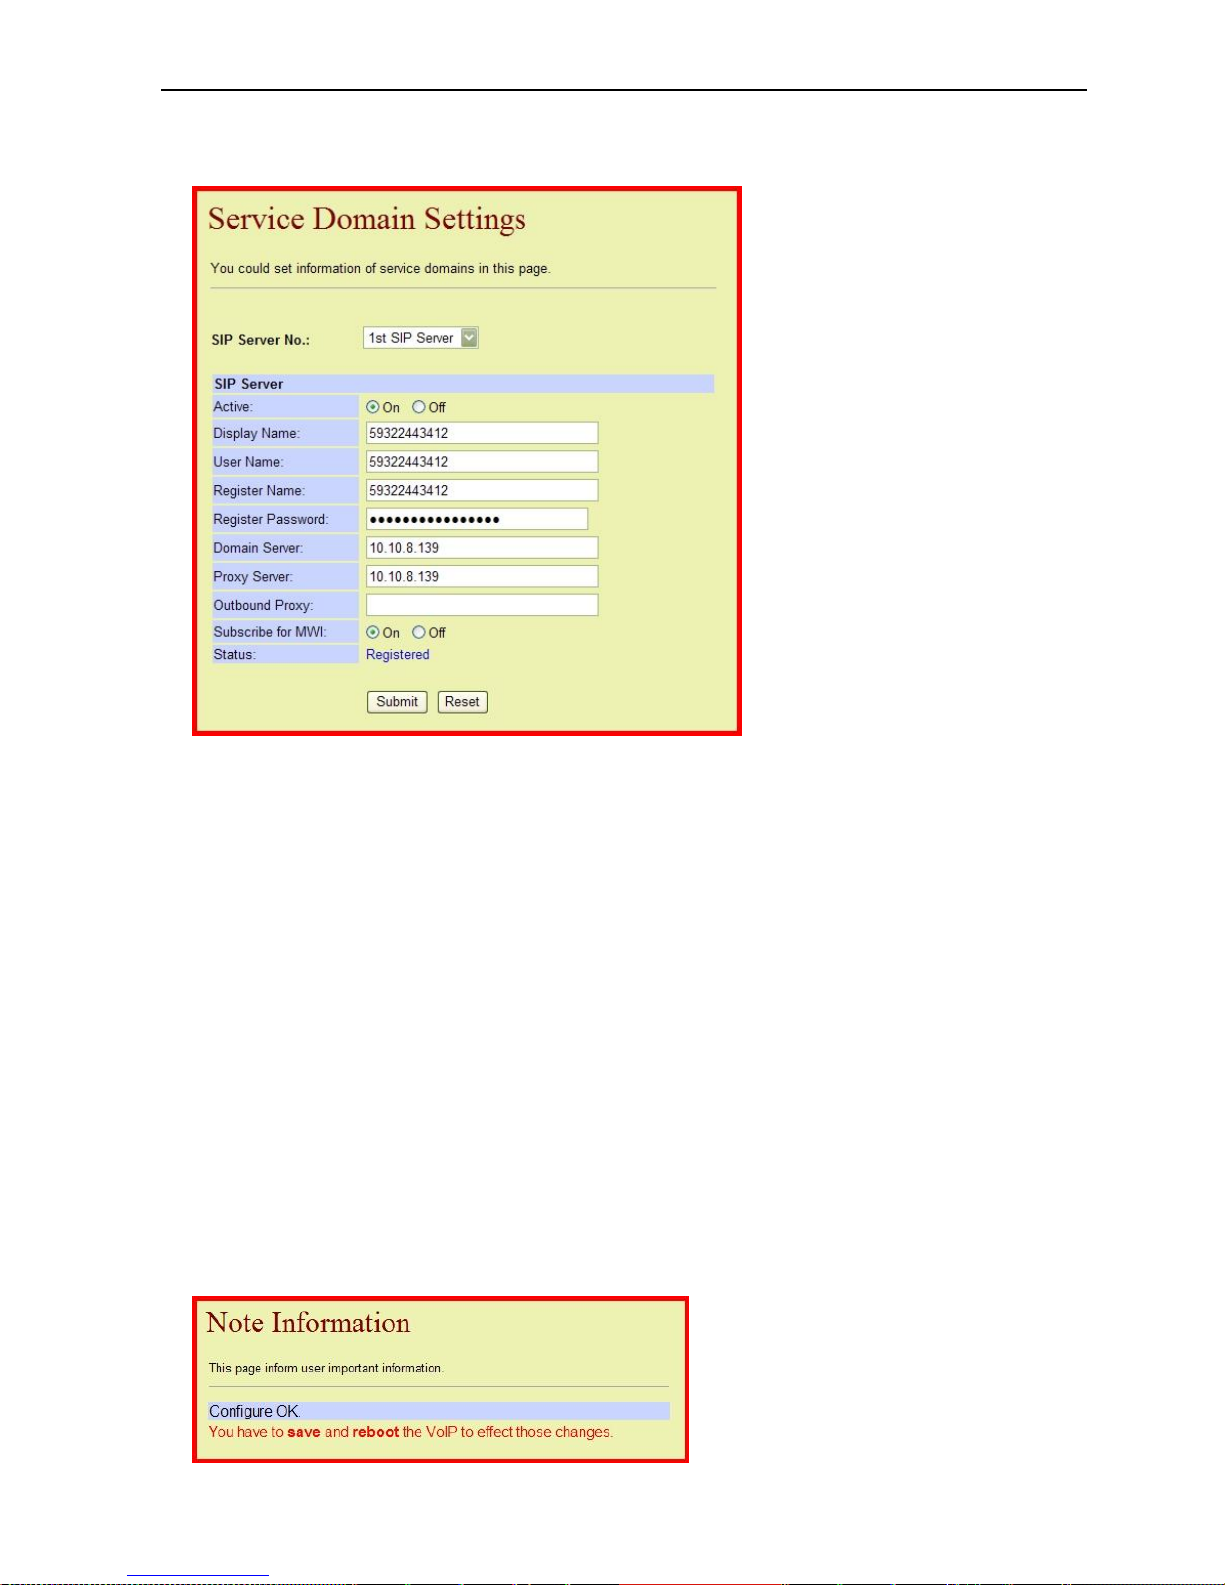
Dual Mode VoIP Keyphone IP37-31
55
5. After clicking “Service Domain”, the following settings page will be shown on the right of
the IE screen.
The setting items on the above page are described below:
SIP Server No: Choose the “1
st
SIP Server”.
Active: Choose “On” to have this SIP server available.
Display Name: Enter Display Name in the VP (e.g.: 59322443412).
User Name: Enter User Name in the VP (e.g.: 59322443412).
Register Name: Enter Register Name in the VP (e.g.: 59322443412).
Register Password: Enter Register Password in the VP (e.g.: 59322443412).
Domain Server: Enter IP address or domain name of VP (e.g.:10.10.8.139).
Proxy Server: Enter IP address or domain name of VP (e.g.:10.10.8.139).
Outbound Proxy: This field does not needed to be set.
Subscribe for MWI: If the Voice Mail feature of the VP is activated, please choose
“On” here; now the [ MSG ] key on the phone will flash when
there is a message left for this phone.
Status: This field indicates if the registration is successfully done.
6. Please press the [ Submit ] button when the user has done the above setting fields. The
following screen will show up.
Page 62
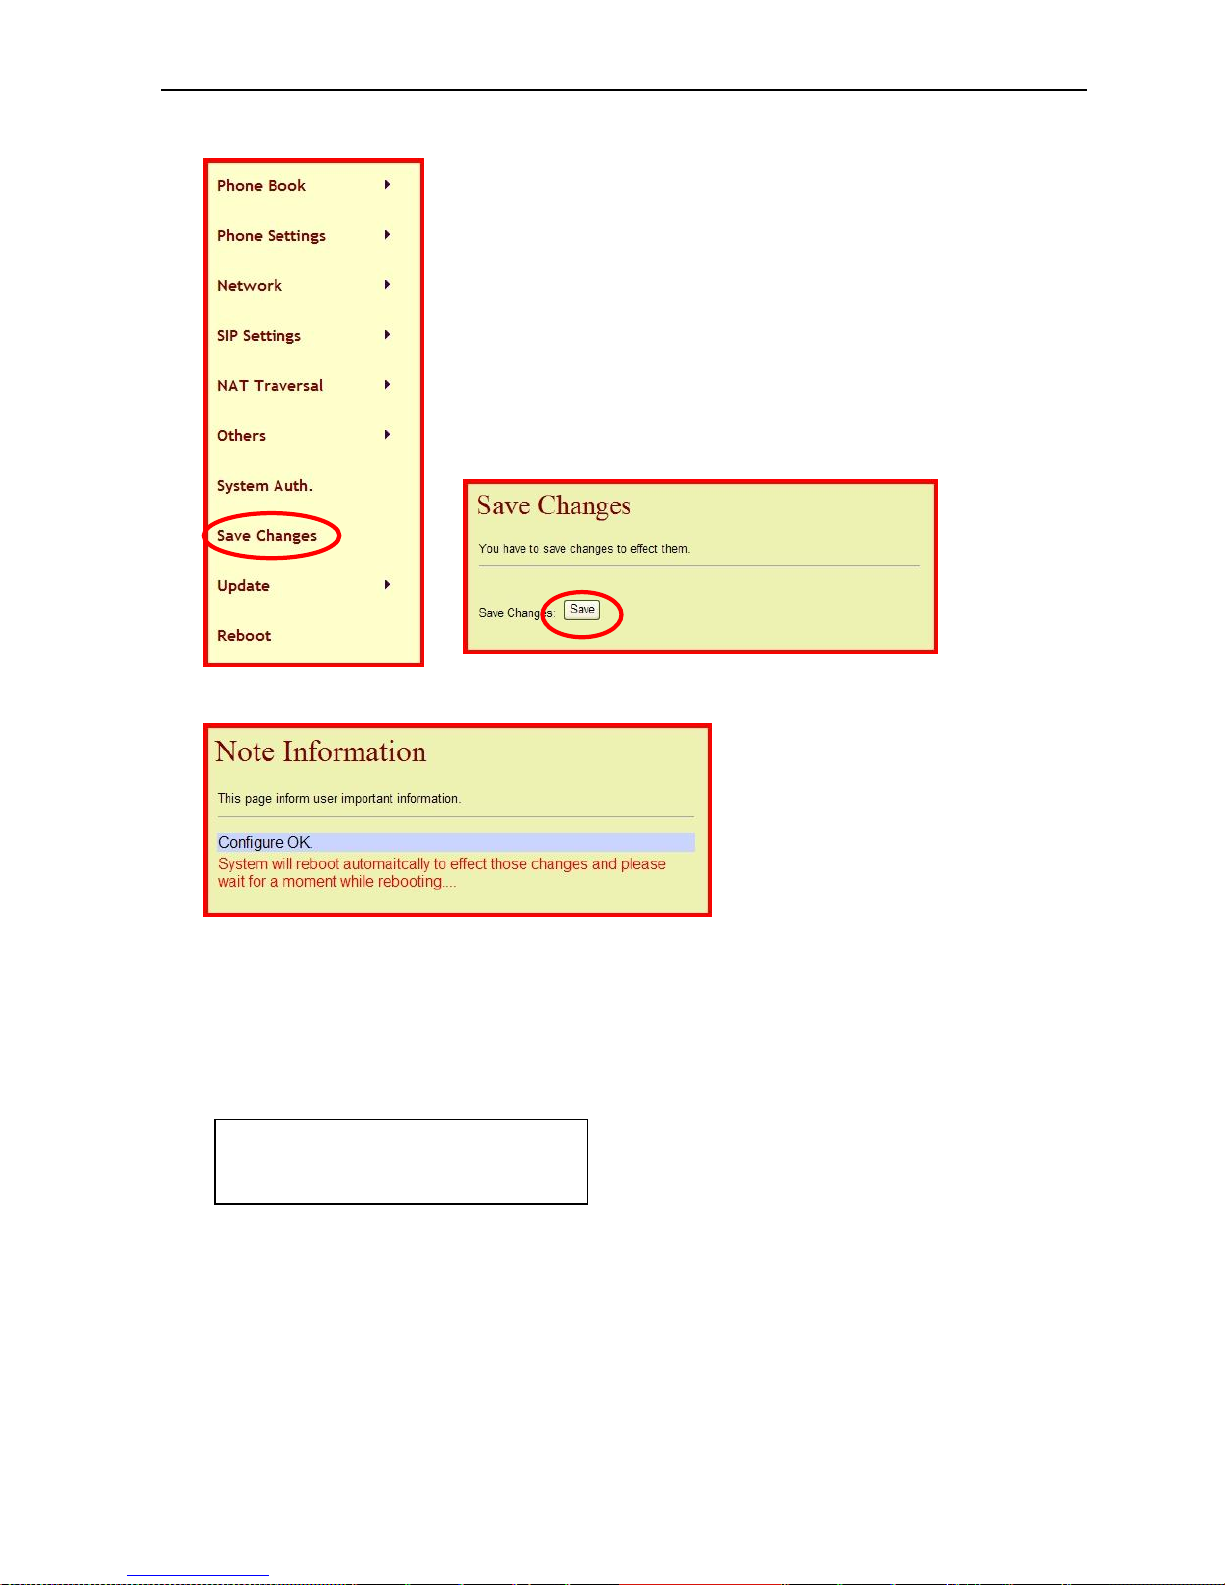
Dual Mode VoIP Keyphone IP37-31
56
7. Please click “Save Changes”, another screen will pop up as shown below.
8. Please click [ Save ] button to see the following screen.
The phone is rebooting now.
9. If the reboot is successful and registration is done, the LCD screen on the phone will
display the current time and the extension number of this phone, as the picture shows
below. The upper line shows the current time. The lower line shows the registered VoIP
phone number.
XX-XX XX: XX
< 59322443412 >
 Loading...