

HXM HDP-1 User Manual
- 1 -
HDP-1 DIGITAL DRUM
USER’S MANUAL
KIT
ENTER
SETUP
EXIT
G.BOX
CLICK
PHRASE
PHONE VOL MASTER VOL

- 2 -
CAUTION
Any changes or modifications in construction of this device which are not expressly approved by the
party responsible for compliance could void the user’s authority to operate the equipment.
WARNING
When using electrical products, basic safety precautions should always be followed, including the
following:
NOTE: This equipment has been tested and found to comply with the limits for a Class B digital device,
pursuant to Part 15 of the FCC Rules.
Also, this equipment has been tested and found to comply with the limits for following standard:
EN55022-2006
EN55024:1998/+A1:2001/+A2:2003
EN55013:2001/+A1:2003/+A3:2006
EN55020:2007
EN61000-3-2:2006
EN61000-3-3:1995/+A1:2001/+A2:2003
These limits are designed to provide reasonable protection against harmful interference in a residential
installation. This equipment generates, uses, and can radiate radio frequency energy and, if not installed
and used in accordance with the instructions, may cause harmful interference to radio communications.
However, there is no guarantee that interference will not occur in a particular installation. If this equipment
does cause harmful interference to radio or television reception, which can be determined by turning the
equipment off and on, the user is encouraged to try to correct the interference by one or more of the
following measures:
- Reorient or relocate the receiving antenna.
- Increase the separation between the equipment and receiver.
- Connect the equipment into an outlet on a circuit different from that to which the receiver is connected.
- Consult the dealer or an experienced radio/TV technician for help.
CAUTION

- 3 -
TAKING CARE OF YOUR DRUM
- direct sunlight (near a window),
- high temperatures (near a heat source, outside,
or in a car during the daytime),
- rain or excessive humidity,
- excessive dust,
- strong vibration.
w The unit shall not be exposed to dripping or
splashing and no objects filled with liquids,
such as vases, shall be placed on the unit.
w The drum contains digital circuitry and may
cause interference if placed too close to radio
or television receivers. If interference occurs,
move the drum further away from the affected
equipment.
POWER
w Only use attached power adaptor.
w Turn the power switch off when the drum is
not in use.
w To avoid damage to the drum and other
devices to which it is connected, turn the
power switches of all related devices off prior
to connection or disconnection of audio
cables.
w Turn the power off if the main cable of the
adaptor is damaged or the instrument is
spattered with liquid.
w Do not switch the unit on and off in quick
succession, this places an undue load on the
electronic components.
w Unplug the AC power cord during an electrical
storm.
w Avoid plugging the AC adaptor into the same
AC outlet as appliances with high power
consumption, such as electric heaters or ovens.
SERVICE AND MODIFICATION
This product should be serviced by qualified service
personnel when,
w the power supply cord or the plug of the adaptor
has been damaged,
w liquid has been spattered into the unit or it has
been exposed to rain,
w the instrument does not appear to operate nor-
mally or exhibits a marked change in
performance,
w the instrument has been dropped or the cabinet
has been damaged.
HANDLING AND TRANSPORT
w Never apply excessive force to the controls,
connectors, pads or other parts of the instrument.
w Always unplug cables by gripping the plug firmly,
not by pulling on the cable.
w Physical shocks caused by dropping, bumping, or
placing heavy objects on the instrument can
result in scratches and/or more serious damage.
w Carefully check the amplifier volume control
before stating to play. Excessive volume can
cause permanent hearing loss.
CLEANING
w Clean the unit with a dry or light-wet soft cloth. Do
not use paint thinner or petrochemical based
polishes.
LOCATION
w Do not expose the drum to the following conditions to avoid deformation, discoloration, or more
serious damage,
DO NOT ATTEMPT TO OPEN THE UNIT OR MAKE ANY CHANGE IN THE CIRCUITS OR
PARTS OF THE UNIT.
!

- 4 -
CONTENTS TABLE
ABOUT MANUAL.....................................................................................................................................7
INSTALLATION........................................................................................................................................8
CONTROL PANEL..................................................................................................................................9
BACK PANEL........................................................................................................................................10
PLAYING PAD.......................................................................................................................................11
EXTERNAL TRIGGERING.....................................................................................................................12
DRUM KIT.............................................................................................................................................13
KIT SELECTION............................................................................................................................13
1. Basic Operation.....................................................................................................................13
2. Chain......................................................................................................................................13
3. Use Pedal to Select...............................................................................................................14
4. External Kit Select.................................................................................................................14
LAYER............................................................................................................................................15
GROOVEBOX........................................................................................................................................16
ENTER THE GROOVEBOX MODE................................................................................................17
INITIALIZATION.............................................................................................................................17
PERFORMANCE............................................................................................................................17
1. Play the Loop Parts...............................................................................................................17
3. Play the Sequential Note.......................................................................................................18
4. Play the Effect Sound............................................................................................................19
5. Play Complete Music.............................................................................................................19
6. Change the G.BOX Number During the Playing.....................................................................19
7. Synchronized Start................................................................................................................19
9. Adjust the Tempo..................................................................................................................19
METRONOME.......................................................................................................................................20
SOUND EFFECTS.................................................................................................................................21
PHRASE................................................................................................................................................22
ENTER THE RECORD MODE........................................................................................................22
RECORDER SETUP.......................................................................................................................23
1. Clear the Phrase....................................................................................................................23
2. Record Mode..........................................................................................................................23
3. Select a Kit for Recording......................................................................................................24
4. Select Accompaniment..........................................................................................................24
5. Measure Setting.....................................................................................................................25
6. Beat Setting...........................................................................................................................25
7. Set Tempo.............................................................................................................................25
8. Set Metronome Volume........................................................................................................26
9. Reverb Effect.........................................................................................................................26
10. Chorus Effect.......................................................................................................................26
11. Delay Effect.........................................................................................................................27
RECORDING..................................................................................................................................28

- 5 -
CONTENTS TABLE
SAVE RECORDING........................................................................................................................28
PLAYBACK CURRENT RECORDING............................................................................................29
PLAY PHRASE...............................................................................................................................30
ERASE PHRASE............................................................................................................................31
DRUM KIT EDIT.....................................................................................................................................32
PAD KIT EDIT................................................................................................................................33
1. Pad Kit Edit Preparing...........................................................................................................33
2. Edit Parameters.....................................................................................................................33
(1) Layer..............................................................................................................................34
(2) Layer A Edit....................................................................................................................34
2-1 Assign the Voice......................................................................................................34
2-2 Adjust Volume.........................................................................................................34
2-3 Set Pan....................................................................................................................35
2-4 Adjust Pitch..............................................................................................................35
2-5 Set Reverb Level for Pad..........................................................................................35
2-6 Set Chorus/Delay Level for Pad...............................................................................35
(3) Edit Layer B.....................................................................................................................36
(4) Complete the Pad Kit Editing..........................................................................................36
EXTERNAL KIT EDIT.....................................................................................................................37
1. External Edit Preparing..........................................................................................................37
2. Edit Parameters.....................................................................................................................38
3. Complete the External Kit Editing..........................................................................................38
GLOBAL EDIT...............................................................................................................................39
1. Enter the Global Edit..............................................................................................................39
2. Select Parameters................................................................................................................40
3. Edit Parameters.....................................................................................................................40
(1) Reverb Effect Edit..........................................................................................................40
(2) Chorus Effect Edit...........................................................................................................40
(3) Delay Effect Edit.............................................................................................................41
4. Complete the Global Editing.................................................................................................41
KIT RESET.....................................................................................................................................42
1. Enter the Kit reset..................................................................................................................42
2. Reset the Kit..........................................................................................................................42
ADVANCED EDIT EDIT........................................................................................................................43
PAD ADVANCED EDIT..................................................................................................................44
1. Preparing................................................................................................................................44
2. Edit Parameters.....................................................................................................................44
(1) Sensitivity........................................................................................................................45
(2) Dynamic Range...............................................................................................................45
(3) Mask Time.......................................................................................................................45
(4) Trigger Curve...................................................................................................................45

- 6 -
CONTENTS TABLE
(5) Cross Talk.......................................................................................................................46
3. Complete the Pad Advanced Edit.........................................................................................46
EXTERNAL ADVANCED EDIT.......................................................................................................47
1. Preparing................................................................................................................................47
2. Edit Parameters.....................................................................................................................47
3. Hi-Hat Control Pedal..............................................................................................................48
4. Complete the External Instrument Advanced Edit................................................................48
SYSTEM SETUP...................................................................................................................................49
GENERAL SETUP PROCEDURE..................................................................................................50
CHAIN.............................................................................................................................................51
OVERALL SETTINGS....................................................................................................................51
1 Equalizer................................................................................................................................51
2 Master Volume.......................................................................................................................51
3 Master Tune...........................................................................................................................52
4 Pedal Switch Function...........................................................................................................52
5 Pedal Effective Action...........................................................................................................52
6 Local......................................................................................................................................52
7 Phrase Playing Mode.............................................................................................................52
USER REVERB EFFECT...............................................................................................................53
USER CHORUS EFFECT...............................................................................................................54
USER DELAY EFFECT..................................................................................................................54
USER EQUALIZER.........................................................................................................................55
RESET...................................................................................................................................................56
MIDI & USB...........................................................................................................................................57
KIT LIST................................................................................................................................................58
GROOVEBOX & ACCOMPANIMENT LIST...........................................................................................60
SOUND EFFECTS LIST........................................................................................................................61
VOICE LIST...........................................................................................................................................62
SPECIFICATIONS.................................................................................................................................69

- 7 -
ABOUT MANUAL
The HDP-1 has many functions. They are introduced in respective chapters in the manual as listed
below. The BASIC FUNCTION is recommended to read at first. Read the ADVANCED FUNCTION in
case you need.
BASIC FUNCTION
PLAYIN PAD and EXTERNAL TRIGGERING - The unit has 8 built-in pads and 5 external instruments
can be connected. These chapters give you essential concept how to play them.
DRUM KIT - The unit has 80 preset pad kits and 5 external instrument kits. Each kit is a configuration of
different voices assigned to each pad or instrument. Voices can be layered - two voices are assigned to
a pad, they could be played in single, mixed or switch way depending on how hard striking the pad. The
kit is very important concept of this drum.
GROOVEBOX - The GrooveBox provides an interesting and unique feature for your performance and
entertainment. In this mode, the pad triggers musical elements including drum beat and other instrument
obbligato, effect sound and sequential notes. You can perform complete music by striking pads.
PHRASE- You can record your performance and save it as user phrases. Then, you can play it back.
Two recording modes provide easy way to edit the recording in real time. Also, orchestration accompaniments can be merged into the phrase.
METRONOME - Built-in editable metronome is one of the useful utilities.
ADVANCED FUNCTION
SOUND EFFECTS - The drum is equipped with DSP device that generates sound effects applying to the
original sound to improve sound quality or change characteristic of the sound.
DRUM KIT EDIT - The unit provides powerful edit function allows you to edit preset kit, for instance,
assign voice to the pad, set its volume, pitch and pan, establish your own layer mode etc.
ADVANCED EDIT – This function allows you to fine adjust behavior of the pad and external instrument
such as sensitivity, dynamic range etc, though the manufacturer already did it. If necessary, read this
chapter to learn how to do it to accommodate your taste.
SYSTEM SETUP - Setup function allows you to setup system parameters such as master tune, equalizer etc. You can also create custom sound effect module. These functions are for more professional
requirement.
RESET - In case you want to recover factory default setting, the Reset function provide different way to
do it.
APPENDIX
It provides detailed information of Kit list, GrooveBox list, Accompaniment list etc.
Please keep the Manual in hand or serve it in safe and convenient place for your frequent
reference.
- 8 -
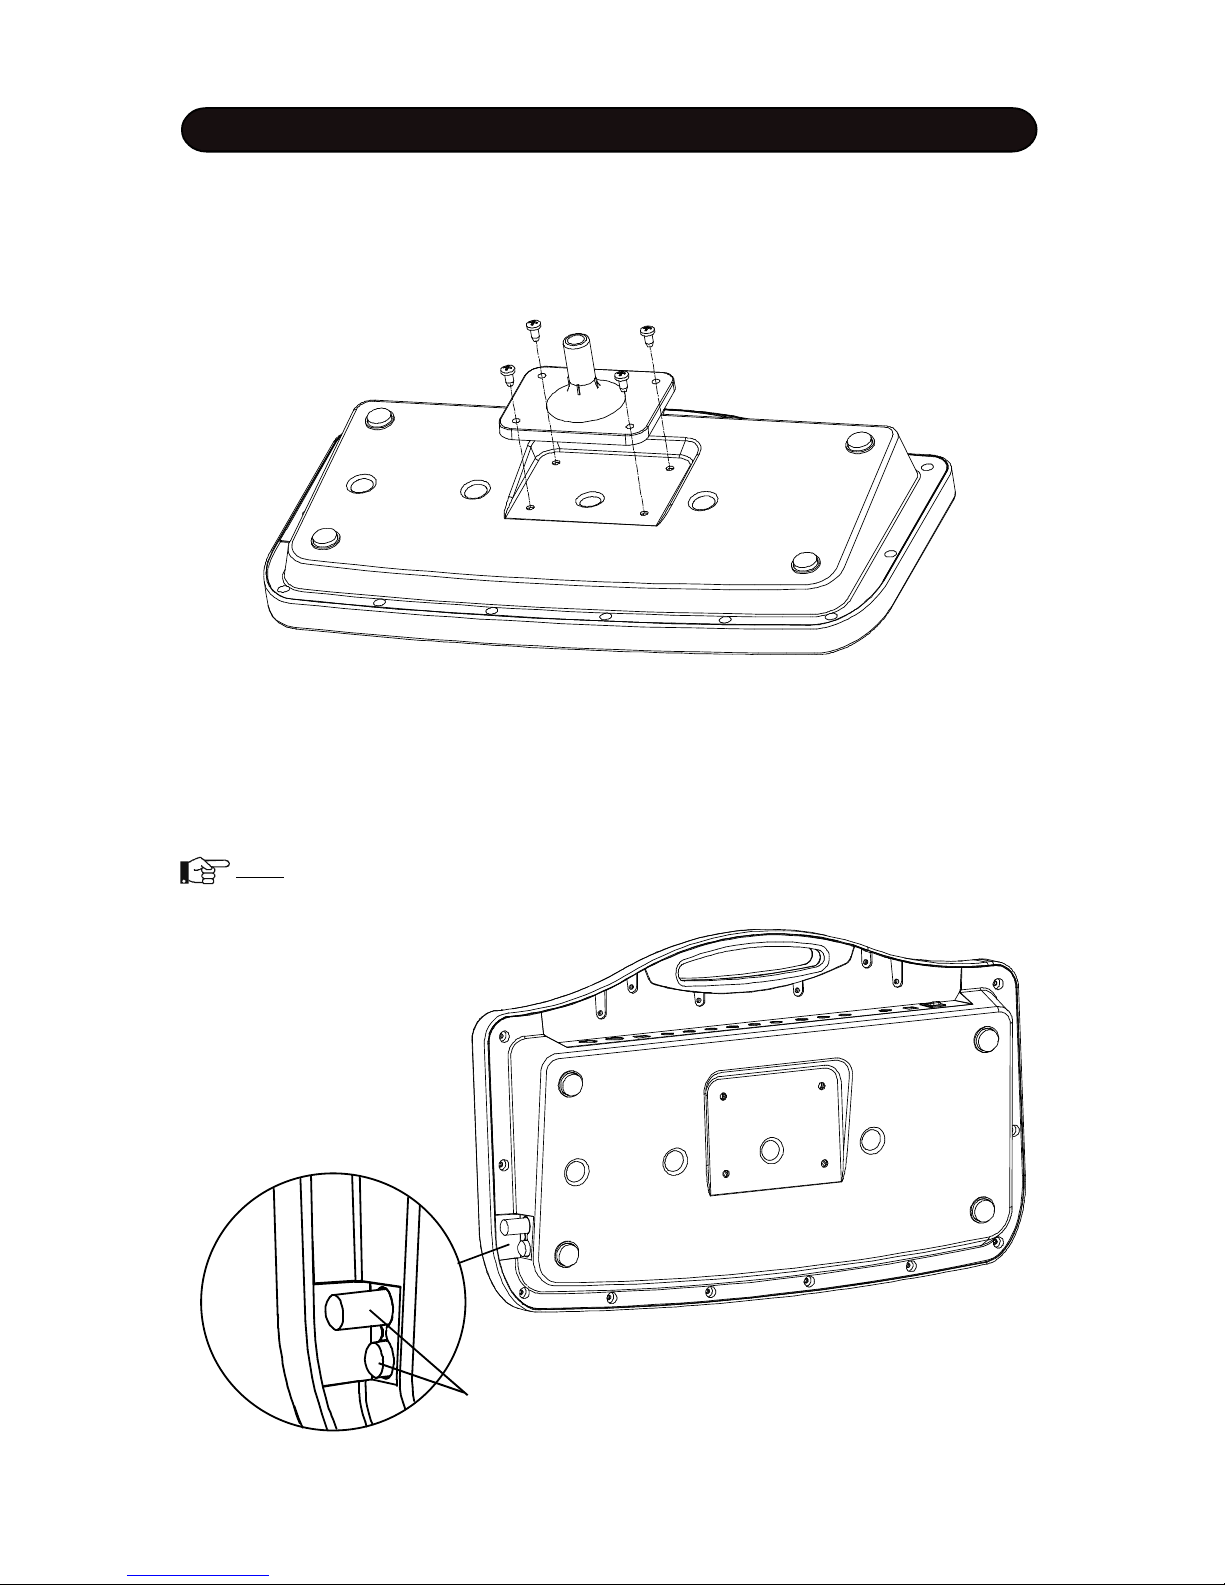
INSTALLATION
Support Board Installation
This unit is for desk-top application. It can be also mounted on stand or drum kit rack with support board
installed.
Align holes in support board and bottom of the unit, then insert four M6X12 screws and fasten it.
Stick Storage
There are attached stick storage in the right side on the unit. Insert stick into the hole of the storage and
push it until the stick hooks in and hear click sound.
Push it again, the stick will pop out.
Note: Please use attached stick. Other sticks might have loose or stuck problem.
Sticks
- 9 -
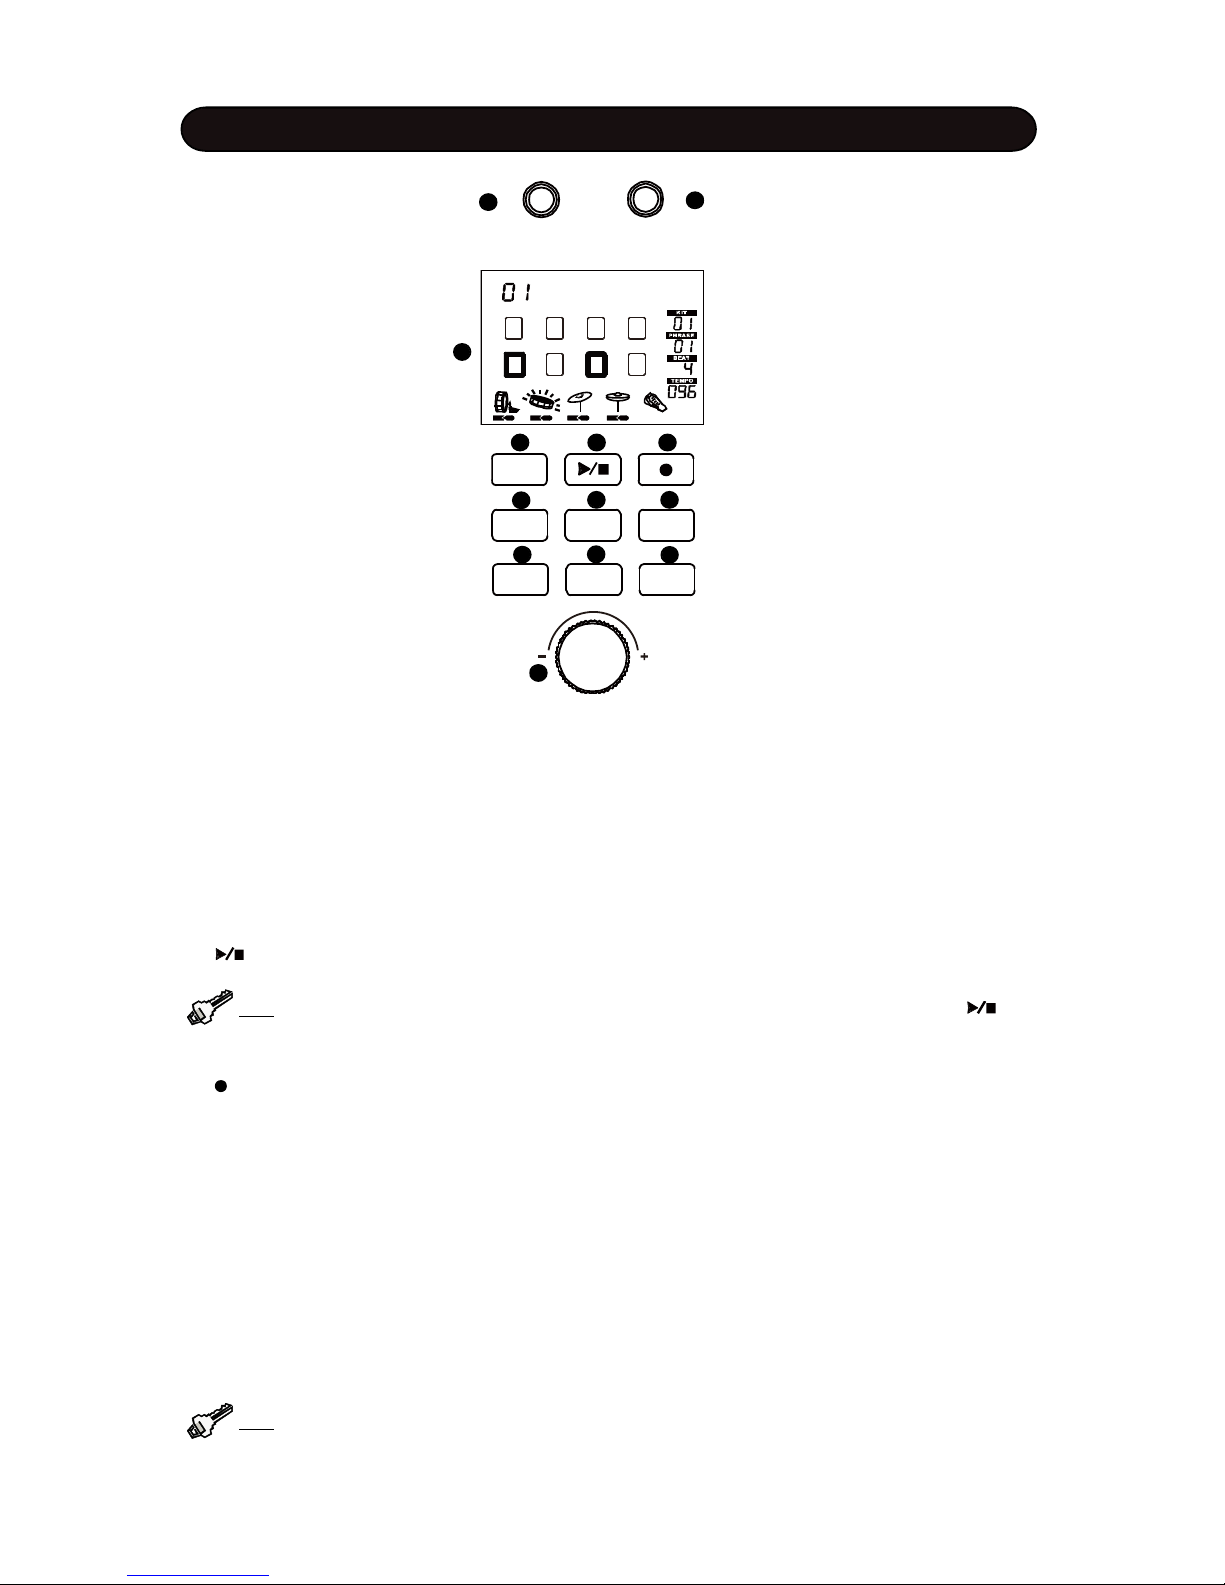
CONTROL PANEL
(1) HEADPHONE VOL Knob: Rotate the HEADPHONE VOL knob to adjust the headphone volume.
Rotate the knob clockwise to increase the headphone volume and counter-clockwise to decrease the
volume.
(2) MASTER VOL Knob: The Master Volume will affect both headphone volume and line out level.
Rotate the MASTER VOL knob to change the master volume ranged 0 - 127. Rotate the knob clockwise
to increase the volume and counter-clockwise to decrease the volume.
(3) Display: Information display such as Kit number and name, pad selection status etc. The display is
back-lit LCD (Liquid Crystal Display) type.
(4) KIT Button: Press this button to enter the Kit selection window.
(5) Button: Press the button to play or stop phrase or GrooveBox
Tip: When switch pedal is plugged in and assigned to Start/Stop type, it’ll function as the
button.
(6) Buttons: Press the button to record phrase.
(7) G.BOX Button: With the GrooveBox feature, the pad triggers musical elements including rhythm,
chord, effect sound and sequencer notes. Press the button to enter the GrooveBox mode.
(8) CLICK Button: Metronome On/Off switch. Press and hold down this button for 2 seconds to engage
metronome setup mode. When the metronome is engaged, indicator of the button will flash per current
beat and tempo
(9) PHRASE Button: Phrase is a short piece of music can be recorded by user. It can be played back
in loop. Press the button to enter the Phrase mode.
(10) SETUP Button: Enter the Setup mode to change many editable parameters
(11) ENTER Button: Confirm your choice or operating
(12) EXIT Button: Exit the current operation
(13) DATA Knob: Rotate the knob to change data for all operations.
Tip: When switch pedal is plugged in and assigned to data plus/minus type, it’ll function as the
Data knob.
1
2
3
4
5
6
7
8
9
10 11 12
13
Standard
MASTERVOL
PHONEVOL
KIT
ENTER
SETUP
EXIT
G.BOX
CLICK
PHRASE

- 10 -
(1) Power Switch: Turn On/Off the sound module
Note: When you turn the power off, do not turn it on immediately. Wait at least five seconds to
turn the power on so that the electronic circuits can properly reset.
(2) Power In Jack: Plug in the DC cable of the attached adaptor
(3) Line In Jack: Line In stereo audio input jacks will mix the supplied signal with the internal drum
sound. It can be used to hook up items such as CD players, MP3 player etc.
(4) Line Out Jack: There is no built-in speaker in the drum. Line Out stereo audio output supplies the
drum output signal to external amplification, such as home stereo, PA system or other stand alone
amplifiers. If you connect with external mono system, stereo/mono adapter is recommended.
(5) Headphone Jack: The drum has stereo headphone jack. You can play in total silence without
disturbing others in the room by plugging a set of headphones into the sockets.
(6) Expand Trigger Jacks: Connect external Ride cymbal, Hi-Hat cymbal, Snare, Kick drum and Hi-Hat
control pedal through these jacks.
(7) Foot SW Jack: Plug in a foot switch pedal. The pedal can be assigned to data plus/minus, Start/
Stop feature for easy operation by the pedal. The default setting is data plus/minus. Please refer to
Overall Setting section of the <SYSTEM SETUP> Chapter for more information.
(8) USB Jack: The USB connector allows you to connect the drum directly to your computer’s USB port.
The USB interface is compatible with Windows XP, Windows Vista, Windows 7 and MAC OSx. The computer will recognize the drum as Audio Device.
(9) MIDI In/Out Jack: This drum contains MIDI in and MIDI output ports which allow communication with
other products equipped with MIDI interfaces
BACK PANEL
123
456789
OUT INMIDI USB FOOTSW HHCTRL
KICK
HI-HATSNARE
RIDE
HEADPHONE
L/MONO
R
LINEIN
LINE OUT
DC IN
ON/OFF
12V
+
-
- 11 -
TURN ON THE POWER
(1) Plug in the DC cable of the attached adaptor to
the POWER jack.
(2) Plug in the headphone to the Headphone jack.
If you connect external audio device such as amplifier and speaker box, turn its volume to lower
level.
(3) Adjust volume of external audio device connected with the drum to lower level.
(4) Press the POWER button.
(5) Turn on external devices if it is connected.
VOLUME
Strike pad and adjust the volume to proper level.
The Master Volume will affect both headphone
volume and line out level. Rotate the MASTER
VOL knob to change the master volume ranged 0
- 127. Rotate the knob clockwise to increase the
volume and count-clockwise to decrease the
volume. The display will show the volume and it’ll
blink. Press the ENTER button to confirm your
setting, or after about 2 seconds without any
operation, it will return to the previous window
automatically.
Rotate the PHONE VOL knob to control the headphone volume only.
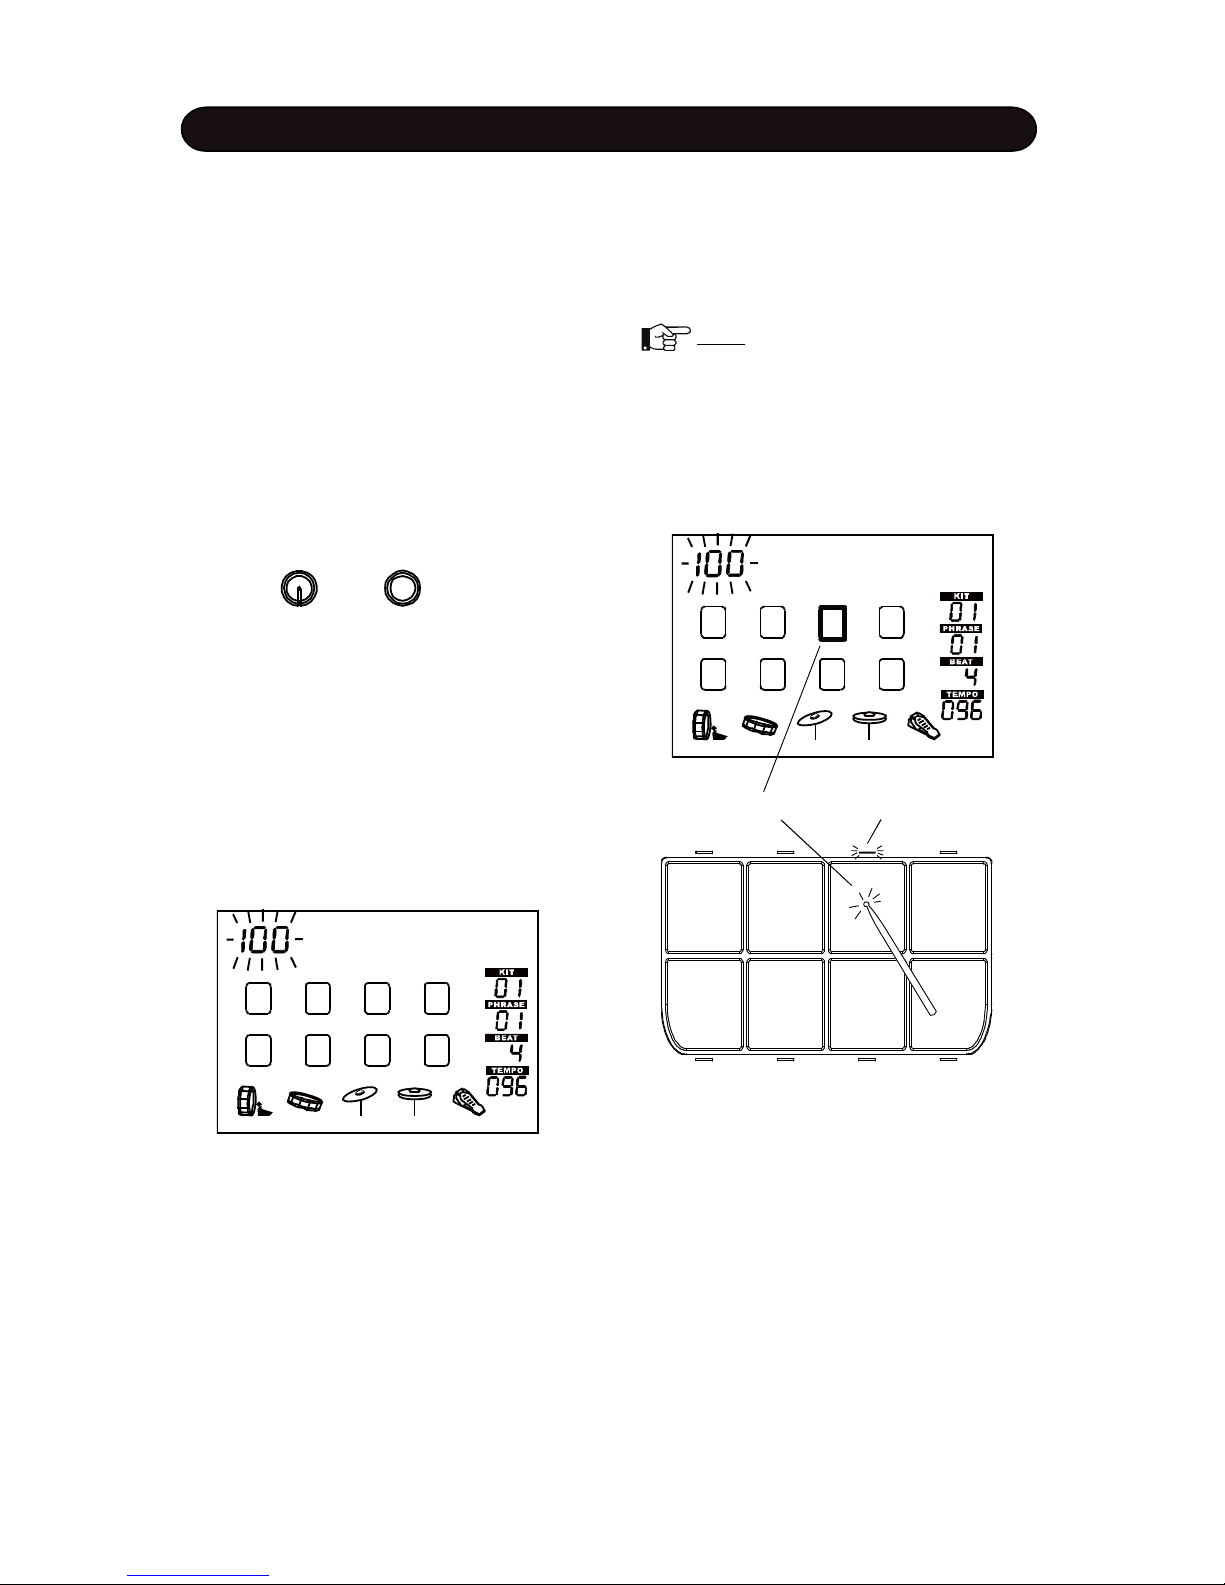
PLAYING PAD
MASTER VO
L
PHONE VOL
PLAYING PADS
All pads have striking strength sensitivity feature.
Strike the pad harder to make higher volume and
strike the pad softer to make lower volume.
Note: The striking strength sensitivity feature is not applied to the pad 1-4 in the
GrooveBox mode. Please refer to Chapter
<GROOVEBOX> for details.
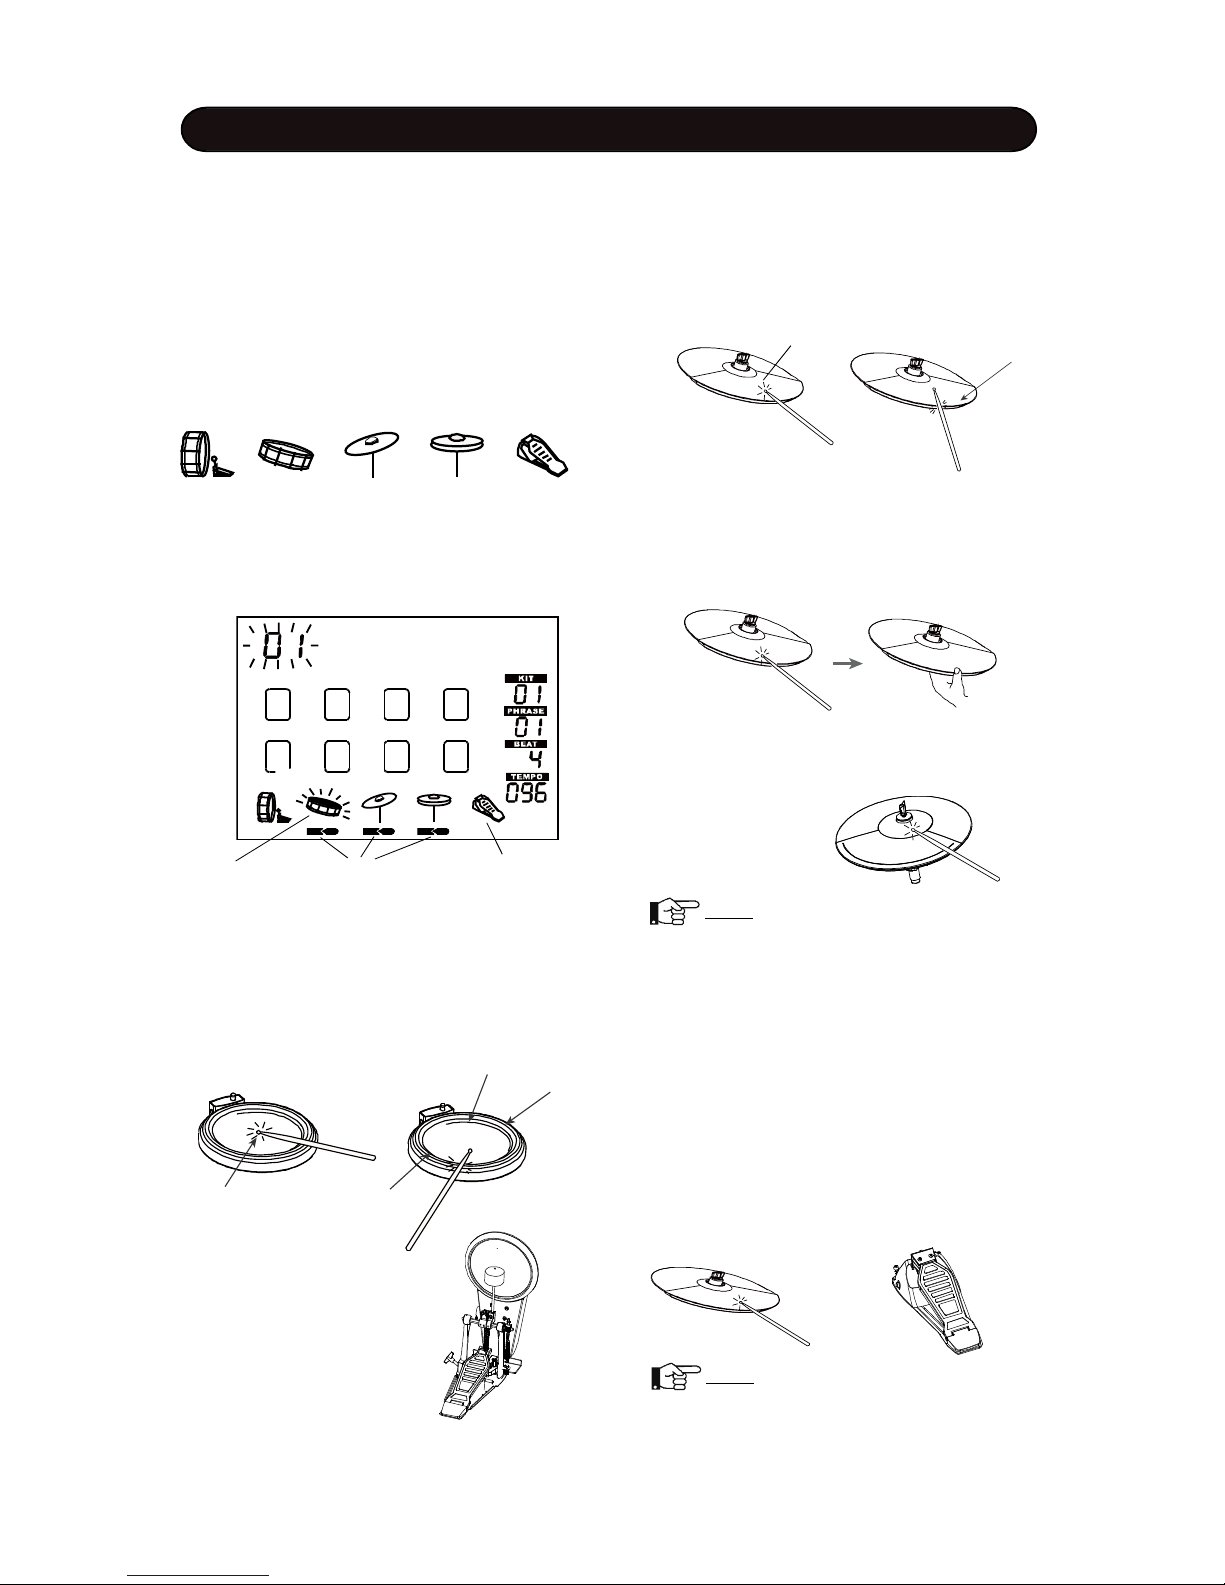
When strike a pad, its indicator will light up and
corresponding block on the display will appear.
Strike Pad Pad Indicator
The pad could have layer feature. Strike the pad
softer to sound a voice and strike the pad harder
to sound another voice or mixed voices. Please
refer to Chapter <Drum Kit> for details.
Master Vol
Standard
- 12 -
Cymbal Choke
Strike thr cymbal, its sound will sustain. Then
squeeze the edge portion to mute the sound.
Please note that the Hi-Hat has no choke
feature.
Playing Kick Drum
Press the Kick drum
pedal to make kick
drum sound.
EXTERNAL TRIGGERING
EXTERNAL TRIGGERING
This unit can connect external instruments
such as snare pad, ride cymbal, kick drum pad,
Hi-Hat and Hi-Hat control pedal. The unit can be
triggered by these external instruments.
Plug in the cable of the instrument to corresponding jack. Connection mark will appear
underneath the external instrument icon on the
display.
When play the external instrument, the external
instrument icon will be triggered with ray symbol.
Kick Snare Ride Hi-Hat Hi-Hat Pedal
Struck
instrument
Connection mark
External instrument
not connected
Playing Cymbal
Strike the central position (bow) of the cymbal
to make cymbal sound, strike the edge of the
cymbal to make edge shot sound.
Bow
Edg
e
Playing Snare Drum
Strike the central position (head) of the pad to
make head sound, strike the rim of the pad to
make rim sound. There are two rim portions with
different rim sound. Also, there is a mark on the
pad to indicate the portion.
Playing Hi-Hat
(1) Strike the Hi-Hat pad without pressing the HiHat control pedal to make open Hi-Hat sound.
(2) Strike the Hi-Hat pad with fully pressing
the Hi-Hat control pedal to make close Hi-Hat
sound.
(3) Strike the Hi-Hat pad while pressing the HiHat control pedal gradually to make consecutive closed Hi-Hat sound.
(4) Press the Hi-Hat pedal down quickly to make
Hi-Hat pedal sound.
R
im2
Rim1
Mar
k
Head
CONTACT YOUR VENDER TO PURCHASE EXTERNAL INSTRUMENT
Playing Cymbal Bell
Strike the bell at the large ride cymbal make cymbal bell sound.
Note: This feature is available for the
cymbal with bell only,
Standard
Note: Hi-Hat cymbal has no edge and
choke features
- 13 -
The unit has 80 preset pad kits and 5 external instrument kits for your choice. Each kit is a configuration of different voices assigned to each pad or instrument.
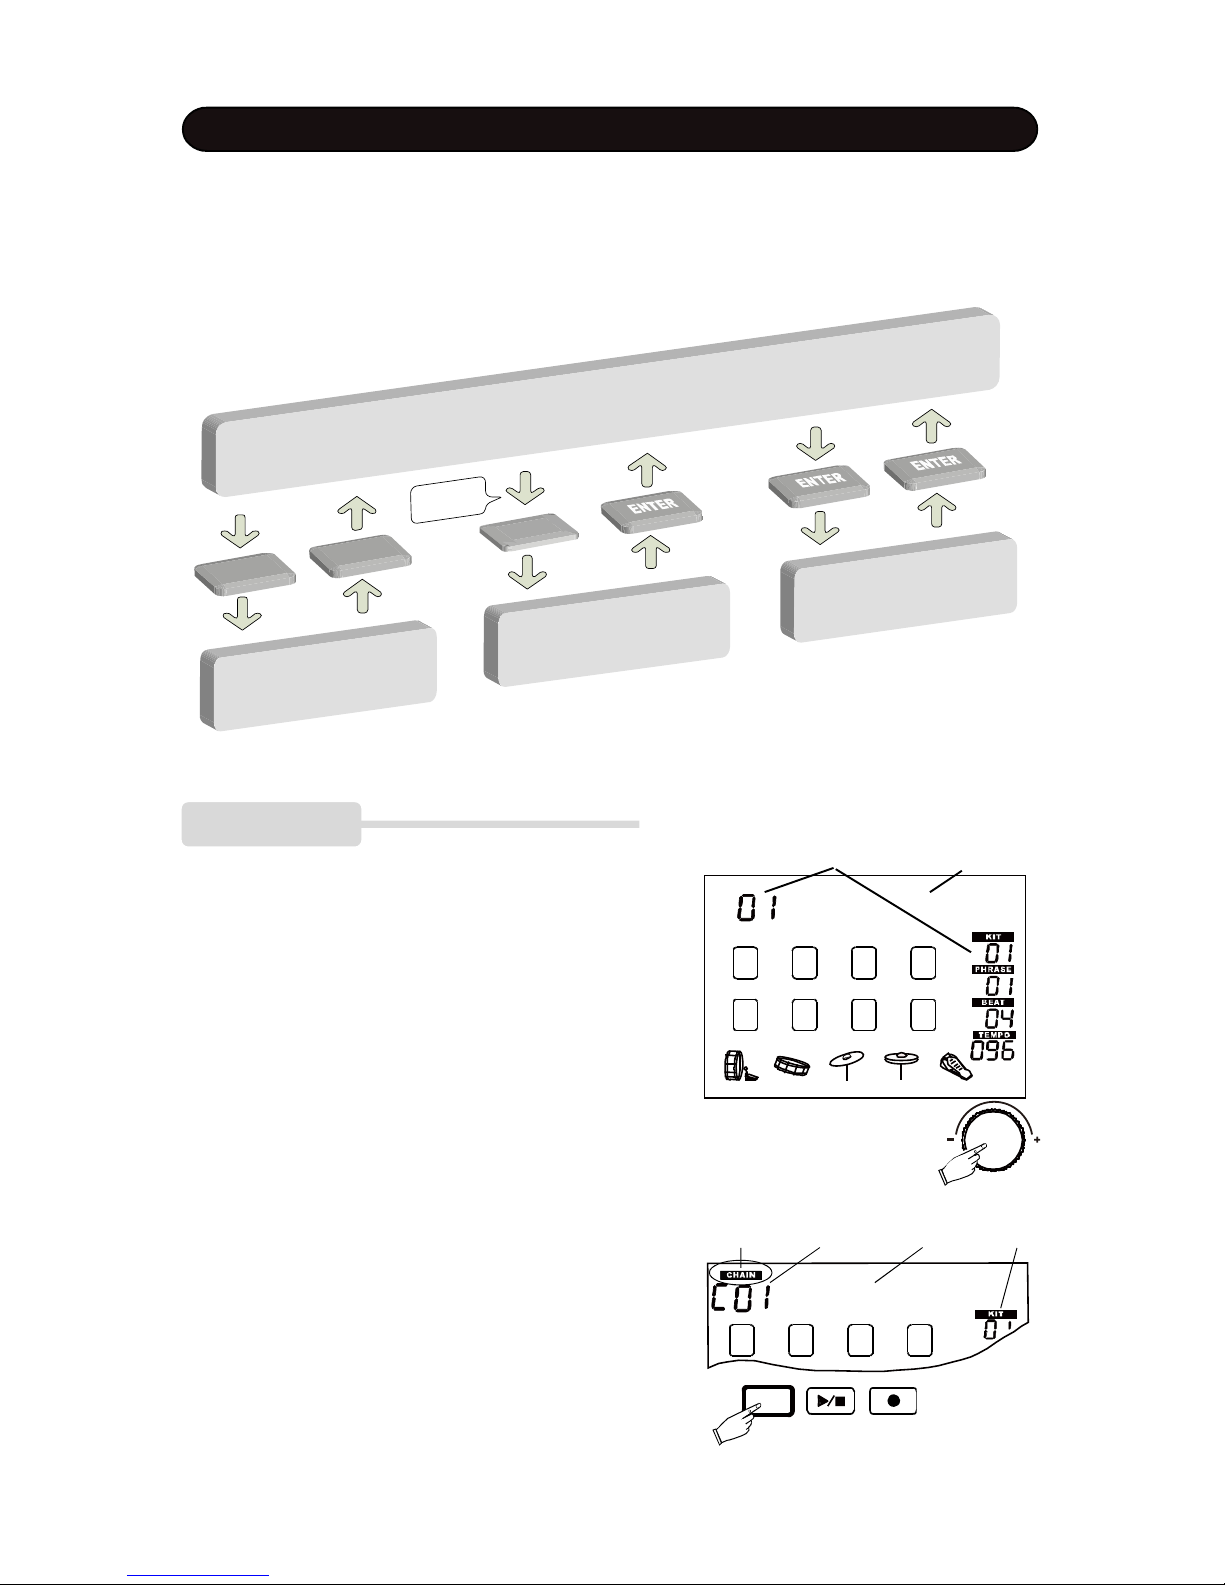
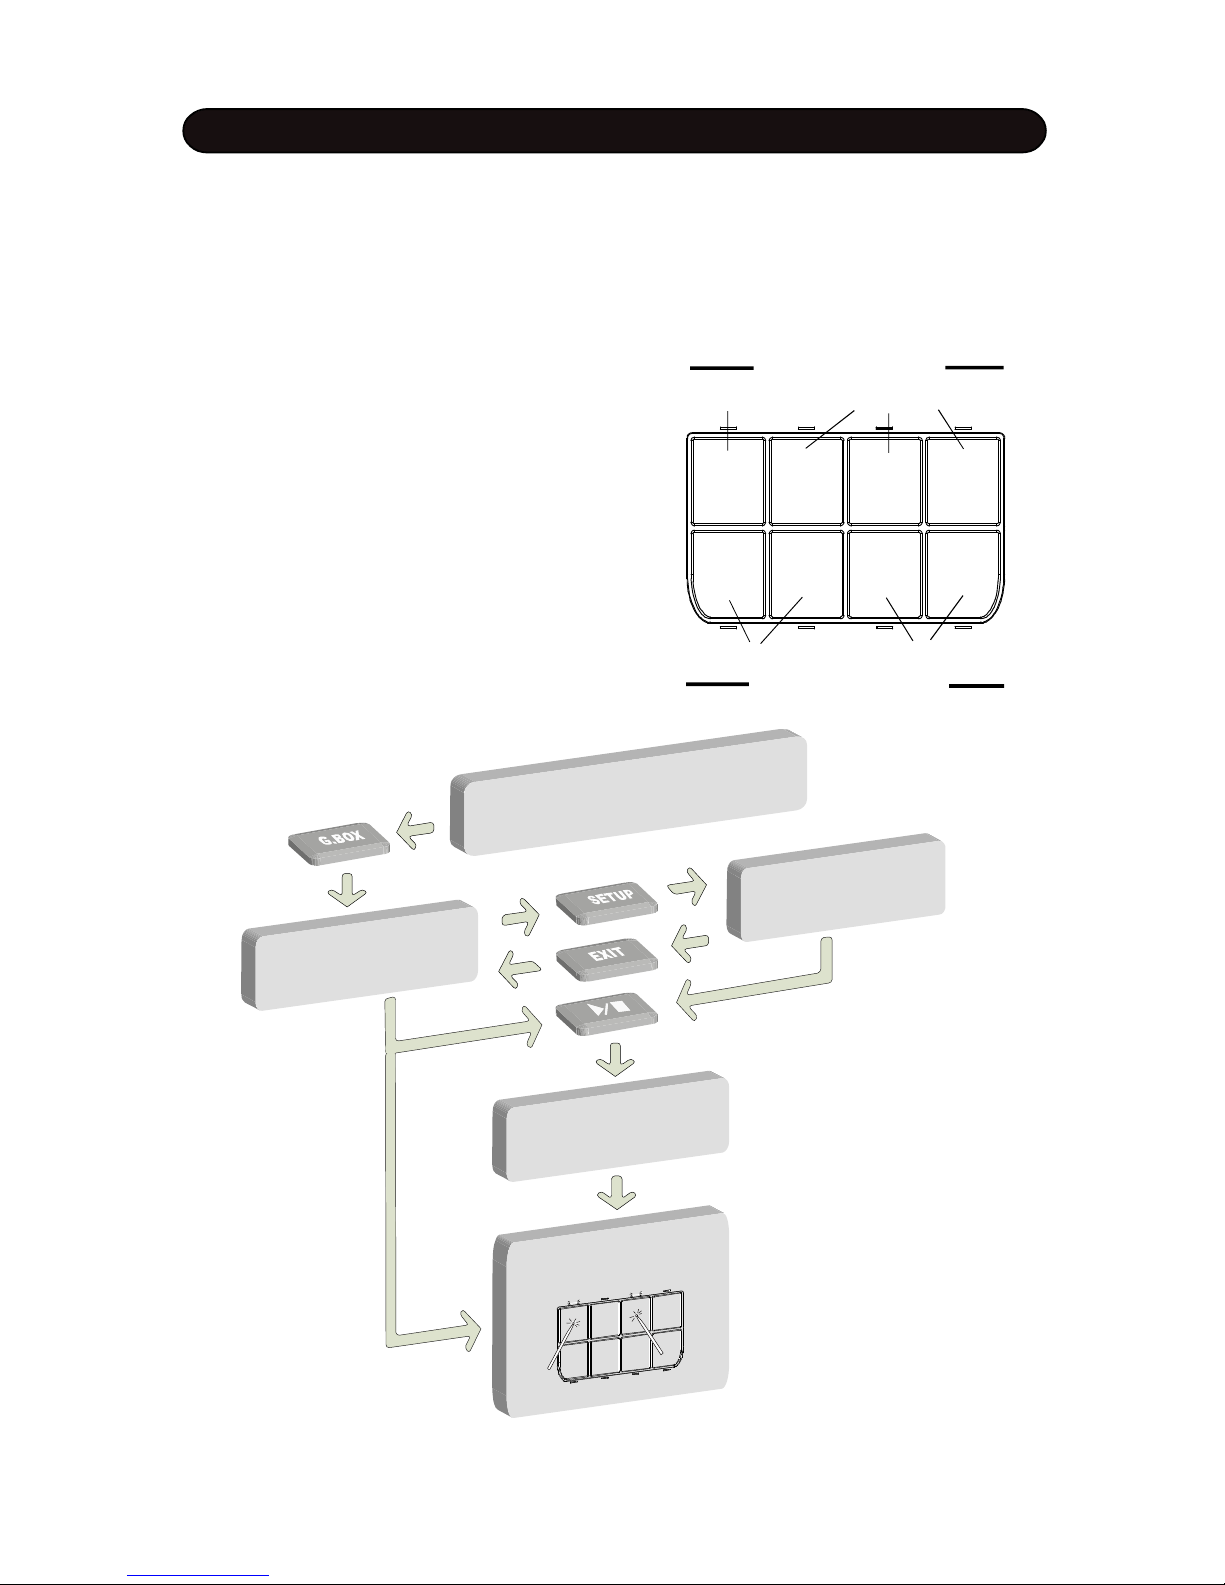
The diagram below presents brief control flow of the kit selection. The following pages will give you
detailed description.
DRUM KIT
Kit number Kit name
CHAIN Icon Chain No. Kit name Kit No.
KIT SELECTION
1. BASIC OPERATION
There are 80 preset pad kits for your choice. The pad kit
is applied to 8 built-in pads. After power on, the pad kit
selection window is engaged automatically while the KIT
button indicator will light up. The kit number and its name
will be shown. The kit number also appears in the right
side of the display.
Rotate the Data knob to select a pad kit. Rotate the knob
clockwise to increase the kit number and anticlockwise
to decrease the kit number. All pad kits listed in the Appendix <KIT LIST> in the back of the manual.
2. CHAIN
It is often to change the pad kit during the performance.
The Chain feature provides easy and fast way to change
the kit. You can organize desired pad kits into a chain
then call your favorite kit consecutively.
There are 10 pad kits can be stored in the chain.In the Kit
Selection window, The KIT button functions as a toggle
switch to select normal selection and Chain selection
mode. Press the KIT button to engage the Chain mode.
The Chain icon will appear and the Chain number with
Standard
Standard
KIT
KIT
KIT
KIT
KI
T
SELEC
T
WINDOW
CHAIN
L
A
YER MODE
EX
T
. KI
T
SELEC
T
Press for
2 Sec.
- 14 -
Light Funk
KIT
DRUM KIT
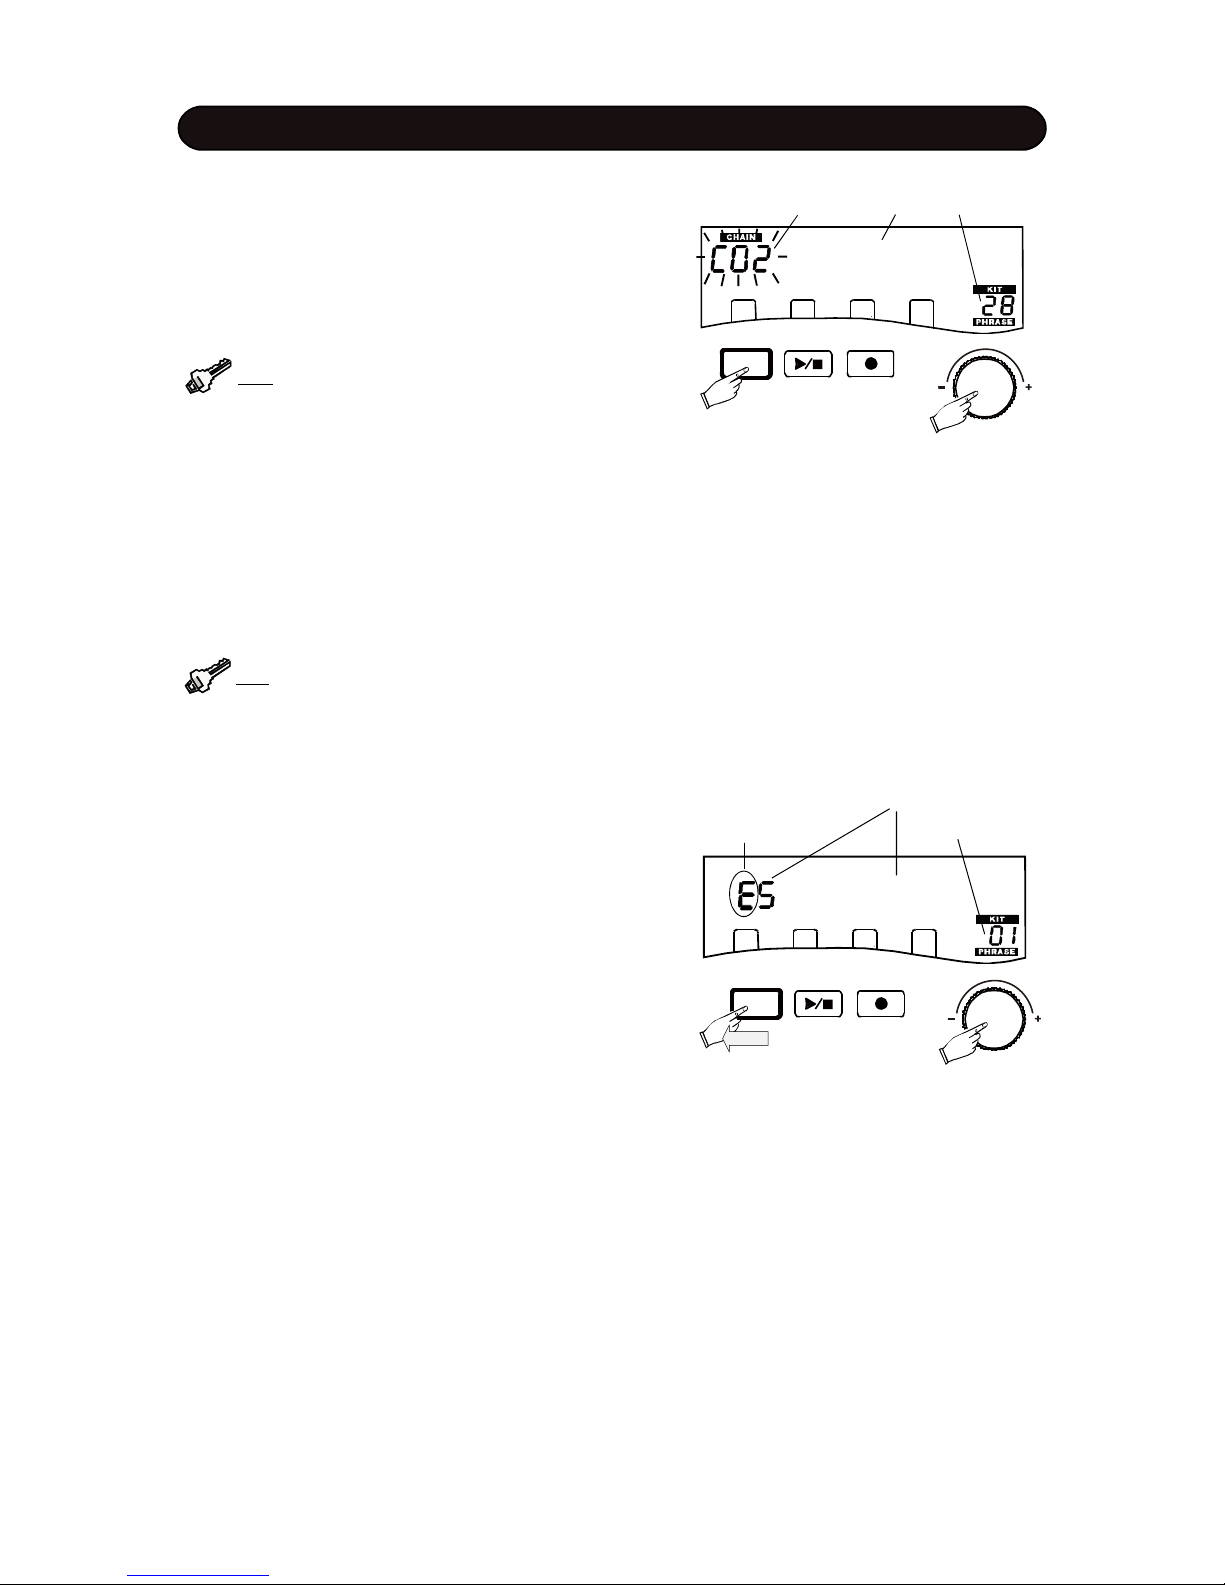
4. EXTERNAL KIT SELECT
When external instruments are connected, they are played
in voice assigned to the external kit.
Press and hold down the KIT button for 2 seconds, the
external kit number with “E” prefix will be shown. Default
external kit is E1.
Rotate the Data knob to select an external kit. There are
5 external kits can be selected.
Press the ENTER button to confirm and exit.
Sign of Ext. kit
Chain No. Kit name & No.
prefix “C” and kit name will be shown on the top row of the
screen. Its corresponding pad kit number will be shown in
the KIT area in the right side of the display. Rotate the
DATA knob to select Chain number..
Press the KIT button again to exit the Chain mode and
convert to normal Kit Selection window.
Tip: You can assign your favorate kits to chain.
Please refer to the <SYSTEN SETUP> Chapter for
details.
3. USE PEDAL TO SELECT
You could also use foot switch pedal to select kit or Chain
number, if the pedal is connected. Press the pedal, the
kit number will increase by one defaultly. You could set it
for decreasing by one with the Setup function. Please
refer to the <SYSTEM SETUP> Chapter in the manual
for details.
Tip: You can use the pedal as the Data Knob in
many other cases.
KIT
2 Sec.
External 5
Ext. Kit number and name
Pad Kit number
- 15 -
DRUM KIT
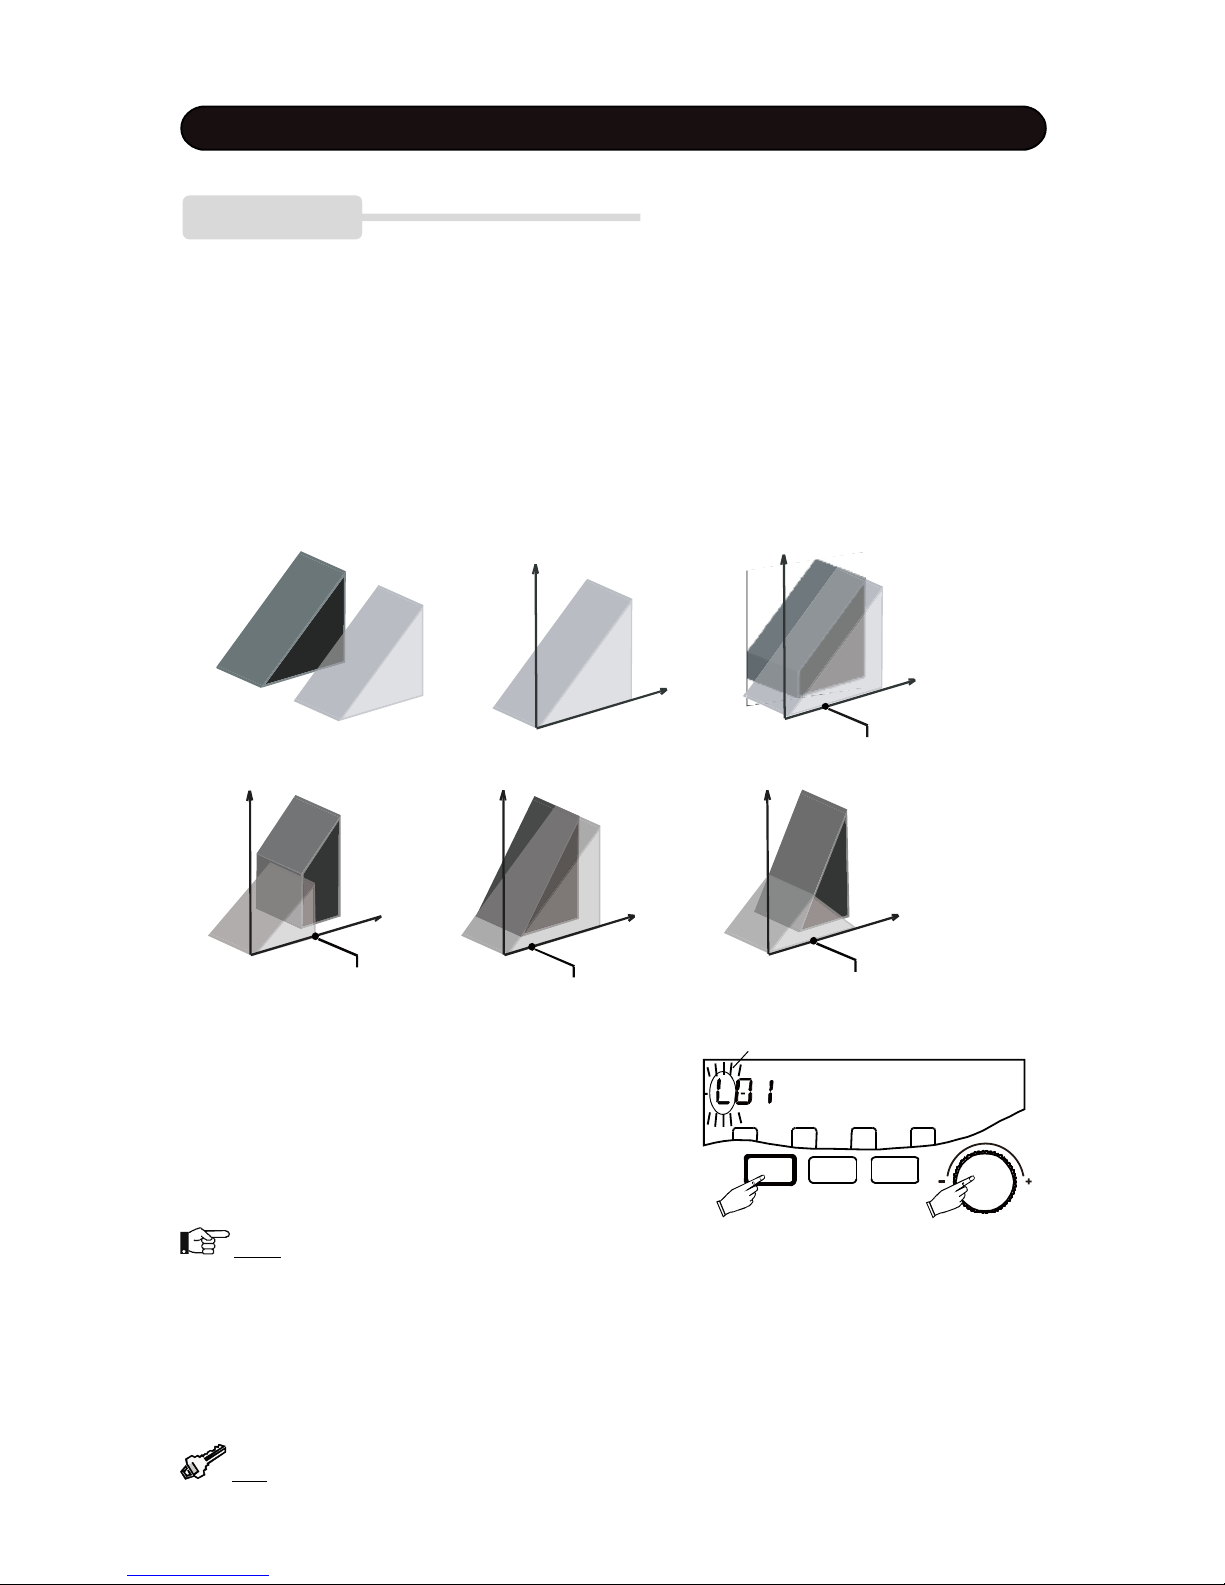
LAYER
In this mode, two voices are assigned to each pad. The sound layering depends on how hard you strike
the pad. This feature allows you have more expressive performance. There are 5 layering types determining how voices of Layer A and Layer B are arranged.
Switch - you’ll hear voice A when strike softer and hear voice B when strike harder than the Layer Point.
Mix - You’ll hear voice A when strike the pad softer and voice B will be added when strike harder than the
Layer Point.
Fade - You’ll hear voice A when strike the pad softer and voice B will be added gradually when strike
harder than the Layer Point. The stronger the striking, the more the voice B will be added.
X.Fade - This is essentially the same as Fade, but Voice A will fade when strike harder than the Layer
Point. The harder the striking, the more fades.
Off - Layer feature off. Voice A only
In the kit select window, press the ENTER buttons to
watch the current layering status. The layer mode mark
A, b or L will be added in front of the kit number and blink.
“A” represents no-layering but voice A only, “b” represents
no-layering but voice B only and “L” represents Layer mode
is engaged. Rotate the Data knob to change the mode.
Press the ENTER button again to confirmand back to
normal kit number display.
Standard
Layering Mode mark
SETUP
ENTER EXIT
2. Not all kits preset layering feature. Please refer to <KIT LIST> in the back of the manual. If the kit is no
layering preset , i.e. the layer type is Off, it always show A when rotate the Data knob. If the kit is preset with
layering mode, the default status is L.
3. The layer mode change here is tempoary. When you re-select this kit, the layer mode will recover to its
default setting.
Tip: You can change layer preset and reserve it. Please refer to the <DRUM KIT EDIT> Chapter.
Note:
1. Not all kits preset layering feature. Please refer to <KIT LIST> in the back of the manual. If the kit is no
layering preset,
V
o
i
c
e
A&B
M
i
x
e
d
Strength
V
o
l
u
m
e
Strength
V
o
l
u
m
e
Off Mix
V
o
i
c
e
A
V
o
i
c
e
A
La
y
e
r
P
o
i
n
t
y
VoiceofLayerB
VoiceofLayerA
La
y
e
r
P
o
i
n
t
V
o
l
u
m
e
Strength
V
o
l
u
m
e
Strength
V
o
l
u
m
e
Switch Fade X.Fade
La
y
e
r
P
o
i
n
t
y
La
y
e
r
P
o
i
n
t
y
V
o
i
c
e
A
V
o
i
c
e
B
V
o
i
c
e
A
La
y
e
r
A
V
o
i
c
e
A&B
M
i
x
e
d
wi
t
h
V
o
i
c
e
A
F
ad
i
n
g
Strength
V
o
i
c
e
A&B
M
i
x
e
d
- 16 -
pads.
There are 20 GrooveBox musics built-in for your choice.
Please refer to the GrooveBox List in the back of this
manual for details.
In this performance mode, 8 pads are divided to two
sections. 4 upper pads marked 1 - 4 are for loop parts
triggering. 4 lower pads marked 5 - 8 are for single Voice
triggering.
The diagram below presents brief control flow of
GrooveBox operation. The following pages will give you
detailed description.
GROOVEBOX
The GrooveBox provides an interesting and unique feature for your performance and entertainment.
When you play pad, it triggers GrooveBox music but not simply pad kit sound.
The GrooveBox music composed of loop playing parts including drum beat and three obbligatos and single
voice parts including effect sound and sequential notes. Each loop part and sequences has 4 variations A to
D.
Combining with these preset elements; you can perform complete music with many variaties by striking
Beat Pad Obbligato Pad
Sequential note Pad Effect sound Pad
Loop Part Section
Single Voice Section
1 2 3 4
5 6 7 8
MUSIC SELEC
T
INITIALIZ
A
TION
SYNCH. S
T
A
RT
PL
A
Y
KI
T
SELEC
T
WINDOW

- 17 -
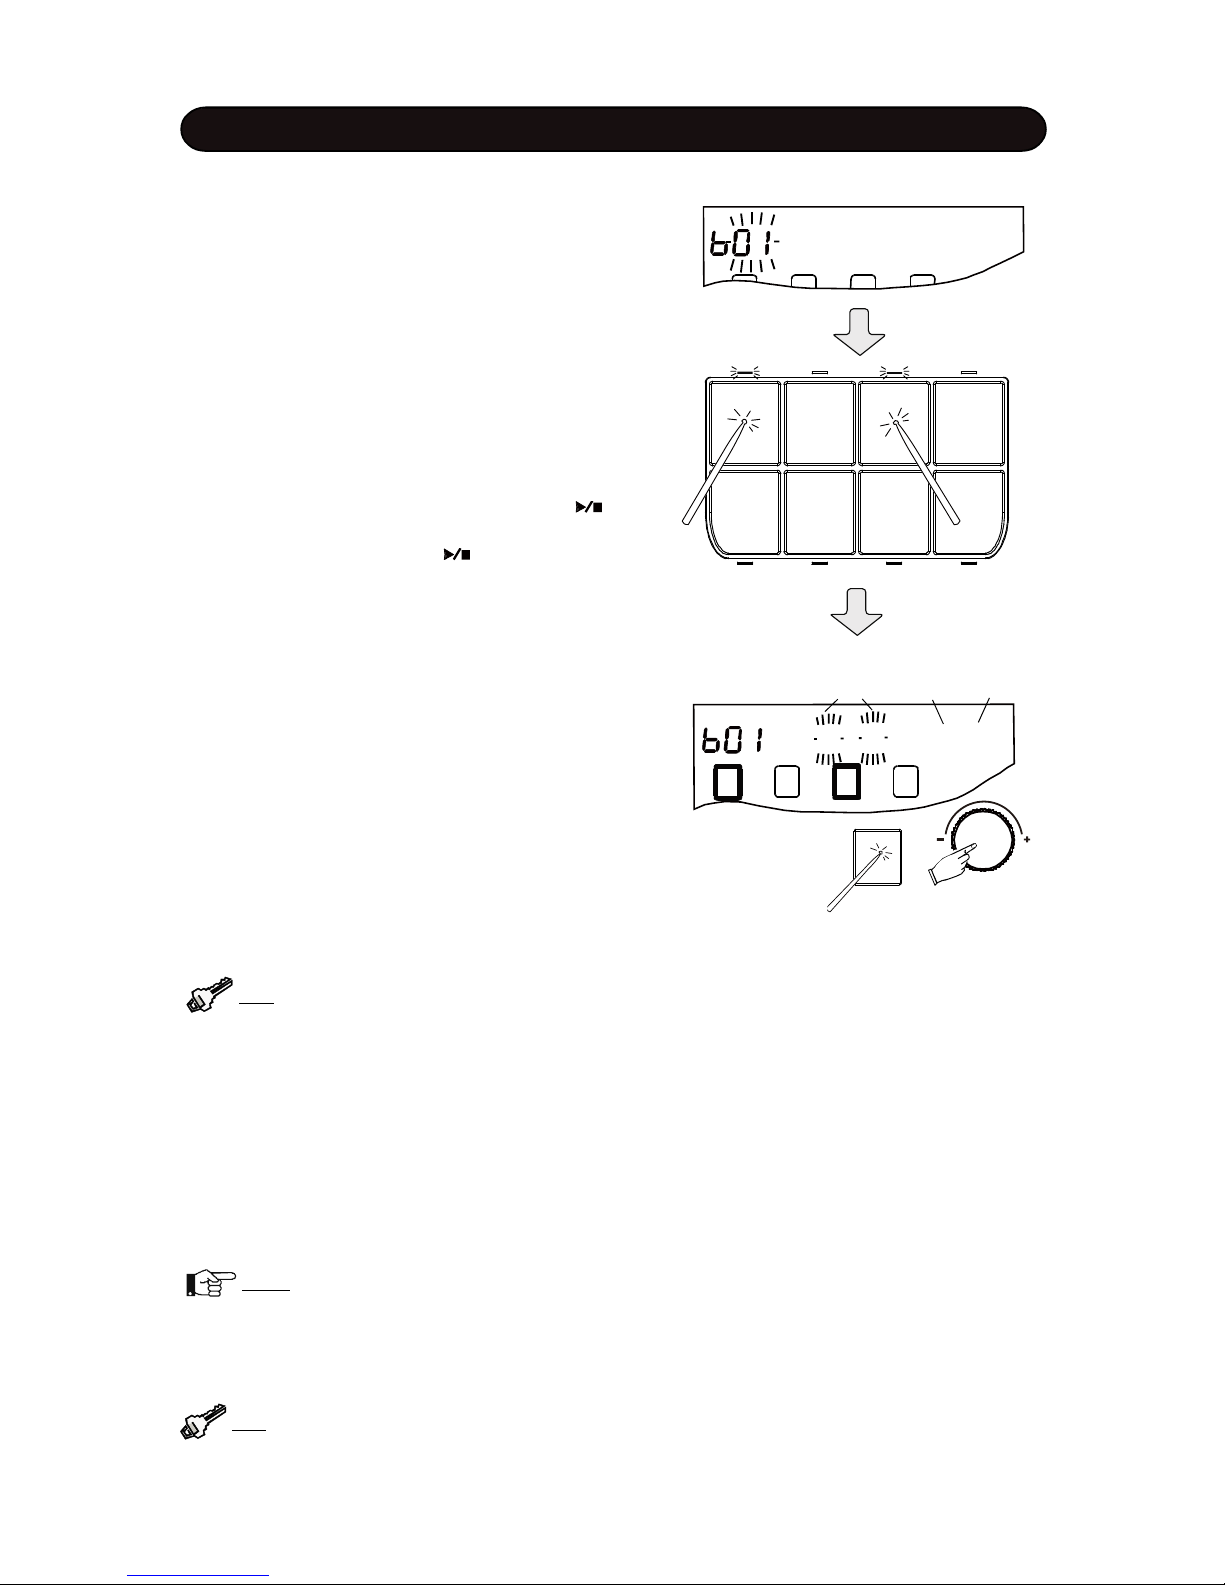
INITIALIZATION
The default variation is A for all pads. If you want, you
can choose any variation as an initial variation to start
play. In the G.Box music select window, press the SETUP
button, the music name will be replaced by blinking variation code A, B, C, D. Rotate the Date knob to change
variation together. Or, you can hit particular pad soft to
change its variation individually. Hit the pad hard to disable it while its variation code will stop blink.Strike the
pad again to enable the pad.
Press the EXIT button to exit the initialization and back
to the music select window.
Tip: The “disable” feature is useful for Synchro-
nized start mode.
Note: Rotating the Data knob cannot change the
variation for disabled pad.
ENTER THE GROOVEBOX MODE
In the kit select window, press the G.BOX button and its
indicator will light up. The name of GrooveBox music and
its index number with prefix “b” will be shown. The tempo
and beat of it will appear on the right side of the screen.
When the music number is blinking, rotate the Data knob
to select GrooveBox music.
Pressing the EXIT or KIT button to exit the GrooveBox
and turn to Kit window.
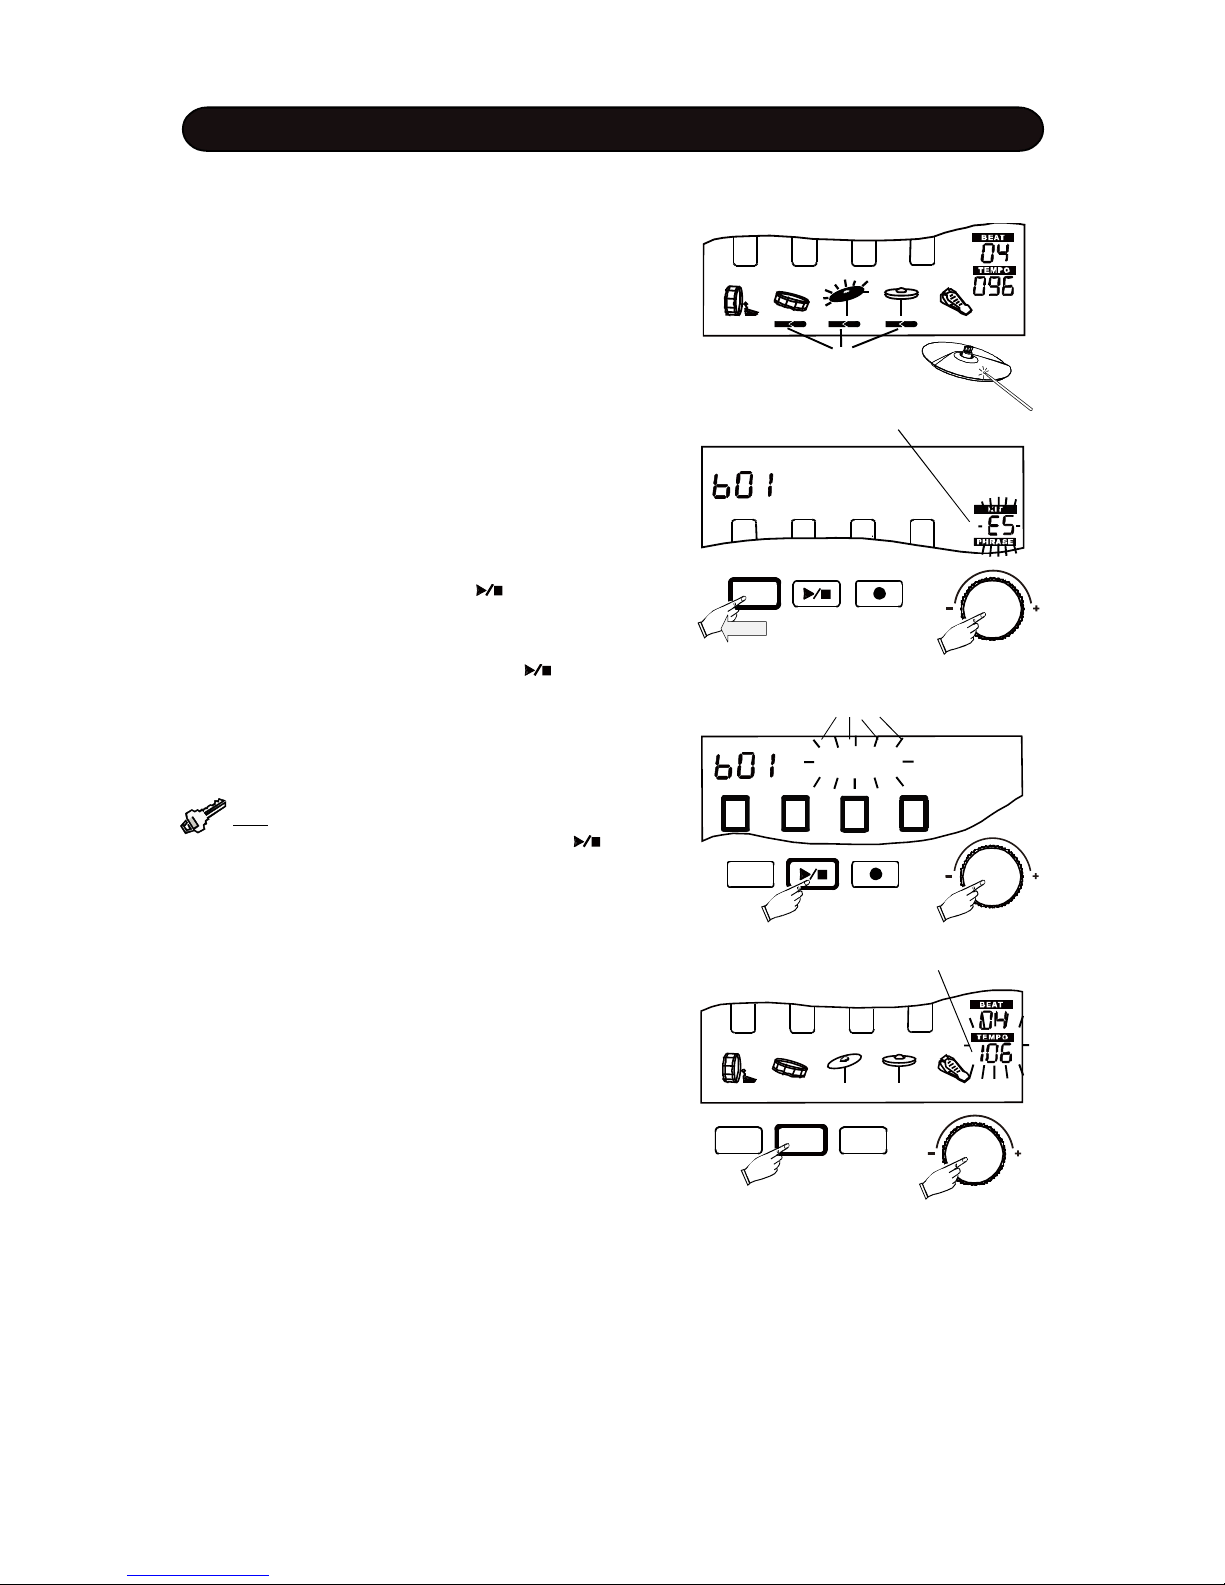
PERFORMANCE
1. PLAY THE LOOP PARTS
Start playing loop parts by strike the Pad 1 to play beat,
strike the Pad 2 - 4 to play obbligato 1 - 3.
Its indicator will light up and corresponding block on the
display will appear. The music name will be replaced by
variation code and the code for working pad will blink.
Then, once you strike the pad soft, it’ll change to the next
GROOVEBOX
variation. The variation change will occur from the next
note and keep the beat and measure consecutively. Strike
the pad hard to mute it and the block of this pad will
disappear, its variation code will stop blink as well.
SETUPENTER
EXIT
Sign of G.Box Music number Music name
Beat and tempo of the music
ABCD
Disabled pad
U got it
G.BOX
CLICK
PHRASE
- 18 -
GROOVEBOX
Tip: You can start two parts at same time by strike
these pads simultaneously.
Tip: You can play the sequence note anytime even if the beat/obbligato are not really
be played.
3. Play the Effect Sound
Strike the Pad 7 or 8 to trigger an effect sound
immediately. Only a single sound is triggered once,
therefore, you don’t need to turn it off. Each effect sound
part has several different sounds. Once you strike the
pad, it’ll change to the next sound.
Note: In the GrooveBox mode, the pad 1 - 4 has
no strength sensitivity feature. It is for triggering
the beat and obbligato only. The pad 5 - 8 has
strength sensitivity feature, the harder the striking,
the louder the volume.
Alternatively, you don’t need to stop beat and obbligato
parts by hitting pads hard separately. Press the button to stop all parts playing and the beat and measure
count will disappear. Press the button again to start
play all beat and obbligato parts from the first measure,
which was effective before the stop.
2. PLAY THE SEQUENTIAL NOTE
Each G.Box music has sequence part. You can control
when its notes sound. When you strike pad 5 or 6, notes
will be triggered sequentially. The variation code of the
pad 5 is the same as pad 1 and the variation code of the
pad 6 is the same as pad 2.
The sequence is synchronized with beat and/or obbligato
in measure. Only notes in the same measure of the beat
and/or obbligato can be played. The triggering point is
free within the measure, but If you strike the pad more
times than the note number of this measure, the notes
will repeat.
ABCD 4-1
Working pads
and its variation
Measure - Beat
The measure count and beat will be displayed in real
time. Even if you mute all parts, the count keeps running.
Rotate the Data Knob, the variation of working pads will
change at same time based on the its current variation.
During the playing, you can add another part by striking
relevant triggering pad. New part will be inserted at the
next note of the current obbligato or beat and keep the
measure and beat consecutively. Please note that the
beat and the obbligato are totally synchronized.
U got it
- 19 -
GROOVEBOX
G.BOX
CLICK
PHRASE
7. ADJUST THE TEMPO
The beat and obbligato part share the same tempo. You
can change the default tempo. Press and hold down the
CLICK button for 2 seconds. The current tempo will blink
in the right side of the display. Rotate the Data knob to
change the tempo ranged 40 - 240 beat per minute. Press
the ENTER button to confirm your setting and the tempo
value will stop blink.
6. SYNCHRONIZED START
After select the G.Box music, press the button, all
beat and obbligato parts will start playing together per their
initial variation and status setting.
In this way, you don’t need to start beat and obbligato
parts by hitting pads.
Tip: In the initializing window, you can enter the
synchronized start directly by pressing the button .
Change variations together
AAAA 4-3
Adjust tempo
KIT
5. CHANGE THE G.BOX NUMBER DURING THE
PLAYING
you can change the GrooveBox by rotating the Data
knob when all pads stopped by the button.
4. PLAY COMPLETE MUSIC
You can compose your music by arranging parts per your
taste in the way described above. You can play pads randomly and could also get amazing results.
When external instrument is are connected, you can also
play it together with the GrooveBox performance. If you
want to change the External kit number, press and hold
down the KIT button for 2 seconds, The external kit number will apear with “E” prefix and blink. Rotate the Data
knob to change it then press the ENTER button to confirm.
Connection mark
External kit number
KIT
2 Sec.
U got it
- 20 -
CHAIN
CLICK
PHRASE
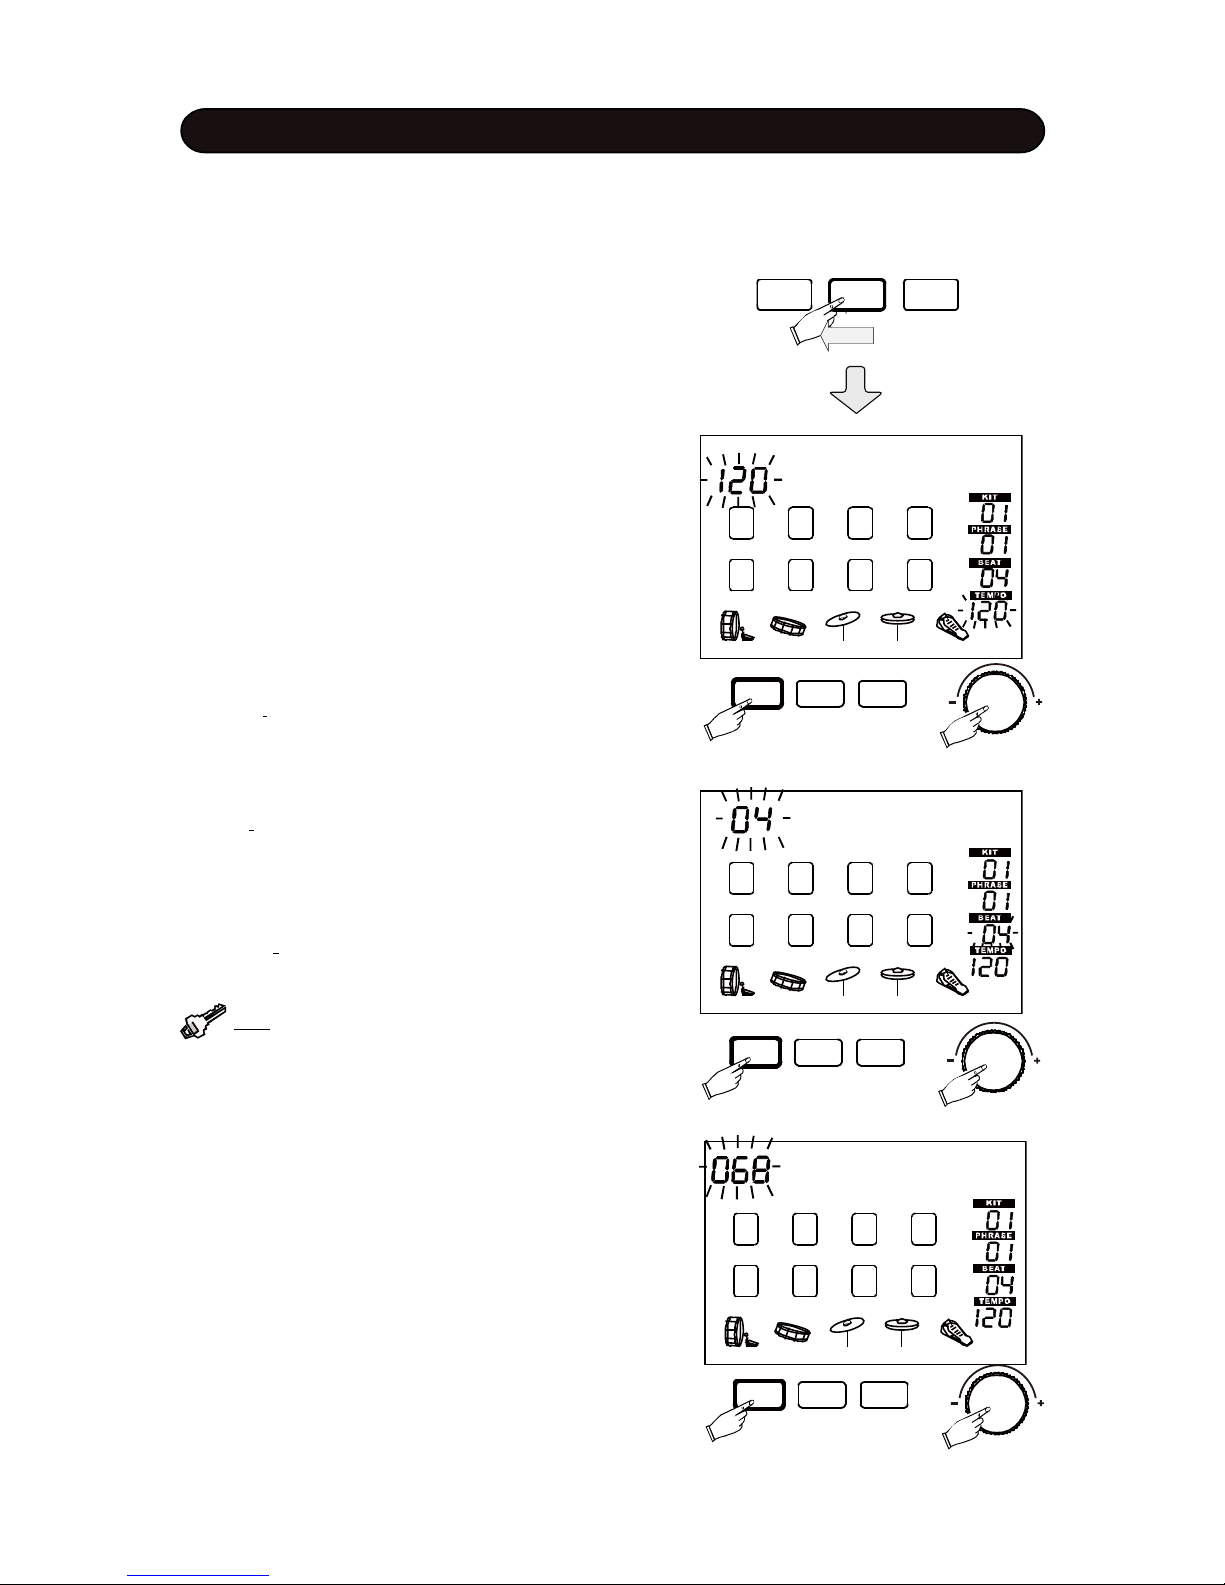
METRONOME
Press the CLICK button, the metronome will start
immediately. The metronome sound is louder at the first
beat and lower for other beats. The CLICK indicator will
flash per beat and tempo setting. The indicator will be
lighter at the first beet. Press the CLICK button again to
stop it.
Press and hold down the CLICK button for 2 seconds to
setup the metronome; and the indicator will blink. The
metronome will keep sounding and response to your setting in real time.
Use the Data knob to setup. After parameter setting, press
the ENTER button to confirm your setting and turn to the
next parameter setting.
Press the KIT button to exit the setting and back to the
Kit Selection window.
Following parameters can be changed.
MetroTempo
MetroVol
(3) Volume - The current metronome volume will blink.
Rotate the DATA knob to change it ranged 0 - 127.
(2) Beat - the current beat will blink. Rotate the DATA
knob to change the beat ranged 2 - 12. The beat will
also be shown in the right side of the screen. The default
beat is 4.
(1) Tempo - The current tempo will blink. Rotate the DATA
knob to change the tempo ranged 40 - 240 beat per
minute. The tempo will be also shown in the right side of
the screen. The default tempo is 120.
2 Sec.
MetroBeat
SETUP
ENTER EXIT
SETUPENTER
EXIT
SETUP
ENTER EXIT
Tip: If you do not want to change the current
parameter, press the ENTER button to skip it.

- 21 -
The drum is equipped with Professional Digital Signal Processor (DSP) that generates sound effects applying to the original sound to improve sound quality or change characteristic of the sound.
These effects are classified to three categories: Reverb, Chorus and Delay. You can choose one of the
effect types from a category and enable/disable it respectively so that you can apply three kinds of the
effect at same time in maximum.
These effects are applied to enter unit but not for individual pad or external instrument. The unit presets
particular effects set for each drum kit, when you change the drum kit, the preset effect set will be bound
with it, except that when you change the kit during phrase record or phrase playing the effect kit will stay on
the original setting.
You can use the Kit Edit function to change the presetting for each kit such as switch On/Off the effect,
change the effect type and its global level. Though effects are applied to enter unit globally, the drum
provides utility to adjust effect level for each pad or external instrument, i.e. voice, separately. Please refer
to the <DRUM KIT EDIT> Chapter for details.
You can create your own effects to fit your taste, or simply for fun, please refer to the <SYSTEM SETUP>
Chapter for details.
Reverb Effect
The unit has 26 reverb types preset.
Reverb effects simulate sound natural reflection from walls and ceilings of various halls, rooms. In addition,
there are several other reverb effects such as Gated Reverb and plate.
- Gated Reverb: add ambience only while the original signal is still sounding. As soon as the signal falls
below a threshold, the reverb is automatically cut off
- Plate: simulate plate type reverb with their tight, dense early reflections and sharp reverb buildup
- Echo: It is a reflection of sound, arriving at the listener some time after the direct sound.
Chorus Effect
The unit has 22 chorus types preset.
Chorus effects thicken the sound or make one sound like many. There are many types of effects in this
category:
- Chorus: An imitation of multiple sounds with the same timbre and pitch converge and are perceived as
one.
- Phaser: It creates a sweeping effect. Its sound is similar to that of flanging.
- Flange: It combines two copies of the same sound, with the second delayed slightly, to produce a swirling
effect.
- Tremolo: An imitation of reiteration of sound.
Delay Effect Edit
The unit has 4 delay types preset.
Delay effect plays sound back after a period of time. You can add Delay effect to Chorus or Flage effect.
Equalizer is another kind of sound effect application.
It adjusts the tone of sound by strengthening or weakening the energy of specific frequency to achieve
desired balance, for instance, to boost bass, brighten treble, moderate alto voice etc.
There are 8 types of built-in equalizer for your choice. You can create your own 4-band equalizer by the User
Equalizer function, please refer to the <SYSTEM SETUP> Chapter for details.
The <SOUND EFFECTS LIST> in the back of the Manual presents all effect types for your reference.
SOUND EFFECTS
 Loading...