

HWAM Wiking Scandic, Wiking Nordic 7, Wiking Nordic 9, Wiking Nordic 9G, Wiking Nordic 10G Installation And User Manual
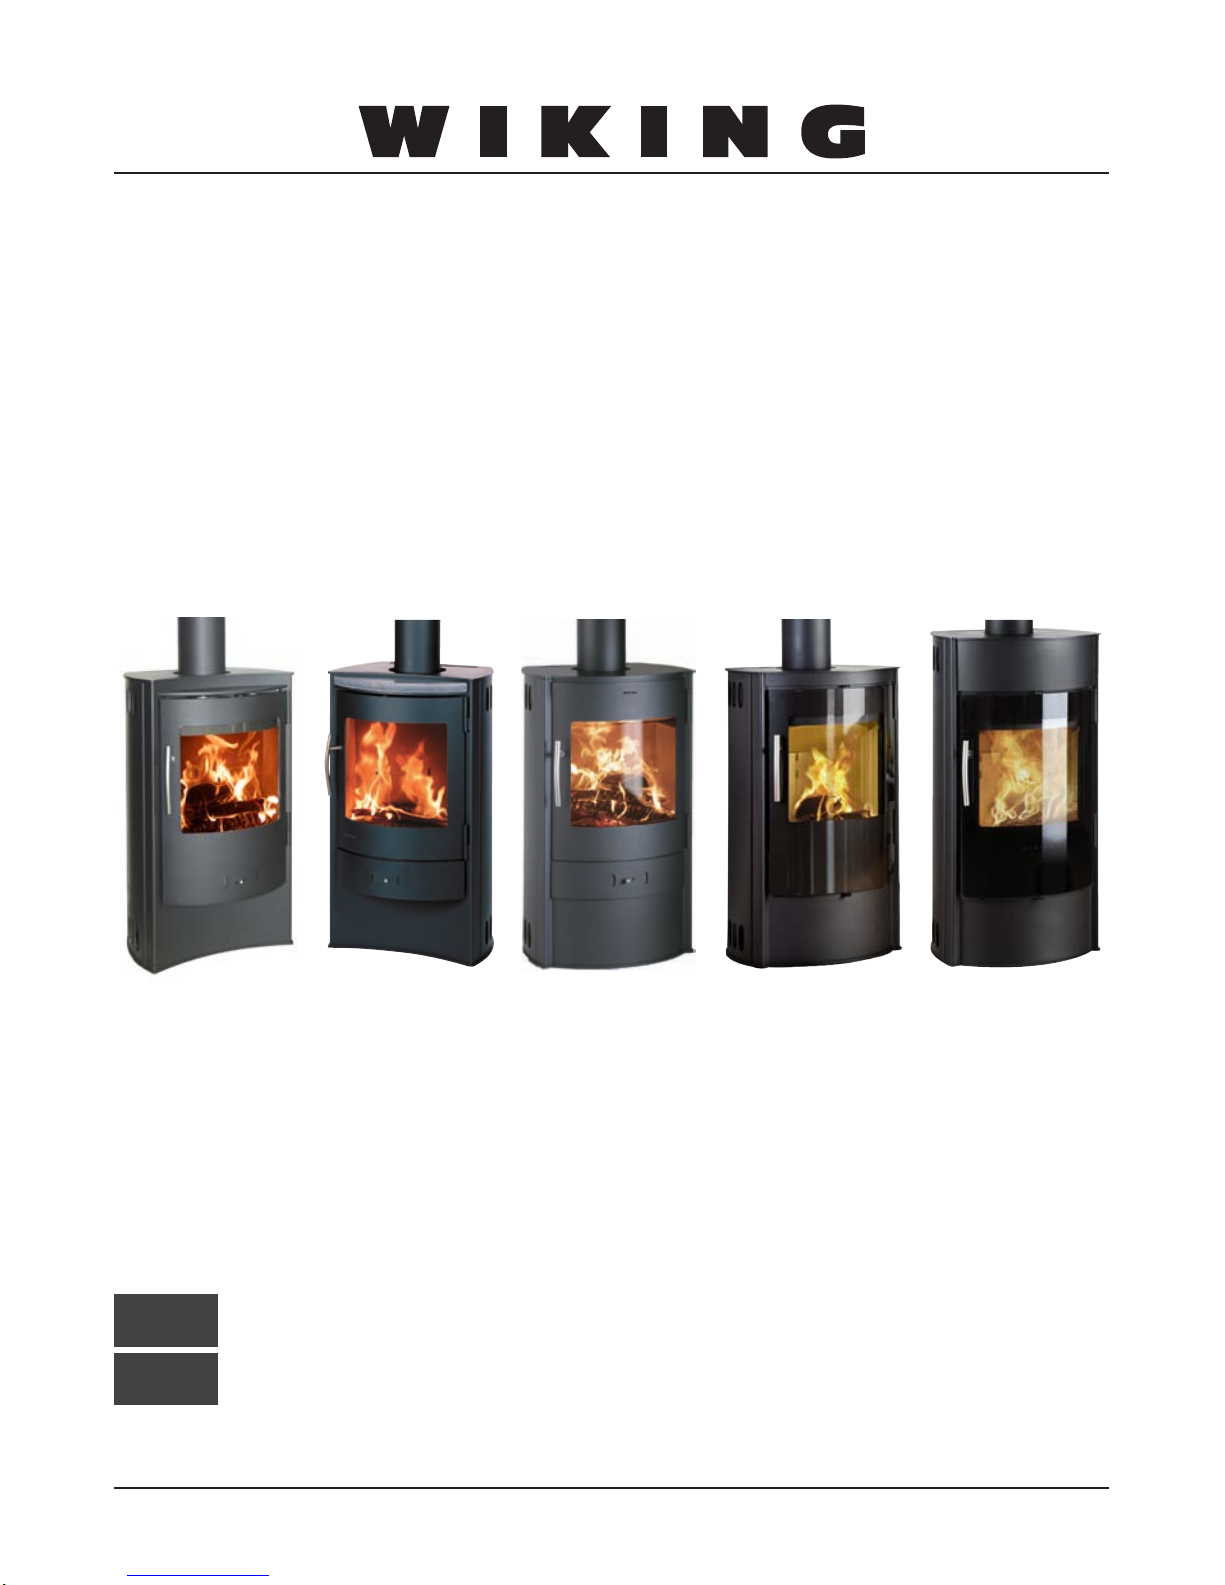
WIKING Scandic
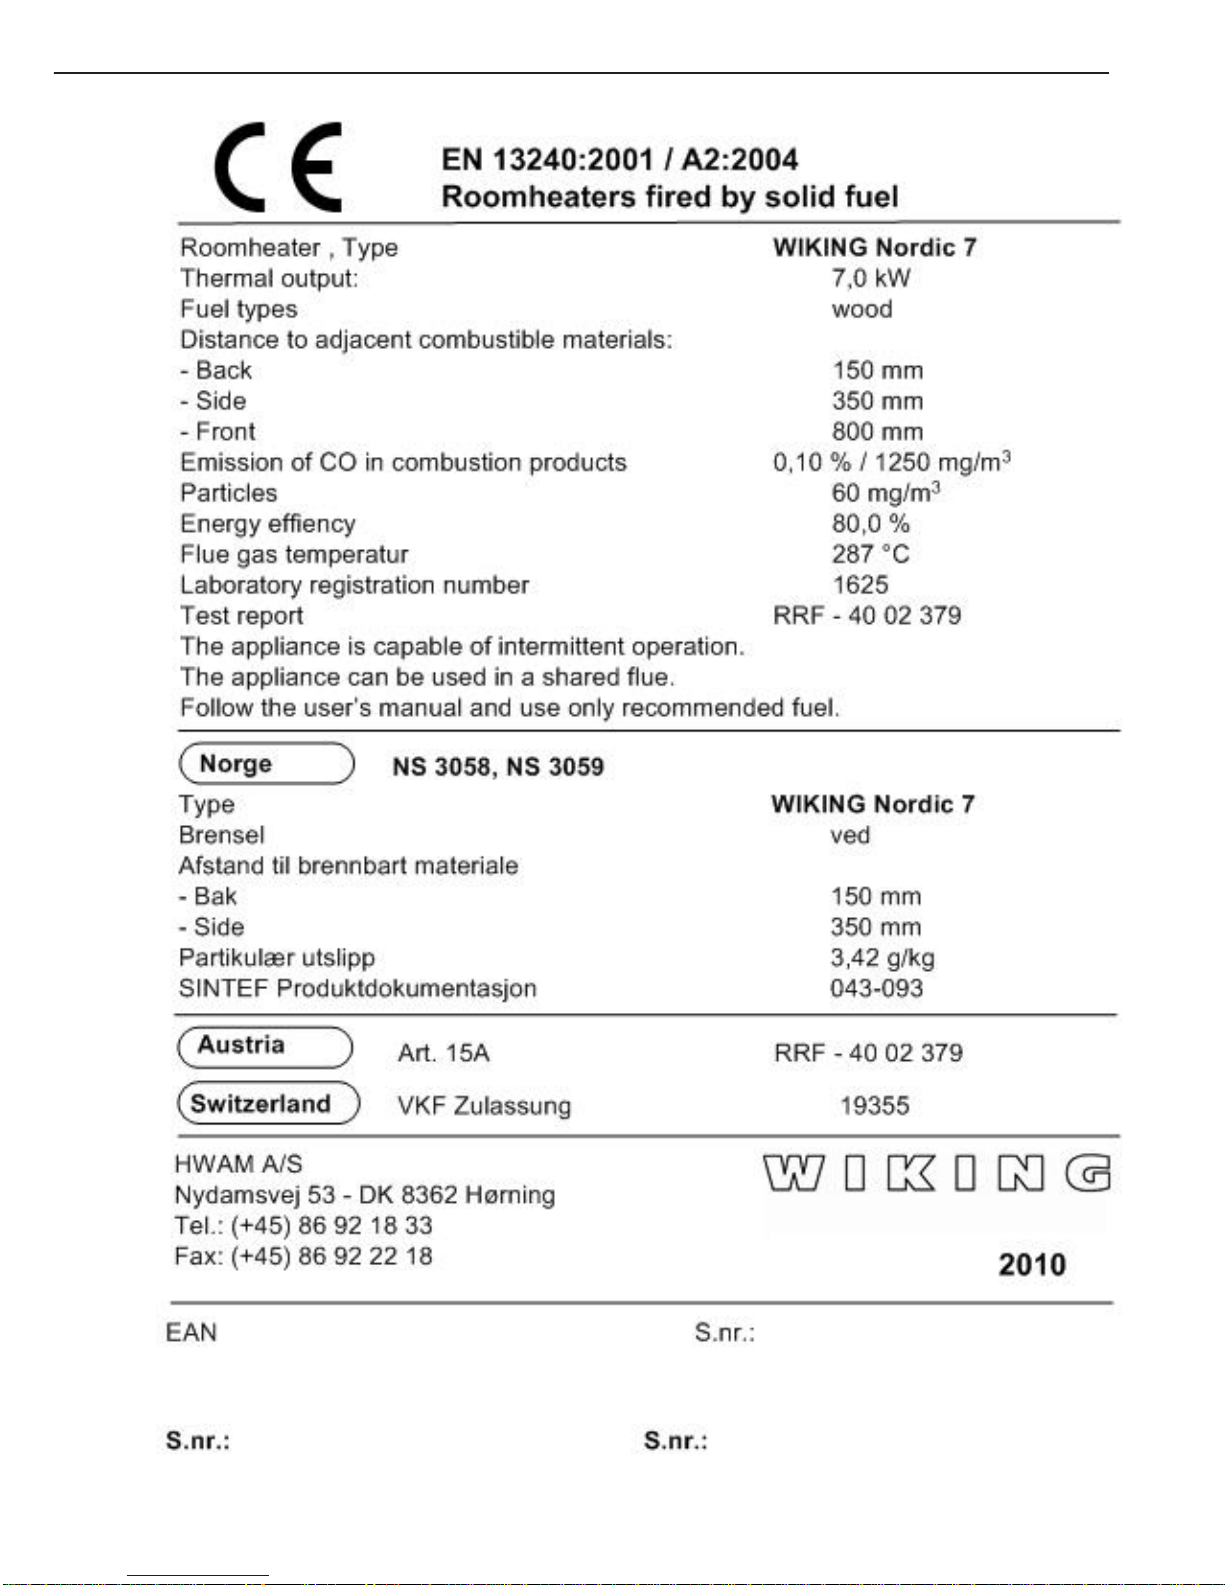
WIKING Nordic 7
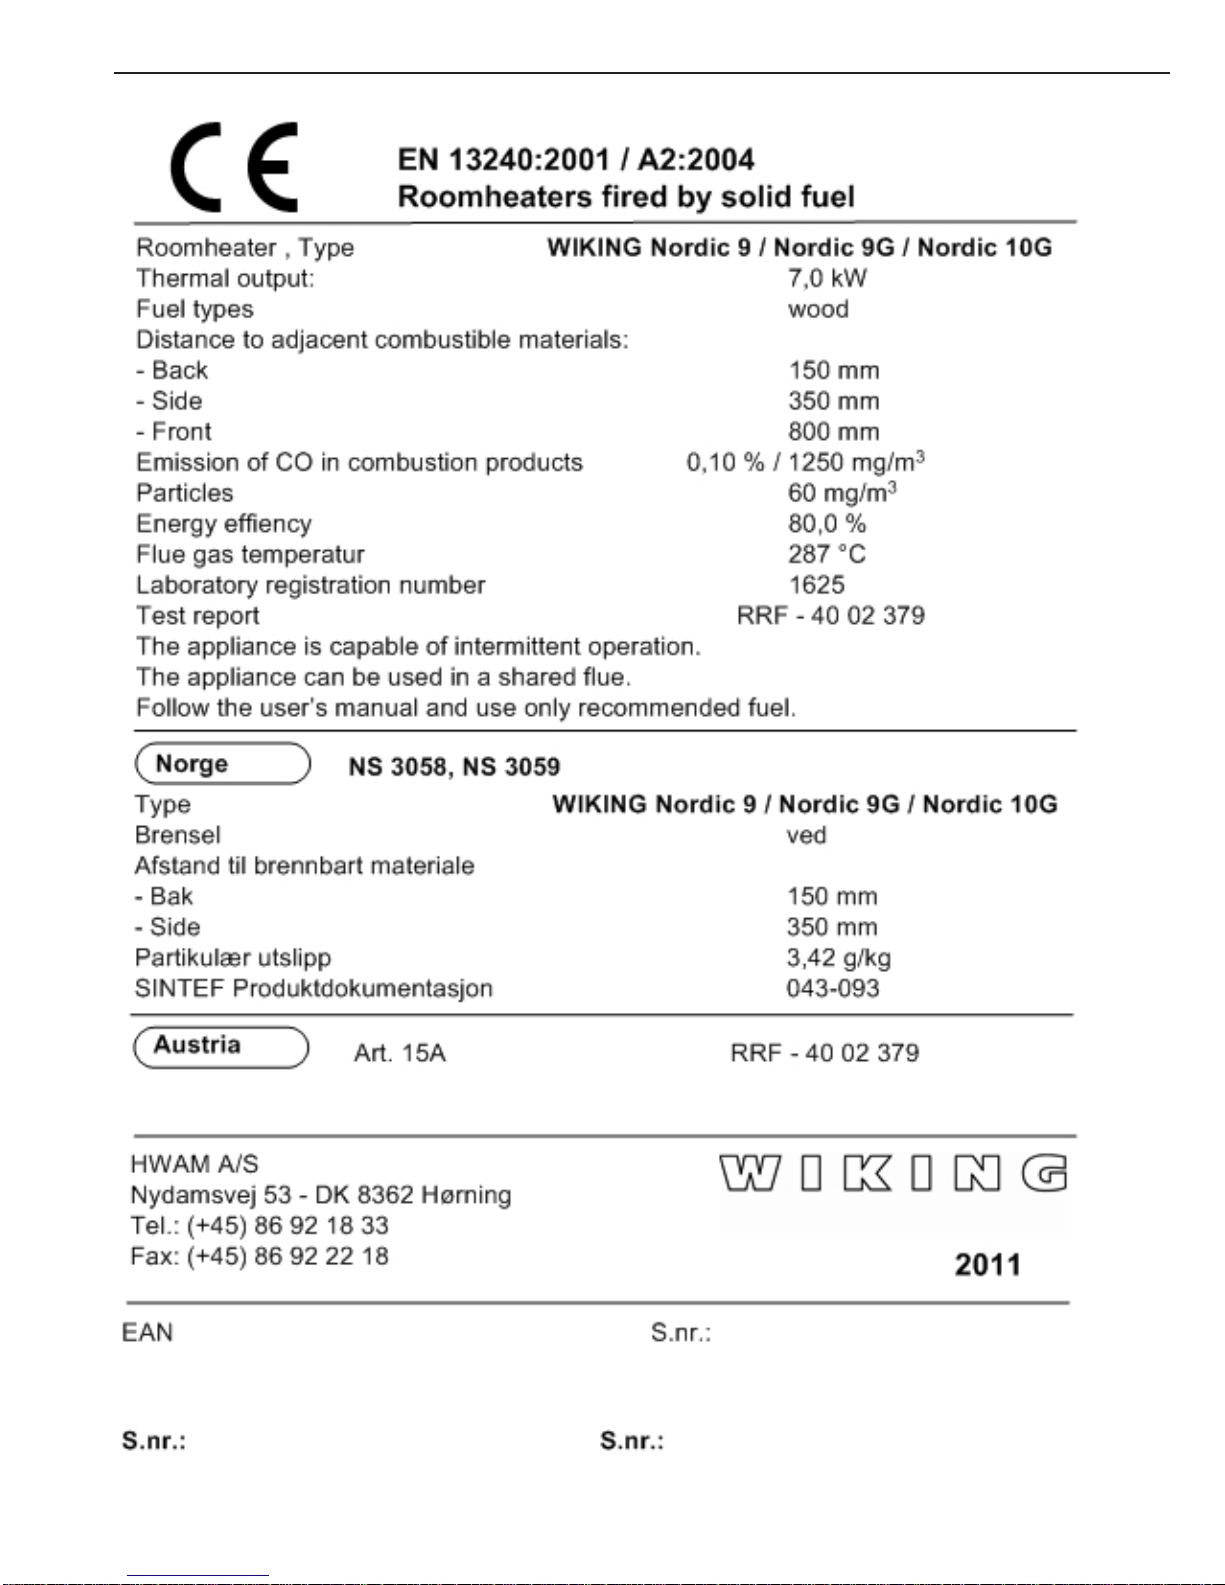
WIKING Nordic 9
WIKING Nordic 9G
WIKING Nordic 10G
13.09.2011 / 97-9556
Installations- und Bedienungsanleitung ....................................... 2
Installation- and User’s Manual
................................................... 18
DE
GB

2
Inhaltsverzeichnis
Einleitung ........................................................................................................................... 3
Installationsanleitung ..................................................................................................... 4
Vorbemerkungen ............................................................................................................... 4
Aufstellung und Anschluss ................................................................................................ 5
Gebrauchsanleitung ........................................................................................................ 7
Vor dem ersten Anheizen .................................................................................................. 7
Zum Thema Brennstoff ...................................................................................................... 7
Der Luftzufuhrregler ........................................................................................................... 8
Tipps für das Befeuern ...................................................................................................... 8
Anheizen und Nachlegen ..................................................................................................... 9
Zum Thema Rauchrohr .......................................................................................................10
Zum Thema Schornstein ....................................................................................................11
Reinigung und Wartung ...................................................................................................... 12
Fehlersuche und -behebung ..............................................................................................14
Konformitätserklärung ........................................................................................................ 15
Bedingungen für Garantie und Reklamationen .................................................................16
Typenschild ........................................................................................................................ 34
Garantieschein ....................................................................................................................40
Deutsch

3
Einleitung
Wir beglückwünschen Sie zu Ihrem neuen WIKING Kaminofen und gehen davon aus, dass Sie damit
viel Freud e haben werd en. WIKI NG die seit 3 0 Jahren h ochwer tige Ö fen ent wickelt u nd fert igt, hat
sich in Europa bezüglich Design und fortschrittlicher Technik einen Namen gemacht. Sie können also
siche r se in, e i ne n Ka mi n ofe n in ze it l o se m D es i gn e rworb en z u ha be n, d er S i e dur c h s ei ne l an ge L ebensdauer erfreut.
Bevor Sie mi t der Aufstell ung beginnen, s ollten Sie die se Anleitu ng sorgfält ig durchles en, denn so
vermeiden Sie Fehler und kommen schneller zum Ziel.
Garantie
Alle WIKING Kaminöfen entsprechen den Vorschriften der Normen EN 13240 (EU) und NS 3058 und
NS 30 59 (nor wegische N ormen bezüg lich Parti kelemission). Sie könn en also sicher s ein, dass Ihr
neuer Ofen alle europäischen Anforderungen an Sicherheit, Qualität und Umweltfreundlichkeit erfüllt.
WIKING gewährt 5 Jahre Garantie auf den Kaminofen.
Die Pluspunkte Ihres Kaminofens
Durch seine runden Formen wirkt das WIKING Modell einfach perfekt - bis ins kleinste Detail.
Der Gr iff au s sandge strahlte m Stahl wei st die glei che Kr ümmung wi e die Frontpar tie a uf. Dank der
großen, gewölbten Scheibe kann man von überall her in die Flammen blicken.
Die runde Formgebung ermöglicht eine exible Aufstellung, denn der Ofen passt zu geraden Wänden
ebenso wie zu Zimmerecken.
Auch wenn dieses Modell zu den kleineren Kaminöfen zählt, wartet es mit hoher Heizleistung auf.
Viel Spaß damit!
4
Installationsanleitung
Vorbemerkungen
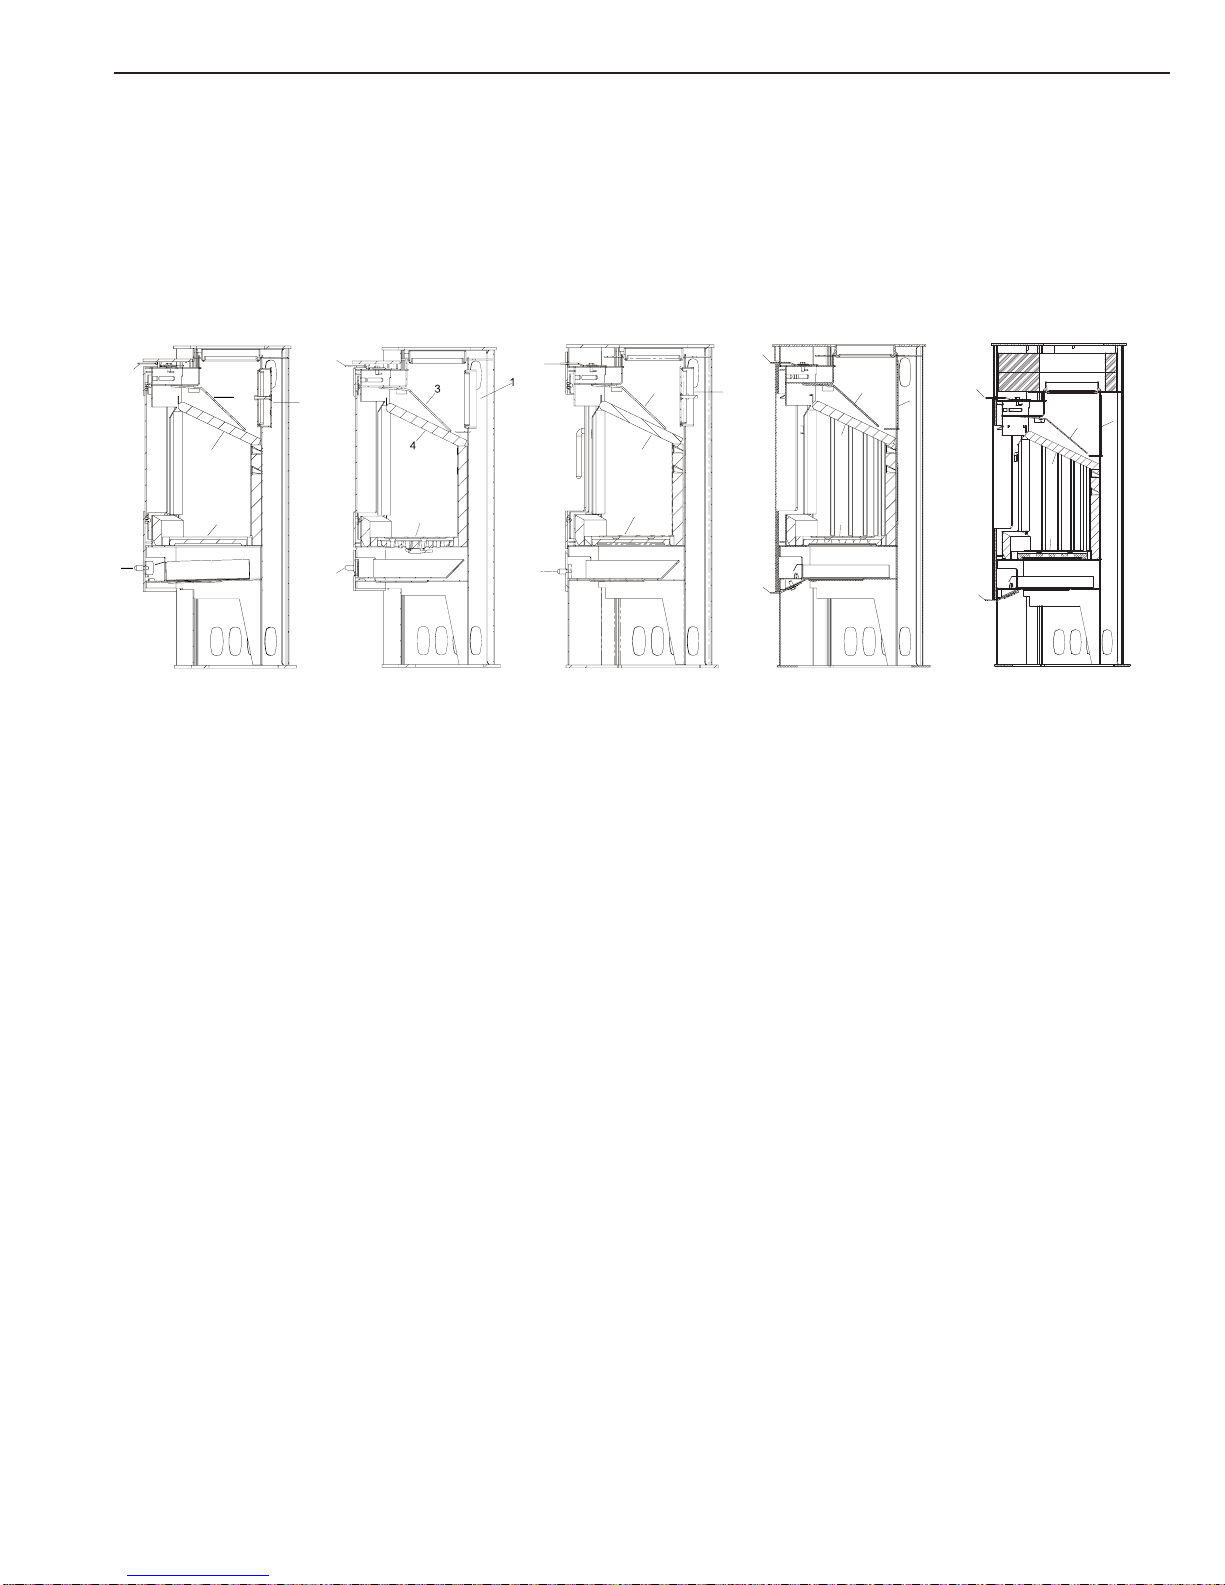
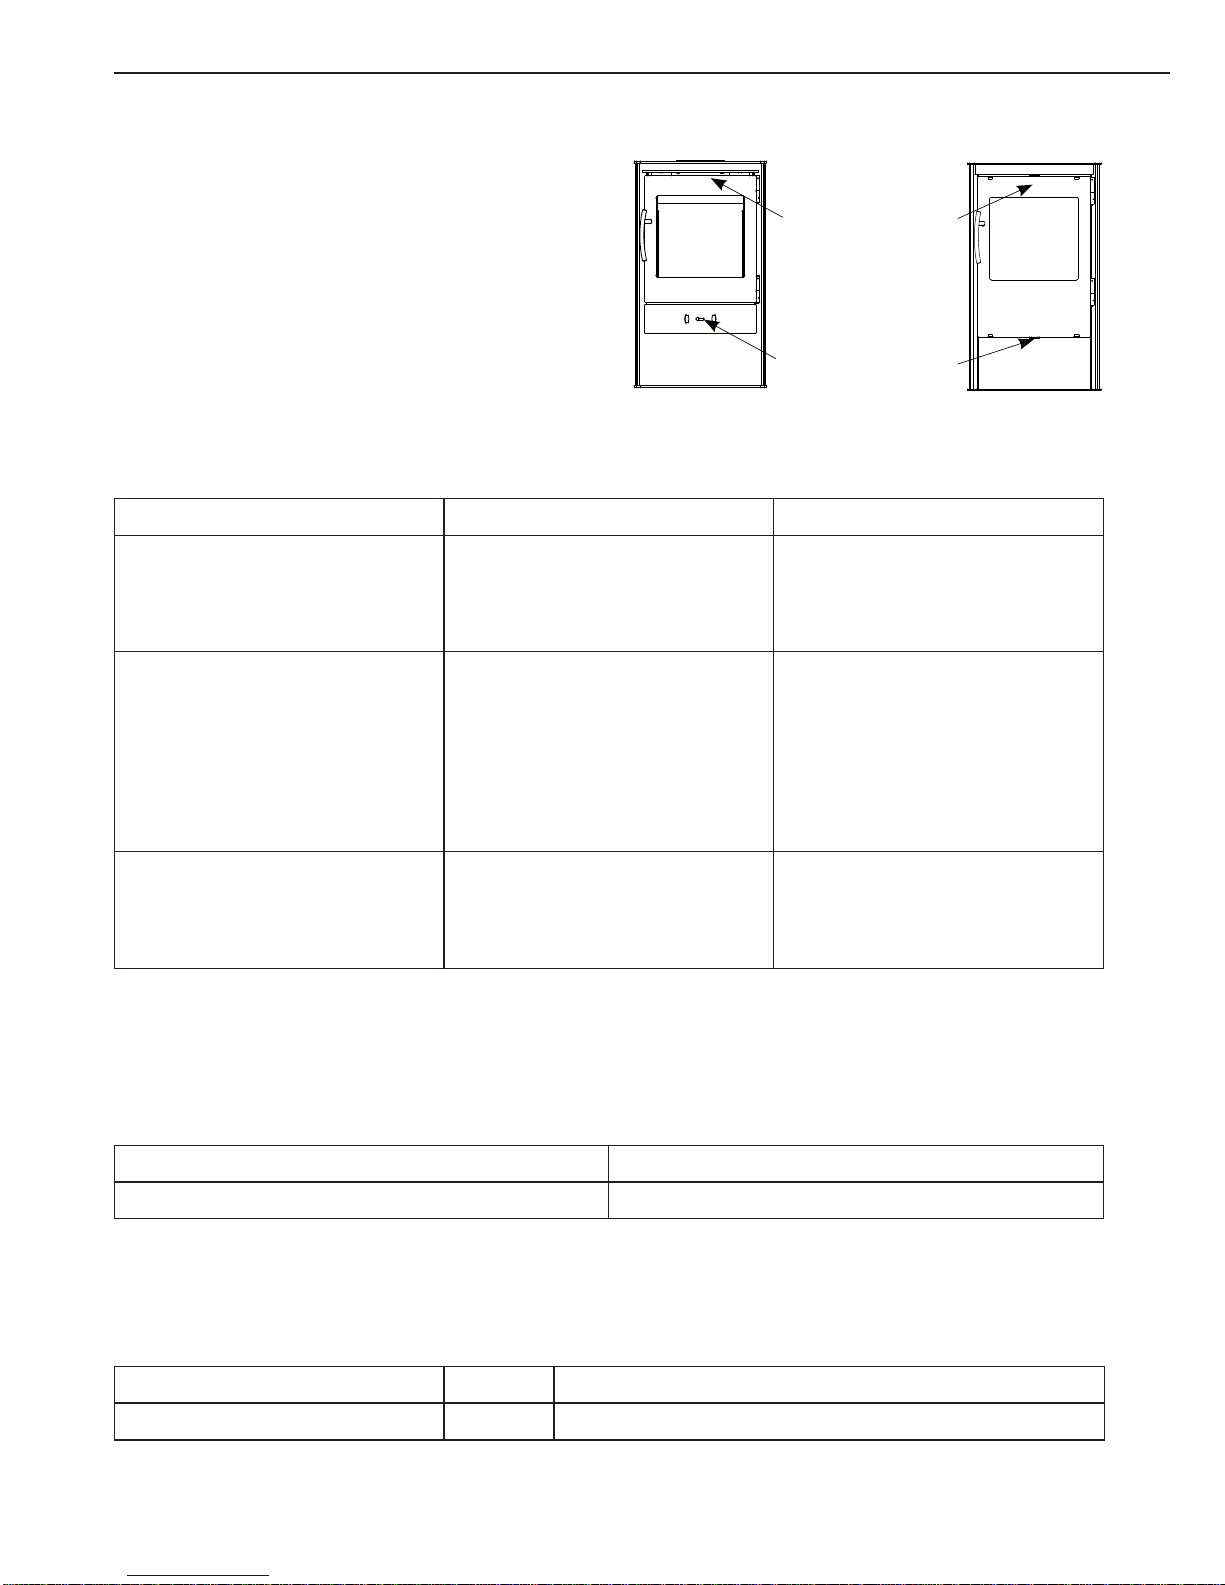
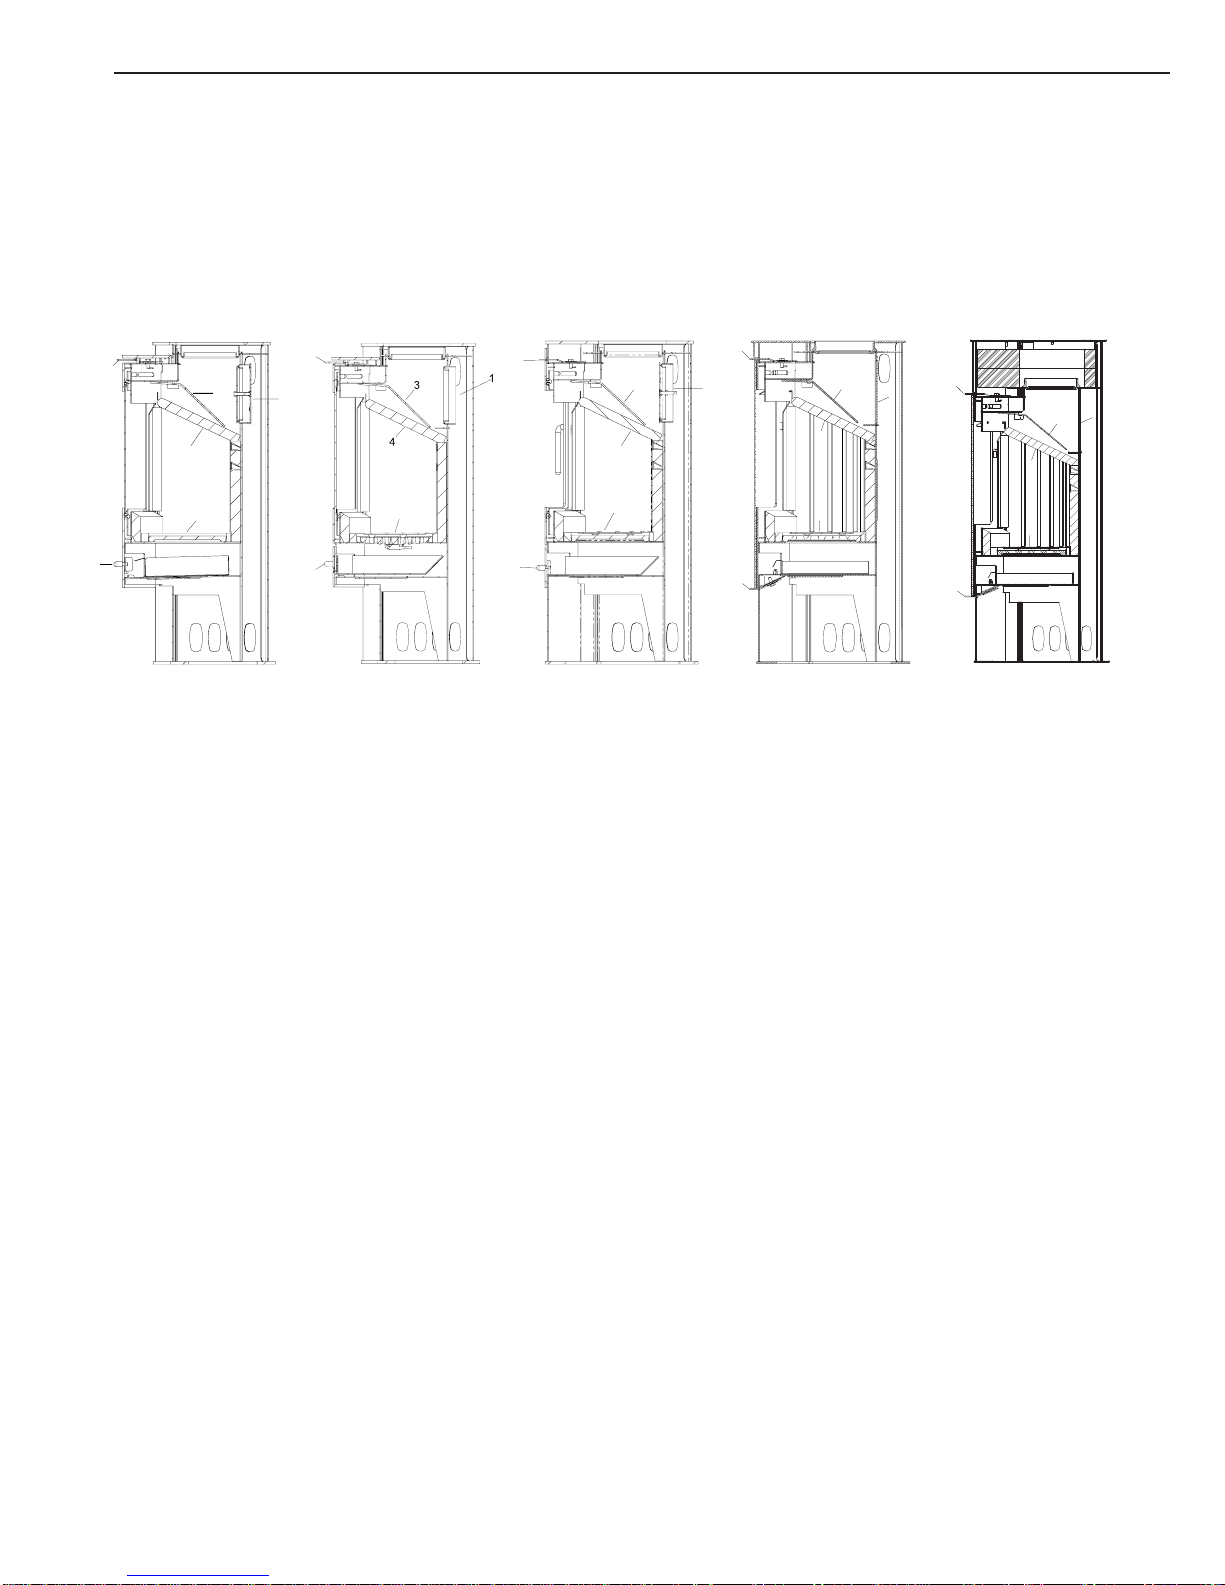
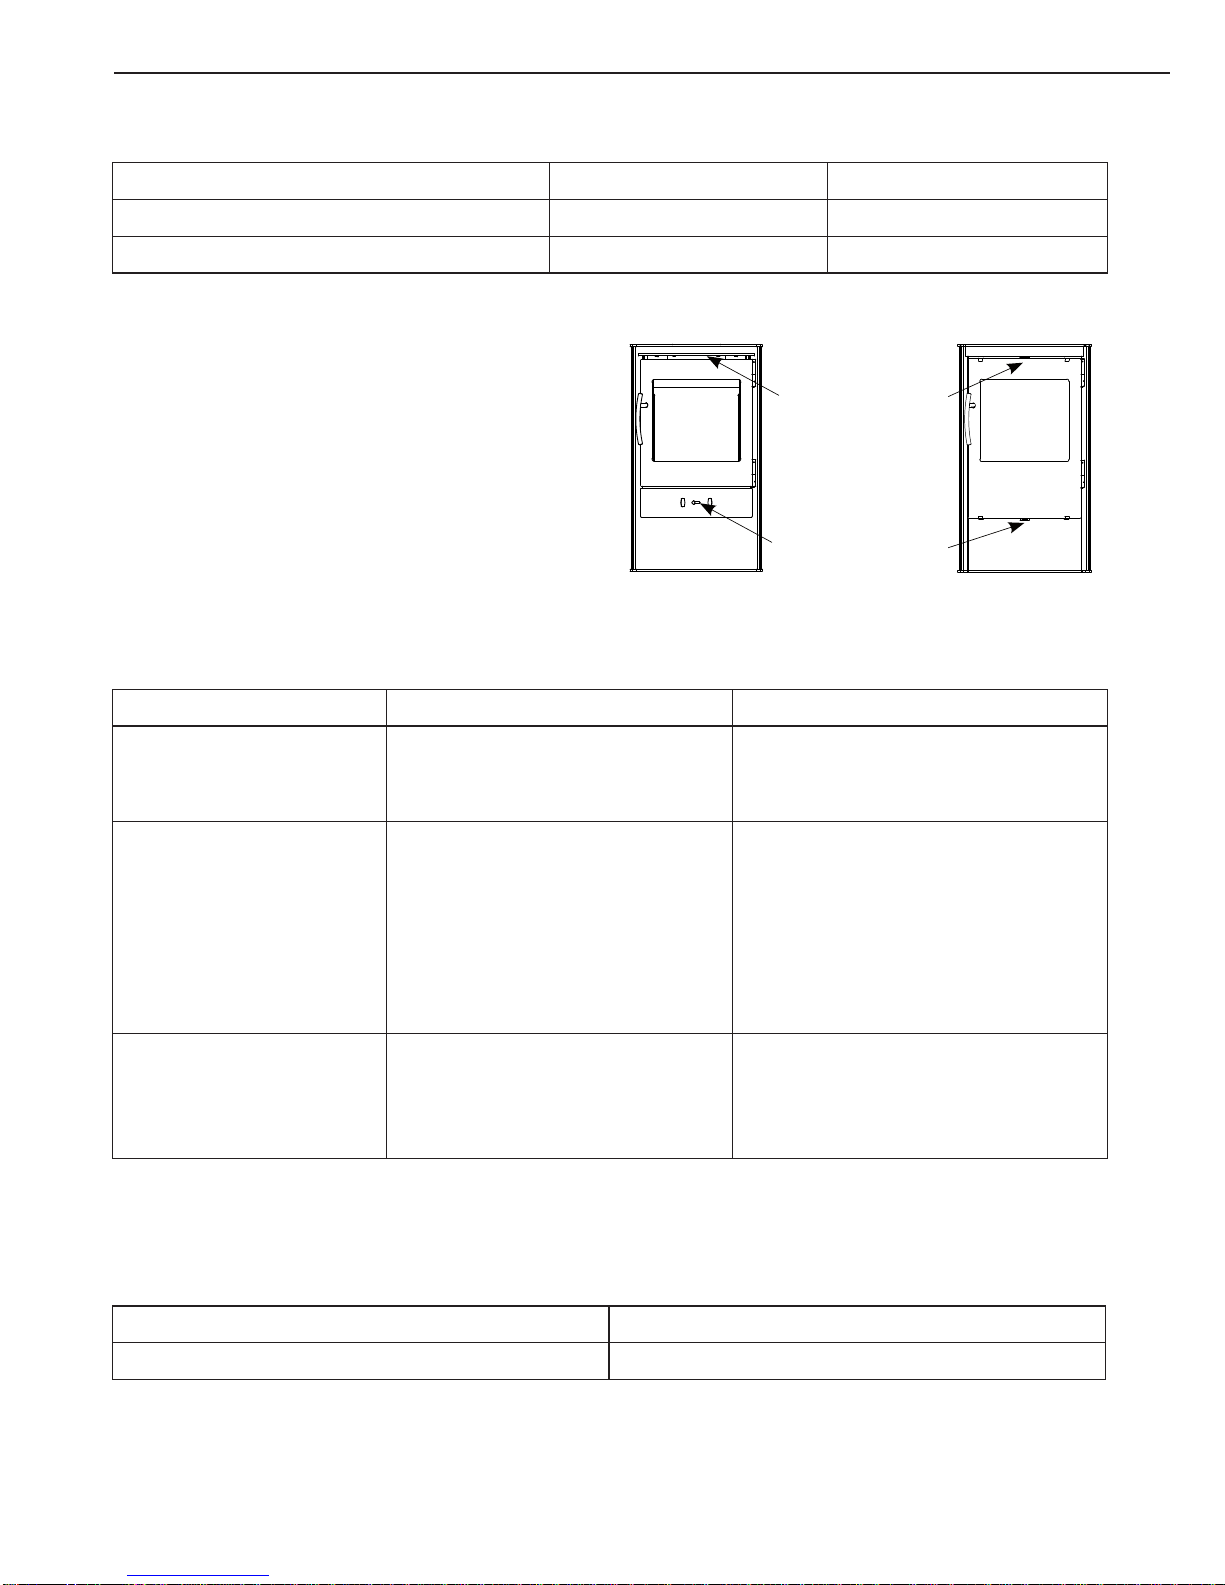
Die Abb. 1 zeigt einen Querschnitt durch Ihren Kaminofen. Nachfolgend ist aufgeführt, aus welchen Teilen
er besteht.
WIKING Scandic WIKING Nordic 7 WIKING Nordic 9 WIKING Nordic 9G WIKING Nordic 10G
1. Abdeckplatte.
2. Schieber zur Regulierung der Scheibenspülung.
3. Rauchleitplatte aus Stahl, hängt an zwei Haken.
4. Rauchleitplatte aus Vermiculite.
5. Deckplatte.
6. Schieber zur Regulierung der Primärluft.
Primärluft wird beim Anmachen des Ofens und beim Nachlegen von Brennholz verwendet.
Bitte beachten! Der Feuerraum ist mit Platten aus dem Wärmedämmmaterial Vermiculit ausgekleidet.
Damit ist gewährleiste t, da ss d ie op timale Verbrennungstempera tur schnell erreicht werden kann und im
Ofen bleibt.
Die beiden Rauch-Umlenkplat ten dienen dazu, den Weg des heißen Rauchgases durch den Ofen zu
verlän ger n, soda ss mö glic hst vie l Wärm e abge gebe n wird. Wei l die Hi tze n icht du rch de n Sch orn stein
entweicht, wird der Brennwert des Holzes optimal genutzt.
Überprüfung loser Teile
Die nicht fest mit dem Ofen verb u ndenen Teile sind auf Unversehrtheit und richtigen Sit z zu ü berpr ü f en.
Die Abb. 1 gibt Auskunft über die zu kontrollierenden Teile im Ofen, bestehend aus:
1. Die Rauchleitplatte aus Stahl ist an 2 Haken aufgehängt und mit einer Transportsicherung in Form vo n 2 Splinten ausg estattet. D iese beide n Splinte müsse n vor der Inbetr iebnahme
des Ofens entfernt werden. Dazu wird die Rauchleitplatte aus dem Skamol aus dem Feuerraum gehoben und dann werden die beiden Splinte aus den Haken zur Aufhängung gezog.
2. Rauch-Umlenkplatte aus Vermiculit, die - auf den seitlichen Platten sitzend - ganz nach hinten geschoben sein muss.
Abb. 1
5
6
2
6
6
5
5
4
4
2
2
3
3
1
1
1
3
2
4
5
6
1
3
2
4
5
6

5
3. Rückwärtige Platte, die ganz hinten im Feuerraum sitzen muss.
4. Die Bodenplatte, die plan liegen muss und den Rost umfängt.
Nachd em man s ich vo m ri chti gen S it z der Teile über ze ugt hat , kann m it Auf stel lung u nd An sch luss b e gonnen werden.
Aufstellung und Anschluss
Einhaltung gesetzlicher Bestimmungen
Bei Aufstellung des WIKING Kaminofens ist sicherzustellen, dass alle einschlägigen Bestimmungen einschließlich der europäischen Normvorschriften beachtet werden. Zuvor sollte man den Bezirksschornste-
infegermeister zurate ziehen, denn er muss den fertig angeschlossenen Ofen abnehmen.
Anforderungen an den Raum
Es ist zu gewährleisten, dass jederzeit Luft in den Raum, in dem der Kaminofen aufgestellt ist, nachströmen kann. Ei n Fenster, das sich ö ff nen lä sst, o der ei n rege lbare s Luf tve ntil ist a usrei chen d. Durc h das
Luftventil bzw. Lüftungsgitter muss Luft frei strömen können! Die nachfolgende Tabelle gibt Auskunft über
die Mindestabstände zu Wänden aus brennbarem bzw. nicht brennbarem Material.
Abstand vom Kaminofen zur .... WIKING Scandic, WIKING Nordic 7,
WIKING Nordic 9, WIKING Nordic 9G,
WIKING Nordic 10G
- Mauer hinter dem Ofen 100 mm
- Mauer neben dem Ofen 100 mm
- brennbaren Wand hinter dem Ofen 150 mm
- brennbaren Wand neben dem Ofen 350 mm
Es ist darauf zu achten, dass Glas nicht unbedingt hitzefest sein muss. Da eine Glasäche ggf. in die Kategorie ’brennbare Wand’ einzustufen ist, sollte der Hersteller bzw. der Schornsteinfegermeister befragt
werden.
Anforderungen an den Aufstellort
Soll der Ofen auf einem brennbaren Fußboden aufgestellt werden, ist der umgebende Bereich mit einer
nicht brennbaren Unterlage abzudecken, etwa mit einer WIKING Bodenplatte aus Glas oder Stahl. Diese
muss min destens 50 c m vor dem Ofe n und mindes tens je 30 c m an den Seiten h erausrei chen.Fer ner
muss der Fußbo den so stabi l sein, dass er das G ewicht von Of en und Schor nstein trag en kann. Das
Gewic ht des Schor nsteins lässt sic h anhand von Durc hmesser und H öhe ermitt eln. Angaben f ür den
Kaminofen gehen aus der nachstehenden Tabelle hervor.
6
WIKING Scandic
WIKING Nordic 7
WIKING Nordic 9
WIKING Nordic 9G WIKING Nordic 10G
Gewicht des Ofens 95 kg 93 kg 95 kg
Maße des Ofens (H/B/T) 894x527x426 mm 894x527x431 mm 1014 x 527 x 431 mm
Mindstbreite der Bodenplatte 955 mm 955 mm 955 mm
Vorderer Abstand zu den
Möbeln
800 mm 800 mm 800 mm
Anschluss an den Schornstein
Den Schornstein für die Modelle WI KING Sc a ndic, WIKING Nor d ic 7, WIKING Nordic 9, WI KING Nordic
9G und WI KING N ordic 10G lä sst sich wa hlweise o ben und hin ten am Ofen a nschli eßen. Dar auf lässt
sich ein zugelassenes Rauchrohr aufsetzen, oder eine Ableitung mittels Rauchrohr zum gemauerten
Schornstein herstellen.
Änderung des Rauchabgangs (WIKING Nordic 9G und WIKING Nordic 10G )
- von oberem Rauchabgang zu hinterem Rauchabgang
1. Die Deckplatte des Kaminofens abheben.
2. Die Rückwand hat eine Aussparung für das Rauchrohr. Die Platte an dieser Aussparung so ausbrechen, dass in der Rückwand ein für das Rauchrohr passendes Loch entsteht.
3. Die Abdeckplatte an der Rückwand des Kaminofens durch Abschrauben der 3 Schrauben (Torx Bit
Nr. 30) abmontie ren. Achtung: Las sen Sie die Sc hrauben nicht hi nter die festges chweißte Rückwand fallen!
4. Zur Demontage des Rauchrings die 3 Schrauben entfernen oben am Kaminofen.
5. Die Abdeckplatte mit den 3 Schrauben oben auf den Feuerraum schrauben (Torx Bit Nr. 30).
6. Den Rauchring vor dem Rauchabgang an der Rückseite des Kaminofens mit den 3 Schrauben
befestigen.
7. Die Deckplatte des Kaminofens wieder an ihren Platz auf den Kaminofen legen.
Einlegen von Speckstein in den Wärmespeicher (WIKING Nordic 10G)
1. Die Deckplatte des Kaminofens abheben.
2. Den Spe ckstein so in de n Wärmespeic her legen, d ass das Loch je des Steins jewe ils direkt ü ber
dem Rauchring liegt.
3. Die Deckplatte des Kaminofens wieder an ihren Platz auf den Kaminofen legen.
Anforderungen bezüglich der Höhe
Der Schornstein muss so hoch sein, dass guter Zug gewährleistet ist und kein Rauch die Nachbarn belästigt. I st der Sch ornste in zu Reinigu ngszwe cken nicht vo n oben zugä nglich, mu ss er eine Re inigung sklappe aufweisen. Wir empfehlen, sich vor dem Kauf eines Schornsteins mit dem Schornsteinfegermei-
ster in Verbindung zu setzen.
Anforderungen an Zug und Durchlass
Zug (Nen nwert): ca. 12 Pascal be i 1,2 mm Wasse rsäule. Durc hlass (Minde stgröße): Ø 150 mm, d. h.
entsprechend dem Durchmesser des Rauchabzugstutzens am Ofen.
7
Gebrauchsanleitung
Vor dem ersten Anheizen
Vorab ist dafür zu sorgen, dass …
• Alle losen Teile im Ofen richtig sitzen,
• Der Schornstein vom Schornsteinfegermeister abgenommen wurde und
• Frischluft in den Raum gelangen kann, wo der Ofen steht.
Zum Thema Brennstoff
Zulässige Brennstoffe
Der Kam in of en i s t ge m äß d e r EN /NS Nor m e n f ü r di e B efe u e r u ng m i t H o lz zu g e la s s en. E s w i rd e m pf o hlen, trockenes Holz mit einer Restfeuchte von höchstens 20% zu verwenden. Bei Holz mit einem höheren
Feuchtigkeitsgrad sind Versottung, umweltschädliche Emissionen und schlechte Brennwertausnutzung
die Folge.
Empfohlene Holzarten
Als Brennstoff für diesen Ofen eignet sich Holz von Birken, Buchen, Eichen, Ulmen, Eschen, Nadel- und
Obstbäumen usw. Die Unterschiede zwischen den einzelnen Arten sind weniger im Brennwert als viel-
mehr im Raumgewicht zu suchen. Da 1 m³ Buchenholz mehr wiegt als die gleiche Menge Rotc hte, muss
man von Letzterer zur Erzielung des gleichen Heizeffekts mehr nehmen.
Unzulässige Brennstoffe
Folgende Brennstoffe dürfen nicht verfeuert werden: Bedrucktes Papier • Kunststoffe • Brennbare Flüssigkeiten • Spanplatten • Gummi • Lackiertes, bemaltes oder imprägniertes Holz • Abfälle wie Milch-
packun gen o. Ä. Eine Ver feueru ng dieser Ma terialie n ist unzuläss ig, weil sich d abei gesund heits- un d
umweltschädliche Stoffe bilden. Da hierbei auch Kaminofen und Schornstein Schaden nehmen können,
entfällt die Garantie bei Zuwiderhandlung.
Befeuerung mit Kohle und Koks
Der WIKING Scandic, WIKING Nordic 7, WIKING Nordic 9, WIKING Nordic 9G und WIKING Nordic 10G
sind nicht für die Verfeuerung von Steinkohle und Koks ausgelegt.
Lagerung des Brennholzes
Eine Rest feu chte vo n hö chs tens 2 0% kan n durc h mi nde stens e inj ähr ig e (bes se r zwe ijä hr ige) Lage ru ng
im Freien er reicht werd en, wobei eine Ü berdachung vo rzusehen i st. Im Haus auf bewahr tes Holz wird
leicht zu t r oc ken u nd ver b re nnt d ah er zu s c hne ll. D i es g ilt j ed o ch n ic ht f ür A n mac h ho lz, d as vor d er B enutzung einige Tagen drinnen liegen sollte.
Die richtige Größe
Da die Größe der Holzstücke Einuss auf die Verbrennung hat, sollten folgende Angaben beachtet werden:
Brennstoff Länge in cm Durchmesser in cm
Anmachholz 25-33 2-5
Holzscheite 25-33 7-9
8
Abb. 2
WIKING Nordic 9G
WIKING Nordic 10G
WIKING Scandic
WIKING Nordic 7
WIKING Nordic 9
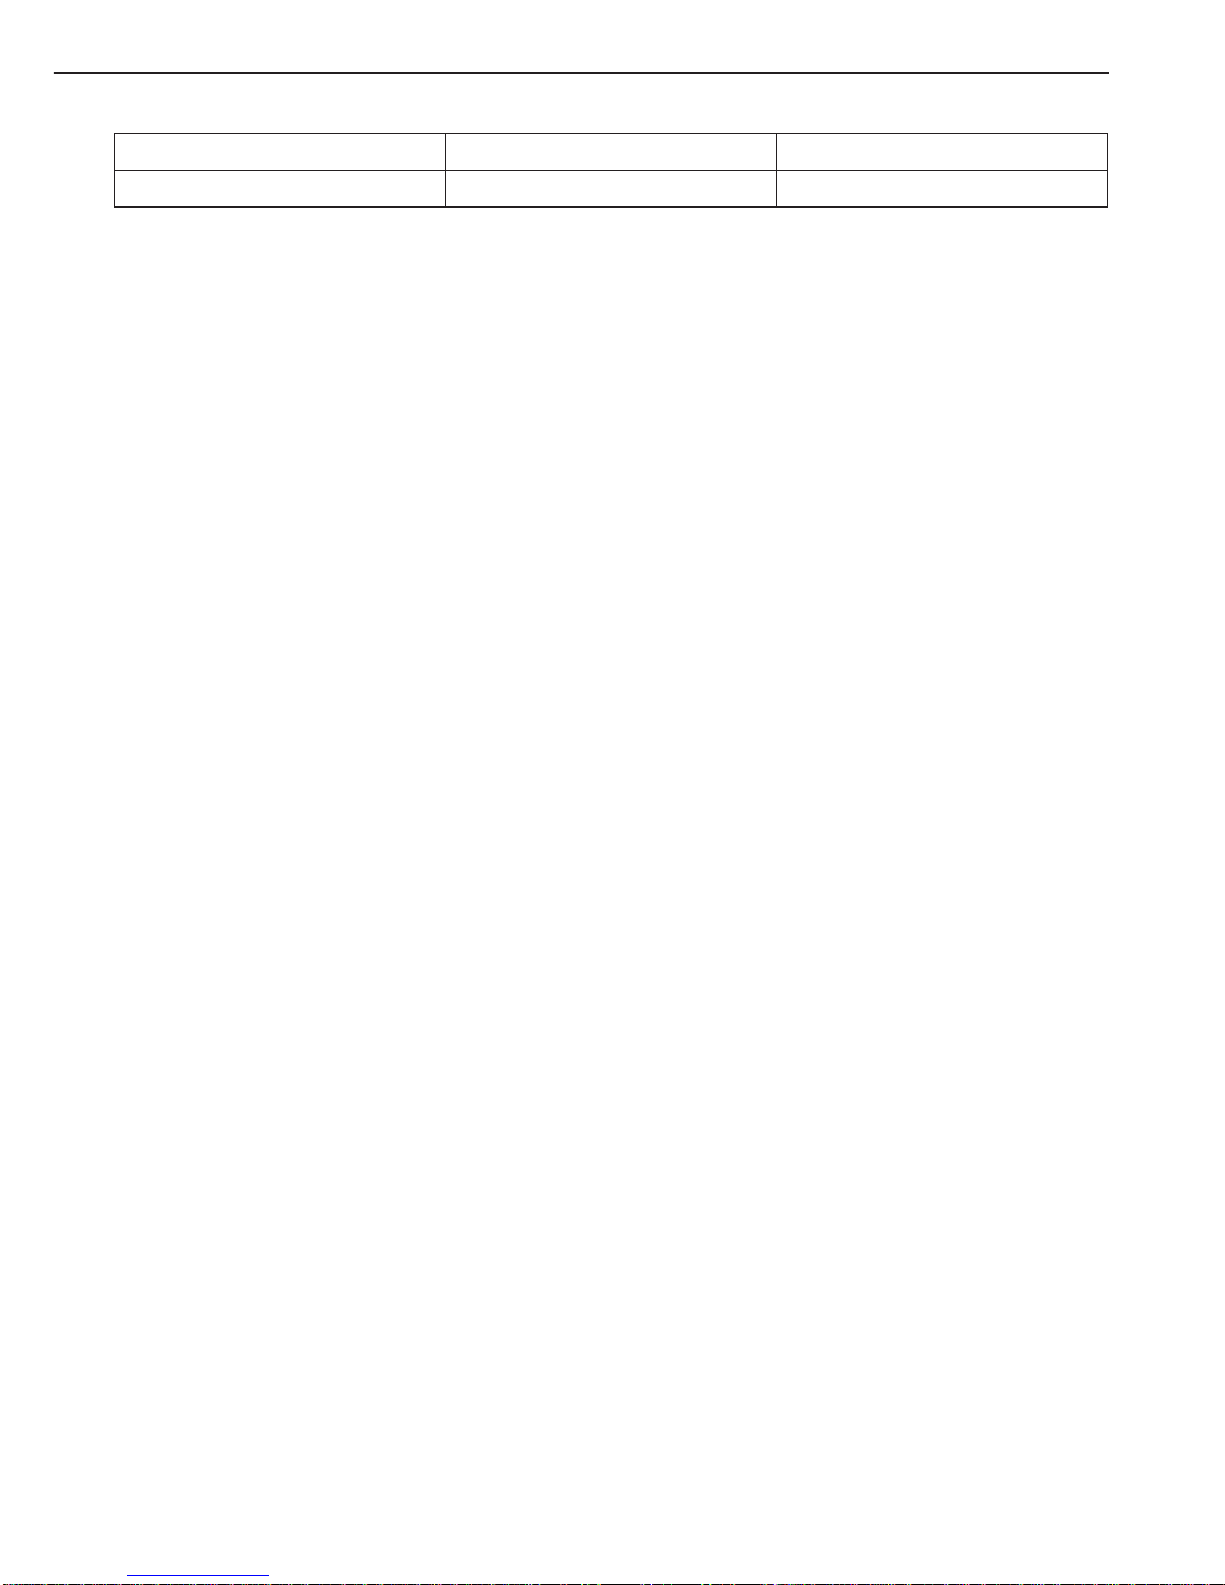
Regulierung
der ’Scheibenspülung’
Regulierung
der Luftzufuhr
zum Anheizen
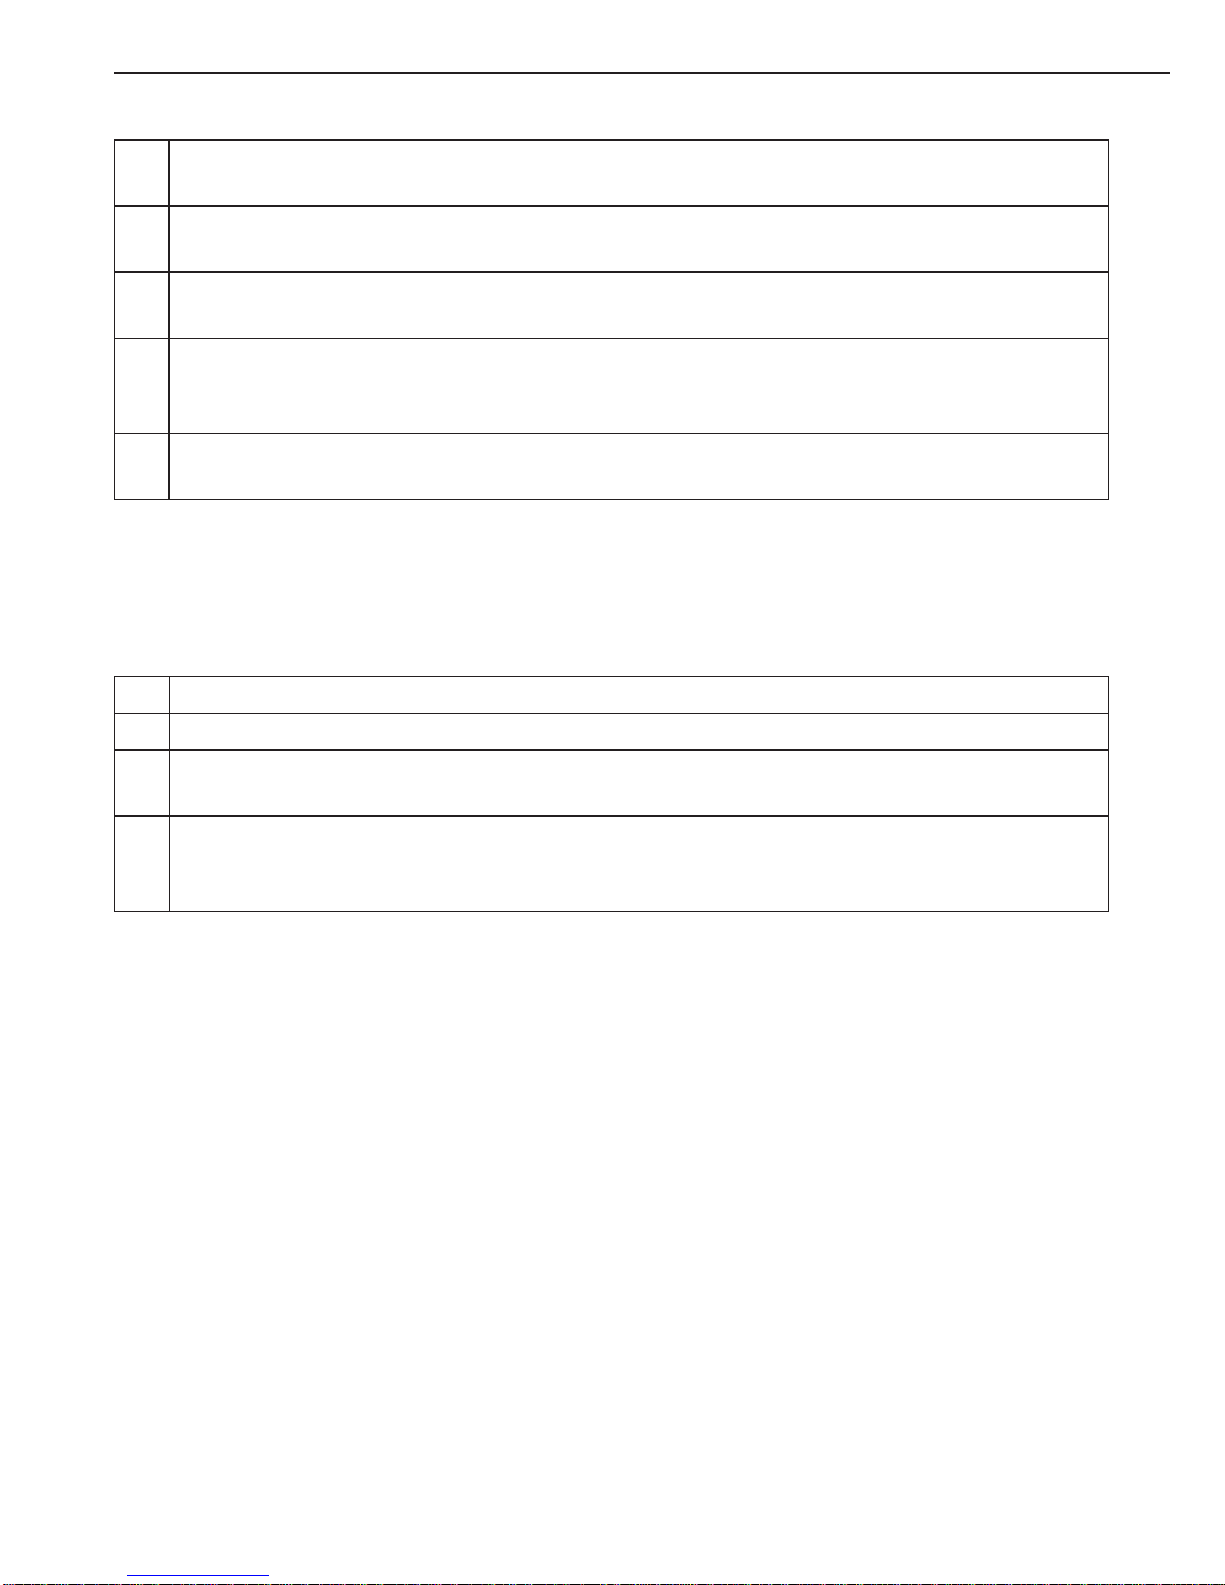
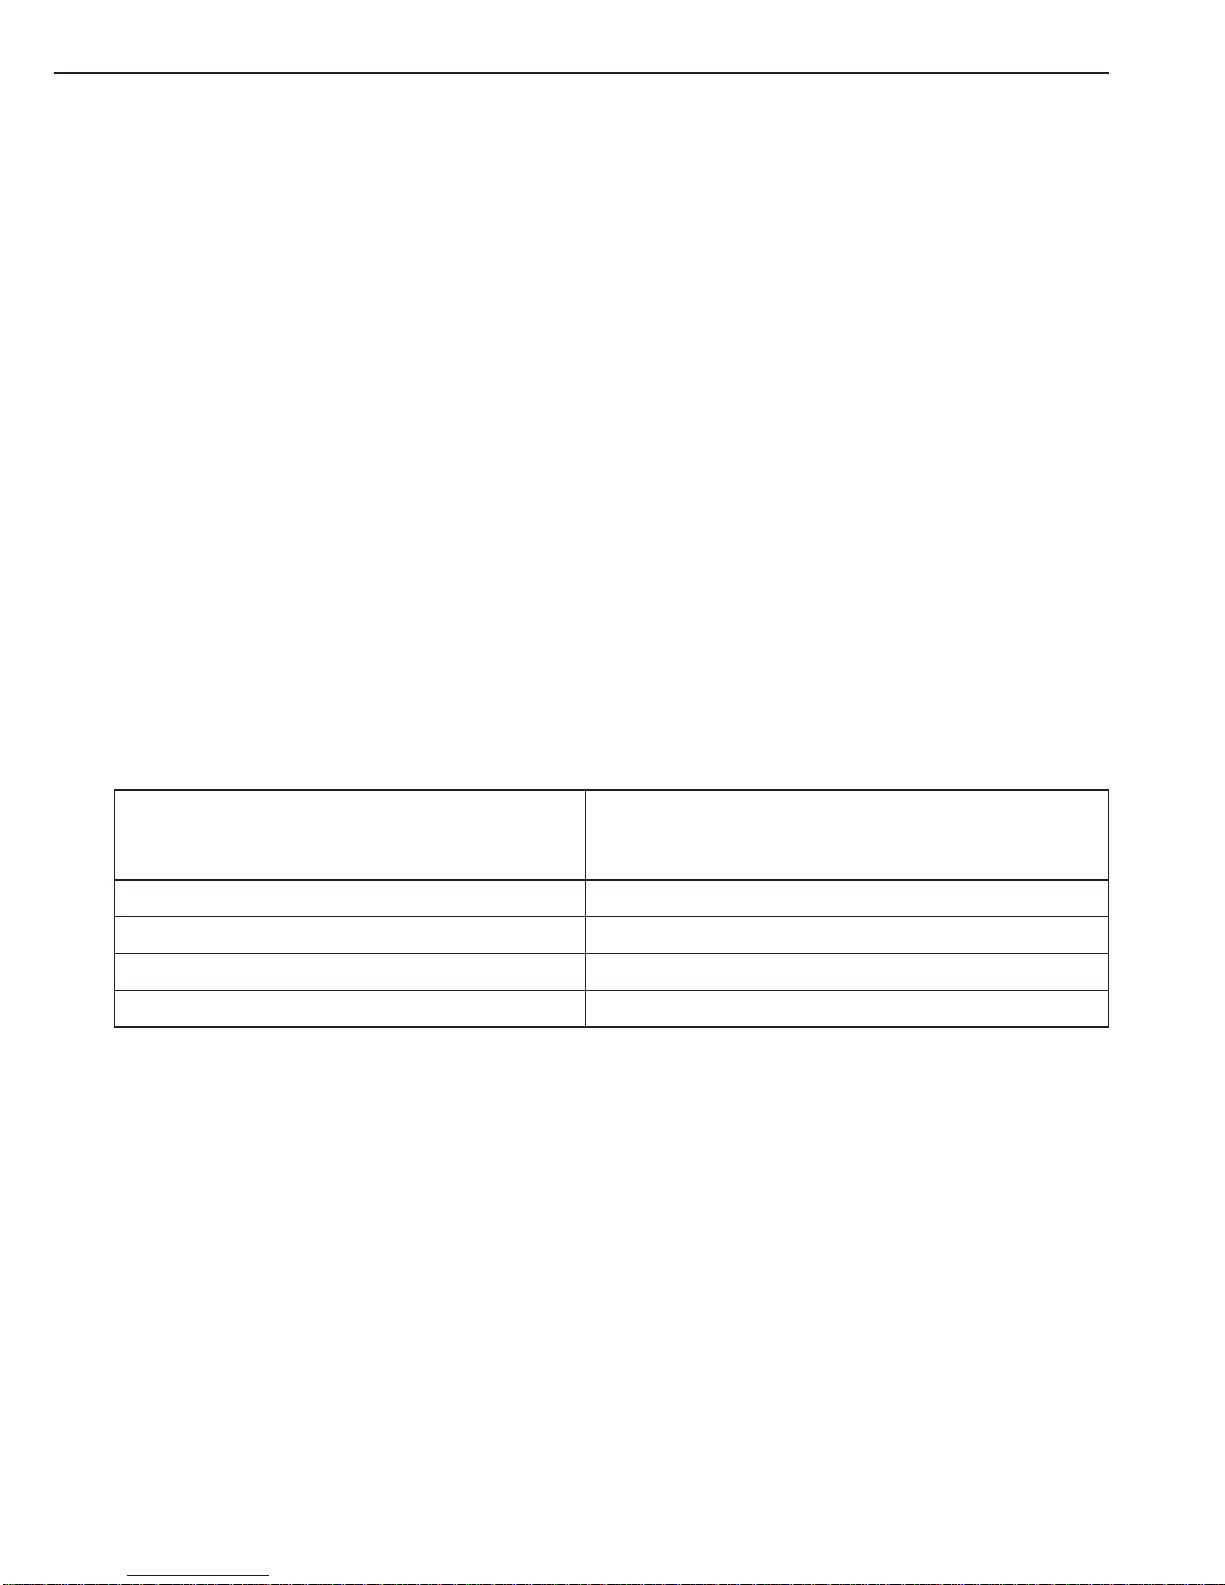
Der Luftzufuhrregler
Im Interesse einer guten, wirtschaf tlic hen Verbrennung muss dem Feuer die richtige Luftmenge zugeführt werden. Die Luft wird mithilfe
der Hebel reguliert, die sich unter bzw. über
der Tür benden. Mit dem unteren Hebel wird
die Regul ierk lappe f ür die Luf t zufuh r zum An heizen geregelt, während sich mit dem oberen
die Regulierklappe der Scheibenspülung einstellen lässt (Abb. 2).
Position des Regulierhebels Luftzufuhr Betriebssituation
Beide Hebel benden sich ganz
rechts.
Die gesamte Luftzufuhr ist
geöffnet, d.h. Luft zum Anheizen
und Scheibenspülung.
Diese Einstellung ist beim Anheizen des kalten Ofens bzw.
beim Nachlegen von Holz vorzunehmen.
Der Hebel zum Anheizen bendet sich ganz links, der andere
ganz rechts.
Die Luftzufuhr zum Anheizen
ist geschlossen, nicht jedoch
die Luft für Scheibenspülung.
Durch sukzessives Verschieben
nach links wird die Luftzufuhr
gedrosselt, wodurch die Temperatur sinkt.
Diese Einstellung ist die richtige,
wenn das Holz gut angebrannt
ist (gleichmäßige Verbrennung).
So wird d er Brennwe rt d es Hol zes am besten genutzt.
Beide Hebel benden sich ganz
links.
Die Luftzufuhr zum Kaminofen
ist komplett geschlossen.
Diese Einstellung kommt nur
bei erloschenem Feuer infrage,
etwa zu Reinigungsarbeiten.
Tipps für das Befeuern
Höchstmenge beim Nachlegen
Folgende Mengen dürfen pro Stunde verbrannt werden:
Brennstoff Max. Nachlegemenge pro Std.
Holzscheite 3,0 kg
Achtung! Zu s tar ke Hit ze ka nn Kam inofe n, Rauc hro hr und S cho rns tein b esc hädi gen. Werd en di e o. a.
Mengen überschritten, entfällt die Werksgarantie hierfür.
Durchschnittliche Nachlegeintervalle
Brennstoff kg Durchschnittliche Nachlegeintervalle
Holzscheite 2,0 Alle 50 Min.
Bitte beachten! Der Kaminofen ist für intermittierende Verbrennung zugelassen!

9
Kurze und lange Brenndauer
Kurze Brenndauer
Durch das Verbrennen vieler, kleiner Holzstücke lässt sich schnell eine starke Heizleistung erzeugen.
Lange Brenndauer
Durch das Verbrennen weniger, großer Holzstücke verlängert sich die Brenndauer. Die beste Verbrennung er reicht man durch Drosseln der Zu luft. Im Interesse einer guten Verbrennung is t jedoch darauf zu
achten, dass etwas Luft über die ‚Scheibenspülung’ zuströmen kann.
Optimale Verbrennung
Benutzen Sie sauberes, trockenes Holz!
Nasses Holz führt zu schlechter Verbrennung und damit zu Rußbildung und Versottung. Ferner geht viel
Energie für die Trocknung verloren, die dann zum Heizen fehlt.
Maßvoll nachlegen!
Beste Verbr e n n u n g e rreich e n S ie durch Nachlegen kleiner M e n gen. Wird zu viel auf einm a l n achgeleg t,
vergeht bis zum Erreichen einer optimalen Verbrennungstemperatur zu viel Zeit.
Sorgen Sie für ausreichend Luftzufuhr!
Es ist dafü r zu sorgen, dass - insbesonde re während der A nheizphase - rei chlich Luf t zugeführt w ird,
damit die Temperat ur i m Ofen schn el l a ns te i gt . A u f di e s e Weis e ve r b r e nn e n nä m li c h a uch die beim Verbrennungsvorgang entstehenden Gase und Partikel. Geschieht das nicht, führt das entweder zu einer
Versottung des Schornsteins mit der Gefahr eines Schornsteinbrandes oder zu einer umweltschädlichen
Emission.
Durchheizen sollte unterbleiben!
Vor dem Zubettgehen sollte man kein Brennholz mehr auegen und die Luftzufuhr drosseln, um bis zum
Morg en du rc hzuh ei zen. I n die se m Fall käm e es n äm lic h zu e ine r st ar ken Ent w ic k lun g von g esu ndh ei ts schädl ichem Rau ch. Ferner k ann sich Ruß im S chor nstein abla gern, was w iederu m zum Schor nstein brand führen kann.
Anheizen und Nachlegen
Erstmalige Ingebrauchnahme
Beim ersten Befeuern ist behutsam vorzugehen, da die Materialen im neuen Ofen erst ’eingebrannt’
werden müssen. Der Kaminofen muss langsam auf maximale Betriebstemperatur gebracht werden, und
dabei ist einige Male nachzulegen, bis er gründlich durchgeheizt ist.
Einbrennen des Lacks
Da der La ck a uf d em Ofen bei de n er s ten zwei bis dre i H ei zdu rc h gä ng en e r st au sh ärten mus s, ka nn e s
dabei le ic ht ra uc hen u nd r ie ch en. Au s die se m Gr u nd so llt e gut g elü f tet we rd en. Währ end d ie ser Z eit i st
die Tür vorsichtig zu öffnen, da sonst die Gefahr besteht, dass die Dichtungen am Lack kleben bleiben.
Achtung! S olange das Einbr ennen noch ni cht abgesch lossen ist, dü rfen die lac kierte n Flächen nicht
berührt werden, auch nicht mit dem mitgelieferten Handschuh.
10
Anmachen des Ofens
1. Die Regulier hebel für Pr imär- und Sekun därluf t sind ganz nac h rechts zu sc hieben. Auf di ese
Weise wird die maximale Luftmenge zugeführt.
2. Danach sind 8 b is 10 Stüc ke Anmac hhol z (1-2 kg) in den Feuer raum ei nzuleg en. Je k lein er die
Stücke sind, desto schneller erreicht der Ofen die optimale Verbrennungstemperatur.
3. In die obere S ch ic ht si nd jetzt 2 Kam ina nzün de r ein zule ge n. Si e so llt en von g ute r Qu ali tät s ei n,
damit sie nicht rauchen oder riechen.
4. Entzünd en Sie di e Kamin anzünde r. Danach ist die Tür ei nige Mi nuten an gelehn t zu lasse n. An
dem warm e n G las k an n si c h so kei n Kon de nsw as se r bi ld en . A bs c hli eß e nd i st di e Tür zu sc hl ießen.
5. Wenn das Holz gut brennt, wird der Hebel für Primärluft ganz nach links geschoben, während der
andere so eingestellt wird, dass sich eine gleichmäßige Verbrennung ergibt.
Achtung! D i e Tür darf nur zum A nh ei ze n, N ac hl e ge n un d zur Ofenrein ig un g ge öffnet we rd en, d a du rc h
stärkere Verbrennung die Gefahr besteht, dass der Ofen überhitzt wird.
Nachlegen von Brennholz
Wenn keine Flammen mehr zu sehen sind und eine ausreichende Glutschicht vorhanden ist, kann Brennstoff nachgelegt werden.
1. Öffnen Sie die Tür so vorsichtig, dass keine Glut herausfallen kann.
2. Nun sind 2 bis 4 Holzscheite (ca. 2 kg) auf die Glut zu legen.
3. Schli eßen Sie di e Tür und öffn en Sie die g esamte Luf tzuf uhr durch Vers chiebe n beider H ebel
nach rechts .
4. Nach kurzer Zeit ammt das Feuer wieder auf. Wenn das Holz gut brennt, wird der Hebel für
Primärluft ganz nach links geschoben, während der andere so eingestellt wird, dass die Flammen
ruhig und gleichmäßig brennen.
Achtung! Da Ofen und Tür beim Betrieb des Ofens sehr heiß werden, muss man Vorsicht walten lassen.
Zum Thema Rauchrohr
Die Aufgabe des Rauchrohrs
Das Rauchrohr bendet sich zwischen Kaminofen und Schornstein. Alle WIKING Kaminöfen weisen
einen Rauchabzugsstutzen mit 150 mm Durchmesser auf.
Soll der Ofen an einen gemauerten Schornstein angeschlossen werden, empehlt es sich, hierfür ein
gebogenes, oben anzusetzendes Rohr vorzusehen. Bei einer solchen Lösung können Sie mit 1 kW mehr
Heizle istung rechne n. Durch die gebogene Form ist gerin ge Verrußung gewähr leistet und die Gef ahr
eines Schornsteinbrandes ausgeschlossen. Aus d iesem Grund empf ehlen wir diese un ter de r V orausse tzung, das s d e r S chorns te i n d i cht ist und gut zieht. Mehr ü b er den Scho rnstein erfahr e n S ie im nächste n
Kapitel.
11
Zum Thema Schornstein
Die Aufgabe des Schornsteins
Der Schornstein hat als ’Motor’ des Kaminofens entscheidenden Einuss auf dessen Leistungsfähigkeit.
Durch den Luftzug entsteht im Ofen ein Unterdruck. Dieser dient dazu, …
1. den Rauch aus dem Ofen abzuziehen
2. und Luft durch die Klappe einzusaugen, die zum Anheizen, zur Verbrennung und zur‚ Scheibenspülung’ benötigt wird.
Optimaler Zug
Wenn man eini ge Dinge miss achtet, kann auch e in guter Schor nstein keine volle Le istung erbr ingen.
Entscheidend ist, dass Kaminofen und Schornstein den Vorschriften entsprechend installiert werden, da
andernfalls keine befriedigende Verbrennung zu erwarten ist.
Der Zug im S chornste in entsteht durc h unterschie dliche Temperaturen i m Schornst ein und außerh alb
des Schornsteins. Je höher die Innentemperatur, desto besser ist der Zug. Daher ist es von größter
Wicht igkeit, dass sich der Schornstein gut aufgew ä rmt hat, bevor m a n d ie Lüftungsklappen schlie ßt u n d
dadurc h d ie Verbrennun g im Ofen dro sselt (s. Seite 10). Dies da uert bei einem gem a uerten Schornstein
länger als bei einem Stahlschornstein.
An T agen mit widrigen Wind- und Witterungsverhältnissen und entsprechend geringem Zug im Schornstein
ist es unerlässlich, für eine möglichst schnelle Erwärmung zu sorgen. Um das durch schnell auodernde
Flammen zu erreichen, werden feines Anmachholz und ein z usätzlicher Kaminanzünder emp fohlen.
Zur richtigen Bemessung des Schornsteins hilft Ihnen nachstehende Tabelle mit Leistungsangaben.
WIKING Nordic 7
WIKING Nordic 9
WIKING Nordic 9G
WIKING Nordic 10G
WIKING Scandic
Nennleistung 7 kW 7 kW
Rauchgastemperatur 287
o
C 287o C
Abgasmassenstrom 5,5 g/sek 6,3 g/sek
Kontrolle bei Wiederinbetriebnahme
Wurde der Kaminofen längere Zeit (z. B. während des Sommers) nicht benutzt, ist das Rauchrohr auf evtl.
Verstopfungen hin zu untersuchen. Wenden Sie sich in dieser Frage an den Schornsteinfegermeister.
Anschluss mehrerer Heizquellen an denselben Schornstein
Dies ist bei einigen Schornsteinen grundsätzlich möglich, wobei ein Schornsteinfeger hinzuzuziehen ist,
der sich mit den einschlägigen Vorschriften auskennt.
Verhalten bei einem Schornsteinbrand
Gehen Sie wie folgt vor:
Regulierklappen im Ofen und Schornstein schließen und die Feuerwehr alarmieren.
Vor der Benut zung des Sc hornste ins nach de m Brand ist di eser von eine m Schor nsteinfeg er zu überprüfen.
5
4
6
3
1
2
12
Abb. 3
Reinigung und Wartung
Achtung! Arbeiten am Kaminofen dürfen nur vorgenommen werden, wenn dieser kalt ist.
Äußere Reinigungsarbeiten
Das Einfac hste ist e s, den K aminofe n außen m it eine m klein en Mun dstüc k mit weic hen Bür sten st aub zusaugen. Sie können den Ofen auch mit einem trockenen, weichen Lappen oder einem weichen Handfeger ab reibe n. Abe r denken Si e daran, nu r bei ein em kalten O fen. Kein Wasser, Alkohol und keinerlei
Reinigungsmittel verwenden, weil dadurch der Lack beschädigt wird.
Reinigung des Glases
Da das Modell mit einer sogenannten ‚Scheibenspülung’ ausgestattet ist, wird die Rußablagerung gering
gehalten. Sollten sich dennoch Spuren von Ruß zeigen, lassen sich diese mit einem feuchten Stück
Küchenk repp reinige n, das leicht in Asc he eingetauc ht wird. Danach w ird mit einem tro ckenen Stück
nachgewischt. Ferner ist darauf zu achten, dass die Luftspalte im Türrahmen frei von Asche und Ruß ist,
und die Di c ht un g e n wei c h s in d u nd kei n e Be s c h äd ig u ng a ufweise n. S o ll te d ort Luft in den Of en e i nd r i ngen können , er sc hwert dies d ie Re ge lun g der Z ulu f t , was zu Ü be r hitzung und Ruß ab lag er un ge n fü hre n
kann. Die Dichtungen sollten daher ausgetauscht werden. Sie sind beim Ofenhändler erhältlich.
Entleeren des Aschenkastens
Zu beachten! Auch 24 Stunden nach Verlöschen des Feuers kann sich noch Glut in der Asche benden.
Am einfachsten lässt sich der Aschenkasten entleeren, wenn man einen Abfallbeutel darüber zieht, ihn
auf den Kopf stellt und danach vorsichtig aus dem Beutel herauszieht.
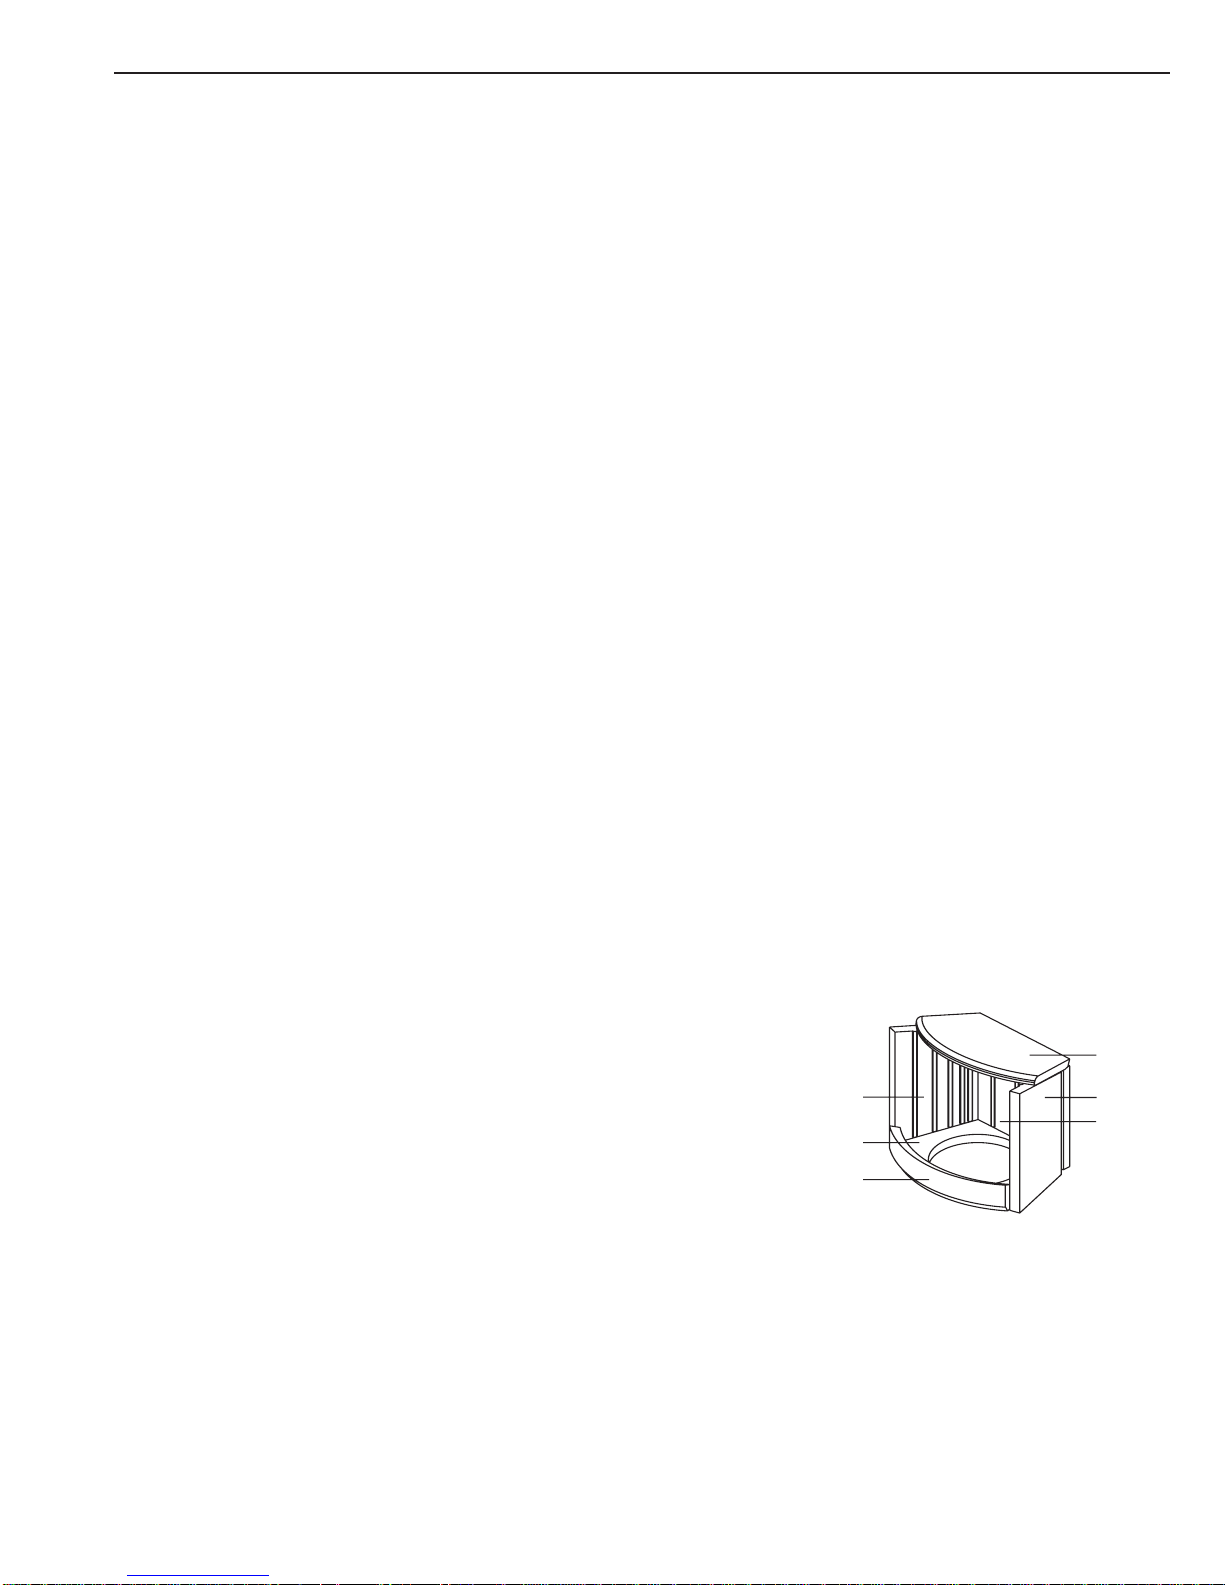
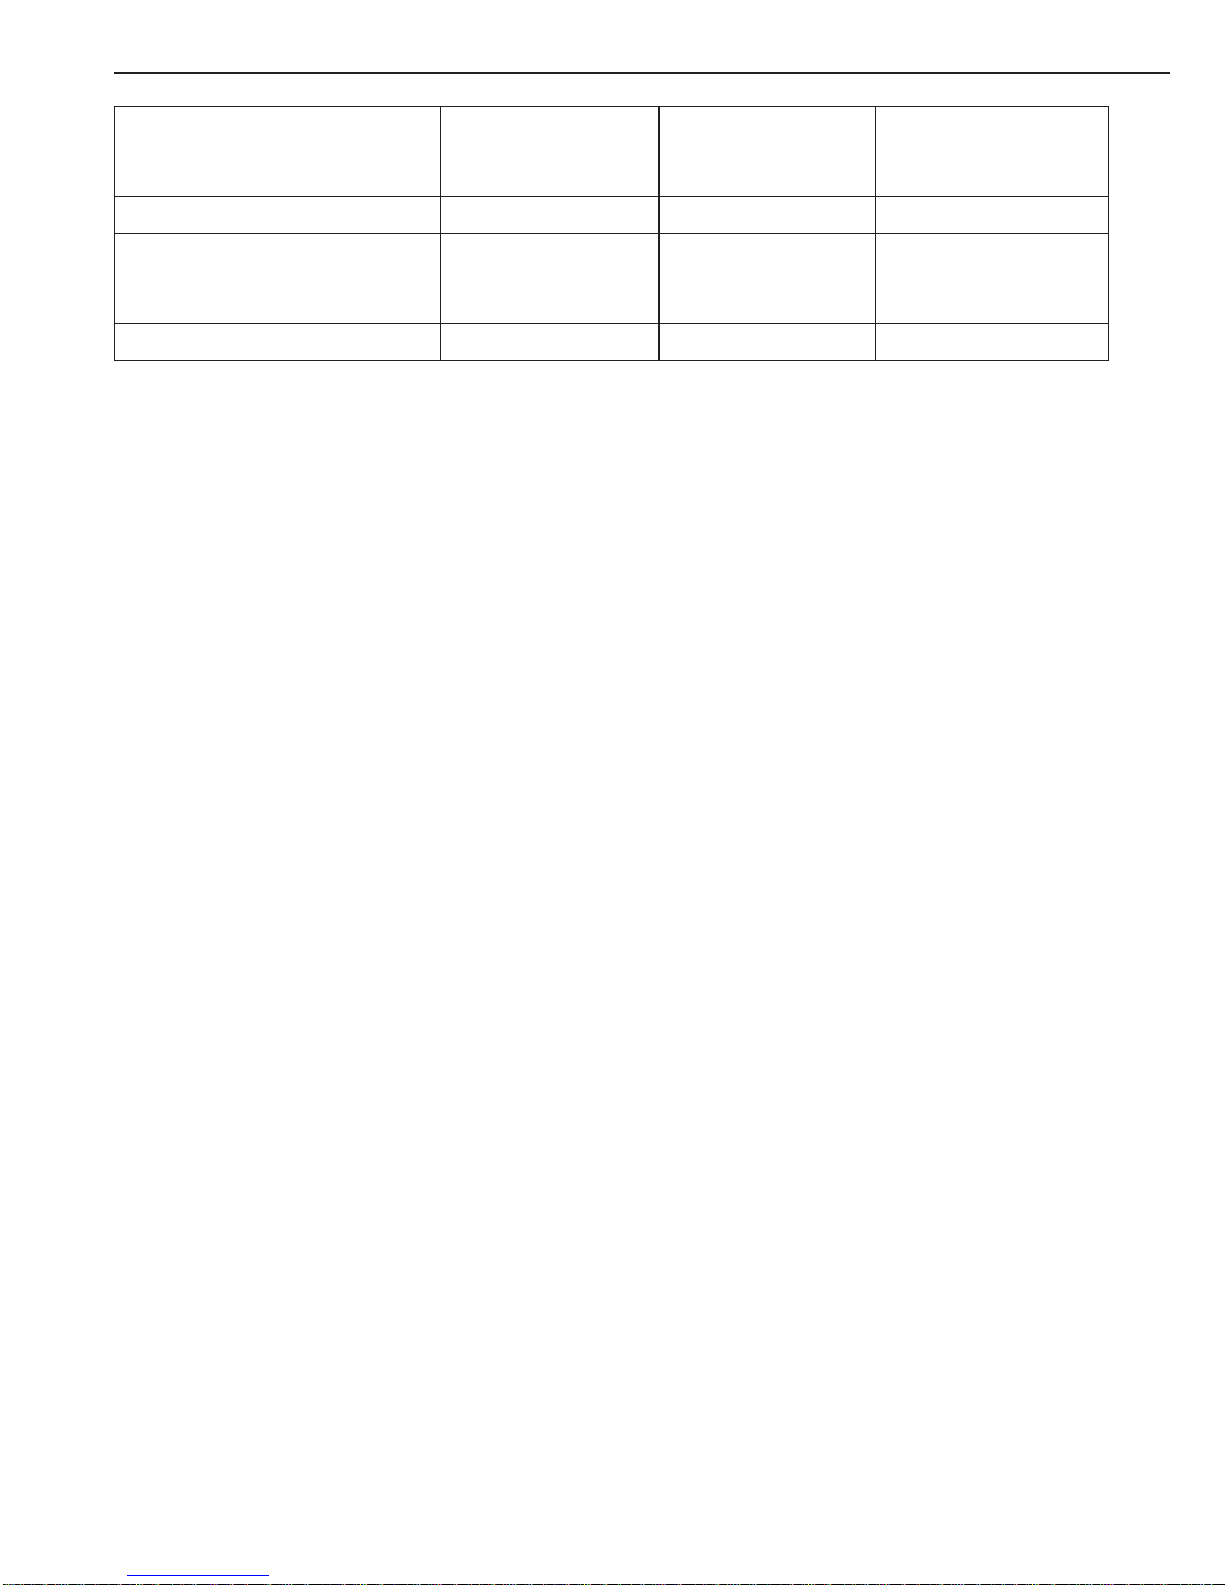
Reinigung des Feuerraums
Im Interesse einer langen Lebensda uer sollte der Kamin-ofen jährlich einer gründlichen Inspektion unterzogen wer de n. Zunä chs t ist d er Feue rr aum vo n As ch e und Ruß z u bef rei en. N ehm en Si e vor si cht ig di e
wärmedämmenden Vermiculit-Platten einzeln heraus.
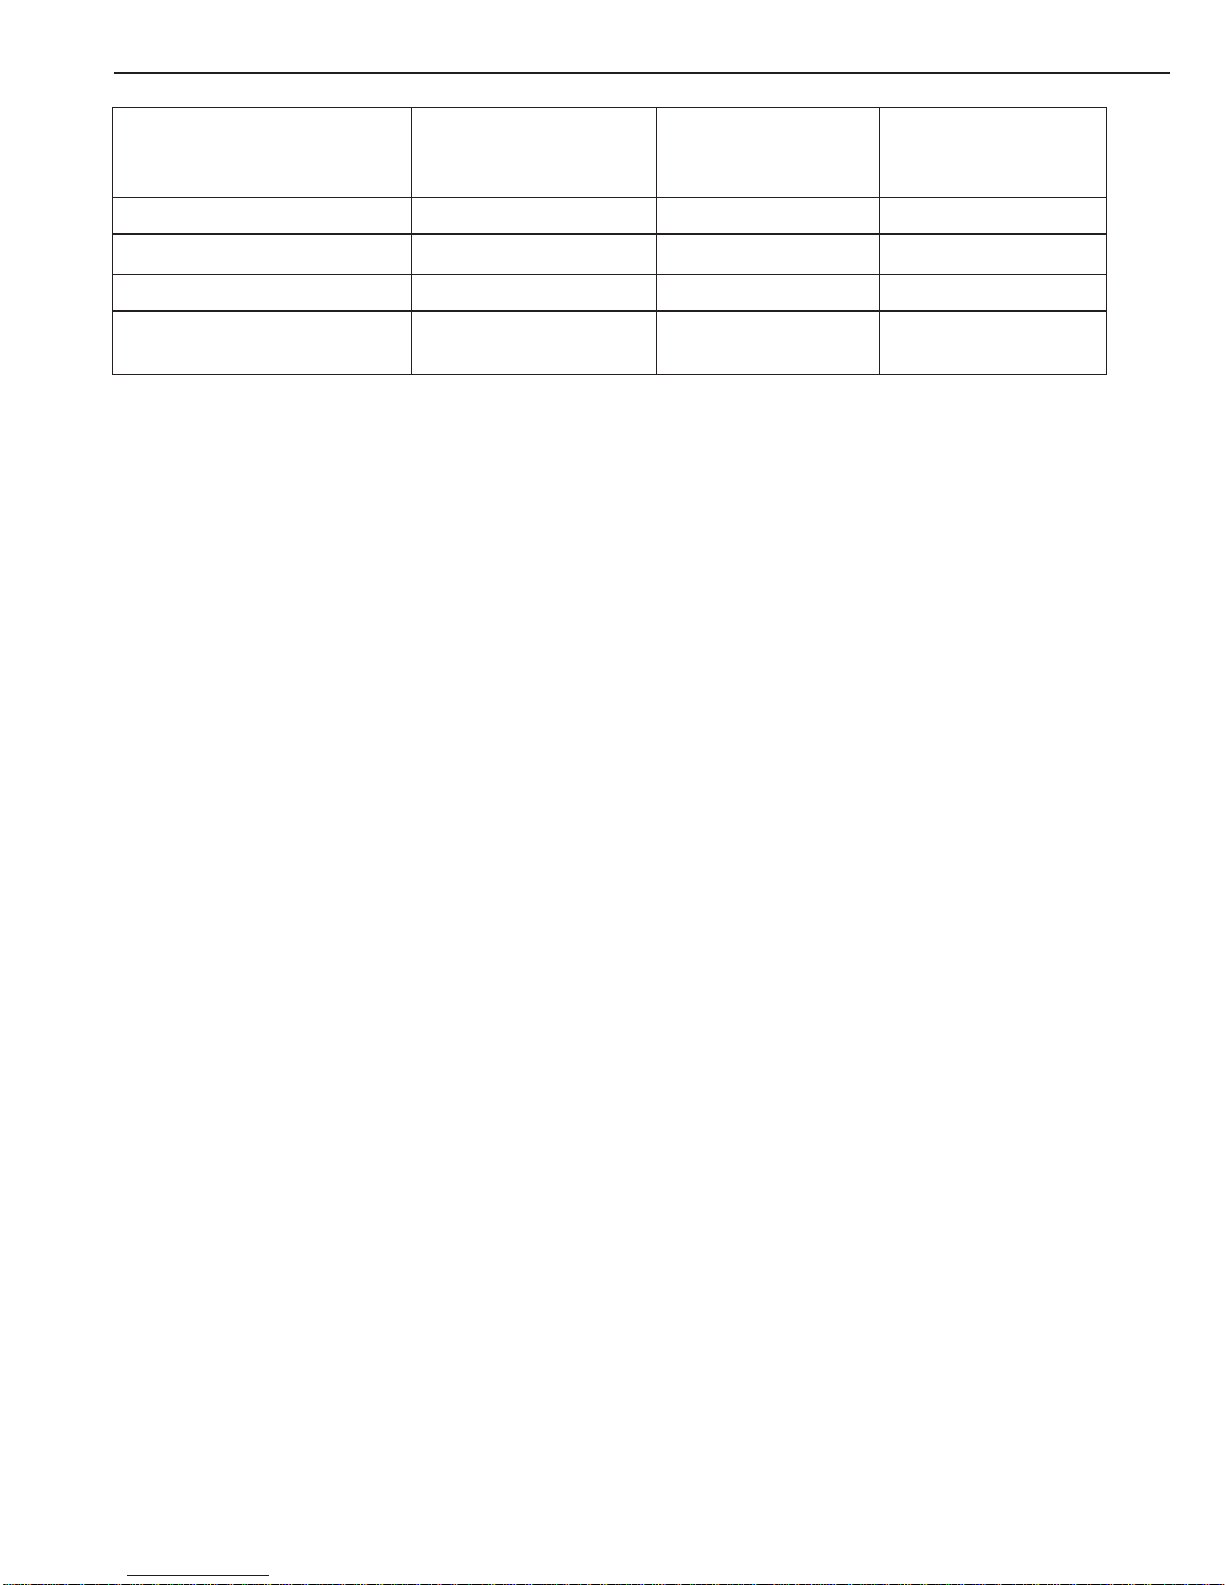
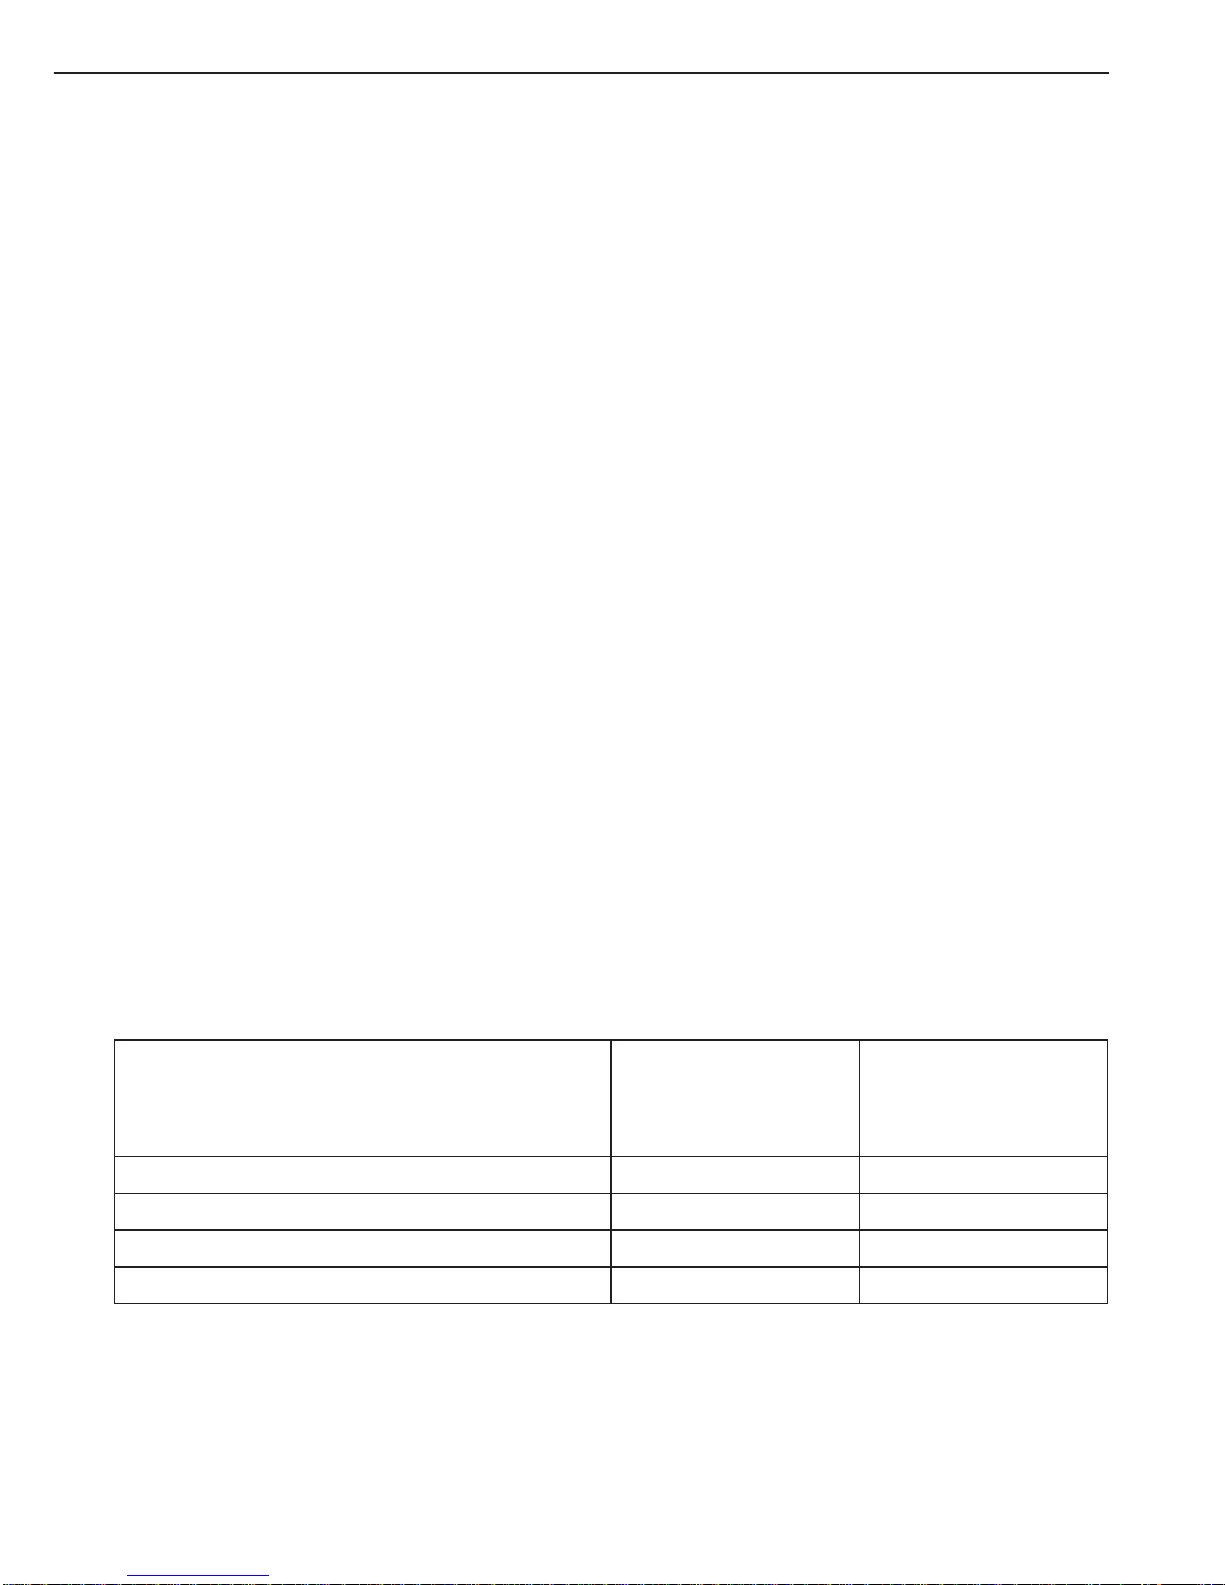
Auf der Abb. 3 sind die Platten zu sehen, die den Feuerraum auskleiden. Dabei handelt es sich um:
1. Bodenplatten 4. Linke Seitenplatte
2. Frontplatte 5. Rauch-Umlenkplatte
3. Rechte Seitenplatte 6. Rückwärtige Platte
Nach erfolgter Reinigung sind diese - beginnend mit der rückwärtige Platte
- wieder einzusetzen.
Es ist ganz wichtig, dass die hintere Platte ganz genau platziert wird, damit die Löcher für die sekundäre
Luftzufuhr in der Vermiculite Platte mit den Löchern im Ofen passen.
Das wid erst andsf ähige, p orös e Isol ier mater ial des Feu err aums kan n mit der Z eit ver schl eißen un d Be schädi gungen davont ragen. Bild en sich Ris se in der rüc kwär tigen Plat te, kann das dazu f ühren, dass
die Seku ndär luf t im Feuer raum ni cht meh r ric htig ver te ilt wir d. Aus die sem Gr und so llte die P latte a us-
getauscht werden. Dagegen hat es keinen Einuss auf die Leistungsfähigkeit des Ofens, wenn sich Risse
in den anderen Platten bilden. Ein Austausch sollte jedoch erfolgen, wenn sie soweit abgenutzt sind,

13
dass ihre Stärke auf die Hälfte geschrumpft ist.
Nachbehandlung der äußeren Flächen
Dies is t nicht e r ford erl ich. B ei La cksc häde n kann ma n diese m it ein em bes onde ren Sp ray (Senot her m)
beheben, das Ihr Händler vorrätig hält.
Schornsteinreinigung
Um einem S chor nstei nbran d vorz ubeuge n, ist der S chor nstei n jähr lich zu r einige n. Parall el hie rzu si nd
Rauchr ohr, Rauchkam mer (über de r Rauch - Umlen kplat te aus S tahl) zu säu ber n. Sollte e ine Rein igung
wegen der Schornsteinhöhe nicht möglich sein, ist eine Reinigungsklappe vorzusehen.
Inspektion
Damit Sie lange Jahre F reude an Ihrem Kaminofen haben , emp fehlen wir eine jährliche Inspektion durch
einen Fachmann. Dabei sollten nur Original-Ersatzteile zur Anwendung kommen.
Zu einer solchen Inspektion gehören folgende Leistungen:
• Gründliche Ofenreinigung
• Einstellung von Handgriff und Tür
• Schmieren der Scharniere mit Kupferfett
• Überprüfung der wärmedämmenden Vermiculit-Platten
• Überprüfung der Regulierklappe unter der Tür
• Sichtprüfung der Dichtungen und ggf. Austausch verschlissener Teile
Sollten Sie hierzu Fragen haben, können Sie die Rubrik FAQ (häug gestellte Fragen) auf der Website
www.wiking.com aufrufen oder sich an Ihren Ofenhändler wenden.

14
Fehlersuche und -behebung
Sollten Ihr Kaminofen F unktionsstörungen aufweisen, können Sie zun ächst versuchen, diese mithilfe der
Angaben in nachfolgender T abelle zu beheben. Sollte Ihnen das nicht möglich sein, wenden Sie sich bitte
an den Händler, bei dem Sie den Ofen erworben haben.
Problem Mögliche Ursache Abhilfe
Das Feuer im Ofen
brennt nicht zufriedenstellend.
Das Anh eizen ist ni cht ord entlich erfolgt.
Hinweis: Beachten Sie bitte die Angaben auf
Seite 10.
Unzureichender Zug im Schornstein.
Über prü fen Si e, ob Rauc hro hr ode r Sch orn stein
verstopf t ist . Stimmt di e Höhe de s Schor nstein s
unter den herrschenden Verhältnissen?
Die Scheibe
verrußt.
Das Brennholz ist zu nass. Verwenden Sie nur Holz, das mindestens 12 Mo-
nate getrocknet wurde und eine Restfeuchte von
höchstens 20% aufweist.
Eine Türdichtung ist undicht. Wenn sich die Dichtungen hart anfühlen, sind sie
auszutauschen. Neue Dichtungen erhalten Sie
bei Ihrem Ofenhändler.
Keine Zuf uhr vo n Se kun där l uf t
für die ’Scheibenspülung’.
Schieben Sie den Regulierhebel für die Sekundärluft ganz nach rechts. Öffnen Sie ggf.
auch ein we nig für die S ekundär luft, o der siehe
nächste Punkt.
Temper atur i m Ofe n ist zu n ie drig.
Mehr Holz nachlegen und beide Hebel ganz
nach rechts schieben.
Wenn die Tür
geöffnet wird, dringt
Rauch ins Zimmer.
Die Klappe im Sch ornstein ist
geschlossen.
Öffnen Sie die Regulierklappe.
Unzureichender Zug im
Schornstein.
Über prü fen Si e, ob Rauc hro hr ode r Sch orn stein
verstopf t ist . Stimmt di e Höhe de s Schor nstein s
unter den herrschenden Verhältnissen?
Es schlagen noch Flammen
aus dem Holz.
Warten Sie, bis sich die Flammen gelegt haben.
Die feuerfesten
Teile im Feuerraum
sind nach dem Verlöschen des Feuers
schwarz.
Die Verbre nnu ng wa r dur ch zu
wenig Brennholz bzw. Luftzufuhr zu schwach.
Lassen Sie mehr Primärluft einströmen, indem
Sie den Re gulierheb el unter der Tür ganz na ch
recht s sc h i eb e n. E s ka nn a uc h e rford e r l ic h s e in ,
mehr Brennholz nachzulegen.
Der Verbrennungsvorgang ist zu stark.
Eine Dic htung an d er Tür bzw.
am Aschenkasten ist undicht.
Wenn sich die Dichtungen hart anfühlen, sind sie
auszutauschen. Neue Dichtungen erhalten Sie
bei Ihrem Ofenhändler.
Zu starker Zug im Schornstein. Schließen Sie die Regulierklappe des Schorn-
steins so we it, bi s das Pro blem g elös t ist. Da bei
ist der Zuuss von Primärluft ganz zu stoppen.
Die Tür ist nicht dicht. Sorge n Sie f ür e in dic hte s Sc hlie ßen d er Tür. Ist
das nicht möglich, i s t d i e s e d ur ch ein Or i g in a l te i l
zu ersetzen.
15
Konformitätserklärung
Der Hersteller:
HWAM A/S
Nydamsvej 53
DK - 8362 Hørning
erklärt hierdurch, dass sich das
Produkt: Modell:
Kaminofen WIKING Scandic
WIKING Nordic 7
WIKING Nordic 9
WIKING Nordic 9G
WIKING Nordic 10G
in Übereinstimmung mit den Vorschriften folgender EU-Richtlinien bendet:
Bezeichnung Titel:
89/106/EWG Richtlinie über Bauprodukte
Dazu gehören auch folgende angeglichenen Normen:
Nr.: Titel: Ausgabe:
EN 13240 Raumheizer für feste Brennstoffe 2001
EN 13240/A2 Raumheizer für feste Brennstoffe
- Anforderungen und Prüfung
2004
sowie folgende Normen und/oder technische Vorgaben
Nr.: Titel: Ausgabe: Teil:
NS 3058 Geschlossene, holzbefeuerte Feuerstätten -
Rauchemissionen
NS 3059 Geschlossene, holzbefeuerte Feuerstätten
- Anforderungen
Hørning, 21.02. 2008
Torsten Hvam Sølund
Werksleiter, verantwortlich für Qualitätssicherung

16
Bedingungen für Garantie und Reklamationen
- erweiterte Gewährleistung (5 Jahre)
Wir beglückwünschen Sie zum Erwerb Ihres WIKING Kaminofens!
Alle un s er e P r o d ukte sind von b e st e r ha n d we rklich e r Q u a li tät, herg e ste l l t au s e r s t k l a s s i g e n M a te rialien,
und eine r g ründlic hen Qualitätskontrolle unterzogen. Wi r s i nd daher davon üb erzeugt, dass Sie e i n P r odukt erhalten haben, welches über viele Jahre hinweg problemlos funktionieren wird. Sollten Sie dennoch
Grund zu einer Reklamation haben, sichern wir Ihnen natürlich erstklassigen Kundendienst zu.
Über die a llge mein üb lich en ges etzl iche n Best immun gen fü r Hand elsg esch äft e hinaus g ewähr t HWA M
A/S ein erweitertes Reklamationsrecht von 5 Jahren ab Kaufdatum. Heben Sie den Rechnungsbeleg auf,
damit sich das Kaufdatum nachweisen lässt.
Gewährleistungsumfang
Das erweiterte Reklamationsrecht schließt die Grundkonstruktion des Ofens ein, wie Plattenteile,
Schweißn ähte usw. und umf asst di e Teile, die nach HWA Ms Eins chät zung a usget ausc ht oder r epar ier t
werden müssen. Verschleißteile fallen nicht unter die Garantie.
Das Reklamationsrecht wird dem ersten Käufer des Produkts gewährt, und kann nicht übertragen werden
(außer bei einem Zwischenverkauf).
Das Reklamationsrecht gilt nur in dem Land, in dem das Produkt ursprünglich geliefert wurde.
Frachtkoste n, die durch Einse ndung des Ofen s oder Teile hier von zur Repar atur oder Austau sch von
Teilen entstehen, werden von HWAM A/S nicht übernommen.
Einschränkungen / Verlust des Gewährleistungsanspruchs
Bestimmte Dinge fallen nicht unter die Garantie, und Gewährleistungsansprüche können entfallen, wenn
der Ofen nicht ordnungsgemäß behandelt wird. Das bezieht sich auf folgende Kriterien:
• Fehler oder Schäden, die entstanden sind durch:
• fehlerhaften Einbau, Aufstellung oder Anschluss des Kaminofens.
• fehlerhafte Bedienung, Anwendung oder Missbrauch des Kaminofens.
• Brand, Unfall oder Ähnliches.
• Reparaturen, die von anderen als HWAM A/S oder einem autorisierten Händler vorgenom
men wurden.
• Verwendung nicht originaler Ersatzteile.
• fehlende oder unzureichende Wartung.
• Änderung des Produkts oder Zubehörs auf irgendeine Weise im Verhältnis zum ursprüng-
lichen Zustand und der Konstruktion.
• Konstruktive Änderungen am Kaminofen.
• Wenn die Seriennummer des Kaminofens beschädigt oder entfernt wurde.
• Verschleißteilen / beweglichen Teilen.
• Rost
• Transportkosten.

17
• Transportschäden.
• Kosten in Verbindung mit einem evt. Abbau und einer erneuten Aufstellung des Kaminofens.
• Allen Formen von Zusatzkosten und Folgeschäden, die auftreten mögen.
Oberächenbehandlung
Sollte si e werks eitig n icht kor rek t ausgef ühr t word en sein, t rit t dies b ereit s nach k urze r Nut zungsd auer
zutage. Spätere Reklamationen bezüglich des Lacks können nicht berücksichtigt werden.
Verschleißteile
Einige Teile des Ofens, die einem natürlichen Verschleiß unterliegen, fallen nicht unter die Gewährleistung. Dazu gehören u. a.:
• Wärmeisolierendes Material - entweder feuerfeste Steine oder spezielle Platten aus Vermiculit.
• Rauchwendeplatten.
• Glas.
• Kacheln und Speckstein.
• Gusseisenteile wie z. B. der Feuerrost.
• Dichtungen.
• Alle beweglichen Teile.
Inspektion und Pege
Es wird empfohlen, den Kaminofen regelmäßig zu pegen und ihn gemäß den Anweisungen in der Bedienungsanleitung nachsehen zu lassen. Dies trägt zu einwandfreier Funktion bei.
Reklamationen
Bei Reklamationen wenden Sie sich bitte an den Fachhändler, bei dem das Modell erworben wurde. Die
HWAM A/S ist hierfür nicht zuständig.
Unberechtigte Reklamationen / Anforderung des Kundendienstes
Vor einer Reklamation sollten Sie das Modell anhand der Bedienungsanleitung zunächst auf Fehler überprüfe n und diese ggf. abs tellen. Sollte s ich erwe isen, dass Ihr e Reklamatio n und die Forder ung nach
Nachbesserung unberechtigt war, werden Ihnen die entstandenen Kosten in Rechnung gestellt.

18
Contents
Welcome .................................................................................................................... 19
Installation Instructions .........................................................................................20
Before You Start .........................................................................................................20
Installation ................................................................................................................. 21
User Instructions .....................................................................................................23
Before Using the Wood-Burning Stove .....................................................................23
Some Things Worth Knowing about Fuels ................................................................23
Using the Air Damper ................................................................................................ 24
Some Things Worth Knowing about Firing ................................................................ 24
Lighting and Firing Your WIKING Wood-Burning Stove ............................................25
Some Things Worth Knowing about the Smoke Pipe .............................................. 26
Some Things Worth Knowing about the Chimney ................................................... 27
Cleaning and Maintaining your Wood-Burning Stove ……….. .................................. 28
Trouble Shooting ........................................................................................................30
Declaration of Conformity .......................................................................................... 31
Guarantee and Claim Conditions .............................................................................. 32
Type plate ................................................................................................................... 34
Guarantee Certicate ............................................................................................... 40
English

19
Welcome
Dear WIKING owner,
We would like to congratulate you on your new WIKING wood-burning stove and hope you will be pleased
with your p urchase. For more t han 30 years now, WIK ING has develope d and produced high- quality
wood-burning stoves, and we are known throughout all of Europe for our design and high technical standards. As a WIKING owner, you have assured yourself a wood-burning stove with a timeless design and
a long service lifetime.
Please re ad through th is installat ion/user ’s manual before set ting up your wo od-bur ning stove so that
you can avoi d any potential pro blems and get to enj oy your WIKING wo od-burn ing stove as soon as
possible.
Guarantee
All WIKING wood-burning stoves are tested and approved in accordance with EN 13240 (European Standard) and NS 3 05 8 and NS 3 05 9 (Nor weg ian sta ndard s for par ti cle em issio ns). This is your gu arante e
that your wood-burning stove fulls all European norms and requirements pertaining to safety, quality
and environmentally sound combustion. WIKING provides a ve-year guarantee on your wood-burning
stove.
Advantages of your new wood-burning stove
The simp le and ro und shap es of your W IKIN G wood -bu rning s tove harm onize pe rf ectl y – down to th e
smallest detail.
The glass-blown, steel handle is shaped in the same curve as that of the front of the wood-burning stove.
The large curved glass makes it possible to enjoy the ames from every corner of the room. Its round
shape makes situating the WIKING wood-burning stove exible, and it is well-suited to both corners and
straight walls.
Even though t he WI KI NG wo od -b urn ing stove b elo ngs to t he cl ass of s mall w ood - bur nin g stoves, it s till
has a high heating output.
Enjoy your new wood-burning stove!
20
Installation Instructions
Before You Start
Figure 1 is a cross-sectional view of your wood-burning stove. Here you can gain an overview of the parts
of which your stove consists.
WIKING Scandic WIKING Nordic 7 WIKING Nordic 9 WIKING Nordic 9G WIKING Nordic 10G
1. Cover plate.
2. Damper for regulating air for pane-ush function.
3. Steel smoke plate, hangs on two hooks.
4. Vermiculite smoke plate.
5. Cover plate.
6. Damper for regulating primary air. Primary air is used during lighting and ring.
Please note: The combustion chamber is covered with plates made of vermiculite, which is a heatinsulating material. These plates ensure that the optimal combustion temperature is qu ickly reached, and
they must therefore remain inside in the wood-burning stove.
The steel smoke deector and the vermiculite smoke deector ensure that the passage of smoke through
the stove is as long as possible, so that the ue gasses have more time to emit their warmth within the
stove and the surrounding area. In this way you get more warmth from the wood you add to the stove, as
the warm smoke is not simply sent out through the chimney.
Arrangement of individual components
It is important to ensure that all individual components are in place and that no damage was done to them
durin g tr ansp ort. In Fi gur e 1 you c an s ee w her e th e parts sho uld b e lo c ated i n th e stove. Th e ind iv idu al
components that you must inspect are:
1. The steel bafe plate is hung from two hooks and equipped with two pins that serve as protection du-
ring transportation. Remember to remove the two pins before you start using the stove. Lift the skamol
bafe plate off the combustion chamber and pull the two pins free from the hooks.
2. The vermiculite smoke deector should rest on the side plates and be pushed all the way back in the
combustion chamber.
3. The rear plates must be pushed all the way back in the combustion chamber.
4. The base plate must lie at on bottom around the grate.
Fig. 1
5
6
2
6
6
5
5
4
4
2
2
3
3
1
1
1
3
2
4
5
6
1
3
2
4
5
6
21
Only when you are condent that the individual components are in place, you may begin with the installation of the wood-burning stove.
Installation
General information
When ins talli ng your WI KING wo od- bur ning stove, you mu st ensure t hat all lo cal re gulati ons, inc ludin g
those r efer ri ng to nat ion al and Eur ope an st anda rds, a re ob ser ve d. It is al ways a go od id ea to c onsu lt a
chimney sweep before installing your stove, as it is he/she who must ultimately approve the installation.
Always follow the instructions of the manual carefully and make sure that the installation is carried out by
a qualied professional.
WIKING packaging material should always be handled in accordance with the local rules for waste handling.
Room requirements
It must always be possible to deliver fresh combustion air to the room in which the wood-burning stove is
to be installed. A window that can be opened or an adjustable air valve is considered to be sufcient. The
adjust ab l e ai r val ve /air g r ate m u st n ot b e b l o c ked. I n t he table bel ow yo u can see the m in i mu m di stance
to the closest combustible and non-combustible walls.
Distance from the wood-burning stove to… WIKING Scandic, WIKING Nordic 7,
WIKING Nordic 9, WIKING Nordic 9G,
WIKING Nordic 10G
the brick wall behind the unit. 100 mm
the brick wall to the side of the unit. 100 mm
combustible wall behind the unit. 150 mm
the combustible wall to the side of the unit. 350 mm
Please be aware that not all glass parts are heat-resistant. For this reason, a glass wall should sometimes
be treated as a ammable wall, in which case we ask that you please contact your local chimney sweep
or glass producer to hear at what distance the stove should be kept from glass.
Installation requirements
If the wood-burning stove is to be placed on a oor made of combustible material, the area around the
stove must be covered with a non-combustible material. The oor construction must also be able to
withstand the weight of the stove and the chimney. The chimney’s weight must be calculated in relation to
dimension and height. In the table below you’ll nd important information about your wood-burning stove.
22
WIKING Scandic
WIKING Nordic 7
WIKING Nordic 9
WIKING Nordic 9G WIKING Nordic 10G
Wood-burning stove’s weight 95 kg 93 kg 95 kg
The wood-burning stove’s di-
mensions
(height x width x depth)
894 x 527 x 426 mm 894 x 527 x 431 mm 1014 x 527 x 431 mm
Distance to furniture - front 800 mm 800 mm 800 mm
The stove is mainly made of sheet iron.
Connection to the chimney
The stove has a smoke outlet at the top and at the back. It can be installed with an approved smoke pipe
and a steel chimney, or connected to a brick chimney with a fullform smoke pipe.
Make sure th at the ch imney is tig ht and that n o false dr aft is c aused a round ne ither t he cover pl ate, in
conne ctio n with a c overed sm oke outle t, nor th e clean out doo r and pip e conn ecti ons. Plea se note th at
bent and/or horizontal smoke pipes will reduce the effect of the chimney draft.
Changing the smoke outlet from top outlet to rear outlet
(WIKING Nordic 9G/WIKING Nordic 10G)
1. Lift the stove top plate off.
2. There is a cut-out in the rear plate for the smoke outlet. Break off the plate within this cut-out to make
a hole in the rear plate so there is room for the smoke outlet.
3. Remove the cover plate on the back of the stove by removing the three screws (Torx Bit no. 30). Be
careful not to lose the screws behind the welded rear plate.
4. Remove the three screws. Lift the ue ring off the top of the stove.
5. Mount the cover plate on the top of the combustion chamber using the three screws (Torx bit no. 30).
6. Insert the ue ring into the smoke outlet hole in the rear of the stove and secure it with the three
screws.
7. Replace the stove top plate.
Installing soapstone in the heat compartment (WIKING Nordic 10G)
1. Lift the stove top plate off.
2. Place so apst one sl abs in t he heat s tora ge co mpa r tmen t maki ng sure t hat th e hol e in ever y sla b is
right above the smoke ring.
3. Replace the stove top plate.
Requirements for chimney and smoke pipe
The stove requires a draft of at least 12 Pa.
The chimney must be of a proper height to ensure that the draft is sufcient and that smoke does not
beco me both erso me. If the c himney i s so high t hat it ca nnot be c leane d from t he top, an easi ly acc essible cleaning hatch must be installed. We recommend that you always contact your local chimney sweep
before purchasing a chimney.
Minimum clearance: Ø150 mm, which corresponds to your WIKING wood-burning stove’s exhaust pipe.

23
Smoke pip e and chi mney must al ways be suit able for a s tove conne ctio n. Ask your W IKI NG deale r for
more information.
User Instructions
Before using the wood-burning stove
• It is important that you ensure the following:
• That all of the wood-burning stove’s individual components are in place.
• That the chimney has been approved by your local chimney sweep.
• That fresh air can be supplied to the room in which the wood-burning stove is to be installed.
Some things worth knowing about fuels
Permitted fuel types
The wood-burning stove is only EN/NS-approved for ring with wood. Using dry wood with a maximum
water co ntent of 20% is rec ommende d. Firing wi th wet wood resu lts in soot, e nvironment al strain an d
poor fuel efciency.
Recommended wood types
All t yp es of wo od , suc h as bi rc h, be ec h, oak , elm , ash, c o nif ero us an d fr ui t tr ees c a n be us ed as f ue l in
your wood - b ur nin g stove. Th e big d if f ere nc e is f oun d not in t he h eat val ue, bu t in th e woo d’s weig ht pe r
cubic m ete r. As beech weighs mo r e p e r c u bi c m et e r of wood than c o m m o n s pruce (e.g.), more commo n
spruce must be added to provide the same amount of warmth the beech provides.
Prohibited fuel types
Firing with the following is prohibited: Printed matter • Plastic • Rubber • Chipboards • Liquid fuels • Waste,
such as milk cartons and the like • Lacquered, painted or impregnated wood • Fossil fuels.
The reason why you cannot re with the abovementioned is that, during combustion, unhealthy and env-
ironmentally dam aging substances are created. T hese subst ances c an also damage your wood-burning
stove, which will result in the guarantee being voided.
Firing with coal or coke
The WIKING Scandic, WIKING Nordic 7, WIKING Nordic 9, WIKING Nordic 9G and WIKING Nordic 10G
are not designed for ring with coal and coke.
Storing wood
Water content of maximum 20% is achieved by storing the wood for at least one year - preferably two
years - outdoors, beneath a shed roof. Wood that is stored indoors tends to become too dry and burn too
quickly; though kindling is best when stored indoors a couple of days before being used.
24
Fig. 2
WIKING Nordic 9G
WIKING Nordic 10G
WIKING Scandic
WIKING Nordic 7
WIKING Nordic 9
Regulates the
pane-ush
system
Regulates
lighting-air
Recommended dimensions
The fuel’s dimensions are important for good combustion, and should be as follows:
Fuel type Length in cm Diameter in cm
Kindling (nely split rewood) 25-33 2-5
Split rewood 25-33 7-9
Using the Air Damper
To achieve go od c ombu stio n, whi ch res ults i n
better heating efciency, it is important to add
the right amount of air to the re. The air is
regulated by using the handles located both
below an d above the do or. The handle bel ow
the door controls the lighting air damper, while
the handle above the door controls the damper
for the pane-ush function; see Figure 2.
Lever’s Position Effect on Air Flow Used for
Both lever s are p ushe d all
the way to the right.
All air, i.e. both primary and pane-
ushing air, is opened up.
This setting is always to be used
when lighting a cold stove and ring
new wood.
The light ing lever is set t o
the left, while the other
lever is still set to the right.
Primar y air is cl osed while pa ne-
ushing air is still completely
open. By gradually adjusting the
lever to the lef t, t he amoun t of air
is lowered, and the temperature is
thereby reduced.
This set ting is to be used when the
wood is burning well and the ame is
even and stead y. This wil l allow you
to get the most out of your rewood.
Both lever s are set all the
way to the left.
All air to the stove is shut off.
This set t ing m ust o nly b e us ed w he n
the wood-burning stove is completely
shut of f and not in use, suc h as during cleaning.
Some Things Worth Knowing about Firing
Maximum Firing Amount
Fuel Maximum Amount per Hour
Wood 3.0 kg
Warning: Too much heat can destroy your wood-burning stove, the chimney and your replace ducts.
Therefore, if you exceed the abovementioned limits, your wood-burning stove, chimney and replace duct
will no longer be covered by the factory guarantee.
25
Normal ring interval for nominal ring
Fuel Kg Normal Firing Interval
Wood 2.0 50 min
Please note: The stove is approved for intermittent use
.
The Difference Between Short and Long Combustion Times
Short combustion time
You create powerful warmth quickly by burning many smaller pieces of rewood.
Long Burning Time
You crea te a lon ger c o mbus tio n tim e by bur nin g fewer a nd lar ger p iec e s of woo d. You achieve the be st
possi ble combust ion by regulat ing with the air d amper. A bit of air must, ho wever, be added f rom the
pane-ush in order to achieve better combustion.
Achieving the Best Possible Combustion
Use dry, clean wood.
Wet wood results in poor combustion, excess smoke and soot. In addition, more warmth will be used to
dry the wood instead of heating the room.
Fire a Bit at a Time
You achieve the best possible combustion by ring often and a bit at a time. If you add too much rewood
at once, to o muc h ti me wi ll pas s befo re th e temp era ture b ec om es hig h eno ugh fo r you to ac hi eve goo d
combustion.
Make Sure There is the Right Amount of Air in the Combustion Chamber
You should also make sure that there is an ample amount of air - especially in the beginning - so that the
temper ature insi de the wood -bur ning stove quic kly ris es. Gases a nd par ticles r eleased d uring bur ning
are then more easil y burned off. Otherwise, they gather a s soot in the chimney (which increases the risk
of chimney re) or are emitted unburned into the atmosphere. The wrong amount of air supply creates
inefcient combustion and modest effect.
Don’t savour the re during night time
We advise against adding re wood to your stove and reducing the air supply at night in an attempt to still
have some em ber s l ef t in t he m or ni ng. If yo u do s o, lar ge am oun ts of h az ar do us sm oke wi ll be e mit t ed,
and your chimney will be exposed to unnecessarily large amounts of soot with the risk of a chimney re.
Lighting and Firing your WIKING Wood-Burning Stove
The First Firing
The rst time you re your wood-burning stove, you must do so carefully, as all materials need to adjust
to the heat. This means that the stove must be heated slowly, until it reaches its maximum heat level.
Afterwards, you should re a few times so that the stove is thoroughly heated throughout.

26
Be Careful of the Lacquer
The lacquer used to treat the wood-burning stove will harden the rst 2-3 times the stove is red, and
this can create unpleasant smoke and odours. Ensure therefore that the room is well ventilated. The door
must also be carefully opened; otherwise there is a risk that the seals will stick to the lacquer.
Warning: The enclosed gloves can scratch the surface paint if the lacquer has not hardened properly. Be
careful not to touch the lacquered surfaces until after the rst 2-3 rings.
Lighting
1. Both the primary and secondary dampers are pushed as far to the right as possible. This
completely opens up both primary and secondary air.
2. Stack 8-10 nely split pieces of rewood, corresponding to 1-2 kg, inside the wood-burning
stove. The smal ler the sticks, the sho rter the time needed for the stove to be h e a ted and for the
optimal combustion temperature to be achieved.
3. Place two relighters between the top layer of kindling. WIKING recommends using high-quality
relighters, as they do not produce smoke or odours.
4. Light the relighters. Keep the door ajar for a couple of minutes until the glass is hot - this pre-
vents condensation. Then close the door completely.
5. When the rewood is burning well, push the primary damper all the way to the left while slightly
adjusting the secondary damper to get an even and steady combustion.
Warning: The door may only be kept open when lighting, adding rewood or cleaning the wood-burning
stove; other wise comb ustion beco mes too power ful, which in t urn increase s the risk of the st ove be coming overheated.
Firing (adding rewood)
When there are no more visible ames and only a solid layer of embers remains, more fuel can be added
to the re.
1. Carefully open the door to prevent smoke and embers from escaping.
2. Lay 2-4 pieces of split rewood (approximately 2 kg) on top of the embers.
3. Close t he door and c omplete ly open th e primar y and se condar y dampe rs by pushin g them to
the right.
4. After a short while the ames should are up again. When the rewood is fully ignited, push the
primary damper to the left again while slightly adjusting the secondary damper, until the ames
burn evenly and steadily.
Warning: During combustion, the stove’s surfaces and door become extremely hot - exercise great
caution.
Some Things Worth Knowing about the Smoke Pipe
Description of the Smoke Pipe’s Function
The smo ke pipe is t he duc t loc ated bet we en your wo od -bu rnin g stove and c himney. All WI KI NG woo d-
burning stoves are equipped with an exhaust pipe 150 mm in diameter.
If your stove is to be connected to a brick chimney, it is bes t to mount a curved smoke pipe to the stove’s
top outlet. Opting for this solution - in which the smoke pipe extends a half meter over the stove before
27
connecting to the chimney - provides your home with 1 kW of extra warmth. The curved shape ensures
minimum soot build-up in the pipe and thereby lessens the risk of chimney res. We only recommend this
solution provided that your brick chimney is completely sealed and has a sufcient draft. You can read
more on the chimney in the next section.
Some Things Worth Knowing about the Chimney
Description of the chimney’s function
The chimney serves as the wood-burning stove’s ‘motor’ , and it is crucial to the stove’s proper functioning.
The chimney draft creates a vacuum inside the wood-burning stove. This vacuum serves two purposes:
1. To remove smoke from inside the wood-burning stove.
2. To suck air i n throug h the air dam per dur ing light ing and c ombust ion, and to kee p the glas s pane
free of soot.
How to create the best possible chimney draft
Even a qualit y chi mney ca n func tio n poor ly if u sed im prop erl y. It is cruc ial th at both yo ur wood - bur ning
stove and the chimney are in s talled in accordance with the direc tions; othe rwise it will not be possible to
attain satisfactory combustion.
Chimney draft is created b y the d ifference in temperature between the inside and outside o f the chimney.
The higher the temperature inside the chimney, the better the chimne y draft. It is there fore very important
that the c him ney is t ho rou ghl y heat ed be for e you c lo se th e pr im ar y d amp er an d lim it c om bust io n ins ide
the stove; see the section on lighting and ring your WIKING wood-burning stove on page 26. Please be
aware that it takes longer to heat a brick chimney than a steel chimney.
On days whe n wea th er a nd w i nd conditi o ns c r eat e a po o r dr aft in the c hi mn ey, it is espe c ia lly i mp o rtant
to heat up the chimney as quickly as possible. When lighting, use extra-nely split rewood and an extra
relighter, as ames quickly heat up the stove.
In the table below you’ll nd your wood-burning stove’s nominal output, which is to be used to properly
dimension your chimney.
WIKING Nordic 7
WIKING Nordic 9
WIKING Nordic 9G
WIKING Nordic 10G
WIKING Scandic
Nominal output according to EN norm: 7 kW 7 kW
Smoke temperature: 287
o
C 287o C
Exhaust gas mass ow: 5,5 g/sek. 6,3 g/sek.
Efciency 80% 80%
After a longer period of disuse
If you have not used your wood-burning stove in a while (e.g. for an entire summer season) , it is important
to check for blockage in the chimney duct. Contact your local chimney sweep.

28
Fig. 3
5
4
6
3
1
2
Connecting several heating sources to the same chimney
It is possible to connect several units to some chimneys. All applicable regulations must rst be consulted, in your building code and with your local chimney sweep.
Chimney re
In the event of a chimney re:
Close all dampers in the stove and chimney and immediately call the re department.
Before using the wood-burning stove again, your local chimney sweep must rst inspect the chimney.
Cleaning and Maintaining your Wood-Burning Stove
Warning:
Cleaning and maintenance of your wood-burning stove may only be performed when it is cool.
External Cleaning
The easiest is to vacuum clean the stove on the outside using a small nozzle with soft brush-es. You can
also wipe the stove clean using a dry, soft cloth or a soft duster. But remember only to do it when the stove
is cold! Do not use water, spirit or any other kind of cleaner, as this will damage the lacquer.
Cleaning the Glass Door
Your WIKING wood-burning stove is equipped with a pane-ush system, which reduces the build-up of
soot on t he g l as s . If s o ot s o m e ho w accumulate s o n t h e pa n e, it can be cle an e d by wi p in g t h e gl ass with
a moist paper towel dipped in ash. Afterwards, dry with a clean paper towel. You should also ensure that
air gaps in t h e d o o r f r a m e a re free of ash and s o o t pa rtic l e s. Also ensur e t h at t h e s e al s o n t h e st ove ar e
soft and fully intact; if they are not, ”false” air can enter the stove, which makes it more difcult to control
combu st io n a nd c a n in tu r n c au se ove r he ati ng o r s oo t ac c umu lat i on. Faul t y o r wo r n se al s sh ou ld t he refore be replaced and can be purchased at your local wood-burning stove dealer.
Emptying the Ash Pan
Important: Be aware that embers in the ash can remain hot for up to 24 hours after the re in the stove
has gone out!
The ash pan is most easily emptied by pulling a waste bag over the pan, turning the pan upside down, and
then carefully pulling it up and out of the bag again.
Cleaning the combustion chamber
In order to extend the service lifetime of the wood-burning stove, it should be thoroughly serviced once a
year. First remove ash and soot from the combustion chamber. Carefully remove the vermiculite plates,
one after the other.
In Figure 3 you can see which plates are found
inside the combustion chamber:
1. Base plate 4. Left side plate
2. Front plate 5. Smoke deector (top plate)
3. Right side plate 6. Rear plate

29
After cleaning, carefully reinsert the vermiculite plates, starting with the rear plate.
It is extremely important that the rear plate is positioned so that the holes for secondary air in the vermiculite plate t with the holes in the stove and are not blocked.
Over tim e, the comb ustion ch amber ’s effecti ve yet porous in sulation c an beco me worn an d damaged.
A crack i n the bac k plate ca n cause s econ dar y air to bec ome in cor rectl y distr ibuted i n the co mbusti on
chamber, and it should therefore be replaced. Cracks in the other plates will not affect the efciency of
the wood-bur ning stove. They should, h owever, be replaced when wor n down to half of their original
thickness.
Surface treatment
It is normally not necessary to treat the wood-burning stove’s surfaces. If the lacquer has been damaged,
you can re pair it by using a spe cial senoth erm spray, which c an be purchas ed from your lo cal woodburning stove dealer.
Chimney sweeping
In order to prevent against the risk of chimney res, the chimney must be cleaned once a year. The smoke
pipe and smoke chamber above the steel smoke deector must be cleaned at the same time as the chim-
ney. If the chimney’s height makes cleaning from above impossible, a cleaning hatch must be installed.
Service inspection
WIKI NG rec om mends a t hor ough se r vic e insp ect ion ever y ot her year, so that yo ur woo d- bur ning stove
will last for many years. The service inspection must be performed by a qualied serviceman, and only
original spare parts should be used.
Among other things, a service inspection includes:
• A thorough cleaning of the stove.
• An adjustment of the handle/door.
• Greasing of the hinges with copper grease.
• Inspection of the heat-insulating plates (the vermiculite set)
• Inspection of the damper beneath the door.
• Inspection of the seals and the replacement of worn parts.
If you have any questions, please consult our FAQ page at www.wiking.com, or contact your local woodburning stove dealer.

30
Trouble Shooting
If you experience that your wood-burning stove is not functioning optimally, consult this table to nd some
usual pro blems t hat may ar ise and h ow to solve t hem. If you c anno t solve th em and/o r other pr oble ms
occur, pleas contact your maintenance man or wood-burning stove dealer.
Problem Possible cause Try the following
I cannot make a
sufcient re in the
stove.
Incorrect lighting Furthe r infor mat ion: See t he se cti on on li ghti ng and
ring the stove on page 26.
Poor chimney draft Ensure that the smoke pipe or chimney is not
blocked. Ensure that the chimney height is correct in
relation to its surroundings.
The glass pane is
covered in soot.
The wood is too moist. Only re with rewood that has dried for at least 12
months beneath a covered shed and with a maximum water content of 20%..
A seal in the door is loose. The seals should be soft and exible. If they are not,
replace them. New seals can be purchased from
your local wood-burning stove dealer.
Insufcient supply of secondary air to the pane-
ushing system.
Push the se c on da r y da mp er a ll th e way to th e r ig ht.
Open th e pr im ary dampe r just a b it , if ne c es sary, or
see below.
The temperature inside
the stove is too low.
Add more rewood to the wood-burning stove and
push both dampers all the way to the right.
Smoke enters the
room wh en I open
the door.
The damper in the
chimney is closed.
Open the damper.
Poor chimney draft. Ensure that the smoke pipe or chimney is not
blocked. Ensure that the chimney height is correct in
relation to its surroundings.
The rewood is in ames. Never open the door if the rewood is in ames.
The re-proof ma-
terials in the combustion chamber
are blackened af-
ter ring.
You have not red
enough, i.e., there is not
enough air or rewood.
Push the lever under the door all the way to the right
to open up primary air. Moreover, igniting a larger
quantity of wood might be needed.
Combustion is
uncontrollable.
A seal in th e door or ash
drawer is loose.
The seals should be soft and exible. If they are not,
replace them. New seals can be purchased from
your local wood-burning stove dealer.
Excess chimney draft Close the damp e r i n t he chimney a bit a t a t i m e u ntil
the pro bl em is s ol ved. A t the s am e ti me, c o mp lete ly
shut off the primary air supply.
The door is not completely sealed.
Close the door completely. If it cannot close completely, it must be replaced with an original spare part.

31
Declaration of Conformity
Manufacturer:
HWAM A/S
Nydamsvej 53
DK - 8362 Hørning
Denmark
hereby declares that:
Product: Type:
Wood-burning stove WIKING Scandic
WIKING Nordic 7
WIKING Nordic 9
WIKING Nordic 9G
WIKING Nordic 10G
was manufactured in accordance with the provisions of the following directive:
Reference no. Title:
89/106/EEC Construction Products - CPD
and the following harmonised standards:
No: Title: Udgave:
EN 13240 Roomheaters red by solid fuel 2001
EN 13240/A2 Roomheaters red by solid fuel 2004
and other standards and/or technical specications
No: Title: Udgave: Part:
NS 3058 Enclosed wood heaters - Smoke emission
NS 3059 Enclosed wood heaters - Smoke emission
Hørning 13.02. 2008
Torsten Hvam Sølund
Factory and quality manager

32
Guarantee and Claim Conditions
- Five Years’ Extended Right to Invoke Lack of Conformity
Congratulations on the purchase of your new WIKING wood-burning stove.
All of our products are of high-quality craftsmanship, manufactured in rst-class materials and subject to
a thorough quality control process. That is why we are convinced that you have purchased a product that
will fun ction p roble m-fr ee for many yea rs to com e. Should a p roblem a rise, ho wever, you are naturally
guaranteed the best possible service available.
In addit ion to the rights you have in accordan ce with the ordinary rules of the Sale of Goods Ac t, HWAM
A/S provides an extended, ve-year right to submit claims from the date of purchase. You must save your
original receipt with purchase date as proof of the date of purchase.
Extent
The extended complaint entitlement covers the basic construction of the stove such as panel components, we lding, etc., an d include s comp onents w hich must b e replac ed or repa ired in ac corda nce wit h
HWAMs evaluation. Wear parts are not covered by the guarantee.
The complaint entitlement is given to the rst buyer of the product and cannot be transferred (except in
connection with resale).
The complaint entitlement is only valid in the country to which the product was originally delivered.
Shipping and handling expenses incurred when sending the stove or individual parts for replacement or
repair will not be covered by HWAM A/S.
Limitations/loss of guarantee
Certain thi n g s ar e n o t covered by the gua r a nt e e, an d t h e right to invoke lac k confor m ity may lapse i f t h e
stove is not maintained and operated in accordance with the instructions. Among other things, this applies
to the following:
• Faults or damage arising through:
• Incorrect tting, installation or connection of the stove.
• Incorrect operation, incorrect use or misuse of the stove.
• Fire, accidents or similar situations.
• Repairs carried out by others than HWAM A/S or authorised distributors.
• The use of spare parts not manufactured by HWAM A/S.
• Lacking or inadequate service and maintenance.
• Changes made in the product or its accessories in relation to the original state and construction
of the stove.
• Construction modications made to the wood-burning stove.
• If the serial number of the stove has been damaged or removed.
• Deterioration of wearing parts and moving parts.
• Corrosion.
• Transport costs.
• Transport damage.
• Costs in connection with any dismantling and reassembling the stove.

33
• Extra costs of any kind and any consequential damage that may occur.
Surface Treatment
If surface treatment is lacking on the factory’s behalf, this should become apparent after the rst few
rings. In other respects, no claims will be accepted related to the lacquer.
Wear Parts
A number of parts of your wood-burning stove are designated as wear parts and are therefore not covered
by the right to invoke a lack of conformity. Wear parts include:
• Heat insulating material. Either reproof stone or special panels made of vermiculite.
• Smoke deection plates.
• Glass.
• Tiles and soapstone.
• Cast iron parts at the base, such as the grate.
• Gaskets.
• All moving parts.
Damage to w eari ng par t s will on ly be c overed by th e guara ntee if t he buyer c an sh ow that t he dama ge
was present when the stove was delivered.
Service and Maintenance
We recommend that you maintain the wood-burning stove and comply with the recommended inspections
called for in the user instruction manual. This will help to ensure that the product functions problem-free.
Claims
All claims must be directed to the dealer from whom the wood-burning stove was purchased. HWAM A/S
does not accept claims directly from the end-user.
Unwarranted Claims/Service Calls
Before r egis ter ing a c laim, yo u sho uld in spe ct you r WIK IN G wood - bur nin g stove for p os sibl e fault s tha t
you yourself can rectify; consult the enclosed user instruction manual as needed. Should your claim and
repair demand prove to be unwarranted, you will be invoiced for the related costs.
34
35
36


Serie Nr. • Serial No.
Garantiservice
Es ist wichtig, vorliegendes Formular sorgfältig auszufüllen, da der Händler für alle Vorkehrungen,
die während der Garantiedauer vorgenommen werden, verantwortlich ist.
Warranty service
It is important that you record your dealers name, address and telepho ne number on this section,
as he is responsible for any ajustment which may be required during the warranty period.
Modell Typ · Model type
Kaufsdatum · Date of purchase
Händler · Dealer
Adresse · Adress
Tel.
HWAM A/S
DK-8362 HØRNING
www.wiking.com
 Loading...