

Page 1
User Manual
Page 2

Before Use
• Thank you for purchasing B4HD.
• This Manual contains important information about the proper use and cautions in use of the product. Please
read carefully before use.
• B4HD is an auxiliary product to alert users for safe driving and prevent accidents, by recording video
during driving. Also purpose for evidence of an accident.
• B4HD does not however guarantee that all accidents are recorded. Minor shock may not detect sensor to
record.
• B4HD may change without notice for further function improvement.
• This User Manual is published
based on the current state of the product, and may contain typographical
errors or omissions.
• Contents of this User Manual may be modified, changed or supplemented without notice for further
improvement.
Page 3

• Safety Precautions
• Product Feature
• Standard Package
• Product Parts
•
•
•
External GPS/TV-OUT Cable Installation
•
•
LED Operation
•
Voice Guide
•
•
PC Original Viewer Program Installation
•
PC Original Viewer – Screen Configuration
•
PC Original Viewer – Viewer Configuration
•
PC Original Viewer – Configuration
•
Configuration Default Setting
•
Recording mode Button function
•
To save video file on your PC
•
•
Firmware Upgrade
How to format the memory card
Contents
REC Time
Specification
FAQ
Warranty
Page 4

Safety Precautions
Operational and Security Precaution
•
Do not operate the product during driving. It may cause accident.
•
The product must be installed at a point which would not obstruct the driver’s view.
•
Do not allow unauthorized disassembly or alteration to the product. It may cause malfunction, and the consequent
product damage will not be covered under the warranty.
•
If the product is damaged or power is cut off by a serious accident, the product may not be able to record such event
• Always keep the windshield clean to enable clear recording.
• Since the product is purpose to record video data during driving, video quality may be deteriorated when in/out the tunnel,
and at night or by contrast and backlight.
•
Contaminated camera lens may deteriorate the video quality. Keep the lens clean.
• Do not place the product under direct sunlight or inside the closed vehicle as it may cause malfunction.
• Do not use chemicals or detergent to clean the product. Clean gently with soft cloth.
•
Use of the product at temperature below -20℃ or above 60℃ may cause malfunction or breakdown.
(This caution should be applied when product is unused.)
• Do not use the product in places in high temperature/humidity.
• Do not exert excessive force to the product (especially to LCD buttons and to bracket) as it may cause breakdown.
• Operate the product for 3-5 minutes to check for correct recording, before each use.
• Extended exposure to sunlight and high temperature in the summer may cause malfunction.
• Do not turn off power, or remove the SD card during firmware upgrading as it may cause malfunction.
• Do not touch the cigar lighter cable with wet hand as it may cause electric shock.
• Do not use a damaged cigar lighter cable as it may cause electric shock or fire.
• Do not place the cigar lighter cable in near heating devices.
• Do not leave the product connected to the cigar lighter if not in use for a long period of time.
Remove the cable from the product.
• Insert the cigar lighter securely.
•
Do not bend or pull the cigar lighter cable by excessive force, or place heavy objects on the cable.
(It may damage the cord and as a result it may cause electric shock or fire.)
• Do not touch the LCD excessive force as it may cause malfunction.
Page 5

•
In order to confirm normal operation of the product, please check the image of a SD card and format it on a regular basis.
•
(PC format needed one to two times per month)
•
Because an SD card is consumables, if it is used for a long time, you may lose the data or may not record due to an error,
so please check it periodically.
•
When the product is in recording or the power is on, do not eject the SD card forcibly. It may cause a failure of the SD card
and data loss.
•
If temperature g
ets too high in the vehicle, data storing may be disabled, or data may be damaged. Park your vehicle in the
shade in the summer.
•
When identify the car's accident or damage, please keep the SD card separately. Due to overwrite, important data may be
deleted.
•
When turn off the power of the body and remove the SD card before LED is turned off, the last recording file may not be
saved, so please be careful.
•
When turn off the power of the body and remove the SD card before LED is t
urned off, the last recording file may not be
saved, so please be careful.
•
When driving a car, do not remove the SD card. Make sure to remove it safely when a car is in parking or stop.
•
After turning on the power, make sure that it is in normal operation.
•
Please note that the warranty period of an SD card is six (6) months, and replace it at the time of more than six (6) months.
•
Please purchase and use SD Card that manufacture recommended specification.
•
•
The SD card randomly purchas
ed other than the one we provide, shall be excluded from the warranty, and we shall not take
When purchasing extra SD card, it is recommended as 8~32GB micro SD card in 10 class (MLC Type)
any responsibility for loss and damage of the data recorded in the SD card in any case.
SD Card Precaution in use
Safety Precautions
Page 6

High Quality Lens and High Image Quality / Resolution support
• 2 Mega Pixel image sensor mounting in Front / Rear.
• Front : 115˚, Back : 140˚
• HD(1280×720) High Image Quality Resolution and total 30fps(Front 20 + Rear 10).
Various Recording Function and Video Data Acknowledgement
•
•
Normal, Manual, Event, Motion and auto change to Parking recording mode
•
Driving records can be stored with GPS data and Google map tracking can be (optional)
•
G sensor built-in Automatic parking recording mode change and event recording mode.
•
Externa
l video output. (real-time video image can be checked in another monitor)
•
•
PC viewer program are provided to change various setting values and map data can be checked when using GPS.
•
(In the general video player (e.g. Windows media player), recorded video can be played)
SD card can be formatted as the product itself, without connecting to a PC.
Each capacity of a normal / event/ motion folder can be set in PC Viewer.
High Quality Voice Record and Voice Guidan
ce
• Operating instructions service by voice guidance
• Voice recording On/Off function and speaker output On/Off function.
• High performance microphone built-in
Back-up battery and Car constant power discharge protection function
• Stored recorded image safety by built - in high-capacity capacitor when power is off.
• Car constant power discharge protection function
• (Selectable ON/OFF on viewer, Not required another equipment for this function)
• Consume less than 2mA when po
wer shutdown (Based on 12V)
• When using car constant power discharge protection functions, If user car voltage is 12V and the voltage of less than 11.8V
is maintained for more than 30 seconds the product power will be shuts-off
(Note: Shutdown time depend on the Type of Car and car condition.)
Other
• Soft look and emotional design. (easy removable body)
• Security LED light are mounted on front body.
Product Feature
Page 7
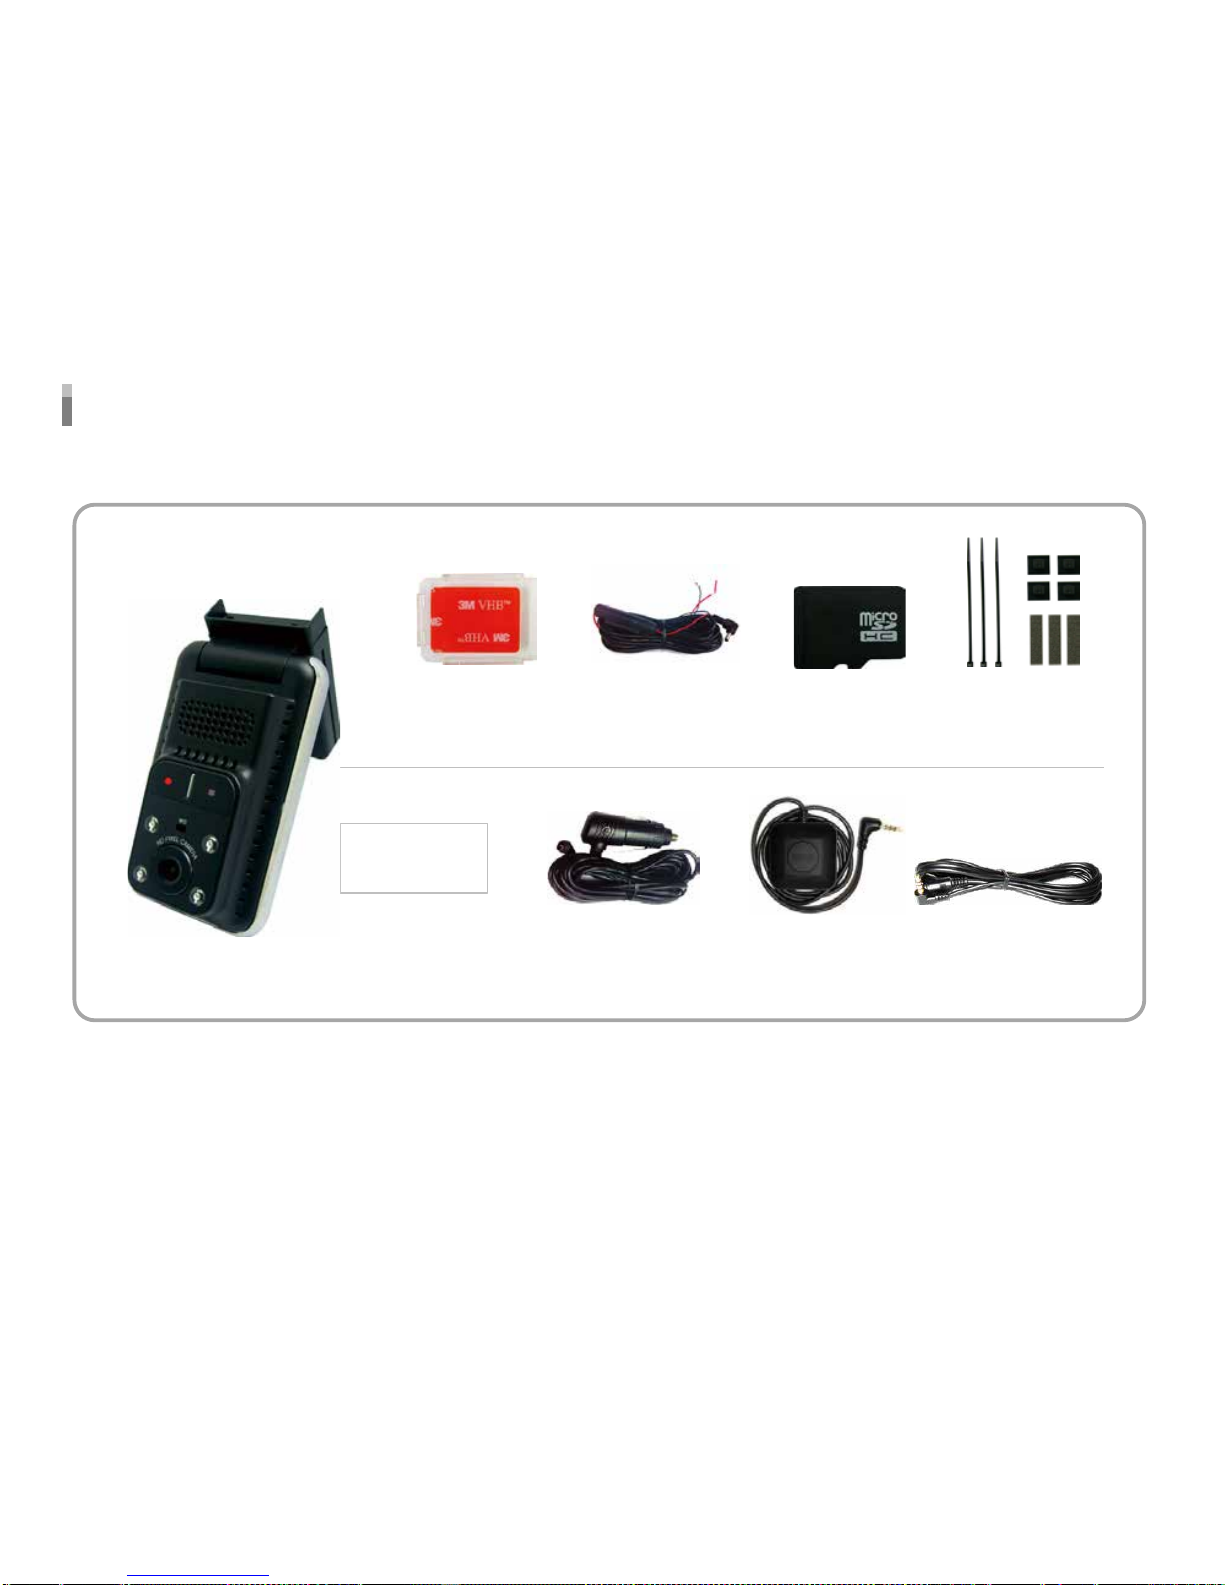
B4HD Body
Installation Accessories
Cigar Lighter
Standard Package
AV OUT
(Option)
GPS
(Option)
Micro SD Card
Direct Cable3M tape for bracket
Option
Accessories
Page 8
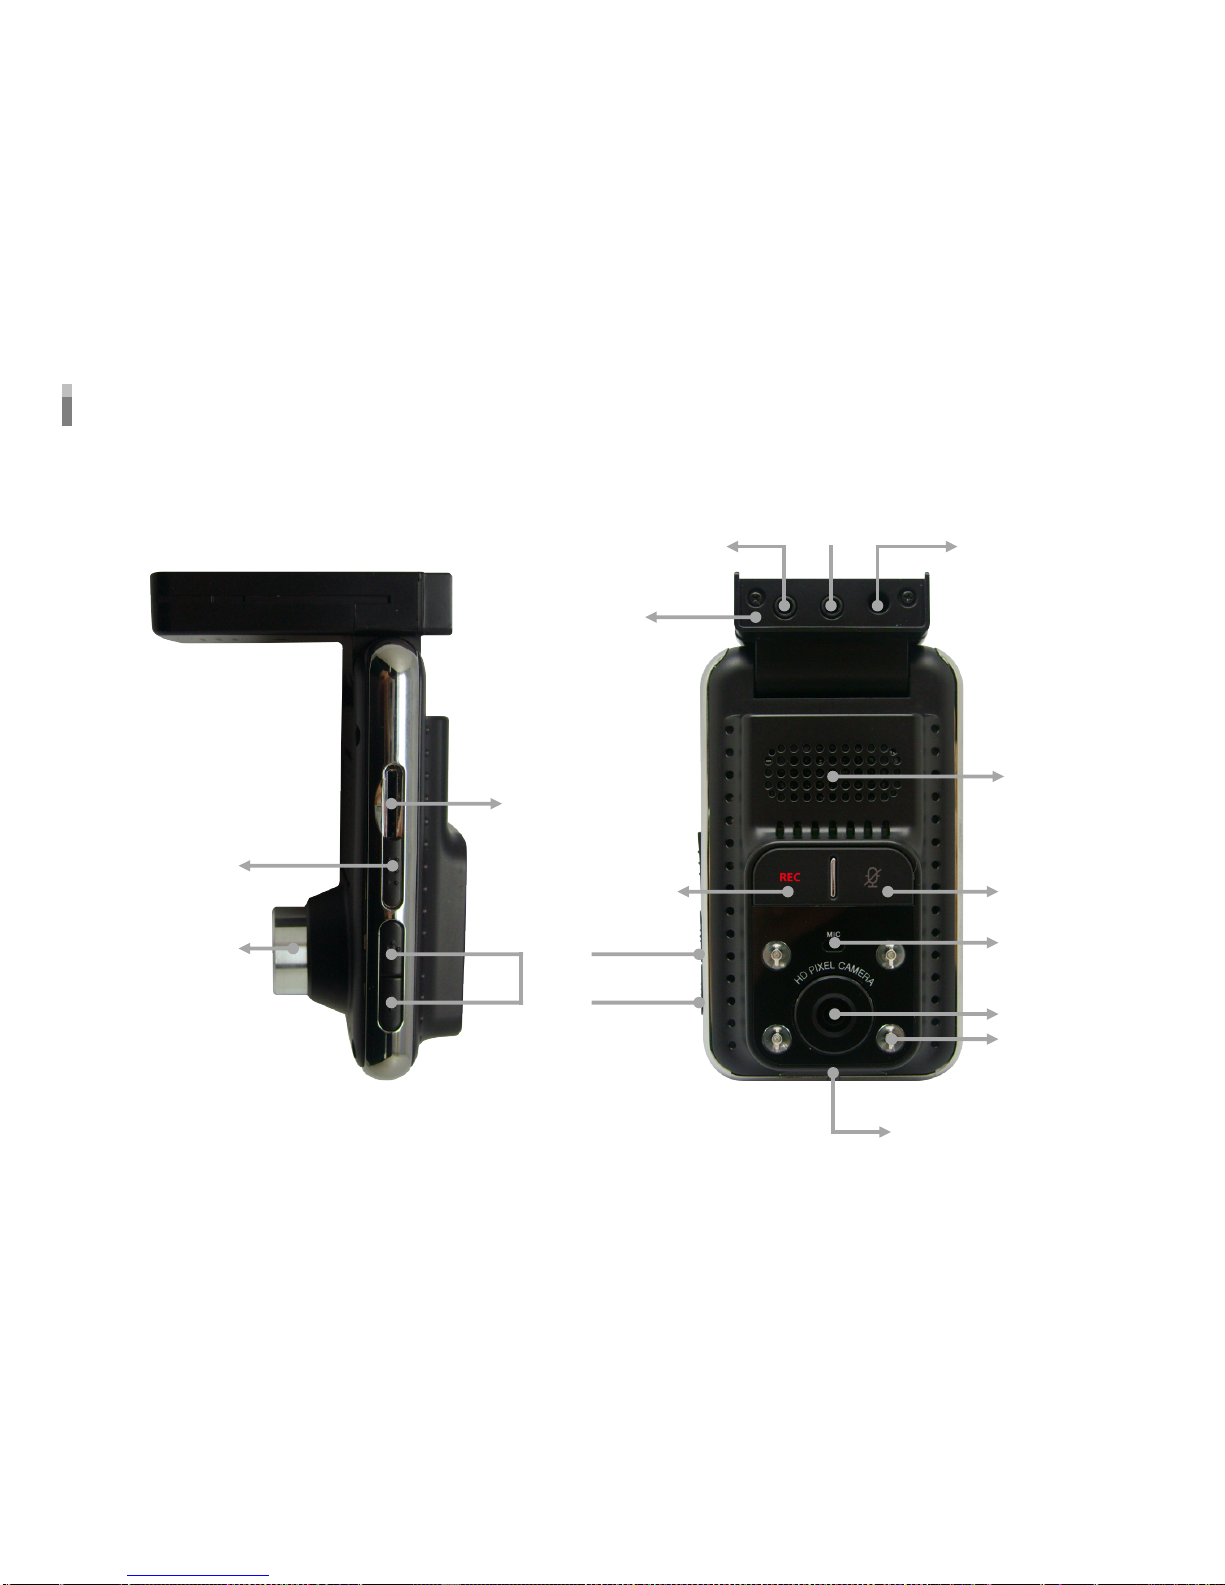
Product Parts
SD Card holder
SD Card slot
Braket slot
TV OUT
GPS
DC Jack
Speaker
MUTE
MIC
Inside camera
IR LED
Power LED
Front camera
Volum
REC Button
by manual
Page 9
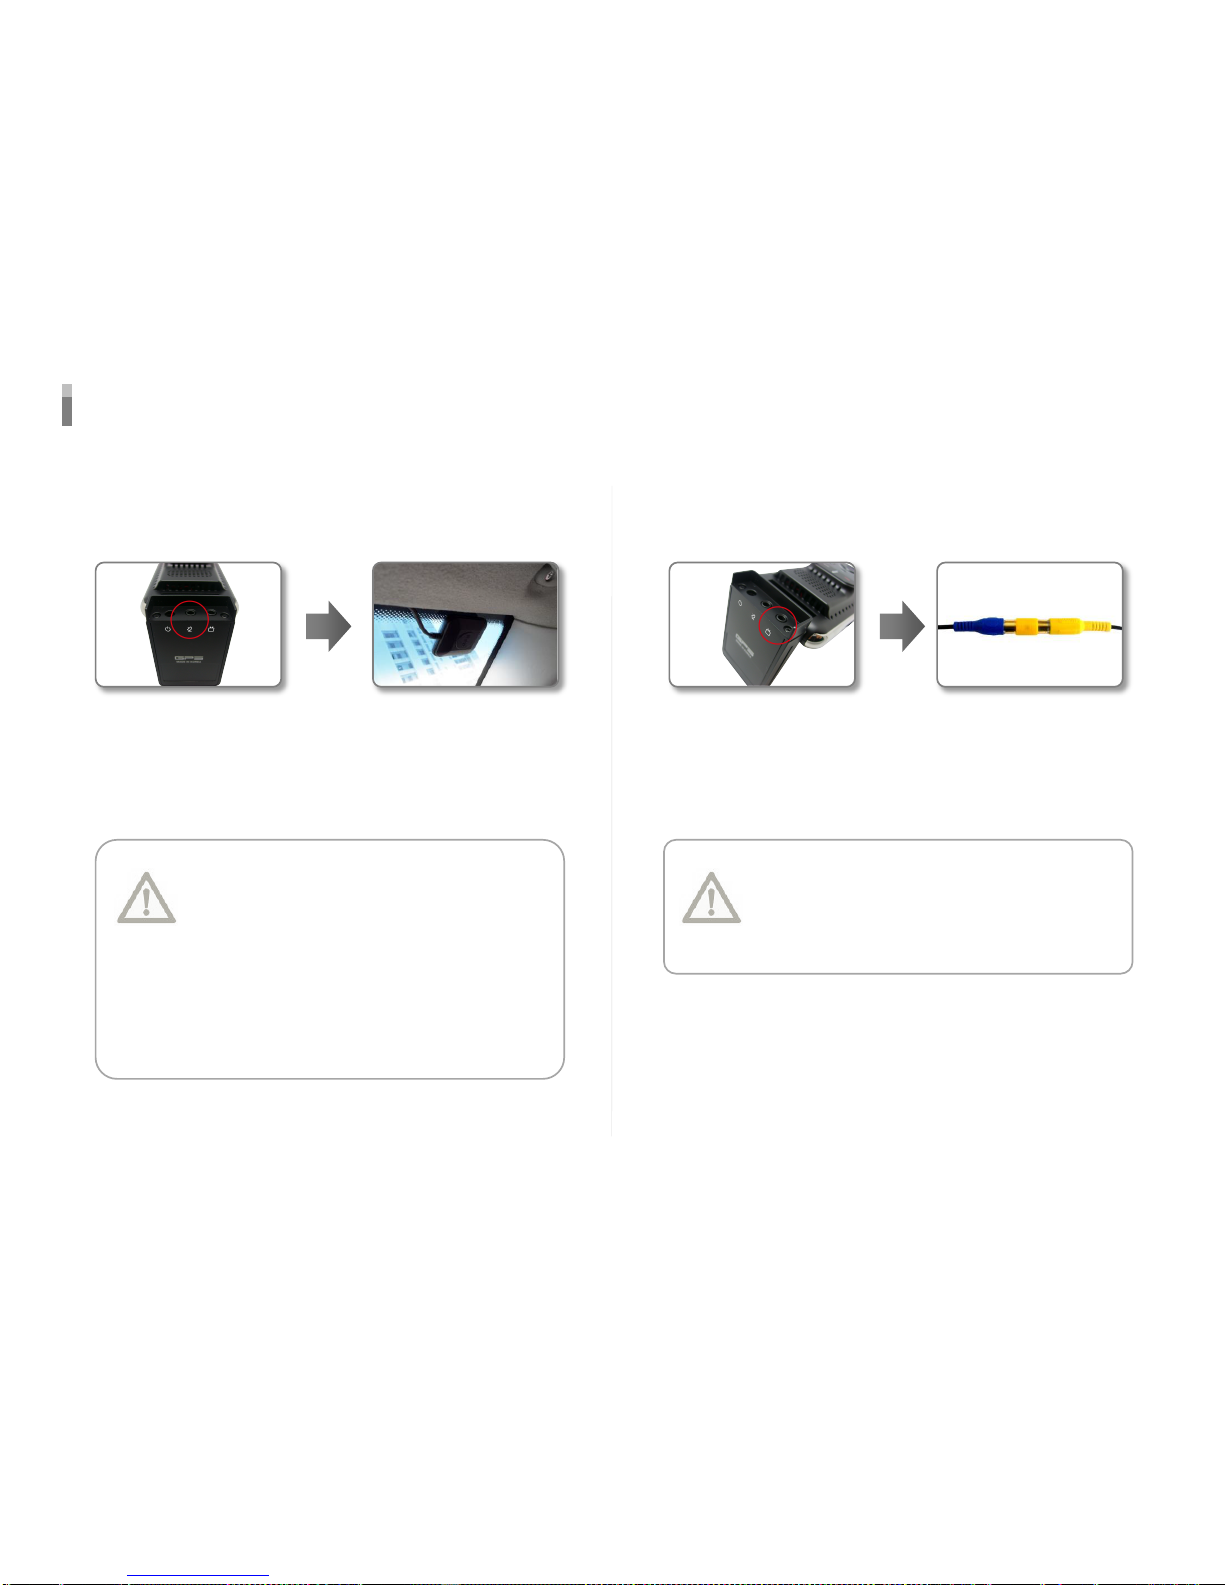
External GPS/TV-OUT Cable Installation
GPS module may be affected by main
body or by other electronic devices if it is
too close each other.
Keep a distance as much as possible.
The receiving signal may become poor
depending on the climate, satellite status
and geography in the neighborhood.
The receiving signal may become poor if
the windshield is heavy sun-coated or fixed
with metallic materials.
Connect External GPS to
GPS connection on
B4HD body.
Attach GPS module at
well visual place and tidy
up a cable.
▶ External GPS Installation
When connecting to your Car Navigation,
you need an applied Car Navigation video
cable. With a specific Car Navigation,
installation may be restricted, and/or extra
service charge may be incurred.
Connect a TV-Out
cable to the TV-Out
jack on a B4HD
body.
Connect a TV-Out cable
to a AV-in jack you car
navigation.
▶ TV OUT Cable Installation
Page 10

LED Operation
▶ LED Operation
▶ IR LED Operation
State Green Red Purple
Booting/SD Format mode/End recording - Blink -
FW Update - Fast Blink -
Normal Recording(with GPS signal) Blink - -
Event Standby(with GPS signal) Light On - -
Event Recording(with GPS signal) Fast Blink - -
Normal Recording(without GPS signal) - - Blink
Event Standby(without GPS signal) - - Light On
Event Recording(without GPS signal) - - Fast Blink
SD Card error/No SD Card - Fast Blink -
When IR sensor indicate darkness LED will turn on.
When IR sensor indicate brightenviroment for 10 mins LED will turn off.
Page 11

Voice Guide
Status Voice Comment
Power on
Memory Error
accessing SD Format
Start recording
Stop recording & power off
In the format process
Volume control
Memory format complete
Event mode
Memory cover error
Mute on
Mute off
Firmware update
please take your seatbelt / do not operate the device while driving
please check the memory card
please press REC button for 5 seconds to delete the entire files
start recording
switching off, please wait
organizing data
zero / one / two / three
entire data have deleted
ding-dong
please close the memory cover to save the data
ding-dong
ding-dong x 2
firmware update will start,
please do not operate the device while updating
Page 12
1. System Requirements
- Windows XP(32bit), Windows Vista(32bit), Window7(32/64)
- Pentium4 2.8GHz & RAM over 1GB.
- Display monitor resolution: 1024 * 768
- DirectX Support (WPF)
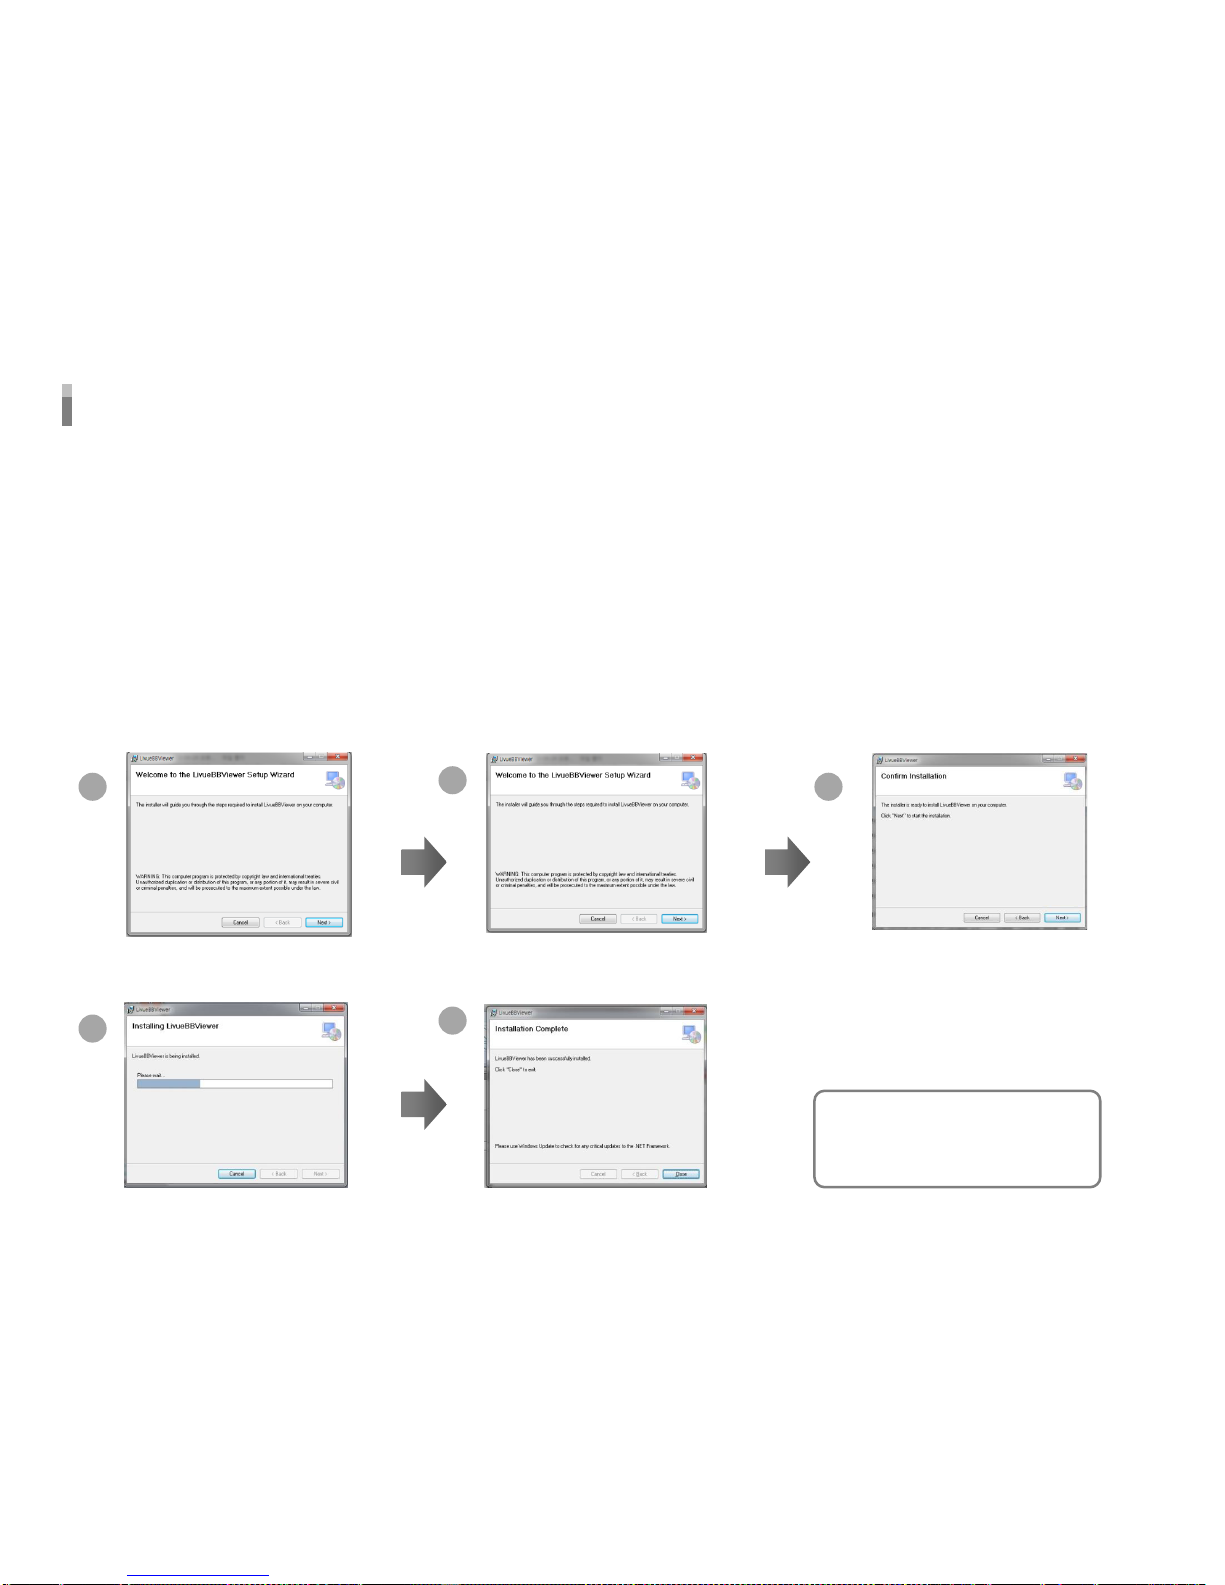
2. Install
- Playback program is in packaged Micro SD card.
- Insert this SD card into the USB card reader and connect to the
computer.
- An executable file is in the SD card as below figure.
If you run “setup.exe”, Blackbox Viewer will be installed. And then,
installation will be continued according
to the installation sequence
of setup dialog box.
* Installation may tale long depend on PC Usage environment.
Next
Select file location
and click “Next”
Next
Installing
Complete installation
1
2
3
4
5
PC Original Viewer Program Installation
※ If viewer program is lost
accidentally, please visit our
website winycam-eng and
download to the SD card
Page 13
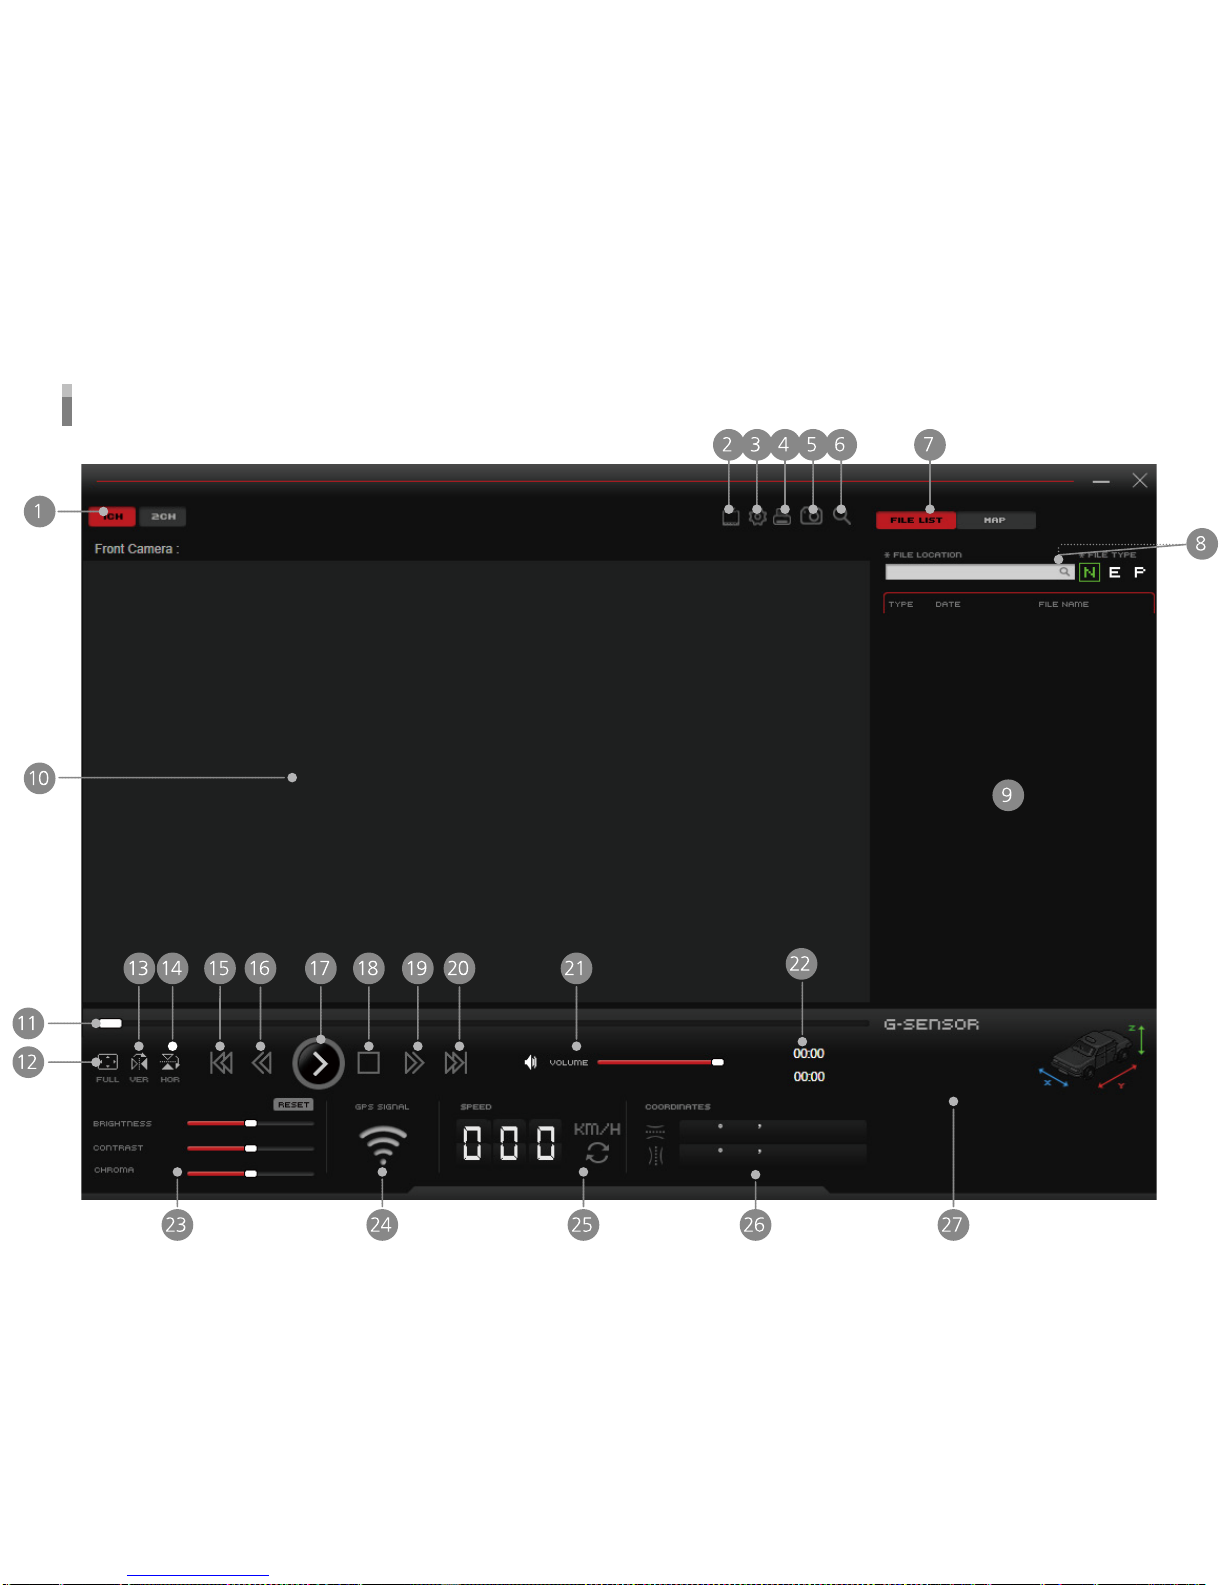
PC Original Viewer – Screen Configuration
Page 14
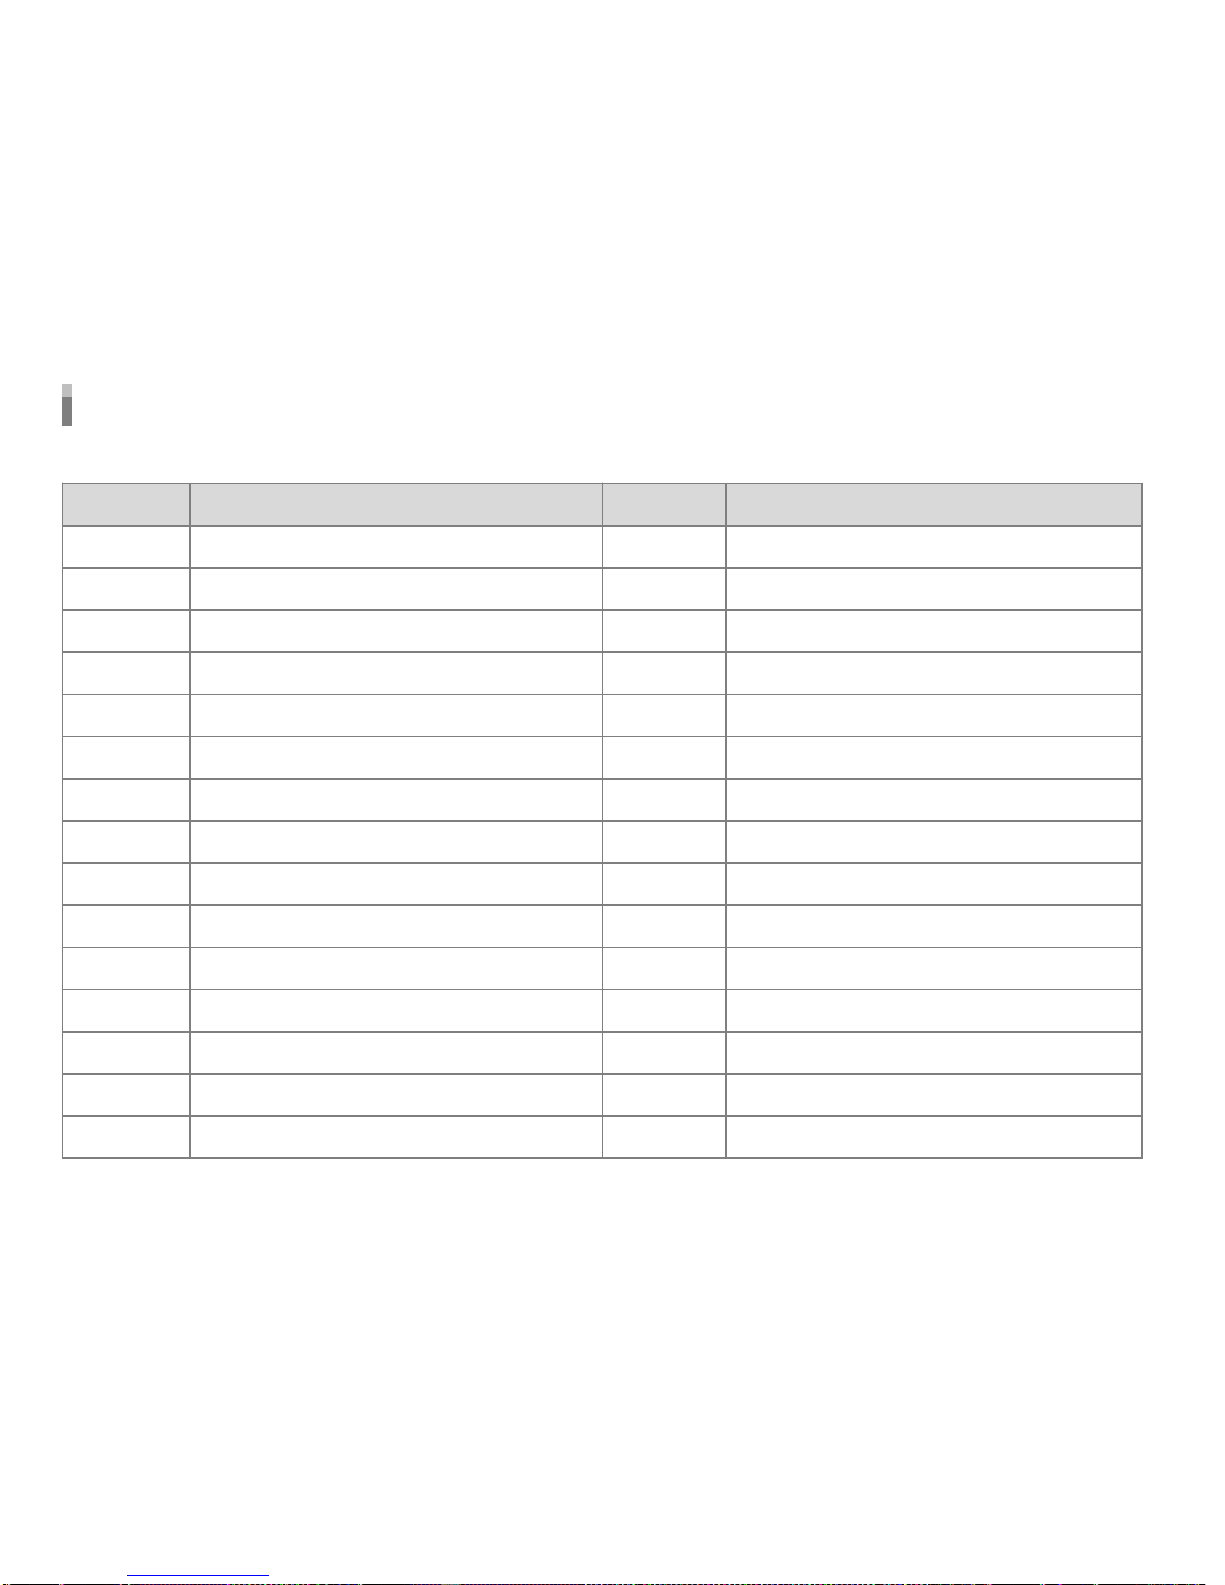
Item Function Item Function
1 1CH / 2CH select screen
16 Fast-Rewind
2 Viewer Configuration 17 Playback or Pause
3 System Configuration 18 Stop
4 Screen Capture 19 Fast-Forward
5 Print 20 File Skip
6 Zoom 21 Control Volume
7 Play List/Map Button 22 Total File Time/Playback Time
8 Playback File Location 23 Brightness/Contrast/Chroma
9 REC file list / Map Display 24 GPS signal condition
10 Playback Video Image 25 Driving speed
11 Playback Control 26 Latitude/Longitude
12 Full Screen 27 G-sensor informa
tion
13 Flip Horizontal
14 Flip Vertical
15 File Skip Back
PC Original Viewer – Screen Configuration
Page 15
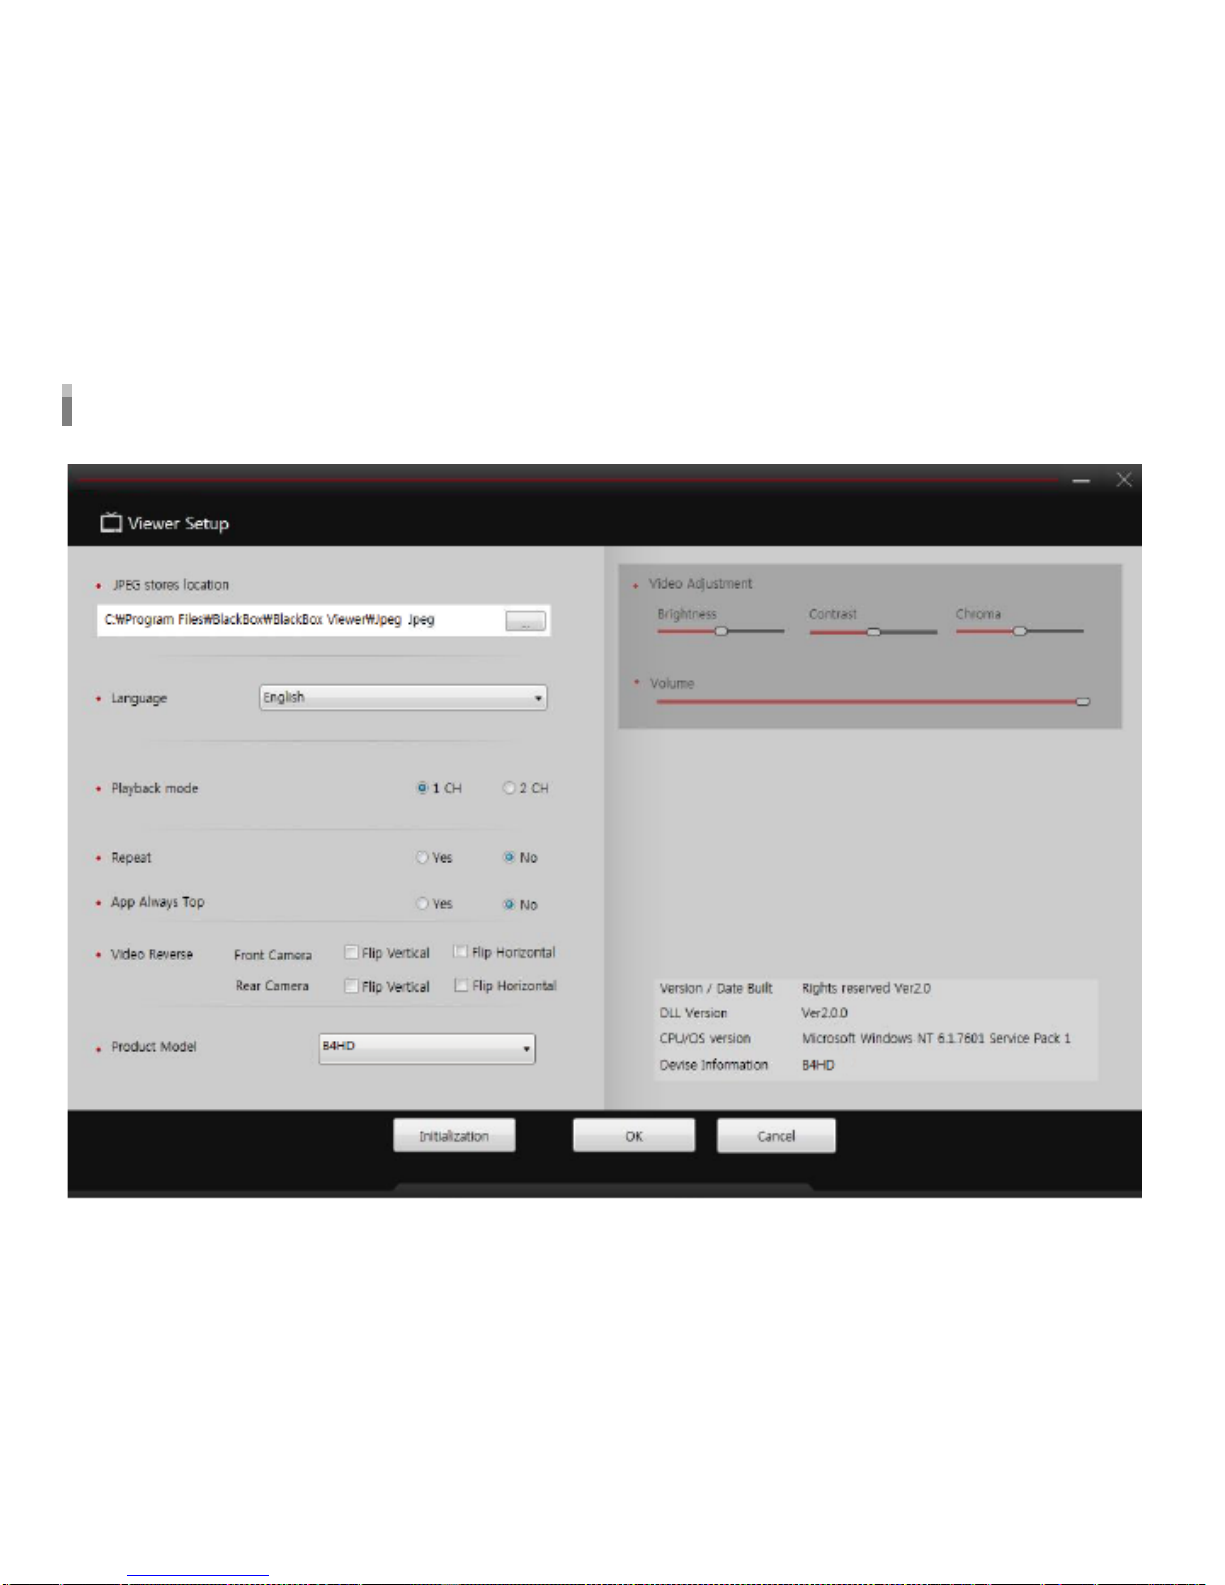
PC Original Viewer – Viewer Configuration
Page 16

PC Original Viewer – Viewer Configuration
Item Description
JPEG stores location
Set location for captured JPEG image.
Language
Select language.
Playback mode
Select display channel.
Repeat
Select repeated playback.
App location
Select App is always the top of another window.
Video reverse
Select video reverse.
Device select
Select the model.
Video adjustment
Control Brightness/Contrast/Chroma
Playback speed
Control playback speed
Volume
Control recording volume level
Page 17
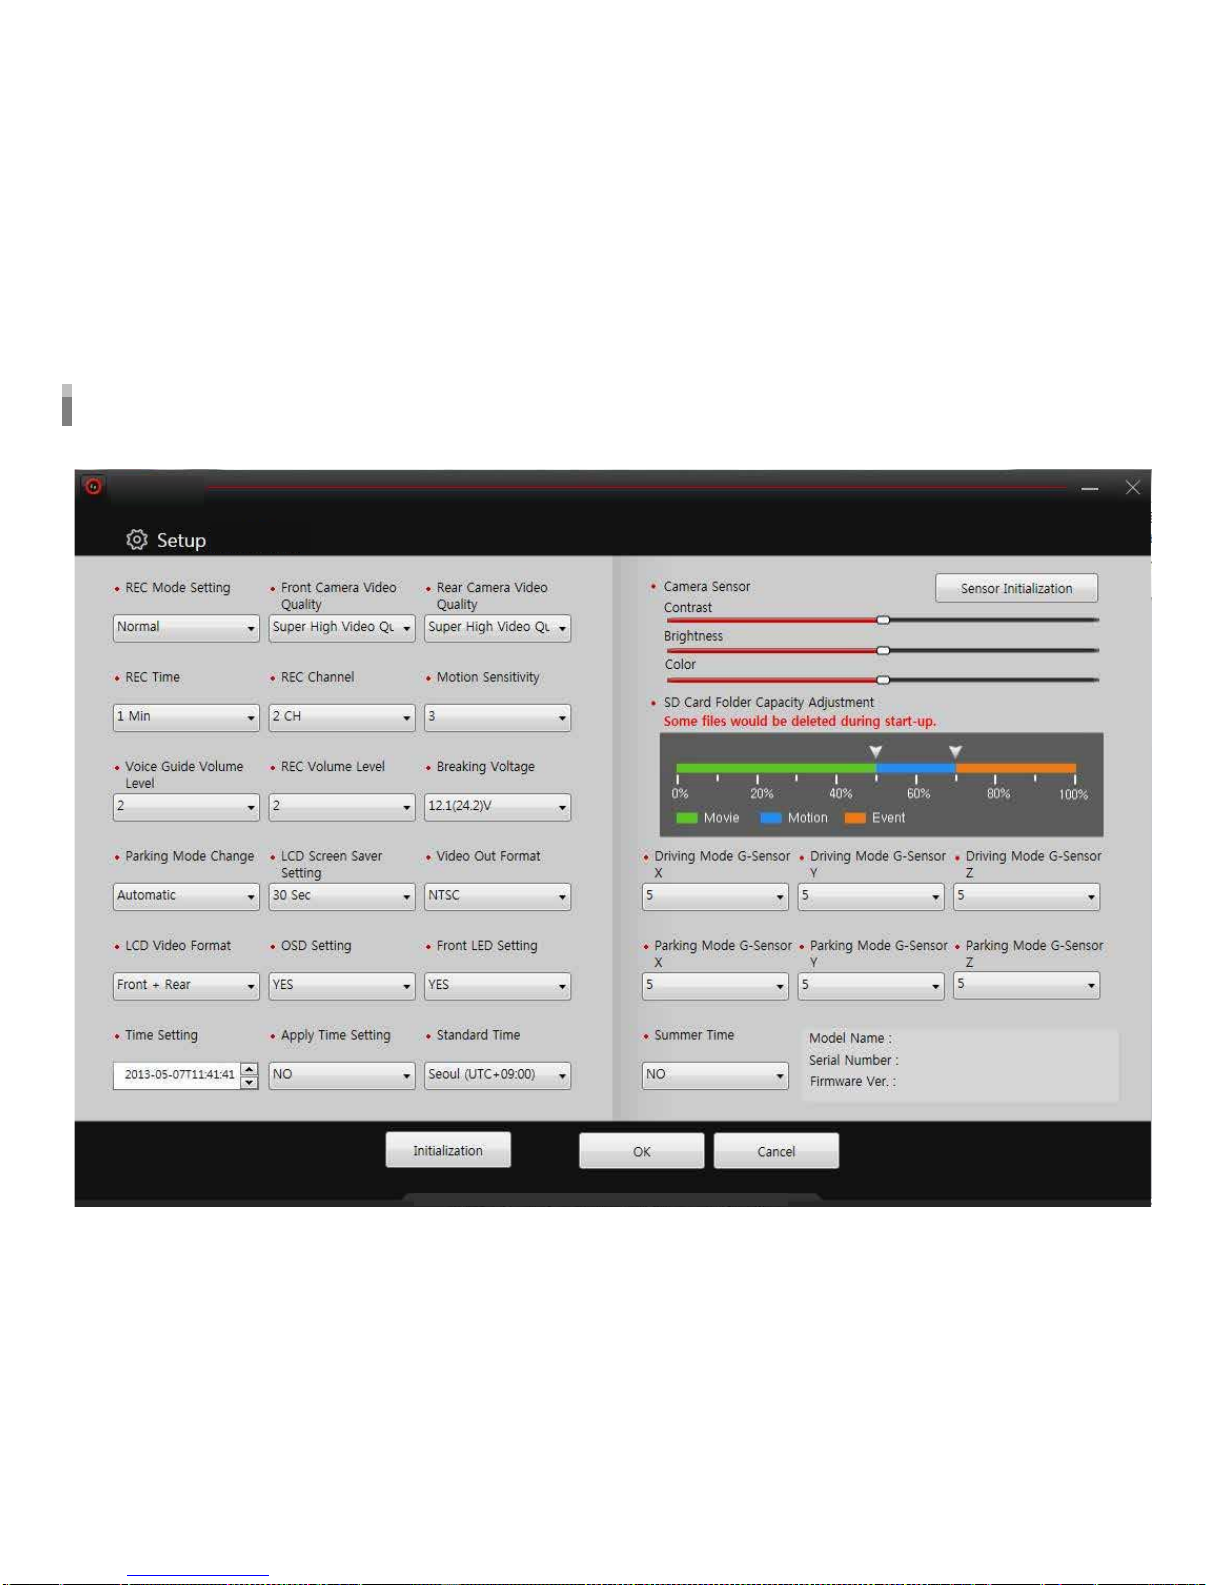
PC Original Viewer – Configuration
Page 18

Item Description
Mode Setup Select the recording mode
Time Setting Set your current time in PC
Front Camera Video Quality Select video quality in a front camera
Rear Camera Video Quality Select video quality in a rear camera
REC Time Select recording time for each file
REC Channel Select a recording channel
Motion Sensitivity Select a motion sensitivity level
Voice Guide Volume Level Select voice guide volume level
REC Volume Level Select a recording audio level
Breaking Voltage Select a breaking voltage for a constant power discharge protection function
Parking Mode Change Select a parking mode auto-change function
LCD Screensaver Setting Select LCD screensaver function
Video Out Format Select a video out format
LCD Video Format Select LCD video out format
OSD Setting Select OSD out on LCD
Front LED Setting Select front security LED function
Apply Time Setting Apply set time to V200HD
Standard time Auto-apply an actual location when using GPS
SD Card Folder Capacity Adjustment Select the capacity of each recording mode in SD card
Camera Sensor Select Brightness, Contrast, Chroma. Back to default value after click sensor initialization
G-Sensor Select a shock sensor sensitivity level
Summer Time Select apply a summer time
PC Original Viewer – Configuration
Page 19

Configuration Default Setting
Event
Item Status
Camera Sensor
Ratio between infinite / event
Brightness Middle
Color Middle
60Movie
40
Front Video quality
Audio volume
Voice information volume
G-sensor sensitivity
Data Overwrite
GMT Time
Sumer time apply
TV-out frequency
Recording FPS
mode
High
2
2
3
Yes
+09:00
No
NTSC
14.5/14.5
Infinite
Contrast Middle
Page 20
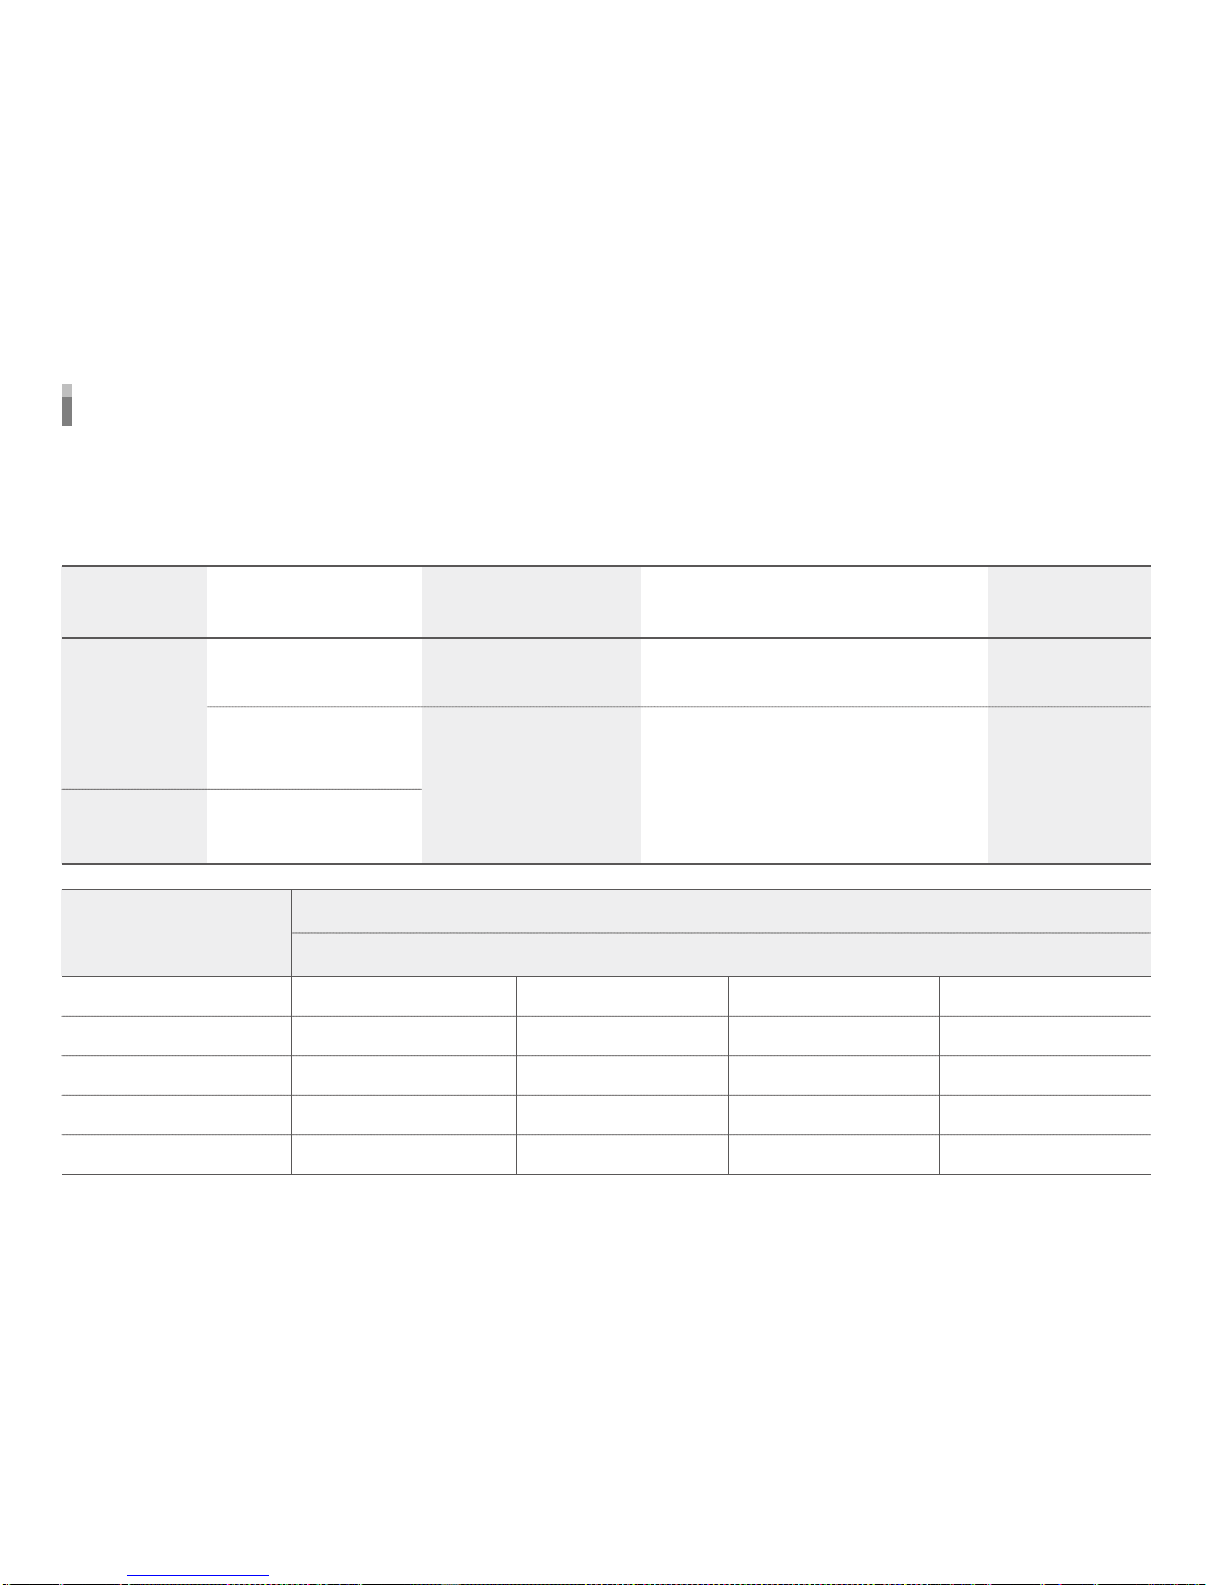
Recording mode and Button function
1. Recording : Device records video with turn on engines
2. Recording type : It is separated between infinite and event
3. Data storing : data store into infinite and event folder.
Recording
mode
Type of button
Driving mode
REC
Volume Up
Volume down
Memory slot cover
Mute
Event mode
Recording
Short Long Slide up Slide down
Infinite
Event record
Raise volume
Reduce voice volume
-
Mute on/off
Movie
-
-
-
Stop record
-
-
-
-
Start record
-
-
SD card format
-
-
-
-
1minute
Event
Event
G-sensor trigger/
Rec button
Event
High quality :
10sec before the event /
20 sec after the event
Normal quality :
15sec before the event /
15sec after the event
Recording method
Button function
Recording time Storing Folder
※ Memory slot cover should be covered to operate the recorder.
Page 21
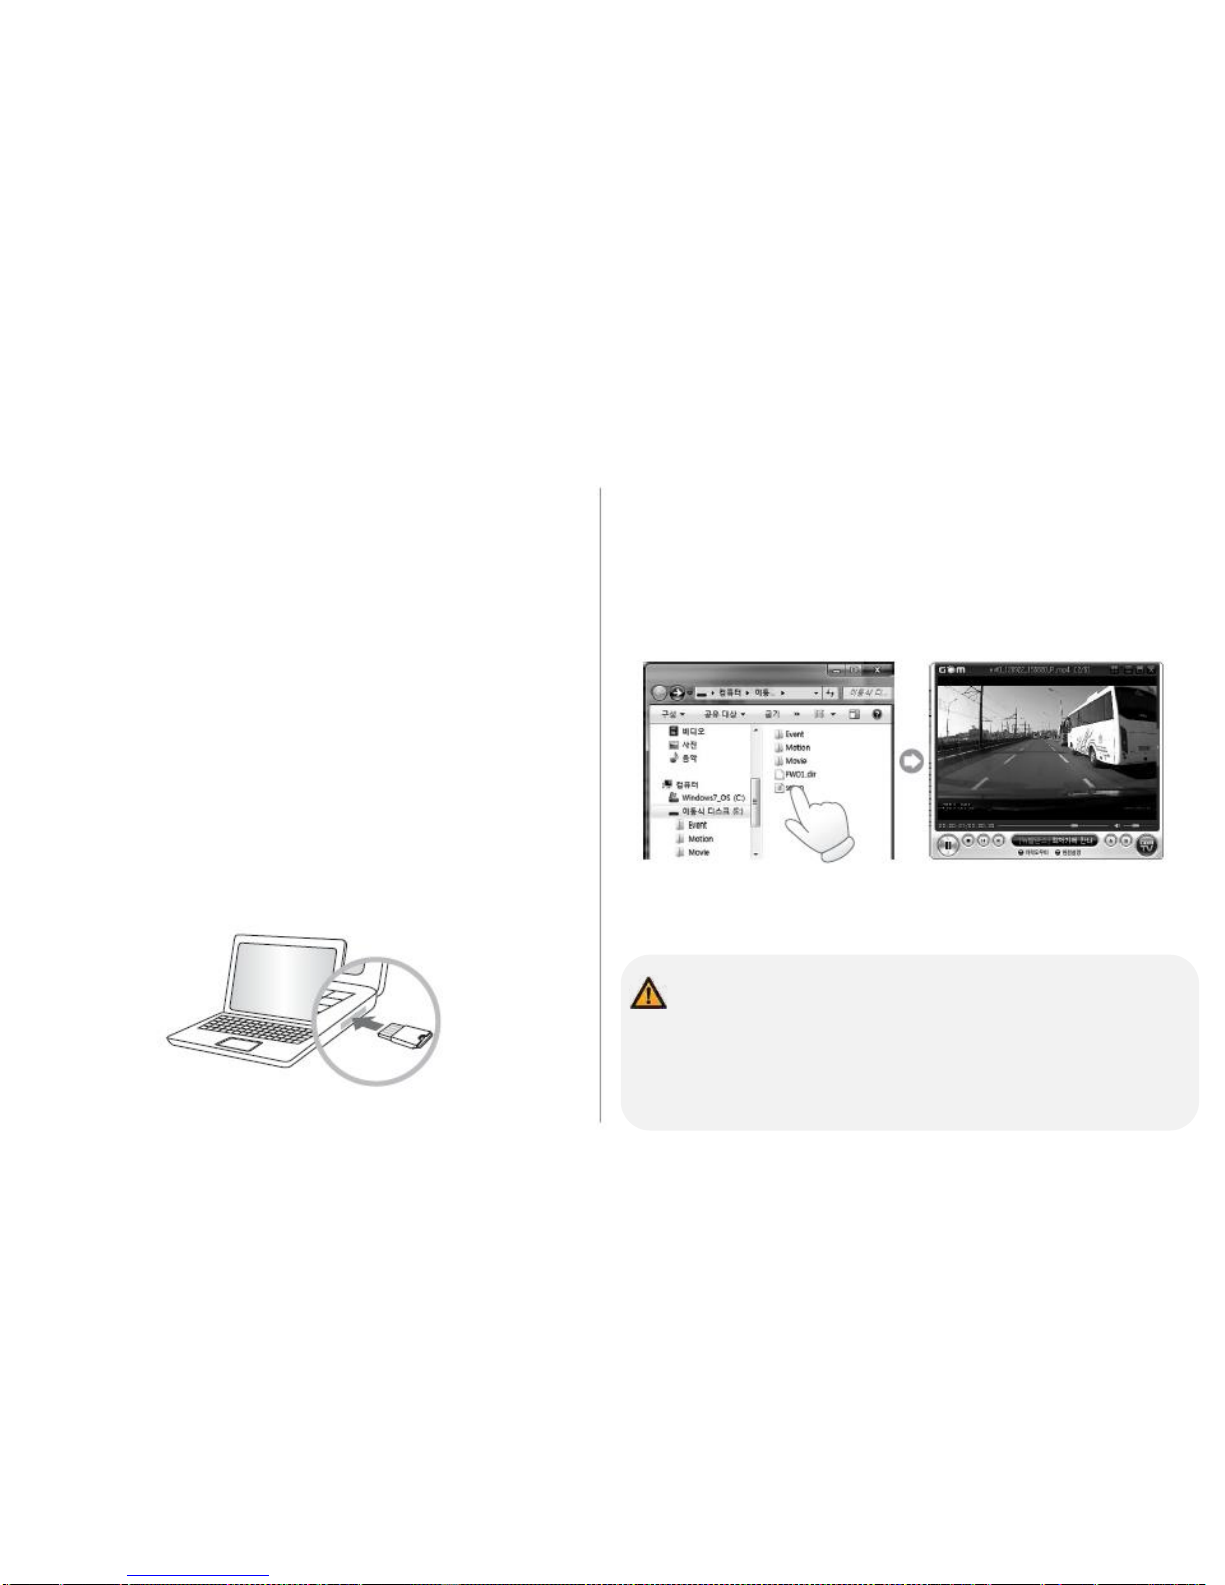
1. Playback in a standard video player
(GOM, Quicktimer, Window Media Player)
1) Remove a SD Card from B4HD
Open a SD Card slot cover and press softly,
then a SD Card can be removed easily.
2) Connect a SD Card to PC
Insert a SD card to SD Card Reader or adapter,
and connect it to PC.
3) Playback
Open a removal disc, you can see each folders. And click
files to playback which is stored in each folders.
- Each recorded video is saved in below folder automatically.
Normal : Normal (Constant) record
Event : Event record which is detected a shock by shock sensor.
- Motion : Motion record which is detected by motion detection
sensor. (Parking mode)
- GPS Information is displayed in the original viewer.
Page 22
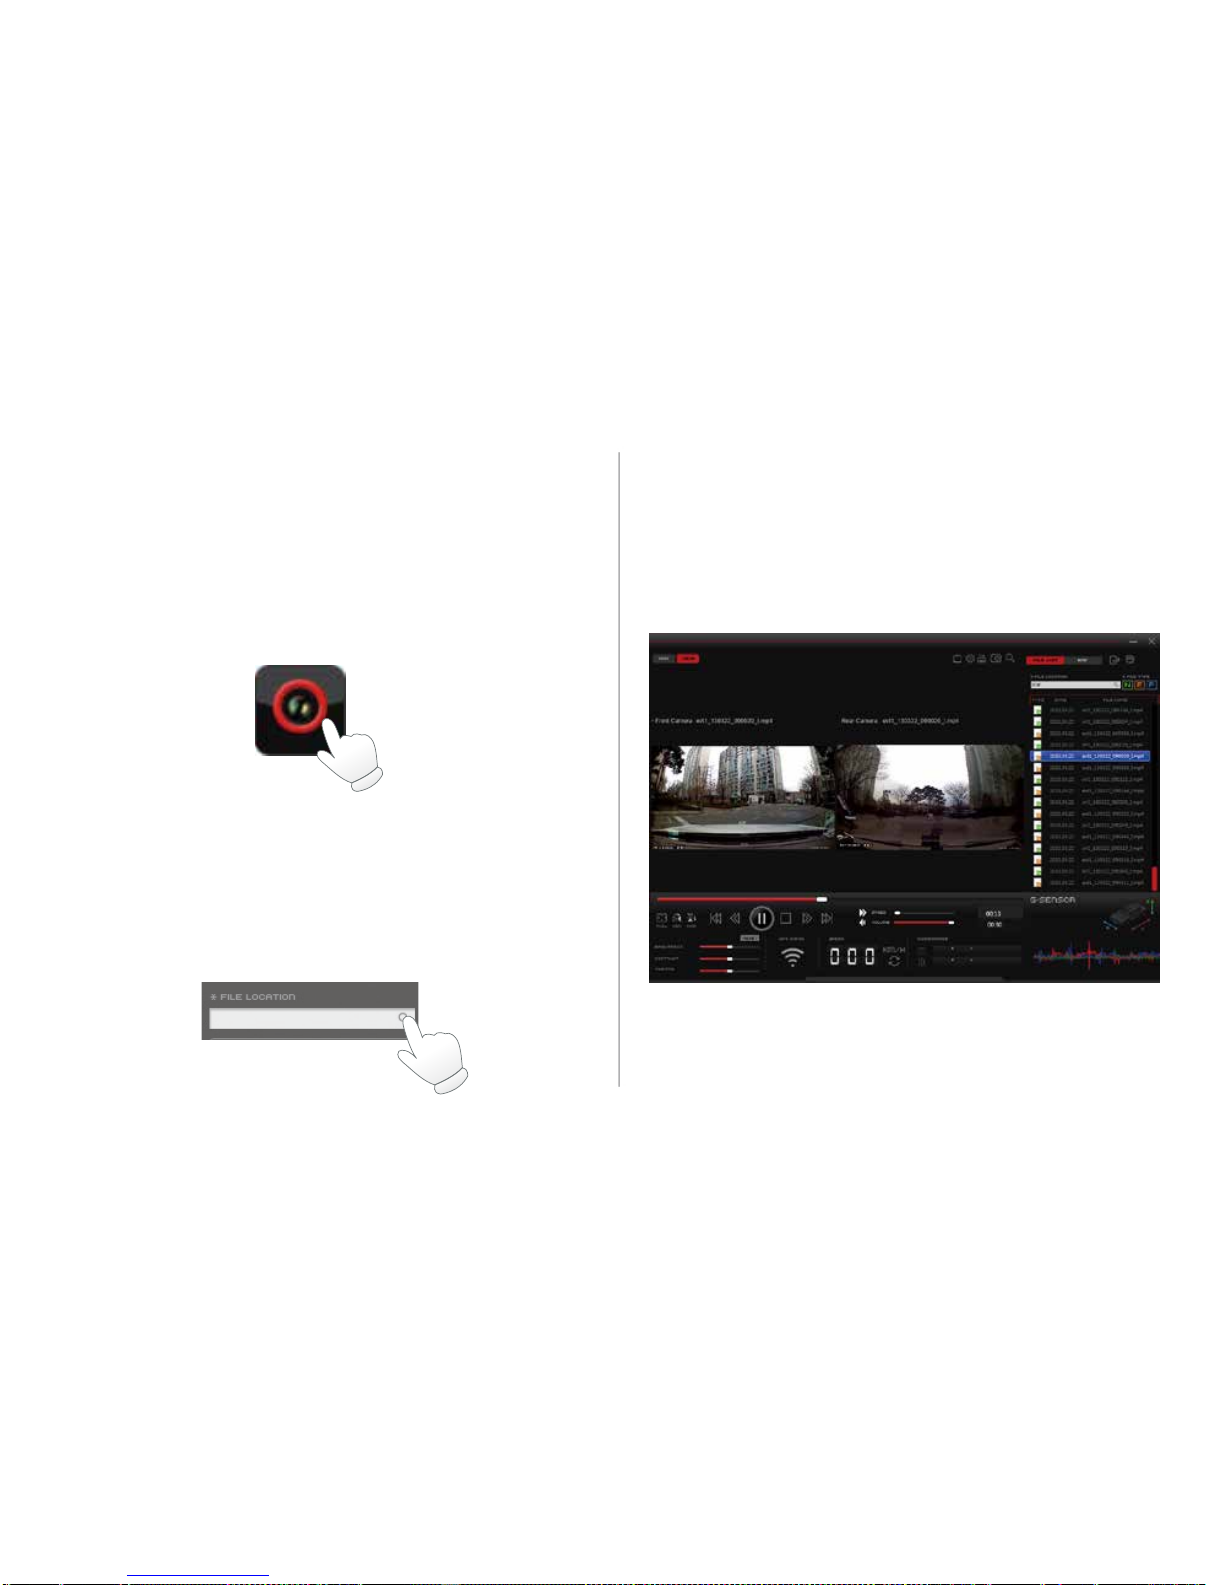
1~2) it is a normal video player with the same
playback method
3) operate the viewer software
2. Playback from own viewer software
5) Playback
By choosing the file on the right hand side of the viewer
file can be played back.
4) open files
Click the magnifying glass located at file location in up
right of the viewer then, files will automatically list up
Page 23
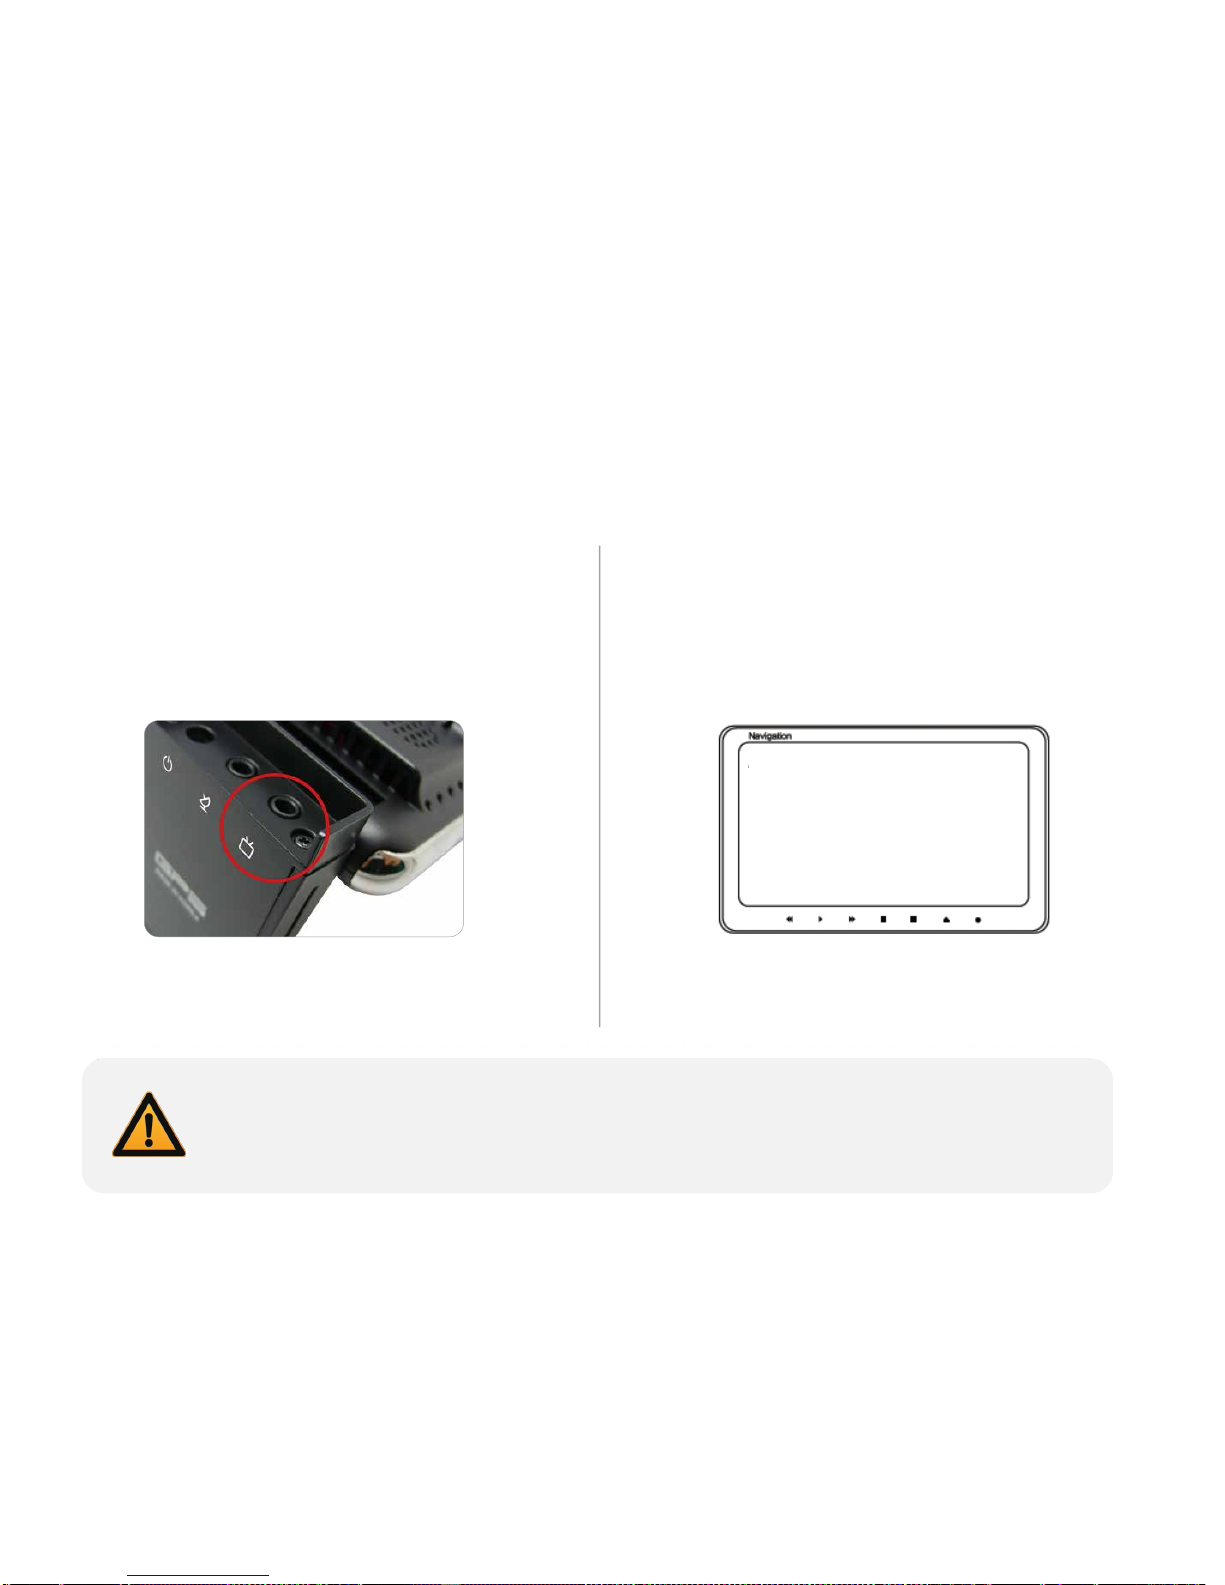
1) connect the AV cable to the port with correct
monitor/navigation (AV cable : optional part)
.
2) change the External display mode real time video
can be displayed.
3.playback from monitor / navigation
AV1(external input mode)
* external device (monitor/navigation) must have input port, for the AV cable purchase please ask
related manufacturer.
* since external devices have different specification please refer to their manuals.
Page 24
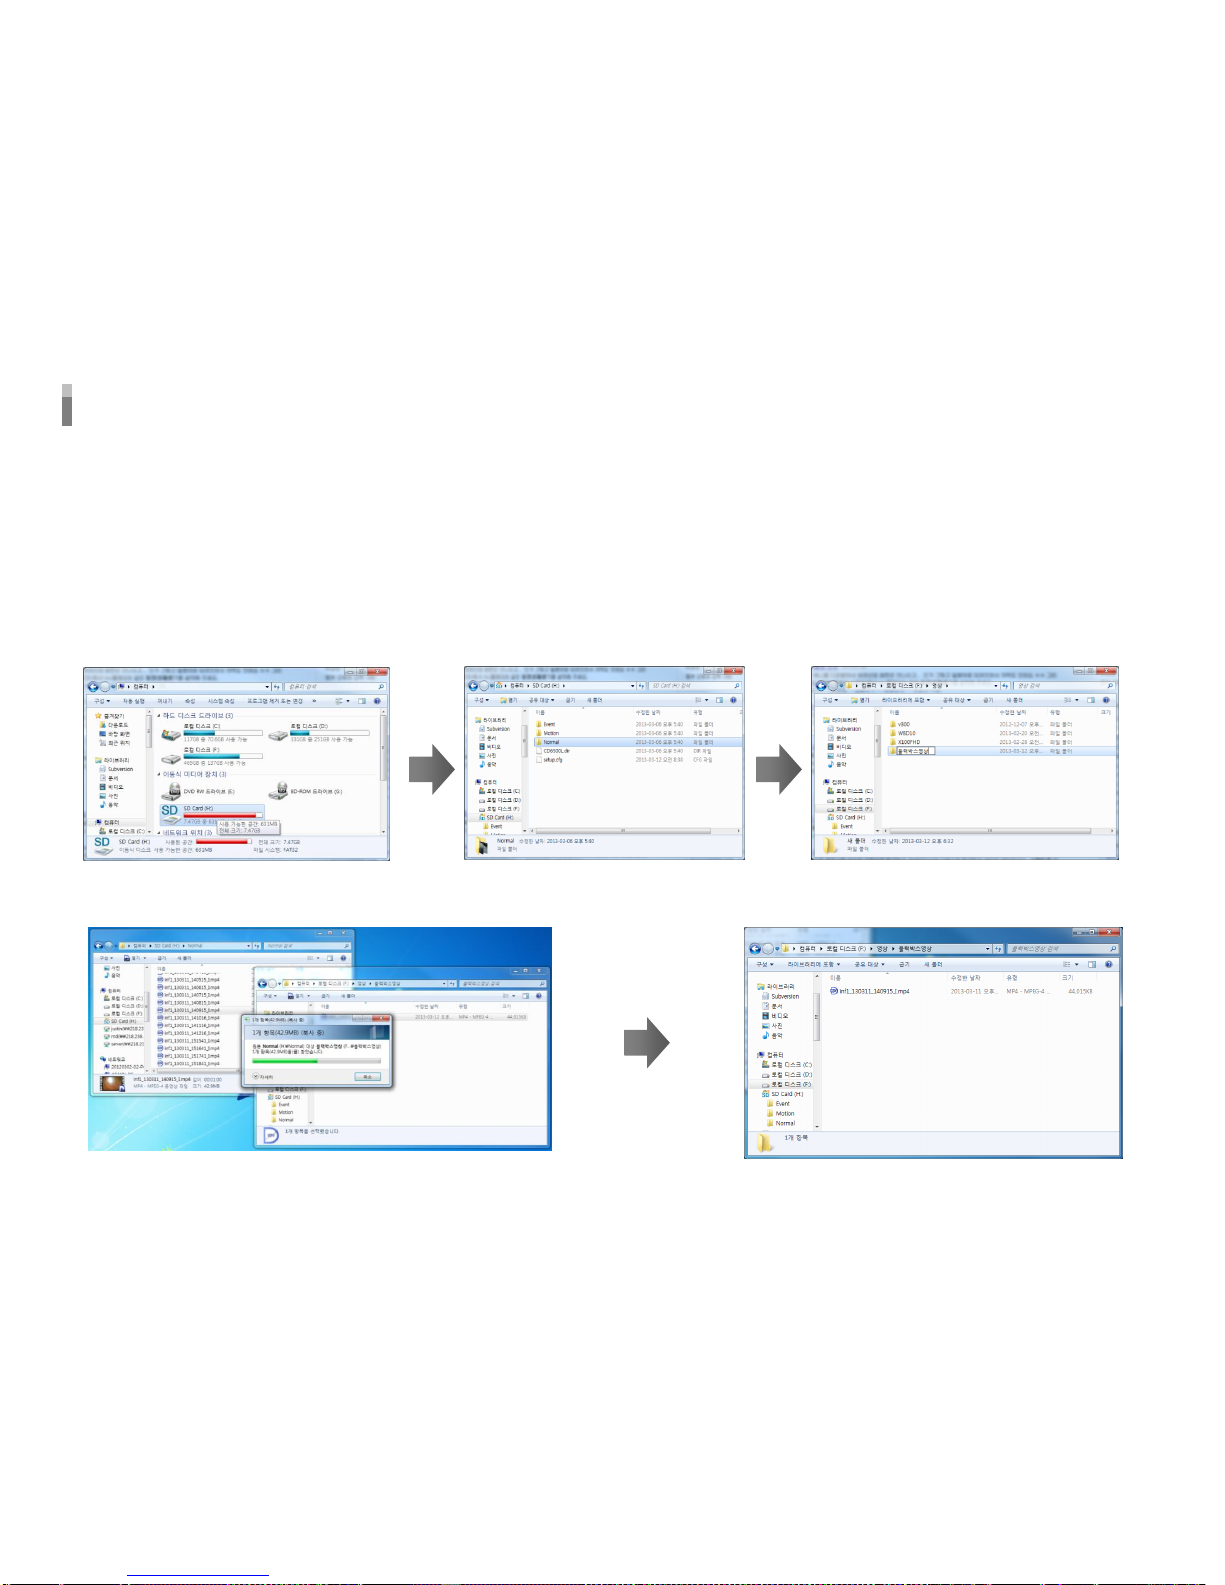
1. Enter to removal disc after insert SD card to your PC.
2. Go to the folder where recorded video files are stored.
3. Create the new folder in same location.
4. Drag the particular file to the new file to copy.
(If you drag a folder, the whole folder will be copied.)
To save video file on your PC
Page 25

• Auto Firmware Upgrade
1) Turn off the recorder and take the memory card out
2) Connect the memory card to your PC and backup the data
3) Format the memory card (please refer to the PC page)
4) Put the firmware file into the memory card
5) Once Put the memory card into the recorder, update starts immediately.
Firmware Upgrade
Page 26

How to format the memory card
1) By using PC
2) From the device.
- Press REC button long while switching on and it will access to the format mode.
- When the formatting completes the recorder will beep and reboots.
Put the memory card
into your PC and click
my computer
click “right side” and click the “format” click 32KB and proceed the
formatting
Please backup the manual and software file before formatting.
However, please choose fat32 when formatting otherwise the recorder could not be operated
correctly.
We suggest the ratio size as 32KB.
Page 27
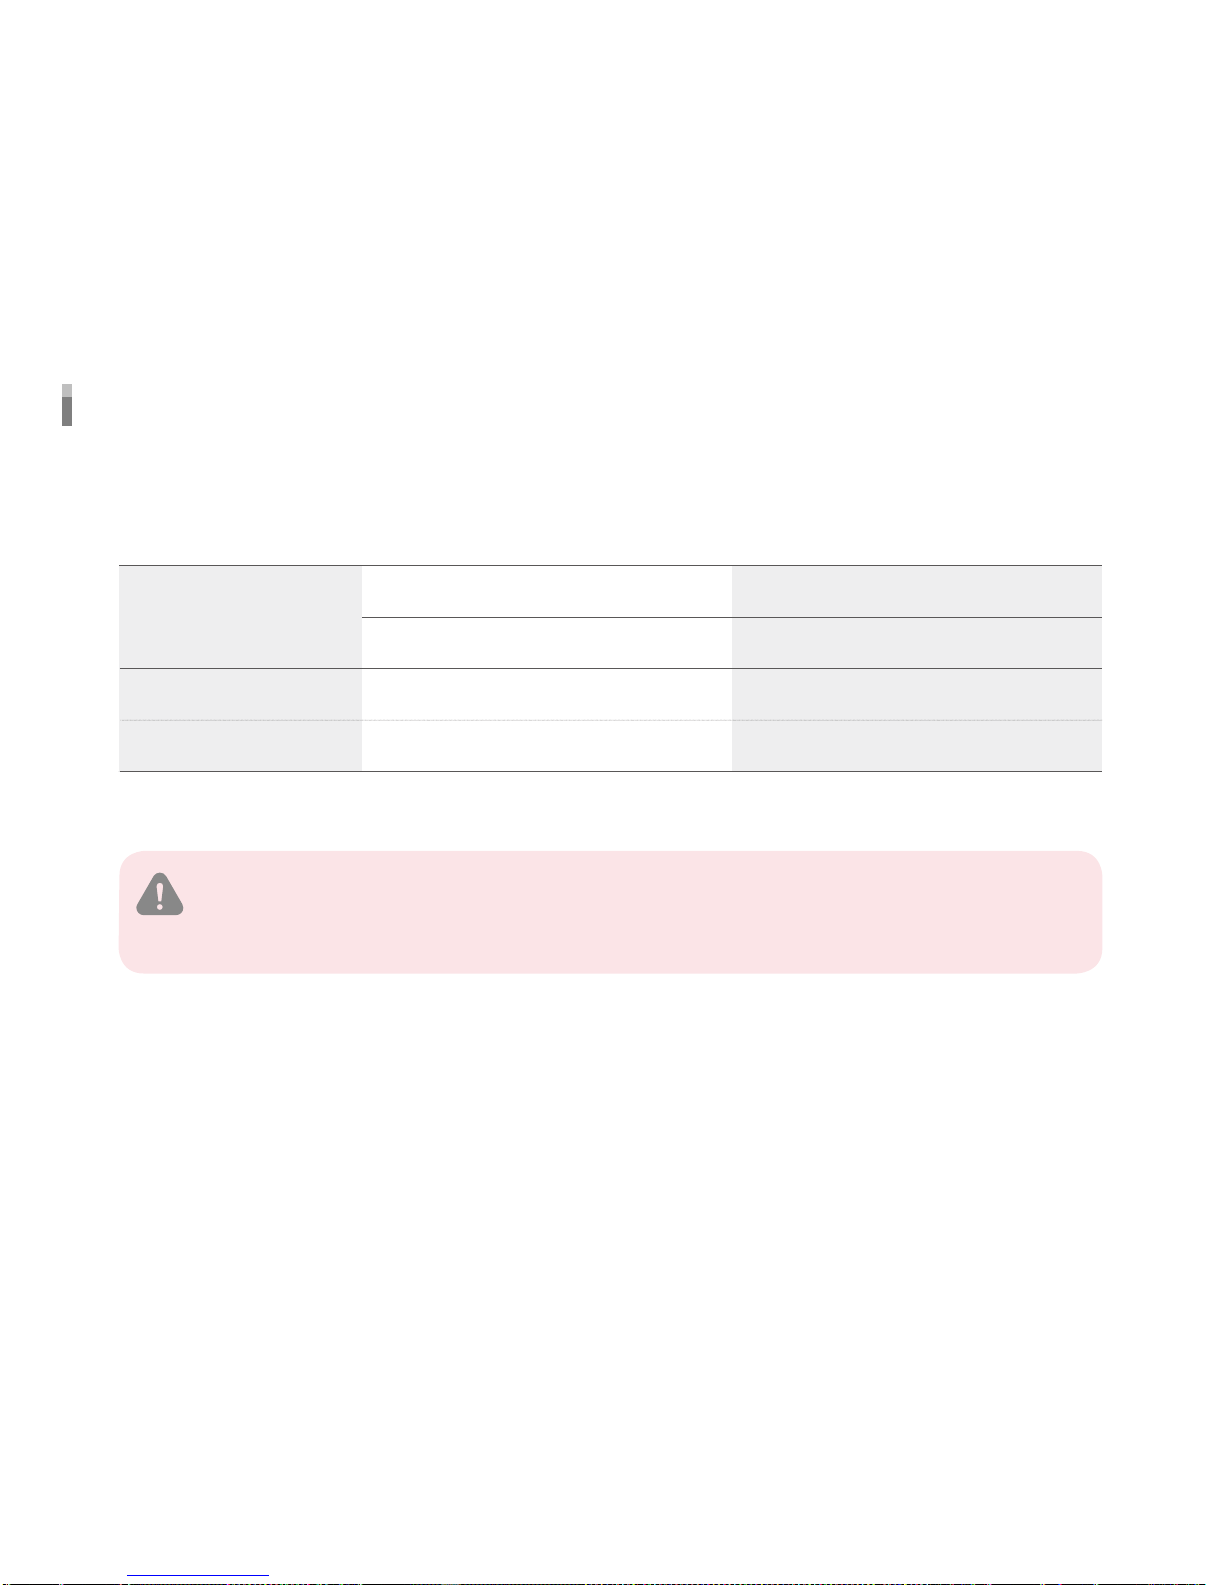
REC Time
* when the memory card has insufficient storage recorder will overwrite from the oldest file
* storage folders has ratio and this individual folders will also overwrite from the oldest file as well as event folder.
▶ Default Setting
Picture quality
16GB 32GB
Very High
High
Event (40%) Event (40%)Infinite (60%) Infinite (60%)
Approx 1.39 hour Approx 3.20 hourApprox 2.30 hour Approx 5.02 hour
Approx 2.12 hour Approx 4.28 hourApprox 3.20 hour Approx 6.44 hour
Page 28

Specification
Item Item
Camera Video Out
G-Sensor Audio record
GPS Voice information
Video compression Memory storage
Audio compression DC input
Recording Ch
Resolution
Dimension/weight
FPS
Storage Temp.
Picture quality
Operating Temp.
Specification Specification
Built-in 3x - G sensor Built-in MIC
External GPS(Optional) Built-in Speaker
H.264/AVC Micro SD card(SDHC)
PCM DC 12V ~ 24V Free Voltage
2ch(front/back)
Front/Back 720p
85(w)x48(H)x36(D)mm
88g(w/o bracket)
(adjustable from viewer software)
-front 14.5FPS, back 14.5FPS
-front 13.5FPS, back 13.5FPS
-Front 13.5FPS, Back 6.75FPS
-40℃ ~ +85℃
2ch :
very high/high/normal
-20℃ ~ +60℃
Front/back 2M Pixels NTSC / PAL Composite
Page 29

1. Power is not turned on.
※ Check once again if the power cable is properly connected. If the problem is not solved, please contact manufacture.
2. The map is not shown when a video is played on a PC original viewer program.
※ Check your Internet connection.
Check if your Internet Explorer is v7.0 or higher.
3. Power is connected, but LED is not lightning.
※ Check if the power cable is connected properly. Then if still LED dose not lightning, the product or the memory card may be defective.
Please contact manufacture.
4. GPS signal dose not recognize. (GPS is sold separately.)
※ GPS signal reception may be interrupted temporarily depending on the environment and locations.
Drive your car to other location where GPS signal reception is abled. Please wait 3-5 minutes in the GPS signal reception area.
If the signal still dose not recognized, please contact manufacture
5. The product does not recognize the memory card.
※ Remove the Micro SD memory card from V200HD after power OFF, and check for any foreign material or abnormality around
the connecting terminal. Format the SD memory card and try again. If the memory card is old, please replace with a new one.
FAQ
Precaution before use
1. Please check for any defect on the product before installation. The Company shall not take responsibility for any cost or
expense incurred as a result of the failure to check before installation.
2. If installation was held at a service center other than those designated by the Company, the Company shall not take a
responsibility for cost or expense charged at such center.
3. If the constant power protect function is set ‘OFF’, monitoring during parking will be performed only for a certain period of
time. If the vehicle battery voltage is lowered for self-protection, power to the device may be disconnected even in the Parking
Mode disabling the recording.
4. The Micro SD card should be formatted every other week, as it may cause a recording error, a disabling saving file or playback
error.
5. The Micro SD card is a consumable. Use of an aged SD card may cause error. Please replace on a regular basis.
6. When a car accident occurred, turn off power of the product immediately, remove the Micro SD card and save the accident
file on your PC. If the file is erased due to the times away, the Company shall not take responsible.
Page 30
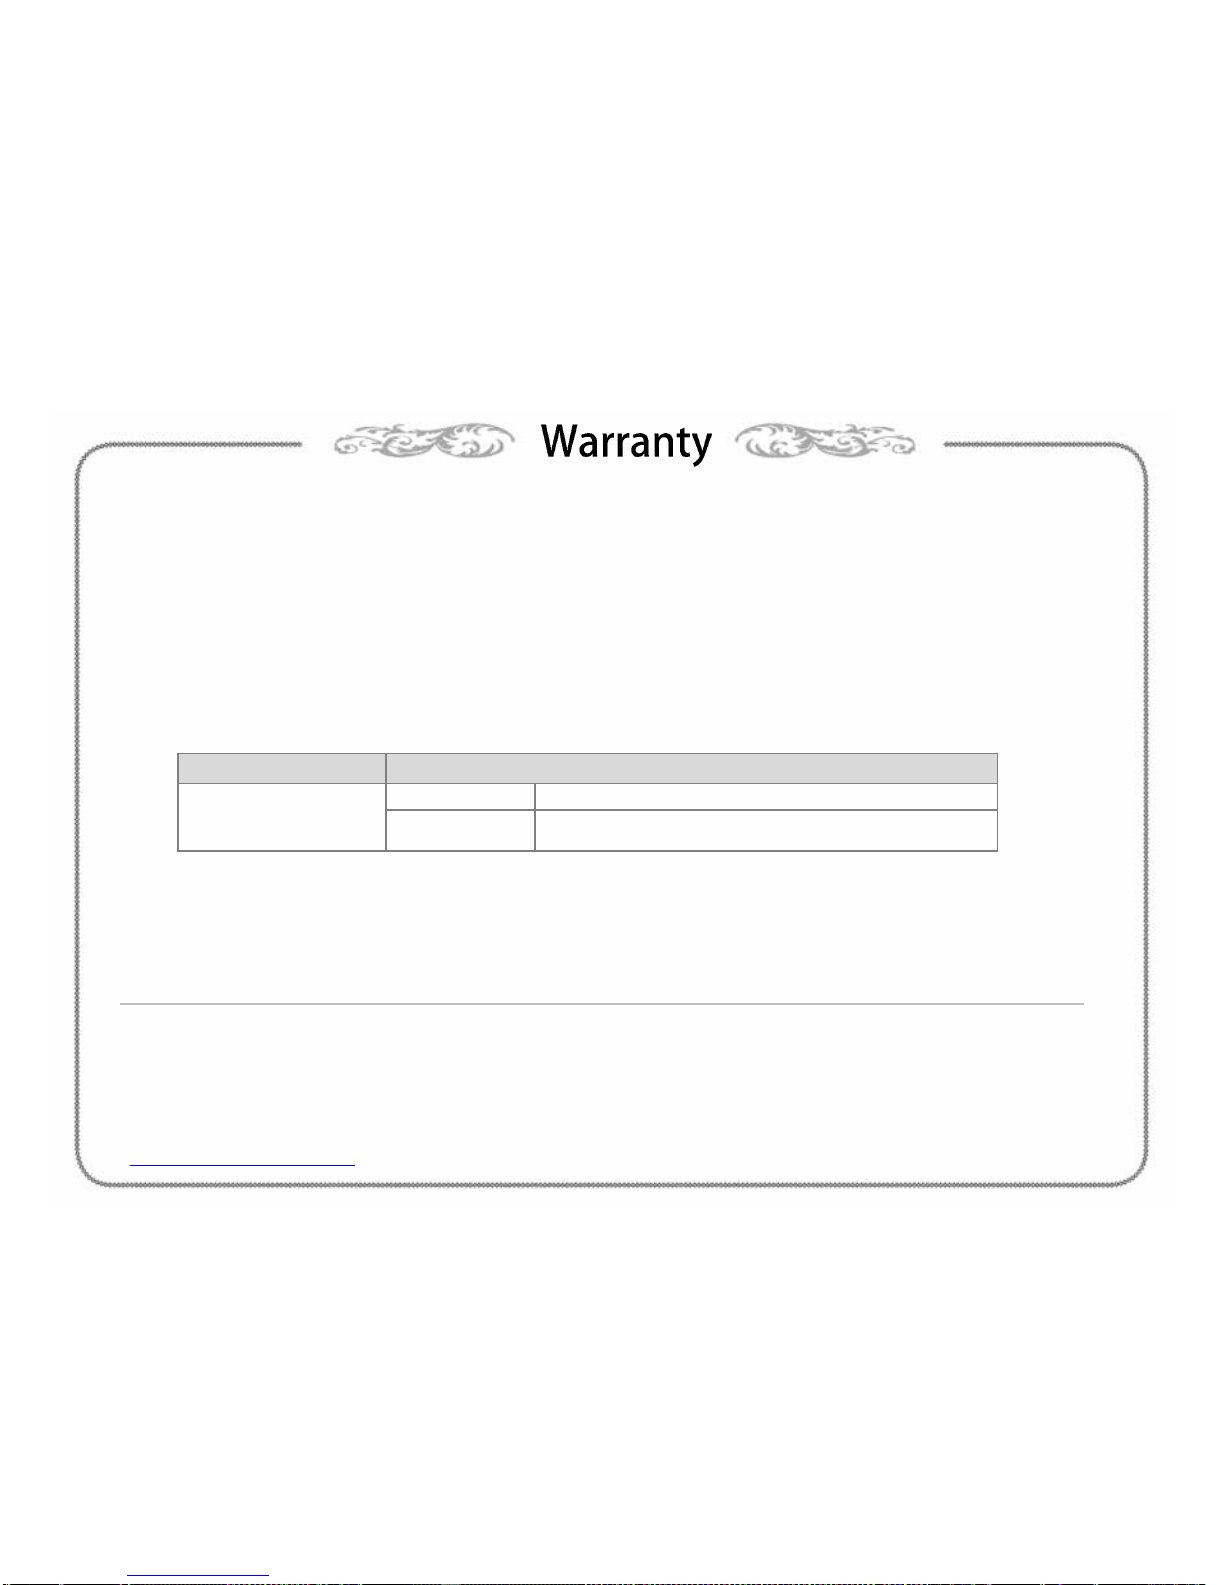
■ Warranty
1. The products are manufactured through the strict quality control and inspection process.
2. The defect occurring in normal use of user within the warranty period will be repaired free of charge.
■ Warranty Details (Conditions)
Free Service: The defect occurring under normal use within the warranty period from the date of purchase will be repaired free of charge.
Paid Service: If the warranty period has passed.
Even within the warranty period
, following cases shall be repaired at cost:
Failures caused by natural disasters (fire, lightning, flood damage, etc.)
Failures caused by carelessness using (drop, flooding, shock, breakage, excessive operation)
Failures caused by the malfunction of power in use and connected equipment.
Failures caused by any changes of a product and repaired from an unauthorized service center.
.
Body Accessory
1 Year
(from purchase date)
Within 6 months SD card, Bracket, Cigar Lighter
Excluded
warrantee
Card Reader, Vided Cable (cut user’s mishandling)
• Accessories are not repaired free of charge. The products other than the warranty period shall not be replaced free
of charge.
Important data shall be backed-up in a safe place and we shall not be responsible for any loss of the data stored in
the product.
Date : D. M. Y.
Distributor :
Customer Service
Manufacture : #201-711 & 712 Chunui Techno Park Ⅱ 202 Chunui-Dong, Wonmi-Gu, Bucheon-City
Gyeonggi-Do, Korea(ZIP:420-857)
Please download the user manual, program from below website
http://www.huvitech.com
 Loading...