

Page 1
PLEASE KEEP THIS GUIDE
This guide contains important information about your lock.
HuTools HT01
Installation Guide
Customer Service: [email protected]
Page 2
Installation Guide
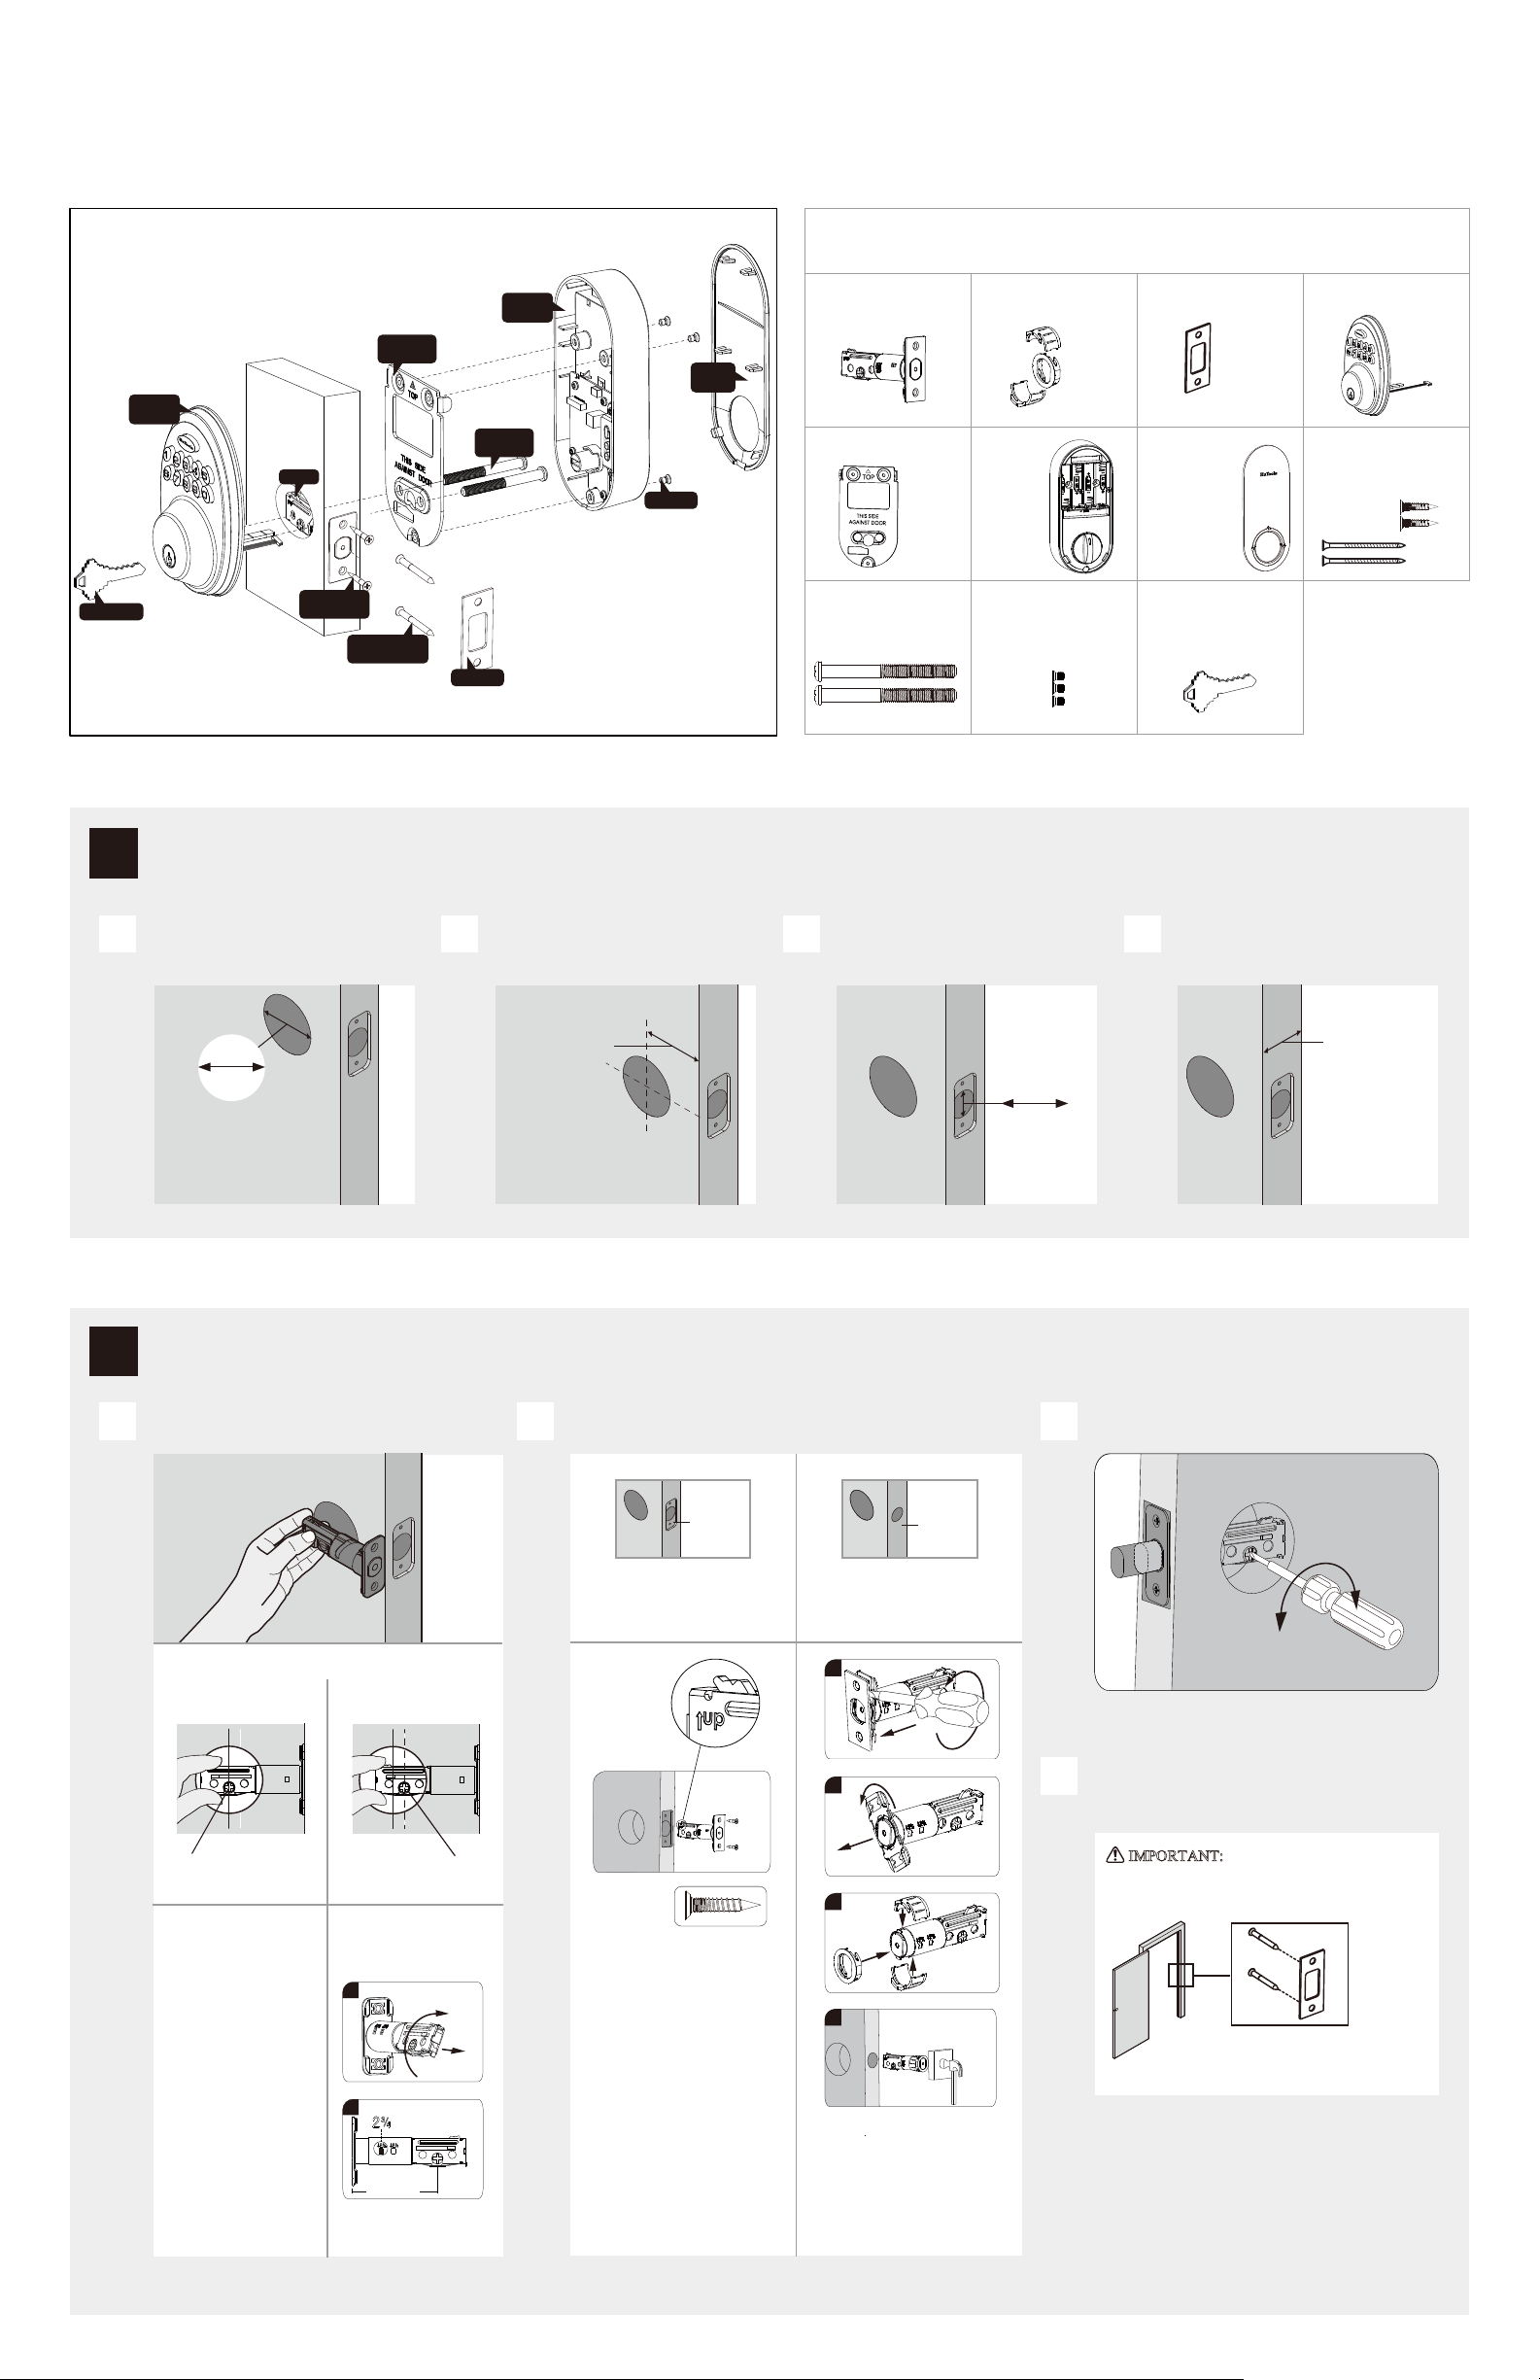
Parts List
Backup Key
1
Mounting
Plate
Exterior
Assembly
Latch
Latch/Strike
Screws(I)
Reinforcement
Screws(H)
Prepare the door and check dimensions
Strike
Interior
assembly
Mounting
Screws(J)
Screws(K)
Battery
Cover
Latch
A
Mounting Plate
Interior Assembly
Screws
J
E
Drive-In Collar
Interior
Assembly
F
Mounting Plate
Screws
K
Strike
B
Battery Cover
C
G
Exterior Assembly
D
Latch and
Strike Screws
I
H
Backup Key
L
Measure to confirm that the hole in the door
A B C D
is 2-1/8" (54 mm)
2-1/8"
54 mm
Install the latch and strike
2
Hold the latch in front of the door hole, with
A B C
the latch face flush against the door edge
Measure to confirm that the backset is
either 2-3/8" or 2-3/4" (60 or 70 mm)
2-3/8" or 2-3/4"
60 or 70 mm
Is the door edge chiseled?
backset
YES
Measure to confirm that the the hole in
the door edge is 1" (25 mm)
1"
25 mm
Use a screwdirver to test if deadbolt works smoothy.
NO
Measure to confirm that the door is 1-3/8"
to 2" (35 mm or 50 mm)thick
1-3/8" to 2"
35 mm to 50 mm
A
Is the slotted hole centered in the door hole?
YES
NO
or
Slotted hole is centered. Slotted hole is NOT centered.
No adjustment is
required. Proceed
to next step.
Rotate and pull the
latch as shown
to extend latch.
1
chiseled
Install latch in door with
supplied screws.
or
Use a flathead screwdriver to remove
Rectangular face from latch and install
drive-in collar.
1
2
3
I
B
4
not
chiseled
Install strike on the door frame
D
IMPORTANT: Make sure hole in door frame
is drilled a minimum of 1" (25 mm) deep.
H
C
2
φ2-3/4”
(70mm)
Install latch in door with wood
block and hammer.
1 / 6
Page 3
Install exterior assembly
3
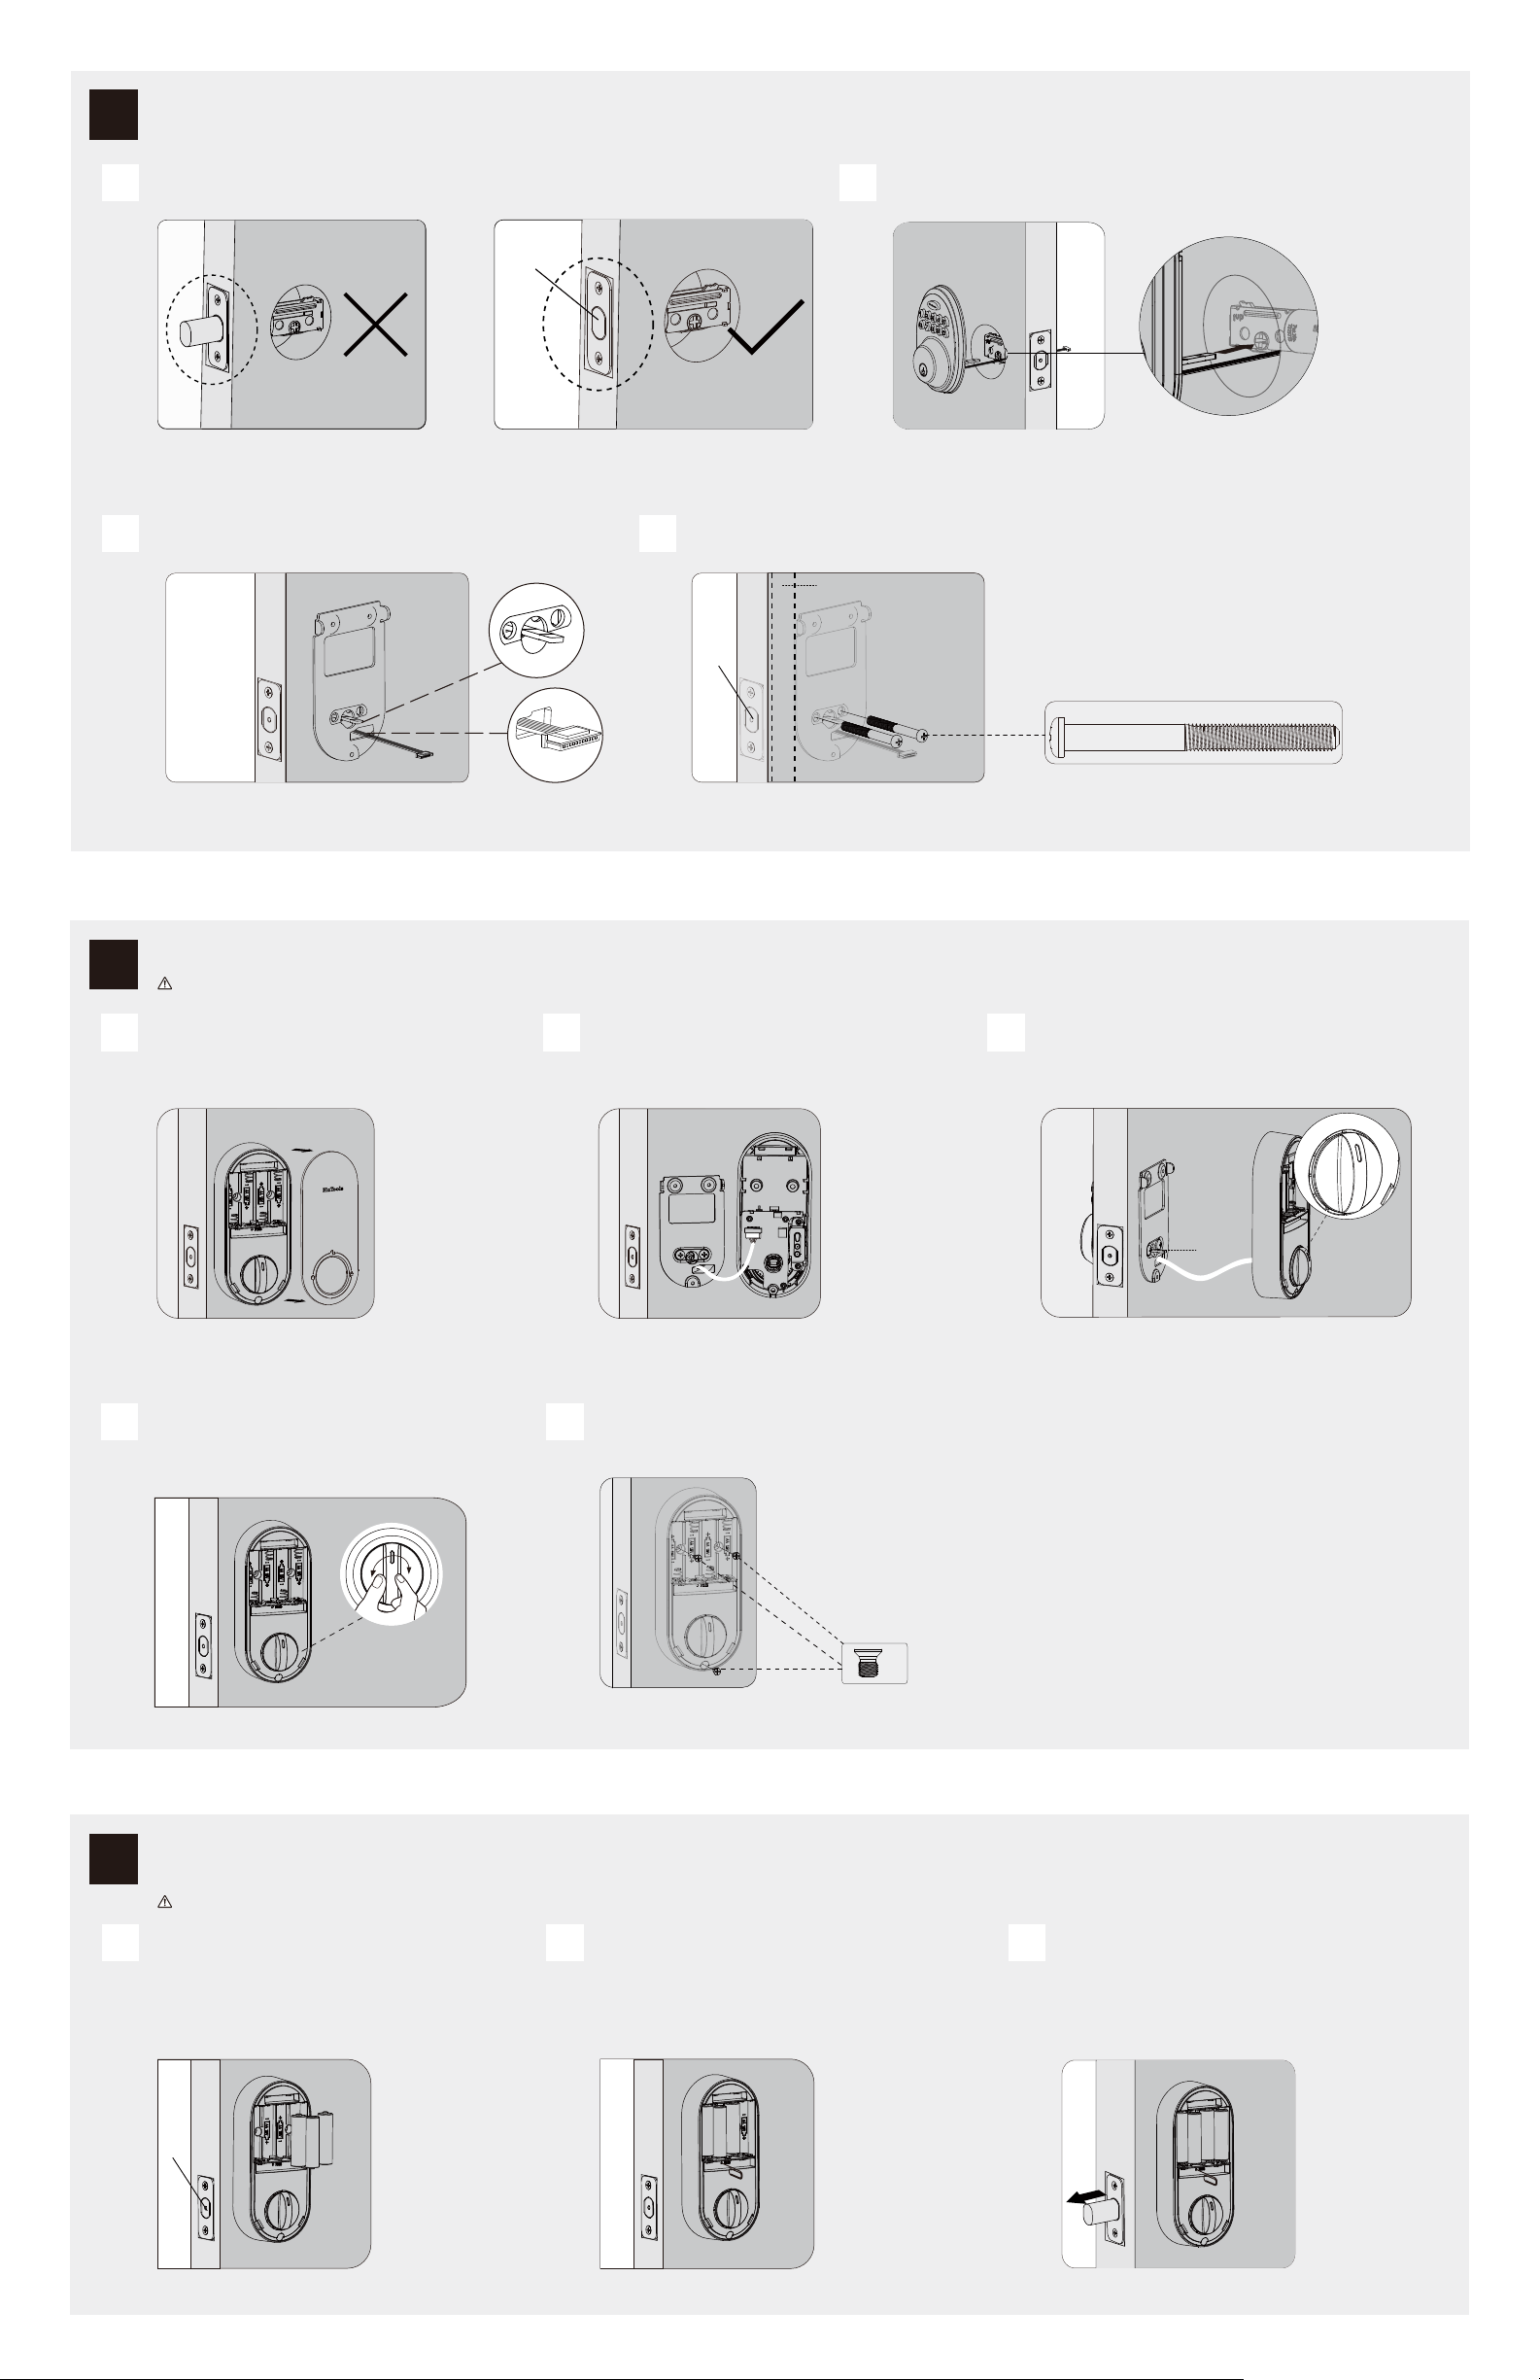
IMPORTANT: Before installation, make sure the latch is fully retracted (in the unlocked position) . Route the cable below the latch
A
unlocked
B
Insert the torque blade
through the slot in the latch.
Send the cable through the bottom horizontal slot in the mounting plate.
C
E
Install interior assembly
4
A
IMPORTANT: Do not load batteries until lock is completely installed.
Remove the battery cover.
Locate the slot at the bottom and use your fingernail or a
flat head screwdriver to pry the cover up and pull it off.
Secure the mounting plate with the supplied screws.
D
Keep Parallel to door edge.
unlocked
Connect the cable and ensure tight cable connection.
B
J
Rotate the turnpiece in vertical position and the torque
C
blade in horizontal position, make sure the latch is
still fully retracted (in the unlocked position).
F
Test operation using backup key and thumbpiece
D
for smooth rotation.If turnpiece doesn’t rotate,
repeat step 4C, making sure the turnpiece in vertical
position, and touque blade in horizontal position.
G
Secure the interior assembly
E
with the supplied screws.
Horizontal
K
Detect left/ right hand door installation
5
Reset the lock to teach the lock the orientation of the door.
IMPORTANT: This step is required and crucial for the lock to operate properly.
While the door is OPEN and UNLOCK, load 3 AA batteries
A
into the interior assembly. For best results, use new,
non-rechargeable Alkaline batteries only.
Press and hold the Reset button on the interior assembly
using a pen or a paper clip.
unlocked
Press and hold the Reset button on the interior assembly
B
using a pen or a paper clip.
2 / 6
Load the last battery and keep holding the reset button
C
for 3 seconds, until you hear the sound of “beep”. The
latch bolt will extend to learn the orientation of the door.
Page 4
How To Use
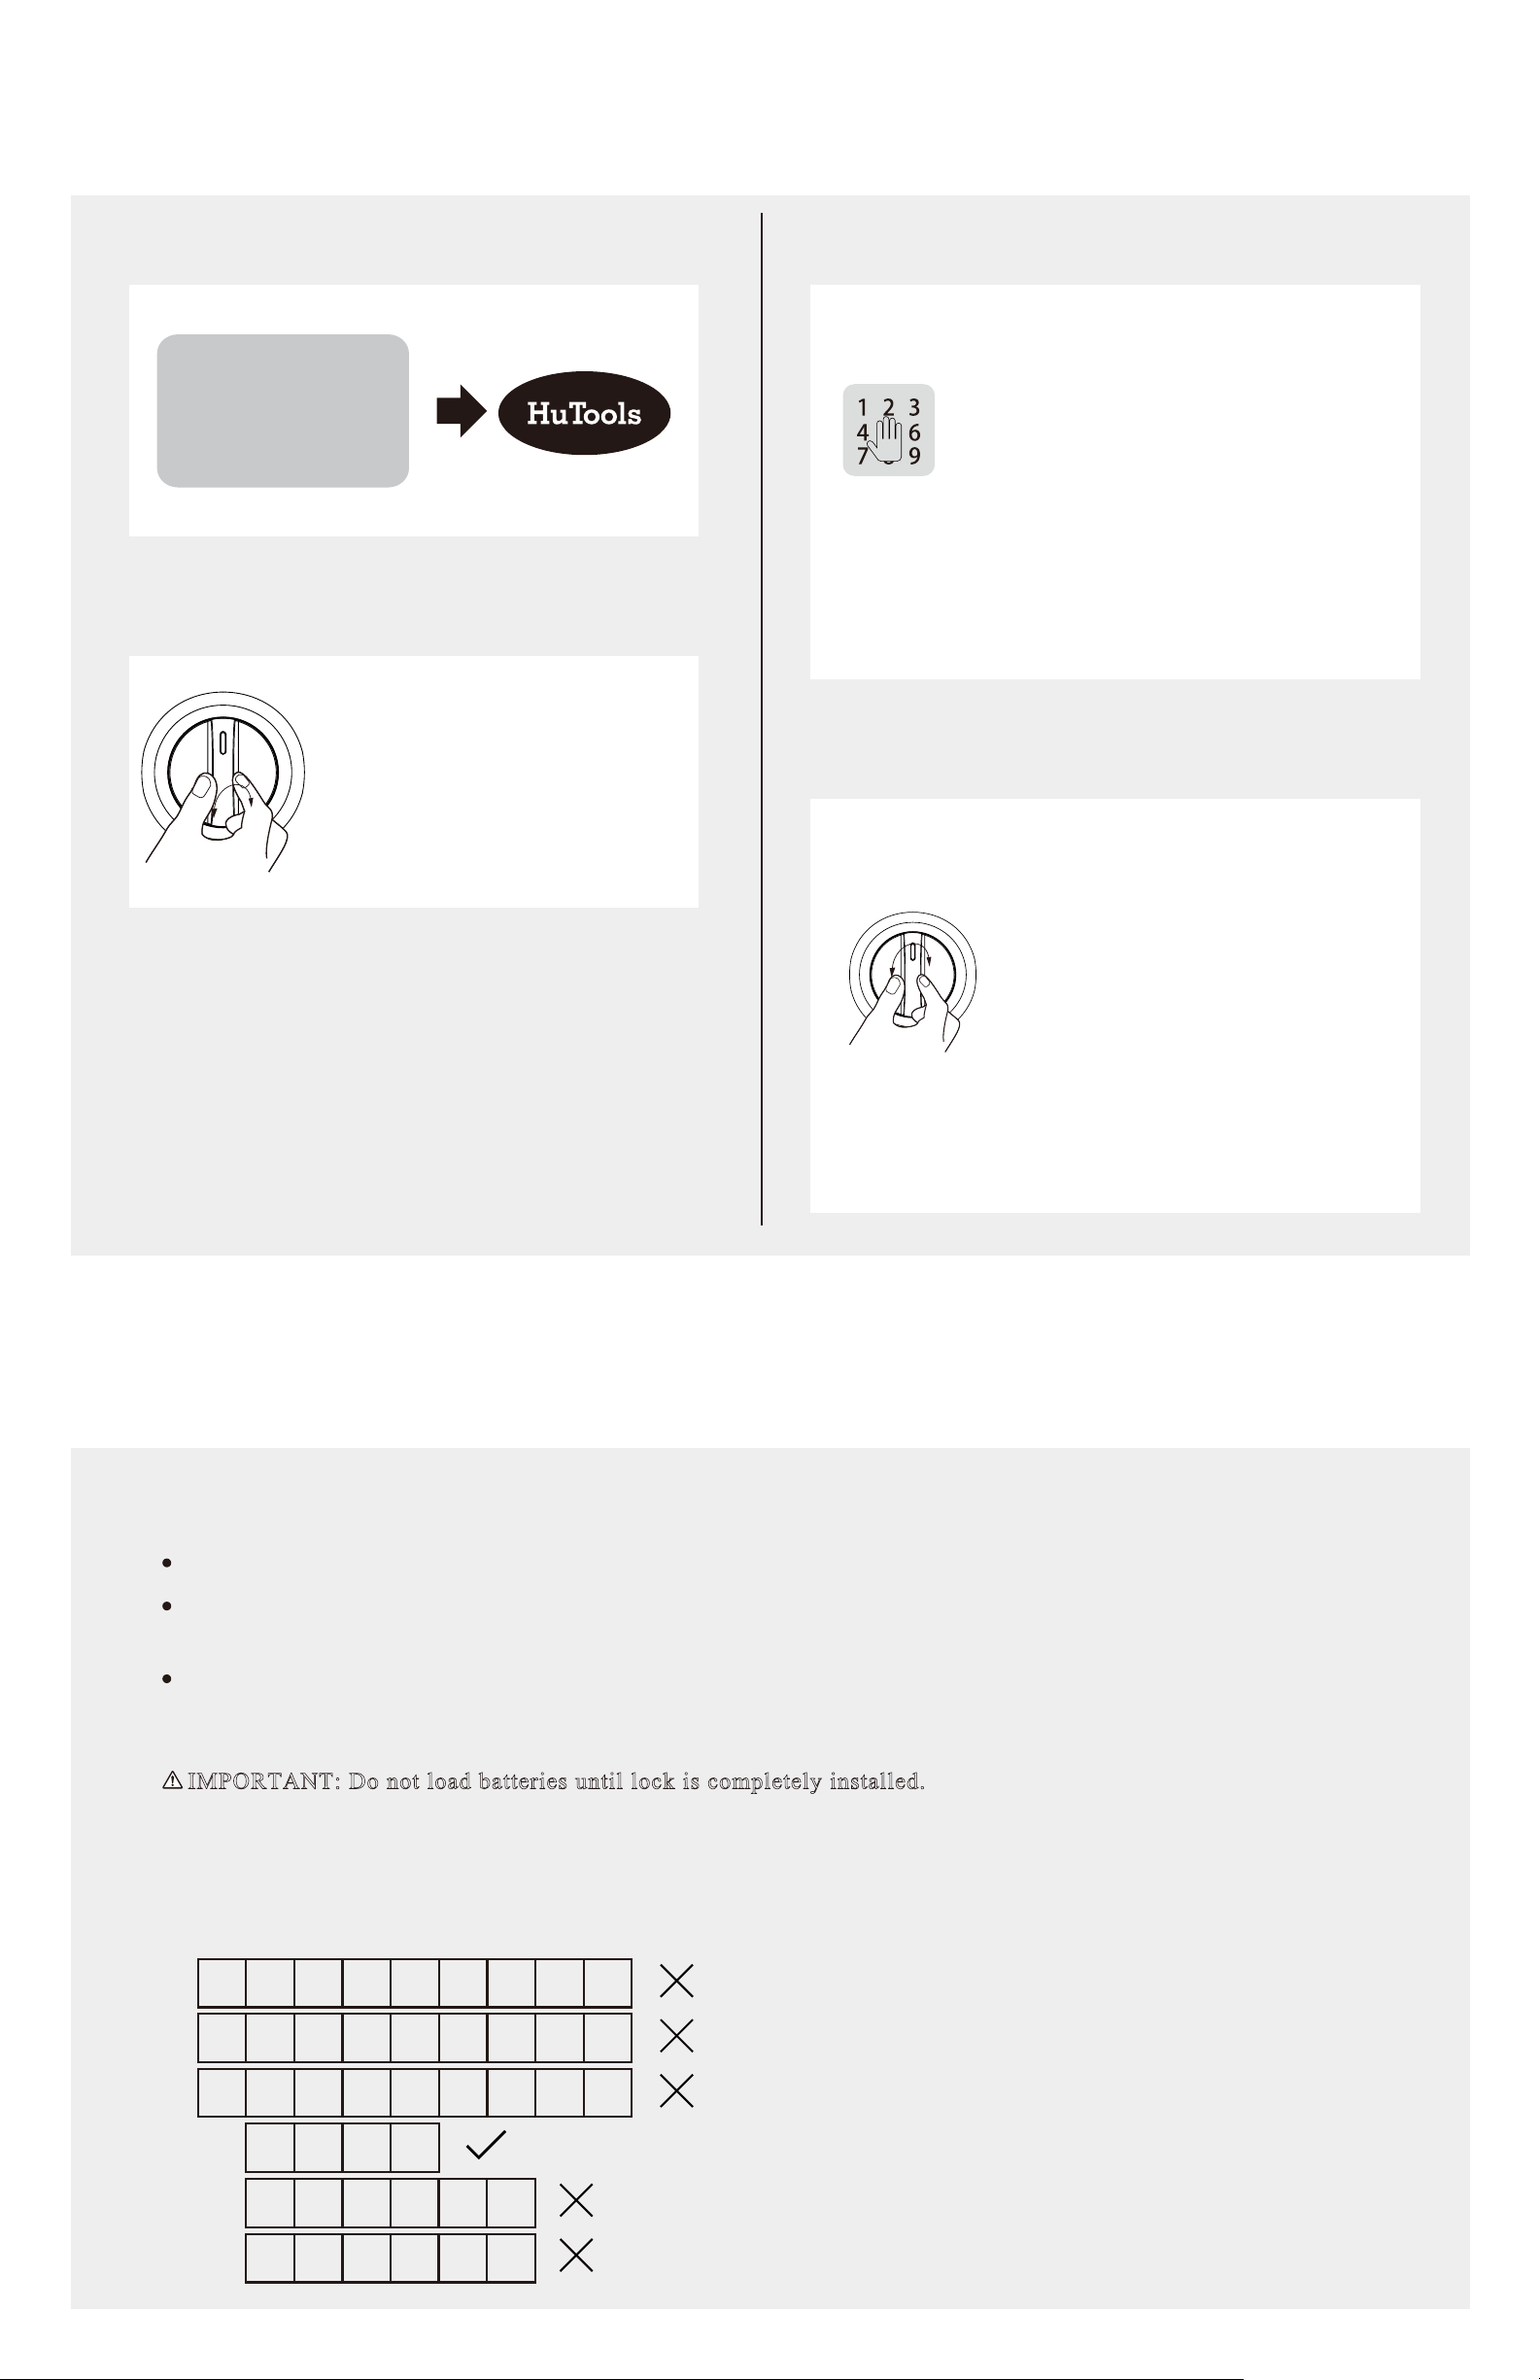
UNLOCK the door from outside LOCK the door from outside
Master/ User
code
Manual Mode
Press any key on keypad for 2 seconds.
Auto Re-lock Mode
In Auto re-lock mode, the bolt will
UNLOCK the door from inside
Rotate the thumb turn to
Unlock position.
extend out automatically in 30 seconds
after unlocking.
LOCK the door from inside
Manual Mode
Rotate the thumb turn to Lock position.
Auto Re-lock Mode
In Auto re-lock mode, the device
will be locked automatically.
Programming Instructions
Information & Safety Warnings
Protect your User Codes and Master Code.
Restrict access to your lock’s interior assembly and routinely check your settings to ensure they have not been altered
without your knowledge.
This lockset is designed to provide the highest standard of product quality and performance. Care should be taken to ensure
a long-lasting finish. When cleaning is required use a soft, damp cloth. Using lacquer thinner, caustic soaps, abrasive
cleaners or polishes could damage the coating and result in tarnishing.
IMPORTANT: Do not load batteries until lock is completely installed.
1. Master Code( 4 to 10 digits) : The default Master Code is 12345678. It is required that you change it to a code of your
own before programming.
2. User Code(4 to 10 digits) : A total of 20 User Codes (and one temporary one-time User Code) may be programmed.
3. Both master and user pin codes don not support the following combination of numbers.
A.
1 2 3 4 5 6 7 8 9
B.
C.
D.
If
Then
and
3865
38 1965
19 3865
123456789
222222222
Forward number sequence
Backward number sequence
Repeat number sequence
Contain existing code sequence
3 / 6
Page 5
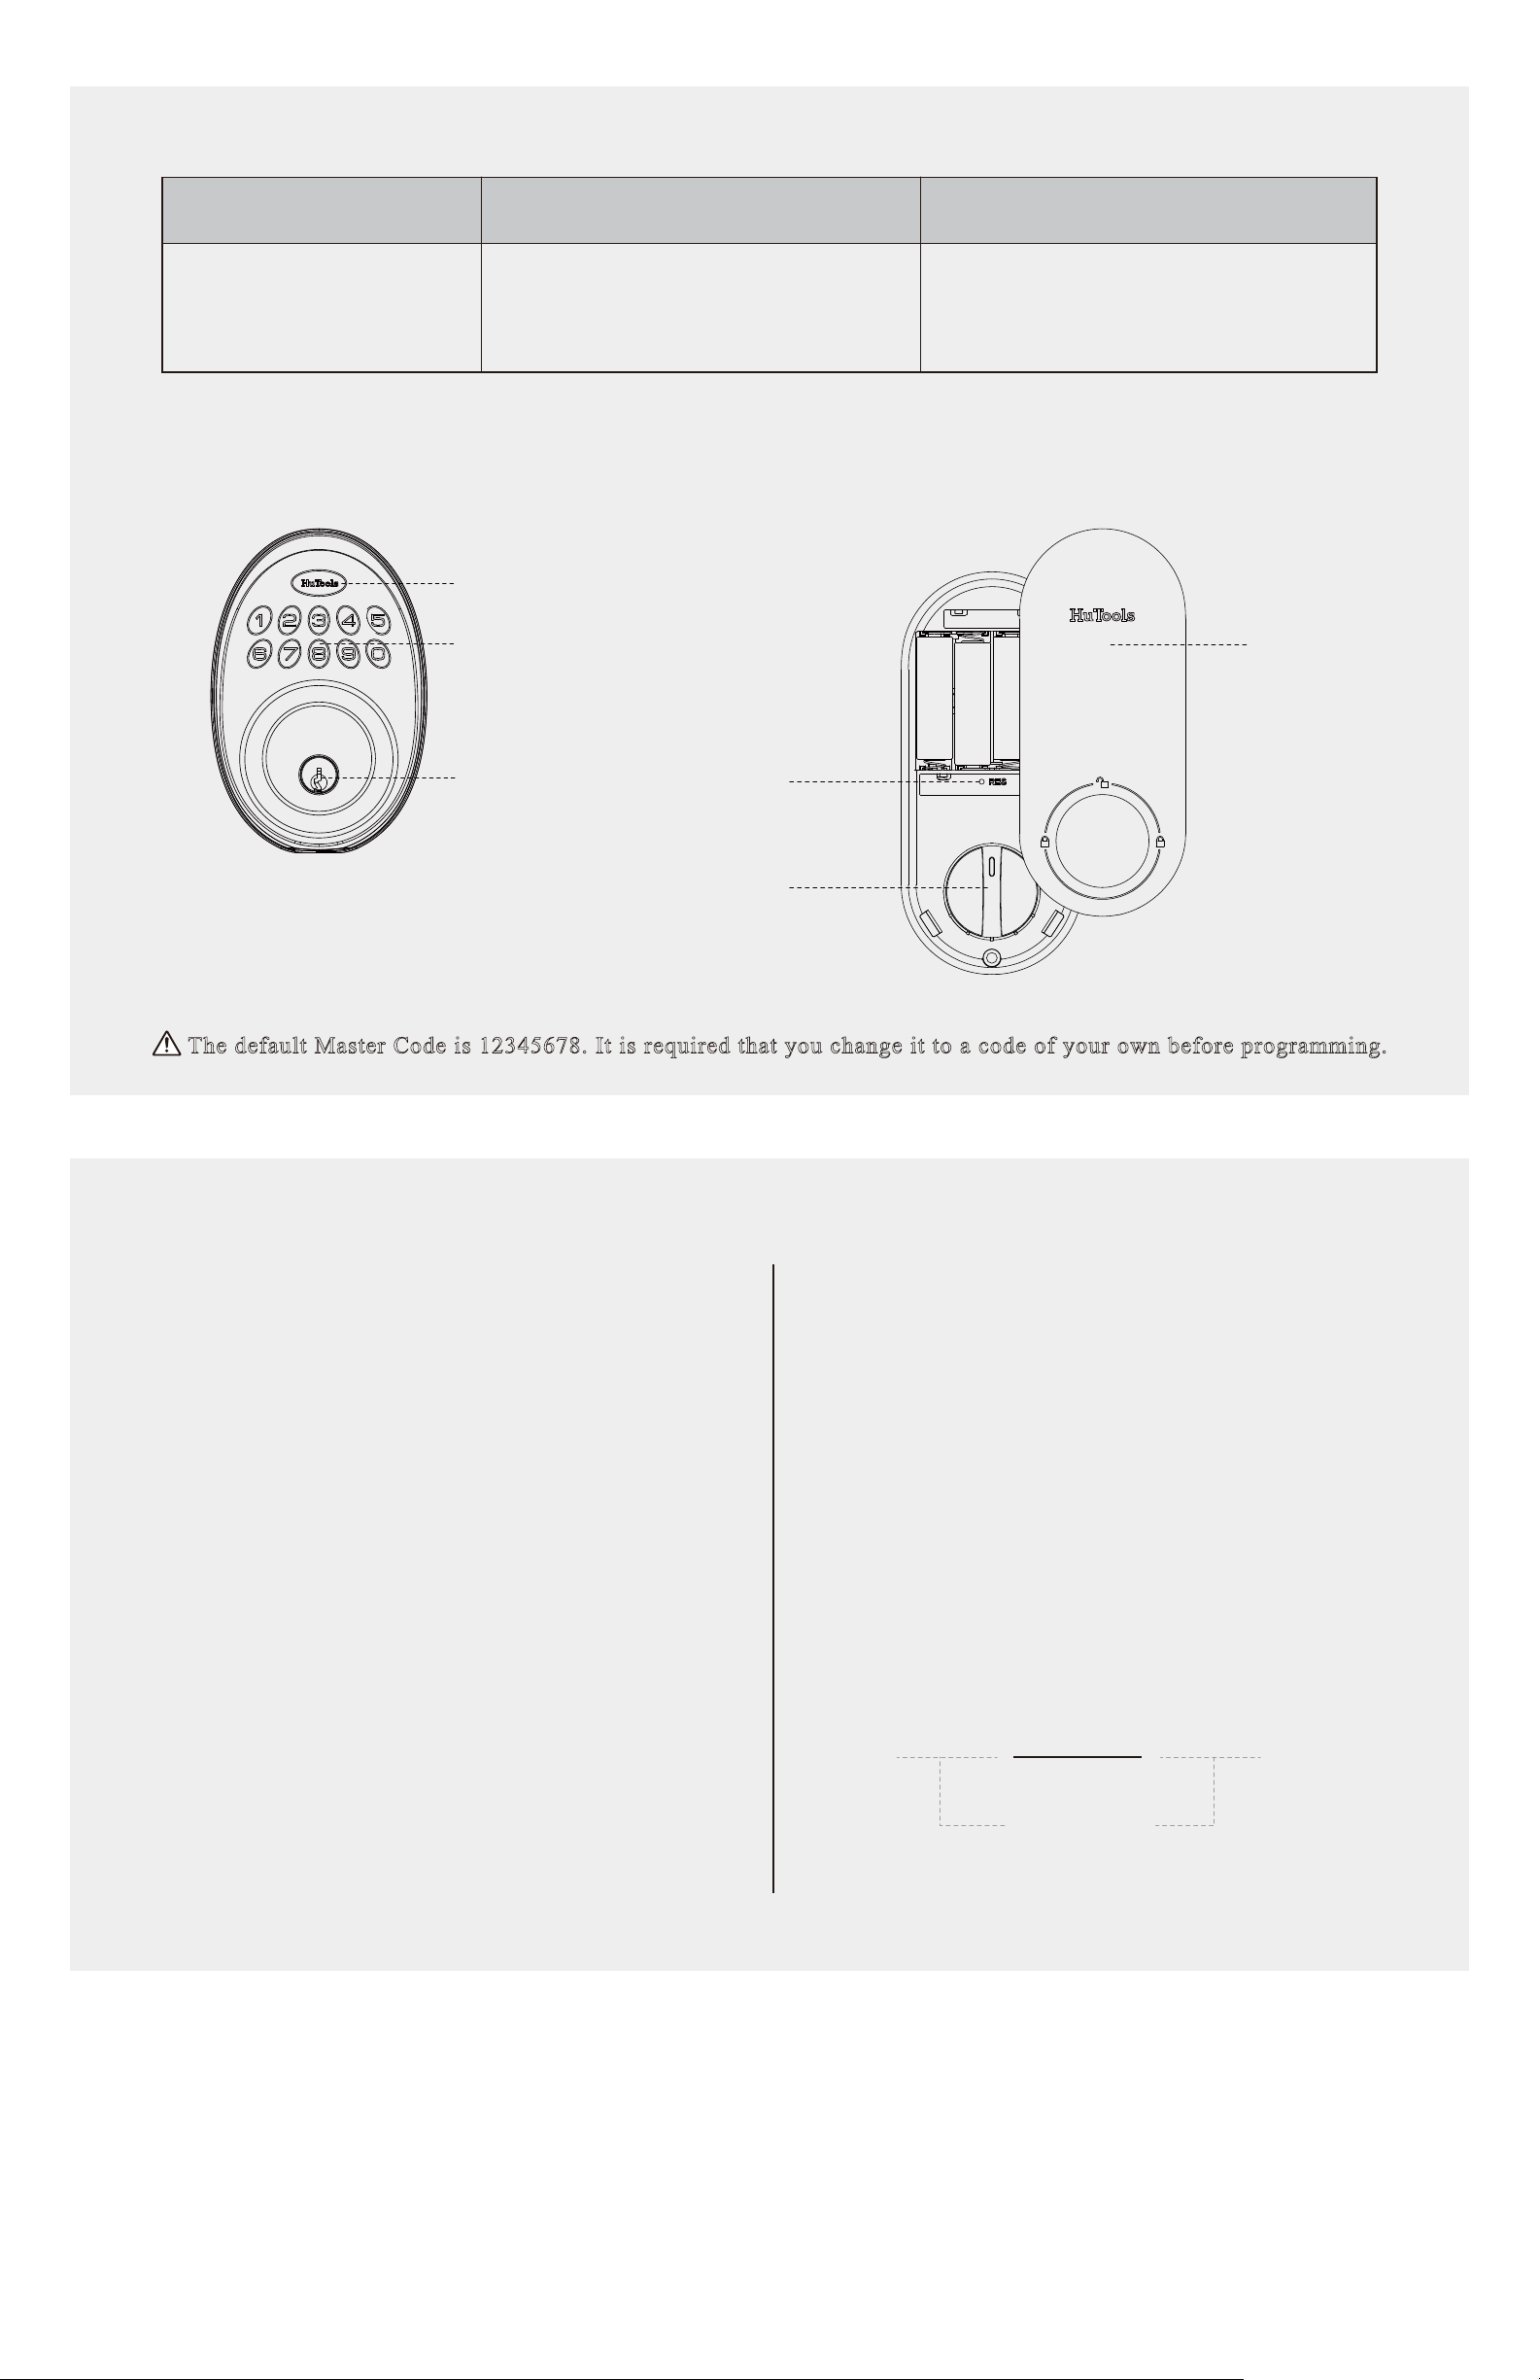
Parts Illustrations
Item Specifications Remarks
Battery
(Use new, non-rechargeable
Alkaline batteries only.)
Exterior Assembly
Multi-function
Button
Keypad
Cylinder
AA alkaline battery x4
(Operation voltage: 4.6~6.0V)
Reset Button
Last up to one year
(10 times open/close per day)
Interior Assembly
Battery Cover
Thumb Turn
The default Master Code is 12345678. It is required that you change it to a code of your own before programming.
Definitions
Master Code
Required for programming and feature settings. Master
code can be used to unlock the door under vacation
mode. The default master code needs to be changed
before programming.
Property owner/ manager should keep this information
confidential.
Vacation Mode
This is a security feature for you when you are leaving
your home for vacation or long trip. Enabling vacation
mode will restrict all user codes until master code is
entered on keypad. If the lock is unlocked by thumb
turn, the lock will sound an alarm.
Auto Lock
Automatically locks the deadbolt 30 seconds after
unlocking. This feature is off by default. You can set
the Auto Lock time delay between 10 and 99 seconds.
Wrong Entry Limit
After 10 unsuccessful attempts at entering a valid PIN
code, the unit will shut down for 3 minuets.
Silent Mode
The beep sounds when pressing keypad can be muted.
But you will still hear low battery and system alerts.
One Time User Code
This code can only be used once and is automatically
deleted when used.
Unlock with Fake code
User can prevent pin code exposure from strangers by
entering random digits before or after pin code.
83618 137192 14710
password
Random digits
4 / 6
Page 6
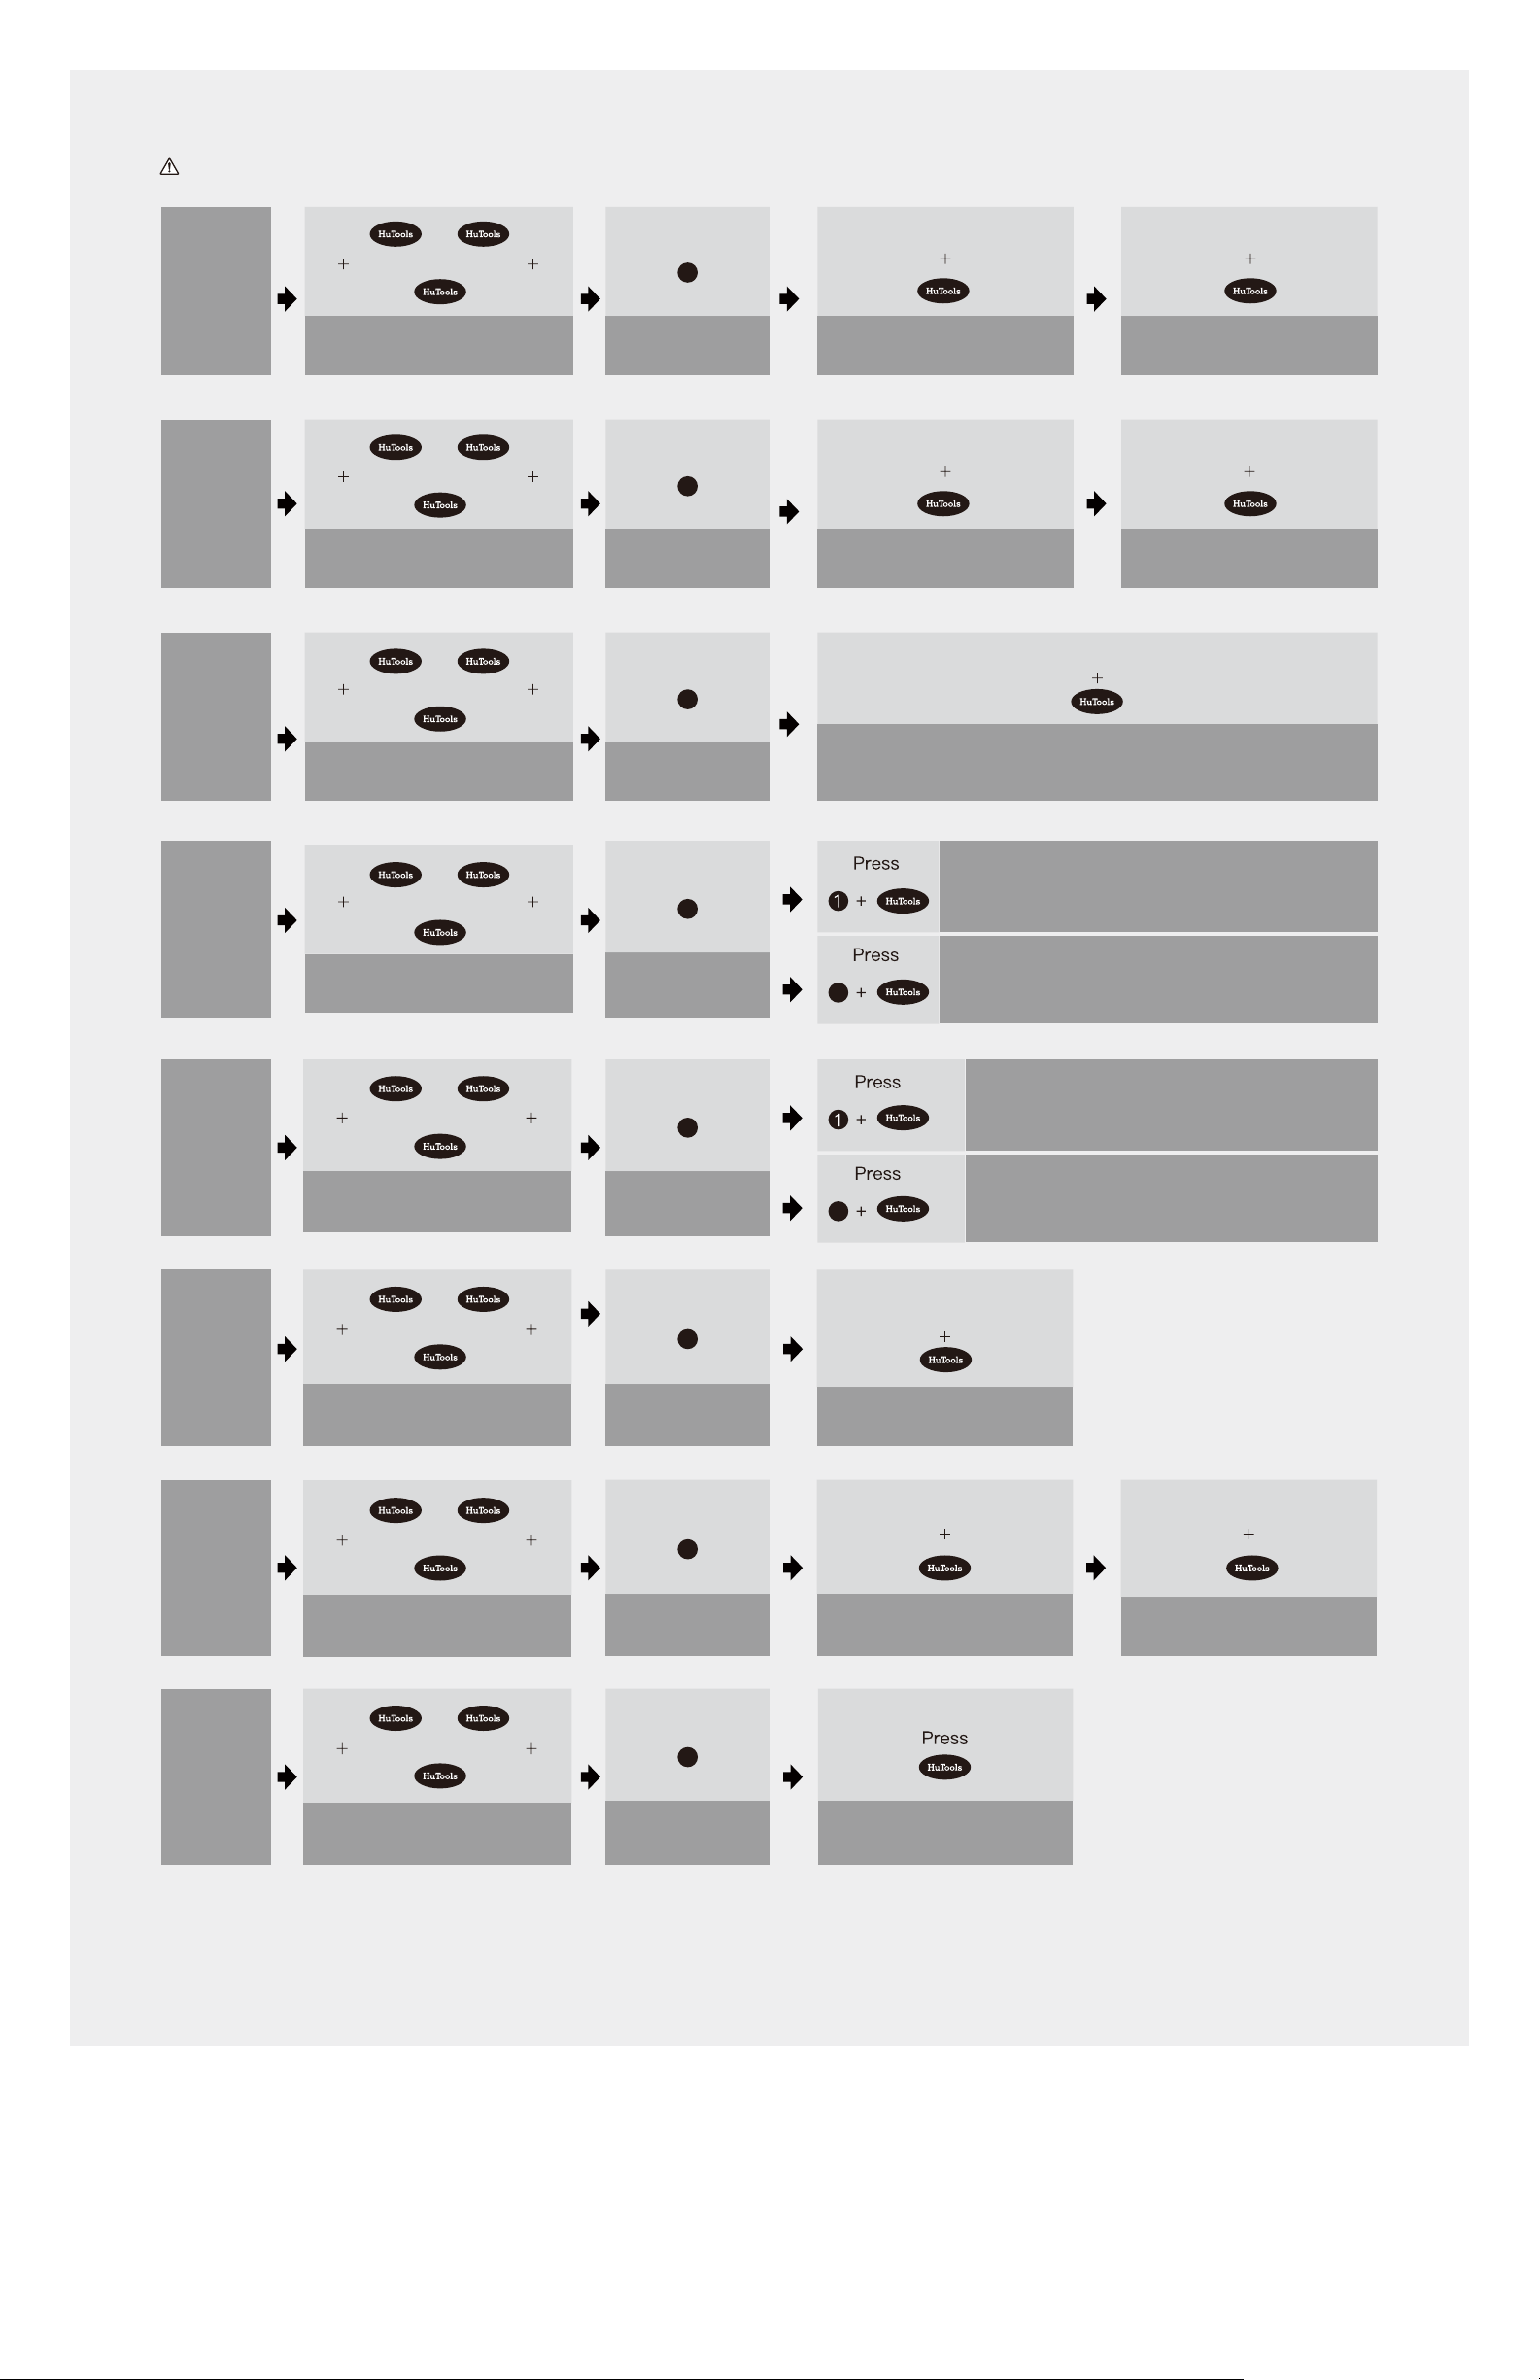
Quick Set Up
IMPORTANT: The default Master Code is 12345678. It is recommended that you change it to a code of your own.
Change
Master
Code
Add
User
Code
Delete
User
Code
Master Code
Wait for
Long Green Lights
Master Code
Wait for
Long Green Lights
Master Code
Wait for
Long Green Lights
Press
1
Wait for
Green Light Flash
Press
2
Wait for
Green Light Flash
Press
3
Wait for
Green Light Flash
New Master Code
Wait for
Green Light Flash
New User Code
Wait for
Green Light Flash
New Master Code
Succeed
Green Light Flash
New User Code
Succeed
Green Light Flash
Unwanted User Code
Succeed
Green Light Flash
Silent
Mode
Auto
Lock
Set
Auto
Lock
Time
Delay
Master Code
Wait for
Long Green Lights
Master Code
Wait for
Long Green Lights
Master Code
Wait for
Long Green Lights
Press
4
Wait for
Green Light Flash
Press
5
Wait for
Green Light Flash
Press
8
Wait for
Green Light Flash
2
2
Enter New Duration
Time (10-99)
Succeed
Green Light Flash
Silent Mode Disabled
Green Light Flash
Silent Mode Enabled
Green Light Flash
Auto Lock Enabled
Green Light Flash
Auto Lock Disabled
Green Light Flash
Add
One-Time
Master Code
Press
7
Code
Wait for
Long Green Lights
Master Code
Vacation
Wait for
Green Light Flash
Press
6
Mode
Wait for
Long Green Lights
Wait for
Green Light Flash
Notes:
When setting is unsuccessful, the indicator light will flash red.
New User Code New User Code
Wait for
Green Light Flash
Vacation Mode Enabled
Green Light Flash
Succeed
Green Light Flash
5 / 6
Page 7
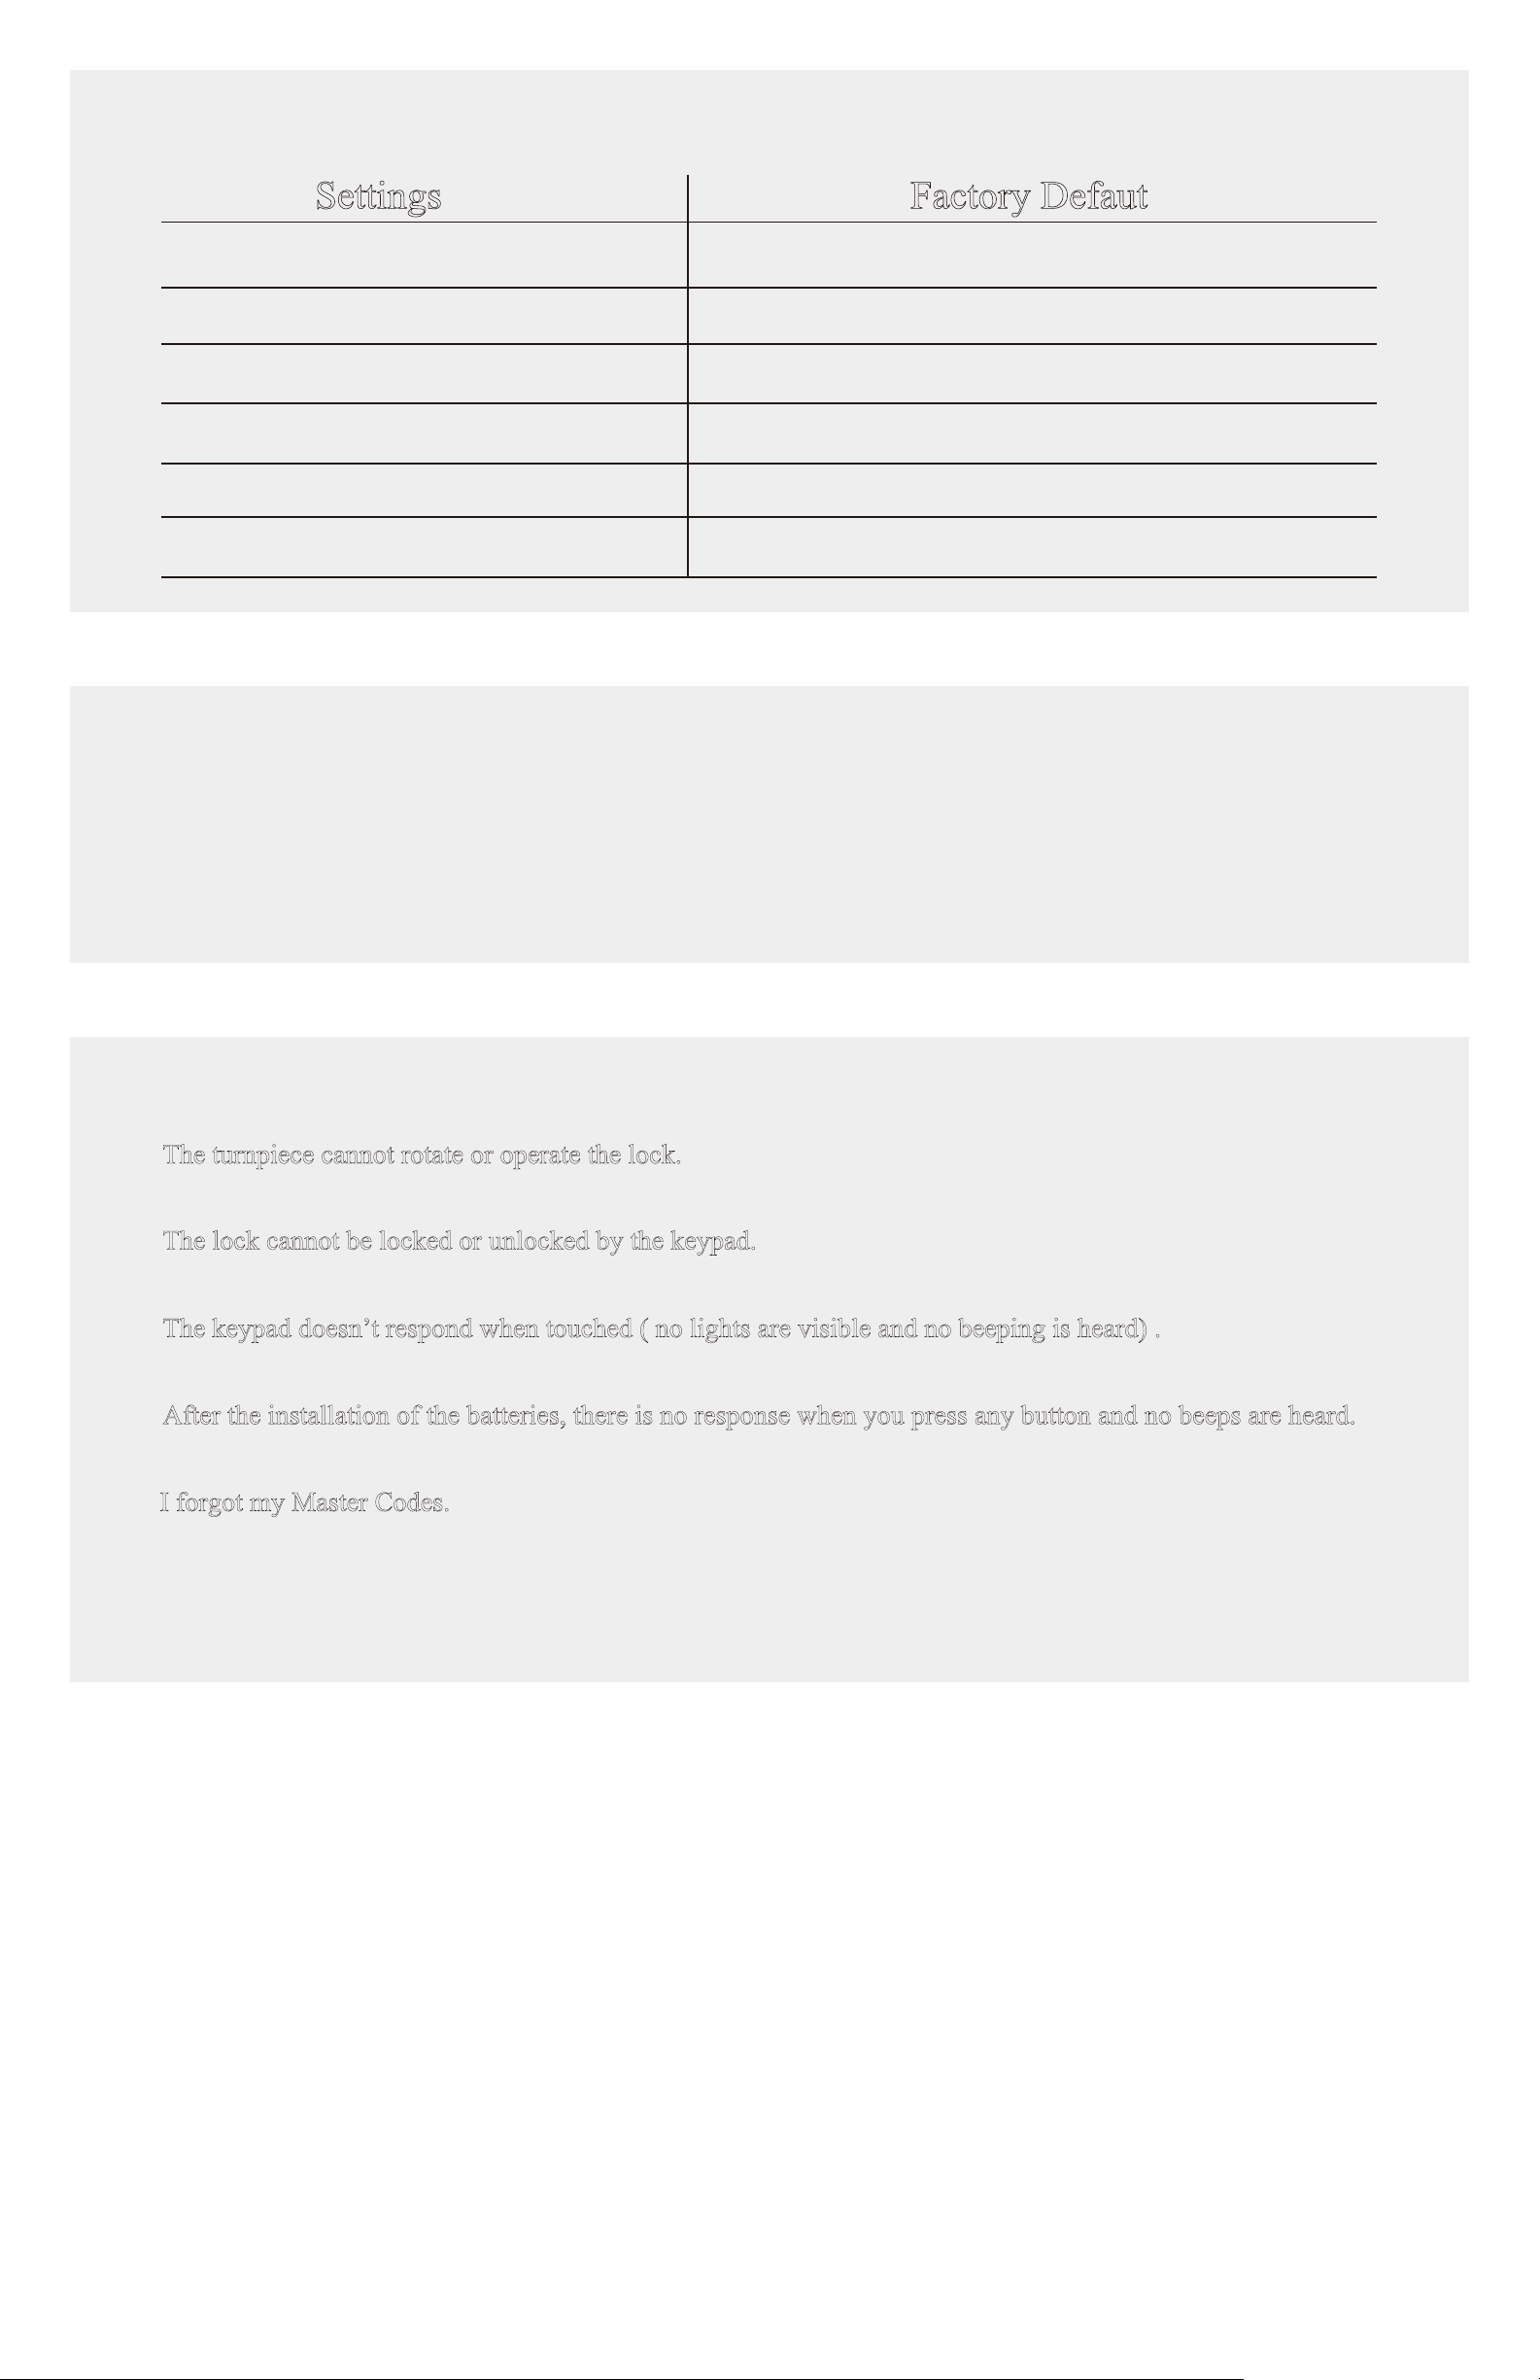
Factory Default Settings
Settings Factory Defaut
Master Code
Auto Lock
Silent Mode
Wrong Code Entry Limit
Shutdown Time
Vacation Mode
Restore To Factory Default Settings
This procedure will delete all User Codes associated with the lock.
1. Keep the door open and unlock.
12345678
Disabled
Disabled
10 times
3 mins
Disabled
2. Press and hold the Reset button, at the same time take out one battery and then place it back.
3. Keep holding the Reset button for 3 seconds, until you hear the sound of beep.
Troubleshooting
The turnpiece cannot rotate or operate the lock.
Remove and re-install the lock, making sure that the turnpiece is in vertical position.
The lock cannot be locked or unlocked by the keypad.
Make sure that the codes are not disabled. If needed, restore the lock’s default settings.
The keypad doesn’t respond when touched ( no lights are visible and no beeping is heard) .
Make sure the cables are properly connected, and make sure the batteries are new and installed correctly.
After the installation of the batteries, there is no response when you press any button and no beeps are heard.
Check the cable connection and the polarity of the batteries. Also make sure the batteries are not dead.
I forgot my Master Codes.
Perform a reset in order to erase all passcodes. Once the reset is complete, all passcodes will be erased and the Master code
will return to the default value ( 12345678) .
* If none of the above resolves your issue, check out our updated user manual by scanning the code below. You could also
contact Hutools customer service at [email protected].
6 / 6
 Loading...