

Page 1
January 2006
Ice Cream Dipping and Storage Chest
INSTALLATION & SERVICE
INSTRUCTIONS
FOR
HD – HS – HDF-8
First Call for help (US and Canada):
1-800-922-1919
Soporte Tècnico y Asistencia (Mèxico):
01-800-522-1900
For a Service Network Locator and other
Information visit us at
www.hussmann.com
select Worldwide Locations
HUSSMANN - GLOVERSVILLE
P/N OII – HD-HS-8HDF
January 2006
Page 2

TABLE OF CONTENTS
Page
Introduction 3
Inspection 3
Base, Exterior Shell, Interior Liner, Sub-top, Insulation and 3
Main Top
Condensing Unit Cabinet Dimensions, Electrical, and Capacity 4
Installation and Start Up 5
Temperature Control and Defrosting 5
Cleaning Condenser 6
Cleaning Exterior 6
Cleaning Interior 6
Trouble Shooting Chart 7 & 8
Lid Gasket Replacement 8 & 9
Main Top Heater Replacement 9
2
Page 3

INTRODUCTION –
The HS and HD models have been
designed to giv e maximum performance
with minimum energy consumption. They
have the versatility in product temperature
range to be used for storage at sub zero to
dipping at desired above zero temperatures. All cabinets are UL and UL sanitation li sted.
INSPECTION
–
Upon receipt of the cabinet, c arefully ex amine the crating for damage. If
damage is found make a note on the delivery ticket before signing. Carefully remove
shipping crate and examine cabinet for
“concealed” damage. If damage is found
contact the delivering carrier immediately
and have his agent prepare an inspection
report for the purpose of filing a claim
THIS IS YOUR RESPO NSI BILIT Y.
SPECIFICATIONS
–
BASE
–
The cabinet base is an all welded assembly of very he avy g auge steel to establish a strong foundation on which the rest
of the cabinet is built.
EXTERIOR SHELL
–
The shell is formed from heavy
gauge steel and is welded together as an assembly and then welded to the cabinet base
assembly to give complete strength and durability. This assembly is processed
through a chemical treatment and painted
with an enamel powder paint for a lasting
finish.
INTERI OR LINER
–
The li ner is an all welded steel ass embly. Copper evaporator tubing is fastened
to the exterior of the liner; and maximum
heat transfer is further enhanced with the
addition of a conductive material on both
top and bottom of the tubing. The liner is
also chemical treated and painted with an
enamel powder paint for a lasting finish.
SUB-TOP
–
The sub-top is an all welded heavy
gauge galvanized assembly with integral
molded plastic breakers. The sub top ties
the shell and liner assemblies together and
s erves as a back up for the main top to prevent denting.
INSULATION
–
The shell, liner and sub top assemblies are foamed in place with a polyurethane insulation providing outstanding insulating qualities and solid unitized construction.
MAINTOP
–
The main top is a one piece design of
heavy gauge 18-8 rust proof stainless steel.
It has a brush satin finish to minimize
scratching and maintain a lasting clean appearance.
3
Page 4

CONDENSING UNIT –
All models incorporate a slide-out
condensing unit for easy access to all components. All have a bare tube condenser
design to minimize field maintenance.
CABINET DIMENSIONS, ELECTRICAL DATA, CABINET CAPACITIES
OUTSIDE INSIDE
Cabinet Length Width He ight Length Width Height
Overall Deep End
2-HS 30 1/2 19 7/16 32 1/2 26 3/8 15 5/16 25 5/8
4-HD 30 1/2 30 1/2 32 1/2 26 3/8 26 3/8 25 5/8
6-HD 43 30 1/2 32 1/2 38 7/8 26 3/8 25 5/8
8-HD 54 1/16 30 1/2 32 1/2 49 15/16 26 3/8 25 5/8
10-HD 66 9/16 30 1/2 32 1/2 6 2 7/16 26 3/8 25 5/8
8-HDF 54 1/16 30 1/2 3 2 1/2* 49 15/16 26 3/8 25 5/8
* Add 8” to top for syrup rail
ELECTRICAL CAPACITY
Volts Run Breaker Ship Cubic 2 1/2 3 # of
Amps Size Wt. Feet gal. gal. Lids
115 3.4 15 amp 188 4.5 4 4 1-S
115 3.5 15 amp 238 7.8 13 8 1-D
115 6.0 15 amp 307 12.7 21 14 1-S, 1-D
115 7.8 15 amp 355 17.0 33 21 2-D
115 7.6 15 amp 419 21.9 41 29 2-D, 1-S
115 7.8 15 amp 386 17.0 33 21 2-S
D=Double Lids S=Single Lids
The step end of each HD is the same height and length with both being 13 3/4.
Check the unit serial plate location in the condensing unit compartment for the type of
refrigerant used. The charges are listed below for the respective refrigerants.
R-12 R404A
HS-2 15 13
HD-4 16 14
HD-6 17 16
HD-8/ HDF-8 16 16
HD-10 23 23
4
Page 5
INSTALLATION and START UP
LEV EL I NG
–
Lev el case front to back and end to
end, shimming where necessary upon installation to assure proper operation of
drains and refrigeration systems.
PLUMBING
–
To simplify cleaning and for sanitary purposes, we s uggest that a connection be made from the cabinet drain tube
to a floor drain. A h ose fitti ng is supplied
for that purpose.
The HS and HD models are
equipped with three wire grounded service
cords . For your own protection, connection mus t be made to a 115 volt grounded
receptacle and a power supply with a fifteen ampere rating minimum.
The cabinets are designed to operate on 115 volts, s ingle phase, 60 cycle current. A separate circuit is recommended to
prevent product l oss due to overloading or
malfunction of other equipment on the
same circuit. Use a 15 amp time delay
fuse. The supply circuit must conform to
National and local electric al codes.
A wiring diagram is provided on
the condenser shroud for case refrigeration.
VO LTAG E, AS ME ASURED AT
THE COMPRESSOR TERMINAL DURING OP ERATION, MUST NOT VARY
MORE THAN 5% FROM CABINET SERIAL PLATE RA TING.
NOTE: DO NOT DRILL ANY HOLES IN
SIDE OF CABINET WITHOUT FIRST
GETTING INSTRUCTIONS FROM FACTORY SERVICE DEPARTMENT.
A space of 4 inches must be left open
at the front and back of the cabinet to insure proper air flow over the condensing
unit.
Cabinets should not be installed in
direct sunlight or near/under heat ducts for
proper operation.
********* IMPORTANT ***********
Cabinet should be started and allowed to cool down to n ormal operating
temperature before loading any products .
OPERATION and NORMAL
MAINTENANCE
TEMPERATURE CONTROL
–
The temperature control which
s enses the cold wall temperature, and is located behind the removable louvered grille
at the s ide of the case, is factory s et at the
3:00 o’clock position. Adjustment of the
contr ol is done by turning the knob clockwise for colder temperatures and counterclockwise for warmer temperatures.
DEFROSTING
–
Defrosting is accomplished manually by scraping frost from areas where it
has collected on cabinet interior. Remove
excess ice and water. After washing and
drying thoroughly reconnect power supply.
5
Page 6

CONDENSING UNIT –
The condens ing unit is mounted on
a slide-out base, acce ssible by removing the
access panel. The condenser is of the baretube des ign. The condenser fan motor
draws air through the condenser and
passes over the condenser for its cooling
and it is expelled out the back of the unit
compartment.
CLEANING CONDENSER
–
The bare-tube conde nser is designed
to require minimum maintenance. However, to keep the unit at top efficiency,
check periodically, and remove any accumulated dust and debris.
To clean condenser, a soft, nylon
brus h should be used to loosen dirt and
lint. Then vacuum up the dirt or blow condenser out with a high pressure gas such as
nitrogen. Never use a wire brush to clean
condens er tubes.
CLEANING EXTERIOR
–
When cleaning the exterior of the
cabinet use a soft cloth or sponge with water and a mild detergent. Rinse and wipe
dry.
CLEANING INT ERIOR
–
F or cleaning the interior of the liner
storage area, a flush out drain has been
provided with a standard hose fitting loca ted in the front o f the c abinet in the bas e
area.
Disc onnect the electrical power cord
and wash using a soft cloth or sponge and
a mild detergent. DO NOT USE AN
ABRASIVE CLEANER OR S TEEL
WOOL – THESE WILL MAR THE FINISH.
Wipe dry before restarting the cabinet. Allow the cabinet to cool down to
proper temperature before reloading product.
PRESSURE CONTROL
–
The 10-HD with R-4 04A utilizes a
high pressure control as a safety device to
ensure the system is not subjected to excessive press ures. It trips out the compressor
at approx. 440 psi. and has an automatic
res et to res tart at 350 ps i .
High pressures normally result
from high ambient conditions and / or
dirty condensers. Correct such application
problems as soon as poss ible.
6
Page 7

TROUBLE SHOOTING CHART
TROUBLE PROBABLE CAUSE SOLUTION
Compressor will not start, no
noise
1. Power disconnected 1. Check service cord for
proper connection
2. Blown fuse or breaker 2. Replace fuse or reset
breaker
3. Defective or broken
3. Repair or replace
wiring
4. Defective overload 4. Replace
5. Defective temperature 5. Replace
Compressor will not cuts out
on overload
1. Low voltage 1. Correct see serial plate for
proper electrical
requirements.
2. Defective compressor 2. Replace
3. Defective relay 3. Replace
4. Restriction pinched cap
4. Repair or replace
tube
5. Restriction moisture 5. Leak check replace drier
evacuate and recharge
6. Inadequate air over
condenser
6. Move cabinet so it has 4”
front and back of unit
compartment opening
7. Defective condenser fan
7. Replace
motor
High head pressure 1. Cabinet location too
warm
2. Defective condenser fan
1. Relocate cabinet remove
air flow restriction
2. Replace
motor
3. Air or non condensable
gases in system
3. Leak check-change drier,
evacuate and recharge
7
Page 8

Warm storage temperatures 1. Temperature control not
set properly
1. Reset control
2. Short of refrigerant 2. Leak check - change
drier, evacuate and recharge
3. Cabinet location too warm 3. Relocate cabinet
4. Too much refrigerant 4. Change drier evacuate and
recharge
5. Low voltage, compressor
5. Check voltage supply
cycling on overload
Compressor runs
1. Defective control 1. Replace
continuously – product too
cold
2. Control feeler tube not
installed in well
2. Push control feeler tube
into well
3. Short on refrigerant 3. Leak check change drier
and recharge
Compressor runs
continuously – product too
1. Short on refrigerant 1. Leak check – change
dryers evacuate and recharge
warm
2. Inefficient compressor 2. Replace
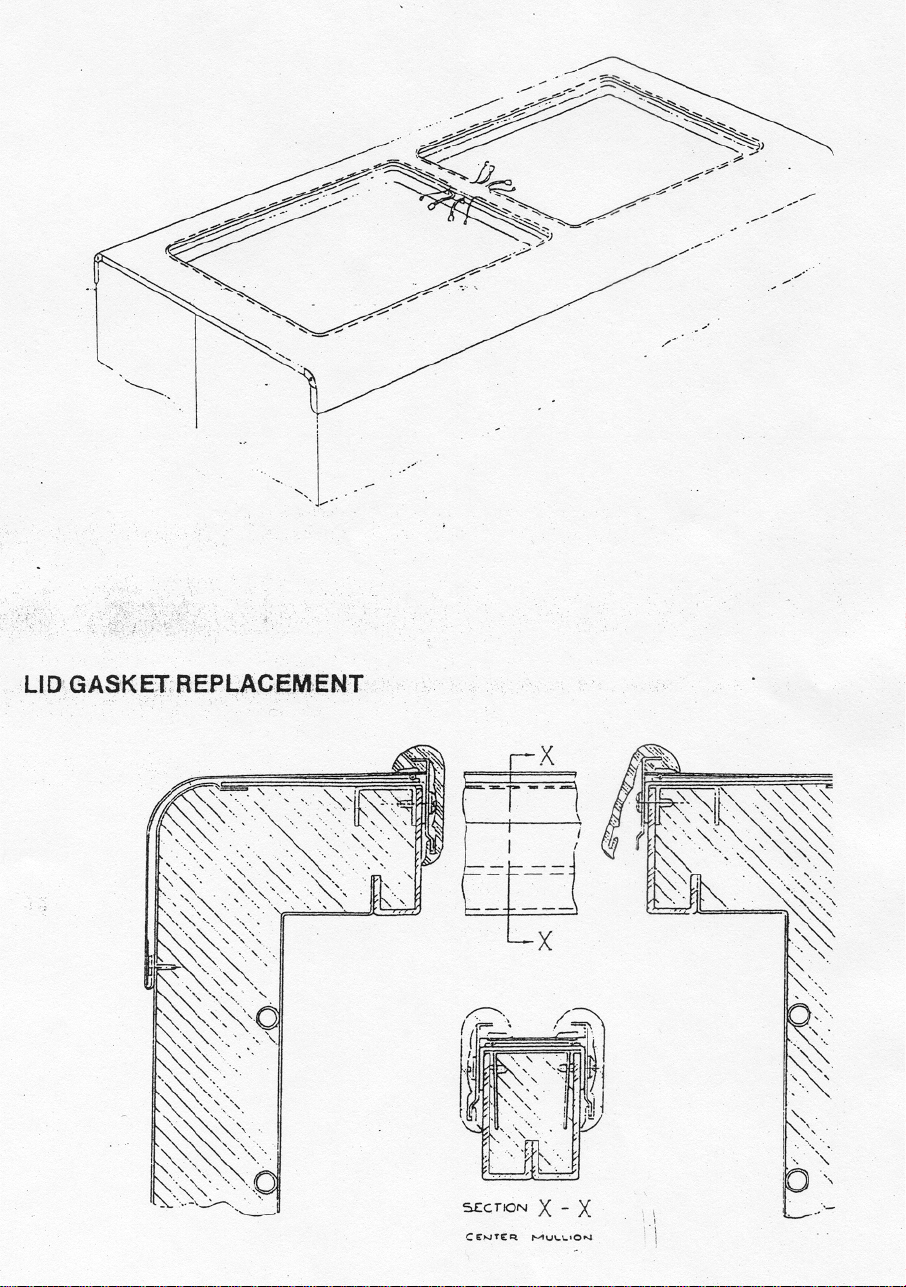
LID GASKET REPLACEMENT
–
Remove lids
Grasp the bottom of the gasket with the fingers and pull outward
Work the bottom of gasket from the retainer all around the perimeter openings.
Lift up the gasket and remove the phillips head screws holding the retainer in place. Note :
Mark retainer location so when reinstalling the screws, the screw holes will line up.
Lift gasket and retainer from opening and remove gasket.
8
Page 9

.
Install gasket on retainer and insert in opening.
Putting downward pressure on gasket-retainer. Reinstall phillips head screws
Stretch gasket downward and install gasket bottom flange over retainer flange.
HOW TO REPLACE HEATERS
–
Disconnect power to cabinet, remove collar as shown.
Lift off collar and retainer, being careful not to put stress on the heater connections.
Remove old heater from slot and carefully remove leads from cavity and disconnect.
Remove old heater from slot with leads aligned with connector cavity.
Connect heater leads and push excess leads into cavity. Avoid bending of heater and
connections other than required for installation. Replace retainer and collar on
cabinet.
Install screws through retainer into cabinet.
Pull rubber collar down over bottom edge of collar retainer, being certain retainer is in
collar groove.
Re-connect cabinet power.
SEE THE DIAGRAMS ON THE FOLLOWING PAGE FOR MORE REFERENCE
9
Page 10
Page 11

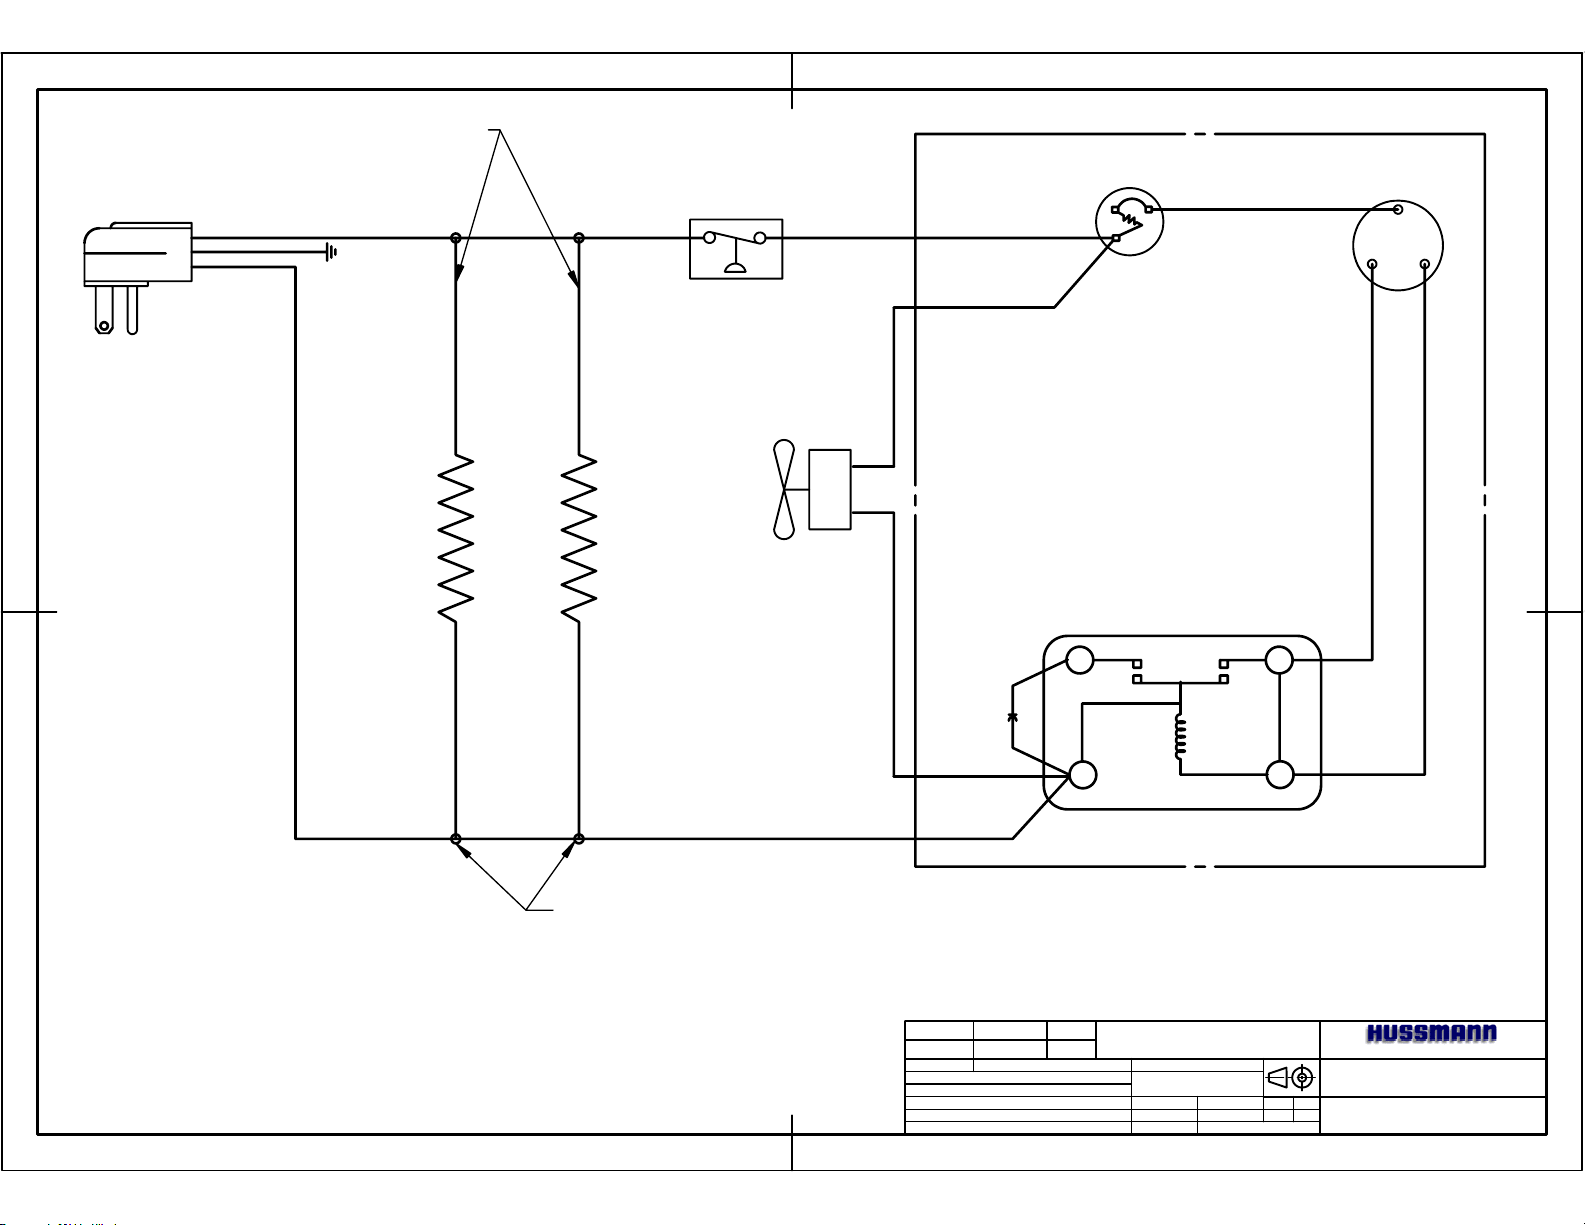
BLK
WHT
GRN
HEATER
CONNECTOR
WIRES
TEMP.
CONTROL
HIGH
PRESSURE
CONTROL
OVERLOAD
COMPRESSOR
MOTOR
C
R
S
POWER CORD
115V
60 HZ
1 PH
RED
RED
ORN
GRAY
RELAY
COND.
FAN
1
START
CAP.
S
ANTI-SWEAT HEATERS
ORN
GRAY
2
M
COMPRESSOR
TAP CONNECTORS
HD-10, R-404A
REV.
XX/XX/XX
DATE
XXX
BY
XXXX
E.C.N.
MATERIAL:
XXXXXX-XX
SIZE
XXXXXXXXXX
DIE NO.
XXXX-XXXX
SHEET
SIZE
B
TOLERANCES UNLESS
OTHERWISE SPECIFIED.
FINISH
1/32"
0.031"
1ü
1/64"
XXXXXXXXXX
FRACTIONAL
DECIMAL
ANGULAR
HOLE LOCATION
& SPACING
SCALE:
TITLE
TYPE
CODE
WIRING DIAGRAM
DRAWN
JWL
DATE
CHECKED
12/19/95
XXX
E
Gloversville, N.Y. 12078
DWG. NUMBER
M100-2020
R
REV.
X
Page 12

POWER CORD
115V
60 HZ
1 PH
BLK
WHT
GRN
HEATER
CONNECTOR
WIRES
RED
ANTI-SWEAT HEATERS
RED
ORN
ORN
TEMP. CONTROL
COND.
FAN
START
CAP.
COMPRESSOR
OVERLOAD
MOTOR
C
R
S
RELAY
1
2
S
M
TAP CONNECTORS
XX/XX/XX
REV.
DATE
XXX
BY
XXXX
E.C.N.
MATERIAL:
XXXXXX-XX
SIZE
XXXXXXXXXX
DIE NO.
XXXX-XXXX
SHEET
SIZE
B
TOLERANCES UNLESS
OTHERWISE SPECIFIED.
FINISH
1/32"
0.031"
1ü
1/64"
XXXXXXXXXX
FRACTIONAL
DECIMAL
ANGULAR
HOLE LOCATION
& SPACING
SCALE:
HD-6, R-404A
TITLE
TYPE
CODE
WIRING DIAGRAM
DRAWN
DATE
E
CHECKED
JWL
12/19/95
XXX
COMPRESSOR
Gloversville, N.Y. 12078
DWG. NUMBER
M100-2018
R
REV.
X
Page 13

POWER CORD
115V
60 Hz
1 PH
BLK
WHT
GRN
TEMP. CONTROL
OVERLOAD
RELAY
COMPRESSOR
MOTOR
C
R
S
COND.
FAN
START
CAP.
REV EO # REV DATE REV BY
-
APPROVED BY
-
-
-
-
-
-
1
2
--
S
M
HS-2, HD-4, R-404A
TOLERANCES UNLESS OTHERWISE SPECIFIED: FRACTIONAL 1/32"
DECIMAL 0.031" ANGULAR 1° HOLE LOCATION & SPACING 1/64"
EO NUMBER
DRAWN BY:
DATE DRAWN :
APPROVED BY:
-
JWL
SCALE
INCHES
SHEET #
12/19/95
-
1 OF 1
COMPRESSOR
GLOVERSVILLE, NY 12078
WIRING DIAGRAM
M100-2017
Page 14
BLK
WHT
GRND
HEATER
CONNECTOR
WIRES
TEMP.
CONTROL
OVERLOAD
COMPRESSOR
MOTOR
C
SR
POWER CORD
115V
60 Hz
1 PH
BLK
BLK
WHT
ANT-SWEAT HEATERS
WHT
TAP CONNECTORS
COND
FAN
START
CAP.
RELAY
1 S
2
N
COMPRESSOR
REV EO # REV DATE REV BY
-
APPROVED BY
-
-
-
-
-
--
-
HD-8, HDF-8 (R-404A)
TOLERANCES UNLESS OTHERWISE SPECIFIED: FRACTIONAL 1/32"
DECIMAL 0.031" ANGULAR 1° HOLE LOCATION & SPACING 1/64"
EO NUMBER
DRAWN BY:
DATE DRAWN :
APPROVED BY:
-
JWL
SCALE
INCHES
SHEET #
12/19/95
-
1 OF 1
GLOVERSVILLE, NY 12078
WIRING DIAGRAM
M100-2019
 Loading...