

Husqvarna-Viking 670 User Manual
User’s Guide
KEEPING THE WORLD SEWING™

This household sewing machine is designed to comply with IEC/EN 60335-2-28 and UL1594
IMPORTANT SAFETY INSTRUCTIONS
When using an electrical appliance, basic safety precautions should always be followed, including the following:
Read all instructions before using this household sewing machine.
DANGER – To reduce the risk of electric shock:
• A sewing machine should never be left unattended when plugged in. Always unplug this sewing machine
from the electric outlet immediately after using and before cleaning.
• Always unplug before relamping.
WARNING – To reduce the risk of burns,
fi re, electric shock, or injury to person:
• This sewing machine is not intended for use by persons (including children) with reduced physical, sensory or
mental capabilities, or lack of experience and knowledge, unless they have been given supervision or instruction
concerning use of the sewing machine by a person responsible for their safety.
• Children should be supervised to ensure that they do not play with the sewing machine.
• Use this sewing machine only for its intended use as described in this manual. Use only attachments
recommended by the manufacturer as contained in this manual.
• Never operate this sewing machine if it has a damaged cord or plug, if it is not working properly, if it has
been dropped or damaged, or dropped into water. Return the sewing machine to the nearest authorized
dealer or service center for examination, repair, electrical or mechanical adjustment.
• Never operate the sewing machine with any air openings blocked. Keep ventilation openings of the
sewing machine and foot controller free from the accumulation of lint, dust, and loose cloth.
• Keep fi ngers away from all moving parts. Special care is required around the sewing machine needle.
• Always use the proper needle plate. The wrong plate can cause the needle to break.
• Do not use bent needles.
• Do not pull or push fabric while stitching. It may defl ect the needle causing it to break.
• Wear safety glasses.
• Switch the sewing machine off (“0”) when making any adjustment in the needle area, such as threading
needle, changing needle, threading bobbin, or changing presser foot, etc.
• Always unplug sewing machine from the electrical outlet when removing covers, lubricating, or when
making any other user servicing adjustments mentioned in the instruction manual.
• Never drop or insert any object into any opening.
• Do not use outdoors.
• Do not operate where aerosol (spray) products are being used or where oxygen is being administrated.
• To disconnect, turn all controls to the off (“0”) position, then remove plug from outlet.
• Do not unplug by pulling on cord. To unplug, grasp the plug, not the cord.
• This sewing machine is provided with double insulation. Use only identical replacement parts.
See instructions for Servicing of Double-Insulated Appliances.
SAVE THESE INSTRUCTIONS
SERVICING OF DOUBLE INSULATED PRODUCTS
In a double-insulated product, two systems of insulation are provided instead of grounding. No ground means is
provided on a double-insulated product, nor should a means for grounding be added to the product. Servicing of a
double-insulated product requires extreme care and knowledge of the system and should be done only by qualifi ed
service personnel. Replacement parts for a double-insulated product must be identical to those parts in the product.
A double-insulated product is marked with the words ‘DOUBLE INSULATION’ or ‘DOUBLE INSULATED’.

CONTENTS
Machine overview ...................................................................4
Included accessories ...............................................................5
Stitch table – Utility Stitches .................................................6
Stitch Overview .......................................................................8
Fonts .........................................................................................8
Getting Ready to Sew 9
Unpacking ..............................................................................10
Packing away after sewing ....................................................10
Accessory tray ........................................................................10
Using the free arm ................................................................10
Connecting the foot control cord ......................................11
Connect the power cord and foot control ........................11
Lower the feed teeth .............................................................12
Presser foot pressure ............................................................12
Raise and lower the presser foot .........................................12
Changing the presser foot ...................................................12
Changing the needle .............................................................13
Needles ...................................................................................13
Spool pins and spool caps ...................................................14
Threading the upper thread .................................................15
Needle threader .....................................................................16
Cutting the thread .................................................................16
Threading for twin needles ..................................................17
Winding the bobbin with the machine threaded..............18
Winding the bobbin using the vertical spool pin .............18
Winding the bobbin using the auxiliary spool pin ...........19
Inserting the bobbin .............................................................19
Thread tension, 650 ..............................................................20
Automatic thread tension, 670 ............................................20
Starting to sew ......................................................................20
Operating Y our OPAL™ 670 Sewing Machine 31
Functions, 670 .......................................................................32
Functions on the TouchScreen ...........................................33
Sewing Mode, 670 .................................................................34
Selecting a stitch ....................................................................35
Selecting a font .....................................................................35
Programming, 670 ................................................................36
My Stitches Menu ...............................................................38
SET Menu ............................................................................39
Pop-Up Messages 41
Pop-up messages ...................................................................42
Sewing 45
Exclusive SEWING ADVISOR™ ....................................46
Seam ........................................................................................47
Overcast ..................................................................................47
Seam and overcast .................................................................48
Baste ........................................................................................48
Blind hem ...............................................................................48
Hem ........................................................................................49
Sewing buttonholes ..............................................................50
Sewing on buttons ................................................................52
Sewing zippers .......................................................................53
Darning and mending ..........................................................54
Bartack (manual) ...................................................................54
Quilting ...................................................................................55
Speciality Stitches ..................................................................56
Smocking Stitches .................................................................57
Automatic Tapering Stitches ..............................................57
Pictogram Stitches ...............................................................58
Operating Y our OPAL™ 650 Sewing Machine 21
Functions, 650 .......................................................................22
Functions on the Touch Panel ............................................23
Sewing Mode, 650 .................................................................24
Selecting a stitch ...................................................................26
Selecting a font .....................................................................26
Programming, 650 ................................................................27
My Stitches Menu ...............................................................29
SET Menu ............................................................................30
Taking Care of Your Machine 59
Cleaning the machine ...........................................................60
Trouble shooting ...................................................................61
Note: The machine models will be referred to as simply
670 and 650 in this User’s Guide.

1
21
2
3
4
5
6
7
8
9
10
11
12
13
14
15
16
17
18
19
20
11
22
23
24
25
26
27
28
29
30
MACHINE OVERVIEW
1. Lid
2. Pre-tension thread guide
3. Thread tension disks
4. Thread take-up lever
5. Presser foot pressure dial
6. Thread tension dial (only 650)
7. Thread tension for bobbin winding
8. Function Panel
9. Thread cutter
10. Sensor One-Step Buttonhole
Foot socket
11. LED-lights
12. Needle threader
13. Presser foot
14. Stitch plate
15. Bobbin cover
16. Free arm
17. Drop feed teeth switch
18. Needle bar with needle clamp screw
19. Presser bar
20. Presser foot ankle
21. Stitch overview
22. Spool pin
23. Spool caps
24. Auxiliary spool pin
25. Thread cutter for bobbin thread
26. Bobbin spindle, Bobbin stop
27. Handwheel
28. GraphicDisplay (650)/
TouchScreen (670)
31
32
29. Function Panel (650)
30. ON/OFF switch, connectors for
power cord and foot control
31. Handle
32. Presser foot lever
4 – Overview
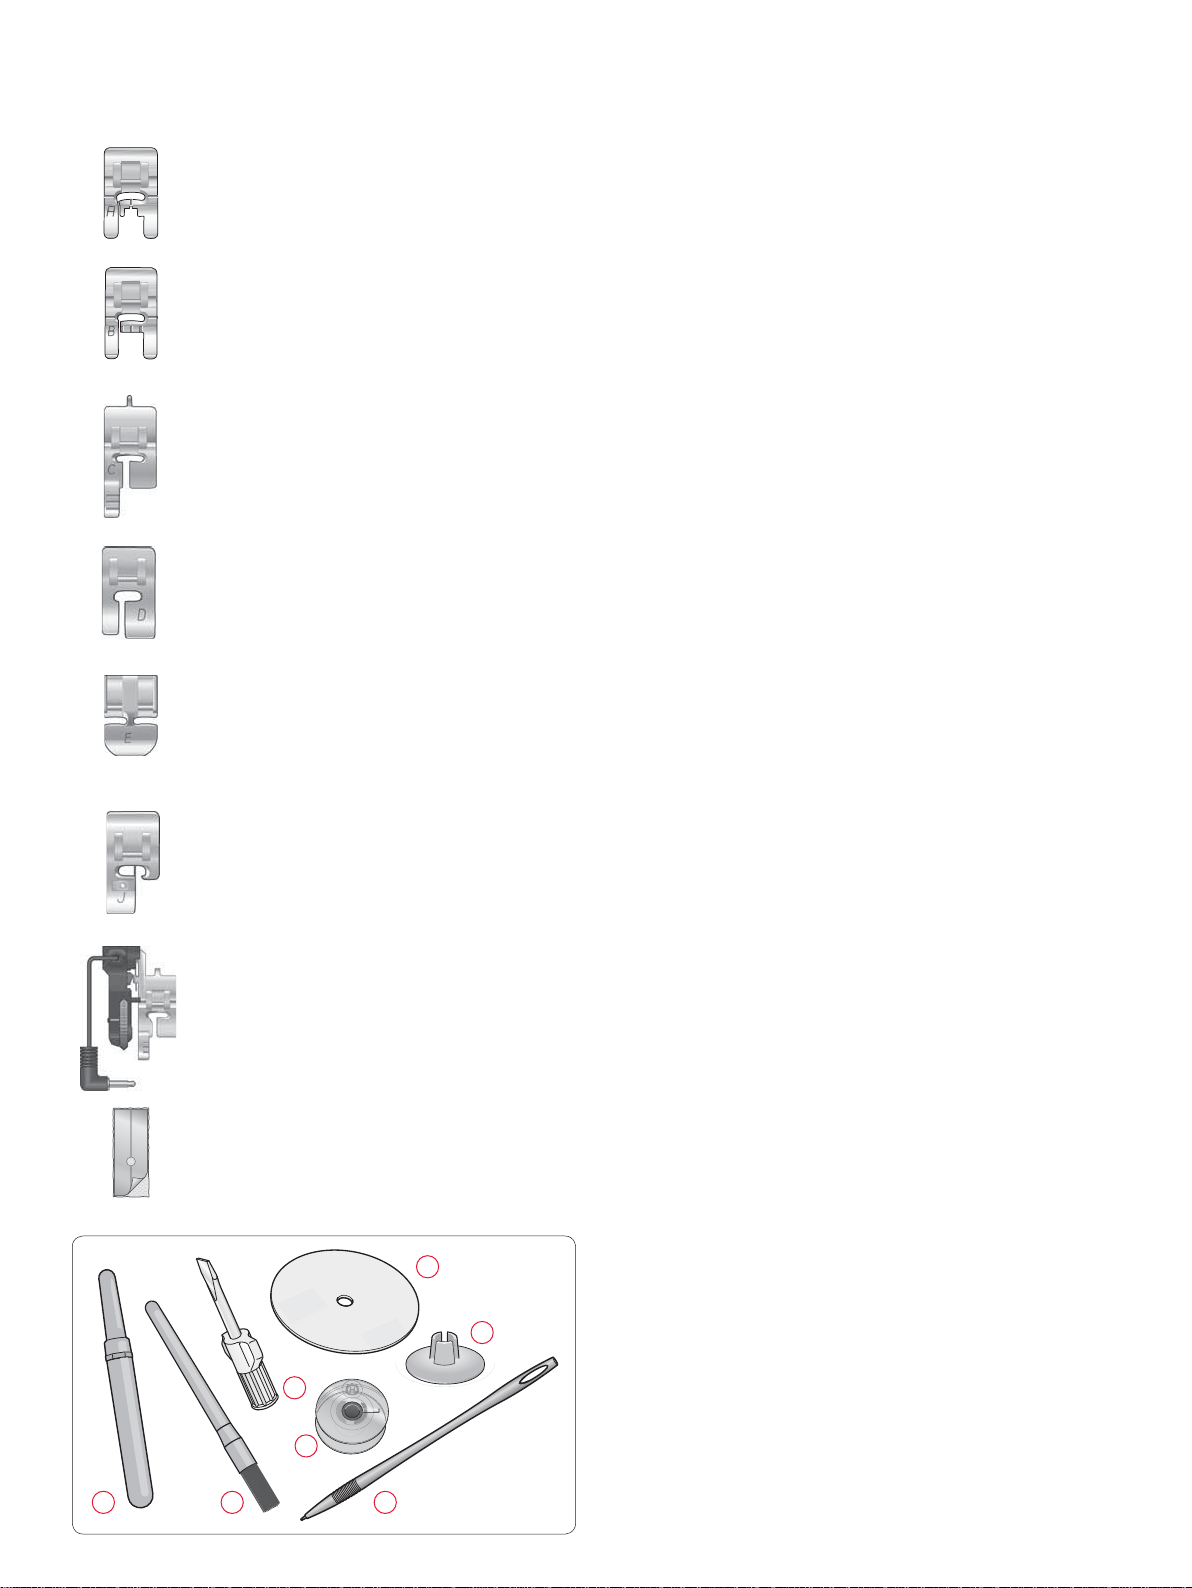
INCLUDED ACCESSORIES
Presser Feet
Utility Foot A
Attached on the machine upon delivery. This foot is used mainly for straight stitching and zigzag stitching with
a stitch length longer than 1.0.
Utility Foot B
When sewing decorative stitches or short zigzag stitches and other utility stitches with less than 1.0 mm stitch
length, use this foot. The tunnel on the underside of the foot is designed to feed smoothly over the stitches.
Buttonhole Foot C
This foot is used for sewing buttonholes step by step. Use the guide lines on the toe of the foot to position
the garment edge. The two tunnels on the bottom of the foot ensures a smooth feed over the buttonhole
columns. The fi nger on the back of the foot holds cording for corded buttonhole.
Blind Hem Foot D
This foot is used for blind hem stitches. The inner edge of this foot guides the fabric. The right toe of the
foot is designed to ride along the hem edge.
Zipper Foot E
This foot can be snapped on either to the right or to the left of the needle, making it easy to sew close to both
sides of the zipper teeth. Move needle position to right or left to sew closer to zipper teeth or for covering
large cording.
Edging Foot J
This foot is used for overcasting and seam/overcasting. Stitches form over the pin which prevents puckering
at the edge of the fabric.
Sensor One-Step Buttonhole Foot
When connected to the machine, the buttonhole is sewn in a suitable length to the button size that has been
entered into the machine.
Glide Sole
If sewing on foam, vinyl, plastic, or leather, the material might stick to the foot and prevent the sewing
machine from feeding properly. When using any of the above materials, sew on a piece of scrap fabric, to
make sure the machine feeds smoothly. If not, fasten the self-adhesive glide soles to the underside of the
presser foot.
1. Seam ripper
4
2. Brush
1 2
6
3
5
7
3. Screwdriver
4. Felt pad (2)
5. Bobbins (5)
6. A small spool cap
7. Stylus (only 670)
Needles (not pictured), see page 13
Overview – 5
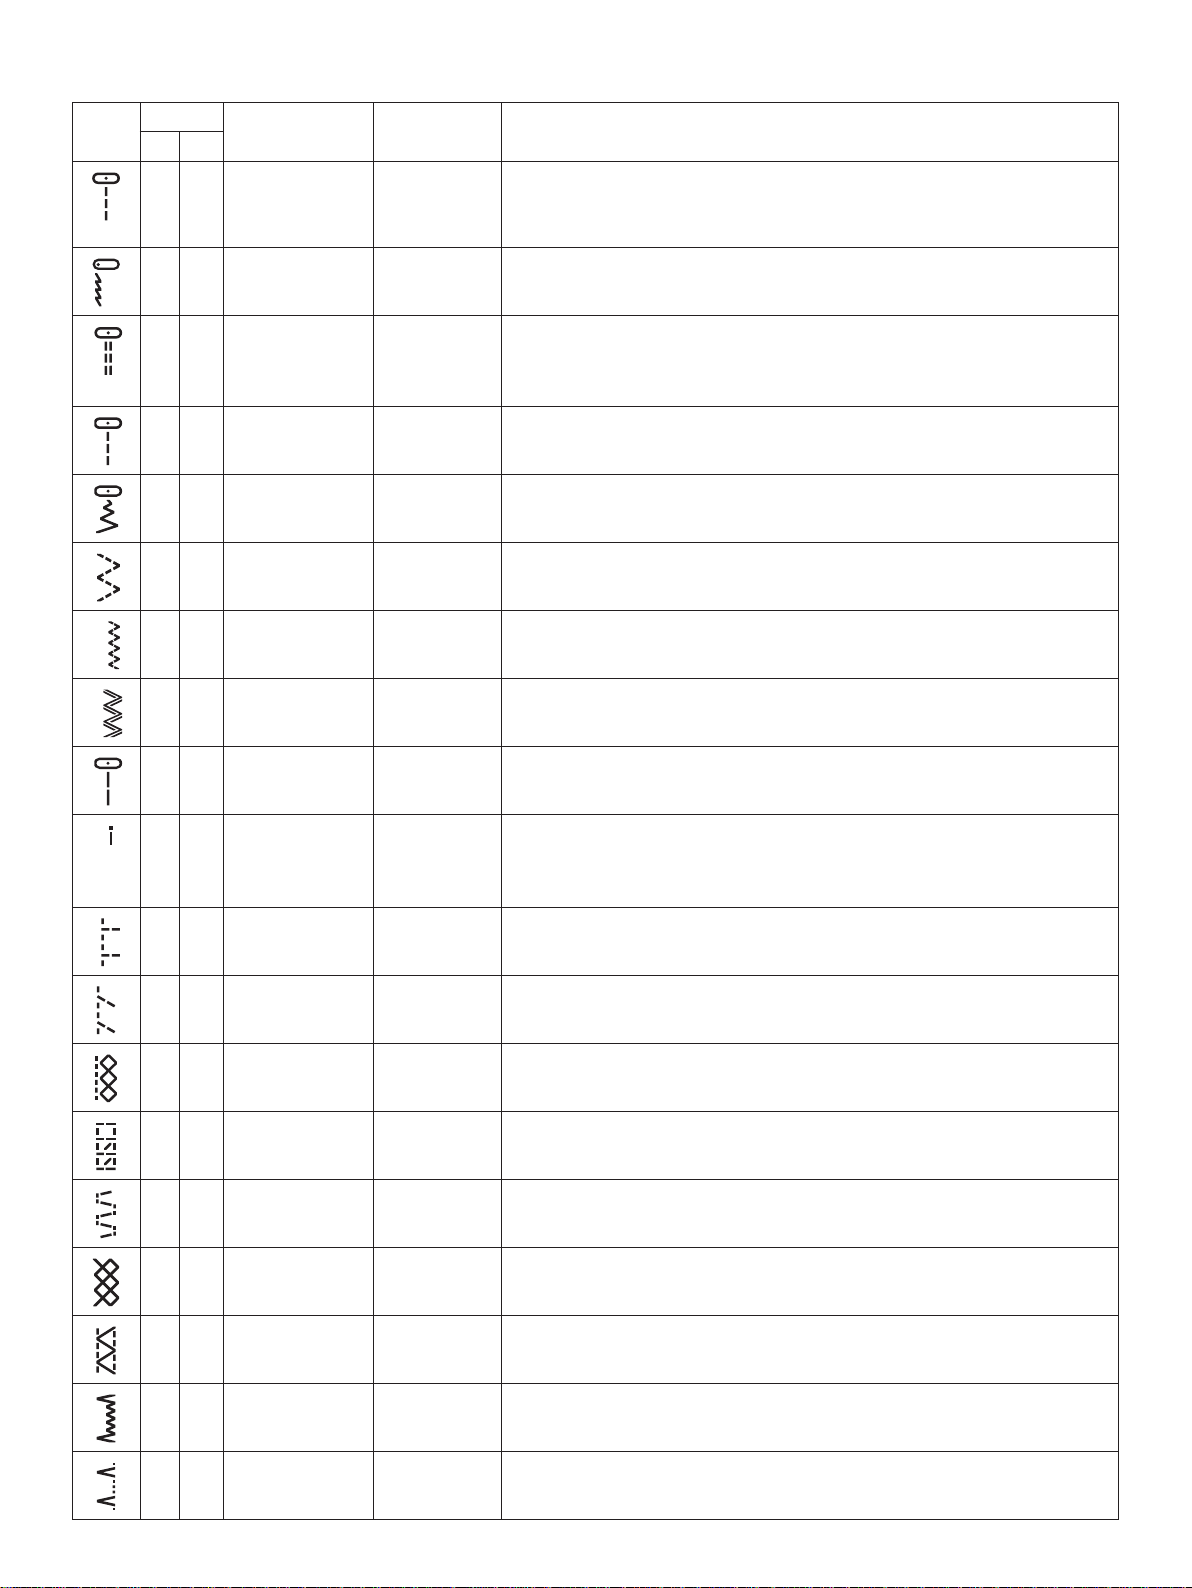
STITCH TABLE – UTILITY STITCHES
Stitch Stitch No. Stitch Name Presser Foot Application
670 650
1 1 Straight Stitch,
center needle
position
A/B For all types of sewing. Select 29 different needle positions.
2 2 Stretch Stitch,
left needle position
3 3 Reinforced Straight
4 – Straight Stitch
5 4 Zigzag A/B For appliqué work, lace edging, sewing on bands etc. Stitch width increases equally to
6 5 Three-Step Zigzag A/B For mending, sewing on patches and elastics. Suitable for light and medium weight
7 6 Two-Step Zigzag A/B For joining two pieces of fabric with fi nished edges and for elastic shirring.
8 7 Reinforced Zigzag B For joining fabric edge to edge or overlapping in leather. For decorative sewing.
9 8 Baste Stitch A/B For joining two pieces of fabric with a long stitch length (reduce thread tension
10 – Straight Basting
Stitch, center
needle position
with FIX
Stitch
A/B For seams in tricot and stretch fabric.
A/B For seams which are subject to considerable strain. Triple and elastic for reinforced
seams. Use to reinforce and topstitch sportswear and working clothes. For topstitch,
increase the stitch length.
A/B Begins and ends with forward and reverse sewing.
the left and right.
fabric..
according to recommendations on the GraphicDisplay (650)).
A Use together with the foot control to baste layers of the fabric together. Lower the
feed teeth. Sew a stitch, raise the presser foot and move the fabric. Lower the presser
foot and make the next stitch. Repeat until the basting is done.
11 9 Overcast Stitch J Seam and overcast in one step along the edge or trim later. For light stretch and non-
stretch fabrics.
12 10 Stretch Seam
Overcast Stitch
13 11 Double Overlock
Stitch
14 12 Overlock Stitch B Seam and overcast in one step along the edge or trim later. For medium stretch fabrics.
15 13 Elastic/Casing
Stitch
16 14 Elastic Stitch
or Smocking
17 15 Flatlock Stitch B Decorative hems and overlapped seams, belts and bands. For medium/heavy stretch
18 16 Stretch Blind
Hem Stitch
19 17 Woven Blind Hem D Blind hems in medium and heavy woven fabrics.
B Seam and overcast in one step along the edge or trim later. For medium and medium/
heavy stretch fabrics.
B Seam and overcast in one step along the edge or trim later. For hea vy stretch and heavy
woven fabrics.
B For overlapped seams in tricot. To sew casing over narrow elastic.
A/B Sew over two rows of elastic thread for elastic shirring.
fabrics.
D Blind hems in medium and heavy stretch fabrics.
6 – Overview
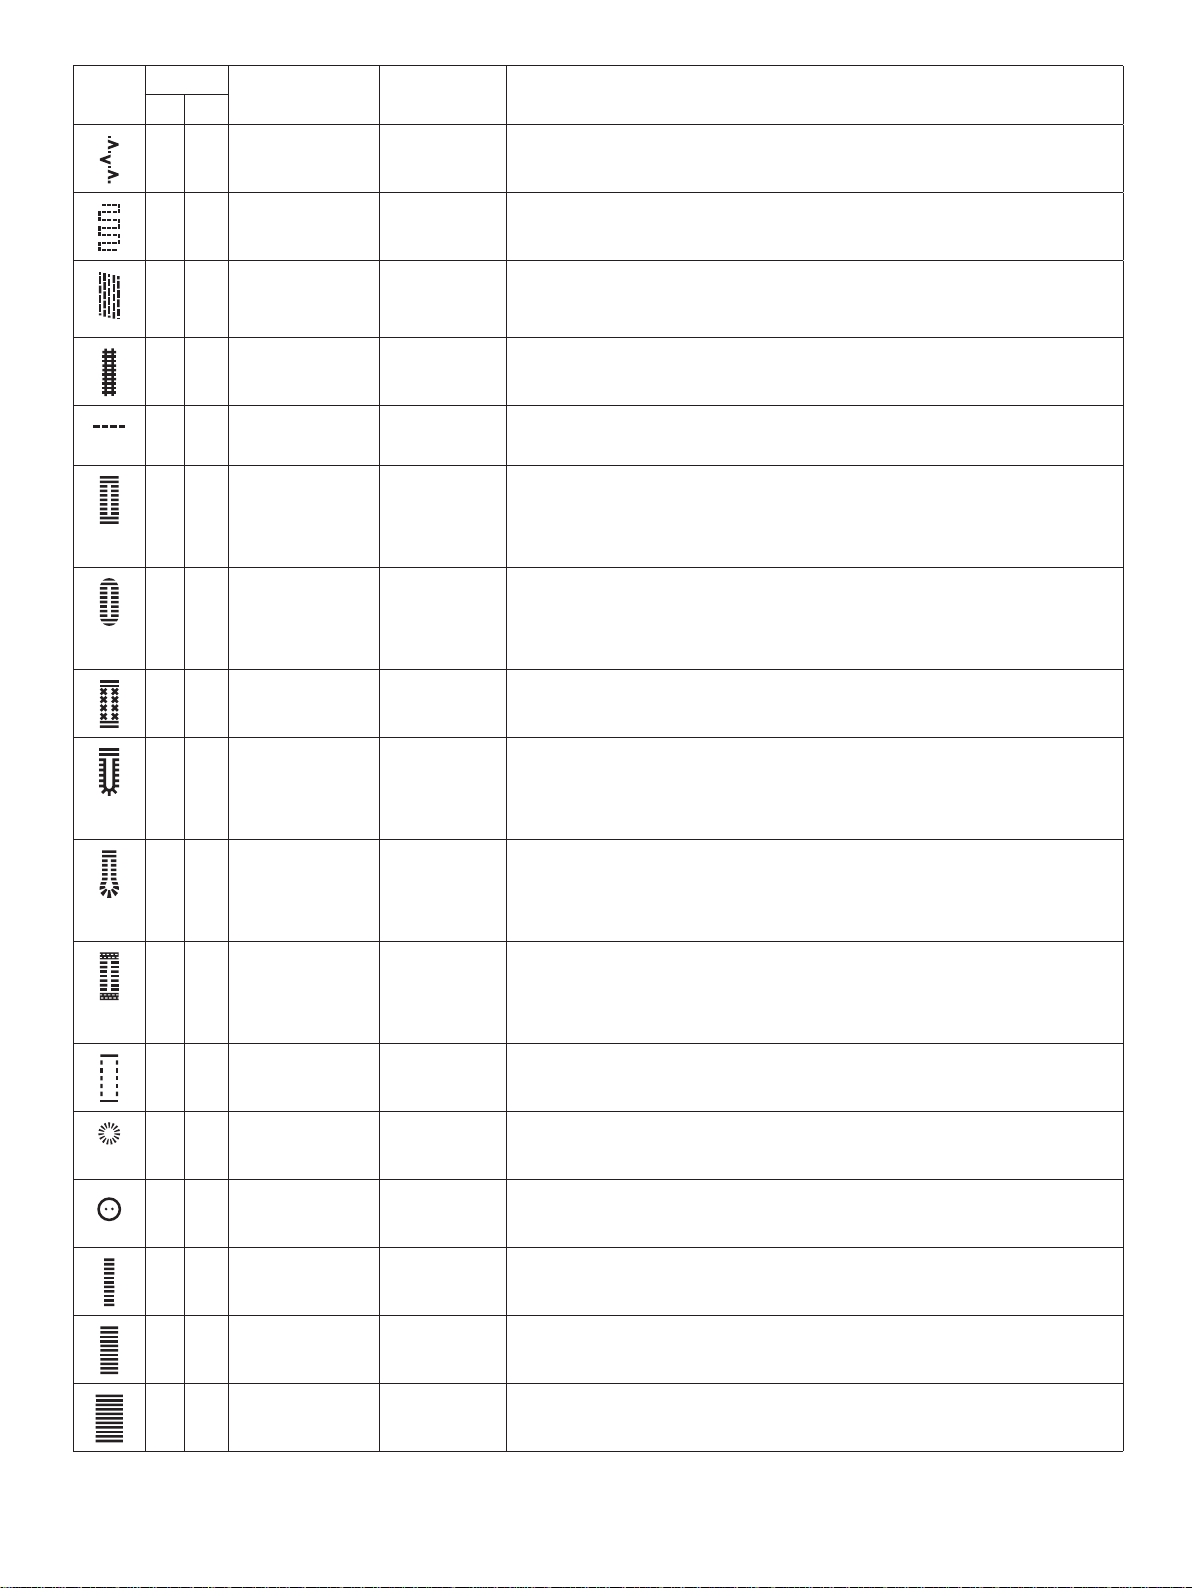
Stitch Stitch No. Stitch Name Presser Foot Application
670 650
20 18 Bridging Stitch A/B For joining two pieces of fabric with fi nished edges and for elastic shirring.
21 – Darning Stitch
A For mending small tears.
(side to side)
22 19 Darning Stitch (for-
ward and backward)
23 20 Bartack
A/B Darn and mend small holes in work clothes, jeans, tablecloths and more. Stitch over
the hole, press reverse for continuous darning and auto stop.
A/B Reinforce pockets, shirts openings, belt loops as well as at lower end of a zipper.
(manual)
24 – Belt Loop Stitch A For securing belt loops.
25 21 Bartack Buttonhole Sensor
Standard buttonhole for most fabric weights.
One-Step
Buttonhole
Foot/C
26 22 Round End
Buttonhole
Sensor
One-Step
For blouses and children’s garments.
Buttonhole
Foot/C
27 23 Medium Reinforced
C For medium and heavy fabrics
Buttonhole
28 24 Heirloom
Buttonhole
Sensor
One-Step
Buttonhole
For “hand look” on fi ne and delicate fabrics.
Tip: For jeans buttonholes, increase length and width of the buttonhole. Use thicker thread.
Foot/C
29 25 Keyhole
Buttonhole
Sensor
One-Step
For tailored jackets, coats, etc.
Buttonhole
Foot/C
30 26 Heavy Duty
Buttonhole
Sensor
One-Step
Buttonhole
With reinforced bartacks.
Foot/C
31 27 Leather Straight
A/B For leather and suede.
Stitch Buttonhole
32 28 Eyelet B For belts, laces, etc.
33 29 Automatic Button
Sewing
No presser foot For sewing on buttons. Set the number of stitches on the GraphicDisplay/
TouchScreen.
34 30 Satin stitch, narrow B For appliqués, sewing on laces and trims. For light and medium fabrics.
35 31 Satin stitch,
B For appliqués, sewing on laces and trims. For light and medium fabrics.
medium
36 32 Satin stitch, wide B For appliqués, sewing on laces and trims. For heavy fabrics.
Overview – 7
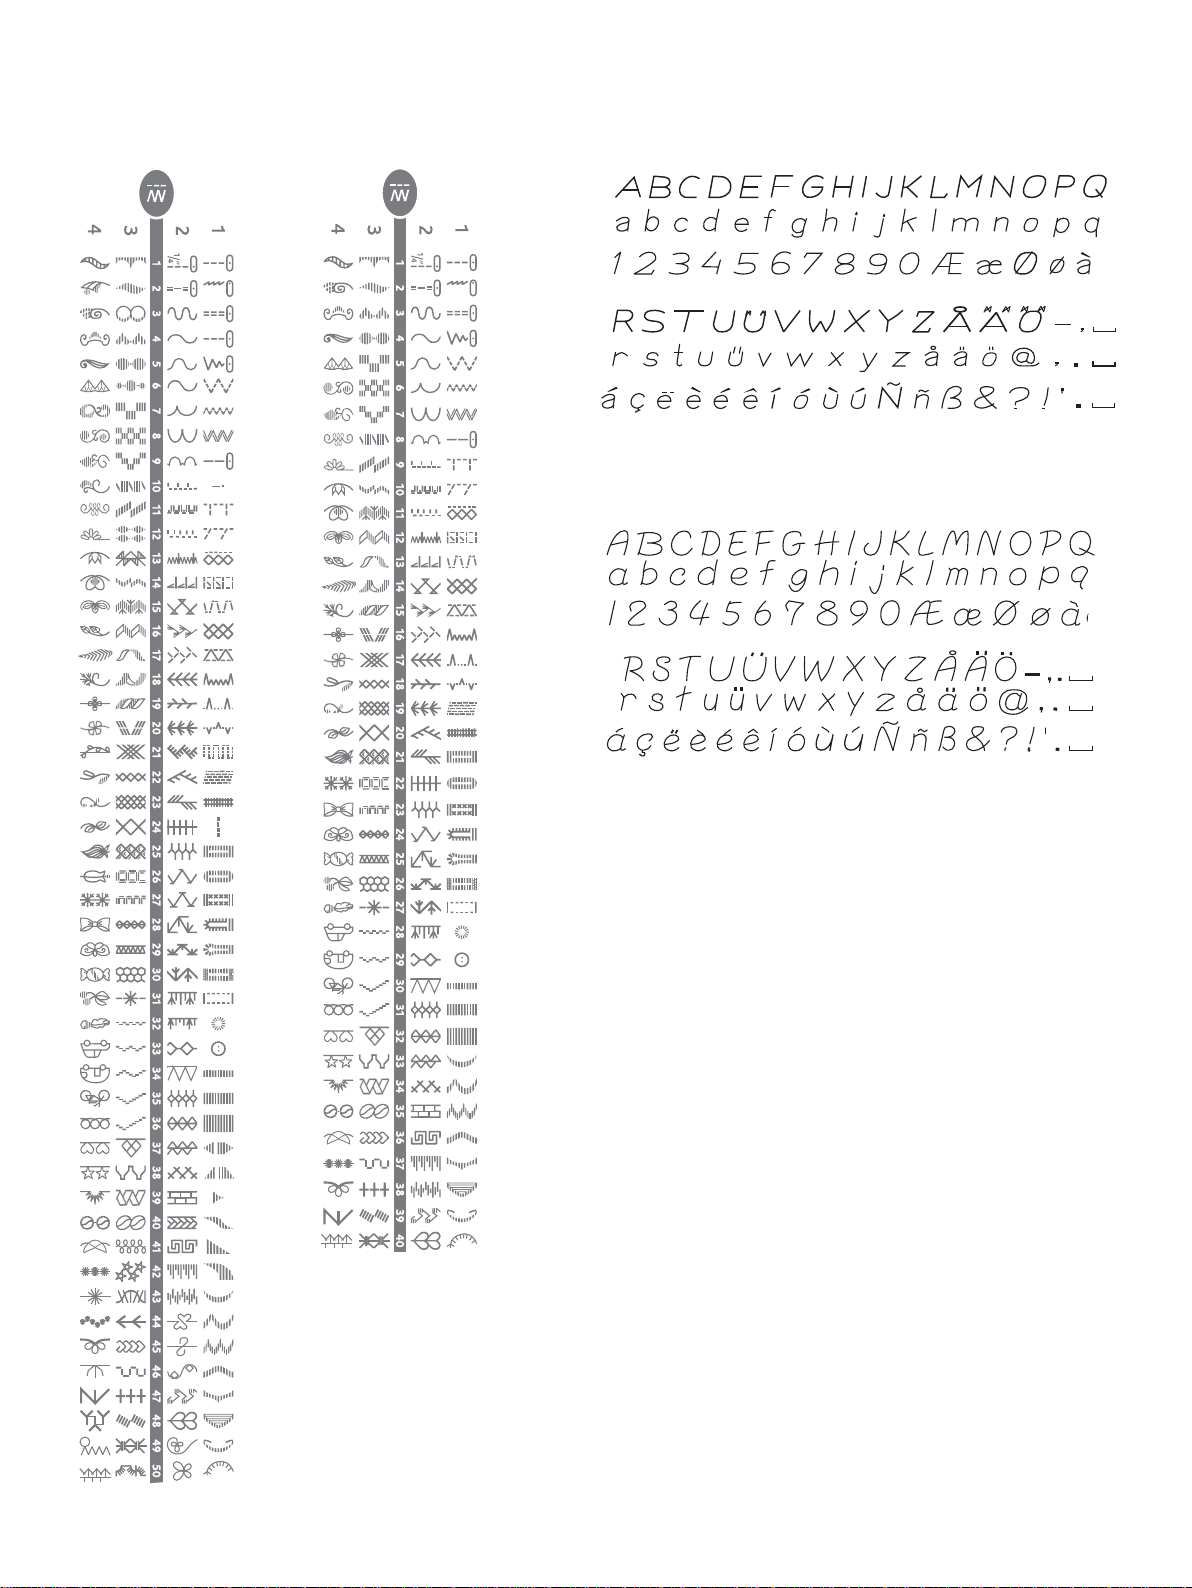
FONTSSTITCH OVERVIEW
670 650
Block (670/650)
Brush Line (670)
Cyrillic and Hiragana (670/650)
Russian and Japanese fonts. See the fonts on the
GraphicDisplay/TouchScreen of your sewing machine.
8 – Overview
GETTING READY TO SEW
UNPACKING
1. Place the machine on a sturdy, fl at surface, remove the packaging and lift off the cover.
2. Remove the packing material and the foot control.
3. The machine is delivered with an accessory bag, a power cord and a foot control cord.
4. Wipe the machine, particularly around the needle and stitch plate to remove any soil before sewing.
Note: Your HUSQVARNA VIKING
®
OPAL™ sewing machine is adjusted to provide the best stitch result at normal room temperature.
Extreme hot or cold temperatures can affect the sewn result.
P ACKING A W A Y AFTER SEWING
1. Press the ON/OFF switch to OFF.
2. Unplug the cord from the wall socket and then from the machine.
3. Unplug the foot control cord from the machine. Wind the foot control cord and place it inside the space on the underside of
the foot control.
4. Check to ensure that all accessories are in the accessory box. Slide the box on to the machine, behind the free arm.
5. Place the foot control in the space above the free arm.
6. Put on the cover.
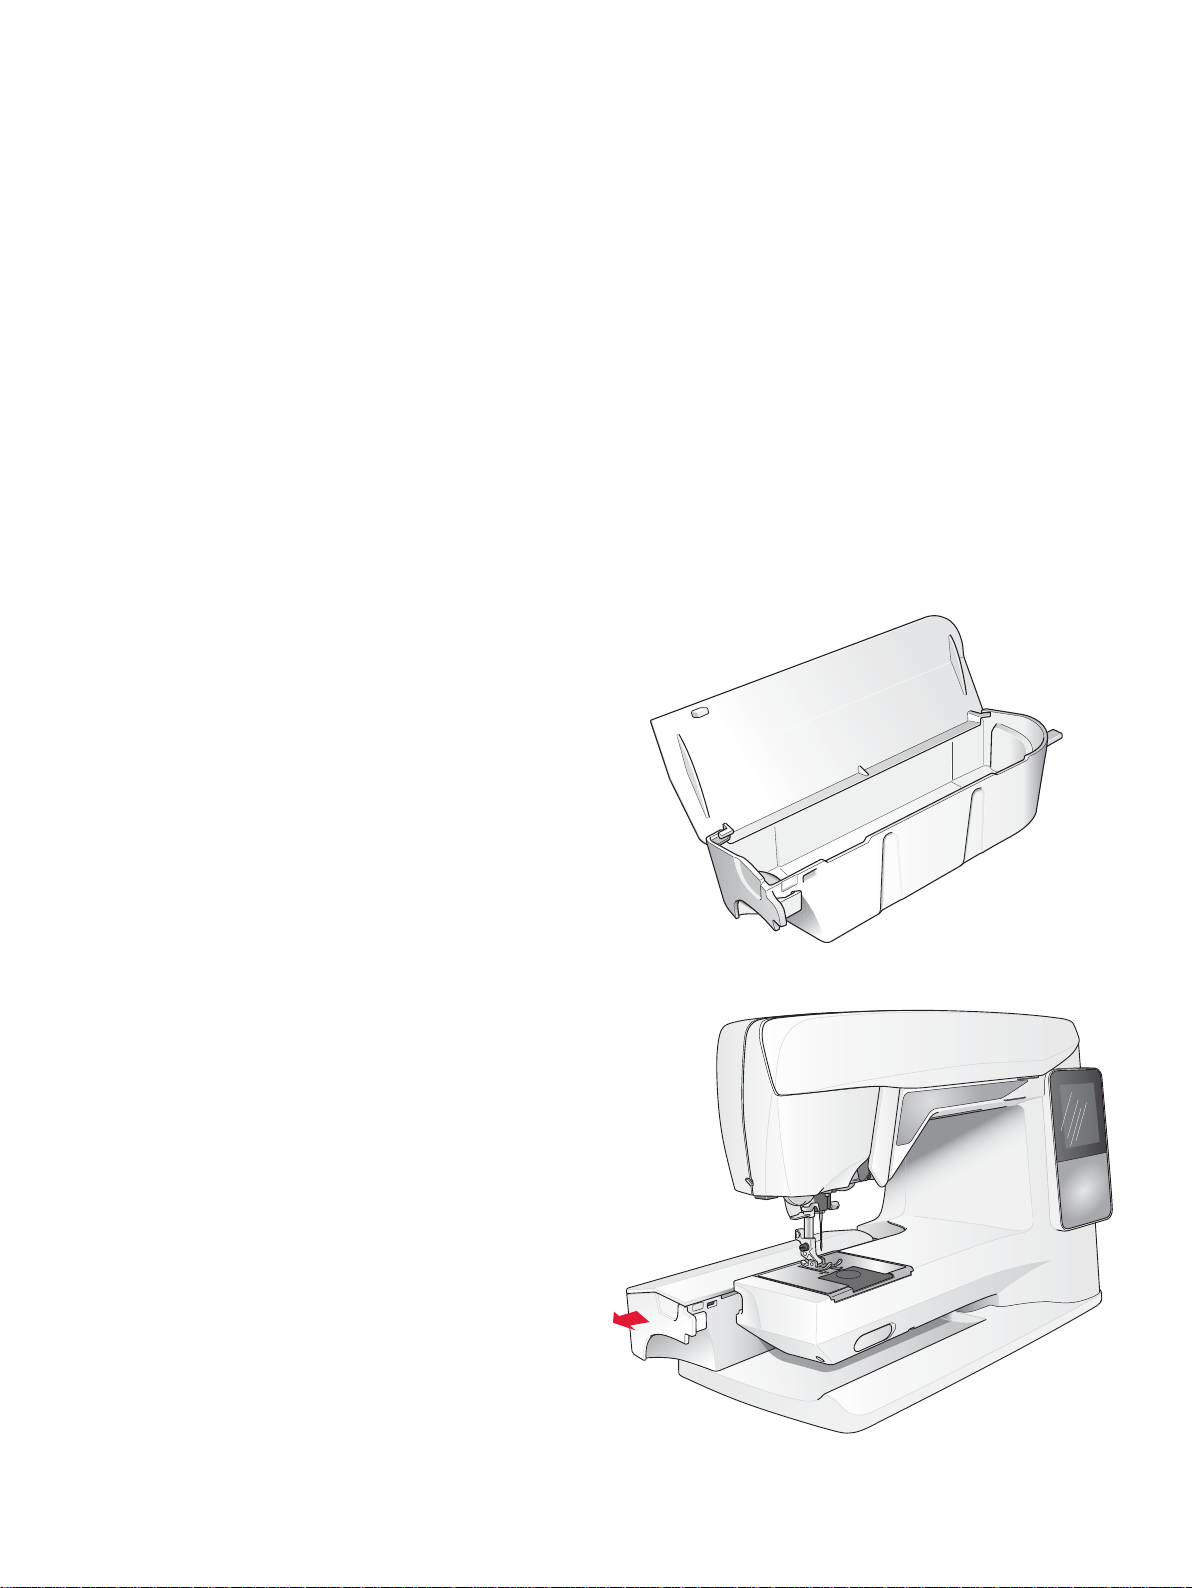
ACCESSOR Y TRA Y
Store presser feet, bobbins, needles and other accessories in
the accessory tray so that they are easily accessible.
Keep the accessory tray on the machine to provide a larger,
fl at work surface.
USING THE FREE ARM
Slide the accessory box to the left when you wish to remove it
and use the free arm.
Use the free arm to facilitate sewing trouser legs and sleeve
hems.
To replace the accessory box, slide it onto the machine until it
fi ts in place.
10 – Getting Ready to Sew
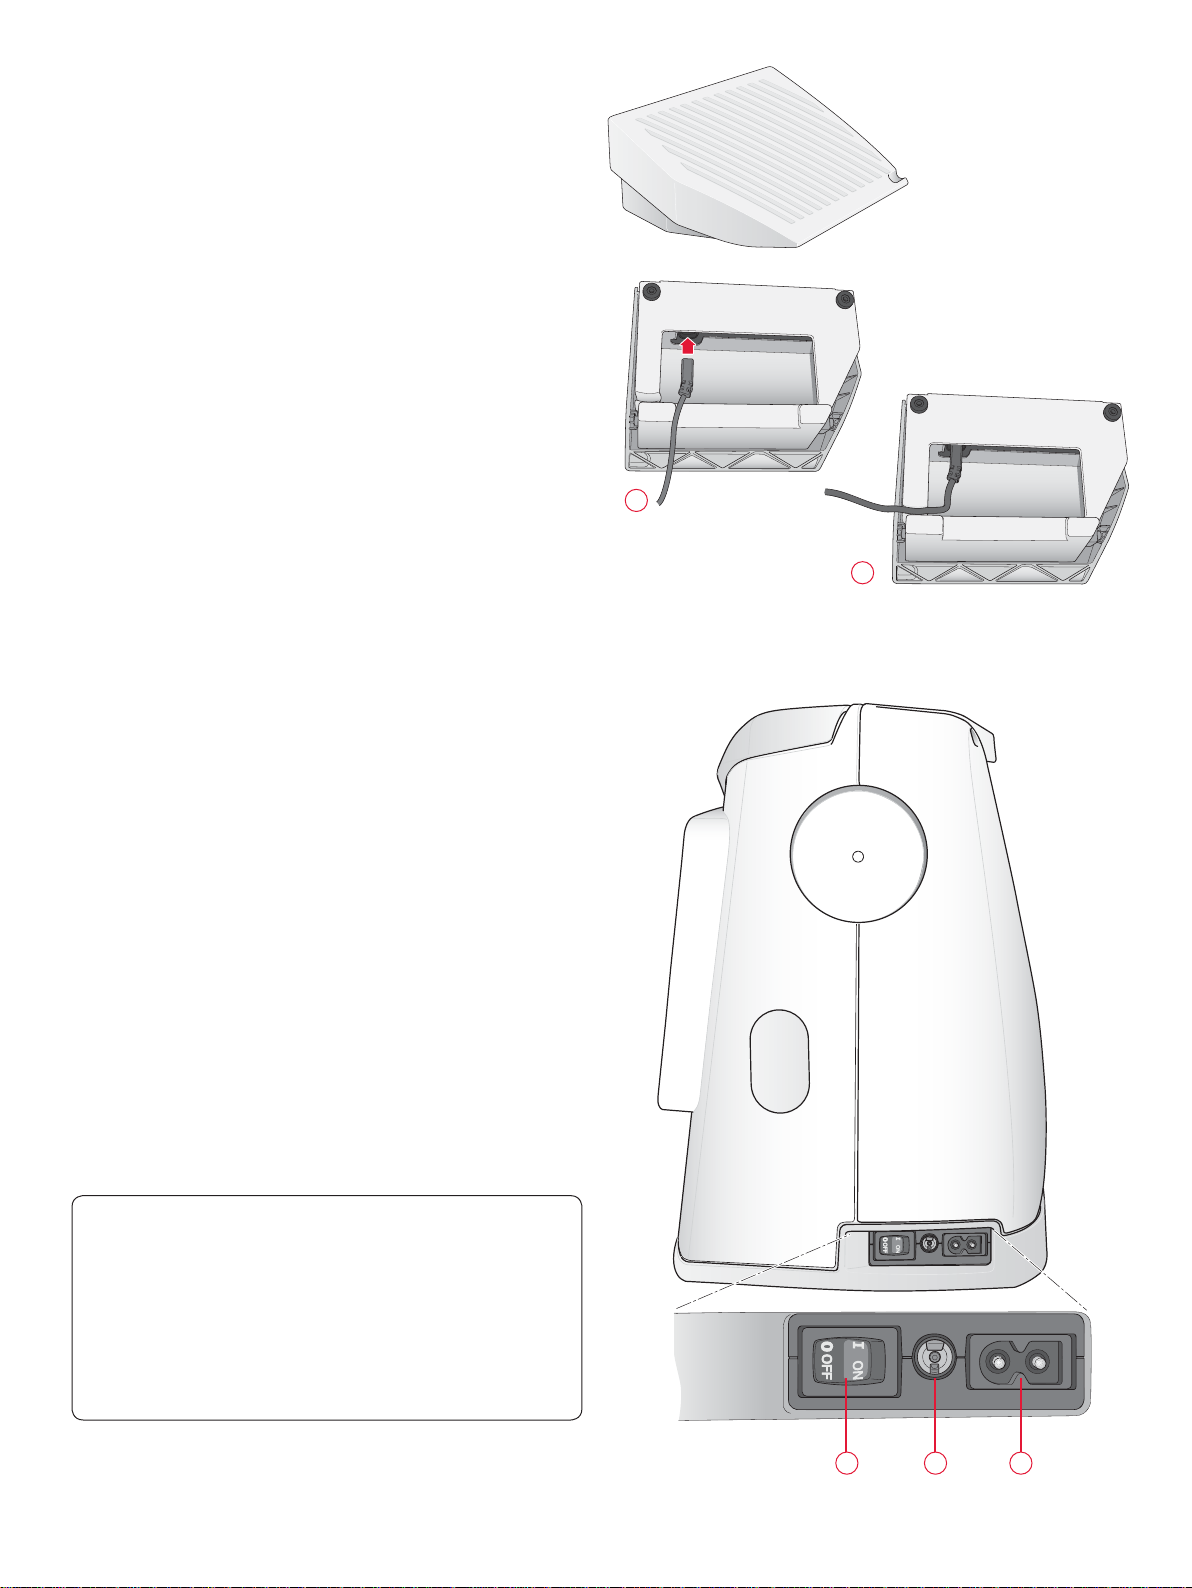
CONNECTING THE FOOT CONTROL CORD
Among the accessories you will fi nd the foot control cord and
the power cord. Connecting the foot control cord to the foot
control is only necessary the very fi rst time you are going to
use the machine.
1. Take out the foot control cord. Turn the foot control over.
Connect the cord to the socket inside the space of the foot
control. Push fi rmly to make sure it is properly connected.
2. Lay the cord in the slot on the underside of the foot
control.
1
2
CONNECT THE POWER CORD
AND FOOT CONTROL
On the underside of the machine you will fi nd information
about the power supply voltage (V) and the frequency (Hz).
Before plugging in the foot control, check to ensure that it is
of type “FR2” (see underside of foot control).
1. Connect the foot control cord to the front socket on the
bottom right side of the machine.
2. Connect the power cord to the rear socket on the bottom
right side of the machine.
3. Press the ON/OFF switch to ON to turn on power and
light.
For the USA and Canada
This sewing machine has a polarized plug (one blade wider
than the other). To reduce the risk of electric shock, this
plug is intended to fi t in a polarized outlet only one way. If
the plug does not fi t fully in the outlet, reverse the plug. If
it still does not fi t, contact a qualifi ed electrician to install
the proper outlet. Do not modify the plug in any way.
1 23
Getting Ready to Sew – 11
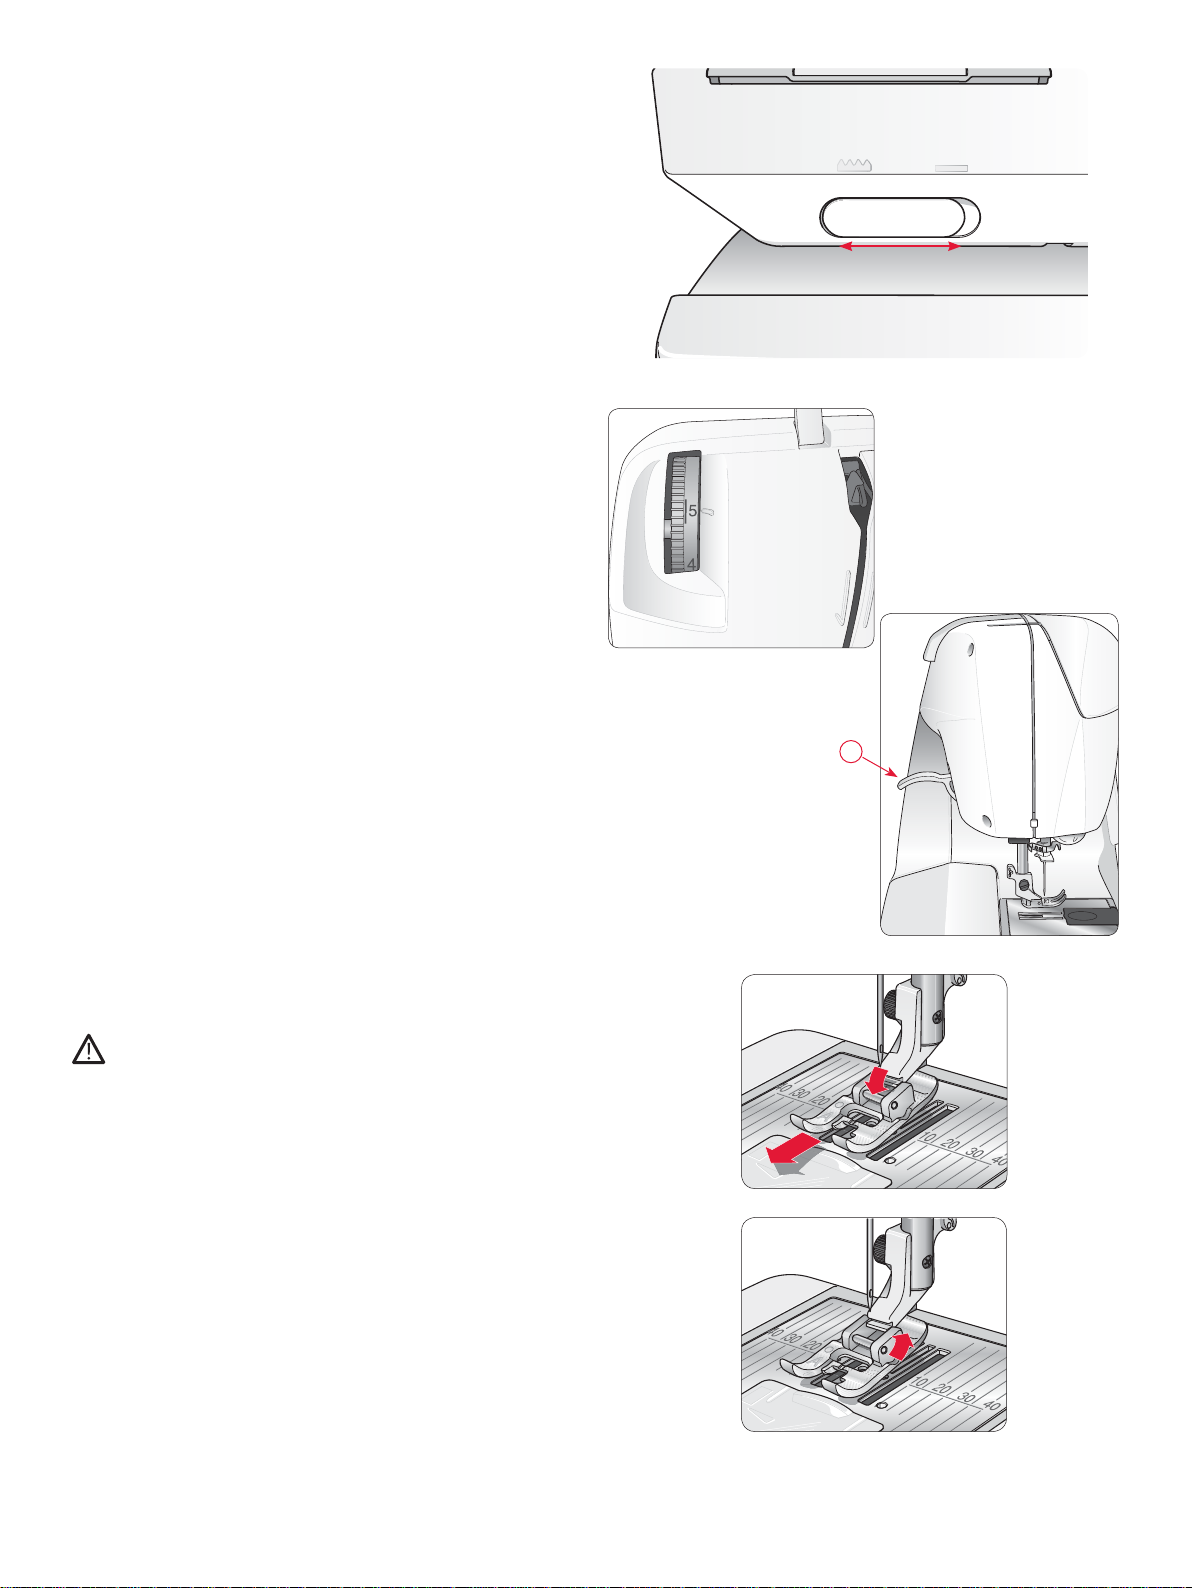
LOWER THE FEED TEETH
The feed teeth are lowered when you move the switch on the
front of the free arm to the right. Move the switch to the left
if you wish to raise the feed teeth. The feed teeth will raise
as you begin to sew. The feed teeth should be lowered when
sewing on buttons and for free motion sewing.
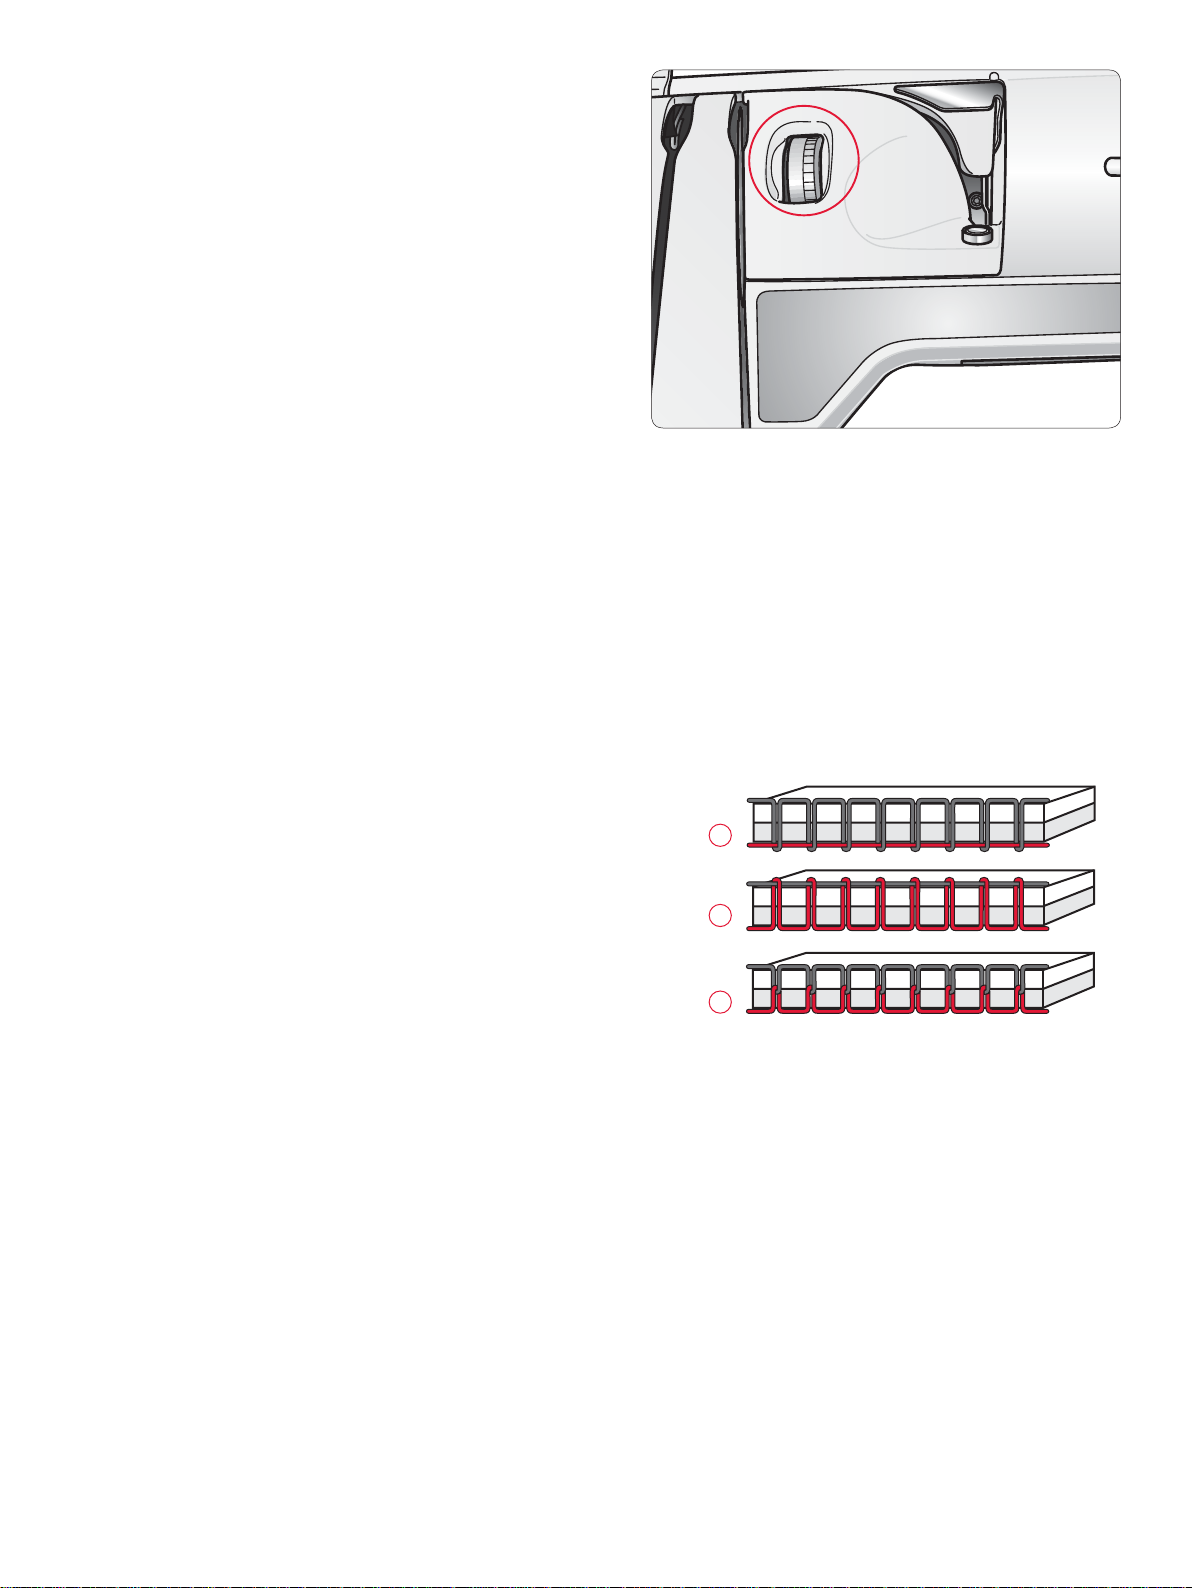
PRESSER FOOT PRESSURE
Normal presser foot pressure is around fi ve. The higher the
number the more pressure the foot puts on the fabric. Knit
and soft fabrics should be sewn at lower pressure.
The presser foot pressure is adjusted with the dial found under
the lid. When adjusting the pressure lower the presser foot
fi rst.
RAISE AND LOWER THE PRESSER FOOT
The presser foot is raised and lowered with the presser foot
lever (A). The presser foot must be lowered when sewing.
By raising the presser foot lever and then pressing it farther
upwards, the lift height of the presser foot is increased to an
extra height allowing you to slide very thick projects under the
foot.
CHANGING THE PRESSER FOOT
Press the ON/OFF switch to OFF.
1. Make sure the needle is in the highest position and the
presser foot is lifted. Pull the presser foot towards you.
2. Line up the cross pin on the foot with the gap in the
presser foot ankle. Push back until the foot snaps into
place.
A
12 – Getting Ready to Sew
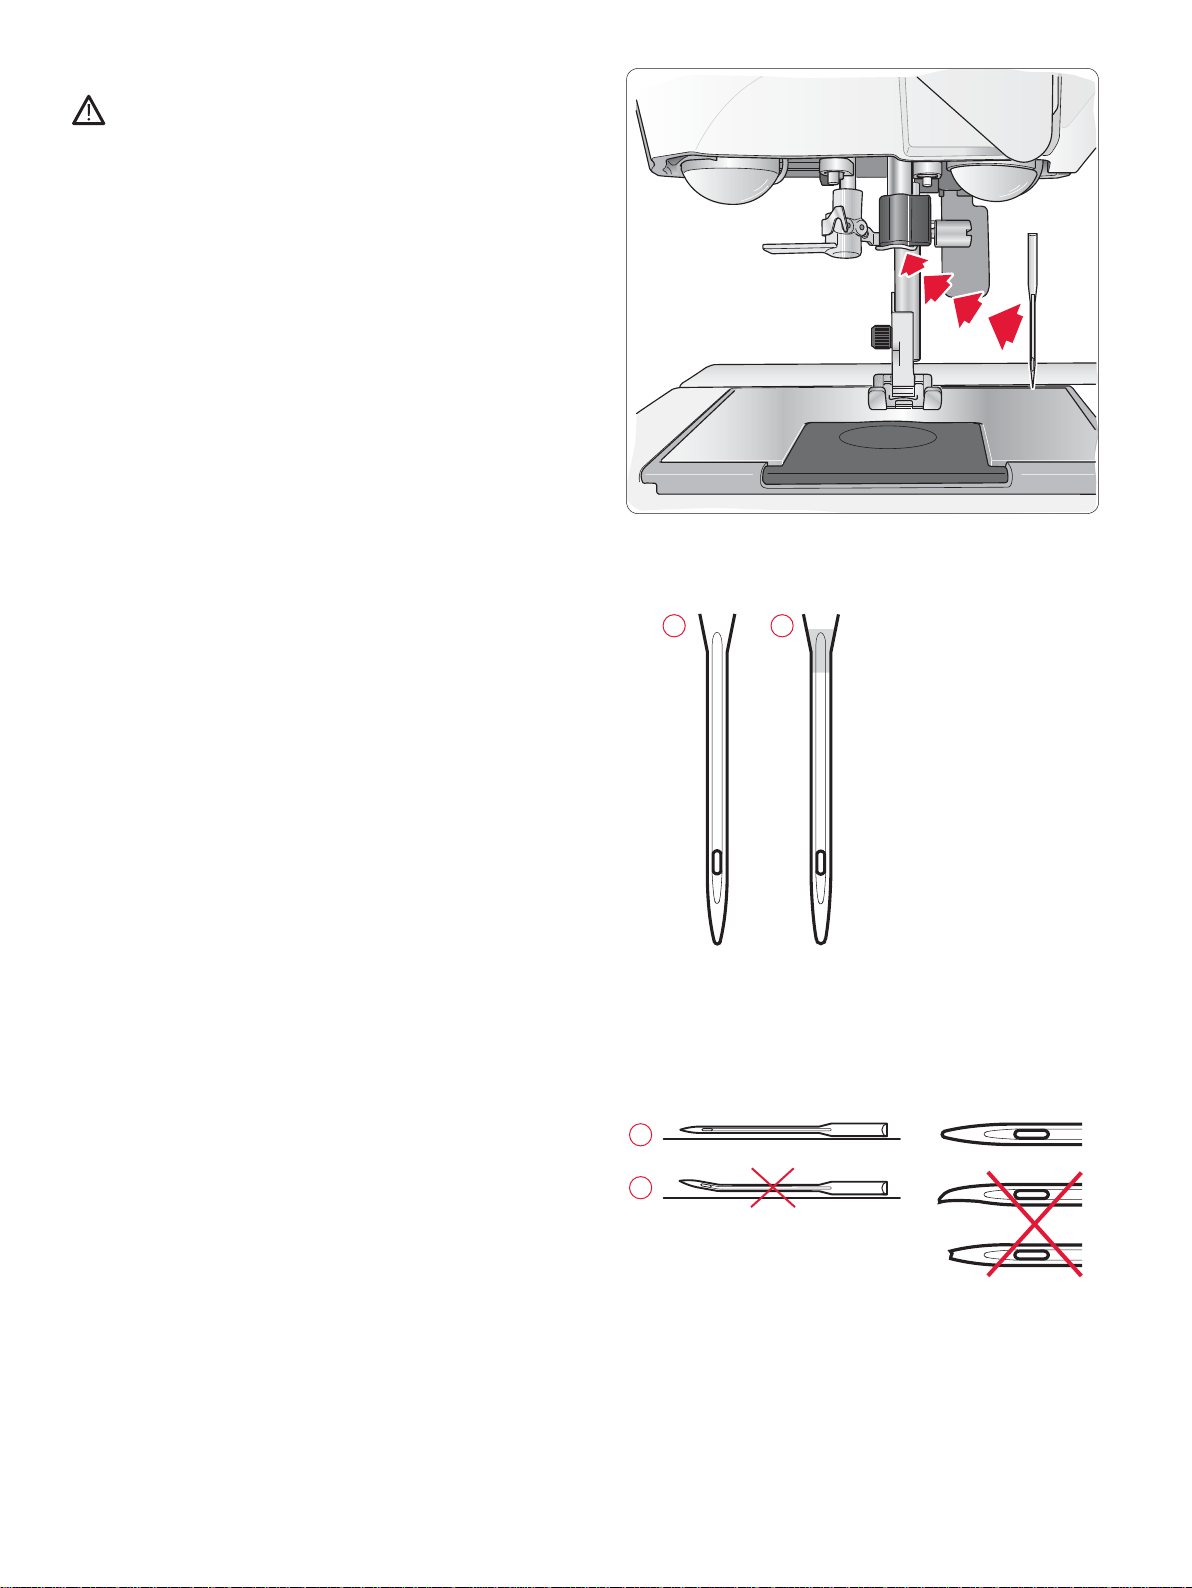
CHANGING THE NEEDLE
Press the ON/OFF switch to OFF.
1. Loosen the screw in the needle clamp with the screwdriver.
2. Remove the needle.
3. Push the new needle upwards with the fl at side away from
you until it will go no further.
4. Use the screwdriver to tighten the screw properly.
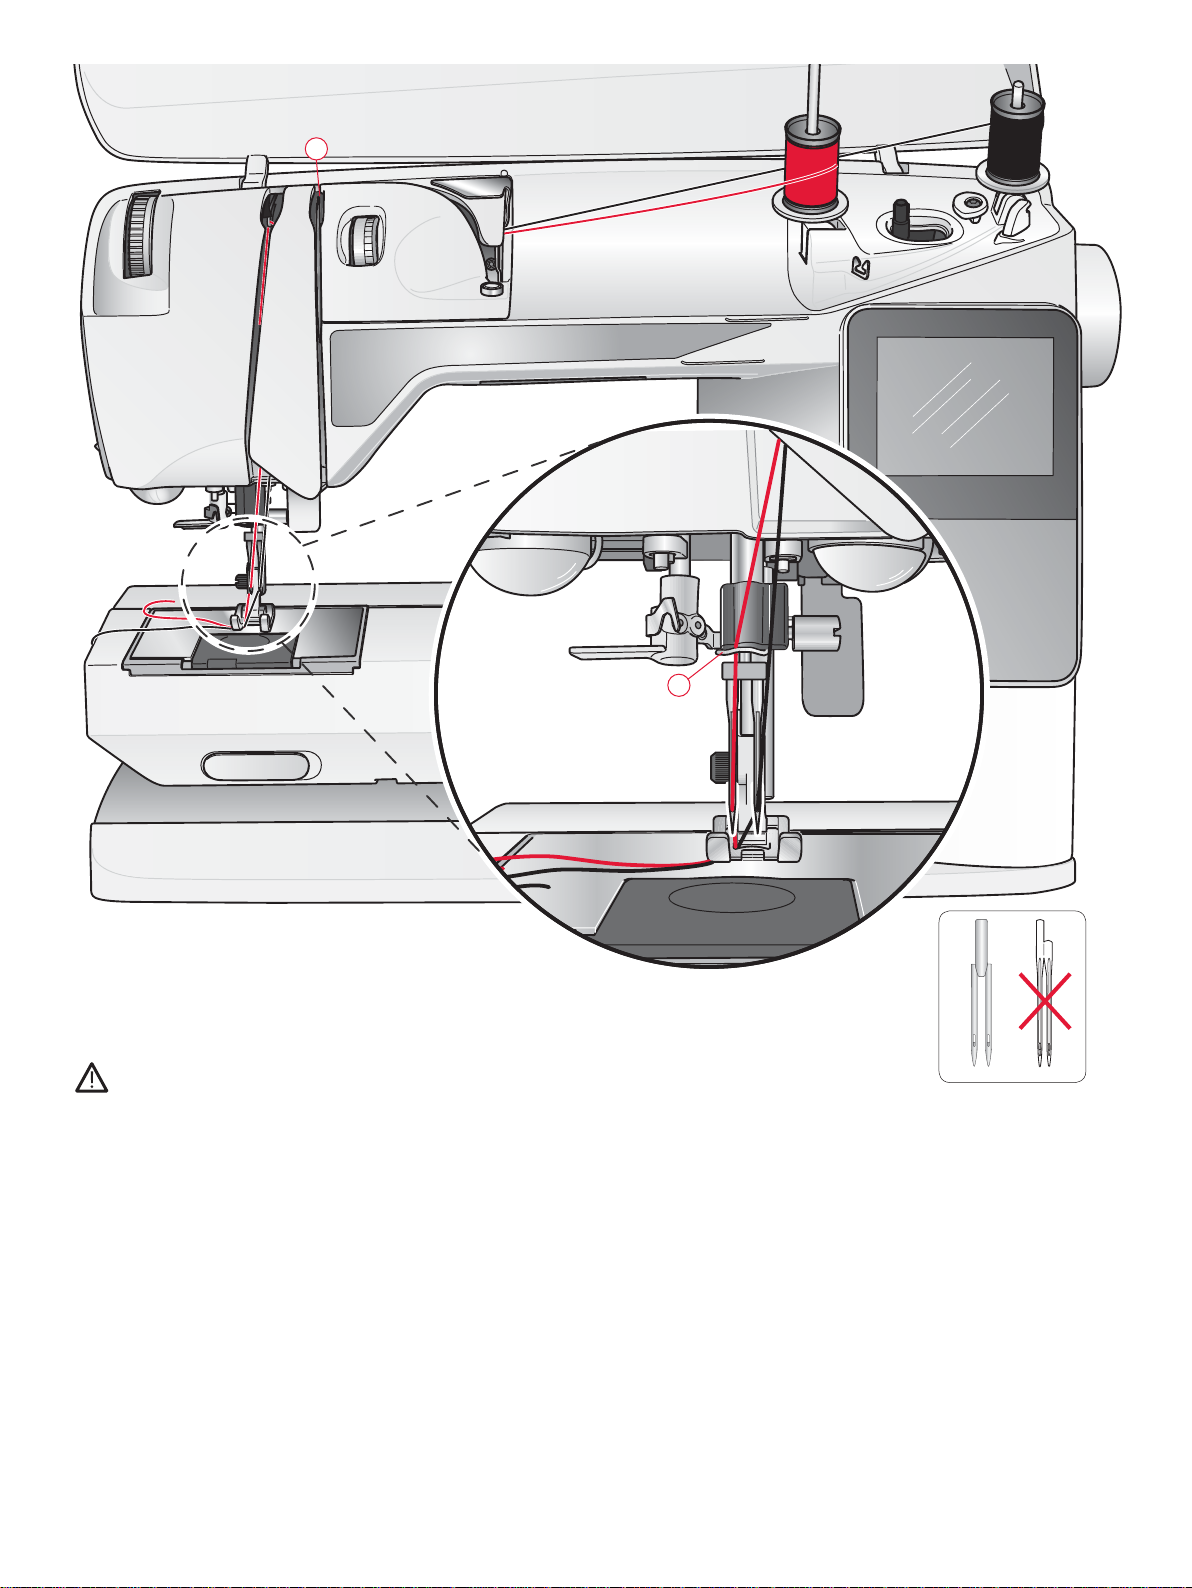
NEEDLES
The sewing machine needle plays an important role in
successful sewing. To ensure you will get a quality needle, we
recommend needles of system 130/705H. The needle package
included with your machine contains needles of the most
frequently used sizes for sewing on woven and stretch fabrics.
A B
Universal needle (A)
Universal needles have a slightly rounded point and come in a
variety of sizes. For general sewing in a variety of fabric types
and weights.
Stretch needle (B)
Stretch needles have a special scarf to eliminate skipped
stitches when there is a fl ex in the fabric. For knits, swimwear,
fl eece, synthetic suedes and leathers. Marked with a yellow
band.
Tip: Read more about different needles in the HUSQVARNA
VIKING Accessory User’s Guide at www.husqvarnaviking.com.
Note: Change the needle often. Always use a straight needle with a sharp
point (1). A damaged needle (2) can cause skipped stitches, breakage of
needles or snapping of thread. A damaged needle can also damage the
stitch plate.
1
2
Getting Ready to Sew – 13
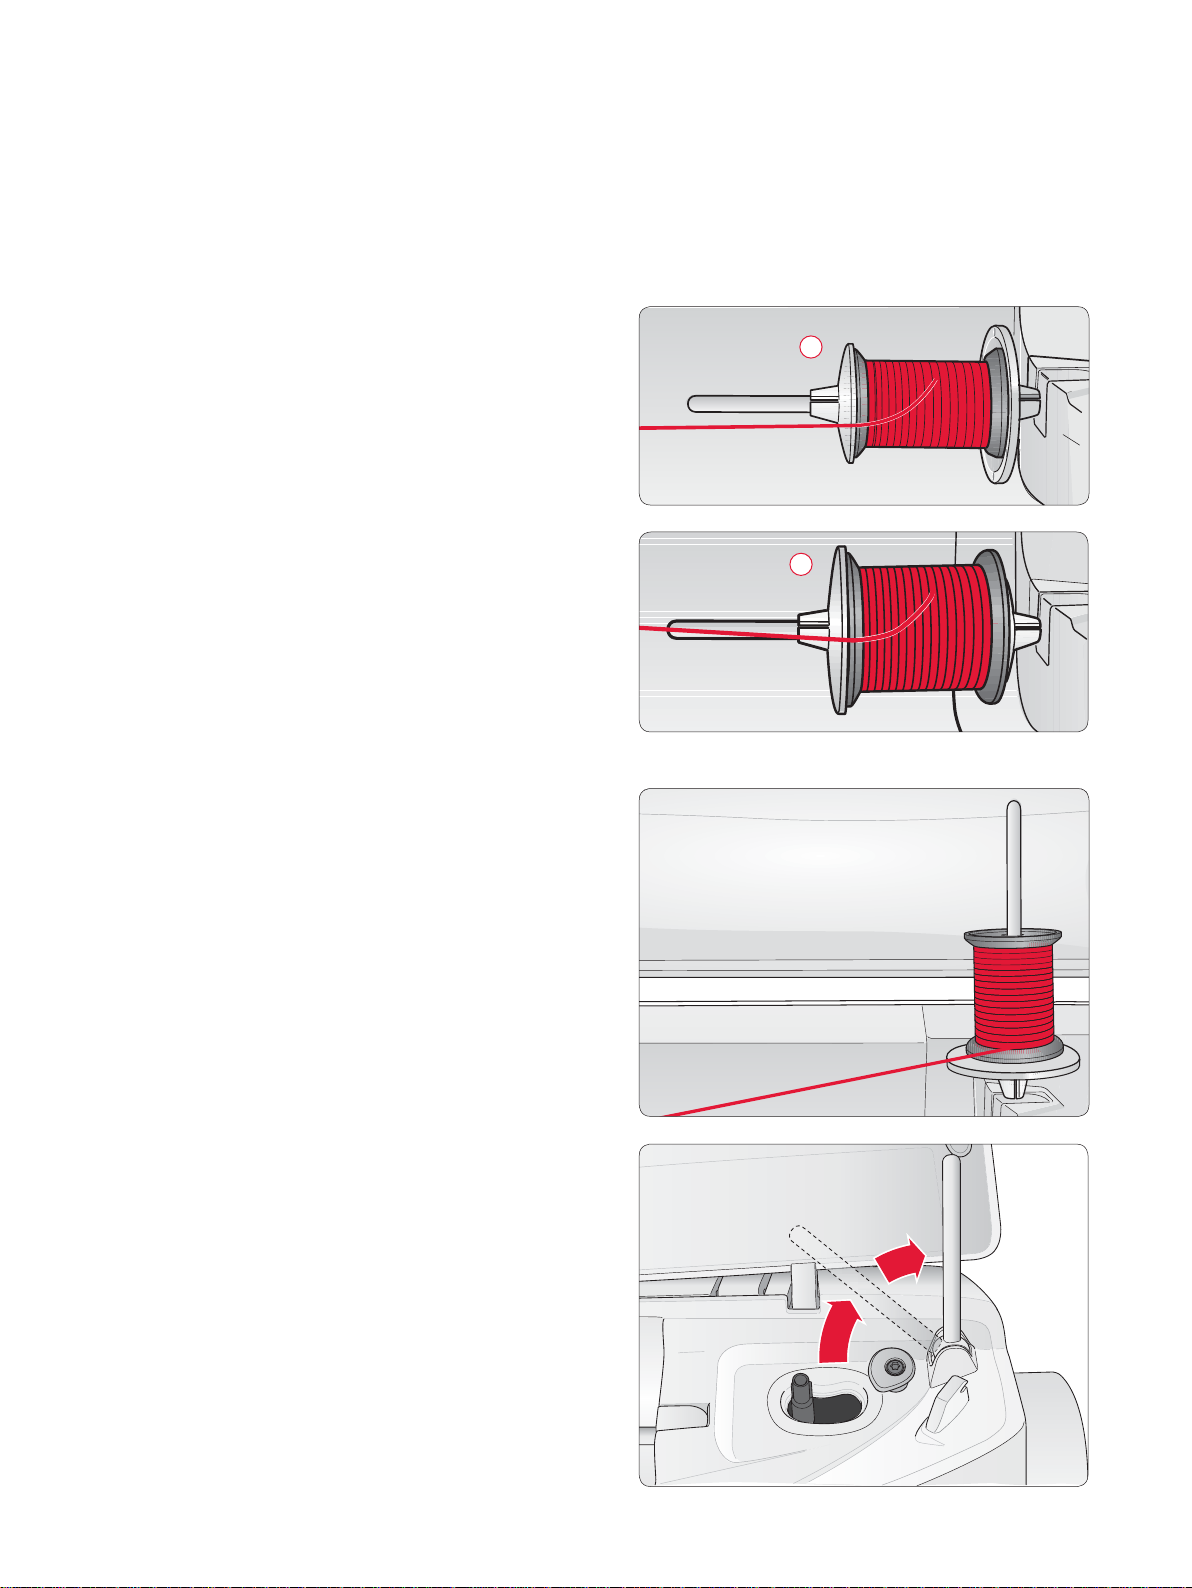
SPOOL PINS AND SPOOL CAPS
Your sewing machine has two spool pins, a main spool pin and an auxiliary spool pin. The spool pins are designed for all types
of thread. The main spool pin is adjustable and can be used in a horizontal position (the thread reels off the stationary spool) or
in a vertical position (the thread spool rotates). Use the horizontal position for all regular sewing threads and the vertical position
for large spools or specialty threads.
Horizontal Position
Lift the spool pin up slightly from its horizontal position to
easily place the thread spool on the pin. The thread should reel
over the top, in a counterclockwise direction, as shown in the
picture. Slide on a spool cap and then move the spool pin back
to the horizontal position.
Each machine comes with two spool caps on the spool pin.
For medium sized thread spools, the medium sized cap (A) is
placed in front of the spool. For large thread spools, the large
cap (B) is placed in front of the spool.
The fl at side of the spool cap should be pressed fi r mly against
the spool. There should be no space between spool cap and
thread spool.
A small spool cap is included as an accessory for your
machine. The small spool cap can be used for small thread
spools.
A
B
Vertical Position
Lift the spool pin up and all the way to the right. Lock the
spool pin in the vertical position by slightly pressing it down.
Slide on the large spool cap. For spools smaller than the
medium size spool cap or when using specialty threads, place
a felt pad under the thread spool to prevent the thread from
reeling off too fast. For larger spools, the felt pad is not
needed.
Note: No spool cap should be placed on top of the spool as this prevents
the spool from rotating.
Auxiliary Spool Pin
The auxiliary spool pin is used when winding a bobbin from
a second spool of thread or for a second spool when sewing
with a twin needle.
Lift the auxiliary spool pin up and to the left. Slide on a spool
cap. For spools smaller than the medium size spool cap, place
a felt pad under the thread spool to prevent the thread from
reeling off too fast. For larger spools, the felt pad shall not be
used.
14 – Getting Ready to Sew
C
D
E
A
B
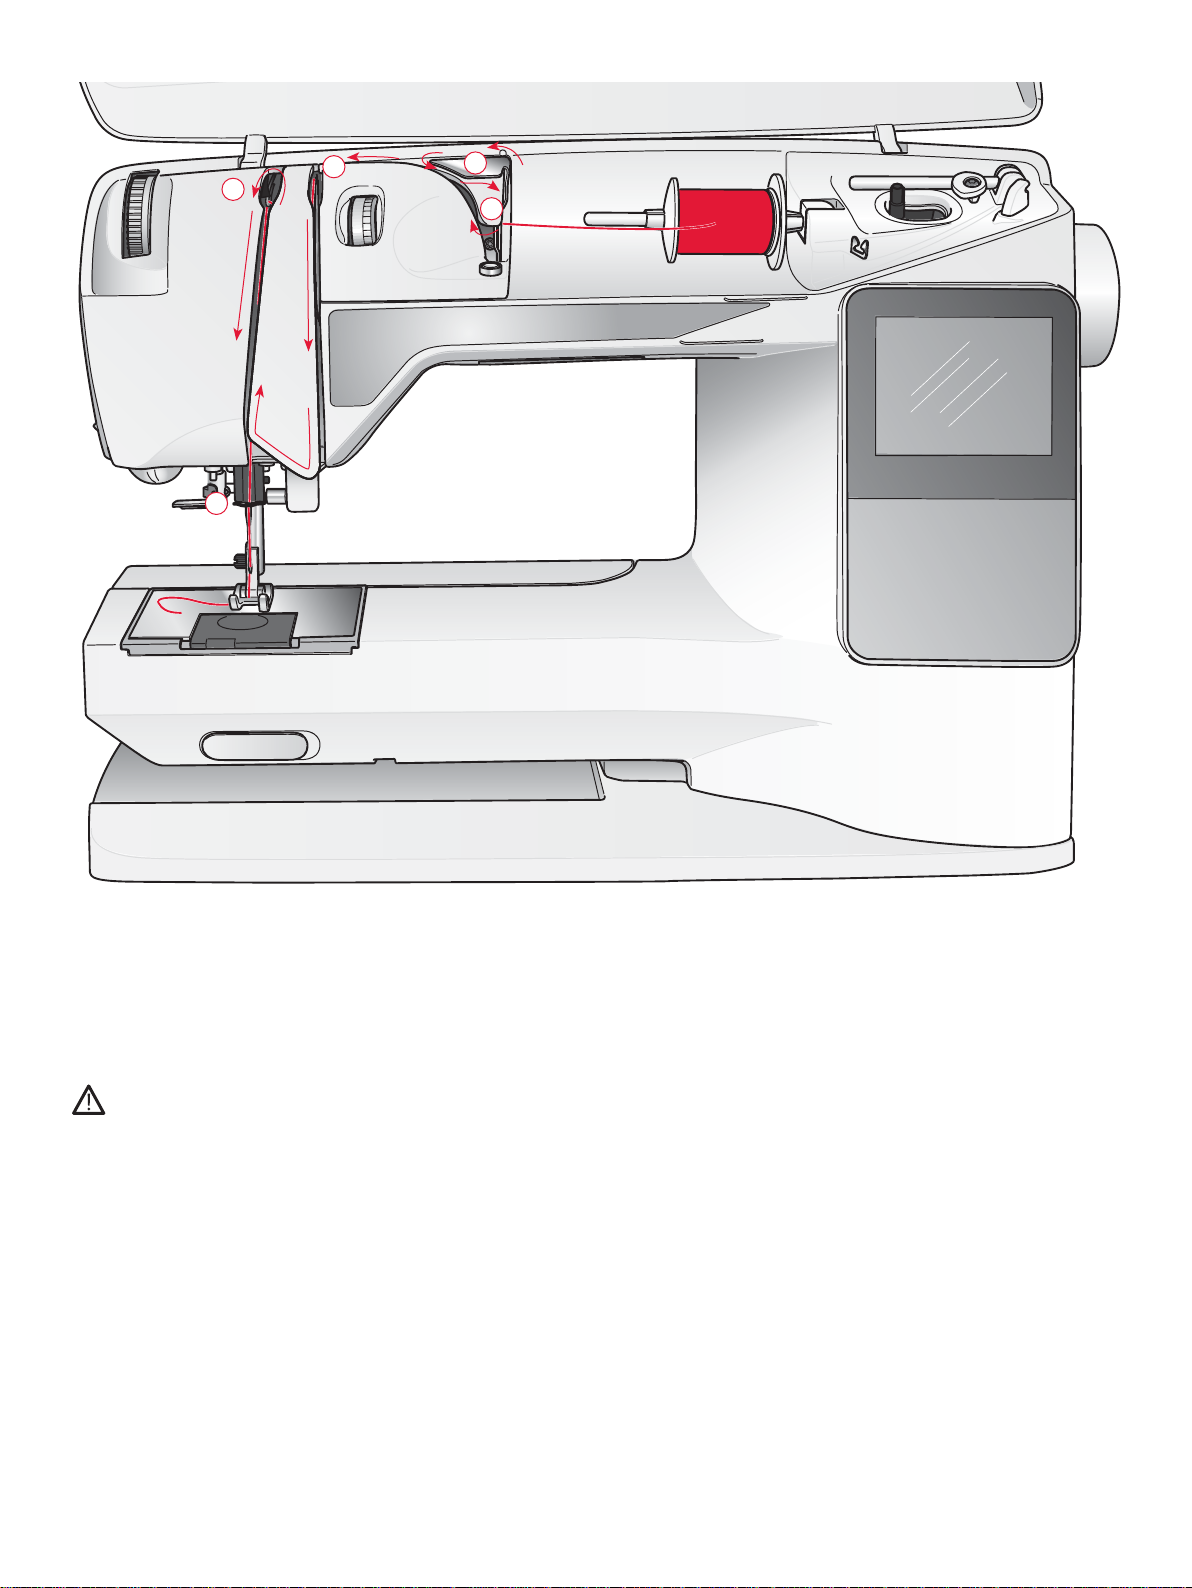
THREADING THE UPPER THREAD
Make sure the presser foot is raised and the needle is in the up
position
Press the ON/OFF switch to OFF.
1. Place the thread on the spool pin and the spool cap on the
spool pin as described on page 14.
2. Spool pin in horizontal position:
Bring the thread over and behind the pre-tension thread
guide (A) and under the thread guide (B).
Spool pin in vertical position:
Instead of bringing the thread into the pre-tension guide
(A), bring it directly under the thread guide (B).
3. Bring the thread down between the thread tension discs
(C).
4. Continue threading in the direction indicated by the arrows.
Bring the thread from the right into the slot on the take-up
lever (D).
5. Take the thread down and behind the last guide just above
the needle (E).
Getting Ready to Sew – 15
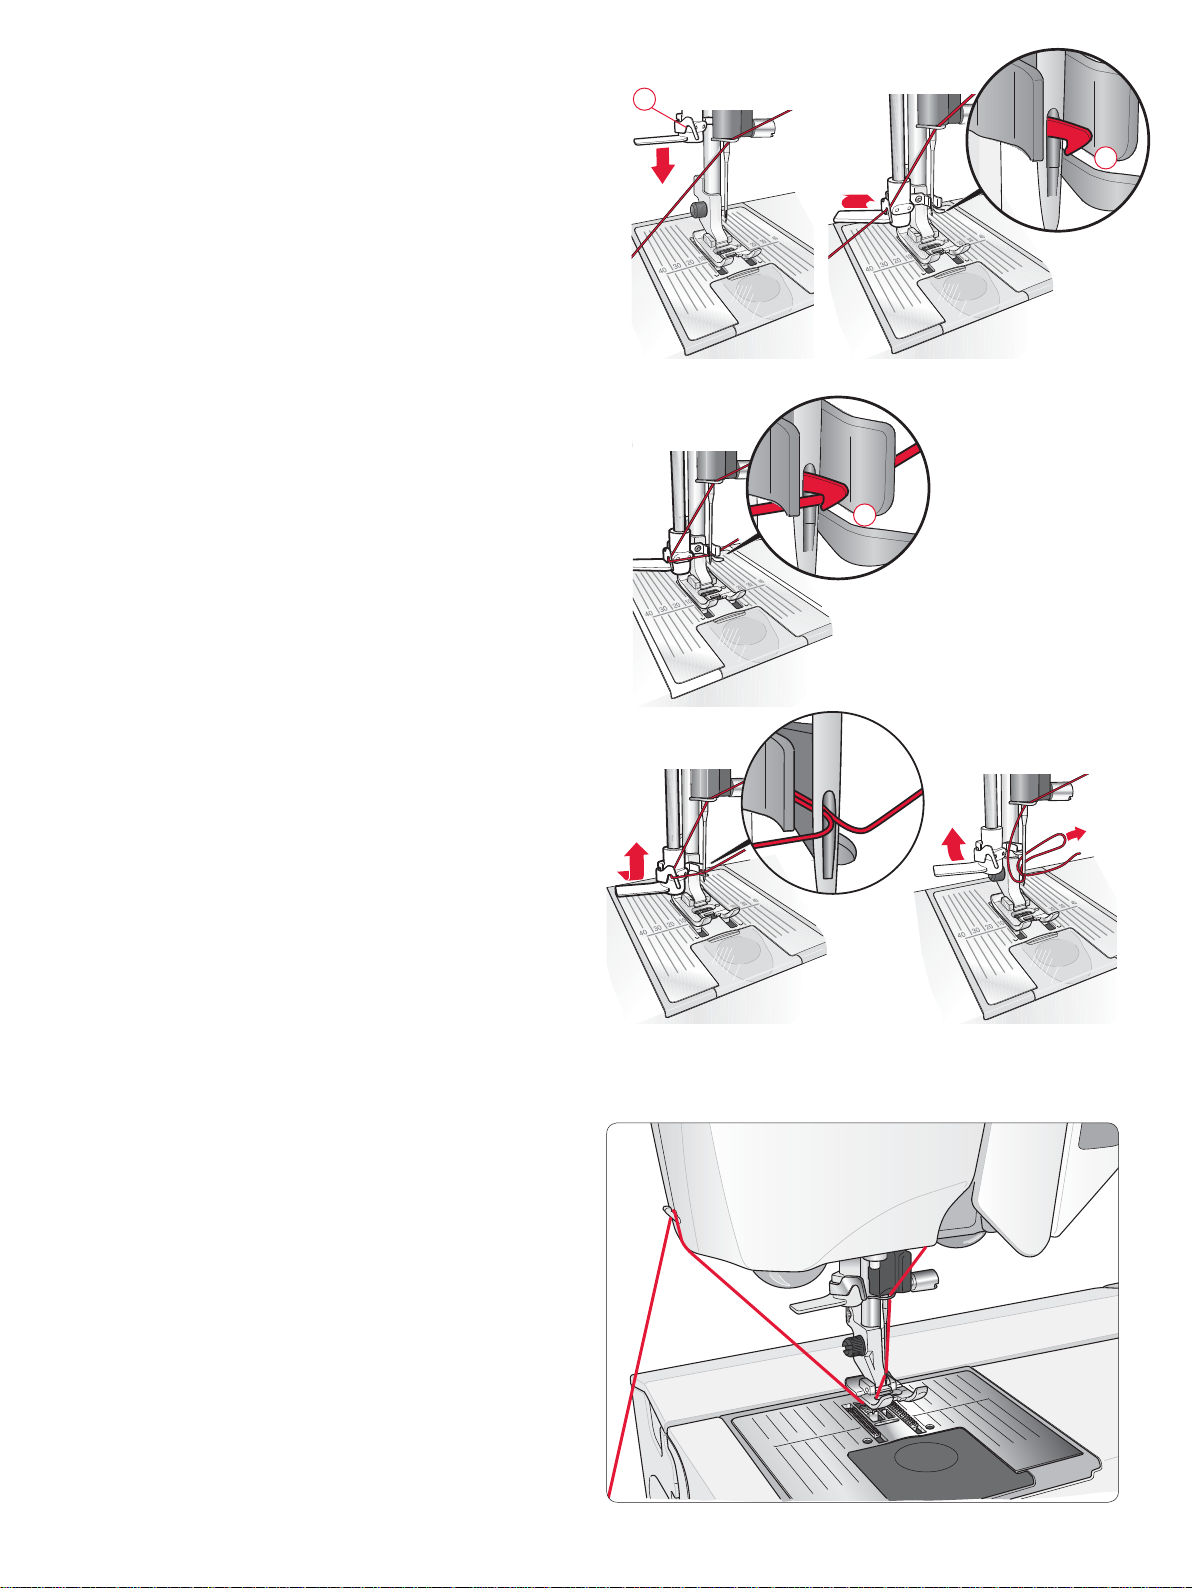
NEEDLE THREADER
The needle must be in the up position to use the built-in
needle threader. We also recommend lowering the presser foot.
1. Use the handle to pull the needle threader all the way
down, catching the thread under the guide (A).
2. Push back to bring the needle threader forward until the
metal fl anges cover the needle. A small hook will pass
through the needle eye (B).
3. Place the thread under the fl anges in front of the needle,
so the thread catches into the small hook (C).
4. Let the needle threader gently swing back. The hook pulls
the thread through the needle eye and forms a loop behind
the needle.
5. Pull the thread loop out behind the needle. Place the thread
under the presser foot.
Note: The needle threader is designed to be used for size 70-120 needles.
You cannot use the needle threader for size 60 needles or smaller, the wing
needle, twin needle, triple needle or when the Sensor One-Step Buttonhole
Foot is on. There are also some other optional accessories that require
manual threading of the needle.
A
B
1. 2.
C
When threading the needle manually, make sure that the needle
is threaded from front to back. The white presser foot ankle
makes it easy to see the eye of the needle. The bobbin case
cover can be used as a magnifying glass.
CUTTING THE THREAD
Once you have fi nished sewing, cut the threads by raising the
presser foot and pulling the threads from the front to the back
into the thread cutter on the left side of the machine.
3.
4.
5.
16 – Getting Ready to Sew
A
B
THREADING FOR TWIN NEEDLE
Press the ON/OFF switch to OFF.
1. Insert a twin needle.
2. Use a second thread spool or wind a bobbin with the
thread you are going to use as the second upper thread.
3. Lift the spool pin up and all the way to the right. Lock
the spool pin in the vertical position by slightly pressing
it down. Slide on a spool cap. For spools smaller than the
medium size spool cap, place a felt pad under the thread
spool.
4. Place the fi rst thread spool on the spool pin. The spool
should rotate in a clockwise direction when the thread reels
off the spool.
5. Left needle: Thread the machine as described on page 13.
Check to ensure that the thread lies between the left thread
tension discs (A). Thread the left needle manually.
Note: Only use symmetrical twin needles (C).
Do not use this type of twin needle (D), since
it may damage your sewing machine.
C
D
6. Pull out the auxiliary spool pin and slide on a spool cap.
For spools smaller than the medium size spool cap, place a
felt pad under the thread spool.
7. Place the second thread on the spool pin. The second
spool should rotate in a counterclockwise direction when the
thread reels off the spool.
8. Right needle: Thread the machine as before but this thread
should lie between the right thread tension discs (A) and
outside the needle thread guide (B). Thread the right needle
manually.
Note: If using specialty threads (such as metallic threads) its weight and
irreglular surface increases the thread tension. By reducing the tension, the
risk of needle breakage is prevented.
Getting Ready to Sew – 17
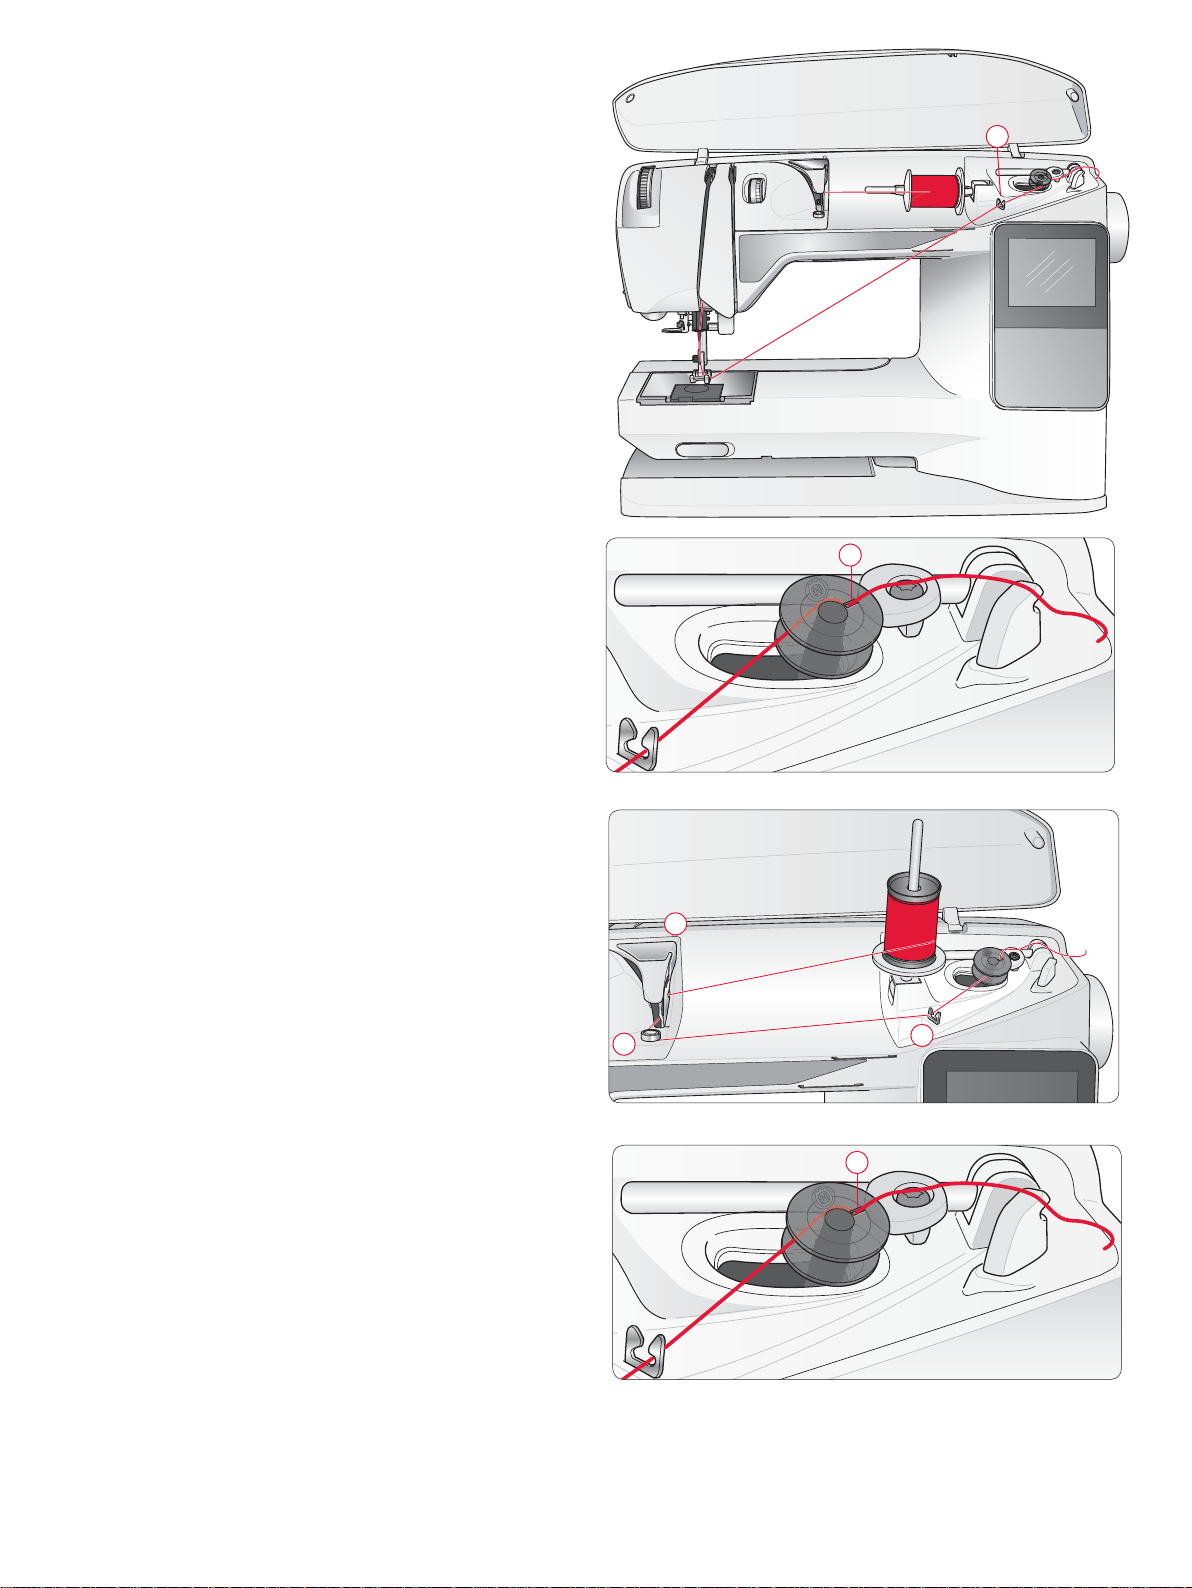
WINDING THE BOBBIN WITH
THE MACHINE THREADED
Make sure that the presser foot is up and the needle is in the
highest position.
Note! Do not use a plastic presser foot when bobbin winding.
1. Place an empty bobbin on the bobbin spindle on the top
of the machine. The bobbin only fi ts on one way, with
the logo facing up. Use only original HUSQVARNA
VIKING
2. Pull the thread from the needle under the presser foot and
to the right through the thread guide (C).
3. Guide the thread through the hole in the bobbin (D) from
the inside to the outside.
Note: When using an earlier version of HUSQVARNA VIKING
bobbins that do not have a hole, wind several turns of thread on the
bobbin to get started.
®
bobbins.
®
C
4. Push the bobbin spindle to the right. A pop-up message
appears on the GraphicDisplay/TouchScreen. Hold the
end of the thread fi rmly when starting to wind. Press the
foot control to start winding. Once the bobbin begins to
wind, cut the excess thread. When the bobbin is full it will
stop rotating. Push the bobbin spindle back to the left,
remove the bobbin and cut off the thread on the thread
cutter.
WINDING THE BOBBIN USING
THE VERTICAL SPOOL PIN
1. Place an empty bobbin on the bobbin spindle on the top
of the machine. The bobbin only fi ts on one way, with
the logo facing up. Use only original HUSQVARNA
VIKING
2. Place the large spool cap and a felt pad under the spool on
the main spool pin set in the vertical position.
3. Bring the thread over and behind the pre-tension thread
guide (A) and down around the thread tension disc (B),
then through thread guide (C) as illustrated.
4. Guide the thread through the hole in the bobbin (D) from
the inside to the outside.
5. Push the bobbin spindle to the right. A pop-up message
appears on the GraphicDisplay/TouchScreen. Hold the
end of the thread fi rmly when starting to wind. Press the
foot control to start winding. Once the bobbin begins to
wind, cut the excess thread. When the bobbin is full it will
stop rotating. Push the bobbin spindle back to the left,
remove the bobbin and cut off the thread on the thread
cutter.
®
bobbins.
D
A
B
D
C
Note: When using an earlier version of HUSQVARNA VIKING
bobbins that do not have a hole, wind several turns of thread clockwise
on the bobbin to get started.
18 – Getting Ready to Sew
®

WINDING THE BOBBIN USING
THE AUXILIARY SPOOL PIN
1. Place an empty bobbin on the bobbin spindle on the top
of the machine. The bobbin only fi ts on one way, with
the logo facing up. Use only original HUSQVARNA
VIKING
®
bobbins.
A
2. Fold out the auxiliary spool pin. Place a spool cap and a
felt pad under the spool.
3. Bring the thread over and behind the pre-tension thread
guide (A) and down around the thread tension disc (B),
then through thread guide (C) as illustrated.
4. Guide the thread through the hole in the bobbin (D) from
the inside to the outside.
5. Push the bobbin spindle to the right. A pop-up message
appears on the GraphicDisplay/TouchScreen. Hold the
end of the thread fi rmly when starting to wind. Press the
foot control to start winding. Once the bobbin begins to
wind, cut the excess thread. When the bobbin is full it will
stop rotating. Push the bobbin spindle back to the left,
remove the bobbin and cut off the thread on the thread
cutter.
INSER TING THE BOBBIN
D
B
C
Press the ON/OFF switch to OFF.
1. Remove the bobbin cover by sliding it towards you.
2. Place the bobbin in the bobbin case. It drops in only one
way with the logo facing up. The thread unreels from the
left of the bobbin. The bobbin will then rotate counterclockwise when you pull the thread.
3. Place your fi nger on the bobbin to keep it from turning as
you pull the thread fi rmly to the right and then to the left
into the tension spring (E) until it “clicks” into place.
4. Continue threading around (F) and to the right of the
thread cutter (G). Slide on the bobbin cover (H). Pull the
thread to the left to cut (I).
1. 2.
F
E
G
3. 4.
I
H
Getting Ready to Sew – 19
THREAD TENSION, 650
Use the recommended top thread tension setting given on
the GraphicDisplay. You might need to adjust the top thread
tension for special threads, fabrics and/or techniques. To set
the tension, turn the numbered tension dial. The higher the
number the tighter the tension.
Normal top thread tension is set to 4-6. When sewing
buttonholes and decorative stitches set thread tension to
around 3. When topstitching with a heavy weight thread
in thick fabric, increase the tension to 7-9. Thread tension
recommendation is always given on the GraphicDisplay for
the selected stitch and fabric.
Make a few tests on a scrap piece of the fabric you are going
to sew and check the tension.
AUT OMATIC THREAD TENSION, 670
The 670 model automatically sets the best thread tension
for the selected stitch and fabric. The thread tension can be
adjusted for specialty thread, techniques or fabric. Touch + to
increase the thread tension and - to decrease it.
Correct and Incorrect Thread Tension
To understand the correct thread tension, sew a few sample
straight stitches at different settings.
1. Begin with a tension that is too loose, i.e. set at the lowest
number. The bobbin thread will lie straight and the top
thread will be drawn to the underside of the fabric.
2. If you set the tension at the highest number, the bobbin
thread will be visible on the top side of the fabric. The
seam may pucker and the top thread might break.
3. The correct thread tension is set when the threads interlock
in between both fabric layers or, in the case of decorative
stitches, on the underside.
1
2
3
ST ARTING TO SEW
A straight stitch is selected by default when you turn on the machine. Before starting to sew, select your fabric quality in the
Exclusive SEWING ADVISOR™ feature, and set yout machine according to the recommendations on the GraphicDisplay/
TouchScreen (page 46).
To start sewing, place top and bobbin thread under the presser foot and to the back. For best results when beginning at the
edge of the fabric, place a fi nger on the threads to hold them in place as you begin.
Place fabric in position under the presser foot. Lower the presser foot and step on the foot control to begin sewing. Guide the
fabric gently with your hands as the machine is feeding.
See page 26 (650)/35 (670) for reference on how to select another stitch or how to use the Exclusive SEWING ADVISOR™
feature (page 46).
20 – Getting Ready to Sew
 Loading...