

Page 1
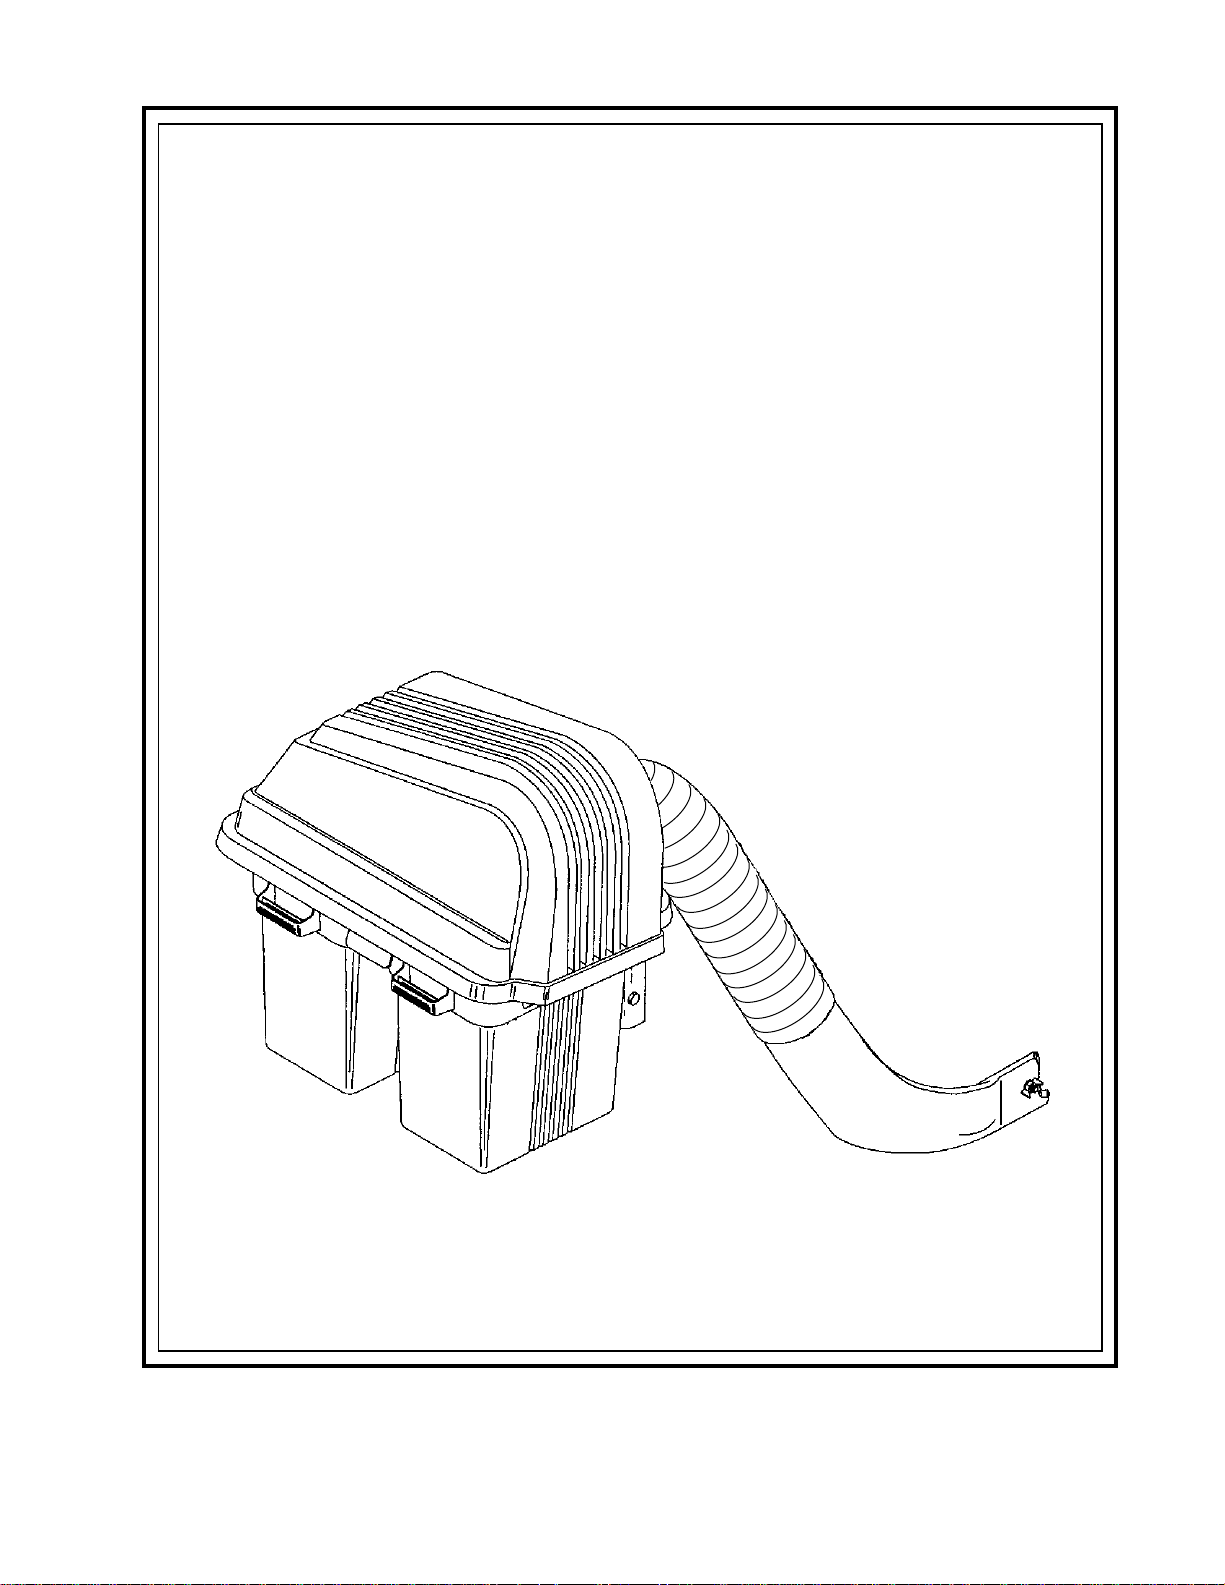
For Husqvarna Parts Call 606-678-9623 or 606-561-4983
Operator And
Parts Manual
For
38 Inch Consumer Z
Grass Catcher
MANUAL NO. 539110995 REV. 01 (05/26/04)
www.mymowerparts.com
Model:
110163 / CZ38
Page 2

For Husqvarna Parts Call 606-678-9623 or 606-561-4983
SAFETY RULES
SAFE OPERATION PRACTICES FOR RIDE-ON MOWERS
DANGER !
THIS CUTTING MACHINE IS CAPABLE OF AMPUTATING HANDS AND FEET AND THROWING
OBJECTS. FAILURE TO OBSERVE THE FOLLOWING SAFETY INSTRUCTIONS COULD
RESULT IN SERIOUS INJURY OR DEATH.
I. GENERAL OPERATION
• Read, understand and follow all instruc-
tions in the manual and on the machine
before starting.
• Only allow responsible adults, who are
familiar with the instructions, to operate the
machine.
• Clear the area of objects such as rocks,
stones, toys, wire etc., which could be
picked up and thrown by the blades.
• Be sure the area is clear of all people and
pets before mowing. Stop the machine if
anyone enters the area.
• Never carry passengers or children even with
blades off.
• Do not mow in reverse unless absolutely
necessary. Always look down and behind
before and while backing.
• Be aware of the mower discharge direction
and do not direct it towards anyone. Do not
operate the mower without either the entire
grass catcher or the guard in place.
• Slow down before turning.
• Never leave a running machine unattended.
Always turn off theblades, set the parking
brake, stop the engine and remove the key
before leaving the machine.
• Turn off blades when not mowing.
• Stop engine before removing grass catcher
or unclogging chute.
• Mow only in daylight or good artificial light.
• Do not operate the machine while under the
influence of alcohol or drugs.
• Watch out for traffic when operating near or
crossing roadways.
• Use extra care when loading and unloading
the machine onto a trailer or truck.
• Data indicates that operators, age 60 years
and above, are involved in a large percentage of riding mower-related injuries. These
operators should evaluate their ability to
operate the riding mower safely enough to
protect themselves and others from serious
injury.
• Keep machine free of grass, leaves or other
debris buildup which can touch hot exhaust/
engine parts and burn. Do not allow the
mower deck to plow leaves or other debris
which can cause buildup to occur. Clean
any oil or fuel spillage before operating or
storing the machine. Allow machine to cool
before storage.
II. SLOPE OPERATION
Slopes are a major factor related to loss-ofcontrol and tip-over accidents, which can result
in severe injury or death. All slopes require extra
caution. If you cannot back up the slope or if you
feel uneasy on it, do not mow it.
DO:
• Mow up and down slopes (10° Max.), not
across.
• Remove obstacles such as rocks, tree
limbs, etc.
• Watch for holes, ruts, or bumps. Uneven
terrain could overturn the machine. Tall
grass can hide obstacles.
• Use slow speed. Choose a low speed so
that you will not have to stop while on the
slope.
• Use extra care with grass catchers or other
attachments. These can change the
stability of the machine.
• Keep all movement on the slopes slow and
gradual. Do not make sudden changes in
speed or direction.
• Avoid starting or stopping on a slope. If tires
lose traction, disengage the blades and
proceed slowly straight down the slope.
©2004 HTC. All Rights Reserved.
2
Beatrice, NE. Printed in U.S.A.
www.mymowerparts.com
Page 3

For Husqvarna Parts Call 606-678-9623 or 606-561-4983
SAFETY RULES
SAFE OPERATION PRACTICES FOR RIDE-ON MOWERS
DO NOT:
• Do not turn on slopes unless necessary,
and then, turn slowly and gradually downhill,
if possible.
• Do not mow near drop-off, ditches, or
embankments. The mower could suddenly
turn over if a wheel is over the edge of a cliff
or ditch, or if an edge caves in.
• Do not mow on wet grass. Reduced traction could cause sliding.
• Do not try to stabilize the machine by
putting your foot on the ground.
• Do not use grass catcher on steep slopes.
III. CHILDREN
Tragic accidents can occur if the operator is not
alert to the presence of children. Children are
often attracted to the machine and the mowing
activity. Never assume that children will remain
where you last saw them.
• NEVER allow children to operate the
machine.
• Keep children out of the mowing area and
under the watchful care of another responsible adult.
• Be alert and turn off the machine if children
enter the area.
• Before and when backing, look behind and
down for small children.
• Never carry children. They may fall off and
be seriously injured or interfere with safe
machine operation.
• Use extra care when approaching blind
corners, shrubs, trees, or other objects that
may obscure vision.
IV. SERVICE
• The operation of any mower can result in
foreign objects thrown into the eyes, which
` can result in severe eye damage. Always
wear safety glasses or eye shields while
operating your mower or performing any
adjustments or repairs. We recommend a
wide vision safety mask over spectacles or
standard safety glasses.
• Use extra care in handling gasoline and
other fuels. They are flammable and vapors
are explosive.
- Use only an approved container.
- Never remove gas cap or add fuel with the
engine running. Allow engine to cool before
refueling. Do not smoke.
- Never refuel the machine indoors.
- Never store the machine or fuel container
inside where there is an open flame, such
as a water heater.
• Never run a machine inside a closed area.
• Keep nuts and bolts, especially blade
attachment bolts, tight and keep equipment
in good condition.
• Never tamper with safety devices. Check
there proper operation regularly.
• Keep machine free of grass, leaves, or other
debris buildup. Clean oil or fuel spillage.
Allow machine to cool before storing.
• Stop and inspect the equipment if you strike
an object. Repair, if necessary, before
restarting.
• Never make adjustments or repairs with the
engine running.
• Grass catcher components are subject to
wear, damage, and deterioration, which
could expose moving parts or allow objects
to be thrown. Frequently check components
and replace with manufacturer’s recommended parts, when necessary.
• Mower blades are sharp and can cut. Wrap
the blade(s) or wear gloves, and use extra
caution when servicing them.
• Check brake operation frequently. Adjust and
service as shown in the Operator’s manual.
www.mymowerparts.com
3
Page 4
For Husqvarna Parts Call 606-678-9623 or 606-561-4983
SAFETY RULES
SAFE OPERATION PRACTICES FOR RIDE-ON MOWERS
• NEVER allow children to operate the
machine.
• Be sure the area is clear of other people
before mowing. Stop machine if anyone
enters the area.
• Never carry passengers or children even
with the blades off.
• Do not drive in reverse unless absolutely
necessary. Always look down and behind
before and while backing.
• Never carry children. They may fall off and
be seriously injured or interfere with safe
machine operation.
• Keep children out of the mowing area and
under the watchful care of another responsible adult.
• Be alert and turn machine off if children
enter the area.
• Before and when backing, look behind and
down for small children.
• Mow up and down slopes (10° Max), not
across.
• Remove obstacles such as rocks, tree
limbs, etc.
• Watch for holes, ruts, or bumps. Uneven
terrain could overturn the machine. Tall
grass can hide obstacles.
• Use a slow speed while on slope or hill.
• Avoid starting or stopping on a slope. If tires
lose traction, disengage the blades and
proceed slowly straight down the slope.
• If machine stops while going uphill, disengage blades, shift into reverse and back
down slowly.
• Do not turn on slopes unless necessary,
and then, turn slowly and gradually downhill,
if possible.
CAUTION
Look for this symbol to point out important safety precautions. It means CAUTION!!! BECOME ALERT!!! YOUR SAFETY
IS INVOLVED.
CAUTION
In order to prevent accidental starting when
setting up, transporting, adjusting or making repairs, always disconnect spark plug
wire and place wire where it cannot contact
spark plug.
WARNING
DO NOT tow any trailers, etc. with this
mower. They may jackknife or over turn
causing damage to the mower and possibly serious injury to the operator.
WARNING
Engine exhaust, some of its constituents,
and certain vehicle components contain or
emit chemicals known to the State of California to cause cancer and birth defects or
other reproductive harm.
WARNING
Battery posts, terminals and related accessories contain lead and lead compounds,
chemicals know to the State of California to
cause cancer and birth defects or other reproductive harm. Wash hands after handling.
4
www.mymowerparts.com
Page 5

For Husqvarna Parts Call 606-678-9623 or 606-561-4983
CONGRATULATIONS on your purchase of a
new Grass Catcher. It has been designed, engineered and manufactured to give you the best
possible dependability and performance.
Should you experience any problem you cannot
easily remedy, please contact your nearest authorized service center/ department. They have
competent, well-trained technicians and the
proper tools to service or repair this mower.
Please read and retain this manual. The instructions will enable you to assemble and maintain
your Grass Catcher properly. Always observe the
"SAFETY RULES”.
NOTE: To make debris disposal easier 30 gallon
(3.0 mil) plastic trash bags may be inserted in
plastic grass containers.
KNOW YOUR GRASS CATCHER
READ THIS OPERATION MANUAL AND SAFETY
RULES BEFORE ASSEMBLING OR OPERATING
YOUR GRASS CATCHER. Compare the illustrations with the carton contents to familiarize yourself with the parts before starting the assembly.
Study the operating instructions and safety precautions thoroughly to insure proper functioning of
your Grass Catcher and to prevent injury to yourself and others. Save this manual for future reference.
WARNING
The operation of any mower can result in
foreign objects thrown into the eyes, which
can result in severe eye damage. ALWAYS
wear safety glasses or eye shields before
starting your mower and while mowing. We
recommend a wide vision safety mask for
over the spectacles or standard safety
glasses.
TABLE OF CONTENTS
SAFETY RULES ........................................... 2-4
CARTON CONTENTS ..................................... 6
ASSEMBLY .............................................. 7 - 11
OPERATION .................................................. 12
www.mymowerparts.com
CUSTOMER RESPONSIBILITIES ................. 13
STORAGE ..................................................... 13
PARTS .................................................... 14 - 15
5
Page 6
For Husqvarna Parts Call 606-678-9623 or 606-561-4983
UNPACKING INSTRUCTIONS
•
Remove all parts and packing materials
from carton.
• Check carton contents against list. Be sure
all parts are there.
TOOLS REQUIRED FOR ASSEMBLY
(2) 9/16" Wrenches
(2) 1/2” Wrenches
(2) 7/16” Wrenches
(1) 9/16” Socket & Ratchet
Standard Screw Driver
Ft/Lbs Torque Wrench
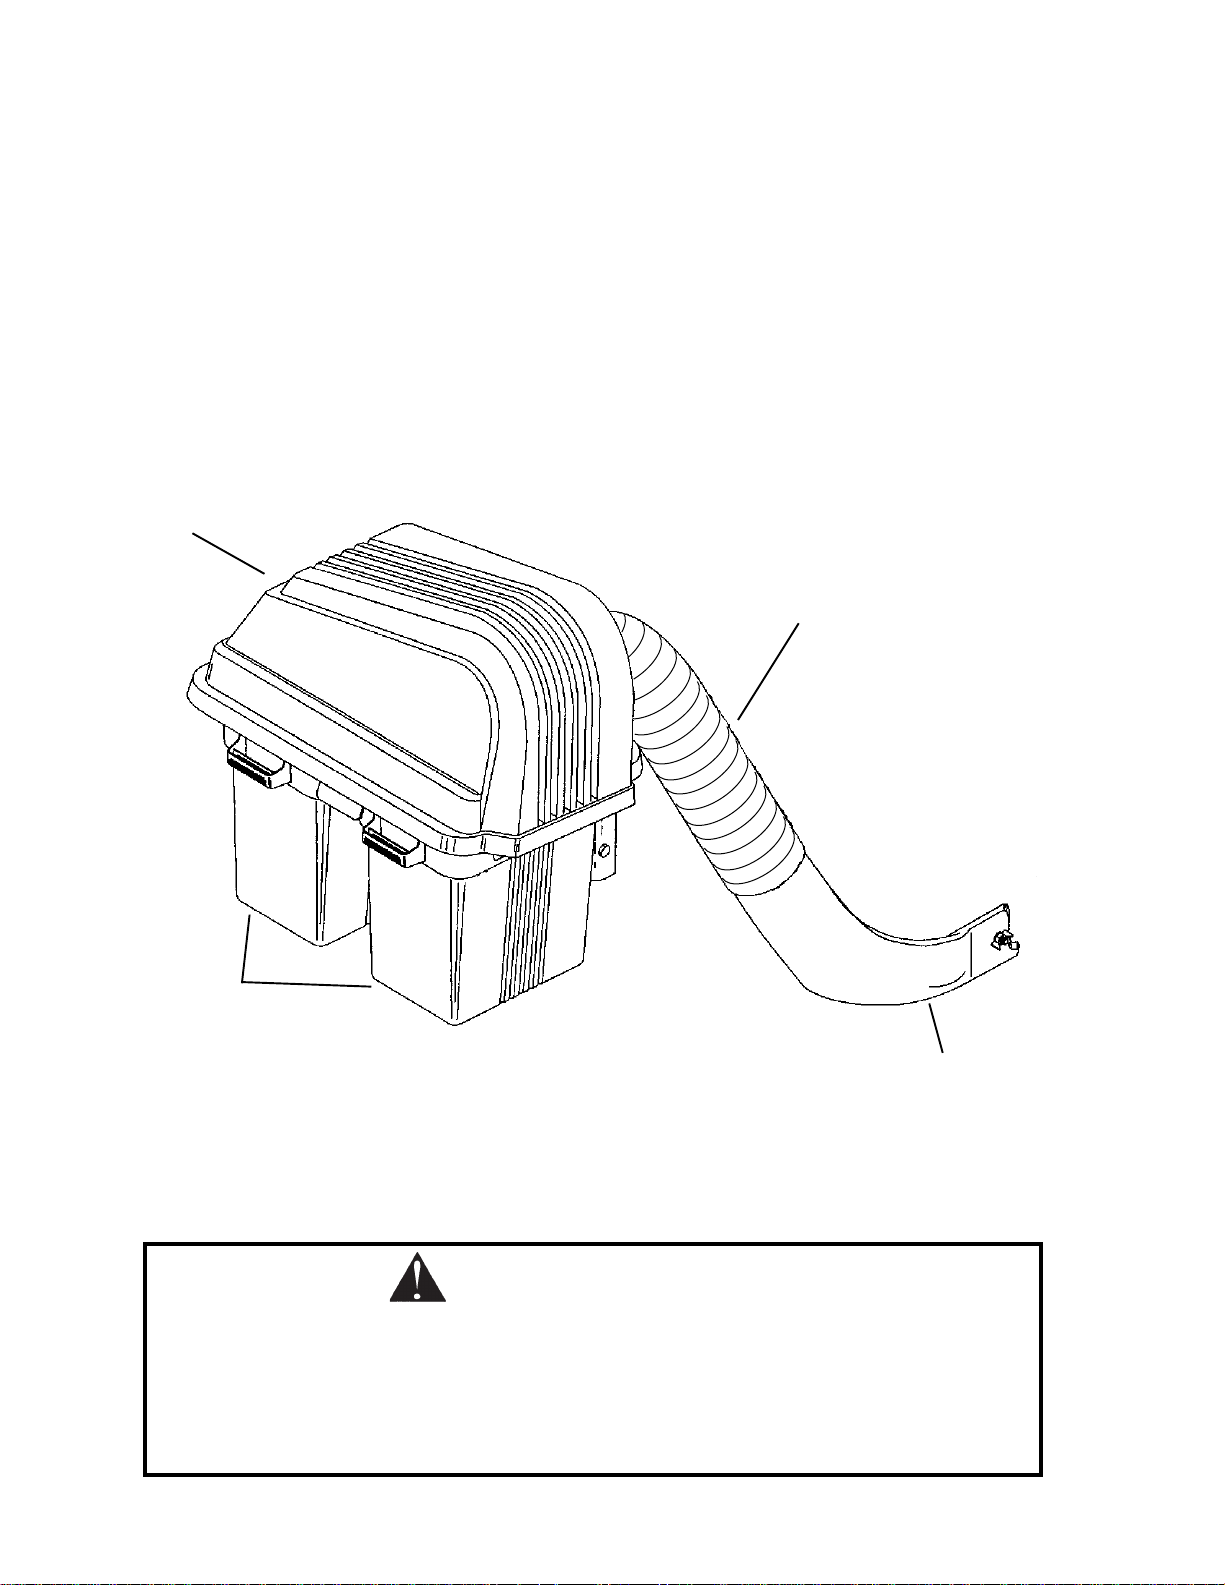
PARTS IDENTIFICATION
COVER
ASSEMBLY
CARTON CONTENTS:
2 - Container Tops 1 - Cover Assembly
2 - Container Bottoms 1 - Inlet
1 - Hose 1 - Bag of Parts
1 - Lower Chute 1 - Owner’s Manual
2 - High Lift Blades
HOSE
GRASS
CATCHER
CONTAINERS
LOWER CHUTE
NOTE: When right hand (R.H.) and left hand (L.H.) are mentioned in this manual, it means when you
are seated on the mower in the operator’s position.
CAUTION
BEFORE ASSEMBLING GRASS CATCHER TO MOWER:
• Set parking brake.
• Place motion control levers in "NEUTRAL " position.
• Turn ignition key "OFF" and remove key.
• Make sure the blades and all moving parts have completely stopped.
• Disconnect spark plug and place wire where it cannot come in contact with plug.
6
www.mymowerparts.com
Page 7
For Husqvarna Parts Call 606-678-9623 or 606-561-4983
ASSEMBLY
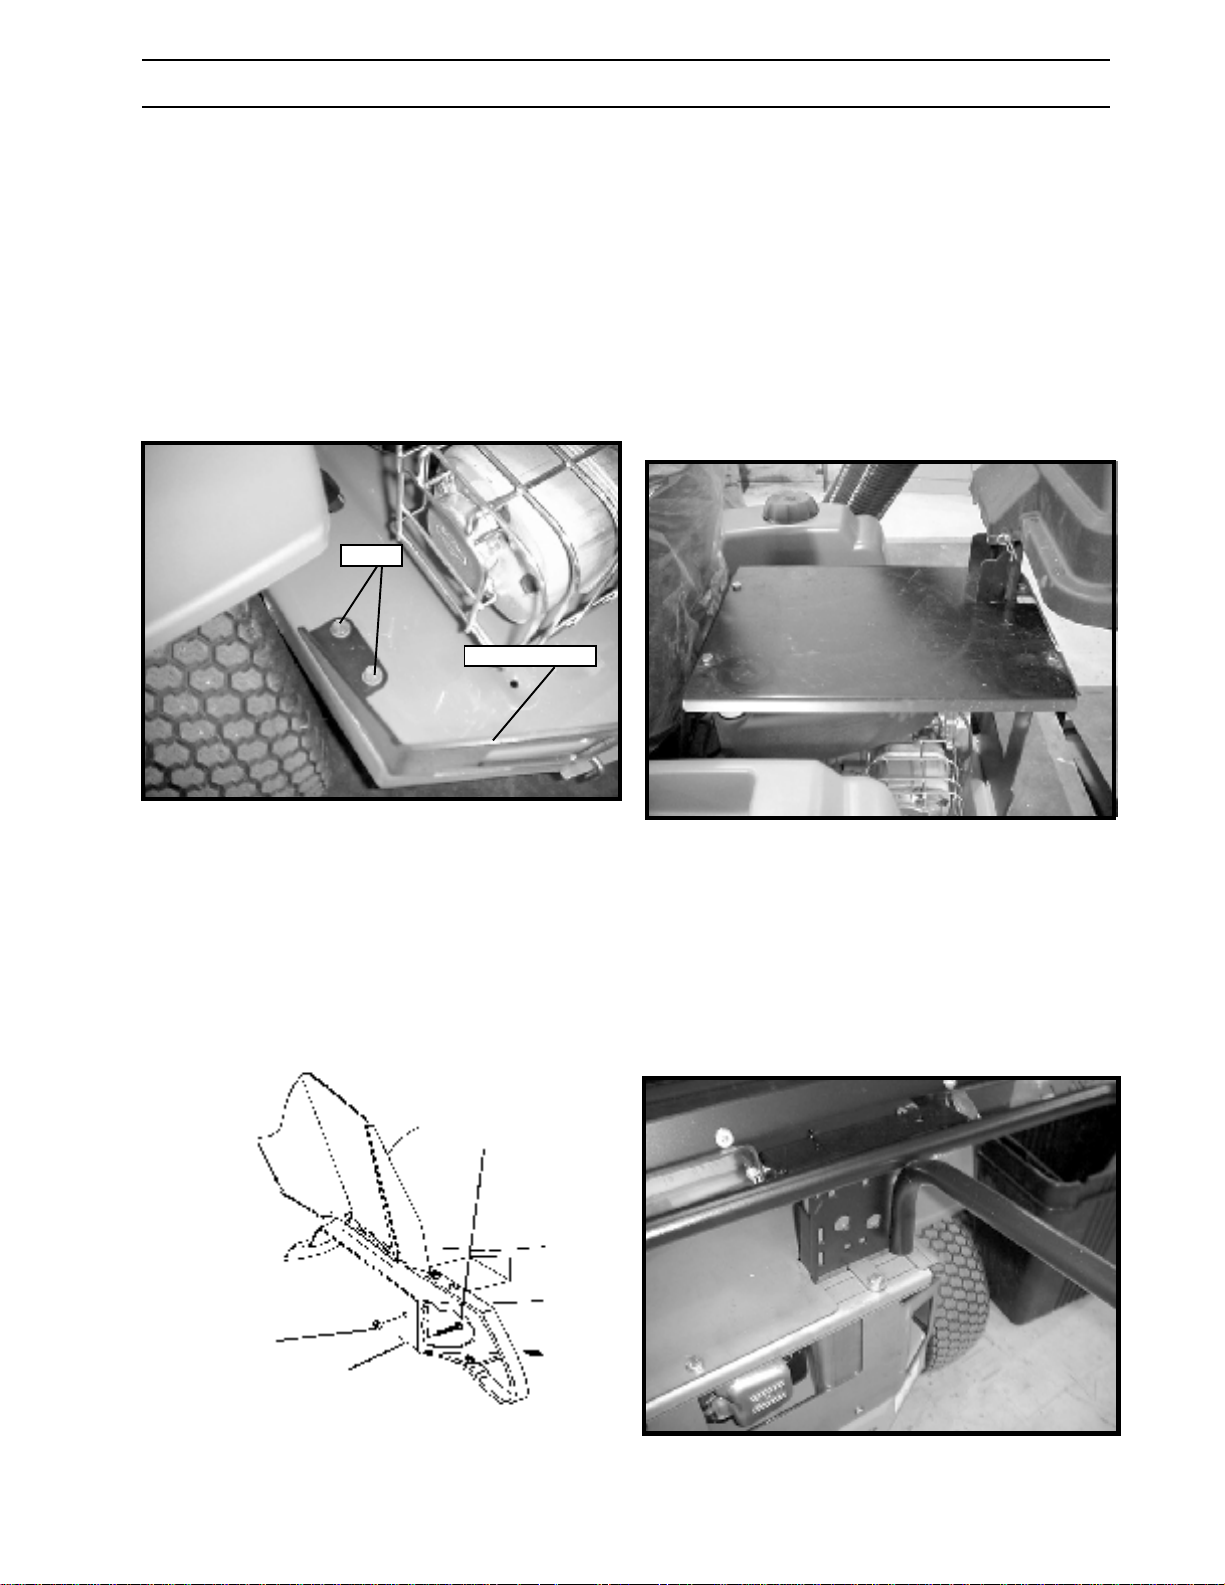
REMOVAL OF UTILITY BOX, AND
REAR GUARD (See Figure 1.)
1
NOTE: Before mounting your new bagger
you will have to remove the mower’s utility
box and rear guard.
1. Remove the hairpins and clevis pins that
secure the utility box to the unit (all four
corners).
2. Using a 1/2” wrench, remove the six bolts
that secure the rear bracket to the unit.
BOLTS
REAR BRACKET
INSTALLATION OF THE REAR GUARD,
PLATE AND HANGER
3
(See Figure 3A and 3B.)
1. Using the 6 bolts removed from the rear
bracket, install the new rear bracket (Part No.
110485).
2. Place the hanger over the tab on the plate.
See Figure 3A.
FIGURE 1
MOWER DECK BAFFLE
(See Figure 2.)
2
1. Raise your mower deck to its highest position.
2. Install the hex bolt, and locknut through
mower deck baffle and tighten securely.
HEX BOLT
LOCKNUT
MOWER
DECK
BAFFLE
FIGURE 3A
3. Using the four bolts (HCS 3/8 x 3/4) and nyloc
nuts (3/8), install the plate to the rear bracket
and front bracket.
4. Secure the hanger to the rear bracket with
two bolts (HCS 5/16 x 3/4) and nyloc nuts
(5/16). See Figure 3B.
FIGURE 2
www.mymowerparts.com
FIGURE 3B
7
Page 8
For Husqvarna Parts Call 606-678-9623 or 606-561-4983
ASSEMBLY
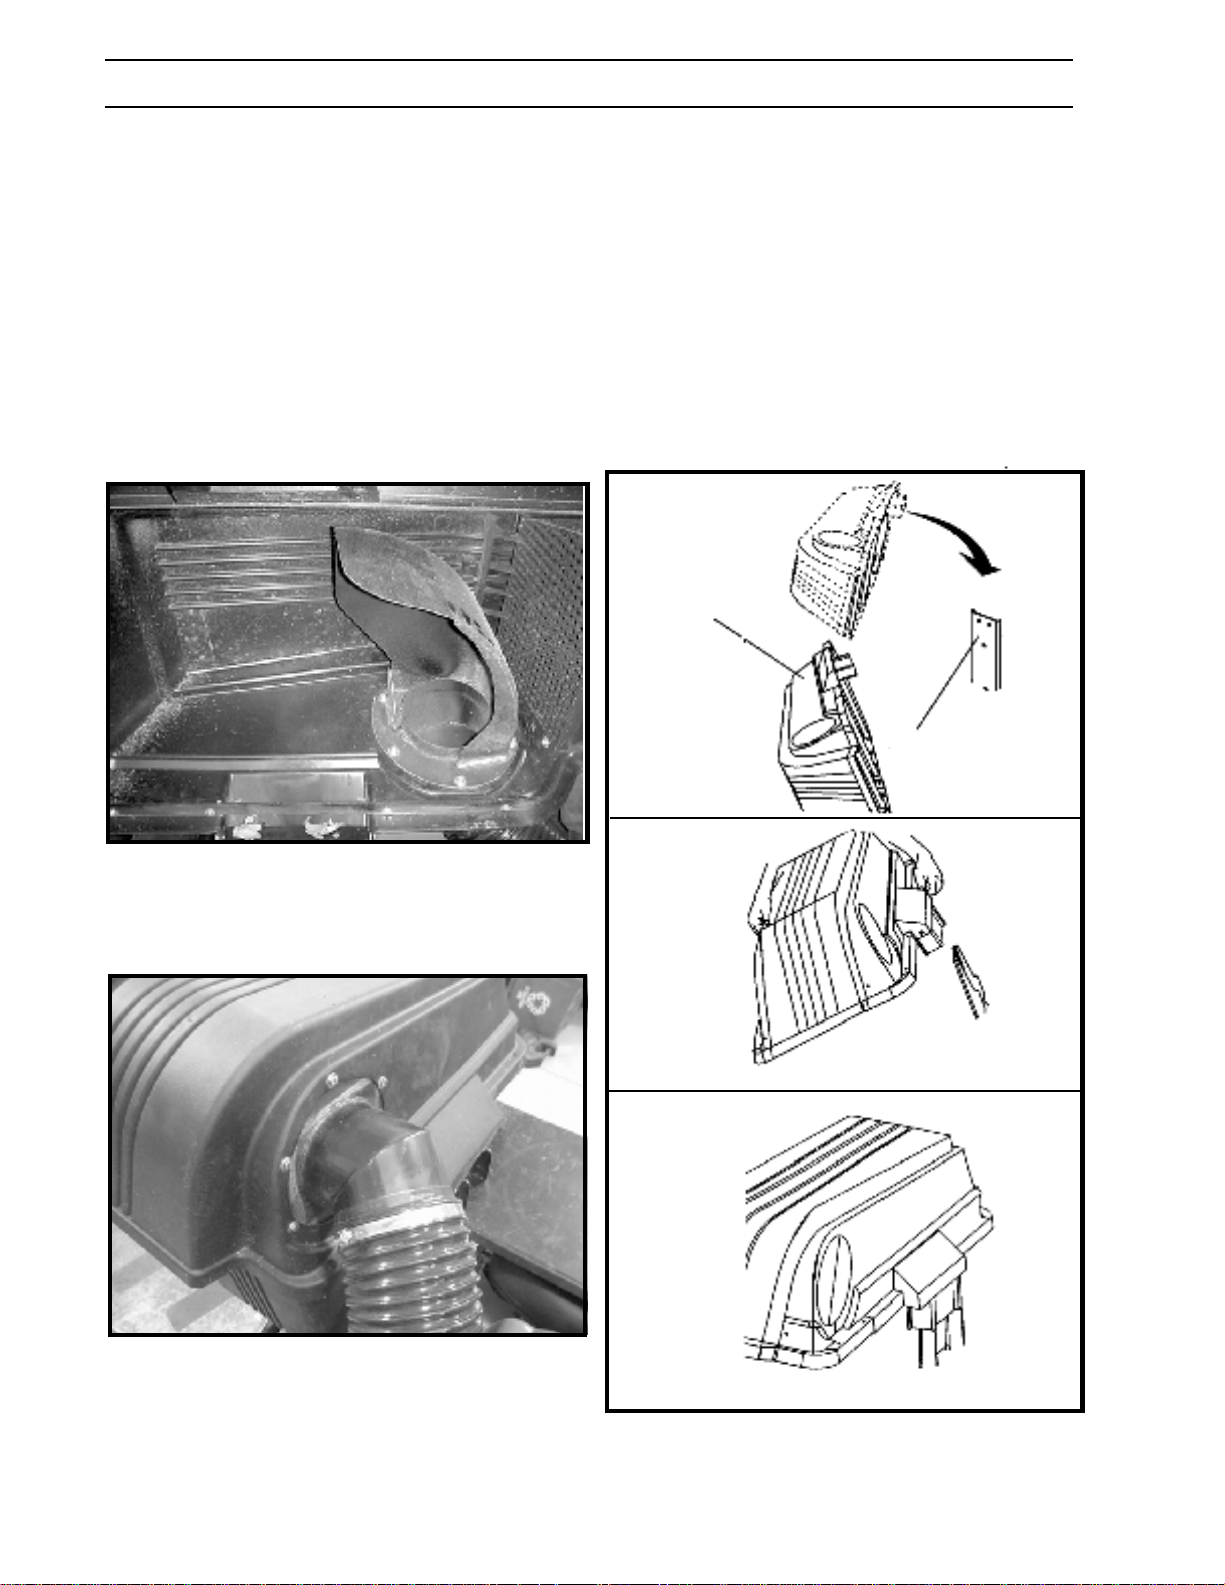
INSTALLATION OF THE INLET
(See Figure 4A and 4B)
4
1. Place the cover assembly upside down on a
table. Secure the six bolts (HCS 1/4 x 3/4),
nyloc nuts (1/4) and twelve flat washers (1/4).
2. Place one washer on each bolt.
3. Place the inlet in the cover and direct it out of
the large hole on the front side of the cover.
4. Place the bolt and washer thru each of the six
holes. See Figure 4.
5. Place the other six washer and nuts on the
bolts and tighten.
MOUNTING COVER ASSEMBLY TO
SUPPORT ASSEMBLY
5
(See Figure 5)
NOTE: For ease of assembly, you may wish to
obtain the assistance of another person for
mounting cover assembly to mower.
1. Position cover assembly on ground behind
mower as shown.
2. Lift and rotate cover to align cover brackets
with support assembly.
3. Slide cover assembly down onto the support
assembly.
COVER
ASSEMBLY
INSIDE COVER
FIGURE 4A
SUPPORT
ASSEMBLY
OUTSIDE COVER
FIGURE 4B
FIGURE 5
8
www.mymowerparts.com
Page 9
For Husqvarna Parts Call 606-678-9623 or 606-561-4983
ASSEMBLY
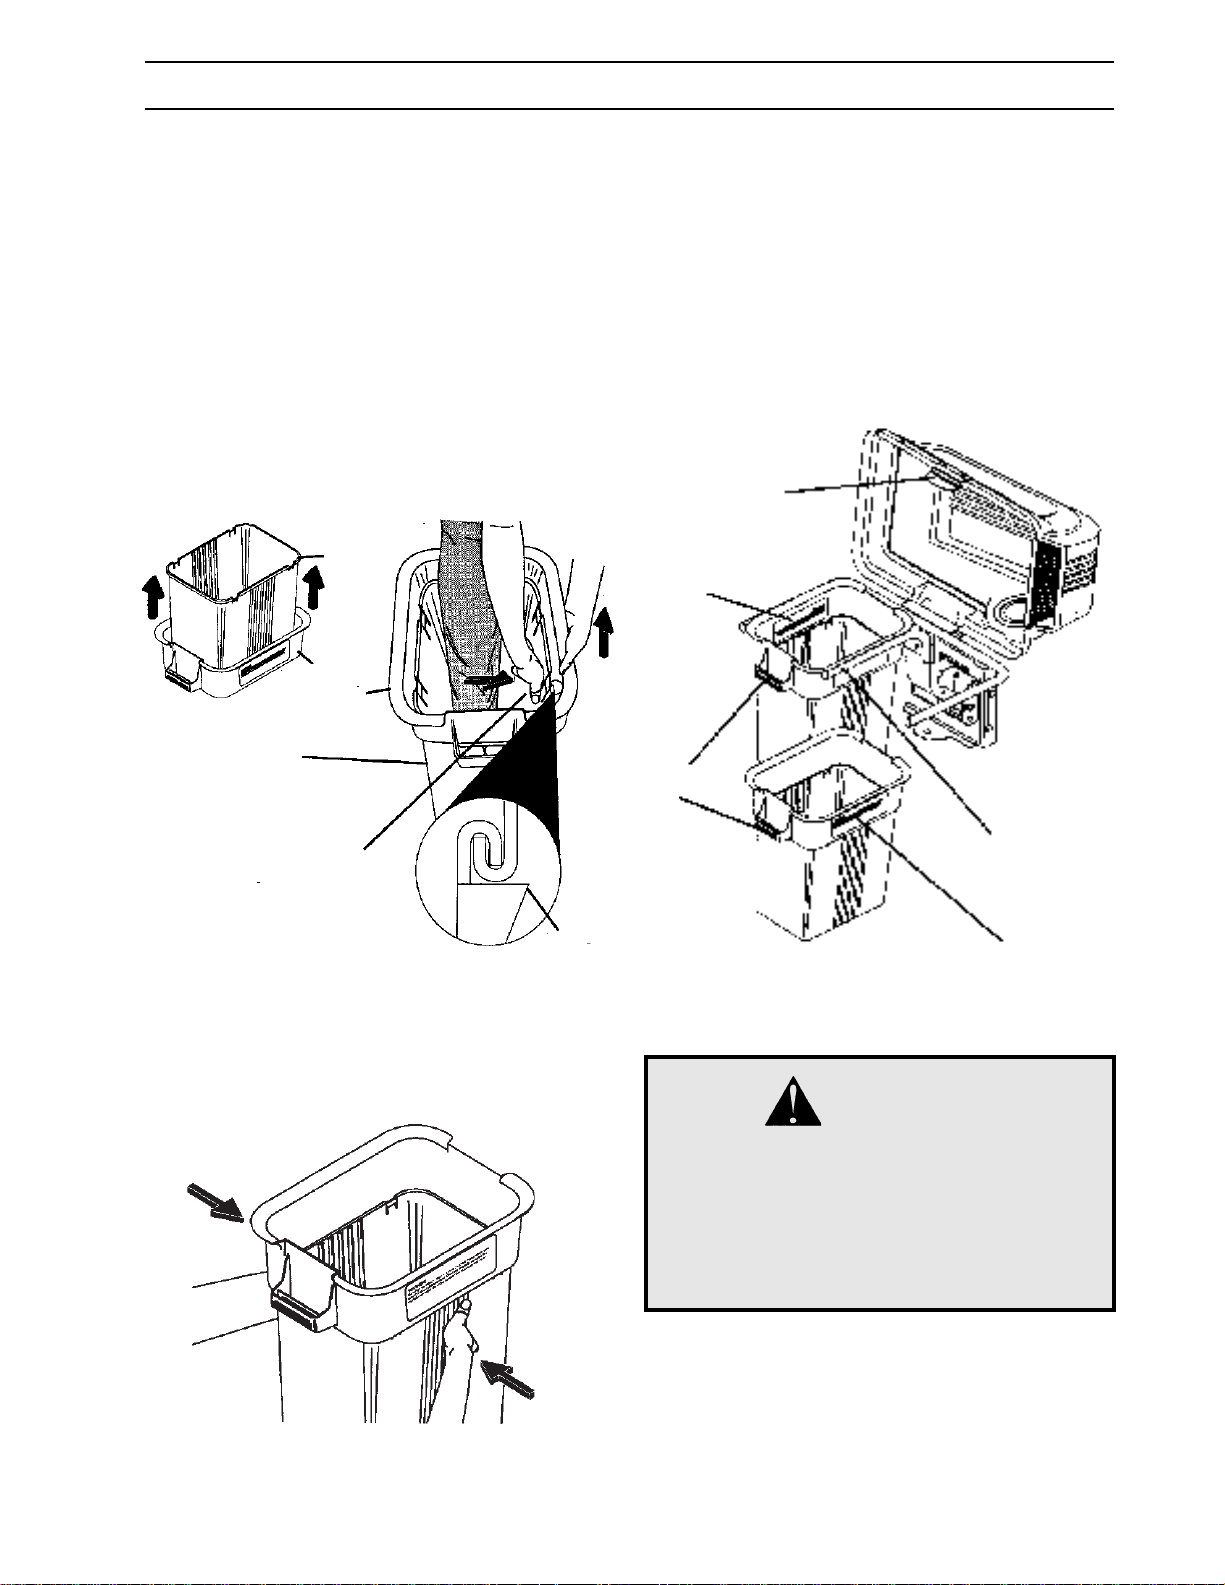
CONTAINER ASSEMBLY
(See Figure 6)
6
1. Place bottom half inside of top half, as shown.
2. Place one foot inside bottom half and lift top
half to meet bottom half.
3. Press halves tightly together while lifting top
to lock into place as shown.
IMPORTANT: BEFORE LOCKING THE TABS,
HOOKED EDGES ON BOTH HALVES MUST
OVERLAP TO FORM SEAL AS SHOWN IN INSET.
CONTAINER
BOTTOM
HALF
CONTAINER
TOP HALF
CONTAINER MOUNTING
(See Figure 7)
7
1. Install one container to left side first with
warning to the outside of unit. Install other
container to the right.
NOTE: Right container should always overlap left
container at center supports.
2. Close cover and lock latch handles over
center support tubes.
COVER LATCH
HANDLES
CONTAINER
WARNING
CONTAINER
BOTTOM
HALF
PRESS TOGETHER
TO FORM SEAL
WHILE LIFTING
TOP HALF
LOCKING
TAB
ASSEMBLY CHECK: Squeeze sides of lower half
of container and check that there is no gap between upper and lower halves. If a gap appears,
unlock tabs to separate container halves and repeat instructions above.
CONTAINER
HANDLE
CENTER
SUPPORT
TUBES
CONTAINER
WARNING
WARNING
DO NOT operate mower unless container
is properly installed. Container is subject
to wear and deterioration, check containers frequently, replace when cracked or
damaged. Use only a recommended replacement container.
FIGURE 6
www.mymowerparts.com
FIGURE 7
9
Page 10
For Husqvarna Parts Call 606-678-9623 or 606-561-4983
ASSEMBLY
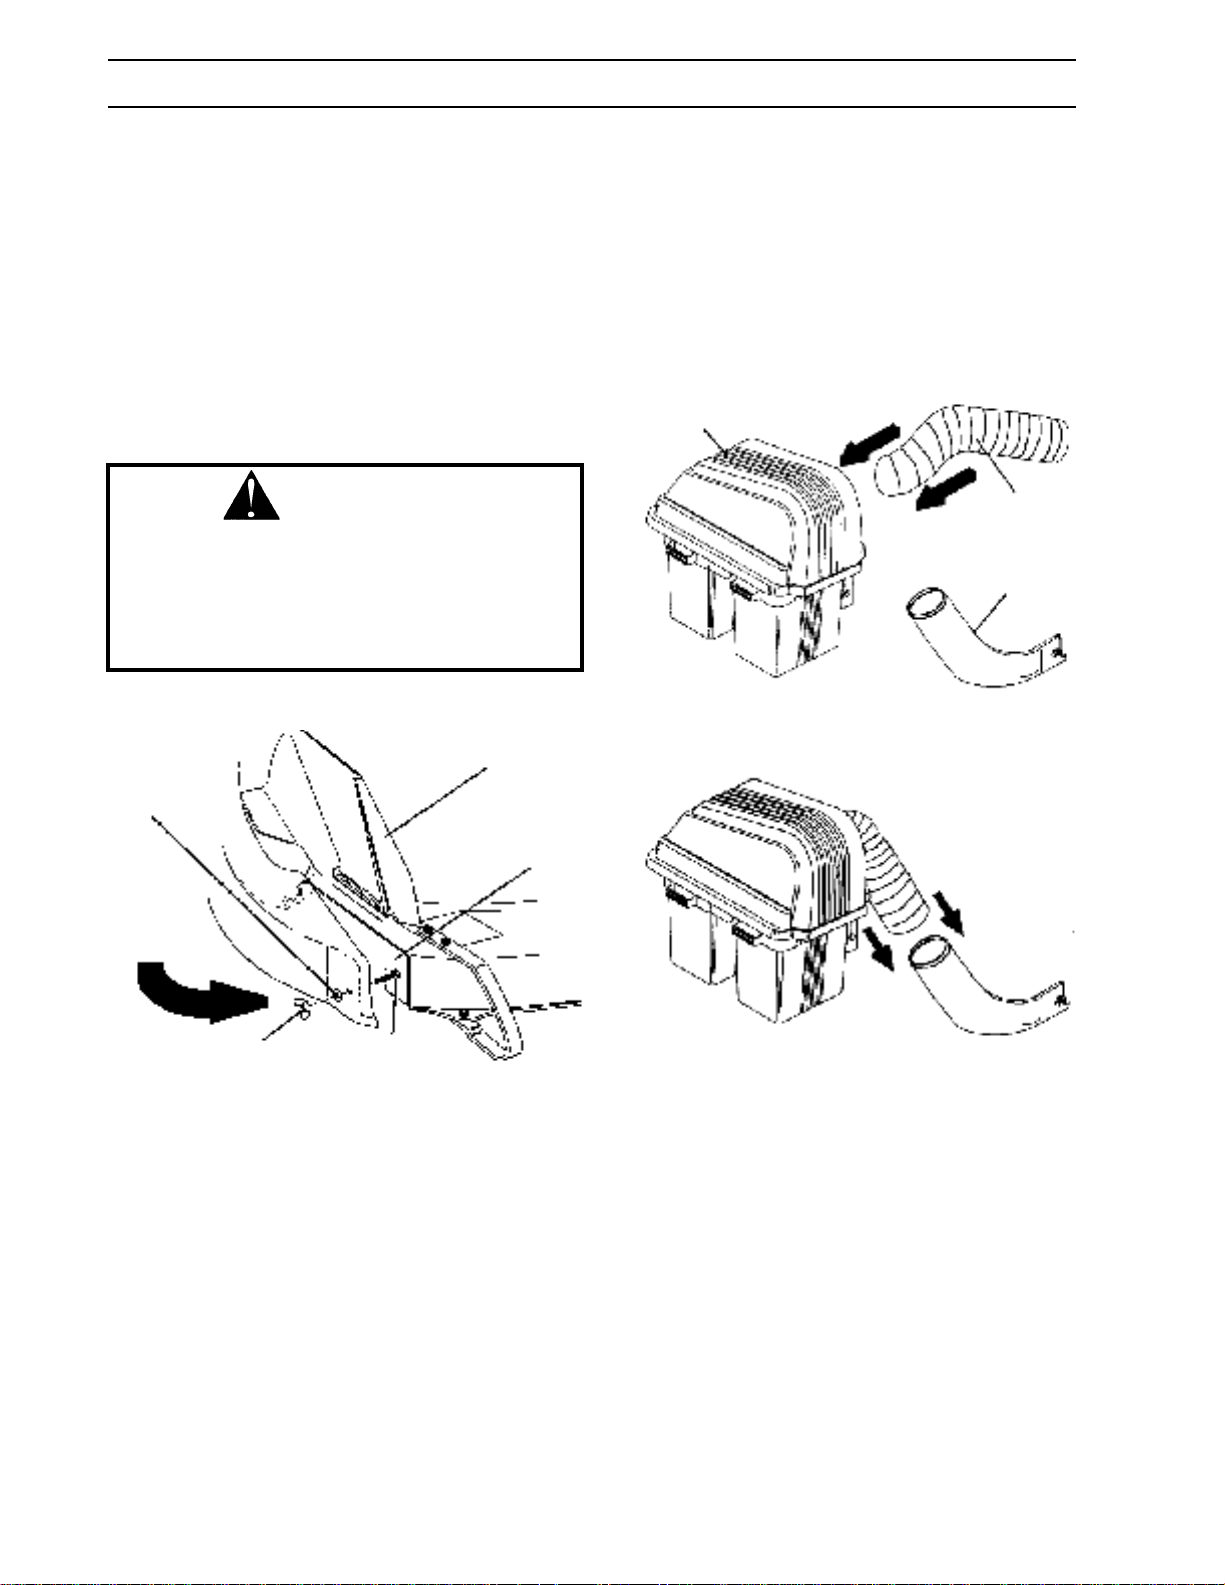
LOWER CHUTE
(See Figure 8)
8
1. Raise and hold deflector shield in upright
position.
2. Place slot in lower chute over tab on mower
deck and position lower chute over deck
opening as shown.
3. Hook rear latch into flange hole on back of
mower deck.
4. Hook front latch into tab hole on front of
mower deck.
CAUTION
Before raising deflector shield, turn mower
engine off. DO NOT remove deflector shield
from mower. Raise and hold shield when attaching lower chute and allow it to rest on
chute while in operation.
HOSE
(See Figures 9A and 9B)
9
1. Place both clamps over the hose.
2. Slide the hose over the inlet at the top end.
3. Slide the hose over the lower chute inlet.
4. Remove any twists in the hose by rotating it
at the top or bottom end.
5. Tighten the clamps.
COVER
HOSE
LOWER
CHUTE
WASHER
WING NUT
HEX BOLT
FIGURE 8
DEFLECTOR
SHIELD
MOWER
DECK
BAFFLE
FIGURE 9A
FIGURE 9B
10
www.mymowerparts.com
Page 11

For Husqvarna Parts Call 606-678-9623 or 606-561-4983
ASSEMBLY
BLADE REPLACEMENT
10
Tools Needed:
9/16” Socket and Ratchet
Ft/Lbs Torque Wrench
The mower comes from the factory with a low lift
blade. The blades need to be replaced with the
high lift blades provided in kit. Failure to do this
may result in poor performance of the collection
system.
1. Lift up the front of the mower and secure with
jack stands.
2. Using a 9/16” socket and ratchet, remove the
blade bolts and blades.
3. Reinstall the new high lift blades and bolts.
4. Torque the blade bolts to 35 ft/lbs.
LEVEL MOWER DECK
11
Be sure deck is properly leveled for best mower
performance. See your mower operator’s manual
for instructions.
www.mymowerparts.com
11
Page 12
For Husqvarna Parts Call 606-678-9623 or 606-561-4983
OPERATION
TIPS FOR IMPROVED BAGGING OPERATION:
Follow the mower operation instructions in you
mower operator’s manual.
When operating your grass catcher on a lawn
where grass and leaf bagging equipment has not
been used, you are picking up thatch and debris
that has accumulated for long periods of time. The
amount collected and the total time of operation
may be greater than you will experience with regular use of your grass catcher.
• Always run throttle at full speed when bagging.
• Select a speed low enough to give good mower
cutting performance, good quality cut and good
bagging performance.
NOTE: It may be necessary to overlap width of
cut to suit your conditions.
• If grass is extremely tall, it should be mowed
twice. The first time relatively high, the second
time to desired height.
• Use left hand side of mower for trimming.
• Plastic trash bags (3.0 mil, 30 gallon) can be
inserted inside grass catcher containers for
ease of debris disposal. To remove the plastic
trash bags when full:
h. Reinstall containers making sure right con-
tainer overlaps left container at center supports..
i. Close cover and secure latches over cen-
ter support tubes.
• Avoid cutting wet grass or in the morning while
the dew is still heavy. Grass clippings collected
under these conditions tend to be sticky and
adhere to the walls of the flow path causing
clogging.
• If the grass catcher fails to pick up cut grass or
leaves, it is an indication that clogging has occurred in the system or that the grass catcher
containers are full.
a. Disengage blades, place motion control
levers in neutral position.
- Unlatch and raise cover.
- Slide out containers and dispose of clippings.
- Replace containers, close cover, and latch.
b. Unlatch chutes and check for clogging.
- Remove all debris in chute.
- Reassemble and latch chutes.
CAUTION
a. Disengage blades, shift into neutral, en-
gage the parking brake and stop the en-
gine.
b. Unlatch and raise cover.
c. Remove one container at a time by grasp-
ing container handles and pulling toward
the rear, off of the tube rails.
d. With the container resting on the ground,
close and secure the top of the plastic lawn
bag.
e. Tip the container on its side and slide the
filled bag from the container.
f. Install a new plastic lawn bag with the
edges of the bag draped over upper lip of
the Container (for replacement bags refer
to REPLACEMENT PARTS).
g. Repeat for other container.
12
www.mymowerparts.com
• DO NOT operate mower with grass
catcher partially installed.
• Disengage blades and stop engine before leaving mower seat to empty containers, unclogging chutes, etc.
• Close cover before starting.
• Disengage mower blades when crossing
driveways or gravel surfaces and other
areas where thrown objects could be a
hazard.
• DO NOT attempt to vacuum up cans or
other potentially hazardous projectiles.
Page 13
For Husqvarna Parts Call 606-678-9623 or 606-561-4983
CUSTOMER RESPONSIBILITIES
GENERAL RECOMMENDATIONS:
Always observe safety rules when performing any
maintenance.
• Before each use check for loose fasteners.
• Clean unit thoroughly after each use.
BLADE CARE:
For best results mower blades must be kept sharp.
Replace bent or damaged blades.
• See BLADE CARE instructions in your mower operator’s manual.
CAUTION
BEFORE PERFORMING ANY MAINTENANCE, SERVICE OR ADJUSTMENTS:
• Set parking brake.
• Place motion control levers in "NEUTRAL" position.
• Place clutch control in "DISENGAGED"
position.
• Turn ignition key to "OFF" position.
• Make sure blades and all moving parts
have completely stopped.
• Disconnect spark plug wire(s) from spark
plug(s) and place wire where it cannot
come in contact with plug.
STORAGE:
When grass catcher is to be stored for a period of
time, clean it thoroughly, remove all dirt, grass,
leaves, etc. Store in a clean, dry place.
CAUTION
Do not leave grass in bagger containers.
Empty containers after each use and before storing. Failure to do so may result in
spontaneous combustion which could develop into a fire.
CAUTION
Grass catcher components are subject to
wear, damage and deterioration, which
could expose moving parts or allow objects
to be thrown. Frequently check components and replace with manufacturer’s recommended parts, when necessary.
www.mymowerparts.com
13
Page 14
For Husqvarna Parts Call 606-678-9623 or 606-561-4983
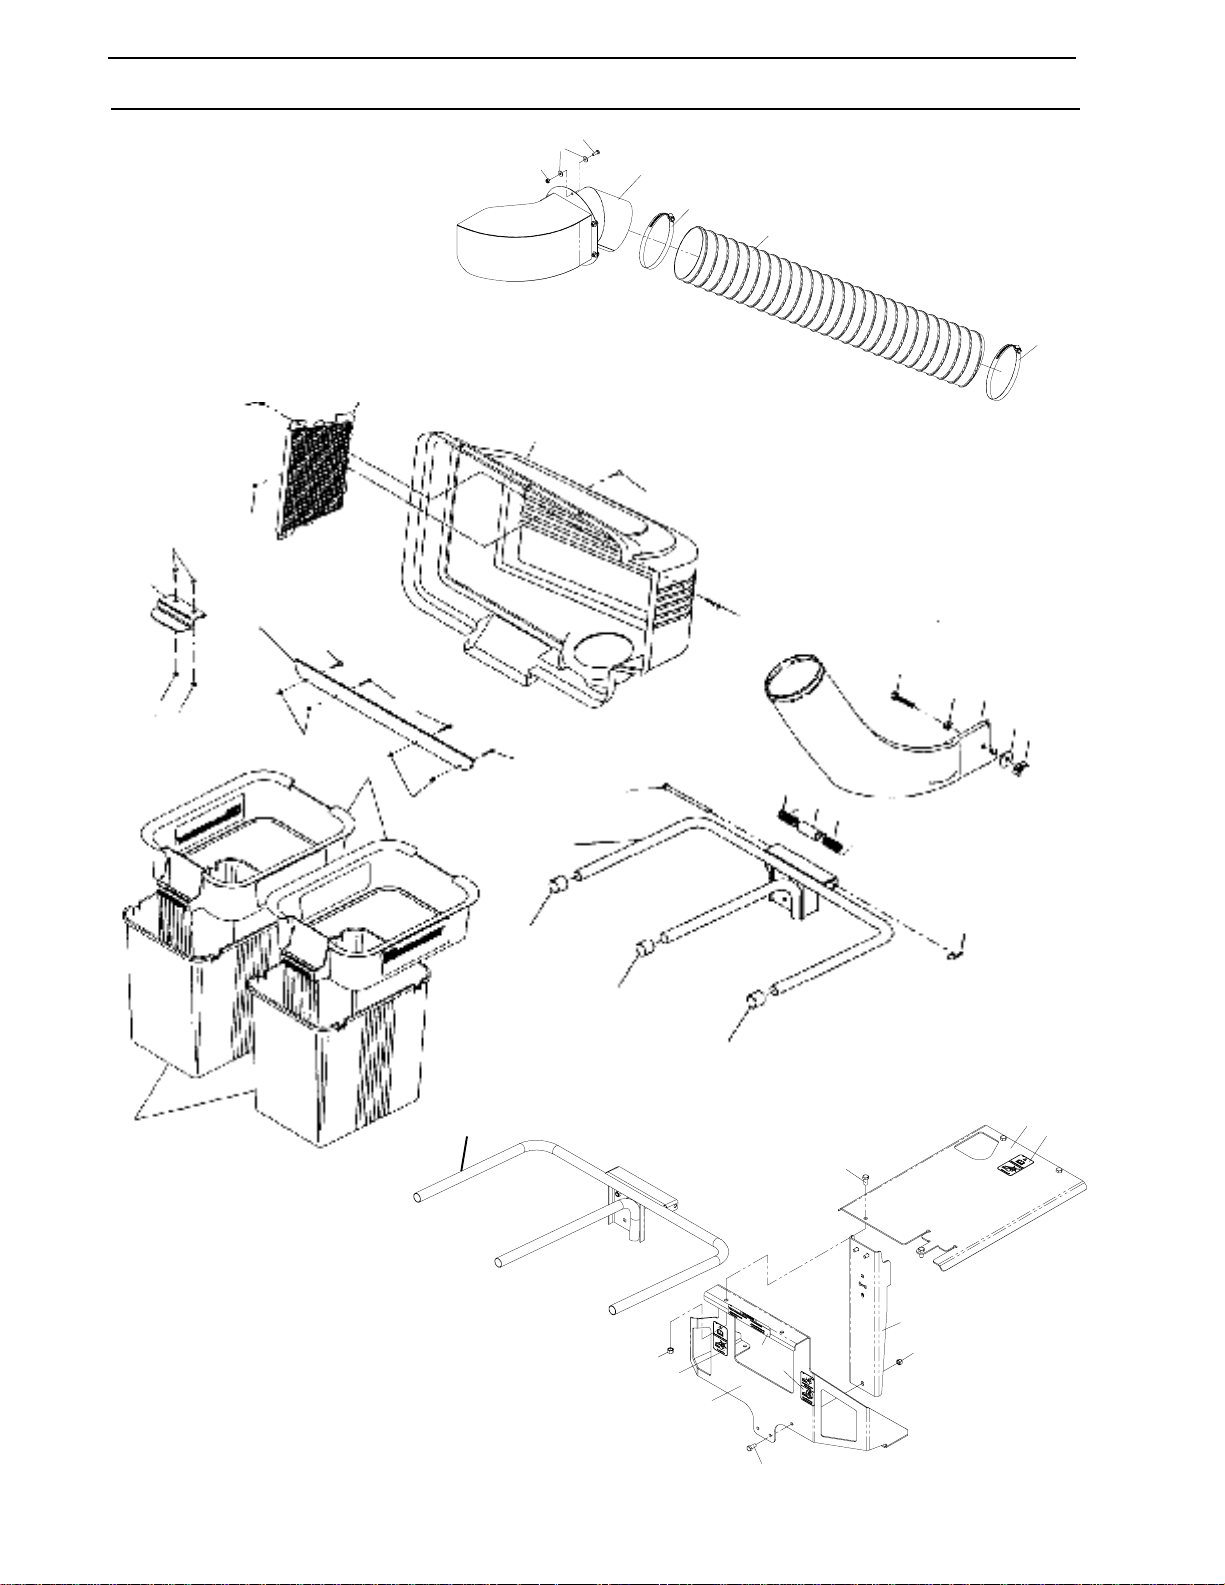
PARTS
30
31
27
24
25
34
25
11
13
19
3
1
13
13
14
16
13
13
10
2
9
8
4
5
6
17
15
18
7
2
13
2
2
2
12
2
20
14
8
8
REF.
29
28
35
36
33
23
26
www.mymowerparts.com
21
35
22
32
Page 15

For Husqvarna Parts Call 606-678-9623 or 606-561-4983
PARTS
ITEM PART NO. QTY. DESCRIPTION
1 ......... 539111139 ........... 1 ......... COVER ASSEMBLY, COMPLETE
..................................................... (INCLUDES ITEM 2 THRU 13)
2 ......... 532063180 .......... 10........ NUT, 3/10-24, CROWNLOCK
3 ......... 532127533 .......... 1 ......... SCREEN, COVER
4 ......... 532132796 .......... 1 ......... SPRING, COVER, L.H.
5 ......... 532133235 .......... 1 ......... SPACER, COVER
6 ......... 532132983 .......... 1 ......... SPRING, COVER R.H.
7 ......... 532124670 .......... 1 ......... SPRING, RETAINER
8 ......... 532174083 .......... 3 ......... PLUG, TUBING END
9 ......... 532179746 .......... 1 ......... BAGGER, FRAME
10 ....... 532128600 .......... 1 ......... PIN, HINGE
11 ........ 532130895 .......... 1 ......... LATCH HANDLE, COVER
12 ....... 532155042 .......... 1 ......... STRIP, REINFORCEMENT
13 ....... 871161010 ........... 10 ........ SCREW #10-24 X 5/8
14 ....... 874930620 .......... 1 ......... BOLT, 3/8-16 X 1 1/4
15 ....... 819131616 .......... 1 ......... WASHER, 13/32
16 ....... 873750600 .......... 1 ......... LOCKNUT, 3/8-16
17 ....... 532111005 ........... 1 ......... LOWER CHUTE
18 ....... 532135651 .......... 1 ......... WINGNUT, 3/8-16
19 ....... 532129585 .......... 1 ......... CONTAINER, TOP
20 ....... 532129586 .......... 1 ......... CONTAINER, BOTTOM
21 ....... 539111003 ........... 1 ......... PLATE W/DECAL
22 ....... 539110997 ........... 1 ......... HANGER
23 ....... 539109930 .......... 1 ......... REAR BRACKET W/DECALS
24 ....... 539110992 ........... 1 ......... INLET
25 ....... 539097076 .......... 2 ......... HOSE CLAMP, 6” TO 7”
26 ....... 539976934 .......... 2 ......... HCS, 5/16-18 X 3/4
27 ....... 539976978 .......... 6 ......... NUT, 1/4-20, NYLOC
28 ....... 539976979 .......... 4 ......... NUT, 3/8-16, NYLOC
29 ....... 539990134 .......... 4 ......... HCS, 3/8-16 X 3/4
30 ....... 539990580 .......... 6 ......... HCS, 1/4-20 X 3/4
31 ....... 539990598 .......... 12 ........ WASHER, 1/4
32 ....... 539990717 .......... 2 ......... NUT, 5/16-18, NYLOC
33 ....... 539109929 .......... 1 ......... DECAL, PAYLOAD/GASOLINE
34 ....... 539110994 ........... 1 ......... HOSE
35 ....... 539109927 .......... 2 ......... DECAL, UTILITY BOX WARNING
36 ....... 539109928 .......... 1 ......... DECAL, UTILITY BOX PAYLOAD
........... 532138497 ....... 2 ......... HIGH LIFT BLADE (NOT SHOWN)
www.mymowerparts.com
15
Page 16

For Husqvarna Parts Call 606-678-9623 or 606-561-4983
HTC
700 Park St.
Beatrice, NE 68310
www.mymowerparts.com
 Loading...