

Page 1

GB Operator´s manual
FR Manuel d'utilisation
ES Manual de instrucciones
EDGER ATTACHMENT
ACCESSOIRE TRANCHE-BORDURE
SUPLEMENTO CORTABORDES
Please read these instructions carefully
and make sure you understand them
before using the machine.
Lire attentivement et bien assimiler le
manuel d’utilisation avant d'utiliser la
machine.
Lea detenidamente el manual de
instrucciones y asegúrese de entender su
contenido antes de utilizar la máquina.
GB FR ES
Page 2
EXPLANATION OF SYMBOLS
Symbols
max
10000 rpm
WARNING! The edger can be
dangerous!
Careless or incorrect use can result in
serious or fatal injury to the operator
or others.
Read through the Operator's Manual
carefully and understand the content
before using the machine.
Always use:
• A protective helmet where there is a
risk of falling objects.
• Ear protection
• Approved eye protection
Max. speed of output axle, rpm
This product is in accordance with
applicable CE directives.
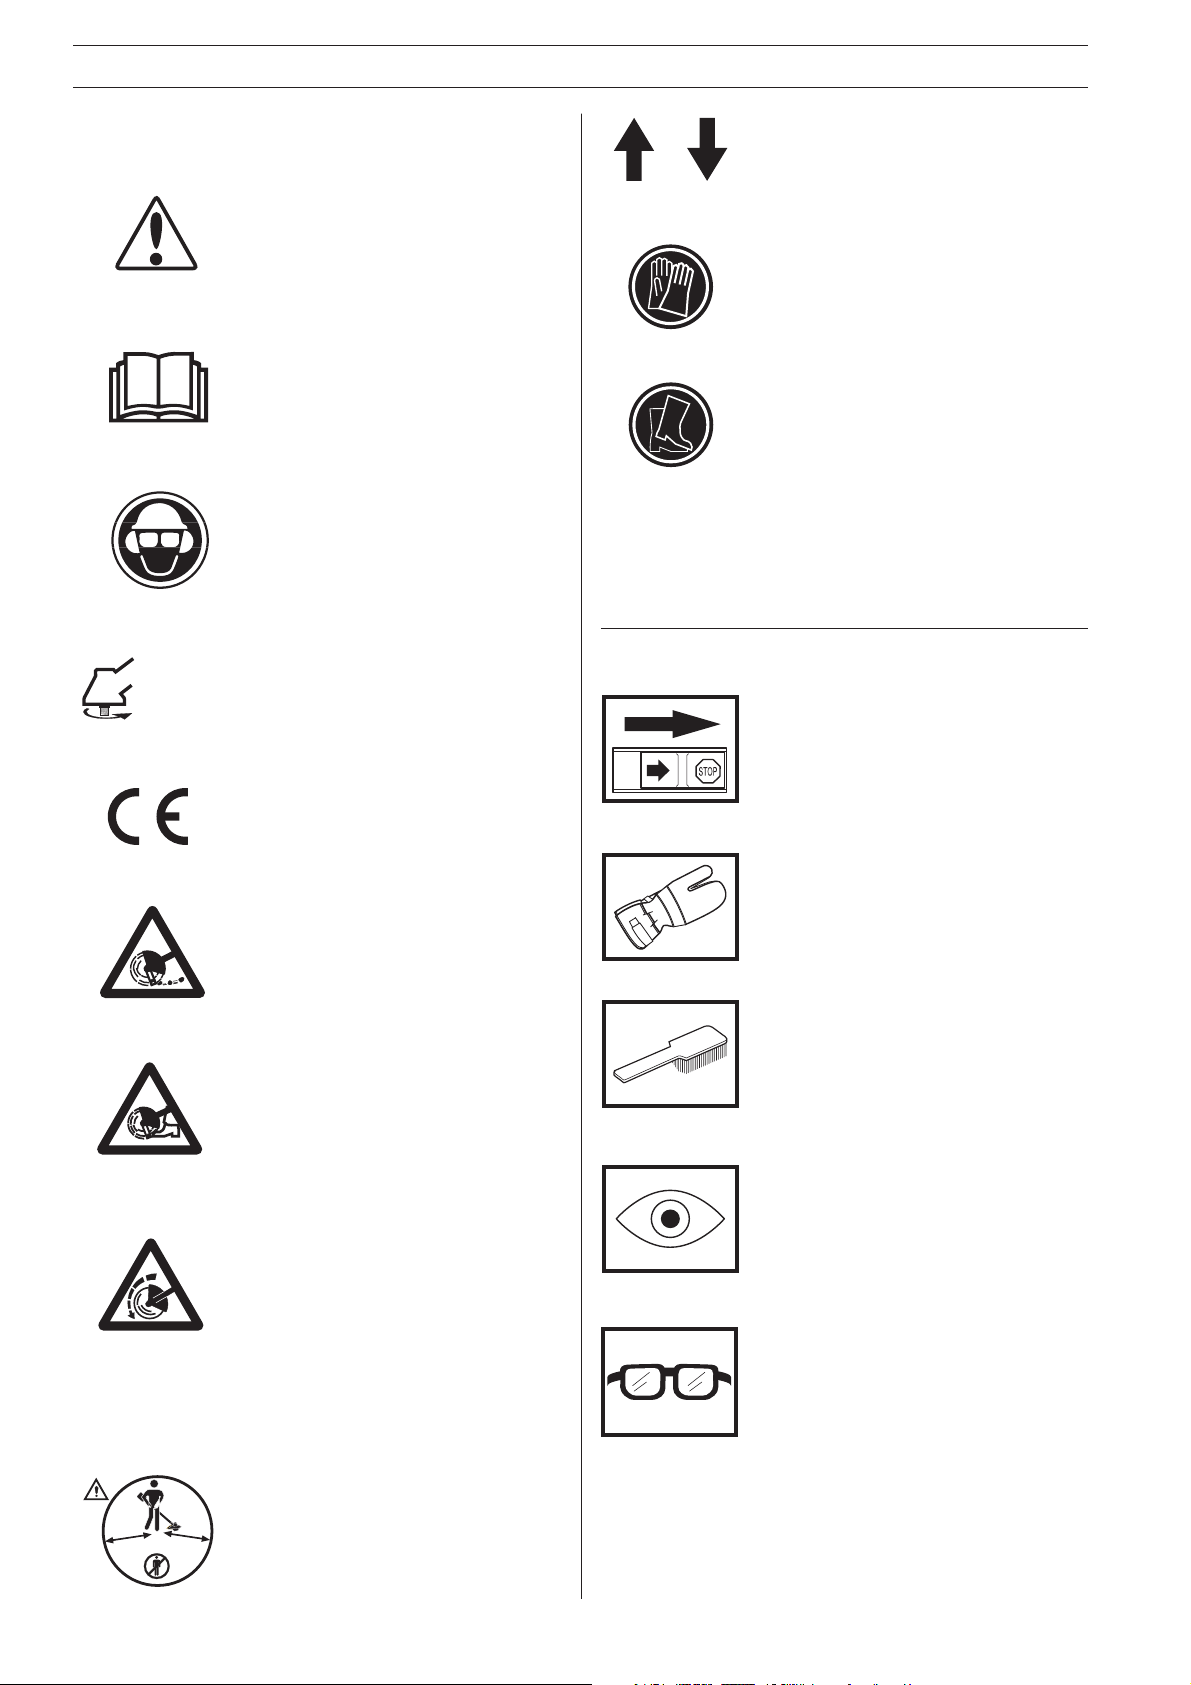
Arrows which show limits for handle
mounting.
Always wear approved protective
gloves.
Use anti-slip and stable boots.
Other symbols/decals on the machine refer to
special certification requirements for certain
markets.
Checks and/or maintenance should be
carried out with the engine switched off,
with the stop switch in the STOP
position.
Beware of thrown objects and
ricochets.
Warning for rotating blade. Keep
hands and feet clear.
Warning! The blade continues to
rotate even after the engine has
stopped.
When the engine has stopped, stop
the blade from rotating by letting the
blade come in contact with the
ground.
Indicates the direction of rotation.
Always wear approved protective
gloves.
Regular cleaning required.
Ocular control.
Approved eye protection must always
be used.
2 – English
15 m
50FT
15 m
50FT
The operator of the machine must
ensure that no persons or animals
comes within a 15 metre radius while
working.
Page 3

CONTENTS
Husqvarna AB has a policy of continuous product
development and therefore reserves the right to modify the
design and appearance of products without prior notice.
Read through the Operator‘s manual
carefully and understand the content before
using the machine.
These instructions supplement the instructions that were
included with the machine. For other procedures, please
refer to the opertaing instructions for hte machine.
WARNING!
Under no circumstances may the design of
!
!
the machine be modified without the
permission of the manufacturer. Always
use genuine accessories. Non authorised
modifications and/or accessories can result
in serious personal injury or the death of
the operator or others.
WARNING!
This accessory may only be used together
with the intended clearing saw/trimmer, see
under heading ”Approved accessories” in
chapter Technical data in the machine's
Operator's Manual.
List of Contents
EXPLANATION OF SYMBOLS
Symbols .............................................................................. 2
CONTENTS
List of Contents ................................................................... 3
SAFETY INSTRUCTIONS
Personal protective equipment ........................................... 4
The machine's safety equipment ........................................ 4
General safety instructions ................................................. 5
General working instructions ............................................... 5
Basic working techniques ................................................... 6
WHAT IS WHAT?
What is what on the edger attachment? ............................. 7
ASSEMBLY
Assembling the angle gear ................................................. 8
Assembling the blade .......................................................... 8
START AND STOP
Control before starting ........................................................ 8
MAINTENANCE
Angle gear ........................................................................... 9
Lubricating the flexible drive axle ........................................ 9
Adjusting the edger's cutting depth ..................................... 9
Maintenance schedule ........................................................ 9
TECHNICAL DATA
Technical data ..................................................................... 9
The machine is only designed for cutting the edges of lawns.
English – 3
Page 4
SAFETY INSTRUCTIONS
Personal protective equipment
IMPORTANT INFORMATION
• When using an edger, personal protective equipment
must be used. Personal protective equipment does
not eliminate the risk of accidents, however, it can
reduce the effects of an injury in the event of an
accident. Ask your dealer for help when choosing
protective equipment.
The machine’s safety equipment
This section describes the machine’s safety equipment, its
function and how checks and maintenance are carried out to
ensure that it operates correctly. (See the chapter
to locate where this equipment is positioned on your
what”
machine.)
WARNING!
Never use a machine with defective safety
!
equipment. Follow the control, maintenance
and service instructions described in this
section.
Cutting attachment
guard
This guard is intended to
prevent objects from being
thrown towards the operator
and to protect the operator
from unintentionel contact with
the cutting attachment.
• Ensure that the guard is
undamaged and is not
cracked.
• Replace the guard if it has
been exposed to impact or is
cracked.
• Always use the prescribed
blade and guard combination,
see chapter
in the machine's Operator's
Manual.
"Technical data"
“What is
Cutting equipment
The two basic rules:
1. Only use the cutting
equipment we recommend! See chapter
“Technical data”
machine's Operator's
Manual.
2. Check the cutting
equipment with regard to
damage and crack
formation. Damaged
cutting equipment
should always be
replaced.
WARNING!
Always stop the engine before starting
!
work on any part of the cutting equipment.
This continues to rotate even after the
throttle has been released. Ensure that the
cutting equipment has stopped completely
and remove the cable from the spark plug
before you start to work on it.
in the
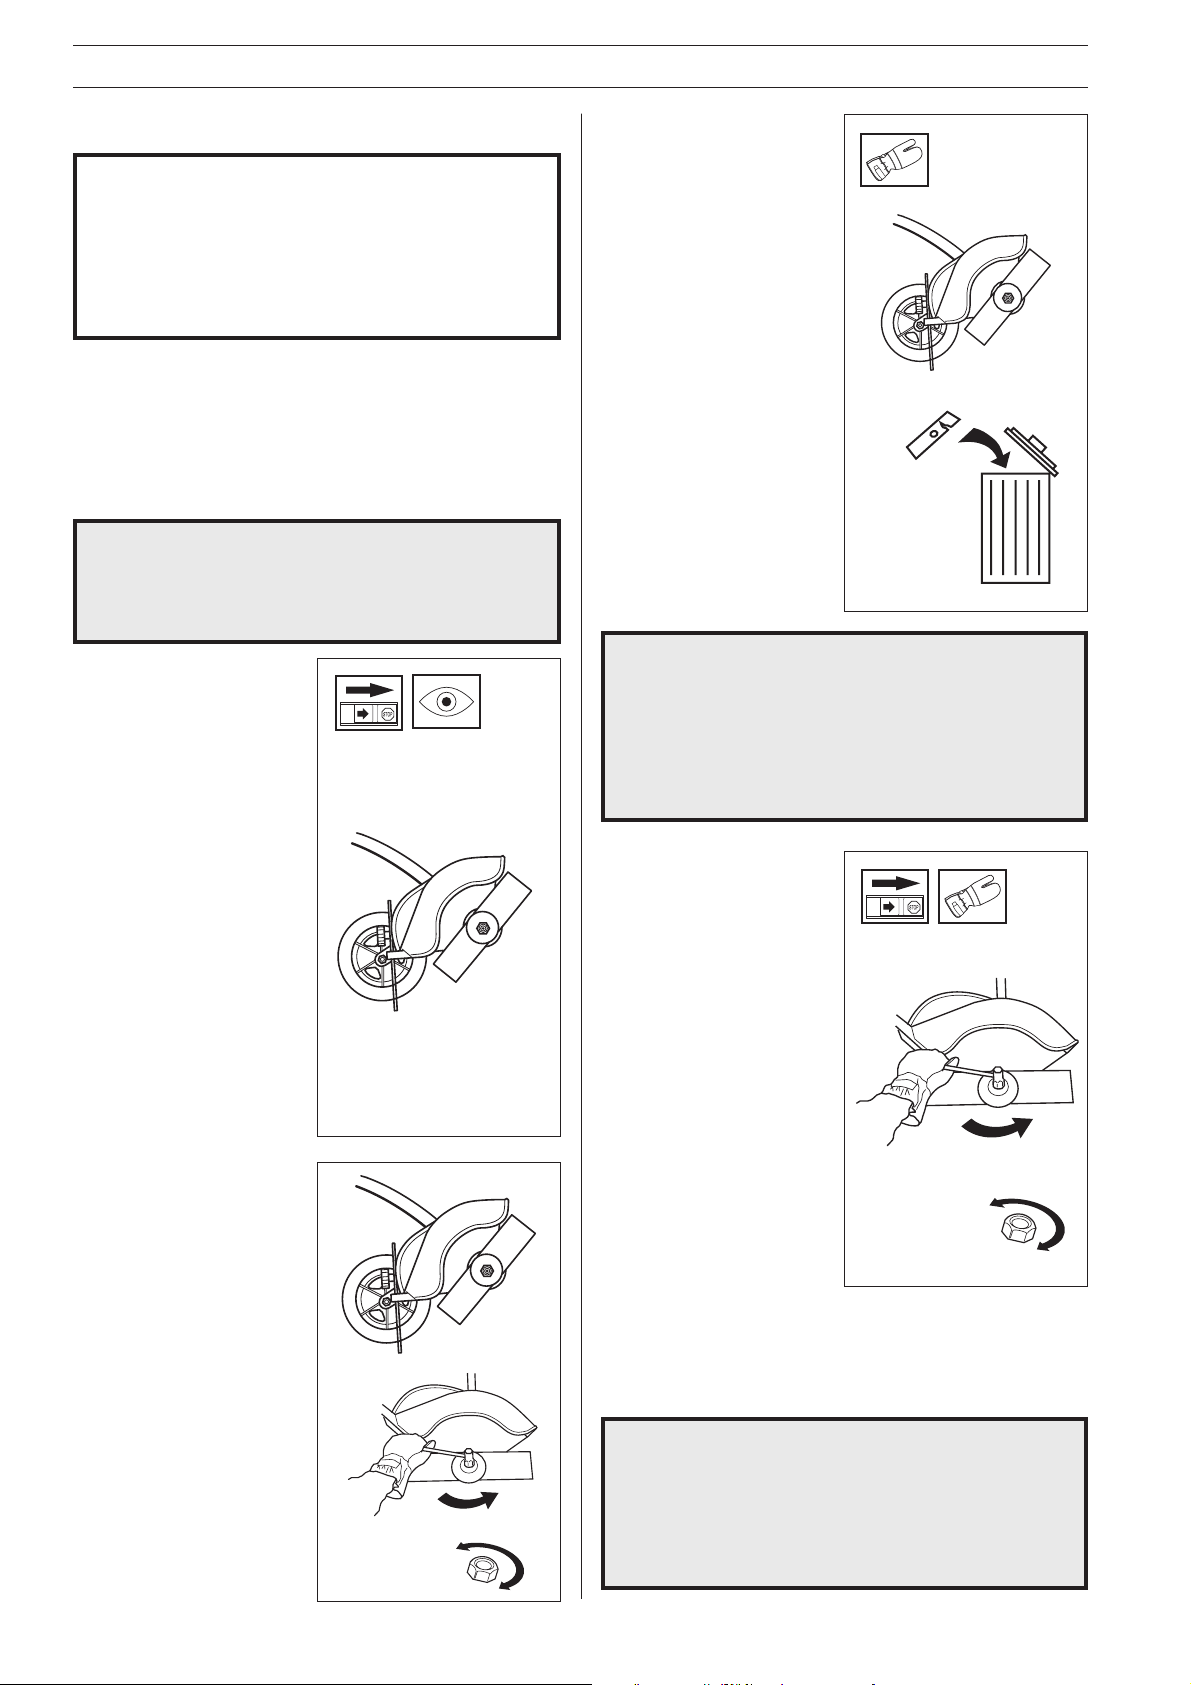
Locking nut
• Protect your hand from
injury when assembling,
use the blade guard as
protection when tightening
with a socket spanner.
Tighten the nut by turning
against the direction of
rotation. Loosen the nut by
turning in the direction of
rotation. (NOTE! the nut
has a left-hand thread).
Cutting equipment
The blade is designed and
processed to withstand loads
that edging of a lawn involves.
Locking nut
The locking nut secures the
cutting equipment on the
output shaft.
4 – English
• Tighten the nut using a
socket spanner, 35 - 50 Nm
(3.5 - 5 kpm).
NOTE!
The locking nut’s nylon lock must not be so worn that it can
be turned by hand. The lock shall hold at least 1.5 Nm. The
nut should be replaced after it has been put on approx. 10
times.
WARNING!
Never use a machine with defective safety
!
equipment. The safety equipment should be
maintained as described in this section. If
your machine does not meet any of these
controls you should contact your service
workshop.
Page 5
SAFETY INSTRUCTIONS
General safety instructions
WARNING!
Faulty cutting equipment increases the
!
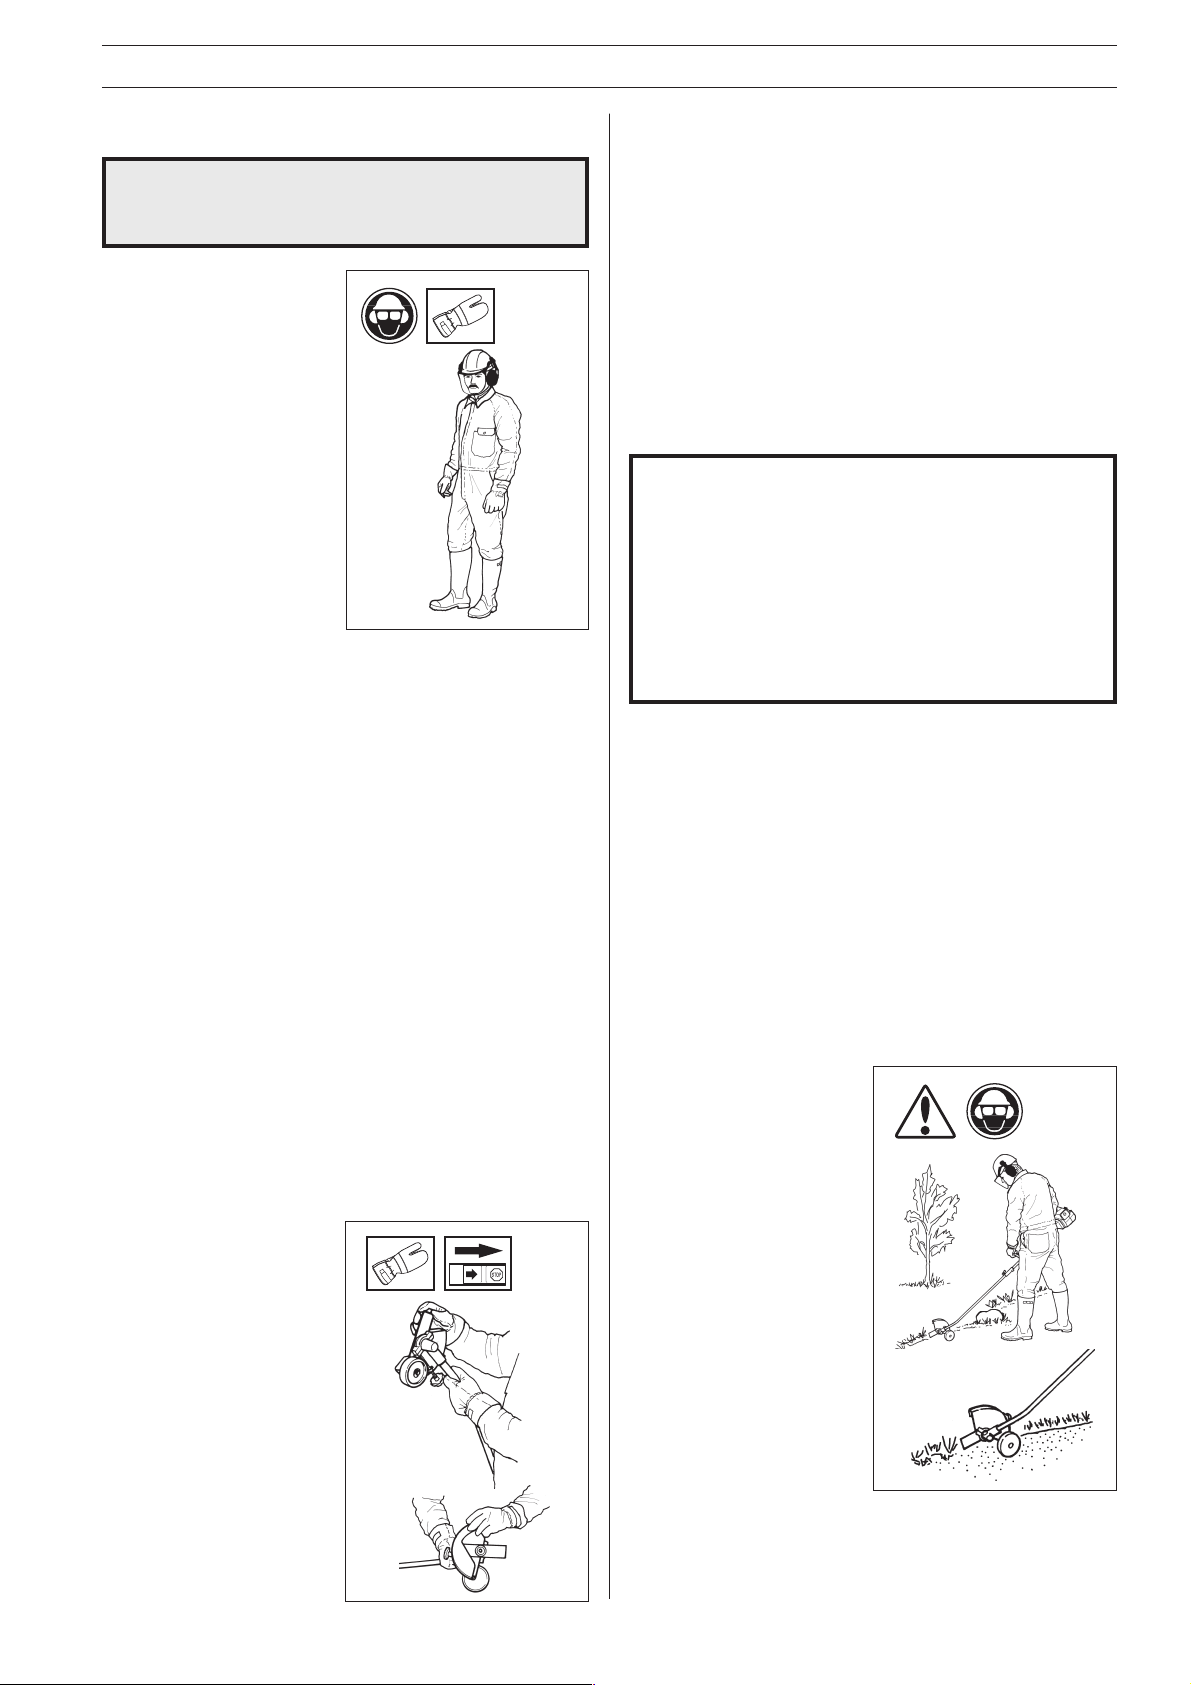
Personal protection
• Always wear boots and other
equipment described in the
section
equipment”
Operator's Manual.
• Always wear working clothes
and heavy-duty long trousers.
• Never wear loose sitting
clothes or jewellery.
• Persons with long hair should,
for personal safety, put their
hair up.
Safety instructions regarding the
surroundings
risk of accidents.
“Personal protective
in the machine's
• Check that the blade and blade guard are correctly secured.
• When adjusting the carburettor make sure the blade is held
against the ground and that no one is in the immediate
vicinity.
• Make sure the blade does not rotate when idling.
• Make sure the handle and safety features are in order. Never
use a machine that has parts missing or has been changed
in relation to the specification.
• Only use the machine for the purpose it was intended for.
General working instructions
IMPORTANT INFORMATION
• This section takes up the basic safety precautions
for working with the edger.
• If you encounter a situation where you are uncertain
how to proceed you should ask an expert. Contact
your dealer or your service workshop.
• Avoid all usage which you consider to be beyond
your capability.
• Never allow children to use the machine.
• Ensure no one comes closer than 15 metres when working.
• Never allow anyone else to use the machine without first
ensuring that they have understood the contents of the
Operator’s Manual.
Safety instructions before starting work
• Inspect the working area. Remove any objects, such as
stones, broken glass, nails, steel wire, string, etc. that can
be thrown or can wrap around the blade or blade guard.
• Keep others at a safe distance. Children, animals,
onlookers and helpers should stand outside of the safety
zone of 15 m (50 feet). Stop the machine immediately if any
one should approach.
• Check the entire machine before starting work. Replace
damaged parts. Check for fuel leakage and that all safety
guards and covers are complete and fastened securely.
Check all nuts and bolts
• Check the blade for cracks
or any other damage.
Basic safety precautions
1. Observe your surroundings:
• To ensure that people, animals or other things cannot affect
your control of the machine.
• To ensure that the above mentioned do not come into
contact with the cutting equipment or objects that can be
thrown by the cutting equipment.
• NOTE! Never use a machine without the possibility of
calling for help in the event of an accident.
2. Avoid usage in unfavour-
able weather conditions.
For example, thick fog,
heavy rain, strong winds
or extreme cold, etc. To
work in bad weather
conditions is tiring and
can create dangerous
circumstances, e.g.
slippery surfaces.
• Ensure the blade guard is
mounted and not damaged.
3. Make sure you can walk
and stand safely. Look
out for any obstacles with
unexpected movement
(roots, stones, branches,
pits, ditches, etc.). Take
great care when working
on sloping ground.
4. The engine should be switched off before moving.
5. Never put the machine down with the engine running
unless you have good sight of it.
English – 5
Page 6
SAFETY INSTRUCTIONS
Basic working techniques
Safety instructions while working
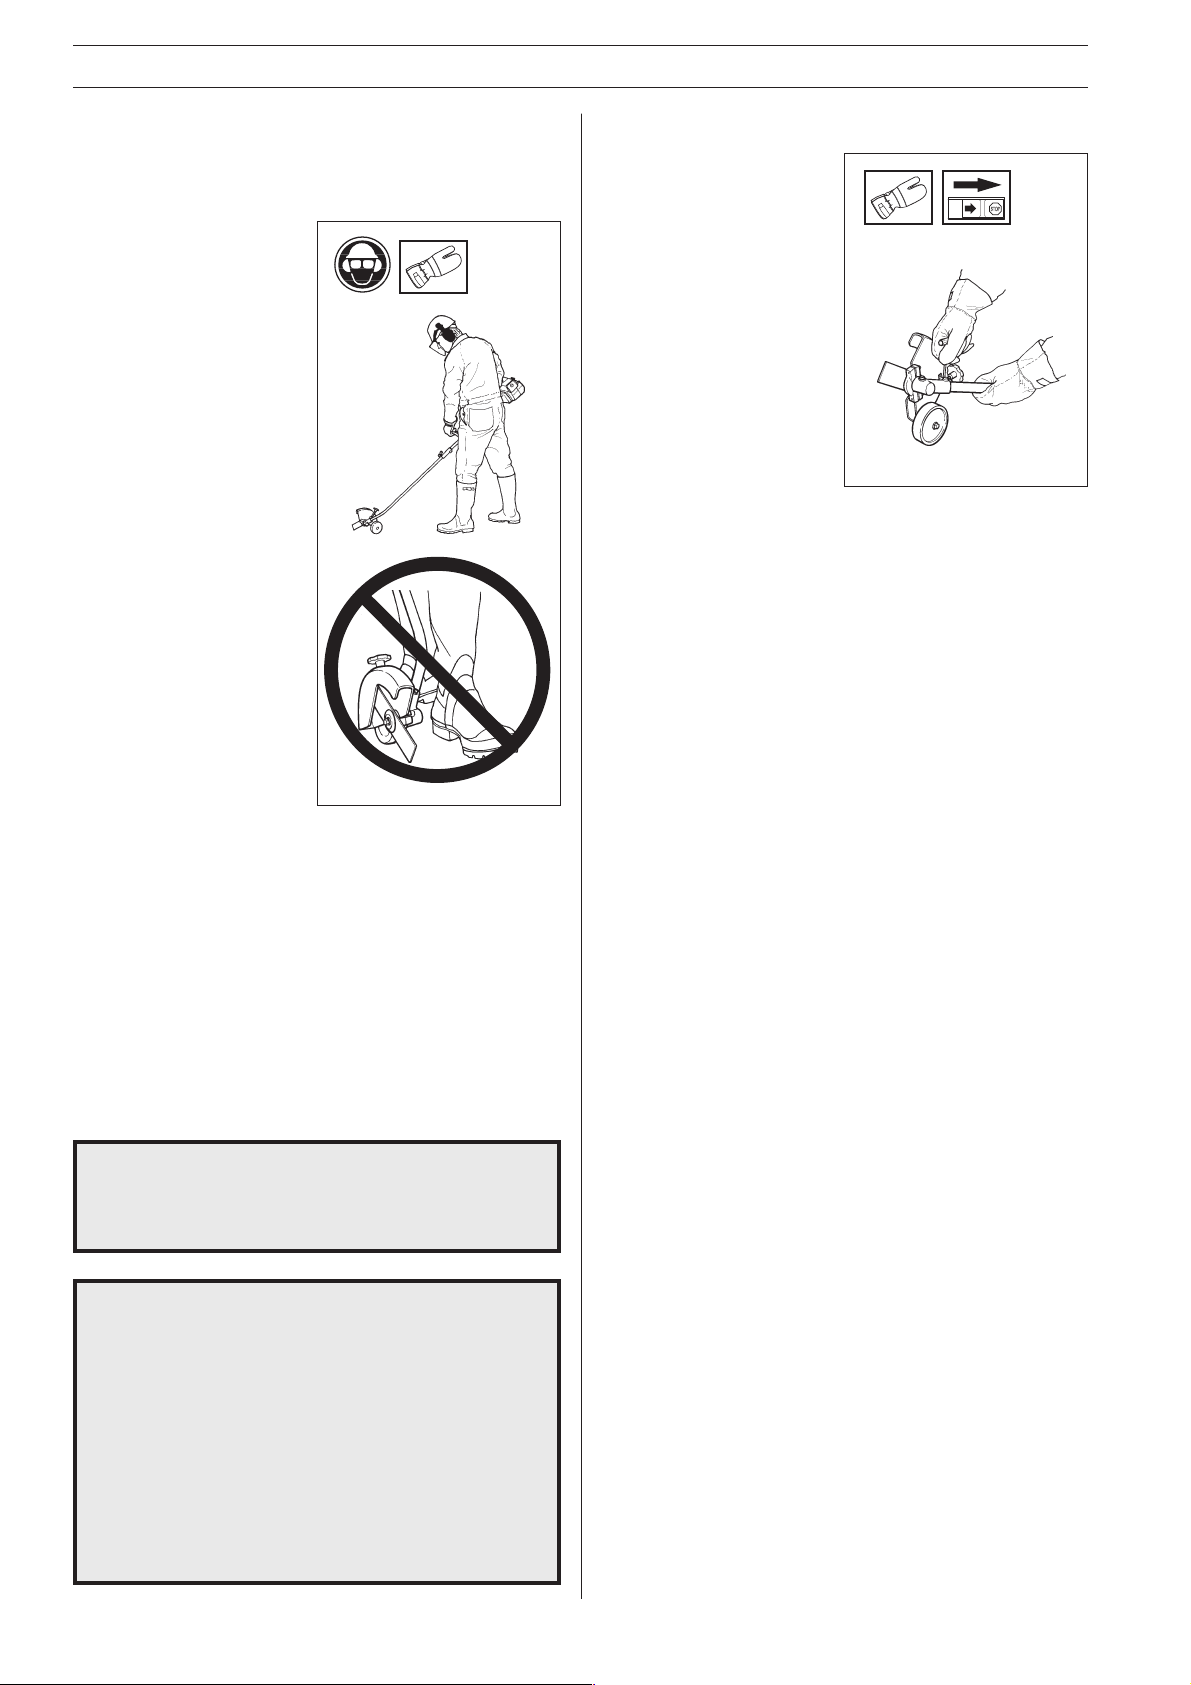
• Always ensure you have a
safe and firm foothold.
• Always hold the machine
with both hands. Hold the
machine of the right-hand
side your the body.
• Make sure your hands and
feet do not come into
contact with the blade
when the engine is running.
• When the engine is
switched off, keep your
hands and feet away from
the blade until it has
stopped.
Safety instructions after completing work
• Ensure the blade has
stopped before cleaning,
carrying out repairs or an
inspection. Remove the
spark plug cable from the
spark plug.
• Wear heavy-duty gloves
when carrying out repairs
on the edger.
• Store the machine out of
reach of children.
• Only use original spare
parts with repair.
• Always cut edges at full
throttle.
• Always keep the blade close to the ground.
• Always drop to idling speed after each working operation.
Longer periods running at full throttle without loading the
engine (that is without resistance, which the engine feels
from the cutting equipment when trimming) can lead to
serious engine damage.
• Be especially careful when pulling the edger towards you
during work.
• If heavy vibrations occur, stop the engine. Remove the
spark plug cable from the spark plug. Check that the
machine is not damaged. Repair any damage.
WARNING!
Sometimes grass and stones can collect in
!
!
the blade guard and blade. Always stop the
engine when cleaning.
WARNING!
Beware of thrown objects. Always wear eye
protection. Never lean over the blade guard.
Stones rubbish etc. can be thrown up into
the eyes resulting in blindness or other
serious injury.
Keep unauthorised persons at a distance.
Children, animals, onlookers and helpers
should be outside the safety zone of 15
meters (50 feet). Stop the machine immediately if anyone approaches.
The bevel gear unit can get hot during use
and may remain so for a while afterwards.
There is a risk of slight burns if you touch it.
6 – English
Page 7
WHAT IS WHAT?
2
4
3
5
1
10
4
1
6
7
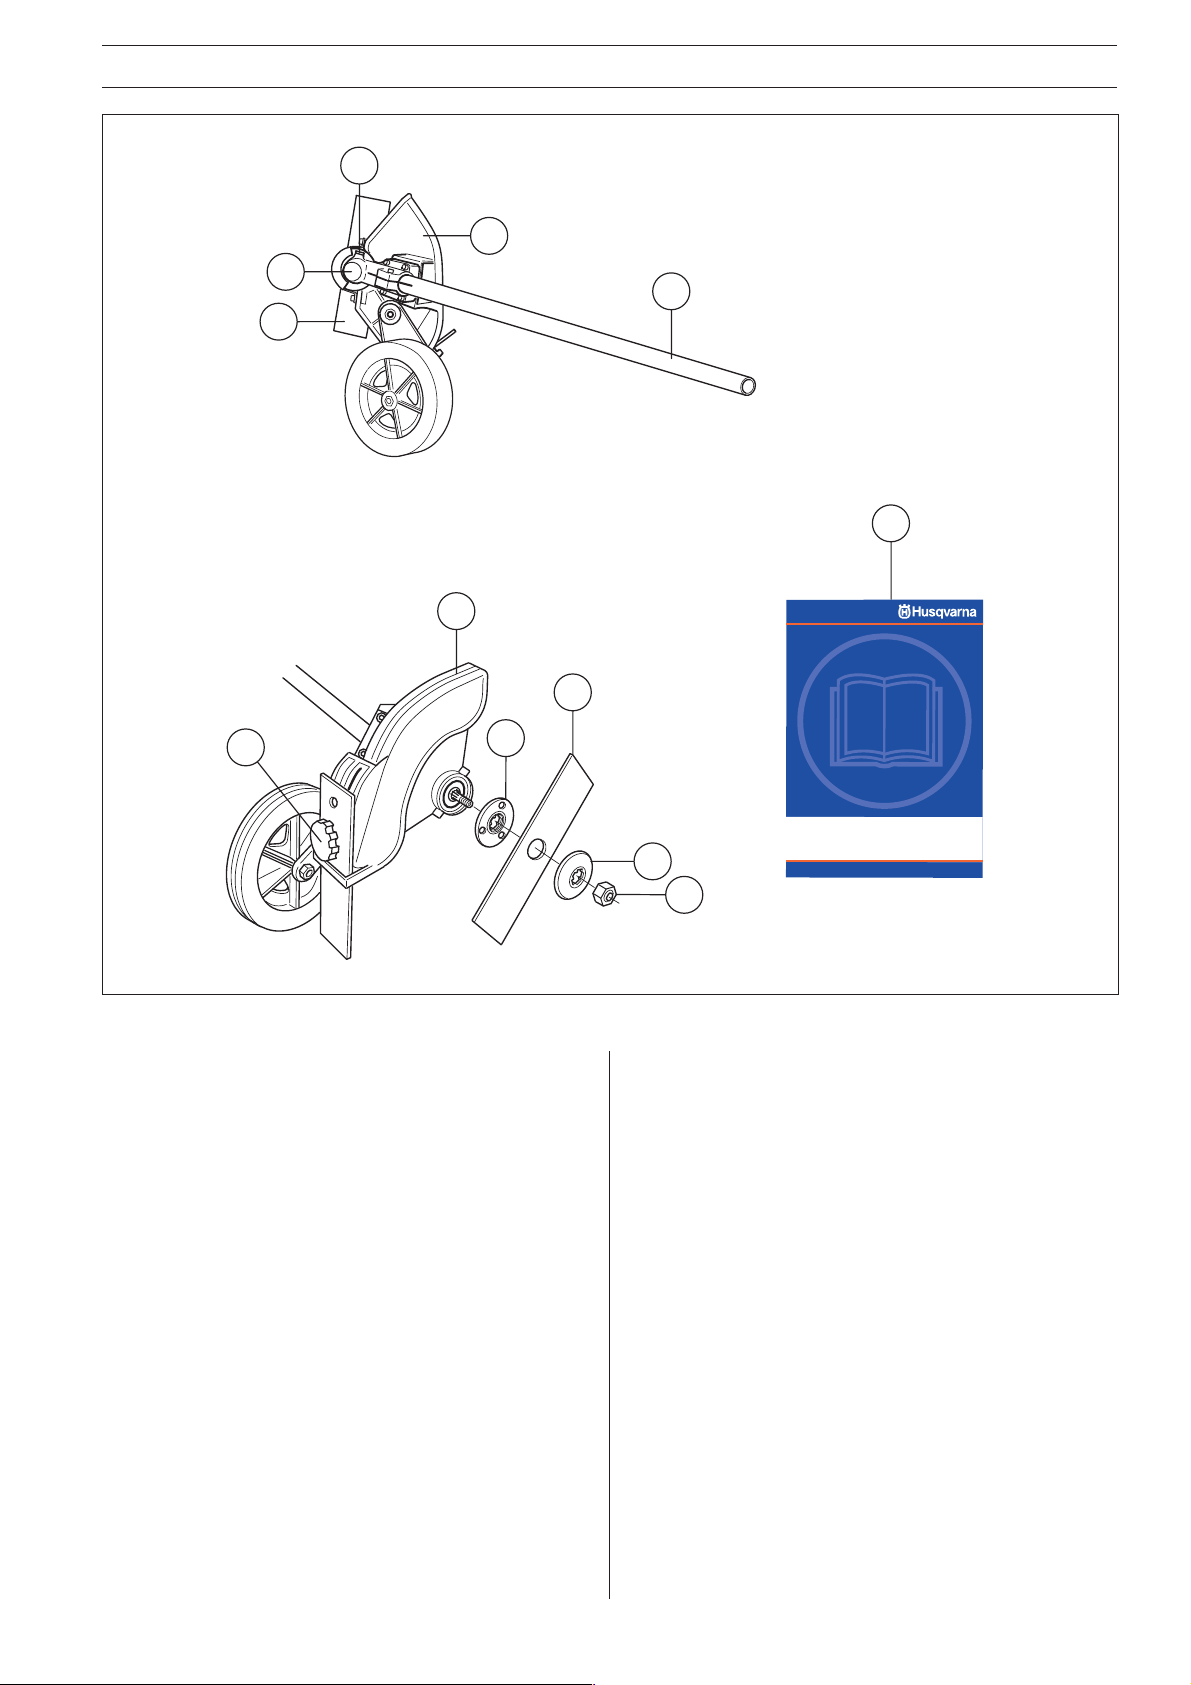
What is what on the edger
attachment?
1. Blade
2. Grease filler cap
3. Angle gear
4. Blade guard
5. Shaft
8
9
6. Locking nut
7. Support flange
8. Drive disc
9. Locking handle
10. Operator's Manual
English – 7
Page 8
ASSEMBLY
START AND STOP
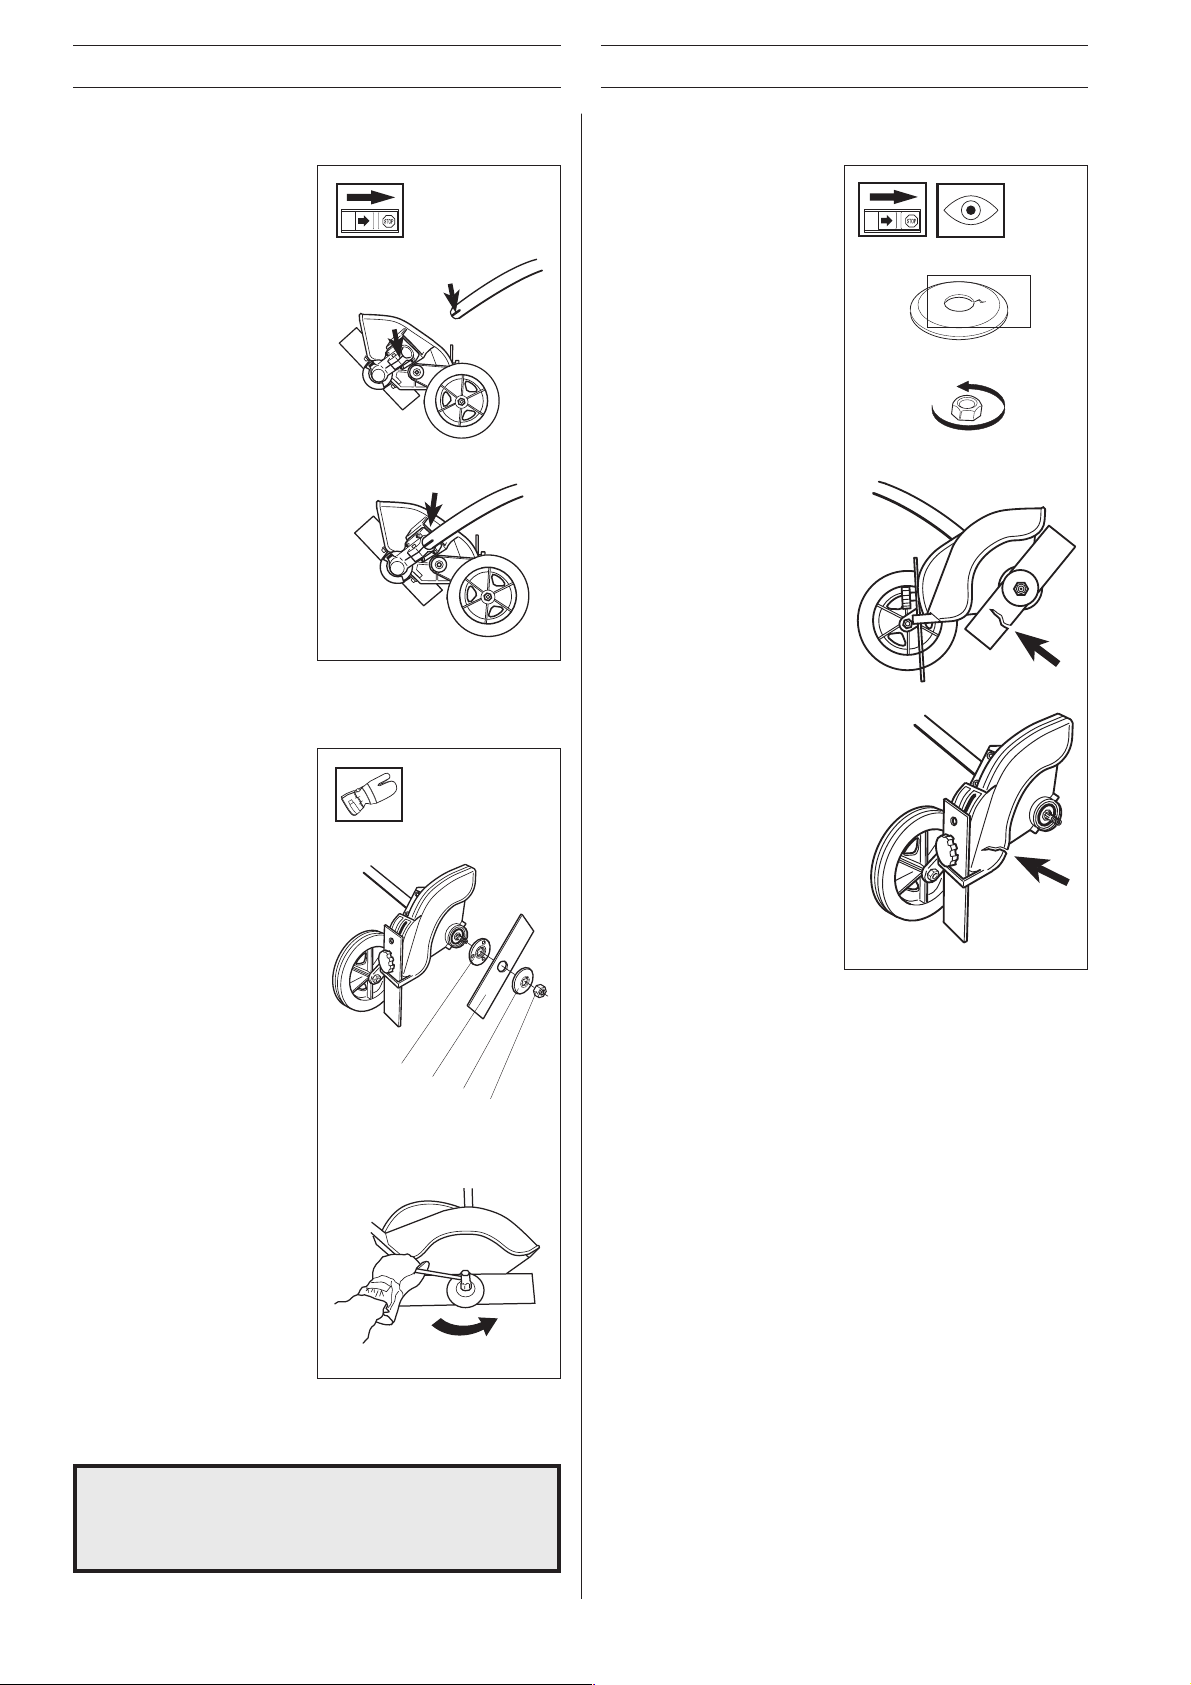
Assembling the angle gear
• Assemble the angle gear
back on the supporting
tube.
Turn the blade so that the
drive shaft engages in the
angle gear.
• Position the angle gear so
that its slot is aligned with
the line on the supporting
tube.
• Firmly tighten the screw.
Assembling the blade
Control before starting
For reasons of safety follow
these recommendations!
• Check that the support
flange is not cracked due to
fatigue or due to being
tightened too much.
Discard the support flange
if it is cracked.
• Ensure that the nut has not
lost its tightening capacity.
The nut lock shall have a
locking torque of at least l.5
Nm. The nut’s tightening
torque shall be 35-50 Nm.
• Check that the blade and
blade guard are not
damaged or cracked.
Replace the blade or blade
guard if it has been
exposed to impact or if it is
cracked.
Fit the blade as follows:
1. Fit the drive disc (A) on
the outgoing shaft. Make
sure that the edge that
fits in the hole of the
blade is facing outward.
2. Block the blade rotation
by inserting locking pin
in the hole behind the
blade guard engaging it
in the corresponding
hole in the drive disc.
3. Fit the blade (B) on the
drive disc.
4. Fit the support
flange (C). The support
flange must be fitted
with its outer edge hard
up against the blade.
5. Fit the locknut (D).
NOTE! The locknut has
left-hand threads. The
tightening torque of the
locknut is 35 – 50 Nm.
A
B
C
D
6. Remove the locking pin.
NOTE! Do not forget to remove the locking pin before
using the machine.
WARNING!
Under no circumstances may the edge
!
cutter blade be used without the blade
guard fitted.
8 – English
Page 9
MAINTENANCE
Angle gear
The angle gear is filled
a sufficient quantity of grease
at the factory. However,
before using the machine you
should check that the angle
gear is filled to 3/4 with
grease. Use HUSQVARNA
special grease.
Normally, the grease does not
need to be changed except
when repairs are carried out.
Lubricating the flexible drive axle
Inside the edger‘s drive shaft
is a flexible drive axle. The
flexible drive axle should be
regularly lubricated after 30
hours of operation. Loosen the
two screws on the angle gear
and remove it. The flexible
drive axle is easily removed
from the shaft by taking a firm
grip on the axle end. Lubricate
the flexible drive axle over its
entire length and reinsert it in
the shaft. Turn the axle while
inserting it so that it correctly
engages in the clutch.
Replace the angle gear on the
drive axle shaft and tighten the
two screws.
Maintenance schedule
Below follows some general maintenance instructions. If you
need further information please contact your service
workshop.
Daily maintenance
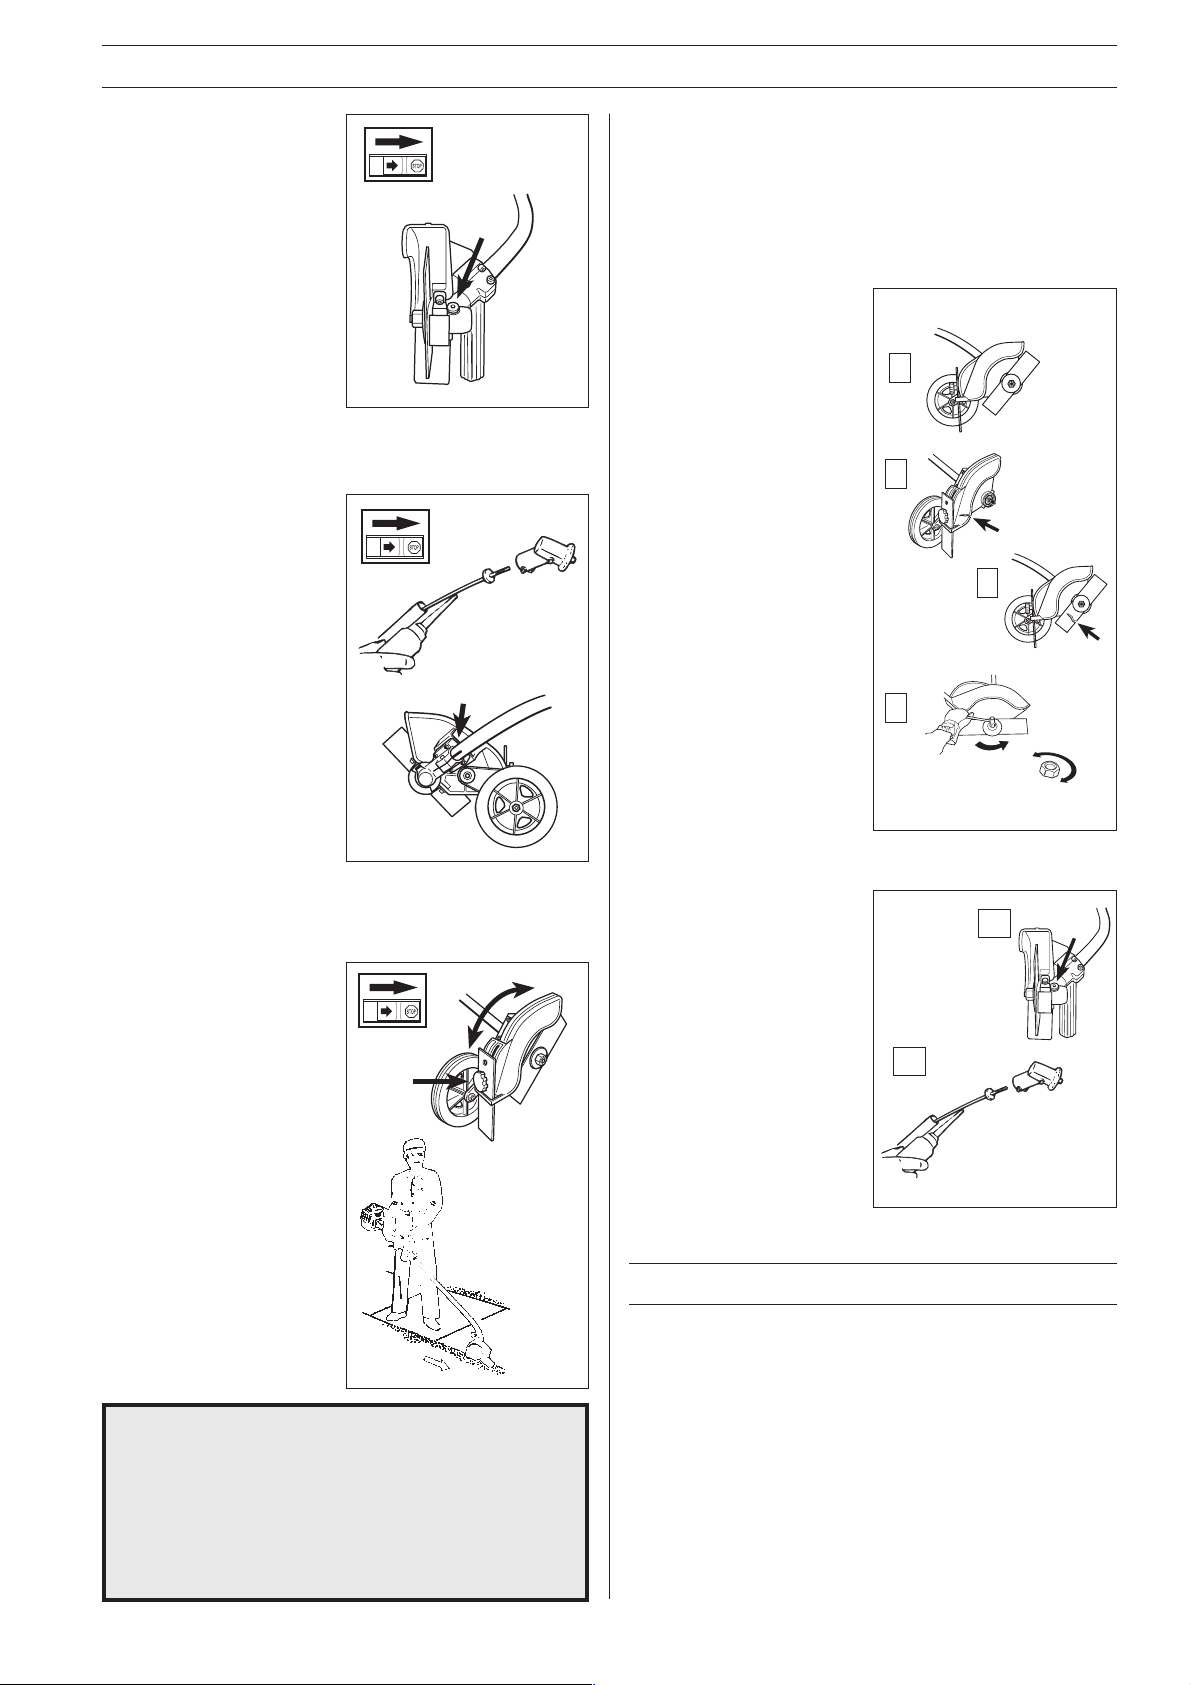
1. Check that the blade
does not rotate while
idling.
2. Check the guard for
damage and ensure that
it is not cracked.
Replace the guard if it
has been exposed to
impact or is cracked.
3. Check that the blade is
undamaged and not
cracked. Replace the
blade if necessary.
4. Check that the locking
nut is tight.
1
2
3
4
Adjusting the edger's cutting depth
The cutting depth should be
adjusted before starting
work.
• Loosen the locking handle
(A) and rotate the guard by
moving the locking knob
forwards or backwards. If
the locking handle is moved
forwards (from the
machine) the cutting depth
is increased. If the locking
handle is moved backwards
(towards the machine) the
cutting depth is reduced.
• Adjust the cutting depth.
• Lock the locking handle.
WARNING!
Always bear the machine on the right side of
!
the body. Always wear protective glasses,
long trousers and heavy-duty shoes when
using the machine. Observe your
surroundings, ensure people and animals do
not come in the immediate vicinity or can be
hit by thrown objects. Apply full throttle
before the blade starts to work on the soil.
A
Weekly
maintenance
1. Check that the angle
gear is 3/4 filled with
grease. Fill if necessary
using special grease.
2. The flexible drive shaft
must be lubricated after
every 30 hours in
operation or more often.
TECHNICAL DATA
Technical data
Weight, Lbs/kg
Blade length
Centre hole, blade
Speed, blade
1
2
1,6
195 mm
1" = 25,4 mm
7140 r/min
English – 9
Page 10

EXPLICATION DES SYMBOLES
Symboles
max
10000 rpm
AVERTISSEMENT! Le tranchebordure peut être dangereux!
Une utilisation négligée ou incorrecte
peut entraîner des blessures graves,
voire mortelles pour l'utilisateur ou
d'autres personnes.
Lire attentivement le manuel
d'utilisation et assimiler son contenu
avant d'utiliser la machine.
Toujours porter:
• Un casque de protection en cas de
risque de chute d'objets.
• Des protège-oreilles
• Des lunettes de protection
homologuées
Régime max. de l'arbre sortant, tr.min
Flèches indicatrices indiquant les limites
pour l’emplacement de la fixation de la
poignée.
Toujours porter des gants de protection
homologués.
Porter des bottes solides et
antidérapantes.
Les autres symboles/autocollants présents sur la
machine concernent des exigences de certification
spécifiques à certains marchés.
Contrôles et/ou entretiens doivent être
effectués avec le moteur arrêté et le
contacteur d'arrêt en position STOP.
Ce produit est conforme aux
directives CE en vigueur.
Attention aux objets projetés et aux
ricochets.
Attention à la lame en rotation.
Surveiller les pieds et les mains.
Attention! La lame continue à tourner,
même après l'arrêt du moteur.
Lorsque le moteur est arrêté, arrêter
la lame en l'amenant en contact avec
le sol.
Indique le sens de rotation.
Toujours porter des gants homologués.
La machine demande un entretien
régulier.
Contrôle visuel.
Toujours porter des lunettes de
protection homologuées.
15 m
50FT
10 – Français
15 m
50FT
L'utilisateur de la machine doit
s'assurer qu'aucune personne ou
animal ne s'approchent à moins de 15
mètres pendant le travail.
Page 11

SOMMAIRE
Husqvarna AB travaille continuellement au développement de
ses produits et se réserve le droit d’en modifier, entre autres, la
conception et l’aspect.
Lire attentivement le manuel d’utlilisation et
assimiler son contenu avant d’utiliser la
machine.
Ces instructions son un complément au manuel qui
accompagne la machine. Pour les autres instructions, se
reporter au manuel d´utilisation de la machine.
AVERTISSEMENT!
En aucun cas, la conception d'origine de la
!
!
machine ne doit être modifiée sans
l'accord du fabricant. Toujours utiliser des
pièces de rechange d'origine. Des
modifications et/ou des pièces non
autorisées peuvent entraîner des
blessures graves, voire mortelles, pour
l'utilisateur ou d'autres personnes.
AVERTISSEMENT!
Cet accessoire ne peut être utilisé que
pour les débroussailleuses/coupebordu-
res auxquels il est expressément destiné.
Voir la section ”Accessoires homologués”
au chapitre Caractéristiques techniques
dans le manuel d'utilisation de la
machine.
Sommaire
EXPLICATION DES SYMBOLES
Symboles .......................................................................... 10
SOMMAIRE
Sommaire ........................................................................... 11
CONSIGNES DE SECURITE
Equipement de protection personnelle ............................. 12
Dispositifs de sécurité de la machine ................................ 12
Consignes générales de sécurité ...................................... 13
Instructions générales de travail ....................................... 13
Techniques de travail de base .......................................... 14
QUELS SONT LES COMPOSANTS?
Quels sont les éléments du kit coupe-bordure? ................ 15
MONTAGE
Montage de l'engrenage angulaire.................................... 16
Montage de la lame .......................................................... 16
MARCHE ET ARRET
Contrôles avant le démarrage ........................................... 16
ENTRETIEN
Engrenage angulaire ......................................................... 17
Lubrification de l'arbre souple d'entraînement .................. 17
Réglage de la profondeur de coupe du tranche-bordure .. 17
Schéma d'entretien ........................................................... 17
CARACTERISTIQUES TECHNIQUES
Caracteristiques techniques .............................................. 17
La machine sert uniquement à couper les bordures de
pelouses.
Français – 11
Page 12

CONSIGNES DE SECURITE
Equipement de protection
personnelle
INFORMATION IMPORTANTE
• Lors de l'utilisation du tranche-bordure, un équipement de protection personnelle être utilisé. L'équipe-
ment de protection personnelle n'élimine pas les
risques d'accidents, mais réduit toutefois la gravité
des blessures en cas d'accident.
Dispositifs de sécurité de la machine
Ce chapitre décrit les dispositifs de sécurité de la machine,
leur fonction ainsi que les contrôles et entretiens à effectuer
pour s’assurer de leur bon fonctionnement (se référer au
chapitre "Quels sont les composants?" pour connaître
l’emplacement de ces dispositifs sur la machine).
AVERTISSEMENT!
Ne jamais utiliser la machine si les dispositifs
!
Protège-lame
Cette protection a pour but
d’empêcher la projection
d’objets détachés vers
l’opérateur. Il empêche
également l’utilisateur d’entrer
en contact avec l’outil de
coupe.
de sécurité sont défectueux.
Suivre les instructions de contrôle, d’entretien
et de maintenance listées dans ce chapitre.
Equipement de
coupe
Deux règles fondamentales:
1. Utiliser uniquement
l'équipement de coupe
avec le protège-lame
recommandé. Se
reporter au chapitre
”Caractéristiques
techniques”
manuel d'utilisation de la
machine
2. S'assurer que l'équipe-
ment de coupe n'est pas
endommagé ou fissuré.
Toujours remplacer un
équipement de coupe
endommagé.
!
dans le
.
AVERTISSEMENT!
Toujours arrêter le moteur avant de débuter
des travaux sur l’équipement de coupe. Le
moteur continue à tourner même après
relâchement de l’accélérateur. S’assurer
que la lame est entièrement immobilisée et
retirer le câble de la bougie d’allumage
avant d’effectuer des travaux sur
l’équipement de coupe.
• S’assurer que le protègelame n’est pas endommagé
ou fissuré.
• Remplacer le protège-lame
en cas de chocs ou de
fissurations.
• Toujours utiliser le protègelame recommandé dans les
"Caractéristiques
techniques"
d'utilisation de la machine,
pour l'équipement de coupe.
dans le manuel
Equipement de
coupe
La lame est conçue pour
supporter les charges
entraînées par la coupe des
bordures de pelouse.
Contre-écrou
Le contre-écrou retient
l’équipement de coupe à
l’arbre sortant.
Contre-écrou
• Se protéger la main lors du
montage, se servir du
protège-lame comme
protection lors du serrage
avec la clé à douille.
Serrage de l’écrou dans le
sens contraire au sens de
rotation. Desserrage de
l’écrou dans le sens de
rotation. (IMPORTANT!
L’écrou est fileté à gauche).
• Serrer l’écrou à l’aide de la
clé à douille, 35-50 Nm
(3,5-5 kpm).
IMPORTANT!
L’usure du verrouillage nylon du contre-écrou ne doit pas
être telle qu’il peut se visser à l’aide des doigts. Le ver-
rouillage doit résister à 1,5 Nm au moins. Remplacer le
contre-écrou après l’avoir resserré une dizaine de fois.
AVERTISSEMENT!
Ne jamais utiliser la machine si le dispositif
!
de sécurité est défectueux. Contrôler et
effectuer l'entretien du dispositif de
sécurité en suivant les indications de ce
chapitre. Si l’un des contrôles de la
machine n'est pas satisfaisant, contacter
un atelier de service.
12 – Français
Page 13

CONSIGNES DE SECURITE
Consignes générales de sécurité
AVERTISSEMENT!
Un équipement de coupe défectueux
!
Protection personnelle
• Toujours porter des bottes
ainsi que l'équipement de
protection indiqué au chapitre
”Equipement de protection
personnelle”
d'utilisation de la machine
• Toujours porter des vêtements
de travail et des pantalons
longs résistants.
• Ne jamais porter des
vêtements amples ou des
bijoux.
• La longueur des cheveux ne
doit pas dépasser les épaules.
Consignes de sécurité pour l'entourage
augmente les risques d’accidents.
dans le manuel
.
• S'assurer que la lame et le protège-lame sont correctement
fixés.
• Pendant le réglage du carburateur, s'assurer que la lame est en
contact avec le sol et que personne ne se trouve à proximité.
• S'assurer que la lame s'arrête toujours au ralenti.
• S'assurer que la poignée et le dispositif de sécurité sont en bon
état. Ne jamais utiliser la machine avec une pièce manquante
ou ayant été modifiée.
• Utiliser la machine uniquement pour les travaux auxquels elle
est destinée.
Instructions générales de travail
INFORMATION IMPORTANTE
• Ce chapitre décrit les consignes de sécurité de base
pour travailler avec un tranche-bordure.
• Dans l’éventualité d’une situation rendant le travail
incertain, consulter un expert. S’adresser au revendeur ou à l’atelier de service.
• L’utilisateur doit éviter les utilisations pour lesquel-
les il n’est pas qualifié.
• Ne jamais laisser un enfant utiliser la machine.
• S'assurer qu'aucune personne ne s'approche à moins de
15 m pendant le travail.
• Ne jamais laisser d'autres personnes utiliser la machine
avant d'avoir vérifié que le contenu du manuel d'utilisation a
été assimilé par ces personnes.
Consignes de sécurité avant la mise en
service
• Inspecter la zone de travail. Enlever tout objet traînant par
terre, tels que cailloux, débris de verre, clous, fil de fer,
ficelle etc., pouvant être projetés ou s'enrouler autour de la
lame ou dans le protège-lame.
• Maintenir les enfants, animaux, spectateurs et aides à 15 m
(50 pieds) de la zone de travail. Stopper la machine
immédiatement si quelqu'un s'approche.
• Contrôler toute la machine
avant de la mettre en
service. Remplacer les
pièces endommagées.
S'assurer que le carburant
ne fuit pas et que toutes les
protections et carters ne
sont pas endommagés et
correctement fixés. Vérifier
toutes les vis et écrous.
• S'assurer que la lame n'est
pas endommagée ou
fissurée.
• S'assurer que le protègelame est monté et en bon
état.
Consignes de sécurité de base
1. Inspecter les environs:
• Afin de s’assurer que ni personnes, ni animaux ou autres
facteurs ne peuvent entraver le contrôle de la machine.
• Afin d’éviter que des personnes ou des animaux n’entrent
en contact avec l’équipement de coupe ou avec d’éventuels
objets projetés par l’équipement de coupe.
• IMPORTANT! Ne jamais utiliser une machine en l’absence
de possibilités d’appeler au secours en cas d’accident.
2. Eviter d’utiliser la ma-
chine en cas d’intempéries. Par exemple, en cas
de brouillard épais, fortes
pluies, vents forts, grands
froids, etc. Ce type
d’intempéries, notamment le verglas, peut
rendre les conditions de
travail dangereuses.
3. S'assurer de pouvoir
marcher et se tenir
debout de manière sûre.
Lors des déplacements
inattendus, prendre
garde aux obstacles
éventuels (racines,
cailloux, branches,
fossés, etc). Faire preuve
de beaucoup de prudence lors du travail sur
des terrains en pente.
4. Arrêter le moteur pour se déplacer.
5. Ne jamais placer la machine sur le sol avec le moteur en
marche sans pouvoir la surveiller.
Français – 13
Page 14

CONSIGNES DE SECURITE
Techniques de travail de base
Consignes de sécurité pendant le travail
• Toujours adopter une
position de travail sûre et
stable.
• Toujours tenir la machine à
deux mains. Porter la
machine sur le côté droit du
corps.
• Garder les mains et les
pieds à l’écart de la lame
lorsque le moteur tourne.
• Après l’arrêt du moteur,
garder les mains et les
pieds éloignés de la lame,
jusqu’à l’arrêt complet de
celle-ci.
• Le moteur doit toujours
tourner à plein régime pour
couper les bordures de
pelouse.
Consignes de sécurité après le travail
• Avant de nettoyer, réparer
ou inspecter la machine,
s'assurer que la lame est
entièrement arrêtée.
Débrancher le câble
d’allumage de la bougie.
• Toujours porter des gants
de protection pour réparer
le tranche-bordure.
• Ranger la machine hors de
portée des enfants.
• Toujours utiliser des pièces
de rechange d’origine pour
réparer la machine.
• Toujours maintenir la lame à proximité du sol.
• Faire tourner le moteur au ralenti après chaque étape de
travail. Une période prolongée de plein régime alors que le
moteur n'est soumis à aucune charge (c'est-à-dire
résistance exercée sur le moteur par l'intermédiaire de
l'équipement de coupe) peut endommager sérieusement le
moteur.
• Etre particulièrement vigilant au moment de ramener le
tranche-bordure vers soi pendant le travail.
• En cas de fortes vibrations, arrêter la machine. Débrancher
le câble d’allumage de la bougie. S'assurer que la machine
n’est pas endommagée. Réparer les avaries éventuelles.
AVERTISSEMENT!
Il arrive que l’herbe s’accroche au protège-
!
!
lame et à la lame. Toujours arrêter le
moteur avant de nettoyer la machine.
AVERTISSEMENT!
Attention aux objets projetés. Toujours
porter une protection des yeux.
Ne jamais se pencher sur la lame ou le
protège-lame. Des pierres, déchets ou
autres objets peuvent être projetés dans les
yeux, provoquant des blessures graves,
voire la cécité.
Maintenez autrui à distance. Enfants,
animaux, spectateurs et aides doivent être
maintenus à une distance de sécurité de 15
m (50 pieds). Arrêtez immédiatement la
machine si quelqu’un s’approche.
Après l’utilisation, l’engrenage angulaire
peut demeurer chaud pendant un certain
temps. Risque de brûlures légères en cas
de contact.
14 – Français
Page 15

QUELS SONT LES COMPOSANTS?
2
4
3
5
1
10
4
1
6
7
Quels sont les éléments du kit
coupe-bordure?
1. Lame
2. Arrivée de lubrifiant
3. Engrenage angulaire
4. Protège-lame
5. Tige
8
9
6. Contre-écrou
7. Bride d'arrêt
8. Toc d'entraînement
9. Vis de verrouillage
10. Manuel d'utilisation
Français – 15
Page 16

MONTAGE
MARCHE ET ARRET
Montage de l'engrenage angulaire
• Monter l'engrenage
angulaire sur la tige.
Tourner la lame pour que
l'arbre s'enclenche dans
l'engrenage angulaire.
• Placer l'engrenage
angulaire pour faire
correspondre la rainure
avec le trait de la tige.
• Serrer entièrement la vis.
Montage de la lame
Pour monter la lame, procé-
der comme suit:
Contrôles avant le démarrage
Pour plus de sécurité, suivre
les recommandations cidessous:
• Contrôler la bride d'arrêt
pour détecter d’éventuelles
fissures dues à l’usure ou à
un serrage trop fort. En cas
de fissures, remplacer la
bride d'arrêt.
• S’assurer que le contre-
écrou n’a pas perdu sa
capacité de blocage. Le
contre-écrou doit résister à
1,5 Nm au moins. Couple
de serrage du contre-écrou:
35-50 Nm.
• Contrôler la lame et le
protège-lame afin de
détecter d’éventuels
dommages ou fissures.
Remplacer la lame ou le
protège-lame en cas de
choc ou de fissures.
1. Monter le toc d'entraîne-
ment (A) sur l'arbre
sortant. S'assurer que le
bord pénétrant dans le
trou de la lame est
monté vers le haut.
2. Stabiliser la lame en
introduisant la goupille
d'arrêt dans le trou situé
derrière le protège-lame,
de telle sorte qu'elle
pénètre aussi dans le
trou correspondant du
toc d'entraînement.
3. Placer la lame (B) sur le
toc d'entraînement.
4. Monter la bride d'arrêt
(C) de telle sorte que
son bord extérieur
repose contre la lame.
5. Monter le contre-écrou
(D). IMPORTANT: le
contre-écrou est fileté à
gauche. Couple de
serrage du contre-écrou:
35-50 Nm.
A
B
C
D
6. Retirer la goupille d'arrêt
IMPORTANT! Ne pas oublier de retirer la goupille d’arrêt
avant d’utiliser la machine.
AVERTISSEMENT!
Ne jamais utiliser la lame si le protège-lame
!
n'est pas monté.
16 – Français
Page 17

ENTRETIEN
Engrenage angulaire
L’engrenage angulaire est
enduit à l'usine de la quantité
de graisse nécessaire.
Toutefois, avant d’utiliser la
machine, il convient de
s’assurer que l’engrenage
angulaire est au 3/4 rempli de
graisse. Utiliser une graisse
HUSQVARNA spéciale.
En général, il n’est pas
nécessaire de remplacer le
lubrifiant du carter, sauf en
cas de réparations.
Lubrification de l'arbre souple
d'entraînement
A l’intérieur du tube de l’arbre
d’entraînement du tranche-
bordure se trouve un arbre
d’entraînement souple. Il
convient de lubrifier cet arbre
souple toutes les 30 heures de
service. Desserrer les deux vis
de l’engrenage angulaire, puis
démonter celui-ci. Il est facile
d’extraire l’arbre souple du tube
d’arbre, en le saisissant
fermement par l’extrémité.
Lubrifier l’arbre souple sur toute
sa longueur, puis le réinsérer
dans le tube de l’arbre d’entraî-
nement. En insérant l’arbre
souple, le tourner pour qu’il se
positionne correctement en
fonction de l’engrenage.
Remonter l’engrenage angulaire, resserrer les deux vis.
Réglage de la profondeur de coupe
du tranche-bordure
Avant de commencer, il faut
régler la profondeur de coupe.
• Desserrer la vis de blocage
(A), tourner le protège-lame
(B) en faisant aller et venir la
vis de blocage. Pour
augmenter la profondeur de
coupe, déplacer la vis vers
l'avant (depuis la machine).
Pour diminuer la profondeur,
déplacer la vis vers l'arrière
(vers la machine).
A
Schéma d'entretien
Quelques instructions générales d’entretien sont données cidessous. Pour plus d’informations, contacter l’atelier de
service.
Contrôles
quotidiens
1. S’assurer que la lame ne
tourne pas lorsque le
moteur tourne au ralenti.
2. S’assurer que le protègelame n’est pas
endommagé et ne
présente aucune
fissuration. Remplacer le
protège-lame en cas de
chocs ou de fissurations.
3. S’assurer que la lame est
intacte et qu’elle n’est pas
fissurée. Si nécessaire,
remplacer la lame.
4Vérifier le serrage du
contre-écrou.
1
2
3
4
Contrôles
hebdomadaires
1
1. S'assurer que
l’engrenage angulaire
est au 3/4 rempli de
graisse. Si nécessaire,
effectuer un remplissage
d’appoint avec une
graisse spéciale.
2. L’arbre moteur courbé
doit être graissé après
30 heures d’utilisation ou
plus fréquemment.
2
CARACTERISTIQUES
• Régler la profondeur
souhaitée.
• Serrer la vis de blocage.
AVERTISSEMENT!
Toujours porter la machine à droite du
!
corps. Toujours porter des lunettes de
protection, des pantalons longs et des
chaussures solides pour travailler avec la
machine. Inspecter les environs et s'assurer
qu’aucune personne ou animal se trouve
dans la zone de travail ou risque d’être
blessé par un objet projeté par la machine.
Ne pas mettre le plein régime tant que la
lame n’a pas commencé son travail au sol.
TECHNIQUES
Caractéristiques
techniques
Poids, kg
Longueur de couteau
Trou central, couteau
Régime, couteau
1,6
195 mm
1" = 25,4 mm
7140 r/min
Français – 17
Page 18

SIGNIFICADO DE LOS SÍMBOLOS
Símbolos
max
10000 rpm
ATENCIÓN: Las rebordeadoras
pueden ser peligrosas.
Su uso negligente o erróneo puede
causar heridas graves o mortales al
operador o terceros.
Antes de utilizar la máquina, lea
atentamente las instrucciones de uso
y asegúrese de comprender su
contenido.
Utilice siempre:
• Casco protector cuando exista el
riesgo de objetos que caen
• Protección auditiva
• Protección ocular homologada
Velocidad máxima en el eje de salida,
rpm.
Marcas de flechas que indican los límites
para colocar la sujeción del mango.
Utilice siempre guantes protectores
homologados.
Utilice botas antideslizantes y seguras.
Los demás símbolos/pegatinas que aparecen en la
máquina corresponden a requisitos de
homologación específicos en determinados
mercados.
Este producto cumple con la directiva
CE vigente.
Cuidado con los objetos lanzados o
rebotados.
Cuidado con la cuchilla giratoria.
Mantenga alejados los brazos y pies.
ATENCIÓN: La cuchilla sigue girando
después de apagar el motor.
Una vez apagado el motor, detener el
movimiento giratorio de la cuchilla
apoyándola contra el suelo.
Cualquier tipo de control o medida de
mantenimiento debe efectuarse con el
motor desactivado, con el mando de
parada en la posición STOP.
Utilice siempre guantes protectores
homologados.
Utilice siempre guantes protectores
homologados.
Control visual.
15 m
18 – Español
50FT
15 m
50FT
Muestra el sentido de rotación
Debe utilizarse protección ocular
homologada.
El operador de la máquina debe
cuidar que ninguna persona o animal
se acerque más de 15 metros durante
el trabajo.
Page 19

CONTENIDO
Husqvarna AB trabaja constantemente para perfeccionar sus
productos y se reserva, por lo tanto, el derecho a introducir
modificaciones en la construcción y el diseño sin previo aviso.
Antes de utilizar la máquina lea bien el
manual de instrucciones hasta comprender
su contenido.
Estas instrucciones son complemento del manual que se
adjunta a la máquina. Para más información sobre el manejo,
consultar el manual de la máquina
ATENCIÓN: El diseño original de la
!
!
máquina no debe ser modificado por
ningún motivo sin la autorización explícita
del fabricante. Utilice siempre accesorios
originales. Las modificaciones o
accesorios no autorizados pueden
ocasionar heridas graves y mortales al
operador o terceros.
ATENCIÓN: Este accesorio sólo puede
ser utilizado con las desbrozadoras/
recortadoras destinadas al mismo, vea
”Accesorios aprobados” en el capítulo
Datos técnicos del manual de
instrucciones de la máquina.
Índice
SIGNIFICADO DE LOS SÍMBOLOS
Símbolos ........................................................................... 18
Contenido
Índice................................................................................. 19
INSTRUCCIONES DE SEGURIDAD
Equipo de protección personal ......................................... 20
Equipo de seguridad de la máquina ................................. 20
Instrucciones generales de seguridad .............................. 21
Instrucciones generales de trabajo ................................... 21
Técnica básica de trabajo ................................................. 22
¿QUÉ ES QUE?
¿Qué es que en el suplemento para cortar cantos? ......... 23
MONTAJE
Montaje del reductor angular ............................................ 24
Montaje de la cuchilla ....................................................... 24
ARRANQUE Y PARADA
Control antes de arrancar ................................................. 24
MANTENIMIENTO
Reductor angular .............................................................. 25
Lubricación del eje propulsor flexible ................................ 25
Ajuste de la profundidad de corte de la rebordeadora ...... 25
Plan de mantenimiento ..................................................... 25
DATOS TÉCNICOS
Datos técnicos .................................................................. 25
La máquina está diseñada exclusivamente para recortar
bordes de céspedes.
Español – 19
Page 20

INSTRUCCIONES DE SEGURIDAD
Equipo de protección personal
INFORMACIÓN IMPORTANTE
• Para trabajar con una rebordeadora debe usarse
siempre un equipo de protección personal. El equipo
de protección personal no elimina el riesgo de
daños, pero reduce el efecto de los mismos en caso
de accidente. El concesionario Husqvarna puede
asesorarle para elegir equipo de protección.
Equipo de seguridad de la máquina
En esta sección se describen los distintos componentes de
seguridad de la máquina, qué función cumplen y cómo se
debe realizar la revisión y el mantenimiento para garantizar su
correcto funcionamiento. (Lea el capítulo
encontrar la posición de cada componente en la máquina.)
ATENCIÓN:
No utilizar nunca una máquina con
!
componentes de seguridad defectuosos.
Siga las instrucciones de control,
mantenimiento y servicio listadas en esta
sección.
”Qué es que”
Protección del
equipo de corte
Esta protección tiene por
objeto impedir el lanzamiento
de objetos sueltos contra el
usuario de la máquina. La
protección también impide que
el usuario entre en contacto
con el equipo de corte.
para
Equipo de corte
Las dos reglas básicas:
1. ¡El equipo de corte sólo
debe usarse junto con la
protección recomendada
por nosotros! Vea el
capítulo ”Datos técnicos”
del manual de
instrucciones de la
máquina.
2. Revise el equipo de corte
para comprobar si tiene
daños o grietas. Un
equipo de corte dañado
debe cambiarse siempre.
¡ADVERTENCIA!
Pare siempre el motor antes de iniciar
!
trabajos en el equipo de corte. El equipo
sigue girando aun después de soltar el
acelerador. Antes de iniciar cualquier
trabajo en el equipo de corte, compruebe
que se haya parado totalmente y
desconecte el cable de la bujía.
Tuerca de fijación
• Compruebe que la protección
no esté dañada y que no
tenga grietas.
• Cambie la protección si ha
sido expuesta a golpes o si
tiene grietas.
• Utilice siempre la protección
especificada en los "Datos
técnicos", del manual de
instrucciones de la máquina,
para el equipo de corte.
Equipo de corte
La cuchilla está diseñada y
fabricada para tolerar las
cargas derivadas del recorte
de cantos en céspedes.
Tuerca de fijación
La tuerca fija el equipo de
corte en el eje saliente.
• Proteja la mano contra
daños al montar y utilice la
protección de cuchilla como
protección al apretar con
llave de tubo. Apriete de la
tuerca: en sentido contrario
al de rotación. Aflojamiento
de la tuerca: en el sentido
de rotación. (¡ATENCIÓN!
La tuerca tiene rosca a
izquierdas)
• Apriete la tuerca con la
llave de tubo, con un par de
35-50 Nm (3,5-5 kpm).
¡ATENCIÓN!
El fiador de nylon de la tuerca de fijación no debe tener un
grado de desgaste tal que se pueda enroscar con los dedos.
El fiador debe aguantar un mínimo de 1,5 Nm.
La tuerca debe cambiarse después de haberla enroscado
unas 10 veces.
ATENCIÓN:
Nunca utilice una máquina con el sistema
!
de seguridad defectuoso. El sistema de
seguridad debe ser controlado y mantenido
como se describe en esta sección. Si su
máquina no supera alguno de los controles
mencionados, diríjase a un taller de
servicio oficial para repararla.
20 – Español
Page 21

INSTRUCCIONES DE SEGURIDAD
Instrucciones generales de seguridad
VATENCIÓN:
Un equipo de corte en mal estado puede
!
Protección personal
• Utilice siempre botas y
además, el equipo indicado
en la sección
protección personal”
manual de instrucciones de
la máquina..
• Utilice siempre
indumentaria de trabajo y
pantalones largos fuertes.
• No utilice nunca ropas
amplias ni joyas.
• Las personas que tengan
cabellos largos, deben
levantarlo por arriba de los
hombros.
Instrucciones de seguridad para el entorno
• No permita nunca que los niños utilicen la máquina.
aumentar el riesgo de accidentes.
”Equipo de
del
• Controle que la cuchilla y su protección estén correctamente
montadas.
• Al ajustar el carburador, controle que la cuchilla esté contra el
suelo y que no haya nadie en las cercanías.
• Controle que la cuchilla siempre se detenga en régimen de
ralentí.
• Controle que los mangos y la función de seguridad estén en
orden. No utilice nunca una máquina a la que le falte una parte o
que haya sido modificada y no coincida con las especificaciones.
• Utilice la máquina solamente para lo que está destinada.
Instrucciones generales de trabajo
INFORMACIÓN IMPORTANTE
• Este capítulo trata las reglas de seguridad
fundamentales para trabajar con la rebordeadora.
• Siempre que se encuentre en situaciones que le
crean inseguridad por lo que respecta al empleo de
la máquina, consulte con un experto. Diríjase a su
concesionario o a su taller de servicio.
• Evite todo uso para el cual no se sienta
suficientemente calificado.
• Controle que nadie se acerque a menos de 15 metros
durante el trabajo.
• No permita que otros utilicen la máquina sin asegurarse
primero de que hayan comprendido el contenido del
manual de instrucciones.
Instrucciones de seguridad antes de
arrancar
• Inspeccione el lugar de trabajo. Aleje todos los objetos sueltos,
como piedras, cristales rotos, claves, alambre de acero,
cuerdas, etc., que pueden ser despedidos o enredarse en la
cuchilla o la protección de ésta.
• Mantenga alejados a terceros. Los niños, animales, curiosos y
ayudantes deben mantenerse fuera de la zona de seguridad de
15 metros. Pare la máquina inmediatamente si alguien se
acerca.
• Controle toda la máquina
antes de arrancar. Cambie
las piezas defectuosas.
Controle que no haya fuga
de combustible y que todas
las protecciones y tapas
estén en buenas condiciones
y bien fijas. Controle todos
los tornillos y tuercas.
• Controle que la cuchilla no
tenga grietas ni otros
daños.
• Verifique que la protección
de la cuchilla está montada
y sin dañar.
Reglas básicas de seguridad
1. Observe el entorno para:
• Comprobar que no haya personas, animales, etc., que
puedan influir en su control de la máquina.
• Para asegurar que no hay riesgo de que los anteriormente
mencionados entren en contacto con el equipo de corte o
con objetos lanzados por el mismo.
• ¡ATENCIÓN! No use nunca una máquina si no tiene
posibilidad de pedir auxilio en caso de accidente.
2. No utilice la máquina en
climáticas adversas. Por
ejemplo, en caso de
niebla, lluvia intensa,
viento intenso, frío intenso,
etc. El trabajo con mal
tiempo es agotador y
puede crear condiciones
peligrosas, por ejemplo
suelo resbaladizo.
3. Asegúrese de que puede
caminar y permanecer de
pié de forma segura. Vea
si hay obstáculos que
puedan dificultar un
desplazamiento imprevisto
(raíces, piedras, ramas,
agujeros, zanjas, etc.).
Proceda con sumo
cuidado al trabajar en
pendientes.
4. Para desplazar la máquina debe pararse el motor.
5. No apoye nunca la máquina con el motor en marcha sin
tenerla bajo control.
Español – 21
Page 22

INSTRUCCIONES DE SEGURIDAD
Técnica básica de trabajo
Instrucciones de seguridad durante el
trabajo
• Debe tener siempre una
posición de trabajo segura
y firme.
• Utilice siempre las dos
manos para sostener la
máquina. Mantenga la
máquina en el lado derecho
de su cuerpo.
• Tenga cuidado en que las
manos y los pies no entren
en contacto con la cuchilla
cuando el motor está en
marcha.
• Al parar el motor, mantenga
las manos y los pies
alejados de la cuchilla
hasta que se haya detenido
completamente.
Instrucciones de seguridad después del
trabajo.
• Antes de la limpieza,
reparación o inspección,
controle que la cuchilla se
haya detenido. Quite el
cable de la bujía.
• Use guantes gruesos para
reparar la rebordeadora.
• Guardar la máquina fuera
del alcance de los niños.
• Utilizar únicamente
recambios originales al
reparar la máquina.
• Para recortar bordes, utilice
siempre la aceleración
máxima.
• Mantenga siempre la cuchilla cerca del suelo.
• Suelte el acelerador para dejar el motor en ralentí después
de cada fase de trabajo. La plena aceleración sin carga del
motor (es decir, sin la resistencia derivada del equipo de
corte) puede causar averías graves del motor.
• Proceda con especial cuidado cuando tire de la máquina
hacia usted durante el trabajo.
• Si hay vibraciones fuertes, pare la máquina. Desconecte el
cable de encendido de la bujía. Compruebe que la máquina
no esté dañada. Repare eventuales daños.
¡ADVERTENCIA!
En ocasiones se atasca hierba o piedras en
!
!
la protección de cuchilla y en la cuchilla.
Pare siempre el motor cuando para limpiar.
¡ADVERTENCIA!
Peligro de objetos lanzados. Utilice siempre
gafas protectoras. No se apoye nunca sobre
la protección de cuchilla. Hay riesgo de
lanzamiento de piedras, residuos, etcétera,
contra los ojos, causando ceguera o daños
graves. Mantenga apartado al público. Los
niños, animales, espectadores y ayudantes
deben estar fuera de la zona de seguridad
de 15 m. Pare la máquina de inmediato si se
acerca alguien. Durante el trabajo y por un
momento después del mismo, el reductor
angular puede estar caliente. Hay riesgo de
quemaduras leves en caso de contacto.
22 – Español
Page 23

¿QUÉ ES QUE?
2
4
3
5
1
10
4
1
6
7
¿Qué es que en el suplemento para
cortar cantos?
1. Cuchilla
2. Carga de lubricante
3. Engranaje angulado
4. Protección de cuchilla
5. Tubo
8
9
6. Manija de fijación
7. Arrastrador
8. Brida de apoyo
9. Tuerca de fijación
10. Manual de instrucciones
Español – 23
Page 24

MONTAJE
ARRANQUE Y PARADA
Montaje del reductor angular Controles antes de arrancar
• Monte el reductor angular
en el tubo. Gire la cuchilla
para que el eje agarre en el
reductor.
• Coloque el reductor de
forma que la ranura
coincida con la raya del
tubo.
• Apriete el tornillo.
Montaje de la cuchilla
Procedimiento de montaje de
la cuchilla:
1. Coloque el arrastrador
(A) en el eje de salida.
Monte hacia afuera el
borde que se adapta
al agujero de la cuchilla.
¡Observe estas
recomendaciones por
razones de seguridad!
• Revise la brida de apoyo
para comprobar que no se
han producido grietas
debidas a agotamiento o
apriete excesivo. ¡Deseche
la brida de apoyo si tiene
grietas!
• Compruebe que la tuerca
no pierde fuerza de fijación.
La fijación de la tuerca
debe tener un par mínimo
de 1,5 Nm. El par de
apriete de la tuerca debe
ser de 35-50 Nm.
• Revise la cuchilla y la
protección de cuchilla para
comprobar que están
intactas y que no tienen
grietas. Cambie la cuchilla
o la protección si han sido
expuestas a golpes o
tienen grietas.
2. Fije la rotación de la
cuchilla insertando el
pasador en el agujero
detrás de la protección,
de modo que entre en el
agujero equivalente del
arrastrador.
3. Ponga la cuchilla (B) en
el arrastrador.
4. Monte la brida de apoyo
(C). La brida de apoyo
debe montarse con su
borde exterior tocando
en la cuchilla.
5. Monte la tuerca de
fijación (D). ¡ATENCIÓN!
La tuerca de fijación
tiene rosca a izquierdas.
El par de apriete de la
tuerca de fijación es de
35-50 Nm.
6. Quite el pasador.
¡ATENCIÓN! No olvide quitar el pasador antes de utilizar la
máquina.
A
B
C
D
!
24 – Español
¡ADVERTENCIA!
La cuchilla de la rebordeadora no debe
usarse, por ningún concepto, sin que esté
montada la protección de cuchilla.
Page 25

MANTENIMIENTO
Reductor angular
El engranaje angulado se
entrega de fábrica con la
cantidad adecuada de grasa.
No obstante, antes de arrancar
la máquina, verifique que el
engranaje esté lleno con grasa
hasta las 3/4 partes. Utilice
grasa especial de
HUSQVARNA.
Generalmente, el lubricante de
la caja del reductor no requiere
cambiarse excepto cuando se
realizan reparaciones.
Lubricación del eje propulsor flexible
En el tubo de la rebordeadora
hay un eje propulsor flexible. El
eje propulsor flexible debe
lubricarse regularmente cada
30 horas de trabajo
aproximadamente. Afloje los
dos tornillos del reductor y
desmóntelo. El eje propulsor
flexible se saca fácilmente del
tubo sujetándolo con firmeza
en el extremo.
Lubrique el eje propulsor
flexible en toda su longitud y
vuelva a introducirlo en el tubo.
Gire el eje durante la
introducción para adaptarlo
bien en el acoplamiento.
Vuelva a montar el reductor en
el tubo del eje de propulsión y
apriete los dos tornillos.
Ajuste de la profundidad de corte de
la rebordeadora
Antes de iniciar el trabajo debe
ajustarse la profundidad de
corte.
Plan de mantenimiento
Las siguientes son instrucciones generales de
mantenimiento. Si necesita más información, póngase en
contacto con el servicio oficial.
Control diario
1. Controle que la cuchilla
de corte no gire en
ralentí.
2. Compruebe que la
protección no esté
dañada y que no tenga
grietas. Cambie la
protección si ha estado
expuesta a golpes o si
tiene grietas.
3. Compruebe que la
cuchilla no esté dañada
y que no tenga grietas.
Cambie la cuchilla si es
necesario.
4. Controle el apriete de la
tuerca de fijación.
Control semanal
1. Compruebe que el
reductor angular esté
lleno en sus tres cuartas
partes con lubricante. Si
es necesario, añada
grasa especial.
1
2
3
4
1
2
• Afloje la manija de fijación (A)
y gire la protección moviendo
la manija hacia adelante o
hacia atrás. Moviendo la
manija hacia adelante
(apartándola de la máquina)
se aumenta la profundidad
de corte. Moviendo la manija
hacia atrás (acercándola a la
máquina) se reduce la
profundidad de corte.
• Ajuste la profundidad de corte
deseada.
• Apriete la manija de fijación.
¡ADVERTENCIA!
Lleve siempre la máquina en el lado
!
derecho del cuerpo. Use gafas protectoras,
pantalones largos y zapatos gruesos para
trabajar con la máquina. Observe el entorno
y procure que no se acerquen personas o
animales a la máquina, así como que no
puedan ser alcanzados por objetos
lanzados. Acelere al máximo antes de que
la cuchilla empiece a trabajar en la tierra.
A
2. El eje propulsor flexible
debe lubricarse cada 30
horas de trabajo o con
mayor frecuencia.
DATOS TÉCNICOS
Datos técnicos
Peso, kg
Longitud de cuchilla
Agujero central
Velocidad de cuchilla
1,6
195 mm
1" = 25,4 mm
7140 r/min
Español – 25
Page 26

´+H(^¶0B¨
Page 27

Page 28

114 00 86-20
´+H(^¶0B¨
2002W12
 Loading...