

UUUUSSSS CCCCAAAA EEEESS
SS
DC 6000
Oper ator’s manual Manuel d’utilisation
Manual de instrucciones
Please r ead the operator’ s man ual car efull y and mak e sur e y ou understand the instructions bef or e using the machine .
Lir e attentiv ement et bien assimiler le man uel d’utilisation a vant d’utiliser la machine .
Lea detenidamente el man ual de instrucciones y asegúr ese de entender su contenido antes de utilizar la máquina
KEY T O SYMBOLS
2
– English
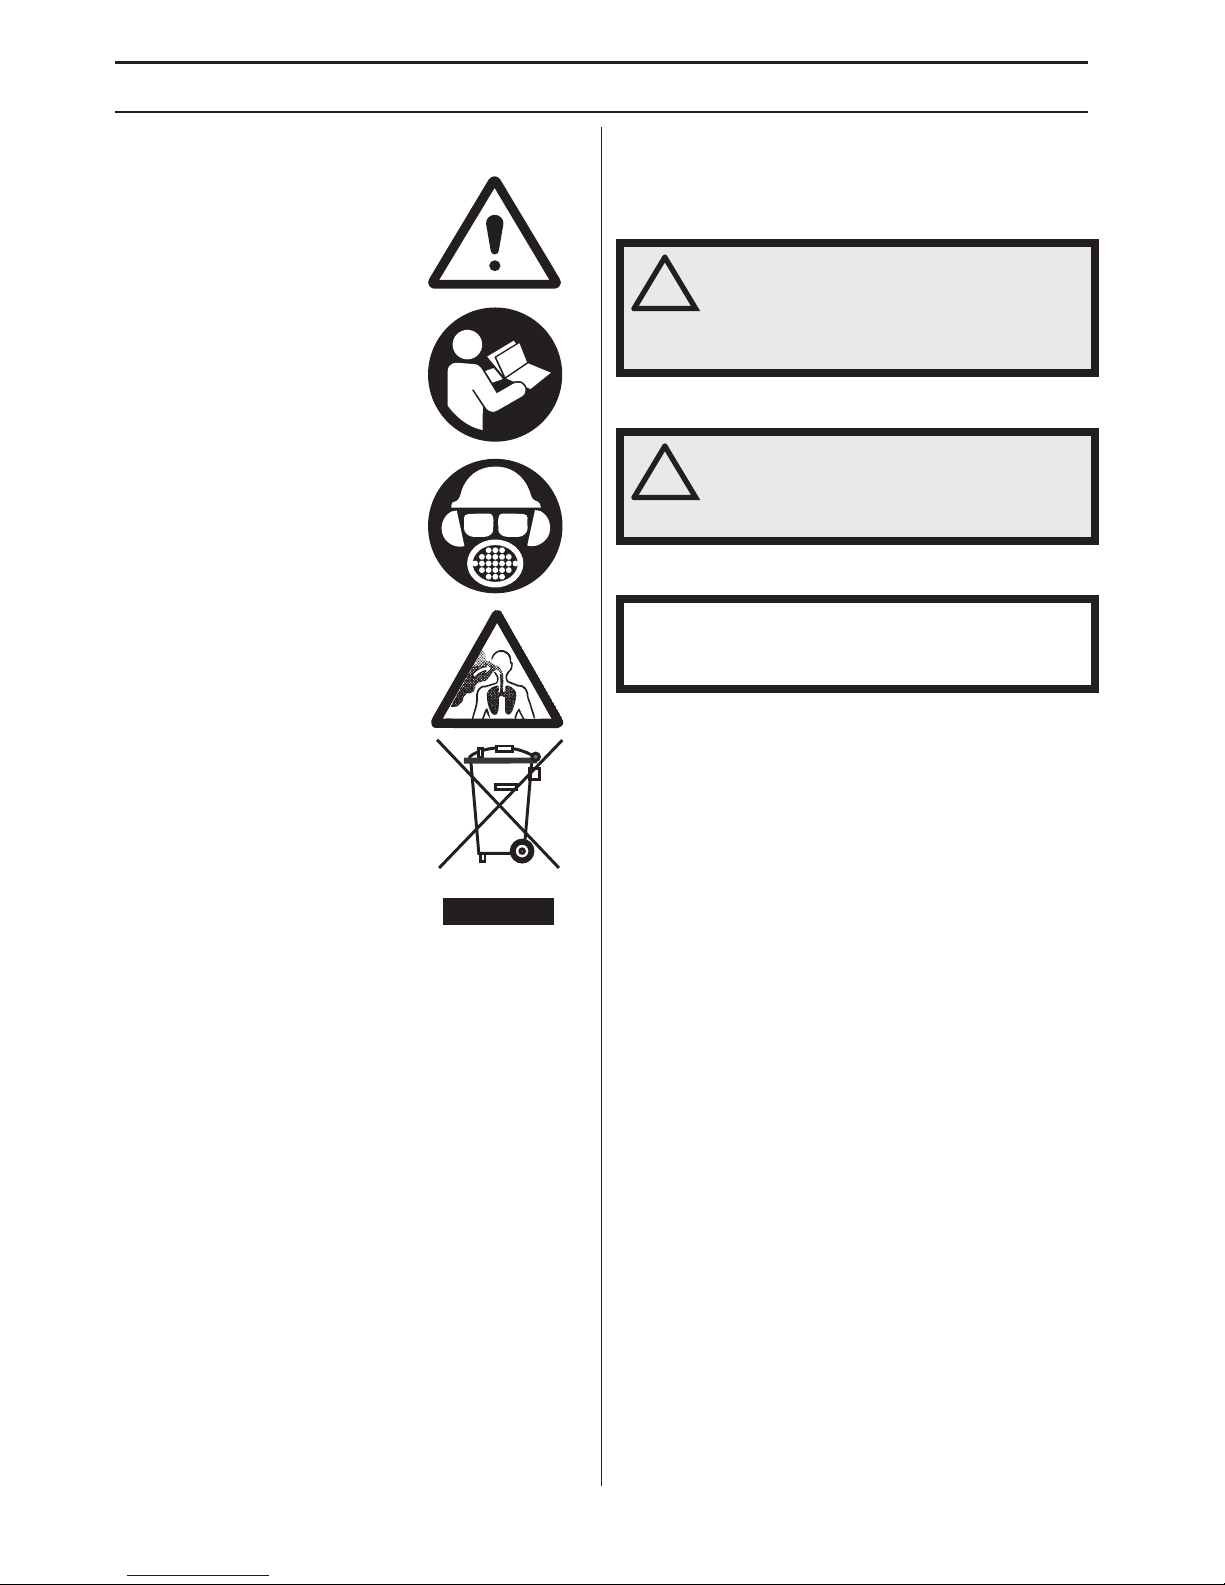
Symbols on the mac hine
W
ARNING! The machine can be a
dangerous tool if used incorrectly or
carelessly, which can cause serious
or fatal injury to the operator or
others.
Please read the operator’s manual
carefully and make sure you
understand the instructions before
using the machine.
Wear personal protective
equipment. See instructions under
the heading ”Personal protective
equipment”.
WARNING! Dust forms when
grinding, which can cause injuries if
inhaled. Use an approved breathing
mask. Always provide for good
ventilation.
En
vironmental marking. Symbols
on the product or its packaging
indicate that this product cannot be
handled as domestic waste.
By ensuring that this product is taken
care of correctly, you can help to
counteract the potential negative
impact on the environment and
people that can otherwise result
through the incorrect waste
management of this product.
For more detailed information about recycling this
product, contact your municipality, your domestic waste
service or the shop from where you purchased the
product.
Other symbols/decals on the mac hine refer to special
certification requirements for certain markets.
Explanation of warning le vels
The w arnings are graded in three levels.
W
ARNING!
CAUTION!
NOTICE!
!
W
ARNING! Used if there is a risk of
serious injury or death for the operator
or damage to the surroundings if the
instructions in the manual are not
followed.
!
CA
UTION! Used if there is a risk of injury
to the operator or damage to the
surroundings if the instructions in the
manual are not followed.
NO
TICE! Used if there is a risk of damage to materials
or the machine if the instructions in the manual are not
followed.

CONTENTS
English
–
3
Contents
KEY TO SYMBOLS
Symbols on the machine ...................................... 2
Explanation of warning levels ............................... 2
CONTENTS
Contents ............................................................... 3
PRESENT ATION
Dear customer! ..................................................... 4
Design and features ............................................. 4
PRESENT ATION
What is what on the machine? ............................. 5
ASSEMBLING AND ADJUSTMENTS
Connect the machine ........................................... 6
OPERA TING
Protectiv e equipment ............................................ 7
General safety precautions ................................... 7
Work safety ........................................................... 8
Transport and storage .......................................... 9
ST
ARTING AND STOPPING
Bef ore starting ...................................................... 10
Auto dump ............................................................ 11
Starting ................................................................. 11
Stopping ............................................................... 12
MAINTENANCE
Gener al ................................................................. 13
Maintenance schedule ......................................... 13
Check the cyclone and container ......................... 14
Cleaning of compressor filter ................................ 14
Cleaning of compressed air dryer filter ................. 14
Cleaning of cyclone and container ....................... 15
Cleaning/replacement of filter ............................... 15
Washing the filter .................................................. 16
Cleaning of cyclone cone ..................................... 16
Transport position ................................................. 17
Service ................................................................. 17
TR
OUBLESHOOTING
T
roubleshooting .................................................... 18
TECHNICAL D ATA
T
echnical data ...................................................... 19

PRESENT A TION
4
– English
Dear customer!
Thank y ou for choosing a Husqvarna product!
It is our wish that you will be satisfied with your product
and that it will be your companion for a long time. A
purchase of one of our products gives you access to
professional help with repairs and services. If the retailer
who sells your machine is not one of our authorised
dealers, ask him for the address of your nearest service
workshop.
This operator’s manual is a valuable document. Make
sure it is always at hand at the work place. By following its
content (operating, service, maintenance etc.) the life
span and the second-hand value of the machine can be
extended. If you ever lend or sell this machine, make sure
that the borrower or buyer gets the operator
′
s manual, so
they will also know how to properly maintain and use it.
More than 300 y ears of innovation
Husqv arna AB is a Swedish company based on a tradition
that dates back to 1689, when the Swedish King Karl XI
ordered the construction of a factory for production of
muskets. At that time, the foundation was already laid for
the engineering skills behind the development of some of
the world's leading products in areas such as hunting
weapons, bicycles, motorcycles, domestic appliances,
sewing machines and outdoor products.
Husqvarna is the global leader in outdoor power products
for forestry, park maintenance and lawn and garden care,
as well as cutting equipment and diamond tools for the
construction and stone industries.
Owner responsibility
It is the o wner’s/employer’s responsibility that the operator
has sufficient knowledge about how to use the machine
safely. Supervisors and operators must have read and
understood the Operator’s Manual. They must be aware
of:
• The machine’s safety instructions.
• The machine’s range of applications and limitations.
• How the machine is to be used and maintained.
National legislation could regulate the use of this
machine. Find out what legislation is applicable in the
place where you work before you start using the machine.
Local regulations could restict the use of this machine.
Find out what regulations are applicable where you work
before you start using the machine.
The man ufacturer’s reservation
Subsequent to pub lishing this manual Husqvarna may
issue additional information for safe operation of this
product. It is the owner’s obligation to keep up with the
safest methods of operation.
Husqvarna AB has a policy of continuous product
development and therefore reserves the right to modify
the design and appearance of products without prior
notice.
For customer information and assistance, contact us at
our website: www.husqvarna.com
Design and f eatures
V
alues such as high performance, reliability, innovative
technology, advanced technical solutions and
environmental considerations distinguish Husqvarna's
products. Safe operation of this product requires the
operator to read this manual carefully. Ask your dealer or
Husqvarna should you need more information.
Some of the unique features of your product are
described below.
• EPA 13 filter with efficient particle filtration 99.95% @
0.1-0.3 micron.
• An efficient dual shell cyclone with >95% separation
efficiency.
• Power outlet for Husqvarna PG 680 and PG 820.
• 75 mm (3”) hose inlet.
• The DC 6000 can be put in transport mode, when the
height of the machine is reduced in order to facilitate
transporting the vehicle.
• Easy to service.
• Robust hose couplings made of cast aluminum.
• Efficient filter cleaning.
• Automatic emptying of the cylone.
English – 5
PRESENT A TION
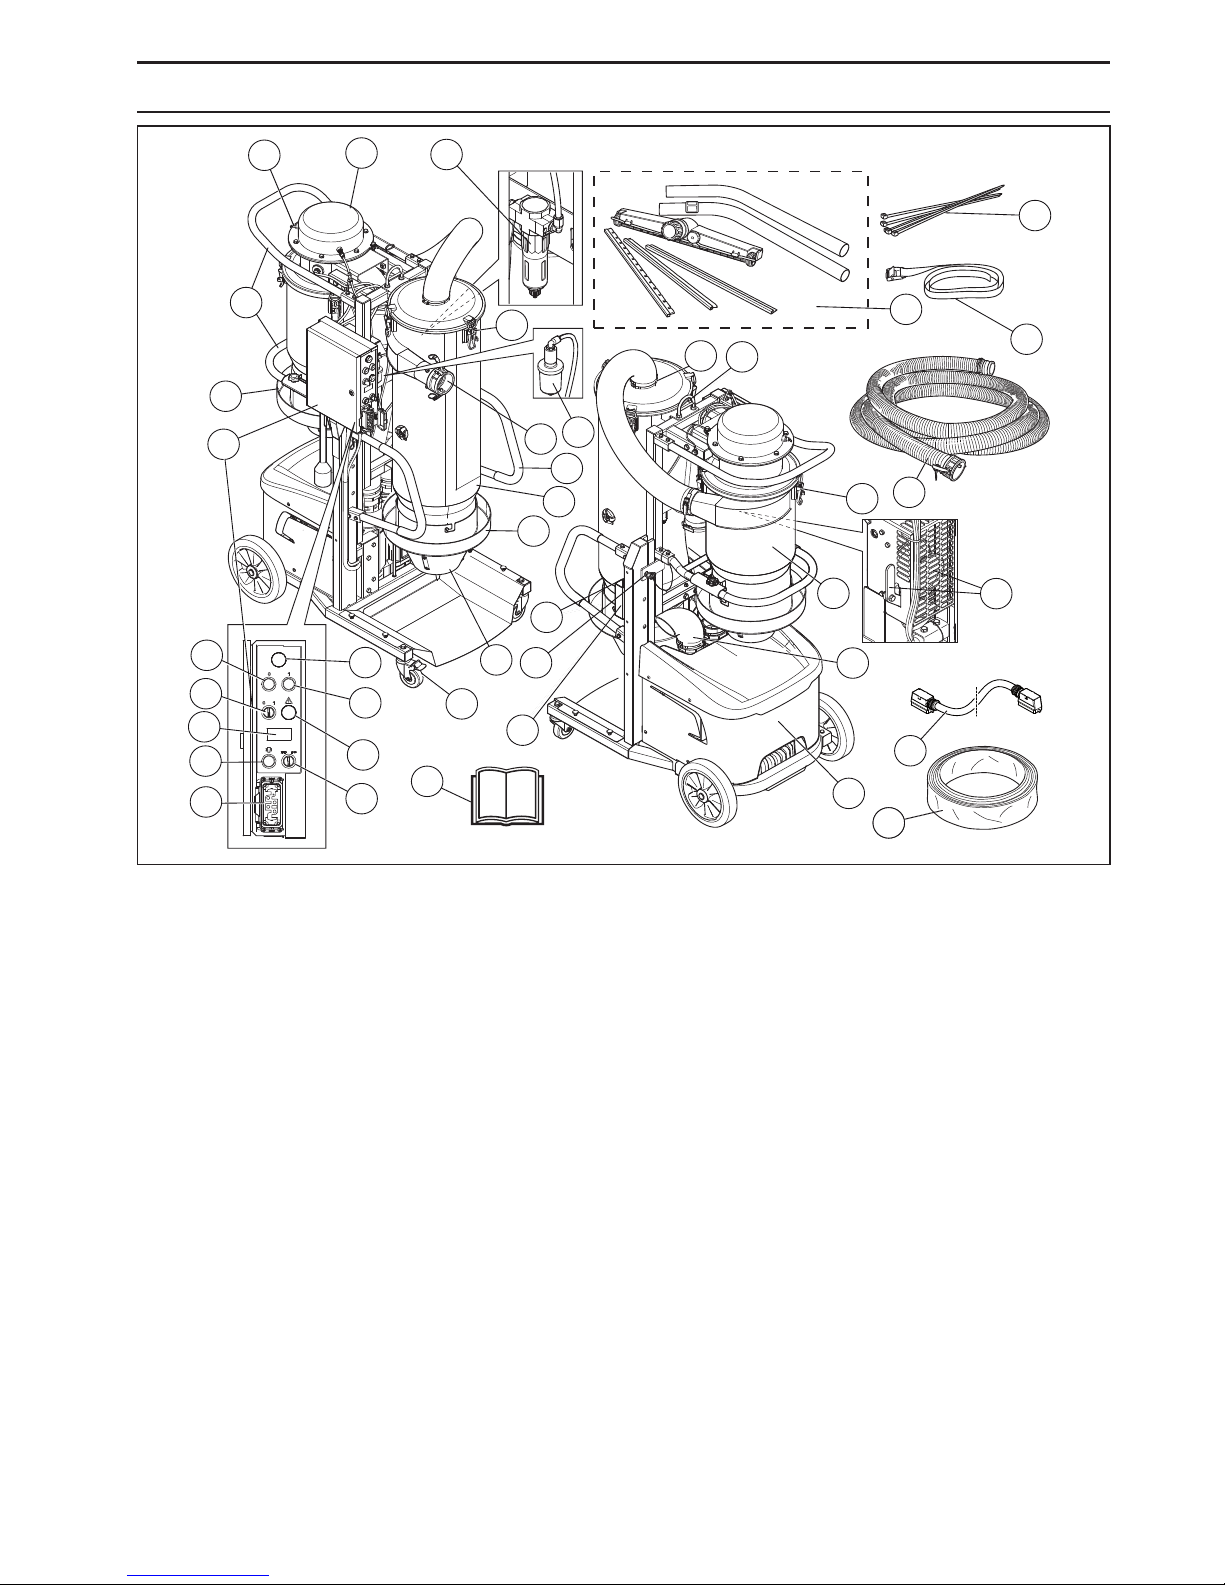
What is what on the mac hine?
26
23
31
30
24
25
26
27
1
13
15
2
4
3
34
14
17
3
32
28
29
38
39
21
16
18
20
22
19
35
9
10
5
6
7
8
12
11
33
36
37
1
pressure container
2 Rear handle
3 Dust bag holder
4 Control Panel
5 Deactivation button OFF (machine)
6 On and Off knob vacuum
7 Chronometer
8 Manual purge
9 Deactivation button ON (machine)
10 Activation lamp (machine)
11 Warning light
12 Purge setting
13 Cyclone container
14 Front handle
15 Vacuum hose inlet
16 Clamping bracket cyclone
17 Chassis/Frame Transport position
18 Engine
19 Exhaust
20 Filter container
21 Strap, cone filter
22 Hose attachment cyclone
23 Vacuum wand with floor tool
24 2 x hose (3’’ 10 m, 2’’ 10 m)
25 Power cable for grinder
26 Longopac
27 Operator’s manual
28 Lifting eye
29 Cable tie holder
30 Tension strap
31 Cable ties
32 Cyclone cone
33 Compressor filter
34 Compressed air dryer
35 Restriction valve lever
36 Power cable connection
37 Lockable wheels
38 Hose cap
39 Pressure release valve
ASSEMBLING AND ADJUSTMENTS
6
– English
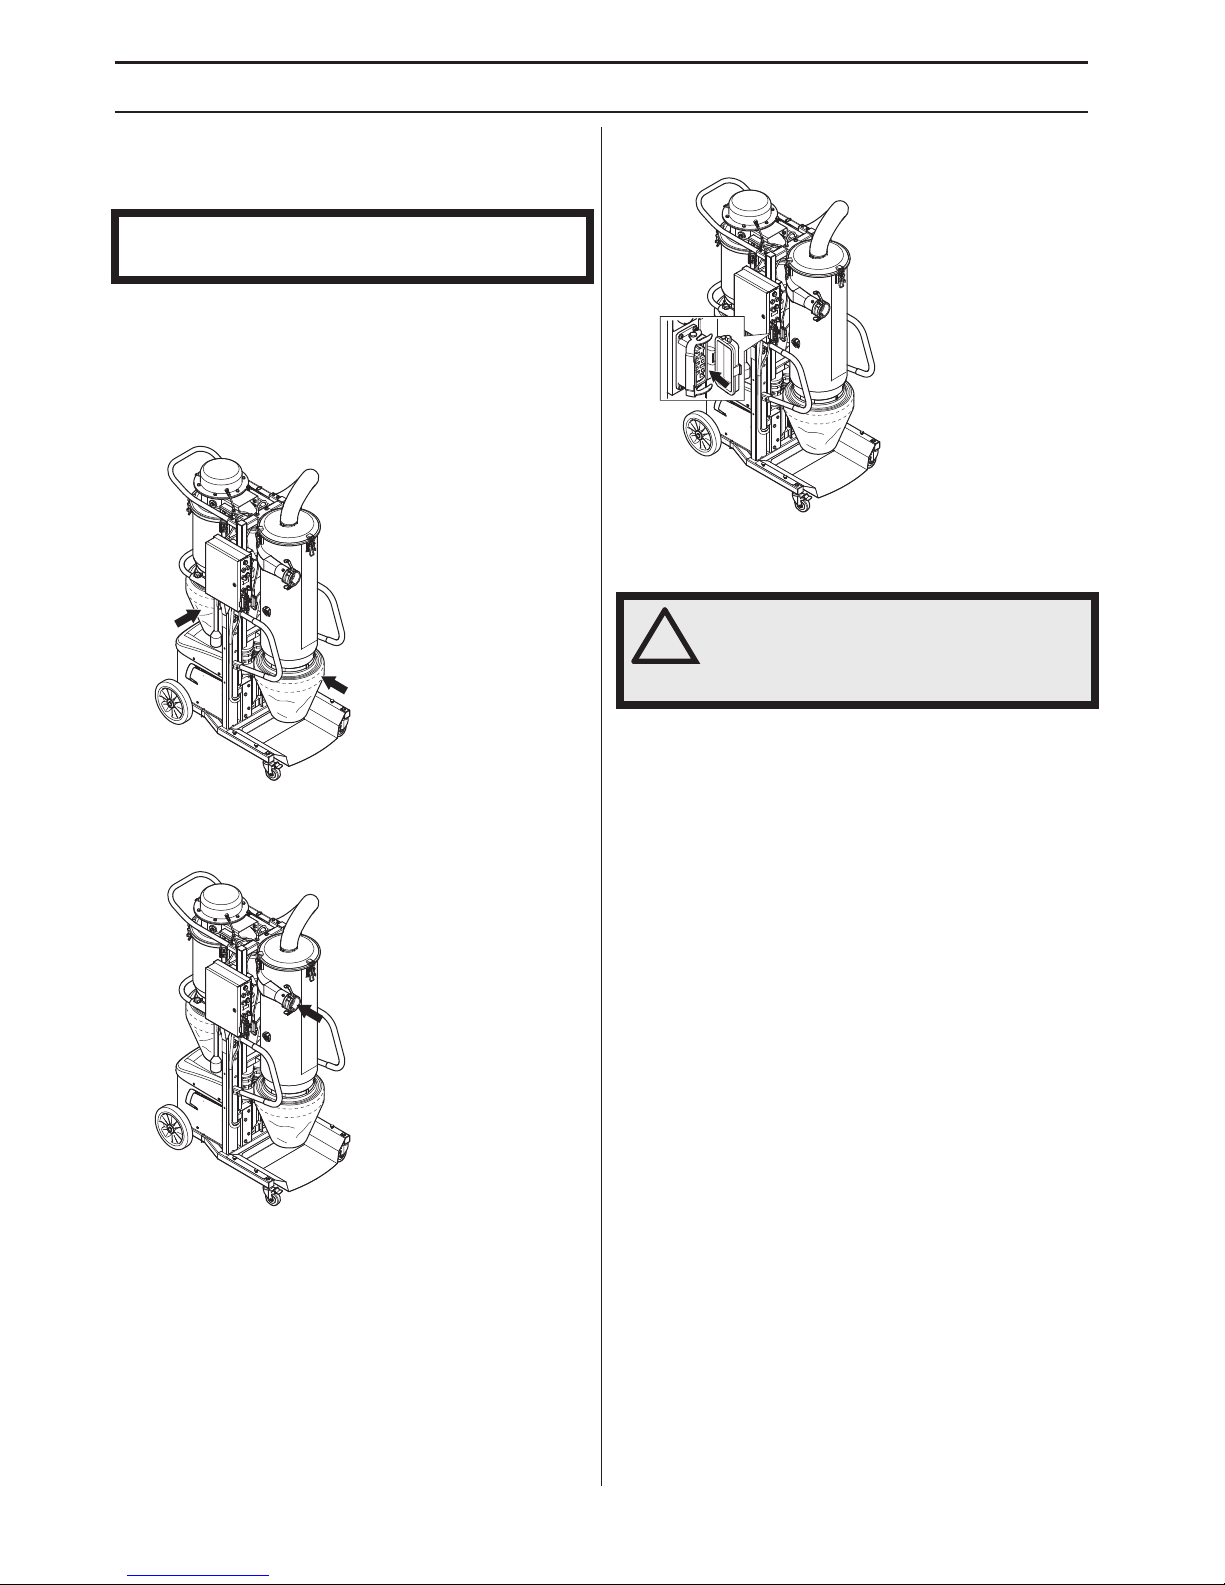
Connect the mac hine
General
•
The machine should be connected to an earthed
outlet socket. See instructions in the section
"Operation".
Dr
y use
•
Fit the dust bags on the machine.
• See dust bag replacement.
• Connect the 3” hose between the outlet port on the
grinder and the inlet port on the vacuumer.
• Connect the power plug from the grinder to the power
outlet on the dust extractor.
• Connect the power plug to the outlet.
Operation (Slurr y management)
Husqv arna DC 6000 can also be used for vacuuming wet
materials, for instance slurry management formed during
wet grinding.
NOTICE! Ensure vacuum is set to OFF position prior to
turning on power supply.
!
CA
UTION! We strongly recommend each
user wear respiratory protection/gas
mask when removing the cone filter from
the machine.

OPERA TING
English
–
7
Pr
otective equipment
General
Do not use the machine unless y ou are able to call for help
in the event of an accident.
P
ersonal protective equipment
Y
ou must use approved personal protective equipment
whenever you use the machine. Personal protective
equipment cannot eliminate the risk of injury but it will
reduce the degree of injury if an accident does happen.
Ask your dealer for help in choosing the right equipment.
Always wear:
• Protective helmet
• Hearing protection
• Protective goggles or a visor
• Breathing mask
• Heavy-duty, firm grip gloves.
• Tight-fitting, heavy-duty and comfortable clothing that
permits full freedom of movement.
• Boots with steel toe-caps and non-slip sole
Be careful as clothing, long hair, and jewellery can get
caught in moving parts.
Other pr otective equipment
•
Fire fighting equipment
• Always have a first aid kit nearby.
General saf ety precautions
This section descr ibes basic safety directions for using
the machine. This information is never a substitute for
professional skills and experience.
• Please read the operator’s manual carefully and make
sure you understand the instructions before using the
machine.
Save all warnings and instructions for
future reference.
•
Keep in mind that the operator is responsible for
accidents or hazards occuring to other people or their
property.
• All operators shall be trained in the use of the
machine. The owner is responsible for ensuring that
the operators receive training.
• The machine must be kept clean. Signs and stickers
must be fully legible.
!
W
ARNING! The use of products such as
cutters, grinders, drills, that sand or form
material can generate dust and vapors
which may contain hazardous chemicals.
Check the nature of the material you
intend to process and use an appropriate
breathing mask.
!
W
ARNING! Long-term exposure to noise
can result in permanent hearing
impairment. So always use approved
hearing protection. Listen out for
warning signals or shouts when you are
wearing hearing protection. Always
remove your hearing protection as soon
as the engine stops.
!
WARNING! There is always a risk of
crush injuries when working with
products containing moving parts. Wear
protective gloves to avoid body injuries.
!
WARNING! Sparks may appear and start
a fire when you work with the machine.
Always keep fire fighting equipment
handy.
!
WARNING! Read all safety warnings and
all instructions. Failure to follow the
warnings and instructions may result in
electric shock, fire and/or serious injury.
!
WARNING! The machine can be a
dangerous tool if used incorrectly or
carelessly, which can cause serious or
fatal injury to the operator or others.
Never allow children or other persons
not trained in the use of the machine to
use or service it. Never allow anyone else
to use the machine without first ensuring
that they have read and understood the
contents of the operator’s manual.
Children shall not play with the
appliance.
Never use the machine if you are
fatigued, while under the influence of
alcohol or drugs, medication or anything
that could affect your vision, alertness,
coordination or judgement.
There is always a risk of shocks from
electrically powered machines. Avoid
unfavourable weather conditions and
body contact with lightning conductors
and metal objects. Always follow the
instructions in the Operator’s manual to
avoid damage.

OPERATING
8 – English
Always use common sense
It is not possible to cover every conceivable situation you
can face. Always exercise care and use your common
sense. If you get into a situation where you feel unsafe,
stop and seek expert advice. Contact your dealer, service
agent or an experienced user. Do not attempt any task
that you feel unsure of!
Work safety
Work area safety
• Do not use the machine in bad weather, such as
dense fog, heavy rain, strong wind, intense cold, etc.
• Keep work area clean and well lit. Cluttered or dark
areas invite accidents.
• The machine should not be used in areas where
potential for fire or explosions exist.
Electrical safety
• Check that the mains voltage corresponds with that
stated on the rating plate on the machine.
• Inspection and/or maintenance should be carried out
with the motor switched off and the plug disconnected.
• Always shut down the machine before disconnecting
the power plug.
• Always unplug the machine during longer work
breaks.
• Never drag the machine by means of the cord and
never pull out the plug by pulling the cord. Hold the
plug to disconnect the power cord.
• Never use the machine if any cable or plug is
damaged, but hand it in to an authorized service
workshop for repair.
• The machine must never be driven to such a depth in
water that it reaches up to the machine’s equipment.
The equipment can be damaged and the machine can
be live, resulting in personal injuries.
Grounding instructions
• The machine is equipped with a grounded cord and
plug and should always be connected to a grounded
outlet. This reduces the risk of electric shock in the
event of malfunction.
• The use of adaptors is not allowed with the machine.
Extension cords and cables
• The marking on the extension cable must be the same
or higher than the value stated on the machine’s rating
plate.
• Use grounded extension cables.
• When operating a power tool outdoors, use an
extension cord suitable for outdoor use.
Use of a
cord suitable for outdoor use reduces the risk of
electric shock.
• Keep the connection to the extension cord dry and off
the ground.
• Keep cable away from heat, oil, charp edges or
moving parts. Damaged or entangled cable increase
the risk of electric shock.
• Check that the cables are intact and in good condition.
Never use the machine if any cable or plug is
damaged, but hand it in to an authorized service
workshop for repair.
• To avoid overheating do not use the extension cord
while it is rolled up.
• Ensure the cord is behind you when you start to use
the machine so that the cord will not be damaged.
!
WARNING! Unauthorized modifications
and/or accessories may lead to serious
injury or death to the user or others.
Do not modify this product or use it if it
appears to have been modified by others.
Never use a machine that is faulty. Carry
out the safety checks, maintenance and
service instructions described in this
manual. Some maintenance and service
measures must be carried out by trained
and qualified specialists. See
instructions under the heading
Maintenance.
Always use genuine accessories.
!
WARNING! There is always a risk of
shocks from electrically powered
machines. Avoid unfavourable weather
conditions and body contact with
lightning conductors and metal objects.
Always follow the instructions in the
Operator’s manual to avoid damage.
Never connect the machine to a outlet if
plug or cord is damaged.
!
WARNING! Improper connection can
result in the risk of electric shock.
Contact a qualified electrician if in doubt
as to whether the appliance is properly
grounded.
Do not modify the plug. If it will not fit the
outlet have a proper outlet installed by a
qualified electrician. Make sure local
regulations and ordinances are followed.
If the grounding instructions are not fully
understood contact a qualified
electrician.

OPERATING
English – 9
Personal safety
• Wear personal protective equipment. See instructions
under the heading ”Personal protective equipment”.
• Never use the machine if you are tired, if you have
drunk alcohol, or if you are taking medication that
could affect your vision, your judgement or your coordination.
• Never allow anyone else to use the machine without
first ensuring that they have read and understood the
contents of the operator’s manual.
• All operators shall be trained in the use of the
machine. The owner is responsible for ensuring that
the operators receive training.
• People and animals can distract you causing you to
lose control of the machine. For this reason, always
remain concentrated and focused on the task. Never
allow children to use or be in the vicinity of the
machine.
• Be careful as clothing, long hair, and jewellery can get
caught in moving parts.
• There is always a risk of crush injuries when working
with products containing moving parts. Keep your
distance!
• Make sure that there is always another person close
at hand when you use the machines, so that you can
call for help if an accident should occur.
• Never leave the machine unsupervised with the motor
running. Always unplug the machine during longer
work breaks.
• Prevent unintentional starting. Ensure the switch is in
the OFF-position.
• Check that no tools or other objects have been left
lying on the machine.
• Always ensure you have a safe and stable working
position.
Use and care
• Husqvarna concrete dust vacuum cleaner DC 6000 is
designed for wet or dry suctioning of concrete dust
and liquid slurry management.
• The machine is intended for use in industrial
applications by experienced operators.
• Inspection and/or maintenance should be carried out
with the motor switched off and the plug disconnected.
• Keep all parts in good working order and ensure that
all fixtures are properly tightened.
• The machine should not be started without the dust
collection bag attached.
Transport and storage
• It is highly recommended that a dust collection bag be
fitted to the machine at all times whether in use or
transportation.
• At no time should lifting of machinery be attempted
without mechanical means such as a hoist or fork lift.
• The machine should not be lifted by handles, motor,
chassis or other parts. Transportation of the machine
is best done on a pallet / skid to which the machine
must be firmly secured. Always use the machine
mounted lifting eye when lifting. Machine dimensions
are 1892 mm raised and 1612 mm lowered.
• Secure the equipment during transportation in order
to avoid transport damage and accidents.
• The machine should be transported under cover
where possible, limiting the exposed to natural
elements – in particular rain and snow.
• Store the equipment in a lockable area so that it is out
of reach of children and unauthorized persons.
• Store the machine and its equipment in a dry and frost
proof place.
IMPORTANT! It is recommended that machinery be
transported upright where possible.
STARTING AND STOPPING
10 – English
Before starting
• Check that the machine is assembled correctly and do
not show any signs of damage. See instructions in the
section "Assembling and adjustments".
• Perform daily maintenance. See instructions in the
section "Maintenance".
• Use the manual purge at start-up and before
operating.
NOTE!
When running the GM 3000, raise the skirt on the grinder
so that there is a gap of around 0.5 cm between the floor
and the machine skirt.
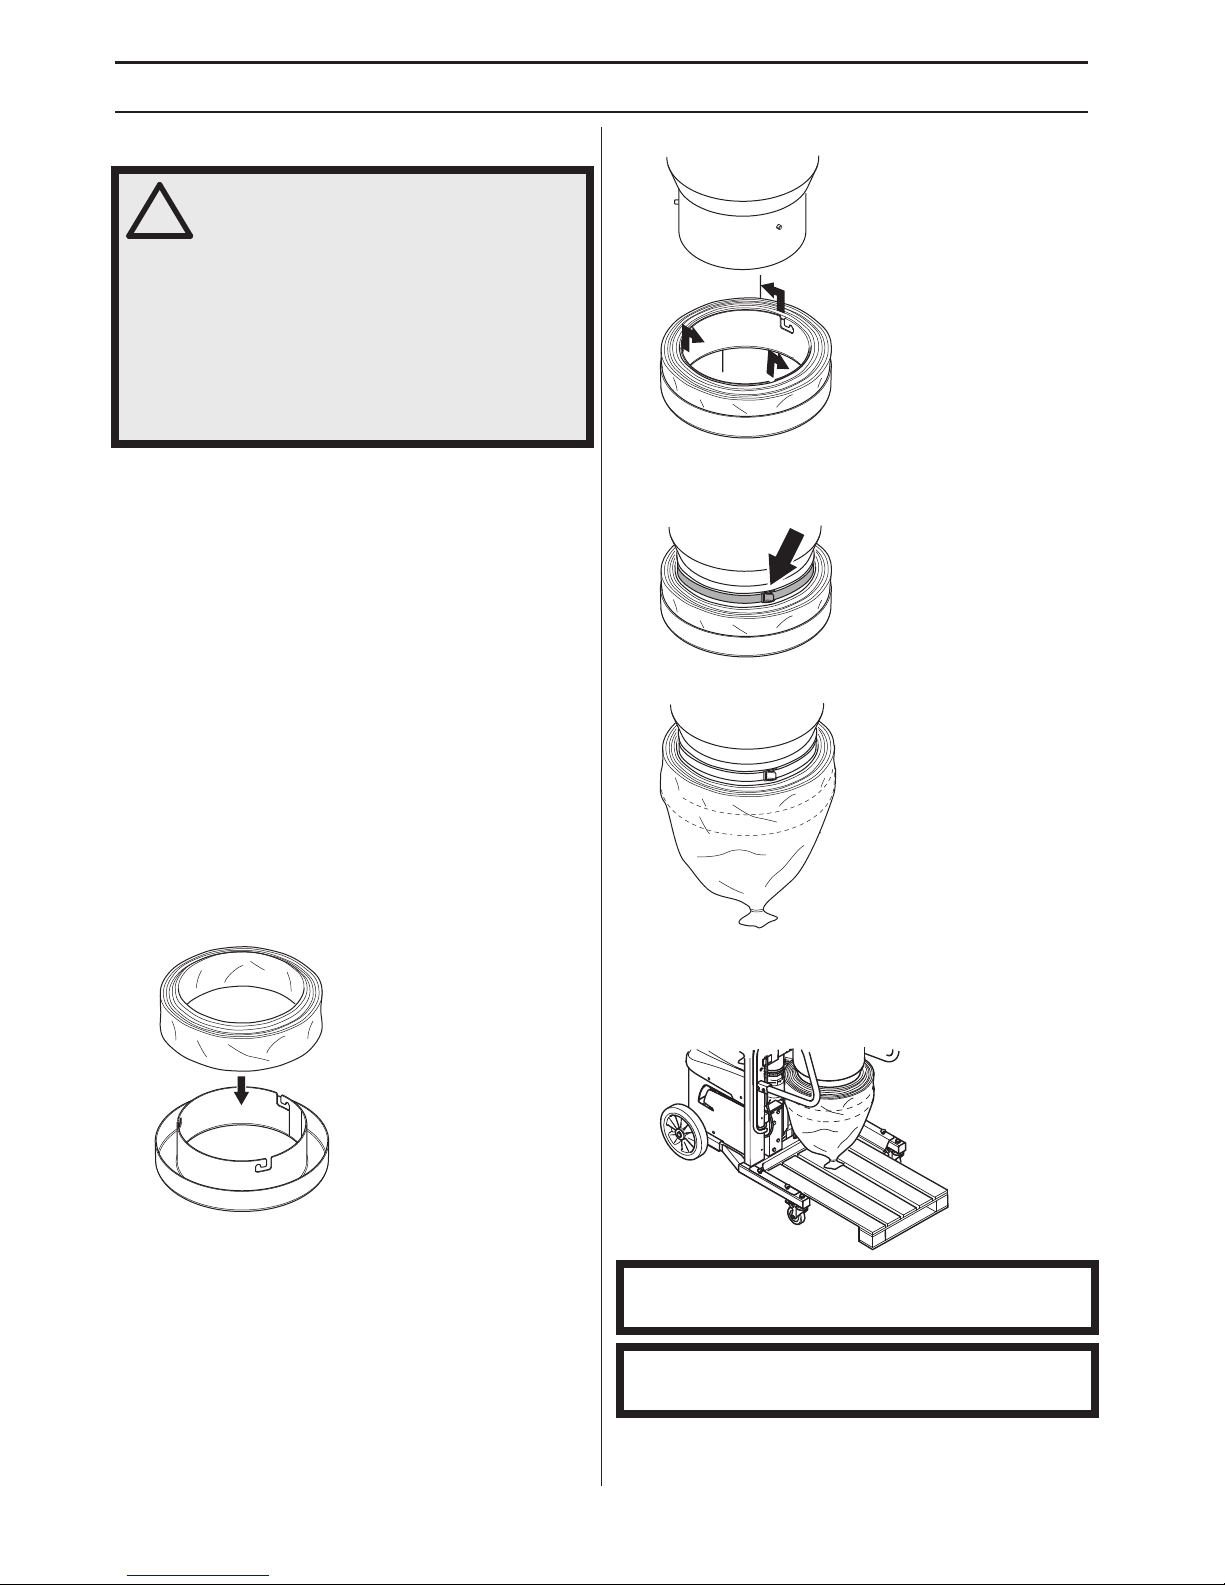
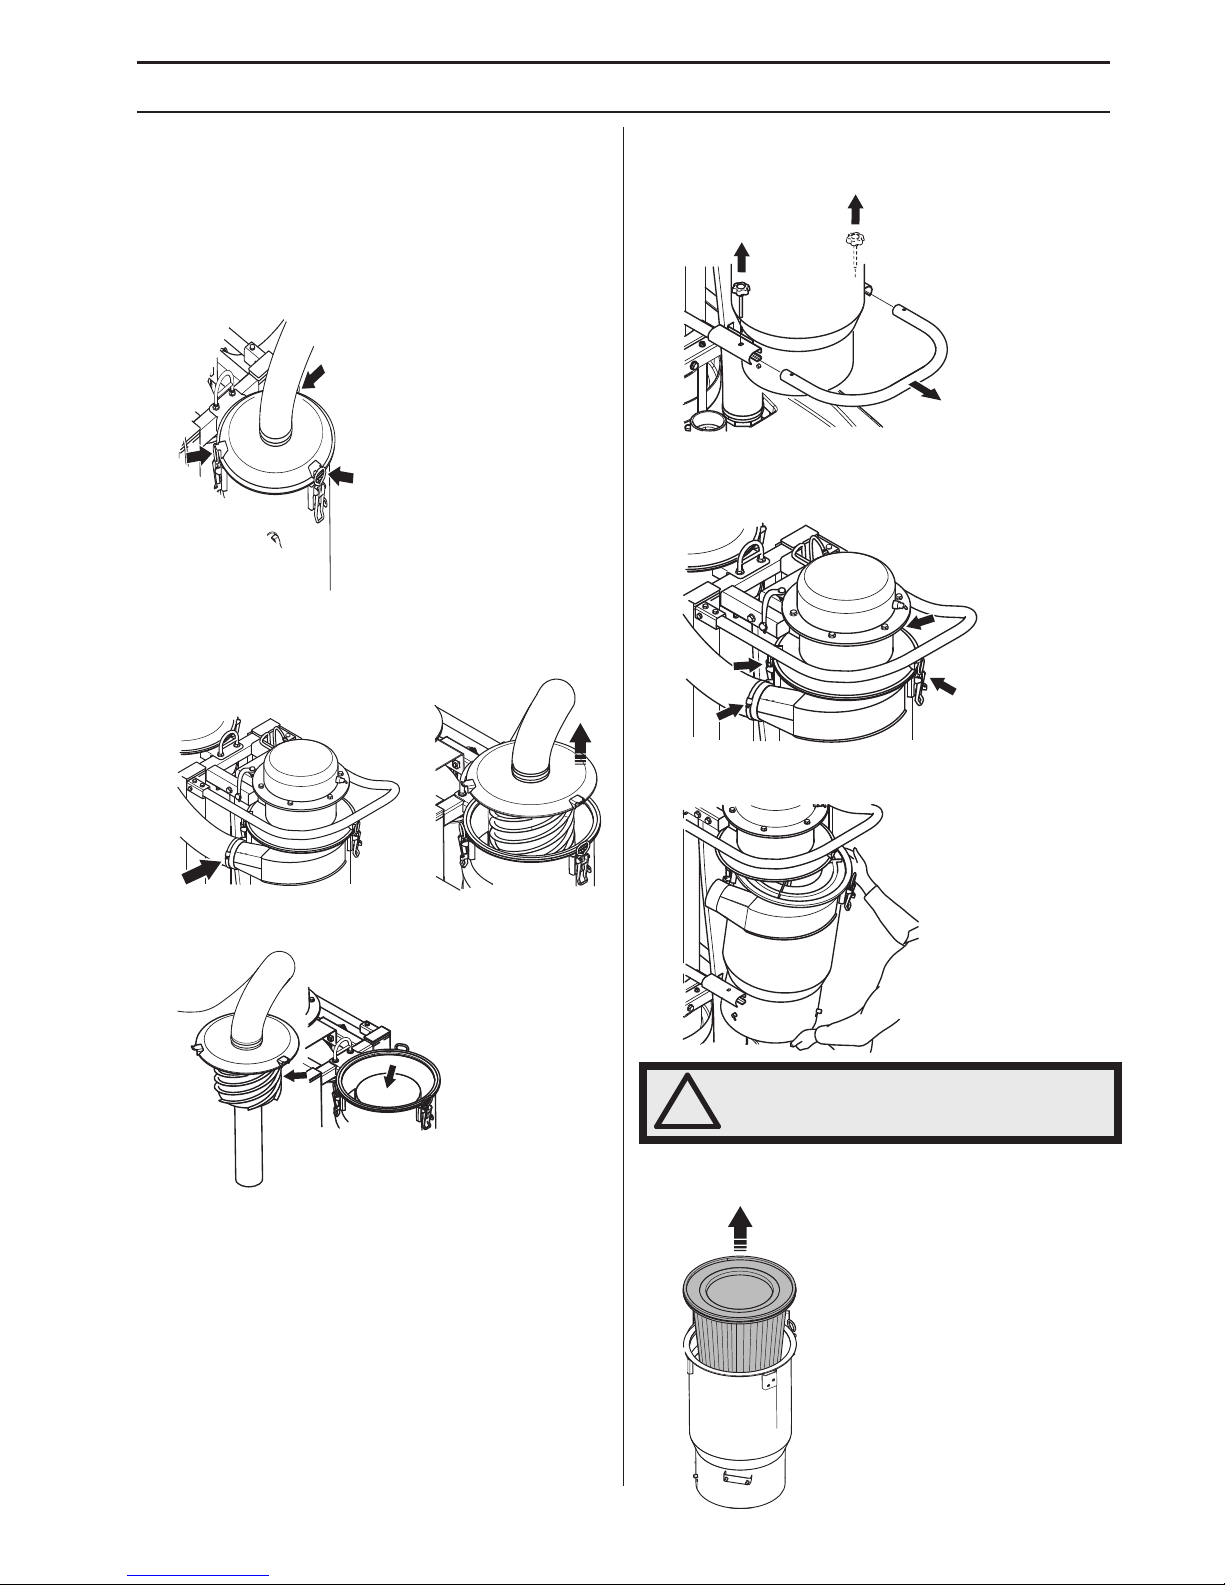
Changing the dust bags
Use Husqvarna recommended dust bags.
Use the manual purge 2 times before replacing the dust
bag. Once the dust bag has collected around 20 kg of
dust, to avoid lifting hazards caused by overfilling of dust
bags, the dust bag should be changed.
• Fit the dust bags in the holder.
• Place the dust bag holder in the container.
• Pull the bag up from the bag holder around the
container. Use a tightening strap to secure the bag
around the container.
• Pull the dust bag around the bag holder.
• Close the bottom of the dust bag with cable ties.
• It is possible to fill a dust bag placed on a half pallet.
Remove the bottom plate under the cyclone container.
Place a half pallet underneath.
!
WARNING! Please read the operator’s
manual carefully and make sure you
understand the instructions before using
the machine.
Wear personal protective equipment. See
instructions under the heading ”Personal
protective equipment”.
Make sure no unauthorised persons are
in the working area, otherwise there is a
risk of serious personal injury.
NOTICE! Check the dust bag regularly during operation
to avoid overfilling.
NOTICE! Be careful not to damage the cyclone cone
when cutting off a full dust bag.
STARTING AND STOPPING
English – 11
Auto dump
The Auto dump function will automatically open/release
pressure and empty the cyclone in pre set intervals. This
function also significantly improves the cleaning of the
filter.
Restriction valve
With the restriction valve you can choose to enable/
disable the Auto dump function. It is recommended to run
the machine with the valve open. NOTE! Dust control of
dust under the grinding head is less efficient with the valve
open during the 3 second auto dump/filter purge function.
Run the machine with the valve closed for more efficient
dust control during the 3 second auto dump/filter purge
function.
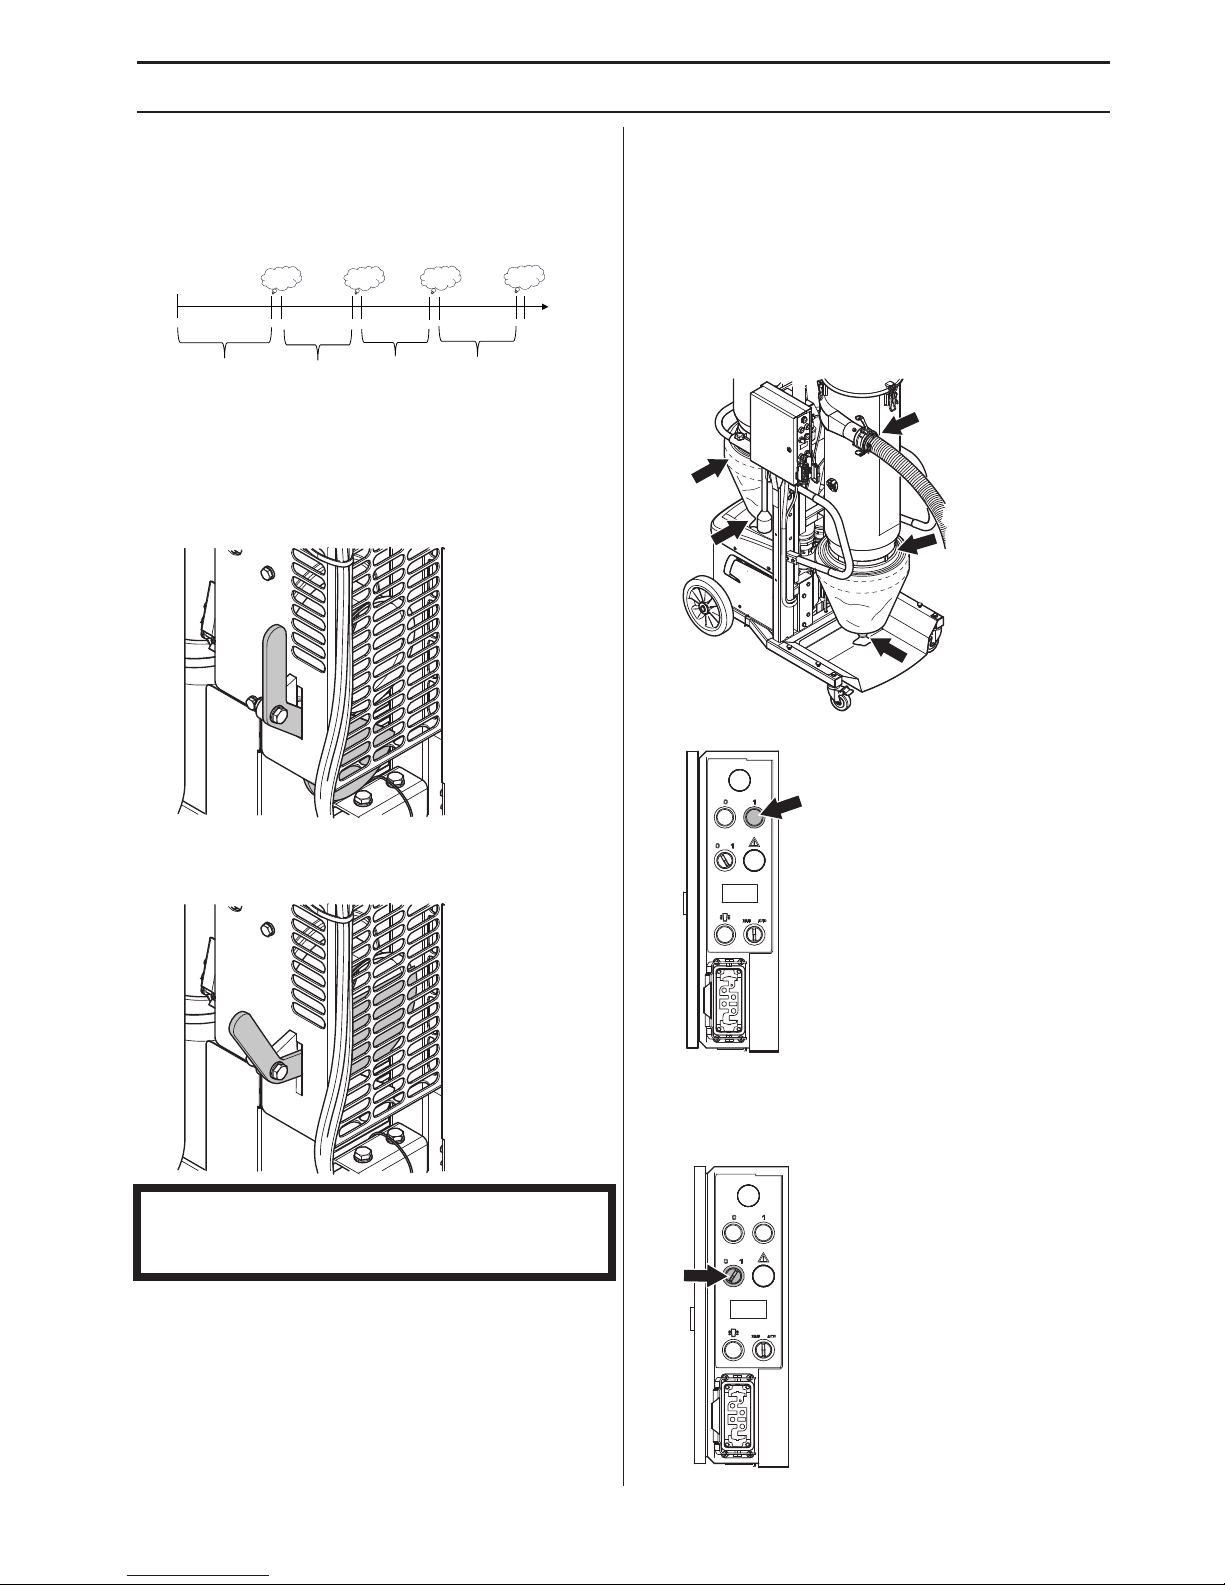
Starting
• Position the vacuum in the working area.
• Ensure the machine is raised.
• Ensure the dust bag holder is secured in its mountings
on the containers. Ensure the dust bag is secured
around the containers and is gathered with cable ties
at the bottom.
• Check that the suction hose is secured to the
connector.
• Push the green button (1).
• A white lamp is lit up. Wait around 30 seconds until
the compressor has reached the correct pressure.
The machine has power and is in stand-by mode.
• Turn the switch to the ON position (I).
NOTE! It is important that the dust skirt on the grinder is
in good condition for efficient containment of dust during
operation.
3 min
3 min 3 min
3 min
3 sec
3 sec
3 sec
3 sec
STARTING AND STOPPING
12 – English
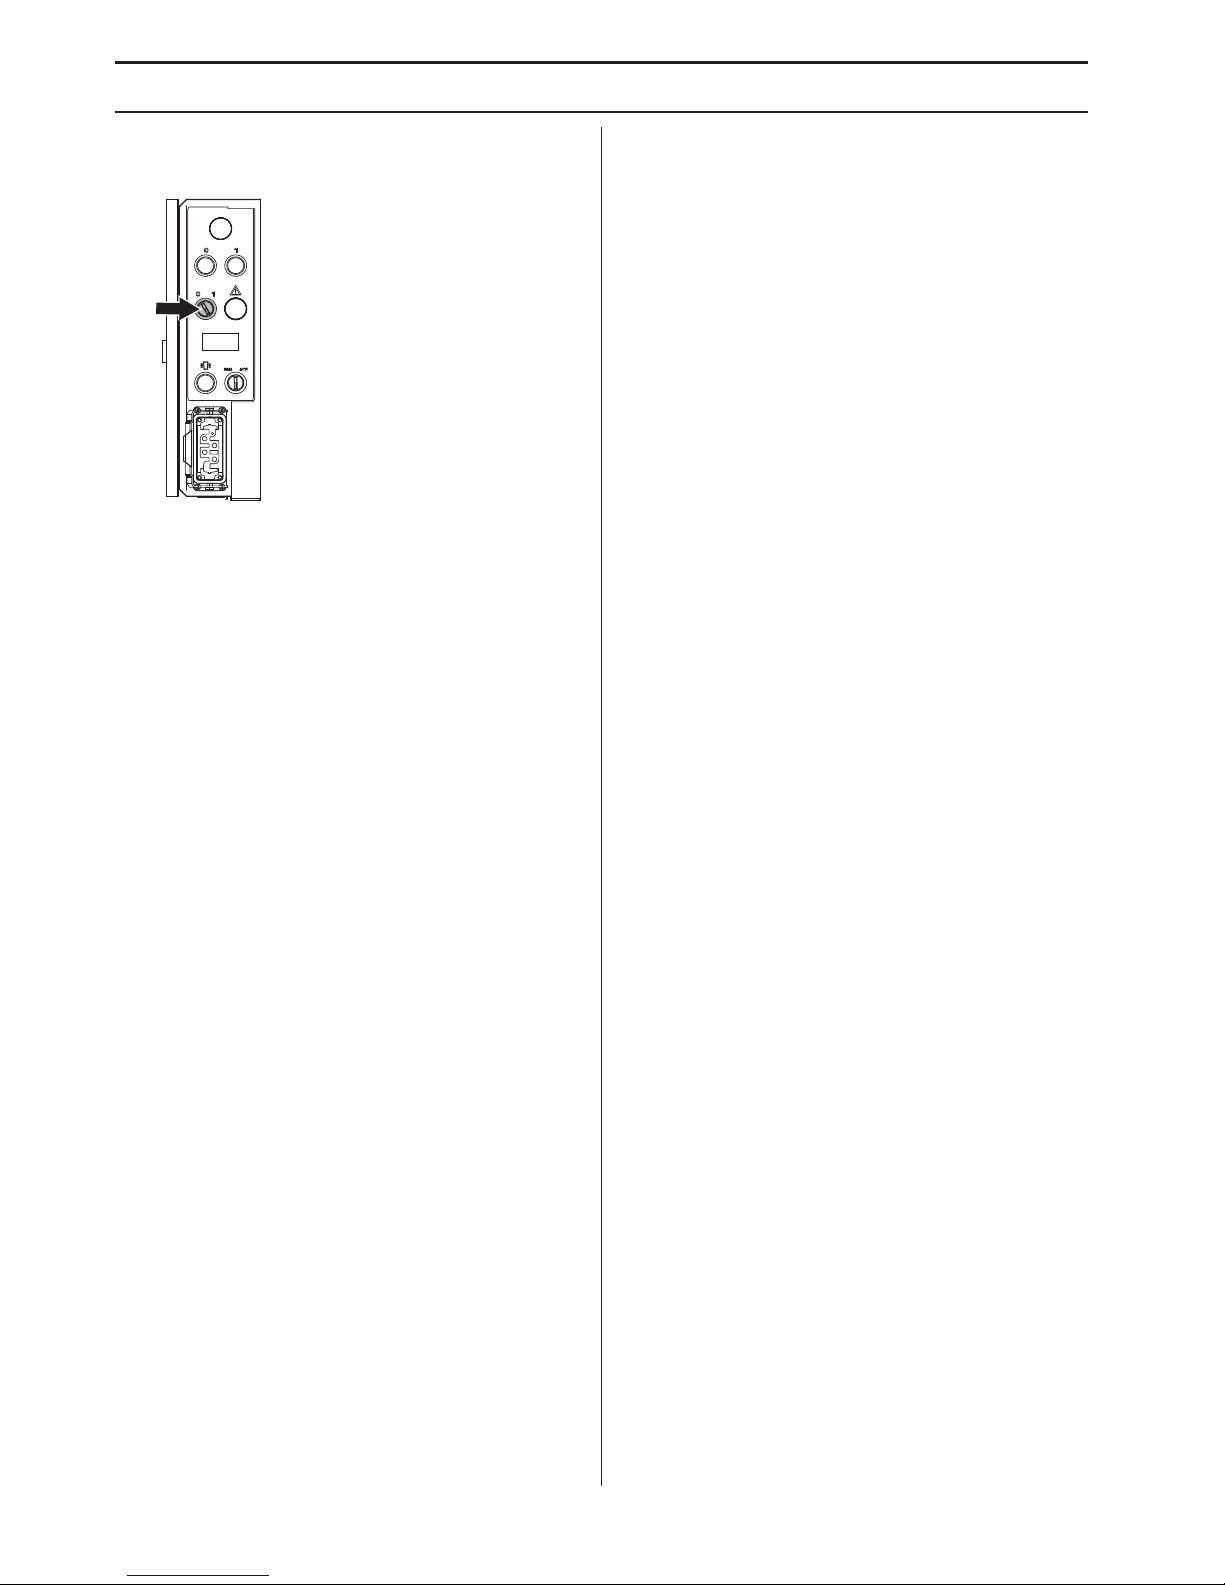
Stopping
• Turn the switch to the OFF position (O).
• Let the machine slow down for around 20-25
seconds.

English – 13
MAINTENANCE
General
The life span of the machine can be reduced and the risk of accidents can increase if machine maintenance is not carried
out correctly and if service and/or repairs are not carried out professionally. If you need further information please contact
your nearest servicing dealer.
Maintenance schedule
In the maintenance schedule you can see which parts of your machine that require maintenance, and with which
intervals it should take place. The intervals are calculated based on daily use of the machine, and may differ depending
on the rate of usage.
!
WARNING! The user must only carry out the maintenance and service work described in this
manual. More extensive work must be carried out by an authorized service workshop.
The machine should be switched off with the power cable disconnected from the outlet.
Wear personal protective equipment. See instructions under the heading ”Personal protective
equipment”. It is strongly advisable that all operators use a dust mask/respirator when changing
dust bags or performing maintenance on the machine.
Daily Maintenance Weekly maintenance Monthly maintenance Occasional maintenance
Check that the cord and
extension cord are intact and in
good condition.
Check the cyclone and
container
Clean the air dryer filter.
Replace if necessary.
Wash the filter elements
with a gentle soft jet of
water.
Clean the outside of the
machine.
Check the rubber bellows
on the cyclone.
Check the filter and if necessary
shake out the dust.
Make sure the grille on
the cyclone retainer is
clean.
Never clean the filter with air
pressure or sharp objects as
this may damage the filter.
Clean the compressor
filter. Replace if heavily
clogged.
The user should carry out a
daily check on the amount of
dust in the filter housing.
MAINTENANCE
14 – English
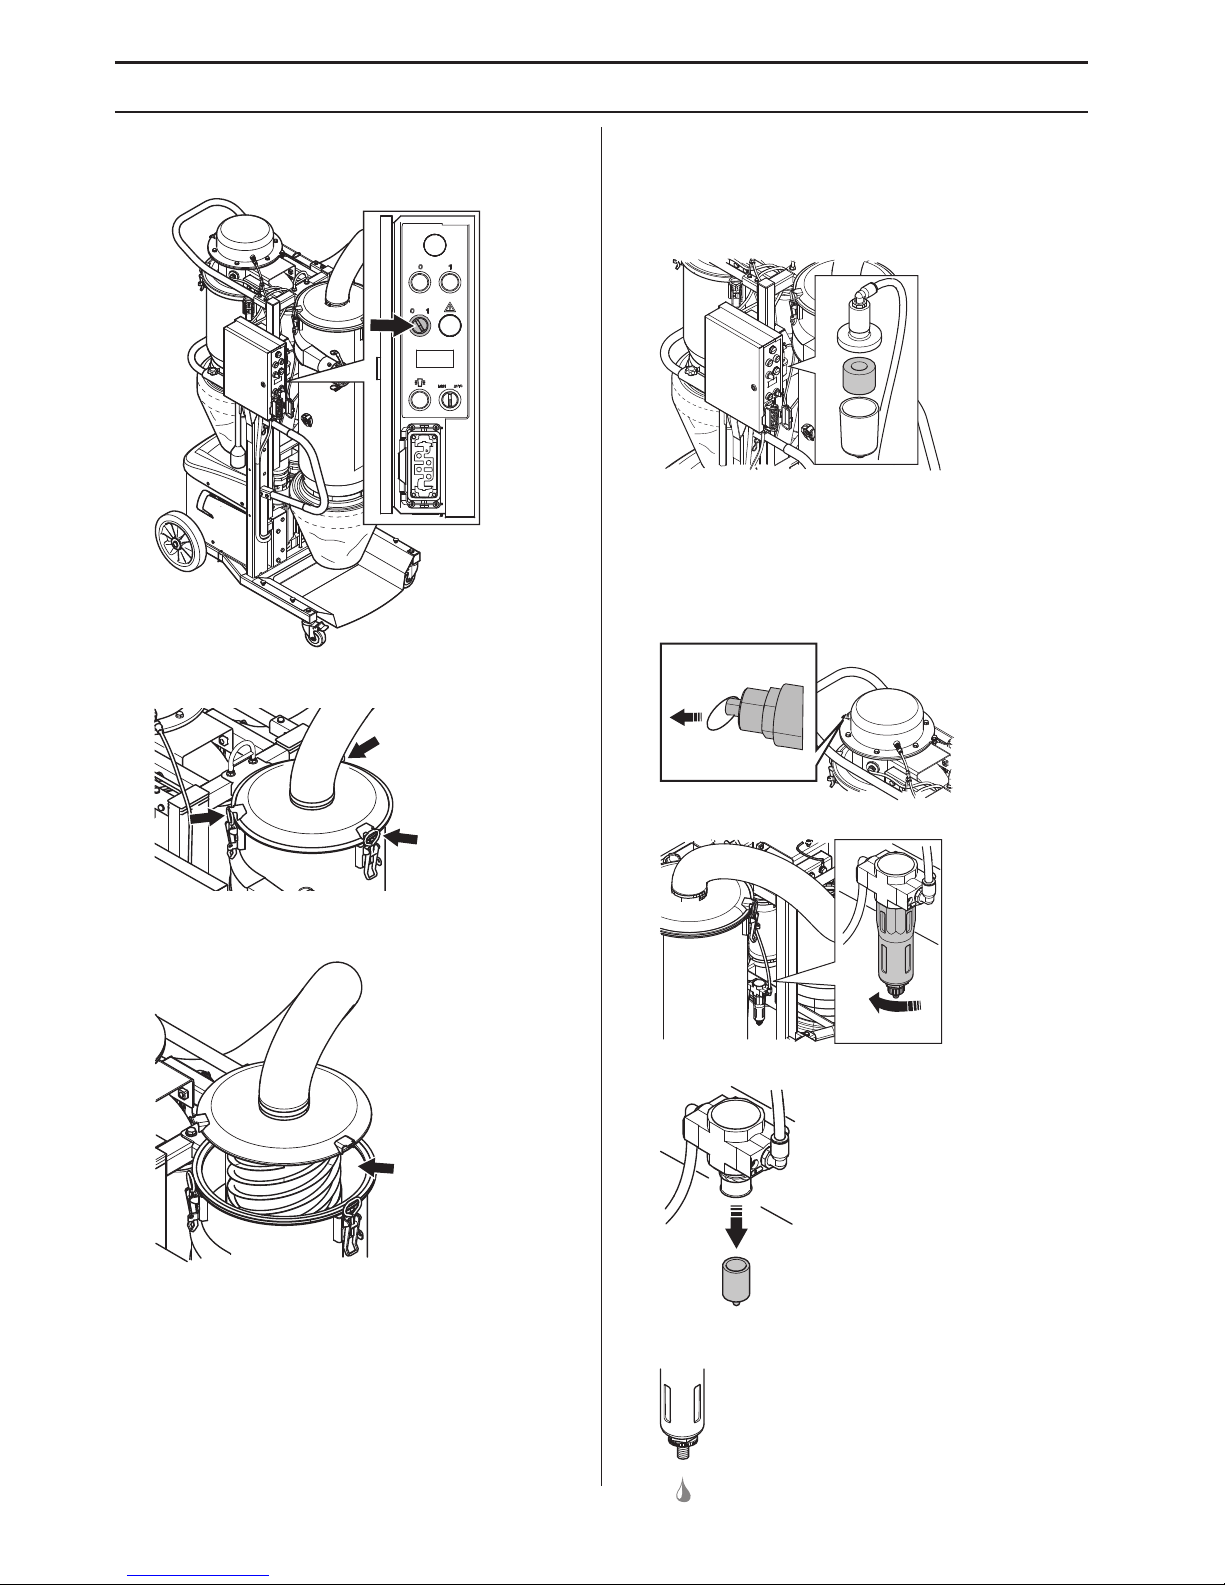
Check the cyclone and container
• Switch the machine to the off position.
• Loosen the clamping brackets for the lid to the cyclone
container.
• Lower the machine to transport position.
• Lift the lid to the cyclone container
• Make sure the cyclone is not clogged by dust or other
substances.
Cleaning of compressor filter
• Switch the machine to the off position.
• Remove the cover and clean the filter. Replace if
heavily clogged.
Cleaning of compressed air dryer
filter
• Switch the machine to the off position.
• Release the pressure in the system with the release
valve on the pressure container.
• Remove the cover.
• Remove and clean the filter. Replace if necessary.
Note! Drops of water will drip from the compressed air
dryer when the machine is running.
MAINTENANCE
English – 15
Cleaning of cyclone and
container
• Switch the machine to the off position.
• Loosen the clamping brackets for the lid to the cyclone
container.
• Loosen the hose connector to the filter container. Lift
the lid and remove the cyclone screw from the
container.
• Use compressed air or a brush to clean the cyclone
screw and container.
• Reinstall the cyclone screw in the container.
• Fit the lid and tighten it.
Cleaning/replacement of filter
• Loosen the handle by loosening the knob.
• Loosen the hose connector to the filter container.
• Loosen the clamping brackets for the lid to the filter
container.
• Grasp the lower rim of the filter container and lift the
container out of its guide groove.
• Place the filter container on the floor and remove the
filter.
!
CAUTION! The filter container is heavy.
MAINTENANCE
16 – English
• Clean the air filter by placing it in a bag and shaking
the dust off. Do not use compressed air or any sharp
objects to clean the air filter as this can cause damage
to the filter.
• The filter is a conical shape and the wider section
should be at the top of the filter container.
• Replace the filter container in its guide groove on the
handle.
• Tighten the container using the clamping brackets.
• Connect the hose connector to the filter container.
• Screw on the handle with the knob.
Washing the filter
The filter is made of a polyester material and can be
washed with water as necessary. Change filter after 500
hours or after 6 months.
• In order to avoid destruction of the finish or ePTFE
membrane clean the filter elements with a gentle soft
jet of water. A strong/sharp jet will destroy the ePTFE
membrane. The cleaning can be supported by a soft
brush.
• Wash the filter elements from top to bottom. Avoid
rubbing or scrubbing on selected spots.
• Dry the filter elements carefully. Approximately one
week at a temperature of 15-20 °C, or at 70 °C during
14 hours in the oven. It is important that they are 100%
dry.
• After washing in above mentioned way, the filter
elements can be used again at low pressure drop. The
life time after washing is approximately 60-70 % of the
life time in new condition.
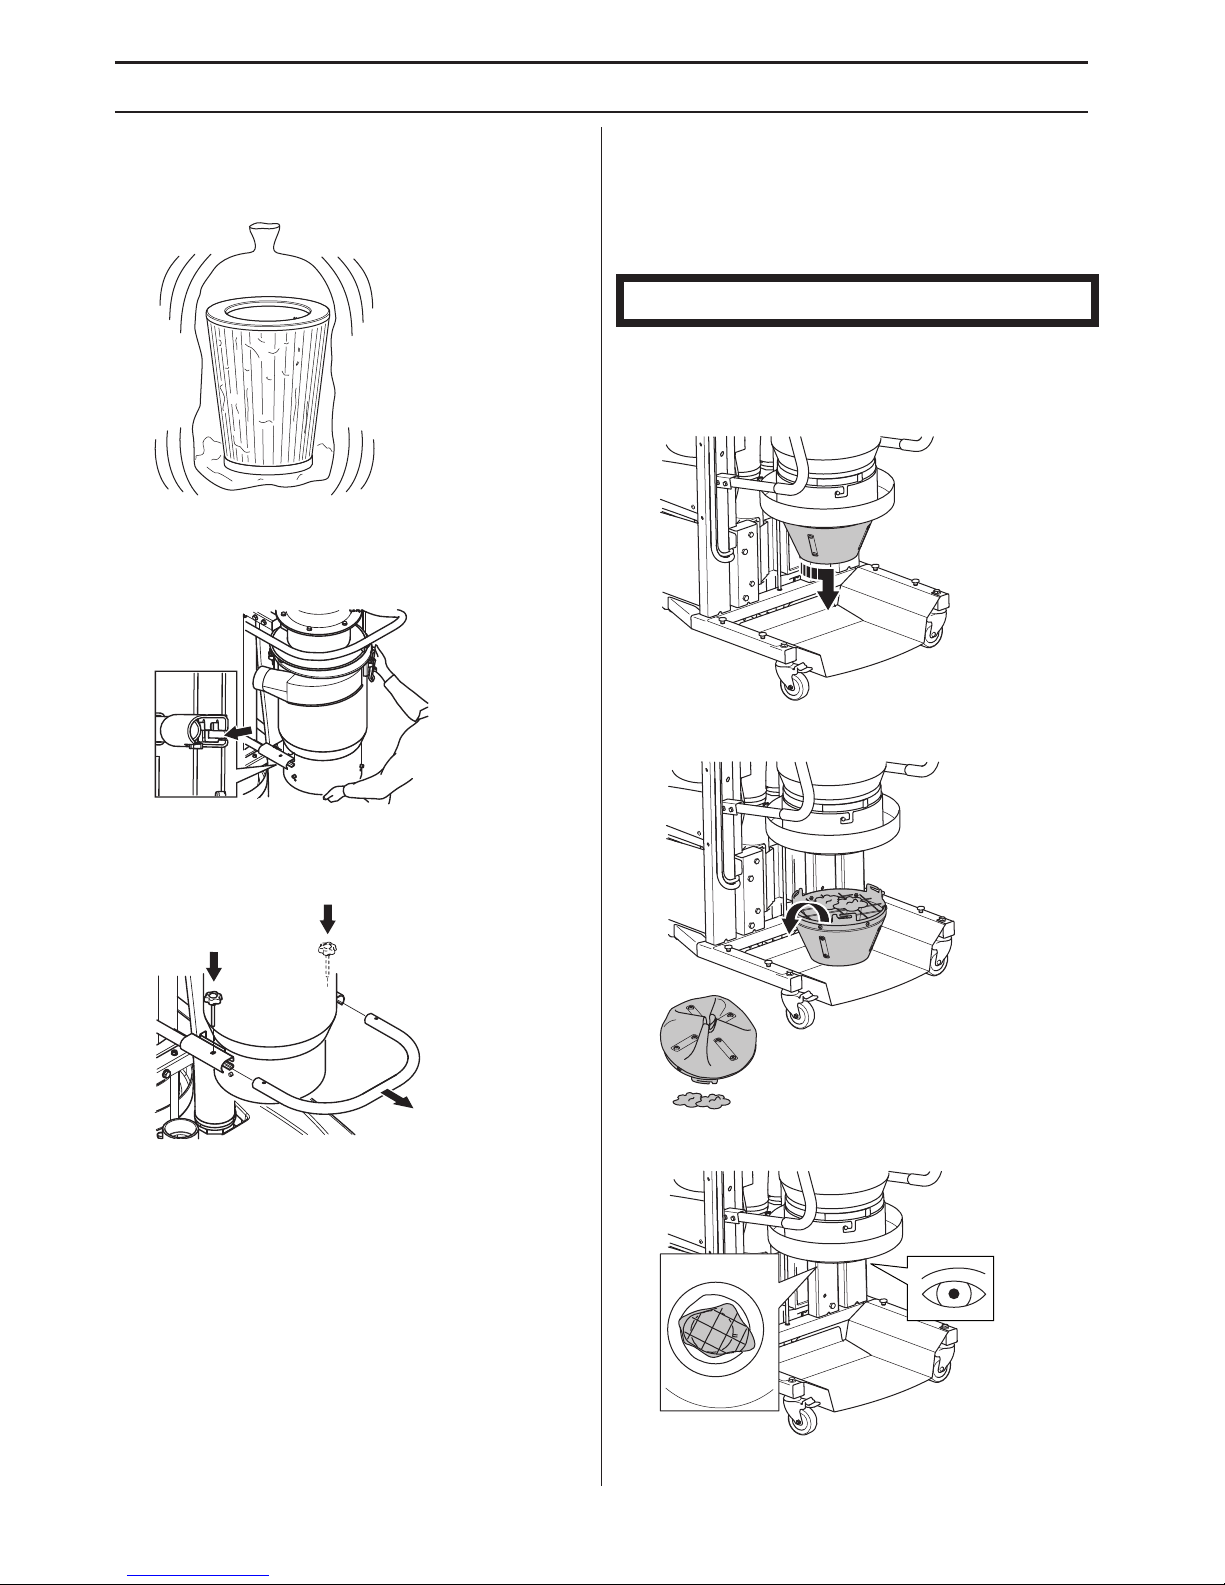
Cleaning of cyclone cone
• Remove the cyclone cone by turning it
counterclockwise.
• Turn the cyclone cone over and empty the dust and
debris on the floor.
• Inspect the gaiter inside the filter container and clean
if necessary.
NOTICE! Ensure that the filter is dry before refitting it.
MAINTENANCE
English – 17
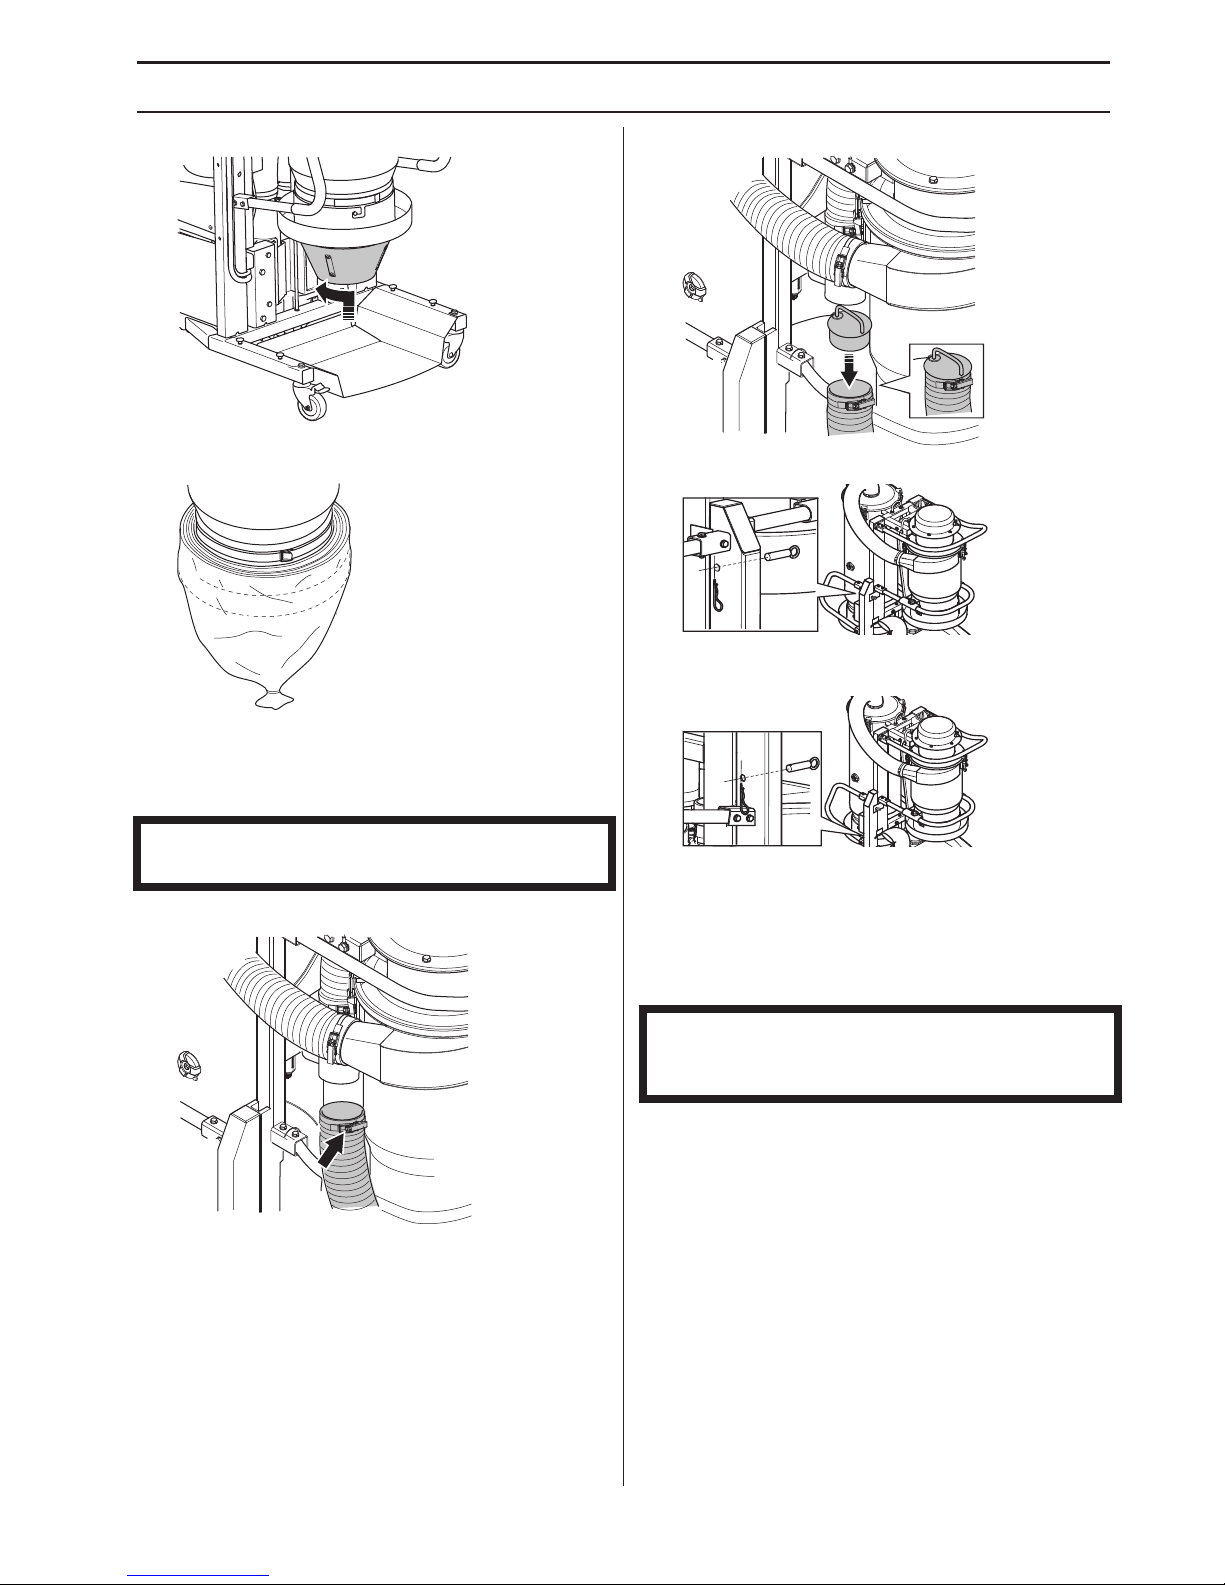
• Reinstall the cyclone cone.
• Pull the dust bag over the cyclone cone and close the
bottom with cable ties.
Transport position
The machine can be raised and lowered to make it easier
to handle during transport.
• Loosen the hose clamp and remove the hose.
• Seal the hose with the cap.
• Remove the pin and locking pin.
• Push down the upper part of the machine until it
reaches the attachment point for the lower position.
• The machine is kept in the upper position by means
of a gas spring. There is no risk of the machine falling
down.
• Replace the locking pin and pin.
Service
IMPORTANT! It is recommended that machinery be
transported upright where possible.
IMPORTANT! All types of repairs may only be carried
out by authorised repairmen. This is so that the
operators are not exposed to great risks.

18 – English
TROUBLESHOOTING
Troubleshooting
*If there are large amounts of dust in the filter housing it means that there is some kind of problem with the filter.
!
WARNING! Most accidents involving machines occur during trouble shooting, service and
maintenance as staff have to locate themselves within the machine’s risk area. Prevent accidents
by being alert and by planning and preparing the work.
The engine should be switched off during operations described in this chapter unless otherwise
stated.
All checks involving electric components should only be performed by a licensed electrician.
Problem Possible Cause Possible action
The machine does not start
The machine has no incomming or
outgoing power.
Check that the power cable is connected
and the machine turned on.
Have a licensed electrician check the
presence of power at the top of the left
side contactor. If no power at the
contactors, test for presence of power at
the power source.
Damaged cables. Contact a licensed electrician.
Circuit breaker has triggered. Make sure the circuit breaker is active.
The machine makes a low humming
sound when switched to ON
Phase error. Only two phases
present. Switch off machine
immediately to aviod motor burn-out.
Contact a licensed electrician.
Dust in the motor impellers. Contact a licensed electrician.
Burned out motor. Contact your service agent.
The machine is blowing instead of
sucking when on a different power
source
Phase relay fault.
Unplug the machine and have a
licensed electrician change L1 and L3
on the motor and test for suction to
confirm failed phase relay.
The machine will run but there is not
power at the accessory power outlet
Unit not correctly connected.
Check that the unit is correctly
connected and properly powered up.
(Eg. safety breaker and emergency stop
are in the correct position on the
grinder.)
Contact problems in electrical
cabinet.
Contact a licensed electrician.
The machine does not have much
suction
The filter is blocked Clean or replace the filter.
Cyclone is clogged.
Use compressed air or a brush to clean
the cyclone screw and container.
The machine is blowing dust out the
exhaust
The filter is not correctly fitted. Ensure the filters are fitted correctly.
The filter has become detached. Ensure the filters are fitted correctly.
Holes or perforations in the cone
filter.
Replace the filter.
Purge does not clean filter and/or
does not work.
Compressed air hose has come
loose or broken.
Check the hoses from the compressor,
pressure switch and purge tank.
Filter on compressor is clogged.
Clean or change the filter on the
compressor.
Compressor running continuously. Filter on compressor is clogged.
Clean or change the filter on the
compressor.
 Loading...