


59643000 09/11
English 5
Français 14
Español 23
2
2x
“Click”
4
5
3
A
1.
2.
B
D
H
4

English
Inform your dealer immediately if there
is any shipping damage.
Completely remove the accessories
from the box.
The suction unit is not suitable for suck-
ing up hazardous dusts as asbestos.
Please consult your Husqvarna branch
or your Husqvarna dealer with regard to
such applications.
Only operate the vacuum from a
grounded outlet. Refer to the Technical
data for the necessary main fuse.
Connect to a properly grounded outlet
only. See Grounding Instructions.
When using an electrical machine, basic
precautions should always be followed, including the following: This vacuum is intended for commercial use.
1 DISCONNECT VACUUM CLEANER
FROM POWER CIRCUIT before removing the cover, performing maintenance work, and when not in use.
2 DO NOT LEAVE the machine unattend-
ed when plugged in.
3 ALWAYS CHECK THE POWER SUP-
PLY CORD for damage or signs of any
aging before each use.
4 DO NOT PULL OR CARRY VACUUM
CLEANER BY CORD. Do not close
door on cord or pull cord around sharp
edges.
5 KEEP CORD AWAY FROM HEAT AND
OIL. Do not leave cord lying around after job is complete. It can become a trip-
ping hazard.
6 DO NOT RUN VACUUM OVER CORD.
7 TURN SWITCH TO OFF before unplug-
ging power supply cord.
8 DO NOT UNPLUG BY PULLING
CORD. To unplug, grasp plug, not cord.
9 DO NOT GRASP PLUG WITH WET
HANDS.
10 A DAMAGED CORD OR PLUG should
only be replaced by an authorized service center representative. DO NOT ATTEMPT TO REPAIR POWER CORD.
11 TO AVOID SHOCK, do not expose to
rain. Store indoors.
12 USE ONLY AS RECOMMENDED BY
THIS MANUAL. Use only with recommended attachments.
13 KEEP HAIR, CLOTHING, LOOSE
JEWELRY, FINGERS and all parts of
the body away from openings and moving parts.
14 DO NOT BLOCK OR OBSTRUCT
OPENINGS. Keep openings free of lint,
hair, dust, and anything that restricts air
flow.
15 DO NOT PICK UP ANYTHING THAT IS
BURNING, smoldering, or smoking
such as matches, cigarettes, or hot ashes.
16 DO NOT USE TO VACUUM COMBUS-
TIBLE EXPLOSIVE MATERIALS, such
as coal, grain, and other finely divided
combustible material.
17 DO NOT USE TO VACUUM COMBUS-
TIBLE, hazardous, toxic, or carcinogenic materials, including gasoline, diesel
fuel, acetone, paint thinner, heating oils,
undiluted acids and solvents, pesticide,and asbestos.
18 USE RECOMMENDED FILTERS when
vacuuming drywall materials.
19 DO NOT USE WITHOUT FILTER and/
or dust bag in proper place.
20 CONNECT VACUUM CLEANER WITH
PROPERLY GROUNDED OUTLET
ONLY. See grounding instructions.
21 DO NOT ALLOW VACUUM CLEANER
TO BE USED AS A TOY. Keep children
away from Vacuum Cleaner.
22 DO NOT LEAVE UNATTENDED while
Vacuum Cleaner is running.
IMPORTANT SAFETY IN-
STRUCTIONS
READ ALL INSTRUCTIONS BEFORE USING THIS MACHINE
5EN

23 DO NOT USE IF CORD, PLUG, FIL-
TER, OR VACUUM CLEANER IS IN
POOR CONDITION. If the Vacuum
Cleaner has been dropped, damaged,
exposed to weather, or dropped into
water; have it checked by an authorized
service.
24 ALWAYS USE EYE PROTECTION
when operating Vacuum Cleaner.
25 USE EXTRA CAUTION when operating
on stairs.
26 STAY ALERT! Do not use Vacuum
Cleaner when you are tired or under the
influence of drugs, alcohol or medica-
tion.
– This appliance must be grounded. If it
should malfunction or break down,
grounding provides a path of least re-
sistance for electric current to reduce
the risk of electric shock.
– This appliance is equipped with a cord
having an equipment grounding con-
ductor and ground plug.
– The plug must be inserted into an ap-
propriate outlet that is properly installed
and grounded in accordance with all lo-
cal codes and ordinances.
– Improper connection of the equipment-
grounding conductor can result in a risk
of electric shock.
– Check with a qualified electrician or
service person if you are in doubt as to
whether the outlet is properly grounded.
– Do not modify the plug provided with
the appliance.
– If it will not fit the outlet, have a proper
outlet installed by a qualified electrician.
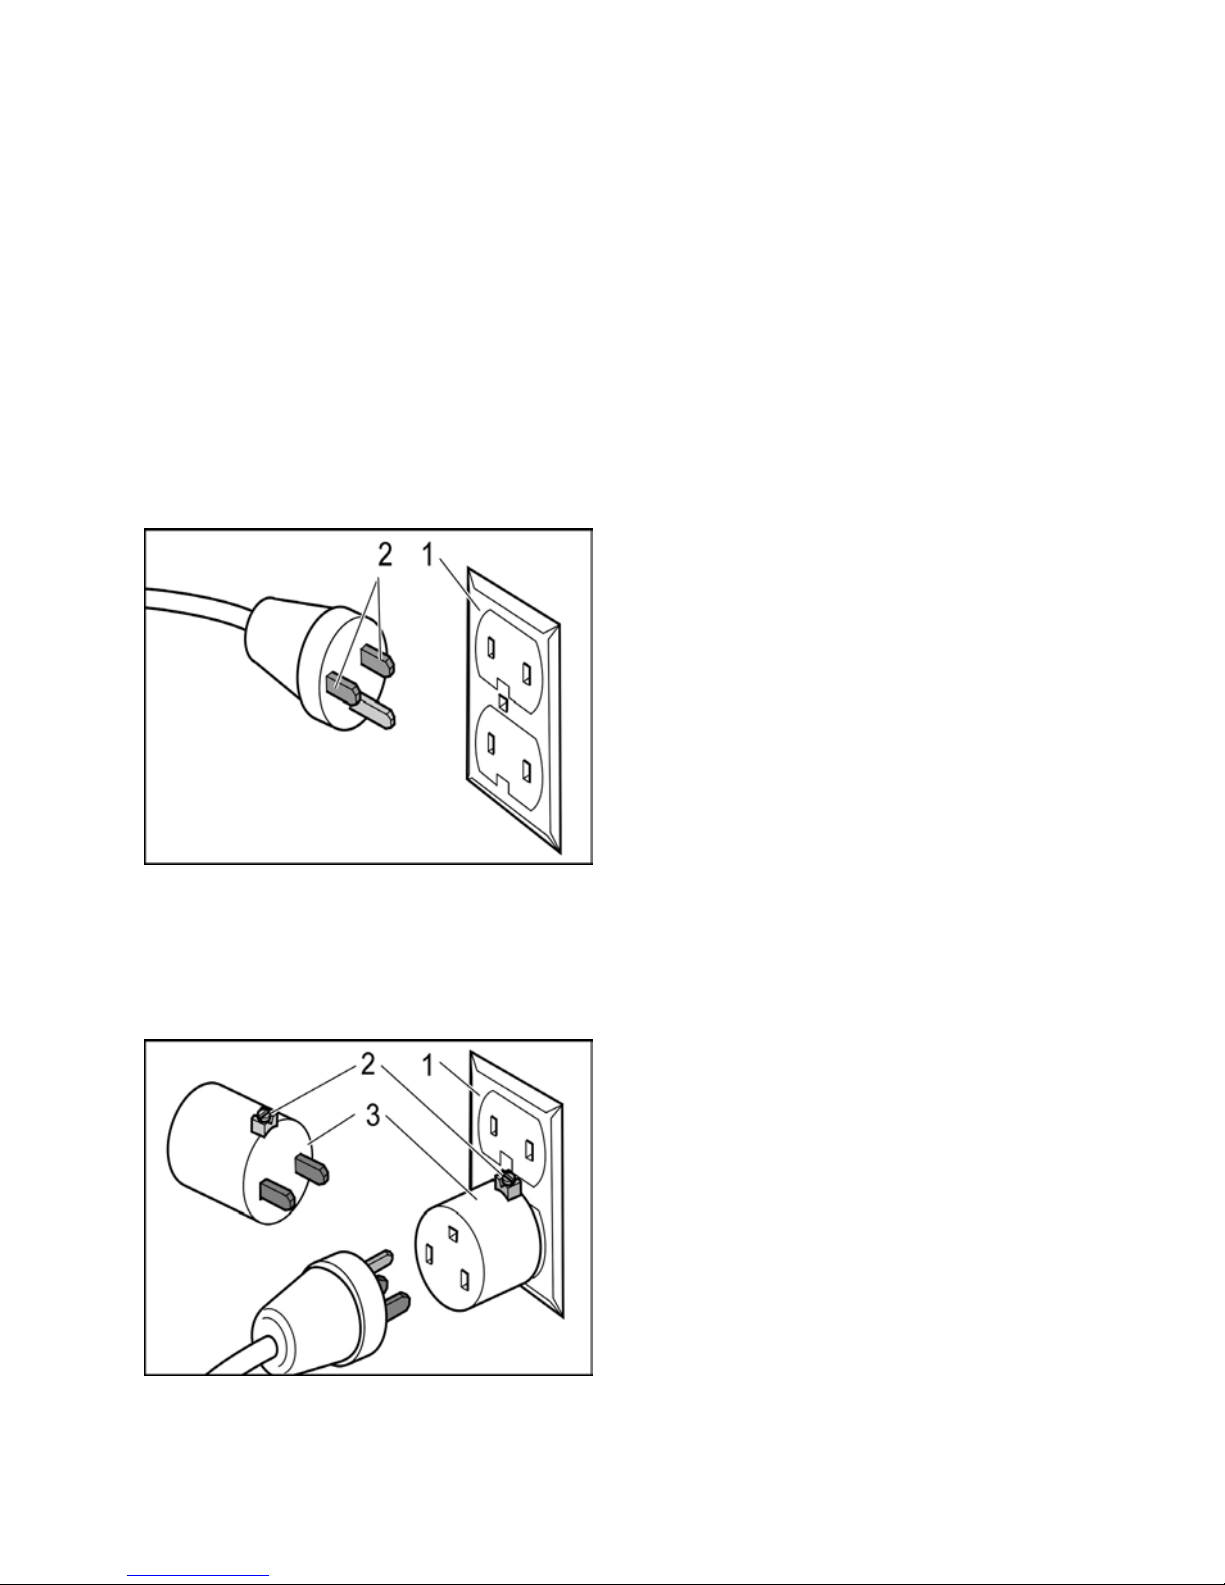
– This appliance is for use on a nominal
120-volt circuit, and has a grounded
plug that looks like the plug illustrated in
Fig.A.
– A temporary adapter that looks like the
adapter illustrated in Fig.B, may be
used to connect this plug to a two-pole
receptacle as shown in Fig.B, if a properly grounded outlet is not available.
– The temporary adapter should be used
only until a properly grounded outlet
(Fig.A) is installed by a qualified electrican.
– The green colored rigid ear, lug, or the
like extending from the adapter must be
connected to a permanent ground such
as a properly grounded outlet box cover.
– Whenever the adapter is used, it must
be held in place by a metal screw.
SAVE THESE INSTRUCTIONS
This vacuum is intended for commercial
use.
SAFETY INSTRUCTIONS
GROUNDING INSTRUCTIONS
WARNING:
IN ALL CASES, MAKE SURE THE RECEPTACLE IN QUESTION IS PROPERLY
GROUNDED.
6 EN
Use only three-wire extension cords that
have three-prong grounding-type plugs and
three-pole receptacle that accepts the appliance’s plug. Replace damaged or worn
cord immediately.
Figure A
1 Grounded outlet box
2 Current carrying prongs
Grounding prong is longest of the 3 prongs
Figure B
1 Grounded outlet box
2 Grounding means
3 Adapter
Note: In Canada, the use of a temporary
adapter is not permitted by the Canadian
Electrical Code.
In a double-insulated machine, two systems of insulation are provided instead of
grounding. No grounding means is provided on a double-insulated machine, nor
should a means for grounding be added to
the machine. Servicing a double-insulated
machine requires extreme care and knowledge of the system, and should be done
only by qualified service personnel. Replacement parts for a double-insulated machine must be identical to the parts they
replace.
NEVER REMOVE GROUNDING PRONG
FROM POWER PLUG.
EXTENSION CORDS
DO NOT ATTEMPT TO REPAIR POWER
CORD.
Servicing of double-insulated machines
7EN
– 1
Please read and comply with
these original instructions prior
to the initial operation of your appliance and
store them for later use or subsequent owners.
– Before first start-up it is definitely nec-
essary to read the safety indications Nr.
5.956-249!
– The non-compliance of the operating
and safety instructions may lead to
damages of the appliance and to dangers for the operator and other persons.
– In case of transport damage inform ven-
dor immediately
Danger
Immediate danger that can cause severe
injury or even death.
몇 Warning
Possible hazardous situation that could
lead to severe injury or even death.
Caution
Possible hazardous situation that could
lead to mild injury to persons or damage to
property.
몇 Warning
The appliance is not suitable for vacuuming
dust which endangers health.
– The machine is meant for dry and wet
cleaning of floors and walls.
– This appliance is suited for the commer-
cial use, e.g. in hotels, schools, hospitals, factories, shops, offices, and rental
companies.
Contents
Environmental protection . . EN . . .1
Symbols in the operating in-
structions . . . . . . . . . . . . . . EN . . .1
Proper use . . . . . . . . . . . . . EN . . .1
Device elements. . . . . . . . . EN . . .2
Start up. . . . . . . . . . . . . . . . EN . . .2
Operation . . . . . . . . . . . . . . EN . . .3
Transport . . . . . . . . . . . . . . EN . . .4
Storage. . . . . . . . . . . . . . . . EN . . .4
Maintenance and care . . . . EN . . .4
Troubleshooting . . . . . . . . . EN . . .4
Warranty. . . . . . . . . . . . . . . EN . . .5
Accessories and Spare Parts EN . . .5
Technical specifications . . . EN . . .6
Environmental protection
The packaging material can be
recycled. Please do not throw
the packaging material into
household waste; please send
it for recycling.
Old appliances contain valuable materials that can be recycled; these should be sent for
recycling. Batteries, oil, and
similar substances must not
enter the environment. Please
dispose of your old appliances
using appropriate collection
systems.
Symbols in the operating in-
structions
Proper use
8 EN

– 2
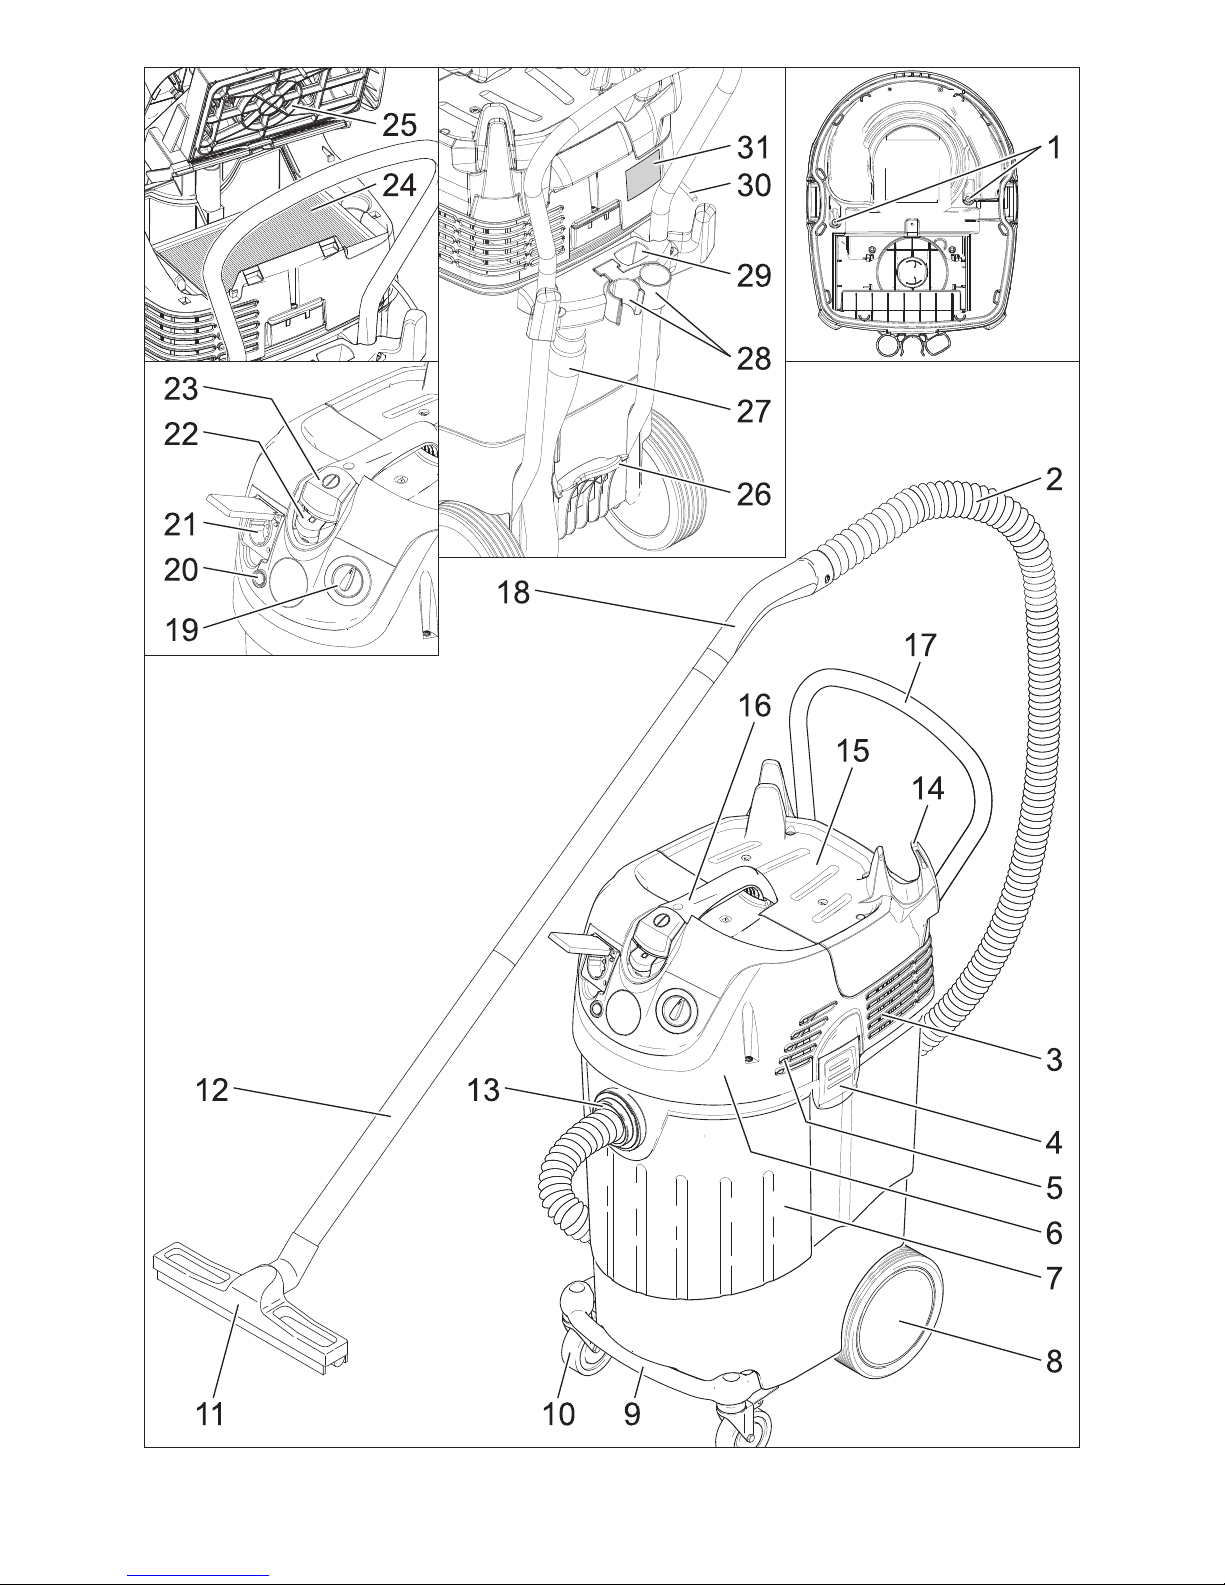
1 Electrodes
2 Suction hose
3 Air outlet, working air
4 Suction head lock
5 Air inlet, motor cooling air
6 Suction head
7 Dirt receptacle
8 Impeller
9 Steering roller bow
10 Steering roller
11 Floor nozzle
12 Suction pipe
13 Suction support
14 Cable hook
15 Filter cover
16 Carrying handle
17 Push handle
18 Bender
19 Rotary switch for suction output (min-
max)
20 Indicator lamp
21 Socket
22 Automatic filter dedusting
23 Main switch
24 Flat fold filter
25 Filter dedusting
26 Floor nozzle holder
27 Drain hose
28 Holder for suction pipes
29 Holder for crevice nozzle
30 Power cord
31 Nameplate
Static charge is deflected by providing
earthing to the connection nozzles. This
prevents the formation of sparks and current shocks due to attachments (option)
with electrical conductivity.
Caution
The flat pleated filter must must always be
in place while vacuuming.
– When vacuuming fine dust, you may
also use an additional paper filter bag or
a membrane filter (special accessory).
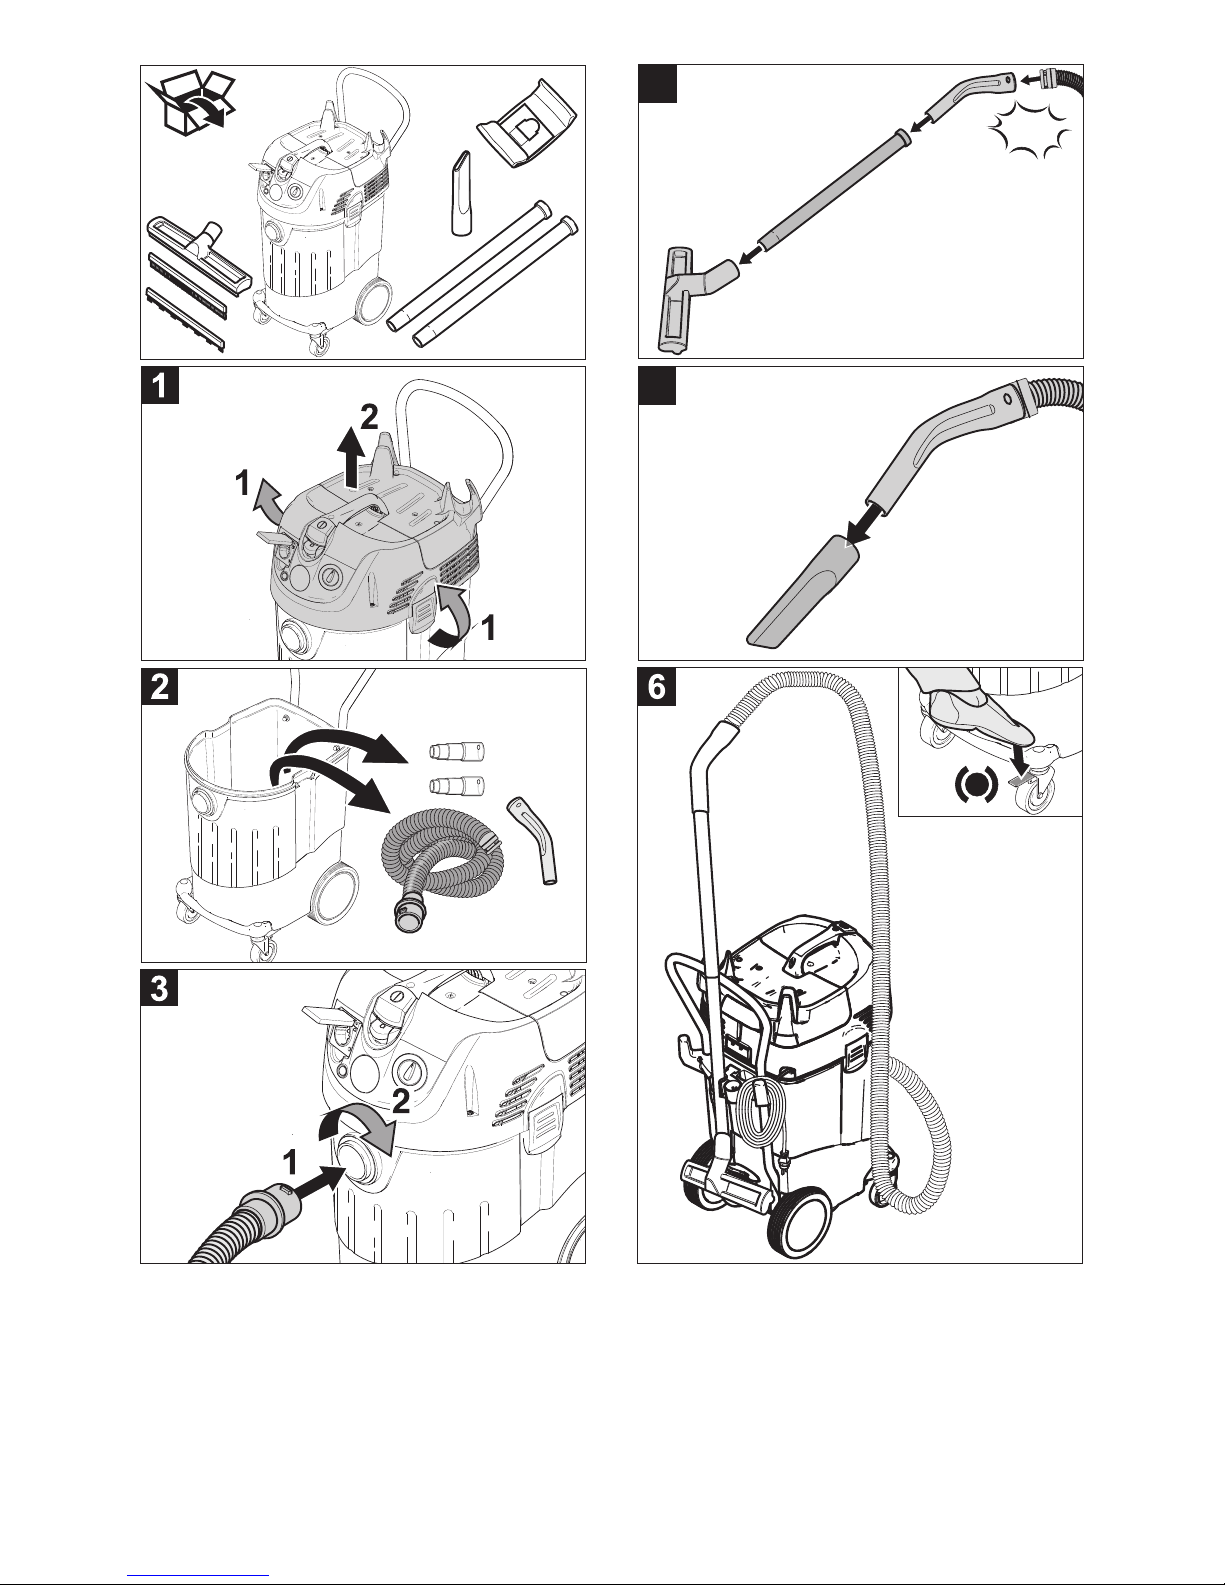
Illustration
Release and remove the suction head.
Insert the paper filter bag or the mem-
brane filter (special attachment).
Insert and lock the suction head.
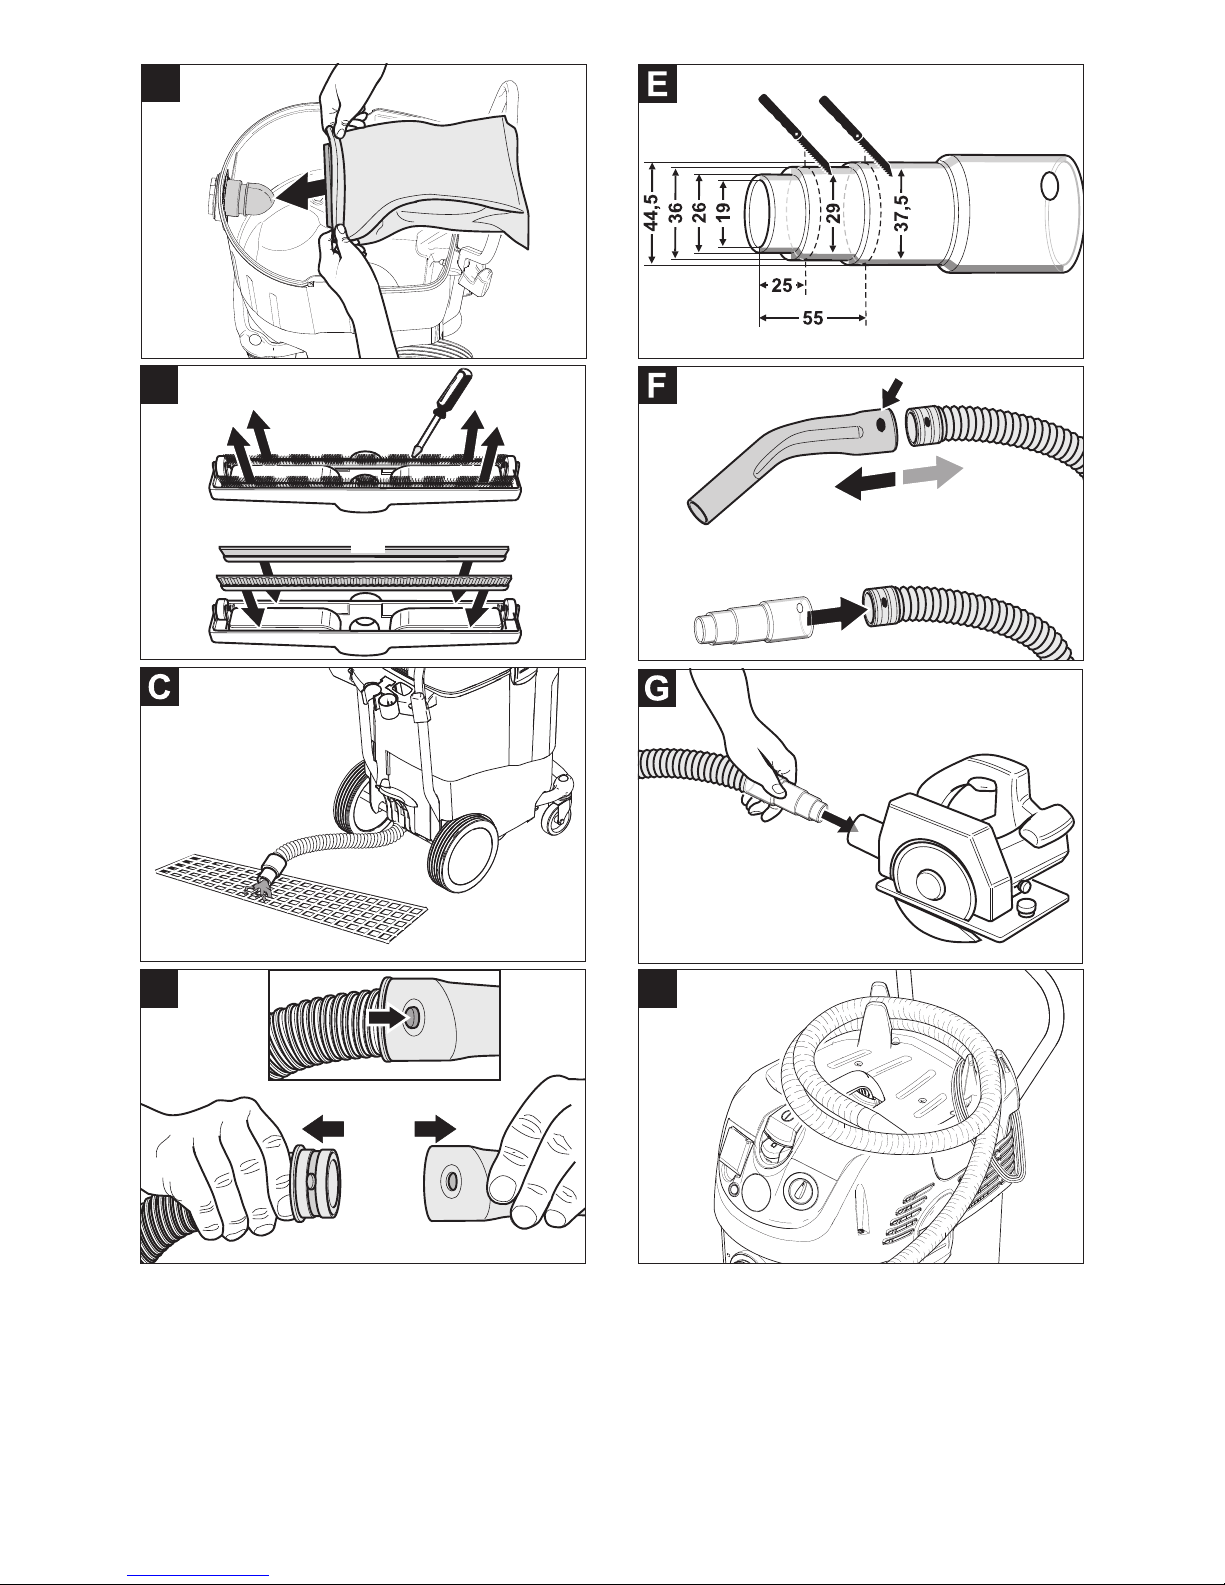
Illustration
Remove the brush strips.
Install the rubber lips.
Note: The structured side of the rubber lips
must point outwards.
– If the appliance is used to vacuum wet
dirt the paper filter bag or the membrane filter (special accessory) must always be removed.
– It is recommended to use a special filter
bag (wet) (see Filter systems).
Illustration
Drain off dirty water through the drain-
age hose.
Caution
The flat pleated filter must must always be
in place while vacuuming.
– If wet dirt is vacuumed with the uphol-
stery or crevice nozzle, or if water is
sucked up from a container, it is recommended to deactivate the "automatic filter cleaning" function.
– If the maximum liquid level is reached
the appliance will turn off automatically.
Device elements
Start up
Anti-static system
Dry vacuum cleaning
Inserting the paper filter bag
Wet vacuum cleaning
Inserting the rubber lips
Remove the paper filter bag
Drain off dirt water
General
9EN

– 3
– In case of non-conductive liquids
(such as emulsion drilling fluids,
oils, and greases) the appliance is
not turned off when the container is
full. The filling level must be continu-
ously monitored and the container
must be emptied in time.
–
After the wet vacuuming: Clean the flat
folded filter with the filter cleaning. Clean
the electrodes with a brush. Clean the
container with a damp rag and dry it.
Illustration
The suction hose is equipped with a clip
system. All C-40/C-DN-40 accessories can
be connected.
Plug in the main plug.
Switch on the appliance at the main
switch.
Set the suction output (min - max) at the
rotary switch.
Danger
Risk of injury and damage! The socket outlet is only for the connection of power tools
to the vacuum cleaner. Any other use of the
socket outlet is not permitted.
Connect the mains plug of the electric
power tool to the vacuum cleaner.
Switch on the appliance at the main
switch.
Indicator lamp is on; vacuum cleaner is in
the standby mode.
Note: The vacuum cleaner is turned on and
off automatically with the electric power
tool.
Note: The vacuum cleaner starts automatically within 0.5 seconds and continues to
run for 15 seconds after the power tool has
being switched off.
Note: Please refer to "Technical specifications" for the power connection specifications of the power tools.
Illustration
Adjust the stepped power tool adaptor
to fit the connection of the electric power tool.
Illustration
Remove the elbow from the suction
hose.
Attach the stepped power tool adaptor
to the suction hose.
Illustration
Connect the adaptor to the electric pow-
er tool.
The appliance has an innovative filter
cleaning system that is particularly effective
with fine dust. The flat pleated filter is automatically cleaned every 15 seconds
through an air jet (pulsating sound).
Note: Automatic filter dedusting is switched
on at the factory.
Note: The automatic filter dedusting function can only be switched on/ off when the
appliance is switched on.
– To switch off automatic filter cleaning:
Activate the switch. Indicator lamp in
the switch goes off.
– To switch on automatic filter cleaning:
Press the switch again. Indicator lamp
in the switch glows green.
Switch off the appliance at the main
switch.
Pull out the mains plug.
Empty the container.
Vacuum and wipe the appliance inside
and outside with a damp cloth.
Clip connection
Operation
Turning on the Appliance
Adjust the suction output
Working with electrical power tools
Automatic filter cleaning
Turn off the appliance
After each operation
10 EN
 Loading...