

Husqvarna 968999246-CZ4217 User Manual
Husqvarna
Operators Manual
Please read these instructions carefully and make
sure you understand them before using the machine.
MANUAL NO. 539110040 REV. IR (1/14/04)
Model:
968999245/ CZ3815
968999246/CZ4217
Congratulations on the purchase of your HUSQVARNA mower. This manual has been prepared
for the owners and operators of the models called out on the front cover of this manual. Read,
understand and follow the safety and operating instructions.
WARNING
Failure to follow cautious operating practices can result in serious injury to the operator or other per-
sons. The owner must understand these instructions, and must allow only trained persons who un-
derstand these instructions to operate the mower. Each person operating the mower must be of
sound mind and body and must not be under the influence of any mind altering substance.
CAUTION
1. Keep all shields, guards and safety devices in place and in proper working condition.
2. Stop engine and remove spark plug wires or remove key before adjusting, servicing, or performing
maintenance.
GOOD SERVICE
Husqvarna products are sold all over the world and only in specialized retail stores with complete
service. This ensures that you as a customer receive only the best support and service. Before the
product is delivered, the machine has, for example, been inspected and adjusted by your retailer.
When you need spare parts or support in service questions, warranty issues, etc., please consult
the following professional:
This Operator's Manual belongs to the Engine Transmission
machine with manufacturing number:
WARNING: Engine exhaust, some of it's constituents, and certain vehicle components I
contain or emit chemicals known to the State of California to cause cancer and birth defects I
or other reproductive harm. I
pounds, chemicals known to the State of California to cause cancer and
I WARNING: Battery posts, terminals and related accessories contain lead and lead com-
birth defects or other reproductive harm. Wash hands after handling.
Continuous dedication to improve our products require that specifications and design are
subject to change without notice.
@2004 Husqvarna. All Rights Reserved.
Beatrice, NE. Printed in U.S.A.
2
CONTENTS
SAFETY INSTRUCTIONS .................... 4
General use and safety rules ...... 4
Driving on slopes ........................ 4
Children safety ............................ 5
Service safety ............................. 5
Transportation ............................ 6
SPECIFICATIONS ................................. 7
ASSEMBLY ........................................... 8
Tools Required ............................ 8
Unpacking ................................... 8
Seat Attachment ......................... 8
Control Lever Attachment ........... 8-9
Check Tire Pressure .................. 10
V-Belts ........................................ 21
Engine ........................................ 21
Air Screen & Air Filter ................. 22
Oil Filter ...................................... 22
Spark Plugs ................................ 22
Fuel Filter .................................... 22
Cleaning ..................................... 22
SERVICE AND ADJUSTMENT ............. 23
Mower ......................................... 23
Deck Level .................................. 23-24
Deck Belt Replacement ............. 24-25
EZT (E-Series Zeroturn
Transaxle) Belt Replacement ..... 25
Utility Box Installation .................. 10
Assembly Checklist .................... 10
OPERATION .......................................... 11
Controls ...................................... 11
Operation Instructions ................ 12-17
CUSTOMER RESPONSIBILITIES ...... 18
Maintenance Schedule ............... 18
Lubrication Chart ........................ 19
Tires ........................................... 19
Operator Presence System ....... 19
Blade Care ................................. 19-20
Seat Adjustment ......................... 26
Control Levers Adjustment ......... 26
Wheel Removal .......................... 26
Jump Starting Engine ................. 26-27
Battery Replacement .................. 27
Park Brake .................................. 27
Tracking ...................................... 28
STORAGE ............................................. 29-30
TROUBLESHOOTING ......................... 31-32
Battery ........................................ 20-21
3
SAFETY RULES
SAFE OPERATION PRACTICES FOR RIDE-ON MOWERS
DANGER !
THIS CUTTING MACHINE IS CAPABLE OFAMPUTATING HANDSAND FEETAND THROWING
OBJECTS. FAILURE TO OBSERVE THE FOLLOWING SAFETY INSTRUCTIONS COULD
RESULT IN SERIOUS INJURY OR DEATH.
I. GENERAL OPERATION
Read, understand and follow all instruc-
tions in the manual and on the machine
before starting.
Only allow responsible adults, who are
familiar with the instructions, to operate the
machine.
Clear the area of objects such as rocks,
stones, toys, wire, etc., which could be
picked up and thrown by the blades.
Be sure the area is clear of all people and
pets before mowing. Stop the machine if
anyone enters the area.
Never carry passengers.
Do not mow in reverse unless absolutely
necessary. Always look down and behind
before and while backing.
Be aware of the mower discharge direction
and do not direct it towards anyone. Do not
operate the mower without either the entire
grass catcher or the guard in place.
Slow down before turning.
Never leave the machine unattended when
the engine is running. Always turn off the
blades, set the parking brake, stop the
engine and remove the key before leaving
the machine.
Turn off blades when not mowing.
Stop engine before removing grass catcher
or unclogging chute.
Mow only in daylight or good artificial light.
Do not operate the machine while under the
influence of alcohol or drugs.
Watch out for traffic when operating near or
crossing roadways.
Use extra care when loading and unloading
the machine onto a trailer or truck.
Data indicates that operators, age 60 years
and above, are involved in a large percent-
age of riding mower-related injuries. These
operators should evaluate their ability to
operate the riding mower safely enough to
protect themselves and others from serious
injury.
• Keep machine free of grass, leaves or other
debris buildup which can touch hot exhaust/
engine parts and burn. Do not allow the
mower deck to plow leaves or other debris
which can cause buildup to occur. Clean
any oil or fuel spillage before operating or
storing the machine. Allow machine to cool
before storage.
I1. SLOPE OPERATION
Slopes are a major factor related to loss-of-
control and tip-over accidents, which can result
in severe injury or death. All slopes require extra
caution. If you cannot back up the slope or if you
feel uneasy on it, do not mow it.
DO:
Mow up and down slopes, not across.
Remove obstacles such as rocks, tree
limbs, etc.
Watch for holes, ruts, or bumps. Uneven
terrain could overturn the machine. Tall
grass can hide obstacles.
Use a slow speed while on a slope.
Use extra care with grass catchers or other
attachments. These can change the
stability of the machine.
Keep all movement on the slopes slow and
gradual. Do not make sudden changes in
speed or direction.
Avoid starting or stopping on a slope. If tires
lose traction, disengage the blades and
proceed slowly straight down the slope.
4

SAFETY RULES
SAFE OPERATION PRACTICES FOR RIDE-ON MOWERS
DO NOT:
• Do not turn on slopes unless necessary,
and then, turn slowly and gradually downhill,
if possible.
• Do not mow near drop-off, ditches, or
embankments. The mower could suddenly
turn over if a wheel is over the edge of a cliff
or ditch, or if an edge caves in.
Do not mow on wet grass. Reduced trac-
tion could cause sliding.
Do not try to stabilize the machine by
putting your foot on the ground.
Do not use grass catcher on steep slopes.
Avoid starting up or down a slop or hill with
excessive ground speed. It is VERY difficult
to reduce your speed or maintain control of
mower once you are going too fast.
II1.CHILDREN
Tragic accidents can occur if the operator is not
alert to the presence of children. Children are
often attracted to the machine and the mowing
activity. Never assume that children will remain
where you last saw them.
NEVER allow children to operate the
machine.
Keep children out of the mowing area and
under the watchful care of another respon-
sible adult.
Be alert and turn off the machine if children
enter the area.
Before and when backing, look behind and
down for small children.
Never carry children. They may fall off and
be seriously injured or interfere with safe
machine operation.
Use extra care when approaching blind
corners, shrubs, trees, or other objects that
may obscure vision.
IV. SERVICE
The operation of any mower can result in
foreign objects thrown into the eyes, which
can result in severe eye damage. Always
wear safety glasses or eye shields while
operating your mower or performing any
adjustments or repairs. We recommend a
wide vision safety mask over spectacles or
standard safety glasses.
• Use extra care in handling gasoline and
other fuels. They are flammable and vapors
are explosive.
- Use only an approved container.
- Never remove gas cap or add fuel with the
engine running. Allow engine to cool before
refueling.
- Do not smoke, when refueling or handling
fuel.
- Never refuel the machine indoors.
- Never store the machine or fuel container
inside where there is an open flame, such
as a water heater.
Never run a machine inside a closed area.
Keep nuts and bolts, especially blade
attachment bolts, tight and keep equipment
in good condition.
Never tamper with safety devices. Check
there proper operation regularly.
• Keep machine free of grass, leaves, or other
debris buildup. Clean oil or fuel spillage.
Allow machine to cool before storing.
Stop and inspect the equipment if you strike
an object. Repair, if necessary, before
restarting.
Never make adjustments or repairs with the
engine running.
Grass catcher components are subject to
wear, damage, and deterioration, which
could expose moving parts or allow objects
to be thrown. Frequently check components
and replace with manufacturer's recom-
mended parts, when necessary.
Mower blades are sharp and can cut. Wrap
the blade(s) or wear gloves, and use extra
caution when servicing them.
Check brake operation frequently. Adjust and
service as required.
SAFETY RULES
SAFE OPERATION PRACTICES FOR RIDE-ON MOWERS
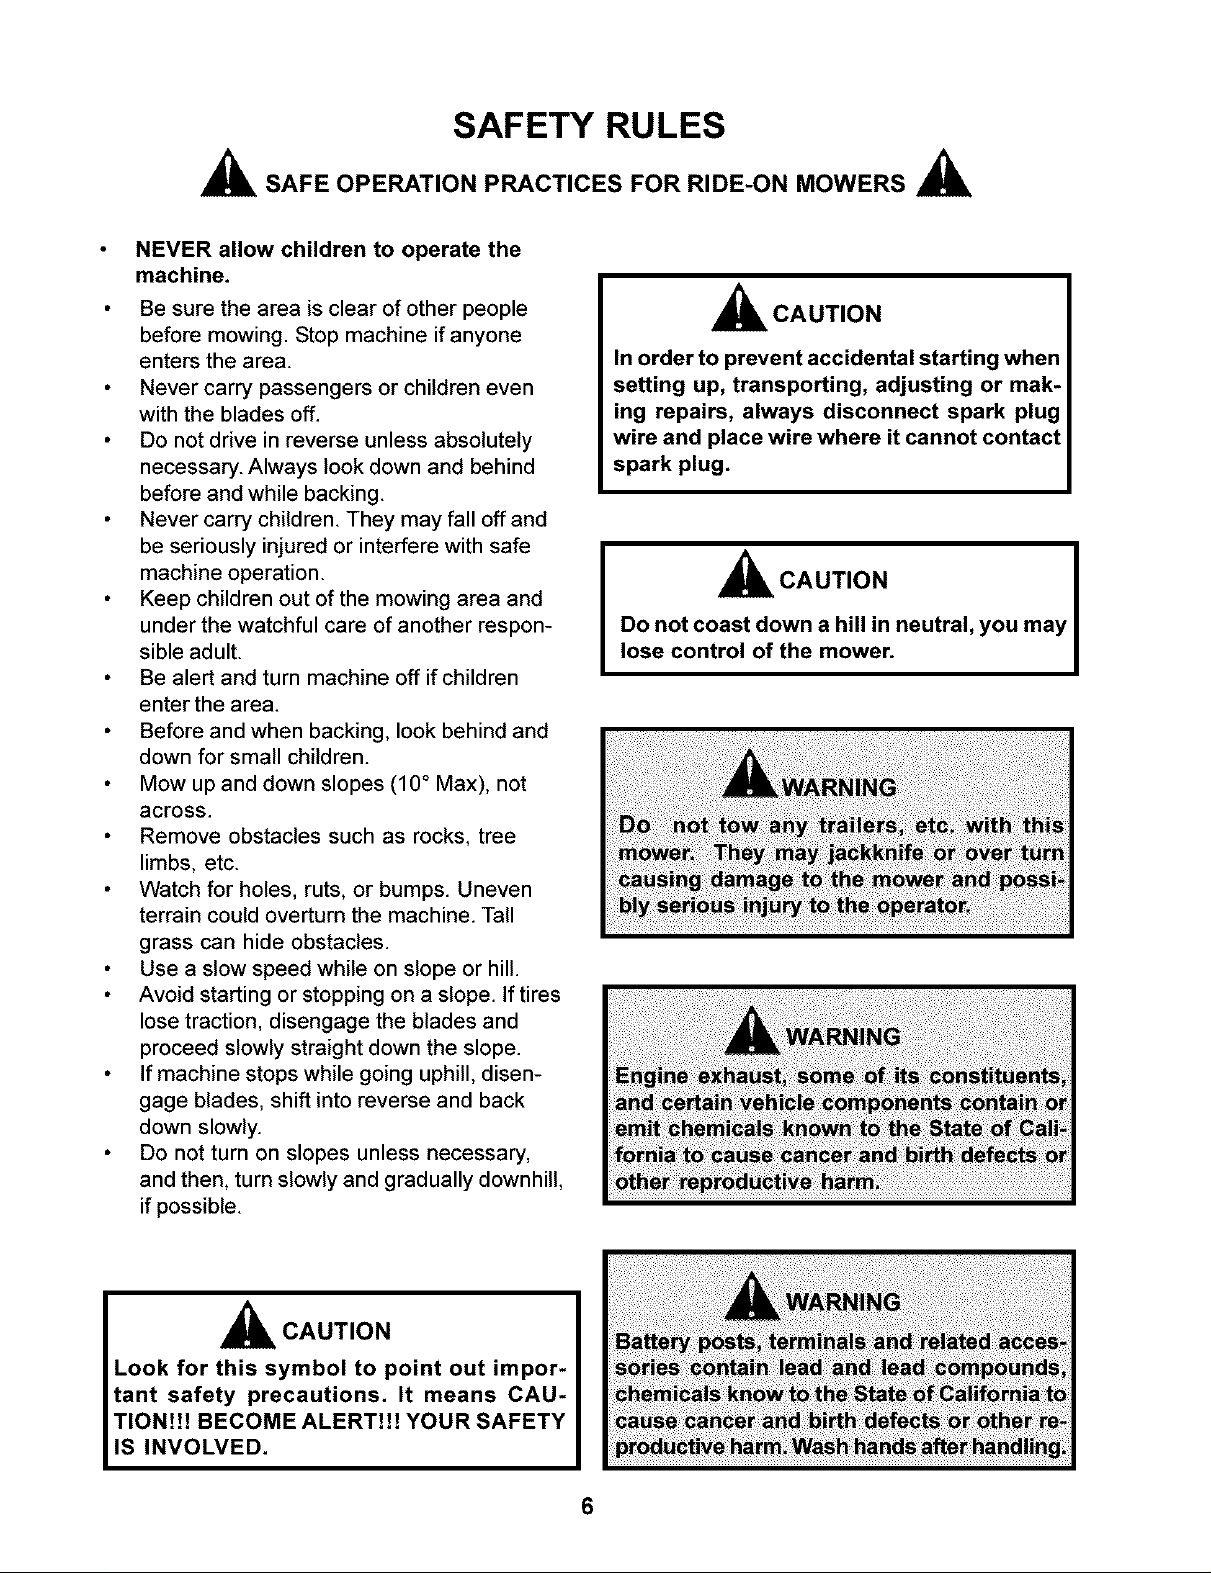
NEVER allow children to operate the
machine.
Be sure the area is clear of other people
before mowing. Stop machine if anyone
enters the area.
Never carry passengers or children even
with the blades off.
Do not drive in reverse unless absolutely
necessary. Always look down and behind
before and while backing.
Never carry children. They may fall off and
be seriously injured or interfere with safe
machine operation.
Keep children out of the mowing area and
under the watchful care of another respon-
sible adult.
Be alert and turn machine off if children
enter the area.
Before and when backing, look behind and
down for small children.
Mow up and down slopes (10 ° Max), not
across.
Remove obstacles such as rocks, tree
limbs, etc.
Watch for holes, ruts, or bumps. Uneven
terrain could overturn the machine. Tall
grass can hide obstacles.
Use a slow speed while on slope or hill.
Avoid starting or stopping on a slope. If tires
lose traction, disengage the blades and
proceed slowly straight down the slope.
If machine stops while going uphill, disen-
gage blades, shift into reverse and back
down slowly.
Do not turn on slopes unless necessary,
and then, turn slowly and gradually downhill,
if possible.
CAUTION
In order to prevent accidental starting when
setting up, transporting, adjusting or mak-
ing repairs, always disconnect spark plug
wire and place wire where it cannot contact
spark plug.
CAUTION
Do not coast down a hill in neutral, you may
lose control of the mower.
CAUTION
Look for this symbol to point out impor-
tant safety precautions. It means CAU-
TIONIH BECOME ALERT[[[ YOUR SAFETY
IS INVOLVED.
6

SPECIFICATIONS
GASOLINE CAPACITY 3 GALLONS
AND TYPE UNLEADED REGULAR
OIL TYPE (SPI-SF-SJ): SEE YOUR ENGINE
OWNERS MANUAL
SPARK PLUG: SEE ENGINE MANUAL
GROUND SPEED (MPH): FORWARD: 0-6 MAX.
REVERSE: 0-3.5
TIRE PRESSURE: FRONT: 15 PSI
REAR: 15PSI
CHARGING SYSTEM: BRIGGS & STRATTON: 9 AMPS
@3300 RPM
KOHLER: 15AMP@ 3300 RPM
BATTERY: MIN. CCA: 300
CASE SIZE: 51/4W X 7 3/4 L X 6 T
BLADE BOLT TORQUE: 27-35 FT./LBS.
CUSTOMER RESPONSIBILITIES
Read and observe the safety rules.
Follow a regular schedule in maintaining,
caring for and using your mower.
Follow the instructions under "Customer
Responsibilities" and "Storage" sections of
this owner's manual.
CONGRATULATIONS on your purchase of a
new mower. It has been designed, engineered
and manufactured to give you the best possible
dependability and performance.
Should you experience any problem you cannot
easily remedy, please contact your nearest
authorized service center/department. We
have competent, well-trained technicians and
the proper tools to service or repair this mower.
Please read and retain this manual. The in-
structions will enable you to assemble and
maintain your mower properly. Always observe
the "SAFETY RULES".
A spark arrester for the muffler is available
through your nearest authorized engine service
center/department.
ASSEMBLY
Your new mower has been assembled at the factory with the exception of those parts left un-
assembled for shipping purposes. To ensure safe and proper operation of your mower, all
parts and hardware you assemble must be tightened securely. Use the correct tools as
necessary to insure proper tightness.
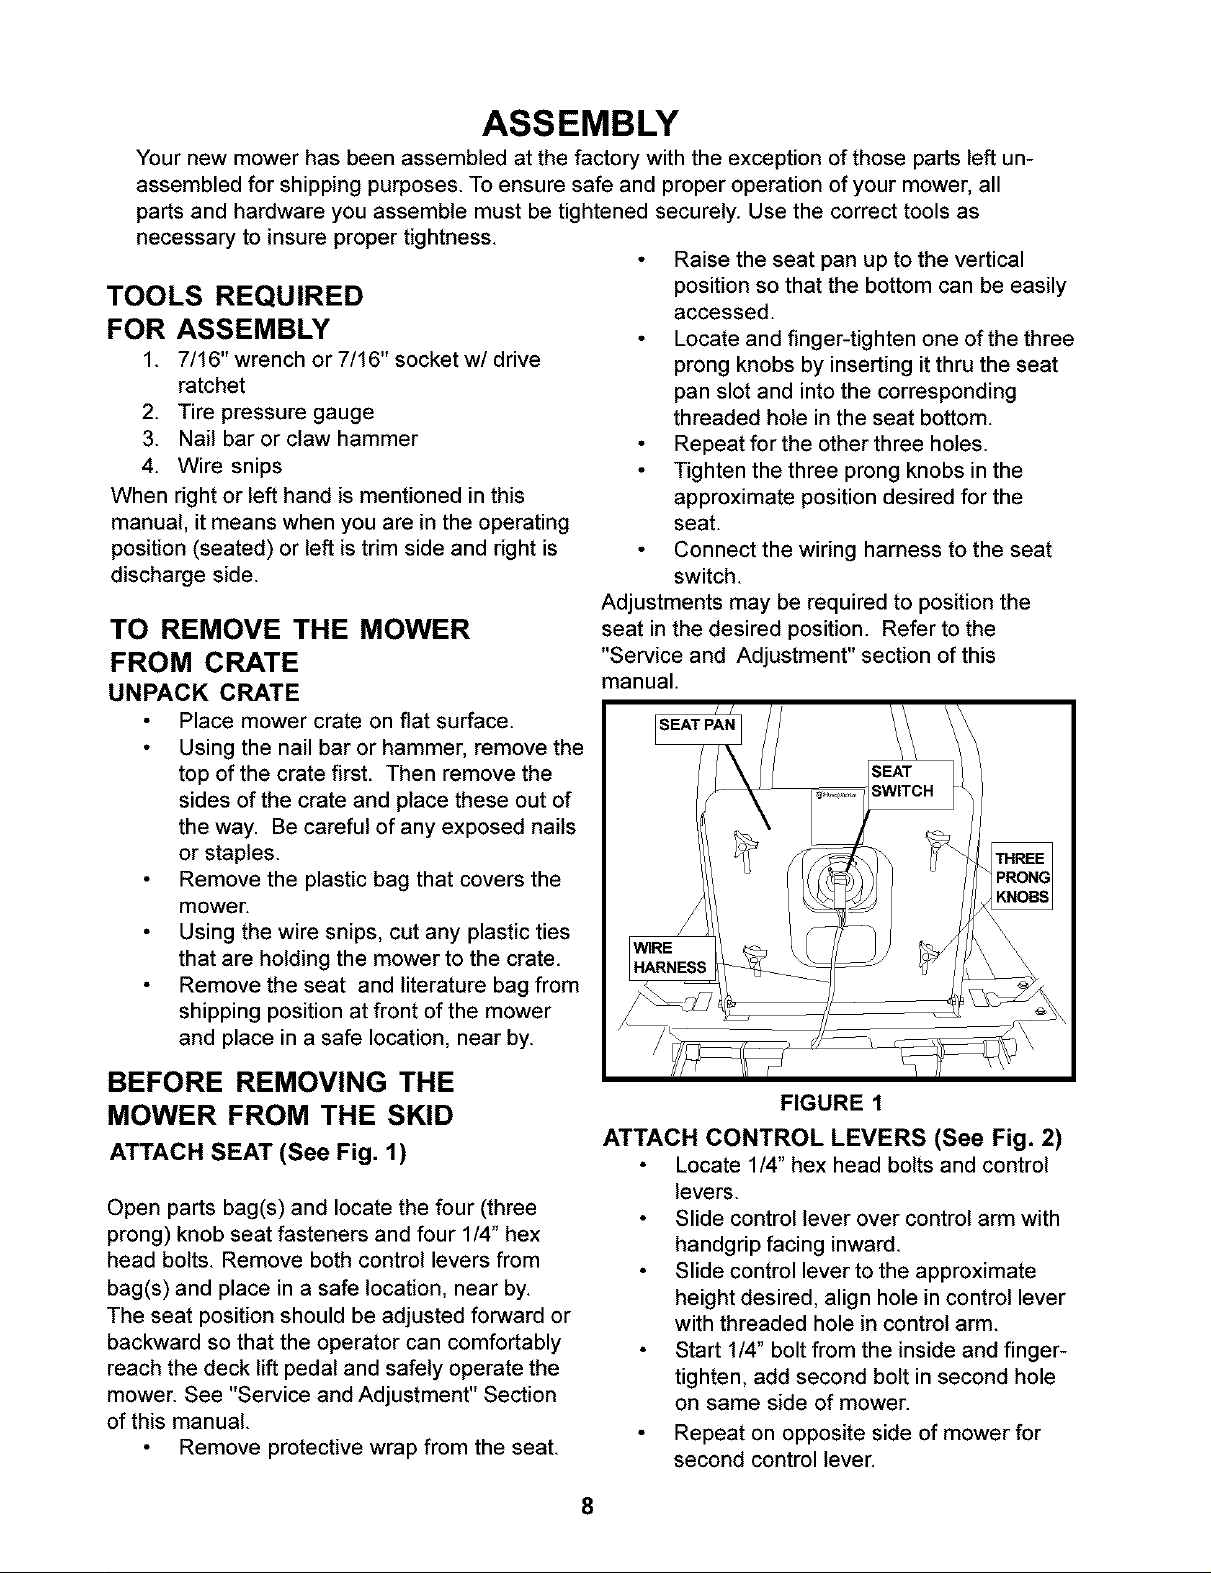
Raise the seat pan up to the vertical
TOOLS REQUIRED
FOR ASSEMBLY
1. 7/16" wrench or 7/16" socket w/drive
ratchet
2. Tire pressure gauge
3. Nail bar or claw hammer
4. Wire snips
When right or left hand is mentioned in this
manual, it means when you are in the operating
position (seated) or left is trim side and right is
discharge side.
TO REMOVE THE MOWER
FROM CRATE
UNPACK CRATE
Place mower crate on fiat surface.
Using the nail bar or hammer, remove the
top of the crate first. Then remove the
sides of the crate and place these out of
the way. Be careful of any exposed nails
or staples.
Remove the plastic bag that covers the
mower.
Using the wire snips, cut any plastic ties
that are holding the mower to the crate.
Remove the seat and literature bag from
shipping position at front of the mower
and place in a safe location, near by.
Adjustments may be required to position the
seat in the desired position. Refer to the
"Service and Adjustment" section of this
manual.
position so that the bottom can be easily
accessed.
Locate and finger-tighten one of the three
prong knobs by inserting it thru the seat
pan slot and into the corresponding
threaded hole in the seat bottom.
Repeat for the other three holes.
Tighten the three prong knobs in the
approximate position desired for the
seat.
Connect the wiring harness to the seat
switch.
BEFORE REMOVING THE
MOWER FROM THE SKID
ATTACH SEAT (See Fig. 1)
Open parts bag(s) and locate the four (three
prong) knob seat fasteners and four 1/4" hex
head bolts. Remove both control levers from
bag(s) and place in a safe location, near by.
The seat position should be adjusted forward or
backward so that the operator can comfortably
reach the deck lift pedal and safely operate the
mower. See "Service and Adjustment" Section
of this manual.
Remove protective wrap from the seat.
FIGURE 1
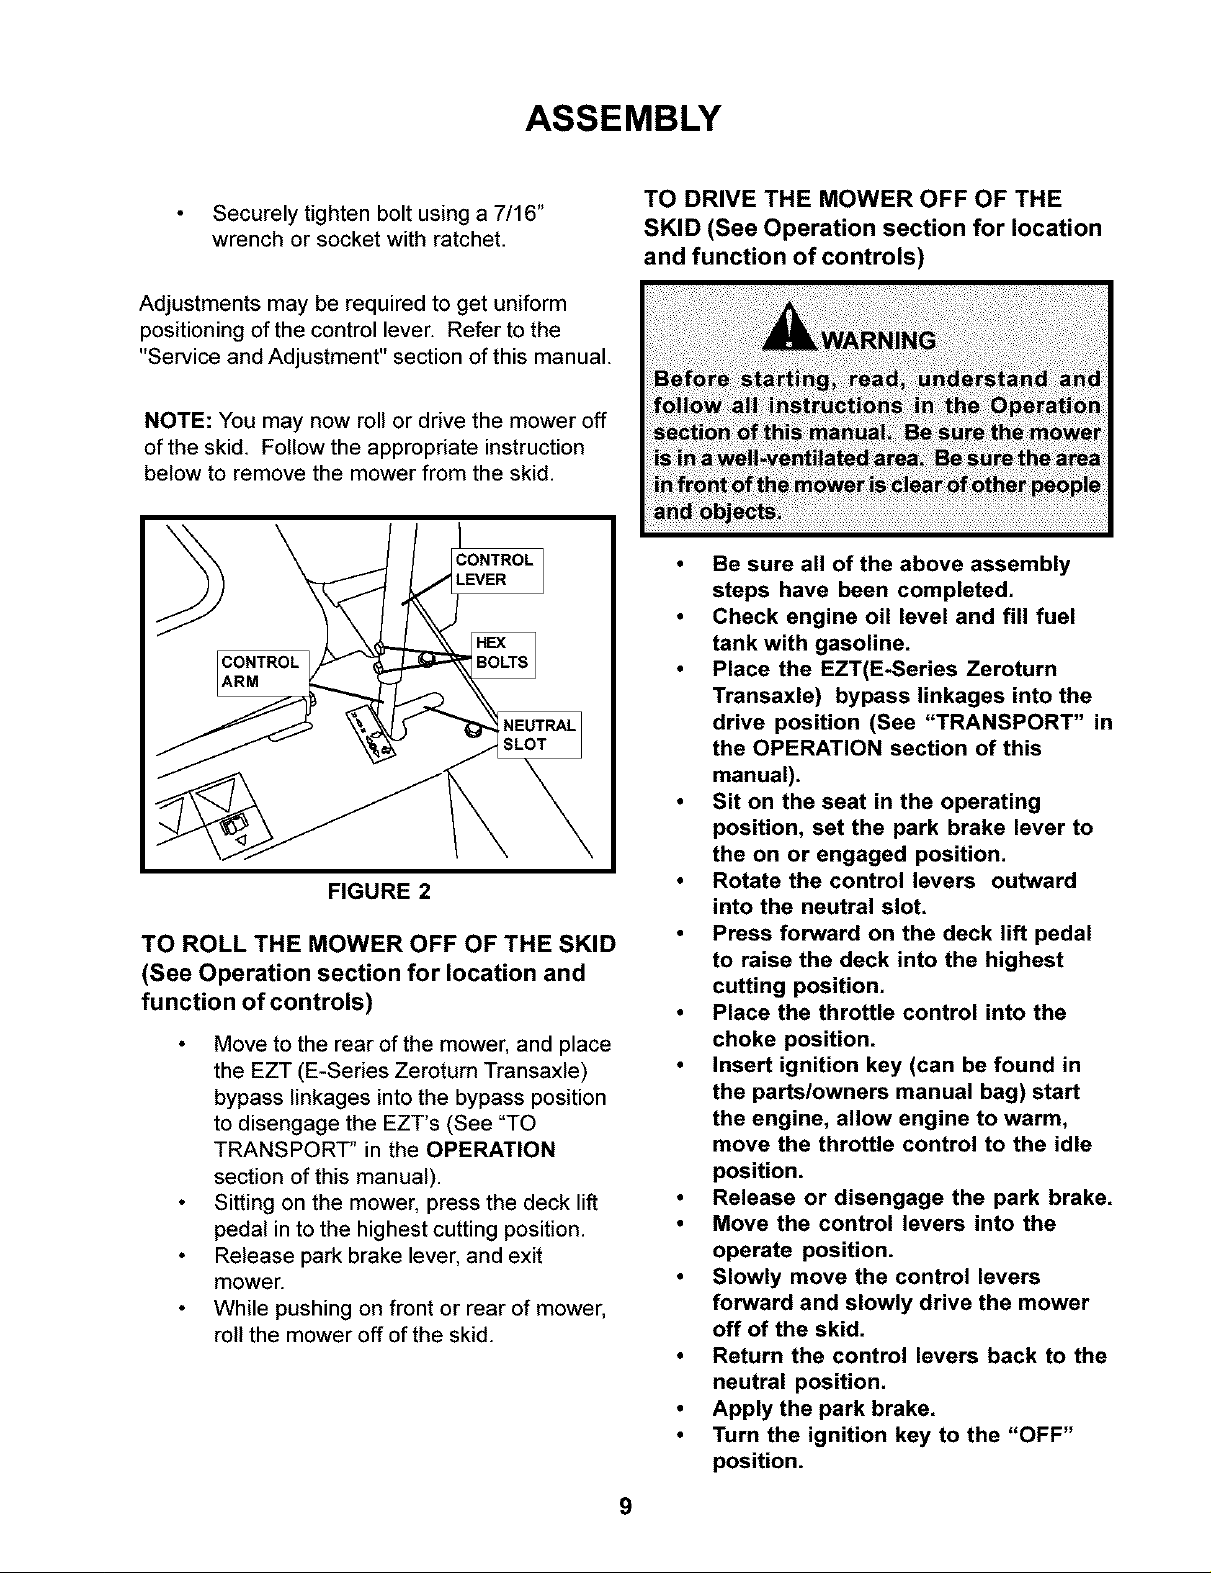
ATTACH CONTROL LEVERS (See Fig. 2)
Locate 1/4" hex head bolts and control
levers.
Slide control lever over control arm with
handgrip facing inward.
Slide control lever to the approximate
height desired, align hole in control lever
with threaded hole in control arm.
Start 1/4" bolt from the inside and finger-
tighten, add second bolt in second hole
on same side of mower.
Repeat on opposite side of mower for
second control lever.
8
ASSEMBLY
Securely tighten bolt using a 7/16"
wrench or socket with ratchet.
Adjustments may be required to get uniform
positioning of the control lever. Refer to the
"Service and Adjustment" section of this manual.
NOTE: You may now roll or drive the mower off
of the skid. Follow the appropriate instruction
below to remove the mower from the skid.
CONTROL
LEVER
CONTROL
ARM
FIGURE 2
TO ROLL THE MOWER OFF OF THE SKID
(See Operation section for location and
function of controls)
Move to the rear of the mower, and place
the EZT (E-Series Zeroturn Transaxle)
bypass linkages into the bypass position
to disengage the EZT's (See "TO
TRANSPORT" in the OPERATION
section of this manual).
Sitting on the mower, press the deck lift
pedal in to the highest cutting position.
Release park brake lever, and exit
mower.
While pushing on front or rear of mower,
roll the mower off of the skid.
TO DRIVE THE MOWER OFF OF THE
SKID (See Operation section for location
and function of controls)
• Be sure all of the above assembly
steps have been completed.
• Check engine oil level and fill fuel
tank with gasoline.
• Place the EZT(E-Series Zeroturn
Transaxle) bypass linkages into the
drive position (See "TRANSPORT" in
the OPERATION section of this
manual).
• Sit on the seat in the operating
position, set the park brake lever to
the on or engaged position.
• Rotate the control levers outward
into the neutral slot.
• Press forward on the deck lift pedal
to raise the deck into the highest
cutting position.
• Place the throttle control into the
choke position.
• Insert ignition key (can be found in
the parts/owners manual bag) start
the engine, allow engine to warm,
move the throttle control to the idle
position.
• Release or disengage the park brake.
• Move the control levers into the
operate position.
• Slowly move the control levers
forward and slowly drive the mower
off of the skid.
• Return the control levers back to the
neutral position.
• Apply the park brake.
• Turn the ignition key to the "OFF"
position.
9
ASSEMBLY
CHECK THE TIRE PRESSURE
Correct tire pressure is important for best cutting
performance and proper straight-line tracking.
Check the tire pressure and adjust
accordingly. Refer to the
"SPECIFICATIONS" section in this
manual.
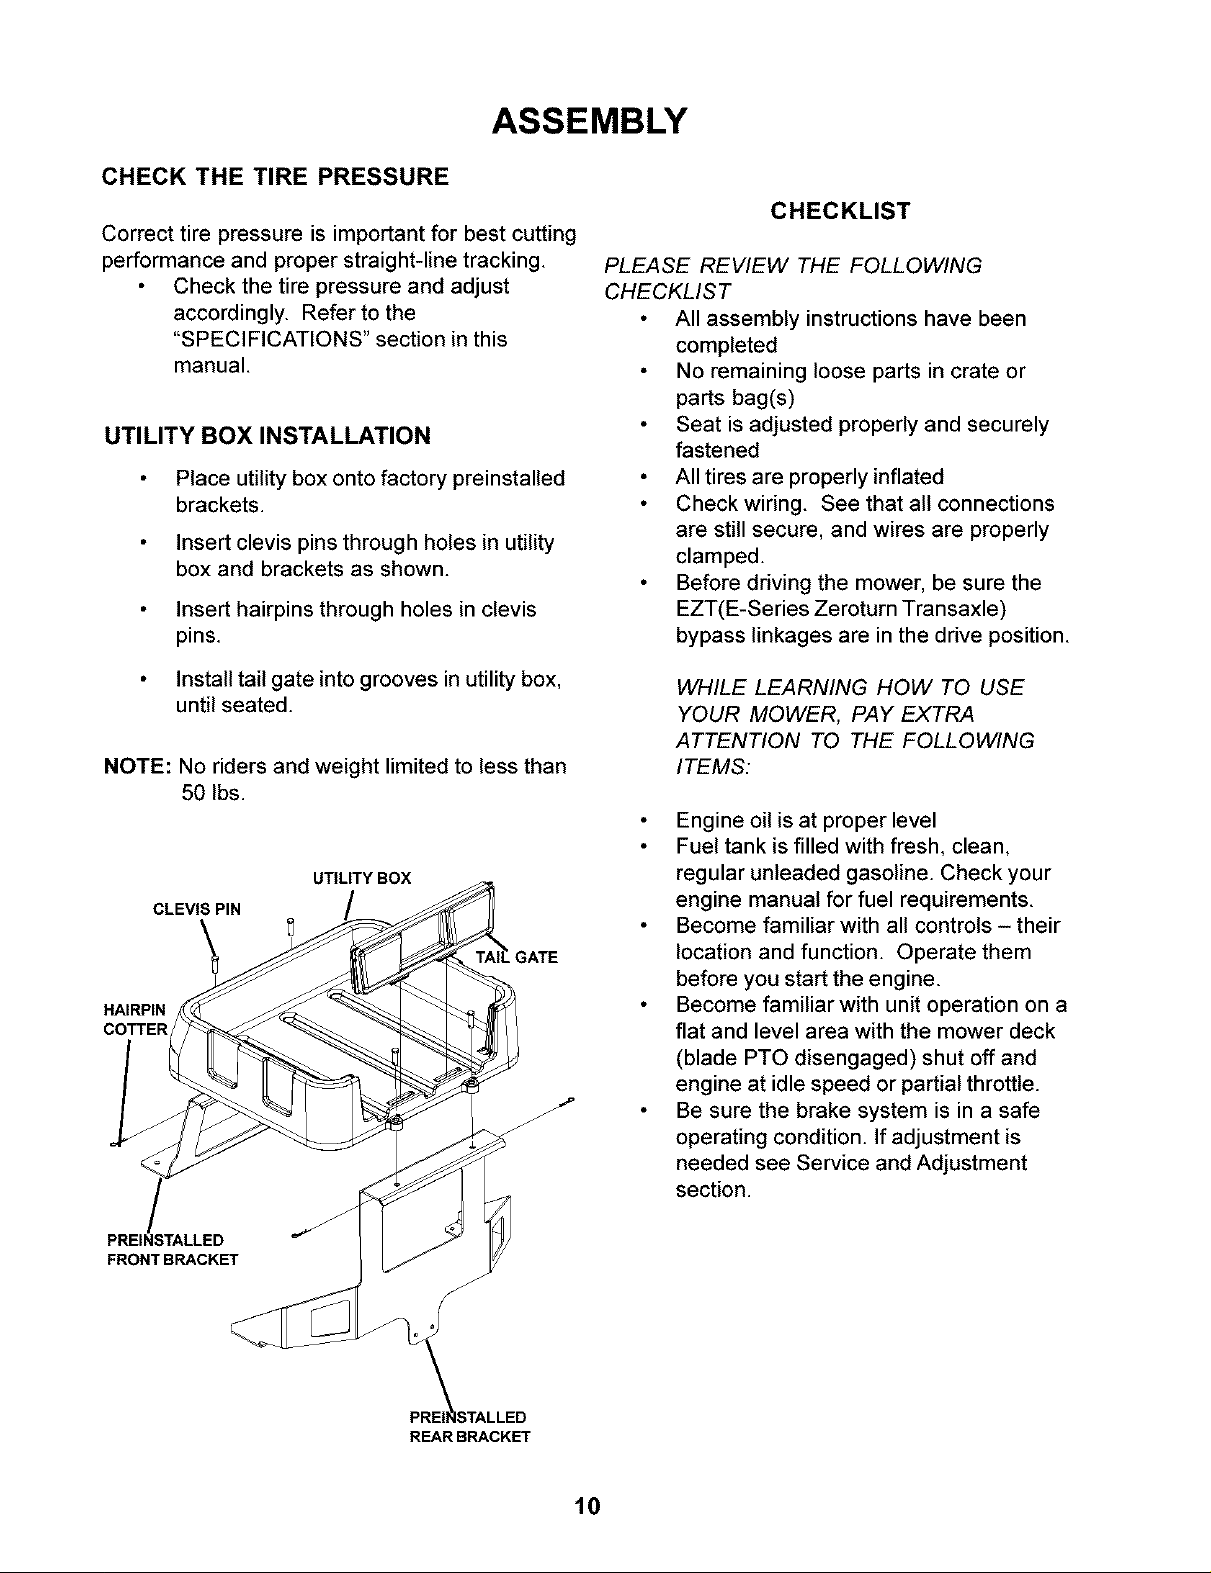
UTILITY BOX INSTALLATION
Place utility box onto factory preinstalled
brackets.
Insert clevis pins through holes in utility
box and brackets as shown.
Insert hairpins through holes in clevis
pins.
CHECKLIST
PLEASE REVIEW THE FOLLOWING
CHECKLIST
All assembly instructions have been
completed
No remaining loose parts in crate or
parts bag(s)
Seat is adjusted properly and securely
fastened
All tires are properly inflated
Check wiring. See that all connections
are still secure, and wires are properly
clamped.
Before driving the mower, be sure the
EZT(E-Series Zeroturn Transaxle)
bypass linkages are in the drive position.
Install tail gate into grooves in utility box,
until seated.
NOTE: No riders and weight limited to less than
50 Ibs.
UTILITY BOX
CLEVIS PIN
\
HAIRPIN
COTTER
PREINSTALLED
FRONTBRACKET
WHILE LEARNING HOW TO USE
YOUR MOWER, PAY EXTRA
ATTENTION TO THE FOLLOWING
ITEMS:
Engine oil is at proper level
Fuel tank is filled with fresh, clean,
regular unleaded gasoline. Check your
engine manual for fuel requirements.
Become familiar with all controls - their
location and function. Operate them
before you start the engine.
Become familiar with unit operation on a
flat and level area with the mower deck
(blade PTO disengaged) shut off and
engine at idle speed or partial throttle.
Be sure the brake system is in a safe
operating condition. If adjustment is
needed see Service and Adjustment
section.
REAR BRACKET
10
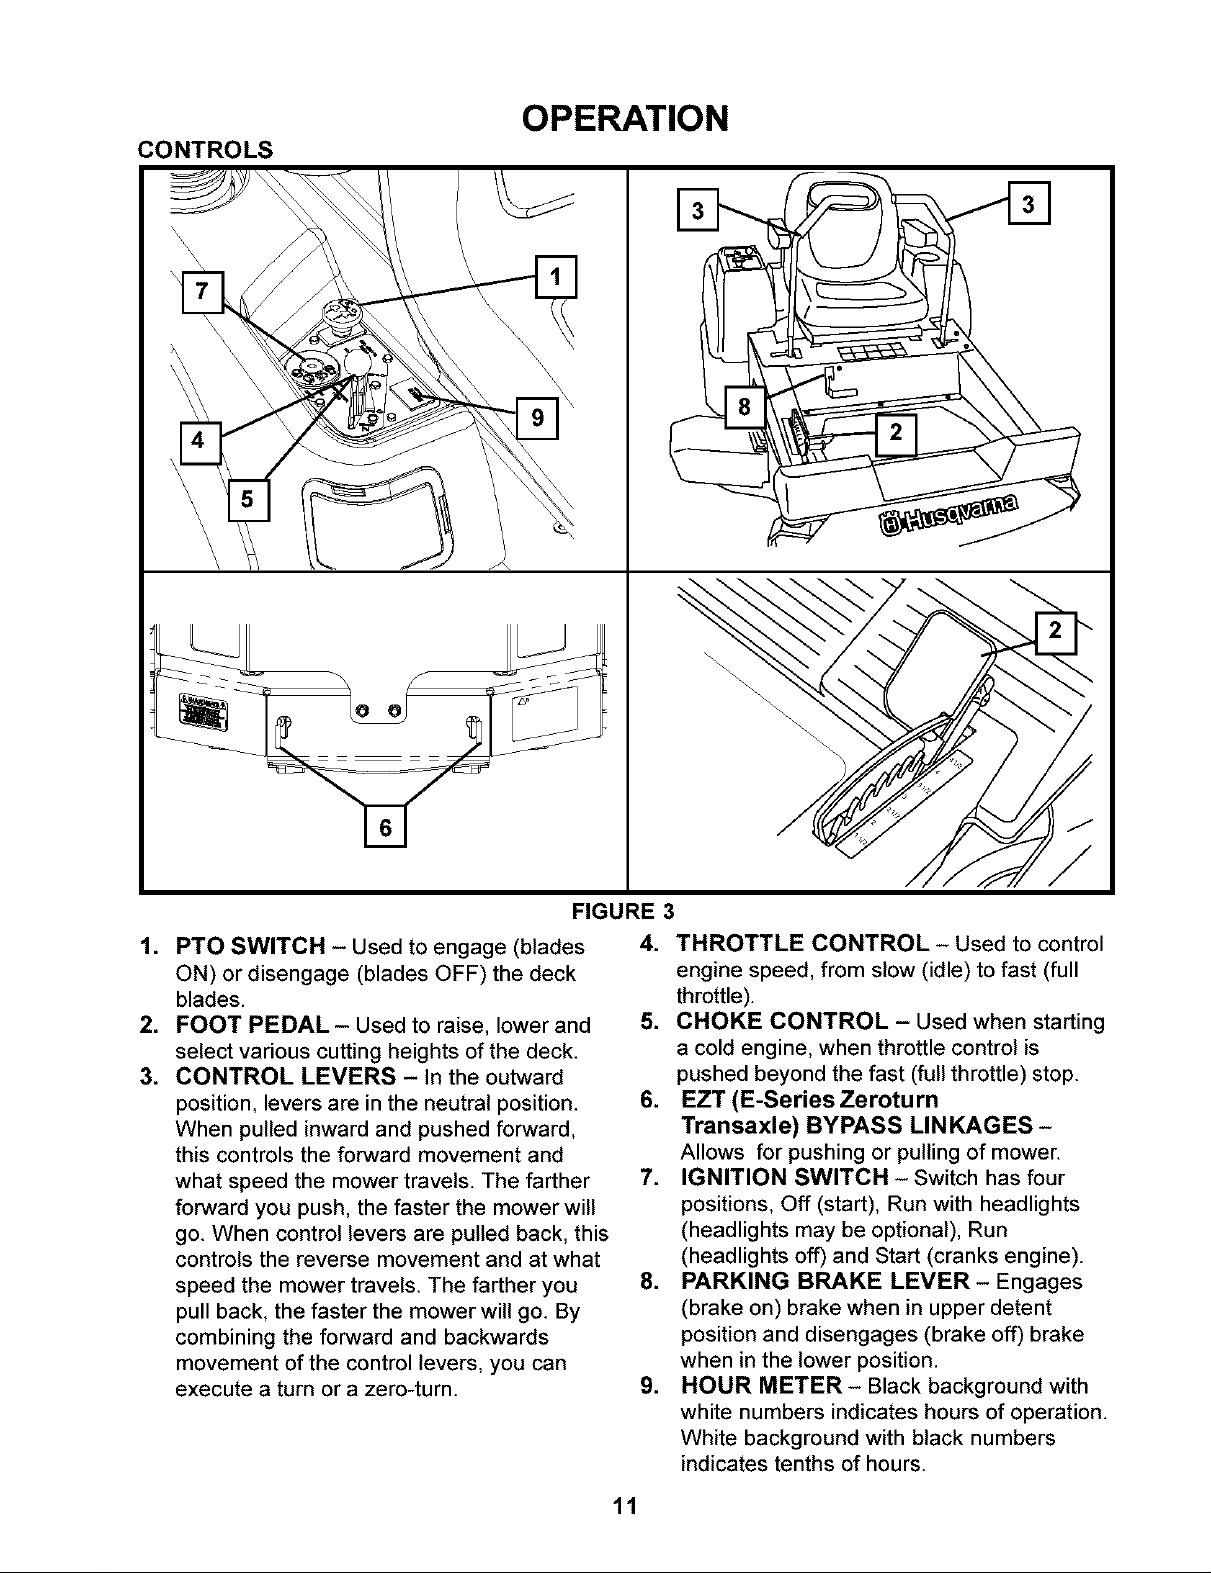
CONTROLS
OPERATION
1. PTO SWITCH - Used to engage (blades
ON) or disengage (blades OFF) the deck
blades.
2. FOOT PEDAL- Used to raise, lower and
select various cutting heights of the deck.
3. CONTROL LEVERS - In the outward
position, levers are in the neutral position.
When pulled inward and pushed forward,
this controls the forward movement and
what speed the mower travels. The farther
forward you push, the faster the mower will
go. When control levers are pulled back, this
controls the reverse movement and at what
speed the mower travels. The farther you
pull back, the faster the mower will go. By
combining the forward and backwards
movement of the control levers, you can
execute a turn or a zero-turn.
FIGURE 3
4. THROTTLE CONTROL - Used to control
engine speed, from slow (idle) to fast (full
throttle).
5. CHOKE CONTROL - Used when starting
a cold engine, when throttle control is
pushed beyond the fast (full throttle) stop.
6. EZT(E-SeriesZeroturn
Transaxle) BYPASS LINKAGES-
Allows for pushing or pulling of mower.
IGNITION SWITCH - Switch has four
positions, Off (start), Run with headlights
(headlights may be optional), Run
(headlights off) and Start (cranks engine).
8. PARKING BRAKE LEVER- Engages
(brake on) brake when in upper detent
position and disengages (brake off) brake
when in the lower position.
9. HOUR METER- Black background with
white numbers indicates hours of operation.
White background with black numbers
indicates tenths of hours.
11
 Loading...