

Page 1
I
I
:p
It
1•
I
ft
fr
Page 2
I
I
I
S
S
I
1
J
qvarna
tions
in
name.
this
manual
show
machines
reasons
with
the
the
illustra
Hus—
For
practical
“Husqvarna’’.
In
Viking
countries
sei’ing
other
machines
than
the
are
U.
sold
S.
A.
under
and
the
the
U.
name
K.,
Minneapolis,
2300
Viking
Louisiana
Sewing
Minn.
Machine
Ave.
55427.
North,
Co.,
Inc.
US
Factory
Subsidiary:
HUSQVARNA
your
We
hope
new
sewing
you
AB,
SWEDEN
will
machine.
have
possibilities.
many
pleasant
hours
with
best
to
operate
use
of
all
this
its
sewing
sewing
machine
and
how
know
to
make
how
We
have
prepared
this
booklet,
to
let
you
Viking
your
For
you
new
and
Page 3

—
Feed
dog,
lowering
45
Presser
foot
feet
for
thin
fabrics
Feed
dog,
cleaning
53_57
48
Presser
Presser
bar
lever
Extra
Extension
Elastic
accessories
straight
table
stitch
16—37
8.
Plugging
the
machine
power
in
the
outlet
machine
to
s.
Elastic
Elastic
knit
blindstitch
stitch
(overlock)
34
33
33
Overlock
Packing
and
(elastic
unpacking
knit
stitch)
the
&1L]
Contents
Darning
Elastic
blind
hem
of
to
accessory
wall
socket
box
S
—52
47
7
Overcasting
Overcasting
Operation
guide
and
assembling
Connection
Cleaning
of
needle
and
thread
48
9
Open
Needle
arm
and
thread
Changing
Choice
the
snap-on
presser
foot.
19
Needle,
changing
ii
Changing
Changing
the
the
presser
needle
foot
ankle
.
.
.
19
9
Mending
Maintenance
hints
threading
Changing
Careofthemachine
Buttonholes
the
light
bulb
38—42
48
48
43
Lower
Lower
Lower
Lowering
thread,
thread
thread,
the
feed
tension
bringing
dog
up
Buttonhole
Buttons,
Bringing
up
sewing
knife
lower
on
thread
45
14
Light
Lace
and
light
switch
Bound
Bobbin
edges
winding
1—12
12—13
26
Hook
Knit
Glide
stitch
(shuttle)
plate
(overlock)
Bobbin
Blindstitching
Blind
hem,
case
elastic
31—33
33
General
Gathering
hints
Appliqués
Blind
Basting
hem
(tacking)
22
32
27
Free-hand
Free-arm
Foot
control
embroidery
.4’
Accessory
box,
contents
.O—S
I
Fine
adjustment
of
buttonhole
I
Table
of
contents
3
IS
Zippers,
foot
sewing
in
21—24
23
17
8
Zipper
Zig-zag
stitching
25
7
6
Zig-zag
Utility
Upperthread.threading
stitch
presser
presser
foot
foot
(7
17
10
IS
34
Upper
Unpacking
thread
the
tension
machine
6
37
Top
stitching
28
17
S8—t0
29
Three-step
Thread
Threading
tension
upper
zig-zag
thread
15,
It)
6
9
7
Threading
lower
thread
II
9
Thread
cutter
4
10
Fhread
and
needle
9
29
49—50
13
IS
Terry
Tensions
Tacking
cloth
(hasting)
(towelling)
15—16
22
14
Straight
stitching
2)
2)
45
7
Stitch
Stitch
selector
length
dial
21
26—27
Spool
pins
10
34
Shuttle
(hook)
13
13
Sewing
on
buttons
21—42
4S
20
17
Seams
Selecting
with
the
edges
stitches
overcast
together
.
35
21
22,
26
46
Reverse
Reinforced
stitching
buttonholes
41-42
44
7
6
Raised
Putting
seams
the
machine
away
6
sewing
40
Presser
foot
pressure
16
Page 4
4
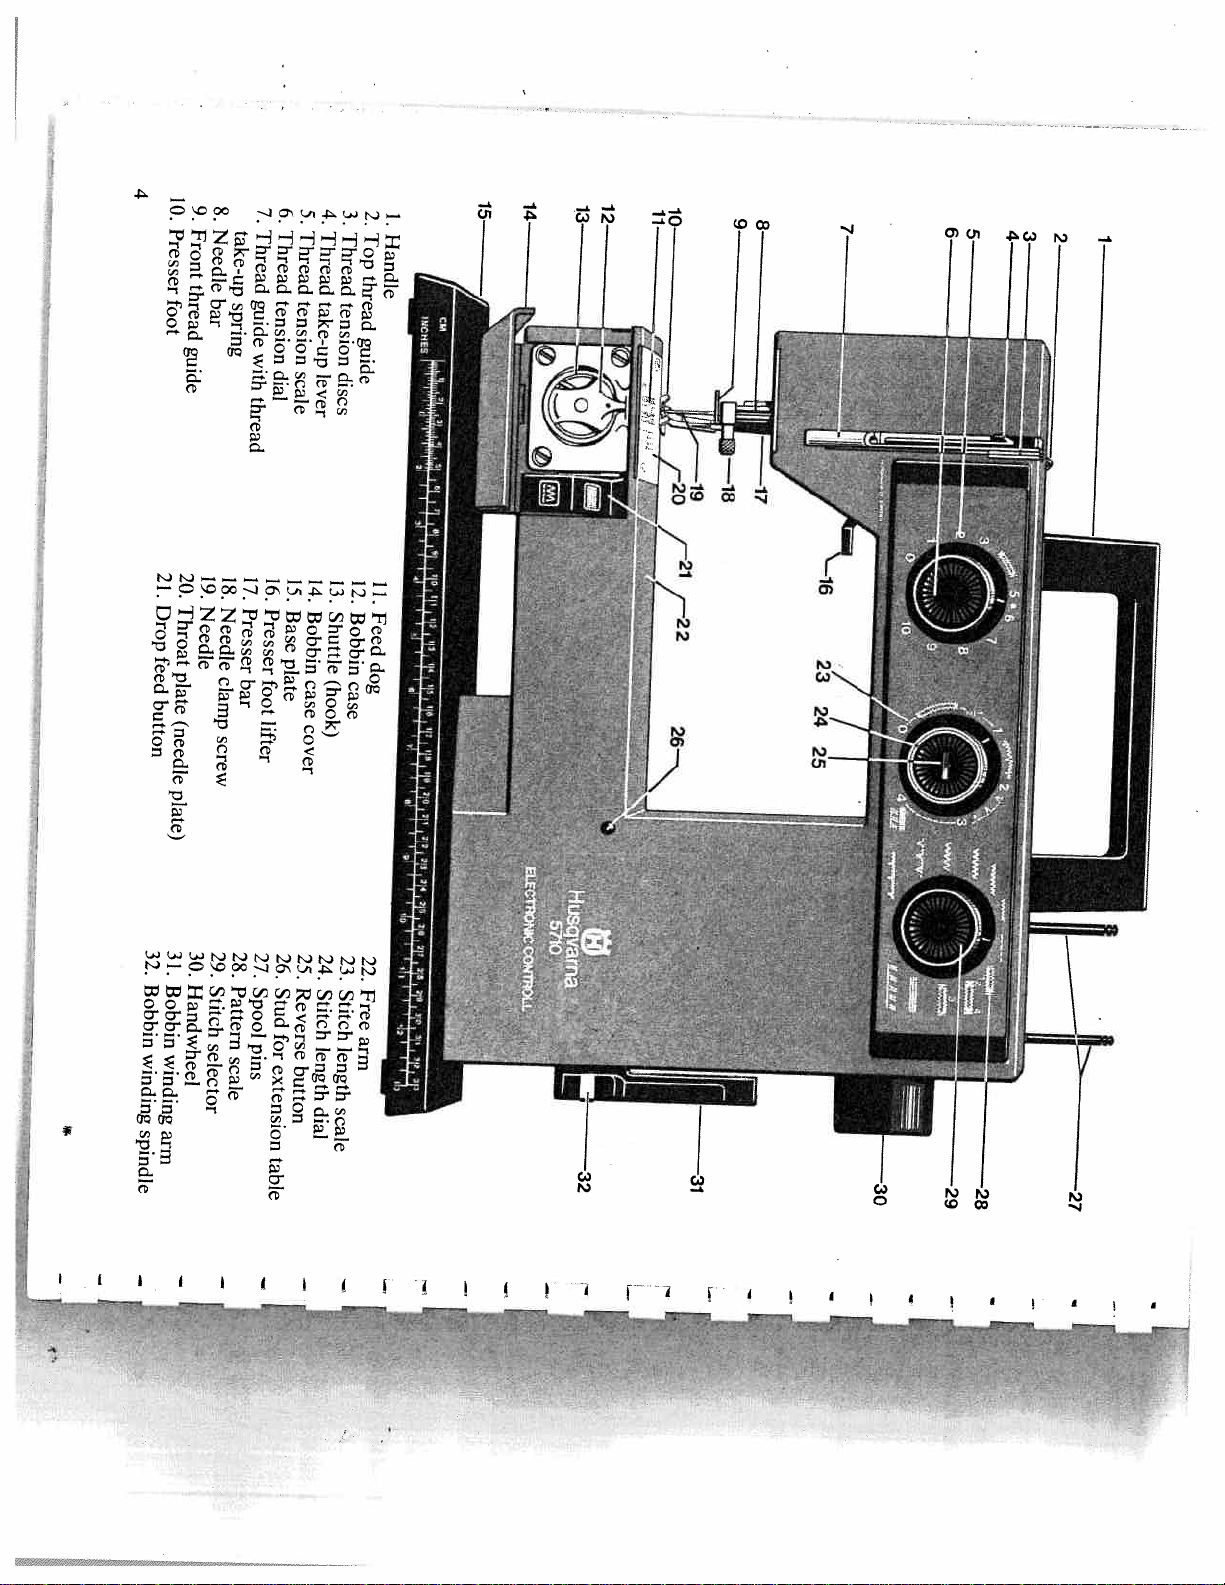
10.
9.
Presser
Front
8.
Needle
take-up
7.
6.
Thread
Thread
Thread
5.
4.
3.
Thread
Thread
Top
2.
1.
Handle
7
6
5
4
3
2
thread
foot
guide
21.
20.
Throat
Drop
feed
plate
button
(needle
plate)
bar
spring
19.
18.
Needle
Needle
clamp
bar
screw
guide
tension
with
dial
thread
17.
16.
Presser
Presser
foot
lifter
tension
scale
lever
14.
15.
Base
Bobbin
plate
case
cover
thread
take-up
tension
guide
discs
12.
13.
Shuttle
Bobbin
(hook)
case
11.
Feed
dog
—t
:
32.
31.
30.
Handwheel
Bobbin
Bobbin
winding
winding
spindle
arm
29.
28.
27.
Stitch
Pattern
Spool
pins
selector
scale
26.
25.
24.
Reverse
Stud
Stitch
for
length
extension
button
dial
table
23.
22.
Free
Stitch
arm
length
scale
1.
fi.
lb
i.
H:
El
28
27
•1114
___::
-
Page 5
5
arm
free
pressure
foot
control
arm
foot
plate
plate
presser
for
winding
for
plate
switch
Cover
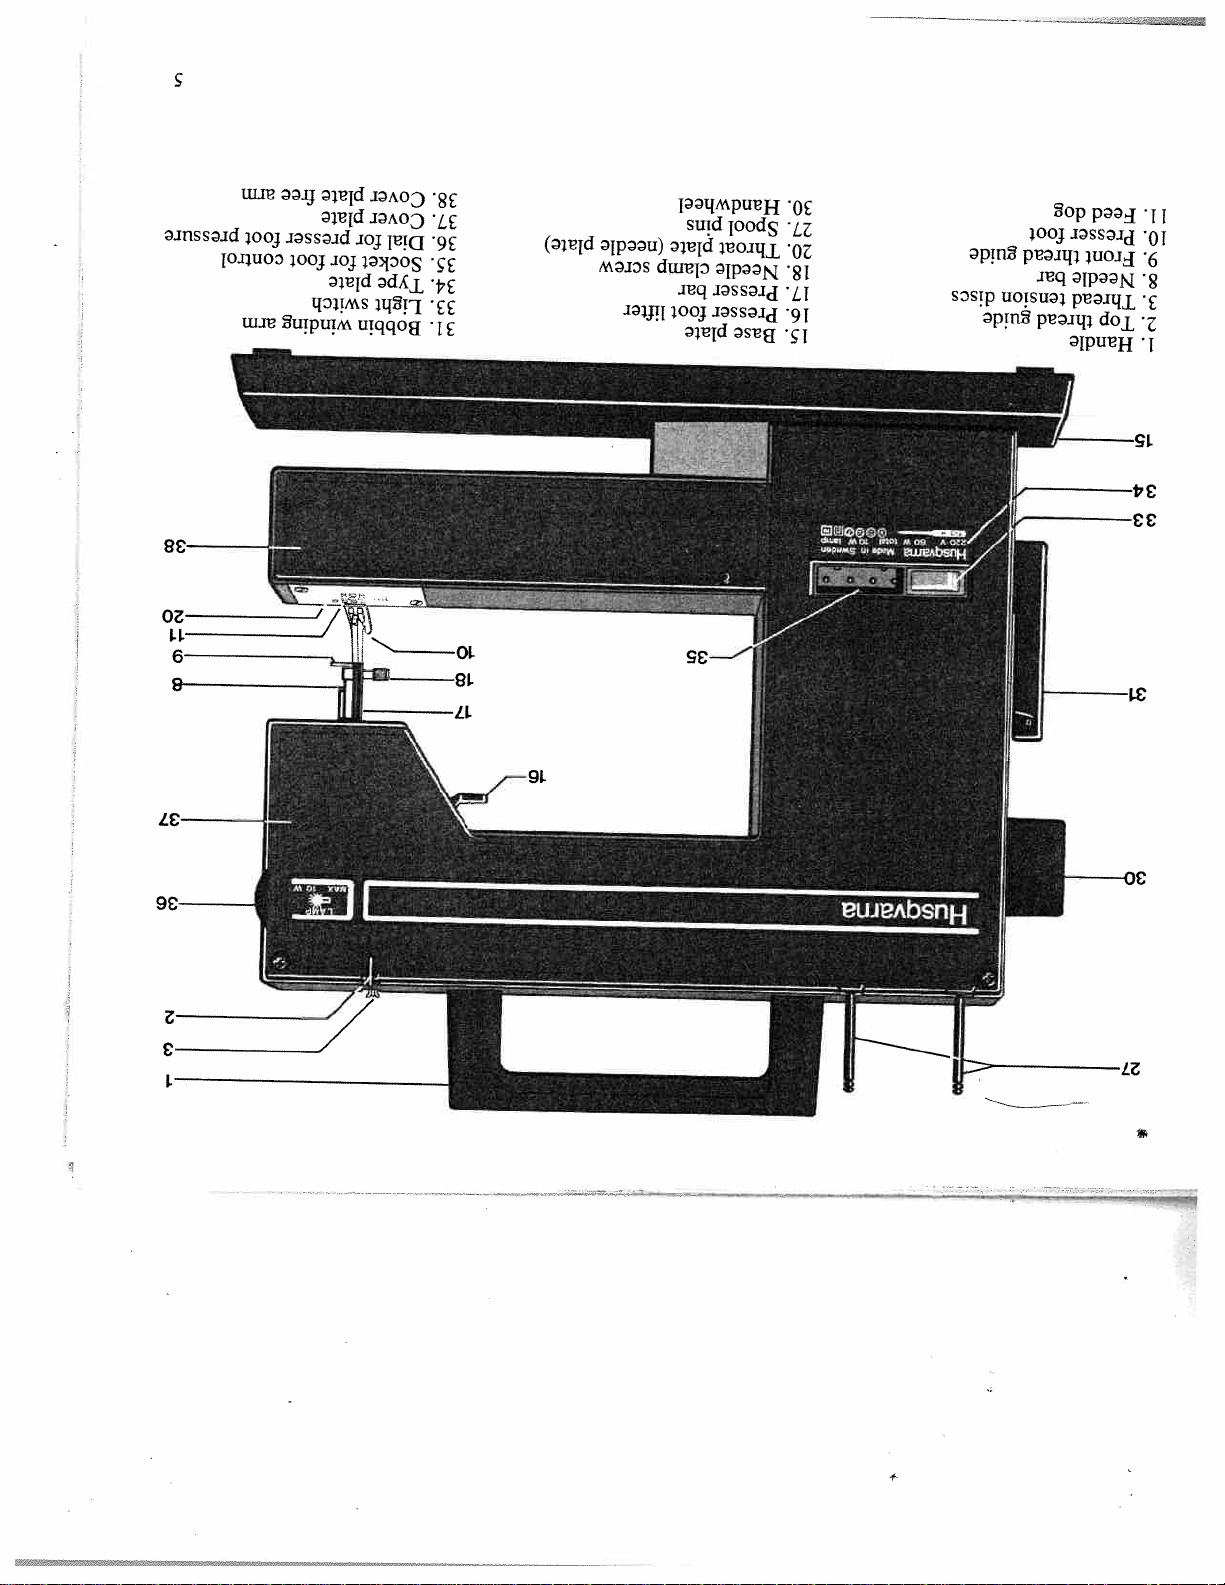
38.
Cover
37.
Dial
36.
Socket
35.
Type
34.
Light
33.
Bobbin
31.
plate)
(needle
screw
lifter
pins
plate
clamp
bar
foot
plate
Handwheel
30.
Spool
27.
Throat
20.
Needle
18.
Presser
17.
Presser
16.
Base
15.
guide
discs
guide
dog
foot
thread
bar
tension
thread
Feed
11.
Presser
10.
9.
Front
Needle
8.
Thread
3.
Top
2.
Handle
1.
15
-
34
33
31
4
Page 6
6
B
iI
Pull
control
into
the
the lead
under
socket,
out
the
A,
of
table.
at
the
the
Insert
foot
back
control
of
the
the
foot
machine.
and
control
place
plug
the
onto
tween
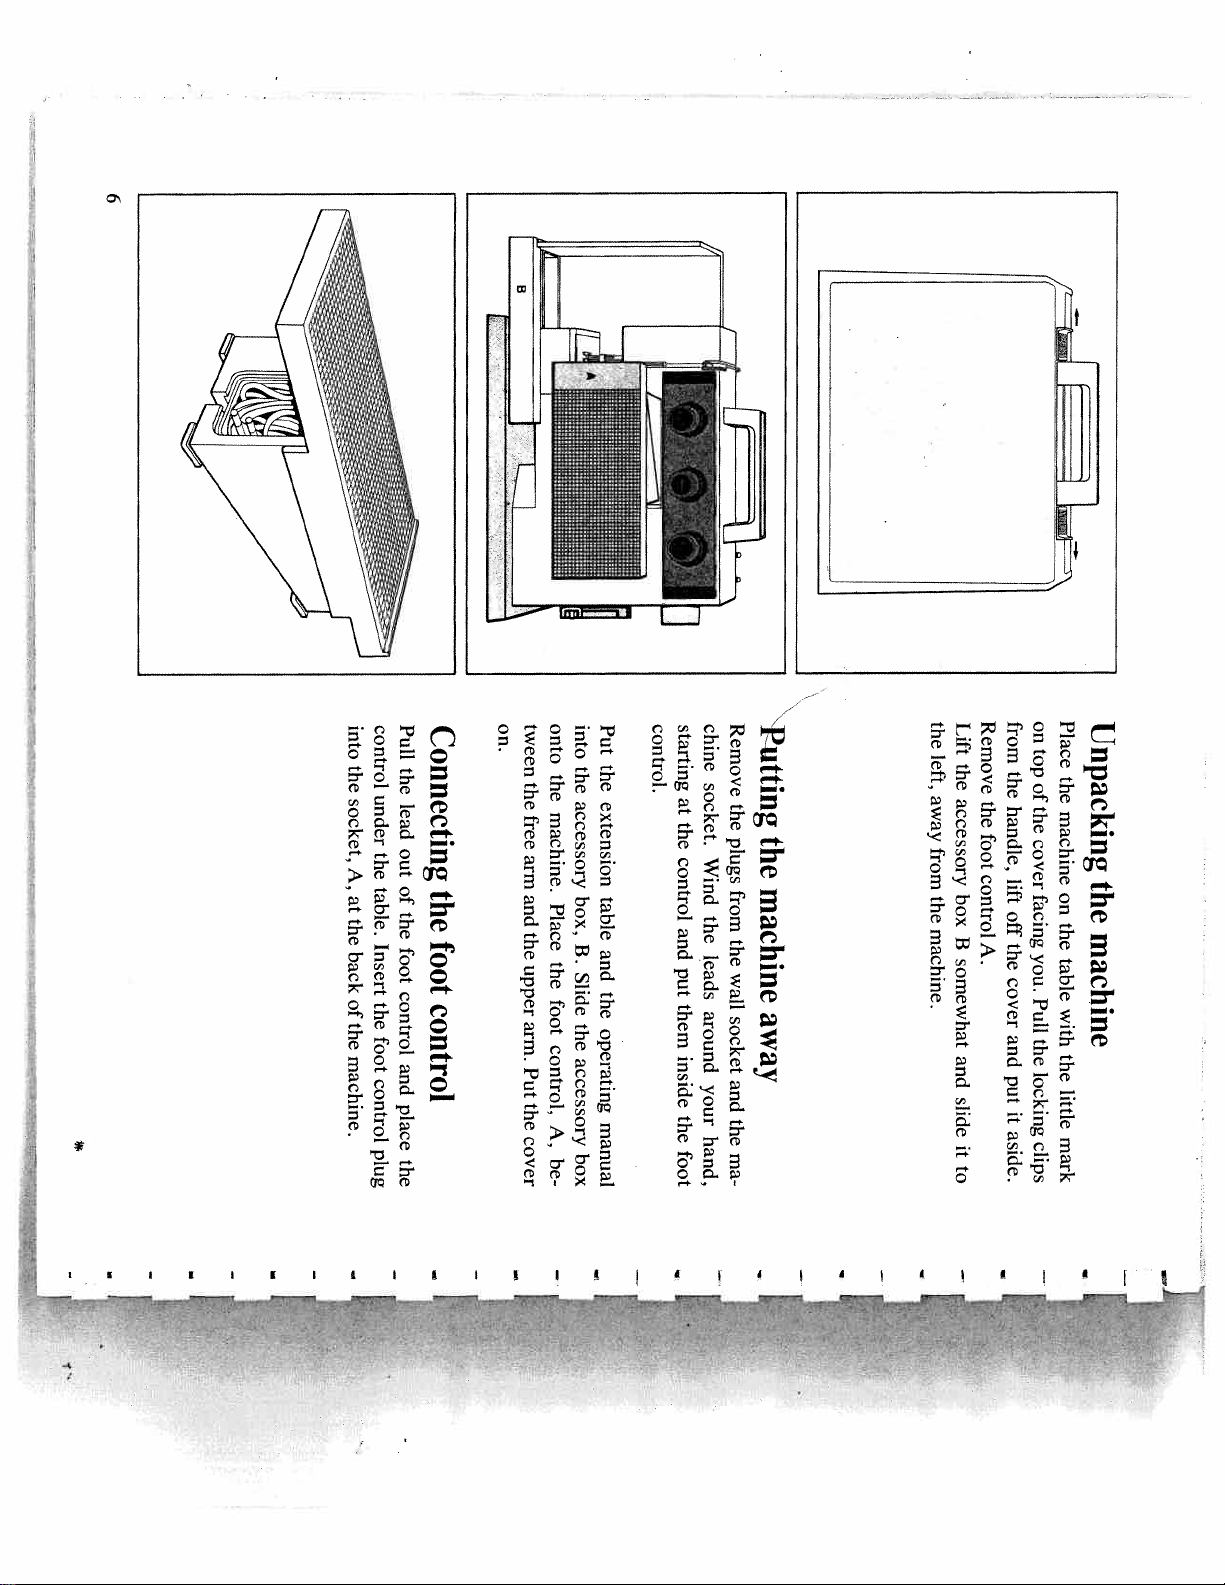
Connecting
the
foot
control
on.
the
the
machine.
free
arm
and
Place
the
the
upper
foot
arm.
control,
Put
the
A,
cover
be
Put
into
the
the
extension
accessory
box,
table
B.
and
Slide
the
the
operating
accessory
manual
box
control.
starting
at
the
control
and
put
them
inside
the
foot
Remove
chine
socket.
the
plugs
Wind
from
the
the
leads
wall
around your
socket
and the
hand,
ma
Putting
the
machine
away
Remove
the
Lift
left,
the
away
accessory
the
foot
from the
control
box
machine.
B
A.
somewhat
and
slide
it
to
on
from
top
the
of
the
handle,
cover
lift
facing
off
the
you.
cover
Pull
and
the locking
put
it
aside.
clips
Place
Unpacking
the
machine
the
on
the table
machine
with
the
little
mark
Page 7
7
to
free
the
the
chil
these
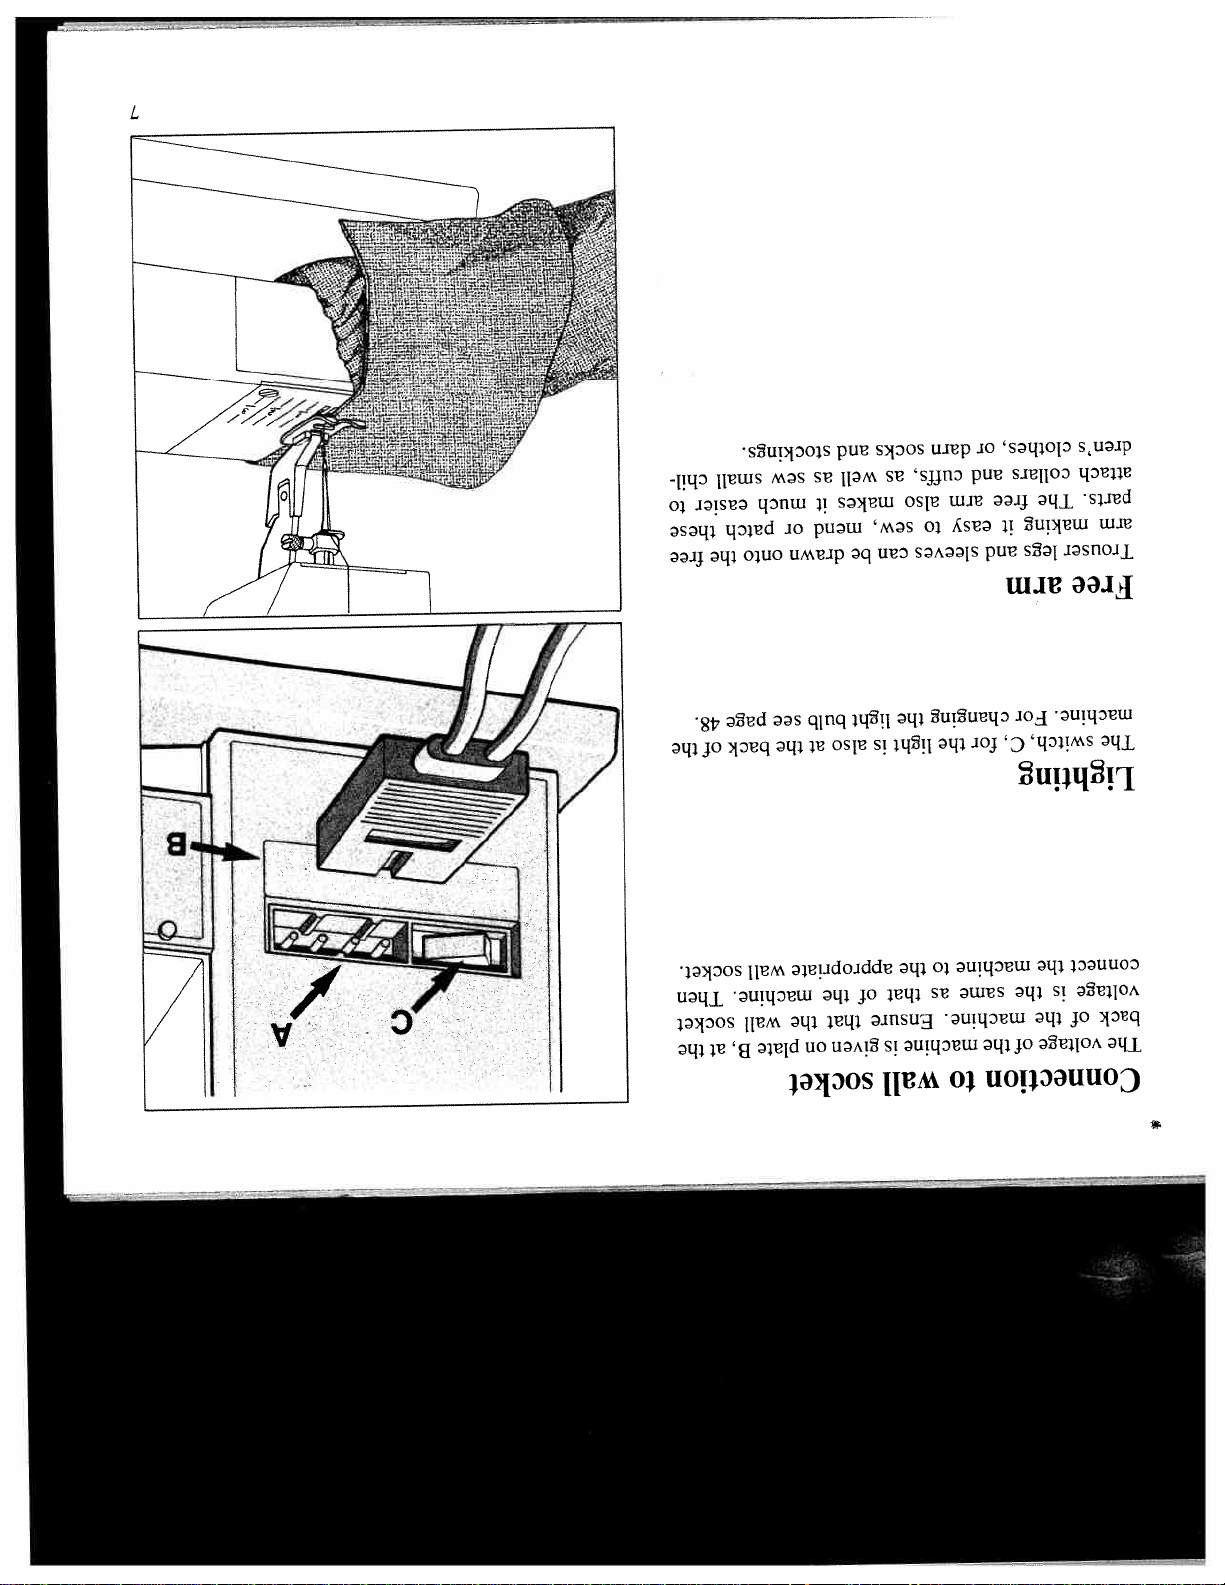
48.
of
Then
easier
the
socket.
socket
B,
at
small
patch
onto
page
back
wall
wall
stockings.
as
sew
much
it
or
drawn
see
at
the
machine.
the
on
plate
and
well
mend
be
bulb
is
also
of
the
that
given
socket
socks
cuffs,
as
also
makes
to
sew,
can
the
light
light
to
the
appropriate
as
that
Ensure
is
wall
or
darn
and
arm
easy
sleeves
for
the
same
machine
to
free
it
legs
and
arm
For
changing
C,
the
machine
is
the
the
machine.
of
the
clothes,
collars
The
making
switch,
of
voltage
dren’s
attach
parts.
arm
Trouser
Free
machine.
The
Lighting
connect
voltage
back
The
Connection
Page 8
V
/
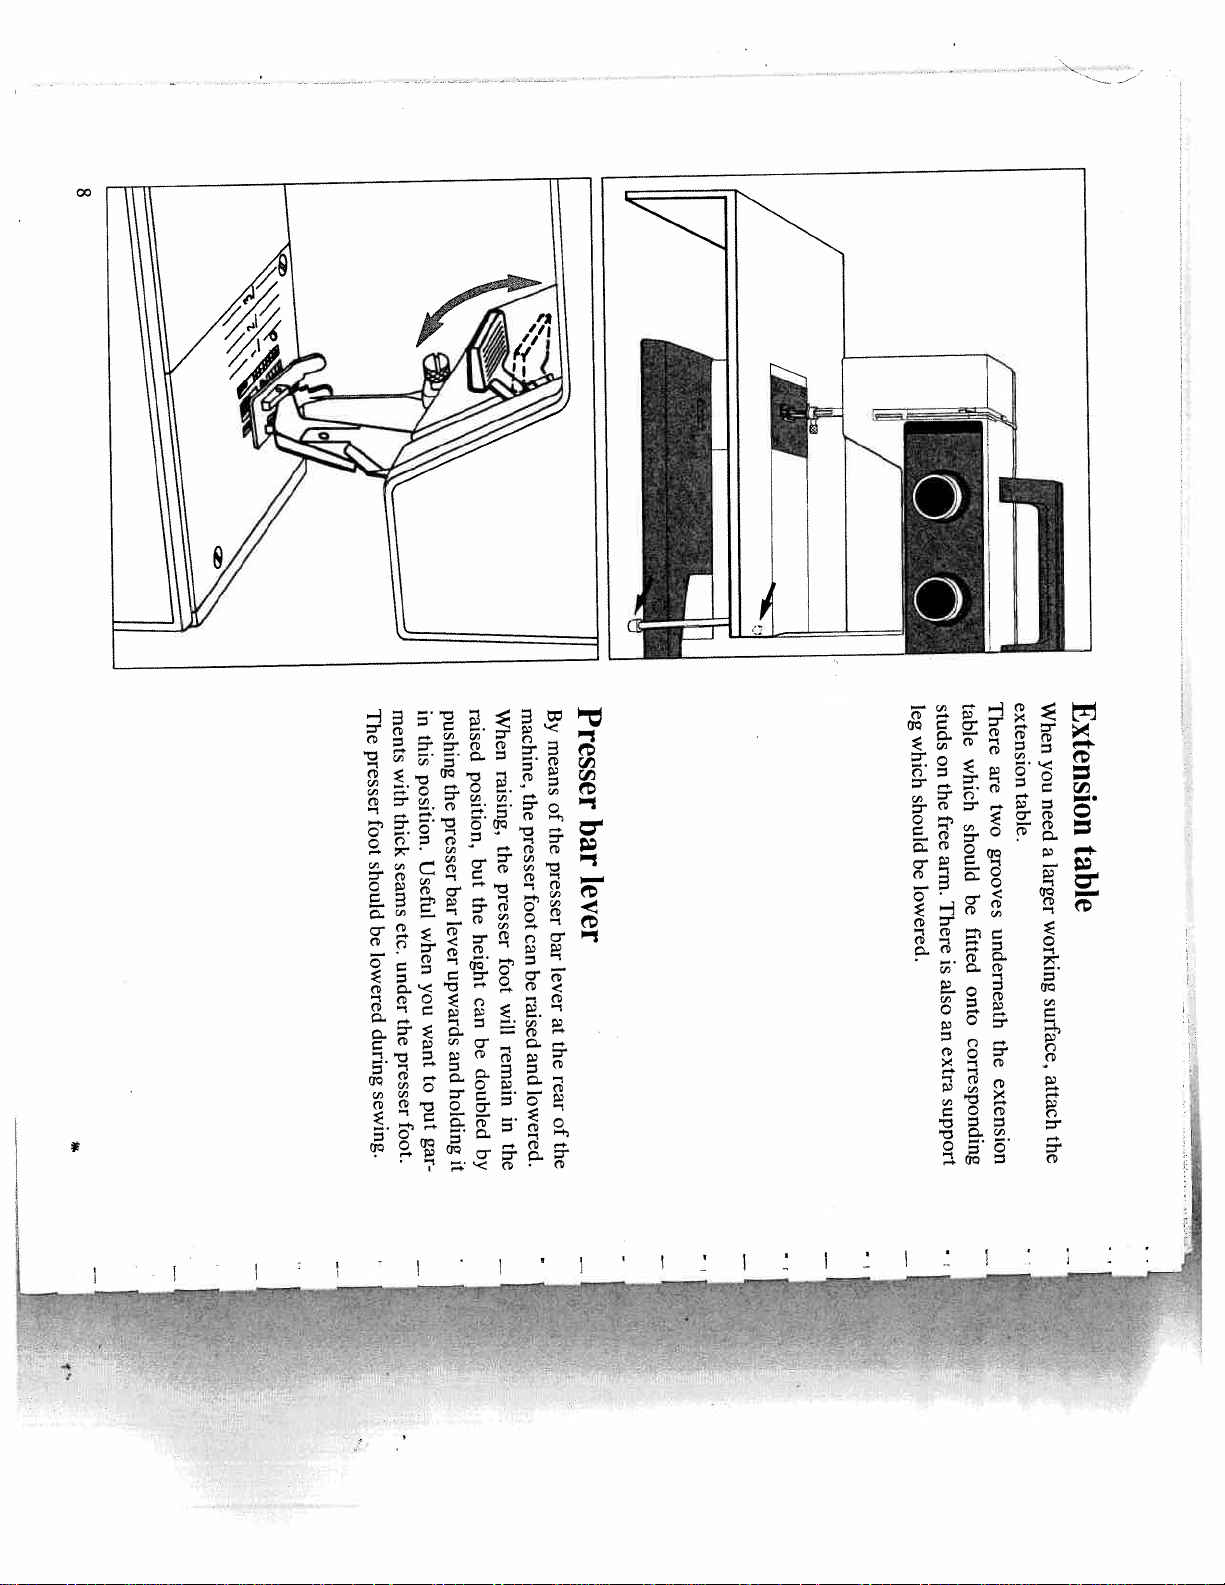
The
ments
presser
with
thick
foot
should
seams
etc.
be
lowered
under
the
during
presser
sewing.
foot.
raised
in
pushing
this
position,
position.
the
presser
but
Useful
bar
the
lever
when
height
upwards
you
can
want
be
and
doubled
to
holding
put
gar
it
When
raising,
the
presser
foot
will
by
machine,
the
presser
foot
can
be
raised
remain
and
lowered.
in
the
Presser
By
means
of
bar
the
presser
lever
bar
lever
at
the
rear
of
the
I
_1nI
1
/
/
g
—
1
Extension
When
There
extension
table
studs
leg
which
on
which
the
should
free
should
arm.
be
lowered.
be
There
fitted
is
also
onto
an
corresponding
extra
support
you
are
table.
need
two
a
grooves
larger
working
underneath
surface,
the
attach
extension
the
table
—
11*
—
:
..
Page 9
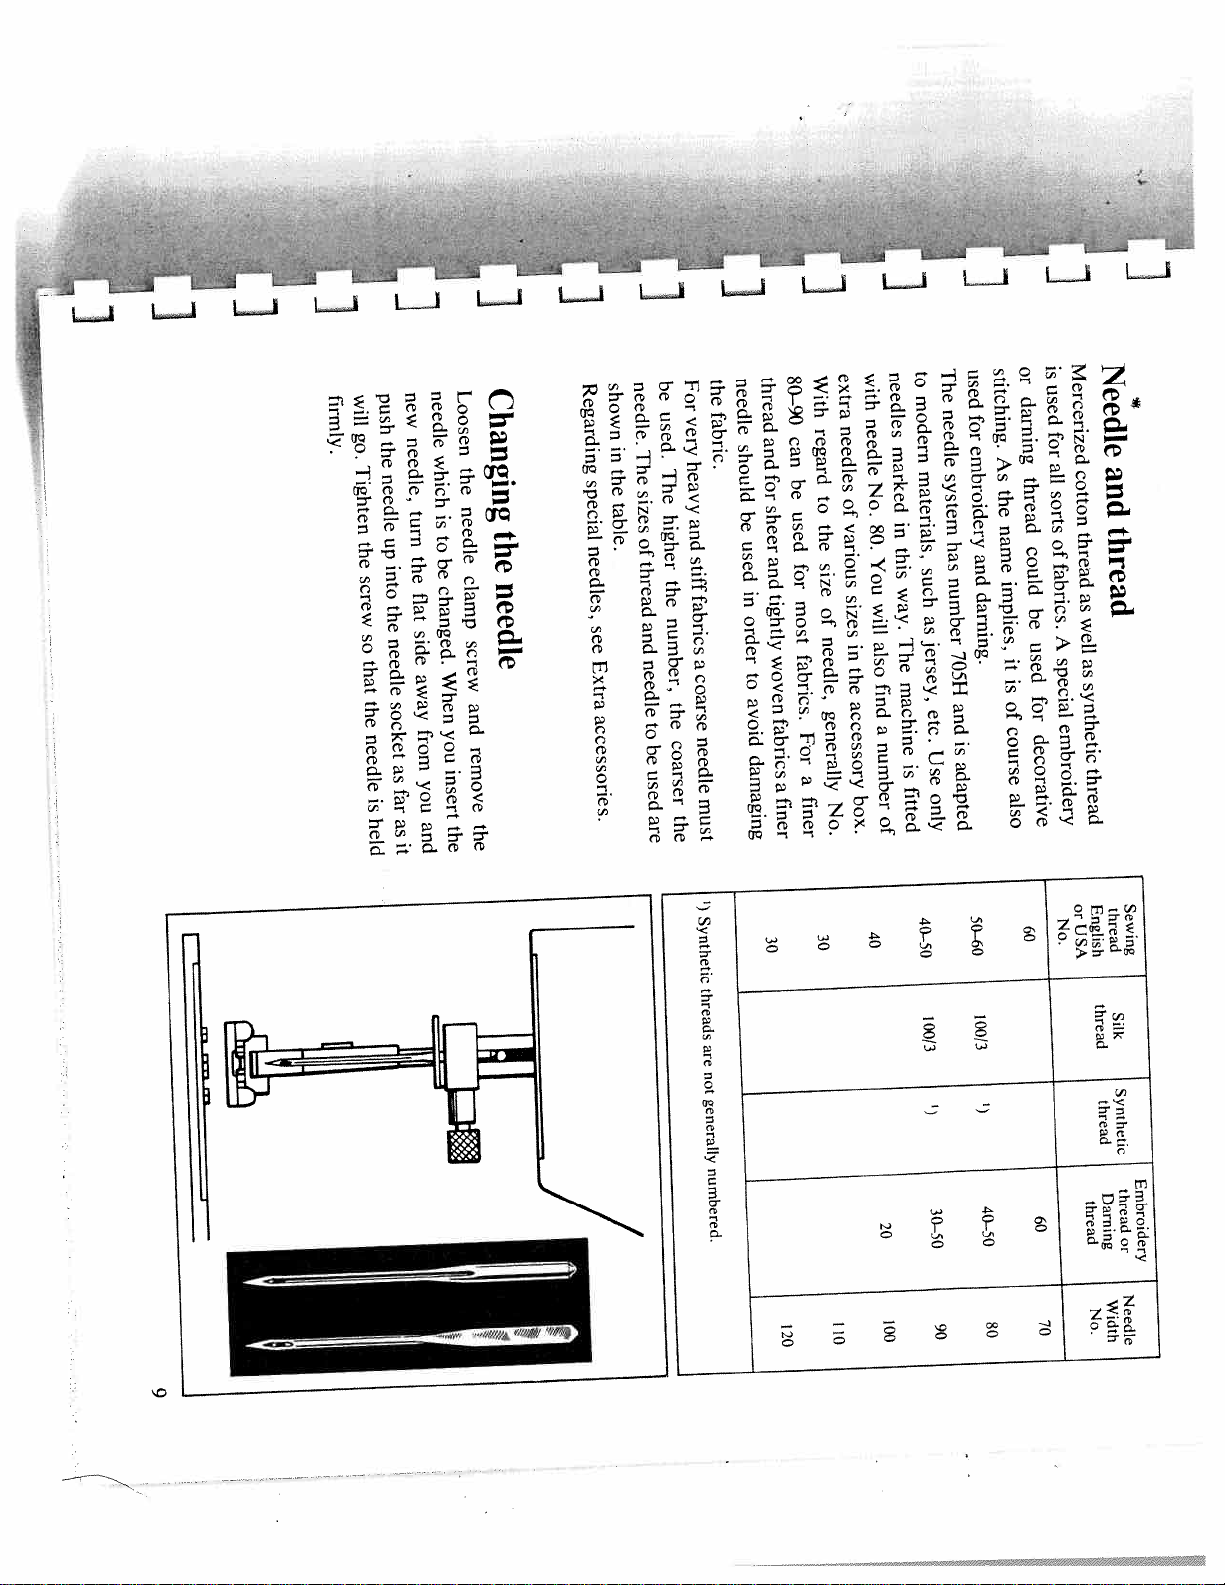
will
firmly.
go.
Tighten
the
screw
so
that
the
needle
is
held
.41
needle
new
push
needle,
the
which
needle
turn
is
to
up
the
be
into
changed.
flat
the
side
needle
away
socket
from
as
you
far
as
and
it
Changing
Loosen
the
needle
the
clamp
needle
screw
When
and
you
remove
insert
the
the
needle.
shown
Regarding
in
The
the
special
sizes
table.
of
needles,
thread
and
see
needle
Extra
accessories.
to
be
used
are
For
be
used.
very
heavy
The
higher
and
stiff
the
fabrics
number,
a
coarse
the
needle
coarser
must
the
needle
the
fabric.
should
be
used
in
order
to
80—90
thread
can
and
for
be
sheer
used
and
for
tightly
most
fabrics.
woven
avoid
fabrics
For
damaging
a
a
finer
finer
extra
With
needles
regard
to
of
various
the
size
sizes
of
needle,
in
the
accessory
generally
box.
No.
L1
to
needles
with
modern
needle
marked
materials,
No.
in
80.
this
You
such
way.
will
as
The
jersey,
also
machine
find
etc.
a
number
Use
is
fitted
only
of
The
used
needle
for
embroidery
system
has
and
number
darning.
705H
and
is
adapted
is
or
stitching.
used
darning
for
As
all
thread
the
sorts
name
of
could
fabrics.
implies,
be
used
it
is
for
of
course
decorative
also
I
Needle
Mercerized
and
cotton
thread
thread
as
well
A
special
as
synthetic
embroidery
thread
l)
L.
I
rn
rrn
rn
9
1
.
I
Synthetic
threads
are
not
generally
numbered.
40
30
30
20
100
110
120
40—SO
100/3
‘)
30—50
90
50-60
10013
40—50
80
No.
60
60
70
or
USA
thread
English
thread
thread
Silk
Synthetic
thread
thread
Darning
or
Width
No.
Sewing
Embroidery
Needle
/
Page 10

10
N
54J
32
II
4
clamp
the
this
front.
way
the
the
Due
needle-eye
threading
to
the
white
of
appears
needle,
field
very
on
7,
is
the
clearly
easier.
presser
and
foot
in
the
the
black
thread
thread
take-up
guide,
lever,
6.
Thread
5.
Draw
the
the
needle,
thread
7,
behind
from
front
the
drawing
thread
between
the
guide,
thread
the
4.
tension
from
Now
discs,
right-to-left
continue
3,
and
the
in
down
threading
the
around
slot
by
on
of
Slide
the
the
“upper”
thread
into
arm.
the
Then
thread
draw
guide,
the
2,
thread
on
the
to
rear
the
Place
you
until
the
the
spool
needle
of
thread
is
at
its
on
highest
the
pin,
position.
1.
Threading
Raise
the
presser
the
foot.
upper
Turn
the
thread
handwheel
toward
Spool
Pull
machine.
out
one
pins
of
the
spool
pins
at
the
back
of
the
N
Page 11
and
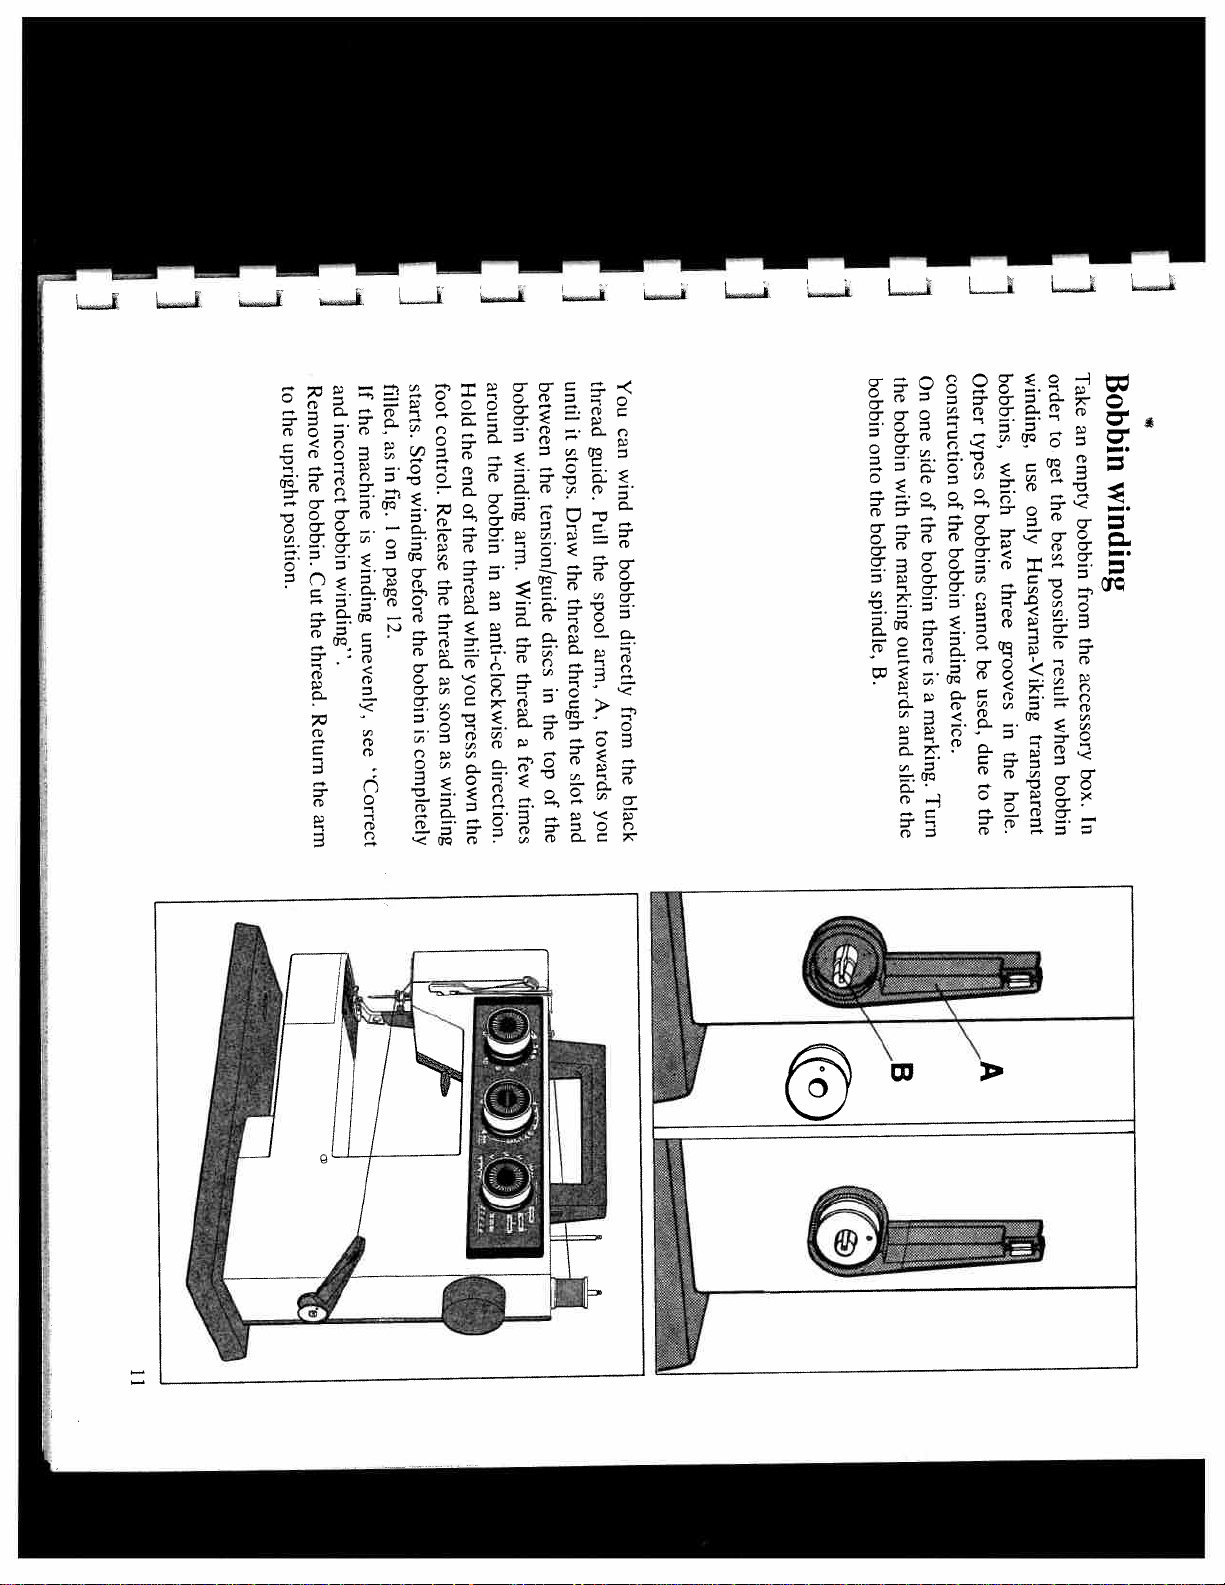
Remove
to
the
incorrect
upright
the
bobbin.
bobbin
position.
Cut
the
thread.
Return
the
arm
filled,
If
the
as
machine
in
fig.
I
is
on
winding
page
winding”.
12.
unevenly,
see
Correct
Hold
foot
starts.
control.
the
Stop
end
winding
Release
of
the
thread
before
the
thread
while
the
bobbin
you
as
soon
press
is
completely
as
down
winding
the
until
between
around
bobbin
it
stops.
winding
the
the
bobbin
tension/guide
Draw
arm.
Wind
discs
the
thread
in
the
a
top
few
of
times
the
the
thread
through
the
slot
and
in
an
anti-clockwise
direction.
You
thread
can
guide.
wind
Pull
the
the
bobbin
spool
directly
arm,
A,
from
towards
the
black
you
the
bobbin
bobbin
onto
with
the
bobbin
the
marking
spindle,
outwards
B.
and
slide
the
Other
construction
On
one
types
side
of
of
of
bobbins
the
the
bobbin
bobbin
cannot
winding
there
be
is
used,
device.
a
marking.
due
to
Turn
the
Take
winding,
order
an
to
empty
get
the
bobbin
best
possible
from
the
result
accessory
when
box.
bobbin
In
Bobbin
bobbins,
which
use
only
have
Husqvarna-Viking
three
grooves
in
transparent
the
hole.
winding
11
Page 12
12
tI
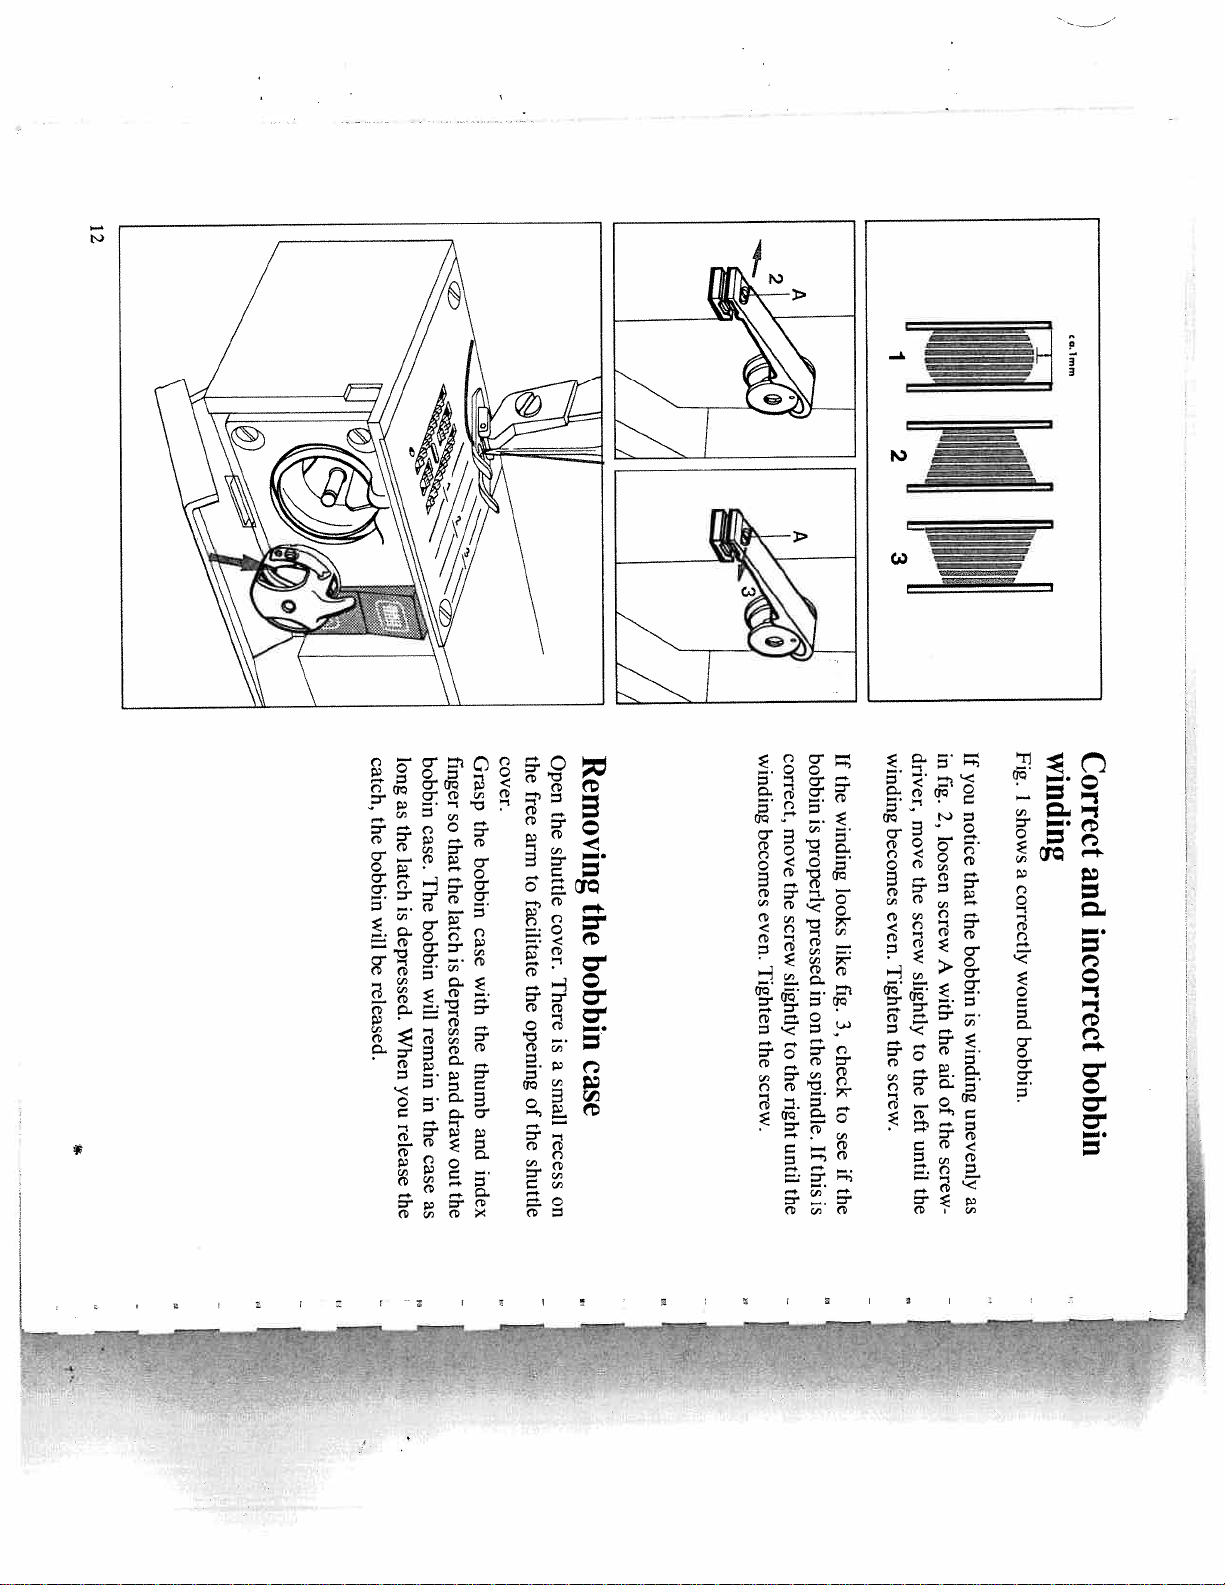
bobbin
long as
catch,
the
the
case.
bobbin
latch
The
is
will
bobbin
depressed.
be
released.
will
remain
When
you
in
the
release
case
the
as
Grasp
cover.
finger
so
the
that
bobbin
the
latch
case
is
with
depressed
the
thumb
and draw
and
out
index
the
Open
Removing
the
free
the
arm
shuttle
to
facilitate
the
cover.
bobbin
There
the
opening
is
case
a
small
of
the
recess
shuttle
on
bobbin
correct,
winding
is
move
becomes
properly
the
even.
screw
pressed
Tighten
slightly
in
on
the
the
to
the
spindle.
screw.
right
until
If
this
the
is
if
the
winding
looks
like
fig.
3,
check
to
see
if
the
[:Dj
II
1!1i
Fig.
if
in
driver,
winding
you
fig.
2,
move
becomes
loosen
the
screw
even.
screw
A
Tighten
slightly
with
the
the
to
aid
the
screw.
of
left
the
until
screw
the
I
shows
notice
a
that
correctly
the
bobbin
wound
is
winding
bobbin.
unevenly
as
ta.1
i-n
mm
Correct
winding
and
incorrect
bobbin
I
i
Page 13
ri
.1]
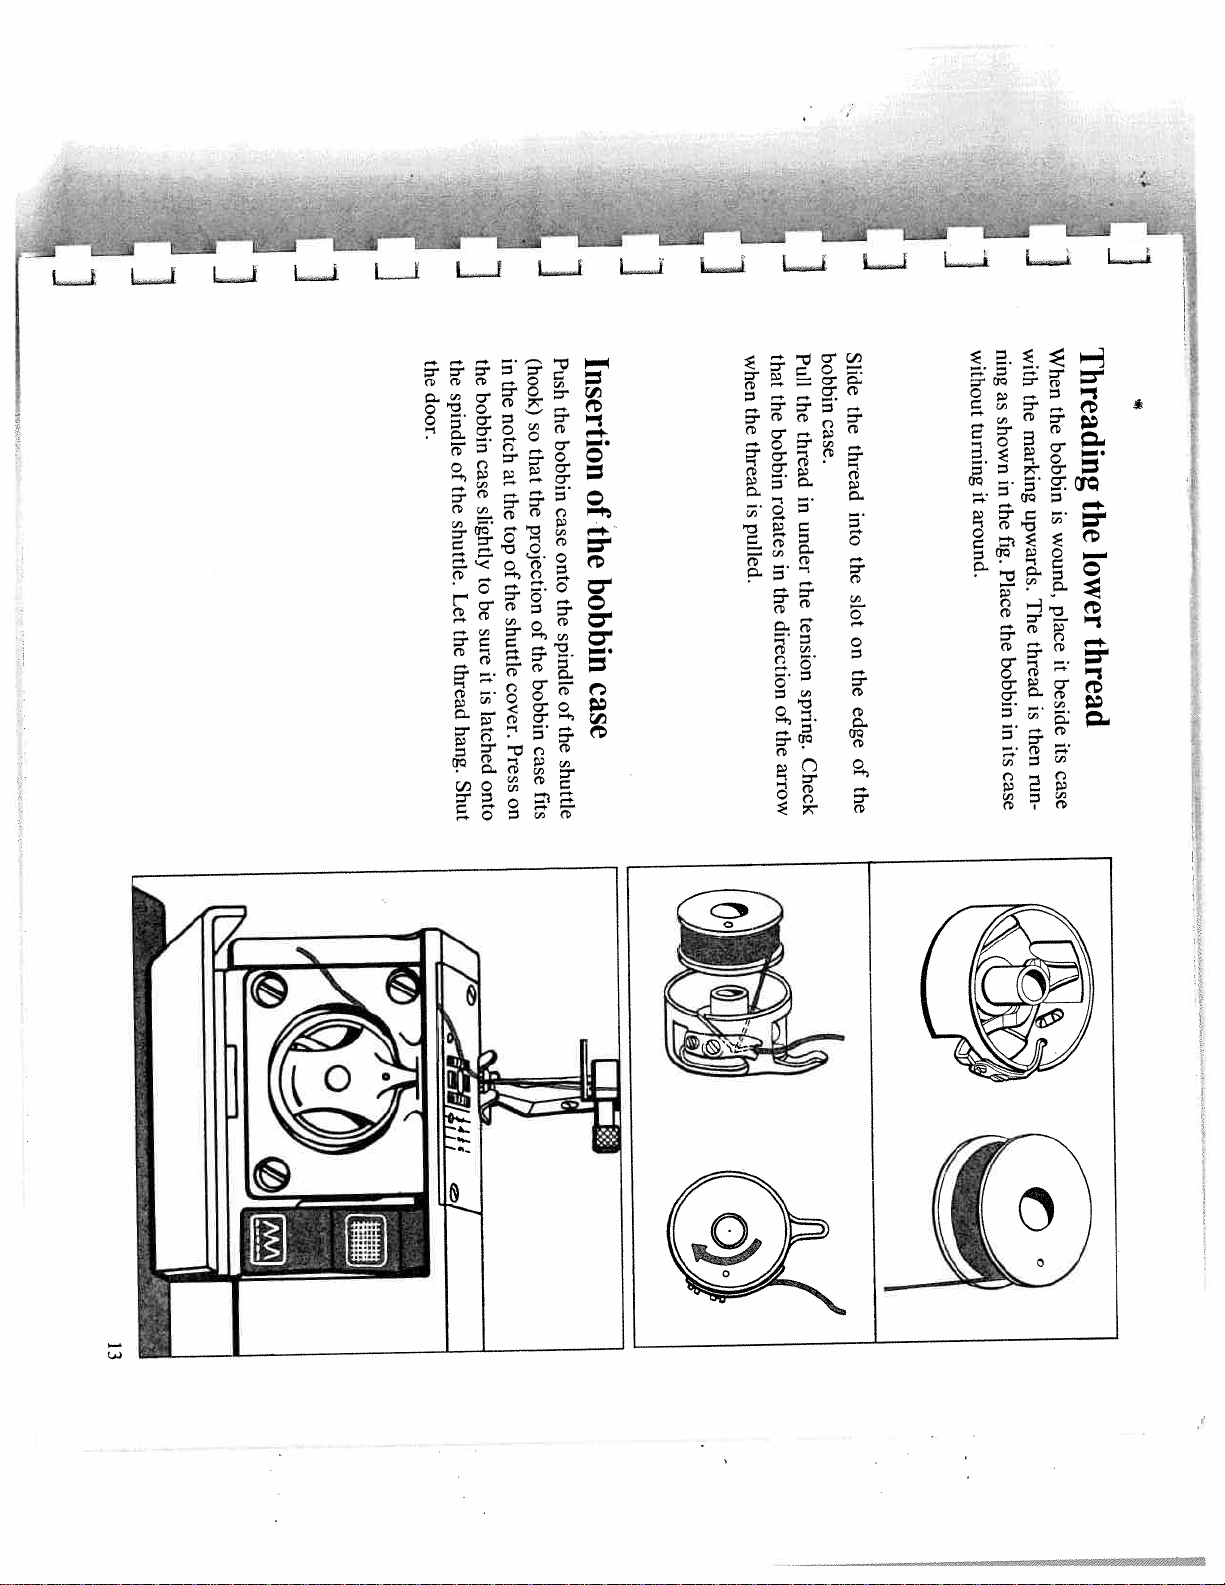
the
the
door.
spindle
of
the
bobbin
case
the
slightly
shuttle.
to
Let
be
sure
the
thread
it
is
latched
hang.
onto
Shut
in
(hook)
the
notch
so
that
at
the
the
projection
top
of
the
shuttle
of
the
bobbin
cover.
Press
case
fits
on
Insertion
Push
the
bobbin
of
case
the
onto
bobbin
the
spindle
case
of
the
shuttle
that
when
the
the
bobbin
thread
rotates
is
pulled.
in
the
direction
of
the
arrow
bobbin
Pull
the
case.
thread
in
under
the
tension
spring.
Check
Slide
the
thread
into
the
slot
on
the
edge
of
the
ning
without
as
shown
turning
in
it
the
around.
fig.
Place
the
bobbin
in
its
case
Threading
When
with
the
the
marking
bobbin
the
upwards.
is
wound,
lower
The
place
thread
thread
it
beside
is
then
its
case
run
*ZL
‘QY
i
-
13
3j9$
(Non
H
471
Page 14
14
I
I
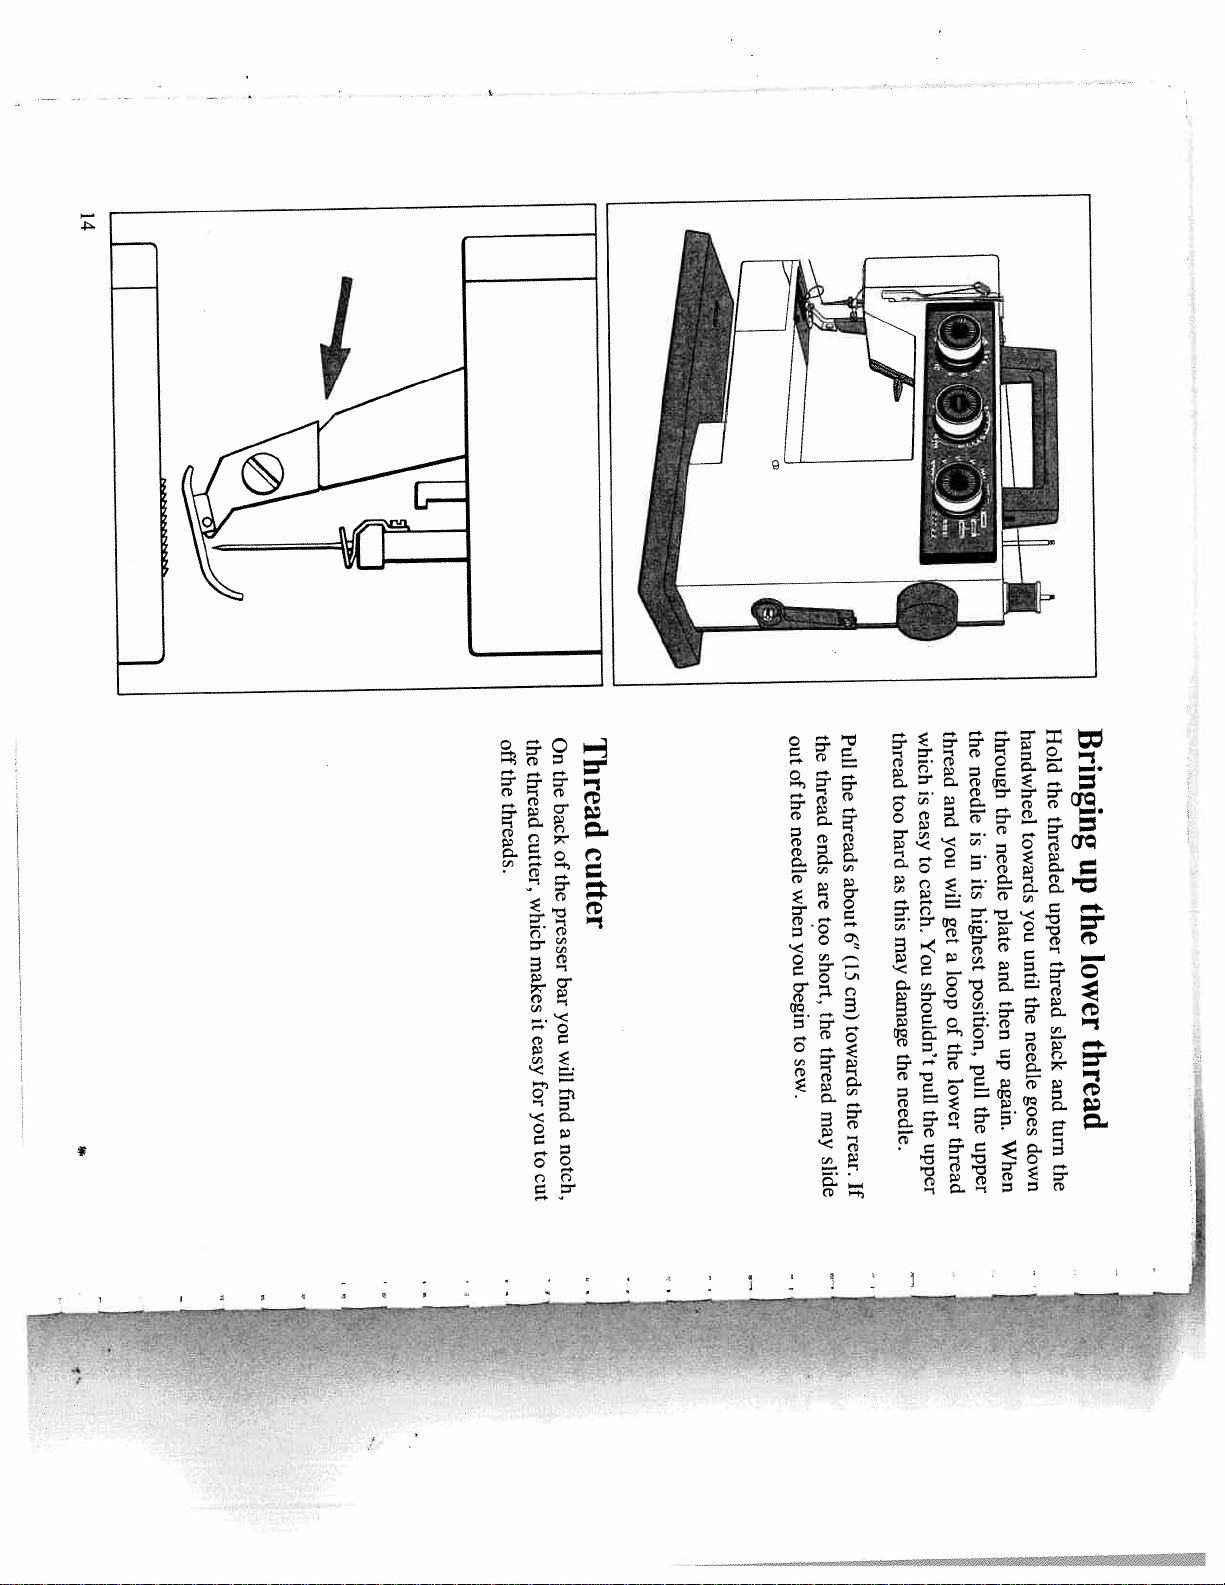
the
off
the
thread
threads.
cutter,
which
makes
it
easy
for
you
to
cut
Thread
On
the
back
cutter
of
the
presser
bar
you
will
find
a
notch,
the
out
thread
of
the
needle
ends
are
when
too
you
short,
begin
the
to
thread
sew.
may
slide
Pull
the
threads
about
6”
(15
cm)
towards
the
rear.
If
which
thread
is
too
easy
hard
to
as
catch.
this
may
You
damage
shouldn’t
the
pull
needle.
the
upper
the
thread
needle
and
is
you
in
will
its
highest
get
a
loop
position,
of
the
pull
lower
the
thread
upper
handwheel
through
the
towards
needle
plate
you
until
and
the
then
needle
up
again.
goes
When
down
Bringing
Hold
the
threaded
up
upper
the
lower
thread
slack
thread
and
turn
the
*
i1
U
Page 15
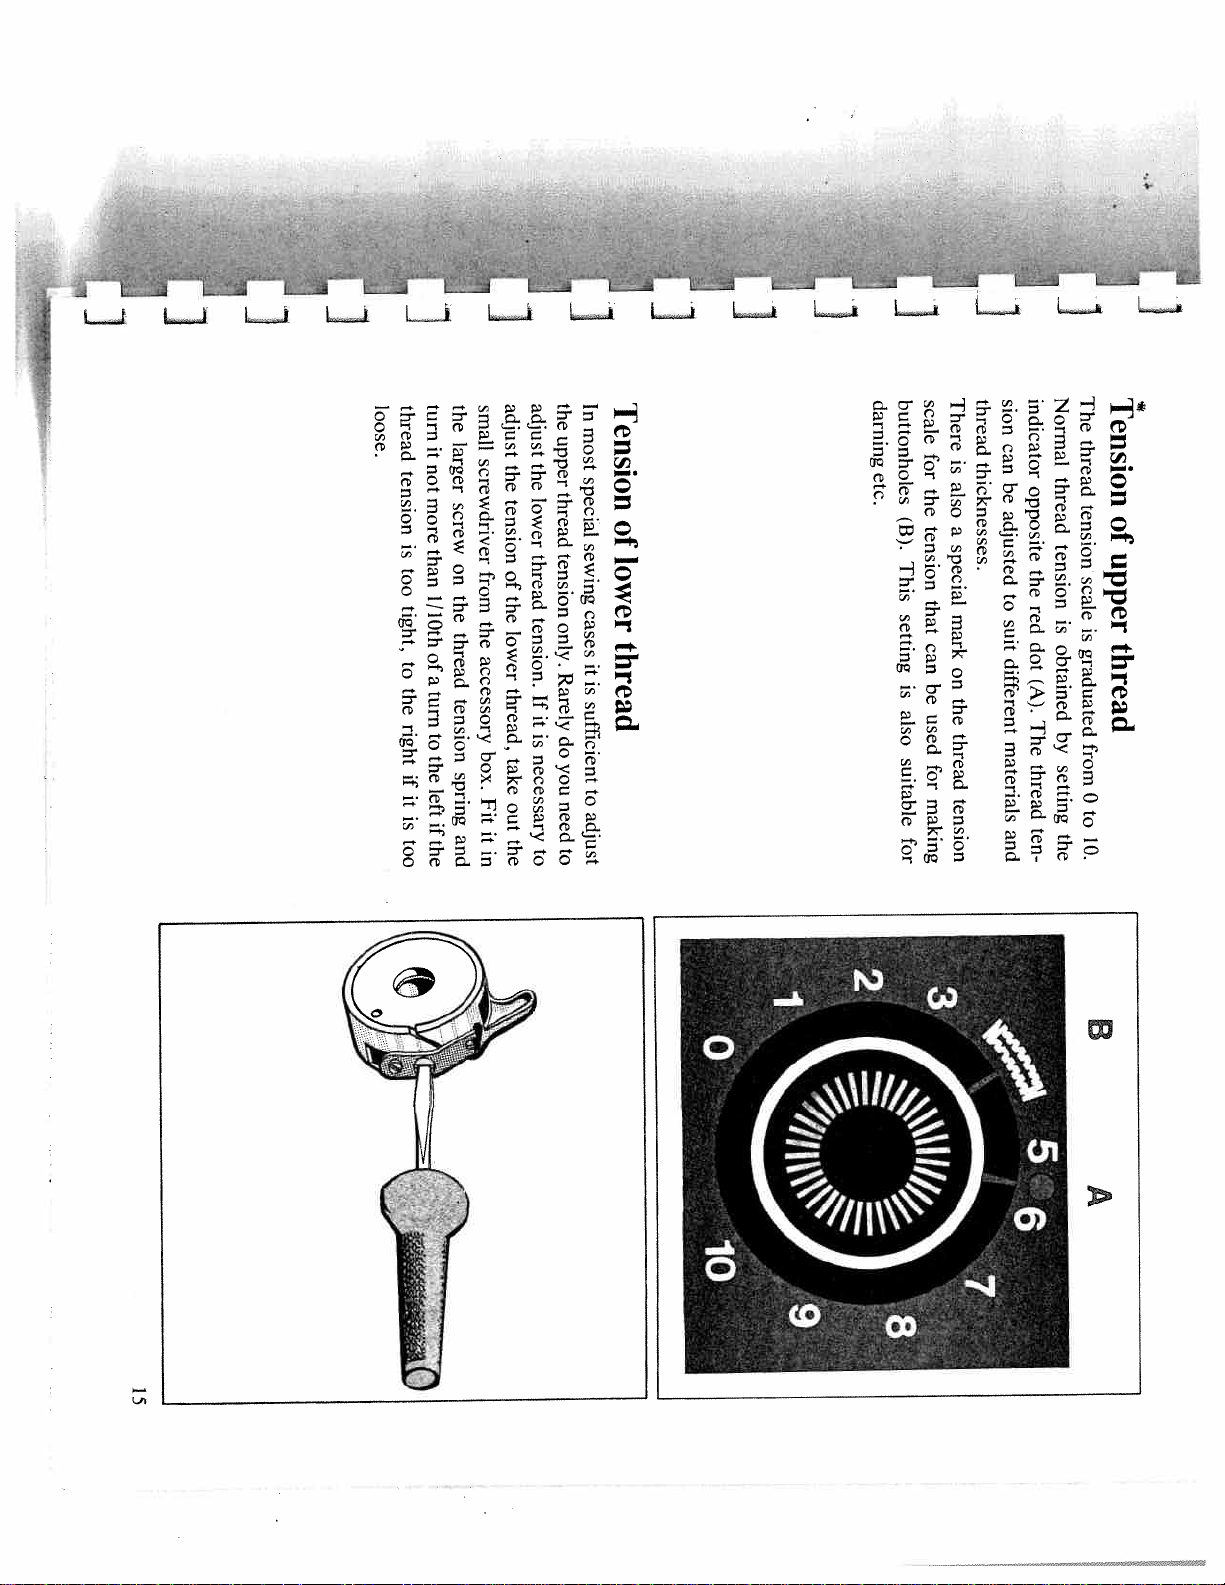
thread
loose.
tension
is
too
tight,
to
the
right
if
it
is
too
turn
the
larger
it
not
more
screw
than
on
the
1/10th
thread
of
a
turn
tension
to
the
spring
left
if
and
the
the
adjust
adjust
small
upper
screwdriver
the
the
thread
lower
tension
tension
thread
of
from
the
tension.
the
accessory
box.
Fit
it
in
lower
thread,
If
it
is
necessary
take
out
the
to
only.
Rarely
do
you
need
to
Tension
In
most
special
of
sewing
lower
cases
thread
it
is
sufficient
to
adjust
buttonholes
scale
darning
for
etc.
the
(B).
tension
This
that
setting
can
be
is
also
used
suitable
for
for
There
is
also
a
special
mark
on
the
thread
tension
making
Normal
indicator
sion
thread
can
thicknesses.
thread
be
opposite
adjusted
tension
the
to
red
suit
is
dot
obtained
different
(A).
The
by
materials
thread
setting
ten
and
the
The
Tension
thread
tension
of
upper
scale
is
thread
graduated
from
0
to
10.
15
B
A
Page 16
16
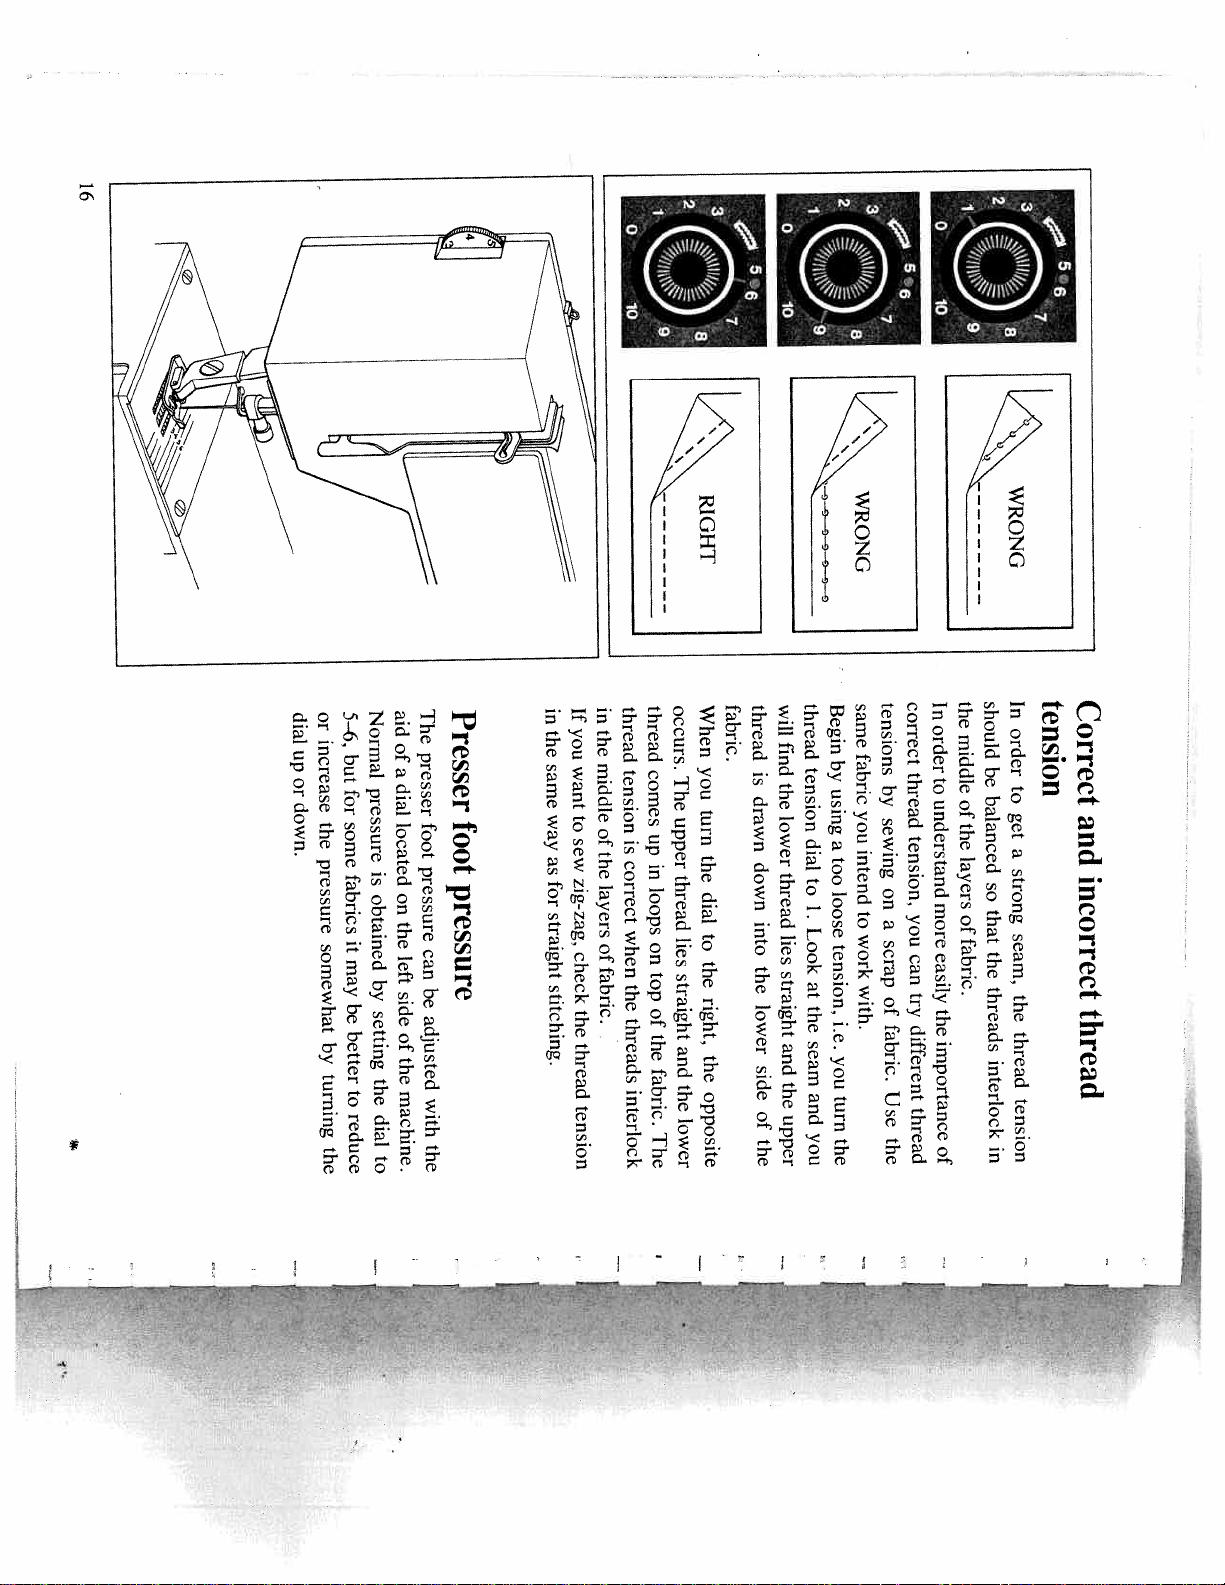
or
dial
increase
up
or
down.
the
pressure
somewhat
by
turning
the
Normal
5—6,
but
pressure
for
some
is
fabrics
obtained
it
may
by
be
setting
better
the
to
reduce
dial
to
The
aid
of
presser
a
dial
located
foot
pressure
on
the
can
left
be
side
adjusted
of
the
machine.
with
the
Presser
in
foot
pressure
in
If
you
the
the
middle
same
want
way
to
of
sew
the
as
zig-zag,
for
layers
straight
of
check
fabric.
stitching.
the
thread
tension
Lzz:jjzz:
fabric.
occurs.
thread
thread
tension
comes
The
upper
up
is
correct
in
loops
when
on
top
the
of
threads
the
fabric.
interlock
The
When
you
turn
the
thread
dial
to
lies
the
straight
right,
and
the
the
opposite
lower
will
thread
find
is
the
drawn
lower
down
thread
into
lies
the
straight
lower
and
side
the
of
upper
the
---\
\\
\
thread
Begin
by
tension
using
dial
a
too
to
loose
1.
Look
tension,
at
the
i.e.
seam
you
and
turn
you
the
WRONG
correct
tensions
same
fabric
thread
by
you
sewing
tension,
intend
on
to
you
a
work
scrap
can
with.
try
of
fabric.
different
Use
thread
the
the
should
In
order
middle
be
to
balanced
of
understand
the
layers
so
more
that
of
fabric.
the
easily
threads
the
importance
interlock
of
in
tension
In
order
to
get
a
strong
seam,
the
thread
tension
Correct
and
incorrect
thread
IF
1fr
Page 17
17
side
Under
5
12-01
4114
foot
presser
—
stitch
—
Utility
side
Upper
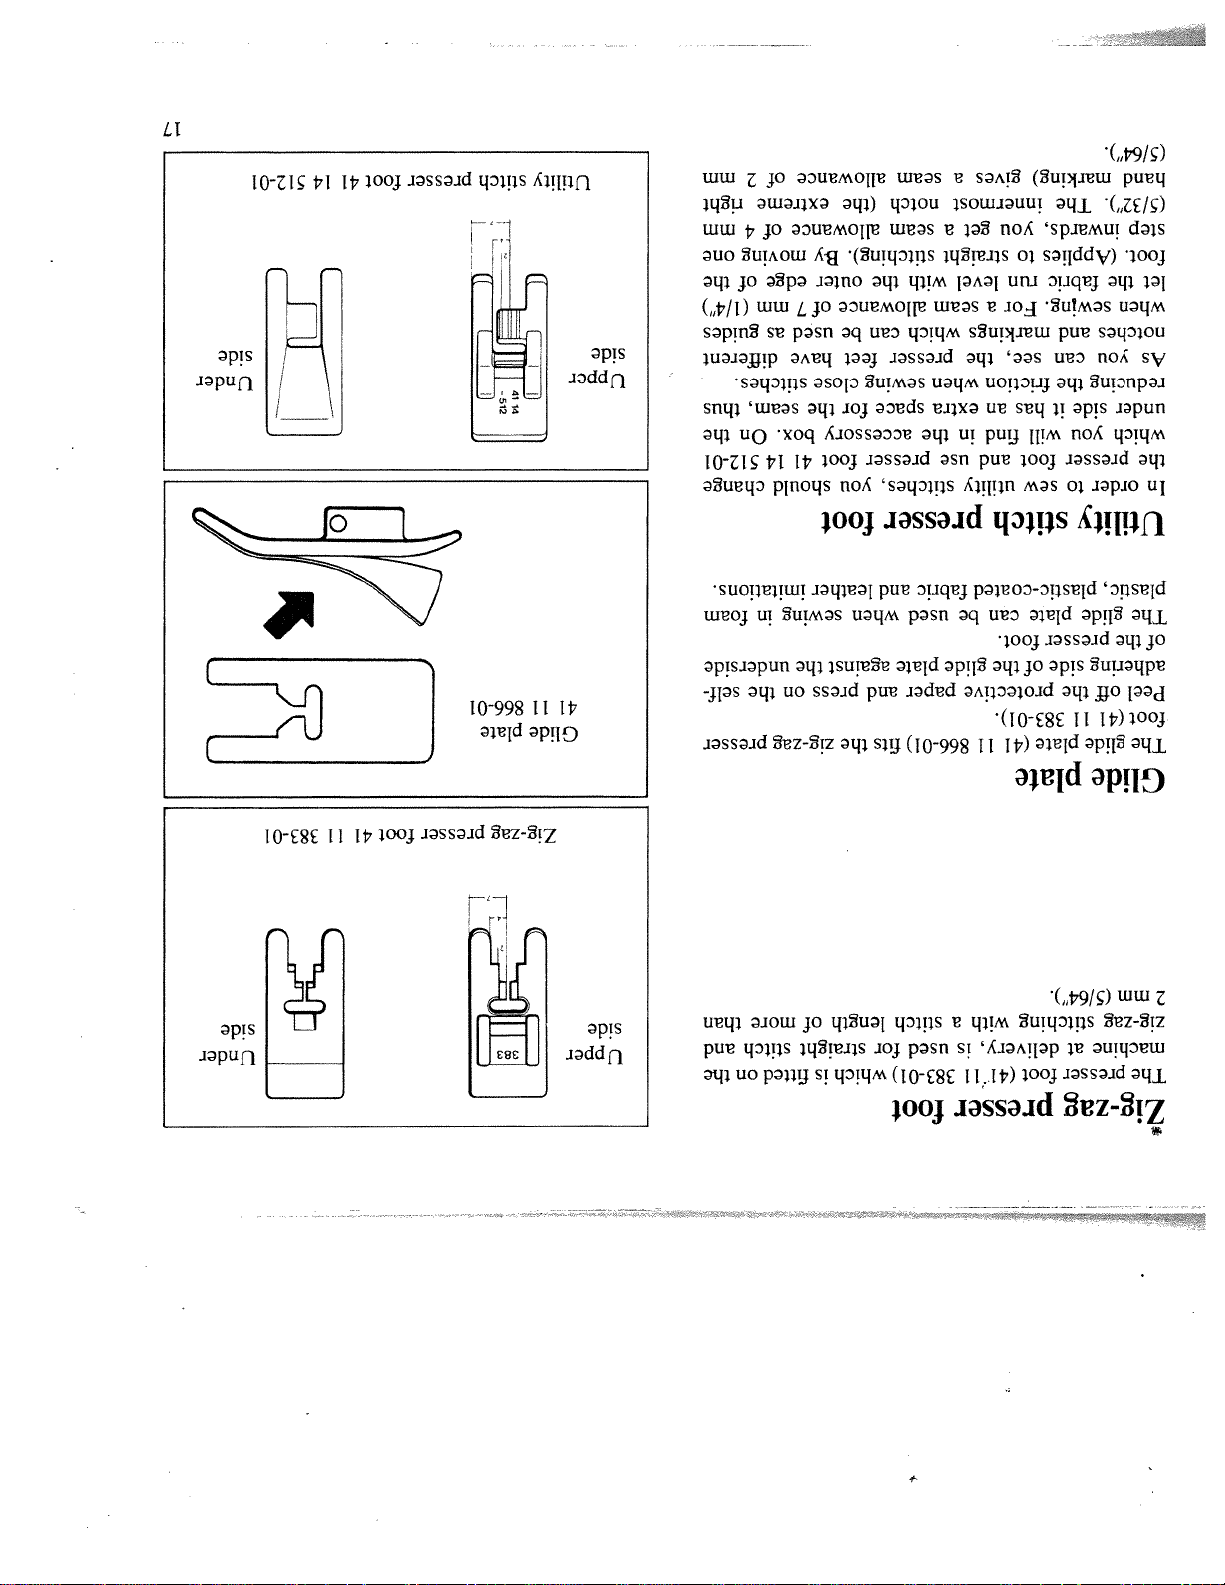
mm
right
mm
one
the
thus
of
2
of
4
of
(1/4”)
as
guides
different
On the
14
512-01
change
moving
edge
7
mm
stitches.
seam,
box.
41
(the
extreme
Ry
outer
of
be
used
feet
have
close
for
the
foot
you
should
foot
seam
allowance
notch
seam
allowance
stitching).
allowance
can
sewing
space
accessory
presser
a
a
get
with the
seam
which
the
presser
when
extra
the
in
use
stitches,
presser
gives
straight
level
a
an
find
and
utility
The
innermost
you
to
run
For
markings
and
can
see,
the
friction
it
has
will
foot
to sew
stitch
marking)
inwards,
(Applies
the
fabric
sewjng.
you
side
you
presser
order
(5/64”).
hand
(5/32”).
step
foot.
let
when
notches
As
reducing
under
which
the
In
Utility
side
Under
11
383-01
41
L
foot
plate
presser
383
4111866-01
Glide
Zig-zag
side
Upper
self-
than
and
the
in
foam
presser
on
imitations.
the
underside
on
the
of
more
stitch
fitted
sewing
press
the
zig-zag
straight
is
and
leather
when
against
and
fits
length
for
which
1)
fabric
used
plate
paper
866-0
a
stitch
is
used
383-01)
foot
be
glide
11
can
the
(41
with
(4lll
foot.
of
plastic-coated
plate
glide
presser
side
off
the
protective
(41
11
383-01).
plate
glide
plate
(5/64”).
stitching
at
delivery,
foot
presser
presser
plastic,
The
of
the
adhering
Peel
foot
The
Glide
2
mm
zig-zag
machine
The
Zig-zag
_______
Page 18
18
Under-
side
Presser
foot
for
thin
fabrics
41
14531-01
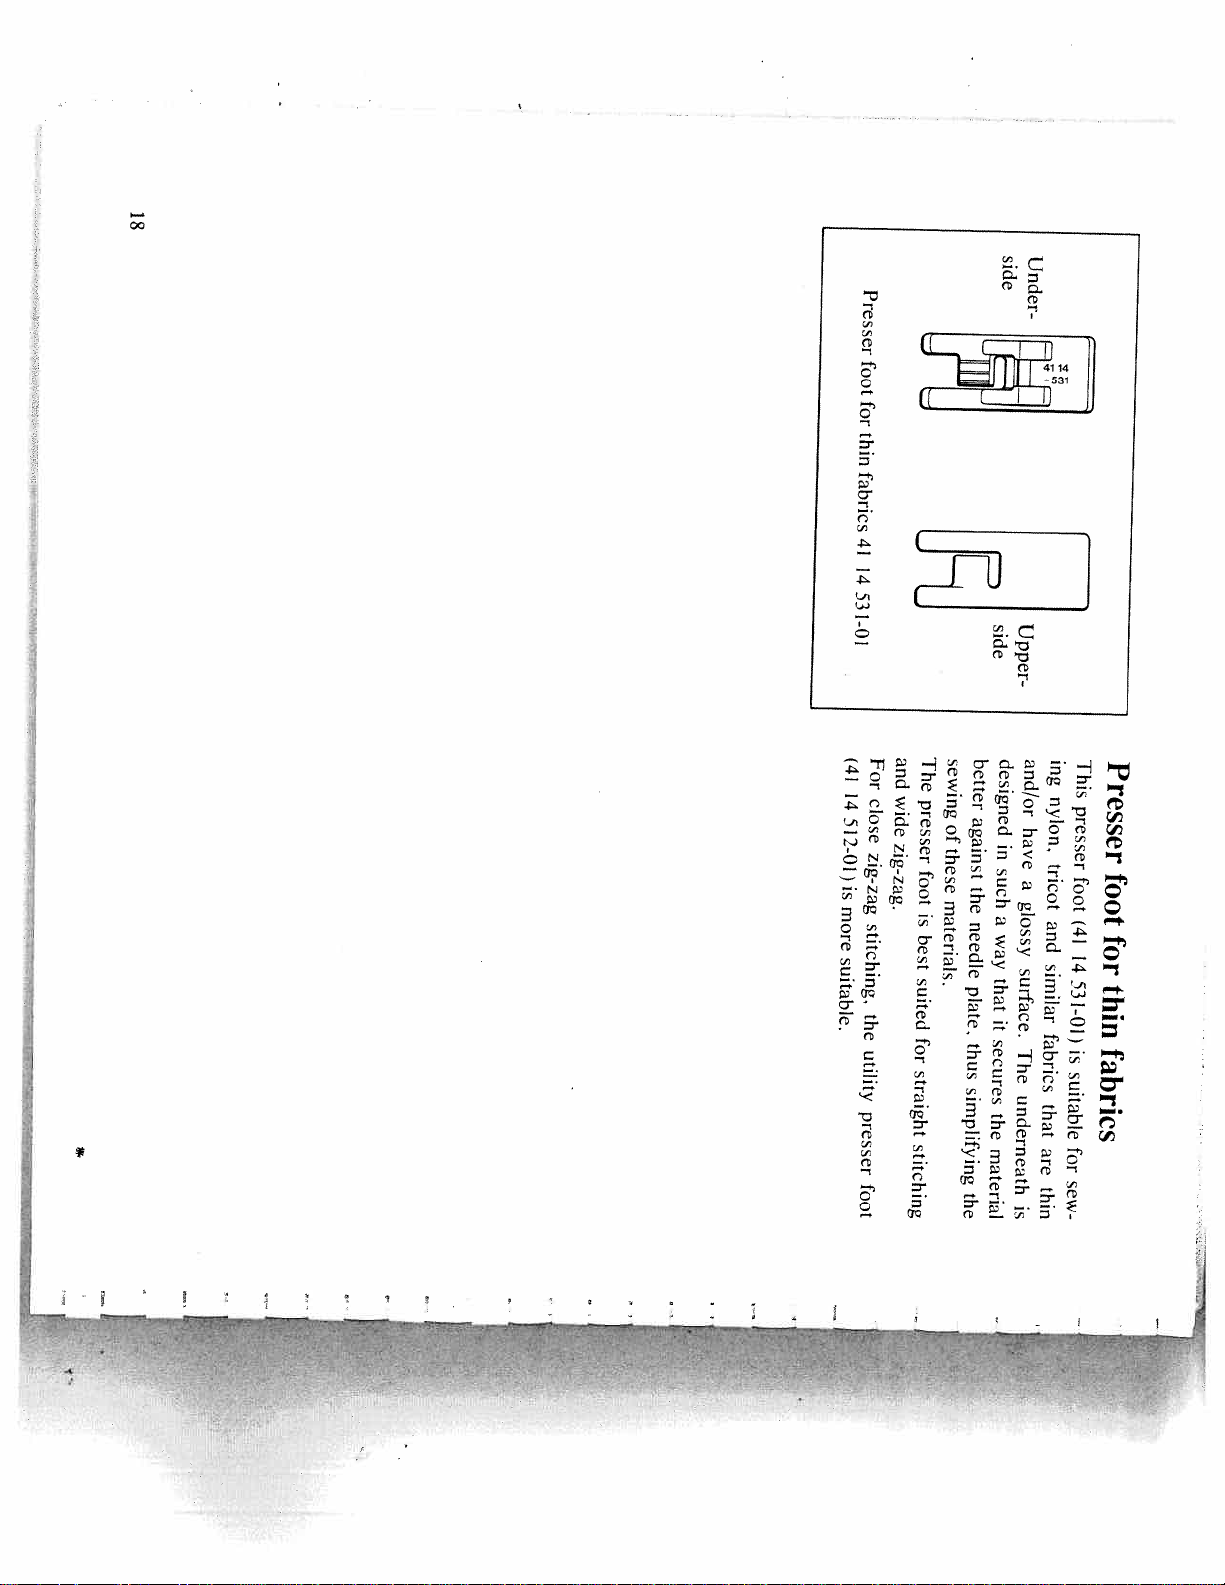
The
and
(41
For
14
close
512-0l)is
zig-zag
more
stitching,
—.
suitable.
the
utility
presser
foot
wide
presser
zig-zag.
foot
is
best
suited
for
straight
stitching
sewing
of
these
materials.
the
—
Upper-
side
better
and/or
designed
against
have
in
such
a
the
glossy
a
needle
way
surface.
that
plate.
it
secures
thus
The
simplifying
underneath
the
are
material
thin
is
This
ing
nylon.
presser
tricot
foot
(41
and
14
similar
531-01)
fabrics
is
suitable
that
for
sew
Presser
foot
for
thin
fabrics
I
:4.
it
IL:
1*.
Page 19

*
4]
iFi
position.
remove
the
Then
presser
screw
foot
off
ankle.
the
retaining
screw
and
changed.
soles
and
Make
then
sure
the
that
ankle
the
be
bracket
needle
is
must
in
its
as
also
highest
loose
be
Certain
Changing
presser
the
feet
cannot
presser
constructed
foot
“ankle”
press
space
ser
foot
lightly
between
will
snap
backward
the
into
bracket
the
and
correct
downward
and
position.
the
spring.
and
the
Then
pres
There
Slide
on
is
a
the
spring
presser
at
the
foot
bottom
so
that
of
the
the
pin
ankle
fits
bracket.
into
the
move
while
you
until
pressing
the
the
presser
needle
slightly
foot
is
downward.
in
by
the
drawing
highest
hand
it
wheel
position.
toward
toward
you
Re
the
change
presser
the
presser
foot
“ankle”
foot,
turn
by
a
the
spring.
If
you
wish
to
The
in
the
presser
form
of
feet
loose
which
soles
accompany
which
are
the
held
machine
in
place
are
on
foot
Cflanging
the
snap-on
presser
19
Page 20

20
I
I
I
I
J
::
.:
Pull
that
at
when
least
it
the
will
6
next
inches
not
be
seam
(15
drawn
is
cm)
started.
out
of
of
thread
the
eye
in
the
of
the
needle
*
needle
so
in
its
the
highest
threads
position.
away
from
you
and
cut
them.
Leave
have
Before
fully
you
completed
remove
the
the
fabric,
last
stitch,
the
machine
with
the
should
needle
utility
feed-dog
ends
by
or
and
holding
zig-zag
sewing
stitches
back
a
few
the
you
stitches.
fabric
can
or
lock
lowering
the
thread
the
range
making
Lock
the
the
the
thread
work.
machine
ends
sew
by
pressing
backwards.
the
reverse
When
button,
sewing
the
plies
fabric
when
and
stopping
raise
the
the
presser
machine
foot.
in
needle
order
This
to
also
down
re-ar
ap
in
When
the
machine
turning
do
a
corner,
the
feeding.
stop
with
the
fabric,
the
fabric
only
at
guide
B
and
it
towards
guide
the
the
work.
presser
Don’t
foot
pull
and
the
let
left
forward.
hand
With
lightly
the
on
right
the
hand
fabric
you
at
hold
A
and
the
guide
edge
of
it
The
follows
best
an
way
edge
to
or
hold
a
seam
the
fabric
—
don’t
is
watch
when
you
the
needle.
rest
the
gradually.
Start
again.
the
machine
Watch
the
gently
presser
and
foot
increase
to
ensure
the
that
speed
it
fabric,
thread
behind
sew
a
few
the
reverse
presser
foot
stitches
when
and
sewing
then
hold
forward
the
wish
down
to
into
extend
the
needle
the
seam
hole
out
in
to
the
the
throat
very
plate.
edge
If
of
you
the
edge
and
soft
of
the
fabrics,
fabric
start
to
prevent
the
seam
it
about
from
1/4”
being
from
pulled
the
foot,
zig-zag
then
and
lower
other
the
stitches,
needle.
first
When
lower
sewing
the
on
presser
thin
wheel
seam
line,
towards
then
lower
you
so
the
that
presser
the
foot.
needle
When
enters
sewing
the
Always
General
start
hints
a
straight
seam
by
turning
the
hand-
-
*
Page 21

21
383-01
II
41
selector
foot
presser
Zig-zag
and when
used
is
example.
as
soon
reverse,
in
By
the
desired
length
you.
to
its
tension
elastic
the
not
stitch
sewing
sew
to
stitch
needle
elastic
much
are
when,
will
sewing.
center
is
set
The
the
stitch
the
fabric
strain.
elastic
for
of
the
selector
stitching
Thread
required.
For
ed
to
which
Straight
a
seam.
useful
forward
chine
reverse
the
In
and
bol.
Set
handwheel towards
Raise
Straight
stitch
is
used.
an
seam
is
be
subject
to
of
fabric
of
very
ma
for
2.
to
4
sym
the
Stitch
length Stitch
the
end
is
normal
the
0
at
This
in,
a
button
from
turning
strong
likely
pieces
resume
will
button
dial
is
normally
stitching
by
extra
not
joining
is
released.
and
this
length,
graduated
straight
position
straight
and
are
for
backtacking
as
it
pressing
length
stitch
stitch
is
dial
the
to
highest
Page 22

22
LIII*I
simultaneously
to
produce
the
gathering.
v-
.
,.,
.
-,.—...
,.....,.
-
Two
—
the
rows
lower
of
threads
gathering
from
stitches
both
are
rows
sewn
are
side
then
by
pulled
side
ened
3—3.5
slightly.
is
used
and
the
upper
are
obtained
thread
tension
if
stitch
is
length
loos
Gathering
Gathering
method.
The
with
best
straight
results
stitch
is
the
most
common
garment,
lower
thread.
remove
the
basting
by
drawing
out
the
garment
with
loose
together.
top
thread
You
tension.
can,
after
Baste
finally
the
parts
sewing
of
the
the
Machine
before
above.
sewing
Set
basting
the
it
machine
together.
allows
for
you
Pin
the
the
to
longest
try
seams
on
stitch
as
the
described
garment
length
ever,
stitches,
are
this
careful,
you
involves
can
use
sew
a
risk
fine
right
of
pins,
blunting
across
and
the
the
relatively
needle.
pins.
How
long
you
the
seam
and
remove
each
pin
as
you
come
to
it.
If
When
Basting
inserting
sewing
pins
simpler
at
right-angles
garments
to
you
the
can
seam.
save
Then
time
sew
by
zt.
I
E
‘I
Page 23

23
to
the
up
the
gar
is
foot
back
the
the
the
the
1/8”
the
open
ten
the
edge
Begin
of
it
seam
fabric
it
to
of
presser
using
of
bottom
lower
side.
side
the
that
presser
at
the
open
now
of
the
in
the
machine
the
from
with
sew
left
3/4”
thread
Baste
edge
basting.
the
at
the
other
Turn
so
the
is
end
Stop
sewing
zipper
and
to
the
the
zipper
top
machine,
closed.
the
from
“right”
on the
needle.
foot
seam.
lower
the
slide
foot,
the
down
and
of
the
seam
seam allowance
is
it
on
approximately
loose
and
by
the
left-hand
sew
the
the
the
presser
from
edge
rear
Put
zipper
Remove
then
a
cross-seam
from
and
sew
of
presser
the
needle,
so
that
the
3/4”
needle
the
upwards.
reversed
the
basted
the
so
that
top.
Leave
stitches
together
the
under
finish
the
lift
the
wards.
and
with
zipper
ment
the right
Turn
and
of
zipper
and
about
with
bottom
work
right-hand
from
Fold
needle.
foot
at
sion.
long
opening
Keep
opening
Zipper
as
be
the
the
sides
This
to
can
ankle,
foot
the
attaching
turning
on
both
needle.
either
989-01)
of
the
sew
of
comes
12
to
illustration.
the
the
presser
part
front
without
it
(41
zippers
left
the
that
foot
in
zipper
possible
to
so
in
onto
the
it
or
shown
clamp
Slide
work.
of
the
makes
right
attached
zipper
The
Sewing
Page 24

24
‘S
—
\
-
-
-
-.
.
*
.
j_
I
I
I
:
-
,-:-
,,
.•,
-:--
-
- -
.1
I....
1.
I..
I.
from
left
Remove
side
the
the
basting.
same
as
the
right
one.
join
ing
the
the
two
seam
long
across
seams.
the
Then
bottom
sew
the
to
Turn
the
right
the
of
presser
the
needle.
foot
so
Start
that
by
it
sew
is
to
foot
back
and
of
the
finish
needle,
the
seam.
lower
the
presser
the
zipper
so
that
the
slide
is
at
the
ished,
the
fabric,
stop
lift
with
the
the
presser
needle
foot,
down
open
in
zipper
the
closed.
bottom
Before
upwards,
the
seam
leaving
is
fin
the
‘
I
hl
•
.1.
the
presser
seam
needle.
by
foot,
hand.
Sew
putting
Change
the
right-hand
it
to
to
the
the
zipper
left
edge
of
I
.1
open
and
baste
the
zipper
under
the
Tt1
•
.1
[
tension.
top
of
the
Leave
opening.
about
Press
3/4”
open
the
at
seam
the
‘
IL1
II
I
I
chine
Baste
with
the
long
opening
stitches
together
and
slack
by
ma
top
I
U
.
L
L
ing.
Zipper
under
the
center
of
the
open
Sewing
in
zippers
(cont.)
Page 25

25
:..
.
.
..
41
11383-01
selector
foot
Stitch
presser
Zig-zag
I
length
more
and
are
and
the
Stitch
edges
opera
you
length.
symbol.
generally
sewing
while
length
stitch
by
turning
is
bound
of
stitch
desired
zig-zag
zig-zag
gathering,
different
for
adjusted
the
to
the
desired
position
used
be
dial
to
you.
highest
three-step
as
appliqués,
is
to
length
suitable
length
selector
towards
needle
can
combination
its
stitching
tension
Thread
lace.
such
stitching
stitch
width.
a
stitch
stitch
the
suitable.
For
overcasting,
inserting
tions
Zig-zag
sewing.
The
stitch
Choose
Set
the
Set
the
handwheel
Raise
Zig-zag
Page 26

or
as
Sew
the
the
zig-zag
1/2”
way
over
on
of
edge
bind
reverse
the
it
fold it
wider.
be
edge
curved
close
place
same
will
the
a
Trim
to
just
to
0.3).
fairly
is
on the
slightly
be
(which
it
over
on
ready-made bias
with
lace
stitch
binding,
to
part
Fold
sewn
use
about
stitch
and
seam
be
is
to
and
to
attach
stitches.
fabric)
lower
is
to
stitching.
to
the
length
fabric
way
the
fabric
a
woven
zig-zag
of
the
the
pre-shaped.
binding
method
edges
(stitch
on
the
simplest
binding.
of
have
small
side
allowing
be
the
side
close
stitches
so
in
The
Lace
bias
for
the
edge
you
If
with
reverse
fabric
should
it
ing.
If
simplest
The
Bound
26
be
the
Stitch
will
that
fabric!
elastic
finished.
gathers
so
—
not
the
and
behind the
elastic gives
stitching
is
work
and the
enough
wide
elastic
in
front
and
nightwear.
smocking and
e.g.
shirring
sufficient.
the
it
be
the
over
within
should
both
clothes
for
zig-zag
usually
glide
stitch
and
stretch
firmly
children’s
gathering
zig-zagging
with
is
elastic
by
2.5
spaced when
can
foot
length
evenly
elastic
The
zig-zag
presser
Hold
the
in
blouses,
soft,
supple
Gathering
Gathering
Page 27

27
edges.
the
a
and
the
fabric.
should
time
zig-zag
figure,
by
using
the
out
around
of
the
stitches
a second
a
long
14
512-01.
contours
cut
41
the
draw
either
stitching
time
be
obtained
thickness
The
the
edges
using
foot
stitching.
or
on,
can
can
to
the
zig-zag.
machine,
pins.
to
the
around
them
you
second
outline
wider
around
by
presser
with
close
garment
for
the
according
and
stitch
on
stitch
pieces
cutting
the
sewing
appliqués
thread
contour
closer
a
Then
figures
the
the
utility
the
trim,
it
onto
before
sewing
gimp
A
raised
be
adjusted
with
stitch.
Sew
Use
Secure
then
sew
figures
When
Appliqués
the
the
with
first
to
wider
again
on
is
Fold
it
close
0.3).
little
a
stitch
1).
sewn
if
straight stitches.
side
and
length
using
side
length
and
attached
with
reverse
fabric
the
(stitch
time
reverse
(stitch
the
firmly
on
this
on
hem and sew
stitches
side,
the
zig-zag
in
more
a
edges
closer
against
1/2”
be
fold
fabric
and
right
spaced
will
or
the
the
back
about
lace
seams,
Trim
zig-zag
from
fabric
widely
placed
The
Page 28

*
41
14
the
terry
edges
frayed
most
sewing
the
ordinary
easily
in
turning
and
mending.
ideal
for
does
not
pull
over
and
thin
for
overcasting
as
to
1
a
recommended
by
position
for darning
is
It
and
advantages
used
dial
to
symbol
highest
used
together.
elastic
more
many
stretchable,
is
length
selector
you.
to
its
zig-zag
is
also
It
is
It
has
especially
zig-zag
stitch
stitch
towards
needle
and
fabric
setting.
the
the
the
cloth
of
the
zig-zag.
fabrics.
fabrics,
Three-step
basic
Turn
Set
handwheel
Raise
Three-step
512-01
stitch
presserfoot
Utility
11383-01
presser
foot4l
Zigzag
28
selector
Stitch
length
Stitch
tension
Thread
Page 29

29
the
with
a
simi
with
only
to
edges
fray.
seam
which
down
in
and flexible
sew
it
is
invisible.
zig-zag.
the
do
not
3/4”
frequently
in
sew
and
through
sew
to
are
fabric
and
finished
smooth
cloth,
almost
right
three-step
and
they
5/8”
hems
once
are
a
once
in
terry
is
it
goes
with
so
that
leaving
as
follows.
woven
hem
armholes
gives
hem
allowances
seams
where
loosely
cloth
the
and
This
the
garments
the
garment,
stitching
garment
the
together
proceed
and
turn
of
the
the
seam
break
is
rather
zig-zag.
Turn
lines
zig-zag.
to
hemming
side
the
Trim
garment
clumsy.
easily
terry
three-step
lar
manner.
hem.
Neck
three-step
necessary
When
“right”
Even
though
against
down
Fold
back
allowance.
Sew
the
When
overcasting
and
thick
seams
Terry
cloth
Sewing
as
the
right-
of
4114
512-01
the
edge
the
overcasting.
No.
follow
over
before
foot
fabric
sews
fabric
the
of
needle
the
of
presser
the
of
the
picture.
the edge
that
edges
in
marking
Let
sure
the
shown
hand
fabric.
Make
Trim
Overcasting
Page 30

of
be
rein
that
and
mend
as
may
fabric
so
row
method
is
called
when
If
the
side
back
a
lining
the
every
easiest
the
material
or
area.
to
For
and
method
by
sewing
and
towels.
reinforcement
side
of
the
fabric
worn
slightly
button.
quickest
This
as
of
the
entire
fabric
reverse
the
zig-zag.
is
repaired
napkins
gauze
reverse
a
piece
the
the
and
is
spot
Use
to
the
worn,
cover
guide
Use
three-step
ing
tablecloths,
forcement.
attached
is
very
the
stitches
stitching,
of
darning.
Quick-mend
forth
with
A
threadbare
30
be
be
of
will
quite
be
is
to
forth
a
piece
fabric
stitch
same
can
times
need
three-step
and
with
three-step
of
the
try
should
of
the
be
used.
majority
setting
not
with
back
tear
with
with,
is
may
the
which
several
do
edges
sew
the
edges
start
foot
stitch
the
patch
length
stitch
the
patch
all
side
and
reinforce
together
bring
the
To
The
adjustment
if
the
thread
presser
and
darning
versatile
the
of
on
around
them
tear,
is
a
it.
round
if
edges
sewn
the
reverse
necessary,
sew
a
the
material.
the
fabric.
better
ordinary
mending
zig-zag
Sewing
under
The
is
twice.
on
If
and
to
as
The
for
strengthen
short.
turned
zig-zag.
A
patch
or
fabric
mending
0.3—1.
is
naturally
once
of
zig-zag.
together
When
length
adapted
colour
It
materials.
utilized
Three-step
Mending
Page 31

31
33.
de
-.=
further
follows
is
fabric
of
the
the
illustration.
blindstitching
foot.
fold
line
in
elastic
presser
the
the
as
shown
of
that
and
B
sure
fabric
line
the
scribed
Invisible
guide
Make
Fold
on
pages
32
and
and
—.
Turn
the
foot
Choose
material
a
wheel
red
on
suitable
towards
the
little
moves
setting.
+
when
when
foot
“ankle”
sewing
—
A
forwards
towards
wheel
the
presser
in
thick
sewing
or
>
+
material.
in
thin
backwards
by
turning
presser
The
fabric.
the
the
foot
the
foot
in
of
of
B
it
thickness
line
the
presser
Attach
presser
the
guide
foot.
box.
to
that
so
thickness,
presser
be
adjusted
sideways
in
differ
accessory
in
the
blindstitching
the
general
the regular
may
as
find
foot can
be
moved
fabrics
15
331-01)
will
presser
can
As
same way
(41
You
Blindstitching,
Page 32

32
Blindstitching
0—I
I
presser
foot
4115
33
1-01
ample,
side.
zig-zag
It
stitches.
without
consists
the
of
small
stitches
straight
showing
stitches
on
and
the
large
right
I—I.’
I
I
I
I
I
This
to
you
Blindstitching
vary
can
setting
the
either
distance
is
an
increase
is
used
average
between
for
or
setting,
decrease
hemming
the
catches.
which
the
skirts,
stitch
means
for
length
ex
that
‘II.”
I
I
Turn
mended
the
basic
stitch
setting.
length
dial
to
2—3,
which
is
a
recom
0’’
handwheel
Set
the
stitch
towards
selector
you.
to
symbol
v’.r.
First
Raise
Blindstitching
read
the
needle
page
31.
to
its
highest
position
by
turning
the
Thread
tension
Stitch
length
Stitch
selector
Ii
V
L
•
Page 33

33
1-01
33
4115
foot
presser
Blindstitching
the
can
the
particularly
zig-zag
blindstitch
vary
you
turning
fabrics,
the
larger
elastic
to
length
that
means
as
a
recommended
V”V’V.
by
a
lot.
elastic
between
the
stitch
which
to
1—2
to
symbol
position
sideways
stitches
stitches,
the
catches.
the
setting,
dial
is
set
you.
its
highest
stretch
for
hemming
zig-zag
of
straight
between
or
decrease
average
stitch
length
selector
towards
31.
needle
page
to
blindstitch
that
used
small
is
an
setting.
the
stitch
the
read
those
It
is
stitches.
has
Instead
distance
increase
This
basic
Turn
The
handwheel
Raise
First
Elastic
selector
Stitch
length
Stitch
tension
Thread
Page 34

of
be
and
the
and
the
attach
overlock
fabric
where
can
finish
for
the
sewing
garments
It
and
selector
turning
be
used
stitching
for
swimsuit
in
suitable
seam
by
may
also
straight
together,
used
fabric,
operation.
elastic
€.LLL.
the stitch
position
It
elastic
When
sweater
are
required
is
particularly
in
one
an
to
symbol
Set
highest
(Overlock)
etc.
both
a
garment
seams
but
sews
dial
you.
to
its
stitch
cuffs,
of
velour.
(jersey),
supple
all
fabrics
allowance
stitch
length
towards
needle
knit
ing
collars,
replaces
stretch
the
overlock
stitch
the
zig-zag
stitch
various
and
double
narrow,
used for
es
The
the
handwheel
Raise
overcasting.
parts
knit
seam
Elastic
foot
14512-01
41
presser
Utility
34
selector
Stitch
length
Stitch
tension
Thread
Page 35

35
can
the
for
have
wider
a
you
once
12-01
5
how
marking
the
left-hand
the
with
4114
picture
that
allowance
foot
the
in
follow
garment
the
seam
presser
see
then
remember
cut
of
can
should
but
can
seam.
guide.
You
seam
you
the
remaining
the
a
as
marking
of
the
allowance,
prefer,
used
seam.
you
finished
Trim
be
left-hand
the
edge
seam
If
in
(overlock).
overcast
obtained
are
and
stitch
knit
together
allowance.
seam
elastic
use
together
overcast
pieces
overcast
edges
1/4”
a
the
can
edges
with
You
you
stitch
with
with
Calculate
step.
one
when
Seams
together
Seams
Page 36

36
*
III
I
II
Utility
41
presser
14512-01
foot
rative
purposes.
III
The
sewing
elastic
and
straight
sewing
on
stitch
the
can
bias
also
for
sleeve
be
used
insertion.
for
deco
III
III
stitch
stretchability
and
other
combining
stretch
makes
fabrics.
stretchability
it
useful
It
is
for
also
and
sewing
used
for
in
crotch
jersey
III
III
The
elastic
straight
stitch
is
a
triple-lock
strength.
straight
The
III
handwheel
the
stitch
length
towards
dial
you.
to
symbol
Set
the
stitch
selector
and
Elastic
Raise
the
needle
straight
to
its
highest
stitch
position
by
turning
the
Thread
tension
Stitch
length
Stitch
selector
4’.
fr
I
1k
Page 37

C)
U
—
C)
.—
UUC)>
+
Cl)
,
C,)
-
4-
.-
.—
U
-
-,
4)_
G)
c-)
VC)Q
I
-)
.i.’
.-
C)
c-.Z
cj,
.—
—
o_
•Qj
iH
cl2.
c
E
ClD)
)
o-
z
D
g
2
>
-.
I
•°
—
ccS
O)
i:
--o
-o
--h
-
w.,
4_
C,)
U
U>QC
C,)•
0
—
..
._
c-e
.cl)UQU
0
c>f4U
;I
Page 38

38
ing
needle
that
is
the
shown
to
machine
its
step
highest
under
begins
by
step
on
the
next
page.
the
position.
to
presser
sew
The
in
foot,
reverse.
buttonhole-sew
remembering
Raise
the
Buttonhole
foot
4111
650-01
Put
the
adjust
fabric
the
stitch
setting.
and
the
thread.
buttonhole.
Mark
on
Always
the
fabric
first
where
test
you
sew
if
you
want
a
buttonhole
use
to
a
place
fine
The
thread
buttonhole
tension
the
upper
dial
will
to
thread
look
the
buttonhole
better,
tension
by
symbol.
turning
the
Loosen
buttonholes
foot
has
graduated
the
same
markings
length.
to
help
you
make
the
way
in
to
the
the
as
buttonhole
accessory
the
ordinary
box
foot
and
presser
(41
11
it
is
650-01).
foot.
attached
The
You
in
buttonhole
will
the
find
same
it
In
Buttonholes
order
to
sew
buttonholes,
you
should
change
over
Thread
tension
Stitch
length
Stitch
selector
dt1ih
—
-
—
4
Page 39

39
2NOcXXXX4
3NOOOOON
the
and
Sew
sym
needle
holding
bar.
to
the
stitches
while
back
with
symbol
closing
dial
the
Stop
zig-zag
buttonholes.
stitches
few
to
final
the
turn
one.
of
cut
to
a
Turn
and
first
column
with
makes
the
as
other
how
stitches.
position
the
shows
43
fabric.
the
threads
the
or
four
machine
the
2/4.
highest
distance
sew
its
Page
back
lock
three
Now
bol
in
same
Now
2W?OOOOXN4
to
the
and
ma
dial
with
three
the
reverse.
machine
the
Sew
fabric
stop
in
The
bar.
the
1.
turn
machine
of
stitches
and
the
closing
out
length,
symbol
fabric
stop
the
2/4.
raised
right
the
zig-zag
of
to
the
is
of
Then
makes
symbol
needle
column
selector
out
to
the
3.
raised
stitches.
machine
dial
with
column
the
first
the
stitch
the
the
the
four
symbol
needle
or
Now
turn
chine
When
sews
Set
Page 40

left
slightly
the
than
towards
towards
button
Turn
Turn
sewing
be
slacker
to
slack:
tight:
reverse
too
too
+.
the
appears
to
turn
column
(—).
column
i.e.
can
column
(+).
left,
you
right
plus
Right-hand
minus
Right-hand
Summary:
to
the
one,
If
the
40
H
H
be
so
as
ap
and
reverse
to
sewing
the
How
in
to
—.
the
appears
positioned
stitches.
in
needle
i.e.
turn
be
the
reverse
fabrics.
buttonholes
right,
you
can
stitches
should
of
zig-zag
a
difference
of
fabric,
usual
to
sew
the
to
the
zig-zag
button
by
turning
most
of
left
one,
of
the
columns
produce
of
the
adjusted
sewing
slightly
horizontal.
two
button
than
the
column
slot
is
Normally
be
adjusted
of
the
might
combinations
thread
possible
is
adjustment
the
right
the
can
certain
as
machine
sewing
tighter
If
that
button.
This
pearance
sewing
ever,
many
The
buttonhole
Fine
H
Page 41

41
2LN4
1
by
bar
first
the
needle
difficulty
the
with
the
closing
slightly.
have
and
sew
Stop
length
should
again
Make
stitch
1
stitches.
2/4.
the
you
If
fabric.
four
symbol
to
symbol
of
the
or
dial
to
feed,
increase
more.
the
dial
out
three
once
the
the
turn
raised
sewing
Turn
with
column
Then
3
OOOOOON
to
when
ma
same
sym
even
making
the
dial
the
slightly
the
to
subject
raised
without
turn
stop
with
require
buttons
needle
and
length,
but
in
exactly
selector
or
length.
the
column
right
the
stitch
sometimes
wear
the
same
Stop
with
the
second
the
Set
may
heavy
is
first
to
needle
ordinary
the
raised,
buttonhole
column
buttonholes
are
bar.
3.
Sew
the
column
for
an
sew
buttonholes.
strain
subject
columns
closing
with
the
stitches.
as
I
and
special
the
any
symbol
chine,
When
longer
way
bol
stronger
to
Garments
Reinforced
Page 42

in
*
side
rein
the
a
needle,
pull
way.
presser
under
picture
better.
the
reverse
Using
the
loop
the
you,
one
the
buttonhole
in
the
shape
buttonholes
to
so
that
finished,
the
normal
Lower
of
shown
the
sew
through
been
in
foot.
towards
the
heel
as
to
keep
to
ends
the
presser
threads
at
ioop
be
of
gimp
buttonhole
the
in
order
can
buttonhole.
thread
has
used
tie
them.
sew
the
loose
one
end
the
the
in
gimp
thread
ends
of
buttonhole
the
and
sew
groove
Draw
the
the
projection
a
gimp
material,
thread
gimp
buttonholes
42
and
hand
forces
loose
When
foot,
each
foot.
around
Attach
elastic
A
Corded
to
few
the
out
a
dial
stitches.
second
with
the
make
raised
the
buttonholes.
fabric.
turn
or
four
and
needle
sew
(cont.)
cut
the
the
threads
and
three
again
the
3
and
to
2/4
raised
with
and
by
symbol
Stop
symbol
shows
holding
needle
bar
to
more.
to
how
back
lock
sewing
buttonholes
the
dial
page
while
--------—
dial
next
with
closing
the
fabric.
once
the
The
stitches,
symbol
Stop
second
Turn
of
the
column
Turn
4
Reinforced
1•
i
F[&N
2
Page 43

43
15
399-01
40
knife
Buttonhole
the
forward,
the
edge
repeat
guide.
of
push
With
blade
Pierce
cut
the
knife
reaches
fabric
the
Cut
buttonhole.
the
from
the
other
direction.
care
or
right
buttonhole
The
taking
more
down
at
to
the
serves
the
the
through
to
middle
bead
red
cut
to
parallel
buttonhole.
until
not
less
to
the
angles
small
and
then
as
a
end
the
fabric,
curved
ZD
1EZZZD
the
will
onto
a
safety
you
with
which
handle.
be
pushed
a
good
off,
can
equipped
is
15
399-01),
box,
(40
knife,
providing
when
taken
accessory
knife
knife
of
the
which,
in
the
buttonhole
back
cap
find
The
Buttonhole
Page 44

44
and
the
to
the
guides.
grooves
wish
you
are
only
it
out
the
seam
tension
of
the
adjust
sides
of
thread
it
is
advisable
prevent
to
seam
you
15
(40
(41
11
clamp.
to
the
let
or
left
edge
use
the
If
you
Parallel
while
it
will
pull
higher
thread
the
needles.
thread
you
on
both
spool
the
raised
If
you.
ment
foot
needle
be
sure
Exchange
Raised
first
height
Then
gled,
order
side
15
427-01
389-01
Under
40
4111
U
foot
seam
attachment
presser
seam
[Jj
4114
235-01-02-03
Raised
Raised
side
Upper
foot
guide
the
work.
of
the
the
previously
the
bottom
several
as
sew
the
can
to
to
foot
you
about
seam
are
sewn
the
presser
seams,
you
of
one
parallel
seams
to
see
it
foot
a
by
means
stitching.
thread
disc.
pins
a
time.
becoming
you
put
lay
edge
seam
seam
right
twin
that
using
thread
one
at
cord,
raised
raised
a
presser
the
you
are
the
adjusted
straight
tension
the
spool
one
from
when
gimp
its
straight
the
the
pressed
for
If
is
for
of
a
fit
to
needle
behind
be.
tighter
seam
course,
of
middle
to
thread
threads
use
with
and
is
it
each
runs
freely
and
then
cord,
gimp
of
each
the
thread
Place
entan
on.
it
under
toward
attach
presser
into
tension
in
For
and
this
up
needle
the
the
The
of
rest
a
In
the
and
presser
right
Place
on
to
sew
raised
sewing.
be
necessary
well
will
—
the
raised
the
machine
usual,
as
of
the
on
the
attachment
to
wish
427-01)
389-01)
Change
see
that
ordinary
seams
Page 45

45
a
and
its
5—6
Hold
one
place
holes
passed
sew
control
first
carefully
holes,
have
has
and
button.
foot
of
test
zig-zag.
the
into
the
other
just
of
the
the
centre
and
widest
between
buttons
button
the
threads.
to
needle
the
bracket
Depress
the
you
to
the
mm)
As
most
put
the
Fasten
move
the
the
position
other.
through
towards
(3—4
bar.
foot,
Then
when
ends
behind
the
goes
eel
stitch
selector
presser
presser
dog.
on
buttons
the
process.
position.
the
machine
thread
disturbing
and
then
the
needle
the
handwh
set
the
1/8”—5/32”
of
lower
the
the
the
feed
repeat
highest
Stop
stitches.
both
without
hole
that
Turn
you
spacing
and
Remove
Lower
Sewing
the
to
raise
the
symbol
out
certain
In
order
pressing
carrying
the
symbol
by
when
dog
press
button.
dog
feed
you
feed
feed
is
lowered
the
drop
the
again,
the
work.
dog
feed
dog
on
You
lower
darning
The
feed
Lowering
Page 46

46
...
‘,
..
...-...
.
..
.
......
.-.‘
\
‘
.
7
-d
..1
•
_1—-__
:
:
•
\.,.
—
.
—
I
I
—
/
,‘
...
._
%
j:..•.
7
-
1’
‘---
_)
,-
--
?
I
/
‘I
‘.
)
/
/
ç
,-
/
/
/
,__••\
)
I
I
II’
,‘
,
I
\
.
Move
thread Press
be high
the work
so
that
the
the
slowly
material
stitches
The
will
against
machine speed
be
close
the
stitch
together
should
plate
er
including
the
presser
the
ankle
bar
in
‘shank
order
and
to
tension
remember
the
to
upper
low-
er:hefeed1o
Set
the
machine
to
zig-zag
and
set
Remove
the
thread
the
tension
presser
to
foot,
the
it
the
stitch
to
paper Stretch
the
Use
fabric
embroidery
and
the
sew
fabric
cotton
the outline
in
a
No
hoop
50—40
with
Remove
straight
monograms
the
ever
technique
If
iou
on
have
Draw
garments It
a
steady
the
pattern
hand,
needs
on
you’ll
tissue
practice
soon
paper
how-
learn
pin
Free
Free—hand
hand
embroidery
embroidery
is
suitable
for
decorations
or
Page 47

47
too
close.
forth
and
back
side.
to
side
yarn
of
the
edge
the
of
the
up
the hole
hole
of
the
with
set
dog
and
of
the
as
the
the
the
the
up
the
the
and
you
of
darn
short
on
straight
back
over
bring
that
structure
bias
with
longer
so
Stretch
to
from
the
woolen
the
groove
and
bring
place
machine
feed
the
the
then
and
slowly
hole
the
determine
disengaged,
forth
stitches
foot
and
foot
5.
and
darn
on
in
the
and
the
the
to
on
the
thus
is
and
a
few
3
machine
work
sew
foot
arm
the needle
suited
done
gauze
hoop
uniform.
hoop,
and
dog
back
darning
the
and
the
and
stitches
yarn
free
5.
Thread
Lower
be
the
across
the
feed
with
the
presser
the
between
set
is
filled
a
few
light
the
through
better
also
it
with
speed
move
yourself
the
sewing
dial
and
sewing
hole
guiding
fingers
of
the darning
over
thread
3
and
zig-zag.
be
can
cover
moving
by
darn
you
by
threads
Lower
under
it
when
yarn.
the
speed,
your
it
with
strand
Lower
sock
the
widest
would
and
90°
machine
the
forth
and
Since
begin
the
table.
place
tension
40—50
stiff
the
when
slow
with
fasten
a
foot.
the
draw
between
to
the
socks
if
this
(Darning
large,
is
obtained
Keep
faster
back
and
Fasten
the
and
thread
No.
across
yarn
at
socks
and
Place
Pull
and
tension
circles
hole
are
work
the
be.
The
stitches.
long
fabric
against
hoop
the
thread
becomes
the
the
hole
the
foot
thread.
the
darning
foot.
cotton
machine
or
in
above.
If
the
which
turn
will
length.
hoop
the
the
thread.
rests
a
in
with
darn
The
zig-zag
with
off
Cut
across
Stretch
hole.
darning
lower
under
presser
darning
the
thread
the
Set
Darning
fabric.)
the
fabric
described
forth.
stitches
Then
stitches
stitch
guide
with
hole
of
edge
lower
the
fabric
work
stitching,
darning
Use
Darning
button.
the
drop
on
C
hook
darning
in
the
the
C
and
that
of
the
between
pin
342-01,
behind
A
sure
the
16
them
arms
action
41
Press
Make
The
pressing
foot,
place
symbol
clamp.
by
finger,
accessory)
pressing
“ankle”.
feet,
darning
the
index
position.
by
E.
needle
the
foot
and
highest
(extra
D.
by
presser
attach
lowered
bar
lever
presser
other
and
thumb
to the
foot
is
support
the
the
B,
dog
and
as
between
needle
feed
feed
The
presser
Lower
against
rests
accomplished
is
foot
spring
the
way
same
clamp,
needle
together
the
Raise
Darning
*
Page 48

48
at
the
back
of
the
bulb.
bulb
in
of
the
turn
take
the
light
machine.
and
a
new
left
and
Push
is
placed
the
wattage
upwards
inserting
the
bulb
correct
it
turn
to
illustration.
light
The
press
When
a
the
The
Changing
Use
only
on
the
the
the
as
shown
original
to
turn
turn
into
arm
is
shown
of
a
it
upwards.
1/4
put
out.
upper
bulb
it
it
the
bulbs.
plate
right.
socket.
/4
it
of
in
bulb
be
of
be
are
any
per
the
fin
that
to
or
shuttle
brush
teeth
plate)
not
sewing
spindle,
should
adhere
Sizing
and
box.
the
the
need
new
the
Also
check
spindle
the
machine’s
can
clean.
case
with
and
(needle
It
your
around
brush.
the
affect
fabric
bobbin
the
accessory
clean
plate
cleaning,
wound
a
case
and
from
the
be
brushed
the
is
in
be
removed
throat
regular
satisfactorily,
remainders,
the
In
such
shuttle
also
necessary,
which
dog
the
with
of
the
should
occasionally
requires
to
serve
of
cleaning
brushed
The
you
machine
removed.
thread
cleaned
formance.
spindle
ishing
compounds
(hook)
Whenever
15
feed
(40
the
should
oiled,
machine
In
order
555—01)
however.
Care
Page 49

49
of
an
page
11—12.
See
See
page
spindle
See
it
with
12.
See
the
plate.
Polish
page
See
pages
tensioned.
threaded.
around
throat
full.
See
tightly
inserted.
48.
wrapped
the
is
damaged.
too
wound.
is
too
is
incorrectly
is
incorrectly
See
page
is
or
change
hole
wound
unevenly
thread
plate
is
is
thread
thread
case
breaks
or
cloth
throat
bobbin
bobbin
15.
lower
13.
lower
bobbin
the
shuttle.
Lint
48.
emery
The
The
The
page
The
page
The
13.
The
thread
7.
6.
5.
4.
3.
2.
1.
Lower
be
can
feed
and
9.
Husqvar
plate
needle
to
page
Use
The
See
size.
the
throat
it.
the
machine
inserted.
right
pulling
needles.
the
against
by
helped
705
H
is
not
come
the
fabric
have
is
incorrectly
needle
easily
may
needle
breaks
na-Viking
3.
The
broken.
then
through
2.
You
1.
The
Needle
has
See
See
See
sharp
change
and
9.
9.
has
too
or
the
needle.
page
pin.
page
eye
cloth
is
chipped
not
correspond.
tensioned.
threaded.
See
the
spool
See
needle
48.
an
emery
plate
do
tightly
incorrectly
Change
inserted.
on
or
page
with
too
blunt.
the
needle.
See
throat
thread
is
is
or
is
entangled
Change
groove
plate.
Polish
the
knotted.
bent
incorrectly
edges.
in
9.
and
is
thread
thread
is
is
breaks
needle
throat
hole
page
needle
thread
16.
upper
10.
upper
needle
needle
thread
9.
Thread
edges.
8.
The
the
sharp
The
7.
table
6.
The
5.
The
page
4.
The
page
3.
The
2.
The
1.
The
Upper
10
the
the
the
of
bobbin
pages
as
16.
9.
a
blunt
spindle
the
in
See
correspond.
See
pages
page
the
needle.
page
examine
to
the
wound.
thickness
do
not
See
See
seam
action.
are
due
around
inserted
same
threaded.
correct.
Change
inserted.
other
always
results
unevenly
the
fabric
not
blunt.
any
48.
wrapped
13.
incorrectly
is
is
not
9.
and
incorrectly
is
or
taking
Therefore
sewing
hints
or
See
bobbin
lower
thread.
lower
table,
needle,
13.
machine
thread
needle
needle
first
cases
shuttle.
Lint
case.
The
11—12.
The
upper
The
See
The
and
The
The
The
The
damaged
most
See
page
threads
page
is
thread
thread
page
thread
is
tension
is
bent
is
incorrectly
stitches—unattractive
before
needle.
poor
9.
8.
7.
6.
5.
4.
3.
2.
1.
Unattractive
needle
or
In
Maintenance
Page 50

50
3.
The
page
needle
9.
is
damaged.
Change
the
needle.
See
relation
15—
16.
to
the
thickness
of
the
fabric.
See
pages
2.
The
page
upper
16.
and
lower
thread
tension
is
too
tight
in
Fabric
1.
The
puckers
upper
thread
is
too
tightly
tensioned.
See
3.
The
winding.
rectly
thread
adjusted.
See
guide
page
See
for
11.
page
bobbin
12.
winding
is
not
cor
2.
1.
The
The
11.
bobbin
machine
is
is
not
not
pressed
correctly
threaded
for
bobbin
Irregular
bobbin
winding
in
far
enough.
See
page
This
Uneven
may
thread
be
due
tension
to
poor
quality
thread.
Lower
The
needle
thread
is
incorrectly
not
brought
inserted.
up
by
the
See
upper
page
thread
9.
Maintenance
hints
(cont.)
3.
The
special
wall
brush.
socket
See
voltage
page
48.
is
too
low.
2.
Dirt
bobbin
or
lint
and
has
bobbin
got
into
case
the
and
shuttle.
brush
Take
clean
out
with
the
of
the
feed
dog.
See
page
48.
1.
Dirt
the
throat
or
lint
plate
has
got
and
under
brush
the
clean
throat
between
plate.
the
Loosen
teeth
Machine
45.
symbol
runs
sluggishly
on
the
drop
feed
button.
See
page
iI
Machine
2.
I.
The
The
stitch
feed
does
dog
length
hot
is
feed
lowered.
dial
the
is
set
fabric
Raise
on
0.
it
by
pressing
the
held
The
thread
together
tension
is
too
slack.
See
page
16.
The
seam
is
too
loose.
Fabric
layers
not
2.
The
with
page
presser
the
48.
special
foot
pressure
brush
or
is
small
too
low.
screwdriver.
See
page
See
16.
fr
Stitch
1.
The
length
feed
dog
varies
is
choked
by
dust
and
dirt.
Clean
it
1c
Page 51

51
foot
II
650-01
Buttonhole
41
fabrics
foot
for
thin
Presser
4114531-01
foot
331-01
presser
Blindstitching
41
5
foot
12
989-01
accessories.
Zipper
41
with
standard
or
box,
complete
grooves
foot.
seam
cord
with
seam
427-01
11389-01
use
guide
15
three
presser
Raised
4!
without
for
cord
Raised
40
Accessory
16
202-02
41
foot
stitch
presser
Utility
4!
14512-01
machine
mounted
presser
on
the
foot
Zig-zag
41
11383-01
box
of
accessory
Contents
Page 52

52
Contents
ED
41
Bobbins,
14
401-01
six
41
II
866-01
Glide
plate
Needle
case
40
(5
819-01
1060
60
80
with
needles System
I
40
15
555-01
Brush
‘I
41
12
697-01
Small
screwdriver
40
15
399-01
Buttonhole
iDItL
knife
(seam
ripper)
of
accessory
box
705Ff
4
9;.,
,,.
,.w
1*
ar
4.
,t’.
r
lw,
A
ps
Page 53

53
mate-
5/64”
For
thin
seams,
mm).
for
(5
Suitable
for
rolled
stitching.
3/16”
zig-zag.
hemmer
zig-zag
hemmer
medium
Jointed
or
medium
Jointed
For
387-01.
stitch
na!.
(2
mm).
4111
385-01.
straight
4111
1/8”
Suitable
5/64”
tension.
scalloping,
stitching.
hemmer,
hard
for
zig-zag
and
or
small
jointed
zig-zag
hemmer
stitch
stitch
wide
Jointed
straight
Straight
soft
material.
mm).
For
386-01.
For
384-01.
for
(3
4111
(2
mm).
4111
accessories
Extra
Page 54

54
the
meaning.)
U.S.A.
“hemstitching”
may
have
a
different
40
two
straight
15
layers
stitching
of
material,
and
long
which
stitches.
are
sewn
(Note:
together
In
parts
with
of
(45
yarn
mm).
over
Weaver’s
the
reed
367-01.
Hemstitcher.
Put
the
fork
between
4113
458-01,
1
3/16”
Extra
can
be
varied,
upper
I
thread
tension.
41
and
(7/8”15/16fl)
II
15
822-01.
mm
wide
wide
Bias
unfolded
binder.
folded
Can
edgings
edgings.
be
used
and
Seam
for
22—24
8,
distance
10,
mm
12
4113
transferring
the
fabric.
931-01.
For
instructions
zig-zag,
accessories
Marking
and
reed
(30mm).
sew
for
on
rug
4113
with
sewing.
458-02,
straight
Wind
1
stitch.
*
25/32”
the
stitch
from
length
the
paper
2—2.5,
pattern
and
loose
to
stitch
Lu
foot,
which
is
used
for
L
Page 55

55
be
but
large
cord
the
on
sewing
Insert
edges.
for
material.
high
with
foot
of
the
attachment.
Presser
layers
Piping
and
buttons
237-01.
the
022-01.
15
93
tons
40
tween
40
with
un
braiding,
down
decora
attached
threads
from
satin-stitching.
for
braiding.
the
and
attaching
the
threader
raised
holes
five
of
guide
for
draw
a
foot
and
needle
or
for
with
middle
the
foot
the
yarn
foot
in
through
Presser
presser
Thread
over
Presser
stitch
inserted
holes.
the
is
005-01.
the
287-01.
538-01.
straight
a
which
93
40
through
derneath
4116
stitching
tive
4114
V
accessories
4
Extra
Page 56

ef
*
56
stitching.
on
small
needle
needle
setting
distance.
Triplet
Triplet
zig-zag
needle
622-02.
distance.
622-01.
Max.
mm)
4111
needle
4111
o.
0
a
hemstitch
iii
stitching.
‘r
zig-zag
produces
for
needle
used
Wing
U
be
Can
684-01.
fect.
4112
(2.5
mm)
straight
3/32”
1/8”
(3
resp.
with
80
with
zig-zag,
90
No.
No.
in
for
sewing
100
No.
needle
Cutting
683-01.
leather.
4112
small
and
mm).
(4
mm).
(2
mm).
(3
middle
5/32”
1/8”
5164”
on
seams.
80,
80,
80,
No.
No.
stitch.
setting
raised
needle No.
needle
needle
straight
zig-zag
seams and
Twin
Twin
Twin
resp.
Max.
parallel
235-03.
235-02.
235-01.
zig-zag,
Notice:
For
4114
4114
4114
n
accessories
Extra
Page 57

58
Gathering.
Zig-zag
Zig-zag
Hemming
Picot
(overcasting
linen
goods.
folded
edge).
can
Stitch
be
length
varied.
and
stitch
width
Zig-zag
Sewing
on
lace.
Appliqués.
can
Stitch
be
length
varied.
and
stitch
width
Overcasting.
Zig-zag
The
can
be
stitch
varied,
length
Basting
Straight
Gathering.
stitch
The
varied.
stitch
length
can
be
Joining,
Straight
hems,
stitching
pleats.
Operation
2,5
Zig-zag
41
11
383-01
presser
foot
OOOOON
.
Utility
presser
foot
0,3-0,5
41
14
512-01
Utility
presser
foot
Zig-zag
41
11
383-01
presser
foot
3—3,5
4
-----—-—
Zig-zag
41
II
383-01
presser
foot
41
Zig-zag
11
383-01
presser
foot
()
1
41
14
512-01
•2
,.
tê
41
Zig-zag
11
383-01
presser
foot
Thread
guide
tension
Stitch
length
Stitch
selector
Presser
foot
L
—
p.
Page 58

57
and
hole,
0
sewing
loose
fabric
for
needle
when
foot.
very
plate
in
used
stitching
with
round
ou
Oi
flHI
plastic-coated
can
be
Zipper
243-01
Glide
thin
fabrics.
straight
plate
imitations.
plastic,
plate
41
12989-01
41
14
or
for
Throat
4116240-01
0
leather
foam
The
glide
(8”)
(6”)
(4”)
(2/32”)
030-Ol
029-01
028-01
extra
embroidery
93
thin
fabrics.
for
diameter
diameter
diameter
diameter
and
40
4093
4093
in
foot
cm
cm
20
15
0cm
5,5cm
Presser
for
darning
stitching
40
93
030-01
40
93
029-01
93
40
028-01
40
15
398-01
Frames
15
398-01
40
Oo
the
tricot
straight
II
394-01
fine
41
etc.
for
foot.
skipped
against
foot
Darning
avoid
flat
nylon,
in
to
fabric
Presser
16342-01.
plate
the
sewing
2988-01.
41
stitches.
throat
Keeps
special
41
plate,
Buttonhole
244-01
Glide
4l
14
foot
for
41
11
650-0
I
EE
3
accessories
Extra
*
Page 59

Elastic
Hemming
blindsi
in
elastic
itch
hemming
fabrics,
Blindstitch
Finishing
Hemming
of
in
hemming
edges.
close-woven
fabrics,
Decorative
Top
stitching
stitching.
crotch
insertion.
Extra
strong,
sewing,
for
and
example
arm
for
Elastic
Joining
straight
of
elastic
stitch
fabrics.
fabrics
stretch
that
materials,
tend
to
especially
fray.
Elastic
operation.
Sews
and
knit
finishes
For
stitch
stretch
seams
and
in
non-
one
Mending
Mending
and
darning
in
all
fabric.
easily
Sewing
frayed
in
terry
fabrics.
cloth.
Overcasting
Three-step
zig-zag
in
elastic,
thin
or
Thread
41
foot
Il
383-01
®
.
Zig-zag
presser
—
1
41
foot
14
512-01
41
Utility
II
383-01
presser
0
.
41
presser
Blindstitching
15
331-01
foot
,
5I
515$
SI
SI
515/
41
presser
Blindstitching
15
331-01
foot
41
Utility
14
5
presser
12-01
foot
EEEEEEE
Utility
41
14
512-01
presser
foot
Utility
41
14
512-01
presser
foot
0,5—1
VVVV
Utility
foot
41
14
512-01
presser
foot
tension
Stitch
length
Stitch
selector
Zig-zag
presser
—-
Presser
foot
59
J
L
Page 60

09
 Loading...