

husquarna PG280 Operator's Manual
GGGGBBBB DDDDEEEE FFFFRRRR NNNNLL
LL
PG280
Oper ator’s manual Bedienungsanweisung
Manuel d’utilisa
tion Gebruiksaanwijzing
Please r ead the operator’s manual carefully and make sure you understand the instructions before using the machine.
Lesen Sie die Bedienungsanweisung sorgfältig durch und machen Sie sich mit dem Inhalt vertraut, bevor Sie das Gerät
ben
utzen.
Lire attentivement et bien assimiler le manuel d’utilisation avant d’utiliser la machine.
Neem de gebruiksaanwijzing grondig door en gebruik de machine niet voor u alles duidelijk heeft begrepen.

KEY T O SYMBOLS
2
– English
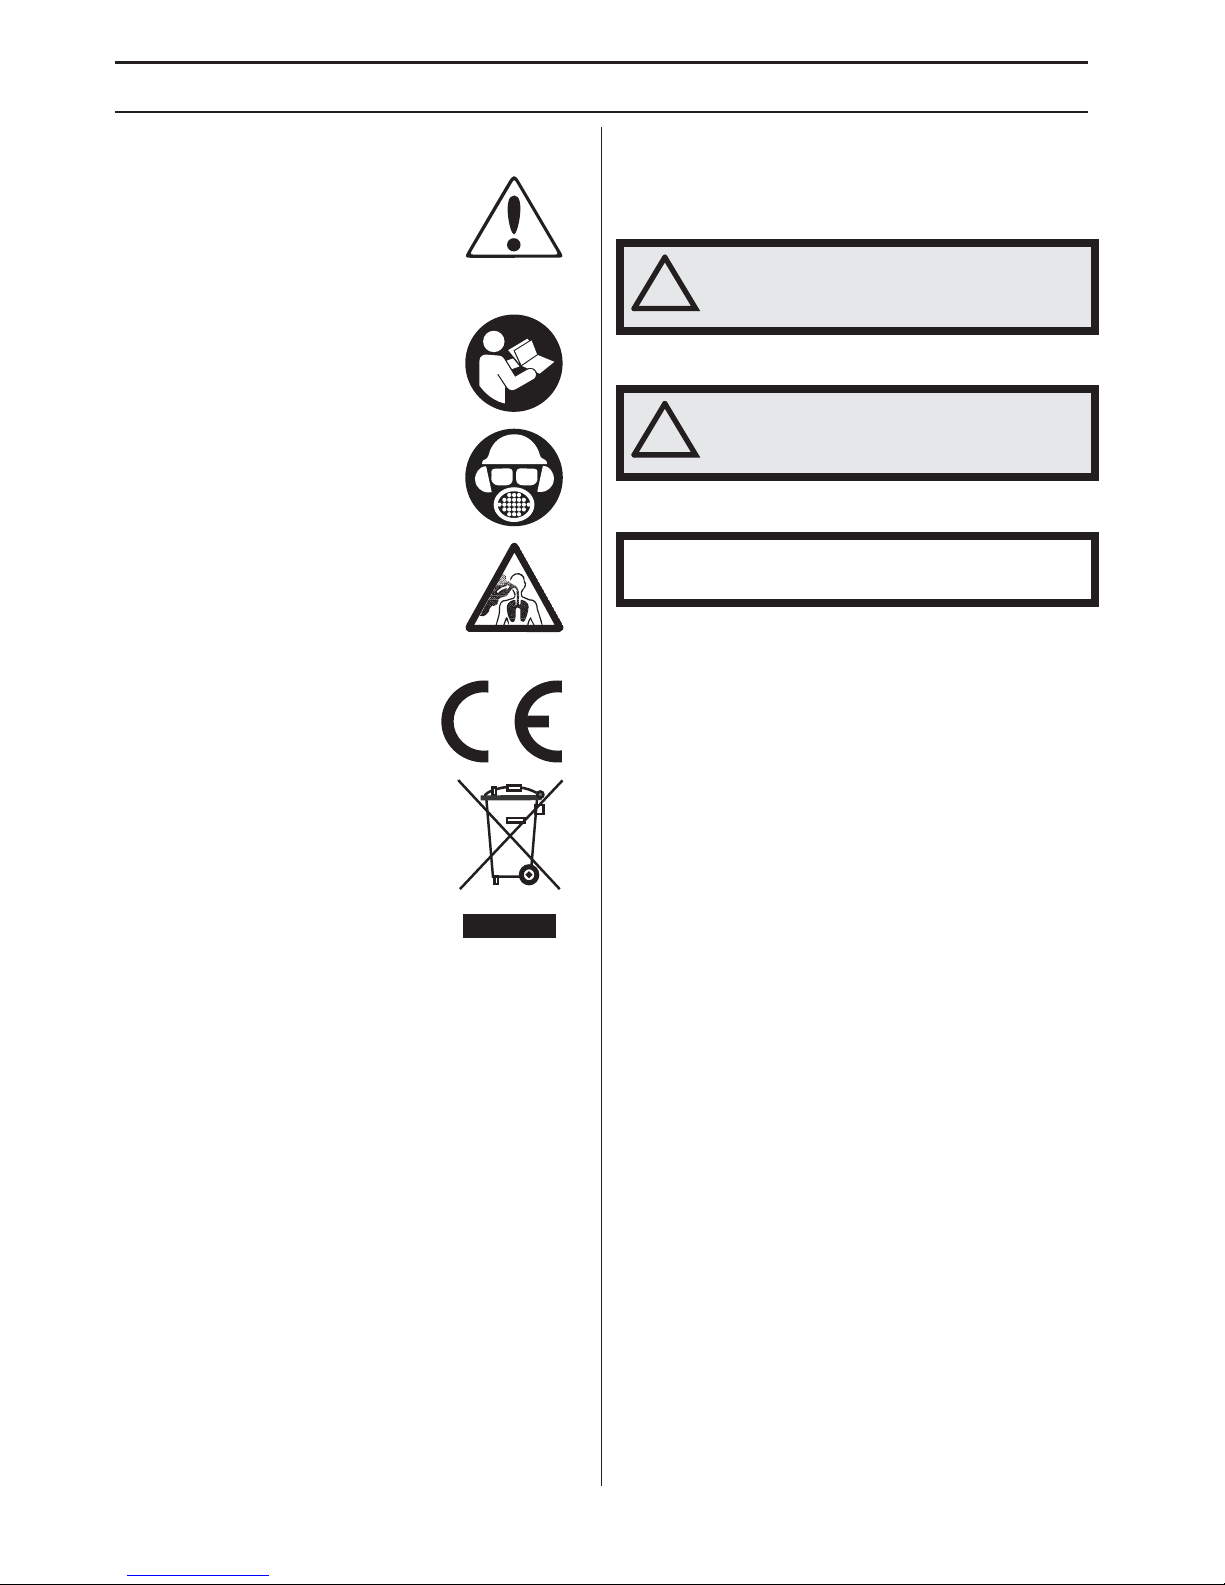
Symbols on the mac hine:
W
ARNING! The machine can be a
dangerous tool if used incorrectly or
carelessly, which can cause serious or
fatal injury to the operator or others.
Please read the operator’s manual
carefully and make sure you understand
the instructions before using the
machine.
Wear personal protective equipment.
See instructions under the ”Personal
protective equipment” heading.
WARNING! Dust forms when grinding,
which can cause injuries if inhaled. Use
an approved breathing mask. Always
provide for good ventilation.
This product is in accordance with
applicable EC directives.
En
vironmental marking. Symbols
on the product or its packaging indicate
that this product cannot be handled as
domestic waste.
By ensuring that this product is taken
care of correctly, you can help to
counteract the potential negative
impact on the environment and people
that can otherwise result through the
incorrect waste management of this product.
For more detailed information about recycling this
product, contact your municipality, your domestic waste
service or the shop from where you purchased the
product.
Other symbols/decals on the mac hine refer to special
certification requirements for certain markets.
Explanation of warning le vels
The w arnings are graded in three levels.
W
ARNING!
CAUTION!
NOTICE!
!
W
ARNING! Indicates a hazardous
situation which, if not avoided, will result
in death or serious injury.
!
CA
UTION! Indicates a hazardous
situation which, if not avoided, could
result in minor or moderate injury.
NO
TICE! Is used to address practices not related to
personal injury.

CONTENTS
English
–
3
Contents
KEY TO SYMBOLS
Symbols on the machine: ..................................... 2
Explanation of warning levels ............................... 2
CONTENTS
Contents ............................................................... 3
PRESENT ATION
Dear Customer , .................................................... 4
Design and features ............................................. 4
PG280 .................................................................. 4
WHA T IS WHAT?
What is what on the g rinder? ................................ 5
MA
CHINE´S SAFETY EQUIPMENT
Gener al ................................................................. 6
Stop/run switch ..................................................... 6
Emergency stop ................................................... 6
OPERA TING
Gener al safety precautions ................................... 7
Personal safety ..................................................... 8
Various machine modes ....................................... 9
Handlebar adjustment .......................................... 9
Frame height adjustment ...................................... 9
Grinding pressures ............................................... 10
Connect the vacuum cleaner ................................ 10
Grinding guide ...................................................... 10
Determining the hardness of concrete ................. 11
The motor’s direction of rotation ........................... 11
Diamond selection ................................................ 12
Changing the diamonds ....................................... 14
Edge grinding ...................................................... 15
Transport and storage .......................................... 16
ST
ARTING AND STOPPING
Bef ore starting ...................................................... 18
Starting ................................................................. 18
Stopping ............................................................... 18
MAINTENANCE
F
aults and trouble shooting .................................. 19
Maintenance ......................................................... 19
Service ................................................................. 19
TECHNICAL D ATA
T
echnical data ...................................................... 20
EC Declaration of Conformity ............................... 21

PRESENT A TION
4
– English
Dear Customer ,
Thank y ou for choosing a Husqvarna product!
It is our wish that you will be satisfied with your product
and that it will be your companion for a long time. A
purchase of one of our products gives you access to
professional help with repairs and services. If the retailer
who sells your machine is not one of our authorized
dealers, ask him for the address of your nearest service
workshop.
This operator’s manual is a valuable document. Make
sure it is always at hand at the work place. By following its
content (operating, service, maintenance etc.) the life
span and the second-hand value of the machine can be
extended. If you will sell this machine, make sure that the
buyer will get the operator´s manual.
More than 300 y ears of innovation
Husqv arna AB is a Swedish company based on a tradition
that dates back to 1689, when the Swedish King Karl XI
ordered the construction of a factory for production of
muskets. At that time, the foundation was already laid for
the engineering skills behind the development of some of
the world's leading products in areas such as hunting
weapons, bicycles, motorcycles, domestic appliances,
sewing machines and outdoor products.
Husqvarna is the global leader in outdoor power products
for forestry, park maintenance and lawn and garden care,
as well as cutting equipment and diamond tools for the
construction and stone industries.
Owner responsibility
It is the o wner’s/employer’s responsibility that the operator
has sufficient knowledge about how to use the machine
safely. Supervisors and operators must have read and
understood the Operator’s Manual. They must be aware
of:
• The machine’s safety instructions.
• The machine’s range of applications and limitations.
• How the machine is to be used and maintained.
National legislation could regulate the use of this
machine. Find out what legislation is applicable in the
place where you work before you start using the machine.
The man ufacturer’s reservation
Subsequent to pub lishing this manual Husqvarna may
issue additional information for safe operation of this
product. It is the owner’s obligation to keep up with the
safest methods of operation.
Husqvarna AB has a policy of continuous product
development and therefore reserves the right to modify
the design and appearance of products without prior
notice.
For customer information and assistance, contact us at
our website: www.husqvarna.com
Design and f eatures
V
alues such as high performance, reliability, innovative
technology, advanced technical solutions and
environmental considerations distinguish Husqvarna's
products. Safe operation of this product requires the
operator to read this manual carefully. Ask your
Husqvarna dealer if you need more information.
Some of the unique features of your product are
described below.
PG280
•
The machine is intended for grinding concrete
surfaces with varying hardness.
• PG280 is robust and easy to use
• The machine can be folded and is collapsible for
simpler transport.
• The machine is equipped with a floating cover.
• The machine is an edge grinder.
• 1-phase
• 280 mm grinding surface
English – 5
WHA T IS WHA T?
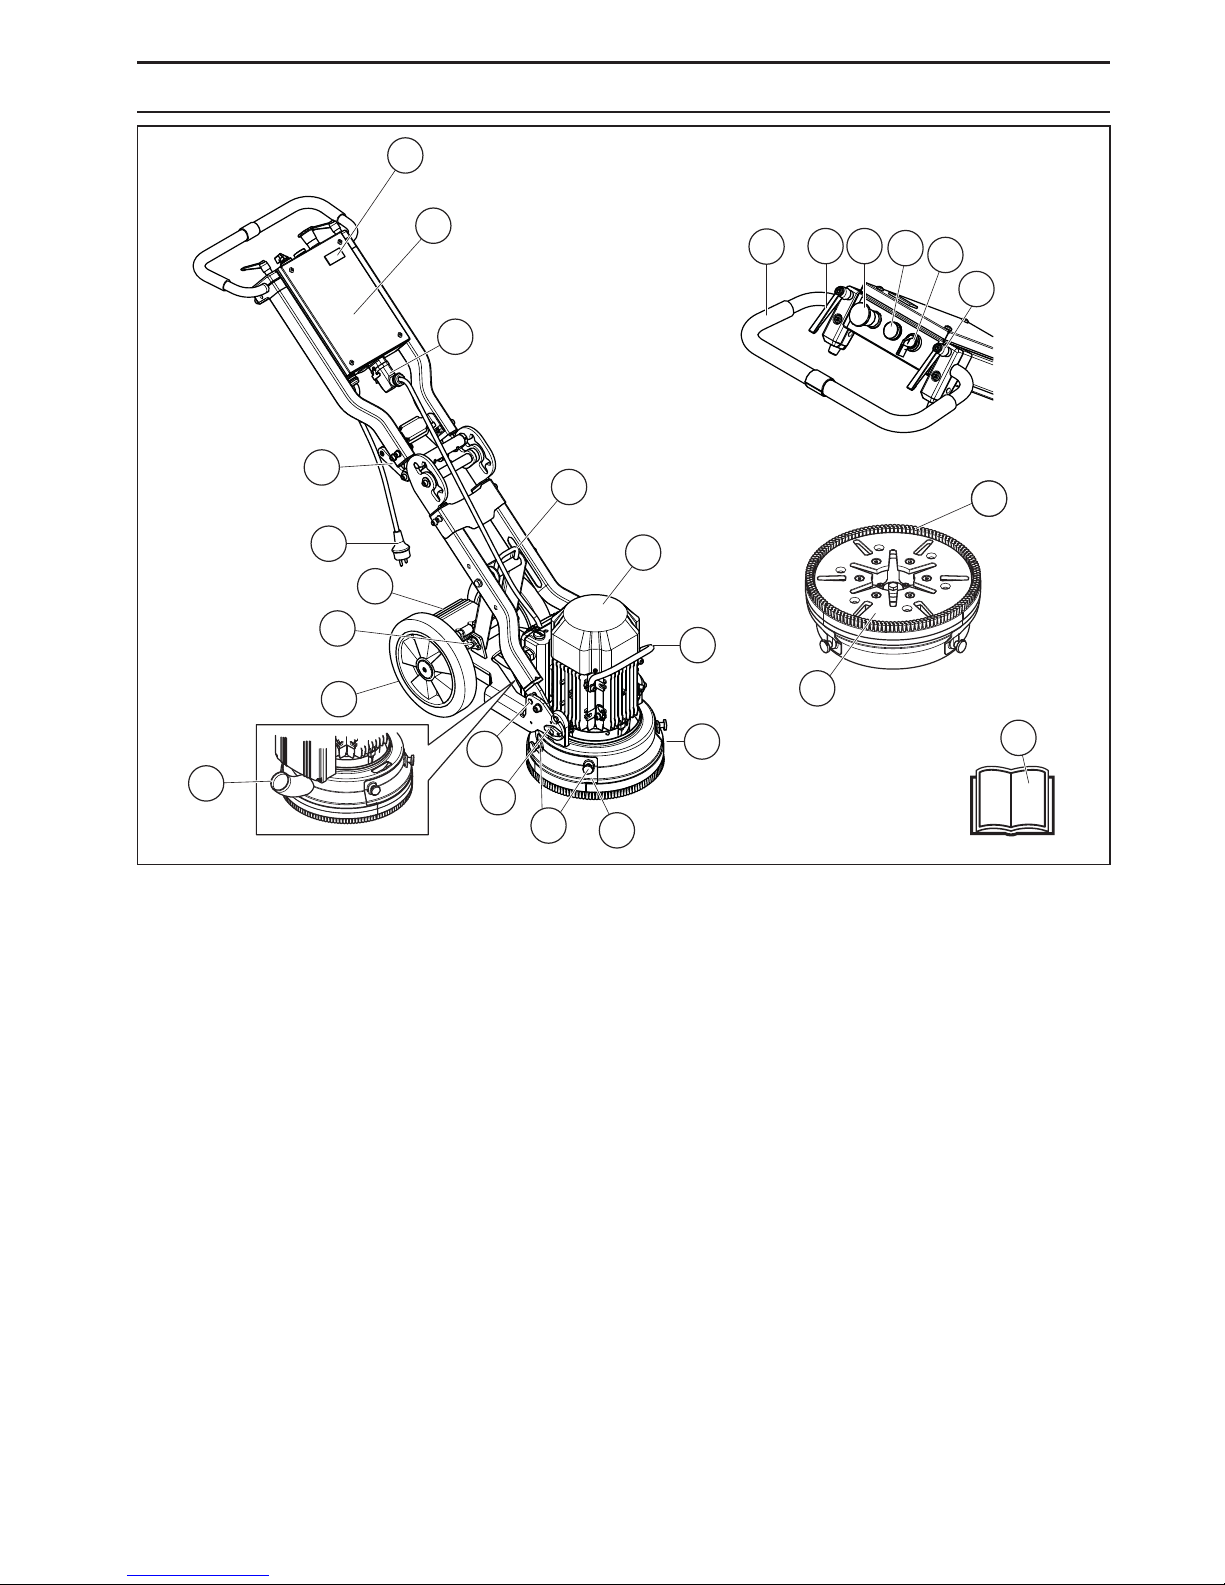
What is what on the grinder?
2
1
4
24
3
4
5
6
7
8
9
10
11
12
13
15
16
17
18
19
20
21
22
23
24
25
14
1
Counter
2 Electrical cabinet
3 Handle / handlebar
4 Locking lever for handlebar adjustment
5 Emergency stop
6 Overload lamp
7 Stop/run switch
8 Connection, quick connection for motor cable
9 Handle for angle joint
10 Plug
11 Foot pedal
12 Locking knob
13 Rubber wheels
14 Connection, vacuum hose
15 Lock function
16 Attachment for motor/grinding head
17 Screws for edge grinding hatch
18 Hatch, edge grinding
19 Lifting eye
20 Electric motor
21 Lift handle, motor
22 Floating cover
23 Tool plate
24 Brush list
25 Operator’s manual
MA CHINE´S SAFETY EQ UIPMENT
6
– English
General
This section descr ibes the machine´s safety equipment,
its purpose, and how checks and maintenance should be
carried out to ensure that it operates correctly.
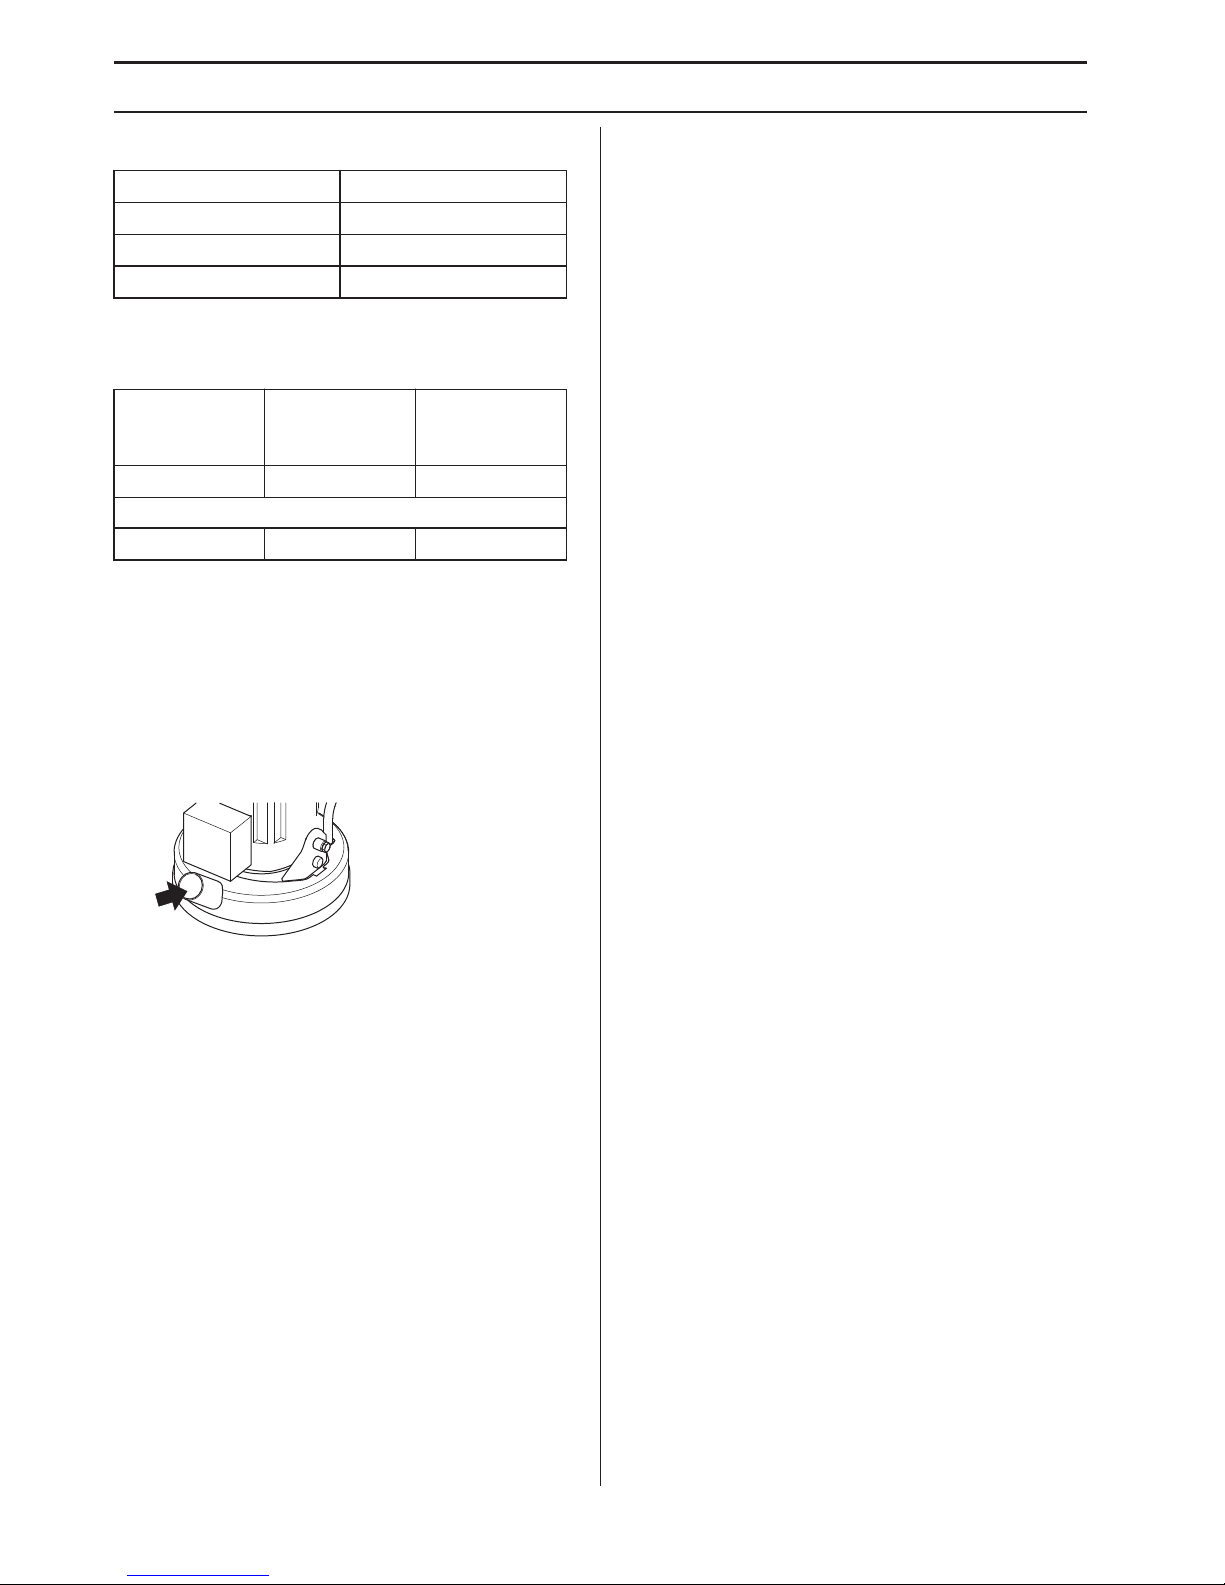
Stop/run s witch
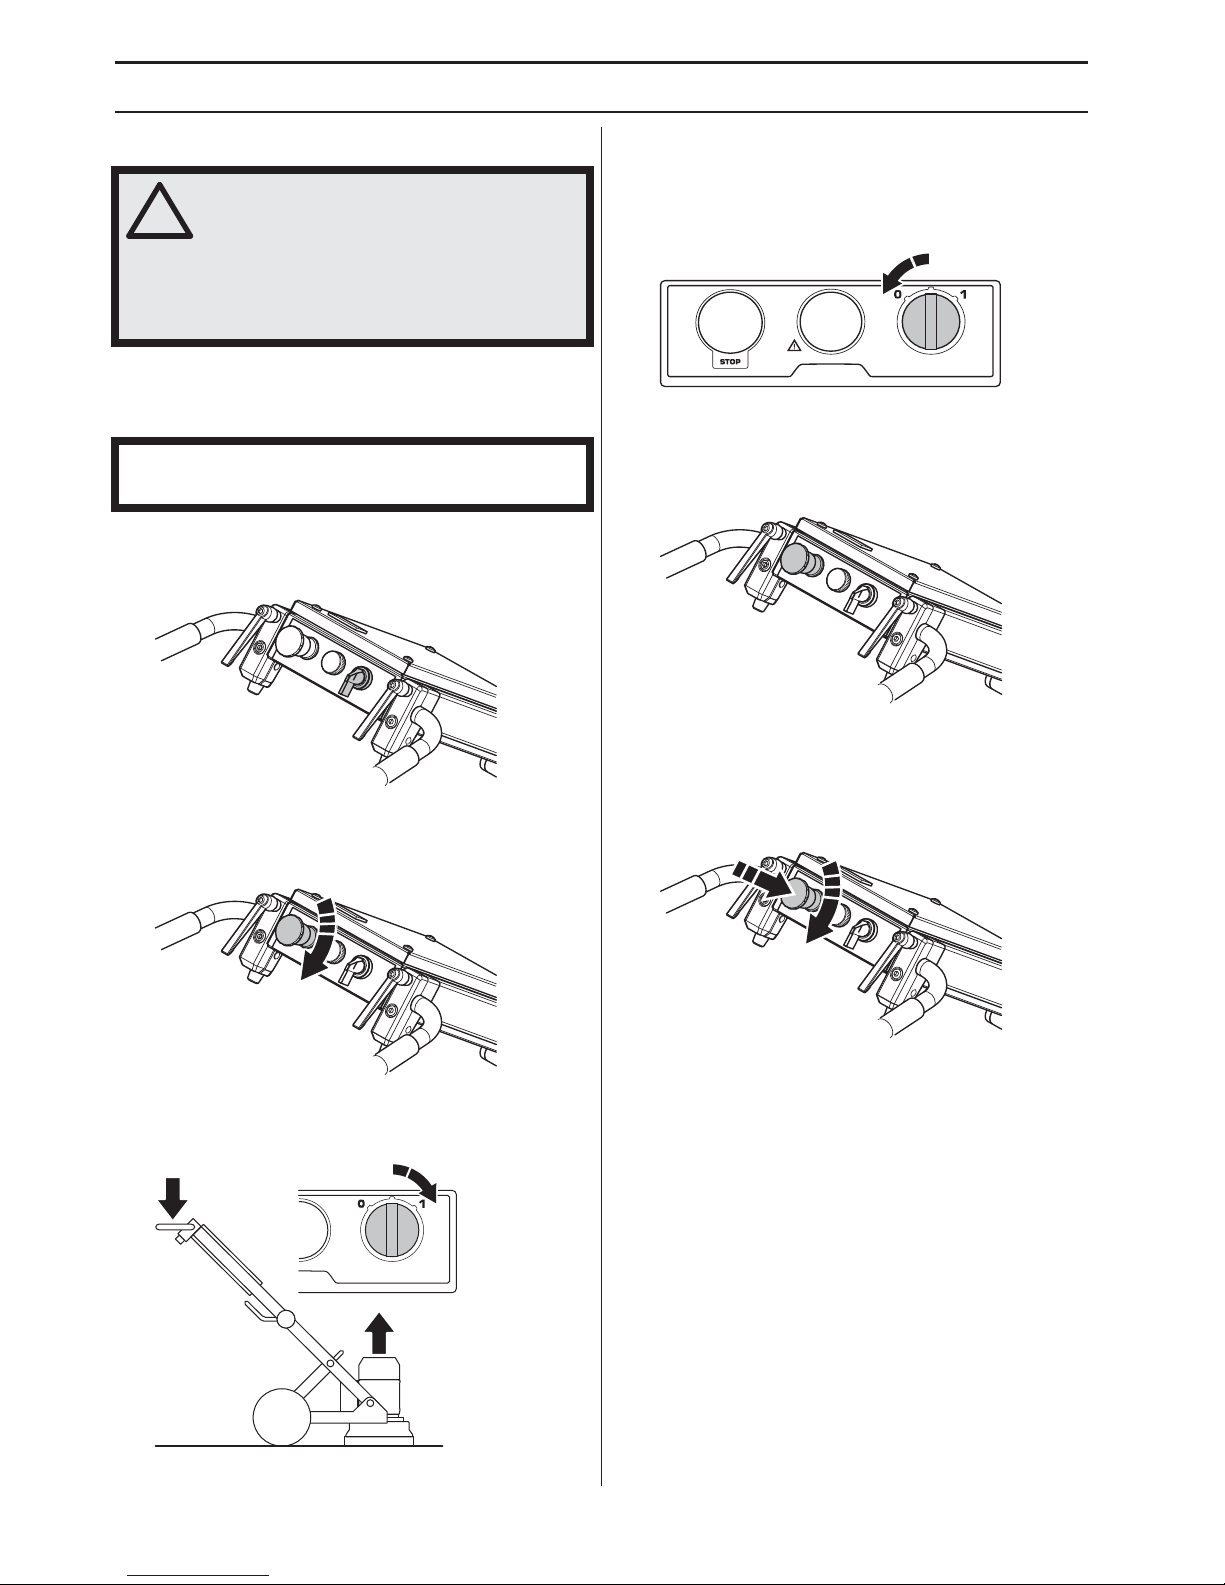
The star t/stop knob is used to start and stop the machine.
Chec king the stop/run switch
Chec k that the emergency stop or machine stop button
are not pressed by turning them clockwise.
• Reduce the pressure between grinding disc and floor
by pushing down the handle without lifting the grinding
unit from the floor when starting.
• Start the machine by turning the 0/1 knob to position
1 (drive). The machine will then start smoothly and
accelerate to the set speed within 5 seconds.
• Turn the start/stop knob to '0' (stop) to stop the
machine.
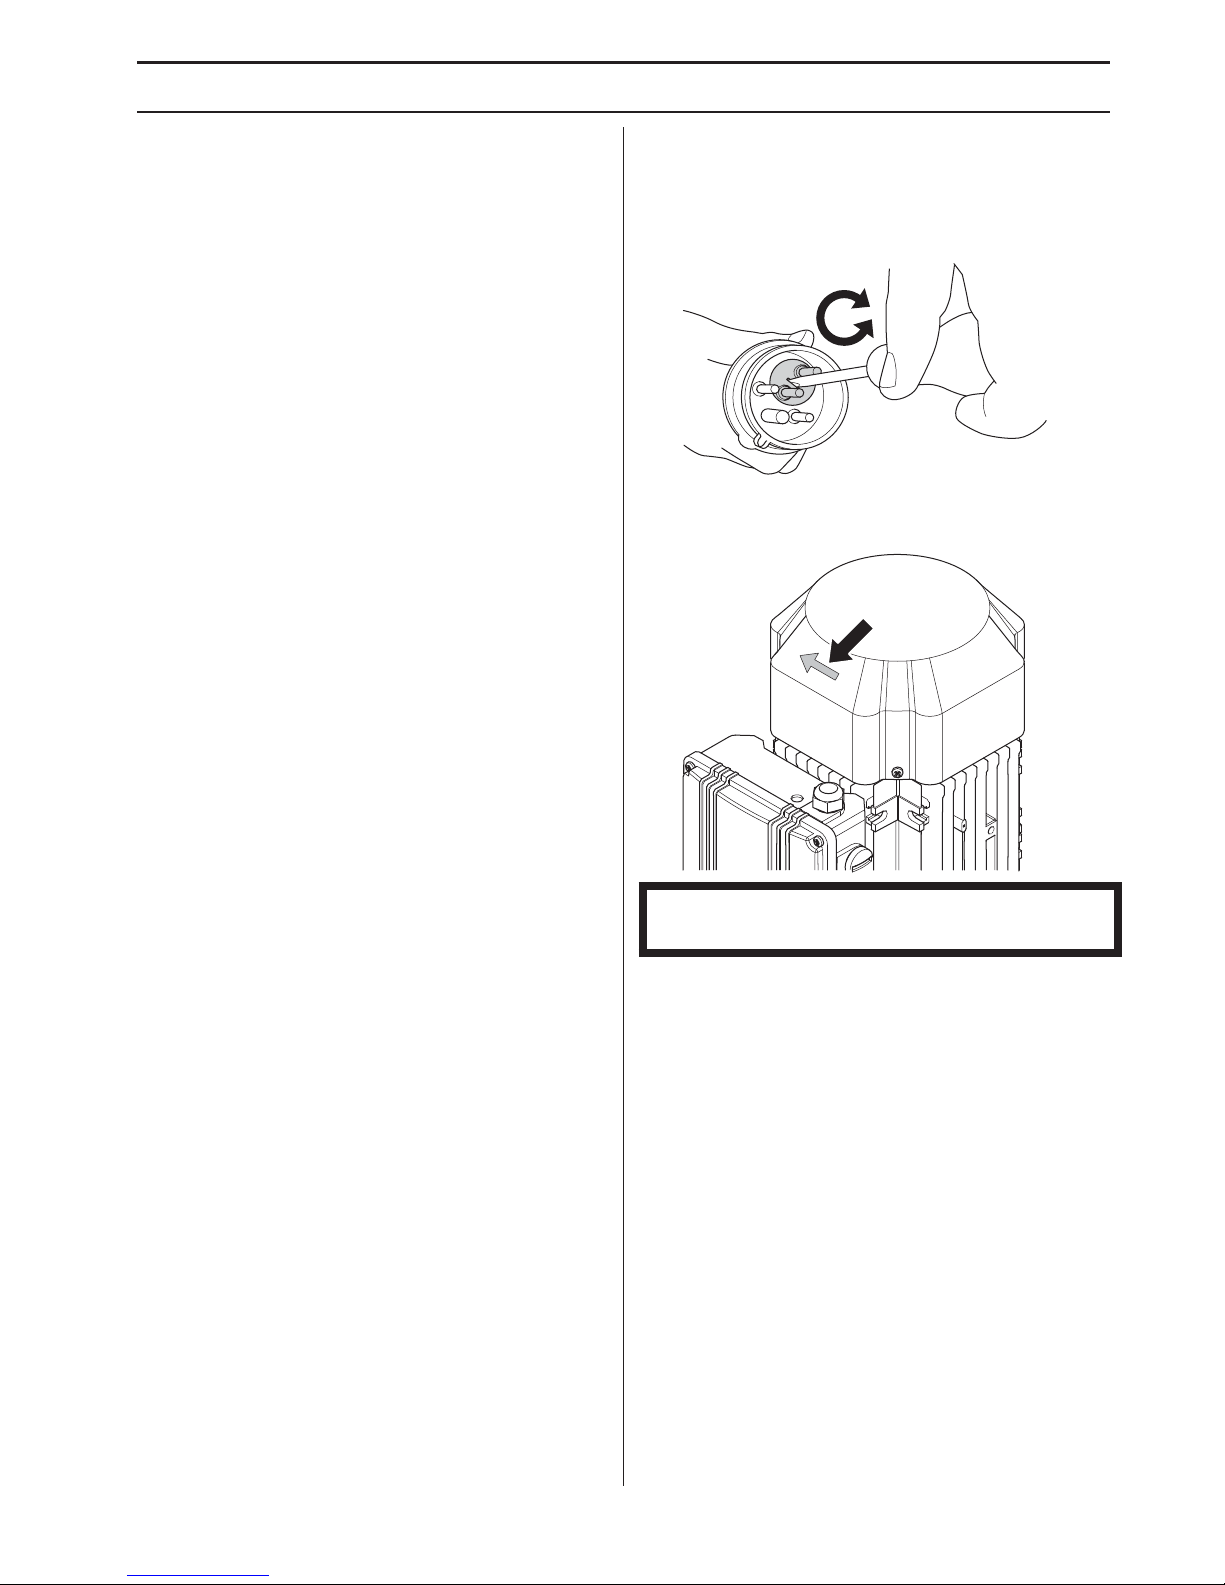
Emer gency stop
The emergency stop is used to quic kly switch off the
engine. The emergency stop at the machine breaks the
mains power supply.
T
esting the emergency stop
•
Press the emergency stop. Check that the engine
stops.
• Disengage Emergency Stop button (twist clockwise).
!
W
ARNING! Never use a machine with
faulty safety equipment. The machine's
safety equipment must be checked and
maintained as described in this section.
If your machine fails any of these checks
contact your service agent to get it
repaired.
CA
UTION! Connect the motor cable to the electrical box
before connecting the plug.
~1 mm
1
2
1
2

OPERATING
English – 7
General safety precautions
• Do not use the machine without first reading and
understanding the contents of this Operator’s Manual.
Save all warnings and instructions for future
reference.
Work area safety
• Keep work area clean and well lit. Cluttered or dark
areas invite accidents.
• The machine should not be used in areas where
potential for fire or explosions exist.
Electrical safety
• Check that the mains voltage corresponds with that
stated on the rating plate on the machine.
• Inspection and/or maintenance should be carried out
with the motor switched off and the plug disconnected.
• Always shut down the machine before disconnecting
the power plug.
• Never drag the machine by means of the cord and
never pull out the plug by pulling the cord. Hold the
plug to disconnect the power cord.
• Never use the machine if any cable or plug is
damaged, but hand it in to an authorized service
workshop for repair.
• The machine must never be driven to such a depth in
water that it reaches up to the machine’s equipment.
The equipment can be damaged and the machine can
be live, resulting in personal injuries.
• Always have the power cable disconnected when
connecting and disconnecting the contact between
the motor and the electrical box.
Grounding instructions
• The machine is equipped with a grounded cord and
plug and should always be connected to a grounded
outlet. This reduces the risk of electric shock in the
event of malfunction.
• The use of adaptors is not allowed with the machine.
Extension cords and cables
• The marking on the extension cable must be the same
or higher than the value stated on the machine’s rating
plate.
• Use grounded extension cables.
•
When operating a power tool outdoors, use an
extension cord suitable for outdoor use.
Use of a
cord suitable for outdoor use reduces the risk of
electric shock.
• Keep the connection to the extension cord dry and off
the ground.
• Keep cable away from heat, oil, sharp edges or
moving parts. Damaged or entangled cable increase
the risk of electric shock.
• Check that the cables are intact and in good condition.
Never use the machine if any cable is damaged, but
hand it in to an authorized service workshop for repair.
• To avoid overheating do not use the extension cord
while it is rolled up.
• Ensure the cord is behind you when you start to use
the machine so that the cord will not be damaged.
• When using an extension cable, use only certified
extension cables with sufficient reach.
!
WARNING! This section describes basic
safety directions for using the machine.
This information is never a substitute for
professional skills and experience. If you
get into a situation where you feel
unsafe, stop and seek expert advice.
Contact your dealer, service agent or an
experienced user. Do not attempt any
task that you feel unsure of!
!
WARNING! There is always a risk of
shocks from electrically powered
machines. Avoid unfavourable weather
conditions and body contact with
lightning conductors and metal objects.
Always follow the instructions in the
Operator’s manual to avoid damage.
Never connect the machine to a outlet if
plug or cord is damaged.
!
CAUTION! The equipment fulfills the
requirements in EN61000-3-11 and is
subject for conditional connection to the
mains. It may be connected in
consultation with the supply authority.
The equipment will only be connected to
the mains supply with impedance lower
than 0,28 ohm. The system impedance at
the interface point may be obtained from
the supply authority.
If the mains supply has higher system
impedance, short voltage dips may
appear when the equipment is started.
This may influence the operation of other
products, e.g flickering lights.
!
WARNING! Improper connection can
result in the risk of electric shock.
Contact a qualified electrician if in doubt
as to whether the appliance is properly
grounded.
Do not modify the plug. If it will not fit the
outlet have a proper outlet installed by a
qualified electrician. Make sure local
regulations and ordinances are followed.
If the grounding instructions are not fully
understood contact a qualified
electrician.

OPERATING
8 – English
Personal safety
• Wear personal protective equipment. See instructions
under the ”Personal protective equipment” heading.
• Never use the machine if you are tired, if you have
drunk alcohol, or if you are taking medication that
could affect your vision, your judgement or your coordination.
• Never allow anyone else to use the machine without
first ensuring that they have read and understood the
contents of the operator’s manual.
• All operators shall be trained in the use of the
machine. The owner is responsible for ensuring that
the operators receive training.
• People and animals can distract you causing you to
lose control of the machine. For this reason, always
remain concentrated and focused on the task. Never
allow children to use or be in the vicinity of the
machine.
• Be careful as clothing, long hair, and jewellery can get
caught in moving parts.
• There is always a risk of crush injuries when working
with products containing moving parts. Keep your
distance!
• Never leave the machine unsupervised with the motor
running.
• Make sure that there is always another person close
at hand when you use the machines, so that you can
call for help if an accident should occur.
• Always ensure you have a safe and stable working
position.
Personal protective equipment
• Hearing protection
• Protective goggles or a visor
• Breathing mask
• Heavy-duty, firm grip gloves.
• Tight-fitting, heavy-duty and comfortable clothing that
permits full freedom of movement.
• Boots with steel toe-caps and non-slip sole.
• Always have a first aid kit nearby.
Use and care
• Only use the machine for the purpose it was intended
for.
• Keep all parts in good working order and ensure that
all fixtures are properly tightened.
• Never use a machine that is faulty. Carry out the safety
checks, maintenance and service instructions
described in this manual. Some maintenance and
service measures must be carried out by trained and
qualified specialists. See instructions under the
Maintenance heading.
• Do not modify safety equipment. Check regularly that
they function as they should. The machine must not
be run with defective or disassembled safety
equipment.
• Never use a machine that has been modified in any
way from its original specification.
• Always use genuine accessories. Contact your dealer
for more information.
• Machinery should only be started when grinding
heads are resting on the ground unless carrying out a
testing procedure as outlined in this manual.
• The machine should not be started without the brush
list attached. It is essential a good seal between
machine and floor be established for safety, especially
when operating in dry grinding applications.
• During grinding, the machine must be connected to a
vacuum cleaner for the removal of the dust.
• Make sure the machine is without power when
changing diamond tools by pressing in the emergency
stop and disconnecting from the power outlet.
• Always dismantle the diamond tool after each grinding
operation.
• Make sure that the brush list is intact and clean and
that it seals tightly against the floor. Damaged brush
list should always be replaced.
• The tool plate continues to rotate for a while after the
motor has been switched off. Maintain grinding action
until the fan has come to a complete stop. Ensure the
tool plate has stopped rotating before lifting up the
machine.
• When grinding adhesive, asphalt, paint or the like, lift
the front of the machine slightly after use to prevent it
sticking to the floor from the heat. Ensure the tool
plate has stopped rotating before lifting up the
machine.
• Diamond tools may be very hot after use. Leave
machine to cool off before removing the diamond
segments. Use protective gloves.
• Always use the machine mounted lifting eye when
lifting.
• Always carry the machine by the carrying handle and
the handle.
!
WARNING! Overexposure to vibration
can lead to circulatory damage or nerve
damage in people who have impaired
circulation. Contact your doctor if you
experience symptoms of overexposure
to vibration. Such symptoms include
numbness, loss of feeling, tingling,
pricking, pain, loss of strength, changes
in skin colour or condition. These
symptoms normally appear in the
fingers, hands or wrists. These
symptoms may be increased in cold
temperatures.
!
WARNING! You must use approved
personal protective equipment whenever
you use the machine. Personal protective
equipment cannot eliminate the risk of
injury but it will reduce the degree of injury
if an accident does happen. Ask your
dealer for help in choosing the right
equipment.
OPERATING
English – 9
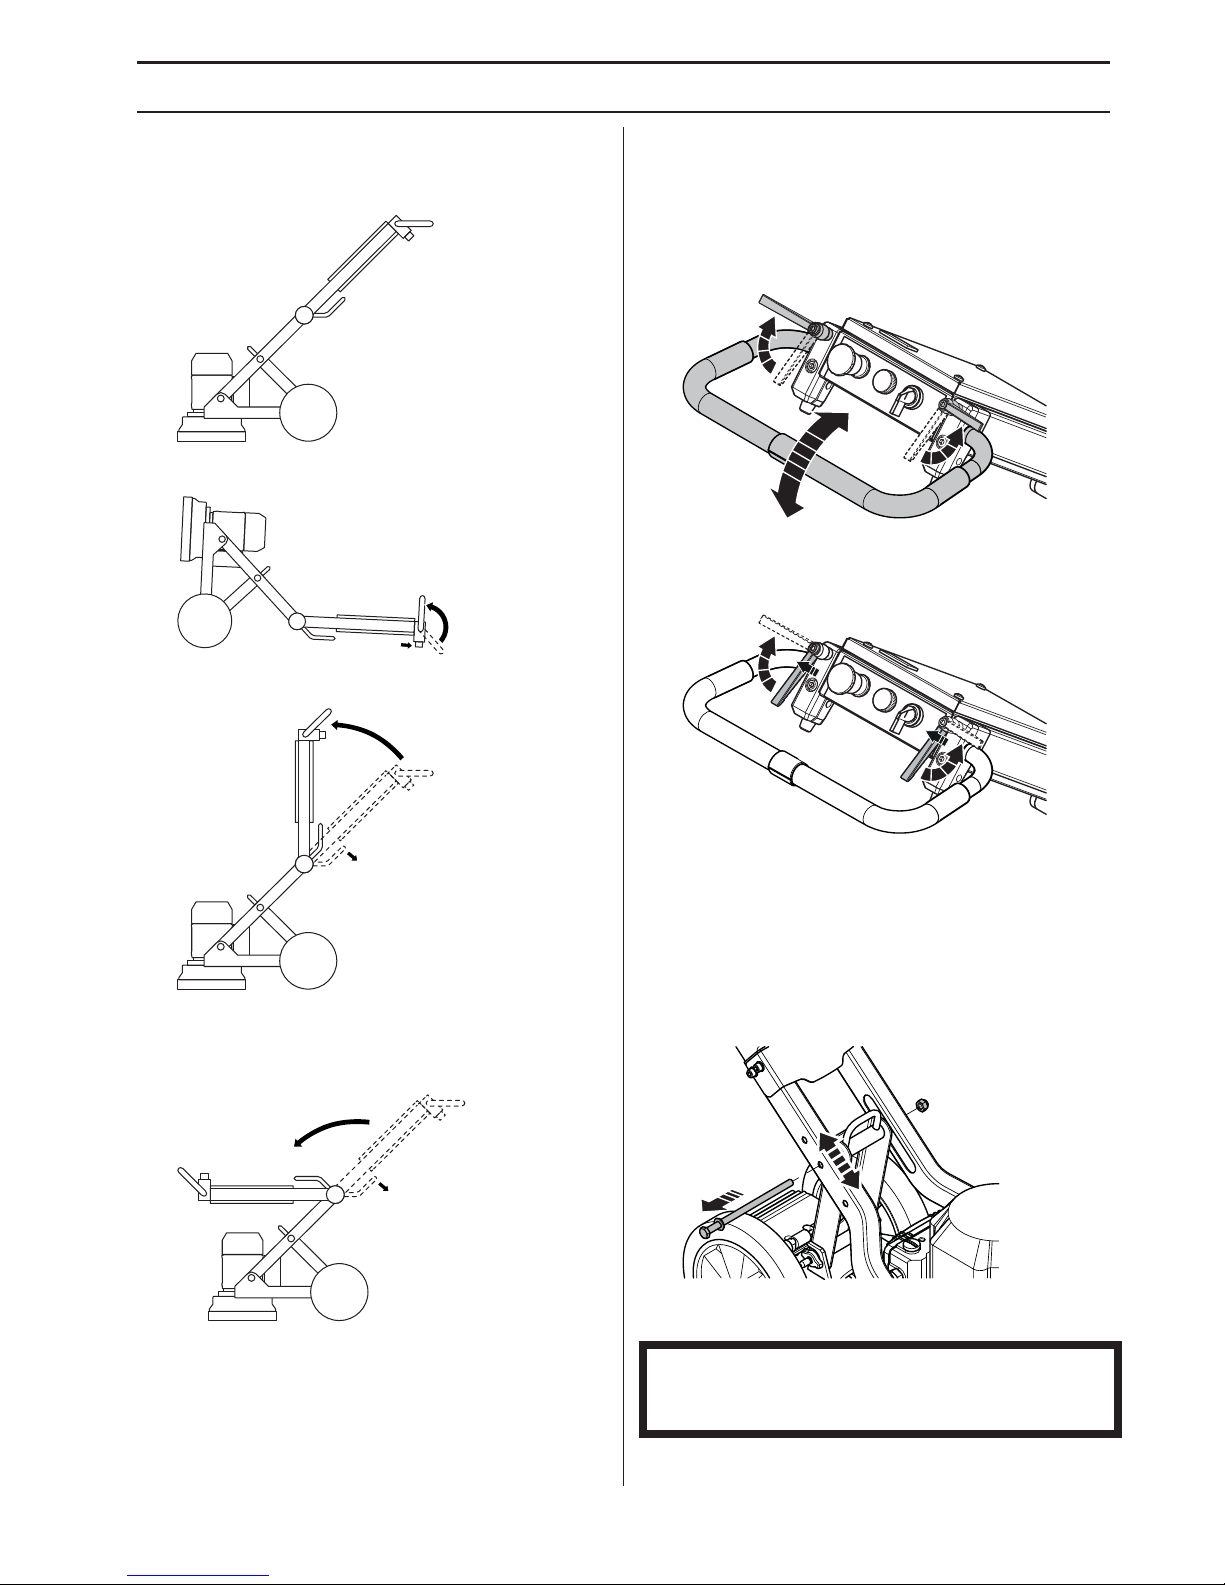
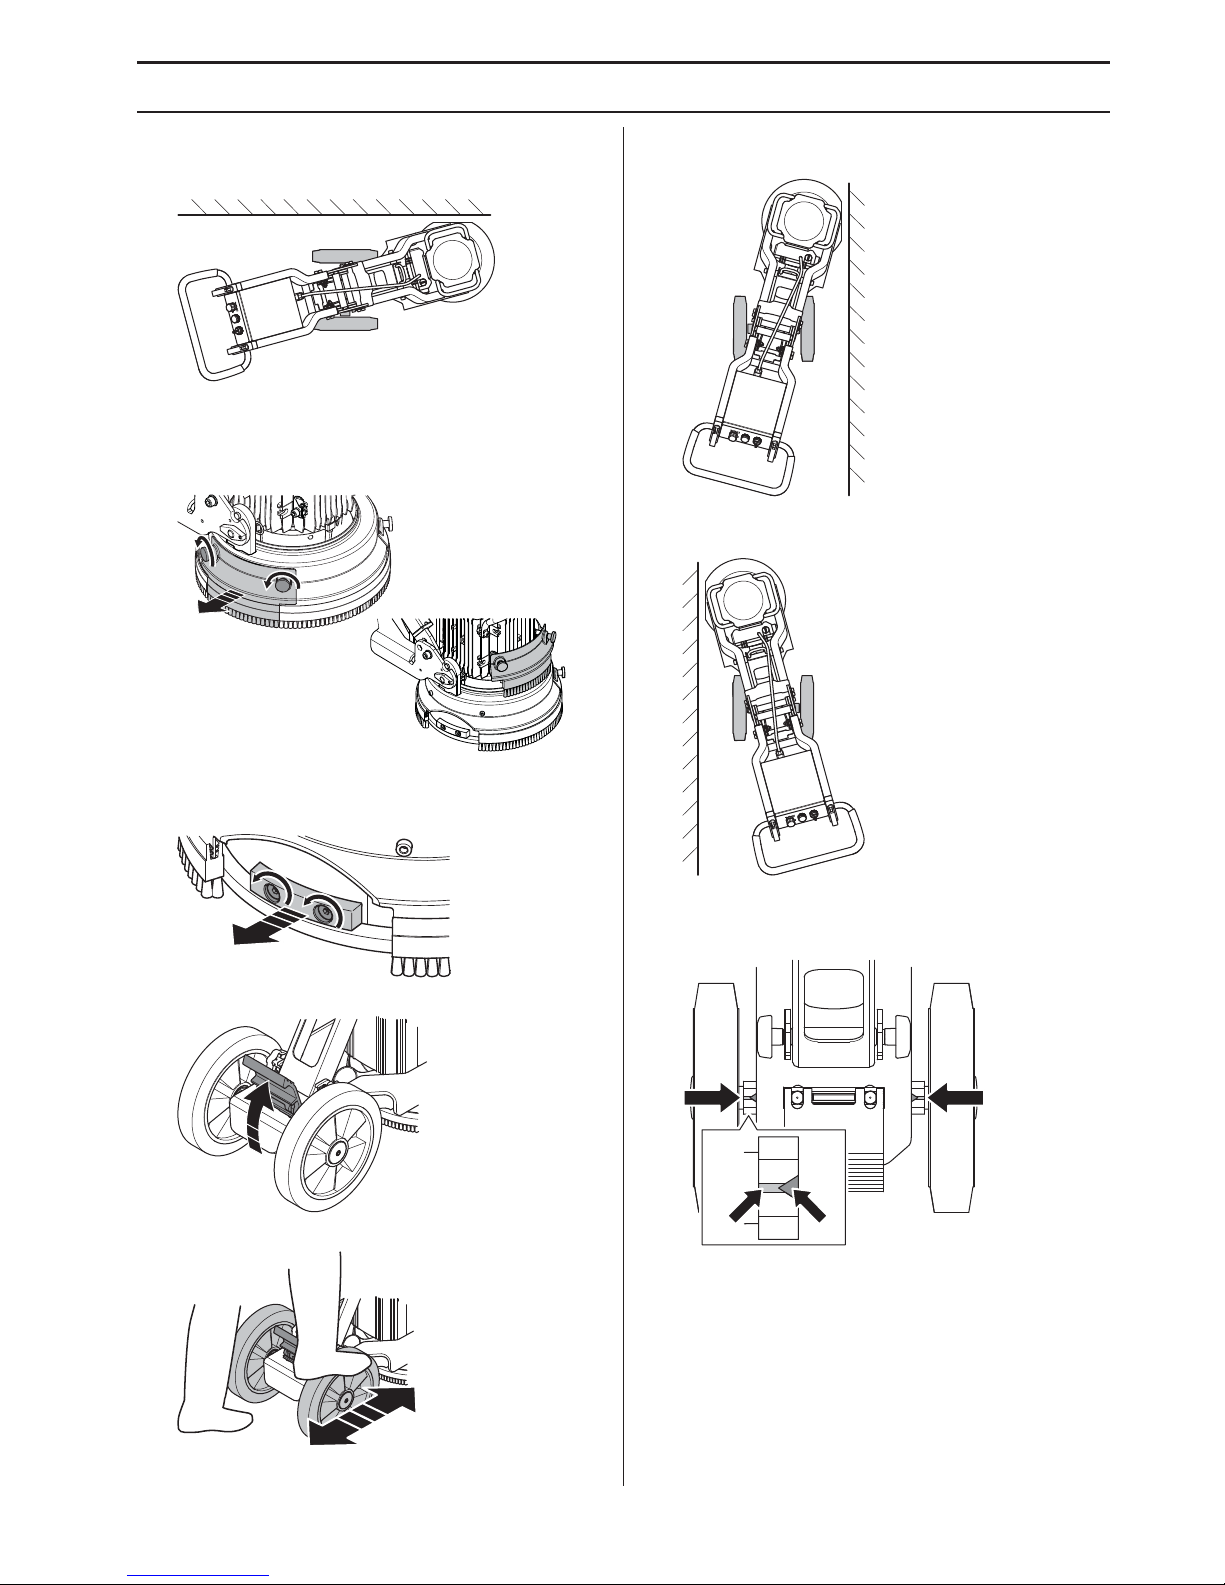
Various machine modes
Operating position
Service position
Tilting transportation position
Lifting transportation position
Put padding between the motor and the electrical cabinet
to prevent damage to the machine.
Handlebar adjustment
The handle can be infinitely adjusted. The handle lock
knobs are operated clockwise, counterclockwise or
placed in idle postion.
• Loosen the lock knobs and adjust the handle to
desired position.
• Fix the position by tightening the lock knobs.
• When not in use, pull the handle lock knobs upwards
and place them into idle position.
Frame height adjustment
The angle of the frame can be adjusted to alter the weight
distribution of the chassis to decrease or increase
grinding pressure. It can also be used to allow a more
comfortable working position for different operators.
• Disconnect the motor cable from the electrical box.
• Loosen the locking knob to adjust the length.
• Choose the appropriate position required by
tightening up the locking knobs in the correct hole.
NOTICE! The lower hole for a higher handlebar and
greater grinding pressure. The upper hole for a lower
handlebar and less grinding pressure.
2
1
OPERATING
10 – English
Handle heights
Grinding pressures
Below matrix shows grinding pressure for each height.
* Factory setting.
Connect the vacuum cleaner
Use a Husqvarna dust extraction system for complete
dust control.
• Connect the dust extractor to the machine. Use a 50
mm (2 inch) hose.
Make sure that the filters in the vacuum cleaner are intact
and clean. Pay attention to dust during operation.
Grinding guide Diamonds
Background
The diamond segment comprises usually of two
components:
• Diamonds (also called diamond crystals or corn).
Changing the size of the diamonds or corn will change
the coarseness or fineness of the scratches after the
grinding process.
• A bonding agent (metal or plastic). Powder is mixed
and suspended in a metal or plastic bonding agent. If
metal is used as a bonding agent, the finished product
is called metal-bonded or sintered diamond segment.
If plastic is used as a bonding agent, the finished
product is called plastic-bonded diamonds or
polishing disc. By changing the hardness of the
bonding agent, you can change how quickly or slowly
the diamond abrasive is worn down.
General Principles
General rules for using diamond tools when grinding
follow below. As with all rules, there are exceptions or
occasions when they do not apply.
Diamond grit size
Changing the size of the diamond grit to a smaller
particle/grit size will effect the performance of the
diamond tool in the following ways:
• Create a finer scratch pattern.
• Increased service life of diamond tools.
The opposite will occur when changing to a larger
particle/grit size.
Binding agent
Increasing hardness of bond will:
• Create a finer scratch pattern.
• Increased service life of diamond tools.
• Decrease production rate.
The opposite will occur when making the metal or resin
bond softer.
Number of diamond tools under the machine
An increased number of tools under the machine leads to:
• Reduce pressure on each individual diamond
segment - reduce wear rate on diamond segments.
• Reduce load
on the machine and cause the grinder to
draw less current.
• Create a smoother scratch pattern (particularly on soft
floors).
The reverse happens if you reduce the number of tools
under the machine.
Summary of diamond principles
The diamond tools must be worn in order to give a high
grinding efficiency. The wear on diamond tools can be
affected by the following factors:
• Pressure.
• Hardness of bond.
• Diamond grit size.
• Number of segments under the machine.
• Adding an additional abrasive (e.g. sand, silicone
carbide) on the floor will increase wear.
Generally, the faster a diamond segment wears, the faster
the productivity will be. By varying the above factors,
changes can also be made to effect the following:
• Scratch pattern.
• Current draw of machine.
• Flatness of floor (see next section).
• Ease of operation.
Hole position Handle height, mm/inch
Upper 835/33
Center 925/36
Lower 1000/39
Handle
position Low,
kg/lbs
Handle
position
Center, kg/lbs
Handle
position High,
kg/lbs
23/51 25/55* 27/60
With
accessory counterweight
17/37 20/44 23/51
OPERATING
English – 11
Determining the hardness of
concrete
All concretes are measured by their compressive strength
and depending on which part of the world you are from,
different compressive strength indices (e.g. PSi & MPa)
are used. Generally, the higher the compressive strength
rating, the harder the concrete and therefore, the harder it
will be to grind.
But there are also factors other than compression
strength that determine how hard a floor is and which
therefore affect the choice of diamond tool. As it is most
often only the top layer (5 mm) that we are talking about
from a grinding point of view, the surface treatment of the
concrete and the condition of the concrete surface have
many times a greater impact on the choice of diamond
segment than the compression strength.
Surface factors to consider when making a diamond
selection
Generally, if a concrete surface is very smooth (i.e. Most
likely it has been heavily trowelled/helicoptered), the
concrete will behave as if it has a high compressive
strength and therefore, require a soft bond segment.
Accordingly, if a concrete surface is coarse/aggressive
(e.g. rain-damaged, shot blasted, scarified, exposed
aggregate e.t.c.), the concrete will behave as if it has a
low compressive strength and therefore, require a hard
bond segment.
Surface coatings/contaminants (e.g. Epoxy coatings,
ceramic tile adhesives, levelling compounds/screeds) will
often have a larger bearing on what diamond to select,
than will the compressive strength of the concrete.
As a general rule, when grinding a concrete slab for the
first time and you are unsure about its hardness, always
begin with harder bond diamonds under the machine.
This will ensure the least amount of wear on the diamond
segments. If a hard diamond segment is not suited to the
application, all it has cost is a little amount of time without
wearing out the diamonds.
If performed the other way around (i.e. a soft segment is
used to begin with) and the concrete is soft or possesses
an abrasive surface or surface contaminant, it is quite
possible to wear-out a considerable amount of diamond in
very short period of time.
The motor’s direction of rotation
3-phase
The motor´s direction can be changed by reversing the
poles in the power plug.
1-phase
The arrow shows the direction of rotation of the motor.
NOTICE! The Piranha/PCD tools are designed to run in
only one direction.
OPERATING
12 – English
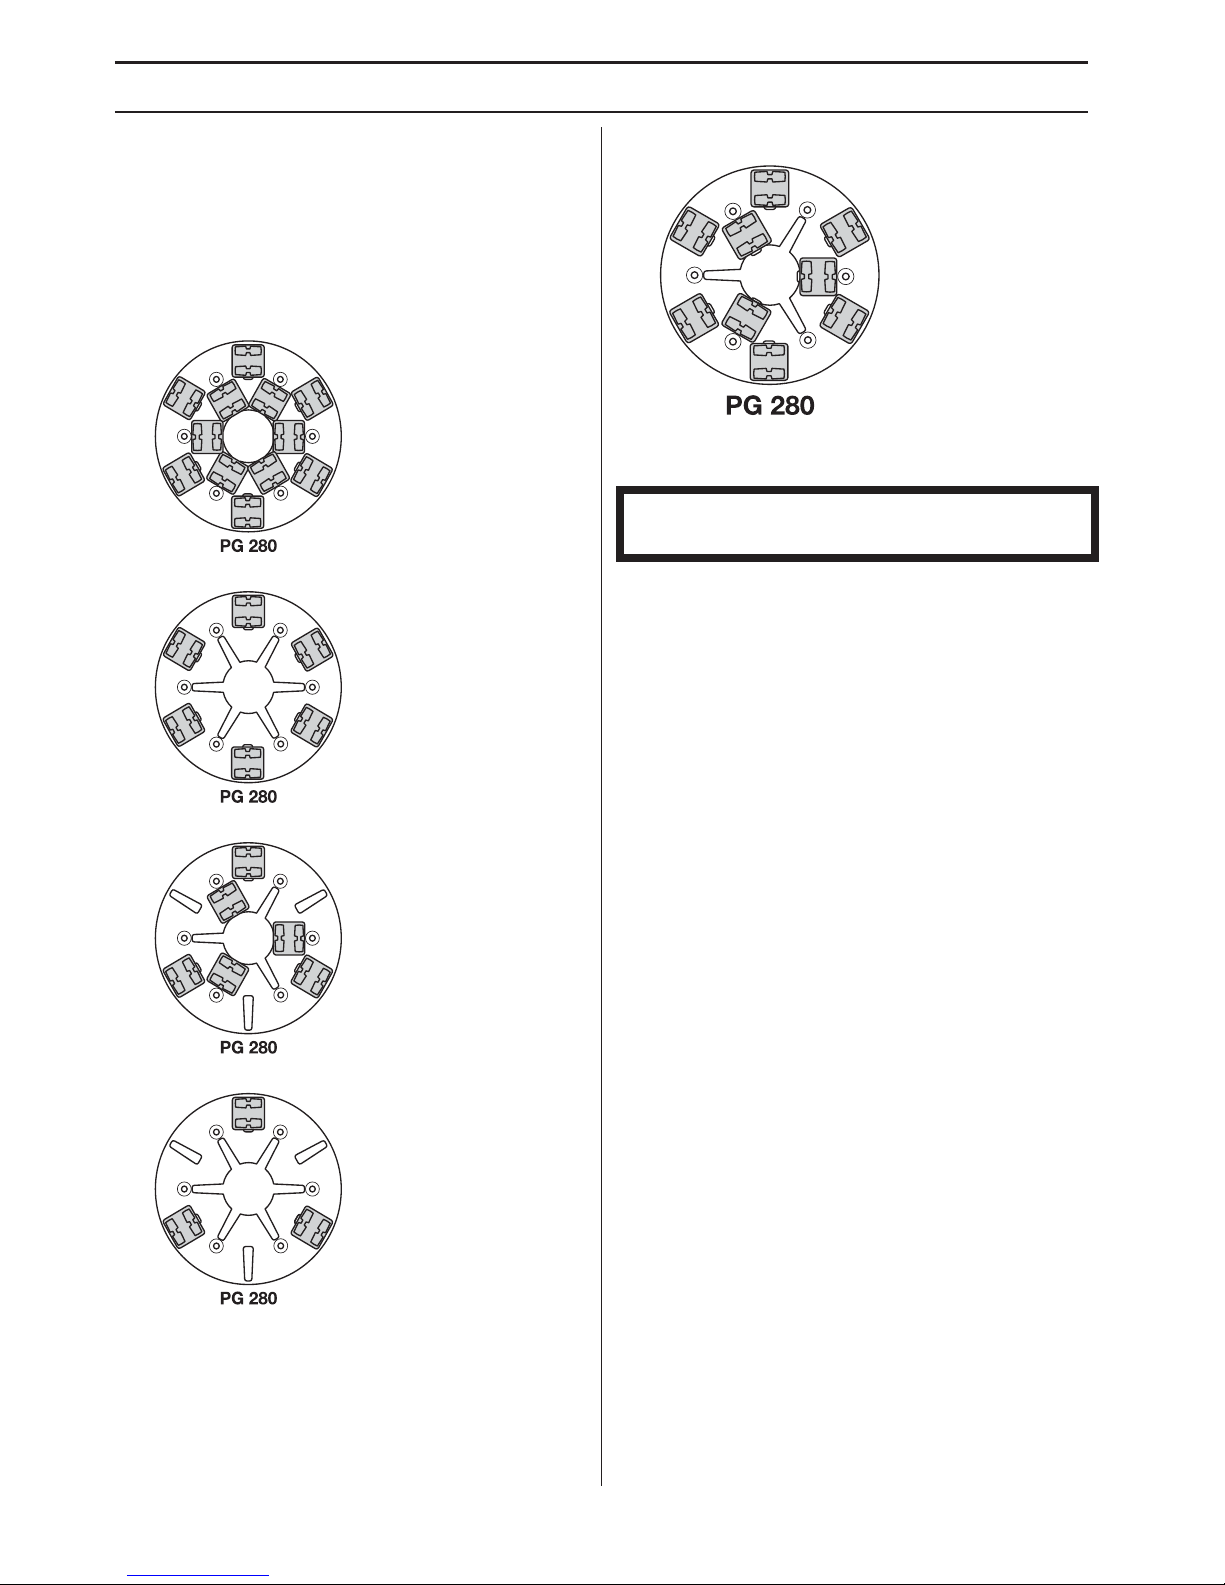
Diamond selection
They way diamond segments are set-up on the grinding
unit will greatly influence the performance of the machine,
the productivity levels and also the finished floor quality.
There are a number of different diamond configurations
that can be achieved on the PG 280.
Metal bond diamonds
Full set - inner and outer row
Full set - outer row
Half set - inner and outer row
Half set - outer row
For edge grinding PG280
Half set - inner row Full set - outer row
NOTICE! Husqvarna’s recommendation regarding
single disc grinders is two segments on each metal tool.

English – 13
OPERATING
Select the correct metal bond diamonds for your application
The following suggestion cover the basic configurations for metal bonded diamond tools.
Applications Metal bond Grit size
Full set - inner
and outer row
Full set outer row
Half set - inner
and outer row
Half set outer row
Flatten floor - Hard concrete Soft 16 or 30 X
Flatten floor - Medium
concrete
Medium 16 or 30 X
Flatten floor - Soft concrete Hard 16 or 30 X
Ceramic tile adhesive
removal
Medium
PIRANHA™
or 16-30
X
Vinyl or Carpet glue
removal - Hard concrete
Soft
PIRANHA™
or 16-30
X X
Vinyl or Carpet glue
removal - Medium concrete
Medium
PIRANHA™
or 16-30
X X
Vinyl or Carpet glue
removal - Soft concrete
Hard
PIRANHA™
or 16-30
X X
Epoxy paint removal - Hard
concrete
Soft
PIRANHA™
or 16-30
X X
Epoxy paint removal Medium concrete
Medium
PIRANHA™
or 16-30
X
Epoxy paint removal - Soft
concrete
Hard
PIRANHA™
or 16-30
X
Rain damaged concrete Hard 16-30 X X
Smoothen exposed
aggregate
Hard 16-30 X X
Lippage removal in
terrazzo/stone tiles
Soft 30 or 60 X
Surface polishing of
concrete floors - Hard
concrete
Soft 60 X X
Surface polishing of
concrete floors - Medium
concrete
Medium 60 X X
Surface polishing of
concrete floors - Soft
concrete
Hard 60 X X
Grinding to exposed
aggregate in concrete Hard concrete
Soft 16-30 X X X
Grinding to exposed
aggregate in concrete Medium concrete
Medium 16-30 X X X
Grinding to exposed
aggregate in concrete - Soft
concrete
Hard 16-30 X X
Flatten undulation in
concrete floors - Hard
concrete
Soft 16 or 30 X X X
Flatten undulation in
concrete floors - Medium
concrete
Medium 16 or 30 X X
Flatten undulation in
concrete floors - Soft
concrete
Hard 16 or 30 X X
OPERATING
14 – English
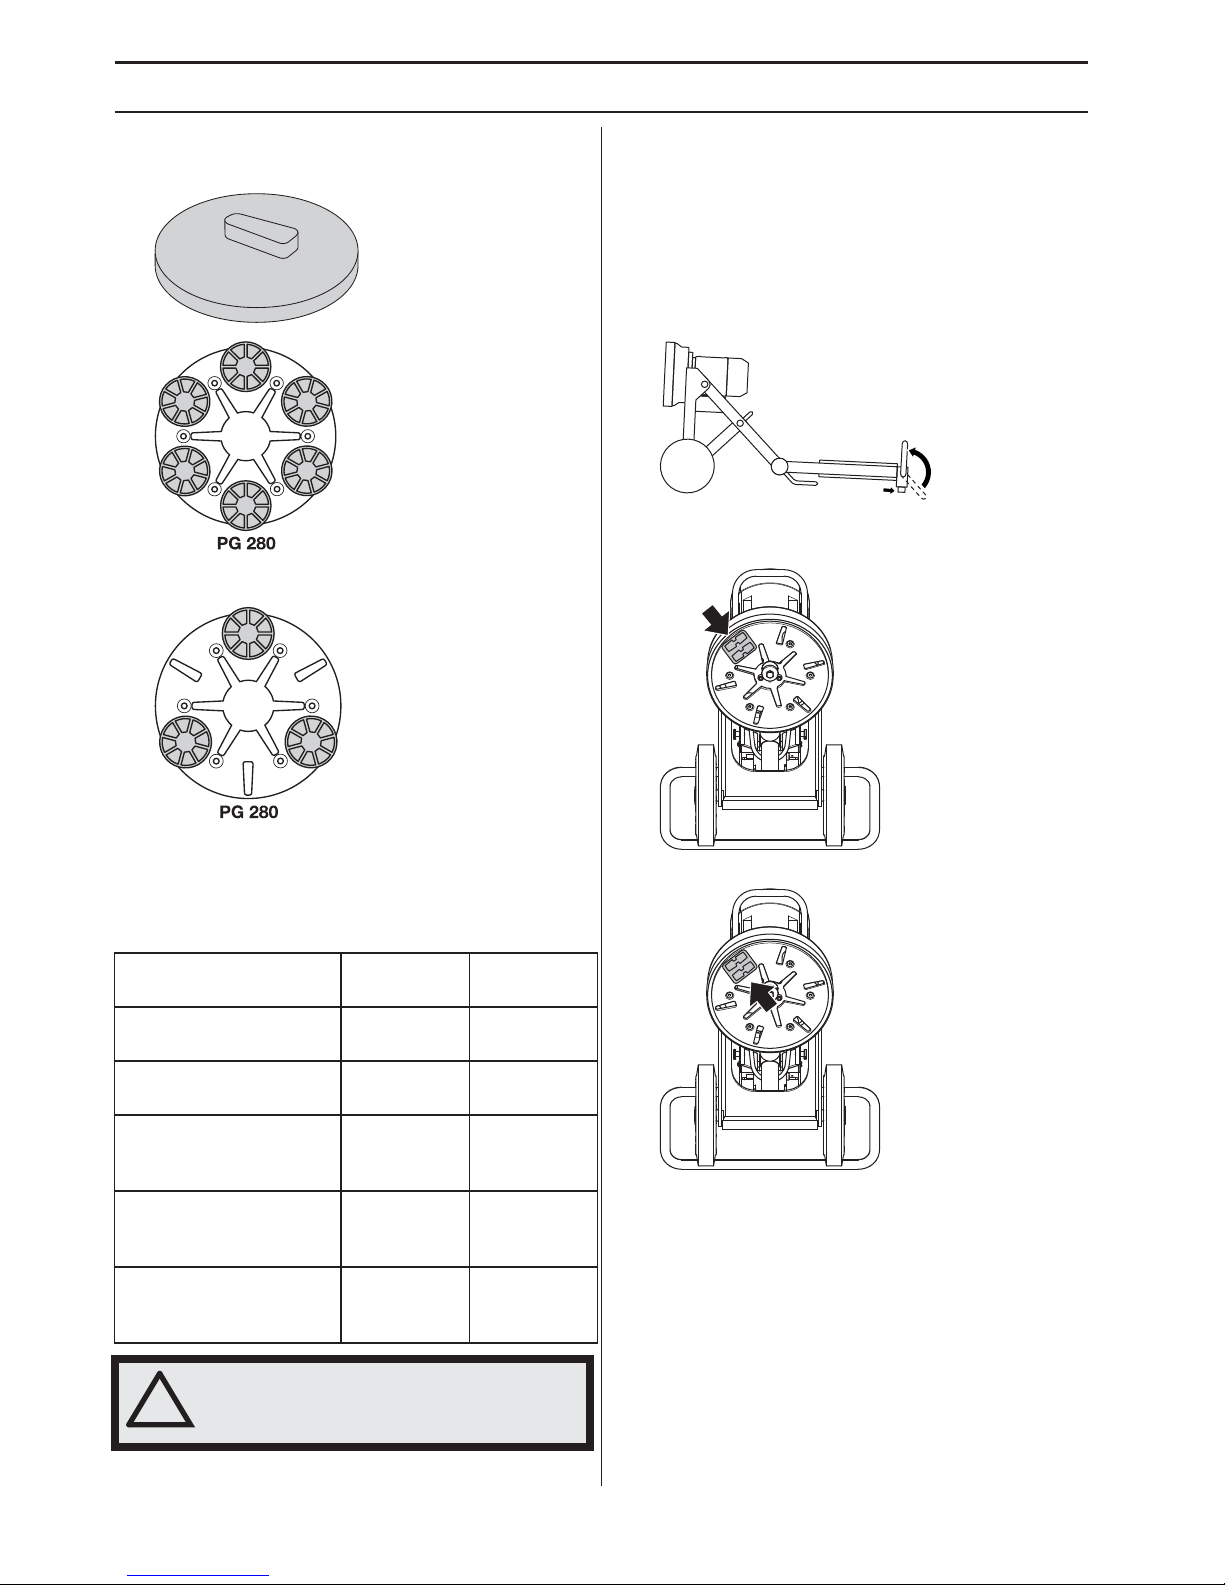
Resin bond diamonds
Redi Lock resin attachment adaptor
Full set - outer row
Half set - outer row
Selecting the correct resin bond diamond
configuration for your application
Changing the diamonds
Shut down the machine and disconnect the power plug.
Have a set of gloves ready, as diamond tools can get very
hot.
• Put the machine into service position.
• Pull back on handle to lift grinding head off the ground.
• Lay machine back on the ground.
• Put on gloves.
• Use a hammer to remove the diamond segments.
• Affix new diamond segments on the grinding disc.
• Once new diamond segments have been attached,
reverse procedure to lower machine to ground.
Applications
Full set outer row
Half set outer row
Polishing terrazzo/stone
tiles
X
Resurfacing terrazzo/
stone tiles
X
Surface polishing of
concrete floors - Hard
concrete
X
Surface polishing of
concrete floors - Medium
concrete
X
Surface polishing of
concrete floors - Soft
concrete
X
!
WARNING! CP1200 and P1100 must not
under any circumstances be used with a
Redi lock adapter.
OPERATING
English – 15
Edge grinding
This machine has edge grinding capabilities.
For edge grinding close to walls, the hatch on the right or
left side of the dust cover must be removed.
• Remove the screws (2) and the hatch. Fit the hatch on
to the holder.
• Under the hatch there is a removable guard to protect
the wall when grinding. The guard can be removed for
grinding closer next to the wall, 2 screws.
• Raise the foot pedal.
• Use your foot to give the wheels the right angle.
• For edge grinding on the right side, the wheels must
be directed left.
• For edge grinding on the left side, the wheels must be
directed right.
• When the red marking on the wheel axle (A) is in line
with the red marking on the frame (B), the direction is
again straight.
AB
OPERATING
16 – English
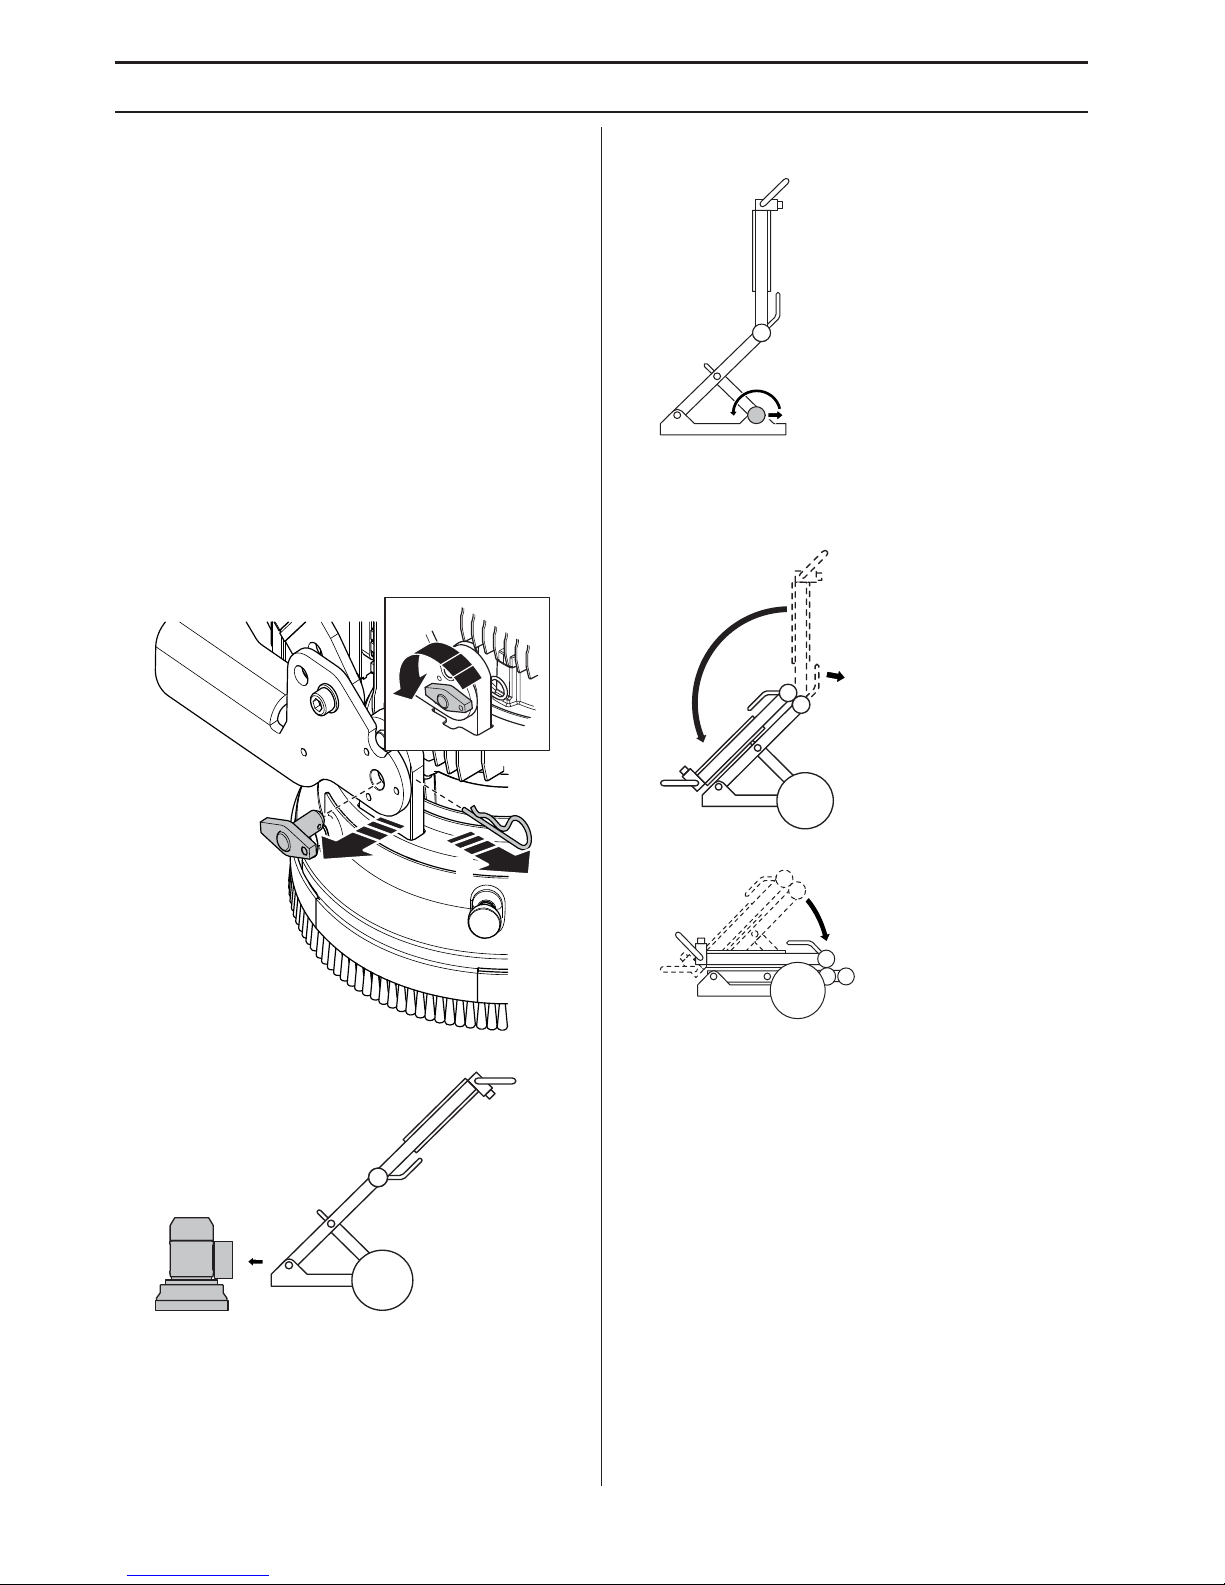
Transport and storage
• Secure the equipment during transportation in order
to avoid transport damage and accidents.
• The machine should be transported under cover
where possible, limiting the exposed to natural
elements – in particular rain and snow.
• Store the equipment in a lockable area so that it is out
of reach of children and unauthorized persons.
• The machine should always be stored in a dry place
when not in use.
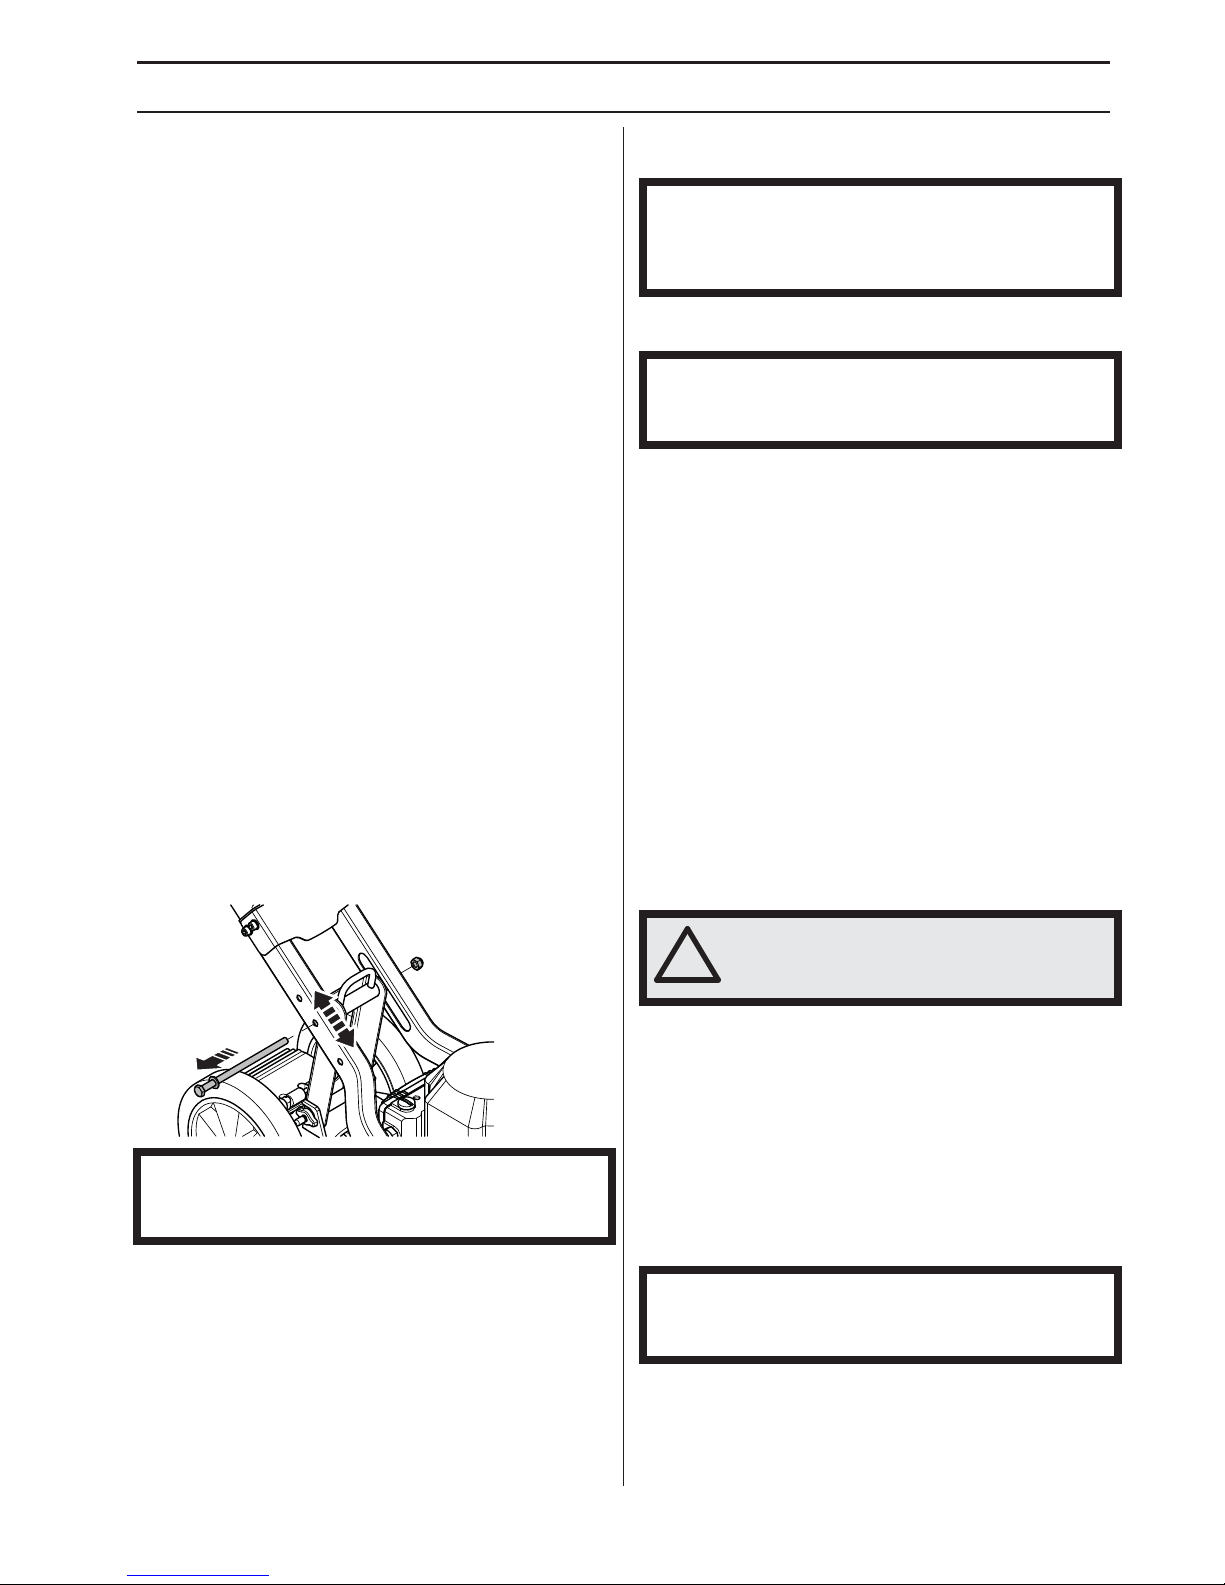
Transport
The machine can be taken apart and folded to give a
smaller size when transporting.
• Disconnect the motor cable from the electrical box.
• Loosen the nuts a few turns to release any pressure,
pull out the locking pins and remove the bolts on each
side.
• Loosen the grinding head from the wheel chassis.
• Put the machine in inclined transport position. Loosen
the locking knobs on the support foot.
• Fold forward the support foot.
• Hold down the handle on the angle joint while
simultaneously angling the upper part of the frame
carefully forward.
• Fold up the machine carefully.
1
3
2
1
2
OPERATING
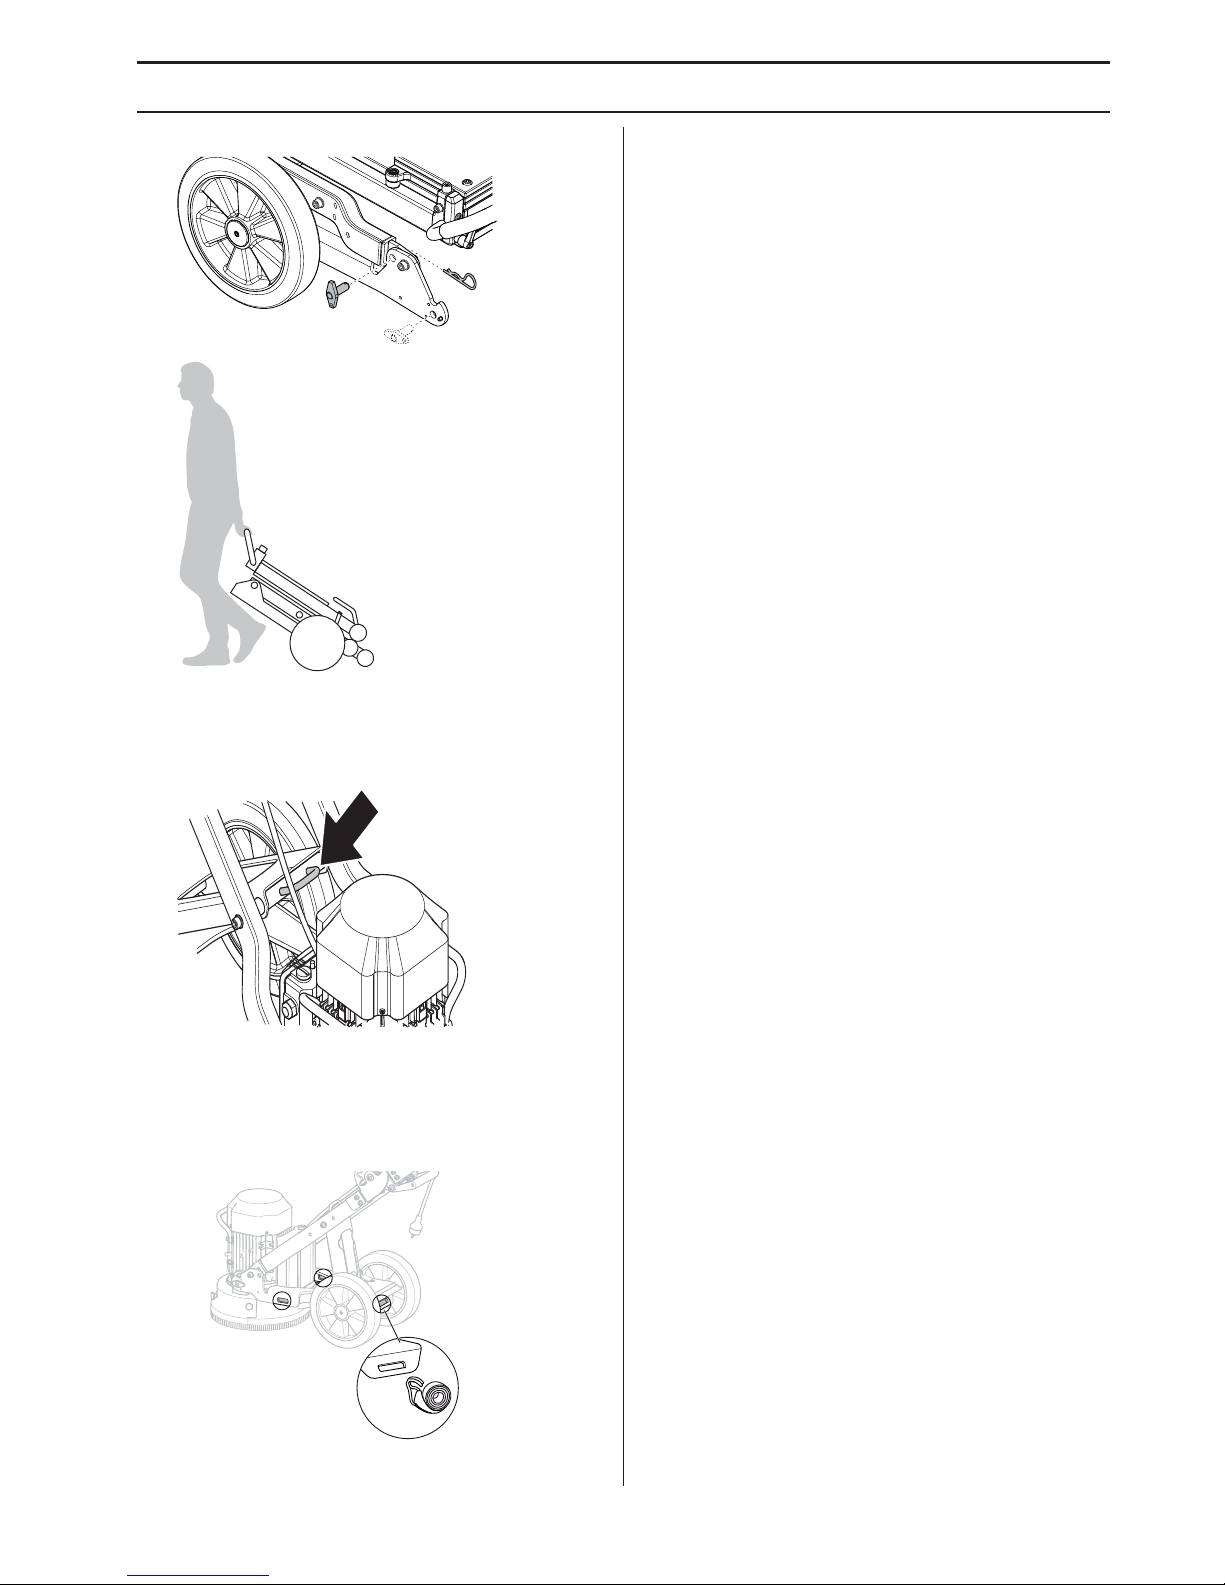
English – 17
• Secure the machine with locking pin and bolt.
Lifting eye
• Always use the machine mounted lifting eye when
lifting. To ensure a balanced lift, use a spotter as
support when lifting.
Secure the machine
The machine is equipped with holes for strapping down
the machine to the vehicle during transport. Attach the
strapping hook into the hole in the chassis and tighten it
firmly downwards.
3X
STARTING AND STOPPING
18 – English
Before starting
• Perform daily maintenance.
• Position grinder on the working area.
• Make sure there are diamonds beneath the machine
and that they are firmly attached.
• Connect the dust extractor to the machine.
• Use locking knobs for handlebar adjustment to set
most comfortable working height.
• Make sure the motor cable is connected to the
electrical box before the machine is plugged into an
electric socket.
• Plug the machine into an electric socket.
• Check that the emergency stop button is not pressed
by turning it clockwise.
• Check the motor’s direction of rotation
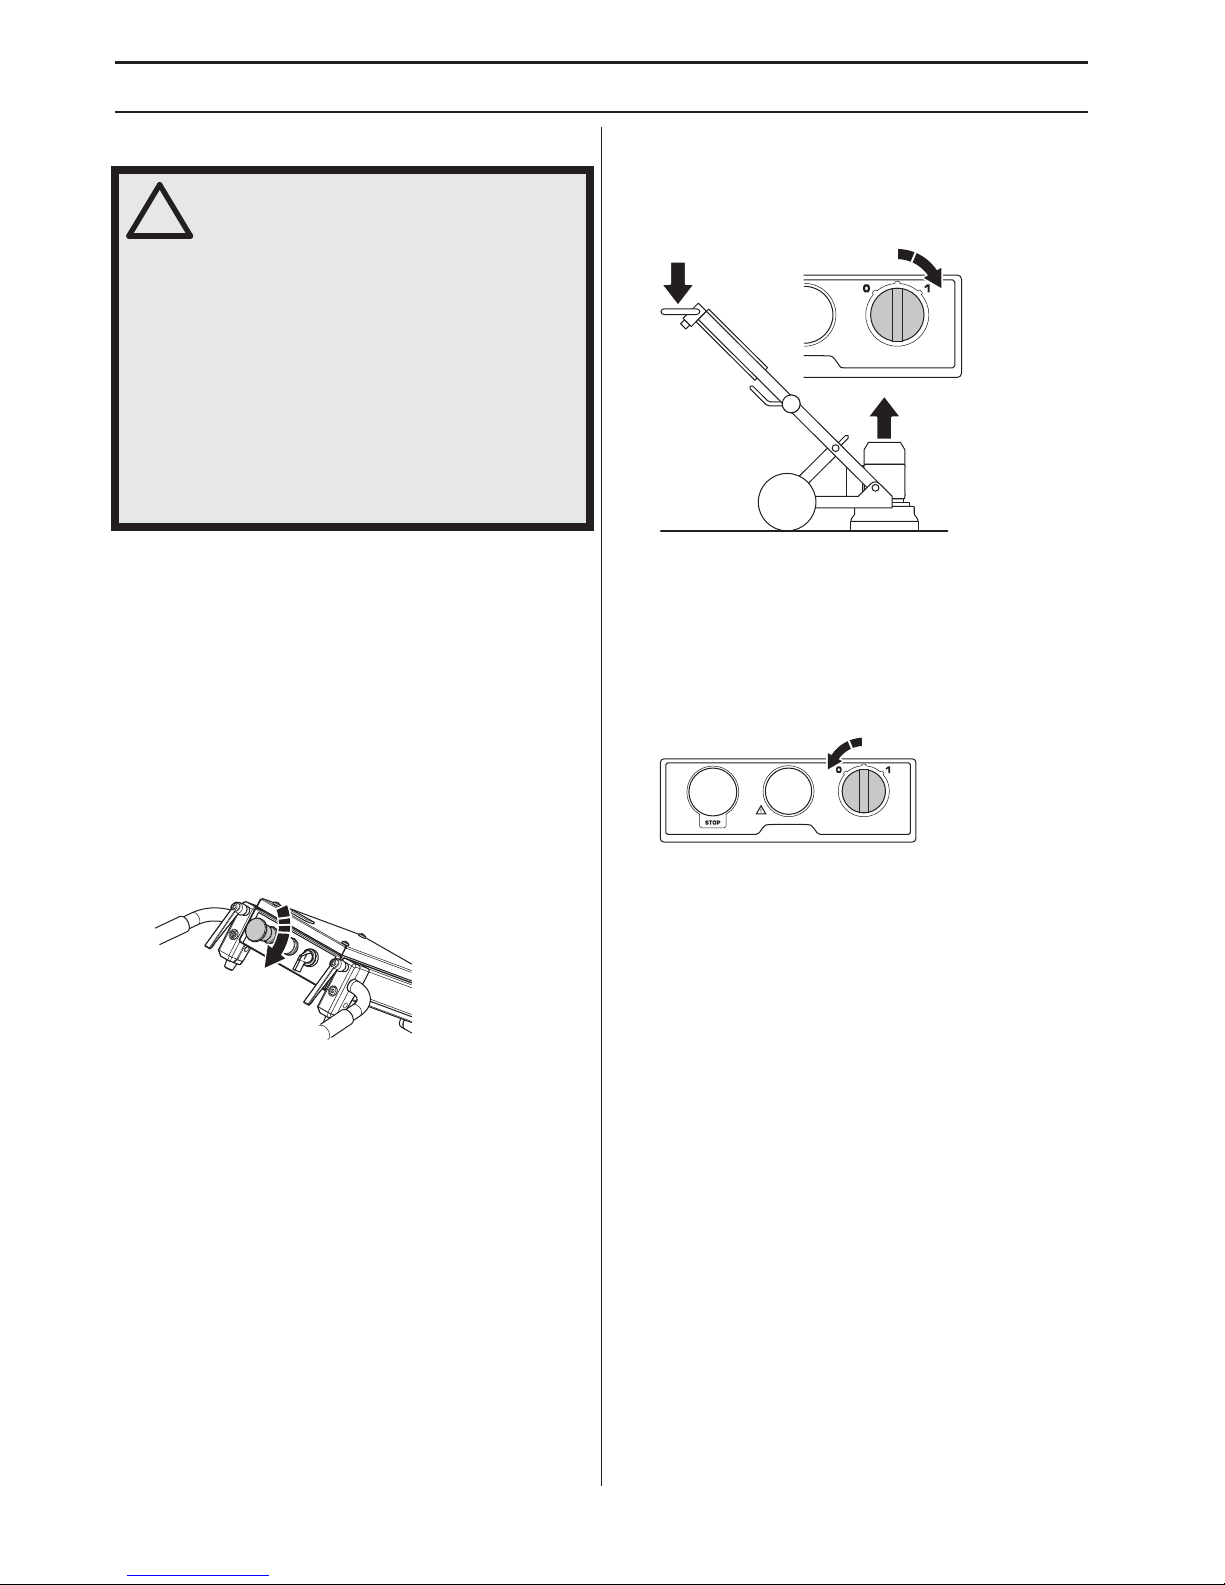
Starting
• Reduce the pressure between grinding disc and floor
by pushing down the handle without lifting the grinding
unit from the floor when starting.
• To start the machine. Start the machine by turning the
0/1 knob to position 1 (drive). The machine will then
start smoothly and accelerate to the set speed within
5 seconds.
Stopping
• Turn off the machine with the start/stop knob, turn it to
'0' (stop).
• Keep grinding segments in contact with the floor when
stopping. This will help bring the machine to a
complete stop quickly. Do not lift the grinding head off
the floor when stopping as this can create a significant
amount of dust in the air.
• Pull out the plug.
!
WARNING! Please read the operator’s
manual carefully and make sure you
understand the instructions before using
the machine.
Wear personal protective equipment. See
instructions under the ”Personal
protective equipment” heading.
Make sure no unauthorised persons are
in the working area, otherwise there is a
risk of serious personal injury.
Check that the machine is assembled
correctly and do not show any signs of
damage.
~1 mm
1
2
MAINTENANCE
English – 19
Faults and trouble shooting
The machine does not start
• Check the power supply and the power cables to
make sure they are not damaged.
• Check that the emergency stop button is not pressed
by turning it clockwise.
• Check the overload lamp. If the overload lamp is on,
allow the motor to cool down for a few minutes until the
machine is automatically reset.
Machine is hard to hold onto
• Too few diamonds under the machine or the wrong
type of tool for the application (stiff adhesive or soft
floor coverings result in high stress to the machine
and the user if there are too few diamonds under the
machine). Usually also accompanied by high current
draw by motor.
Use the number of diamonds recommended by
Husqvarna to reduce the stress on the grinder and the
user.
Machine is jumping around
• Diamonds may not be fitted correctly or have different
heights. Check to ensure all diamonds are fitted
correctly and are the same height.
The machine stops after just a while
• The machine is overloaded and the overload
protection has been released. Reduce load. The
machine will reboot after about a minute when the
motor has cooled off.
• Ensure any extension cables are not under
dimensioned.
The machine stops during start-up
• The electric motor has overloaded and the overload
lamp is on. Give the machine one or two minutes to
reset and try again. When this does not help, contact
an authorised service workshop.
• Ensure any extension cables are not under
dimensioned.
Maintenance
Used correctly, the machine is an extremely lowmaintenance and reliable product.
Daily maintenance
• Cleaning
• Electrical Feed
• Brush list
Cleaning
Always pull out the plug from the outlet socket before
cleaning, maintenance or assembly.
Always clean all the equipment at the end of the working
day. Do not use a high pressure washer to clean the
machine.
In order for the machine to always be cooled sufficiently
the cooling air openings must be kept clear and clean.
Electrical Feed
Check that the cord and extension cord are intact and in
good condition.
Never use the machine if the cord is damaged, hand it in
to an authorized service workshop for repair.
Brush list
Make sure the brush strip is whole and reaches down to
the floor.
Service
NOTICE! The lower hole for a higher handlebar and
greater grinding pressure. The upper hole for a lower
handlebar and less grinding pressure.
NOTICE! Good motor performance depends on proper
voltage. Extension cables that are too long and/or which
have a gage that is too small, reduce power to the motor
under load.
IMPORTANT! Inspection and/or maintenance should be
carried out with the motor switched off and the plug
disconnected.
!
WARNING! Never use damaged cables.
They can cause serious, even fatal,
personal injuries.
IMPORTANT! All types of repairs may only be carried
out by authorised repairmen. This is so that the
operators are not exposed to great risks.

20 – English
TECHNICAL DATA
Technical data
Noise emissions
Note 1: Noise emission in the environment measured as sound power according to EN 60335-2-72. Expected
measurement uncertainty 2,5 dB(A).
Note 2: Sound pressure level according to EN 60335-2-72. Expected measurement uncertainty 4 dB(A).
Note 3: Vibration level according to EN 60335-2-72. Reported data for vibration level has a typical statistical dispersion
(standard deviation) of 1 m/s
2
PG280 (Single-phase,
220-240V)
PG280 (Single-phase,
100-120V)
50 Hz 60 Hz 50 Hz 60 Hz
Motor Power, kW/hp 2,2/3,0 2,2/3,0 1,5/2,0 1,5/2,0
Rated current, A 13 13 20 19
Rated voltage, V 220-240 220-240 100-120 100-120
Weight, kg/lbs 72/158 72/158 72/158 72/158
Grinding width, mm/inch 280/11 280/11 280/11 280/11
Grinding pressure, kg/lbs 25/55 25/55 25/55 25/55
Rotation speed - grinding disc, rpm 1410 1730 940 1150
PG280
Noise emissions (see note 1)
Sound power level, measured dB(A) 90
Sound levels (see note 2)
Sound pressure level at the operators ear, dB(A) 74,1
Vibration levels (see note 3)
Handle right, m/s
2
4,0
Handle left, m/s
2
3,8

English – 21
TECHNICAL DATA
EC Declaration of Conformity
(Applies to Europe only)
Husqvarna AB, SE–561 82 Huskvarna, Sweden, tel: +46–36–146500, declares under sole responsibility that the floor
grinder
Husqvarna PG280 dating from 2014 serial numbers and onward (the year is clearly stated on the type plate,
followed by the serial number), complies with the requirements of the COUNCIL’S DIRECTIVE:
• of May 17, 2006 ”relating to machinery” 2006/42/EC.
• of February 26, 2014 ”relating to electromagnetic compatibility” 2014/30/EU.
• of February 26, 2014 ”relating to electrical equipment designed for use within certain voltage limits” 2014/35/EU.
• of June 8, 2011 on the ”restriction of use of certain hazardous substances” 2011/65/EU.
The following standards have been applied: EN ISO 12100:2010, EN 55014-1:2006+A1:2009+A2:2011, EN 55014-
2:1997+A1:2001+A2:2008, EN 61000-3-11, EN 60335-2-72:2012, EN 60335-1:2010.
The supplied machine conforms to the example that underwent EC type examination.
Partille, August 21, 2017
Joakim Ed
Global R & D Director
Construction Equipment Husqvarna AB
(Authorized representative for Husqvarna AB and responsible for technical documentation.)
SYMBOLERKLÄRUNG
22 – German
Symbole am Gerät:
WARNUNG! Das Gerät kann falsch
oder nachlässig angewendet gefährlich
sein und zu schweren oder gar
lebensgefährlichen Verletzungen des
Benutzers oder anderer Personen
führen.
Lesen Sie die Bedienungsanweisung
sorgfältig durch und machen Sie sich
mit dem Inhalt vertraut, bevor Sie das
Gerät benutzen.
Tragen Sie persönliche
Schutzausrüstung. Siehe die
Anweisungen unter der Überschrift
”Persönliche Schutzausrüstung”.
WARNUNG! Bei der Arbeit mit dem
Schleifer bildet sich Staub, der beim
Einatmen gesundheitsschädlich sein
kann. Verwenden Sie einen
zugelassenen Atemschutz. Sorgen Sie
stets für gute Belüftung.
Dieses Produkt stimmt mit den
geltenden CE-Richtlinien überein.
Umweltkennzeichnung. Das
Symbol auf dem Produkt oder der
Verpackung gibt an, dass dieses
Produkt nicht im Hausmüll entsorgt
werden darf.
Durch eine korrekte Entsorgung dieses
Produkts tragen Sie dazu bei, mögliche
negative Auswirkungen auf Ihre
Umwelt und Mitmenschen zu
verhindern. Durch eine unsachgemäße Entsorgung
dieses Produkts können Schäden entstehen.
Ausführliche Recyclinginformationen zu diesem Produkt
erhalten Sie von Ihrer Kommune,
Entsorgungsunternehmen für Hausmüll oder dem
Geschäft, in dem Sie das Produkt erworben haben.
Sonstige Symbole/Aufkleber am Gerät beziehen sich
auf spezielle Zertifizierungsanforderungen, die in
bestimmten Ländern gelten.
Erläuterung der Warnstufen
Es bestehen drei unterschiedliche Warnstufen.
WARNUNG!
ACHTUNG!
HINWEIS!
!
WARNUNG! Zeigt eine Gefahrensituation
an, deren Nichtvermeidung zum Tod oder
zu schweren Verletzungen führen kann.
!
ACHTUNG! Zeigt eine Gefahrensituation
an, deren Nichtvermeidung zu leichten
oder mittleren Verletzungen führen kann.
HINWEIS! Weist auf Handlungen hin, die nicht zu
Verletzungen führen.

INHALT
German – 23
Inhalt
SYMBOLERKLÄRUNG
Symbole am Gerät: ............................................... 22
Erläuterung der Warnstufen ................................. 22
INHALT
Inhalt ..................................................................... 23
VORSTELLUNG
Sehr geehrter Kunde! ........................................... 24
Konstruktion und Funktionen ................................ 24
PG280 .................................................................. 24
WAS IST WAS?
Was ist was am Schleifer? .................................... 25
SICHERHEITSAUSRÜSTUNG DES GERÄTES
Allgemeines .......................................................... 26
Stopp-/Anlassschalter .......................................... 26
Nothalt .................................................................. 26
BETRIEB
Allgemeine Sicherheitsvorschriften ...................... 27
Persönliche Sicherheit .......................................... 28
Verschiedene Maschinenmodi ............................. 30
Handgriffverstellung ............................................. 30
Einstellung der Rahmenhöhe ............................... 30
Schleifdrücke ........................................................ 31
Anschließen des Unterdrucksaugers ................... 31
Anleitung zum Schleifen ....................................... 31
Bestimmung des Härtegrads von Beton ............... 32
Motordrehrichtung ................................................ 32
Auswahl der Diamanten ....................................... 33
Auswechseln der Diamanten ................................ 35
Kantenschleifen ................................................... 36
Transport und Aufbewahrung ............................... 37
STARTEN UND STOPPEN
Vor dem Start ....................................................... 39
Starten .................................................................. 39
Stoppen ................................................................ 39
WARTUNG
Störungsbeseitigung ............................................. 40
Wartung ................................................................ 40
Service ................................................................. 40
TECHNISCHE DATEN
Technische Daten ................................................. 41
EG-Konformitätserklärung .................................... 42

VORSTELLUNG
24 – German
Sehr geehrter Kunde!
Vielen Dank, dass Sie sich für ein Produkt von Husqvarna
entschieden haben.
Wir hoffen, dass Sie mit Ihrer Maschine über lange Jahre
zufrieden sein werden. Mit dem Erwerb unserer Produkte
erhalten Sie professionelle Hilfe bei Reparaturen und
Service. Haben Sie das Gerät nicht bei einem unserer
Vertragshändler gekauft, fragen Sie dort nach der
nächsten Servicewerkstatt.
Diese Bedienungsanweisung ist ein wertvolles
Dokument. Halten Sie die Bedienungsanweisung stets
griffbereit. Die genaue Befolgung ihres Inhalts
(Verwendung, Service, Wartung usw.) verlängert die
Lebensdauer der Maschine erheblich und erhöht zudem
ihren Wiederverkaufswert.Sollten Sie Ihre Maschine
verkaufen, händigen Sie dem neuen Besitzer bitte auch
die Bedienungsanleitung aus.
Über 300 Jahre Innovationsgeschichte
Husqvarna ist ein schwedisches Unternehmen, dessen
Geschichte bis ins Jahr 1689 zurückreicht, als König Karl
XI eine Fabrik errichten ließ, in der Musketen gefertigt
werden sollten. Damit wurden die Grundlagen einer
erfolgreichen Firmengeschichte gelegt, in deren Verlauf
bahnbrechende technische Neuerungen in Bereichen wie
Waffensysteme, Fahr- und Motorräder, Haushaltsgeräte,
Nähmaschinen und Gartenprodukte auf den Markt
gebracht werden konnten.
Husqvarna gilt als führender Anbieter von Geräten zur
Garten- und Waldpflege sowie von Schneidausrüstungen
und Diamantwerkzeugen für die Bau- und Steinindustrie.
Pflichten des Betreibers
Der Betreiber ist verpflichtet, nur entsprechend
ausgebildete Personen mit der Bedienung der Maschine
zu betrauen. Aufsichtspersonen und Bediener haben
sämtliche Anweisungen in diesem Handbuch zur
Kenntnis zu nehmen. Insbesondere ist auf Folgendes zu
achten:
• Sicherheitshinweise
• Vorgesehene Anwendungsbereiche
• Nutzungs- und Wartungshinweise
Die Benutzung dieser Maschine könnte durch eine
nationales Gesetz geregelt sein. Finden Sie heraus,
welche Gesetze Anwendung finden, bevor Sie mit der
Benutzung der Maschine beginnen.
Vorbehaltsbestimmungen des Herstellers
Es ist möglich, dass Husqvarna nach der Veröffentlichung
dieses Handbuchs weitere Informationen zum sicheren
Betrieb dieses Produkts herausgibt. Der Betreiber ist
verpflichtet, stets über die sichersten Betriebsverfahren
informiert zu sein.
Die Husqvarna AB arbeitet ständig an der
Weiterentwicklung ihrer Produkte und behält sich daher
das Recht auf Änderungen ohne vorherige Ankündigung,
z. B. von Form und Aussehen, vor.
Informationen und Hilfe für unsere Kunden bietet unsere
Website: www.husqvarna.com
Konstruktion und Funktionen
Die Entwicklung von zuverlässigen und innovativen
Hochleistungstechnologien und eine umweltfreundliche
Produktfertigung sind die erklärten Ziele von Husqvarna.
Ein sicherer Betrieb dieses Produkts setzt voraus, dass
der Betreiber dieses Handbuch aufmerksam durchliest.
Weitere Informationen erhalten Sie von Ihrem Händler
oder Husqvarna.
Hier werden einige der Funktionen aufgeführt, die
unseren Produkten das entscheidende Plus an Qualität
verleihen.
PG280
• Die Maschine ist für das Schleifen von BetonOberflächen unterschiedlicher Härtegrade ausgelegt.
• PG280 Sie ist robust und benutzerfreundlich
• Die Maschine kann zum einfacheren Transportieren
zusammengeklappt werden.
• Die Maschine ist mit einer Schwimmabdeckung
ausgerüstet.
• Die Maschine ist eine Kantenschleifmaschine.
• 1-phasig
• 280 mm Schleiffläche

German – 25
WAS IST WAS?
Was ist was am Schleifer?
2
1
4
24
3
4
5
6
7
8
9
10
11
12
13
15
16
17
18
19
20
21
22
23
24
25
14
1 Betriebsstundenzähler
2 Schaltkasten
3 Griff/Führungsholm
4 Verriegelungshebel für die Lenkereinstellung
5 Nothalt
6 Überlastlampe
7 Stopp-/Anlassschalter
8 Anschluss, Schnellanschluss für Motorkabel
9 Handgriff für Winkelanschluss
10 Stecker
11 Fußpedal
12 Verriegelungsknopf
13 Gummiräder
14 Verbindung, Vakuumschlauch
15 Sperrfunktion
16 Befestigung für Motor/Schleifkopf
17 Schrauben für Luke zum Kantenschleifen
18 Luke, Kantenschleifen
19 Lifting eye
20 Elektromotor
21 Hubhebel, Motor
22 Schwimmabdeckung
23 Werkzeugplatte
24 Bürstenrasterung
25 Bedienungsanweisung

SICHERHEITSAUSRÜSTUNG DES GERÄTES
26 – German
Allgemeines
In diesem Abschnitt werden einzelnen Teile der
Sicherheitsausrüstung des Gerätes beschrieben, welche
Funktion sie haben und wie ihre Kontrolle und Wartung
ausgeführt werden sollen, um sicherzustellen, dass sie
funktionsfähig sind.
Stopp-/Anlassschalter
Der Start/Stopp-Knopf wird zum Starten und Abstellen
des Gerätes verwendet.
Überprüfen des Stopp-/Anlassschalters
Stellen Sie sicher, dass die Not-Aus- oder die MaschinenStopp-Taste nicht betätigt wird, indem Sie sie im
Uhrzeigersinn drehen.
• Senken Sie den Druck zwischen der Schleifscheibe
und dem Boden durch Herunterdrücken des
Handgriffs, ohne dass das Schleifgerät beim Start
vom Boden angehoben wird.
• Starten Sie die Maschine durch Drehen des Start/
Stopp-Knopfs in Position 1 (Antrieb). Die Maschine
startet dann reibungslos und beschleunigt innerhalb
von 5 Sekunden auf die eingestellte Geschwindigkeit.
• Drehen Sie den Start/Stopp-Knopf auf 0 (Stopp), um
die Maschine anzuhalten.
Nothalt
Mit dem Notschalter kann die Maschine schnell
abgeschaltet werden. Mit dem Notschalter der Maschine
können Sie die Stromzufuhr zur Maschine unterbrechen.
Testen des Notschalters
• Drücken Sie den Notschalter (STOP). Prüfen Sie, ob
der Motor stoppt.
• Not-Aus-Taster freigeben (im Uhrzeigersinn drehen).
!
WARNUNG! Benutzen Sie nie ein Gerät
mit defekter Sicherheitsausrüstung. Die
Sicherheitsausrüstung des Gerätes
muss so kontrolliert und gewartet
werden, wie dies in diesem Abschnitt
beschrieben wird. Wenn Ihr Gerät den
Kontrollanforderungen nicht entspricht,
muss eine Servicewerkstatt aufgesucht
werden.
ACHTUNG! Schließen Sie das Motorkabel an den
Schaltkasten an, bevor der Stecker angeschlossen
wird.
~1 mm
1
2
1
2
BETRIEB
German – 27
Allgemeine
Sicherheitsvorschriften
• Lesen Sie vor der Inbetriebnahme der Maschine
diese Bedienungsanleitung aufmerksam durch und
machen Sie sich mit dem Inhalt vertraut.
Bewahren
Sie alle Warnhinweise und Anweisungen für
spätere Referenzzwecke auf.
Sicherheit im Arbeitsbereich
• Sorgen Sie für einen sauberen und gut
ausgeleuchteten Arbeitsbereich.
Durch zugestellte
oder dunkle Arbeitsbereiche steigt die Unfallgefahr
stark an.
• Kein Betrieb der Maschine in feuer- und
explosionsgefährdeten Bereichen.
Elektrische Sicherheit
• Kontrollieren, ob die Netzspannung mit der auf dem
Geräteschild angegebenen übereinstimmt.
• Kontrollen und/oder Wartungsarbeiten sind bei
abgeschaltetem Motor und abgezogenem Stecker
durchzuführen.
• Schalten sie das Gerät aus, bevor Sie den
Stromstecker ziehen.
• Maschine nicht am Netzkabel ziehen und Stecker
nicht am Kabel aus der Steckdose ziehen. Ziehen Sie
direkt am Stecker, nicht am Kabel.
• Das Gerät nicht benutzen, wenn ein Kabel oder
Stecker beschädigt ist, sondern zur Reparatur in eine
autorisierte Servicewerkstatt geben.
• Beim Betrieb unter Wasser darf die Maschine nicht so
weit getaucht werden, dass die Gerätschaften
dadurch beschädigt werden. Bei spannungsführender
Maschine können außerdem Verletzungen die Folge
sein.
• Achten Sie stets darauf, dass das Stromkabel nicht
angeschlossen ist, wenn Sie den Kontakt zwischen
Motor und Schaltkasten herstellen oder trennen.
!
WARNUNG! In diesem Abschnitt werden
grundlegende Sicherheitsregeln
vorgestellt. Die folgenden Informationen
sind kein Ersatz für das Wissen, das ein
professioneller Anwender durch seine
Ausbildung und praktische Erfahrung
erworben hat. Lassen Sie sich bei
Unsicherheiten von einer Fachkraft
beraten. Fragen Sie Ihren Fachhändler,
Ihre Servicewerkstatt oder einen
erfahrenen Anwender. Führen Sie keine
Arbeiten aus, wenn Unsicherheiten
bezüglich der richtigen Vorgehensweise
bestehen.
!
WARNUNG! An elektrisch betriebenen
Geräten besteht stets die Gefahr von
elektrischen Schlägen. Ungünstige
Witterungsbedingungen sowie einen
Körperkontakt mit Blitzableiter und
metallischen Gegenständen vermeiden.
Stets die Vorgaben in der
Bedienungsanleitung befolgen, um
Schäden auszuschließen.
Schließen Sie das Gerät niemals an eine
Steckdose an, wenn Stecker oder Kabel
beschädigt sind.
!
ACHTUNG! Das Gerät erfüllt die
Anforderungen nach EN
61000-3-11 und
kann unter bestimmten Bedingungen an
das Netz angeschlossen werden. Es
kann in Absprache mit dem
Energieversorgungsunternehmen
angeschlossen werden.
Das Gerät kann nur an das Stromnetz
angeschlossen werden, wenn die
Impedanz weniger als 0,28
Ohm beträgt.
Die Systemimpedanz am
Anschlusspunkt kann beim
Energieversorgungsunternehmen erfragt
werden.
Wenn das Stromnetz über eine höhere
Impedanz verfügt, können beim Start des
Geräts kurze Spannungseinbrüche
auftreten. Dies kann Einfluss auf den
Betrieb anderer Produkte haben, z.
B.
Flackern von Lampen.
 Loading...