

Page 1

PART NO. 5600
94-01 DODGE RAM FRONT MUD GUARDS
INSTALLATION INSTRUCTIONS
Please read instructions thoroughly before installation.
Tools Required:
• 1/8” & 1/4” drill bits / Drill
• Center punch / Hammer
• Short Phillips screwdriver or drill attachment
• Marking utensil (fine tip marker, grease pencil, etc.)
Package Contents
• Driver & passenger side mud guard
• #10 screw (qty. 8)
• Plastic fastener (qty. 2)
• U-clip (for rear mud guard only) (qty. 4)
• Instruction sheet (front & rear)
NOTE: Turn the front wheels all the way to the left or right for mud guard installation. However, it may be necessary
to remove the wheels depending on the tools being used for installation.
1. Clean and degrease the mud guard location area on the fender before installation.
2. Using the mud guard as a template, position and mark hole location B with a marking utensil. Make sure the mud guard fits flush against
the front fender and is parallel to the ground (figure 1).
3. Center punch and drill 1/8” hole at location B.
4. Attach mud guard to front panel with #10 screw, check fit and alignment. Adjust accordingly.
5. Center punch and drill 1/8” holes at locations A, C and D using the mud guard as a template.
6. Install #10 screws at locations A, C and D, check fit and tighten.
7. Using mud guard as a template, drill a 1/4” hole at location E.
8. Install plastic fastener at location E attaching the mud guard to the fender liner.
PAINTING INSTRUCTIONS
1. Clean mud guard with a soap and water solution to remove dirt and other contaminates.
2. Sand painting surface with 320 grit sand paper.
3. Apply a coating of flexible primer-adhesion promoter.
4. Apply a flexible paint as directed by the paint manufacturer
5600 Front_Rear Instruc#5FF.doc
Rev: 2
Page 2
PART NO. 5600
94-01 DODGE RAM REAR MUD GUARDS
INSTALLATION INSTRUCTIONS
Please read instructions thoroughly before installation.
Tools Required:
• 1/8” & 1/4” drill bits / drill
• Center punch / hammer
• Short Phillips screwdriver
Package Contents
• Driver & passenger side mud guard
• #10 Screw (qty. 8)
• Plastic fastener (qty. 2)
• U-clip (for rear mud guard only) (qty. 4)
• Instruction sheet (front & rear)
NOTE: It may be necessary to remove the rear wheels depending on the tools being used for installation.
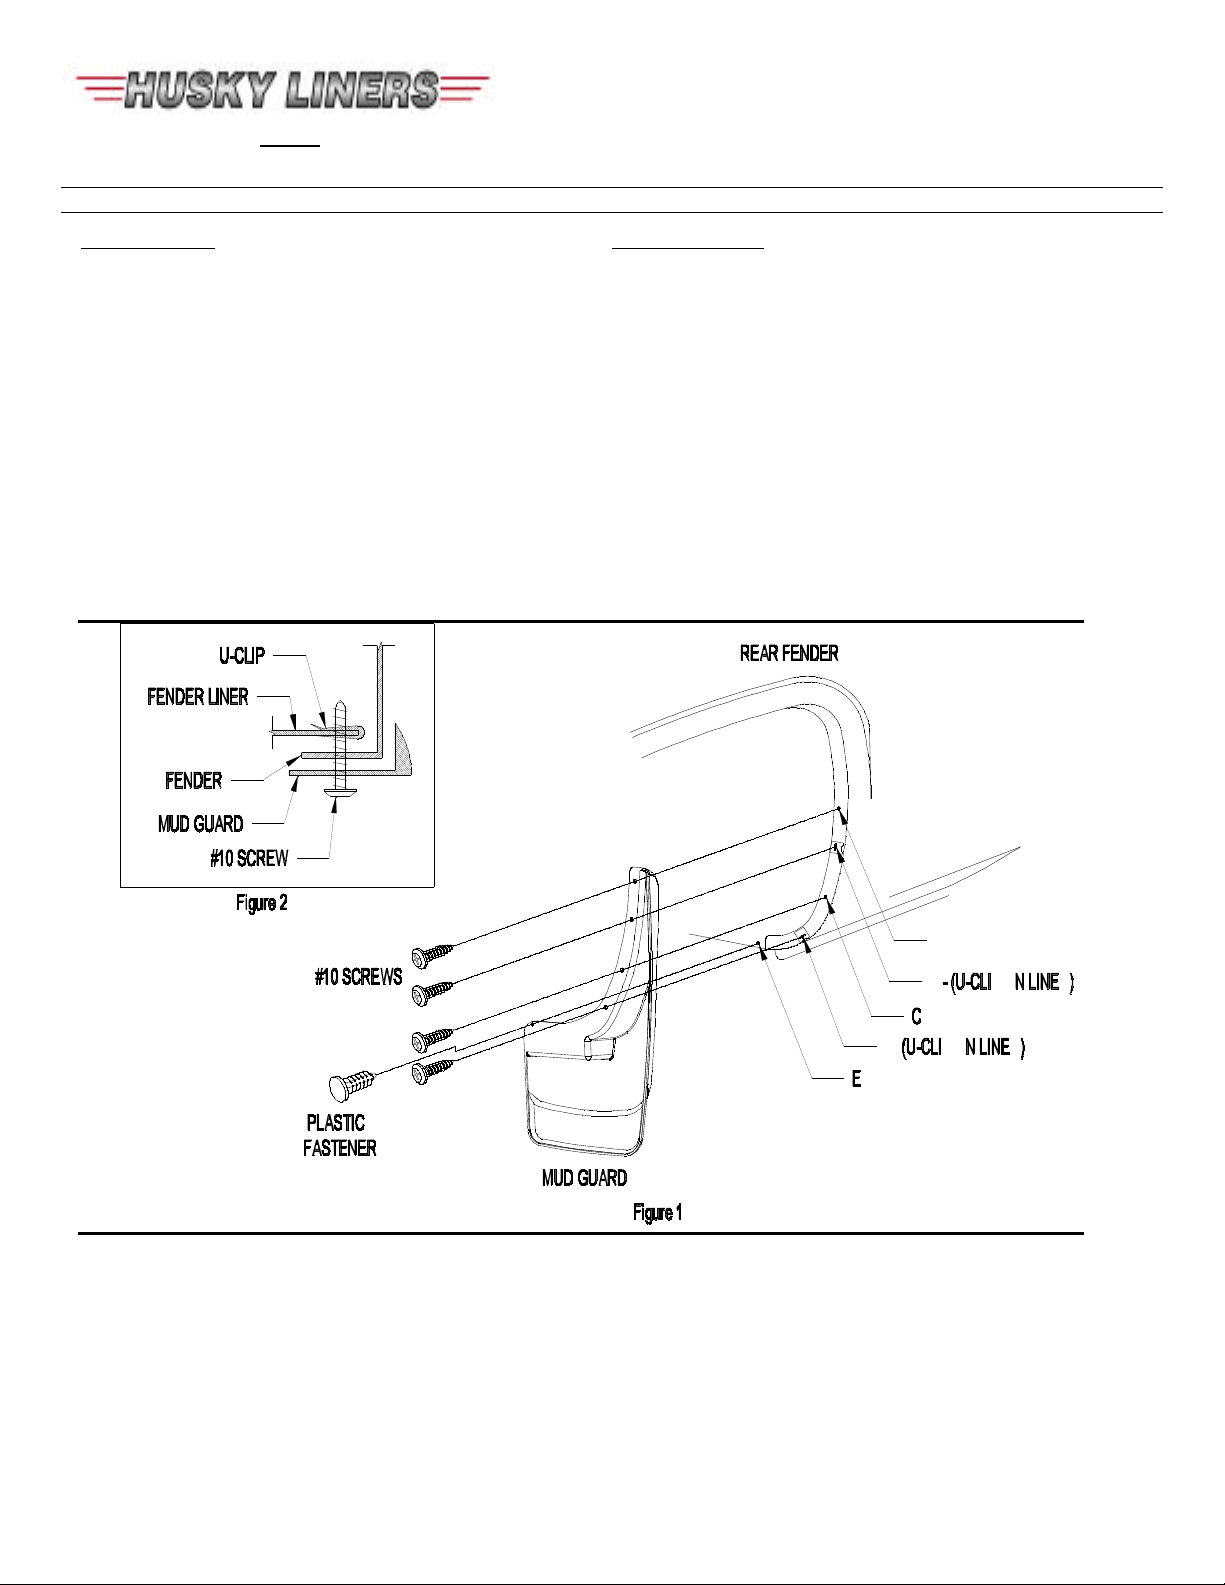
9. Clean and degrease the mud guard location area on the rear panel before installation.
10. Remove existing fasteners (either plastic rivets or factory sheet metal screws) from locations B and D (see figure 1). If vehicle has factory
sheet metal screws in locations B and D, remove and save for reuse (SKIP STEP 3). If fasteners are plastic rivets, break to remove and
discard.
11. Pull liner out and install U-clips over liner at locations B and D (see figure 2), return liner to original position.
12. Attach mud guard to rear panel with #10 screws or existing factory sheet metal screws at locations B and D.
13. Center punch and drill 1/8” hole at locations A and C using the mud guard as a template.
14. Install #10 screws at locations A and C, check fit and tighten.
15. Using mud guard as a template, drill 1/4” hole at location E.
16. Install plastic fastener at location E attaching the liner to the mud guard.
PAINTING INSTRUCTIONS
1. Clean mud guard with a soap and water solution to remove dirt and other contaminates.
2. Sand painting surface with 320 grit sand paper.
3. Apply a coating of flexible primer-adhesion promoter.
4. Apply a flexible paint as directed by the paint manufacturer
5600 Front_Rear Instruc#5FF.doc
Rev: 2
 Loading...