

Page 1
Item #1001 863 390
Model #K40071
USE AND CARE GUIDE
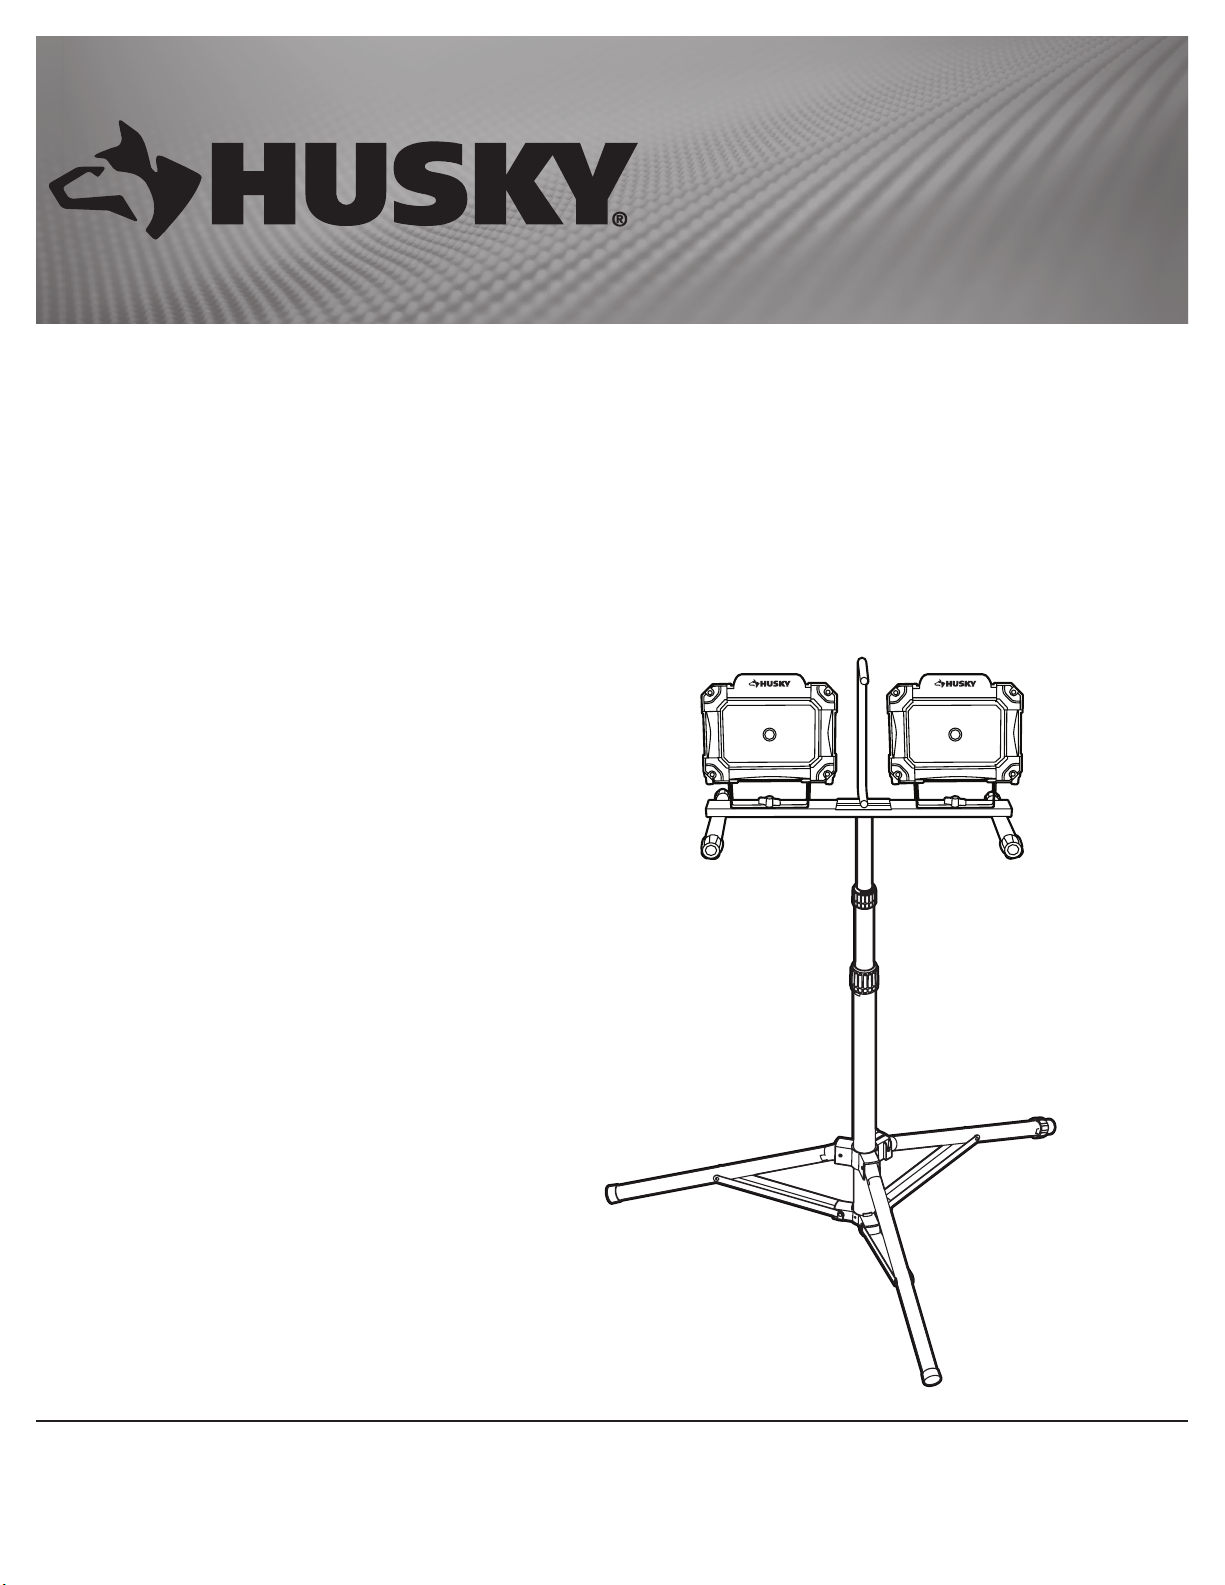
7000 LUMEN TWIN HEAD LED WORKLIGHT WITH TRIPOD
Questions, problems, missing parts?
Before returning to the store, call
Husky Customer Service
8 a.m. - 7 p.m., EST, Monday - Friday
9 a.m. - 6 p.m., EST, Saturday
1-888-HD-HUSKY
HUSKYTOOLS.COM
THANK YOU
We appreciate the trust and condence you have placed in Husky through the purchase of this twin head worklight. We strive to continually
create quality products designed to enhance your home. Visit us online to see our full line of products available for your home improvement
needs. Thank you for choosing Husky!
Page 2
Table of Contents
Table of Contents ...................................2
Safety Information ..................................2
Warranty ..........................................3
Pre-Assembly ......................................3
Safety Information
Read and understand all Safety and Operating instructions in this
manual before using this product.
DANGER: BE EXTREMELY CAREFUL WHEN USING THIS
DEVICE. Improper use of this worklight can result in injury
or death.
WARNING: Failure to observe the following safety rules
may result in FIRE, ELECTRICAL SHOCK, OR INJURY.
Follow all safe guards stated in this manual, in addition to normal
safety precautions in working with electrical devices. When using
outdoor-use Portable Lamp Stand / Tripod Worklights, always follow
basic safety precautions to reduce the risk of re, electric shock and
personal injury.
1. Use only 3-wire UL listed outdoor extension cords that have
3-prong grounded plugs and grounded receptacles that accept
the worklight’s plug.
2. Ground Fault Circuit Interrupter (GFCI) protection should be
provided on the circuit(s) or outlet(s) to be used for wet location
tripod worklights. Receptacles are available having the builtin GFCI protection and are able to be used for this measure of
safety.
3. Use only with an extension cord for outdoor use, such as an
extension cord of cord type SEW, SEOW, SEOOW, SOW, SOOW,
STW, STOW, STOOW, SJEW, SJEOW, SJEOOW, SJW, SJOW, SJOOW,
SJTW, SJTOW, or SJTOOW.
4. Never use around heavy volatile uids such as gasoline.
5. Do not use with an extension cord near water, or in areas where
water may accumulate. Keep the worklight at least 16 ft. from
pools or spas. Keep plugs dry. Only use this worklight with GFCIprotected outlets when in wet locations.
SAVE THESE INSTRUCTIONS.
Assembly. . . . . . . . . . . . . . . . . . . . . . . . . . . . . . . . . . . . . . . . . . 5
Operation .........................................7
Care and Cleaning ..................................7
Maintenance .......................................7
FCC STATEMENT
WARNING: Changes or modications to this unit not
expressly approved by the party responsible for compliance
could void the user’s authority to operate the equipment.
NOTICE: This equipment has been tested and found to comply with
the limits for a Class B digital device, pursuant to Part 15 of the FCC
Rules. These limits are designed to provide reasonable protection
against harmful interference in a residential installation. This
equipment generates, uses and can radiate radio frequency energy
and, if not installed and used in accordance with the instructions,
may cause harmful interference to radio communications. However,
there is no guarantee that interference will not occur in a particular
installation. If this equipment does cause harmful interference to
radio or television reception, which can be determined by turning the
equipment off and on, the user is encouraged to try to correct the
interference by one or more of the following measures:
- Reorient or relocate the receiving antenna.
- Increase the separation between the equipment and receiver.
- Connect the equipment into an outlet on a circuit different from that
to which the receiver is connected.
- Consult the dealer or an experienced radio/TV technician for help.
2
Page 3
Warranty
The manufacturer warrants the products to be free from defects in materials and workmanship for a period of three (3) years from date
of purchase. We take pride in the design and construction of each of our products and work to maintain the quality of our materials and
craftsmanship to assure your satisfaction.
If any problems appear, the purchaser may return the item, freight prepaid, together with a copy of your original purchase receipt to place
of purchase and it will be replaced with the same or comparable model free of charge. This warranty does not cover xtures that have been
altered in any way; it is void if damage or defect has resulted from accident, abuse, misuse or faulty repair.
In no event will the manufacturer be liable for any incidental or consequential damages. No charge will be acceptable for unauthorized
repairs, parts or service. Some states do not allow the exclusion or limitation of incidental or consequential damages, so the above
exclusion or limitation of incidental or consequential damages may not apply to you. Legal warranty rights will vary from state to state and
you may have other rights.
Contact the Customer Service Team at 1-888-HD-HUSKY or visit www.HUSKYTOOLS.com.
Pre-Assembly
SPECIFICATIONS
Product Weight
Product Width
Product Depth
Product Height
15.92 lbs
39.37 in.
39.37 in.
74.80 in.
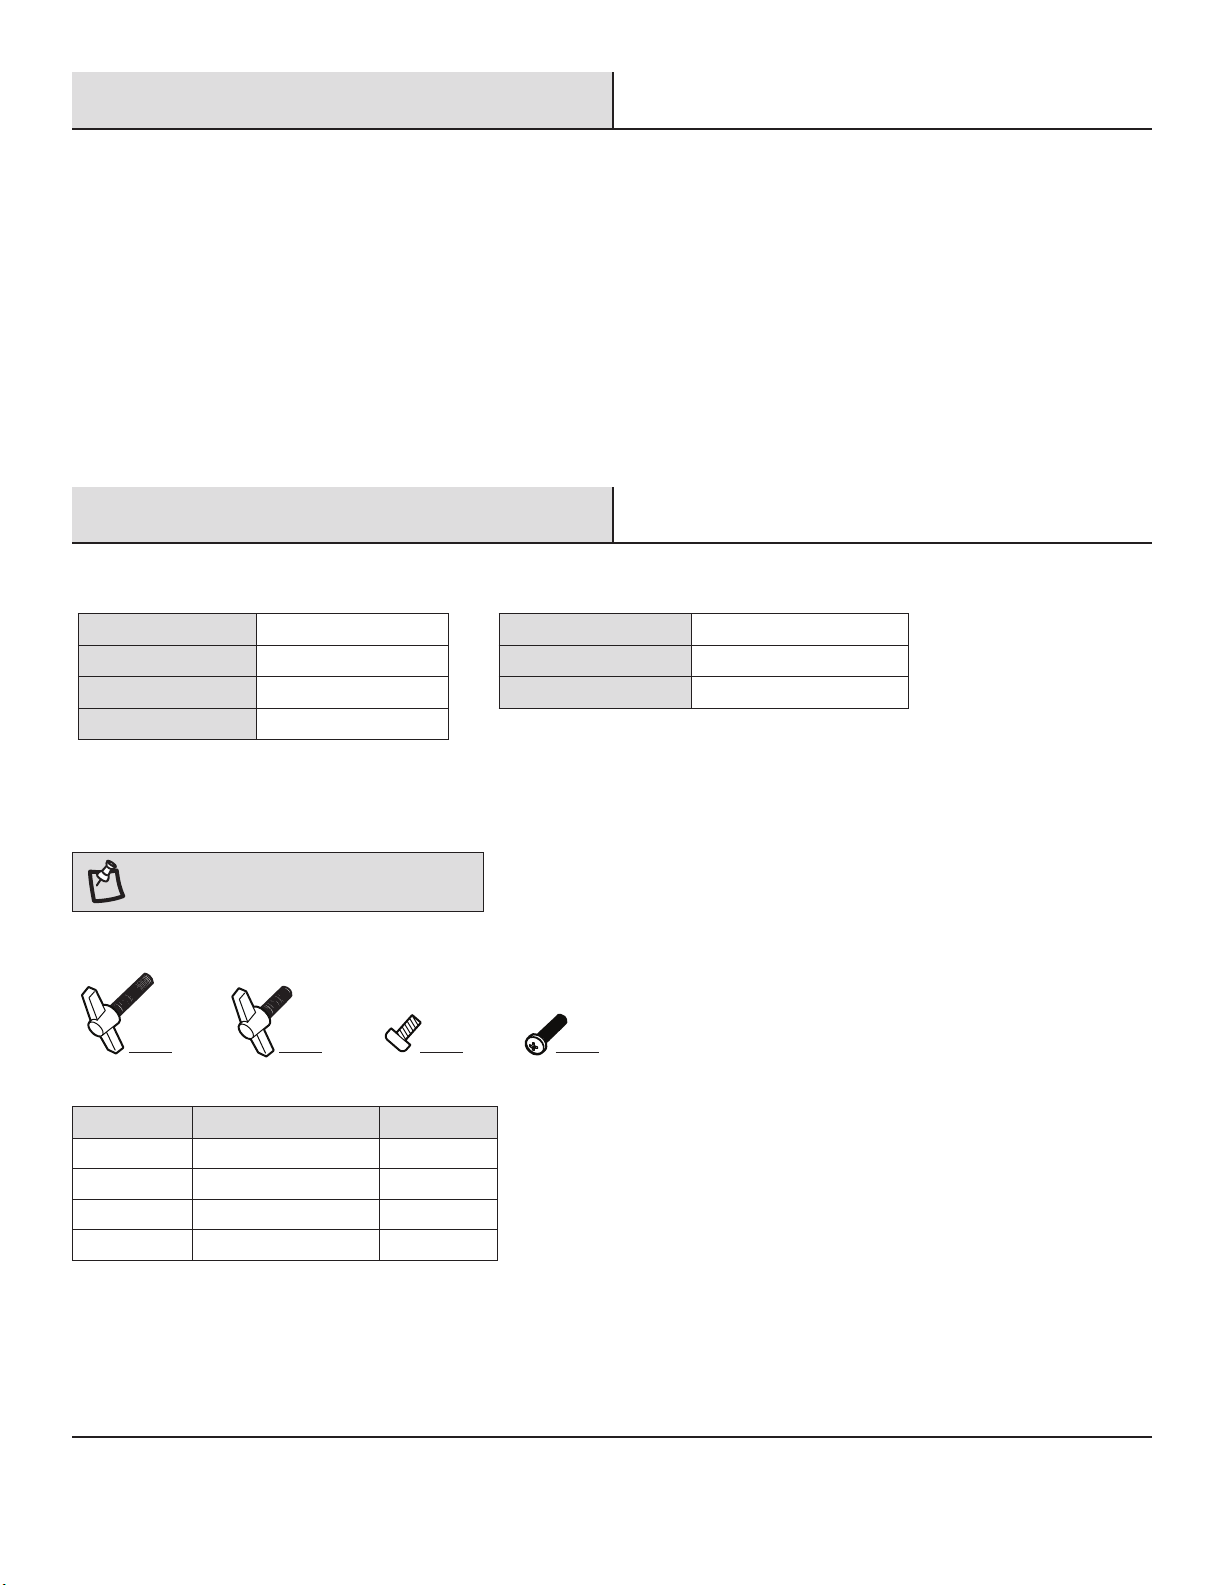
HARDWARE INCLUDED
NOTE: Hardware not shown to actual size.
AA BB CC DD
Part Description Quantity
AA Tripod screw 1
BB Lamp head screw 2
CC Screw 1
DD Handle screw 2
Rated Voltage
Rated Currency
Rated Power
120V, 60Hz
0.8A
96W
3 HUSKYTOOLS.COM
Please contact 1-888-HD-HUSKY for further assistance.
Page 4

Pre-Assembly (continued)
PACKAGE CONTENTS
B
C
A
D
E
Part Description Quantity
A Central handle 1
B Lamp head 2
C Stand 1
D Tripod 1
E Power cord 1
4
Page 5

Assembly
Attaching the lamp heads to the
1
stand
□ Lay the lamp heads (B) face down and position the stand (C)
against the U-shaped bracket on the lamp head (B).
□ Attach the lamp heads (B) to the stand (C) by inserting the
lamp head screws (BB) into the bottom of the lamp heads and
into the stand (C).
BB
B
BB
B
C
Preparing the tripod
2
□ Loosen the tripod screw (AA) and move the support legs (2)
away from the center tube (1) of the tripod (D).
□ Push down on the leg connector until the support legs (2)
are fully extended and rmly tighten the tripod screw (AA).
□ Adjust the height of the tripod (D) by loosening the red
twist collars (3) on the center tube (1) and raising the pole
section.
□ Extend the legs as necessary at the ends (4) for added
balance in various situations.
□ Firmly tighten the twist collars (3) once you have adjusted
the tripod (D) to the desired height.
□ Tighten the tripod screw (AA) to secure the base of the
tripod into position.
D
3
1
AA
2
4
5 HUSKYTOOLS.COM
Please contact 1-888-HD-HUSKY for further assistance.
Page 6

Assembly (continued)
Attaching the lamps to the tripod
3
□ Secure the central handle (A) to the stand (C) by inserting the
handle screws (DD).
□ Position the center of the stand (C) over the center of the
tripod (D) and insert the post on the bottom of the stand (C)
into the top of the tripod (D).
□ Push the lever (1) on the tripod (D) to lock the stand (C) in
place.
□ To unlock the stand (C) from the tripod (D), pull the lever (1)
and lift the stand (C) using the central handle (A).
A
B
DD
C
Securing the power cord
4
□ Attach the Y-shaped portion of the power cord (E) to
the central handle (A) using the screw (CC) that is
preassembled to the cord (E).
□ Hook the bottom of the cord (E) around the hook (1) located
on the bottom of the tripod.
A
A
CC
E
D
1
1
E
6
Page 7

Operation
Adjusting the light direction
1
□ Adjust the lamp heads (B) by loosening the twist knobs (1)
on each side of the lamp heads (B).
□ Hold the top of the lamp heads (B) and move forward or
backward to the desired position. Retighten the twist knobs
(1).
1
B
Turning the lamp head on
2
NOTE: Always turn the lamp head (A) off before you
unplug the worklight.
□ Plug the power cord into a 120V outlet.
□ Press the On/Off switch (1) on the lamp heads (B) to turn
the lamps on ( — ) and off ( O ).
B
1
Care and Cleaning
WARNING: Always make sure that the worklight is
unplugged and cooled down before attempting to clean it.
□ Clean the lamp head, lens cover, lamp stand and tripod regularly with a non-abrasive cleaner.
□ Allow the worklight to cool down completely before storing.
□ Store in a safe place, out of the reach of children.
Maintenance
If the light does not work, check the following:
□ Ensure the xture is properly plugged into the power source.
□ Ensure the switch is in the ON position.
7 HUSKYTOOLS.COM
Please contact 1-888-HD-HUSKY for further assistance.
Page 8

Questions, problems, missing parts? Before returning to the store,
call Husky Customer Service
8 a.m. - 7 p.m., EST, Monday-Friday
9 a.m. - 6 p.m., EST, Saturday
1-888-HD-HUSKY
HUSKYTOOLS.COM
Retain this manual for future use.
 Loading...