

Page 1

petrol lawn mower
original operating instructions
models:
HBD-41 (DYM1651PF)
Manufactured by
HBD-46R (DYM1666)
for DYM1651PF
(for DYM1666)
)
Imported by
Ningbo Daye Garden Machinery Co., Ltd.
No.58 Jinfeng Road
Yuyao, Zhejiang 315403
P. R. China
Daye Europe GmbH
Parkstraße 1a
66450 Bexbach
Germany
1
Page 2
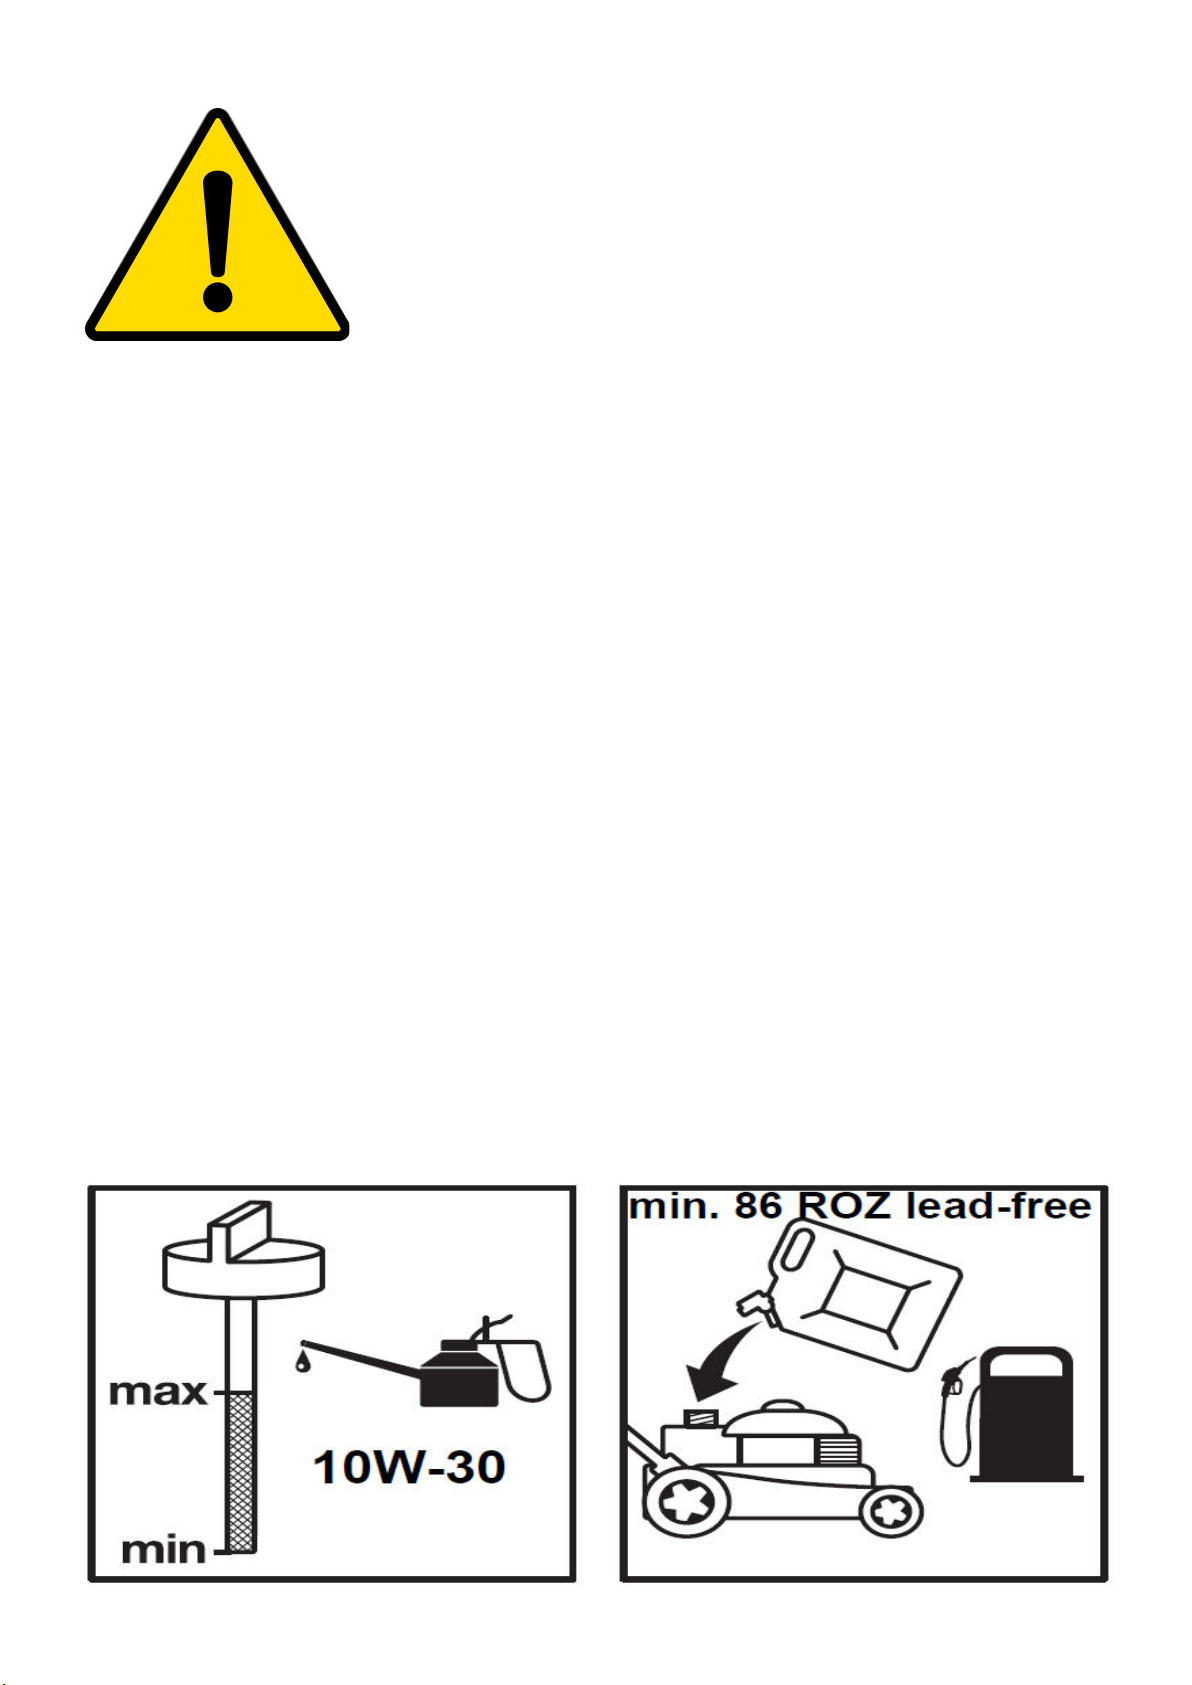
WARNING
For your own safety, please read this manual before attempting to operate your
new unit. Failure to follow these instructions can result in serious personal injury.
Spend a few moments to familiarize yourself with your mower before each use.
Keep this manual in a safe place, so that the information is available anytime. If
you give the equipment to any other person, hand over these operating
instructions and safety regulations as well.
:
Intended use
The equipment may only be used for the purpose it is designed for. Any other use is deemed to be a case of
misuse. The operator, and not the manufacturer, will be liable for any resulting damage or injuries of any kind.
The petrol lawn mower is intended for private use, i.e. for use in home and gardening environments.
Private use of the lawn mower refers an annual operating time up to of 50 hours, during which time the machine
is primarily used to maintain small-scale, residential lawns and home/ hobby gardens. Public facilities, sportis
grounds and agricultural or forestry applications are excluded.
Please note that our equipment has not been designed for use in commercial, trade or industrial applications.
Our warranty will be void if the machine is used in a commercial, trade or industrial business or for equivalent
purposes.
The operating instructions as supplied by the manufacturer must be kept and referred to in order to ensure that
the lawn mower is properly used and mainteed. The instructions contain valuable information on operating,
maintenance and servicing conditions.
Important! Due to the high risk of body injury to the user, the lawn mower may not be used to trim bushes,
hedges or shrubs, to cut scaling vegetation, planted roofs or balcony-grown grass, to clean (suck up) dirt and
debris off walkways, or to chop up tree or hedge clippings. Moreover, the lawn mower may not be used as a
power cultivator to level out elevated soil pieces such as molehills.
For safety reasons, the lawn mower may not be used as a drive unit for other work tools or toolkits of any kind.
2
Page 3
CONTENTS
SECTION . 1 SYMBOLS MARKED ON THE PRODUCT 4
SECTION 2 GENERAL SAFETY RULES 4
SECTION 3 PARTS DESCRIPTION 7
SECTION 4 TECHNICAL DATA 8
SECTION 5 ASSEMBLY 8
SECTION 6 OPERATING INSTRUCTIONS 11
SECTION 7 MAINTENANCE INSTRUCTIONS 15
SECTION 8 LUBRICATION INSTRUCTIONS 16
SECTION 9 CLEANING 16
SECTION 10 STORAGE INSTRUCTIONS (OFF SEASON) 18
SECTION 11 TROUBLESHOOTING 20
SECTION 12 WARRANTY 21
SECTION 13 ENVIRONMENT 22
SECTION 14 EC-DECLARATION OF CONFORMITY 23
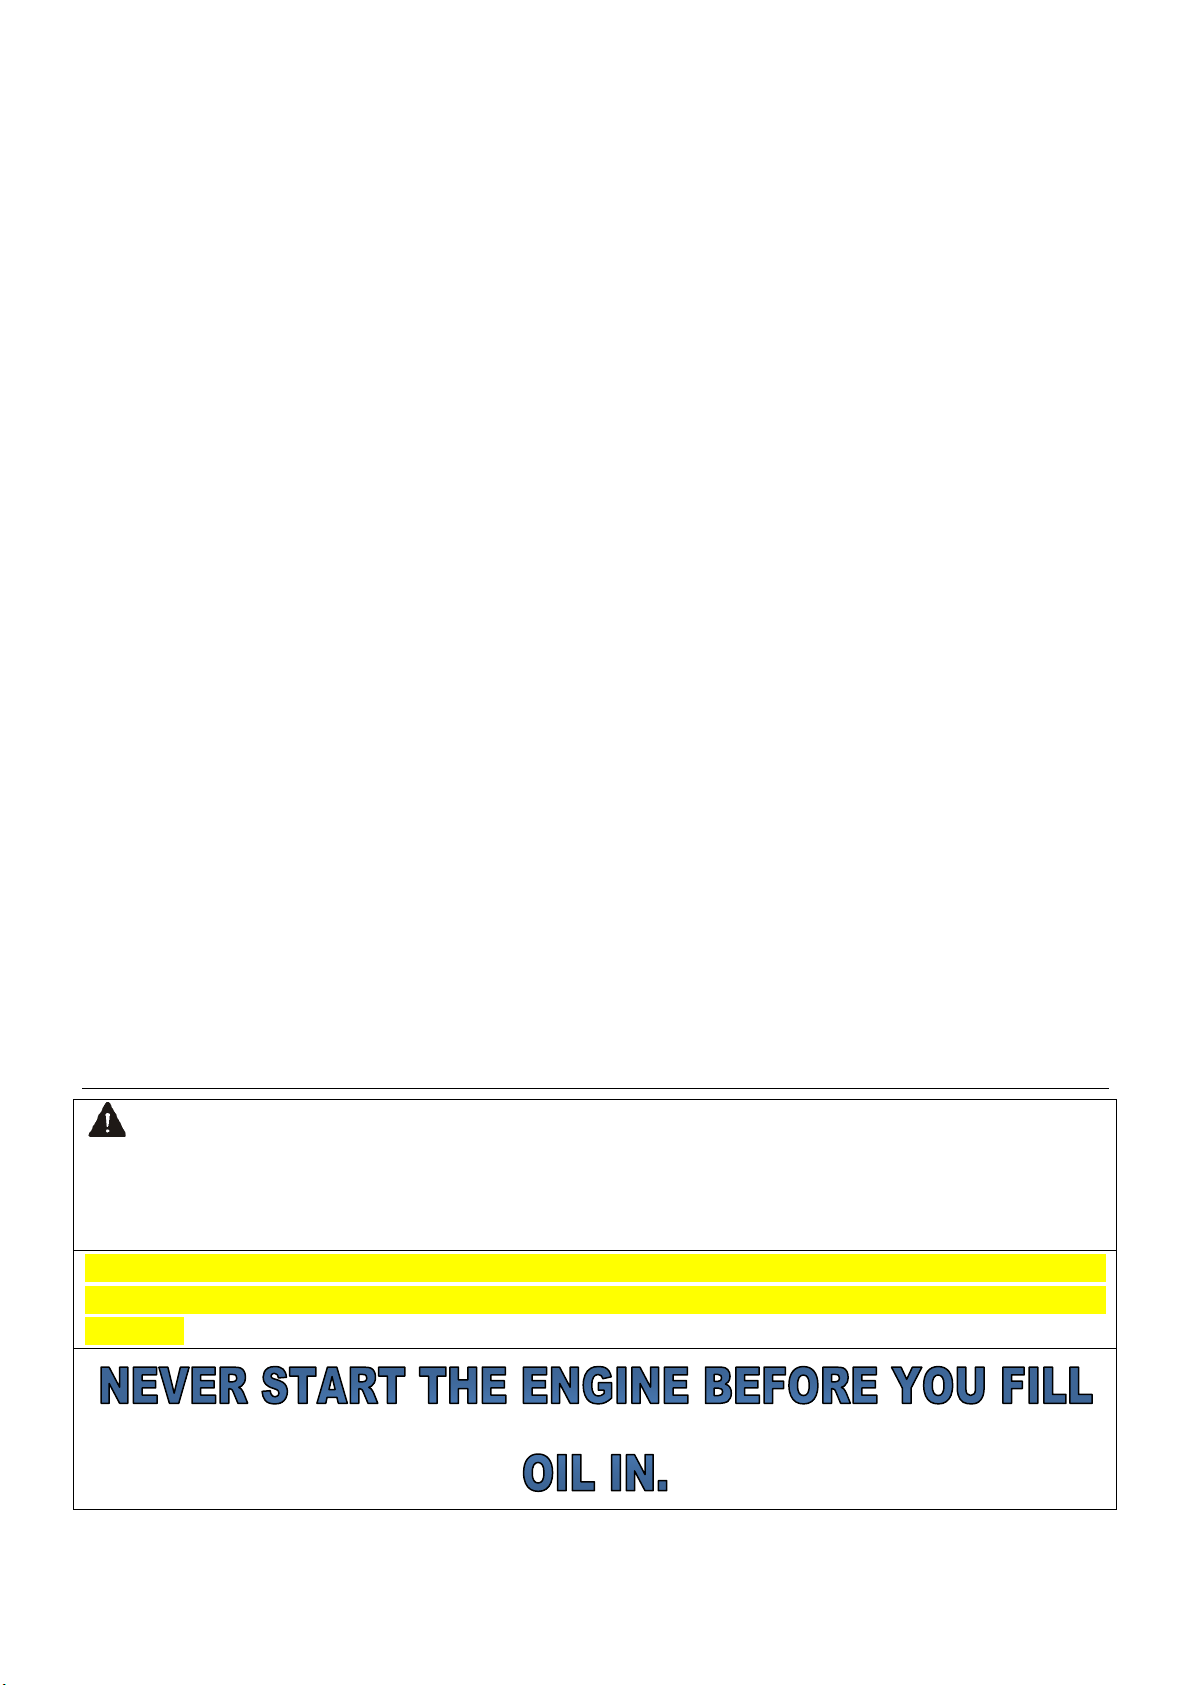
WARNING:
For your own safety please read this manual before attempting to operate your new unit. Failure to follow
instructions can result in serious personal injury. Spend a few moments to familiarize yourself with your mower
before each use.
When you unpack the lawn mower, pay close attention not to twist or bend the cables and not to
pull the appliance on the cords. That may lead to irreversible damages that are not subject to
warranty.
3
Page 4
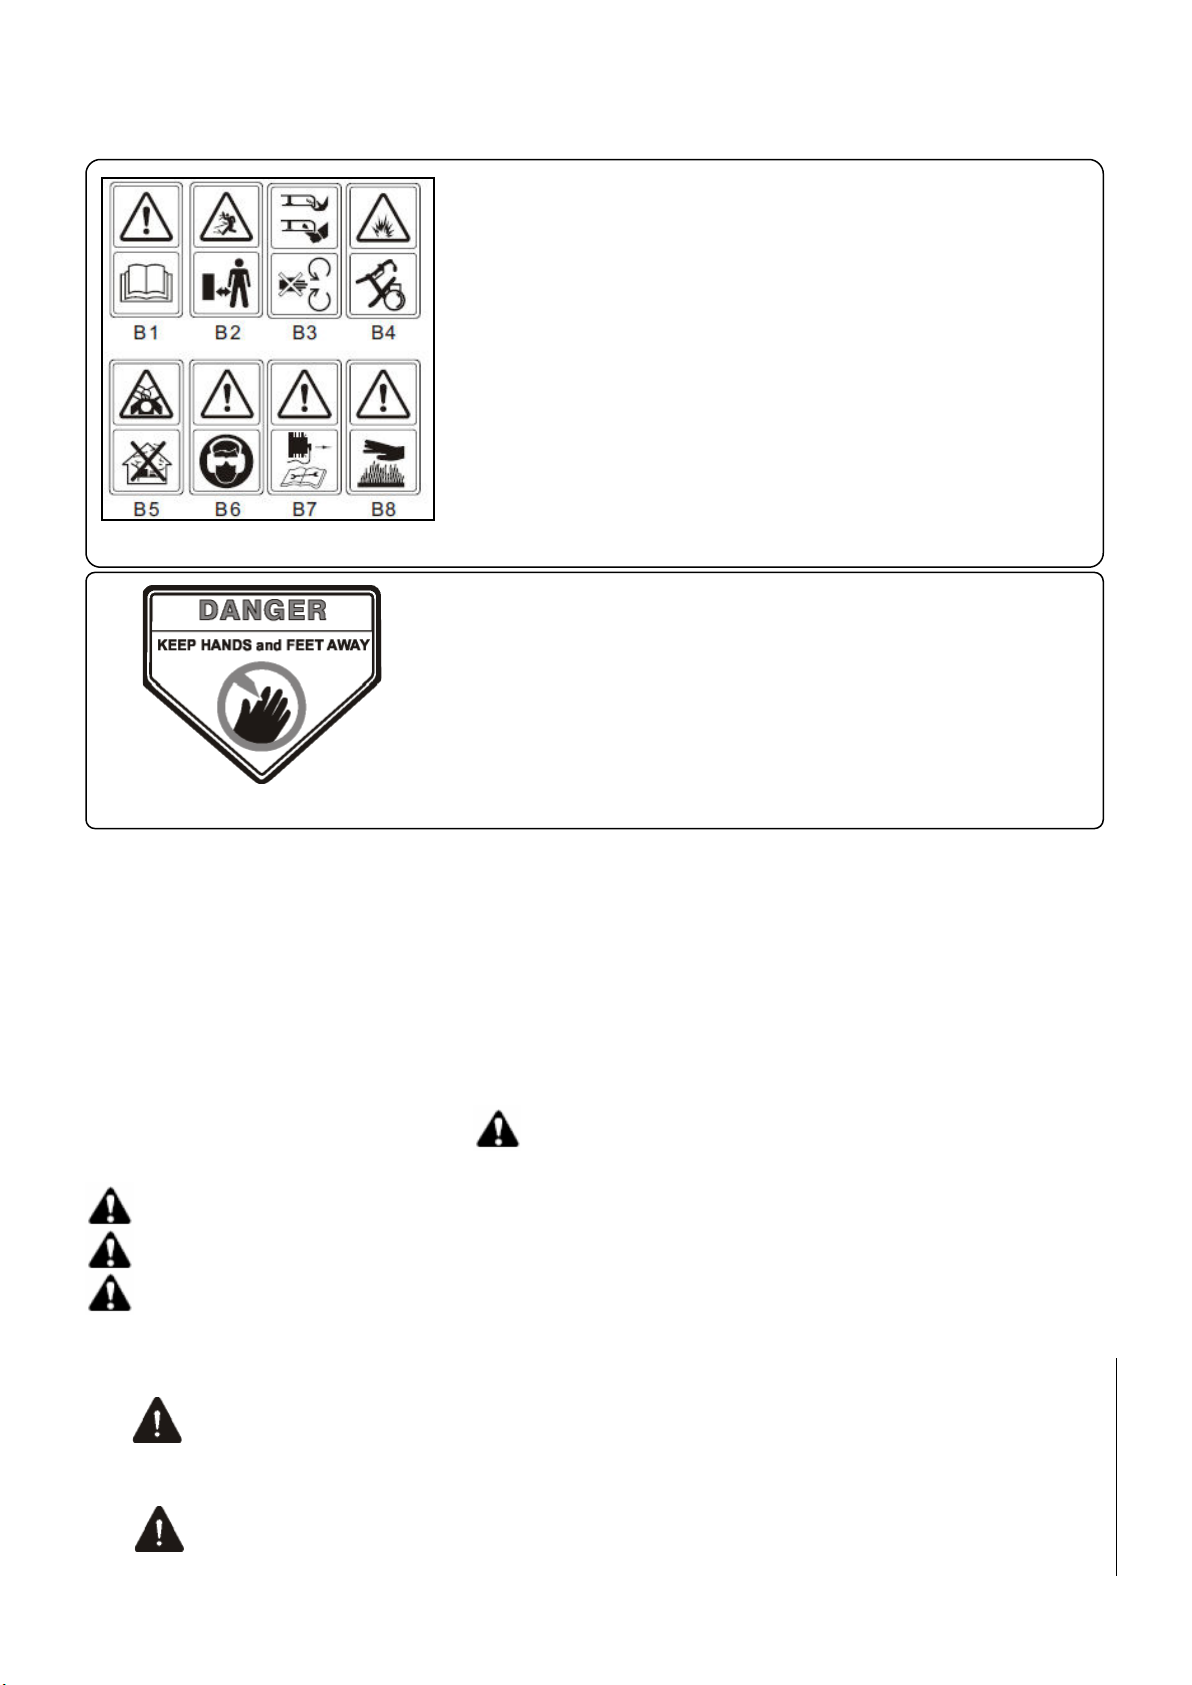
1. SYMBOLS MARKED ON THE PRODUCT
Figure 1: Symbols marked on the rear cover
Figure
B1 Read operating instructions.
B2 Keep bystanders away.
B3 Risk of injury to hands and feet.
B4 Flammable fuel. Keep fire away. Do not add fuel on running
machine.
B5 Toxic fumes. Don’t operate in closed rooms.
B6 Wear glasses and ear plugs during operation.
B7 High-current electric ignition circuit. Remove spark plug for
maintenace.
B8 Caution: Engine hot.
Sharp knives can cause severe injuries or even amputate limbs.
KEEP HANDS AND FEET AWAY.
2: Safety label
Warning: Keep the safety signs clear and visible on the equipment. Replace the safety signs if they are missing
or illegible.
2. GENERAL SAFETY RULES
Your safety and the safety of others are very important. We have provided important safety messages in this
manual and on the engine. Please read these messages carefully.
A safety message alerts you to potential hazards that could hurt you or others. Each safety message is
preceded by a safety alert symbol and one of three words:
These signal words mean:
DANGER: You WILL be KILLED or SERIOUSLY HURT if you don't follow instructions.
WARNING:
CAUTION:
Each message tells you what the hazard is, what can happen, and what you can do to avoid injury.
WARNING: When using petrol tools, basic safety precautions, including the following, should always be
WARNING: This machine produces an electromagnetic field during operation. This field may, under some
You CAN be KILLED or SERIOUSLY HURT if you don't follow instructions.
You CAN be HURT if you don't follow instructions.
followed to reduce the risk of serious personal injury and/or damage to the unit. Read all these
instructions prior to operating this product and retain these instructions for future reference.
circumstances, interfere with active or passive medical implants. To reduce the risk of serious or
fatal injury, we recommend persons with medical implants to consult their physician and the
medical implant manufacturer before operating this machine.
DANGER, WARNING or CAUTION.
4
Page 5
Training
● Read the instructions carefully. Be familiar with the controls and the proper use of the equipment.
● Never allow children or people unfamiliar with these instructions to use the lawn mower. Local
regulations may restrict the age of the operator.
● Never mow while people, especially children, or pets are nearby.
● Keep in mind that the operator or user is responsible for accidents or hazards occurring to other people
or their property.
● The operators must receive proper training in the use, adjustment and operation of the machine,
including prohibited operations.
Preparation
● In operation, always wear sturdy footwear and long trousers. Do not operate the equipment barefoot or
wearing open sandals.
● Thoroughly inspect the area where the equipment is to be used and remove all objects, such as stones,
toys, sticks and wires, which can be whirled up by the machine.
● WARNING:- Petrol is highly flammable.
- Store fuel in sealable canisters specially designed for this purpose.
- Refuel outdoor only and do not smoke while refueling.
- Add fuel before starting the engine. Never remove the cap of the fuel tank or add petrol while the
engine is running or when the engine is hot.
- If petrol is spilled, do not attempt to start the engine. Ignition sparks maylead to an explosion.
Move the machine away from the area of spillage and avoid creating any source of ignition until
petrol vapors have dissipated.
- Close all fuel tank and container caps securely.
● WARNING
cause a malfunction in which you can be seriously hurt or killed. Always perform a preparation inspection
before each operation, and correct any problem.
Always check the following items before you start the engine:
1. fuel level • 2. oil level • 3. Air cleaner • 4. fluid leaks and loose or damaged parts
● Replace faulty silencers.
● Before each use, always visually inspect the blade and blade bolts on traces of wear or damages.
Replace worn or damaged blades and bolts in sets to preserve the balance.
: Improper maintenance to this engine, or failure to correct a problem before operation, can
Operation
WARNING: Your engine's exhaust contains poisonous carbon monoxide. Carbon monoxide gas is toxic.
Breathing it can cause unconsciousness and even kill you. Do not run the engine without adequate
ventilation, and never run the engine indoors.
● WARNING: Do not use the lawnmower during lighting.
● DANGER: The engine and exhaust become very hot during operation. Keep the engine at least 1
meter away from buildings and other equipment during operation. Keep flammable
materials away, and do not place anything on the engine while it is running.
● It is recommended to limit the duration of operation in order to minimize the risks from noise and
vibration.
● Be careful when using the lawnmower in slopes and near drop-offs, ditches or embankments.
● Mow only in daylight.
5
Page 6

● Avoid operating the equipment in wet grass.
● Watch your steps on slopes.
● Walk, never run.
● Mow across slopes, never up and down.
● Exercise extreme caution when changing direction on slopes.
● Do not mow excessively steep slopes.
● Use extreme caution when reversing or pulling the lawn mower towards you.
● Stop the blade if the lawn mower has to be tilted for transportation when crossing surfaces other than
grass, and when transporting the lawn mower to and from the area to be mown.
● Never operate the lawn mower with defective guards, e.g. deflectors and/or grass catchers.
● Caution: The lawnmower must not be operated without either the grass catcher or self-closing
discharge opening guard in place.
● Do not change the speed governor of the engine.
● The lawnmower safety systems or features shall not be tampered with or disabled.
● Disengage all and drive clutches before starting the engine.
● Start the engine carefully according to instructions and with feet well away from the blade.
● Do not tilt the lawn mower when starting the engine.
● Do not start the engine when standing in front of the discharge chute.
● Do not put hands or feet near or under rotating parts. Keep clear of the discharge opening at all times.
● Never pick up or carry a lawn mower while the engine is running.
● Stop the engine and disconnect the spark plug wire, make sure that all moving parts have come to a
complete stop and, where a key is fitted, remove the key
- before clearing blockages or unclogging the discharge chute;
- before checking, cleaning or working on the lawn mower;
- after having hit a foreign object. Inspect the lawnmower for damage and make repairs before
restarting and operating the lawn mower.
- If the lawn mower starts to vibrate abnormally (immediate check necessary);
- before refueling.
Maintenance and storage
● Keep all nuts, bolts and screws tight to ensure a safe working condition.
● Be sure there is adequate ventilation whenever you operate or service the engine.
● Never store the equipment with petrol in the tank inside a building.
● Allow the engine to cool down before storage. Clean and maintain the lawnmower before storage.
● To reduce fire hazard, keep the engine, silencer and petrol tank area free of grass, leaves or resin.
● Regularly check the grass catcher for wear or deterioration.
● Replace worn or damaged parts.
● If the fuel tank has to be drained, do so only outdoors.Allow it to cool down for at least 15 minutes first.
● Improper maintenance, use of non-conform replacement components, or the removal or modification of
safety components can damage the lawnmower and lead to serious injuries or death.
● Only use the blades and spare parts recommended by the manufacturer. The use of counterfeit parts
can damage the machine and injure the operators. Keep the lawnmower in good working condition.
● If the blade doesn’t immediately stop on stopping the engine, please contact the service center.
DANGER: Do not touch the rotating blade.
WARNING: Refuel in a well ventilated area with the engine stopped.
6
Page 7
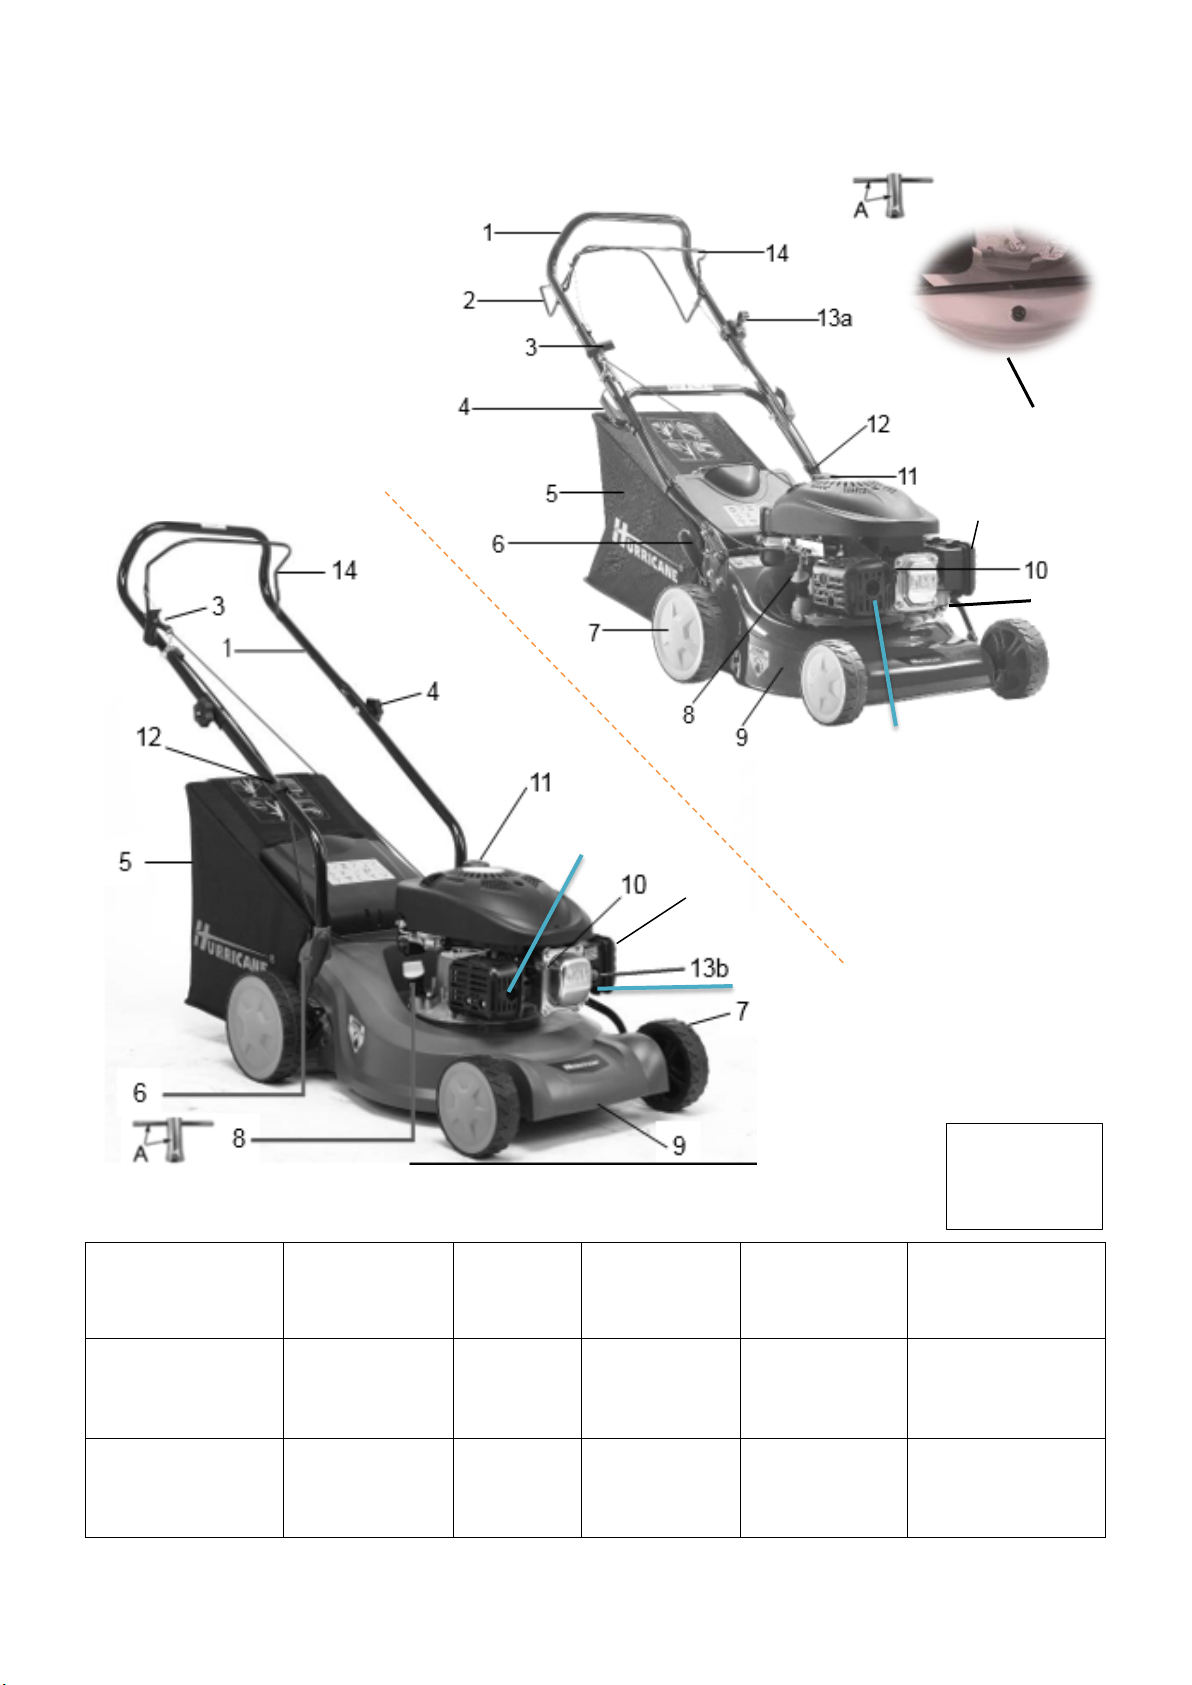
3. PARTS DESCRIPTION
Figure
15
17
16
17
16
18
wrench
1.
upper handle
7.
wheel
self-drive control
oil filler pipe and
2.
handle
8.
dipstick
4 HBD-41 (DYM1651PF)
3.
starter
handle
9.
deck
4.
quick release
skewer
10.
spark plug
15
Figure 3 HBD-46R (DYM1666)
accessory:
A. spark plug
5.
grass catcher
11.
fuel tank cap
height adjustment
6.
lever
12.
cable clamp
13
a. choke lever
b. primer pump
14.
brake control
handle
15.
air filter
16.
carburetor
17. muffler 18.
water hose
connector
7
Page 8

4. TECHNICAL DATA
model
HBD-41
HBD-46R
stroke, overhead
valve, single cylinder
single cylinder
engine displacement
98.5 cm3
135 cm3
PTO shaft rotation
counter-clockwise
counter clockwise
spark plug gap
0.7 - 0.8 mm
0.7 - 0.8 mm
rated speed
3000 min-1
2800 min
valve clearance (cold)
0.1 - 0.15 mm
0.12 - 0.15 mm
fuel tank capacity
0.8 l
1.4 l
sound pressure level at the operator’s
ISO 5395-2, EN ISO 4871
ISO 5395-2)
K = 1.5 m/s²
K = 1.5 m/s²
(DYM1651PF)
engine type DG350 DG450 (DYM1P64FA)
engine build 4-
nominal power 1.9 kW 2.4 kW
blade length 410 mm 460 mm
max. torque 4.9 Nm at 3000 min-1 7 Nm at 2600 min-1
cooling system forced air forced air
lubrication systems forced splash forced splash
ignition system TCI TCI
motor oil quantity needed 0.4 l 0.5 l
grass catcher capacity 50 l 60 l
net weight 19.6 kg 33 kg
height adjustment 25 - 75mm, 7 positions 25 – 75 mm, 10 positions
guaranteed
position (according to EN ISO 5395-1 annex F & EN
83.7 dB(A)
K = 3 dB(A)
4-stroke, overhead valve,
83 dB(A)
K = 3 dB(A)
(DYM1666)
-1
measured sound power level
guaranteed sound power level
(according to 2000/14/EC)
vibration (according to EN ISO 5395-1 annex G & EN
91.73 dB(A)
K = 0.85 dB(A)
96 dB(A) 96 dB(A)
5.786 m/s²
91.7 dB(A)
K = 1.81 dB(A)
3.01 m/s²
5. ASSEMBLY
5.1 FOLDABLE HANDLE
5.1.1 for DYM1651PF
1. Insert the lower handlebars into the vertical cylindric holes rear of the deck. Then fix it with the supplied
screws by using a PZ2 screwdriver (fig. 5-7).
2. Carefully bring the upper handlebar into the correct adjoint position with the lower handlebars.
3. Connect the upper handle and the lower handle with the locking knobs and bolts (fig. 8).
4. Attach the cable clamp at the shown position with the bowden cable underneath (fig. 9).
8
Page 9
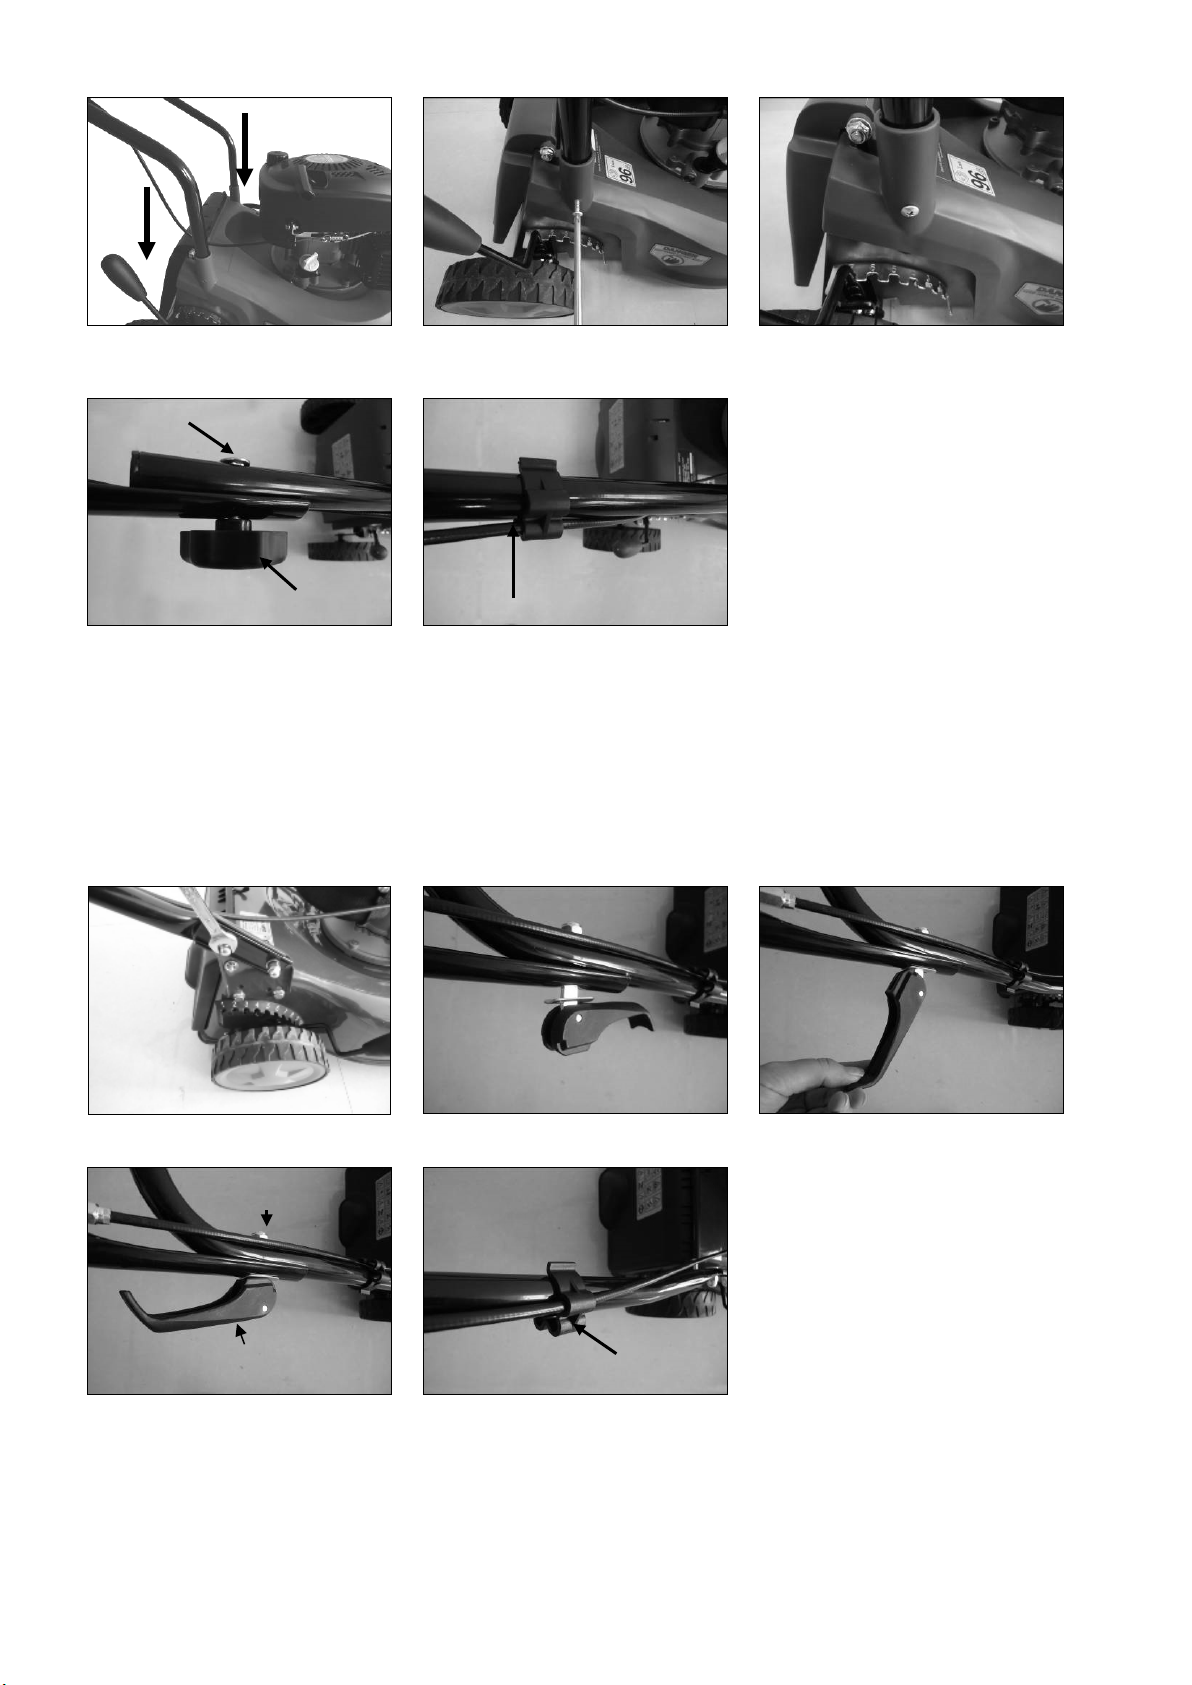
locking knob
bolt
cable clamp
lock nut
cable clamp
Figure 5 Figure 6 Figure 7
Figure 8 Figure 9
5.1.2 for DYM1666
1. Fix the lower handlebars to the rear deck with a wrench (fig. 8).
2. Open the two quick release skewers to unfold the upper handlebar (fig. 9).
3. Bring the the upper handlebar in the operating position. Close the two quick release skewers (fig. 9 & 10).
4. Adjust the tension by turning the lock nut with a wrench (fig. 11).
5. Attach the cable clamp at the shown position with the bowden cables underneath (fig. 12).
Figure 8 Figure 9 Figure 10
quick release skewer
Figure 11 Figure 12
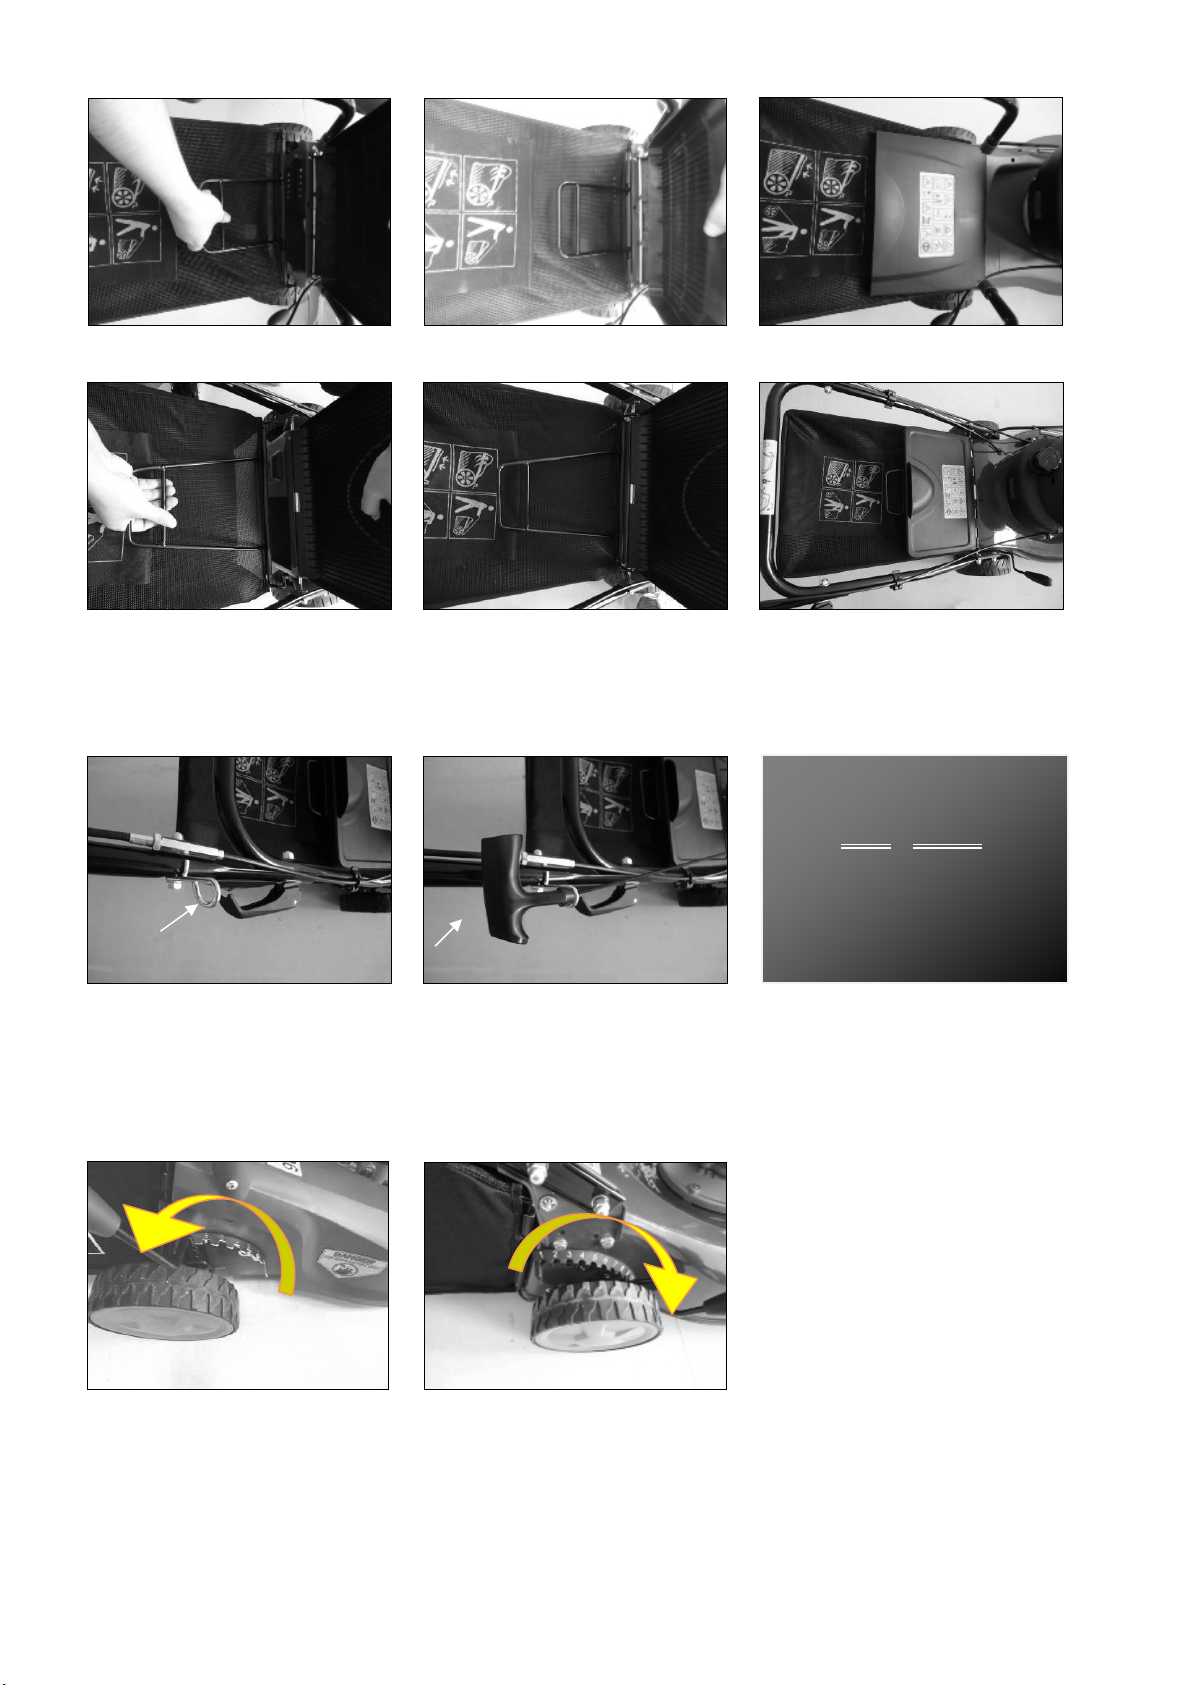
5.2 MOUNTING AND DISMOUNTING THE GRASS CATCHER
1. To fit: Raise the rear cover and hitch the grass catcher to the rear of mower (fig.13-18).
2. To remove: Lift the rear cover. Lift up the grass catcher.
9
Page 10
fill oil in!
low
high
Figure 13 HBD-41 (DYM1651PF) Figure 14 HBD-41 (DYM1651PF) Figu re 15 HBD-41 (DYM1651PF)
Figure 16 HBD-46R (DYM1666) Figure 17 HBD-46R (DYM1666) Figure 18 HBD-46R (DYM1666)
5.3 STARTER HANDLE
Gently pull out the starter handle from the engine to the rope guide (fig. 19, 20).
Do not start the
engine before you
rope guide
Figure 19 Figure 20
starter handle
5.4 HEIGHT OF CUT
Apply outward pressure to disengage the lever from the right rear wheel rack. Move the lever forward or
backwards to adjust the cutting height. The setting applies to all 4 wheels with one lever (fig. 21 & 22).
high
Figure 21: HBD-41 (DYM1651PF) Figure 22: HBD-46R (DYM1666)
low
10
Page 11
6. OPERATING INSTRUCTIONS
6.1 BEFORE STARTING
6.2.1 Adding oil
CAUTION: This engine is delivered without oil. Starting
the engine without oil will destroy it.
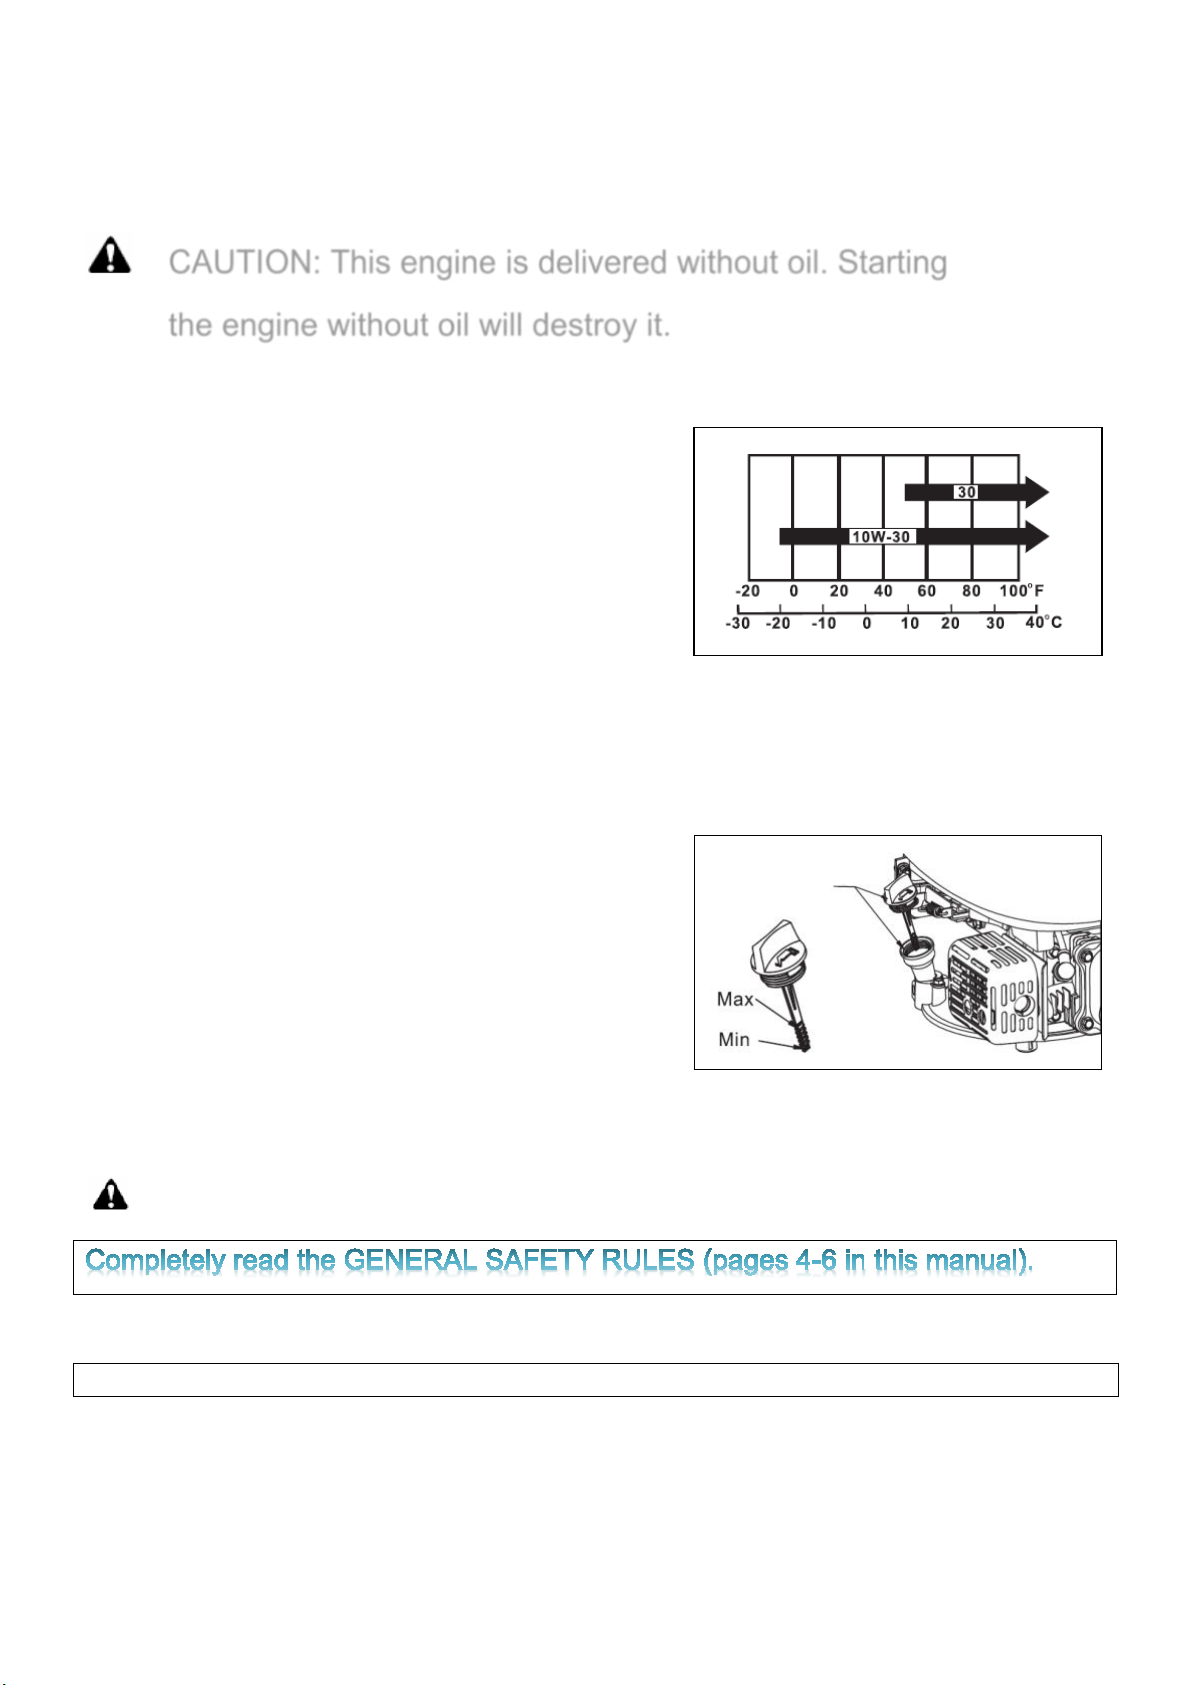
Be sure to put oil in the engine before starting. Use a clean and high-quality oil SAE30 and API.SG, SH or SJ
classification.
Use 4-stroke motor oil that meets or exceeds the requirements
for API service classification SH, SJ, or equivalent. Always
check the API service label on the oil container to be sure it
includes the letters SH, SJ, or equivalent.
SAE 10W-30 is recommended for general use. Other
viscosities shown in the chart may be used when the average
temperature in your area is within the indicated range.
Engine oil capacity:
DG350: 0.4 l
DG450 (DYM1P64FA): 0.5 l
6.2.2 Oil level check
1. Check oil level when engine is stopped.
2. Remove the oil filler cap/ dipstick and wipe it clean.
3. Insert the oil filler cap/ dipstick into the oil filler neck
without screwing it in; remove it to check the oil level.
4. If the oil level is near or below the lower limit mark on the
dipstick, refill with the recommended oil to the upper limit
mark (bottom edge of the oil fill hole). Do not overfill.
5. Reinstall the oil filler cap/ dipstick.
6.2.3 Adding fuel
DANGER! Petrol is highly flammable.
Use unleaded gasoline with a pump octane rating of 86 or higher. This engine is certified to operate on unleaded
gasoline. Unleaded gasoline produces fewer engine and spark plug deposits and extends exhaust system life.
Never use an oil/ gasoline mixture.
● Stop engine and keep heat, sparks, and open fire away.
● Refuel only outdoors.
● Wipe up spills immediately.
Fuel can damage paint and some types of plastic. Be careful not to spill fuel when filling your fuel tank. Damage
caused by spilled fuel is not covered under warranty. Never use stale or contaminated gasoline. Avoid getting
dirt or water in the fuel tank.
11
Page 12
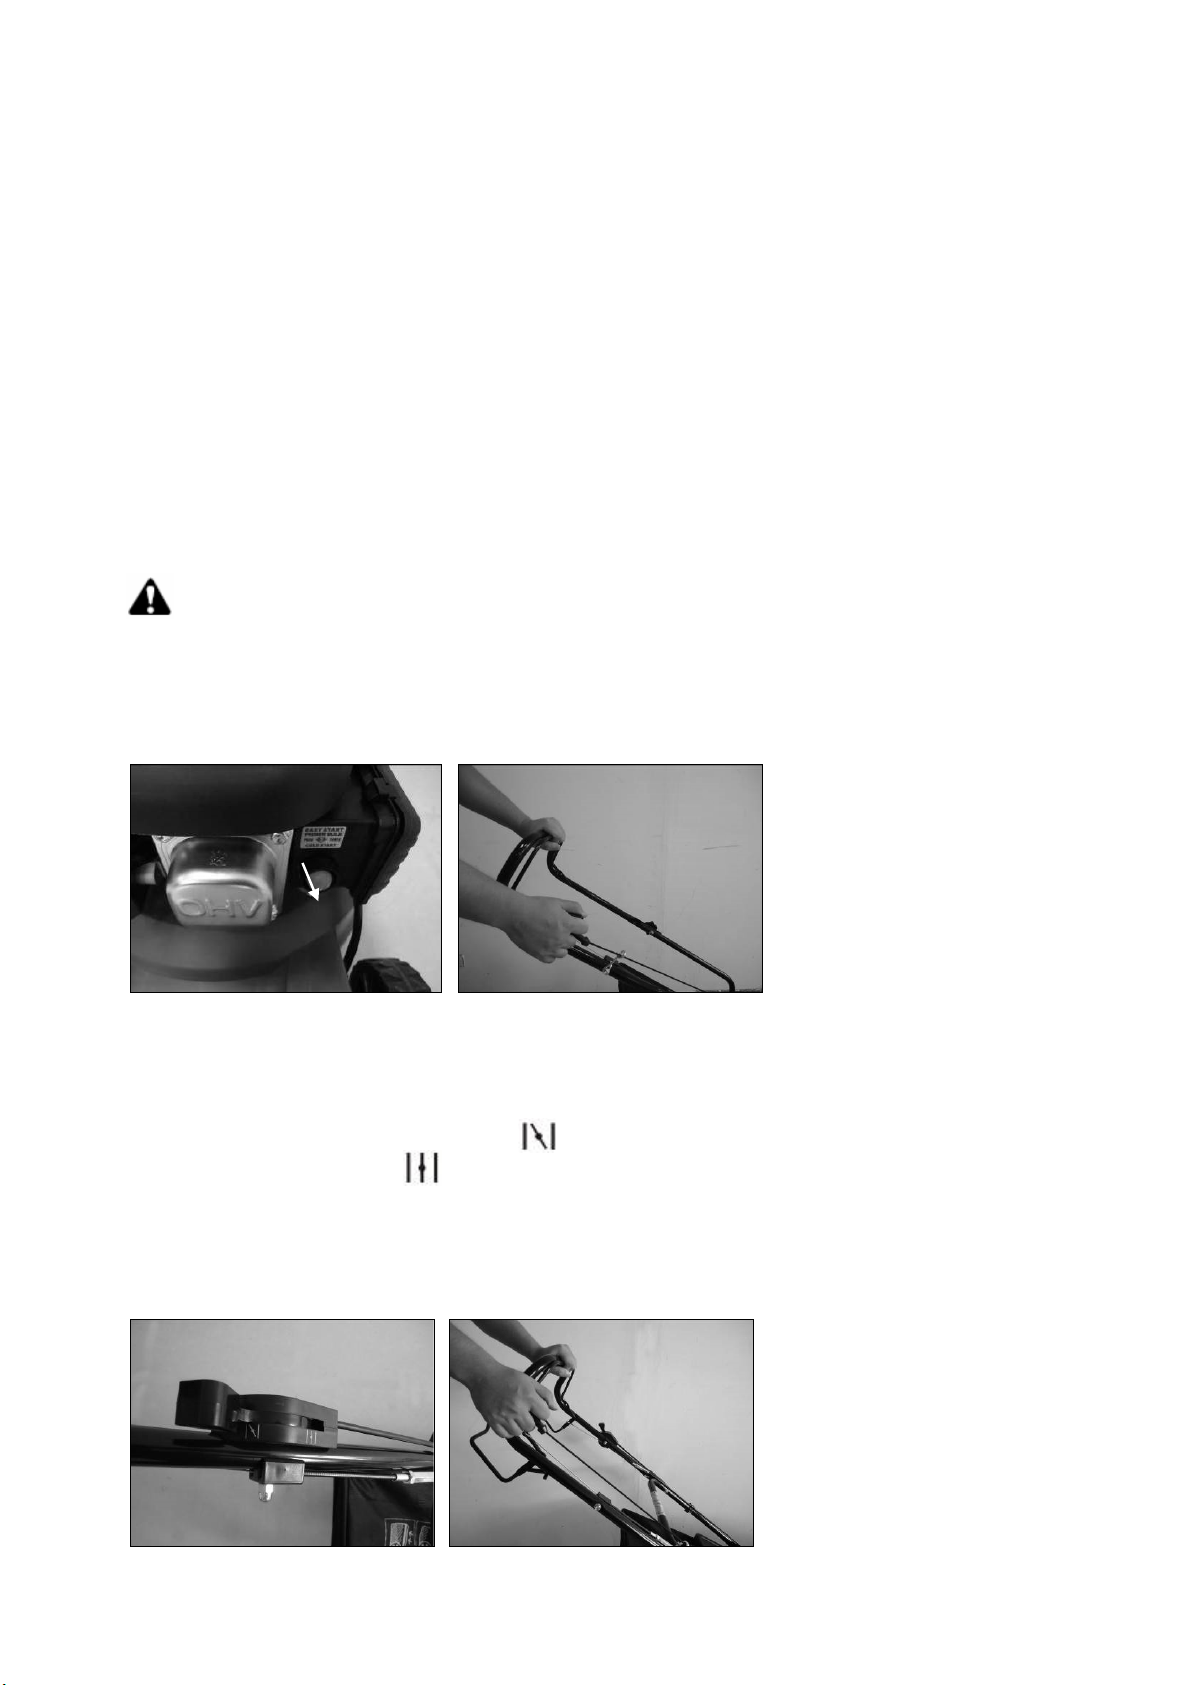
1. Remove the fuel cap.
Primer bulb
2. Add fuel to the bottom of the fuel level limit in the neck of the fuel tank.
3. Do not overfill. Wipe up spilled fuel before starting the engine.
4. Install and tighten the fuel cap.
5. Fuel tank capacity:
DG350: 0.8 l
DG450 (DYM1P64FA): 1.4 l
6.2 START ENGINE AND ENGAGE BLADE
6.2.1 for HBD-41 (DYM1651PF)
1. The unit is equipped with a rubber tip on the spark plug, make sure it is fastened securely.
2. For a cold start, press the primer bulb 3-5 times before starting the engine (fig. 23).
Note:Priming is usually unnecessary when restarting a warm engine.
3. Standing behind the unit, push & hold the brake control handle against the upper handle (fig. 24).
WARNING: If you push the primer bulb too many times, excessive fuel will flood the carburetor and
the engine will be difficult to start.
4. Pull out the starter handle slowly until you feel a resistance in the rope. Then completely pull the rope out
with one fast movement. Once the engine starts, return it slowly to the rope guide bolt (fig. 19).
Do not allow the starter grip (1) to snap back against the engine. Return it gently to prevent damage to
the starter. Release the brake control handle to stop engine and blade.
Figure 23 HBD-41 (DYM1651PF)
Figure 24
HBD-41 (DYM1651PF)
6.2.2 for HBD-46 R (DYM1666)
1. The unit is equipped with a rubber tip on the spark plug, make sure it is fastened securely.
2. For a cold start, turn the choke lever to “ ” position. Immediately after the engine starts turning,
turn the choke lever to the “ ” position (fig. 25).
3. Standing behind the unit, push & hold the brake control handle against the upper handle (fig. 26).
4. Pull out the starter handle slowly until you feel a resistance in the rope. Then completely pull the rope out
with one fast movement. Once the engine starts, return it slowly to the rope guide bolt (fig. 19).
Release the brake control handle to stop engine and blade.
Figure 25 HBD-46R (DYM1666) Figure 26 HBD-46R (DYM1666)
12
Page 13
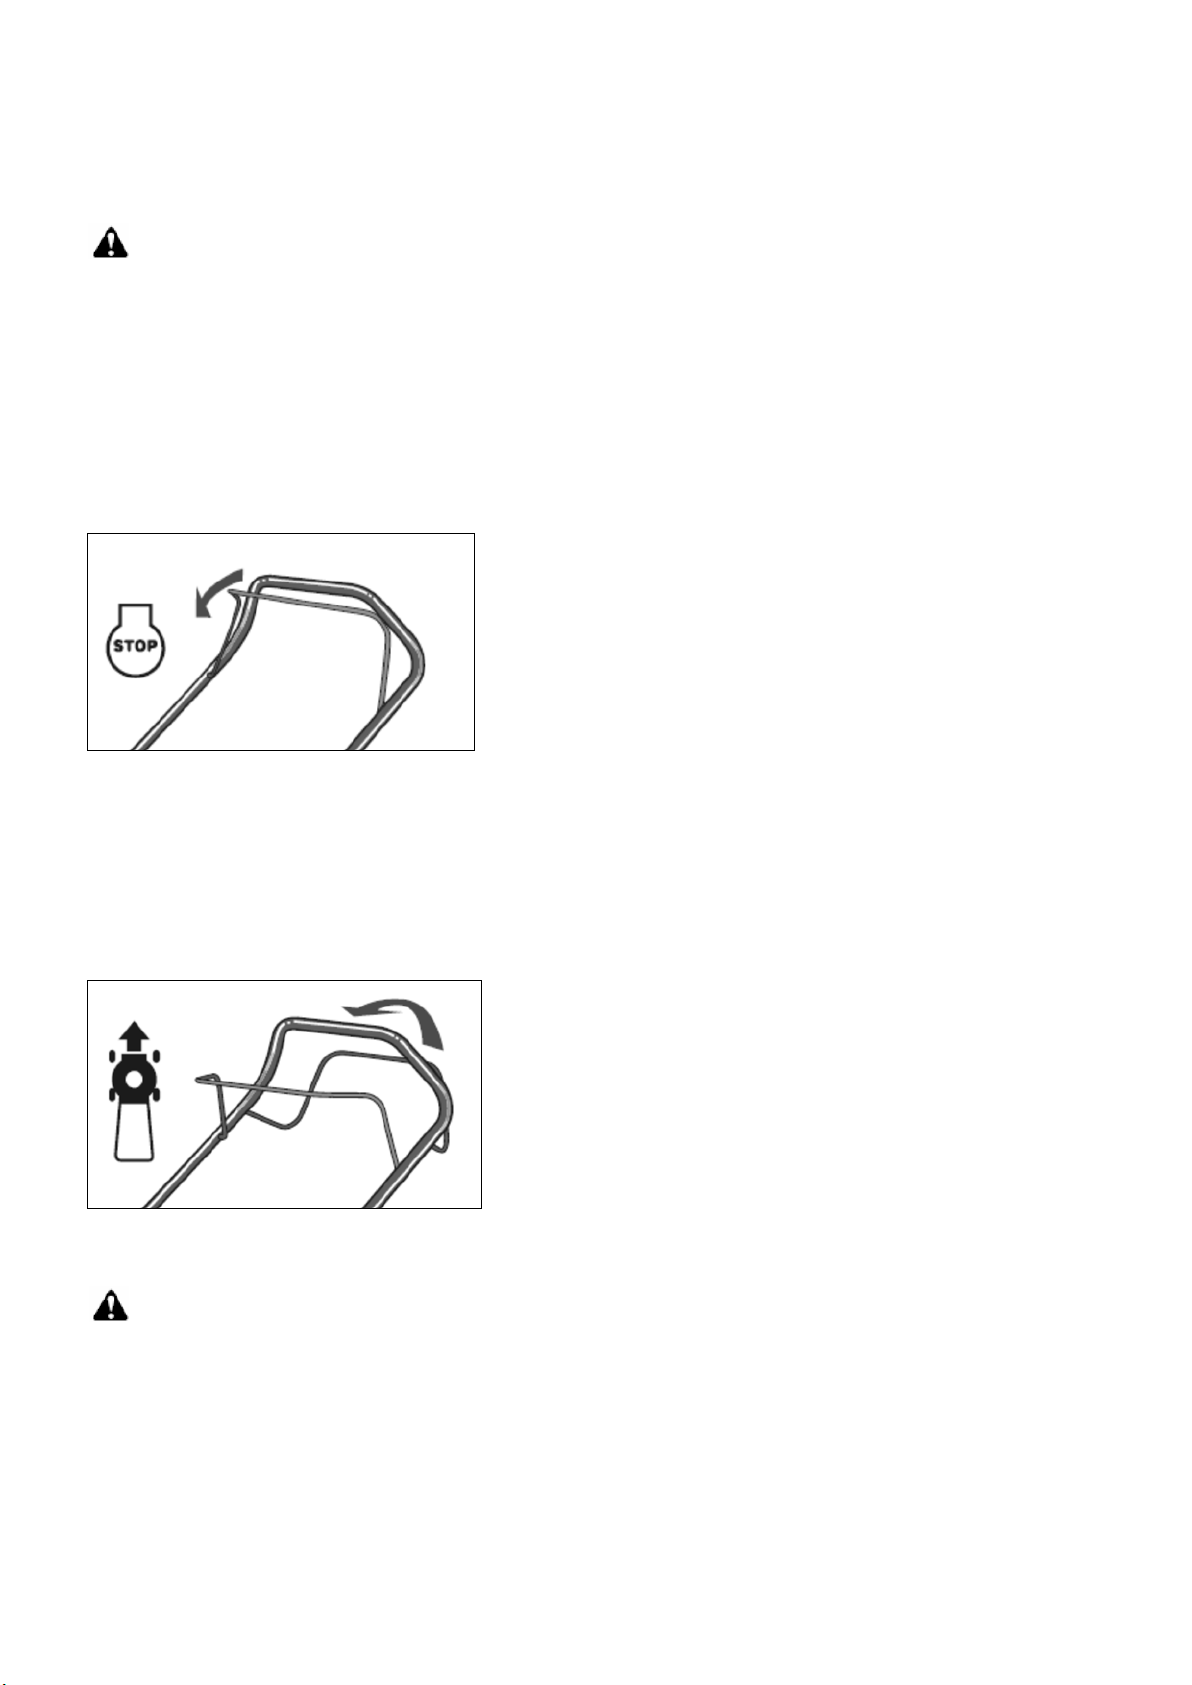
6.3 OPERATION PROCEDURE
During operation, tightly hold the brake handle with both hands.
Note: During operation, when the brake handle is released, the engine and thus the lawnmower stops to
operate.
WARNING: In order to avoid any unintentional start-ups of the lawn mower, it comes equipped with an
engine brake which must be pulled back before the engine can be started. To mow, hold the lever in the
working position. When the engine control lever is released, it must return to its initial position, at which point
the engine automatically switches off and the blade stops immediately. Before you start to mow, check the
start/stop lever several times to be sure that it is working properly. Ensure that the tension cable can be
smoothly operated (i.e. is not catching or kinking in any way).
6.4 STOPPING THE ENGINE
Release the brake control handle to stop the engine and blade (figure 27).
Figure 27
6.5 REAR-WHEEL DRIVE
for HBD-46R (DYM1666) only
Grip the self-drive control handle, the lawnmower will move forward automatically with about 3.0 km/h.
Release the self-drive handle, the lawnmower will stop moving (fig. 28).
Figure 28
CAUTION: your mower is designed to cut normal residential grass up to 250 mm height.
Do not attempt to mow through unusually tall dry or wet grass or piles of dry leaves. Debris may
accumulate on the mower deck or contact the engine exhaust presenting a potential fire hazard.
6.6 OBTAINING THE BEST MOWING RESULTS
Clear the lawn from stones, branches, wire or other foreign objects. The mower could whirl these up and
throw to any direction. leading to serious personal injury as well as to damage to property, surrounding
objects and the mower itself. Do not cut wet grass. Wet grass clippings tend to clog the discharge opening the
underside of the deck. Cut no more than 1/3 of the length of the grass. When mowing long grass you may
have to cut the lawn in two stages, lowering the blade another 1/3 of the length for the second cut. Mow in a
13
Page 14
different pattern than you did the first time. To overlap the cutting tracks on each pass will also help to clean
up any stray clippings. The mower must be operated at full throttle to get the best cut. Clean the underside of
the deck after each use to remove grass lumps that prevent proper mulching. When mowing leaves, make
sure they are dry and are not collected to large piles. (Do not wait for all the leaves to fall off the trees before
you mow.)
WARNING: If you strike a foreign object, stop the engine. Remove the spark plug, thoroughly inspect the
mower for any damage and repair the damage before restarting and operating the mower. Extensive vibration
of the mower during operation is an indication of damage. The unit should be promptly inspected and
repaired.
6.7 GRASS CATCHER
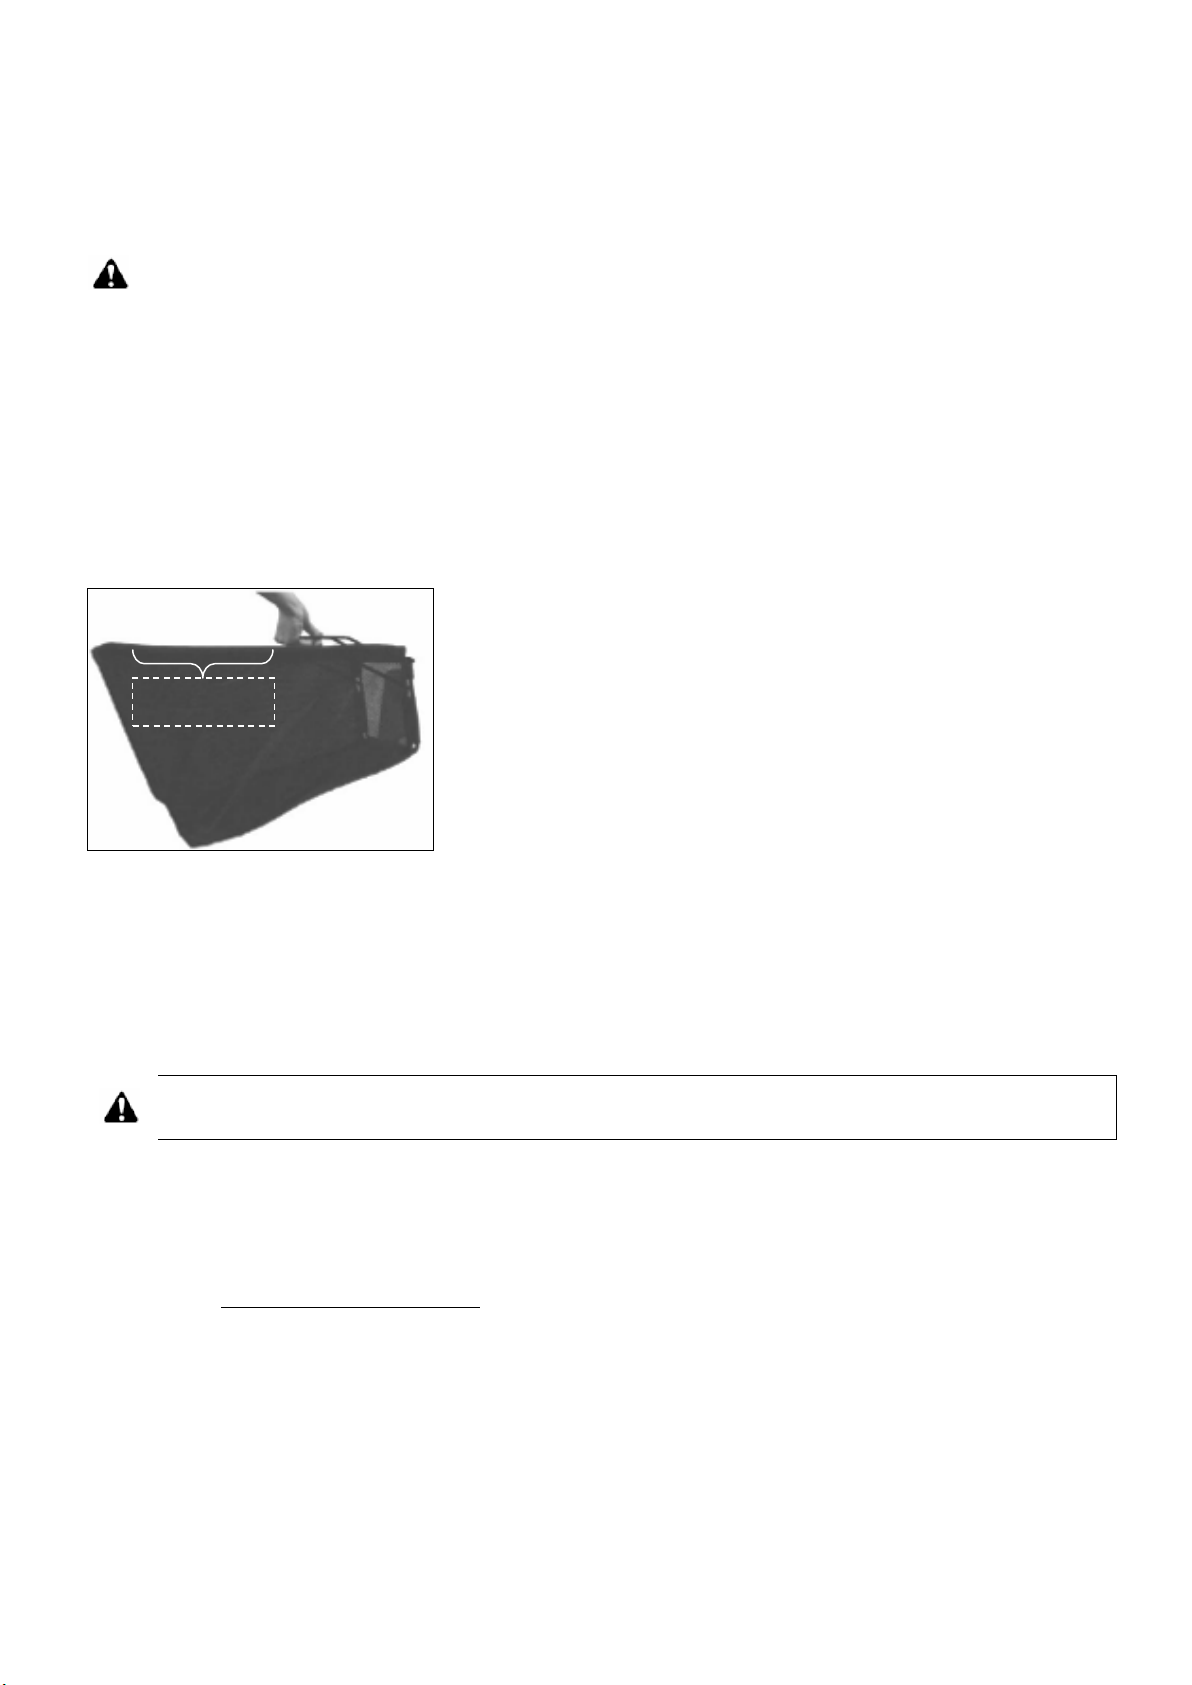
The grass catcher is equipped with an additional textile cloth un its upside (fig. 29). This is a filling indicator.
The indicator is lifted up and down during operation to indicate that the grass clippings are sucked into the grass
catcher. Once that indicator stops moving, the grass catcher is full. Turn the mower off. Empty and clean the
grass catcher.
filling indicator
Figure 29
6.8 DECK
The underside of the mower deck should be cleaned after each use to remove any grass clippings, leaves
and dirt. These residues contain active organic substances that favor rust and corrosion. The deck may be
cleaned by tilting the mower and scraping clean with a suitable tool (make certain the spark plug is
disconnected).
Always lay the mower on that side where the air filter is directed upwards. The air filter lying face
down will lead to fuel and oil spills.
6.9 HEIGHT ADJUSTMENT INSTRUCTIONS
for HBD-41 (DYM1651PF)
Your mower is equipped with a central height adjustment lever offering 7 height positions.
Height means distance of blade to ground. It can be adjusted from 25 mm to 75 mm (7 height positions)
(fig. 30) .
1. Stop the mower before changing the cutting height.
2. The central height adjustment lever offers you 7 different height positions.
To change the height of cut, squeeze the adjustment lever towards the wheel and move it left or right
along the scale to your to selected height.
14
Page 15
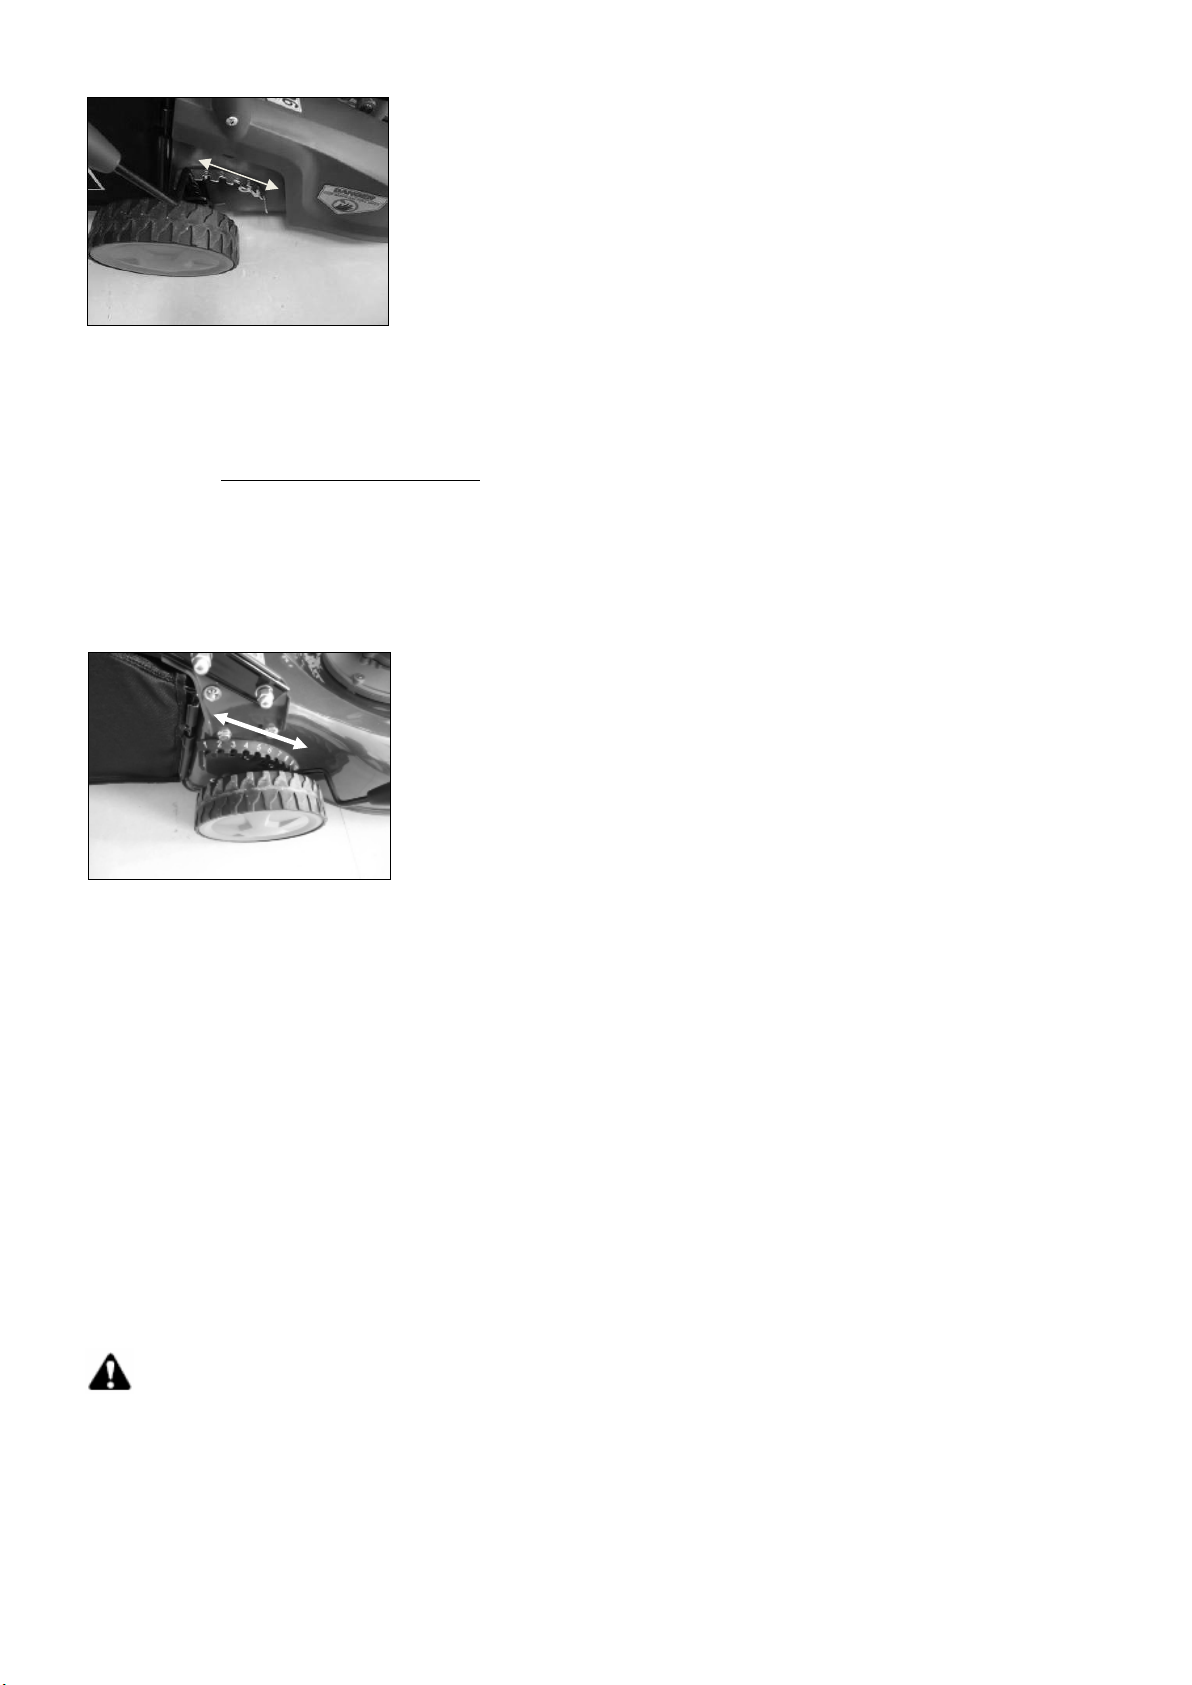
10- highest
7 - highest
1 - lowest
Figure 30
for HBD-46R (DYM1666)
Your mower is equipped with a central height adjustment lever offering 10 height positions.
Height means distance of blade to ground. It can be adjusted from 25 mm to 75 mm (10 height positions)
(fig 31).
1. Stop the mower before changing the cutting height
2. The central height adjustment lever offers you 10 different height positions.
To change the height of cut, squeeze the adjustment lever towards the wheel and move it left or right along
the scale to your to selected height..
1 - lowest
Figure 31
7. MAINTENANCE INSTRUCTIONS
Good maintenance is essential for safe, economical and trouble-free operation. It is also necessary to maintain
the low emission level of the engine.
Remember that an authorized servicing dealer knows your engine best and is fully equipped to maintain and
repair it.
SPARK PLUG
Use only original manufacturer replacement spark plugs. For best results, replace the spark plug every 100
hours of use.
DG350: Recommended spark plug ► Torch F6RTC or Torch F7RTC.
DG450 (DYM1P64FA): Recommended spark plug: ► Torch F6RTC.
WARNING: Incorrect spark plugs can cause engine damage.
For good performance, the spark plug must be properly gapped and free of deposits.
1. Disconnect the cap (part 10) from the spark plug, and remove any dirt from the spark plug area.
2. Use the spark plug wrench (accessory part A) to remove the spark plug.
3. Inspect the spark plug. Replace it damaged or corroded, if the sealing washer is in poor condition or if the
electrode is worn.
4. Measure the electrode gap with a suitable gauge. Refer to the table under point 4. If adjustment is needed,
correct the gap by carefully bending the side electrode.
15
Page 16
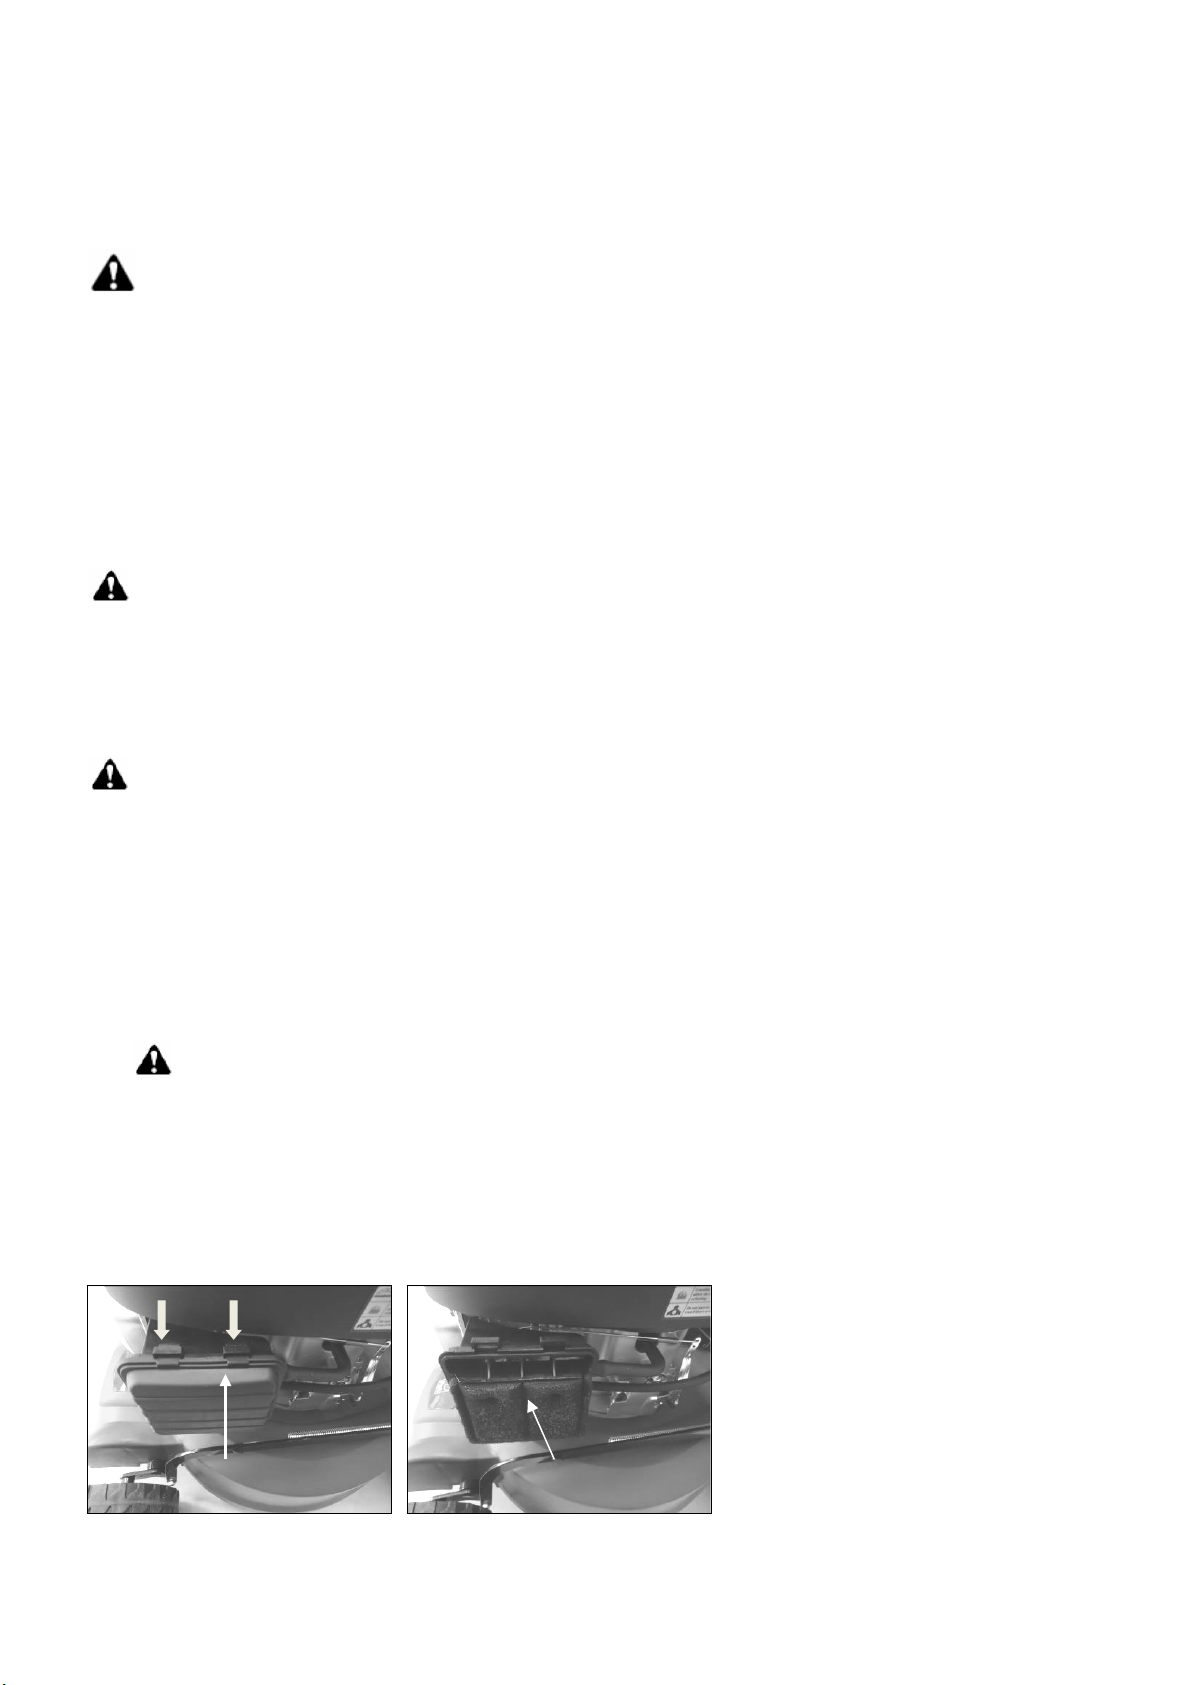
5. Install the spark plug carefully, by hand, to avoid cross-threading.
foam element
filter cover
6. After the spark plug is seated, tighten with the spark plug wrench (accessory part A).
7. When installing a new spark plug, tighten 1/2 turn after the spark plug seats to compress the washer.
8. When reinstalling the original spark plug, tighten 1/8-1/4 turn after the spark plug seats to compress the
washer.
WARNING: A loose spark plug can become very hot and can damage the engine. Over-tightening the
spark plug can damage the threads in the cylinder head.
9. Attach the spark plug cap onto the spark plug.
BRAKE PADS
Check and/or replace the engine brake pads in a local workshop regularly, only original parts can be used as
replacement.
8. LUBRICATION INSTRUCIONS
CAUTION: DISCONNECT SPARK PLUG BEFORE SERVICING.
1. WHEELS-Lubricate the ball bearings in each wheel at least once a season with a light oil.
2. ENGINE- Change engine oil every 25 hours when used under heavy load or in high ambient temperatures.
9. CLEANING
CAUTION: Do not spray the engine with water. Water can damage the engine or contaminate the fuel
system.
1. Wipe the deck with a dry cloth.
2. Clean the underside of the deck with fluid or sprayinfg water. Tilt the mower aside always with the air filter
on the upside.
9.1 ENGINE AIR FILTER
The air cleaner system uses a foam element that can be washed and reused.
CAUTION: Do not allow dirt or dust to clog the air filter foam element. The engine air cleaner element must
be serviced (cleaned) after 25 hours of normal mowing. The foam element must be serviced more
frequently if the mower is used in dry dusty conditions.
1. Press down the two tabs on top of the filter cover (fig. 32) .
2. Remove the filter cover (fig. 33).
3. Wash the filter element in soapy liquor. DO NOT USE GASOLINE!
4. Dry the filter element in circulating ar for at least 12 hours.
5. Reinstall filter.
NOTE: Replace filter if frayed, torn, damaged or unable to be cleaned.
Figure 32 Figure 33
16
Page 17
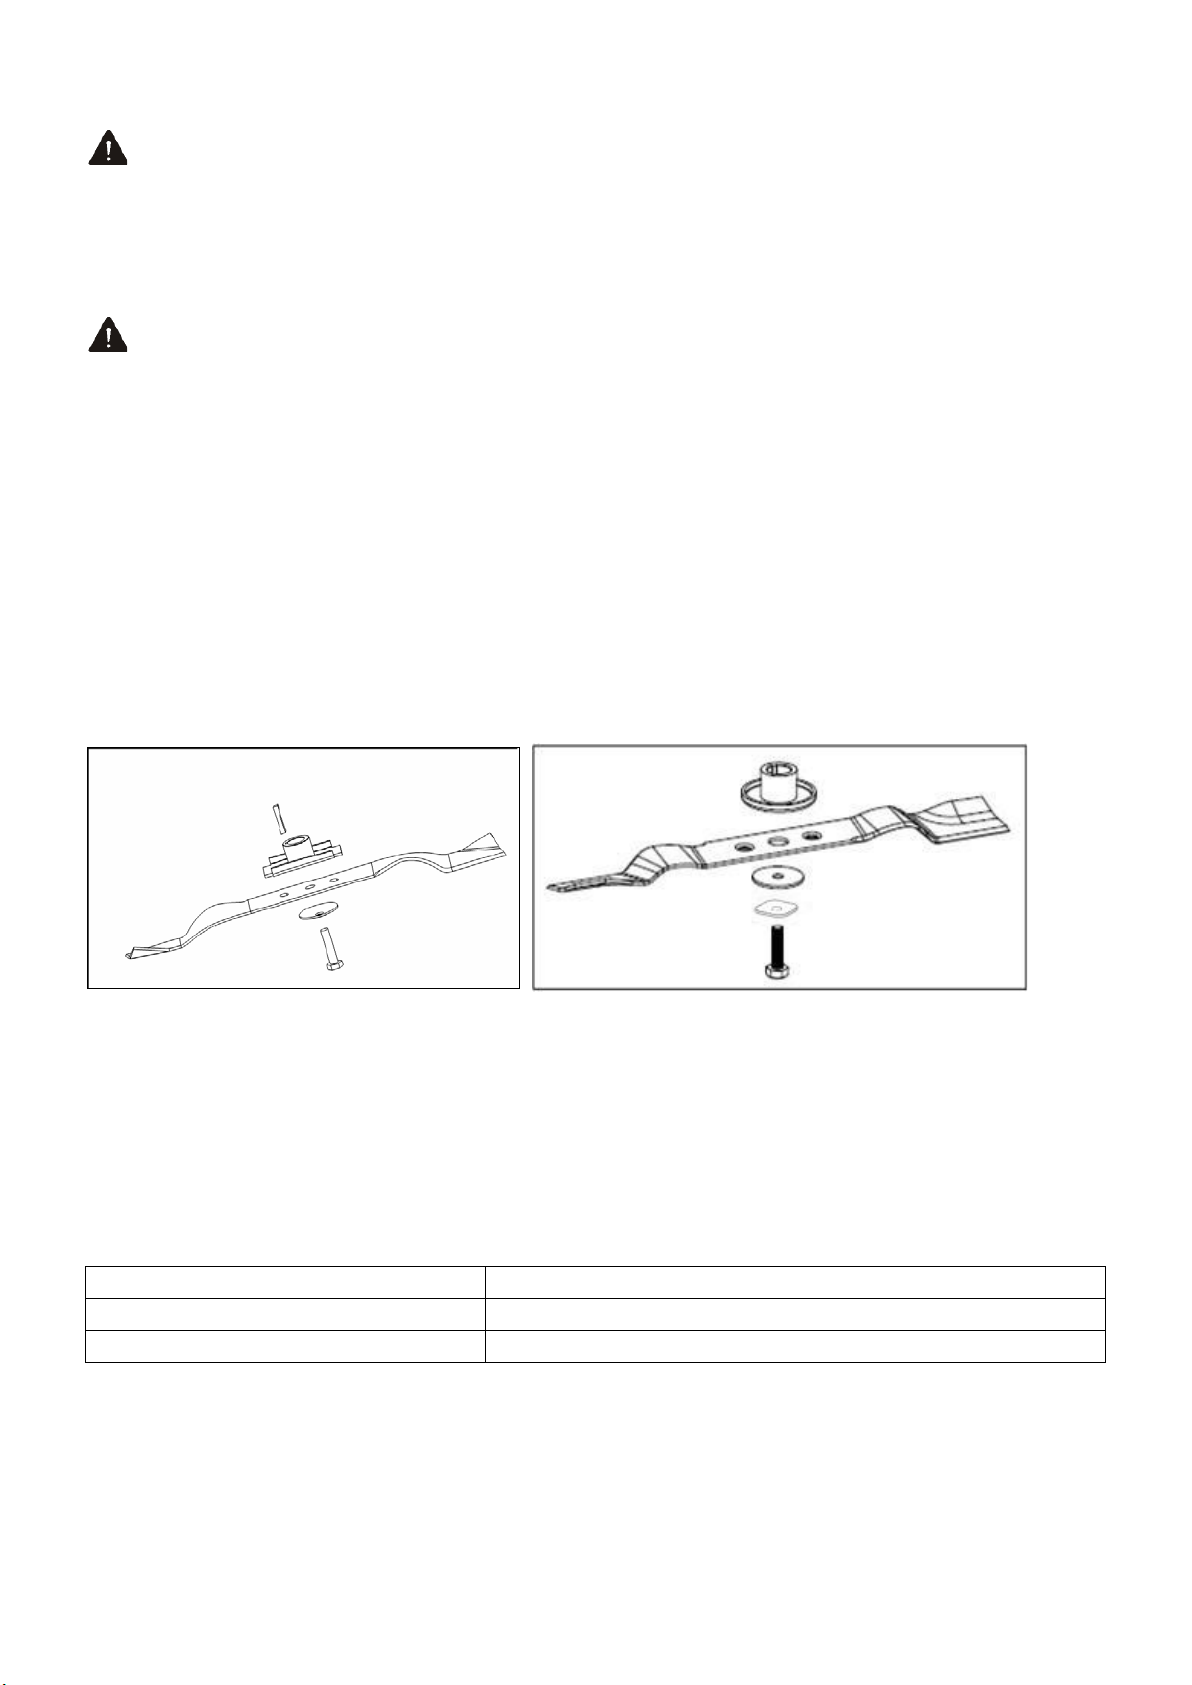
9.2 CUTTING BLADE
CAUTION: Be sure to disconnect and ground the spark plug wire before working on the cutting blade to
prevent accidental engine starting. Protect your hands with heavy gloves before you touch the cutting blades.
Tilt the mower aside always with the air filter on the upside. Remove the hexagonal screw and the washer
that hold the blade and the blade adapter in place onto the engine crankshaft. Remove blade adapter from
the crankshaft.
WARNING: Periodically inspect the blade adapter for cracks, especially if you strike a foreign object.
Replace when necessary.
For best results your blade should be sharp. The blade may be resharpened by removing it and either
grinding or filing the cutting edge keeping as close to the original bevel as possible. It is extremely important
that each cutting edge receives an equal amount of grinding to prevent an unbalanced blade. Improper blade
balance will result in excessive vibration causing eventual damage to the engine and mower. The blade can
be tested for balance by balancing it on a round shaft screwdriver. Remove metal from the heavy side until it
balances evenly.
Before reassembling the blade and the blade adapter to the unit, lubricate the engine crankshaft and the inner
surface of the blade adapter with light oil. Insert the key into the blade adapter and Install the blade adapter
on the engine crankshaft, push the washer into the blade adapter and install the blade (figure 34 & 35). Place
the blade with the part number facing away from the adapter. Align the washer over the blade and insert the
hexagonal bolt. Tighten the bolt to the torque listed below:
Figure 34 HBD-41 (DYM1651F) Figure 35 HBD-46R (DYM1666)
9.3 BLADE MOUNTING TORQUE
Center bolt 40 Nm – 50 Nm. ALL nuts and bolts must be checked periodically for correct torque.
After prolonged use, especially in sandy soil conditions, the blade will wear out and lose some of the original
shape. Cutting efficiency will be reduced and the blade should be replaced. Replace with an approved factory
replacement blade only. Possible damage resulting from blade unbalancing or weak material is not the
responsibility of the manufacturer.
When you change the blade use the original type marked on the blade.
Model Blade type
HBD-41 (DYM1651PF) DAYE 26300100401
HBD-46R (DYM1666) DAYE 2105200263
9.4 ENGINE
Inspect the oil level every time you start the engine. The oil must be refilled when the “min”-marking on the
disptick is reached. The oil must be exchanged once a year.
Service the air cleaner as instructed under 9.1.
Clean every few hours under extremely dusty conditions. Poor engine performance usually indicates that the
air cleaner should be serviced.
17
Page 18
The spark plug should be cleaned and the the electrode gap checked once a season. A spark plug
replacement is recommended at the start of each mowing season. Refer to point 7 of this manual for correct
plug type and electrode gap specifications.
Clean the engine regularly with a cloth or brush. Keep the cooling system (blower housing area) clean to
permit proper air circulation which is essential to engine performance and life. Be certain to remove all grass
and dirt from the muffler area.
In order to have a valid warranty, your lawn mower should be checked by a motorist once a season.
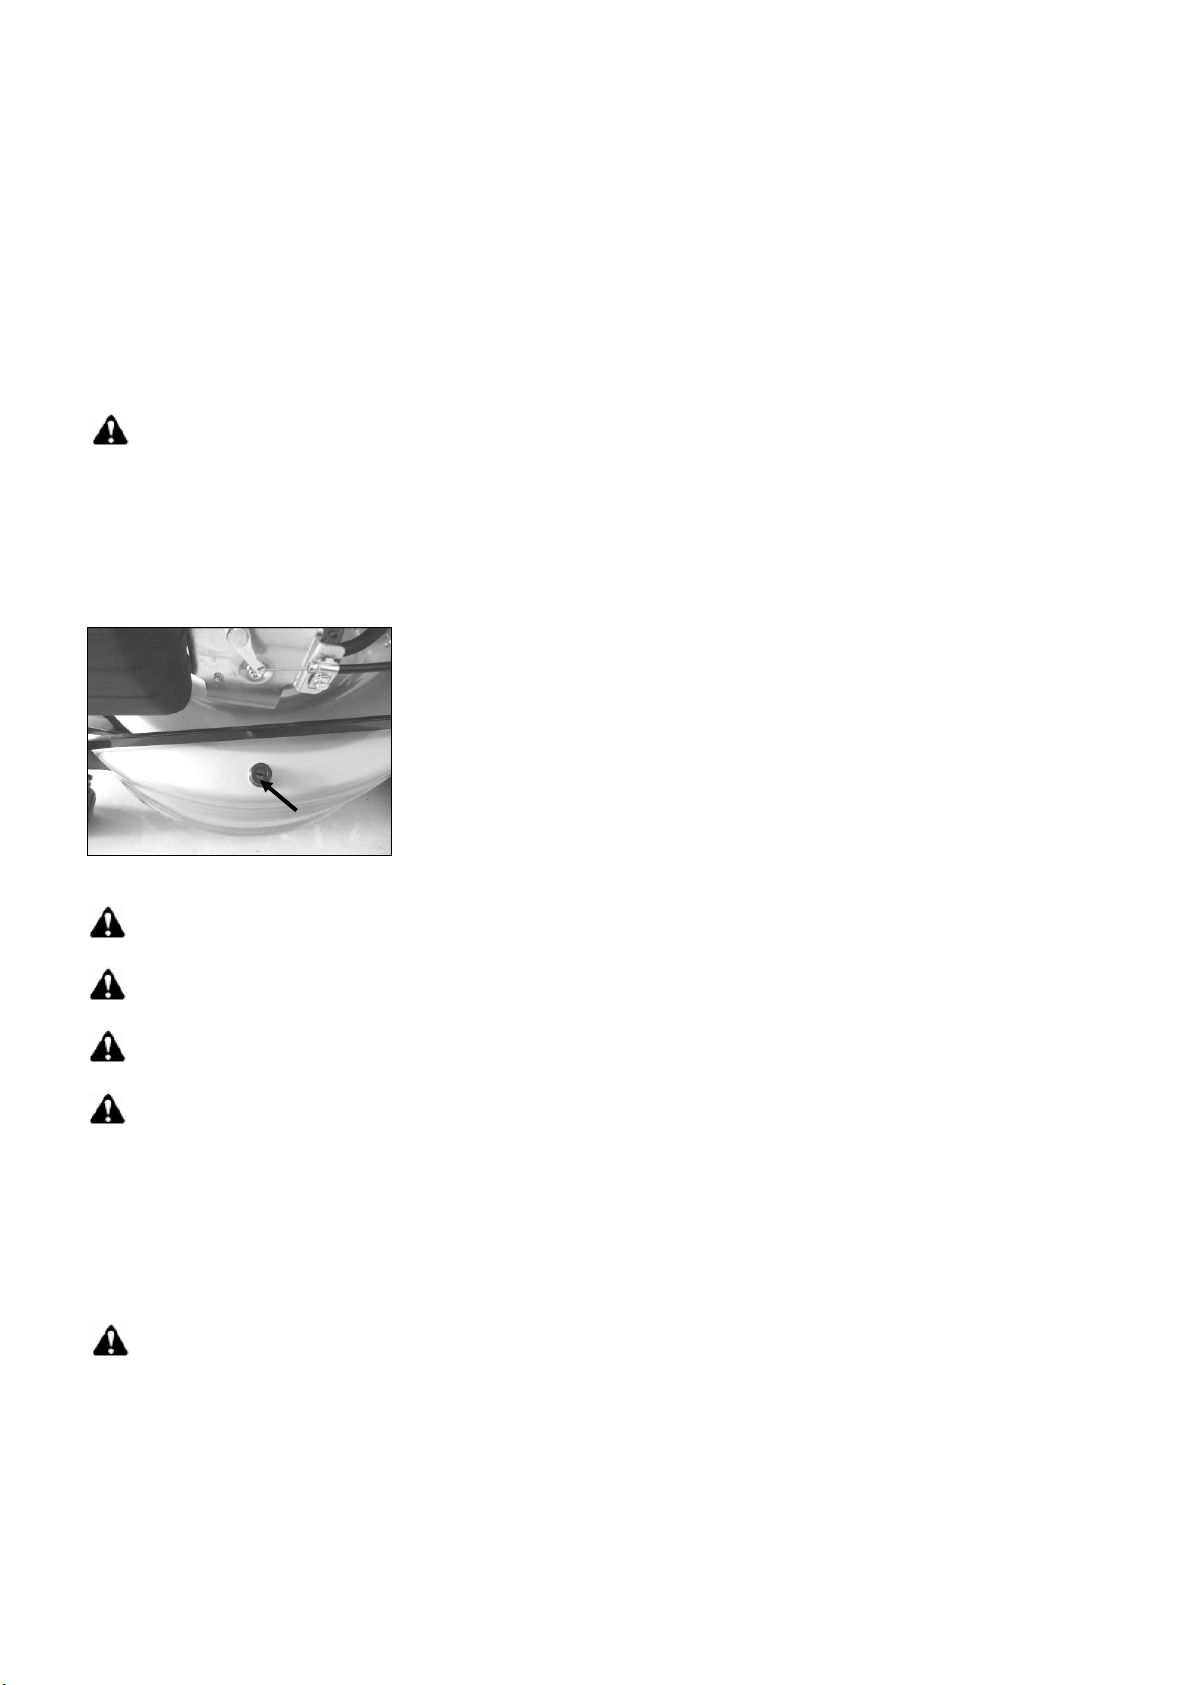
9.5 HOSE CONNECTOR FOR CLEANING THE DECK AND THE CUTTING BLADE
for HBD-46R (DYM1666) only
NOTE: Before cleaning, remove the grass.
1. Insert the hose connector into the water hose connector on the deck; ensure they are firmly connected (fig.36).
2. Connect the other end of the hose to the water tap. Turn the water supply on.
3. Start the engine. The automatic cleaning takes place. Shut the engine off after max. 5 minutes.
4. After cleaning, take away the hose, and store it in a clean and safe place.
5. Wipe the water on the deck and the blade surface. Lightly grease the blade to avoid corrosion and rust.
hose connector
Figure 36
CAUTION: Start the engine carefully according to instructions and with feet well away from the
blade.
CAUTION: Do not tilt the lawn mower when starting the engine. Start the mower on a levelled
surface, free of high grass or obstacles.
CAUTION: Keep hands and feet away from the rotating parts. Do not start the engine when standing
in front of the discharge opening.
WARNING: When cleaning, omit all other actions, for example mowing, mulching etc.
10. STORAGE INSTRUCTIONS (OFF SEASON)
Proper storage preparation is essential for keeping your lawn mower trouble-free and looking good. The
following steps will help to keep rust and corrosion from impairing your appliance’s function and appearance,
and will make the engine easier to start when you use it again.
CAUTION! The engine must have completely cooled down before storing the lawnmower.
The following steps should be taken to prepare the lawn mower for storage.
1. Empty the tank after the last mowing of the season.
Gasoline will oxidize and deteriorate in storage. Deteriorated gasoline will cause hard starting and gum
deposits that clog the fuel system. If the gasoline in your engine deteriorates during storage, you may need
to have the carburetor, and other fuel system components, serviced or replaced.
The length of time that gasoline can be left in your fuel tank and carburetor without causing functional
problems will vary with such factors as gasoline blend, your storage temperatures, and whether the fuel
18
Page 19
tank is partially or completely filled.
The air in a partially filled fuel tank promotes fuel deterioration. Very warm storage temperatures accelerate
that. Fuel problems may occur within a few months, or even less if the gasoline was not fresh when you
filled the fuel tank.
Fuel system damage or engine performance problems resulting from neglected storage preparation are
not covered under warranty.
a) Empty the petrol tank with a suction pump or through the fuel strainer.
CAUTION! Do not drain the petrol in closed rooms, in proximity of open fire etc. Do not smoke! Petrol
fumes can cause explosion or fire. Gasoline is highly flammable and explosive, and you can be burned
or seriously injured when handling fuel. Stop engine and keep heat, sparks, and flame away. Refuel
only outdoors. Wipe up spills immediately.
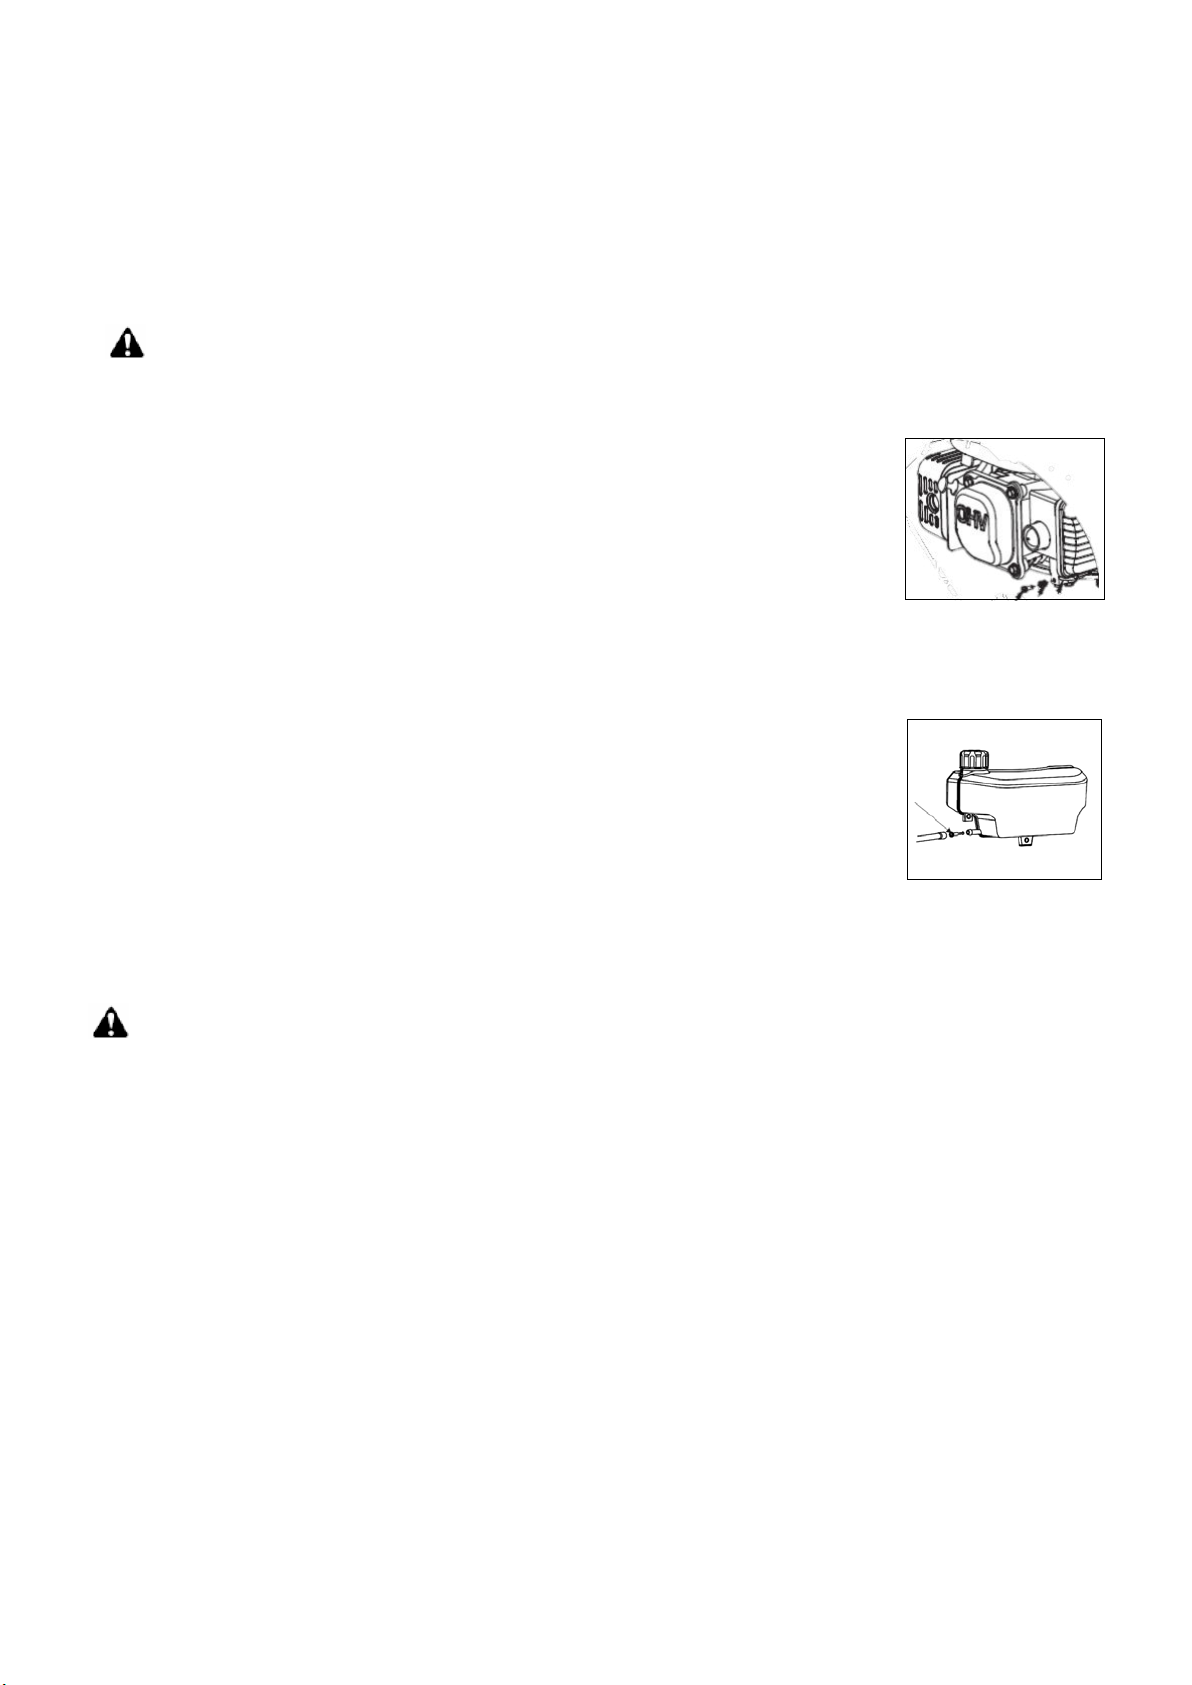
i. Place an approved gasoline canister under the carburetor (part 16),
and use a funnel to avoid spilling fuel.
ii. Remove the drain bolt, and then move the fuel valve lever to the “ON”
position.
iii. After all the fuel has drained into the container; reinstall drain bolt and
washer. Tighten the drain bolt securely.
b) Start the engine and let it run until it has used up all remaining petrol.
c) Remove the spark plug. Use an oilcan to fill approx. 20 ml oil into the combustion chamber. Operate
the starter to evenly distribute the oil in the combustion chamber. Replace the spark plug.
2. Clean the fuel strainer.
i. Remove the fuel strainer from the fuel tank and fuel line.
ii. Clean the fuel strainer (remove dirt which has accumulated on the
mesh, and check that the mesh is not broken anywhere).
iii. Reinstall fuel strainer (A) and fuel line.
3. Clean and grease the lawnmower carefully as described above under
“Lubrication instructions”.
4. Slightly grease the cutter to avoid corrosion.
5. Store the lawnmower in a dry, clean and frost-protected place, out of reach of unauthorized persons.
NOTE: When storing any type of power equipment in an unventilated or material storage shed,
- Care should be taken to rust-proof the equipment. Use a light oil or silicone, coat the equipment,
especially the cables and all moving parts.
- Be careful not to bend or kink cables.
- If the starter rope becomes disconnected from rope guide on handle, disconnect and ground the
spark plug wire and pull the starter rope out from engine slowly. Slip the starter rope into the
rope guide bolt on handle.
Transport
Turn the engine off and allow the engine to cool down. Then disconnect the spark plug wire and empty the fuel
tank according to the instructions in the engine manual. Ensure not to bend or damage the cutter when pushing
the lawnmower over obstacles.
19
Page 20
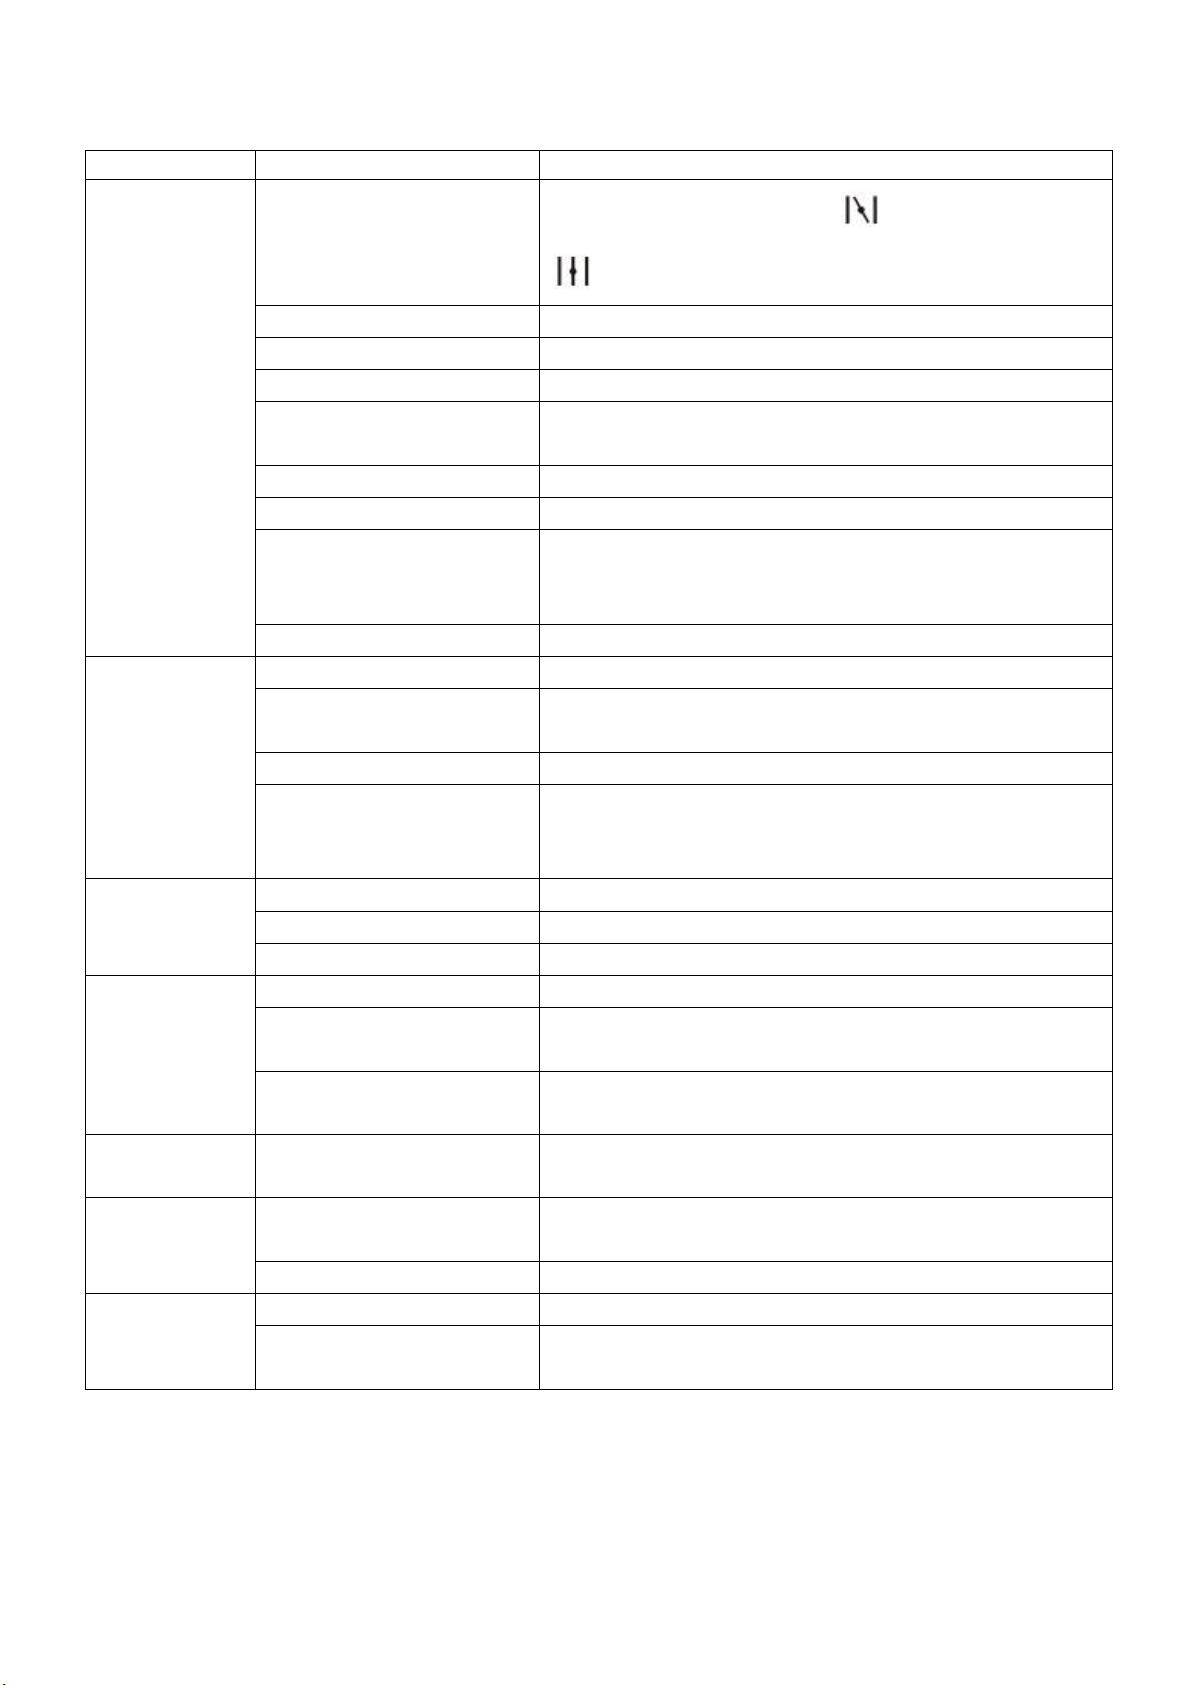
11. TROUBLESHOOTING
PROBLEM
PROBABLE CAUSE
CORRECTIVE ACTION
Fuel tank is empty.
Fill tank with fuel.
Air cleaner element is dirty.
Clean air cleaner element.
Spark plug loose.
Tighten spark plug.
Spark plug gap is incorrect.
Set gap between electrodes.
Spark plug is defective.
Install new, correctly gapped plug.
cleaner element.
cap is clogged.
Air cleaner element is dirty.
Clean air cleaner element.
Air cleaner element is dirty.
Clean air cleaner element.
high speed.
spark plug is too close.
Cutting assembly is loose.
Tighten blade
Engine does
not start.
Engine difficult
to start or loses
power.
Engine
operates
erratically.
Choke lever in wrong
position.
Spark plug wire loose or
disconnected from plug.
Carburetor is flooded with
fuel.
Faulty ignition module. Contact the service agency.
Dirt or water in fuel tank. Drain fuel and clean tank. Fill tank with clean, fresh fuel.
Ventilation hole in fuel tank
The carburettor is clogged.
Wrong or dirty fuel has
been used.
Spark plug is defective. Install new, correctly gapped plug.
Spark plug gap is incorrect. Set gap between electrodes.
Air cleaner element is dirty. Clean air cleaner element.
Move lever to correct position: for starting.
for operation.
Install spark plug wire on spark plug.
Remove air cleaner element and pull starter rope
continuously until carburetor clears itself and install air
Clean or replace fuel tank cap.
Remove the spark plug. Drain the fuel tank. Clean the
spark plug and the carburettor. This should be done by an
authorized motorist workshop.
Engine idles
poorly.
Engine skips at
Engine
overheats
Mower vibrates
abnormally
Air slots in engine shroud
are blocked.
Cooling fins under engine
blower housing are blocked.
Gap between electrodes of
Cooling air flow is restricted.
Incorrect spark plug. Install original spark plug and cooling fins on engine.
Cutting assembly is
unbalanced.
Remove dirt from slots.
Remove dirt from cooling fins and air passages.
Set gap between electrodes.
Remove any debris from slots in shroud, blower housing,
air passages.
Exchange blade.
20
Page 21

12. WARRANTY
12.1 warranty in the first 2 years
Eventual faults of material or production are eliminated with repair or exchange of our choice. This product has
a 24-month warranty counting from the day of first purchase. This warranty covers all defects caused by
material or production. Not covered by this warranty are:
• Wear parts like
o knives
o grass catching bags
o wheels, wheel caps and wheel bearings
o drive belts, bowden cables
o air filters, spark plugs, carburettors
• Damages and defects that origin from improper handling, outer influence or modifications
• Damages after commercial use
What to do in case of warranty?
• Which is important: The purchase receipt must be kept as a proof for the date of first purchase. For an
eventual repair please also store the original package carton. In a warranty case, please contact our
customer service with this warranty sheet and a copy of your proof of purchase. We reserve the right
to reject claims if the purchase cannot be substantiated or the product is obviously not properly
serviced.
12.2 warranty extension to five years
Hurricane extends your warranty to five years (60 months) from the first date of purchase as described under
12.1 if
• the lawn mower has had a yearly service by a certified service dealer or by Hurricane’s send-in repair
and maintenance service,
• the below proof of maintenance is stamped in the fields provided,
• copies of the repair and/ or maintenance invoices are being presented together with your warranty
claim.
21
Page 22

item
year 1
year 2
year 3
year 4
year 5
PROOF OF MAINTENANCE
engine oil changed
Air filter element cleaned
Air filter element exchanged
Spark plug adjusted
Spark plug exchanged
Flywheel brake pad checked and,
if necessary, exchanged
Spark arrester cleaned and, if
necessary, exchanged
Fuel tank cleaned
Fuel tube checked and, if
necessary, exchanged
Valve clearance checked and, if
necessary, adjusted
Combustion chamber cleaned
nuts, bolts and screws tightened
Blade sharpened and balanced or
exchanged
Wheel bearnings and blade
greased
Other done/ remarks
Certified workshop stamp &
signature
13. ENVIRONMENT
The unit is supplied in packaging to prevent its being damaged in transit. This packaging is raw material and
can therefore be reused or can be returned to the raw material system. The unit and its accessories are made
of various types of material, such as metal and plastic. Defective components must be disposed of as special
waste. Ask your dealer or your local council.
22
Page 23
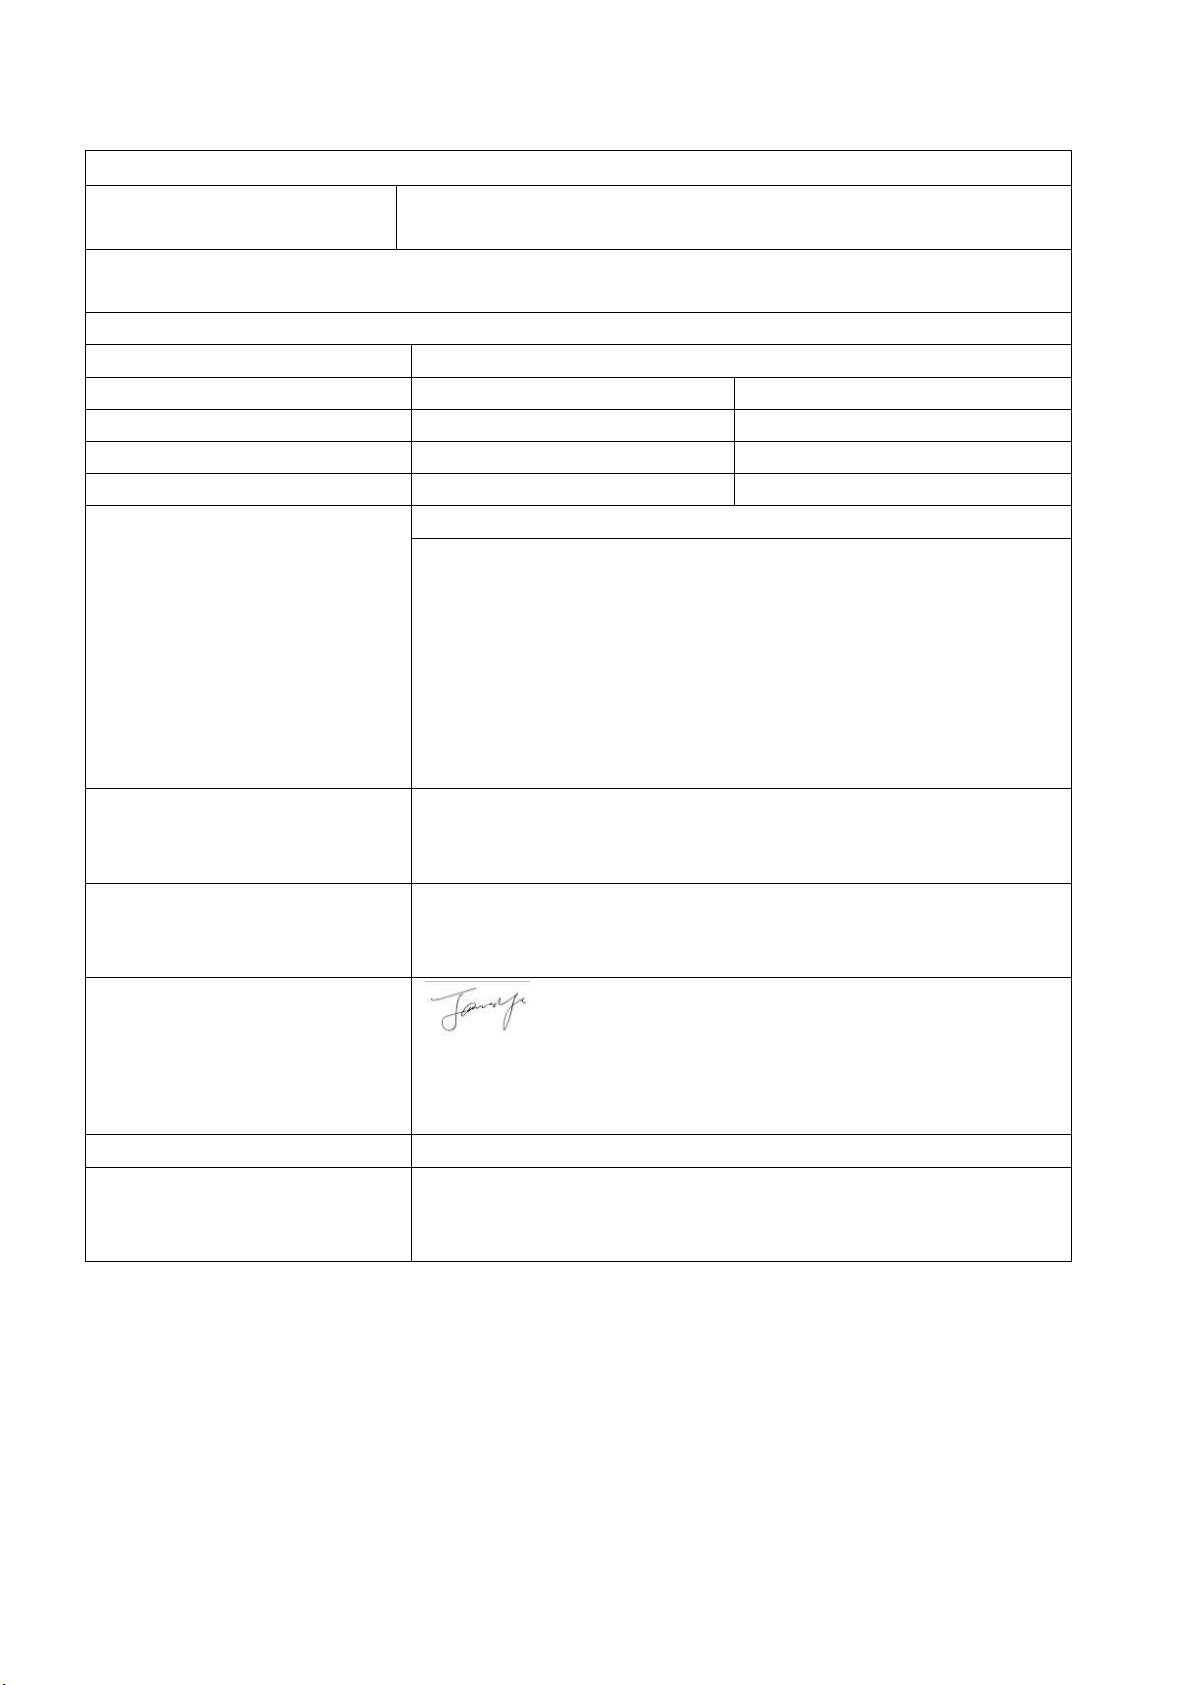
14. EC-DECLARATION OF CONFORMITY
max. cutting width
410 mm
460 mm
measured sound power level
91.73 dB(A)
91.7 dB(A)
96 dB(A)
EN ISO 14982
technical file
EC Declaration of Conformity
We herewith declare, Ningbo Daye Garden Machinery Co., Ltd.,
58 Jinfeng Road, Yuyao, Zhejiang 315403, P. R. China,
that the following machine complies with the appropriate basic safety and health requirements of the
EC Directive based on its design and type, as brought into circulation by us.
In case of alteration of the machine, not agreed upon by us, this declaration will lose its validity.
machine description: Petrol Lawn Mower
machine type DYM1651PF DYM1666
displacement 98.5 cm3 135 cm3
guaranteed sound power level
For DYM1651PF
Notified Body for EC Directive 2000/14/EC:0499
TÜV Rheinland LGA Products GmbH
Tillystrasse 2, 90431 Nürnberg, Germany 0197
For DYM1666
Notified Body for EC Directive 2000/14/EC:0036
TÜV SÜD Industrie Service GmbH
Westendstrasse 199 • 80686 München • Deutschland
applicable EC directives EC Machinery Directive 2006/42/EC
EC Directive of electromagnetic compatibility 2014/30/EU
EC Directive of noise emission: 2000/14/EC
applicable hHarmonized
standards
EN ISO 5395-1
EN ISO 5395-2
authorized signature/ date/
place
Ningbo Daye Garden Machinery Co., Ltd.
58 Jinfeng Road, Yuyao, Zhejiang 315403, P. R. China
title of signatory General Manager
name and address of the person
authorized to compile the
Daye Europe GmbH
Parkstraße 1a, 66450 Bexbach • Germany
2018-10-07
23
Page 24
Österreich [email protected]
België [email protected]
Hrvatska [email protected]
Čeština [email protected]
Danmark [email protected]
Eesti [email protected]
Suomi [email protected]
Deutschland [email protected]
Magyarország [email protected]
Ísland [email protected]
Luxembourg [email protected]
Nederland [email protected]
Norge [email protected]
Slovensko [email protected]
Slovenija [email protected]
España [email protected]
Sverige [email protected]
Schweiz [email protected]
Türkiye [email protected]
 Loading...