

Page 1
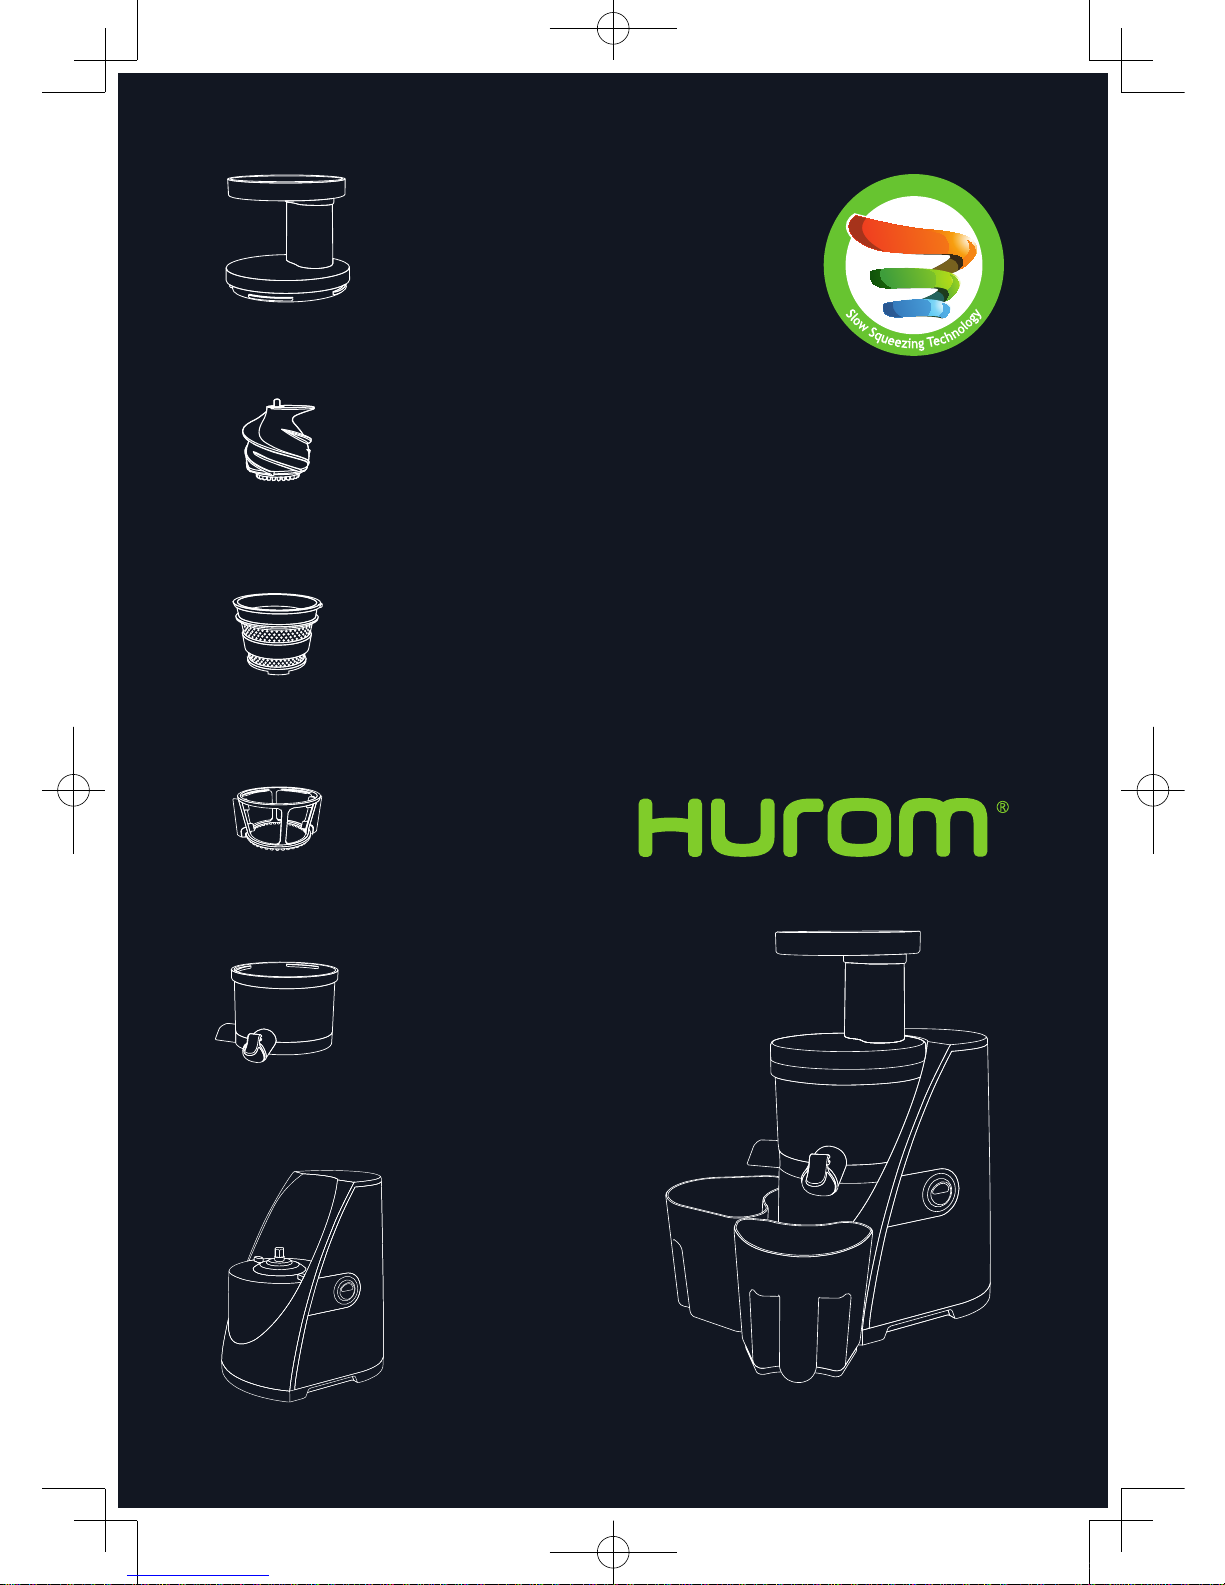
+
+
+
+
+
Product Contents
HJ Series
HJ SERIES MANUAL
4PJ12242_V.01.indd 1 2013-07-12 오후 4:51:12
Page 2

IMPORTANT SAFEGUARDS
1. When using electrical appliances, basic safety precautions should always be
followed including the following. Read all instructions.
2. To protect against risk of electrical shock, do not put the main body (motor) in
water or any other liquid.
3. Close supervision is necessary when any appliance is used by or near children.
4. Unplug from outlet when not in use, before assembling or taking off parts and
before cleaning.
5. Avoid contact with moving parts.
6. Do not operate any appliance with a damaged cord or plug of after the appliance
malfunctions, or is dropped or damaged in any manner.
Return appliance to the nearest authorized service facility for examination, repair or
electrical or mechanical adjustment.
7. The use of attachments not recommended or sold by the manufacturer may
cause fire, electric shock or injury.
8. Do not let cord hang over edge of table or counter.
9. Always make sure hopper is securely fastened in place before motor is turned on.
Do not unfasten hopper while juicer is in operation.
10. Be sure to turn switch to off position after each use of your juicer.
Make sure the motor stops completely before disassembling.
4PJ12242_V.01.indd 2 2013-07-12 오후 4:51:13
Page 3

11. Do not put your fingers or other objects into the juicer while it is in operation.
If food becomes lodged in opening, use food plunger or another piece of fruit
or vegetable to push it down. When this method is not possible, turn the motor
off and disassemble juicer to remove the remaining food.
12. Do not use outdoors.
13. Do not place on or near a hot gas or electric burner or in a hearted over.
14. Do not use appliance for other than intended use.
SAVE THESE INSTRUCTIONS
IMPORTANT SAFEGUARDS
4PJ12242_V.01.indd 3 2013-07-12 오후 4:51:13
Page 4

Dear Hurom Customers
General description and parts names
Specific terms for parts
Precautions for safe use
Warnings and cautions
Slow Juicer assembly
Slow Juicer assembly in detail
How to use the Slow Juicer
Juice Cap and Extraction Seal
When the auger stops during operation (How to use [Reverse/REV] button)
Important safeguards for use
Disassembling, cleaning and care
Disassembling and cleaning the chamber
Sterilization and Easy Cleaning System
Disassembling and cleaning the spinning brush
Assembling the spinning brush
Assembling the chamber seal
Assembling the juice cap seal
Troubleshooting
Appliance specifications
Warranty
Hurom Juicer Manual For Household Use (Warranty Included)
1 Read “Precautions for safe use (Page 4)” carefully and use the appliance properly.
2 Save the manual and keep it in a convenient location for future reference.
3 Check if the voltage indicated on the base of the appliance corresponds to the local voltage before you connect the
appliance.
4 Any quality improvements are subject to change without notice.
CONTENTS
01
02
03
04
05
08
09
10
11
12
13
14
16
17
18
19
20
21
22
23
24
4PJ12242_V.01.indd 4 2013-07-12 오후 4:51:13
Page 5

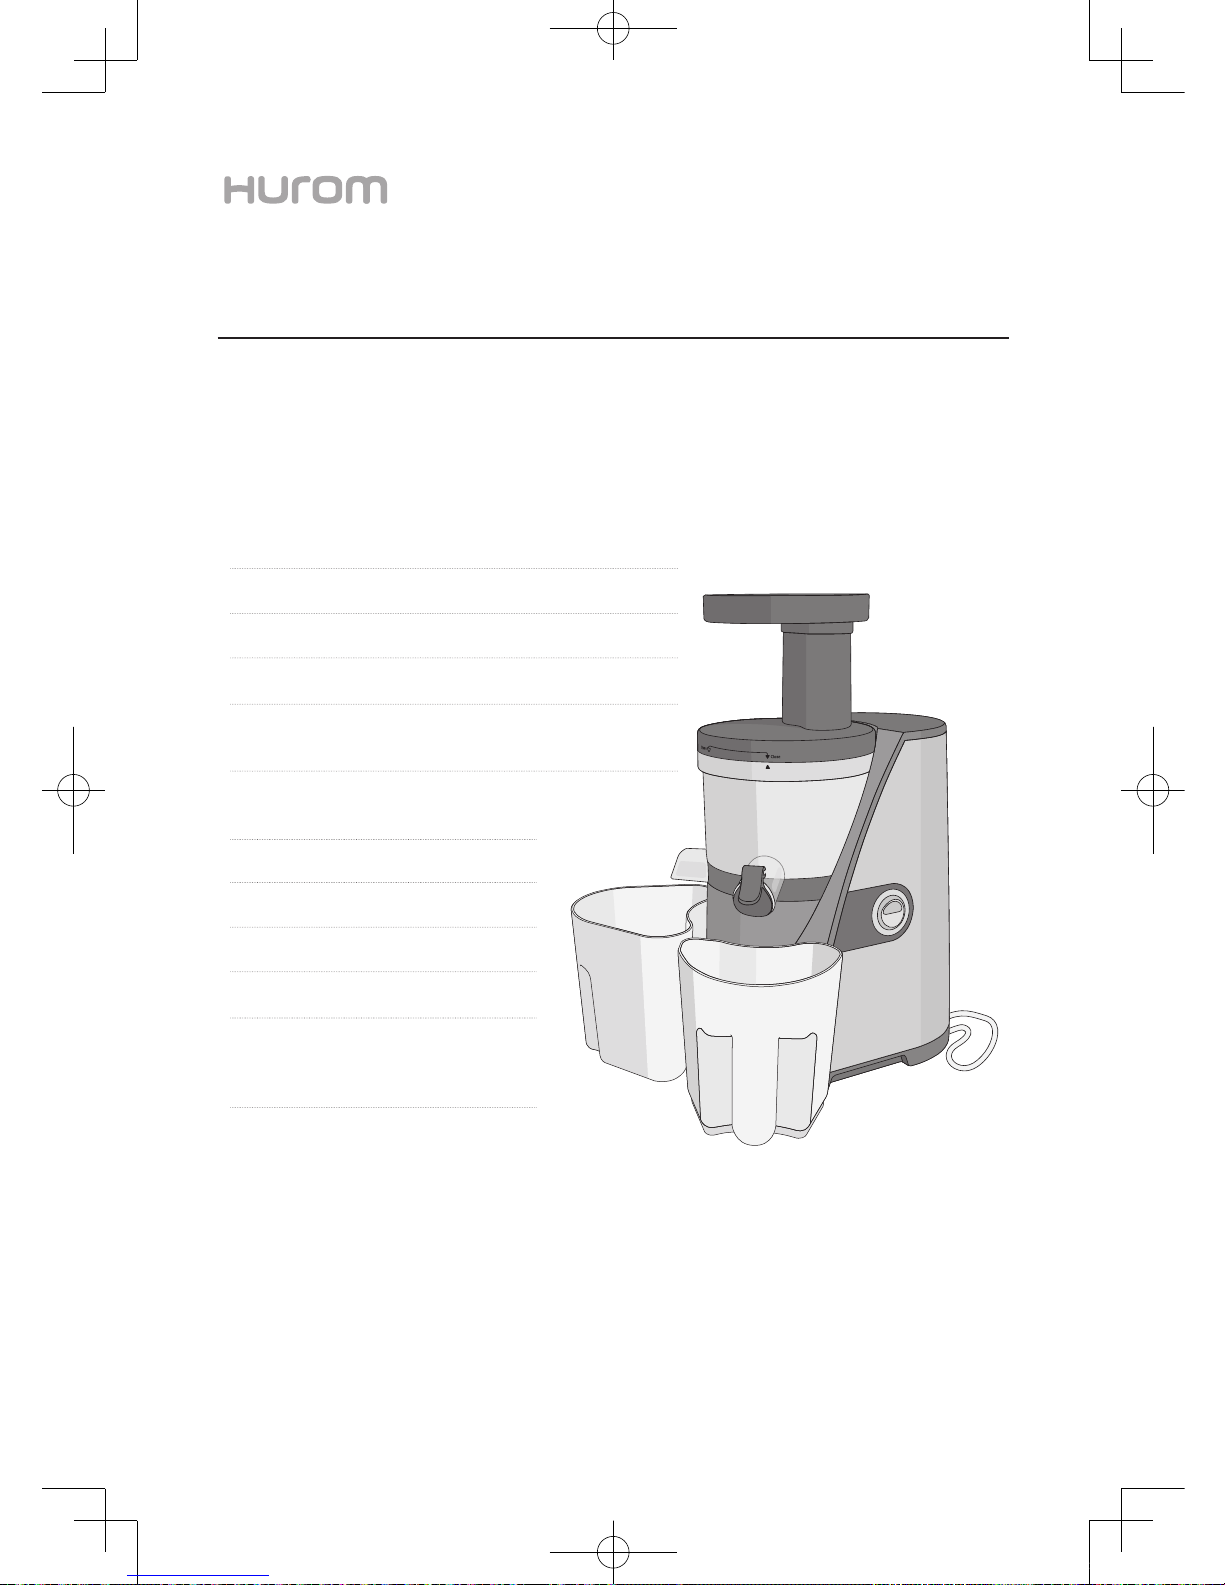
With Hurom’s own Slow Squeezing Technology and the all-new juice cap mixing function, you can
easily make your own personalized juice filled with rich flavor and nutrients.
1. More Nutrients and Flavor: Your own personalized juice
Various mixed juices
Make an easy, simple juice with a single type of fruit or a mixed juice that is custom-fit to your taste and health needs
by combining various ingredients together. With versatility of juice cap mixing function, you can be your own juice
mixologist.
Hurom juice as an alternative meal
Drink a cup of Hurom juice as a quick and easy meal full of rich flavor and balanced nutrients. Mix fortifying ingredients
such as banana, corn, boiled potato, sweet potato and pumpkin together for a satisfying juice mix filled with essential
nutrients.
Hurom baby food
Easily make wholesome, all-natural baby food by mixing various grains and vegetables together. You can control the
thickness simply by adding water.
Soy milk and soy juice
It’s easy to make soy milk and soy juice with Hurom’s all new juice cap. Now you can simply adjust the thickness and
portion of the mixture by operating the juicer with the juice cap closed.
2. More Convenient and User-Friendly
By using the juice cap, you can easily pour the exact desired amount of juice without any mess or hassle.
3. More Advanced Easy Cleaning System (Page 17)
Juice cap makes cleaning simpler and easier. Just close the juice cap, fill the chamber with water and turn on the
juicer for easily cleaning.
4PJ12242_V.01.indd 5 2013-07-12 오후 4:51:13
Page 6
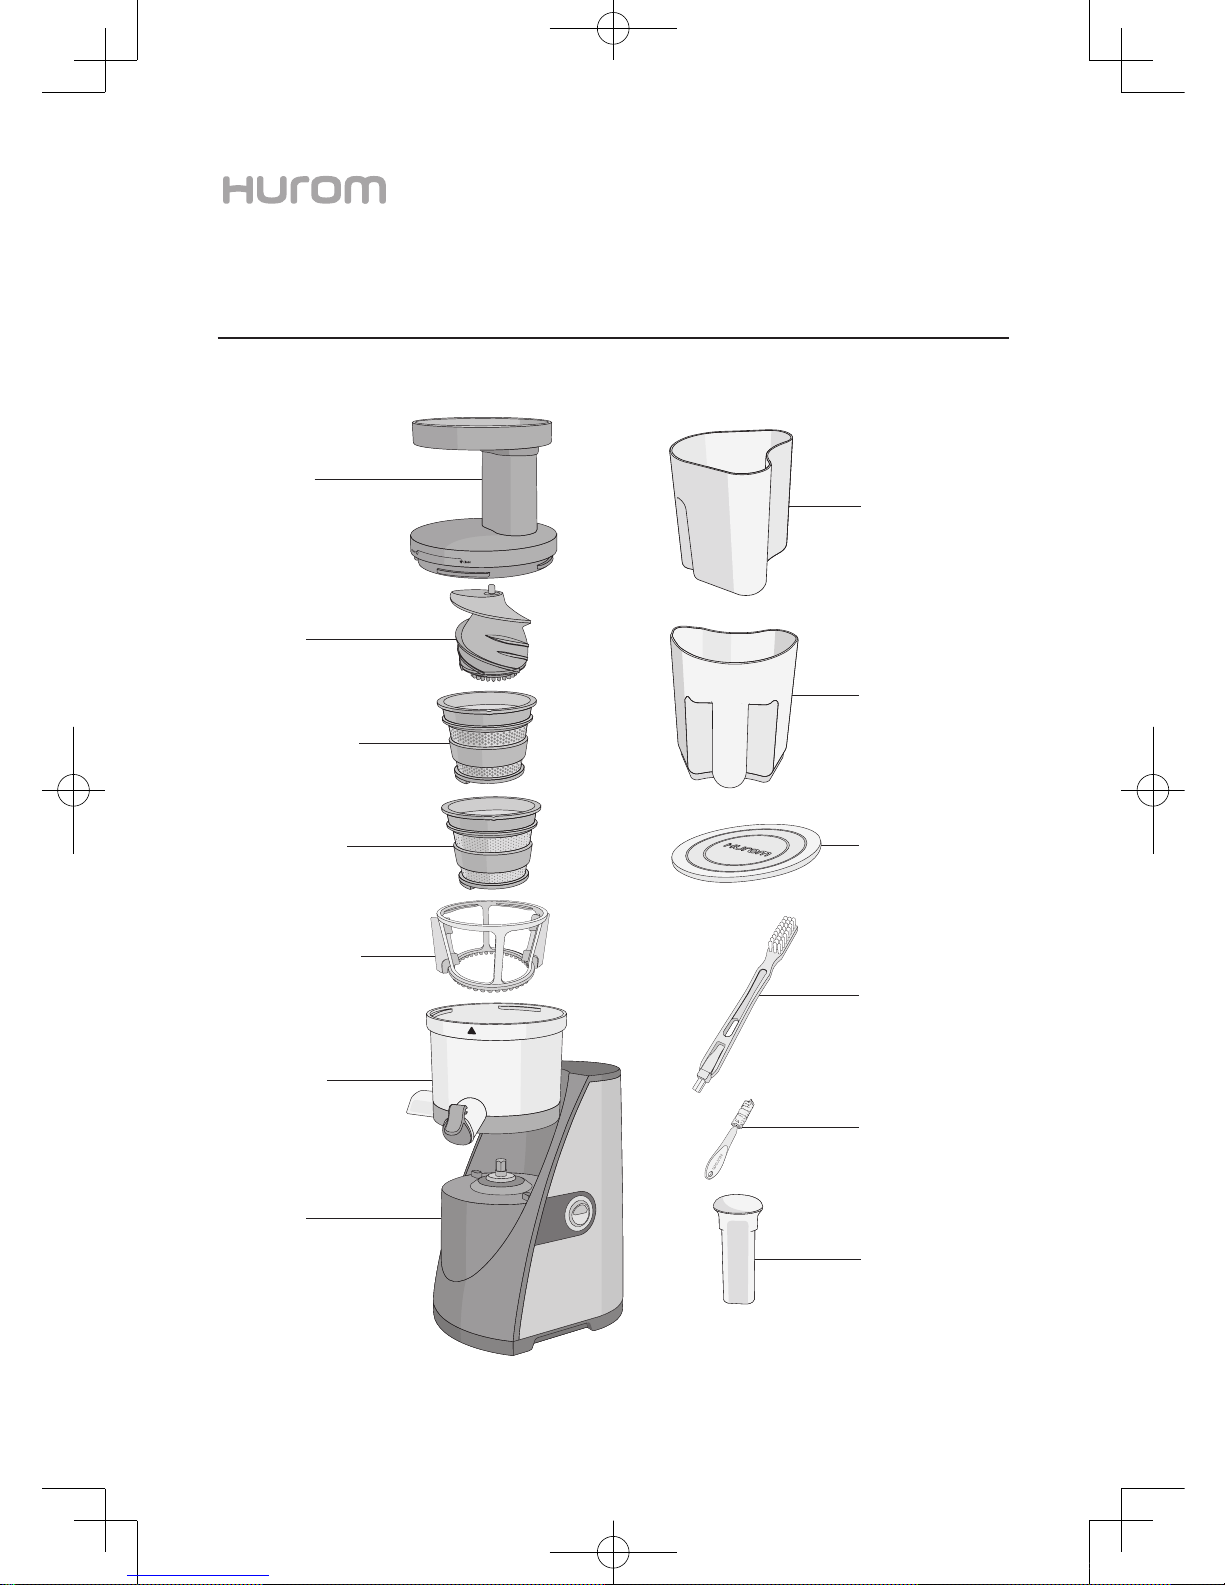
Hopper lid
Cleaning brush
Hopper
Base
Auger
02 l
Pusher
GENERAL DESCRIPTION AND PARTS NAMES
Small cleaning brush
Chamber
Coarse strainer
Fine strainer
Spinning brush
Pulp container
Juice container
4PJ12242_V.01.indd 6 2013-07-12 오후 4:51:14
Page 7
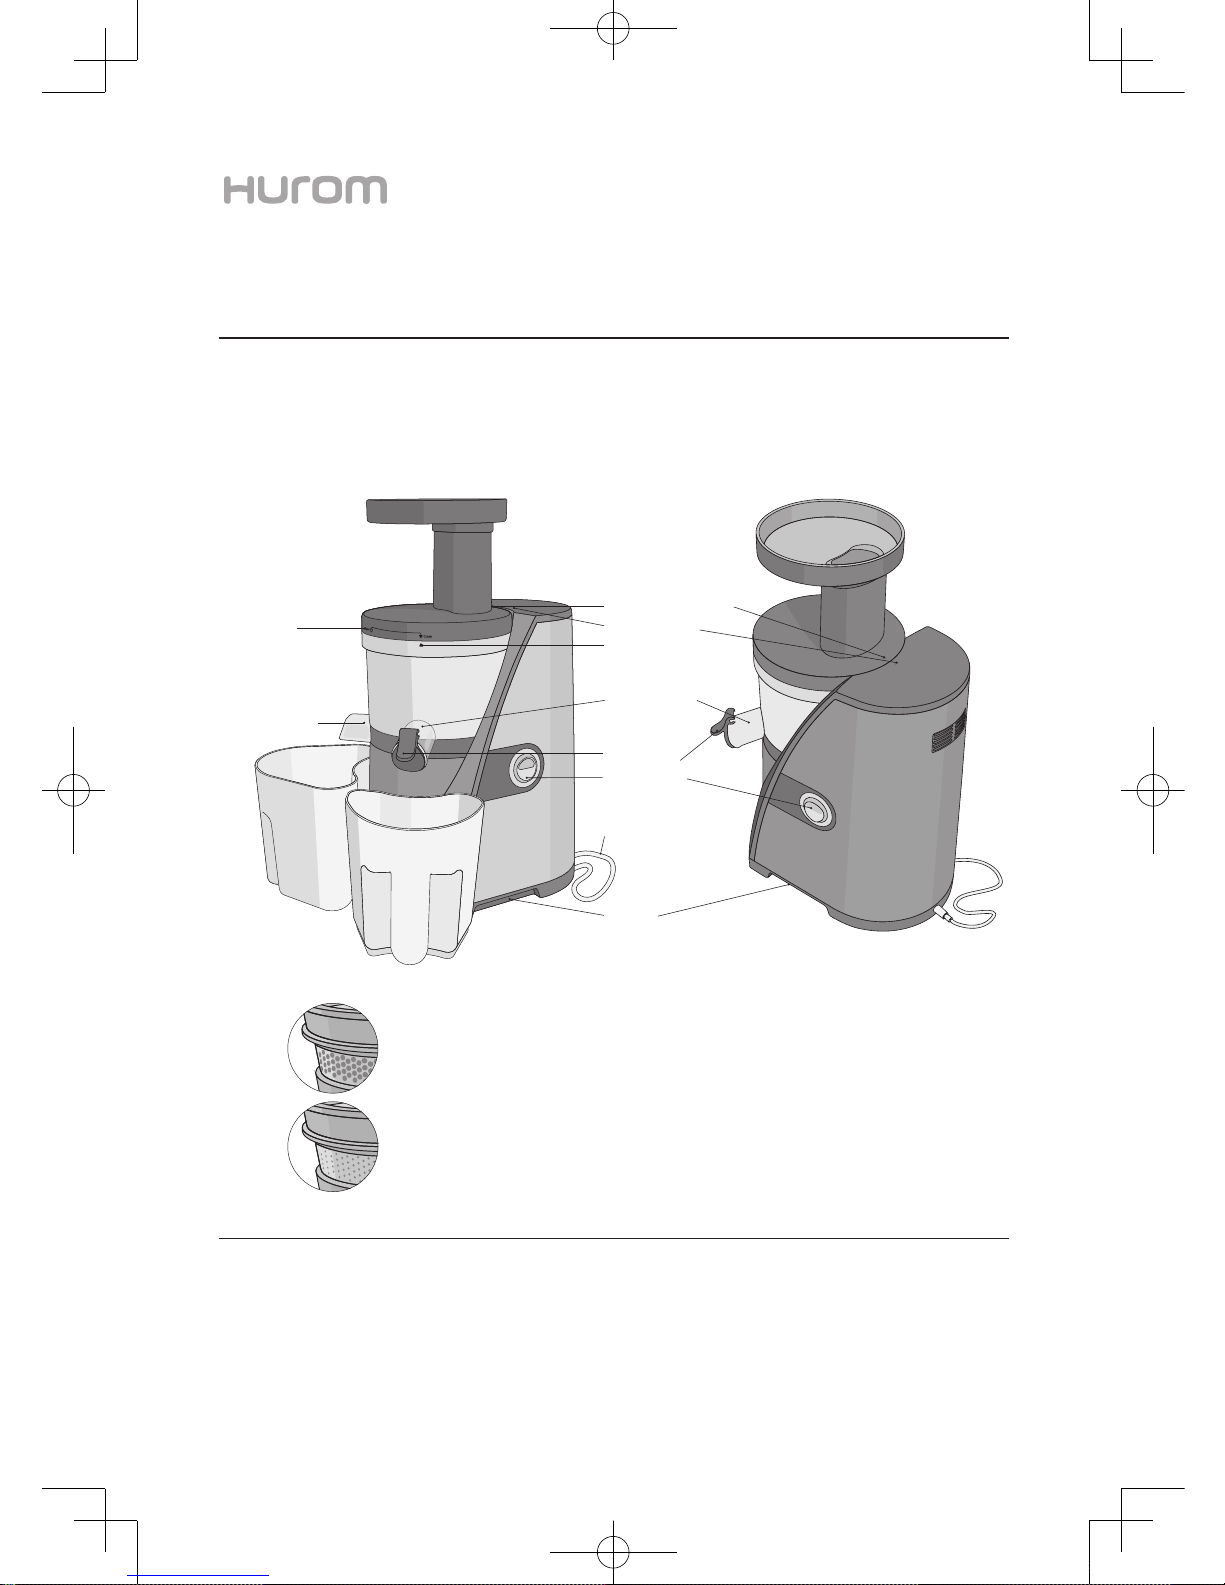
www.hurom.com I 03
NUMBER OF
ATTACHMENT
SPECIFIC TERMS FOR PARTS
1.Hopper front
arrow
7.Juice cap
3.Hopper rear arrow
5.Chamber arrow
8.Operating
switch
6. Juice outlet
9.Power cord
The holes of the strainer are small. Use for making pure juice with hard fruits, beans or fibrous vegetables.
Use to extract clearer juice.
The bigger holes of the strainer produce thicker juice with tender and soft fruits such as strawberries, kiwis and
tomatoes. Use for more pulpy juice.
10.Grip
<FRONT> <REAR>
4.Base arrow
1 pusher, 1 hopper, 1 hopper lid, 1 Auger, 1 fine strainer, 1 coarse strainer, 1 spinning brush, 1 chamber, 1 base, 1 juice container,
1 pulp container, 1 small cleaning brush, 1 cleaning brush, 1 manual
STRAINER
*
COARSE STRAINER
FINE STRAINER
2.Pulp outlet
4PJ12242_V.01.indd 7 2013-07-12 오후 4:51:14
Page 8
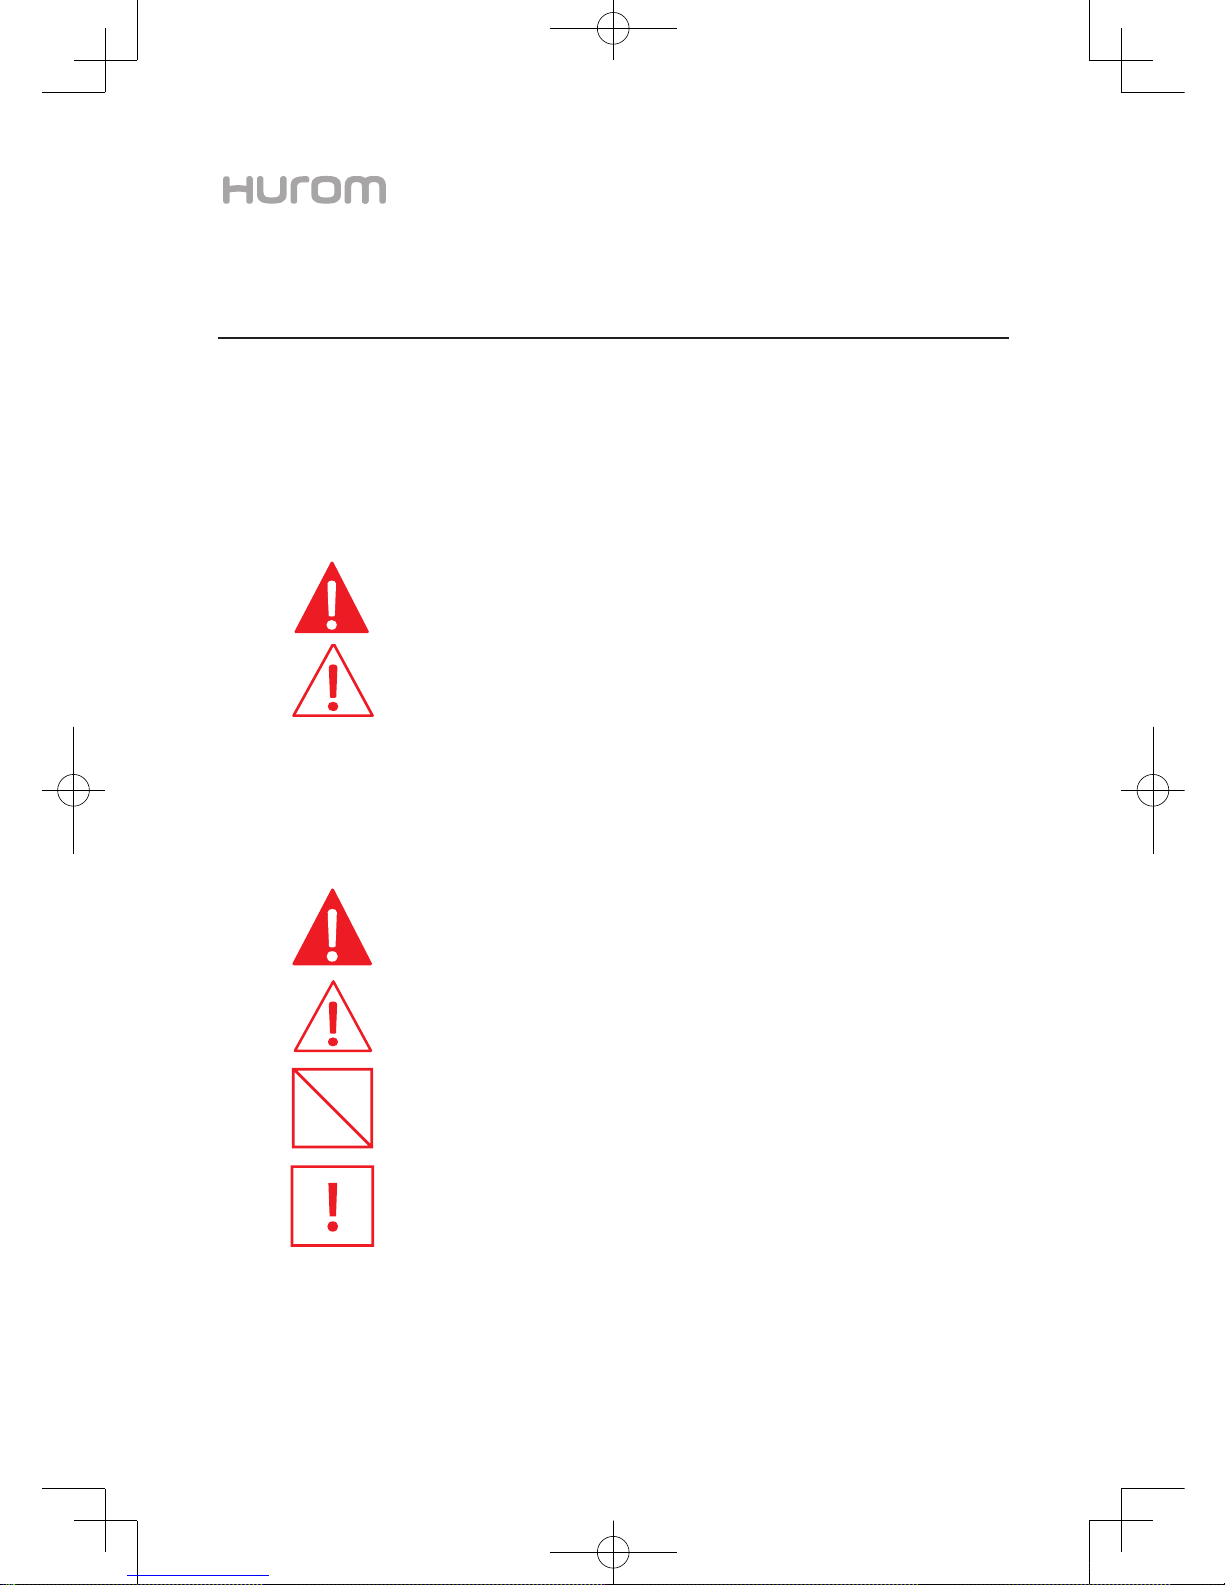
All users of this appliance must read and understand this safety precaution before operating.
WARNING Hazards or unsafe practices which could result in serious personal injury or death.
This sign indicates contents of regulating or directing actions.
Specific instructions are written around or in the sign.
This sign indicates prohibited acts.
Specific prohibitions are written around or in the sign.
CAUTION Hazards or unsafe practices which could result in minor personal injury or appliance damage.
This sign indicates contents that may cause risk of a fire or an electrical shock.
Specific warnings are written in the sign.
SIGN EXAMPLES
This sign indicates contents that may cause risk of a fire or an electrical shock.
Specific warning is written in the sign.
PRECAUTIONS FOR SAFE USE
04 l
4PJ12242_V.01.indd 8 2013-07-12 오후 4:51:15
Page 9
www.hurom.com l 05
WARNINGS AND CAUTIONS
WARNING Hazards or unsafe practices which could result in serious personal injury or death.
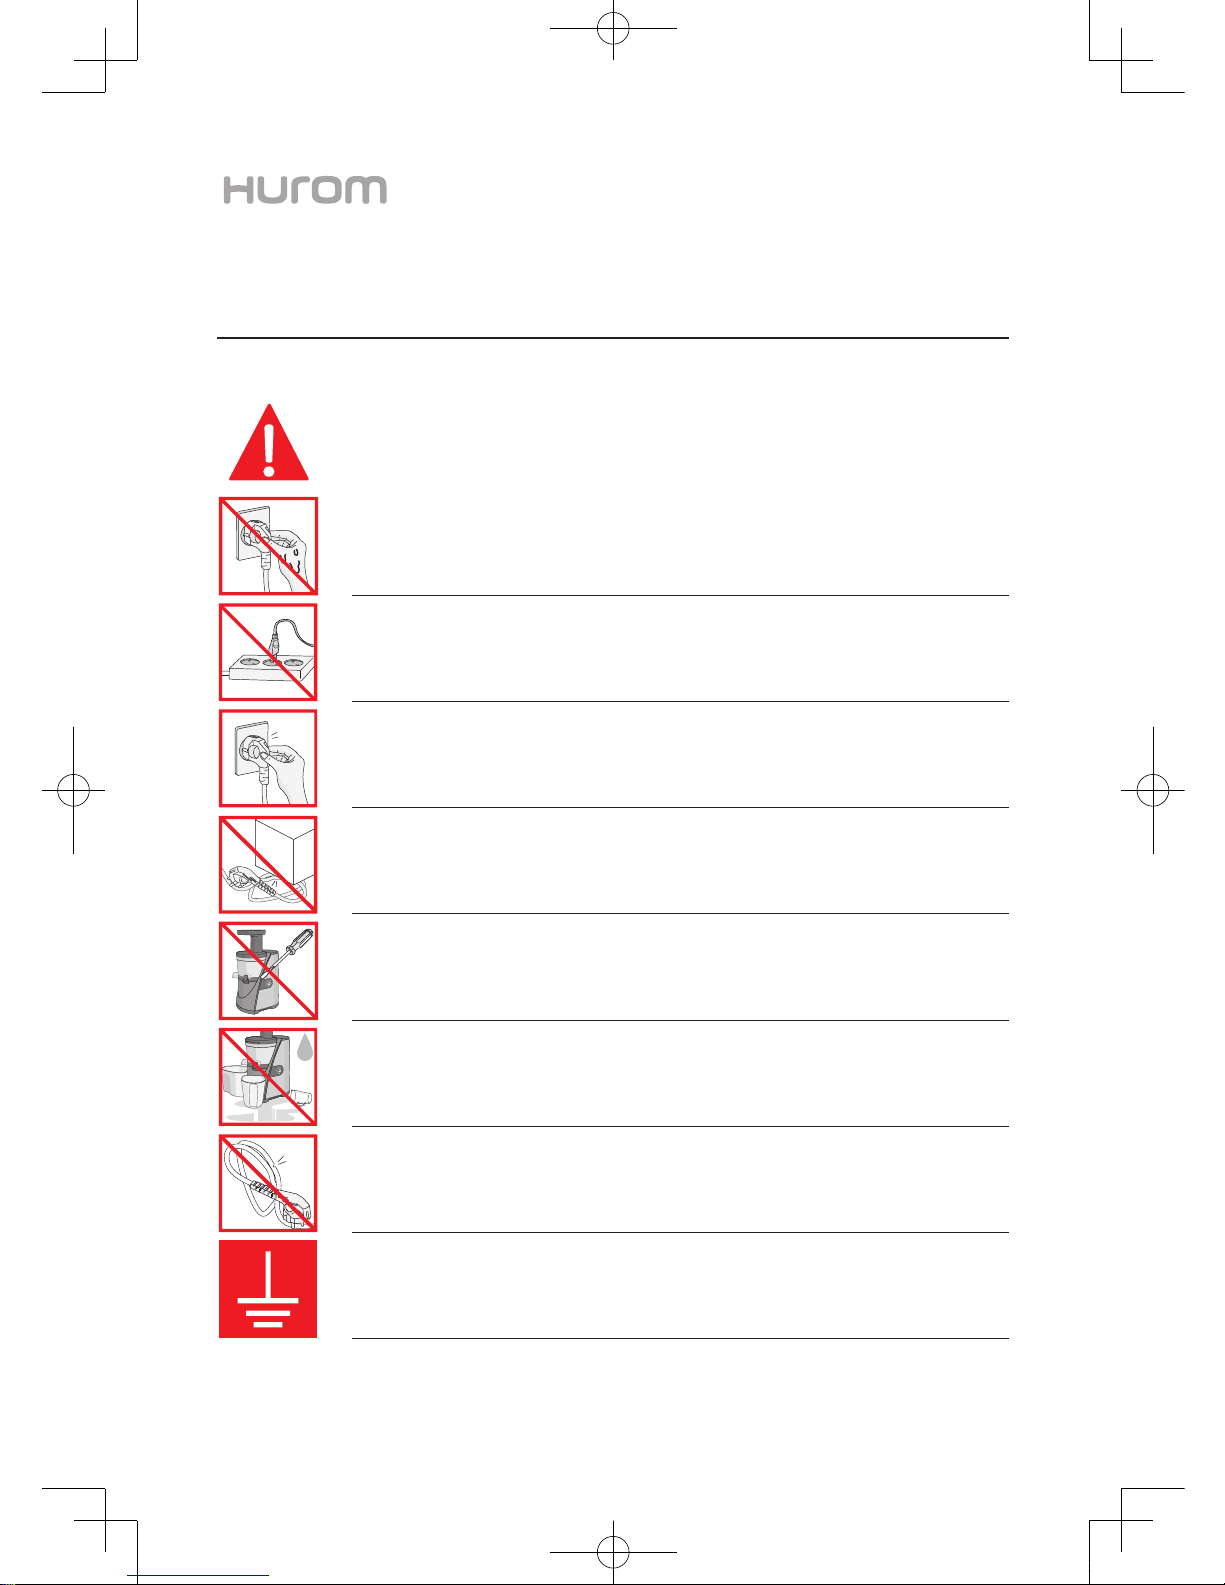
DO NOT PLUG IN OR UNPLUG WITH WET HANDS.
It may cause electric shock or injury.
DO NOT USE OTHER THAN 120V AC.
It may cause electric shock, fire or abnormal performance.
If the voltage is different, it may shorten the life of the motor or cause a failure.
PLUG IN THE POWER CORD CORRECTLY AND COMPLETELY PUSH IT INTO THE
WALL SOCKET.
Failure to do so may cause electric shock or fire.
DO NOT WET THE BASE OR SPLASH WATER ON THE BASE.
Be careful not to let any liquids or other substances get into the switch on the appliance.
DO NOT OPERATE THE SWITCH WITH WET HANDS.
It may cause an electric shock or fire.
NEVER ALTER THE APPLIANCE. ALSO, DO NOT DISASSEMBLE OR REPAIR PERSONALLY. DO NOT INSERT FINGERS, FOREIGN SUBSTANCES OR OBJECTS SUCH
AS PINS INTO GAPS OR HOLES IN THE BASE. It may cause a fire, electric shock or failure.
For any technical support, contact the authorized local Customer Care Center.
DO NOT OPERATE IF THE POWER CORD IS DAMAGED OR IF THE PLUG IS LOOSE.
It may cause electric shock, fire or injury.
FOR SAFETY PURPOSE, ALWAYS OPERATE THE APPLIANCE ON A GROUNDED CONNECTION. DO NOT GROUND ON GAS PIPE, PLASTIC WATER PIPE, TELEPHONE WIRE, ETC.
It could cause electric shock, fire, malfunction or explosion.
Be sure to use the electrical outlet with ground connection.
IF THE POWER CORD IS DAMAGED, IT MUST BE REPLACED BY THE MANUFACTURER
OR SIMILARLY QUALIFIED PERSONS IN ORDER TO AVOID A HAZARD.
If the power cord is damaged, it may cause electric shock or fire.
4PJ12242_V.01.indd 9 2013-07-12 오후 4:51:15
Page 10
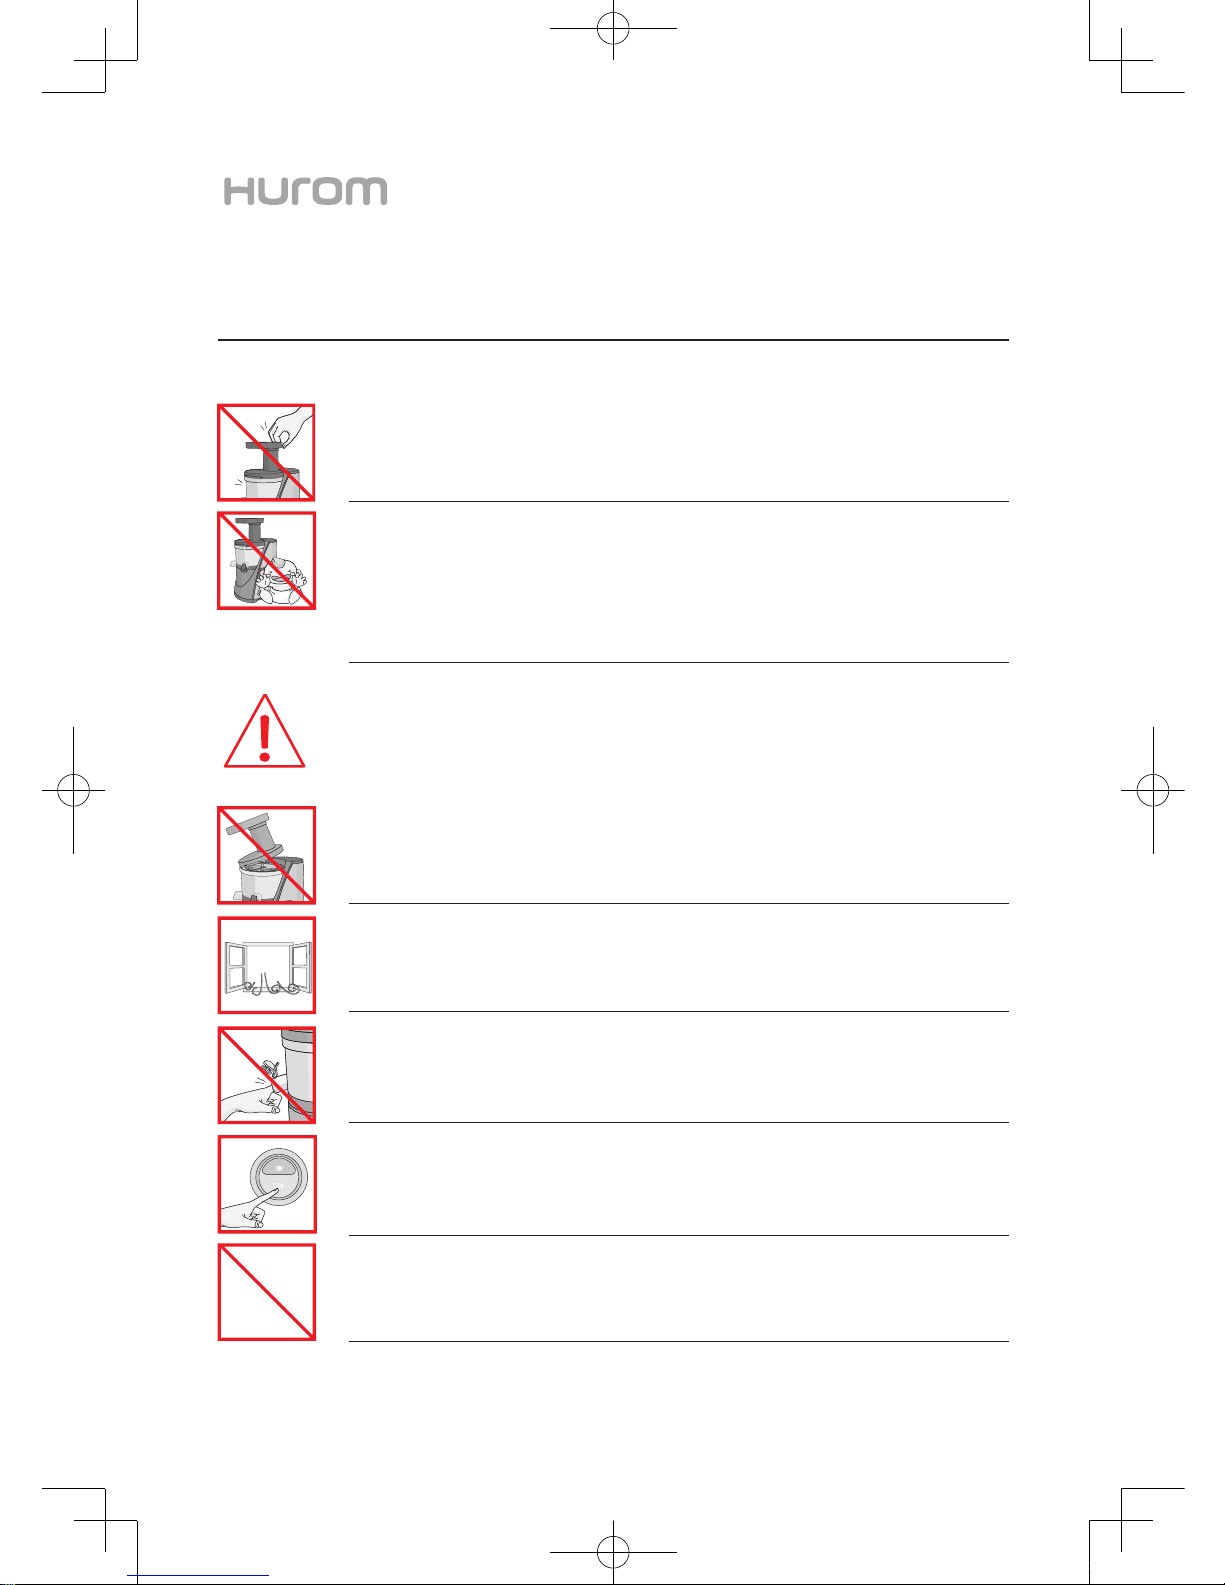
NEVER DISASSEMBLE THE CHAMBER SET DURING OPERATION OR INSERT FINGERS, FOREIGN OBJECTS SUCH AS FORKS, SPOONS ETC. INTO HOPPER CHUTE OR
JUICE OUTLET. It may cause injury, accident or failure.
DO NOT OPERATE WITHOUT LOCKING THE HOPPER PROPERLY.
It may cause injury or failure.
IF GAS LEAK IS DETECTED, DO NOT INSERT THE POWER CORD INTO THE ELECTRICAL OUTLET.
It may cause injury or failure.
NEVER PUT A FINGER, FORK OR SPOON, ETC. INTO JUICE OUTLET.
It may cause injury or failure.
DURING THE OPERATION, DO NOT ATTEMPT TO MOVE THE BASE OR DISASSEMBLE
THE CHAMBER SET DURING OPERATION.
It may cause injury or failure. Always switch off first and unplug the power cord before moving or
disassembling the appliance.
WARNINGS AND CAUTIONS
CAUTION Hazards or unsafe practices which could result in minor personal injury or appliance damage.
06 l
IF AUGER ROTATION STOPS RUNNING DURING NORMAL OPERATION, PRESS [REVERSE/REV] BUTTON AND HOLD FOR 2~3 SECONDS. AFTER REVERSE OPERATION
HAS COME TO A COMPLETE STOP, PRESS [ON] BUTTON AGAIN. If such stoppage contin-
ues, parts may be damaged and performance may be deteriorated due to overheating of the motor.
If problem continues, immediately stop the appliance and contact the local Customer Care Center.
APPLIANCES CAN BE USED BY PERSONS WITH REDUCED PHYSICAL, SENSORY OR
MENTAL CAPABILITIES OR LACK OF EXPERIENCE AND KNOWLEDGE IF THEY HAVE
BEEN GIVEN SUPERVISION OR INSTRUCTION CONCERNING USE OF THE APPLIANCE IN
A SAFE WAY AND IF THEY UNDERSTAND THE HAZARDS INVOLVED. CHILDREN SHALL
NOT PLAY WITH THE APPLIANCE. CLEANING AND USER MAINTENANCE SHALL NOT BE
MADE BY CHILDREN WITHOUT SUPERVISION. THIS APPLIANCE SHALL NOT BE USED BY
CHILDREN. KEEP THE APPLIANCE AND ITS CORD OUT OF REACH OF CHILDREN.
4PJ12242_V.01.indd 10 2013-07-12 오후 4:51:16
Page 11
www.hurom.com l 07
WARNINGS AND CAUTIONS
30minute
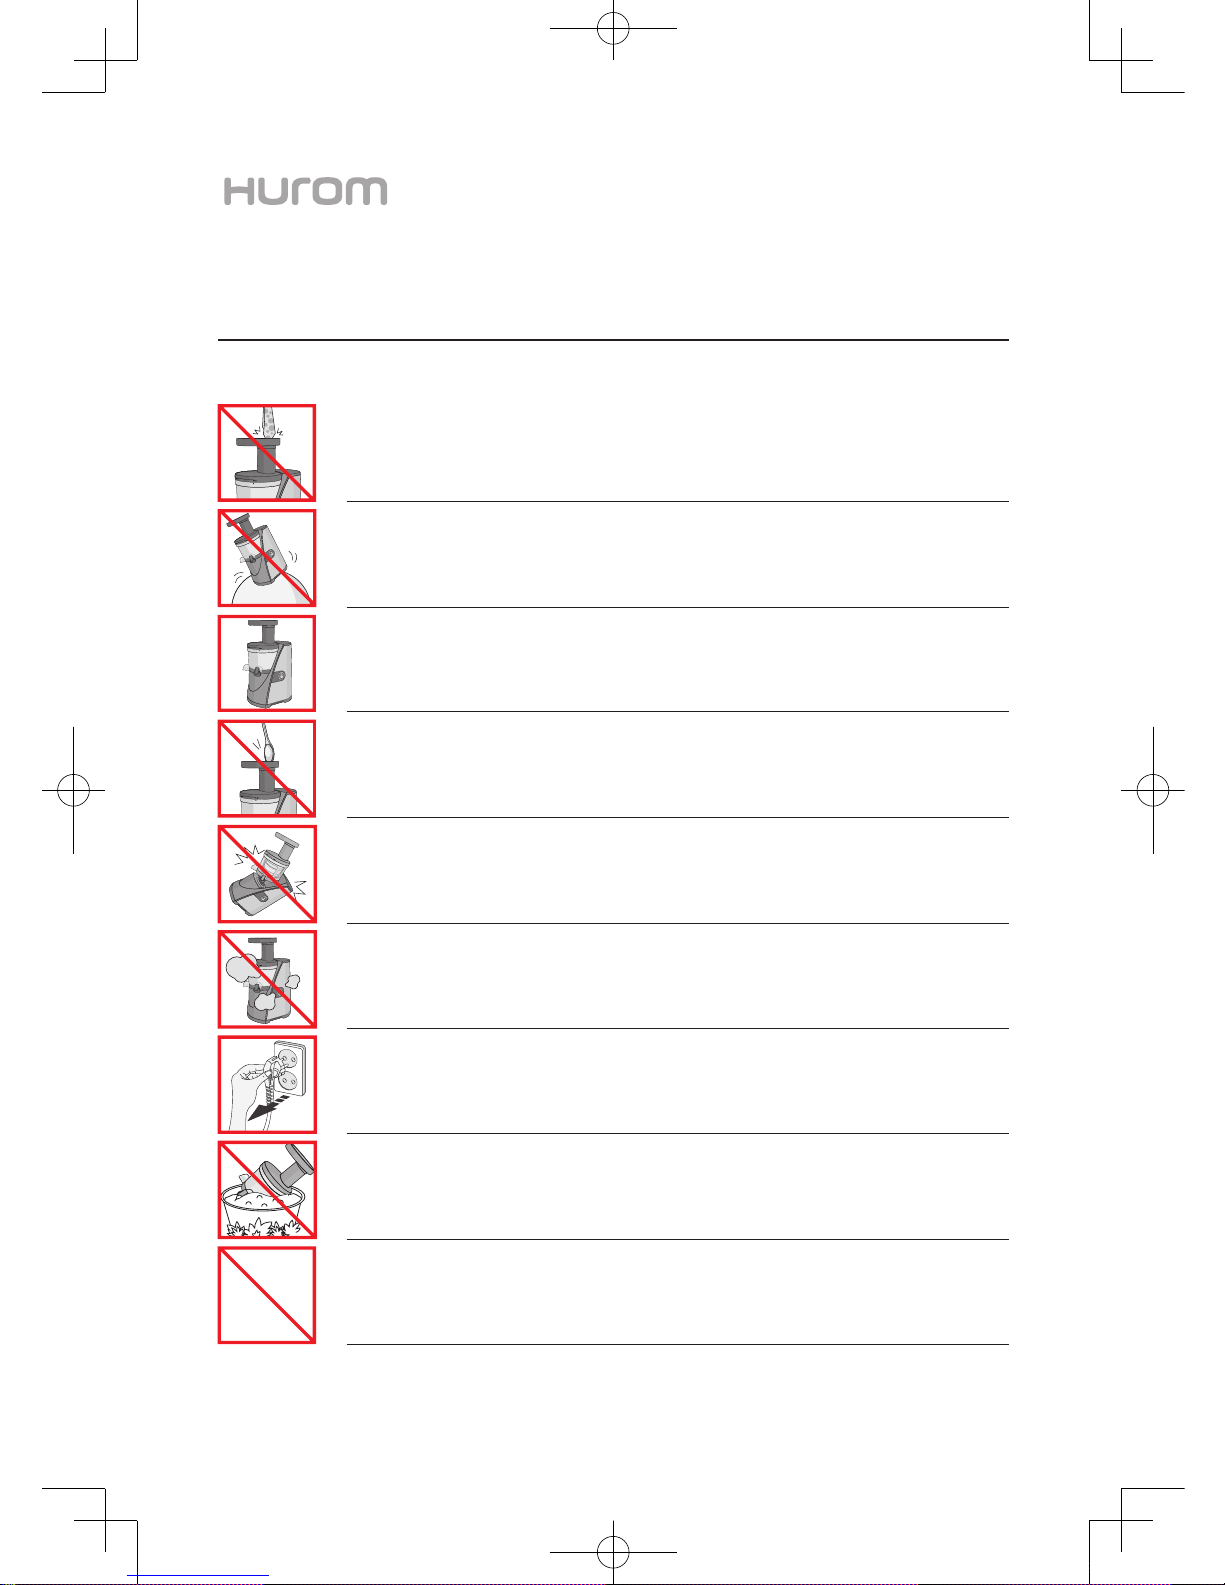
DO NOT OPERATE THE APPLIANCE FOR MORE THAN 30 MINUTES AT A TIME.
It may cause a motor failure due to overheating.
Cool it down sufficiently for about 5 minutes before operating it again.
WHEN PLACING INGREDIENTS INTO THE HOPPER CHUTE, ONLY USE THE PUSHER
PROVIDED.
It may cause injury or failure.
DO NOT APPLY SEVERE SHOCK TO THE APPLIANCE OR DROP IT.
It may cause electric shock, fire or damage.
IF THE APPLIANCE GIVES OFF AN UNPLEASANT SMELL, PRODUCES SMOKE OR HEATS
EXCESSIVELY, STOP USING IMMEDIATELY AND CONTACT THE LOCAL CUSTOMER CARE
CENTER.
When using a new appliance, it may initially give off a smell. The smell will disappear naturally over time.
ALWAYS UNPLUG THE APPLIANCE AFTER USE. WHEN UNPLUGGING THE POWER
CORD, MAKE SURE TO HOLD THE HEAD OF THE POWER CORD.
Pulling on the wire to unplug may cause electric shock or fire.
DO NOT WASH AT HIGH TEMPERATURES OF 800C(1760F) OR HIGHER.
DO NOT PLACE THE APPLIANCE IN A DISHWASHER, A DRYER OR A MICROWAVE.
It may cause failure or deformation of parts.
THE APPLIANCE WEIGHS ABOUT 6.35KG (14LB).
WHEN MOVING THE APPLIANCE, ALWAYS SECURELY HOLD BY THE GRIP ON THE
BOTTOM OF THE BASE WITH BOTH HANDS.
Do not hold the appliance by the chamber or the edge of the base. The base may slip and drop,
causing injury or failure.
WHEN USING THE APPLIANCE, BE CAREFUL TO KEEP LOOSE ITEMS SUCH AS
NECKTIE, LONG NECKLACE, SCARF, ETC. AWAY FROM THE HOPPER CHUTE.
It may cause injury, failure or breakage.
PLACE THE APPLIANCE ON A FLAT AND STABLE SURFACE.
It may cause injury or failure.
4PJ12242_V.01.indd 11 2013-07-12 오후 4:51:22
Page 12
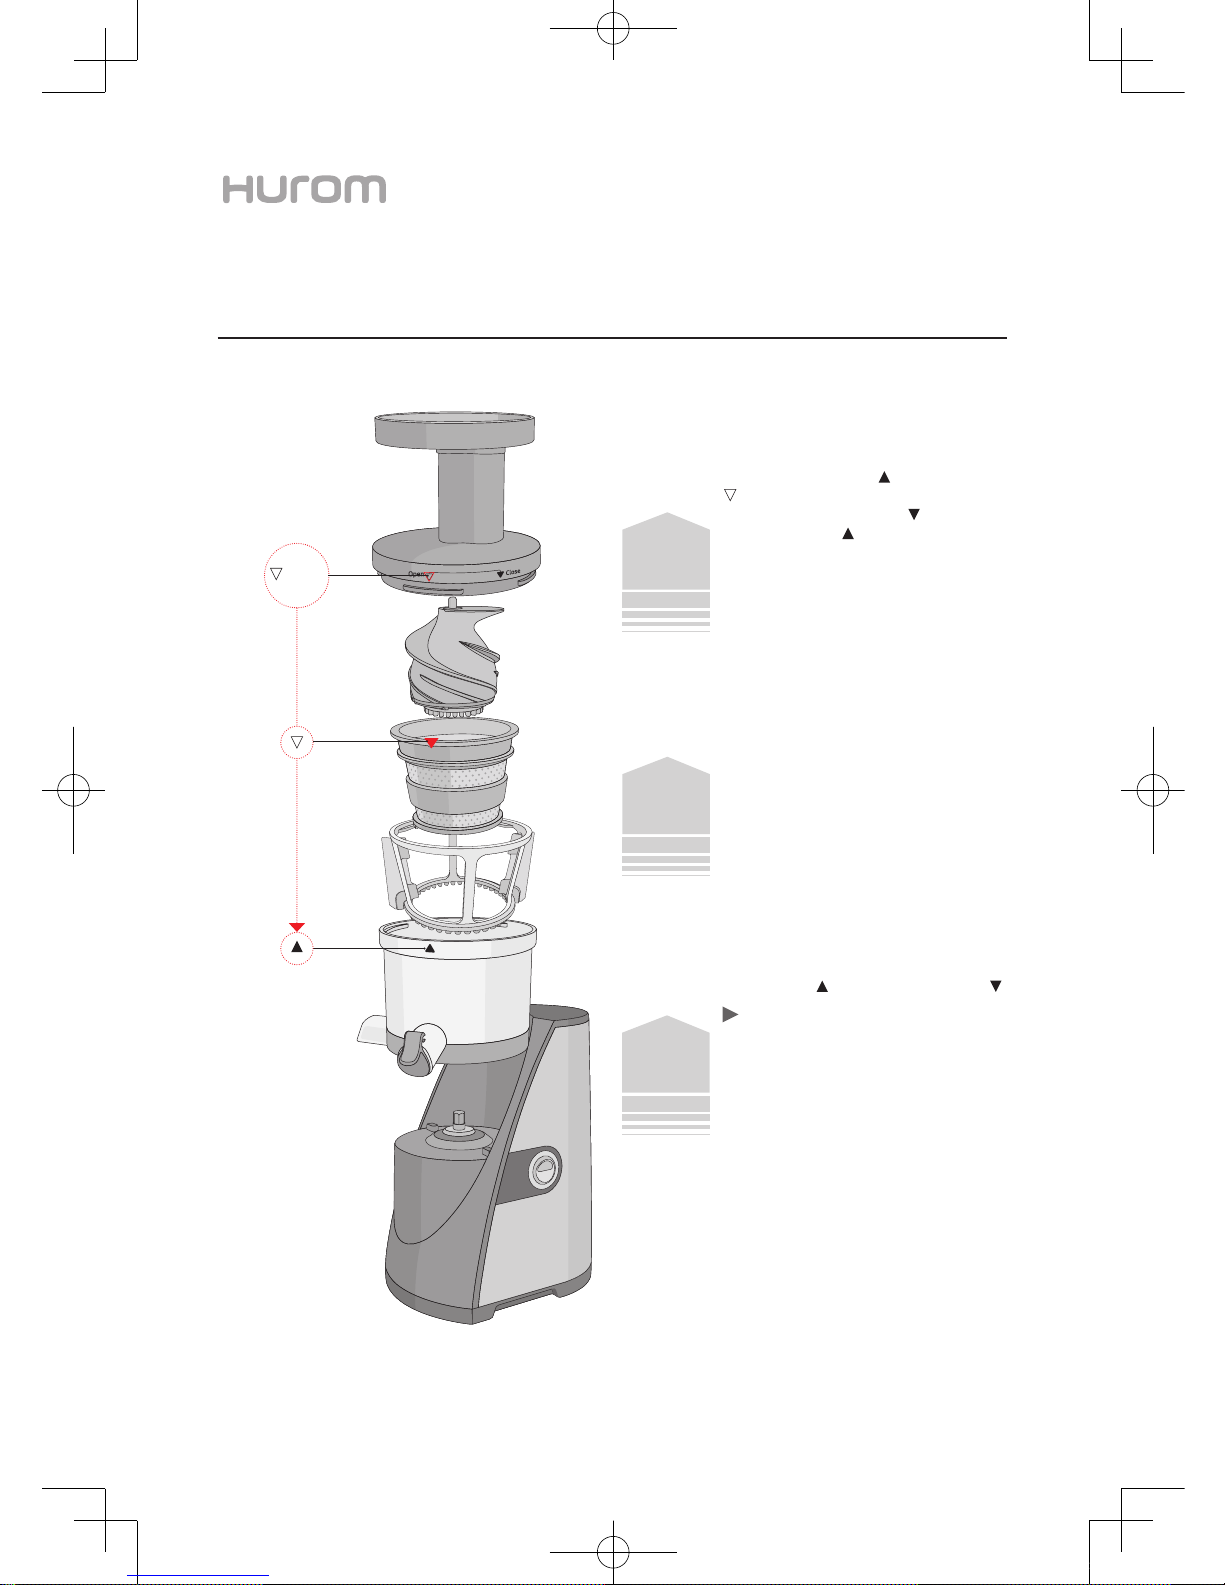
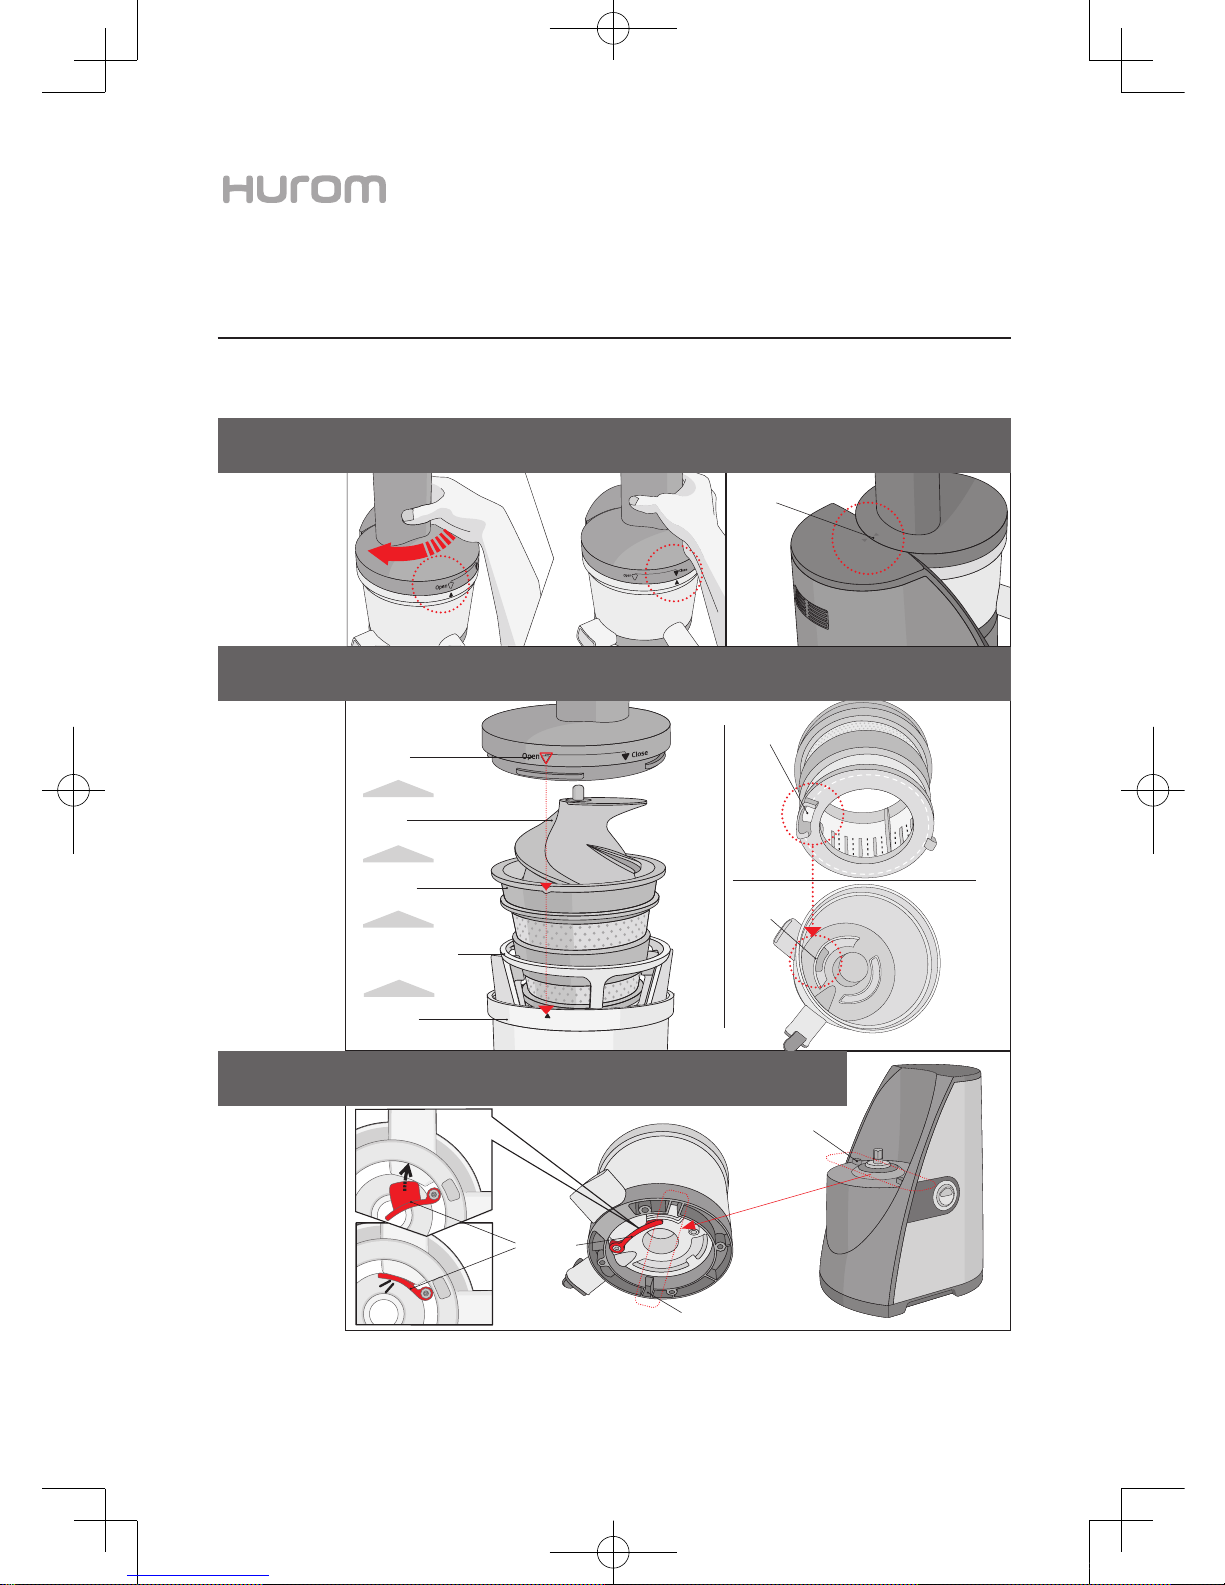
Align the Chamber arrow [ ] with hopper arrow
[ OPEN] and turn the hopper clockwise until it
clicks so that the hopper arrow [ CLOSE] aligned
with Chamber arrow[ ].
OPEN
SLOW JUICER ASSEMBLY
Place the Chamber on the base.
Make sure to press the Auger down into the strainer in STEP 2. The hopper does not close properly
when the Auger does not fit in completely.
4
3
2
1
Assemble the parts in the following order:
Chamber>Spinning Brush> Strainer. Make sure
Chamber arrow [ ] aligns with strainer arrow [ ].
08 l
The spinning brush can be assembled regardless
of the direction.
STEP
STEP
STEP
STEP
4PJ12242_V.01.indd 12 2013-07-12 오후 4:51:23
Page 13
Hopper
Strainer
Chamber
Spinning brush
www.hurom.com I 09
SLOW JUICER ASSEMBLY IN DETAIL
Firmly insert the extraction seal located at the bottom of the chamber into the pulp outlet.
Make sure the outer groove of the chamber is completely aligned with the base ridge.
1
Assemble the parts in the order of chamber>spinning brush>strainer>squeezing auger>hopper. When assembling the spinning
brush, line up the strainer ridge with the inner groove of the chamber. Align all arrows on the chamber, strainer and hopper.
2,3
Chamber outer groove
Base ridge
Strainer
ridge
BOTTOM
OF THE
STRAINER
INSIDE
THE
CHAMBER
Chamber inner
groove
Extraction
seal
Hopper
rear arrow
Align the hopper arrow with the base arrow located at the rear of the appliance.
The hopper will not close if the parts are assembled incorrectly.
4
Auger
4PJ12242_V.01.indd 13 2013-07-12 오후 4:51:24
Page 14
HOW TO USE THE APPLIANCE
10 l
누름
정회전
역회전
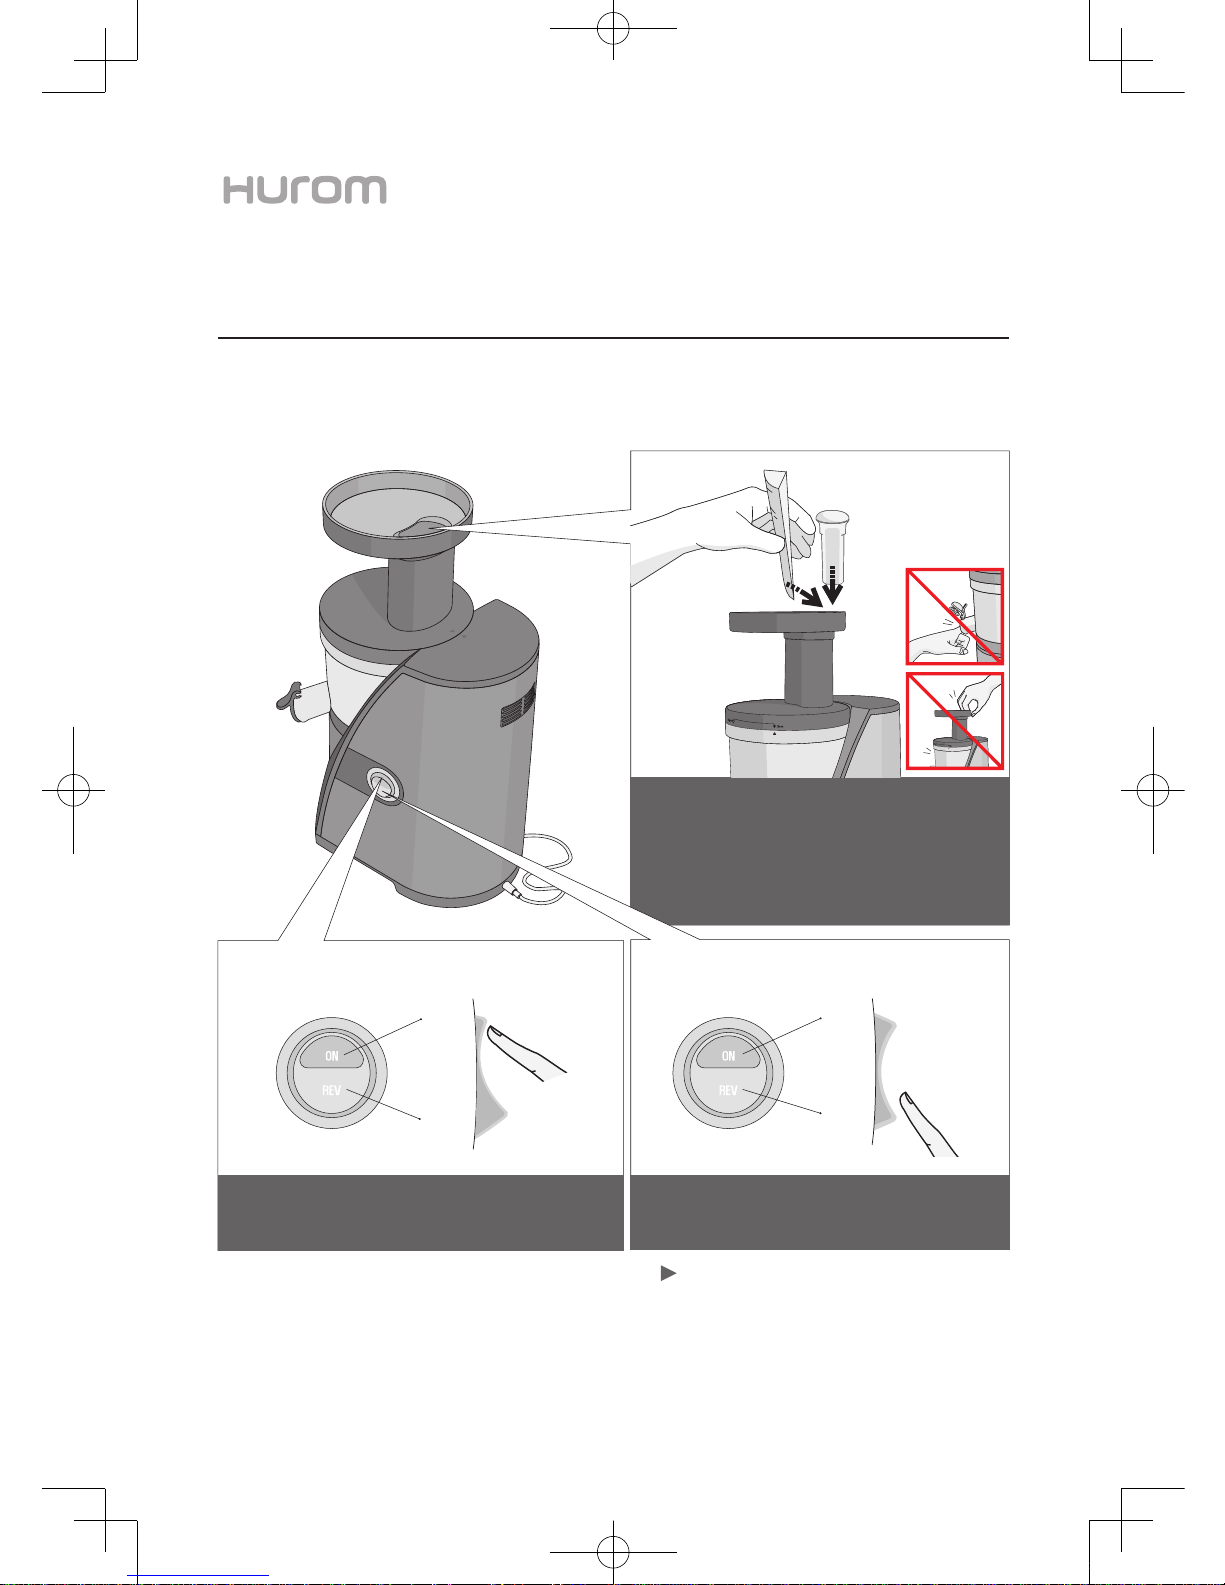
Press [On] button to start.
정지상태
정지
REAR VIEW
1
2
3
Motor does not stop immediately upon pressing [Reverse/REV].
For safety reasons and to preserve the performance level of the
appliance, the motor will slowly come to a complete stop.
OPERATING
SWITCHES
Press
off (stop)
Normal
direction
Reverse
direction
OPERATING
SWITCHES
Reverse
direction
Normal
direction
STOP
After juicing is complete, click [Reverse/
REV] to stop.
Wash the fruits and/or vegetables and cut
them into small pieces that can fit into the
hopper chute. Place the suitable pieces
into hopper chute slowly and press with a
pusher.
Use fresh fruits and vegetable for juicing as they contain more juice
themselves.
4PJ12242_V.01.indd 14 2013-07-12 오후 4:51:25
Page 15
JUICE CAP AND EXTRACTION SEAL
www.hurom.com l 11
JUICE CAP
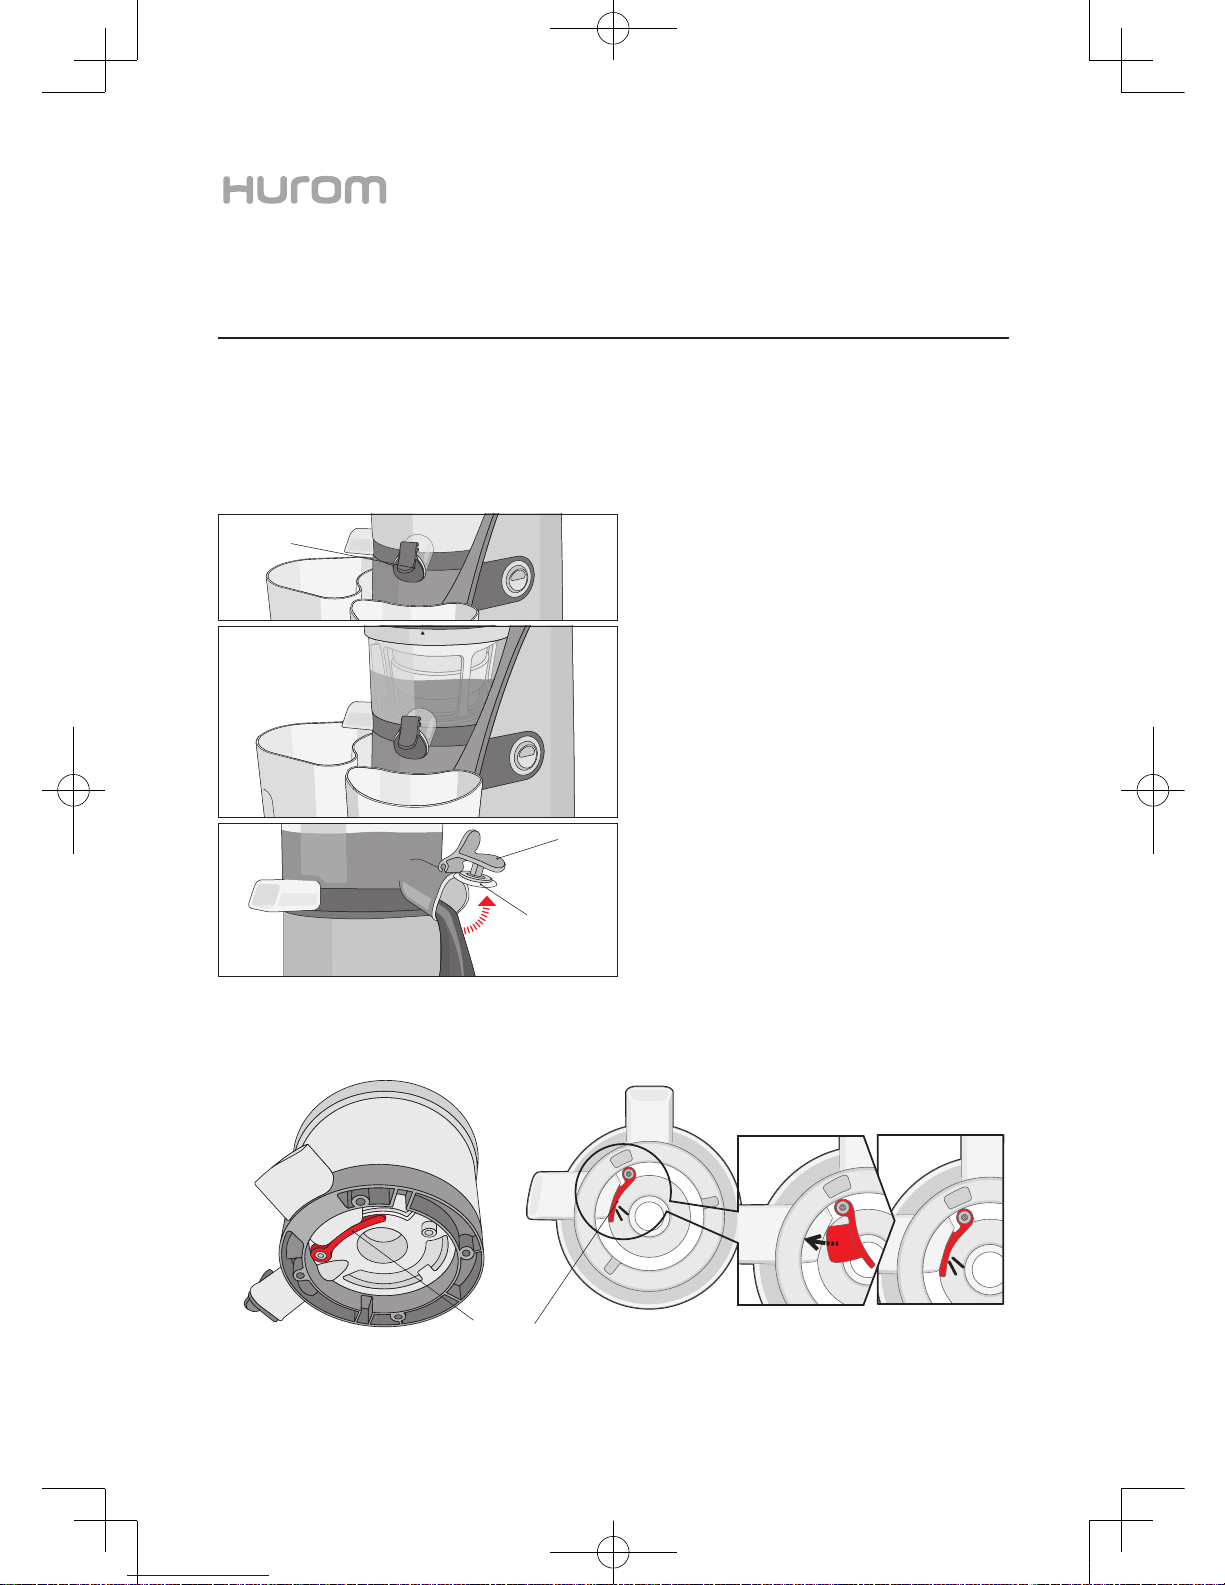
This is the juice outlet cap on the chamber.
Close the juice cap to fill up the chamber with juice from various ingredients.
Close juice cap and press [ON] button to start.
1
When juice starts filling up the chamber, you can
mix banana, nuts, boiled sweet potato, etc. and
liquids such as milk as well as vegetables and
fruits for a unique smoothie.
2
3
Open the juice cap to pour out as much juice as
you need and close it to save the juice for another serving without any drops or mess on the
counter.
EXTRACTION SEAL
This is the pulp stopper made of silicone located at the bottom of the chamber. Always close the extraction seal before every use as shown below. For
cleaning, open the extraction seal and wash out the trapped food particles. (Page 16)
CLOSED
Extraction
seal
Juice cap
Juice cap
Juice cap
seal
4PJ12242_V.01.indd 15 2013-07-12 오후 4:51:25
Page 16
If the auger does not work even after following the directions above, unplug the power cord form the electrical
outlet, disassemble and clean the chamber set before attempting again.
NOTE
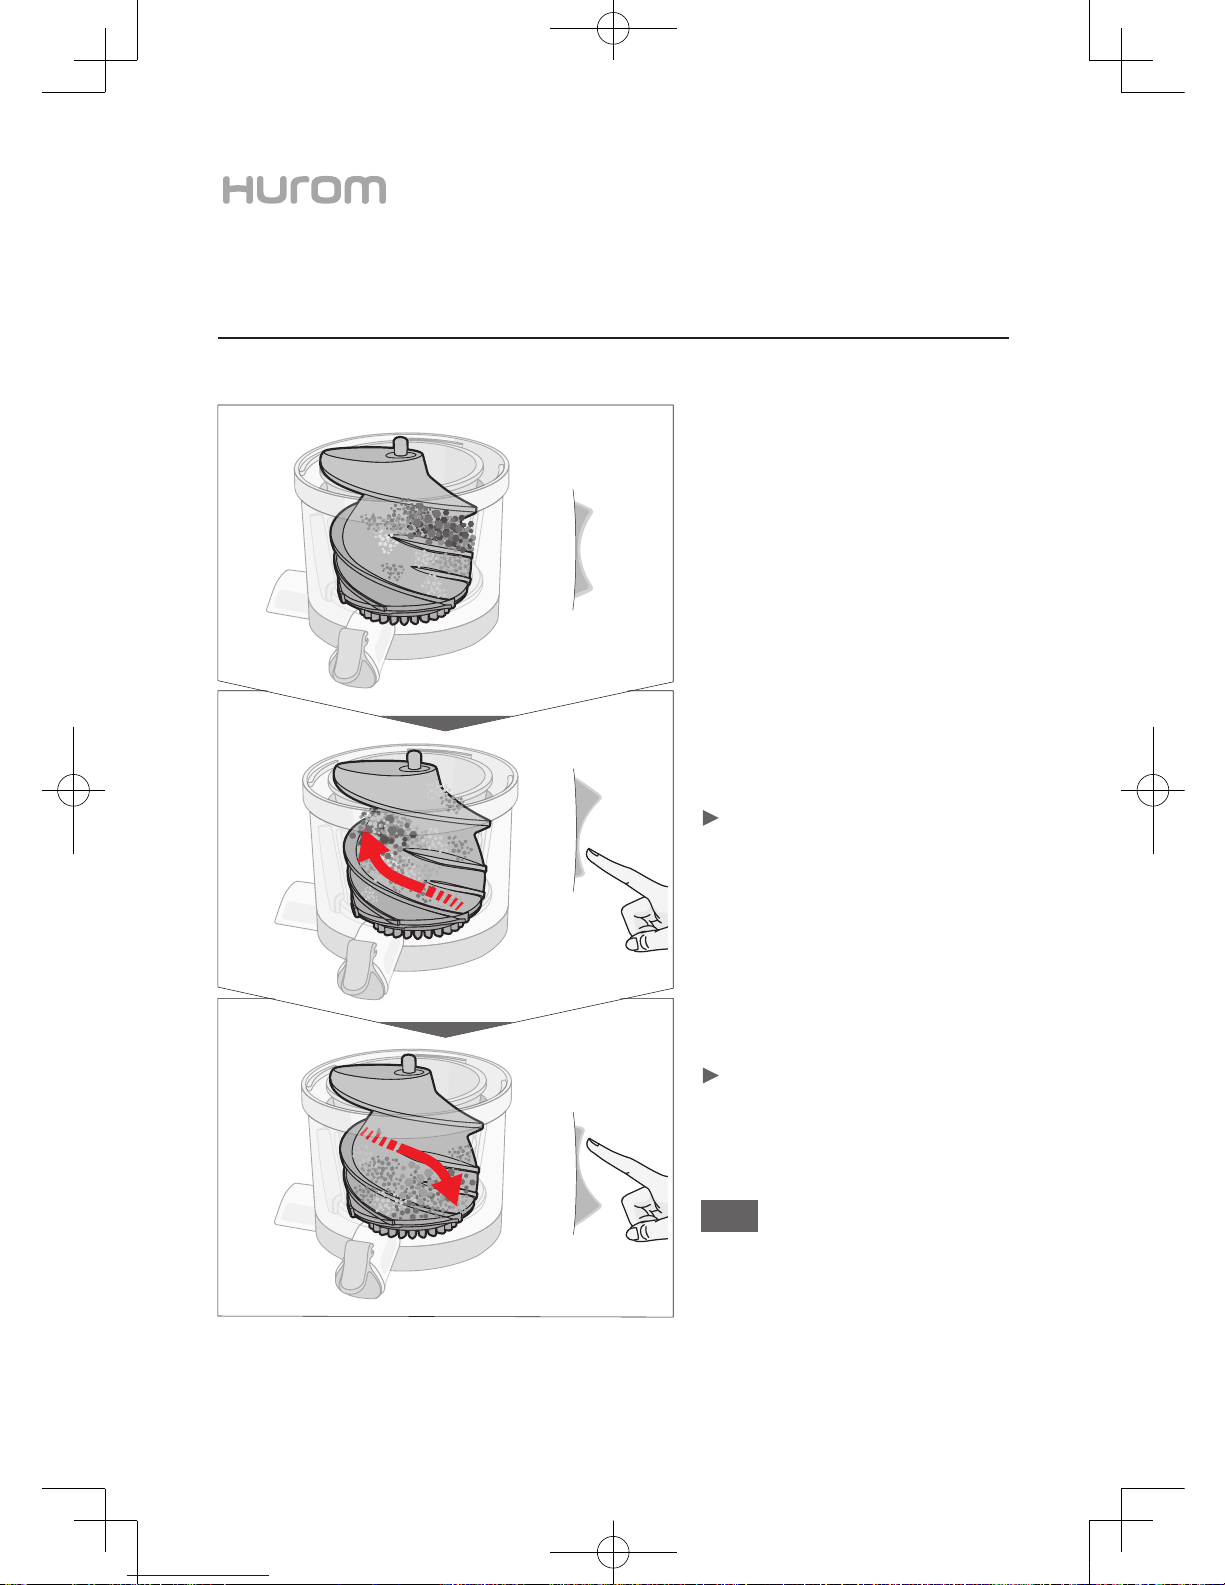
Click the [Reverse/REV] button on the
operating switch and stop the appliance.
Hold down the [Reverse/REV] on the
operating switch for 3~5 seconds and
release it. Repeat this process 2~3
times.
After the rotation stops completely,
press [ON] button to operate.
Reverse button pushes the ingredients back up. Reverse only works while the button held down. The
Reverse rotation of the auger stops once the button
is released.
Before changing the rotation direction of the auger,
make sure that auger has come to a complete stop.
Normal
direction
(ON)
WHEN THE AUGER IS STOPPED DURING OPERATION (REVERSE/REV BUTTON)
Open
1
2
3
Reverse
direction
(REV)
Stop
12 l
4PJ12242_V.01.indd 16 2013-07-12 오후 4:51:26
Page 17
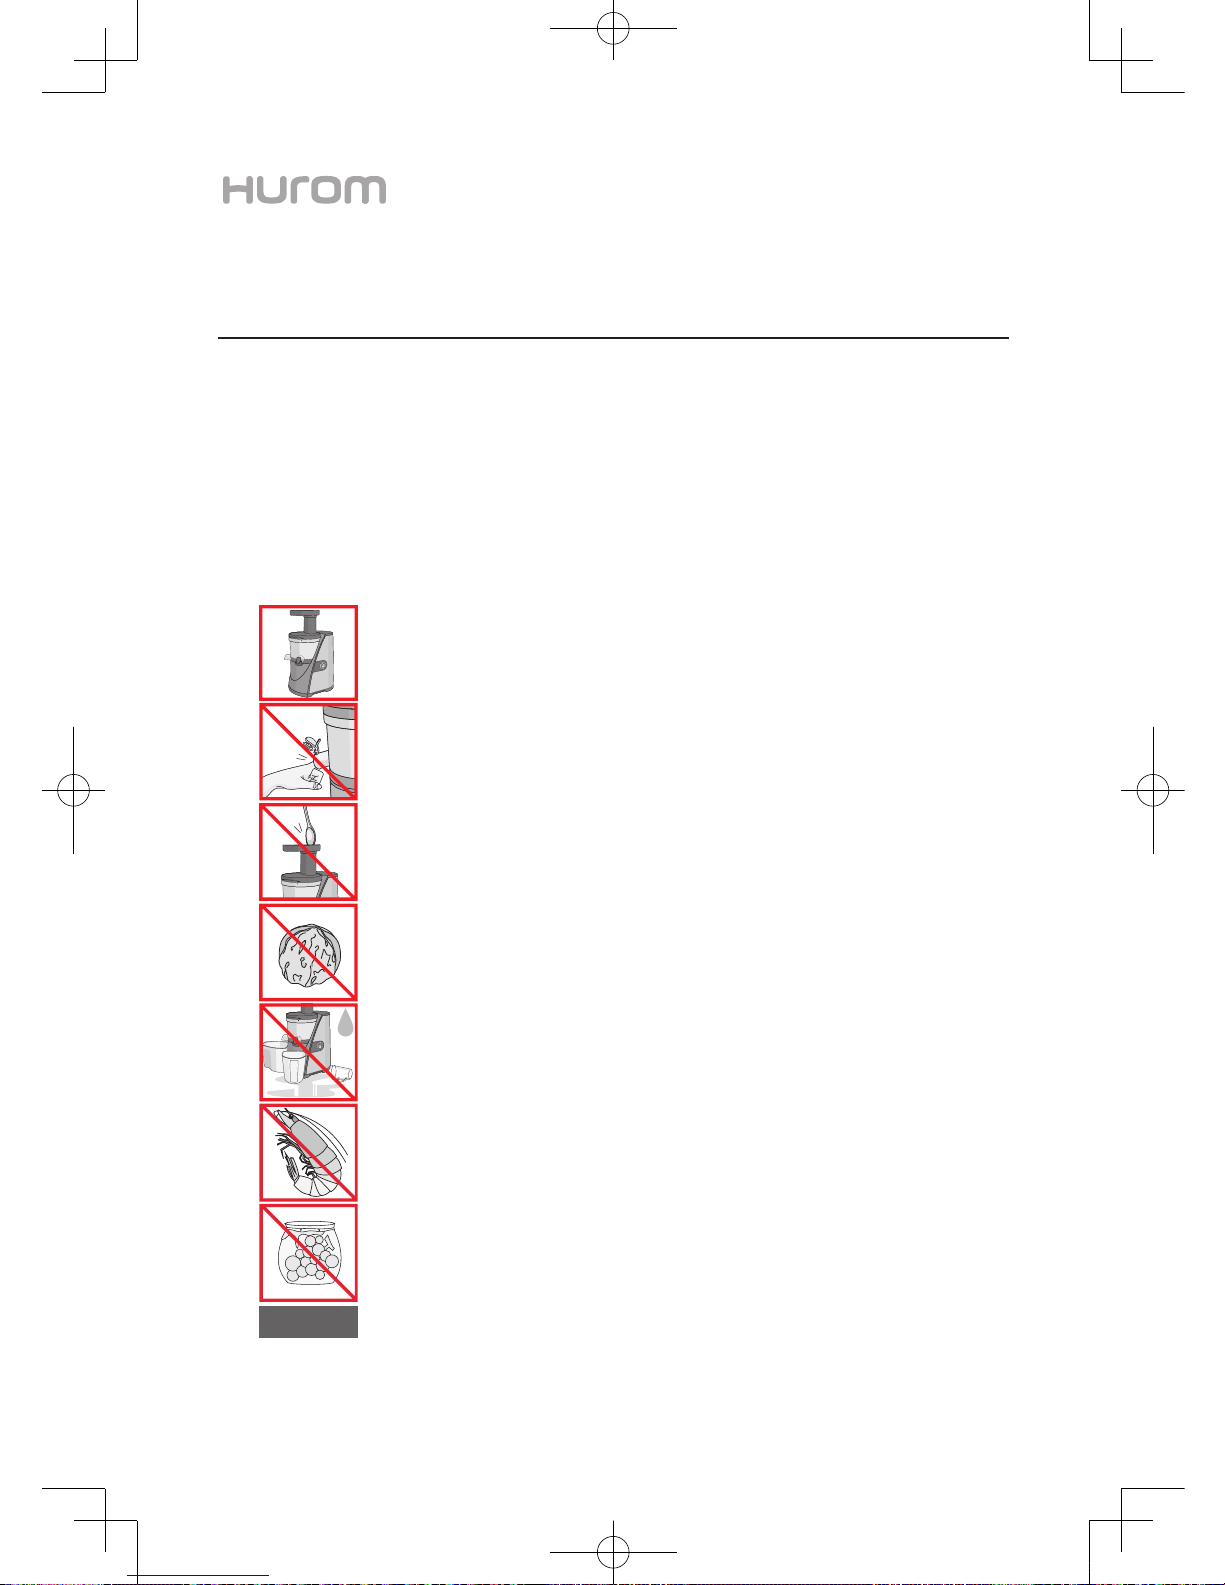
DO NOT OPERATE SWITCHES WITH WET HANDS.
It may cause electric shock or fire.
Do not put foreign objects on or near the switch.
IMPORTANT SAFEGUARDS FOR USE
NEVER INSERT FINGER, FORK OR SPOON, ETC.
INTO THE JUICER OUTLET DURING OPERATION.
Inserting foreign objects into the juice outlet during operation may cause the spinning bush to become stuck and damage
the parts.
USE ONLY THE PUSHER TO PRESS DOWN THE INGREDIENTS.
Any other objects may damage the parts and cause injury or failure of equipment.
DO NOT PLACE GRAINS, FRUIT WITH HARD SEED OR NUTS WITH HARD SHELL
SUCH AS WALNUTS INTO THE JUICER.
It may damage the chamber, auger, squeezing strainer, etc.
Fruits with pits, hard seeds such as nectarines, peaches, mangos, apricots, plums and cherries must be pitted before juicing.
DO NOT USE CONTINUOUSLY FOR MORE THAN 30 MINUTES.
It may cause a failure due to overheating of the motor.
When using continuously, stop and cool it down for about 5 minutes after each use.
Frozen fruit or withered ingredients that have been stored in the refrigerator for a long time may produce less juice or may
be difficult to juice.
DO NOT USE FOR FRUIT PRESERVED IN SUGAR, HONEY, ALCOHOL, ETC.
(GRAPES, APRICOT, BERRES, ETC.)
It may cause the hopper to become stuck and difficult to open.
DO NOT USE FOR MEAT OR SEAFOOD.
It may cause abnormal performances or a failure.
∙ Fruits with pits and hard seeds such as nectarines, peaches, mangos, apricots, plums and cherries must be pitted before juicing.
∙ Cut fibrous ingredients (water parsleys, etc) into small sizes about 3~4cm(1.5inch) before placing into the hopper chute.
∙ Drink the fruit juice or green vegetable juice immediately after extraction.
The juice will lose taste and nutritional value longer it is exposed to air.
∙ Do not use the appliance for grinding dry ingredients such as grains, coffee beans, etc.
This may damage the parts or cause failure of the appliance.
∙ Do not re-squeeze leftovers expelled through the pulp outlet.
∙ Do not operate the appliance when the chamber is empty.
www.hurom.com l 13
30minute
NOTE
4PJ12242_V.01.indd 17 2013-07-12 오후 4:51:27
Page 18
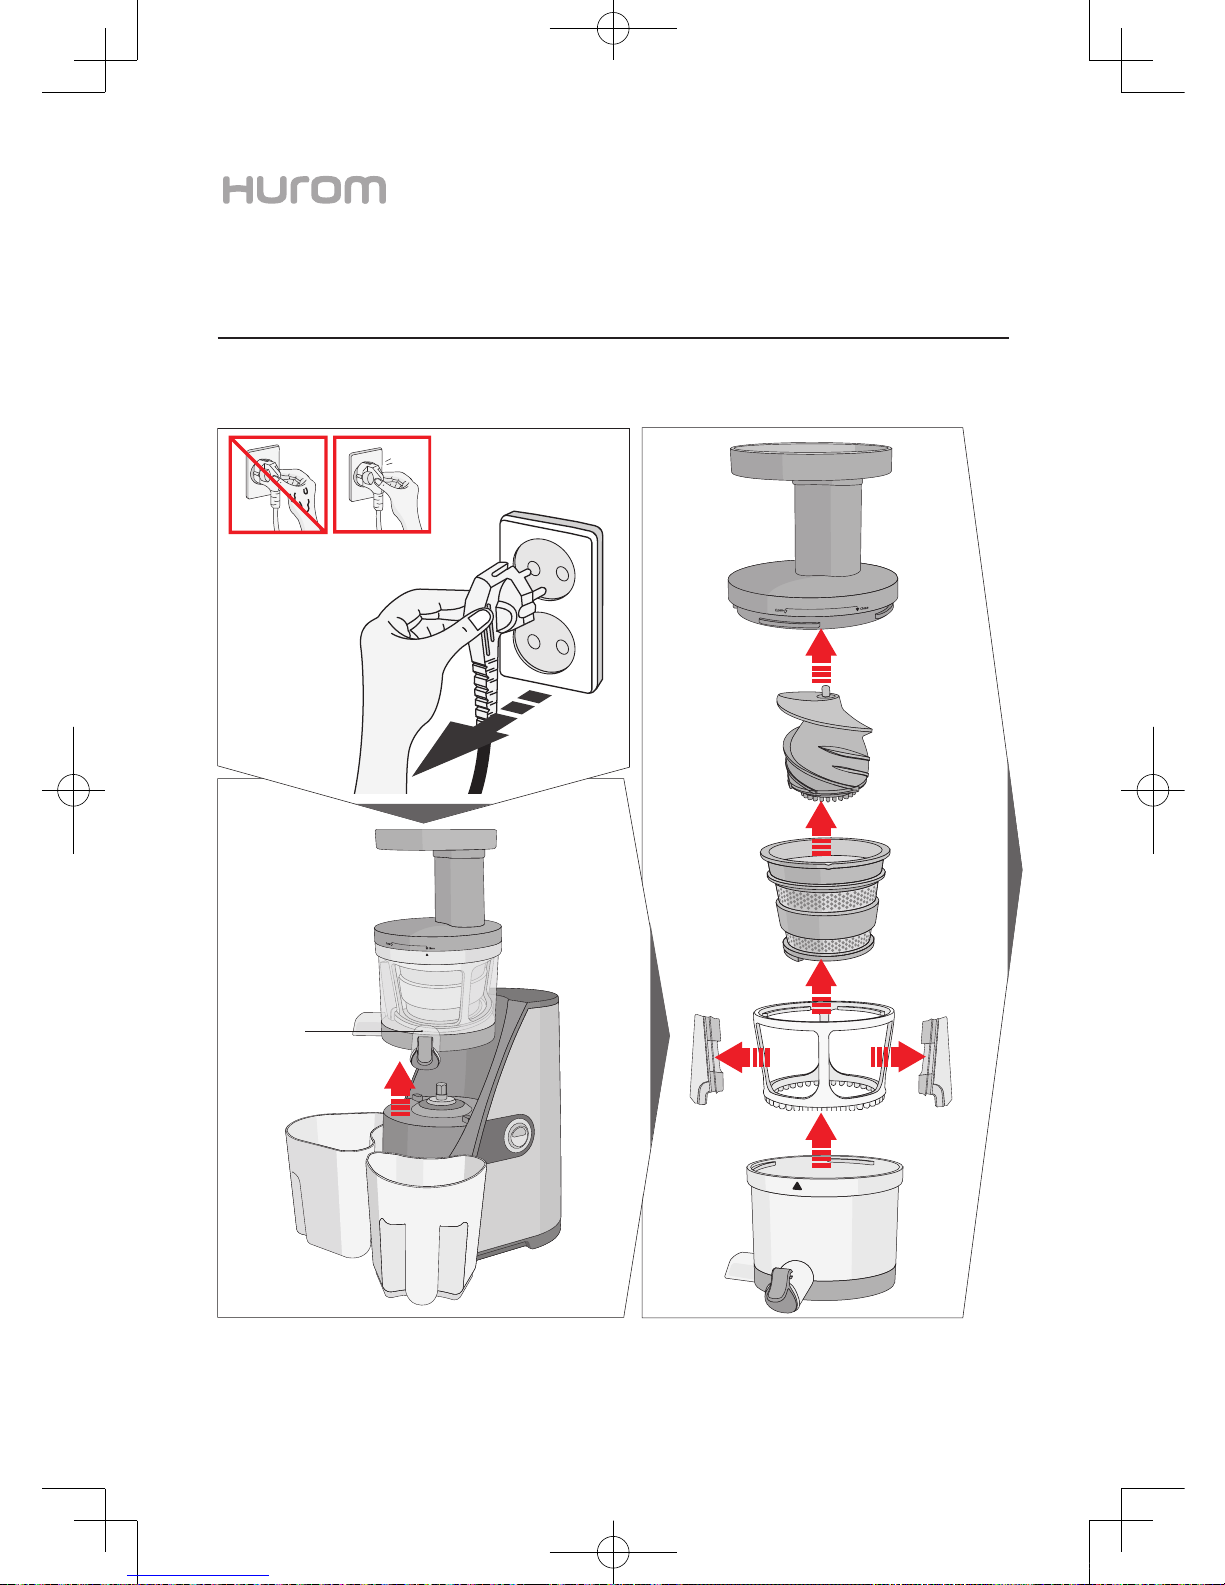
Juice outlet
14 l
DISASSEMBLING, CLEANING AND CARE
1
2
3
FIGURE IN ORDER
4PJ12242_V.01.indd 18 2013-07-12 오후 4:51:28
Page 19
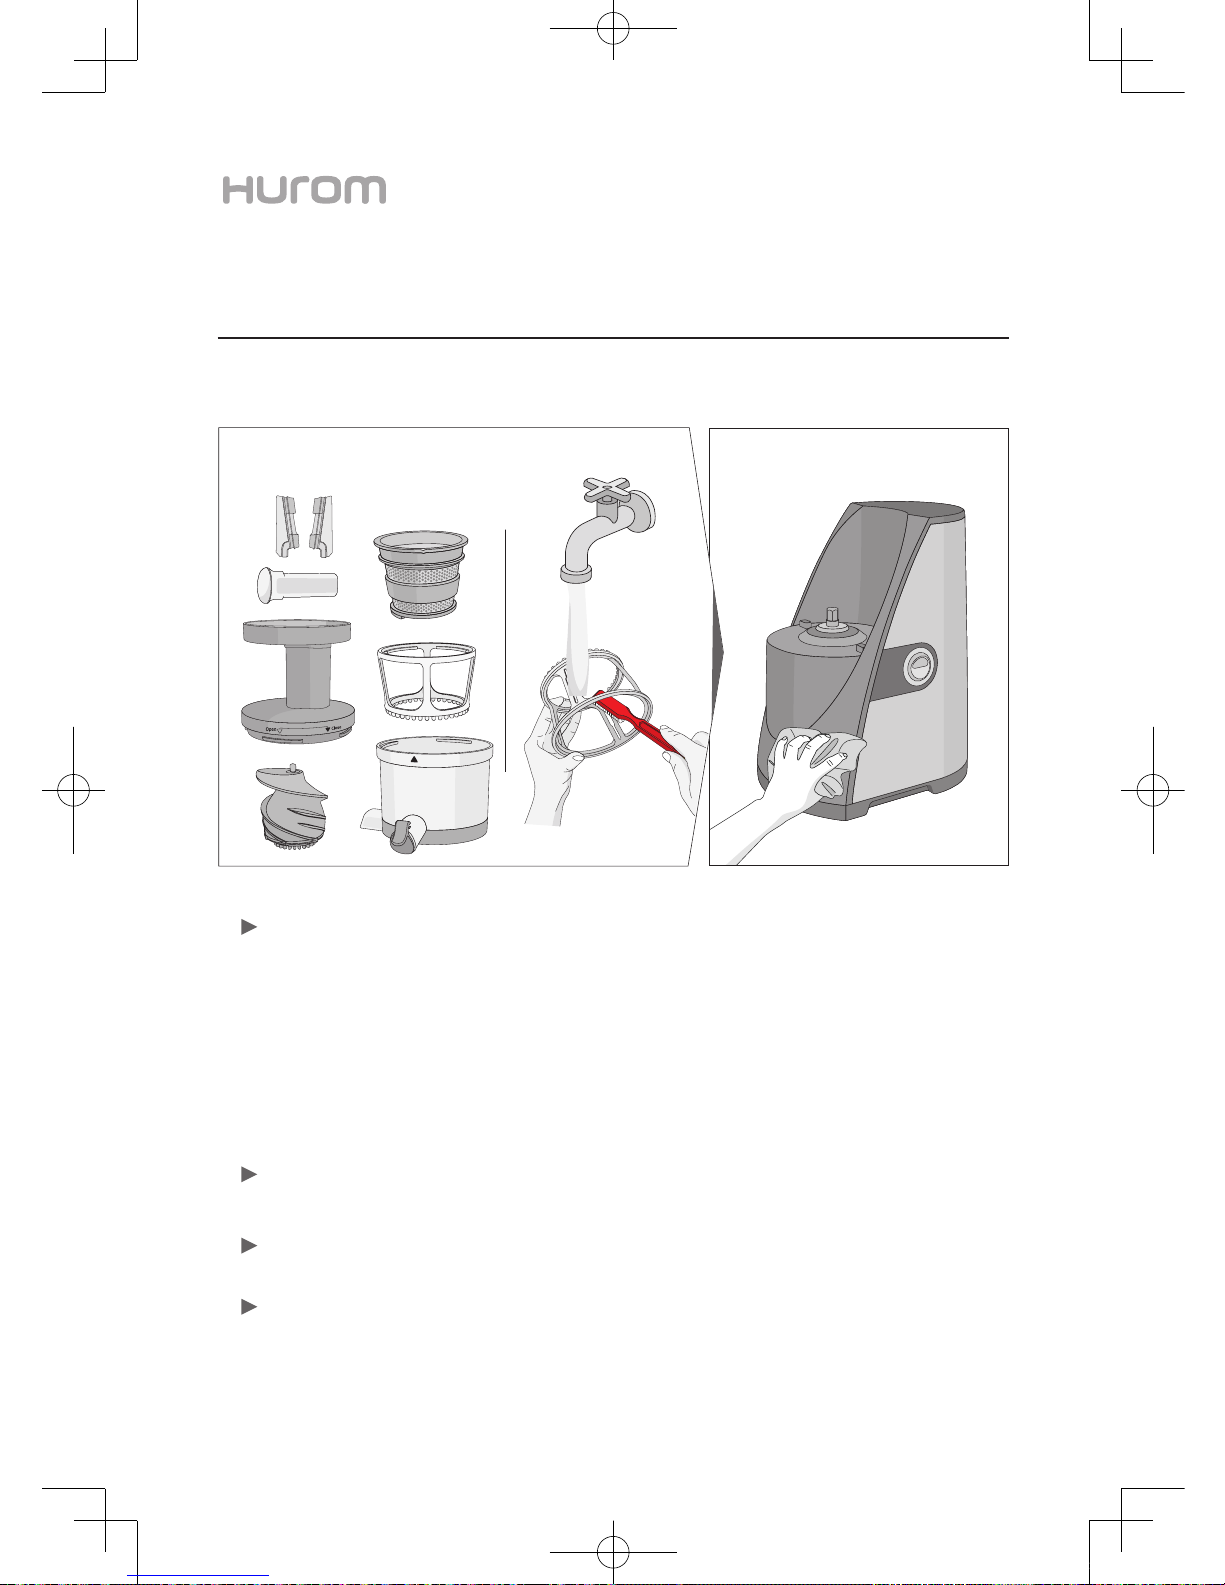
1. Ensure the motor has stopped completely and unplug the power cord.
2. Hold the juice outlet and the hopper with both hands and lift them up from the base.
When unplugging the power cord, hold the head part of the power cord and unplug it.
Do not touch the power cord with wet hands.
Always wash the chamber set immediately after use. Without prompt cleaning, the pulp residue may dry and crust on the parts, making it
difficult to disassemble or clean at a later time. Improper cleaning may also cause decreased performance of the appliance.
3. Disassemble parts as below:
1) Unlock the chamber by rotating it counterclockwise.
2) Remove the auger.
3) Remove the strainer.
4) Remove the spinning brush.
4. Rinse each part with the cleaning brush. Brush the inside and outside of each part thoroughly under
running water.
Never use scouring pads, abrasive cleaning agents, harsh detergents or sharp cleaning tools.
Do not wash the parts in the dishwasher or a dish dryer.
5. Wipe the base with a soft, damp cloth and dry thoroughly.
Do not immerse the base unit in water or any other liquid or rinse it under running water.
6. After cleaning, allow the parts to air-dry completely and store it in a clean and safe place.
www.hurom.com l 15
DISASSEMBLING, CLEANING AND CARE
4 5
4PJ12242_V.01.indd 19 2013-07-12 오후 4:51:29
Page 20
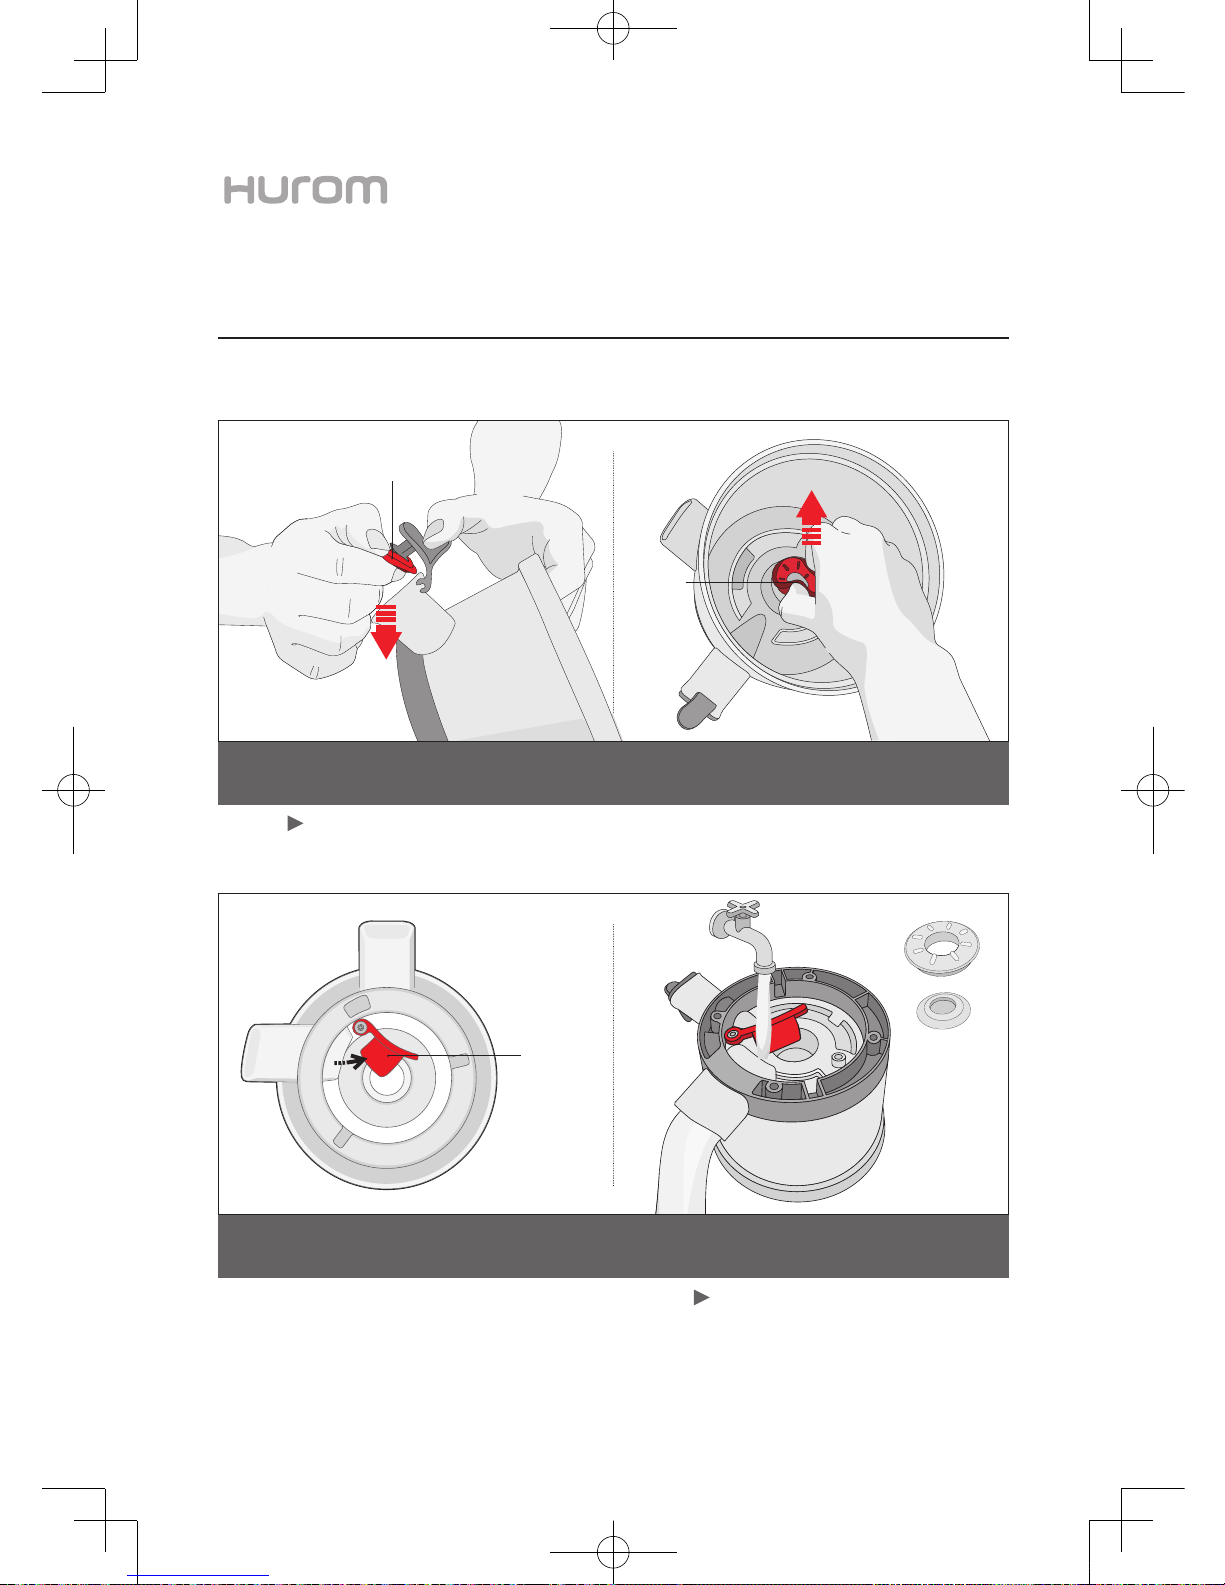
DISASSEMBLING AND CLEANING THE CHAMBER
Open juice cap first. Hold the chamber and juice cap with one hand and peel off the juice cap seal with the other hand.
Remove the chamber seal by pinching and twisting it off with fingers.
Wash the chamber and the seals with cleaning brush
under the running water.
16 l
1
Remove the juice cap seal and the chamber seal.
2
Open the extraction seal at the bottom
of the Chamber.
3
Wash the chamber and both seals.
Juice cap
seal
chamber
seal
Extraction
Seal
4PJ12242_V.01.indd 20 2013-07-12 오후 4:51:29
Page 21
www.hurom.com l 17
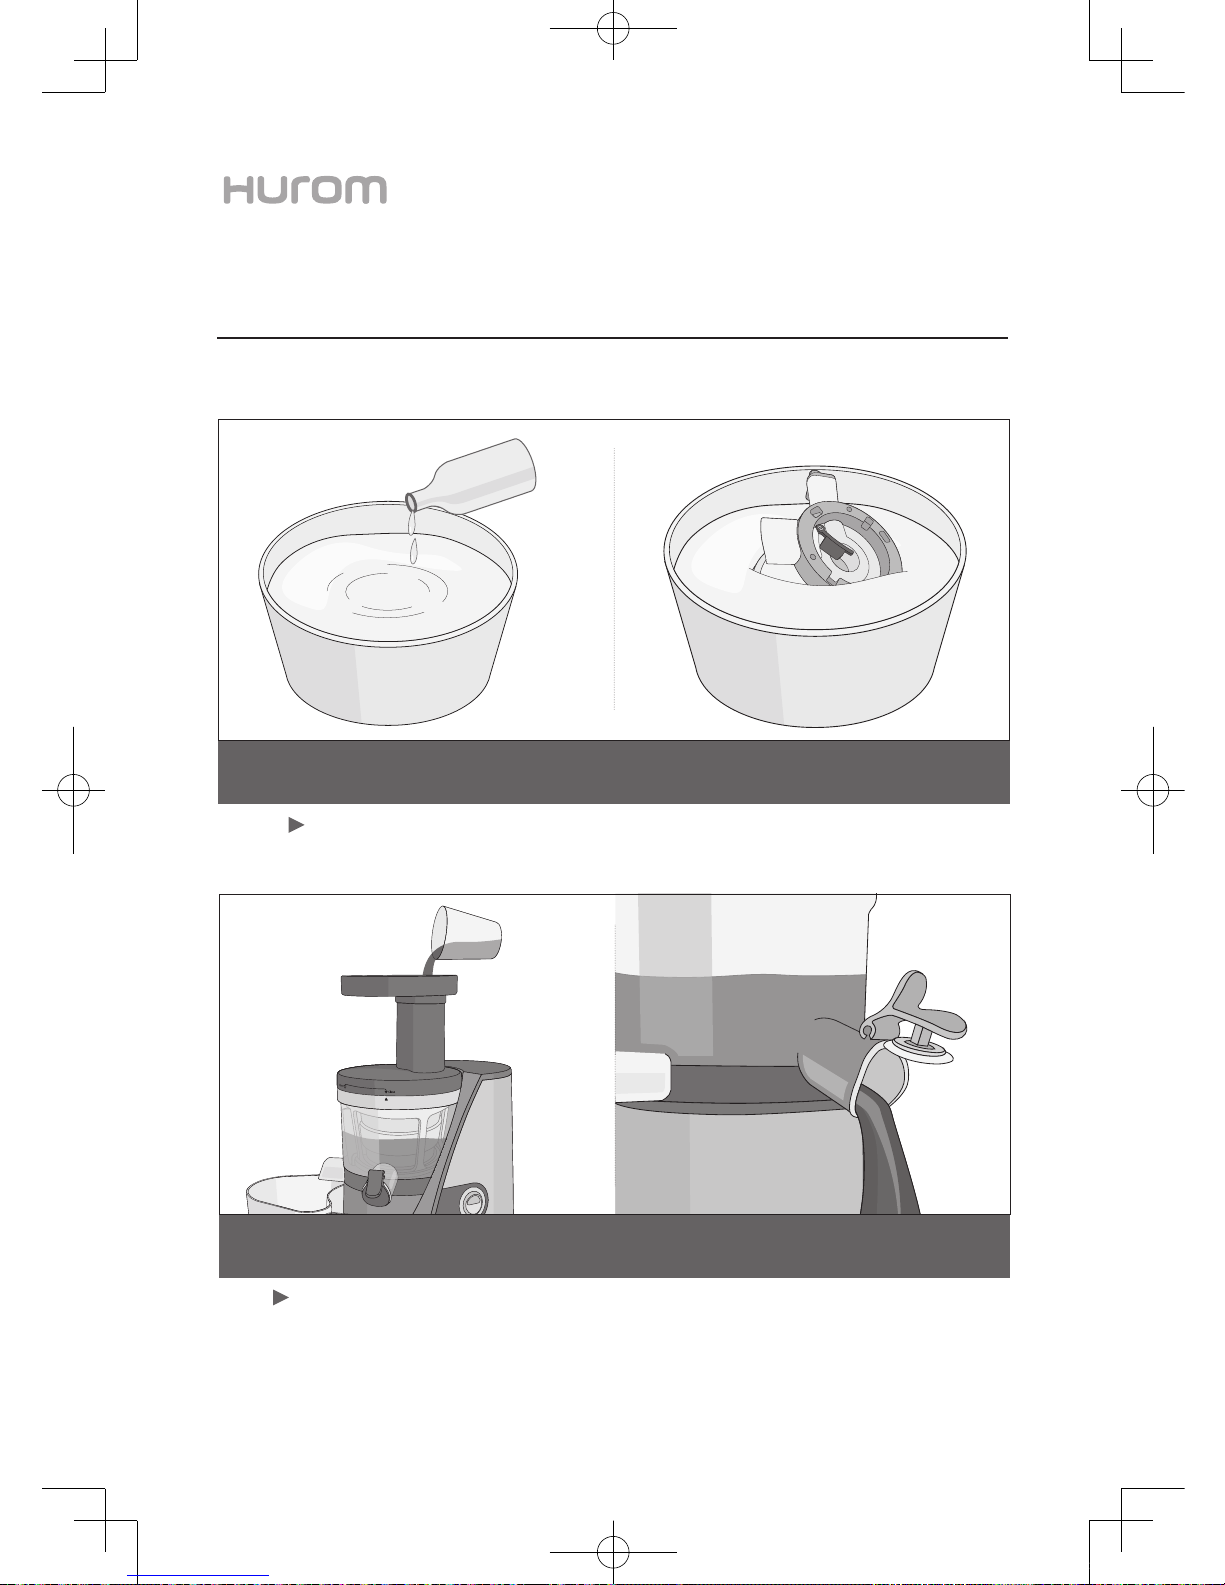
STERILIZATION AND EASY CLEANING SYSTEM
Sterilize all washable parts by immersing in a dilute solution of baking soda (about 1~2 teaspoon in 1 quart of water) for
30 minutes.
For sterilization, use baking soda or natural cleaning liquids only.
1
After closing the juice cap, pour water into the
hopper chute and press the [ON] button.
2
After about 15 seconds, turn off the appliance,
open the juice cap and discharge the water.
STERILIZATION
EASY CLEANING SYSTEM
It is not necessary to disassemble and wash the chamber every time between different recipes.
However, always disassemble and wash the chamber set after the last juicing.
4PJ12242_V.01.indd 21 2013-07-12 오후 4:51:30
Page 22
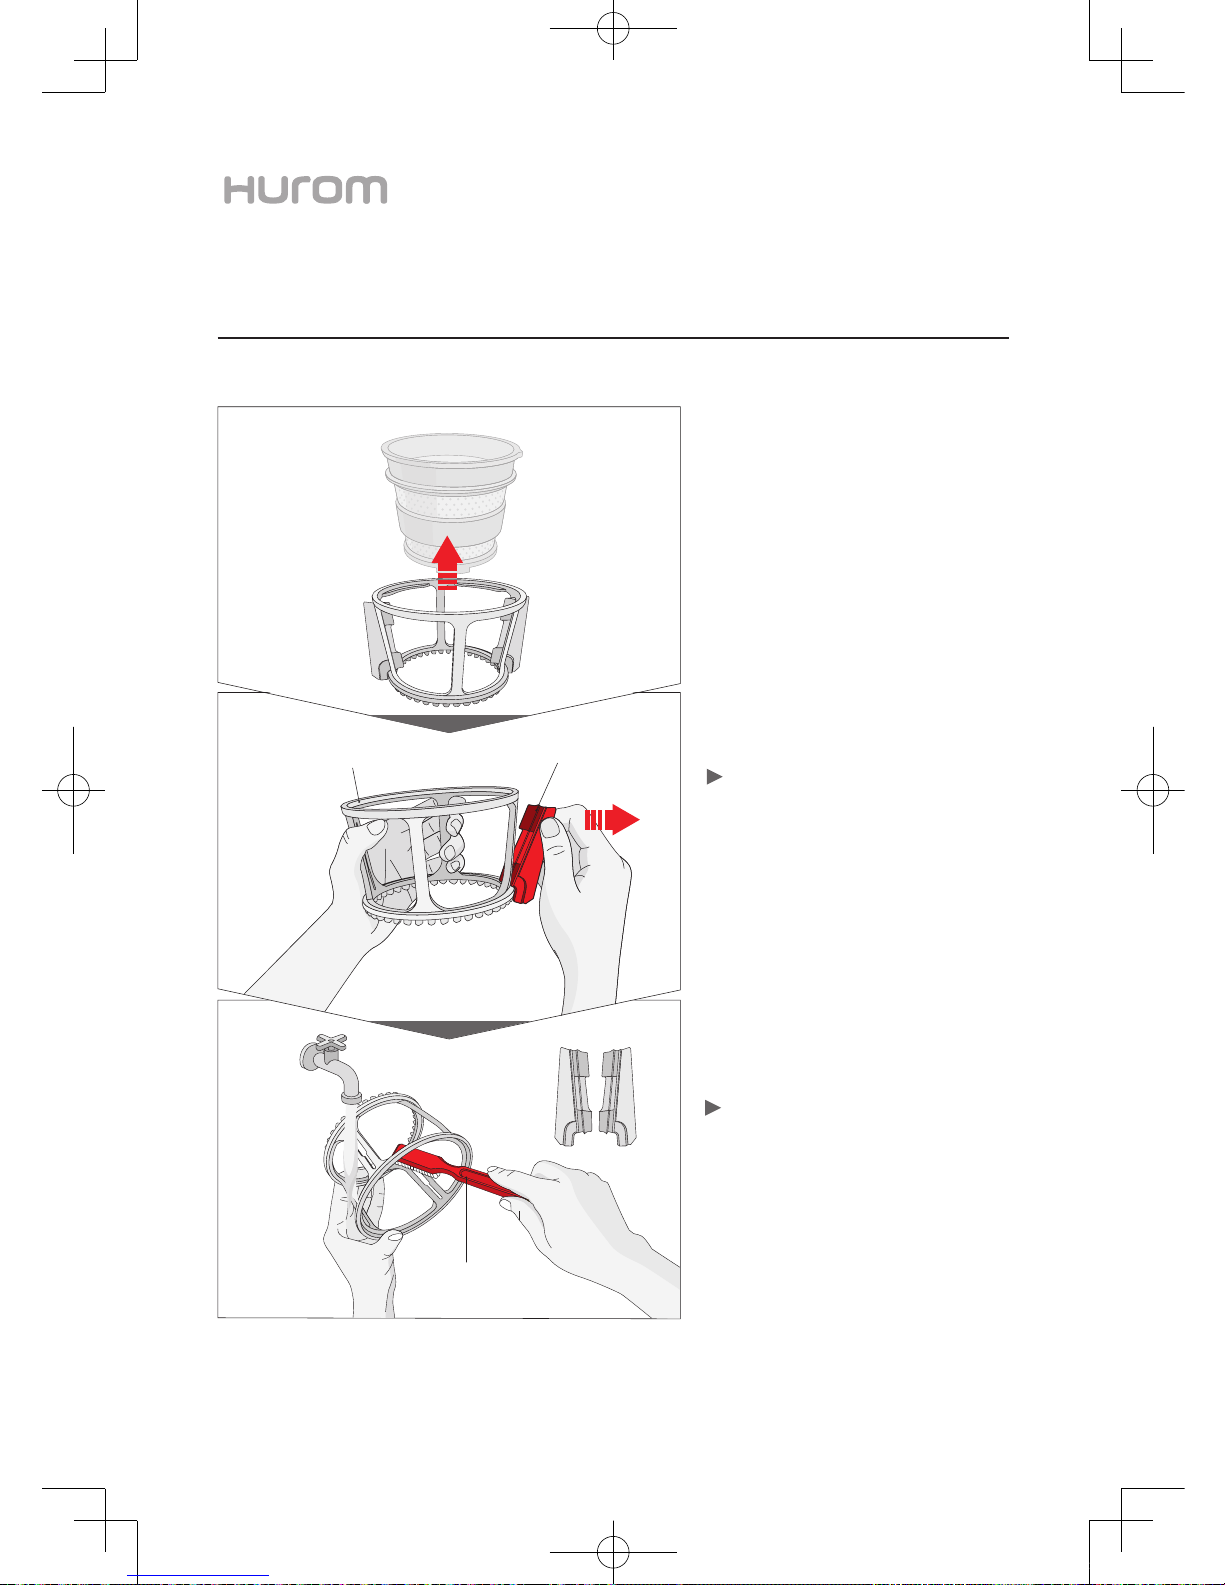
Detach the silicone brush from the spinning brush.
With the cleaning brush, wash inside
and outside of spinning brush under
running water.
As shown in the figure, hold the outer part of silicone
brush and pull it out gently in the direction of the arrow.
Silicone brush may be torn or damaged if it is pulled
apart forcefully.
Clean the silicone brush in the same way under running water.
Remove the spinning brush from strainer.
3
DISASSEMBLING AND CLEANING THE SPINNING BRUSH
2
1
18 l
Silicone brush
Cleaning brush
Spinning brush
4PJ12242_V.01.indd 22 2013-07-12 오후 4:51:30
Page 23
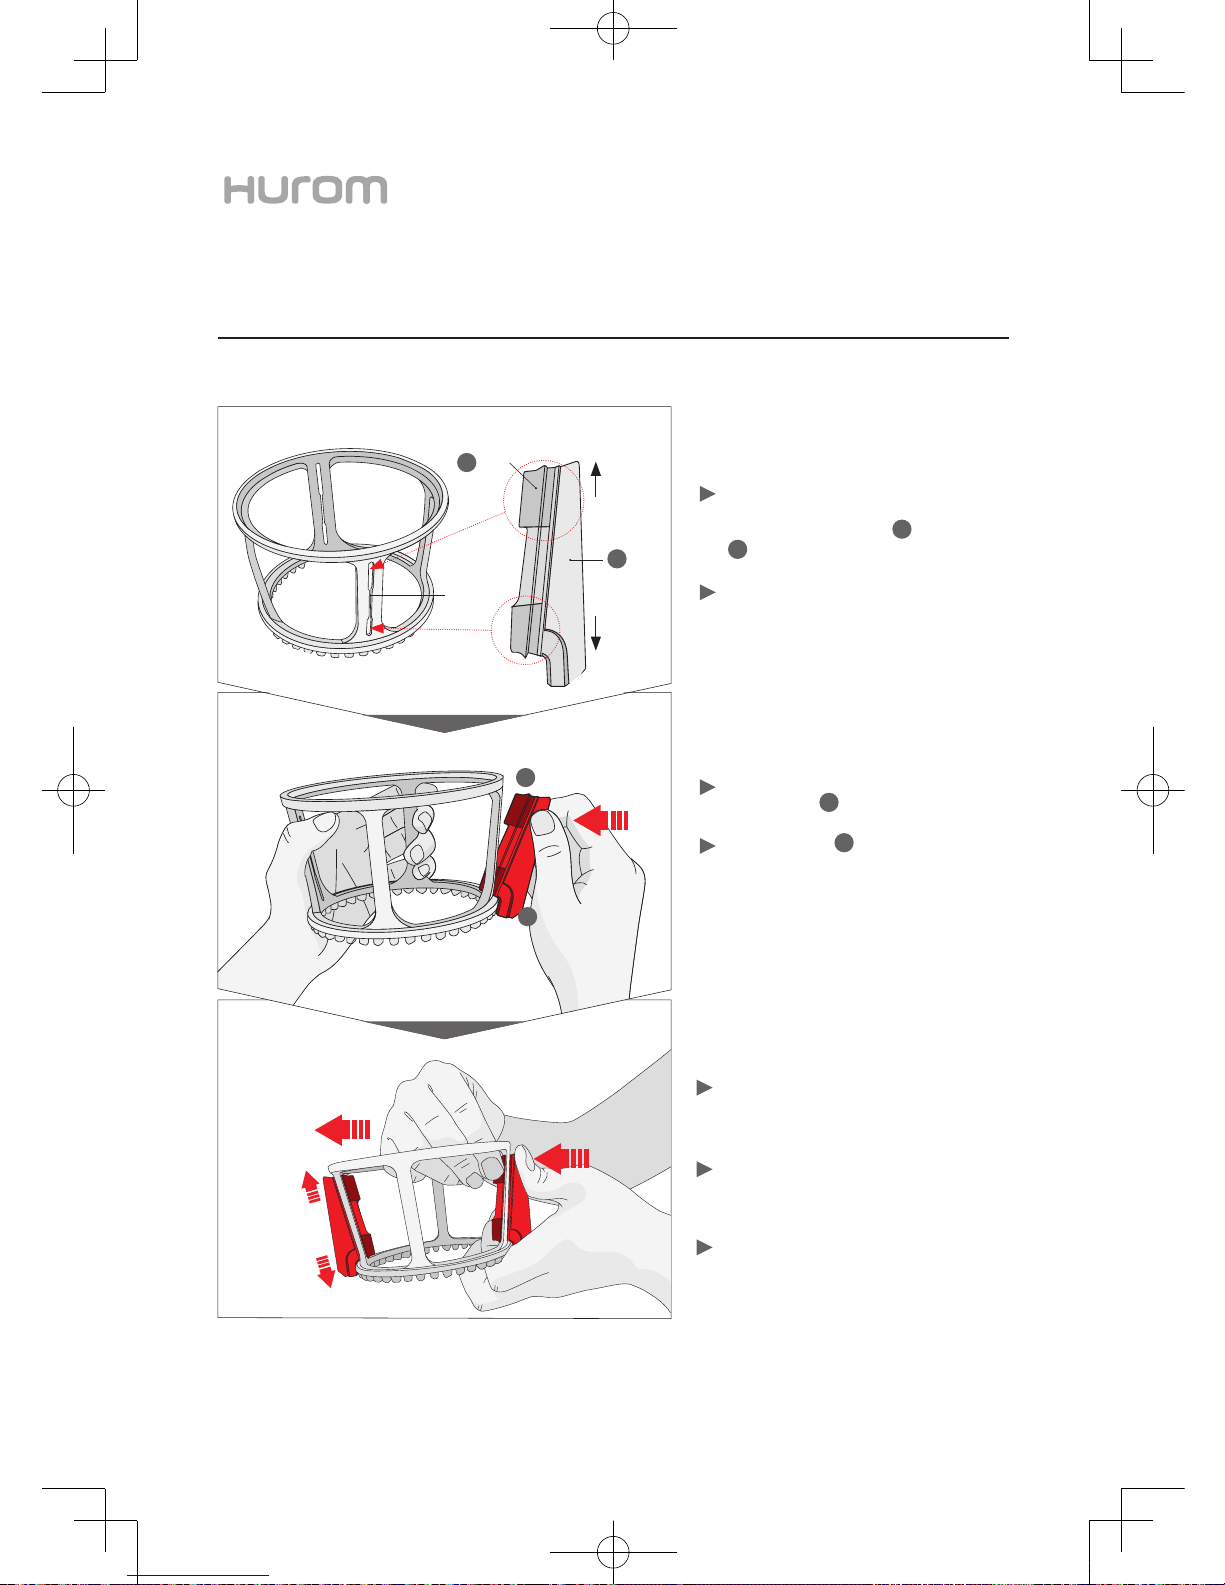
Insert the silicone brush into the spinning brush.
Hold the wing so the longer part of inner wing face
upward (see Step 1 above).
Hold the outer wing 2 of silicone brush with your
thumb and index finger and insert the inner wing into
the groove of spinning brush.
Check the groove of the spinning brush
and the direction of silicone brush.
There are grooves to insert silicone brush in the spinning brush.
Silicone brush has inner wing 1 and outer wing
2
.
As shown in the figure on left, position the silicone
brush so the ‘inner wing’ faces the spinning brush.
Pull the inner wing tightly into the spinning brush.
Push the silicone brush in from the outside and pull
the inner wing into the spinning brush with the other
hand. (See figure)
Pull the silicone brush tightly into the groove on the
spinning brush. The unit may be damaged if it is operated without being properly and fully assembled.
Make sure the silicone brush is placed firmly into the
groove by holding the top and bottom part of the
outer wing and pulling it up and down in opposite
directions.
www.hurom.com l 19
ASSEMBLING THE SPINNING BRUSH
3
2
1
Brush
groove
Inner
wing
Outer wing
1
2
1
2
SPINNING BRUSH SILICONE BRUSH
Top
(longer)
Bottom
(shorter)
4PJ12242_V.01.indd 23 2013-07-12 오후 4:51:31
Page 24
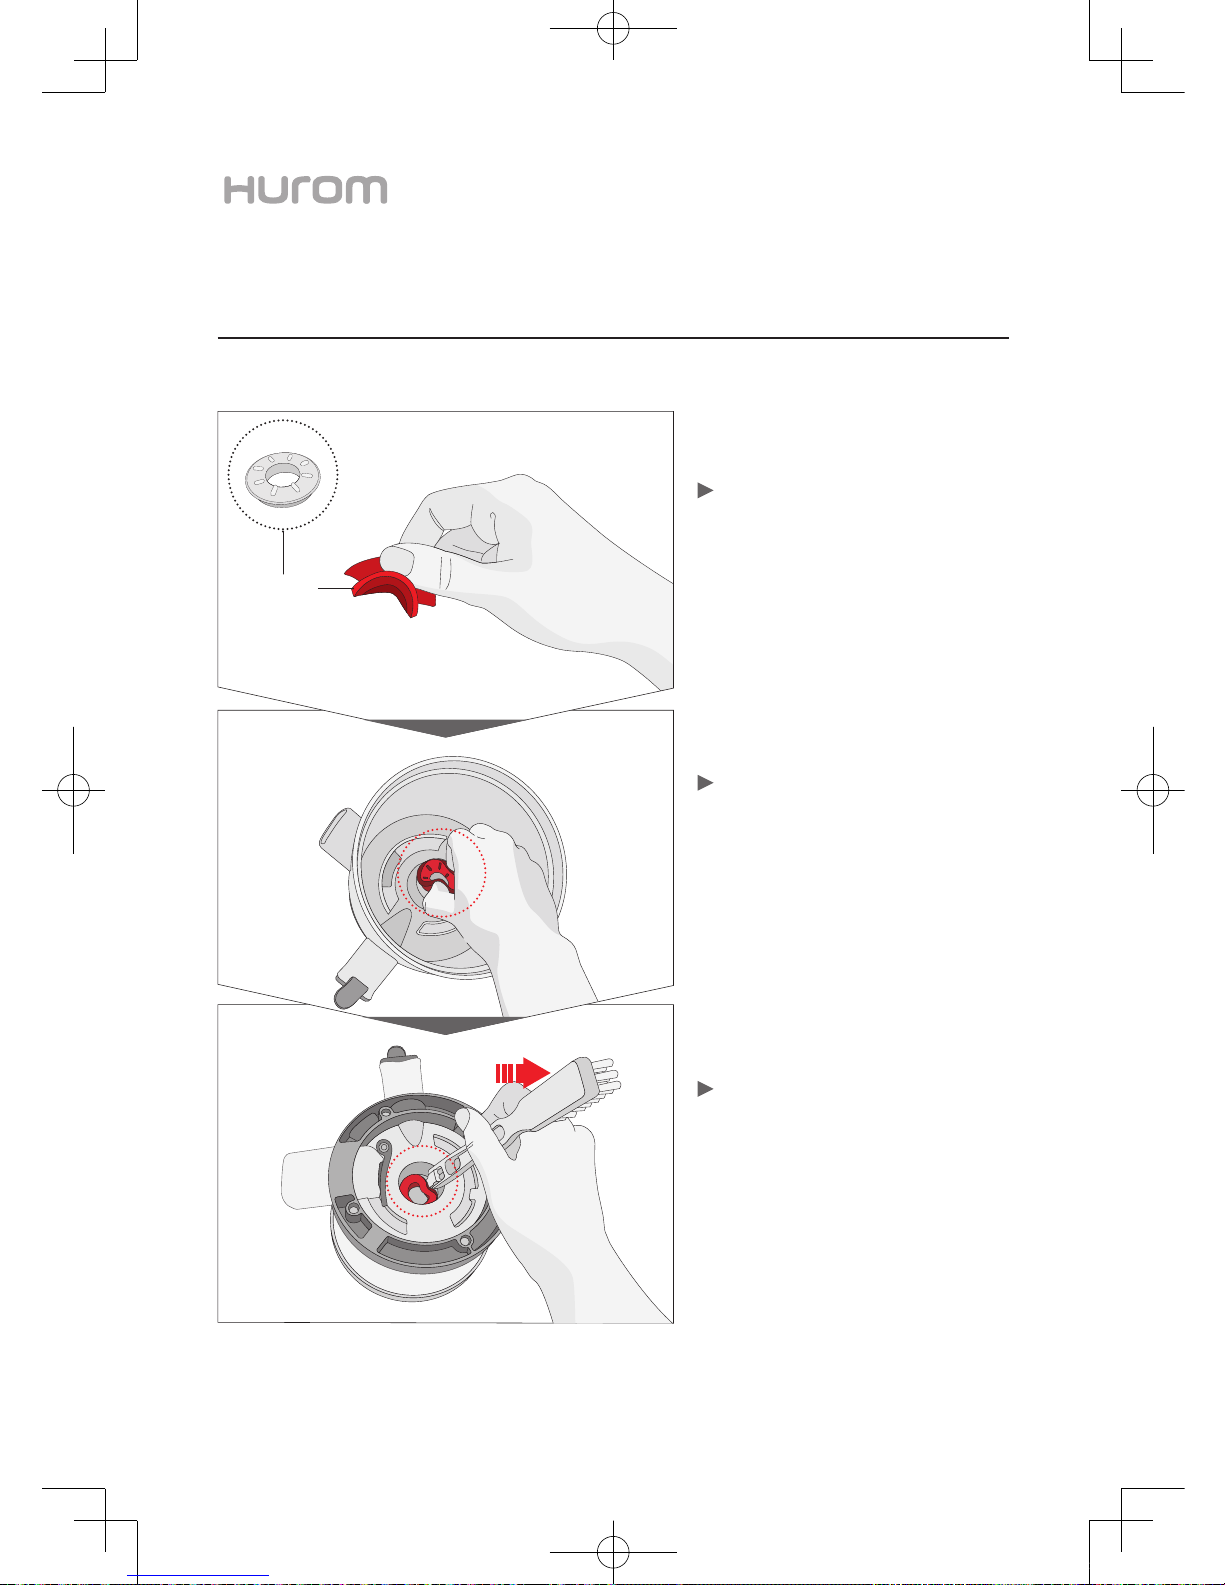
ASSEMBLING THE CHAMBER SEAL
Insert the chamber seal into the chamber hole.
Turn over the chamber and settle the
chamber seal into place.
Insert the bottom of the chamber seal into the chamber hole and press it down fully. Do not insert the
entire chamber seal. The upper part of the chamber
seal must stay above the chamber hole.
If the chamber seal at the bottom of the chamber is
not fully installed, set it into place properly with the
rotating pick on the end of the cleaning brush.
Hold the chamber seal by pinching it
between the thumb and index finger.
As shown to the left in the dotted circle, let the protruding part on the chamber seal face upward when
you hold it by pinching it between the thumb and
index finger.
20 l
Chamber seal
3
2
1
4PJ12242_V.01.indd 24 2013-07-12 오후 4:51:31
Page 25
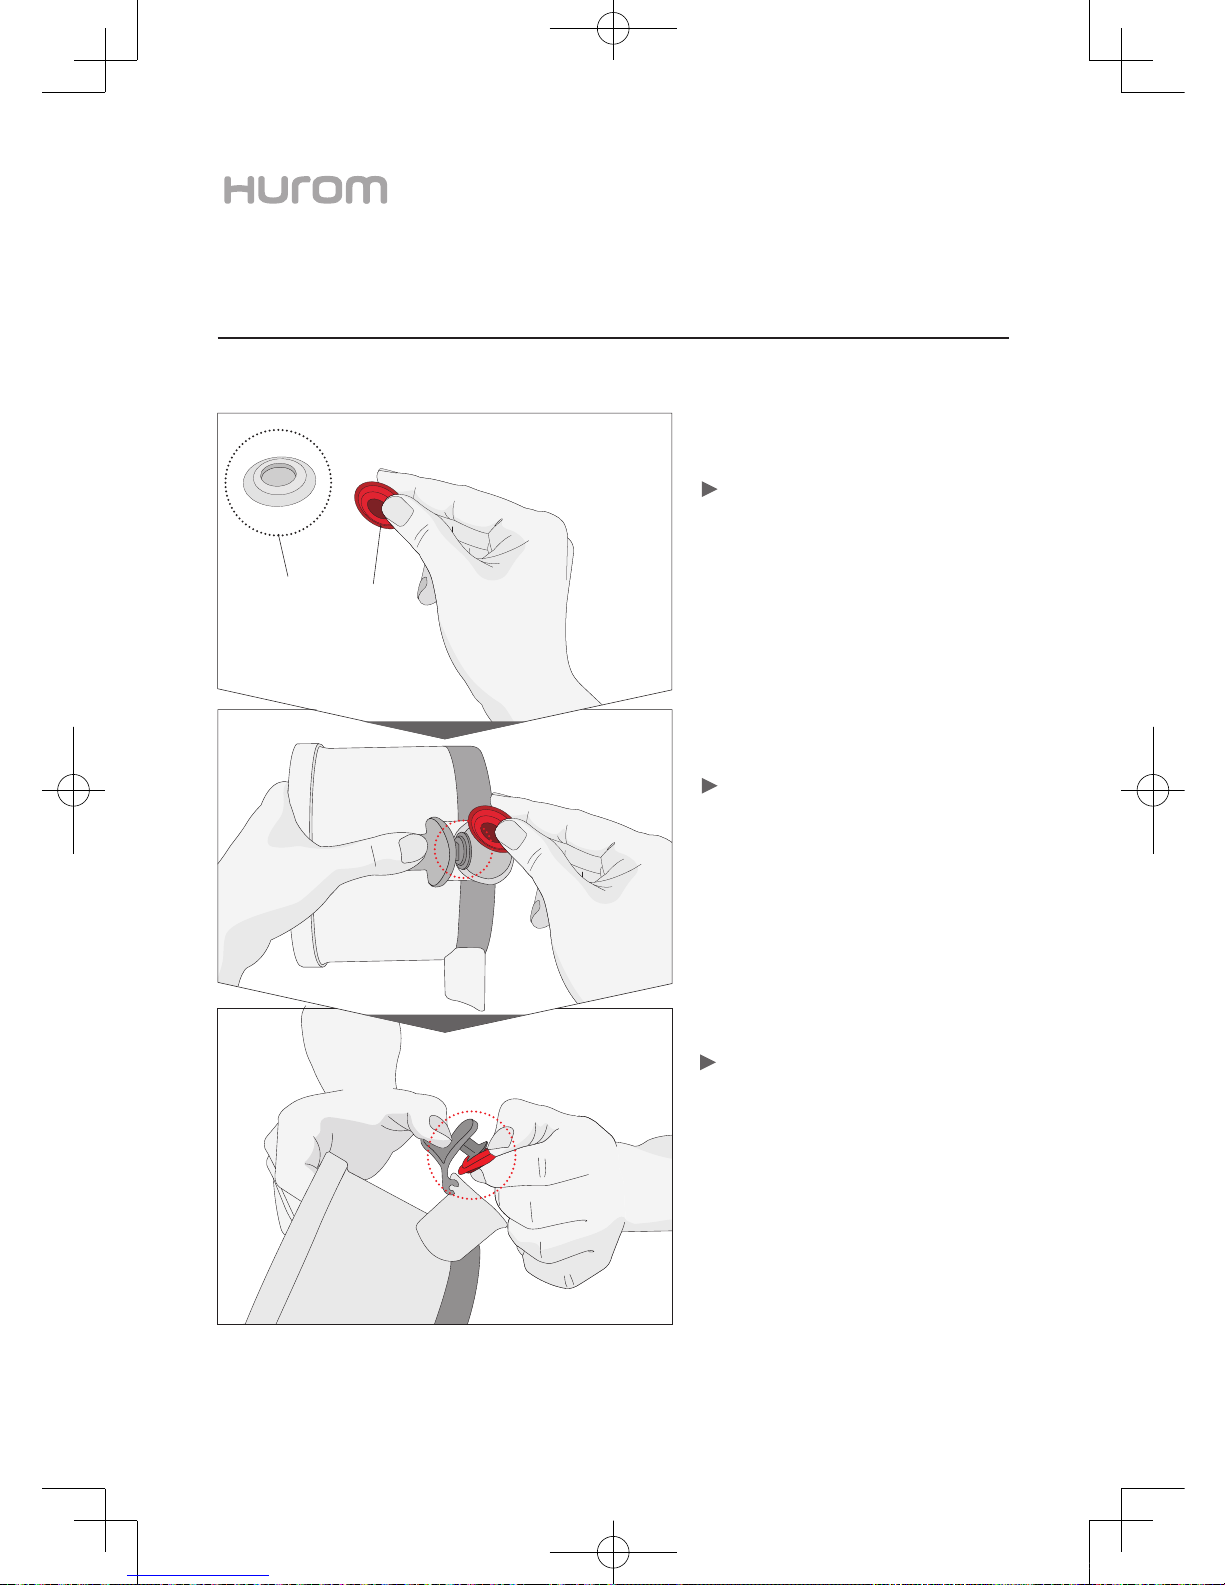
Open the juice cap and fit the juice cap
seal on to the inner disk.
Arrange the seal for a complete fit.
Be careful not to drop the chamber.
If the seal is not placed correctly, it may cause juice
leakage.
Hold juice cap seal as shown on the
left.
As shown on the left in the dotted circle, the opening
on the seal must be visible when you hold the seal.
www.hurom.com l 21
ASSEMBLING THE JUICE CAP SEAL
Juice cap seal
3
2
1
4PJ12242_V.01.indd 25 2013-07-12 오후 4:51:31
Page 26

Please check the details below before contacting Technical Support for repair or service.
If you need additional information, please contact the local Customer Care Center or visit www.hurom.com.
When applying for after-sales service, please have the manufacturer’s serial number or bar code available.
THE APPLIANCE DOES NOT WORK.
Make sure the power cord is properly plugged in.
Check if the hopper is assembled properly. If the hopper has not been locked into place, the appliance will not operate for safety reasons.
Check if the appliance has been assembled according to the directions given in the manual.
Refer to the assembling instructions in the manual or consult with a local Customer Care Center for additional assistance.
THE HOPPER DOES NOT OPEN.
Is there lot of pulp left inside the chamber? Press [ON] button to expel excess pulp.
Have you placed any foreign substances or solid objects such as hard seeds in the juicer?
Press the [Reverse/REV] button to bring the foreign objects back up toward the hopper chute.
DO NOT attempt to open the hopper by force. If the issue is not resolved after following the above process, contact the local Customer
Care Center.
THE APPLIANCE STOPS DURING NORMAL OPERATION.
Have you put in heavy loads or large pieces of ingredients into the appliance?
Read page 12 of the manual and follow the guideline for using [Reverse/REV] button.
If the issue is not resolved after following the above process, contact the local Customer Care Center.
THERE ARE FINE LINES OR SCRATCH MARKS ON THE PRODUCT.
These are molding marks resulting from the normal manufacturing process. This is a normal product and there is no problem for use.
WHAT IS THE DIFFERENCE BETWEEN FINE STRAINER AND COARSE STRAINER?
Use the fine strainer with smaller holes for clearer, less pulpy juice.
Use the coarse strainer with bigger holes for thicker, more pulpy juice.
Refer to page 3 of the manual for selection of suitable ingredients for each strainer.
JUICE LEAKS OVER THE BASE.
Is extraction seal inserted properly?
Juice could leak out when the extraction seal is loose or has not been inserted properly. Push the extraction seal all the way for a tight seal.
Juice is still leaking even with the extraction seal inserted correctly.
Overloading may be the problem. If the chamber is overloaded with ingredients, the extraction seal may be pushed out of position, allowing the juice to leak
out through the gap. Always juice small, manageable amount of ingredients at a time and avoid processing heavy loads.
THE CHAMBER SHAKES DURING OPERATION.
Slight shaking may be caused by the motor.
Depending on the texture of the ingredient, there may be slight to more pronounced shaking of the appliance.
There is some level of shaking when the auger is rotating. This is a normal occurrence and not a malfunction.
Hard ingredients (e.g. carrot, potato, radish, beet, etc.) may cause more shaking than soft ingredients.
TROUBLESHOOTING
22 l
4PJ12242_V.01.indd 26 2013-07-12 오후 4:51:31
Page 27
www.hurom.com l 23
SPECIFICATIONS
APPLIANCE SPECIFICATIONS
PRODUCT NAME
MODEL NAME
RATED VOLTAGE
RATED FREQUENCY
RATED POWER
CONSUMPTION
RPM (REVOLUTIONS
PER MINUTE)
CORD LENGTH
MOTOR
FUSE
WEIGHT
OUTWARD
DIMENSIONS
RATED
OPERATING HOUR
Hurom Slow Juicer
HJ Series
120 V
60 Hz
150 W
80 rpm
1.4 m이이
Single-phase induction motor
250 V 8 A
6.35 kg (14 lb)
Width 173 mm
Length 243 mm
Height 398 mm
Less than 30 minutes
4PJ12242_V.01.indd 27 2013-07-12 오후 4:51:31
Page 28
Product name
Important: To better protect your purchase, fill out and mail this form to a local distributor where you purchased the appliance and keep the original receipt.
This certifies that the Hurom Slow juicer is covered under warranty by to be free from defects in material
construction and workmanship.
provides warranty for ten (10) years for the motor and two (2) years for other parts from the date of
purchase by the original purchaser. Coverage is valid only with proof of purchase from an Authorized Local Distributor.
(No international warranty available)
This warranty does not apply to damages cause by accident, misuse, abuse, commercial use, alteration, failure to follow operating instructions, or damage caused by parts or service unauthorized by . Damages cause by
transportation must be claimed with carrier.
disclaims all responsibilities for consequential damages from incidental losses caused by use of this appliance. For service and assistance with technical difficulty, please contact local customer care center.
Manufacturer :
Hurom webpage : www.hurom.com
Manufacture’s
serial number
Supplier
Address
Model name
Date of purchase
Customer name
WARRANTY
24 l
4PJ12242_V.01.indd 28 2013-07-12 오후 4:51:31
Page 29

www.hurom.com l 25
MEMO
4PJ12242_V.01.indd 29 2013-07-12 오후 4:51:32
Page 30

MEMO
26 l
4PJ12242_V.01.indd 30 2013-07-12 오후 4:51:32
Page 31

www.hurom.com l 27
MEMO
4PJ12242_V.01.indd 31 2013-07-12 오후 4:51:32
Page 32

www.hurom.com
Copyright© All Rights Reserved by HUROM
2 4PJ12242_V.01
4PJ12242_V.01.indd 32 2013-07-12 오후 4:51:32
 Loading...