

Page 1

HUR SmartTouch Hi5
installation instruction
V.1 20.12.2018 APPLIES TO HI5 APP VERSION 1.0.1.4
Page 2

Table of Contents
1 Quick guide for the installation ....................................................................................... 2
1.1 Quick guide for installation with Tosibox router .................................................................... 2
1.2 Quick guide for installation without Tosibox router .............................................................. 2
2 Attaching the display to the lever arm ............................................................................ 3
2.1 Tools needed ....................................................................................................................... 3
2.2 Right display to the right machine ..................................................................................... 3
2.3 Attaching the Display Unit ................................................................................................. 4
3 Panel configuration/Settings .......................................................................................... 5
3.1 Access to the settings view ................................................................................................... 5
3.2 Basic settings ...................................................................................................................... 6
3.2.1 Wi-Fi Settings ................................................................................................................................... 7
3.2.2 Machine details ................................................................................................................................. 7
3.2.3 Time and Date Settings ................................................................................................................... 7
3.2.4 Language settings ............................................................................................................................. 7
3.3 Factory setup ...................................................................................................................... 7
Page 3

1 Quick guide for the installation
1.1 Quick guide for installation with Tosibox router
This is the quick guide how to install the HUR SmartTouch Hi5 machines by using the Tosibox router
which is prepared in HUR factory, please read the whole document in order to learn more about the
steps of the quick guide.
Router
1. Setup the router by connecting the power cable and ethernet cable (WAN-port)
2. Press the power button on Tosibox router
HUR Machines
3. Attach the panel to the machine
4. Turn on the power
5. Machine should connect to the router automatically
6. Press Setup equipment
7. Exit the settings view by pressing the lock icon
8. Test that the machine counts repetitions
9. Test that machine is connected to the SmartTouch system by showing RFID which have a
training program.
1.2 Quick guide for installation without Tosibox router
This is the quick guide how to install the HUR SmartTouch Hi5 machines, please read the whole
document in order to learn more about the steps of the quick guide.
1. Attach the panel to the machine
2. Turn on the power
3. Select right Wi-Fi network
4. Press Setup equipment
5. Exit the settings view by pressing the lock icon
6. Test that the machine counts repetitions
7. Test that machine is connected to the SmartTouch system by showing RFID which have a
training program.
Page 4

2 Attaching the display to the lever arm
2.1 Tools needed
To attaching the display to the lever arm you need to have 4mm Allen key. In some machines like
Pulley and its variants, you might also need 6mm Allen key. Both tools are delivered with the
machines.
To attach the lever arm to the machine you will need a 6mm Allen key.
2.2 Right display to the right machine
In the normal delivery the panel is always preconfigurated and tested when it leaves from the
HUR factory. Preconfiguration means that the machine details are inserted in to the panel.
Machine details contains username and password. These credentials need to match with server
username and password. Credentials are delivered to the person who is responsible of the
installation.
Every Hi5 Panel carton contains the name of the machine, before installing please check that all
the machines have the named cartons and the cartons are intact.
Page 5
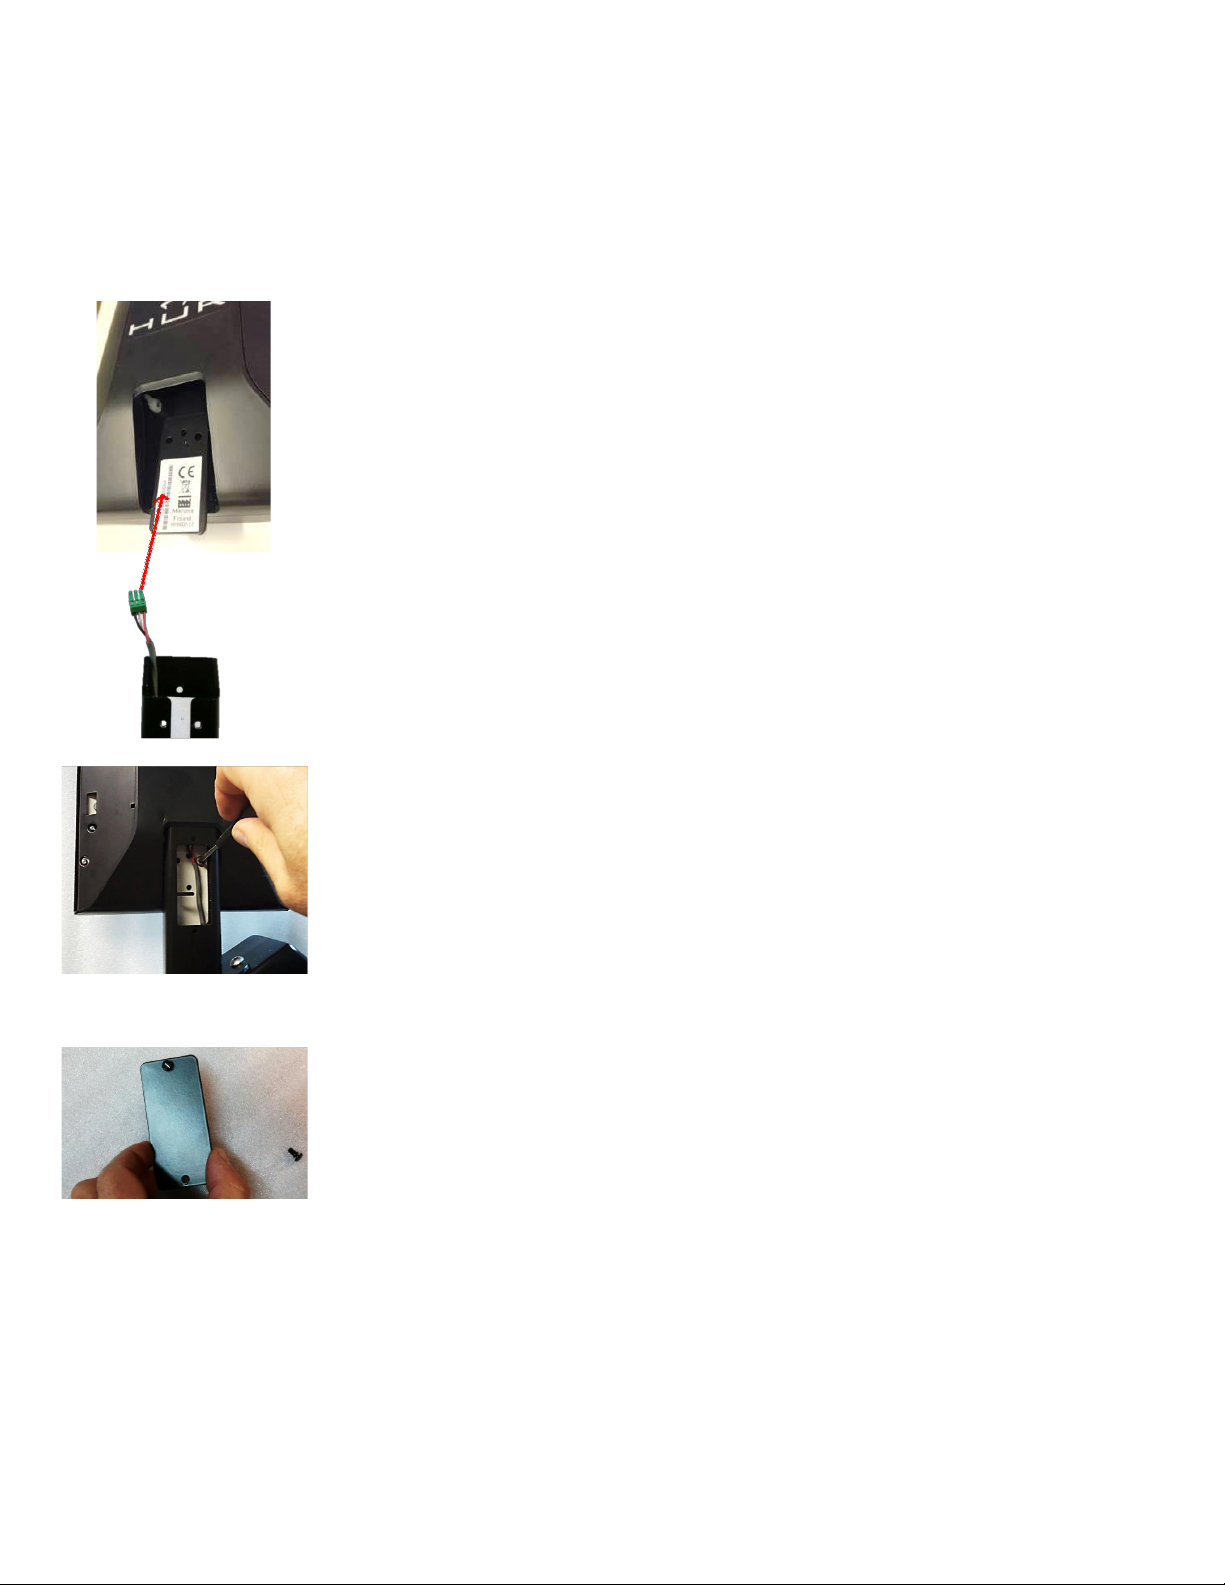
2.3 Attaching the Display Unit
1.Make sure that the machine is switched off.
2.Insert the 3-pole plug into Display Unit’s terminal
3.Insert the Display unit to the Display arm.
4. Before tightening the two screws you can test that the 3-pole plug is
connected correctly to the terminal by switching the machine on. If the
Panel does not activate in 15 seconds please check, that the 3-pole plug is
connected properly.
5. Check that the cord from the 3-pole plug can move freely and ensure
that cable is not stucked between mounting surfaces
6. Tighten the two screws with 4mm Allen key
7. Insert the cover plate with two pins
Page 6
3 Panel configuration/Settings
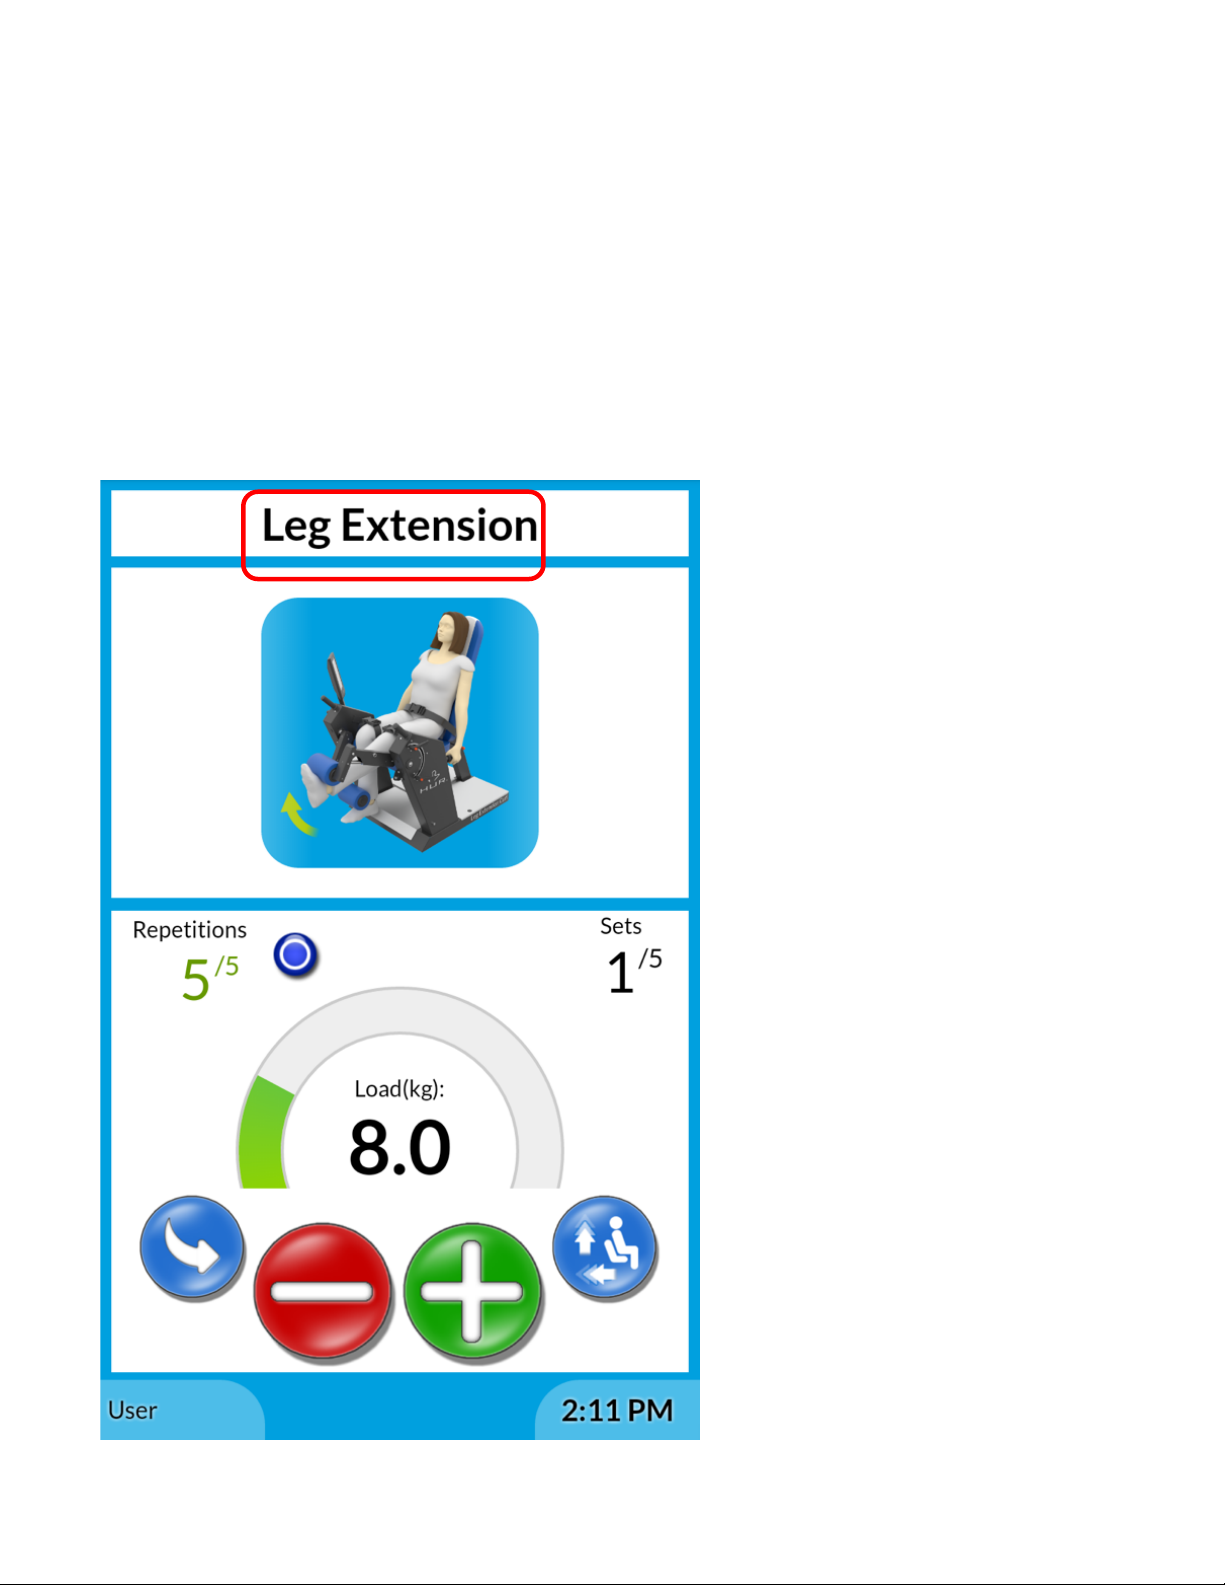
Tap five times in 3 seconds
3.1 Access to the settings view
Access to the settings by tapping 5 times to the activity name. After tapping five times the
machine releases pressure and shows the basic settings menu.
NOTE! When the machine is turned on first time it opens the settings view automatically.
Page 7
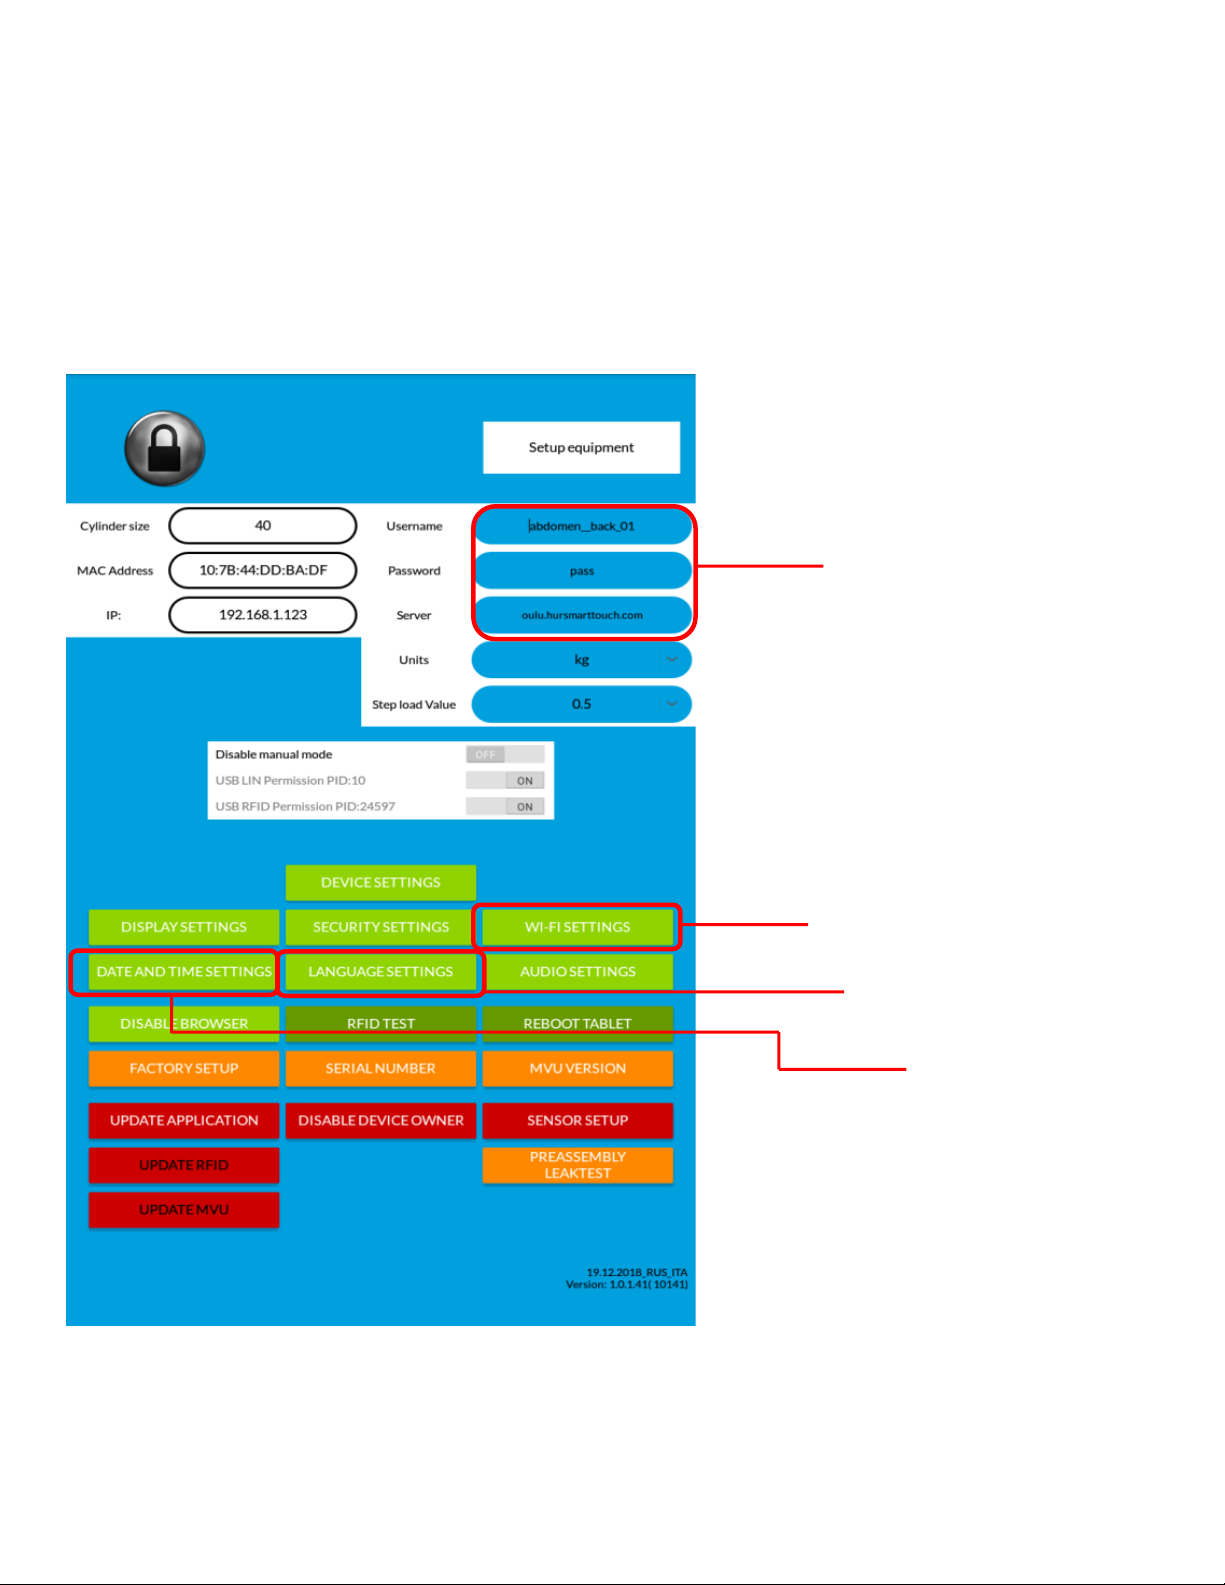
3.2 Basic settings
1.Wifi settings
2.Machine details
3. Language settings
4. Date and time settings
From the basic settings view you can change the machine details and access other settting menus. The
important settings are listed here.
Page 8

3.2.1 Wi-Fi Settings
In order to create connection between the machine and HUR SmartTouch system you need to
have Wi-Fi connection to the server. Access the Wi-Fi settings by pressing the button (1.)
Choose the right Wi-Fi network and insert the password.
3.2.2 Machine details
Machine details (2.) contains machine name and and password. These details are normally inserted
during the configuration already at HUR factory. Machine names and passwords are always delivered to
the person responsible of the installation.
3.2.3 Time and Date Settings
Under the Time and Date Setting you can change the Time Zone and how the date is displayed. You can
also use automatic time setting.
3.2.4 Language settings
You can change the panel’s language from this menu, if the language that you chose is supported by Hi5
system it will also change the language displayed in Hi5. Please note that every user can have own
language which is set in the SmartTouch system.
3.3 Factory setup
Factory setup is performed only when the machine requires you to do it. Press the factory setup button
and follow the instructions.
 Loading...