

Page 1
Bedienungsanleitung
Operating instructions
Mode d’emploi
Bedieningsvoorschrift
Istruzioni di esercizio
Manual de instrucciones
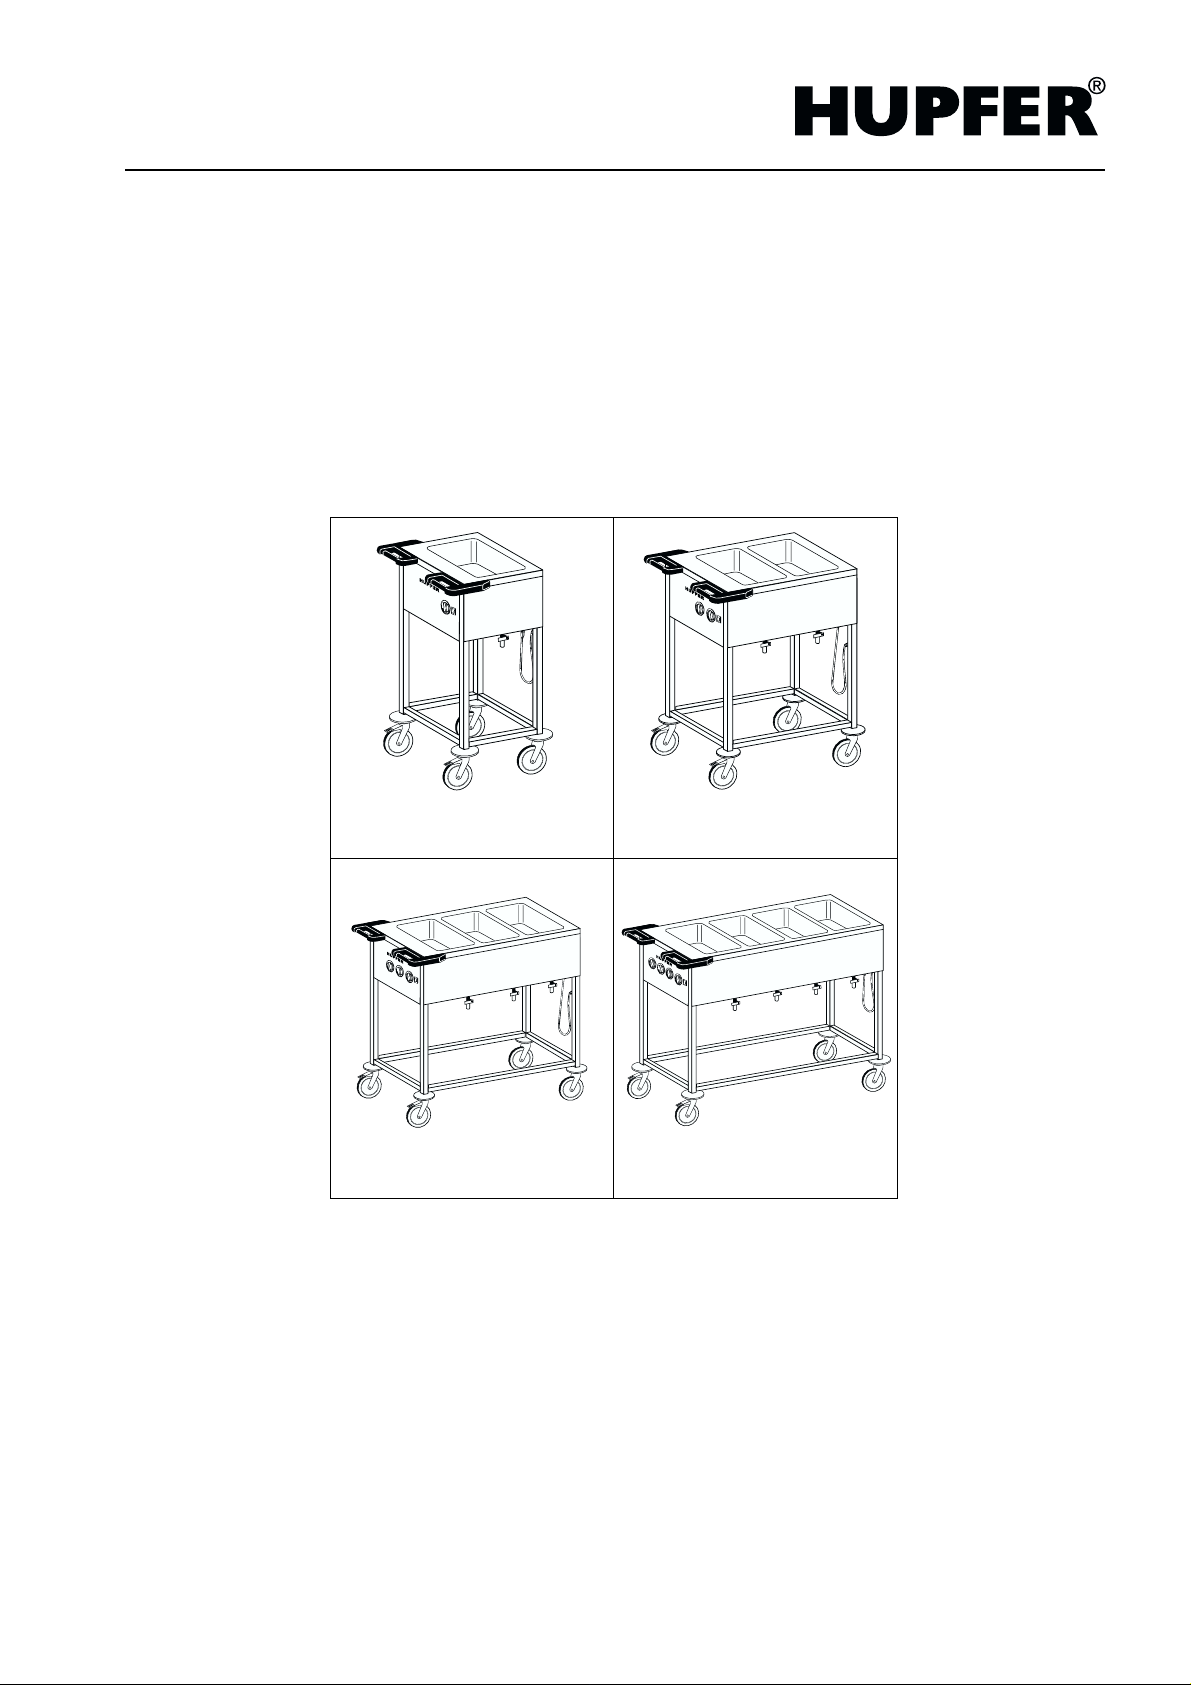
SPA/EB-1 SPA/EB-2
SPA/EB-3 SPA/EB-4
Speisenausgabewagen
Food serving trolley
Chariot de présentation des mets
Uitschepwagens
Carrelli erogatori di vivande
Carro baño maría
43.3000.2 - B91 Technische Änderungen vorbehalten
Page 2

2
Page 3

Speisenausgabewagen
Inhaltsverzeichnis (DE, AT, CH, LI)
Allgemeine Hinweise. . . . . . . . . . . . . . . . . . . . . . . . . . . . . 4
Geräteverwendung . . . . . . . . . . . . . . . . . . . . . . . . . . . . . . 4
Benutzerhinweise . . . . . . . . . . . . . . . . . . . . . . . . . . . . . . . 4
Typenschild . . . . . . . . . . . . . . . . . . . . . . . . . . . . . . . . . . . . 4
Geräteansicht . . . . . . . . . . . . . . . . . . . . . . . . . . . . . . . . . . 5
Sicherheitshinweise . . . . . . . . . . . . . . . . . . . . . . . . . . . . . 6
Bedienung . . . . . . . . . . . . . . . . . . . . . . . . . . . . . . . . . . . . . 8
Inbetriebnahme . . . . . . . . . . . . . . . . . . . . . . . . . . . . . . . . . . . . 8
Becken füllen
Gerät einschalten
Benutzung des Gerätes . . . . . . . . . . . . . . . . . . . . . . . . . . . . . . 9
GN-Behälter einsetzen
Transport
Außerbetriebnahme . . . . . . . . . . . . . . . . . . . . . . . . . . . . . . . . . 9
Gerät ausschalten
Wasser ablassen
Sonderzubehör . . . . . . . . . . . . . . . . . . . . . . . . . . . . . . . . 10
Klappborde
Bodenborde
Ablaufverlängerung
Reinigung und Pflege . . . . . . . . . . . . . . . . . . . . . . . . . . . 11
Wissenswertes über „Edelstahl rostfrei“
Allgemeine Arbeitsgrundsätze für die Behandlung von
Geräten aus „Edelstahl rostfrei“
Hilfe bei Störungen . . . . . . . . . . . . . . . . . . . . . . . . . . . . . 12
Technische Daten . . . . . . . . . . . . . . . . . . . . . . . . . . . . . . 13
Ersatzteile . . . . . . . . . . . . . . . . . . . . . . . . . . . . . . . . . . . . 14
CE-Konformitätserklärung . . . . . . . . . . . . . . . . . . . . . . . .78
List of Contents (UK, IE) 15
Table des matières (FR, BE, CH) 27
Inhoud (NL, BE) 39
Indice (IT, CH) 51
Índice (ES) 63
CE-Konformitätserklärung 78
43.3000.2 3
Page 4
Allgemeine Hinweise
Änderungsvorbehalt
Die Produkte zu dieser Bedienungsanleitung wurden unter Berücksichtigung
der Markterfordernisse und des Standes der Technik entwickelt. HUPFER
behält sich das Recht vor, Änderungen an den Produkten sowie an der
dazugehörigen technischen Dokumentation vorzunehmen, sofern sie dem
technischen Fortschritt dienen. Ausschlaggebend sind stets, die in der Auftragsbestätigung als verbindlich zugesicherten Daten und Gewichte sowie
Leistungs- und Funktionsbeschreibung.
Verpackung und Transport
Ihr HUPFER
gereinigt verpackt. Die Verpackung besteht aus recyclingfähigen Materialien
und kann entsprechend entsorgt werden.
Geräteverwendung
Speiseausgabewagen sind elektrisch beheizte, mobile Warmhaltebecken.
Haupteinsatzgebiet ist das Warmhalten und Bereitstellen von Speisen an
Speisenverteilbändern in der Gemeinschaftsverpflegung. Je nach Küchentyp
und -größe werden Geräte mit 1 bis 4 Becken verwendet.
Ein typisches Nebeneinsatzgebiet ist das Event-Catering (Party- und Konferenz-Service) mit Verwendung aller Gerätetypen.
Zusätzlich sind die Geräte zur direkten Speisenausgabe vor dem Gast geeignet, aufgrund der stirnseitigen Bedien- und Anzeigeelemente allerdings für
diesen Zweck nicht optimal ausgerüstet.
Speisenausgabewagen
®
-Produkt wurde einer sorgfältigen Funktionsprüfung unterzogen,
®
Benutzerhinweise
Typenschild
Hinweise:
• Vor dem ersten Gebrauch ist die Schutzfolie von Blechen zu entfernen.
• Aus Sicherheitsgründen ist die maximal erreichbare Wasserbadtemperatur
auf 95 °C begrenzt. Das bedeutet, daß die Leistung eines Speisenausgabewagen nicht mit der Leistung eines stationären Wasserbads zu vergleichen ist.
Lesen Sie diese Bedienungsanleitung vor Erstinbetriebnahme sorgfältig
durch. Sorgen Sie dafür, daß das Bedienpersonal auf Gefahrenquellen und
mögliche Fehlbedienung en hin gewi es en worden ist.
Wichtige Hinweise zur Sicherheit und Schadensverhütung sind in dieser Anleitung durch ein „Achtung“-Symbol gekennzeichnet.
Achtung, Hinweis zur Sicherheit oder Schadensverhütung!
Die so gekennzeichneten Hinweise müssen dem Bedienpersonal zur Kenntnis gebracht werden.
Mit dem „Hand“-Symbol werden nützliche Hinweise und Tipps für den Betrieb
des Gerätes gekennzeichnet.
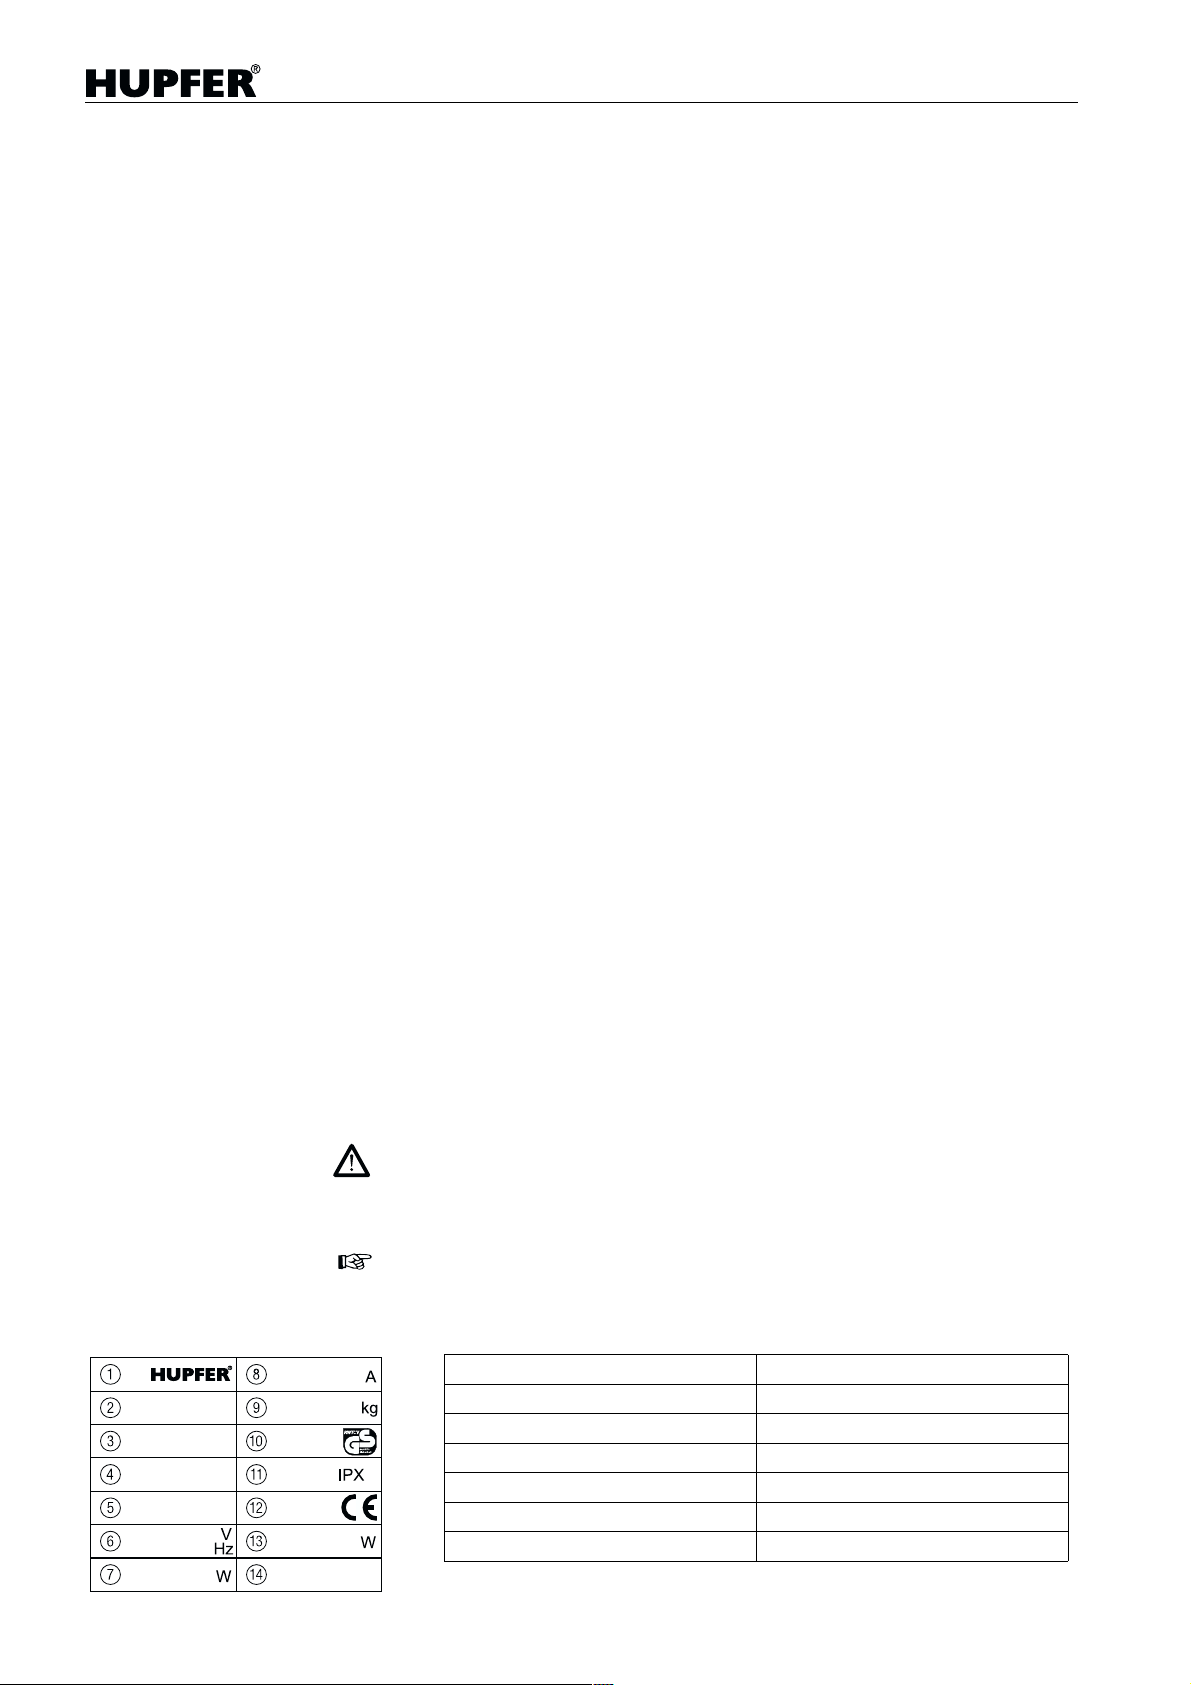
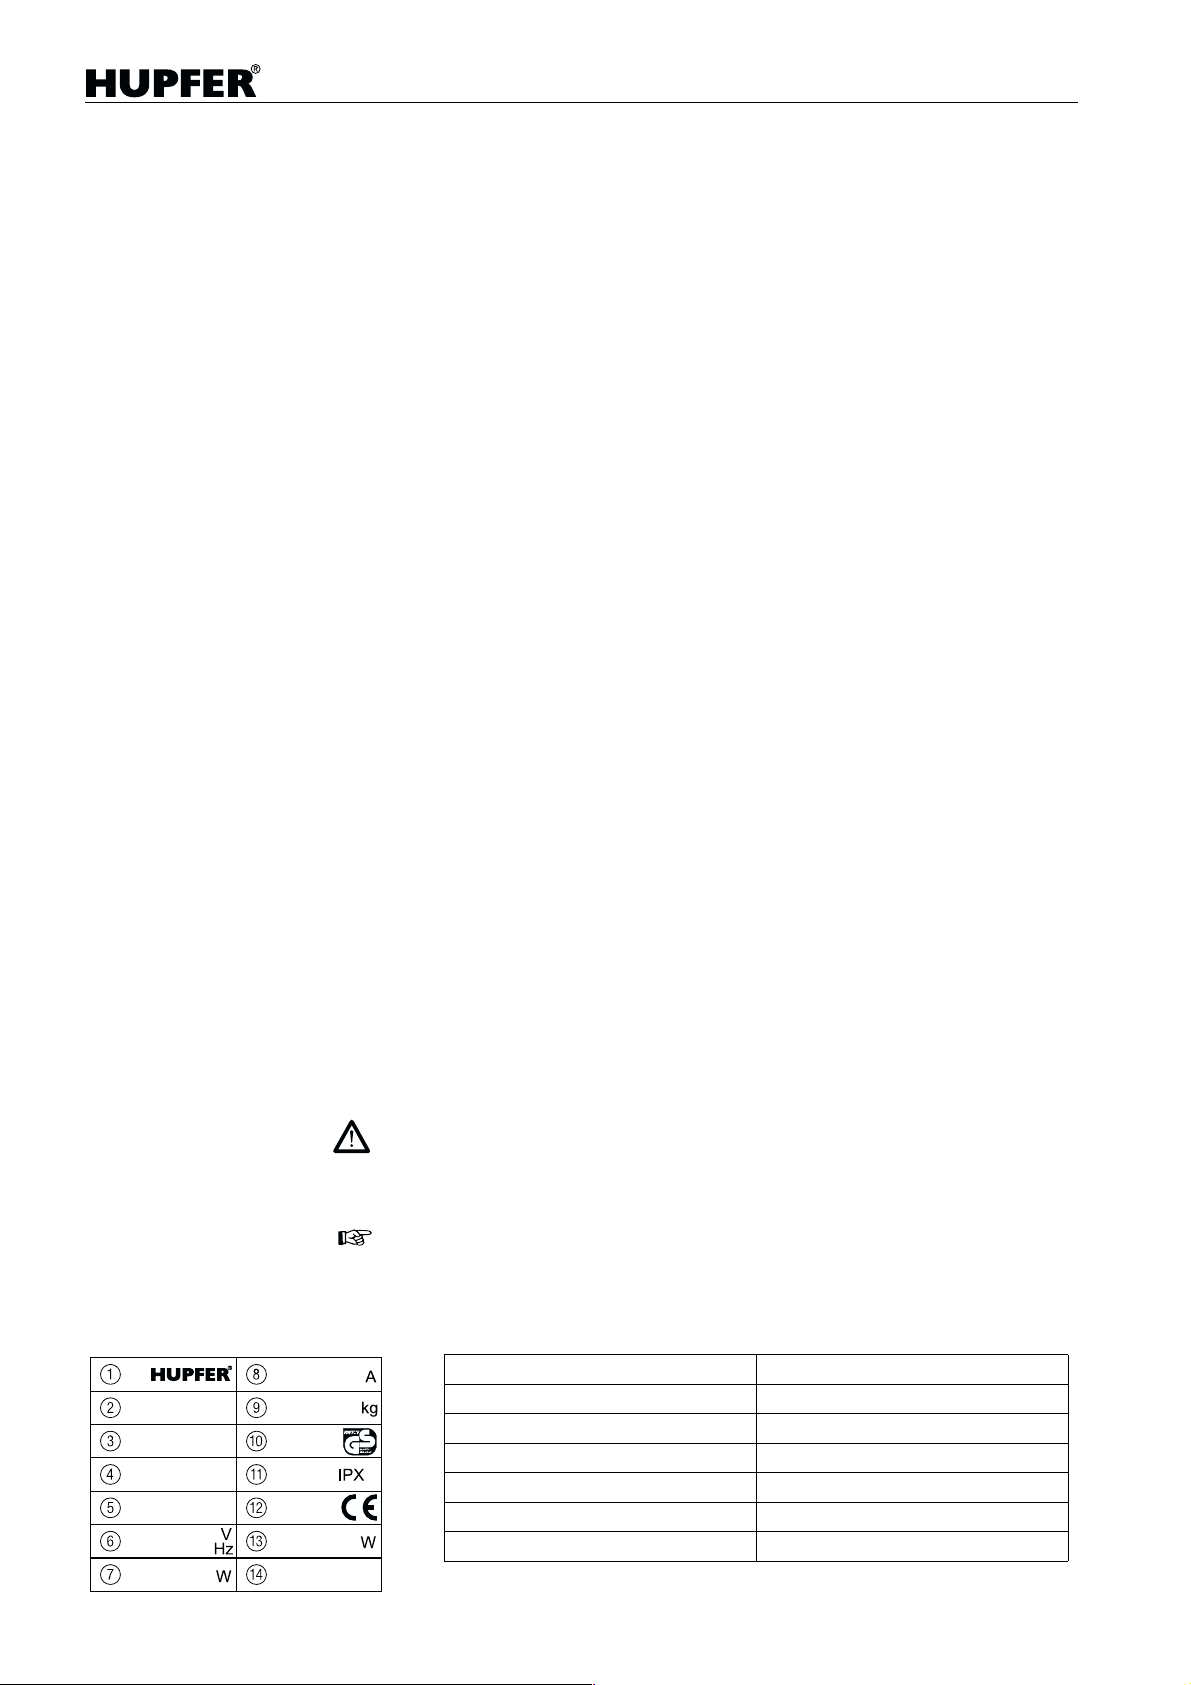
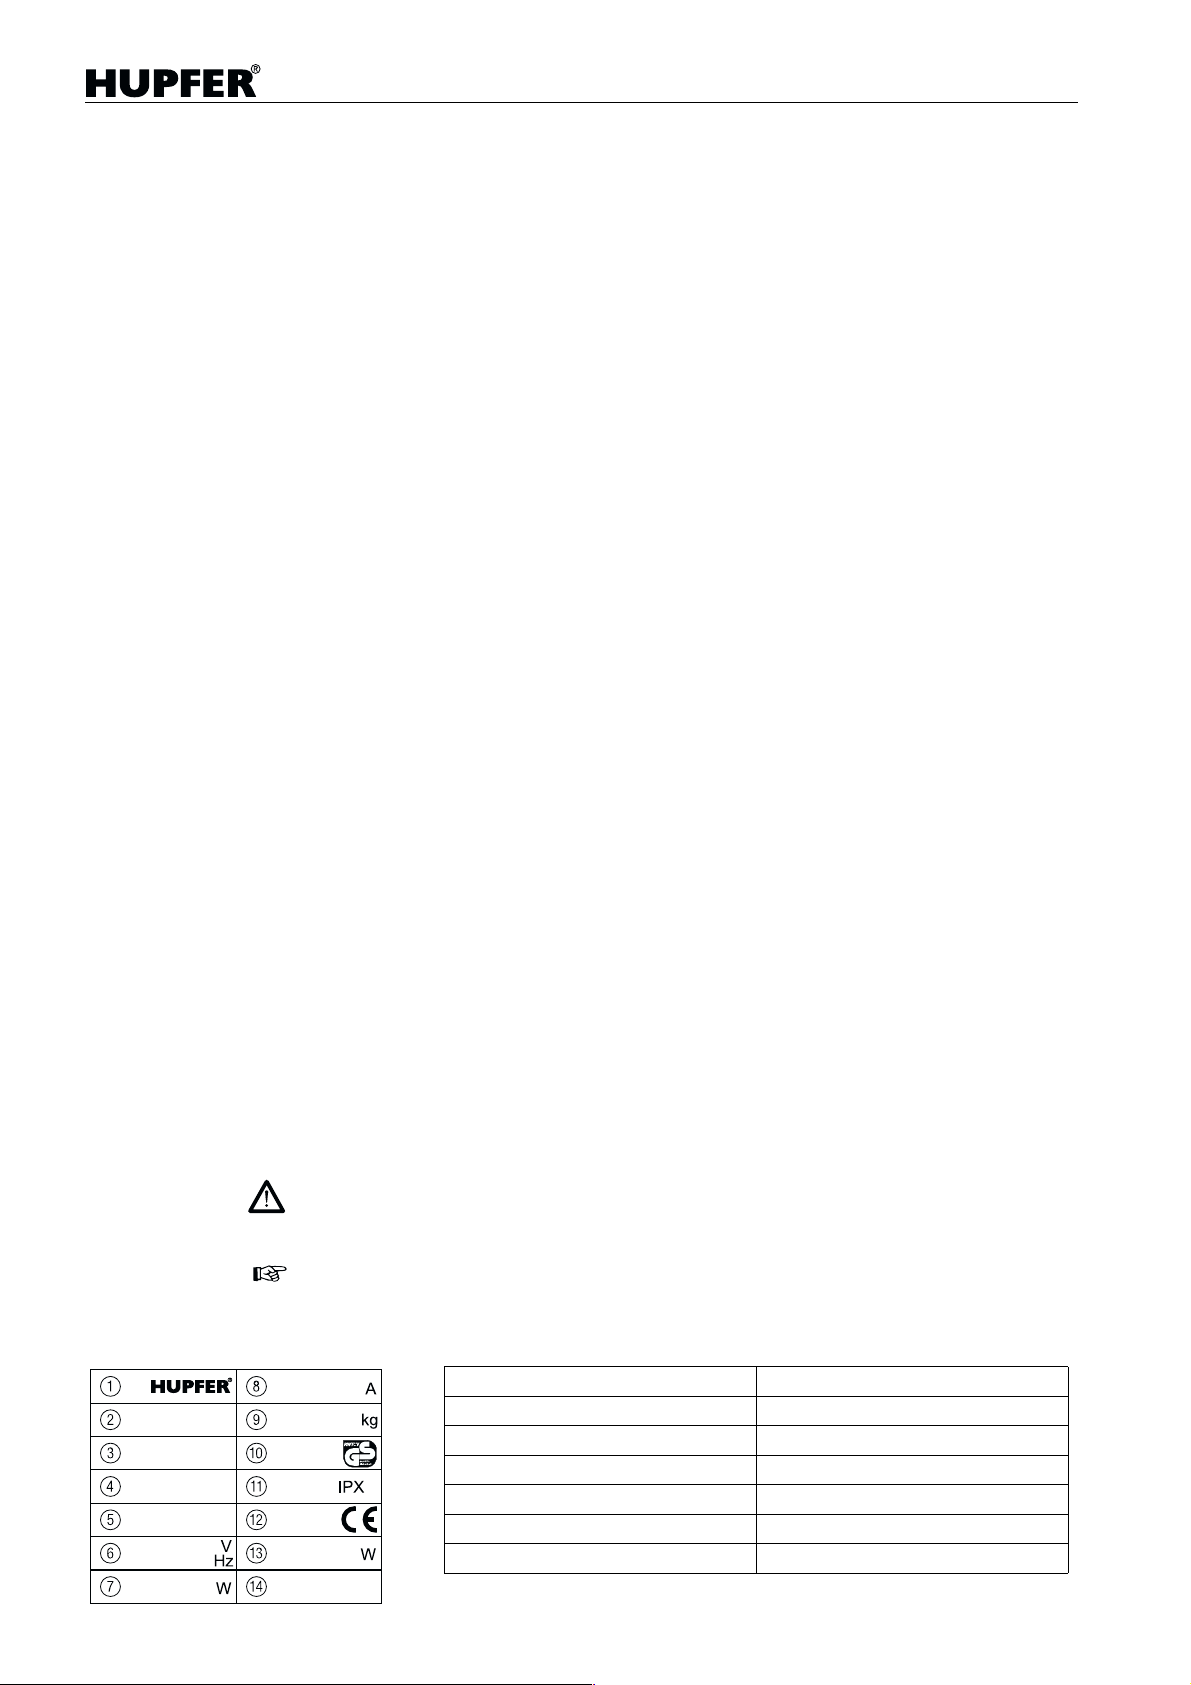
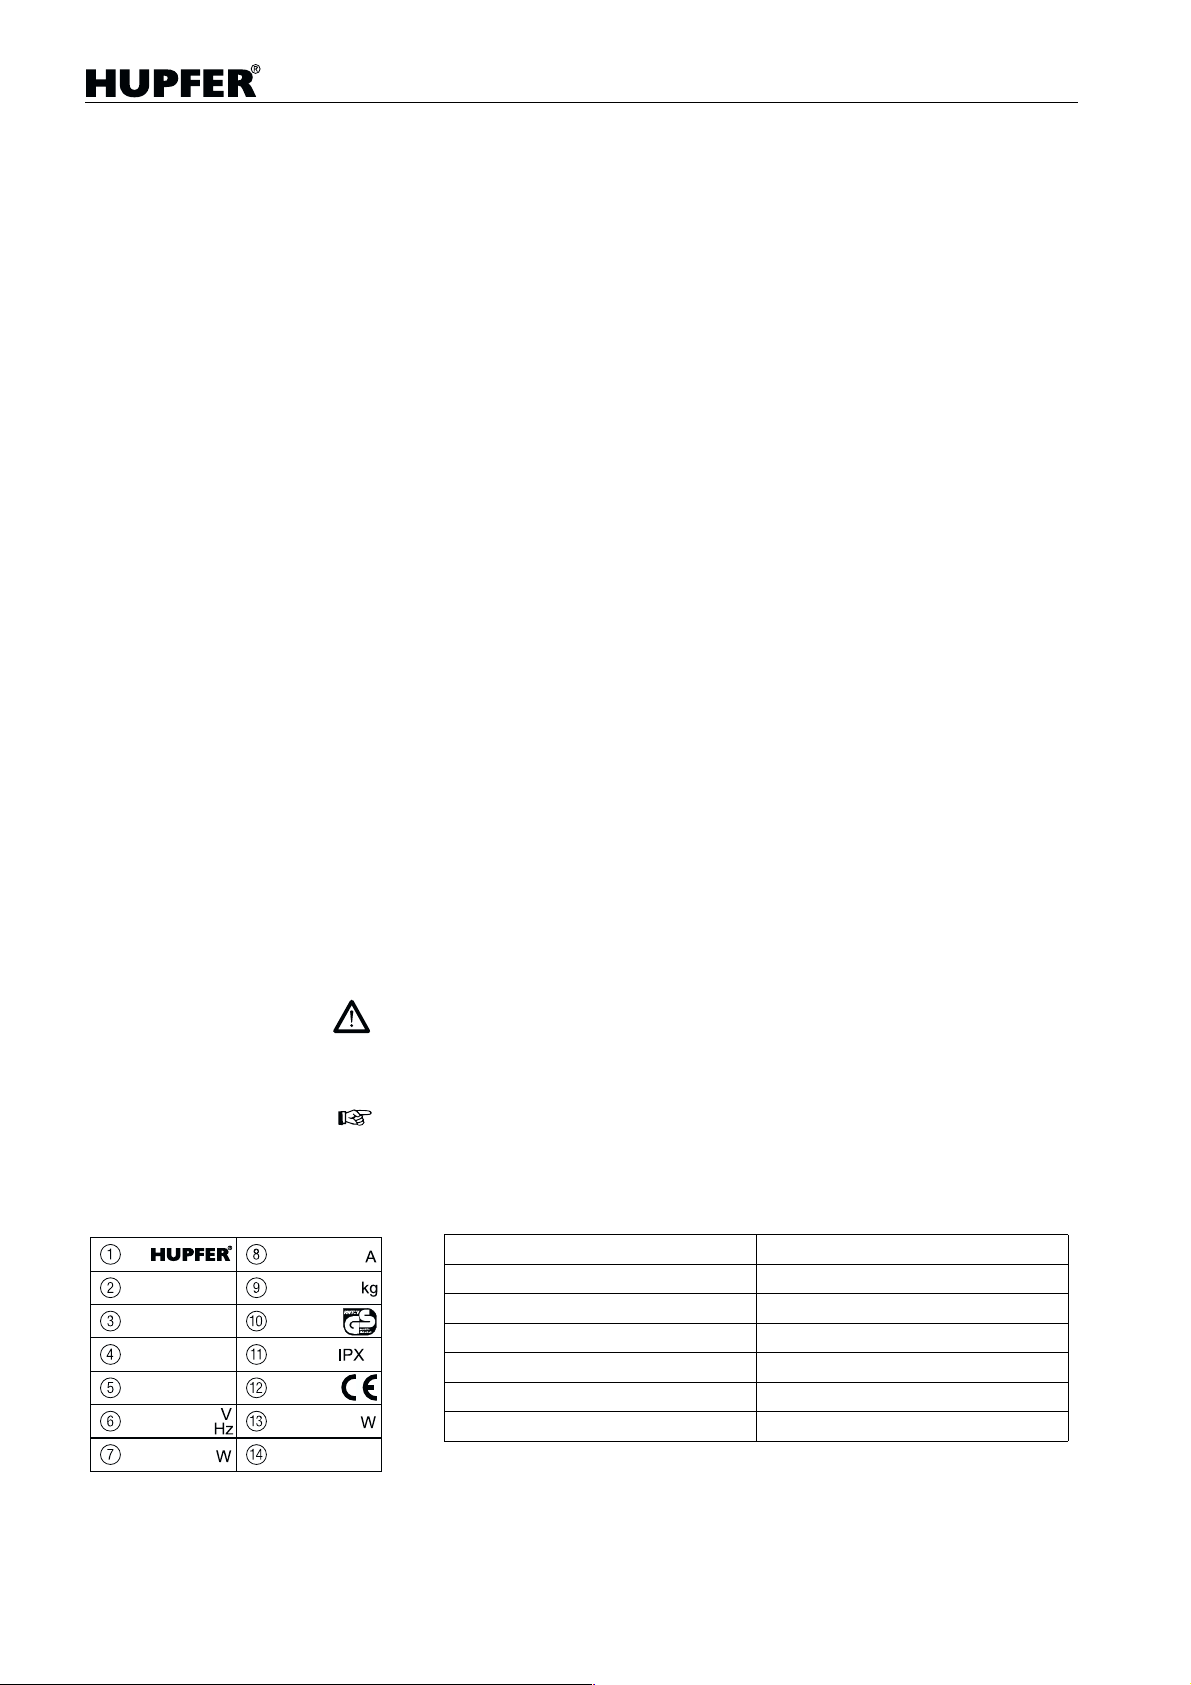
Hersteller Stromaufnahme
Modell * Maximale Zuladung
Artikel-Nr. * ! Prüfzeichen
Auftrags-Nr. * " Schutzart
Serien-Nr. * # Konformitätszeichen
Nennspannung $ Kälteleistung
Anschlußwert % Kältemittel
* Notwendige Angaben im Kundendienstfall
4 43.3000.2
Page 5

Speisenausgabewagen
Geräteansicht
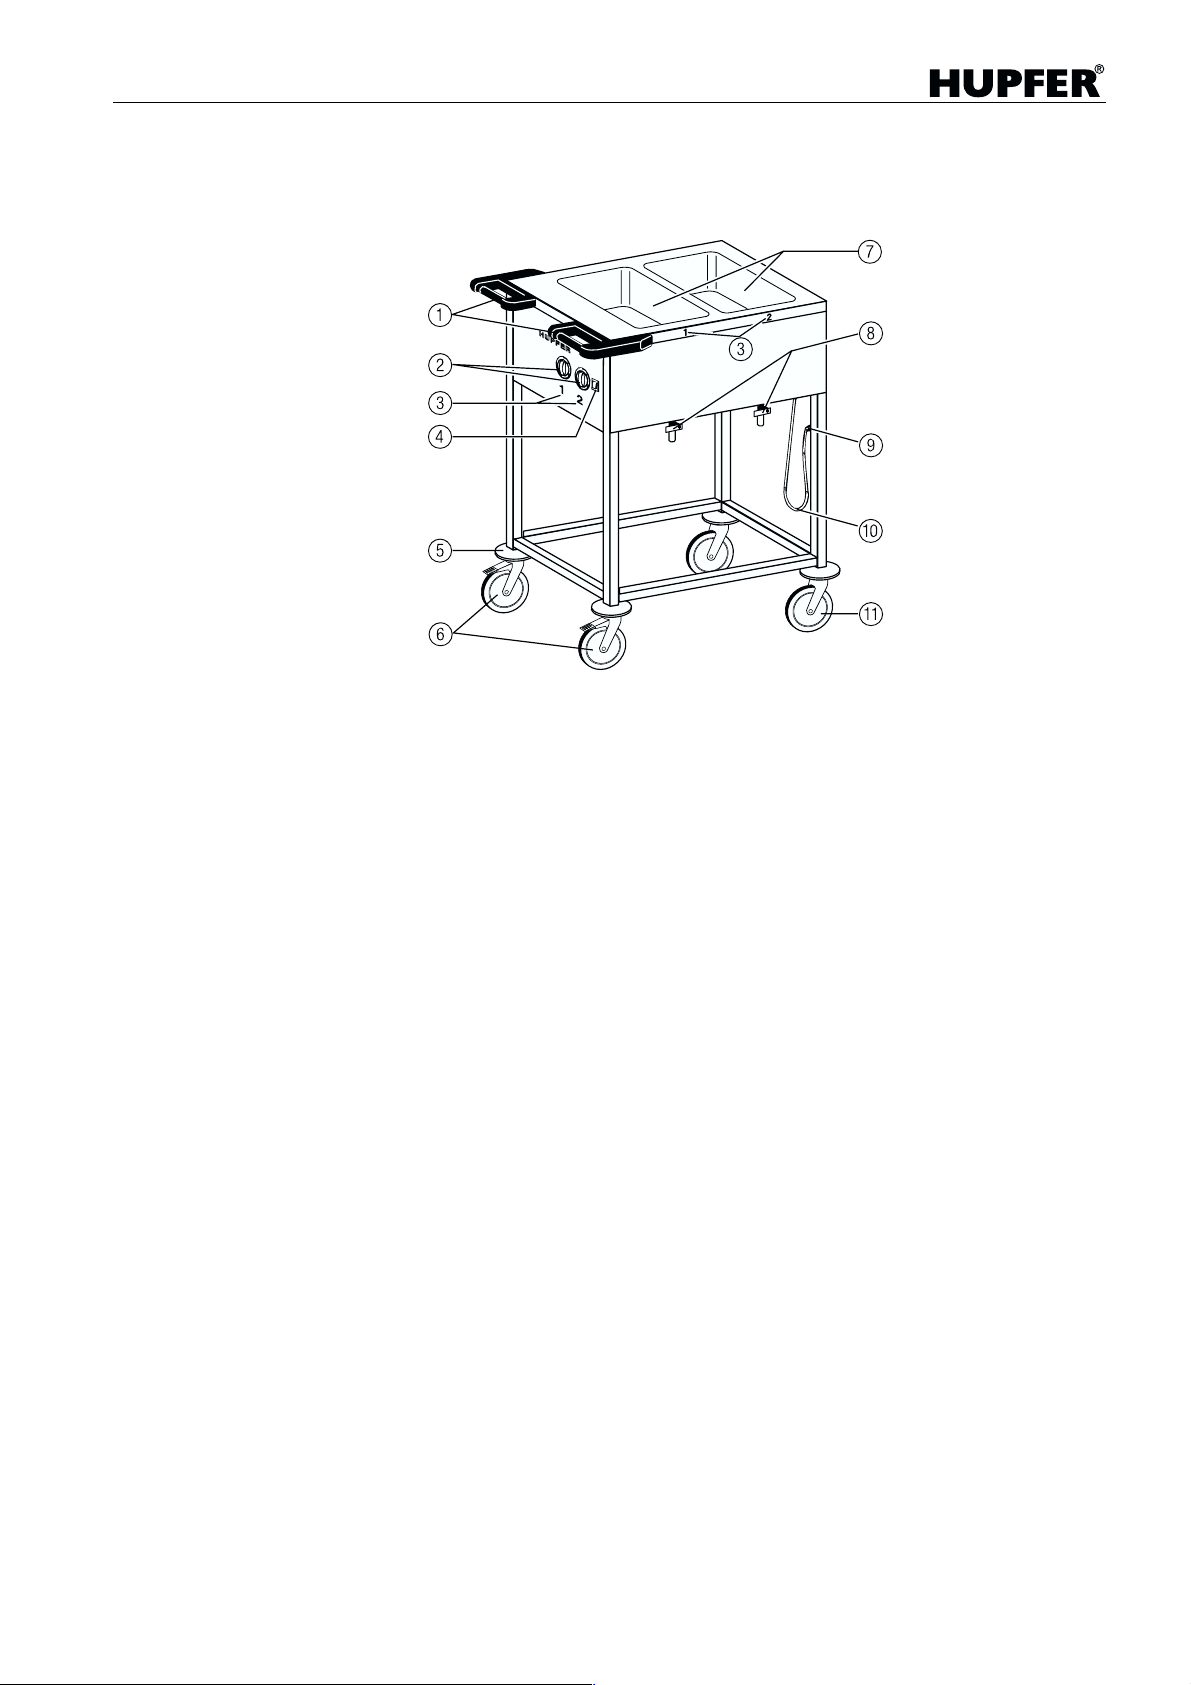
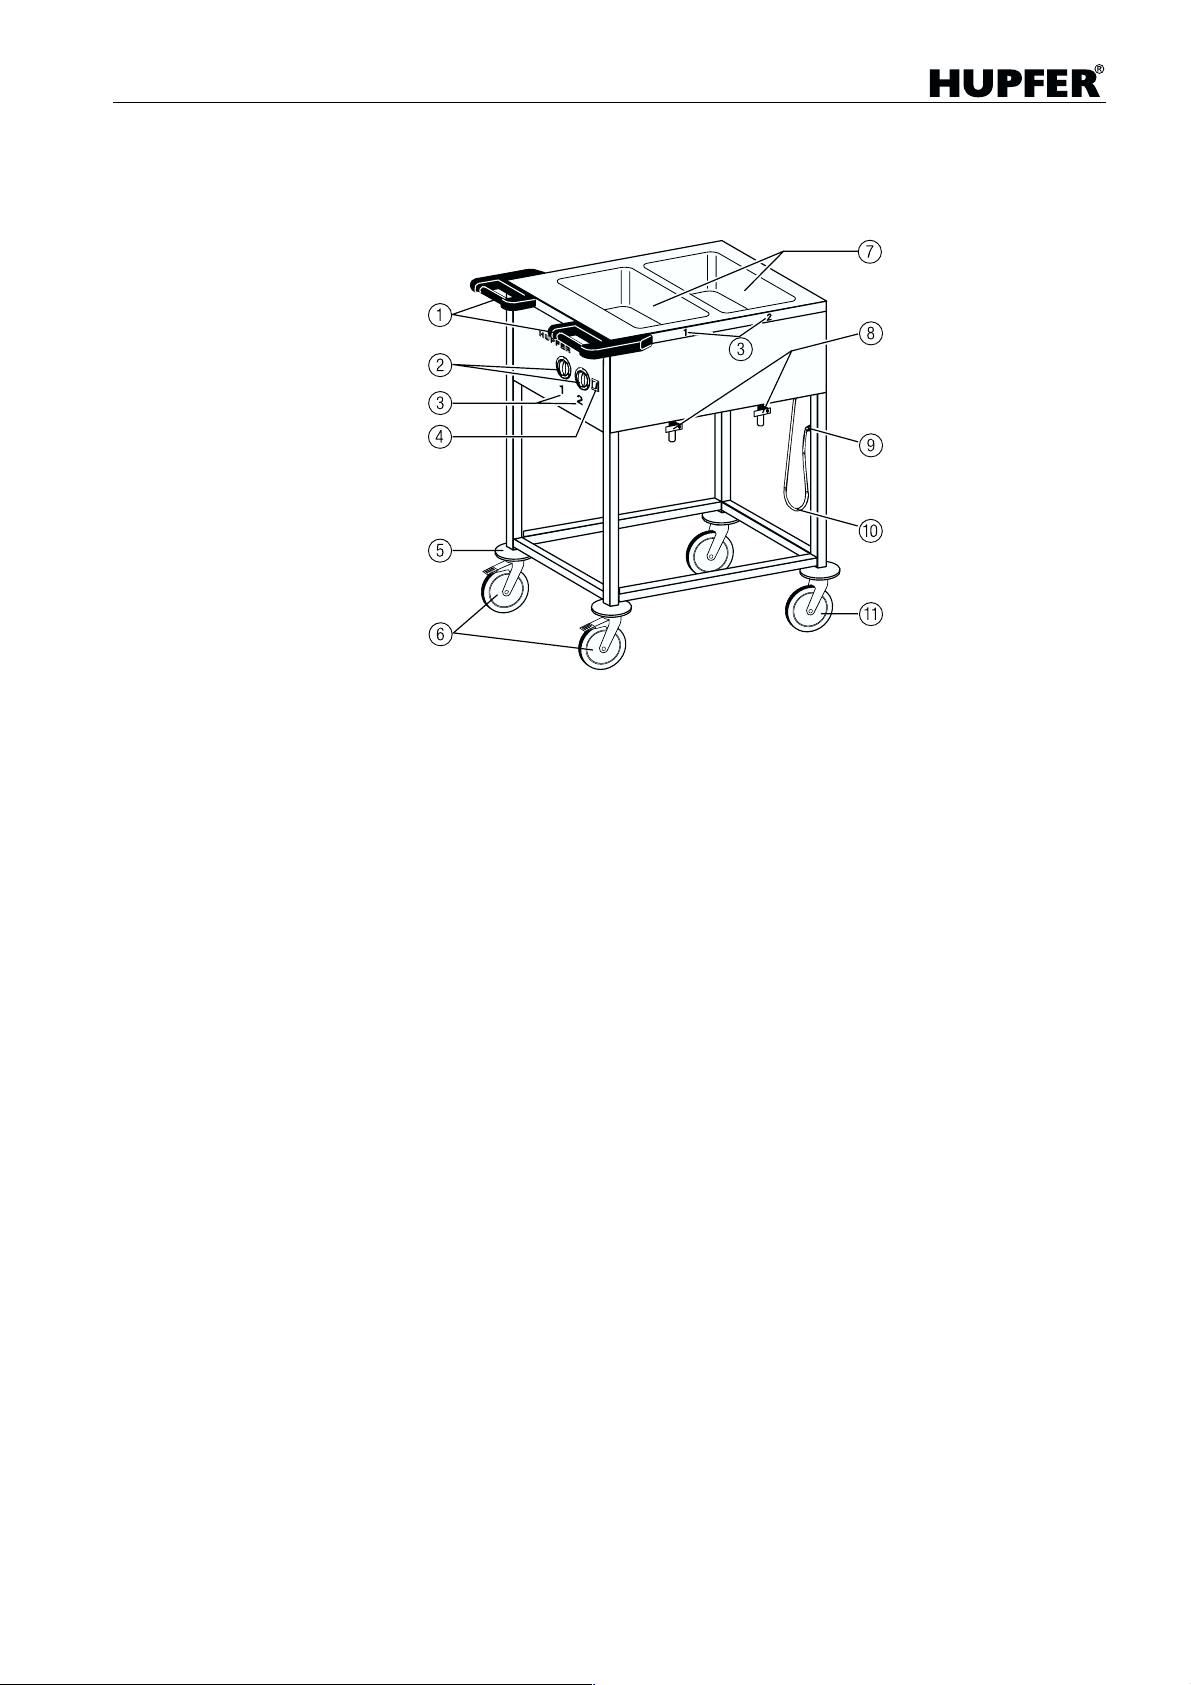
Sicherheitsschiebegriffe mit integrierter Stoßkante
Knebel zur Regelung der Beckentemperatur
Ziffern für Beckenzuordnung
Ein- / Aus-Schalter
Abweiserrollen
Lenkrollen mit Totalfeststeller
Warmhaltebecken
Wasserablaufhähne für Warmhaltebecken
Steckerhalterung
! Anschlußkabel mit Stecker
" Lenkrollen ohne Feststeller
Sonderzubehör:
• GN-Behälter
• Einhängestege für Becken, (Länge 325 oder 530 mm)
• Flexible Ablaufverlängerung ½", 42 cm
• Bodenbord aus Chrom-Nickel-Stahl 1.4301
• Abklappbares Bord längsseitig, aus Chrom-Nickel-Stahl 1.4301*
• Abklappbares Bord stirnseitig, aus Chrom-Nickel-Stahl 1.4301*
• Lenkrollen aus Chrom-Nickel-Stahl, Ø 125 mm, mit und ohne Totalfeststel-
ler, Zapfenbefestigung
*Die Nachträgliche Befestigung der abklappbaren Borde am Gerät ist nur
durch autorisiertes Fachpersonal erlaubt. Ein WIG-Schweißgerät ist erforderlich.
43.3000.2 5
Page 6
Sicherheitshinweise
• Die Geräte sind nur für den beaufsichtigten Betrieb vorgesehen.
• Die Geräte sind für den Transport von Lebensmitteln in eingesetzten
• Das Gerät SPA/EB-1 darf wegen Kippgefahr nur im leeren Zustand gefah-
• Der Transport darf nur über ebene Böden erfolgen. Das Befahren stark un-
• Vor dem Transport Gerät aussc halte n, Netzs teck er ziehe n un d in die vor-
Speisenausgabewagen
GN-Behältern und eingefülltem W asser in den Becken vorgesehen. Der
Transport von anderen Lasten ist nicht zulässig.
ren werden, das heißt ohne Wasserfüllung und ohne eingehängte GN-Behälter. Aufgrund der sehr schmalen, platzsparenden Bauweise besteht bei
diesem Modell grundsätzlich Kippgefahr.
ebener Böden kann zur Beschädigung des Fahrwerks führen.
gesehene Halterung einhängen.
• Netzstecker niemals am Kabel aus der Steckdose ziehen.
Die Speiseausgabewagen von HUPFER
mit einem Schuko-Winkelstecker ausgerüstet. Im Gegensatz zu einem geraden Schuko-Stecker steht dieser Stecker nur unwesentlich von der
Steckdose ab und k ann daher ni cht durch seitliches Anfahren b eschädigt
werden.
Wird das Gerät bewegt, ohne vorher den Stecker zu ziehen, kann durch die
auftretende Hebelwir kung nach Überdehnung des Kab els die Steckdose
stark beschädigt oder sogar aus der Wand gerissen werden.
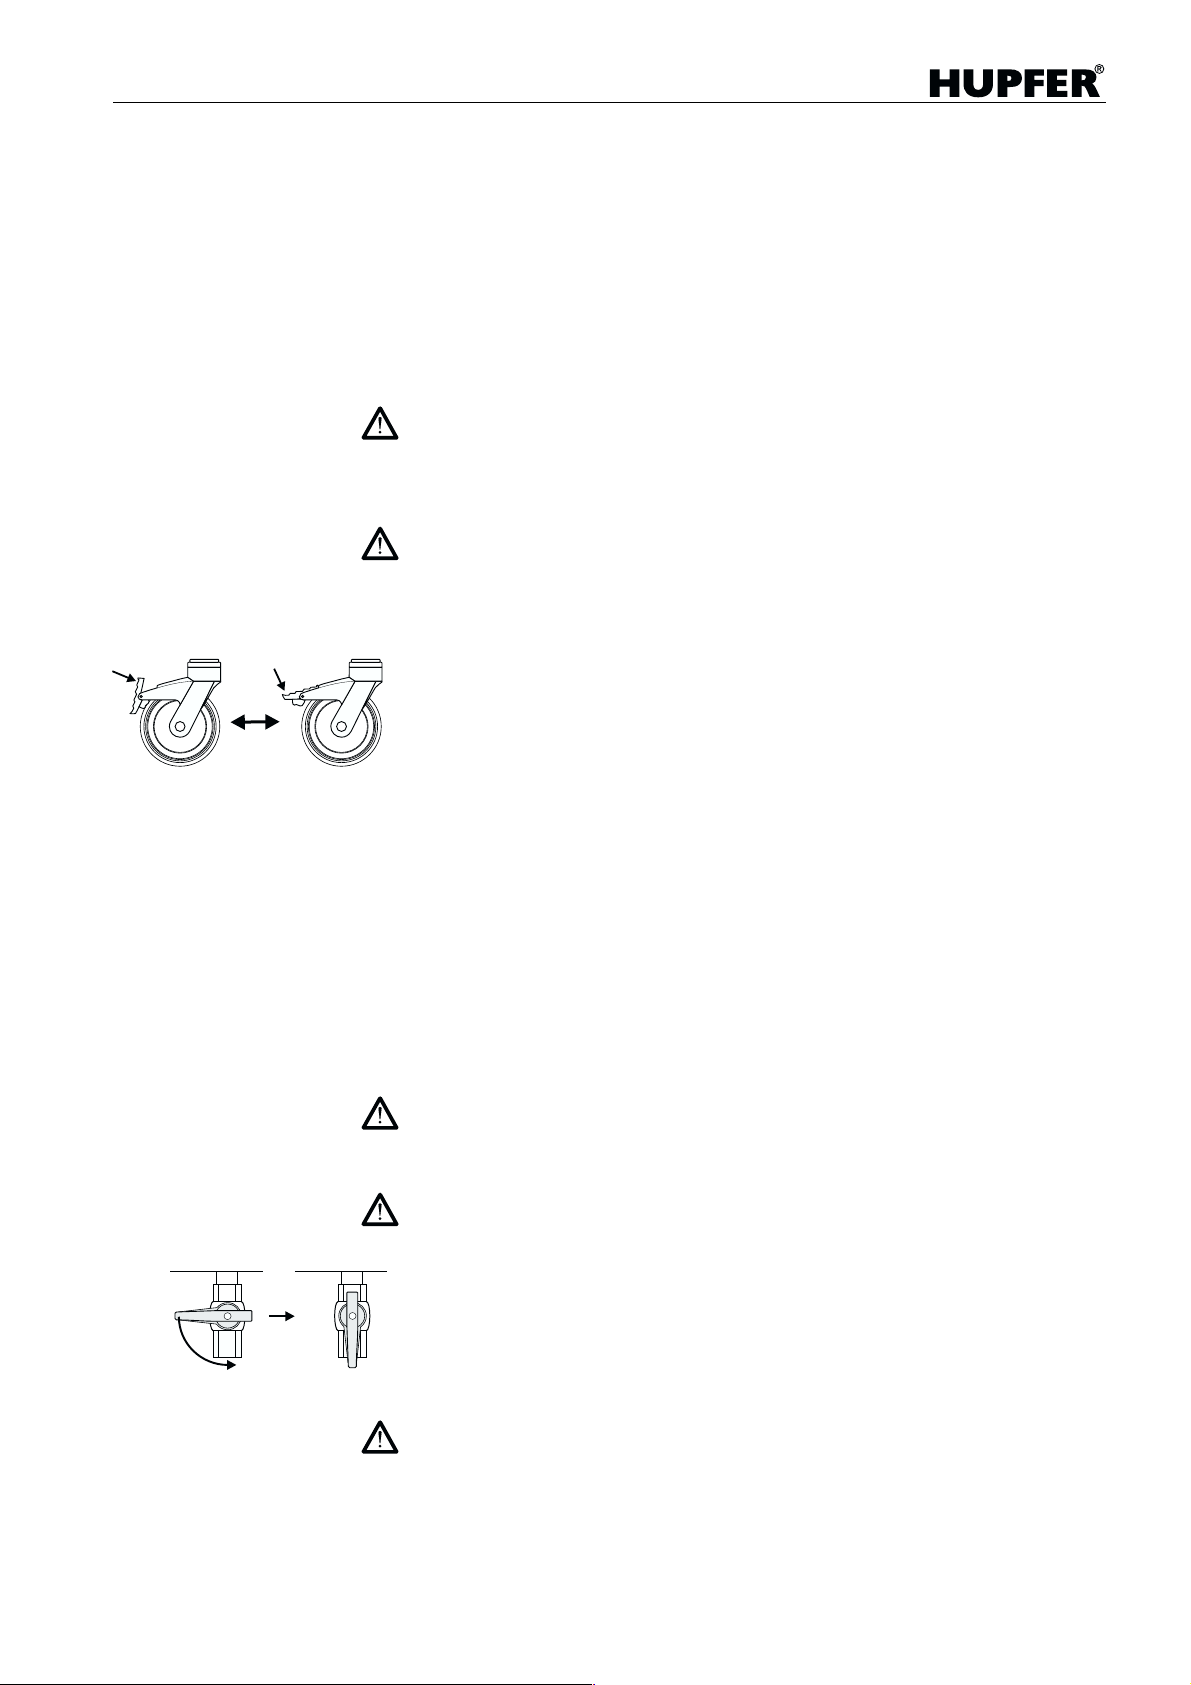
• Vor dem Transport beide Feststellbremsen lösen. Fahren mit arretierten
Feststellbremsen kann zur Beschädigung des Fahrwerks führen.
• Die Geräte sind ausschließlich zum manuellen Transport vorgesehen. Ein
maschinell unterstützter Transport ist nicht zulässig. Verletzungs- und Beschädigungsgefahr.
• Bei Transport mit Hilfs mitteln wie z.B . LKW ist eine Si cherung der Geräte
vorzunehmen. Die Total feststeller sind als Transpor tsicherung nicht ausreichend.
• Gerät niemals durch Ziehen am Anschlußkabel bewegen.
• Der Transport über schiefe Ebenen oder Treppen ist nicht zulässig.
®
sind in der Standardausführung
• Das Gerät beim Transport nicht schneller als Schrittgeschwindigkeit bewe-
gen. Stark beladen e Wagen lassen sich nur s chwer abbremsen und lenken. Gegebenenfalls Hilfe für den Transport holen.
• Durch Fremdeinwir kung oder Unach tsamkeit zum K ippen gebrachte W agen niemals manuell auffa nge n. Ver le tzu ngs ge fahr!
• Nicht auf das Gerät setzen oder stellen. Niemals Personen mit dem Gerät
befördern.
6 43.3000.2
Page 7

Speisenausgabewagen
• Geräte nicht auf abschüssigem Boden abstellen.
• Die Geräte sind nach dem Abstellen mittels beider Totalfe ststeller gegen
Wegrollen zu sichern.
• Wenn der Stecker mit Wasser in Kontakt gekommen ist, ist dieser vor Ein-
führen in die Steckdose zu trocknen. Lebensgefahr!
• Beschädigte Netzanschlußstecke r oder -kabel sind vor Verwen dung des
Gerätes durch autorisiertes Fachpersonal auszutauschen.
• Das Spiralkabel ist für eine maxima le Auszugslänge von 1,80 m geeignet.
Eine gewaltsame Überdehnung des Kabels kann zur Beschädigung der innenliegenden Leitungen führen. Brandgefahr!
• In Naß- und Feuchträumen keine Verlängerungskabel verwenden.
• Das Gerät nicht mit Dampfstrahl- oder Hochdruckreinigern säubern.
Ist es vorgesehen, i n de r Umge bun g m it Da mpf str ah l- od er Hochdruckreinigern zu arbeiten, so muß das Gerät vorher außer Betrieb genommen und
vom Stromnetz getrennt werden.
• Stecker nur in passende Schutzkontaktsteckdosen einführen. Bei nicht
passendem Stecker i st da s Netzans chl ußka bel de s G erätes durch autorisiertes Fachpersonal umzurüsten (siehe verwendbare Steckertypen auf
Seite 14).
Die Verwendung von Steckdosenadaptern ist unzulässig. Brandgefahr!
• Die Laufrollen sind f ür Temperaturen zwisch en -20 und + 50 °C zugelas-
sen. Der Einsatz in anderen Temperaturbereichen kann eine Schwächung
der Werkstoffstruktur z ur Folge haben. Beschädigungen d urch mechanische Einwirkungen sind dann nicht mehr auszuschließen.
43.3000.2 7
Page 8
Bedienung
Inbetriebnahme
Speisenausgabewagen
Zur Inbetriebnahme müssen die Be cken de s Gerätes kalt, sauber und frei von
Kalkablagerungen sein. Gegebenenfalls müssen bereits zum Einsatz gekommene Becken, bei denen das Wasser komplett abgelassen wurde, einige Zeit
abkühlen.
Trockenbeheizung der Becken ist gefahrlos möglich, wird allerdings, aufgrund
des sehr schlechten Wärmeübergangs, von HUPFER
Bei trocken aufgeheiztem Becken kommt es bei Kontakt mit kaltem Wasser zu
starker Dampfentwicklung. Verbrühungsgefahr!
Zusätzlich sind Verwerfungen des Beckenbodens und Mikrorißbildung möglich. Ein Totalschaden des Gerätes kann die Folge sein.
Eine Kalkschicht wirkt als thermische Isolierung und kann zu einem Wär-
mestau oberhalb der Rohrheizkörper führen; eine Beschädigung des Beckenbodens kann die Folge sein.
Zusätzlich besteht Korrosionsgefahr unterhalb der Kalkschicht.
Beachten Sie die Sicherheitshinweise ab Seite 6.
®
nicht empfohlen.
Becken füllen
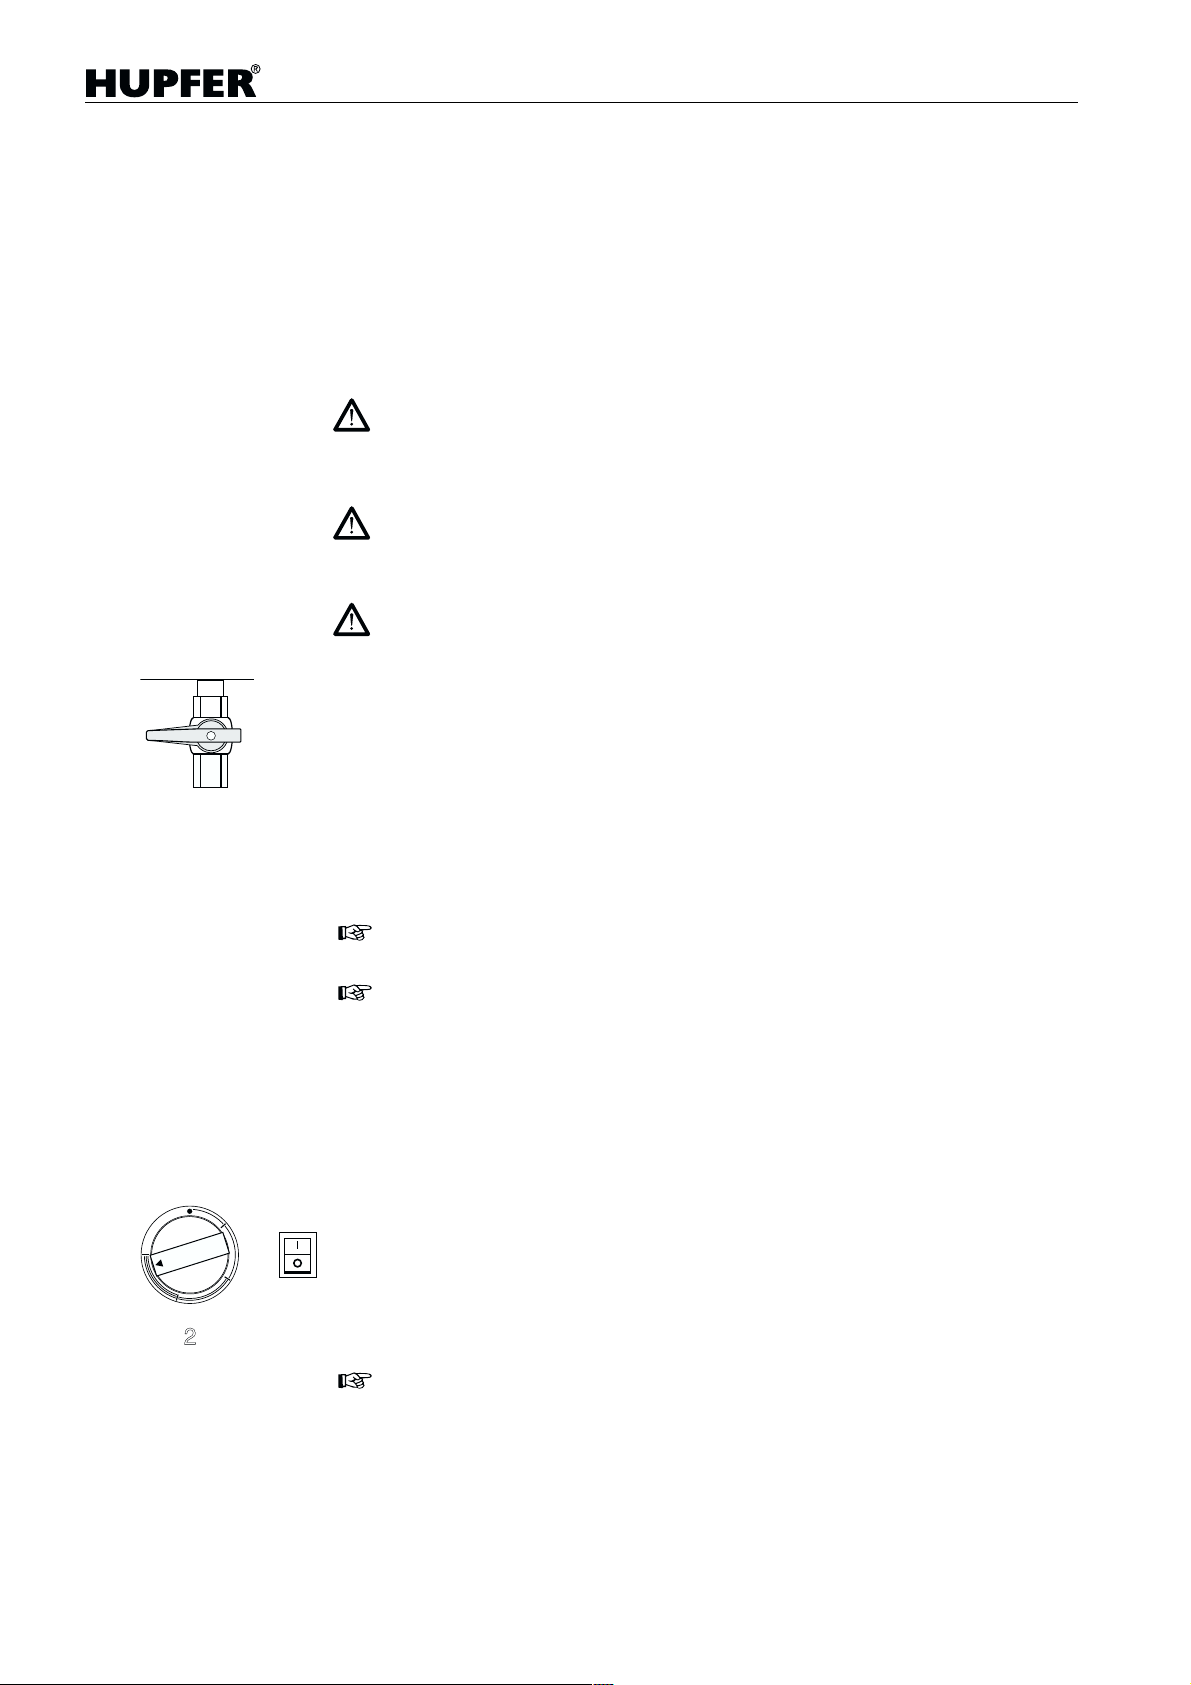
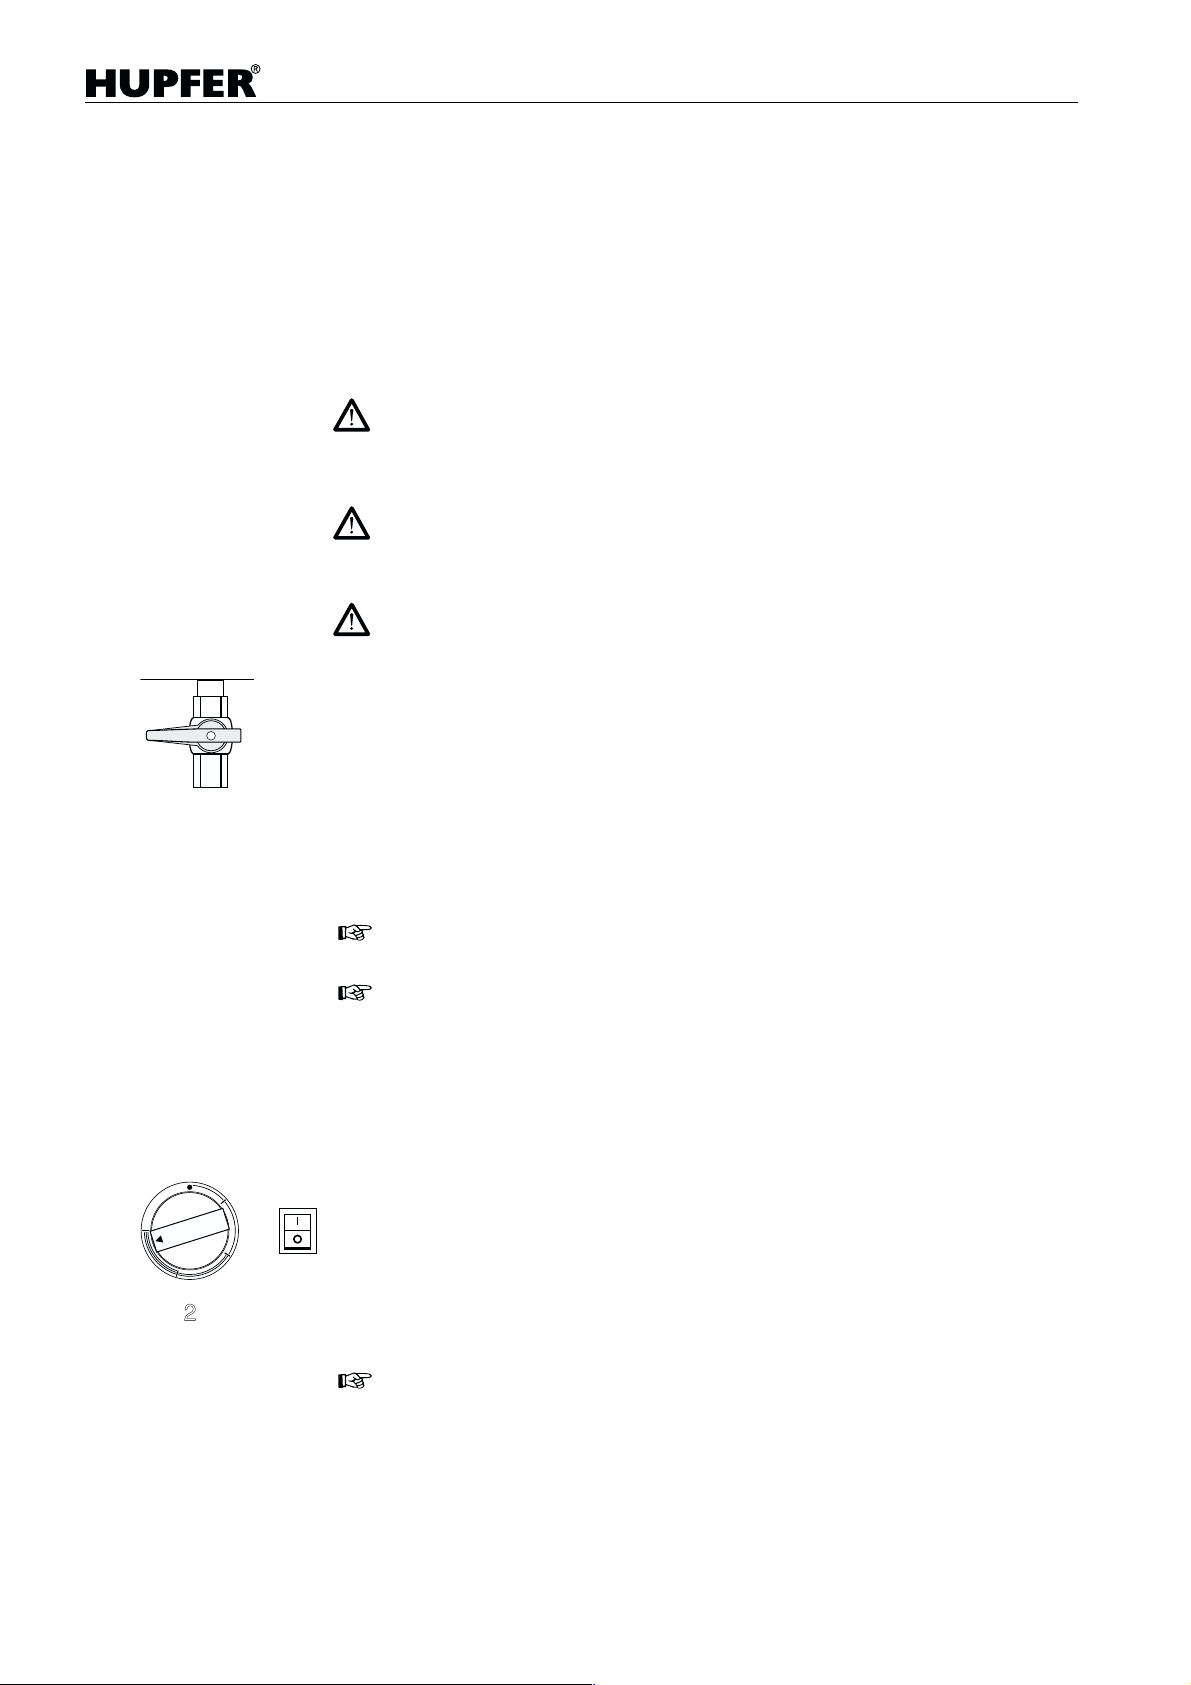
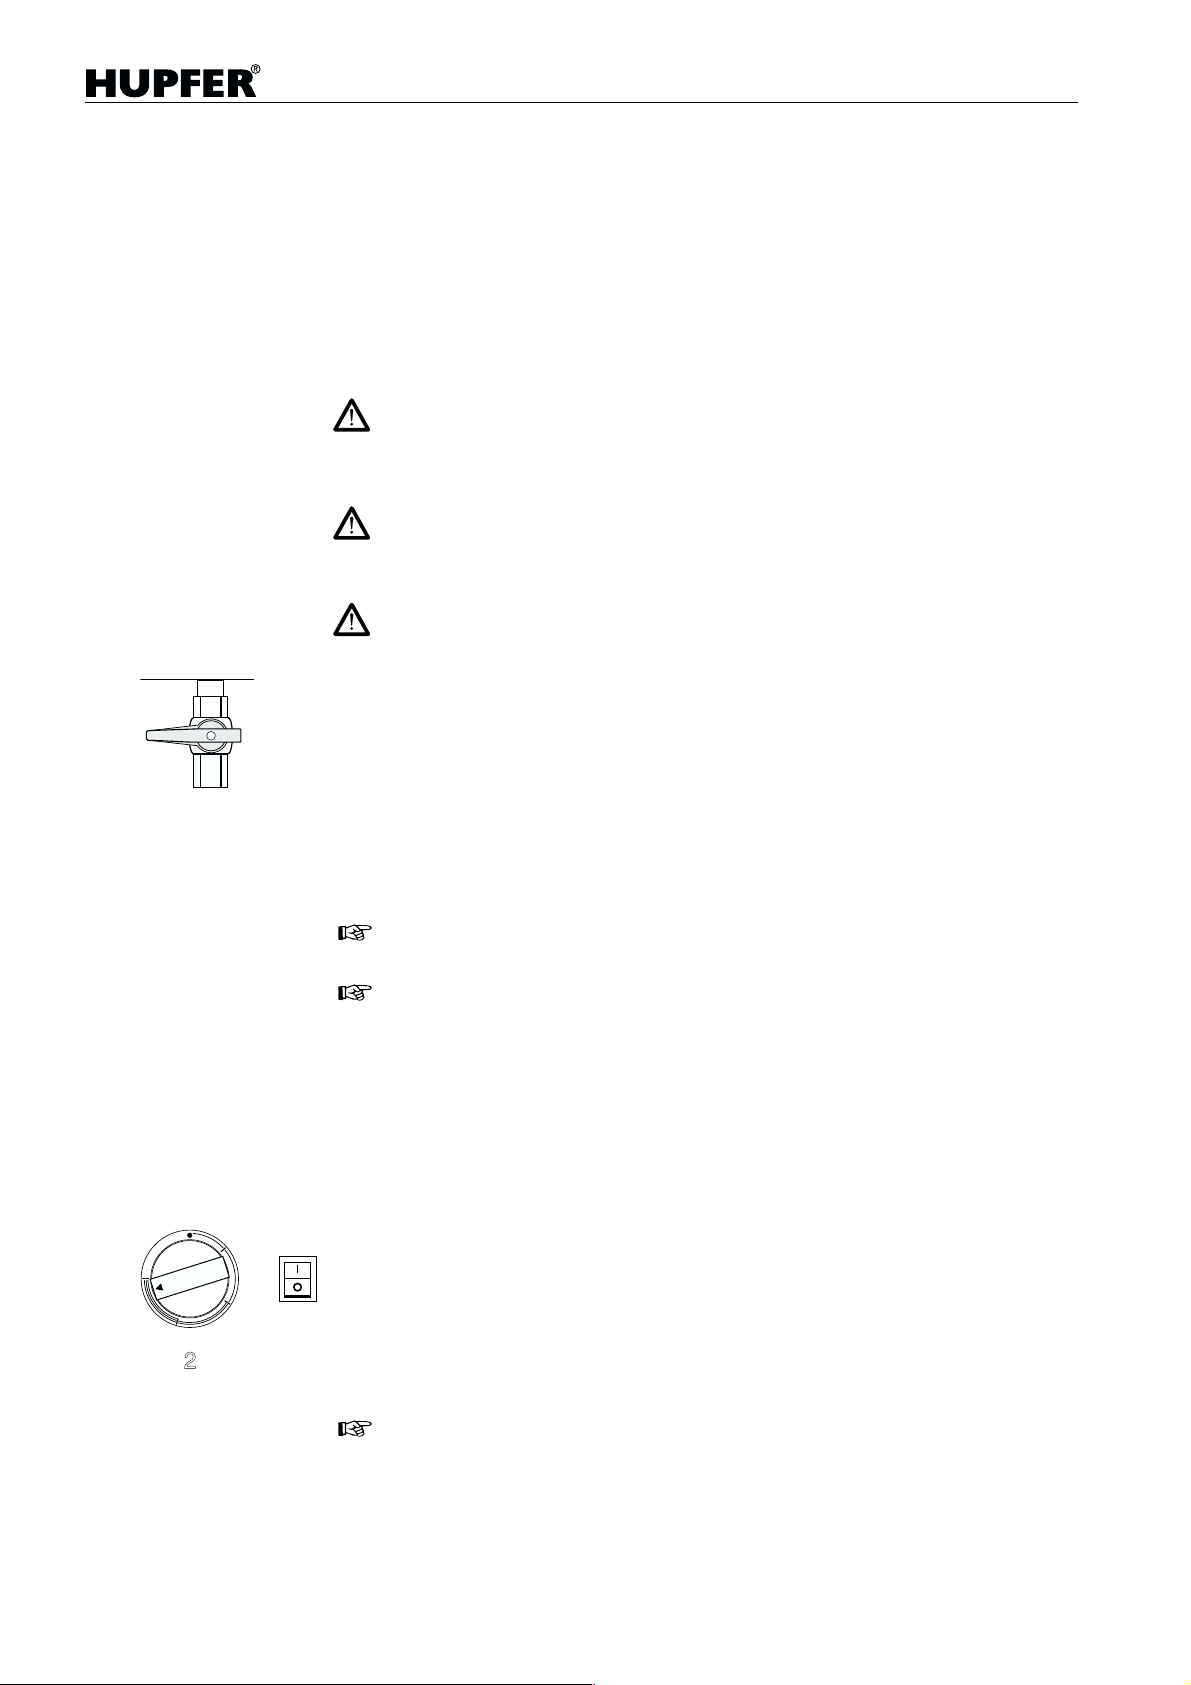
– Ablaufhähne schließen.
– Becken bis zur an der Innenseite des Beckens befindlichen Füllstandsan-
zeige mit Wasser füllen. Dies entspricht etwa 3 l Wasser.
Die später eingesetzten GN-Behälter (maximale Tiefe 200 mm) sollten keinen
Kontakt mit dem Wasser haben, da dies die Wärmeübertragung vermindert.
Die beste Wärmeübertragung erfolgt durch Dampf.
Höhere Füllstände verlängern die Aufheizzeit.
Bei stark mineralhaltigem Leitungswasser sollte Weichwasser verwendet werden, um Kalkablagerungen zu verringern.
Zum Auffüllen des Beckens sollte warmes oder heißes Wasser verwendet
werden. Dies verringert die Aufheizzeit des Gerätes.
Gerät einschalten
– Becken abdecken, um Wärmeverluste zu vermeiden.
– Gerätestecker in geeign ete Sc hut zk on tak tst ec kdo se eins tec ken .
Benutzen Sie nur die dafür vorgesehene Steckerverbindung. Das Gerät
darf nicht bei beschädigter Anschlußleitung oder sichtbaren Beschädigungen betrieben werden.
– Gerät am Ein- / Aus-Schalter einschalten.
Die im Schalter integrierte Anzeige für Betriebsbereitschaft leuchtet.
– Mit dem zum Becken gehörenden Regler die gewünschte Leistung einstel-
len. Innerhalb der 4 Leistungsbereiche ist eine stufenlose Einstellung mög-
lich. Die Zuordnung der Schalter zu den Becken erfolgt über im Gehäuse
eingeprägte Ziffern.
Bei einer Füllhöhe von 2 cm (kaltes Wasser), guter Abdeckung und voller Geräteleistung erreicht das Wasser im Becken nach ca. 45 Minuten eine Temperatur von 90 °C.
8 43.3000.2
Page 9
Speisenausgabewagen
Benutzung des Gerätes
GN-Behälter einsetzen
GN 1/1-Behälter bis zu einer Tiefe von 200 mm können ohne weitere Maßnah-
men in die Becken eingehängt werden. Bei Verwendung von GN 2/3-,
GN 1/2- und GN 1/3-Behältern sollten Trennstege (Sonderzubehör) verwendet werden, um den Dampfaustritt zwischen den Behältern und den damit verbundenen Wärmeverlust zu minimieren.
Bei Verwendung noch kleinerer GN-Behälter müssen Einhängestege verwendet werden, um den Abschluß mit dem Beckenrand zu gewährleisten.
Auf guten Absc hluß der Einsatzbecken achten, da austretender Wasserdampf
zu Verbrühungen führen kann. Berührbare Metallteile des Deckels können gefährlich erhitzt werden.
Transport
Beachten Sie die Sicherheitshinweise ab Seite 6.
Außerbetriebnahme
– Alle Regler auf
– Gerät am Ein- / Aus-Schalter ausschalten.
– Netzstecker ziehen und in die vorgesehene Halterung einhängen.
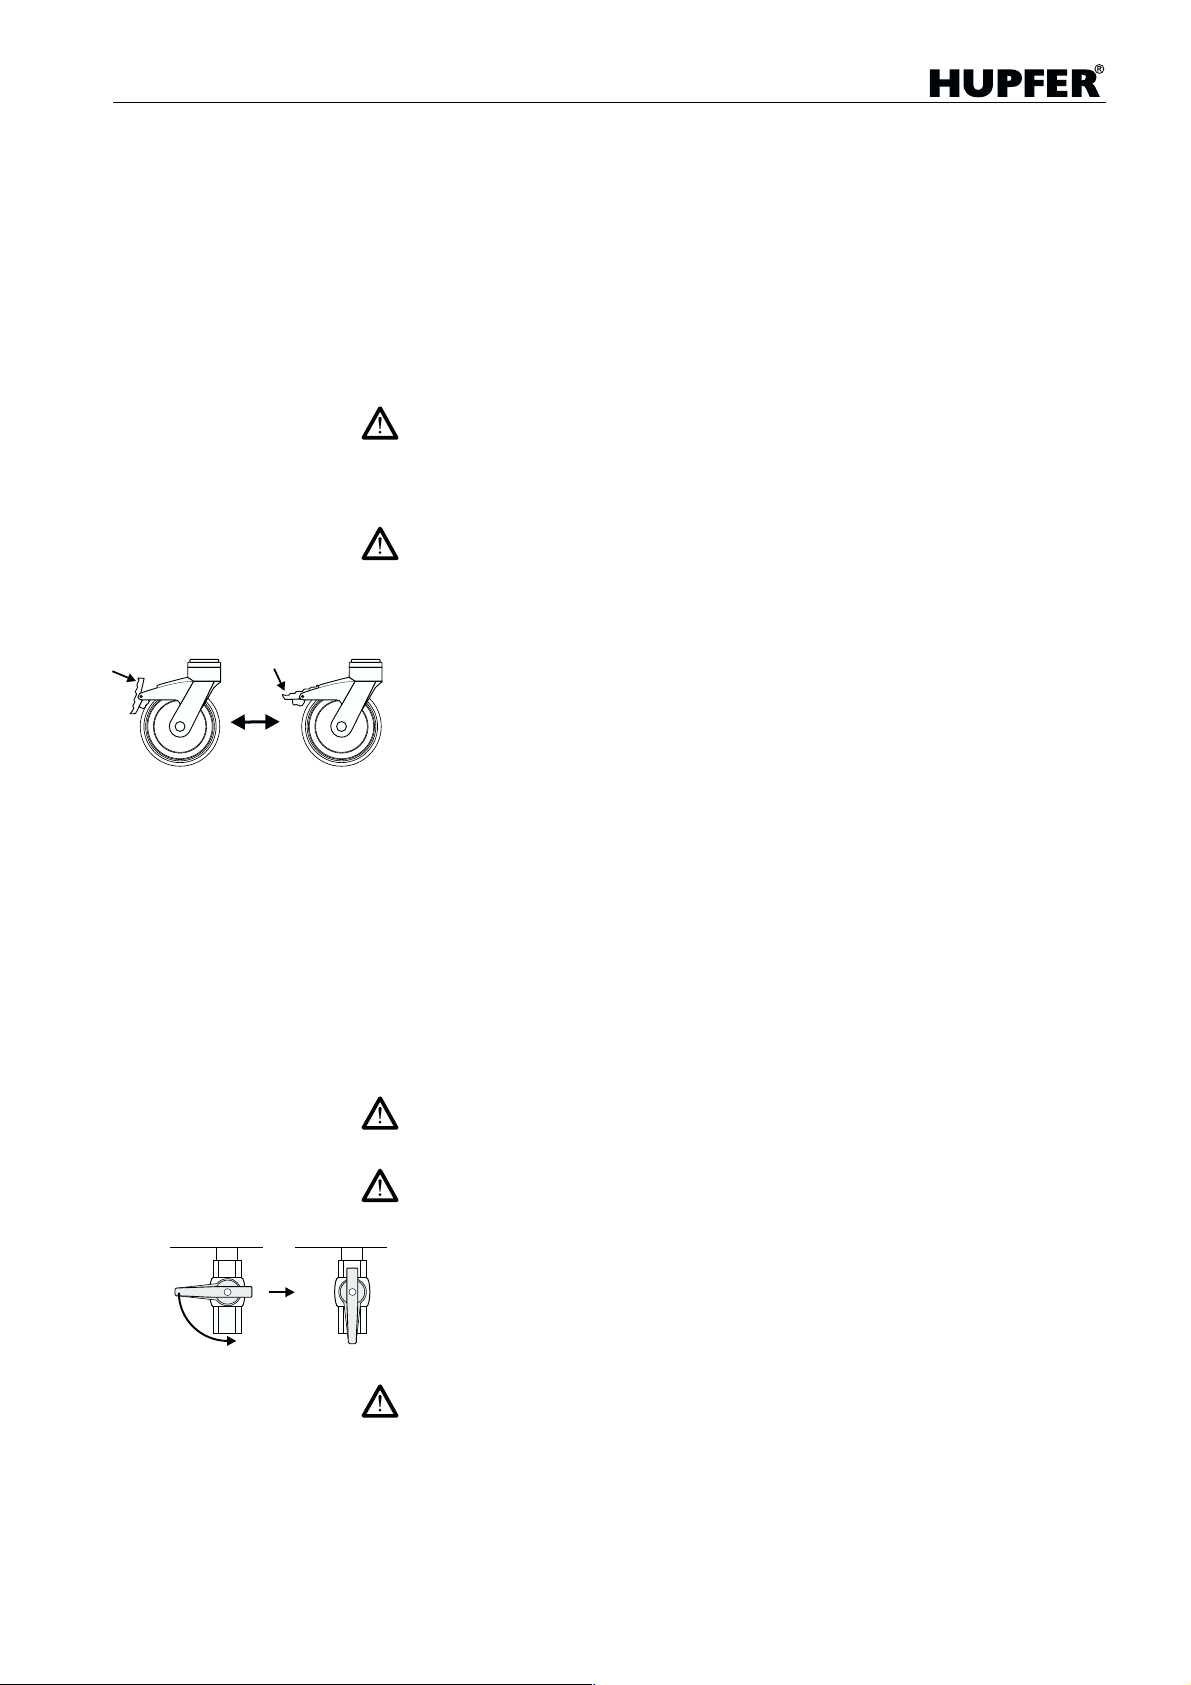
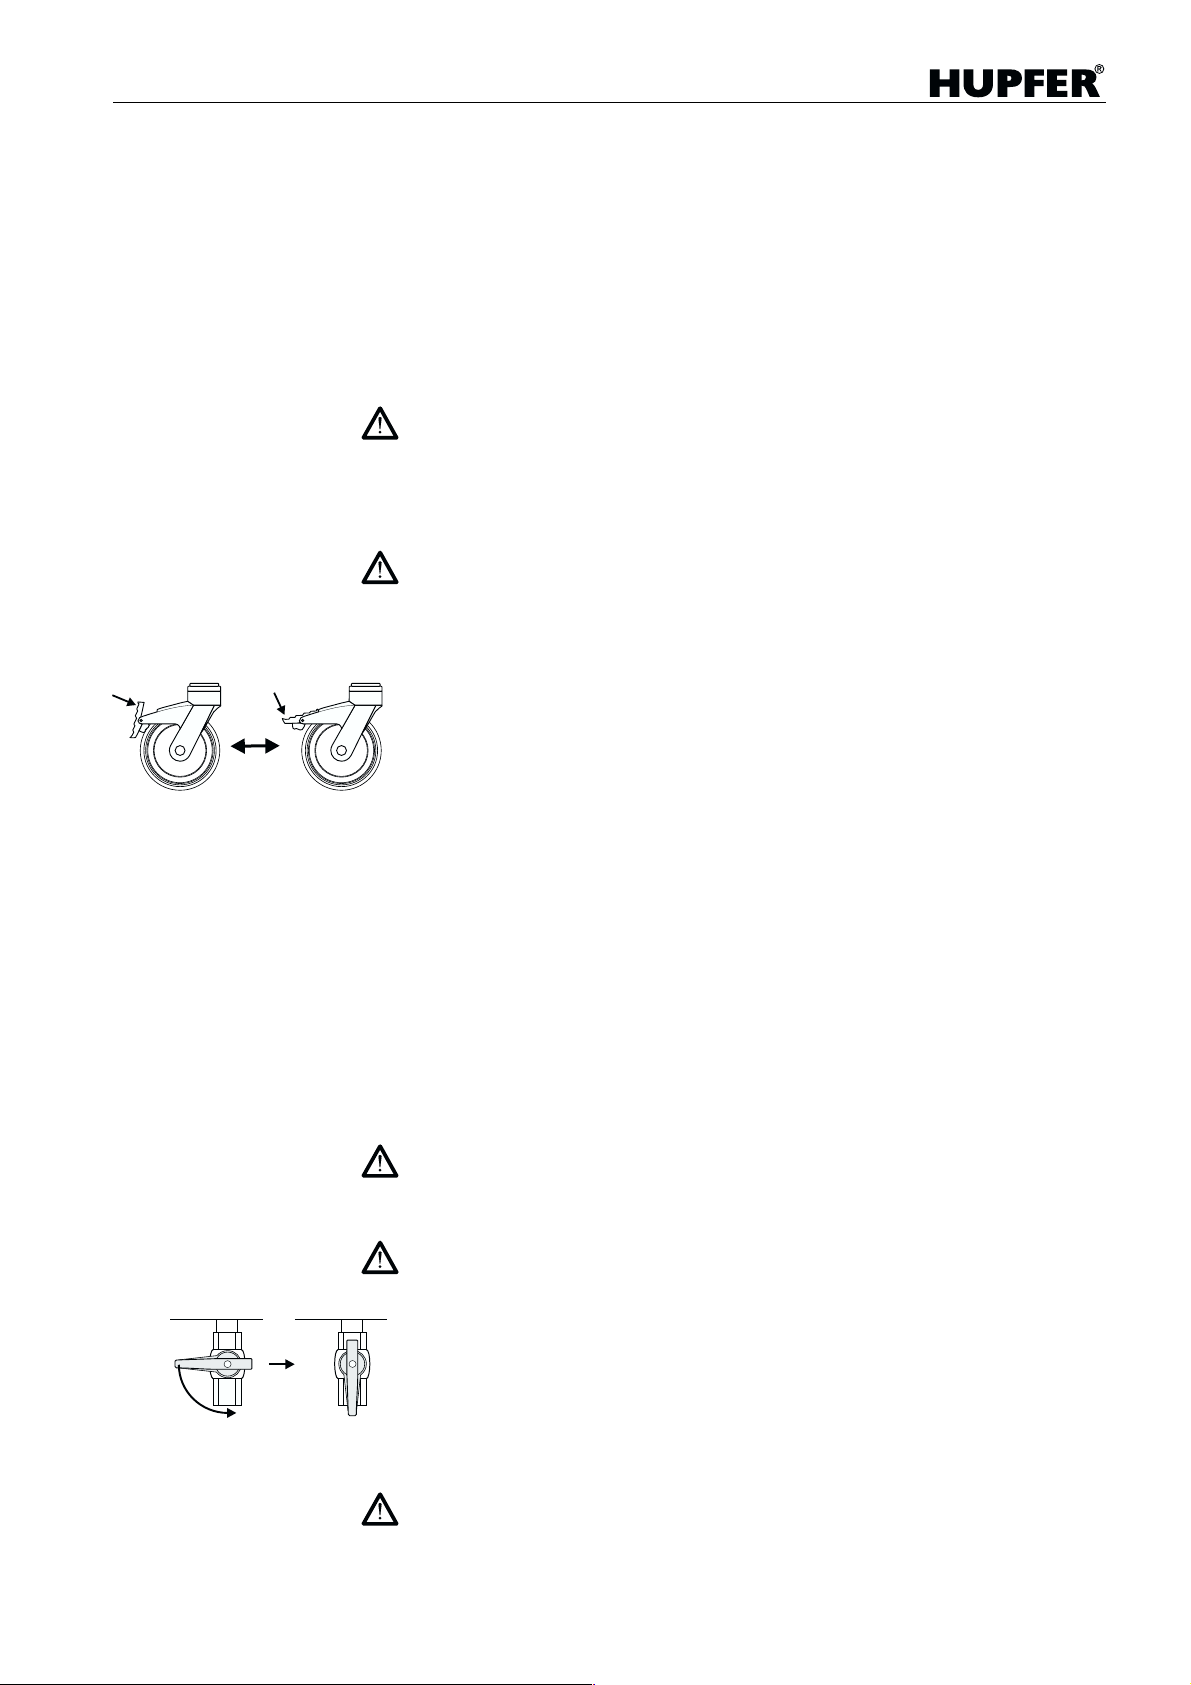
– Beide Feststellbremsen lösen.
– Gerät an den Schiebegriffen fassen und zum Zielort fahren.
– Am Zielort beide Feststellbremsen arretieren, um das Gerät gegen unbe-
absichtigtes Versch ie ben zu sichern.
– Gerätestecker in geeignete Schutzkontaktsteckdose einstecken.
– Gerät am Ein- / Aus-Schalter einschalten.
– Mit dem zum Becken gehörenden Regler die gewünschte Leistung einstellen.
● stellen.
Gerät ausschalten
– Alle Regler auf ● stell en.
– Gerät am Ein- / Aus-Schalter ausschalten.
– Netzstecker ziehen und in die vorgesehene Halterung einhängen.
Wasser ablassen
Ablaßhähne niemals mit Werkzeug betätigen.
Bei festsitzenden Hähnen mit gesundheitlich unbedenklichen Trennmitteln arbeiten (z.B. Teflonspray). Anschließend Ablauf und Becken gründlich reinigen.
Wird heißes Wasser abgelassen besteht Verbrühungsgefahr.
Ablaßhahn nur direkt über einer bauseitigen Abflußrinne bzw. zentralem Kü-
chenabfluß öffnen.
Bei eingesetztem Bodenbord (Sonderzubehör gegen Mehrpreis) Auffangbehälter mit ausreichendem Volumen oder Abflußverlängerung (Sonderzubehör
gegen Mehrpreis) verwenden.
Nach dem Ablassen des Wassers können das Ablaßrohr und der Hahn eine
höhere Temperatur aufweisen. Verbrennungsgefahr!
43.3000.2 9
Page 10
Sonderzubehör
Speisenausgabewagen
Klappborde
• Die Klappborde sind nicht zum Aufstellen schwerer Lasten zugelassen.
• Während des Transports des Gerätes müssen die Klappborde eingeklappt
sein.
• Beim Hochklappen und Arretieren der Klappborde besteht Quetschgefahr.
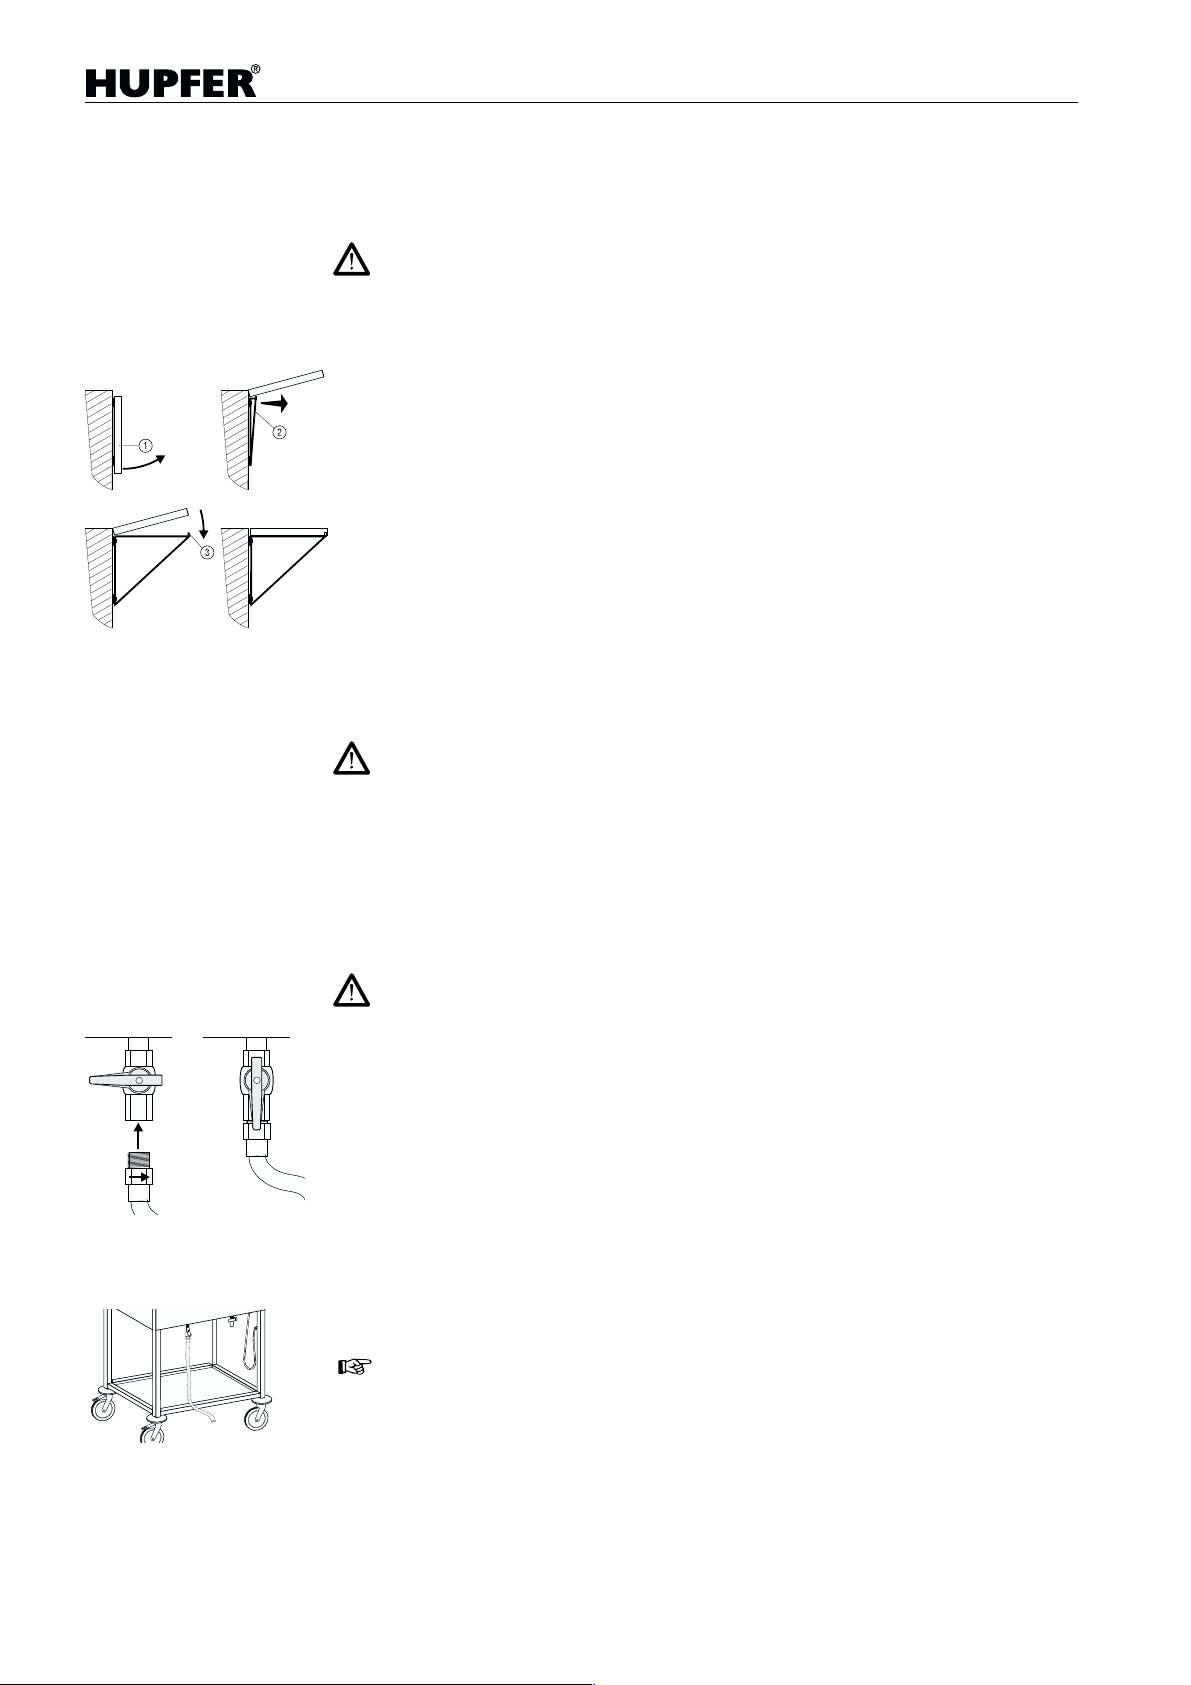
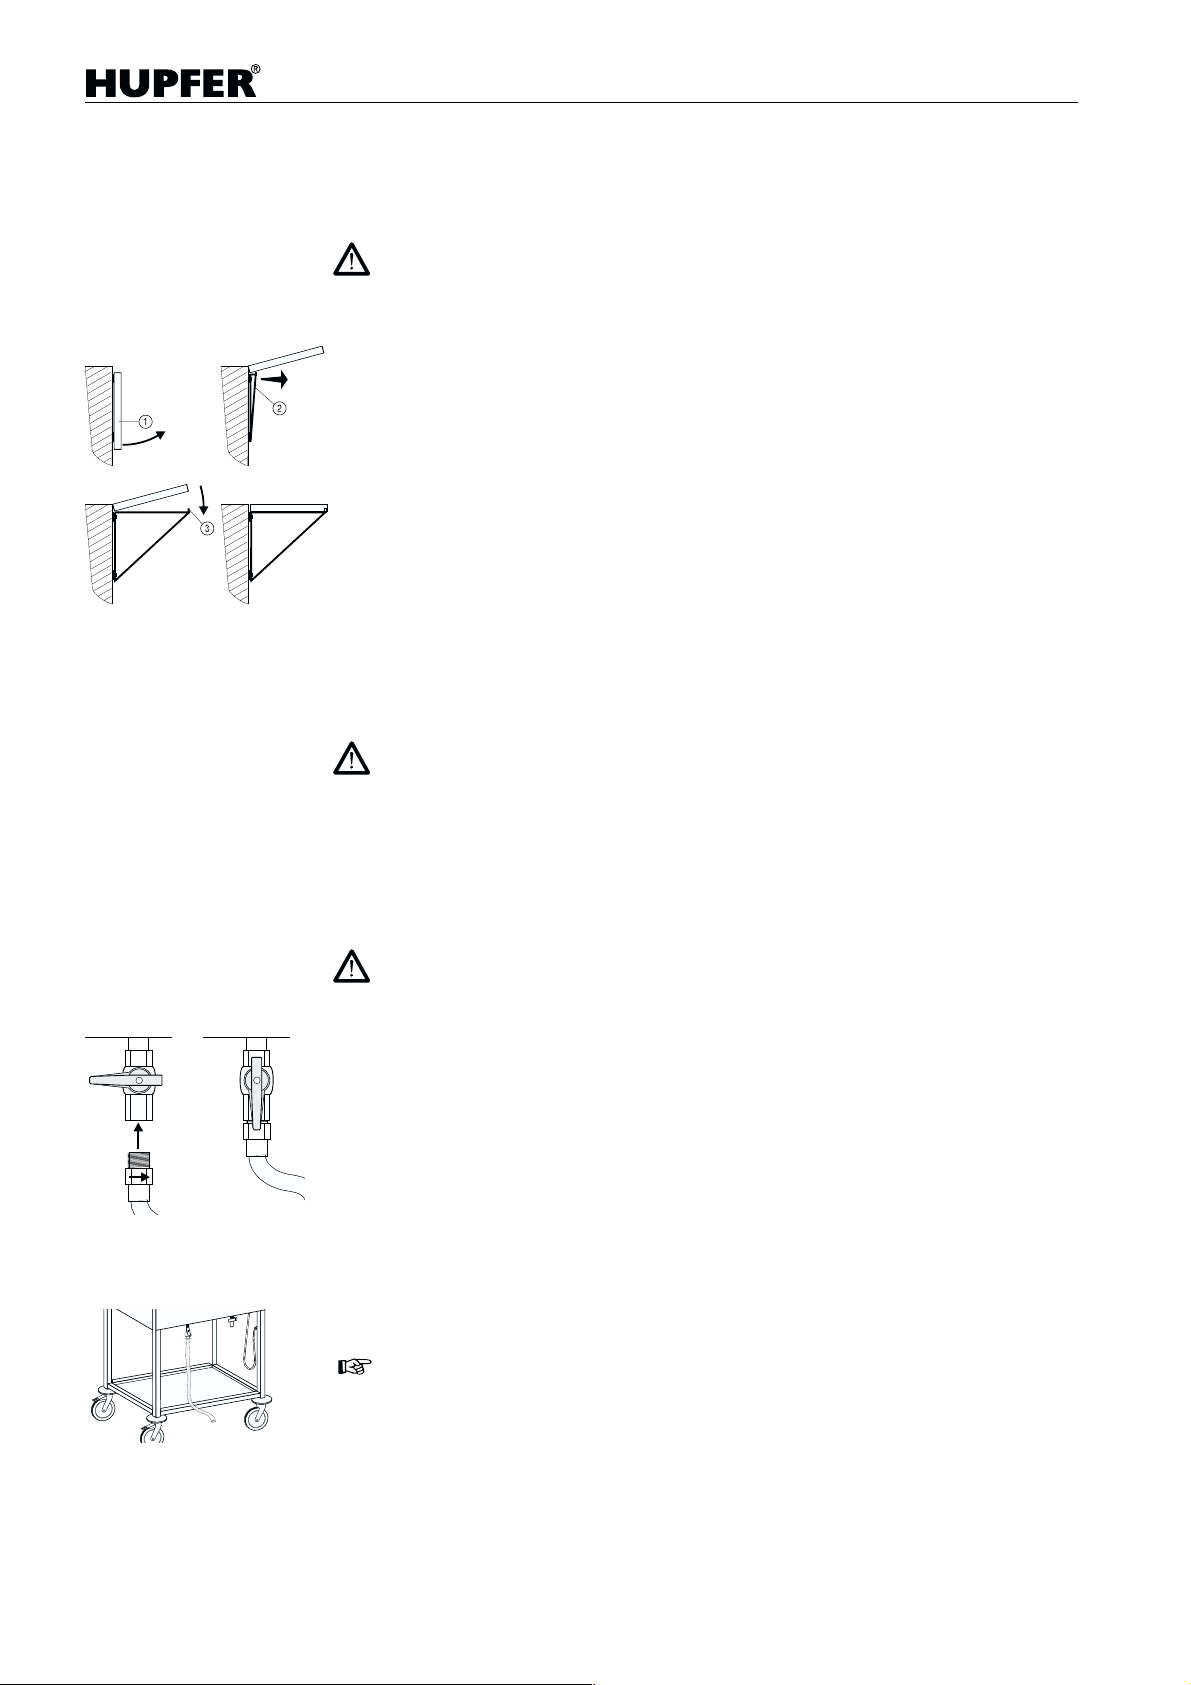
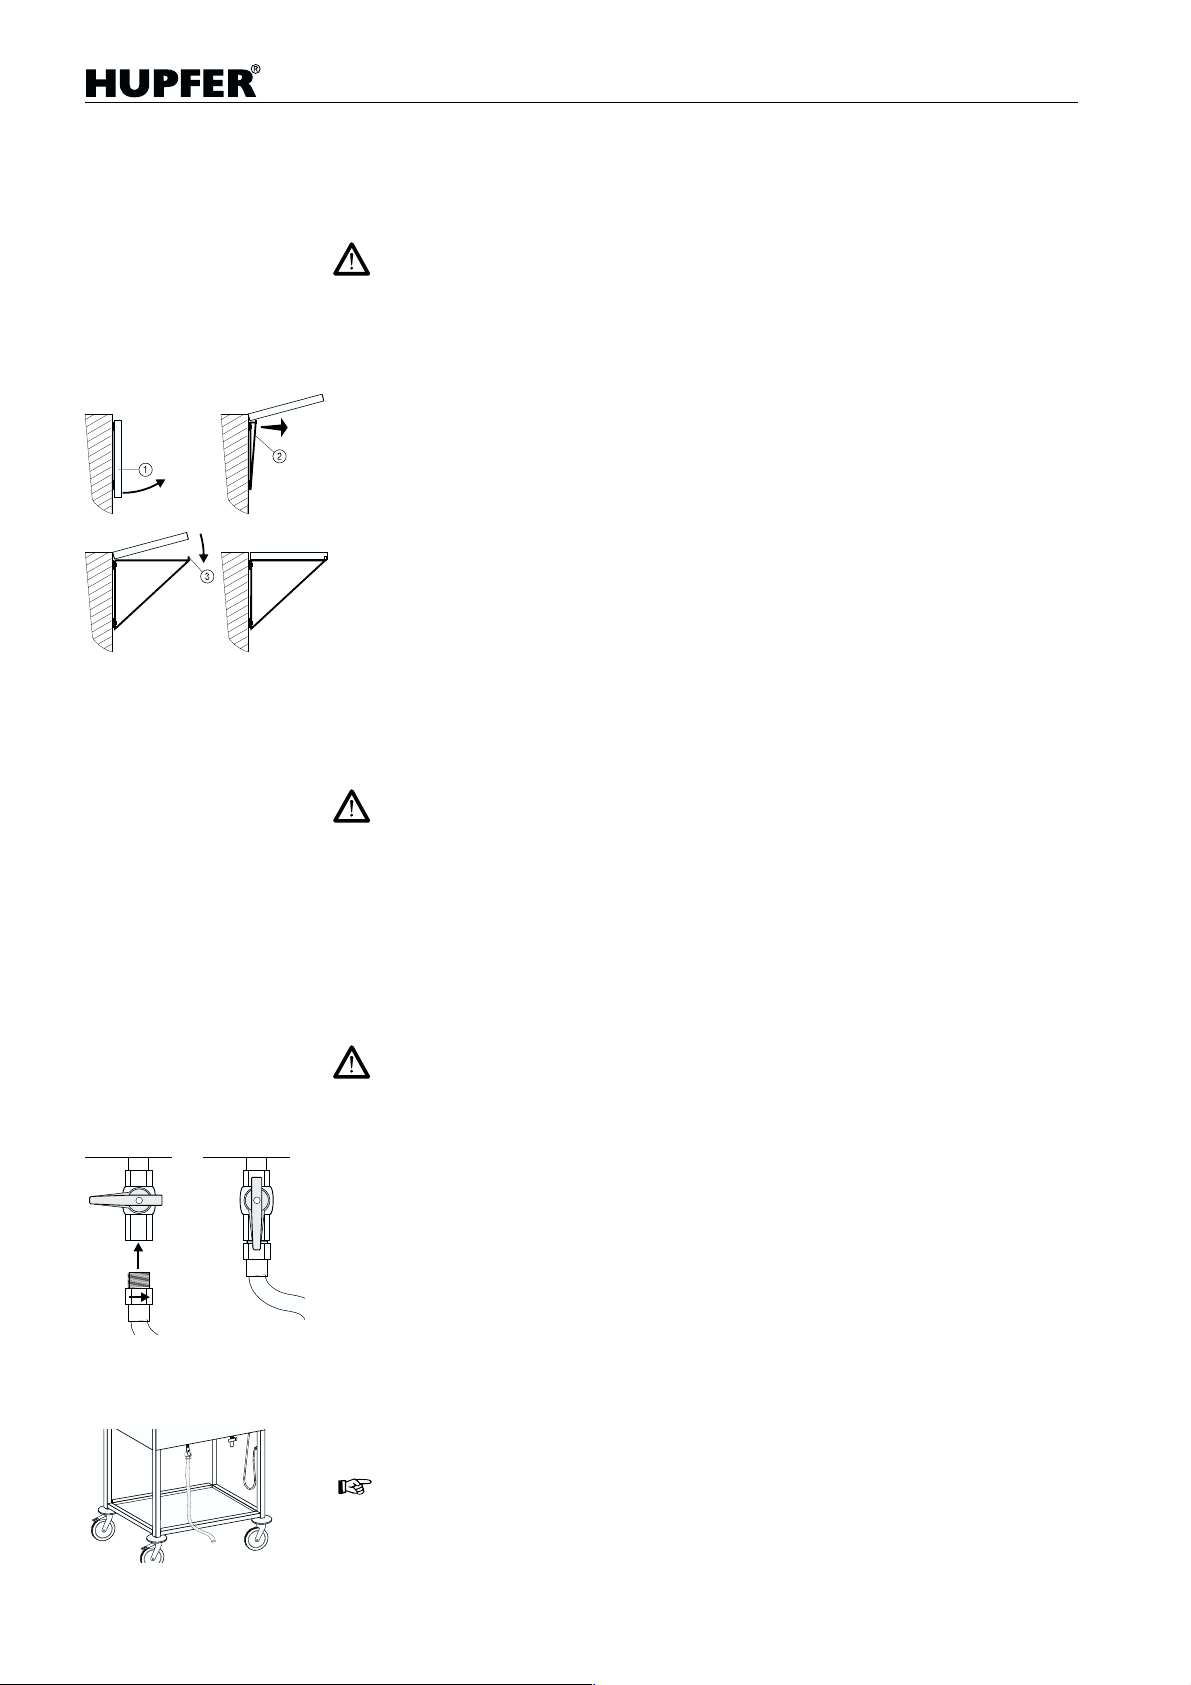
– Klappbord
– Stützen
– Stützen so plazieren, daß die Stifte
die dortigen Löcher gleiten.
– Das Einklappen der Borde erfolgt in umgekehrter Reihenfolge.
nach oben schwenken.
herausschwenken.
beim Absenken des Klappbords in
Bodenborde
Auf Bodenborden dürfen nur Gegenstände mit festem Stand abgestellt werden. Das zulässige Gesamtgewicht darf nicht überschritten werden (siehe
„Technische Daten“, Seite 13).
Offene Behälter mit heißen Flüssigkeiten dürfen nicht transportiert werden.
Ablaufverlängerung
• Gerät niemals durch Ziehen an der Ablaufverlängerung bewegen.
• Beim Wasserablassen auf die Position des Schlauchendes achten.
• Beim Ablassen vo n he ißem Wasser kann die Ablaufverlängerung eine hö-
here Temperatur aufweisen. Verbrennungsgefahr!
– Außengewinde der Ablaufverlängerung mit dem Endstutzen des Ablaß-
hahns fest verschrauben.
– Schlauchende über einem Abfluß plazieren.
– Ablaßhahn öffnen.
Mit der Ablaufverlängerung kann das Wasser auch bei eingesetztem Bodenbord ohne Verwendung eines Auffangbehälters abgelassen werden.
10 43.3000.2
Page 11

Speisenausgabewagen
Reinigung und Pflege
• Vor Reinigungsbeginn Gerät außer Betrieb nehmen. Netzstecker ziehen
und in die dafür vorgesehene Halterung am Gerät einhängen. Die Becken
entleeren.
• Das Gerät nicht mit Dampfstrahl- oder Hochdruckreinigern säubern. Ist es
vorgesehen, in der Umgebung mit Dampfstrahl- oder Hochdruckreinigern
zu arbeiten, so muß das Gerät vorher außer Betrieb genommen und vom
Stromnetz getrennt werden.
• Für die Reinigung muß das Gerät außer Betrieb und ausreichend abge-
kühlt sein.
Sind nach der Reinigung noch Kalkablagerungen vorhanden, müssen diese
entfernt werden, da sonst der Energieverbrauch steigt und die Wirtschaftlichkeit sinkt. Bei starken Kalkablagerungen kann das Gerät Schaden nehmen.
Zum Entkalken handelsübliche Flächenentkalker oder Essigwasser verwenden.
Der Ablaßhahn kann mit Lebensmittelschmierfett (Bratfette sind für diesen
Zweck ungeeignet) nachgefettet werden, um seine Dichtigkeit und Leichtgän-
gigkeit zu erhalten.
Wissenswertes über „Edelstahl rostfrei“
Die Korrosionsbeständigkeit der nichtrostenden Stähle beruht auf einer Passivschicht, die an der Oberfläche bei Zutritt von Sauerstoff gebildet wird. Der
Sauerstoff der Luft reicht zur Bildung der Passivschicht bereits aus, so daß
durch mechanische Einwirkung eingetretene Störungen oder Verletzungen
der Passivschicht selbsttätig wieder behoben werden. Die Passivschicht bildet
sich schneIler aus bzw. neu, wenn der Stahl mit fließendem sauerstoffhaltigen
Wasser in Berührung kommt. Eine w eitere Steig erung des Effe ktes wird dur ch
oxidierend wirkende Säuren (Salpetersäure, Oxalsäure) erreicht. Diese Säuren werden angewendet, falls der Stahl stark chemisch beansprucht worden
ist und deshalb seine Passivschicht weitgehend verloren hat.
Die Passivschicht kann chemisch geschädigt oder gestört werden durch reduzierend wirkende (sauerstoffverbrauchende) Mittel, wenn sie konzentriert oder bei
hohen Tempera t ur en au f den Stahl treffen. Solche ag gr essiven Stoffe sind z.B. :
• salz- und schwefelhaltige Stoffe
• Chloride (Salze)
• Würzkonzentrate wie Senf, Essigessenz, Würztabletten, Kochsalzlösun-
gen usw.
Weitere Schädigungen können entstehen durch:
• Fremdrost (z.B. von anderen Bauteilen, Werkzeugen oder Flugrost)
• Eisenteilchen (z.B. Schleifstaub)
• Berührung mit Nichteisenmeta ll en (E le men tbi ldu ng)
• Mangel an Sauerstoff (z.B. kein Luftzutritt, sauerstoffarmes Wasser).
Allgemeine Arbeitsgrundsätze für die Behandlung von
Geräten aus „Edelstahl rost frei“
Halten Sie die Oberfläche von Geräten aus nichtrostendem Stahl immer sauber und für die Luft zugänglich.
Entfernen Sie Kalk- Fett-, Stärke- und Eiweißschichten täglich durch Reinigen.
Unter diesen Schichten kann durch fehlenden Luftzutritt Korrosion entstehen.
Zur Reinigung dürfen keine bleichenden und chlorhaltigen Reinigungsmittel
verwendet werden.
Werden keine besonderen Reinigungsempfehlungen gegeben, sollten in jedem Fall chloridarme Reinigungsmittel verwendet werden.
Entfernen Sie nach jeder Reinigung sämtliche Reinigungsmittelrückstände
durch Spülen mit reichlich frischem Wasser. Danach sollte die Oberfläche
gründlich getrocknet werden.
43.3000.2 11
Page 12
Speisenausgabewagen
Bringen Sie Teile aus nichtrostendem Stahl nicht länger als unbedingt erforderlich mit konzentrierte n Säuren, Gew ürzen, Salzen usw. in Berührung. Auch
Säuredämpfe, die sich beim Fliesenreinigen bilden, fördern die Korrosion von
„Edelstahl rostfrei“.
Vermeiden Sie, die Oberfläche des nichtrostenden Stahls zu verletzen, insbesondere durch andere Metalle als nichtrostenden Stahl. Durch Fremdmetallreste bilden sich kleinste chemische Elemente, die Korrosion verursachen
können. Auf jeden Fall sollte ein Kontakt mit Eisen und Stahl vermieden werden, weil das zu Fremdrost führt. Kommt nichtrostender Stahl mit Eisen (Stahlwolle, Späne aus Leitungen, eisenhaltiges Wasser) in Berührung, kann dies
der Auslöser von Korrosion sein. Verwenden Sie deshalb zur mechanischen
Reinigung ausschließlich Edelstahlwolle oder Bürsten mit Natur-, Kunststoffoder Edelstahlborsten. Stahlwolle oder Bürsten mit unlegiertem Stahl führen
zu Fremdrost durch Abrieb. Frische Roststellen können Sie mit mild wirkenden Scheuermitteln oder feinem Schleifpapier beseitigen. Stärkere Roststellen lassen sich mit warmer 2 - 3 %iger Oxalsäurelösung wegwaschen. Wenn
diese Reinigungsmittel versagen, ist eine Behandlung mit 10 %iger Salpetersäure erforderlich.
Vorsicht! Dies darf nur von technisch geschultem Personal unter Einhaltung
der bestehenden Vorschriften durchgeführt werden!
Hilfe bei Störungen
Servicearbeiten dürfen nur von autorisiertem Fachpersonal durchgeführt werden.
Defekte Komponenten dürfen nur durch Originalteile ersetzt werden.
Prüfen Sie bitte zuerst, ob ein Bedienfehler vorliegt. Einige Störungen können Sie selbst beseitigen.
Geben Sie im Kundendienstfall und bei der Ersatzteilbestellung die auf dem Typenschild angeführten Daten
(siehe Seite 4) an.
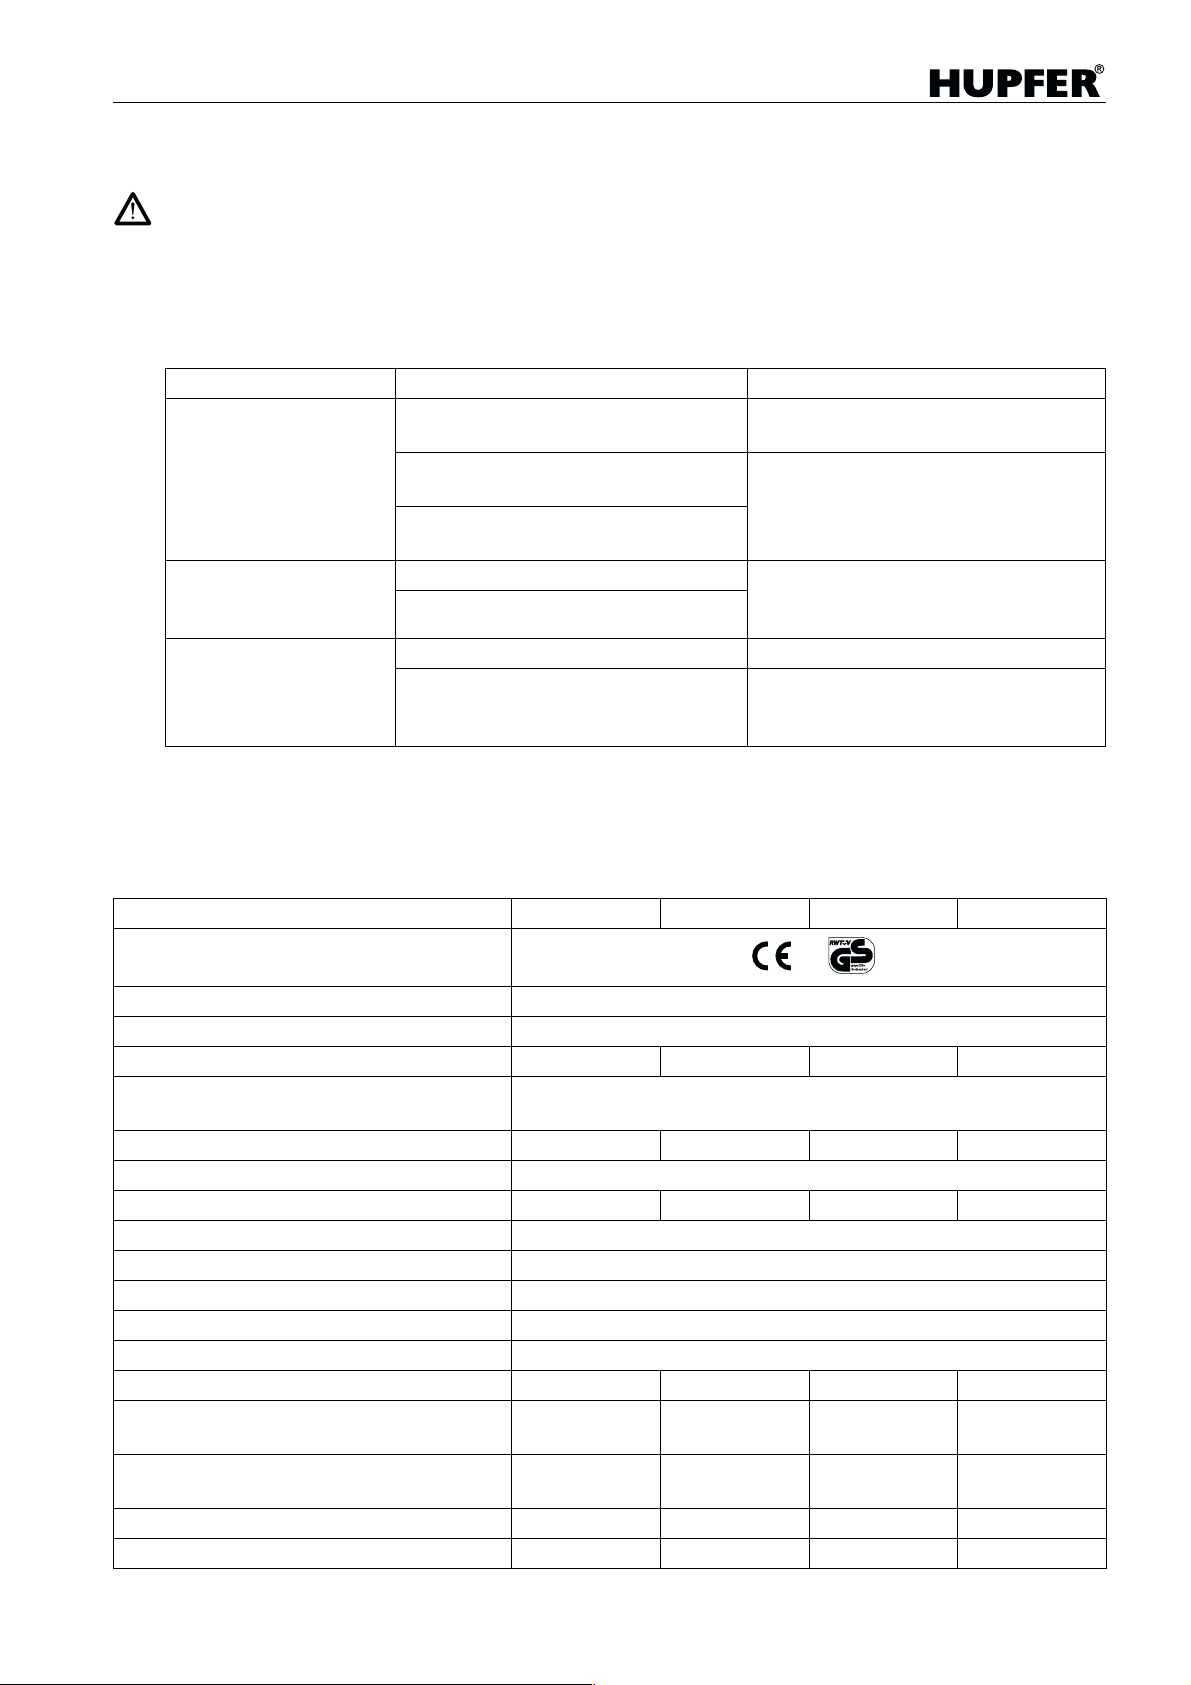
Störung Mögliche Ursache Abhilfe
Gerät wird nicht warm,
Kontrolleuchte leuchtet nicht.
Gerät wird warm,
Kontrolleuchte leuchtet nicht.
Gerät heizt nur sehr langsam auf. Zu viel Wasser im Becken. Wassermenge reduzieren.
Bauseitige Sicher ung
defekt.
Ein- / Aus-Schalter defekt. Gerät vom Netz trennen und von autoriNetzanschlußkabel oder
Netzstecker defekt.
Kontrolleuchte defekt. Gerät außer Betrieb nehm en und von
Schaltkreis defekt.
Kalkablagerungen oder
Verschmutzungen im Bekken.
Sicherung überprüfen und gegebenenfalls
instand setzen.
siertem Fachpersona l überprüfen und
gegebenenfalls instand setzen lassen.
autorisiertem Fachpersonal überprüfen
und gegebenenfalls instand setzen lassen.
Gerät außer Betrieb nehmen und nach
dem Abkühlen das Becken entkalken bzw.
reinigen.
Regelmäßige Inspektion und Wartung des Gerätes verhindern Betriebsstörungen und dienen der Sicherheit. Inspektions- und Wartungsintervalle hängen vom Einsatz des Gerätes ab. Fragen Sie den Kundendienst Ihres Händlers.
12 43.3000.2
Page 13
Speisenausgabewagen
Technische Daten
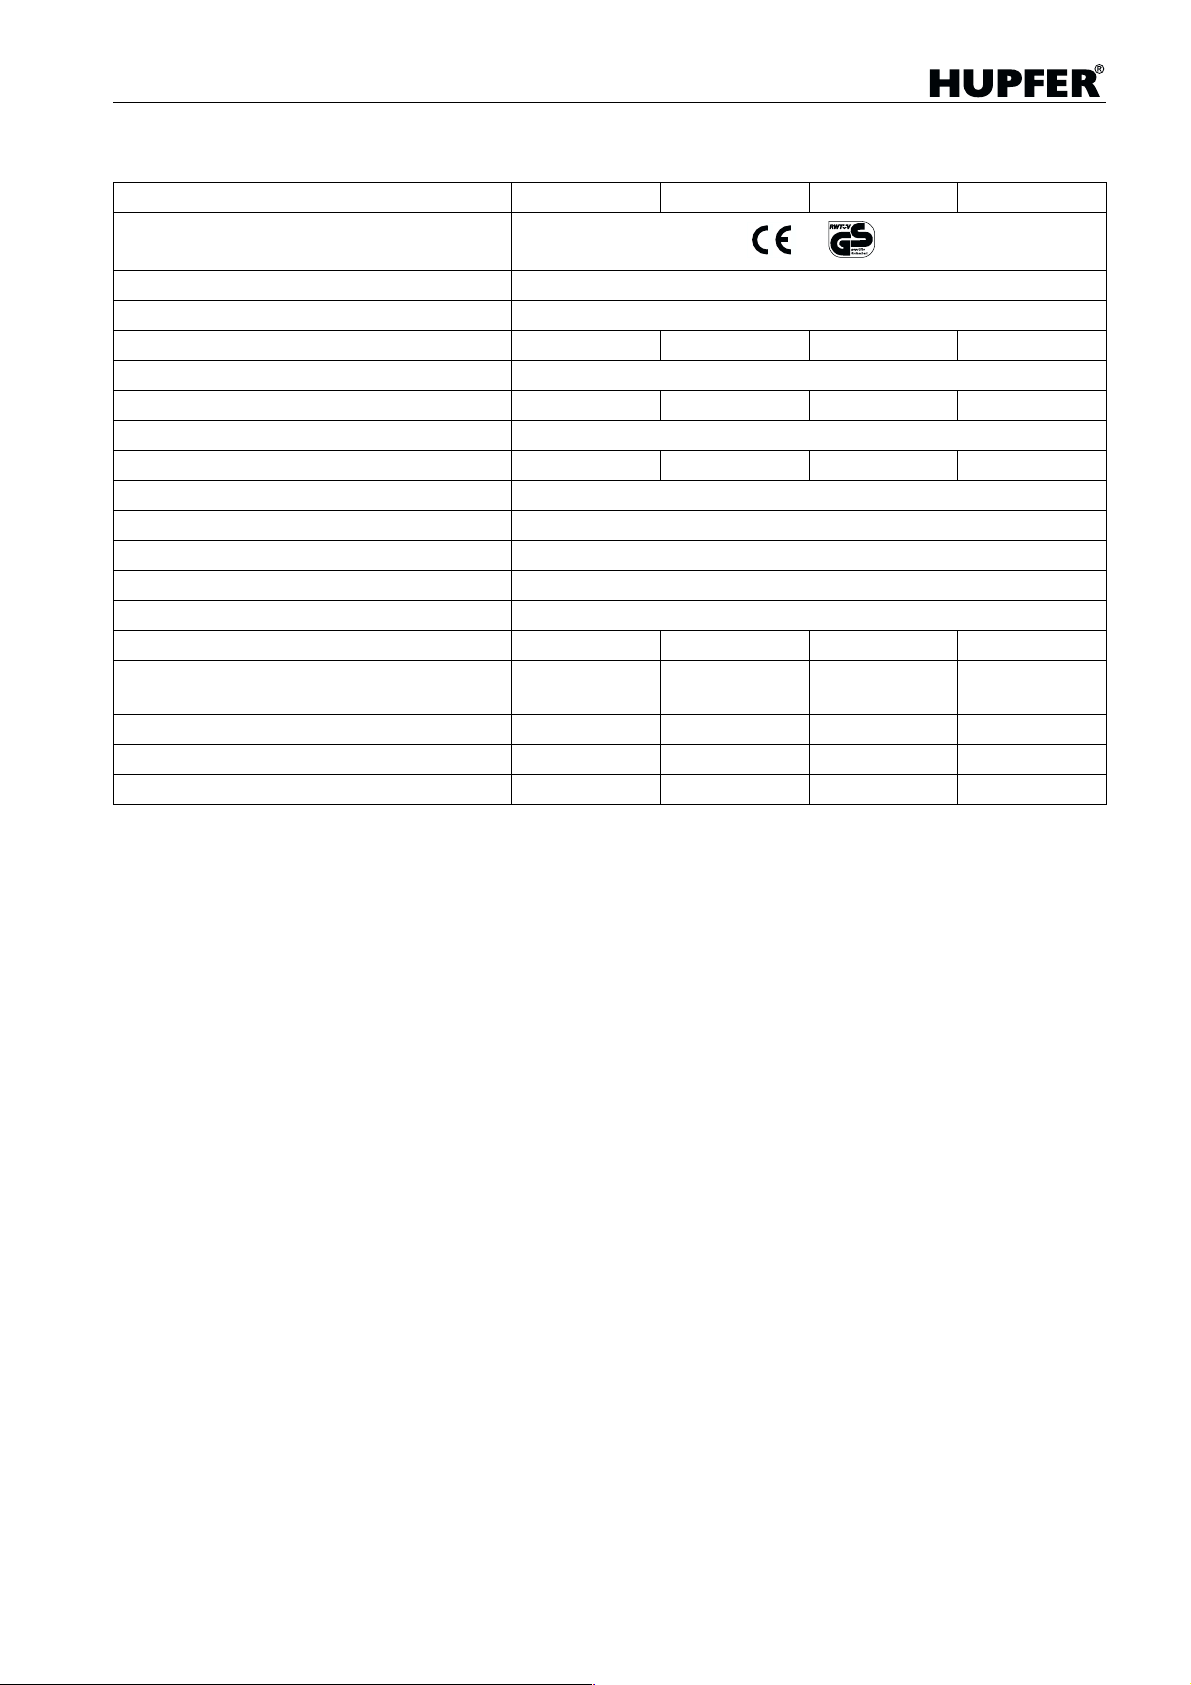
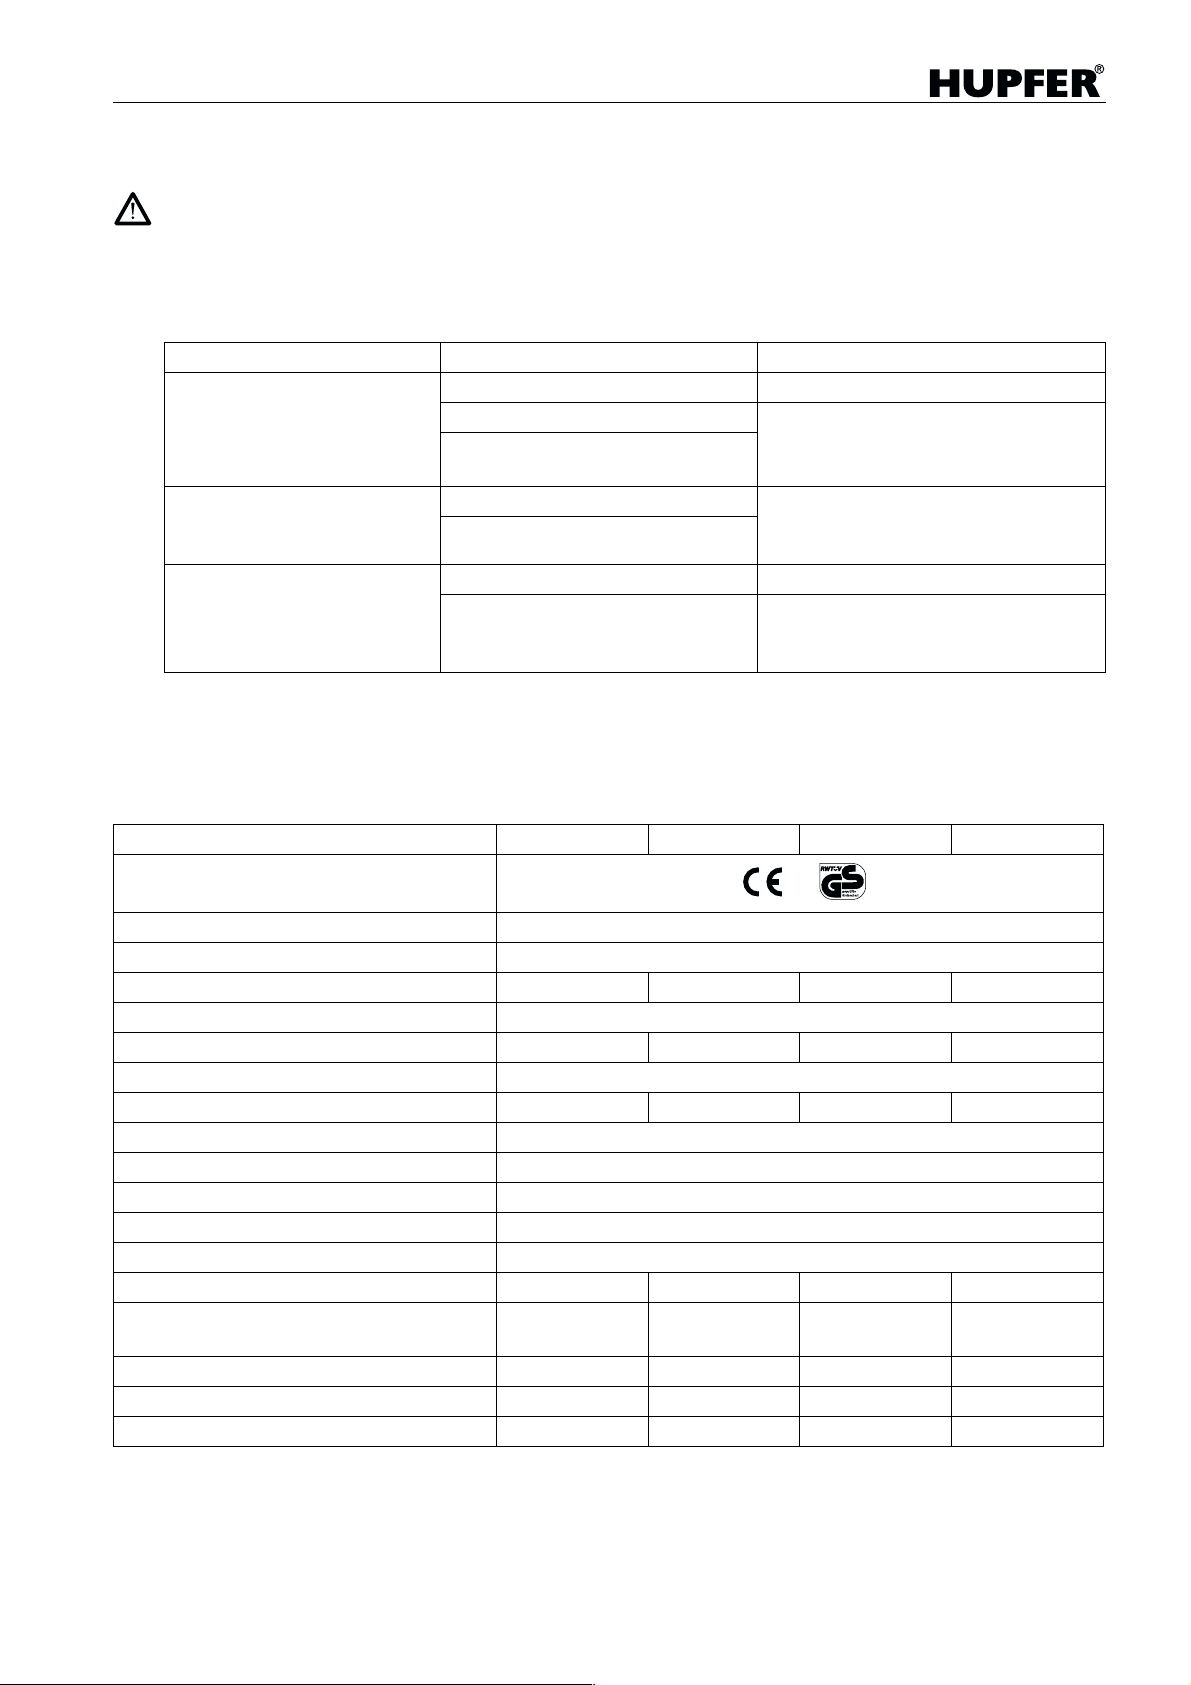
SPA/EB-1 SPA/EB-2 SPA/EB-3 SPA/EB-4
Prüfzeichen
Gerät gefertigt gemäß DIN 18867–7
Strahlwasserschutz IPX5
Beckenanzahl 1234
Beckengrößefür GN 1/1 und deren Unterteilungen bis max. 200 mm Tiefe
Mittlere Kapazität in Personen* 15 25 50 80
Beheizung CNS-Rohrheizkörper
Anschlußwert 0,7 kW 1,4 kW 2,1 kW 2,8 kW
Elektrischer Anschluß 230 V 1N AC 50 Hz
Thermische Isolierung keramisches Vlies
Temperaturregelung stufenlos, jedes Becken separat
Temperaturbereich 30–95 °C
Fahrgestell 4 Lenkrollen, davon 2 mit Totalfeststeller, Ø 125 mm
Nettogewicht ohne Bodenbord 32 kg 44 kg 55 kg 66 kg
Gerätegewicht mit maximaler Beladung der
Becken, ohne Bodenborde
Maximale Punktlast der Bodenborde 50 kg 40 kg 30 kg 20 kg
Maximale Flächenlast der Bodenborde 100 kg 80 kg 65 kg 50 kg
Zulässiges Gesamtgewicht 170 kg 195 kg 220 kg 250 kg
* Die Kapazität ist abhängig von der Speisenkonzeption und der Komponentenvielfalt.
64 kg 108 kg 151 kg 194 kg
43.3000.2 13
Page 14

Food serving trolley
List of contents (UK, IE)
General notes. . . . . . . . . . . . . . . . . . . . . . . . . . . . . . . . . . 16
Use of appliances . . . . . . . . . . . . . . . . . . . . . . . . . . . . . . 16
Advice to users . . . . . . . . . . . . . . . . . . . . . . . . . . . . . . . . 16
Type plate. . . . . . . . . . . . . . . . . . . . . . . . . . . . . . . . . . . . . 16
View of the appliance . . . . . . . . . . . . . . . . . . . . . . . . . . 17
Safety instructions . . . . . . . . . . . . . . . . . . . . . . . . . . . . . 18
Operation . . . . . . . . . . . . . . . . . . . . . . . . . . . . . . . . . . . . . 20
Putting the food serving trolleys into operation . . . . . . . . . . . 20
Fill bowls
Switch on the appliance
Use of the appliance . . . . . . . . . . . . . . . . . . . . . . . . . . . . . . . 21
Insert GN containers
Transport
Taking out of operation . . . . . . . . . . . . . . . . . . . . . . . . . . . . . 21
Switch off the appliance
Drain off water
Special accessories. . . . . . . . . . . . . . . . . . . . . . . . . . . . . 22
Hinged edges
Base edges
Drain extension
Cleaning and care . . . . . . . . . . . . . . . . . . . . . . . . . . . . . . 23
Valuable information about "refined stainless steel"
General working principles for the handling
of appliances made from "refined stainless steel"
Help in the event of faults. . . . . . . . . . . . . . . . . . . . . . . . 25
Technical Data . . . . . . . . . . . . . . . . . . . . . . . . . . . . . . . . 25
Replacement parts . . . . . . . . . . . . . . . . . . . . . . . . . . . . . 26
CE-Conformity declaration. . . . . . . . . . . . . . . . . . . . . . . .78
43.3000.2 15
Page 15
General notes
Use of appliances
Food serving trolley
Subject to modification
The products covered by these operating instructions have been developed
taking into consideration the requirements of the market and the latest technology. HUPFER
and to the appertaining technical documentation in so far as the modifications
are in the name of progress. The data and weights assured as binding in the
confirmation of the order as well as the description of performance and functions are always decisive.
Packing and transport
Your HUPFER
packed in a clean condition. The packaging consists of recyclable materials
and can be disposed of appropriately.
Food serving trolleys are electrically heated mobile warming bowls.
The main field of use is to keep food warm and to prepare food on food distribution belts in canteen catering. Depending upon the type and size of kitchen,
appliances with 1 to 4 bowls are used.
A typical additional field of use is event catering (party and conference service)
with the use of all appliance types.
In addition the appliances are suitable for serving food directly in front of the
customer, although due to the operating and display elements on the front side
they are not ideally equipped for this purpose.
®
reserves the right to make modifications to the products
®
product has been subjected to careful functional testing and
Advice to users
Type plate
Notes:
• Before the first use, the protective film should be removed from metal plates.
• For safety reasons, the maximum water bath temperature which can be
reached is limited to 95 °C. This means that the performance of a food serving trolley is not comparable with the performance of a stationary water bath.
Read these operating instructions carefully before first putting the appliance
into operation. Ensure that sources of danger and possible faulty operations
have been pointed out to the operating staff.
Important advice concerning safety and prevention of damage is indicated in
these instructions by a "warning" symbol.
Warning, advice on safety or prevention of damage!
The advice denoted in this way must be brought to the attention of the operating staff.
Useful advice and tips for the operation of the appliance are denoted by the
"hand" symbol.
Manufacturer Current consumption
Model * Maximum safe load
Part No. * ! Test mark
Order No. * " Type of protection
Serial No. * # Conformity symbol
Rated voltage $ Refrigerating power
Connected load % Refrigerant
* necessary details in the event of after-sales service
16 43.3000.2
Page 16
Food serving trolley
View of the appliance
Safety sliding handles with integrated abutting edge
Toggle switch for regulation of the bowl temperature
Figures for assignment of the bowls
ON/OFF switch
Deflector rollers
Castors with total lock
Warming bowl
Water drain cocks for warming bowl
Plug holder
! Connecting cable with plug
" Castors without lock
Special accessories:
• GN containers
• Suspension bars for bowls, (length 325 or 530 mm)
• Flexible drain extension ½", 42 cm
• Base edge made from nickel chromium steel 1.4301
• Hinged edge for long side, made from nickel chromium steel 1.4301*
• Hinged edge for front side, made from nickel chromium steel 1.4301*
• Castors made from nickel chromium steel, Ø 125 mm,
with and without total lock, journal attachment
* The subsequent fixing of the hinged edges on the appliance must only be
carried out by authorised specialist staff. An inert gas welding device is
necessary.
43.3000.2 17
Page 17
Safety instructions
Food serving trolley
• The appliances are only intended for supervised operation.
• The appliances are provided for the transport of foods in inserted GN con-
tainers and with the bo wls fi ll ed w ith wate r. The tr an sp or t of oth er lo ads is
not permitted.
• Because of the danger of ti pping, the ap plian ce SPA/E B-1 shoul d only be
moved in the empty state, th at is to sa y wi tho ut wate r in it an d with out G N
containers inse rted. Because of t he very narrow, space-saving co nstruction there is in principle a danger of tipping with this model.
• Transport sho uld only be undertak en over level floors . Moving the appliance over very uneven floors can cause damage to the chassis.
• Before transport, swit ch off the applian ce, disconnec t the mains plug and
insert it into the holder provided.
• Never pull the mains plug out of the socket by the cable.
The food serving trolleys from HUPFER
earthing contact plug on the standard model. In contrast to a straight
shock-proof plug this plug only sticks out insignificantly from the socket and
so cannot be damaged by being hit at the side.
If the device is moved wit hout pulling out th e plug beforehand the soc ket
can - as a result of the lever age arising throu gh the overstretching of the
cable - be severely damaged or even pulled out of the wall.
• Before transpor t, release both lock ing brakes. Movin g the appliance with
the locking brakes locked can damage the chassis.
• The appliances are provided exclusively for manual transport. Mechanically assisted transport is not permitted. Danger of injury and damage.
• In the case of transport with the ai d, for ex amp le, of a lo rry the ap pli an ces
should be secured. The total lock s are not su ffici ent as trans port sec uring
means.
• Never move the appliance by pulling on the connecting cable.
• Transport over inclined planes or steps is not permitted.
• During transport do not move the appliance faster than walking pace.
Heavily laden trolle ys c an on ly be braked and ste ered with d ifficulty . If r equired obtain assistance for transport.
®
are equipped with an angled
• Never try to catch in your hands trolleys which have been caused to tip due
to extraneous action or inattention. Danger of injury!
• Do not sit or stand on the appliance. Never convey persons with the appliance.
• Do not stop appliances on a sloping floor.
• After stopping, the applianc es should be secured against rolling away by
means of both total locks.
18 43.3000.2
Page 18

Food serving trolley
• If the plug has come into contact with water it must be dried before it is in-
serted into the socket. Danger to life!
• Damaged mains connecti ng p lug s o r cab les are to be r ep laced by author-
ised specialist staff before the appliance is used.
• The spiral cable is suitable for a maximum extended length of 1.80 m.
Forceful straining of the cable can lead to damage to the internal leads. Fire
risk!
• Do not use any extension cables in wet and damp areas.
• Do not clean the appliance with steam-jet or high-pressure cleaners.
If it is anticipated that steam -jet or high-pressure c leaners will be used in
the surroundings, then the appli ance must be taken out of operation and
disconnected from the mains power supply beforehand.
• Only insert plugs into suitable sockets with earth contacts. If the plug does
not fit, the mains connecti ng cable should be adapted by author ised specialist staff (see plug types which can be used on page 26).
The use of socket adapters is not permitted. Fire risk!
• The castors are permitted for temp erature s between -20 und +50 °C. Use
in other temperature ranges can result in weakening of the structure of the
material. Damage due to mechanical actions can no longer be excluded.
43.3000.2 19
Page 19
Operation
Putting the food serving trolleys into operation
In order to put the food serving trolleys into operation, the bowls of the appliance must be cold, clean and free of limescale. If need be, bowls which have
already been used and from which the water has been completely drained off
must be allowed to cool for some time.
It is possible to dry heat the bowls without any risk, but because of the very
poor heat transfer this is not recommended by HUPFER
If bowls have been heated dry, on contact with cold water a great deal of steam
is generated. Danger of scalding!
In addition, deformations of the bowl base and the formation of microcracks
are possible. This may result in total damage to the appliance.
A layer of limescale acts as heat insulation and can lead to an accumulation
of heat above the tubular heating element; this may result in damage to the
base of the bowl.
In addition there is a danger of corrosion below the layer of limescale.
Observe the safety instructions from page 18 onwards.
Fill bowls
Food serving trolley
®
.
– Close drain cocks.
– Fill bowls with about 3 litres of water.
This corresponds to a water level of about 2 cm.
The GN containers (maximum depth 200 mm) used later should not have any
contact with the water, since this reduces the heat transmission. The best heat
transmission takes place through steam.
Higher filling levels prolong the heating-up time.
If the tap water has a high mineral content, softened water should be used in
order to reduce limescale.
Warm or hot water should be used for filling the bowl. This reduces the time
for heating up the appliance.
Switch on the appliance
– Cover bowls in order to avoid loss of heat.
– Insert appliance plug into a suitable socket with an earth contact.
Only use the plug connection provided for this. The appliance should not
be operated with a damaged connecting lead or other visible damage.
– Switch on the appliance with the ON/OFF switch.
The indicator integrated in the switch lights up to show that it is ready for
operation.
– Set the desired power with the regulator belonging to the bowl. A continous
adjustment is possible wit hin the 4 powe r ranges. The assignment of the
switches to the bowls takes place by way of figures imprinted in the housing.
With a filling level of 2 cm (cold water), good covering and full appliance power
the water in the bowl reaches a temperature of 90 °C after about 45 minutes.
20 43.3000.2
Page 20
Food serving trolley
Use of the appliance
Insert GN containers
GN 1/1 containers up to a depth of 200 mm can be inserted into the bowls without additional measures. When GN 2/3, GN 1/2 and GN 1/3 containers are
used, separators (special accessories) should be used in order to minimise the
escape of steam between the containers and the heat loss associated with
this.
When even smaller GN containers are used, suspension bars must be used
in order to ensure the sealing with the bowl rim.
Ensure that there is a good seal around the insert bowls, since escaping steam
can lead to scalding. Metal parts of the cover which can be touched can become dangerously hot.
Transport
Observe the safety instructions from page 18 onwards.
Taking out of operation
– Set all regulators to
– Switch off the appliance at the ON/OFF switch.
– Pull out the mains plug and insert it into the holder provided.
– Release both locking brakes.
– Grip the appliance by the sliding handles and move it to the destination.
– At the destination, lock both locking brakes in order to secure the appliance
against inadvertent movement.
– Insert appliance plug into suitable socket with earth contact
– Switch on the appliance with the ON/OFF switch.
– Set the desired power with the regulator belonging to the bowl.
●.
Switch off the appliance
– Set all regulators to ●.
– Switch off the appliance with the ON/OFF switch.
– Pull out the mains plug and insert it into the holder provided.
Drain off water
Never actuate drain cocks with a tool.
If the cock is stuck, use separating means which are safe in health terms (e.g.
Teflon spray). Then thoroughly clean drain and bowls.
If hot water is drained off, there is a danger of scalding.
Only open the drain cock directly above a drainage channel in the building or
a central kitchen drain.
When a base edge is used (special accessory at extra cost) use a collecting
tank with sufficient volume or drain extension (special accessory at extra cost).
After the water has been drained off, the drain pipe and the cock may have a
higher temperature. Danger of burning!
43.3000.2 21
Page 21
Special accessories
Hinged edges
• It is not permitted to place heavy loads on the hinged edges.
• During transport of the appliance the hinged edges must be folded in.
• When the hinged edges are being hinged up and locked there is a danger
Food serving trolley
of crushing.
– Pivot hinged edge
– Pivot supports
– Place supports so that as the hinged edge is lowered the pins
the holes there.
– The edges are hinged in in the reverse sequence.
upwards.
out.
slide into
Bottom shelves
Only fixed standing objects are allowed to be put on the bottom shelf The maximum laden weight must not be exceeded (see “Specifications” page 25).
Open containers with hot liquids should not be transported.
Drain extension
• Never move the appliance by pulling on the drain extension.
• When draining off the water pay attention to the position of the end of the
hose.
• When hot water is drained off the drain extension may have a higher temperature. Danger of burning!
– Screw the external thread of the drain extension firmly to the end connec-
tion of the drain cock.
– Place the end of the hose over a drain.
– Open drain cock.
Even when a base edge is used the water can be drained off without the use
of a collecting tank.
22 43.3000.2
Page 22

Food serving trolley
Cleaning and care
• Take the appliance out of operation before starting the cleaning process.
Pull out the mains plug and insert it into the holder provided on the appliance. Empty the bowls.
• Do not clean the appliance with steam-jet or high-pressure cleaners. If it is
anticipat ed tha t stea m-jet or high -pre ssure c leane rs will be us ed in th e sur roundings, then the appliance must be taken out of operation and disconnected from the mains power supply beforehand.
• For cleaning, the appliance must be out of operation and sufficiently
cooled.
If after cleaning there are still limescale deposits present these must be removed since otherwise the energy consumption increases and the appliance
becomes less economical. In the event of severe limescale deposits the appliance may sustain damage. Use commercially available surface descalers or
vinegar water for descaling.
The drain cock can be re-greased with food grease (cooking fats are unsuitable for this purpose) in order to provide sealing and ease of action.
Valuable information about "refined stainless steel"
The resistance to corrosion of stainless steels is based on a passive layer
which is formed on the surface when oxygen is admitted. The oxygen in the
air is sufficie nt for the form ation of the pass ive la yer, so tha t faul ts or dama ge
to the passive layer can be remedied again automatically by mechanical action. The passive layer develops or reforms more quickly when the steel
comes into contact with flowing water containing oxygen. A further increase in
the effect is achieved by acids having an oxidising action (nitric acid, oxalic
acid). These acids are used if the steel has been severely chemically stressed
and therefore has largely lost its passive layer. The passive layer can be
chemically damaged or disrupted by agents having a reducing (oxygen-consuming) action when the steel comes into contact with them in concentrated
form or at high temperatures. Such aggressive substances are for example:
• substances containing salt and sulphur
• chlorides (salts)
• seasoning concentrates such as mustard, vinegar essence, seasoning
cubes, saline solutions, etc.
Further damage can occur due to:
• extraneous rust (e.g. from other components, tools or rust film)
• iron particles (e.g. grinding dust)
• contact with non-ferrous metals (element formation)
• lack of oxygen (e.g. no admission of air, water with a low oxygen contend).
General working principles for the handling
of appliances made from "refined stainless steel"
Always keep the surface of appliances made from stainless steel clean and
accessible to the air.
Remove layers of limescale, grease, starch and egg-white daily by cleaning.
Corrosion can occur underneath these layers due to lack of air admission. No
bleaching and chloride-containing cleaning agents should be used.
If no special cleaning recommendations are given, low-chloride cleaning
agents should be used in any case.
After each cleaning operation remove all cleaning agent residues by rinsing
with copious fresh water. Afterwards the surface should be thoroughly dried.
43.3000.2 23
Page 23

Food serving trolley
Do not bring parts made from stainless steel into contact with concentrated acids, seasonings, salts etc. for longer than is absolutely necessary. Acid fumes
which form during cleaning of tiles also promote the corrosion of "refined stainless steel".
Avoid damaging the surface of the stainless steel, particularly by metals other
than stainless steel. Residues of extraneous metals produce extremely small
amounts of chemical elements which can cause corrosion. In any case, contact with iron and steel should be avoided because that leads to extraneous
rust. If stainless steel comes into contact with iron (steel wool, swarf from
pipes, water containing iron), this can be the trigger for corrosion. Therefore
for mechanical cleaning use exclusively refined steel wool or brushes with natural, plastics or refined steel bristles. Steel wool or brushes with unalloyed
steel lead to extraneous rust due to abrasion. Fresh rust sites can be eliminated using gentle abrasives or fine abrasive paper. More severe rust sites can
be washed away with warm 2 – 3 % oxalic acid solution. If these cleaning
agents fail, treatment with 10 % nitric acid is necessary.
Caution! This should only be carried out by technically trained staff observing
the existing regulations!
24 43.3000.2
Page 24
Food serving trolley
Help in the event of faults
Service work should only be carried out by authorised specialist staff.
Defective components should only be replaced with original parts.
Please check first of all whether there has been an operating error. You yourself can eliminate some faults.
In the event of after-sales service and when ordering replacement parts give the data set out in the identification plate (see page 16).
Fault Possible cause Action
Appliance does not become
warm,
indicator light does not come
on.
Appliance becomes warm,
indicator light does not come
on.
Appliance only heats up very
slowly.
Defective fuse at the building end. Check fuse and repair if need be.
ON/OFF switch defective. Disconnect appliance from the mains
Mains connection cable or
mains plug defective.
Indicator light defective. Take appliance out of operation and
Circuit defective.
Too much water in the bowl. Reduce quantity of water
Limescale or dirt in the bowl. Take the appliance out of operation
and have it checked and repaired if
need be by authorised specialist staff.
have it checked and repaired if need
be by authorised specialist staff.
and after cooling descale or clean the
bowl.
Regular inspection and maintenance of the appliance prevent disruptions to operation and ensure safety.
Inspection and maintenance intervals depend upon the use of the appliance. Consult your dealer’s after-sales
service department.
Technical Data
SPA/EB-1 SPA/EB-2 SPA/EB-3 SPA/EB-4
Test mark
Appliance m anufactured in accordance with
Water spray protection IPX5
Number of bowls 1 2 3 4
Bowl size for GN 1/1 und sub-divisions thereof up to max. 200 mm depth
Average capacity in persons* 15 25 50 80
Heating CNS tubular heating element
Connected load 0,7 kW 1,4 kW 2,1 kW 2,8 kW
Electrical connection 230 V 1N AC 50 Hz
Heat insulation ceramic mat
Temperature regulation continuous, each bowl separate
Temperature range 30–95 °C
Chassis 4 castors, of which 2 with total locks, Ø 125 mm
Nett weight without base edge 32 kg 44 kg 55 kg 66 kg
Appliance weight with maximum loading
of bowls, without base edges
Maximum localised load on base edges 50 kg 40 kg 30 kg 20 kg
Maximum area load on base edges 100 kg 80 kg 65 kg 50 kg
Permitted total weight 170 kg 195 kg 220 kg 250 kg
* The capacity is dependent upon the food recipe and the multiplicity of ingredients.
64 kg 108 kg 151 kg 194 kg
DIN 18867– 7
43.3000.2 25
Page 25

Chariot de présentation des mets
Table des matières (FR, BE, CH)
Remarques générales . . . . . . . . . . . . . . . . . . . . . . . . . . . 28
Utilisation des appareils. . . . . . . . . . . . . . . . . . . . . . . . . 28
Remarques à l’attention de l’utilisateur. . . . . . . . . . . . . 28
Plaque d'identification. . . . . . . . . . . . . . . . . . . . . . . . . . . 28
Vue de l’appareil . . . . . . . . . . . . . . . . . . . . . . . . . . . . . . 29
Avis de sécurité. . . . . . . . . . . . . . . . . . . . . . . . . . . . . . . . 30
Maniement . . . . . . . . . . . . . . . . . . . . . . . . . . . . . . . . . . . . 32
Mise en servic e . . . . . . . . . . . . . . . . . . . . . . . . . . . . . . . . . . . 3 2
Remplissage du bac
Enclenchement de l’appareil
Utilisation de l’appareil . . . . . . . . . . . . . . . . . . . . . . . . . . . . . . 33
Mise en place des récipients GN
Transport
Mise hors service . . . . . . . . . . . . . . . . . . . . . . . . . . . . . . . . . . 33
Mise hors tension de l’appareil
Evacuation de l’eau
Accessoires spéciaux. . . . . . . . . . . . . . . . . . . . . . . . . . . 34
Plaques rabattantes
Plaques de fond
Prolongement d’écoulement
Nettoyage et entretien. . . . . . . . . . . . . . . . . . . . . . . . . . . 35
A savoir sur les « aciers inoxydables »
Principes de travail généraux pour le traitemen t
des appareils en « acier inoxydable »
Contre-mesures à prendre lors de défauts. . . . . . . . . . 37
Données techniques . . . . . . . . . . . . . . . . . . . . . . . . . . . . 37
Pièces détachées . . . . . . . . . . . . . . . . . . . . . . . . . . . . . . 38
Déclaration de conformite de la CE. . . . . . . . . . . . . . . . .78
43.3000.2 27
Page 26
Remarques générales
Sous réserve de modifications
Les produits auxquels se réfèrent ce mode d’emploi ont été développés en fonction des
besoins du marché et de l’état de la technique. La société HUPFER
de procéder à des modifications sur les produits et sur la documentation technique associée, dans la mesure où elles présentent une utilité pour les progrès techniques. Les
données et les poids ainsi que la description des fonctions et des performances, garantis de manière engageante dans la confirmation d’ordre de commande, sont toujours dé-
cisifs.
Emballage et transport
Votre produit HUPFER
de le nettoyer et de l’emballer. L’emballage se compose de matériaux qui peuvent être
recyclés, et de ce fait, il est possible de l’éliminer sans problème.
Utilisation des appareils
Les chariots de présentation des mets sont des bacs mobiles et chauffés électriquement
qui gardent les plats culinaires au chaud.
Le domaine d’application principal est la préparation et le maintien au chaud des denrées devant les tapis roulants de distribution dans les cantines. On utilise des appareils
comportant 1 à 4 bacs selon le type et les dimensions de la cuisine.
Un domaine d’application annexe typique est le « Event-Catering » (service de surprises parties et de conférence) où tous les types d’appareils sont utilisés.
De plus, les appareils conviennent à la distribution directe des aliments devant le consommateur, mais en raison des éléments d’affichage et de commande placés sur la face
frontale, ils ne sont pas équipés de manière optimale pour ce mode d’utilisation.
Chariot de présentation des mets
®
se réserve le droit
®
a été soumis à un contrôle de fonctionnement minutieux avant
Remarques :
• Retirer le film de protection des tôles avant la première mise en service.
• Pour des raisons de sécurité, la température maximale du bain-marie qu’il est pos-
sible d’atteindre est limitée à 95 °C. Cela signifie que la puissance d’un chariot de
présentation des mets ne doit pas être comparée à la puissance d’un bain-marie stationnaire.
Remarques à l’attention de l’utilisateur
Veuillez lire ce mode d’emploi avec attention avant la première mise en service. Ve illez
à instruire le personnel opérateur sur les sources de danger et les erreurs de maniement
possibles.
Dans ce mode d’empoi, les remarques et avis importants concernant la sécurité et la
prévention d’accidents sont mis en évidence par le pictogramme « Attention ».
Attention, avis de sécurité ou remarque concernant la prévention d’accidents !
Le personnel opérateur doit prendre connaissance des remarques ainsi caractérisées.
Le pictogramme de la « main » permet de mettre en évidence des remarques et con-
seils utiles.
Plaque d’identification
Fabricant Consommation de courant
Modèle * Charge maximale
N° d’article * ! Estampille de contrôle
N° d’ordre de commande * " Type de protection
N° de série * # Estampille de conformité
Tension nominale $ Puissance frigorifique
Valeur de branchement % Fluide frigorigène
* Indications nécessaires au cas où il faut contacter le service après-vente
28 43.3000.2
Page 27
Chariot de présentation des mets
Vue de l’appareil
Poignée de sécurité à pousser avec rebord pare-choc intégré
Manette pour réguler la température du bac
Chiffres indiquant le bac concerné
Bouton de mise sous/hors tension
Roulettes de chasse
Roulettes directrices avec fein total
Bacs chauffants
Robinet de vidange d’eau pour les bacs chauffants
Monture pour accrocher la fiche secteur
! Câble de raccordement avec fiche secteur
" Roulettes directrices sans fein
Accessoires spéciaux :
• Récipient selon la norme gastronomique (GN)
• Nervures d’accrochage pour bacs (longueur : 325 ou 530 mm)
• Prolongement d’écoulement flexible ½", 42 cm
• Plaque de fond en acier nickelé et chromé 1.4301
• Plaque rabattante vers le bas, sur le côté longitudinal, en acier nickelé
et chromé 1.4301*
• Plaque rabattante vers le bas, sur la face frontale, en acier nickelé
et chromé 1.4301*
• Roulettes directrices en acier nickelé et chromé, Ø 125 mm, avec et
sans fein total, fixation par cheville
* La fixation à postériori des plaques rabattantes vers le bas est réservée
exclusivement au personnel spécialisé et autorisé. Un appareil de soudage WIG est nécessaire.
43.3000.2 29
Page 28
Avis de sécurité
Chariot de présentation des mets
• Les chariots sont destinés uniquement pour l’emploi prévu.
• Les chariots sont pr évus pour le tran sport de s produits alimen taires dans
des récipients GN enca strés et le transport de l’eau remplie dans les bacs.
Il est interdit de transporter d’autres charges.
• A cause du risque de ba scul ement, l e chario t SPA/E B-1 do it être déplacé
uniquement à vide, c’est-à-dire sans remplissa ge d’eau et sans récipient
GN accroché. Ce chariot présente toujours un r isque de bas culement e n
raison de sa construction très mince qui écono mise de la place.
• Le transport doit avoir lieu uniquement sur des sols plans. Le déplacement
sur des sols très irréguliers peut endommager le châssi s de roulem ent .
• Mettre l’appareil ho rs tens ion avan t le tr anspo rt ; d ébranche r la fiche secteur de la prise de courant et l’accrocher dans la monture prévue à cet effet.
• Ne jamais débra ncher la fi che s ecte ur d e la pr ise de c ourant e n tirant s ur
le câble.
Les chariots de présentation des m ets de l a société HUPFER
pés d’une fiche coudée à contact de pr otection dans la version s tandard.
Contrairement à une fiche droite, cette fiche coudée dépasse seulement à
peine de la prise de courant et c’est pourquoi elle ne peut pas être endommagée par un déplacement latéral.
Si le chariot est déplacé sans retirer auparavant le fiche secteur de la prise,
l’effet de levier qui se produit peut allonger le câble, puis endommager considérablement la prise de courant, voire même l’arracher du mur.
®
sont équi-
• Desserrer les deux freins parkings avant le transport. Le déplacement avec
les freins parkings enclenchés peut endommager le châssis de roulement.
• Les chariots sont prévus exclusivement pour le transport manuel. Un trans-
port assist é par machine est interdi t car il y a risque de bles sure et d’en-
dommagement.
• Assurer les chariots lors du transport avec des moyens auxiliaires, comme
par exemple, sur un camion. Les freins totaux ne sont pas suffisants comme mesure de sécurité pendant le transport.
• Ne jamais déplacer le chariot en t irant sur le câble de raccordement.
• Le transport sur des surfaces en biais ou dans des escaliers est interdit.
• Lors du transport, ne p as dépl acer le cha r iot t ro p r api dem ent (m ar ch er au
pas). Les chariots très chargés ne peuvent être freinés et dirigés que difficilement. Le cas échéant, demander de l’aide pour le transport.
• Ne jamais essayer de rattrapper à la main les chariots qui basculent à cause d’une inattention ou d ’une influence externe. Risque de blessure !
• Il est interdit de s’asseoir et de se tenir sur le chariot. Ne jamais transporter
de personnes avec l’appareil.
• Ne pas parquer les chariots sur un sol incliné.
• Les chariots parqu és doivent être assurés contre un déplacement inopiné
à l’aide des deux freins totaux.
30 43.3000.2
Page 29

Chariot de présentation des mets
• Si la fiche secteur e st entrée en contact avec de l’eau, il faut l a sécher
avant de l’entroduire dans la prise de courant. Danger de mort !
• Faire remplacer une fiche secteur endommagée ou un câble de raccorde-
ment abîmé par un personnel spécialisé et agréé avant d’utiliser l’appareil.
• Le câble spiralé convient à une longueur d’étirement maximale de 1,80 m.
Une élongation forcée du câble peut endommager les lignes électriques intérieures. Risque d’incendie !
• Ne pas utiliser les câbles de prolongation dans les salles humides ou
mouillées.
• Ne pas nettoyer le chariot avec des nettoyeurs au jet de vapeur ou à haute
pression.
Si des travaux avec des nettoye urs au jet de vapeur o u à h aute pr ession
sont prévus dans l’environnement, il faut auparavant mettre l’appareil hors
tension et le débrancher du réseau secteur.
• Brancher la fiche secteur uniquement dans les prises de courant à contact
de protection adéquates. Si la fiche secteur ne convient pas, faire transformer le câble de raccor dement au réseau par un personnel spécialisé et
agréé (voir les types de fiches utilisables à la page 38).
L’utilisation d’adaptateurs de fiches est interdite. Risque d’incendie !
• Les roulettes de roulement sont homologuées pour des températures com-
prises entre -20 et +50 °C. L’utilisation dans d’autres plages de températu-
res peut affaiblir la structure du matériau. Il n’est alors plus possible
d’exclure des endommagements à cause des actions mécaniques.
43.3000.2 31
Page 30
Maniement
Mise en service
Chariot de présentation des mets
Pour la mise en service, les bacs de l’appareil doivent être froids, propres et
exempts de tout dépôt de tartre. Le cas échéant, il faudra faire refroidir pendant quelque temps les bacs mis en service dans lesquels l’eau a été entière-
ment évacuée.
Le chauffage à sec des bacs est possible sans danger, mais la société
HUPFER
Il y a une formation importante de vapeur lorsque de l’eau froide est versée
dans les bacs chauffés à sec. Risque de s’ébouillanter !
De plus, il est possible que le fond du bac se déforme et que des micr ofissures
se forment. Cela peut conduire à une destructiont totale de l’appareil.
Une couche de tartre agit comme isolation thermique et peut mener à une accumulation de chaleur au-dessus des radiateurs tubulaires. Conséquence
possible : endommagement du fond du bac.
Par ailleurs, il y a risque de corrosion sous la couche de tartre.
Observer les avis de sécurité figurant à la page 30.
®
le déconseille à cause de la mauvaise transmission de chaleur.
Remplissage du bac
– Fermer les robinets de vidange.
– Verser environ 3 l d’eau dans le bac.
Cela correspond à un niveau d’eau d’environ 2 cm.
Les récipients GN mis en place plus tard (profondeur maximale : 200 mm) ne
doivent avoir aucun contact avec l’eau car cela réduit la transmission de chaleur. La meilleure transmission de chaleur est réalisée avec de la vapeur.
Des niveaux de remplissage plu s impor tan ts pr olo nge nt le temps de chauf fe.
Pour éviter les dépôts de tartre, utiliser de l’eau douce si la teneur en minéraux
de l’eau du robinet est très élevée.
Pour remplir le bac, utiliser de l’eau chaude ou très chaude. Cela diminue le
temps de chauffe de l’appareil.
Enclenchement de l’appareil
– Recouvrir les bacs pour éviter les pertes de chaleur.
– Brancher la fiche secteur de l’appreil dans une prise de courant appropriée
à contact de protection.
Utiliser uniquement le câble de joncti on prévu à cet effet. L’appareil ne doit
pas être mis en se rvice si le câble de raccordement est abîmé ou lors de
dommages visibl es .
– En clencher l’appareil en appuyant sur le bouton de mise sous/hors tension.
Le témoin intégré dans le bouton s’allume, indiquant ainsi que l’appareil est
prêt pour la mise en service.
– Ajuster la puissance souhaitée avec le régulateur associé au bac. Un ré-
glage progressif est possible dans les 4 plages de puissance. Il est possible de voir quel régulateur est associé à quel bac grâce aux chiffres qui
sont gravés dans le bâti.
Avec un niveau de remplissage de 2 cm (eau froide), un bon recouvrement et
si l’appareil tourne à pleine puissance, l’eau dans le bac atteint une tempéra-
ture de 90 °C après environ 45 minutes.
32 43.3000.2
Page 31
Chariot de présentation des mets
Utilisation de l’appareil
Mise en place des récipients GN
Les récipients GN 1/1 jusqu ’à une profondeur de 200 peuvent être accrochés
dans les bacs sans autre mesure supplémentaire. Lors de l’utilisation de réci-
pients GN 2/3, GN 1/2 et GN 1/3, il est recommandé d’utiliser des
nervures de séparation (accessoires spéciaux) afin de minimser la sortie de
vapeur entre les récipients et, ainsi, la perte de chaleur qui est associée.
Si des récipients GN encore plus petits sont mis en place, il faut utiliser des
nervures d’accrochage pour garantir la jonction avec le rebord du bac.
Veiller à une bonne jonction avec les rebords du bac car la vapeur d’eau qui
s’échappe peut ébouillanter. Les pièces métalliques du couvercle susceptibles d’être touchées peuvent être tellement chauffées qu’elles présente un
danger réel.
Transport
Observer les avis de sécurité figu r ant à la page 30.
Mise hors service
– Positionner tous les régulateurs sur
– Eteindre l’appareil en appuyant sur le bouton de mise sous/hors tension.
– Débrancher la fiche secteur et l’accrocher dans la monture prévue à cet effet.
– Desserrer les deux freins pa rking.
– Saisir l’appareil par les deux poignées et le conduire à l’endroit choisi.
– Arrivé à cet endroit, enclencher les freins parking pour assurer l’appareil
contre un déplacement inopiné.
– B ra nc her la fi che se ct eur de l’appareil dans une prise à contact de protec-
tion appropriée.
– Enclencher l’appareil en appuyant sur le bouton de mise sous/hors tension.
– Ajuster la puissance souhaitée avec le régulateur associé au bac.
●.
Mise hors tension de l’appareil
– Positionner tous les régulateurs sur ●.
– Eteindre l’appareil en appuyant sur le bouton de mise sous/hors tension.
– Débrancher la fiche secteur et l’accrocher dans la monture prévue à cet effet.
Evacuation de l’eau
Ne jamais actionner les robinets de vidange avec des outils.
Si les robinets se sont grippés, utiliser des décapants qui ne présentent aucun
risque pour la santé (par exemple, un spray au Téflon). Ensuite, nettoyer à
fond la tubulure d’écoulement et le bac.
Il y a risque de s’ébouillanter si de l’eau très chaude s’écoule.
N’ouvrir le robinet de vidange que s’il est placé directement au-dessus d’une
rigole d’écoulement prévue dans la construction ou au-dessus de l’écoule-
ment central.
Si une plaque de fond est utilisée (acces s oir e spécial contre majoration du
prix), utiliser un récipient collecteur avec un volume suffisant ou un prolongement d’écoulement adéquate (accessoire s pécial contre majoration du prix).
Après l’évacuation de l’eau, il se peut que le tube d’écoulement et le robinet
de vidange soient échauffés à une température plus élevée. Risque de
brûlure !
43.3000.2 33
Page 32
Accessoires spéciaux
Plaques rabattantes
• Les plaques rab a tt an t es ne so nt pa s hom ol o gu ées pour y poser des charges lourdes.
• Les plaques rabattantes doivent être rabattues vers l’intérieur pendant le
transport de l’appareil.
• Il y a risque d’écrasement en rabattant les plaques vers le haut et en les
bloquant.
Chariot de présentation des mets
– Rabattre la plaque rabattante
– Rabattre le pilier
– Placer les piliers de sorte que les tiges
pondants lorsque la plaque rabattante est abaissée.
– Le rabattement des plaques vers l’intérieur est exécuté en sens inverse.
vers l’extérieur.
vers le haut.
glissent dans les trous corres-
Plaques de fond
Seuls des objets possédant une bonne stabilité doivent être posés sur les plaques de fond. Le poids total admissible. Il est interdit de dépasser le poids total
admissibl e (voir les « Données techniques », à la page 37).
Il est interdit de transporter les récipients ouverts qui contiennent des liquides
très chauds.
Prolongement d’écoulement
• Ne jamais déplacer le chariot en tirant sur le prolongement d’écoulement.
• Veiller à la postion de l’extrémité du tuyau flexible lors de l’écoulement d e
l’eau.
• Après l’évacuation de l’eau très chaude, il se peut que le prolongement
d’écoulement soit échauffé à une température plus élevée. Risque de
brûlure !
– Visser fermement le filetage extérieur du prolongement d’écoulement à la
tubulure terminale du robinet de vidange.
– Placer l’extrémité du tuyau flexible au-dessus d’un déversoir.
– Ouvrir le robinet de vidange.
Le prolongement d’écoulement permet d’évacuer l’eau, même si une plaque
de fond est mise en place et sans utiliser un récipient collecteur.
34 43.3000.2
Page 33

Chariot de présentation des mets
Nettoyage et entretien
• Mettre l’appareil hors service avant de commencer le nettoyage. Débran-
cher la fiche secteur de la prise de courant et l’accrocher dans la monture
prévue à cet effet. Vider les bacs.
• Ne pas nettoyer le chariot avec des nettoyeurs au jet de vapeur ou à haute
pression. Si des travaux avec des nettoyeurs au jet de vapeur ou à haute
pression sont prévus dans l’environnement, il faut auparavant mettre l’ap-
pareil hors tension et le débrancher du réseau secteur.
• Pour le nettoyage, l’appareil doit être mis hors service et être suffisamment
refroidi.
Si, après le nettoyage, des dépôts de tartre sont encore présents, il faut les
éliminer car, sinon, la consommation en énergie monte et la rentabilité baisse.
Des dépôts de tartre importants peuvent endomamger l’appareil.
Utiliser de l’eau vinaigrée ou des produits de détartrage surfaciques usuels
dans le commerce.
Le robinet de vidange peut être re-graissé avec une grai ss e po u r pr od u i ts al i mentaires (les graisses de cuisson ne conviennent pas à de telles applications) pour conserver son étanchéité et sa facilité d’ouverture/de fermeture.
A savoir sur les « aciers inoxydables »
La résistance à la corrosion des aciers inoxydables se base sur une couche
passive qui se form e à la surface dès l’arrivée de l’oxygène. L’oxygène de l’air
suffit déjà pour former la couche passive de sorte que les défauts ou les en-
dommagements de la couche passive qui se sont produits par action mécani-
que, sont supprimés à nouveau automatiquement. La couche passive se
forme plus rapidement ou nouvellement si l’acier entre en contact avec de
l’eau courante qui contient de l’oxygène. Cet effet est amplifié encore plus
avec des acides à action oxydante (acide nitrique, acide oxalique). Ces acides
sont utilisés s i l’ac ier a été soumis à de hautes sollicitations chimiques et s’il a
perdu sa couche passive pour cette raison.
La couche passive peut être endommagée ou détruite chim ique men t par des
agents qui provoquent une réduction (qui consomment de l’oxygène) s’ils contactent l’acier sous forme concentrée ou à des températures élevées. E telles
substances agressives sont par exemple :
• les substances contenant des sels ou du soufre,
• les chlorures (sels),
• les concentrés d’épices, comme la moutarde, l’essence acétique, les cu-
bes d’épices, les solu tions de sel de cuisine , etc.
D’autres dommages peuvent se produire par :
• la rouille externe (provenant, par exemple, d’autres éléments de construc-
tion, comme les outils ou les couches minces de rouille),
• les particules de fer (par exemple, la poussière de meulage),
• le contact avec les métaux non ferreux (formation d’élément),
• le manque d’oxygène (par exemple, aucune arrivée d’air, eau pauvre en
oxygène).
43.3000.2 35
Page 34

Chariot de présentation des mets
Principes de travail généraux pour le traitement
des appareils en « acier inoxydable »
Toujours tenir la surface des appareils en acier inoxydable propre et permettre
l’arrivée de l’air.
Exécuter un nettoyage quotidien pour éliminer les couches de tartre, de graisse, d’amidon et d’albumine. La corrosion peut se former sous ces couches à
cause d’un manque d’arrivée d’air. Pour le nettoyage, il est interdit d’utiliser
des produits de blanchiment ou qui contiennent du chlore.
Si aucune recommandation spéciale n’est fournie pour le nettoyage, il est impératif en tous cas d’utiliser des produits de nettoyage pauvres en chlorures.
Après chaque nettoyage, éliminer tous les restes de produits de nettoyage en
rinçant abondamment à l’eau fraîche. Ensuite, bien sécher la surface.
Eviter un contact prolongé des pièces en acier inoxydable avec les acides
concentrés, l es épices , les se ls, etc. à moins que cel a soit néce ssaire. Les va peurs acides qui se forment pendant le nettoyage des carreaux, favorisent la
corrosion des « aciers inoxydables ».
Eviter de blesser la surface de l’acier inoxydable, en particulier par des métaux
autres que l’acier inoxydable. Les restes de métal externe permettent la formation des éléments chimiques extrêmement petits qui peuvent provoquer la
corrosion. En to us cas, éviter tout contact avec le fer et l’acier car cela conduit
à une rouille externe. Si l’acier inoxydable entre en contact avec du fer (laine
d’acier, copeaux de conduites, eau contenant du fer), cela peut déclencher la
corrosion. C’est pourquoi il faut toujours utiliser exclusivement de la laine
d’acier inoxydable ou des brosses avec des poils naturels, en plastique ou en
acier inox ydable po ur le nettoya ge mécanique. La laine d’acier ou les b rosses
avec de l’acier non allié entraînent la formation de rouille externe par abrasion.
Les taches de rouille fraîches peuvent être supprimées avec des agents abrasifs doux ou de la toile émeri fine. Les surfa ces ro uillées plus importantes peuvent être lavées avec une solution d’acide oxalique chaude `une concentration
de 2 – 3%. Si ces mesures de ne ttoy age n’apportent aucun effet satisfaisant,
un traitement avec de l’acide nitrique concentré à 10% est nécessaire.
Attention ! Cette procédure est réservée exclusivement au personnel qui a
subi la formation technique correspondante et sous le respect des réglemen-
tations existantes !
36 43.3000.2
Page 35
Chariot de présentation des mets
Contre-mesures à prendre lors de défauts
Les travaux de maintenance doivent être ex écutés uniquement par un personnel spécialisé et agréé.
Il est interdit de remplacer les composants défectueux par des pièces détachées autres que des pièces originales.
Veuillez vérifier tout d’abord si une erreur de maniement est à l’origine du défaut. Vous pouvez éliminer
vous-même certains défauts. Indiquez la mesure pour le service après-vente et, si vous voulez commander
les pièces détachées, les données figurant sur la plaque signalétiq ue (voi r à la page 28).
Défaut Origine possible Contre-mesure
L’appareil ne chauffe
pas, le témoin de contrôle ne s’allume pas.
L’appareil chauffe, mais
le témoin de contrôle ne
s’allume pas.
L’appareil ne chauffe
que très lentement.
Le fusible de l’édifice est défectueux. V érifier le fusible et le réparer si néces-
saire.
Le bouton de mise sous/hors tension
est défectueux.
Le câble de raccordement au réseau
secteur est défectueux.
Le témoin de contrôle est défectueux. Mettre l’appsrei l ho rs service et le faire
Le circuit électrique est défectueux.
Le bac contient trop d’eau. Réduire la quantité d’eau.
Il y a des dépôts de tartre dans le bac
ou le bac est encrassé.
Débrancher l’appareil du réseau et le
faire contrôler par un personnel spécia-
lisé et agréé. Le faire réparer si nécessaire.
contrôler par un personnel spécialisé et
agréé. Le faire réparer si nécessaire.
Mettre l’appsreil hors service et détar-
trer le bac ou le nettoyer après le refroidissement.
Une inspection et une maintenance régulières de l’appareil évitent les erreurs de fonctionnement et servent
à la sécurité. Les intervalles d’inspection et de maintenance dépendent de l’utilisation de l’appareil. Demandez au service après-vente de votre distributeur.
Données techniques
SPA/EB-1 SPA/EB-2 SPA/EB-3 SPA/EB-4
Estampille de contrôle
Appareil fabriqué conformément à la norme DIN 18867–7
Protection contre les jets d’eau IPX5
Nombre de bacs 1234
Dimension de bac pour GN 1/1 et leurs subdivisions jusqu’à une profondeur
maximale de 200 mm
Capacité moyenne en personnes* 15 25 50 80
Chaufffage Radiateur tubulaire en acier nickelé et chromé
Valeurs de raccordement 0,7 kW 1,4 kW 2,1 kW 2,8 kW
Branchement électrique 230 V 1N AC 50 Hz
Isolation thermique Carreaux en céramique
Régulation de la température progressive, séparée pour chaque bac
Palge de température 30–95 °C
Châssis de roulement 4 roulettes directrices, dont 2 avec frein total, Ø 125 mm
Poids net sans plaque de fond 32 kg 44 kg 55 kg 66 kg
Poids de l’appareil avec char gem ent max i-
mal des bacs, sans plaque de fond
Charge ponctuelle maximale des plaques
de fond
Charge surfacique des plaques de fond 100 kg 80 kg 65 kg 50 kg
Poids total admissible 170 kg 195 kg 220 kg 250 kg
* La capacité dépend de la composition des mets et de la diversité des composants.
64 kg 108 kg 151 kg 194 kg
50 kg 40 kg 30 kg 20 kg
43.3000.2 37
Page 36

Uitschepwagens
Inhoudsopgave (NL, BE)
Algemeen . . . . . . . . . . . . . . . . . . . . . . . . . . . . . . . . . . . . . 40
Gebruik. . . . . . . . . . . . . . . . . . . . . . . . . . . . . . . . . . . . . . . 40
Aanwijzingen voor het gebruik. . . . . . . . . . . . . . . . . . . . 40
Typeplaatje . . . . . . . . . . . . . . . . . . . . . . . . . . . . . . . . . . . 40
Detailtekening . . . . . . . . . . . . . . . . . . . . . . . . . . . . . . . . 41
Veiligheidsvoorschriften. . . . . . . . . . . . . . . . . . . . . . . . . 42
Bediening . . . . . . . . . . . . . . . . . . . . . . . . . . . . . . . . . . . . . 44
Ingebruikname . . . . . . . . . . . . . . . . . . . . . . . . . . . . . . . . . . . . 44
Bakken vullen met water
Apparaat inschakelen
Gebruik . . . . . . . . . . . . . . . . . . . . . . . . . . . . . . . . . . . . . . . . . . 45
GN- bakken plaatsen
Transport
Uitschakelen . . . . . . . . . . . . . . . . . . . . . . . . . . . . . . . . . . . . . . 45
Apparaat uitschakelen
Water weg laten lopen
Toebehoren tegen meerprijs . . . . . . . . . . . . . . . . . . . . . 46
Opklapbare bladen
Bodemplaten
Uitloopverlenging
Schoonmaak en onderhoud . . . . . . . . . . . . . . . . . . . . . . 47
Wetenswaardigheden over „roestvrijstaal”
Algemene voorschriften voor de behandeling van apparaten
van „roestvrijstaal”
Hulp bij storingen . . . . . . . . . . . . . . . . . . . . . . . . . . . . . . 49
Technische Details . . . . . . . . . . . . . . . . . . . . . . . . . . . . . 49
Onderdelen . . . . . . . . . . . . . . . . . . . . . . . . . . . . . . . . . . . 50
CE-conformiteitsverklaring. . . . . . . . . . . . . . . . . . . . . . . .78
43.3000.2 39
Page 37
Algemeen
Gebruik
Uitschepwagens
Wijzigingsvoorbehoud
De producten uit dit bedieningsvoorschrift worden geproduceerd op basis van
de wensen uit de markt en de huidige stand der techniek.HUPFER behoudt
zich het recht voor wijzigingen aan de producten zowel als aan de daartoe behorende documentatie door te voeren indien daartoe onzerzijds reden bestaat. De definitief geleverde uitvoering blijkt steeds uit de orderbevestiging
waarmee dit apparaat geleverd werd.
Verpakking en transport
®
Dit HUPFER
en ingepakt. De verpakking bestaat uit volledig recyclebaar materiaal.
Uitschepwagens zijn electrisch verwarmde, mobie le war mho udb ak ken .
Deze worden hoofdzakelijk gebruikt voor het warmhouden en klaarzetten van
maaltijdcomponenten in instellingskeukens. Al naar gelang de behoefte van
de klant hebben deze 1–4 bakken.
Een belangrijke toepassing is ook plaatsing achter een buffet alsmede de zg.
party-catering.
product werd na de productie uitvoerig getest, daarna gereinigd
Attentie:
• Voor het eerste gebruik de beschermfolie verwijderen.
• Uit veiligheidsoverwegingen is de maximale watertemperatuur begrensd
op 95 graden Celsius.
Aanwijzingen voor het gebruik
Dit bedieningsvoorschrift dient voor de eerste ingebruikname zorgvuldig gelezen te worden.
Zorgt u ervoor dat het bedienend personeel op de hoogte is van mogelijke bedieningsfouten en daardoor mogelijk gevaarlijke situaties.
Belangrijke tips voor veiligheid en het voorkomen van schade zijn in dit bedieningsvoorschrift met een „attentie”-symbool aangegeven.
Attentie, tips voor veiligheid en het voorkomen van schade!
De zo gemerkte tips moeten gemeld worden aan het bedienend personeel.
Met het „hand”-symbool worden nuttige tips voor het gebruik van het apparaat
aangegeven.
Typeplaatje
Fabrikant Stroomopname
Type * Maximale belading
Artikelnummer * ! Keurmerk
Ordernummer * " Beveiliging
Serienummer * # Conformiteitsverklaring
Spanning $ Koudecapaciteit
Aansluitwaarde % Koelmiddel
* Verplicht op te geven bij storing
40 43.3000.2
Page 38
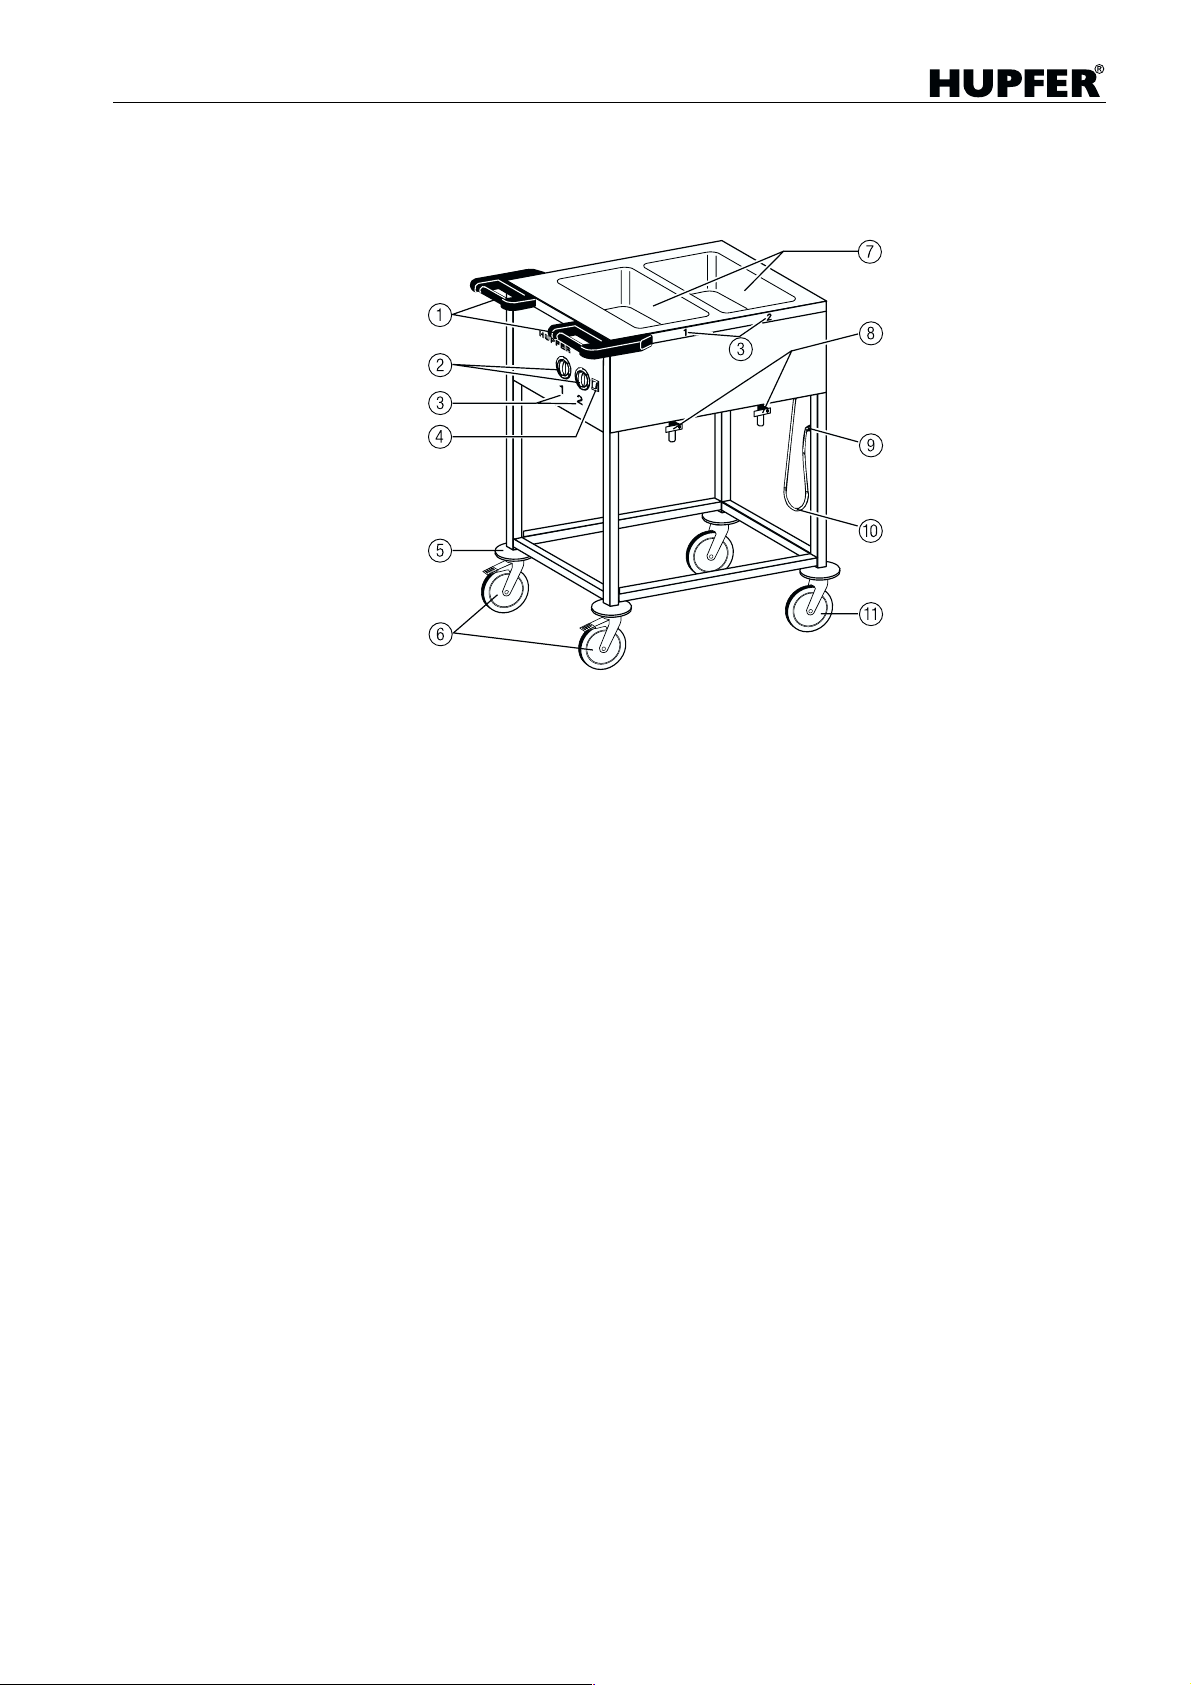
Uitschepwagens
Detailtekening
Duwhandgreep met geintegreerde stootkant
Knoppen voor regeling van de watertemperatuur
Nummering van de bakken
Aan/uit schakelaar
Stootrollen
Zwenkwielen met rem
Warmhoudbakken
Aftapkranen
Stekkerhouder
! Aansluitsnoer met stekker
" Zwenkwielen zonder rem
Toebehoren tegen meerprijs:
• GN-bakken
• Tussenstrips voor kleine bakken (lengte 325 of 530 mm)
• Flexibele uitloopverlenging , 42 cm lang ½"
• Bodemplaat van roestvrijstaal
• Opklapbaar blad lange zijde van roestvrijstaal*
• Opklapbaar blad korte zijde van roestvrijstaal*
• Zwenkwielen met roestvrijstalen gaffel Ø 125 mm, met of zonder rem, met
penbevestiging
* Het eventueel aanbrengen van opklapbare bladen na de levering is al-
leen toegestaan door deskundig technisch personeel. Hierbij is een
WIG-lasapparaat benodigd.
43.3000.2 41
Page 39
Veiligheidsvoorschriften
• De apparaten dienen alleen onder toezicht te worden gebruikt.
• De wagens zijn bedo eld voor het transport van maaltijdco mponenten in
GN-bakken; elke andere vorm van vervoer is niet toegestaan.
• Het model SPA/EB-1 ma g vanwege kantelgev aar alleen in lege toes tand
weggereden worden, d.w.z. zonder water en ingehangen GN-b akken; dit
ivm. de zeer smalle bouwwijze van het apparaat.
• Het verrijden mag alleen over vlakke vloeren plaatsvinden. Indien toch over
zeer ongelijke vloeren of drempels wordt g ereden kan dit de constru ctie
en/of de wielen beschadigen.
• Voor het verrijde n het apparaat ui tschakelen, d e stekker ui t de wandcontactdoos trekken en in de stekkerhouder plaatsen.
Uitschepwagens
• Stekker nooit aan het snoer uit de wandcontactdoos trekken. De
HUPFER
een haakse Schuko stekker met randaarde, hetgeen als voordeel heeft dat
deze veel minder uitsteekt dan een rechte stekker en dus minder makkelijk
kan worden beschadigd. Als de wagen per ongeluk wordt weggereden terwijl vergeten is de stekker uit de wandcontactdoos te halen kan dit tot schade aan de stekker en/of de contactdoos leiden.
• Voor het transport beide remmen loshalen. Rijden met de wielen op de rem
zorgt onherroepelijk voor schade.
• De wagens mogen uitsluitend met de hand worden voo rtbewogen. Een
machinaal onder steund tran sport i s niet toeg estaan. Ge vaar v oor schad e
en verwondingen.
• Indien de wagens in bijv . een vracht wagen worde n vervoer d dienen deze
te worden vastgezet. De rem op de wielen is hiervoor niet voldoende.
• De wagen nooit voortbewegen door aan het aansluitsnoer te trekken.
• Het transport over hellingen of trappen is niet toegestaan.
• De maximale sne lheid i s normaal wandeltem po. Vol ledig belas te wagens
zijn zwaar en laten zich daardoor moeilijk manoeuvreren of afremmen.
Desgewenst hierbij hulp inroepen.
®
uitschepwagens zijn in de standaarduitvoering voorzien van
• Indien een apparaat doo r wat vo or omstan dighe id van b uitena f ook drei gt
te kantelen, nooit proberen dit te verhinderen. Verwondingsgevaar.
• Niet op het appara at leun en o f ga an zi tten en n iet geb ru iken voor het vervoer van personen.
• De wagen niet op een vloer die op afschot staat plaatsen.
• Indien de wagen zijn plaats van bestemming heeft bereikt de remmen vast-
zetten.
42 43.3000.2
Page 40

Uitschepwagens
• Wanneer de stekker met wa ter in contac t geweest is moet d eze voor ge-
bruik eerst worden gedroogd. Levensgevaar!
• Een eventueel beschadigd snoer of stekker dient voor gebruik door een er-
kend vakman te worden vervangen.
• Het aansluitsnoer kan een maximale lengte van 1,80 meter bereiken. In-
dien door geweld deze lengte wordt overschreden kan dit intern tot beschadigingen leiden. Brandgevaar !
• In natte of vochtige ruimtes geen verlengsnoer gebruiken.
• Het apparaat niet met stoom of een hogedrukspuit schoonmaken. Indien in
de buurt van het apparaat met stoom of hoge druk wordt gewerkt dient het
apparaat te worden uitg eschakeld en de s tekker uit de wandc ontactdoos
gehaald.
• Stekker alleen invoeren in passende wandconta ctdoos . In di en e en e n an-
der niet op elkaar past dient een vakman voor ombouw zorg te dragen (zie
gebruikte stekkertypes op blz. 50) Het gebruik van stekkeradapters is verboden. Brandgevaar!
• De wielen zijn geschikt voor gebruik in temperaturen van –20 tot +50 gra-
den Celsius. Indien deze zouden worden gebruikt bij lagere of hogere temperaturen kan dit leiden tot problemen, waarbij mechanische
beschadigingen kunnen optreden.
43.3000.2 43
Page 41
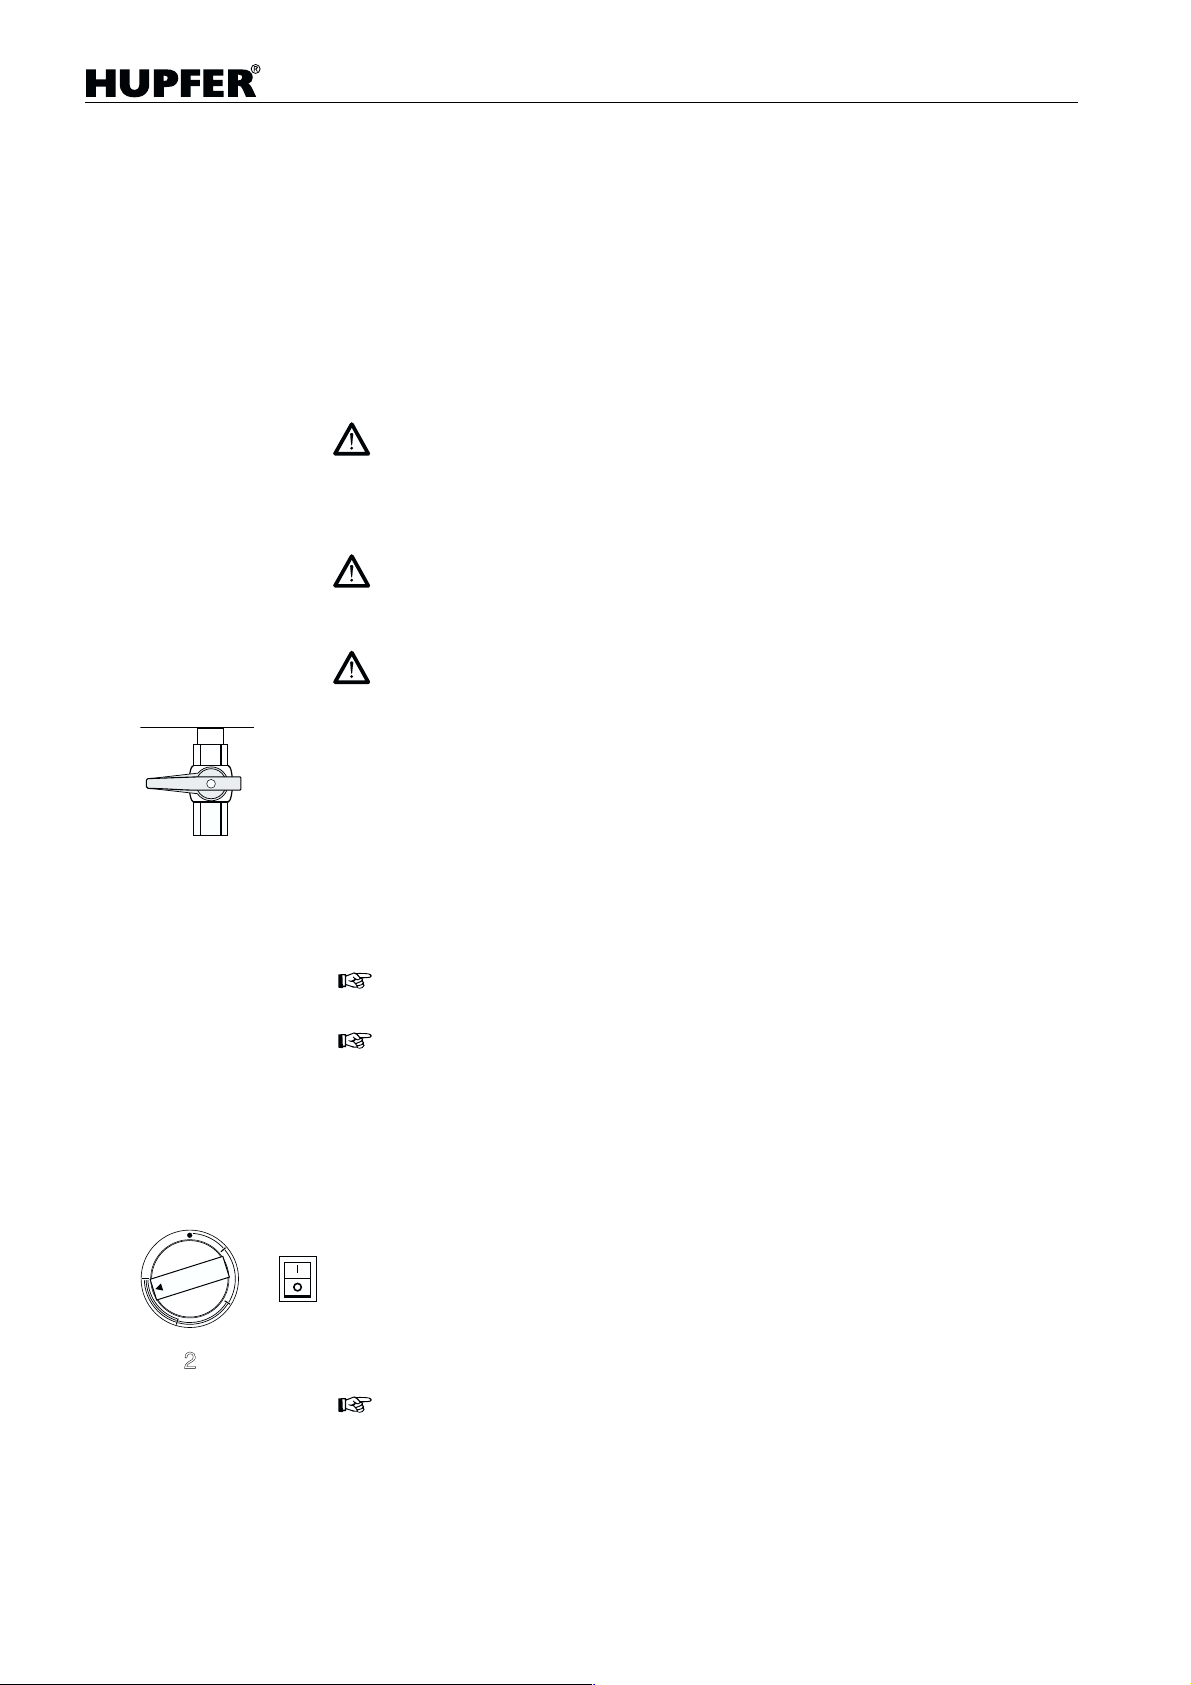
Bediening
Ingebruikname
Uitschepwagens
Om de apparatuur in gebruik te nemen moet deze koud, schoon en moeten
de bakken vrij van kalkaanslag zijn.Dientengevolge dienen wagens die recent
gebruikt zijn en waarvan men zojuist het water heeft laten weglopen eerst enige tijd af te koelen.
Droge verwarming is in principe mogelijk maar wordt door HUPFER
bevolen vanwege de slechte warmteoverdracht en daardoor onnodige energieverspilling.
Bij droog voorverwarmde bakken ontstaat bij contact met koud water een zeer
sterke stoomontwikkelling. Verbrandingsgevaar!
Bovendien kan hierdoor de bodem van de bakken zich vervormen of kunnen
er kleine scheurtjes ontstaan. Hierdoor kan de wagen volledig onbruikbaar
worden en moeten worden vervangen.
Een kalklaag werkt als thermische isolatie en kan leiden tot een oververhitting
van de verwarmingselementen; een beschadiging van de bakken kan hierdoor
eveneens ontstaan.
Bovendien bestaat corrosiegevaar onder de kalkafzetting.
Houdt u rekening met de veiligheidsvoorschriften van blz 42 en 43.
®
niet aan-
Bakken vullen met water
– Aftapkranen sluiten.
– Bakken met circa 3 liter water vullen.
Dit is een waterhoogte van slechts ongeveer 2 centimeter.
De later te plaatsen GN-inzetbakken (maximale diepte 200 mm) moeten geen
contact met het water hebben, omdat dit de warmteoverdracht nadelig beinvloedt. De beste warmte ontstaat door stoom. Een hoger waterniveau verlengt
de opwarmtijd onnodig.
In gebieden met zeer hard water bevelen wij het gebruik van onthard of gedemineraliseerd water aan om kalkvorming te vermijden.
Voor het vullen van de bakken bij voorkeur warm of heet water gebruiken zodat de opwarmtijd zo kort mogelijk is.
Apparaat inschakelen
– Bakken afdekken, om warmteverllies te vermijden.
– Stekker in een passende wandcontactdoos plaatsen.
Indien de stekker of het aansluitsnoer beschadigd is moeten deze eerst
door een vakman worden vervangen.
– Apparaat inschakelen door het indrukken van de aan/uit schakelaar.
Het geintegreerde controlelampje gaat aan.
– Met de tot de bak behorende thermostaatknop de gewenste warmtegraad
instellen. Binnen de 4 aanduidingen op de knop is een traploze instelling
mogelijk. U kunt zien welke knop bij welke bak hoort door de ingeslagen
cijfers.
Bij een vulhoogte van 2 cm (koud water), volledige afdekking en maximale
thermostaatstand bereikt het water in de bakken na circa 45 minuten een temperatuur van 90 graden Celsius.
44 43.3000.2
Page 42
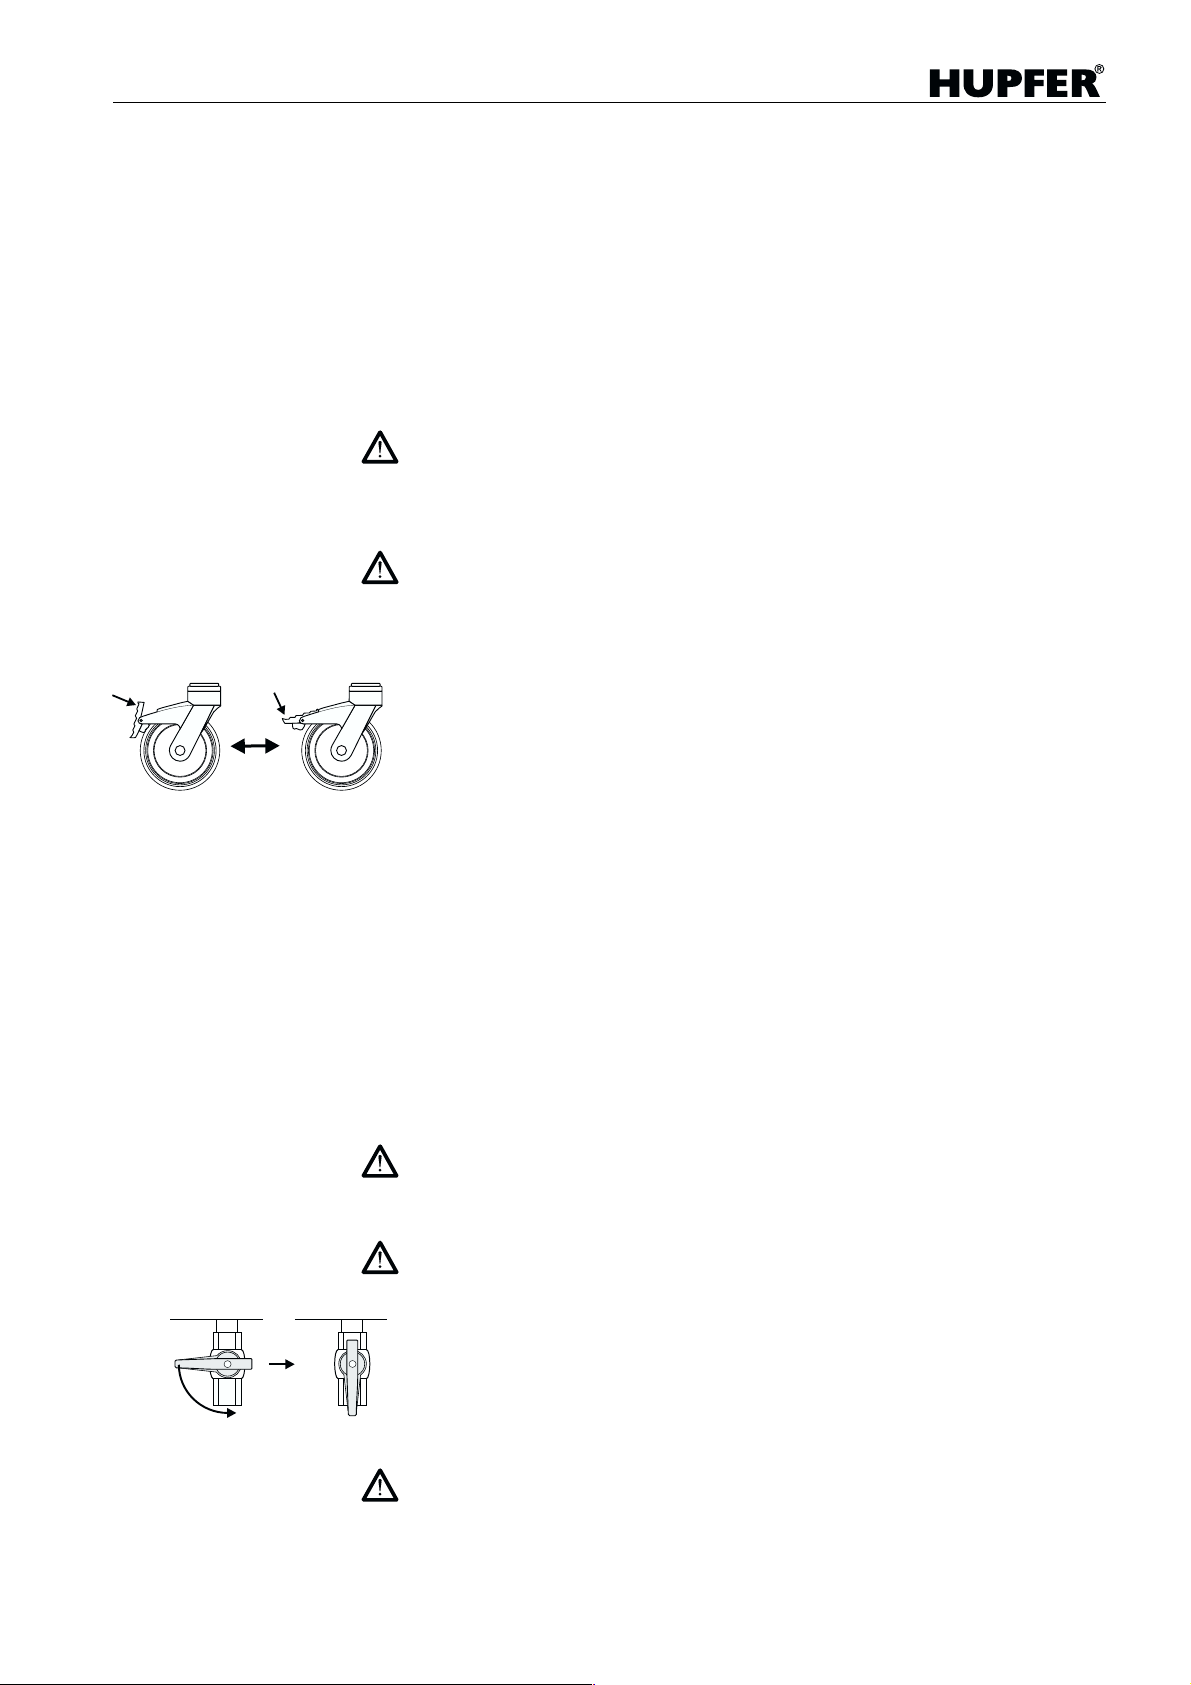
Uitschepwagens
Gebruik
GN- bakken plaatsen
GN 1/1-bakken tot een diepte van 200 mm kunnen zonder verdere voorzieningen in de bakken worden geplaatst. Bij gebruik van GN1/2 - en 1/3 bakken
moeten tussenstrips worden gebruikt (meerprijs) om het uittreden van stoom
tussen de bakken en het daarmee gepaard gaande warmteverlies te voorkomen.
Bij gebruik van nog kleinere GN-bakken dient hiermede nog meer rekening te
worden gehouden, het openlaten van een plaats in de indeling is funest voor
de watertemperatuur.
Erop letten dat de bakken goed aansluiten en geen ezelsoren hebben, omdat
uittredende stoom tot verbrandingen zou kunnen leiden. Ook delen van de uitschepbakken en het bovenblad kunnen hierdoor gevaarlijk heet worden.
Transport
Houdt u rekening met de veiligheidsvoorschriften van blz 42 en 43.
Uitschakelen
– Alle knoppen op
– Apparaat uitschakelen dmv. aan/uitschakelaar.
– Stekker uit de wandcontactdoos en in stekkerhouder plaatsen.
– Beide remmen loshalen.
– Apparaat aan de duwhandgrepen vastpakken en verplaatsen.
– T er plekke aangekomen de remmen weer vastzetten om een verrijden van
de wagen te voorkomen.
– Stekker in passende wandcontactdoos steken.
– Apparaat inschakelen dmv. aan/uitschakelaar.
– Met de tot de bak behorende thermostaatknop de gewenste temperatuur
instellen.
● zetten.
Apparaat uitschakelen
– Alle thermostaat knoppen op ● zetten.
– Apparaat uitschakelen dmv. aan/uitschakelaar.
– Stekker uit de wandcontactdoos en in de stekkerhouder plaatsen.
Water weg laten lopen
Aftapkranen nooit met gereedschap bewerken.
Bij eventueel vastzittende kranen een goedgekeurd middel, bijv. teflonspray,
gebruiken om deze los te maken. Daarna de bakken en de afvoer grondig
schoonmaken.
Indien men heet water weg laat lopen bestaat verbrandingsgevaar.
Aftapkraan alleen direct boven een afvoergoot of afvoerputje openen.
Indien de wagen is voorzien van een bodemplaat (meerprijs) dient een opvangbak met voldoende capaciteit of een uitloopverlenging (meerprijs) te worden toegepast.
Na het weg laten lopen van het water blijven het afvoerbuisje en de aftapkraan
nog lange tijd warm. Verbrandingsgevaar!
43.3000.2 45
Page 43
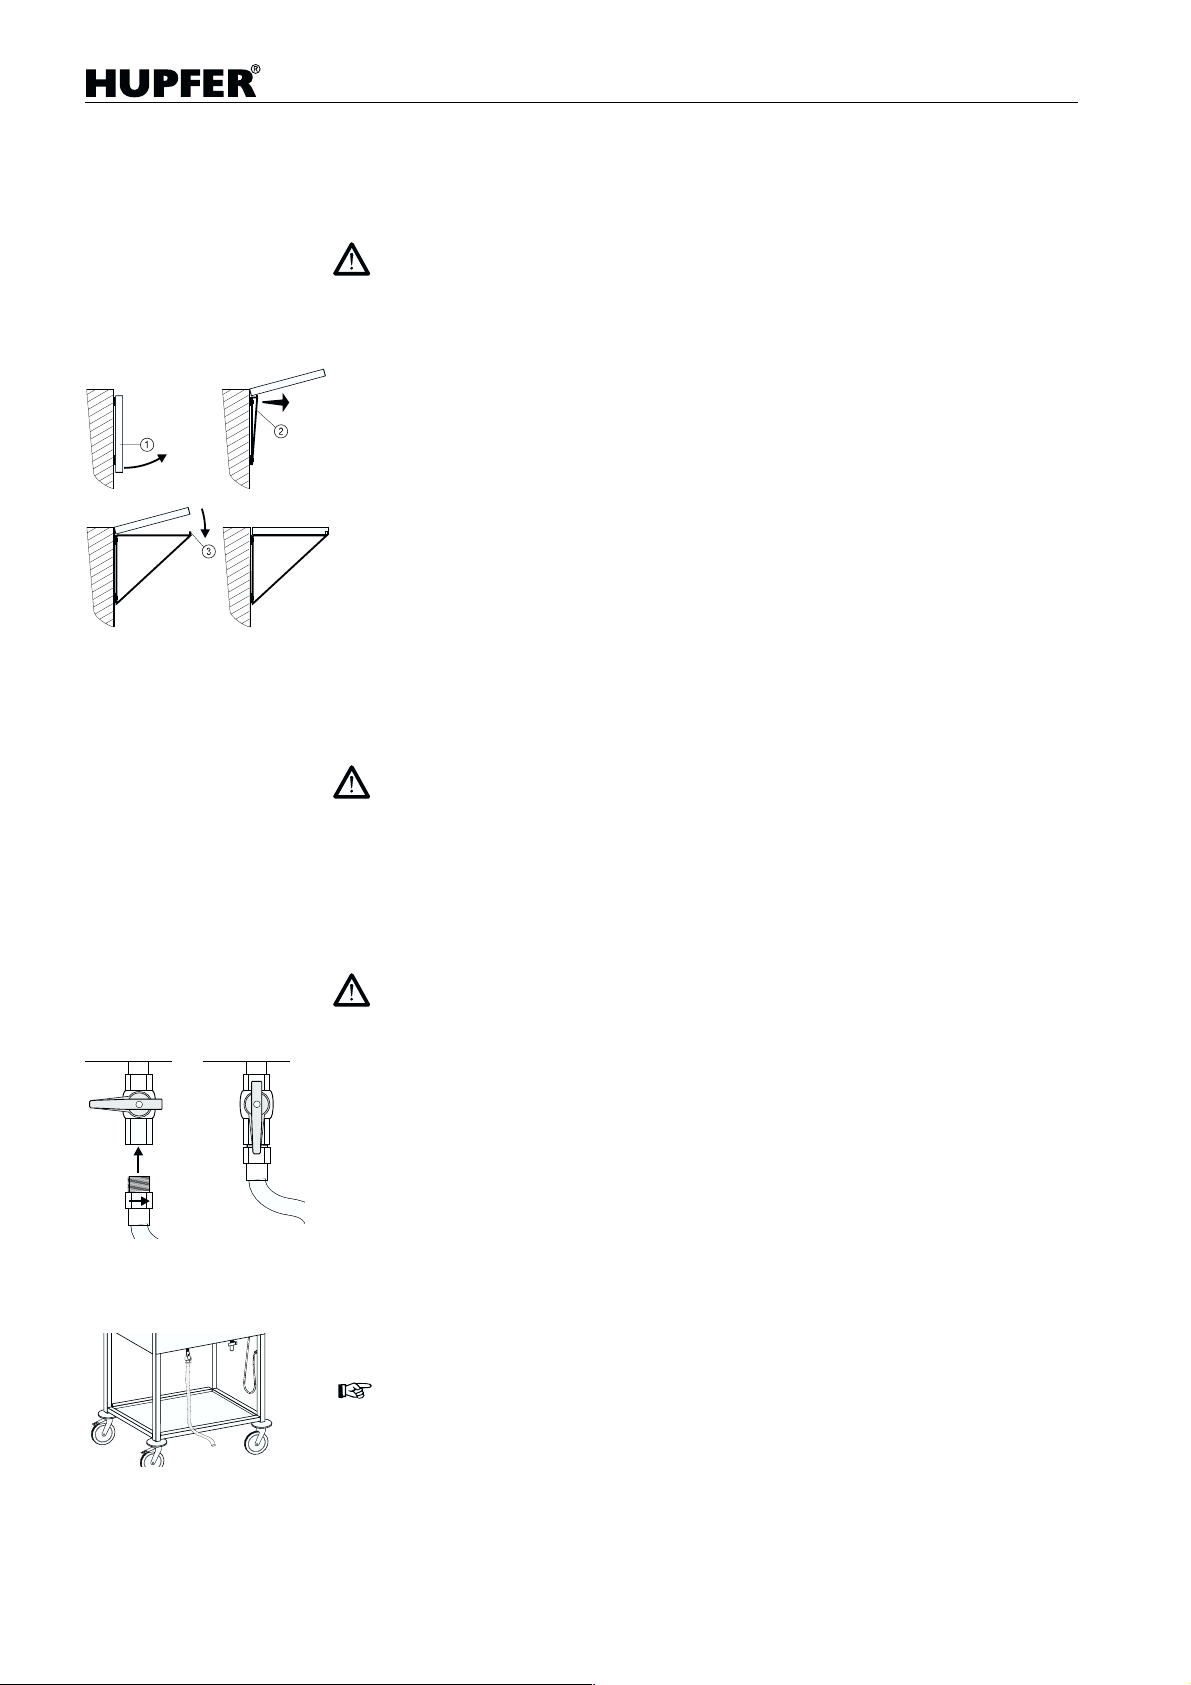
Toebehoren tegen meerprijs
Opklapbare bladen
• De opklapbare bladen zijn niet geschikt om zware belastingen te verdragen.
• Gedurende het transport van de wagens moeten de opklapbare bladen
neergeklapt zijn.
• Bij het opklappen en vastzetten van de bladen bestaat verwondingsgevaar.
Uitschepwagens
– Opklapbaar blad
– Consoles
– Consoles zo plaatsen dat de nok
in de centeergaten past.
– Het neerklappen van het blad gebeurt in omgekeerde volgorde.
naar voren bewegen.
naar boven bewegen
bij het laten dalen van het blad precies
Bodemplaten
Op de bodemplaten mogen dingen worden geplaatst, rekening houdend met
de maximale belasting (zie „technische details” blz 49).
Open bakken met hete vloeistoffen mogen hierop niet worden vervoerd.
Uitloopverlenging
• Apparaat nooit bewegen door trekken aan de uitloopverlenging.
• Bij het weg laten lopen van het water op de positie van het einde van de
slang letten.
• Bij het weg laten lopen van water kan de uitloopverlenging heet worden.
Verbrandingsgevaar!
– Uitloopverlenging via schroefdraad bevestigen aan de aftapkraan en goed
vastzetten.
– Einde van slang boven afvoergoot plaatsen.
– Aftapkraan openen.
Met behulp van de uitloopverlenging kan het water ook bij toepassing van een
bodemplaat probleemloos worden afgevoerd.
46 43.3000.2
Page 44

Uitschepwagens
Schoonmaak en onderhoud
• Alvorens met de schoonmaak te beginnen apparaat uitschakelen. Stekker
uit de wandcontactdoos en ophangen in de daarvoor aan de achterzijde
van het apparaat aangebrachte voorziening. Bakken leeg laten lopen.
• Het apparaat niet met stoom of een hogedrukspuit schoonmaken. Indien in
de directe omgeving van het apparaat met stoom of hoge druk gewerkt
wordt, moet het uitgeschakeld worden en van het stroomnet ontkoppeld.
• Voor de schoonmaak het geheel goed laten afkoelen.
Indien na de reiniging in de bakken kalkresten achterblijven, dienen deze te
worden verwijderd, omdat anders het energieverbruik stijgt, hetgeen voor onnodige extra kosten zorgt. Bij veel kalkafzetting kan dit ook nog tot schade aan
het apparaat leiden.
Voor het ontkalken de daarvoor speciaal in de handel zijnde middelen of
schoonmaakazijn gebruiken.
De aftapkraan kan eventueel met speciaal, voor contact met levensmiddelen
geschikt smeervet (braadboter is hiervoor absoluut ongeschikt),nagevet worden, om de dichting en het makkelijk bewegen te bevorderen.
Wetenswaardigheden over „roestvrijstaal”
De corrosiebestendigheid van roestvrijstaal berust op een passieve laag, die
aan de oppervlakte wordt gevormd door het contact met zuurstof. De zuurstof
in de lucht is voldoende voor het ontstaan van deze beschermlaag en zorgt
ervoor dat deze ook automatisch wordt hersteld na eventuele beschadigingen.
Ook het in aanraking komen van het roestvrijstaal met zuurstofhoudend stromend water zorgt voor een constante vernieuwing van deze laag. Een verdere
verbetering van dit effect wordt bereikt door oxiderend werkende zuren (salpeterzuur, oxaalzuur). Deze zuren worden gebruikt als het roestvrijstaal aan
hoge concentraties chemische middelen heeft blootgestaan en daardoor de
passieve laag grotendeels is verstoord.
De passieve laag kan chemisch beschadigd of verstoord worden door (zuurstofverbruikende) middelen, die in geconcentreerde vorm of bij hoge temperaturen met het staal in aanraking komen, zoals:
• zout- en zwavelhoudende stoffen
• chloriden (zouten)
• concentraten zoals mosterd, azijn, kruidenblokjes, keukenzout
Verdere beschadigingen kunnen ontstaan door:
• roestdeeltjes (bijv van andere apparaten, gereedschappen o.d.)
• ijzerdeeltjes (bijv slijpstof)
• contact met niet ijzerhoudende metalen
• gebrek aan zuurstof (bijv geen contact met de lucht, zuurstofarm water).
Algemene voorschriften voor de behandeling van apparaten
van „roestvrijstaal”
Het oppervlak van apparaten uit roestvrijstaal altijd schoon en voor de lucht
toegankelijk houden.
Dagelijks dient u kalk-, vet-, zetmeel- en eiwitresten te verwijderen, anders kan
onder deze lagen corrosie ontstaan doordat er geen contact met de lucht kan
plaatsvinden.
Indien er geen speciale middelen worden voorgeschreven, dan dienen in elk
geval chloorarme reinigingsmiddelen te worden gebruikt.
Na elke schoonmaak dienen resten van de reinigingsmiddelen te worden verwijderd door na te spoelen met ruime hoeveelheden schoon water, waarna de
oppervlakte dient te worden gedroogd.
U dient erop te letten dat roestvrijstaal niet langer als beslist noodzakelijk in
43.3000.2 47
Page 45

Uitschepwagens
aanraking komt met geconcentreerde zuren, kruiden, zouten e.d. Ook zuurdampen, die onstaan bij het reinigen van vloeren kunnen zorgen voor corrosie
op roestvrijstaal.
U dient ervoor te zorgen dat het oppervlak niet wordt beschadigd, en wel in het
bijzonder door andere metalen, niet zijnde roestvrijstaal. Door dit contact vormen zich zeer kleine chemische deeltjes, die corrosie kunnen veroorzaken. In
ieder geval dient te worden voorkomen dat er contact is met ijzer of staal, omdat dat bijna onherroepelijk leidt tot roestvorming; voorbeelden hiervan zijn
o.a. stalen schuursponsjes, metalen deeltjes uit waterleidingen bij nieuwbouw
of sterk ijzerhoudend water. Gebruik dus voor het reinigen uitsluitend kunststof schuursponsjes of borstels. Verse roestplekken kunnen worden verwijderd met mild werkende schuurmiddelen of met heel fijn schuurpapier. Lukt
het hiermee niet, dan kan gebruik worden gemaakt van een 2–3 % oplossing
van oxaalzuur in warm water. Als ook dat niet helpt kan een behandeling met
10 % salpeterzuur uitkomst bieden.
Attentie! Dit mag alleen door technisch geschoold personeel dat zich strikt
houdt aan de daarvoor geldende voorschriften gebeuren!
48 43.3000.2
Page 46
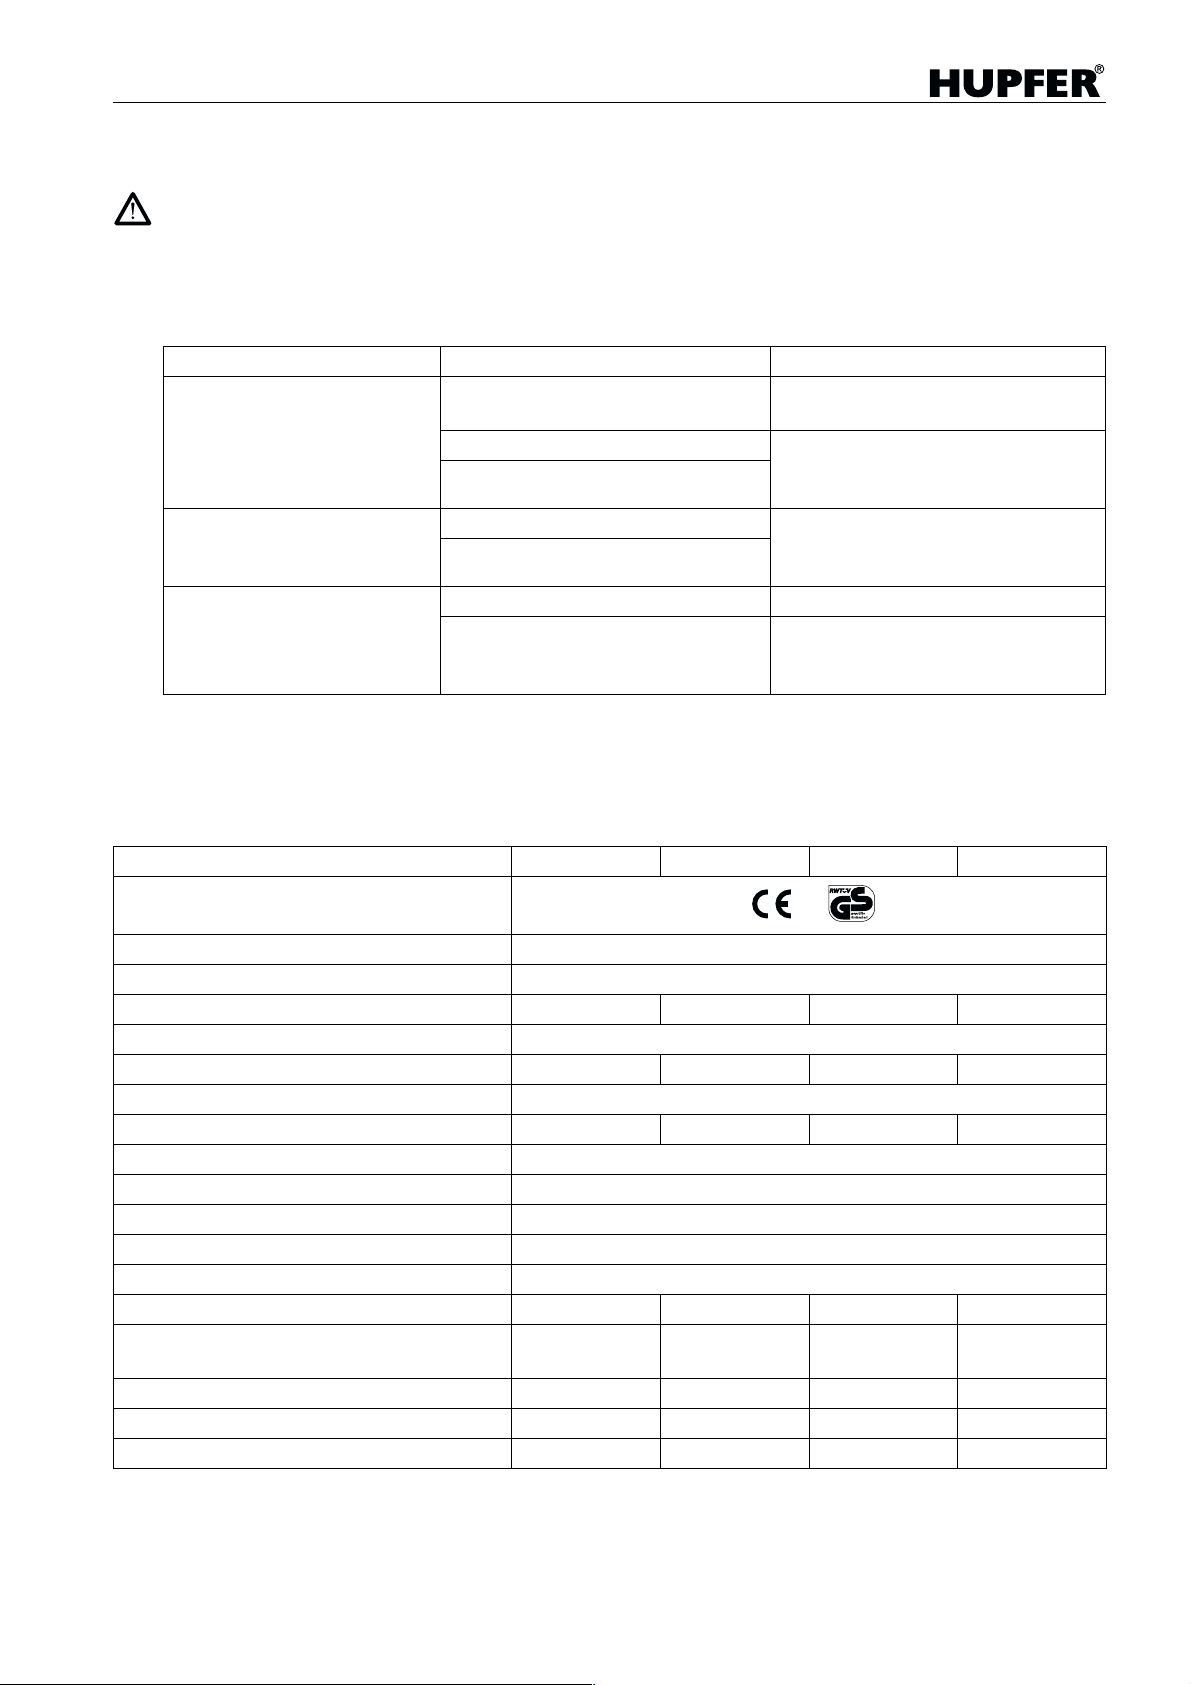
Uitschepwagens
Hulp bij storingen
Servicewerkzaamheden mogen alleen door daartoe bevoegd personeel worden uitgevoerd.
Defecte onderdelen dienen uitsluitend door originele onderdelen te worden vervangen
Controleert u aub eerst, of er een bedieningsfout is gemaakt. Enkele storingen kunt u zelf oplossen.
Indien u een storing wilt melden of onderdelen nodig heeft dan dient u de gegevens van het typeplaatje pa-
raat te hebben (zie blz. 40).
Storing Mogelijke oorzaak Oplossing
Apparaat wordt niet warm,
controlelampje brandt niet.
Apparaat wordt warm,
controlelampje brandt niet.
Apparaat warmt zeer langzaam op.
Bouwkundige zekering defect. Zekering controleren en eventueel
vervangen.
Aan/uitschakelaar defect. Apparaat uitschakelen en door
Aansluitkabel of stekker defect.
Controlelampje defect. Apparaat buiten bedrijf stellen en
Storing in bedrading.
Te veel water in de bakken. Waterhoeveelheid verminderen.
Kalkafzetting of vervuiling in de bak-
ken.
bevoegd personeel laten controleren
en eventueel repareren.
door bevoegd personeel laten con-
troleren en eventueel repareren.
Apparaat uitschakelen en na afkoe-
len de bakken ontkalken resp.
schoonmaken.
Regelmatige inspectie en onderhoud van het apparaat voorkomt storingen en zorgt voor meer veiligheid.
Inspectie- en onderhoudsintervallen zijn sterk afhankelijk van de intensiteit van het gebruik. Vraag advies
aan de technische dienst van de dealer die de wagen heeft geleverd.
Technische Details
SPA/EB-1 SPA/EB-2 SPA/EB-3 SPA/EB-4
Keurmerk
Apparaat gefabriceerd volgens DIN 18867– 7
Spuitwaterbeveiliging IPX5
Aantal bakken 1234
Afmetingen bakken voor GN-1/1 of onderverdelingen tot max. 200 mm diepte
Gemiddelde capaciteit in personen* 15 25 50 80
Verwarming door verwarmingselement van roestvrijstaal
Aansluitwaarde 0,7 kW 1,4 kW 2,1 kW 2,8 kW
Voltage 230 V 1N AC 50 Hz
Thermische isolatie keramisch vl ies
Temperatuurregeling traploos, elke bak separaat
Temperatuur water 30–95 °C
Wielen 4 zwenkwielen, daarva n 2 met rem, Ø 125 mm
Nettogewicht zonder bode mpl aat 32 kg 44 kg 55 kg 66 kg
Gewicht bij maximale belading van bakken,
zonder bodemplaat
Maximale puntbelasting bodemplaat 50 kg 40 kg 30 kg 20 k g
Maximale belasting bo dem pla at 100 k g 80 kg 6 5 kg 50 k g
Toelaatbaar totaalgewicht 170 kg 195 kg 220 kg 250 kg
* De capaciteit is sterk afhankelijk van het aantal maaltijdcomponenten en eventuele dieetafleidingen.
64 kg 108 kg 151 kg 194 kg
43.3000.2 49
Page 47

Carrelli erogatori di vivande
Indice (IT, CH)
Annotazioni di carattere generale . . . . . . . . . . . . . . . . . 52
Utilizzo dell’apparecchiatura . . . . . . . . . . . . . . . . . . . . . 52
Annotazioni per l’utilizzatore . . . . . . . . . . . . . . . . . . . . . 52
Targhetta identificativa del tipo . . . . . . . . . . . . . . . . . . 52
Vista dell’apparecchiatura . . . . . . . . . . . . . . . . . . . . . . 53
Annotazioni di sicurezza. . . . . . . . . . . . . . . . . . . . . . . . . 54
Conduzione . . . . . . . . . . . . . . . . . . . . . . . . . . . . . . . . . . . 56
Messa in esercizio . . . . . . . . . . . . . . . . . . . . . . . . . . . . . . . . . 56
Riempimento delle vaschette
Avviamento dell'unità
Utilizzo dell’apparecchiatura . . . . . . . . . . . . . . . . . . . . . . . . . . 57
Inserimento dei recipienti GN
Movimentazione
Disconnessione . . . . . . . . . . . . . . . . . . . . . . . . . . . . . . . . . . . 57
Spegnimento dell'apparec c hiatur a
Scarico dell'acqua
Accessori speciali. . . . . . . . . . . . . . . . . . . . . . . . . . . . . . 58
Bordi ribaltabili
Bordi di fondo
Prolunga di deflusso
Pulizia e preservazione. . . . . . . . . . . . . . . . . . . . . . . . . . 59
Qualche informazione utile in tema di "acciaio inossidabile"
Principi generali di lavoro per il trattamento di
apparecchiature in “acciaio inossidabile”
Un ausilio in caso di disfunzioni . . . . . . . . . . . . . . . . . . 61
Dati tecnici . . . . . . . . . . . . . . . . . . . . . . . . . . . . . . . . . . . . 61
Parti di ricambio . . . . . . . . . . . . . . . . . . . . . . . . . . . . . . . 62
Dichiarazione di conformità CE . . . . . . . . . . . . . . . . . . . .78
43.3000.2 51
Page 48
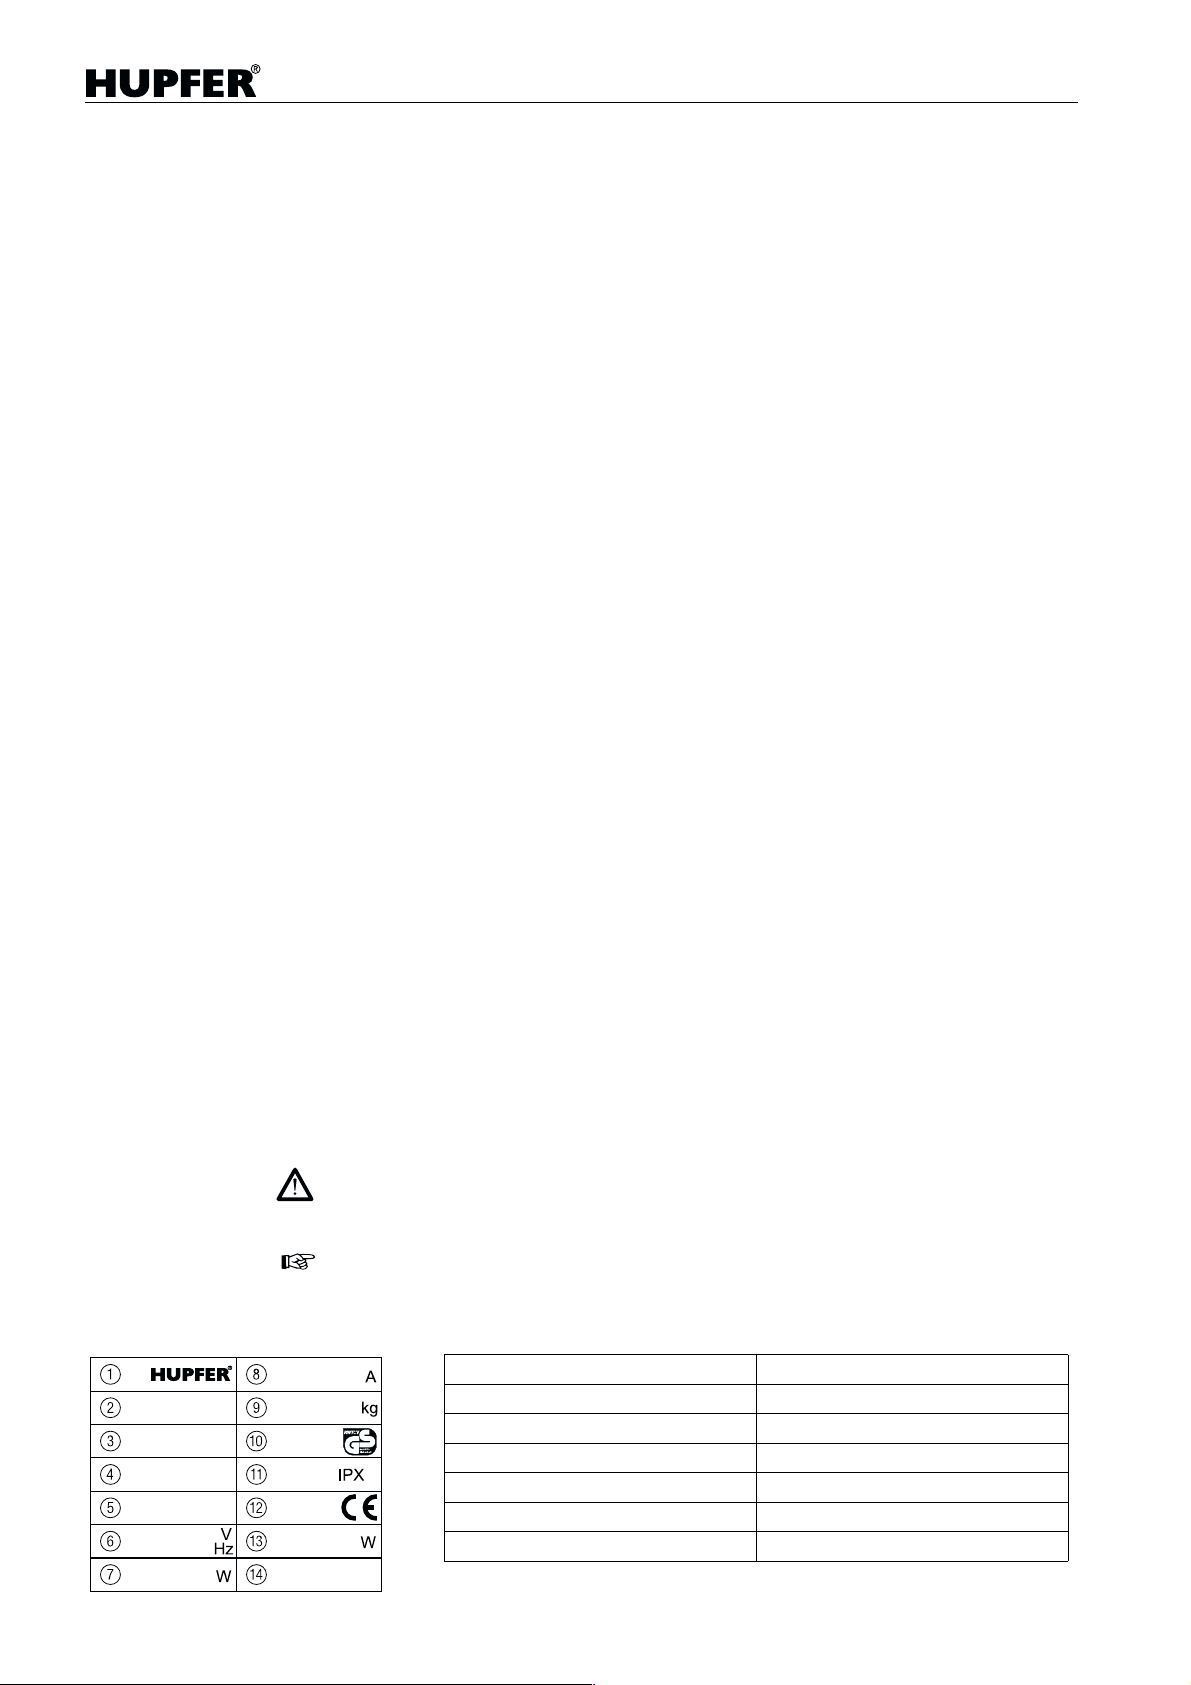
Annotazioni di carattere generale
Riserva di modifiche
I prodotti di cui alle presenti istruzioni di esercizio sono stati sviluppati tenendo conto
dei requisiti di mercato e dello stato dell’arte. HUPFER
re modifiche nei prodotti e nella documentazione tecnica correlata, ove queste siano
finalizzate al progresso tecnologico. Fanno fede sempre i dati ed i parametri ponderali garantiti quali vincolanti in sede di conferma d'ordine, nonché la descrizione delle
prestazioni e del funzionamento.
Imballo e trasporto
®
La vostra unità HUPFER
ballata previa pulizia. L'imballo consiste di materiali riciclabili e può essere smaltito
in conformità.
è stata sottoposta ad un accurato test funzionale ed im-
Utilizzo dell’apparecchiatura
I carrelli erogatori di vivande sono costituiti da vaschette termostatate mobili dotate
di riscaldamento elettrico.
L'applicazione principale è data dal mantenimento a temperatura e dall'erogazione
di vivande presso catene di distribuzione degli alimenti in ambito ristorazione per comunità. A seconda del tipo e delle dimensioni della cucina si utilizzano unità con un
numero di vaschette da 1 a 4.
Un tipico campo applicativo collaterale è il c.d. Event-Catering (Servizio per party e
conferenze), con l'impiego di tutti e quattro i tipi di apparecchiature.
Le unità sono inoltre idonee all'erogazione diretta di alimenti all'ospite, ma gli elementi di servizio e di visualizzazione collocati frontalmente non costituiscono una dotazione ottimale per tale scopo.
Carrelli erogatori di vivande
®
si riserva il diritto di introdur-
Note:
• antecedentemente al primo utilizzo, occorre rimuovere il film protettivo dai lamierati.
• per motivi di sicurezza, la temperatura max raggiungibile del bagnomaria è limitata a 95 °C. Ciò significa che la potenza prestazionale di un carrello erogatore di
vivande non è comparabile a quella di un bagnomaria stazionario.
Annotazioni per l’utilizzatore
Antecedentemente alla prima messa in funzione leggere accuratamente le presenti
istruzioni di esercizio. Accertarsi che il personale di conduzione sia stato edotto circa
le fonti di rischio ed i possibili malfunzionamenti.
Annotazioni importanti per la sicurezza e la prevenzione di danni sono evidenziate,
nelle presenti istruzioni di esercizio, tramite un simbolo di “Attenzione”.
Attenzione, nota concernente la sicurezza e la prevenzione di danni!
Le note così evidenziate vanno poste a conoscenza del personale di servizio.
Con il simbolo della “Mano” vengono evidenziate annotazioni utili e suggerimenti per
l'esercizio dell'unità.
Targhetta identificativa del tipo
Costruttore Potenza assorbita
Modello * Carico utile max
Nr. articolo * ! Marchio di controllo
Nr. ordine * " Classe di protezione
Nr. serie * # Marchio di conformità
Tensione nominale $ Potenza frigorifera
Potenza allacciata % Fluido refrigerante
* Dati necessari in caso di assistenza
52 43.3000.2
Page 49
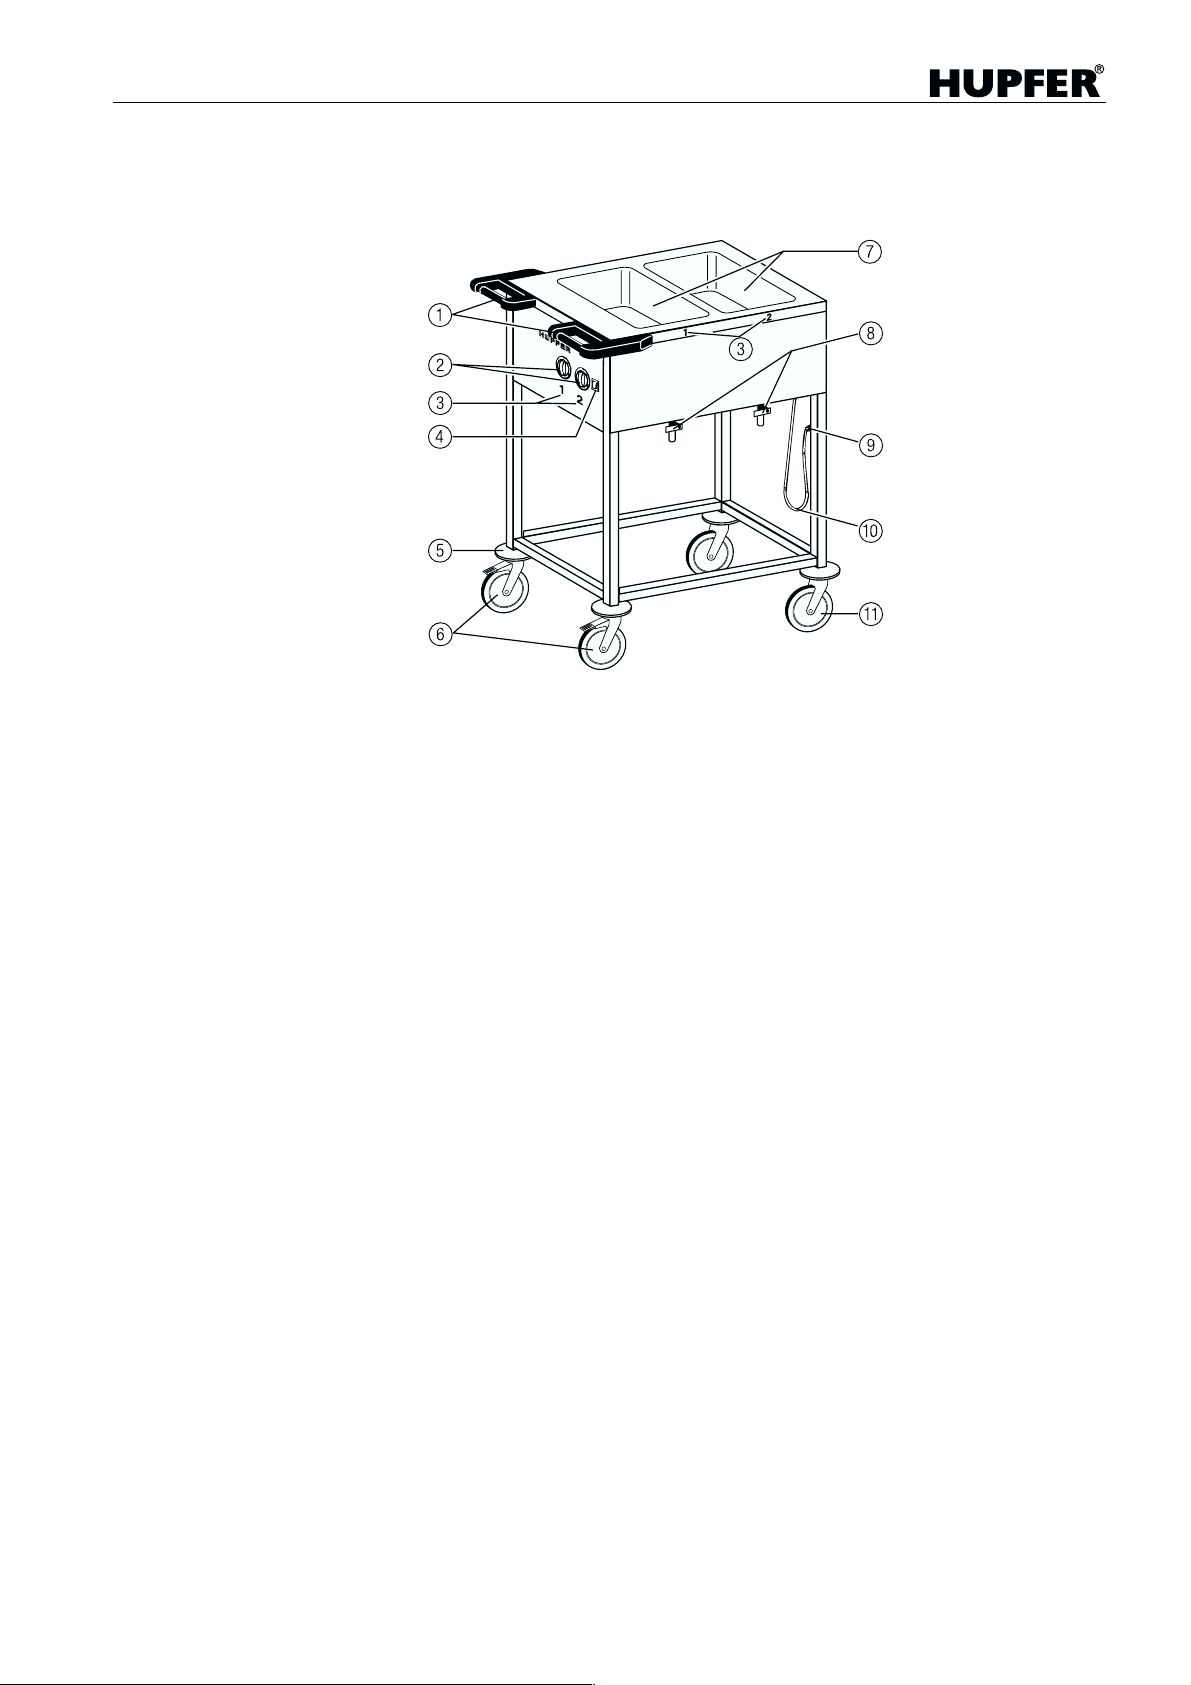
Carrelli erogatori di vivande
Vista dell’apparecchiatura
Impugnatura di spinta di sicurezza, con bordo di contatto incorporato
Nottola per la regolazione termica delle vaschette
Cifre per l’allocazione delle va schette
Interruttore ON / OFF
Rulli deflettori di protezione
Ruote sterzanti con fermo integrale
Vaschette di termostatazione
Rubinetti di scarico dell’acqua per le vaschette di termostatazione
Supporto per spina
! Cavo di attacco con spina
" Ruote sterzanti prive di fermo
Accessori speciali
• Recipienti GN
• Partitori a sospensione, per recipienti (lunghezza 325 ovv. 530 mm)
• Prolunga flessibile di scar ic o ½", 42 cm
• Bordo di fondo in acciaio al Cr-Ni 1.4301
• Bordo ribaltabile longitudinalmente, in acciaio al Cr-Ni 1.4301*
• Bordo ribaltabile frontalmente, in acciaio al Cr-Ni 1.4301*
• Ruote sterzanti in acciaio al Cr-Ni, Ø 125 mm, con e senza fermo integrale,
fissaggio a perno
* Il fissaggio a posteriori dei bordi ribaltabili all'apparecchiatura è consen-
tito solo ad opera di personale specializzato e autorizzato. È necessaria
una saldatrice TIG.
43.3000.2 53
Page 50
Annotazioni di sicurezza
• Le unità sono previste esclusivamente per un funzionamento presidiato.
• Le unità sono previste per il trasporto di alimenti entro recipienti GN inseriti
e con riempimento d'acqua nelle vaschette. Non è ammesso il traspo r to di
altri carichi.
• A causa del rischio di ribaltamento, l'unità SPA/EB-1 può essere movimentata solo a vuoto, ossia senza riemp im ento d' acqua e s enz a rec ip ien ti GN
appesi. A motivo del la sua str ut tur a as sa i compatta ed a basso in gom bro,
per questo modello sussiste fondamentalmente rischio di ribaltamento.
• La movimentazio ne può aver luogo esclus ivamente su fondo piano. Pe rcorrendo fondi fortemente aplanari è possibile un danneggiamento del carrello.
• Prima di effettuare la movimentazione spegnere l'unità, estrarre la spina ed
innestare il supporto previsto.
Carrelli erogatori di vivande
• Non estrarre mai la spina dalla presa agendo sul cavo.
In versione standard, i carrelli HUPFER
dotati di spina a s quad ra Sc huk o. A differenza di una spi na S chuk o re ttil inea, questo connetto re sporge solo in misura trascurabile da lla presa e
non può quindi subire danni a causa della movimentazione laterale.
Se si movimenta l'unit à senza prima e strarre la spina, l'effe tto leva insorgente dopo una sovrasollecitazione del cavo può danneggiare gravemente
la presa o addirittura strapparla dalla parete.
• Prima della mov imentazione , sblocc are i due fr eni di s tazionamen to. Una
movimentazione a freni di stazion amento bloc cati può tradurs i in un danneggiamento del carrello.
• Le unità sono previste esclusivamente per la m ovimentazione manuale.
Una movimentazione supportata m eccanicam ente non è ammessa. Pericolo di lesioni e danni.
• In fase di trasporto con mezzi ausiliari come ad es. tramite camion occorre
prevedere un bloc co di sicu rezza pe r le uni tà. I fermi integrali non sono sufficienti quali protezioni per il trasporto.
• Non spostar e ma i l'un ità tramite trazione del cavo elettrico di connessione.
• Non è ammessa una movimentazione su piani obliqui o scale.
®
per l’erogazione di alimenti sono
• In fase di movimentazione, non spostare l'unità a velocità superiore al pas-
so d'uomo. I carrel li con elevato carico possono essere frena ti e sterzati
solo con difficoltà. Ove necessario ricorrere ad un aiuto per la movimentazione.
• Non raccogliere mai manualmente i carrelli che abbiano subito ribaltamento a causa di azione esterna o disattenzione. Pericolo di lesioni!
• Non sedersi o porsi sull'apparecchiatura. Non trasportare mai persone con
l'apparecchiatura.
54 43.3000.2
Page 51

Carrelli erogatori di vivande
• Non arrestare le unità su fondo ripido.
• Dopo l'arresto, le unità vanno protette agendo sui due fermi int egrali, per
far sì che non rotolino via.
• Se la spina entra a contatto con acqua, essa dovrà essere asciugata prima
dell'inserimento nella presa. Pericolo di morte!
• Prima di utilizzare l'unità, la spina od il cavo di connessione alla rete vanno
sostituiti, se danneggiati, ad opera di personale specializzato e autorizzato.
• Il cavo spira lato è idoneo ad un'estensione massima pari a 1,80 m. Una so-
vrallungamento forzato del cavo può provocare danni ai fili interni. Pericolo
di incendio!
• In ambienti bagnati e umidi non impiegare cavi di prolunga.
• Non pulire l'unità con pulitrici a getto di vapore o ad alta pressione.
Se è pr evisto di op erare nell'amb iente con pu litrici a get to di vapore o ad
alta pressione, è nece ssar io prim a po rre l'app arec chiat ura fuo ri serv izio e
scollegarla dalla rete elettrica.
• Inserire la spina solo in idonee prese dotate di messa a terra. Per il caso di
spina inidonea, occorre far sostituire il cavo di allacciamento alla rete
dell'unità ad opera di personale specializzato e autorizzato (v. tipi di presa
utilizzabili, a pag. 62).
Non è ammesso l'utilizzo di adattatori di presa. Pericolo di incendio!
• Le ruote di scorrimento sono omologate per temperature comprese fra
-20 e +50 °C. L'utilizzo in al tri ca mpi d i tem perat ura pu ò tradursi in un infragilimento del materiale strutturale. Non sono quindi più da escludere danni
provocati da azioni di natura meccanica.
43.3000.2 55
Page 52
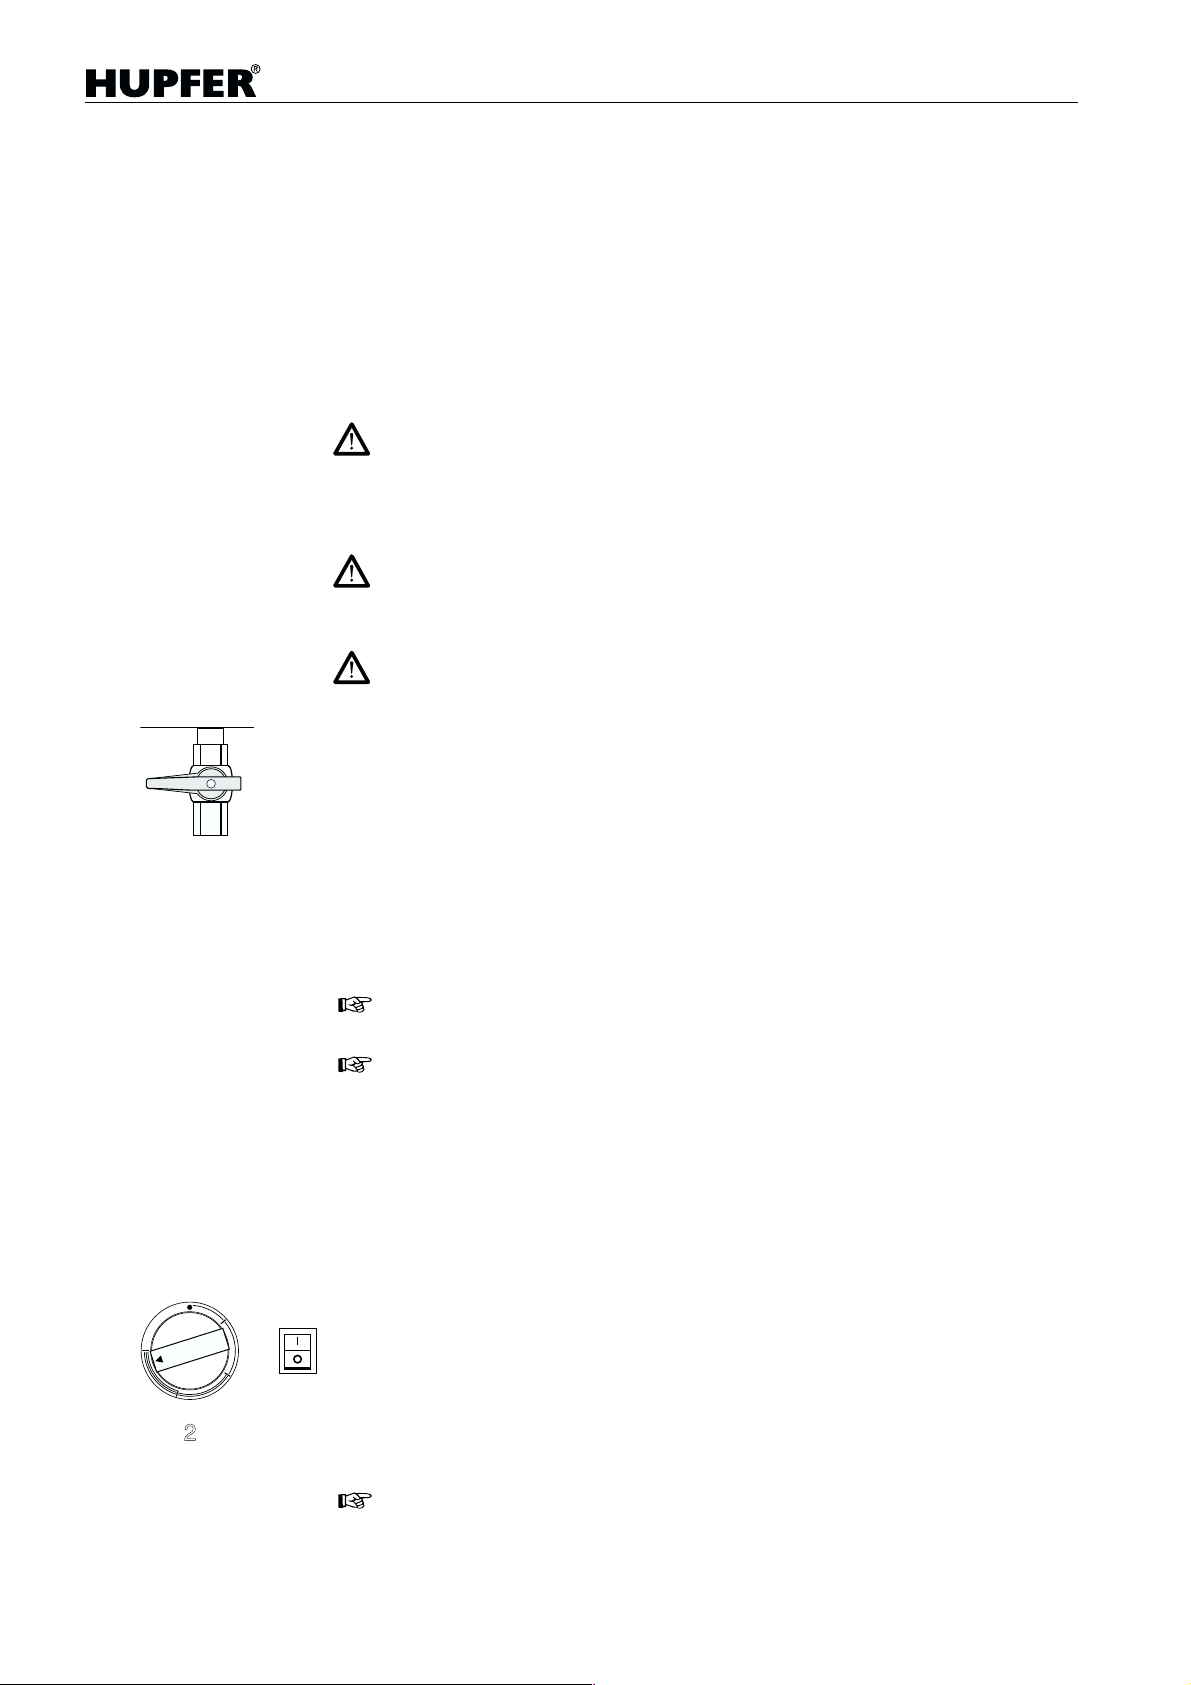
Conduzione
Messa in esercizio
Carrelli erogatori di vivande
Per la messa in ese rc izi o oc co rre ch e le va sc he tt e dell 'u ni tà siano fredde, pulite ed esenti da incrostazioni calcaree. Ove necessario, le vaschette già precedentemente utilizzate – per le quali l'acqua sia stata completamente
scaricata – dovranno essere sottoposte a raffreddamento per un certo tempo.
Un riscaldament o a secco delle va schette è possibi le senza r ischi di sort a, ma
tale operazione non è raccomandata da HUPFER
del calore assai ridotta.
Per il caso di vaschette riscaldate a secco, il contatto con l’acqua fredda pro-
voca un intenso sviluppo di vapore. Peric olo di ustioni!
Sono inoltre possibili svergolamenti del fondo delle vaschette ed una formazione di microcricche. Come conseguenza può verificarsi un danno totale
dell'apparecchiatura.
Uno strato di calcare agisce come isolante termico e può comportare un accumulo di calore al di sopra dei corpi riscaldanti tubolari; di conseguenza è
possibile un danneggiamento del fondo delle vaschette.
Sussiste inoltre pericolo di corrosione al di sotto dello strato di calcare.
Prestare attenzione alle annotazioni di sicurezza riportate a partire da pag. 54.
®
a causa della trasmissione
Riempimento delle vaschette
– Chiudere i rubinetti di scarico.
– Riempire le vaschette con ca. 3 l d'acqua.
Ciò corrisponde ad un livello d'acqua pari a ca. 2 cm.
È bene che i recipienti GN inseriti successivamente (profondità max 200 mm)
non permangano a contatto con l'acqua, perché tale circostanza riduce la trasmissione del calore. La migliore trasmissione del calore ha luogo mediante il
vapore.
Livelli di riempimento più elevati allungano il tempo di riscaldamento.
Se l'acqua di rete presenta una forte concentrazione di sostanze minerali, è
opportuno impiegare acqua addolcita per ridurre i sedimenti calcarei.
Per il riempimento delle vaschette è raccomandabile l'utilizzo di acqua calda
o molto calda. Ciò riduce il tempo di riscaldamento dell'apparecchiatura.
Avviamento dell'unità
– Coprire le vaschette per evitare dispersioni di calore.
– Infilare la spina dell'apparecchiatura in un'idonea presa dotata di messa a
terra.
Impiegare solo la connessione a spina prevista in proposito. L'apparecchiatura non può essere fatta funzionare se la linea di connessione è danneggiata o se si evidenziano danni visibili.
– Accendere l'apparecchiatura agendo sull'interruttore ON / OFF.
Si accende la luce spia di abilitazione all'esercizio incorporata nell'interruttore.
– Tramite il regolatore in dotazione alla vaschetta, impostare la potenza pre-
stazionale desiderata. Nell'ambito dei 4 campi di potenza è possibile una
regolazione in continuo. La correlazione fra i commutatori e le vaschette ha
luogo tramite i numeri impressi nel corpo.
Per un livello di riempimento pari a 2 cm (acqua fredda), una copertura efficiente ed una potenza max dell'apparecchiatura, l'acqua della vaschetta raggiunge in ca. 45 minuti una temperatura di 90 °C.
56 43.3000.2
Page 53
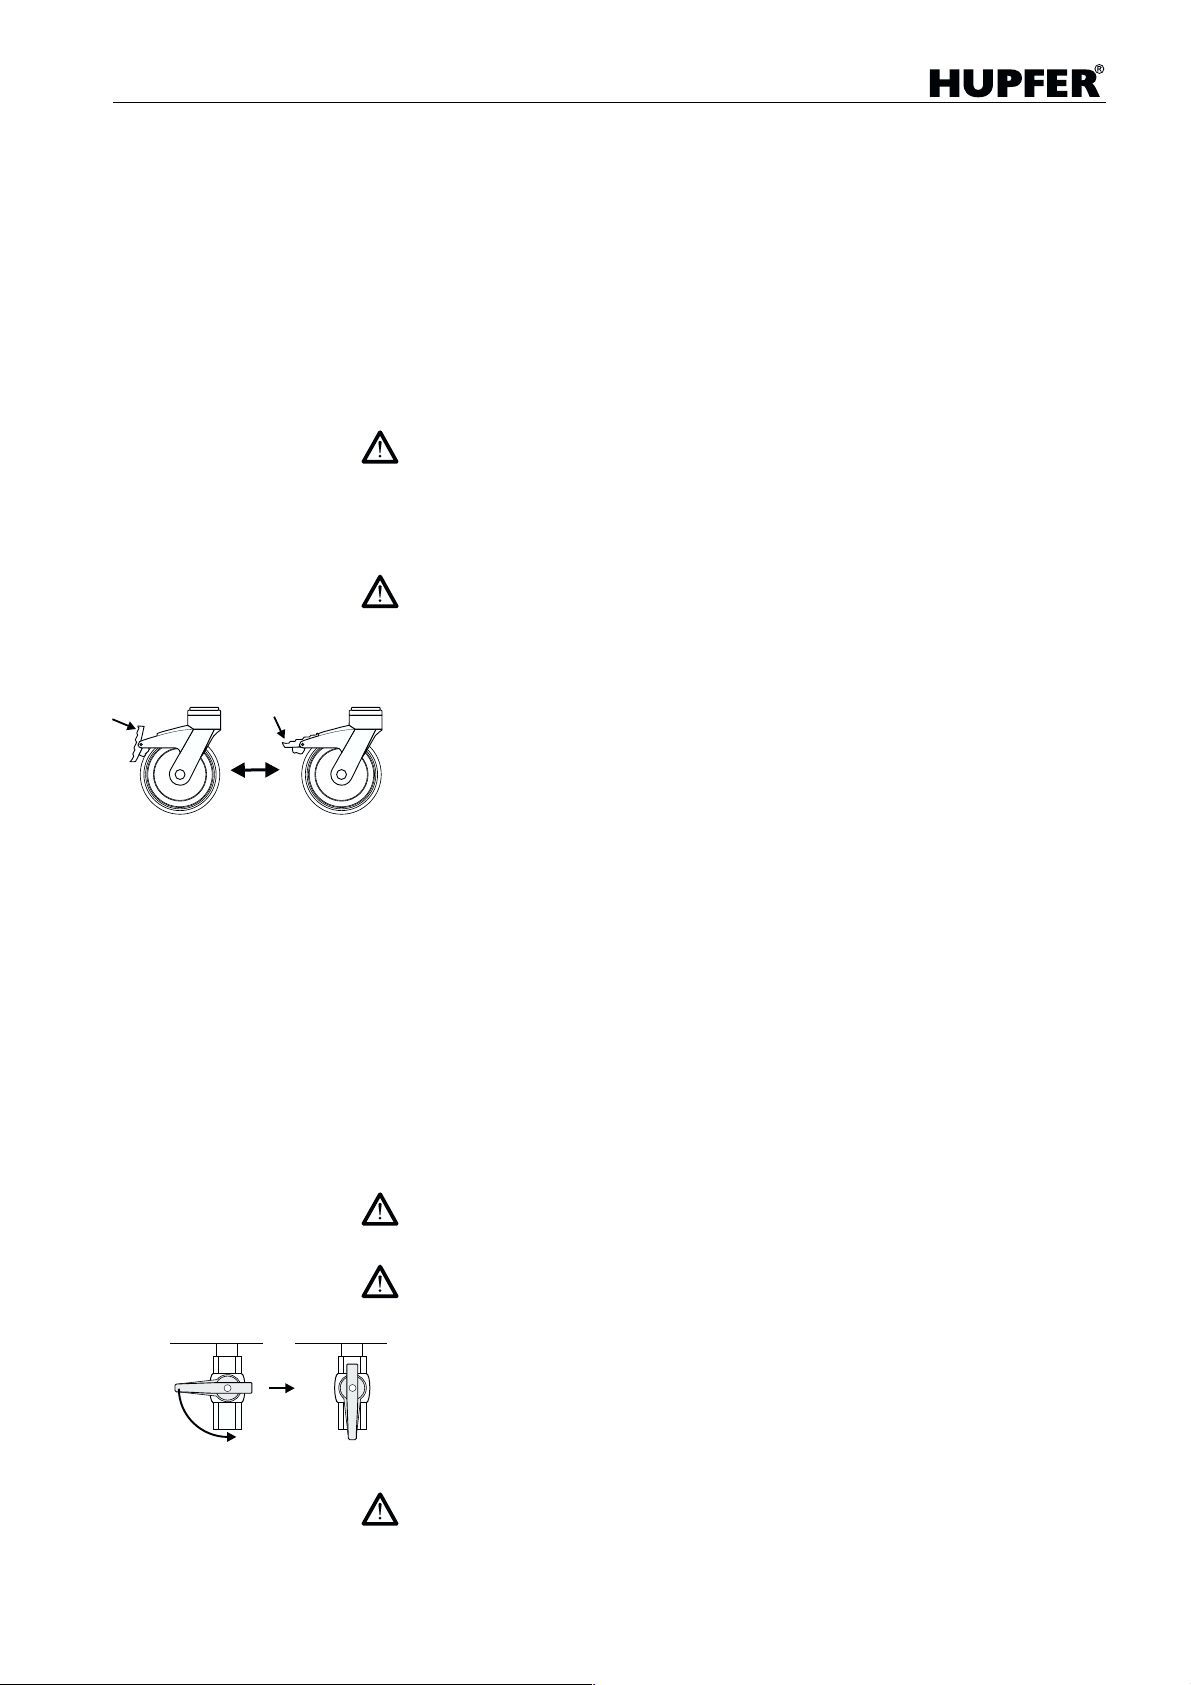
Carrelli erogatori di vivande
Utilizzo dell’apparecchiatura
Inserimento dei recipienti GN
Sino ad una profondità di 200 mm, i recipienti GN 1/1 possono essere agganciati senza ulteriori accorgimenti nelle vaschette. Utilizzando recipienti GN 2/3,
GN 1/2 e GN 1/3 è opportuno impiegare traverse di partizione (accessorio
speciale) per ridurre al minimo la fuoriuscita di vapore e la dispersione di calore ad essa concomitante.
Se si utilizzano recipienti GN ancora più piccoli è necessario utilizzare partitori
a sospensione, in modo tale da assicurare un'idonea chiusura con il bordo della vaschetta.
Prestare attenzione ad una chiusura ottimale delle vaschette operative, perché la fuoriuscita di vapore acqueo può provocare ustioni. I componenti metallici del coperchio suscettibili di contatto possono riscaldarsi in misura
pericolosa.
Movimentazione
Prestare attenzione alle annotazioni di sicurezza riportate a partire da pag. 54.
Disconnessione
– Posizionare su
– Spegnere l'apparecchiatura agendo sull'interruttore ON / OFF.
– Estrarre la spina di rete e fissarla nel supporto previsto.
– Sbloccare i due freni di stazionamento.
– Afferrare le impugnature di spinta dell'unità e trasportarla sino al luogo di
destinazione.
– Nel luogo di destinazione, bloccare i due freni di stazionamento per assi-
curare l'apparecchiatura nei confronti di uno spostamento fortuito.
– Inserire la spina dell'apparecchiatura in un'idonea presa dotata di messa a
terra.
– Accendere l'apparecchiatura agendo sull'interruttore ON / OFF.
– Impostare la potenza voluta tramite il regolatore correlato con la vaschetta.
● tutti i regolatori.
Spegnimento dell’apparecchiatura
– Posizionare su ● tutti i regolatori.
– Spegnere l'apparecchiatura agendo sull'interruttore ON / OFF.
– Estrarre la spina di rete e fissarla nel supporto previsto.
Scarico dell’acqua
Non azionare mai i rubinetti di scarico mediante utensili.
In caso di rubinetti bloccati, operare con agenti di distacco innocui per la salute
(ad es. spray al teflon). Quindi pulire a fondo lo scarico e le vaschette.
Se si scarica acqua ad alta temperatura sussiste rischio di ustioni.
Aprire il rubinetto di scarico solo direttamente al di sopra di una canaletta di
deflusso (a carico cliente) oppure di uno scarico di cucina centralizzato.
In caso di bordo di fondo installato (accessorio speciale contro sovrapprezzo)
impiegare un serbatoio di captazione avente volumetria sufficiente, oppure la
prolunga di scarico (accessorio speciale contro sovrapprezzo).
Successivamente allo scarico dell'acqua, il tubo di deflusso ed il rubinetto possono presentare una temperatura piuttosto elevata. Pericolo di ustioni!
43.3000.2 57
Page 54
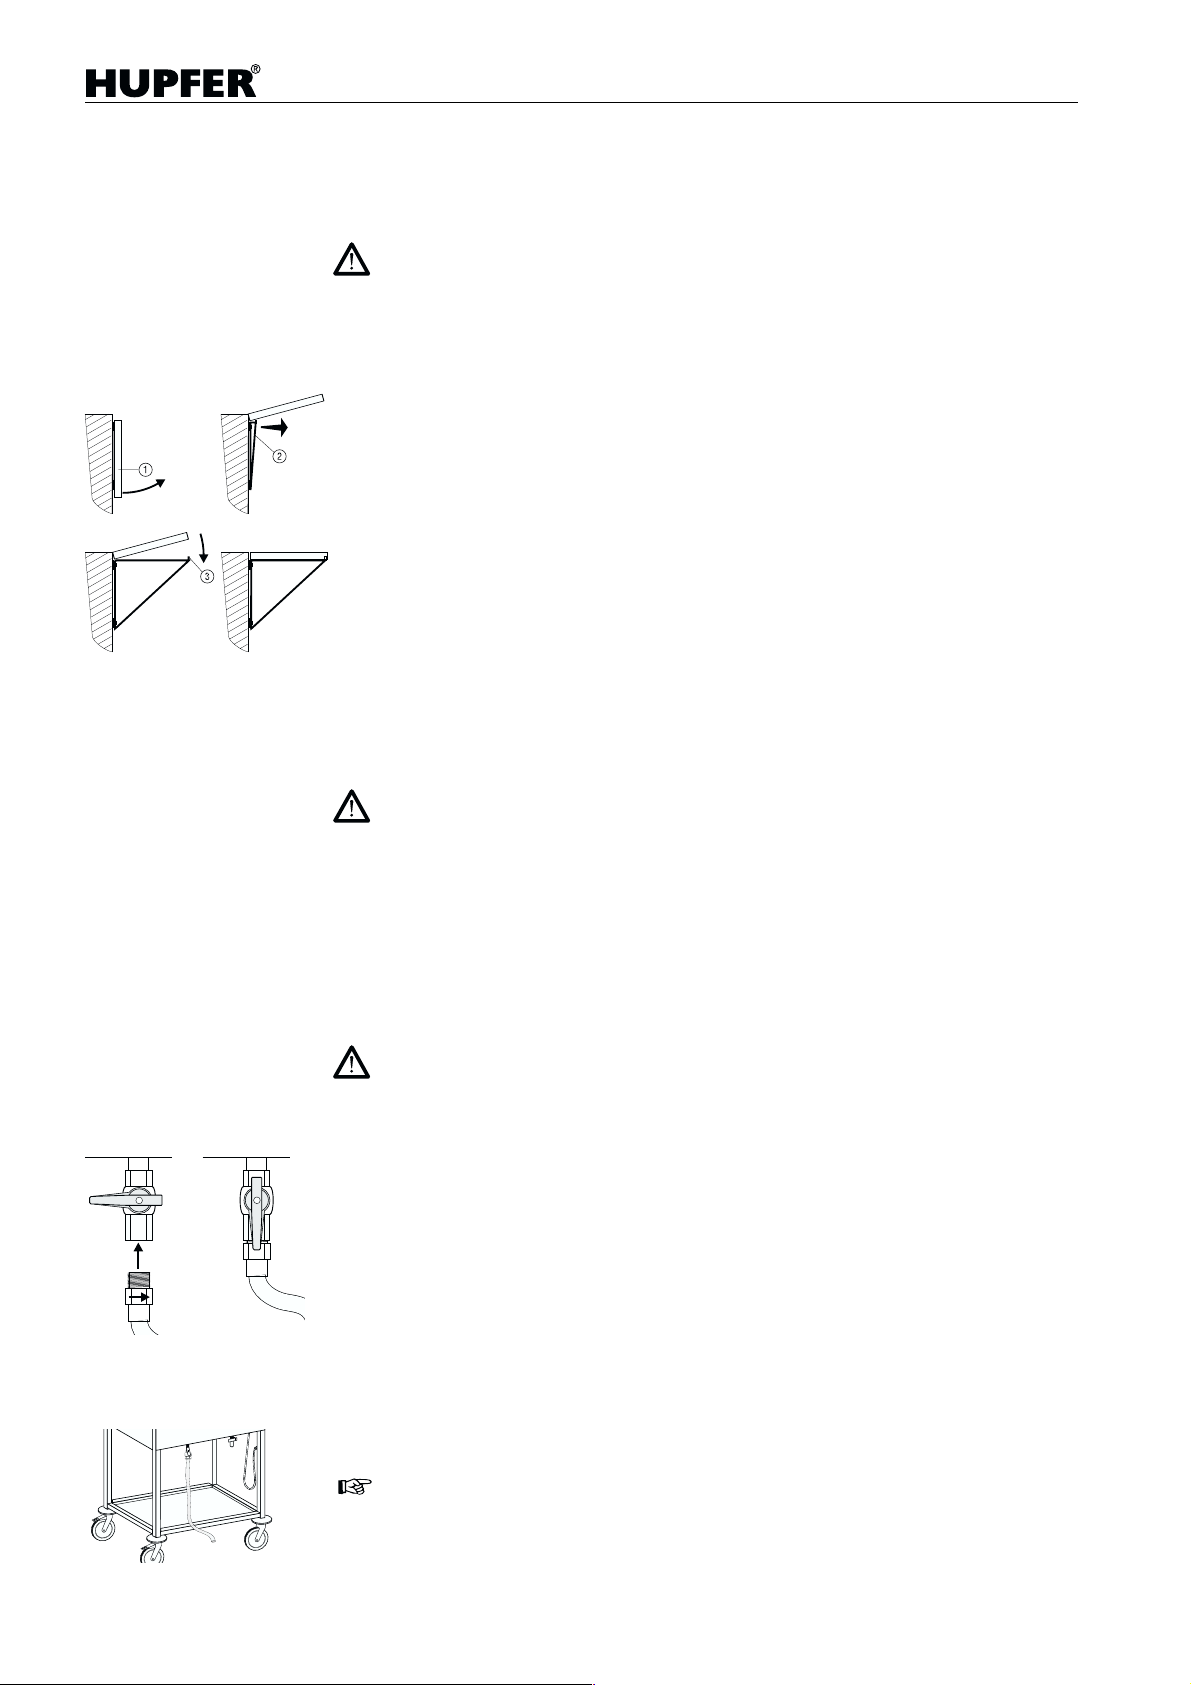
Accessori speciali
Carrelli erogatori di vivande
Bordi ribaltabili
• I bordi ribaltabili non sono omologati per il posizionamento di carichi pesanti.
• Durante la movimentazione dell'unità, i bordi ribaltabili devono essere fatti
rientrare.
• In fase di estensione e bloccaggio dei bordi ribaltabili sussiste pericolo di
schiacciamento.
– Ruotare verso l'alto il bordo ribaltabile
– Estrarre il supporto
– Posizionare il supporto in modo tale che, abbassando il bordo ribaltabile,
le spine
– La ritrazione dei bordi ha luogo in base ad una sequenza inversa.
scivolino nei fori previsti in esso.
.
.
Bordi di fondo
Sui bordi di fondo possono essere collocati solamente oggetti con base stabile. Non è consentito supe rare il peso comp lessivo amme sso (v. “Dati Tecnici”,
pag. 61).
Non è ammesso il trasporto di recipienti aperti che contengano liquidi ad alta
temperatura.
Prolunga di deflusso
• Non movimentare mai l'unità esercitando trazione sulla prolunga di deflusso.
• In fase di scarico dell'acqua, badare alla posizione del terminale di tubo
flessibile.
• Scaricando acqua molto calda, la prolunga di deflusso può presentare una
temperatura piuttosto elevata. Pericolo di ustioni!
– Avvitare saldamente la filettatura esterna della prolunga di deflusso con il
raccordo terminale del rubinetto di scarico.
– Posizionare il terminale del tubo flessibile su di un punto di deflusso.
– Aprire il rubinetto di scarico.
Con la prolunga di deflusso è possibile scaricare l'acqua anche a bordo di fondo innestato, senza dover impiegare un recipiente di captazione.
58 43.3000.2
Page 55

Carrelli erogatori di vivande
Pulizia e preservazione
• Prima di iniziare la pulizia porre fuori servizio l'apparecchiatura. Estrarre la
spina di rete ed agganciarla al supporto previsto in proposito sull'unità.
Svuotare le vaschette.
• Non pulire l'unità con pulitrici a getto di vapore o ad alta pressione. Se è
previsto di operare nell'ambiente con pulitrici a getto di vapore o ad alta
pressione, è necessario prima porre l'apparecchiatura fuori servizio e scollegarla dalla rete elettrica.
• Per la pulizia occorre che l'apparecchiatura sia fuori servizio ed adeguata-
mente raffreddata.
Se dopo la pulizia sono ancora presenti dei depositi calcarei è necessario effettuarne la rimozione, dato che altrimenti aumenta il consumo di energia mentre si riduce l'economicità. In caso di forti incrostazioni calcaree
l'apparecchiatura può subire danni.
Per la rimozione del calcare usare un decalcificatore per superficie consueto
del commercio oppure acqua e aceto.
Il rubinett o di scarico pu ò essere rilubrificato con grasso per prodotti alimentari
(i grassi da arrosti non sono idonei) per preservarne la tenuta e l'azionamento
agevole.
Qualche informazione utile in tema di "acciaio inossidabile"
La resistenza alla corrosione degli acciai inossidabili si basa su di uno strato
di passivazione che si crea superficialmente in presenza di ossigeno. L'ossigeno atmosferico è di per sé sufficiente a formare questo strato di passivazione, così che guasti o fratture di tale stra to provocat i da un'azion e meccanica
si riparano spontaneamente. Lo strato di passivazione si forma o si riforma più
velocemente se l'acciaio viene posto a contatto con acqua ricca di ossigeno.
Un ulteriore incremento di tale effetto viene conseguito ricorrendo ad acidi ossidanti (acido nitrico, acido ossalico). Questi acidi vengono impiegati qualora
l'acciaio abbia subito un intenso attacco chimico ed il suo strato di passivazione sia andato ampiamente perduto.
Lo strato di passivazione può essere danneggiato o demolito per via chimica
con agenti ad effetto riducente (accettori di ossigeno), sempre che essi agiscano sull'acciaio in forma concentrata od a temperature elevate. Queste sostanze aggressive sono ad es.:
• formulazioni contenenti sale e zolfo
• cloruri (sali)
• concentrati di erbe aromatiche quali senape, essenza acetica, dadi agli
aromi, soluzioni di sale da cucina etc.
Altri danni possono insorgere a causa di:
• ruggine este rna (ad es. da altri comp onenti, utensili ovv. ruggine c.d . volatile)
• particelle di ferro (ad es. pulviscolo di rettifica)
• contatto con metalli non ferrosi (passaggio allo stato elementare)
• carenza di ossigeno (ad es. assenza di aerazione, acqua povera di ossigeno).
43.3000.2 59
Page 56

Carrelli erogatori di vivande
Principi generali di lavoro per il trattamento di
apparecchiature in “acciaio inossidabile”
Mantenere la superficie esterna delle apparecchiature in acciaio inossidabile
sempre pulita e ben accessibile all’aria.
Rimuovere quotidianamente tramite pulizia i depositi di calcare, grasso, amido
ed albume. Sotto questi depositi, a causa dell'insufficiente afflusso d'aria può
aver luogo una corrosione. Per la pulizia non devono essere impiegati detergenti ad azione sbiancante e contenenti cloro.
Ove non vengano impartite particolari norme di pulizia, è bene in ogni caso utilizzare detergenti a basso tenore di cloro.
Dopo ciascuna operazione di pulizia rimuovere, tramite lavaggio con abbondante acqua di rete, tutti i residui di detergente. Quindi è opportuno far asciugare a fondo le superficie.
Non porre i componenti in acciaio inossidabile più a lungo di quanto strettamente necessario a contatto con acidi concentrati, spezie, sali etc. Anche i vapori acidi che si sviluppano durante la pulizia delle piastrelle promuovono la
corrosione "dell'acciaio inossidabile".
Evitare di danneggiare le superficie esterne in acciaio inox, particolarmente
tramite altri metalli diversi dall'acciaio inossidabile stesso. I residui di metalli
estranei formano tracce minuscole di elementi chimici in grado di provocare
corrosione. In ogni caso, è bene evitare un contatto con ferro e acciaio perché
ciò porta alla ruggine c.d. esterna. Se l'acciaio inox entra a contatto con il ferro
(lana d'acciaio, trucioli di tubazioni, acqua ad alta concentrazione di ferro) tale
fenomeno può costituire un innesco per la corrosione. Per la pulizia meccanica impiegare quindi esclusivamente lana di acciaio inox oppure spazzole dotate di setole naturali, in plastica o in acciaio inossidabile. La lana d'acciaio o
le spazzole in acciaio non legato danno luogo a ruggine esterna a causa
dell'usura. I punti di ruggine appena formati possono essere eliminati con
agenti abrasivi ad azione blanda o con carta abrasiva a grana fine. Punti di
ruggine più consistenti sono rimovibili impiegando una soluzione calda di acido ossalico al 2 – 3 %. Ove questi detergenti risultino inefficaci, è necessario
un trattamento con acido nitrico al 10 %.
Attenzione, pericolo! Questa operazione può essere effettuata solo da personale tecnicamente addestrato e nel rispetto delle presenti norme!
60 43.3000.2
Page 57
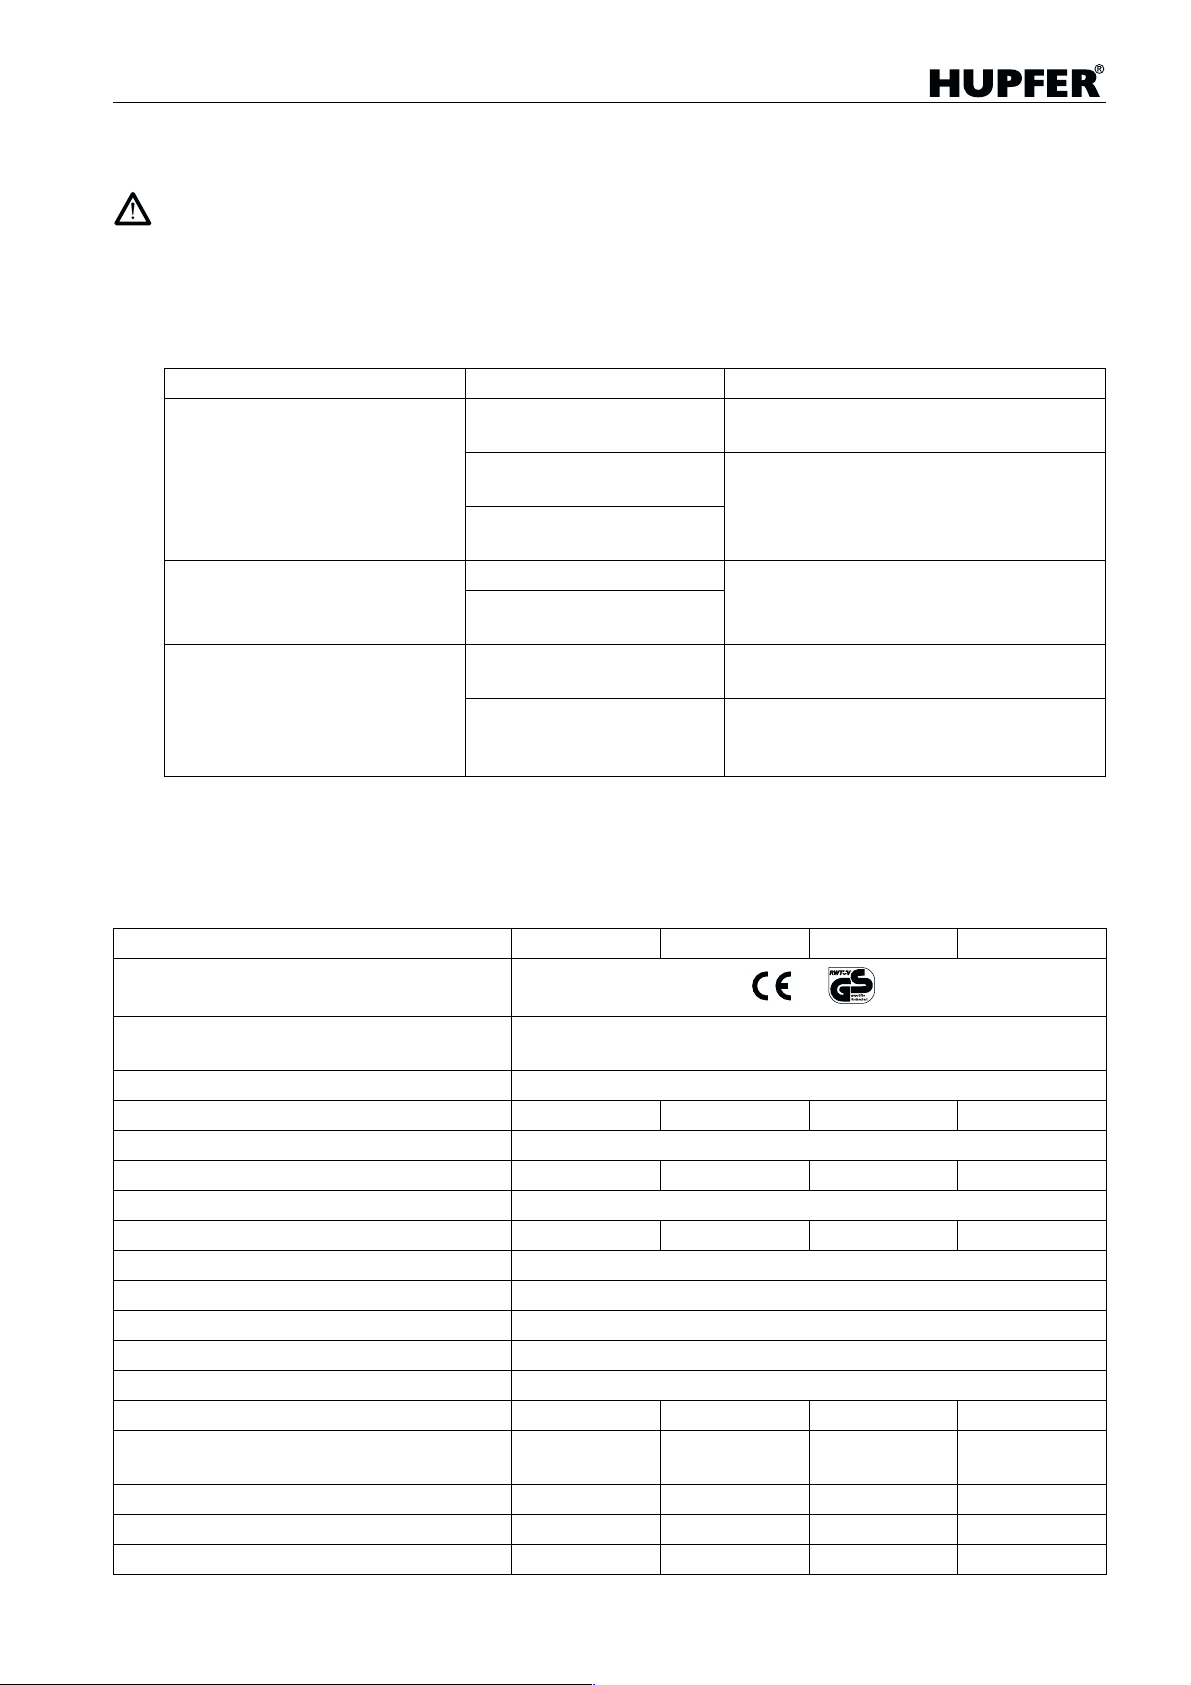
Carrelli erogatori di vivande
Un ausilio in caso di disfunzioni
Le attività di manutenzione possono essere espletate esclusivamente da personale specializzato e debitamente autorizzato. I componenti difettosi possono essere sostituiti solo con parti originali.
Per prima cosa, controllare se si è verificato un errore di conduzione. Alcune disfunzioni possono essere
risolte direttamente.
Per l'eventualità di un intervento di assistenza ed in caso di ordine di ricambi, indicare i dati impressi sulla
targhetta identificativa del tipo (v. pag. 52).
Disfunzione Causa possibile Rimedio
L'apparecchiatura non si scalda,
la luce spia non si accende.
L'apparecchiatura si sca lda ,
la luce spia non si accende
L'apparecchiatura si scalda solo
molto lentamente.
Fusibile esterno difettoso. Controllare il fusibile e, se necessario,
sottoporlo a manutenzione.
Interruttore ON / OFF difettoso.
Cavo di collegamento alla
rete o spina difettosa.
Luce spia difettosa. Porre fuori servizio l'unità, farla controlCircuito di commutazione
difettoso.
Troppa acqua nella
vaschetta.
Depositi di calcare o di con-
taminanti nella vaschetta.
Scollegare l' unità dalla rete, farla controllare - e se necessario riparare - da personale specializzato ed autorizzato.
lare - e se necessario riparare - da personale specializzato ed autorizzato.
Ridurre la quantità d'acqua.
Porre fuori servizio l'unità e, dopo adeguato raffreddamento, decalcific ar e o
pulire la vaschetta.
Attività regolari di controllo e manutenzione dell'unità servono a prevenire disfunzioni di esercizio e contribuiscono alla sicurezza. La periodicità dei controlli e degli interventi di manutenzione dipende dall'impiego
dell'apparecchiatura. Rivolgersi al Servizio assistenza del rivenditore di fiducia.
Dati tecnici
SPA/EB-1 SPA/EB-2 SPA/EB-3 SPA/EB-4
Marchio di controllo
Norme seguite nella produzione dell'appa-
recchiatura
Protezione contro gli spruzzi d'acqua IPX5
Nr. vaschette 1234
Dimensioni vaschette per GN 1/1 e rispettive suddivisioni, profondità max 200 mm
Capacità media, come persone servite* 15 25 50 80
Riscaldamento corpi scaldanti tubolari CNS
Potenza installat a 0,7 kW 1,4 kW 2,1 kW 2,8 kW
Allacciamento elettrico 230 V 1N AC 50 Hz
Isolamento termico piastrellatura ceramica
Regolazione temperatura in continuo, separatamente per ciascuna vaschetta
Campo termico 30– 95 °C
Telaio 4 ruote sterzanti, di cui 2 con fermo integrale, Ø 125 mm
Peso netto, senza bordo di fondo 32 kg 44 kg 55 kg 66 kg
Peso dell'unità a pieno carico delle
vaschette, senza bordi di fondo
Carico concentrato max dei bordi di fondo 50 kg 40 kg 30 kg 20 kg
Carico superficiale max dei bordi di fondo 100 kg 80 kg 65 kg 50 kg
Peso complessivo ammesso 170 kg 195 kg 220 kg 250 kg
* La capacità è funzione della tipologia di alimenti e della gamma di componenti.
64 kg 108 kg 151 kg 194 kg
DIN 18867–7
43.3000.2 61
Page 58

Carro baño maría
Índice (ES)
Indicaciones generales. . . . . . . . . . . . . . . . . . . . . . . . . . 64
Utilización de los aparatos. . . . . . . . . . . . . . . . . . . . . . . 64
Indicación al usuario. . . . . . . . . . . . . . . . . . . . . . . . . . . . 64
Placa de identificación . . . . . . . . . . . . . . . . . . . . . . . . . 64
Imagen del aparato . . . . . . . . . . . . . . . . . . . . . . . . . . . . 65
Indicaciones de seguridad . . . . . . . . . . . . . . . . . . . . . . . 66
Utilización. . . . . . . . . . . . . . . . . . . . . . . . . . . . . . . . . . . . . 68
Puesta en marcha . . . . . . . . . . . . . . . . . . . . . . . . . . . . . . . . . 68
Llenado de la cubeta
Conexión del aparato
Utilización del aparato . . . . . . . . . . . . . . . . . . . . . . . . . . . . . . 69
Empleo de recipientes GN
Transporte
Puesta en fuera de servicio . . . . . . . . . . . . . . . . . . . . . . . . . . 69
Apagado del aparato
Desagüe
Accesorios especiales . . . . . . . . . . . . . . . . . . . . . . . . . . 70
Pestaña plegable
Estante inferior
Alargo de desagüe
Limpieza y cuidados . . . . . . . . . . . . . . . . . . . . . . . . . . . . 71
Información acerca del «acero inoxidable»
Principios generales de trabajo para tratar aparatos
de «acero inoxidable»
Ayuda en caso de incidencias . . . . . . . . . . . . . . . . . . . . 73
Datos técnicos . . . . . . . . . . . . . . . . . . . . . . . . . . . . . . . . 73
Recambios . . . . . . . . . . . . . . . . . . . . . . . . . . . . . . . . . . . . 74
Declaración de conformidad CE . . . . . . . . . . . . . . . . . . .78
43.3000.2 63
Page 59
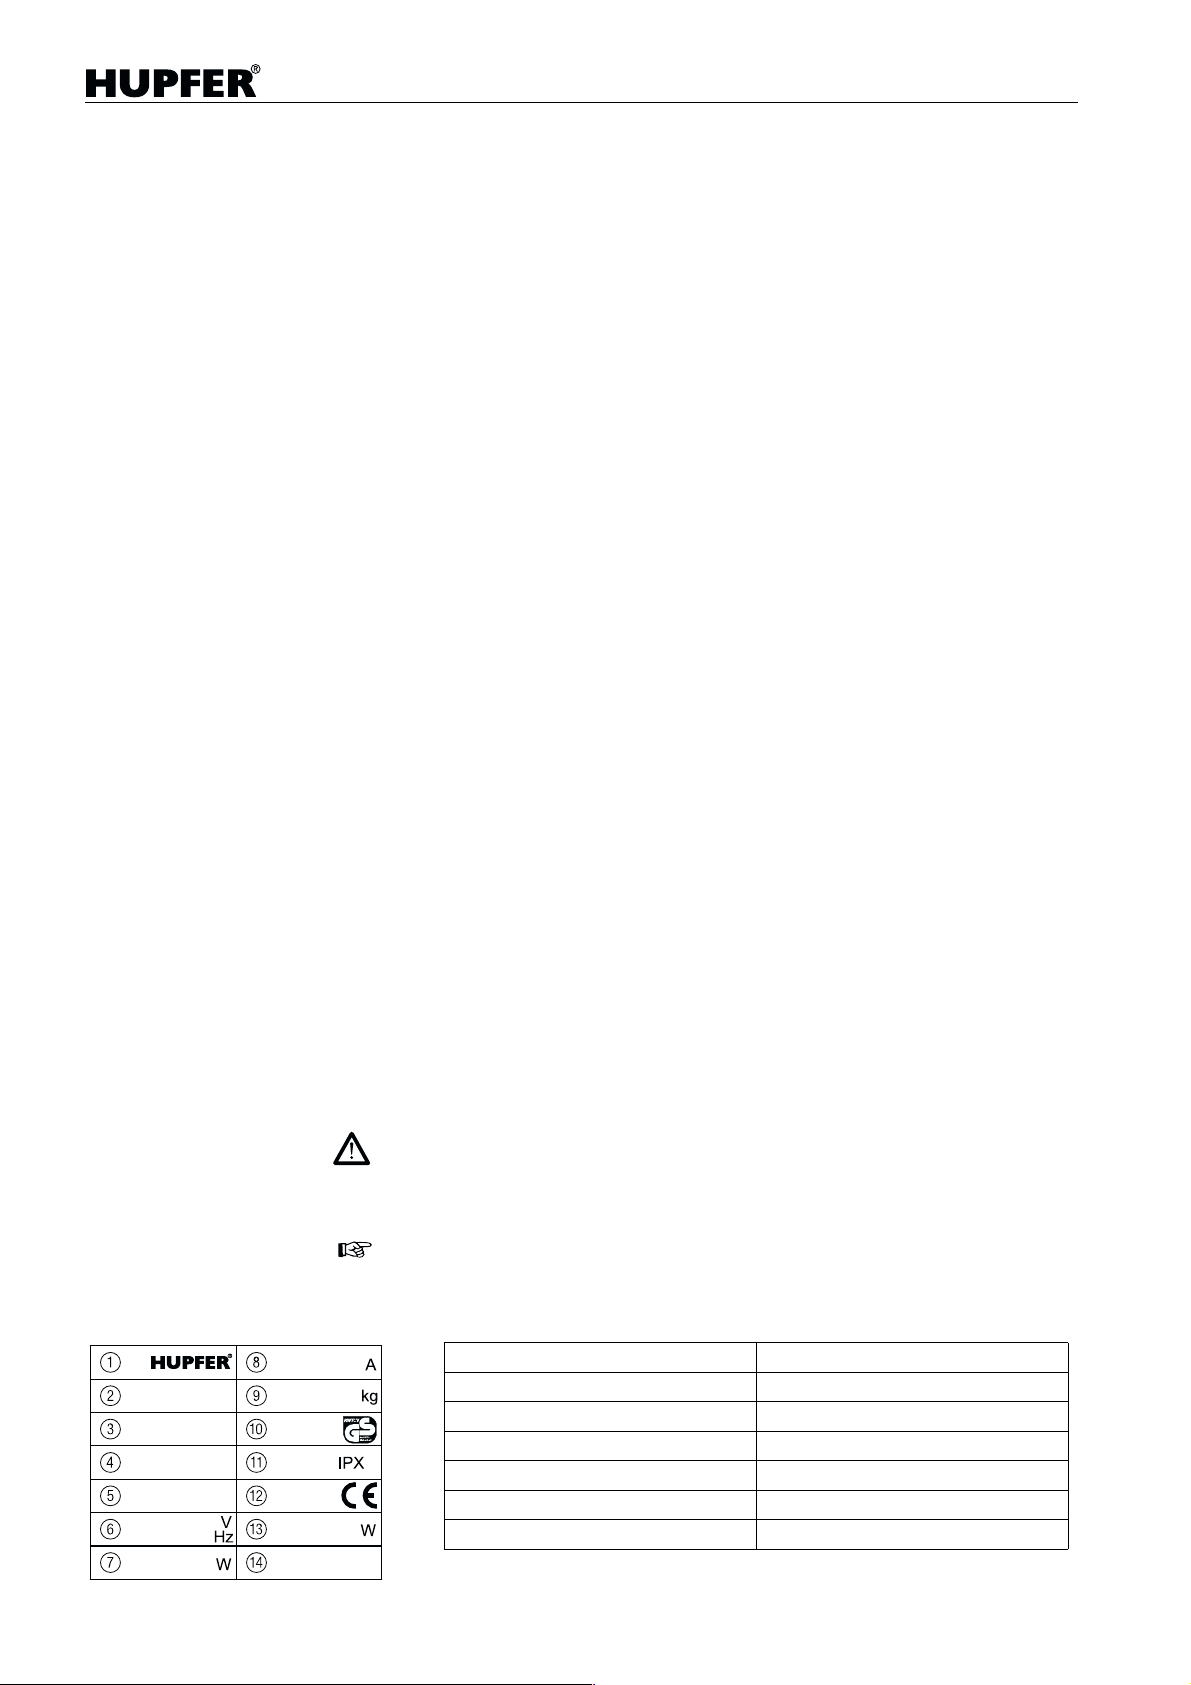
Indicaciones generales
Reserva de modificaciones
Los productos relativos a este manual fueron desarrollados de acuerdo con
las necesidades del mercado y de la situación de la técnica. HUPFER
serva el derecho a introducir modificaciones en el producto y en las correspondientes documentaciones técnicas, siempre que respondan a un adelanto
técnico. Son determinantes los datos y pesos, así como rendimiento y descripciones, expli cit ad os en la confirmación del pedido.
Embalaje y transporte
Su producto HUPFER
miento, y se ha embalado limpio. El embalaje está compuesto por materiales
reciclables y puede tirarse de forma correspondiente.
Utilización de los aparatos
Carros baño m aría son cubetas para mantener caliente, gracias a resistencias
eléctricas.
Su aplicación principal es el mantener caliente y poner a disposición comidas
para cintas de emplatado en el servicio a colectividades. Según el tipo de cocina y tamaño se utilizan aparatos de 1 hasta 4 cubetas.
Otra aplicación típica es el cátering de eventos (fiestas y servicios a conferencias) con la utilización de todos los tipos de aparatos.
Además los aparatos se pueden emplear para el servicio directo delante del
comensal, aunque debido a la disposición frontal de los mandos e indicadores
no está equipado de forma óptima para este uso.
Carro baño maría
®
se re-
®
ha sido sometido a un completo examen de funciona-
Indicaciones:
• Antes del primer uso debe quitarse la lámina protectora de plástico.
• Por motivos de seguridad la temperatura máxima alcanzable está limitada
a 95 °C. Esto quiere decir, que el rendimiento de un carro baño maría no
es comparable con el de un baño maría estacionario.
Indicación al usuario
Lea con detenimiento este manual antes de la puesta en marcha del aparato.
Asegúrese que el personal de servicio esté informado de los puntos peligrosos y de los posibles errores de uso.
Indicaciones importantes de seguridad y de correcto uso están señaladas en
este manual a través de un símbolo de «atención».
¡Atención, indicación de seguridad o de uso correcto!
Las indicaciones así señaladas deben ponerse en conocimiento del personal
de servicio.
Con el símbolo de la mano se destacan indicaciones y consejos para el uso
del aparato.
Placa de identificación
Fabricante Consumo eléctrico
Modelo * Carga máxima
Nº artículo * ! Símbolo de certificación
Nº pedido * " Tipo de protección
Nº de serie * # Símbolo de conformidad
Tensión nominal $ Rendimiento frigorífico
Valor de conexión % Refrigerante
* Datos necesarios para el servicio técnico.
64 43.3000.2
Page 60
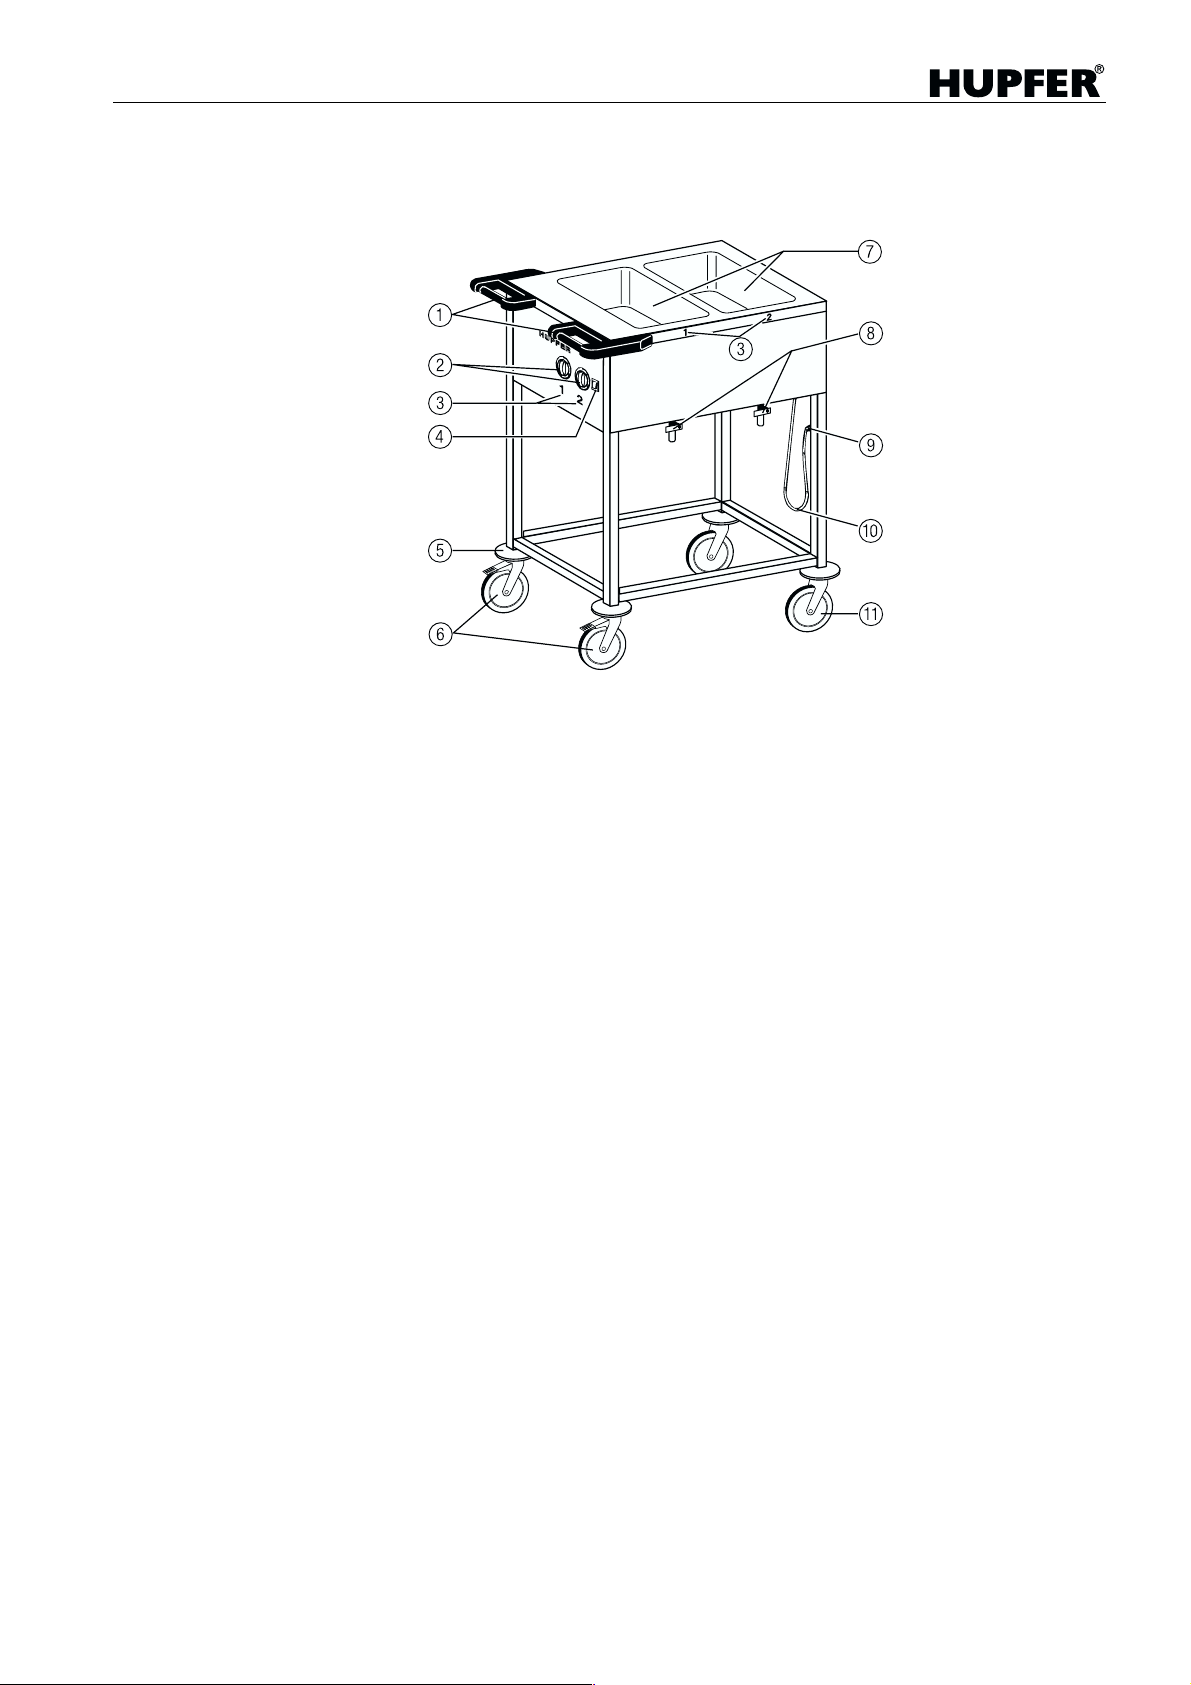
Carro baño maría
Imagen del aparato
Asas de empuje de seguridad con protección integrada
Mando de regulación de la temperatura de la cubeta
Número de identificación de cubeta
Interruptor de MARCHA / PARO
Discos paragolpes
Ruedas giratorias con freno y bloqueo
Cubeta baño maría
Grifos de desagüe para cubetas
Soporte del enchufe
! Cable de conexión con enchufe
" Ruedas giratorias sin freno
Accesorios especiales:
• Recipientes GN
• Listón divisor para cubeta (longitud 325 o 530 mm)
• Tubo alargo de desagüe flexible ½", 42 cm
• Bandeja de acero inoxidable 1.4301
• Pestaña plegable lateral, de acero inoxidable 1.4301*
• Pestaña plegable frontal, de acero inoxidable 1.4301*
• Ruedas de acero inoxidable, Ø 125 mm, con y sin freno y bloqueo, suje-
ción por vástago
* El montaje a posteriori de las pestañas plagables al aparato sólo está
permitido a personal especializado. Es necesario un aparato de soldadura WIG
43.3000.2 65
Page 61
Indicaciones de seguridad
• Los aparatos sólo están previstos para el uso indicado.
• Los aparatos están prev istos p ara e l trans porte de al imento s en recipi en-
tes GN encima de la s c ube tas con agua. El transporte de otras ca rg as no
está permitido.
• Debido al peligro de vuelco, el aparato SPA/EB-1 sólo debe trasladarse vacio, ello signific a s in ag ua y s i n rec ip ien te GN . Debido a una construcci ón
muy estrecha, con intención de ahorrar espacio, existe en este modelo peligor de vuelco.
• El transporte debe se r sobre suel os regula res. El tránsito por suelos muy
irregulares puede conducir al deterioro del tren de rodaje.
• Antes del transporte apagar el aparato, sacar el enchufe y colgarlo del soporte previsto al respecto.
Carro baño maría
• No tirar nunca del cable para desenchufar. Los carros baño maría de HU-
• Antes del transporte desfrenar las ruedas. Rodar con los frenos activados
• Los aparatos están previstos únicamente para el transporte manua l. Un
• En el transporte con elementos de ayuda como camiones debe adoptarse
• No mover jamás el aparato tirando del cable de conexión eléctrica.
• El transporte por pendientes o escaleras no está permitido.
• Durante el transp orte no sobrepa sar la velo cidad de a pie. Ca rros carga-
®
PFER
gulo. Al contrario del c aso de e nch ufe s S ch uko r ec tos, es te s obres al e de l
enchufe lo mínimo necesario y de esta forma se evita el riesgo de deterioro
por choque lateral al maniobrar el carro cerca de la pared.
Si se mueve el carro, sin sacar previamente el enchufe, después de sobrepasado el margen de elasticidad del cable y debido a la tracción puede deteriorarse la base del enchufe o incluso arrancarse de la pared.
puede provocar el deterioro del tren de rodaje.
transporte mecánico no está permitido. Peligro de herida y de deterioro del
aparato.
una sujeción de los aparatos. Los frenos y bloqueos de las ruedas no son
suficientes como sujeción para el transporte.
dos son difíciles de parar y maniobrar. En caso necesario pedir ayuda para
el transporte.
se entregan en la versión estándar con un enchufe Schuko en án-
• En caso de carro volc ando, no in tentar aguantarl o nunca con la s manos.
¡Peligro de lesiones!
• No sentarse o colo cars e so bre el carr o. Nun ca l levar personas con el c a-
rro.
• No dejar carros sobre pendientes.
• Al estacionar el carro debe asegurarse utilizando los dos frenos.
66 43.3000.2
Page 62

Carro baño maría
• Si la clavija del en chufe se ha mo jado, se debe secar antes de enchufar .
¡Peligro de muerte!
• Enchufes o cables da ñados deben ser rem plazado s por pers onal técnico
autorizado antes de su utilización.
• El cable en espiral està pensado para el estiramiento hasta 1,80 m de lon-
gitud. Un estiramiento violento del cable por encima de esa longitud puede
dañar los conductores interiores. ¡Peligro de incendio!
• En estancias mojadas o húmedas no utilizar cables de alargo.
• No limpiar el aparato con chorro de vapor o aparatos de agua a presión.
En caso de tener previsto usar esos métodos en las inmediaciones, el aparato se debe apagar y desenchufar.
• Enchufar sólo en bas es correspondientes. En caso de clavija no c orres-
pondiente, el cable de conexión del aparato debe ser sustituido por personal técnico autorizado. (Ver los tipos de clavijas disponibles en la
página 74).
La utilización de adaptadores no se puede aceptar. ¡Peligro de incendio!
• Las ruedas están pensadas para utilización entre -20 y +50 °C. Su uso fue-
ra de ese margen puede ocas ionar un debili tamiento de la estr uctura del
material. En ese caso no deben descartarse afecciones mecánicas.
43.3000.2 67
Page 63
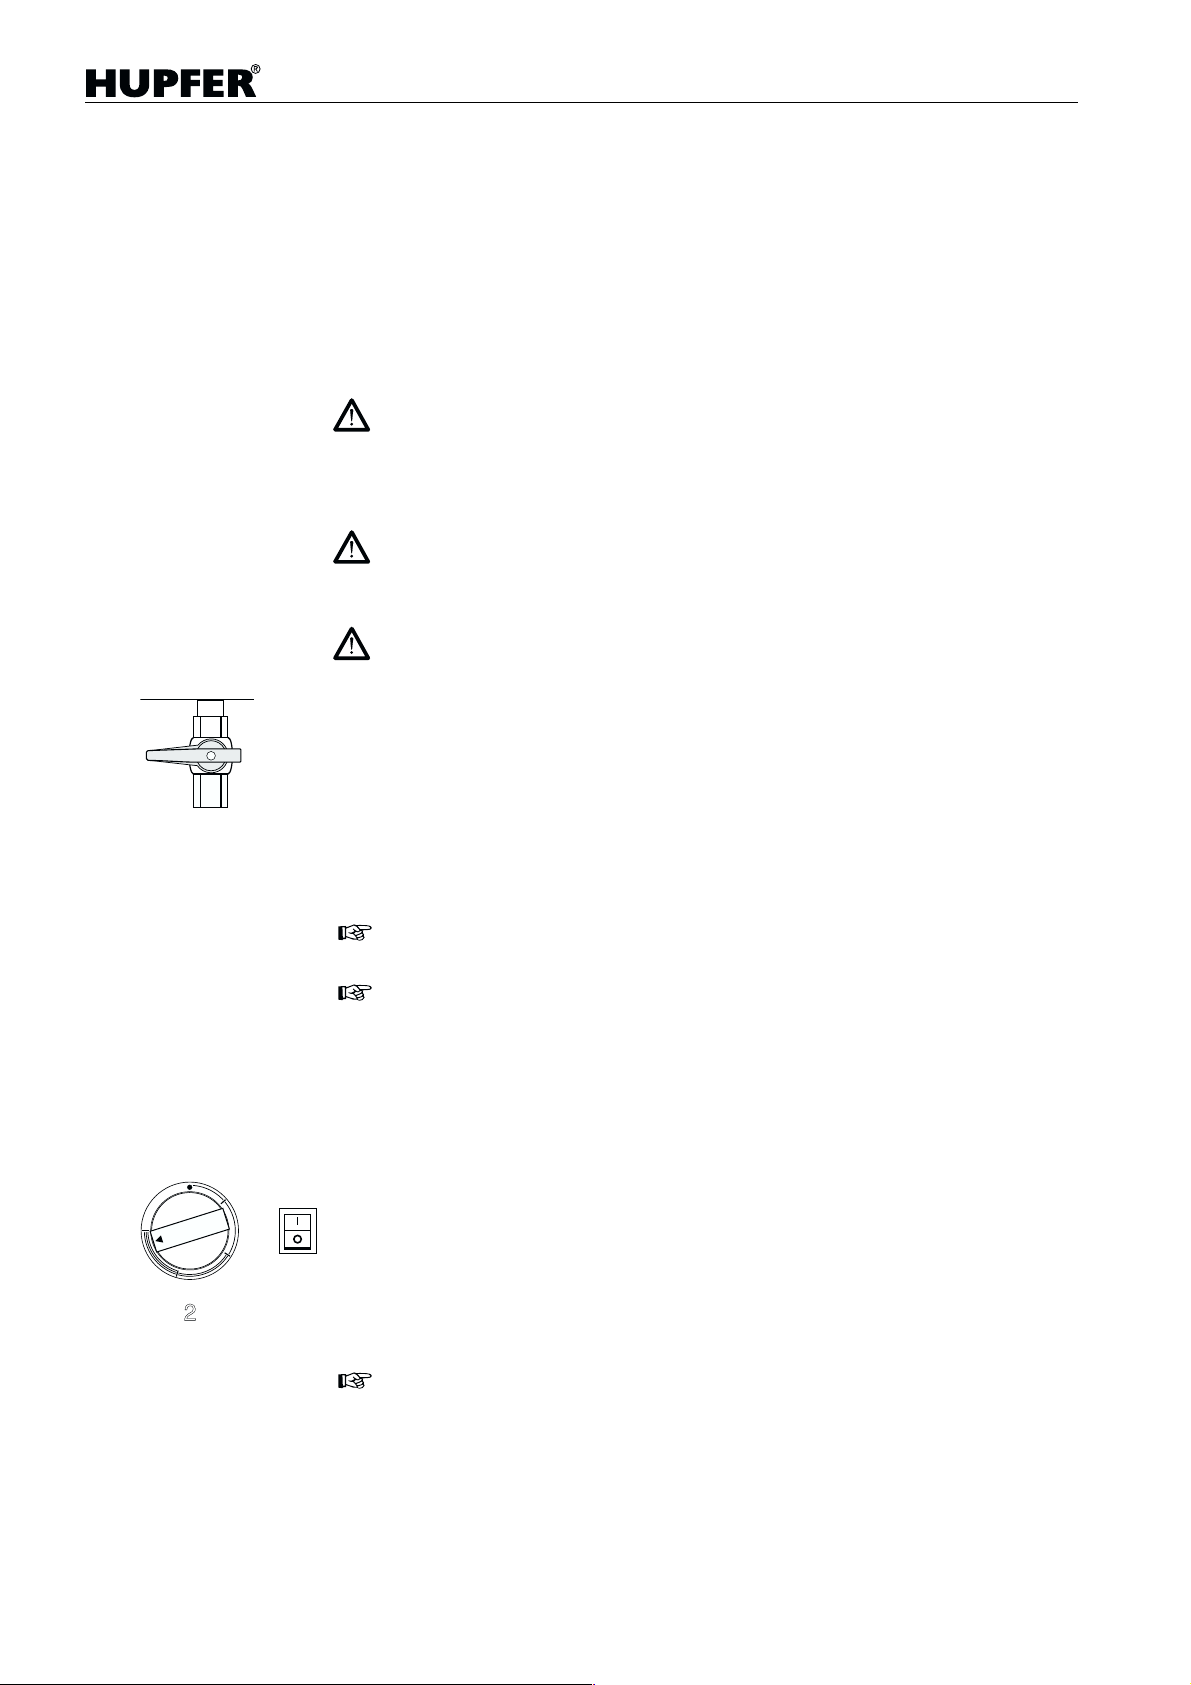
Utilización
Puesta en marcha
Carro baño maría
Para su puesta en marcha las cubetas del aparato deben estar frías, limpias
y libres de depósitos calcáreos. En caso de utilizar cubetas recientemente utilizadas, que se han desagüado completamente, deberían dejarse enfriar un
tiempo.
La utilización en seco es posible sin peligro, pero debido al bajo rendimiento
por la pobre transmisión térmica, HUPFER
En cubetas calientes en seco cuando entran en contacto con agua fría hay generación abundante de vapor. ¡Peligro de quemaduras!
Además pueden originarse una deformación del fondo de la cubeta así como
la aparición de microgrietas. La consecuencia puede ser el siniestro total del
aparato.
Una capa de cal actua como un aislante térmico que provoca la acumulación
de calor sobre las resistencias; puede ocasionar el deterioro del fondo de la
cubeta.
Además existe el peligro de corrosión bajo la capa de cal.
Observe las indicaciones de seguridad a partir de la página 66.
®
no la recomienda.
Llenado de la cubeta
– Cerrar el grifo de desagüe
– Llenar la cubeta con unos 3 litros de agua, equivale a unos 2 cm de nivel
de agua.
Las cubetas GN a introducir posteriormente (profundidad máxima 200 mm) no
deberían tener ningún contacto con el agua, ya que reduce la transmisión calorífica. La mejor transmisión calorífica es a través de vapor.
Niveles de agua mayores alargan el tiempo de calentamiento.
En casos de agua con alto contenido en sales debería utilizarse agua blanda,
para minimizar los depósitos de cal.
Para el llenado de las cubetas debería utilizarse agua caliente. Esto acorta el
tiempo de calentamiento del aparato.
Conexión del aparato
– Tapar la cubeta para evitar perdidas de calor.
– Enchufar la clavija en una base que se corresponda.
Utilice para ello sólo la conexión prevista. El aparato no debe utilizarse en
caso de conexión dañada o casos patentes de desperfectos.
– Poner el aparato en marcha con el interruptor MARCHA / PARO.
El indicador luminoso integrado en el interruptor se enciende informando
que está preparado.
– Ajuste con el regulador correspondiente a la cubeta, la potencia deseada.
Dentro de las 4 gamas de potencia es posible un ajuste continuo. La asignación de los reguladores a las cubetas está indicada con los números estampados en el panel.
Con una altura de agua de 2 cm (agua fría), bien tapado y a potencia máxima,
se alcanzan 90 ºC en unos 45 minutos.
68 43.3000.2
Page 64
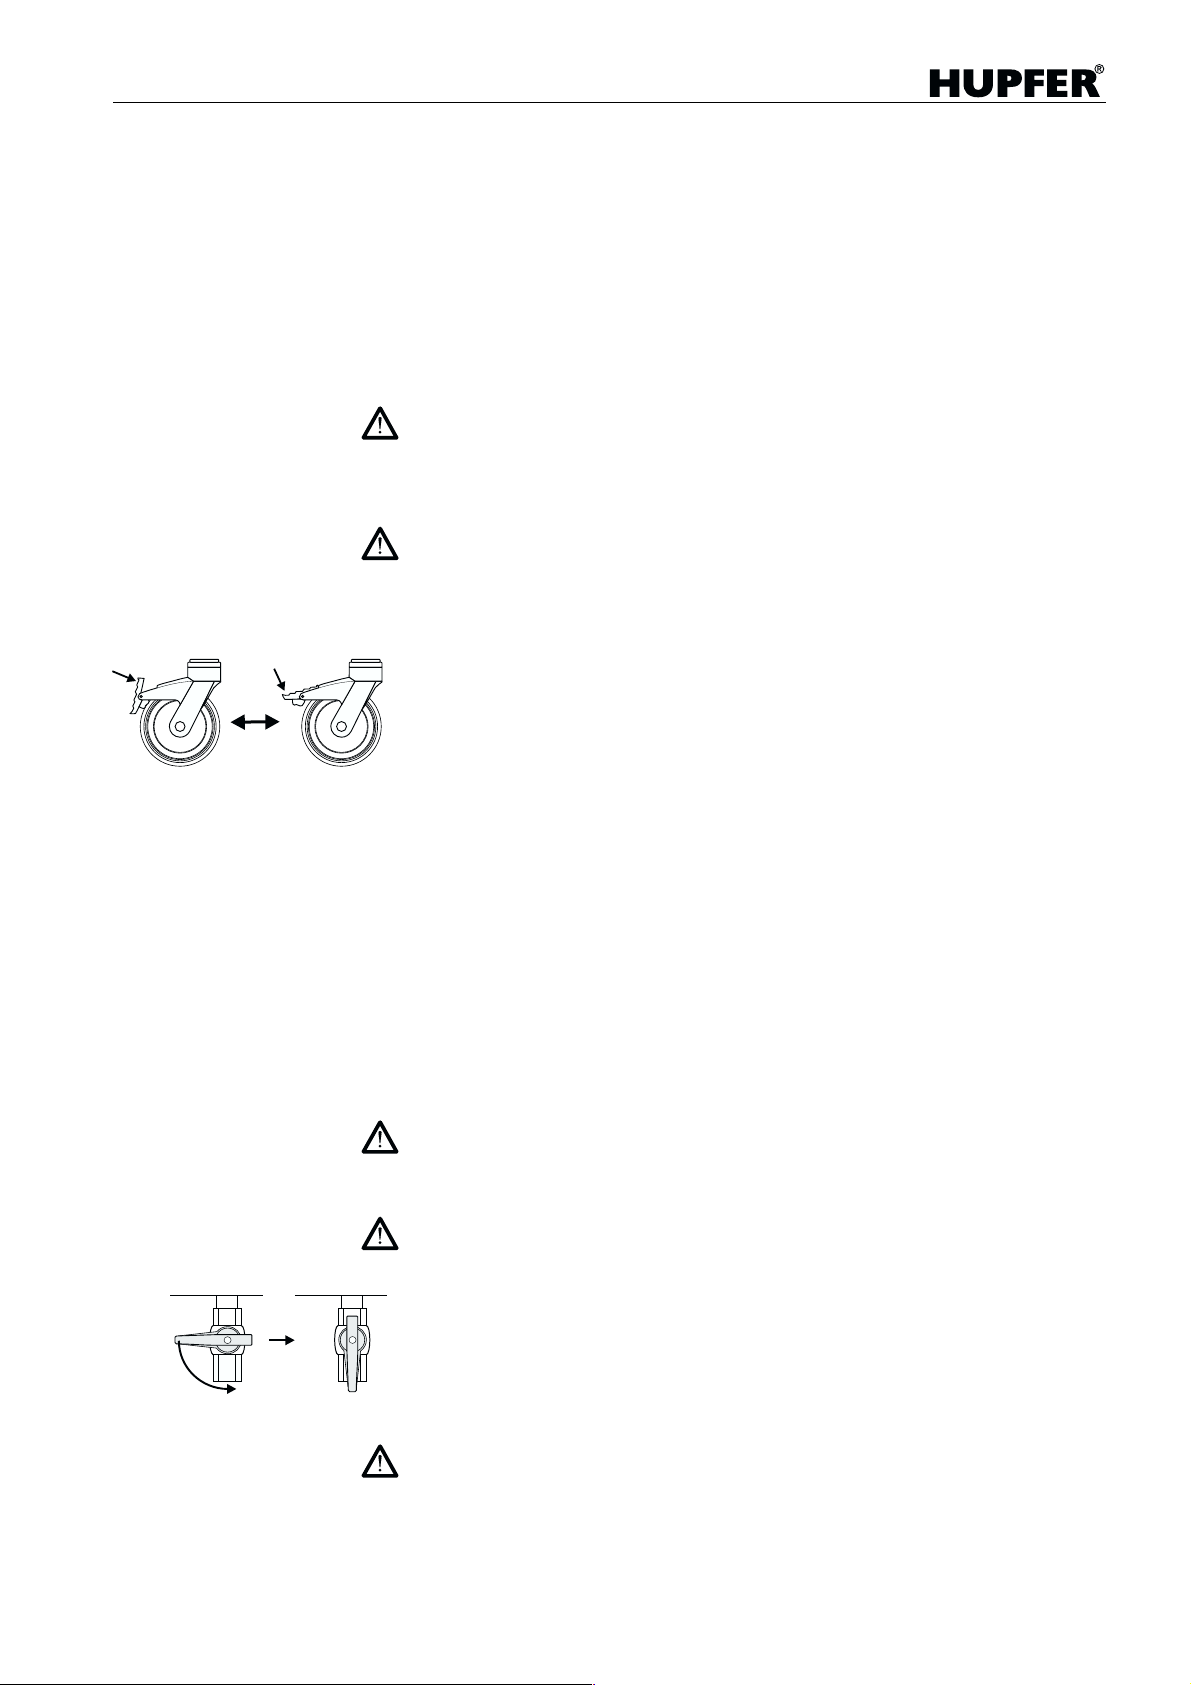
Carro baño maría
Utilización del aparato
Empleo de recipientes GN
La colocación de recipientes GN con una profundiddad de hasta 200 mm en
las cubetas puede realizarse sin consideraciones adicionales. En el uso de recipientes GN 2/3, GN ½ y GN 1/3 se recomienda el uso de listones divisores
(accesorio opcional), para evitar el escape del vapor entre las cubetas y con
ello minimizar las consiguientes pérdidas de calor.
En el uso de recipientes GN menores son necesarios los listones divisores
para garantizar el ajuste con el contorno de la cubeta.
Observar un ajuste de las cubetas, ya que el vapor que se escapa puede provocar quemaduras. Zonas metálicas de la tapadora susceptibles de ser tocadas pueden calentarse peligrosamente.
Transporte
Observe las indicaciones de seguridad a partir de la página 66.
– Colocar todos los reguladores a la posición
– Desconectar el aparato mediante el interruptor MARCHA / PARO.
– Desenchufar la clavija y colgarla del soporte previsto al respecto.
– Soltar ambos frenos.
– Asir el aparato por las asas y empujarlo hasta el punto de destino.
– En el punto de destino frenar ambas ruedas, para evitar desplazamientos
involuntarios.
– Enchufar la clavija en la correpondiente base protegida.
– En cender el aparato por el interruptor MARCHA / PARO.
– Con el regulador correspondiente seleccionar la potencia deseada de la
cubeta.
Puesta en fuera de servicio
Apagado del aparato
– Colocar todos los reguladores a la posición ●.
– Desconectar el aparato mediante el interruptor MARCHA / PARO.
– Desenchufar la clavija y colgarla del soporte previsto al respecto.
Desagüe
Nunca accionar los grifos con herramientas.
En caso de grifos atascados utilizar productos no perjudiciales para la salud
(por ejemplo aerosol de teflón). A continuación limpiar en profundidad el grifo
y el desagüe.
●.
Si se suelta agua caliente hay peligro de quemadura.
Abrir el desag üe sólo encima de la regata del desagüe o del desagüe general
de la cocina.
En el caso de disponer de estante inferior (accesorio opcional) utilizar un recipiente con suficiente capacidad o un alargo de desagüe (accesorio opcional).
Después del desagüe el tubo de desagüe y el grifo pueden estar a alta temperatura. ¡Peligro de quemadura!
43.3000.2 69
Page 65
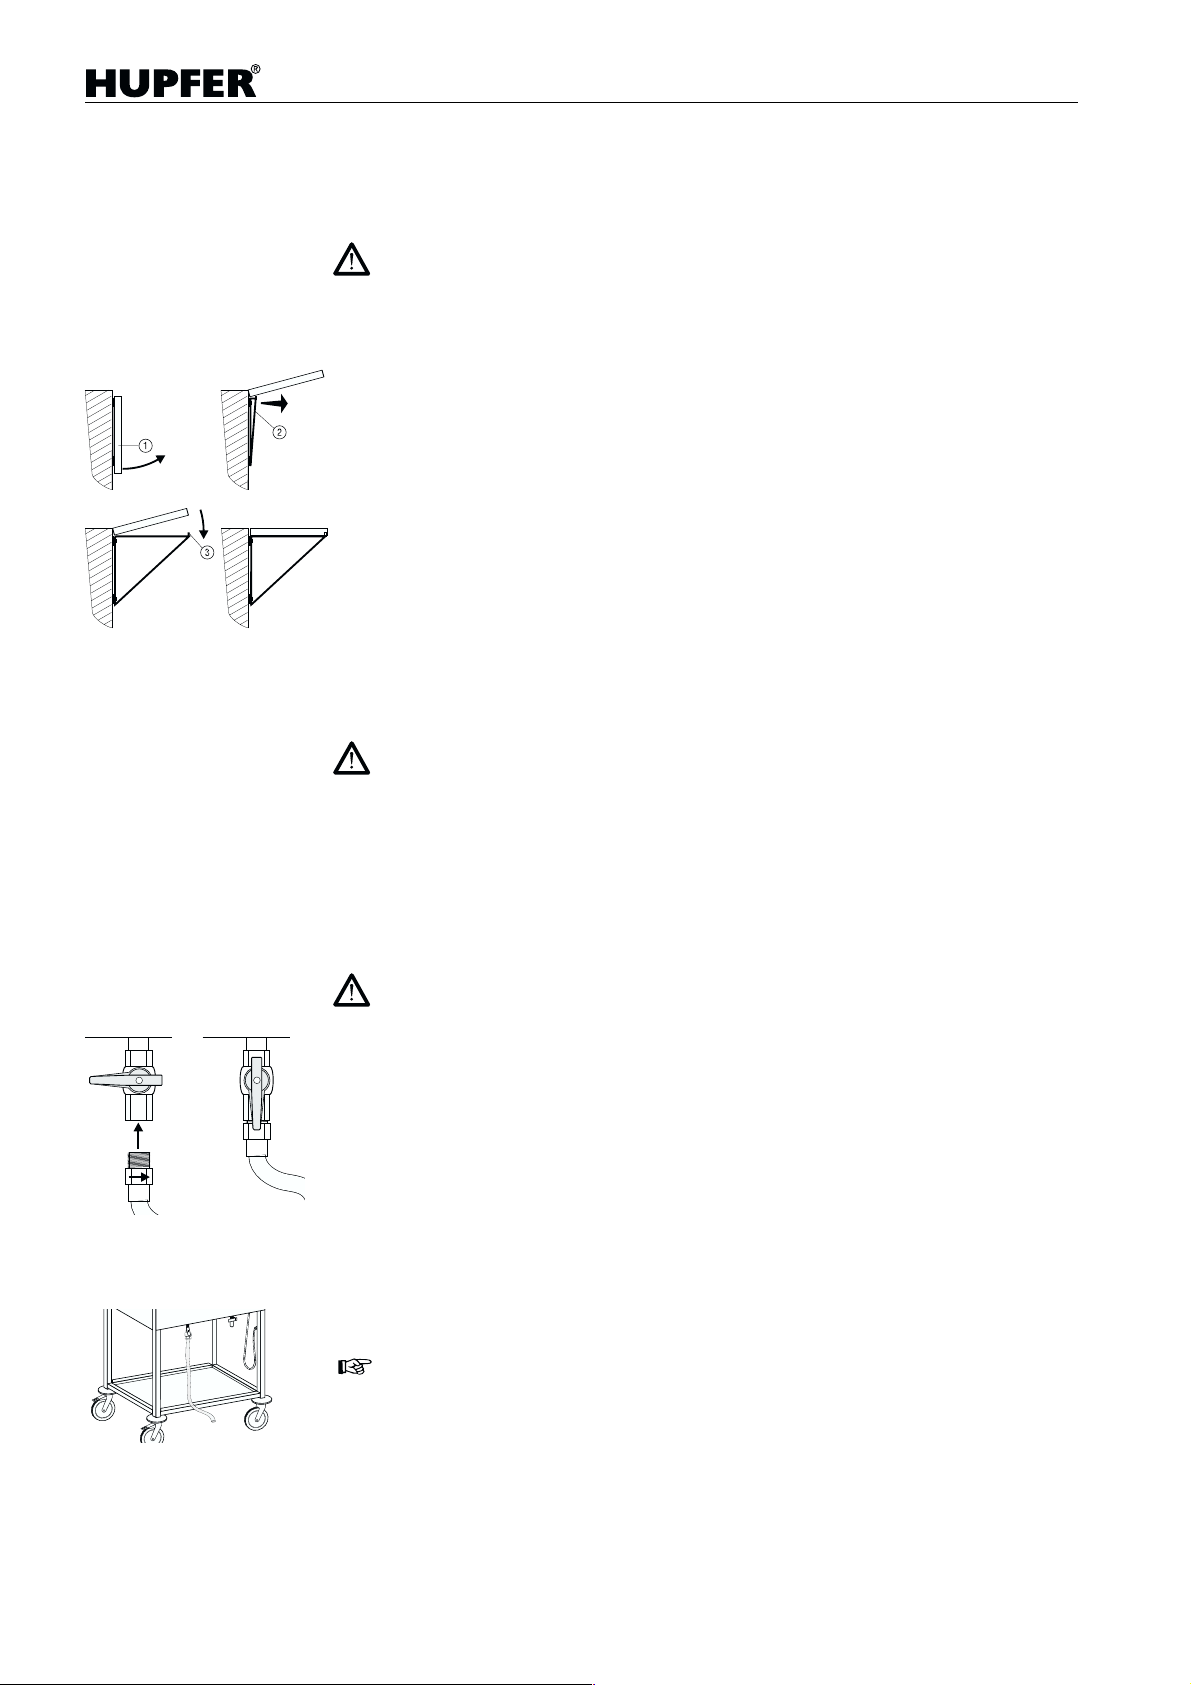
Accesorios especiales
Pestaña plegable
• Las pestañas plegables no están previstas para la colocación de objetos
pesados.
• Durante el transporte del aparato las pestañas deben de estar plegadas.
• Al desplegar y fijar las pestañas existe peligro de pellizcarse.
Carro baño maría
– Oscilar la pestaña
– Oscilar hacia afuera los soportes
– Colocar los soportes de forma que el pestillo
pestaña al bajarla.
– El plegado de las pestañas se realiza de forma inversa.
hacia arriba.
.
entre en los agujeros de la
Estante inferior
En el estante inferior sólo deben depositarse objetos de posición estable . El
peso máximo autorizado no debe sobrepasarse (ver «Datos técnicos»,
página 73).
No se deben transportar recipientes abiertos con líquido caliente.
Alargo de desagüe
• No mover jamás el aparato tirando del alargo de desagüe.
• Al desaguar observar la posición del final del tubo.
• Al desaguar agua caliente el alargo puede calentarse.
¡Peligro de quemadura!
– Apretar el racor macho en el extremo del alargo de desagüe con el grifo.
– Colocar el final del tubo de desagüe sobre el desagüe.
– Abrir el grifo de desagüe.
Con el alargo de desagüe también puede desaguarse directamente sin la utilización de recipientes aun teniendo montado el estante inferior.
70 43.3000.2
Page 66

Carro baño maría
Limpieza y cuidados
• Antes de comenzar a limpiar poner fuera de servicio el aparato. Desenchu-
• No limpiar el aparato con chorro de vapor o aparatos de agua a presión.
• Para su limpieza el aparato debe estar fuera de servicio y suficientemente
Si después de la limpieza todavía hay depósitos de cal, estos deben eliminarse, sinó el consumo energético aumentará y la rentabilidad desminuirá. Con
depósitos importantes de cal el aparato puede estropearse.
Para descalcificar usar productos comunes de descalcificación o vinagre.
El grifo de desagüe puede engrasarse con grasas alimentarias (la grasa de
freidora no es apropiada para esta finalidad), para conservar la estanqueidad
y suavidad de uso.
Información acerca del «acero inoxidable»
La resistenci a a la oxidaci ón de los aceros inoxidables se debe a una capa pasiva, que se forma en la superficie por contacto con el oxígeno. El oxígeno del
aire es suficiente para restaurar la capa pasiva en el caso de que esta se haya
deteriorado por algún motivo. La capa pasiva se regenera más rápidamente,
se el acero está en contacto con agua con alto contenido de oxígeno. Un incremento del efecto se consigue con acidos oxidantes (áci do nítrico, ácido
oxálico). Estos ácidos se emplean en el caso de que el acero haya sido atacado químicamente y perdido la capa pasiva.
La capa pasiva puede deteriorarse químicamente con productos reductores
(consumidores de oxígeno) si entran en contacto con el acero en altas concentraciones o a alta temperatura. Tales productos agresivos son por ejemplo:
• productos que contengan sal o azufre
• Cloruros (sales)
• Condimentos concentrados como mostaza, esencia de vinagre, pastillas
Otros deterioros pueden deberse a:
• Oxido ajeno (p. e. de otros elementos, herramientas o óxido aéreo)
• Partículas de hierro (p. e. limaduras)
• Contacto con metales no férricos (combinación química)
• Falta de oxígeno (p. e. falta de aire, agua con escasez de oxígeno).
far la clavija y colgarla del soporte previsto al respecto. Vaciar las cubetas.
En caso de tener previsto usar esos métodos en las inmediaciones, el aparato se debe apagar y desenchufar.
frío.
de caldo, concentrados para cocinar, etc.
Principios generales de trabajo para tratar aparatos
de «acero inoxidable»
Mantenga las superficies de aparatos de acero inoxidable siempre limpias y
accesibles al aire.
Elimine depósitos de cal, grasa, concentrados y albúminas limpiando diariamente. Debajo de estos depósitos puede generarse corrosión por falta de
aire. Para la limpieza no deben utilizarse productos de limpieza que contengan sosa o cloro.
En el caso de no darse consejos concretos de limpieza, en cualquier caso deben usarse productos baj os en clor uros .
Elimine después de la limpieza todos los restos del producto de limpieza y
aclare abundantemente con agua limpia. A continuación debería secarse
completamente.
43.3000.2 71
Page 67

Carro baño maría
No mantenga más de lo necesario elementos de acero inoxidable en contacto
con concentrados de ácidos, condimentos, sales, etc. También los vapores de
ácidos, que generan los limpia-azulejos, facilitan la corrosión del “acero inoxidable”.
Evite dañar las superficies del acero inoxidable, especialmente con otros metales. Debido a restos de otros metales se forman pequeños elementos quí-
micos, que pueden originar corrosión. En cualquier caso debe evitarse el
contacto entre hierro y acero inoxidable, ya que conduce a óxido externo. Al
entrar en contacto acero inoxidable con hierro (estropajo, limaduras de la tubería, agua con hierro), puede desencadenarse la corrosión. Utilice por tanto
para la limpieza mecánica exclusivamente estropajo de acero inoxidable o cepillos con cerdas naturales, sintéticas o de acero inoxidable. Estropajos o cepillos de acero sin aleación generan oxido ajeno por erosión. Puntos de
oxidación reciente pueden eliminarse con productos de limpieza suaves o papel de lija fino. Oxidaciones más importantes pueden lavarse con una disolución caliente al 2 – 3 % de ácido oxálico. En caso de no tener éxito, será
necesario tratar con una disolución al 10 % de ácido nítrico.
¡Cuidado! ¡Esto debe realizarse por personal técnico entrenado y siguiendo
las prescripciones correspondientes!
72 43.3000.2
Page 68
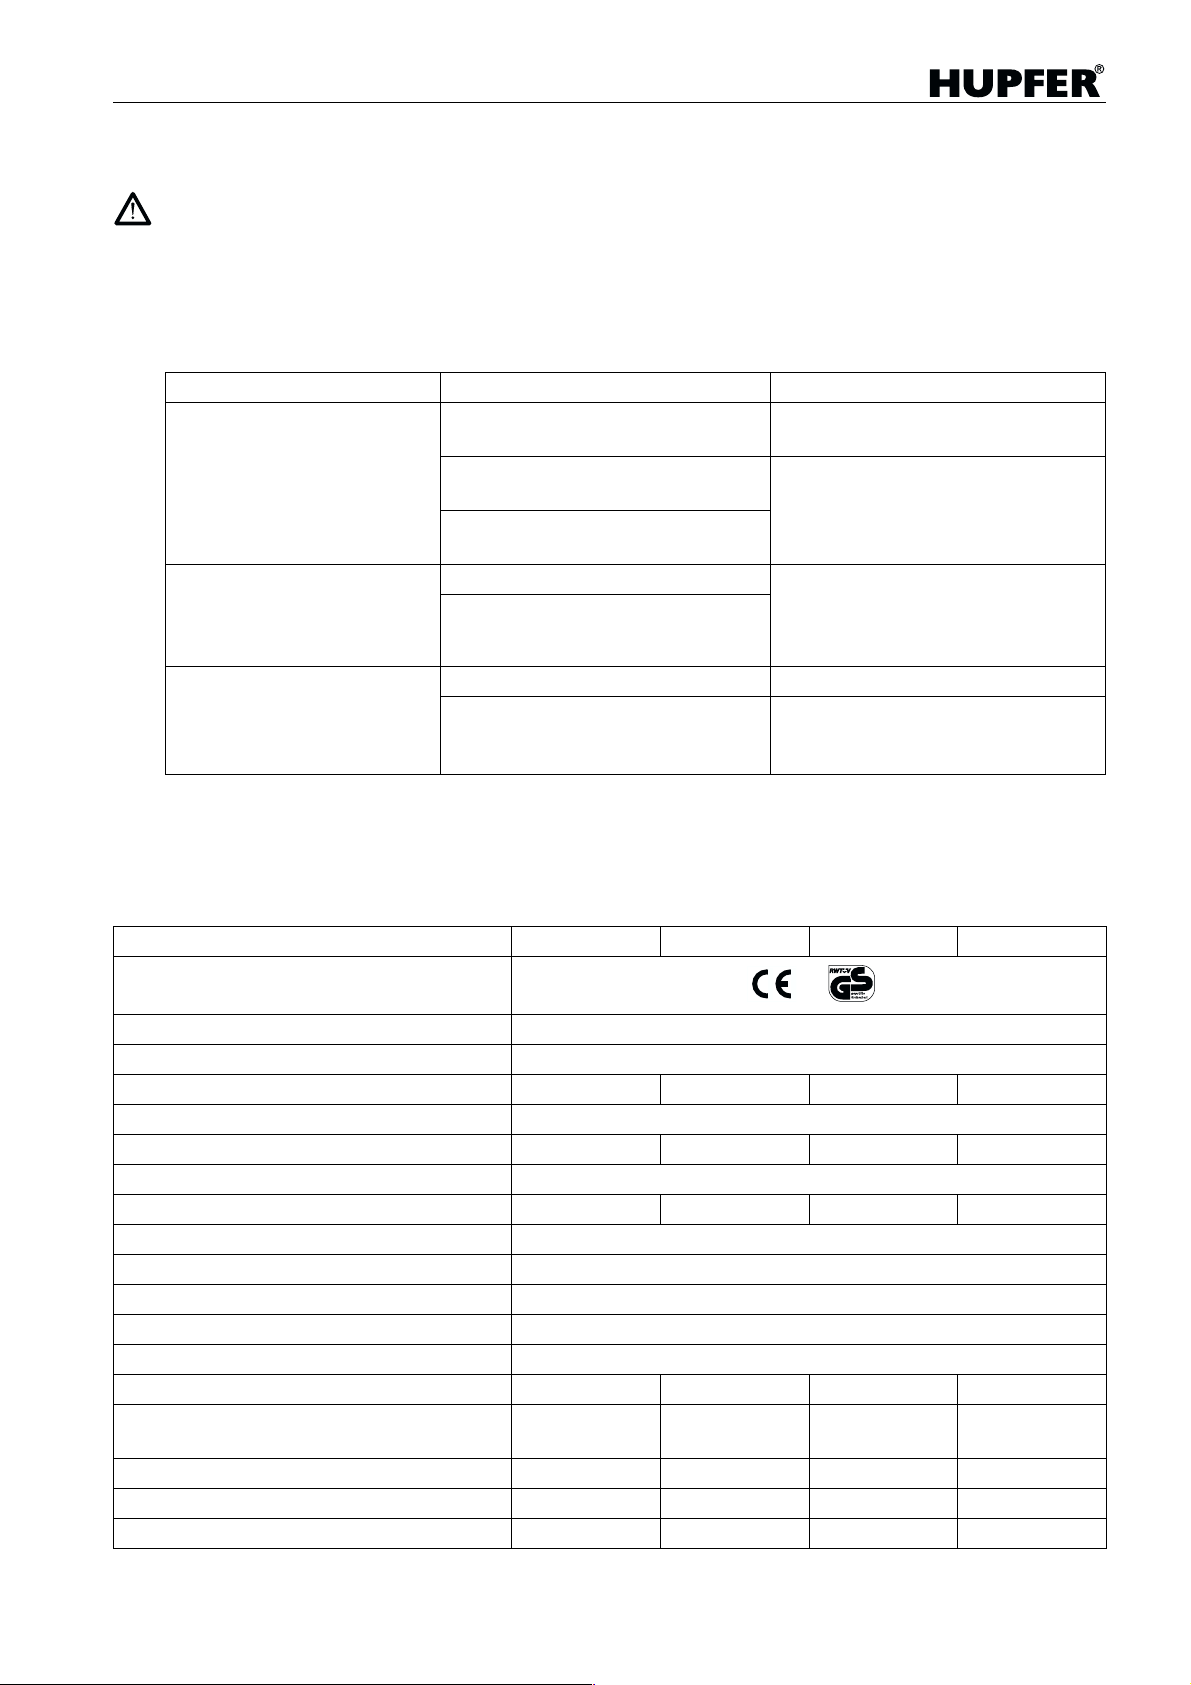
Carro baño maría
Ayuda en caso de incidencias
El servicio técnico debe ser realizado sólo por personal especializado.
Elementos defectuosos deben remplazarse por elementos originales.
Compruebe primero si se trata de un problema de comandamiento. Algunas incidencias las puede subsanar
Ud. mismo.
De al servicio técnico y en el pedido de recambios los datos que aparecen en la placa identificativa
(ver página 64).
Anomalía Posible causa Acción
El aparato no se calienta. El
piloto de control no se
enciende.
El aparato se calienta, el
piloto de control no se
enciende.
El aparato se calienta muy
lentamente.
El fusible de la instalación está fundido.
Interruptor MARCHA / PARO defectuoso.
Cable de conexión defectu os o o
base de conexión defectu os a.
Piloto de control defectuoso. Poner fuera de servicio el aparato y
Circuito del interruptor defectuoso.
Demasiada agua en la cubeta. Reducir la cantidad de agua.
Depósitos de cal o de suciedad en
la cubeta.
Comprobar el fusible y sustituir en
su caso.
Desenchufar el aparato de la red y
comprobar por personal técnico
autorizado, que sustituirá en su
caso.
comprobar por personal técnico
autorizado, que sustituirá en su
caso.
Poner fuera de servicio el aparato y
después de enfriar descalcificar y
limpiar la cubeta.
Las inspecciones y mantenimiento regular del aparato evitan averías y redundan en la seguridad. Los intervalos de mantenimiento dependen del uso del aparato. Pregunte al servicio de atención al cliente de su proveedor.
Datos técnicos
SPA/EB-1 SPA/EB-2 SPA/EB-3 SPA/EB-4
Símbolo de comprobación
Aparato fabricado según DIN 18867–7
Protección al agua IPX5
Número de cubetas 1234
Tamaño de las cubetas para GN 1/1 y sus divisiones hasta 200 mm de profundidad
Media de capacidad en personas* 15 25 50 80
Calefacción resistencia de acero inoxidable
Potencia nominal 0,7 kW 1,4 kW 2,1 kW 2,8 kW
Conexión eléctrica 230 V 1N AC 50 Hz
Aislamiento térmico guata cerámica
Regulación de la temperatura Continua, cada cubeta independiente
Gama de temperatura 30–95 °C
Tren de rodaje 4 ruedas giratorias, 2 con freno y bloqueo, Ø 125 mm
Peso neto sin estante inferior 32 kg 44 kg 55 kg 66 kg
Peso del aparato con la carga máxima de
las cubetas sin estante inferior
Carga máxima puntual del estante inferior 50 kg 40 kg 30 kg 20 kg
Carga máxima repartida del estante inferior 100 kg 80 kg 65 kg 50 kg
Peso máximo autorizado 170 kg 195 kg 220 kg 250 kg
* La capacidad es dependiente de la concepción de la comida y de la diversidad de sus componentes.
64 kg 108 kg 151 kg 194 kg
43.3000.2 73
Page 69
Speisenausgabewagen
78 43.3000.2
Page 70
Speisenausgabewagen
43.3000.2 79
Page 71

HUPFER®-Stammhaus
HUPFER® Metallwerke GmbH & Co
Dieselstraße 20 ë D-48653 Coesfeld
Postfach 1463 ë D-48634 Coesfeld
Tel.: +49 (0) 2541 / 805-0
Fax: +49 (0) 2541 / 805-111
www.hupfer.de ë [email protected]
HUPFER®-Auslandsvertretungen
FRANKREICH
HUPFER® SAS
11, Rue du Ried ë F-67720 Weyersheim
BP 421 ë F-67728 Weyersheim-Hoerdt Cedex
Tel.: +33 (0) 388517343
Fax: +33 (0) 388517323
www.hupfer.fr ë [email protected]
SPANIEN /PORTUGAL
HUPFER® Industrias Metálicas, S.L.
Avda. d´Europa, 3 ë E-08350 Arenys de Mar
Tel.: +34. 937 922 448
Fax: +34. 937 920 775
www.hupfer.de ë [email protected]
NORWEGEN/ SCHWEDEN /DÄNEMARK /
FINNLAND
HUPFER® Danmark
Grønager 7 ë DK-2670 Greve
Tel.: +45 (0) 43901711
Fax: +45 (0) 43903611
www.hupfer.de ë [email protected]
BELGIEN/NIEDERLANDE
HUPFER® Benelux b.v.
Henry Dunantweg 22 ë NL-2402 NP Alphen aan den Rij n
Postbus 623 ë NL-2400 AP Alphen aan den Rijn
Tel.: +31 (0) 172433954
Fax.: +31 (0) 172441277
www.hupfer.nl ë [email protected]
ÖSTERREICH
HUPFER® Einrichtungen für Großküchen Handels mbH
Robert-Schumann-Gasse 38 ë A-2380 Perchtoldsdorf
Tel.: +43 (1) 8652321 oder 8 65 2341
Fax: +43 (1) 8652355
www.hupfer.de ë [email protected]
ITALIEN
HUPFER® ITALIA S.R.L.
V. L. Settembrini, 7 ë I-20020 Lainate - Milano
Tel.: +39 (02) 9373220
Fax: +39 (02) 9370725
www.hupfer.de ë [email protected]
GROSSBITANNIEN
Trak HUPFER®
Randles Rd, Knowsley Business Park
Merseyside, L34 9XH - ENGLAND
Tel.: +44 (0) 151 549 1010
Fax: +44 (0) 151 549 1212
www.trakhupfer.co.uk ë [email protected]
 Loading...