

Hunter Stoves Parkray ASPECT 5 COMPACT, Parkray ASPECT 5, Parkray ASPECT 7, Parkray ASPECT 8 COMPACT, Parkray ASPECT 8 User Manual
...Page 1
ASPECT 4 / 4 COMPACT
ASPECT 5 / 5 COMPACT
ASPECT 6
ASPECT 7
ASPECT 8
ASPECT 14
WOOD BURNING STOVE MODELS
HUNTERSTOVES.CO.UK
Page 2
Welcome to the Hunter Stoves family and thank you for
purchasing a Parkray Aspect stove. This stove was designed and
built to be a high-performance heating appliance, and we hope
it will bring you great enjoyment. The natural environment is
important to us, so our stoves are manufactured to provided you
with a clean and efcient burn that will keep you warm through
cold winter nights.
CONTENTS INDEX
STOVE INFORMATION
GENERAL INFORMATION 4/5
MATERIAL CLEARANCES 6
GENERAL GUIDANCE 7 - 10
OPERATING INSTRUCTIONS 11/12
MAINTENANCE AND SERVICING 13 - 14
3
IMPORTANT INFORMATION 15/16
TROUBLESHOOTING 17
WARRANTY INFORMATION 18/19
Page 3
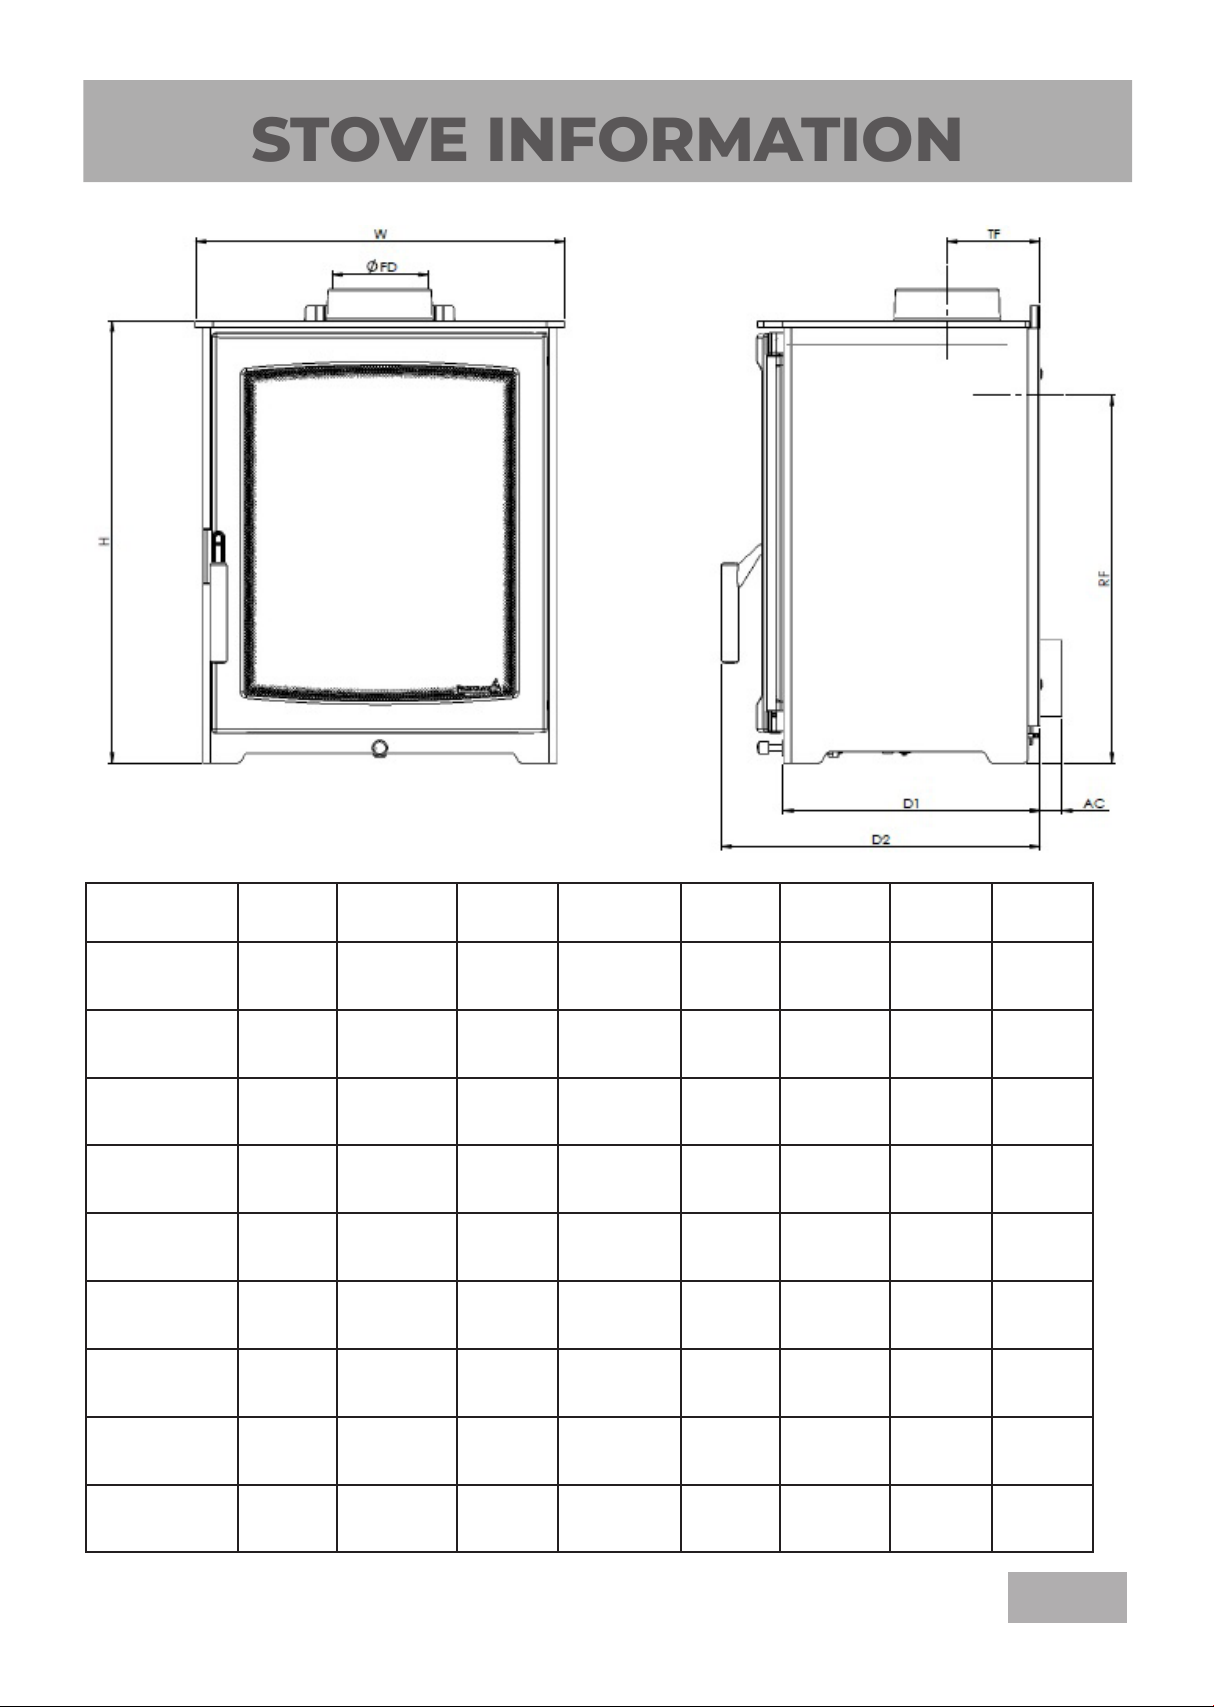
STOVE INFORMATION
DIMENSIONS H W FD TF RF AC D1 D2
ASPECT 4 515mm 400mm 127mm 110mm 416mm 17.5mm 327mm 410mm
ASPECT 4
COMPACT
ASPECT 5 590mm
ASPECT 5
COMPACT
ASPECT 6 623mm 557mm 127mm 143mm 523mm 2 mm 343mm 422mm
ASPECT 7 550mm 579mm 127mm 110mm 451mm 17.5mm 327mm 410mm
ASPECT 8 623mm 617mm 127mm 128mm. 524mm 7mm 343mm 417mm
ASPECT 8
COMPACT
ASPECT 14 658mm 667mm 127mm
515mm 400mm 127mm 110mm 416mm 17.5mm 277mm 379mm
494mm 127mm 110mm
590mm 494mm 127mm 110mm 491mm 17.5mm 277mm 358mm
648mm 617mm 127mm 153mm
153mm 559mm NA
491mm 17.5mm 327mm 410mm
539mm 13mm 398mm
468mm 555mm
459mm
- 3 -
Page 4
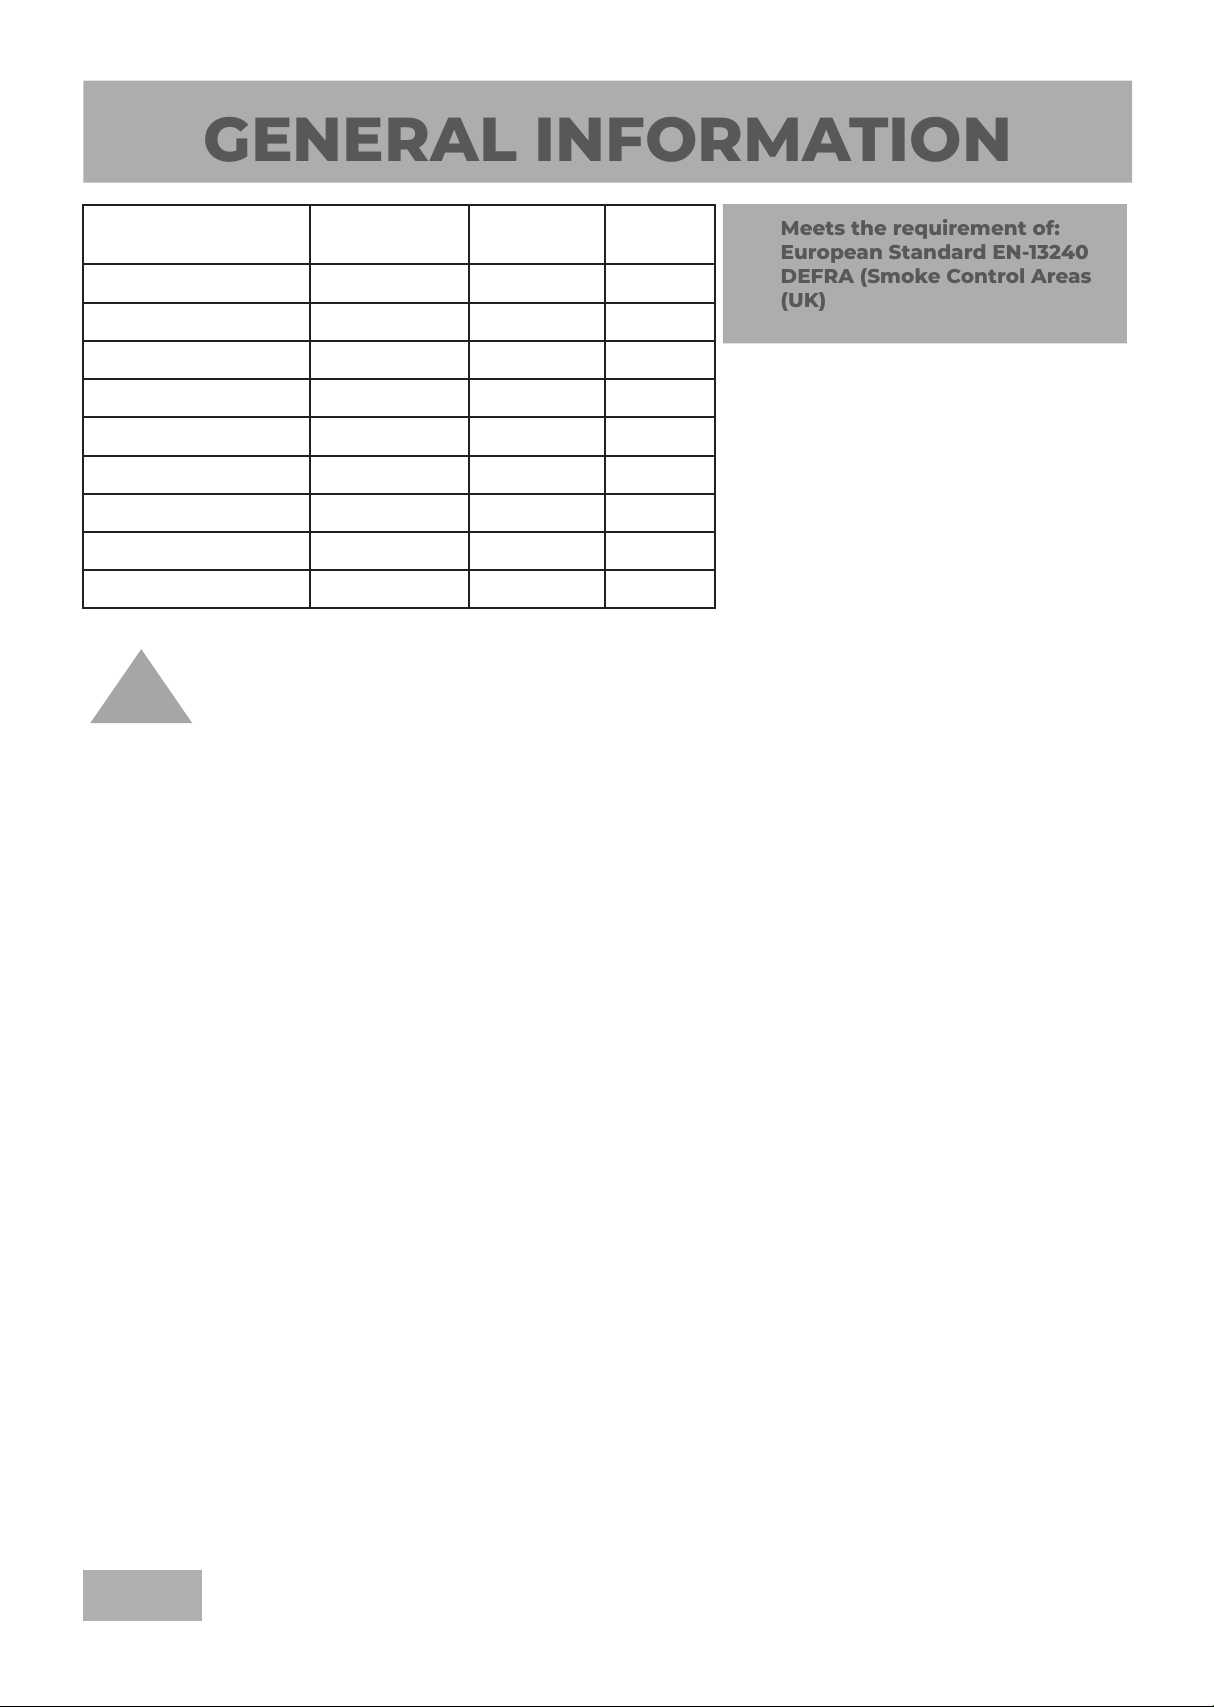
GENERAL INFORMATION
Meets the requirement of:
European Standard EN-13240
DEFRA (Smoke Control Areas
(UK)
Stove Model Nominal
Heat Output
Aspect 4 4.5kW 81.0% 56kg
Efciency Weight
Aspect 4 Compact
Aspect 5
Aspect 5 Compact
Aspect 6
Aspect 7 5.0kW 81.0% 86kg
Aspect 8 7.5kW 76.0% 110kg
Aspect 8 Compact
Aspect 14
!
The appliance will become very hot when used in
accordance with the instructions. The supplied
operating tool or glove may be used to open the door
and operate the air controls. We also recommend use
of a reguard in the presence of childre, the elderley or
the inrm. The reguard should be manufactured in
accordance with BS8423.
4.5kW 81.0%
5.0kW 80.0%
5.0kW 80.0%
5.0kW 80.0%
7.5kw 76.0%
7.8kW 77%
52kg
79kg
72kg
93kg
110kg
130kg
Competent Persons Scheme
Hunter Stoves Group recommend that this stove be
installed by a member of an accredited competent
persons scheme e.g. HETAS.
If the installer is not a member of a competent person’s
scheme, it is a legal requirement, in the UK, to notify
your Local Building Control Ofcer in advance of any
installation work starting.
Legal Requirements
These instructions cover the basic principles to ensure
satisfactory installation of the stove, although details
may need slight modication to suit particular local
site conditions.
In all cases the installation must comply with
current Building Regulations, Local Authority
Byelaws, European and National Standards and
other specications or regulations as they affect the
installation of the stove.
It should be noted that the Building Regulations
requirements may be met by adopting the relevant
recommendations given in British Standards BS
8303, BS 6461 and BS 7566 as an alternative means
to achieve an equivalent level of performance to that
obtained following the guidance given in Approved
Document J.
Hearth
Hearth constructions must comply with the current
building regulations.
Your stove must be installed on a oor with adequate
load-bearing capacity, otherwise suitable measures
should be taken.
If the existing construction does not meet this
pre-requisite, suitable measures (e.g. load distributing
plate) should be put in place.
The hearth should extend at least 225mm from the
front of the appliance(as per Building Regulations) we
recommend 300 mm.
The stove should stand wholly above a solid,
non-combustible hearth, at least 125 mm thick (this
may include the thickness of a solid oor).
Please refer to Building Regulations Approved
Document J for further information.
- 4 -
Page 5
Air Supply
Connection to the Chimney
Aspects 4, 4C, 5, 5C, 6 and 7
The room or space containing this appliance does not
need a permanent, unobstructed air opening unless
the air permeability rating is less than or equal to 5m³/
hour/m².
Aspects 8, 8 Compact, 14
The room or space containing this appliance does
need a permanent, unobstructed air opening.
1375mm² - Aspect 8
1540mm² - Aspect 14.
All
If a draught stabiliser is tted, the air opening should
be at least: -
3825mm² (Aspect 4s),
4250mm² (Aspect 5s, 6 and 7)
3625mm² (Aspect 8)
3880mm² (Aspect 14).
Due consideration should be given to air requirements
for any other appliance in the same room or space.
Any air opening must be kept clear from blockage or
obstruction.
New Build
Attention is needed in new built properties where
the design air permeability is less than 5m3/h.m2.
Approved Document J and Appendix F gives further
information. A window opening is not appropriate.
An existing replace opening can be bricked up or
sealed with a register plate. A short length of ue pipe
of minimum 125mm internal diameter may then be
used to connect the stove to the chimney. This ue
pipe should be made of 316 grade stainless steel or
vitreous enamelled steel, nominal thickness 1.2mm.
Ensure that the pipe end is no closer than 76mm to
the chimney walls. The length of any horizontal run of
ue pipe must not exceed 125mm. It is essential that
all connections between the stove and chimney-ue
are sealed and made airtight. Any bend in the chimney
or connected ue pipe should not exceed 45
bends should not be used.
Ensure any existing chimneys are clear of obstruction
and have been swept prior to installation. If the stove
is being tted into a previous open replace then the
chimney must be swept one month after tting.
Make provision to access the chimney/ue system for
cleaning and the removal of debris. If there is no
existing chimney then either a prefabricated block
chimney in accordance with Building Regulations
Approved Document J, or a twin-walled insulated
stainless-steel ue to BS4543 can be used. These
chimneys must be tted in accordance with the
manufacturer’s instructions and Building Regulations.
New masonry and ue block chimneys must meet
the requirements of Building Regulations Document
J. Any connecting ue pipe systems must also meet
these regulations.
Please check the suitability of the replace and/or
surround for use with this appliance before installing
it. If you have any doubts about the suitability of
your chimney, consult your local Dealer/Stockist or
Installation Engineer.
0
and 90
0
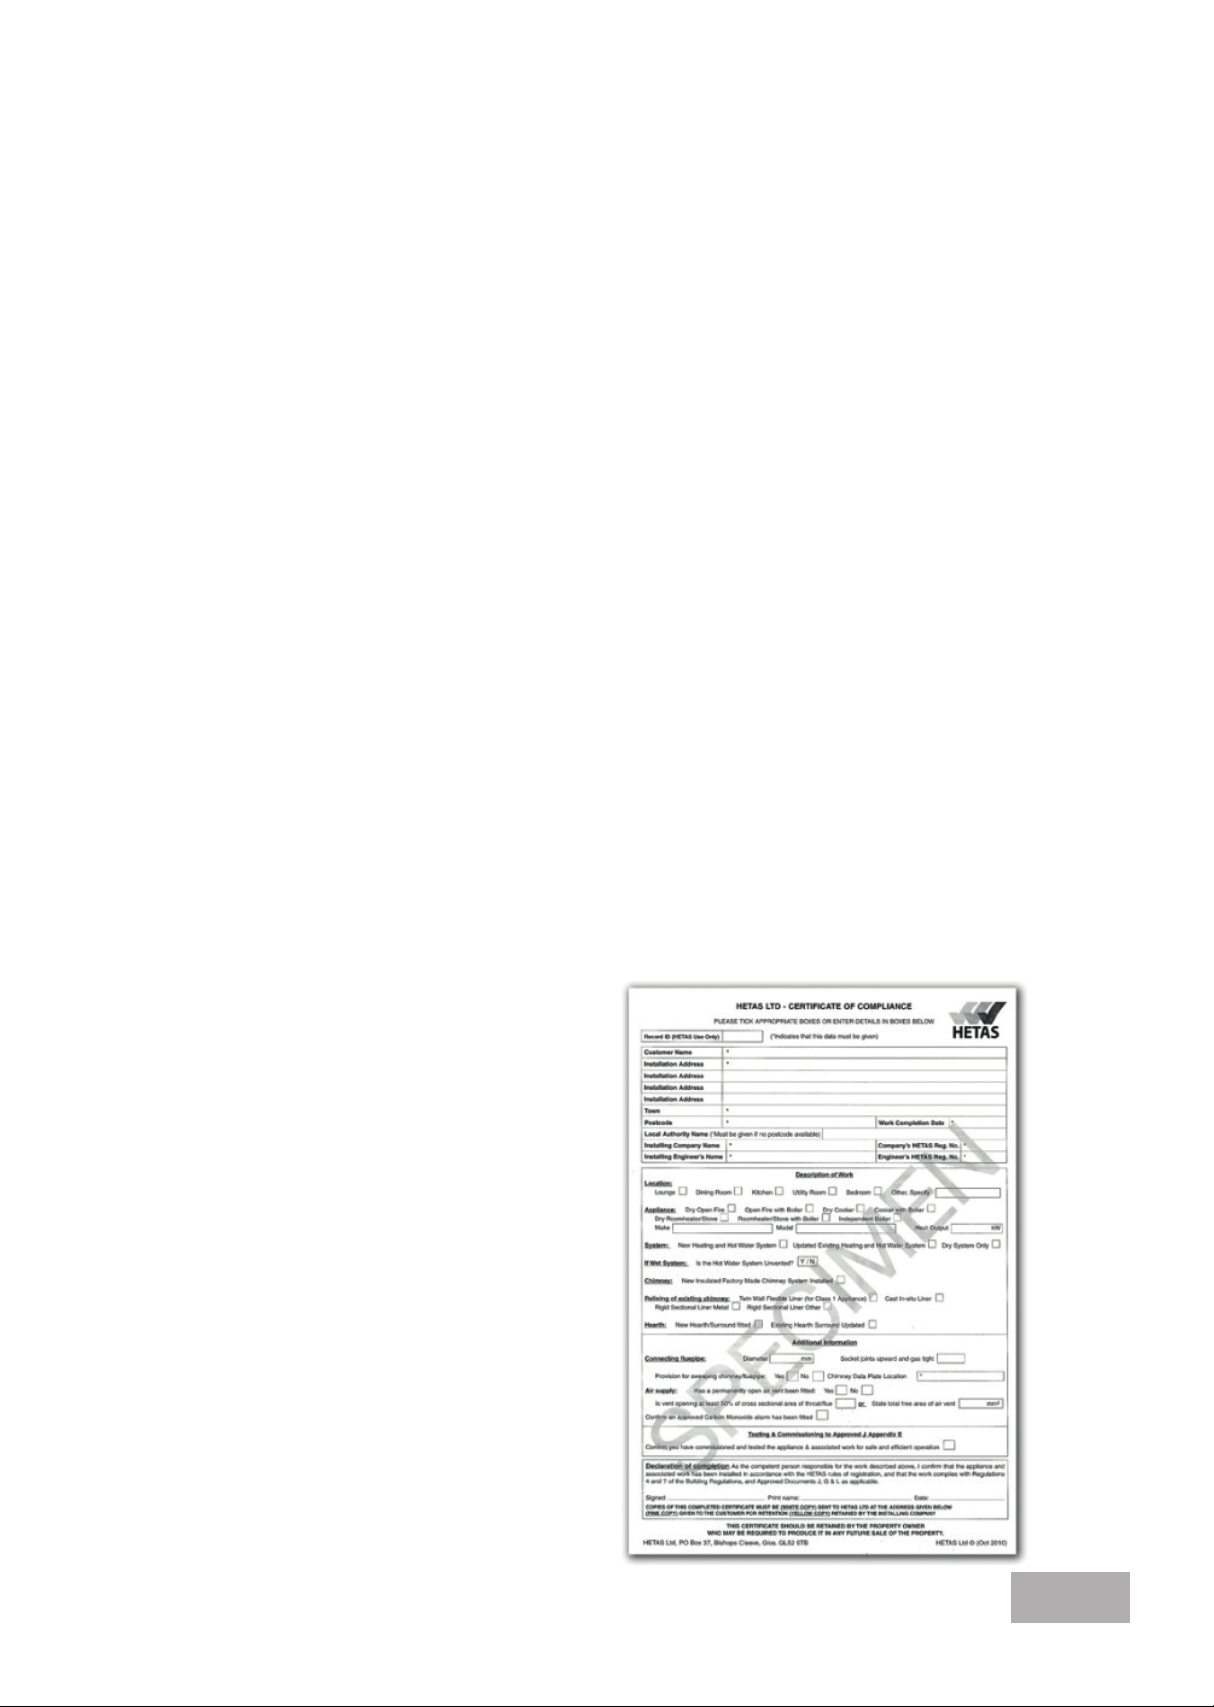
Certicate of Compliance
After completionof the appliance instalation please
ensure the form below (specimen) is completed by your
installer to comply with the requirements of HETAS and
building regulations. The installer must supply these
details, including registration number for any insurance
details that may need changing after installation of the
appliance.
- 5 -
Page 6
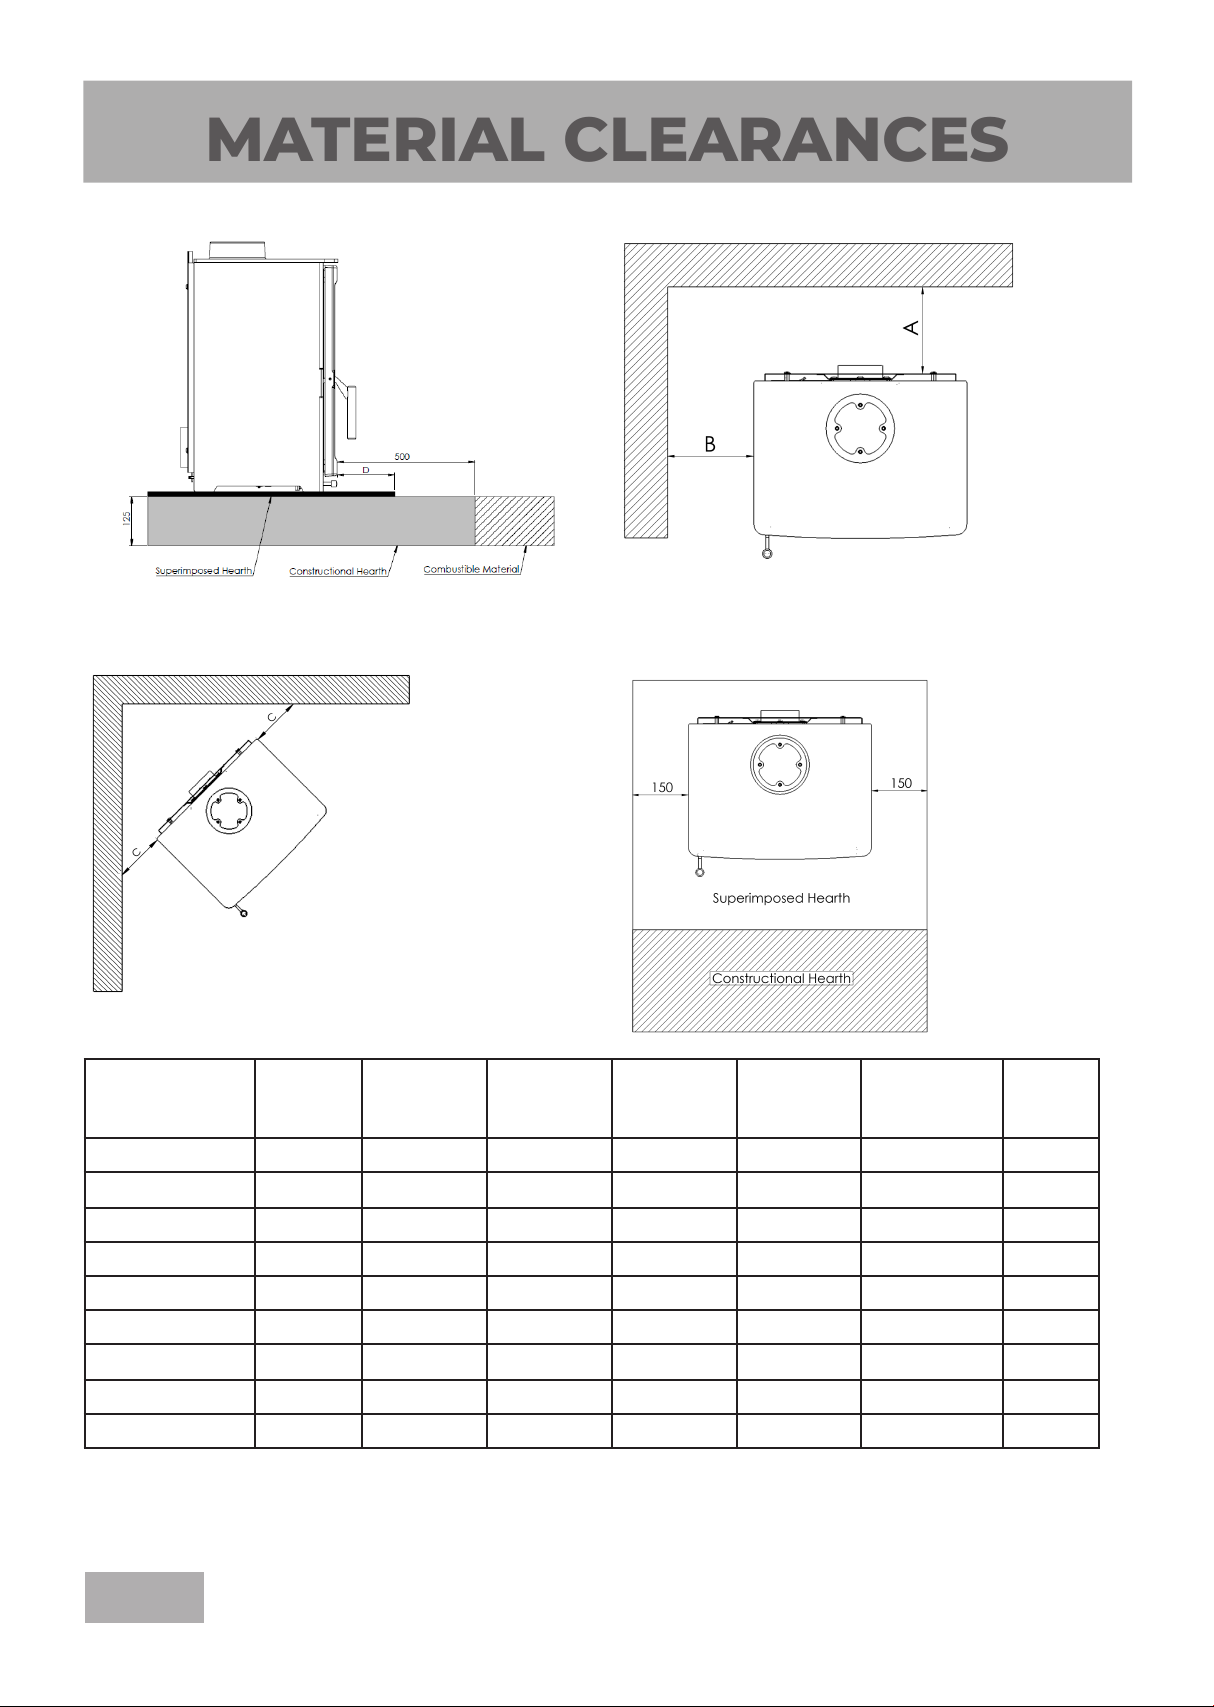
MATERIAL CLEARANCES
Hearth Requirements
Combustible/Non Combustible Distances
Model A (to Twin-
Walled
Flue)
Aspect 4 125mm 500mm 500mm
Aspect 4 Compact 125mm 500mm
Aspect 5 125mm 600mm 600mm 50mm 50mm 500mm 1230mm
Aspect 5 Compact 125mm 600mm 600mm 50mm 50mm 500mm 1230mm
Aspect 6 125mm 600mm 600mm 50mm 50mm 500mm 1230mm
Aspect 7 125mm 500mm 500mm 50mm 50mm 500mm 1230mm
Aspect 8 Compact 100mm 375mm 375mm 50mm 50mm 600mm 1200mm
Aspect 8 100mm 375mm 375mm 50mm 50mm 600mm 1200mm
Aspect 14 100mm 525mm 525mm 50mm 50mm 650mm 1500mm
For clearance distances for the single skin ue pipe please refer to Building Regulations Document J.
B
CombustibleCCombustible
500mm 50mm 50mm
B
Non
Combustible
50mm 50mm 500mm
C
Non
Combustible
Superimposed
Hearth
500mm 1230mm
D
Front
to
Furniture
1230mm
- 6 -
Page 7

Unpacking and Removing Internal
GENERAL GUIDANCE
Components
After unpacking all internal components must be
removed prior to tting the stove. This will make
handling the stove easier; allow access to
xings and the ue outlet; as well as protect the
internal components from damage during the
installation process.
1
1) Box
2) Instructions
3) All bricks
4) Shovel
5) Flue Collar Fixing Box
6) Log Retainer
7) Gauntlet (pair)
2
4
Flue Collar/Blanking Plate Data Plate
If uing from the
rear then reverse
collar and blanking
plate.
3
5
6
7
Direct Air
EXAMPLE
- 7 -
Page 8

Heat Shield
Brick Baffle
Secondary Baffle
Bafes
Heat Shield
shown up.
To take out the secondary bafe rstly remove the brick
bafe. The undo the two screws (as shown) holding the
secondary bafe in. Then remove the secondary bafe.
For top ue installation ensure heatshield plate is in the
correct position (as shown in above drawing).
Smoke Control Stop
Smoke Control Stop
If you are in a Smoke Control Area then the
plate needs to be set fully across to the left.
- 8 -
Page 9

SMOKE CONTROL
AREA EXEMPT
The Clean Air Act 1993 And Smoke Control Areas
Under the Clean Air Act local authorities may declare the whole or part of the district of the authority to be a
smoke control area. It is an offence to emit smoke from a chimney of a building, from a furnace or from any
xed boiler if located in a designated smoke control area. It is also an offence to acquire an “unauthorised fuel”
for use within a smoke control area unless it is used in an “exempt” appliance (“exempted” from the controls
which generally apply in the smoke control area).
In England appliances are exempted by publication on a list by the Secretary of State in accordance with
changes made to sections 20 and 21 of the Clean Air Act 1993 by section 15 of the Deregulation Act 2015.
In Scotland appliances are exempted by publication on a list by Scottish Ministers under section 50 of the
Regulatory Reform (Scotland) Act 2014. Similarly, In Northern Ireland appliances are exempted by publication
on a list by the Department of Agriculture, Environment and Rural Affairs under Section 16 of the Environmental
Better regulation Act (Northern Ireland) 2016. In Wales appliances are exempted by regulations made by Welsh
Ministers.
Further information on the requirements of the Clean Air Act can be found here:
https://www.gov.uk/smoke-control-area-rules
Your local authority is responsible for implementing the Clean Air Act 1993 including designation and
supervision of smoke control areas and you can contact them for details of Clean Air Act requirements.
The Aspect wood burning stoves have been recommended as suitable for use in smoke control areas. Suitable
Authorised fuels can also be used in the appliances in Smoke Control Areas (see Authorised fuel list
https://smokecontrol.defra.gov.uk/fuels.php ) (Applies only if a multifuel conversion kit is installed).
Refuelling on to a low re bed
If there is insufcient burning material in the rebed to light a new fuel charge, excessive smoke emission can
occur. Refuelling must be carried out onto a sufcient quantity of glowing embers and ash that the new fuel
charge will ignite in a reasonable period. If there are too few embers in the re bed, add suitable kindling to
prevent excessive smoke.
Fuel overloading
The maximum amount of fuel specied in this manual should not be exceeded, overloading can cause excess
smoke.
Operation with door left open
Operation with the door open can cause excess smoke. The appliance must not be operated with the appliance
door left open except as directed in the instructions.
Dampers left open
Operation with the air controls or appliance dampers open can cause excess smoke. The appliance must not be
operated with air controls, appliance dampers or door left open except as directed in the instructions.
- 9 -
Page 10

Health and Safety Guidance
Special care must be taken when installing the stove such that the requirements of the Health and Safety at Work
Act are met.
Handling
This appliance is very heavy. Adequate facilities must be available for loading, unloading and side handling.
Fire Cement
Some types of re cement are caustic and should not be allowed to come into contact with the skin. In case of
contact, wash immediately with plenty of water.
Asbestos
This stove contains no asbestos. If there is any possibility of disturbing any asbestos in the course of installation,
then please seek specialist guidance and use appropriate protective equipment.
Metal Parts
When installing or servicing this stove, care should be taken to avoid the possibility of personal injury.
Stove Performance
This is a Domestic Appliance nad must only be used in accordance with these instructions.
Important Warning
This stove must not be installed into a chimney that serves any other heating appliance.
Fitting a stove in a room which also contains an extractor fan and/or cooker hood should be avoided where
possible. If this is unavoidable, the suitability of the space for tting this appliance must be decided at the
discretion of a qualied installer, and a ue draught interference test must be performed.
Operating With The Doors Open
The stove is tested as a closed door appliance and as such should not be operated with the doors open (except for
fuel re-loading etc.)
TRIPLEBURN TECHNOLOGY
Our unique cleaner burning technology utilises three streams of air - Primary, Secondary and Tertiary - to
provide optimum air ow to the rebox, aiding combustion and ensuring maximum efciency throughout.
This draws air over the fuel, across the door and behind the fuel. This means a faster light up and a fuller burn
of the fuel.
Airwash Technology allows air to ow over the glass and across the fuel to ensure that the glass is always kept
clean - guaranteering an excelelnt view of of your re as it burns.
THE ENVIRONMENT (FRIENDLY FIRING)
To produce a more enviromentally friendly way of burning your stove avoid turning it down to the point where
you cannot see any visible ames. If the stove is run this way then the gases produced from the wood will
not be burnt off (due to low temperatures in the chamber). This can also cause soot to condense in the ue
system and could lead to a chimney re. The smoke that is left as it exits the chimney will also pollute the
surroundings and cause an unpleasant smell.
Rember - your chimney (however good) will not perform well if the stove is not used correctly.
- 10 -
Page 11

OPERATING INSTRUCTIONS
Stove Body
Safety Advice
The stove paint curing process takes place at room temperature and the surface coating is virtually free f rom fumes
and odours. When being put into operation for the rst time we would recommend that windows and doors are
opened for a short time to provide ventilation.
Air Controls
Air control rod
fully closed
When the air control rod is pushed in fully then both
the Primary and Secondary air intakes are in the closed
position.
Lighting the Stove
1) Ensure all air controls are in the fully open
position.
To operate pull the air control away from the stove.
For the air control to be in the fully open position both
Primary and Secondary pull the air control rod away
from the stove until it stops. This is necessary for
lighting the stove.
Air control rod
fully opened
2)
In the base of the stove, place the larger split
and dry logs (amount dependant upon size of
the rebox). Ensure a gap is left between the
logs as this allows air movement to help the re
breathe when lit.
3) Place approximately six to eight pieces of
kindling (nely chopped wood) on top of the
logs in the opposite direction to the split logs.
4) Put 2 to 4 Eco re lighters on top of the kindling
in the centre.
5) Finally, place 2 to 4 pieces of kindling on top of
the Eco re lighters.
6) Close the door as soon as ames appear.
7) A small amount of soot may appear on the glass
during the lighting. This is perfectly normal and
will go after a period of time.
8) Extra logs should not be added until there is a
bed of glowing embers.
Kindling:
Length - 15cm to 20cm
Diameter - 2cm to 5cm
Approximately 8-12 nely chopped pieces
- 11 -
Page 12

WARNING!
Burning wet or unseasoned wood will create excess smoke emissions, tar deposits in the
stove and chimney and will not produce a satisfactory heat output.
WARNING - DO NOT BURN BITUMINOUS COAL, PETRO-COKE, OTHER PETROLEUM BASED
FUELS OR TREATED WOOD SUCH AS PALLETS AS THIS WILL INVALIDATE THE PRODUCT
WARRANTY. HOUSEHOLD WASTE MUST NOT BE BURNT ON THIS APPLIANCE.
OVER-FIRING
Using an excess amount of wood (than recommended) and/or the air intake is too
much (check instructions on correct use of air controls) can cause the stove to over-
re. This can cause damage to both the stove and the surrounding walls. Therefore, as
recommended use the maximum amount of fuel.
Adding Wood
1. Firstly ensure that the wood you are using has a moisture content of less than 20% (we recommend 12-15%
to ensure an efcient burn).
2. When refuelling open all the air controls fully and the damper (if tted).
3. Open the door slowly by releasing the handle and allowing to stay like this for 10 to 20 seconds. As
opening the door to fast can cause smoke to be drawn into the room as the rebox has not had time
for the pressure to equalise. The smoke will then take the easiest route which is out through the
opening.
4. Fully open the door slowly and carefully place the fuel.
5. It is recommended to use 2 pieces of wood weighing 1.2 to 1.4kg in total. 25cm long. Only refuel when
ames die down.
6. Put the logs diagnoally to each other so that they can catch re easily.
7. Close the door. (All our stoves are tested as closed door appliances and should be used as such.)
8. Keep the air control in the fully open position until the logs catch re.
9. This can then be reduced to aid slower combustion.
Important!
Ensure the wood has a moisture content of less than
20% (we advise 12-15% for a more efcient burn) to
allow the fuel to catch quickly. If the fuel has a higher
moisture content then the you are mostly burning
of this and this will reduce the heat output and take
longer to burn correctly. This can also cause a build up
of soot and tar which could lead to a chimney re. It
will also cause the glass of the stove to blacken.
Refuelling must be carried out with a sufcient
quantity of glowing embers and ash, so that the
new fuel charge will ignite quickly. If there are too
few embers, add some kindling to prevent excessive
smoke. After refuelling leave the air control fully open
for one minute before reducing to the desired setting.
Guide to Wood
Hardwood is a denser fuel than softwood and provides
a higher heat content. Softwood burns at 50% of the
heat content of harwood. Softwoods are more prone to
spitting and popping as they have pockets of moisture
and sap contained within them (this can be reduced
by seasoning and drying correctly).
Woods suitable for closed appliances - Ash, Beech,
Birch, Blackthorn, Elm, Eucalyptus, Hawthorn, Hazel,
Hornbeam, Maple, Oak, Rowan, Sycamore, Wild Cherry,
Willow, Alder, Apple, Pear and Holly. (Oak, beech
and birch burn at the highest rate when seasoned
correctly).
These woods are also suitable but can crackle and spit Cedar, Douglas Fir, Horse Chestnut, Larch, Plane, Sweet
Chestnut and Willow.
- 12 -
Page 13

MAINTENANCE AND SERVICING
Periods Of Prolonged Non-Use
If the stove is to be left unused for a prolonged period, then it should be given a thorough clean to remove ash
and unburned fuel residues. To enable a good ow of air through the appliance to reduce condensation and
subsequent damage, leave the air controls fully open. If the appliance has been unused for a long period, such as
during the spring and summer months, a competent person should check the chimney for potential
obstructions before lighting the stove i.e. get the chimney swept before the start of the heating season?
Bafe Brick
The bafe is located in the upper part of the stove
and this should be removed and cleaned on a regular
basis. This prevents any build-up of soot or y ash that
could lead to blocked ue ways and dangerous fume
emission. If the bafe is removed the chimney/ue way
can be swept through the appliance.
Firebricks
In normal use, these can last for many years. It is
possible however, to crack them if logs are continually
jammed against them or if they are frequently struck
with a poker. Check periodically for seriously cracked
bricks, which can be replaced with new, available from
your dealer or our spares website www.hunterstoves.
co.uk/spares.
1
2
3
2
Glass Panel (see diagram below)
Printed glass should not be cleaned using cleaners
high in alkaline or acidic content. Clean the glass panel
when cool with a propriety glass cleaner by applying
the cleaner to a cloth. Do not apply directly to the
glass as this could cause run of which could soak into
the rope seals around the edge of the glass.
Highly abrasive substances should be avoided as these
can scratch the glass and make subsequent cleaning
more difcult. Wet logs on heated glass, a badly aimed
poker or heavy slamming of the doors could crack the
glass panels, the glass will not fracture from heat.
Should you need to replace a glass panel please ensure
you purchase a new Gasket at the same time. Please
check periodically that the glass clips and screws have
not become loose. They should only be nger tight to
allow for the expansion and contraction of the glass.
Rope
Check the rope (2) around the door. If rope is becoming
detached, use rope glue to reattach it. If the rope is in
poor condition, a replacement rope kit may be ordered
from the Hunter Stoves Group spares range.
4
To remove the bricks -
Bafe brick (1) - Slide over to the LH side of the body and
drop down into the rebox and remove.
Base brick (4) - Lift base brick out of rebox and remove.
(Ensure side bricks are supported).
Side brick (2) - Pull base of the LH side brick in towards
the centre of the rebox and remove. Repeat with RH
side brick.
Rear brick (3) - Bring RH side in towards the centre of the
rebox and remove.
To replace the bricks work in reverse order as above.
Gasket Tape
The glass gasket tape (3) will have to be replaced when a
new piece of glass (4) is tted as the self-adhesive tape is
stuck onto the glass.
Over time you may also nd that the gasket tape
changes colour. This is due to a reduction in the
pigment used in the manufacture of the product and no
cause for concern.
1
2
3
4
- 13 -
Page 14

Stove Body
You can wipe the stove with a damp cloth. Repair any
light damage with Hunter stove paint available through
our spares website www.hunterstoves.co.uk/spares.
Chimney and Flue Ways
It is important that the chimney, ue ways and any
connecting ue pipe are swept regularly. This should
only be carried out by an experienced chimney sweep
with a trusted trade rating.
This means at least once a year for smokeless fuels and
at least twice a year for wood and other fuels. The brick
bafe will need to be removed from the stove in order
to sweep the chimney.
If it is not possible to sweep all parts of the chimney
through the appliance, ensure there is adequate access
to cleaning doors.
If the stove is tted in place of an open re, then the
chimney should be swept one month after installation
to clear any soot falls which may have occurred due to
the difference in combustion between the stove and
the open re.
Annual Service
Hunter Stoves Group recommend that this appliance
be serviced annually, preferably prior to the start of the
heating season, thus avoiding any delay in receiving
replacement components, should you need them. If
you feel unable to undertake this task, Hunter Stoves
recommend that you contact the installation engineer
for advice.
Remove all the internal components: Log retainer,
bricks, ignition air bar & bafe brick. Clean them with a
soft brush carefully and inspect them for damage.
Sweep the chimney/ue system if necessary.
Clean down the internal surfaces of the appliance
using a scraper or wire brush. Inspect these surfaces
for damage/corrosion. If corrosion or damage is found,
we advise that you consult with your installer about
rectication/repair.
Brush out or vacuum the inside of the appliance and re-
t the internal components.
Inspect the glass and glass bretape. Clean the glass
with a non-abrasive cleaner if required. If the glass
bretape is torn or damaged, we recommend that is
replaced to ensure that no products of combustion
enters the room when the appliance is used.
Painted Finish – You can wipe the stove with a damp
cloth. Repair any light damage with Hunter stove paint
spray.
Spares
All spare parts can be purchased through our website www.hunterstoves.co.uk/spares.
- 14 -
Page 15

IMPORTANT INFORMATION
IMPORTANT NOTES
IMPORTANT INFORMATION
WARNING NOTE
Properly installed and operated, this appliance will not emit fumes. Occasional fumes from de-ashing and
refuelling may occur. Persistent fume emission must not be tolerated.
This appliance should not be operated with the door open.
If fume emission persists, then the following immediate action should be taken: -
Open doors and windows to ventilate the room.
Let the re go out or eject and safely dispose of fuel from the appliance.
Check for ue/chimney blockage and clean if required.
Do not attempt to re-light the re until the cause of the fume emission has been identied and
corrected.
If necessary, seek expert advice.
General
Before lighting the stove check with the installer that the installation work and commissioning checks described
above have been carried out correctly and that the chimney has been swept clean, is sound and free from any
obstructions. As part of the stoves’ commissioning and handover, the installer should have shown you how to
operate the stove correctly.
Carbon Monoxide Detector
Hunter Stoves recommend a Carbon Monoxide Detector that conforms to the latest issue of BS EN 50292 be placed
in the same room as the appliance. The installation of such an alarm is not considered a substitute for regular
maintenance or servicing of the appliance and ue system.
Air Controls
See how to use Air Controls on page 10.
Fireguards
Always use a reguard in the presence of children, the elderly or the inrm. The reguard should be
manufactured in accordance with BS8423 – Fireguards for use with solid fuel appliances.
Extractor Fan
Fitting a stove in a room which also contains an extractor fan and/or cooker hood should be avoided where
possible. If this is unavoidable, the suitability of the space for tting this appliance must be decided at the
discretion of a qualied installer, and a ue draught interference test must be performed.
Recommended Fuels
Hunter Stoves Group recommend that only wood logs with a moisture content of less than 20% should be burnt on
this appliance.
Burning wet or unseasoned wood will create excess smoke emissions, tar deposits in the stove and chimney and
will not produce a satisfactory heat output.
WARNING - DO NOT BURN BITUMINOUS COAL, PETRO-COKE, OTHER PETROLEUM BASED FUELS OR
TREATED WOOD SUCH AS PALLETS AS THIS WILL INVALIDATE THE PRODUCT WARRANTY. HOUSEHOLD
WASTE MUST NOT BE BURNT ON THIS APPLIANCE.
- 15 -
Page 16

Aerosols
Do not use an aerosol spray on or near the stove when it is alight.
Operating The Stove
Warning! – This Appliance will be hot when in operation and due care should be taken.
We advise that suitable gloves, or the operating tool is used when operating the air control, and when opening the
door.
Ventilation
It is essential that the stove has an adequate air supply for combustion and ventilation. Requirements can be found
by checking Building Regulations Approved Document J.
Do not obstruct the ventilation required for the safe use of this appliance.
In The Event Of A Chimney Fire
Raise the alarm
Call the Fire Brigade
Close appliance air controls
Move furniture, ornaments etc. away
Place a reguard in front of stove
Check the chimney breast for signs of excessive heat.
If the wall is becoming excessively hot, move furniture away.
Ensure the Fire Brigade can gain access to your roof space in order to check for re spread.
- 16 -
Page 17

TROUBLESHOOTING
PACKAGING
All our packaging both for our stoves and spares
is recyclable. For information detailing where it
can be disposed check with your local council.
Smoke
This can happen for a variety of reasons e.g cold air
trapped in chimney/ue. As cold air is denser, this
causes smoke to be forced back down the chimney.
We recommend trying to heat the chimney before
lighting for example, placing a relighter on top of the
kindling. Ensure wood has a moisture content of less
than 20% as this can cause excess smoke. Also check
the type of wood as softwood produces a lot more
smoke.
Glass
If your glass is blackening this can be due to incorrect
use of air controls (see instructions). Alternatively, poor
quality fuel which has a high moisture content can
also be a cause. When the glass has a white shadow(or
crazing) on the inside then this can be caused due to
over-ring, too much primary air or a vacuum in the
room.
Weather Conditions
Operation Of Fire
There are varying reasons for problems with your
stove however, this could be due to a low or high ue
draught in which case you need to speak to your
installer. Correct use of the air controls (please refer
to instructions). Quality and moisture content of fuel.
Check that chimney is not blocked or that nearby
buildings or trees affect the wind around it.
Appliance Body
Paint Curing
The stove paint curing process takes place at room
temperature and the surface coating is virtually free
from fumes and odours. When being put into operation
for the rst time we would recommend that windows
and doors are opened for a short time to provide
ventilation.
If the surface of the appliance turns grey or the paint
starts to ake or peel then this is caused by over-ring.
Noise
When the appliance body heats up and cools down it
may make some clicking noises. This is due to the large
temperature differences and is not a problem with the
appliance.
Varying weather can have an impact on the way
the stove burns, especially the wind. An anti-down
draught cowl might need to be tted (speak to a
specialist) or a ue damper may also be of help.
Mist and fog may also have an impact on the chimney
draught and you will need to change the settings you
are using on the stove.
Fire Goes Out After A Short Time
Check the ue draught of the stove is not to strong
or to low.
Is the air vent blocked?
Check use of air controls (please refer to these
instructions).
Ensure that the amount of kindling used is enough
to light the added fuel.
Try heating the ue/chimney up rst to ensure air
pressure is not allowing the ue to operate correctly.
If any further help is needed then please refer to the Help section on our website https://www.hunterstoves.co.uk/helpandsupport or contact your dealer.
- 17 -
Page 18

WARRANTY
Hunter Stoves Group Ltd Extended 5 and 10 year Warranty
2 Year Standard Warranty
Any appliance bought through the showroom of an authorised Hunter Stoves Group dealership will automatically
be covered by our standard 2-year conditional guarantee.
However, this standard 2-year warranty can be extended to a 5-year or 10-year conditional warranty dependent on
the model type (5 years - Boiler model and Gas models, 10 year - Room heater).
To qualify for this extended warranty option, you need to:
1.
Register your purchase online at https://www.hunterstoves.co.uk/ProductRegistration
2.
Retain your proof of purchase.
Warranty Conditions
For the Standard 2 year or extended 5/10-year warranty to be valid and to remain in force throughout the warranty
period the following must have been carried out:
1. The appliance must have been installed by an appropriately qualied engineer (from the Competent Person
Scheme/Gas Safe) in accordance with the manufacturer’s instructions and in compliance of any relevant
national or local building regulations. Please visit the following links for details on the Competent Person
Scheme: https://www.gov.uk/guidance/competent-person-scheme-current-schemes-and-how-schemes-areauthorised and Gas Safe register: https://www.gassaferegister.co.uk/
2. The appliance will need to be registered within two months of purchase and the commissioning and
installation documentation completed (these need to be kept by the end user).
3. The appliance must be serviced within 12 months of the installation date for the second year of the standard
warranty to be valid, and within every 12-month anniversary thereafter to maintain the validity and coverage
of any extended warranty. For this purpose, the installation and user instructions, supplied with the appliance,
makes a provision for receipts and annual services to be recorded. This is needed in the event of a claim
during the warranty period.
4. Only genuine Hunter Stoves spare parts or consumables can be used in the servicing and maintenance of
the appliance during any standard or extended warranty period. These can be sourced from your authorised
supplier directly or through our website spares portal. www.hunterstoves.co.uk/spares.
5. Any problems or issues giving rise to any claim under the standard or extended warranty must be submitted
to the authorised Hunter Stoves Group retailer from whom you originally purchased the appliance. Hunter
Stoves Group will then offer appropriate support and help through your original authorised supplier to solve
any issues.
6. The standard or extended warranty option is not transferable. It is solely for the benet of the original
purchaser of the appliance. For this purpose, please retain the proof of purchase.
Warranty Exclusions
For Solid Fuel Stoves:
Glass and rope/ceramic seals
Fire bricks
Bafes/Throat Plates
Log retainers, grate supports and catch bars
Grate parts
Ashpans
Clip-in Boilers
For Gas Stoves:
Gas pilot assemblies
Thermocouples and Oxy pilots
Ceraic log and coal ‘fuel-effects’
Batteries
- 18 -
Page 19

Paint and Surface Coverings
The paint or surface covering of the appliance will be covered (for 2 years after installation) provided the warranty
conditions are met. However, damage due to the following events will not be covered:
1.
2.
3.
Damage to the paint surface caused by the appliance being stored in a damp and cold environment is not
covered under warranty. Please be aware that any moisture within the room where the stove is installed
e.g. through clothes drying, can be a cause of paint issues.
In the course of the initial rings of the appliance the paint or enamel surface may change colour. This is
normal and as such is therefore not covered under warranty.
Damaged caused by over ring, resulting in cracking, bubbling or discolouration to the paint or enamelled
surface nish is not covered under warranty.
Warranty Limitations
1.
2.
3.
4.
5.
6.
Damage to the appliance due to specic local conditions caused by draft or chimney defects.
Damage resulting from installation and use where installation is not in accordance with the
manufacturer’s instructions or local building and/or safety regulations.
Damage or premature wear caused by burning inappropriate fuels such as Bituminous coal, “PetroCoke” or any other Petroleum based coals. Please visit the HETAS website, www.hetas.co.uk, for a full
list of approved fuels which are covered by the warranty. Fuels outside of this list are not covered by the
warranty.
Damage caused by burning material with high creosote content or any other painted/treated timber.
Consequential loss to associated non-Hunter Stoves Group products is not covered under the warranty.
Consequential loss relating to decorations, soft furnishings or other household assets is not covered under
the warranty.
7.
Hunter Stoves Group total liability will only extend to the total purchase price paid for the goods in any warranty
claim. Hunter Stoves Group reserve the right to replace, repair or refund to value of goods purchased.
Cost associated with the removal and re-installation of an appliance subject to a warranty claim.
ANY HUNTERS STOVES GROUP PRODUCT PURCHASED VIA AN INTERNET SUPPLIER, OR THROUGH
AN UNAUTHORISED STOCKIST WILL ONLY BE SUPPORTED BY THE STATUTORY, 12 MONTH
GUARANTEE AND WILL NOT QUALIFY FOR ANY EXTENDED 5 OR 10 YEAR WARRANTY.
The Hunter Stoves Group extended warranty option does not affect your statutory rights.
This revised standard or extended 5 or 10-year warranty option comes into effect on 1st September 2015 and will
apply to all appliances sold from that date.
This standard/extended warranty applies to purchases of Hunter Stoves within the United Kingdom and the
Republic of Ireland. Purchases in all other countries are subject to the warranty conditions specied by the
distributer in those markets.
Hunter Stoves Ltd, 8 Emperor Way, Exeter Business Park, Exeter, Devon, EX1 3QS
www.hunterstoves.co.uk Email: info@hunterstoves.co.uk
- 19 -
Page 20

BRITISH
EXCELLENCE
8 EMPEROR WAY EXETER DEVON EX1 3QS
INFO@HUNTERSTOVES.CO.UK WWW.HUNTERSTOVES.CO.UK
Hunter Stoves reserve the right to change dimensions and procedures described in these instructions
at anytime without special notice.
 Loading...