

Page 1
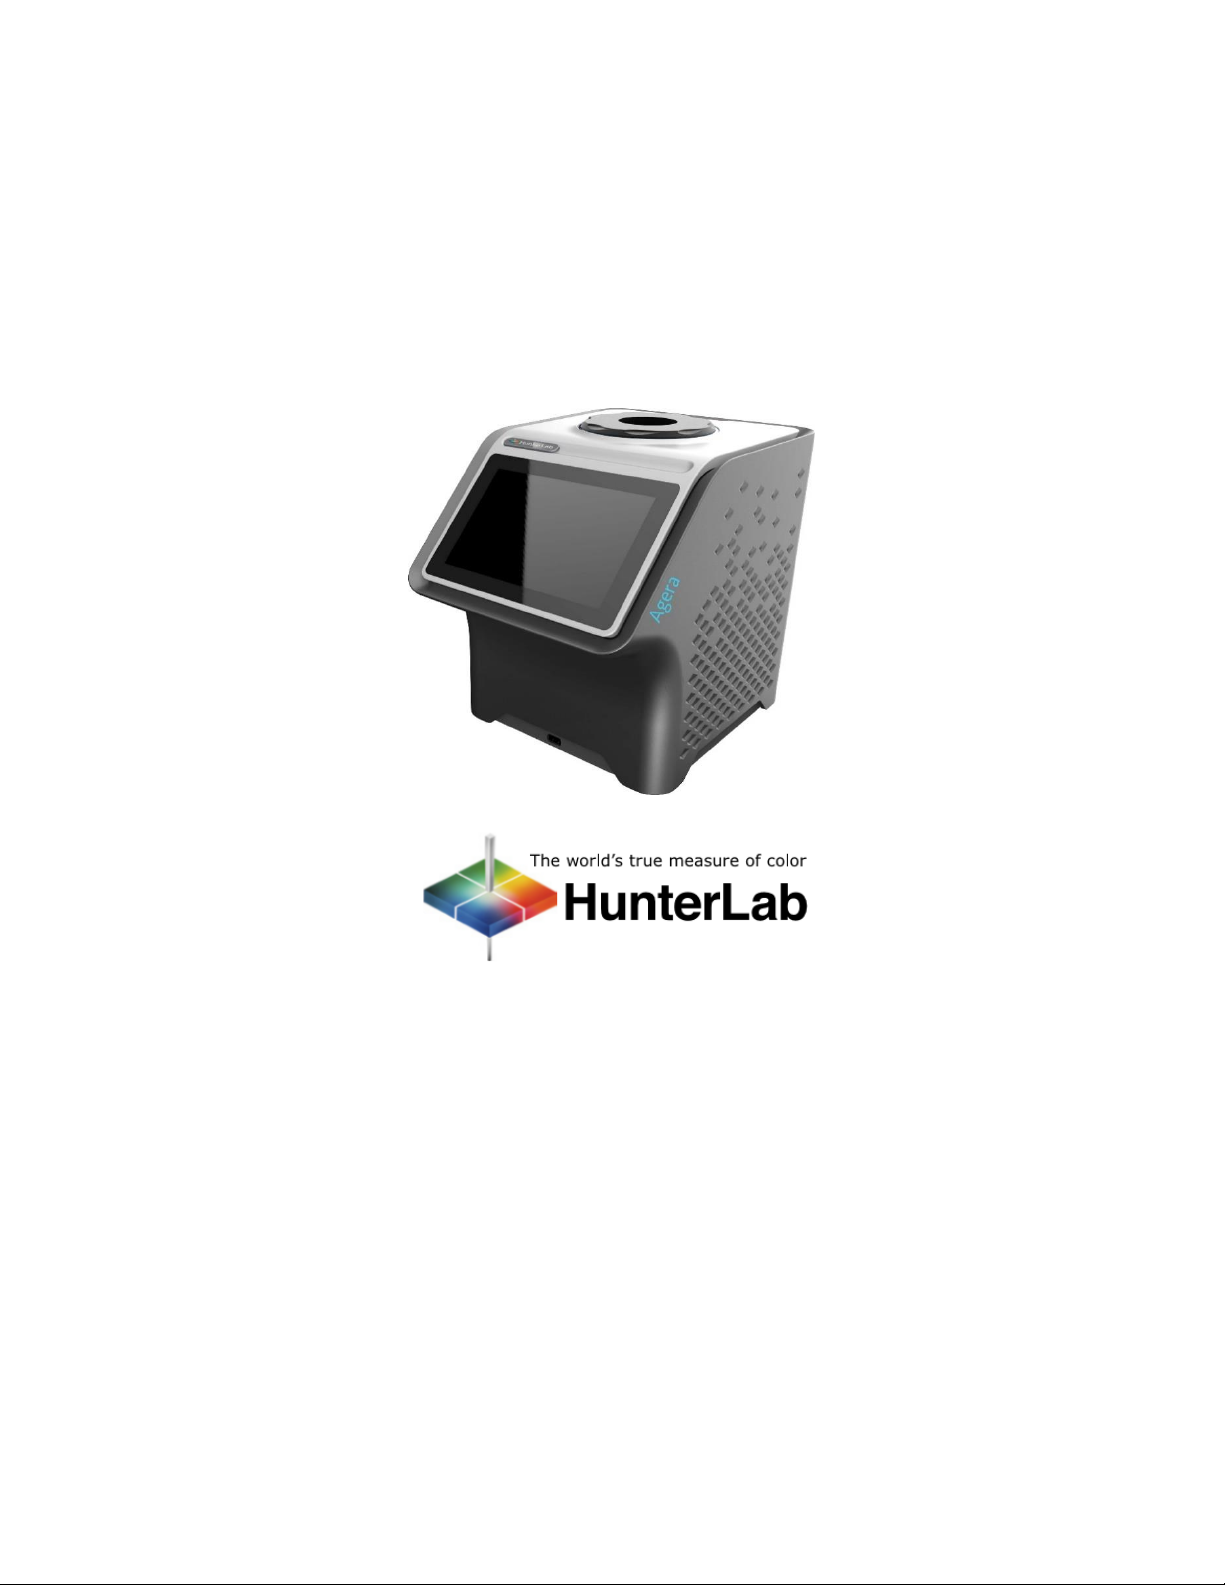
User’s Manual for Agera®
and EasyMatch® Essentials
Hunter Associates Laboratory
11491 Sunset Hills Road
Reston, Virginia 20190 USA
www.hunterlab.com
A60-1018-812 Version 1.0
For EasyMatch Essentials 100.0051 and Above
Page 2
User’s Manual for Agera and EasyMatch Essentials v 1.0
2
Copyrights and Trademarks
This documentation contains proprietary information of Hunter Associates Laboratory, Inc. Its
reproduction, in whole or in part, without express written consent of Hunter Associates Laboratory, Inc.
is prohibited.
Agera and EasyMatch are registered trademarks of Hunter Associates Laboratory, Inc.
Windows is a registered trademark of Microsoft Corporation in the United States and other countries.
Safety Notes
Caution: If the equipment is used in a manner not specified by the HunterLab, the overall safety and
protection provided by the equipment may be impaired. The instrument is for indoor use only and not
suitable for a wet location.
Caution: There is a potential of a UV Light hazard in using this instrument. Please avoid looking
directly at the light. The frequency of this flashing light is in the range of sensitivity for those prone to
epileptic seizures.
For your safety when using the Agera, you should pay attention to the following types of statements in
this User’s Manual:
▪ General safety instruction that should be observed at all times while operating the
instrument.
▪ Specific safety instruction critical to the type of instrument operation being explained in the
manual where the caution appears.
▪ Use of this equipment in a manner not specified by the manufacturer may impair the
protection afforded by the equipment.
▪ Danger of electric shock if liquids are spilled and fire if volatile or flammable liquids are
spilled. Use care when measuring liquid samples.
▪ The Agera is for indoor use only at an altitude of up to 2000m and pollution degree 2.
Page 3

User’s Manual for Agera and EasyMatch Essentials v 1.0
3
Contents
SETTING UP THE AGERA ...................................................................................... 7
Standard Accessories ................................................................................................................................ 7
Selecting A Space for the Agera ................................................................................................................ 7
Power Jack ................................................................................................................................................. 7
Power Switch............................................................................................................................................. 7
Port Forward Orientation .......................................................................................................................... 8
Keyboard and Mouse ................................................................................................................................ 8
Front and Rear USB Connectors ................................................................................................................ 8
Ethernet Port ............................................................................................................................................. 8
NAVIGATING THE ESSENTIALS SCREEN ................................................................ 9
Tools: Status Bar........................................................................................................................................ 9
Tools: Read ................................................................................................................................................ 9
Tools: View Flippers ................................................................................................................................ 10
Tools: Information ................................................................................................................................... 10
Tools: Quick View .................................................................................................................................... 10
Tools: View Options ................................................................................................................................ 10
Tools: Workspace & System Settings ...................................................................................................... 11
Tools: Jobs ............................................................................................................................................... 11
TAKING A SIMPLE MEASUREMENT .................................................................... 13
What is HunterLab Agera & EasyMatch Essentials? ............................................................................... 13
Connecting the Sensor and Taking a Measurement ............................................................................... 13
Standardization .................................................................................................................................... 13
Create a Workspace ............................................................................................................................. 15
Read Sample ........................................................................................................................................ 16
TOOL BAR: JOBS FUNCTION .............................................................................. 19
Jobs ......................................................................................................................................................... 19
Jobs > New .............................................................................................................................................. 19
Jobs > Open ............................................................................................................................................. 19
Jobs > Save & Save As ............................................................................................................................. 20
Jobs > Print .............................................................................................................................................. 20
Jobs > Data Management ....................................................................................................................... 22
Page 4

User’s Manual for Agera and EasyMatch Essentials v 1.0
4
Jobs > Help .............................................................................................................................................. 27
Jobs > About ............................................................................................................................................ 27
TOOL BAR: WORKSPACE & SYSTEM SETTINGS ................................................... 29
Workspace > Color Scales ....................................................................................................................... 29
Workspace > Read Options ..................................................................................................................... 33
Read Options > Options ....................................................................................................................... 33
Read Options > Measurement Configuration ...................................................................................... 37
Workspace: Standard and Tolerances .................................................................................................... 39
AutoTolerances Setting........................................................................................................................ 42
Tolerances ............................................................................................................................................ 43
Workspace: Views ................................................................................................................................... 43
Workspace: New Workspace .................................................................................................................. 43
System Settings: Standardization............................................................................................................ 44
Multi-Standardization Mode ............................................................................................................... 45
Standardization and Port Plate/Area of View...................................................................................... 46
Gloss Standardization .......................................................................................................................... 46
System Settings: Diagnostics ................................................................................................................... 46
Colorimetric Repeatability ................................................................................................................... 46
Reading the Green Tile ........................................................................................................................ 48
Advanced Tests .................................................................................................................................... 49
System Settings: Preferences .................................................................................................................. 53
Preferences: General ........................................................................................................................... 53
Preferences: Print ................................................................................................................................ 55
System Settings: User Manager .............................................................................................................. 55
TOOLBAR: VIEW OPTIONS ................................................................................. 59
Views: EZ View ........................................................................................................................................ 59
Views: Color Data Table .......................................................................................................................... 60
Views: Spectral Data Table ...................................................................................................................... 62
Views: Spectral Plot................................................................................................................................. 63
Views: Trend Plot .................................................................................................................................... 64
Views: Color Plot ..................................................................................................................................... 65
SPECIAL FUNCTIONS ...................................................................................... 67
Auto-Exporting Data through a Network Connection ............................................................................ 67
Page 5

User’s Manual for Agera and EasyMatch Essentials v 1.0
5
Option A: Connect to a network hub using an Ethernet ..................................................................... 67
Optional B: Connect to a hotspot through the WiFi connection ......................................................... 69
Auto-Exporting Data via Direct Connection between Agera and a Computer ....................................... 71
Connect Agera to Computer: ............................................................................................................... 71
Open Command Prompt in the PC ...................................................................................................... 72
Configure the Agera ............................................................................................................................. 72
Configure the Computer ...................................................................................................................... 73
Send Data from the Agera: .................................................................................................................. 74
Tips & Tricks: Recover Unsaved Measurement Data .............................................................................. 74
SPECIFICATIONS ...................................................................................... 75
Operating Conditions .............................................................................................................................. 75
Physical Characteristics ........................................................................................................................... 75
Conditions of Illumination and Viewing .................................................................................................. 75
Instrument Performance ......................................................................................................................... 76
Measurement .......................................................................................................................................... 76
Regulatory Notice ................................................................................................................................... 77
FEATURES, ACCESSORIES & MAINTENANCE ...................................................... 79
Agera Maintenance & Safety .................................................................................................................. 79
Options and Sample Devices ................................................................................................................... 79
Easy Match Quality Control Software (EZMQC-OPT ............................................................................ 79
Disk Assembly (02-4522-00) ................................................................................................................ 80
Ring and Disk Set (02-4579-00)............................................................................................................ 80
Sample Cup Opaque Cover (04-4000-00) ............................................................................................ 80
Ring Only (04-4230-00) ........................................................................................................................ 81
Glass Sample Cup (04-7209-00) ........................................................................................................... 81
Sample Cup Set (Agera-SC-Assy) .......................................................................................................... 81
Skein/Swatch Holder (02-7396-00)...................................................................................................... 81
Foot switch Assembly (D02-1010-327) ................................................................................................ 82
Sample Clamp (D02-1018-462) ............................................................................................................ 82
Gloss Check Tile (D02-1018-997) ......................................................................................................... 82
INSTRUMENT REPLACEMENT, REPAIR, PROBLEMS, AND QUESTIONS ................ 83
Warranty ................................................................................................................................................. 83
Shipping Claims ....................................................................................................................................... 83
Page 6

User’s Manual for Agera and EasyMatch Essentials v 1.0
6
Shortage .................................................................................................................................................. 84
Incorrect Shipment ................................................................................................................................. 84
Returns for Repair ................................................................................................................................... 84
When You Need Assistance .................................................................................................................... 86
INDEX ...................................................................................... 87
TABLE OF FIGURES ...................................................................................... 89
Page 7
User’s Manual for Agera and EasyMatch Essentials v 1.0
7
Setting Up the Agera
The Agera is a dual beam 0-degree illumination and 45-degree circumferential detection
spectrocolorimeter with a wavelength range from 400 to 700 nanometers (nm). It is designed for use
with the sample port facing up or forward.
The optical delivery and collection system combined with port openings of nominally 51 mm (2 in), 25.4
mm (1 in), and 16.9 mm (0.625 in) delivers measurement of semi non-homogenous samples such as
pellets, granules, and textured flat samples including textiles, plastics, paper. The multiple viewing area
accommodate powders, opaque and semi-opaque sauces and liquids.
Standard Accessories
• Calibration Box with calibrated Agera white tile, Agera black glass and Agera green
diagnostics tile
• Area of View Port Plates - Set of 3
• Certificate of Traceability
• Power Supply
• Agera Quick Start Guide
• USB Flash Drive
Selecting A Space for the Agera
The Agera can be setup in a laboratory setting with controlled, consistent temperature (10°C to 40°C)
and humidity. A laboratory bench is recommended with easy access to the rear connectors.
Power Jack
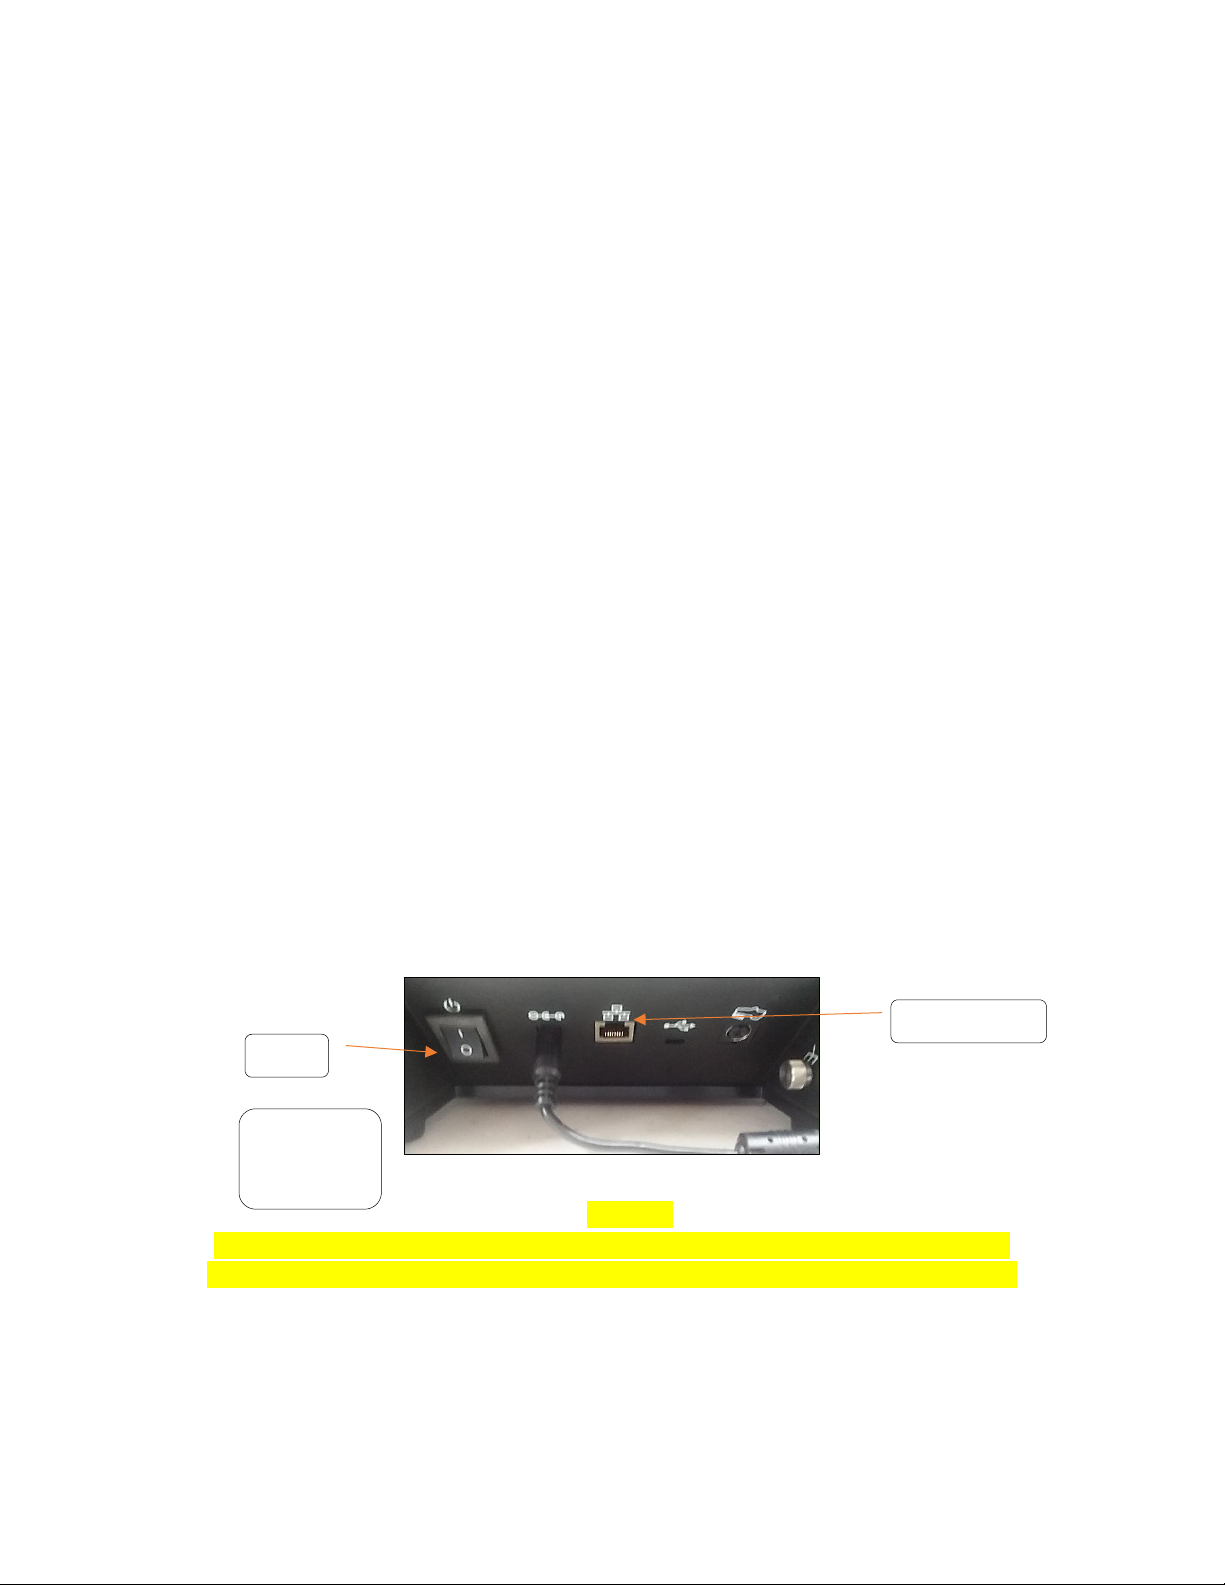
• The instrument is supplied with a 24 VDC (3.75A) power supply. The power supply is plugged
into the back of the instrument as shown along with the Ethernet port and the USB port.
Figure 1. Rear View with Connectors
CAUTION
Note: Use only the power cord included with this instrument or a replacement obtained
from HunterLab. Be certain that the power cord is in good condition before connecting it.
Power Switch
• To turn the instrument on, press the rocker switch on the back of the instrument.
Power
Ethernet Port
Power
Supply
Connection
Page 8
User’s Manual for Agera and EasyMatch Essentials v 1.0
8
Port Forward Orientation
• The Essentials screen is default setup for port up Agera. If port forward orientation is
required, then go to Workspace > Preferences and check REVERSE SCREEN ORIENTATION
and click APPLY. Power off/on Agera to get the screen orientation changed.
Keyboard and Mouse
• The Agera works with the following keyboard and mouse:
▪ L02-1017-434 Wireless keyboard and mouse kit.
• To use this accessory, turn the power off. Plug in the micro USB adaptor into the instrument
and then attach the nano-receiver for the keyboard into the USB port. Install the batteries
into the keyboard/mouse and turn the power back on.
Front and Rear USB Connectors
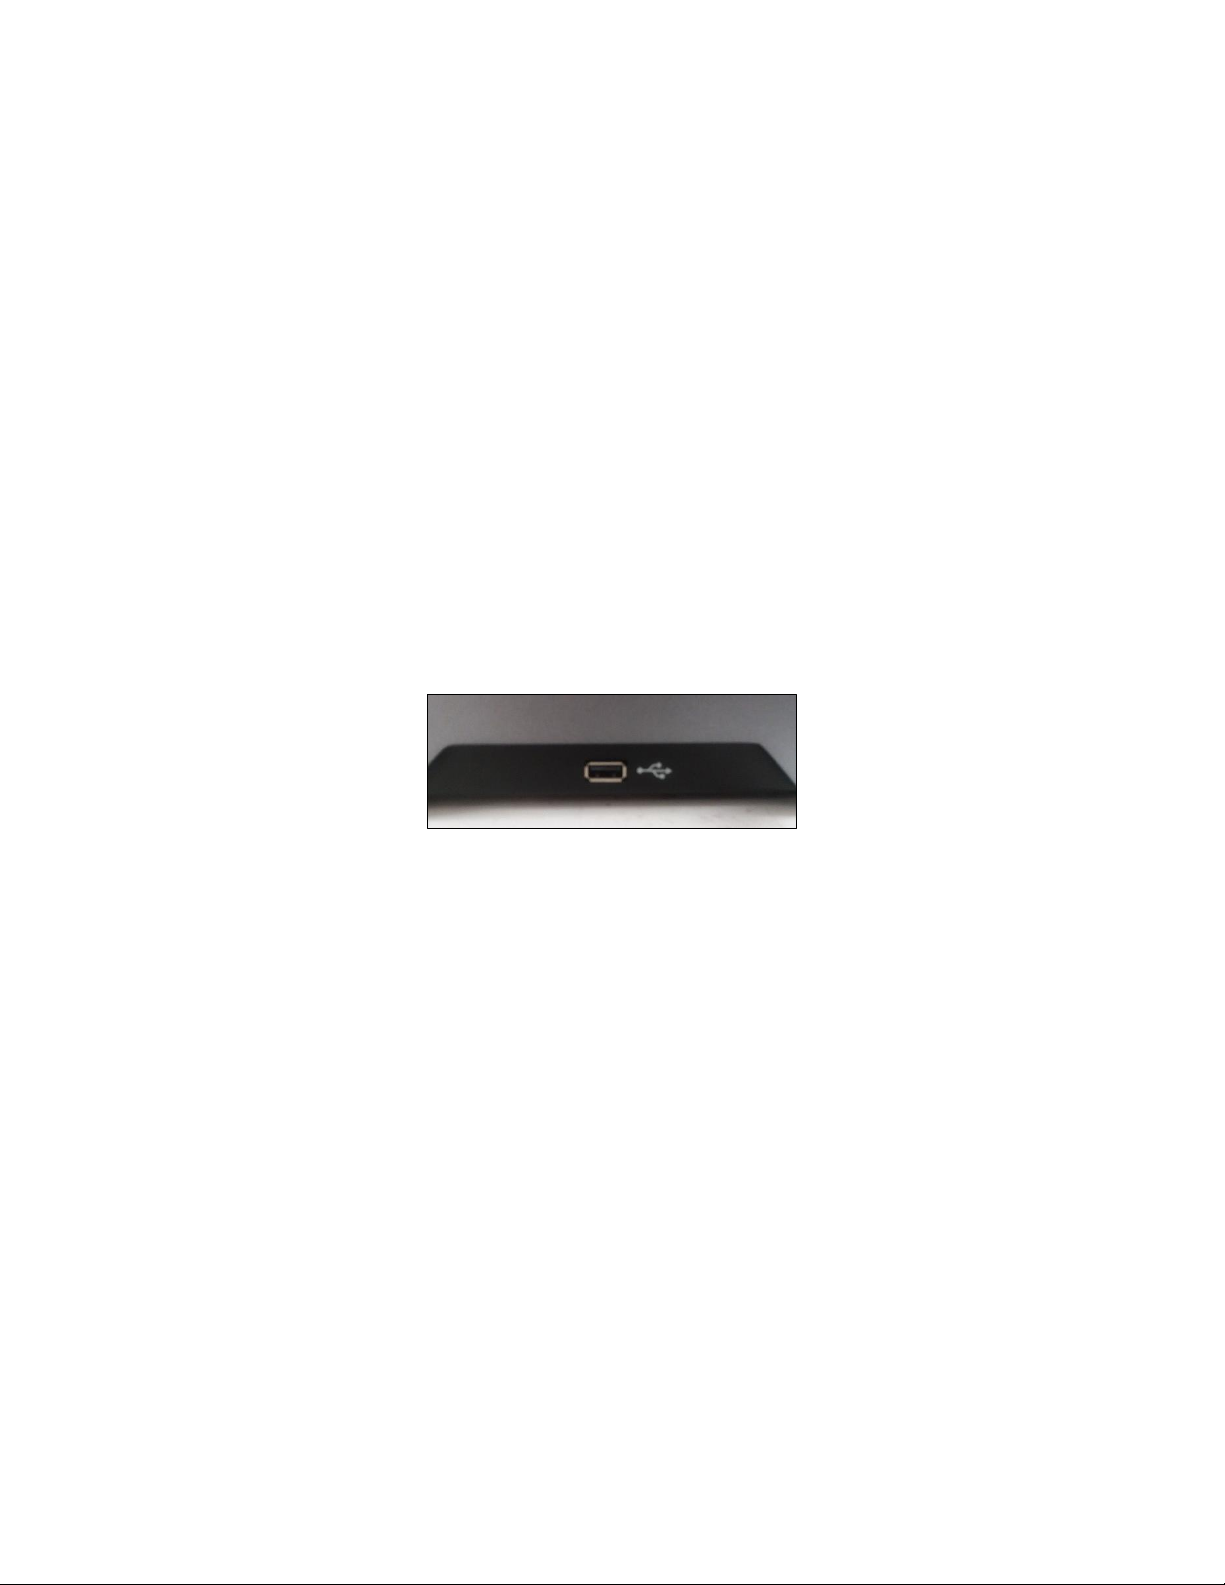
• There are two USB connectors on the Agera. The one in the front is typically used to connect
a printer or a keyboard to the Agera. If the user wants to connect multiple devices at the
same time, a USB hub can be plugged in to the front of the instrument. Either port can be
used for exporting jobs and workspaces, backing up the instrument and updating software
Figure 2. USB Port on Front of Instrument
Ethernet Port
• This port is used to connect the Agera to:
▪ Computer or to a network with the purpose of sending data (ASCII) to a server
▪ Connect with EasyMatch QC and EasyMatch QC Electronic Records
▪ Remote Support
▪ Network printer
▪ Email data
Page 9
User’s Manual for Agera and EasyMatch Essentials v 1.0
9
Navigating the Essentials Screen
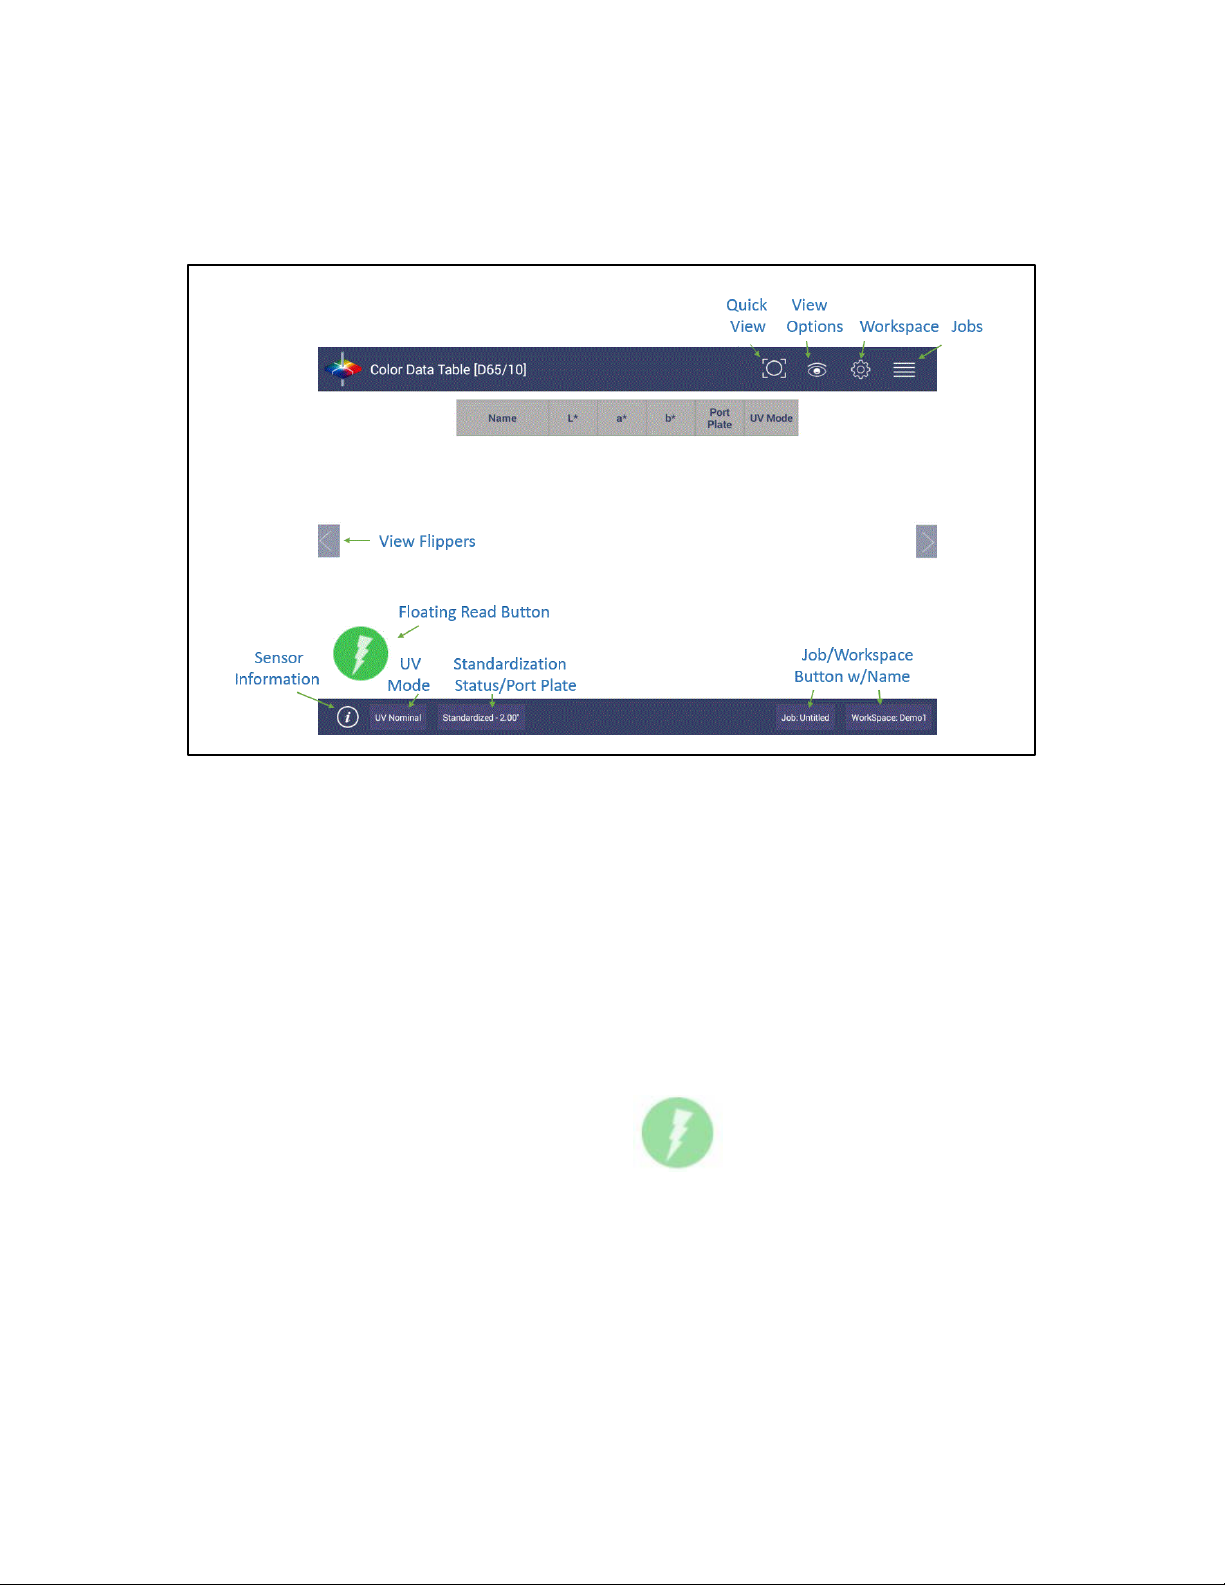
The EasyMatch Essentials Tools and Status features are shown below.
Figure 3. User Interface Screen for Agera & Essentials
Tools: Status Bar
This area shows the current mode settings.
• UV STATUS – To change the UV mode, press this button.
• STANDARDIZATION – To re-standardize, press this button. The standardization status and
current port plate size will be shown.
• WORKSPACE - To open a new Job, press this button. The software will prompt to select a
Workspace for a new Job. Workspace Name is reported on this button.
• JOB – To open an existing Job, press this button. Job Name is reported on this button.
Tools: Read
Read Measurement Icon
• Samples are read using this key.
• This tool can be moved around the screen by pressing and moving the icon.
Page 10
User’s Manual for Agera and EasyMatch Essentials v 1.0
10
Tools: View Flippers
View Flippers Icon
• Switching between Views can be accomplished by using the semi-transparent NEXT and
PREV buttons placed at the side edges of the screen or by swiping left or right with two
fingers on the screen.
Tools: Information
Sensor Information Icon
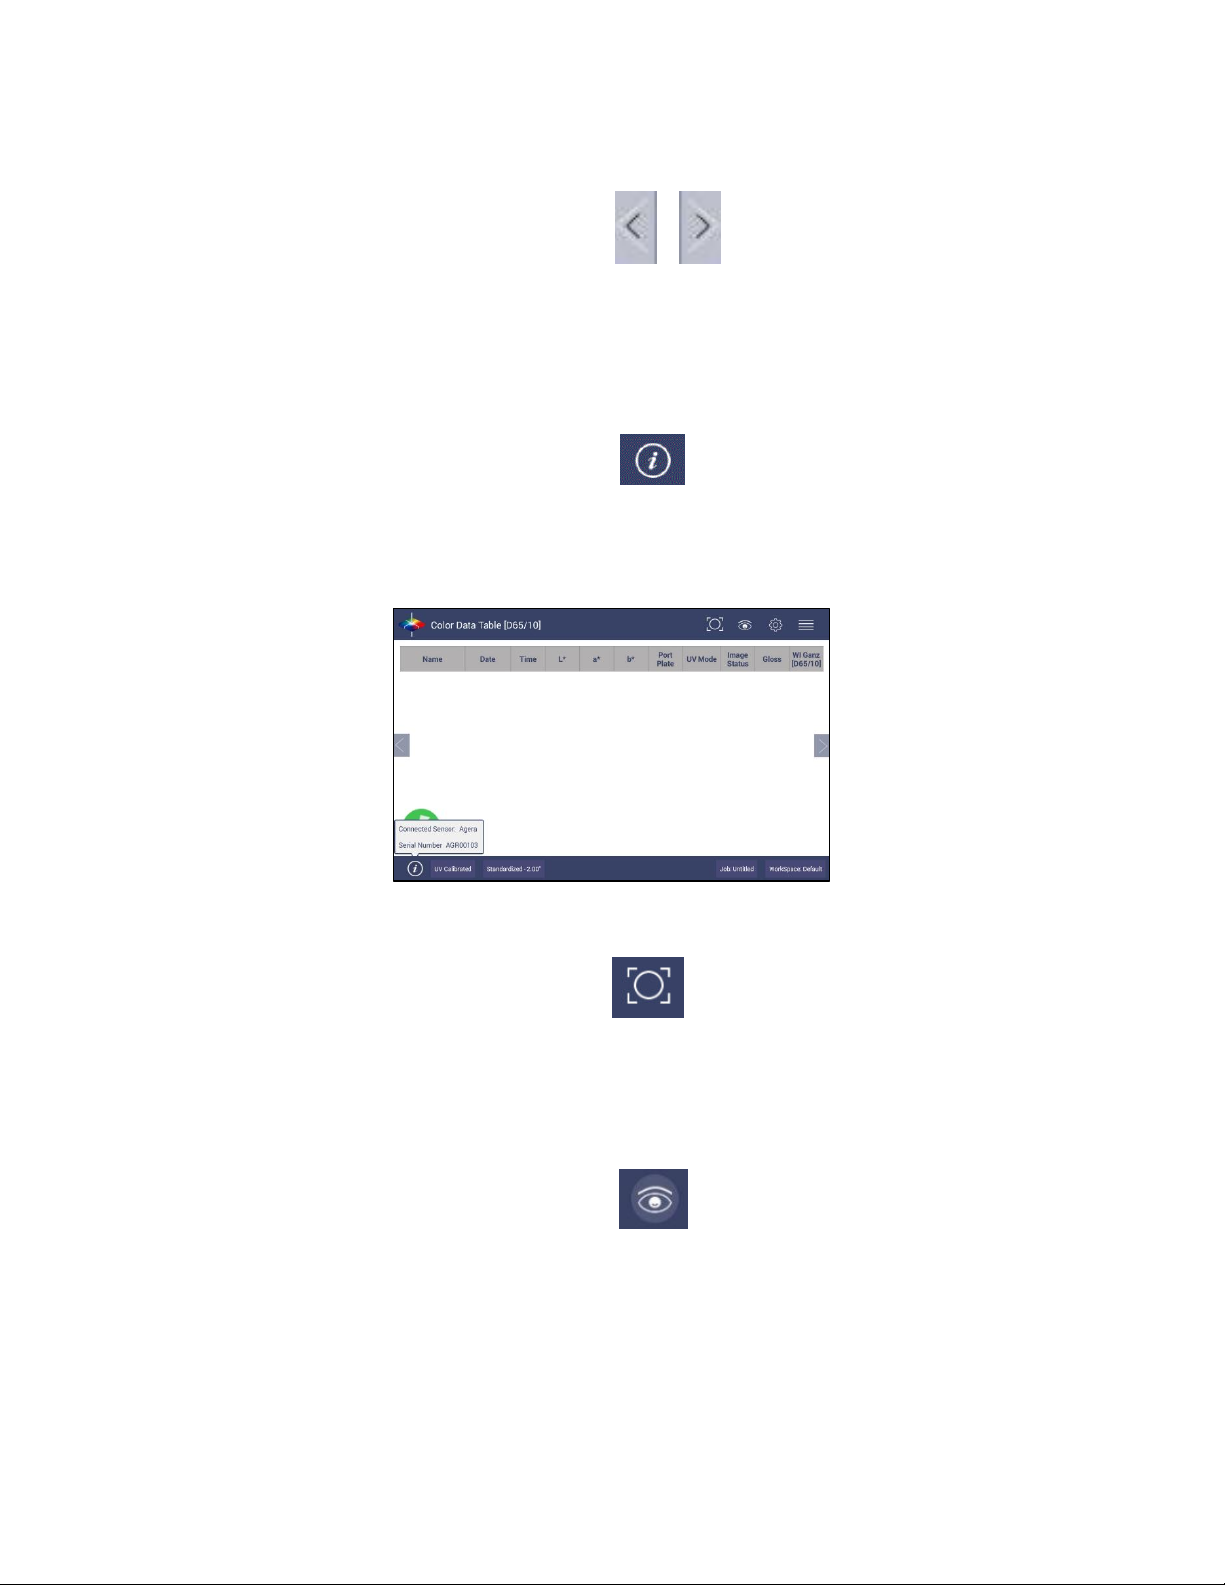
• The sensor type and serial number is shown at the bottom left side of the System Bar when
the i is pressed. When application security is enabled and the user logs into Essentials, the
User Account will also be shown in the Information box.
Figure 4. Sensor Serial Number
Tools: Quick View
Quick View Icon
• Quick View is used to see the positioning of a sample at the port before a measurement is
taken. This function does not allow for image saving. Pressing the QUICK VIEW icon on the
toolbar provides an onscreen image for viewing.
Tools: View Options
View Options Icon
• This menu shows the configuration options for the active view. A total of six views are
available. Each view shows a different option. Views can be added or removed in Workspace
> Views.
Page 11

User’s Manual for Agera and EasyMatch Essentials v 1.0
11
Tools: Workspace & System Settings
Workspace/Systems Settings Icon
• The Workspace menu sets up the data screen with measurement color scales, read options,
standards, tolerances and views.
• Systems Settings initiates Standardization, Diagnostics, Preferences, and the User Manager
for System Security.
Tools: Jobs
Jobs Icon
• A job is a collection of all the sample measurements and a workspace used for a task,
product, or customer. Jobs are the ‘readings’ of EasyMatch Essentials. Jobs can be created
for many different reasons, such as to hold data for a certain customer or a specific product
line. Each operator may maintain their own job with preferences or create separate jobs for
different operations. A workspace is a collection of the measurement parameters for a job
along with tolerances and the standard, i.e. analogous to word processing documents
containing text and formatting. Each job has only one workspace.
Page 12

User’s Manual for Agera and EasyMatch Essentials v 1.0
12
Page 13
User’s Manual for Agera and EasyMatch Essentials v 1.0
13
Taking a Simple Measurement
What is HunterLab Agera & EasyMatch Essentials?
Agera is a multi-purpose 0/45° color and appearance measurement system that provides users with 400700 nm reflectance color, ASTM 60-degree gloss, and sample imaging capabilities in either a port up or
port forward configurations. UV controlled LED illumination provides superior color accuracy and
repeatability on standard and fluorescent samples. An internal camera provides on-screen 45/0° sample
viewing during the measurement preparation and will capture and save a sample image for retrieval
with the sample data, while providing an RGB histogram of image color distribution. All measurement
results are simultaneously displayed on a 7” high resolution touch screen interface via the embedded
EasyMatch Essentials quality control software, which includes most color scales, indices and
Illuminant/observer combinations desired for industrial applications. With Ethernet, wireless and USB
connectivity, data results can be saved, emailed directly from the Agera instrument, printed to local or
networked printers, and streamed to LIMS and SPC systems.
Connecting the Sensor and Taking a Measurement
After unpacking and setting up the instrument, turn on the power using the rocker switch on the back of
the instrument base.
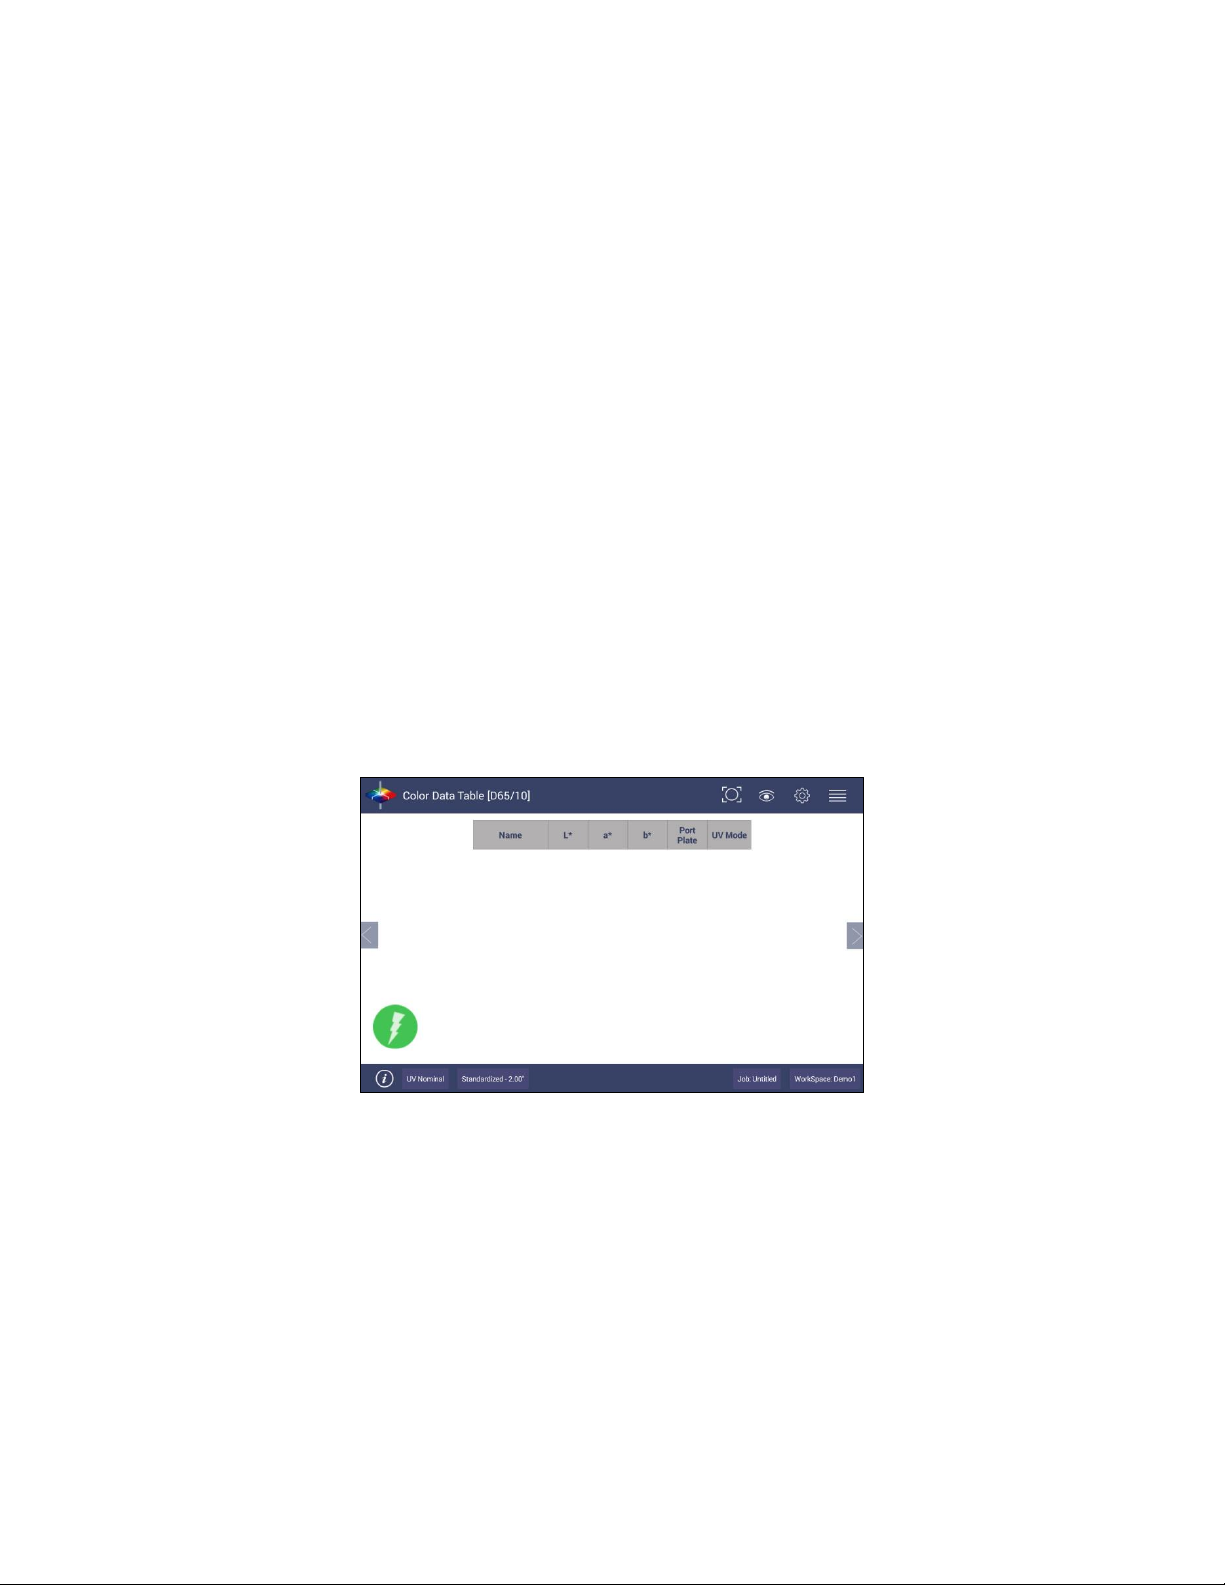
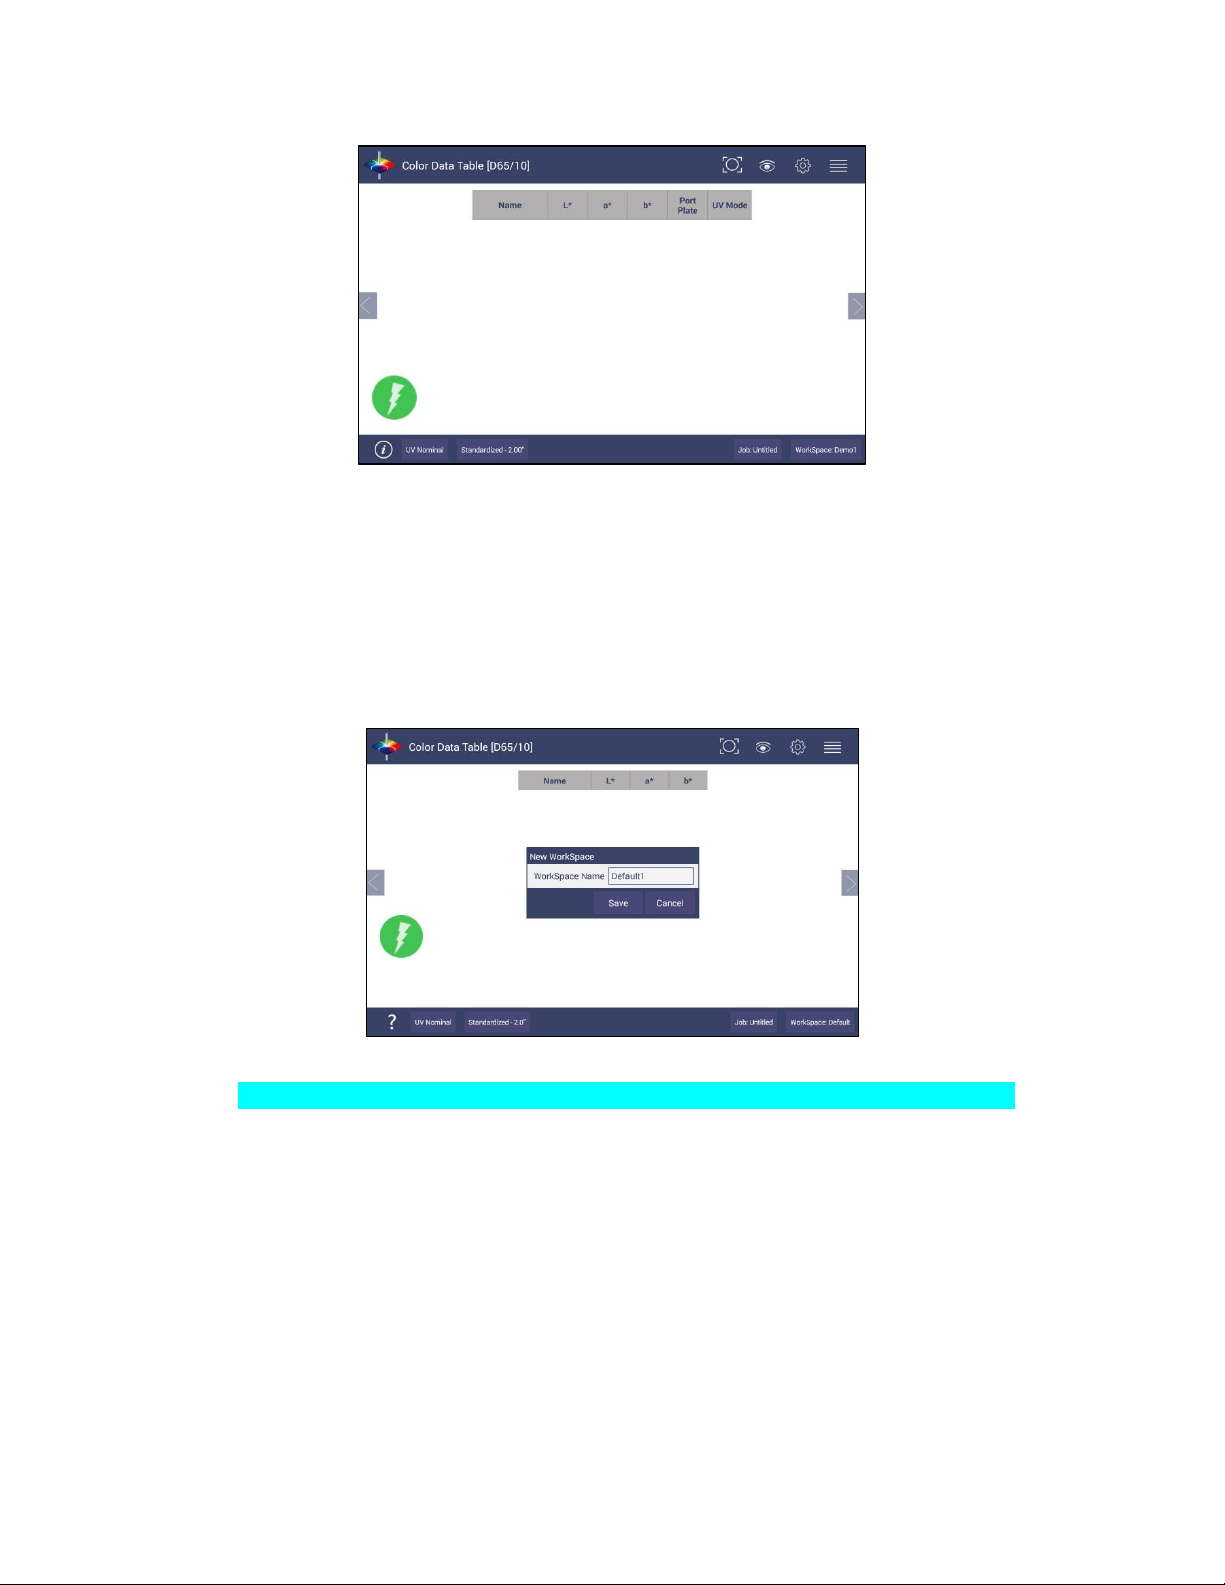
• Once inside the software, the main measurement screen is displayed – Color Data Table
(D65/10).
Figure 5. Measurement Screen
• The instrument is automatically connected, and this is reported on the status bar. Next, the
unit must be Standardized.
Standardization
• Configure UV MODE: The UV mode is shown in the status bar. To change the mode, click the
UV BUTTON and select a UV mode. Then click APPLY.
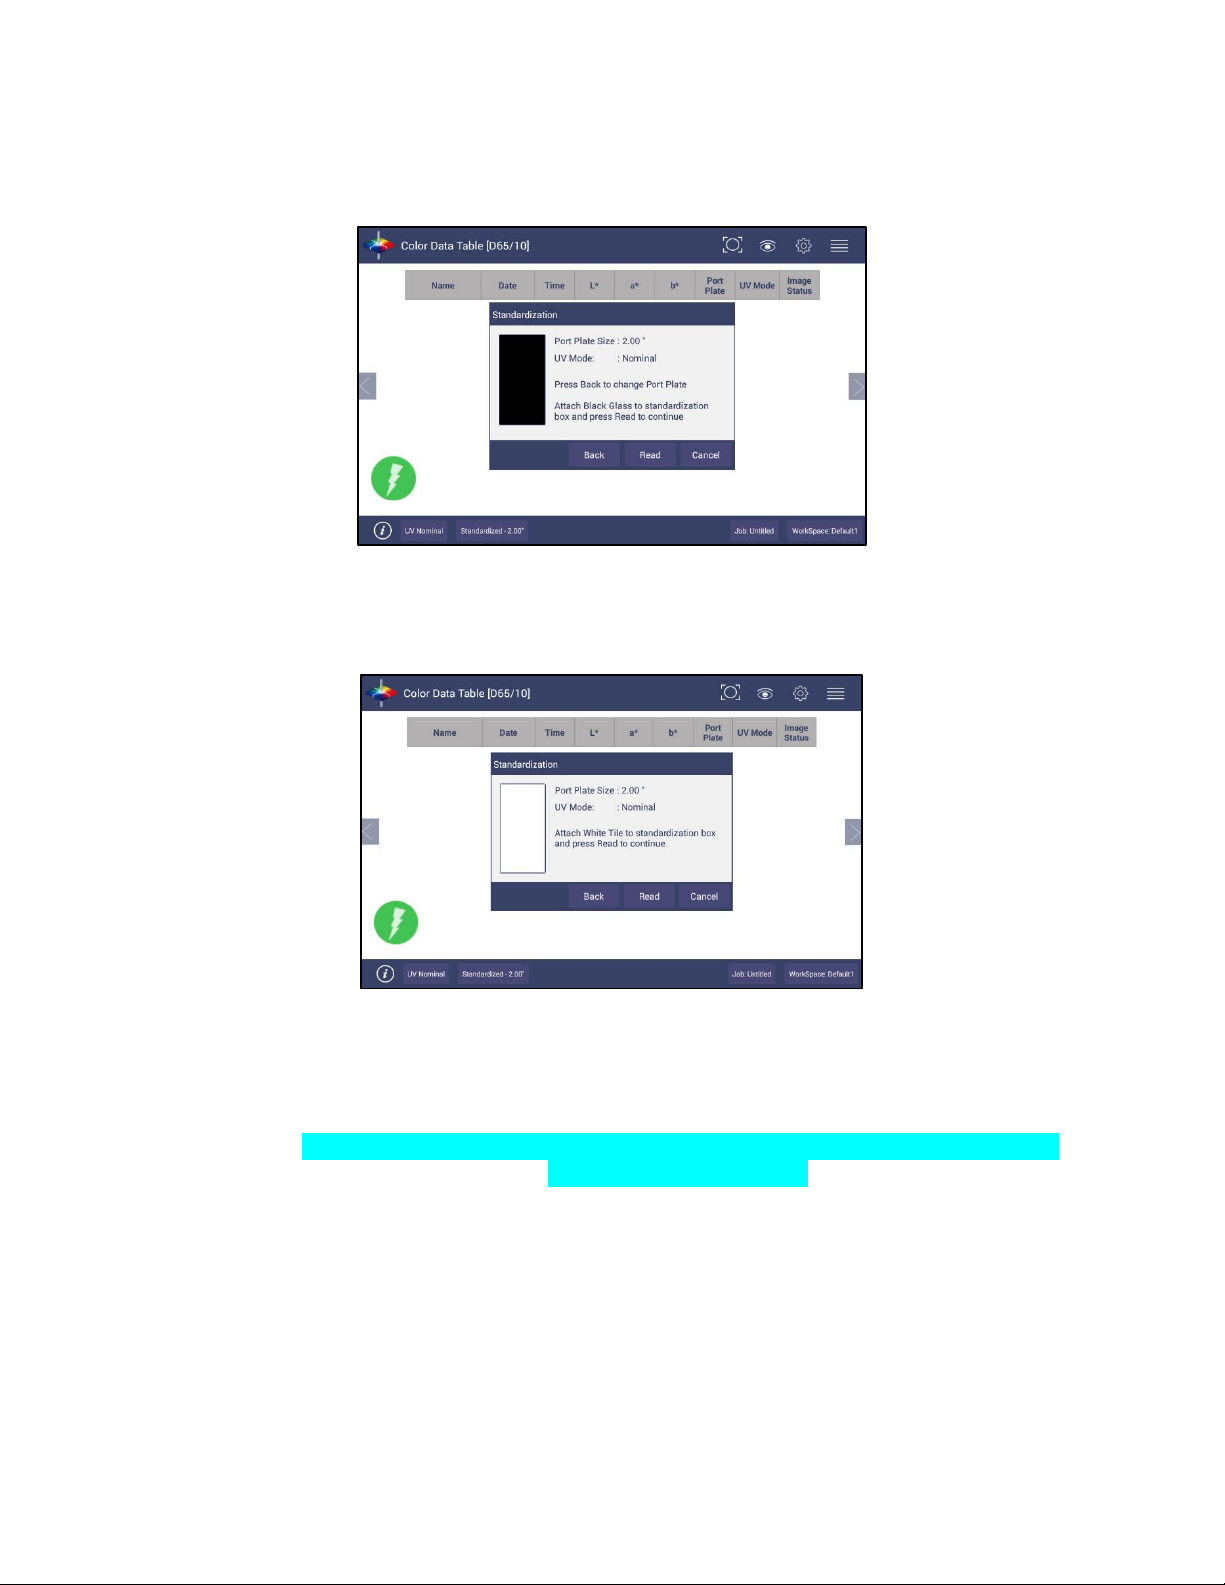
• Press the STANDARDIZATION BUTTON on the status bar to initiate standardization. The port
plate size and UV mode is shown in the standardization dialog. To change the port plate,
place the new port plate on Agera and click BACK to update the port plate information.
Page 14
User’s Manual for Agera and EasyMatch Essentials v 1.0
14
▪ Read Black Glass: Place the Agera black glass at the sensor port and press READ.
Make sure that the line on the tile matches the port plate white line.
Figure 6. Read the Black Glass for Bottom-of-Scale
▪ Read White Tile: Remove the black glass and place the Agera white tile at the port.
Press READ to continue.
Figure 7. Read the White Tile for Top-of-Scale
▪ Remove the calibrated white tile when standardization is completed. Click OK.
▪ Standardization is updated and reported as STANDARDIZED in the bottom status bar
along with UV Mode and Port Plate Size.
Note: Agera supports multiple modes allowing for switching among different valid
modes after standardization.
Page 15
User’s Manual for Agera and EasyMatch Essentials v 1.0
15
Figure 8. Standardization Status Bar
• To update Standardization Status for a new port plate, place the new port plate on the
instrument and click the READ button. The standardization status will be updated. If the
standardization of this new mode is valid, then the sample will be read. If the
standardization is not valid, a dialog box will be shown so prompt for new Standardization.
Create a Workspace
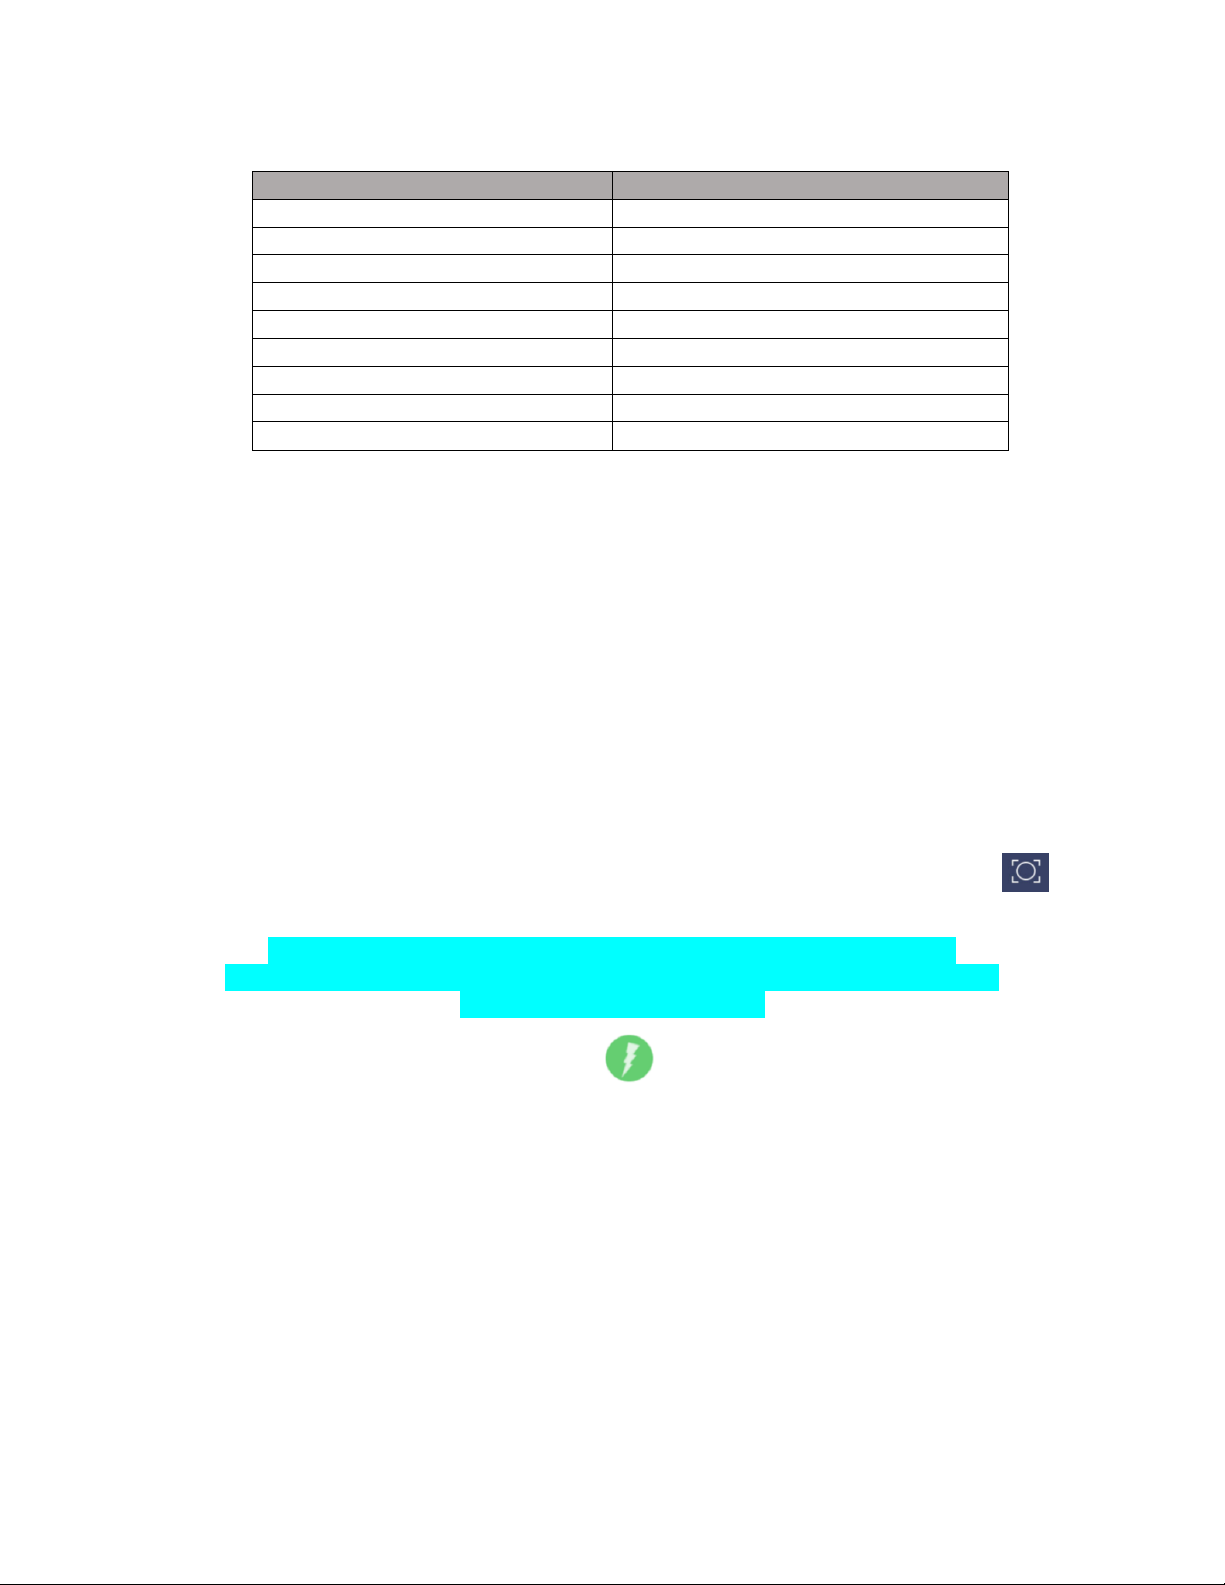
From the WORKSPACE MENU, press NEW WORKSPACE and ENTER A NAME for this Workspace
Figure 9. Name New Workspace
Note: The active Workspace name is displayed in the lower right corner of the screen.
• Default Workspace Settings: The default settings for a new Workspace are shown in the
Table below:
Page 16
User’s Manual for Agera and EasyMatch Essentials v 1.0
16
Table 1. Workspace Parameters
Parameter
Selection
ColorScales
CIE L*a*b*
Illuminant
D65/10
Indices
None
Differences
None
Read Options > Options
Prompt for Sample Name, Auto Save Job
Read Options > Measurement Config
UV Nominal
Standard and Tolerances
None
Views
Color Data Table only
View Options for Color Data Table
Latest Data First selected, Precision = 2
• Configure the New Workspace: With this new workspace open, you can start to change the
following settings:
To change measurement scales, select WORKSPACE > COLOR SCALES. This configures the
desired color scales, indices, and differences.
To change measurement procedure, select WORKSPACE > READ OPTIONS.
To add tolerances, select WORKSPACE > STANDARDS & TOLERANCES.
To select the view screens, go to WORKSPACE > VIEWS. To configure each view screen, click
VIEW OPTIONS in the toolbar.
▪ Now your instrument is ready to read your product under this new workspace. If
you’d like to start a new job for this product, you can press NEW JOB and load this
configured workspace to continue.
Read Sample
• Prepare Sample: Place the sample at the port. The QUICK VIEW icon on the toolbar
can be used to assist to position your sample.
Note: QUICK VIEW does not save image. If you want to save image for each
measurement, please enable Image Viewer under WORKSPACE > READ OPTIONS and
VIEW OPTIONS > IMAGE VIEWER.
• Use the READ MEASUREMENT button to read samples.
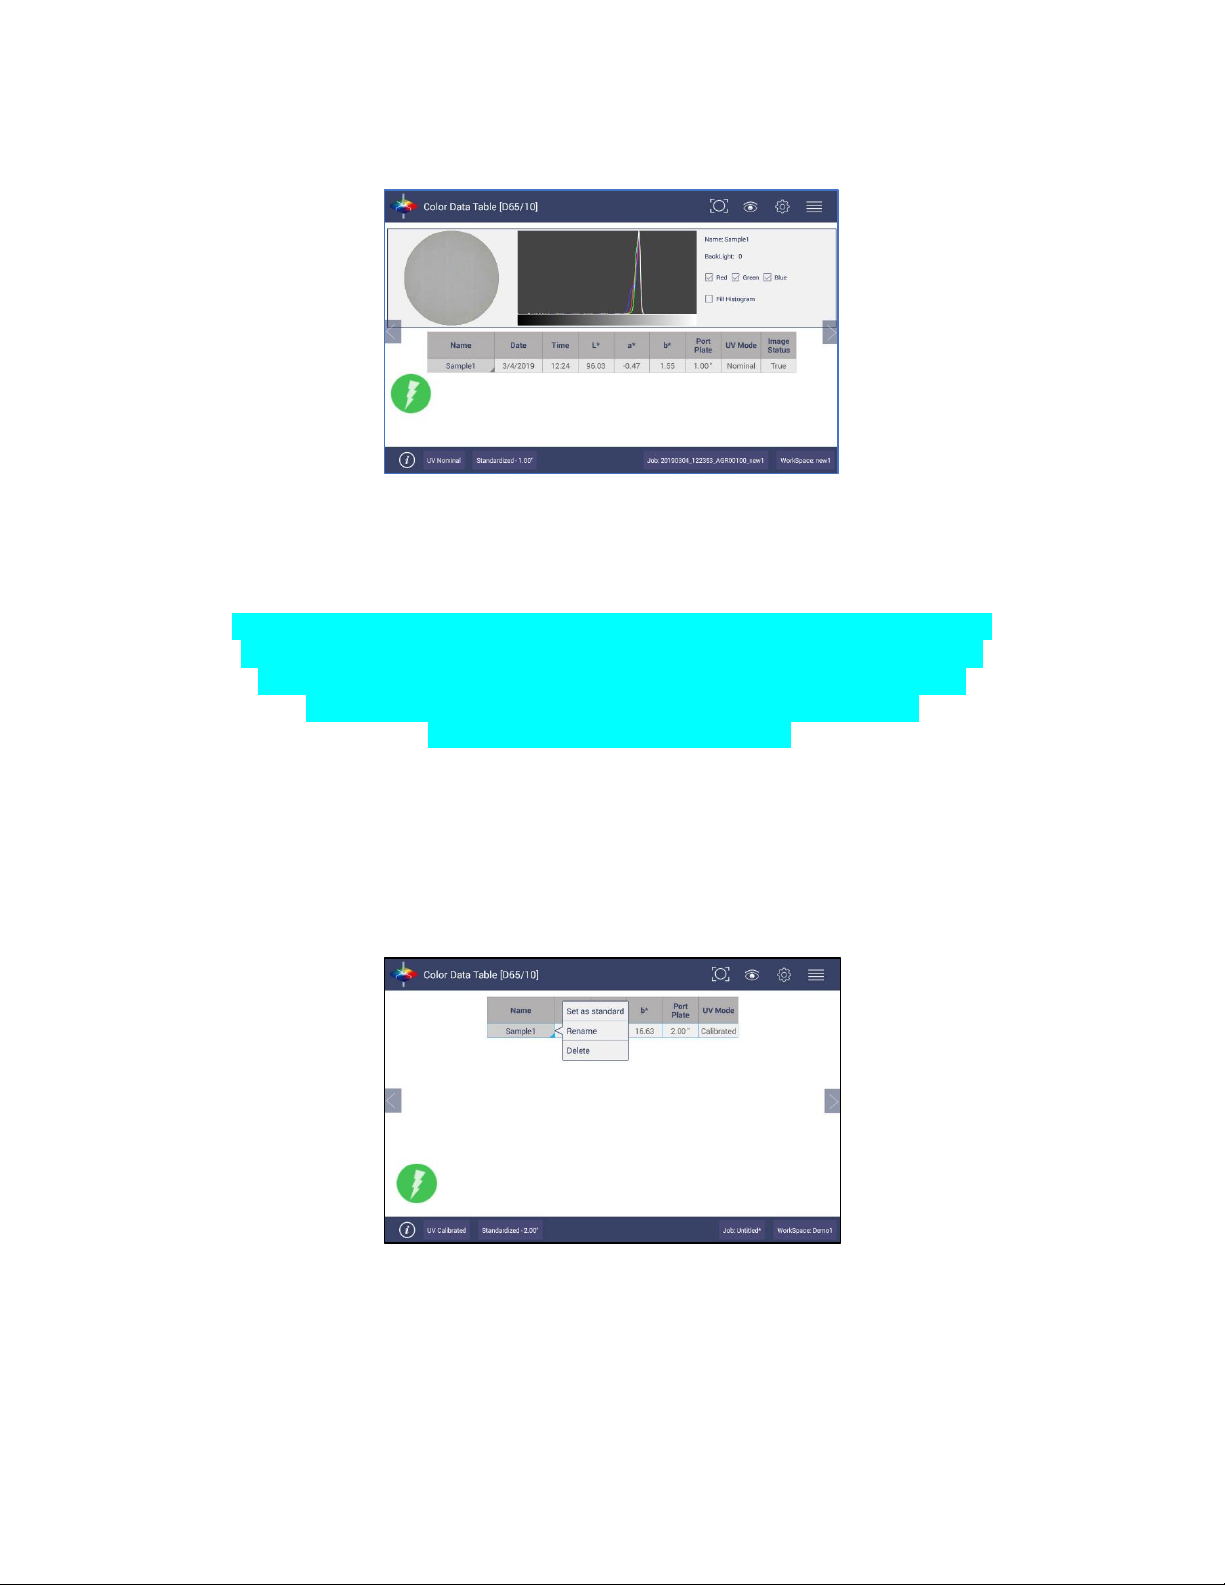
• If IMAGE VIEWER is enabled, the camera preview dialog will be prompted before color
measurement. Click CAPTURE to save the image and CONTINUE to measure color. To view
the sample image in Color Data Table and/or EZ view, please use VIEW OPTIONS > IMAGE
VIEW.
Page 17
User’s Manual for Agera and EasyMatch Essentials v 1.0
17
Figure 10. Image View with CDT
• Main Measurement Screen: The Color Data Table view shows the configured Color Scale
results for the standard and sample measurements in the job. The configured tolerances can
be applied to the Job and Pass/Fail results will also be displayed.
Note: Agera includes a built-in 60-degree gloss meter with a single LED illumination
(filtered to C/2)/detector pair in conformance with ASTM D523 and located right
below the sample port plate. Gloss is measured for each sample and standard
measurement. To show the Gloss value, please select Gloss index in
WORKSPACE > COLOR SCALES > INDICES.
• To output data, select the JOBS icon from the upper right corner. Under Jobs, data can be
saved, sent to a printer, emailed to the network or exported to a flash drive.
• A long press on the Sample name will show a menu with the following options:
▪ SET AS STANDARD – to set the sample as Standard
▪ RENAME – to rename the sample
▪ DELETE – to delete the sample.
Figure 11. Changing, Renaming or Deleting a Sample
Page 18
User’s Manual for Agera and EasyMatch Essentials v 1.0
18
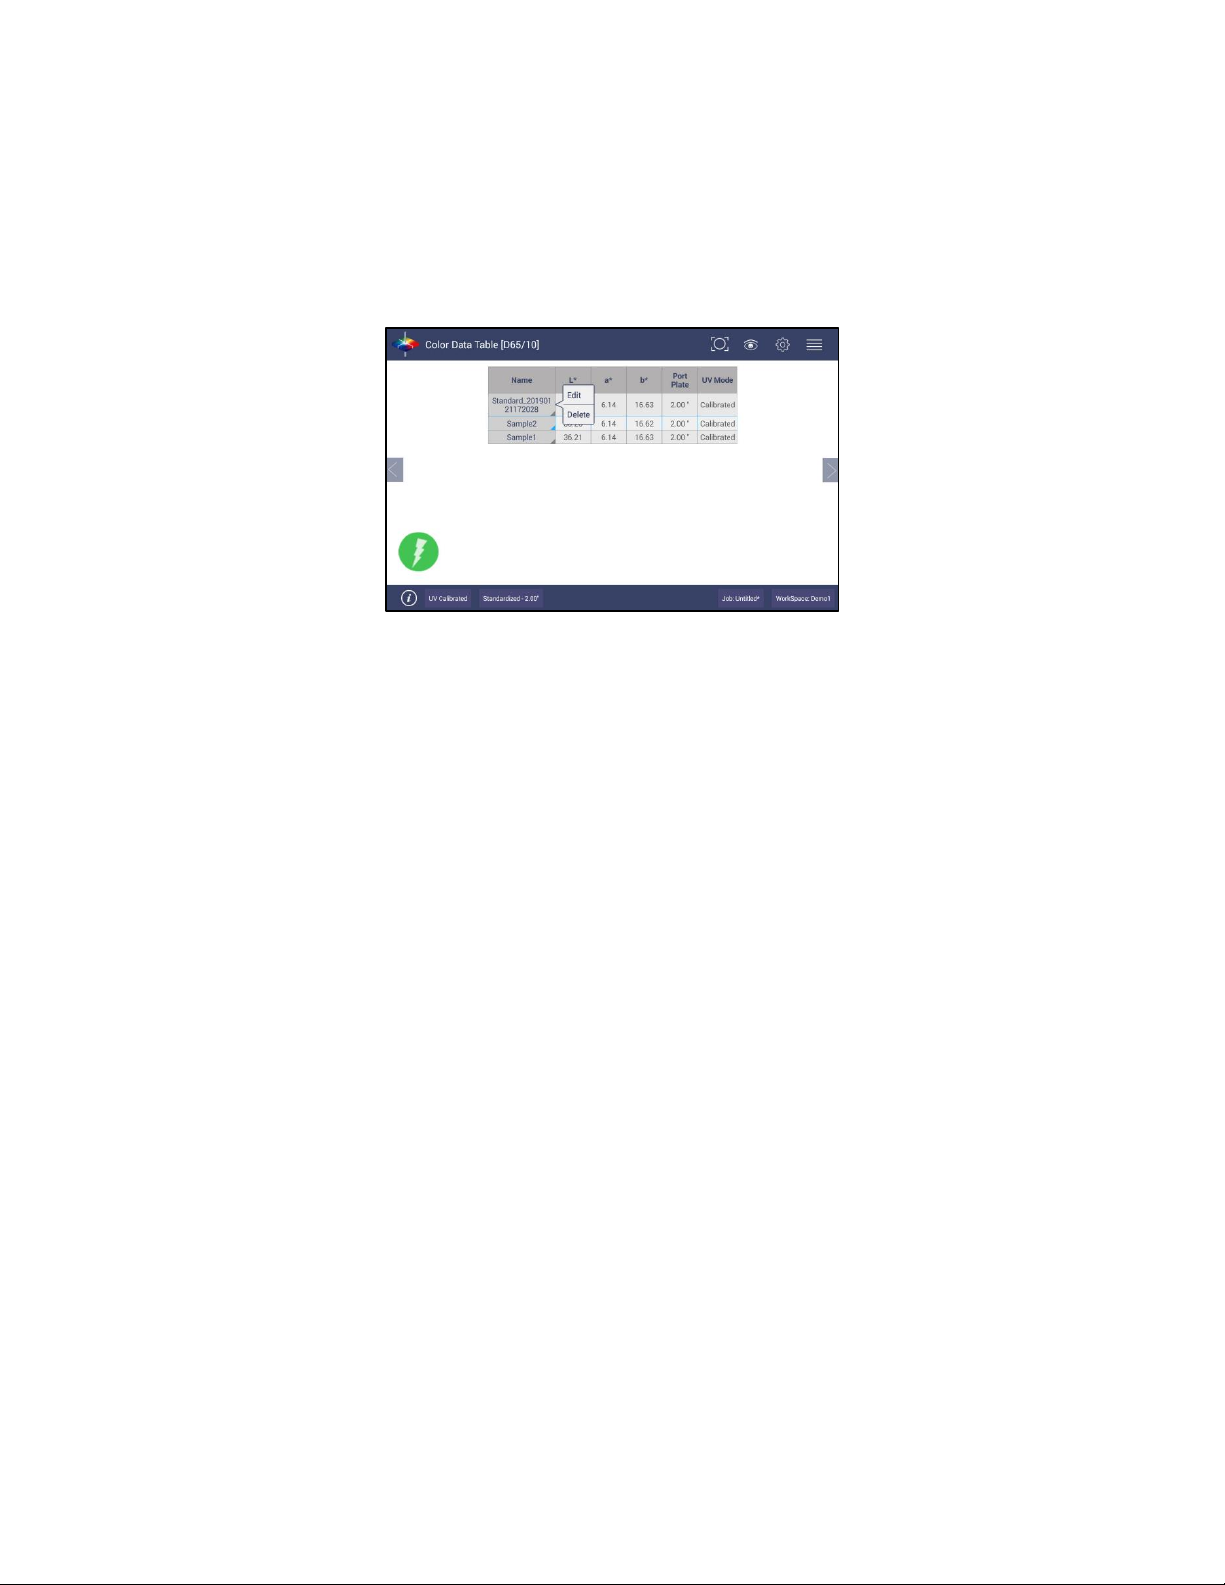
• A long press on the Standard name will show a menu with the following options:
▪ EDIT – to edit the standard. If Edit is selected, the WORKSPACE > STANDARD AND
TOLERANCES dialog box is presented to allow for editing the name, assigning
tolerances or changing the type of standard.
▪ DELETE – to delete the standard. The deleted Standard is reverted into the samples
list with its original name.
Figure 12. Edit/Delete a Standard
Page 19
User’s Manual for Agera and EasyMatch Essentials v 1.0
19
Tool Bar: Jobs Function
Jobs Icon
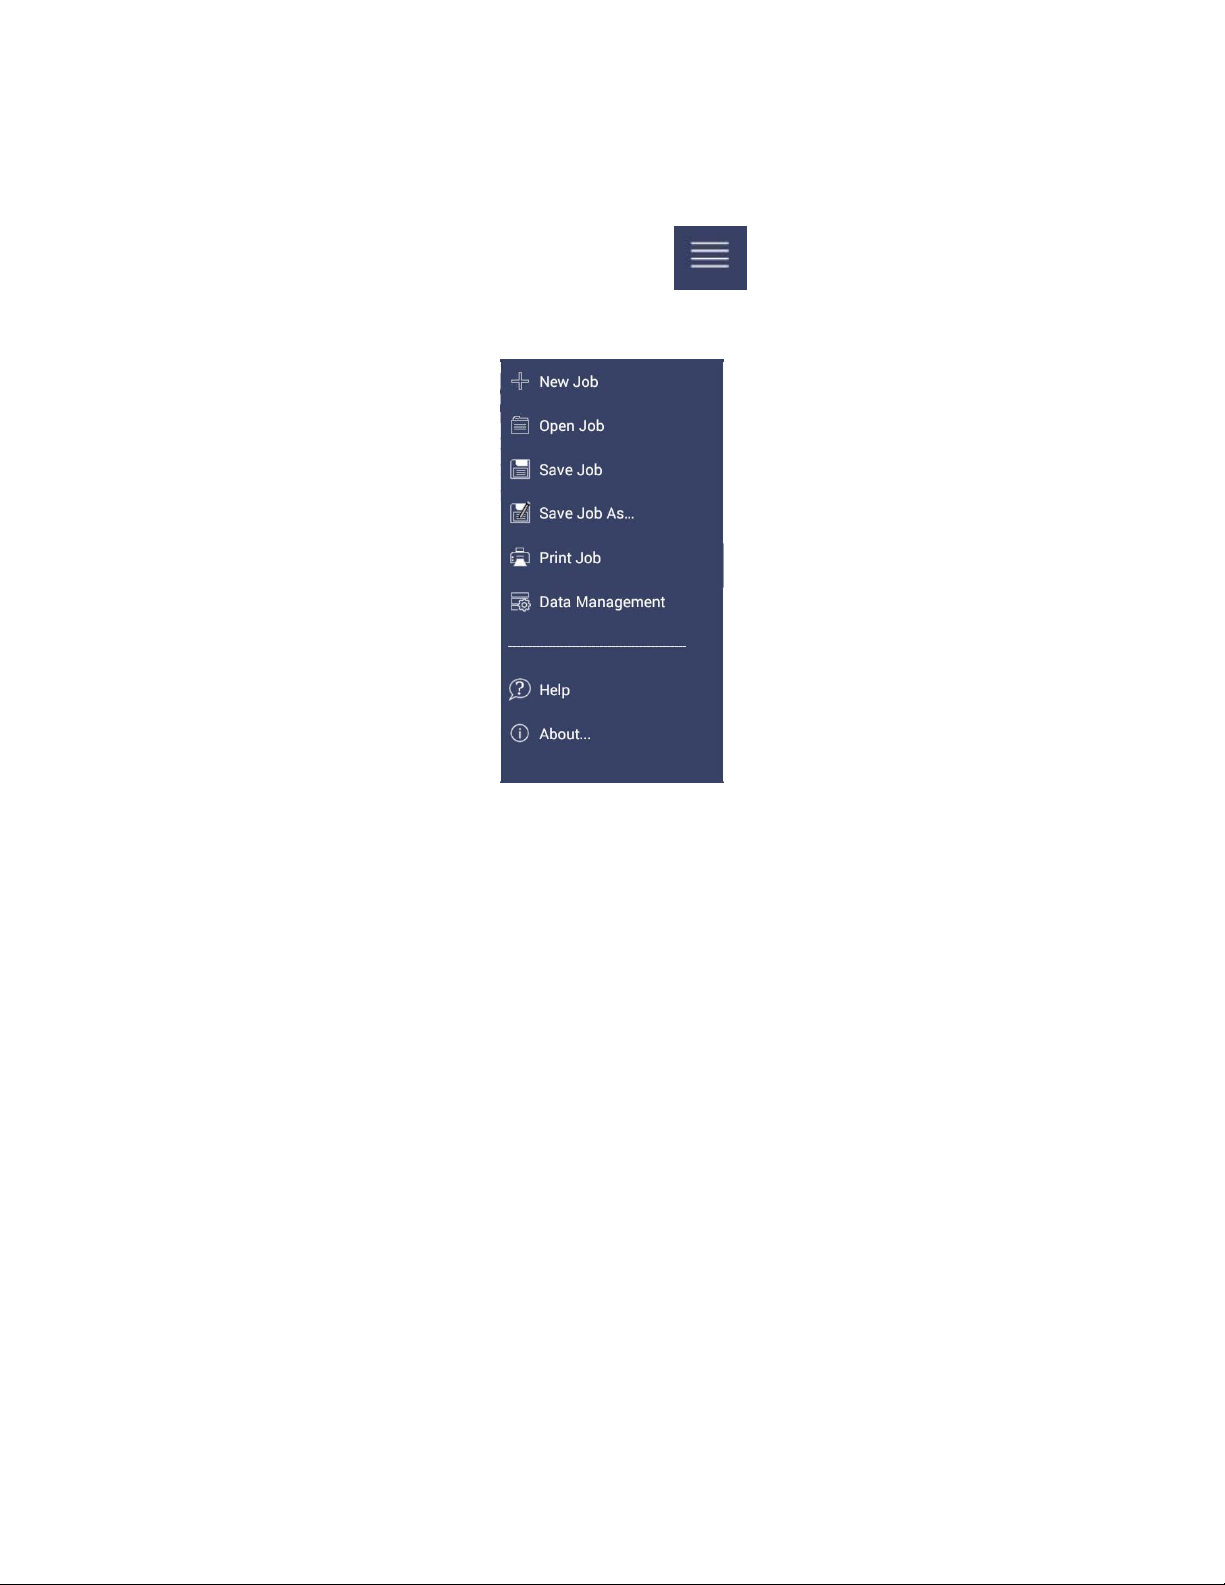
Under the Job function, the following tasks can be accomplished:
Figure 13. Job Menu
Jobs
Jobs vs. Workspace: A job consists of samples measured according to a specific workspace. A workspace
is a template with measurement conditions such as standard & tolerances, color scale, index, illuminant,
etc. There can be only one workspace associated with a job. The main tool bar provides the options to
create a new job, open an existing job and save a job.
Jobs > New
• When click NEW JOB (Shortcut: press Workspace name in the lower right status bar), the
Load Workspace dialog will pop out. The default selected workspace is the current
workspace. User can change the workspace and click LOAD. Then the selected Workspace is
opened in the NEW JOB. Once the Workspace has been loaded to the New Job, the
Workspace name associated with this job cannot be edited.
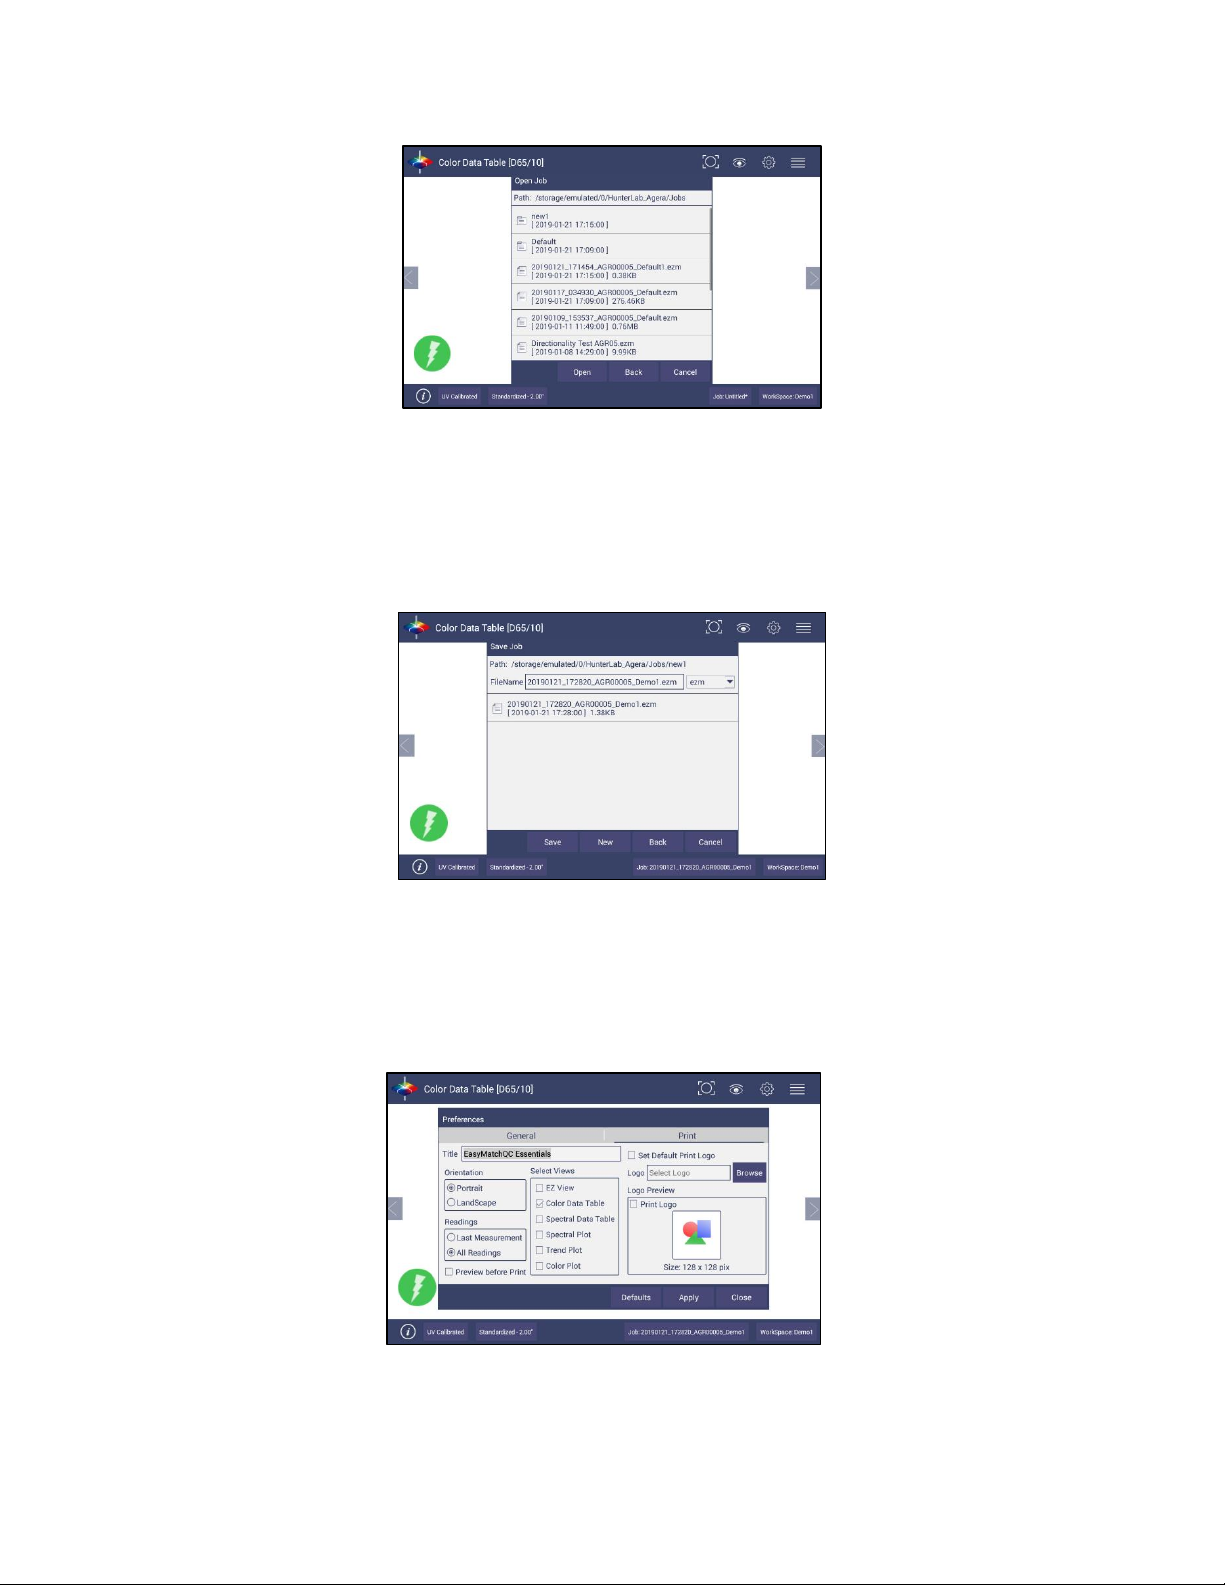
Jobs > Open
• OPEN a saved Job: A list of available jobs under the current path are displayed for selection.
If the job that is needed exists in another folder, then it is an option to change the folder.
When the job to be opened is displayed select the file and press OPEN.
• Shortcut: press job name in the status bar on the lower right.
Page 20
User’s Manual for Agera and EasyMatch Essentials v 1.0
20
Figure 14. Open A Job
Jobs > Save & Save As
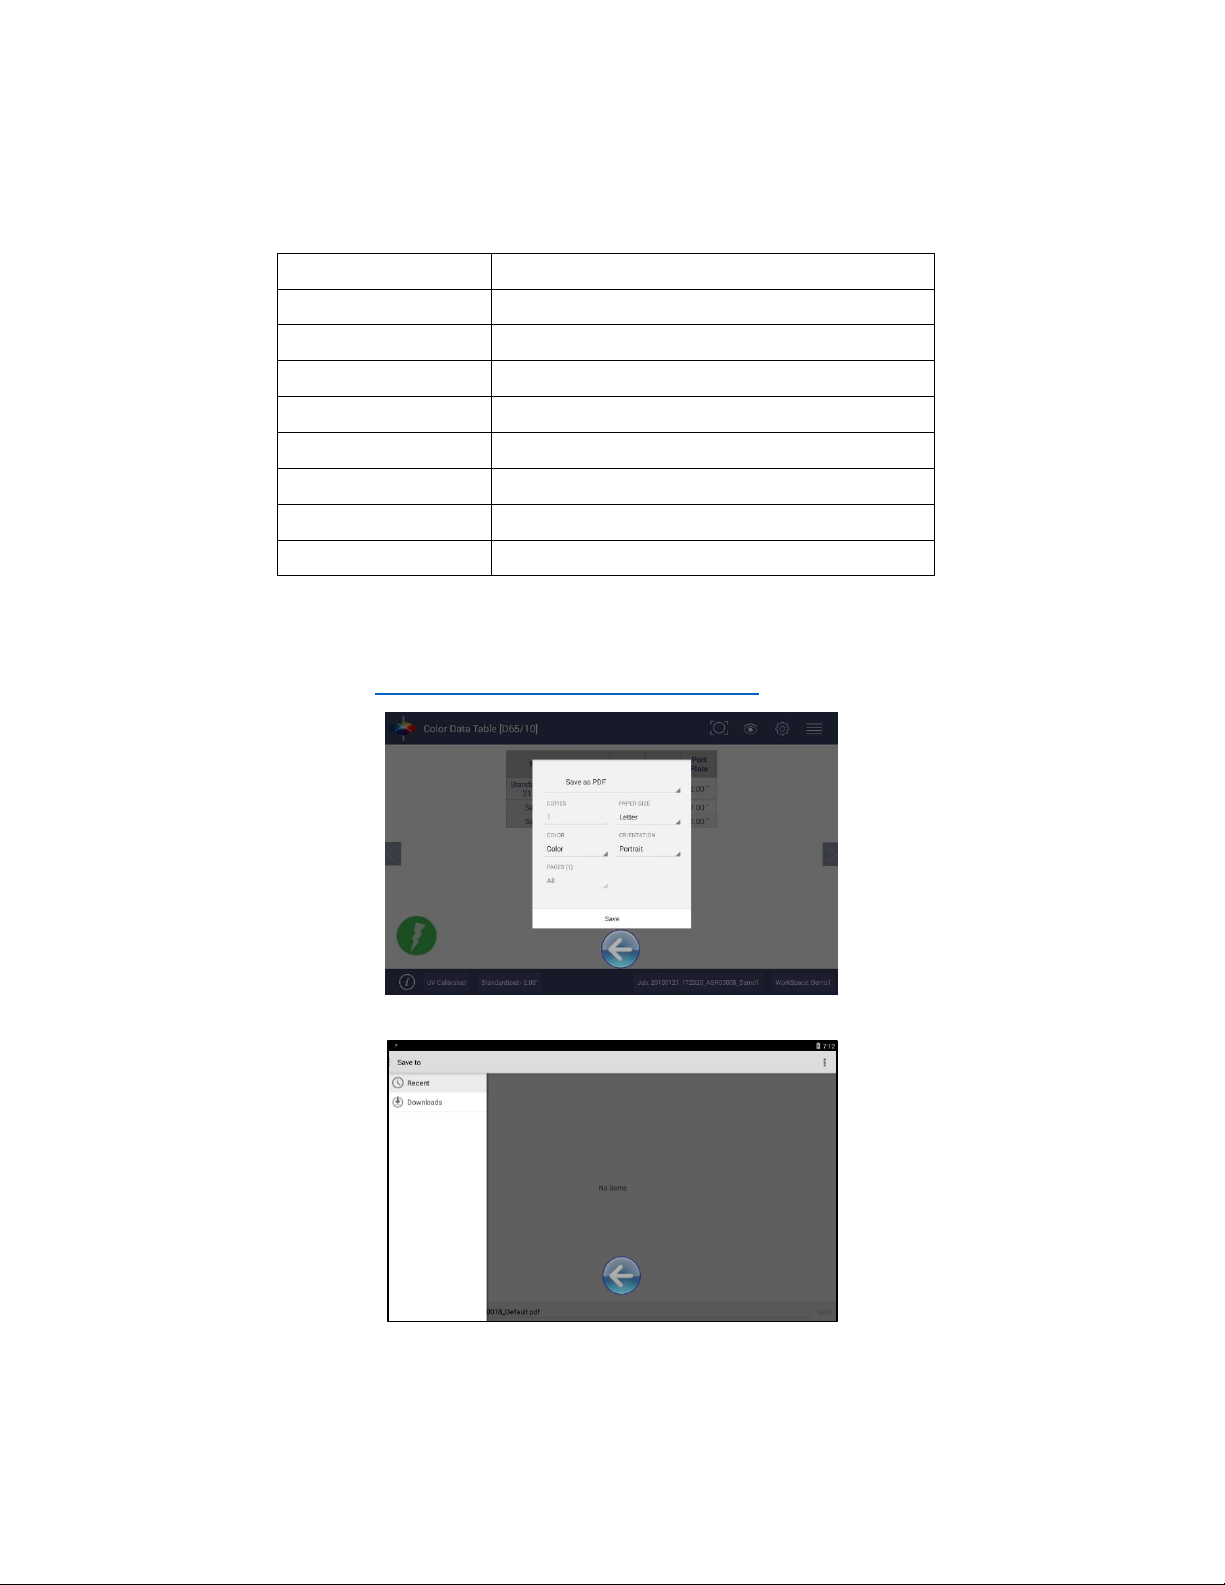
• SAVE the Job under the desired name: To save a job, select the folder, name the Job and
save the Job contents into a file. These files have an ‘.ezm’ extension. There will be a default
name filled in Filename box as date&time&instrument#&workspace. You can edit it if
needed.
Figure 15. Save A Job
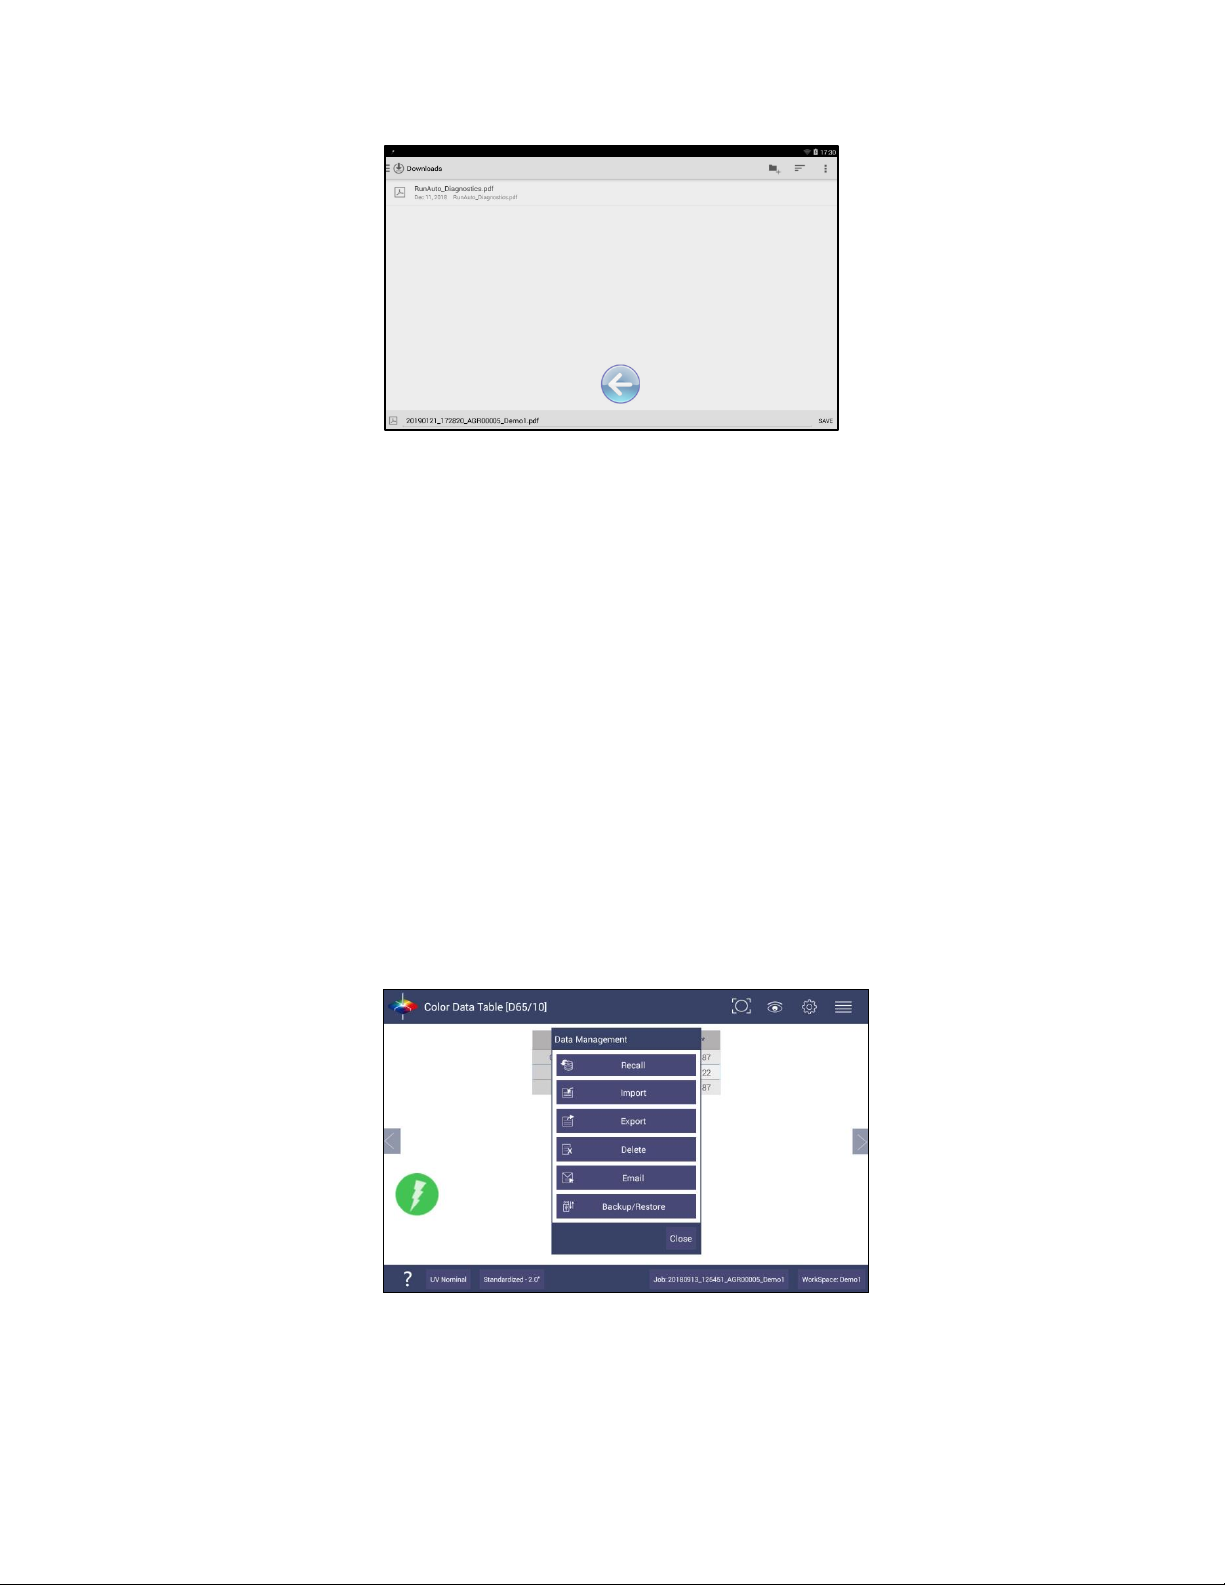
Jobs > Print
• PRINT an open Job using the parameters set up under WORKSPACE & SYSTEMS SETTINGS >
PREFERENCES. For Agera, if the user selects the Color Data Table, then the saved images will
also be printed.
Figure 16. Workspace & System Settings > Preferences > Print
Page 21
User’s Manual for Agera and EasyMatch Essentials v 1.0
21
• Drivers included in the Agera are shown below. Additional printer drivers can be added under
WORKSPACE > DIAGNOSTICS > ADVANCED.
Table 2: Printer Drivers Included
Printer
Driver
Canon
Canon Print Service 4.4+
HP
HP Print Service Plugin 4.1+
Epson
Epson Print Enabler 4.4+
Konica Minolta
Konica Minolta Print Service Plugin 4.4+
Kyocera
Kyocera Print Service Plugin 4.4+
Lexmark
Lexmark Print Service Plugin 4.4+
Sharp
Sharp Print Service Plugin 4.4+
Xerox
Xerox Print Service Plugin 4.4+
• Printing can be downloaded to a pdf file by selecting, SAVE AS PDF. Once this is selected, the
parameters for the output are presented. Please save the file to the download folder. To access
these files, see DATA MANAGEMENT > EXPORT > OTHERS.
Figure 17. Save as PDF
Figure 18. Save PDF to Downloads File
Page 22
User’s Manual for Agera and EasyMatch Essentials v 1.0
22
Figure 19. Download File Contents
Jobs > Data Management
Standard(s) and sample measurements are saved in Job files and database along with the sensor
information. The saved measurements are also associated with a respective Workspace and Job.
• The Data Management contains the features to Recall, Import, Export, Email a Job and
Backup/Restore.
▪ RECALL the measurements from the database.
▪ IMPORT a selected Job(s), Standard(s), Workspace(s)Diagnostics, photos for logo
print setup and others from a USB flash drive.
▪ EXPORT the Job(s), Standard(s), Workspace(s), Diagnostics, pdf reports and others to
a USB flash drive.
▪ EMAIL the selected Job(s), pdf reports and other files.
▪ DELETE Job(s), Standard(s), Workspace(s), Diagnostics, pdf reports and others.
▪ BACKUP the HunterLab folder (all jobs, database and user manager settings) into a
USB Flash drive.
▪ RESTORE the HunterLab folder (all jobs, database and user manager settings) from a
USB Flash drive.
Figure 20. Data Management Menu
Page 23
User’s Manual for Agera and EasyMatch Essentials v 1.0
23
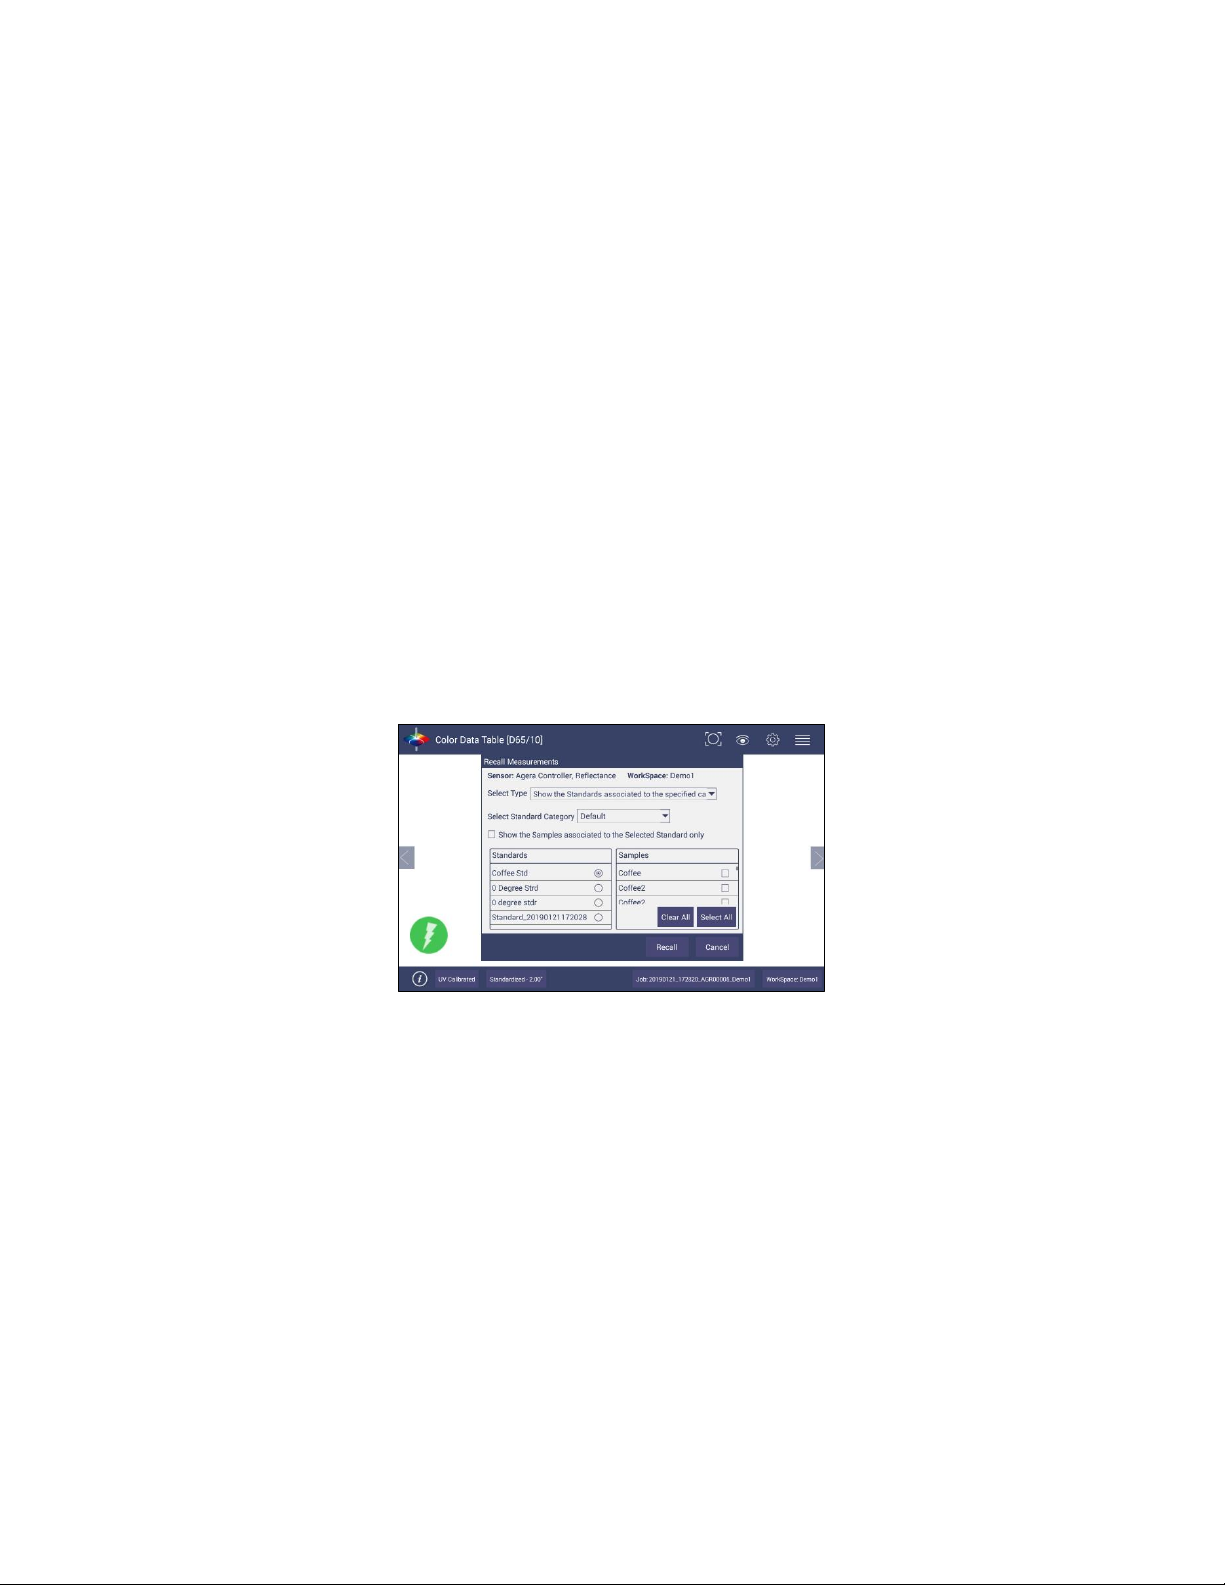
• JOBS > DATA MANAGEMENT > RECALL
Recall measurements that have been stored to a job.
This feature enables the user to recall the Standard/Sample(s) stored in the Database into
the current running Job.
Click RECALL option in Data Management. A dialog will be displayed where the user can
recall the measurements from the database by SELECTING THE TYPE:
▪ SHOW THE STANDARD ASSOCIATED WITH A SPECIFIED CATEGORY
▪ SHOW ALL THE MEASUREMENTS IN THE SELECTED JOB
When this option is selected, the standard and samples for that job are listed.
▪ SHOW THE STANDARDS/SAMPLES IN THE CURRENT WORKSPACE
When this option is selected, the list is filled with the standards and samples
associated with the current workspace. To narrow the sample list, the user can
select the samples only associated with the selected standard.
▪ SHOW THE IMPORTED STANDARDS
When this option is selected, the standards list is only filled with the standards
imported into the database.
After selecting the measurements click RECALL placing them into the active Job.
Figure 21. Recall Measurements
• JOBS > DATA MANAGEMENT > IMPORT
This feature allows the user to import the below data from a USB flash drive into the
instrument. Data can be one file or multiple files. All selected files should be in the same file
path location. The following data can be imported:
▪ Job
▪ Standard
▪ Workspace
▪ Diagnostics
▪ Others
Page 24
User’s Manual for Agera and EasyMatch Essentials v 1.0
24
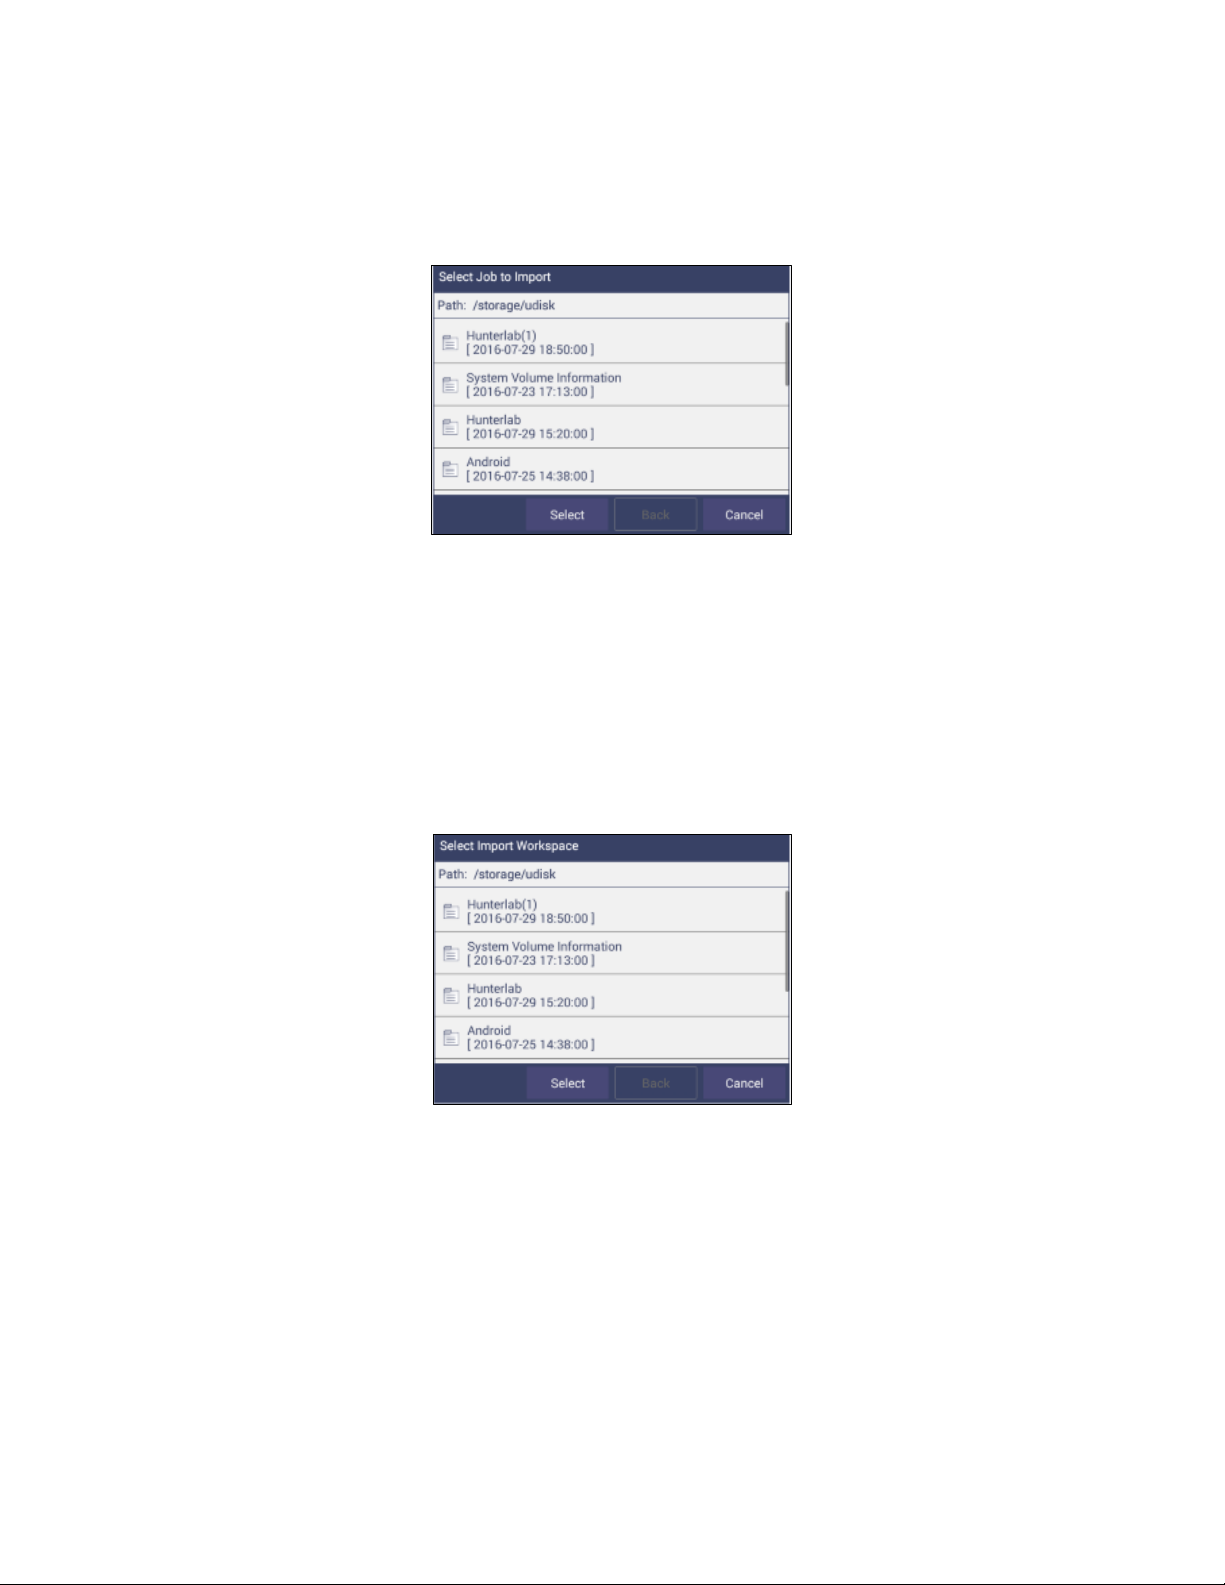
▪ IMPORT JOB
This option allows the user to browse and select a Job file(s) (.ezm) from the USB
flash drive and import into the instrument. If a file name already exists, then the
name will be incremented numerically.
Figure 22. Import Job
▪ IMPORT STANDARD
This option allows the user to browse and select a Standard(s) (extension .std) from
the USB flash drive and import into the database. If required, the Standard Name
can be changed.
▪ IMPORT WORKSPACE
This option allows the user to browse and select a Workspace(s) (extension .wsp)
from the USB flash drive and import into the database. If the workspace already
exists, then the user is prompted to specify a different name.
Figure 23. Import Workspace
To use the above functions, a USB flash drive must be present in the port.
▪ IMPORT DIAGNOSTICS: This option allows the user to browse and select a
Diagnostics file from the USB flash drive for import into the instrument database.
▪ IMPORT OTHERS: This function is available to import other items such as a logo for
the printed report. Once the logo is imported, go to WORKSPACE & SYSTEM
SETTINGS > PREFERENCES > PRINT to add the logo to a report.
Page 25
User’s Manual for Agera and EasyMatch Essentials v 1.0
25
• JOBS > DATA MANAGEMENT > EXPORT. This feature allows the user to export the below data
from instrument into a USB flash drive. Data can be one file or multiple files. All selected files
should be in the same file path location. The following data can be exported:
▪ Job
▪ Standard
▪ Workspace
▪ Diagnostics
▪ Others (e.g all files in Hunterlab folder, and all pdf reports in Download folder)
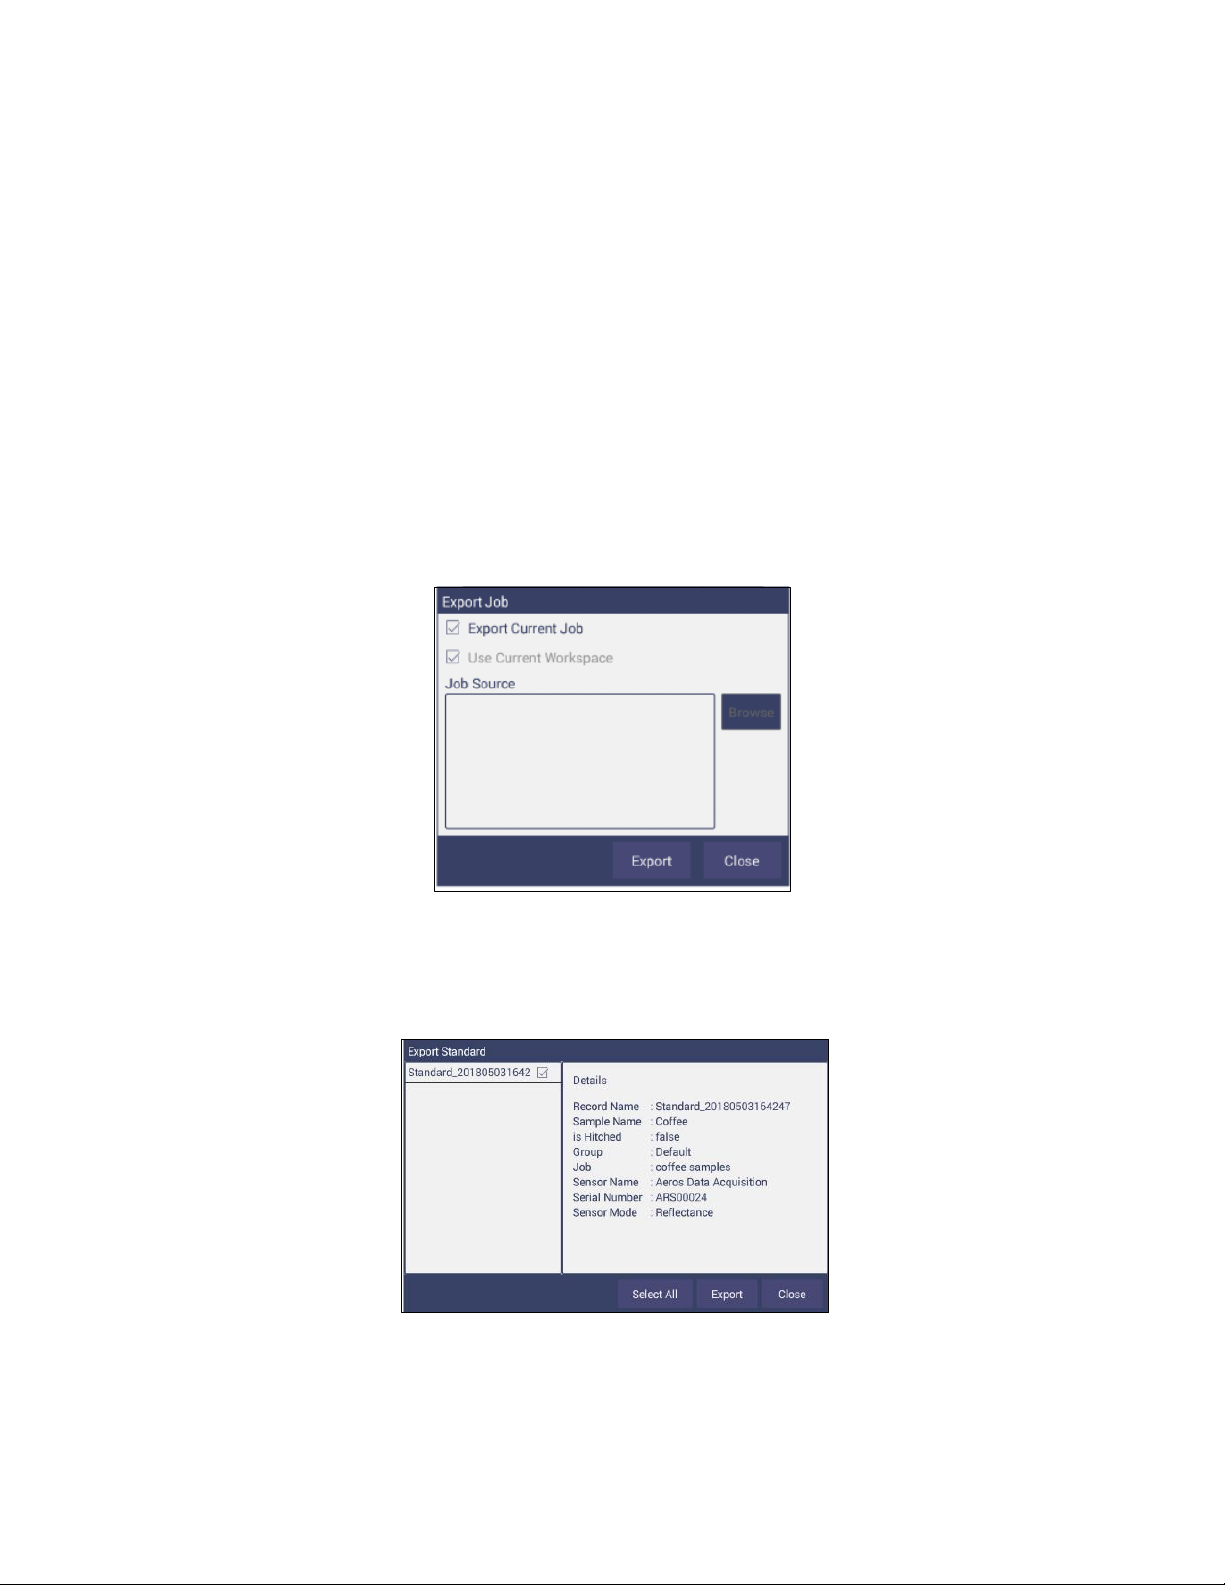
▪ EXPORT JOB: This option allows the user to browse and select an existing Job(s)
(.ezm) or the current active Job data and copy into a USB flash drive either in CSV or
EZM file format. While exporting into EZM format, the current active Workspace
settings can be applied. The color data shown in the Color Data View and the
Spectral Data is saved in a CSV file.
Figure 24. Export Current Job
▪ EXPORT STANDARD
This option allows the user to browse and select an existing Standard(s) in the
database and copy into the USB flash drive as a file (.std).
Figure 25. Export Standard
Page 26
User’s Manual for Agera and EasyMatch Essentials v 1.0
26
▪ EXPORT WORKSPACE
This option allows the user to browse and select an existing Workspace(s) in the
database and copy into the USB flash drive as a file (.wsp). To use the above functions,
a USB flash drive must be present in the port.
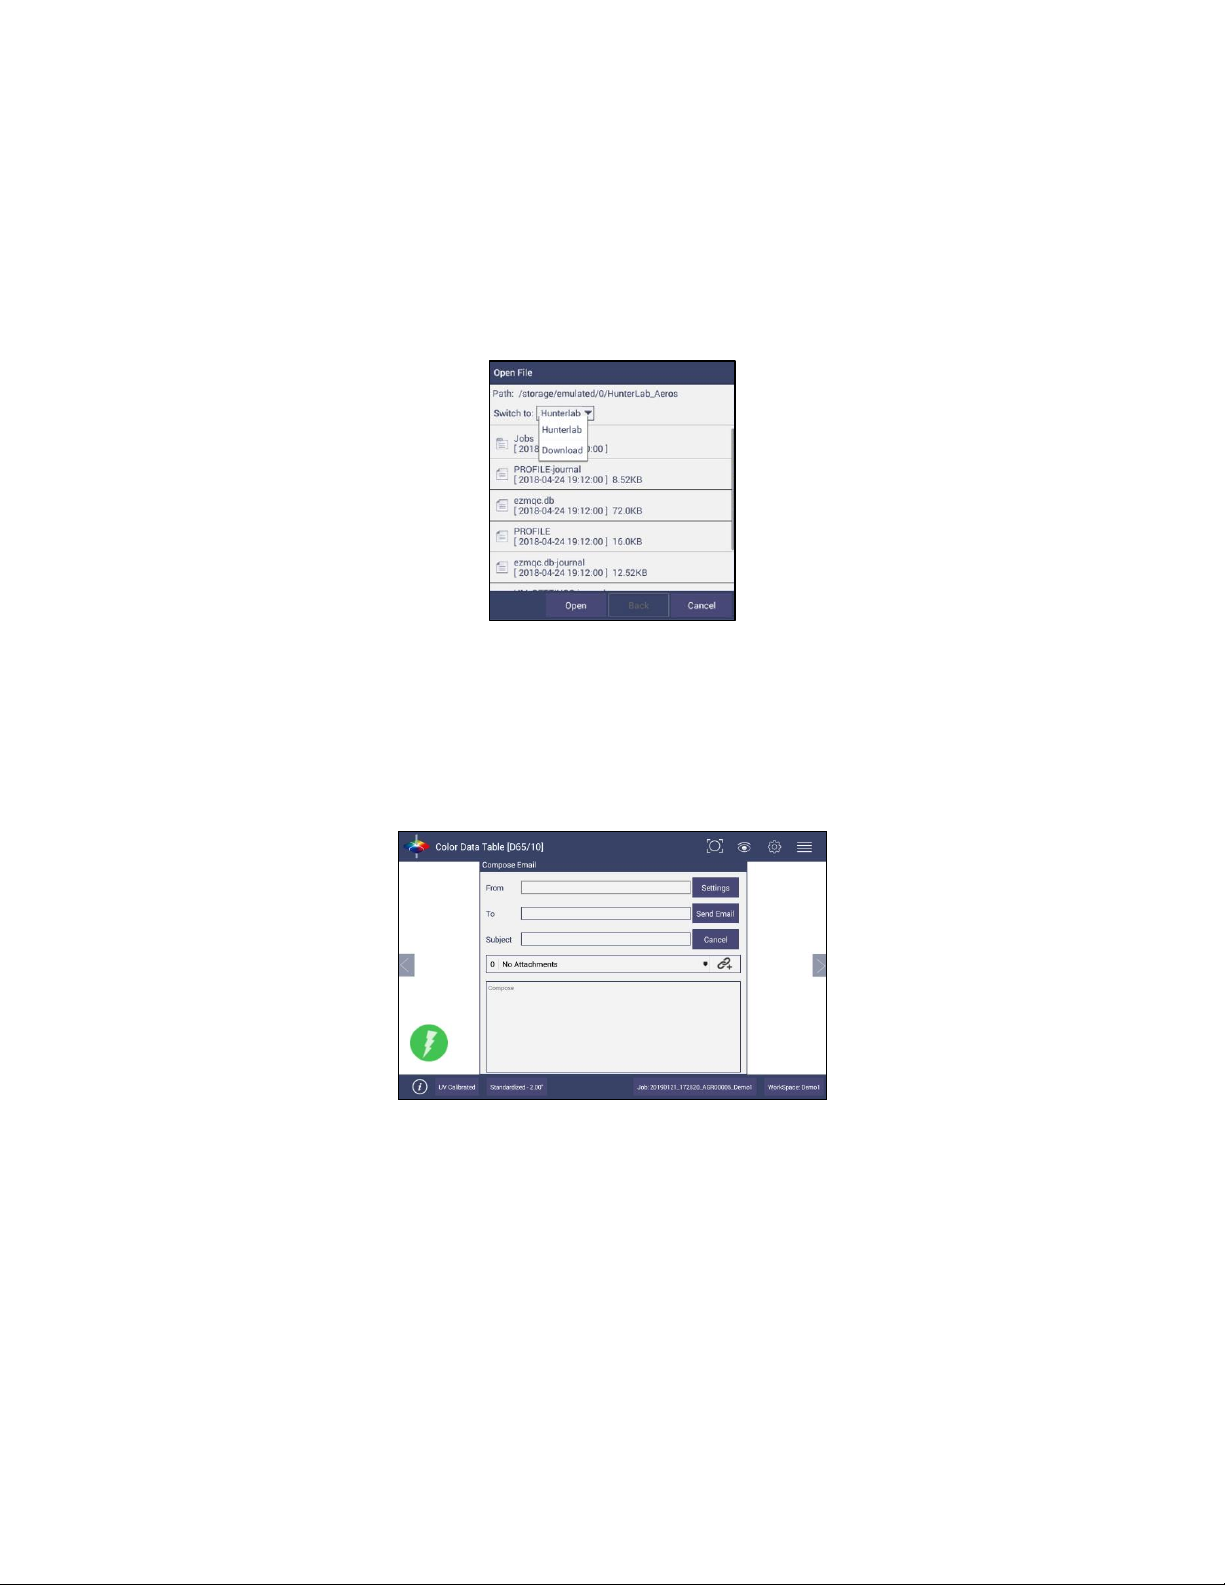
▪ EXPORT PDF
This allows the user to select a PDF file from the Downloads folder to export. Switch
to the Download folder in the dropdown list and then select the pdf files to export.
Figure 26. Select Download Folder for PDF File Export
• JOBS > DATA MANAGEMENT > EMAIL. Saved Jobs can be emailed if there is an active
internet connection. When the EMAIL option is clicked, the following screen is shown
prompting the user to browse and select a user and enter the recipient mail address. Data
can be one file or multiple files. All selected files for one email should be in the same file
path location. You can email any file in HunterLab folder as well as in the downloads folder.
Figure 27. Enter an Address to Email a Job
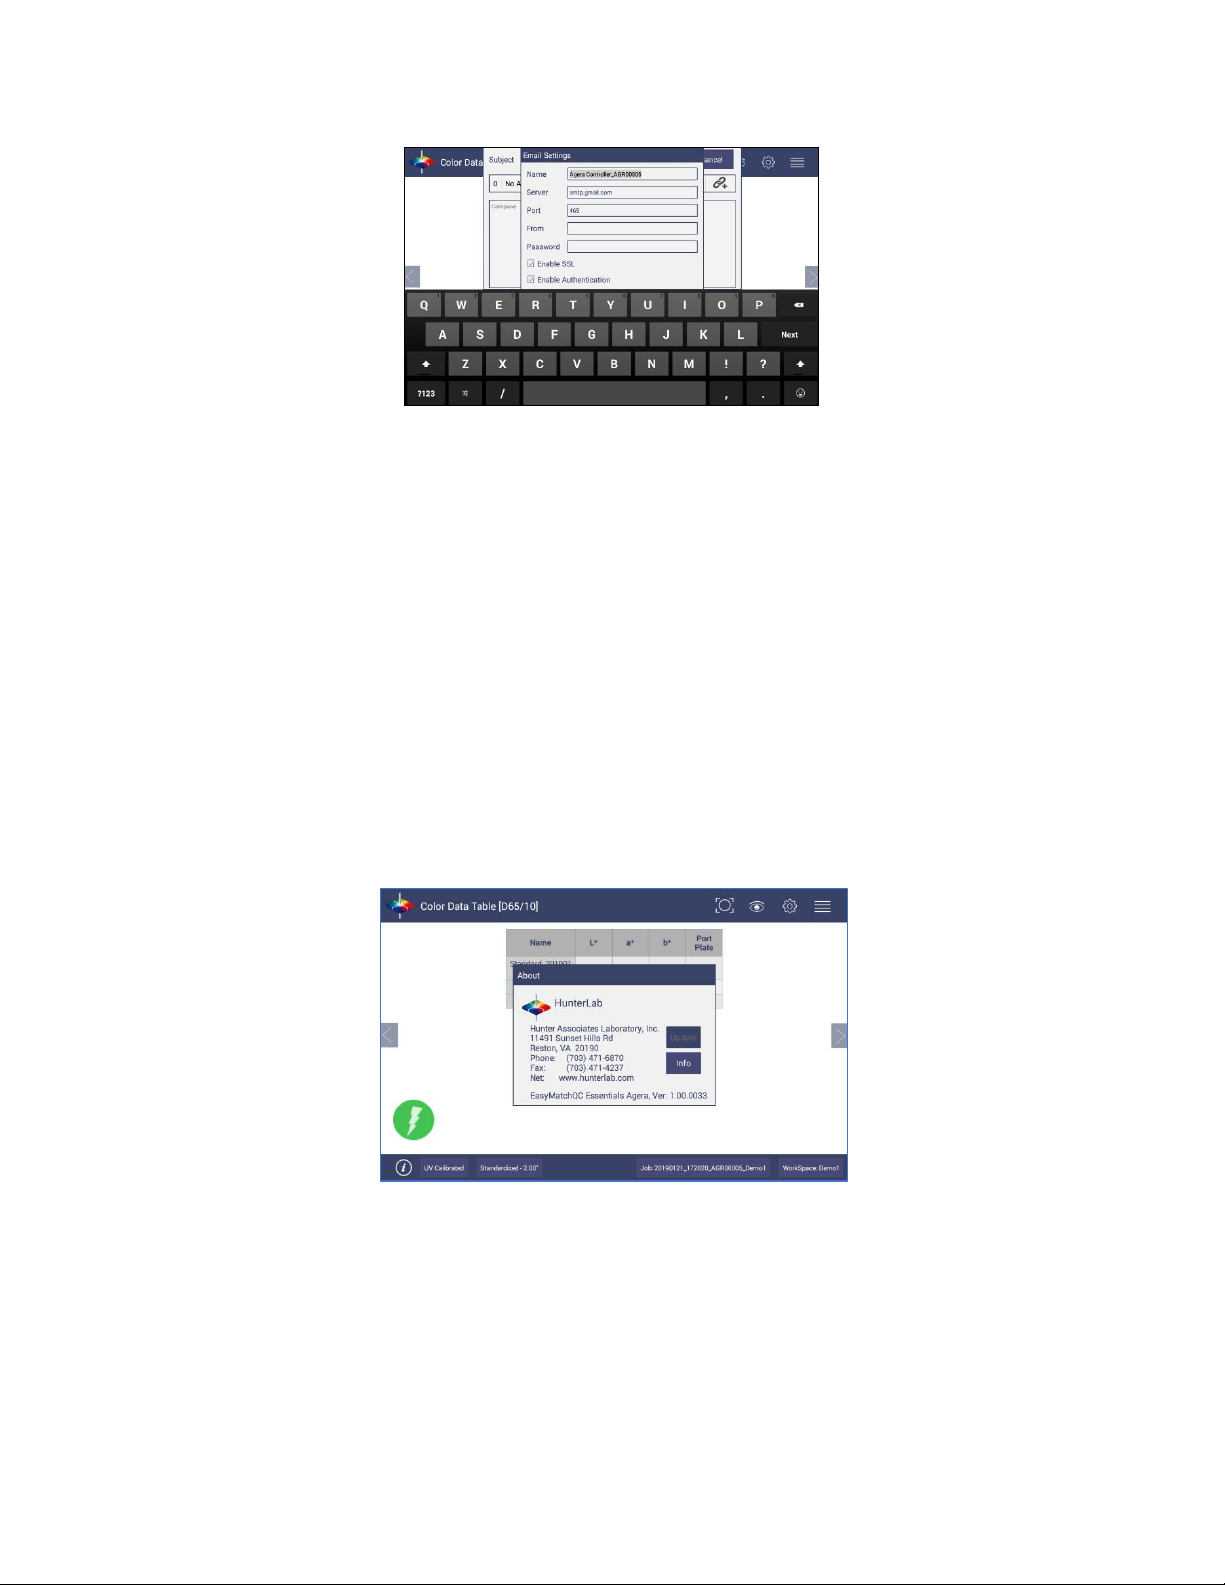
▪ MAIL SETTINGS
Click MAIL SETTINGS button to configure the SMTP mail server configuration (Port,
Server) as shown below. The mail settings configuration is mandatory to enable the
mail job feature in the application. When done, press SEND.
Page 27
User’s Manual for Agera and EasyMatch Essentials v 1.0
27
Figure 28. Enter SMTP Mail Server Information
• JOBS > DATA MANAGEMENT > DELETE. The Delete function will allow deletion of Jobs,
Standards, Workspace, Diagnostics and others. Data can be one file or multiple files. All
selected files must be in the same file path location. In addition, one can delete PDF files
from the Downloads folder.
• JOBS > DATA MANAGEMENT > BACKUP/RESTORE. The Backup function will copy the entire
HunterLab folder to a thumb drive. Restore enables the user to copy the backup folder of a
thumb drive and upload to the Agera.
Jobs > Help
To access the onboard manual, use JOBS > HELP. Novice Help can also be enabled under
PREFERENCES > GENERAL.
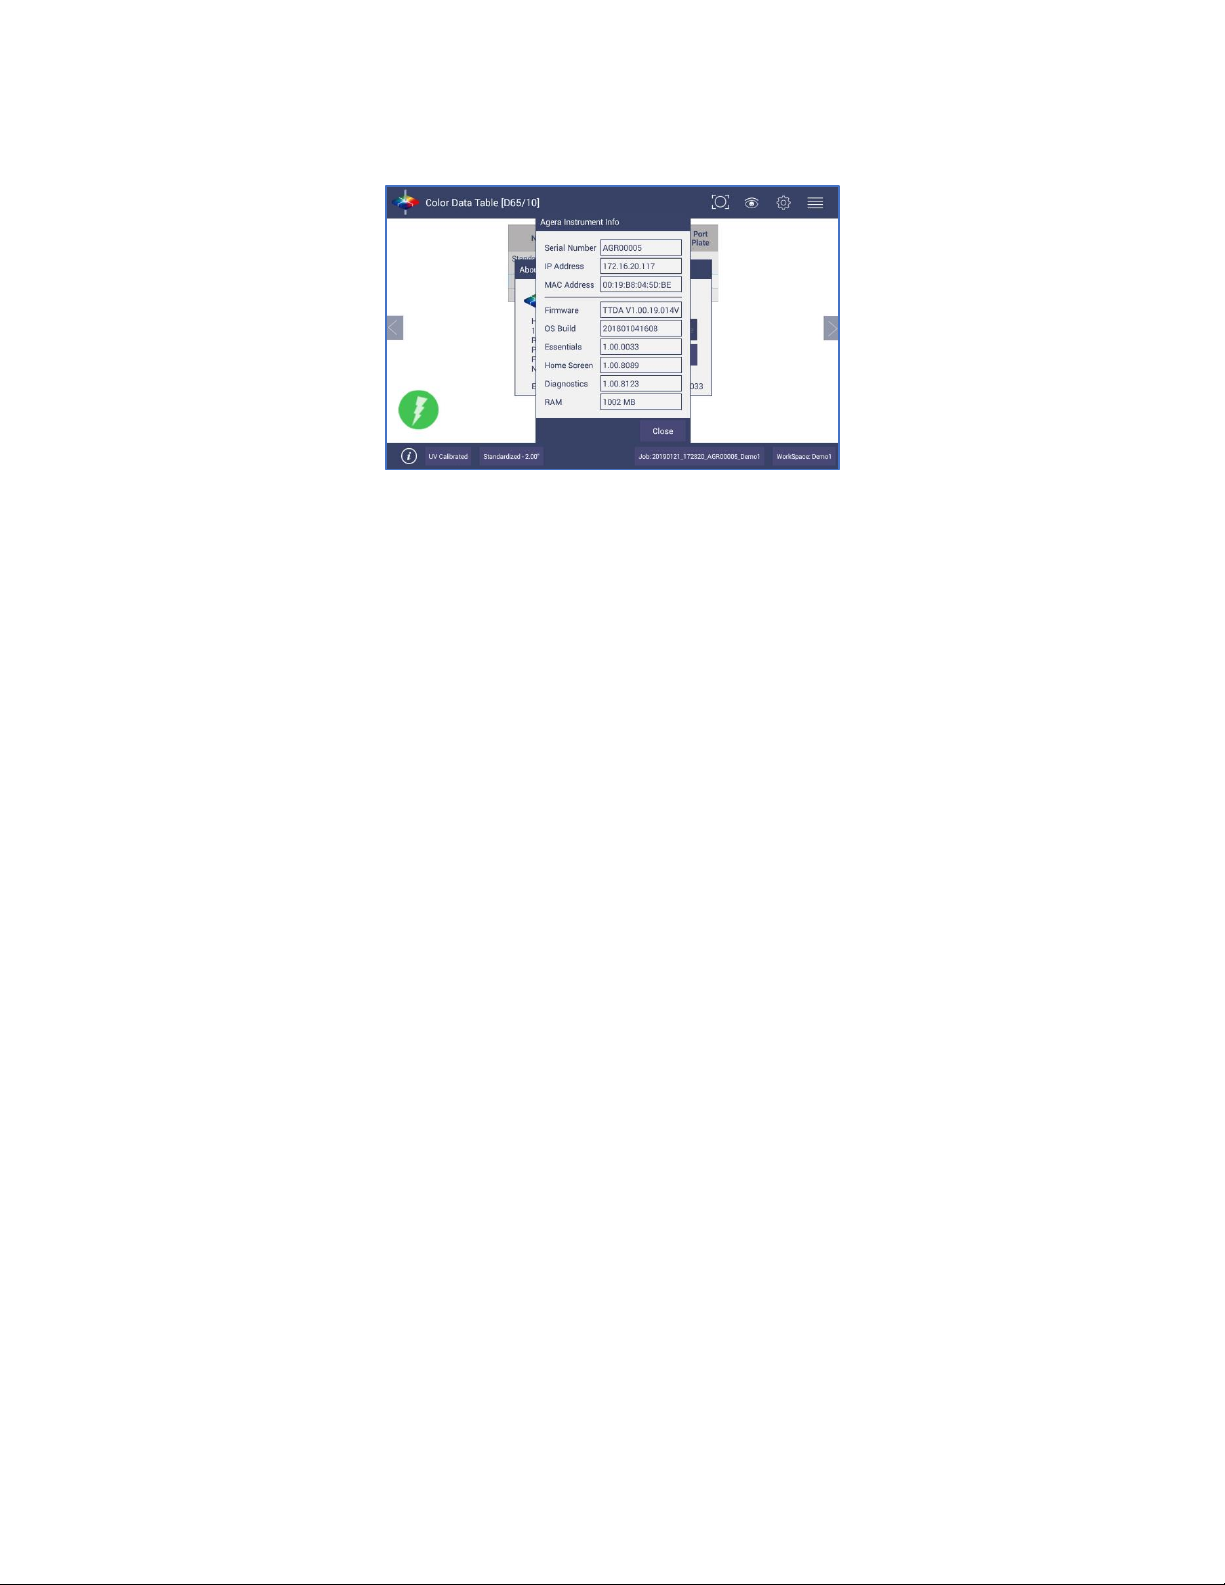
Jobs > About
The ABOUT menu provides information about HunterLab and the current software version.
Figure 29. Job > About the Software
To update the software version from a USB flash drive, insert the USB flash drive into the port on the
front of the instrument. Open the JOBS > ABOUT menu and press UPDATE to continue. After update,
open Essentials and it will prompt to enter or create an Administrator Account. If needed, you can edit
this account in User Manager later.
Page 28
User’s Manual for Agera and EasyMatch Essentials v 1.0
28
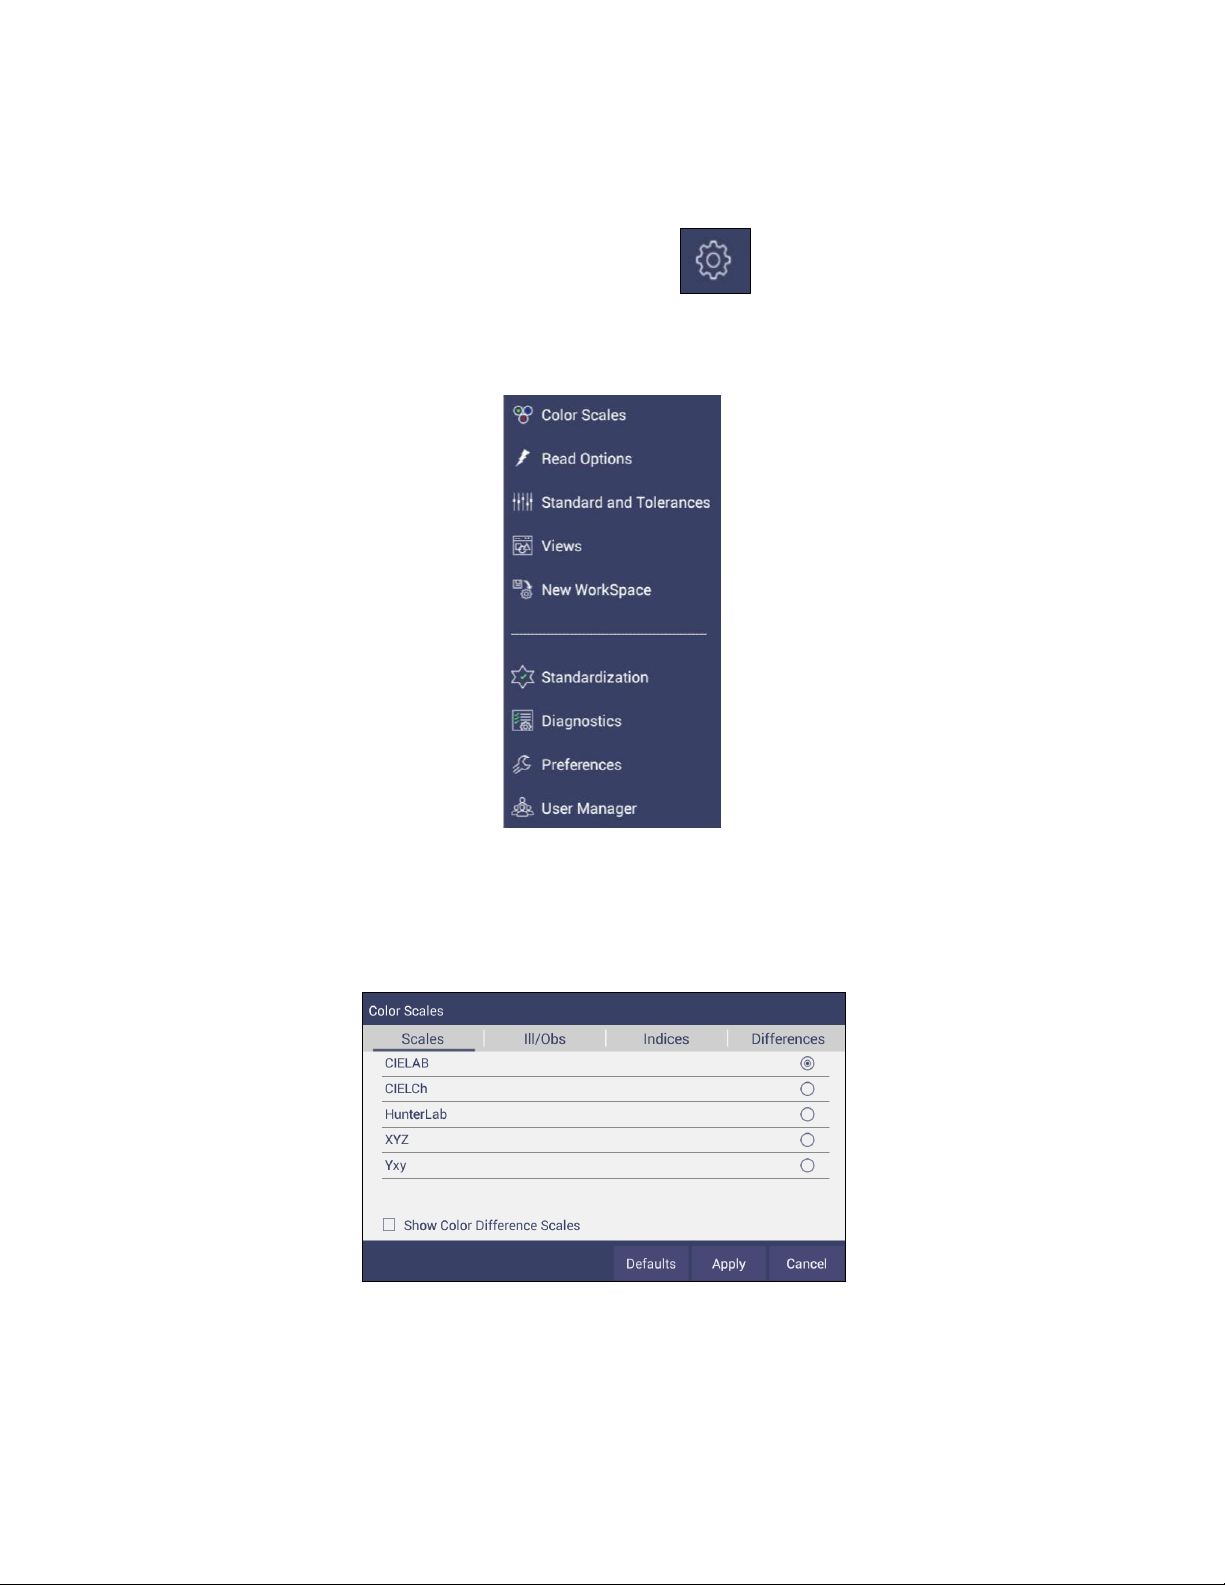
For detailed information on firmware and more, please press the INFO button on the screen.
Figure 30. Instrument Info
Page 29
User’s Manual for Agera and EasyMatch Essentials v 1.0
29
Tool Bar: Workspace & System Settings
Workspace Icon
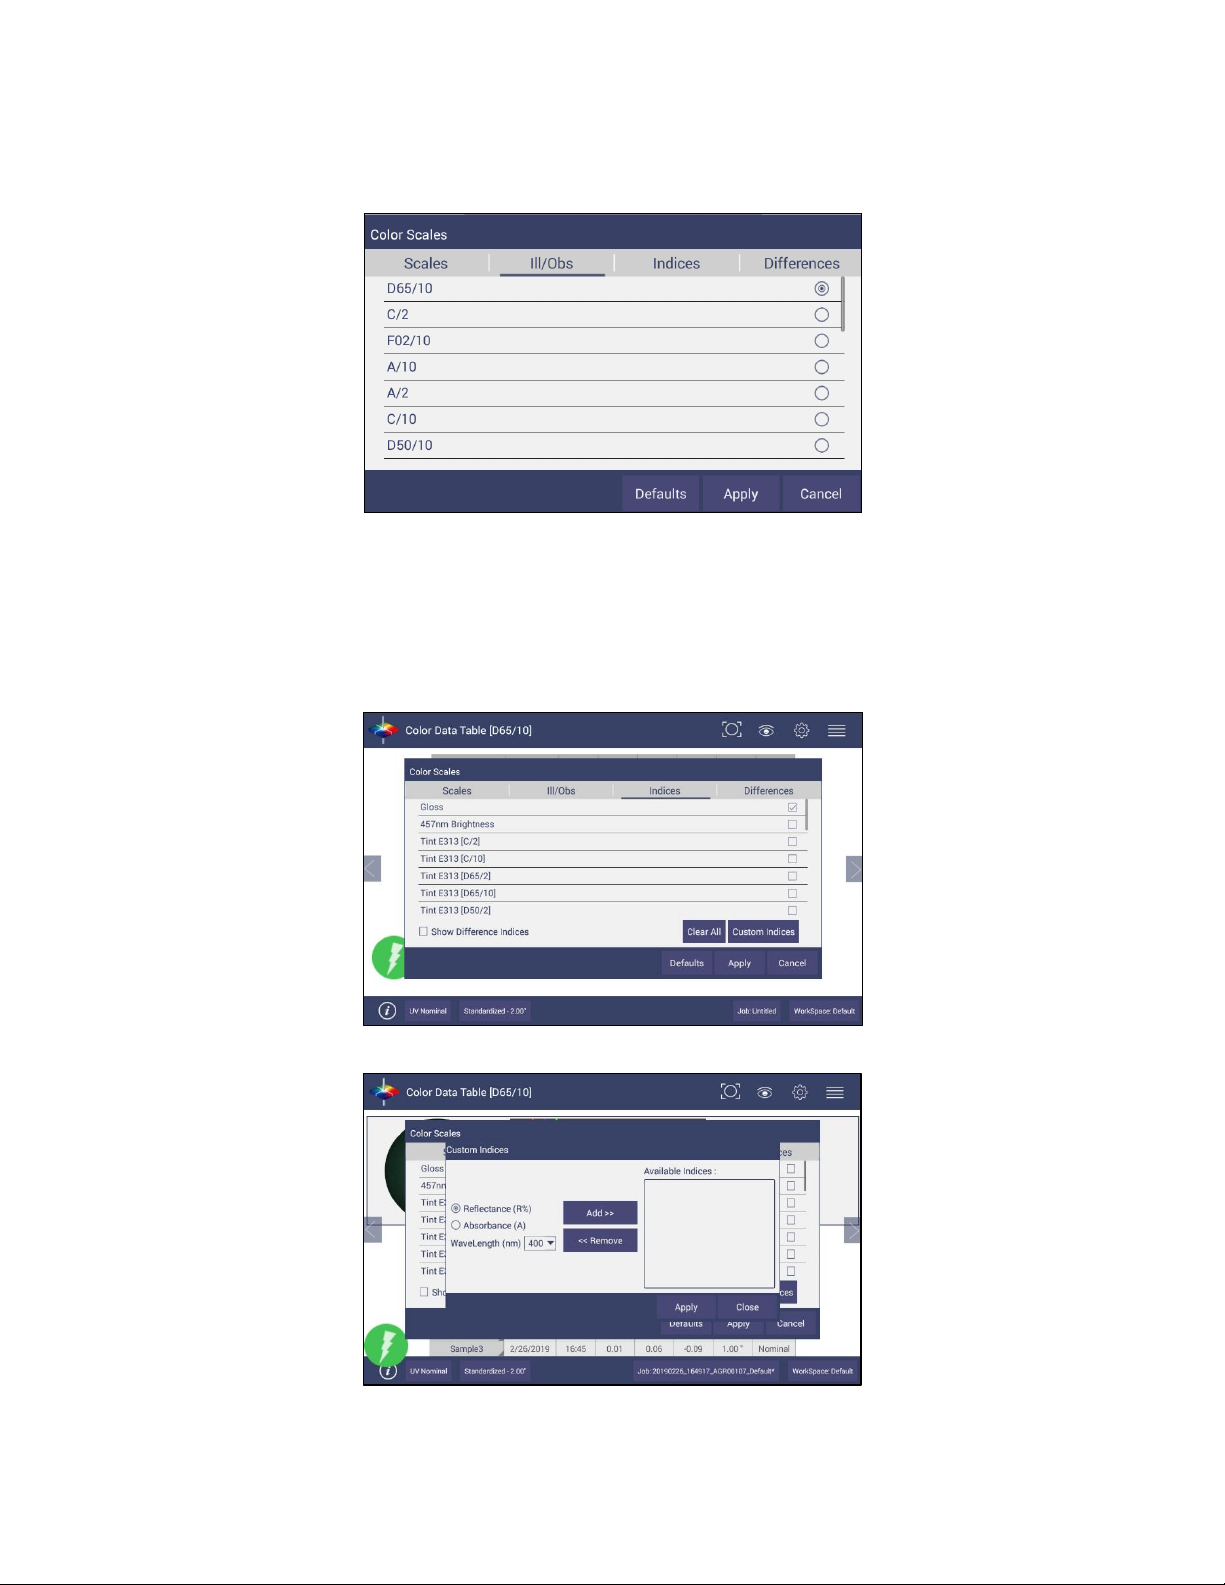
Under the WORKSPACE & SYSTEMS SETTINGS, the following tasks can be accomplished:
Figure 31. Workspace Parameters
Workspace > Color Scales
Color Scales provide four tabs in which the SCALES, INDICES, DIFFERENCES AND
ILLUMINANT/OBSERVER (ILL/OBS) can be configured.
Figure 32. Color Measurement Scales
• The SCALES Tab showsthe five scales available for measurement. Select the absolute scale
or color difference scales (if a standard is selected). Press APPLY and begin to read your
samples.
Page 30
User’s Manual for Agera and EasyMatch Essentials v 1.0
30
• The ILLUMINANT/OBSERVER tab displays combination selections for these parameters. To
see all of the choices, you can scroll through the selections by viewing the screen.
Figure 33. Illuminant/Observer Configuration
• To select indices, go to the INDICES tab and check the corresponding box on the right side.
Multiple selections are available. To remove all selections, press CLEAR ALL. To see more
choices, the screen can be scrolled. Custom Indices allows the user to input a %R at a
wavelength as an indice. The Bias configuration in Read Options can then be used to adjust
the value. Press APPLY to continue.
Figure 34. Index Configuration
Figure 35. Custom Indices
Page 31
User’s Manual for Agera and EasyMatch Essentials v 1.0
31
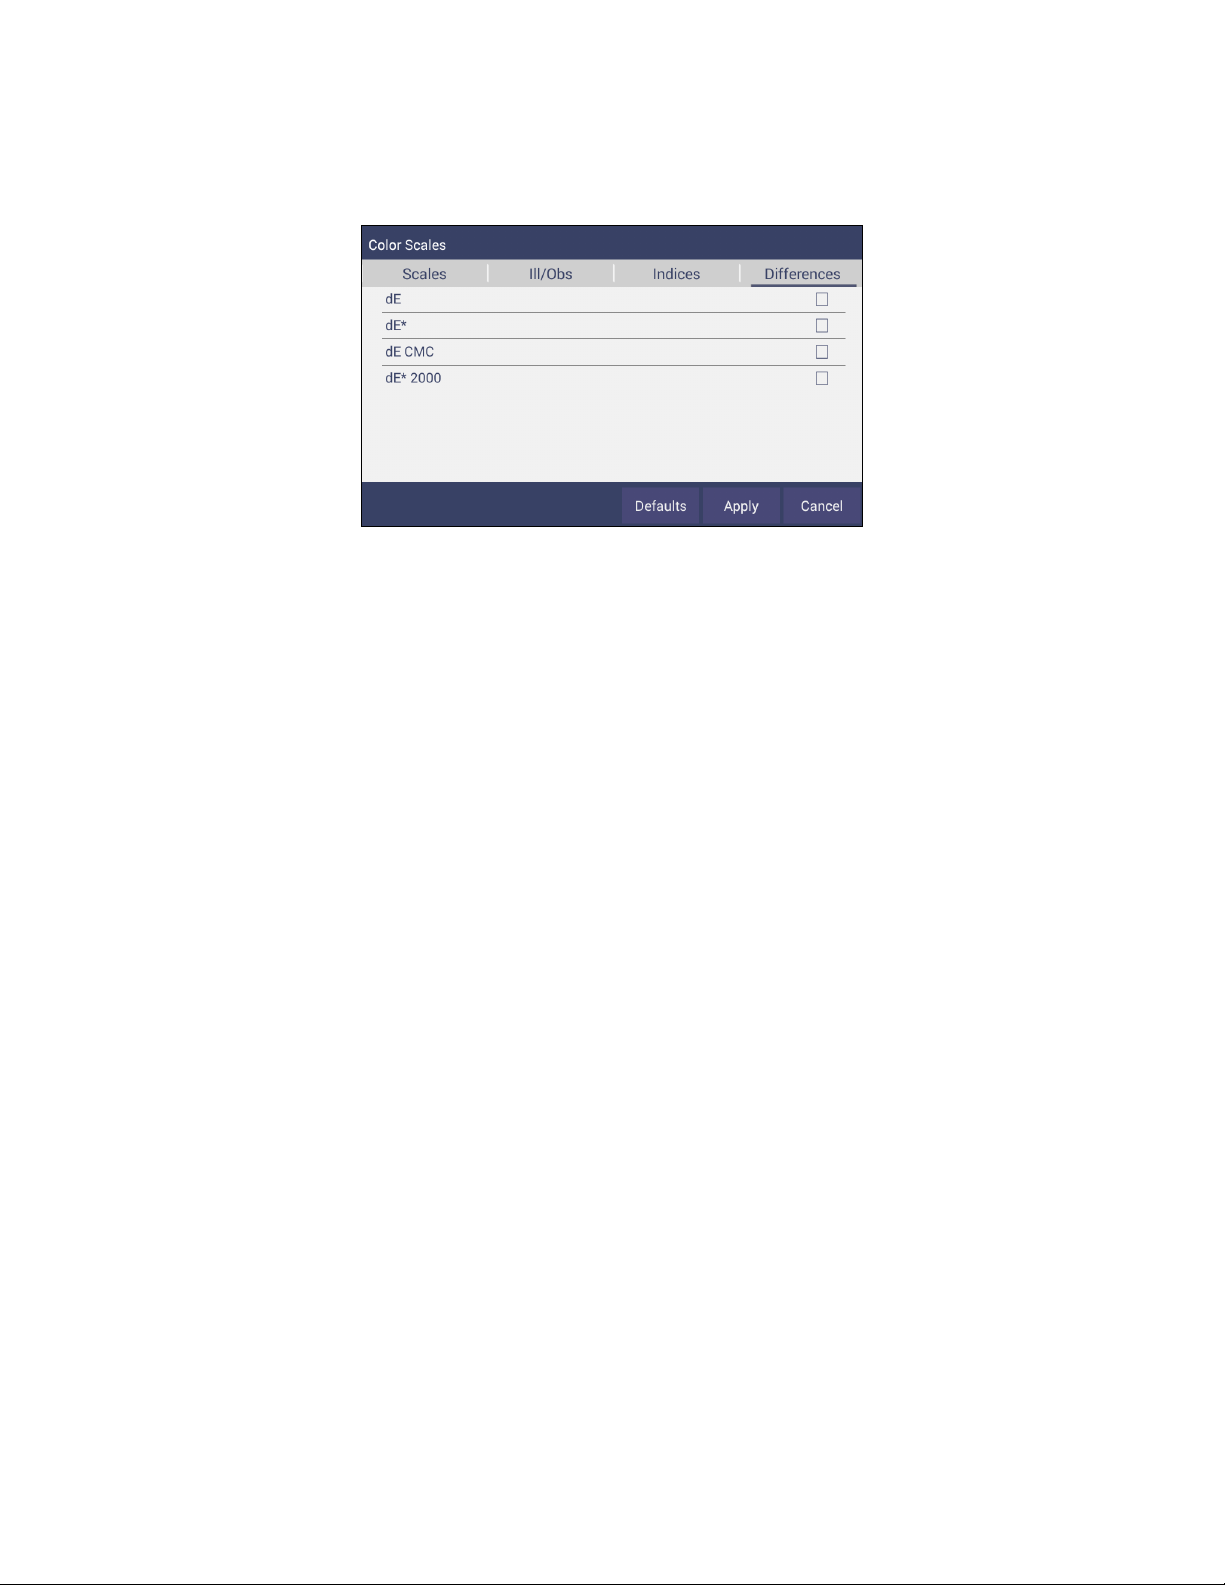
• To select differences, go to the DIFFERENCES tab and check the corresponding box on the
right side. Press APPLY to continue.
Figure 36. Color Measurement Differences
Page 32
User’s Manual for Agera and EasyMatch Essentials v 1.0
32
Table 3. Overview of Color Measurement Parameters for
EZ View, Color Data Table, Trend Plot & Color Plot
Illuminant
Observer
Scales
Differences
Indices
View Options
D65
2/10
CIE Lab
dL*a*b*
457nm Brightness
Pass/Fail1
C
2/10
CIE LCh
dL*C*h
Tint E313
Tolerances
F02
2/10
Hunter Lab
dLab
WI E313
Time3
D50
2/10
XYZ1
dXYZ
WI Ganz
Date3
D55
2/10
Yxy1
dYxy
Tint Ganz
Port Plate
D75
2/10 dE
Y Bright
Image Status
F07
2/10
dE CMC
YI D1925
UV Mode
F11
2/10
dE* 2000
YI E313
Image View
TL84
2/10 dE*
Z%
Latest Data First
ULT 30
2/10
SCAA/C
Trace Range 12
ULT 35
2/10
SCAA/G
Trace Range 22
2/10
HCCI
Trace Range 32
BCU
Trace Range 42
Gloss
Auto Range2
Display: Line2
Display: Point2
Zoom
Average2
Std. Deviation2
Meas per Display2
1
Not Available on Color Plot, 2Trend Plot Only, 3Color Data Table Only
Page 33
User’s Manual for Agera and EasyMatch Essentials v 1.0
33
Workspace > Read Options
Read Options > Options
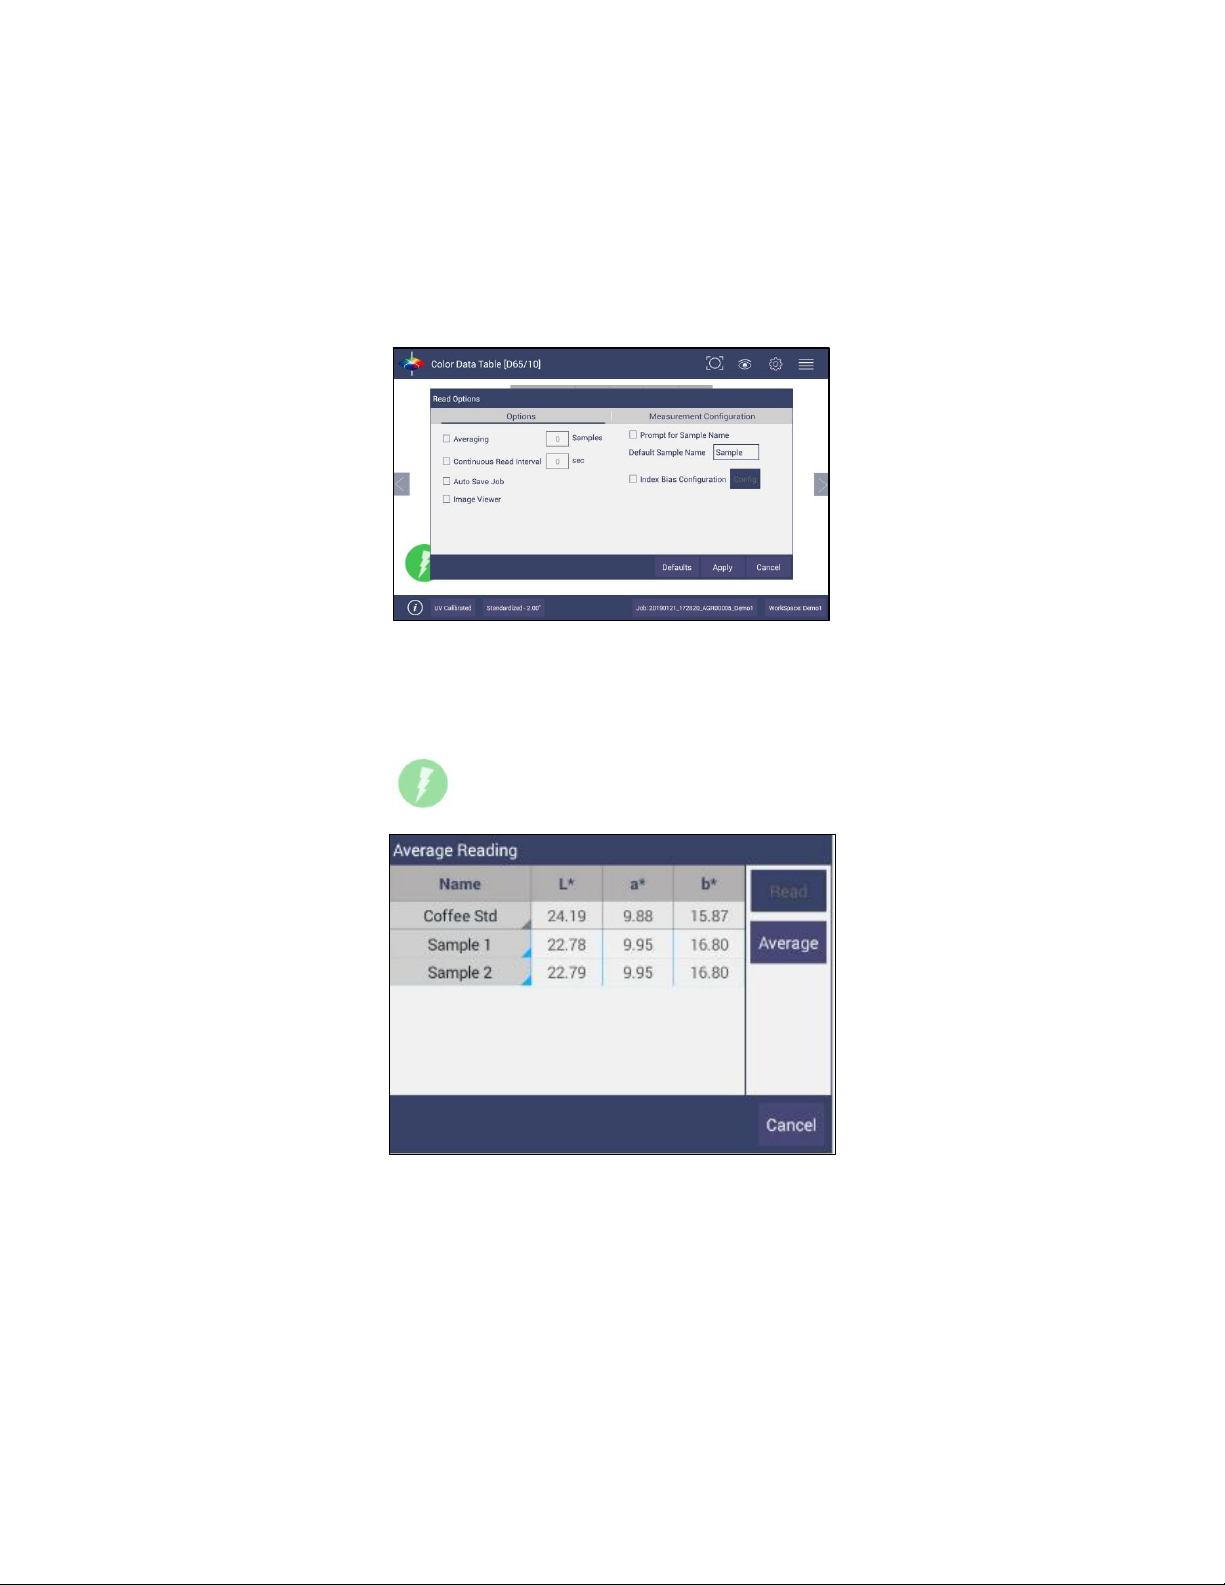
Shows a dialog box to configure AVERAGING, CONTINUOUS READ INTERVAL, AUTO SAVE, IMAGE
VIEWER, INDEX BIAS CONFIGURATION, SAMPLE NAME, and STANDARD NAME. The Read command
performs the operation based on the configured options.
Figure 37. Read Options
▪ AVERAGING
Select the number of readings to average to produce the final measurement. The total
number of readings to be averaged can be no less than two. Press APPLY to close the screen
and press Read to initiate Readings.
Figure 38. Reading and Averaging
Once the READ button is pressed, the instrument will display a unique dialog box to READ
and AVERAGE the readings. The second reading is taken using the dialog box button, Read.
Once all the readings are taken, press AVERAGE to obtain the results. Average and
Continuous Read are mutually exclusive.
Page 34
User’s Manual for Agera and EasyMatch Essentials v 1.0
34
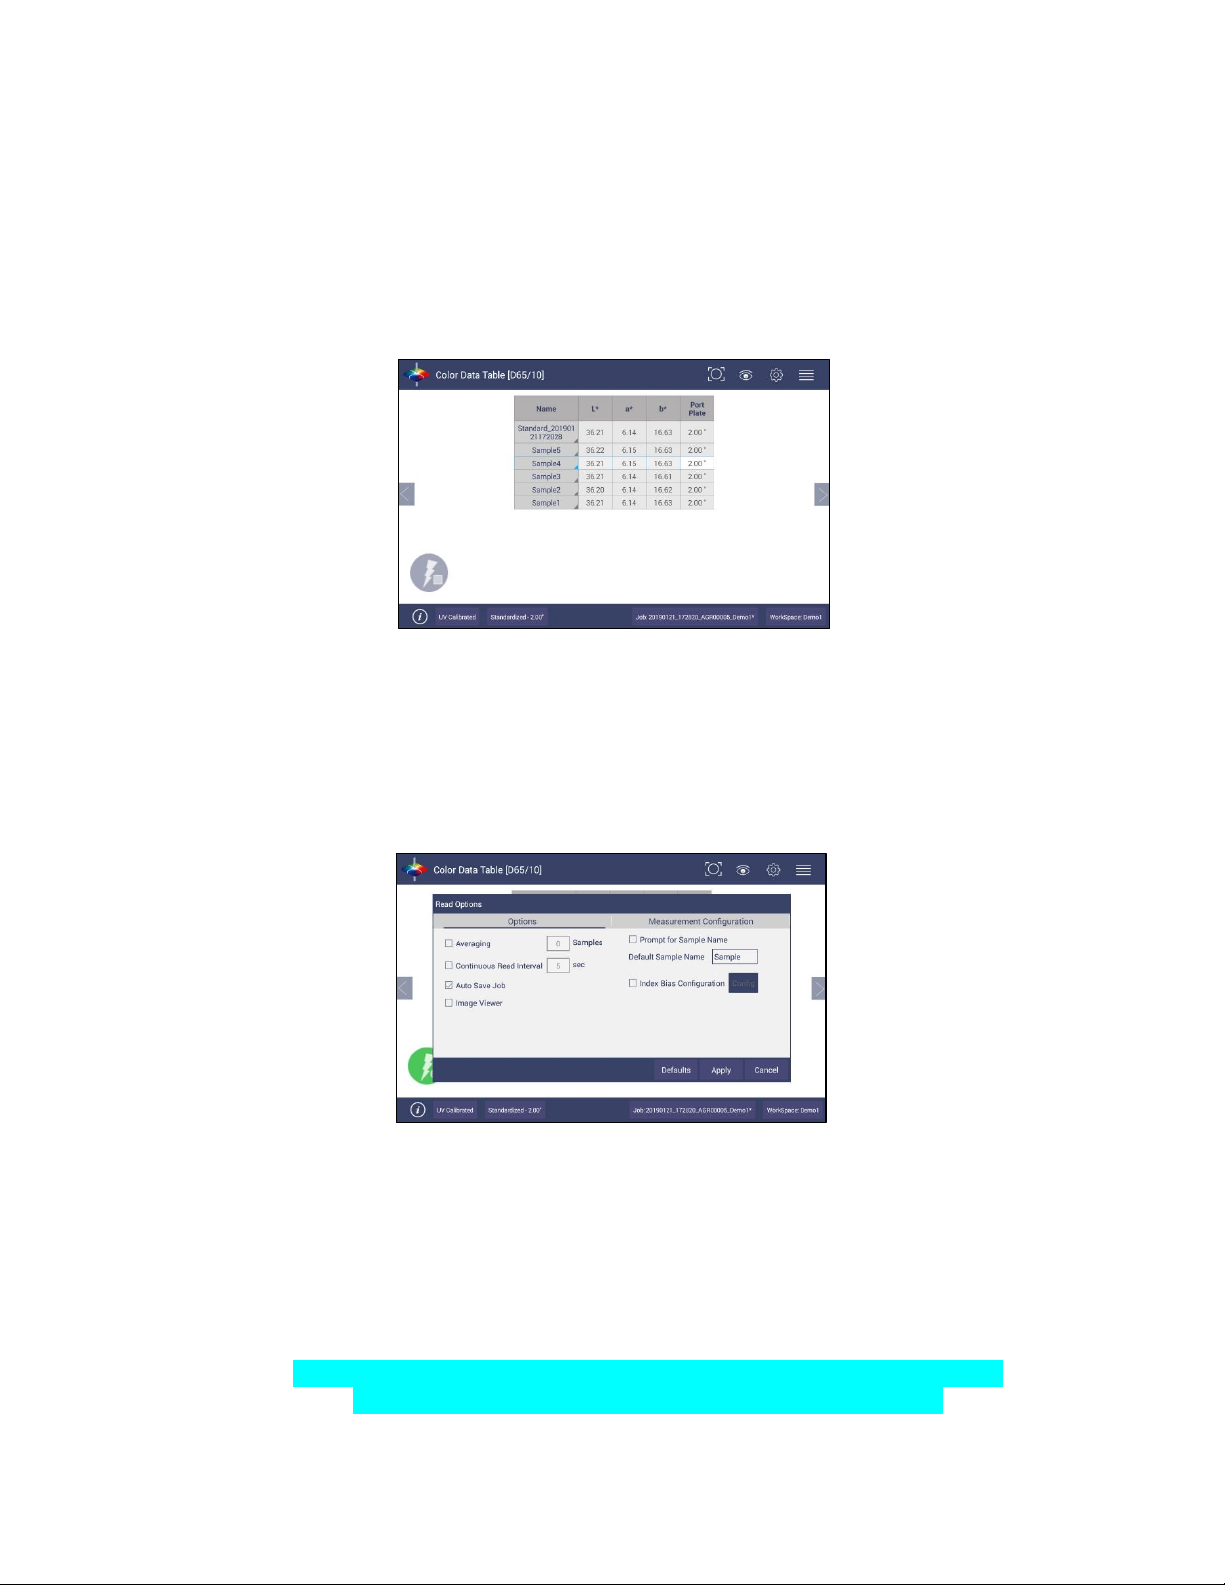
▪ CONTINUOUS READ INTERVAL
This feature performs measurements continuously. In CONTINUOUS READ mode,
measurements are initiated and stopped using the READ Button. The minimum value of the
Read interval is 5 seconds and it will read as fast as it can update. When in CONTINUOUS
READ mode, the Read Button is enhanced with a checkmark.
When taking measurements, the Read button is greyed out. When waiting to take the next
measurement, the Read button turns green.
Figure 39. Continuous Read
To stop the Continuous Read, press the READ button when the button is green.
▪ AUTO SAVE JOB
This selection will automatically save a job. Once this feature is selected, a dialog box will be
displayed to name the job. If there is no name for a job yet, the file name will be default
with the date, time, instrument and workspace.
Figure 40. Auto Save Job
• IMAGE VIEWER
To preview/capture an image of each sample prior to measurement, go to WORKSPACE >
READ OPTIONS > IMAGE VIEWER. Check the IMAGE VIEWER and press APPLY.
When this option is checked, the camera will look on sample before taking each
measurement. You can just view the sample’s area without any capture or capture an image
and save it together with a measurement.
Note: When Averaging or Continuous Read is selected with Image Viewer, the
camera will only view the sample once at the first measurement.
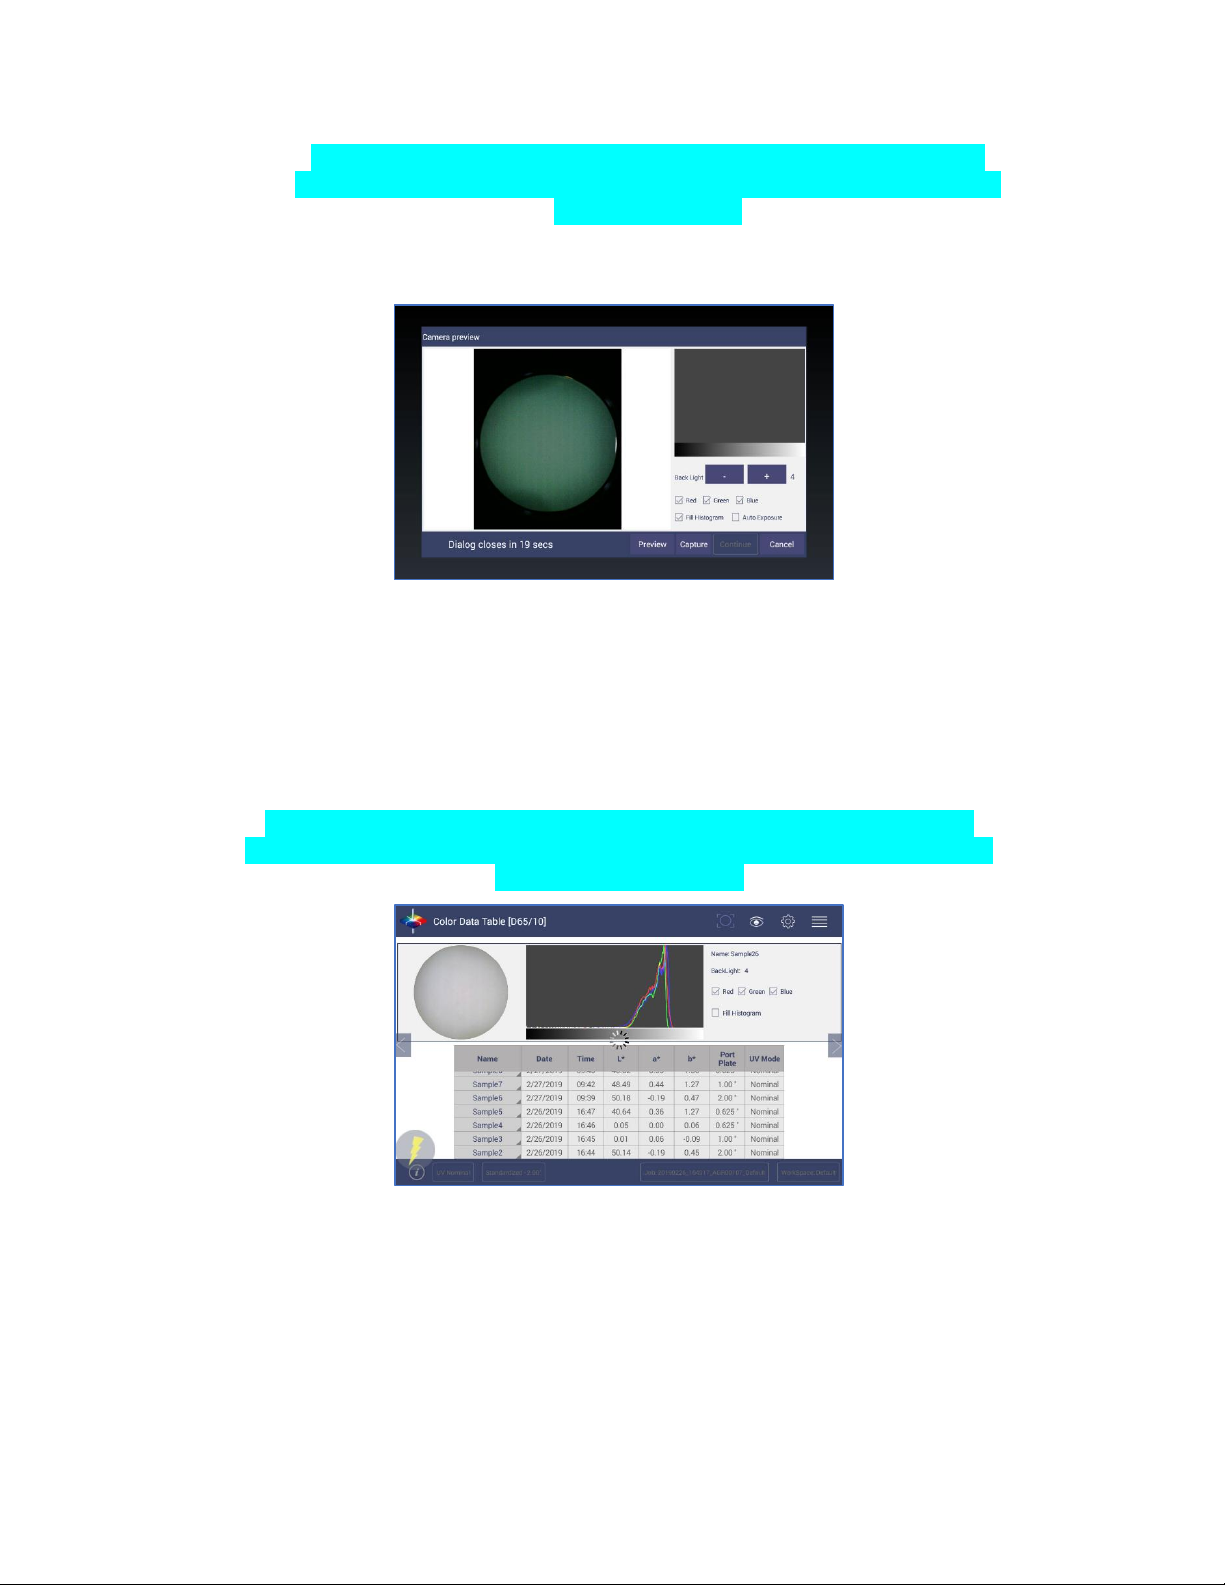
Page 35
User’s Manual for Agera and EasyMatch Essentials v 1.0
35
Note: The Camera preview dialog can only last 30 seconds maximum each
time. This dialog will automatically close and take sample measurement once
it passes 30 seconds.
• To take an image of a sample, place the sample on the port plate, and click the
READ button. A CAMERA PREVIEW dialog will be prompted in your screen.
Figure 41. Camera Preview
▪ If the image shown in your screen appears to be fuzzy, tap on the image to perform
auto-focus.
▪ Set the back-light level by adjusting the -/+ button and position your sample in the
right place. Then, click on CAPTURE to save an image.
▪ The camera analyses the colors in your image and creates a histogram that plots
three colors of you captured image: Red, Green, and Blue.
Note: To fix the camera’s auto focus, we use a sample with a sharp image (for
example a paper with characters). Do not use the white tile or black glass for auto
focus as it won’t work well.
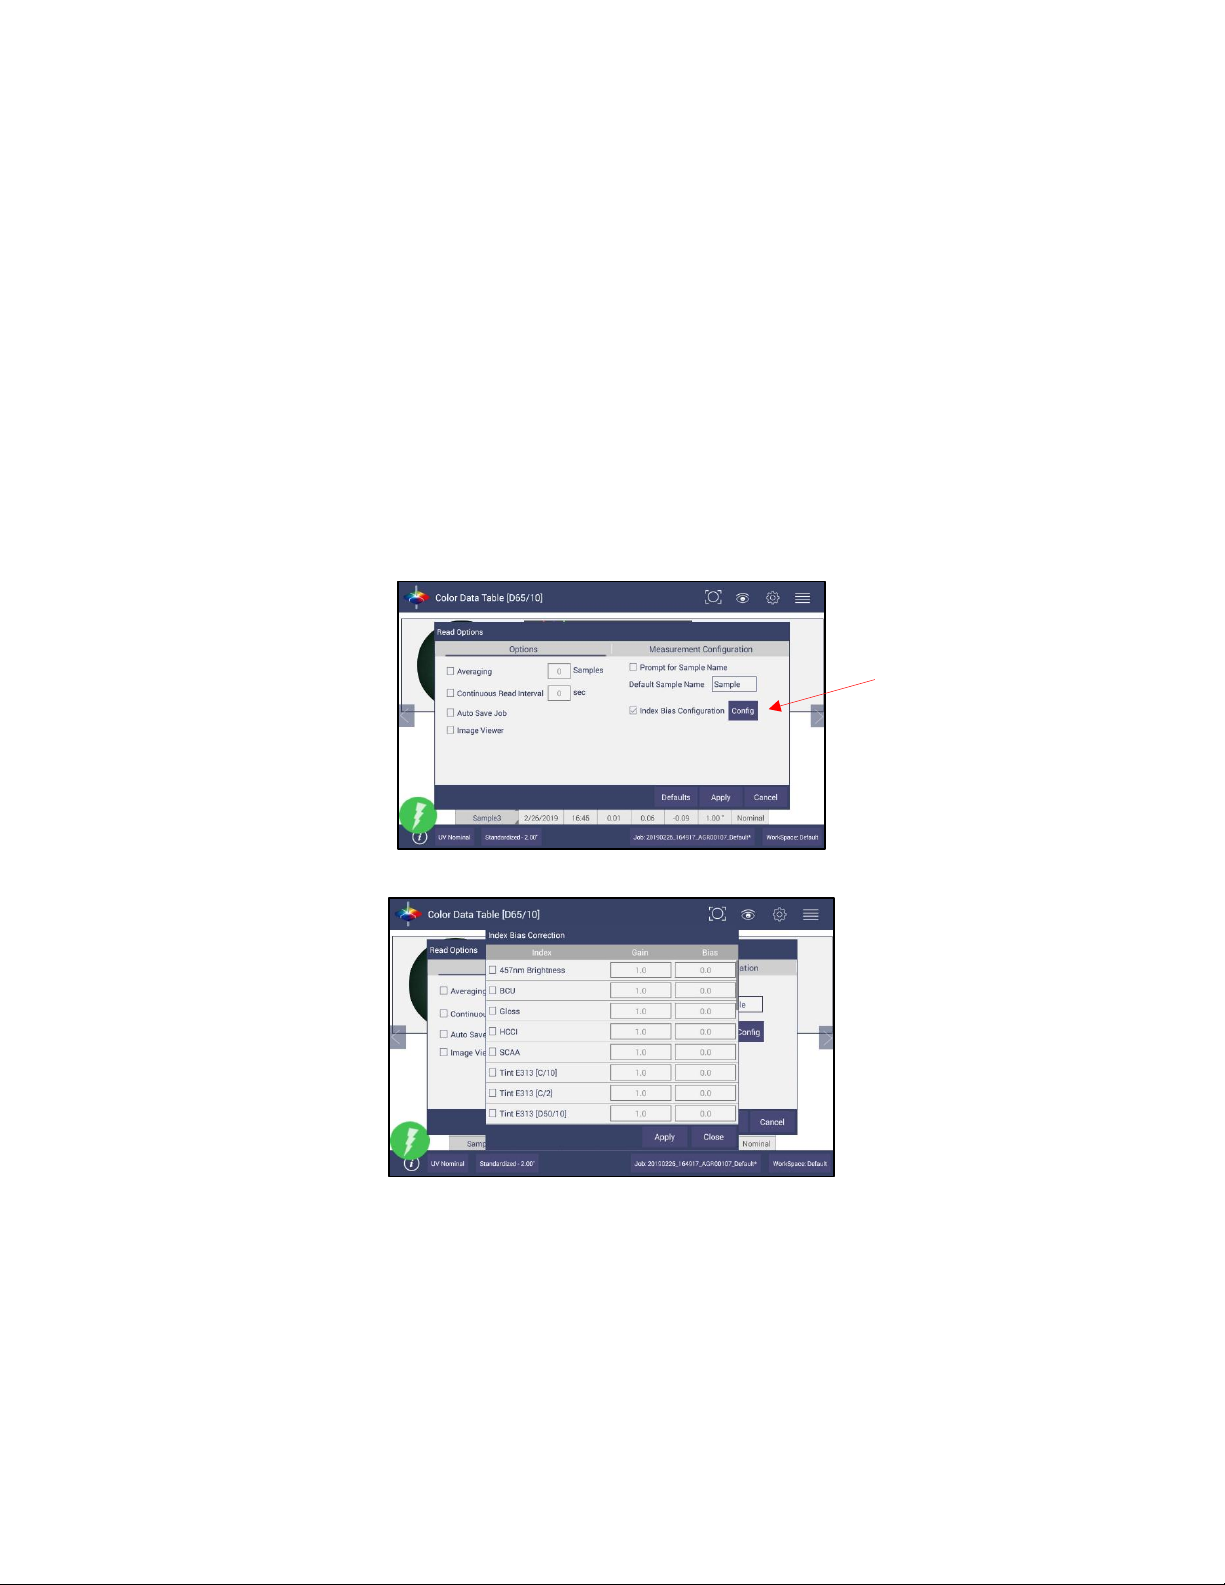
Figure 42. Image Viewer with CDT Screen
• INDEX BIAS CORRECTION
This option allows the user to input a custom slope and intercept correction for indices. The
user can select any Index from the list of applicable indices and input the desired GAIN AND
BIAS values. After selecting the required Indices, select the Apply button to save the
selected Indices values and update the Views accordingly. The Bias-corrected Indices will be
marked with * (eg: HCCI *) in the respective view display.
Page 36
User’s Manual for Agera and EasyMatch Essentials v 1.0
36
To calculate the slope and bias correction, read a series of samples around the target values
of interest. Three methods can be used to provide corrected values:
1. One standard data point: In this case, the single data point is compared to the
expected value. The Gain remains at 1.0 and the Bias is corrected:
Bias = Expected Value- Measured Value
2. Two data points: In this case, the two readings are compared to the expected
values.
Bias Correction=Expected Value 1-(Measured Value 1*Gain)
Gain Correction= (Expected Value 1-Expected Value 2)/
(Measured Value 1- Measured Value 2)
3. Linear regression: Create a y=mx + b relationship comparing actual readings to
target values, where target values is on the Y-axis and actual readings are on the xaxis. Enter the slope correction under Gain and the intercept correction under Bias.
Figure 43. Slope & Bias Correction
Figure 44. Input Gain & Bias
The indices with bias correction include: 457nm Brightness, BCU, HCCI, SCAA/C, SCAA/G,
Tint E313, WI E313, Y Brightness, YI D195, YI E313, Z%.
Select Index
Bias
Configuration
Page 37
User’s Manual for Agera and EasyMatch Essentials v 1.0
37
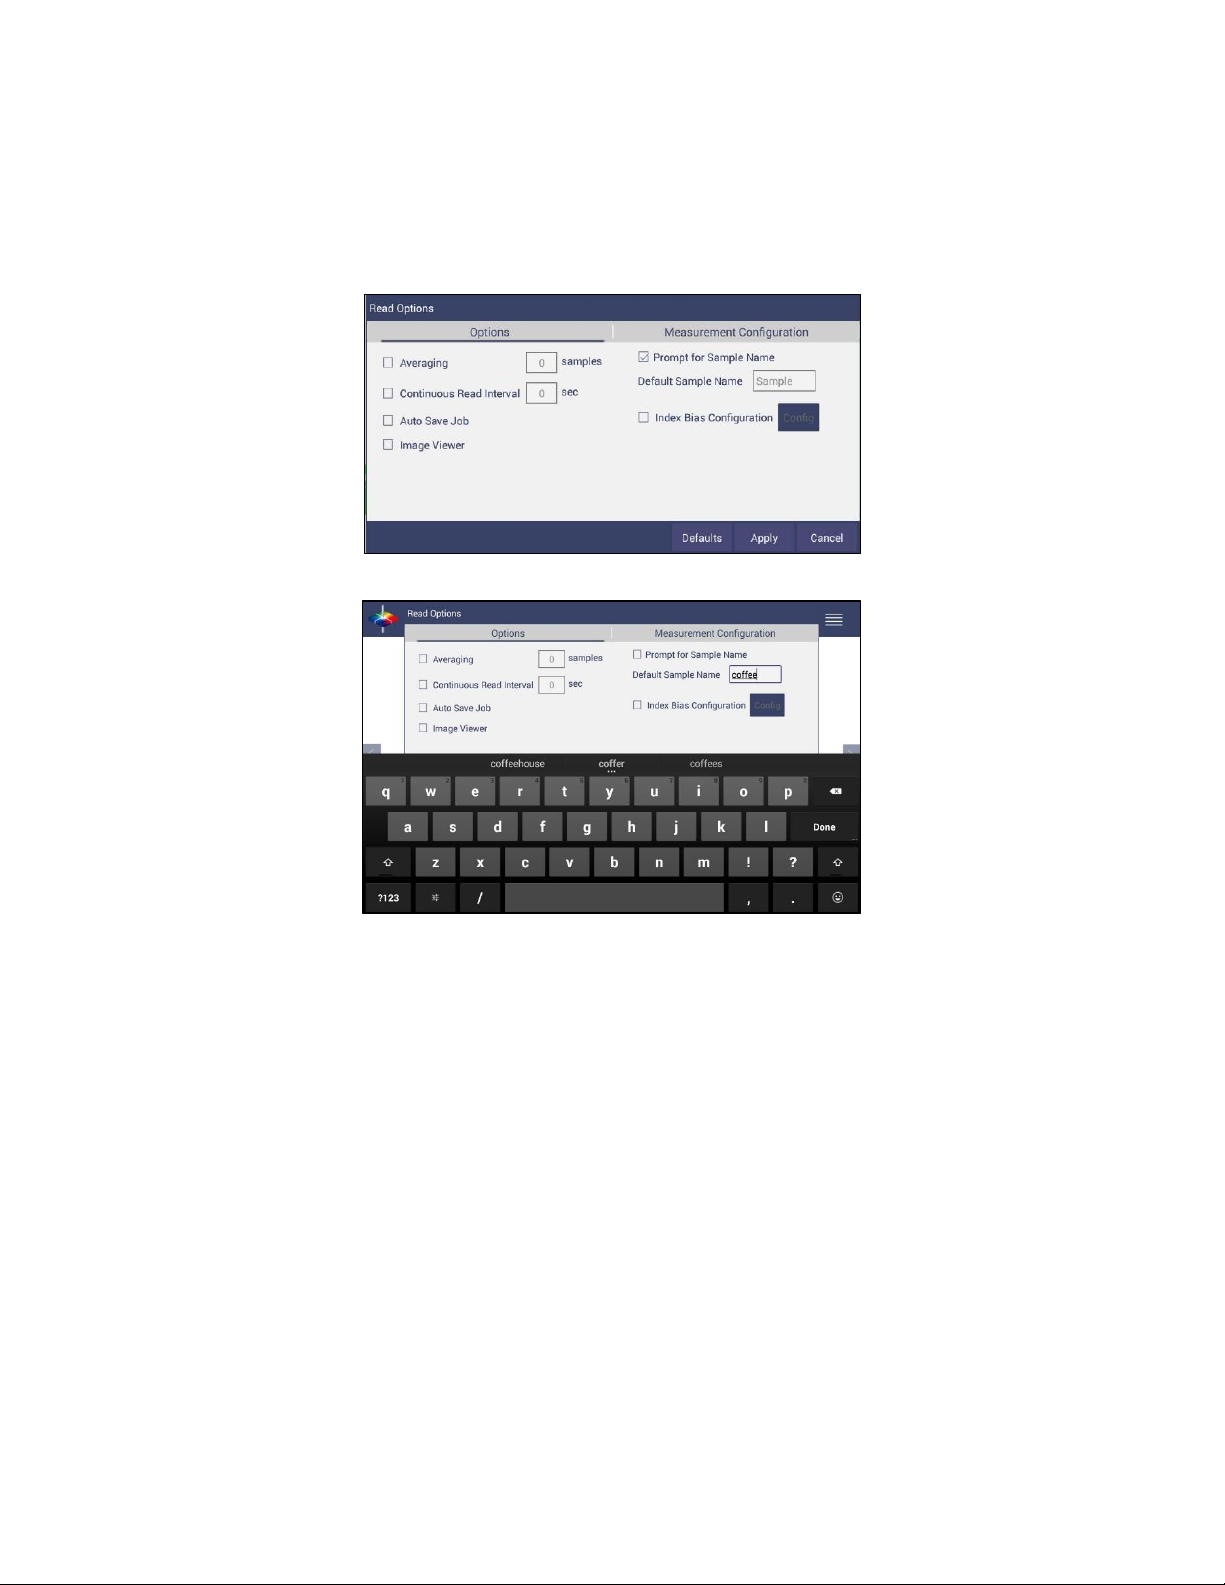
• PROMPT FOR SAMPLE/STANDARD NAME
Select this feature to input the Sample (or Standard) name manually during the
measurement cycle so that the Sample measurement will be inserted with the specified
name. If this option is not selected, the Samples will be inserted with the specified default
sample name suffixed with the auto incremented index number. Press APPLY when done.
Figure 45. Prompt for Sample (Standard) Name
Figure 46. Input Sample Name
Read Options > Measurement Configuration
• UV Mode
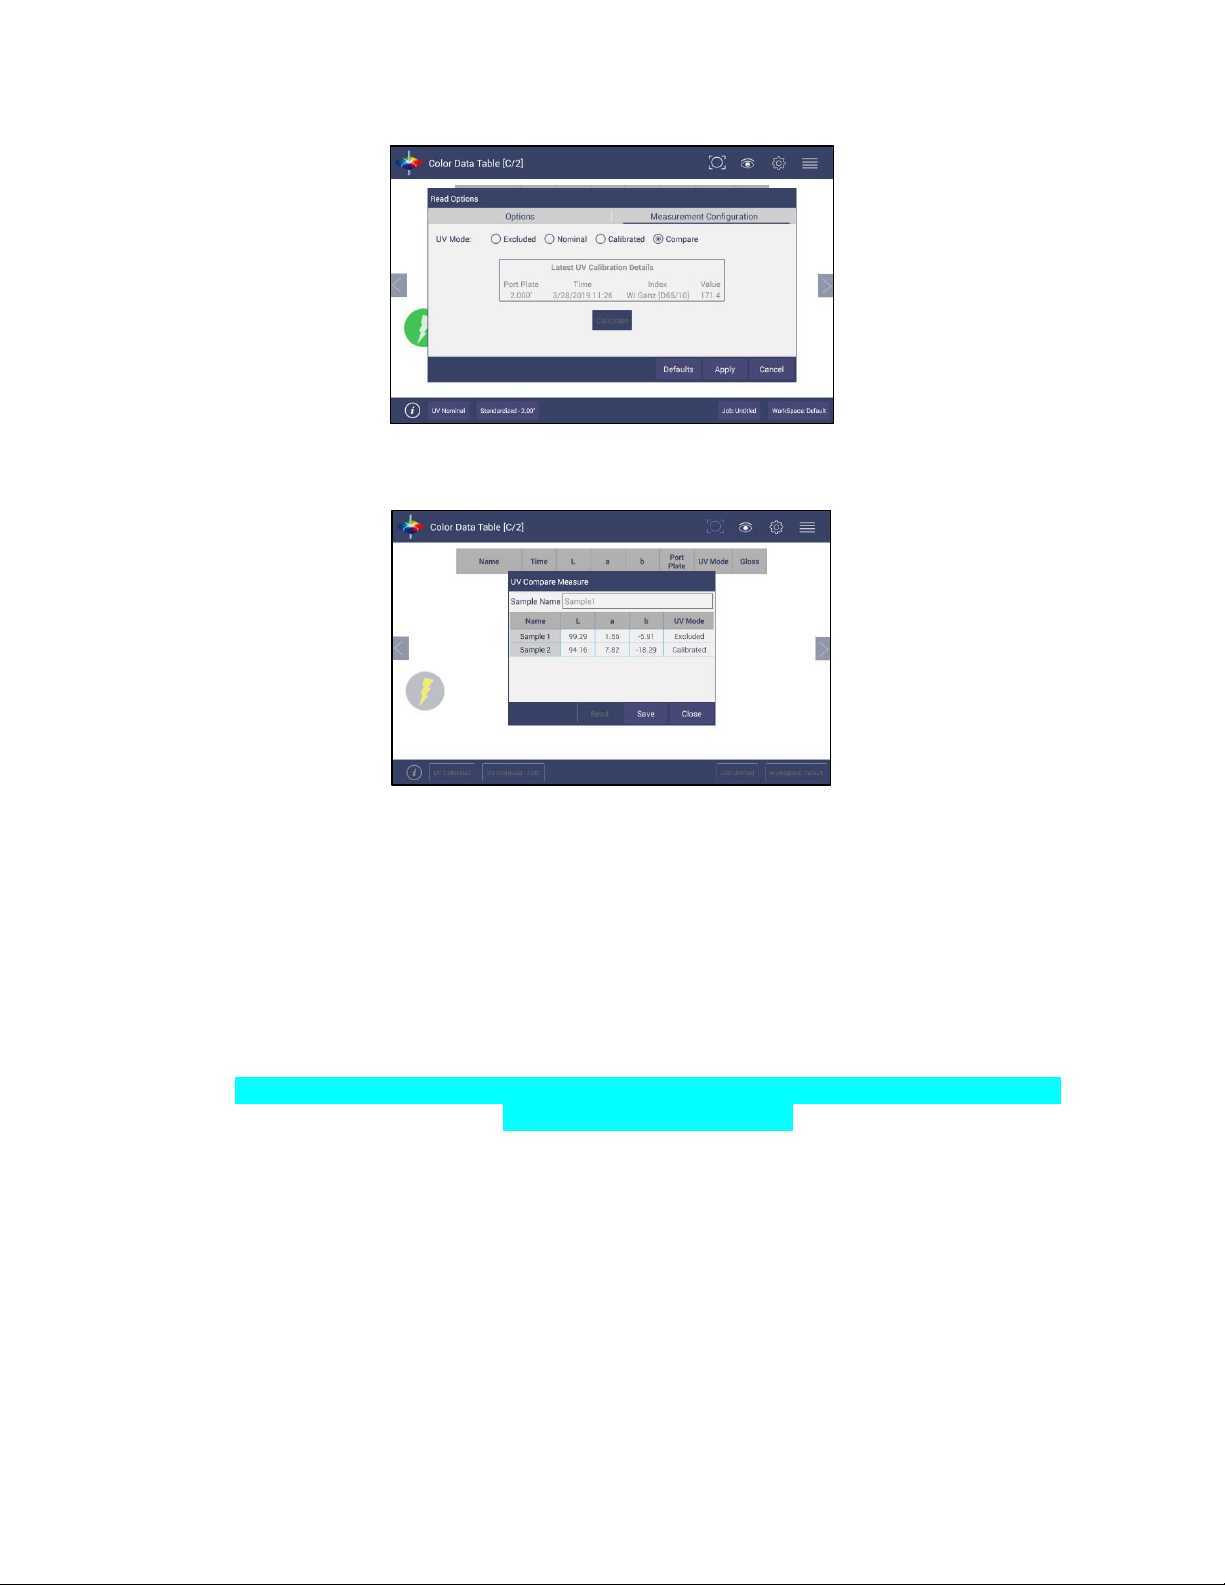
Agera uses LEDs to determine UV-nominal, UV-excluded and UV-calibrated. UV compare will
take two measurements automatically; one by UV-excluded mode and UV-calibrated mode
for one sample. Both measurements will be saved with the same name. If the Image View is
captured, the sample image will be saved for both measurements. The procedure is to
standardize in 2 modes – one with the UV-excluded and one with the UV-calibrated. In this
way, a numerical value for the ultraviolet contribution can be documented. To begin, select
UV STATUS from the Status bar or go to WORKSPACE > READ OPTIONS > MEASUREMENT
CONFIGURATION.
Page 38
User’s Manual for Agera and EasyMatch Essentials v 1.0
38
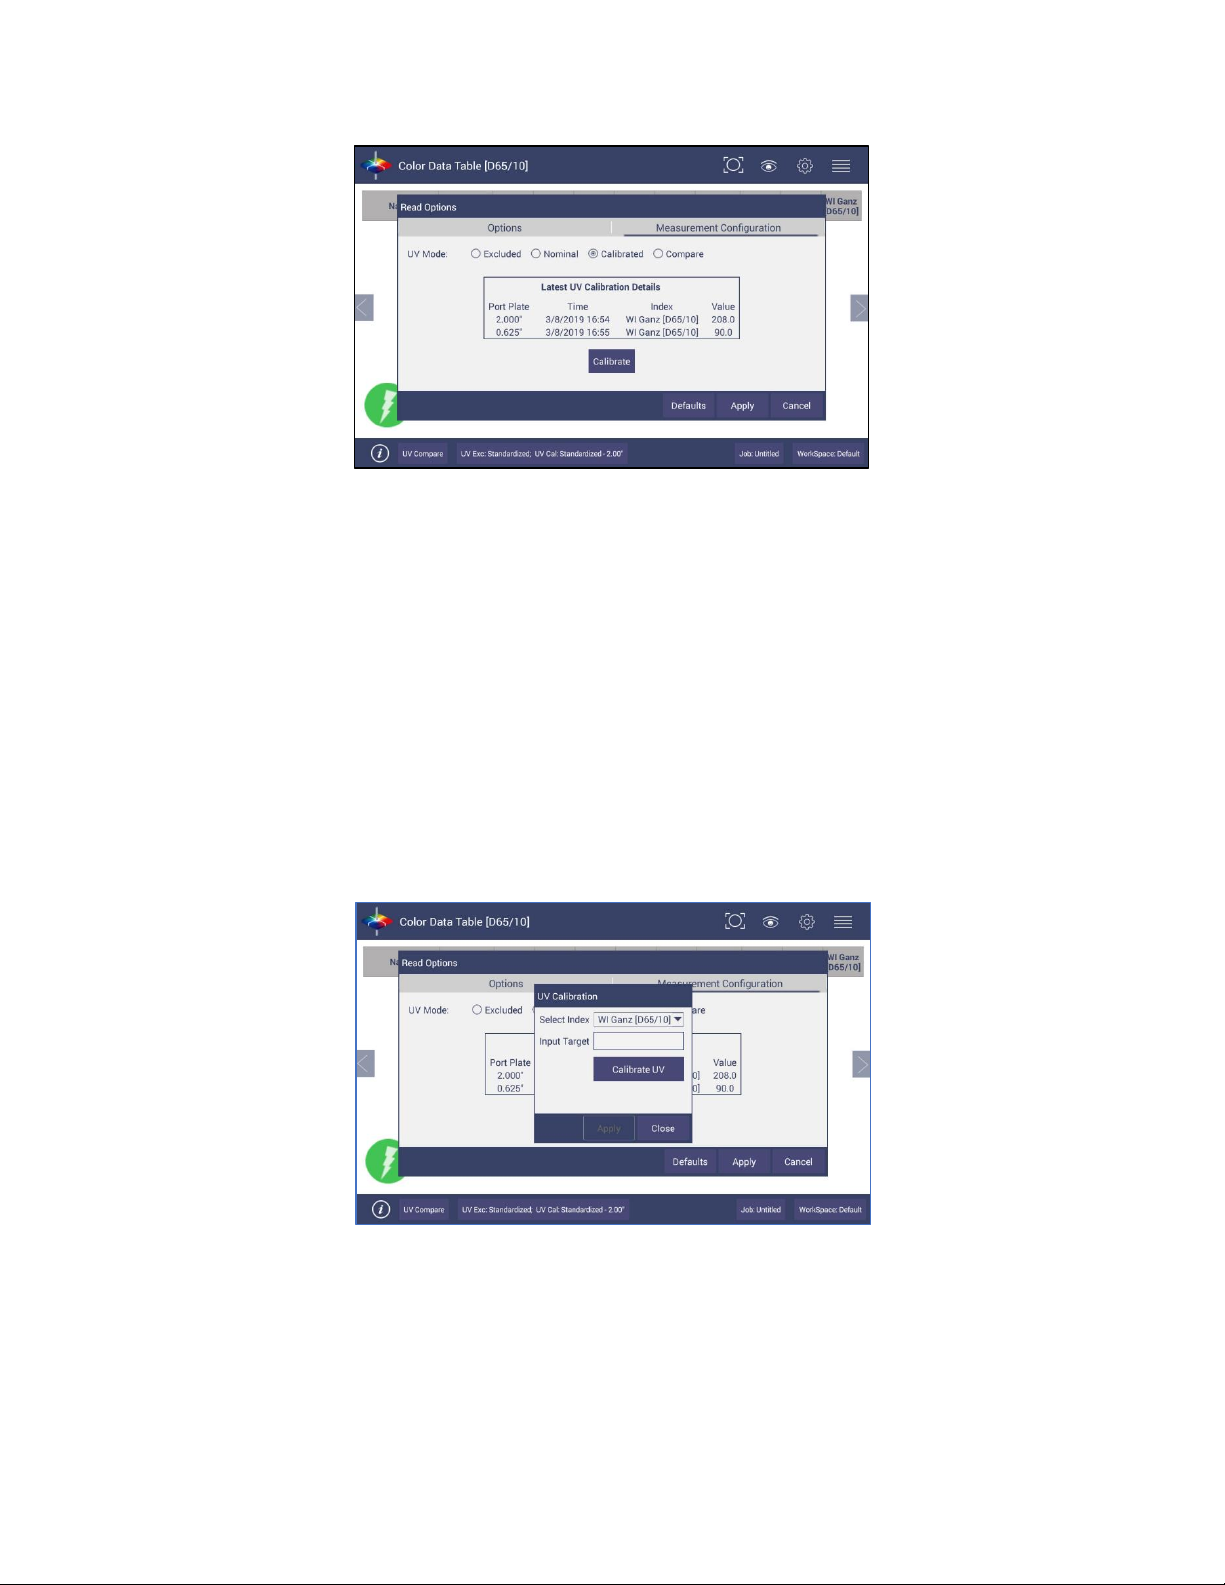
Figure 47. UV Mode Settings
▪ UV-Nominal - This mode includes UV. The UV for this mode can only be
calibrated/updated at HunterLab.
▪ UV-Excluded - This option allows the user to negate the effect of optically-
brightened agents or when used in multi-mode with UV-nominal or UV-calibrated,
determines the amount of optical brightening agents present.
▪ UV-Calibrated - This UV calibration procedure optimizes the UV content to match
D65 Daylight over time using a Fluorescent Standard with an assigned whiteness
index value such as WI Ganz [D65/10] and WI E313 [D65/10]. When UV calibration is
done correctly (i.e. the measurement is <0.5 from the calibration value), it will show
port plate size, calibrate date and Whiteness index in this dialog as a stamp. If the
measurement is >0.5, then the user will be asked to re-standardize and re-read the
fluorescent standard. If the tolerance is not met, then this procedure will repeat 2
more times.
Figure 48. UV Calibration
▪ UV-Compare – This UV procedure automatically takes two measurements for one
sample; one by UV-excluded and one by UV-calibrated.
Page 39
User’s Manual for Agera and EasyMatch Essentials v 1.0
39
Figure 49. Select UV Compare
Read the sample for results UV-excluded and UV-calibrated.
Figure 50. UV-compare Measurement
Workspace: Standard and Tolerances
Standard and Tolerances. Standards can be one of four types: retrieved from database, physical
(measured), and ad hoc and numeric. A standard that is retrieved from Database has been previously
stored. A physical standard is one that has been read as a sample and made into a standard. An Ad Hoc
(or working) standard is one that is read at the beginning of a job and becomes the standard for a run. In
this case, auto tolerances are recommended. A numeric standard is one that has color measurement
values but is not present and cannot be read. A subset of this is the Hitch Standard. All types of
standards can apply Hitch.
Note: Image can be saved with physical standards. When recall the physical standards, the
image will be recalled together.
• A Standard is saved with standard name, standard color value and standard tolerances to
the database by pressing the button at the bottom of the screen. When there is a standard
applied in a job, you must delete it first if you want to change the standard type (Recall.
Physical/Adhoc and Numeric). You can click the CALC AUTO TOLERANCES here to calculate
the tolerances of standards.
Page 40
User’s Manual for Agera and EasyMatch Essentials v 1.0
40
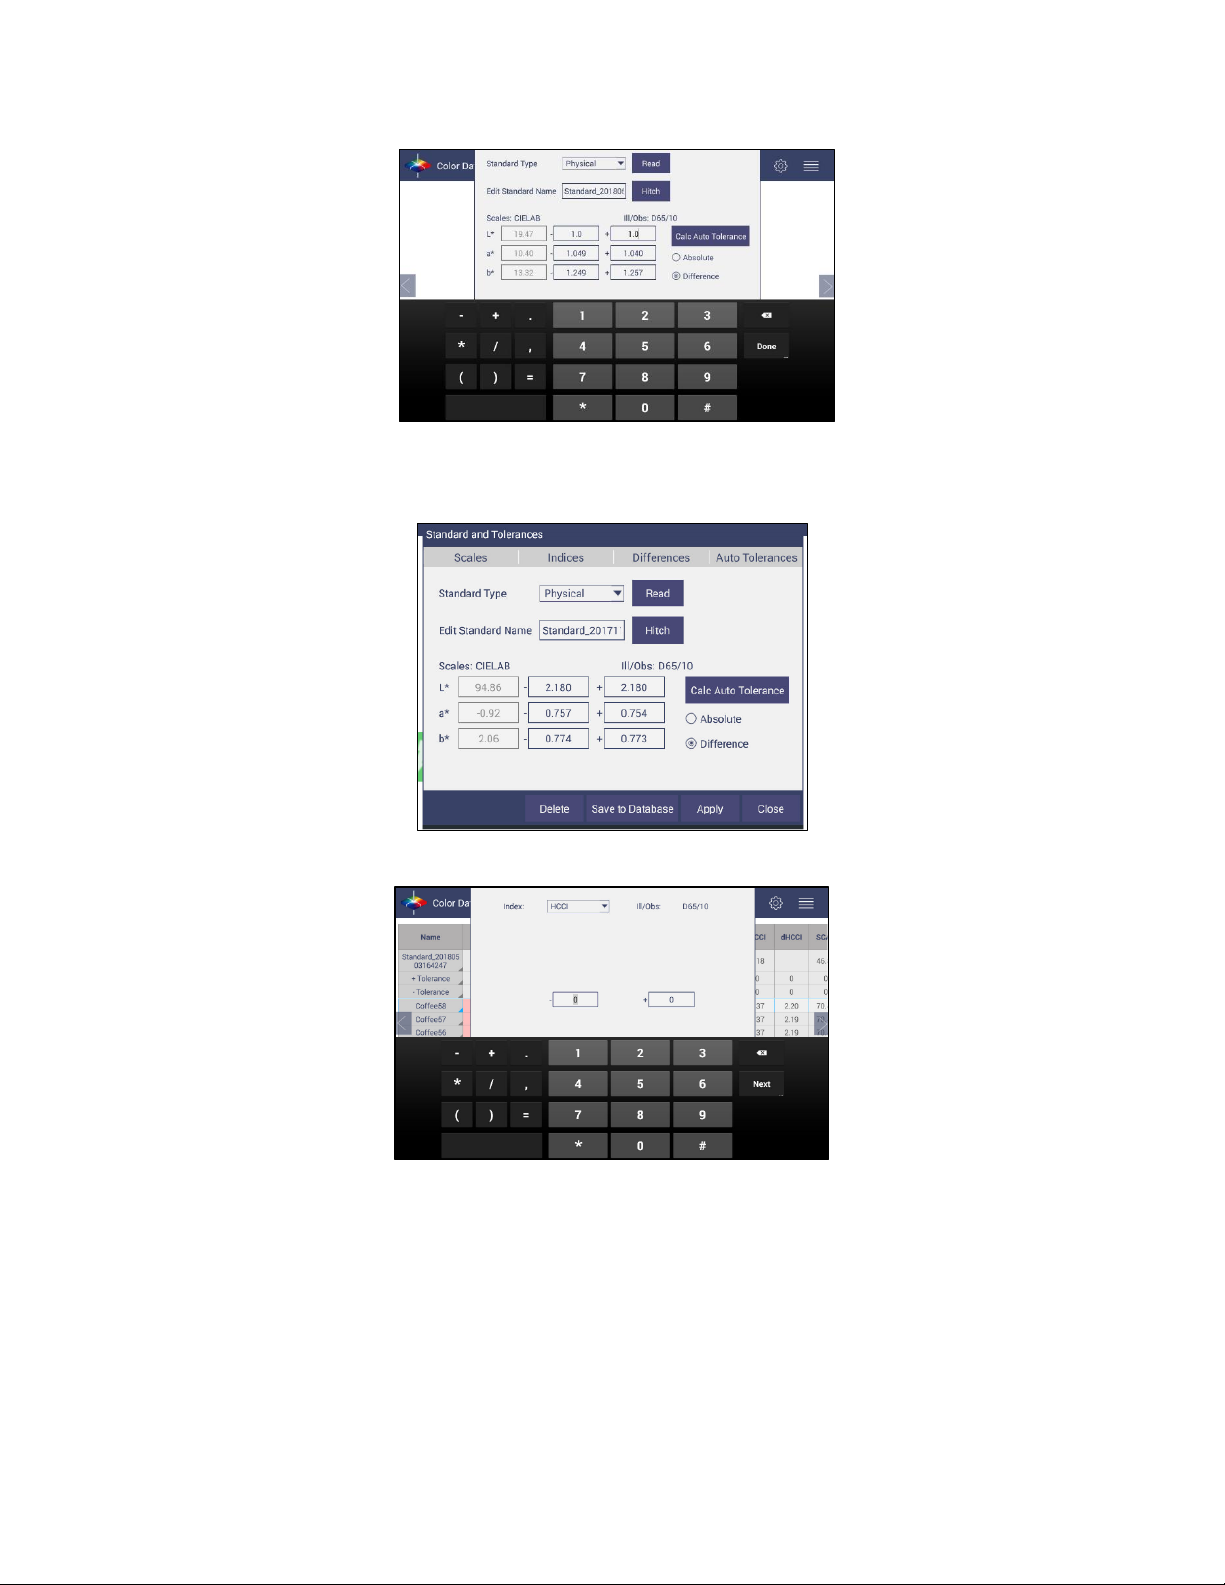
Figure 51. Tolerances Configuration
• Tolerances can be entered manually for a selected scale, index and difference.
Figure 52. Enter Tolerances
Figure 53. Index Selection and Tolerances
• Tolerances will be displayed on the measurement screen if enabled under VIEW OPTIONS for
the Color Data and the Color Plot Screens.
Page 41
User’s Manual for Agera and EasyMatch Essentials v 1.0
41
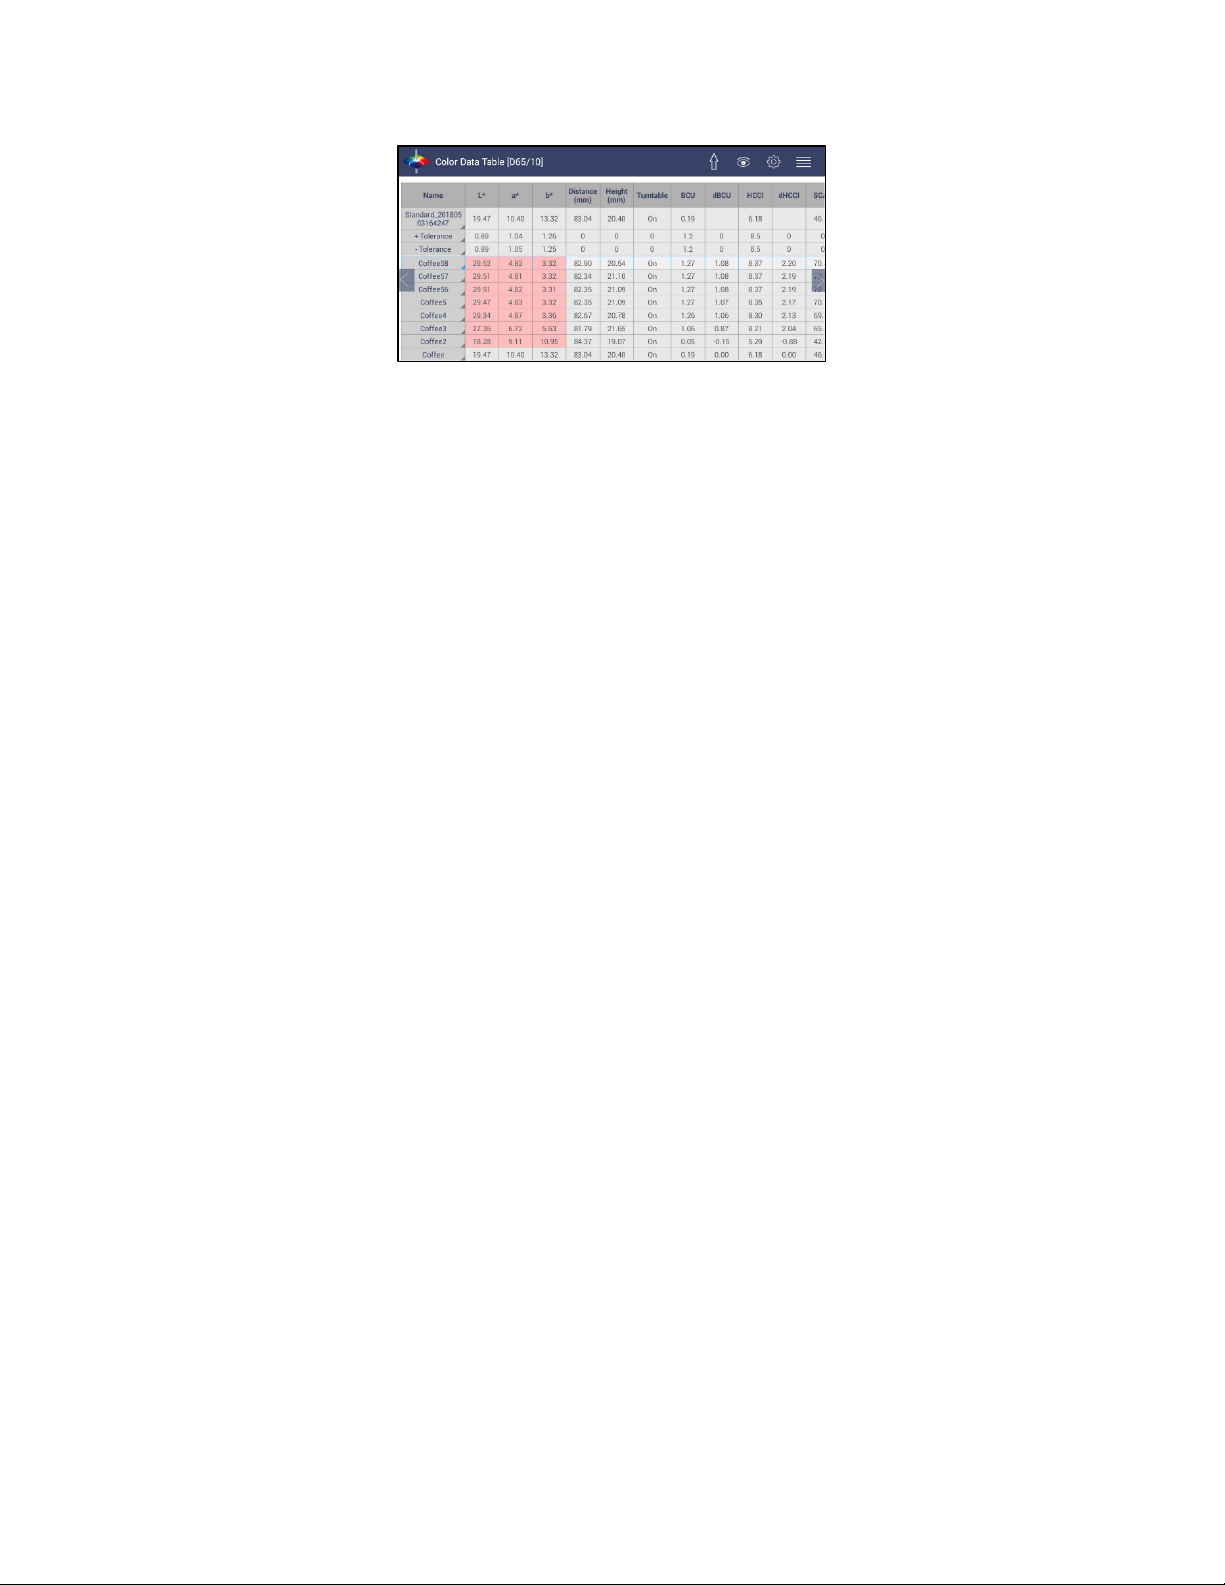
Figure 54. Indices & Tolerances on CDT
• Pass/Fail based on these tolerances can be used on the EZ View as well as Color Data View.
• Hitch Standardization
▪ Hitch Standardization is a process by which two or more instruments of similar
design can be made to read the same color values on a group of specimens. This
process is very useful in expanding the communications of color around the world or
between vendor and customer.
▪ The process of Hitch Standardization (also known as transfer standardization)
involves assigning one instrument to be the reference, or master, unit and
mathematically adjusting the secondary, or slave, unit(s) to read the “same” values.
In this way, two or more instruments can be hitched together. Hitching a secondary
unit to a reference instrument requires that a specimen be read on both units and
the values compared and adjusted accordingly. This specimen, known as the hitch
standard, is first read on the reference instrument and its values recorded as
spectral data or colorimetric (tristimulus) data. The hitch standard is then physically
moved to the secondary instrument where it is reread and the values from the
reference unit are input into the secondary instrument’s processor.
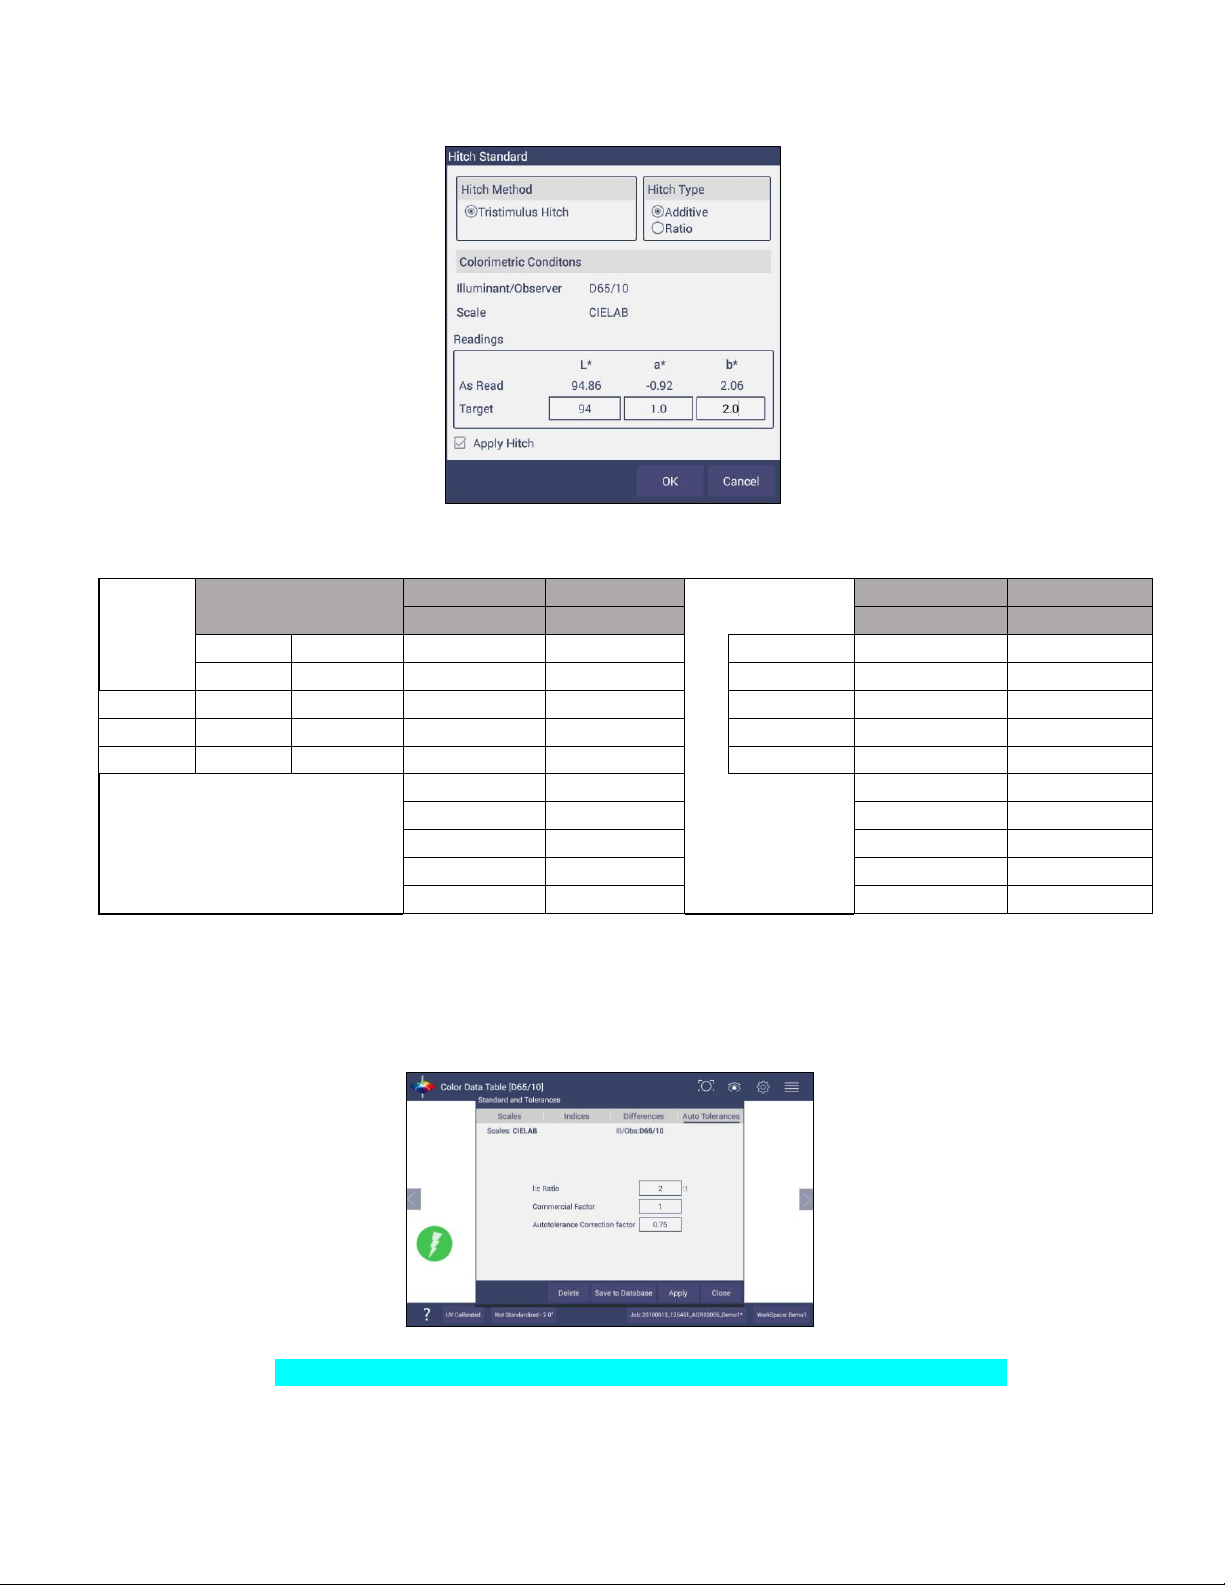
❖ Steps for Hitch Standardization:
o Read a standard.
o Go to WORKSPACE > STANDARD AND TOLERANCES and select
HITCH.
o The Standard is displayed under AS READ. Enter the TARGET
VALUES.
o Check the APPLY HITCH box and press OK.
Page 42
User’s Manual for Agera and EasyMatch Essentials v 1.0
42
Figure 55. Hitch Standardization
Table 4. Hitch Standardization by Additive or Ratio Application
Hitch Standard
Calculate
Calculate
Apply Hitch
Apply Hitch
Additive
Ratio
Additive
Ratio
Target
Measured
Hitch
Hitch
New Read
New Read
New Read
X 80.27
78.29
= +1.98
=*1.025
70.84
72.82
72.63
Y
81.00
79.21
= + 1.79
=*1.022
72.25
74.04
73.88
Z
50.71
47.76
= +2.95
=*1.061
46.07
49.02
48.91
Hitch Factor
Hitch Factor
Hitch Calc
Hitch Calc
1.98
1.025290586
70.84+1.98
=72.84*1.025
1.79
1.022598156
72.25+1.79
=72.25*1.022
2.95
1.061767169
46.07+2.95
=46.07*1.061
AutoTolerances Setting
Using Tab 4, AutoTolerances are calculated for a Color Scale using CMC. The default values of l:C – 2:1
with auto correction factor = 0.75 and commercial factor = 1. However, these ratios can be modified as
needed.
Figure 56. AutoTolerance Configuration
Note: If AutoTolerances are selected, the user cannot manually enter tolerances.
Page 43
User’s Manual for Agera and EasyMatch Essentials v 1.0
43
Tolerances
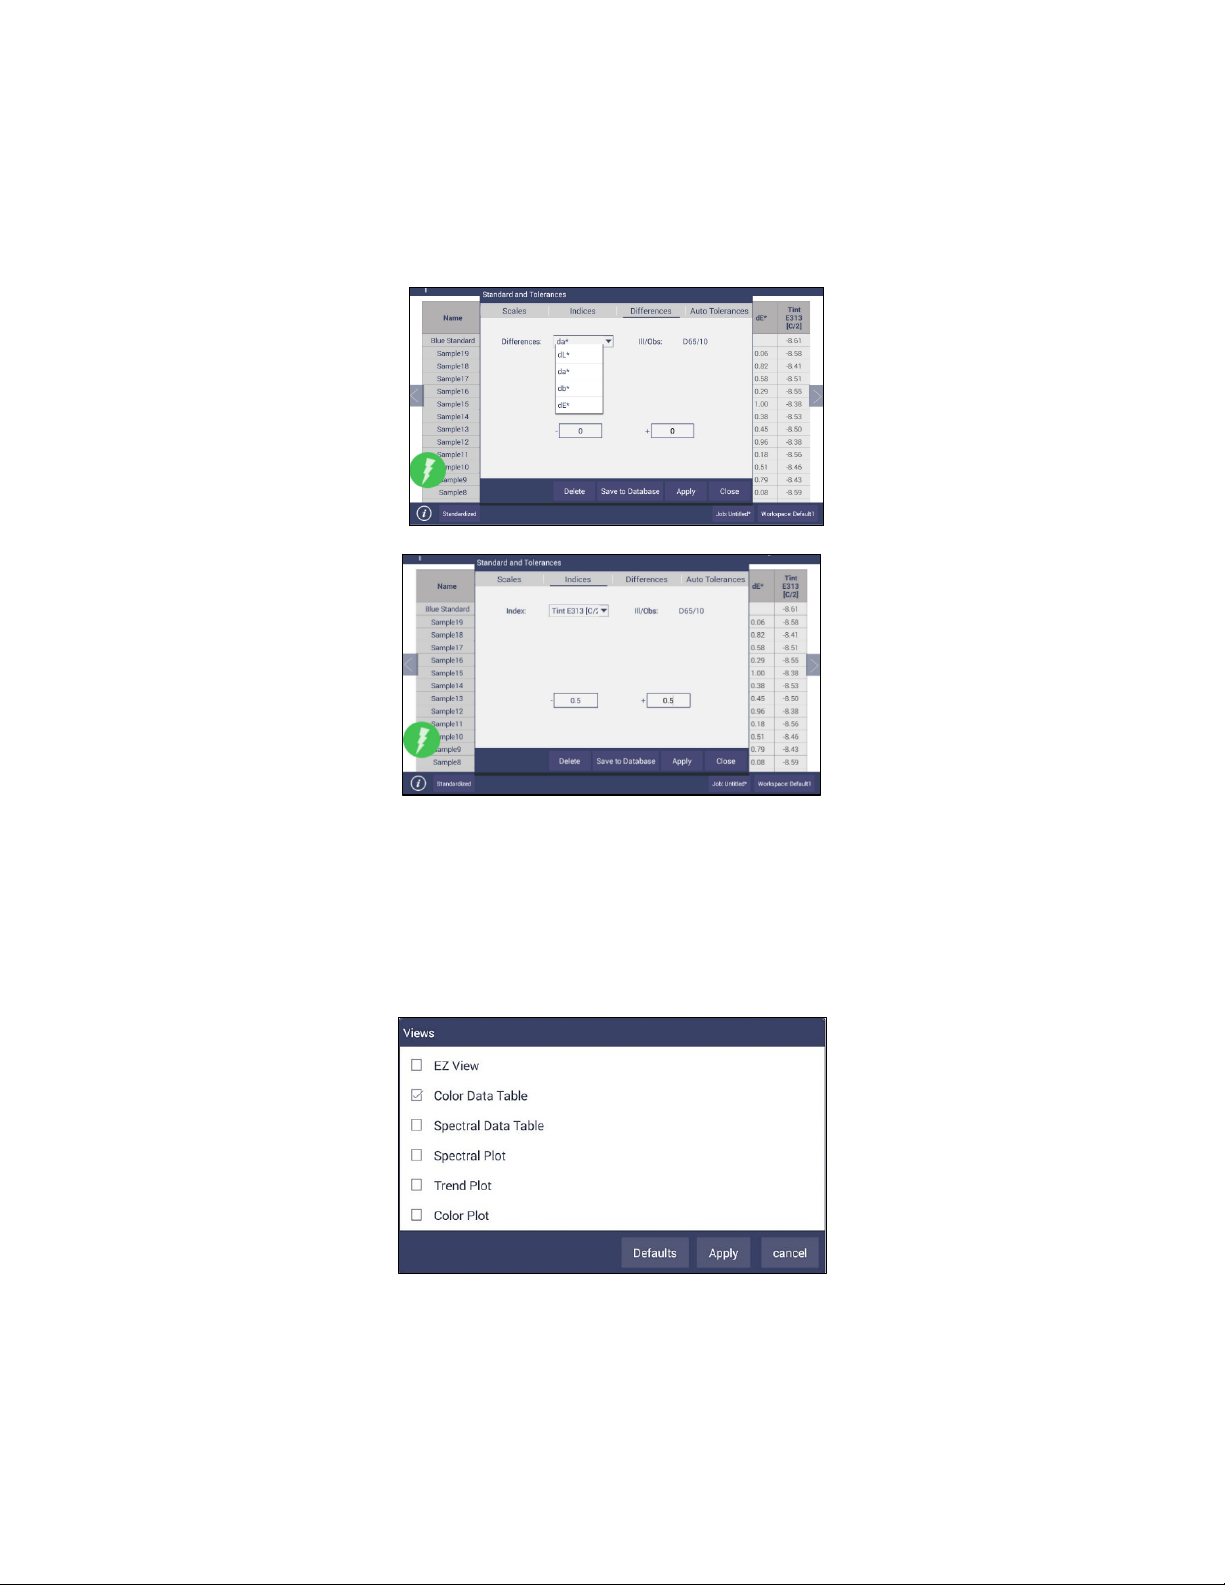
Tolerances can be manually entered for Scales, Indices and Differences. Tolerances will be displayed on
the measurement screen if enabled under VIEW OPTIONS for the Color Data and EZ View Screens.
Pass/Fail based on these tolerances can also be viewed on these screens.
Figure 57. Difference Tolerance Configuration
Figure 58. Indices Tolerance Configuration
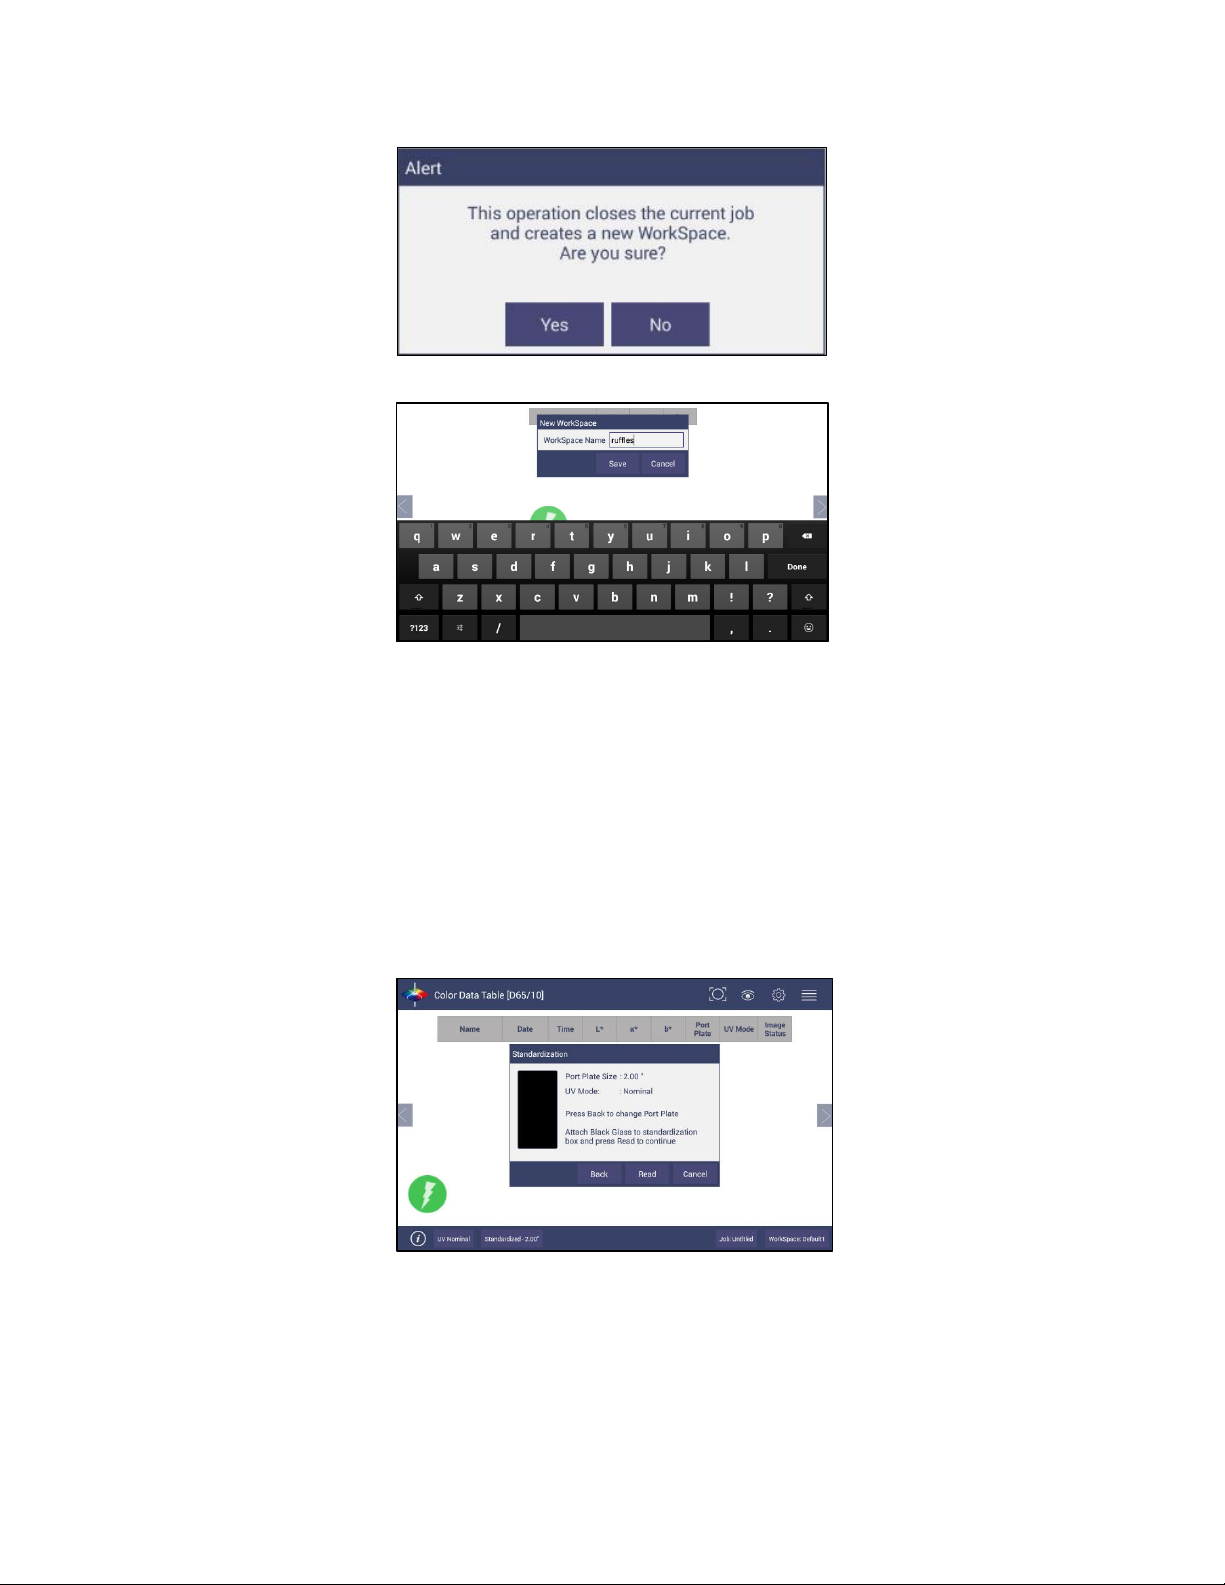
Workspace: Views
This option can be used to select the screen views to be used. Simply check on the box of the screen
needed. Press APPLY to save one or all of the screens. The default screen is the COLOR DATA TABLE. To
navigate between screens once the selections have been applied, use the VIEW FLIPPERS on the left and
right of the screen.
Figure 59. Workspace Views
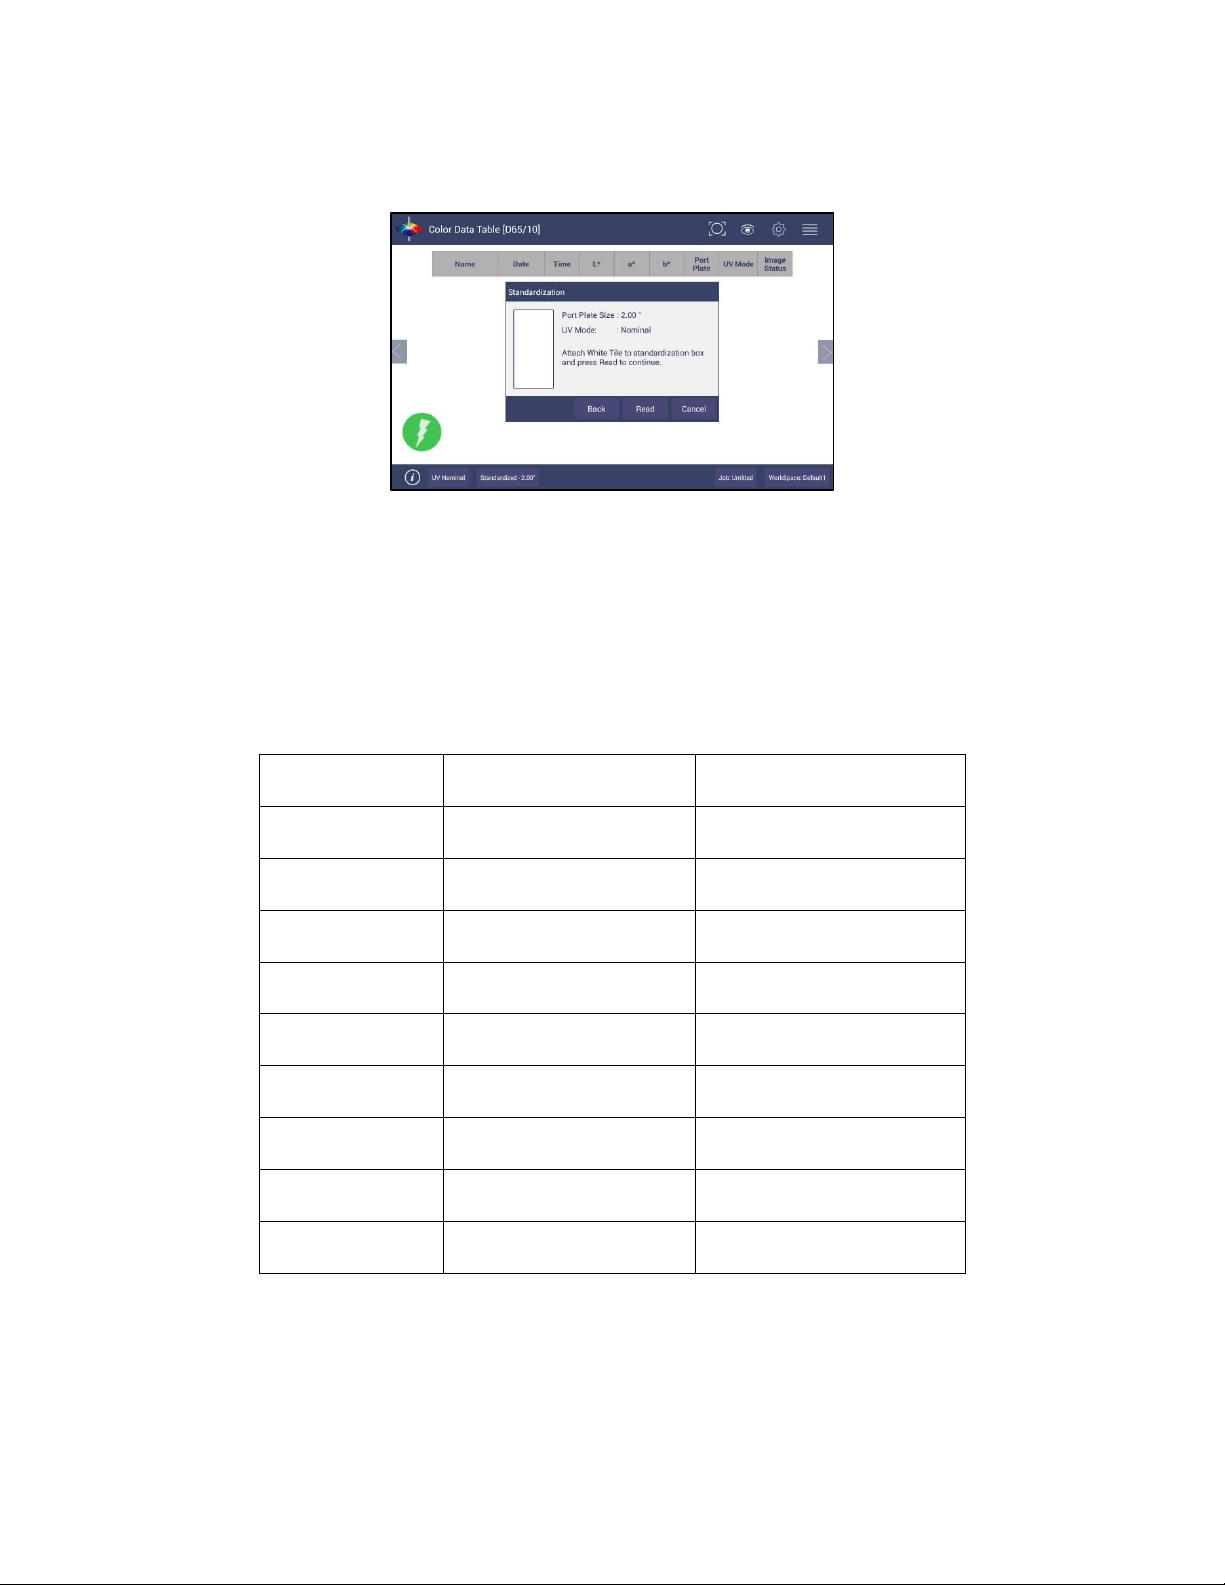
Workspace: New Workspace
This allows the user to create a new workspace. A warning is shown to make sure that the current Job is
saved. All settings in the previous workspace will be loaded in the new workspace.
Page 44
User’s Manual for Agera and EasyMatch Essentials v 1.0
44
Figure 60. New Workspace
Figure 61. Name the New Workspace
System Settings: Standardization
From the WORKSPACE menu, select STANDARDIZATION. You can also press the Standardization button
in the Status bar as a shortcut. The instrument can report the current port plate and UV Mode on the
status bar. Agera can save multiple modes contains different UV settings (nominal, excluded and
calibration) and Area of View (LAV1, LAV2, and SAV).
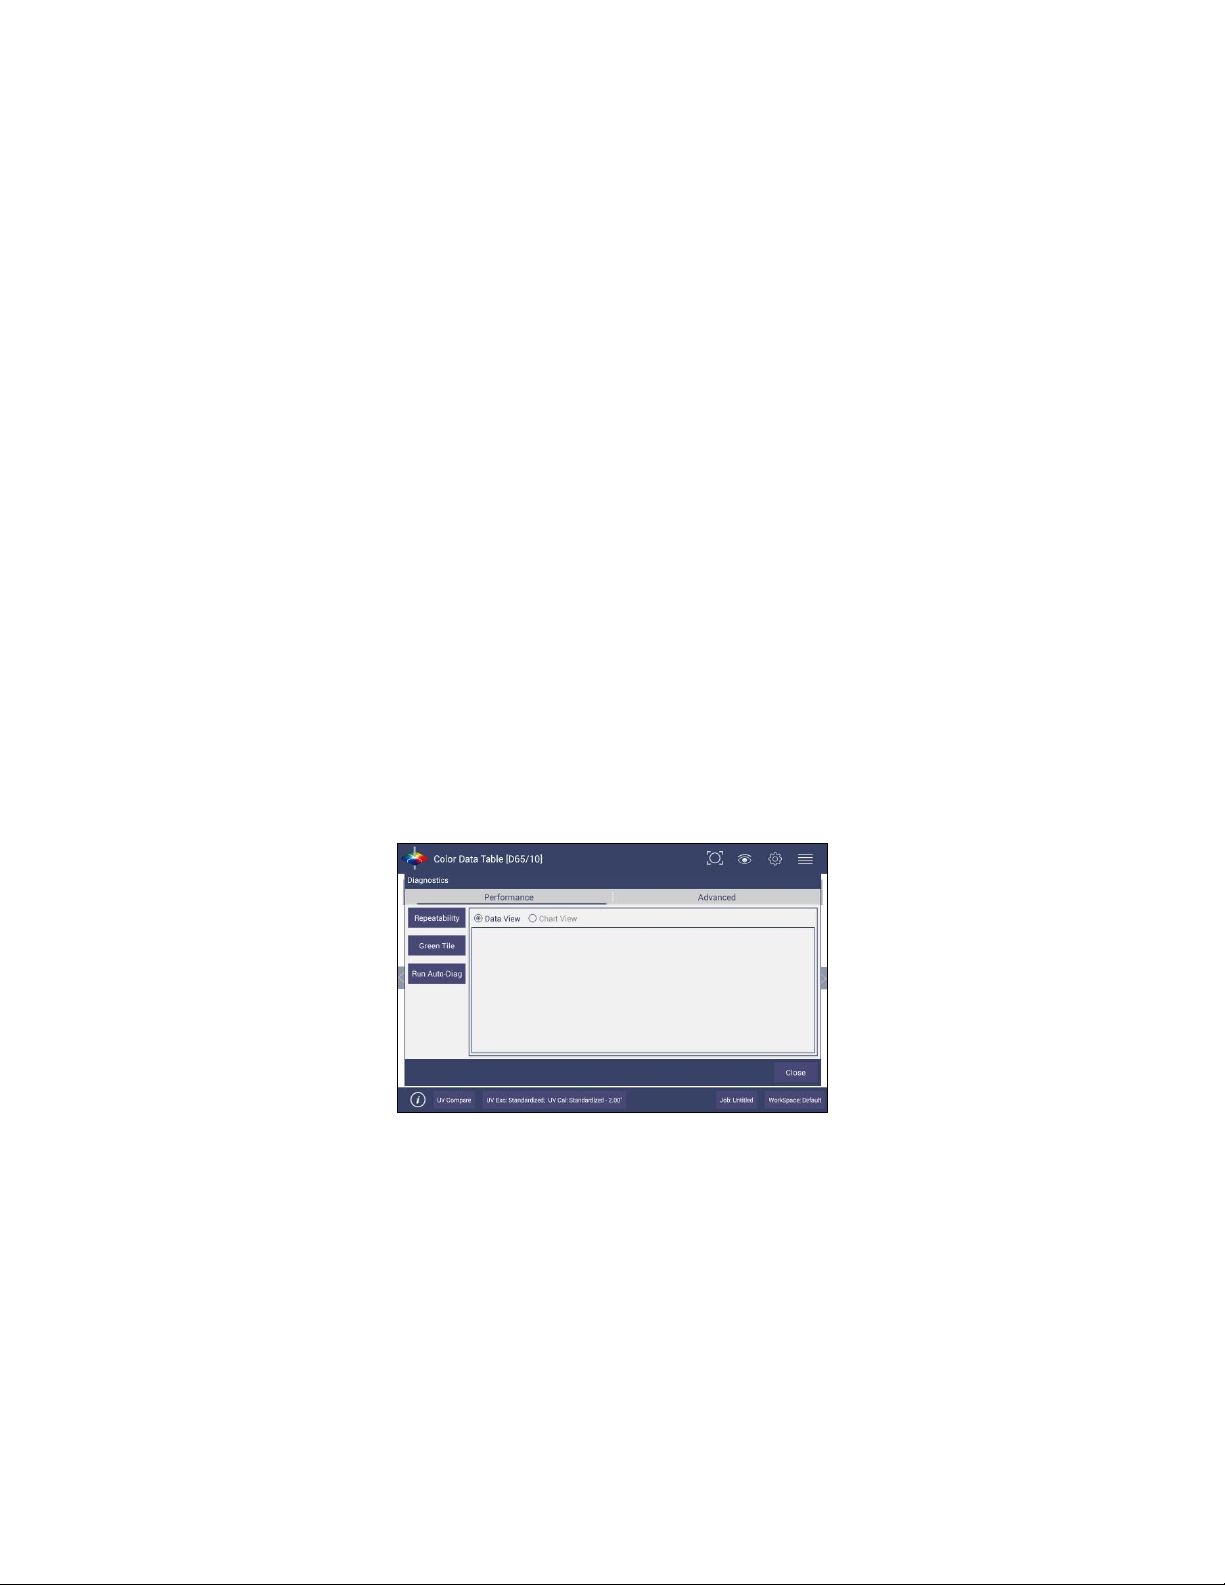
Each Agera has a specific set of Black Glass and White Tile unique to the instrument. These are not
interchangeable with other instruments. Position the standard tiles on the instrument with the white
line matching the white line on the port plate.
• READ BLACK GLASS: Place the Agera black glass on the sensor port. Press READ to continue.
Figure 62. Read Black Glass
Page 45
User’s Manual for Agera and EasyMatch Essentials v 1.0
45
• READ WHITE TILE: Remove the black glass and place the Agera white tile at the port. Press
READ to continue.
Figure 63. Change to White Tile
• Remove the calibrated white tile when standardization is complete. The instrument is ready
to Read Samples.
Multi-Standardization Mode
Agera can save multiple modes with UV Modes and Area of View (Port Plate Settings). Based on the UVstatus and the port plate standardization, the nine modes can be stored and recalled for measurement.
Table 5. Multiple Modes
Mode
UV
Port Plate
1
Nominal
LAV 1: 51mm (2.0 in)
2
Nominal
LAV2: 25.4mm (1.0 in)
3
Nominal
SAV: 16.9mm (0.625 in)
4
Calibrated
LAV 1: 51mm (2.0 in)
5
Calibrated
LAV2: 25.4mm (1.0 in)
6
Calibrated
SAV: 16.9mm (0.625 in)
7
Excluded
LAV 1: 51mm (2.0 in)
8
Excluded
LAV2: 25.4mm (1.0 in)
9
Excluded
SAV: 16.9mm (0.625 in)
To update Standardization Status for a new mode, place the new port plate on the instrument and/or
change UV status by UV button and click the READ button. The standardization status will be updated. If
the standardization of this new mode is valid, then the sample will be read. If the standardization is not
valid, a dialog box will be shown so prompt for new Standardization.
Page 46
User’s Manual for Agera and EasyMatch Essentials v 1.0
46
When using UV compare, there are two standardization modes associated – one for UVcalibrated and one for UV-excluded. Both modes must be valid before measurements can be
taken.
Standardization and Port Plate/Area of View
Each Agera can determine the port plate in view and adjust accordingly. The sizes are as follows:
• LAV 1 - 54 mm (2.125 in) illumination; 51 mm (2.0 in) measured
• LAV 2 - 28.6 mm (1.125 in) illumination; 25.4 mm (1.0 in) measured
• SAV - 17.46 mm (0.6875 in) illumination; 16.9 mm (0.625 in) measured
Gloss Standardization
Gloss standardization is automatically done while performing instrument color standardization and uses
the Black Glass as the reference.
Agera includes a built-in 60-degree gloss meter with a single LED illumination (filtered to C/2)/detector
pair in conformance with ASTM D523and located right below the sample port plate.
Gloss measurement works with all three port plates.
Agera reports gloss when selected as an index in WORKSPACE > COLOR SCALES > INDICES > GLOSS.
System Settings: Diagnostics
The performance diagnostics are Repeatability and a Green Tile Test. Both tests use the 1.00 in port
plate and UV-excluded.
Figure 64. Performance Diagnostics Menu
Colorimetric Repeatability
The Repeatability Test assesses how consistently the instrument can measure color. To begin the
sample pan should be free of samples and obstacles. Click NEW button to start the repeatability test
and the user is prompted to press OK to standardize. All sample readings must be within the
tolerances to pass the test.
Page 47
User’s Manual for Agera and EasyMatch Essentials v 1.0
47
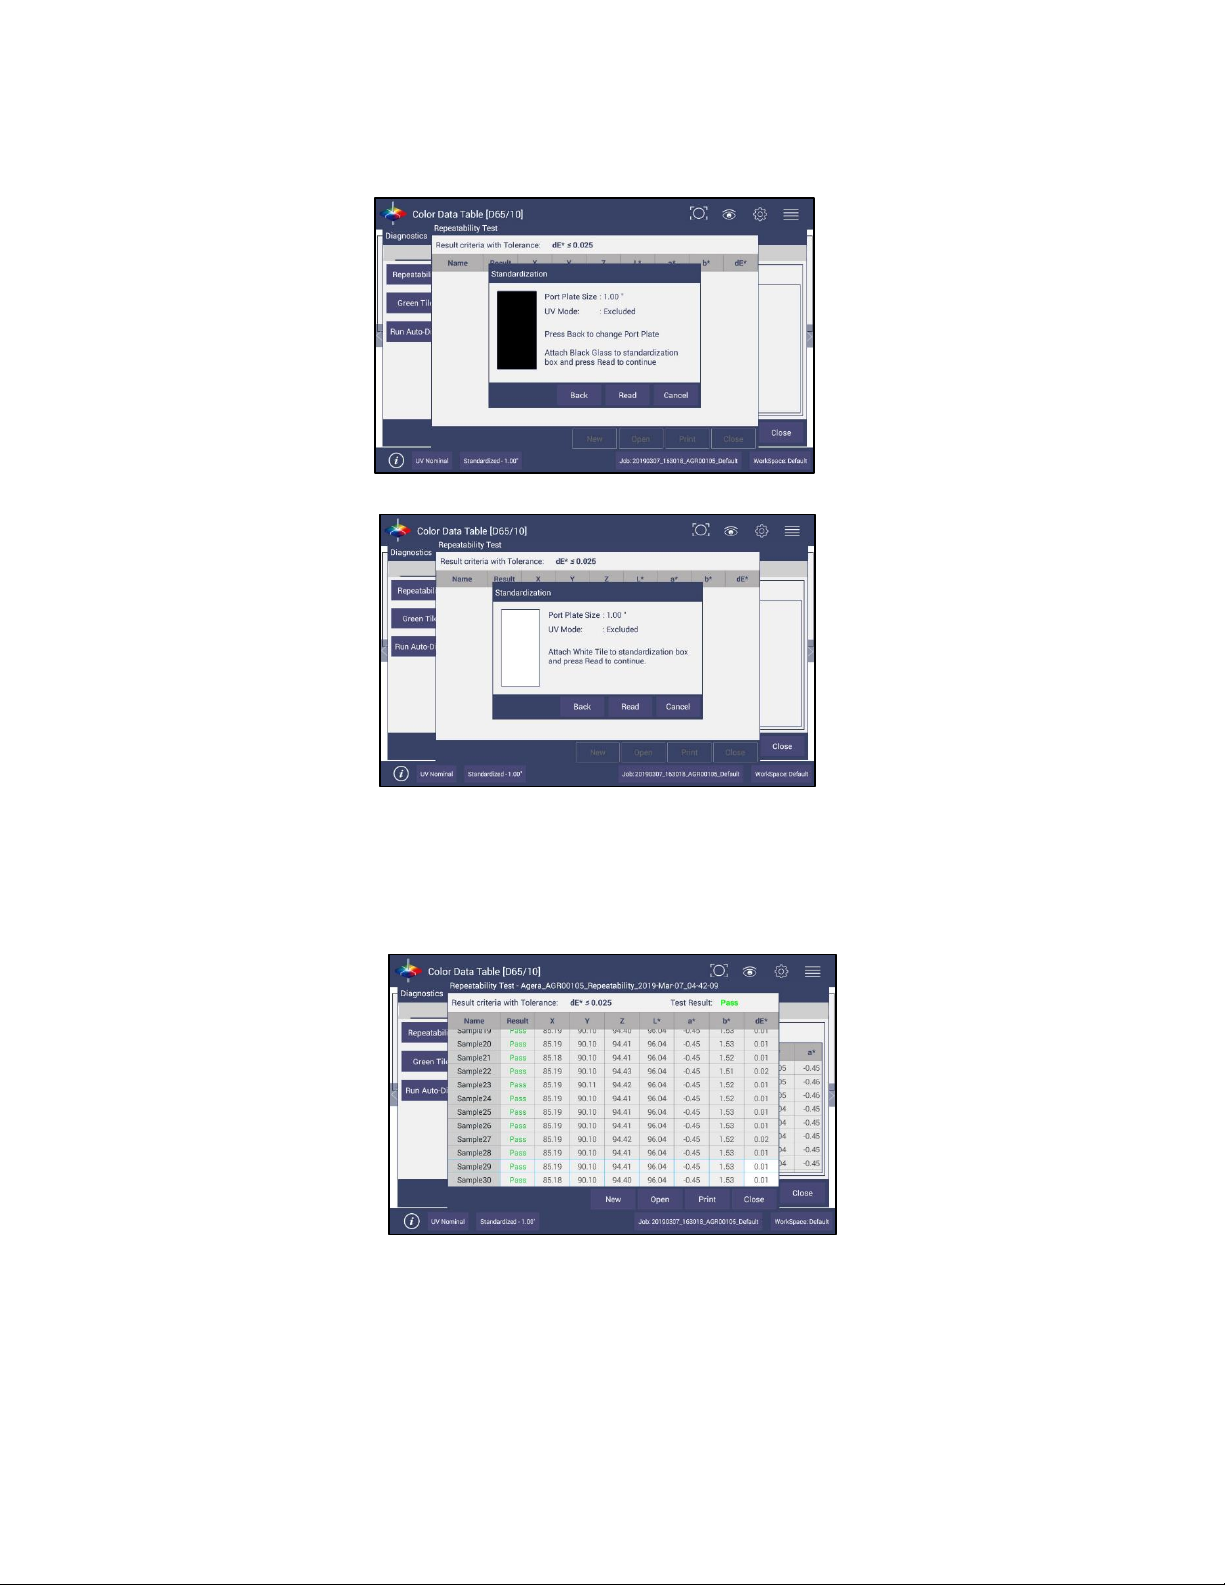
• READ the Agera black glass and then the Agera white tile.
Figure 65. Standardize the Instrument
Figure 66. Read White Tile
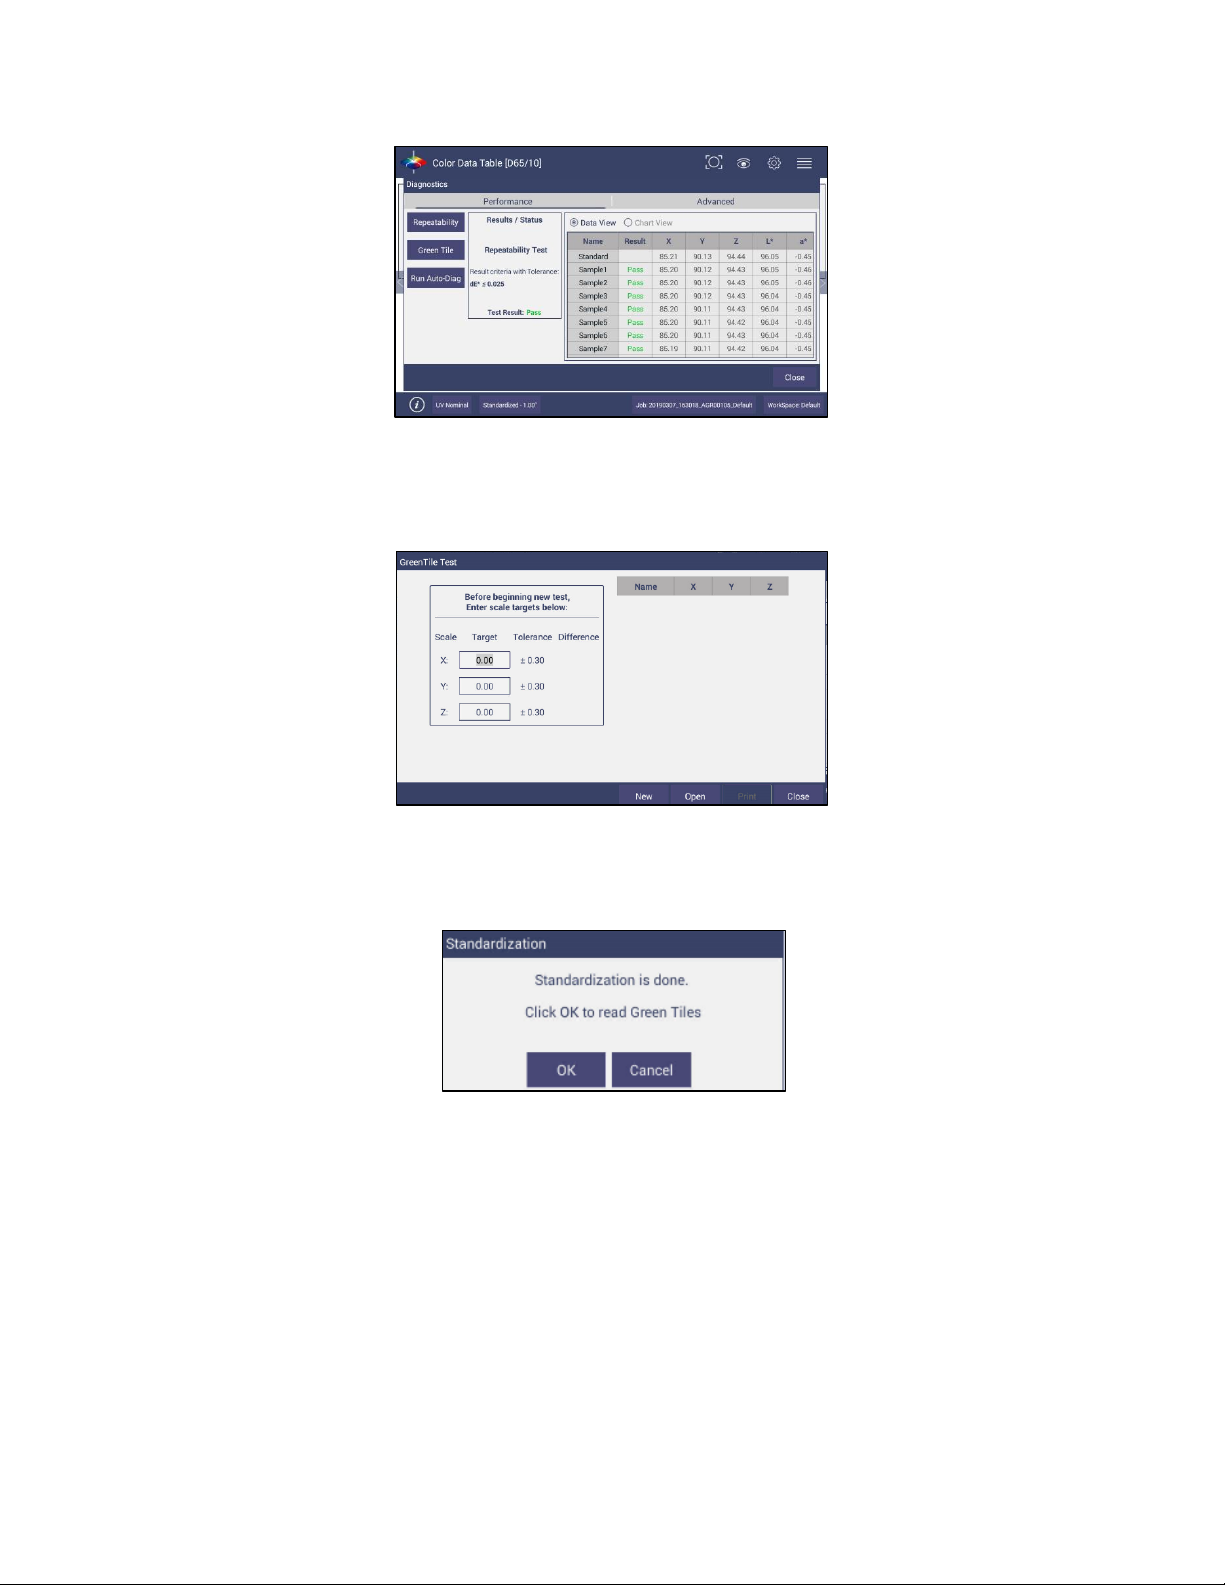
• Leave the white tile at the port and press OK to initiate the repeatability readings. The
white tile is read 30 times and the individual results reported. A table of the difference
between the current reading and Standard is shown after every measurement. By
comparing each reading to the tolerance, a Pass/Fail assessment is shown.
Figure 67. Repeatability Readings with Pass/Fail
When all 30 readings have been made, the final test result is shown and saved
automatically. To print the results, press the PRINT button or click to open the file and then
Print.
Page 48
User’s Manual for Agera and EasyMatch Essentials v 1.0
48
Figure 68. Diagnostics Repeatability Test Results
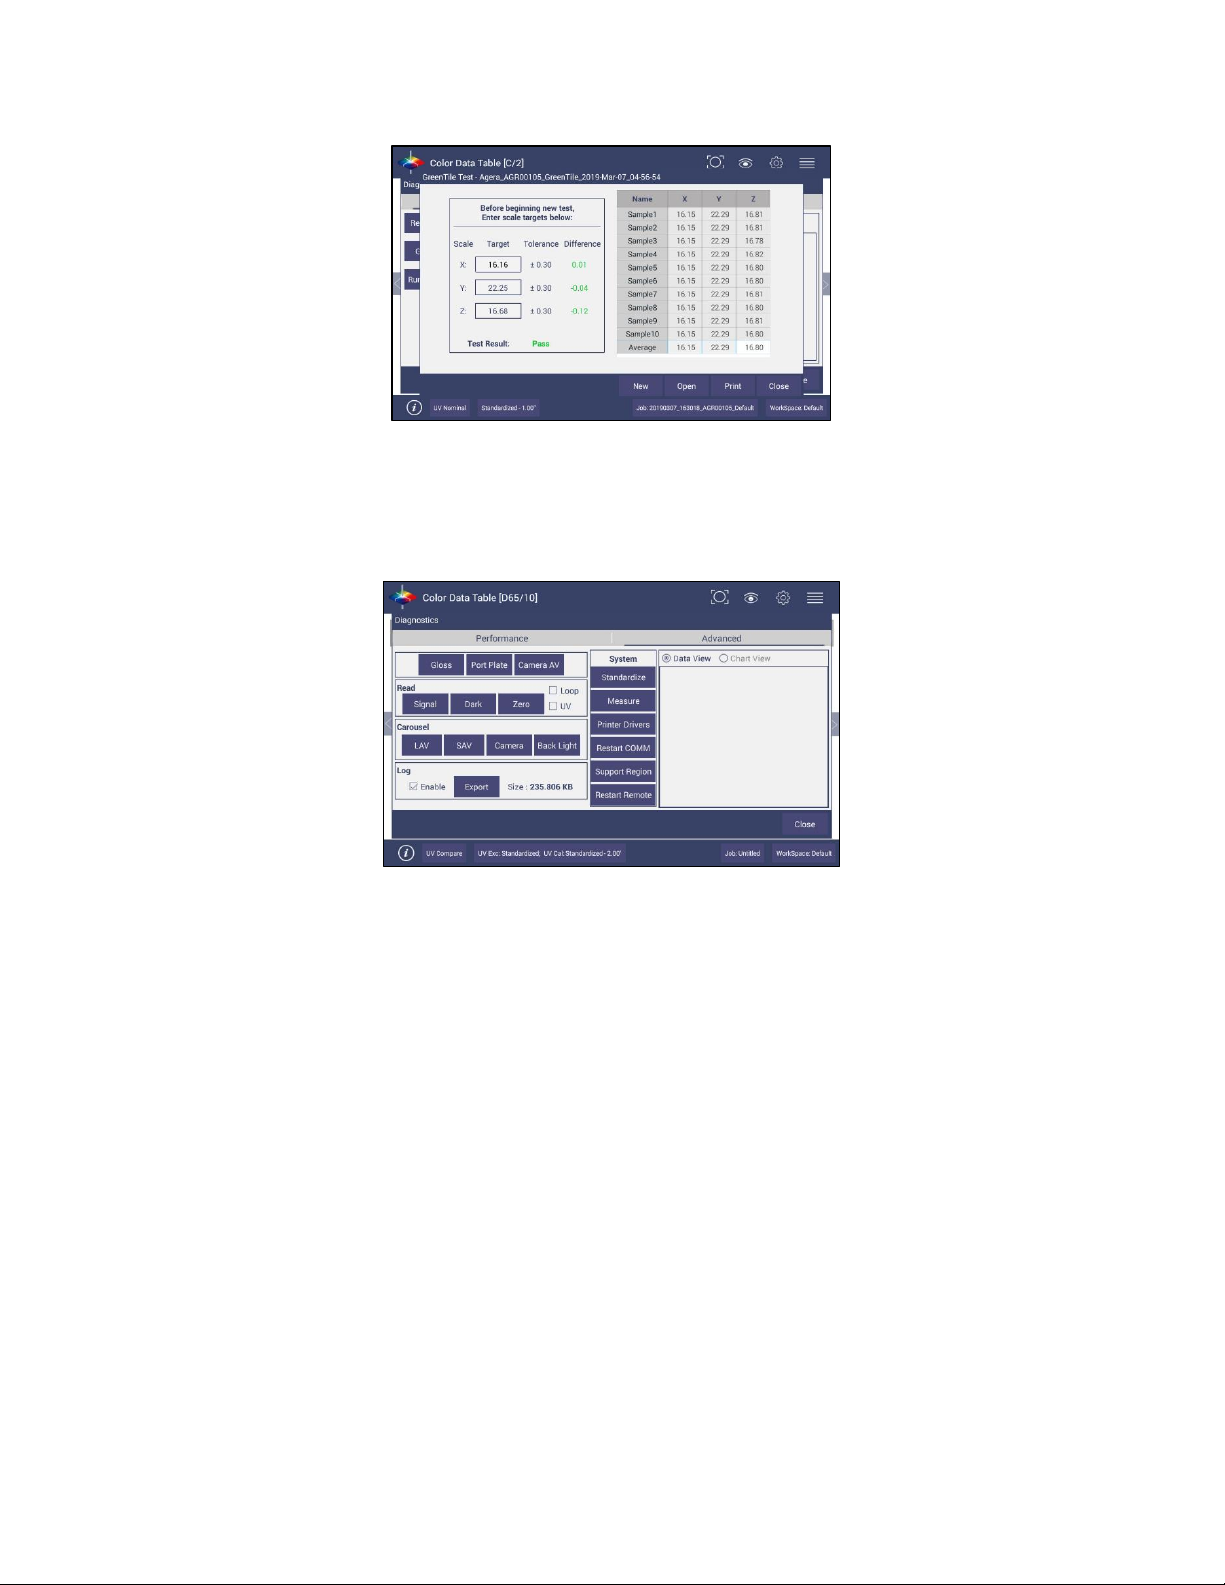
Reading the Green Tile
• This test requires entry of the target values for the green tile.
Figure 69. Input Target Values for Green Tile
• Once the target values have been entered, press NEXT. Standardize the instrument and
attach the Green Tile. Press OK to continue.
Figure 70. Place the Green Tile at the Port
• Ten readings are taken and compared to the tolerance as an average. This test is then
automatically saved and can be printed by pressing PRINT.
Page 49
User’s Manual for Agera and EasyMatch Essentials v 1.0
49
Figure 71. Green Tile Readings
Advanced Tests
Advanced Tests are primarily for use by HunterLab’s Service Department. However, this menu supports
the upload of Printer Drivers, Parking of the sensor for Shipping, and remote support setting.
Figure 72. Advanced Menu
• GLOSS: Provides the current sample’s gloss value and raw gloss counts in the Data View.
• PORT PLATE: Provides the current port plate code and size in the Data View. If the port
plates are being read incorrectly, please contact the Service Department.
• CAMERA AV: Used to detect/calculate the sampling area of each port plate. To use this
feature each port plate should be read with a white translucent sample at the plate. The
process of reading will calibrate the sampling area.
• READ SIGNAL, DARK, ZERO: This function will enable the Service Department to determine
proper performance of the instrument.
• CAROUSEL: Moves the LAV lens/SAV lens/Camera position of the item selected. For
example, if you click on LAV, it will move to the LAV lens. The Back light is used to check if
the SAV/LAV lens are aligned correctly.
• ENABLE LOG: Once check enabled, this feature records the instrument actions for tracking
purposes. When complete the user returns to this screen and exports the data to a thumb
drive. Once the data export is completed the data size becomes ‘0’ again.
• STANDARDIZE: Initiates standardization from the Diagnostics screen.
• MEASURE: Initiates the measurement of a sample from the Diagnostics screen. The
reflectance spectra data will be showed in this Data View.
Page 50
User’s Manual for Agera and EasyMatch Essentials v 1.0
50
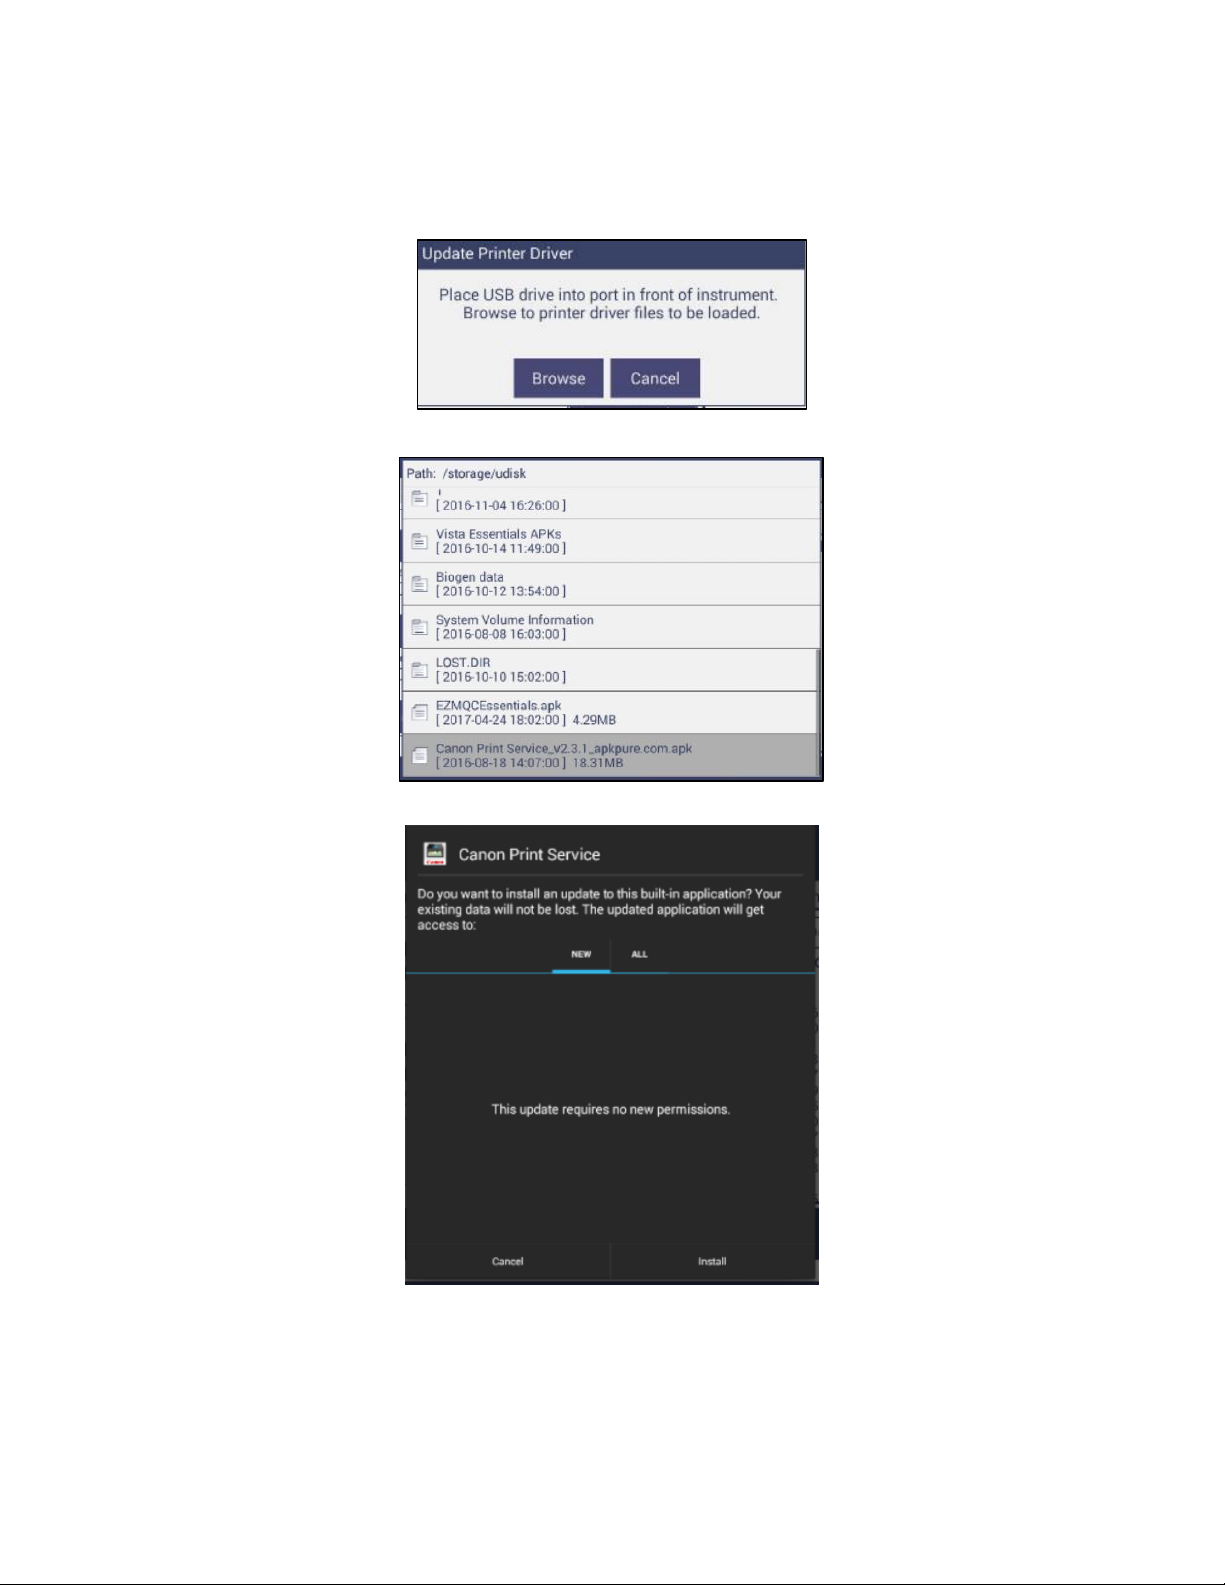
• PRINTER DRIVERS: To upload a new print driver or apk file, download the apk file needed
from the internet onto a flash drive. Place the flash drive into the instrument (front port) so
that it can access the list of apk files. Select the driver to upload and press OK.
Figure 73. Insert USB with Printer Driver
Figure 74. Select Printer Driver
Figure 75. Updating Printer Drivers
Page 51
User’s Manual for Agera and EasyMatch Essentials v 1.0
51
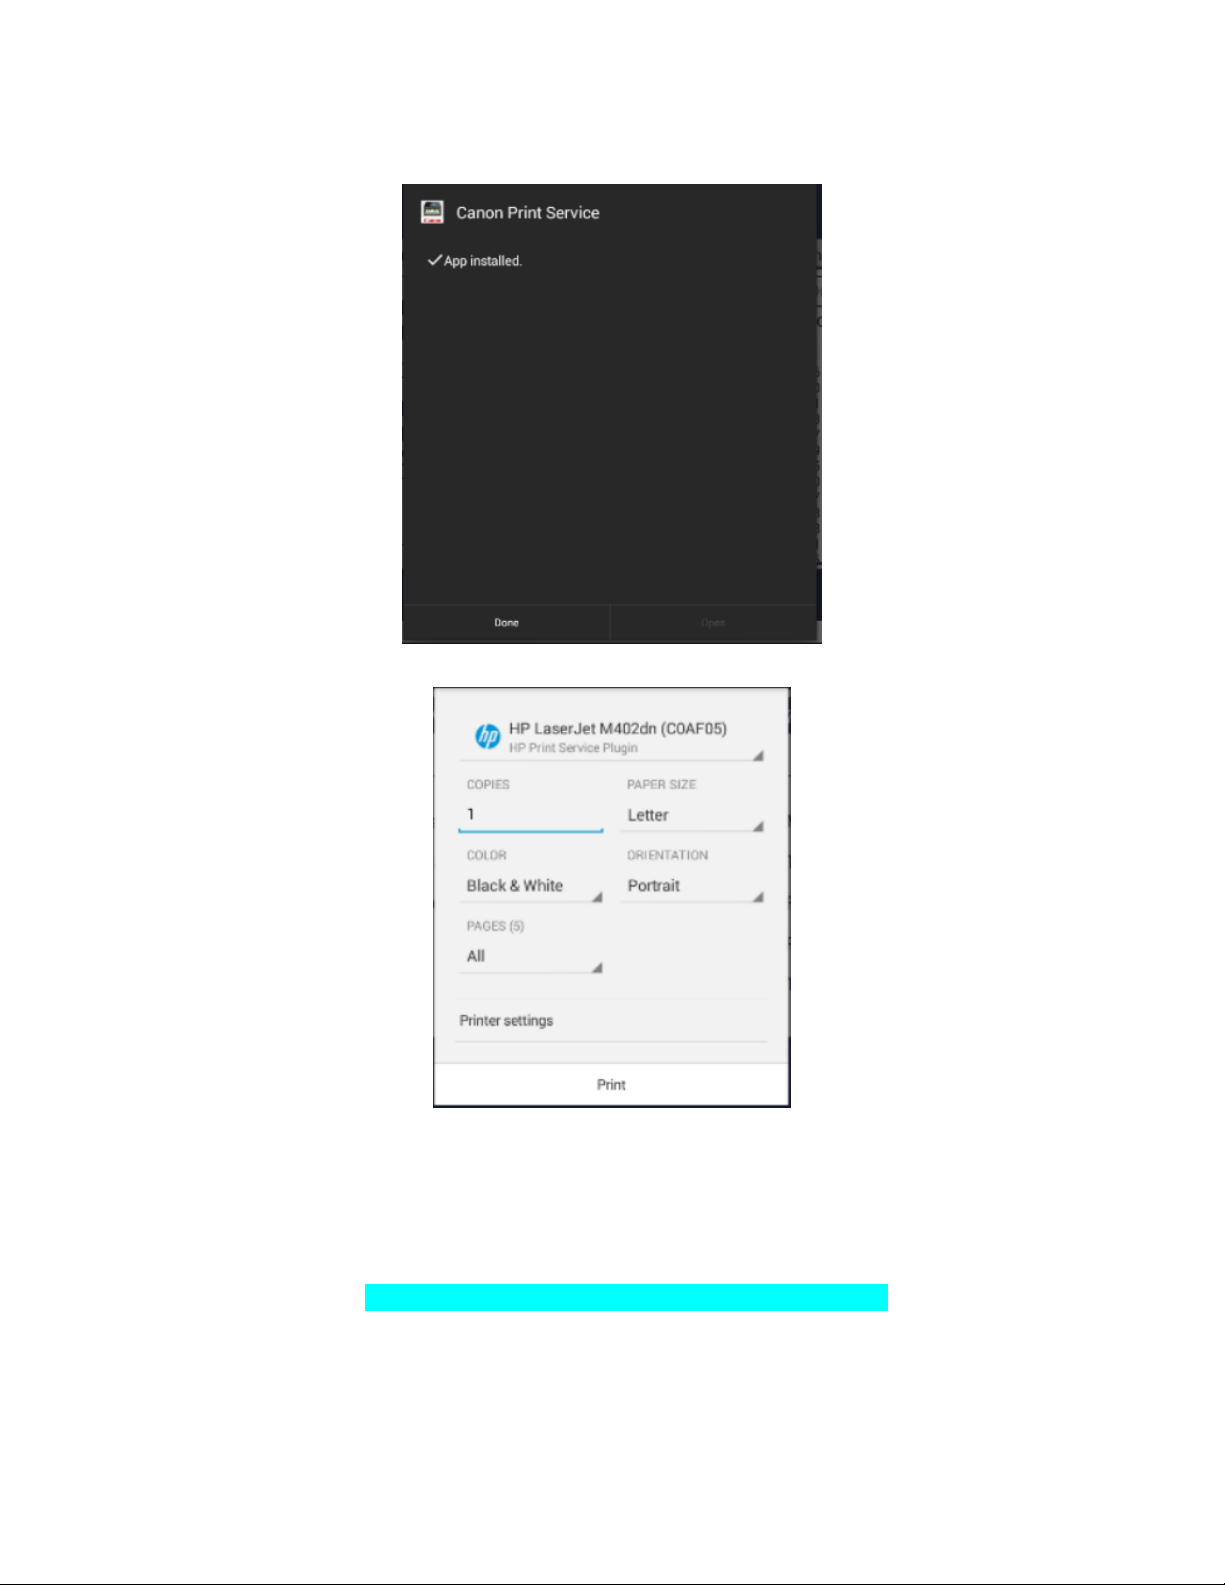
• The Agera will install the new printer driver.
Figure 76. Printer Driver Installed
Figure 77. Printer Page
• RESTART COMM can be used to reset the ethernet communications for EasyMatch QC.
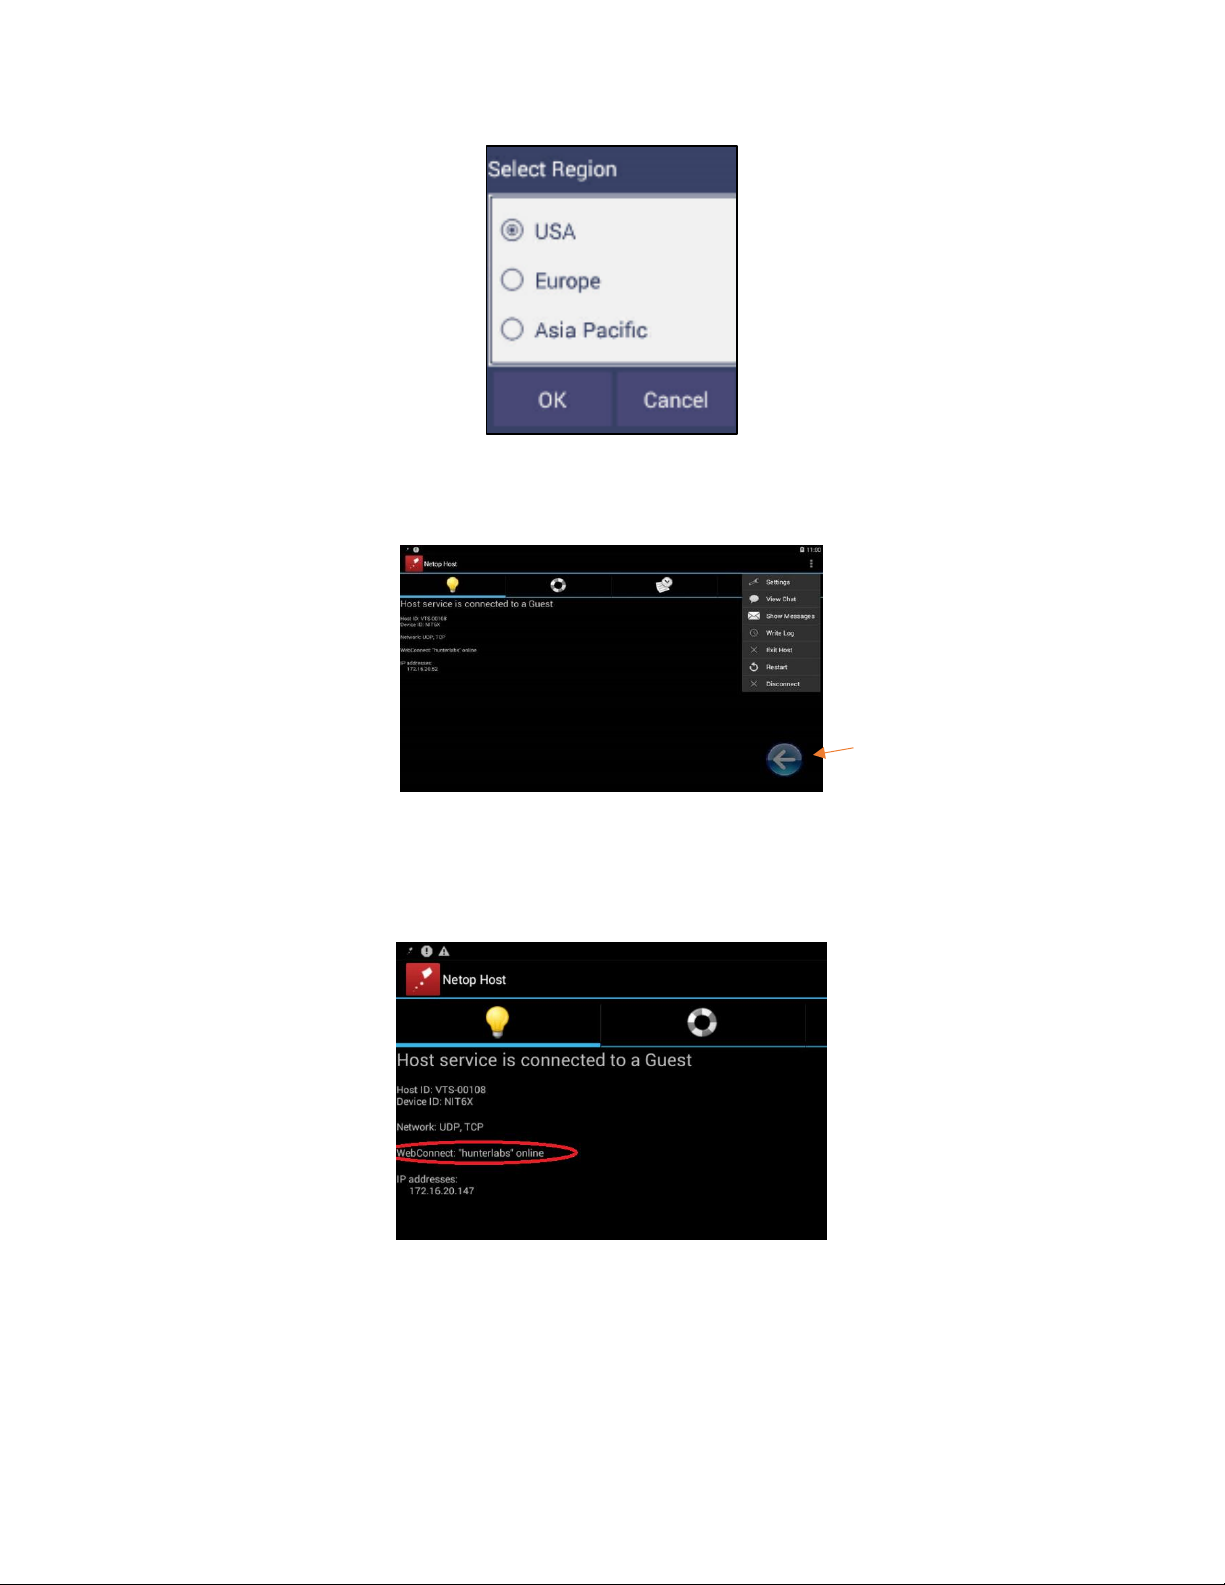
▪ SUPPORT REGION: Select SUPPORT REGION. A dialog is displayed with three options for
region selection. Select the region (from USA, EUROPE OR ASIA PACIFIC) and then press OK.
To apply this change, please restart support using the method below.
Note: Your instrument must be connected to the internet.
Page 52
User’s Manual for Agera and EasyMatch Essentials v 1.0
52
Figure 78. Select Region
• RESTART SUPPORT to view the Netops Host Screen. From the top right side of the
Netops Host screen, select the 3 dots. From the list menu, select RESTART.
Figure 79. Remote Access Screen
▪ To ensure that REMOTE SUPPORT is successfully restarted, make sure that you see
the message WebConnect: ‘hunterlabs’ online. If this message does not appear,
please contact our support team. To exit press the floating back button.
Figure 80. Web connect to HunterLab
Exit Arrow
Page 53
User’s Manual for Agera and EasyMatch Essentials v 1.0
53
System Settings: Preferences
Preferences: General
This allows the user to set preferences to:
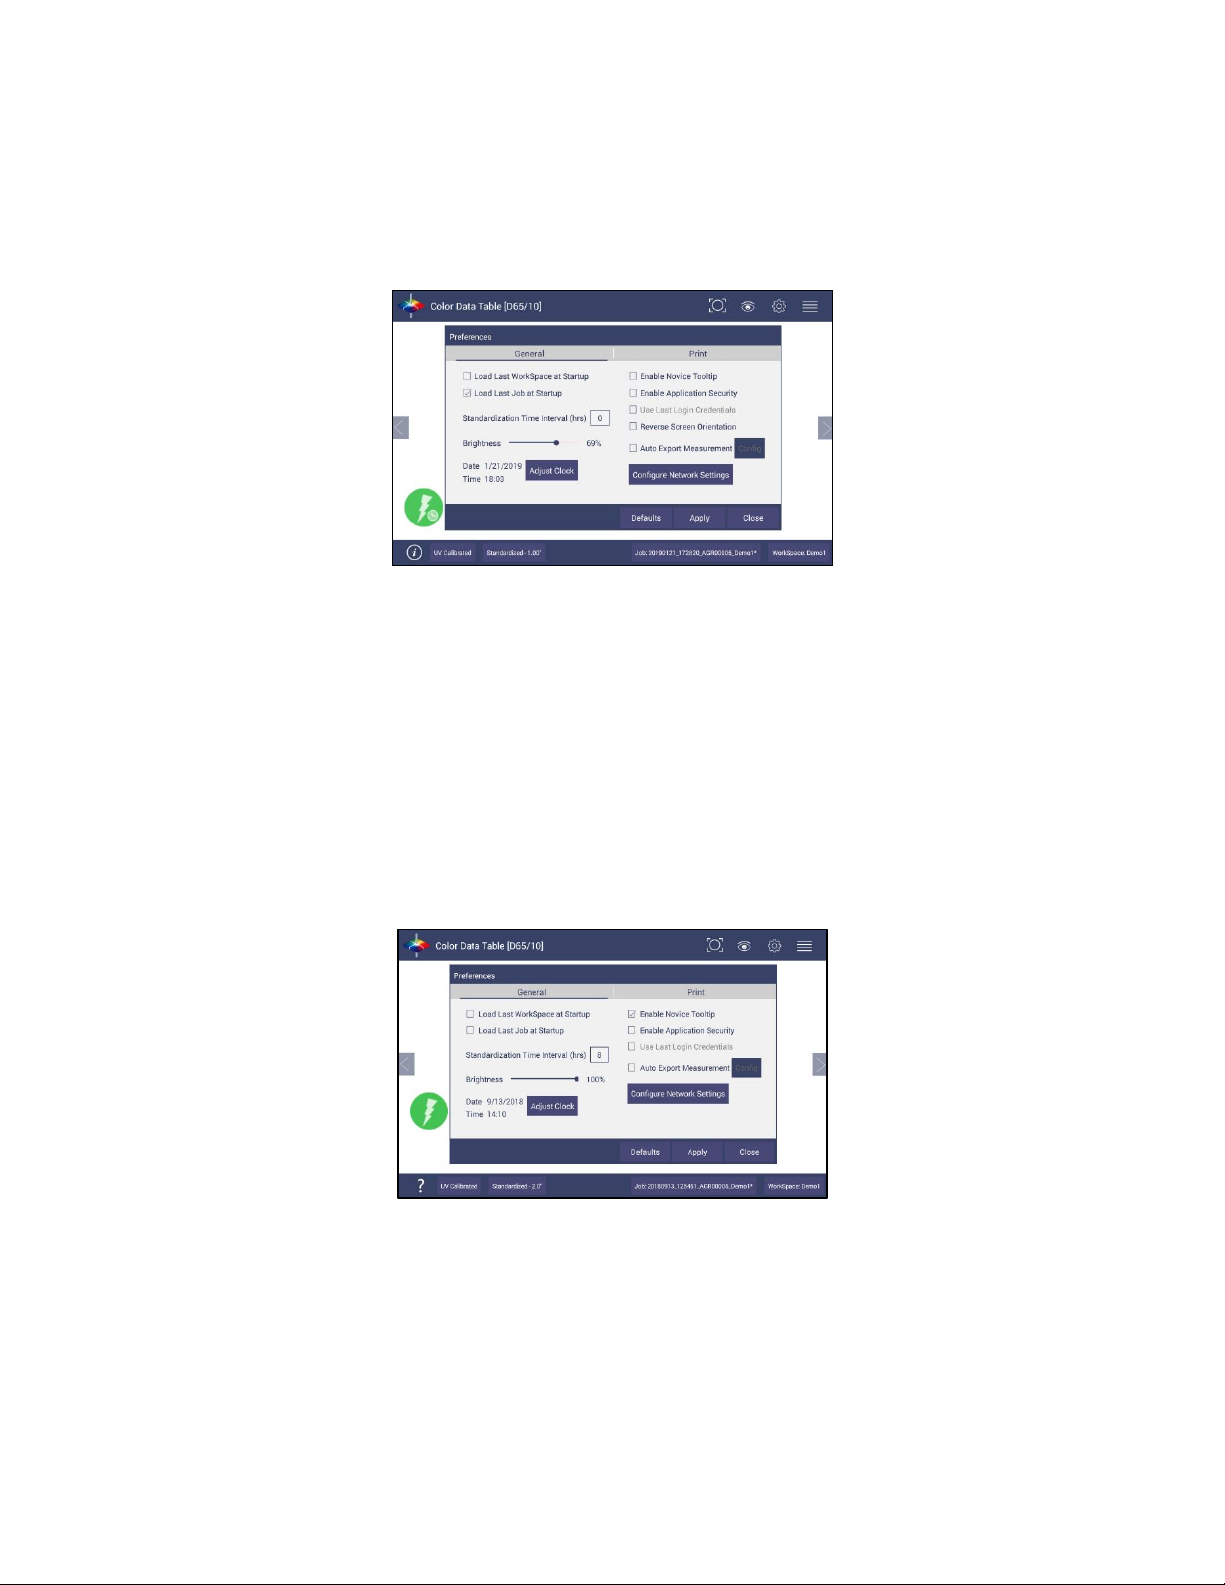
Figure 81. System Settings > Preferences > General Page
• To Load the LAST WORKSPACE AT STARTUP check this box and press APPLY.
• To Load the LAST JOB AT STARTUP, check this box and press APPLY.
• The STANDARDIZATION TIME INTERVAL is a useful reminder to re-standardize. Press APPLY
to set the new interval. When the time has lapsed, a prompt to re-standardize will be
displayed before measurements can be taken.
• Set the screen BRIGHTNESS using a sliding scale and press APPLY.
• Set the Date and Time, time zone, and format use the ADJUST CLOCK feature.
• ENABLE NOVICE TOOLTIPS by checking on the box. Once enabled, on screen tips are displayed
for 3 seconds. To display again, roll over the LIGHTBULB ICON on the lower right part of the
screen.
Figure 82. Enable Novice Tool Tips
Page 54
User’s Manual for Agera and EasyMatch Essentials v 1.0
54
Figure 83. Example of Novice Tool Tip
• ENABLE APPLICATION SECURITY. This selection is available after the User Manager has been
set up. Please refer to the SYSTEM SETTINGS > USER MANAGER for more information.
▪ When this is selected, the application will require valid login credentials at startup.
On successful login, the user name will be shown in the status bar. If USE LAST
LOGIN CREDENTIALS is checked, the user will be automatically logged in on
subsequent startups.
• REVERSE SCREEN ORIENTATION. The Essentials screen is default setup for port up Agera. If
port forward orientation is required, then go to WORKSPACE > PREFERENCES and check
REVERSE SCREEN ORIENTATION and click APPLY. Power off/on Agera to get the screen
orientation changed.
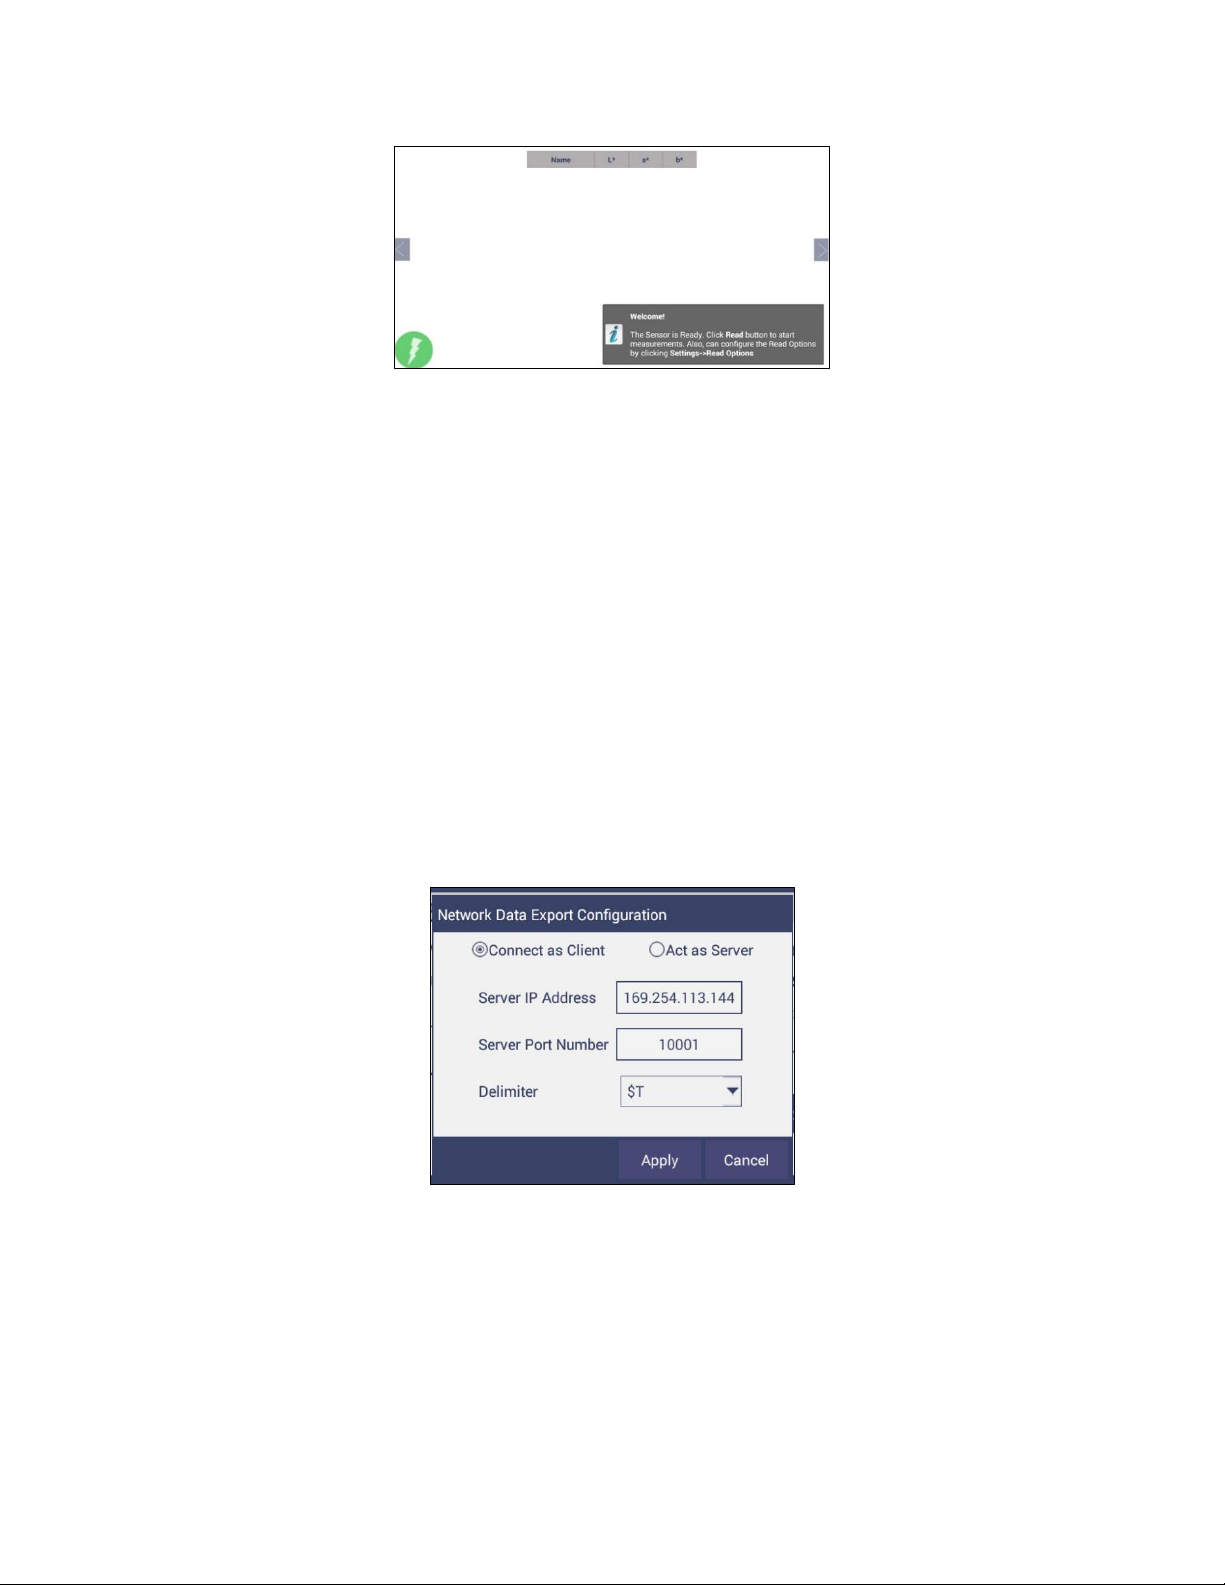
• To CONFIGURE AND ENABLE THE NETWORK DATA EXPORT, the Configuration menu is
presented.
For direct connection to a computer, CONNECT AS CLIENT. Enter the SERVER IP ADDRESS,
PORT NUMBER and DELIMITER and press APPLY.
For connection to a network, select ACT AS SERVER. Enter the Port number and delimiter
and press APPLY.
Figure 84. Data Export Configuration
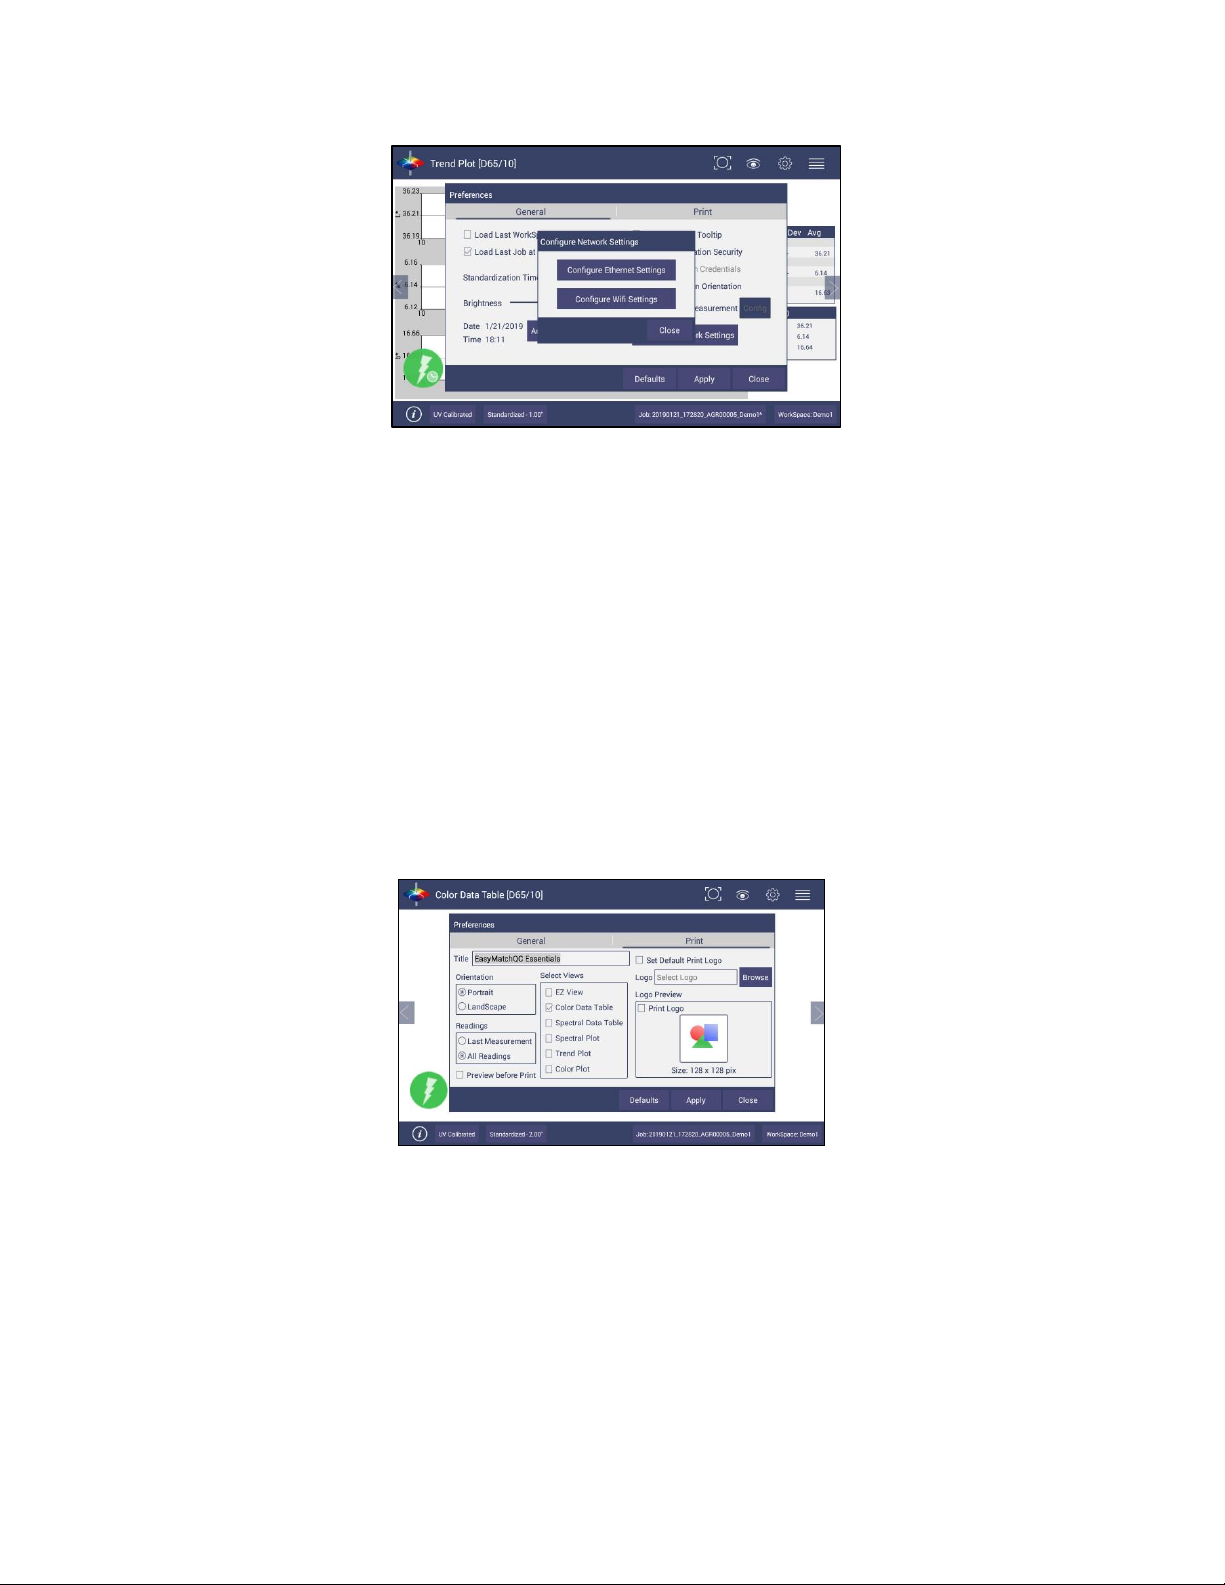
• In Network settings, one can use an Ethernet cable or setup a WiFi Connection.
Page 55
User’s Manual for Agera and EasyMatch Essentials v 1.0
55
Figure 85. Network Settings
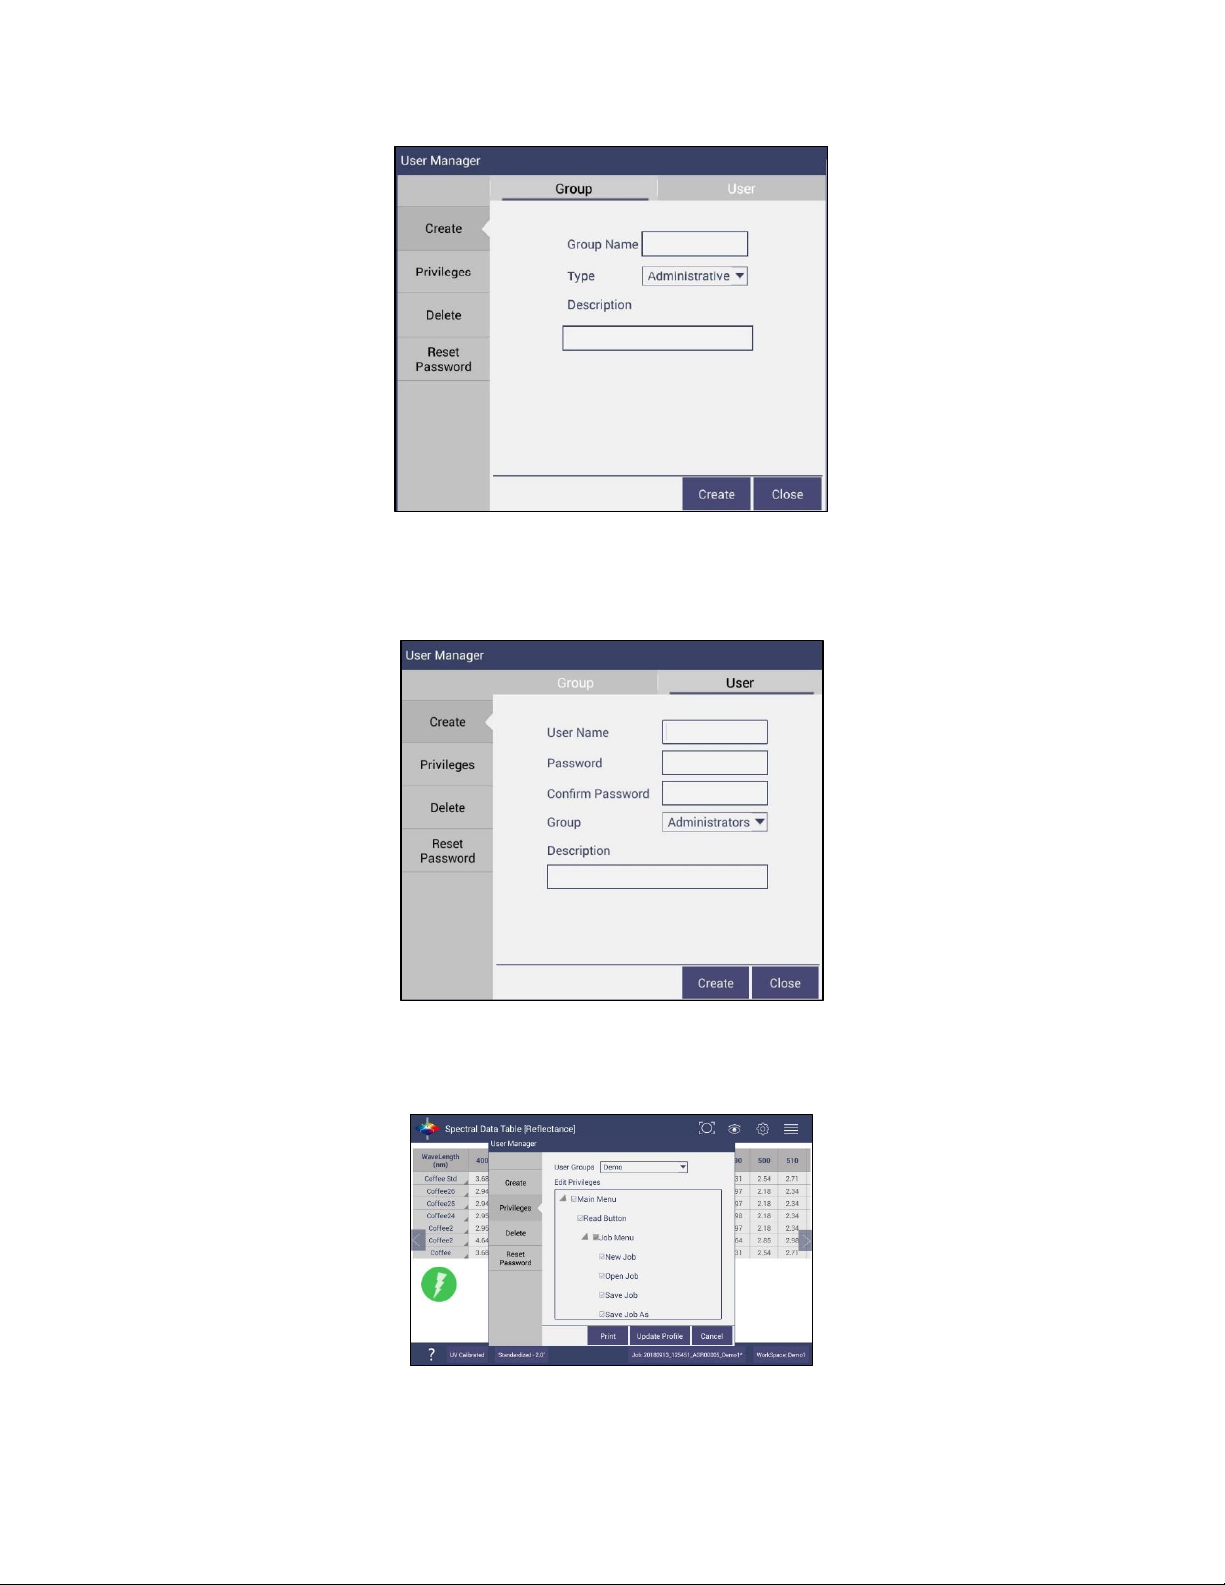
Preferences: Print
The Print page allows the user to configure:
• Enter a TITLE for the printout.
• Select PORTRAIT OR LANDSCAPE orientation.
• Select LAST MEASUREMENT or ALL READINGS for the job.
• The option to PREVIEW before print.
• Select the VIEW to print, i.e. EZ VIEW, COLOR DATA TABLE, SPECTRAL DATA TABLE, SPECTRAL
PLOT, TREND PLOT and COLOR PLOT.
• Select LOGO. To apply a logo, import the logo first and then BROWSE to select. This logo can
be used as a DEFAULT LOGO for all printouts or selected for each printout using the
SELECTION BOX TO PRINT the Logo.
• To save changes, press APPLY. To use a default setup, press DEFAULTS.
Figure 86. System Settings > Preferences > Configure Print Page
System Settings: User Manager
Security can be enabled on the Agera to ensure that operators cannot modify/delete folders or files and
limit their functionality. An administrator is identified to set up the users/groups with selected
privileges.
• To begin, go to WORKSPACE > USER MANAGER to set up Create Administrative Groups first
followed by Create User Groups.
Page 56
User’s Manual for Agera and EasyMatch Essentials v 1.0
56
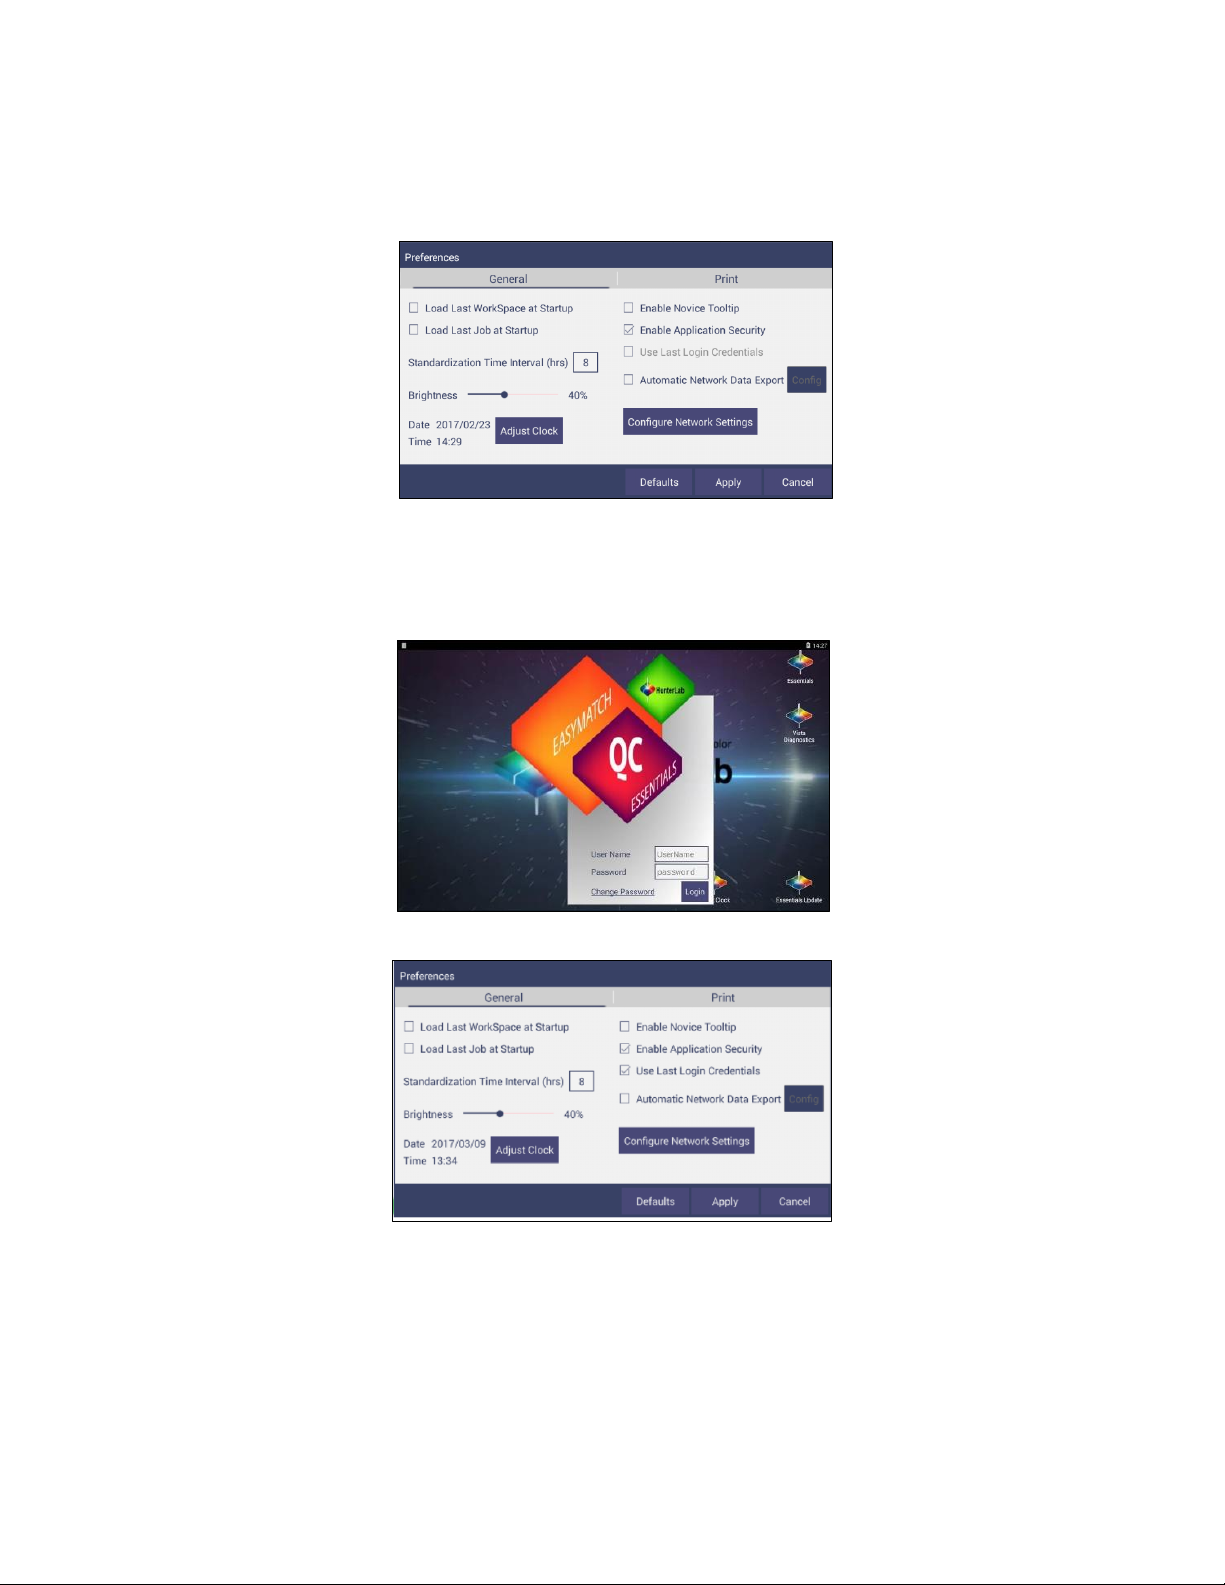
Figure 87. Create a Group
• Once the groups have been established, then individual users with USER NAMES and
PASSWORDS can be setup for both Administrator and User Groups.
Figure 88. Setup Administrative & General Users
•
Users in Administrative Groups have all features enabled. For Users in User Groups,
Privileges can be setup as shown below. Press UPDATE PROFILE to complete.
Figure 89. User Privileges
Page 57
User’s Manual for Agera and EasyMatch Essentials v 1.0
57
• If a printer is attached, you can PRINT a list of Privileges selected.
• To complete enabling security, go to WORKSPACE > PREFERENCES and ENABLE SECURITY on
the right side.
Figure 90. Enabling Security
• After enabling security, each user must enter a name and password when logging into the
Agera. For convenience, the user can check the box under WORKSPACE > PREFERENCES >
GENERAL to use the LAST LOGIN CREDENTIALS.
Figure 91. Login Credentials
Figure 92. Enable Last Login Credentials
• If needed, the administrative user can delete groups / users and reset passwords of all
Groups & Users.
Page 58

User’s Manual for Agera and EasyMatch Essentials v 1.0
58
Page 59
User’s Manual for Agera and EasyMatch Essentials v 1.0
59
Toolbar: View Options
View Options Icon
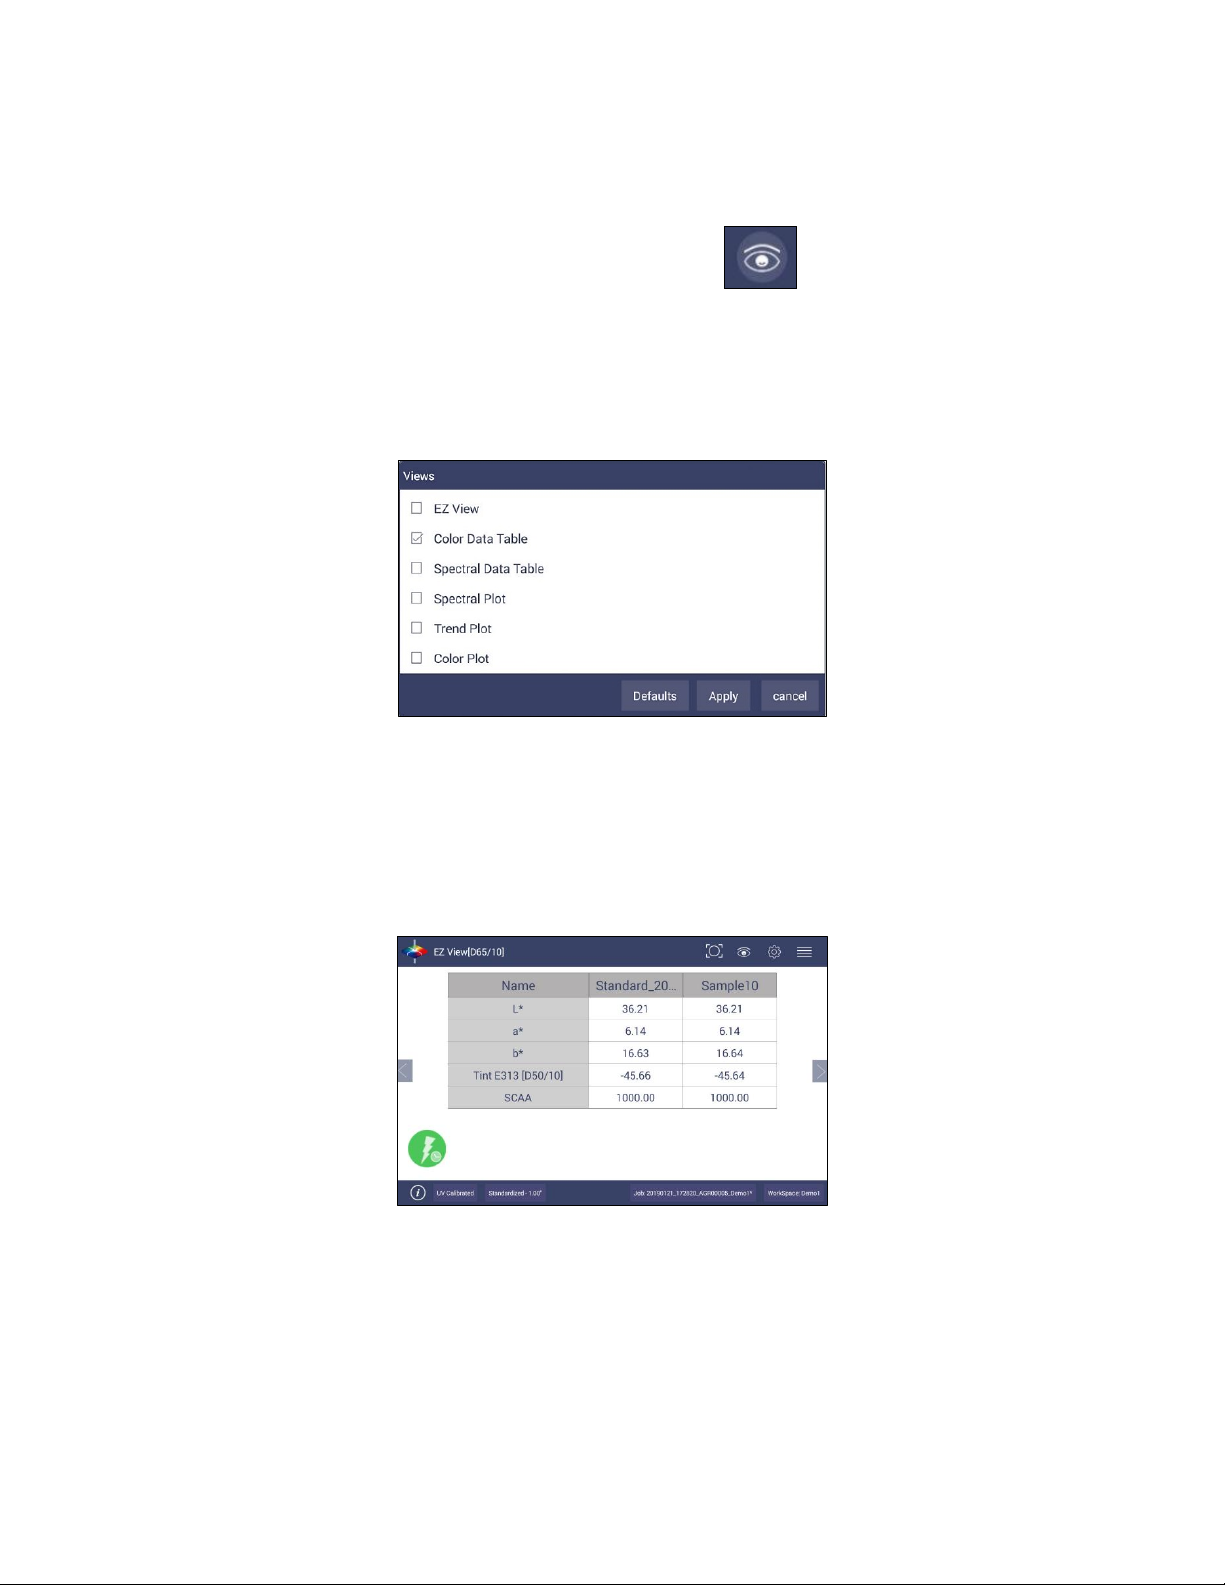
Views are selected using a dialog box under Workspace. Simply check on the box of the screen needed.
Press APPLY to save one or all of the screens. The default screen is the Color Data Table. To navigate
between screens once the selections have been applied, use the VIEW FLIPPERS on the left and right of
the screen.
Figure 93. Workspace > select Views
Once the views have been selected, then VIEW OPTIONS are available to configure the views on the
screen. Each screen has a unique set of view options associated with it.
Views: EZ View
This view provides a simple display of STANDARD vs. SAMPLE and PASS/FAIL results.
Figure 94. EZ View Display
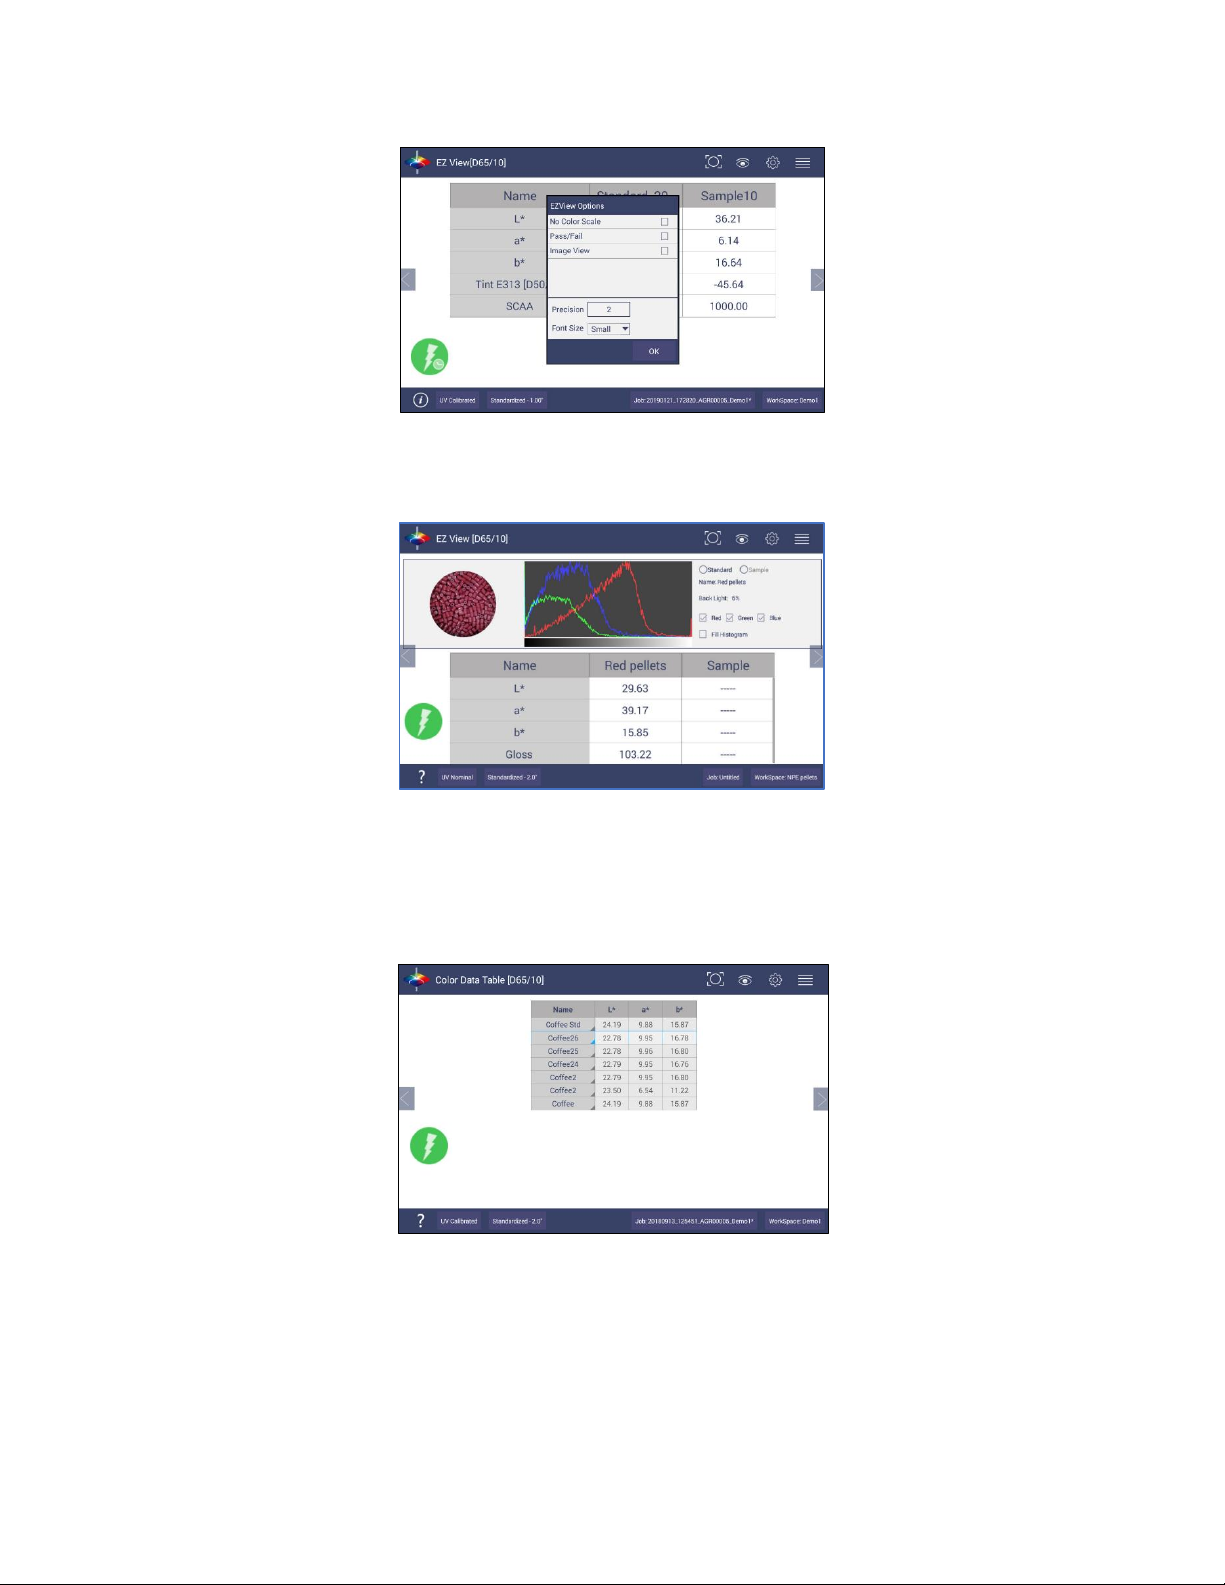
▪ VIEW OPTIONS includes the selection of NO COLOR SCALE, PASS/FAIL, IMAGE VIEW,
PRECISION and FONT SIZE.
Page 60
User’s Manual for Agera and EasyMatch Essentials v 1.0
60
Figure 95. EZ View Options
• Selecting the IMAGE VIEW allows you to see an image of the sample as well as a histogram
of the same image.
Figure 96. Image View for EZ View
Views: Color Data Table
The COLOR DATA TABLE view shows COLOR SCALE, COLOR DIFFERENCE, and INDICE data for the
STANDARDS and SAMPLES in the job.
Figure 97. Color Data Display
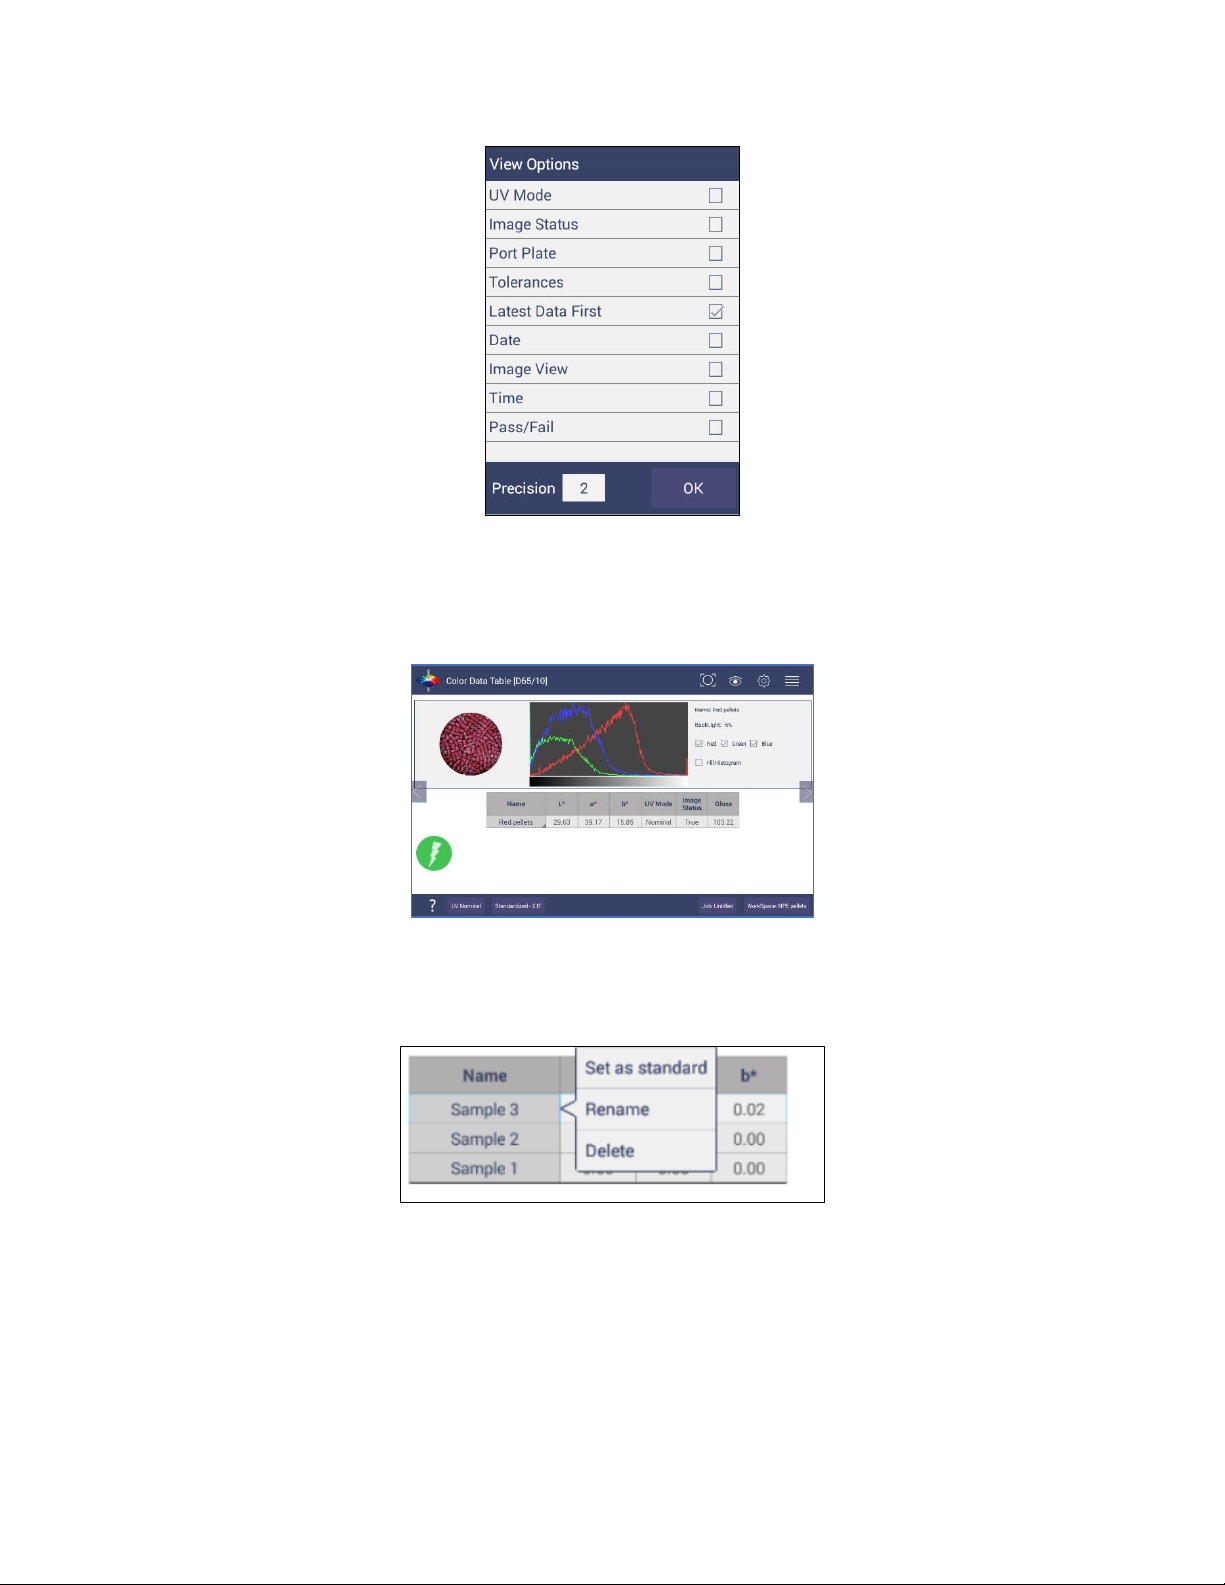
• Options such as UV MODE, IMAGE STATUS, PORT PLATE SIZE, TOLERANCES, DATA ORDER,
DATE, IMAGE VIEW, TIME and PASS/FAIL can be selected for viewing using the VIEW
OPTIONS.
Page 61
User’s Manual for Agera and EasyMatch Essentials v 1.0
61
Figure 98. Color Data Screen: View Options
• IMAGE VIEW allows you to see the captured image of your sample along with a histogram of
the image. IMAGE STATUS shows the status whether the sample or standard is saved with
the image - False means no image and True means with image.
Figure 99. Image View
• A long press on the SAMPLE can enable the user to make the sample into a standard,
change the name or delete the reading.
Figure 100. Changing a Sample into a Standard
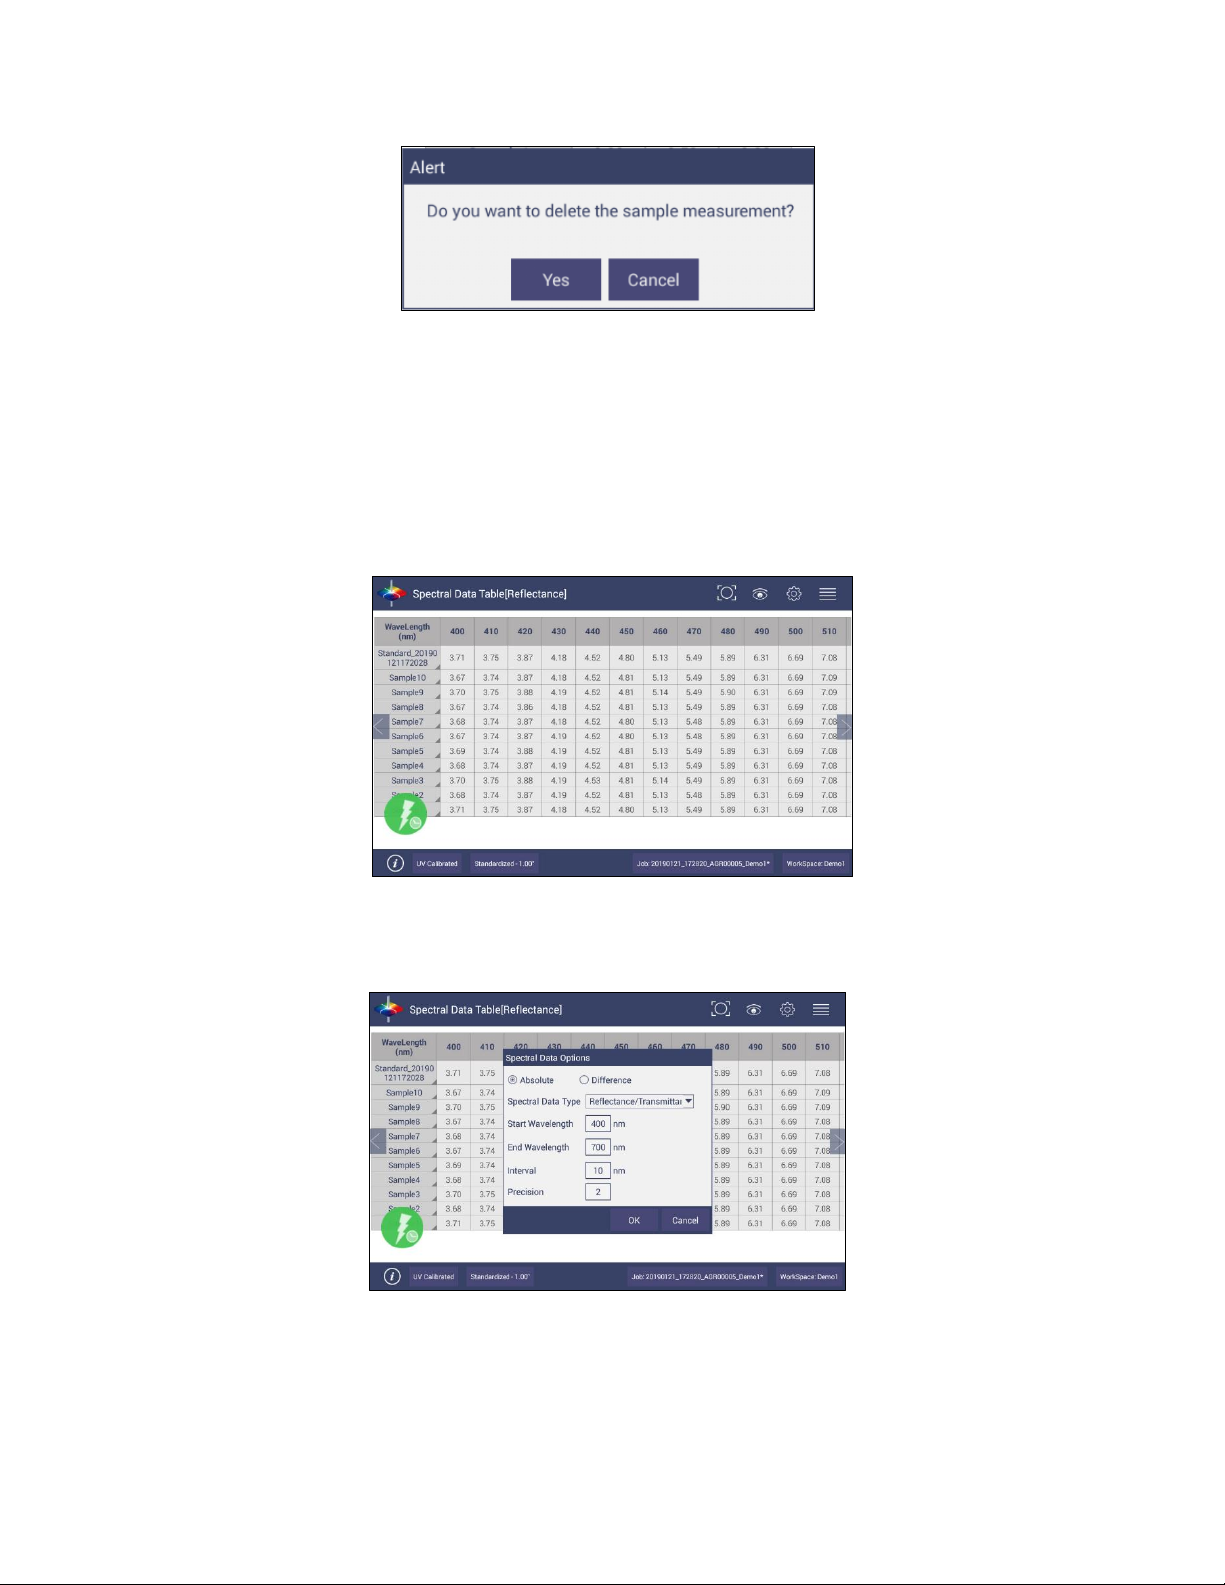
• To delete a sample (or standard), select DELETE and then confirm the action.
Page 62
User’s Manual for Agera and EasyMatch Essentials v 1.0
62
Figure 101. Delete the Sample Measurement
• A long press on the STANDARD will enable the user to edit or delete the standard. Edit
opens the Standard and Tolerances dialog box. Delete will delete the standard from the
current workspace.
Views: Spectral Data Table
The SPECTRAL DATA TABLE displays percent reflectance or absorbance values for each selected
measurement at the wavelengths being measured.
Figure 102. Spectral Data Table
• Selections include ABSOLUTE or DIFFERENCE for REFLECTANCE, STRENGTH or K/S. Enter the
start and stop wavelength, the interval and the precision and press OK to continue.
Figure 103. Spectral Data Table Options
Page 63
User’s Manual for Agera and EasyMatch Essentials v 1.0
63
Views: Spectral Plot
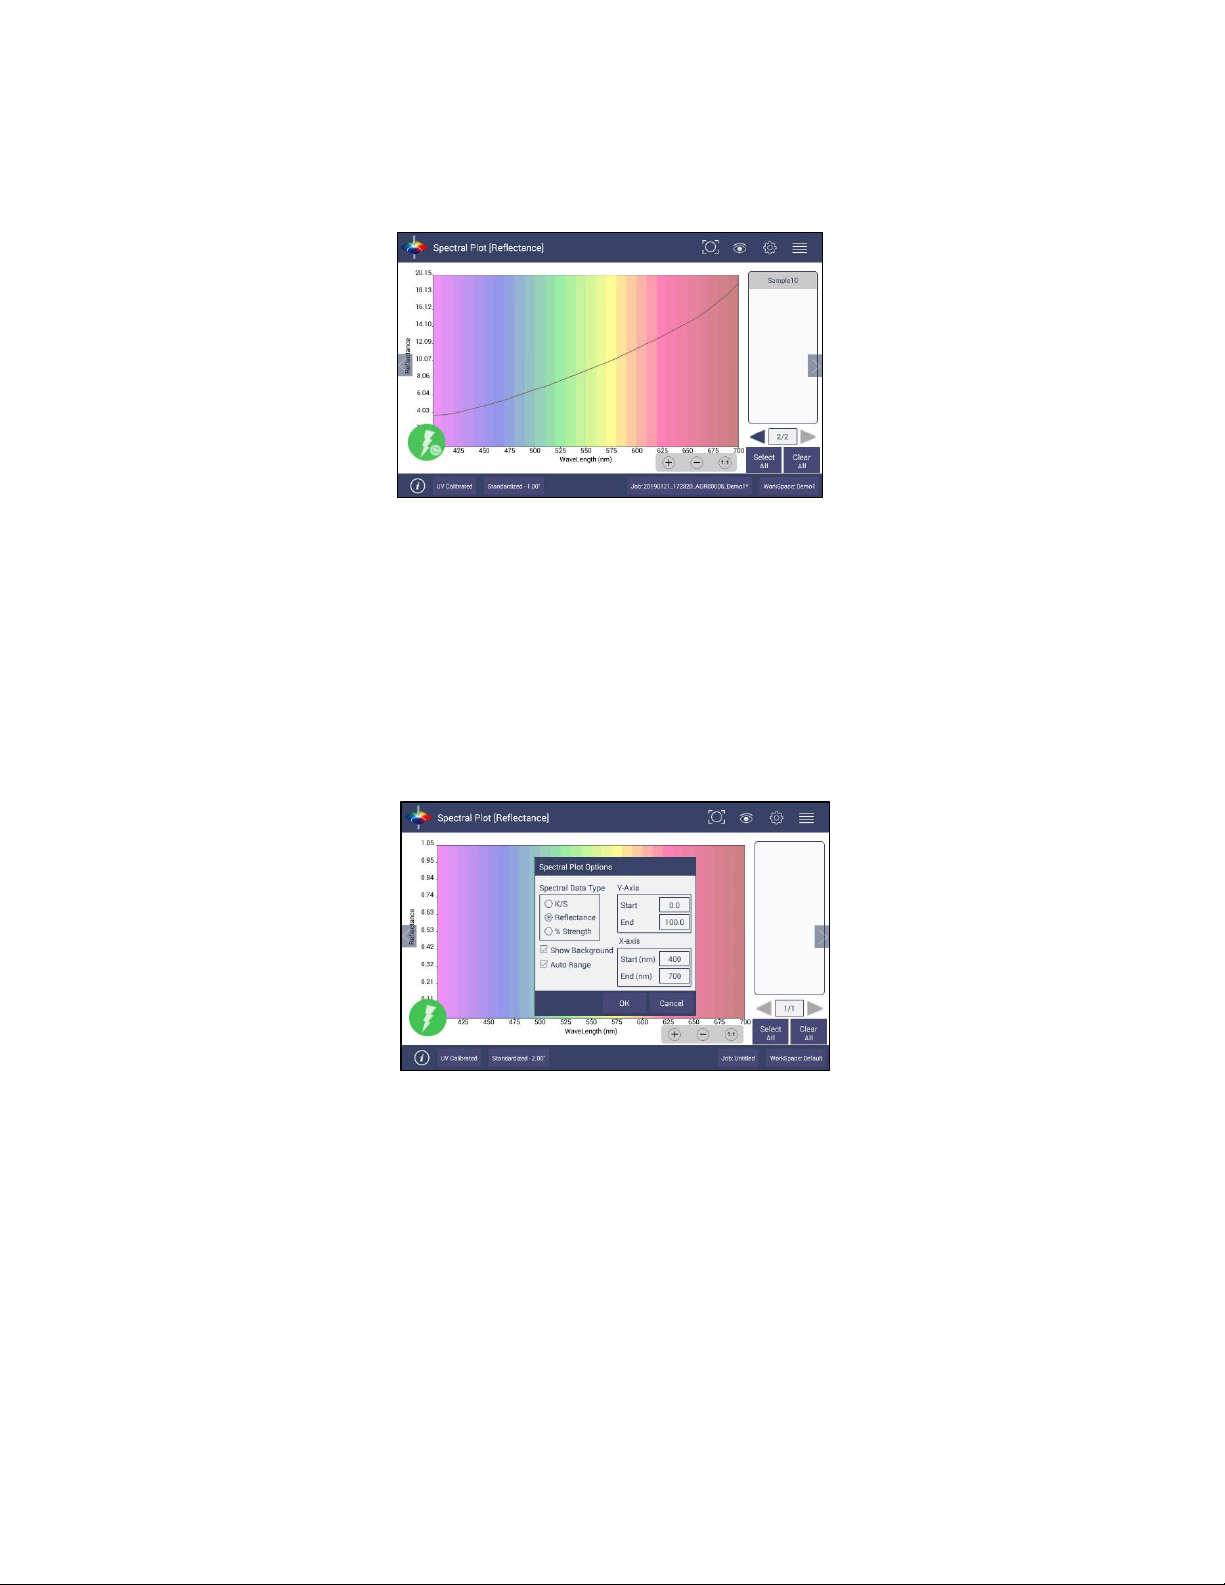
This view provides a plot of wavelength vs. spectral measurement parameter.
Figure 104. Spectral Plot View
• Press CLEAR ALL to remove all the samples to display. Press SELECT ALL to enable display of
all samples. To select an individual sample, click on the respective Sample in the list located
on the right edge of the screen.
• The Sample List is paginated. Click the left and right arrow buttons below the samples list to
navigate between pages.
• Press and hold on the left/right page number arrows under the sample list to show a small
dialog box. This dialog allows you to select the number of records per page to display and
the page number to display.
Figure 105. Spectral Plot Options
• SPECTRAL PLOT OPTIONS: There are three choices for spectral plot options:
▪ K/S – mathematical calculation based on reflectance and determined at each
wavelength for the standard and sample.
▪ REFLECTANCE - Displays the reflectance value at each wavelength.
▪ % STRENGTH – Percentage of the ratio of the K/S of the sample to the K/S of the
standard.
• Uncheck the OPTIONS: SHOW BACKGROUND, to display the plot with white background
color.
Page 64
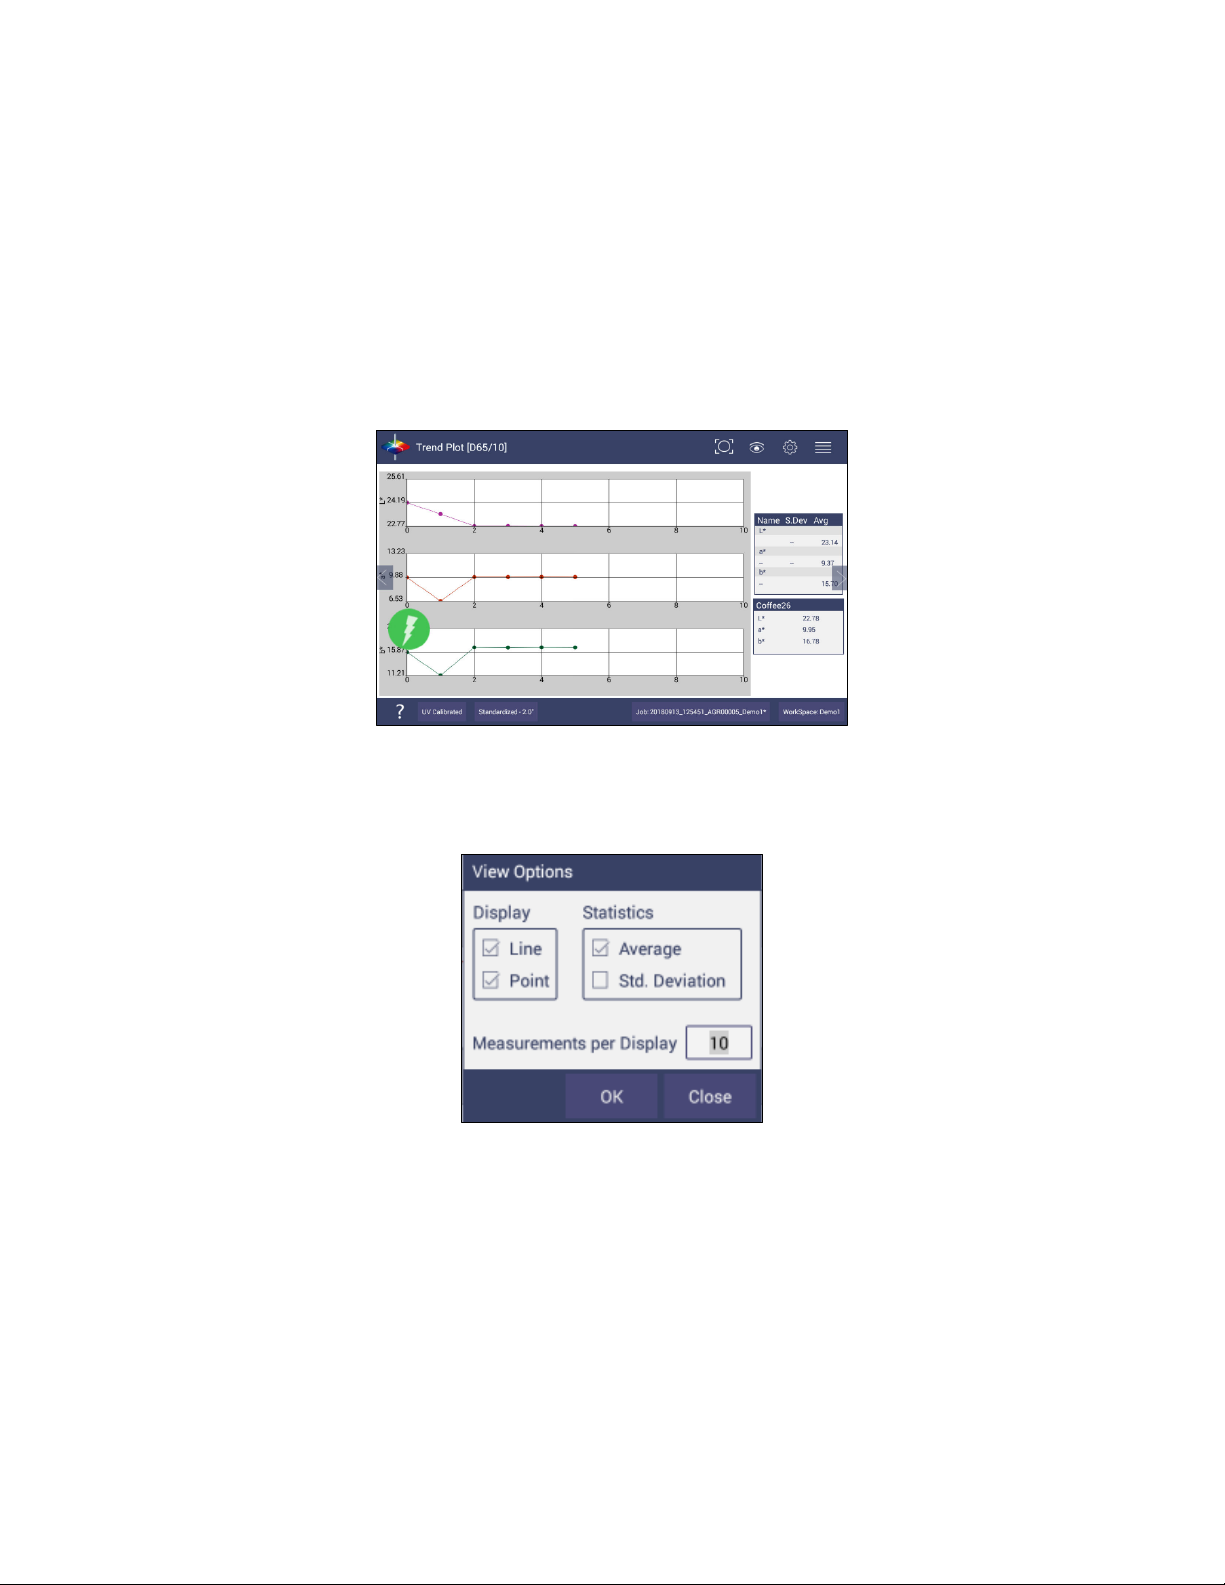
User’s Manual for Agera and EasyMatch Essentials v 1.0
64
• Check OPTIONS: AUTO RANGE to automatically scale the contents to fit. If AUTO RANGE is
not selected, then enter the Y-and X-axis range to display.
Views: Trend Plot
This tool can be used to study the trends in production and identify color variations. There are four
parameters of color measurement (three scale values and optional indice) which can be represented in
four traces. If a sample point is selected in one of the four traces, it is highlighted in the other 3 traces in
blue. The name is shown at the bottom right hand corner of the View. The AVERAGE and STANDARD
DEVIATION can be shown as per the view configuration settings. XE "Trend Plot"
Figure 106. Trend Plot
• VIEW OPTIONS for the Trend Plot include the TYPE OF DISPLAY, the STATISTICS and the
NUMBER OF READINGS per display.
Figure 107. Trend Plot Options
Page 65
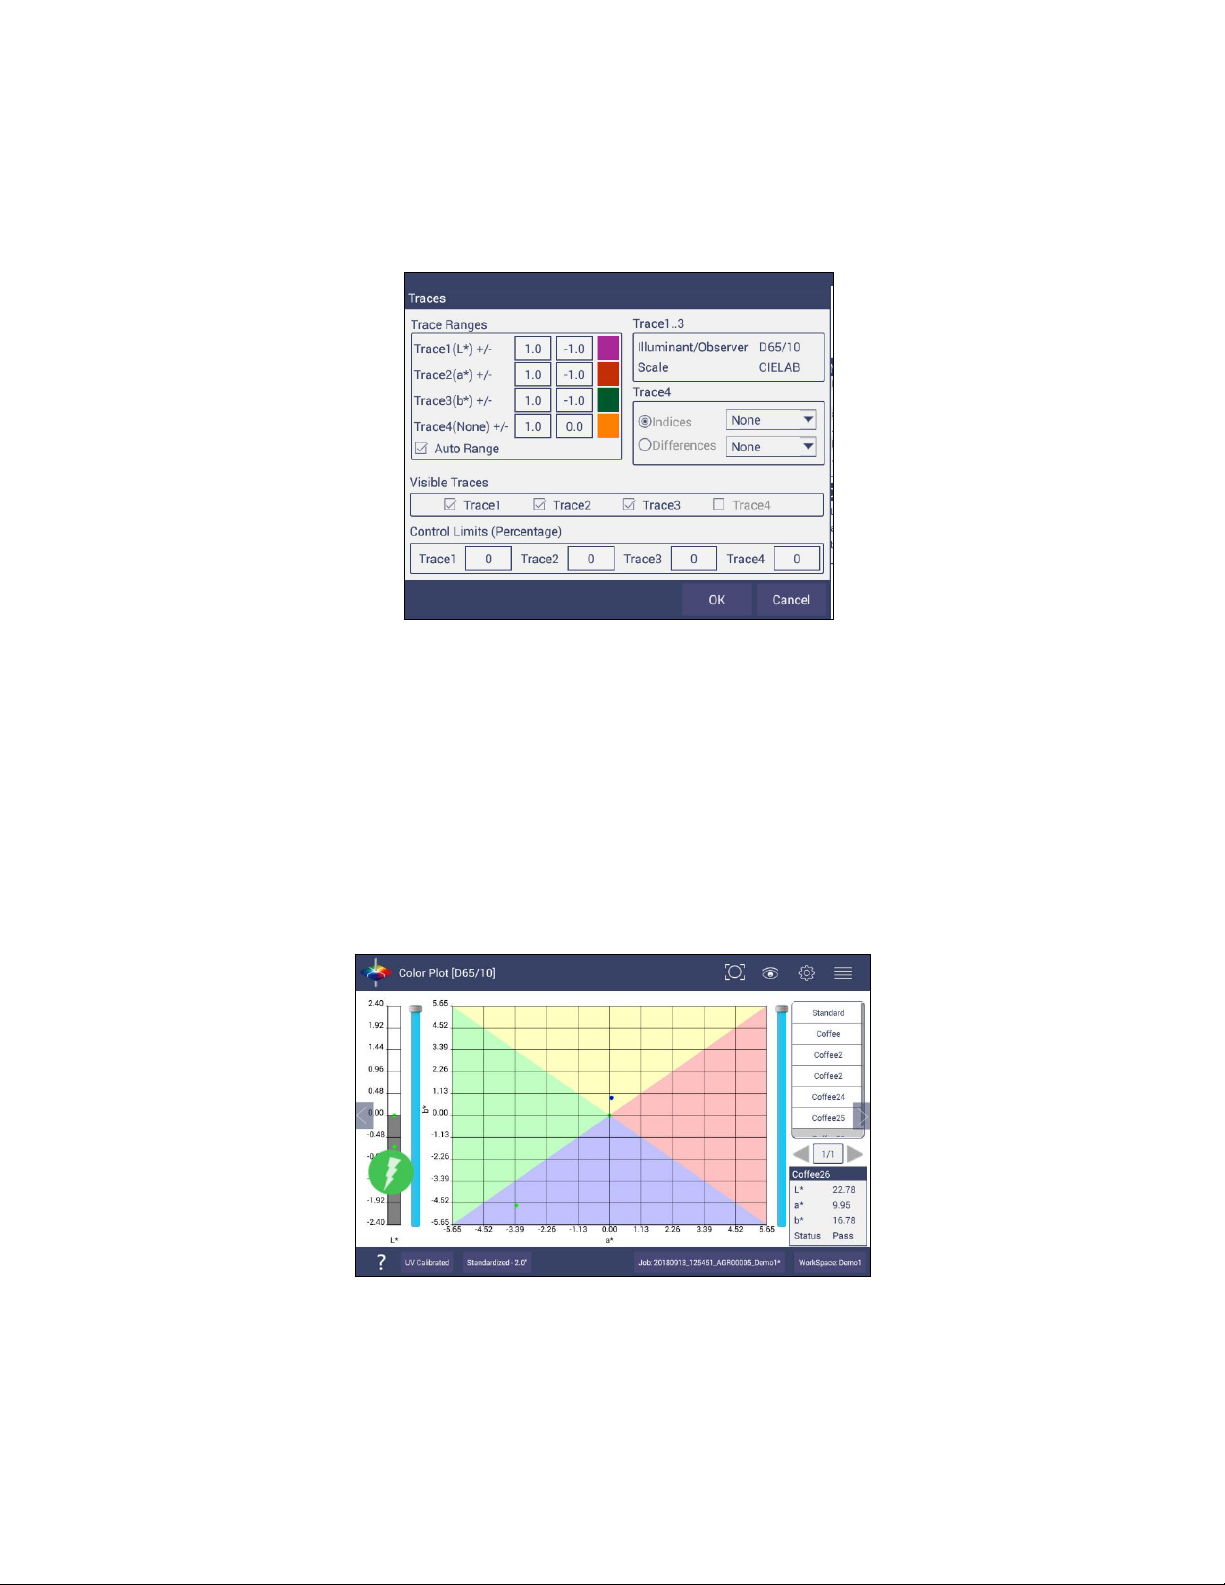
User’s Manual for Agera and EasyMatch Essentials v 1.0
65
• VIEW OPTIONS > TRACES set the ranges for the traces or allow selection of AUTO RANGE.
Trace 1 to 3 uses the current Color Measurement Scale and Trace 4 will allow for
measurement of differences or an index. The user can select which Traces to view and set
control limits as a percent.
Figure 108. Trend Plot Traces
Views: Color Plot
This shows the sample location in two-dimensional Color Space with respect to the standard for
difference measurements or the samples in absolute measurement. For differences, the standard is the
center point of the plot and the samples are plotted separately on the graph.
• The displayed samples are shown in a list box on the right of the screen. The Color Plot can
be zoomed, and the data points can be viewed in detail.
• Press and hold on the left/right page number arrows to show a small dialog box. This dialog
allows you to select the number of records per page to display and the default page number
to display.
Figure 109. Color Plot View
Page 66
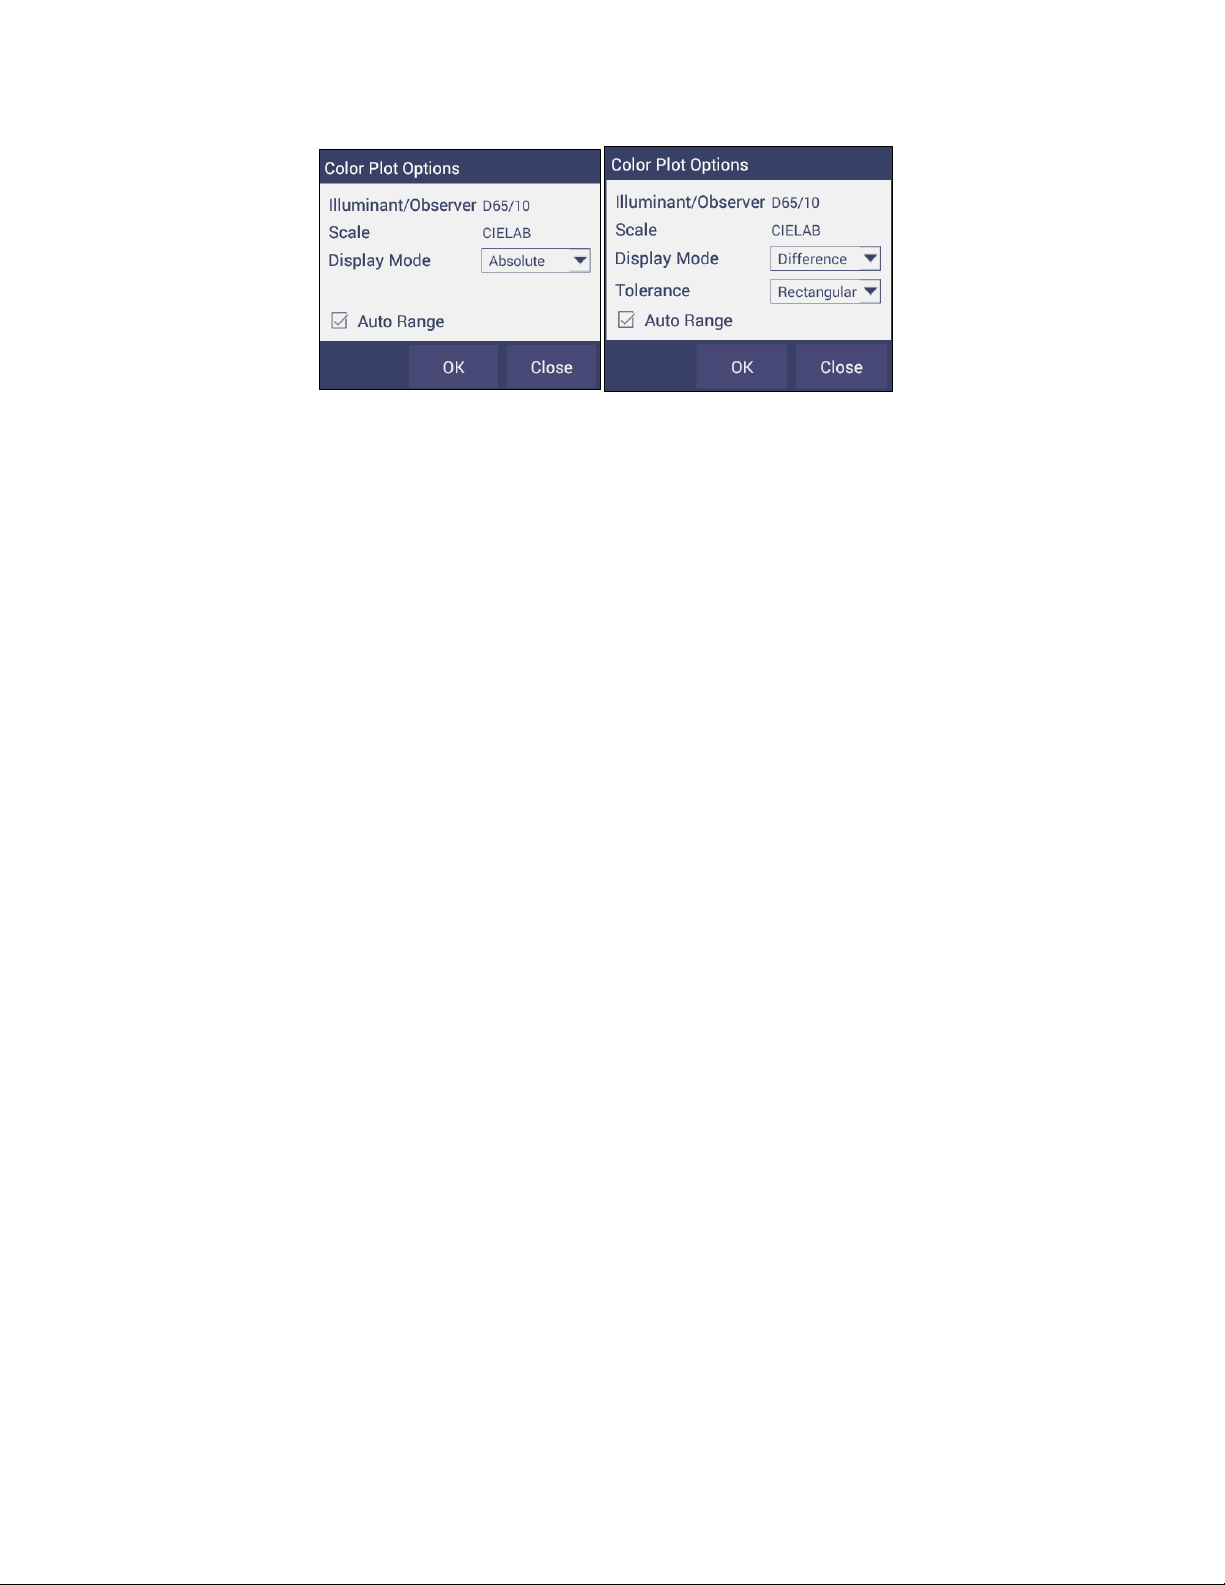
User’s Manual for Agera and EasyMatch Essentials v 1.0
66
Figure 110. Color Plot Options
• The Tolerance Plot is available in rectangular and elliptical color space. The PASS/FAIL
sample points are shown in green and red when in difference mode, respectively. In
Absolute Mode, they are shown in green.
Page 67
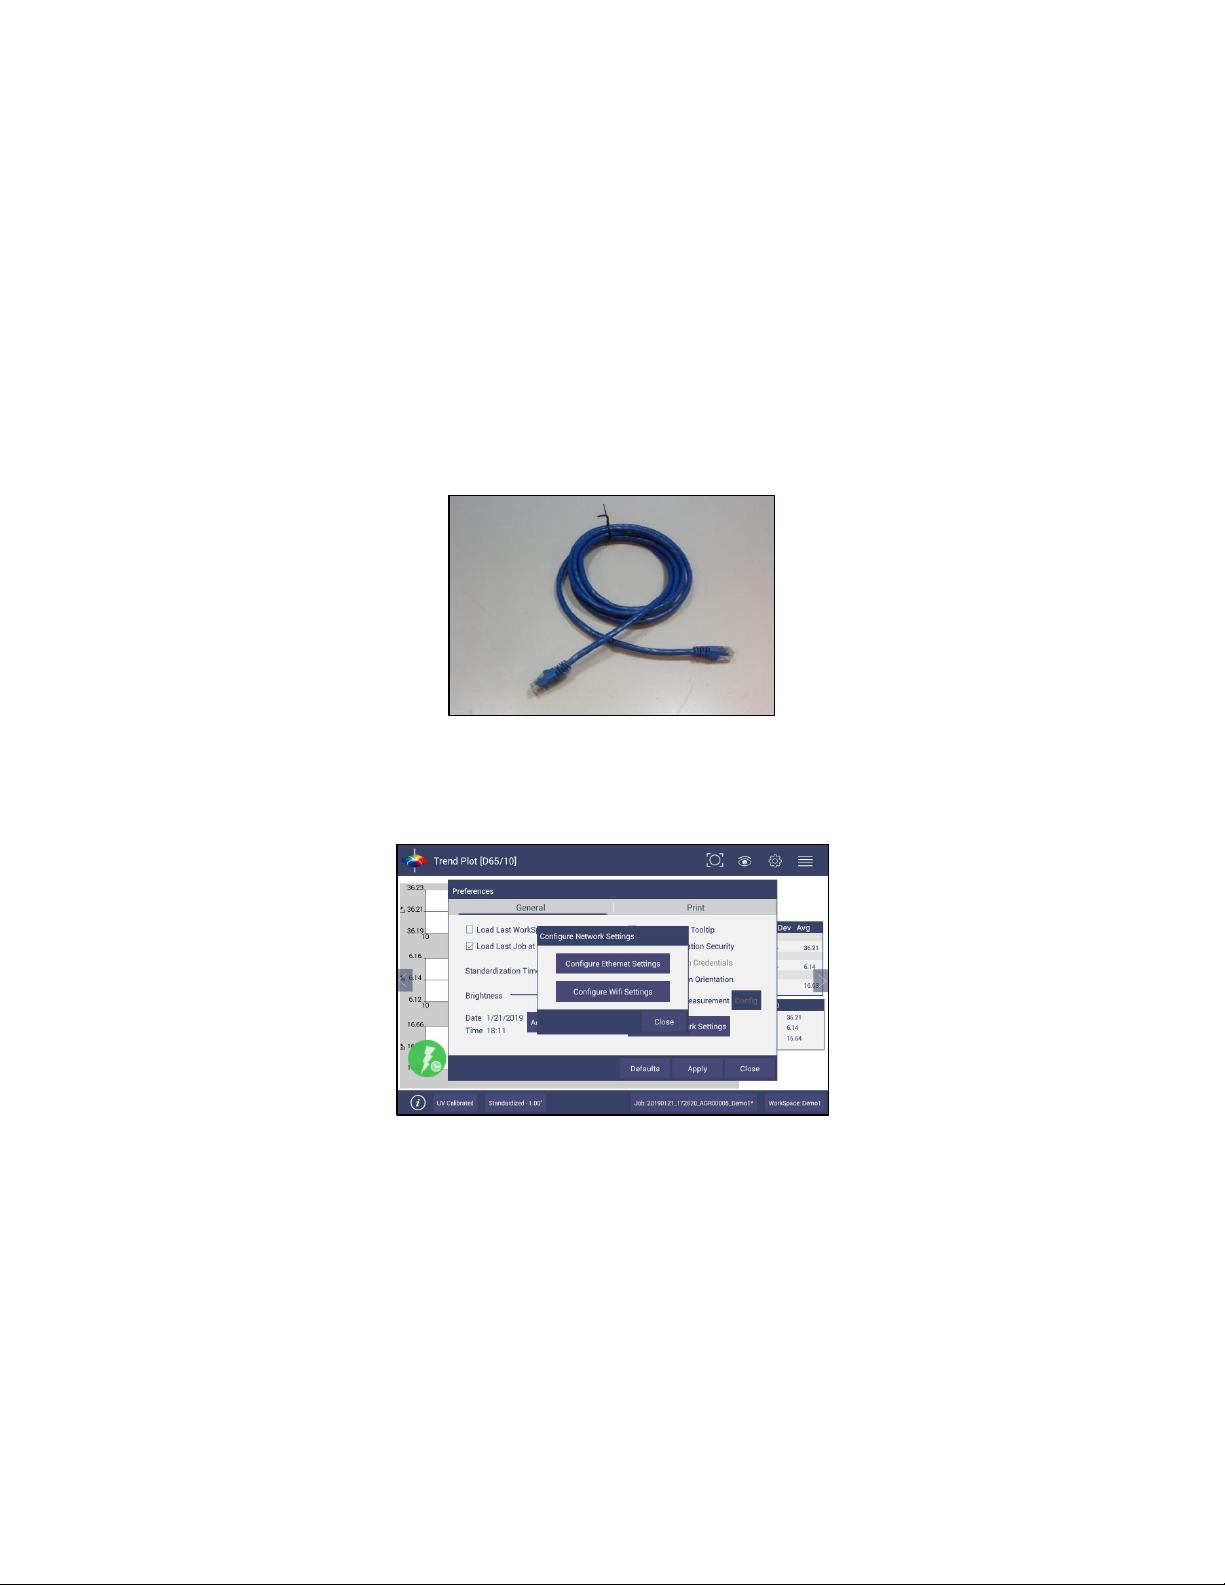
User’s Manual for Agera and EasyMatch Essentials v 1.0
67
Special Functions
Auto-Exporting Data through a Network Connection
Connect Agera to a network. You can connect Agera to a network hub using the Ethernet cable or
connect Agera to a network hotspot through a WiFi connection. The computer must be connected to
the same network as the Agera.
Option A: Connect to a network hub using an Ethernet
• Hardware needed: Ethernet cable plugged into the back of the Agera and the other end to a
network hub.
Figure 111. Ethernet Cable
• To connect Agera to network, go to WORKSPACES > PREFERENCES and Select CONFIG
NETWORK SETTINGS.
Figure 112. Preferences (General) > Network Settings
• Select CONFIGURE ETHERNET SETTINGS.
• Check USE DHCP FOR ETHERNET CONFIG. Please write down the IP address showing in the
Ethernet Setting dialog. You can also check the IP address of Agera in JOBS > ABOUT > INFO.
Page 68
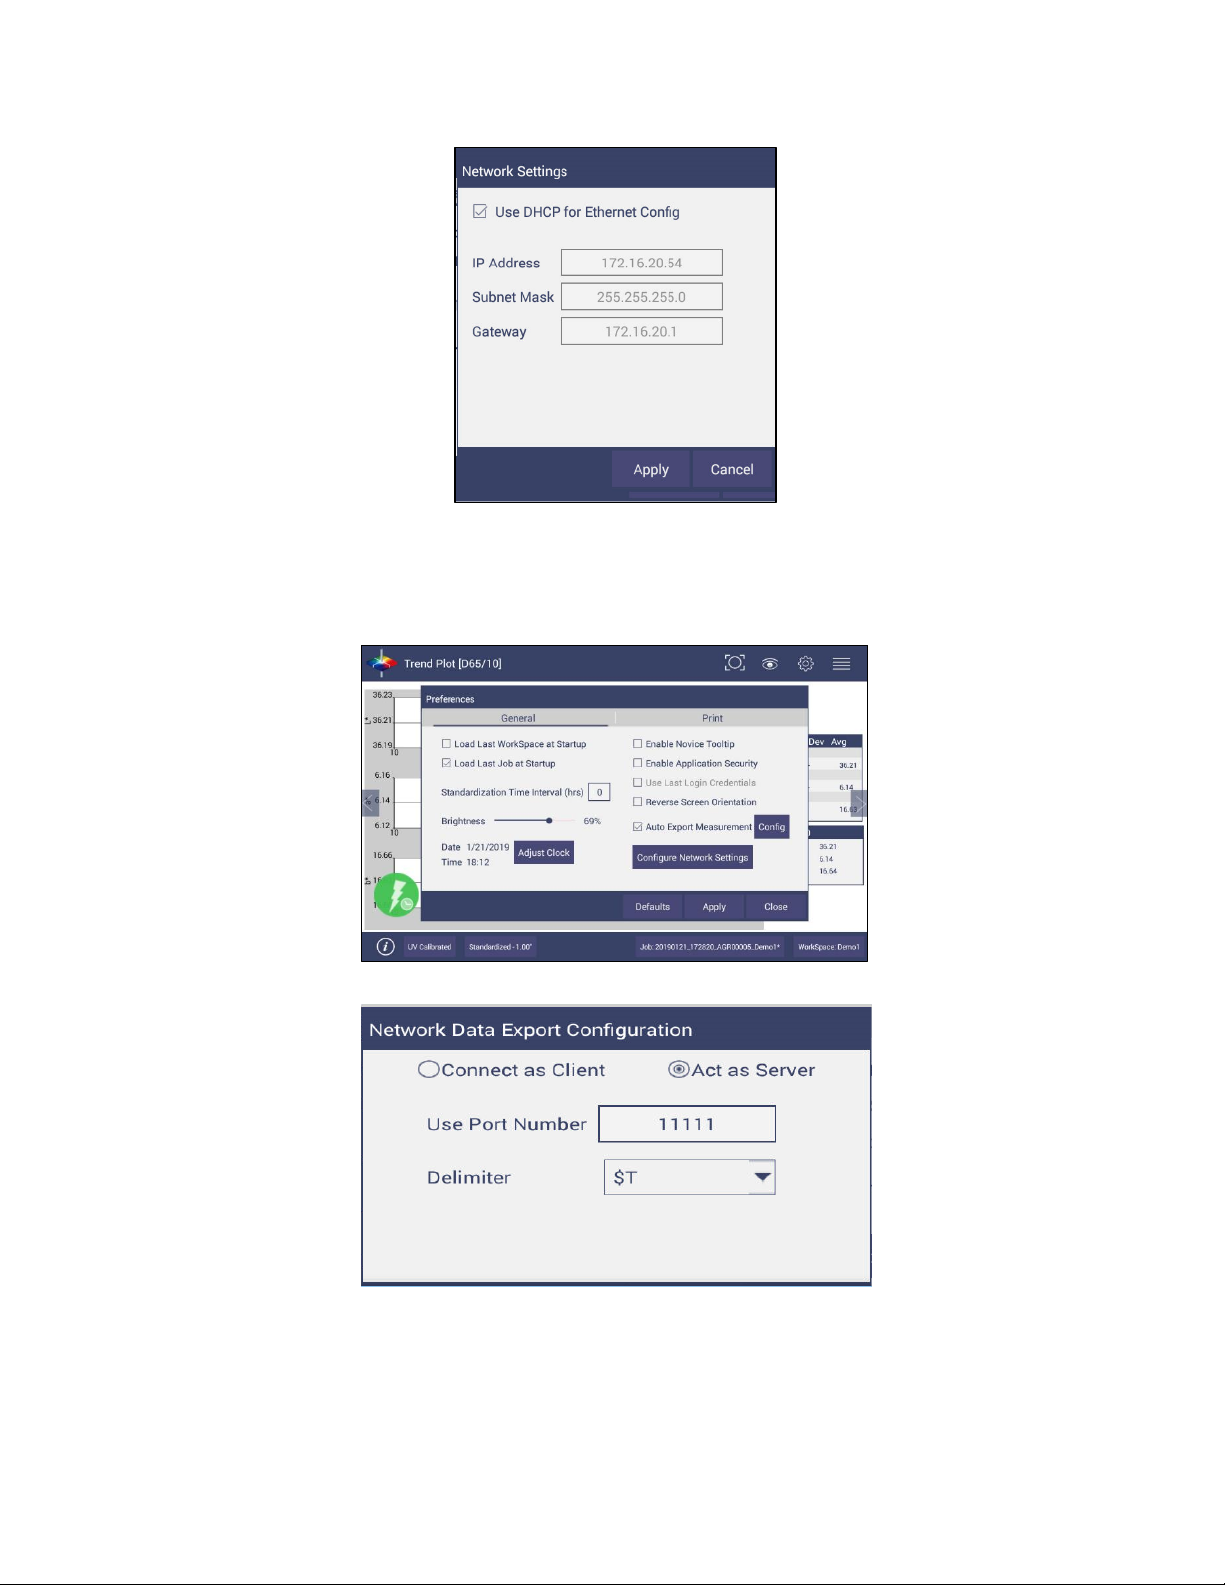
User’s Manual for Agera and EasyMatch Essentials v 1.0
68
Figure 113. Select DCHP
• Go to WORKSPACE > PREFERENCES and select AUTO NETWORK DATA EXPORT
MEASUREMENT using a check and select Config. Choose ACT AS SERVER and PORT
NUMBER AS 11111. You can also choose a delimiter to mark your data.
Figure 114. Auto Export Measurement
Figure 115. Network Data Export
• Configure the computer with the following settings:
▪ Set COMPUTER AS CLIENT.
▪ Enter the IP ADDRESS of Agera as recorded above.
Page 69
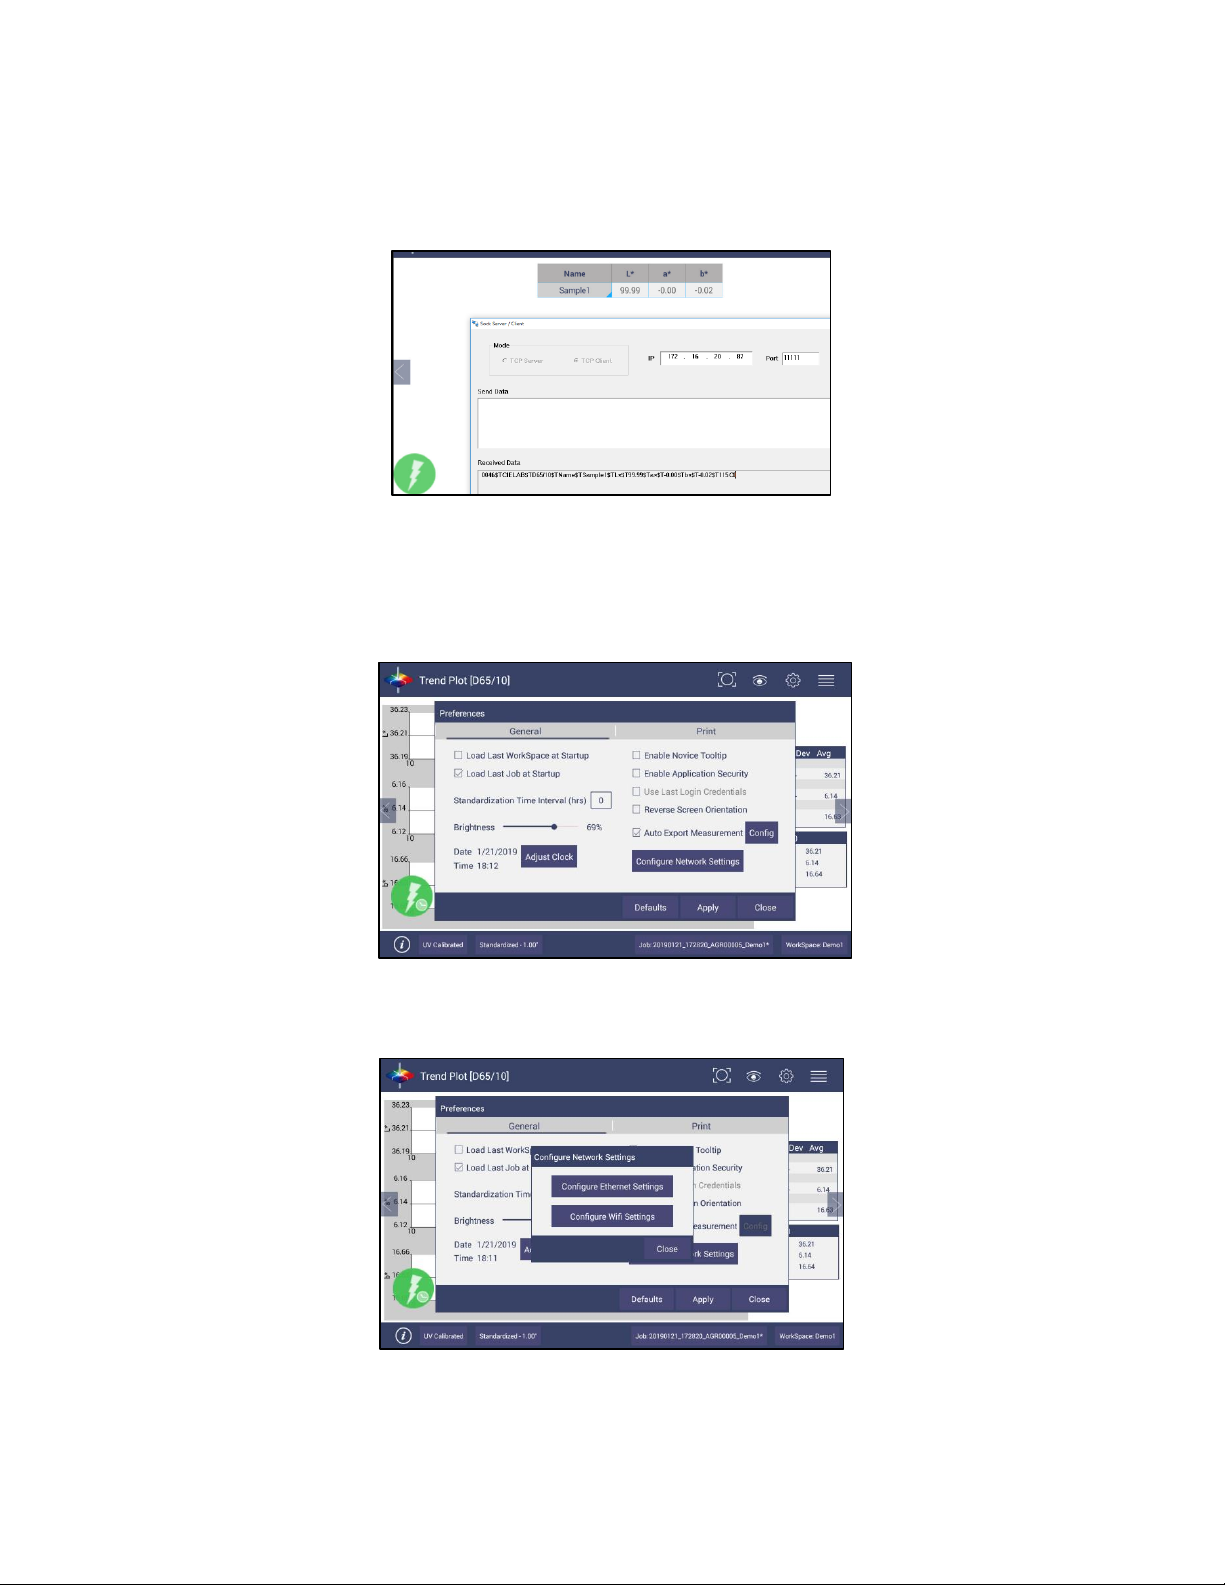
User’s Manual for Agera and EasyMatch Essentials v 1.0
69
▪ Set the PORT NUMBER as 11111.
▪ After all have been set, the data is ready to be exported from Agera to the
computer.
Figure 116. Data Export
Optional B: Connect to a hotspot through the WiFi connection
• To connect Agera to network, go to WORKSPACES > PREFERENCES and select CONFIG
NETWORK SETTINGS.
Figure 117. Configure Network Settings
• Select CONFIGURE WIFI SETTINGS and the WiFi configuration dialog will be prompted.
Figure 118. Configure WIFI settings
Page 70
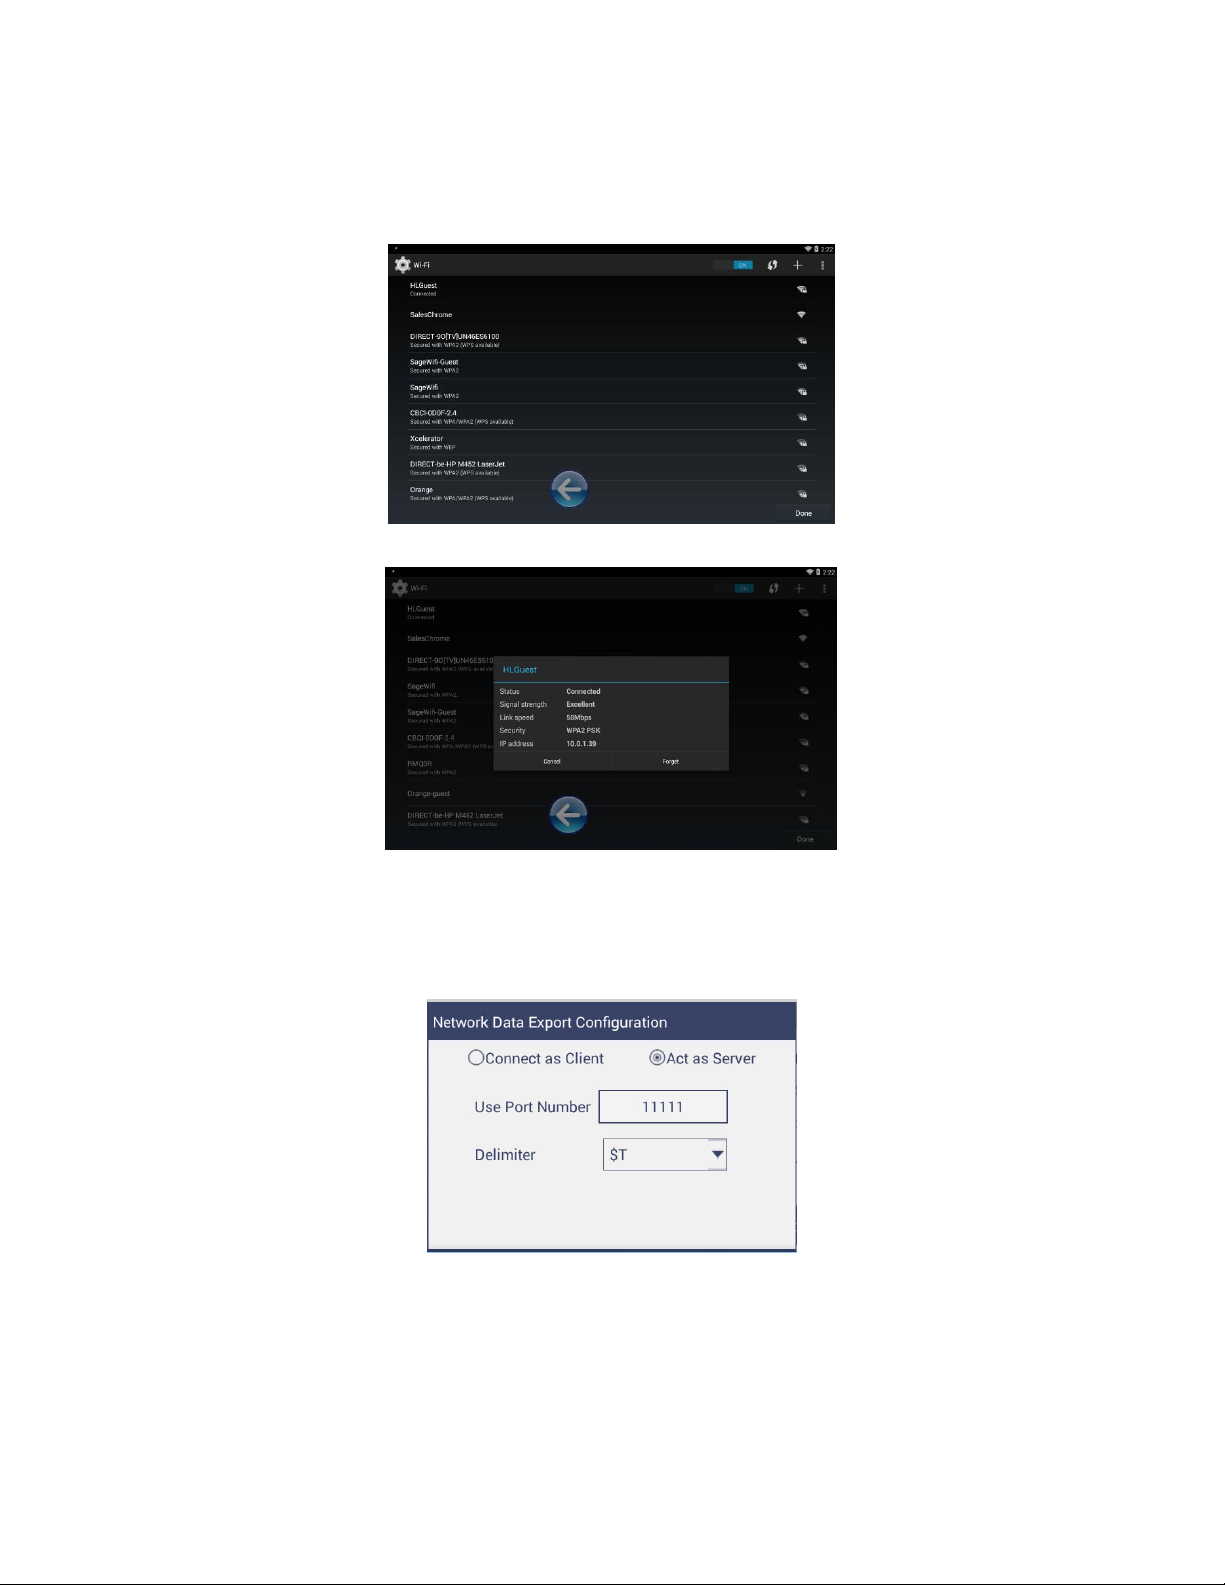
User’s Manual for Agera and EasyMatch Essentials v 1.0
70
• Please search and connect to the available WiFi and write down the IP address showing in
this dialog. After the WiFi configuration, please click the floating BACK BUTTON to go back
to Essentials app.
Figure 119. Find IP Address
Figure 120. Find IP Address (Part2)
• Go back to WORKSPACES > PREFERENCES > AUTO EXPORT MEASUREMENT and check
CONFIG. Choose ACT AS SERVER and PORT NUMBER AS 11111. You can also choose a
delimiter to mark your data.
Figure 121. Network Data Export Config
Page 71
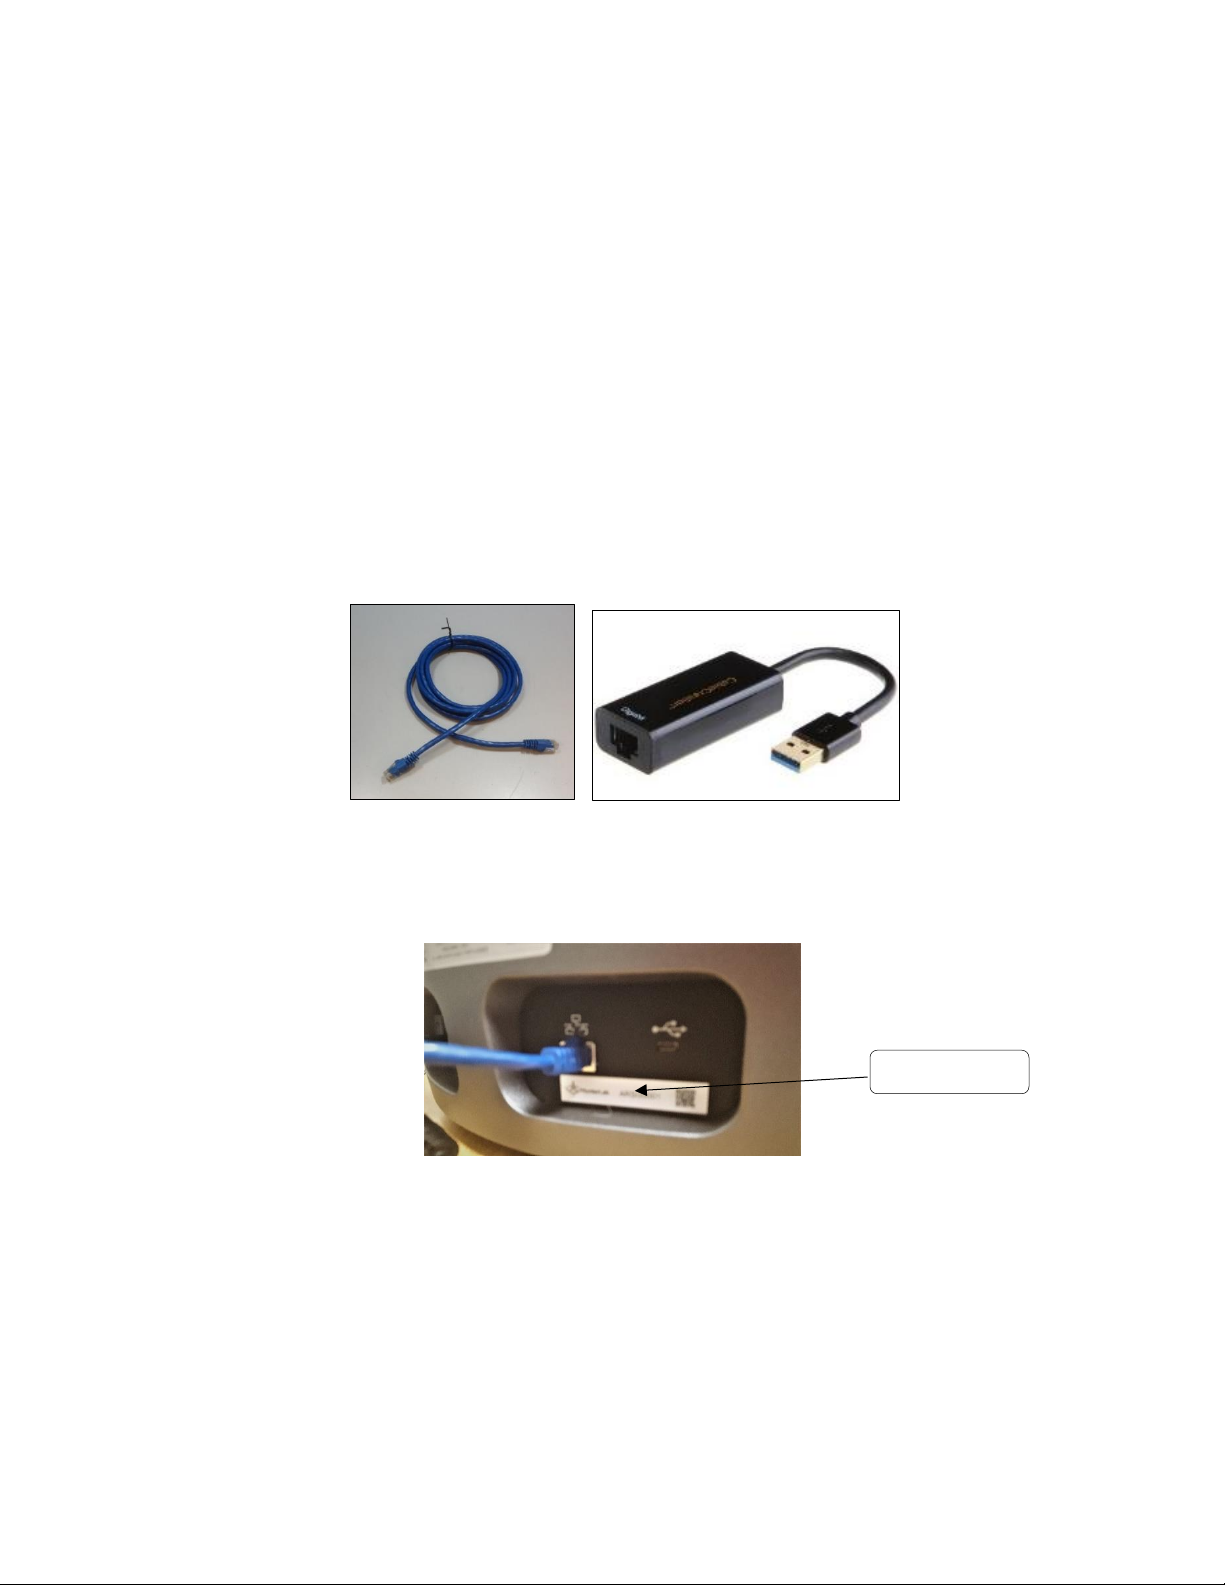
User’s Manual for Agera and EasyMatch Essentials v 1.0
71
• Configure the computer with the following settings:
▪ Set computer as CLIENT
▪ Enter the IP ADDRESS of Agera which is recorded in step 1 above
▪ Put the port number as 11111
• After all is set, the data is ready to be exported from Agera to the computer.
Auto-Exporting Data via Direct Connection between Agera and a Computer
Ethernet cable is plugged into the back of the Agera and the other end is connected to the computer.
Ethernet adapter USB can be applied here if the computer does not have available Ethernet port.
• Materials needed: Ethernet cable and Ethernet adapter to USB can be applied here if the
computer does not have available Ethernet port. Hardware needed: Ethernet cable and
Ethernet adapter to USB can be applied here if the computer does not have available
Ethernet port.
Figure 122. Ethernet Cable Figure 123. Ethernet to USB Adapter
Connect Agera to Computer:
• Plug Ethernet cable into RJ-45 Ethernet connection at rear of Agera.
Figure 124. Rear View of Agera
• Plug the other end into the computer or into the Ethernet adapter
Ethernet Port
Page 72
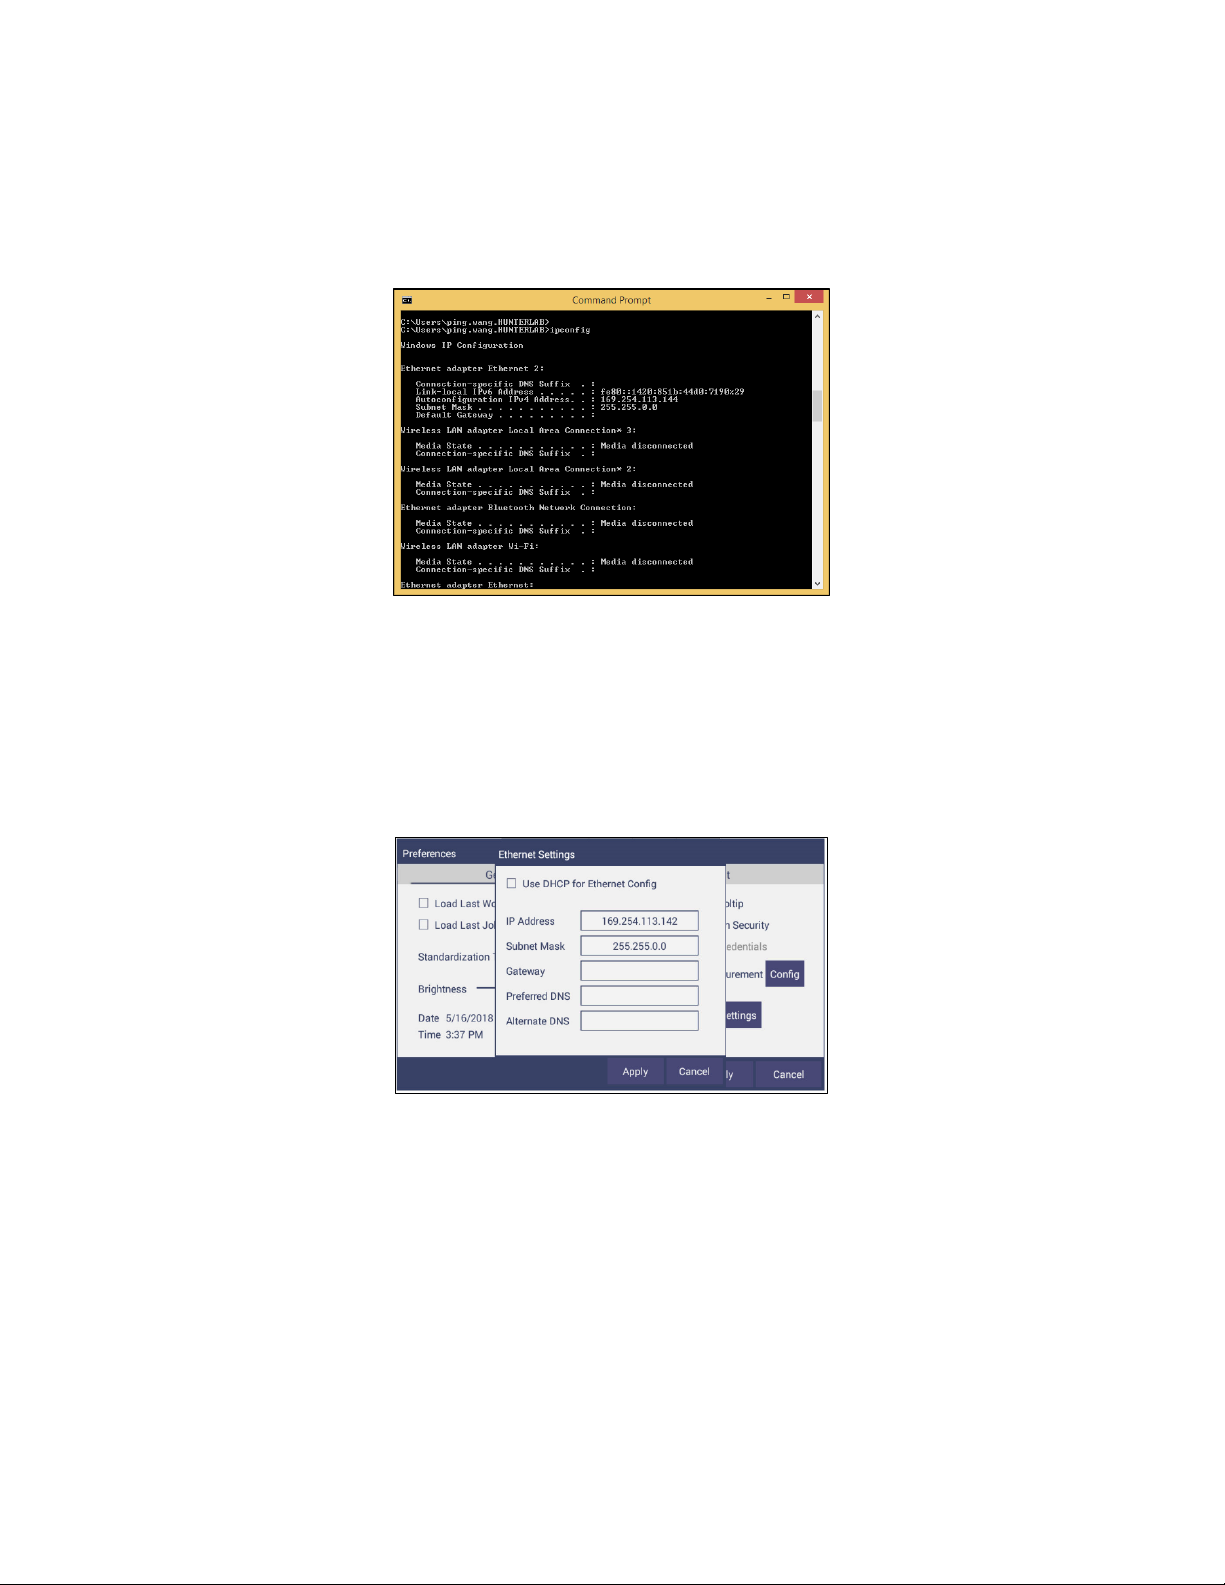
User’s Manual for Agera and EasyMatch Essentials v 1.0
72
Open Command Prompt in the PC
• Type in IPCONFIG to find the right ethernet (in this case, it is ETHERNET ADAPTER
ETHERNET) and write down AUTOCONFIGURATION IPV4 ADDRESS as well as the SUBNET
MASK.
Figure 125. Command Prompt ipconfig
Configure the Agera
Open Agera Essentials, go to WORKSPACES > PREFERENCES > CONFIGURE NETWORK SETTINGS. First,
select the ETHERNET CONFIGURATION. Uncheck USE DHCP FOR ETHERNET CONFIG. Type in IP
ADDRESS and SUBNET MASK manually. The IP address here should be same as the autoconfiguration
IPv4 Address in the PC, except changing the last number. The Subnet Mask is the exact same. Restart
Agera to get network setting applied.
Figure 126. Configuration Parameters for Ethernet
• Press APPLY on the Ethernet Configuration and then APPLY on the Preferences Page to
complete.
• Turn the instrument off and then back on.
• Go to PREFERENCES > AUTO NETWORK DATA EXPORT.
Page 73
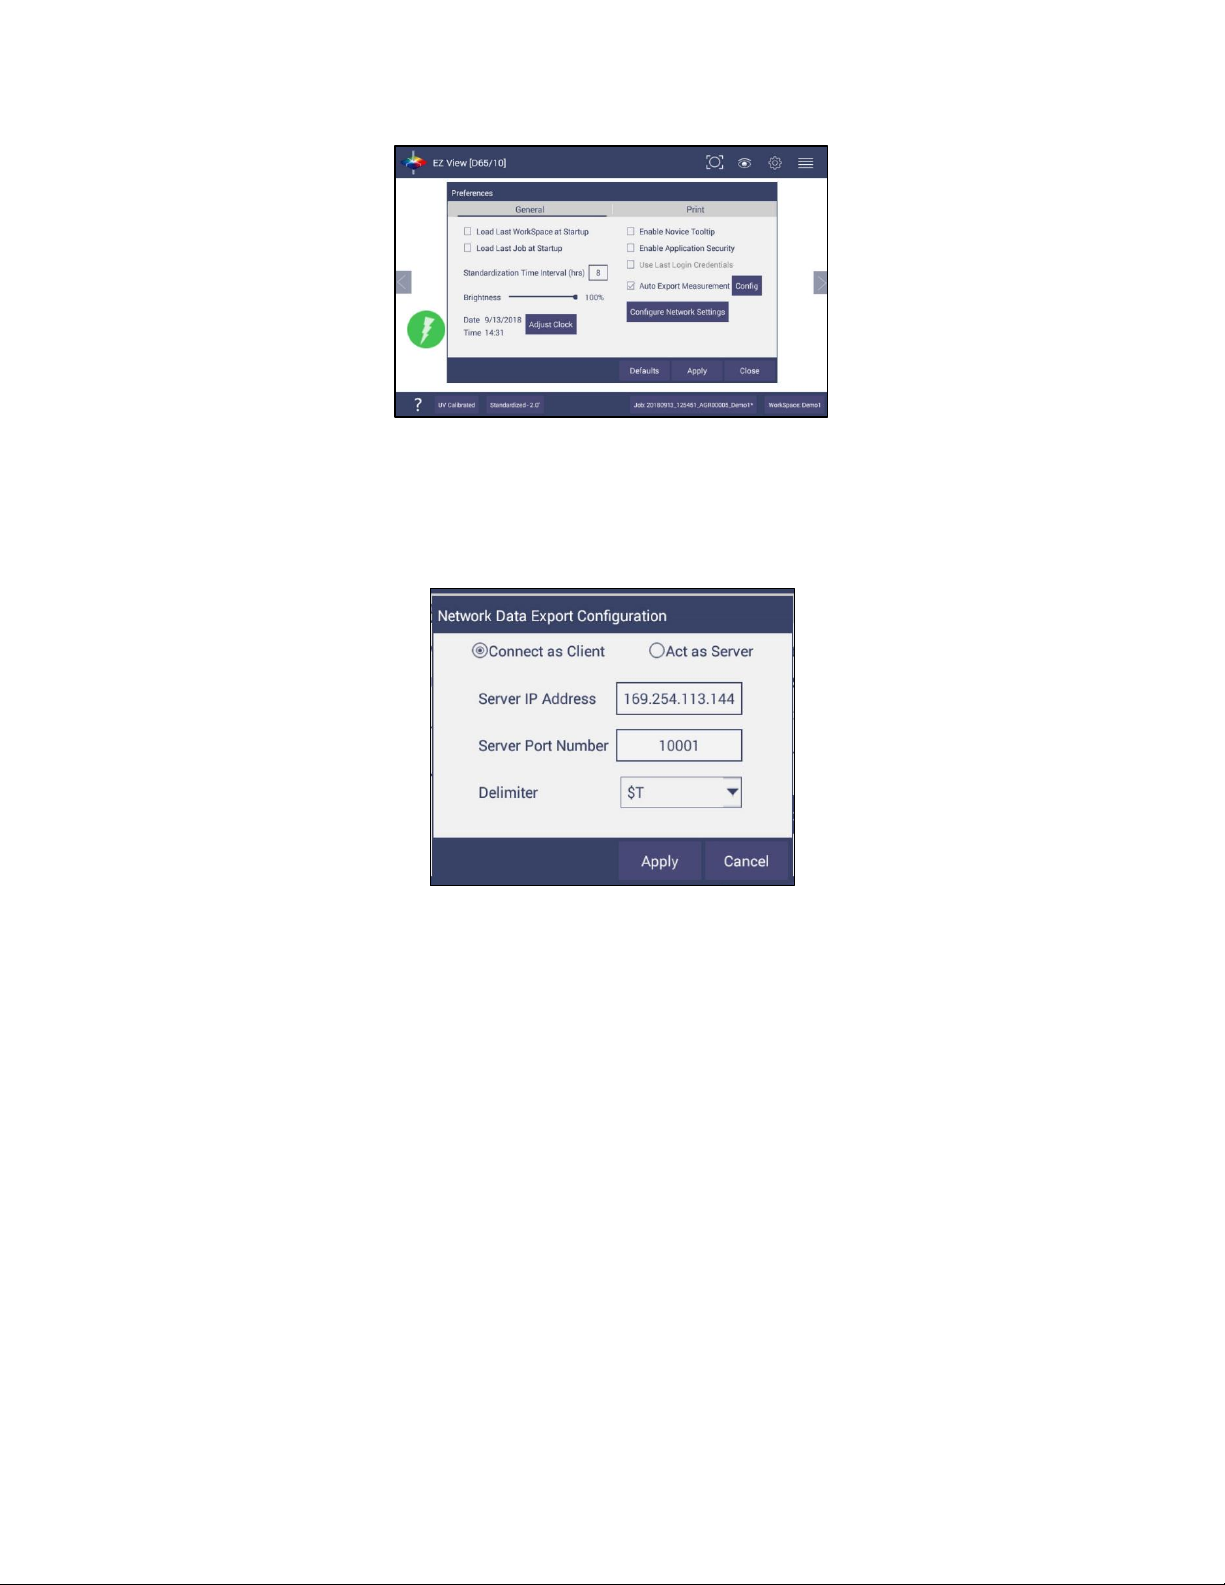
User’s Manual for Agera and EasyMatch Essentials v 1.0
73
Figure 127. Read Options> Auto Export Measurements
• For a direct connection between Agera and data collection computer, set up the Agera as a
CLIENT.
• Enter the computer IP address here, in this case 169.254.113.144 and the PORT as 11111.
Press APPLY on the screen to continue.
Figure 128. Read Options Export
▪ Agera is now ready to send data.
Configure the Computer
• Connection configurations differ depending on data collection software. The data collection
computer will be set up as a Server.
• Connect as follows:
▪ Set computer as SERVER.
▪ Enter the computer IP address 169.254.113.144.
▪ Put the port number as 11111.
Page 74
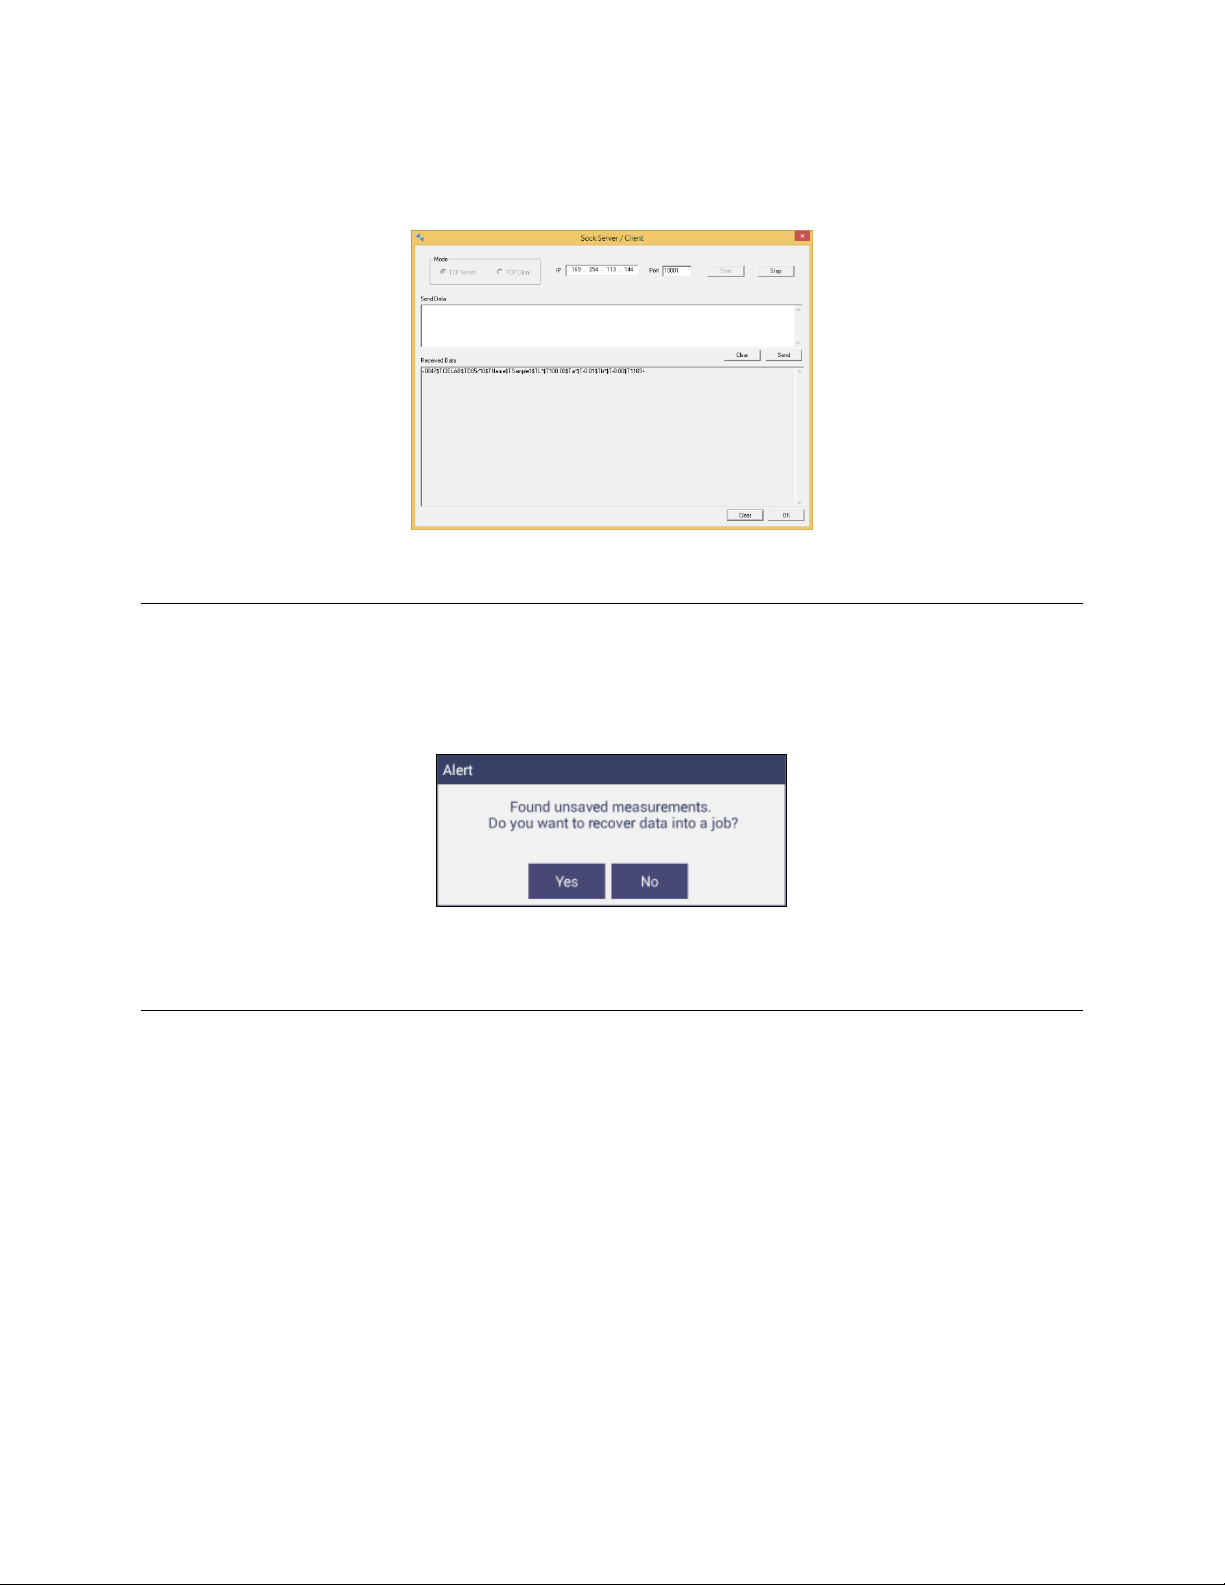
User’s Manual for Agera and EasyMatch Essentials v 1.0
74
Send Data from the Agera:
• CONFIGURE THE COLOR DATA TABLE with the color scale and parameters to be measured.
Figure 129. Data Output
Tips & Tricks: Recover Unsaved Measurement Data
In the case where the application is closed unexpectedly, the data is temporarily stored in a table along
with the Job details. When the application restarts, a prompt allows the user to recover the data.
Figure 130. Recover Data
If the user answers YES, all measurements are recovered into a new job or appended to a saved job.
Page 75
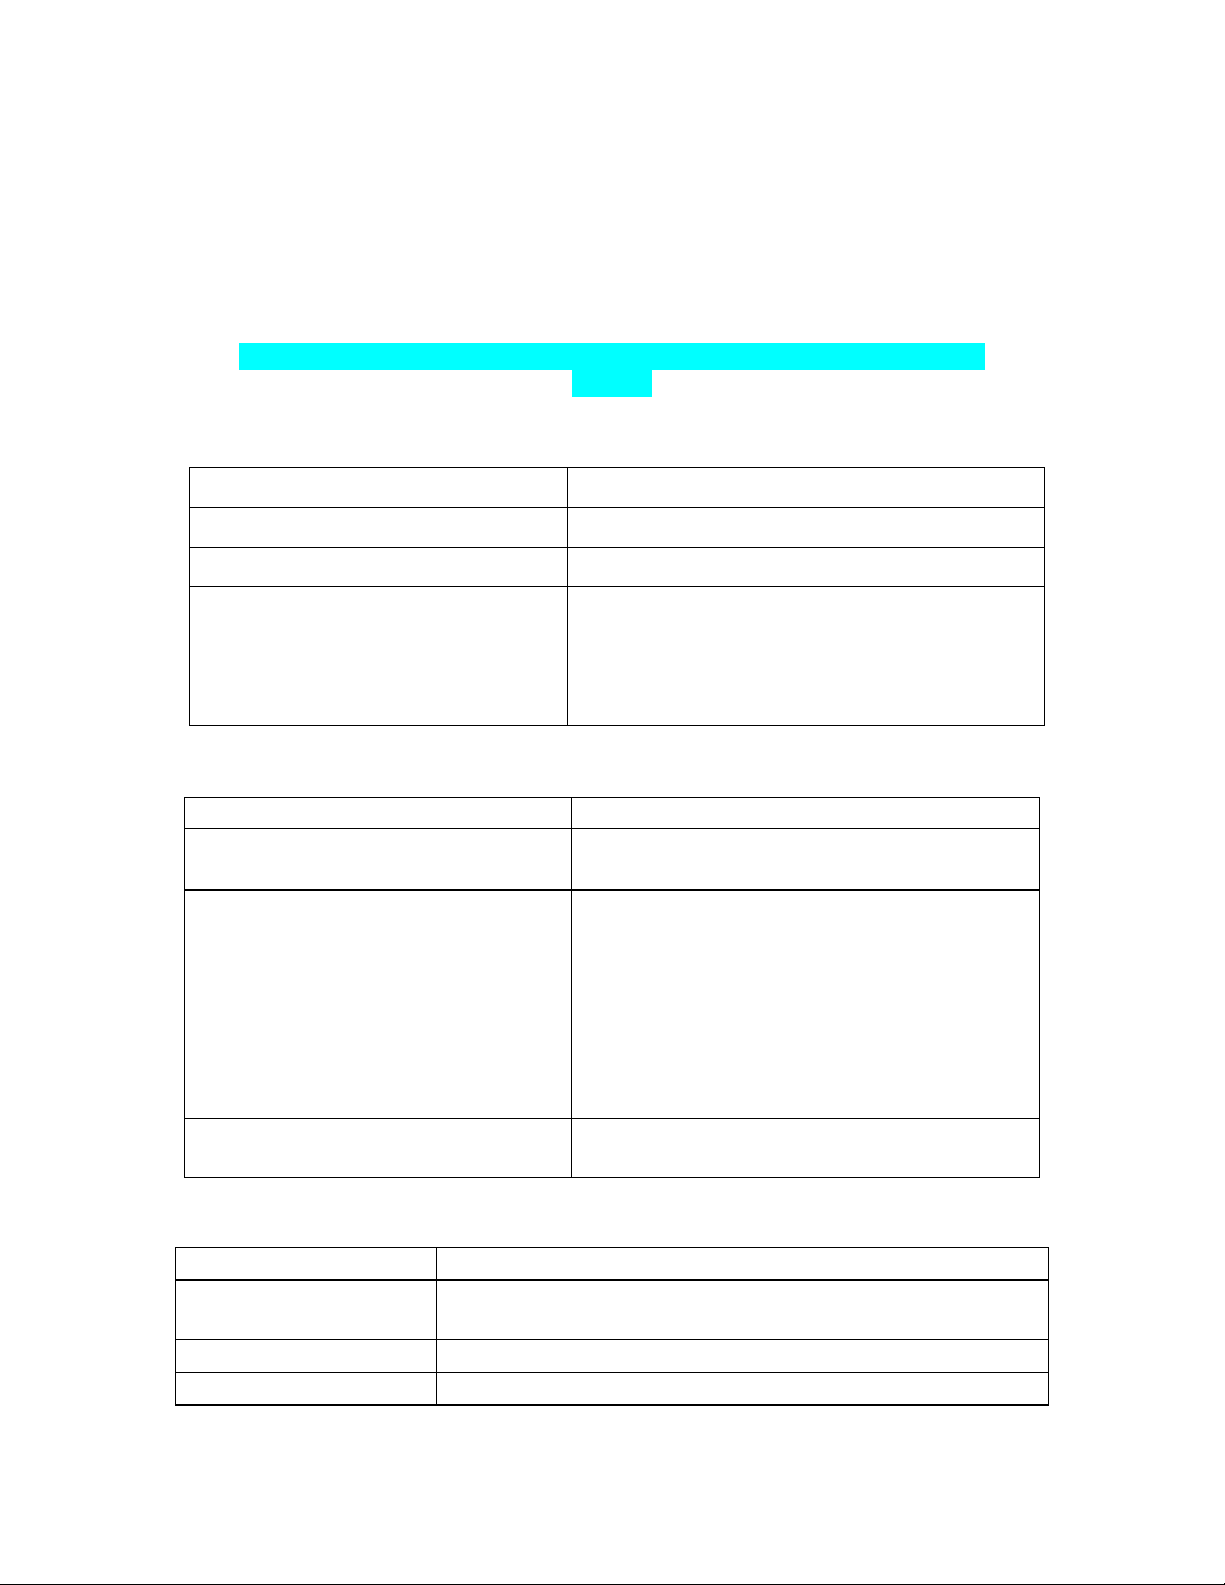
User’s Manual for Agera and EasyMatch Essentials v 1.0
75
Specifications
The specifications and characteristics of the instrument are given in this chapter. For best performance,
the instrument should be placed where there is ample work space with medium or subdued illumination
and no drafts. The operating conditions (temperature and humidity ranges) are given in the Operating
Conditions section below.
Note: Do not leave Agera in an area where temperature or humidity extremes are
possible.
Operating Conditions
Storage Temperature (3weeks)
-20°C to 65°C (-5°F to 150°F)
Operating Temperature
4°C to 38°C (40°F to 100°F)
Noncondensing Humidity
10% to 85%
Standard Accessories
Calibrated instrument White Tile, Certificate of
Traceability, Black Glass Standard, Green
Diagnostic Tile, Standards Box, Port Plates of LAV
1, LAV2 and SAV, Power Supply, Quick Start Guide,
Agera User’s Manual on USB
Physical Characteristics
Weight
6.35 kg (14.0 lbs)
Dimensions
(Height x width x depth)
28 cm x 21.6 cm x 31 cm
(11.0 in x 8.75 in x 12.25 in)
Communications I/O:
USB
Ethernet RJ45
Remote Access Support
Bluetooth Enabled
Connectivity to thumb drive, printer, keyboard,
mouse and other peripherals;
Print directly to standalone or network printers;
email directly from the instrument; stream data
to LIMS and SPC systems;
Enabled via internet-based support tool
Computer, Wireless Mouse & Keyboard
System Power
100 – 240 VAC, 47 – 63 Hz to universal power
supply @ 24 VDC/3.75A
Conditions of Illumination and Viewing
Light Source
Full spectrum balanced LED system array
Dual Beam
Spectrophotometer
256 element diode array and high resolution, concave
holographic grating
Geometry
0/45 circumferential
Measurement Conditions
Port Forward, Port Up
Page 76
User’s Manual for Agera and EasyMatch Essentials v 1.0
76
Instrument Performance
Spectral Data
Range: 400 nm -700 nm; Reporting Interval (nm): 10 nm
Illumination Range
360nm – 700 nm
Spectral Resolution
<3 nm
Effective Bandwidth
10 nm equivalent triangular
Photometric Range
0 to150%
Measurement Duration
<3 second; <5 sec interval
LED life
5 years typical
Inter-instrument
Agreement
∆E 2000 < 0.15 CIE L*a*b* (Avg) on BCRA II Tile Set
Colorimetric Repeatability
∆E 2000*< 0.03 CIE L*a*b* (Max) on White Tile
UV Control
UV Nominal, UV-Calibrated; UV-Excluded; UV-Compare
Measurement
Image Capture
High-resolution, D65 illuminated, 45/0 image viewing, image
capture and image recall with RGB histogram display for image
analysis.
Area Measured
LAV 1 - 54 mm (2.125 in) illumination; 51 mm (2.0 in) measured;
LAV 2 - 28.6 mm (1.125 in) illumination; 25.4 mm (1.0 in)
measured; SAV - 17.46 mm (0.6875 in) illumination; 16.9 mm
(0.625 in) measured
Data Views
Color Data, Spectral Data, Spectral Plot, EZ View, Tristimulus Color
Plot, Trend Plot
Illuminants
A, C, D50, D55, D65, D75, F02, F07, F11,
Observers
2° and 10°
Color Scales
CIE L*a*b*, Hunter Lab, CIE L*C*h, CIE Yxy, CIE XYZ and
Differences
Color Difference Indices
∆E*, ∆E, ∆E CMC, ∆E 2000
Indices and Metrics
Gloss, E313 Yellowness, E313 Whiteness, YI D1925, Y Brightness,
Z%, 457nm Brightness, Baking Contrast Units, Tint, HCCI, SCAA/G,
SCAA/C, Custom Indice
Gloss
60 Gloss conformance to ASTM D523 and ISO2813
Data Storage
500,000 Records max
Page 77
User’s Manual for Agera and EasyMatch Essentials v 1.0
77
Regulatory Notice
Page 78

User’s Manual for Agera and EasyMatch Essentials v 1.0
78
Page 79

User’s Manual for Agera and EasyMatch Essentials v 1.0
79
Features, Accessories & Maintenance
Agera Maintenance & Safety
The Agera is engineered to be virtually maintenance free. This section outlines the few parts of the sensor
that are to be maintained for the instrument to function properly.
• Cleaning the Agera: The Agera is NOT waterproof, but the exterior of the case may be wiped
with a damp cloth.
• Power Required: Voltage: 100-240 VAC, 3.75A, 47/63 Hz; Single Phase; 60 VA maximum;
Installation Category (Over Voltage): II
• Safety
▪ Do not view the instrument LED’s directly as it may be damaging to the eyes.
▪ Do not submerge the instrument in water.
▪ Do not take the instrument apart as there are ‘no user serviceable parts’ in the
instrument.
▪ Do not disassemble the instrument and attempt to clean the optical components.
▪ Do not open the instrument or remove any covers except using the instructions
given in this User’s Manual or under the direction of HunterLab Technical Support.
Options and Sample Devices
There are many options and devices available for positioning samples at the measurement port of the
Agera and for making the instrument easier to use. Any or all of the following options and sample
devices may be purchased for use with the Agera. HunterLab part numbers are provided for
convenience in ordering.
• EasyMatch Quality Control Software
• Ring and Disk Set
• Disk Assembly
• Ring Only
• Glass Sample Cup
• Sample Cup Opaque Cover
• Agera Sample Cup Set
• Skein/Swatch Holder
• Footswitch Assembly
• Sample Clamp
• 50% Gloss Check Tile
Easy Match Quality Control Software (EZMQC-OPT
Used on: CFEZ/MSEZ/Vista/Aeros/Agera EZMQC-OPT should be purchased as an option. Easy Match QC
is a Window’s based color quality control package. EZMQC interfaces directly with your HunterLab
instrument for instrument control and data collection. Product features include simple operation with
standard vs samples and Pass/Fail displays for quick QC analysis and automatic Pass/Fail tolerancing
Page 80
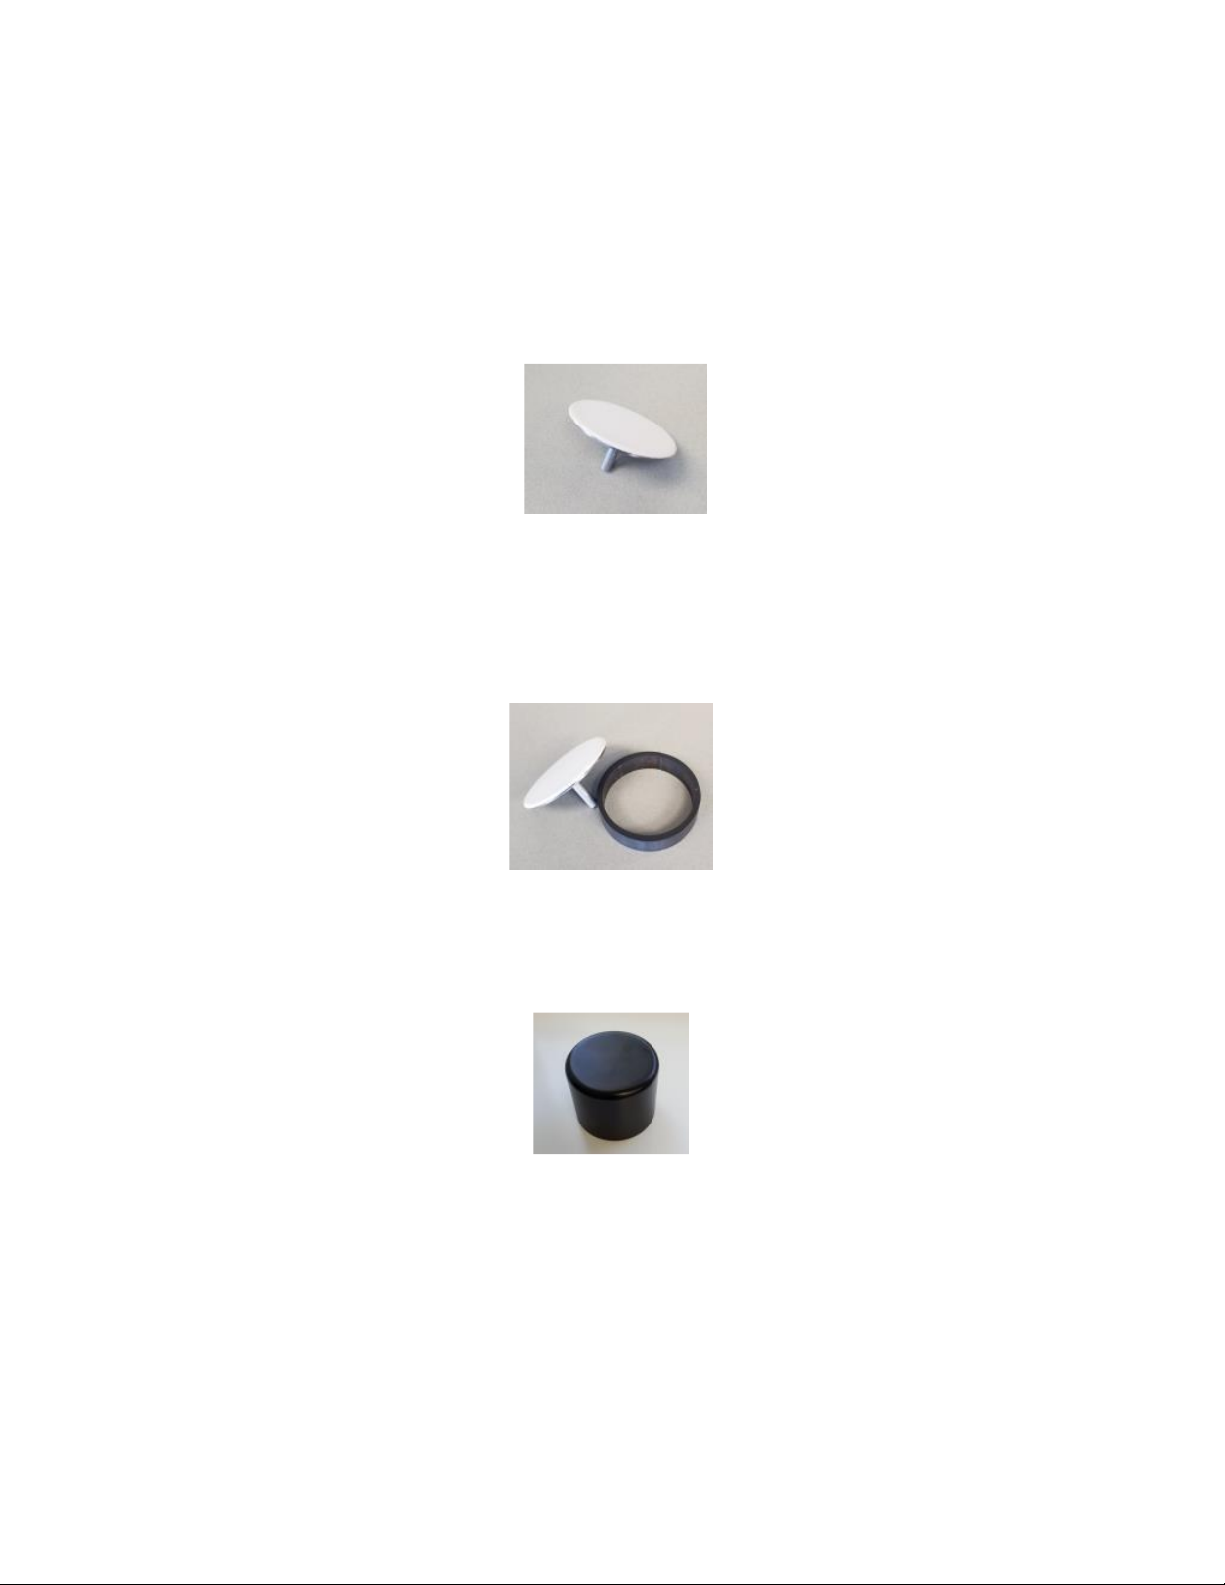
User’s Manual for Agera and EasyMatch Essentials v 1.0
80
based on color standard. Advanced features include multiple configurable data views, customized
templates for color data and display, customizable print job reports, data records stored to data base
with standard and user defined search fields, automatic data output to Microsoft Excel, and data
protection with definable user and supervisor access privileges.
Disk Assembly (02-4522-00)
From Ring and Disk set.
Figure 131. Disk Assembly
Ring and Disk Set (02-4579-00)
For use in the glass sample cup (purchased separately). Used for transparent and translucent liquids or
semi-solids where the sample path length must be fixed. The minimum sample volume required for the
ring and disk in the sample cup is 25ml.
Figure 132. Ring and Disk Set
Sample Cup Opaque Cover (04-4000-00)
Provides a light trap to exclude the interference of external ambient light on the sample.
Figure 133. Sample Cup Cover
Page 81
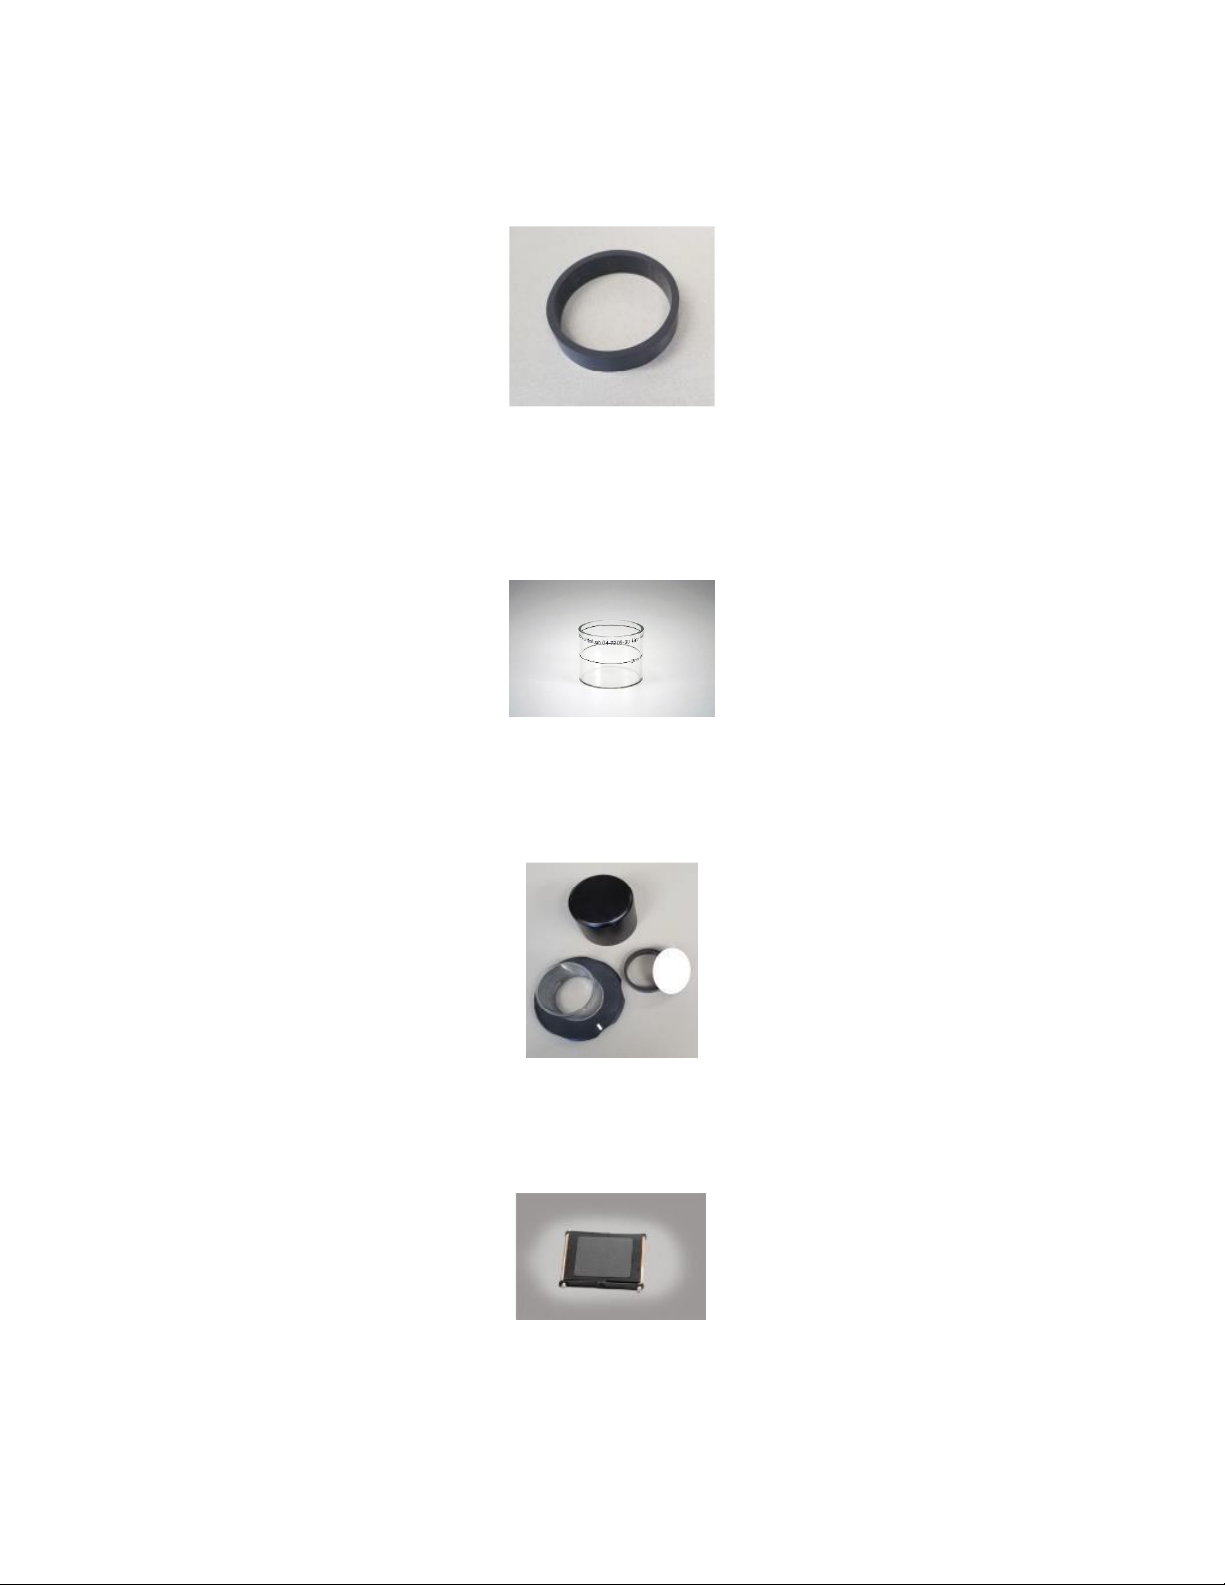
User’s Manual for Agera and EasyMatch Essentials v 1.0
81
Ring Only (04-4230-00)
From Ring and Disk set (92-4579-00) to hold light inside sample cup.
Figure 134. Ring Only
Glass Sample Cup (04-7209-00)
Optically clear glass cup for sample presentation of liquids, powders, granules and pellets. The sample
cup measures 64mm (2.5 inch).
Figure 135. 64mm Glass Sample Cup
Sample Cup Set (Agera-SC-Assy)
Consists of a 2.5 inch glass sample cup, sample cup opaque cover, ring and disk set and port insert.
Figure 136. Sample Cup Set
Skein/Swatch Holder (02-7396-00)
Sample Presentation Device used for measuring swatches, yarns and string skeins.
Figure 137. Skein/Swatch Holder
Page 82
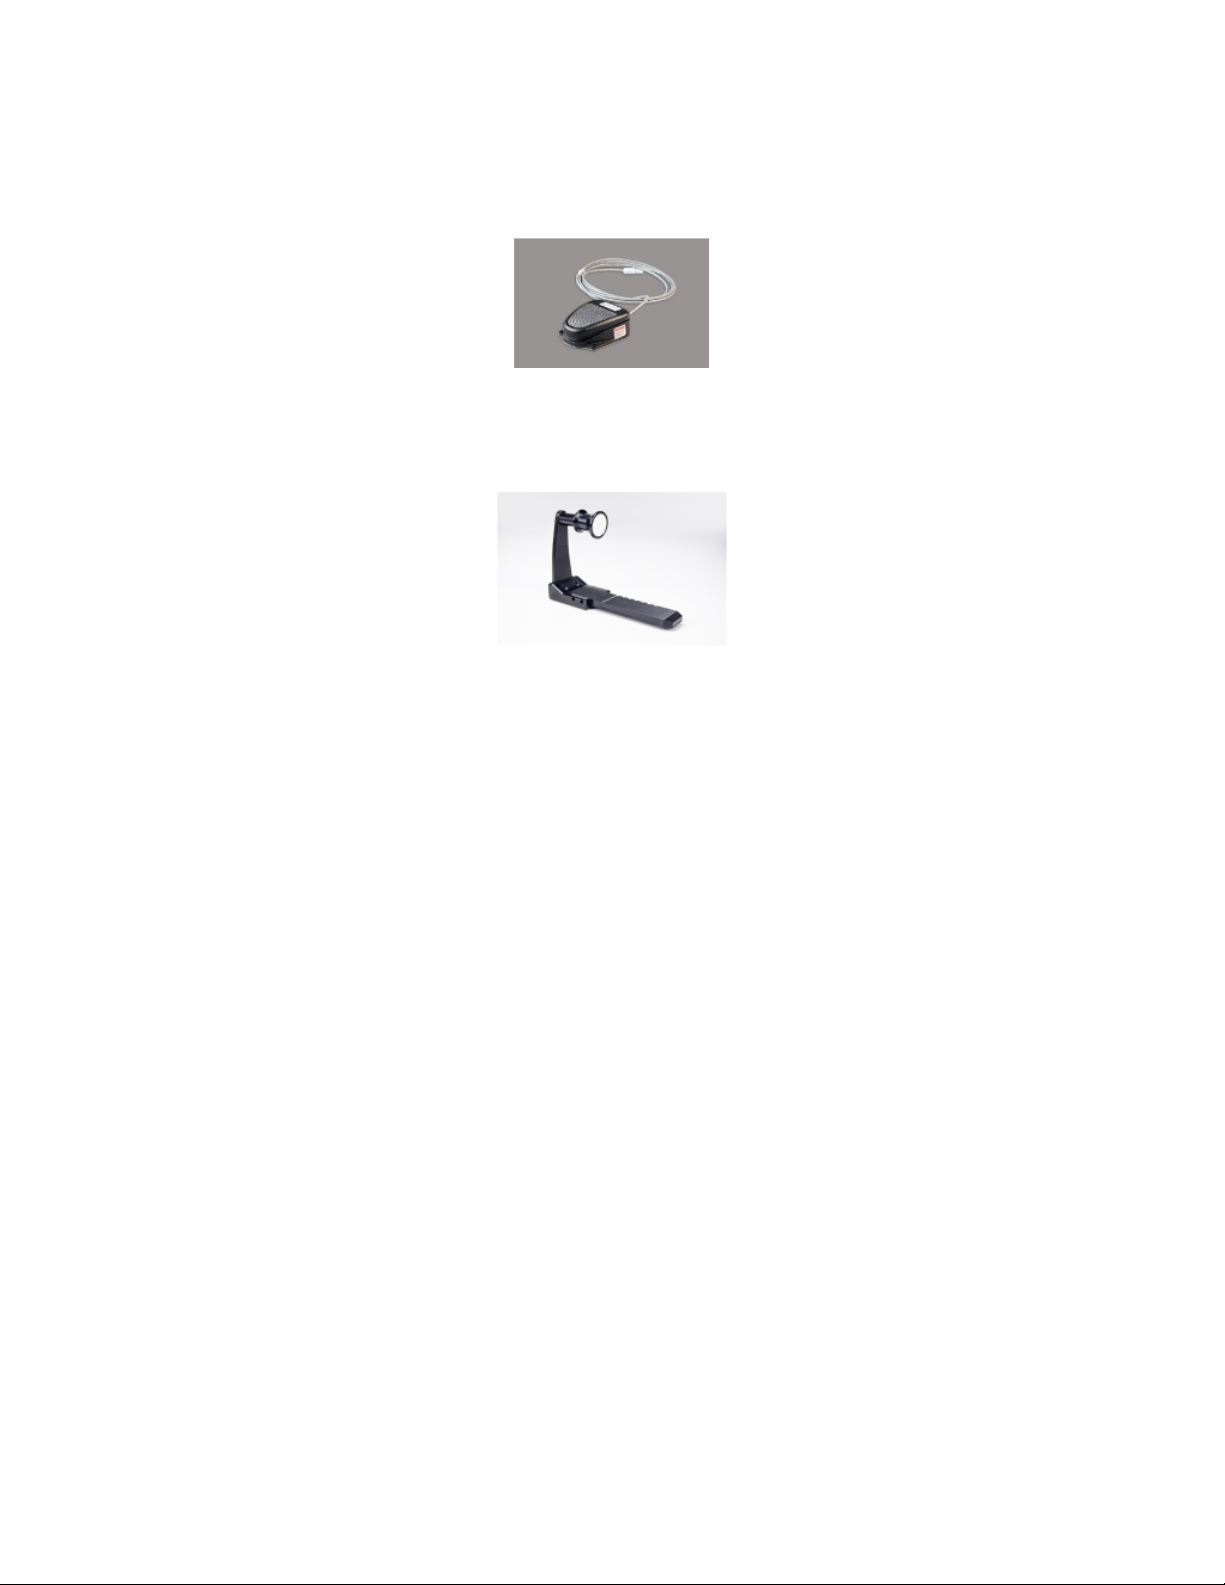
User’s Manual for Agera and EasyMatch Essentials v 1.0
82
Foot switch Assembly (D02-1010-327)
The footswitch is used to initiate sample measurement without the use of hands.
Figure 138. Foot Switch
Sample Clamp (D02-1018-462)
Used to hold sample in place in standard and port-forward orientation.
Figure 139. Sample Clamp
Gloss Check Tile (D02-1018-997)
Nominal 50 Gloss Units Check tile for Agera.
Page 83

User’s Manual for Agera and EasyMatch Essentials v 1.0
83
Instrument Replacement, Repair, Problems, and Questions
The following HunterLab policies are described in this chapter:
• Warranty
• Shipping claims
• Returns/service
• Technical assistance.
Warranty
HunterLab warrants that all instruments it manufactures are free from defects in material and
workmanship under normal use. This warranty is limited to repairing or replacing any defective
hardware or software that may cause the instrument to perform outside of its specified tolerances. This
warranty is one year from date of shipment of new instruments and two months from the date of
shipment of repaired instruments.
Note: Printers and computers are covered under the original manufacturer’s warranty.
The warranty is void if the user has made unauthorized repairs, improperly installation, operated, or
subjected the instrument to conditions outside of the operating conditions specified in the product
documentation.
The HunterLab warranty does not cover consumable items such as lamps, fuses, batteries, etc. An
instrument registration card is available online at https://www.hunterlab.com/ras-registration.html.
It is important that the instrument owner fills this out on receipt of equipment.
Questions concerning operation, maintenance, or repair of your equipment can be directed to the
Service Department at [email protected]. Additional information can be obtained at
http://support.hunterlab.com.
Shipping Claims
All materials are sold F.O.B. from Reston, Virginia (unless otherwise specified) and HunterLab
responsibility ends upon delivery to the first carrier. All claims for loss or damage must be rendered by
the consignee against the carrier within fifteen days of receipt of goods. A copy of this notice must also
be forwarded to HunterLab within five days of its receipt.
• Breakage or Damage
Per the contract terms and conditions of the carrier, the responsibility of the shipper ends at
the time and place of shipment. The carrier then assumes full responsibility. Perform the
following procedures in the case that your instrument arrives broken or damaged.
• Freight or Express
▪ Notify your local carrier.
▪ Hold the damaged goods with their container and packaging for inspection by the
examining agent. Do not return any goods to HunterLab prior to inspection by and
authorization of the carrier.
Page 84

User’s Manual for Agera and EasyMatch Essentials v 1.0
84
▪ File a claim against the carrier. Substantiate this claim with the examining agent’s
report. A certified copy of our invoice is available upon request. The original B/L is
attached to our original invoice. If the shipment is prepaid, write for a receipted
transportation bill.
▪ Advise HunterLab regarding replacement.
• Parcel Post Shipment
▪ Notify HunterLab at once in writing, giving details of the loss or damage. This
information is required for filing a claim.
▪ Hold the damaged goods with their container and packaging for possible inspection
by postal authorities.
▪ Advise HunterLab regarding replacement.
• United Parcel Service
▪ Contact your local UPS office regarding damage and insurance claims. Each UPS
office has a different method of handling these occurrences and yours will advise
you of its procedures.
▪ Retain the container and packaging.
▪ Notify HunterLab at once for replacement.
Shortage
Perform the following procedure if your order appears to be missing items.
• Check the packing list notations. The apparent shortage may be a backordered item and
may be marked as an intentional short-ship.
• Re-inspect the container and packing material, particularly to locate smaller items.
• Ascertain that the item was not removed by unauthorized personnel prior to complete
unpacking and checking.
• Notify HunterLab immediately of the shortage in writing.
Incorrect Shipment
Perform the following procedure if material received does not correspond with your order.
• Notify HunterLab immediately, referencing your order number and item.
• Hold incorrect items until return shipping instructions are received.
Returns for Repair
A service request order (SRO) number is required before any items can be returned to HunterLab.
Contact HunterLab’s Order Processing Department to obtain an SRO for damaged or incorrect parts, or
the HunterLab Service Department to obtain an SRO to return an instrument for service.
Do not return any damaged or incorrect items until all shipping instructions are received.
Page 85

User’s Manual for Agera and EasyMatch Essentials v 1.0
85
HunterLab offers complete repair services for all instruments it manufactures. Call HunterLab for the
service facility nearest your location. If your equipment is not functioning properly, contact HunterLab
Service for maintenance or repair instructions. Many times, this on-the-spot diagnosis is all that is
required.
If repair is required, the instrument may be returned to a HunterLab service facility. For schedule and
terms for repairs, call HunterLab Service. Please read the next section, “When You Need Assistance,”
prior to contacting HunterLab.
Customers are responsible for incoming and outgoing freight charges for instrument returned to
HunterLab for all repairs, including warranty repairs.
• Packing and Shipping Instruments for Repair
Please regard the following instructions when packing your instrument to return it to
HunterLab for repair. Please save the original packing to use if needed. These instructions
do not replace the recommended professional packaging for your instrument, but may
assist in eliminating the need for a shipment claim due to faulty packaging. Purchasing
freight insurance does not guarantee a successful damaged shipment claim if the carrier
determines the instrument was not packaged properly.
▪ All instrument tiles, black glass, power supply, power cords, and cables for the
instrument should be included in your shipment. Your repair estimate will be
delayed if the instrument tiles are shipped separately later.
▪ Cover the measurement port. Do not use duct tape. “Painter’s tape” is preferred, as
it will not leave residue on the instrument.
▪ Place the instrument inside original box. Styrofoam peanuts should not be used as
packing material for instruments, as they can suspend items weighing only up to 5
pounds. Observe the information listed on the bottom of most cartons about burst
strength and gross weight limits. Single wall cardboard cartons should not be used.
(A proper packing carton with packing material may be purchased from HunterLab,
if desired.)
▪ Insure the shipment.
▪ Provide an itemized packing list of all contents of the shipment.
▪ Label the carton(s) as follows:
HunterLab
Attn: SRO #____________
11491 Sunset Hills Road
Reston, VA 20190
U.S.A.
Page 86

User’s Manual for Agera and EasyMatch Essentials v 1.0
86
When You Need Assistance
When you have a problem with an instrument or software, or need technical advice concerning a
specific application, you may want to consult the support.hunterlab.com webpage. If you need to
contact HunterLab for assistance, please have the following information available:
• The type of sensor for which you need assistance (Agera).
• The serial number of the instrument (found on the back of the unit).
• The type of processor or software you are using to access the sensor output (such as
EasyMatch Essentials), the version of the software, the operating system, and the brand and
type of computer, if applicable.
• The specific nature of the problem, including the exact error message received or the
number of units the sensor reads “off” from the standard tiles.
• The steps performed prior to the start of the problem.
• Steps already performed to reconcile the problem and/or results of any diagnostic tests.
• The type of product being measured.
• Environmental conditions under which the instrument is normally used (temperature,
humidity, dust, fumes, etc.)
• Whether the instrument has recently been moved or the computer reconfigured.
• The name(s) of any HunterLab personnel with whom you have previously discussed the
problem. The HunterLab address within the united states is available on the previous page.
Customers outside the united states should contact their HunterLab distributor for initial
assistance.
Page 87

User’s Manual for Agera and EasyMatch Essentials v 1.0
87
Index
Auto Save Job, 34
Average, 33
Backup/Restore, 27
Color Data screen, 17
Color Data Table, 13, 32, 43, 59, 60
color scale, 60
Color Scales, 29
Continuous Read, 34
Custom Indices, 30
Data Management, 22
Delete, 27
Diagnostics, 46
Email, 26
Ethernet Port, 8
Export, 25
EZ View, 32, 40
Gloss, 46
Image View, 16, 59, 60
Image Viewer, 33
Import, 23
Index Bias Correction, 36
Instrument Power, 7
Jobs, 11, 19
Keyboard & Mouse, 8
Mail Settings, 26
Multi-Mode Function, 46
New Workspace, 43
Operating Conditions, 75
Options, 79
Quick View, 16
Read Options, 33
Recall, 23
Sample Devices, 79
Sample Name, 37
Save as PDF, 21
Sensor Status, 10
Spectral Data Table, 62
Standard and Tolerances, 39
Standardize, 44
Taking a Measurement, 13
Tolerances, 40, 60
Trend Plot, 32, 64
USB Connectors, 8
User Manager, 55
UV Mode, 37
View Flippers, 10, 43, 59
View Options, 10, 40, 59, 60, 64
Views, 43
Workspace, 9, 29
Page 88

User’s Manual for Agera and EasyMatch Essentials v 1.0
88
Page 89

User’s Manual for Agera and EasyMatch Essentials v 1.0
89
Table of Figures
Figure 1. Rear View with Connectors 7
Figure 2. USB Port on Front of Instrument 8
Figure 3. User Interface Screen for Agera & Essentials 9
Figure 4. Sensor Serial Number 10
Figure 5. Measurement Screen 13
Figure 6. Read the Black Glass for Bottom-of-Scale 14
Figure 7. Read the White Tile for Top-of-Scale 14
Figure 8. Standardization Status Bar 15
Figure 9. Name New Workspace 15
Figure 10. Image View with CDT 17
Figure 11. Changing, Renaming or Deleting a Sample 17
Figure 12. Edit/Delete a Standard 18
Figure 13. Job Menu 19
Figure 14. Open A Job 20
Figure 15. Save A Job 20
Figure 16. Workspace & System Settings > Preferences > Print 20
Figure 17. Save as PDF 21
Figure 18. Save PDF to Downloads File 21
Figure 19. Download File Contents 22
Figure 20. Data Management Menu 22
Figure 21. Recall Measurements 23
Figure 22. Import Job 24
Figure 23. Import Workspace 24
Figure 24. Export Current Job 25
Figure 25. Export Standard 25
Figure 26. Select Download Folder for PDF File Export 26
Figure 27. Enter an Address to Email a Job 26
Figure 28. Enter SMTP Mail Server Information 27
Figure 29. Job > About the Software 27
Figure 30. Instrument Info 28
Figure 31. Workspace Parameters 29
Figure 32. Color Measurement Scales 29
Figure 33. Illuminant/Observer Configuration 30
Figure 34. Index Configuration 30
Figure 35. Custom Indices 30
Figure 36. Color Measurement Differences 31
Figure 37. Read Options 33
Figure 38. Reading and Averaging 33
Figure 39. Continuous Read 34
Figure 40. Auto Save Job 34
Figure 41. Camera Preview 35
Figure 42. Image Viewer with CDT Screen 35
Figure 43. Slope & Bias Correction 36
Figure 44. Input Gain & Bias 36
Figure 45. Prompt for Sample (Standard) Name 37
Figure 46. Input Sample Name 37
Figure 47. UV Mode Settings 38
Figure 48. UV Calibration 38
Figure 49. Two UV Modes 39
Page 90

User’s Manual for Agera and EasyMatch Essentials v 1.0
90
Figure 50. Tolerances Configuration 40
Figure 51. Enter Tolerances 40
Figure 52. Index Selection and Tolerances 40
Figure 53. Indices & Tolerances on CDT 41
Figure 54. Hitch Standardization 42
Figure 55. AutoTolerance Configuration 42
Figure 56. Difference Tolerance Configuration 43
Figure 57. Indices Tolerance Configuration 43
Figure 58. Workspace Views 43
Figure 59. New Workspace 44
Figure 60. Name the New Workspace 44
Figure 61. Read Black Glass 44
Figure 62. Change to White Tile 45
Figure 63. Performance Diagnostics Menu 46
Figure 64. Standardize the Instrument 47
Figure 65. Read White Tile 47
Figure 66. Repeatability Readings with Pass/Fail 47
Figure 67. Diagnostics Repeatability Test Results 48
Figure 68. Input Target Values for Green Tile 48
Figure 69. Place the Green Tile at the Port 48
Figure 70. Green Tile Readings 49
Figure 71. Advanced Menu 49
Figure 72. Insert USB with Printer Driver 50
Figure 73. Select Printer Driver 50
Figure 74. Updating Printer Drivers 50
Figure 75. Printer Driver Installed 51
Figure 76. Printer Page 51
Figure 77. Select Region 52
Figure 78. Remote Access Screen 52
Figure 79. Web connect to HunterLab 52
Figure 80. System Settings > Preferences > General Page 53
Figure 81. Enable Novice Tool Tips 53
Figure 82. Example of Novice Tool Tip 54
Figure 83. Data Export Configuration 54
Figure 84. Network Settings 55
Figure 85. System Settings > Preferences > Configure Print Page 55
Figure 86. Create a Group 56
Figure 87. Setup Administrative & General Users 56
Figure 88. User Privileges 56
Figure 89. Enabling Security 57
Figure 90. Login Credentials 57
Figure 91. Enable Last Login Credentials 57
Figure 92. Workspace > select Views 59
Figure 93. EZ View Display 59
Figure 94. EZ View Options 60
Figure 95. Image View for EZ View 60
Figure 96. Color Data Display 60
Figure 97. Color Data Screen: View Options 61
Figure 98. Image View 61
Figure 99. Changing a Sample into a Standard 61
Figure 100. Delete the Sample Measurement 62
Figure 101. Spectral Data Table 62
Figure 102. Spectral Data Table Options 62
Page 91

User’s Manual for Agera and EasyMatch Essentials v 1.0
91
Figure 103. Spectral Plot View 63
Figure 104. Spectral Plot Options 63
Figure 105. Trend Plot 64
Figure 106. Trend Plot Options 64
Figure 107. Trend Plot Traces 65
Figure 108. Color Plot View 65
Figure 109. Color Plot Options 66
Figure 110. Ethernet Cable 67
Figure 111. Preferences (General) > Network Settings 67
Figure 112. Select DCHP 68
Figure 113. Auto Export Measurement 68
Figure 114. Network Data Export 68
Figure 115. Data Export 69
Figure 116. Configure Network Settings 69
Figure 117. Configure WIFI settings 69
Figure 118. Find IP Address 70
Figure 119. Find IP Address (Part2) 70
Figure 120. Network Data Export Config 70
Figure 121. Ethernet Cable Figure 122. Ethernet to USB Adapter 71
Figure 123. Rear View of Agera 71
Figure 124. Command Prompt ipconfig 72
Figure 125. Configuration Parameters for Ethernet 72
Figure 126. Read Options> Auto Export Measurements 73
Figure 127. Read Options Export 73
Figure 128. Data Output 74
Figure 129. Recover Data 74
Figure 130. Disk Assembly 80
Figure 131. Ring and Disk Set 80
Figure 132. Sample Cup Cover 80
Figure 133. Ring Only 81
Figure 134. 64mm Glass Sample Cup 81
Figure 135. Sample Cup Set 81
Figure 136. Skein/Swatch Holder 81
Figure 137. Foot Switch 82
Figure 138. Sample Clamp 82
 Loading...