

Page 1

Page 2
READ AND SAVE THESE INSTRUCTIONS
Important Safety Instructions:
Read all instructions before
using this humidifier.
1. This humidifier may not work properly
on an uneven surface. ALWAYS place
this humidifier on a firm, level, and water resistant surface. ALWAYS place the
humidifier at least six (6) inches away from
walls and heat sources such as stoves,
radiators, or heaters.
2. ALWAYS place the humidifier in an area
that is out of the reach of children.
3. Before using the humidifier, extend the
cord and inspect for any signs of damage. DO NOT use the product if the cord
has been damaged.
4. This product has a polarized plug (one
blade is wider than the other) as a safety
feature. This plug will fit into a polarized
outlet only one way. If the plug does not
fit fully into the outlet, reverse the plug.
If it still does not fit, contact a qualified
electrician. DO NOT attempt to defeat
or override this safety feature.
5. ALWAYS UNPLUG AND EMPTY the hu-
midifier when it is not in operation or
while it is being cleaned.
6. DO NOT tilt or move the humidifier while
it is in operation. Never move the humidifier while there is water in the tank.
Empty the water tank, turn off, and unplug the unit before moving.
7. In addition to routine maintenance which
may be required, this humidifier requires
seasonal cleaning. Refer to and follow
CLEANING THE HUMIDIFIER AND THE
WATER TANK instructions.
Thank you for purchasing The Care Free
Humidifier Plus Evaporative Humidifier by
Hunter Fan Company. Please read and
save these instructions to receive the maximum benefit and performance from your
humidifier.
®
How The Care Free® Humidifier Plus
Evaporative Humidifier Works
The Care Free® Humidifier Plus Evaporative
Humidifier has a unique patented design with
several innovative features:
• Low Maintenance – Other humidifiers have
paper filters that need to be replaced every
few months. Our exclusive PermaWick™ filter saves time and money. It’s designed to
last season after season, saving up to $45 a
year. No wet paper odors either.
• Regulated Release™ System – By dis-
persing water from the top of the
PermaWick™ filter, stagnant water around
the PermaWick™ filter is eliminated, and
the buildup of mineral residue that can
clog the filter and impede performance
is eliminated. NOTE: The filter has a coat-
41554-01 06/09/2004 2 © 2004 HUNTER FAN CO.
ing on the wick which may make it appear
old or used, but is actually new.
• Built-in Antimicrobial Properties – The
plastic parts and the PermaWick™ filter
have built-in antimicrobial properties to inhibit the growth of bacteria, mold and
fungi that may affect these parts.
NOTE: This product contains antimicrobial
properties which are built-in to inhibit the
growth of bacteria which may affect the
plastic and PermaWick™ filter in the humidifier. These properties do not extend to
the water, humidified air or users. Conduct
routine cleaning and maintenance based
upon use and individual conditions.
Page 3

• No White Dust – The Care Free® Humidi-
fier Plus Evaporative Humidifier produces
no white dust that can settle on furniture
or be inhaled.
NOTE: You may notice mineral deposits
accumulating in the tank base or on the
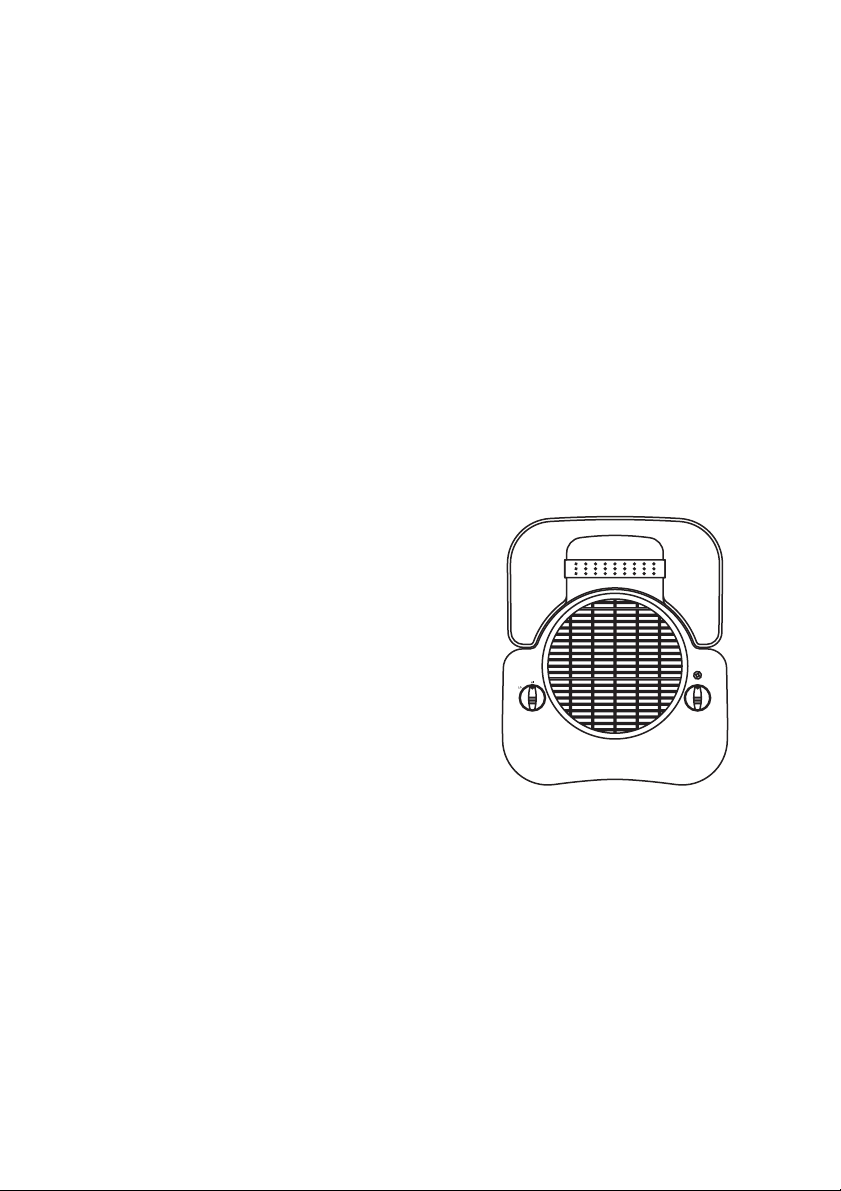
Humidifier Parts
PermaWick™ filter. This is normal and
does not affect performance. If you
would like to clean these deposits away,
please see CLEANING THE HUMIDIFIER
AND WATER TANK.
Figure 1
41554-01 06/09/2004 3 © 2004 HUNTER FAN CO.
Page 4
41554-01 06/09/2004 4 © 2004 HUNTER FAN CO.
Page 5

For Models 33250A, 33280A, 34331 & 37250
Adjustable Humidistat: Enables you to set a
desired maximum humidity level. Once this
level is reached, the unit will shut off until the
humidity level drops.
Note: The humidifier may not be running
because the humidistat setting may need to be
adjusted.
Desired Humidity Light: The green light will
Desired
Humidity
Light
Adjustable
Humidistat
be illuminated when the humidity in the room
has reached the level that you selected with
the adjustable humidistat knob.
Power/Speed Control: Turns the humidifier
‘ON’ and ‘OFF’. The power should always be
Figure 4
off before unplugging the humidifier, moving the
humidifier, or refilling the water tank.
Power Light: The light will be illuminated when
the power is on.
For Models 33203, 33252, 33282, 34332 37203 & 37252
Adjustable Humidistat: Enables you to set a
desired maximum humidity level. Once this
level is reached, the unit will shut off until the
humidity level drops.
Note: The humidifier may not be running
because the humidistat setting may need to
be adjusted.
Desired Humidity Light: The green light will
be illuminated when the humidity in the room
has reached the level that you selected with
the adjustable humidistat knob.
Power/Speed Control: Turns the humidifier
‘ON’ and ‘OFF’. The power should always be
off before unplugging the humidifier, moving
the humidifier, or refilling the water tank.
Power Light: The light will be illuminated
when the power is on.
NiteGlo™ Night Light Control: Turns the
night light ‘ON’ and ‘OFF’. The night light can
be turned on even if the humidifier fan is turned
off.
Desired
Humidity
Light
Adjustable
Humidistat
Figure 5
Power
Light
Power/
Speed
Control
Power
Light
Power/
Speed
Control
NiteGlo™
Night
Light
Control
41554-01 06/09/2004 5 © 2004 HUNTER FAN CO.
Page 6

For Models 34301, 34351, 37300 & 37350
Adjustable Humidistat: Enables you to set a
desired maximum humidity level. Once this
level is reached, the unit will shut off until the
humidity level drops.
Note: The humidifier may not be running
because the humidistat setting may need to be
adjusted.
Desired Humidity Light: The green light will
be illuminated when the humidity in the room
has reached the level that you selected with
Desired
Humidity
Light
Adjustable
Humidistat
Refill
Light
Power/
Speed
Control
the adjustable humidistat knob.
Power/Speed Control: Turns the humidifier
‘ON’ and ‘OFF’. The power should always be
Figure 6
off before unplugging the humidifier, moving the
humidifier, or refilling the water tank.
Refill Light: The red light will be illuminated to
signal you that the humidifier has automatically
turned off and the water tank needs to be
refilled.
For Models 34302, 34352, 37302 & 37352
Adjustable Humidistat: Enables you to set a
desired maximum humidity level. Once this
level is reached, the unit will shut off until the
humidity level drops.
Note: The humidifier may not be running
because the humidistat setting may need to
be adjusted.
Desired Humidity Light: The green light will
be illuminated when the humidity in the room
has reached the level that you selected with
the adjustable humidistat knob.
Power/Speed Control: Turns the humidifier
‘ON’ and ‘OFF’. The power should always be
off before unplugging the humidifier, moving
the humidifier, or refilling the water tank.
Refill Light: The red light will be illuminated
to signal you that the humidifier has
automatically turned off and the water tank
needs to be refilled.
NiteGlo™ Night Light Control: Turns the
night light ‘ON’ and ‘OFF’. The night light can
be turned on even if the humidifier fan is turned
off.
41554-01 06/09/2004 6 © 2004 HUNTER FAN CO.
Desired
Humidity
Light
Adjustable
Humidistat
Refill
Light
Power/
Speed
Control
NiteGlo™
Night
Light
Control
Figure 7
Page 7

Using Your Humidifier
1. Remove The Care Free® Humidifier Plus
Evaporative Humidifier from its packaging.
Read and Save the Instructions.
2. Place the humidifier on a hard, flat, water
resistant surface. Always place the humidifier at least six (6) inches away from walls and
sources of heat.
3. Lift the main housing to confirm that the
PermaWick™ filters are placed upright in the
slots. Replace the main housing. (See Figure 1.)
4. Remove the water tank and take it to the
sink or tub to fill.
5. Turn the tank upside down and unscrew the
tank cap by turning it counterclockwise. Fill
the water tank with cool water and replace
the tank cap (Never use hot water). Be sure
not to overfill the tank as water damage may
occur to furniture or flooring due to spillage.
HUNTER WILL NOT ACCEPT RESPONSIBILITY FOR
DAMAGE TO PROPERTY CAUSED BY WATER
SPILLAGE.
6. Carry the tank back to the humidifier. Turn
the tank upright and place it on the humidifier. Be sure that the tank is seated properly
in the base. If the tank is properly located on
the base, you will see air bubbles flowing up
into the tank.
7. With the power control knob in the ‘OFF’ position, plug the humidifier into the wall.
CAUTION: Never plug in the Humidifier
while your hands are wet as Electric Shock
could occur.
8. Use the power control knob to turn the
humidifier ‘ON’ by selecting a speed setting.
Only for models with an Adjustable Humidistat
9. You can choose the desired humidity output by adjusting the Adjustable Humidistat knob. In a very dry room, the “HI”
setting should be used to quickly achieve
a comfortable level of humidity. Once the
room is comfortable, you can turn the
Adjustable Humidistat down. Selection
of your desired humidity level is a personal choice and you may have to adjust
the dial to find the level where you feel
most comfortable. To begin with, we suggest you try a middle location between
the lowest and the maximum setting.
Then, adjust the level to suit your needs.
10. When the humidity reaches the level you
have set, the “Desired Humidity” light will
be illuminated. The humidifier will not
output humidity while the humidity in the
room is at the selected humidity level. The
“Desired Humidity” light will stay on until the humidity changes. When the humidity in the room drops below the selected level, the humidifier will cycle on
again and the “Desired Humidity” light
will go off.
Only for models with Automatic Shut-off
11. When the water tank is empty, the humidifier will automatically shut itself off. The
red light will be illuminated, indicating that
the water tank needs to be refilled.
12. Follow REFILLING THE WATER TANK di-
rections. Once the water tank is refilled,
the Refill Light will not be illuminated.
Only for models with a NiteGlo™ Night Light
13. Use the control to turn the night light off
and on. The night light can be operated
even if the humidifier fan is turned ‘OFF’.
41554-01 06/09/2004 7 © 2004 HUNTER FAN CO.
Page 8

Refilling The Water Tank
1. When the water tank level is low, turn the
humidifier ‘OFF’, and unplug.
2. Remove the tank and take it to the sink or
tub to refill.
3. Turn the tank upside down and unscrew the
tank cap by turning it counterclockwise.
Empty the tank, refill with fresh cool water
(never use hot water), and replace the tank
cap. Be sure not to overfill the tank as water
damage may occur to furniture or flooring
due to spillage.
HUNTER WILL NOT ACCEPT RESPONSIBILITY FOR DAMAGE TO PROPERTY CAUSED
BY WATER SPILLAGE.
4. Carry the tank back to the humidifier. Turn
the tank upright and place it on the humidifier. Be sure that the tank is seated
properly in the base. If the tank is properly
located on the base, you will see air bubbles
flowing up into the tank.
Cleaning The Humidifier And The Water Tank
Many regions have hard water with high
concentrations of minerals. When water
evaporates from The Care Free
Evaporative Humidifier, minerals may be left
behind. These minerals can form a hard white
scale which can be removed by following the
cleaning instructions. The frequency of
cleaning due to mineral build up can vary
depending upon the quality of water you
may have.
Refer to Figure 1 for part names.
1. Turn the humidifier ‘OFF’ and unplug the
unit.
2. Lift the main housing and remove the water dispersion tray and the PermaWick™
Filters. The motor is attached to the main
housing. Do not place the motor near
water. Do not use a wet towel on the
motor or motor housing as electrical
shock may occur.
3. The PermaWick™ Filter should be cleaned
in a vinegar and water solution to remove
any mineral buildup. Place in a solution of
one (1) gallon of water and eight (8) ounces
of undiluted white vinegar. Allow the filter
to soak for 20 minutes.
4. After soaking, rinse it several times with
clean water. Place the PermaWick™ Filter
®
Humidifier Plus
in a location where it can drip dry while
you clean the other parts of your humidifier.
5. Remove the water tank from the base and
empty any water that is left in the tank.
Soak the base in a mixture of one (1) gallon of water and eight (8) ounces of vinegar for 20 minutes.
6. After soaking, wipe the base with a soft
cloth or sponge to remove any mineral
build up. Rinse with clean water several
times. If you are planning on storing the
humidifier, be sure the base is completely dry.
7. Fill the water tank with one (1) gallon of
water and eight ounces of undiluted white
vinegar. Replace the tank cap and shake
the tank vigorously until all interior surfaces of the tank have been exposed to the
water/vinegar mixture.
8. Empty the tank of the water/vinegar mixture. Rinse it several times with clean water
and then replace the tank cap. If you are
planning on storing the humidifier, dry it
inside and out, leaving the cap off to allow
the tank to completely dry. Continue to
clean the other parts of your humidifier.
9. Remove the water diffuser cap and sponge.
Rinse the sponge in clean water to remove
any debris. If the sponge contains hard
41554-01 06/09/2004 8 © 2004 HUNTER FAN CO.
Page 9

water residue, soak it in a mixture of
A
p
one (1) gallon of water and eight (8)
ounces of vinegar for 20 minutes. Rinse
well and reinstall sponge and diffuser cap
in unit. Do not expose motor or other
electrical components to water.
10. Wipe the surfaces of the main housing with
11.Once all the parts are clean, reassemble the humidifier, and follow the
USING YOUR HUMIDIFIER
to con-
tinue use. If you are storing the hu-
midifier, make sure the parts are
completely dry, reassemble, and
store in a dry location.
a soft cloth.
Service Parts
To obtain a service part for your humidifier, call customer service at 1-888-830-1326 or e-mail us
at Techsupport@hunterfanhq.com. Please be prepared to tell the operator the model number of
your humidifier and the name of the part you need to replace and the part number. Refer to
Figure 1 for part names.
Model No.
33200A
33203 64101-01-325
33232
33250A
33251
33252
33280A
33282
34301
34302
34331
34332
34351
34352
37200
37203 64102-01-325
37232
37250
37251
37252
37300
37302
37350
37352
Filter
Frame
64171-01-000
64171-01-001
64171-01-000
64171-01-001
64171-03-000
64171-01-000
67171-01-001
64171-01-000
67171-01-001
64171-03-000
Base
92849-01-325
92850-01-325
92849-01-325
92850-01-325
Water
Tank
92851-01-326
92852-01-326
92851-01-326
92852-01-326
Knob
64102-01-325
64102-01-325
64102-01-325
64102-01-325
Knob
B
64101-01-325
Tank
Ca
74079-01-325
Perma wick
Filter
74080
74082
74080
74082
41554-01 06/09/2004 9 © 2004 HUNTER FAN CO.
Page 10

The Care Free
5 YEAR LIMITED WARRANTY
Hunter Fan Company
®
Humidifier Plus Evaporative Humidifier
The Hunter Fan Company, Inc. makes the
following warranty to the original residen-
tial user or consumer purchaser of The Care
Free® Humidifier Plus Evaporative Humidi-
fier:
If any part of The Care Free® Humidifier Plus
Evaporative Humidifier (“Humidifier”) mo-
tor fails during the first 5 (five) years from the
date of installation due to a defect in mate-
rial or workmanship, we will provide a re-
placement part free of charge. If no replace-
ment part can be provided for such motor, we
will replace your humidifier.
If your Humidifier motor fails any time
within 1 (one) year after the date of instal-
lation due to a defect in material or work-
manship, labor to repair the defect will be
provided free of charge at our nearest ser-
vice centre or at our Service Department in
Memphis, Tennessee. You will be respon-
sible for all parts and labor costs after this
one-year period.
If your Humidifier water tank, filter fame, base,
knobs, or tank cap fail any time within 1 (one)
year after the date of sale to you due to a
defect in material or workmanship, we will
repair or, at our option, replace the water tank,
filter frame, base, knobs, or tank cap free of
charge for parts or labor performed at our near-
est service centre or our Service Department
in Memphis, Tennessee.
NO WARRANTY, EXPRESSED OR IM-
PLIED, INCLUDING ANY WARRANTY OF
MERCHANTABILITY OR FITNESS FOR A
PARTICULAR PURPOSE, IS MADE IN RE-
SPECT TO THE FILTER.
THIS WARRANTY IS IN LIEU OF ALL
OTHER EXPRESS WARRANTIES. THE DU-
RATION OF ANY IMPLIED WARRANTY,
INCLUDING BUT NOT LIMITED TO ANY
IMPLIED WARRANTY OF MERCHANT-
ABILITY OR FITNESS FOR A PARTICULAR
PURPOSE, IN RESPECT TO THE MOTOR
IS EXPRESSLY LIMITED TO THE PERIOD
OF THE EXPRESS WARRANTY SET
FORTH ABOVE.
This warranty is voided if your Humidi-
fier is not purchased and used in the USA
or Canada.
This warranty excludes and does not cover
defects, malfunctions, or failures of the Hu-
midifier which were caused by repairs by per-
sons not authorized by us, use of parts, or
accessories not authorized by us, mishan-
dling, modifications, or damage to the Hu-
midifier while in your possession, or unrea-
sonable use, including failure to provide rea-
sonable and necessary maintenance. This
warranty does not cover humidifiers used in
commercial applications. There are no express
or implied warranties as to commercial pur-
chasers or users.
IF THE ORIGINAL RESIDENTIAL USER OR
CONSUMER PURCHASER CEASES TO
OWN THE HUMIDIFIER, THIS WARRANTY
AND ANY IMPLIED WARRANTY WHICH
THEN REMAINS IN EFFECT, INCLUDING
BUT NOT LIMITED TO ANY IMPLIED
WARRANTY OF MERCHANTABILITY OR
FITNESS FOR A PARTICULAR PURPOSE,
ARE VOIDED.
41554-01 06/09/2004 10 © 2004 HUNTER FAN CO.
To obtain service, contact the nearest Hunter
authorized service centre or the Hunter Fan
Company Service Department, 2500 Frisco
Avenue, Memphis, Tennessee 38114, 901-
248-2222. You will be responsible for insur-
ance and freight or other transportation to
our factory service center. We will return the
Humidifier freight prepaid to you. The Hu-
midifier should be properly packaged to
Page 11

avoid damage in transit since we will not be
responsible for any such damage. Proof of
purchase is required when requesting war-
ranty service. The purchaser must present the
sales receipt or other document that estab-
lishes proof of purchase.
IN NO EVENT SHALL HUNTER FAN COM-
PANY BE LIABLE FOR DIRECT, INDIRECT,
SPECIAL, CONSEQUENTIAL OR INCIDEN-
TAL DAMAGES IN EXCESS OF THE PUR-
CHASE PRICE OF THE HUMIDIFIER. YOUR
SOLE REMEDY WILL BE REPAIR OR RE-
PLACEMENT AS PROVIDED ABOVE.
SOME AMERICAN STATES AND CANA-
DIAN PROVINCES DO NOT ALLOW
•LIMITATIONS ON HOW LONG AN
IMPLIED WARRANTY LASTS;
•THE EXCLUSION OR LIMITATION
OF DIRECT, INDIRECT, SPECIAL, IN-
CIDENTAL OR CONSEQUENTIAL
DAMAGES;
•THE EXCLUSION OR INVALIDITY
OF EXPRESS OR IMPLIED WARRAN-
TIES IF THE USER CEASES TO OWN
THE HUMIDIFIER;
•THE LIMITATION OF THE REM-
EDIES AND RECOURSES AVAIL-
ABLE TO THE PURCHASER; OR
•THE INVALIDITY OF AN EXPRESS
WARRANTY WHEN A PRODUCT
IDENTIFIED BY BRAND NAME IS
NOT USED (UNLESS SPECIFIC CON-
DITIONS ARE FULFILLED);
SO THE ABOVE LIMITATIONS OR EXCLU-
SIONS MAY NOT APPLY TO YOU.
THIS WARRANTY GIVES YOU SPECIFIC
LEGAL RIGHTS AND YOU MAY ALSO
HAVE OTHER RIGHTS WHICH VARY FROM
STATE TO STATE OR PROVINCE TO PROV-
INCE.
HUNTER FAN COMPANY
2500 FRISCO AVENUE
MEMPHIS, TN 38114, USA
41554-01 06/09/2004 11 © 2004 HUNTER FAN CO.
Page 12

Other Home Comfort Products from Hunter
TM
Pr
e-
F
il
Fi
te
lt
r
F
er
i
lt
R
es
er
e
t
Hunter Original
®
QuietFlo™
True HEPA Air
Programmable
Thermostat
Purifier
To learn more about Hunter Fan Company products, please see our web page at:
www.hunterfan.com
41554-01 06/09/2004 12 © 2004 HUNTER FAN CO.
 Loading...