

I N S T A L L A T I O N
5 MINUTE
Owner’s Manual
English
Models
44272
44277
5-1-1Programmable
Weekdays-Saturday-Sunday
Form# 44033-01
20100511
©2010 Hunter Fan Co.

Table Of Contents
At A Glance
Know Your ermostat . . . . . . . . . . . . . . . . . . . . . . . . . . . . . . . . . . . . . . . . . . . . . . . . . . . . 3
Setup
Setting Day and Time . . . . . . . . . . . . . . . . . . . . . . . . . . . . . . . . . . . . . . . . . . . . . . . . . . . . .10
Scheduling
Scheduling Introduction . . . . . . . . . . . . . . . . . . . . . . . . . . . . . . . . . . . . . . . . . . . . . . . . . .12
Setting Your Schedule . . . . . . . . . . . . . . . . . . . . . . . . . . . . . . . . . . . . . . . . . . . . . . . . . . . . .14
Temporary Temperature Change . . . . . . . . . . . . . . . . . . . . . . . . . . . . . . . . . . . . . . . . . .18
Turning Off Scheduling . . . . . . . . . . . . . . . . . . . . . . . . . . . . . . . . . . . . . . . . . . . . . . . . . . .20
Save Away . . . . . . . . . . . . . . . . . . . . . . . . . . . . . . . . . . . . . . . . . . . . . . . . . . . . . . . . . . . . . . . . .22
Features
Alerts . . . . . . . . . . . . . . . . . . . . . . . . . . . . . . . . . . . . . . . . . . . . . . . . . . . . . . . . . . . . . . . . . . . . .24
Menu Options . . . . . . . . . . . . . . . . . . . . . . . . . . . . . . . . . . . . . . . . . . . . . . . . . . . . . . . . . . . .28
Additional Features . . . . . . . . . . . . . . . . . . . . . . . . . . . . . . . . . . . . . . . . . . . . . . . . . . . . . . .32
ermostat Assistance
Troubleshooting and Support . . . . . . . . . . . . . . . . . . . . . . . . . . . . . . . . . . . . . . . . . . . . .33
Technical Support . . . . . . . . . . . . . . . . . . . . . . . . . . . . . . . . . . . . . . . . . . . . . . . . . . . . . . . . .35
Warranty
1 Year Guarantee . . . . . . . . . . . . . . . . . . . . . . . . . . . . . . . . . . . . . . . . . . . . . . . . . . . . . . . . . .36
2
44033-01 • 05/11/2010

3
Your thermostat has been pre-programmed from the factory with no programming
necessary. We recommend using these pre-programmed settings for a few days
before altering them as they offer maximum energy saving benets. If you
do decide to alter your programs, use the charts on page 13 to write out your
scheduled times and temperatures. After you have recorded your preferences,
follow the instructions on page 14 to alter your temperature settings.
There is no need to program the thermosat at the wall where it is mounted to!
Remove the thermostat from the backplate by gripping the sides rmly and pulling
it straight off. This allows you to program the thermostat in comfort.
After you have programmed your thermostat, no other setting changes are
necessary unless you wish to browse through the menu to see how you may
further adjust the independent settings of your thermostat to meet your lifestyle.
The features section starting on page 28 of this manual will describe these settings.
Most settings have been preset for optimal performance.
If you need any assistance with installion or setup of your new
Hunter Thermostat, please call us, our technical support staff is
ready to help!
USA: 1-888-830-1326
Canada: 1-866-268-1936
Hours of operation are from 7:00 am to 7:00 pm Monday - Friday and 8:00 am
to 5:00 pm on Saturday, Central Time. You may also contact us over the Internet
at:
www.hunterfan.com
At A Glance
Know Your ermostat
©2010 Hunter Fan Company
3

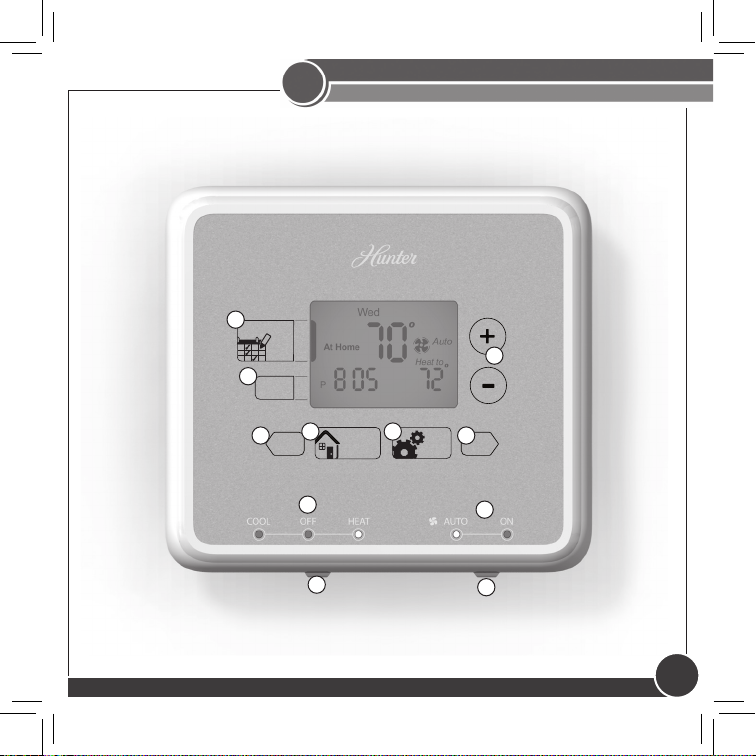
At A Glance
Know Your ermostat
1. Enters Schedule Setup for altering scheduled programs.
2. Sets the Save Away feature for when you will not be home during a regularly
programmed time.
3. Conrms completion of an action or returns you to the Home screen.
4. Allows access to the advanced features of the thermostat.
5. Moves you forward or backward while setting up features or schedules.
6. Adjusts time and temperature settings as well as moving up or down menu
lists.
7. Indicates whether the system is set to Heat, Cool, or Off.
8. Shows if the fan is set to Auto or On modes.
9. Allows you to switch between Heat, Cool, and Off modes.
10. Allows you to switch between fan Auto and On modes.
3
4
44033-01 • 05/11/2010
3
Save
Away
Schedule
Back
Done/
Home
Menu
Next
Know Your ermostat
At A Glance
1
6
2
5
7
9
©2010 Hunter Fan Company
43
5
8
10
5

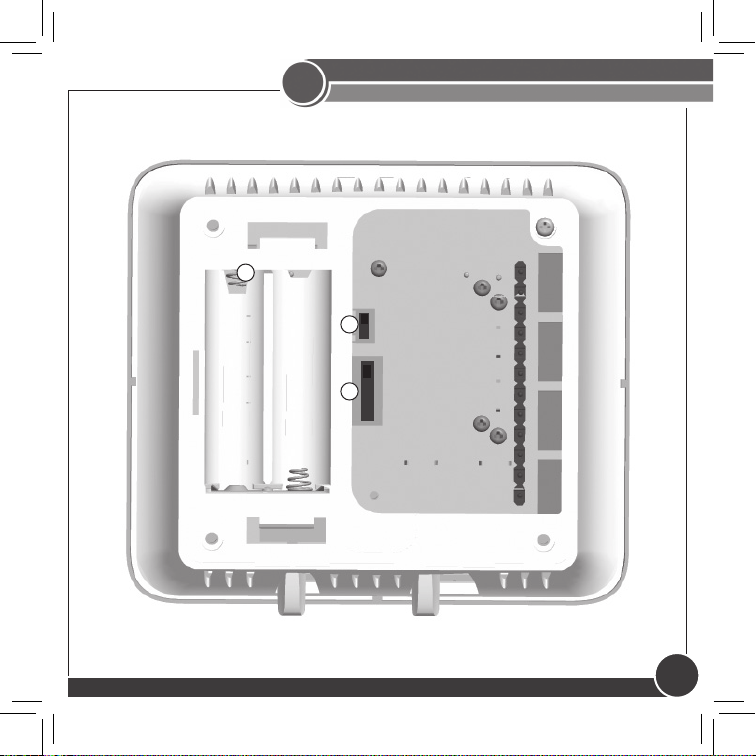
At A Glance
Know Your ermostat
1. Holds 2 “AA” Batteries.
2. HE/HG Switch - allows you to set your furnace to Gas/Oil or Electric, based
on the type of system you have.
3. Allows your thermostat to operate your HVAC system* properly by indicating
the system type that you have.
3
*Conventional System: Uses a condensing unit for cooling and a
separate furnace system for heating.
*Heat Pump System: Uses the condensing unit for both heating and
cooling.
NOTE: If you are unsure of your system type it may be necessary to
contact our technical support department at 1-888-830-1326, your
HVAC manufacturer, or a local HVAC technician to determine this.
Improper selection of your system type could cause the thermostat to not
operate your system properly.
6
44033-01 • 05/11/2010
3
1
2
3
Know Your ermostat
At A Glance
©2010 Hunter Fan Company
7

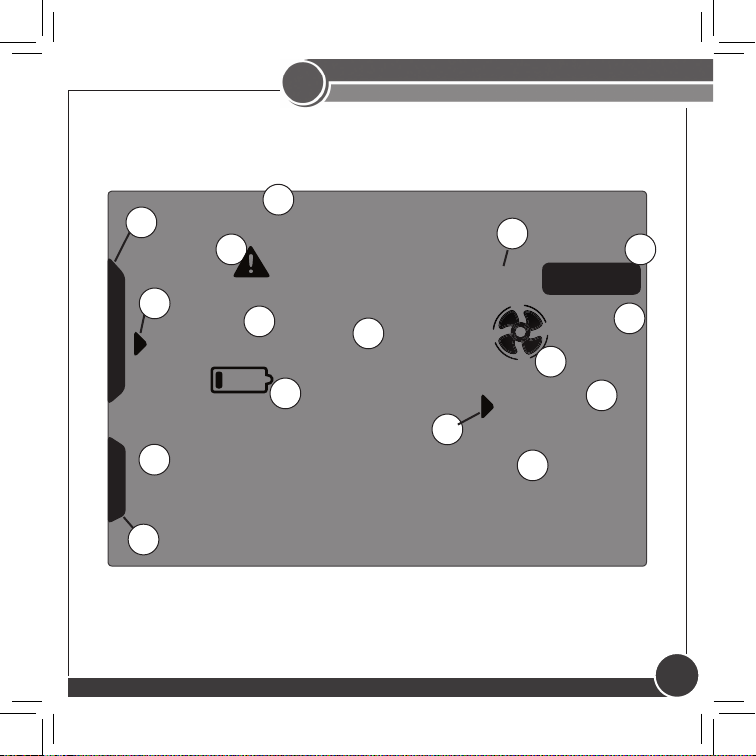
At A Glance
Know Your ermostat
3
1. Shows the current day of the week or weekend.
2. Indicates the thermostat is running in schedule mode.
3. Will show when your heat pump or system is reporting a problem to
the thermostat.
4. Indicates the current room temperature.
5. C will display when in Celsius mode. Nothing will display when set
to Fahrenheit.
6. Flashes when the furnace lter should be checked for replacement.
7. On when the current schedule period is running.
8. Indicates the current active schedule period.
9. Low battery warning, replace the batteries in the thermostat.
10. Indicates the fan is running when displayed.
11. Shows the current mode of the fan, Auto or On.
12. Indicates the current time in am(A) or pm (P).
13. On when the current operating mode, heat or cool, is running.
14. Current operating mode, heat or cool.
15. Indicates the thermostat is running in save away mode.
16. Current Set temperature the thermostat is scheduled to run.
8
44033-01 • 05/11/2010
3
1
2
3
7
At Home
Wed
8
9
70
12
P
10:05
15
At A Glance
Know Your ermostat
5
o
C
4
13
Filter
Auto
10
Heat to
16
6
11
14
o
72
©2010 Hunter Fan Company
9

Setup
Setting Day and Time
4
Once you install the batteries, the thermostat will prompt you to set the
current day and time.
1. You will notice that “Mon” will be ashing at the top left of your screen.
Use the or buttons to move to your current day of the week and
press the
Next
button to advance to the next step.
2. Use the or button to change between am(A) and pm(P). Choose
Next
to advance.
3. Next you will select your current hour by using the or buttons.
Next
The
4. Set your minutes using the or and press
button advances you to the next step.
Done/
Home
to nish or
Back
if
you need to make a correction to a previous step.
5. When nished, the thermostat will show “Updated!” to conrm your
settings are saved.
6. Your thermostat will next prompt you to set your programming, see
page 14 step 2 if you wish to alter your programs at this time.
10
44033-01 • 05/11/2010
4
Done/
Home
Menu
Save
Away
Schedule
Back Next
Done/
Home
Menu
Save
Away
Schedule
Back Next
Setting Day and Time
Setup
1-4
Mon
12:00ASet
5
©2010 Hunter Fan Company
Updated!
11

Scheduling
Scheduling Introduction
5
Read the scheduling section thoroughly to ensure you understand your scheduling
options and which will best t with your lifestyle. The following notes should help
you with scheduling:
• The schedule time can be set in 15 minute increments, and remains the same
for both Heat and Cool programs.
• The scheduled temperature can be set in increments of 1°F (1°C).
• After 15 minutes without a key press, the thermostat will return to the home
display screen and save any changes you have made.
• When setting the schedule time, note the AM / PM indicator.
Next
• At any stage during your scheduling, you can use the
Done/
move forward or backwards through the steps.
Home
Back
or
buttons to
will also save any changes,
even if you have not scheduled or altered all settings.
• Arrows beside each schedule mode and beside heat/cool modes will indicate
which is active.
This thermostat has been pre-programmed to provide optimal energy savings.
No programming is necessary. We recommend you run these programs for a
few days before adjusting your programming. If it is necessary to change these
settings, use the scheduling table on the next page to record your new settings.
You will also nd the default schedule there as well.
12
44033-01 • 05/11/2010
 Loading...