

Page 1
The Care Free®
Permawick™
Evaporative Humidier
See page 2
ENGLISH
Vea la página 19
ESPAÑOL
Model 34407
Read and save these instructions.
www.hunterfan.com
43002-01 05/30/2007 1 © 2007 Hunter Fan Co.
Page 2

Table of Contents
SAFETY INSTRUCTIONS ...............................................................3
How The Hunter Evaporative Humidifier Works .........................3
Humidifier Parts ...................................................................................4
Using Your Humidifier ........................................................................6
Features and Options .........................................................................7
Refilling the Water Tank.....................................................................8
Humidifier Maintenance .....................................................................9
Service Parts ......................................................................................15
Warranty ..............................................................................................16
43002-01 05/30/2007 2 © 2007 Hunter Fan Co.
Page 3
READ AND SAVE THESE INSTRUCTIONS
Important Safety
Instructions: Read all
instructions before using
this humidier.
1. This humidier may not work properly
on an uneven surface. ALWAYS place
this humidier on a rm, level, and water
resistant surface. ALWAYS place the hu-
midier at least six (6) inches away from
walls and heat sources such as stoves,
radiators, or heaters.
2. ALWAYS place the humidier in an area
that is out of the reach of children.
3. Before using the humidier, extend the
cord and inspect for any signs of damage. DO NOT use the product if the cord
has been damaged.
4. This product has a polarized plug (one
blade is wider than the other) as a safety
feature. This plug will t into a polarized
outlet only one way. If the plug does not
t fully into the outlet, reverse the plug.
If it still does not t, contact a qualied
electrician. DO NOT attempt to defeat or
override this safety feature.
5. ALWAYS UNPLUG AND EMPTY the
humidier when it is not in operation or
while it is being cleaned.
6. DO NOT tilt or move the humidier while
it is in operation. Never move the humidi-
er while there is water in the tank. Empty
the water tank, turn off, and unplug the
unit before moving.
7. In addition to routine maintenance which
may be required, this humidier requires
seasonal cleaning. Refer to and follow
CLEANING THE HUMIDIFIER AND THE
WATER TANK instructions.
Thank you for purchasing The Care
Free® Humidier Evaporative Humidier
by Hunter Fan Company. Please read
and save these instructions to receive
the maximum benet and performance
from your humidier.
How The Hunter®
Evaporative Humidier Works
The Hunter® Evaporative Humidier has a unique patented design with several innovative
features:
• Low Maintenance – Other humidiers have paper lters that need to be replaced every
few months. Our exclusive PermaWick™ lter saves time and money. It’s designed to last
season after season, saving up to $45 a year. No wet paper odors, either.
• Regulated Release™ System – By dispersing water from the top of the PermaWick™ lter, stagnant water around the PermaWick™ lter is elimnated, and the buildup of mineral
residue that can clog the lter and impede performance is eliminated. NOTE: The lter has
a coating on the wick which may make it appear old or used, but is actually new.
• Built-in Antimicrobial Properties – The plastic parts and the lter have built-in antimicrobial
properties to inhibit the growth of bacteria, mold and fungi that may affect these parts.
NOTE: This product contains antimicrobial properties which are built-in to inhibit the growth
of bacteria which may affect the plastic and lter in the humidier. These properties do not
extend to the water, humidied air or users. Conduct routine cleaning and maintenance
based upon use and individual conditions.
43002-01 05/30/2007 3 © 2007 Hunter Fan Co.
Page 4
• No White Dust – The Hunter® Evaporative Humidier produces no white dust that can settle
on furniture or be inhaled.
NOTE: You may notice mineral deposits accumulating in the tank base. This is normal and
does not affect performance. If you would like to clean these deposits away, please see
CLEANING THE HUMIDIFIER AND WATER TANK.
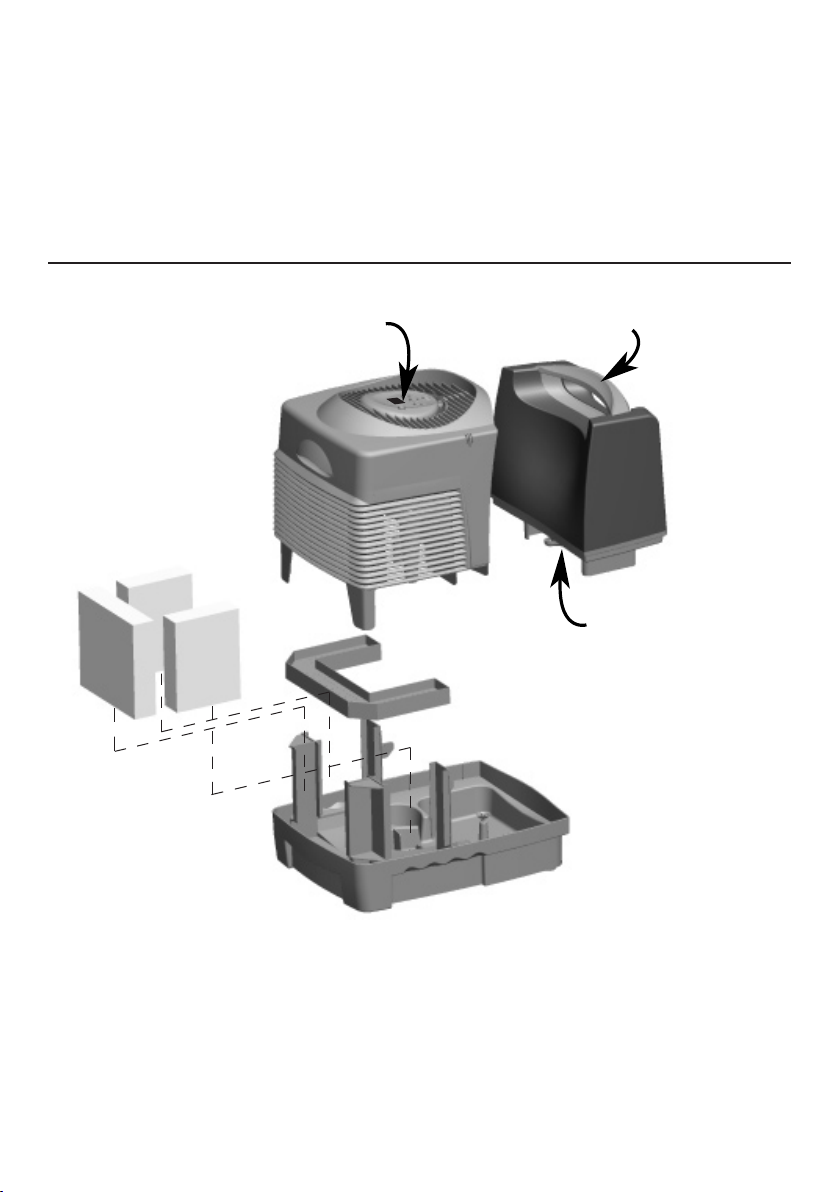
Humidier Parts
Wicks (3)
Control Panel
Main Housing
Tank Tote
Water Tank
Water Tank Cap
(under Tank)
Drainage Tray
Base
Figure 1
43002-01 05/30/2007 4 © 2007 Hunter Fan Co.
Page 5
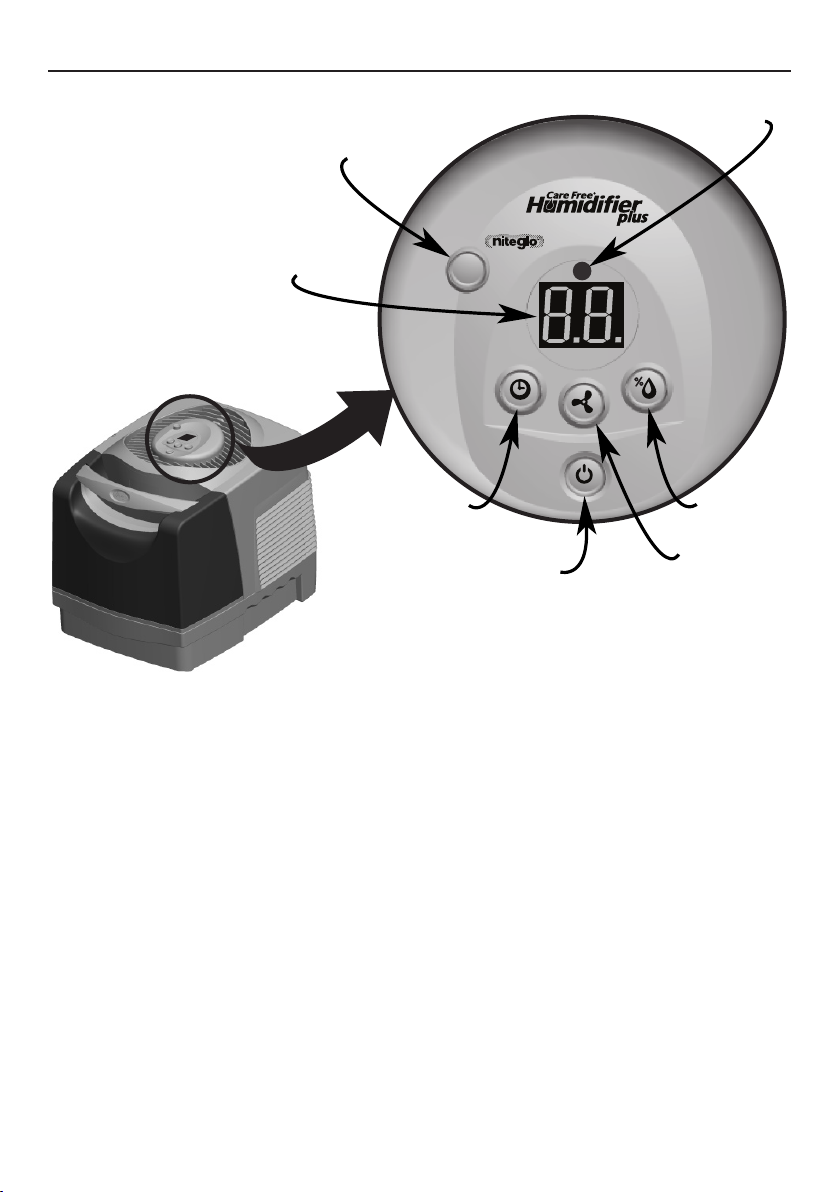
Humidier Parts (continued)
NiteGlo™
LED Display
Control Panel
Timer Humidity
Power
Rell Tank
LED (Red)
Speed
Figure 2
Power: Turns the humidier on and off. the power should always be off before unplugging the
humidier, moving the humdier, or relling the water tank.
Rell Light: The red LED turns on to signal that the humidier has automatically turned off and
the Water Tank needs to be relled.
Humidity: Enables you to set the desired maximum humidity level. Once this level is reached,
the unit will autimatically shut off until the humidity level drops. NOTE: The humidier may
not ne running because the Span Setting may need to be adjusted.
Speed: Sets the humdier’s fan speed to Low (1), Medium (2), or High (3).
Timer: Sets the humidier to run for 2, 4, 8, or 10 hours. when the timer is not used, the humidi-
er will run and cycle automatically.
43002-01 05/30/2007 5 © 2007 Hunter Fan Co.
Page 6
Using Your Humidier (continued)
Basic Set-Up and Operation
1. Remove the Hunter
2. Place the humidier on a hard, at, water resistant surface. Always place the humidier at
least six (6) inches away from walls and sources of heat.
3. Grasp the Water Tank by its Tank Tote and remove it from the Base. See Figure 3.
Tank Tote
®
Evaporative Humidier from its packaging.
Figure 3
4. Turn the Water Tank upside-down and remove the Water Tank Cap. See Figure 4.
Twist to open
Water Tank Cap
(under Tank)
Figure 4
43002-01 05/30/2007 6 © 2007 Hunter Fan Co.
Page 7

Using Your Humidier (continued)
5. Fill the Water Tank with water, return the Water Tank Cap to its position and tighten it, and
return the Water Tank to the Base.
6. Plug the humidier’s Power Cord into a standard household power outlet.
7. Press the Power Button on the Control Panel.
8. To see the current humidity, press the Humidity button. To change the humidity, press and
hold the Humidity button for 3 seconds. The LED Display will ash the current humidity set-
ting. Press the Humidity button until the LED Display shows your desired humidity setting.
You can change the setting in 5% increments from 30% relative humidity to 80%. When
the LED Dispaly shows your desired humidity setting, release the Humidity button. After 2
seconds, the humidity setting is set and the LED Display will show the relative humidity.
9. To see the current Fan speed setting, press the Speed button. To change the Fan speed
setting, press and hold the Speed button for 3 seconds. The LED Display will ash the cur-
rent Fan speed setting. Press the Speed button until the LED Display shows your desired
Fan speed setting, Off (“OF”), Low (1), Medium (2), or High (3). Release the Speed button.
After 2 seconds, the Fan speed is set and the LED Display will show the relative humidity.
10. During normal operation, the LED Display will show the relative humidity of the space in
which you place your humidier.
Features and Options
Automatic Shut-Off
When the Water Tank is empty, the humidier will automatically turn off and the red Rell
Tank LED will turn on. The Rell Tank LED will turn off when the Tank is relled and placed
back on the humidier.
Timer
You can set your humidier to run for pre-set periods of time.
1. To see the current Timer setting, press the Timer button once.
2. To change the Timer setting, press the Timer button and hold it for 3 seconds. The current
Timer setting will begin to ash.
3. Press the Timer button again to change the setting. The settings in hours are OF (Off), 2,
4, 8 and 10.
3. When the LED Display shows your desired run time, release the Timer Button. After 2 seconds, the run time is set and the LED Display will show the relative humidity.
4. The humidier will shut down automatically when the set time expires.
43002-01 05/30/2007 7 © 2007 Hunter Fan Co.
Page 8

Humidier Features and Options (continued)
Span Setting
Your humidier is set at the factory to cycle at setting 2. If you nd your humidier is cycling
either too often of not often enough, change the Span setting to change the cycle time.
1. To see the current Span setting, press both the Humidity and Speed buttons.
2. To change the Span setting, Press and hold both the Humidity and Speed buttons for 3
seconds. The LED Display will ash the current Span Setting.
3. Press the Speed button to change the Span setting. Set the Span to 3 to increase the
humidier’s run time. Set the Span to 1 to decrease the humidier’s run time.
4. When the LED Display shows your desired Span setting, release the Speed button. After
two seconds, the Span is set and the LED Display will show the relative humidity.
The NiteGlo™ Night Light
Press the NiteGlo™ button on the Control Panel to turn the night light on and off. The Nite-
Glo™ night light can be turned on even when the humidier is turned off.
Relling The Water Tank
1. When the water tank level is low, turn the humidier ‘OFF’, and unplug.
2. Remove the tank and take it to the sink or tub to rell.
3. Turn the tank upside down and unscrew the tank cap by turning it counterclockwise. Empty the
tank, rell with fresh cool water (never use hot water), and replace the tank cap. Be sure not to
overll the tank as water damage may occur to furniture or ooring due to spillage. HUNTER
WILL NOT ACCEPT RESPONSIBILITY FOR DAMAGE TO PROPERTY CAUSED BY
WATER SPILLAGE.
4. Carry the tank back to the humidier. Turn the tank upright and place it on the humidier.
Be sure that the tank is seated properly in the base. If the tank is properly located on the
base, you will see air bubbles owing up into the tank.
43002-01 05/30/2007 8 © 2007 Hunter Fan Co.
Page 9
Humidier Maintenance
Many regions have hard water with high concentrations of minerals. When water evaporates
from The Hunter® Evaporative Humidier, minerals may be left behind. These minerals can
form a hard white scale which can be removed by following the cleaning instructions. The
frequency of cleaning due to mineral build up can vary depending upon the quality of water
you may have.
Refer to Figure 1 for part names.
1. Turn the humidier ‘OFF’ and unplug the unit.
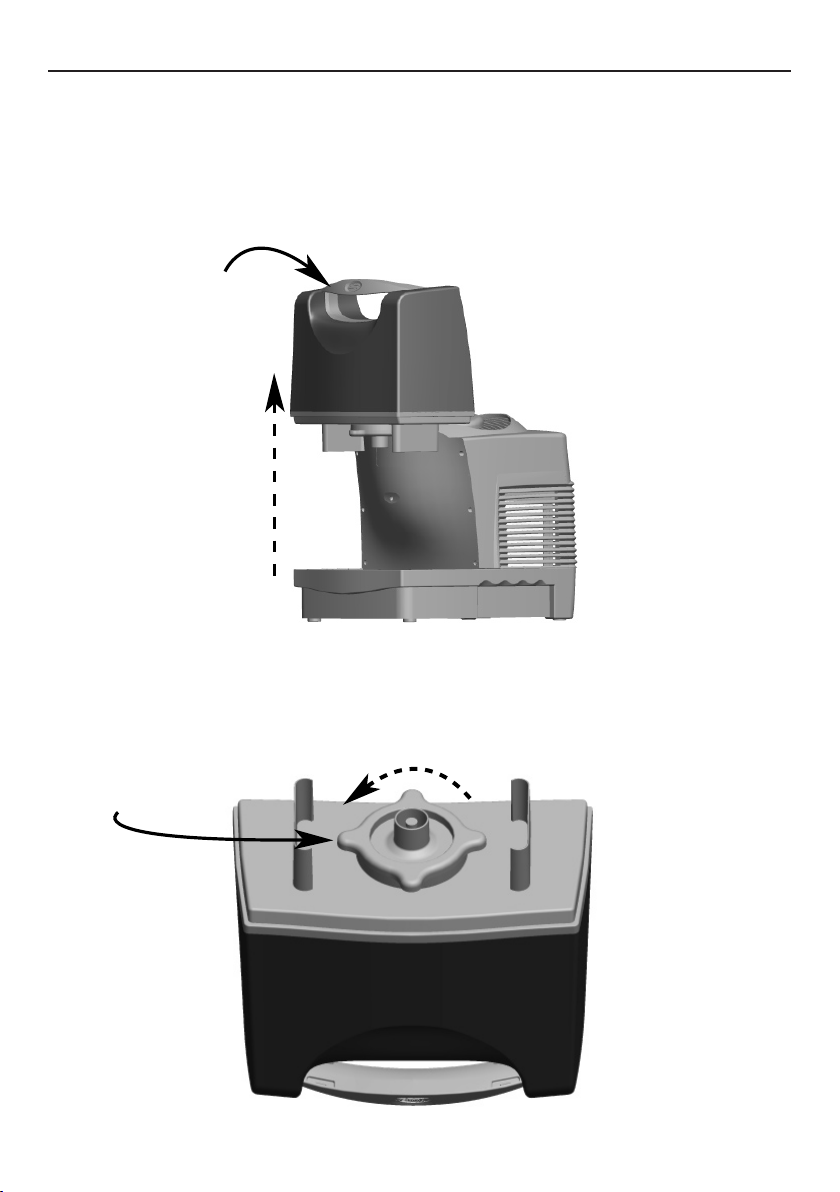
2. Lift the Main Housing as shown in Figure 5. The motor is attached to the main housing. Do
not place the motor near water.
Grasp here
Figure 5
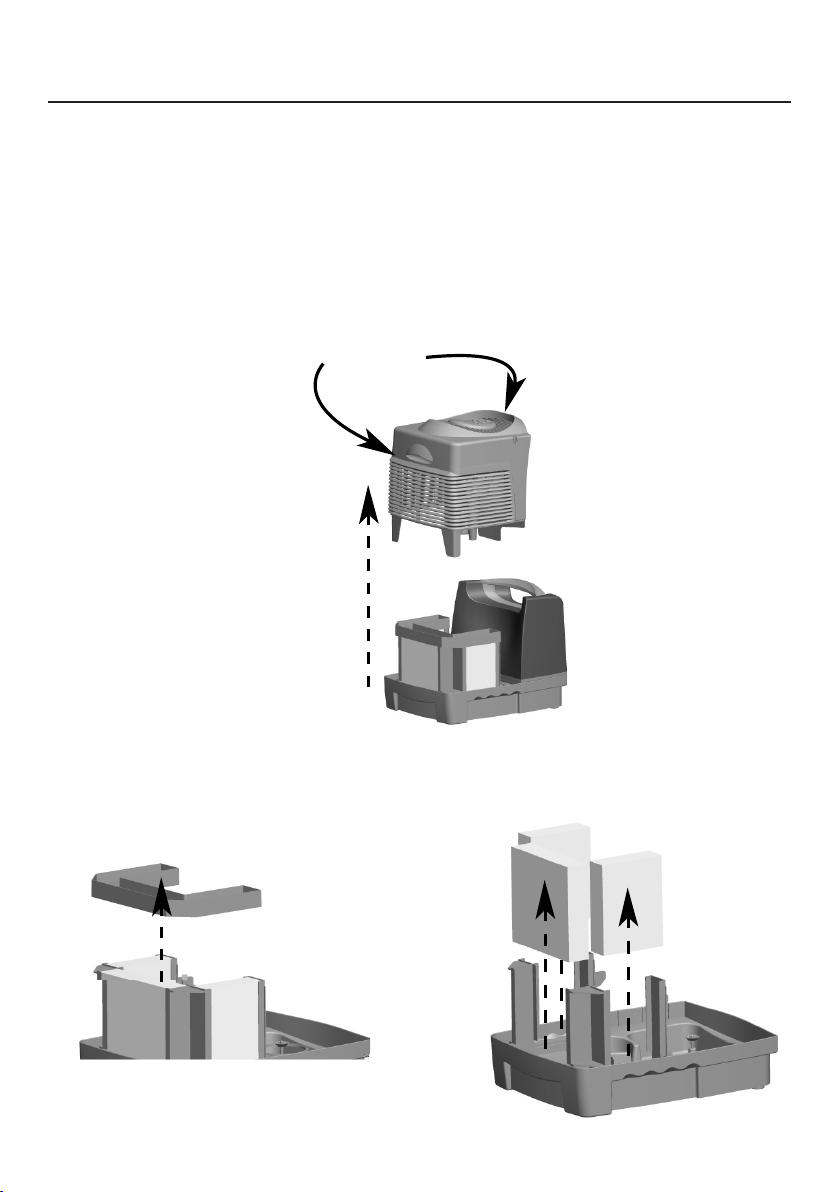
3. Remove the Drainage Plate and the three Wicks. See Figures 6A and 6B.
Wicks
Drainage Plate
43002-01 05/30/2007 9 © 2007 Hunter Fan Co.
Figure 6A
Figure 6B
Page 10
Humidier Maintenance (continued)
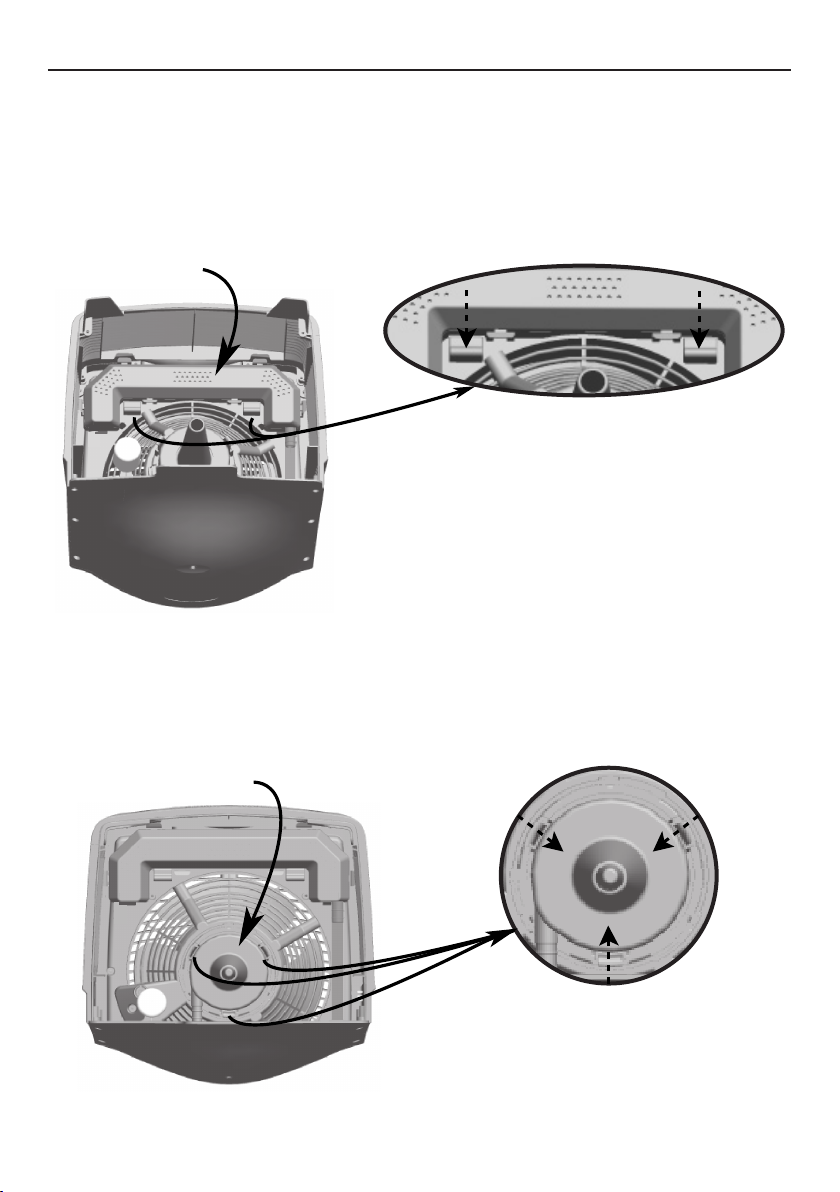
4. Turn the Main Housing upside down to gain access to the humidier’s cleanable parts.
5. Press the Shower Head Latches in the direction shown in Figure 7, releasing the Shower
Head. Then, gently lift the Shower Head from its position and let it rest in the Main Hous-
ing.
Shower Head
Shower Head Latches
Figure 7
6. Press the three Pump Cover Latches in the direction shown in Figure 8, releasing the Pump
Cover.
Pump Cover
Pump Cover Latches
Figure 8
43002-01 05/30/2007 10 © 2007 Hunter Fan Co.
Page 11
Humidier Maintenance (continued)
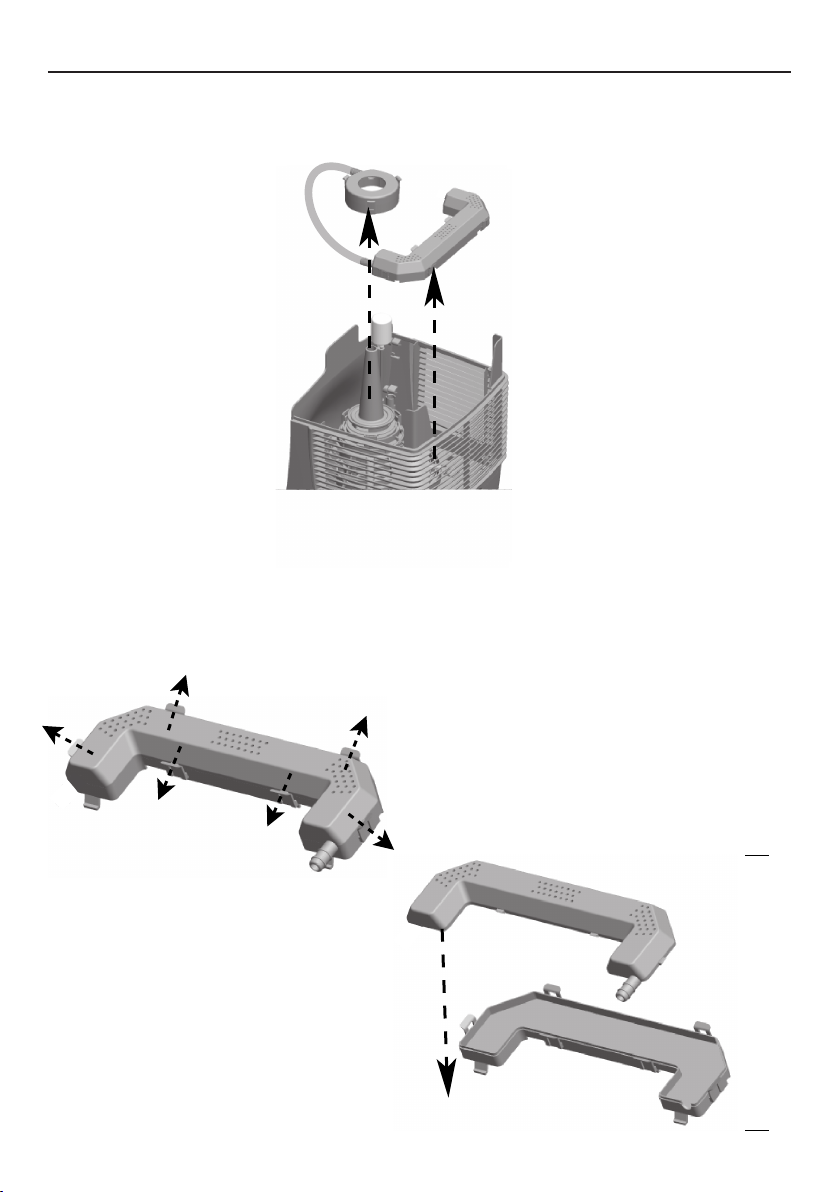
7. Remove the Shower Head, Pump Cover, and Tubing from the Main Housing. See Figure
9.
Pump Cover
Tubing
Figure 9
8. Press the six Shower Head Latches in the direction shown in Figure 10 to separate the two
halfs of the Shower Head.
NOTE: Tubing has been omitted for
clarity.
Shower Head
Figure 10
43002-01 05/30/2007 11 © 2007 Hunter Fan Co.
Page 12

Humidier Maintenance (continued)
9. Hold the Motor Shaft Stopper Ring so that it can not rotate. Twist the pump counter-clockwise
as shown in Figure 11 to loosen it. NOTE: Turning twisting the pump clockwise tightens it.
Pump
Motor Shaft
Stopper Ring
Figure 11
10. Remove the Pump and the Motor Shaft Stopper Ring. See Figure 12.
Figure 12
43002-01 05/30/2007 12 © 2007 Hunter Fan Co.
Page 13

Humidier Maintenance (continued)
11. Do not expose Motor or other electrical components to water. Do not use a wet towel on
the Motor or Motor Housing as electrical shock may occur.
12. Remove the Water Tank from the base and empty it of any remaining water. Fill the Water
Tank with a mixture of one (1) gallon of water and eight (8) ounces of white vinegar. Leave
the mixture in the Water Tank for 20 minutes, giving the Water Tank a shake every few
minutes. After 20 minutes, give the Water Tank a nal shake and discard the mixture. Rinse
the Water Tank several times with clean water. Leave the Water Tank Cap off to allow the
Water Tank to dry completely.
13. Fill the Base with a mixture of one (1) gallon of water and eight (8) ounces of white vinegar.
Leave the mixture in the Base for 20 minutes, then discard the mixture. Rinse the Base well
with clean water and let it air dry or wipe it dry with a cloth.
14. Rinse the Shower Head, Pump Cap, Tubing, Pump, and Motor Shaft Stopper Ring in clean
water to remove any debris. If the parts show hard water residue, soak them in a mixture
of one (1) gallon of water and eight (8) ounces of white vinegar for 20 minutes, then rinse
the parts well with clean water.
15. Wipe the surfaces of the main housing with a soft damp cloth.
16. Once all the parts are clean, reassemble the humidier. NOTE: The underside of Motor
Shaft Stopper Ring has a groove that ts over two nibs on the Motor Shaft. See Figure 13.
The groove and the nibs MUST BE MATED for the humidier to be properly reassembled.
Motor Shaft
Stopper Ring
Groove
Figure 13
17. Follow the USING YOUR HUMIDIFIER section to continue use. If you are storing the
humidier, make sure the parts are completely dry.
Motor Shaft
Nibs
43002-01 05/30/2007 13 © 2007 Hunter Fan Co.
Page 14

Service Parts
To obtain a service part for your humidier, call customer service at 1-888-830-1326 or e-mail
us at techsupport@hunterfan.com. Please be prepared to tell the operator the model number
of your humidier and the name of the part you need to replace and the part number. Refer to
Figure 1 for part names.
Model No.
34407
Base
97668
Tank
Assembly
97670
Replacement
Wick Set
87955
43002-01 05/30/2007 14 © 2007 Hunter Fan Co.
Page 15

Hunter Fan Company
Hunter® Humidier Evaporative Humidier
5 YEAR LIMITED WARRANTY
The Hunter Fan Company, Inc. makes the following warranty to the original residential
user or consumer purchaser of The Evaporative Humidier:
If any part of The Evaporative Humidier (“Humidier”) motor fails during the rst 5
(ve) years from the date of installation due to a defect in material or workmanship, we
will provide a replacement part free of charge. If no replacement part can be provided
for such motor, we will replace your humidier.
If your Humidier motor fails any time within 1 (one) year after the date of installation
due to a defect in material or workmanship, labor to repair the defect will be provided
free of charge at our nearest service centre or at our Service Department in Memphis,
Tennessee. You will be responsible for all parts and labor costs after this one-year
period.
If your Humidier water tank, lter fame, base, knobs, or tank cap fail any time within
1 (one) year after the date of sale to you due to a defect in material or workmanship,
we will repair or, at our option, replace the water tank, lter frame, base, knobs, or
tank cap free of charge for parts or labor performed at our nearest service centre or
our Service Department in Memphis, Tennessee.
IF THE ORIGINAL RESIDENTIAL USER OR CONSUMER PURCHASER CEASES
TO OWN THE HUMIDIFIER, THIS WARRANTY AND ANY IMPLIED WARRANTY
WHICH THEN REMAINS IN EFFECT, INCLUDING BUT NOT LIMITED TO ANY
IMPLIED WARRANTY OF MERCHANTABILITY OR FITNESS FOR A PARTICULAR
PURPOSE, ARE VOIDED.
NO WARRANTY, EXPRESSED OR IMPLIED, INCLUDING ANY WARRANTY OF
MERCHANTABILITY OR FITNESS FOR A PARTICULAR PURPOSE, IS MADE IN
RESPECT TO THE FILTER.
THIS WARRANTY IS IN LIEU OF ALL OTHER EXPRESS WARRANTIES. THE DURATION OF ANY IMPLIED WARRANTY, INCLUDING BUT NOT LIMITED TO ANY
IMPLIED WARRANTY OF MERCHANTABILITY OR FITNESS FOR A PARTICULAR
PURPOSE, IN RESPECT TO THE MOTOR IS EXPRESSLY LIMITED TO THE PERIOD OF THE EXPRESS WARRANTY SET FORTH ABOVE.
This warranty is voided if your Humidier is not purchased and used in the USA or
Canada.
This warranty excludes and does not cover defects, malfunctions, or failures of the
Humidier which were caused by repairs by persons not authorized by us, use of parts,
Continued
43002-01 05/30/2007 15 © 2007 Hunter Fan Co.
Page 16

or accessories not authorized by us, mishandling, modications, or damage to the
Humidier while in your possession, or unreasonable use, including failure to provide
reasonable and necessary maintenance. This warranty does not cover humidiers
used in commercial applications. There are no express or implied warranties as to
commercial purchasers or users.
To obtain service, contact Hunter Fan Company Service Department, 2500 Frisco
Avenue, Memphis, Tennessee 38114, 1-888-830-1326. You will be responsible for
insurance and freight or other transportation to our factory service center. We will return
the Humidier freight prepaid to you. The Humidier should be properly packaged to
avoid damage in transit since we will not be responsible for any such damage. Proof of
purchase is required when requesting warranty service. The purchaser must present
the sales receipt or other document that establishes proof of purchase.
IN NO EVENT SHALL HUNTER FAN COMPANY BE LIABLE FOR DIRECT, INDIRECT, SPECIAL, CONSEQUENTIAL OR INCIDENTAL DAMAGES IN EXCESS OF
THE PURCHASE PRICE OF THE HUMIDIFIER. YOUR SOLE REMEDY WILL BE
REPAIR OR REPLACEMENT AS PROVIDED ABOVE.
SOME AMERICAN STATES AND CANADIAN PROVINCES DO NOT ALLOW
• LIMITATIONS ON HOW LONG AN IMPLIED WARRANTY LASTS;
• THE EXCLUSION OR LIMITATION OF DIRECT, INDIRECT, SPECIAL, INCI-
DENTAL OR CONSEQUENTIAL DAMAGES;
• THE EXCLUSION OR INVALIDITY OF EXPRESS OR IMPLIED WARRANTIES
IF THE USER CEASES TO OWN THE HUMIDIFIER;
• THE LIMITATION OF THE REMEDIES AND RECOURSES AVAILABLE TO THE
PURCHASER; OR
• THE INVALIDITY OF AN EXPRESS WARRANTY WHEN A PRODUCT IDENTI-
FIED BY BRAND NAME IS NOT USED (UNLESS SPECIFIC CONDITIONS ARE
FULFILLED);
SO THE ABOVE LIMITATIONS OR EXCLUSIONS MAY NOT APPLY TO YOU.
THIS WARRANTY GIVES YOU SPECIFIC LEGAL RIGHTS AND YOU MAY ALSO
HAVE OTHER RIGHTS WHICH VARY FROM STATE TO STATE OR PROVINCE TO
PROVINCE.
43002-01 05/30/2007 16 © 2007 Hunter Fan Co.
Page 17

Other Home Comfort Products from Hunter
M
AM
4
TEMP
Hunter Original
®
Air Purier Programmable
Thermostat
To learn more about Hunter Fan Company products, please see our web page at:
www.hunterfan.com
43002-01 05/30/2007 17 © 2007 Hunter Fan Co.
HUNTER FAN COMPANY
2500 FRISCO AVENUE
MEMPHIS, TN 38114, USA
Page 18

43002-01 05/30/2007 18 © 2007 Hunter Fan Co.
Page 19

Humidicador de
evaporación Care Free®
de Permawick™
Modelo 34407
Lea y guarde estas instrucciones
www.hunterfan.com
43002-02 05/30/2007 19 © 2007 Hunter Fan Co.
Page 20

Tabla de contenido
INSTRUCCIONES DE SEGURIDAD ............................................3
Cómo trabaja el Humidificador de evaporación de Hunter ......3
Partes del humidificador....................................................................4
Uso de su humidificador ....................................................................6
Características y opciones ...............................................................7
Rellenado del tanque de agua .........................................................8
Mantenimiento del humidificador ....................................................9
Partes de repuesto ...........................................................................15
Garantía ...............................................................................................16
43002-02 05/30/2007 20 © 2007 Hunter Fan Co.
Page 21

LEA Y GUARDE ESTAS INSTRUCCIONES
Instrucciones importantes
de seguridad: Lea todas las
instrucciones antes de usar
este humidicador.
1. Este humidicador no puede funcionar
correctamente en una supercie irregular.
SIEMPRE coloque este humidicador
sobre una supercie rme, nivelada y
resistente al agua. SIEMPRE coloque
el humidicador al menos a 15 cm. (6")
de distancia de las paredes y de fuentes
de calor como estufas, radiadores o
calentadores.
2. SIEMPRE coloque el humidicador en
un área fuera del alcance de los niños.
3. Antes de usar el humidicador, extienda
el cordón e inspecciónelo buscando
cualquier señal de daños. NO utilice el
producto si el cordón está dañado.
4. Este producto tiene un enchufe polariza-
do (una espiga es más ancha que la otra)
como característica de seguridad. El
enchufe sólo se podrá introducir en una
toma polarizada de una sola manera.
Si el enchufe no entra completamente
en la toma de corriente, invierta el enchufe. Si todavía no encaja, contacte
con un electricista calicado. NO trate
de inhabilitar o anular esta característica
de seguridad.
5. SIEMPRE DESCONECTE Y VACÍE el
humidicador cuando no esté en funcionamiento o mientras lo esté limpiando.
6. NO lo incline ni lo mueva durante su
operación. Nunca mueva el humidicador
mientras haya agua en el tanque. Vacíe
el tanque de agua, apague y desconecte
la unidad antes de moverla.
7. Además del mantenimiento de rutina
que puede requerirse, este humidicador
req uiere limpi eza por tempora da.
Consulte y siga las instrucciones de
LIMPIEZA DEL HUMIDIFICADOR Y DEL
TANQUE DE AGUA.
Gracias por comprar el Humidicador de
evaporación Care Free® de Hunter Fan
Company. Lea y guarde estas instruccio-
nes para obtener el máximo rendimiento
y benecio de su humidicador.
Cómo trabaja el Humidicador
de evaporación de Hunter®
El Humidicador de evaporación de Hunter® tiene un diseño único patentado con varias
características innovadoras:
• Bajo mantenimiento – Otros humidicadores poseen ltros de papel que requieren ser
reemplazados luego de unos cuantos meses. Nuestro ltro exclusivo PermaWick™ ahorra
tiempo y dinero. Está diseñado para durar temporada tras temporada, ahorrando hasta $45
al año. Tampoco hay olores a papel mojado.
• Sistema Release™ regulado – Al distribuir agua desde la parte superior del filtro
PermaWick™ se elimina el agua estancada alrededor del ltro PermaWick™ y se elimina
también la acumulación de residuos minerales que pueden obstruir el ltro e impedir su
funcionamiento. NOTA: El ltro posee un recubrimiento en la mecha que puede hacer que
parezca viejo o usado, pero en realidad es nuevo.
• Propiedades antimicrobianas incorporadas – Las partes plásticas y el ltro tienen propiedades
antimicrobianas incorporadas para inhibir el crecimiento de bacterias, moho y hongos que
puedan afectar dichos componentes.
43002-02 05/30/2007 21 © 2007 Hunter Fan Co.
Page 22

NOTA: Este producto contiene propiedades antimicrobianas incorporadas para inhibir el cre-
cimiento de las bacterias que puedan afectar el material plástico y el ltro en el humidicador.
Estas propiedades no se extienden al agua, aire humidicado o a los usuarios. Realice la
limpieza y el mantenimiento periódico según el uso y las condiciones individuales.
• Sin polvo blanco – El Humidicador de evaporación de Hunter® no produce polvo blanco
que pueda asentarse en los muebles o que pueda ser inhalado.
NOTA: Puede notar que se acumulan depósitos minerales en la base del tanque. Esto es
normal y no afecta el funcionamiento. Si desea limpiar estos depósitos, consulte LIMPIEZA
DEL HUMIDIFICADOR Y DEL TANQUE DE AGUA.
Partes del humidicador
Alojamiento principal
Mechas (3)
Panel de control
Asa del tanque
Bandeja de drenaje
Tanque
de agua
Tapa del tanque
de agua (debajo
del tanque)
Base
Figura 1
43002-02 05/30/2007 22 © 2007 Hunter Fan Co.
Page 23

Partes del humidicador (continuación)
LED recordatorio para
rellenado del tanque (en rojo)
NiteGlo™
Pantalla LED
Panel de control
Temporizador Humedad
Velocidad
Energía
Figura 2
Energía: Enciende o apaga el humidicador. La energía siempre debe estar apagada antes de
desconectar el humidicador, mover el humidicador o rellenar el tanque de agua.
Luz de rellenado: La luz roja de la pantalla LED se enciende para indicar que el humidicador se
ha apagado automáticamente y que el tanque de agua necesita ser llenado nuevamente.
Humedad: Le permite jar el nivel máximo de humedad deseado. Una vez que se llegue a este
nivel, la unidad se cerrará automáticamente hasta que el nivel de humedad descienda.
NOTA: El humidicador puede no estar funcionando porque el ajuste Span puede necesitar El humidicador puede no estar funcionando porque el ajuste Span puede necesitar
un ajuste.
Velocidad: Regula la velocidad del ventilador del humidicador en Baja (1), Media (2), o Alta (3).
Temporizador: Regula el humidicador para que funcione por 2, 4, 8 ó 10 horas. Cuando no se
utiliza el temporizador, el humidicador funcionará y alternará automáticamente.
43002-02 05/30/2007 23 © 2007 Hunter Fan Co.
Page 24

Uso de su Humidicador (continuación)
Conguración y operación básica
1. Retire el Humidicador de evaporación de Hunter
2. Coloque el humidicador en una supercie dura, plana y resistente al agua. SIEMPRE
coloque el humidicador al menos a 15 cm. (6") de distancia de las paredes y de fuentes
de calor.
3. Tome el tanque de agua por el asa y retírelo de la base. Vea la Figura 3.
Asa del tanque
®
del paquete.
Figura 3
4. Invierta la posición del tanque y retire la tapa del tanque de agua. Vea la Figura 4.
Tapa del tanque
Gire para abrir
de agua (debajo
del tanque)
Figura 4
43002-02 05/30/2007 24 © 2007 Hunter Fan Co.
Page 25

Uso de su Humidicador (continuación)
5. Llene el tanque de agua, coloque nuevamente la tapa del tanque de agua en su posición
y apriétela, y coloque nuevamente el tanque de agua en la base.
6. Conecte el cordón de alimentación del humidicador a una toma de corriente doméstica
estándar.
7. Presione el botón de encendido del panel de control.
8. Para ver la humedad actual, presione el botón Humedad. Para cambiar la humedad, presione
y mantenga presionado por 3 segundos el botón Humedad. La pantalla LED destellará el
ajuste actual de humedad. Presione el botón Humedad hasta que la pantalla LED muestre
el ajuste de humedad que usted desea. Puede cambiar el ajuste en incrementos de 5% de
humedad relativa de 30% a 80%. Cuando la pantalla LED muestre el ajuste de humedad
que usted desea, libere el botón Humedad. Luego de 2 segundos, el ajuste de humedad
está jado y la pantalla LED mostrará la humedad relativa.
9. Para ver el ajuste actual de velocidad del ventilador, presione el botón Velocidad. Para cambiar el ajuste de velocidad del ventilador, presione y mantenga presionado por 3 segundos
el botón Velocidad. La pantalla LED destellará el ajuste actual de velocidad del ventilador.
Presione el botón Velocidad hasta que la pantalla LED muestre el ajuste de velocidad del
ventilador que usted desea, Apagado (“OF”), Baja (1), Media (2), o Alta (3). Libere el botón
Velocidad. Luego de 2 segundos, la velocidad del ventilador está jada y la pantalla LED
mostrará la humedad relativa.
10. Durante la operación normal, la pantalla LED mostrará la humedad relativa del espacio en
el que usted coloque su humidicador.
Características y opciones
Apagado automático
Cuando el Tanque de agua esté vacío, el humidicador automáticamente se apagará y se
encenderá la luz roja de Rellenar tanque en la pantalla LED. La luz de Rellenar tanque se
apagará cuando el Tanque sea llenado nuevamente y colocado de vuelta en el humidicador.
Temporizador
Puede programar que su humidicador funcione por periodos de tiempo predeterminados.
1. Para ver el ajuste actual del temporizador, presione el botón Temporizador una vez.
2. Para cambiar el ajuste del temporizador, presione el botón temporizador y manténgalo
presionado por 3 segundos. El ajuste actual del temporizador empezará a destellar.
3. Presione el botón Temporizador nuevamente para cambiar el ajuste. Los ajustes en horas
son APAGADO (Off), 2, 4, 8 y 10.
3. Cuando la pantalla LED muestre el tiempo de operación que usted desea, libere el botón
temporizador. Luego de 2 segundos, el tiempo de operación está jado y la pantalla LED
mostrará la humedad relativa.
4. El humidicador automáticamente se apagará cuando expire el tiempo jado.
43002-02 05/30/2007 25 © 2007 Hunter Fan Co.
Page 26

Características y opciones del Humidicador
(continuación)
Ajuste Span
Su humidicador es jado en fábrica para alternar en el ajuste 2. Si encuentra que los ciclos
de su humidicador alternan muy seguido o con poca frecuencia, modique el ajuste Span
para cambiar el tiempo del ciclo.
1. Para ver el ajuste Span actual, presione los botones Humedad y Velocidad.
2. Para cambiar el ajuste Span, presione y mantenga presionados por 3 segundos los botones
Humedad y Velocidad. La pantalla LED destellará el ajuste Span actual.
3. Presione el botón Velocidad para cambiar el ajuste Span. Fije el Span en 3 para aumentar
el tiempo de funcionamiento del humidicador. Fije el Span en 1 para disminuir el tiempo
de funcionamiento del humidicador.
4. Cuando la pantalla LED muestre el ajuste que usted desee, libere el botón Velocidad. Luego
de dos segundos, el Span está jado y la pantalla LED mostrará la humedad relativa.
Luz de noche NiteGlo™
Presione el botón NiteGlo™ del Panel de control para encender y apagar la luz de noche.
La luz de noche NiteGlo™ puede ser encendida incluso cuando el humidicador esté
apagado.
Rellenado del Tanque de agua
1. Si el nivel del tanque de agua es bajo, APAGUE y desconecte el humidicador.
2. Retire el tanque y llévelo a un fregadero o bañera para llenarlo nuevamente.
3. Invierta la posición del tanque y desenrosque la tapa del tanque girando en sentido antihorario.
Vacíe el tanque, llénelo con agua fría y fresca (jamás use agua caliente), y coloque nuevamente la tapa del tanque. Asegúrese de no llenar demasiado el tanque ya que pueden ocurrir
daños en los muebles o en el suelo debido a derrames de agua. HUNTER NO ACEPTARÁ
RESPONSABILIDAD POR DAÑOS A LA PROPIEDAD CAUSADOS POR DERRAMES DE
AGUA.
4. Coloque el tanque nuevamente en el humidicador. Voltee el tanque verticalmente y
colóquelo sobre el humidicador. Asegúrese de que el tanque encaje correctamente en la
base. Si el tanque está colocado correctamente en la base, usted podrá ver burbujas de
aire que uyen del tanque.
43002-02 05/30/2007 26 © 2007 Hunter Fan Co.
Page 27

Mantenimiento del Humidicador
Muchas regiones tienen agua dura con altas concentraciones de minerales. Cuando el agua se
evapora del Humidicador de evaporación Hunter®, los minerales pueden permanecer. Estos
minerales pueden formar una dura incrustación blanca que puede ser eliminada usando las
siguientes instrucciones de limpieza. La frecuencia de limpieza debido a la acumulación de
mineral puede variar según la calidad del agua que tenga.
Consulte los nombres de las partes en la Figura 1.
1. APAGUE el humidicador y desconecte la unidad.
2. Levante el alojamiento principal como se muestra en la gura 5. El motor está jado al
alojamiento principal. No coloque el motor cerca del agua.
Sujete aquí
Figura 5
3. Retire la Placa de drenaje y las tres Mechas. Vea las guras 6A y 6B.
Mechas
Placa de drenaje
43002-02 05/30/2007 27 © 2007 Hunter Fan Co.
Figura 6A
Figura 6B
Page 28

Mantenimiento del humidicador (continuación)
4. Invierta la posición del alojamiento principal para tener acceso a las partes limpiables del
humidicador.
5. Presione los seguros del cabezal rociador en la dirección que se muestra en la gura 7,
liberando el cabezal. Luego levante suavemente el cabezal rociador de su posición y déjelo
descansar en el alojamiento principal.
Cabezal rociador
Seguros del cabezal rociador
Figura 7
6. Presione los tres seguros de la cubierta de la bomba en la dirección que se muestra en la
gura 8, liberando la cubierta de la bomba.
Cubierta de la bomba
Seguros de la cubierta
de la bomba
Figura 8
43002-02 05/30/2007 28 © 2007 Hunter Fan Co.
Page 29

Mantenimiento del humidicador (continuación)
7. Retire el cabezal rociador, la cubierta de la bomba y la manguera del alojamiento principal.
Vea la Figura 9.
Cubierta de
la bomba
Manguera
Figura 9
8. Presione los seis seguros del cabezal rociador en la dirección que se muestra en la gura
10 para separar las dos mitades del cabezal rociador.
NOTA: Para mayor claridad se ha
omitido la manguera.
Cabezal rociador
Figura 10
43002-02 05/30/2007 29 © 2007 Hunter Fan Co.
Page 30

Mantenimiento del humidicador (continuación)
9. Sujete el anillo bloqueador del eje del motor de manera que no pueda girar. Gire la bomba
en sentido antihorario como se muestra en la gura 11 para aojarlo. NOTA: Girar la bomba
en sentido horario la ajusta.
Bomba
Anillo bloqueador
del eje del motor
Figura 11
10. Retire la bomba y el anillo bloqueador del eje del motor. Vea la Figura 12.
Figura 12
43002-02 05/30/2007 30 © 2007 Hunter Fan Co.
Page 31

Mantenimiento del humidicador (continuación)
11. No exponga el motor ni otros componentes eléctricos al agua. No use una toalla húmeda
en el motor o alojamiento del motor, ya que puede provocar un choque eléctrico.
12. Retire el tanque de agua de la base y vacíe el agua que haya quedado en el tanque. Llene
el tanque de agua con una mezcla de un (1) galón de agua y ocho (8) onzas de vinagre
blanco. Deje la mezcla en el tanque de agua por 20 minutos, sacudiendo el Tanque de
cuando en cuando. Luego de 20 minutos, sacuda por última vez el Tanque y deseche la
mezcla. Enjuague el tanque de agua varias veces con agua limpia. Deje el tanque de agua
destapado para que seque completamente.
13. Llene la base con una mezcla de un (1) galón de agua y ocho (8) onzas de vinagre blanco.
Deje la mezcla en la base por 20 minutos, luego deseche la mezcla. Enjuague bien la base
con agua limpia y deje secar al aire o séquela con un paño.
14. Enjuague con agua limpia el cabezal rociador, la tapa de la bomba, la manguera, la bomba y
el anillo bloqueador del eje del motor para eliminar cualquier residuo. Si las partes muestran
residuo de agua dura, remójelas en una mezcla de un (1) galón de agua y ocho (8) onzas
de vinagre blanco por 20 minutos, luego enjuague bien las partes con agua limpia.
15. Limpie las supercies del alojamiento principal con un paño suave.
16. Una vez que todas las partes estén limpias, vuelva a ensamblar el humidicador. NOTA: La
parte inferior del anillo bloqueador del eje del motor tiene una ranura que encaja en las dos
puntas del eje del motor. Vea la Figura 13. La ranura y las puntas DEBEN ACOPLARSE
para que el humidicador sea ensamblado adecuadamente.
Anillo bloqueador
del eje del motor
Ranura
Figura 13
17. Siga la sección USO DE SU HUMIDIFICADOR para continuar el uso. Si guarda el humidi-
cador, asegúrese de que las partes estén completamente secas.
43002-02 05/30/2007 31 © 2007 Hunter Fan Co.
Eje del motor
Puntas
Page 32

Partes de repuesto
Para obtener una parte de repuesto para su humidicador, llame a Servicio al cliente al
1-888-830-1326 o escríbanos a techsupport@hunterfan.com. Debe estar preparado para
indicar al operador el número de modelo de su humidicador y el nombre y número de parte
del componente que necesita reemplazar. Consulte los nombres de las partes en la Figura 1.
Modelo Nº:
34407
Base
97668
Conjunto
del Tanque
97670
Juego de mechas
de repuesto
87955
43002-02 05/30/2007 32 © 2007 Hunter Fan Co.
Page 33

Hunter Fan Company
Humidicador de evaporación Hunter®
GARANTÍA LIMITADA DE 5 AÑOS
Hunter Fan Company, Inc. otorga la siguiente garantía al usuario o comprador
residencial original del Humidicador de evaporación:
Si cualquier pieza del Humidicador de evaporación (“Humidicador”) falla durante los
primeros 5 (cinco) años desde la fecha de instalación debido a un defecto en el material
o en la mano de obra, proporcionaremos una pieza de repuesto en forma gratuita.
Si no puede suministrarse la parte de reemplazo para dicho motor, reemplazaremos
su humidicador.
Si su humidicador falla dentro de un (1) año después de la fecha de instalación debido
a un defecto en el material o en la realización, se suministrará gratuitamente la mano
de obra para reparar la falla en nuestro centro de servicio más cercano o en nuestro
Departamento de Servicio en Memphis, Tennessee. Usted será responsable por el
costo de las piezas y la mano de obra después de este período de un año.
Si el tanque de agua, marco del ltro, base, perillas o tapa del tanque de su humidicador fallan en cualquier momento dentro de un (1) año a partir de la fecha de compra
debido a un defecto de material o mano de obra, repararemos o a nuestra opción,
reemplazaremos el tanque de agua, marco del ltro, base, perillas o tapa del tanque
sin ningún cargo para usted por partes o mano de obra en nuestro centro de servicio
más cercano o en nuestro Departamento de Servicio en Memphis, Tennessee.
SI EL USUARIO O COMPRADOR RESIDENCIAL ORIGINAL DEJA DE POSEER
EL HUMIDIFICADOR, ESTA GARANTÍA Y CUALQUIER GARANTÍA IMPLÍCITA
QUE PERMANEZCA EN EFECTO, INCLUYENDO PERO SIN LIMITARSE A TODA
GARANTÍA IMPLÍCITA DE COMERCIABILIDAD O IDONEIDAD PARA UN PROPÓSITO
PARTICULAR, QUEDA ANULADA.
NO SE OFRECE NINGUNA GARANTÍA EXPRESA O IMPLÍCITA, INCLUYENDO
CUALQUIER GARANTÍA DE COMERCIABILIDAD O IDONEIDAD PARA UN
PROPÓSITO PARTICULAR, EN RELACIÓN CON EL FILTRO.
ESTA GARANTÍA SUSTITUYE A TODAS LAS OTRAS GARANTÍAS EXPRESAS.
LA DURACIÓN DE TODA GARANTÍA IMPLÍCITA, INCLUYENDO PERO SIN
LIMITARSE A CUALQUIER GARANTÍA IMPLÍCITA DE COMERCIABILIDAD O
IDONEIDAD PARA UN PROPÓSITO PARTICULAR, RELACIONADA CON EL MOTOR
ESTÁ EXPRESAMENTE LIMITADA AL PERÍODO DE LA GARANTÍA EXPRESA
ESTABLECIDA ANTERIORMENTE.
Esta garantía es nula si su humidicador no es adquirido y usado en los EE.UU.
o Canadá.
Continuación
43002-02 05/30/2007 33 © 2007 Hunter Fan Co.
Page 34

Esta garantía excluye y no cubre defectos, funcionamientos defectuosos o fallas
del Humidicador que fueran ocasionadas por reparaciones hechas por personas
no autorizadas por nosotros, por el uso de piezas, o accesorios no autorizados por
nosotros, por mal uso, modicaciones o daños al Humidicador mientras estuvo en su
poder, o por un empleo no razonable, incluyendo la falta de suministrar mantenimiento
razonable y necesario. Esta garantía no cubre humidicadores usados en aplicaciones
comerciales. No hay garantías expresas o implícitas en lo que respecta a compradores
o usuarios comerciales.
Para obtener servicio, contacte con Departamento de servicio de Hunter Fan Company, en 2500 Frisco Avenue, Memphis, Tennessee 38114, 1-888-830-1326. Usted
será responsable por el seguro y el ete u otro transporte hasta nuestro centro de
servicio en la fábrica. Devolveremos el humidicador con el ete prepagado a usted.
El humidicador debe estar adecuadamente empacado para evitar daños mientras
esté en tránsito, ya que no seremos responsables de dichos daños. Debe proporcio-
nar una prueba de su compra cuando solicite un servicio de garantía. El comprador
debe presentar el recibo de compra u otro documento que establezca la prueba de
su compra.
EN NINGÚN CASO, HUNTER FAN COMPANY SERÁ RESPONSABLE DE DAÑOS
DIRECTOS, INDIRECTOS, CUANTIFICABLES, PERJUDICIALES O ACCESORIOS,
EN EXCESO DEL PRECIO DE COMPRA DEL HUMIDIFICADOR. SU ÚNICO
RECURSO SERÁ LA REPARACIÓN O EL REEMPLAZO COMO SE ESTIPULÓ
ANTERIORMENTE.
ALGUNOS ESTADOS NORTEAMERICANOS Y ALGUNAS PROVINCIAS CANADIENSES NO PERMITEN
• LIMITACIONES SOBRE LA DURACIÓN DE UNA GARANTÍA IMPLÍCITA;
• LA EXCLUSIÓN O LIMITACIÓN DE DAÑOS DIRECTOS, INDIRECTOS,
CUANTIFICABLES, ACCESORIOS O PERJUDICIALES;
• LA EXCLUSIÓN O NULIDAD DE LAS GARANTÍAS EXPRESAS O IMPLÍCITAS
SI EL USUARIO DEJA DE POSEER EL HUMIDIFICADOR;
• LA LIMITACIÓN DE LAS SOLUCIONES Y RECURSOS DISPONIBLES AL
COMPRADOR; O
• LA NULIDAD DE UNA GARANTÍA EXPRESA CUANDO NO SE USA UN
PRODUCTO IDENTIFICADO POR NOMBRE DE MARCA (A MENOS QUE SE
CUMPLAN CONDICIONES ESPECÍFICAS);
DE MODO QUE LAS LIMITACIONES O EXCLUSIONES ANTES MENCIONADAS
PUEDEN NO APLICARSE A USTED.
ESTA GARANTÍA LE DA DERECHOS LEGALES ESPECÍFICOS, PERO USTED
TAMBIÉN PUEDE TENER OTROS DERECHOS QUE VARÍAN DE ESTADO A
ESTADO O DE PROVINCIA A PROVINCIA.
43002-02 05/30/2007 34 © 2007 Hunter Fan Co.
Page 35

Otros productos Hunter para la comodidad de su hogar
Hunter Original
®
Puricador de aire Termostato
programable
Para obtener más información sobre los productos Hunter Fan Company,
visite nuestra página Web en:
www.hunterfan.com
HUNTER FAN COMPANY
2500 FRISCO AVENUE
Memphis, TN 38114, USA
43002-02 05/30/2007 35 © 2007 Hunter Fan Co.
 Loading...